Knowledge base
1000 FAQs, 500 tutorials and instructional videos. Here, there are only solutions!
This guide explains how to view information about visitors who have accessed your Web Hosting sites (traffic statistics).
Preamble
- The result is presented in a simple format with graphs, allowing for easy interpretation.
- Annual, monthly, daily, and hourly statistics are displayed by site, HTTP address, referring site, country, etc.
- Refer to this other guide if you are specifically looking for access logs.
Accessing visit statistics
To view public traffic statistics:
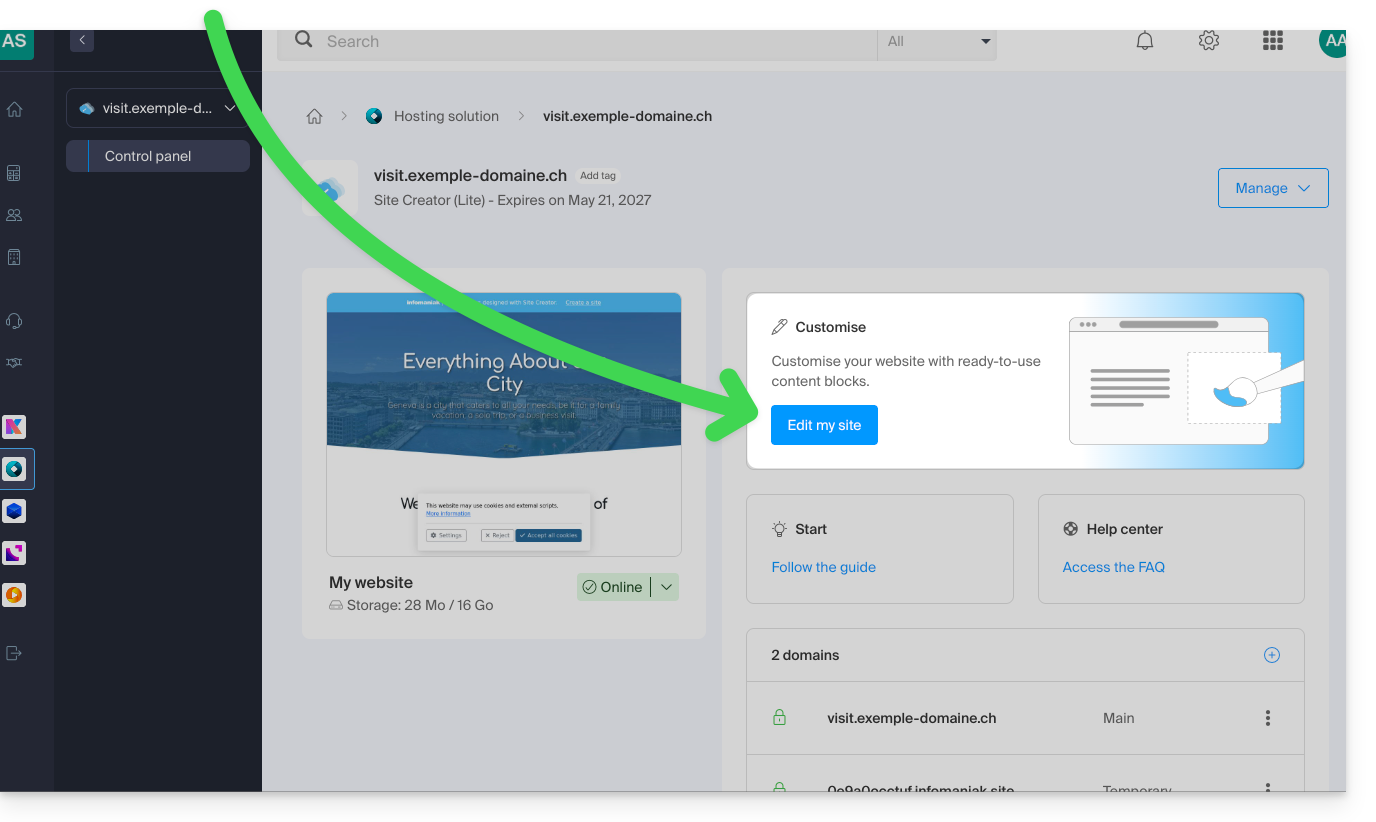
- Click here to access your site management on the Infomaniak Manager (need help?).
- Click directly on the name assigned to the site in question.
- Click on Statistics in the left sidebar:
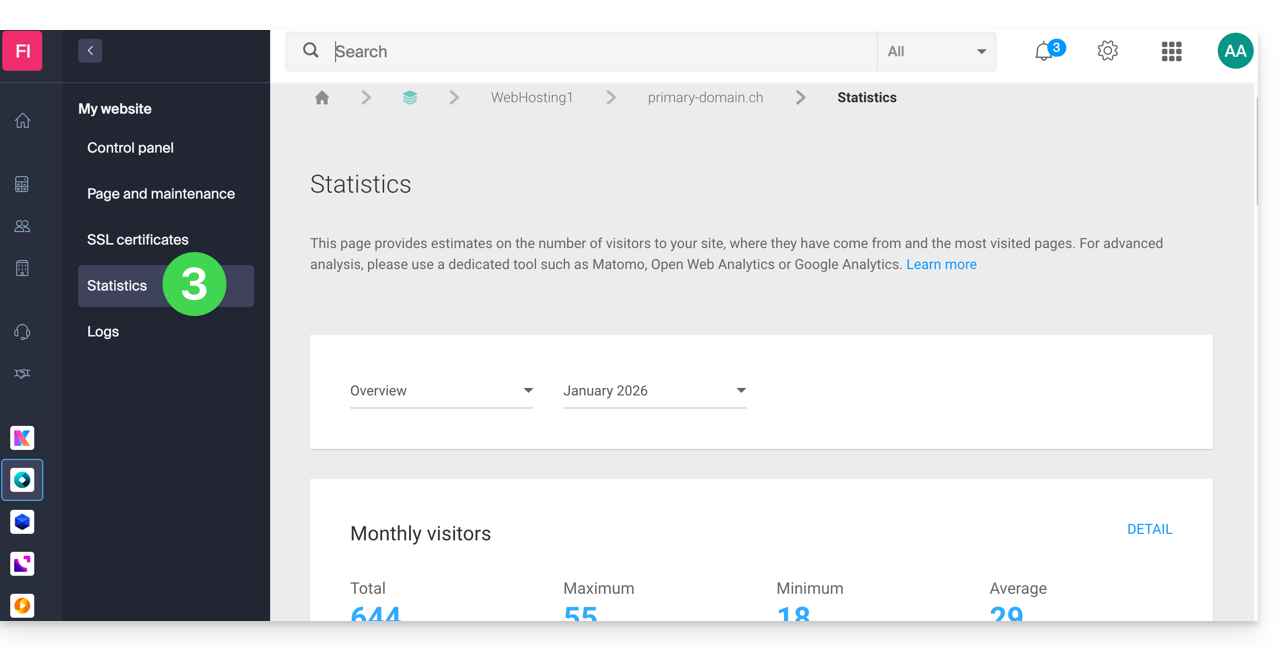
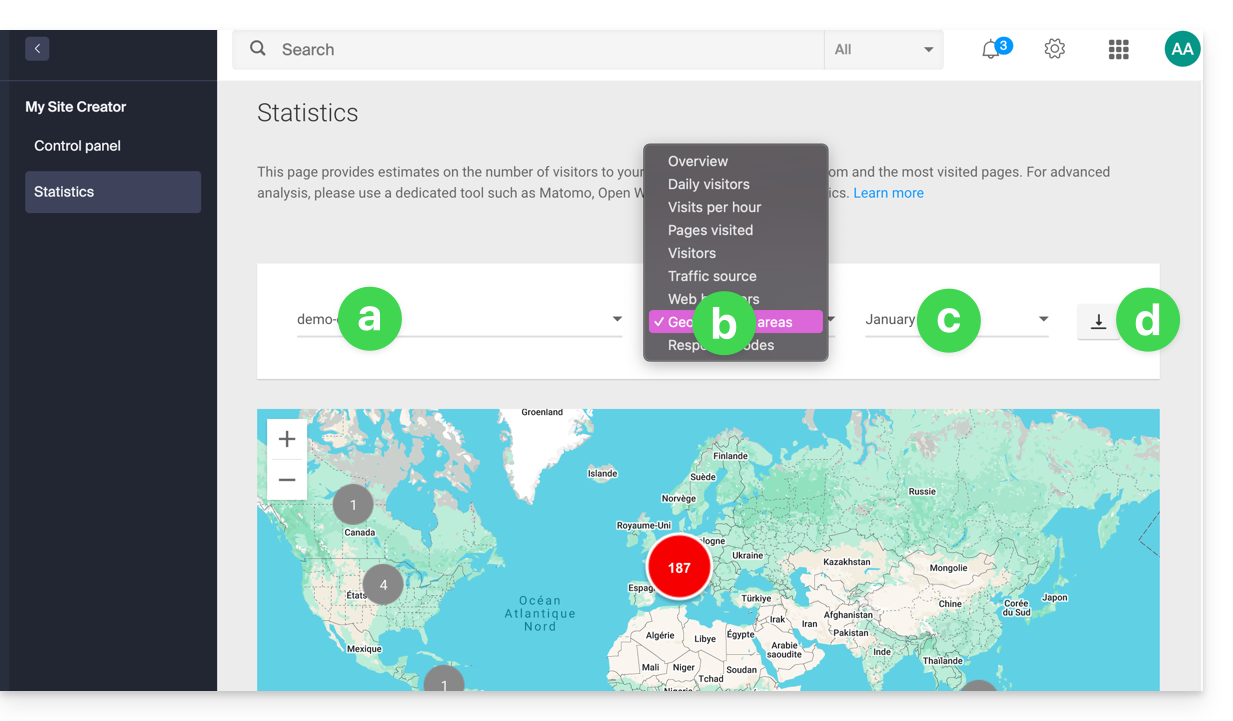
- The upper part allows you to choose:
- the site,
- the type of statistics,
- the period,
- or to download the data for a third-party tool:
Explanation of terms
There is no distinction between humans and robots. You can also use tools like Matomo, Open Web Analytics, or Google Analytics.
| Category | Description | Details |
|---|---|---|
| Hits | Any request addressed to the server. | Includes everything (HTML, images, audio, etc.). Each element requested, visible or not, counts as a hit. It's as if a visitor activates an invisible button with each interaction. |
| Files | Requests requiring data to be sent back. | Records requests that require the server to return a file (graphic, HTML). The difference with hits corresponds to the ratio between incoming requests and outgoing data. |
| Pages | Number of pages displayed on your site. | Measures the HTML pages viewed, excluding graphic or audio files. Each access to a new HTML page is recorded as a page view. |
| Visits | Sessions based on the IP address. | A visit begins with an IP request. If the address returns within 30 minutes, it is a unique visit. Beyond that, a new visit is counted. |
| Sites | Estimation of visits via fixed IP addresses. | Excludes mobile or dynamic connections. This targets regular visitors (companies, institutions) to better understand your target audience. |
| KB | Volume of data sent by the server. | Total amount of data transferred during the period, calculated via log files (with a possible margin of error depending on the size of the files). |
| Total hits | Overall cumulative requests. | A page with 3 images and a text generates 5 hits (the page + the text + the 3 images). This total is therefore much higher than the number of pages viewed. |
| Total Pages / Visits | Engagement indicators. | The number of pages viewed relative to unique visits allows you to assess the interest of internet users in your content. |
| Total unique sites | Number of distinct IPs. | Represents the diversity of traffic sources and helps identify the most active audience segments during the period. |
| Total unique URLs | Distinct paths taken. | Corresponds to the different pages or files consulted, providing an overview of your navigation structure and the most popular content. |
| Total unique referrers | Number of source sites. | External sites that have directed traffic to you. This is a key indicator of the effectiveness of your marketing and partnerships. |
Meaning of 'Commercial (com)' and 'Unresolved'
"Commercial" often represents a significant portion of geographic traffic. It includes users connected through Internet Service Providers (ISPs) using a .com domain. Since this extension is used by many ISPs and companies worldwide, it does not allow for the determination of a specific country.
"Unresolved" are geographically unresolved IP addresses, often due to privacy settings, the use of VPNs, or network restrictions.
Link to this FAQ:
Has this FAQ been helpful?
This guide will quickly introduce you to the essential functions of the Euria writing assistant available on Infomaniak's Site Creator.
Introduction
- The writing assistant will help you write text on the topic of your choice, including if it needs to be based on existing elements, using artificial intelligence.
- This is not a conversational agent or chatbot; it may not necessarily answer generic questions or engage in a dialogue with you.
- Use it, for example, to write:
- a new title that must contain specific elements
- a new paragraph on a particular topic
- a reformulation of a text excerpt
- correct grammatical syntax
- a translation into a foreign language
- a blog post
- etc.
- Please read this other guide about the model used by the writing assistant and the responsibilities of each party.
How to use the assistant?
Prerequisites
- Access Site Creator:
- Click here to access the management of your product on the Infomaniak Manager (need help?).
- Click directly on the name assigned to the Site Creator in question.
- Click on the Edit my site button to start the editor:
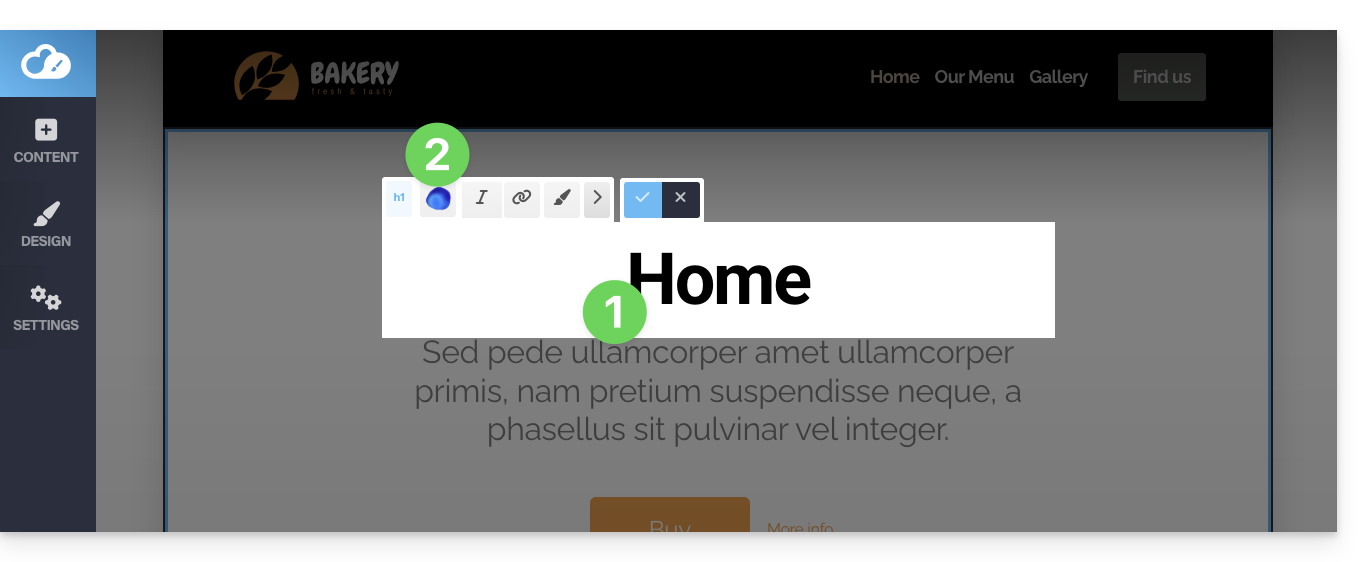
Next, to start the writing assistant:
- Click on a content block, text, etc.
- Click on the Euria icon in the editing bar to open the assistant:
- To go back to the main selection after choosing a type of addition, click on the icon in the top right corner:

If the block already contains content and you choose to rephrase a paragraph, you will be able to use the assistant's buttons to select the tone for your text (serious / friendly) and add or shorten the suggested phrases…
- For example:

Link to this FAQ:
Has this FAQ been helpful?
Thank you for entrusting Infomaniak with hosting your website and creating its content with Site Creator. This guide helps you quickly use the essential features of this accessible and easy-to-use site creation tool.
Introduction
- Site Creator is available…
- … with each paid web hosting
- … or standalone (available in 3 versions) and does not require any other specific offer in this case
- It is recommended to use the latest version of a browser such as Chrome, Firefox, Safari, and Microsoft Edge, preferably on a computer.
Operation Guides
Basic Information:
- Manage Pages
- Simple Page Editing
- Manage Content Blocks
- Manage Media (Images, Videos, Documents, etc.)
- Manage Navigation Menu(s)
- Manage Themes, Colors, Fonts
- Manage Site Name and Details
Advanced Information:
- Advanced Page Editing
- Manage Additional Modules (Gallery, Blog, Shop, etc.)
- Manage Languages and Translations
- Create a Contact Form
- Cookie Management (GDPR)
- Site Creator Limitations
You can also delete your site created with Site Creator and start over by creating a new blank site.
Learn more about Site Creator:
- French | Recorded Webinar at Infomaniak's premises.
- German | Quickstart :: Tutorial
- Italian | Tutorial
Contextual help
To view or review the contextual help when starting Site Creator, click here in your Manager:
In case of a problem, consult the knowledge base before contacting Infomaniak support.
Click here to share a review or suggestion about an Infomaniak product.
Link to this FAQ:
Has this FAQ been helpful?
This guide introduces the Knowledge Base module for Infomaniak's Site Creator, similar to the Questions & Answers module, which allows you to quickly format FAQ-style articles or similar ones present on your page.
Prerequisites
- Access Site Creator:
- Click here to access your product management on the Infomaniak Manager (need help?).
- Click directly on the name assigned to the relevant Site Creator.
- Click the Edit my site button to start the editor:

Configuration and use
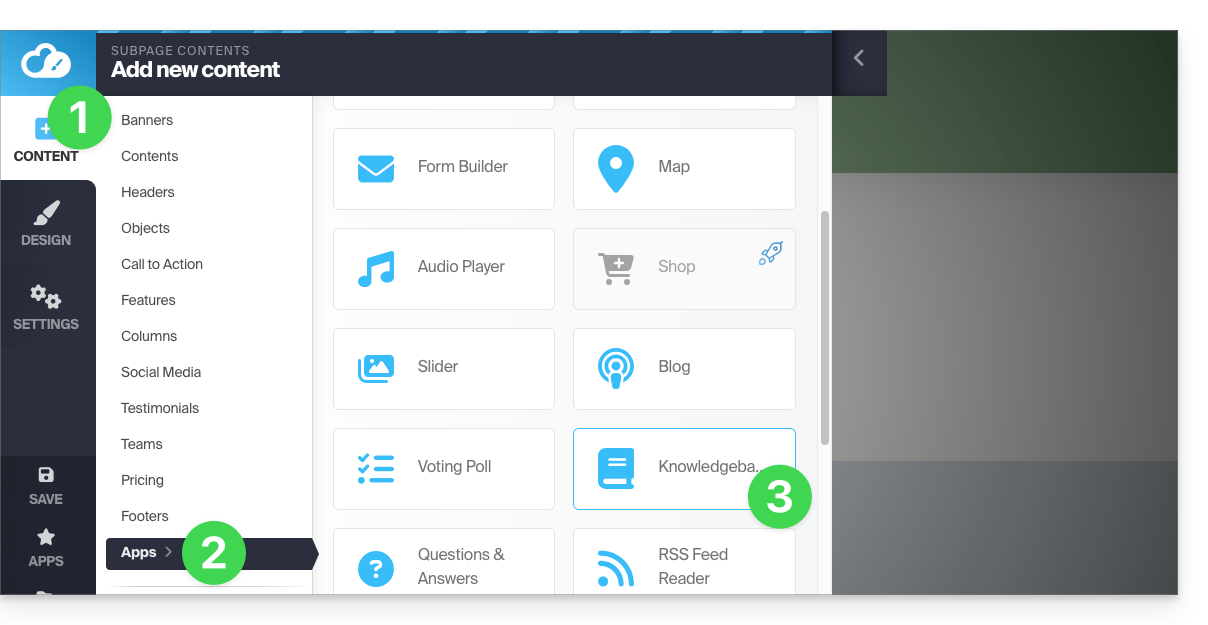
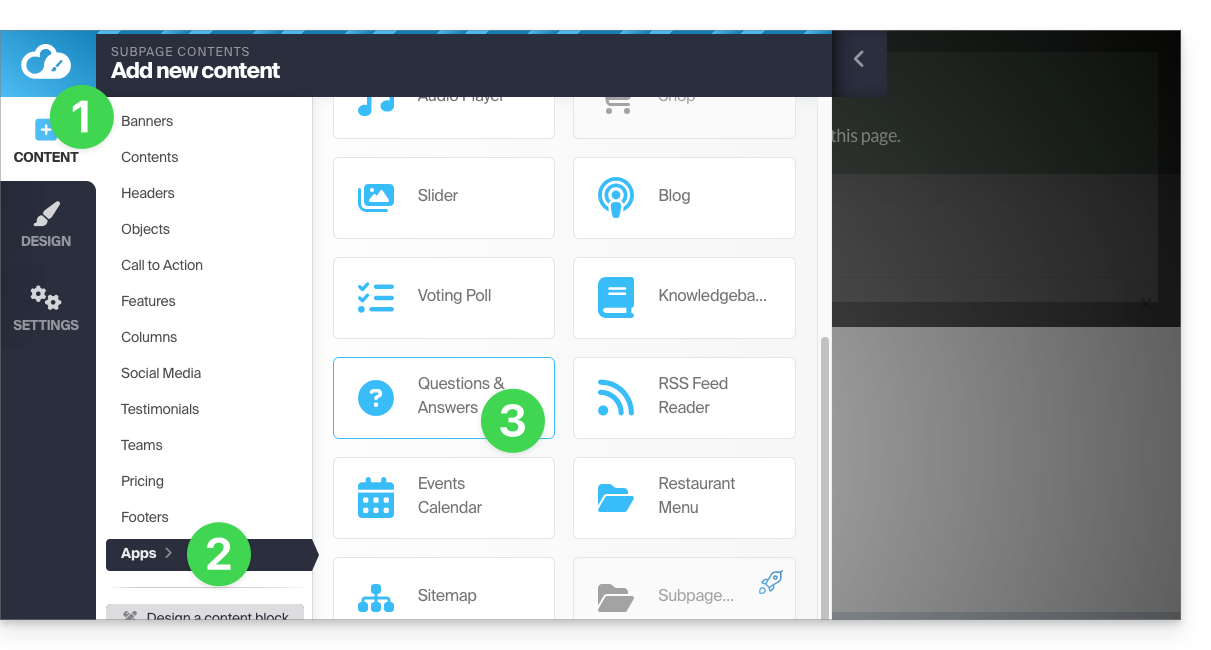
To insert the module in the desired location in Site Creator:
- Click the Content button in the left sidebar.
- Click Applications at the bottom of the list.
- Click Knowledge Base:
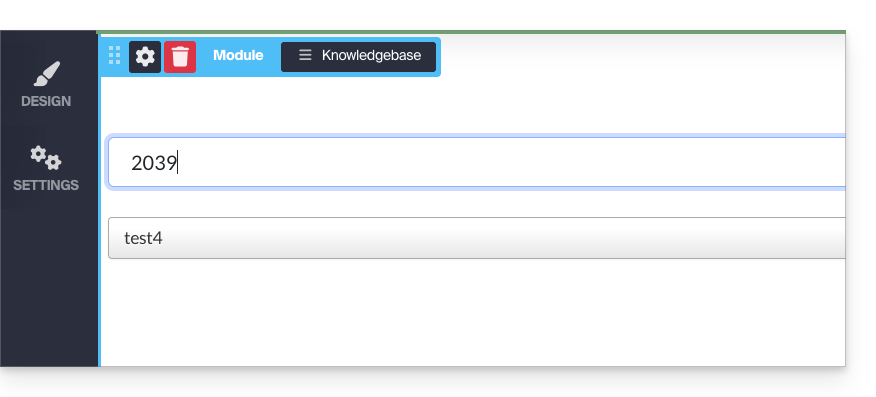
- Once the module is added, hover over it to edit:
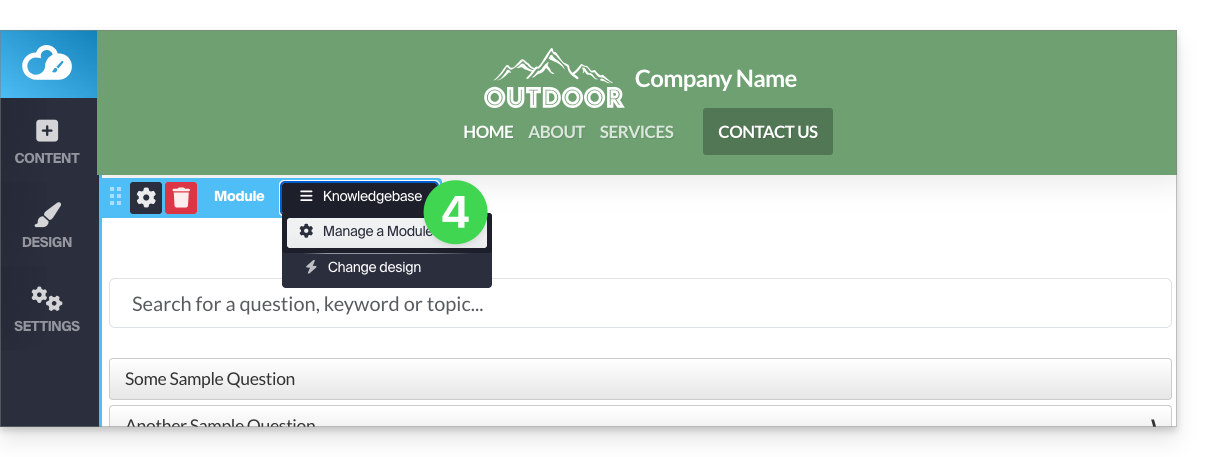
- The blue button allows you to add a new question:
Once the card is completed (title, text with formatting, keyword facilitating search, summary and optional link to a YouTube video), save at the bottom of the page.
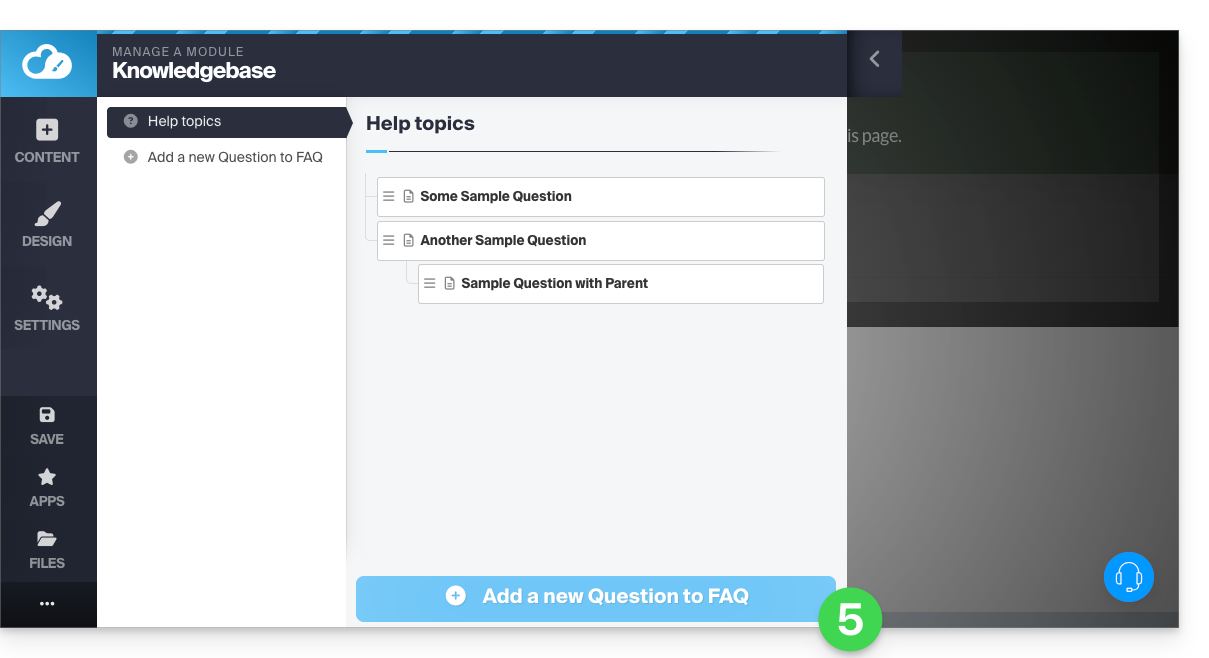
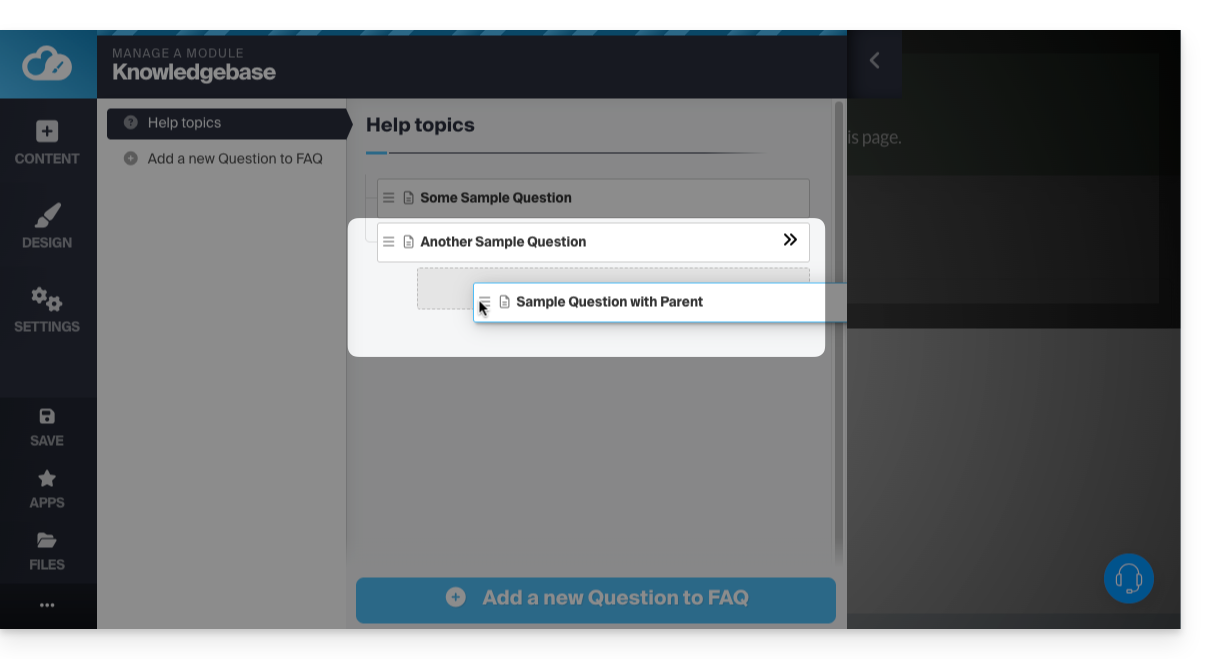
- You can organize your texts by creating a card with only a "category" title ("General" for example), then drag your cards to the right to subcategorize them (parent - child):
Browse the knowledge base
Navigation through your cards will be presented as follows. A click on the "category" thus created will expand the questions/answers: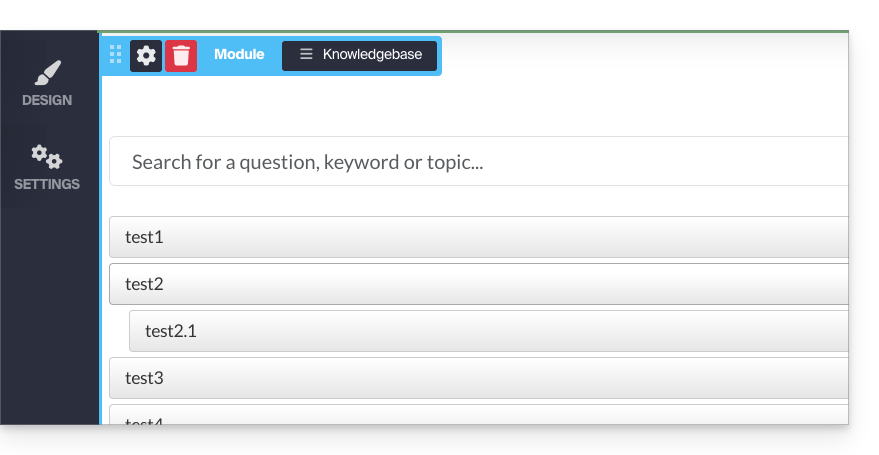
URL of created cards
A click on a question will open a separate web page, with the question repeated as the title and its answer below. The URL of this answer page will be composed of the address to the page where you placed the module, followed by "/kb/X-the-question", X being the number corresponding to the order of creation of your cards:
Customize the display
By hovering over your module in edit mode again, you can change the display and make your tree structure transparent:
Add keywords
Keywords (separated by a space) can be added: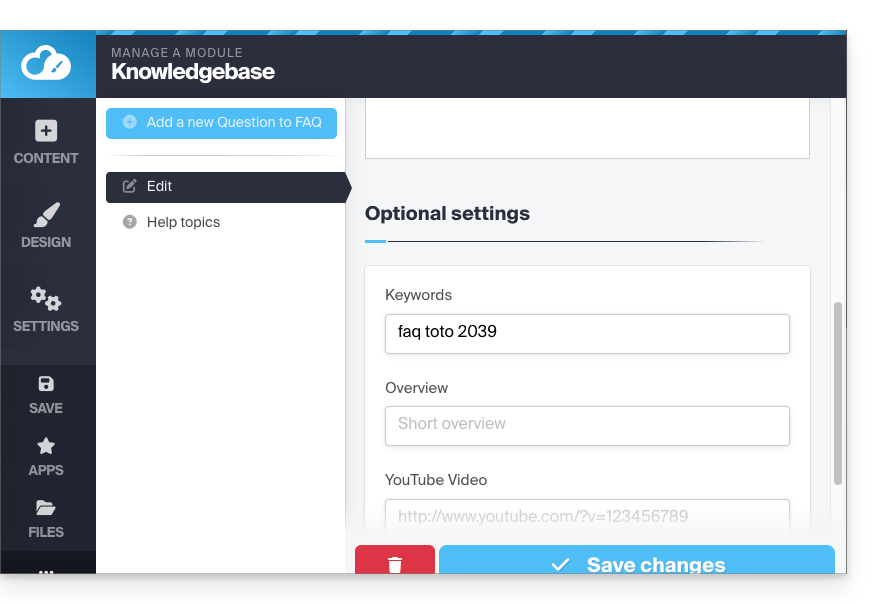
This then allows you to filter the display of responses if you enter the tag in the search bar (of the inserted module):
Display the module in multiple locations
The Knowledge Base application can be added to different places on your site but it will be the same and unique module each time. It is not possible to differentiate the display or content according to the pages where the module is inserted.
Link to this FAQ:
Has this FAQ been helpful?
This guide presents the Questions & Answers module for Infomaniak's Site Creator, similar to the Knowledge Base module, which allows you to quickly format FAQ-style articles within your page.
Prerequisites
- Access Site Creator:
- Click here to access the management of your product on the Infomaniak Manager (need help?).
- Click directly on the name assigned to the Site Creator in question.
- Click on the Edit my site button to start the editor:
Configuration and Usage
To insert the module at the desired location in Site Creator:
- Click on the Content button in the left-hand menu.
- Click on Applications at the bottom of the list.
- Click on Knowledge Base:
- Once the module has been added, hover over it to edit it:
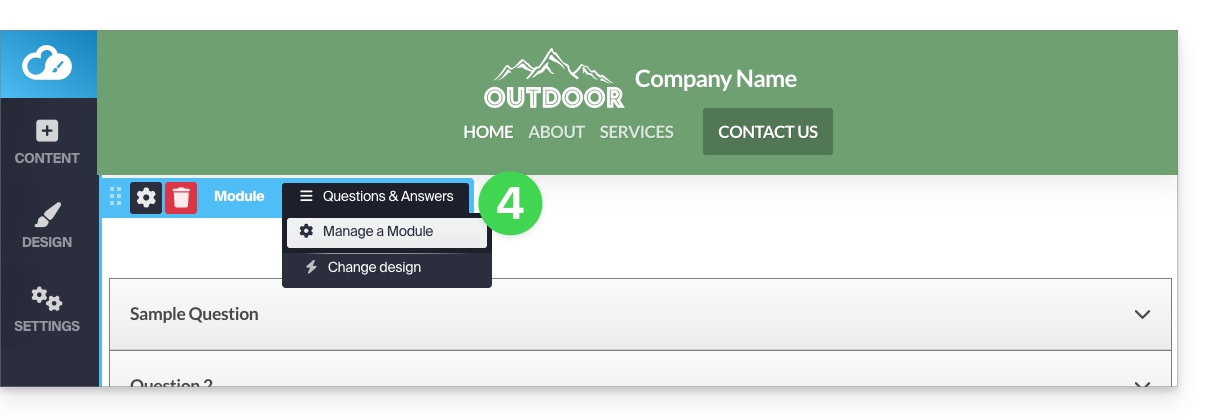
- The gray button allows you to add a new question/answer:

Save your changes at the bottom of the page.
These questions can be transformed into headings (like small title blocks) if you want to format your cards within "categories," for example. To do this, hover over the card and click on the pencil, then on the gear icon to switch to the desired display system: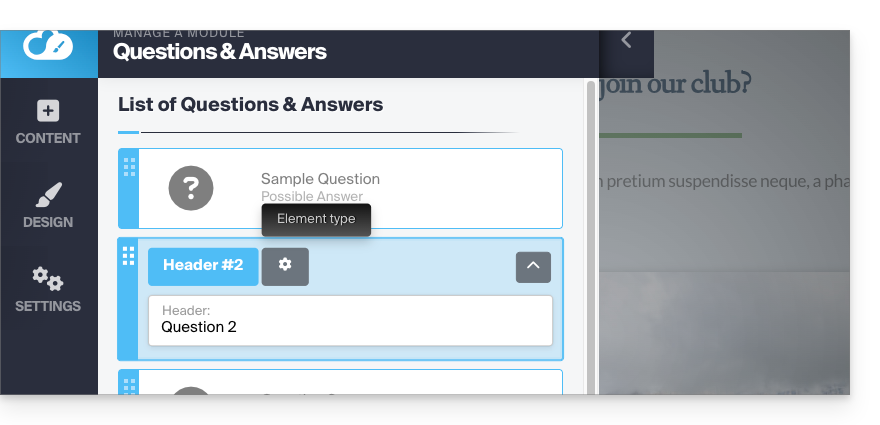
Reorganize the order of your questions/answers if necessary by dragging the cards up or down: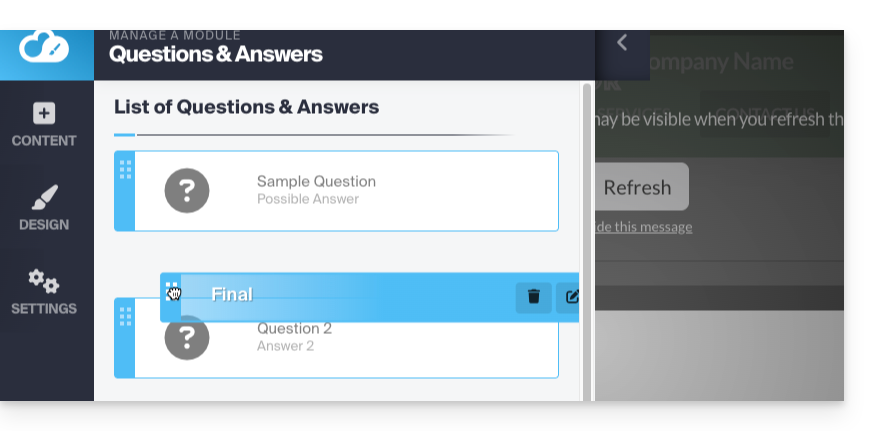
Browse questions/answers
Navigating your cards will be presented as shown below. Clicking on a question (or ) will display the answer: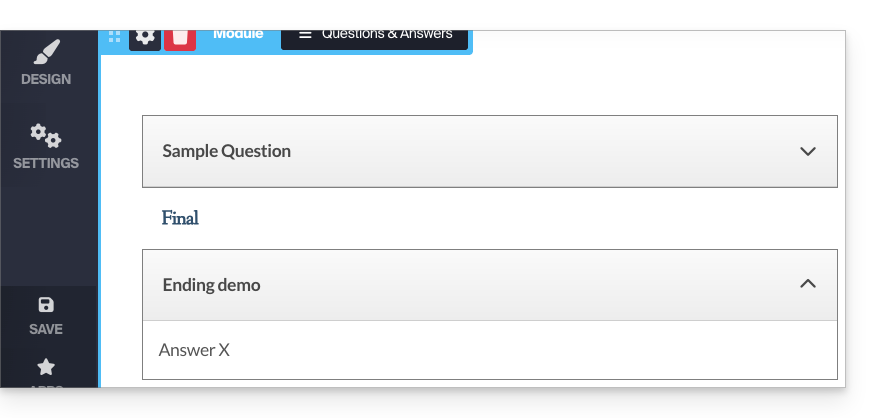
Customize the display
By hovering over your module again in edit mode, you can change the display and make your structure transparent.
You can also apply HTML code when writing your answers, in order to create a hyperlink, for example: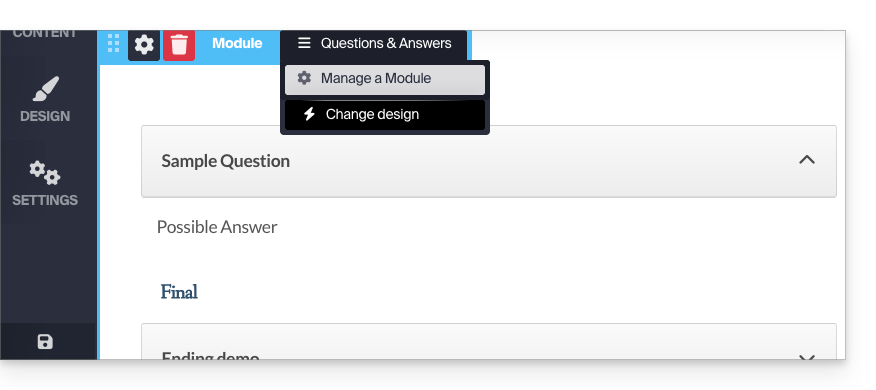
Display the module in multiple locations
The application can be added to different locations on your site, but it will be the same and unique module each time. It is not possible to differentiate the display or content depending on the pages where the module is inserted.
Link to this FAQ:
Has this FAQ been helpful?
This guide concerns messages sent from Site Creator (e.g., contact form or e-commerce module).
Introduction
- By default, emails are sent using the unauthenticated PHP mail() protocol.
- It is recommended to use the authenticated SMTP method instead.
Change the Sending Method
Prerequisites
- Have a valid email address (even a free one).
- Have created an app password (add an app named, for example, “
Site Creator” or “SC2026”, it doesn't matter) for this email address:
- Access Site Creator:
- Click here to access the management of your product on the Infomaniak Manager (need help?).
- Click directly on the name assigned to the Site Creator in question.
- Click on the Edit my site button to start the editor:
To change the email sending method from Site Creator:
- Click on the Settings button in the left-hand menu.
- Click on General Settings:

- Choose the SMTP method, then fill in the fields with the SMTP server name
mail.infomaniak.com, and the information related to your email address and its password (see prerequisites). - Once all the fields are filled in, click the Verify button.
- If everything is correct, the Save button will appear, and you can click it to save your email settings:
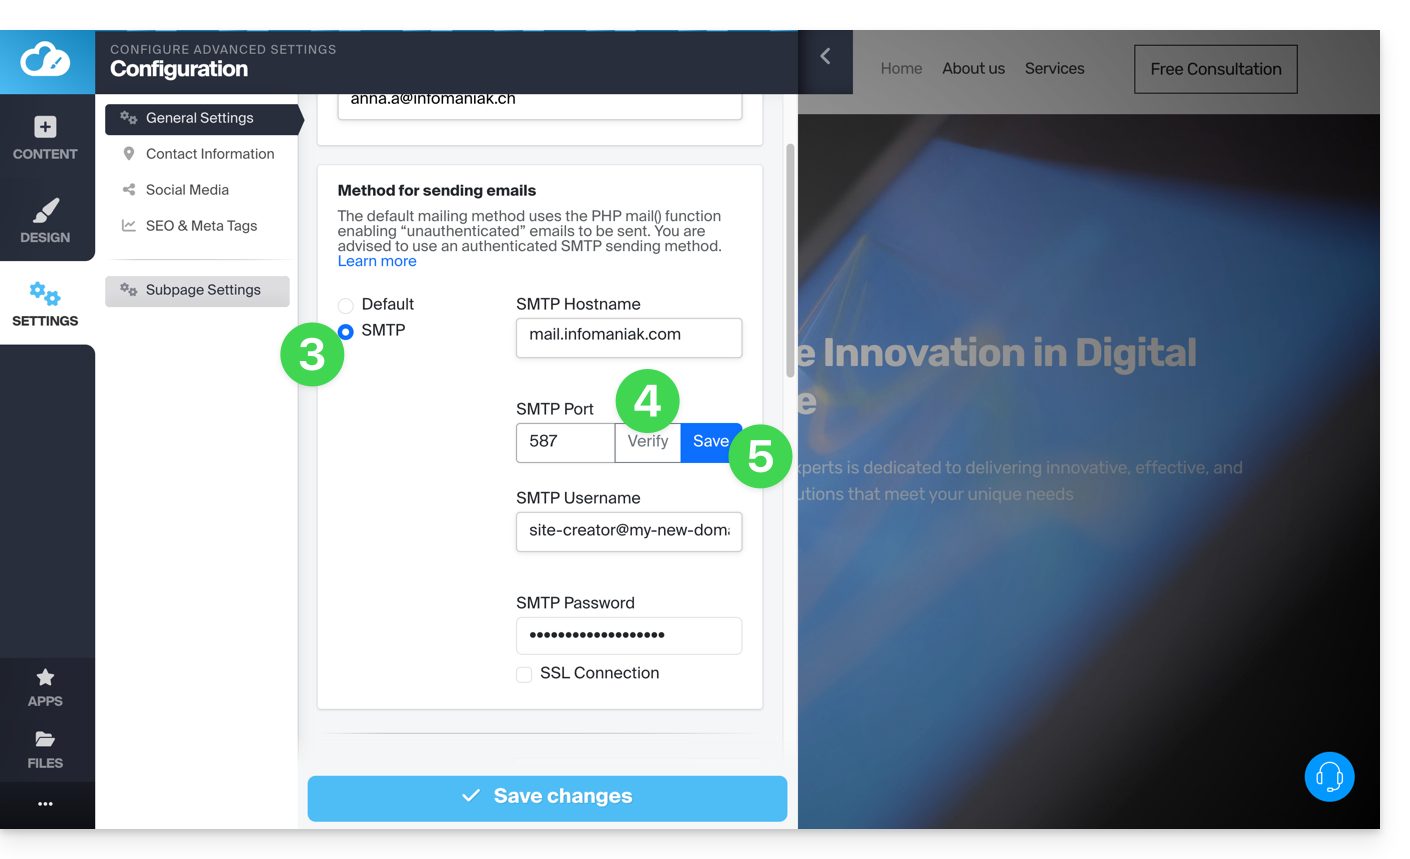
Settings to use
- Outgoing SMTP server = mail.infomaniak.com
- SMTP port = 587
- Username = the complete email address
- Password = the password assigned to the email address (see prerequisites)
Link to this FAQ:
Has this FAQ been helpful?
This guide helps you resolve configuration errors if you encounter difficulties linking your domain name to Site Creator.
Common issues and solutions
Identify the current status of your domain to apply the corresponding solution:
| Domain status | Recommended solution |
|---|---|
| Managed by another provider (external) | Order a DNS zone or transfer the domain to Infomaniak |
| Already associated with a site or defined as alias (synonym) | Delete the existing site or disassociate the domain |
| Currently using a dedicated IP address | Uninstall the dedicated IP |
| Protected by a SSL certificate (Self-signed, DV or EV) | Uninstall the certificate |
| Insufficient permissions on the hosting | Modify access rights |
Link to this FAQ:
Has this FAQ been helpful?
This guide explains how to add and configure an online store module to your website created with Infomaniak Site Creator, so you can start selling online and offer your products for sale.
Prerequisites
- Access Site Creator:
- Click here to access the management of your product on the Infomaniak Manager (need help?).
- Click directly on the name assigned to the Site Creator in question.
- Click on the Edit my site button to start the editor:
Add the online store to Site Creator
Dedicated themes
If you plan to create a website entirely dedicated to your products in the form of an online store, you can choose to apply a theme from the E-Commerce category right from the start: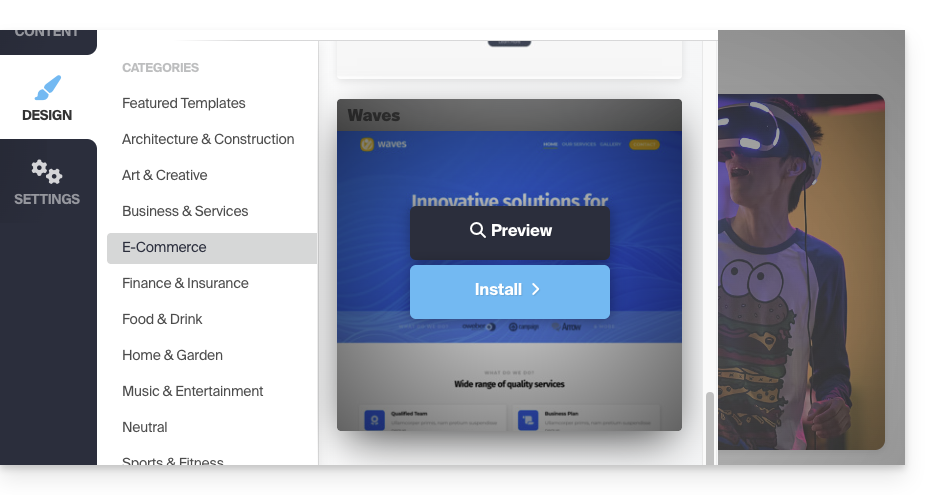
Shop module for Site Creator
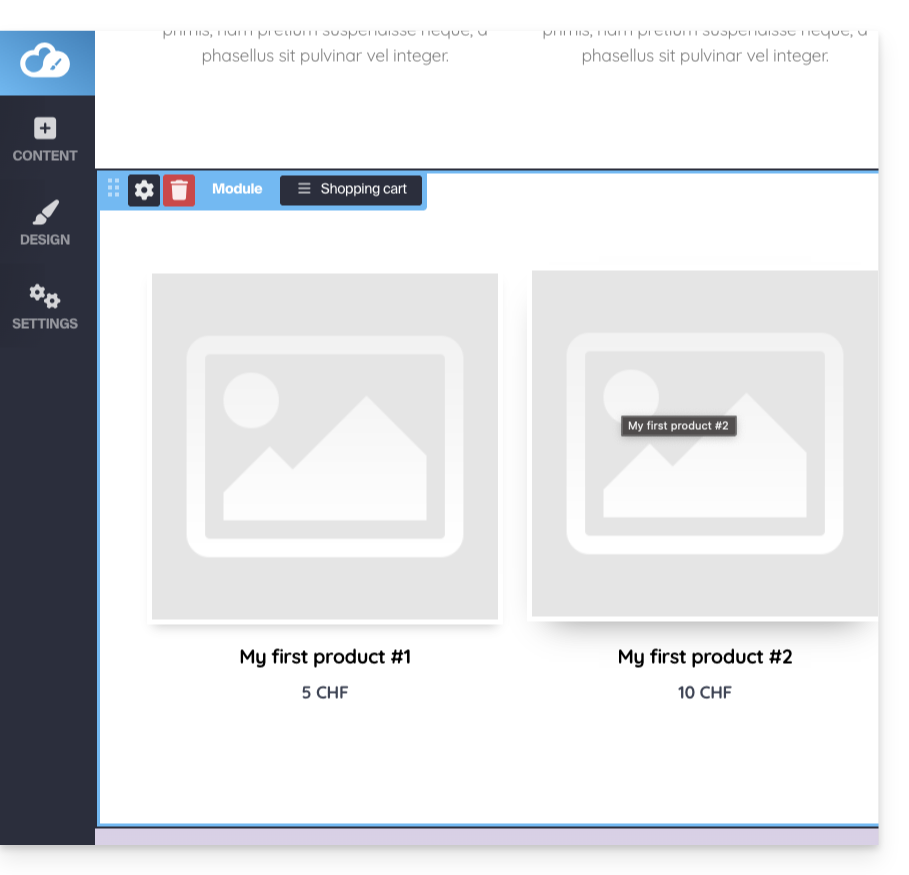
If the Shop module is not yet integrated into your pages, simply add it to the location of your choice:
- Click on the Content button in the left sidebar.
- Click on Applications at the bottom of the list, then on Shop:
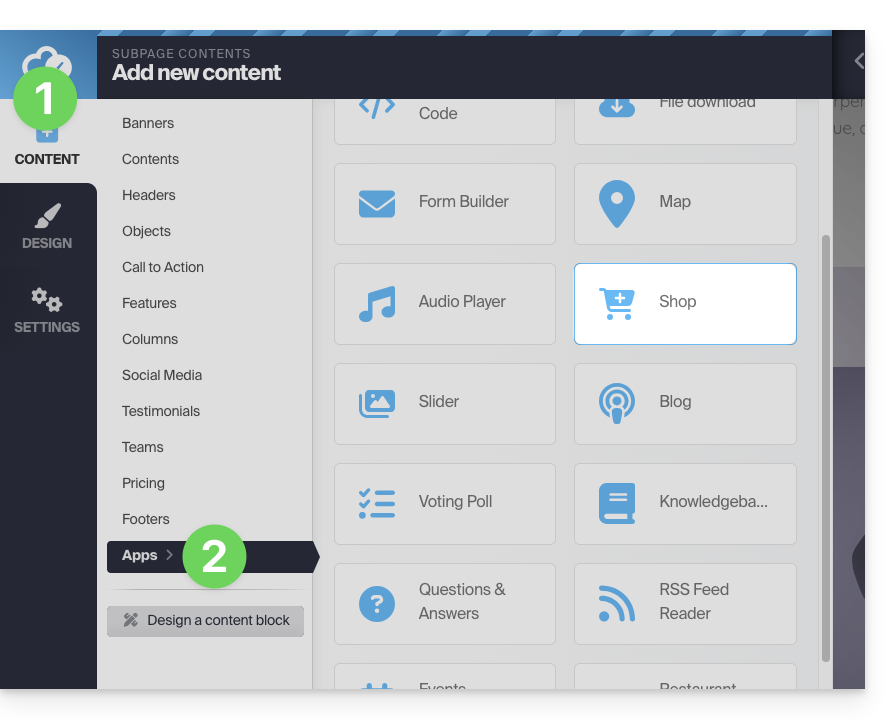
- The store and 3 example products are inserted:
Configure the store
Refer to this other guide for information on the various configuration options for the Site Creator store.
Link to this FAQ:
Has this FAQ been helpful?
Infomaniak offers various Site Creator plans, both free and paid, to meet different needs. It is essential to understand the terms associated with each type of plan before making your choice.
Understanding the Different Site Creator Plans
Site Creator is available…
- … either free with every existing paid web hosting plan (add one if necessary):
- In this case, only 1 Site Creator can be set up per Infomaniak web hosting plan.
- To manage multiple sites created with Site Creator within the same Organization, you must have multiple web hosting plans.
- … or as a standalone plan (standalone available in 3 versions), which does not require any other specific plan:
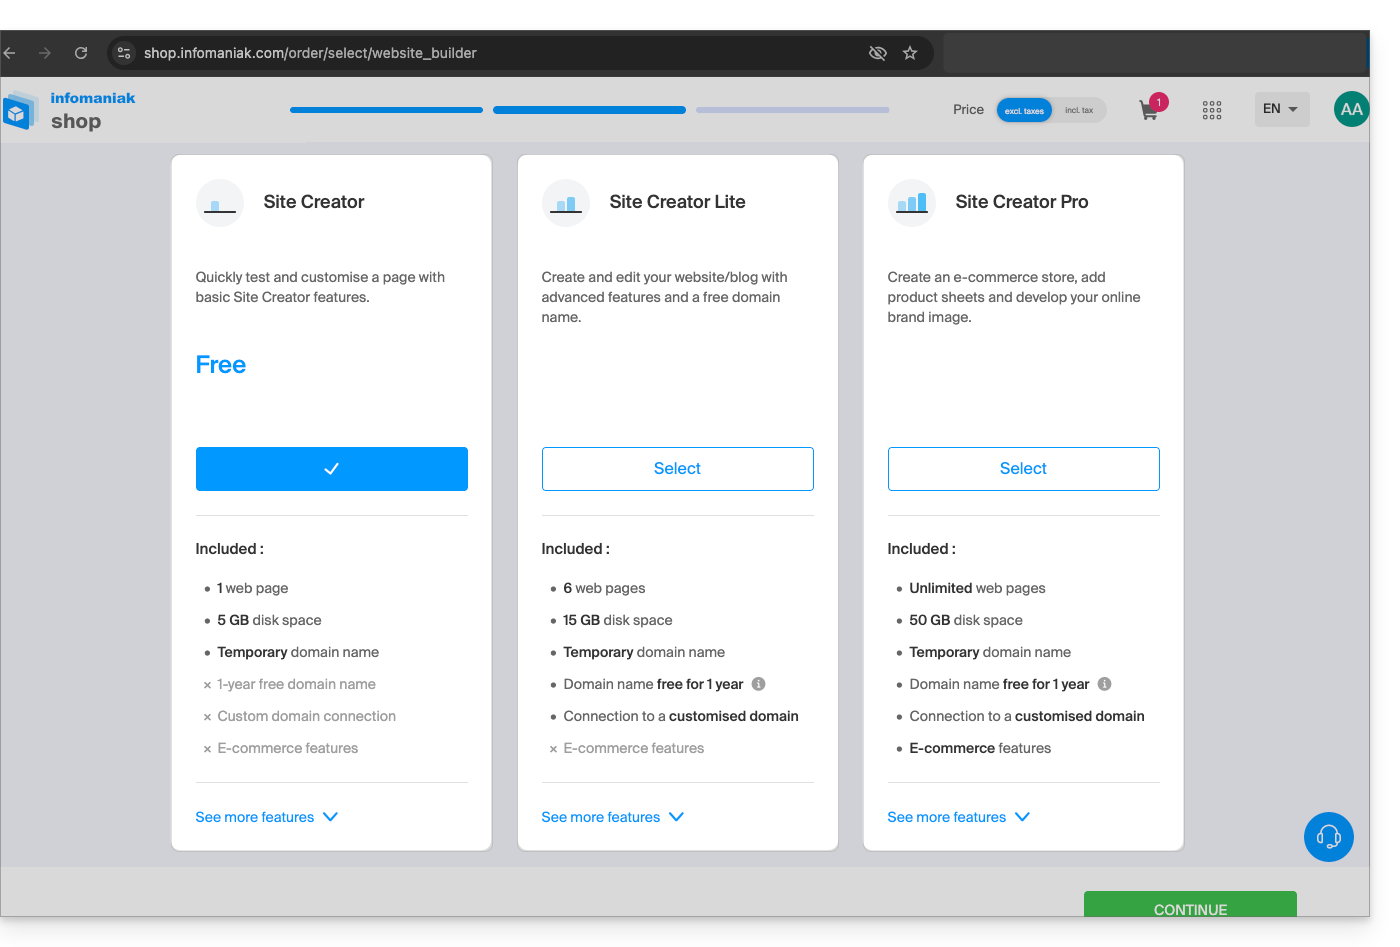
- Site Creator Free
- Site Creator Lite
- Site Creator Pro
1. Site Creator Free
This plan is designed as a testing and discovery solution and is completely free. It is intended for users who want to familiarize themselves with the tool or publish a very simple web page:
- It only allows one web page and offers limited disk space (5 GB).
- This offer does not allow connection to a custom domain name (it will be in the format
*.infomaniak.site) and includes the mandatory display of Infomaniak's advertising message. - Important growth modules, such as full blog management, the use of Artificial Intelligence for text generation, or the "Sitemap" function, are not included.
2. Site Creator Lite
The Lite plan is Infomaniak's entry-level paid offer. It is ideal for creating a simple showcase website or personal blog, as it eliminates the main limitations of the free version and unlocks the modules needed for a complete website:
- It allows you to create a more substantial website with a limit of 6 web pages and more comfortable disk space (15 GB).
- It includes a domain name for one year and, most importantly, removes all Infomaniak advertising from the site.
- Unlike the Free offer, the Lite plan unlocks access to important features for navigation and organization, including the Blog Creation and Management module and the Sitemap module.
3. Site Creator Pro
The Pro offer is the premium version of Site Creator. It is exclusively dedicated to the most ambitious projects, such as launching a complete online store, by removing all content restrictions and integrating advanced commerce and analysis tools:
- It removes all content limitations by offering unlimited web pages and a large disk space of 50 GB.
- This is the only plan that includes complete e-commerce management (orders, inventory, discounts) and allows integration of essential payment gateways (Stripe, PayPal, Mollie) for an online business.
- The Pro plan is the only one that provides access to crucial external analysis and performance tracking tools, such as Google Analytics, Hotjar, and tools like Google reCaptcha.
Commitment related to paid plans
Unlike other Infomaniak products, some Site Creator plans include a free domain name. These plans require a firm commitment for a minimum period of 12 months, with no possibility of a refund, even partial, even if:
- you decide to stop using Site Creator before the end of the first year,
- you cancel your products,
- you close your user account or your Organization.
Plan upgrades and keeping your site
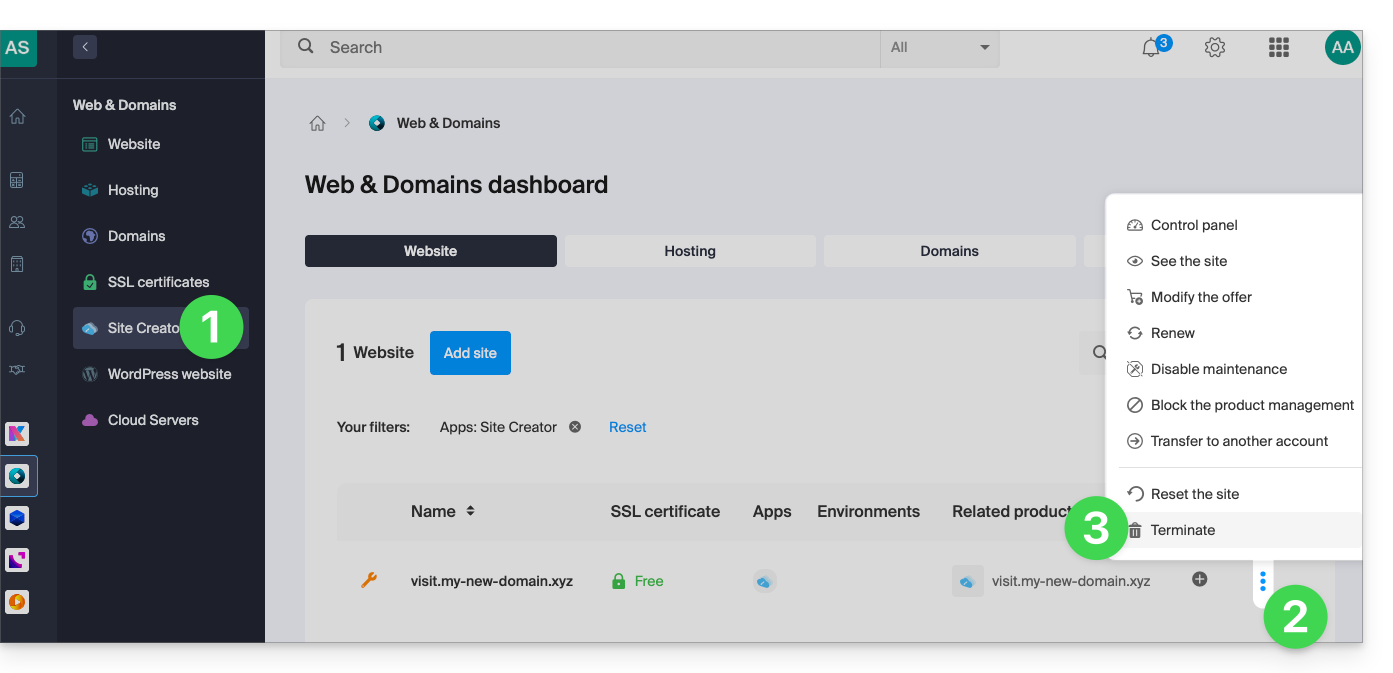
It is possible to upgrade from a free plan to a more comprehensive paid plan:
- Click here to access the management of your site on the Infomaniak Manager (need help?).
- Click on the action menu ⋮ to the right of the site in question in the table that appears.
- Click on Change plan:

It is also possible to upgrade to a higher plan (e.g., from Lite to Pro).
However, it is not possible to downgrade to a lower plan or revert to a free plan once a paid plan has been activated.
If you want to keep your site active, you must renew the same paid plan. It is not possible to switch to a free version of Site Creator, even if:
- you are not using any of the paid modules,
- your site only has one page.
What to do if you want to revert to the free plan?
In this case, you must:
- cancel your current site after manually copying all the information you want to keep,
- activate a new free Site Creator plan,
- recreate your site by pasting the content recovered from the old one.
Link to this FAQ:
Has this FAQ been helpful?
This guide explains how to embed video/audio files imported on an Infomaniak VOD/AOD service on web pages.
Preamble
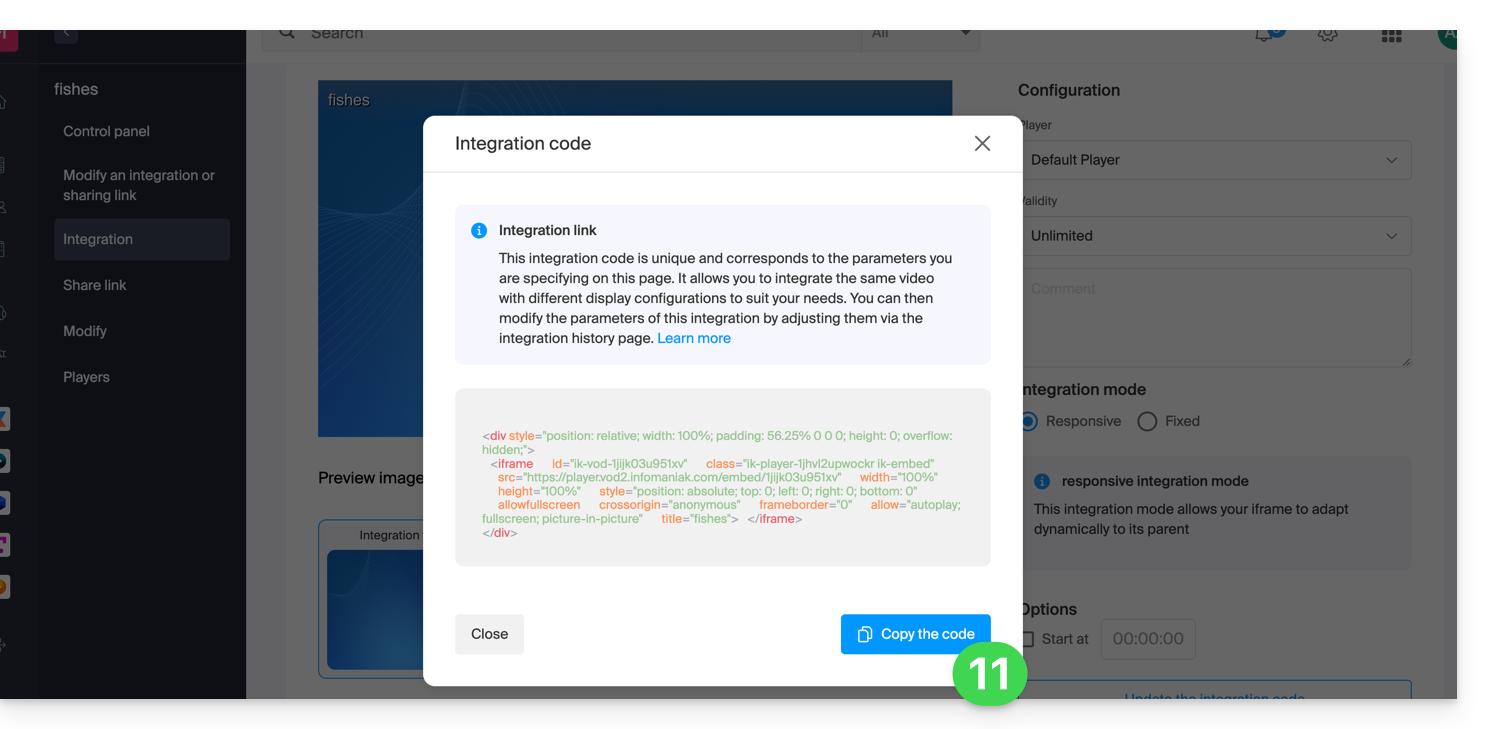
- This VOD/AOD integration code is unique and corresponds to the parameters you are currently specifying on the page.
- It allows you to embed the same video with different display configurations according to your needs.
- Later, you will be able to modify the parameters of this integration by adjusting them from the integration history page on the Infomaniak Manager.
- You can also share a media in different ways.
Generate and copy the integration code
The integration code is on your VOD interface; here is an example with a default Player:
- Click here to access the management of your product on the Infomaniak Manager (need help?).
- Click directly on the name assigned to the product concerned:
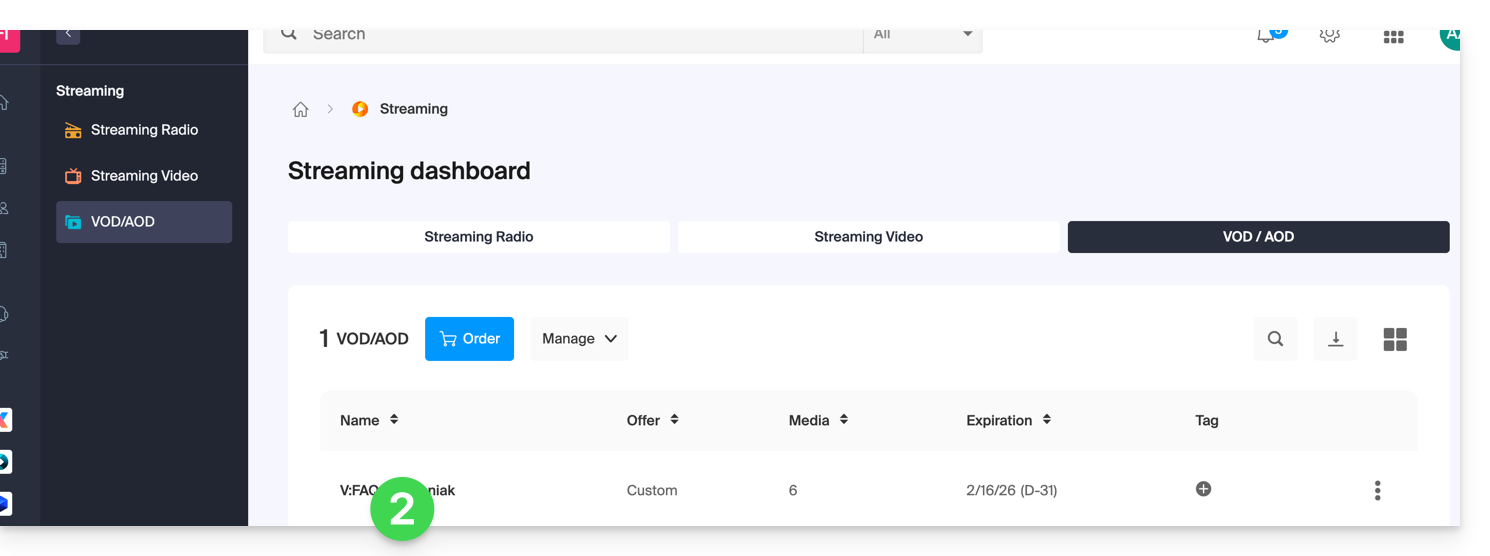
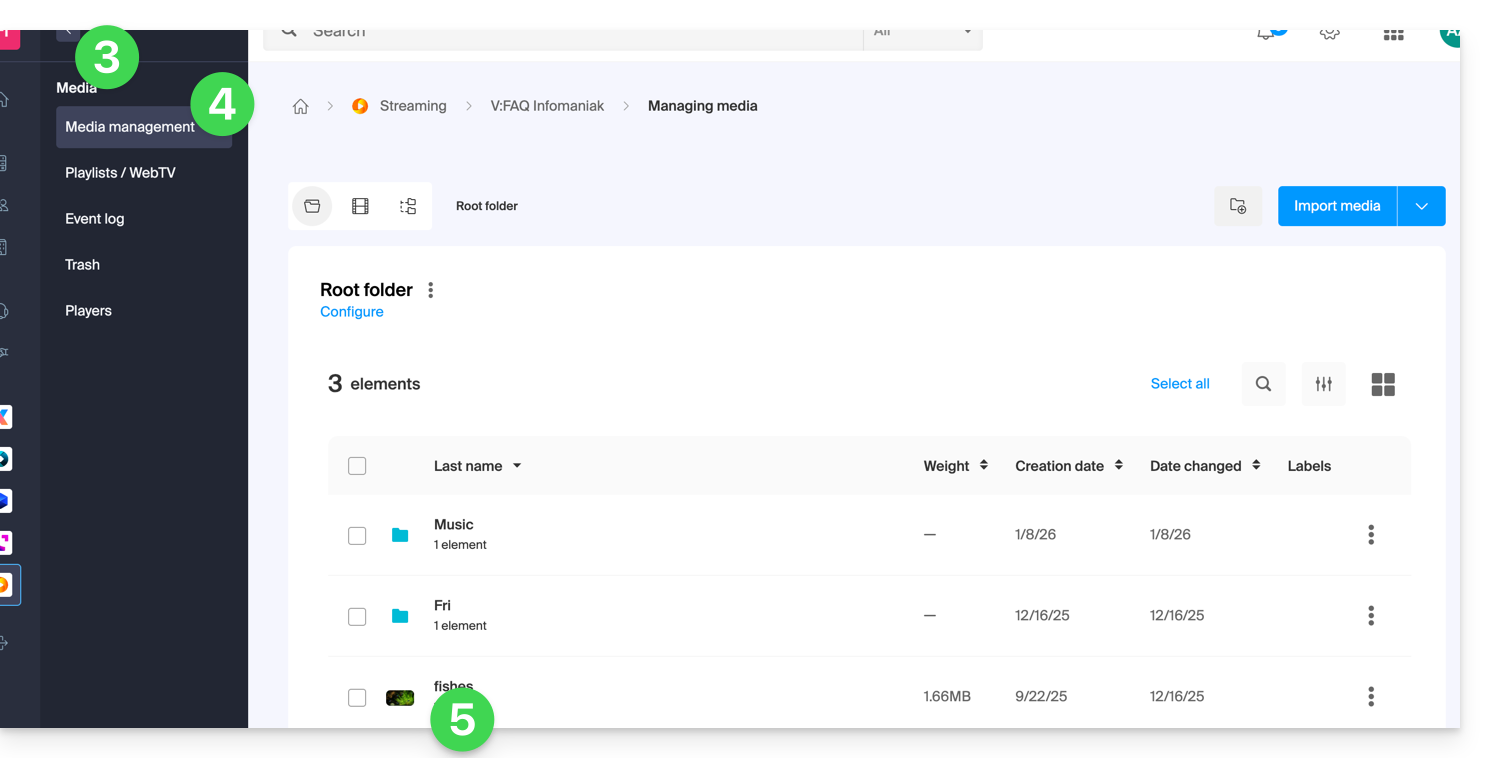
- Click on Media in the left sidebar menu.
- Click on Media management in the left sidebar menu.
- Click on the media concerned in the table that appears:
- Click on the blue Embed button.
- Click on Create an integration:
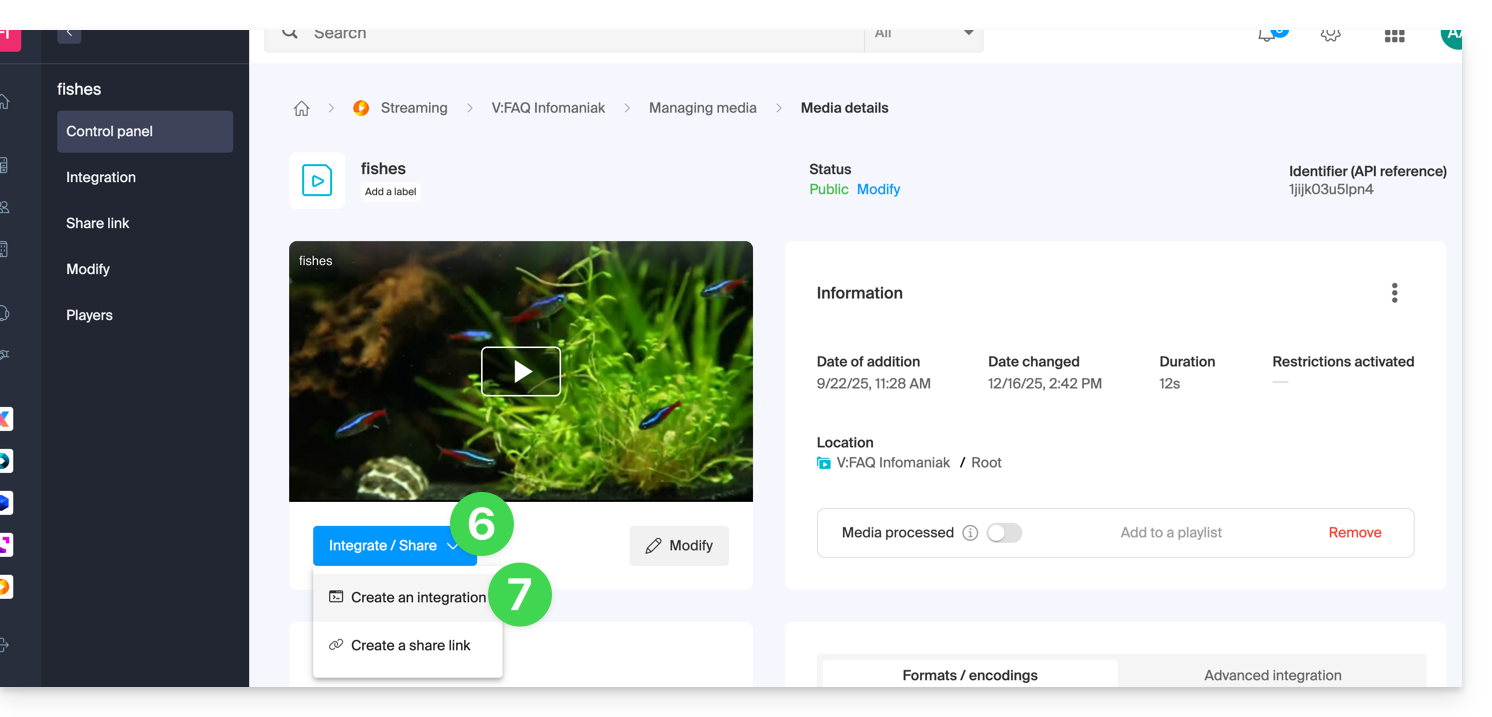
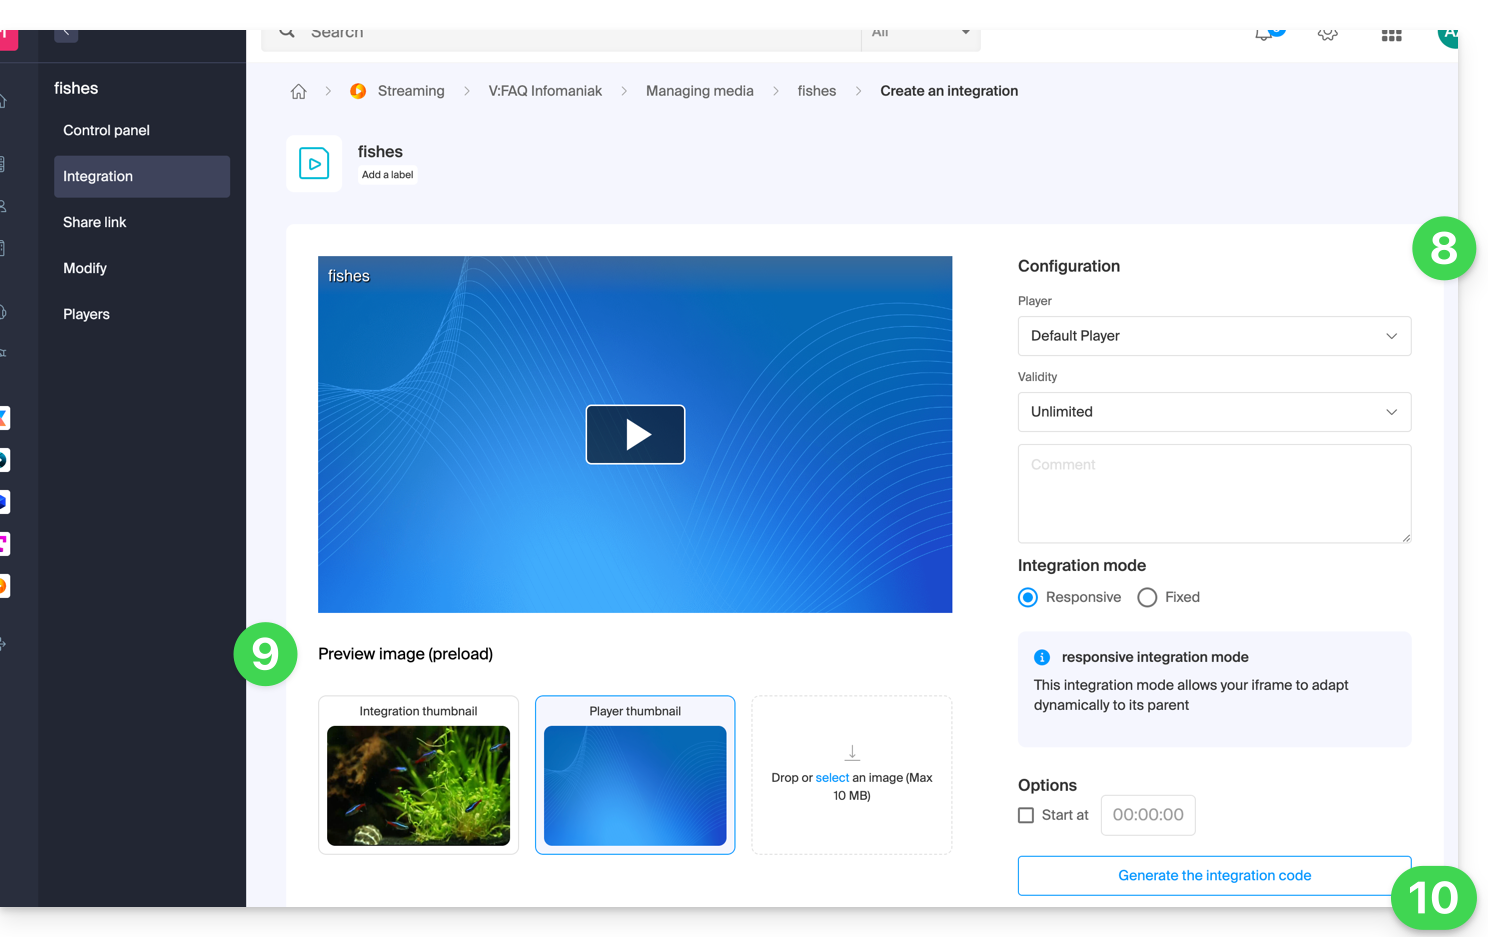
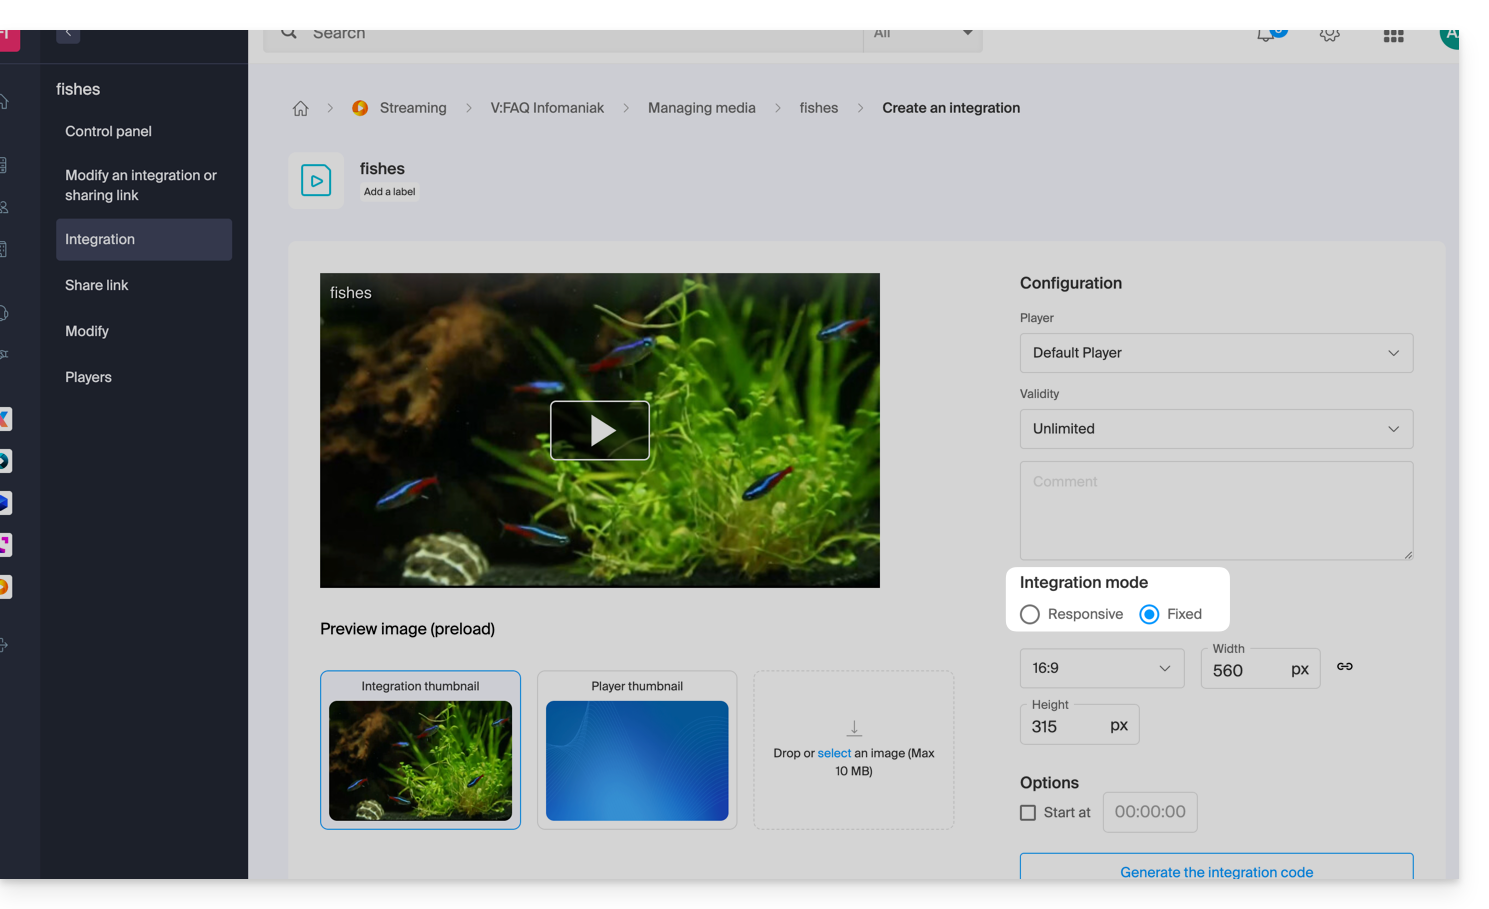
- Customize the media integration (Player to use, timestamp, loop playback, automatic start, …).
- Choose the thumbnail to display when the media is stopped.
- Click on the button to Generate the integration code:
- Copy the code to embed it in the location of your choice:
The media will be inserted with the default Player but you have the option to choose from your created Players the one to be proposed during the integration.
Modify a previous integration
To customize the integration of your media that has already been done, and with the aim of keeping the corresponding code without having to insert it again:
- Click here to access the management of your product on the Infomaniak Manager (need help?).
- Click directly on the name assigned to the product concerned.
- Click on Media in the left sidebar menu.
- Click on Media management in the left sidebar menu.
- Click on the media concerned in the table that appears.
- Click on the blue button Integrate.
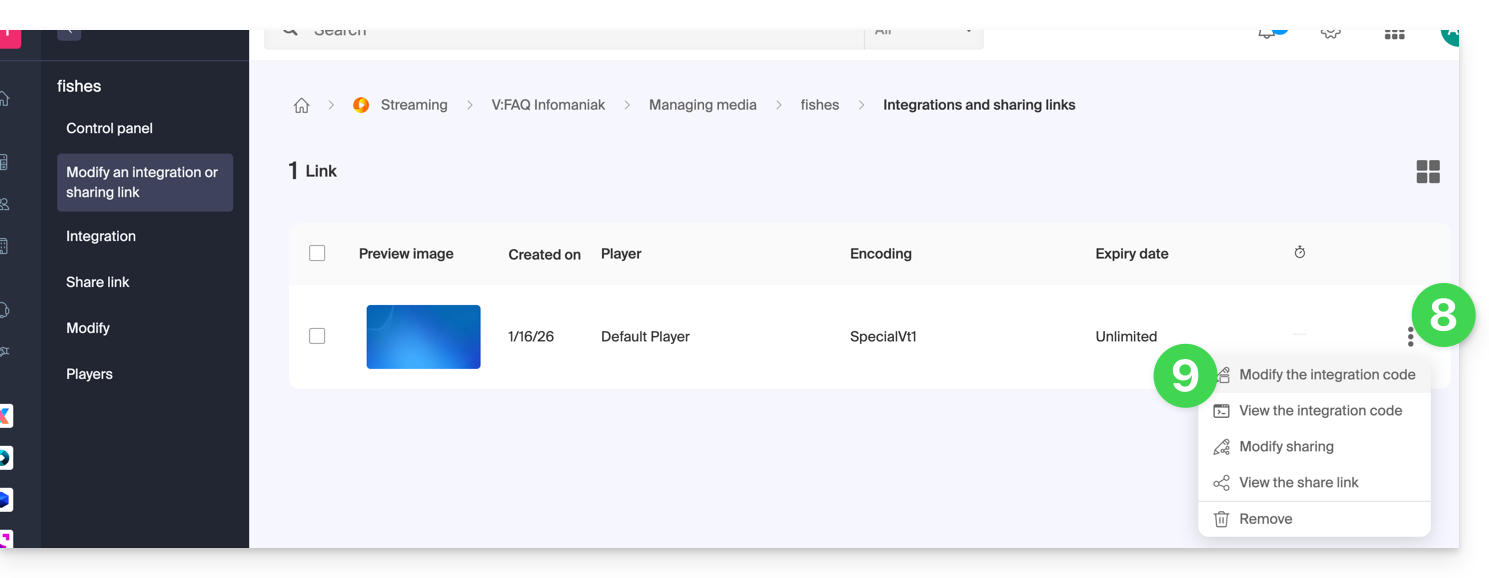
- Click on Modify an integration:
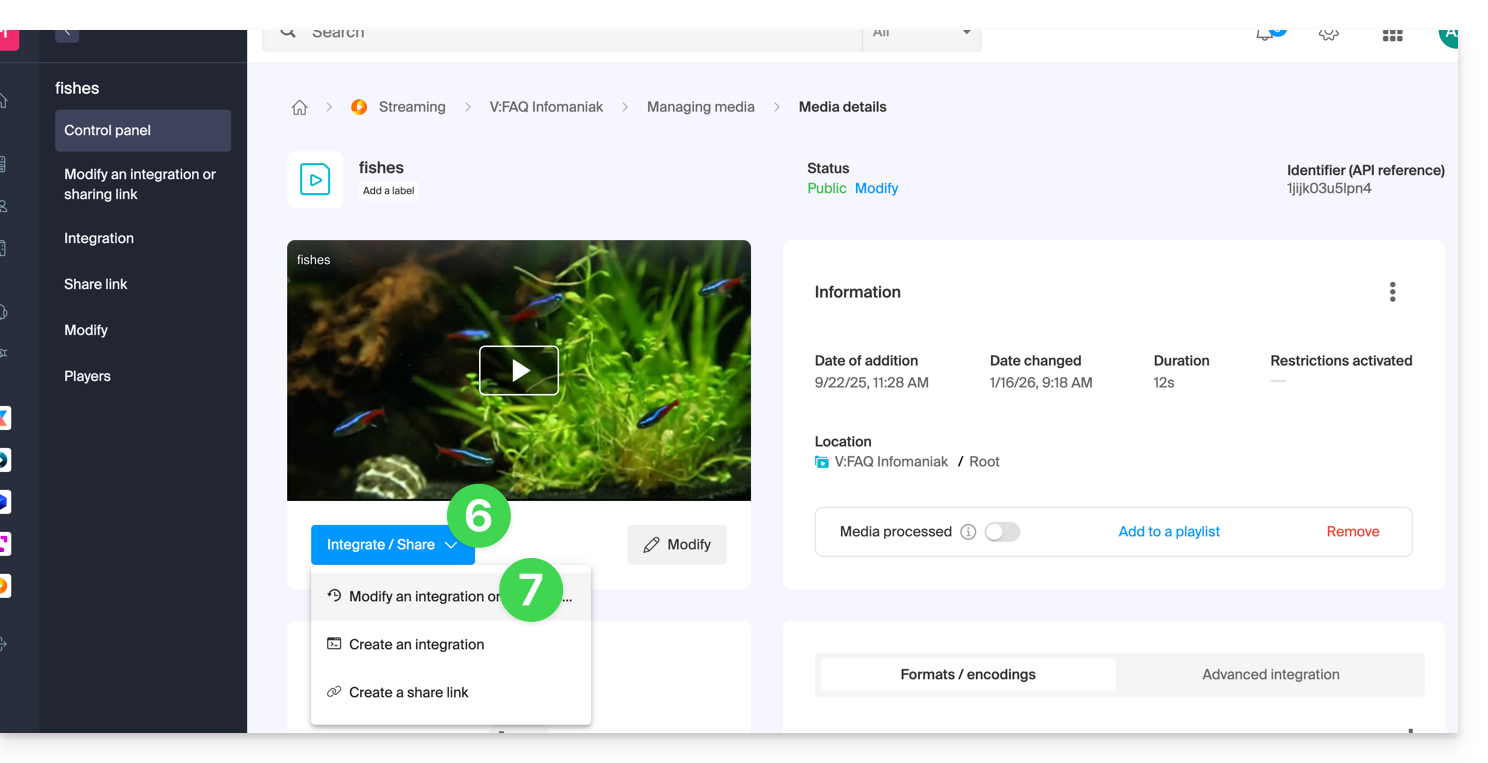
- Click on the action menu ⋮ to the right of the object concerned in the table that appears.
- Click on the desired element to obtain / modify the integration codes:
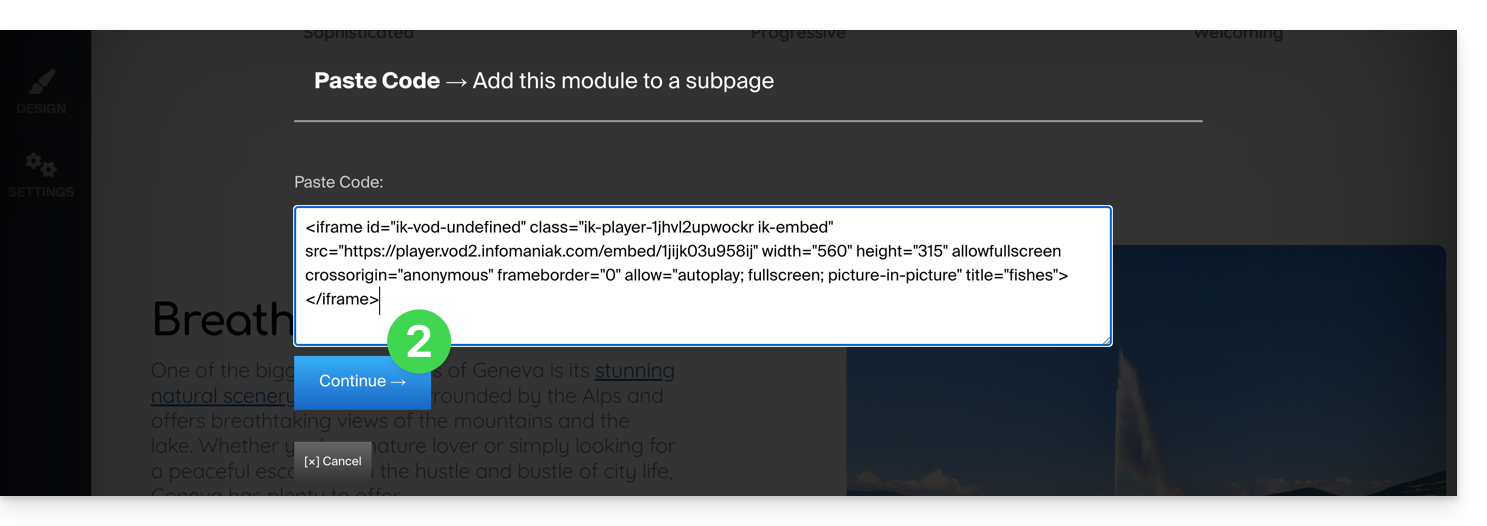
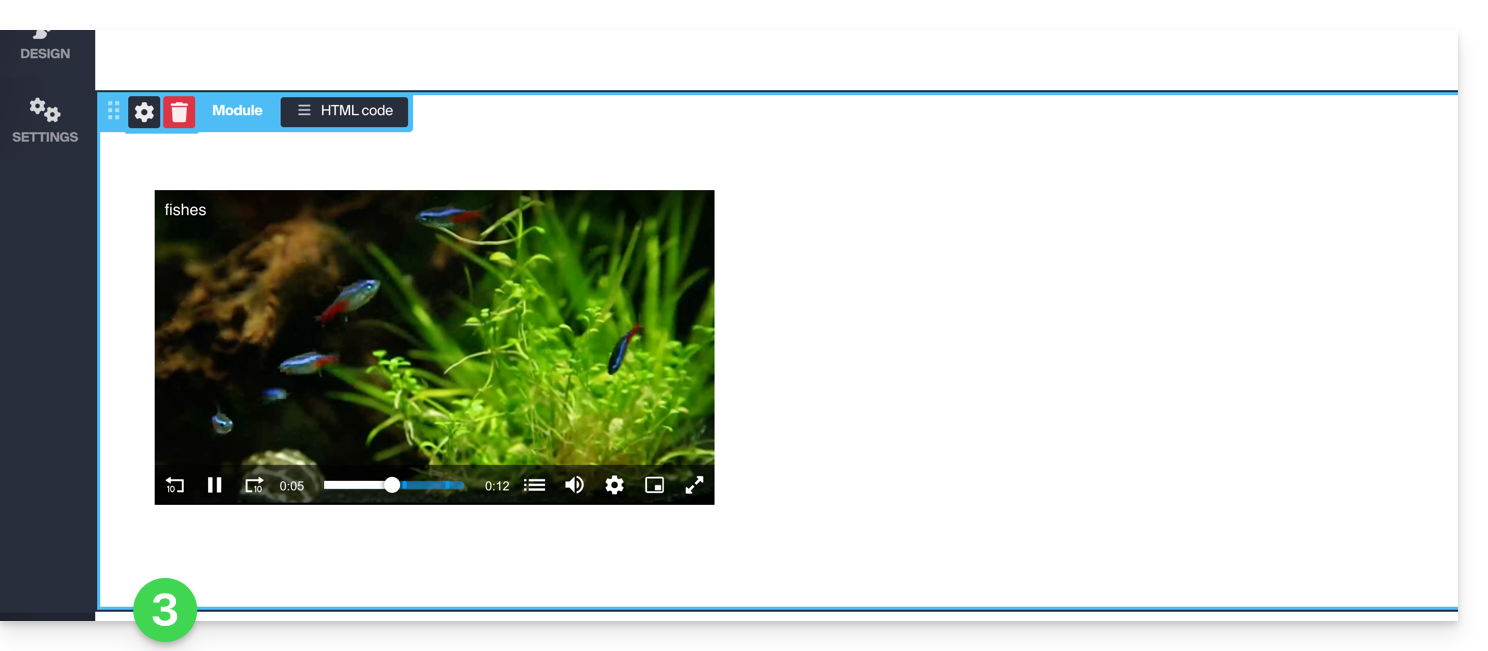
Paste the integration code…
On the Web page of your choice, paste the HTML code where desired: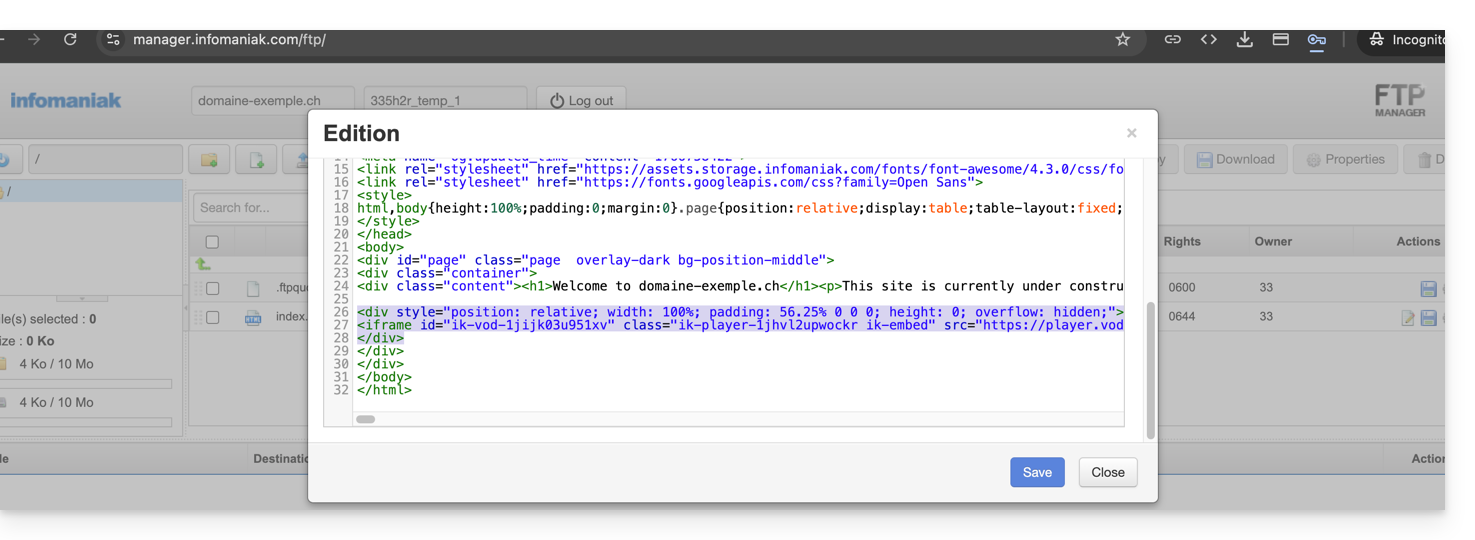
… on Infomaniak Site Creator
- For Site Creator, you need to generate a “Fixed” integration code (and not “Responsive / Reactive”):
- Then paste this code on Site Creator within a “Custom HTML Code” block:
Link to this FAQ:
Has this FAQ been helpful?
This guide presents the Calendar and Calendly modules for Infomaniak's Site Creator.
Prerequisites
- Access Site Creator:
- Click here to access the management of your product on the Infomaniak Manager (need help?).
- Click directly on the name assigned to the Site Creator in question.
- Click on the Edit my site button to start the editor:
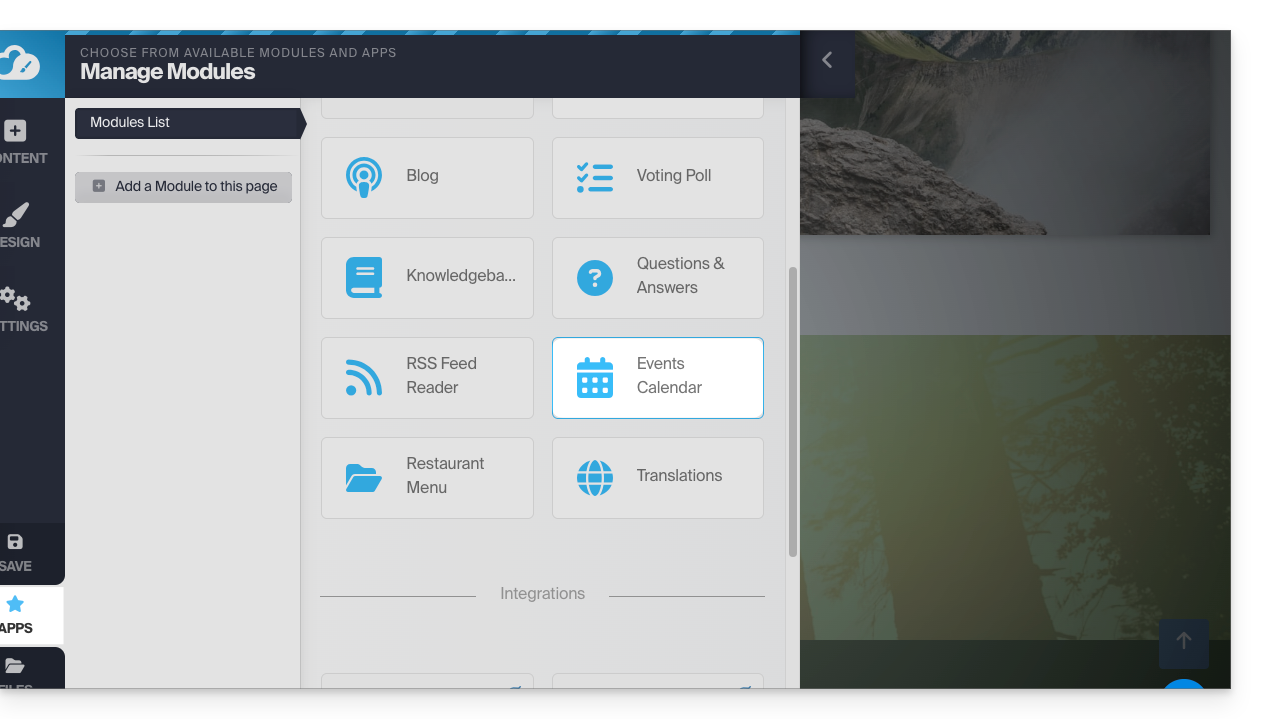
Calendar Module
From Site Creator:
- Click on the Applications button in the left-hand menu.
- Click on Calendar:
Add events related to your activity that you want to display on your site in a dynamic way: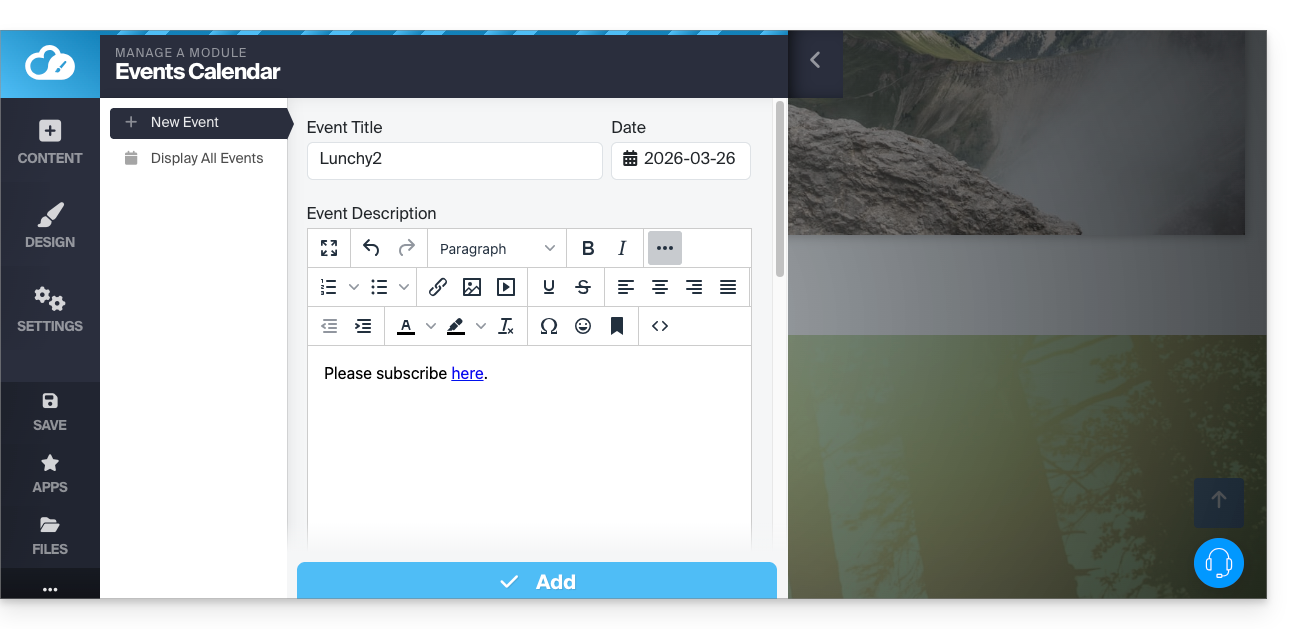
Once you have added a few events, you can view them on the calendar in the same place:
Then, insert the Calendar module in the desired location on your site: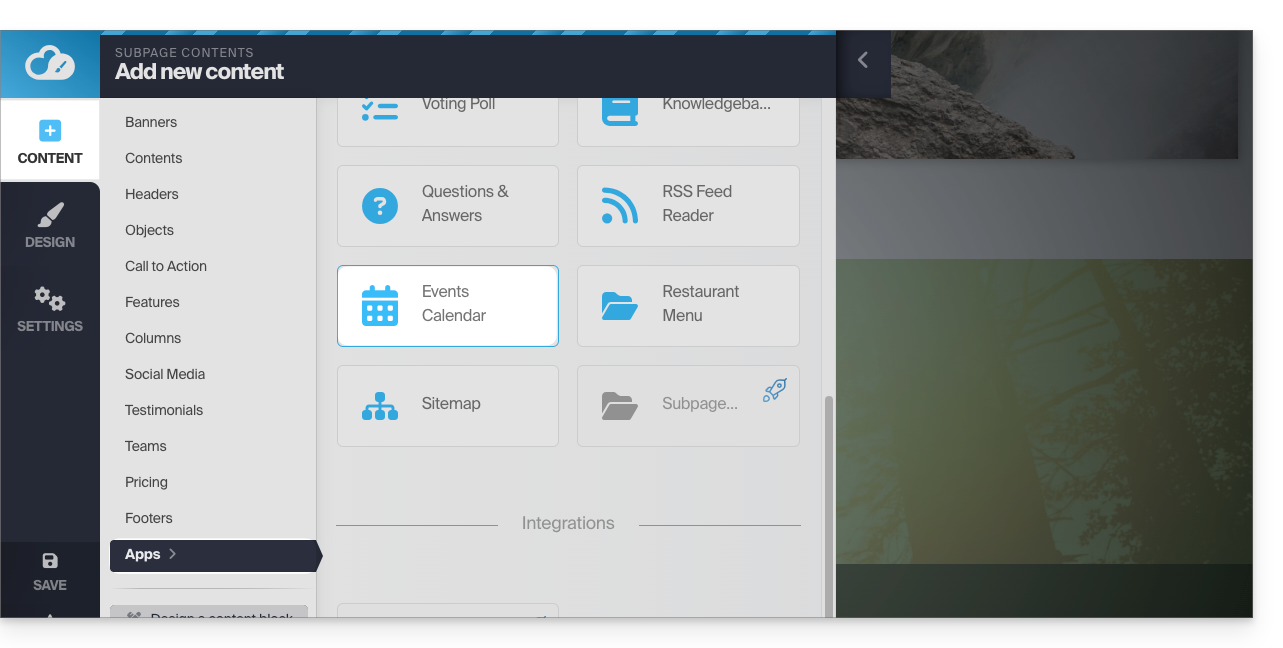
Your visitors will be able to see the scheduled events, including when you modify them in your calendar: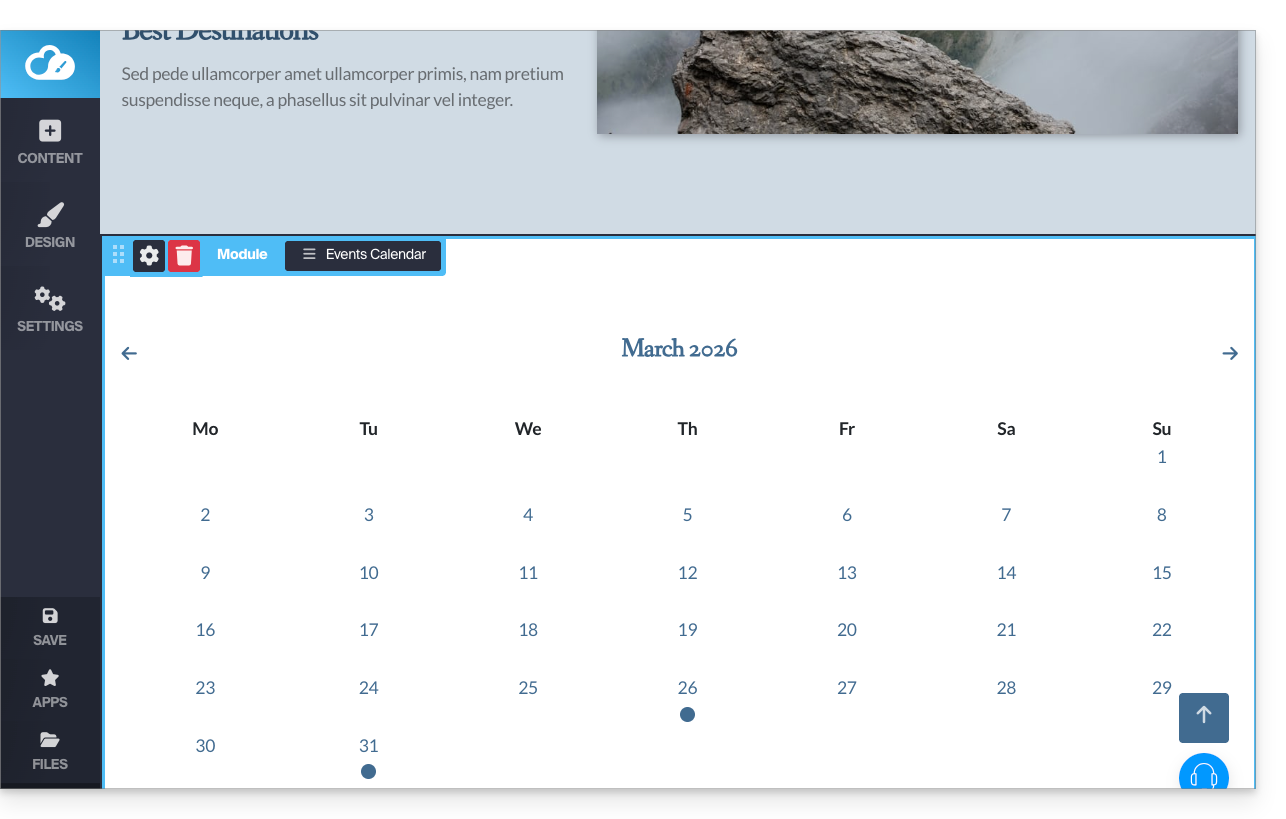
Calendly Module
✘ UNAVAILABLE with
Site Creator Free / Lite
This integration is possible if you have an account on the external Calendly service.
From Site Creator:
- Click on the Content button in the left-hand menu.
- Click on Apps in the left-hand menu.
- Click on Calendly to insert the module:
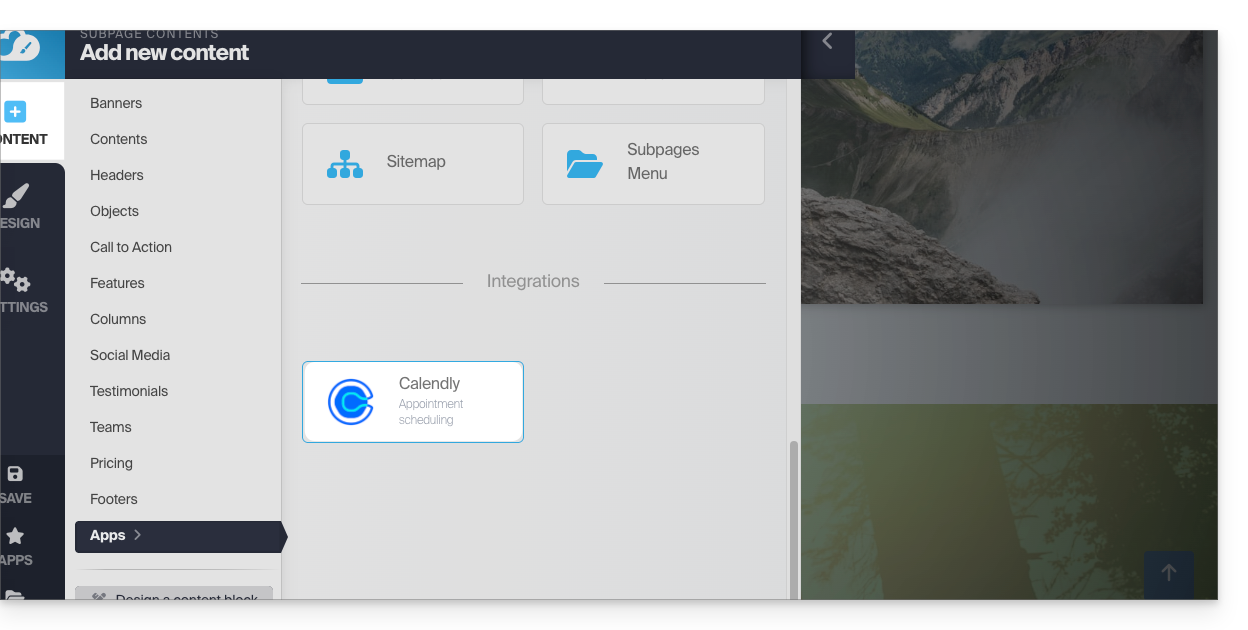
- Click to configure the application with the information related to your Calendly account:
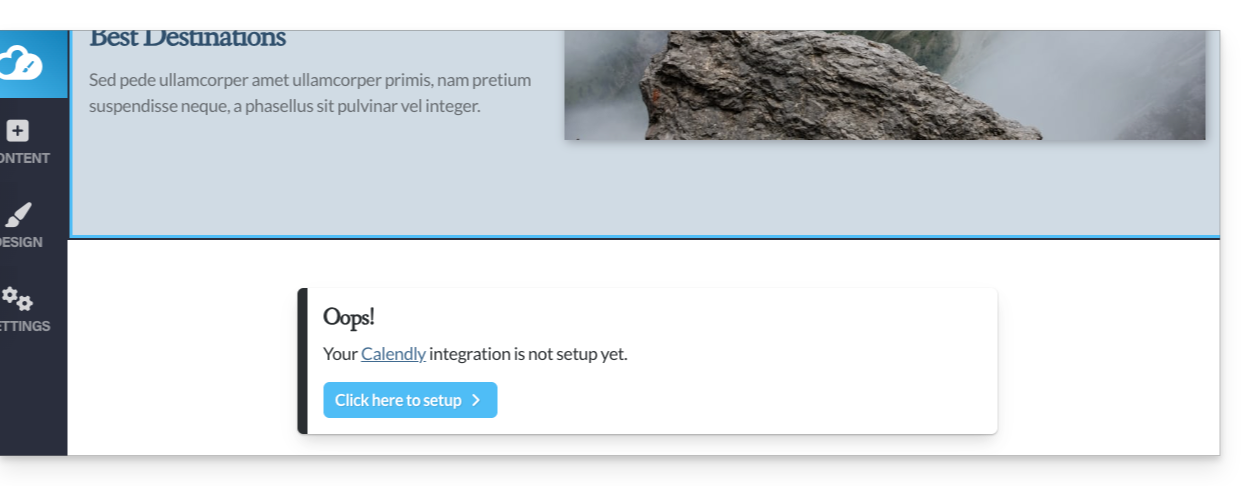
Then, insert the Calendly module in the desired location on your site to display your Calendly information: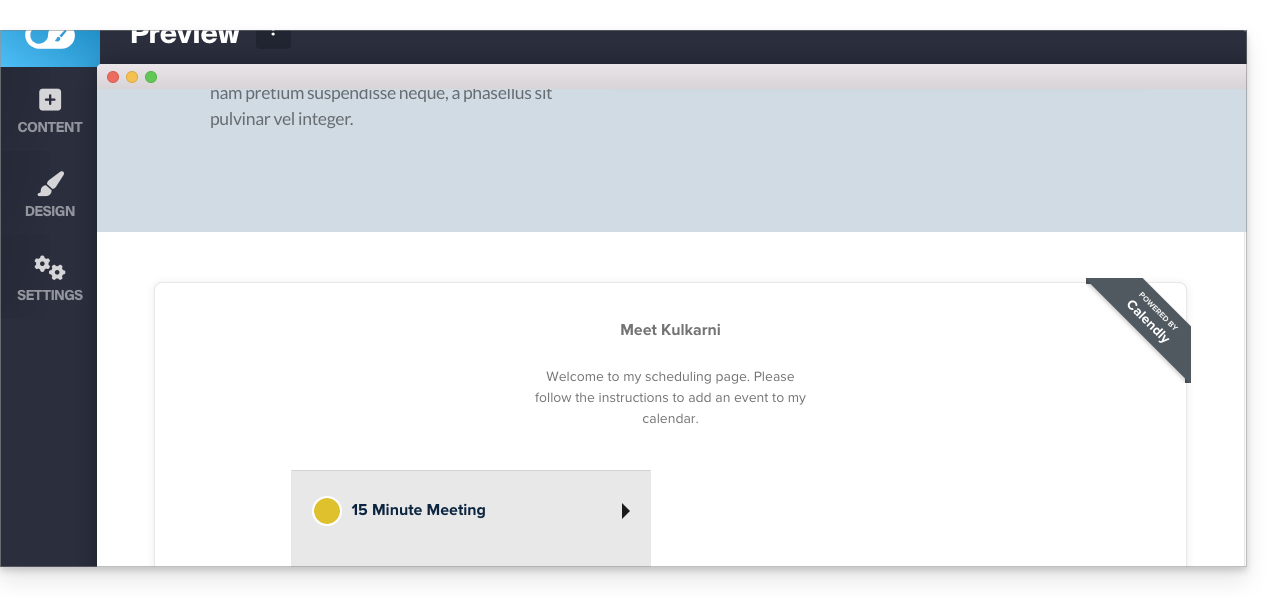
Link to this FAQ:
Has this FAQ been helpful?
This guide explains how to manage the first page of an Infomaniak Site Creator, i.e., the homepage that is displayed when you type in your website's address (e.g., www.domain.xyz).
Introduction
- The homepage is mandatory, but you can easily define a new one from your existing pages at any time.
- Refer to this other guide to manage additional pages.
Modify the website's homepage
Prerequisites
- Access Site Creator:
- Click here to access the management of your product on the Infomaniak Manager (need help?).
- Click directly on the name assigned to the Site Creator in question.
- Click on the Edit my site button to start the editor:
Once in Site Creator:
- Click on the Settings button in the left-hand menu – the list of your pages appears:
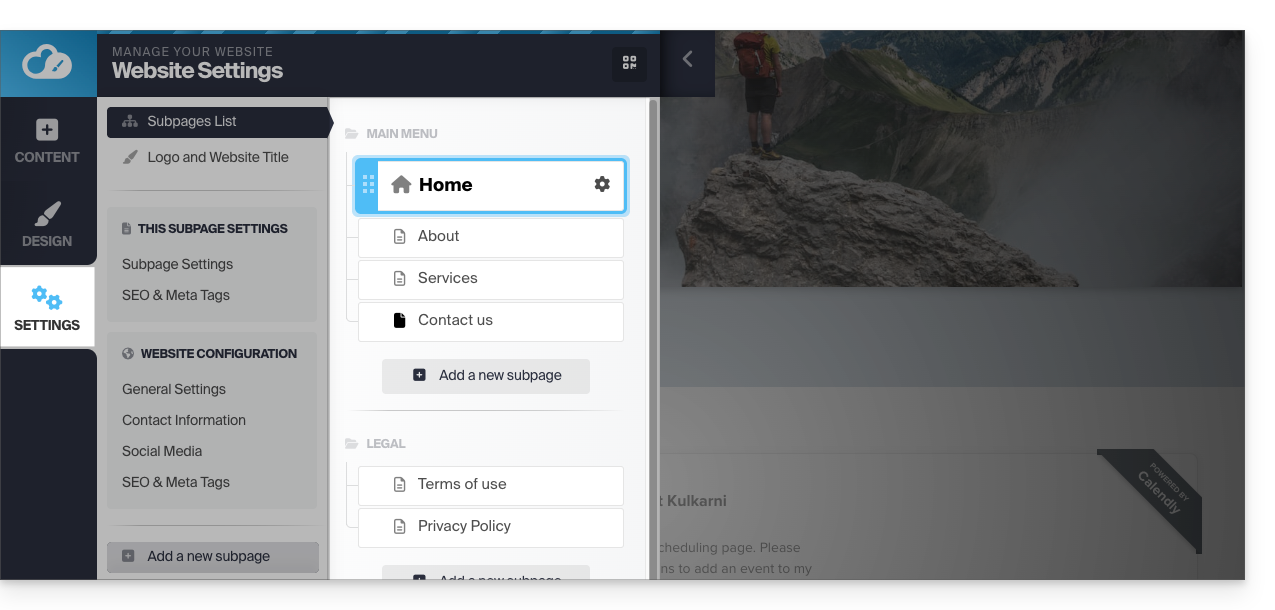
- Click, then drag and drop the current homepage (represented by a house icon) to the bottom of the list:
- Click on the icon of this page to change its page type to a standard page.
- Save the changes:
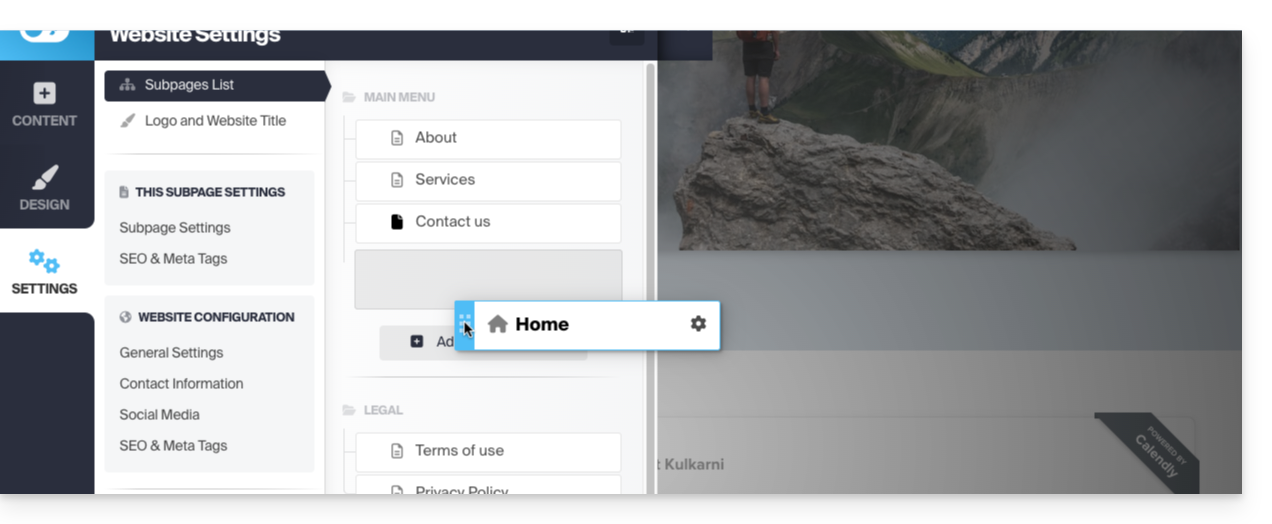
- Go back to the settings and click on the Settings icon on the page you want to set as the new homepage:
- Click on the toggle switch to set this page as the homepage of your site.
- Save the changes:
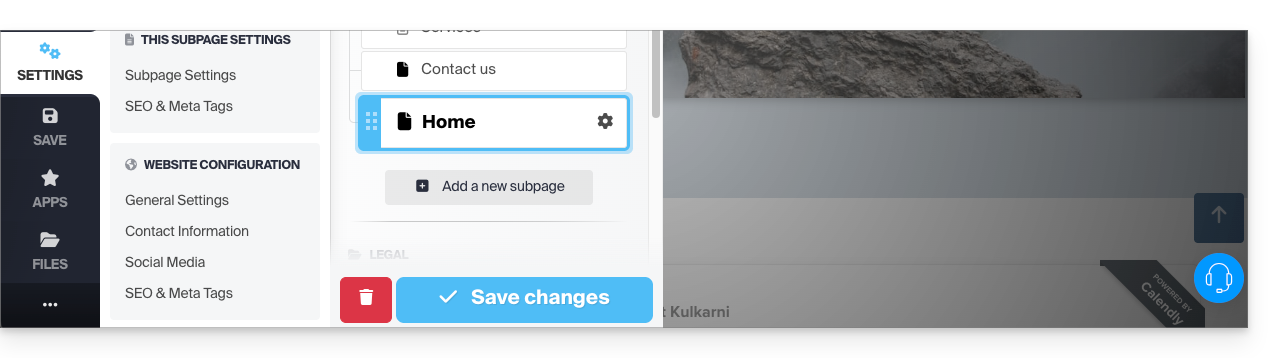
- Go back to the settings and click on the icon of this page to change its page type to homepage and position it first:
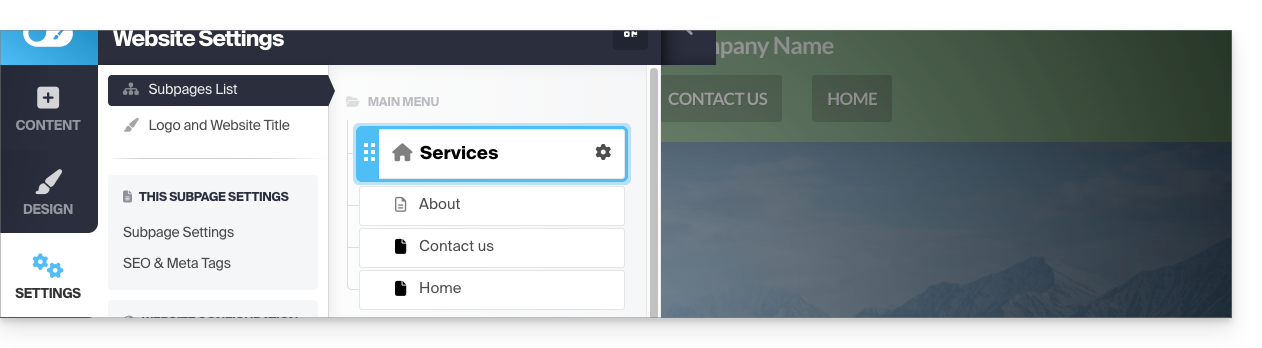
- Save the changes and test the effect of the change by visiting your site, which will no longer have the same default homepage:
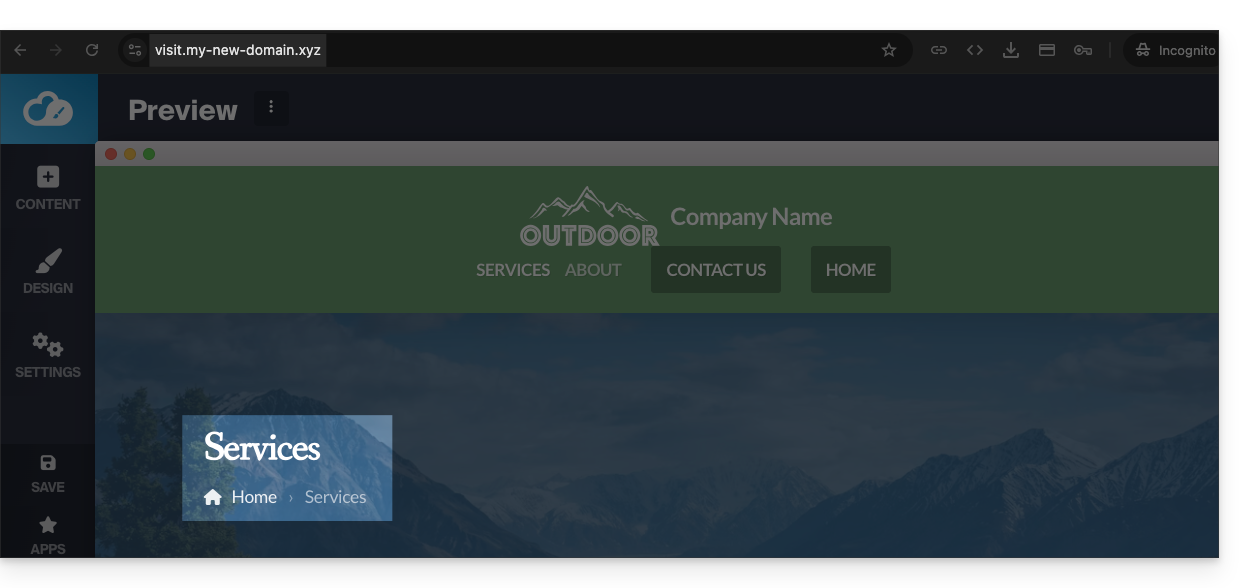
- Before, the homepage was the default one:
- Before, the homepage was the default one:
Link to this FAQ:
Has this FAQ been helpful?
This guide concerns Site Creator. The tool is free with a Web Hosting plan or available under different plans when ordered separately.
Introduction
- When Site Creator is installed as a site on one of your Web Hosting plans, you delete the site (and its content) created with Site Creator, just like any other site you own on a Web Hosting plan.
- A cancellation confirmation is sent to any other administrators of the Organization.
- Backups will be permanently deleted upon cancellation of any Site Creator, making any restoration impossible.
Procedure for Deleting Site Creator
To delete the site created with Infomaniak Site Creator:
- Click here to access the management of your product on the Infomaniak Manager (need help?).
- Click on the action menu ⋮ to the right of the site in question in the table that appears.
- Click on Cancel:
You can start a new, blank Site Creator after deleting the tool.
Link to this FAQ:
Has this FAQ been helpful?
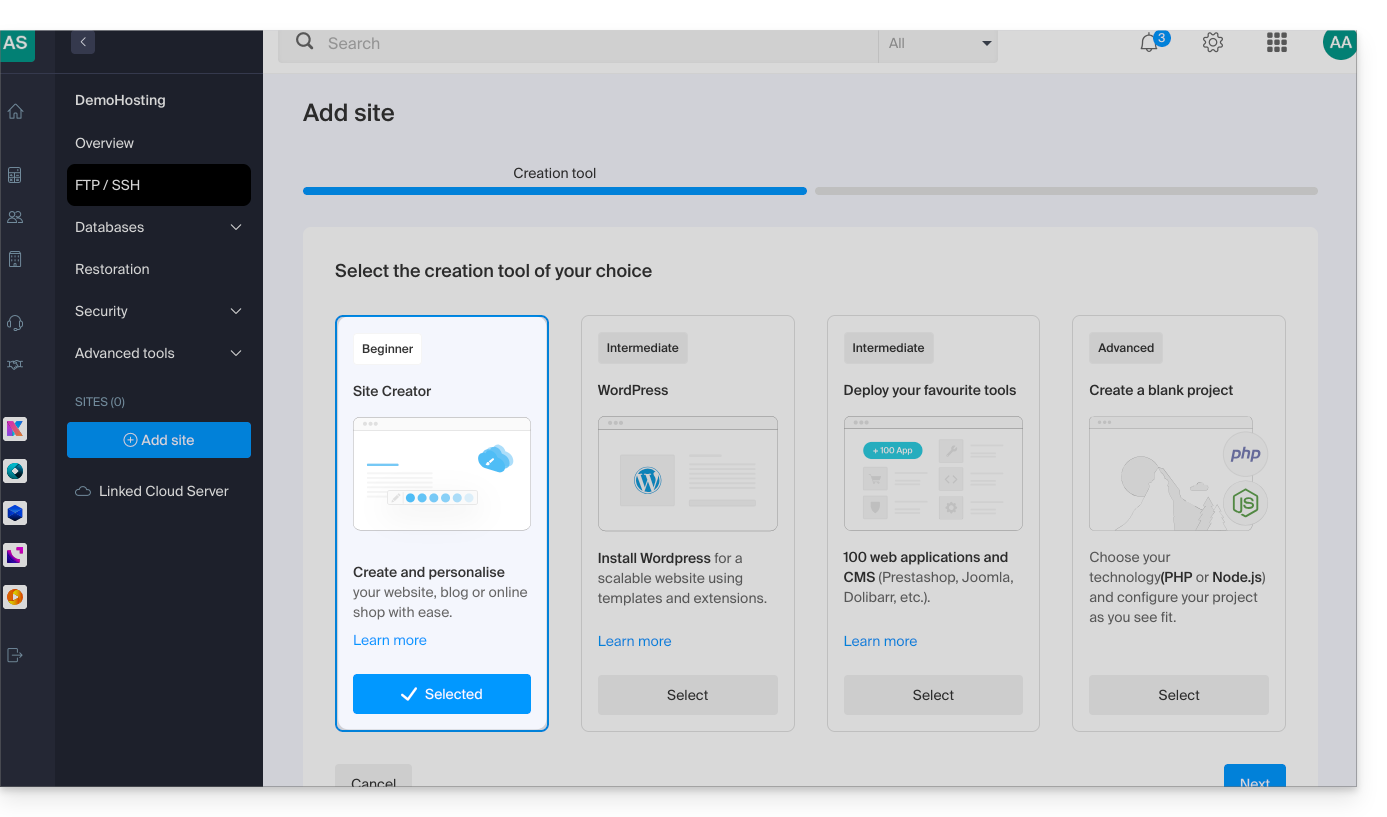
This guide explains how to obtain and connect to Infomaniak's Site Creator with an existing web hosting plan.
Introduction
- Site Creator is available…
- … either free of charge with every paid web hosting plan.
- … or as a standalone product (available in 3 versions) and does not require any other specific offer in this case.
- Please refer to this other guide to compare the different plans available.
- You do not need to download anything to use Site Creator; everything is done online through an interface accessible from any browser.
1. Adding Site Creator to your existing web hosting plan
To add Site Creator to a site on your existing web hosting plan:
- Click here to access the management of your hosting plan in the Infomaniak Manager (need help?).
- Click directly on the name of the hosting plan in question.
- To add a site, refer to this other guide from step 3 and choose Site Creator in step 4:
2. Ordering Site Creator without a specific hosting plan
To obtain Site Creator independently, go to the Site Creator Free, Lite, and Pro offer descriptions and follow the instructions by clicking on the button for the offer that interests you.
Accessing Site Creator
To start using Site Creator to design your website:
- Click here to access the management of your product on the Infomaniak Manager (need help?).
- Click directly on the name assigned to the Site Creator in question.
- Click on the Edit my site button to start the editor:
When Site Creator is installed on your site and you are browsing it, if you have not logged out of the Infomaniak Manager, the editing menu will be visible (only to you) so you can use the editor at any time.
You can hide it and return to it whenever you want:

Link to this FAQ:
Has this FAQ been helpful?
This guide concerns Site Creator, Infomaniak's website creation tool, which offers a library for your media (images, videos, documents, etc.).
Prerequisites
- Access Site Creator:
- Click here to access the management of your product on the Infomaniak Manager (need help?).
- Click directly on the name assigned to the Site Creator in question.
- Click on the Edit my site button to start the editor:
Accessing files
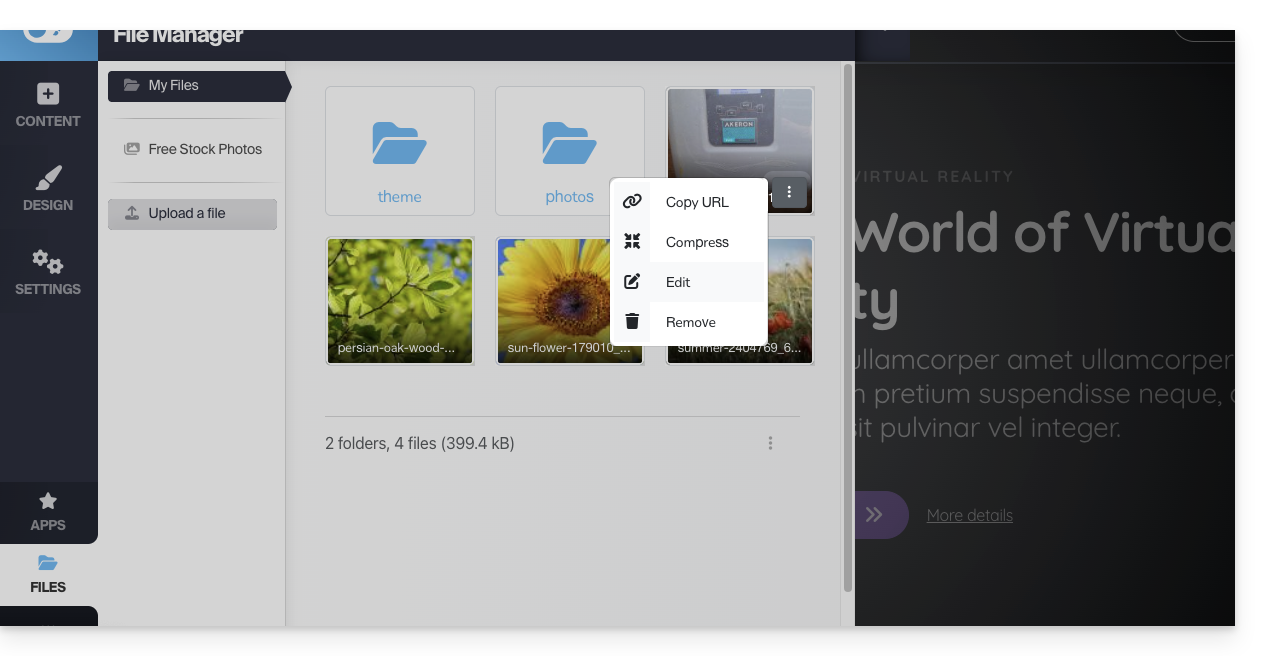
The library is accessible from the bottom of the left-hand side menu, under Files: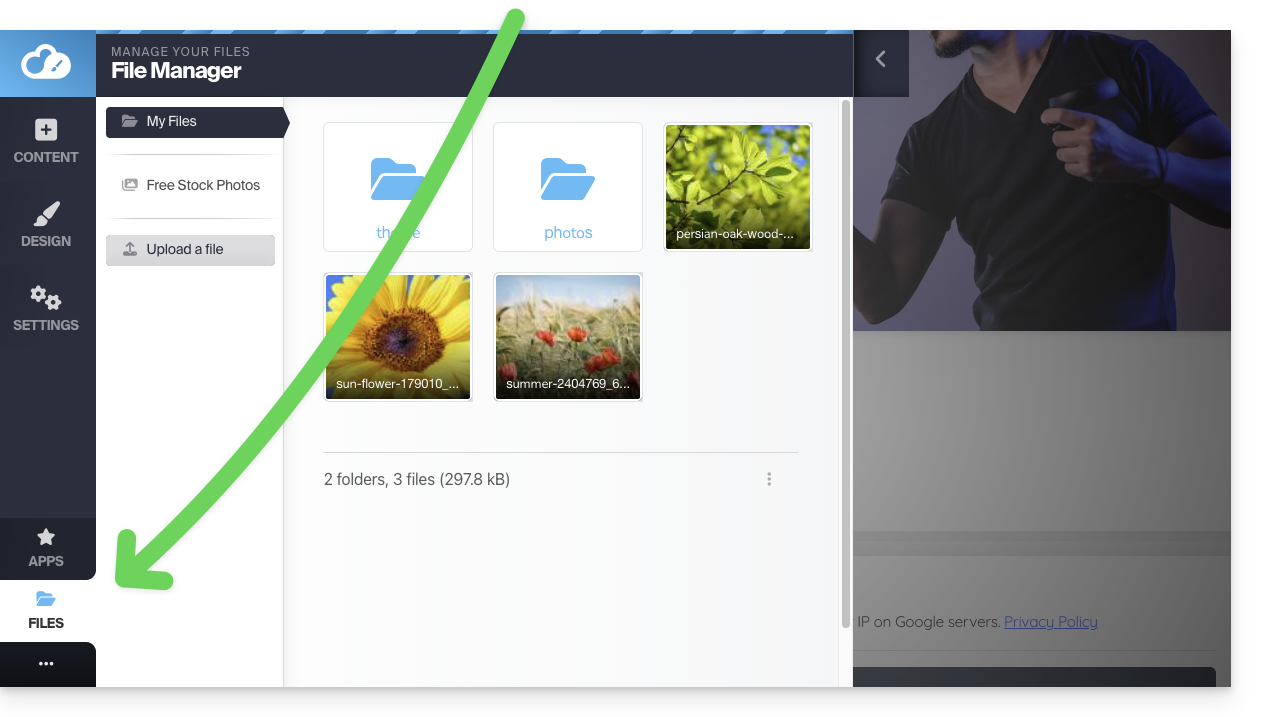
These media will be available to you when you edit your pages and want to insert content.
Organize your files, folders, and subfolders
Please note that you cannot:
- move files/folders
- rename files/folders
- delete a folder if it is not completely empty
Therefore, think about the organization of your media and their structure, if possible, before creating the site.
Create a new folder
Use the action menu ⋮ at the bottom right of the window: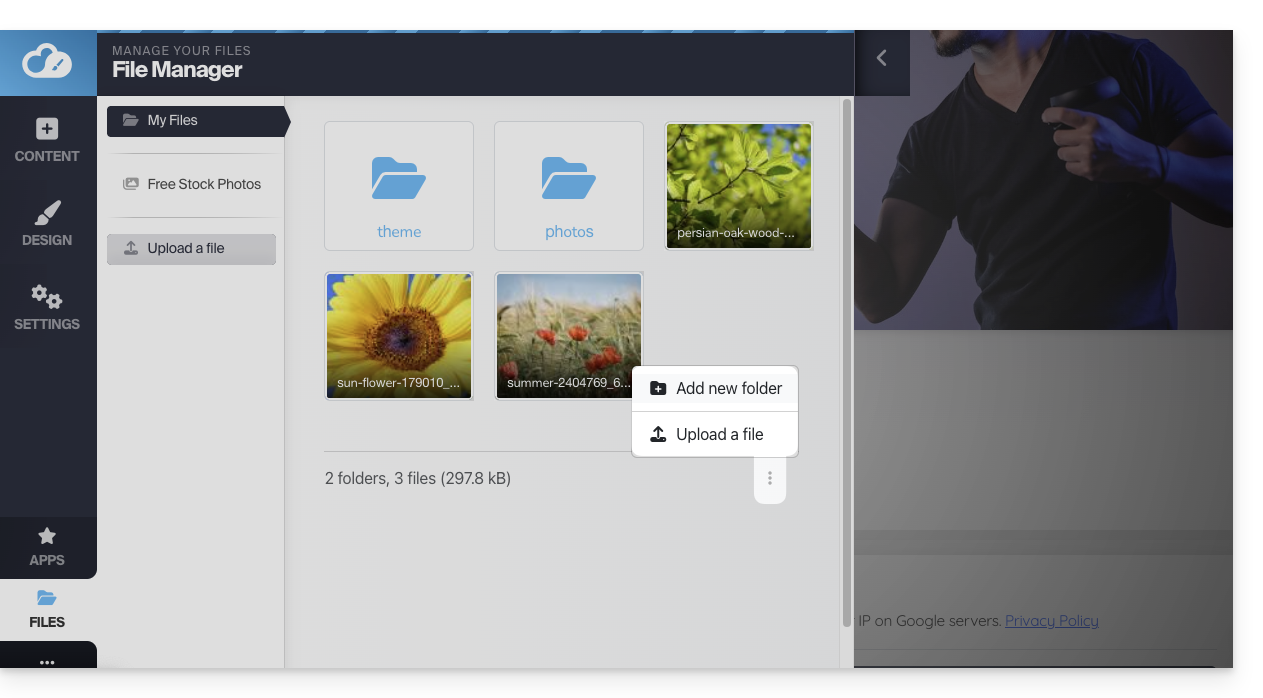
Upload a new file to the library
Click on Upload a file to browse your hard drive and upload the desired files: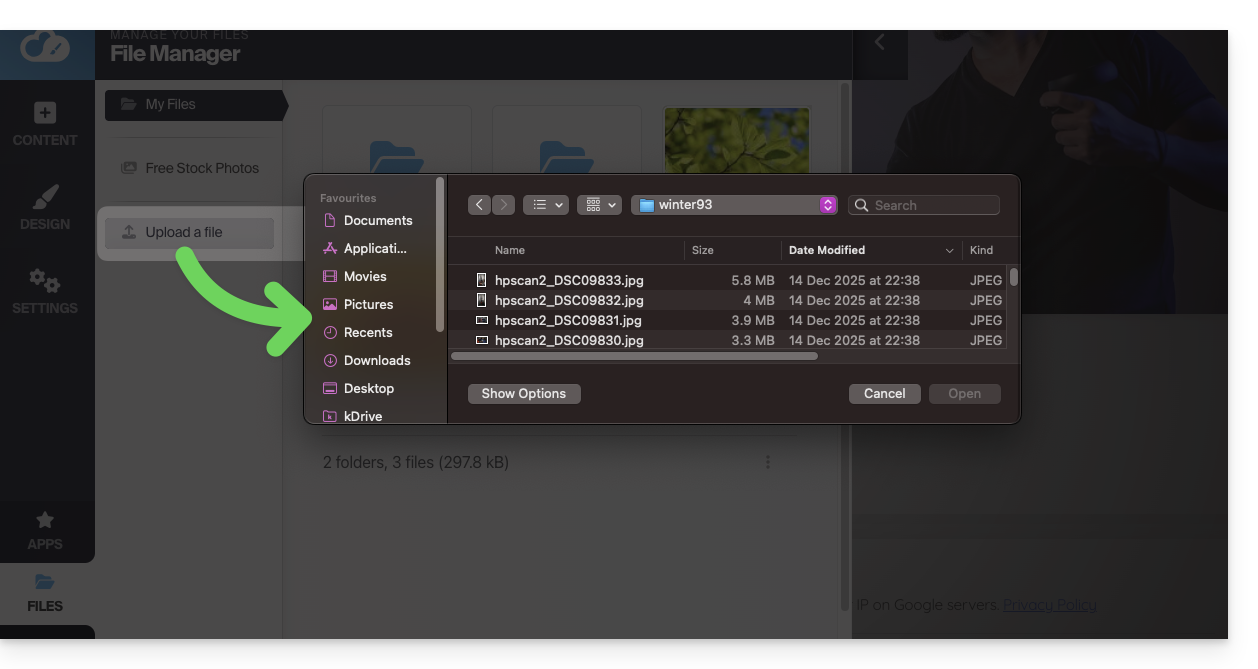
Common image formats are supported (webp, jpg, jpeg, png, gif, svg, etc.), with the webp format being recommended (it offers the best quality/compression ratio for ultra-fast web display).
The same applies to videos (mp4, mov, etc.), and you can also upload files (zip, pdf, etc.) to make them available to visitors via the File Download module.
Compress an image
Large images are automatically resized by default when imported: images larger than 1200 px are automatically reduced to 1200 px, but you can manage this in the general settings: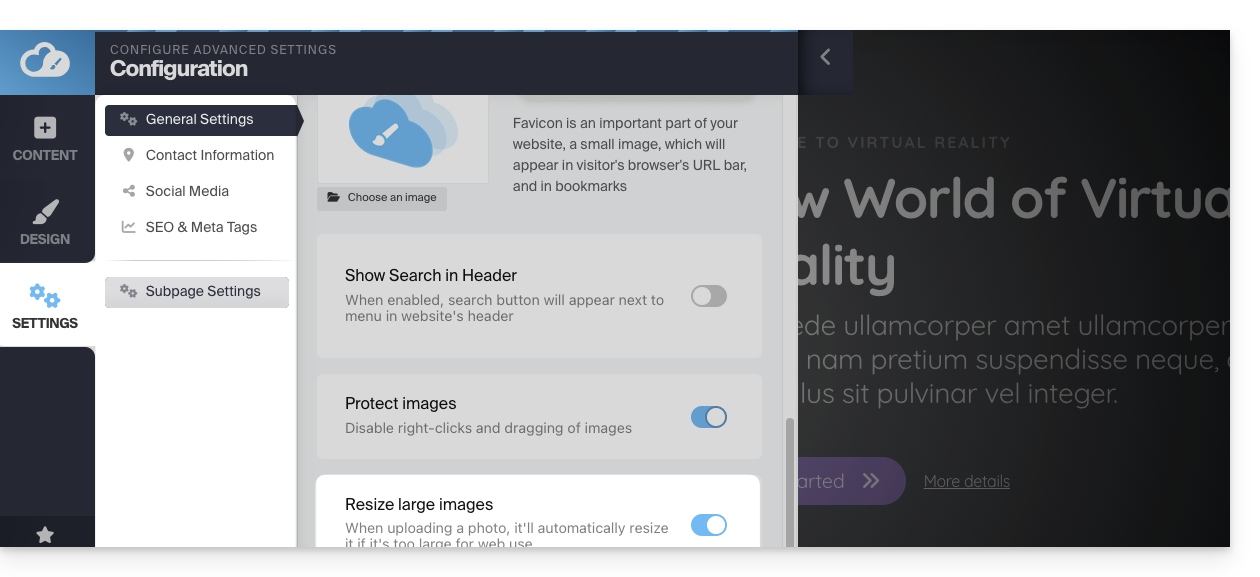
You can also compress the image itself using the Compress an image option from the library, to improve the display speed of your site: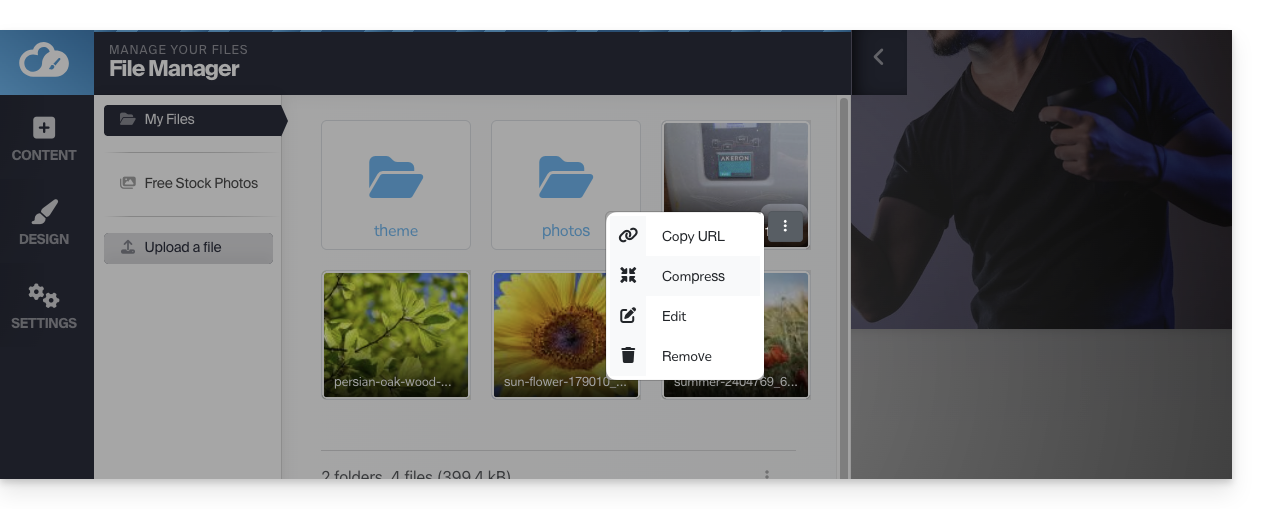
⚠ The Compress Image option is generating the TinyPNG API key error (TinyPNG API key is not set)…
To avoid this, obtain a TinyPNG API key from their website and enter it under Applications > TinyPNG in SiteCreator: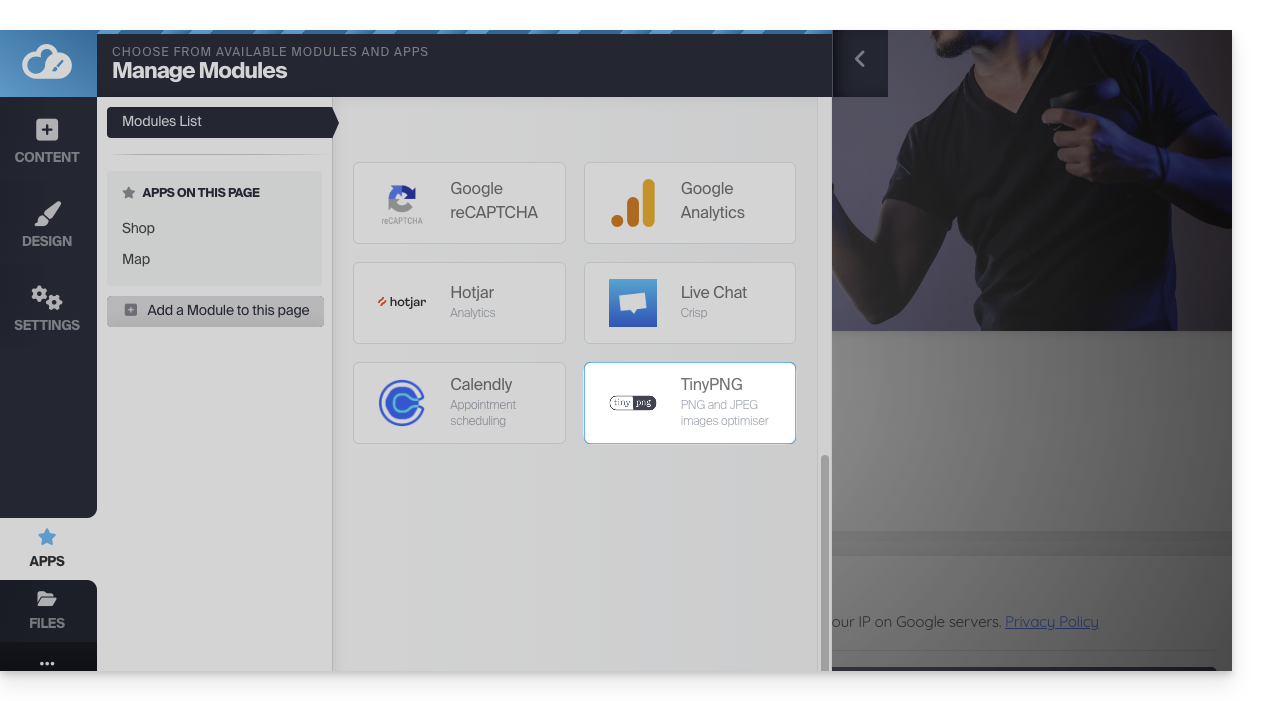
Open the Image Editor
Hover over an image in the library and click the ⋮ action menu to access the image editor:
When you save your changes, the image will be saved as a copy in your library: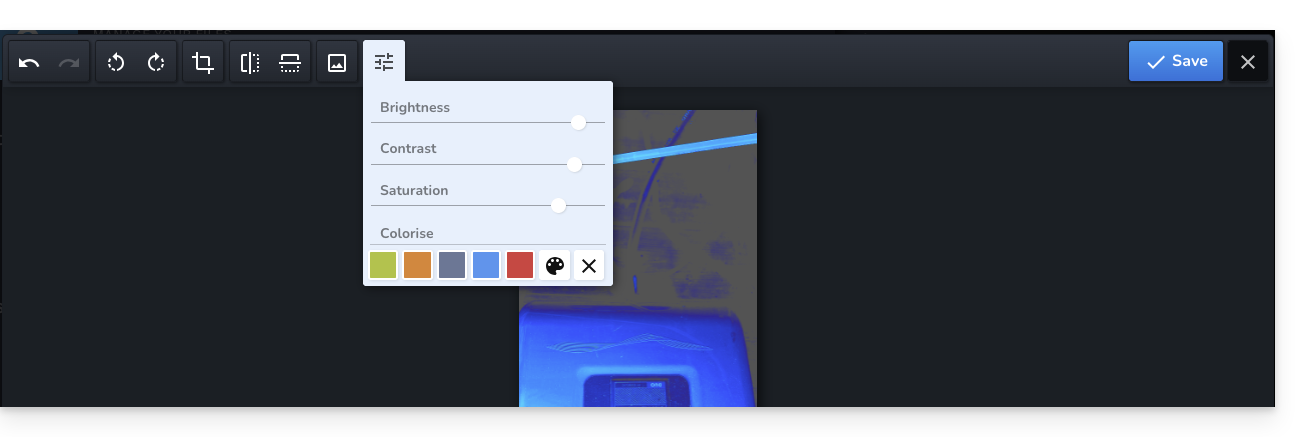
Optimize SEO and Accessibility
Once your images have been imported from the library to your web pages, remember to fill in their Alt Text (Alt tag) in the image block settings. This text description is essential: it allows search engines (like Google) to understand the content of your visuals, while also making your site accessible to visually impaired people who use screen readers.
And since it is not possible to rename files once they are online, make it a habit to name them correctly on your computer before uploading them. Avoid generic names (e.g., IMG_1234.jpg) and use descriptive names with hyphens (e.g., swiss-home-repair.jpg) to improve your search engine ranking.
Search for and Use Royalty-Free Images
In the left sidebar of the library, you will find a menu item that leads to a stock image library (image bank) containing royalty-free images that you can insert into your library to enhance your website: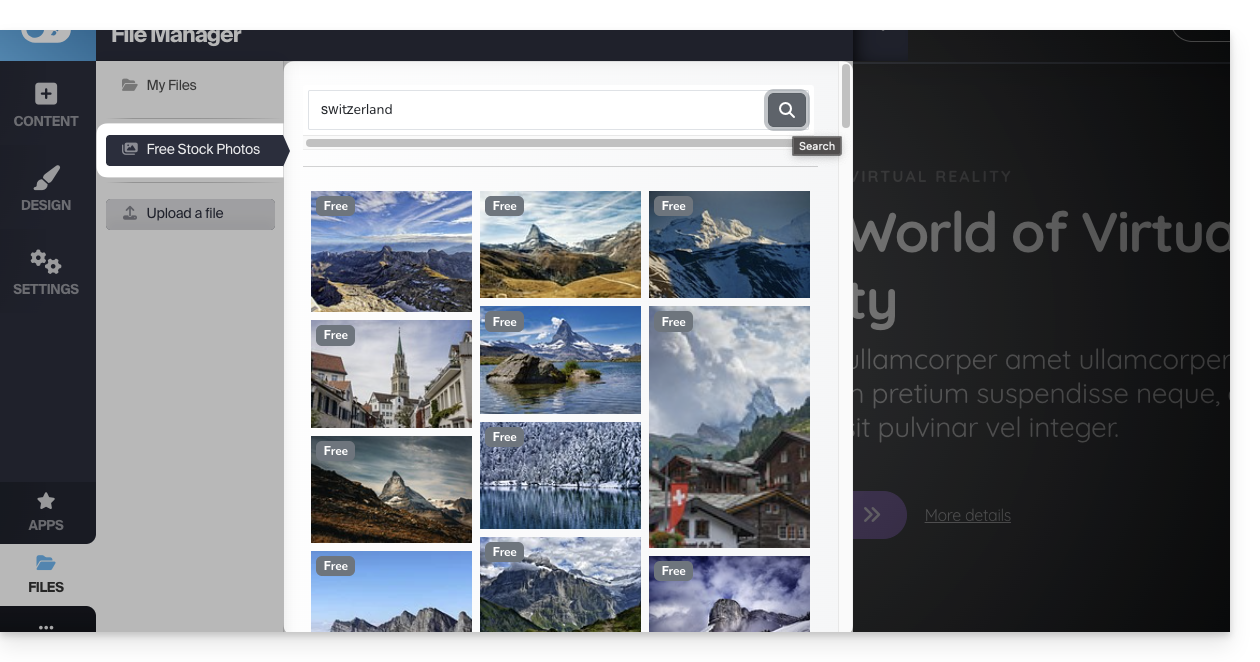
Protect your content: disable right-click
Click on Settings in the left sidebar, then on General Settings. At the bottom, you will find an option that, when enabled, disables the right-click function for visitors on your site: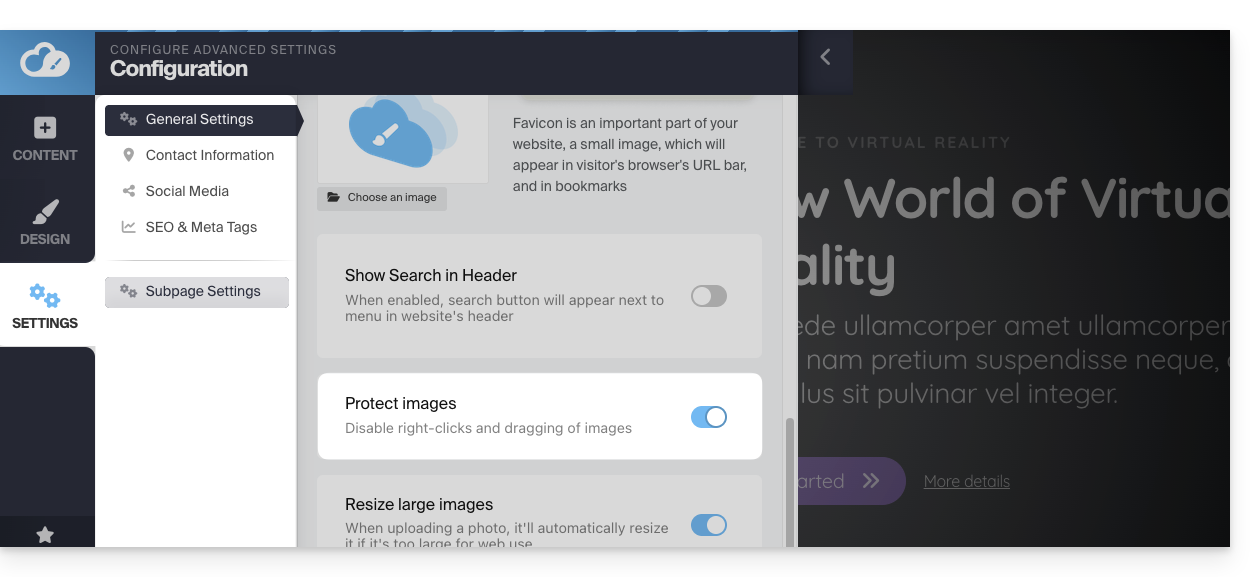
Troubleshooting media upload issues
Try uploading WEBP, JPG, or PNG files that are as lightweight as possible (ideally under 500 KB). It is not necessary to upload images with a width greater than 1000-2000 pixels to the server.
Also, make sure that your image files are saved with the RGB color profile, which is the standard for display on screens. Avoid the CMYK profile, which is very heavy and exclusively reserved for paper printing, as it can cause display errors or block the import.
If you are trying to upload files directly from your camera or smartphone, try resizing them before uploading. For example, from your iPhone, the image may be in HEIF/HEIC format, which is not natively supported by web browsers – try converting it to JPG first.
Link to this FAQ:
Has this FAQ been helpful?
This guide concerns Infomaniak's Site Creator, which allows you to create a complete website consisting of several pages.
Introduction
- The homepage is mandatory (with or without a header and footer).
- Add additional pages, which can be blank, password-protected, or contain specific content directly (e.g., a contact form).
- Add legal pages (to include your terms and conditions, for example).
- All of these will be part of the site's navigation menu(s).
- To (re)create a complete website with pages and subpages (examples of pre-designed websites), you can install a website template.
Add a page to the site
Prerequisites
- Access Site Creator:
- Click here to access the management of your product on the Infomaniak Manager (need help?).
- Click directly on the name assigned to the Site Creator in question.
- Click on the Edit my site button to start the editor:
Once in Site Creator:
- Click on the Settings button in the left-hand menu – the list of your pages will appear.
- Click on the Add a page button below the existing tree:
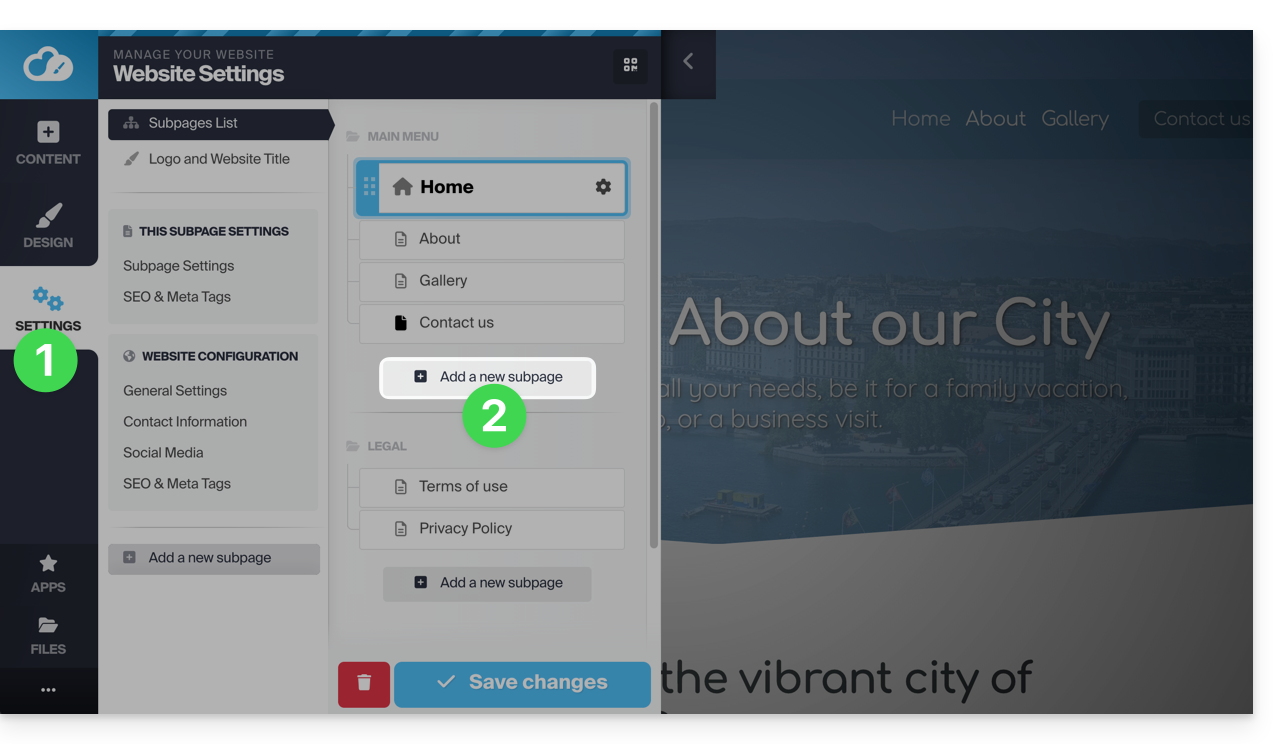
- Choose a page name and Show more options to choose the page type and other settings, then click to Add the page:
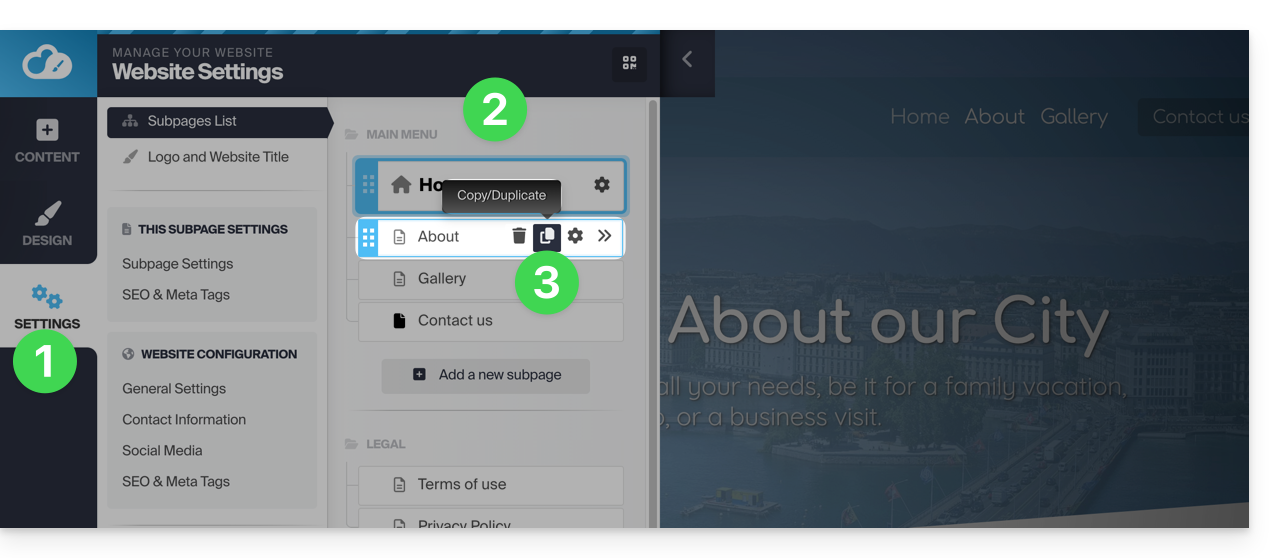
Copy / Duplicate a page
To do this:
- Click on the Settings button in the left-hand menu - the list of your pages appears.
- Hover over the desired page in the existing tree.
- Click on the duplication icon that appears when you hover:
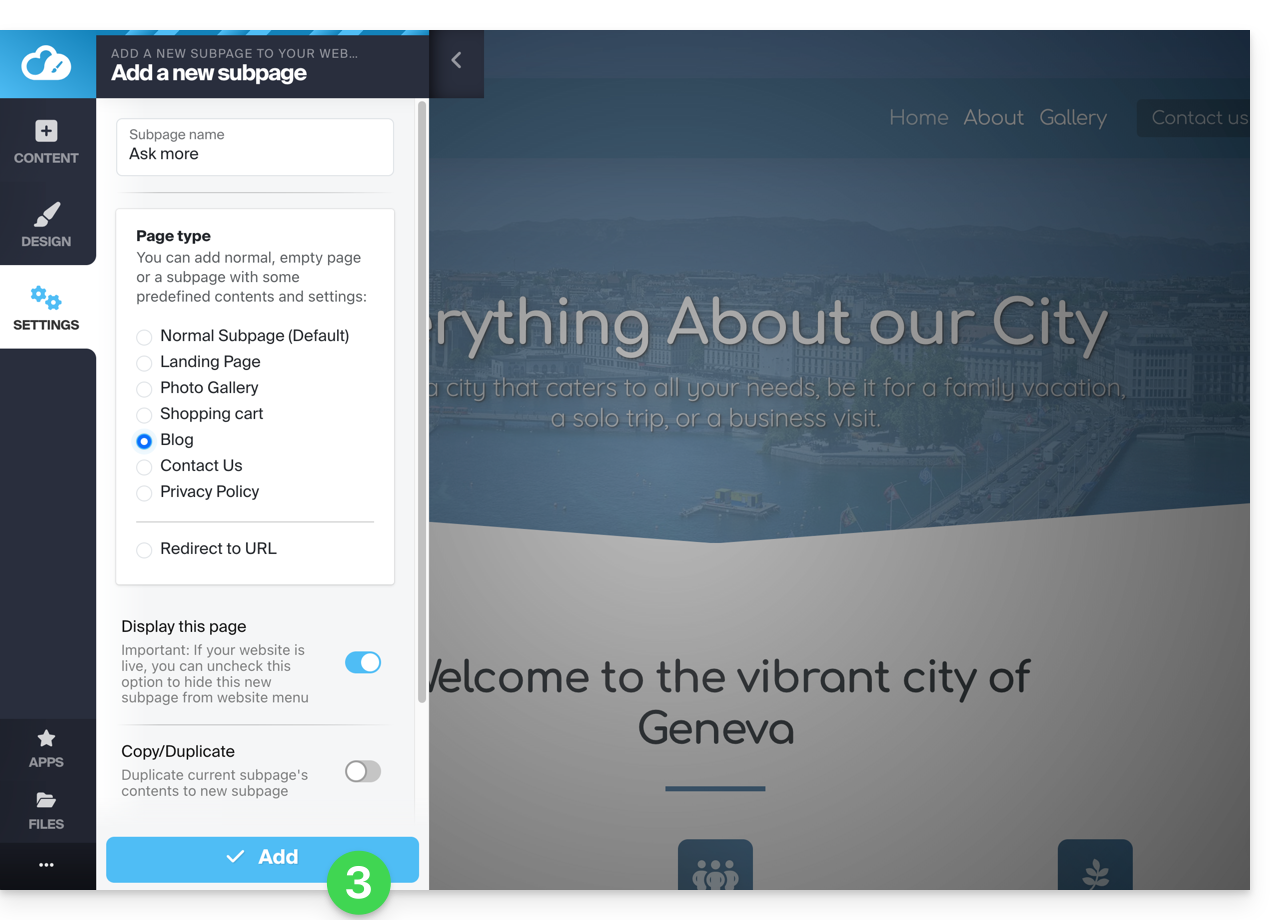
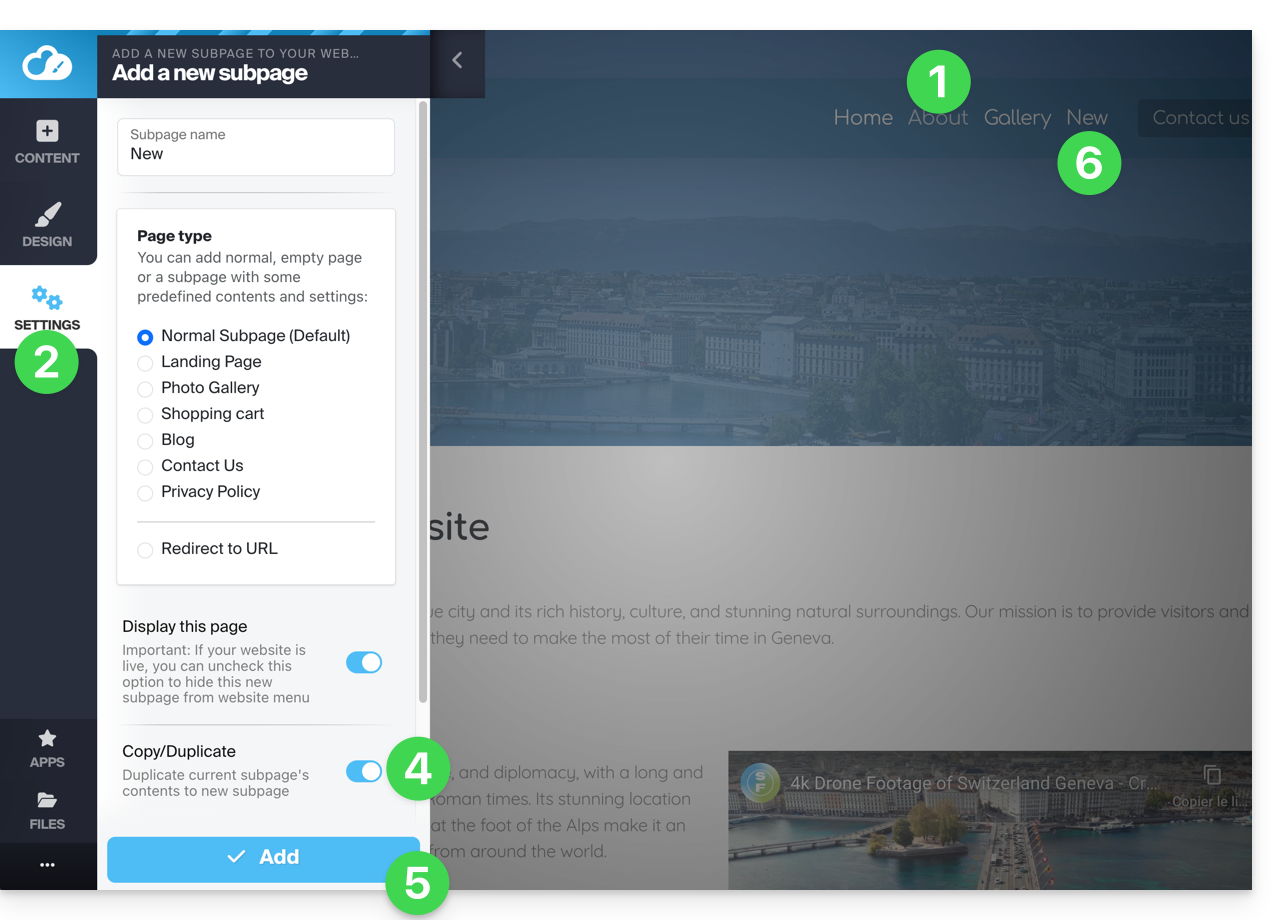
Another option:
- Go to the page of your site that you want to clone.
- Click on the Settings button in the left-hand menu.
- Click on the Add a page button below the existing tree. Choose a page name and Show more options to choose the page type.
- In Show more options, enable Clone / duplicate, so that you can reuse the content of the current page.
- Click to Add the page.
- The new page will appear in the menu with the same content as the page you were on in step 1:
Rename a page
Please note that renaming a page changes its URL.
To do this:
- Click on the Settings button in the left-hand menu – the list of your pages will appear.
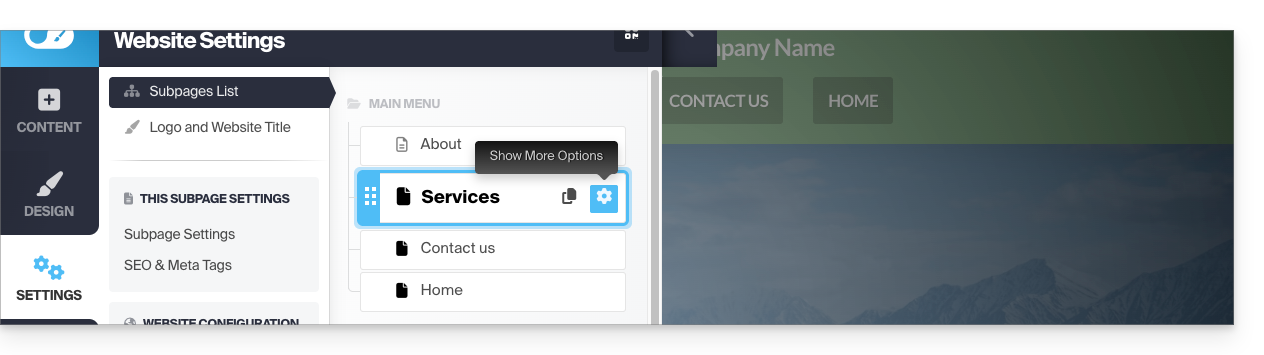
- Hover over the desired page in the existing tree and click on the gear icon to access the page options, including the display name:
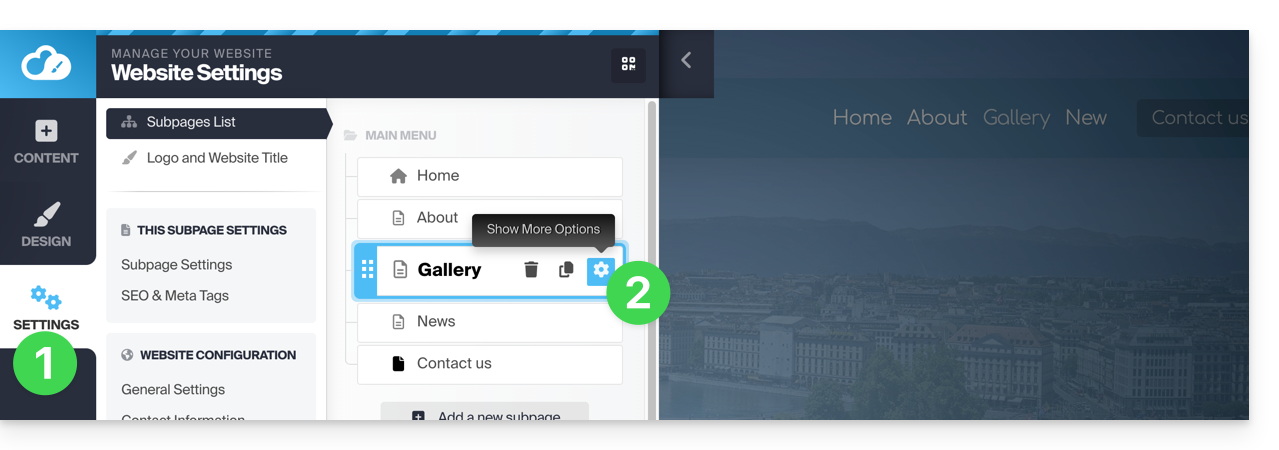
Alternatively: under Settings, in the existing tree, you can directly rename your pages and then Save changes at the bottom of the page: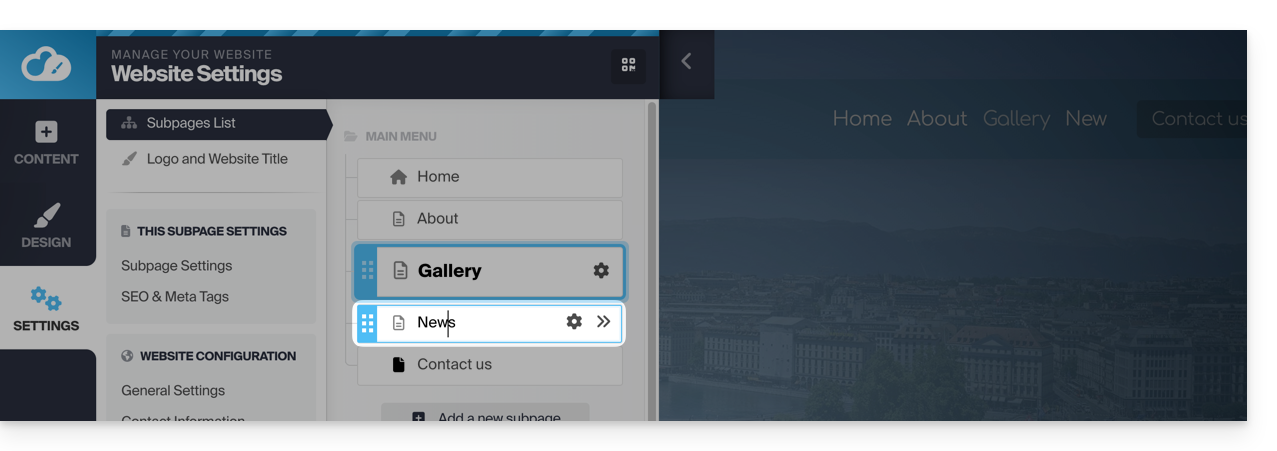
Change the order of pages
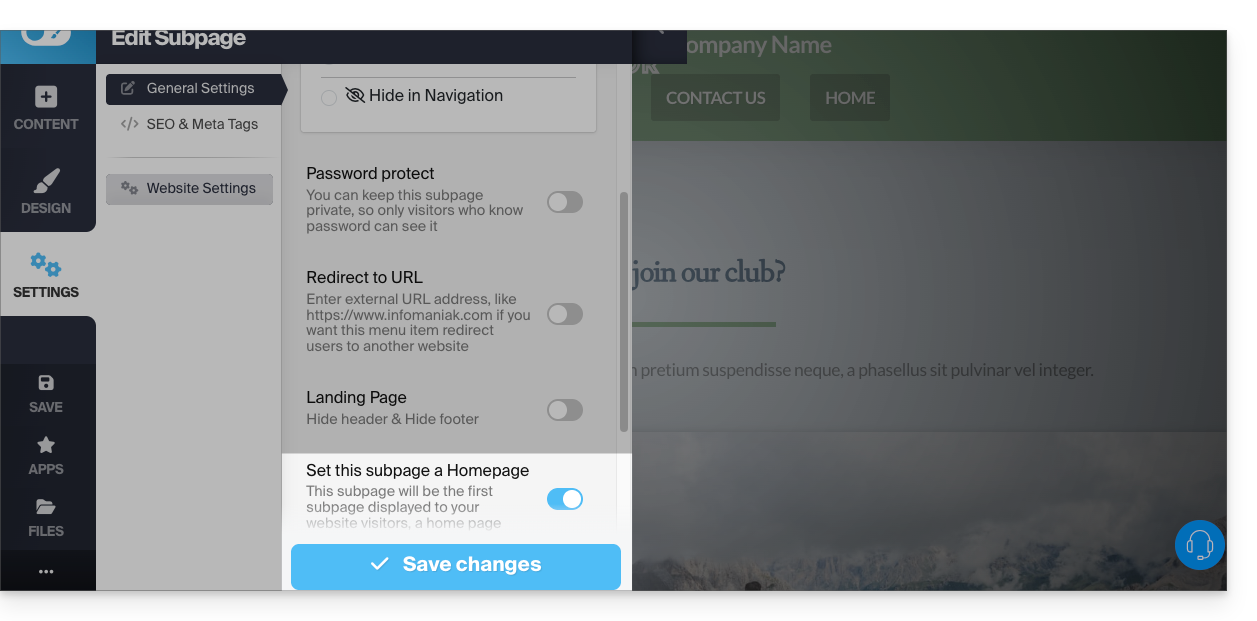
This can be useful, in particular, for setting one of your current pages as the first page (homepage) instead of the current homepage. To do this:
- Click on the Settings button in the left-hand menu – the list of your pages will appear.
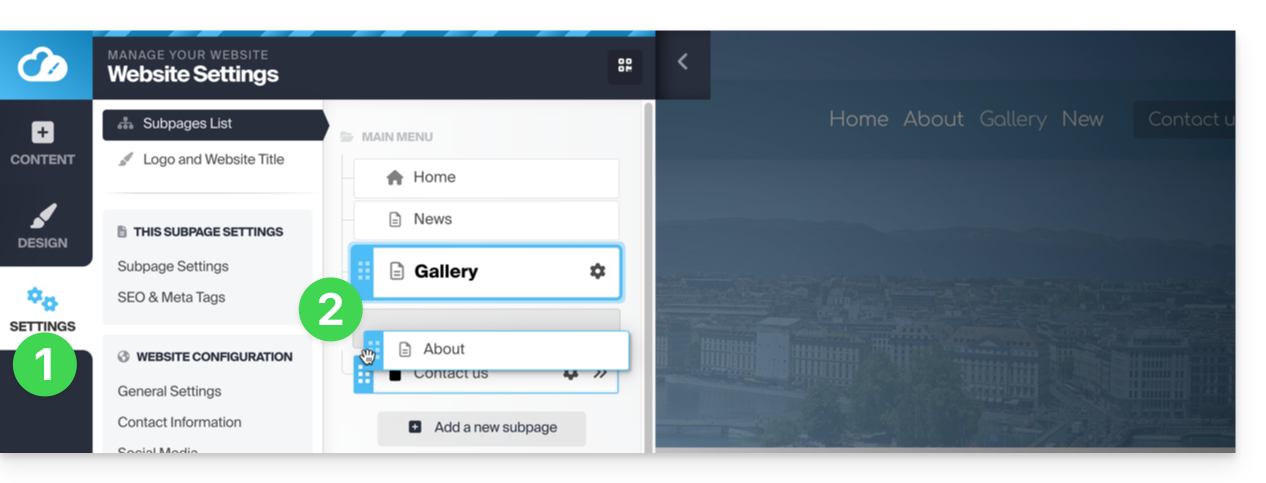
- In the existing tree, you can directly drag and drop your pages to change their order (this mainly affects the display of pages within a menu) and then Save changes at the bottom of the page:
Delete a page
To do this:
- Click on the Settings button in the left-hand menu – the list of your pages will appear.
- Hover over the desired page in the existing tree.
- Hover over the gear icon and then click on the trash can that appears when you hover:
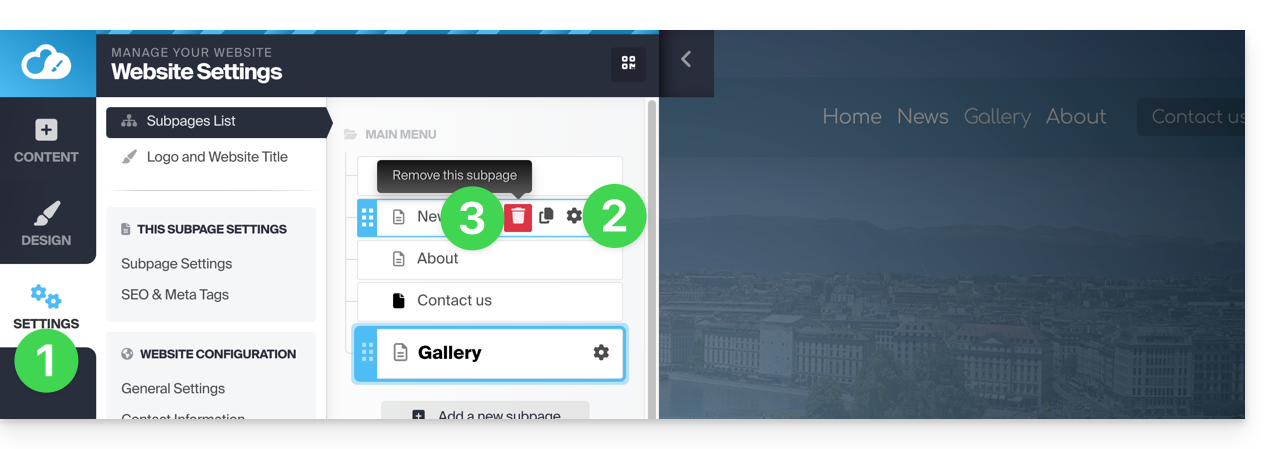
- Confirm the deletion, and the page will disappear without the possibility of undoing it.
Another option: go to the page you want to delete. Under Settings, click the red Trash button at the bottom of the page to delete the current page: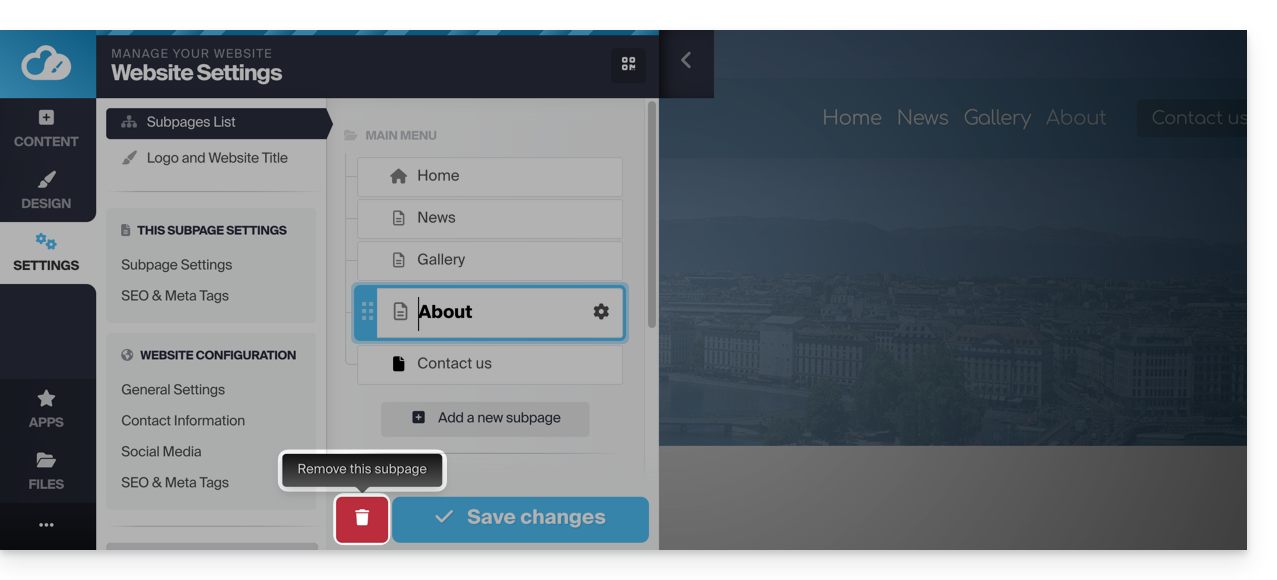
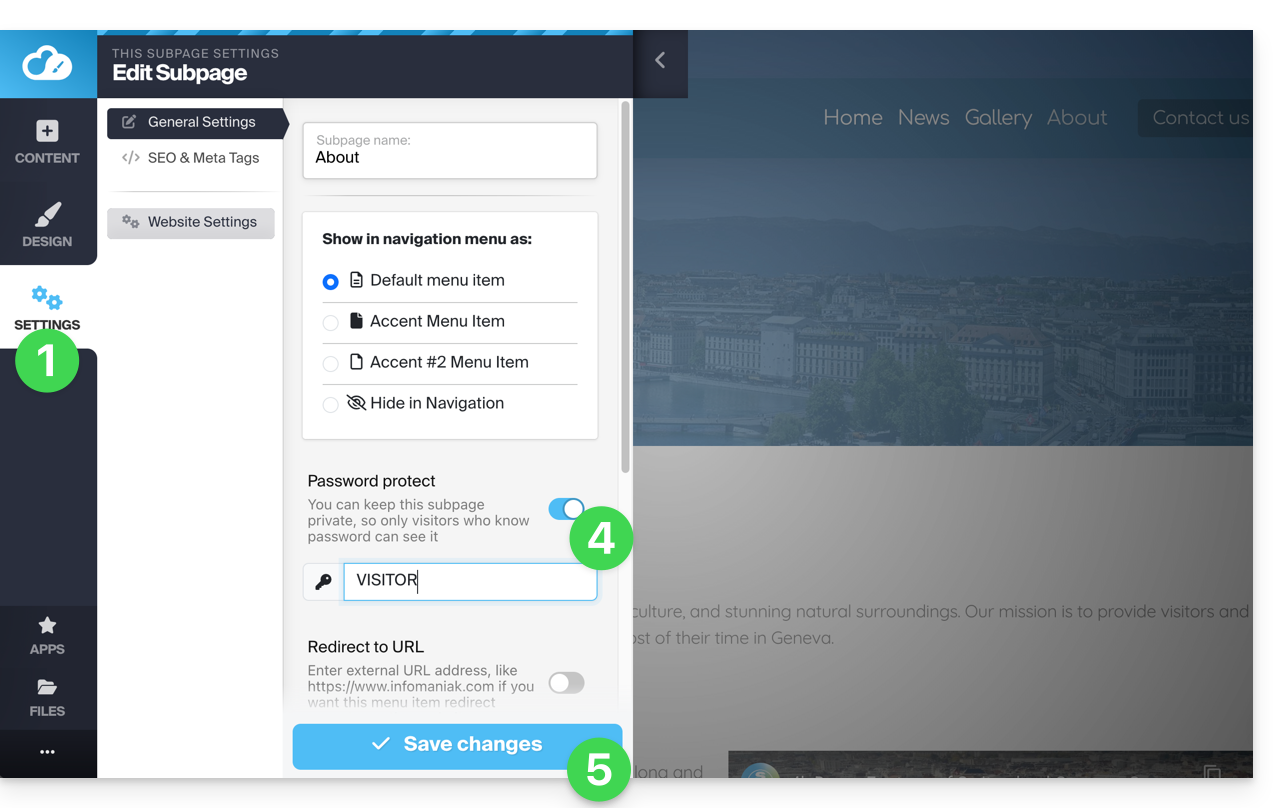
Create a private / password-protected page
To do this:
- Click the Settings button in the left-hand menu - the list of your pages will appear.
- Hover over the desired page in the existing tree.
- Click the gear icon to access the page options.
- Enable the password protection option to set a password that will be required when viewing the page.
- Save the changes at the bottom of the page:
To test, visit the page from a browser in private browsing mode (so you are not logged in to Site Creator) or preview the page from the editor: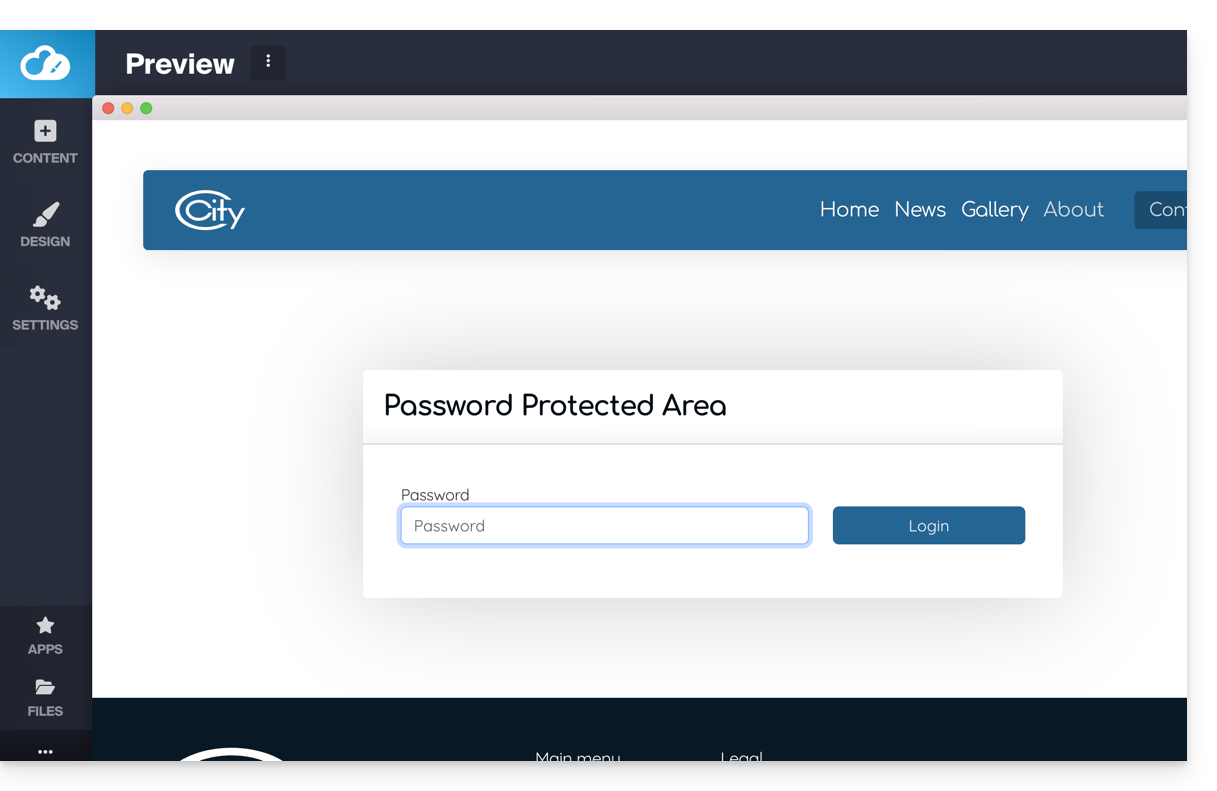
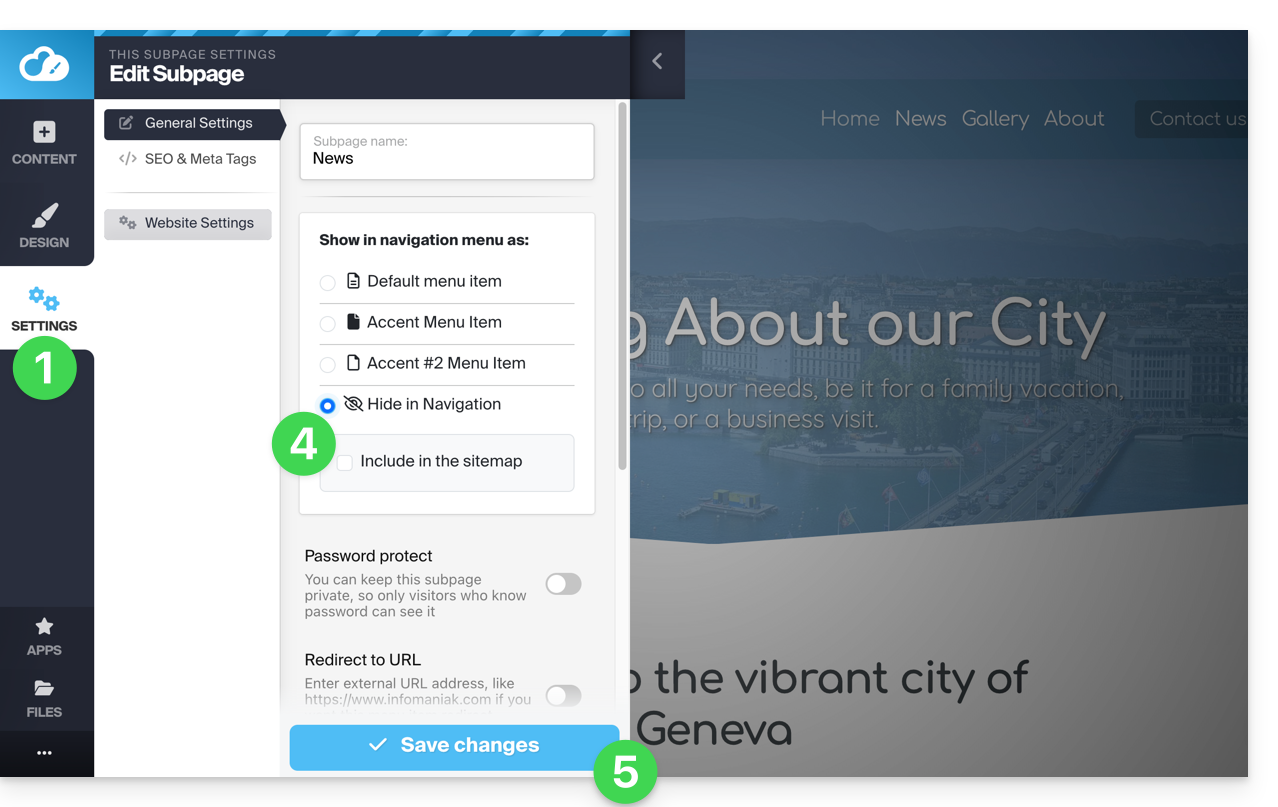
Add a "hidden" page
To add a page that will not appear in the main menu (but will remain accessible via its direct address and by a search engine if it indexes your page, as well as in the sitemap if you wish):
- Click the Settings button in the left-hand menu - the list of your pages appears.
- Hover over the desired page in the existing tree.
- Click on the gear icon to access the page options.
- Choose the last display type to hide the page in the navigation and determine whether you still want to include the page in the sitemap.
- Save the changes at the bottom of the page:
Alternatively, hover over the desired page in the existing tree and click on the page icon to the left of your page name until the crossed-out eye appears:
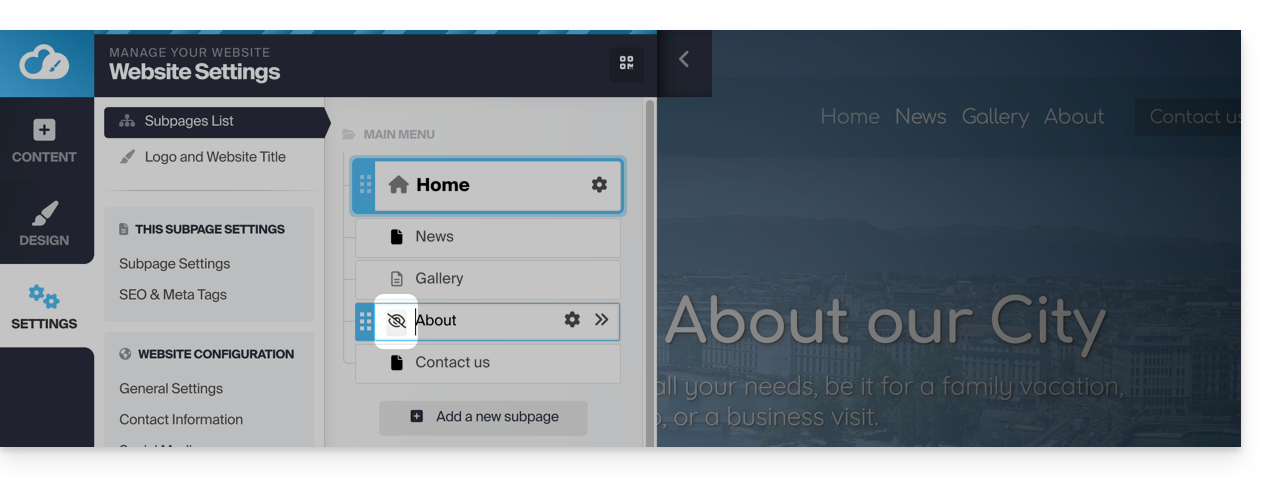
Save the changes at the bottom of the page.
If necessary, you can create a link to this hidden page from another page, as the hidden page will still appear in the list of site pages when you add an internal link:
Link to this FAQ:
Has this FAQ been helpful?
This guide details how Infomaniak's Site Creator and the website created with it behave with different screen formats and resolutions.
Prerequisites
- Accessing Site Creator:
- Click here to access the management of your product on the Infomaniak Manager (need help?).
- Click directly on the name assigned to the Site Creator in question.
- Click on the Edit my site button to start the editor:
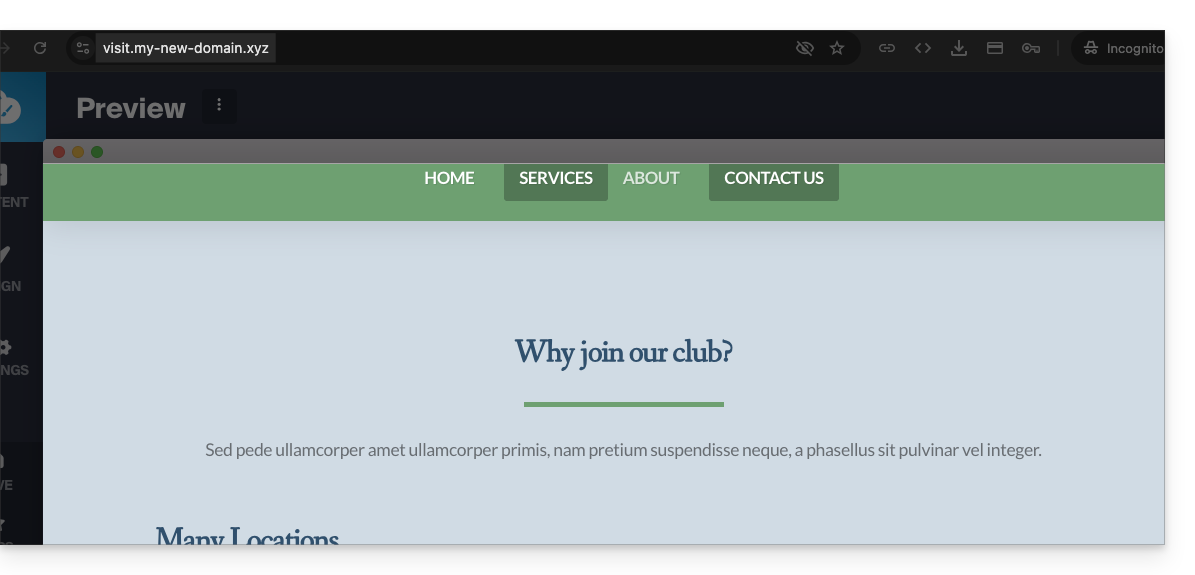
Viewing the site on different devices
Websites created with Site Creator are automatically adapted to browsers regardless of their device (computer, mobile device, tablet, large and small screen, etc.). However, they may react differently depending on certain settings that you can adjust.
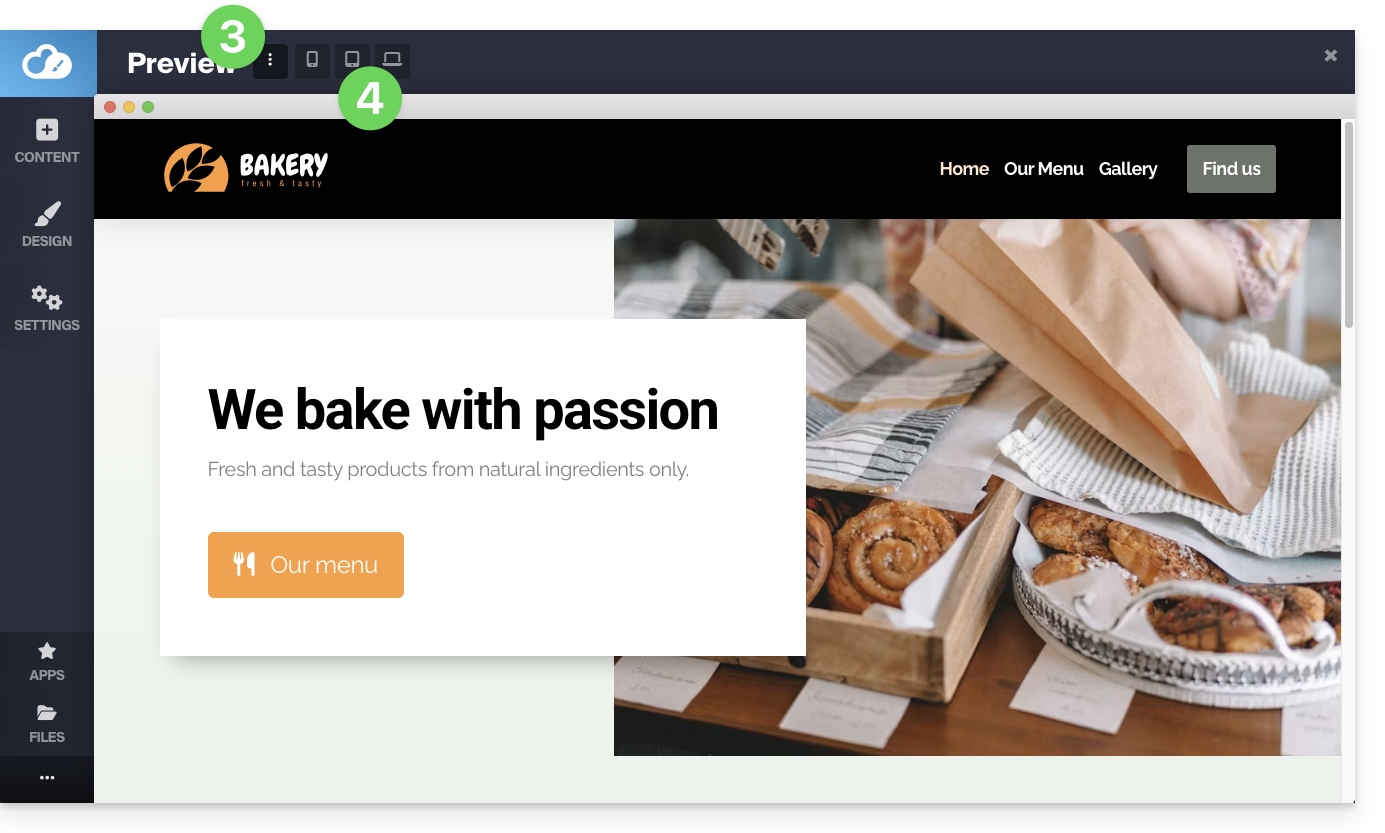
To preview the website version based on the viewing device:
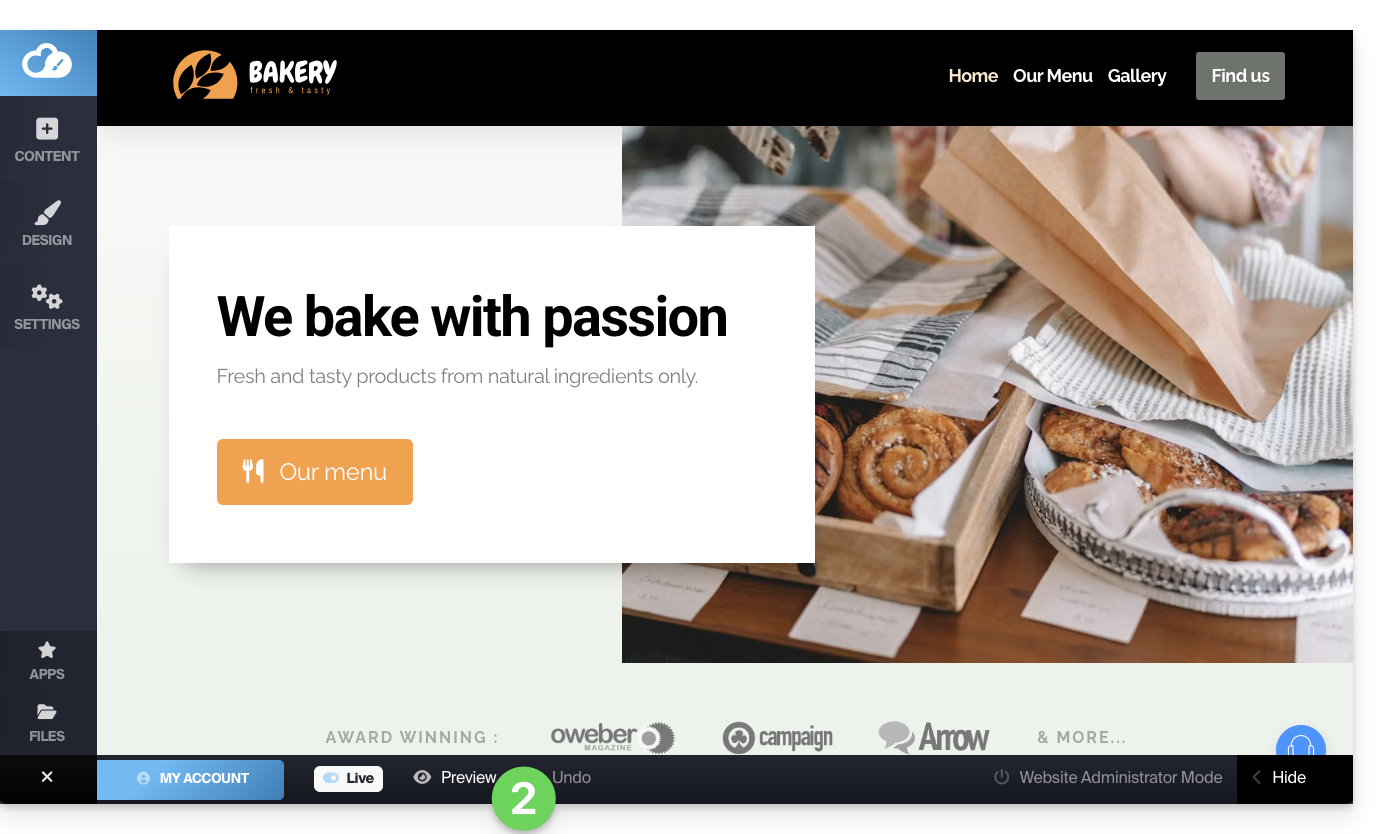
- Click on the ••• button at the very bottom of the left-hand side menu to expand the publishing and preview options:
- Click on Preview:
- At the top of the page, click on the action menu ⋮ to the right of Preview to change the type of viewing device.
- Click on the different device icons to simulate the different display formats (mobile, vertical, horizontal, etc.):
Display your site in a reduced width
You can reduce the width of your site within a "container" or "box". This special display will only be visible on large screens, such as desktop computers:
- Click on the Design button in the left-hand menu.
- Click on More settings.
- Activate the toggle switch for the Container display:
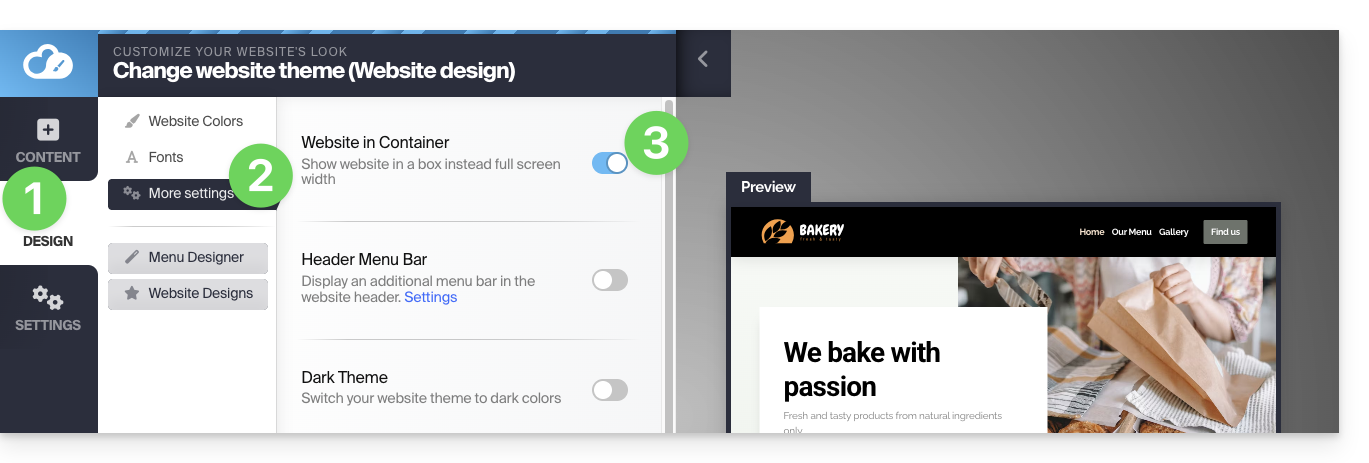
- Save the changes at the bottom of the page.
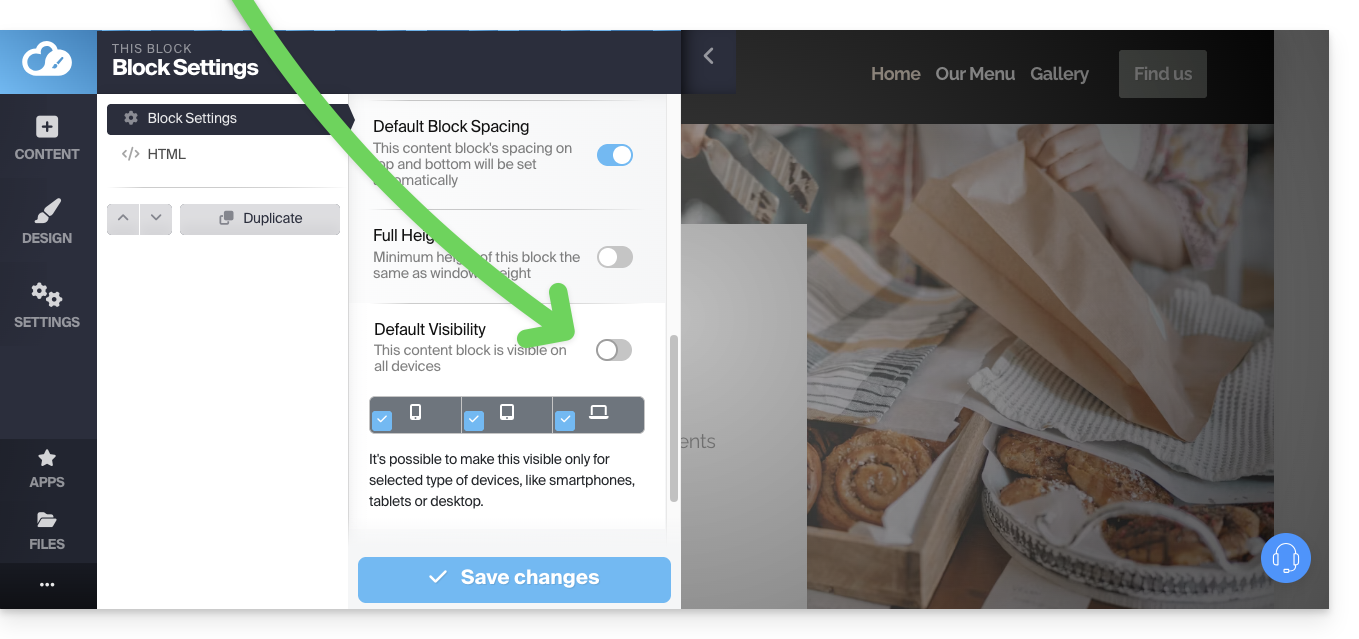
Hide a content block based on the device type
In the options of a content block, by deactivating the default visibility, you can then define below that it should only be displayed on certain types of devices (e.g., mobile devices):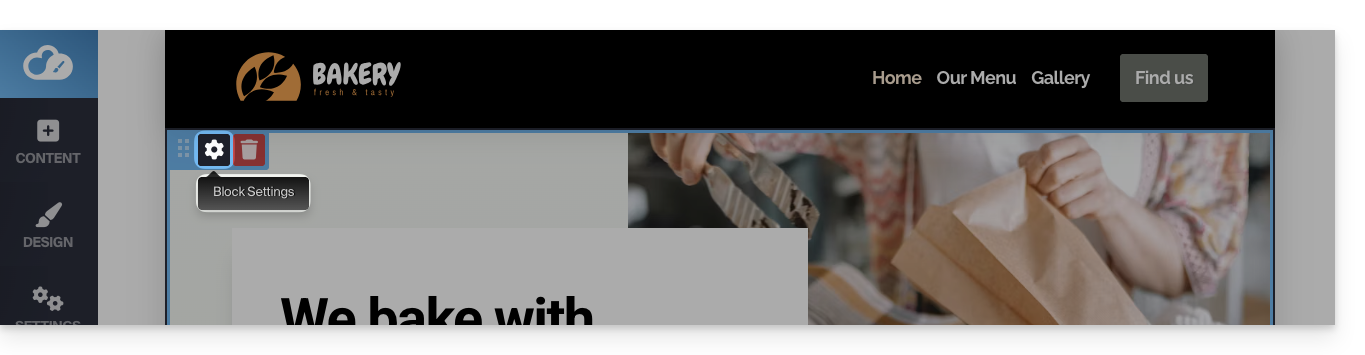
Link to this FAQ:
Has this FAQ been helpful?
This guide concerns content blocks, which are one of the most important elements of Infomaniak's Site Creator.
Introduction
- Content blocks allow you to easily create content on your pages.
- There are all kinds of blocks available, including separators, price lists, site maps, and simple text or image blocks, etc.
- They are generally preconfigured to make it easier for you to get started.
Adding a content block
Prerequisites
- Access Site Creator:
- Click here to access the management of your product on the Infomaniak Manager (need help?).
- Click directly on the name assigned to the Site Creator in question.
- Click on the Edit my site button to start the editor:
Once in Site Creator:
- Click on the Content button in the left-hand menu: the list of blocks will appear.
- Choose the desired category on the left, then the desired content on the right.
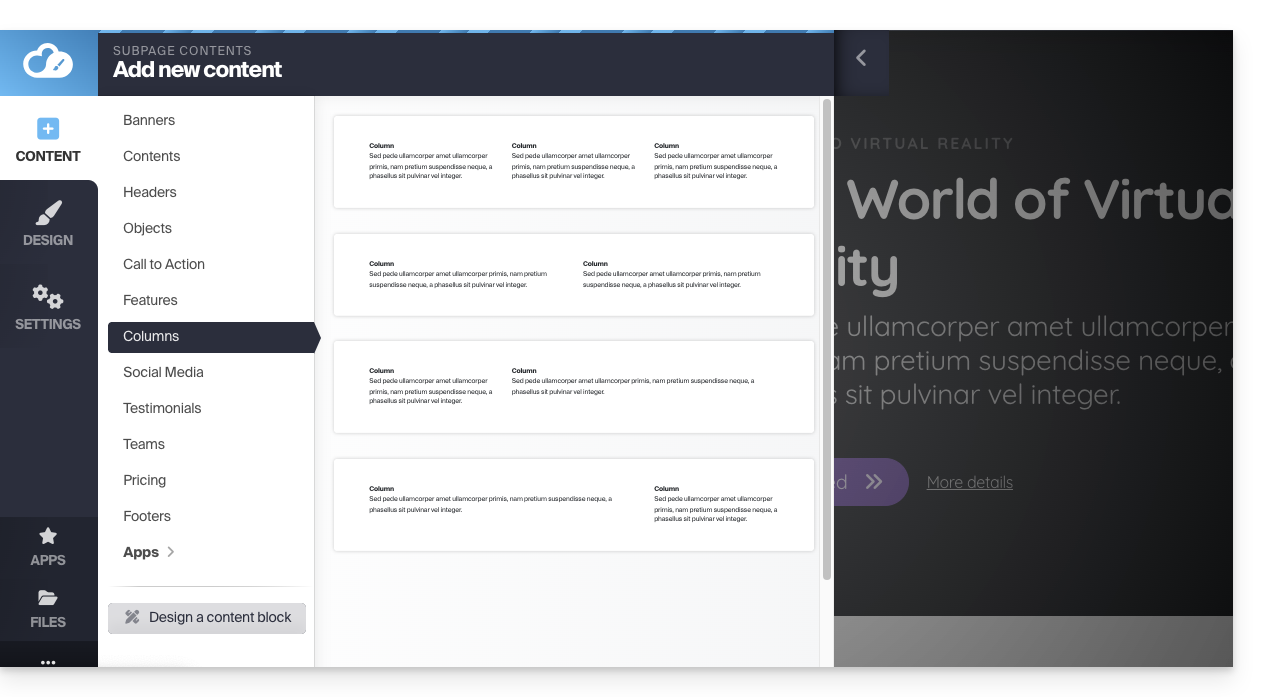
By clicking on the desired content, you will add it to the page you were editing.
Another option: go directly to the page and hover over the space above or below an existing block: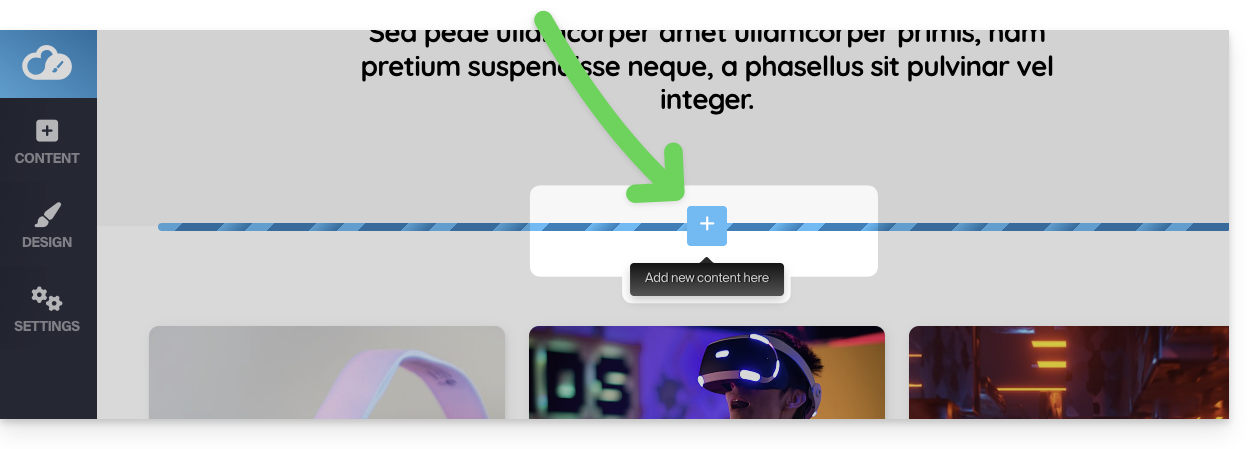
Delete a content block
Hover over the block to be deleted on your page and click on the trash can that appears when you hover over it: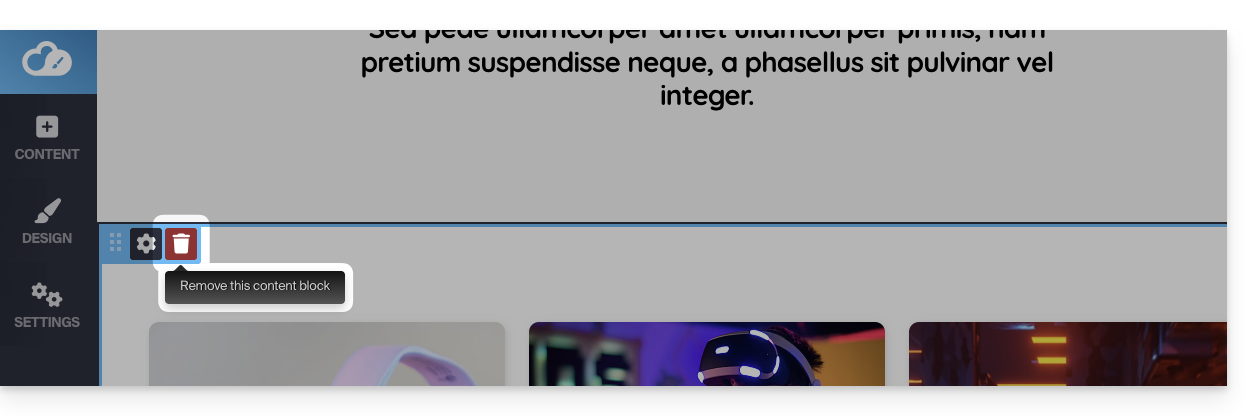
Confirm the deletion and it will disappear.
You can undo this type of operation.
Duplicate a block
Hover over the block to be duplicated on your page and click on the gear icon that appears when you hover over it.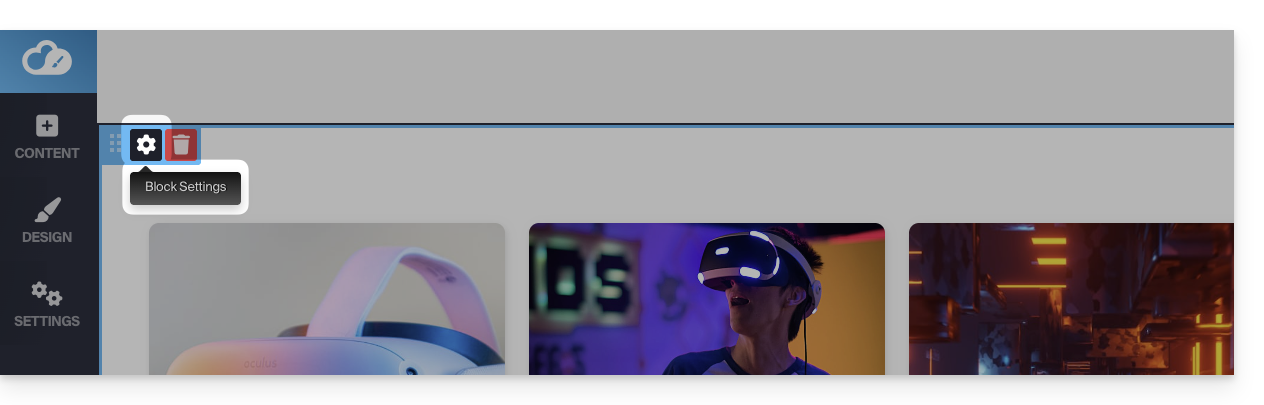
Then, choose the desired location for its duplication: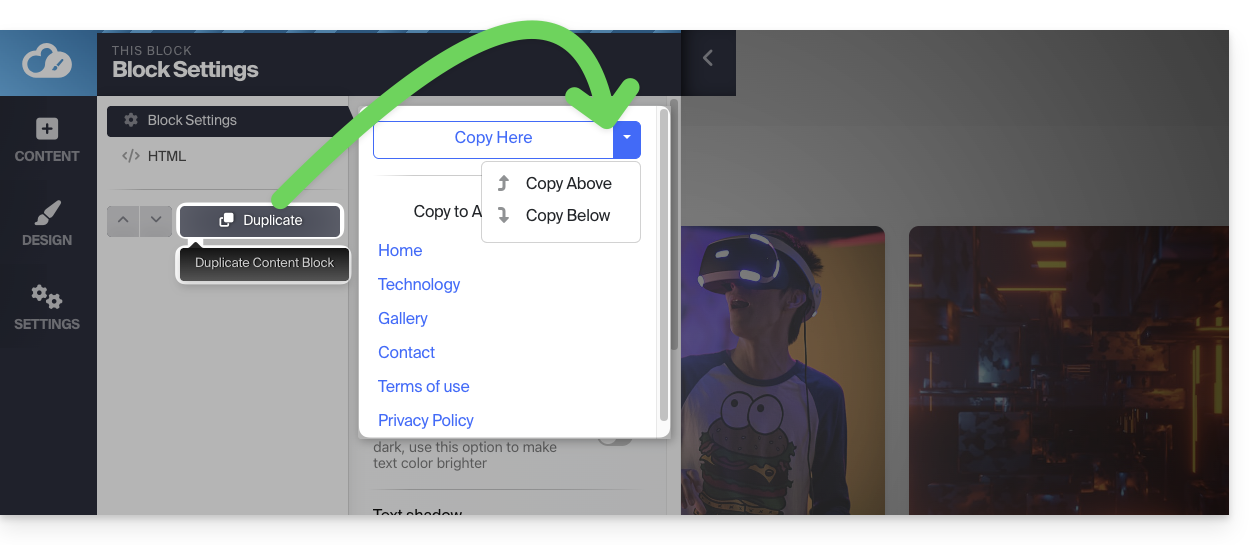
Edit a content block
Each editable element of the content block will be highlighted when you move your mouse over it. Simply click on one of these elements to start editing.
In addition, you can edit the HTML code (recommended for advanced users only) if you need more control over any content block; this allows you, for example, to insert an HTML code for subscribing to the Infomaniak Newsletter.
You can also delete certain elements from your content blocks: when editing text, there is the "arrow to the right" button that displays more options and the Delete button: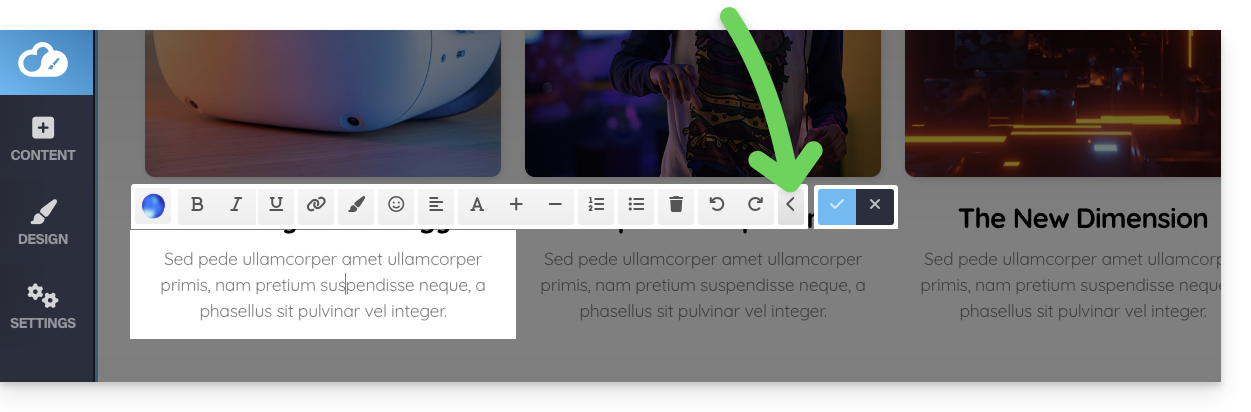
To edit an image, click on it and a new window will appear. In the lower part, there is the Save button on the right and the red Delete button on the left: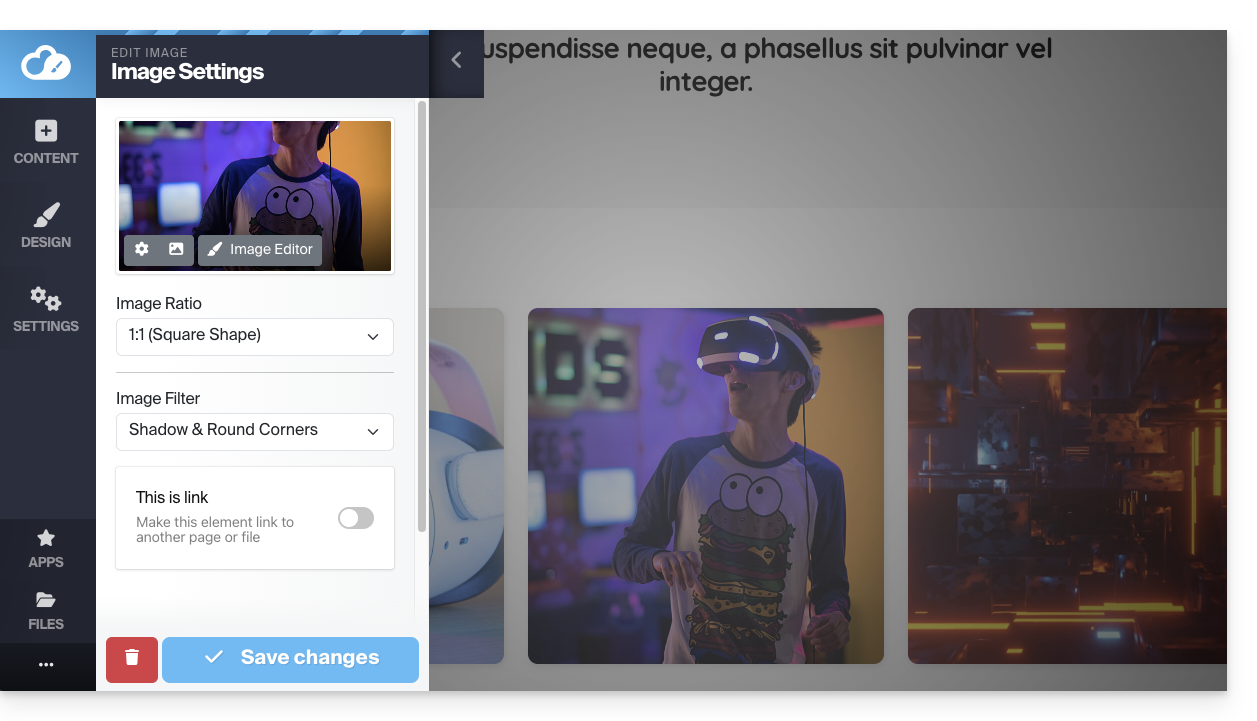
Create a content block template
In the left sidebar, under the content that can be added to your page, you will find a button to Design a content block: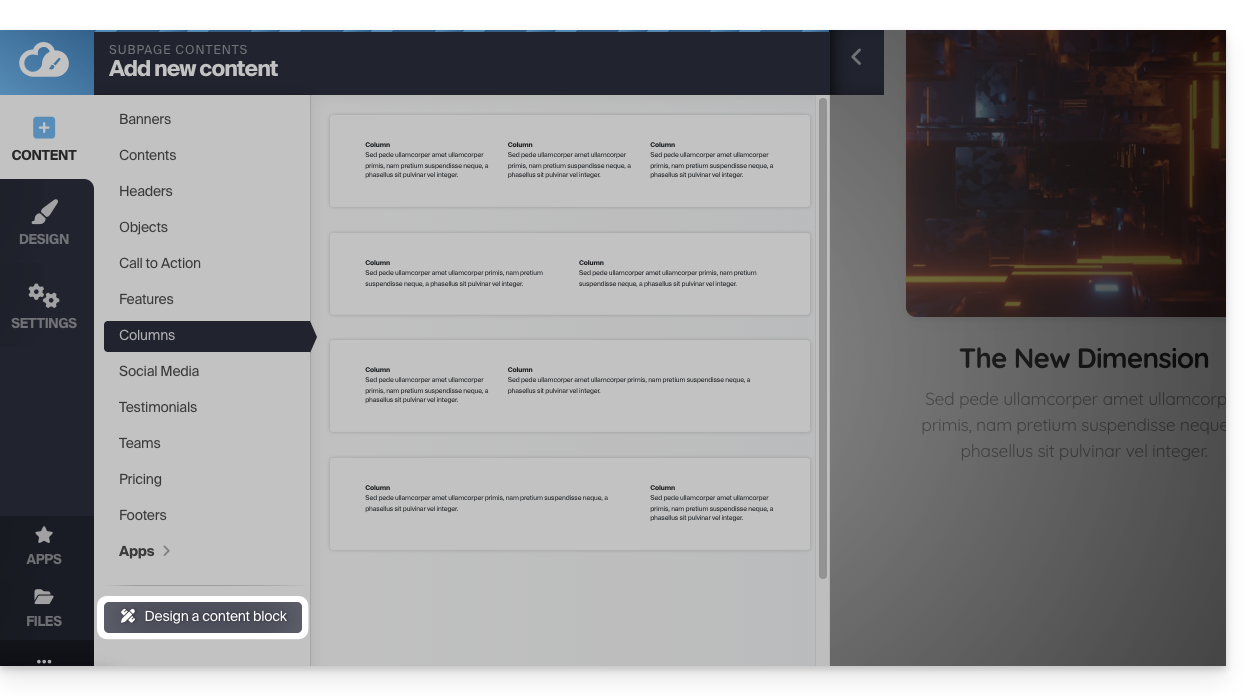
All the elements that make up the blocks are arranged on the left. You can drag them to your template block to design your ideal block. This will be inserted into your page by clicking on Apply changes at the bottom of the page: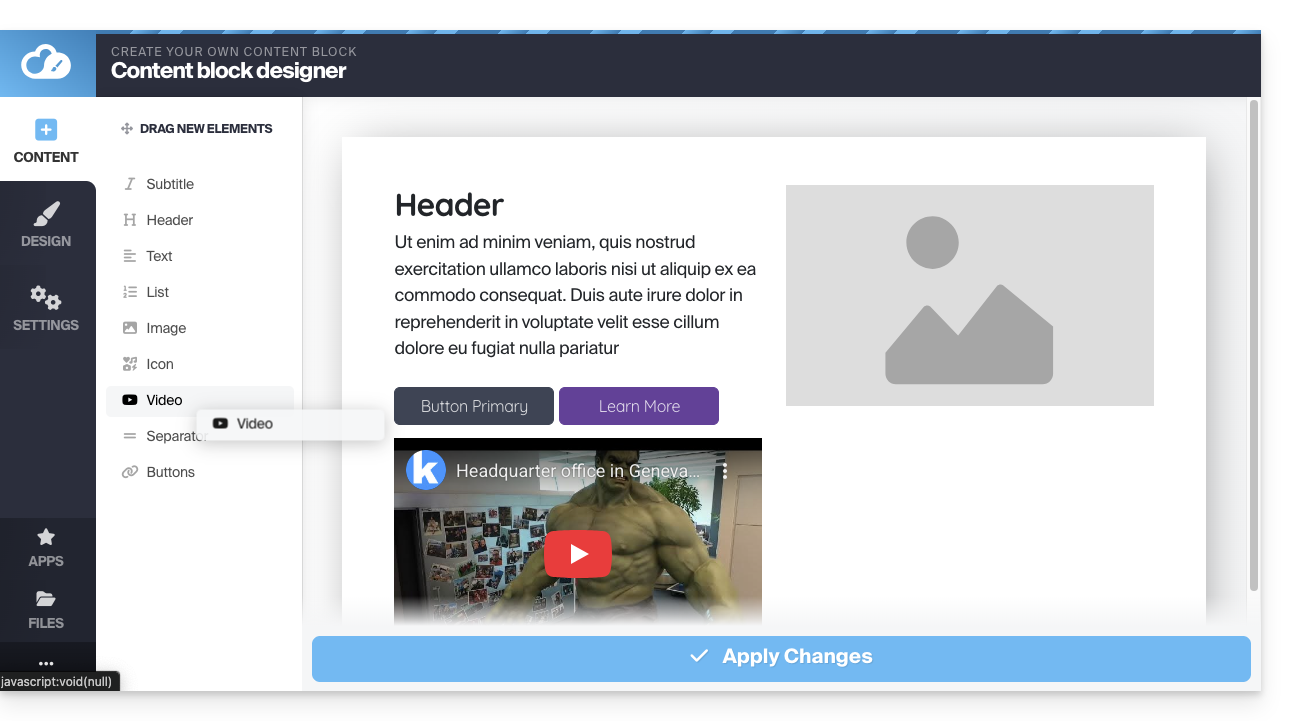
Modify the block margins
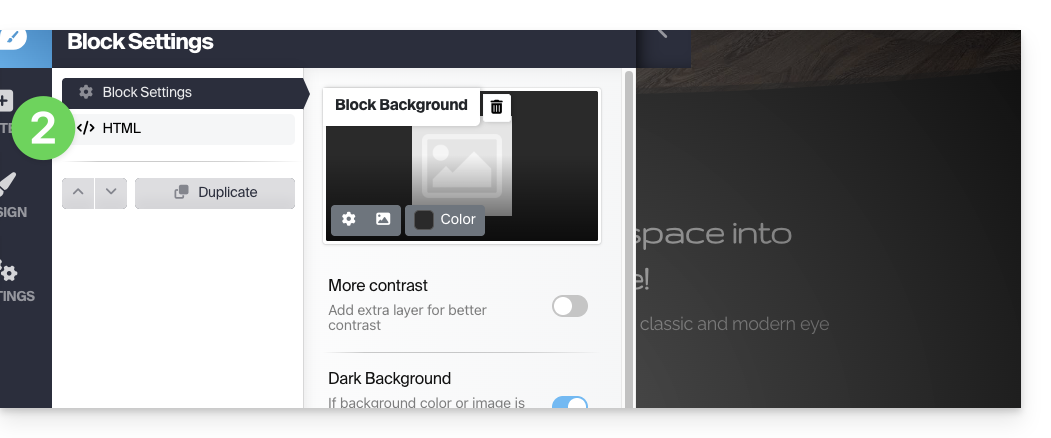
Hover over the content block to be modified and click on the gear icon:
Scroll through the settings to Default block spacing and click on it to define your own settings: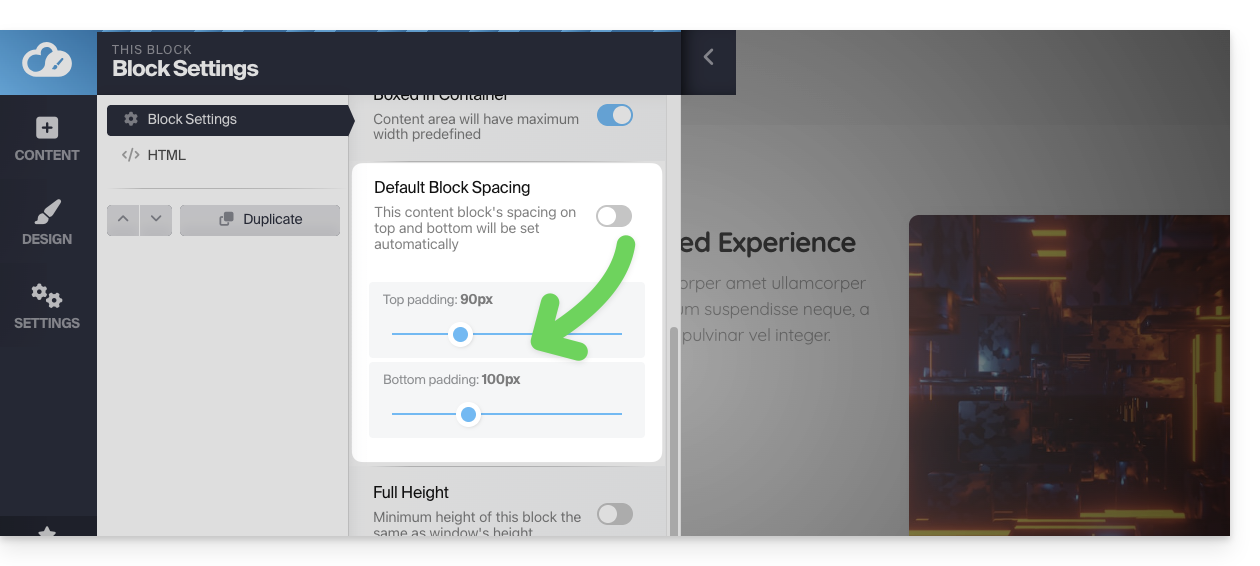
The settings cogwheel also allows you to change the background color or image of the block: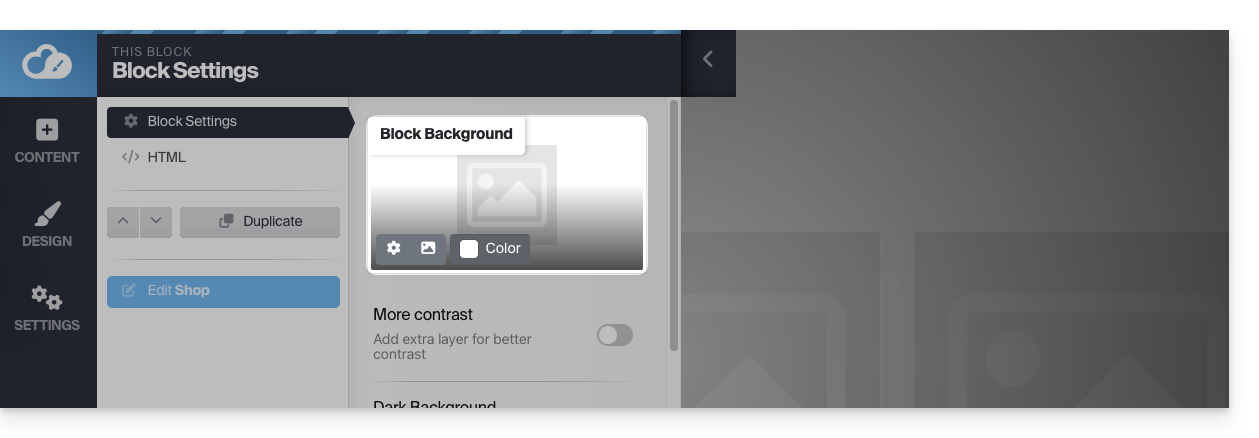
Move a block up or down
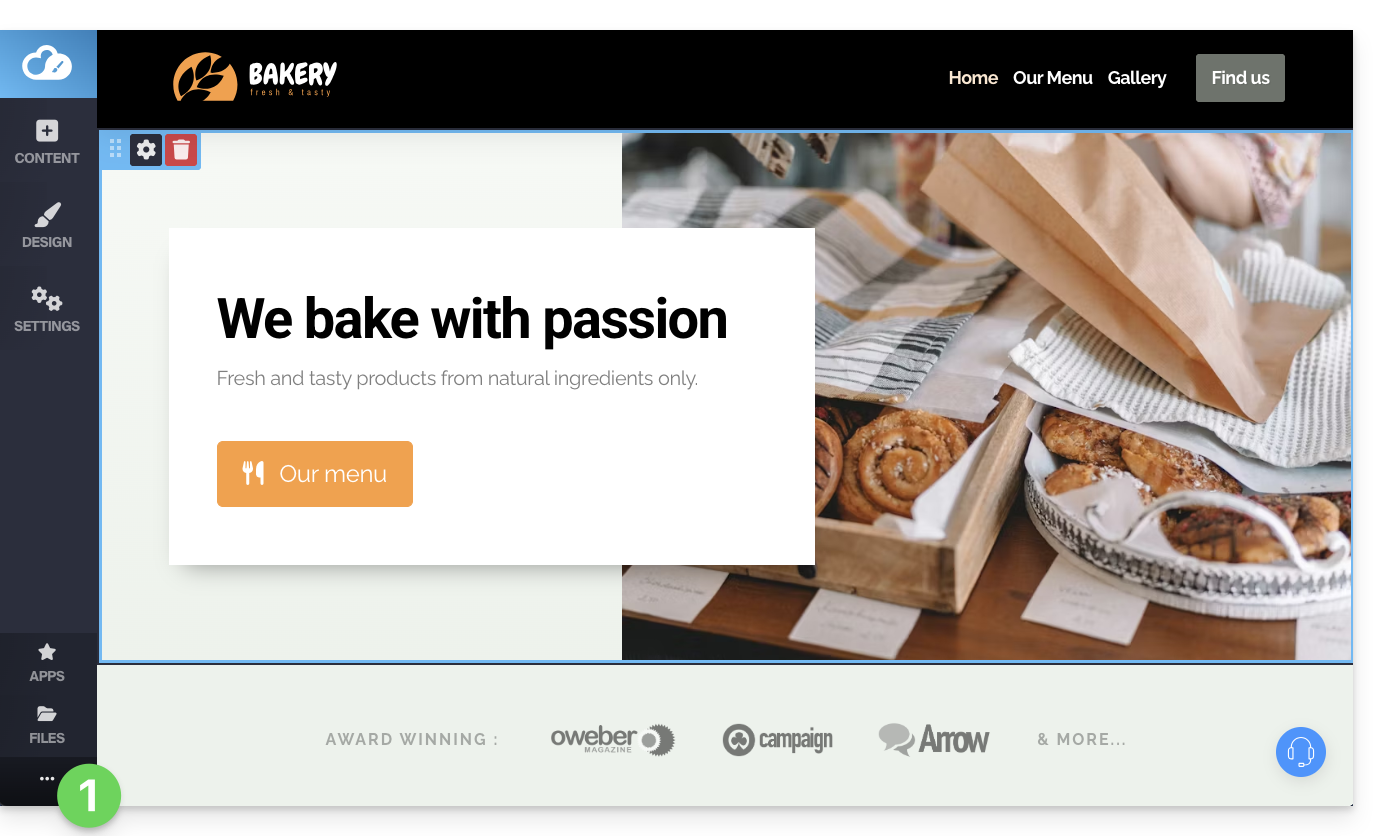
The content of your page is divided into "blocks". You can add more blocks and rearrange them.
Hover over the content block you want to move, then click on the dots area in the upper left corner; hold down to move the block: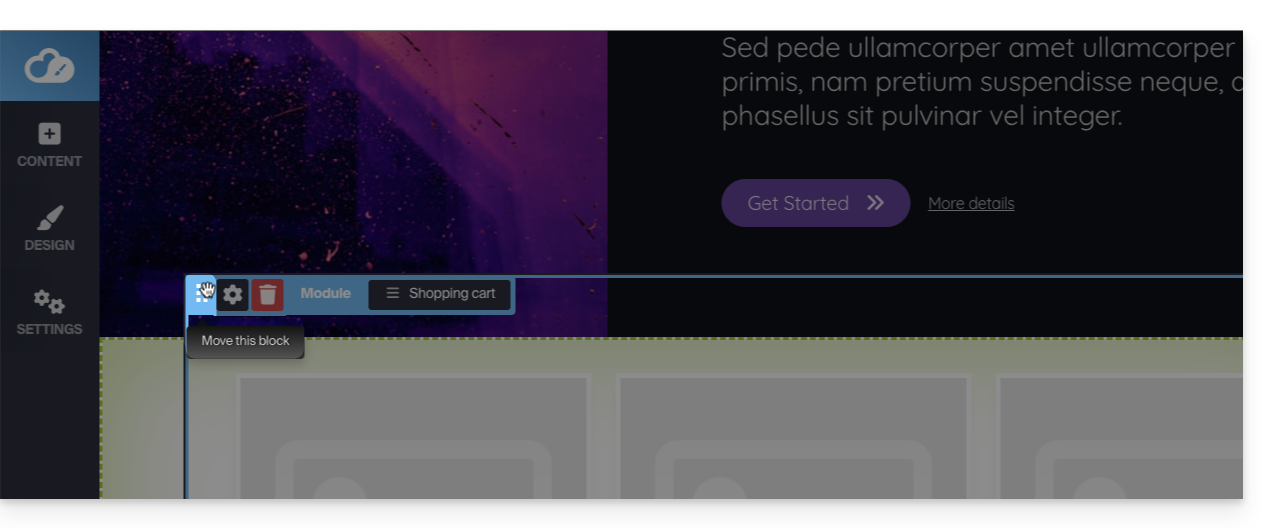
Create space between two blocks
To create horizontal space between content blocks, add a separator manually: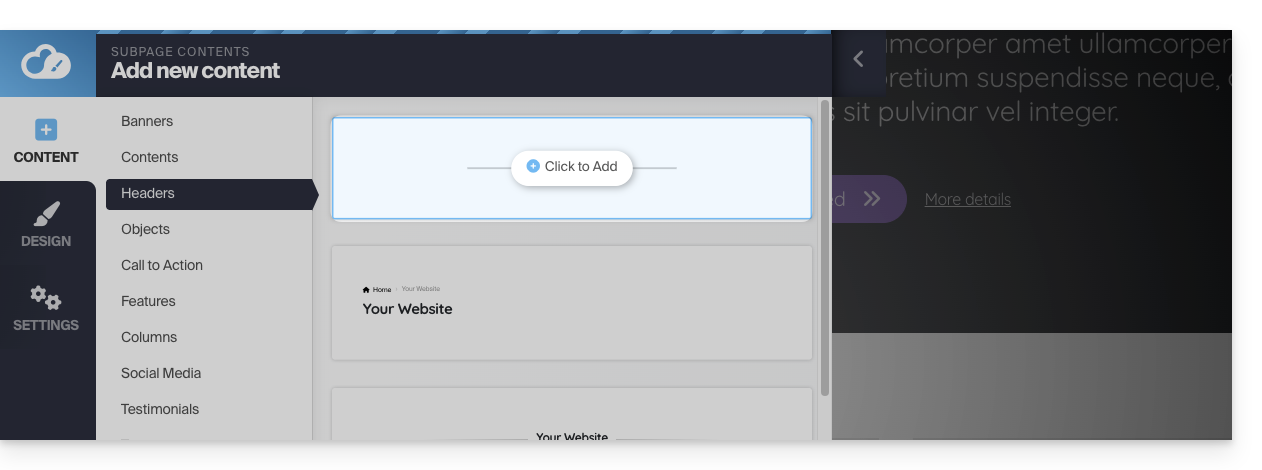
You can then define its color and size by clicking directly on the separator: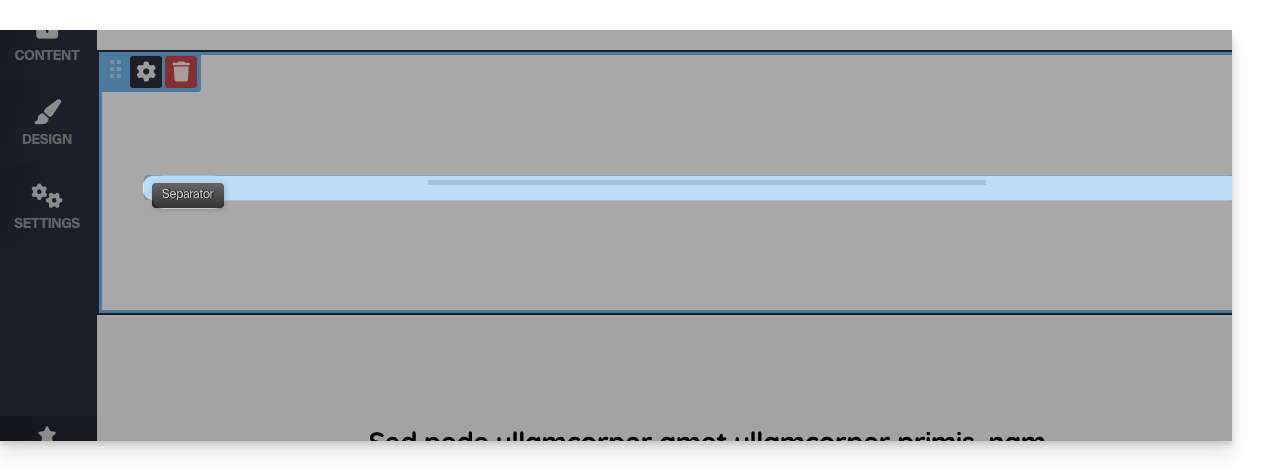
You can also "decorate" the top and bottom of a block in a more automatic way by activating the Decoration option when editing a block: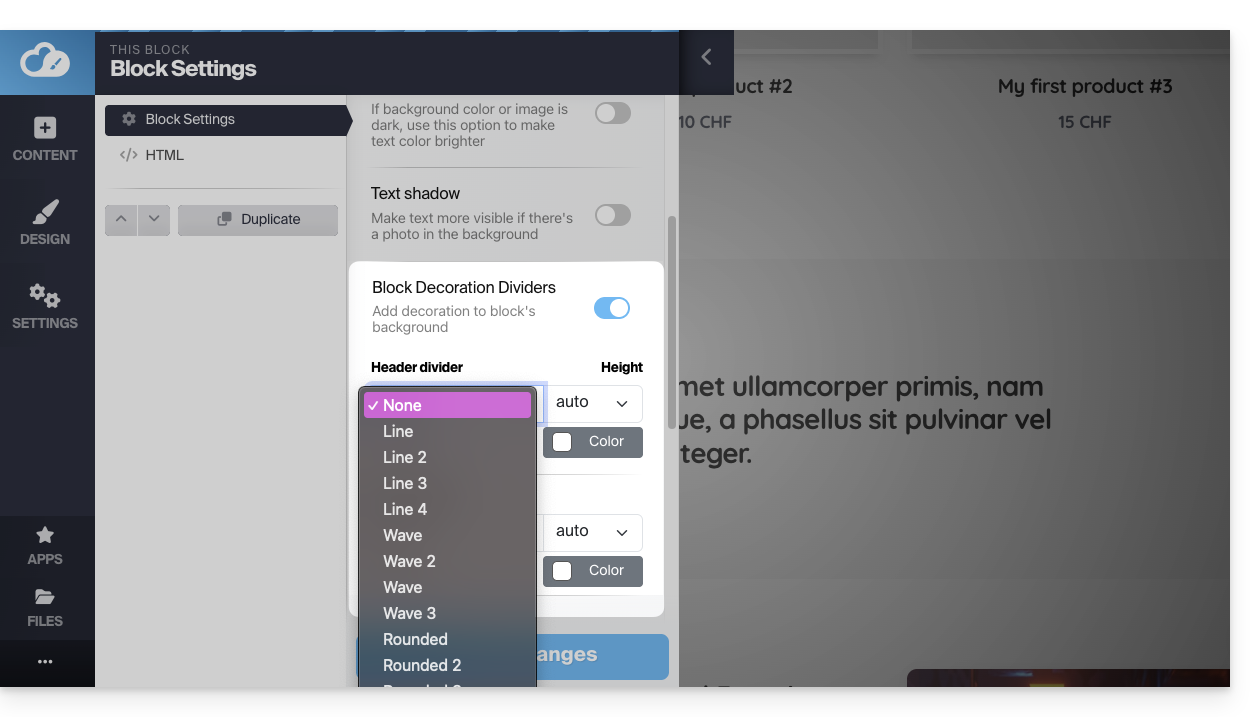
Link to this FAQ:
Has this FAQ been helpful?
This guide helps you understand how to create and edit pages in Infomaniak's Site Creator.
Prerequisites
- Accessing Site Creator:
- Click here to access the management of your product on the Infomaniak Manager (need help?).
- Click directly on the name assigned to the Site Creator in question.
- Click on the Edit my site button to start the editor:
Simple page editing
Page editing is done live, and your changes are saved as you go while you edit the content of your blocks. You can undo your changes if necessary.
Create a link
Create a link from an image or text by selecting the object directly. On the toolbar that appears, click on the action menu •••.
Then click on the link icon to open the section that will allow you to specify the type of link and the associated options: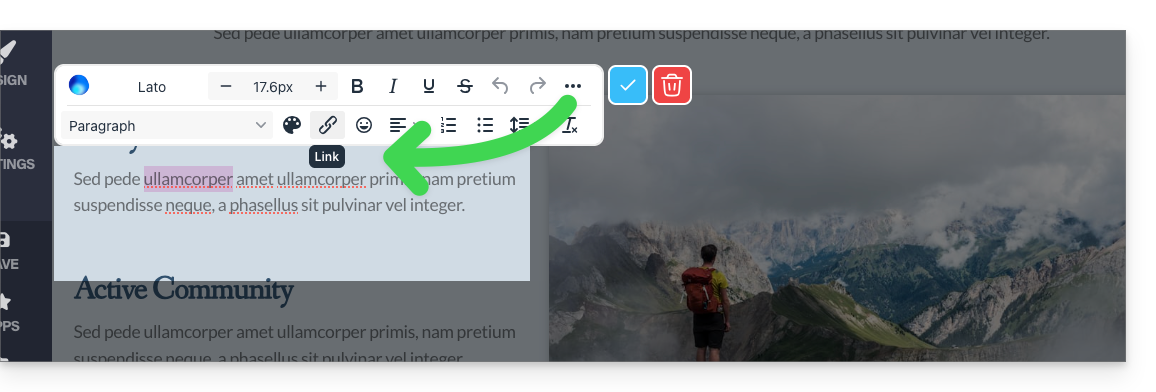
Turn a link into a button
In your link settings, you can choose its style (rounded button, solid, etc.), the associated icon, etc.: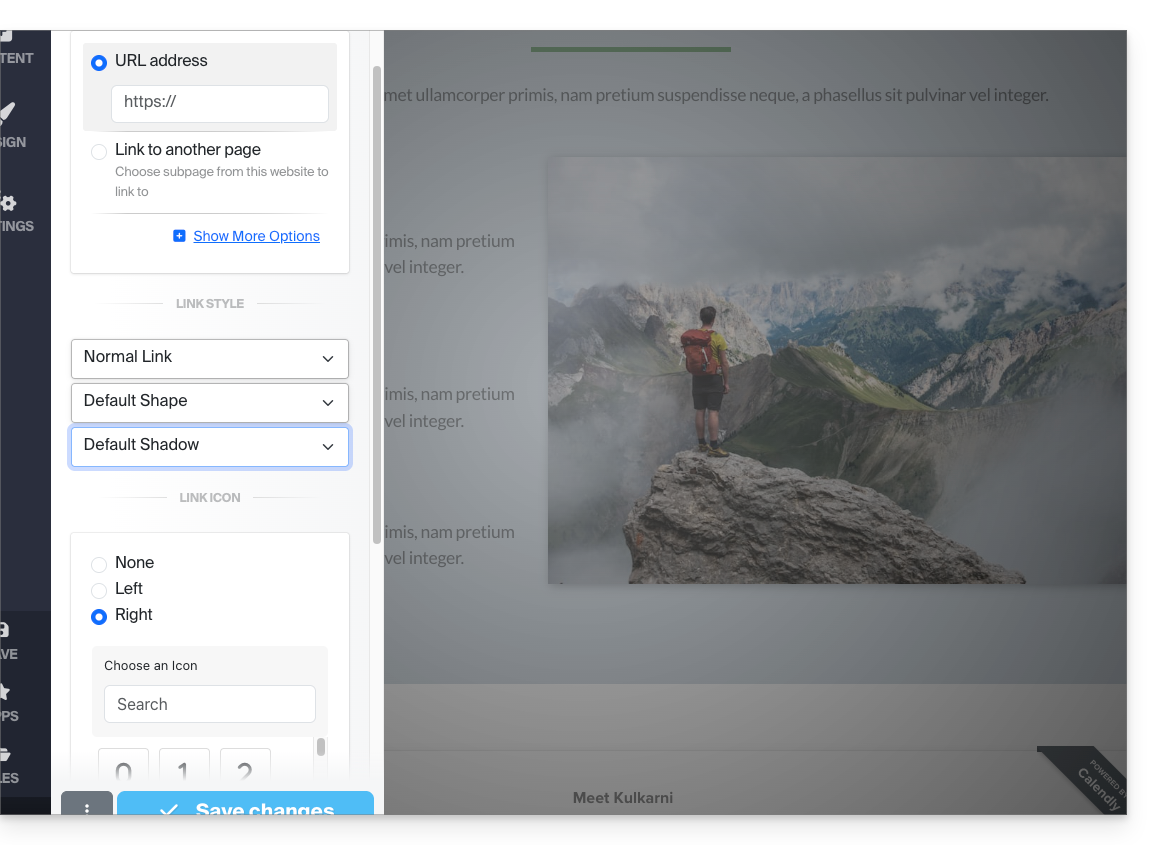
Edit a link
Edit a link by clicking on it and then clicking on the chain icon: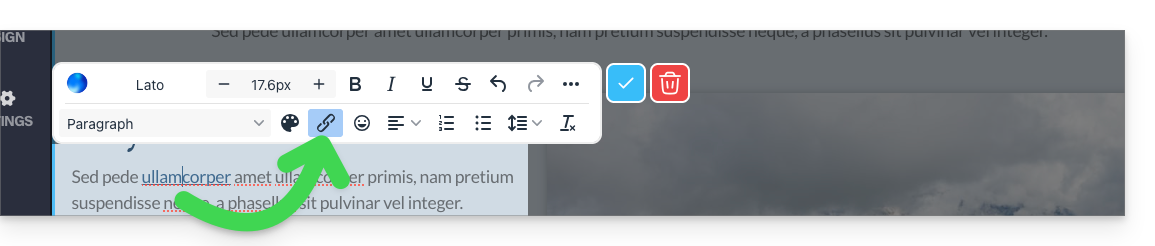
Create a link to a file
To allow your visitors to download a file from a link on an object, click Show more options in your link settings.
Then choose the "File" type, which will allow you to upload the corresponding file to the server, so that you can offer it for download to your visitors: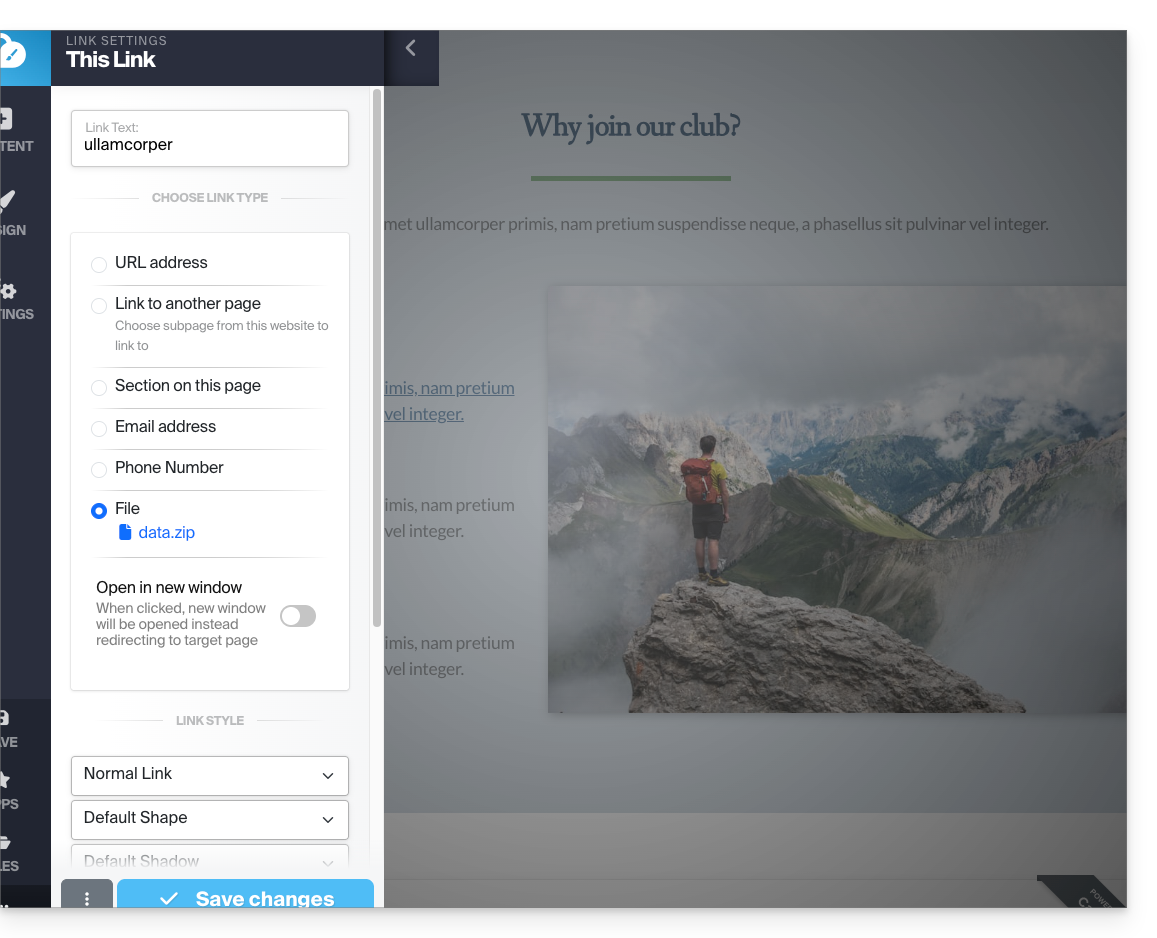
Create a link to an email
Choose the "Email address" type in your link settings. Clicking on the link will open the visitor's default email application and start composing an email with the pre-written email address: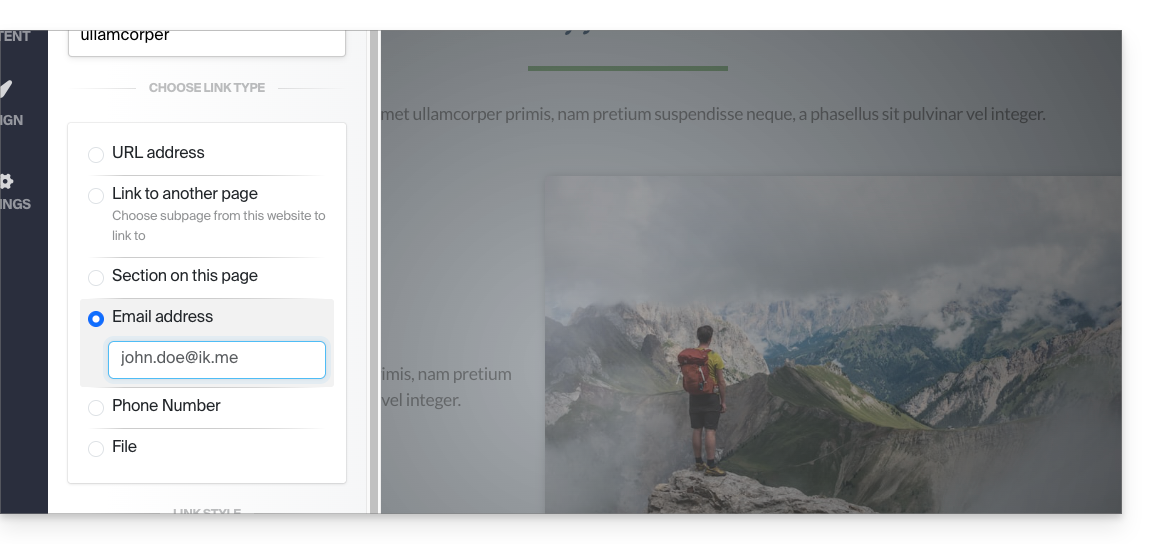
To avoid having the email address hard-coded on your page, insert a contact form.
Create a link to a specific section
To direct the visitor to a specific section of your site or another site, use the anchor system.
Create a link from an image
When you click on an image to edit it, simply activate the "This is a link" button below the image to specify the URL that will be displayed when a visitor clicks on it: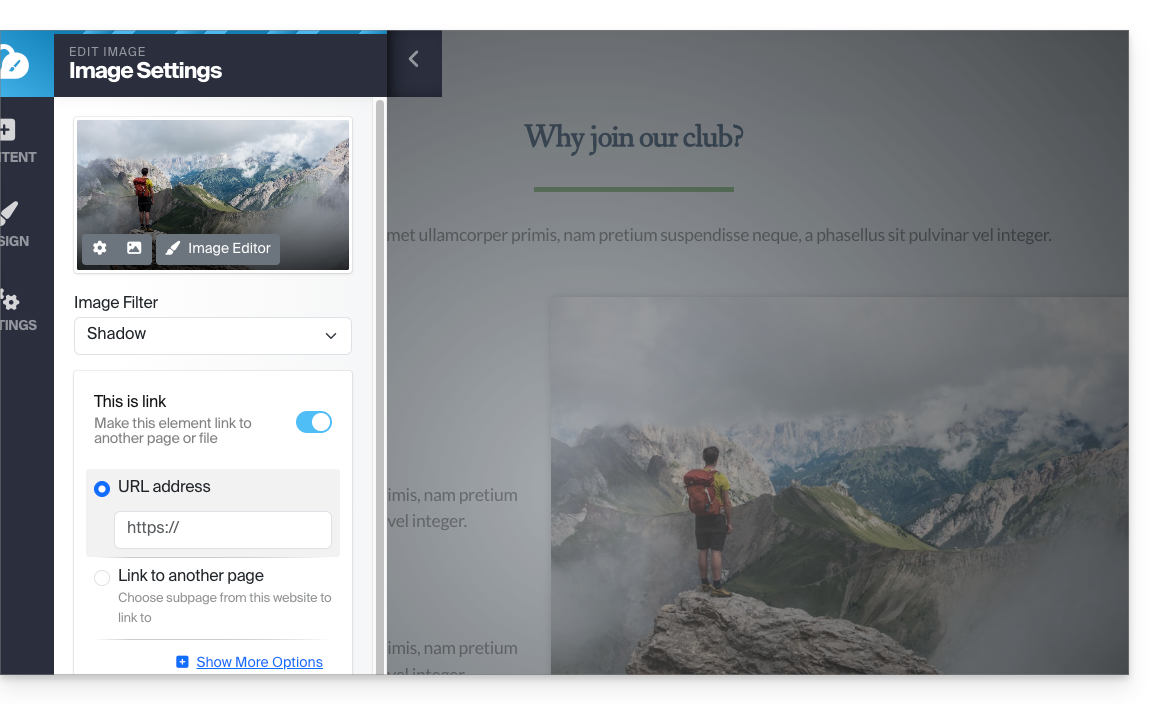
You can also apply a link to an image by using a YouTube video as the URL: this will automatically create a PLAY-type icon that, when clicked, will open the video in a lightbox window.
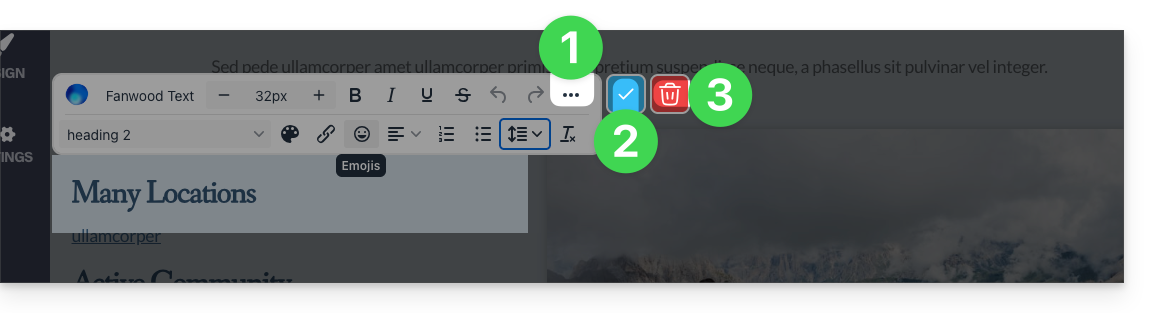
Create a list, insert an emoticon... and save
The various text formatting options are located above the text selection:
- Additional options (bulleted lists, alignment, emojis, etc.) are accessible via the ••• action menu.
- Apply and validate the changes with the ✓ symbol.
- Caution: the trash can deletes the text you are editing:
Link to this FAQ:
Has this FAQ been helpful?
This guide is intended for users of the Site Creator tool who wish to go further in editing their pages.
Prerequisites
- Access Site Creator:
- Click here to access the management of your product on the Infomaniak Manager (need help?).
- Click directly on the name assigned to the Site Creator in question.
- Click on the Edit my site button to start the editor:
Open the HTML editor
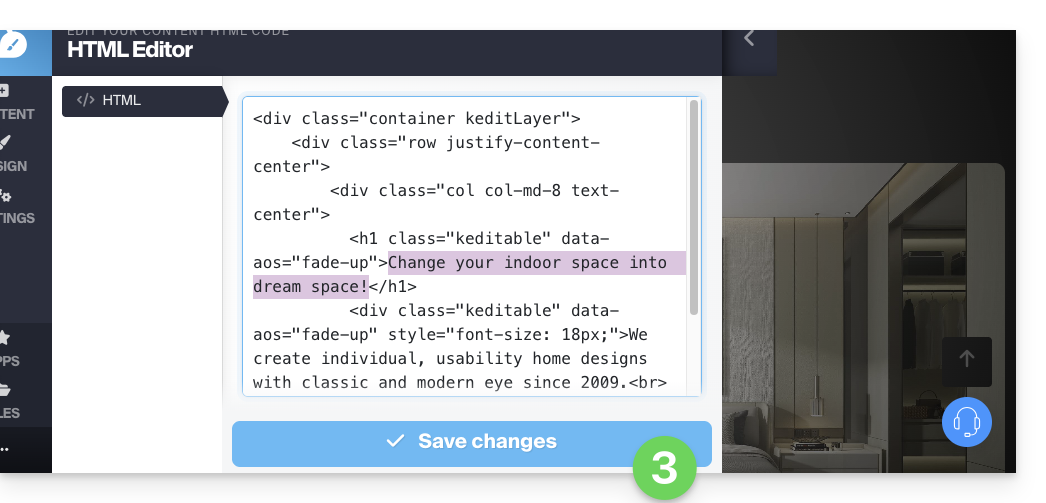
Once in Site Creator, you can modify the HTML code (recommended for advanced users only) if you need more control over any content block:
- Hover over the block to edit on your page and click on the gear icon that appears on hover:

- Click on the HTML element in the left sidebar to edit the HTML code of the block:
- Remember to save your changes:
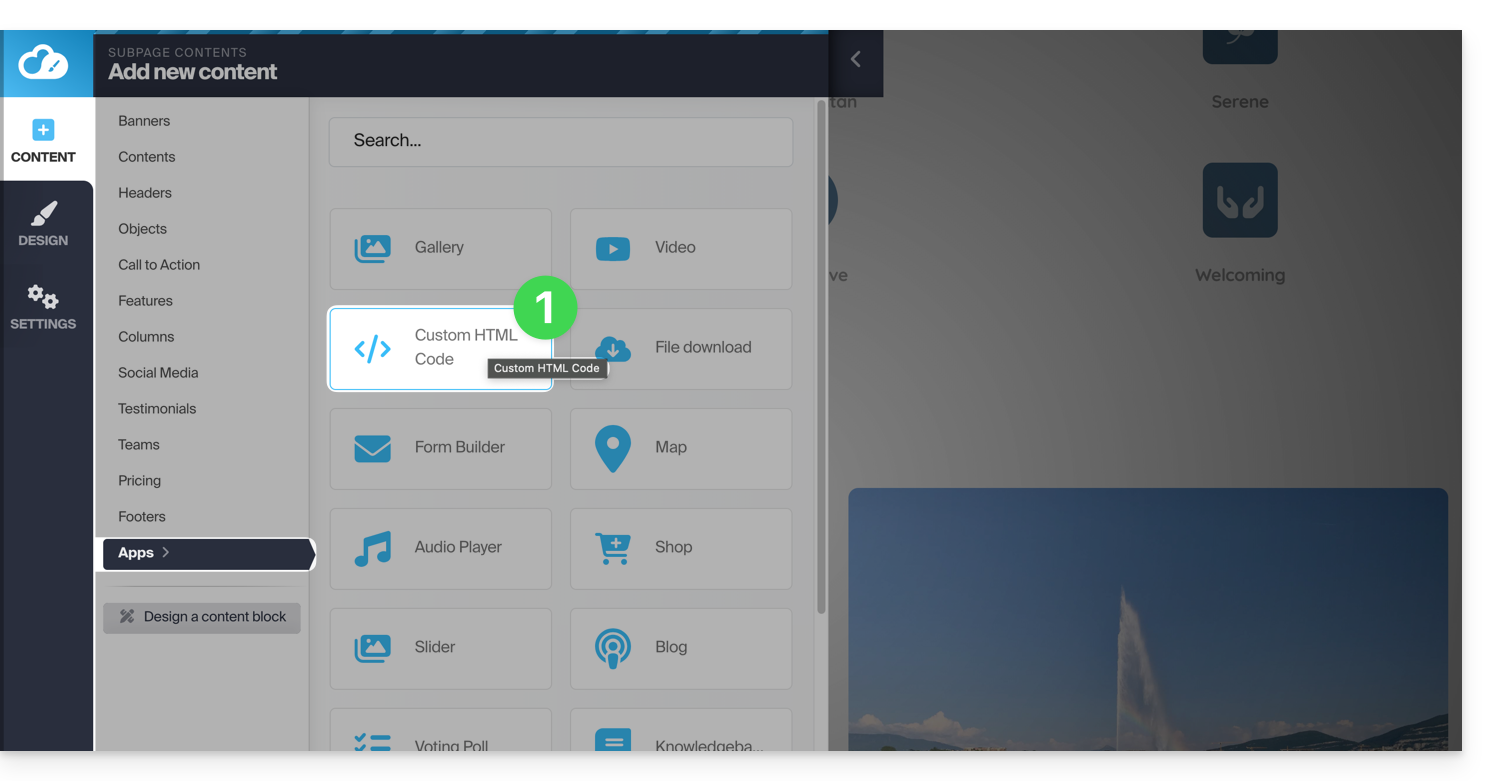
Add an HTML block
To start from scratch with a blank HTML block, you can insert the Custom HTML Code module onto your page from the Apps list:
The text can then be edited using the HTML CODE button, which opens the HTML editor:
You can also add code outside of the blocks.
It is strongly recommended that you never insert tags such as html, head, or body, as these could conflict with the application's source code.
Link to this FAQ:
Has this FAQ been helpful?