Knowledge base
1000 FAQs, 500 tutorials and instructional videos. Here, there are only solutions!
This guide explains how to freely integrate emojis / emoticons / smileys in the title and content of an Infomaniak Newsletter.
Insert an emoticon in the title
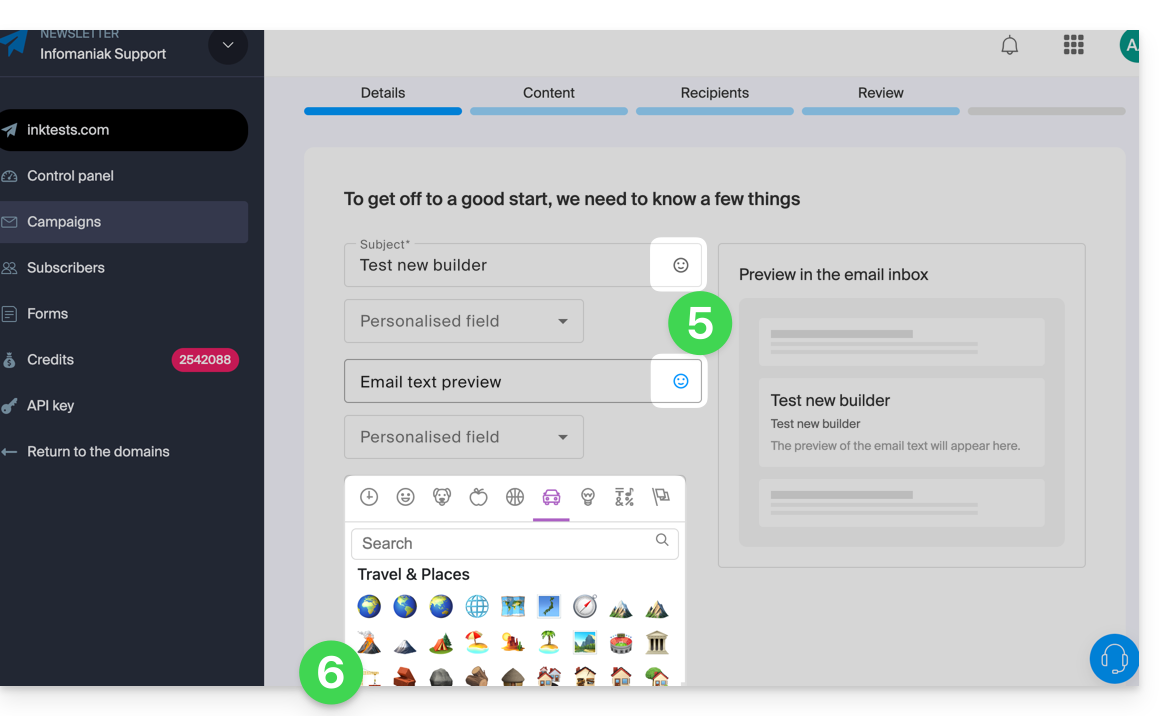
To choose an emoticon for your Newsletter title (and/or its preview text):
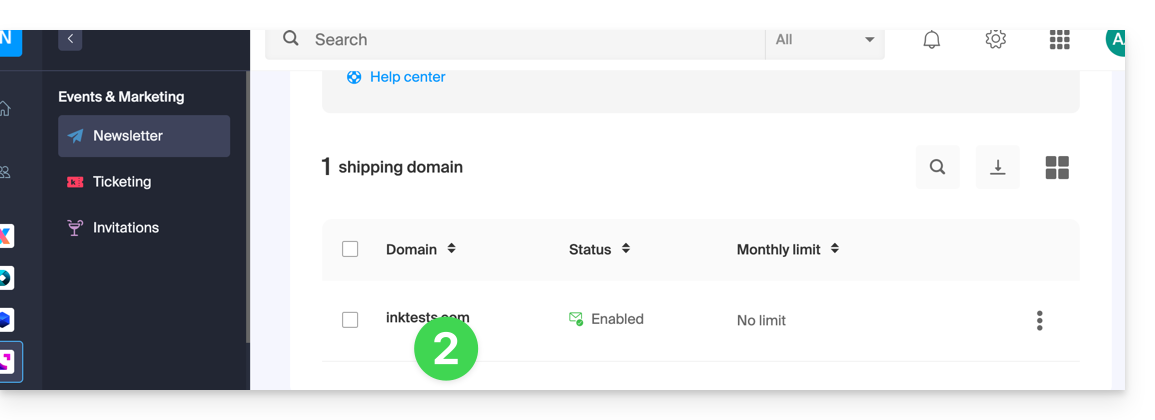
- Click here to access the management of your product on the Infomaniak Manager (need help?).
- Click on the domain name concerned in the displayed table:
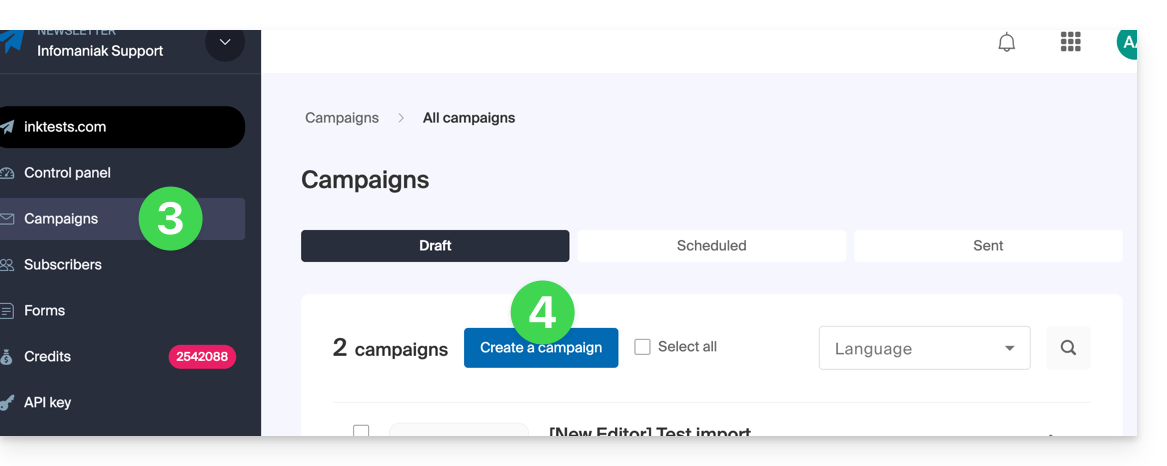
- Click on Campaigns in the left sidebar menu.
- Click on Create a campaign:
- Click on the Smiley icon in the relevant field to open the emoji panel.
- Click on the emoji to insert:
Insert an emoticon in the body of the email
You can paste any unicode character or emoji that you have copied elsewhere into your text: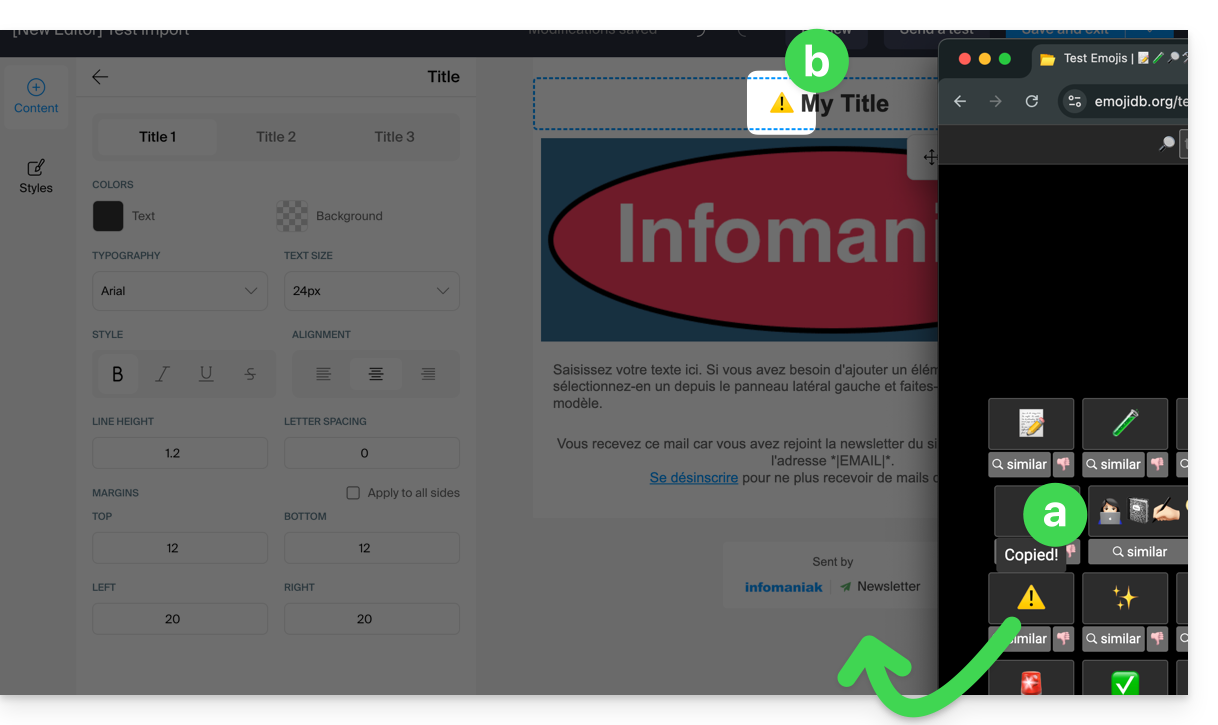
… or display emojis
… on macOS
Press the keys CTRL + CMD ⌘ + SPACE
… on Windows
Press the keys WINDOWS LOGO + PERIOD (.)
Alternative method:
- Right-click on an empty area of the taskbar.
- In the menu, click on Show the on-screen keyboard.
- A keyboard icon will then appear in the taskbar at the bottom right of your screen.
- Click on this icon to display the virtual keyboard.
- Click on the key with a smiley at the bottom left of the keyboard.
- Use the different Windows emojis.
Link to this FAQ:
Has this FAQ been helpful?
This guide concerns UTM tags, or Urchin Tracking Module, tags added to URLs to track and analyze the performance of online marketing campaigns from the Infomaniak Newsletter tool.
Preamble
- These UTM tags, which are optional, consist of specific parameters such as source, medium, campaign, term, and content, which help identify the origin of the traffic from a link.
- By using UTM tags, marketers can understand which campaigns generate traffic, which channels are the most effective, and which ads or strategies work best, based on the data collected by web analytics tools.
- UTM tags therefore allow you to create a correspondence between the links in your Newsletters and the tracking of a tool like Google Analytics on your site.
Enable the UTM feature
Enable this option in the very first step of creating your Newsletter:
- Click here to access the management of your product on the Infomaniak Manager (need help?).
- Click on the domain name concerned in the table that appears:
- Click on Campaigns in the left sidebar menu.
- Click on Create a campaign:
- Set the UTM parameter to ON using the toggle switch:
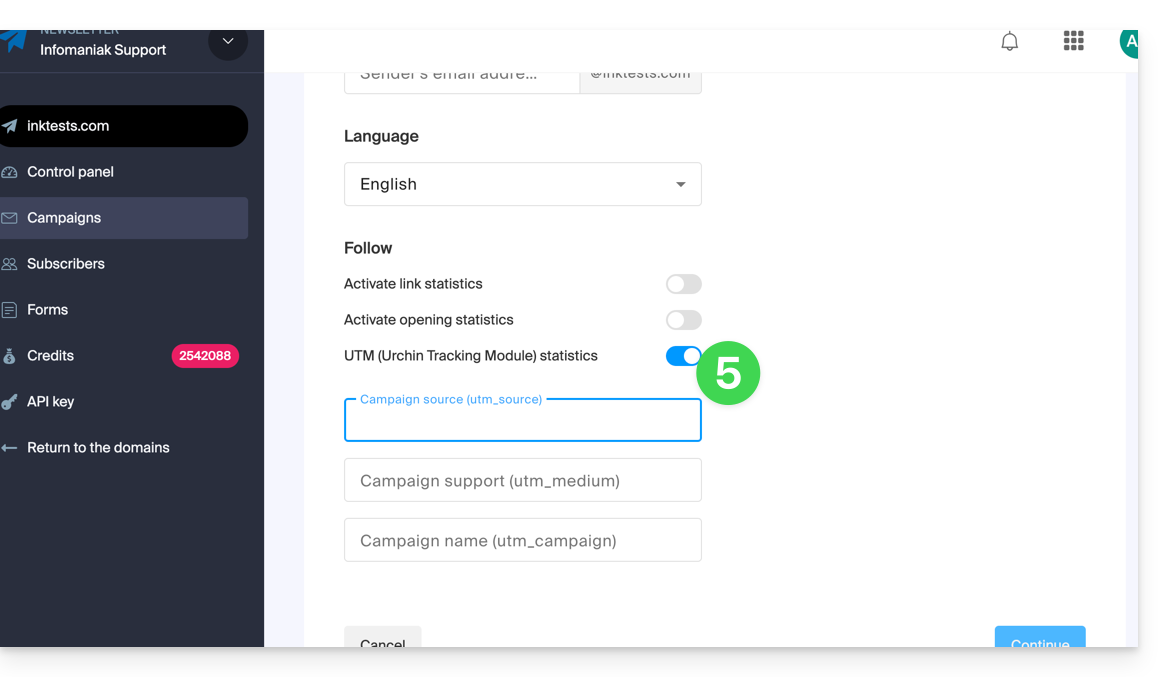
You will then find 3 fields to indicate keywords of type utm_parameters:
- campaign source (
utm_source) - campaign medium (
utm_mediumsuch as e-mail for example) - campaign name (
utm_campaign= the name of your campaign for example)
Therefore:
- Fill in the 3 UTM fields in step 1 of creating a Newsletter.
- Insert a link to the URL of your site (the latter must be properly configured and analyzed by Google Analytics for example) in the body of the Newsletter in step 3.
- When the reader clicks on it, they will arrive at the URL followed by the terms "
?utm_source=...&utm_medium=...&utm_campaign=..." with obviously your keywords in place of "...".
If you enter multiple keywords in these fields, any spaces will be replaced by underscore _ signs.
Later, it is planned to be able to enter dynamic formulas in these fields, such as today's date for example. Also, refer to the article https://news.infomaniak.com/comment-creer-un-objectif-google-analytics.
Link to this FAQ:
Has this FAQ been helpful?
This guide explains how to enable or disable tracking in your next Infomaniak Newsletter.
Preamble
- A tracker is a small element (a 1-pixel image or a special link) inserted in the Newsletter.
- When the recipient opens the email, the image is downloaded from the sender's server, thus recording the opening.
- Not all email software/clients automatically load images, and some users choose to disable them; this means that a person who has read the email may be counted as never having opened it.
- The links in the Newsletter are transformed into redirect links via the tracking server, thus recording the clicks.
- Some email tools, like Outlook, automatically explore the links contained in the email, thus recording an opening even if the user never viewed it.
- Trackers are used to collect various data useful for marketers, such as:
- Open rate to know how many people opened the Newsletter
- Opening time to determine when the newsletter is opened
- Geographical location based on the recipient's IP address
- Device and software type to know the device (computer, smartphone, tablet) and the software (browser, email software/client) used to read the Newsletter
- Click-through rate to measure how many people click on the links in the Newsletter
- Conversions to track if the recipients perform specific actions after opening the Newsletter (purchases, registrations, etc.)
Enable statistics collection
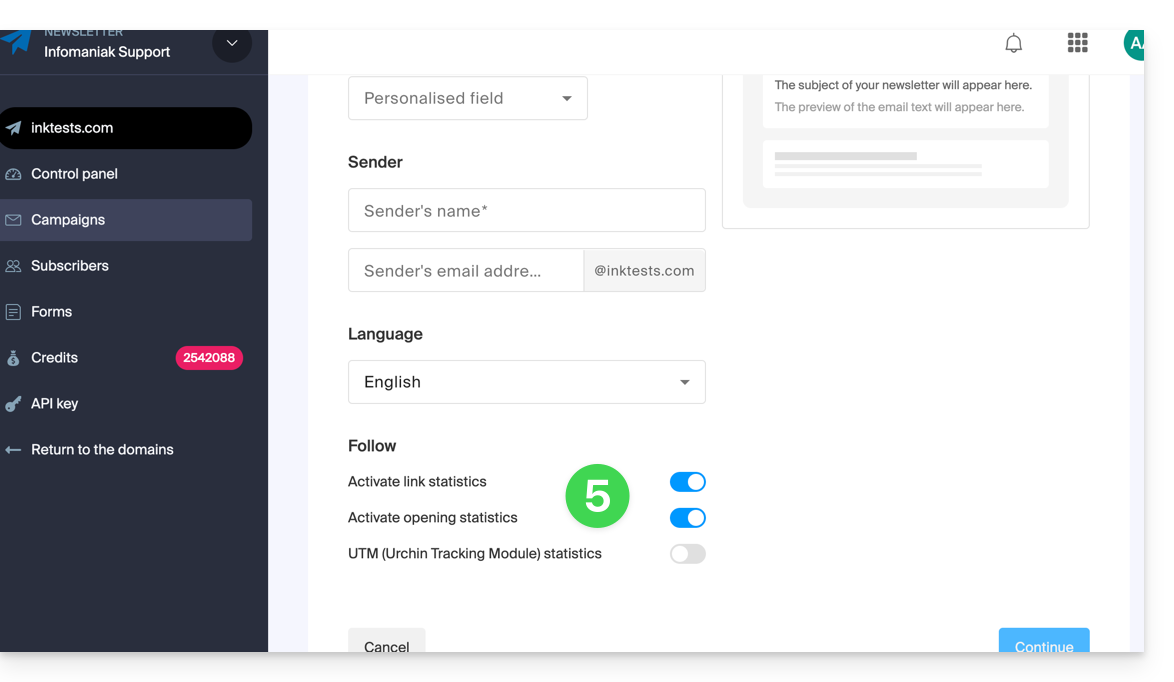
Enable this option at the very first step of creating your Newsletter:
- Click here to access the management of your product on the Infomaniak Manager (need help?).
- Click on the domain name concerned in the table that appears:
- Click on Campaigns in the left sidebar.
- Click on Create a campaign:
- Turn on the stats parameters using the toggle switches:
By deactivating statistics, the URLs of the links you insert inside the body of your Newsletter will no longer be transformed and you will not receive statistical feedback on the use of your Newsletter by your recipients.
Refer to this other guide regarding the last option on the page.
Link to this FAQ:
Has this FAQ been helpful?
This guide explains how to completely cancel an Infomaniak Newsletter.
Preamble
- The Newsletter is based on a domain name, the latter will not be affected.
- If you own multiple domains within the Newsletter, you can of course cancel only one of these domains from the Newsletter tool.
- For most products, confirm the cancellation request by email otherwise no data will be deleted.
- Open and out-of-package fees remain due.
- A cancellation confirmation is sent to any other administrators of the Organization.
- Backups will be irrevocably deleted upon cancellation, making any restoration impossible.
Cancel a newsletter
To access the cancellation of a Newsletter:
- Click here to access the management of your product on the Infomaniak Manager (need help?).
- Click on the action menu ⋮ to the right of the domain concerned in the table that appears.
- Choose Delete.
- Follow the procedure to the end.
Link to this FAQ:
Has this FAQ been helpful?
This guide explains how to create groups to distribute your Newsletter subscribers.
Preamble
- You need to create at least 1 group to place your future contacts/subscribers in it.
- This will be useful, for example, to create a subscription form for your Newsletter.
- Without a group, it is impossible to create the form, the button will remain disabled:
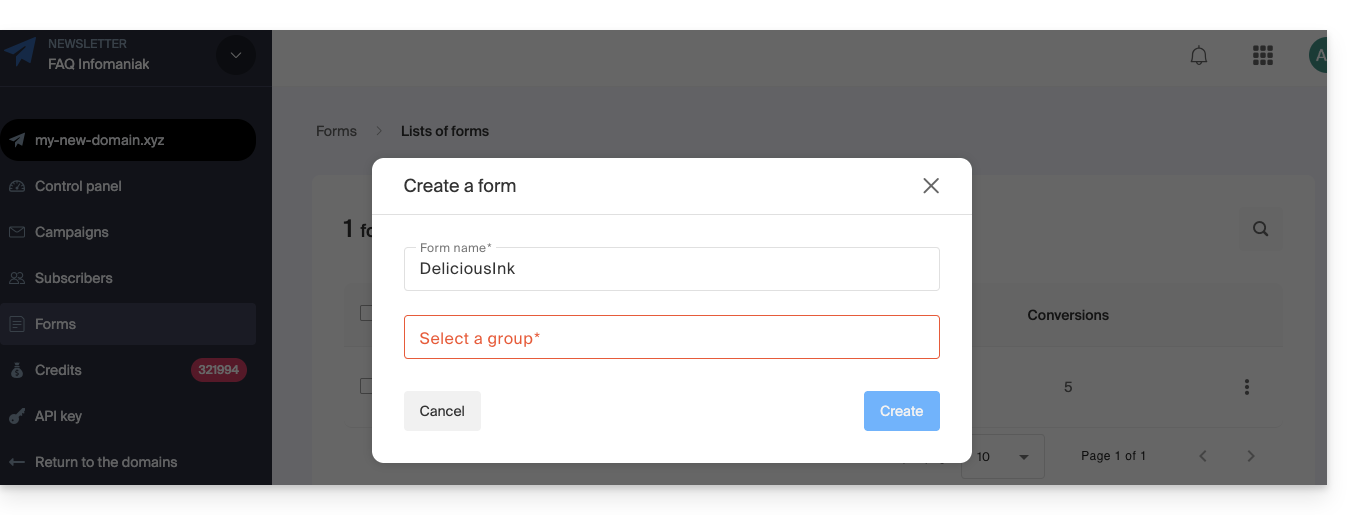
- Without a group, it is impossible to create the form, the button will remain disabled:
Create a subscriber group
To access the management of the Newsletter groups:
- Click here to access the management of your product on the Infomaniak Manager (need help?).
- Click directly on the domain name assigned to the product concerned.
- Click on Subscribers in the left sidebar.
- Click on the Groups tab.
- Click on the button to Create a group.
- Enter a name for your group.
- Click on the Create button:

Once the group is created, you can now add a new subscription form without any hassle, and define which group should be used to store future subscribers: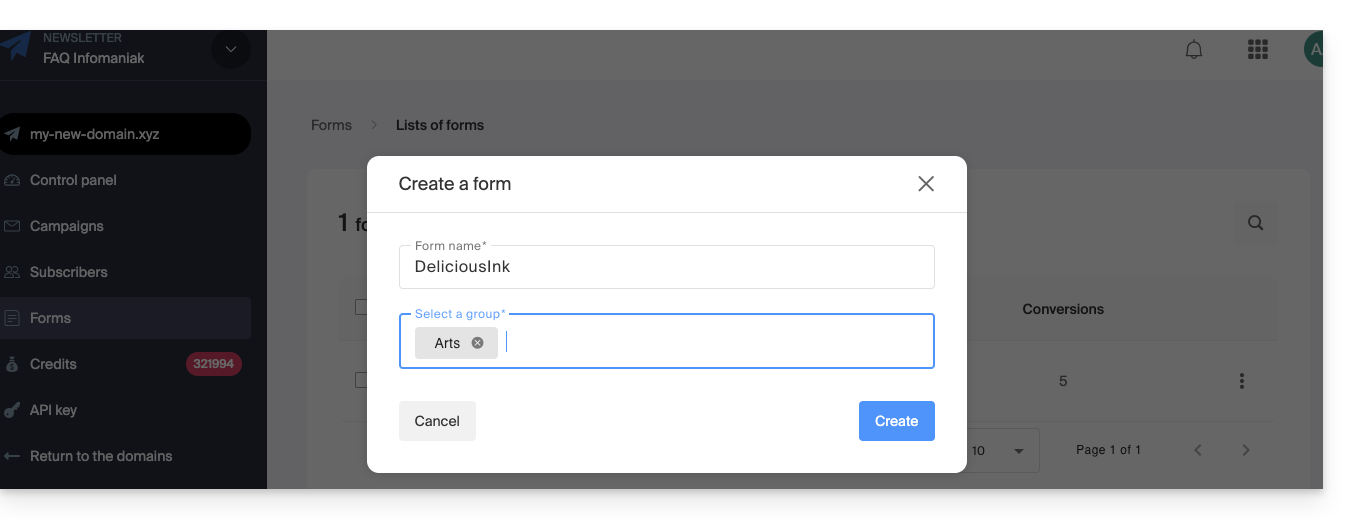
Creating multiple groups allows you, for example, to send Newsletters to only one of them and not to the others. This also allows you to have a subscription form in a location corresponding to the filling of a specific contact list, then another form elsewhere corresponding to another list, in order to send a more personalized Newsletter afterwards.
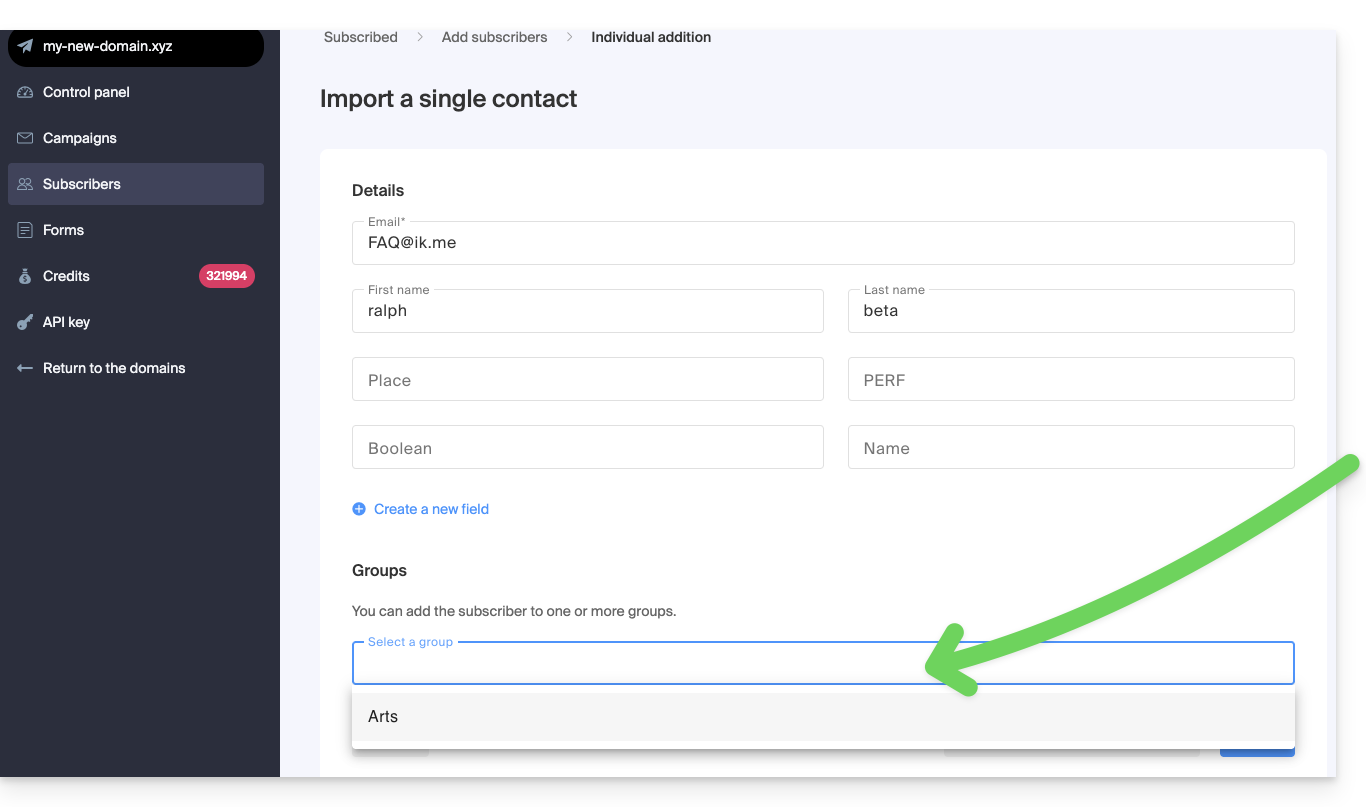
Add subscribers to the group
It is possible to select the group created during the creation/importation of a new contact:
- Click here to access the management of your product on the Infomaniak Manager (need help?).
- Click directly on the domain name assigned to the product concerned.
- Click on Subscribers in the left sidebar.
- Click on Add a subscriber.
- Click, for example, on the box for an individual addition.
- Select the appropriate group at the bottom of the form:
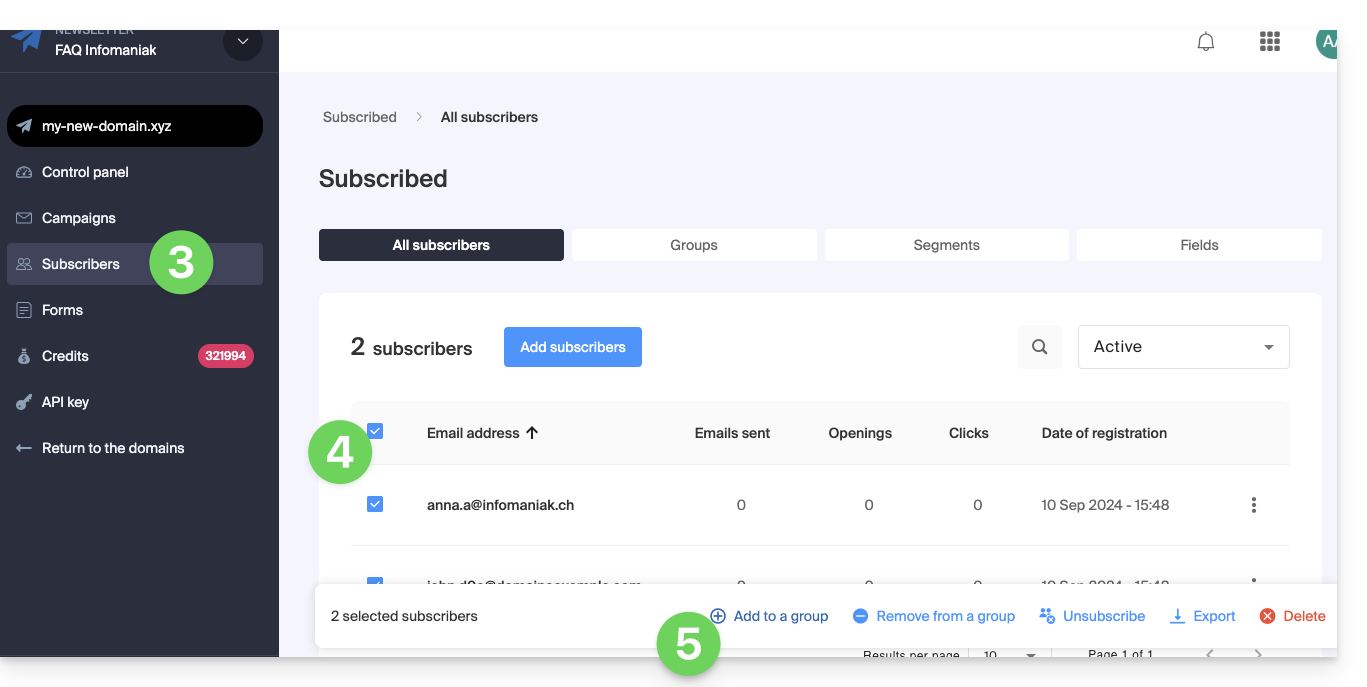
To add existing subscribers to the created group:
- Click here to access the management of your product on the Infomaniak Manager (need help?).
- Click directly on the domain name assigned to the product concerned.
- Click on Subscribers in the left sidebar.
- Select the subscribers to group.
- Click on Add to a group from the action menu that appears at the bottom of the screen:
- Enter the name(s) of existing group(s).
- Click on the Add button:
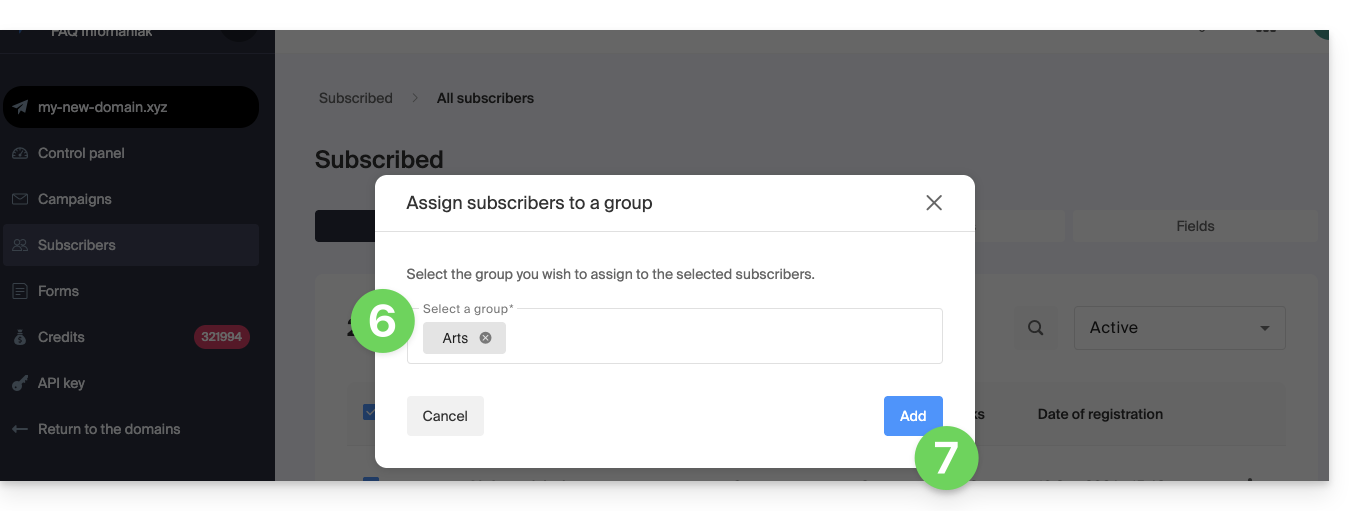
To remove subscribers from certain groups, choose Remove from a group at point 5 above.
Link to this FAQ:
Has this FAQ been helpful?
This guide concerns the Infomaniak Newsletter tool, which offers detailed reports to precisely measure the impact of your mailings.
Preamble
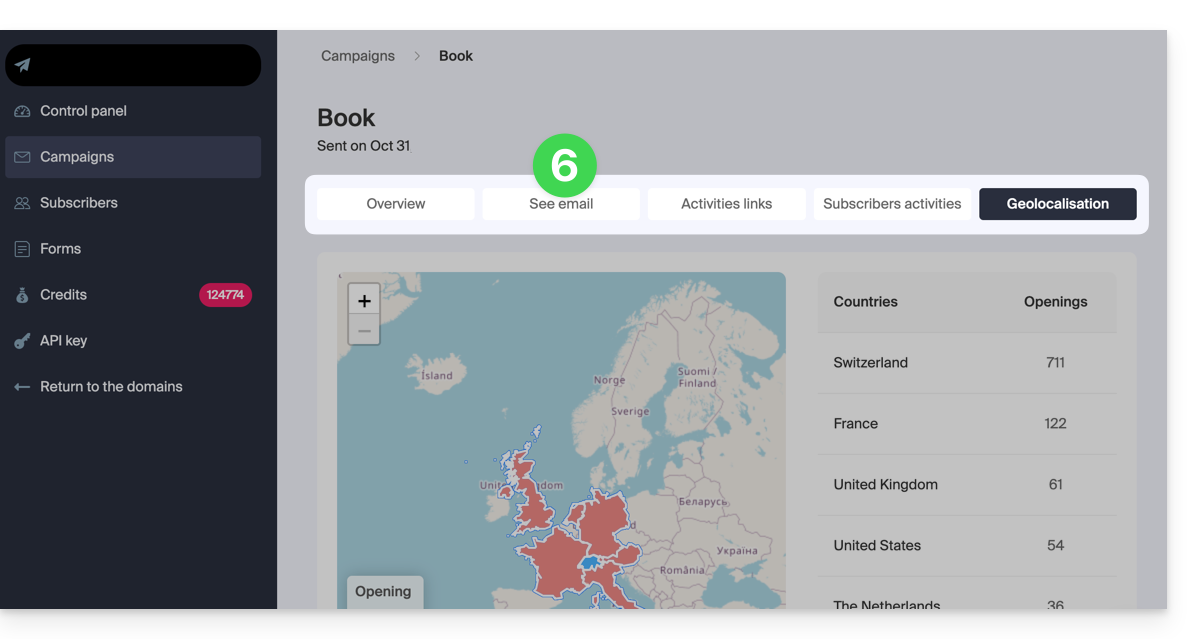
- Get to know the people who follow you:
- Discover on a world map where your subscribers are located (geolocation) and which devices they use to read your messages (mobile devices, computers, etc.).
- This information helps you better understand your contacts and adapt the content of your newsletters accordingly.
- Track the activity of your newsletters:
- At a glance, display all the important data to measure the quality and reach of your email campaigns: the unique open rate, the unsubscribe rate, and the number of invalid email addresses (bounce).
- Find out what really interests your subscribers:
- Easily measure the interest of your recipients by consulting the link statistics.
- You will thus be able to see exactly how many unique people clicked on the links in your newsletters and know what interests your subscribers the most.
Access reports from previous mailings
The dashboard offers a quick overview of the evolution of your campaigns since the beginning with monthly statistics:
- Click here to access the management of your product on the Infomaniak Manager (need help?).
- Click on the domain name concerned in the table that appears:
- Click on Campaigns in the left sidebar menu.
- Click on the SENT tab.
- Click on the VIEW REPORT button:
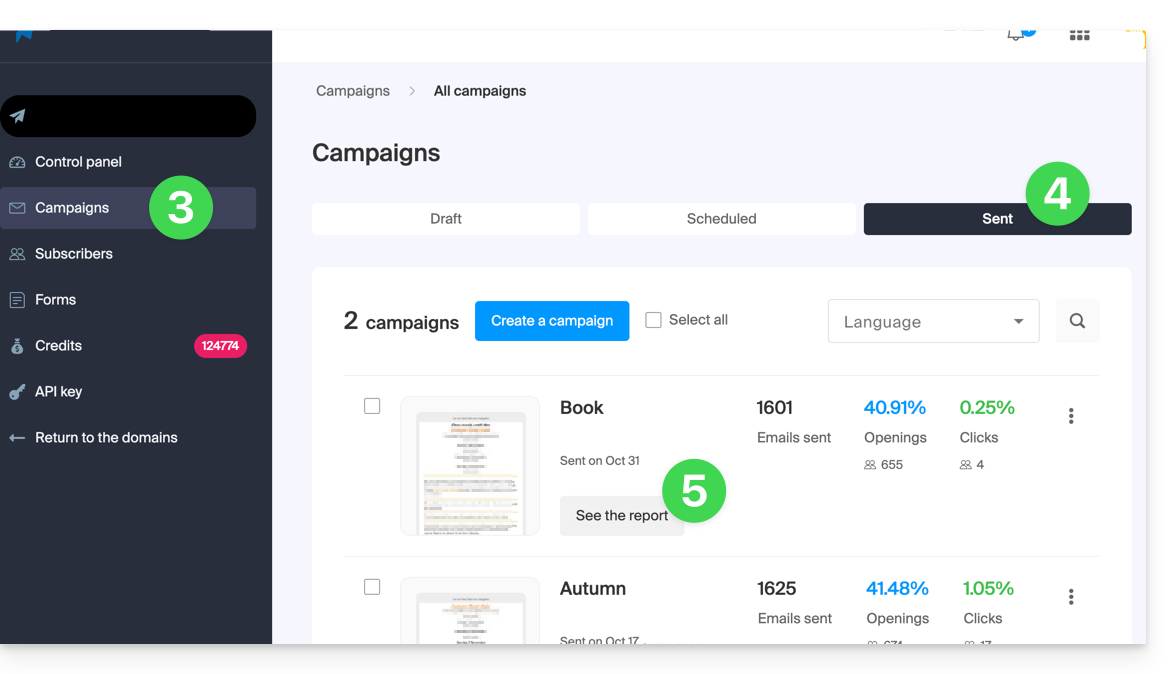
- Then, you have different tabs at your disposal to analyze the impact of your mailing, including the possibility to review the email and download it:
Link to this FAQ:
Has this FAQ been helpful?
This guide explains how to handle Soft Bounce & Hard Bounce errors that can occur when sending emails, particularly when using the Infomaniak Newsletter.
Hard Bounce
A hard bounce is an email that cannot be delivered for permanent reasons.
- email sent to a fake address
- recipient's email domain that is not a real domain
- recipient's server that does not accept emails
- etc.
Soft Bounce
A soft bounce is an error message indicating that the email has not been delivered to its recipient and corresponds to a presumably temporary delivery issue: the email address is valid, the sender can resend the email.
Several reasons can explain a soft bounce and therefore why the recipient's server temporarily refuses the email:
- the recipient's inbox is full: due to insufficient storage capacity, the recipient no longer receives messages
- an issue occurs at the recipient's mail server: the server is temporarily unavailable or down, or the user has inadvertently set filters that prevent the reception of certain messages
- when the content of the email, particularly its attachments, is too large, the delivery issue is observed at the time of sending
Unless the recipient has permanently abandoned their inbox without deleting their account, the soft bounce is a temporary issue.
Example of the Infomaniak Newsletter tool after a send with a good score of 0% "Permanent Bounces" and 0.31% "Temporary Bounces":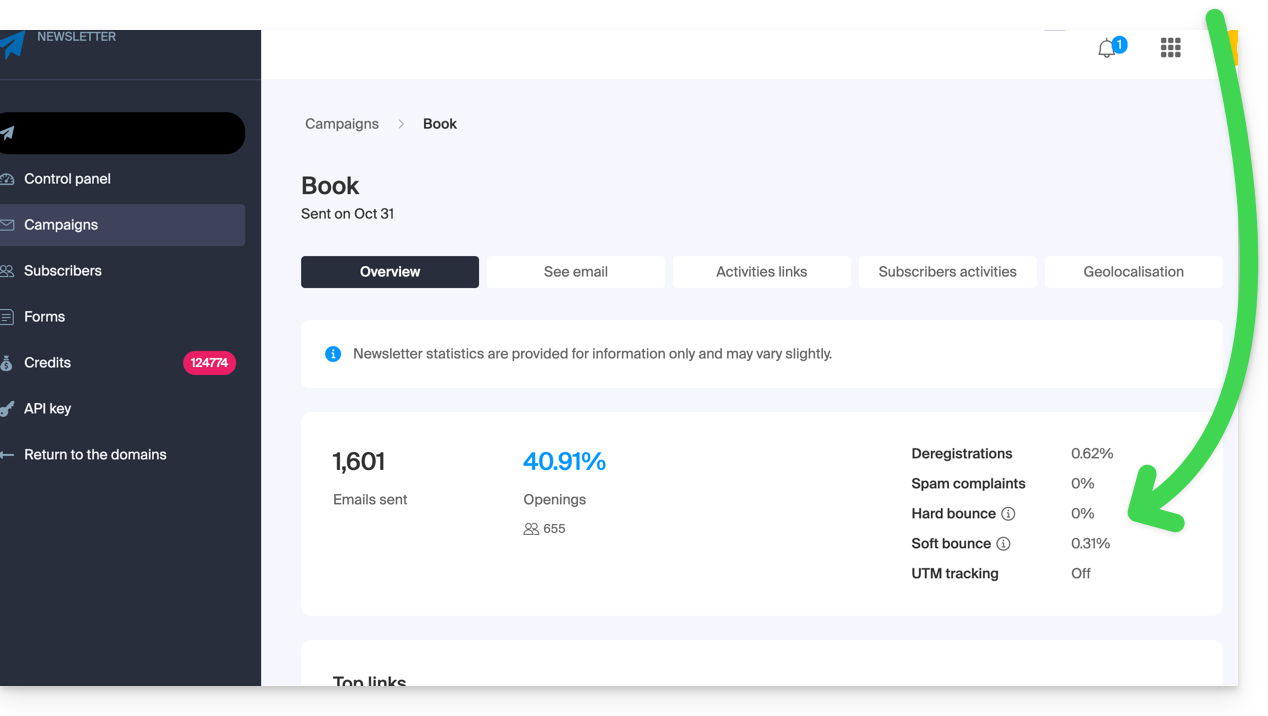
Also refer to this other guide.
Link to this FAQ:
Has this FAQ been helpful?
This guide details the rules for sending group emails at Infomaniak to avoid any Spam qualification, in accordance with the Swiss federal laws and the Infomaniak Terms of Service.
Obtain consent (double opt-in)
The double opt-in is the only method to protect against complaints.
To be valid, the interested party's registration must:
- Come from a form dedicated to a specific subject.
- Be confirmed by the recipient via a validation link sent by email.
- Be tracked by the system (recording of the IP address and date).
How to stay compliant?
- Use a contact form with double opt-in to build your lists.
- Systematically keep the IP address and the registration date of each subscriber.
- Insert a mandatory unsubscribe link visible at the bottom of each email.
Handling spam complaints
In case of a complaint, Infomaniak may temporarily suspend the emails.
- If you provide proof of registration (IP and date): the complaint is closed without further action.
- Without proof of registration: the complaint is deemed justified. Infomaniak may then suspend the email address, the domain, or terminate the contract in case of recurrence.
Link to this FAQ:
Has this FAQ been helpful?
This guide explains how the Infomaniak Newsletter sending management system works.
Sending volumes available for your newsletters
In general, the rule is simple: 1 sending = 1 newsletter sent to 1 subscriber.
There are two types of sending volumes:
- The free sendings included with your Infomaniak products (not carried over from month to month if not used).
- The purchased sendings via packs (unlimited validity).
1. Obtaining and using free sendings
Each Infomaniak product you own entitles you to a monthly quota of free sendings. For example: owning at least one Infomaniak Ticketing (even if no event is created or active) allows you to benefit from 2500 free sendings each month. This volume is fixed, whether you have one or more ticketing systems on the same account. The same principle applies to kSuite (the Enterprise version gives you 5000 sendings).
Regarding usage, your purchased sendings are consumed first. Your free sendings only start to be deducted when your total balance reaches the amount of your monthly free quota.
Example of how it works:
A customer benefits from 2000 monthly free sendings.
- If, at the end of the month, their balance is 1500, the system automatically tops it up to 2000 sendings at the beginning of the following month.
- If they have a stock of 10,000 sendings following the purchase of a pack, no additional free sendings are added, because their balance is already higher than the offered quota.
2. Viewing and ordering additional sendings
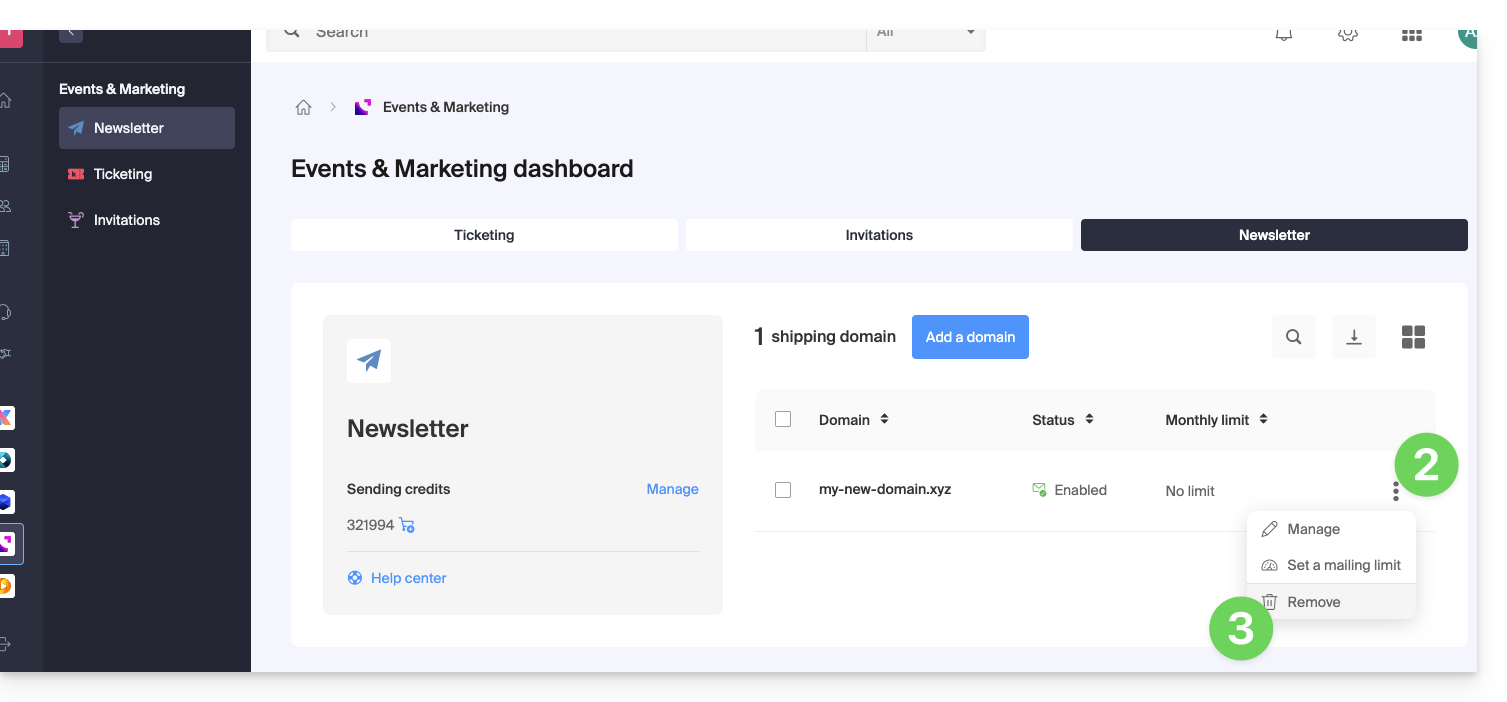
To access the management of your free and paid sending volumes:
- Click here to access the management of your product on the Infomaniak Manager (need help?).
- Click on the domain name assigned to your Newsletter.
- Click on Sendings (or the balance management menu) in the left-hand menu.
- You can view the details of your consumption and obtain more sendings by clicking on the Get sendings button:
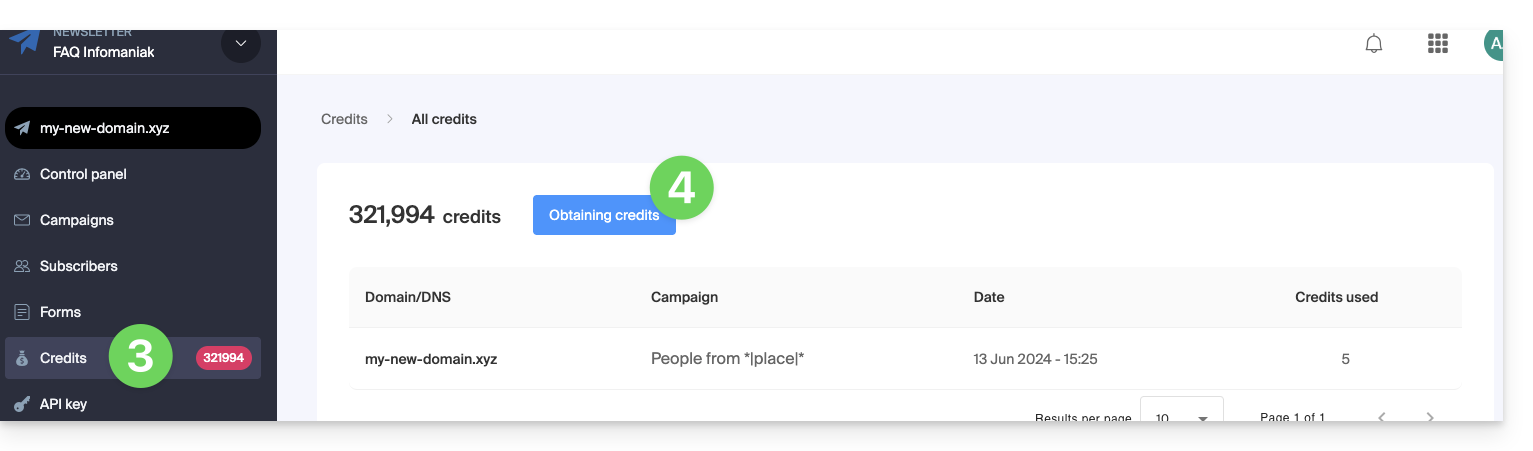
- To increase your allowance, click on Order sendings.
- Click on Details to view the credits obtained thanks to your other products,
- Click on the blue button to see the credits that your other products provide:

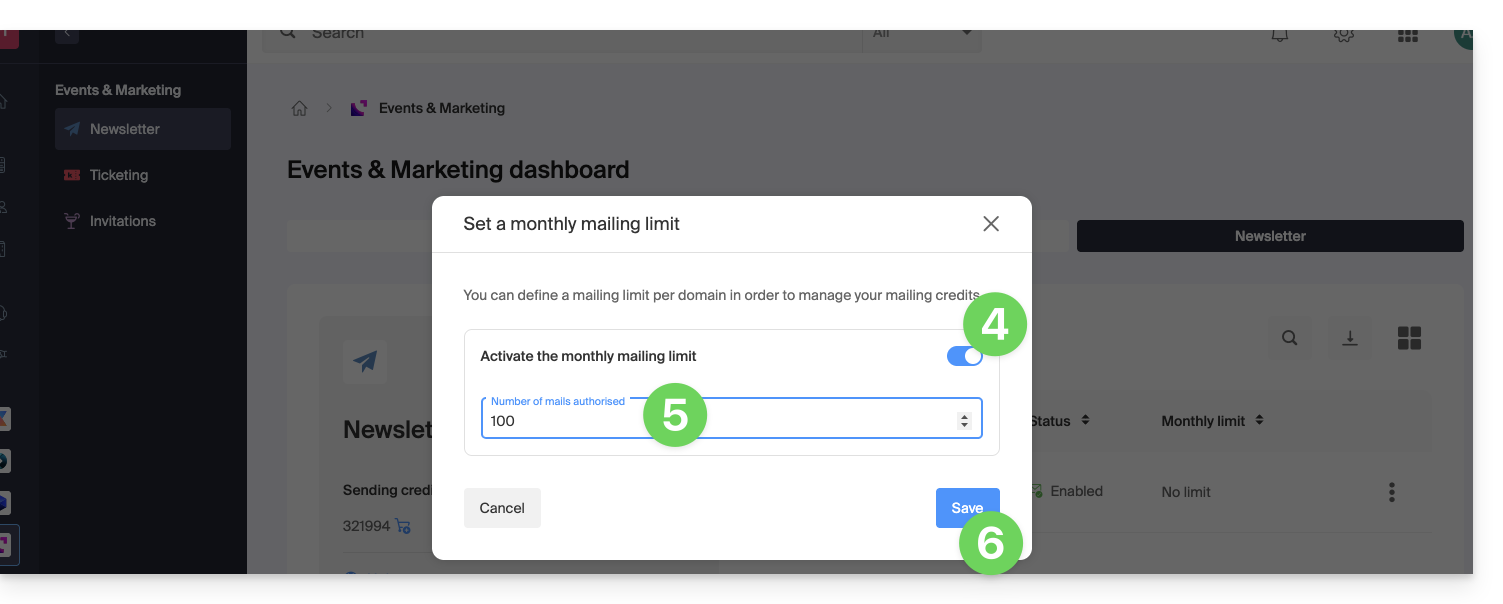
Set a monthly usage limit
If you want to control your consumption, you can limit the number of emails sent per month:
- Click here to access your Newsletter interface.
- Click on the action menu ⋮ to the right of the domain concerned.
- Select Set a sending limit:
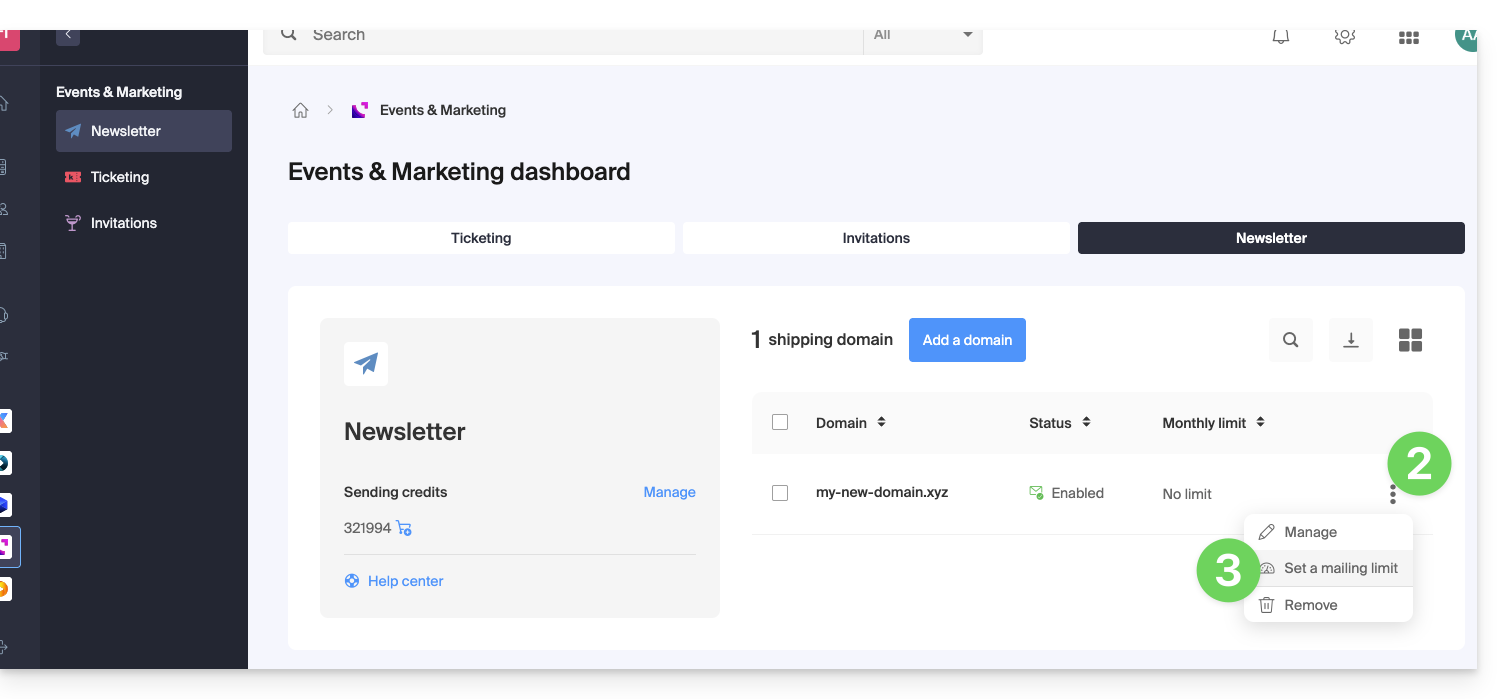
- Activate the toggle to configure your limit.
- Enter the maximum number of emails allowed per month.
- Click Save:
Link to this FAQ:
Has this FAQ been helpful?
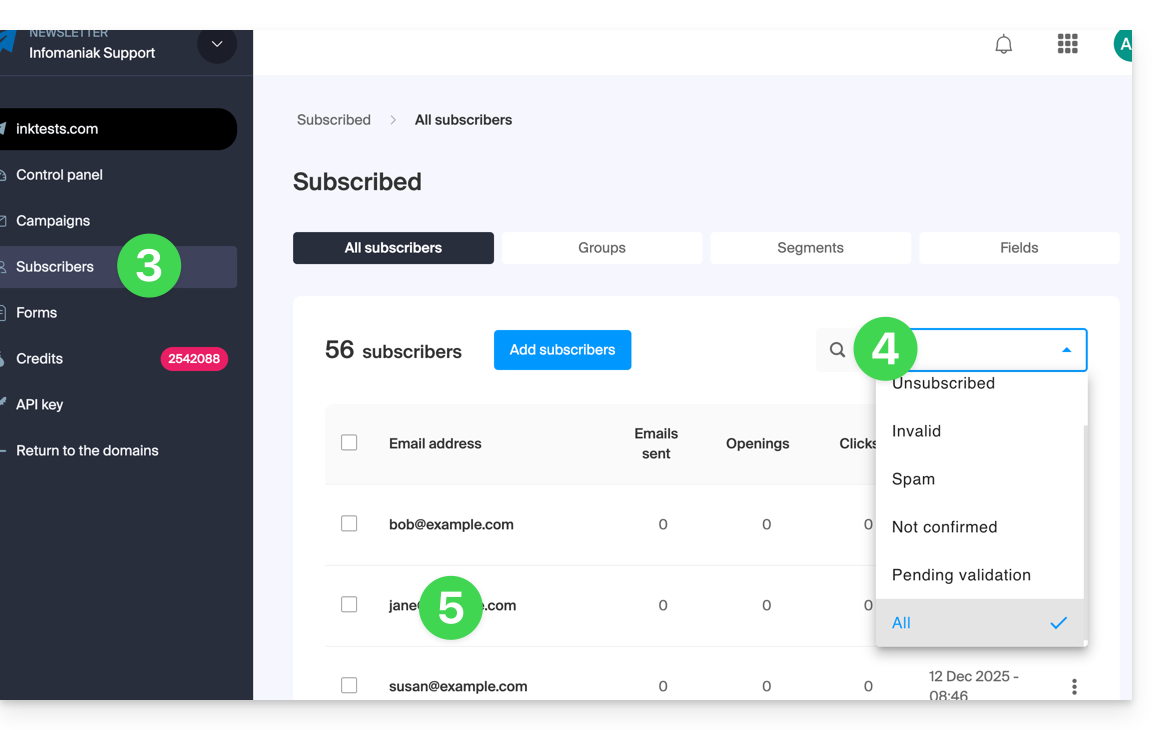
This guide explains the different statuses of your Infomaniak Newsletter subscribers and details how to manage invalid addresses to optimize the deliverability of your emails.
Access the list of subscribers and filter the view
To organize and filter your contacts by their status:
- Click here to access your Infomaniak Newsletter management on the Manager Infomaniak (need help?).
- Click on the domain name concerned in the displayed table:
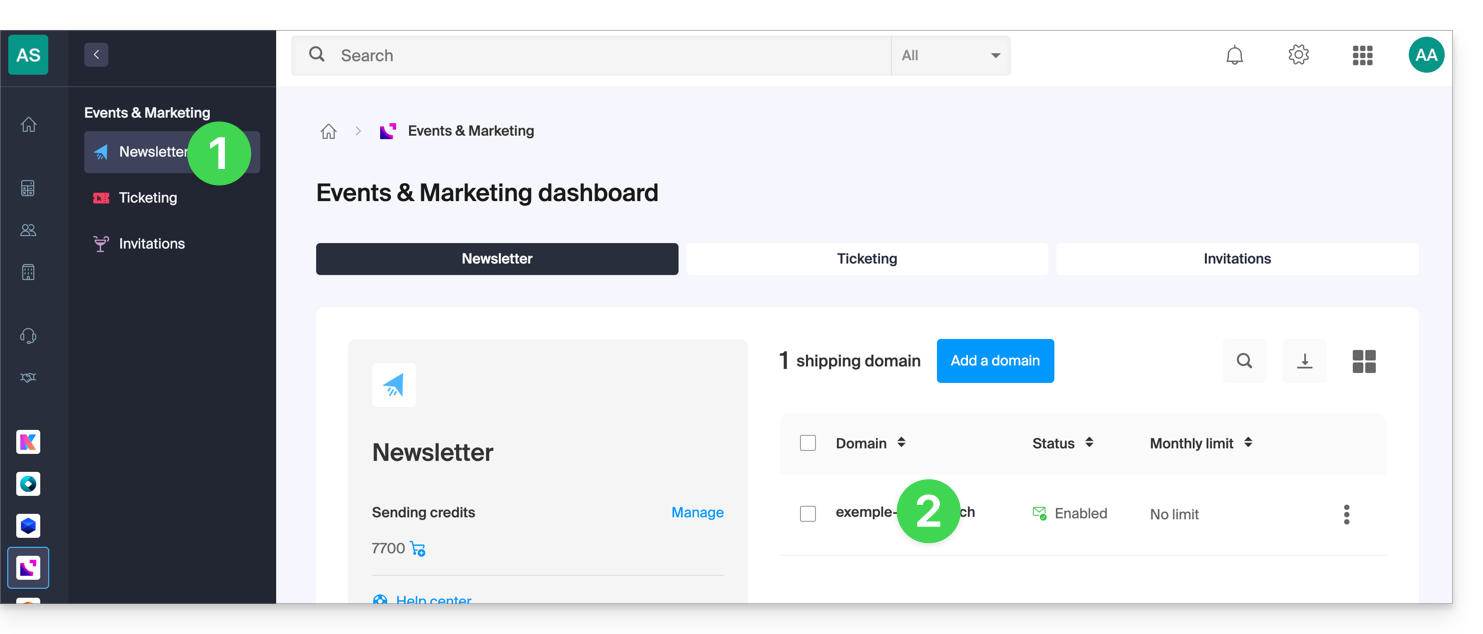
- Click on Subscribers in the left sidebar.
- Use the dropdown menu located to the right above the table (default filter: ACTIVE) to modify the display according to the desired status:
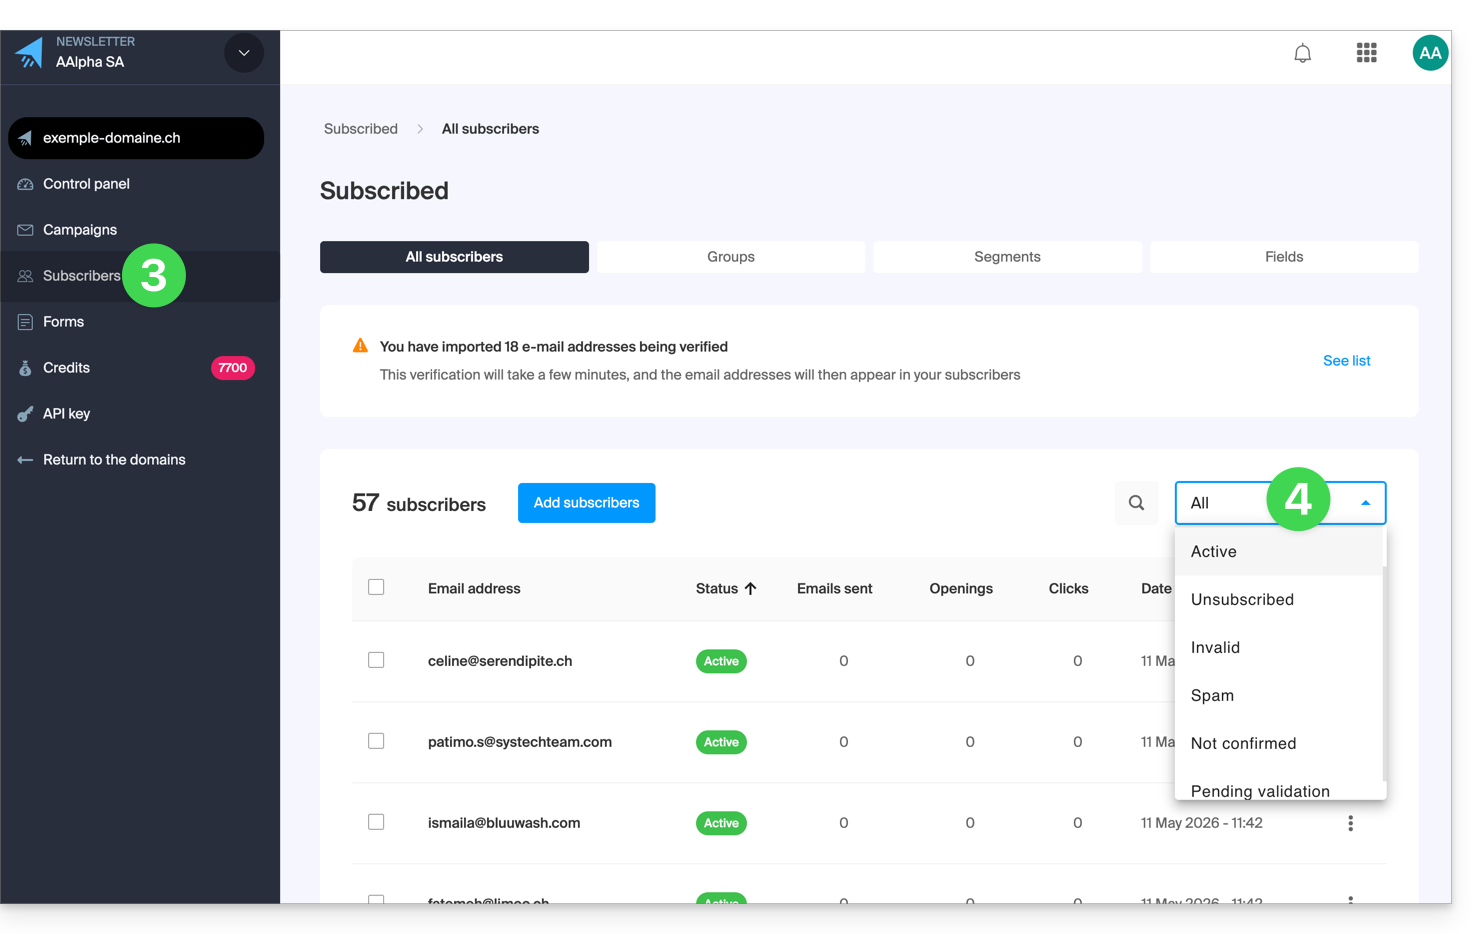
- The ALL filter allows you to display all of your contacts.
Understanding the different statuses of a subscriber
Each contact in your list has a specific status that determines whether they will receive your communications:
1. Active subscribers
- This is the default status upon successful registration or import.
- An active subscriber receives all your Newsletters as long as their status does not change.
2. Unsubscribed subscribers
- This status indicates that the subscriber has chosen to no longer receive your messages (usually via the unsubscribe link at the bottom of your emails).
- You can also manually unsubscribe a contact from their subscriber profile via the dedicated button (refer to this other guide).
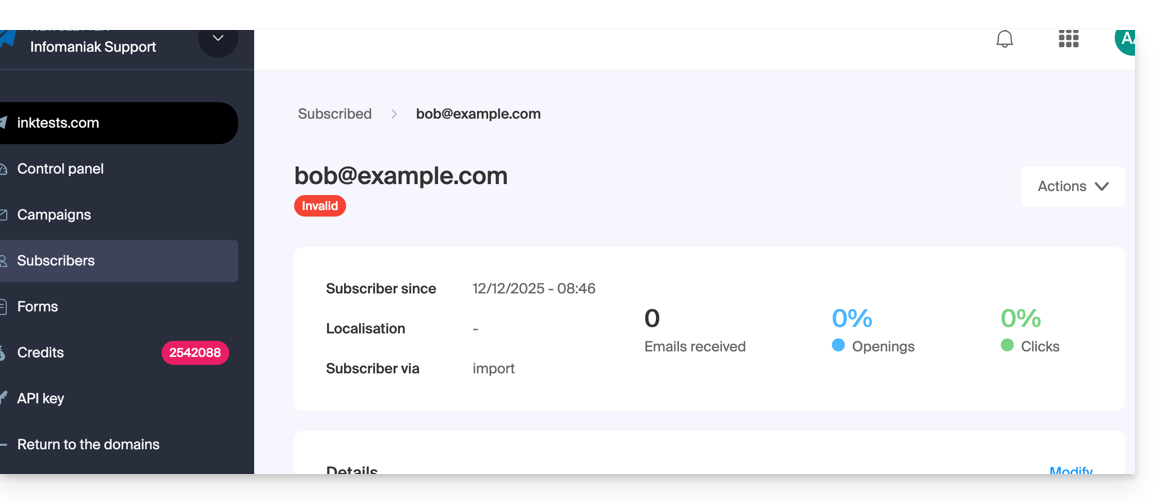
3. Invalid subscribers
- An address is marked as Invalid if it is detected as erroneous, unreachable, deactivated, or at risk.
- This status change can occur at two times:
- Upon import: following the automatic scan of the verification system.
- Upon sending: if the recipient's host permanently informs that the address is unreachable (hard bounce).
4. SPAM subscribers
- This status indicates that the subscriber has chosen to no longer receive your messages by selecting 'this is spam' or 'I never signed up' on the unsubscribe link at the bottom of your emails.
5. Unconfirmed subscribers
- This status applies to users who signed up through a form using the double opt-in model but have not yet clicked on the confirmation link.
- Note: It is impossible to force the subscription of a contact until they have validated their registration.
6. Subscribers AWAITING VALIDATION
- Temporary status occurring immediately after an import.
- The system analyzes the addresses to verify their technical validity; the final status is assigned once the scan is complete.
Why are some addresses filtered?
Rigorous management of Invalid addresses is essential to ensure that your newsletters reach the inbox (deliverability) and to avoid blocking Infomaniak's sending services.
Main causes of invalidity
- Non-existent address: This can be due to a typo (e.g.,
john.doe@infomania.cominstead ofinfomaniak.com) or a deleted address. - Obsolescence of lists: An unmaintained list can see its rate of invalid addresses double every year.
- Technical restrictions: If the Catchall option is enabled on the destination domain or if the remote server refuses verification, the system may mark the address as invalid as a security measure to protect your sender reputation.
By excluding these addresses, you maximize your open rate and minimize the risk of spam complaints from your recipients' hosts.
Link to this FAQ:
Has this FAQ been helpful?
This guide concerns the use of the Newsletter tool offered by Infomaniak and details the various possibilities for creating and writing targeted mailings to subscribers on the contact lists within the tool.
Create and send a newsletter
Your newsletters are managed from the left-hand menu titled "Campaigns," which allows you to view your previous sends and create new ones:
- Click here to access the management of your product on the Infomaniak Manager (need help?).
- Click on the domain name concerned in the table that appears:
- Click on Campaigns in the left-hand menu.
- Click on Create a campaign:
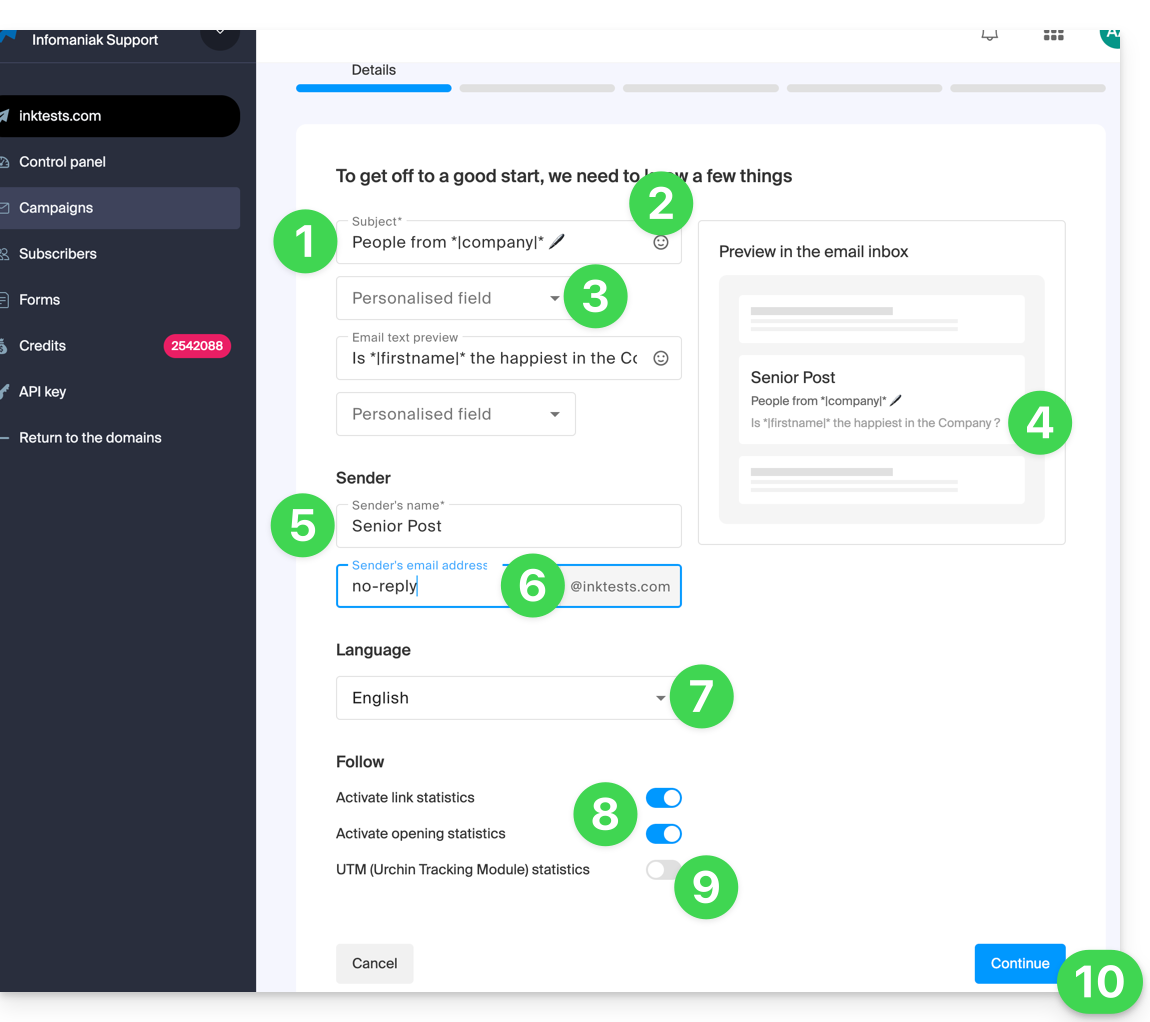
1. Details: configure the sending
To begin writing your Newsletter, complete the required information:
- Enter a subject for the email (visible to the recipient and in the list of your sends).
- Insert an emoticon if necessary.
- Insert variables (custom fields) if necessary.
- This is exactly the same principle for the preview message (which you can preview along with the rest of the subject on the right side of the window).
- Then, for this excerpt to be visible once your Newsletter reaches a user of the Infomaniak Mail web app, that user must have enabled this setting:
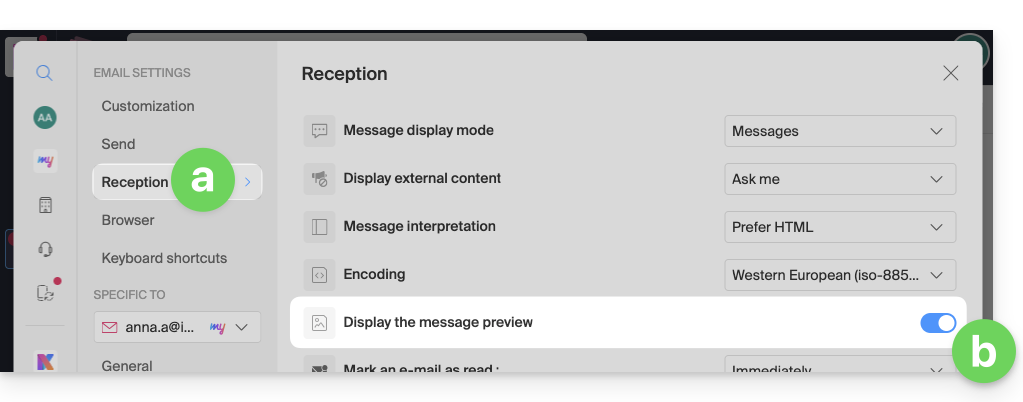
- On Gmail, this is the setting you need to enable:
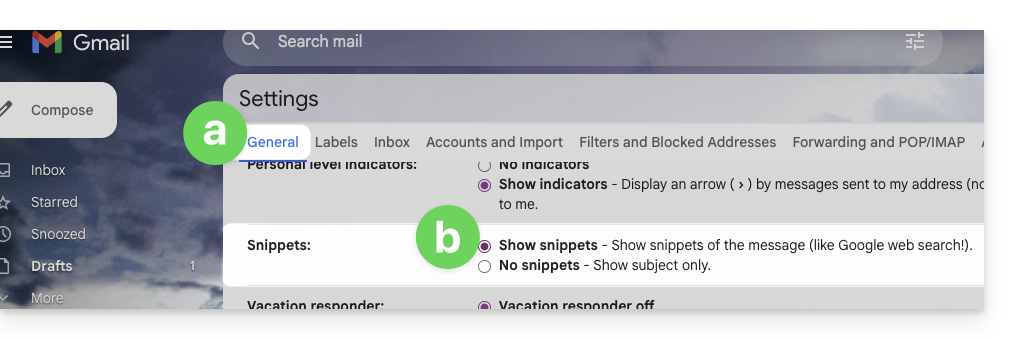
- The result once the option is activated:

- By default, the first lines of the message will appear if nothing is specified, as these two fields are optional.
- Then, for this excerpt to be visible once your Newsletter reaches a user of the Infomaniak Mail web app, that user must have enabled this setting:
- Enter a name corresponding to the sender (visible to the recipient).
- Enter the sender's email address (from among those existing for the domain corresponding to the Newsletter; the email address must exist and be valid).
- Choose the language (for the language used in attachments such as the unsubscribe message).
- Enable or disable tracking (click here).
- Enable or disable the UTM section (click here).
- Click on Continue to proceed to the next step (your Newsletter is now saved as a draft):
2. Choose the Newsletter theme
- If you have previously saved writing templates (blocks and designs configured to your liking), you can find them under the “My templates” tab to reuse them.
- Otherwise, click on the templates tab.
- Hover over a pre-configured design to start editing from that template or preview it.
- Click on the blank template to start a brand new creation from the block editor:

3. Write and edit the content
- At any time, your changes are saved and can be undone; you can also preview the appearance (desktop / mobile) of your Newsletter (and send a test).
- The Sections tab groups together various pre-built elements, such as blocks intended for the top (header) or bottom (footer) section, etc.
- Click on the chevron to expand the content and select an element:
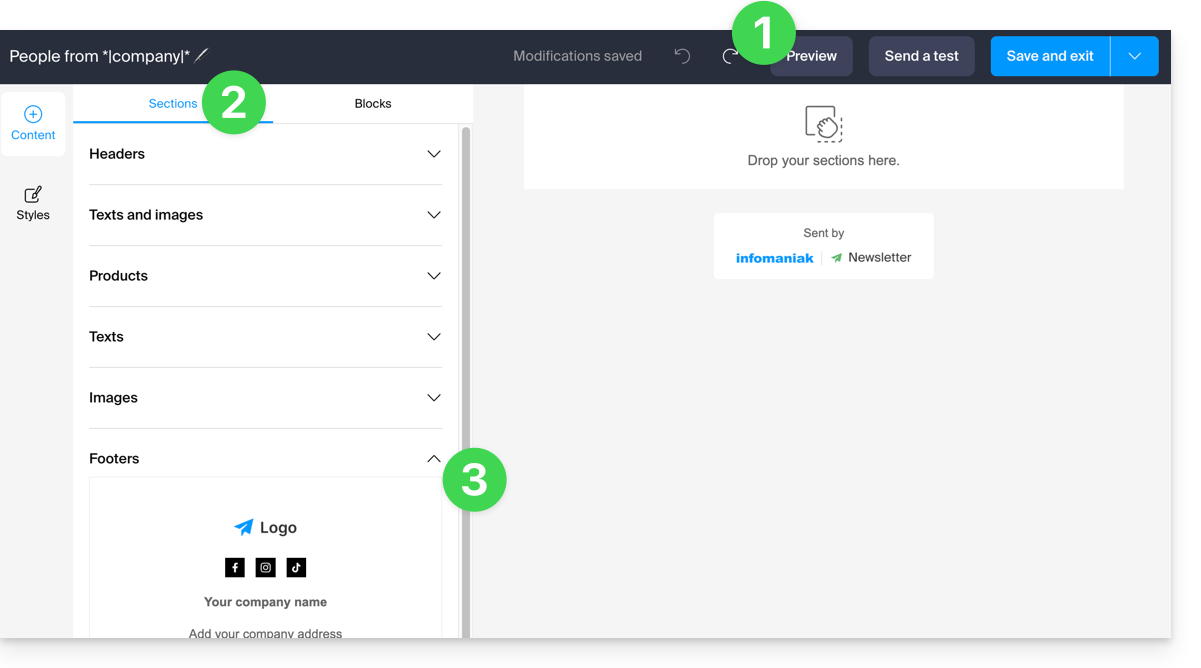
- Click on the Blocks tab to get simpler elements that you can use to compose your layout.
- Drag the selected elements to the desired location in the right sidebar:
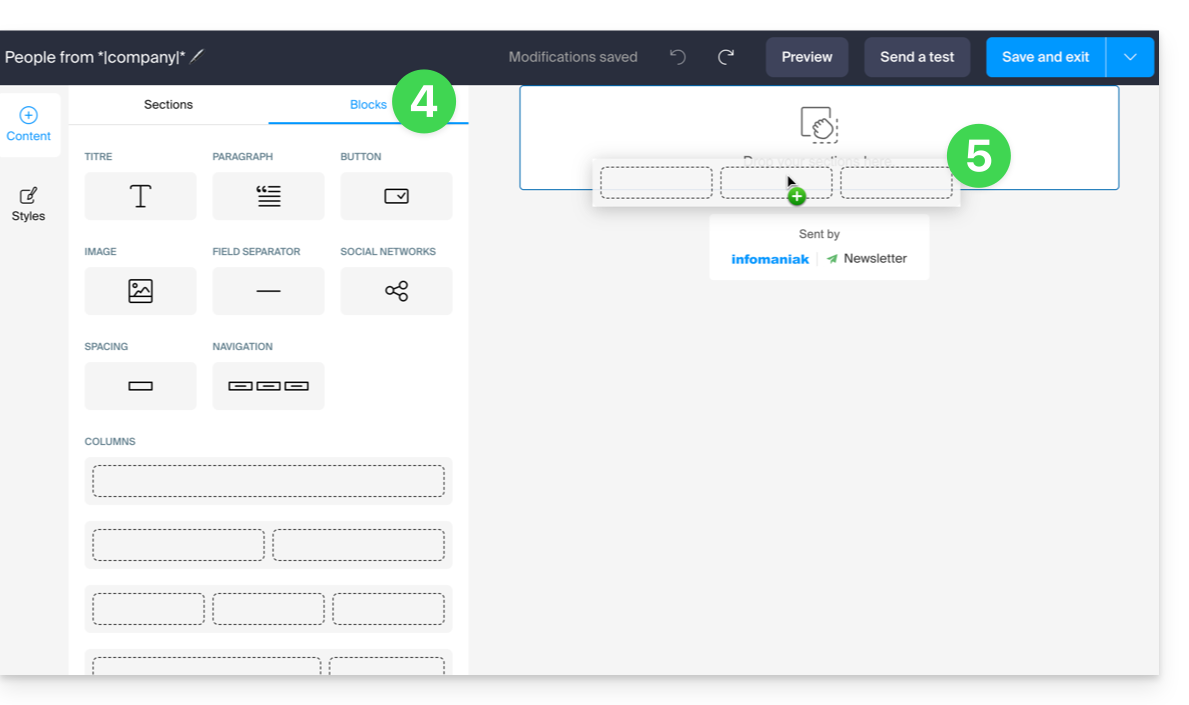
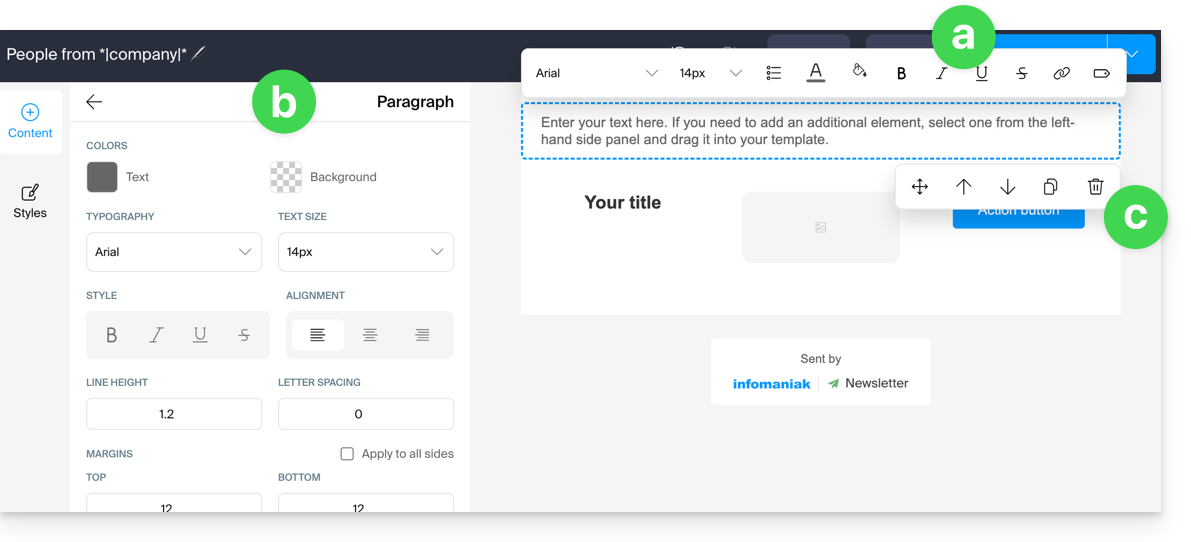
- Each element can be further adjusted by clicking on it:
- The text can be formatted using the toolbar that appears above (variables can also be inserted).
- More comprehensive editing of the element can always be found in the left sidebar (background color, file selection (5 MB max.) for image blocks, etc.).
- The block itself can be moved on the page, duplicated, or deleted:
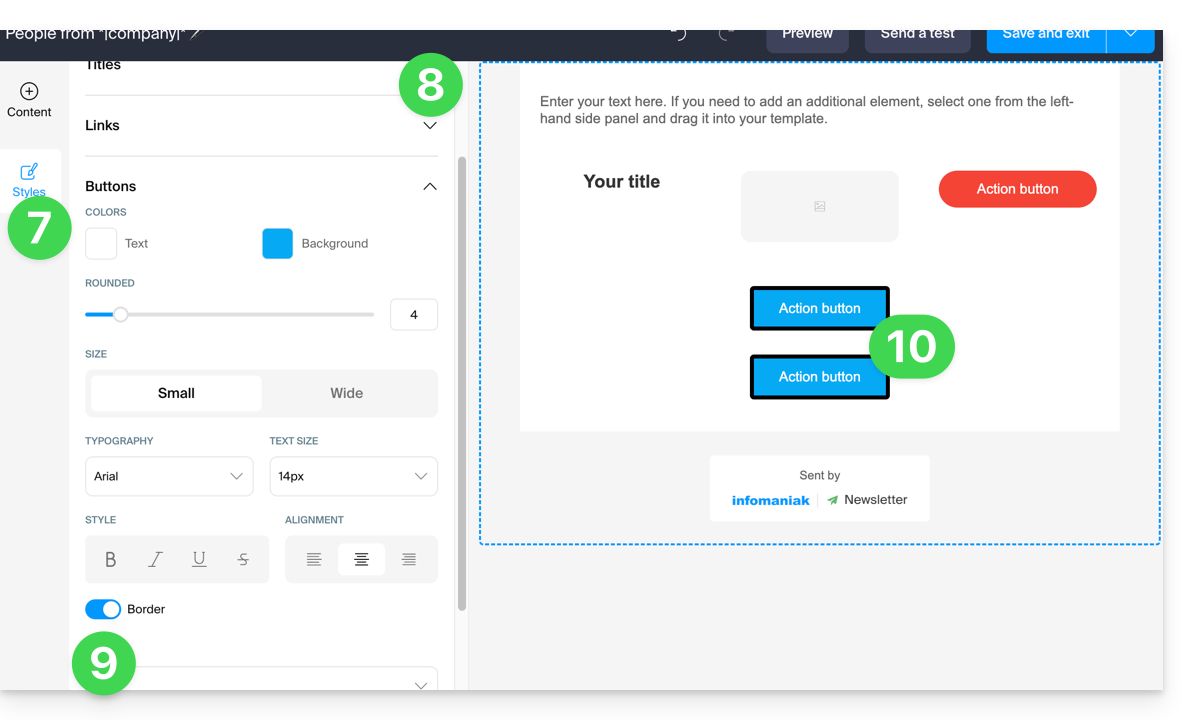
- Click on Styles to manage the characteristics that make up your different elements.
- Choose the elements you want to customize.
- For example, add a border to the button style.
- All new insertions of buttons and all existing buttons without customization will be affected by the change:
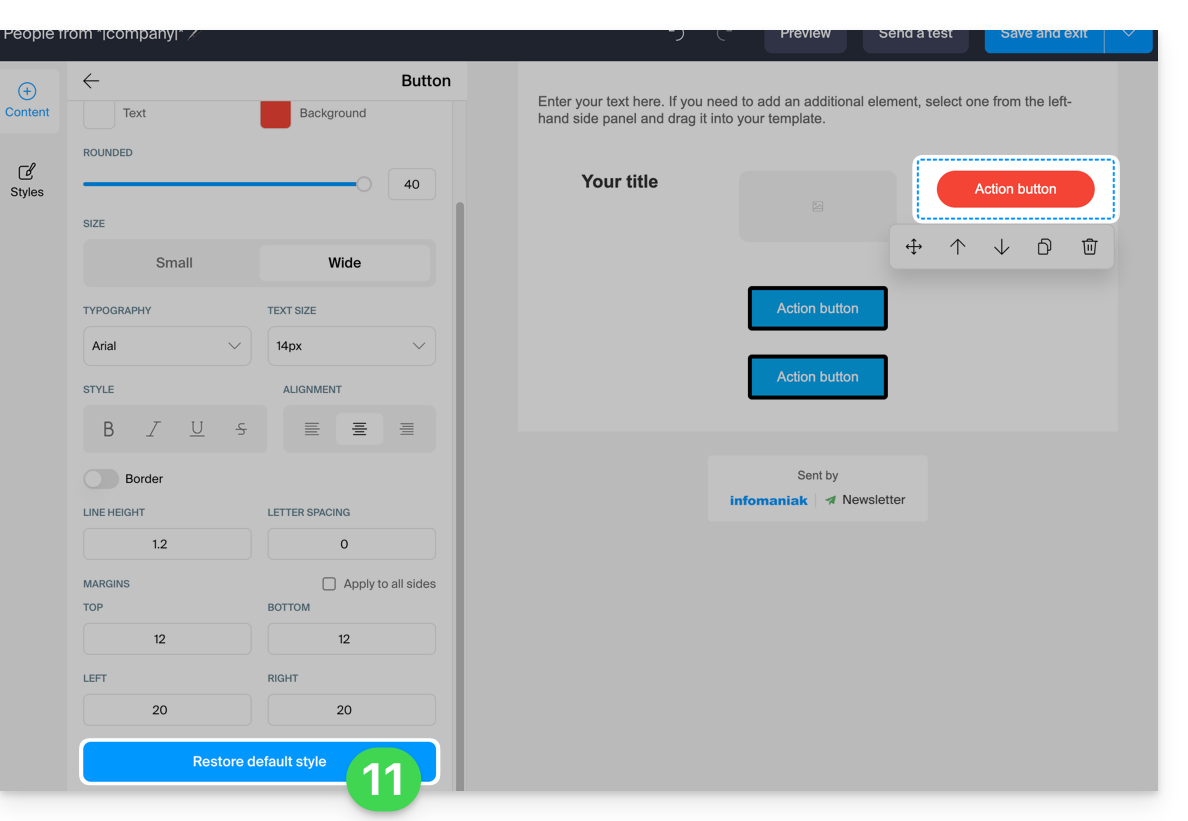
- At any time, it is possible to assign the style that has been decided for the different elements (point 8 above) by applying the default style to elements that have been customized previously:
- When saving, if any mandatory information regarding user unsubscription is missing, it will be added to your content:
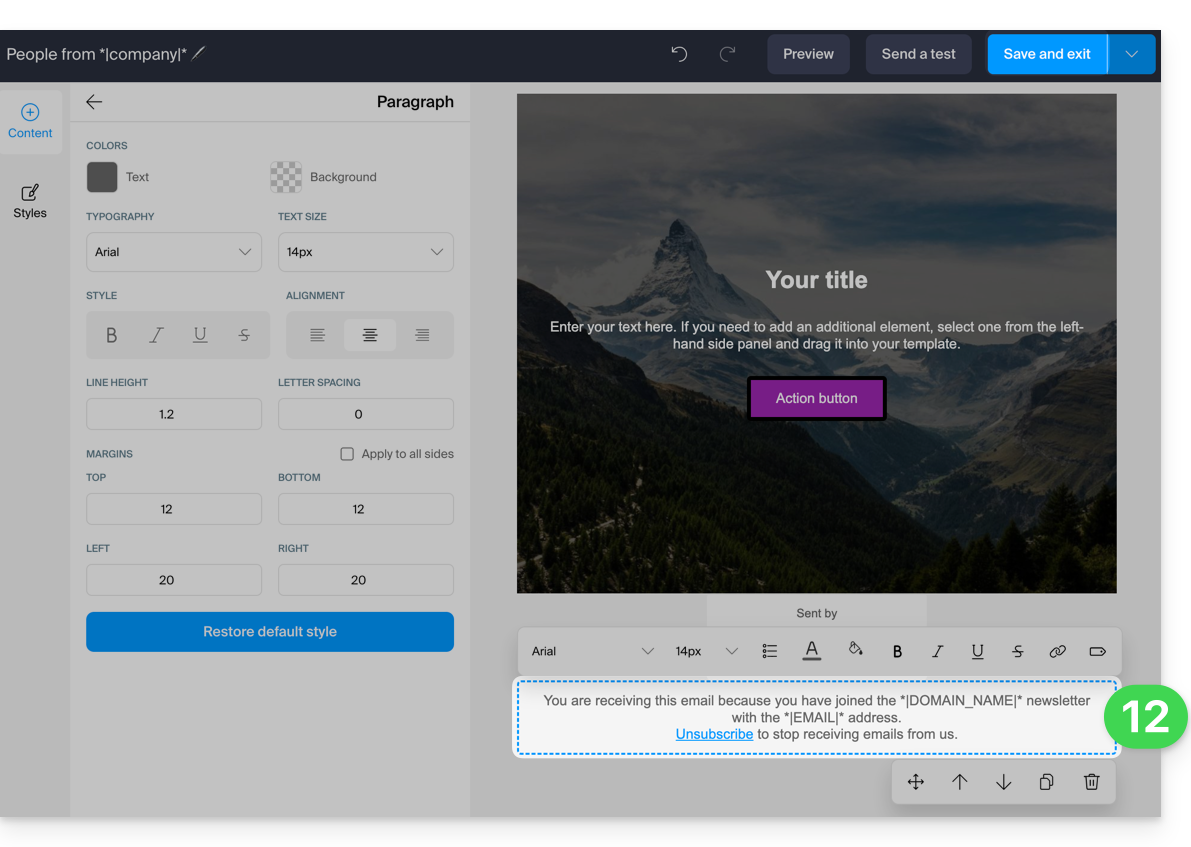
- You can save your template to reuse it when creating other newsletters (the template will be visible in the dedicated tab, see point 2.1 above) by clicking on the down arrow to the right of the save button:
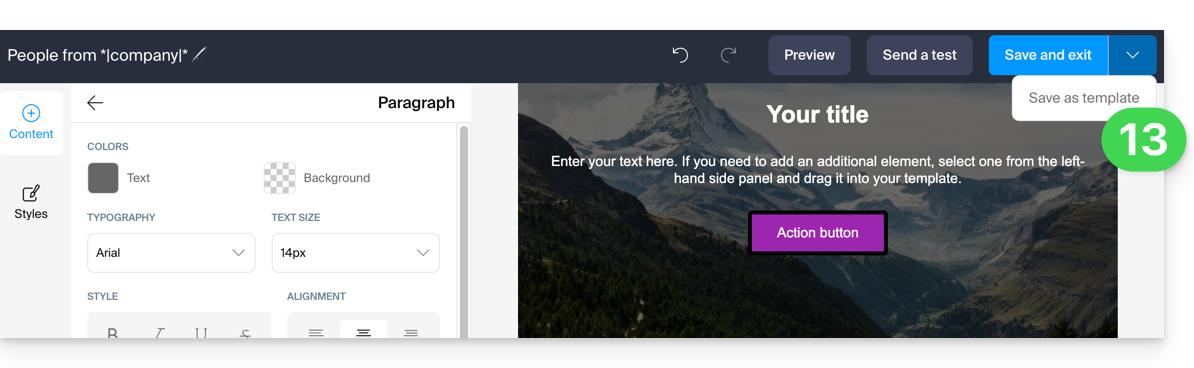
- Click on the save button in the top right corner when you have finished writing your newsletter.
4. Choosing recipients
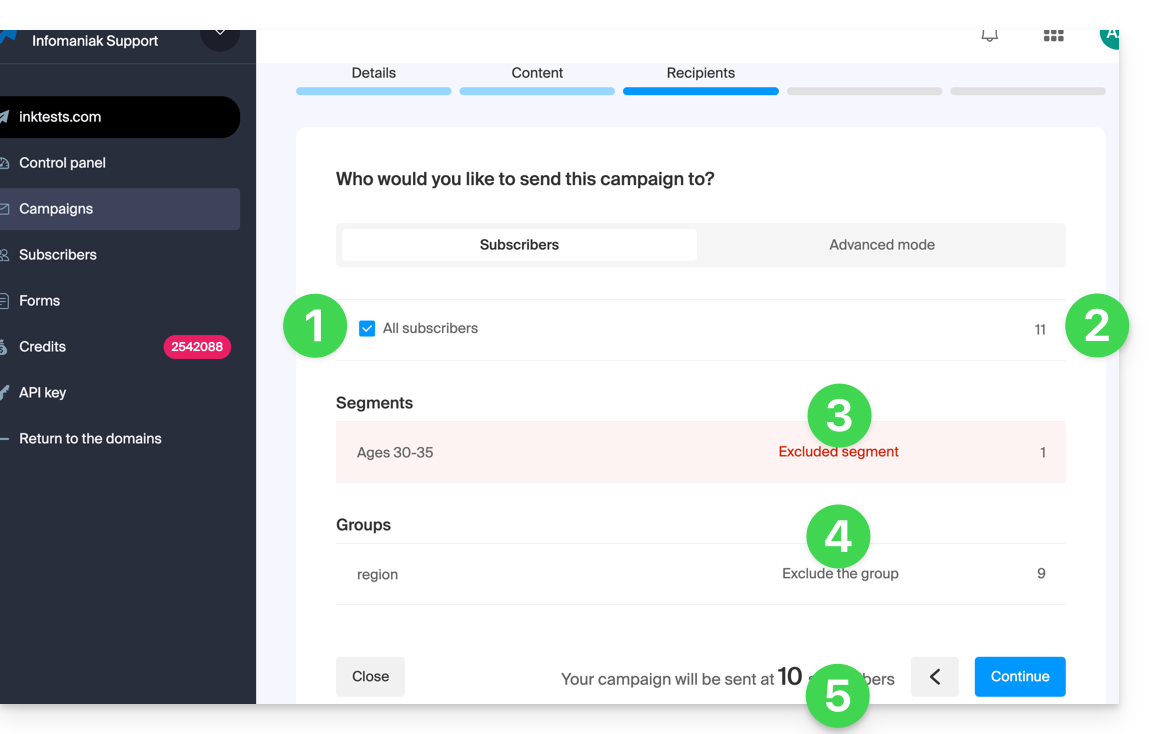
To select your subscribers (simple mode):
- Select all subscribers by checking the box.
- The total number of subscribers represented by this item is displayed to the right, as is the case for the items described below.
- You can subtract from the total number of recipients subscribers who are automatically selected based on criteria that you have pre-established at the segmentation level; you could also only select this segmentation.
- You can subtract from the total number of recipients subscribers who are grouped; you could also only select this group.
- The total number of subscribers to whom the newsletter will be sent is automatically updated based on your choices:
To select recipients based on specific criteria (refer to this other guide):
- Click on the Advanced tab:
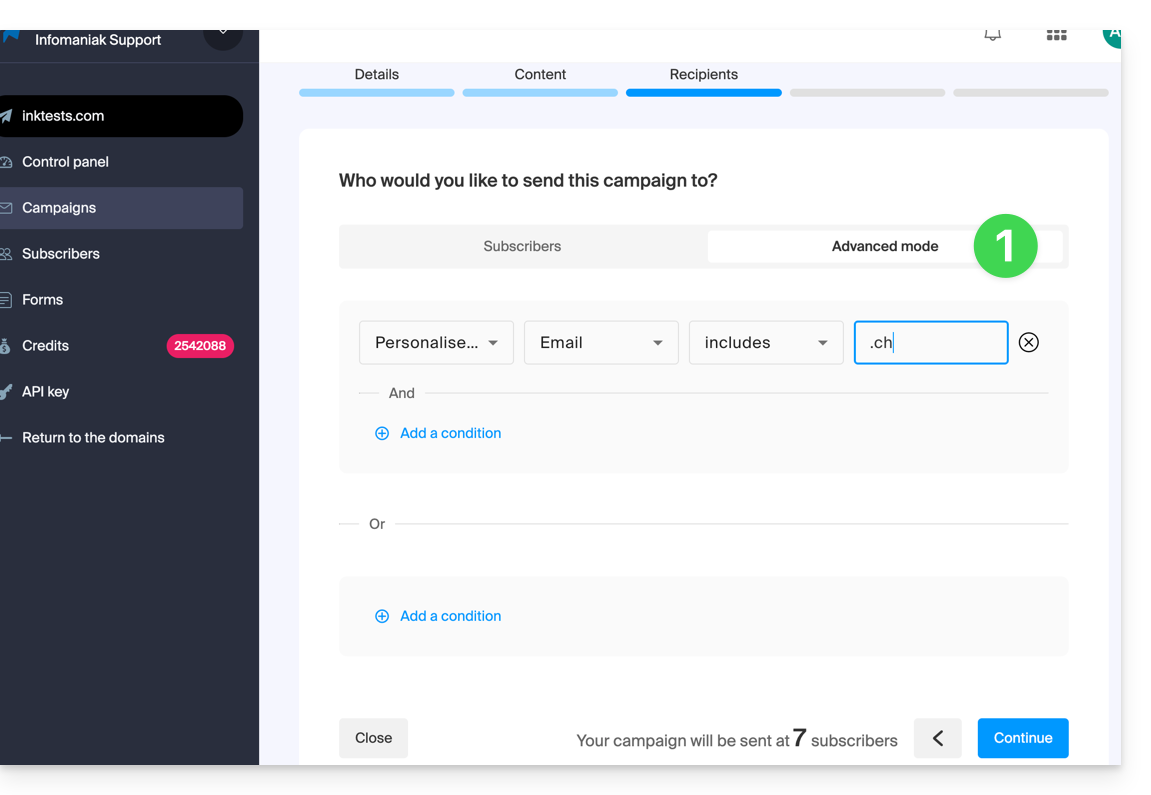
This allows you to add criteria. Be careful if you add several criteria, as the additional condition may be linked with “AND” or “OR”, which can include or exclude a large number of subscribers depending on your criteria.
As with the previous tab, the total number of recipients is updated dynamically at the bottom of the page based on your choices.
5. Preview and test the sending
This penultimate step is a summary: it allows you to check the main characteristics of your sending and to modify any information at the last minute.
When you are ready, click on the blue button at the bottom right to proceed to the final step.
6. Trigger an immediate or delayed sending
The final step allows you to choose when to send your Newsletter:
- The sending can be scheduled for the desired time, or triggered immediately:
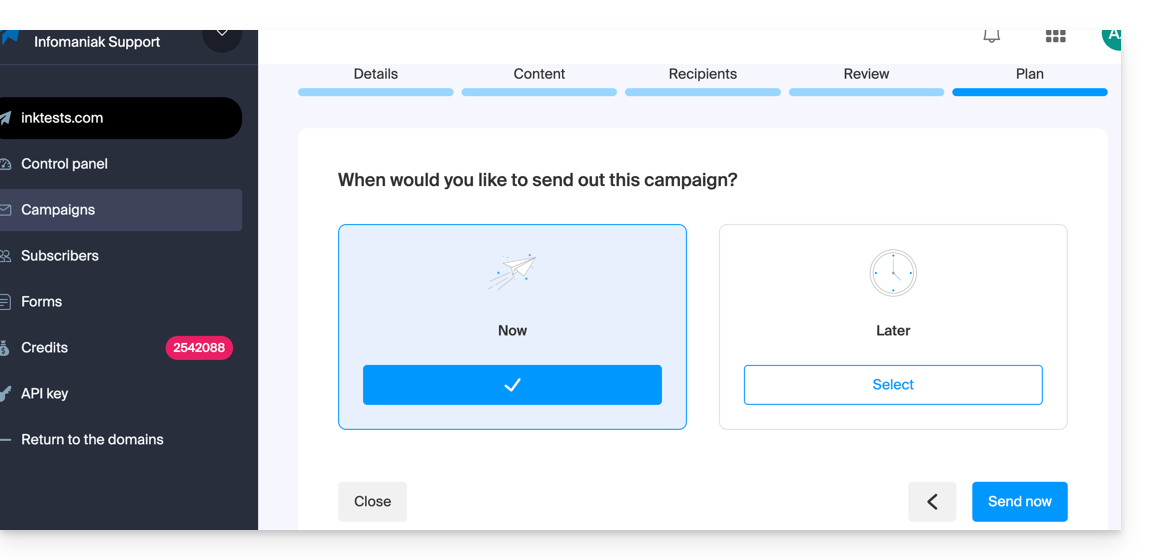
The sending will then take place over several hours, depending on the overall volume of Newsletters being sent, the number of your recipients, and the hourly quota allowed for your account. You will be informed of the progress of your sending.
Link to this FAQ:
Has this FAQ been helpful?
This guide explains how to add tags (codes and variables) in the body of your text to customize your sends with Infomaniak Newsletter.
Preamble
- A subscriber exists in the form of an email address, but not only:
- You may have additional details about them, which must be included in the file you import so that you can define a custom field associated with each of these additional details.
- Many other details can be collected during the subscription of a subscriber via a form.
- You can add many other details manually at any time.
- The information associated with each subscriber can be used to segment your audience, send targeted messages, and improve engagement.
- By leveraging these additional details, you increase the chances of conversion and loyalty, thus creating a stronger and more personalized relationship with each subscriber.
Manage custom fields
To view the content of each field for each subscriber, refer to this other guide (under Edit a subscriber's record).
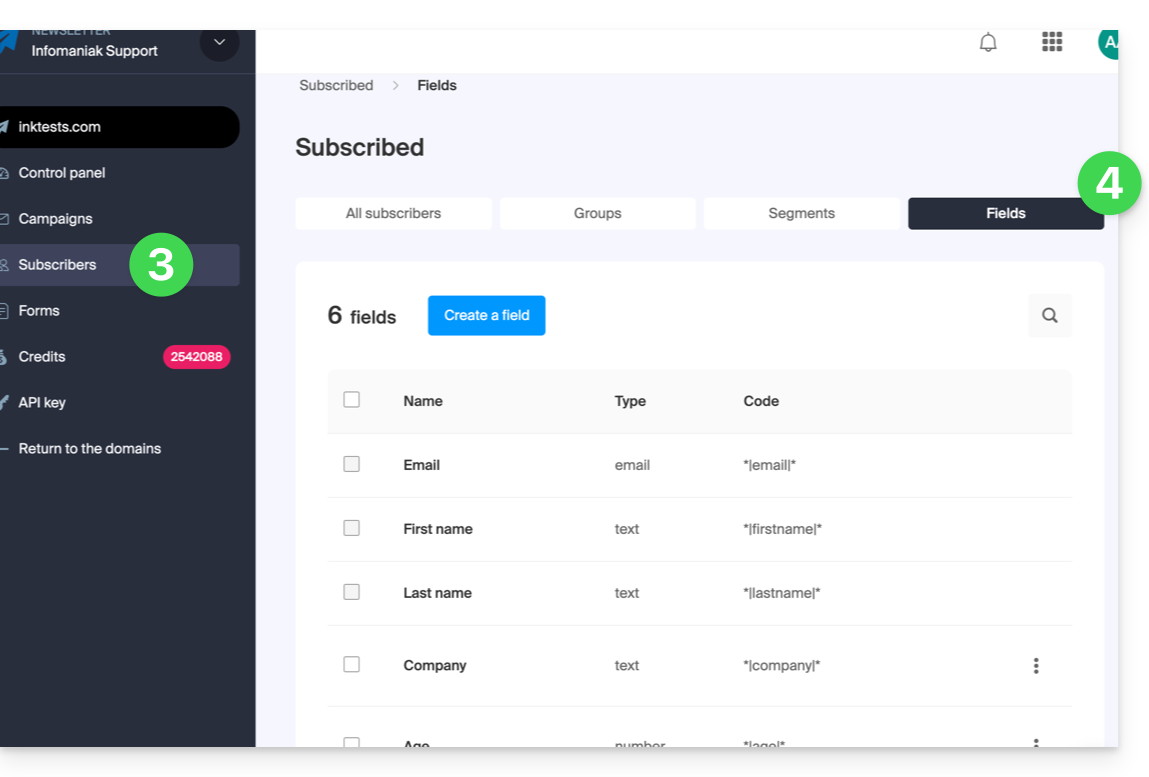
To manage the names of these fields, or simply delete or add them, go to the Subscribers section:
- Click here to access the management of your product on the Infomaniak Manager (need help?).
- Click on the domain name concerned in the table that appears:
- Click on Subscribers in the left sidebar menu.
- Click on the Fields tab:
Insert a variable...
... in the Newsletter title
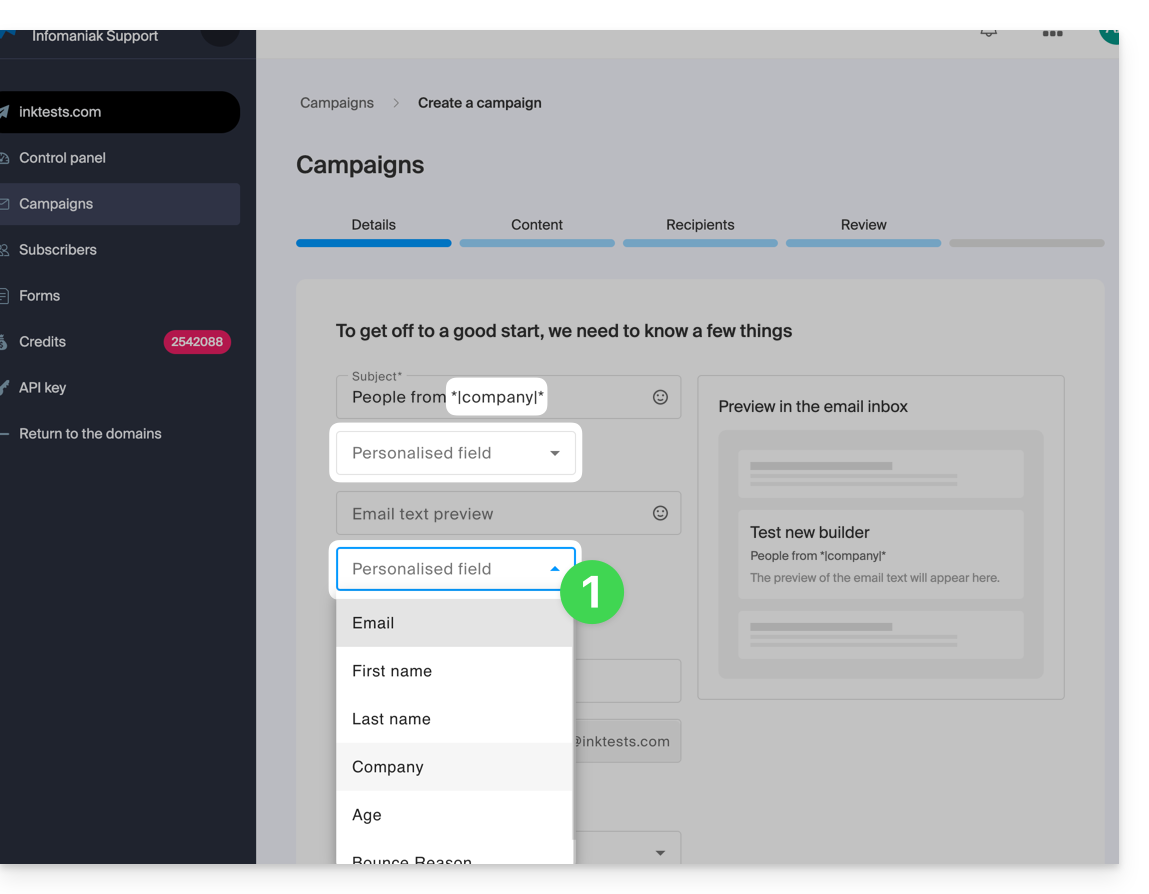
When you create a new Newsletter, insert the custom fields in the subject and preview text:
- In the very first step of creation, click on the drop-down menus dedicated to this use:
... in the body of the email
When you build your Newsletter with the block editor:
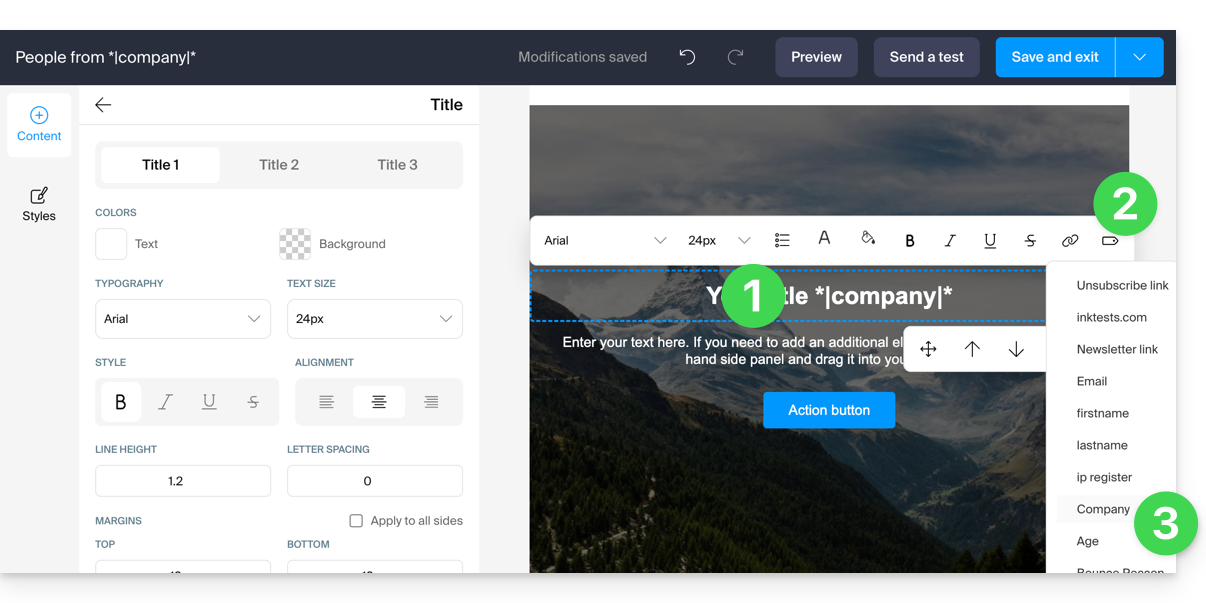
- Click on the text where you want to insert your variable.
- Click on the Tag / Label icon in the toolbar.
- Choose the variable to insert:
You can also simply insert the variable name surrounded by asterisks and separators: *|VARIABLE|*
List of basic variables
*|FIRSTNAME|* | first name |
*|LASTNAME|* | last name: this variable can also be integrated into a link href for example https://domain.xyz?name=*|LASTNAME|* |
*|EMAIL|* | email address |
*|DOMAIN_NAME|* | Newsletter domain name |
*|IP-REGISTER|* | user's IP address when registering |
Unsubscribe link | To place an unsubscribe link ('unsubscribe') at the desired location without any action on your part, this link is automatically inserted at the bottom of your Newsletter |
Newsletter link | To manually add a link to an online version of your Newsletter without any action on your part, this link is automatically inserted at the top of your Newsletter |
Link to this FAQ:
Has this FAQ been helpful?
This guide concerns the configuration of the Infomaniak product Newsletter in the case where the domain name used to send your emails is not managed by Infomaniak.
Preamble
- For automatic use of the Newsletter tool, it is necessary to manage the domain name from which you send your newsletters (as well as its DNS zone) with Infomaniak.
- For example, if you send your newsletters from the address
news@domain.xyz, the domaindomain.xyzmust be managed with Infomaniak.
Specific DNS configuration
To use the Newsletter tool with a domain not managed by Infomaniak, you will need to add specific entries to your DNS zone provided in your Manager: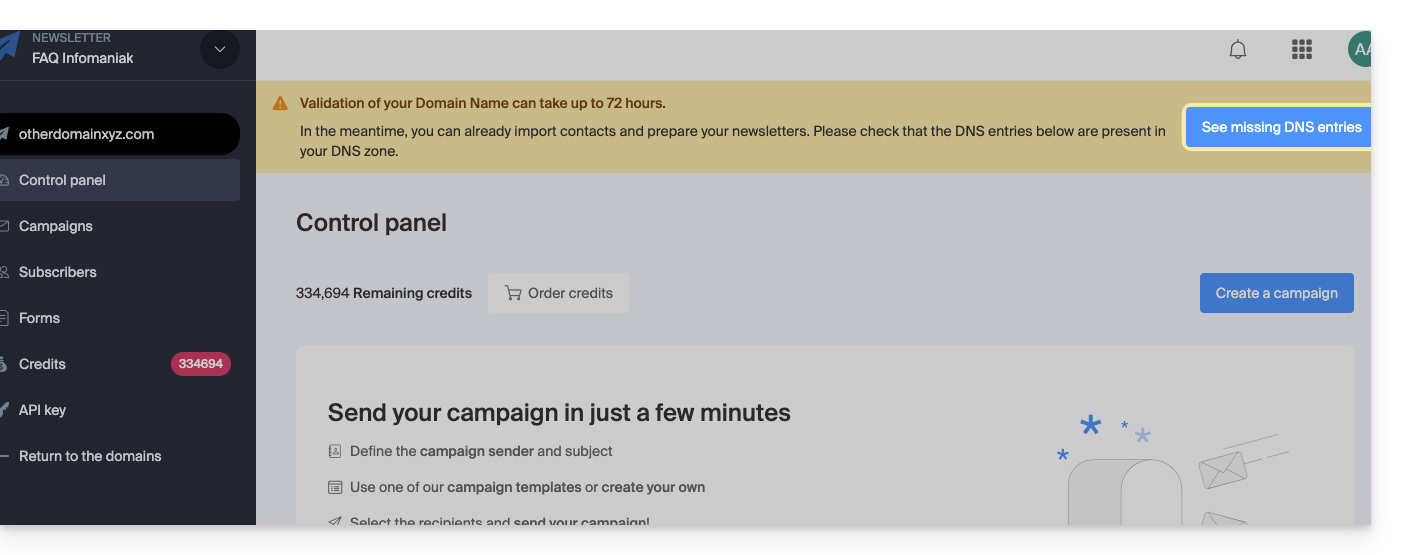
Refer to this other guide to add the DNS entries mentioning ._domainkey making sure to choose the type DKIM first, then the subtype CNAME when adding the DKIM.
In case of outgoing domain transfer
If the domain name currently managed by Infomaniak (and corresponding to the Newsletter) is transferred to another registrar, the Newsletter tool will be deactivated within 30 days if no corresponding DNS modifications are made.
Link to this FAQ:
Has this FAQ been helpful?
This guide details the reasons why sending a Newsletter via Infomaniak may be blocked, as well as best practices to prevent these blocks in the future.
Common causes of Newsletter blocking
Sending a Newsletter can be interrupted in the following cases:
- an excessive number of recipient email addresses are invalid or non-existent, generating a high bounce rate.
- a high rate of spam reports from recipients.
As an email host and newsletter sending service provider, Infomaniak is required to implement strict mechanisms to combat spam.
Indeed, if Infomaniak’s IP addresses or domains are listed on blacklists, this would compromise the deliverability of all emails sent by its customers, including compliant ones, and harm the overall reputation of the service.
Preventing blocks when sending a Newsletter
To do this:
- Use only contact lists obtained with explicit consent.
- Prioritize building your lists through double opt-in forms, ensuring active validation of subscribers.
- Regularly clean your contact lists — at least once a year — with specialized services such as NeverBounce, Bounceless, Verifalia or QuickEmailVerification, to remove invalid or inactive addresses.
- Ensure your emails clearly display your brand or company name, building trust with recipients and transparency in your communications.
- Avoid importing lists from other hosts without first performing a thorough cleaning of these contacts.
- Carefully check the targeting of your campaign to ensure that only relevant and consenting subscribers receive the Newsletter.
What to do in case of a sending block?
In case of a block, contact Infomaniak support promptly to diagnose the cause and get assistance to complete the blocked send.
Link to this FAQ:
Has this FAQ been helpful?
This guide shows how to use the Newsletter tool provided by Infomaniak to create and send newsletters, i.e., recurring messages to multiple recipients.
Why use Newsletter instead of a Mail Service
A newsletter is a periodic communication tool sent by email to a specific group of subscribers. It generally aims to inform, share news, updates or relevant content on a specific subject and maintain a relationship with a targeted audience.
They can contain articles, announcements, promotions, links to recent content, upcoming events, and sometimes exclusive offers for subscribers. The main goal is to provide interesting and relevant content to stimulate engagement and maintain the interest of subscribers.
Infomaniak Newsletter allows you to schedule and send newsletters to a list of email recipients waiting for your sends; you thus distribute email marketing campaigns effectively and personally and maintain regular and relevant communication with your customers and subscribers.
The features include the creation of templates, management of the subscriber list, performance analysis and all this is not directly feasible with a traditional Mail Service. Moreover, the tool has its own interface, standalone within your browser, completely separate from Mail Infomaniak and does not require a mail application. This means that if you already have contacts to whom you wish to write with their consent, you will need to import them to the tool beforehand.
Prerequisites
- Have a domain name on which you will activate the Newsletter:
- Access to its DNS zone if the domain name is not with Infomaniak.
- Create a new domain name if necessary.
- Have Newsletter credits to allow sending (1 credit = 1 newsletter sent to 1 subscriber).
You must have the explicit consent of your recipients via the double opt-in model. Sending spam and using purchased/rented address lists is prohibited. The owners of the domain name used to send newsletters are legally responsible and violation of the general conditions may result in the suspension of the account.
Activate the Newsletter tool
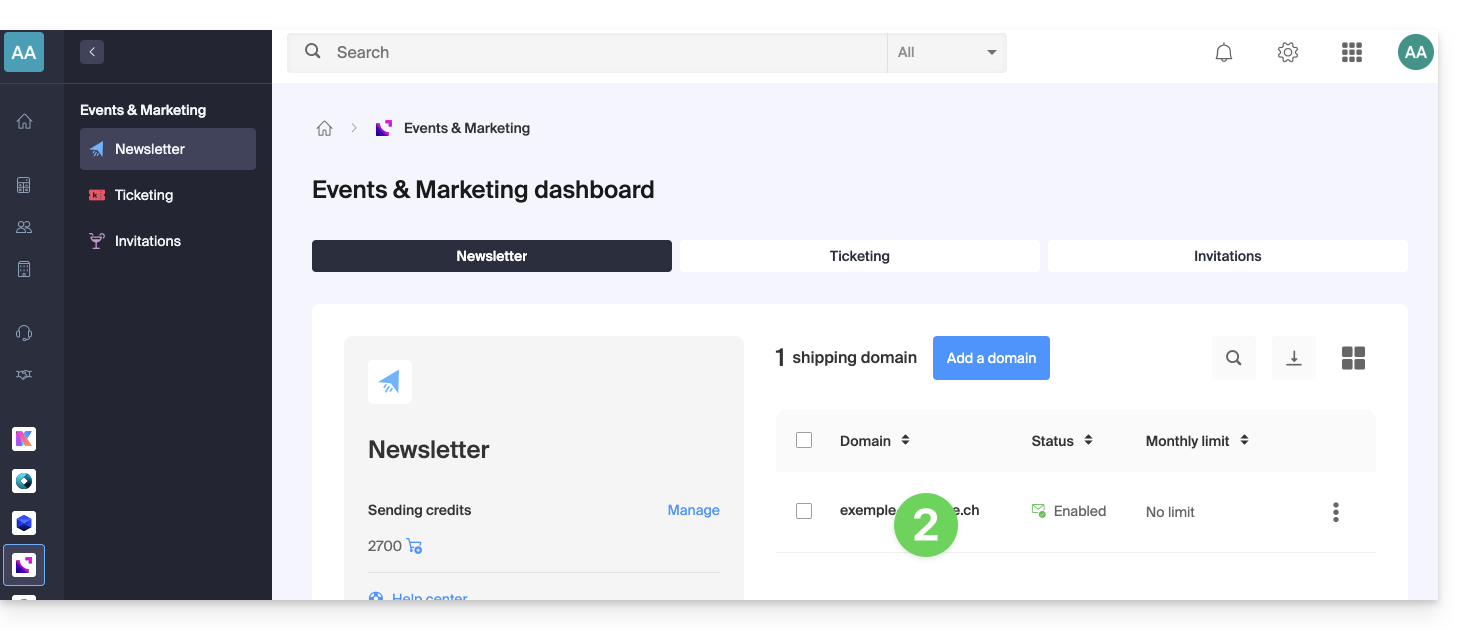
To activate the Newsletter tool for the first time:
- Click here to access the management of your product on the Infomaniak Manager (need help?).
- Click on START FREE to subscribe to the Newsletter offer.
- Enter the domain name that will be used (and that must belong to you - see prerequisites above).
- Click the blue button to Approve.
- Start using the tool - or refer to this other guide if you encounter a problem or if additional configuration is requested on the screen.
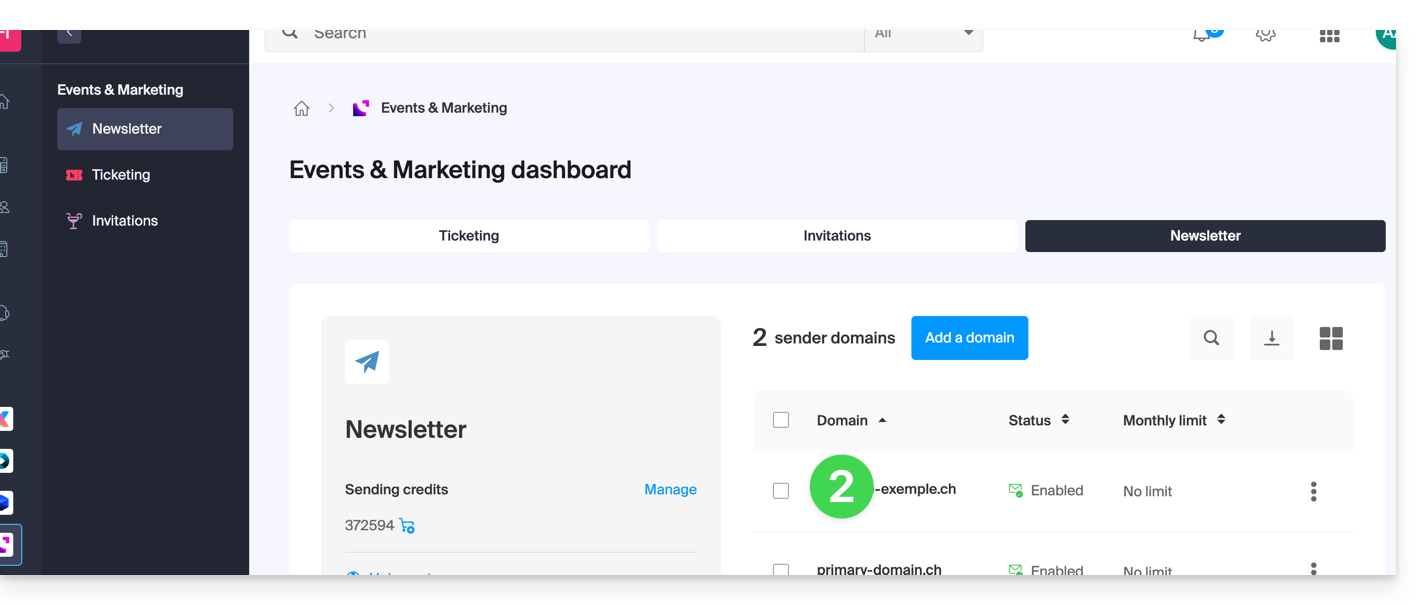
Access the Newsletter tool
To access the Newsletter once activated:
- Click here to access the management of your product on the Infomaniak Manager (need help?).
- Click on the domain name concerned in the table that appears:
Go further with the tool
- Import contacts
- Create and send a newsletter
- Newsletter credits
- Newsletter subscription form
- Double opt-in to avoid being labeled as a spammer
- Resend a newsletter to specific types of subscribers
- The variables to customize your content
- Use the Newsletter API
See all Newsletter FAQs ; click here to share feedback or a suggestion on an Infomaniak product.
Link to this FAQ:
Has this FAQ been helpful?
This guide shows you how to create / import / manage contacts within subscriber lists for Infomaniak Newsletters.
Preamble
- You must obtain the explicit consent of your recipients via the double opt-in model:
- Sending spam and using purchased/rented address lists is prohibited.
- Importing does not send any messages to the added contacts (so read and accept the points above).
- Duplicates will be automatically removed.
- If you re-import an address that is already subscribed, the different custom fields will be updated.
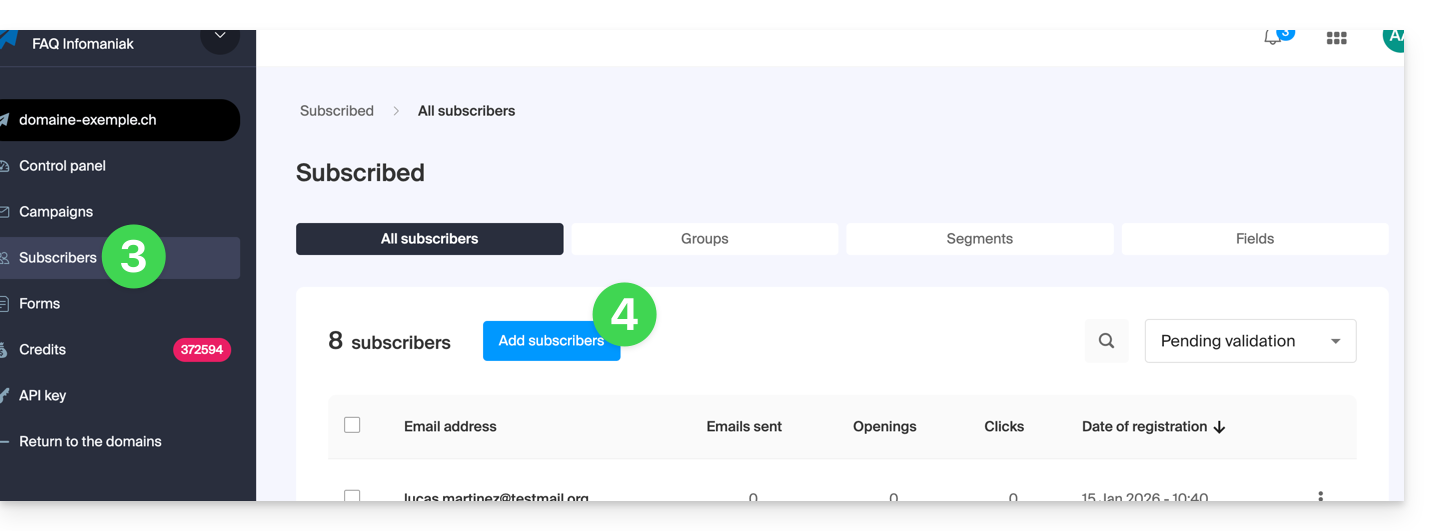
Create a subscriber list
To access the management of Newsletter subscribers:
- Click here to access the management of your product on the Infomaniak Manager (need help?).
- Click on the domain name concerned in the table that appears:
- Click on Subscribers in the left sidebar.
- Click on the blue button Add contacts:
- Read and accept the Terms of Service.
- Choose from the different ways to create a subscriber list:

A. Import a CSV file (format .csv) or .txt file (predefined format)
- The format must be respected (a template to download is available as an example on the page). Maximum size: 300 Mo

- Once the spreadsheet-type document is written, export it as
.csvwhich will create a kind of text document with a separator between each piece of information in the different cells: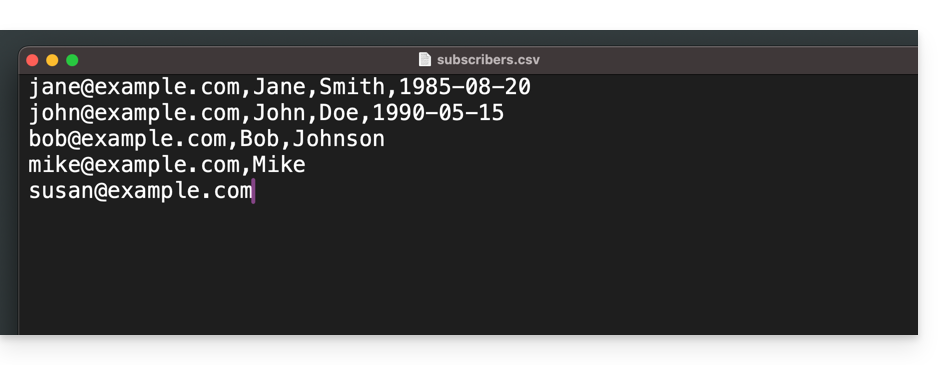
- Select the
.csvfile from the import interface and then click on the blue button Import: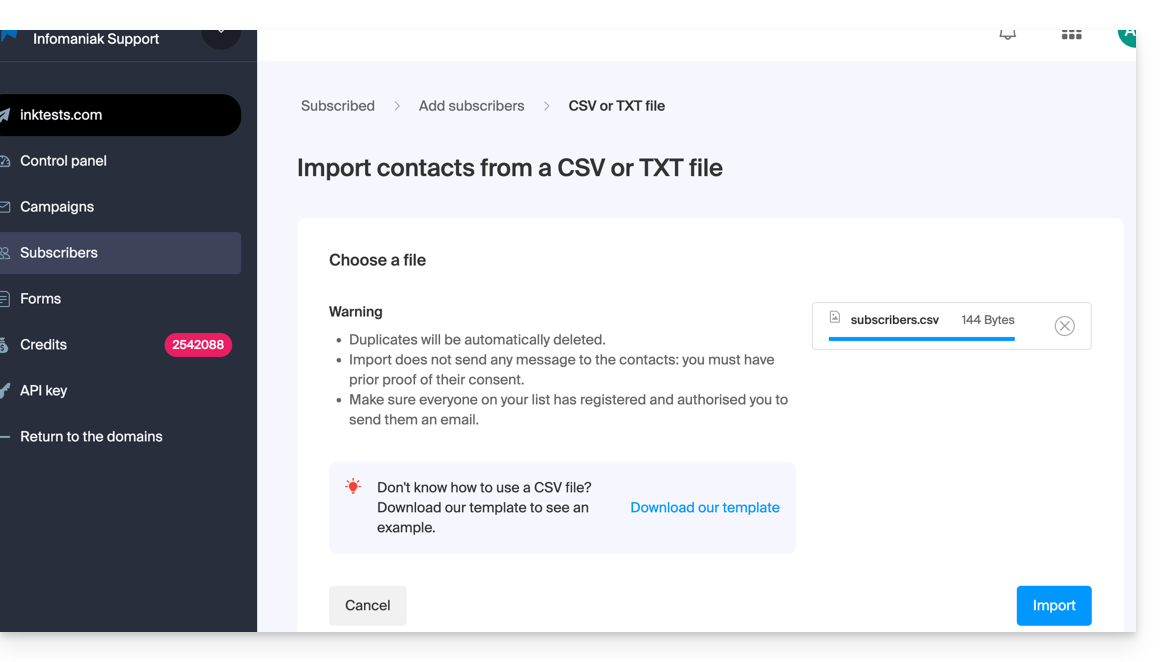
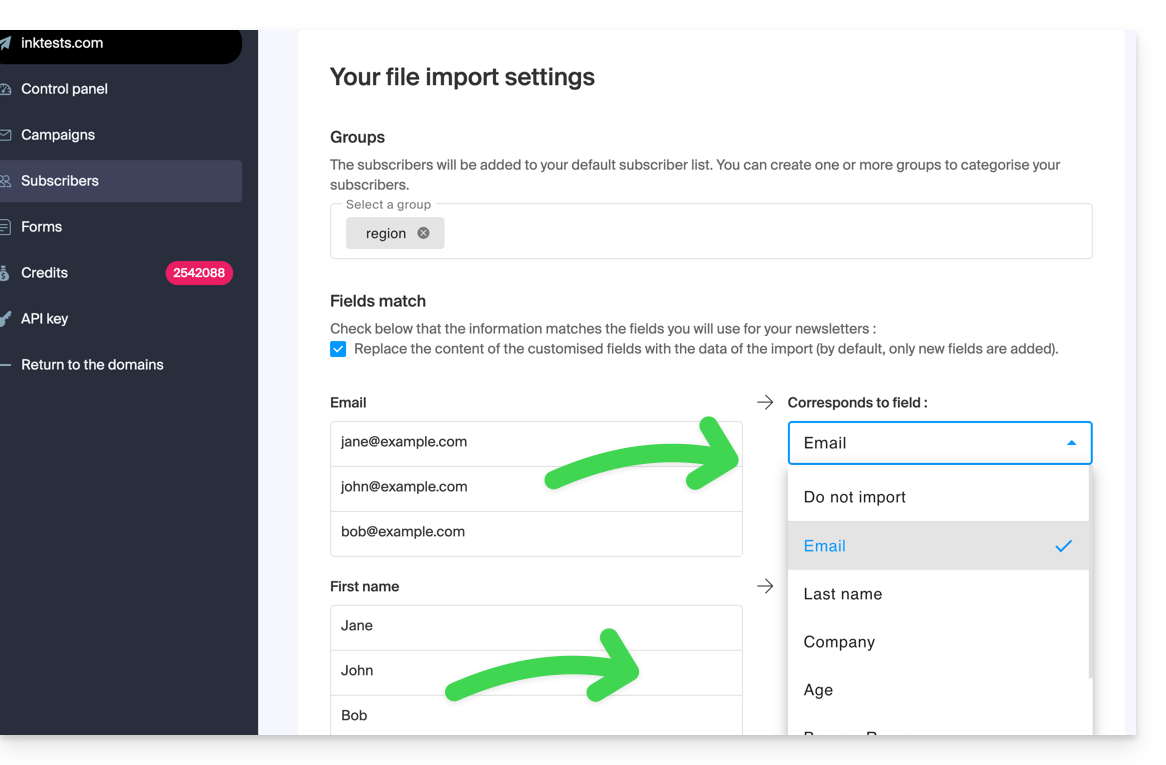
- You need to assign the desired field to the desired information (the information is grouped according to the original columns).
- At the bottom of the dropdown menu, it is possible to create the fields that do not yet exist (the type of field can be forced to numbers or a date, boolean, etc.).
- Choose an optional group from your created groups in which to place the imported contacts:
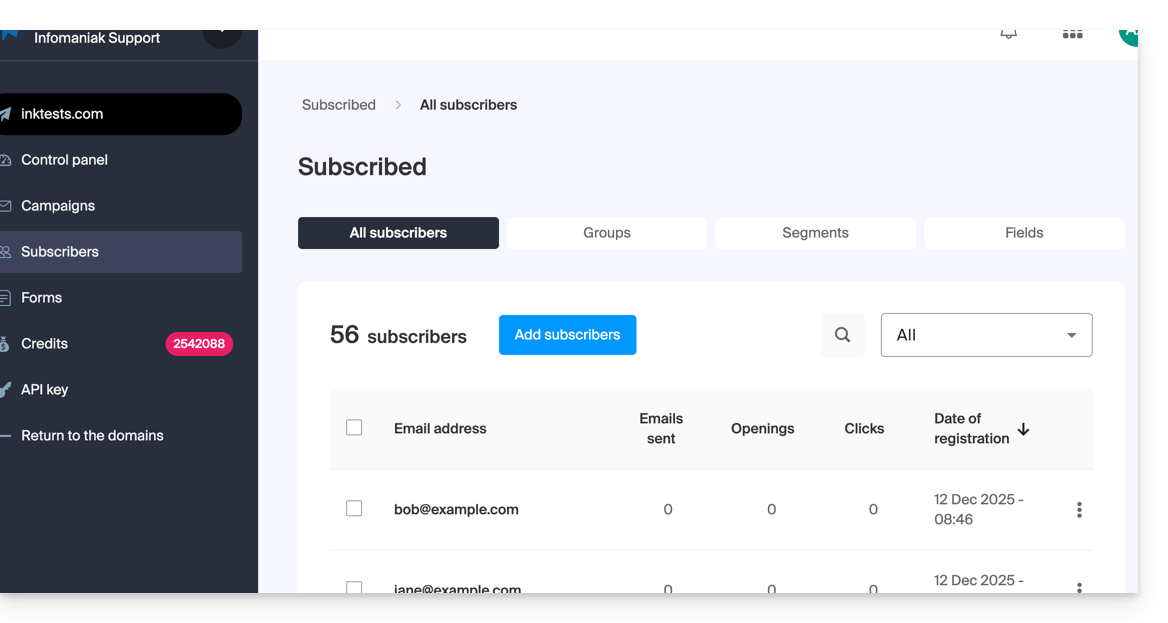
- There you go, whether under Groups or under Subscribers, your import is visible.
- If this is not the case, check if they are visible with the display filtering "All":
- It may be that after an email verification, the status of the imported subscriber is invalid, so you will not be able to write to them:
- If this is not the case, check if they are visible with the display filtering "All":
B. Copy-paste the equivalent of a .csv or .txt (predefined format)
- The format must be respected, as in the file to download (see above), for example:
anna.a@domain.xyz,Anna,Alpha,1985-08-20
alfred.a@domain.xyz,Alfred,Alpha
contact@domain.xyz,Support
mail@domain.xyz- Once this information is pasted into the dedicated field, click on the blue Continue button:
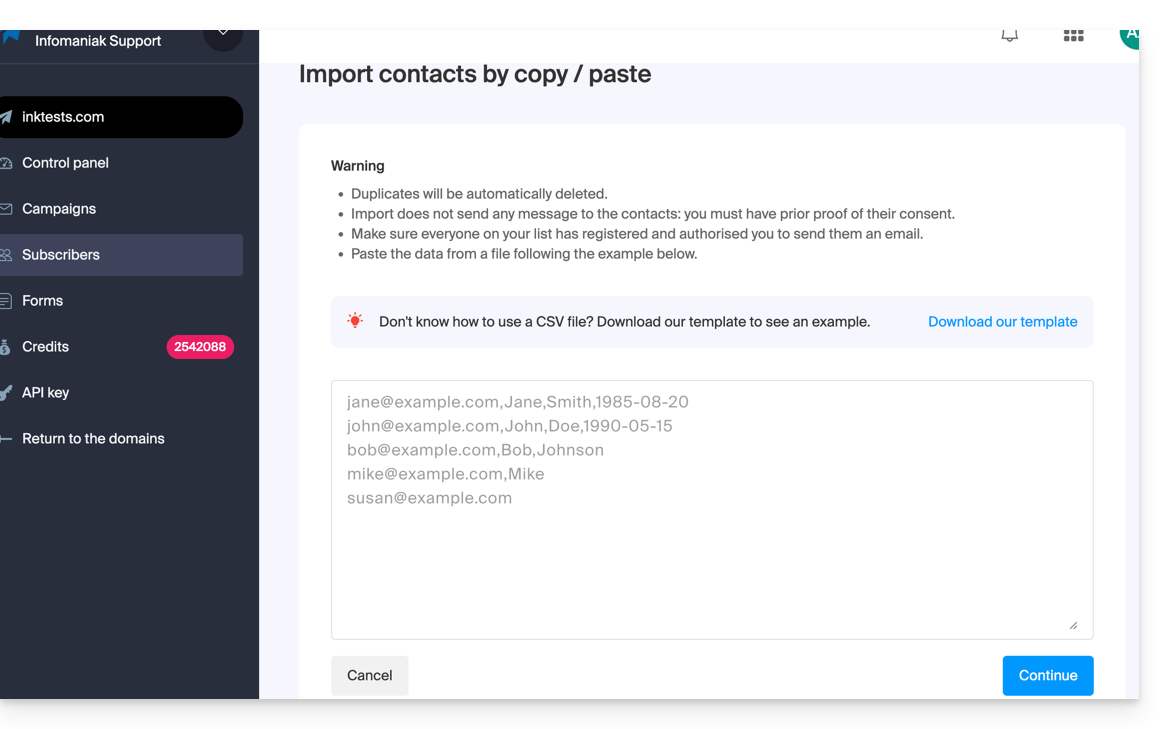
- The rest of the import is identical to point A above.
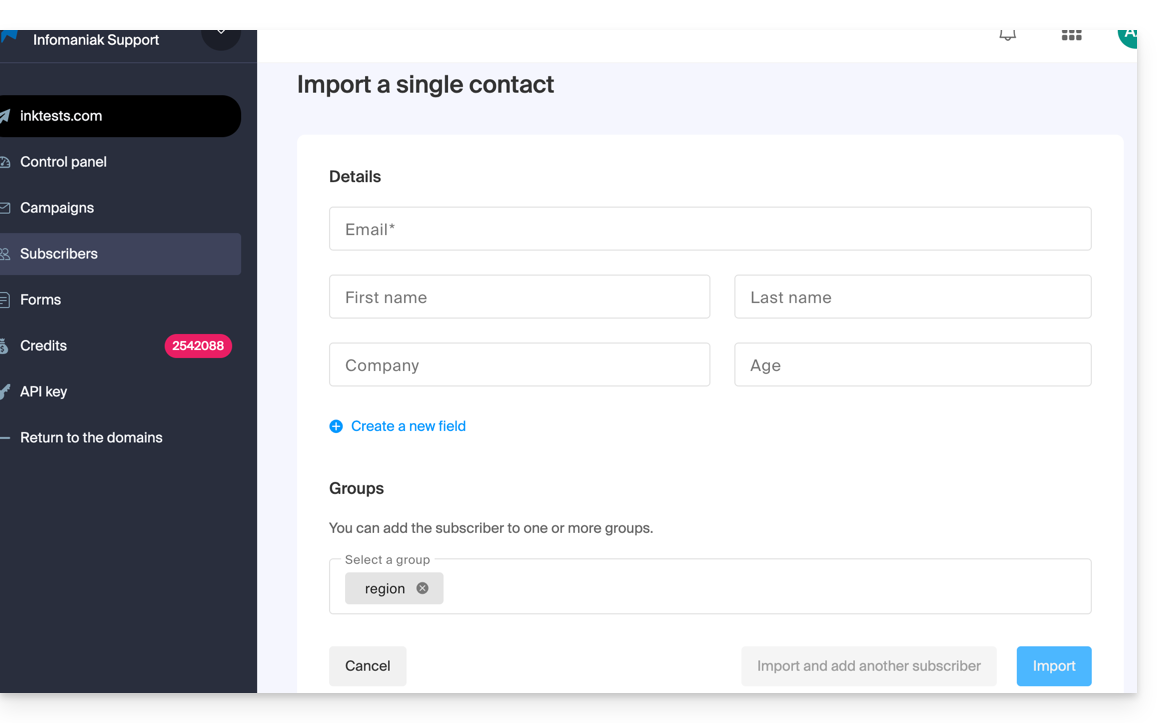
C. Filling out an individual contact form
- Import contacts one by one using the proposed form.
- Add free fields if necessary (the type of field can be forced to numbers or a date, boolean, etc.).
- Specify the optional existing group:
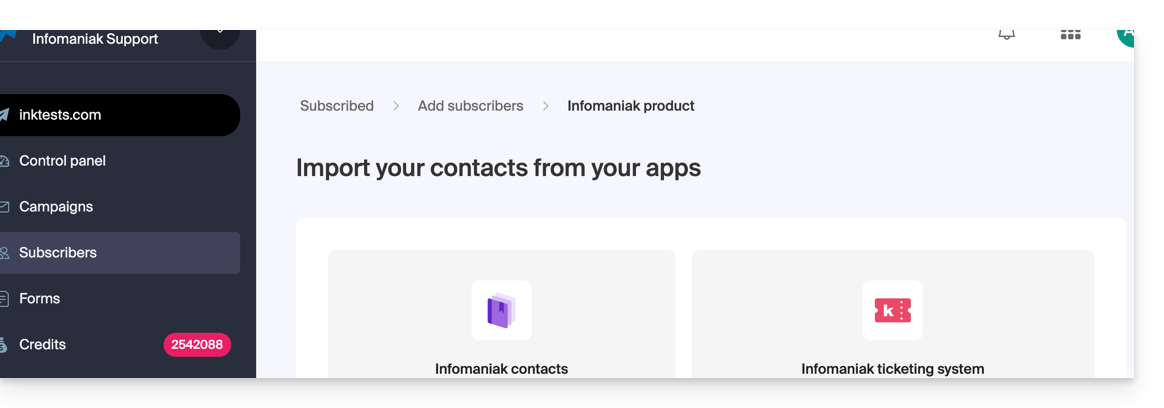
D. Automatic import from other Infomaniak tools
- Import contacts from your Infomaniak address books and from the Infomaniak ticketing tool if available (with the possibility of importing only users who have specified that they want to receive a Newsletter):
Edit a subscriber's details
To edit the information related to your subscribers:
- Click here to access the management of your product on the Infomaniak Manager (need help?).
- Click on the domain name concerned in the table that appears.
- Click on Subscribers in the left sidebar.
- Search or filter the type of display if necessary.
- Click on the subscriber whose details you wish to edit:
- Click on Modify:
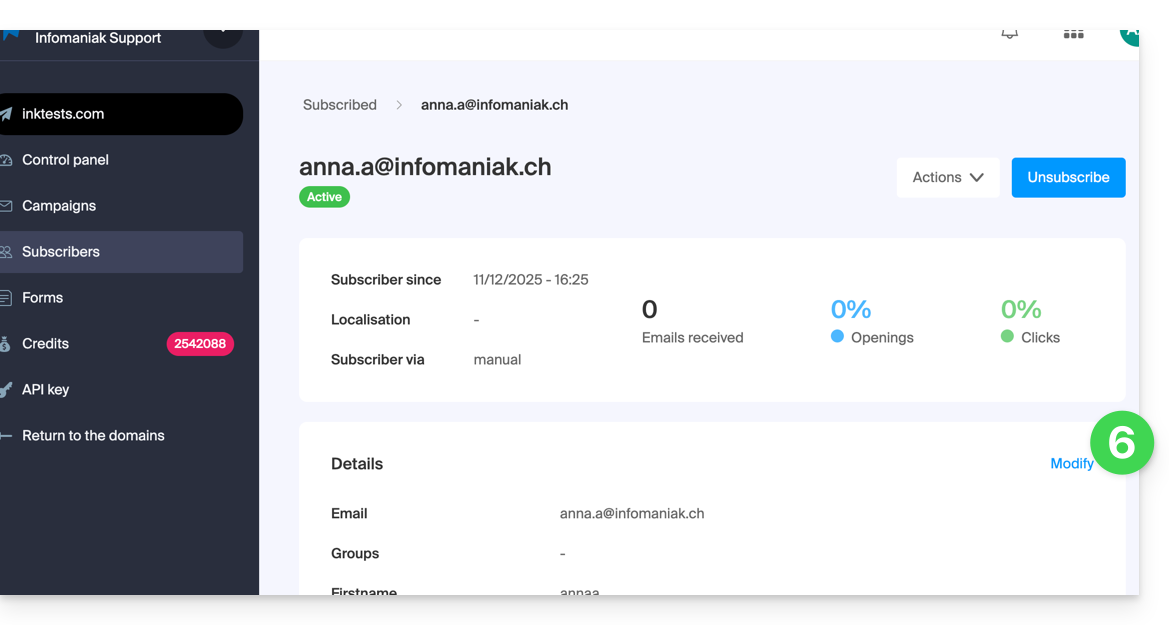
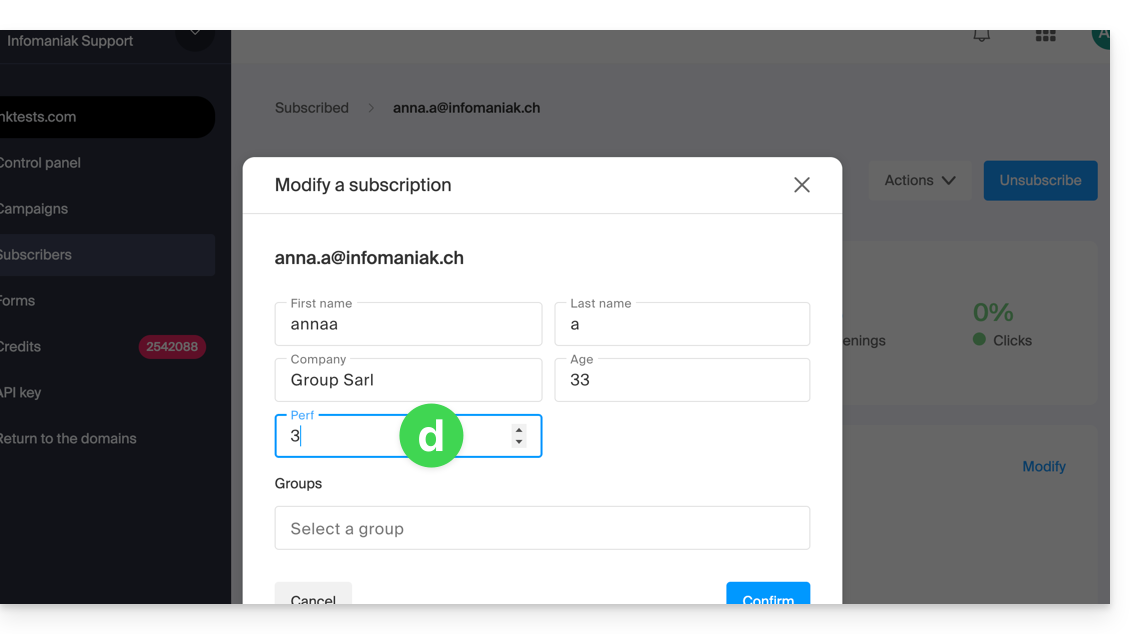
- Edit the information (only the email address cannot be modified):
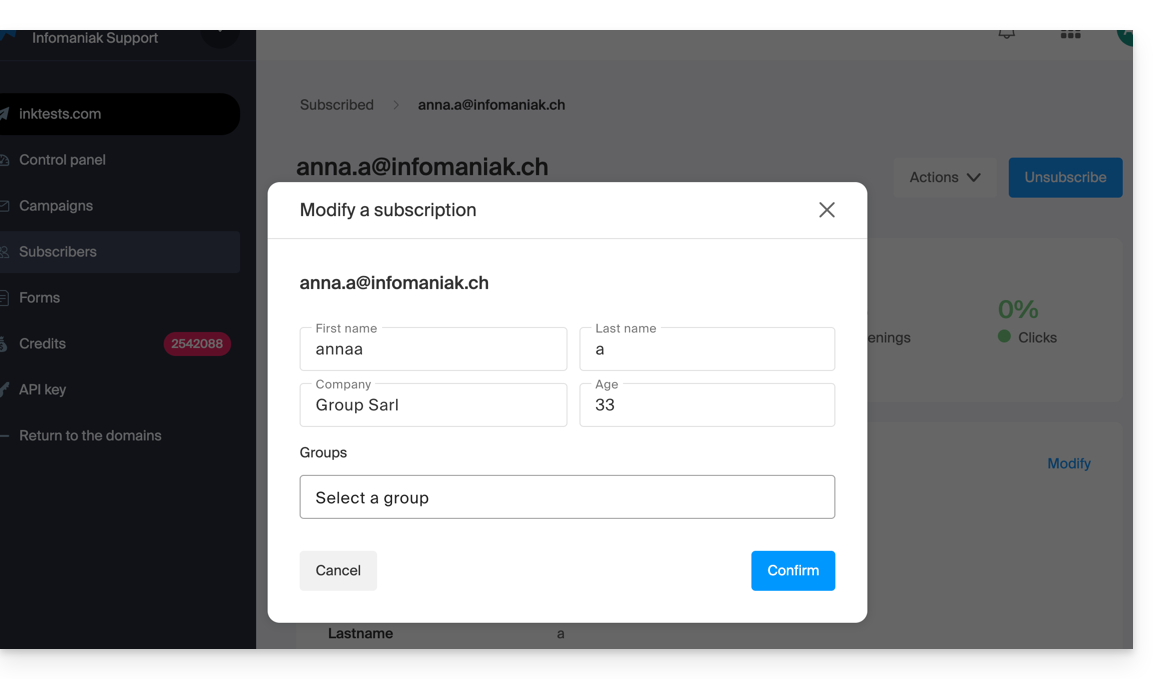
- If you wish to add a new field, you must add it globally by returning to the Subscribers menu.
- Click on the Fields tab.
- Click on Create a field.

- The subscriber's details can now be edited at the level of this new field:
Delete subscribers
To delete newsletter subscribers:
- Click here to access the management of your product on the Infomaniak Manager (need help?).
- Click on the domain name concerned in the table that appears.
- Click on Subscribers in the left sidebar.
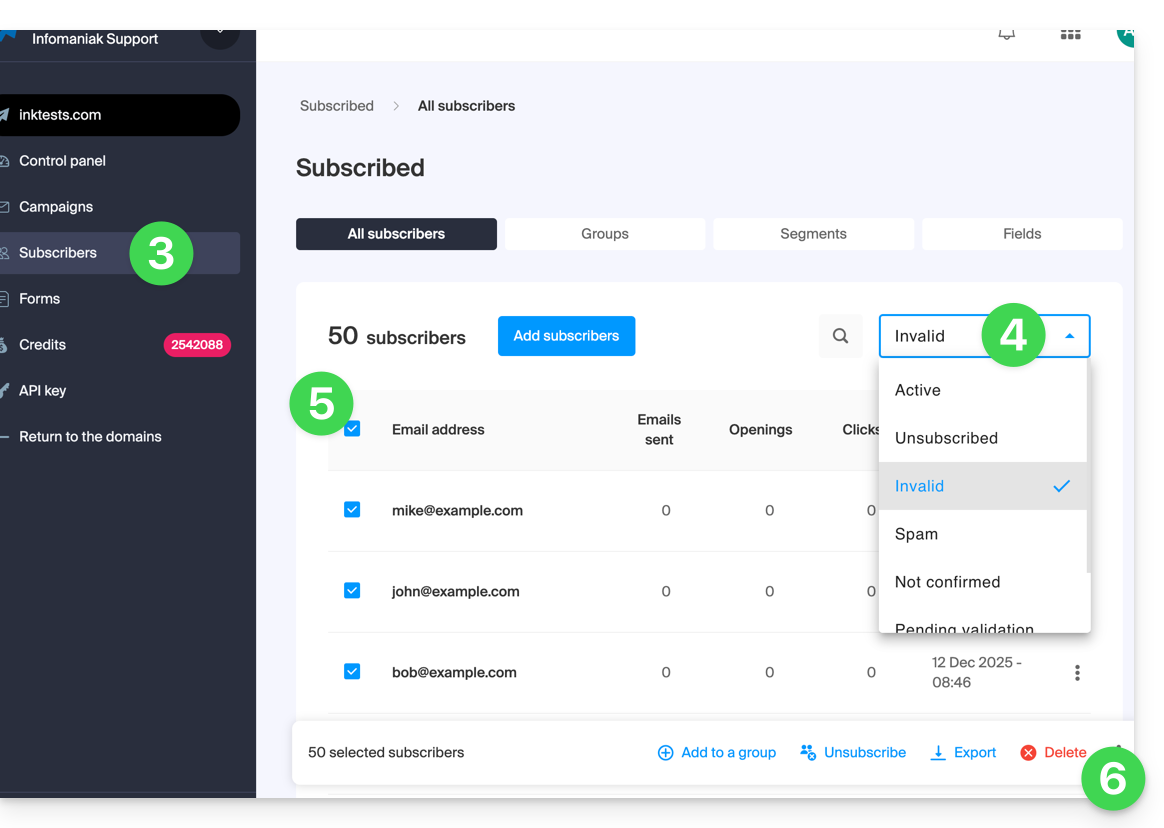
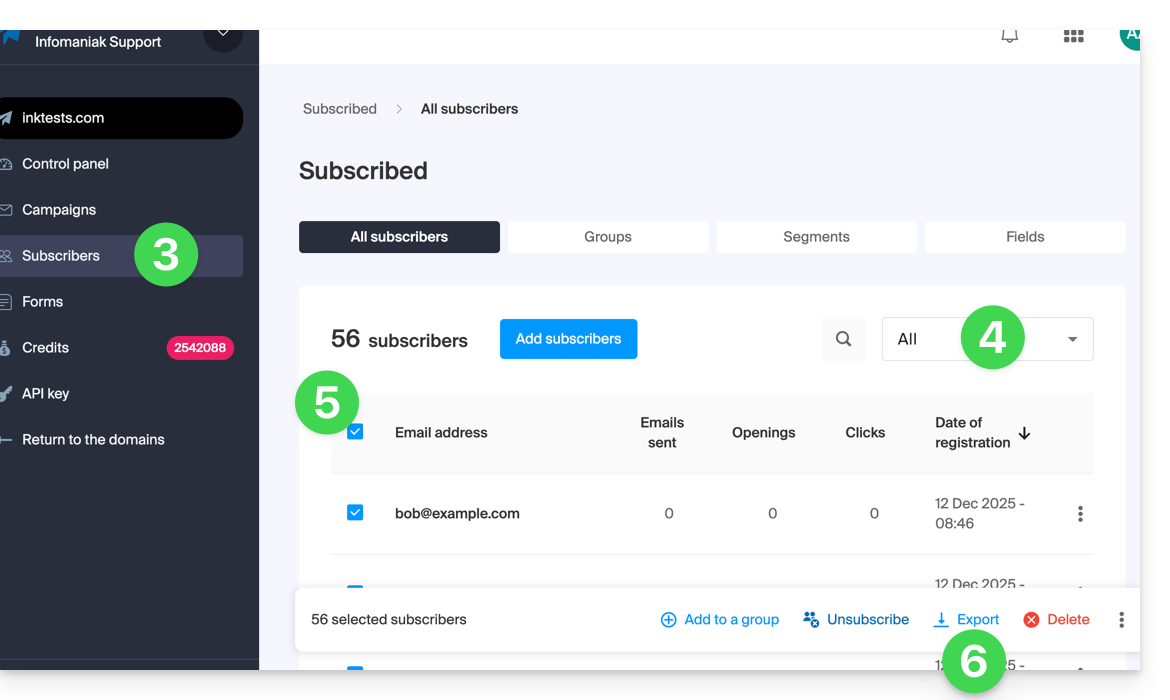
- Search for or filter the display type if necessary.
- Click the box to select one or more subscribers.
- Click on Delete:
- Confirm the deletion
You can also click on Unsubscribe instead of Delete so that the contacts remain in the list: refer to this other guide.
Export subscribers
To export the list of newsletter subscribers in .csv format and according to selected criteria:
- Click here to access the management of your product on the Infomaniak Manager (need help?).
- Click on the domain name concerned in the table that appears.
- Click on Subscribers in the left sidebar.
- Search for or filter the display type if necessary.
- Click the box to select one or more subscribers.
- Click on Export:
- Click the blue button once the export is prepared to download the data into a CSV file (format
.csv).
The resulting file includes these columns: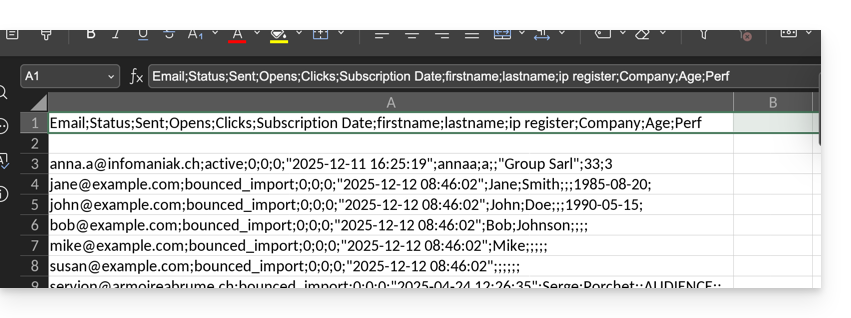
- Status
- Sent
- Opens
- Clicks
- Subscription Date
- firstname
- lastname
- ip register
- and then the custom fields (text, number, date, etc.) created manually…
Link to this FAQ:
Has this FAQ been helpful?
This guide explains how to create a signup form for Infomaniak's Newsletter tool, how to embed it on a web page, and how to manage subscriber sends and unsubscriptions.
Introduction
- The management page lists the forms that have already been created and indicates the number of views and conversions for each.
- A conversion is a form submission, even if the person hasn't confirmed their email address, for example.
Create a signup form
Prerequisites
- You must have created at least one group.
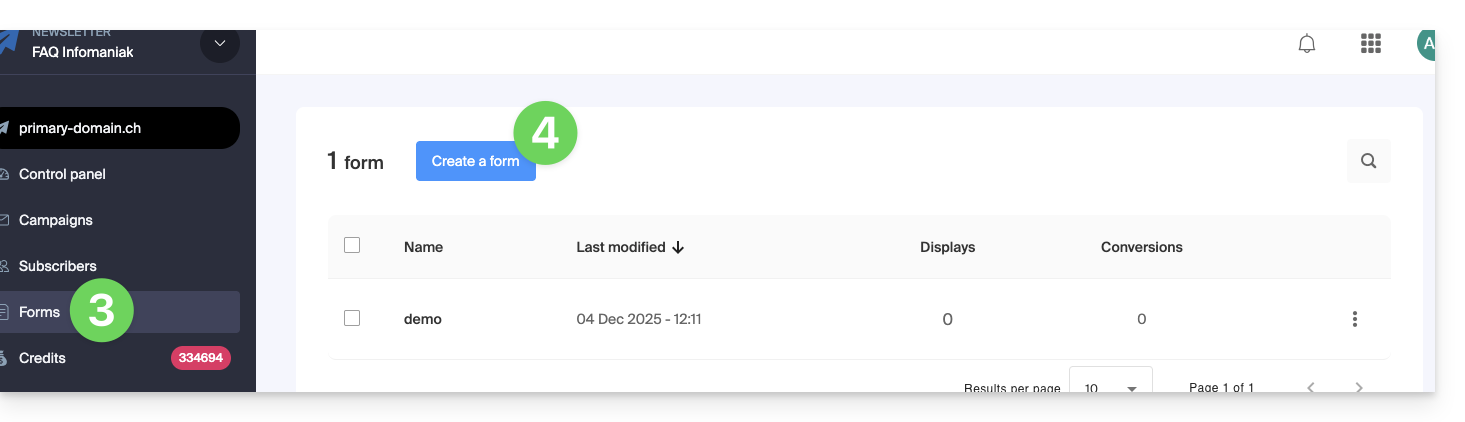
A signup form allows visitors to a website to subscribe to a newsletter and enrich one or more contact lists/groups (see prerequisites). To access form management:
- Click here to access the management of your product on the Infomaniak Manager (need help?).
- Click directly on the domain name of the Newsletter.
- Click on Forms in the left-hand menu.
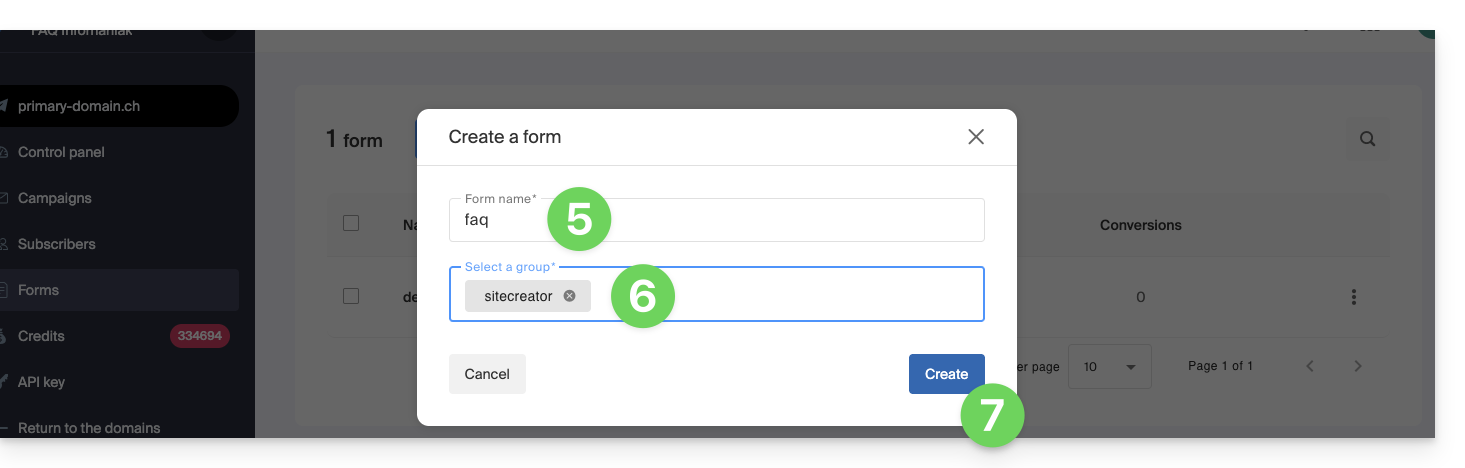
- Click on the blue Create a form button:
- Give your form a name.
- Indicate the contact group that should be incremented by the subscriptions made on this form.
- Click the button to continue:
You will then be taken to the form customization area.
A. Customize the content and generate an HTML / javascript code
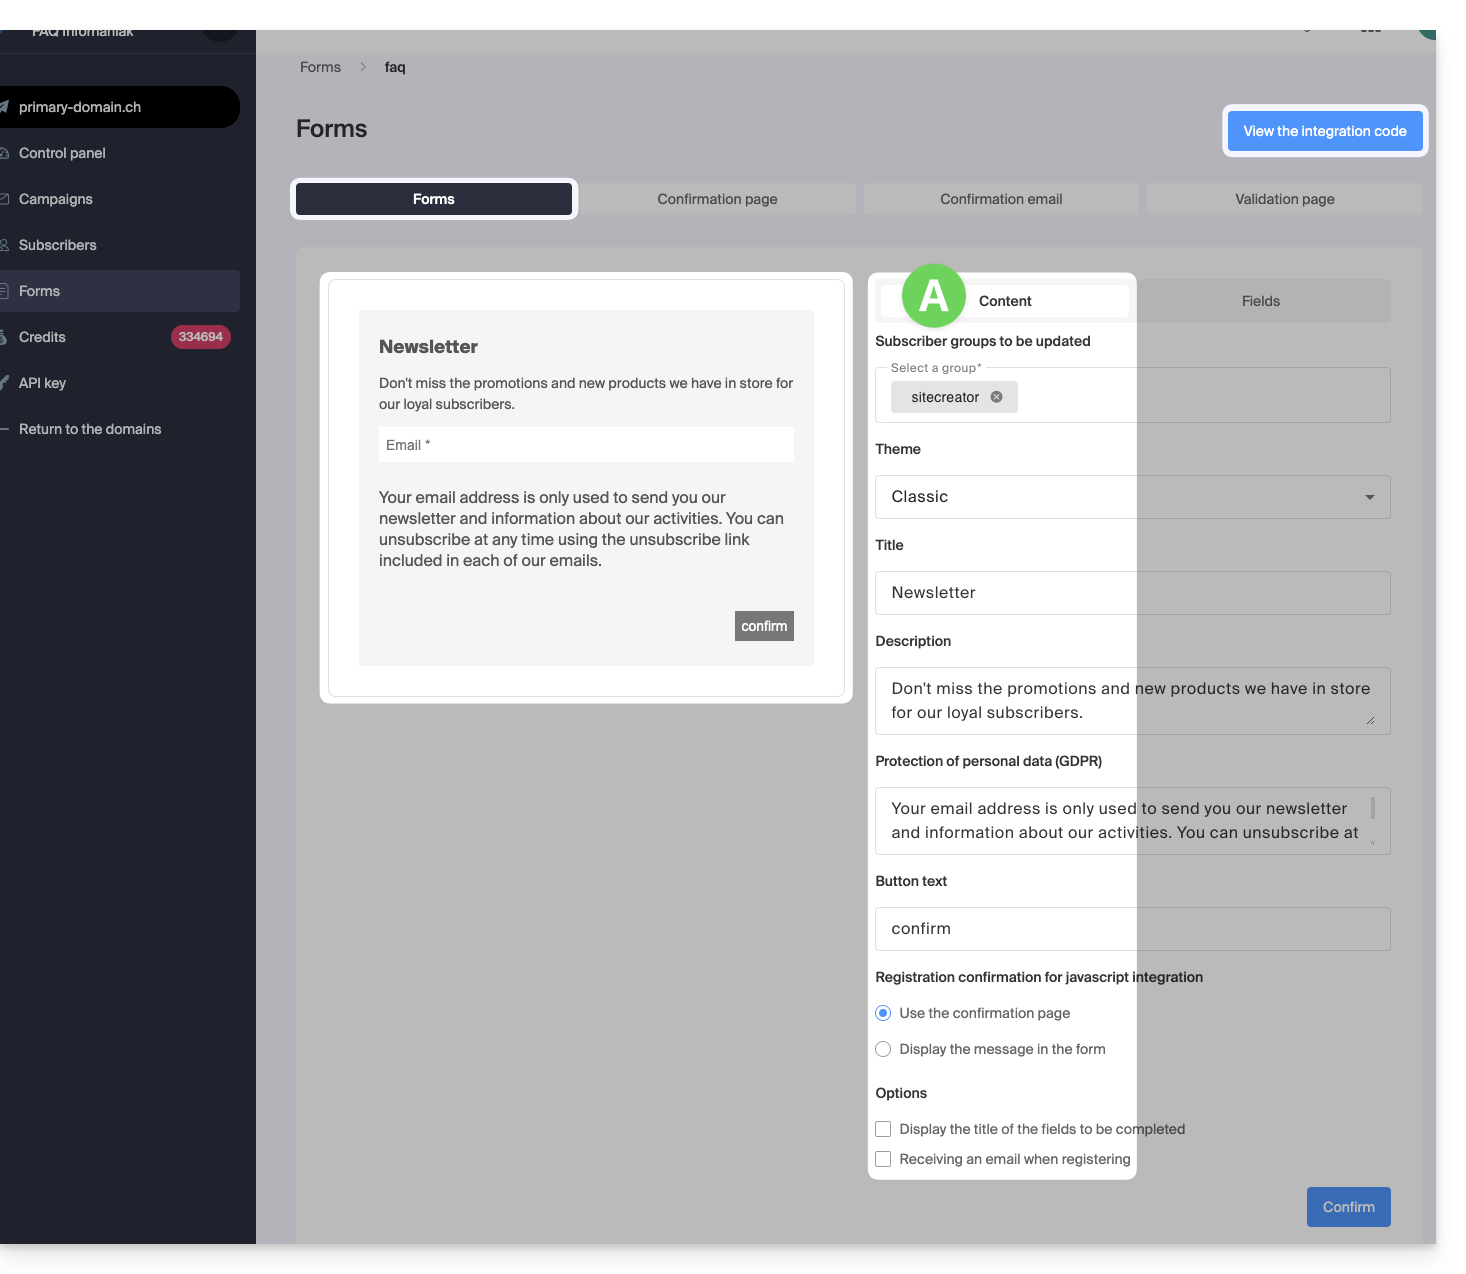
- The left-hand side previews your form.
- Specify which of your groups should contain the future subscribers of this form.
- This allows you, for example, to have a form in a location corresponding to filling out a specific contact list, and then another form elsewhere corresponding to a different list, in order to subsequently send an even more personalized Newsletter.
- The Theme menu allows you to choose the color palette that best suits your form so that it integrates as well as possible with the rest of the content next to which your form will be inserted.
- All elements of the form can be customized, including the text of the button that visitors will click to subscribe and the confirmation text that will be displayed after this click (integration with the javascript code only).
- The boxes at the bottom under Options allow you to
- display the title above the fields instead of displaying it inside them
- receive an email (as the Newsletter manager) when someone uses the form to subscribe
- Click on the blue button at the bottom of the page to save your changes as you go.
- Click on the blue button at the top of the page to display the JavaScript code and HTML code to be integrated into your pages (refer to this other guide for more information) if you have finished or continue to customize your form before copying the code.
B. Manage the information collected from the subscriber (configure the fields)
The Fields tab displays any fields that have already been configured and allows you to configure new ones (click the Create button at the top of the tab):
- These fields can be text-based, of the "date" type, or can force the insertion of numbers only.
- The "Required" column allows you to activate the required status of the field, which forces the subscriber to complete the required information; otherwise, the subscription will not be allowed.
- The information collected by these different fields will be stored in the subscriber's profile and can be used as a variable in your Newsletter and inserted into the body of the Newsletter when writing it.
- Click the blue button at the bottom of the page to save your changes as you go.
- You can delete fields from the Subscribers section.
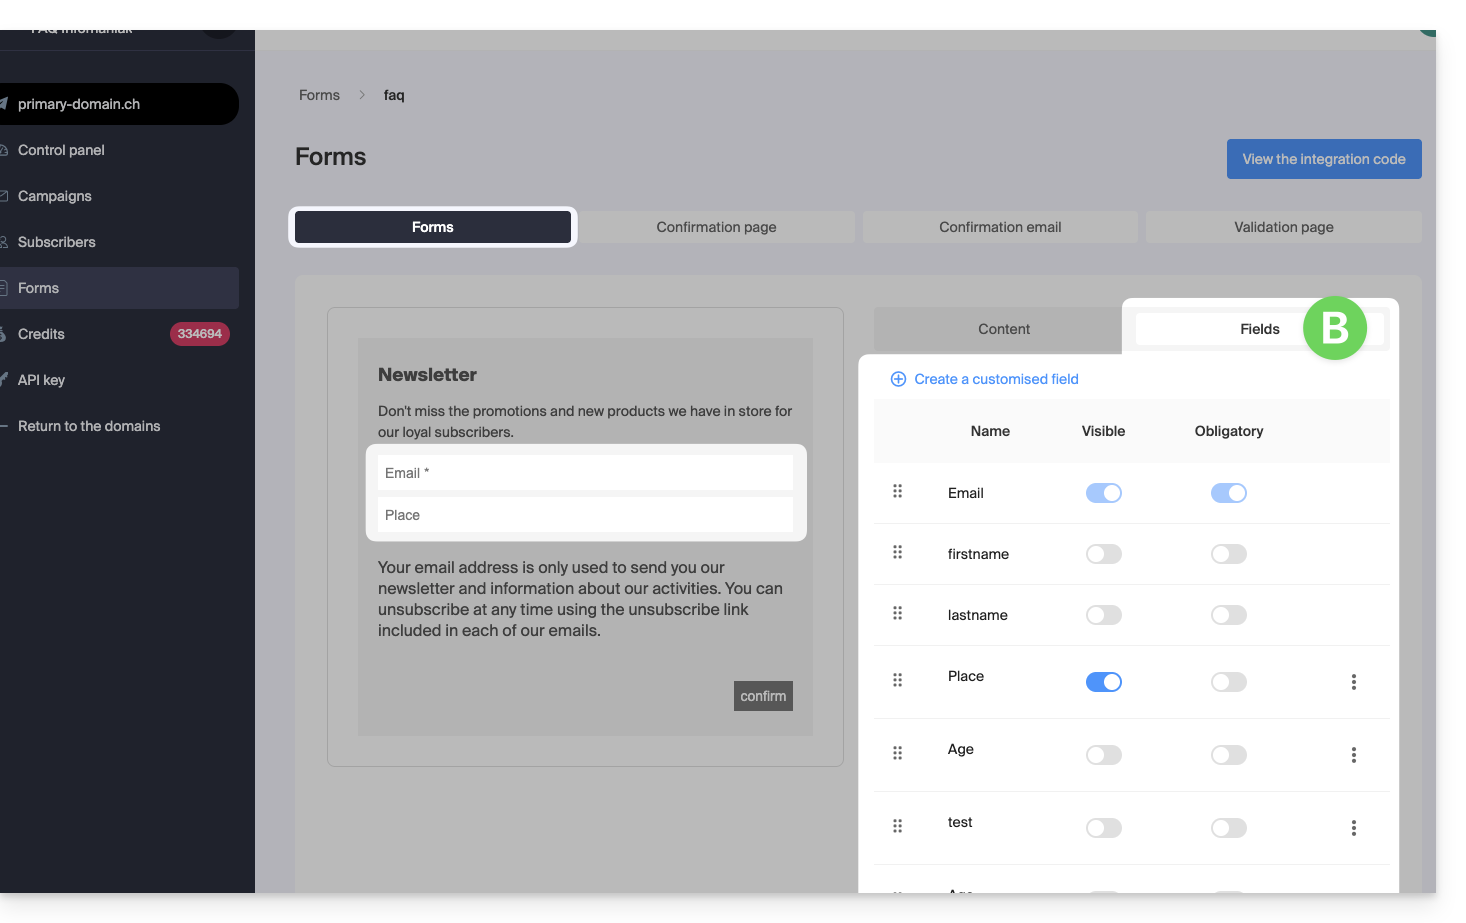
C. Continuing the subscription configuration
The following tabs allow you to manage the rest of the subscriber's journey:
Indeed, a visitor's registration via the form works according to the double opt-in principle: a first message is sent to the address of the person who registered, who must manually and voluntarily validate their registration by clicking on a unique link contained in the email received.
Only then will the person be definitively registered in your database as a subscriber, until they eventually unsubscribe.
You can then customize the following in the remaining three tabs:
- the page or text that should be displayed during the first registration phase (which informs the user that an email is being sent to them)
- the email that is sent to the user who wished to register (content, sender, title, etc.)
- the page or text that should be displayed when the user confirms their registration by clicking on the link in the email body
Link to this FAQ:
Has this FAQ been helpful?
This guide concerns the links present in the Newsletter that you have written.
Invalid links?
If you perform a test send of your Newsletter…
- Click here to access the management of your product on the Infomaniak Manager (need help?).
- Click on the domain name concerned in the table that appears:
- Click on Campaigns in the left sidebar menu.
- Click on Create a campaign:
- At the content drafting stage, if you send a test (dedicated button for this purpose in the top bar) to the address of your choice…
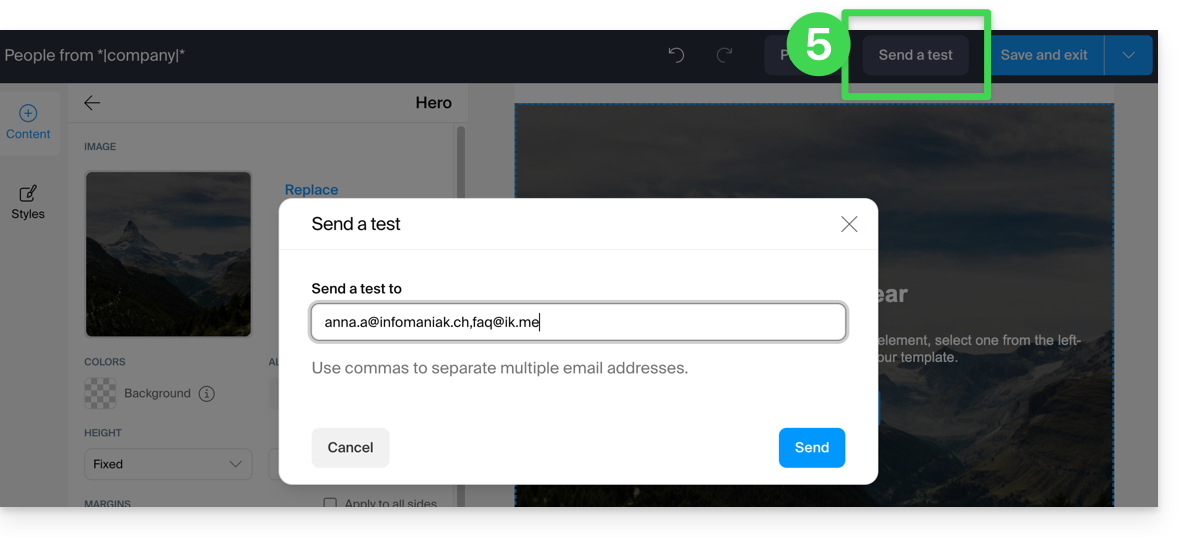
… then it is normal that the links present in your message sent during the test (upper part: "VIEW THIS EMAIL IN MY BROWSER" = link to view the message in a browser and lower part: "UNSUBSCRIBE" = link to allow the user to unsubscribe) do not work.
They will obviously be functional during your final send.
Link to this FAQ:
Has this FAQ been helpful?
This guide presents the conditions available for segmenting and filtering your contact lists when sending an Infomaniak Newsletter.
Introduction
- Filtering subscribers based on certain criteria allows you to send Newsletters only to specific people among your subscribers.
- The criteria can be their subscription date, custom fields, or actions performed or not performed during previous sends.
- You can combine multiple conditions and add "
OR" conditions to refine your filters.
Segmenting sends based on…
Access your Newsletter:
- Click here to access the management of your product on the Infomaniak Manager (need help?).
- Click on the domain name concerned in the table that appears:
… subscriber specifics
Here is an example of a Newsletter subscription form with additional fields that allow you to ask the person who is subscribing for custom information: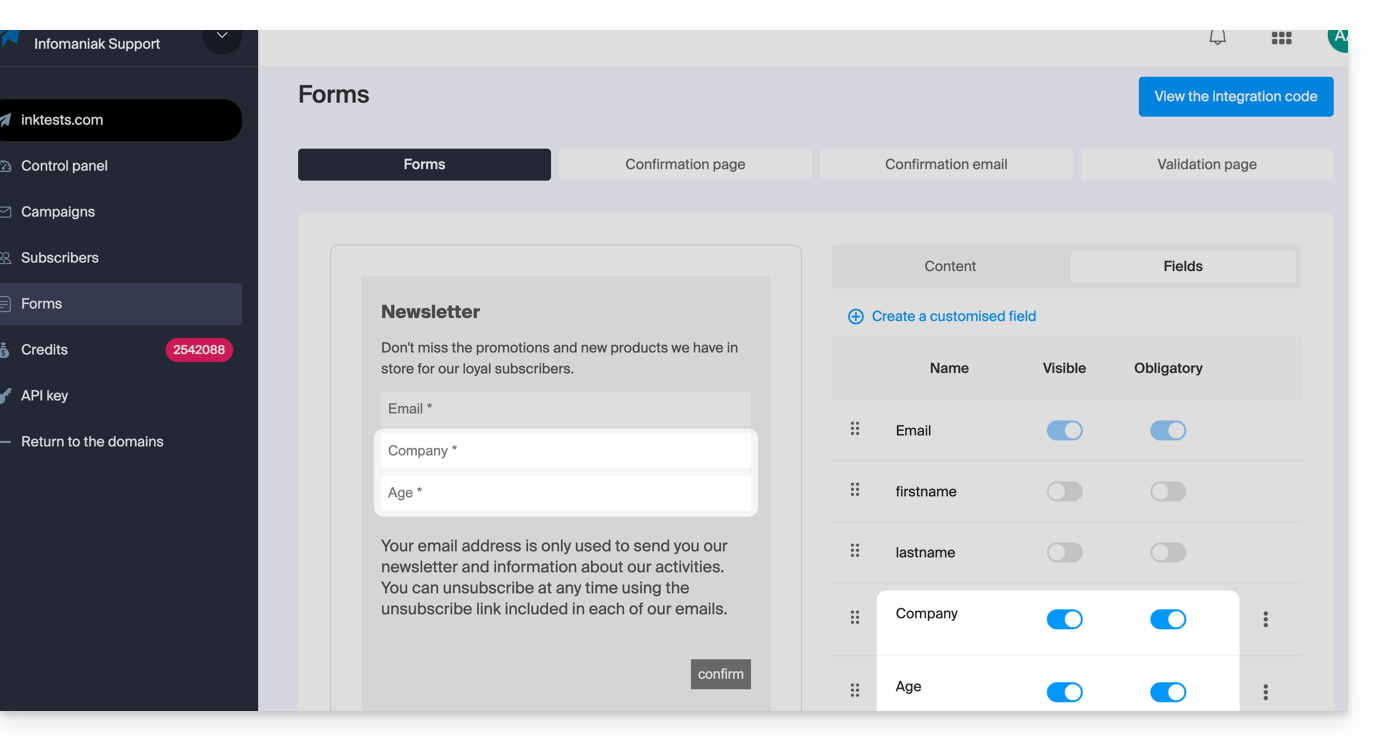
Once some users enter this information, you can find it in the details of their contact profile: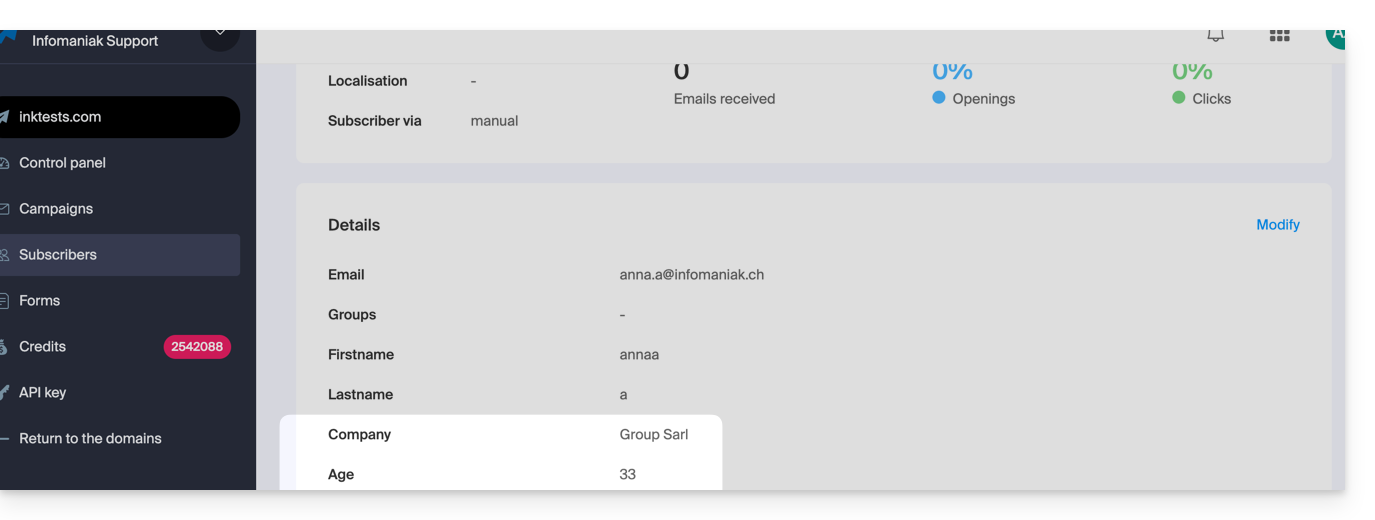
This type of information can be used to segment your subscriber list and send emails only to a portion of it. Refer to Chapter 4 of this other guide.
… the subscriber's past actions
Information about a previous mailing can be used to segment your next email campaign. Example: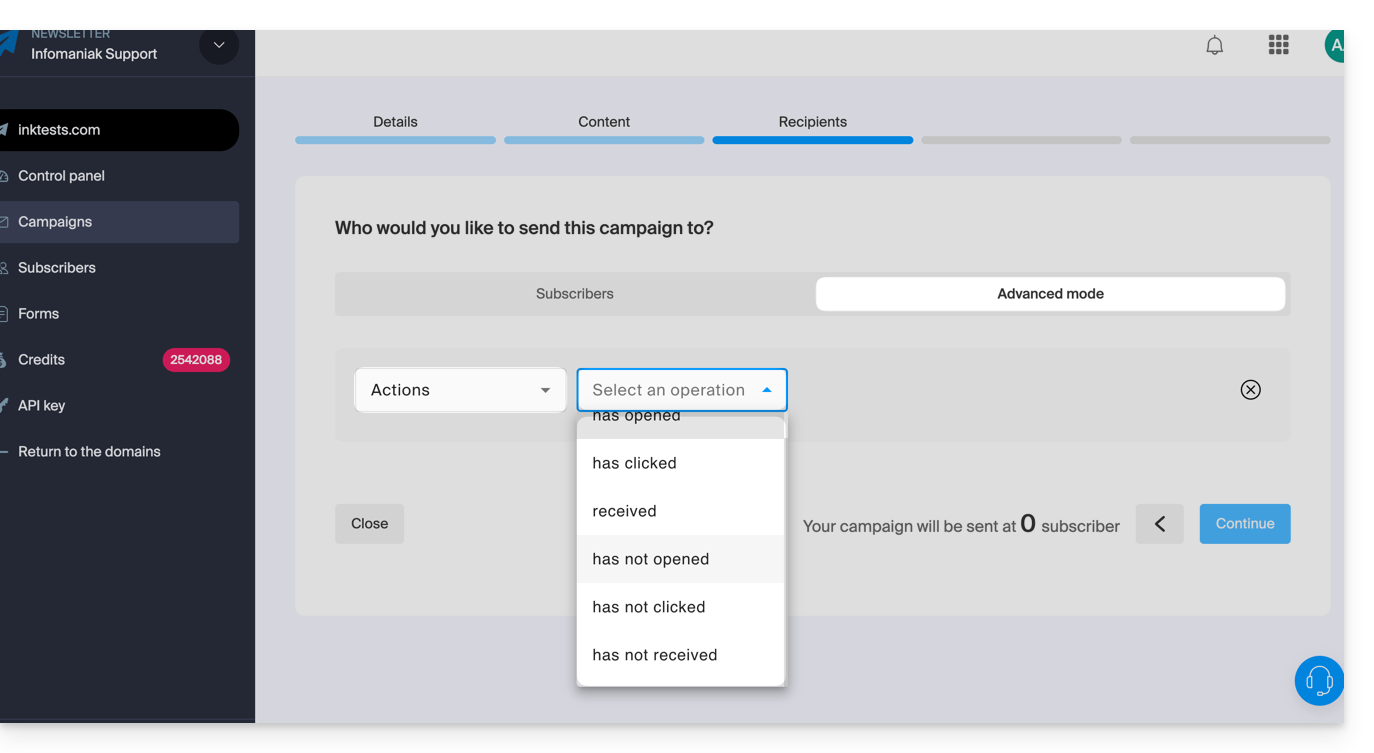
- Send only to subscribers who have opened the last 5 campaigns.
- Send only to subscribers who have never clicked on the specific newsletter sent 1 month ago.
- etc.
To do this:
- Refer to Chapter 4 of this other guide.
- Choose Actions instead of custom field to select the criteria that define the people who should receive this next newsletter.
- This same drop-down menu also allows you to segment an email campaign based on the subscription dates of subscribers (e.g., send only to subscribers who signed up in a specific month).
Link to this FAQ:
Has this FAQ been helpful?
This guide concerns the Newsletter by Infomaniak and provides some use cases around user registrations.
Registration and re-registration, different data...
To access your Newsletter:
- Click here to access the management of your product on the Infomaniak Manager (need help?).
- If necessary, click on the domain name concerned in the table that appears.
- The Newsletter interface appears.
It is possible to register multiple times consecutively for the same Newsletter (including re-registration of the user after unsubscription):
- The registration date displayed on the subscriber management page will always correspond to the first registration (even if the registrations are multiple and even if the user has not unsubscribed in the meantime):
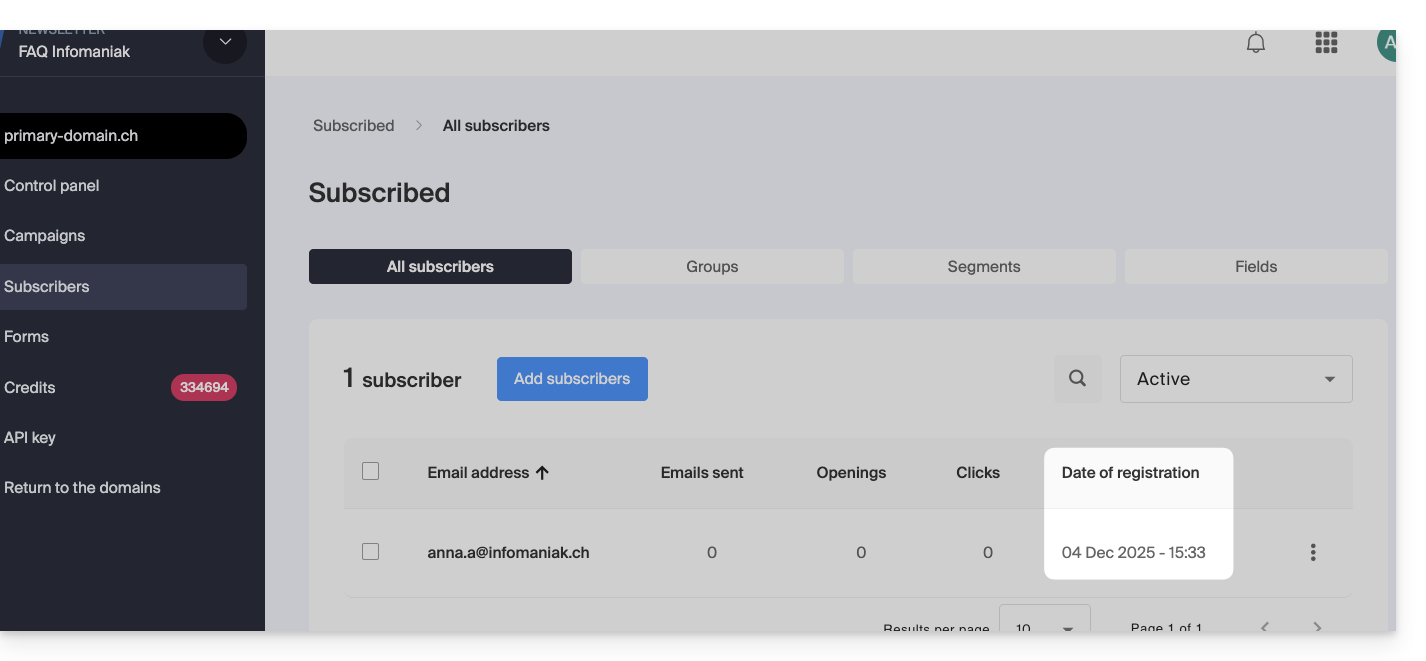
- If the user re-registers without being unsubscribed but provides other information upon registration (different name, for example), this new information will be applied
Unsubscription, deletion, and forgetting
The Newsletter manager can perform 3 actions on a subscriber's record: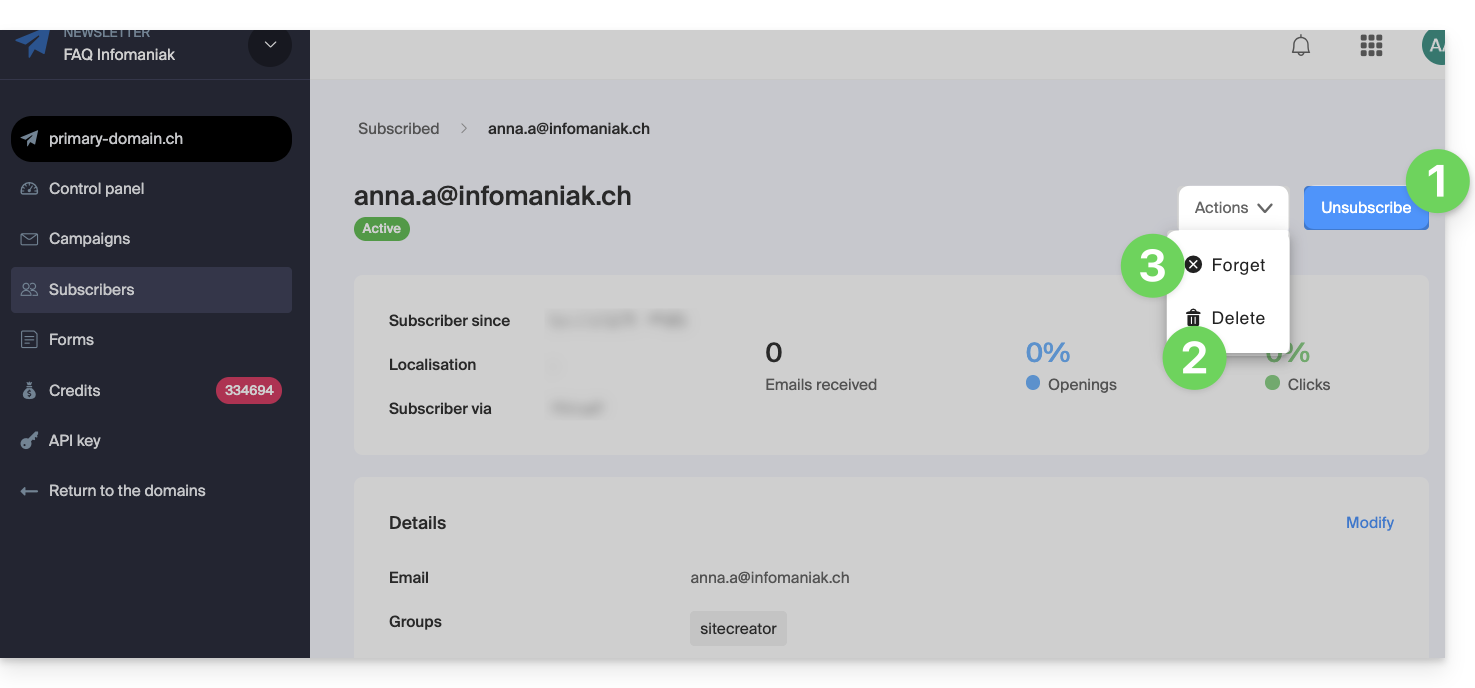
1. Unsubscribe the subscriber manually
In this case, the subscriber
- becomes unsubscribed
- will no longer receive the Newsletter
- remains visible in the lists (by activating the Unsubscribed filter)
- can be modified via a re-import, unique or otherwise, but their subscribed or unsubscribed status will remain the same
- and it is possible to re-register them manually from their subscriber record:
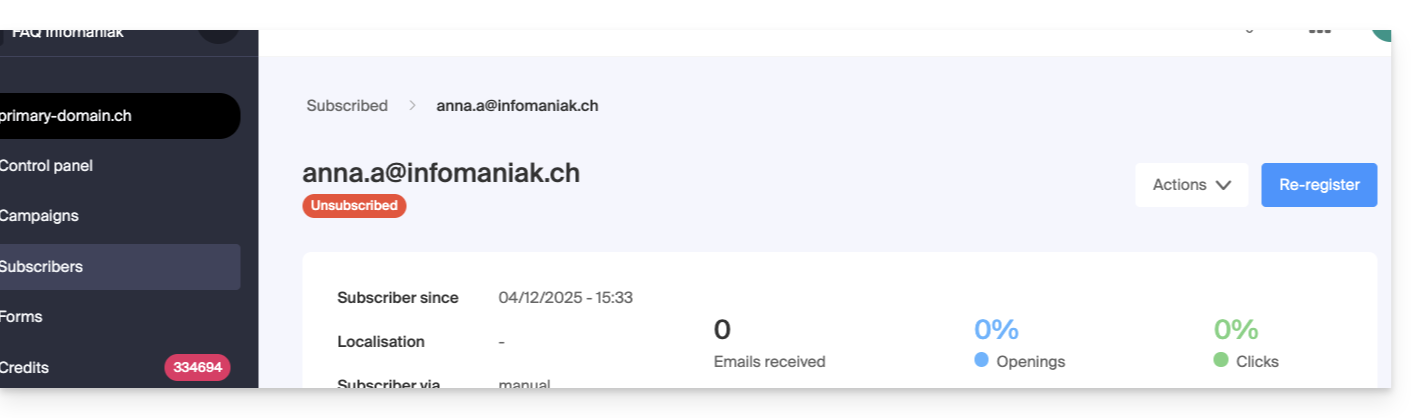
No email is sent to the user during these operations.
2. Delete the subscriber
In this case the subscriber (registered or unregistered)
- is deleted from the lists and no search filter (or a recycling system) allows to find a deleted user
- can be modified via a re-import, unique or otherwise, but its registered or unregistered status will remain the same:
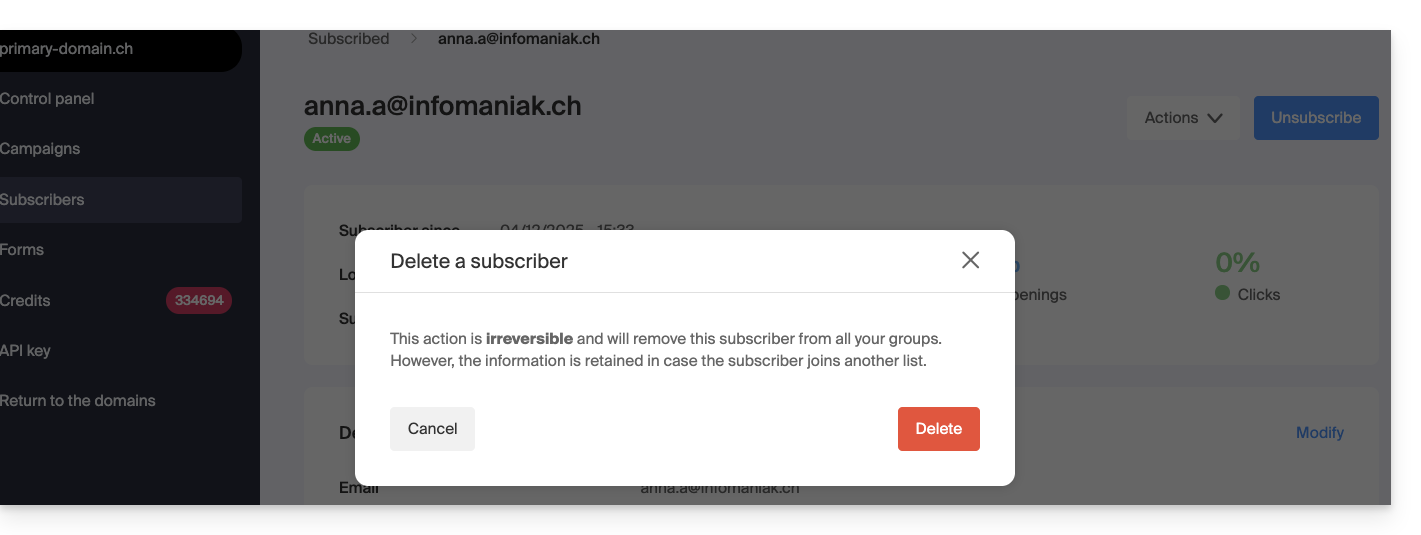
- all information relating to its activity since its first registration is retrieved and displayed
No email is sent to the user during these operations.
3. Forget the subscriber
In this case the result and the possibilities are exactly the same as for the deletion (point 2 above) except that:
- beyond 30 days all information relating to its activity is irrecoverable:
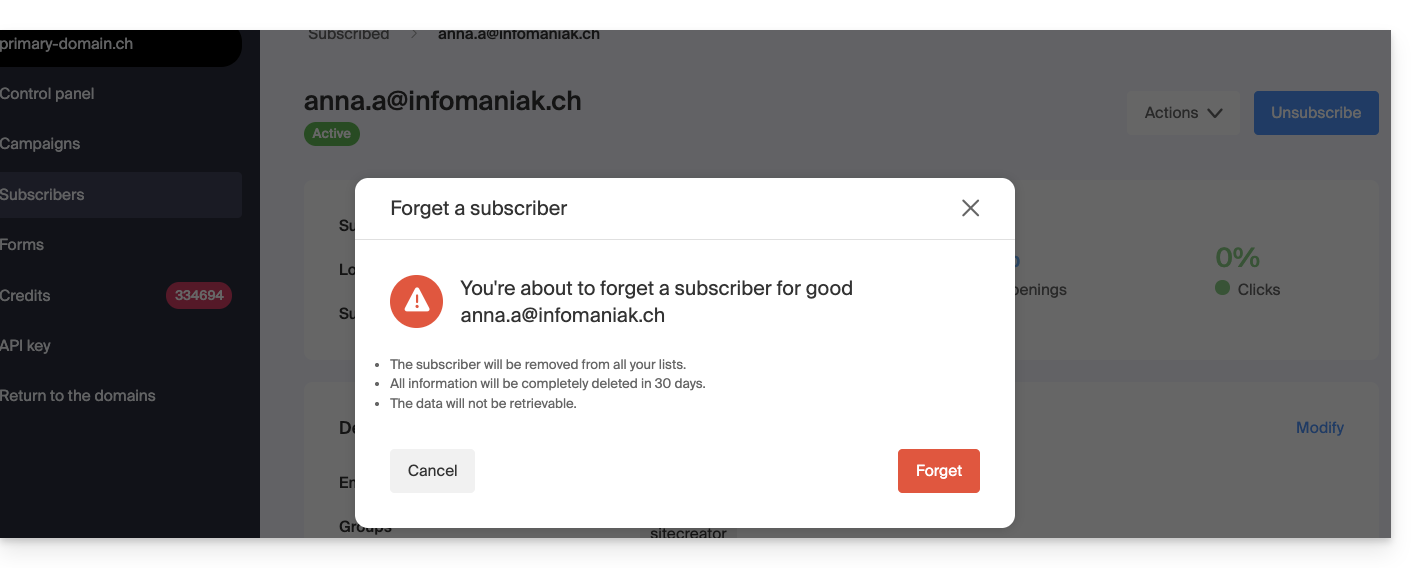
No email is sent to the user during these operations.
Link to this FAQ:
Has this FAQ been helpful?