Knowledge base
1000 FAQs, 500 tutorials and instructional videos. Here, there are only solutions!
This guide details how to save data from your Web hostings (Starter, shared, or Managed Cloud Server) using the application restic via the OpenStack Swift protocol on Swiss Backup, the backup solution in an independent Swiss cloud.
Preamble
- Other solutions exist to back up your web data: refer to this other guide.
Install Restic
Prerequisites
- Use a Web hosting.
- Have a Swiss Backup Infomaniak space with available device quota (minimum 1) for a Cloud Backup.
- Add 1 device of type Cloud to obtain the OpenStack Swift parameters.
To do this:
Download the linux_amd64 binary from the restic github repository:
wget -O restic.bz2 https://github.com/restic/restic/releases/download/v0.14.0/restic_0.14.0_linux_amd64.bz2⚠️ The download link may vary with the release of a new version; version
0.14uses the default compression.Unzip the archive and make the binary executable:
bunzip2 restic.bz2
chmod +x restic
Configure Restic
Creation of an encryption key to encrypt the data
- The key cannot be changed and in case of loss the data will no longer be readable.
- Place this key in a file readable by Restic.
Example of key generation:
openssl rand -base64 16 > restickey
Configuration of restic
To configure the backup:
Create a resticconfig file with the following content to be adapted according to the information specific to your device:
echo "export OS_AUTH_URL=https://swiss-backupXX.infomaniak.com/identity/v3 export OS_REGION_NAME=RegionOne export OS_PROJECT_NAME=sb_project_SBI-XXXX export OS_PASSWORD='' export OS_USER_DOMAIN_NAME=default export OS_USERNAME=SBI-XXXX export OS_PROJECT_DOMAIN_NAME=default export RESTIC_REPOSITORY=swift:sb_project_SBI-XXXX:/ export RESTIC_PASSWORD_FILE=restickey" > resticconfOS_AUTH_URLCluster access URL for Swiss Backup (1)OS_PROJECT_NAMEandOS_USERNAMEreplace SBI-XXXX with your identifierOS_PASSWORDreplace with the password generated during activationRESTIC_REPOSITORY- replace SBI-XXXX with your identifier
- replace the
bucket namewith the name you want to give to your container that stores the backups
RESTIC_PASSWORD_FILEreplace with the full path to the file containing the encryption key
Load the Restic configuration by running the following command:
source resticconfInitialize the bucket with the following command:
./restic -r $RESTIC_REPOSITORY init
(1) The indication "//swiss-backup02", "//swiss-backup03" etc. changes depending on the cluster number indicated in the Manager under Cloud Storage Information under "Location"; and if your Swiss Backup device was created before October 2020, you will need to use https://swiss-backup.infomaniak.com/identity/v3
Backup your files
To back up your files, simply run the following command:
./restic backup
#Example: Backing up the entire hosting account
./restic backup ./
#Example: Backing up the “sites” folder
./restic backup sites/
The first snapshot is long (several hours depending on the amount of data) because all files are copied while the subsequent ones will use the differential principle.
Backup databases
Restic can read data from stdin to record the output of a program.
Use the following command to back up an individual MySQL database:
mysqldump --databases db_name -u db_username -p | restic backup --stdin --stdin-filename database_dump.sql To back up all databases, run the mysqldump command to extract all databases from the server, then redirect the output to Restic:
mysqldump -u -p --all-databases | restic backup --stdin --stdin-filename all_databases.sql
List backups
To list your backups, you can use the following command:
./restic snapshots
Restore a backup
You can restore a backup with the following command:
./restic restore --target
Automate
On Cloud Server, it is possible to add a cron task to automate the launch of the backup.
On shared hosting, this option is not available.
Link to this FAQ: https://faq.infomaniak.com/1019
Has this FAQ been helpful?
This guide explains how to enable and configure two-factor authentication (also known as two-factor authentication, 2FA) for the Acronis application used with Swiss Backup.
✘ UNAVAILABLE with
free kSuite / kSuite Standard
my kSuite / my kSuite+ (ik.me, etik.com, ikmail.com)
Introduction
- Two-factor authentication enhances the security of your account: in addition to your usual password, a unique code must be entered when logging in.
- This code is generated by an authentication application installed on a device you own, such as a phone, tablet, or computer.
- Therefore, even if someone knows your username and password, they cannot log in without this second code.
Enable two-factor authentication for the organization
The Acronis application uses temporary codes of the TOTP type. These codes are generated automatically by an authentication application and usually change every 30 seconds. You can use, for example:
- Google Authenticator
- Microsoft Authenticator
- any other application compatible with TOTP codes
Make sure that the time on the device used to generate the codes is correct. An incorrect time may prevent the code from being validated.
Two-factor authentication must be enabled by an organization administrator.
- Log in to the Acronis console used with Swiss Backup.
- Enable two-factor authentication at the organization level.
- If necessary, consult the official Acronis documentation.
- Then, ask users to reconnect to the console.
Upon their next login, users will be prompted to configure two-factor authentication for their own account.
Configure two-factor authentication for your user account
Prerequisites
- Two-factor authentication must be enabled for the organization.
- A TOTP-compatible authentication app must be installed.
- The time on the device used must be correct.
Next:
- Log in to the Acronis console used with Swiss Backup.
- Enter your username and password.
- When the two-factor authentication setup screen appears, open your authentication app.
- Scan the QR code displayed on the screen.
- If scanning the QR code does not work, manually enter the alphanumeric code displayed below the QR code.
- Save the QR code or alphanumeric code in a safe place.
- This can be used to reconfigure two-factor authentication if you lose the device used to generate the codes.
- Enter the code generated by the authentication app into the Acronis console.
- Validate the configuration.
Two-factor authentication is now active for your account. On subsequent logins, you will need to enter your password and then the code generated by the authentication app.
If the option is offered, you can trust the browser being used. In this case, the one-time code will not be requested each time you log in from that same browser.
In case of problems
Lost the device used to generate the codes
If you have saved the QR code or alphanumeric code, add the account again in your authentication app on a new device.
If you have not saved this code, ask your administrator to reset the two-factor authentication for your account.
Changing devices
To use a different device, reset the two-factor authentication for your account, then configure it again with the new authentication app.
Link to this FAQ: https://faq.infomaniak.com/1356
Has this FAQ been helpful?
This guide details how to manually back up data using the command line interface (CLI) via the S3 Compatible protocol on Swiss Backup, the backup solution in a Swiss independent cloud.
Using an S3 location in CLI
Prerequisites
- Have an Infomaniak Swiss Backup space with an available device quota (minimum 1) for a cloud backup.
- Add 1 device of type Cloud to obtain the S3 Compatible settings.
- Use a
Terminalapplication (command line interface,CLI /Command Line Interface) on your device.
With a Terminal application (command line interface, CLI /Command Line Interface) on your device:
Install
s3cmd, for example on Debian/Ubuntu:sudo apt install s3cmdor on macOS (with Homebrew):
brew install s3cmdand for Windows, it is recommended to use S3Express, an open-source command-line tool (need help?).
Enter the following command to configure the connection:
s3cmd --configure- Enter the fields according to the information specific to your device (refer to this other guide):
Display name= choose a name for the storage.AccessKeyandSecretKey= the access keys generated from the email you received from Infomaniak after creating the storage space.Service point= for example https://s3.swiss-backup02.infomaniak.com (1)Bucket name= defaultDefault regionS3 Endpoint: use the URL provided by InfomaniakUse HTTPS: yesHTTP Proxy server: leave blank unless a specific configuration is requiredSignature version: force the use of v4Path style: choose Yes if prompted- Test access: you can perform the test to validate the configuration
(1) The indication "//s3.swiss-backup02", "//s3.swiss-backup03", etc. changes depending on the cluster number indicated in the Manager in the Cloud storage information under "Location"; and if your Swiss Backup device was created before October 2020, you will need to use https://swiss-backup.infomaniak.com/identity/v3
Once completed, a configuration file will be saved (by default in ~/.s3cfg).
Start a copy to Swiss Backup
Here are some basic commands to interact with Swiss Backup:
- List buckets:
s3cmd ls - List the contents of a bucket:
s3cmd ls s3://bucket-name - Send a file:
s3cmd put example.txt s3://bucket-name/ - Download a file:
s3cmd get s3://bucket-name/example.txt - Synchronize a local directory to a bucket:
s3cmd sync /path/local/ s3://bucket-name/
In case of problems
Following an update to the AWS CLI (Amazon Web Services Command Line Interface) tool, you may encounter an error when attempting to connect to or transfer data to a Swiss Backup S3 location:
Transferring payloads in multiple chunks using aws-chunked is not supported
This error is related to a transfer method used by AWS CLI (aws-chunked), which is not compatible with the Swiss Backup service.
Unfortunately, Infomaniak has no way to address this incompatibility, as it is related to the internal operation of the AWS CLI client, developed by Amazon.
In order to continue using Swiss Backup effectively via the command line, Infomaniak recommends using the open-source s3cmd tool described above in this guide, which is fully compatible with S3 locations.
Link to this FAQ: https://faq.infomaniak.com/1579
Has this FAQ been helpful?
This guide explains how to back up a VPS (Virtual Private Server) with Acronis on Swiss Backup, the backup solution in an independent Swiss cloud. It describes the prerequisites, the differences between the types of licenses and redirects to the useful resources.
Summary of license choices
- Linux:
- Virtual Machine: For VPS or virtualized environments.
- Linux Server: For standalone, physical or virtual machines without a hypervisor.
- Windows:
- Workstation: For physical workstations.
- Server: For physical or virtual machines with advanced roles.
- Virtual Machine: For Windows VMs in a hypervisor environment.
Back up a VPS on Linux
Differences between the types of licenses
- Virtual Machine:
- For a VPS or virtual machine hosted in a virtualization environment (e.g. VMware, Hyper-V, Virtuozzo).
- A license covers the physical host and all virtual machines it contains.
- Suitable for Infomaniak Public Cloud environments or hypervisor clusters (each host requires a license).
- Linux Server:
- For an individual physical or virtual machine running Linux (server operating system).
- Suitable for standalone, local or colocated servers.
- Each license covers an individual physical or virtual machine.
To configure the Linux backup:
- Refer to this guide for complete details.
Back up a VPS on Windows
Differences between the types of licenses
- Workstation:
- A license per physical machine to back up.
- Limitation: This license does not support Microsoft Exchange Server, SQL Server, or Active Directory applications.
- Server:
- A license per physical or virtual machine running Windows.
- Supports Microsoft SQL Server, SharePoint, and Active Directory.
- Compatible with virtualization host roles (Hyper-V, VMware ESXi, etc.).
- Virtual Machine:
- A license per virtual machine running Windows in a hypervisor environment.
- Each cluster host requires a license.
To configure the Windows backup:
- Refer to this guide for complete details.
Link to this FAQ: https://faq.infomaniak.com/1660
Has this FAQ been helpful?
This guide details how to back up Nextcloud data via the OpenStack Swift protocol on Swiss Backup, the backup solution in a Swiss independent cloud.
Introduction
- It is also possible to use Hyper Backup (recommended): refer to this other guide.
Configure Nextcloud for Swiss Backup
Prerequisites
- Have an Swiss Backup Infomaniak account with an available device quota (minimum 1) for a Cloud backup.
- Add 1 device of type Cloud to obtain the OpenStack Swift parameters.
To configure a new backup:
- Enable the External storage support app in the Apps section of your Nextcloud installation:

- Click on External storage in the Administration section of your Nextcloud installation:

- Click on the dropdown menu and choose OpenStack Object Storage:

- Enter the fields with information specific to your device (refer to this other guide) and modify the drop-down menus as needed, as shown below:

Region:RegionOne
Bucket:default
Username: your Swiss Backup user ID, in the formatSBI-AA12345
Domain:default
Password: the password obtained after creating the Swiss Backup user
Tenant name:sb_project_SBI-AA12345(based on the username above)
Identity endpoint: take the location (1) followed by the path (2) from your login information…
… therefore, here:swiss-backup03.infomaniak.com/identity/v3
Link to this FAQ: https://faq.infomaniak.com/1661
Has this FAQ been helpful?
This guide explains how to find a solution if the Acronis Agent for Swiss Backup asks you to register your machine and then returns an error when you click on "Register the Machine".
Manual registration...
In some situations, especially if you have (re)installed Acronis on your device, the application may ask you to register your machine and then display an error. In this case, you need to perform a manual Acronis registration according to your OS.
... on macOS
Refer to this other guide to uninstall the application.
Otherwise, run the following commands from a Terminal type application (command line interface, CLI / Command Line Interface) on your macOS device:
To unregister, enter the following command:
sudo "/Library/Application Support/BackupClient/Acronis/RegisterAgentTool/RegisterAgent" -o unregister -t cloud -a acronis.infomaniak.comTo reregister, enter:
sudo "/Library/Application Support/BackupClient/Acronis/RegisterAgentTool/RegisterAgent" -o register -t cloud -a acronis.infomaniak.com -u SBA-XXXX-XX -p "PASSWORD_HERE"- Replace and complete the information specific to your account in the commands above, then enter your computer password when prompted.
... on Windows
Use the Acronis Cleanup Utility to uninstall the application.
Otherwise, run the following commands from a Terminal type application (command line interface, CLI / Command Line Interface) on your Windows device:
Open the Start menu by typing the following command:
cmd
- In the search results, right-click on
cmdand select Run as administrator. To unregister, enter:
cd "C:\Program Files\BackupClient\RegisterAgentTool\"Then:
.\register_agent.exe -o unregister -t cloud -a acronis.infomaniak.comTo reregister, enter:
cd "C:\Program Files\BackupClient\RegisterAgentTool\"Then:
.\register_agent.exe -o register -t cloud -a acronis.infomaniak.com -u SBA-XXXX-XX -p "PASSWORD_HERE"- Replace and complete the information specific to your account in the commands above.
If you have Acronis 2FA enabled...
If Acronis double authentication is enabled, then the commands change slightly:
- Generate a registration token from https://acronis.infomaniak.com (need help?).
- Run the
unregistercommand (see above according to your OS). - Run the
registercommand as above but adapting to…… macOS
sudo "/Library/Application Support/BackupClient/Acronis/RegisterAgentTool/RegisterAgent" -o register -t cloud -a acronis.infomaniak.com --token TOKEN_HERE… Windows
.\register_agent.exe -o register -t cloud -a acronis.infomaniak.com --token TOKEN_HERE
Has the registration been successful?
If you get a 200 message or "success", the command executed successfully.
If the result is different, take a screenshot of the error message then contact Infomaniak support.
Link to this FAQ: https://faq.infomaniak.com/2121
Has this FAQ been helpful?
This guide details how to back up a Synology NAS using the Cloud Sync application via the OpenStack Swift protocol on Swiss Backup, the backup solution in an independent Swiss cloud.
Preamble
- It is also possible to use Hyper Backup (recommended): refer to this other guide.
- The various services offered by Infomaniak are all compatible with the corresponding standard protocols (S3/Swift for storage, for example), therefore if you encounter a problem with third-party software, contact its publisher or a Partner and consult the support policy as well as section 11.9 of the Infomaniak Terms of Service.
Configure Cloud Sync
Prerequisites
- Have a Swiss Backup Infomaniak space with an available device quota (minimum 1) for a cloud backup.
- Add 1 device of type Cloud to obtain the OpenStack Swift parameters.
To configure a new backup:
- Log in to the administration interface of your Synology NAS (DSM).
- If necessary, install the Cloud Sync application from the Package Center.
- Open the Cloud Sync application.
- If necessary, click on the + to add a new cloud provider.
- Choose OpenStack Swift from the list of providers:
- Fill in the fields according to the information specific to your device (refer to this other guide) and modify the drop-down menus if necessary as follows:
- After clicking Next, fill in the fields according to the information specific to your device (refer to this other guide) and modify the drop-down menus if necessary as follows:
- Choose the location (the default choice proposed).
- Choose the container name (this is the domain name in your device information).
- Task configuration: enter...
- … the connection name (e.g. OpenStack Swift)
- … the local path (the content to be backed up)
- … the remote path (the folder in which your files will be backed up)
- … the synchronization direction (transfer only local changes recommended for a backup)
Link to this FAQ: https://faq.infomaniak.com/2277
Has this FAQ been helpful?
This guide explains how to activate the Acronis account on Swiss Backup, the backup solution in a Swiss independent cloud.
Prerequisites
- Order an Infomaniak Swiss Backup space (Acronis backup).
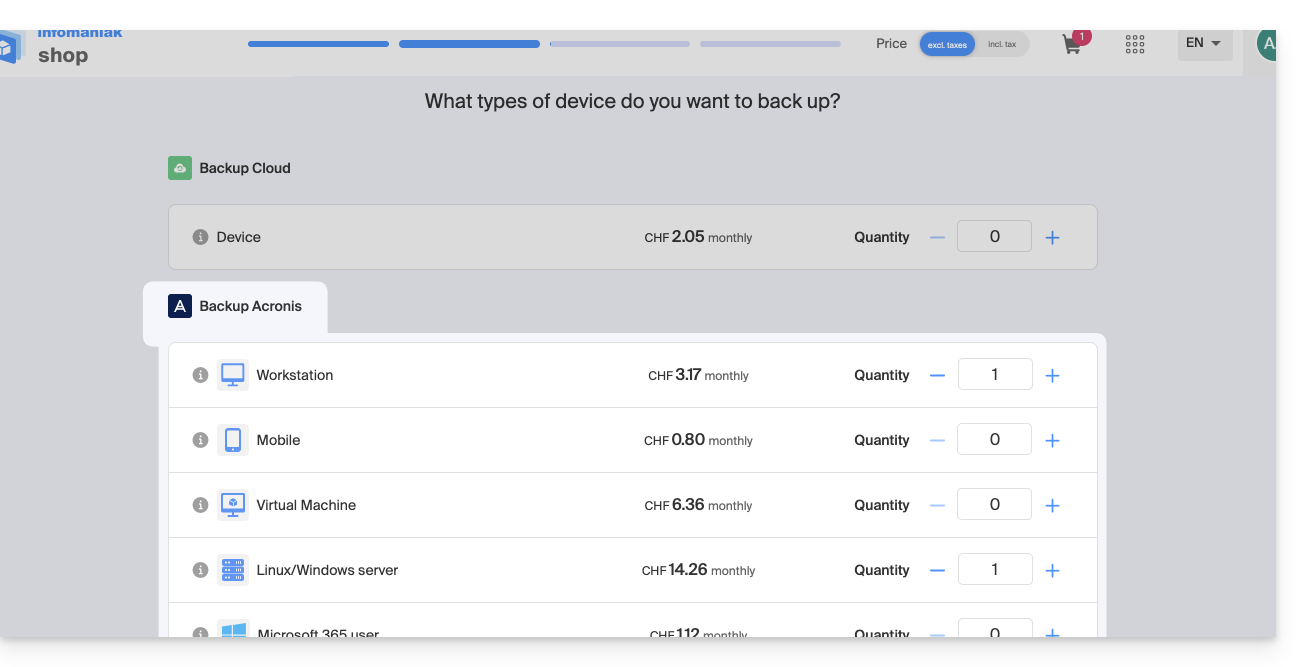
- During the order, define the available device quota (minimum 1) according to your needs:
- If necessary, increase the device quota according to your needs.
Activate the Acronis account for backup
To access Swiss Backup and prepare a new Acronis backup:
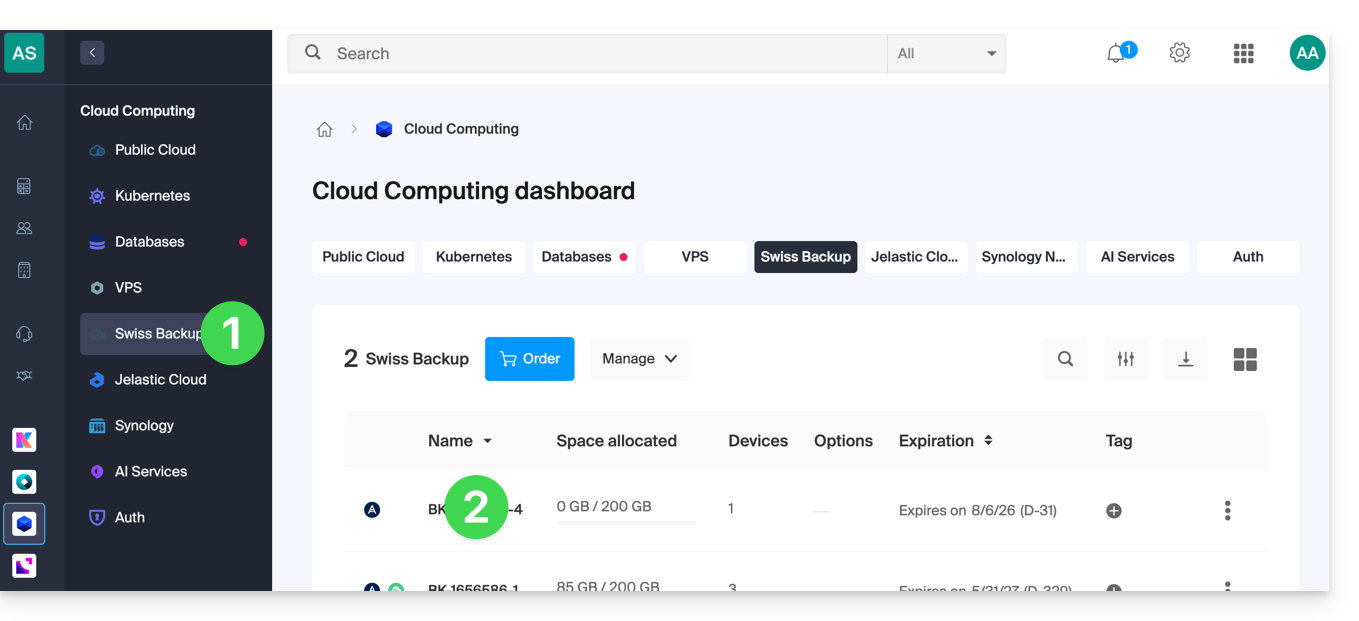
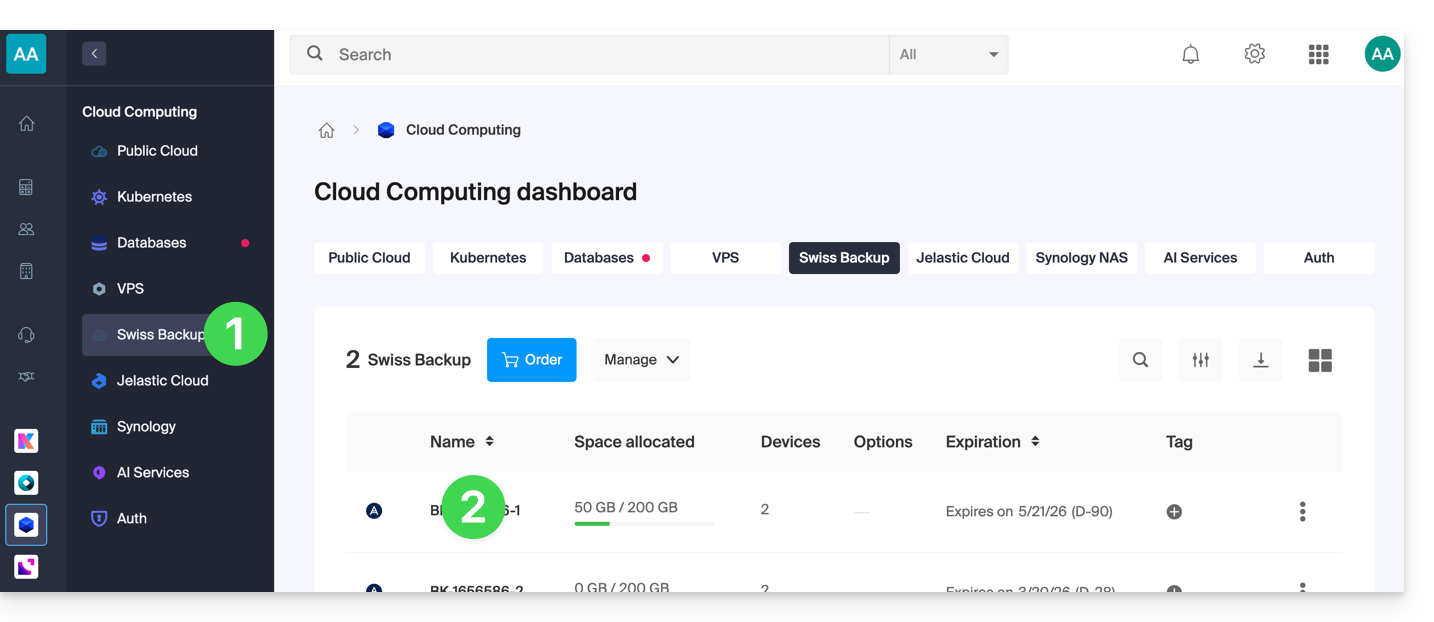
- Click here to access the management of your product on the Infomaniak Manager (need help?).
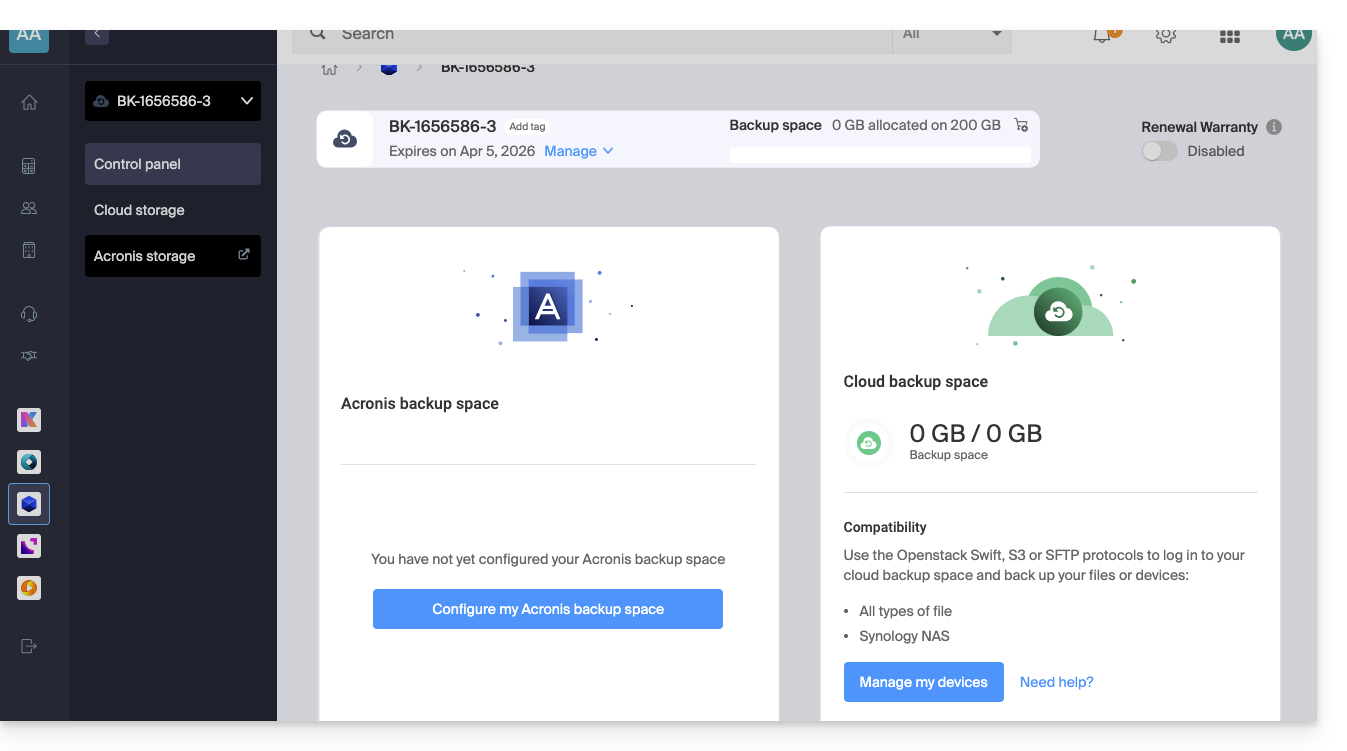
- Click directly on the name assigned to the product in question:
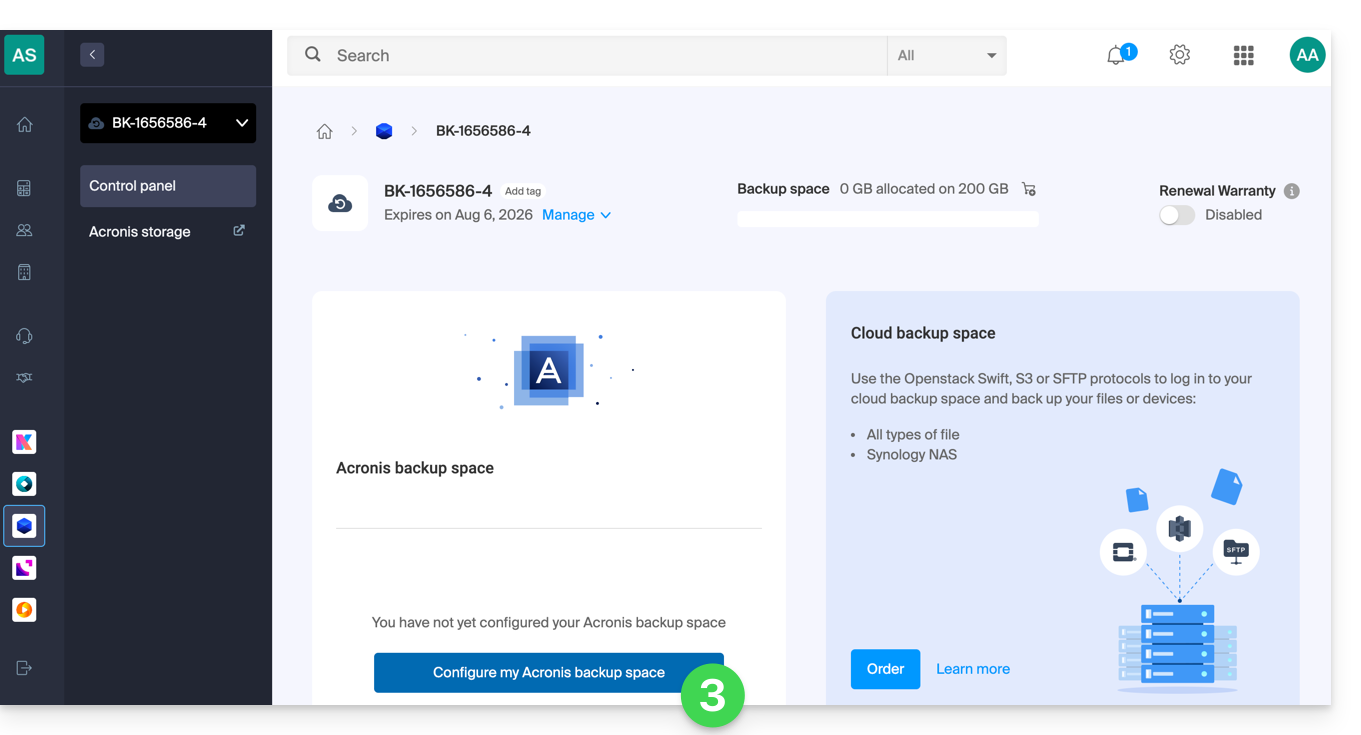
- Click on the Configure my Acronis backup space button (in the Acronis backup space section):
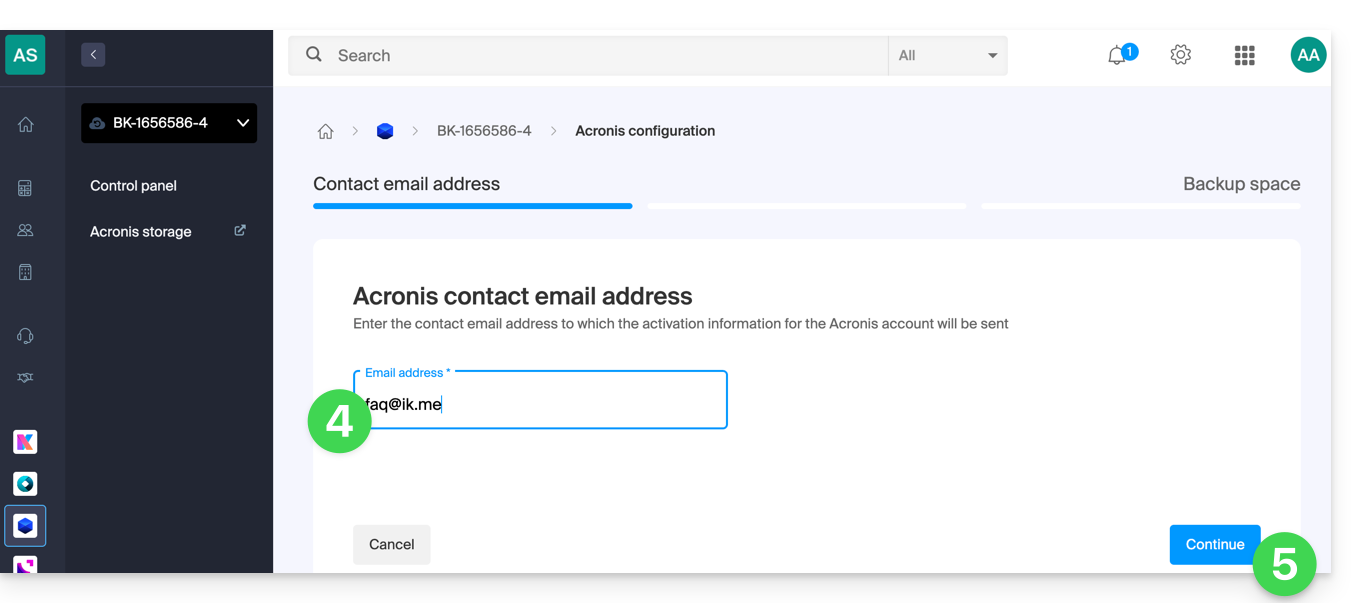
- Enter a valid contact email address.
- Click on the Continue button:
- Define the maximum disk space that this backup space should represent, based on the total volume of the subscribed Swiss Backup plan, and increase the total size if necessary using the blue link.
- Click the Continue button:

- Check the email you received to activate the account and generate a login password:
- Click the button in the email you received:
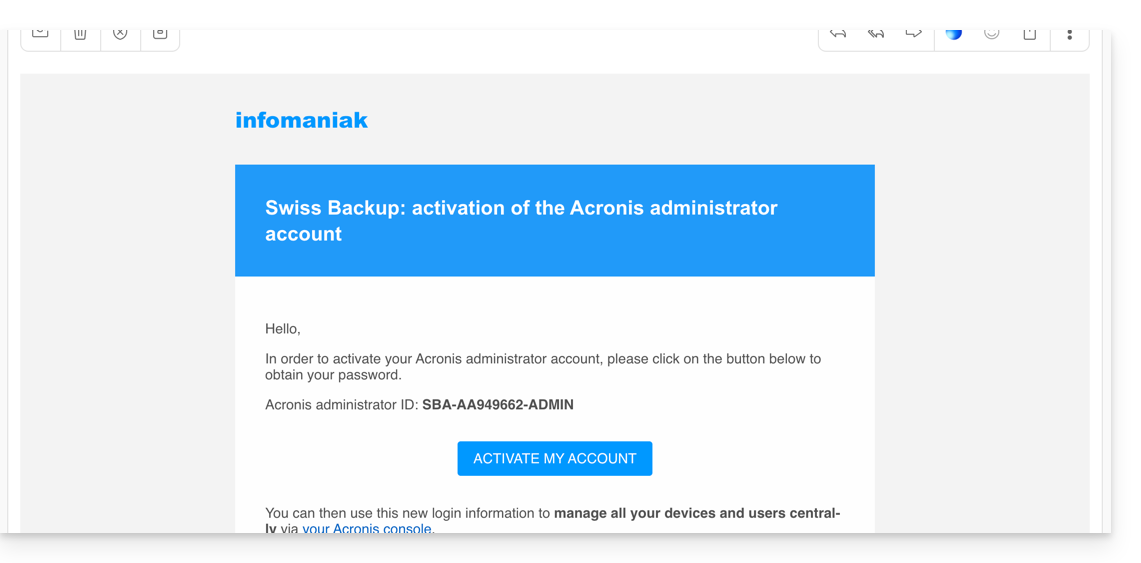
- Carefully note the password that will appear on your screen (example below):
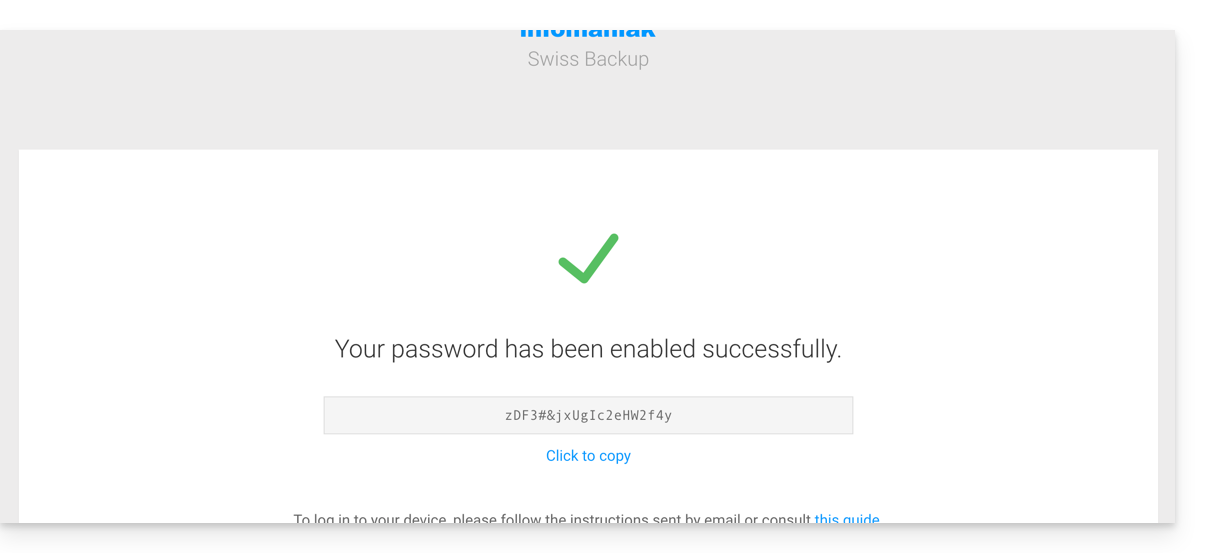
- If needed, you can regenerate a new Acronis account password.
- Click the button in the email you received:
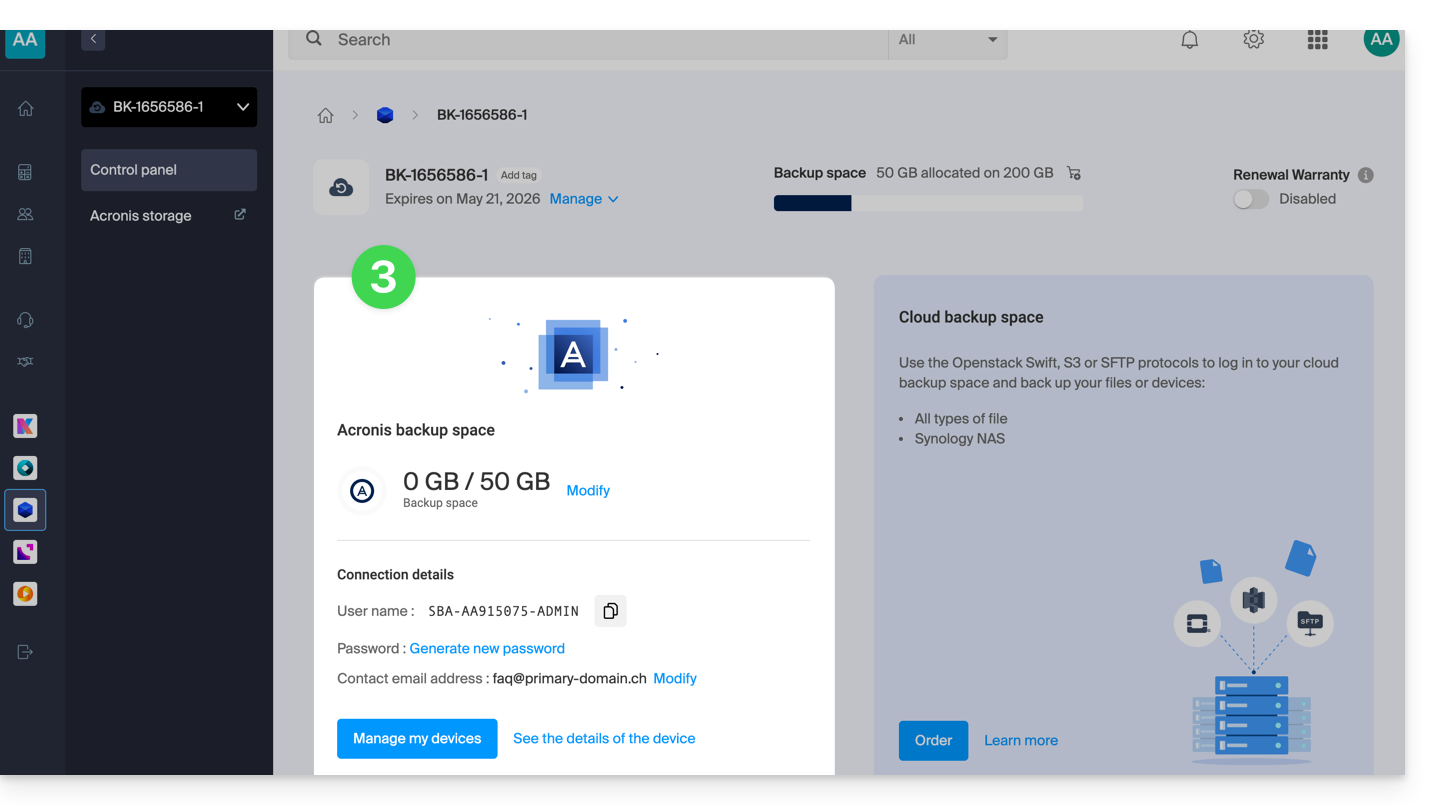
- The login information is now displayed on the Swiss Backup management page in the Infomaniak Manager:
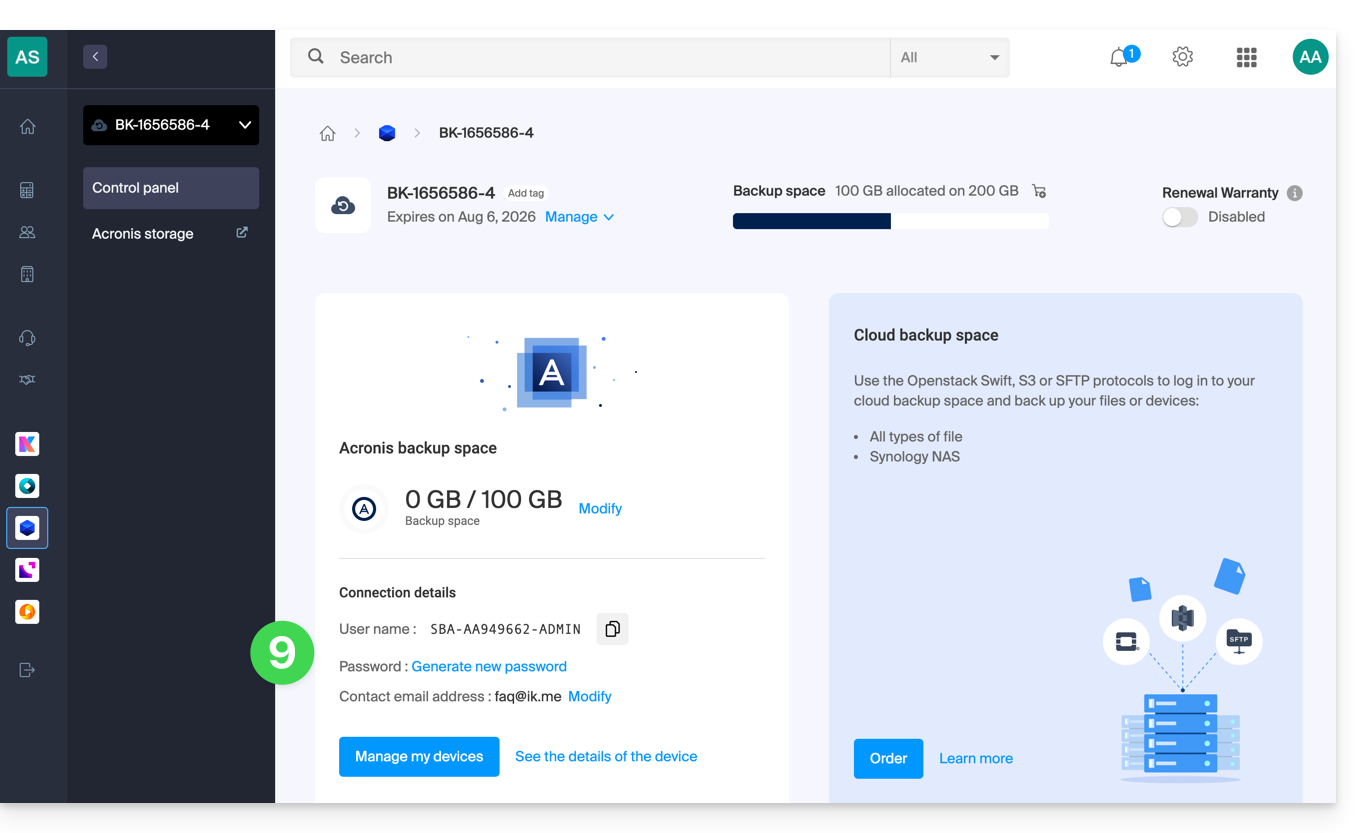
- The button below this information allows you to log in to Acronis.
What's next?
Once the device has been added to the Swiss Backup interface within the Infomaniak Manager, you can configure the Acronis application to start your backup plans.
Link to this FAQ: https://faq.infomaniak.com/2279
Has this FAQ been helpful?
This guide details how to back up a computer running Microsoft Windows using Acronis on Swiss Backup Infomaniak, the backup solution in a Swiss independent cloud.
It is also possible to back up Windows installed on a virtual machine such as VMware, Virtuozzo, or Microsoft Hyper-V.
Prerequisites
- Check the Windows versions supported by the Acronis Agent.
- Have a Swiss Backup space with an available device quota (min. 1) for Windows (see below).

- If necessary, increase the device quota according to your needs.
- Add the device in the Infomaniak Manager to receive the login credentials.
Differences between devices
Workstation
- 1 license per physical machine to be backed up.
- Note: this license does NOT support backing up Microsoft Exchange Server, Microsoft SQL Server, or Active Directory.
- If you want to back up Microsoft applications installed on a workstation operating system, a server license is required.
Virtual Machine
- 1 license per virtual machine to be backed up.
- Supports Microsoft SQL Server, Microsoft SharePoint, and Active Directory.
- When Acronis is installed on a cluster (e.g., Hyper-V), each host in the cluster requires a VM license.
- If you have installed Windows in a virtual machine, it is necessary to add a device of this type.
Server
- 1 license per physical or virtual machine running Windows.
- Supports Microsoft SQL Server, Microsoft SharePoint, and Active Directory.
- Supports backing up a server acting as a virtualization host (Hyper-V, VMware ESXi, etc.).
Configure the backup
To configure the backup with Acronis:
- Click here to access the Acronis Console using the credentials obtained after adding the device (need help?).
- Click on Devices in the left-hand menu.
- Choose the agent for Windows:
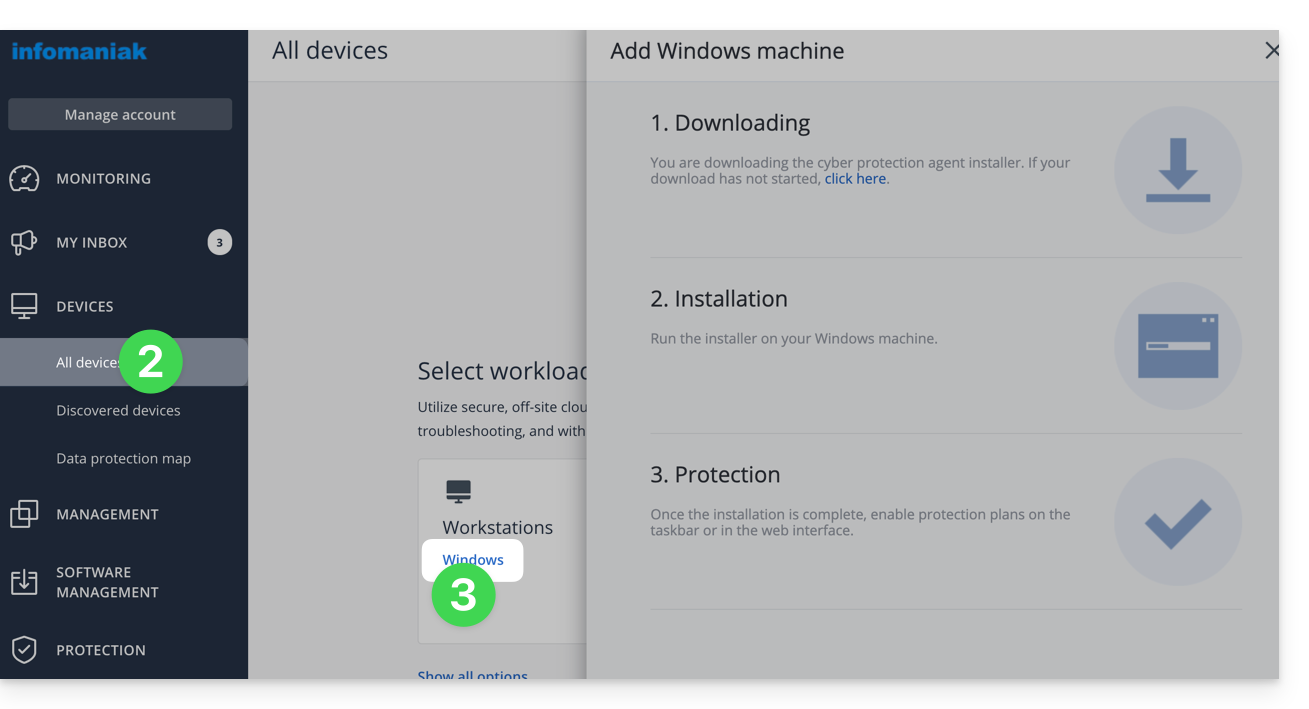
- Then install the Acronis application for Windows:
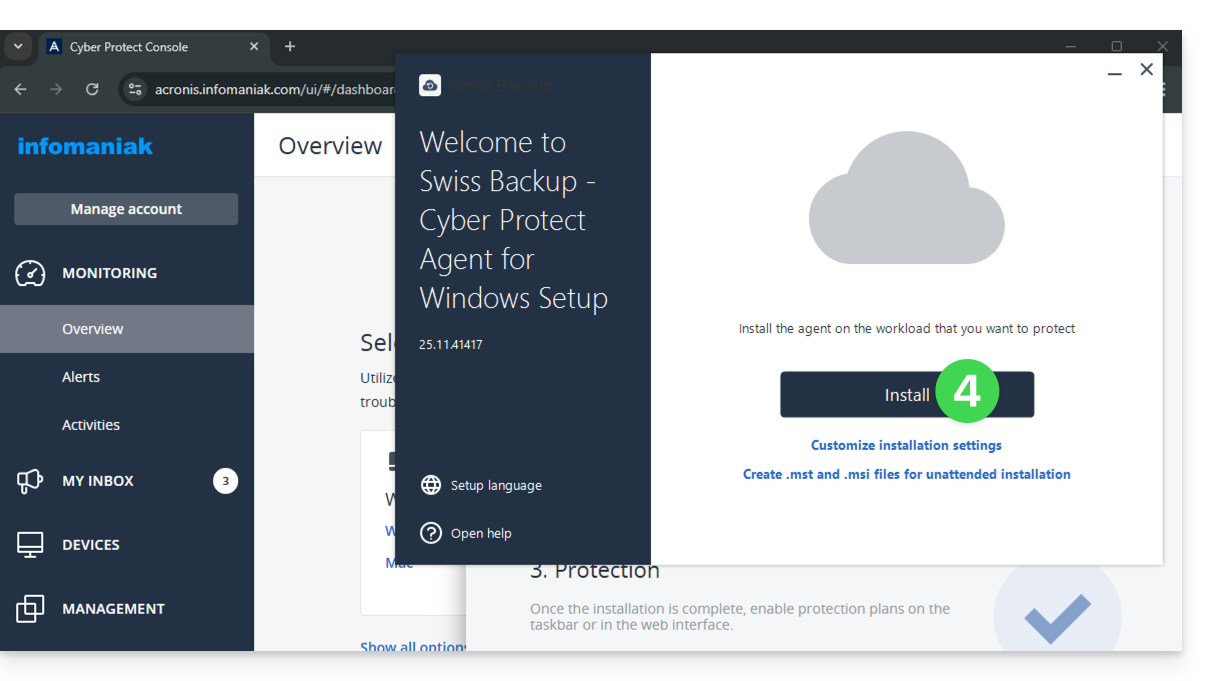
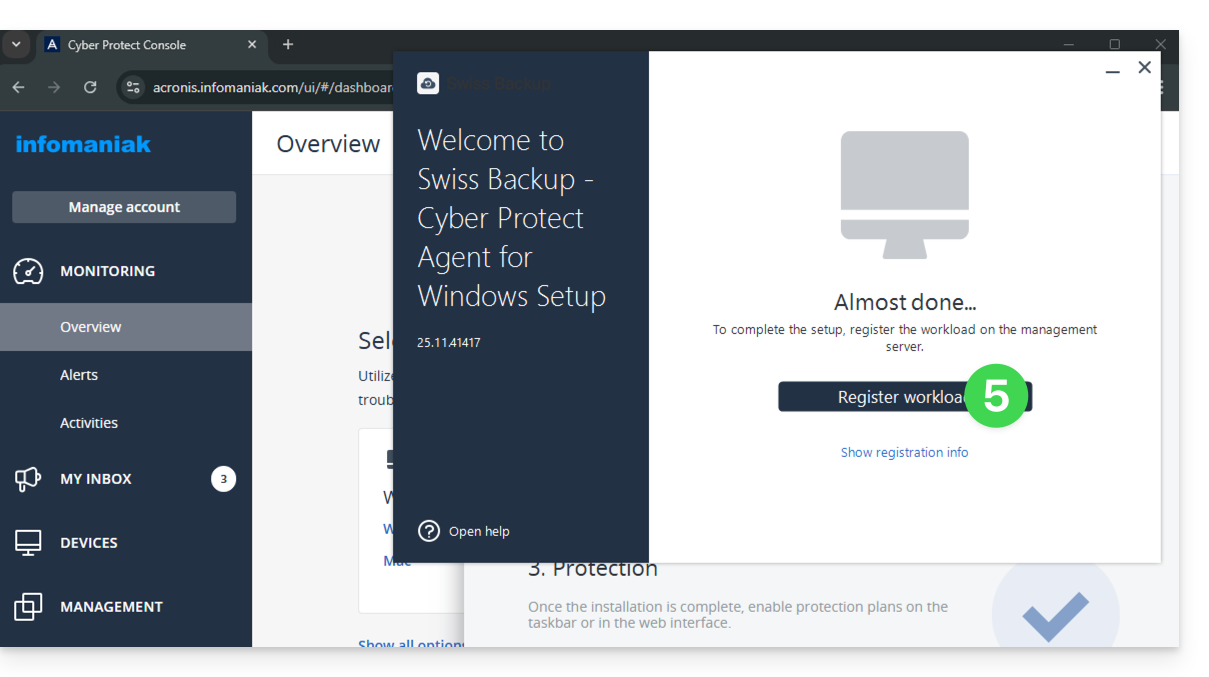
- Click on the Save workload button:
- If necessary, select the user concerned by this backup:
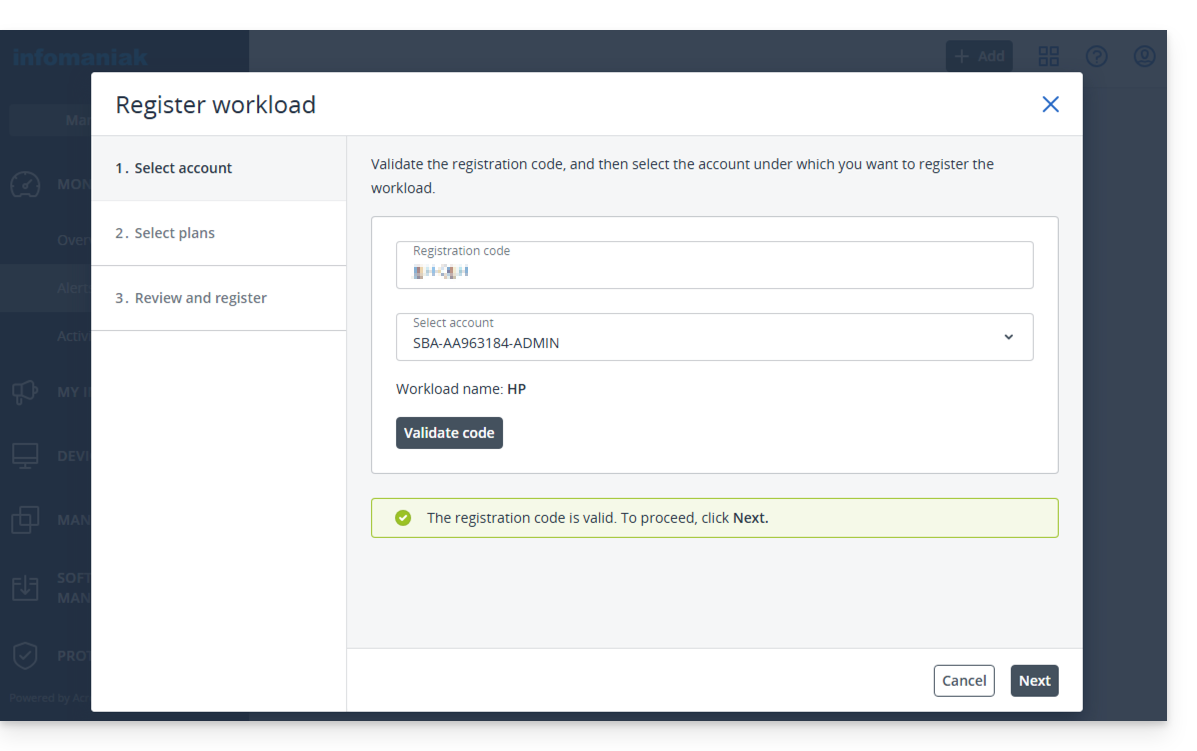
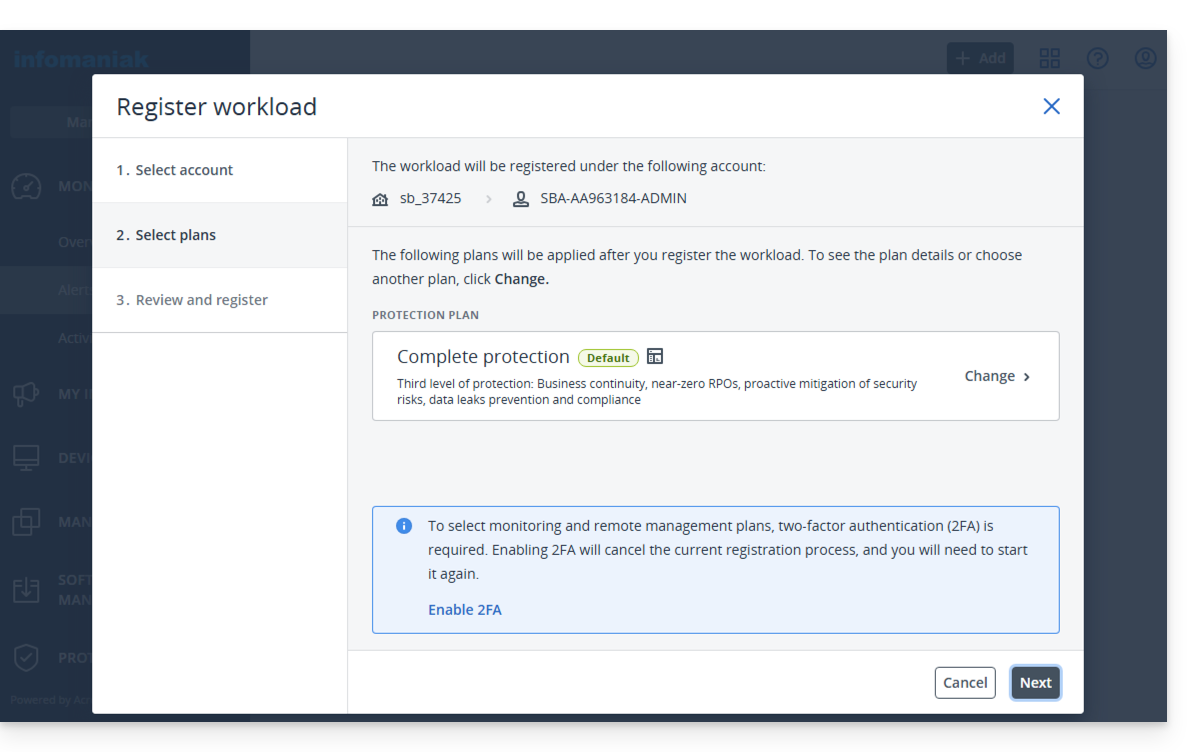
- Continue to complete and activate the selected protection plan:
- Wait for the Acronis interface to display your new machine:
- Check the active backup plan or replace it with a new one to activate, if necessary, the backup encryption by setting a password that you must never lose, otherwise you will not be able to restore your machine.
- Downloading a boot file in
.isoformat is not necessary (you can always do this from another computer in case your machine becomes unusable in the future). - The protection will run in the background at the times configured in your backup plan.
Restore the backup
For a (partial or complete) restoration, please refer to this other guide.
Link to this FAQ: https://faq.infomaniak.com/2280
Has this FAQ been helpful?
This guide details how to back up an Apple macOS computer using Acronis on Swiss Backup, the backup solution in a Swiss independent cloud.
Prerequisites
- Check the macOS versions supported by the Acronis Agent.
- Have an Swiss Backup Infomaniak account with an available device quota (minimum 1) for macOS:
- If necessary, increase the device quota according to your needs.
- Add the device to the Infomaniak Manager to receive the login credentials.
Configure the backup
To configure the backup with Acronis:
- Click here to access the Acronis Console with the credentials obtained after adding the device (need help?).
- Download and install the Acronis Agent for macOS (need help?):
- Also, refer to the chapter below regarding disk access requested by the installer.
- Click on Register machine at the end of the Cyber Protect installation:
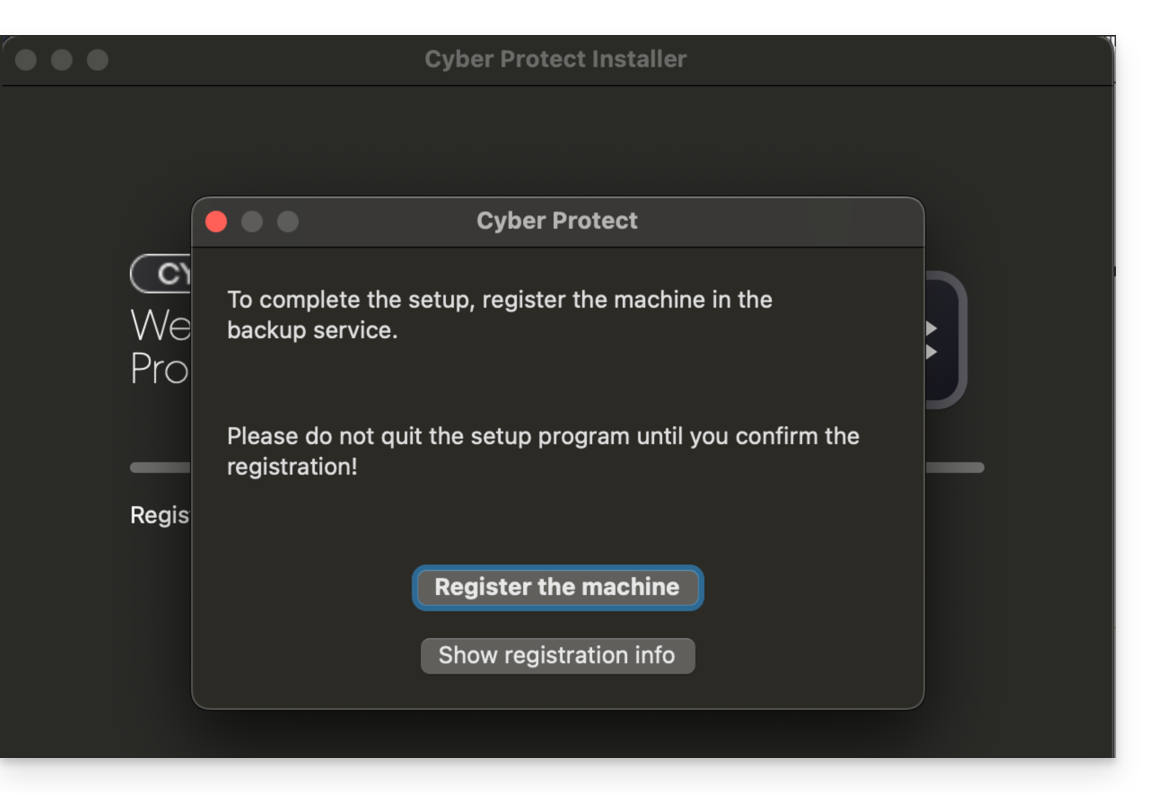
- Do not change the code provided, select the relevant user if necessary, and click on Verify code:
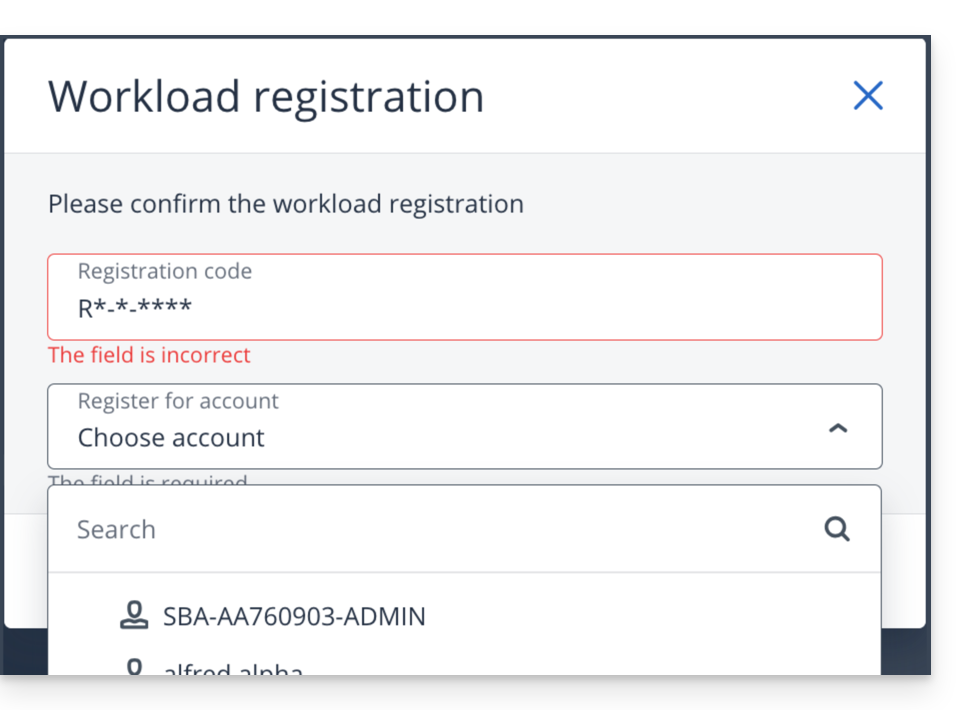
- Refer to this other guide if machine registration fails.
- Create a backup plan.
Password and access permissions
During the installation of the desktop app (point 2 above), the required password is your Mac's password (user account).
You will also need to grant (from macOS settings) full disk access to the Acronis Cyber-Protect-Service Agent: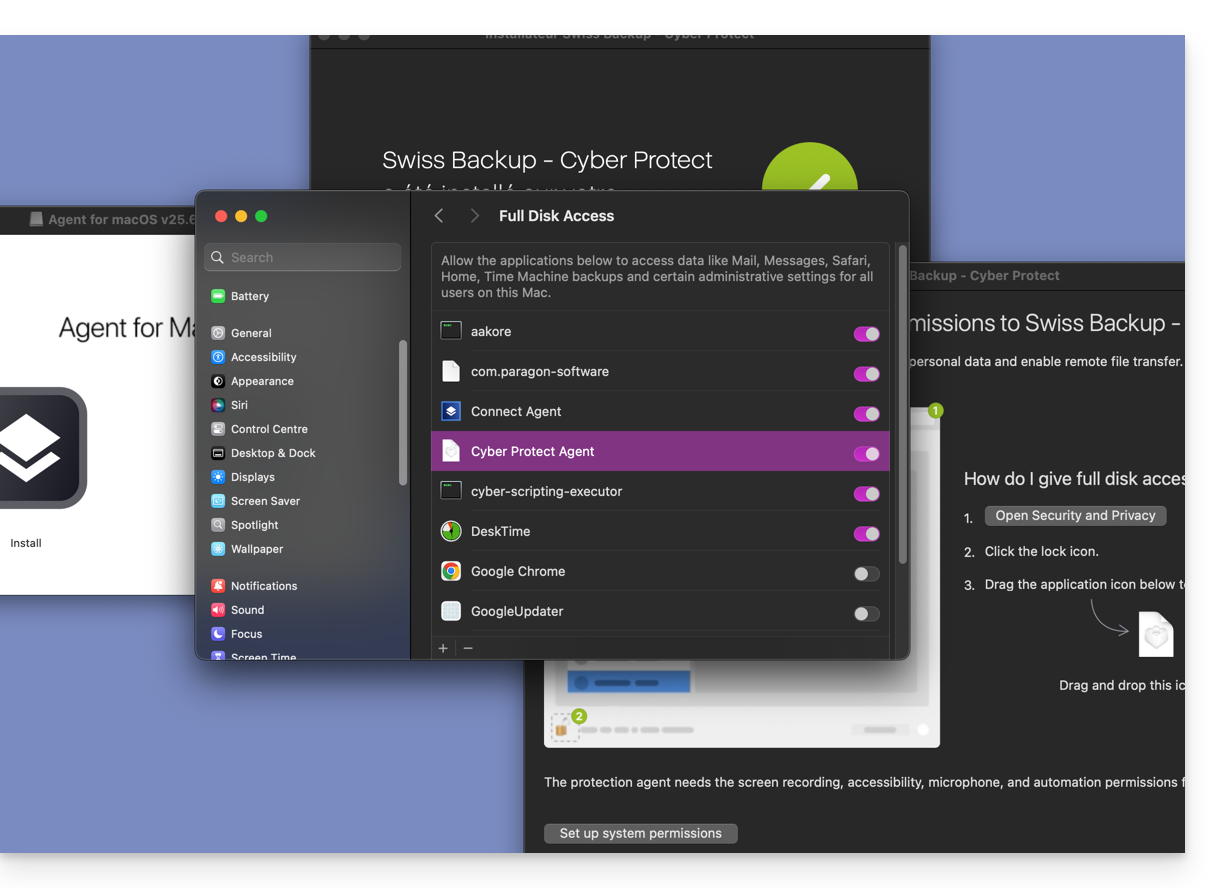
Accessing and restoring backed-up files
Refer to this other guide for restoring your data.
Link to this FAQ: https://faq.infomaniak.com/2281
Has this FAQ been helpful?
This guide details how to manually back up data using the Cyberduck application (macOS / Windows) via the OpenStack Swift protocol on Swiss Backup, the backup solution in a Swiss independent cloud.
Introduction
Configuring Cyberduck
Prerequisites
- Have an Swiss Backup Infomaniak account with an available device quota (minimum 1) for a Cloud backup.
- Add 1 device of type Cloud to obtain the OpenStack Swift parameters.
- Download and install Cyberduck (macOS / Windows).
- Familiarize yourself with the official documentation https://docs.cyberduck.io/protocols/openstack/infomaniak/.
To configure a new backup:
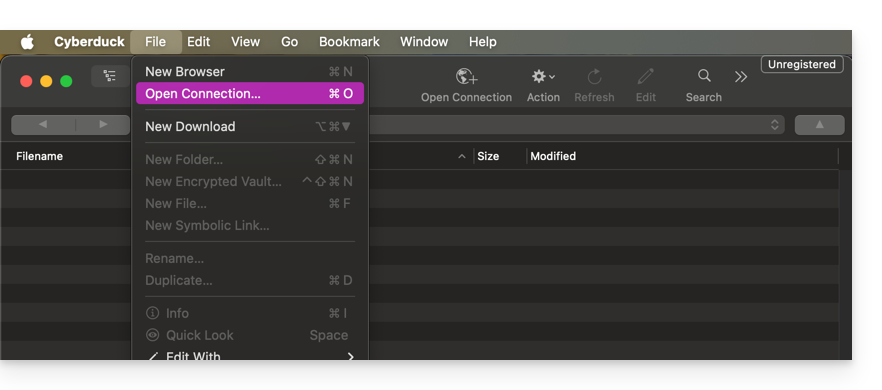
- Open the Cyberduck application.
- Click on Open Connection:
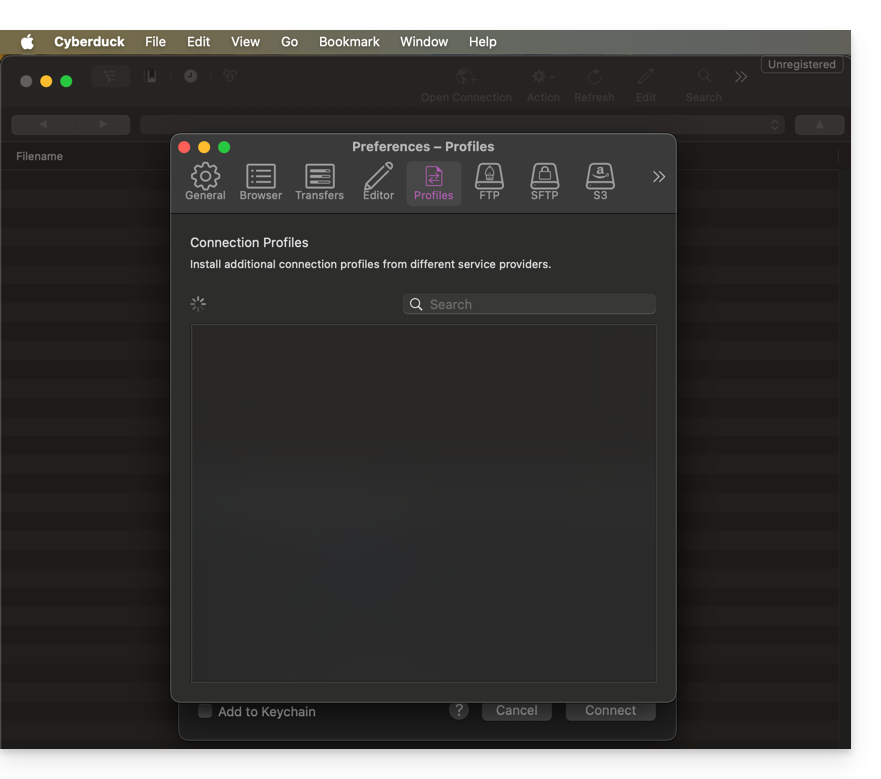
- Click on the dropdown menu and choose More Options:
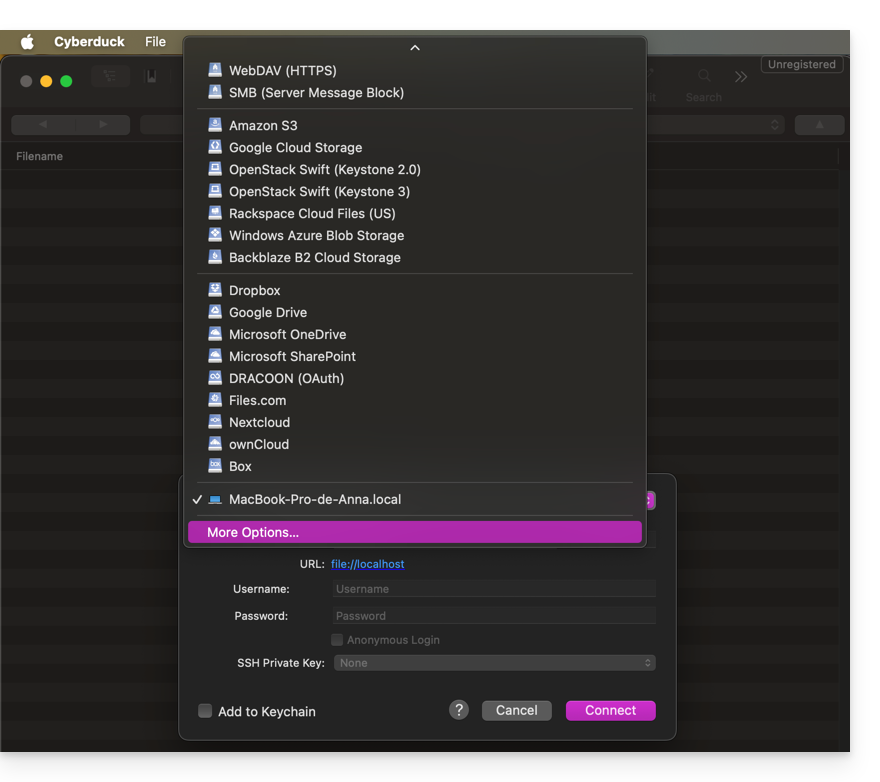
- Wait for the additional profiles to load:
- Search for and select the profiles corresponding to Infomaniak Swift:
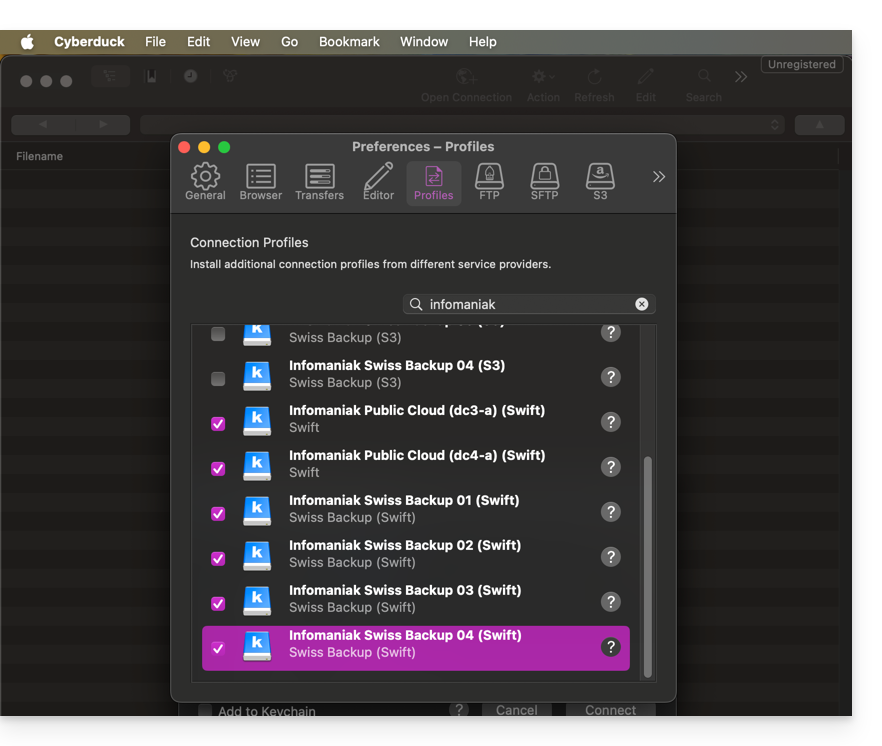
- If necessary, check your cluster number, which is indicated in the Manager under Cloud storage information, in the "Location" section.
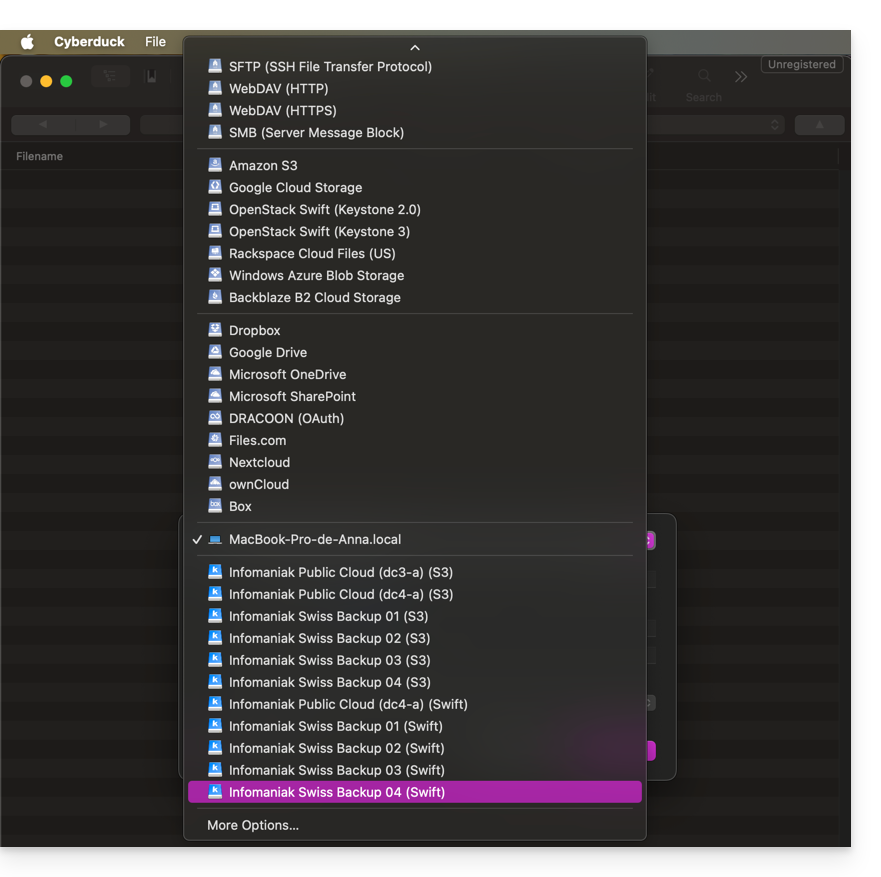
- Close the window and restart Cyberduck if the profiles do not appear in the drop-down menu in step 3 above.
- Choose the corresponding profile:
- Fill in the fields according to the information specific to your device:

- Click the Connect button to establish the Swift connection.
Link to this FAQ: https://faq.infomaniak.com/2282
Has this FAQ been helpful?
This guide details how to obtain the connection and configuration information for Swiss Backup (backup with Acronis), the backup solution in an independent Swiss cloud. It also explains the differences between the passwords available to you.
Accessing connection information
To access the information related to your connection to Acronis:
- Click here to access the management of your product on the Infomaniak Manager (need help?).
- Click directly on the name assigned to the product concerned:
- The different information related to your device is displayed on the page:
- User name:
SBA-AB123456-ABCDE - Password: *** (see below to manage it)
- User name:
Different passwords
Infomaniak user account
To access the management of the Swiss Backup product (Acronis or Cloud storage), you need to log in to the Infomaniak Manager: refer to this other guide on this subject.
Acronis Backup Account
To establish a connection to the Acronis interface, a password must be generated for the first time when creating a device on the Swiss Backup interface and activating the identifier (point 8 at the bottom of this other guide). It is not possible to display an already generated password.
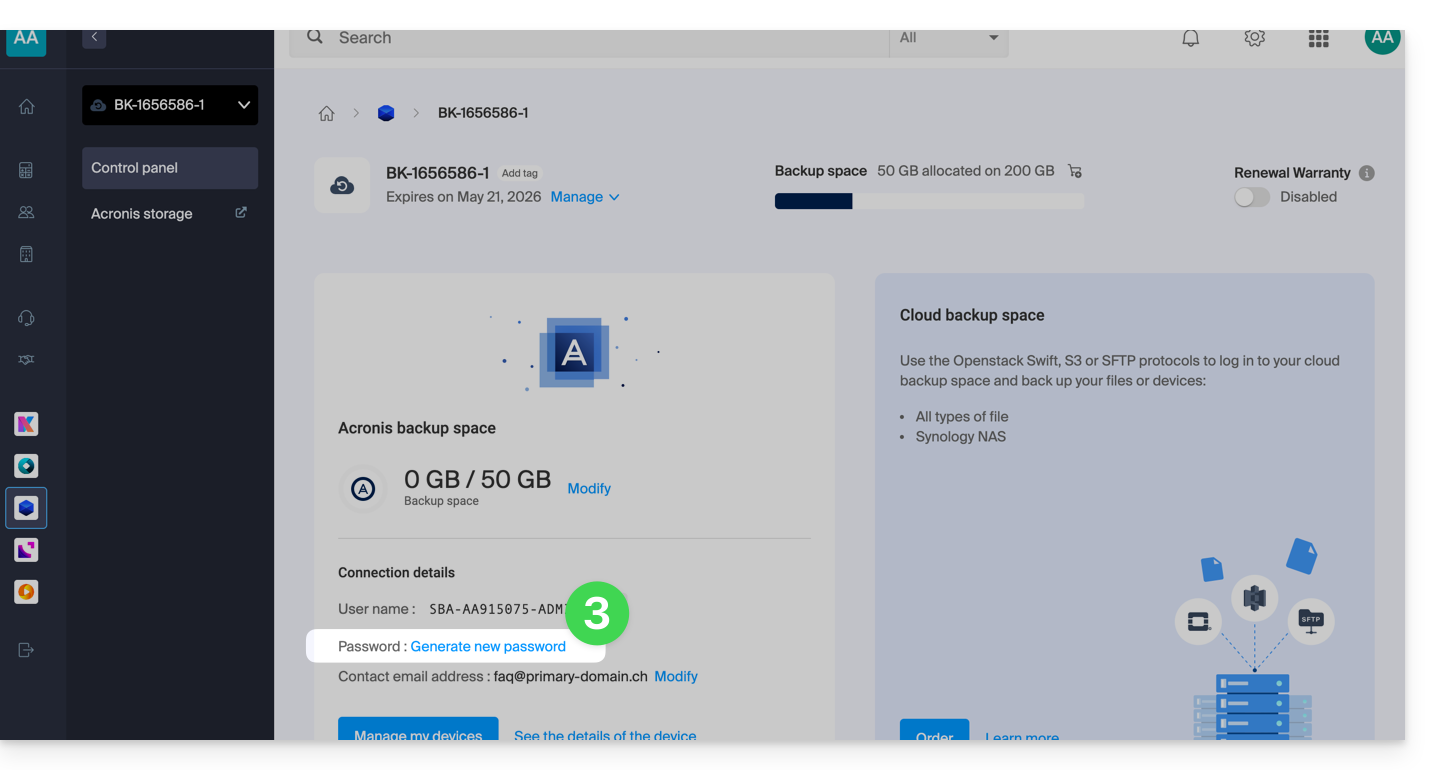
If you forget it, you need to generate a new one:
- Click here to access the management of your product on the Infomaniak Manager (need help?).
- Click directly on the name assigned to the product concerned.
- Click on Generate a new password (in the Acronis Backup Space section) and follow the wizard:
Non-administrator account
An administrator account can create non-administrator accounts. Resetting a non-admin account password is requested on the login page to the Acronis interface and is then offered by email to the user's address: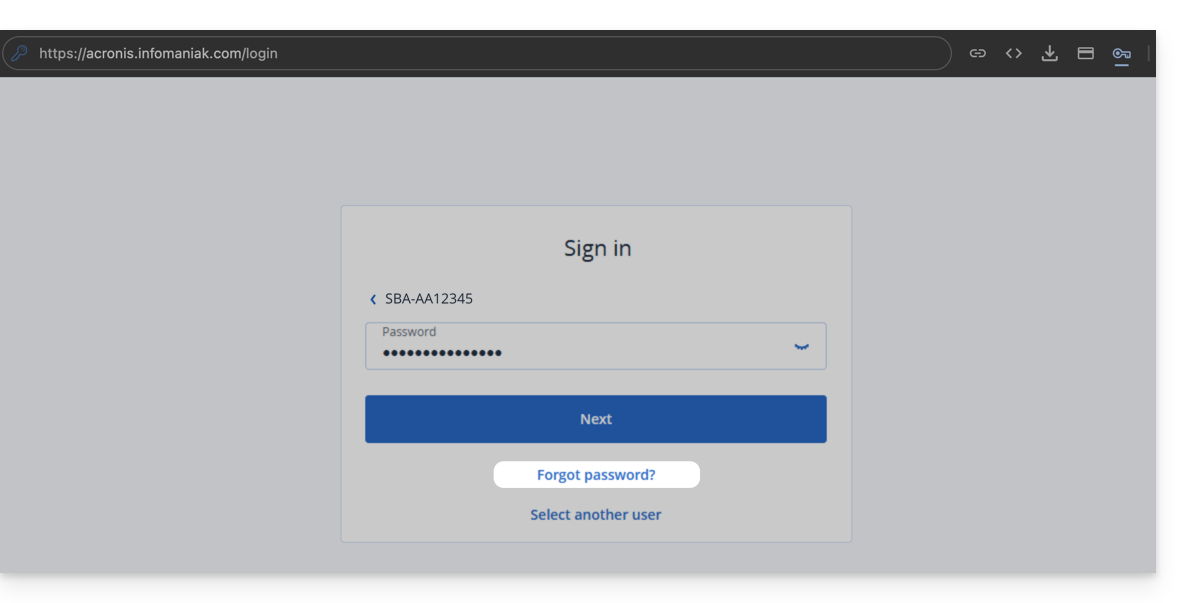
If no message arrives in the user's email, check that the username is correct (SBA-12345 may sometimes have been created with a username and it is this name that must be specified to reset the password).
Acronis Encryption
It is recommended to encrypt all backups stored in the Cloud storage, especially if your company is subject to regulatory compliance. The encryption password is not subject to any length or complexity requirements.
It is impossible to restore encrypted backups if you lose or forget the password.
To activate encryption, specify the encryption parameters when creating a protection plan. Once a protection plan is applied, the encryption parameters cannot be modified.
To use different encryption parameters, create a new protection plan.
Cloud Backup
To establish a Swift / S3 / FTP/SFTP / etc. type of connection, a password for this type of backup is generated when creating a device on the Swiss Backup interface and activating the identifier.
Link to this FAQ: https://faq.infomaniak.com/2283
Has this FAQ been helpful?
This guide details how to get started with Swiss Backup, the backup solution in an independent Swiss cloud.
Preamble
- Infomaniak offers two variants at the level of backup modes, this depending on what you want to back up:
- You have already made your choice in principle during the ordering of a Swiss Backup backup space but it is quite possible to modify the offer at any time.
1. CLOUD Backup Mode
Allows you to back up and synchronize files via the protocols:
- Swift (recommended)
- FTP / SFTP
- S3
- Synology NAS system
with the application of your choice…
2. ACRONIS Backup Mode
Ideal solution for backing up:
- Windows / macOS workstations
- iOS / Android mobiles (iPhone / Samsung, etc.)
- Windows / Linux servers
- VMware, Hyper-V, Virtuozzo virtual machines...
- Microsoft 365 / Google Workspace spaces...
using the Acronis Cyber Protect Cloud software which will perform automatic and customized backups…
Link to this FAQ: https://faq.infomaniak.com/2284
Has this FAQ been helpful?
This guide details how to back up a server running your Linux distribution of choice to Swiss Backup, the backup solution in a Swiss independent cloud.
Configure rClone for Swiss Backup
Prerequisites
- Have an Swiss Backup Infomaniak account with an available device quota (minimum 1) for a Cloud backup.
- Install the rClone application via your Linux distribution's package manager.
- Add 1 device, but of type Server, to obtain the rClone settings
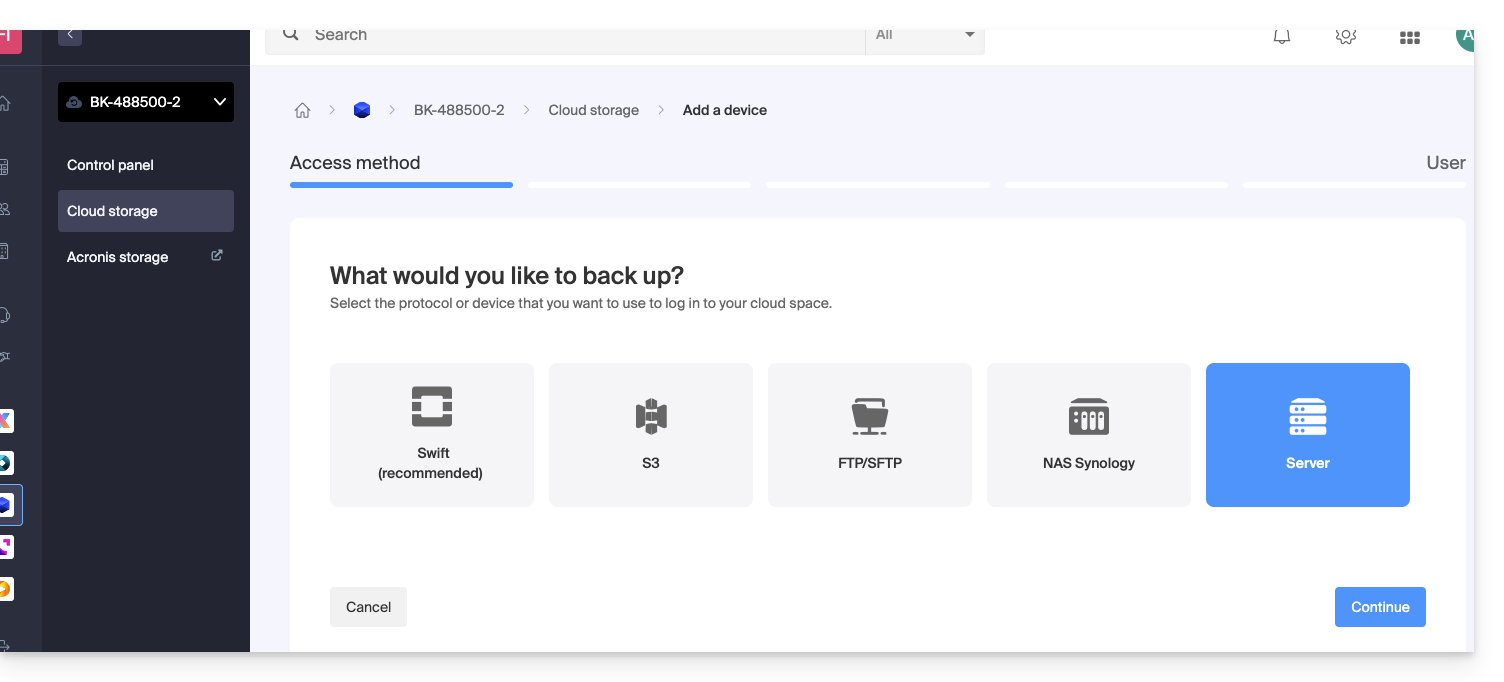
To configure a new backup:
- Download the rclone file received by email after adding the device:
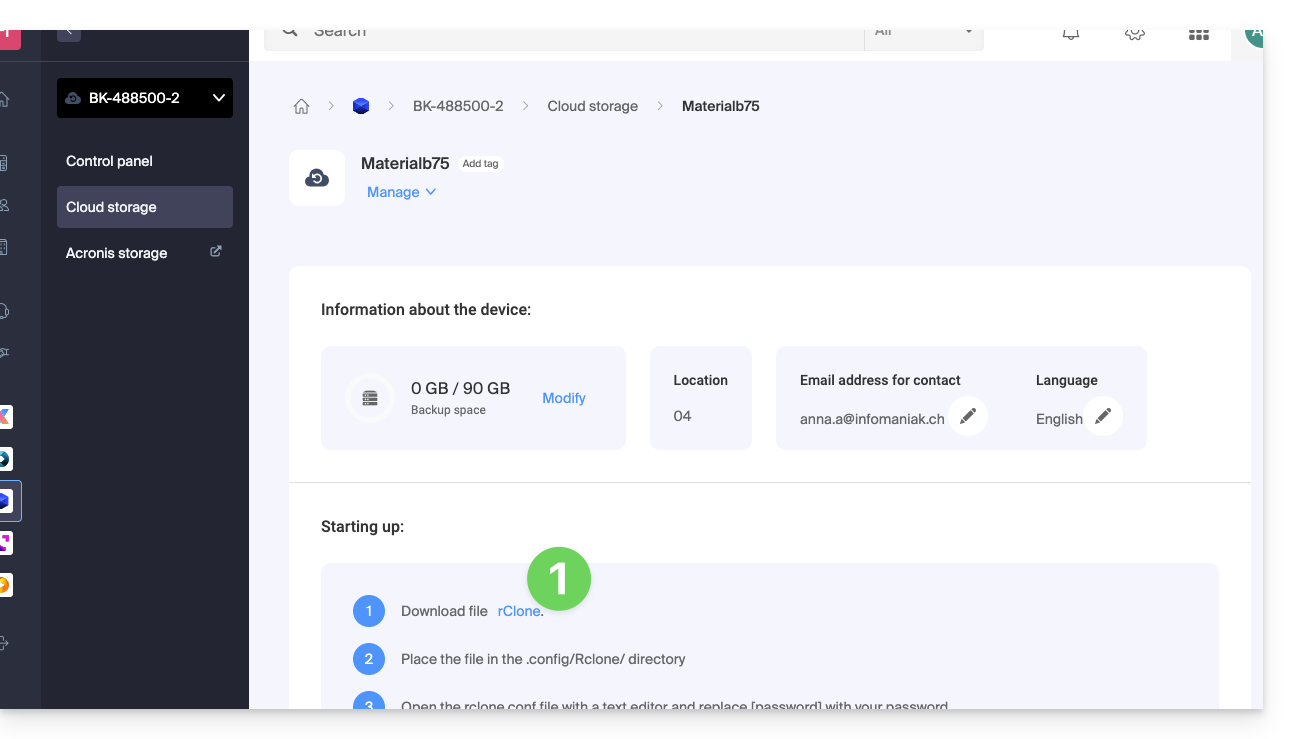
- Place the file in the
~/.rclone.conf.config/rclone/directory, or place the contents of the file at the end of the existing~/.rclone.conf.config/rclone/rclone.conffile (on debian stretch, this file is located at:~/.rclone.conf) — also refer to the rClone documentation. - Open the
rclone.conffile with a text editor and replace[password]with the generated password: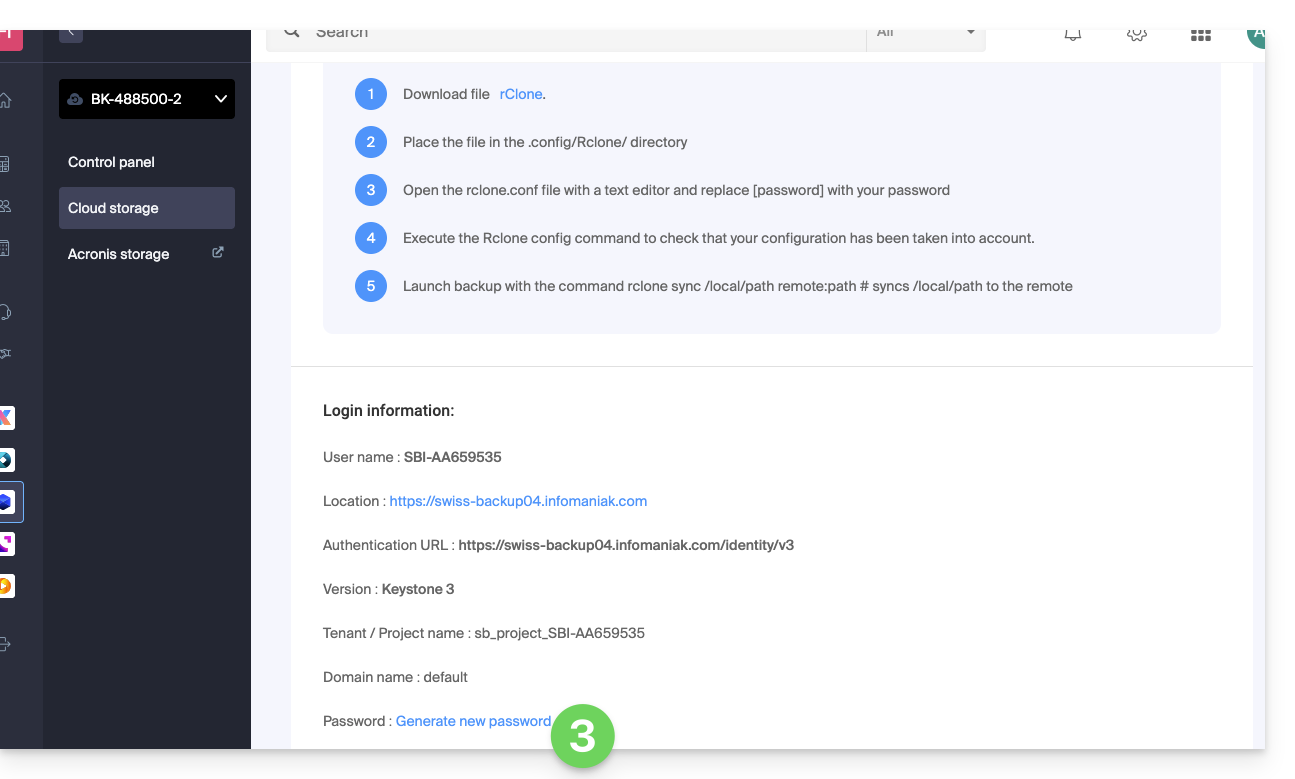
- Run the
rclone configcommand to verify that the configuration has been applied correctly. - Start the backup using the
rclone sync /local/path project_name:defaultcommand.
If needed, you can find your login details in the Manager.
Example rClone configuration
[sb_project_SBI-AB123456]
type = swift
user = SBI-AB123456
key = [password]
auth (1) = https://swiss-backup02.infomaniak.com/identity/v3
domain = default
tenant = sb_project_SBI-AB123456
tenant_domain = default
region = RegionOne
storage_url =
auth_version =
(1) The indication "//swiss-backup02", "//swiss-backup03", etc. changes depending on the cluster number indicated in the Manager under Cloud storage information in the "Location" section; and if your Swiss Backup device was created before October 2020, you will need to use https://swiss-backup.infomaniak.com/identity/v3.
You can change [sb_project_SBI-AB123456] to an indication of your choice for easier use.
For example, the indication [swissbackup] will result in:
rclone sync /local/folder swissbackup:remote/folderinstead of:
rclone sync /local/folder sb_project_SBI-AB123456:remote/folder
Start a backup or restore
Start a backup with the following command:
rclone sync /local/folder sb_project_SBI-AB123456:remote/folderStart a restore with the following command:
rclone sync sb_project_SBI-AB123456:remote/folder /local/folderLink to this FAQ: https://faq.infomaniak.com/2285
Has this FAQ been helpful?
This guide details how to get started with Swiss Backup (Acronis backup), the backup solution in a Swiss independent cloud.
Configuration
- Activate the Acronis account to add a new device
- Swiss Backup login information
- Manage Acronis users
- Modify user quotas
- Modify the frequency of Acronis backups
- Limit the resources used by Acronis
- Enable two-factor authentication
- Manage Acronis notifications and alerts
- Modify the Acronis language
- Resolve a Gatekeeper error on macOS
- Resolve an Acronis registration error
- Resolve a connection error
- Immutable storage in Swiss Backup
Usage examples
- Back up Windows
- Back up macOS (Acronis Agent (Apple M1/M2...) / uninstall Acronis Agent (macOS))
- Back up Linux (Acronis Agent (AlmaLinux 9))
- Back up an Android mobile (Samsung, Huawei, OnePlus, etc.)
- Back up an iOS mobile (iPhone, iPad, etc.)
- Back up Microsoft 365
- Back up Google Workspace
- Restore specific files and folders
- Restore a Mac completely
- Restore a PC (Windows) completely
- Restore a Swiss Backup backup to a virtual machine
- Troubleshoot Acronis backup deletion issues
Link to this FAQ: https://faq.infomaniak.com/2286
Has this FAQ been helpful?
This guide explains how to schedule a daily, weekly, or monthly Swiss Backup with Acronis.
Also refer to the Acronis documentation on this subject.
Modify the frequency of Acronis backups
To do this:
- Click here to access the Acronis Console with the credentials obtained after adding the device (need help?).
- Click on the All devices menu in the left sidebar.
- Click on the device in question.
- Click on the 3-dot action menu on the Protection plan that appears on the right.
- Click on Edit:
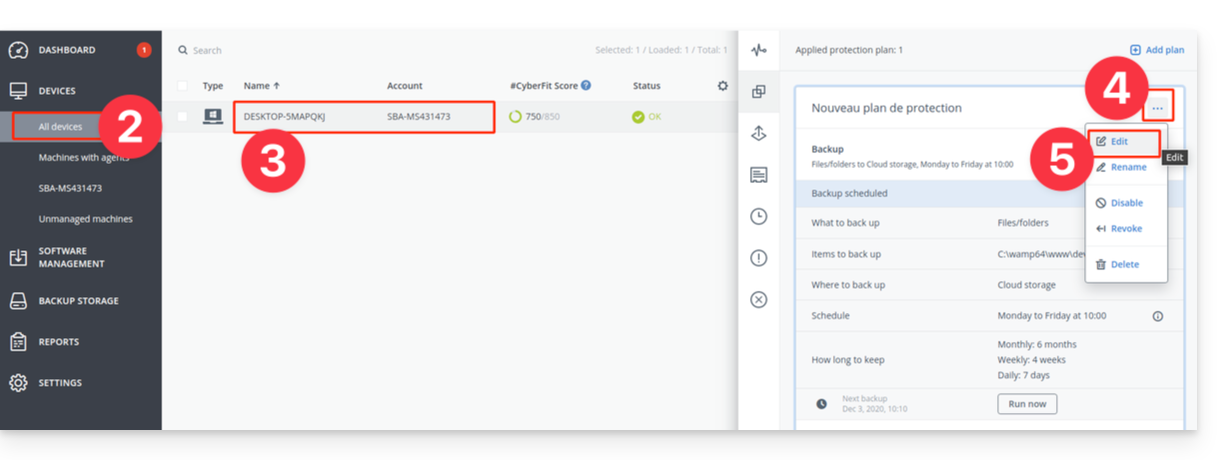
- Customize the Protection plan according to your needs.
- Once all changes have been made, click on the Save button in the upper right corner of your Protection plan.
Link to this FAQ: https://faq.infomaniak.com/2287
Has this FAQ been helpful?
This guide details how to restore a Windows computer using Acronis on Swiss Backup, the backup solution in an independent Swiss cloud.
Prerequisites
- Have a backup of the computer on Swiss Backup (refer to this other guide).
- Refer to Acronis documentation regarding the recovery of physical machines.
- The computer to be restored must be connected to the Internet via Ethernet cable (or WiFi depending on the computer's capabilities).
Restore the backup
To begin, from the affected computer or any other machine:
- Click here to access the Acronis Console with the credentials obtained after adding the device (need help?).
- Click on Devices in the left sidebar
- Click the Restore button on your relevant backup plan
- Click on the other ways to restore at the top of the interface:
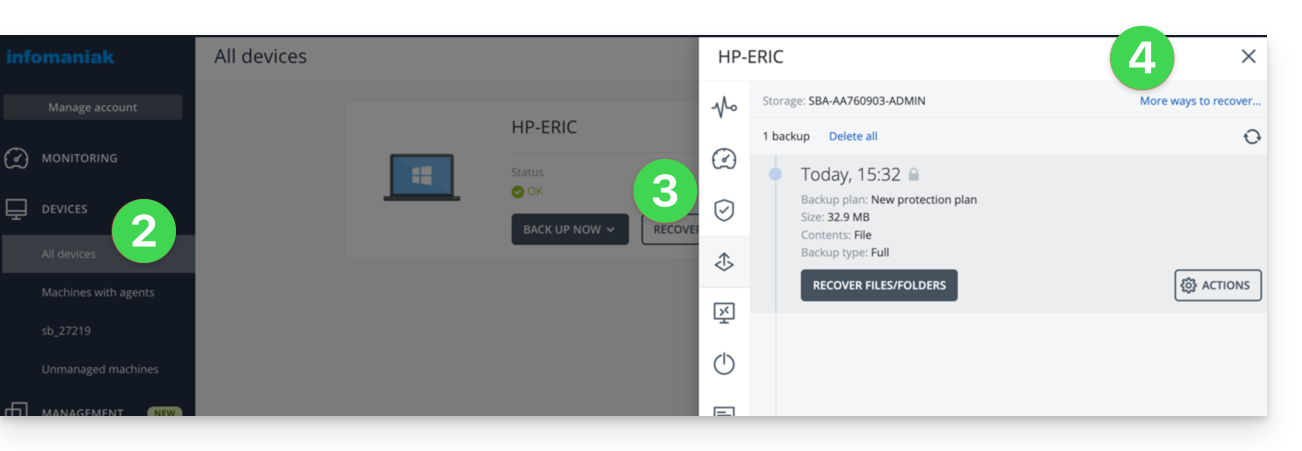
Navigate among the saved files
If necessary, locally or remotely, you can first simply restore the files you need:
- Click the Download files button (in the Browse Cloud Storage section).
- Open the relevant backup.
- Enter the encryption password if necessary.
- Browse the directory, select your files:
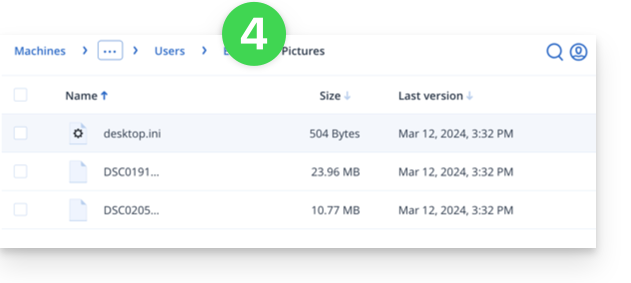
- Click Download to obtain a
.zipcontaining your selected files.
Also refer to this other guide.
Create a boot disk (on a USB key, for example)
To create a Windows boot disk and allow the restoration of a computer:
- Click the Download an ISO image button (in the Restore an entire machine section):
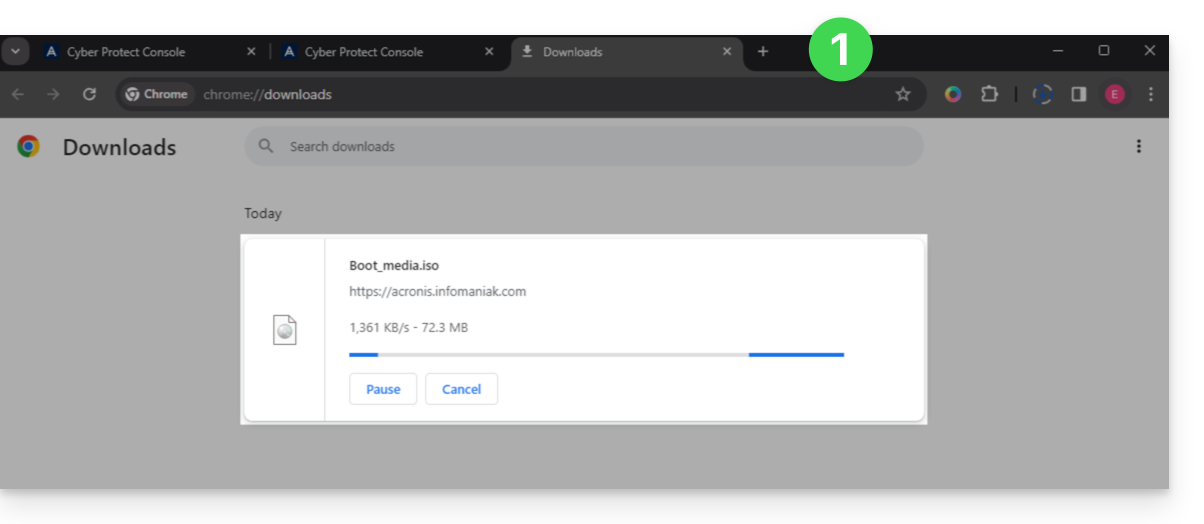
- Note down the code in the form
AA11-BB22-CC33that appears on the screen (more information). - Use software like Etcher to create a boot disk from the downloaded
.isofile.
Boot the computer from the removable media
Boot the computer from this boot disk (by pressing the required key according to your machine: F1, F2, F10, F12, DEL, etc.) then follow the steps below:
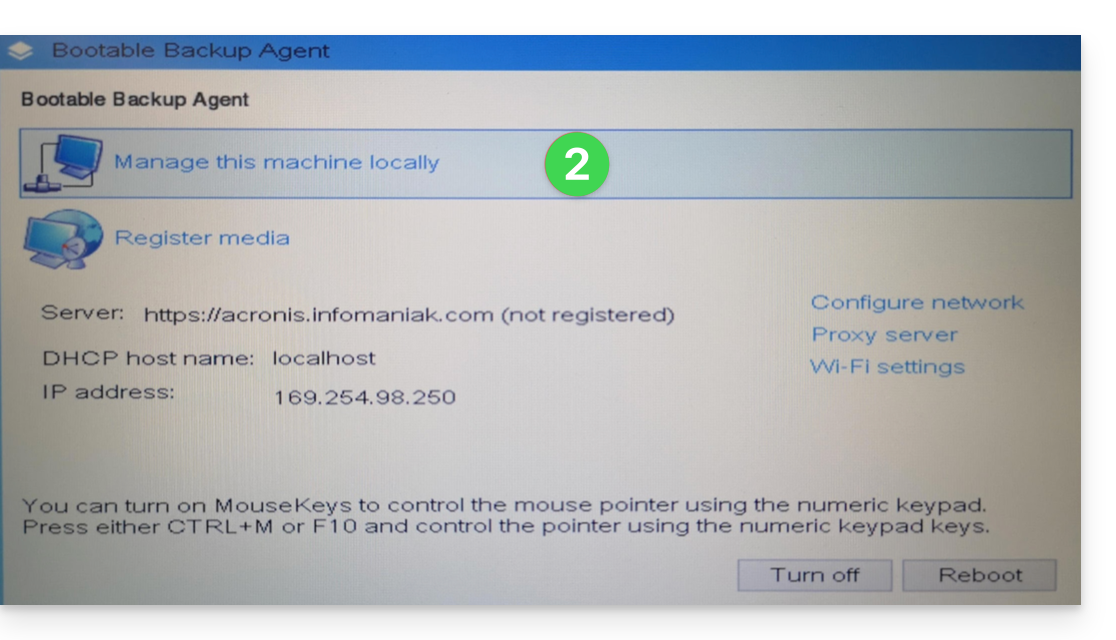
- Click on Rescue Media:
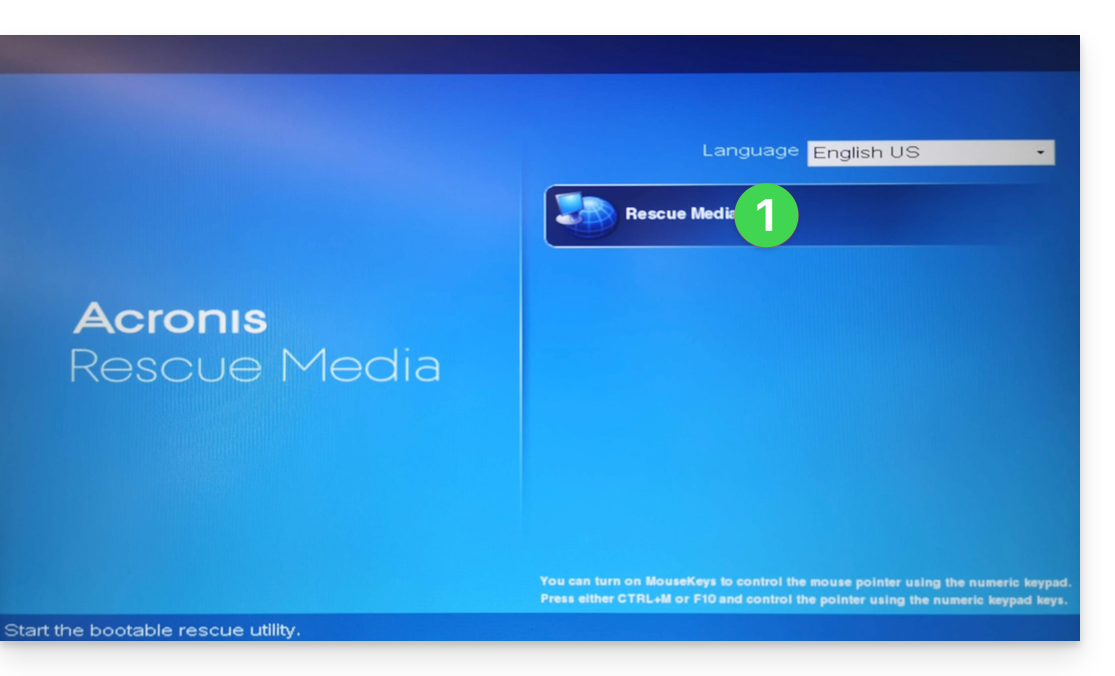
- Connect the computer via Ethernet (or if necessary configure the WiFi from the link located on the right side of the interface if the computer allows it) then click on Manage the device locally:
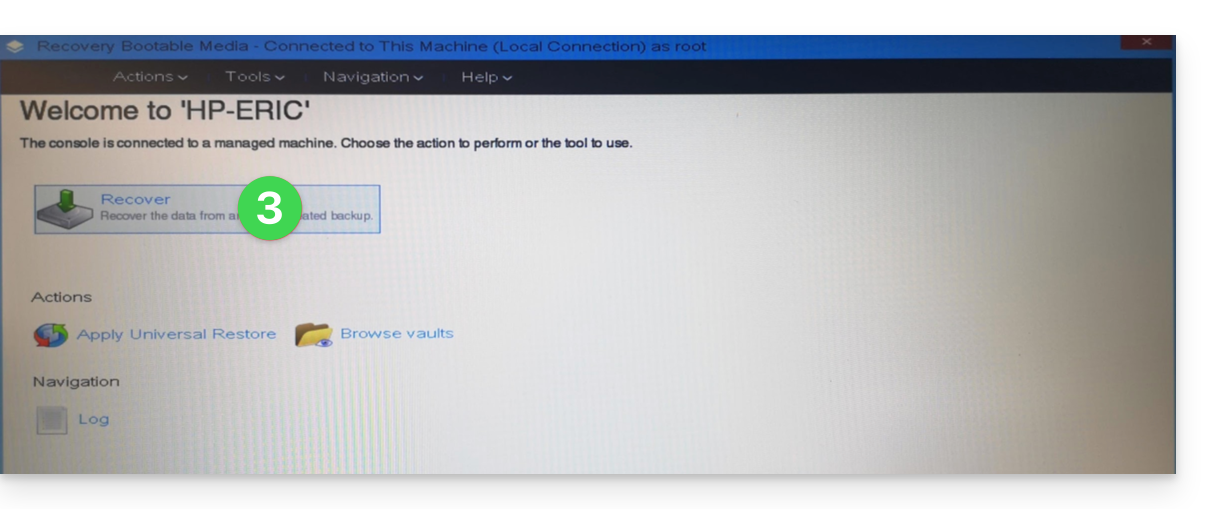
- Click on Restore:
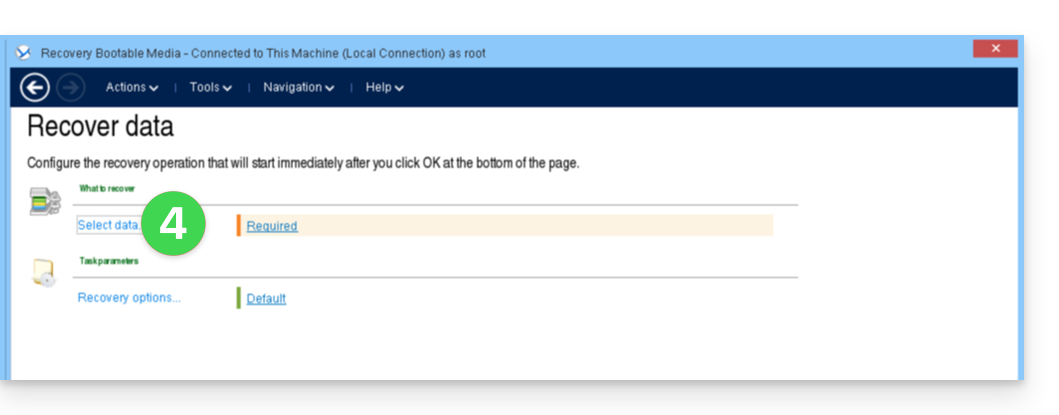
- Click on Select data...
- Click the Browse button:

- Under Cloud Storage click on either:
- Log In and use the Acronis credentials (in the form
SBA-XXXX-ADMIN) to authenticate (the keyboard is by default in EN-US, make sure to type the word in plain text to verify it if necessary):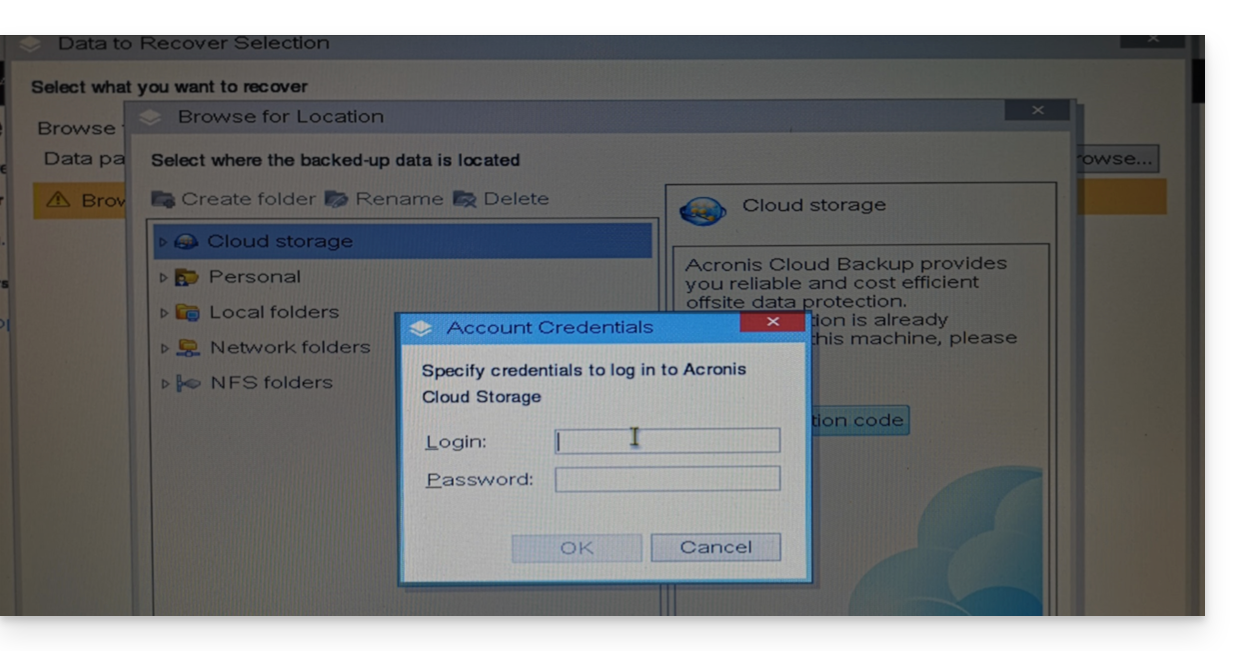
- OR Use the registration code if you have 2FA enabled, by following the proposed procedure (which involves requesting a temporary code (in the form ABCD-ABCD) and then going to the page
https://acronis.infomaniak.com/ui/#w=agentRegistrationto enter this code once logged into your Acronis account):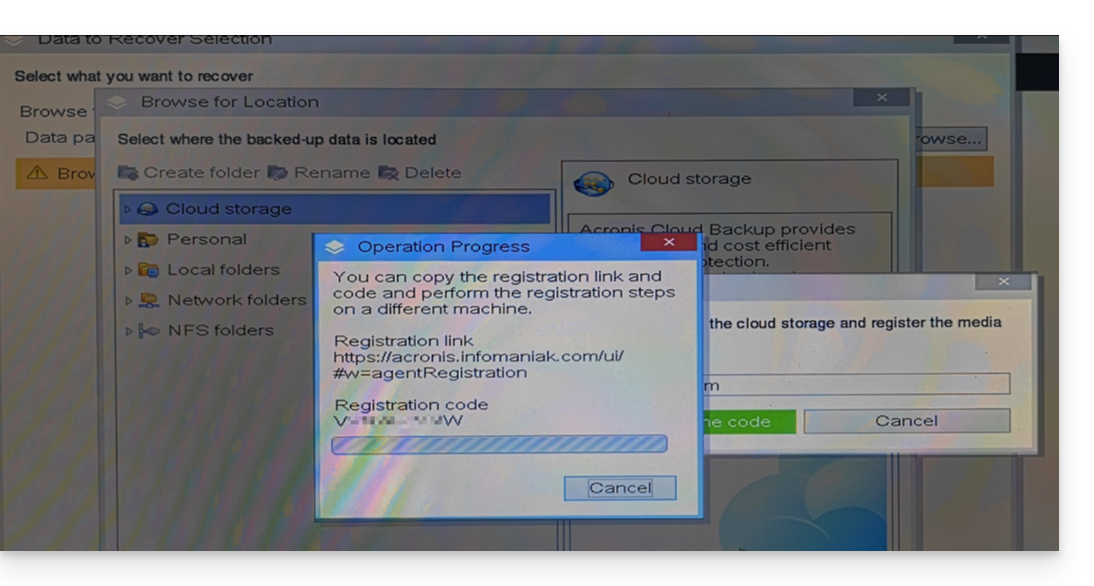
- Log In and use the Acronis credentials (in the form
- Click on your Acronis account ID and continue to access the backups (the encryption password will be requested if it had been enabled - see point 12 of this guide).
- Choose the workstation, the restore point, and the volumes (disks) to restore:
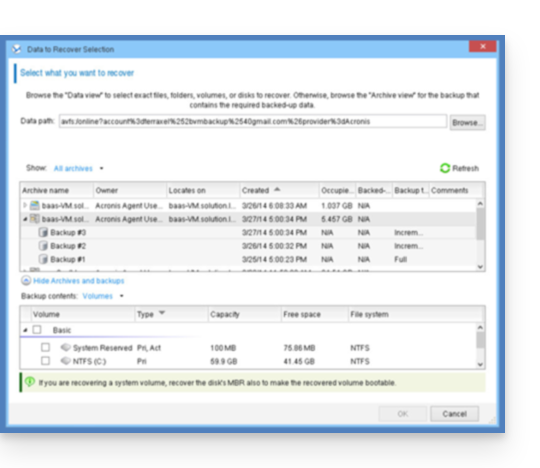
Useful information:- Use the arrow to the left of the workstation names to display the backups...
- The first table at the top allows you to choose the workstation and the backup to restore...
- The second table allows you to choose the content (the disks) of the backup to restore...
- Click OK to continue.
- Match the source and destination volumes:
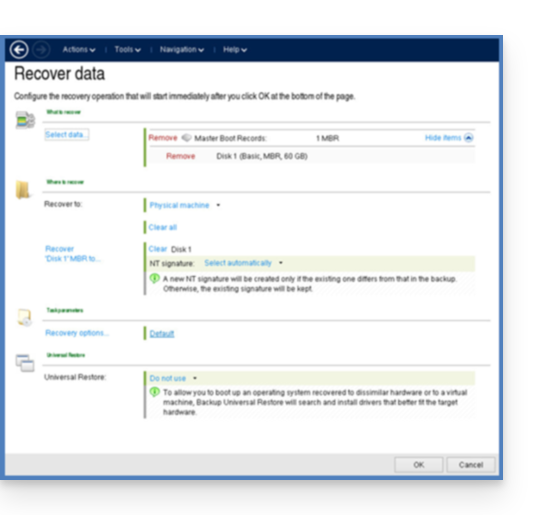
Useful information:- For each volume or disk of the source backup, click on Required to choose where to restore the data.
- Under Restore options, it is recommended to check the Automatic restart box.
- Click OK to start the restoration.
Link to this FAQ: https://faq.infomaniak.com/2288
Has this FAQ been helpful?
This guide details how to restore an Apple macOS computer using Acronis on Swiss Backup, the backup solution in an independent Swiss cloud.
Prerequisites
- The Acronis application must be installed on the computer on which you want to perform the restoration; use the same credentials as those used to save the machine when registering the agent:
- Click here to access the Acronis Console with the credentials obtained after adding the device (need help?).
- Click on the user icon at the top right.
- Click on Downloads:
- Choose the client suitable for your macOS machine:
Create a bootable USB key
To do this:
- Insert a blank USB key of at least 4 GB into your computer (be careful: the data on the key will be deleted).
- Open the Rescue Media Builder application from the Applications folder of the Finder on your macOS. This application has been automatically installed with the Acronis application.
- Check the detected USB key and click on Create Media.
Start the restore procedure
To do this:
- Restart the macOS computer with the bootable USB key.
- Depending on the macOS version, press and hold a key on the keyboard (refer to this Apple guide to know which one) during the restart.
- If necessary, click on the bootable USB key to start from it.
Configure and start the restoration
To do this:
- Select your key on Rescue Media Builder:
- Click on Recovery Boot Media:
- Click on Recover:
- Click on Select data:
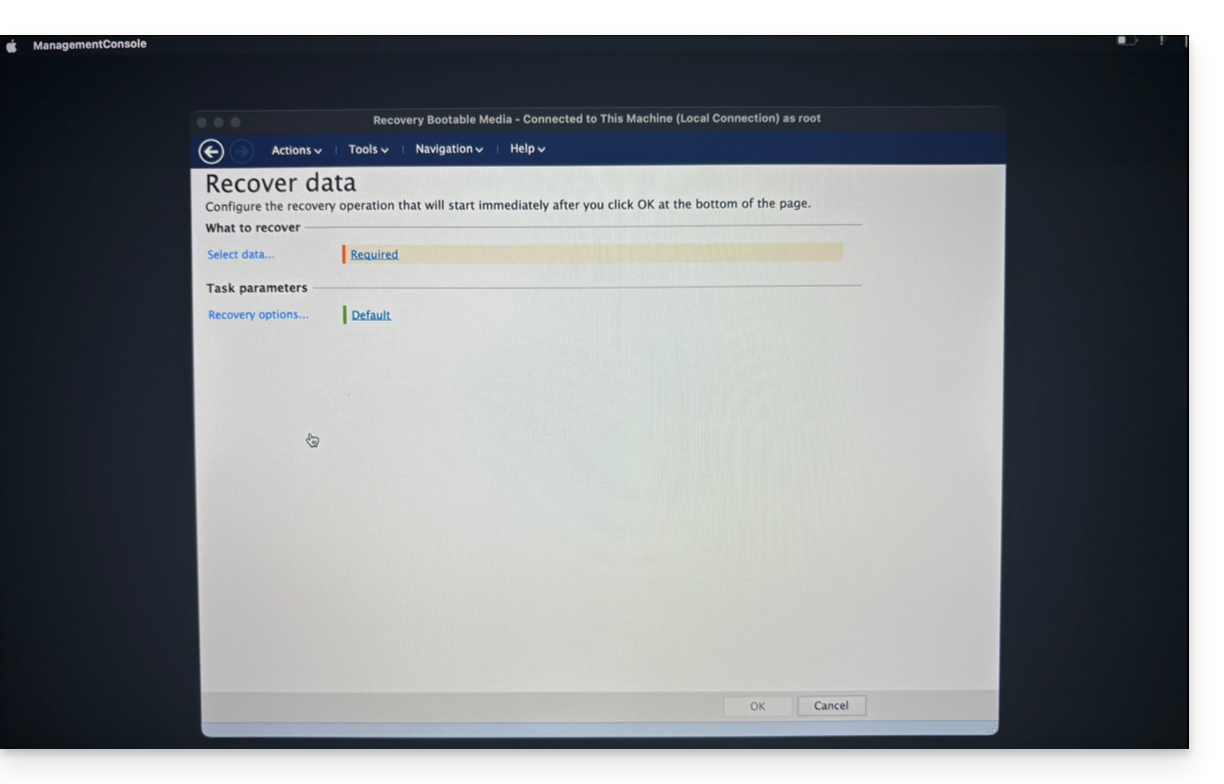
- … then on Browse:

- and select Cloud Storage; then click on the Log in button:

- Use the device credentials to authenticate:

- Choose the macOS machine to restore, then click on OK to start the restoration:

- If you chose to encrypt your backups, you will be asked for the backup password:

- In the upper part of the screen, select the available backup you want to restore:

- Once the backup is selected, you can select the type of item to restore in the lower part of the screen, as well as those you want to restore; it is recommended to select the type Volumes and to restore all available Volumes, in order to restore all of your hard drive(s)... then start the restoration with the OK button:

- The restoration is then started, you can follow the progress via the Progress tab:

Once at 100% the macOS machine will restart several times in a row (this is normal) until the entire procedure is complete.
Link to this FAQ: https://faq.infomaniak.com/2289
Has this FAQ been helpful?
This guide explains how to increase or decrease the space allocated to a device backed up with Swiss Backup, which is particularly useful when you receive an email informing you that you no longer have enough free space to perform your backups.
Modify quotas for user devices
To do this:
- Click here to access the Acronis Console with the credentials obtained after adding the device (need help?).
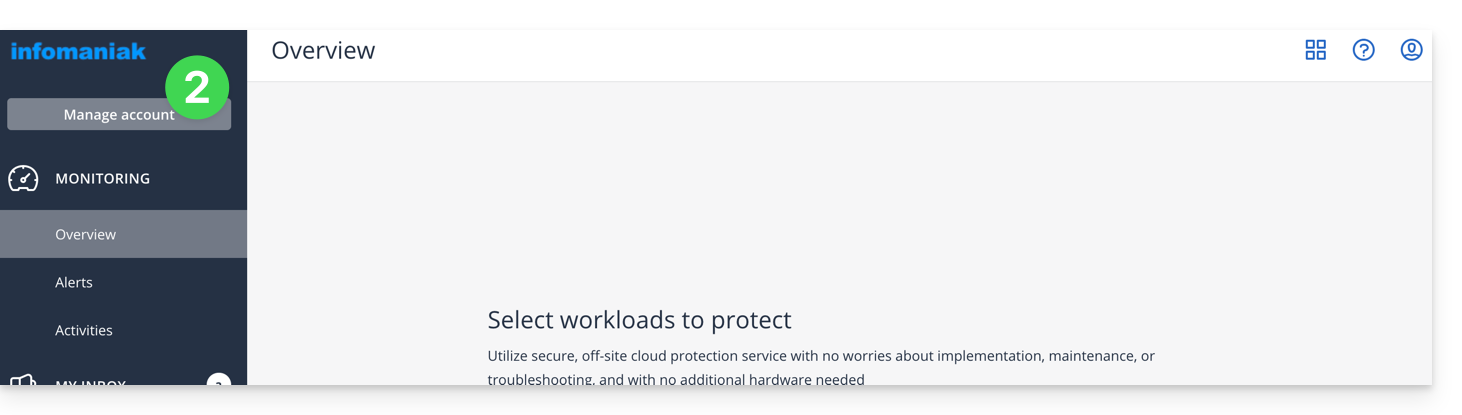
- Click on Manage account in the left sidebar:
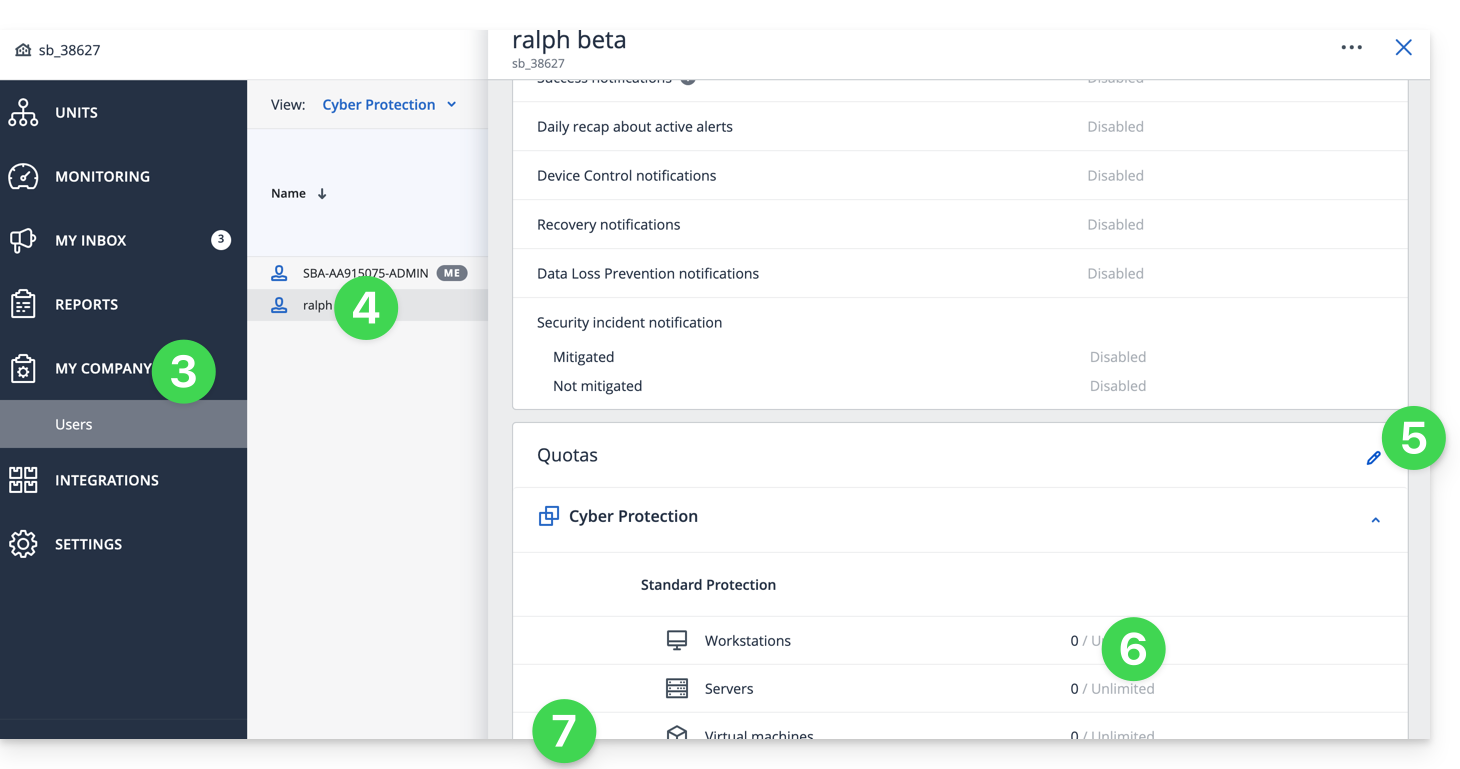
- Click on Company Directors.
- Click on the user concerned under Users.
- Click on the pencil in the QUOTAS rectangle on the right.
- Click directly on the disk space to edit the desired values.
- Validate with the button at the bottom of the section:
Link to this FAQ: https://faq.infomaniak.com/2290
Has this FAQ been helpful?
This guide explains how to obtain a backup space with Swiss Backup, the backup solution in an independent Swiss cloud.
Prerequisites
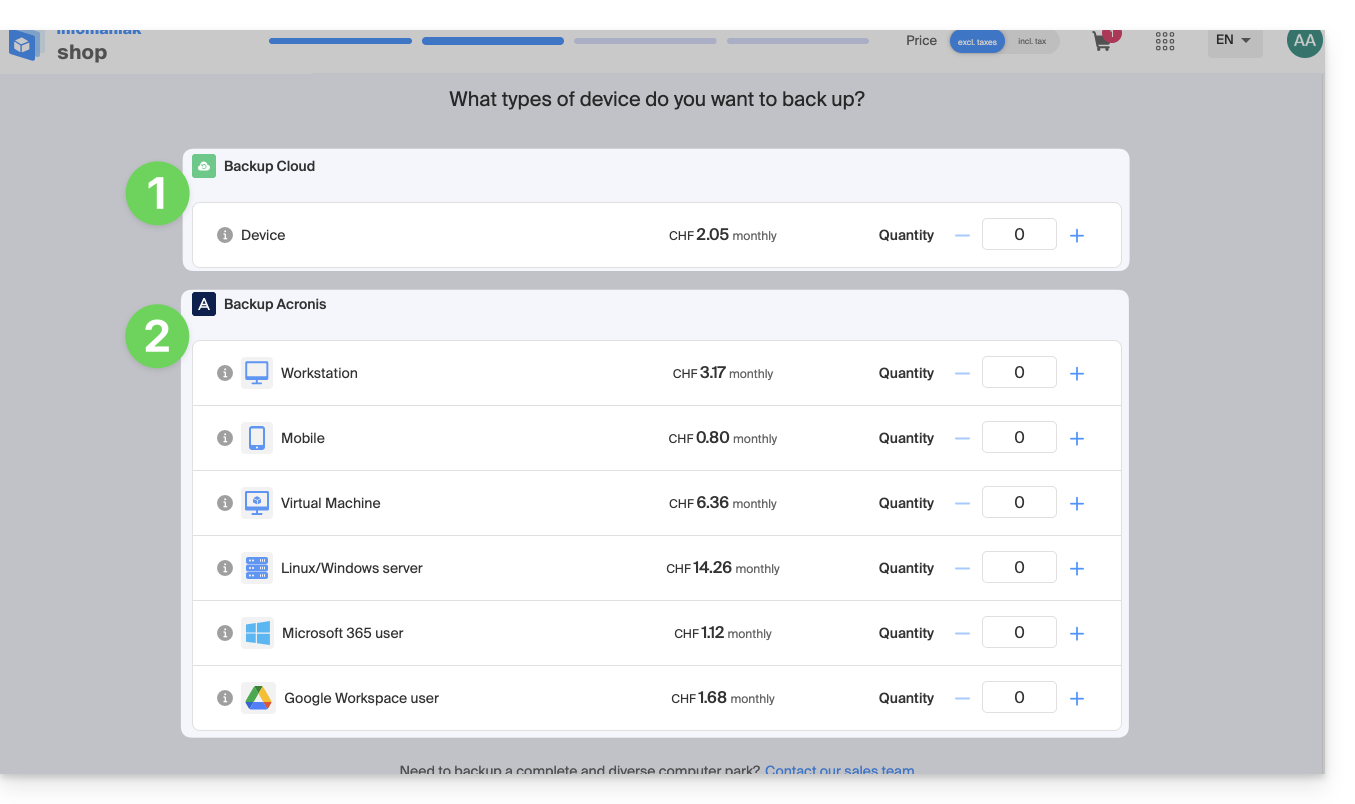
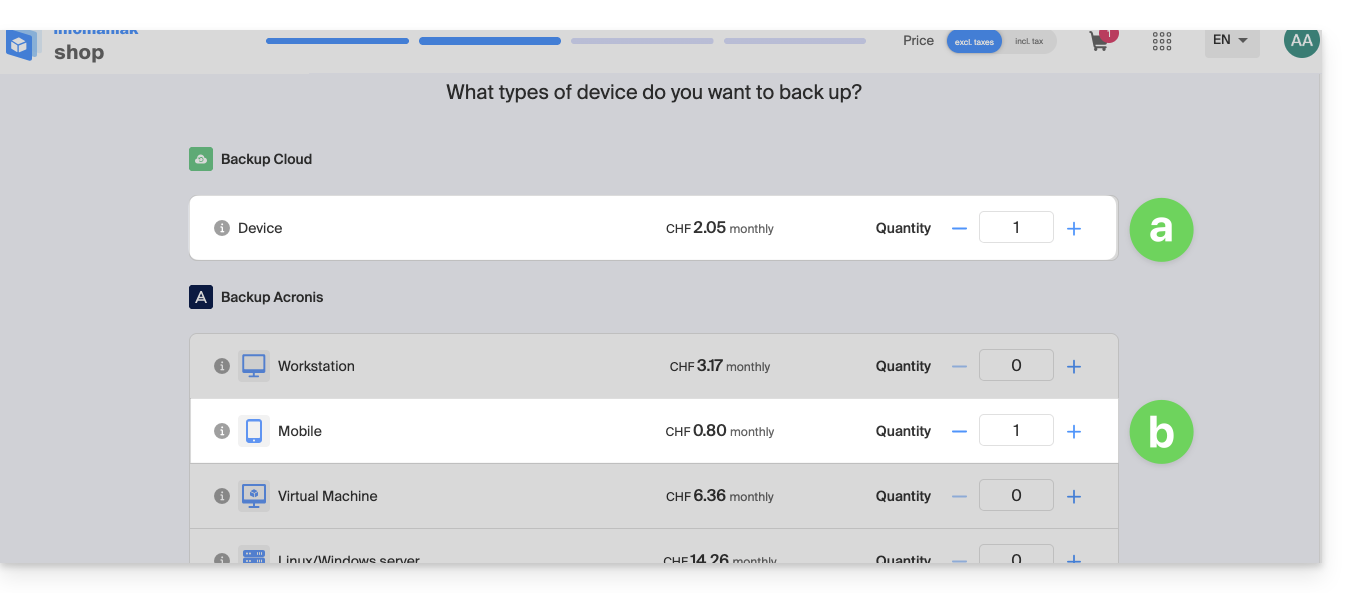
- Determine which type of device will need to be backed up on Swiss Backup:
CLOUD BACKUPS - allows you to back up and synchronize files via the protocols:
- Swift (recommended)
- FTP / SFTP
- S3 Compatible
- Synology NAS system
with the application of your choice…
ACRONIS BACKUPS - ideal solution for backing up:
- Windows / macOS workstations
- Android / iOS (iPhone) mobiles
- Windows / Linux servers
- VMware, Hyper-V, Virtuozzo virtual machines...
- Microsoft 365 / Google Workspace spaces…
using the Acronis Cyber Protect Cloud software, which allows you to store backup data using Swift as a backend and create "protection plans" where you can choose between:
- full machine backup (all hard drives attached to the machine in SATA)
- file / folder backup (specifically of your choice)
- volume / disk backup (if you have external drives)
- backup scheduling
- backup retention period
- backup restoration
- backup encryption
Obtain Swiss Backup
To order a Swiss Backup storage space:
- Click here to access the management of your product on the Infomaniak Manager (need help?).
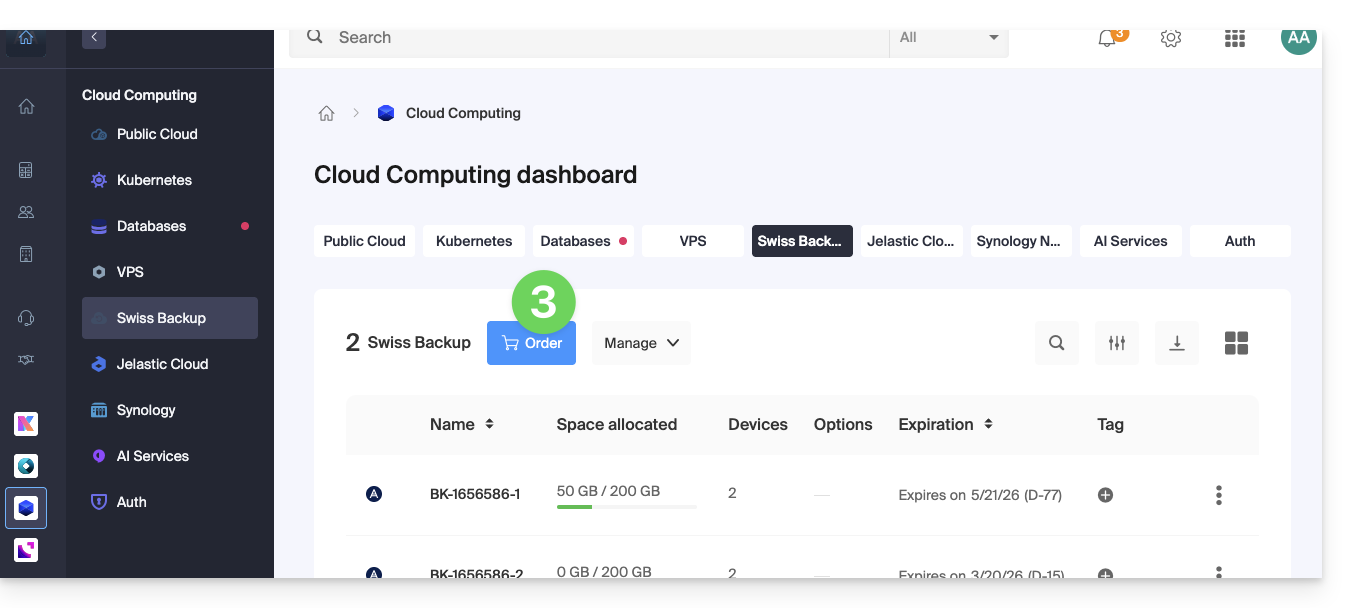
- Click on Order:
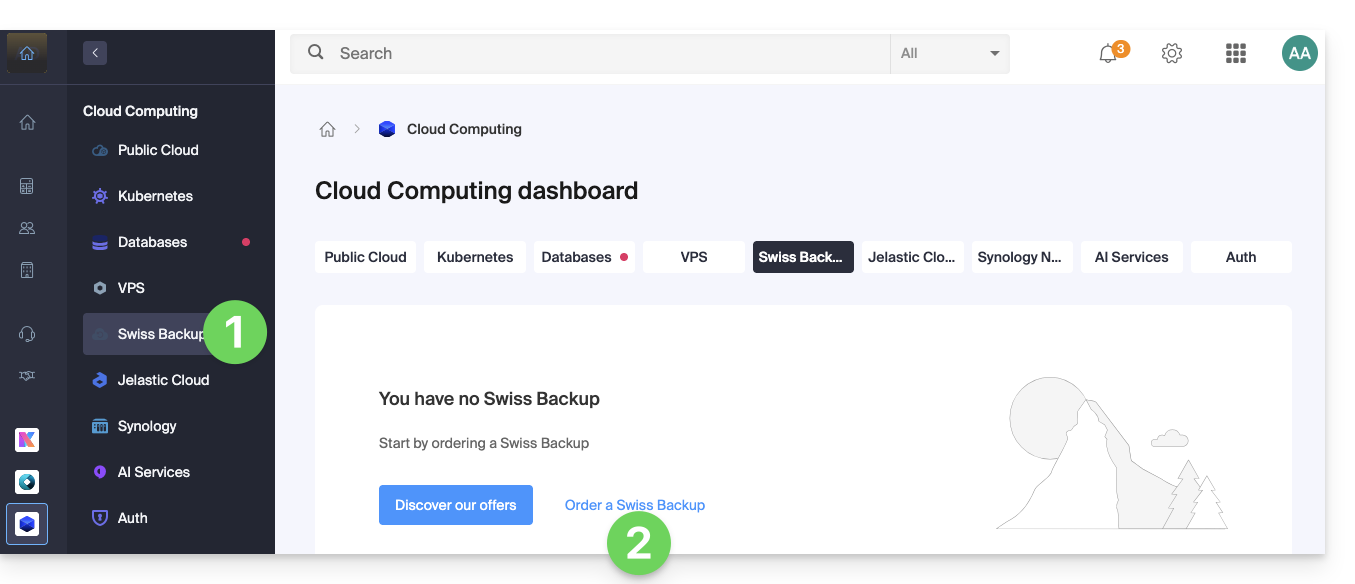
- or on the cart icon if a Swiss Backup product is already active on the Organization and you wish to order an additional one:
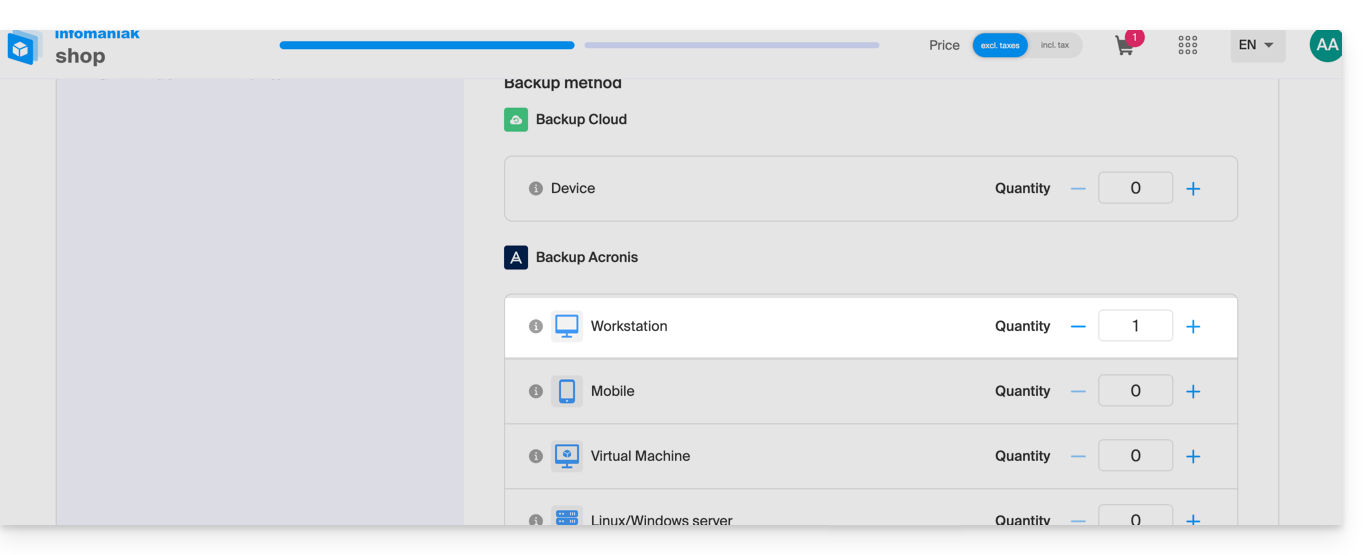
- Choose the maximum size of all the storage space needed for your project(s), regardless of the number and type of backups you will perform:
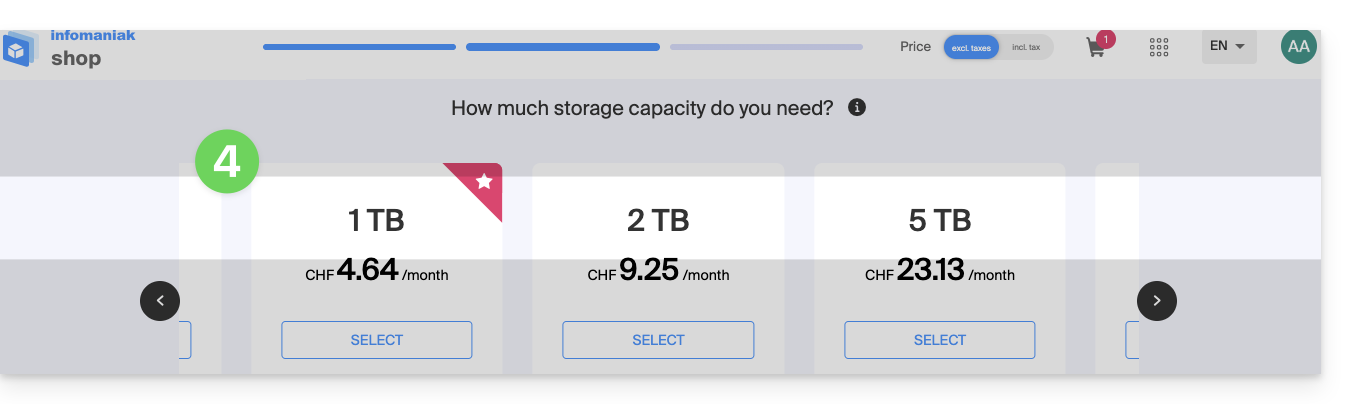
- Here the example project is to back up 2 things:
- important & large documents located on 1 NAS
- photos/videos from an Android mobile device
- Complete the order and pay.
- The Swiss Backup product appears in your Manager with the disk space and quotas selected during the order:
- You can then add the desired devices to your Swiss Backup interface: refer to this other guide.
Link to this FAQ: https://faq.infomaniak.com/2291
Has this FAQ been helpful?