
Knowledge base
1000 FAQs, 500 tutorials and explanatory videos. Here, there are only solutions!
This guide details how to back up the data from your folders and nodes Jelastic Cloud via the OpenStack Swift protocol on Swiss Backup, the backup solution in an independent Swiss cloud.
Preamble
- To back up the data, an extension for Virtuozzo (Jelastic Cloud) is available in the node addons.
- Learn more about the extension (add-on) on Github.
- Do not look for the extension in the Marketplace, it is not there.
- The various services offered by Infomaniak are all compatible with the corresponding standard protocols (S3/Swift for storage, for example), therefore if you encounter a problem with third-party software, contact its publisher or a Partner and consult the support policy as well as article 11.9 of the Infomaniak TOS.
Configure the Swiss Backup extension on Jelastic Cloud
Prerequisites
- Use Jelastic Cloud (at least one Jelastic environment must be active with the extension installed for your backups to be visible).
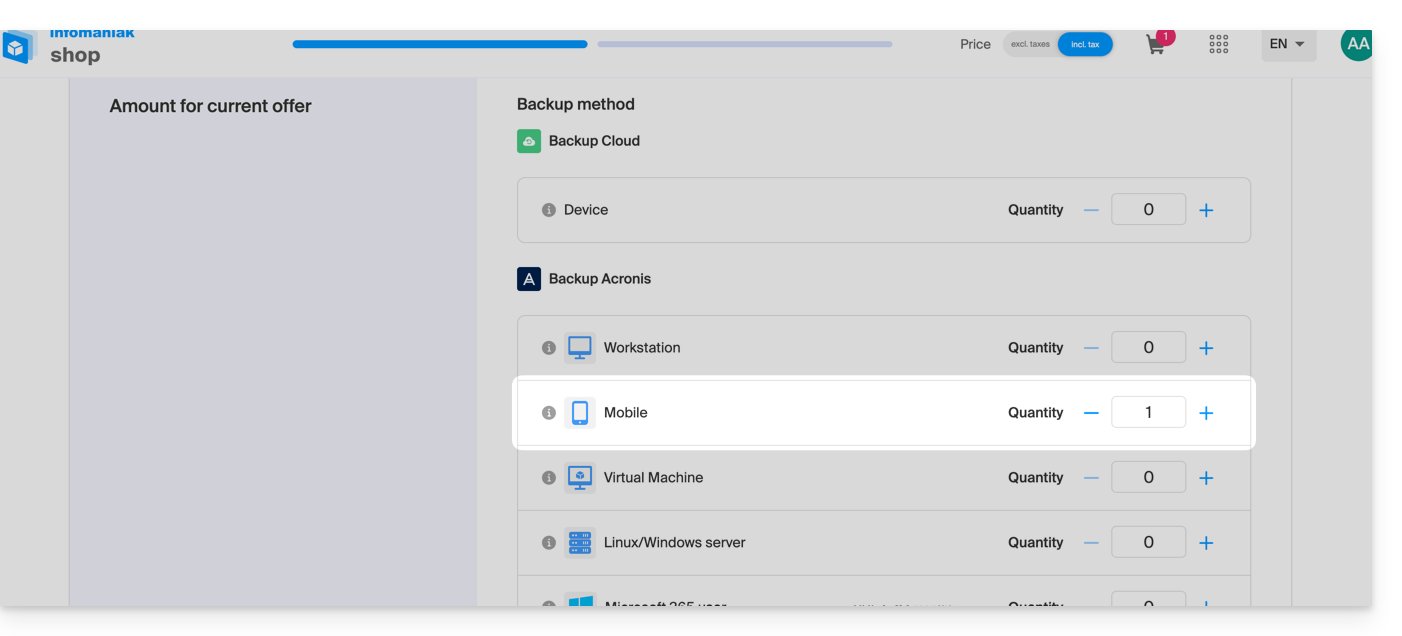
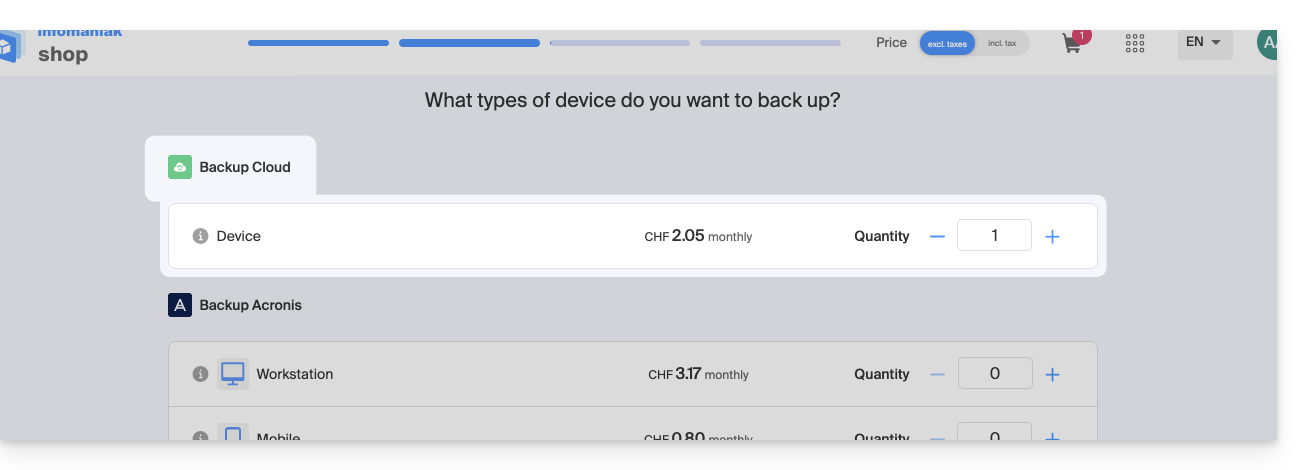
- Have a Swiss Backup Infomaniak space with a quota of available devices (minimum 1) for a Cloud backup.
- Add 1 device of type Cloud to obtain the OpenStack Swift parameters.
To add the extension useful to Swiss Backup on Jelastic Cloud:
- Log in to the Jelastic Cloud Dashboard of your server.
- Go to the node addons section:

- Search for and install the Backup / Restoration extension:

Two types of backups are then possible and detailed below:
- Back up specific folders.
- Create a snapshot of an entire node.
Back up specific folders
To back up specific directories:
- Enter the username and password according to the information specific to your device.
- Check Backup your data.
- Check Backup specific folders
- Enter the absolute path of the folders to back up in the Folders to backup field; it is possible to specify multiple folders by separating each path with a comma, for example:
/root/admin/, /home/user1/, /jelastic/containers/(in this example, 3 folders have been specified)…
Next, you need to define the frequency of backups (read more below).
Back up an entire node
To back up an entire node:
- Enter the username and password of your Swift device on Swiss Backup.
- Check Backup your data.
- Check Backup all files to back up the entire file system of a node; some files are automatically excluded:
- the folders
/dev,/proc,/sys,/run - unmounted file systems as part of the root partition, including virtual file systems

- the folders
Next, you need to define the frequency of backups.
Define backup frequency and retention policy
Two options are available to perform the backup:
- daily (at 20h UTC)
- every hour (at the start of the hour, for example at 13h, 14h, etc.)
You can define the retention period of your backups in years, months, days, and hours. To keep your backups indefinitely, simply set the parameters to 0.
If, for example, you perform backups every hour and set a retention policy of 1 year, 2 months, 4 days, 2 hours, this means that each backup will be available for a period of 1 year, 2 months, 4 days, 2 hours (=10322 backups). Note that backups are deleted every Sunday at 22h30 (UTC).
Attention: do not set all parameters to 0, as permanent backups can cause backup failures.
Recommended limits:
- Year: 1
- Month: 12
- Days: 99
For an hourly backup (every hour), it is recommended to have a maximum retention of one month. Beyond this value, some backups may fail.
Restore backups
Restore data from a node
- Log in to your server's Jelastic Dashboard.
- Once the extension is added and the username and password of your Swift device on Swiss Backup are provided, check Restore your data.
- Select the node containing the backup to restore:

- Select the backup to restore and the restore folder.
- Click the Restore button:

Restore specific folders from a snapshot (CLI)
Each backup corresponds to a unique ID. You can include and exclude folders from your snapshots during a restore. To view your snapshots:
. /home/.config/swissbackup/openrc.shrestic snapshots
- Use
--excludeand--includeto restrict the restore to a subset of files in the snapshot. For example, to restore a single file:restore 79766175 --target /tmp/restore-work --include /work/foo
There are case-insensitive variants of --exclude and --include called --iexclude and --iinclude. These options work the same way but ignore the case of the paths.
Modify the backup configuration
To do this:
- Log in to your server's Jelastic Dashboard.
- Once the extension is added and the username and password of your Swift device on Swiss Backup are provided, modify the configuration as desired.
The backup schedule is set by a cron job, and backups are performed using the restic tool.
To manually modify the backup schedule (CLI), as a root user, run the command crontab -l to display the current times:
- The line containing
retention-all.shcorresponds to the backup task - The line containing
purge.shcorresponds to the backup retention task
Example:

Modify the schedule using the command crontab -e.
You can modify the line composed of the script retention-all.sh or retention.sh, these scripts correspond to the launch of your backups. Warning: the crons have been designed to avoid issues between backups and multiple deletions. Be mindful of the time required for backups and deletions…
- Learn more about cronjobs: crontab.guru
- Learn more about restic: restic.net
Manually delete backups (CLI)
To do this:
- Source the configuration file:
. /home/.config/swissbackup/openrc.sh - Display available backups:
restic snapshots - Delete the desired backup:
restic forget IdBackup --prune - Delete all backups of a file except one:
restic forget --tag folders --keep-last 1 --prune

Delete backup scheduling
This button allows you to delete the scheduling of your backup:
Uninstall the Swiss Backup extension
It is necessary to delete the backup scheduling (see above) before being able to delete the Swiss Backup extension:

This guide details how to back up an Android device (Samsung, Huawei, OnePlus, etc.) using Acronis on Swiss Backup Infomaniak, the independent Swiss cloud backup solution.
Preamble
- What you will be able to back up:
- Contacts & Calendars
- Photos (the size and original format of your photos are preserved)
- Videos
- It is also possible to back up other types of data.
- Make your life easier! If needed, local partners referenced by Infomaniak can handle these procedures. Launch a free call for tenders. They handle everything, freeing you from technical details.
Configure the backup
Prerequisites
- Have a Swiss Backup Infomaniak space with available device quota (minimum 1) for Mobile:
- If necessary, increase the device quota according to your needs.
- Add the device to the Infomaniak Manager to receive the login credentials.
- Refer to the Acronis documentation on this subject.
To configure the mobile backup on Android with Acronis:
- Download and install the Acronis Cyber Protect application from the Google Play Store.
- Open the Cyber Protect mobile app by logging in to the Acronis Agent with the credentials obtained after adding the device (need help?).
- Click on Back up and choose the data to back up.
- Click on Confirm to start the data backup.
This guide details how to back up an Apple iOS device (iPhone, iPad, etc.) using Acronis on Swiss Backup, the independent Swiss cloud backup solution.
Preamble
- What you can back up:
- Contacts & Calendars
- Photos (the size and original format of your photos are preserved)
- Videos
- It is also possible to back up other types of data.
- Make your life easier! If needed, local partners referenced by Infomaniak can handle these procedures. Launch a free call for tenders. They take care of everything, freeing you from technical details.
Configure the backup
Prerequisites
- Have a Swiss Backup Infomaniak space with an available device quota (minimum 1) for Mobile:
- If necessary, increase the device quota according to your needs.
- Add the device to the Infomaniak Manager to receive the login credentials.
- Review the Acronis documentation on this subject.
To configure mobile backup on Android with Acronis:
- Download and install the Acronis Cyber Protect app (not Acronis Mobile) from the App Store.
- Open the application by logging in to the Acronis Agent with the credentials obtained after adding the device (need help?).
- Click on Backup and select the data to back up.
- Click on Validate to start the data backup.
This guide details how to back up a computer equipped with the Linux distribution of your choice using Acronis on Swiss Backup, the backup solution in an independent Swiss cloud.
It is also possible to back up (Cloud Backup) a Linux server using rClone.
Prerequisites
- Check the Linux versions supported by the Acronis Agent; use
uname -rto know your kernel version. - Have a Swiss Backup Infomaniak space with available device quota (minimum 1) for VM or Linux/Windows server:

- If necessary, increase the device quota according to your needs.
- Add the device to the Infomaniak Manager to receive the login credentials.
Differences between devices
Choose Virtual Machine:
- Virtual machine hosted on a hypervisor environment (e.g., VMware, Hyper-V, Scale Computing HC3, or Virtuozzo).
- VPS server or virtual machine in a Public Cloud Infomaniak environment
- These environments rely on virtualization technologies, and the license is designed to cover this type of configuration.
- The physical host that hosts the virtual machines must be covered by a single license, and this license includes all VMs present on this host.
- Hypervisor cluster with multiple hosts (each host requires a VM license).
Choose Linux Server:
- Physical machine or an individual virtual machine running Linux (server operating system).
- Standalone server machine (whether it is hosted locally or on a cloud without a complex virtualization environment, and without a hypervisor like VMware or Hyper-V to manage virtual machines on this device).
- Each license covers an individual physical or virtual machine.
- Physical server at your home or in a colocation.
Configure the backup
To install the Acronis Cyber Protect 15 agent on a Debian system using only the command line, without a graphical interface:
1. System update
Before installing anything, it is recommended to update the list of available packages.
sudo apt updateYou can display the list of available updates without installing them:
apt list --upgradablePartial update (optional)
If you only want to update certain specific packages:
sudo apt install nom_du_paquet_1 nom_du_paquet_2Complete system update (optional)
To apply all available updates:
sudo apt upgrade -y2. Installation of required dependencies
The following packages are necessary for the proper functioning of the Acronis agent:
sudo apt install -y rpm gcc linux-image-$(uname -r) linux-headers-$(uname -r)3. Downloading the Acronis agent
Download the official installer for the Acronis Cyber Protect 15 agent for Linux (full version):
wget "https://dl.acronis.com/u/AcronisCyberProtect15/Release/AcronisCyberProtect_15_64-bit.x86_64" -O acronis_agent.bin4. Agent installation
Make the file executable and start the installation:
chmod +x acronis_agent.bin
sudo ./acronis_agent.bin
The installation starts in interactive mode.
5. Agent registration
At the end of the installation, a message will appear asking you to register the agent.
You will be given a registration code of the type:
Go to https://acronis.infomaniak.com/bc/reg
Enter the code: AB12-CD34
Open the indicated URL from another device with a browser (computer, tablet, or phone) and enter the displayed code to complete the registration.
Then create a backup plan.
This guide details how to restore a Windows computer using Acronis on Swiss Backup, the backup solution in an independent Swiss cloud.
Prerequisites
- Have a backup of the computer on Swiss Backup (refer to this other guide).
- Refer to Acronis documentation regarding the recovery of physical machines.
- The computer to be restored must be connected to the Internet via Ethernet cable (or WiFi depending on the computer's capabilities).
Restore the backup
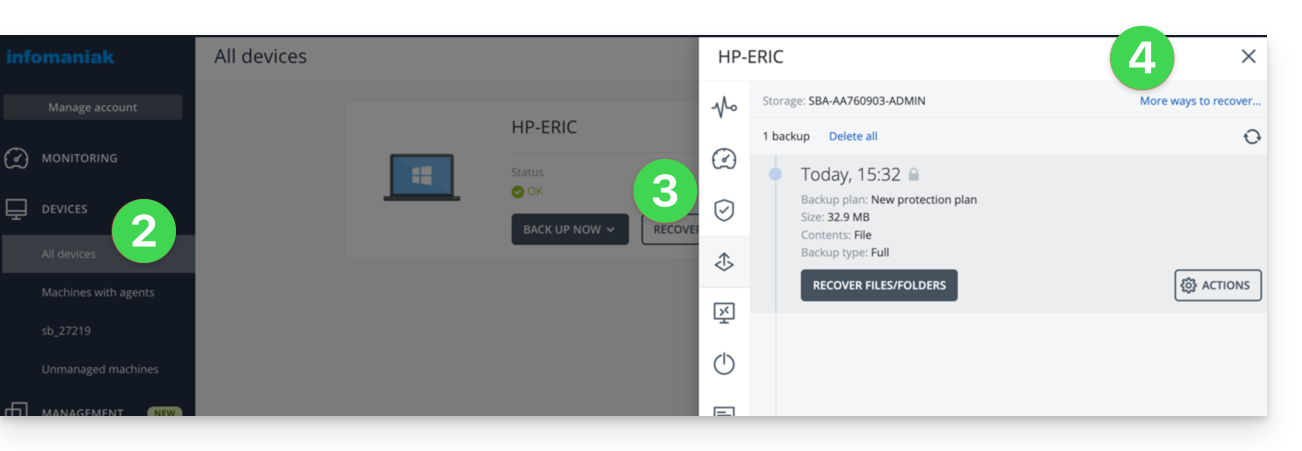
To begin, from the affected computer or any other machine:
- Click here to access the Acronis Console with the credentials obtained after adding the device (need help?).
- Click on Devices in the left sidebar
- Click the Restore button on your relevant backup plan
- Click on other ways to restore at the top of the interface:
Navigate among the saved files
If necessary, locally or remotely, you can first simply restore the files you need:
- Click the Download files button (in the Browse Cloud Storage section).
- Open the relevant backup.
- Enter the encryption password if necessary.
- Browse the directory, select your files:
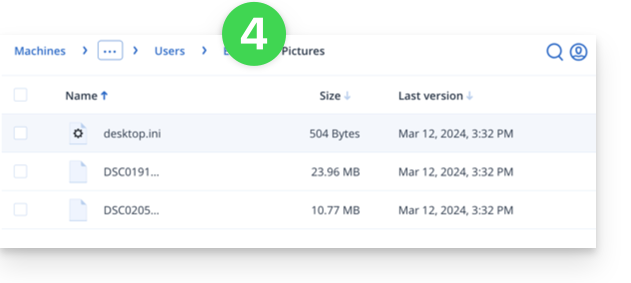
- Click Download to obtain a
.zipcontaining your selected files.
Also refer to this other guide.
Create a boot disk (on a USB key, for example)
To create a Windows boot disk and allow the restoration of a computer:
- Click the Download ISO Image button (in the Restore an entire machine section):
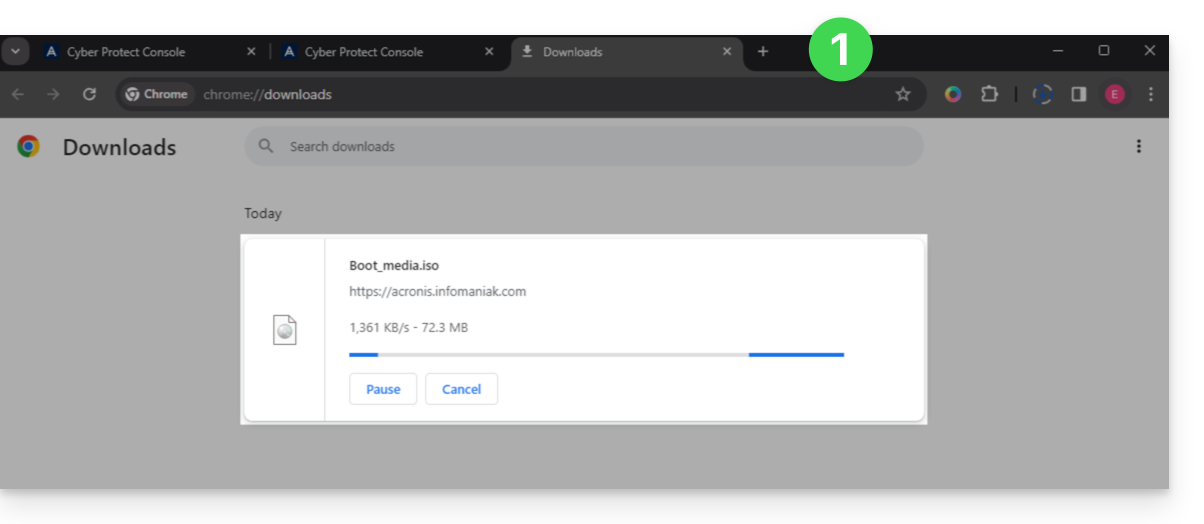
- Note down the code in the form
AA11-BB22-CC33that appears on the screen (more information). - Use software like Etcher to create a boot disk from the downloaded
.isofile.
Boot the computer from the removable media
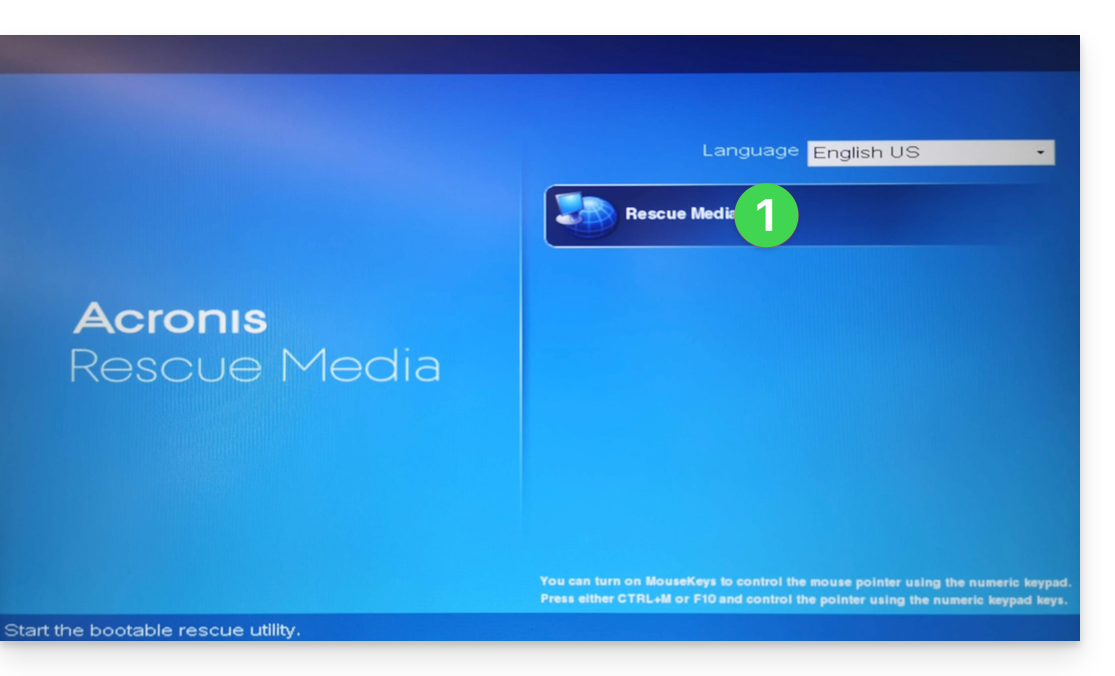
Boot the computer from this boot disk (by pressing the required key according to your machine: F1, F2, F10, F12, DEL, etc.) then follow the steps below:
- Click on Rescue Media:
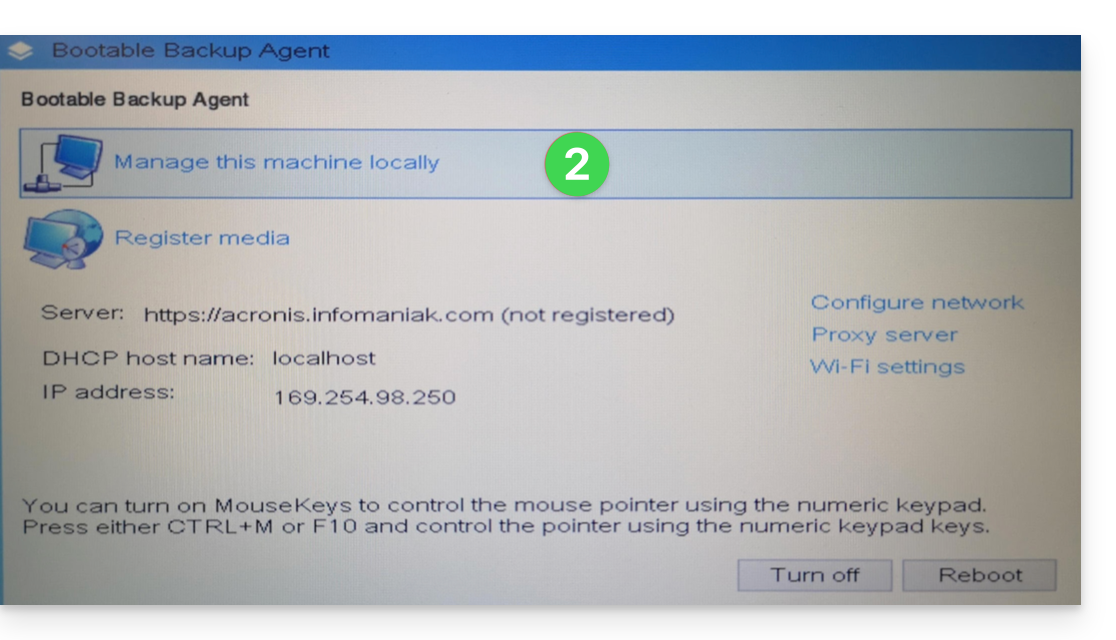
- Connect the computer via Ethernet (or if necessary, configure WiFi from the link on the right side of the interface if the computer allows it) then click on Manage the device locally:
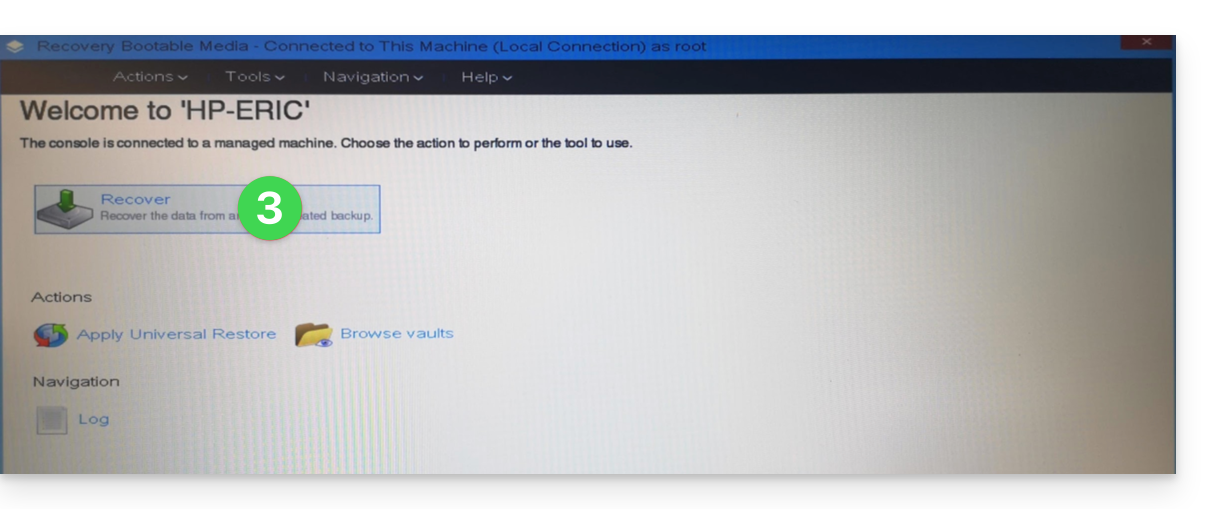
- Click on Restore:
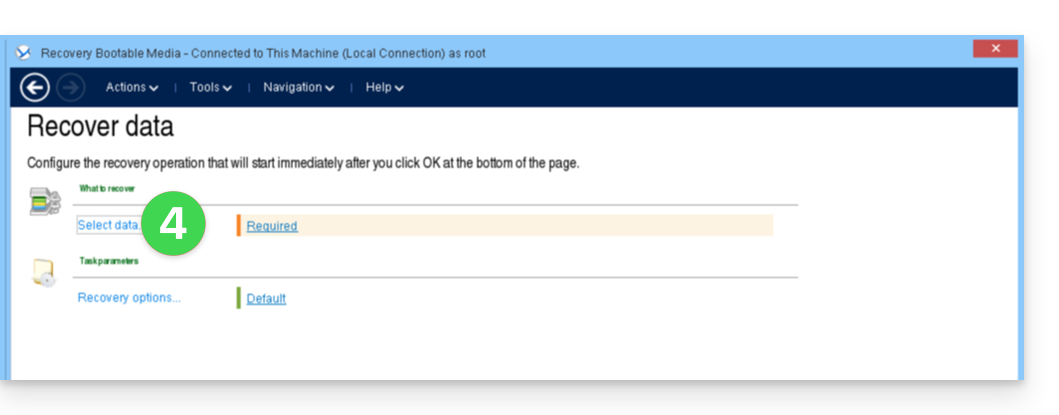
- Click on Select data...
- Click the Browse button:

- Under Cloud Storage click on either:
- Log In and use the Acronis credentials (in the form
SBA-XXXX-ADMIN) to authenticate (the keyboard is set to EN-US by default, make sure to type the word in plain text to verify it if necessary):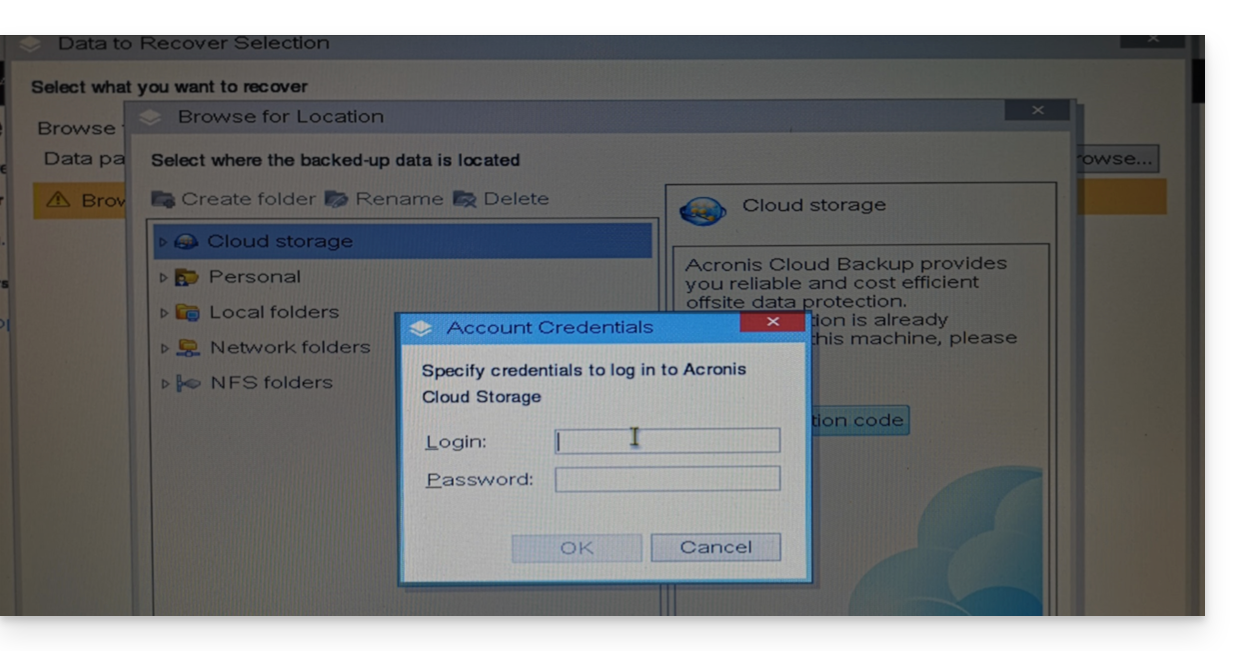
- OR Use the registration code if you have 2FA enabled, by following the proposed procedure (which involves requesting a temporary code (in the form ABCD-ABCD) and then going to the page
https://acronis.infomaniak.com/ui/#w=agentRegistrationto enter this code once logged into your Acronis account):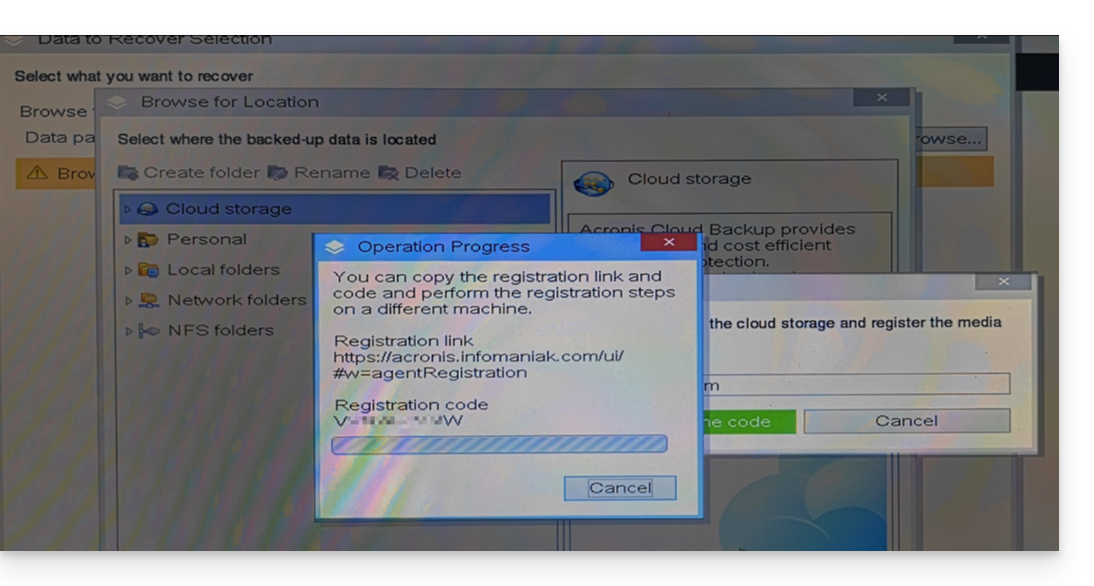
- Log In and use the Acronis credentials (in the form
- Click on your Acronis account identifier and continue to access the backups (the encryption password will be requested if it had been enabled - see point 12 of this guide).
- Choose the workstation, the restore point, and the volumes (disks) to restore:
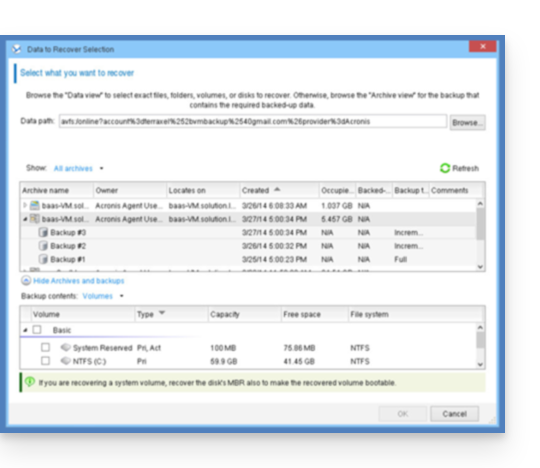
Useful information:- Use the arrow to the left of the workstation names to display the backups...
- The first table at the top allows you to choose the workstation and the backup to restore...
- The second table allows you to choose the content (the disks) of the backup to restore...
- Click OK to continue.
- Match the source and destination volumes:
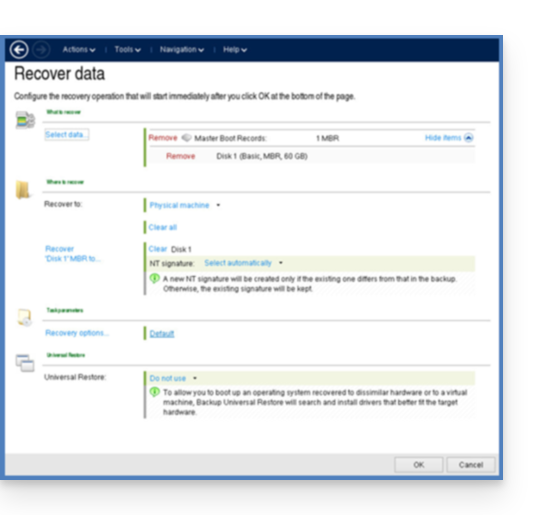
Useful information:- For each volume or disk in the source backup, click Required to choose where to restore the data.
- Under Restore options, it is recommended to check the Automatic restart box.
- Click OK to start the restoration.
This guide details how to save your chosen files and directories using the Duplicati application via the OpenStack Swift protocol on Swiss Backup, the backup solution in an independent Swiss cloud.
Preamble
- The various services offered by Infomaniak are all compatible with the corresponding standard protocols (S3/Swift for storage, for example), therefore if you encounter a problem with third-party software, contact its publisher or a Partner and consult the support policy as well as section 11.9 of the Infomaniak Terms and Conditions.
Install the Duplicati software
To do this:
- Go to the Duplicati website: https://www.duplicati.com/
- Click the "Download Duplicati" button.
- Choose the version corresponding to your operating system or your Linux distribution.
- Launch the program installation, you can keep the default choices.
Configure the Duplicati software
Prerequisites
- Have a Swiss Backup Infomaniak space with available device quota (minimum 1) for a Cloud Backup.
- Add 1 device of type Cloud to obtain the OpenStack Swift parameters.
Then:
- After installation, a web page should have opened; if not, go to
http://localhost:8200. - Click on Add Backup then select Configure a new backup.
- Give a name and optionally a description to your backup plan.
- Enable or disable encryption and create an encryption phrase if necessary.
- In Storage Type select Openstack Object Storage / Swift
- Replace
SBI-XXXXXXXXand "passwd" according to your device's specific information (refer to this other guide):
Bucket Name:default
OpenStack AuthURi:https://swiss-backupXX.infomaniak.com/identity/v3(XX = check your Swiss Backup Manager account and replace the exact URL)
Keystone API Version:V3
Domain Name:default
Username:SBI-XXXXXXXX
Password: your password
Identity Name:sb_project_SBI-XXXXXXXXXX
API Key: leave blank
Container Region: leave blank - Click on Test Connection and verify that your credentials are correct, then click on Next.
- Replace
- Select the folders to back up and click on Next.
- Define your backup preferences.
- It is recommended to leave the Remote volume size option at its default value.
- Choose your data retention preference.
- The Smart backup retention option is recommended - a backup will then be kept for each of the last 7 days, each of the last 4 weeks, each of the last 12 months.
- Click on Save.
- You will be taken back to the home page; you can start a backup immediately by clicking on Start now next to the name of your backup or wait for the next scheduled backup.
Restore a device with Duplicati
To do this:
- Open a web browser and go to http://localhost:8200.
- Click on the "Restore" menu on the left.
- If Duplicati is not configured to access your Swiss Backup space, see above.
- Choose the location from which you want to restore data.
- Choose the date of the data to restore in the Restore from dropdown menu…
- You can also use the search field if you want to restore a specific file/folder.
- Select the data to restore in the tree view.
- Choose the data restoration location:
- Original location restores the data where it was during the backup.
- Choose location allows you to restore data to a different folder than the original one.
- Choose whether you want to keep the files that already exist on your machine in case of conflict or rename the files with their last modification date.
- Click on Restore and wait for the process to complete.
Resolve a 502 bad gateway or 401 unauth error
With Windows 10, connections to the Infomaniak Swift server are made with TLS1.2, whereas with Windows 11, this is done with TLS1.3, which generates errors. If you restrict the choice to TLS 1.2, then everything works fine.
To do this:
- Add the advanced option of allowed SSL versions:

- and select Tls 1 2:

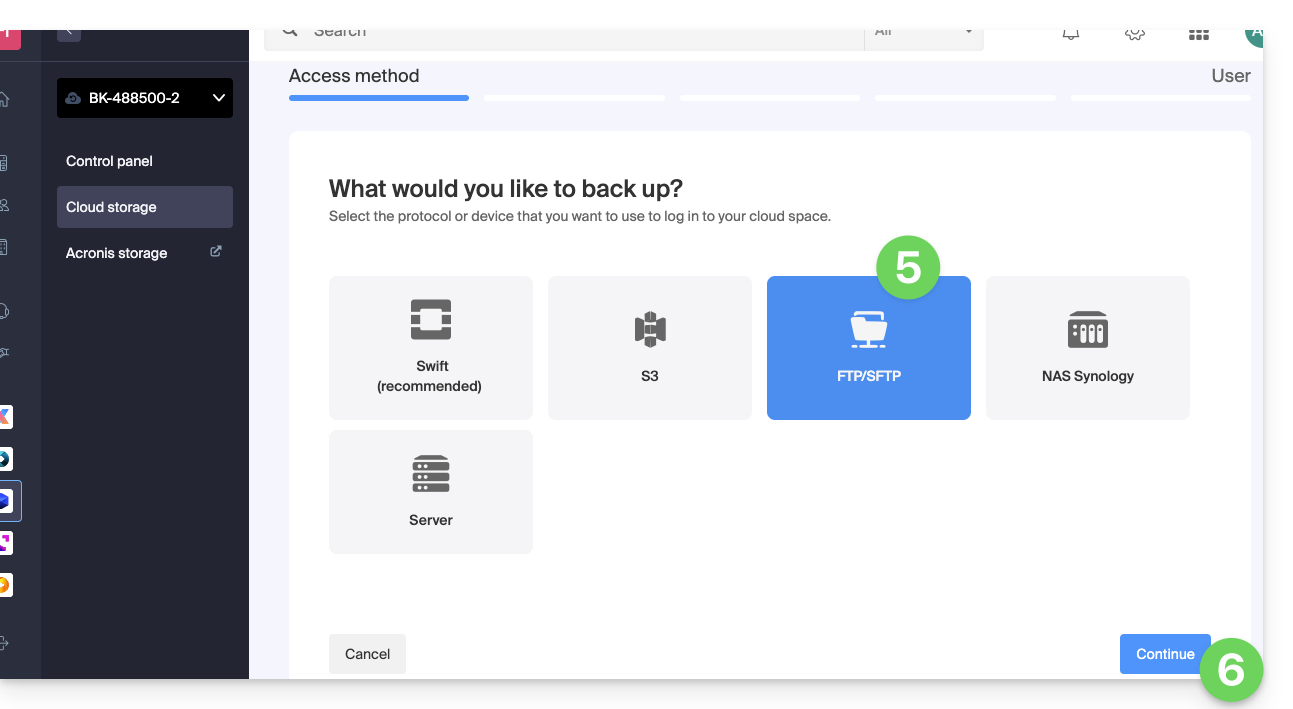
This guide explains how to create a new device (Cloud backup via FTP / SFTP) on Swiss Backup, the solution for backup in an independent Swiss cloud.
Prerequisites
- Order a Swiss Backup space from Infomaniak.
- When ordering, have defined the quota of available device(s) (minimum 1) under backup type Cloud:
- If necessary, increase the device quota according to your needs.
- Warning: for the transfer of a file from an FTP / SFTP connection to succeed, the file size must not exceed 10 TB.
- It is recommended to check and adjust if necessary the timeout parameters of your FTP software/client.
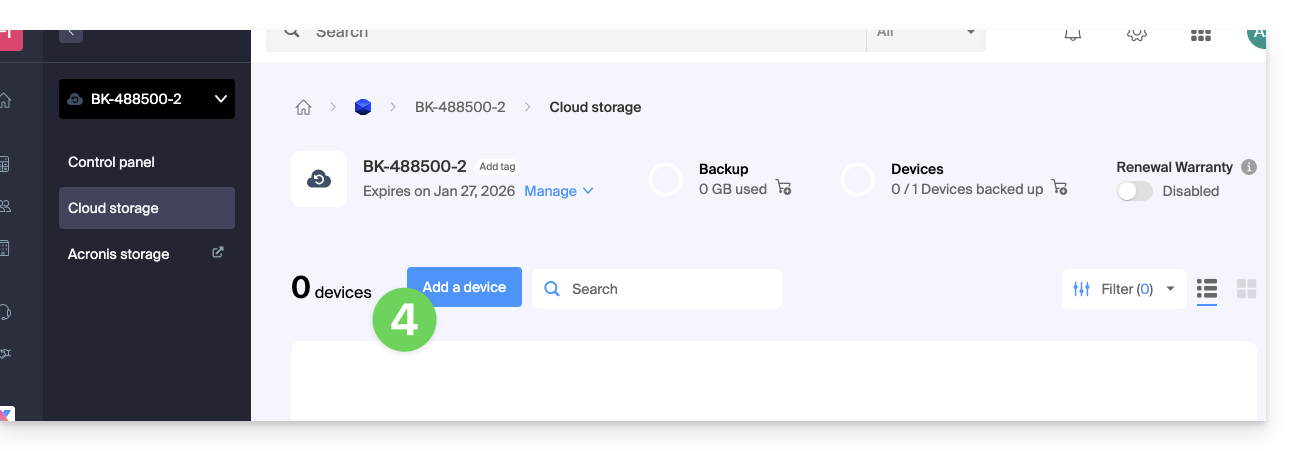
Add a device (for FTP/SFTP connection)
To access Swiss Backup and configure a new free backup:
- Click here to access the management of your product on the Infomaniak Manager (need help?).
- Click directly on the name assigned to the product concerned:
- Click on the blue button Manage my devices (in the Cloud Backup Space section):
- Click on the blue button Add a device:
- Choose the free backup type / protocol FTP/SFTP.
- Click on the blue button Continue:
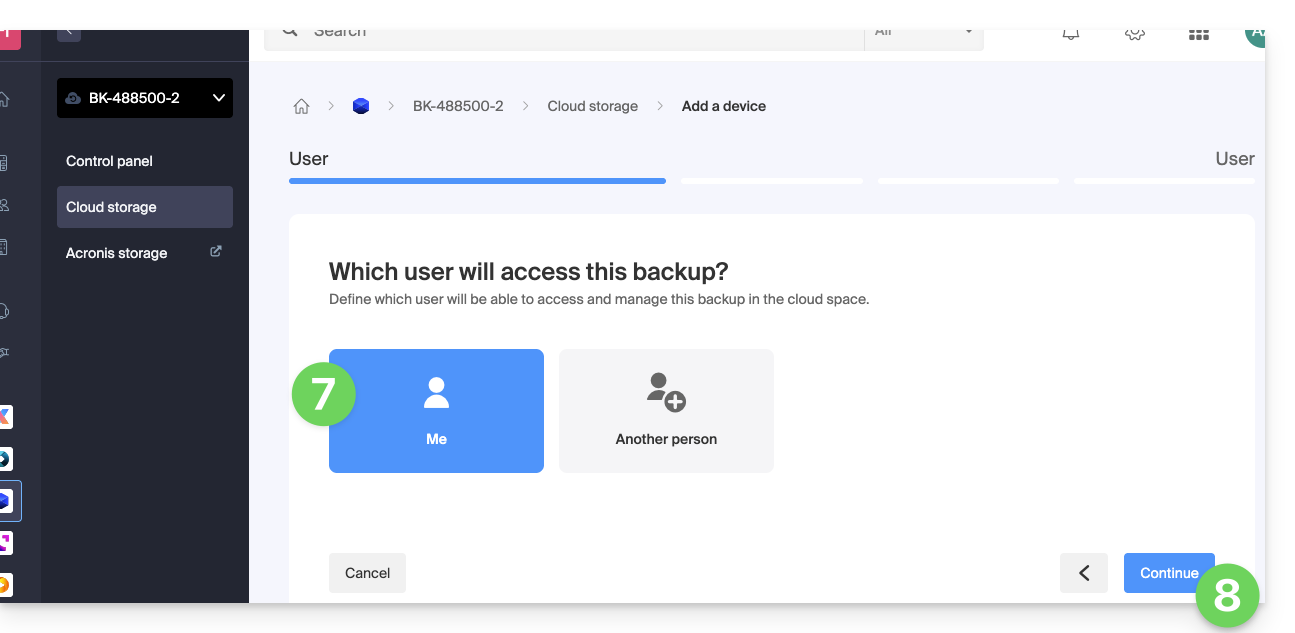
- Choose the user who will receive the connection information (if necessary, choose a user different from yours and specify the contact details of the person in the additional step that follows).
- Click on the blue button Continue:
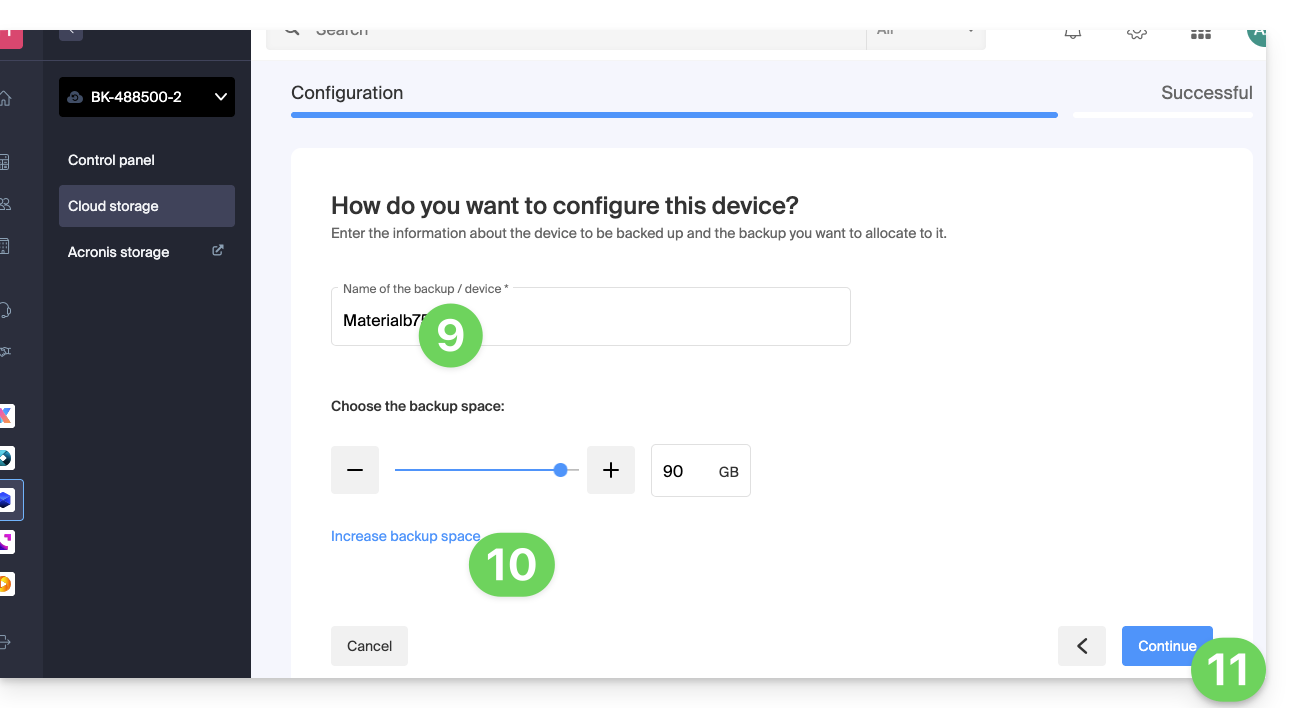
- Give a name to the backup.
- Define the maximum disk space that this backup space should represent from the total volume of the subscribed Swiss Backup, increasing if necessary the total size via the blue link.
- Click on the blue button Continue:
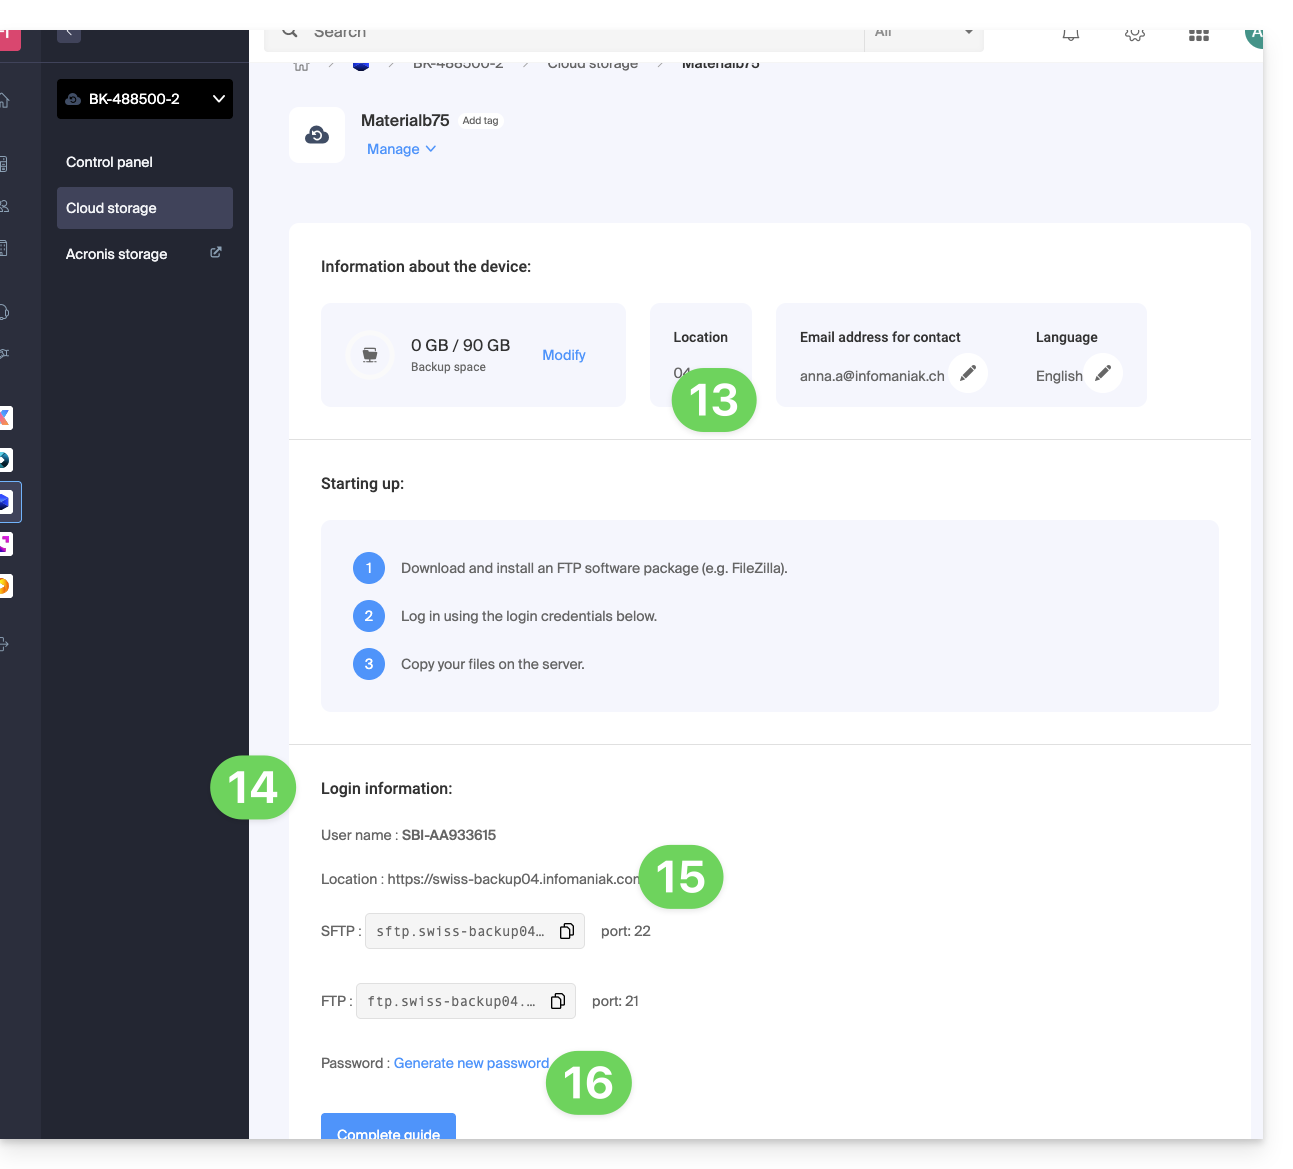
- Click on the blue button to display the connection information:

- This section mentions, among other things, the figure representing the location, useful for completing certain information that you will need to provide when configuring your backup application.
- This section provides the full connection information.
- The location or host server name for the SFTP and FTP connection below, with the port number (default ports for these protocols).
- The password (to be generated using the blue link that will open the assistant in a browser popup or via the link received by email):
And then?
Once the device is added to the Swiss Backup interface within the Infomaniak Manager, you can configure the application of your choice to start your Cloud backups via the protocol mentioned in this guide.
This guide explains how to edit the email notifications & alerts of the Acronis Agent used to back up your devices with Swiss Backup.
Enable / disable alerts & notifications
To access the management interface:
- Click here to access the Acronis Console with the credentials obtained after adding the device (need help?).
- Click on Account Management in the left sidebar:

- Click on Business Owner.
- Click on the user concerned in the table that appears.
- Click on the pencil icon ✎ in the settings block:

- Click on Validate to save the changes:

Modify the email address for receiving notifications
To change the email address that receives the notifications:
- Click here to access the Acronis Console with the credentials obtained after adding the device (need help?).
- Click on Account Management in the left sidebar.
- Click on Business Owner.
- Click on the user concerned in the table that appears.
- Click on the General Information tab at the top right.
- Click on the pencil icon ✎:

- Edit the email address.
- Click on Validate to save the modification:

Generate ad hoc reports
Refer to this other guide if you are looking for information about managing ad hoc reports (customizing them, or allowing multiple people to receive them).
This guide explains how to completely uninstall the Acronis Backup Agent for Swiss Backup on Apple devices.
Also refer to Acronis documentation on this topic.
Remove Backup Agent from macOS
To remove Cyber Protect:
- Click here to access the Acronis Console with the credentials obtained after adding the device (need help?).
- Click on the user icon at the top right.
- Click on Downloads:
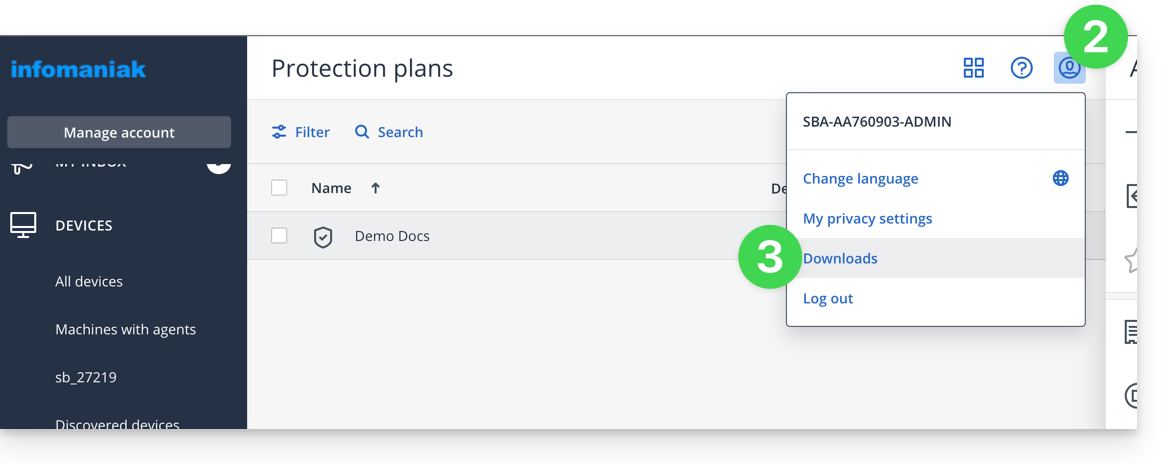
- Choose the client suitable for your machine.
- Open the
.dmgonce downloaded. - Double-click on Uninstall:
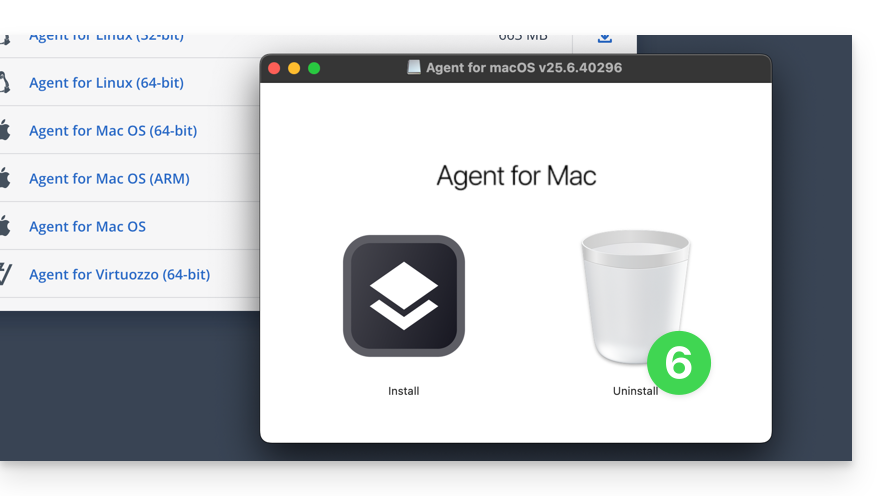
- Confirm if necessary the opening of the application.
- Confirm if necessary the uninstallation of the application.
- Wait until the uninstallation is complete.
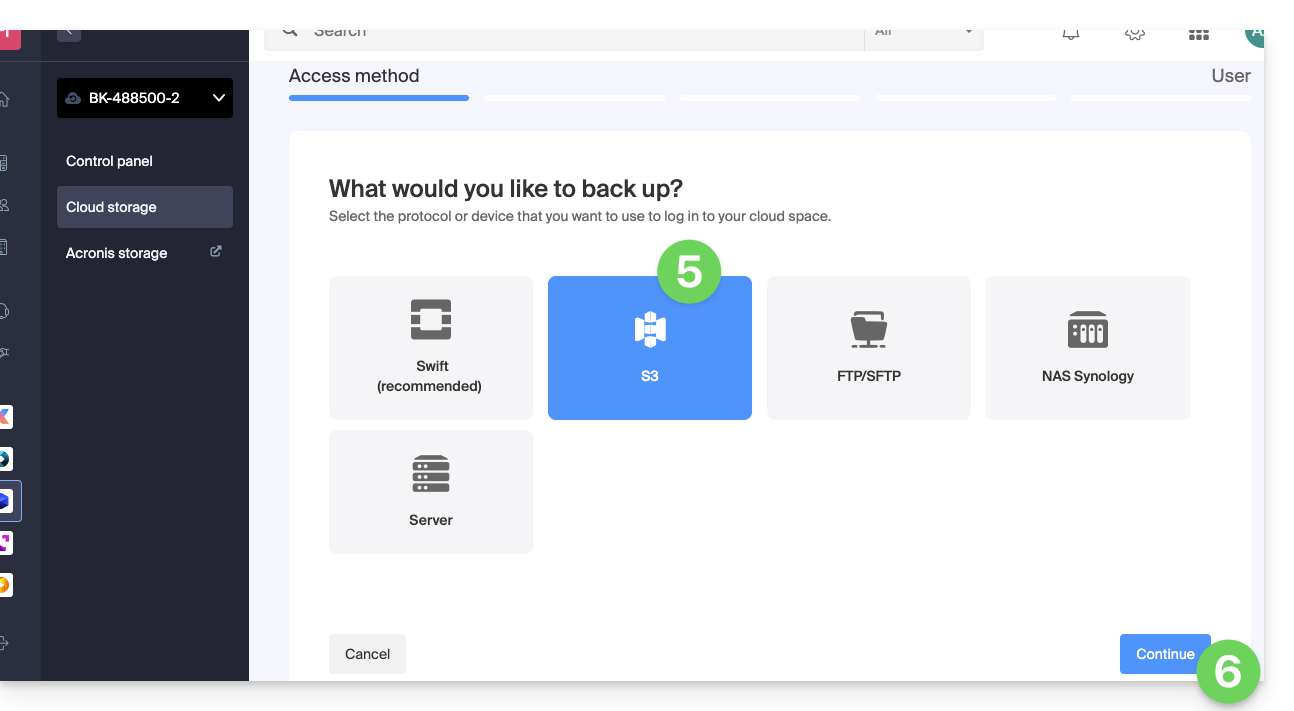
This guide explains how to create a new device (Cloud backup via S3 Compatible) on Swiss Backup, the independent Swiss cloud backup solution.
Prerequisites
- Order a Swiss Backup space from Infomaniak.
- When ordering, have defined the quota of available device(s) (minimum 1) under backup type Cloud:
- If necessary, increase the device quota according to your needs.
Add a device (for S3 connection)
To access Swiss Backup and configure a new free backup:
- Click here to access the management of your product on the Infomaniak Manager (need help?).
- Click directly on the name assigned to the product concerned:
- Click on the blue button Manage my devices (in the Cloud Backup Space section):
- Click on the blue button Add a device:
- Choose the free backup type/protocol S3.
- Click on the blue button Continue:
- Choose the user who will receive the connection information (if necessary, choose a user different from yours and specify the contact details of the person in the next additional step).
- Click on the blue button Continue:
- Give a name to the backup.
- Define the maximum disk space that this backup space should represent from the total volume of the subscribed Swiss Backup, increasing the total size if necessary via the blue link.
- Click on the blue button Continue:
- Click on the blue button to display the connection information:
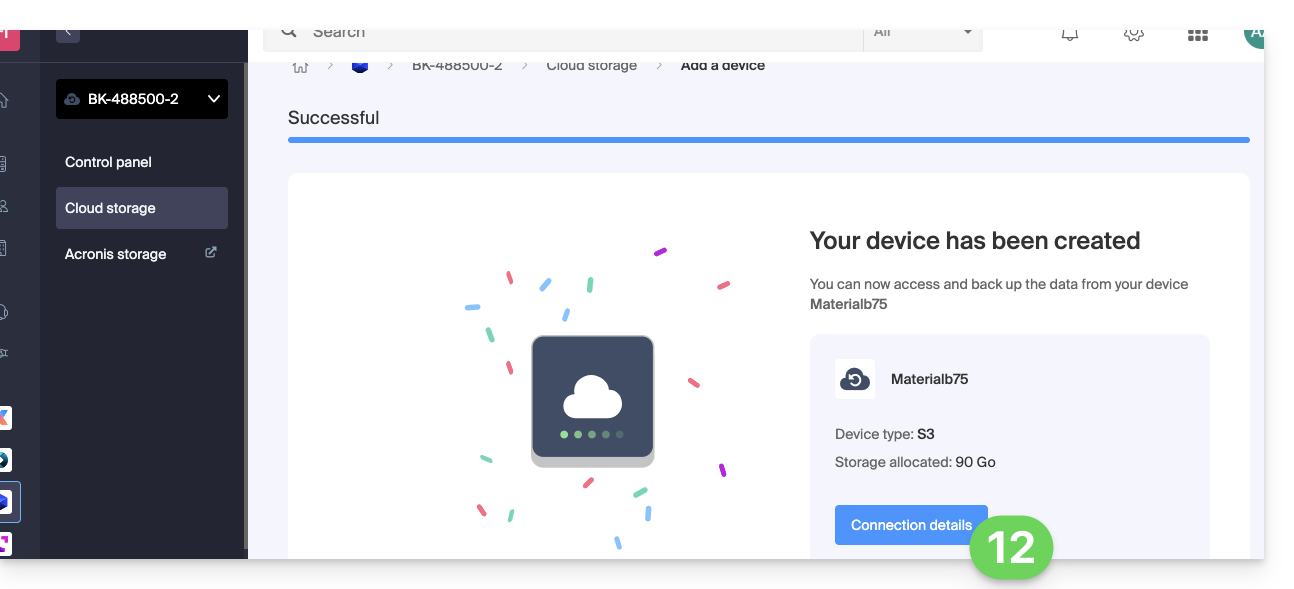
- This section mentions, among other things, the figure representing the location, useful for completing certain information that you will need to provide when configuring your backup application.
- This section provides all the connection information.
- The password (to be generated using the blue link that will open the assistant in a browser popup or via the link received by email) which includes a "
Endpoint", a "Access Key" and a "Secret Key" :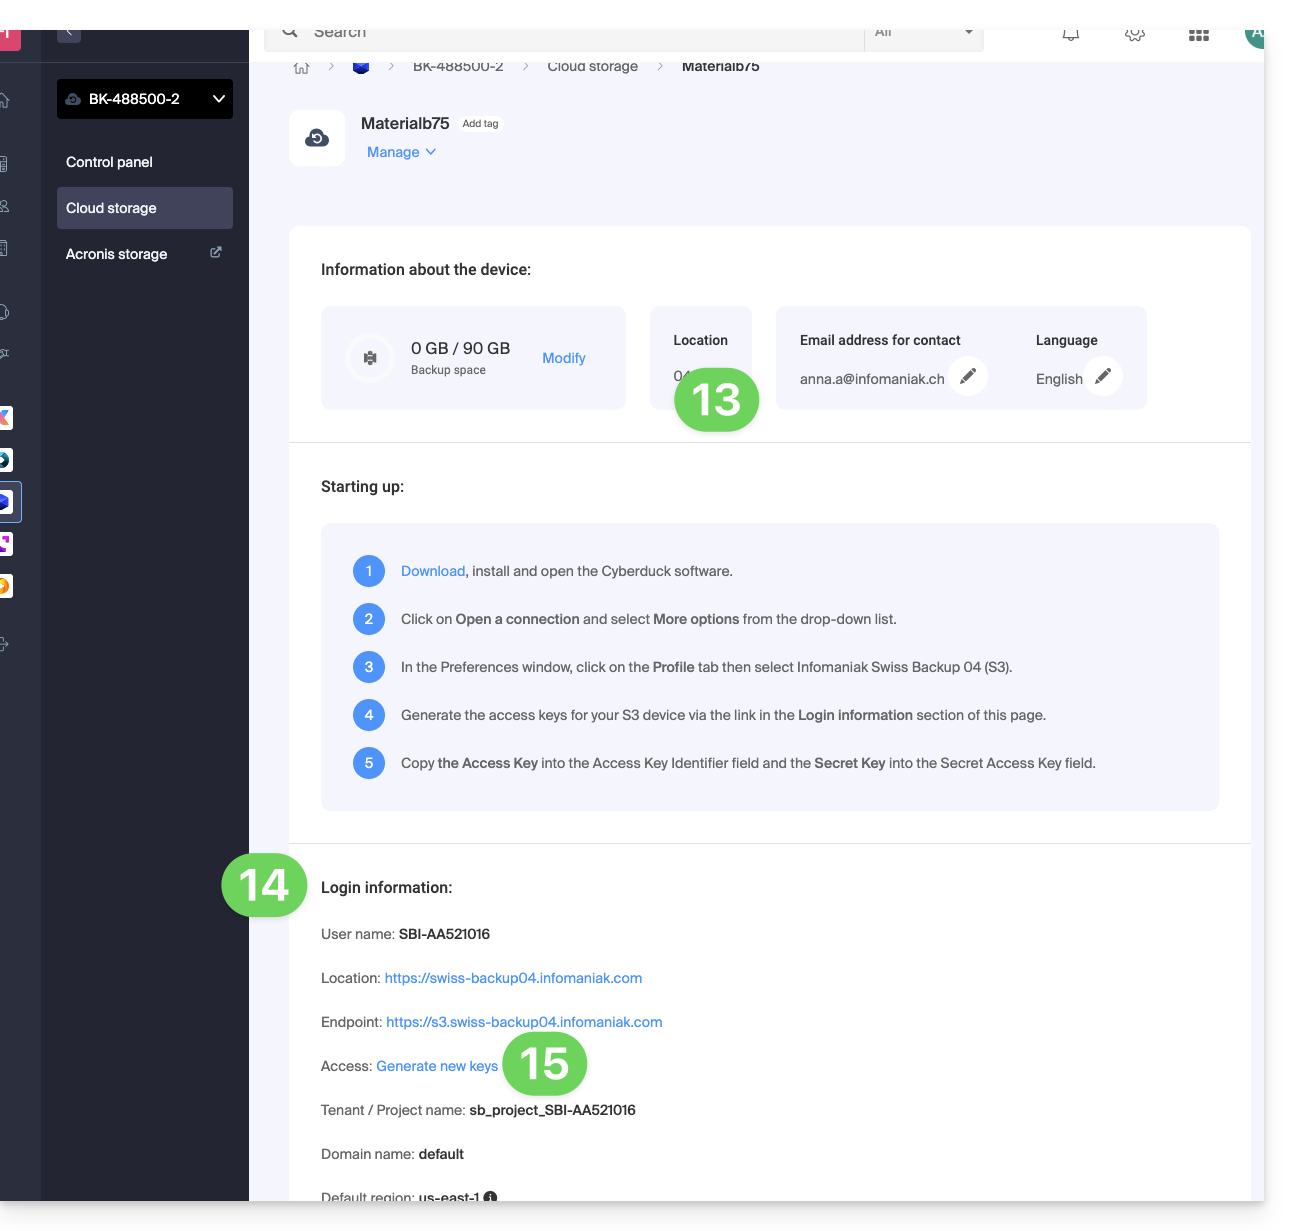
And then?
Once the device is added to the Swiss Backup interface within the Infomaniak Manager, you can configure the application of your choice to start your Cloud backups via the protocol mentioned in this guide.
This guide details how to restore an Apple macOS computer using Acronis on Swiss Backup, the backup solution in an independent Swiss cloud.
Prerequisites
- The Acronis application must be installed on the computer on which you want to perform the restoration; use the same credentials as those used to save the machine when registering the agent:
- Click here to access the Acronis Console with the credentials obtained after adding the device (need help?).
- Click on the user icon at the top right.
- Click on Downloads:

- Choose the client suitable for your macOS machine:
Create a USB startup key
To do this:
- Insert a blank USB key of at least 4 GB into your computer (be careful: the data contained on the key will be deleted).
- Open the Rescue Media Builder application from the Applications folder of the Finder of your macOS. This application has been automatically installed with the Acronis application.
- Check the detected USB key and click on Create Media.
Start the restore procedure
To do this:
- Restart the macOS computer with the USB startup key.
- Depending on the macOS version, press and hold a key on the keyboard (refer to this Apple guide to know which one) during the restart.
- If necessary, click on the USB startup key to start it.
Configure and start the restoration
To do this:
- Select your key on Rescue Media Builder:

- Click on Recovery Boot Media:

- Click on Recover:

- Click on Select data:
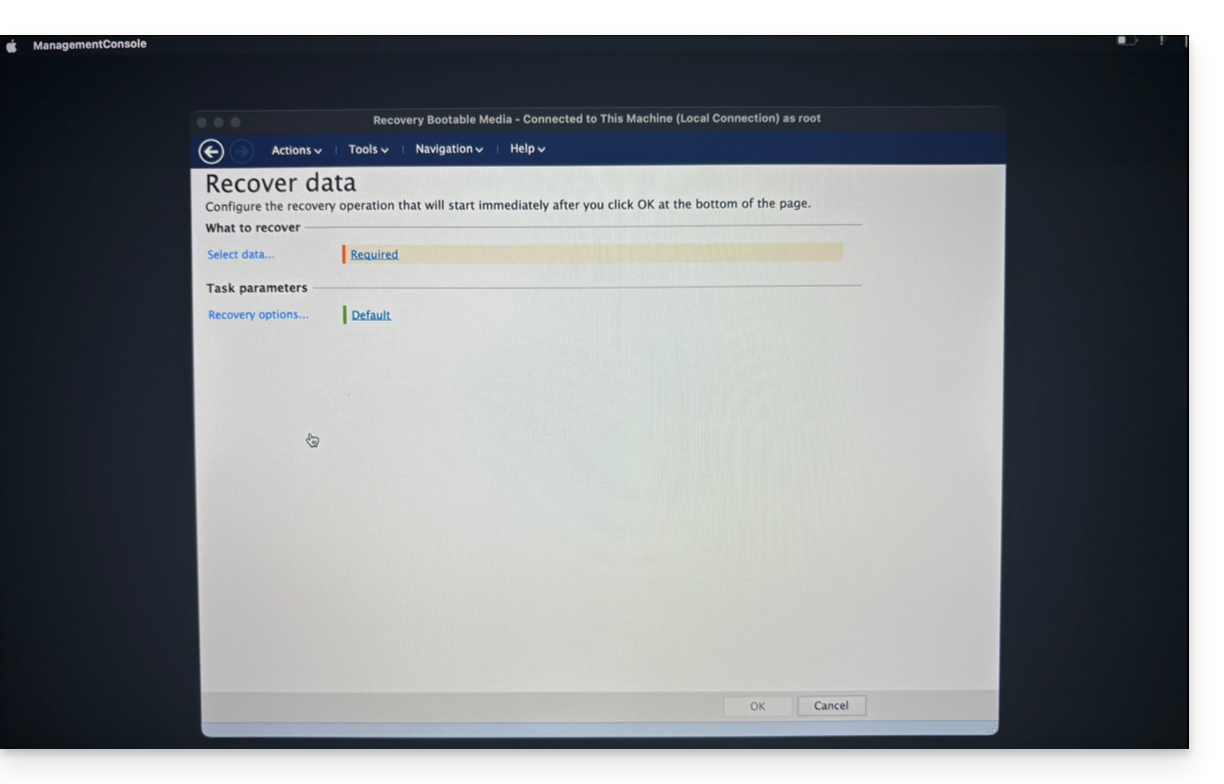
- … then on Browse:

- and select Cloud Storage; then click on the Log in button:

- Use the device credentials to authenticate:

- Select the macOS machine to restore, then click on OK to start the restoration:

- If you chose to encrypt your backups, you will be asked for the backup password:

- In the upper part of the screen, select the available backup you want to restore:

- Once the backup is selected, you can select the type of item to restore in the lower part of the screen, as well as those you want to restore; it is recommended to select the type Volumes and to restore all available Volumes, in order to restore all of your hard drive(s)... then start the restoration with the OK button:

- The restoration is then started, you can follow the progress via the Progress tab:

Once at 100%, the macOS machine will restart several times in a row (this is normal) until the entire procedure is complete.
This guide details how to manually save data using the FileZilla application (macOS / Windows / Linux) via the SFTP protocol on Swiss Backup, the backup solution in an independent Swiss cloud.
Preamble
- It is also possible to use Cyberduck (Swift): refer to this other guide.
- The various services offered by Infomaniak are all compatible with the corresponding standard protocols (S3/Swift for storage, for example). Therefore, if you encounter a problem with third-party software, contact its publisher or a Partner and consult the support policy as well as section 11.9 of the Infomaniak Terms of Service.
Configure FileZilla
Prerequisites
- Have a Swiss Backup Infomaniak space with available device quota (minimum 1) for a Cloud Backup.
- Add 1 device of type Cloud to obtain the SFTP parameters.
- Download and install FileZilla (macOS / Windows / Linux).
To configure a new backup:
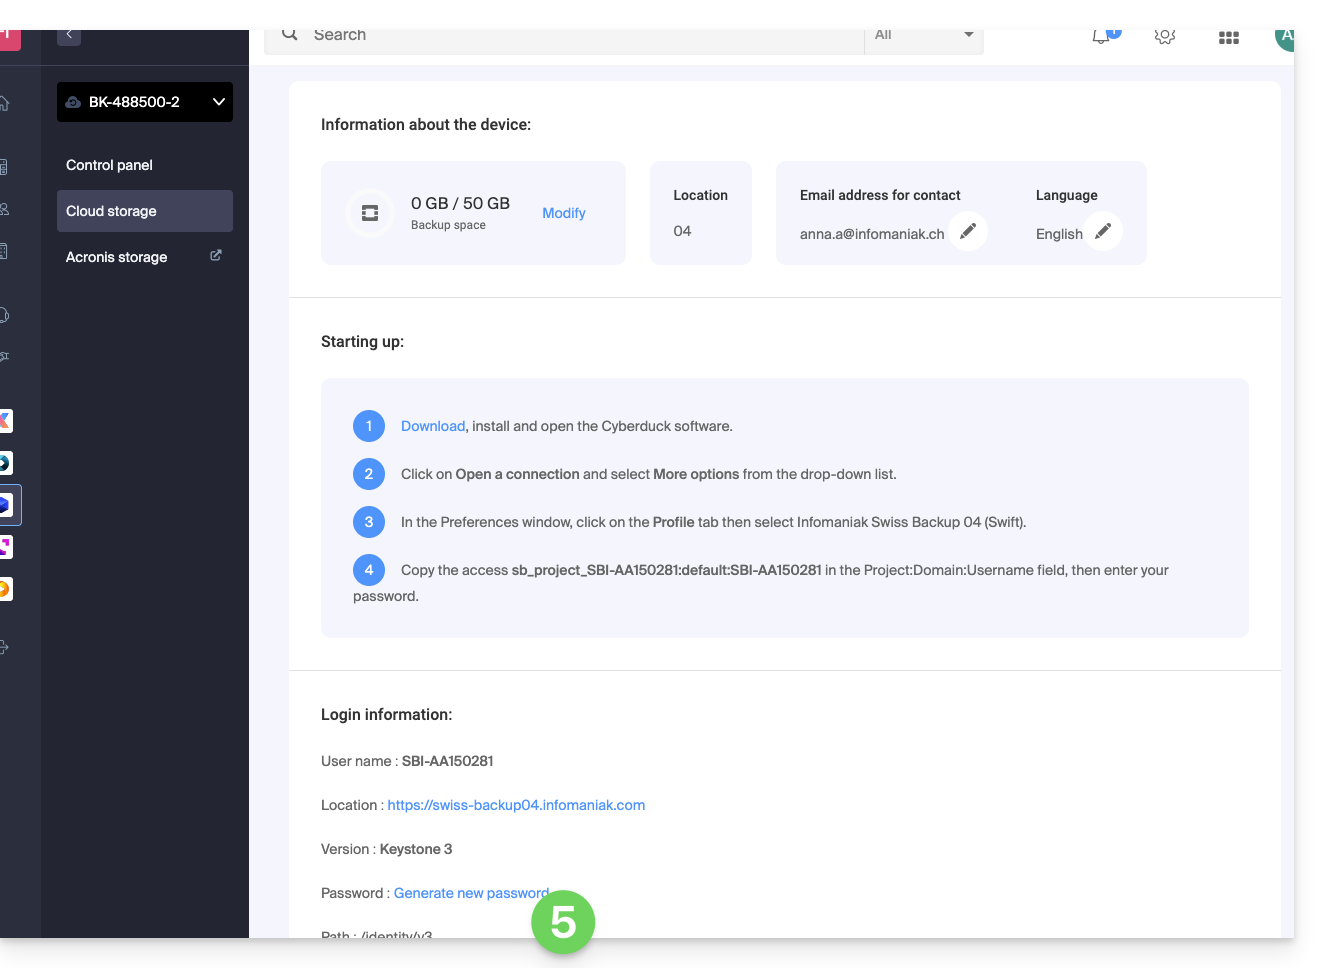
- Fill in the fields according to the information specific to your device (refer to this other guide):
- Host:
sftp.swiss-backup02.infomaniak.com - Username: Swiss Backup device name (e.g.,
SBI-MS0020) - Password: Password generated via the email received after creating the Swiss Backup device
- Port:
22 - Click on Connect
- Host:
FileZilla also allows you to set up connections so that you do not have to re-enter the login credentials:
- Click on the Site Manager icon:

- Click on New Site:

- Fill in the fields according to the information specific to your device (refer to this other guide):
- Host:
sftp.swiss-backup02.infomaniak.com - User: Swiss Backup device name (e.g.,
SBI-MS0020) - Password: Password generated via the email received after creating the Swiss Backup device.
- Port:
22 - Click on "Connect".
- Host:
The SFTP connection is recommended for secure data transmission. It is entirely possible to use the host connection, for example, "ftp.swiss-backup02.infomaniak.com" with port 21. However, the data will be transmitted in plain text (unencrypted) over the Internet (not recommended).
This guide explains how to change the language of the Acronis dashboard as well as the language of the Acronis Agent email communications used to back up your devices with Swiss Backup.
Manage Acronis language settings
To modify the language displayed by Acronis:
- Click here to access the Acronis Console with the credentials obtained after adding the device (need help?).
- Click on the user icon at the top right.
- Click on Change language:
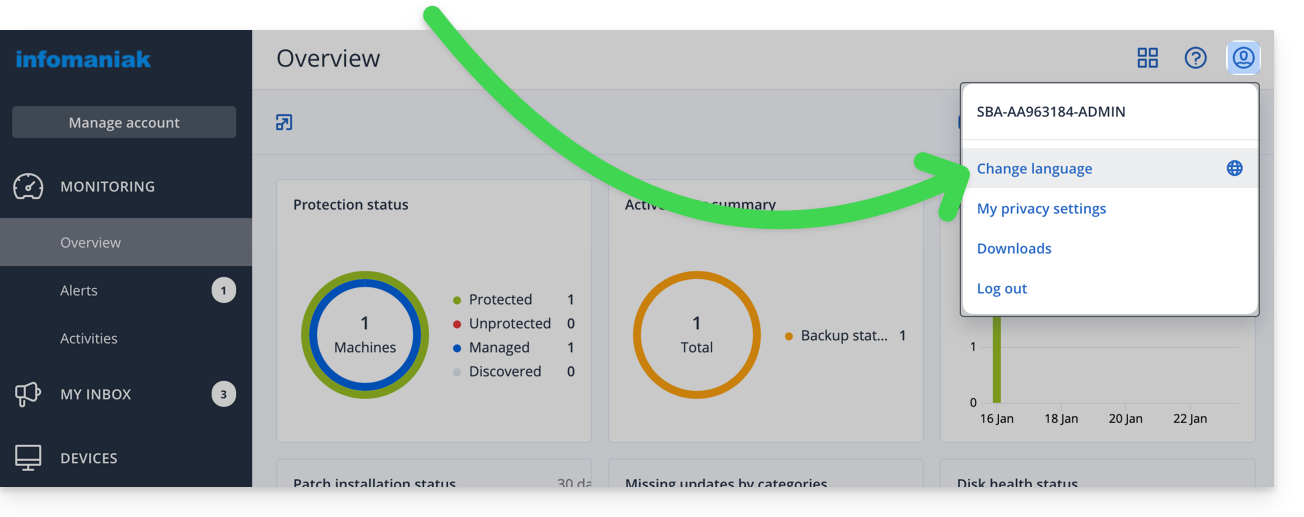
- It is also possible to access this menu from the Acronis account management:

- Click on the desired language.
Manage settings per user
It is possible to change the language of emails / alerts / notifications for your different clients/users (e.g., one speaks English and the other French) - this does not change the language of the interface itself - by going to the Acronis account management and then in the order A, B, C…: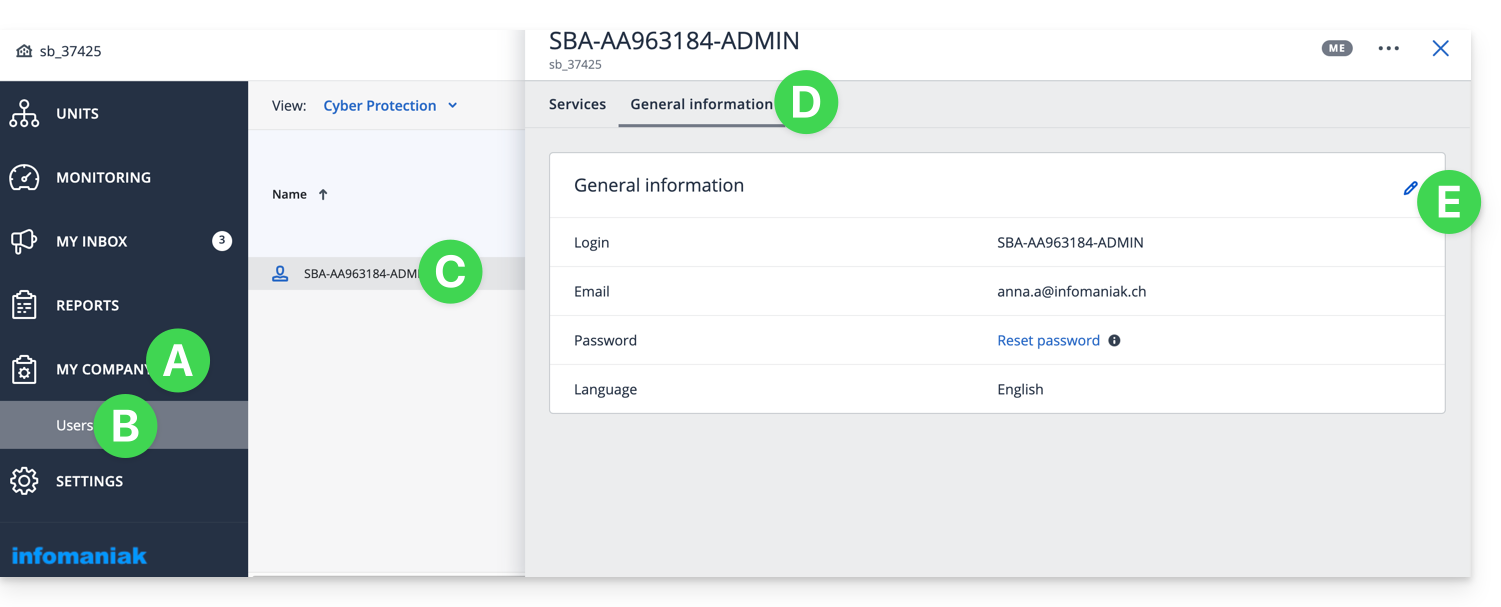
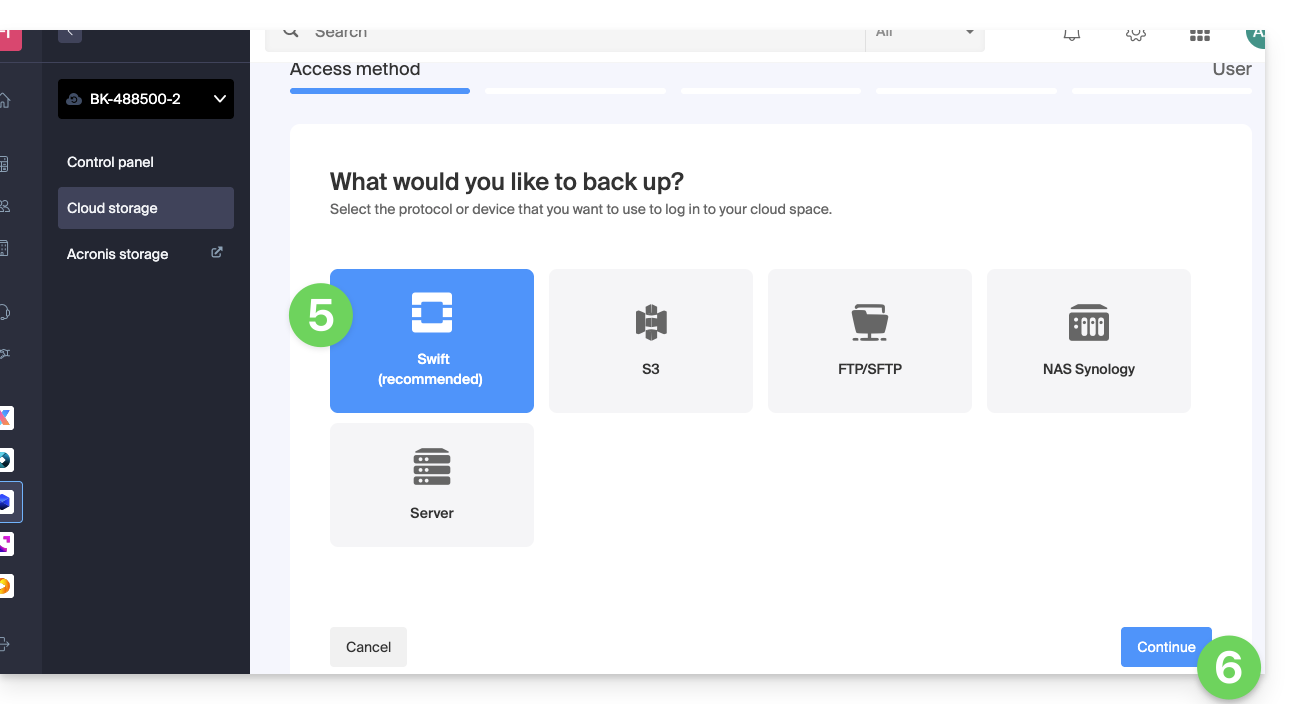
This guide explains how to create a new device (Cloud backup via OpenStack Swift) on Swiss Backup, the independent Swiss cloud backup solution.
Prerequisites
- Order an Infomaniak Swiss Backup space.
- When ordering, have defined the quota of available device(s) (minimum 1) under backup type Cloud:
- If necessary, increase the device quota according to your needs.
Add a device (for OpenStack Swift connection)
To access Swiss Backup and configure a new free backup:
- Click here to access the management of your product on the Infomaniak Manager (need help?).
- Click directly on the name assigned to the product concerned:
- Click on the blue button Manage my devices (in the Cloud Backup Space section):
- Click on the blue button Add a device:
- Choose the free backup type/protocol Swift.
- Click on the blue button Continue:
- Choose the user who will receive the connection information (if necessary, choose a user different from yours and specify the details of the person in the additional step that follows).
- Click on the blue button Continue:
- Give a name to the backup.
- Define the maximum disk space that this backup space should represent from the total volume of the subscribed Swiss Backup, increasing the total size if necessary via the blue link.
- Click on the blue button Continue:
- Click on the blue button to display the connection information:
- This section mentions, among other things, the figure representing the location, useful for completing certain information that you will need to provide when configuring your backup application.
- This section provides an example of a backup method, made easier by downloading a configuration profile.
- This section provides all the connection information.
- The location or host server name.
- The password (to be generated using the blue link that will open the assistant in a browser popup or via the link received by email) as well as other additional information, such as the
Tenant, for certain backup applications: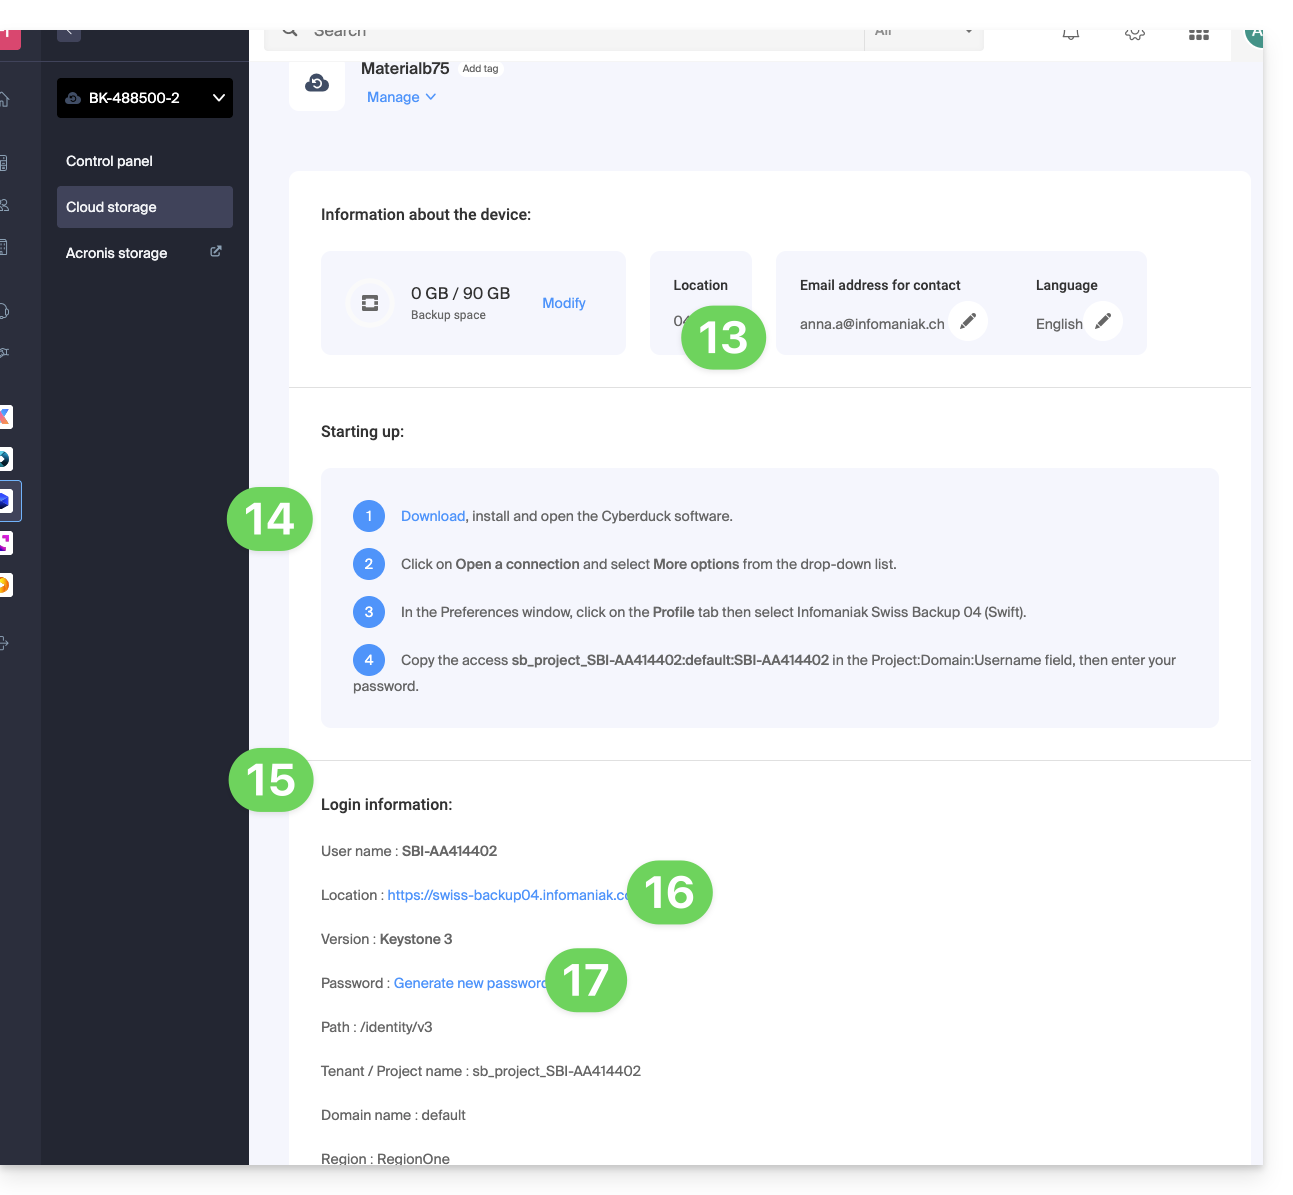
And then?
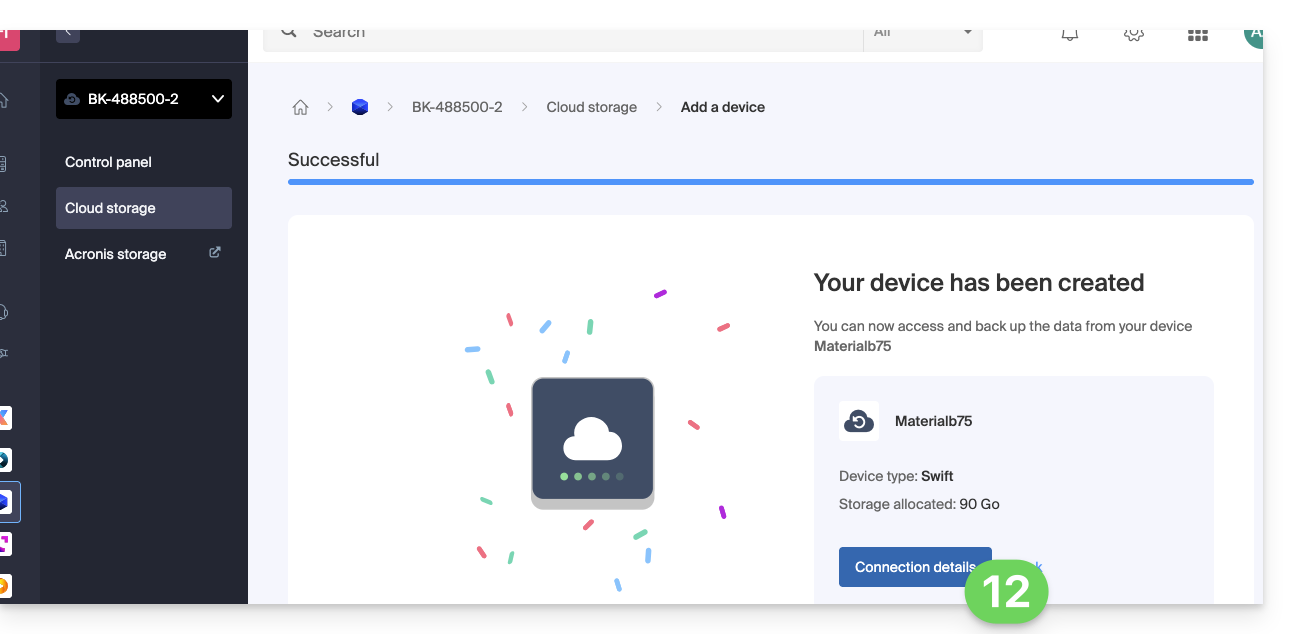
Once the device is added to the Swiss Backup interface within the Infomaniak Manager, you can configure the application of your choice to start your Cloud backups via the protocol mentioned in this guide.
This guide explains how to back up a VPS (Virtual Private Server) with Acronis on Swiss Backup, the backup solution in an independent Swiss cloud. It describes the prerequisites, the differences between the types of licenses and redirects to the useful resources.
Summary of license choices
- Linux :
- Virtual Machine : For VPS or virtualized environments.
- Linux Server : For standalone, physical or virtual machines without a hypervisor.
- Windows :
- Workstation : For physical workstations.
- Server : For physical or virtual machines with advanced roles.
- Virtual Machine : For Windows VMs in a hypervisor environment.
Back up a VPS on Linux
Differences between the types of licenses
- Virtual Machine :
- For a VPS or virtual machine hosted in a virtualization environment (e.g. VMware, Hyper-V, Virtuozzo).
- A license covers the physical host and all virtual machines it contains.
- Suitable for Infomaniak Public Cloud environments or hypervisor clusters (each host requires a license).
- Linux Server :
- For an individual physical or virtual machine running Linux (server operating system).
- Suitable for standalone, local or colocated servers.
- Each license covers an individual physical or virtual machine.
To configure the Linux backup:
- Refer to this guide to get the full details.
Back up a VPS on Windows
Differences between the types of licenses
- Workstation :
- A license per physical machine to back up.
- Limitation: This license does not support Microsoft Exchange Server, SQL Server or Active Directory applications.
- Server :
- A license per physical or virtual machine running Windows.
- Supports Microsoft SQL Server, SharePoint and Active Directory.
- Compatible with virtualization host roles (Hyper-V, VMware ESXi, etc.).
- Virtual Machine :
- A license per virtual machine running Windows in a hypervisor environment.
- Each cluster host requires a license.
To configure the Windows backup:
- Refer to this guide to get the full details.
This guide details how to manually save data using the Mountain Duck application (macOS / Windows) via the OpenStack Swift protocol on Swiss Backup, the backup solution in an independent Swiss cloud.
Preamble
- Mountain Duck allows file synchronization as an alternative to Dropbox (for this use, it is also recommended to use kDrive).
- The various services offered by Infomaniak are all compatible with the corresponding standard protocols (S3/Swift for storage, for example), therefore if you encounter a problem with third-party software, contact its publisher or a Partner and consult the support policy as well as article 11.9 of the Infomaniak TOS.
Configure Mountain Duck with Swiss Backup
Prerequisites
- Have a Swiss Backup Infomaniak space with available device quota (minimum 1) for a Cloud backup.
- Add 1 device of type Cloud to obtain the OpenStack Swift parameters.
- Download and install Mountain Duck (macOS / Windows).
To configure a new backup:
- Open Mountain Duck.
- Create a New connection.
- Select the corresponding profile from the list of available profiles (according to information specific to your device — refer to this other guide) or choose more options:

- and search for the corresponding profile:

- Fill in the fields according to information specific to your device (according to information specific to your device — refer to this other guide) by assembling Project:Domain:Username:

- Click on Connect.
- Enter the password (see point 4 above):

- Click on Log in.
- To automatically start Mountain Duck when you log in, check the Enable item at startup box from the General tab of Preferences:

This guide details how to obtain the connection and configuration information for Swiss Backup (open-source backup type Openstack Swift, S3, SFTP...), the backup solution in an independent Swiss cloud.
It also explains the differences between the passwords available to you.
Connection information (Cloud backup)
Access information
To access information related to your open-source backup type Openstack Swift, S3, SFTP...:
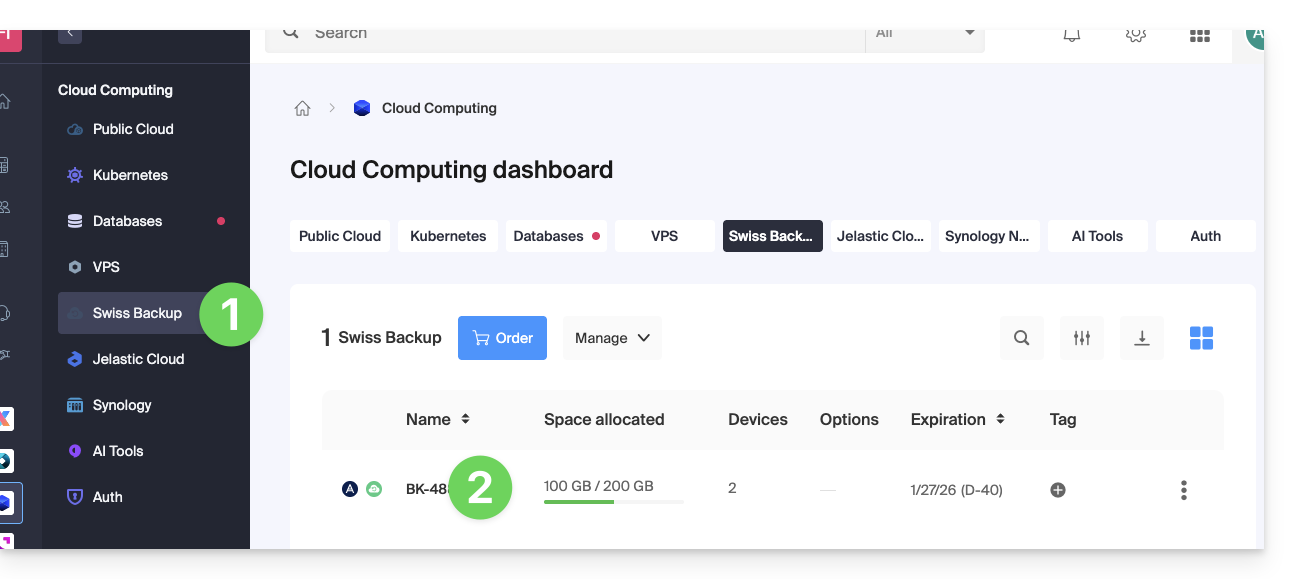
- Click here to access the management of your product on the Infomaniak Manager (need help?).
- Click directly on the name assigned to the product concerned:
- Click on the blue button Manage my devices (in the Cloud backup space section):

- Click on the name of the object concerned in the table that appears:
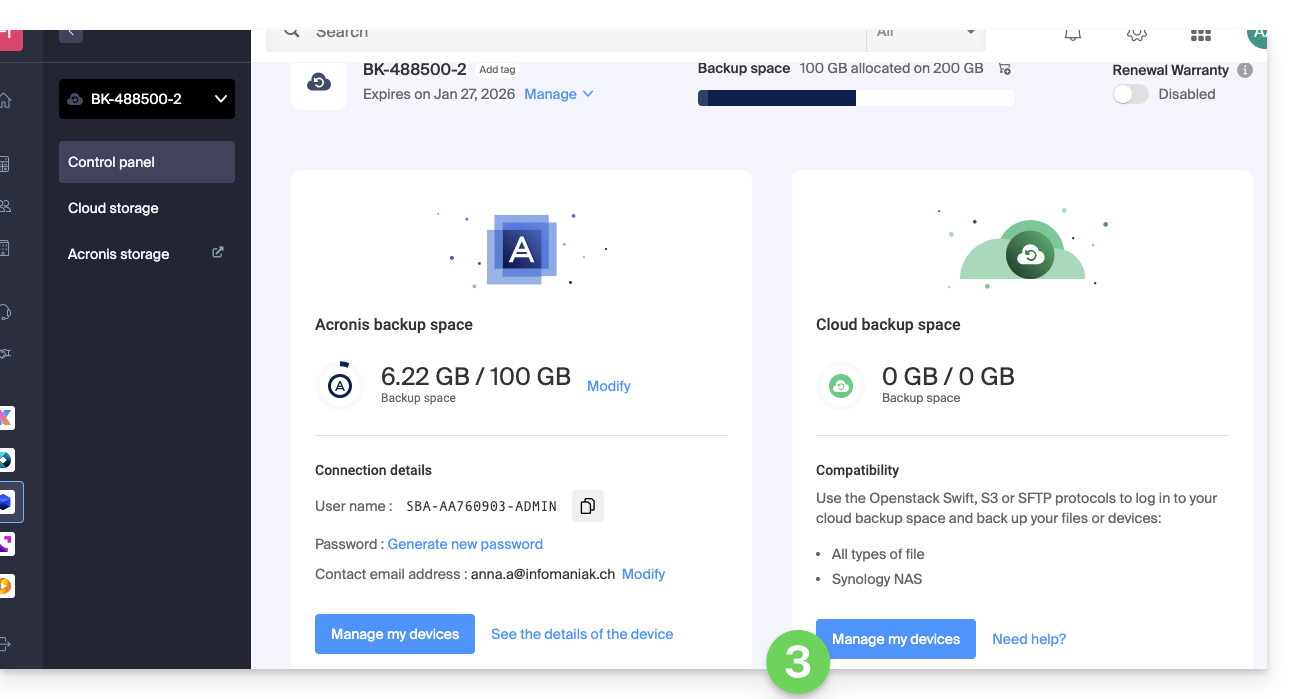
- The various information related to your device appears at the bottom of the page...
The various connection information (Swift, S3, etc.)
This information varies depending on the type of device chosen (Swift, SFTP, etc.) but notably includes:
| information requested | content to specify |
|---|---|
| username / login ID / username | most of the time in the form SBI-AB123456 |
| location | https://swiss-backup01.infomaniak.com or swiss-backup02... 03... etc. |
| version number | Keystone 3 |
| a password / access keys | ***** (see below to manage it) |
| path / path | /identity/v3 |
| Tenant / project name / project | most of the time in the form sb_project_ followed by username so sb_project_SBI-AB123456 e.g. |
| domain name / domain | most of the time register default |
| region | RegionOne |
| bucket | most of the time register default or /default |
| identity endpoint | most of the time the location followed by path (see above) so swiss-backup01.infomaniak.com/identity/v3 e.g. |
Different passwords
Infomaniak account
To access the management of the Swiss Backup product (Acronis or Cloud storage), you need to log in to the Infomaniak Manager: refer to this other guide on this subject.
Cloud Backup - regeneration of the login password
To establish a connection of the Swift / S3 / FTP/SFTP / etc. type, a password must be generated for the first time when creating a device on the Swiss Backup interface and activating the identifier.
It is not possible to display an already generated password. If you forget it, you need to generate a new one:
- Click here to access the management of your product on the Infomaniak Manager (need help?).
- Click directly on the name assigned to the product concerned.
- Click on the blue button Manage my devices (in the Cloud backup space section):
- Click on the name of the object concerned in the table that appears:
- Click on Generate a new password or access keys and follow the wizard:
Acronis Backup
To establish a connection with Acronis, a password for this type of backup is generated when creating a device on the Swiss Backup interface and activating the identifier. There is also an encryption password.
This guide covers immutable storage, an essential security feature that helps protect your backups against accidental or malicious deletion, including ransomware attacks.
Preamble
- The Immutable Storage (Immutability) is a setting that makes your Acronis backup data non-modifiable and non-deletable for a period of time that you define.
- Once the retention period is active, no action (deletion or modification) can be performed on this data until it expires.
Configuration and Usage
This feature is managed directly via the Backup Plans in the Acronis Cyber Protect management console.
Refer to the Acronis documentation for detailed steps on enabling the immutability option in your backup plan.
Limitation on other protocols (Swift and S3)
Immutability is not available on other Swiss Backup storage protocols, such as Swift and S3. This limitation is due to technical constraints inherent in the OpenStack Swift protocol used by these storages.
This guide explains how to install the Acronis Agent on macOS for Swiss Backup even if the Gatekeeper application attempts to block the installation and causes an error “install.pkg cannot be opened because Apple cannot verify that it does not contain malicious software.”
Allow Acronis in Gatekeeper
To do this:
- Open the Acronis file
install.pkgso that the error appears. - Go to System Preferences (in the Apple menu).
- Select Security & Privacy then the General tab if necessary.
- A text appears regarding
install.pkg, click on Open Anyway. - Confirm your decision to open the file by clicking the appropriate button.
This guide covers the management of users for Swiss Backup for Acronis backups.
Swiss Backup Administrator
Your account SBA-XXXX-ADMIN obtained after the configuration of Swiss Backup on the Infomaniak Manager has by default access to all licenses, devices, locations, and all the quota at its disposal:
- Click here to access the Acronis Console with the credentials obtained after adding the device (need help?).
- On the homepage, an administrator account will always see the management button, which will not be the case with a limited account:
- This gives access to the part reserved for admin accounts (or "business leader" according to the terms visible on the platform acronis.infomaniak.com):
If you have acquired 2 licenses/devices and your total storage quota is 1 TB for Acronis (e.g.):
- 1 Mobile
- 1 Server
your account SBA-XXXX-ADMIN will be able to back up 1 mobile device and 1 server; the storage quota for the 2 devices will be shared, but limited to 1 TB.
In the Acronis interface, you will see an "unlimited" quota, but it remains limited to the options you have chosen in the Swiss Backup Manager.
To better manage storage quotas and service quotas (licenses), create users on Acronis, this allows you to:
Add a user
There are two types of user accounts: administrator accounts and user accounts (read the Acronis help on this subject). Only an administrator account can add/remove users:
- Click here to access the Acronis Console with the credentials obtained after adding the device (need help?).
- Click on Manage Account in the left sidebar.
- Click on Business Leaders.
- Click on the Users button.
- Click on the +New button at the top of the page.
- Fill in the information (read Acronis help on this subject).
Delete a user
Warning:
- Deleting the device is irreversible and all saved data will be deleted from the Infomaniak servers.
- The machines associated with this user will be unregistered.
- All protection plans will be revoked from all machines associated with this user.
To delete the account:
- Click here to access the Acronis Console with an Admin account.
- Click on Manage Account in the left sidebar.
- Click on Company Directors (as in this example).
- Click on the action menu ⋮ to the right of the user concerned in the table that appears.
- Deactivate the account.
- Once the account is deactivated, delete the account (from point 5 above).
Link device and user
Example
1 To storage
Licenses 2 Mobiles, 1 Server, 1 VM
- SBA-XXXX-ADMIN (limited to the Infomaniak Manager quotas by default)
- User1 (storage quota: 800 GB, service quota: 1 Mobile, 1 Server)
- User2 (storage quota: 200 GB, service quota: 1 Mobile, 1 VM)
To link a device to a user, download and install the Acronis agent on the device in question then confirm the registration with the correct account (SBA-XXXX-ADMIN, user1 or user2):
To resolve registration issues, refer to this other guide.