
Knowledge base
1000 FAQs, 500 tutorials and explanatory videos. Here, there are only solutions!
This guide concerns the Discussion List service, exclusively offered to Infomaniak users who activated it in the past and for whom a tool migration was performed in early 2025.
Introduction
- The discussion list service stands out from classic email or a newsletter service by offering unique features:
- Allow users to subscribe to a “subscription” via a simple registration form for which the code is provided.
- Allow one or more designated moderators to accept or reject subscriptions, send messages to subscribers, and moderate member responses before publication.
- Allow users to contribute to the discussion by replying to a single address that automatically redistributes the email to the other members.
- Offer an easy and GDPR-compliant unsubscribe option.
- Familiarize yourself with this other guide regarding the service limits.
The subscription forms (html code) that may have been previously integrated on various pages must be regenerated and reintegrated to work (see the Forms chapter below).
Accessing the discussion list
The discussion list service, if activated in the past, is accessible within your Mail Service:
- Click here to access the management of your Mail Service on the Infomaniak Manager (need help?).
- Click directly on the domain name assigned to the relevant product.
- Click on Discussion List in the left sidebar:

Creation and configuration of the discussion list
To create a new discussion list:
- Click on the Start button …

- … or on the button above your existing lists:

Otherwise:
- Edit an existing list by clicking on its name:

- Click on its Configuration tab:

The parameters necessary for the proper functioning of the system are as follows:
- A discussion list revolves around an email address that should not yet exist in the Mail Service of the relevant domain (and that cannot be created or modified thereafter).
- You can give a name to the list to identify it more easily if you have several or if the email address is not sufficiently explicit.
- You can also add an additional description.
- You must determine the email address(es) that will be moderators (= highest permission on the list).
- You can set a language for your mailing list.
- The setting of “who can subscribe to the list” is important:
- It is possible to specify that the user will have to confirm their own registration (in addition to a moderator).
- The setting of “who can write to the list” is just as important:
- You can use the service as a one-way tool for information dissemination, for example, or as a multi-way tool for information exchange and discussion, including with non-members (with moderation)...
Click on Advanced Options.

- It is possible to configure where responses should be sent…
- … to the sender with the sender's email address visible
- … to the list (everyone receives) with the sender's email address visible
- … to the list as coming from the list's email address itself
- Allows you to limit the size of emails sent via the discussion list (especially in case of attachment).
- Allows you to customize a message that will be automatically sent to an email address upon subscription to the list.
- Allows you to customize a message that will be automatically sent to an email address upon unsubscribing from the list.
- Click on the button to save.
Subscription (according to settings in point 6 above)
- Subscribers can sign up by sending a message to the email address in the form
list-name-join@list-domain. - They can also be manually subscribed by the moderator via the interface and in this case, they receive a notification email whose content can be customized.
- If the subscription made by a subscriber must be validated by a moderator, the latter receives an email:
- The moderator approves the request by clicking on the “
mailto:” type link, which generates a new message that can be sent to the email address in the formnom-de-la-liste-request@domaine-de-la-listewith the subjectaccept adresse-mail-abonnéand in the body of the message the lineApproved: mot-de-passe-de-la-liste, optionally adding a linestopto prevent the execution of other scripts, for example in the case where there is a signature.
- The moderator approves the request by clicking on the “
- If the subscription made by a subscriber must be validated by the subscriber himself, the latter receives an email to which he must respond (by clicking on the link to create a new reply email and pre-filled):

- And in this case, the moderator receives the request at a second time, after validation by the subscriber, and he must respond to it to validate the subscription (the easiest is always to click on the link):

- And in this case, the moderator receives the request at a second time, after validation by the subscriber, and he must respond to it to validate the subscription (the easiest is always to click on the link):
Unsubscription
- Subscribers can unsubscribe by sending a message to the email address in the form
list-name-leave@list-domain. - When unsubscribing, a confirmation request message is sent to the user.
- The user approves the request (always by clicking on the “
mailto:” type link which generates a new message that can be sent to the email address in the formnom-de-la-liste-request@domaine-de-la-listewith the subject specified in the confirmation email and an empty message body).
- The user approves the request (always by clicking on the “
Sending / receiving messages
- Each subscriber can create a Mail signature and choose their name when sending an email.
- A footer is automatically added to each message sent via the mailing list:

- Also see the
reply-toandfromparameters in point 9 above.
Message Moderation
- To reject a message, the moderator must click on the link of type “
mailto:” which generates a new message that can be sent to the email address in the formnom-de-la-liste-request@domaine-de-la-liste. - When a moderator is also a member of the list, they do not receive the messages they send themselves, but they do receive those sent by other moderators.
Forms (subscription/unsubscription)
To allow a website visitor to subscribe to your list, you can generate a code to insert on your chosen site; example with Site Creator:
The Form tab allows you to specify the URL to which the user will be redirected after subscribing or unsubscribing:
- In case of an error while using the form, an error page may display the email address
moderation-owner@domaine-de-la-listeallowing to contact the moderators. - A user already subscribed to the list can sign up multiple times without any specific message being displayed.
Error management
The system indicates the number of errors encountered by an address and the date:
This guide details the administrative procedures for transferring the management of a domain with a .de extension to another registrar than Infomaniak.
Transfer a .de domain elsewhere
As long as the administrative contact mentioned in the WHOIS of the domain to be transferred does not contain an address located in Germany, it will be impossible to request the transfer code. Refer to this other guide to modify the details.
Otherwise, you can delete the domain name and in this case, you must…
- … either contact Infomaniak support (by entering the email address mentioned in the WHOIS details) and request the deletion
- … or wait for the domain to expire after which it will be transferred to DENIC whom you can contact to request the final deletion.
This guide explains how to create a new project with Public Cloud Infomaniak.
Prerequisites
- Have read and understood the Guide de démarrage.
- Have Public Cloud on your Manager Infomaniak.
Create a new project
To access Public Cloud:
- Click here to access the management of your product on the Manager Infomaniak (need help?).
- Click directly on the name assigned to the relevant product, on which a new project will be created

- Click on the Create a project button:

- Name your project.
- An OpenStack identifier is automatically created (in the form
PCU-XXXX). - It is possible to add a description (to specify who the identifier is intended for, for example).
- Set a password (or send the procedure by email).
- Click on Create to complete the project creation:

Resource level
The highest level of resources to which your organization has access is automatically assigned to the project. You can change it at any time once the project is created.
Also refer to this other guide if you are looking for information about actions on an existing project.
This guide presents several examples of using Varnish on Cloud Server Infomaniak.
⚠️ For additional help contact a partner or launch a free tender — also discover the role of the host.
Varnish Configuration
After installation, configuring Varnish includes important rules for caching and purging. Be careful not to accidentally allow unwanted IP addresses.
Here is what a basic configuration file might look like with a few common cases and different actions/rules in one example:
vcl 4.0;
# Configuration du backend par défaut
backend default {
    .host = "127.0.0.80";  # Adresse IP du backend
    .port = "80";           # Port du backend
}
# Définition d'une liste de contrôle d'accès (ACL) pour les IPs autorisées à purger le cache
acl purge {
    "localhost";            # IP locale
    "1.2.3.4";              # IP de votre domicile
    "42.42.42.0"/24;        # Plage d'IP publique de votre entreprise
    ! "42.42.42.7";         # Exclusion d'une IP spécifique (ex : un collègue gênant)
}
# Traitement des requêtes à leur réception par Varnish
sub vcl_recv {
    # Autoriser les requêtes de purge
    if (req.method == "PURGE") {
        # Vérification si l'IP du client est autorisée à purger
        if (!client.ip ~ purge) {  # 'purge' fait référence à l'ACL définie plus haut
            # Retourne une page d'erreur si l'IP n'est pas autorisée
            return (synth(405, "Cette IP n'est pas autorisée à envoyer des requêtes PURGE."));
        }
        # Si l'IP est autorisée, purger le cache pour cette requête
        return (purge);
    }
    # Autoriser la purge de toutes les images via une requête PURGEALL
    if (req.method == "PURGEALL" && req.url == "/images") {
        if (!client.ip ~ purge) {
            return (synth(405, "Cette IP n'est pas autorisée à envoyer des requêtes PURGE."));
        }
        # Invalider tous les objets en cache correspondant à des images
        ban("req.url ~ \.(jpg|png|gif|svg)$");
        return (synth(200, "Images purgées."));
    }
    # Ne pas mettre en cache les pages avec une autorisation (header Authorization)
    if (req.http.Authorization) {
        # Passer la requête directement au backend sans la mettre en cache
        return (pass);
    }
}
# Traitement de la réponse du backend avant de la renvoyer au client
sub vcl_backend_response {
    # Mise en cache des images pour une durée de 1 jour
    if (beresp.http.content-type ~ "image") {
        set beresp.ttl = 1d;
    }
    # Si le backend indique que la réponse ne doit pas être mise en cache, respecter cette consigne
    if (beresp.http.uncacheable) {
        set beresp.uncacheable = true;
    }
}
Purge from the CLI interface
From there, the rules stated in the configuration above apply to all requests, so if the configured site is "domain.xyz", you can simply use the CLI tool "curl" and do the following:
# Envoyer une requête PURGE pour purger la page d'accueil de "domain.xyz"
$ curl -X PURGE https://domain.xyz/
# Réponse renvoyée par le serveur Varnish
<!DOCTYPE html>
<html>
<head>
    <title>200 Purged</title>
</head>
<body>
    <h1>Erreur 200 : Purge effectuée</h1>
    <p>La page a été purgée avec succès.</p>
    <h3>Guru Meditation:</h3>
    <p>XID: 2</p>
    <hr>
    <p>Serveur de cache Varnish</p>
</body>
</html>
And there, the homepage has been purged. Or to purge another URL, simply point the request to the latter:
# Envoyer une requête PURGE pour purger un fichier spécifique à "domain.xyz"
$ curl -X PURGE https://domain.xyz/some_path/some_file.html
# Réponse renvoyée par le serveur Varnish
<!DOCTYPE html>
<html>
<head>
    <title>200 Purged</title>
</head>
<body>
    <h1>Erreur 200 : Purge effectuée</h1>
    <p>Le fichier a été purgé avec succès.</p>
    <h3>Guru Meditation:</h3>
    <p>XID: 4</p>
    <hr>
    <p>Serveur de cache Varnish</p>
</body>
</html>
Or, as indicated in the VCL configuration, purge all images:
# Envoyer une requête PURGEALL pour purger toutes les images dans "domain.xyz"
$ curl -X PURGEALL https://domain.xyz/images
# Réponse renvoyée par le serveur Varnish
<!DOCTYPE html>
<html>
<head>
    <title>200 Purged images</title>
</head>
<body>
    <h1>Erreur 200 : Images purgées</h1>
    <p>Toutes les images ont été purgées avec succès.</p>
    <h3>Guru Meditation:</h3>
    <p>XID: 32770</p>
    <hr>
    <p>Serveur de cache Varnish</p>
</body>
</html>
Purge from a CMS
It is a bit more difficult to illustrate this case because there are many ways to manage caching from a backend. In the configuration example above, a control on the header "Uncacheable" is added, which disables caching. With this option, any CMS could simply set this header on the response to disable caching for this request, for example.
From any PHP code and with the configuration above, you can simply send an HTTP request and use this snippet to perform a PURGE of the cache:
<?php
if ($curl = curl_init("http://127.0.0.1/some_url")) {
    curl_setopt_array($curl, [
        CURLOPT_RETURNTRANSFER => true,
        CURLOPT_CUSTOMREQUEST => "PURGE",
        CURLOPT_HTTPHEADER => [
            "Host: {$_SERVER['HTTP_HOST']}"
        ]
    ]);
    curl_exec($curl);
    if (curl_getinfo($curl, CURLINFO_HTTP_CODE) == 200) {
        echo "Cache purged!";
    }
    curl_close($curl);
}
?>
Learn more
Useful links regarding the Varnish configuration language (VCL) to control request processing, routing, caching and several other aspects:
This guide explains why a website may be "broken" or stop displaying anything, following a password change at the level of a Web Hosting.
Broken link with the database
When your website, and more specifically a script (CMS, WordPress, Prestashop or any other application using MySQL databases), can no longer connect to the MySQL MariaDB or other database, an error message may display, such as:
Erreur lors de la connexion à la base de donnéesDatabase Error: Unable to connect to the database:Could not connect to MySQLLink to database cannot be established
Remember your last action…
In case an error occurs on your site, you should always examine the recent history. In this case, has there been…
- … an action on your part regarding the configuration file of the script in question? Has it been altered, modified, or moved?
Sometimes, the unintentional insertion of a space before or after a word can sever the connection between the web server and the database server. Go back and review your file modifications.
If necessary, restore an older version of the files that you recently modified.
- … an action regarding the database password in the Infomaniak Manager?
If you change the password of your database via the Infomaniak Manager, then your script, which retrieves its information from the databases, will no longer display anything.Changing something in the Infomaniak Manager means you have to change it everywhere else. This change that you made in the Manager, you also need to report / reflect it in the configuration file of the script by connecting via FTP and going to modify the appropriate file, usually "wp-config.php", "configuration.php" or similar.
- … a server move announced by Infomaniak?
If this error follows a server move or another operation announced by email and related to the product in question, do not hesitate to contact Infomaniak support.
Thank you for entrusting the management of your domain names to Infomaniak.
This guide allows you to quickly use the essential functions of your new product.
Some important guides
Administrative
- Protect your personal information in the WHOIS
- Protect your domain against theft and loss
- Update the domain name details
- Who does a domain name belong to?
- Use the free services (mail and Web 10 Mo) linked to a domain managed by Infomaniak
- Transfer another domain to Infomaniak
Technical
- Edit the records (A, MX, Web, Mail, etc.) of a domain registered with Infomaniak to join, for example, a hosting service not managed by Infomaniak
- Change the DNS servers
- Redirect traffic
- Set up DynDNS
- Link a domain name to the Mail Service
- Add an additional domain to the Mail Service
- Unlink a domain linked to the Mail Service
- Link a domain name to Infomaniak Web Hosting
- Add an additional domain to a website
- Unlink a domain linked to the website
- Link a domain name to the NAS Synology Infomaniak
- Link a domain name to Wix
- Link a domain name to Site Creator
- Link a domain name to the Newsletter
- Link an Infomaniak domain to an external service
Otherwise, find the topic you are looking for among the rest of the FAQs.
Click here to share a review or suggestion about an Infomaniak product.
This guide explains how to install and configure systemd on a Serveur Cloud and presents the main commands that can be used.
⚠️ For additional help contact a partner or launch a free tender — also discover the role of the host.
Prerequisites
- Follow the installation guide for
systemdon Serveur Cloud. - Consult the official documentation to learn about all the possibilities offered by systemd
- The "unit" files must be placed in:
~/.config/systemd/user/ (/home/clients/absolute-path-id/.config/systemd/user)(replacing absolute-path-id visible in your Manager) and the permissions must be set to 0644. - The
--userparameter must be specified in each command.
Main commands
Here is a non-exhaustive list of commands that can be used with systemd.
Force systemd to reload the unit files and take the changes into account:
systemctl --user daemon-reloadActivating a service:
systemctl --user enable --now SERVICENAME.serviceChecking the status of a service:
systemctl --user status SERVICENAME.serviceConfiguration of Node as a service with systemd
It will be necessary to create a "Unit" file with the ".service" extension, which will need to be saved in the directory:
~/.config/systemd/user/It is possible to reuse the example below by replacing the values starting with {}:
[Unit]
Description={Le nom du service} # Spécifier ici un nom du service. Celui-ci est obligatoire mais n'a pas d'impact sur le fonctionnement

[Service]
Restart=always
Environment=NODE_VERSION={la version souhaitée} # Spécifier ici la version de Node à utiliser. S'assurer qu'elle soit installée au préalable avec "nvm install {la version souhaitée}"
WorkingDirectory=%h/{repertoire du projet Node} # %h correspond à la racine de l'hébergement
ExecStart=/bin/bash -c "exec $HOME/.nvm/nvm-exec {commande de lancement du script node}" # Cette commande dépend du projet. Par exemple, "npm run start", "npm run serve" ou encore "node server.js" sont courants

[Install]
WantedBy=default.target
Additional actions with a Unit file
systemctl --user daemon-reloadStart the service (if it is already active, nothing happens):
systemctl --user start [Nom du Unit]Stop the service (if it is not active, nothing happens):
systemctl --user stop [Nom du Unit]Restart the service (if it is not running, it will be started):
systemctl --user restart [Nom du Unit]Get information about the service; namely:
- "Active" which indicates whether the service is running and for how long
- "CGroup" shows the process group managed by the service, this allows you to see the active processes, with their arguments and their ID
Below "CGroup" are any logs (the standard output and error of the process):
systemctl --user status [Nom du Unit]Enable automatic startup of the service at server boot; NB: this does not start the service:
systemctl --user enable [Nom du Unit]Disable the automatic startup of the service at server boot; NB: this does not stop the service:
systemctl --user disable [Nom du Unit]Configuration with user entries:
[Unit]
Description="nom service"

[Service]
Restart=always
Environment=NODE_VERSION=16.17
WorkingDirectory=%h/sites/"nom-repertoire-site"/
ExecStart=/bin/bash -c "exec $HOME/.nvm/nvm-exec npm run start"

[Install]
WantedBy=default.targetThis guide details the structure of kDrive Infomaniak: online interface, menus to manage and find your shares, usefulness and meaning of default folders, etc.
Preamble
- This guide applies to the Web app kDrive (online service kdrive.infomaniak.com).
- The desktop app kDrive (desktop application on macOS / Windows / Linux) is not directly concerned (and will not display certain elements).
- The mobile app (application for iOS / Android smartphone or tablet) is, however, similar in terms of menu organization (with a few singularities such as offline files, for example).
- The Shared folders and the Shares menu are only visible with certain multi-user offers.
- Do not rename and/or move the default-created folders either on the Web version and even less locally, as this causes synchronization issues.
- To quickly access the different features/operations, right-click on your files.
3 main elements
The kDrive interface offers a left-side menu that leads you to the kDrive data, including these 3 main elements:
1. Organization folders: common to the collaborators of your Organization
This folder displays the folder tree of shared folders automatically to some or all users of the same kDrive; if they contain documents, they will be displayed in the center of the interface: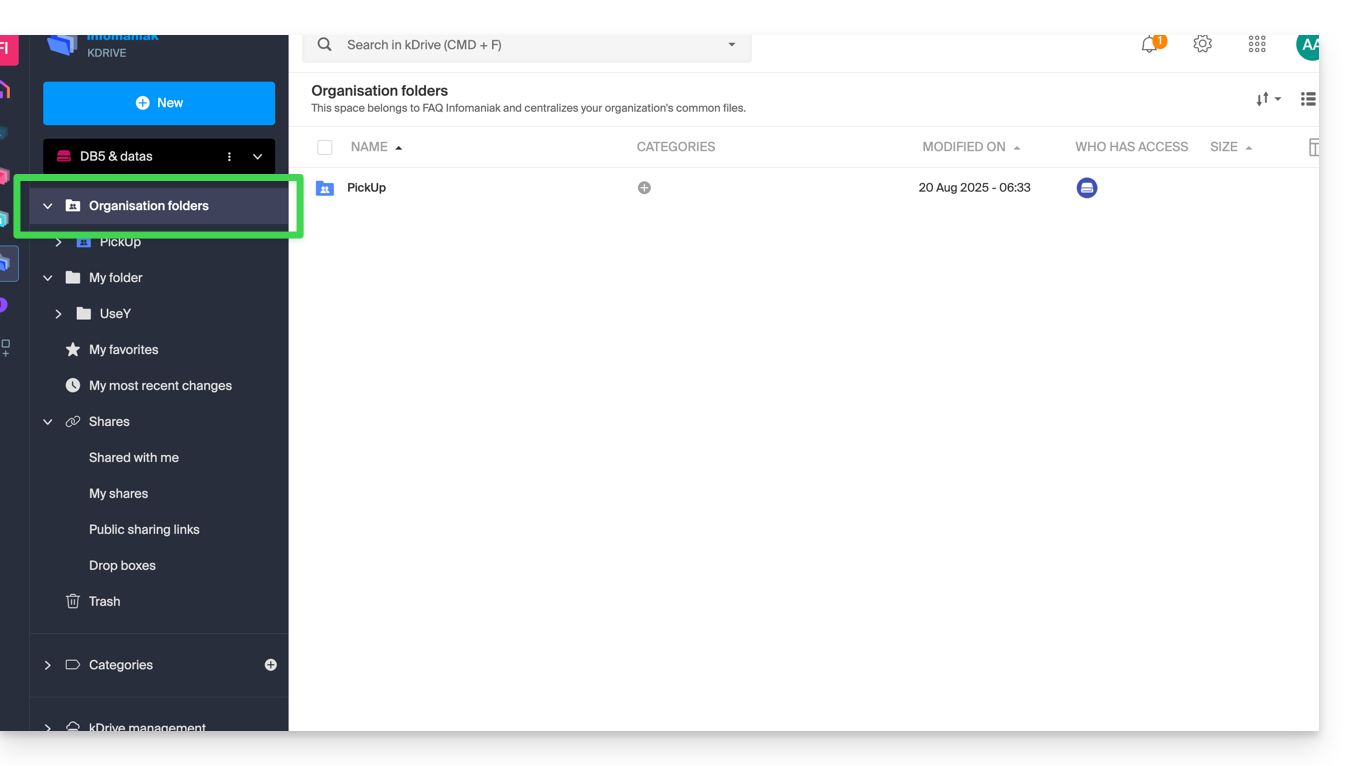
If you create a new folder here, you can choose to share it with the entire Organization (all kDrive users) or only a few users / work teams who will then need to request access if necessary:
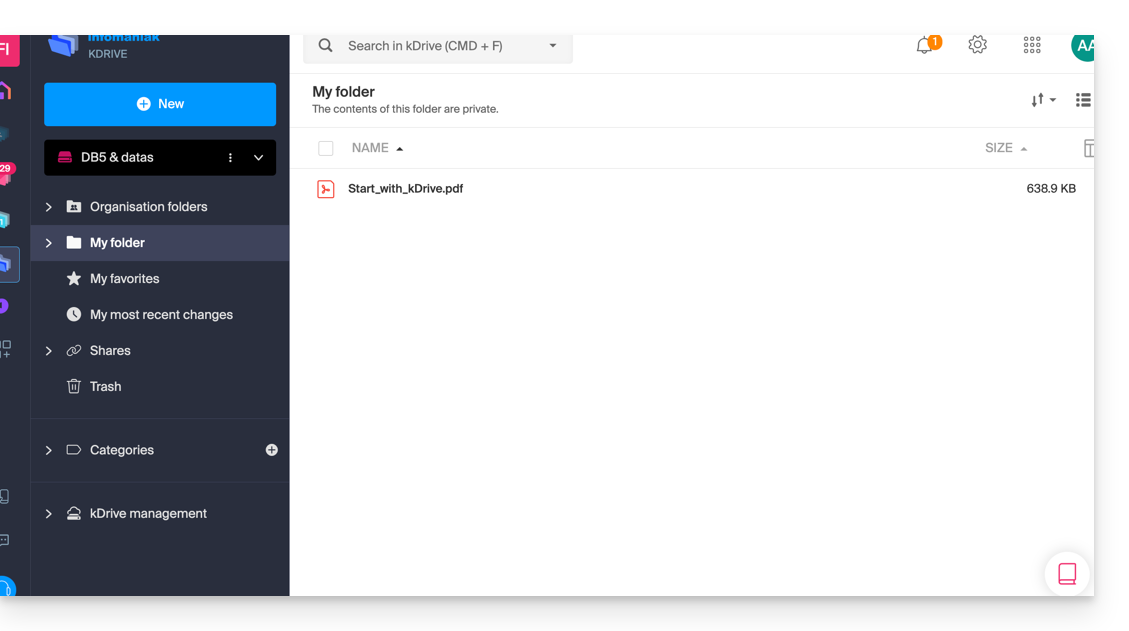
2. My folder: personal & private folder by default
This folder displays the folder tree specific to the user themselves: indeed, each kDrive user has their own personal space that will not be automatically shared with other users of the same kDrive: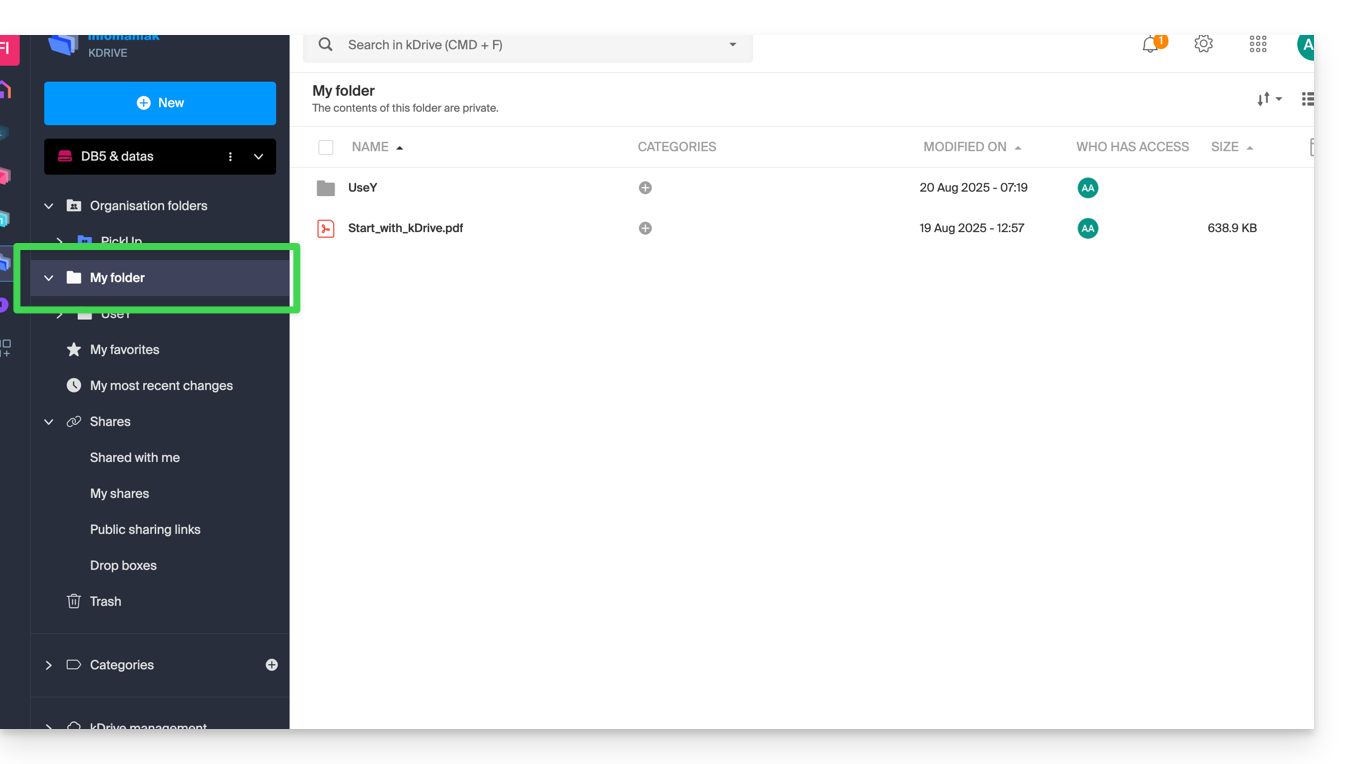
Any documents will be displayed in the center of the interface.
3. Shares
The Shares menu leads to 4 sub-menus displayed in the left-side menu:
- The elements shared with you by other kDrive users, among the kDrives you have access to with your login credentials
- The elements that you share with other users
- The elements that you have shared by creating a public share link
- Les boîtes de dépôt
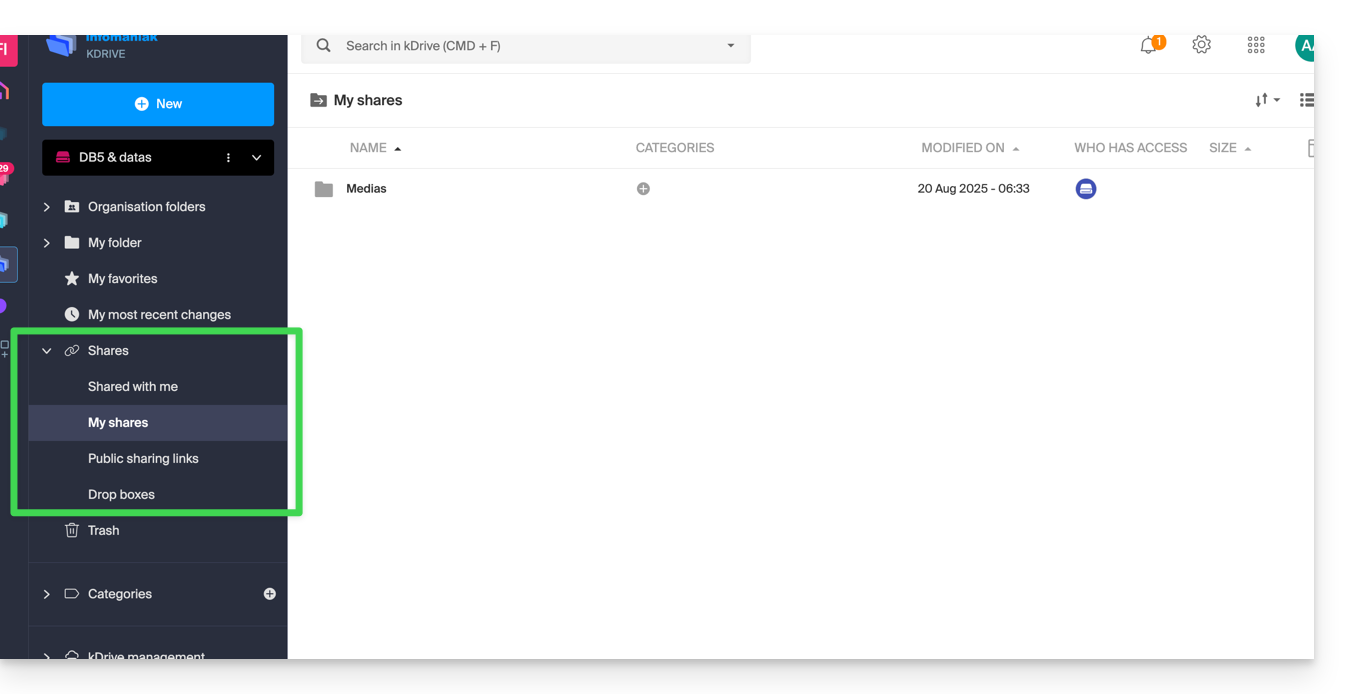
Any additional elements will appear in the center of the interface and can be modified / deleted.
Secondary elements
My favorites
This menu groups your files and folders defined as favorites on kDrive, which you can then find on the Web app…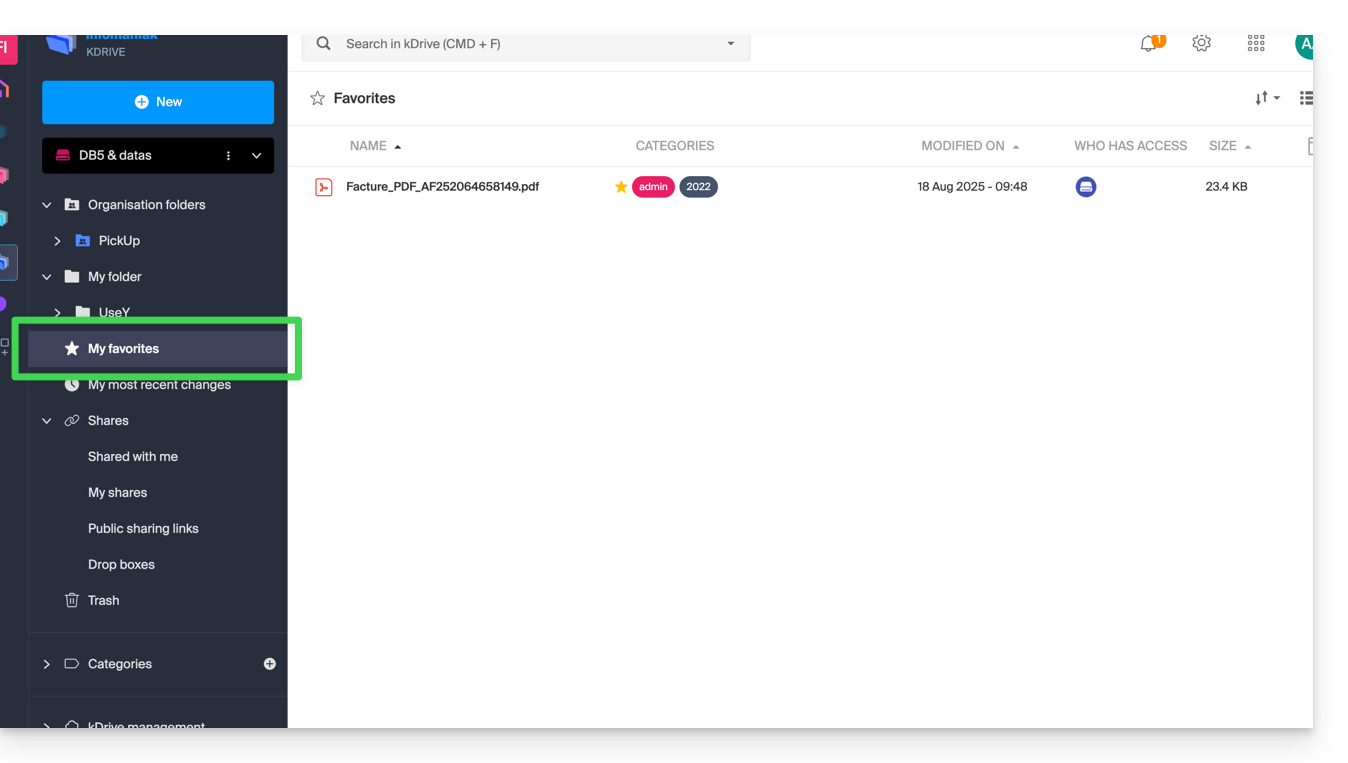
… and the mobile app:
My latest modifications
This menu displays the latest operations performed by your user: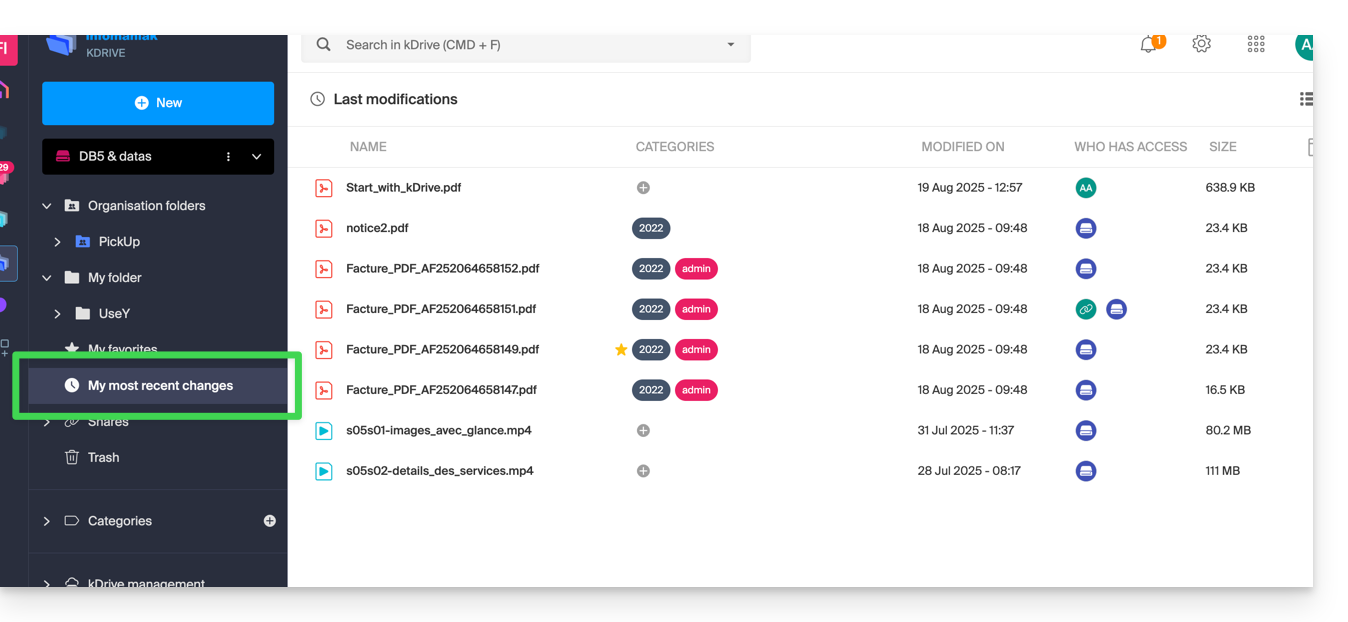
You can quickly return to recently modified files, even if their location is scattered across different subfolders of your kDrive. You can also select these files to move or delete them in bulk.
Trash
This menu leads to your deleted data that can still be restored: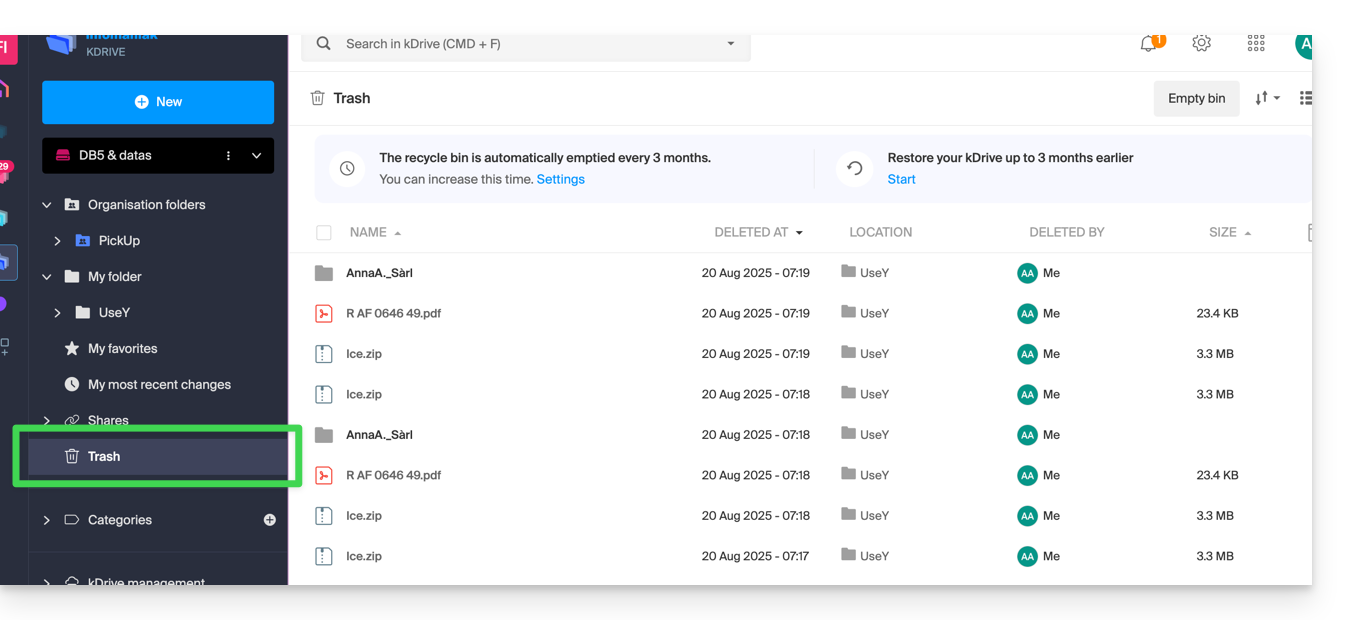
Categories
You can also quickly access your files if they are categorized using the Categories menu by clicking on the different categories listed there: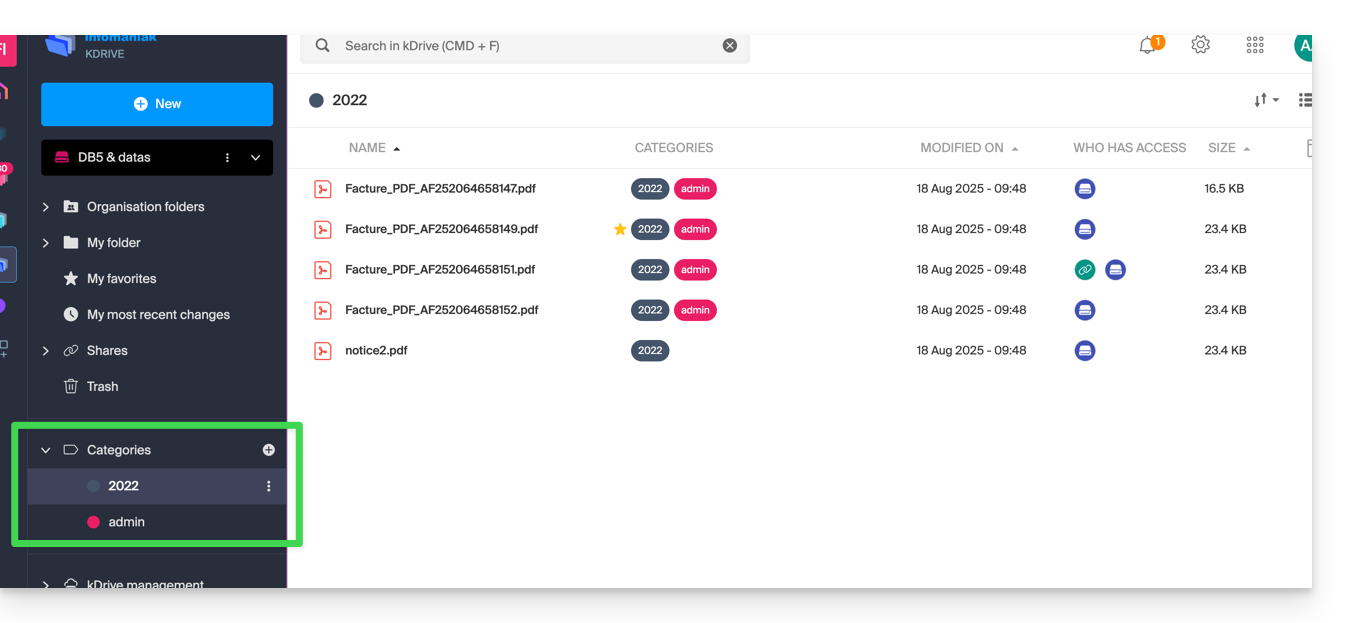
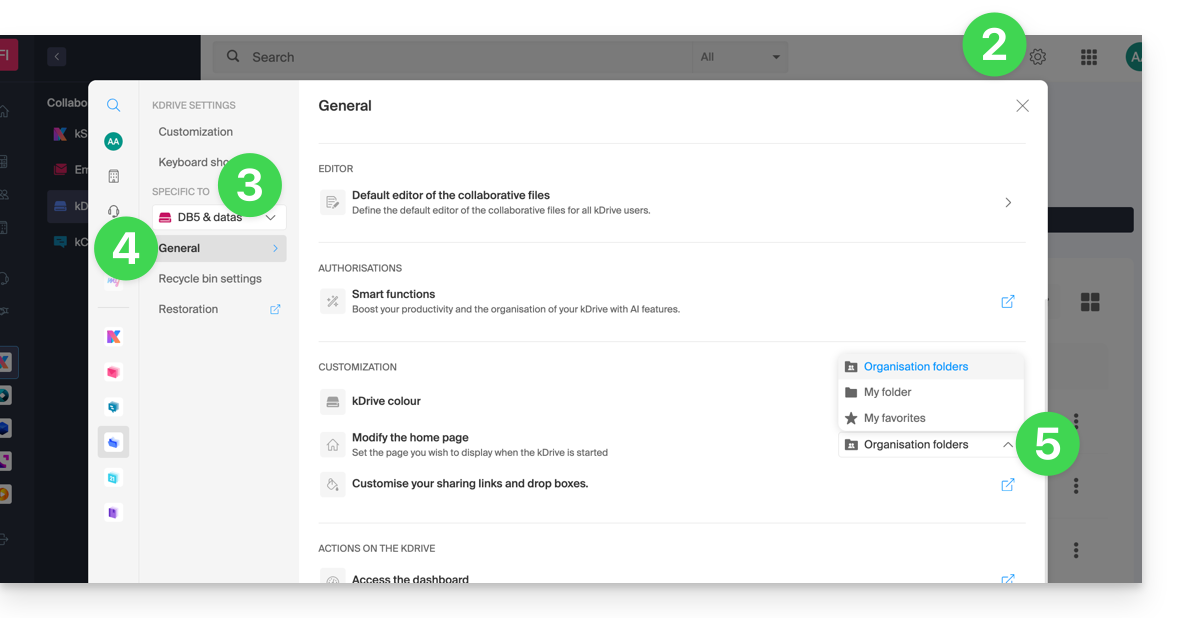
Set the default display when starting up
You can choose which homepage to start navigating within the online kDrive, from the following 3 options:
- your personal folder
- the shared documents folder
- favorites (which groups the documents added as favorites by your user)
To access kDrive and modify the homepage:
- Click here to access the management of your product on the Infomaniak Manager (need help?).
- Click on the Settings icon in the top right corner.
- Check or select the relevant kDrive in the dropdown menu of the left sidebar.
- Click on General in the left sidebar.
- Choose the page that should be displayed by default when arriving at the homepage:
This guide helps you identify and correct most email errors encountered after sending an email to a recipient. Refer to this other guide if you are looking for information about errors obtained when configuring an email address in a software/email client.
Introduction
- Generally, a mail error message is the result of…
- … an incorrect configuration of the domain name used with your email,
- … an issue with your recipient's (mail provider).
- In any case, a delivery failure report (Mailer Daemon or Mail Delivery Subsystem) containing the explanation is sent to the sender.
Searching for and identifying the email error
When your message does not reach your recipient, an initial failure report (Temporary Delivery Failure Report) is sent and specifies that the server will attempt to resend your message several times.
A final delivery failure report (Final Delivery Failure Report or Undeliverable Mail) issued by the recipient's server is sent to the sender (via a passage through the Infomaniak mail server, hence the mention of Infomaniak at the beginning of most error messages you may receive) to inform them that the email could not be delivered even after several attempts.
The notification always contains the reason for the failure. Example below:
This is the mail system at host smtp-1-1234.mail.infomaniak.ch.
I'm sorry to have to inform you that your message could not be delivered to one or more recipients. It's attached below.
For further assistance, please send mail to postmaster.
If you do so, please include this problem report. You can delete your own text from the attached returned message.
The mail system anna.a@abc.xyz: host mxbw-abc-xyz.abc-ab12.abc.ch[123.456.789.00] said: 550 5.1.1
anna.a@abc.xyz recipient rejected, account administratively disabled (in reply to RCPT TO command)
So here the address of your recipient is visibly suspended by their email provider (account administratively disabled).
Sometimes you need to look for the reason for the error message received among its attachments (often a raw text file). Example:
Reporting-MTA: dns; mxbw.abc.ch [123.456.789.00]
Received-From-MTA: dns; smtp-1-1234.mail.infomaniak.ch [12.345.678.99]
Arrival-Date: Tue, 01 Aug 2023 15:49:22 +0200
Final-recipient: rfc822; anna.a@abc.xyz
Diagnostic-Code: smtp; 552 RCPT TO:anna.a@abc.xyz Mailbox disk quota exceeded
Last-attempt-Date: Tue, 01 Aug 2023 15:49:22 +0200Here the mailbox of your correspondent external to Infomaniak seems to be full (Mailbox disk quota exceeded).
Most common cases
SPF Failure
The SPF (Sender Policy Framework) record is not correctly configured:
Subject: Delivery Status Notification (Failure)
From: Mail Delivery System mailer-daemon@domain.xyz
To: Anna.A anna.a@abc.xyz
This is an automatically generated Delivery Status Notification.
Delivery to the following recipient failed due to SPF failure:
anna.a@abc.xyz
Technical details of SPF failure:
The sender's domain domain.xyz does not have a valid SPF record. Please contact your email administrator to correct the SPF configuration.
Solution: check the configuration of your domain name and especially the SPF record if your website is hosted with Wix or another provider.
User Unknown
The email address specified in the message is invalid or does not exist:
Subject: Delivery Status Notification (Failure)
From: Mail Delivery System mailer-daemon@domain.xyz
To: Anna.A anna.a@abc.xyz
This is an automatically generated Delivery Status Notification.
Delivery to the following recipient failed permanently:
anna.a@abc.xyz
Technical details of permanent failure:
The email address does not exist. Please check the recipient's email address and try again.
Solution: carefully check the recipient's email address and correct it if necessary; ensure that you are using a valid email address for the recipient.
Temporary Failure
Le serveur de messagerie du destinataire rencontre des problèmes temporaires ou est indisponible.Solution: wait for some time, then try sending the message again later. If the problem persists, contact the recipient's technical support for help.
Blocked by SPAM Filter (or Content Rejected)
The recipient's mail server has blocked the message due to anti-spam filtering rules:
Subject: Delivery Status Notification (Failure)
From: Mail Delivery System mailer-daemon@domain.xyz
To: Anna.A anna.a@domain.xyz
This is an automatically generated Delivery Status Notification.
Delivery to the following recipient failed due to the message being rejected as spam:
anna.a@domain.xyz
Technical details of delivery failure:
The content of the message triggered the spam filters of the recipient's email server. Please review the message content and try again.
Solution: check if your message contains elements that may be considered spam (keywords, suspicious links, etc.). Contact the recipient to check if the message has been filtered into the junk mail folder.
Refer to this other guide regarding outgoing spam and this other guide regarding incoming spam.
Bad Reputation
The recipient's mail server has blocked the message due to anti-spam filtering rules:
gmail-smtp-in.l.google.com said: 550-5.7.1
Our system has detected that this message is likely suspicious due to the very low reputation of the sending domain.
To best protect our users from spam, the message has been blocked.
Please visit https://support.google.com/mail/answer/188131 for more information.
Solution: check the reputation of the domain, determine if one of your email addresses has been recently and involuntarily exploited for malicious purposes, for example.
Domain Not Found (or DNS Error)
Le nom de domaine du destinataire n'a pas pu être résolu ou n'existe pas.Solution: check the spelling of the recipient's domain and correct it if necessary; ensure that the domain name and DNS are valid and active.
Mailbox Full
La boîte de réception du destinataire est pleine, empêchant la réception de nouveaux messages.Solution: inform the recipient of the situation and ask them to free up space by deleting emails or archiving items.
This cannot happen with email addresses managed by Infomaniak since they have no storage size limit.
Part of their network is on our block list
If the error message (usually obtained after sending from an online tool, placed on the server where your website is hosted, for example a order confirmation from Prestashop or another online store that you manage) contains this:
host hotmail-com.olc.protection.outlook.com[104.47.30.97] said: 550 5.7.1
Unfortunately, messages from [89.123.456.789] weren't sent. Please contact your Internet service provider since part of their network is on our block list.
Solution: change the email sending method. The sending is unauthenticated and is sent from the server with a specific IP address that is apparently blocked by the recipient for some reason (Infomaniak does not intervene to request unblocking). Therefore, you need to configure the online tool to perform authenticated sendings.
Less frequent errors
Deferred - Delayed
The error message Deferred - Delayed - Warning: message still undelivered after 4 hours, Will keep trying until message is 3 days old means that the Infomaniak mail server tried to connect to your contact's mail server to send the message but was unable to do so for an undetermined reason. This error message specifies that the Infomaniak server will continue to attempt to send your message for the period specified in the error message. If, after this delay, the message has still not been delivered, you will receive a final error message informing you that your message could not be delivered and that your contact did not receive it.
Greylisting Delay
This error Greylisting Delay occurs when the recipient's mail server, like Infomaniak, uses a technique called "greylisting" that imposes a temporary delay on the first delivery attempt of a message from an unknown sender. The Mailer Daemon may possibly send an error report indicating that delivery has been delayed due to greylisting. The error may also mention banned sender. You should try resending your message a few minutes/hours later.
Malware message rejected
This error Malware message rejected occurs when the message contains an attachment, a link to a storage site like Dropbox, or dynamic content, including in the "forwarded" part of the message (in the case of a "forward" message, for example). You should try resending the message from the Web app Mail Infomaniak (online service mail.infomaniak.com) instead of a mail application, and remove any content that may cause this error.
Message Size Exceeded / File Too Large
These errors Message Size Exceeded / File Too Large occur when the size of the message (or attachments) exceeds the limit allowed by the recipient's mail server. The Mailer Daemon will return an error report indicating that delivery failed due to the message size being exceeded.
Rate Limit Exceeded
This error Rate Limit Exceeded occurs when the sender exceeds the allowed frequency or volume limit set by the recipient's mail server. Mail servers may impose these limits to prevent spam or system overload.
Sender denied: auth guards failed
Refer to this other guide if you encounter an error Sender denied: auth guards failed.
The message contains a Unicode character in a disallowed header
This error The message contains a unicode character in a disallowed header may appear if you have inserted a special character like a heart ♥ e.g. in the body of the email, the subject or especially in the full name; the risk of being rejected by providers is very high: it is best to keep the use of signs, characters and fonts as simple as possible.
Infomaniak continuously improves its products and customer service by prioritizing your suggestions shared via support, social media, or the web. These suggestions are then discussed during the meetings of the relevant service.
Provide feedback on...
INFOMANIAK SERVICE | [FR] | [EN] | [DE] | [IT] | [ES] |
|---|---|---|---|---|---|
| DOMAIN [ ☍ ] | |||||
| HOSTING / Site Creator [ ☍ ] | |||||
| CLOUD SERVER [ ☍ ] | |||||
| PUBLIC CLOUD [ ☍ ] | |||||
| JELASTIC CLOUD [ ☍ ] | |||||
| SYNOLOGY [ ☍ ] | |||||
| HOUSING [ ☍ ] | |||||
| SWISS BACKUP [ ☍ ] | |||||
| kSuite / my kSuite [ ☍ ] | |||||
| MAIL [ ☍ ] | |||||
| MAIL iOS app [ ☍ ] | |||||
| MAIL Android app [ ☍ ] | |||||
| kDrive [ ☍ ] | |||||
| CALENDAR [ ☍ ] | |||||
| CONTACTS [ ☍ ] | |||||
| NEWSLETTER [ ☍ ] | |||||
| SWISSTRANSFER [ ☍ ] | |||||
| STREAMING RADIO [ ☍ ] | |||||
| STREAMING VIDEO [ ☍ ] | |||||
| VOD / AOD [ ☍ ] | |||||
| GUEST MANAGER [ ☍ ] | |||||
| kChat [ ☍ ] | |||||
| kMeet [ ☍ ] | |||||
Infomaniak support is also at your disposal by email, chat or phone if needed.
This guide concerns the recovery of the password for a Windows image (any version) on Public Cloud.
Connecting to the Windows instance
The default username is Administrator.
The password is generated during the first boot sequence of the instance.
If you cannot establish the first connection to your Windows instance, you need the private key used during the deployment process. Enter this command to install or check that nova-client is installed:
pip3 install python-novaclientThen to retrieve the password for the instance:
nova get-password <INSTANCE_ID> <PRIVATE_KEY_FILE>Refer to the official documentation. Also, be aware of any current issues on https://infomaniakstatus.com/. For Public Cloud specifically, the list of scheduled maintenances and current issues is at https://status.infomaniak.cloud/.
This guide explains how to get event reminders from the Infomaniak Web app Calendar (online service ksuite.infomaniak.com/calendar) on a discussion system like kChat or Slack.
⚠ Available with:
| kSuite | Free | * |
| Standard | ||
| Business | ||
| Enterprise | ||
| my kSuite | ||
| my kSuite+ | ||
| Mail Service | Starter 1 max. address | |
| Premium 5 min. addresses |
*limited to 1 webhook
Preamble
- This feature will allow you to be notified in the discussion thread of your choice when an event is approaching.
- The webhook system is a method for an application or service to send information to another application or service in real-time, securely, and authenticated.
Announce the webhook to Calendar
To add the webhook from your discussion system to Calendar:
- Click here to access the Infomaniak Web app Calendar (online service ksuite.infomaniak.com/calendar).
- Click on the Settings icon at the top right.
- Click on Integrations in the left sidebar.
- Click on the Add a webhook button:

- Define:

- A name to easily identify the Webhook when you add reminders.
- The webhook URL (obtained from your chat system - examples are shown below in the FAQ).
- The elements (automatically taken from your event and/or added manually here) and their arrangement in the message to be sent:
- Insert %subject% to include the event subject.
- Insert %date% to include the event date.
- Insert %description% to include the event description.
- Insert %location% to include the possible location of the event.
- Click on Add.
Create an event with a chat reminder
Now that Calendar is linked to your chat account, you can choose to be notified in a chat when you add a reminder to an event:
- Click here to access the Infomaniak Web app Calendar (online service ksuite.infomaniak.com/calendar).
- Create a new event.
- Click at the bottom right to display additional fields:

- Add a reminder:

- In the dropdown menu, choose the configured webhook.
- Validate the changes.
You will now receive a reminder in the chat corresponding to the webhook.
Examples for obtaining a webhook
kChat
- Click here to access the kChat Web app (online service ksuite.infomaniak.com/kchat) or open the kChat desktop app (desktop application on macOS / Windows / Linux).
- Go to the Integrations section.
- Click on Incoming Webhooks:

- Click at the top right on Add.
- Complete the required information to create the "bot" that will post follow-up messages in kChat in the channel of your choice:

- Save to get the webhook URL:

- Create the custom notification in Calendar (read above if necessary):

- Select your custom notification when adding a reminder to your event:

Slack
- Click here to access the Slack WebHooks.
- Choose the conversation thread where your reminders will appear (e.g. @slackbot or #general):

- Save to get the webhook URL.
Create other webhooks to set reminders in other conversation threads.
Customize the follow-ups of a Slack reminder
You can freely use Slack formatting options in your notifications. Example in French:
N'oubliez pas de %subject% pour le %date%.
À prendre avec le jour J : %description%.
Lieu de l'évènement : %location%This guide shows you how to use the Newsletter tool offered by Infomaniak to create and send newsletters, i.e., recurring messages to multiple recipients.
Why use Newsletter instead of an Email Service
A newsletter is a periodic communication tool sent by email to a specific group of subscribers. It generally aims to inform, share news, updates, or relevant content on a specific topic, and maintain a relationship with a targeted audience.
They can contain articles, announcements, promotions, links to recent content, upcoming events, and sometimes exclusive offers for subscribers. The main goal is to provide interesting and relevant content to engage and maintain the interest of subscribers.
Newsletter Infomaniak allows you to schedule and send newsletters to a list of email recipients who are waiting for your emails; you thus effectively and personally distribute email marketing campaigns and maintain regular and relevant communication with your clients and subscribers.
The features include creating templates, managing the subscriber list, analyzing performance, and all of this is not directly possible with a traditional Email Service. Moreover, the tool has its own interface, autonomous within your browser, completely separate from Mail Infomaniak and does not require a messaging application. This means that if you already have contacts to whom you wish to write with their consent, you will need to import them into the tool first.
Prerequisites
- Have a domain name on which you will activate the Newsletter:
- Access to your DNS zone if the domain name is not with Infomaniak.
- Create a new domain name if necessary.
- Have Newsletter credits to allow sending (1 credit = 1 newsletter sent to 1 subscriber).
You must have the explicit consent of your recipients via the double opt-in model. Sending spam and using purchased/rented address lists is prohibited. The owners of the domain name used to send newsletters are legally responsible, and violation of the general terms may result in the suspension of the account.
Activate the Newsletter tool
To activate the Newsletter tool for the first time:
- Click here to access the management of your product on the Infomaniak Manager (need help?).
- Click on START FREE to subscribe to the Newsletter offer.
- Enter the domain name that will be used (and that must belong to you - see the prerequisites above).
- Click the blue button to Approve.
- Start using the tool - or refer to this other guide if you encounter a problem or if additional configuration is requested on the screen.
Access the Newsletter tool
To access the Newsletter once activated:
- Click here to access the management of your product on the Infomaniak Manager (need help?).
- Click directly on the domain name assigned to the product concerned.
Go further with the tool
- Import contacts
- Create and send a newsletter
- Newsletter credits
- Newsletter subscription form
- Double opt-in to avoid being labeled as a spammer
- Resend a newsletter to specific types of subscribers
- Variables to customize your content
- Use the Newsletter API
See all Newsletter FAQs ; click here to share feedback or a suggestion on an Infomaniak product.
This guide concerns kSuite, the online productivity and collaboration tool suite developed in Switzerland by Infomaniak.
Preamble
- Only 1 kSuite is possible per Organization!
- Create multiple Organizations (while keeping your Infomaniak account and switching from one Organization to another) to manage multiple kSuites.
- Be careful, a kSuite cannot be transferred from one Organization to another!
Administer kSuite
- Link a domain name to kSuite
- Link an additional domain name to kSuite
- Convert existing products to kSuite (or dissociate them)
- Determine the user quota
- Understand the storage of data related to kSuite
- Obtain a website
- Modify an existing kSuite offer
Use kSuite
Each product included in kSuite has its guides in the sections kChat, kMeet, kDrive, etc. that you will find on https://faq.infomaniak.com.
You can also enter the name of the product you are looking for:
A question or feedback?
- To help you identify the my kSuite / kSuite offer most suited to your needs, refer to this other guide.
- In case of a problem, please consult the knowledge base before contacting support.
- Click here to share an opinion or suggestion on an Infomaniak product.
Thank you for trusting Infomaniak with the hosting of your website.
Preamble
- A web hosting is a storage space available on a computer, also called a "server", connected to the Internet and managed by a web host, Infomaniak.
- This storage space, made available to professionals and individuals, is used to install websites or other types of tools (CRM, extranet, intranet...) that need to be accessible via the Internet.
- These guides allow you to quickly use the essential functions of your new product, your web hosting, which can accommodate multiple websites.
Where to start?
- Create a WordPress website
- Build the site with Site Creator
- Install a web application (ownCloud, Joomla, Typo3, Drupal, phpBB, Simple Machines Forum, Magento, Prestashop, ...)
- Manage your FTP accounts/users
- Manage and publish files on your hosting via FTP Manager
- Manage your MySQL databases
- Add a site or subdomain to your hosting (multisites/multi domains)
- Link another domain name to an existing website (domain alias)
- Preview your site even if your domain name does not yet point to Infomaniak's servers
IMPORTANT: the domain name...
A web hosting, to be visible to the public on the Internet, must be associated with a domain name!
Your domain name is not managed by Infomaniak? Or is it in a different Organization than that of your web hosting? Then refer to this other guide to configure the DNS or the "A records" in order to link the domain name to your web hosting.
In case of a problem
To resolve a problem, please consult the Web Hosting Knowledge Base before contacting Infomaniak support.
Click here to share a review or suggestion about an Infomaniak product.
This guide explains how to insert rich text and images within your messages on kChat.
Format the message text (markdown)
Here are the symbols to add before and after your text to format it in the desired style:
| Symbols | Result | Example |
|---|---|---|
* | italic | *Ceci sera en italic* |
** | bold | **Ceci sera en gras** |
*** | italic+bold | ***Ceci sera en italic+gras*** |
~~ | strikethrough | ~~Ceci sera barré~~ |
``` | | ```Ceci est du code``` |
You can also insert this:
| Symbols | Result | Example |
|---|---|---|
*** | (separator / line / horizontal line) | 1ère partie***2ème partie |
Insert an image in the message…
… from a URL
Insert the following code into your message by replacing the alternative text and the address (URL) of the image with the image link (the latter must be accessible and visible on the Web):

Example
Message with image insertion syntax:
and if the URL to the image is in the clipboard, simply paste the link into a conversation and the image will be added to your message.
… from the hard drive or kDrive
Click on the paperclip icon to insert an existing image on your hard drive or kDrive:
The image will be inserted into the message that you can send directly in the conversation without necessarily adding additional text.
Thank you for choosing kDrive, the independent and privacy-respecting solution for collaborating, sharing, and accessing your data from all your devices. Your data is encrypted, continuously backed up, and exclusively hosted in Switzerland.
Collaborative storage on a 100% Swiss Made cloud
- Discover kDrive in video (the interface has evolved since)
Getting Started
- Synchronize kDrive across different devices
- Manage the kDrive Lite Sync option (macOS)
- Manage the kDrive Lite Sync option (Windows)
- Install kDrive on Linux
- kDrive folders (personal, shared, common)
- Choose the kDrive folders to synchronize
- Edit an Office-type file on kDrive (Word, Excel, PowerPoint)
- kDrive subscription via Apple iOS
- Manage kDrive storage space
- Search for data on kDrive
Share your data
- Manage kDrive drop boxes
- Customize shares and kDrive repositories
- Share data from kDrive (Web interface)
- Share data by email from kDrive (Web interface)
Fill your kDrive
- Import external data to kDrive
- Import data to kDrive (iOS) or just the photos from the iPhone automatically
- Import photos to kDrive (Android)
- Import data to kDrive without the kDrive app
- Import data to kDrive via WebDAV
- Connect to kDrive via WebDAV
- Access kDrive files locally and online
- Scan documents with kDrive (iOS / Android)
With multiple people
- Manage a kDrive user's rights
- Manage folder and subfolder access permissions
- Manage kDrive users
- Manage multiple kDrive (iOS / Android)
- Manage multiple kDrive (macOS / Windows)
- Copy certain data between kDrive you have access to
Go further with kDrive
- Modify an existing kDrive offer
- Manage kDrive categories to classify data
- Sync Joplin notes via WebDAV with kDrive
- Sync Qnap with kDrive
- Sync Synology with kDrive
- Save a kMeet meeting on kDrive
- Export email attachments from Mail
- Export an email to kDrive
- Add an attachment to an event in Calendar
For advanced users
In case of a problem
- Resolve a kDrive blockage (antivirus, firewall, etc.)
- Resolve a kDrive sync conflict
- Resolve a kDrive synchronization issue
- Resolve a kDrive issue on Android device (don't kill my app)
- Resolve a Lite Sync plugin error on macOS
- Clear the browser cache
- Clear the kDrive mobile app cache
- kDrive application version (macOS / Windows / Linux)
- Restore a kDrive file to a previous version
- Restore a deleted kDrive file
- Force kDrive to sync hidden and excluded files
- Authorize access to your products / Complete a support request
- Display kDrive debugging information
Learn more about kDrive
A question or feedback?
- Contact Infomaniak Support
- Click here to share feedback or a suggestion about an Infomaniak product
Thank you for choosing kMeet Infomaniak as a video conferencing solution for individuals & businesses:
- Unlimited audio and video calls
- Access without registration
- Compatibility Web, mobile and desktop
- Integrated chat & reactions (emojis, sounds)
- Screen sharing with drawing tools, remote control
- Breakout rooms
- Integration with calendar (video link creation)
- Integration with kDrive for storing meeting recordings
- Integration with kChat for video calls
- Privacy respect (no ads, hosted in Switzerland)
- Security with AES-256 encryption
- Eco-friendly (renewable energy, CO2 compensation)
What would you like to do?
- Create an online meeting
- Join a meeting
- Download the kMeet app on your macOS, Windows, Linux, iOS (iPhone/iPad) and Android devices.
- Control participants (moderation)
- Create a kMeet breakout room
- Secure meeting access with a password and/or an encryption key
- Record and share a video conference
- Share your screen with participants
- Remotely control a device with kMeet
- Start the chat during an online meeting
- Stream the kMeet feed via Video Streaming
- Draw on kMeet
- Replace Skype with kMeet
A question, problem or feedback?
- Resolve an audio, video, device access authorization…
- In case of a problem, please consult the knowledge base before contacting support.
- Click here to share feedback or a suggestion on an Infomaniak product.
This guide explains how to obtain the authorization code (EPP code) for a domain name managed by Infomaniak, thus allowing the transfer of domain management to another registrar.
Preamble
- The terms "
EPP", "AuthCode", "AuthInfo", "transfer code" and "authorization code" all refer to alphanumeric sequences specific to the domain, the main purpose of which is to verify the owner's authorization before a transfer between Registrars. - Refer to the main guide regarding domain transfer procedures.
- The authorization code is always and only sent to the email address of the owner listed in the WHOIS of the domain.
Obtain the authorization code for a domain
To obtain the transfer authorization code:
- Click here to access the management of your product on the Infomaniak Manager (need help?).
- Click directly on the name assigned to the product concerned.
- Click on the Manage button.
- Click on Transfer to another registrar:

- Check the box to disable the Domain Privacy option (if necessary) to authorize the transfer:

- Click on the Unlock this domain button (if necessary) to authorize the transfer.
- Click on the Send the code button.
Particularity of certain extensions
And then?
Once you have entered the authorization code with the third-party provider and the outgoing transfer has started, Infomaniak is no longer involved.
Contact the new registrar to find out the transfer time during which the domain name will still be visible in your Infomaniak interface. Infomaniak unfortunately cannot intervene in any operation that would speed up the outgoing transfer.
Thank you for entrusting the hosting of your emails to Infomaniak.
This guide allows you to quickly use the essential functions of your new Mail Service. If you encounter any issues, consult the knowledge base before contacting Infomaniak support.
If your domain name is not managed by Infomaniak or if your Mail Service is not managed in the same user account as your domain name, refer to this other guide to link the domain name to your Mail Service.
Create email addresses
- Get started with the interface
- Create email addresses
- Create bulk email addresses
- Create email addresses that serve only as redirections
- Copy the mail content from Gmail, OVH, etc. to Infomaniak
Use your created email addresses
- Synchronize your devices
- Check the log of incoming and outgoing emails
- Hide the recipient addresses of an email
- Discover the Infomaniak Mail mobile app
- Use the messaging even if the domain name points to Wix or similar
- Use the messaging with your website
- Use Euria (Infomaniak AI) on your mailbox
Become aware of important information
- Sending limits
- Size limits
- Recipient limit
- The different identifiers
- Troubleshoot an error with a software/mail client
Customize your mailbox
- Add a signature
- Add an alias
- Add an automatic out-of-office reply
- Add a domain name
- Automatically sort incoming emails
Secure your email address
- Filtering solutions guide
- Secure a send with message encryption
- Manage security warnings
- Change the password of an email address
- Manage SPF, DKIM, DMARC, etc.
- Report a phishing email