Knowledge base
1000 FAQs, 500 tutorials and instructional videos. Here, there are only solutions!
This guide explains how to resolve any potential issues during a meeting with kMeet, Infomaniak's secure, unlimited, and free videoconferencing service.
For a problem specific to the video, refer to this other guide; for the audio, this other guide. In all cases, it is recommended to use the desktop app kMeet (desktop application) on macOS / Windows / Linux if a problem occurs with the kMeet Web app Infomaniak (online service kmeet.infomaniak.com) or vice versa.
Unable to see or hear the correspondent
If the conference is started, your correspondent has turned on the webcam and their microphone, but you still cannot see/hear them, ask them to check for the presence of a potential firewall on their machine or corporate network.
A firewall may allow solutions like Google Meet or Microsoft Teams without necessarily allowing kMeet streams.
In your firewall settings, here is what you need to allow:
- UDP protocol:
443. - For the turn server (recommended), add the TCP port
443. - Allow the following IP addresses:
185.125.24.0/24(TCP)185.125.24.0/24(UDP)
You can also switch connections (from WiFi to 4G/5G, for example) to check if it is indeed a firewall causing the desynchronizations.
Screen sharing impossible
When using the kMeet videoconferencing solution, if the button to share your screen is not available and/or remains grayed out, check the security settings on your computer/operating system regarding…
- … the kMeet application
- … the browser (if you are using kMeet directly online without going through the application):
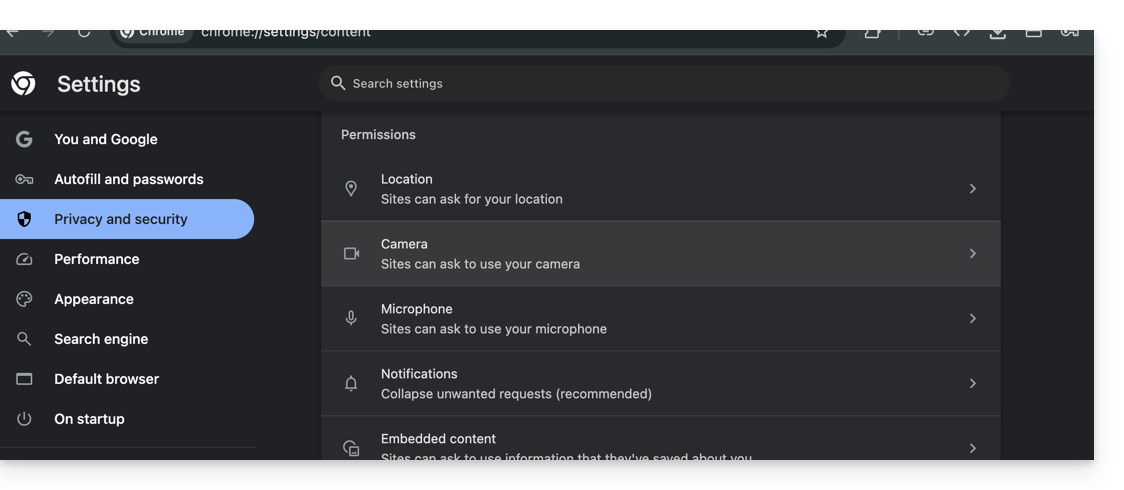
For example, on macOS, check and then activate the required permissions:
- Go to System Settings under Privacy and Security then Screen Recording:
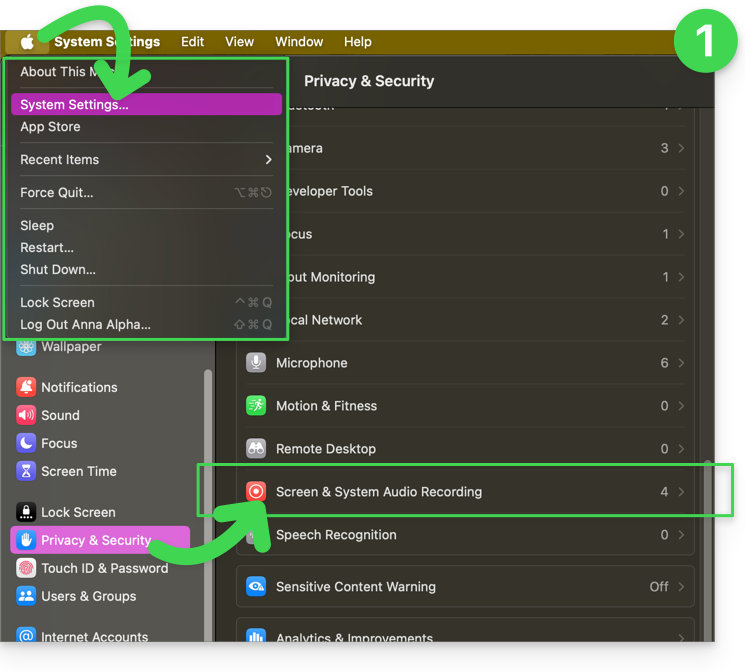
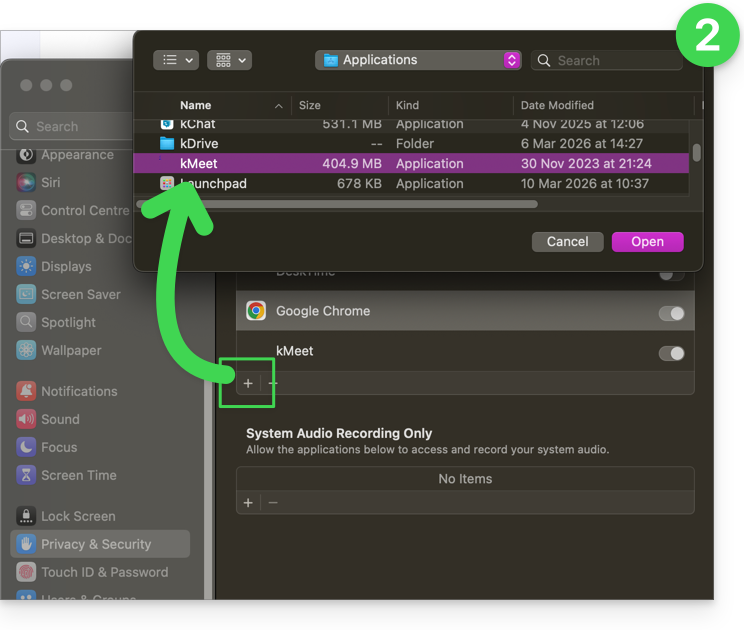
- Add your browser if necessary, or even kMeet if you have the desktop app on your computer:
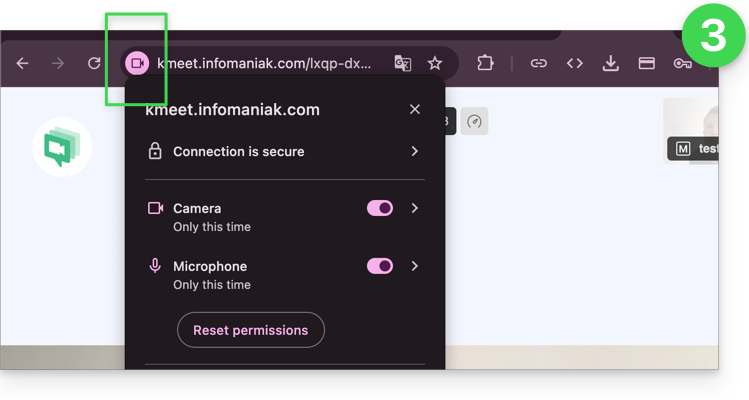
- Then also check the icons present in your browser's address bar and detect any potential authorization issue by clicking on the symbols:
Link to this FAQ: https://faq.infomaniak.com/289
Has this FAQ been helpful?
This guide explains how to add a simple new, one-time event to a calendar in the Infomaniak Web app Calendar (online service ksuite.infomaniak.com/calendar).
Introduction
- To create a recurring event, please refer to this other guide.
- To schedule a meeting with multiple users and find the best time slot, please refer to this other guide about the meeting scheduler.
Add a new event
To schedule a one-time event in a calendar managed by Infomaniak:
- Click here to access the Infomaniak Web app Calendar (online service ksuite.infomaniak.com/calendar).
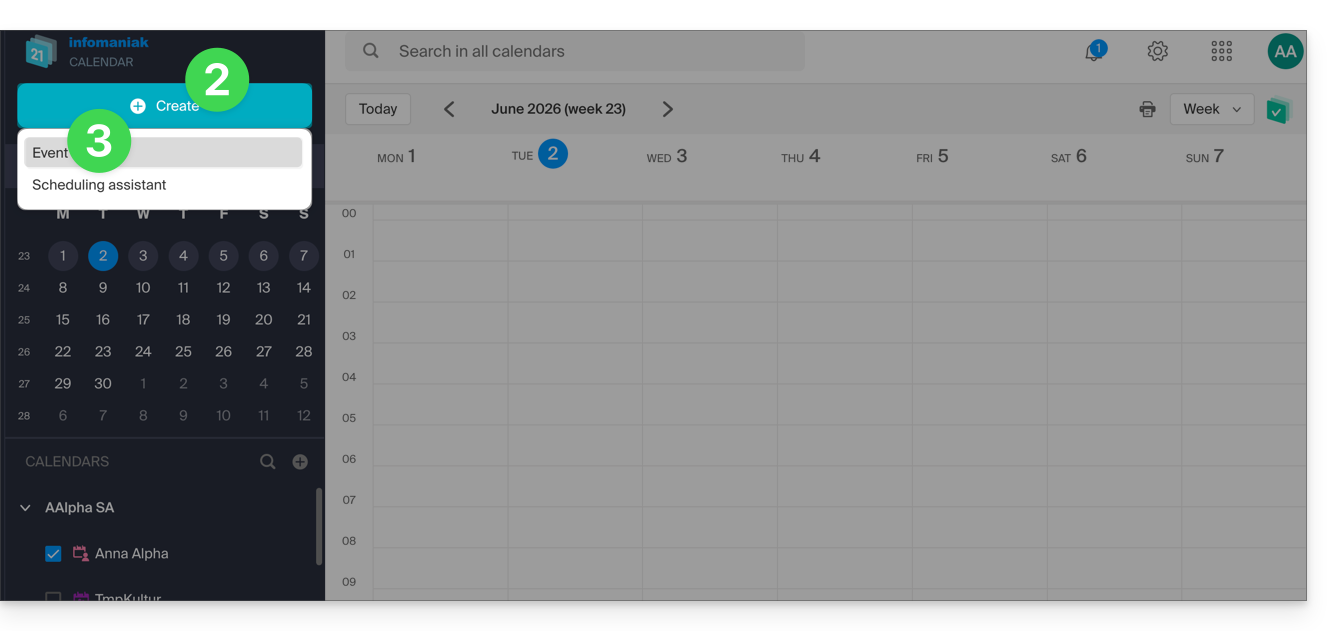
- Click on the Create button in the top left corner.
- Click on Event:
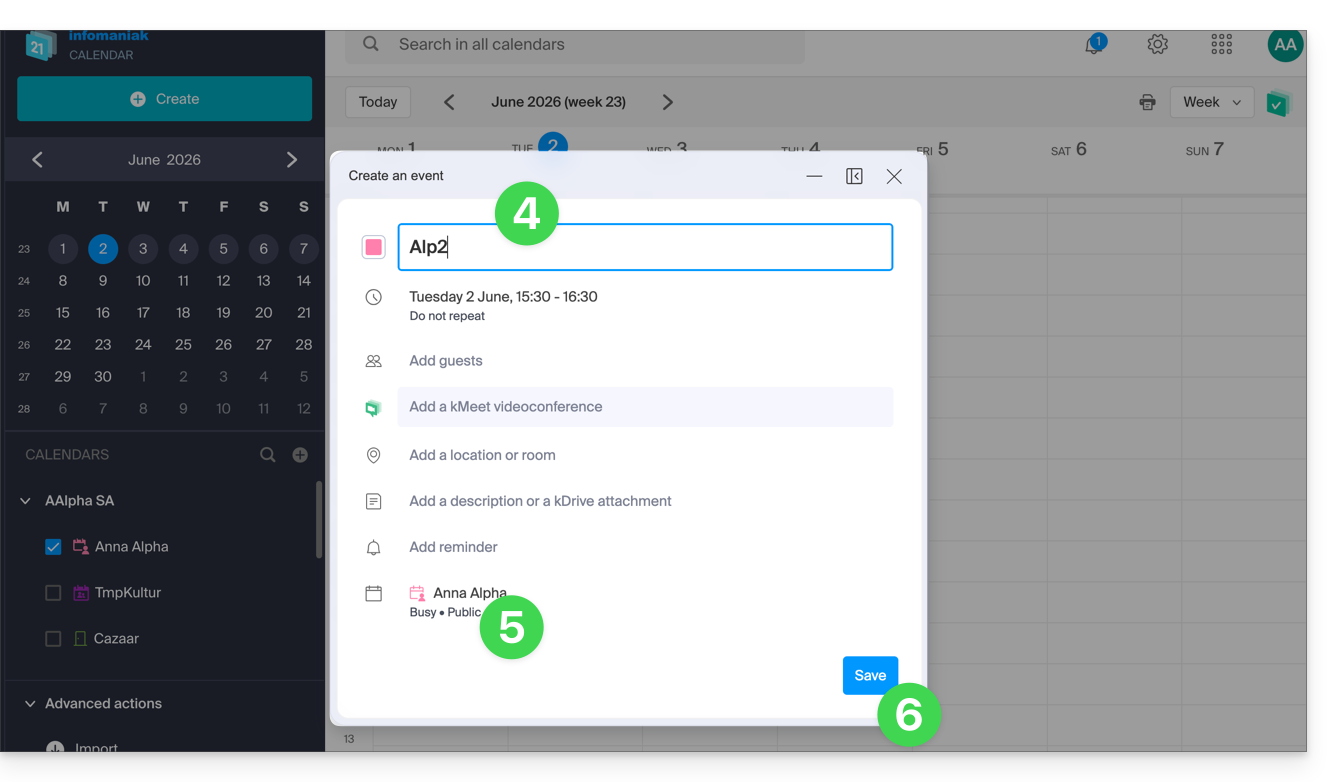
- Fill in the various fields:
- Color and title (subject) of the event
- Date/time or duration, possible recurrence
- Possible participants (see below)
- kMeet link if the event corresponds to a meeting between several people
- Geographical location or meeting room
- Description or attachment from kDrive
- Reminder (notification) deadline
- Calendar concerned
- Choose:
- the calendar concerned
- whether the event should have a busy or free status (in order not to block any possible appointment scheduling)
- whether it should be public or private (and in this case, no one will see the event in your calendar unless they have editing rights)
- Click SAVE to add the event to the selected calendar:
You can also click directly on the calendar to add a new event by dragging the mouse pointer over the desired time period. The editing window can be moved on the screen or even inserted into the left sidebar for better calendar visibility: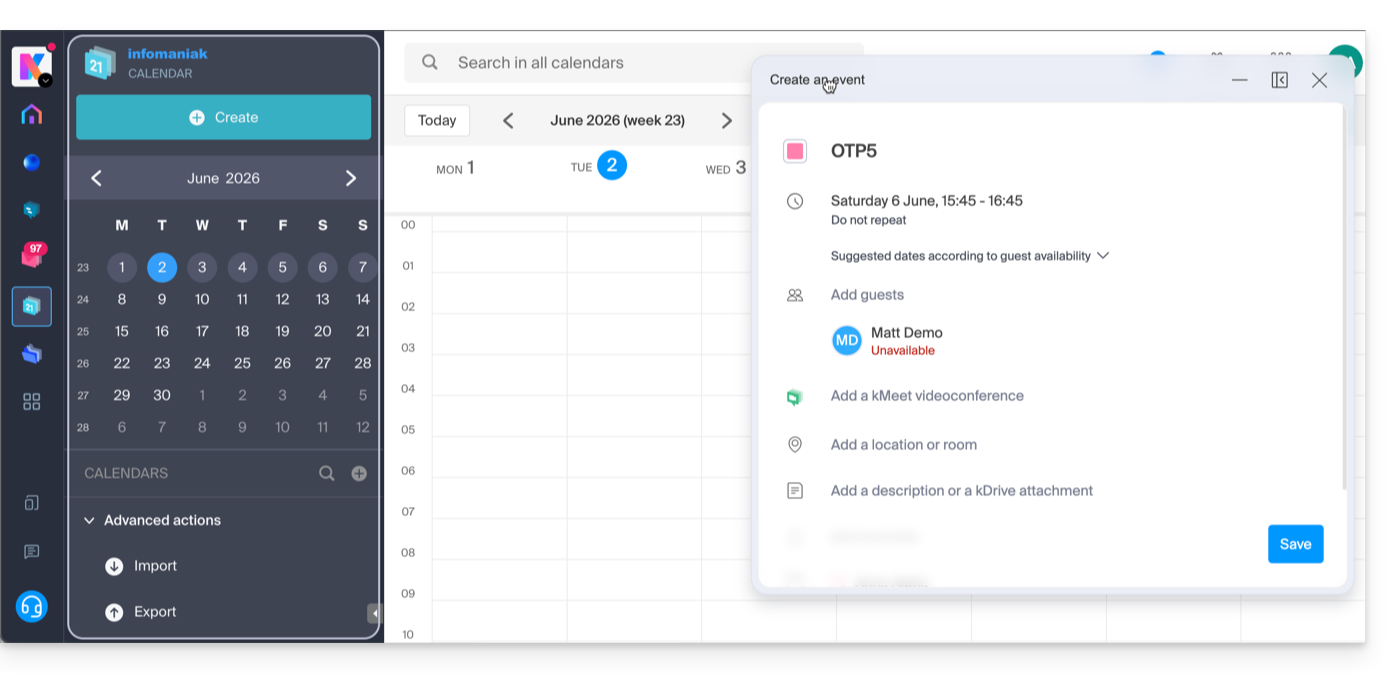
Add participants to the event
To invite users, add their name or email address when creating the event or later: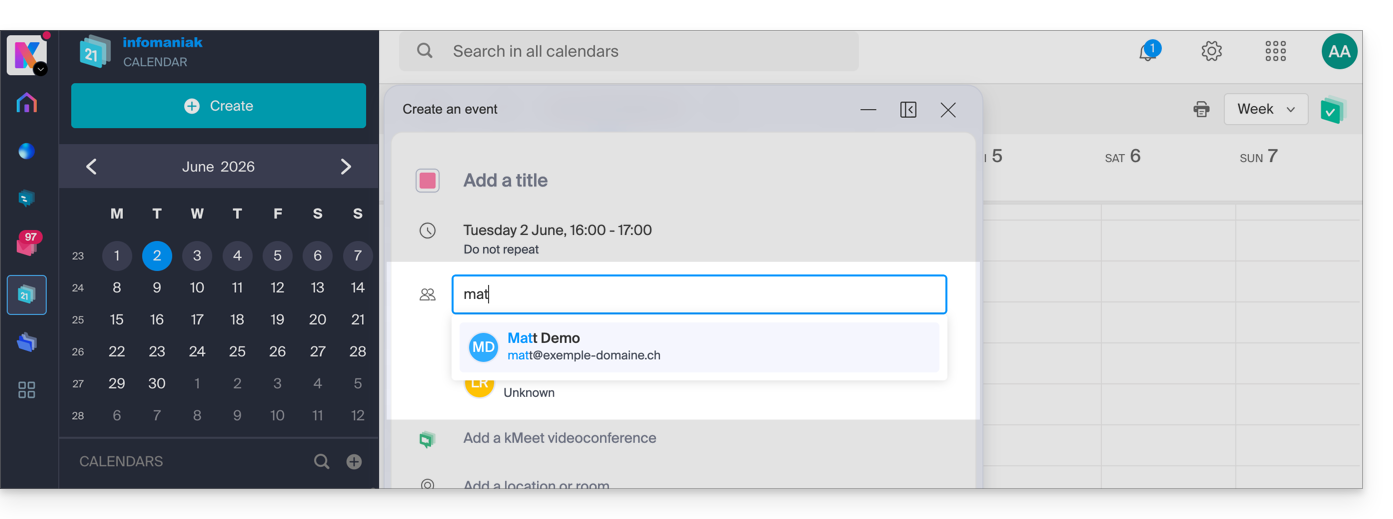
You will be notified of their attendance or their refusal if they follow the procedure sent to them by email when the event is created.
Any update to a scheduled event is also sent by email to all participants.
Link to this FAQ: https://faq.infomaniak.com/956
Has this FAQ been helpful?
This guide explains how to broadcast an online meeting using kMeet to a separate stream accessible via a unique URL, thanks to Infomaniak's Video Streaming service.
✘ UNAVAILABLE with
kSuite Free / kSuite Standard
my kSuite / my kSuite+ (ik.me, etik.com, ikmail.com)
Introduction
- Broadcasting a typical conference-style meeting via a Video Streaming feed rather than within the kMeet application offers several advantages:
- Public broadcasting on a large scale without having to restrict access to an audience limited to invited individuals.
- Attracting a wider audience, such as for conferences, webinars, or live events where hundreds or thousands of viewers can follow the event without joining a private call.
- Allows reaching an unlimited number of viewers.
- No need to manage access for each participant; the feed can simply be viewed via a link.
- A simple web browser is sufficient to access the streaming feed.
- Passive access: viewers are not forced to participate actively or interact; they can simply watch the event without registering or logging in, which is better suited for large events.
- No voice interruptions or disruptions related to microphone management; this helps maintain a smoother flow and keeps the focus on the speaker.
- Higher broadcast resolution when kMeet may be limited by bandwidth constraints and lower video quality to avoid network overload.
Create the Video Streaming sharing link
Prerequisites
- You must be a moderator of the kMeet to be able to create a live broadcast link.
- It is not necessary to have an Infomaniak Video Streaming plan.
Then:
- Start kMeet via ksuite.infomaniak.com/kmeet or from one of the applications for desktop or mobile devices.
- Once in the meeting, click on the action menu ○○○ in the kMeet toolbar.
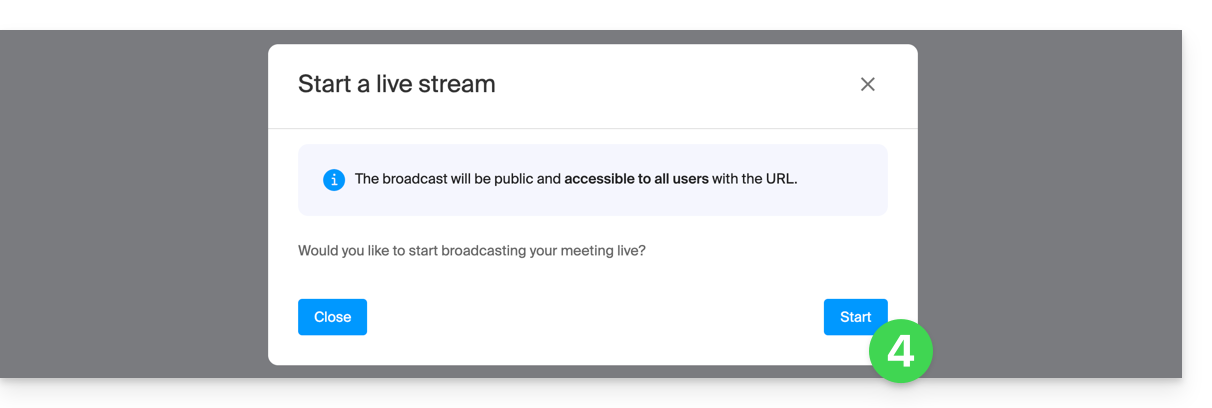
- Choose Start Live Broadcast:
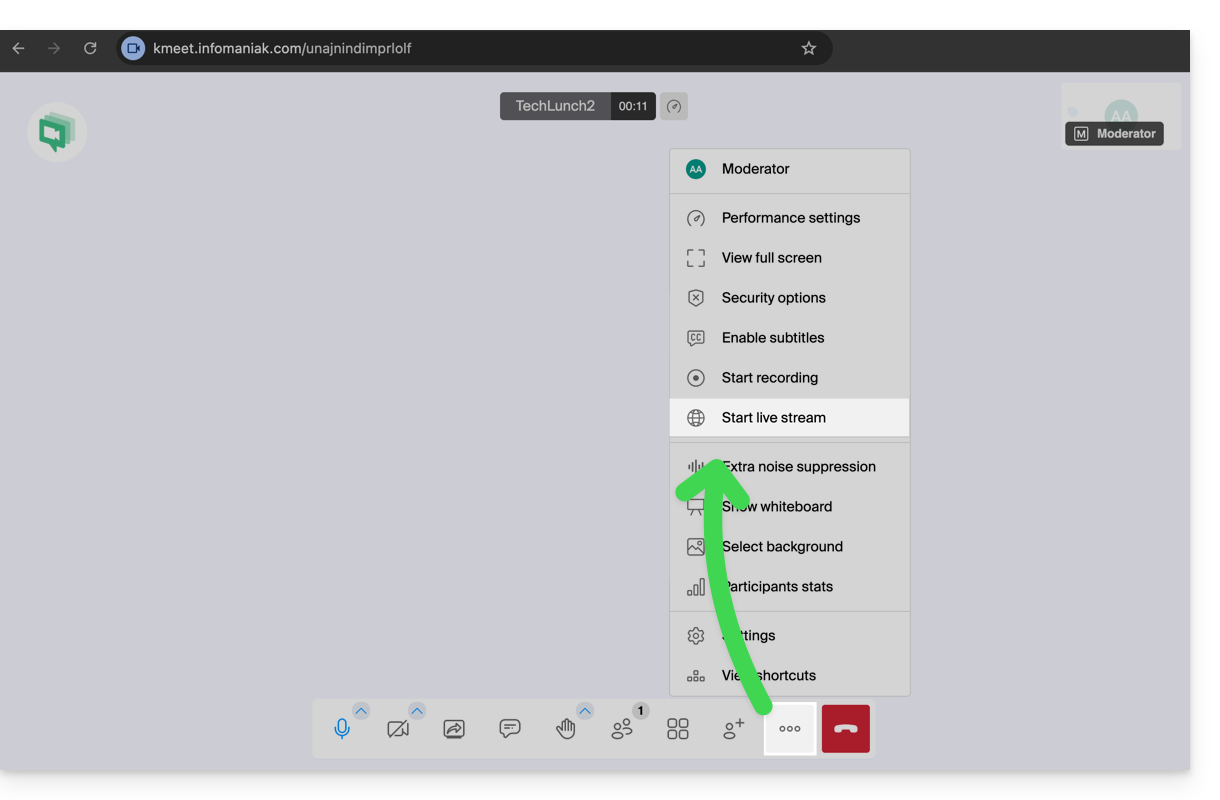
- Click the button to Start:
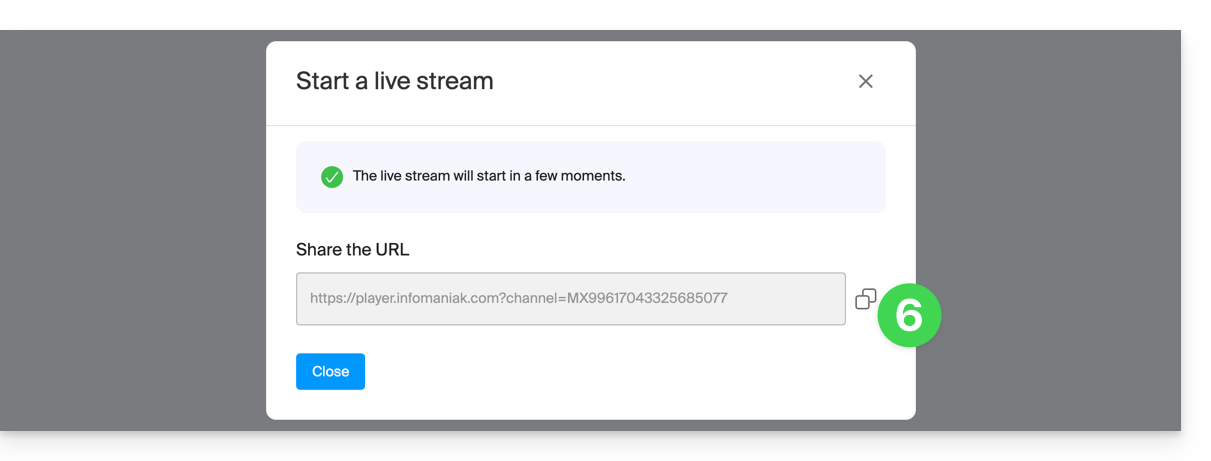
- Wait for the Video Streaming feed to be created; a symbol displayed on kMeet, as well as an audible signal, indicates the start of the live broadcast.
- In the same location, once the stream link is displayed, click the icon on the right to copy the URL corresponding to the live stream; paste the URL into a message for the participants or anyone who needs to watch the live broadcast:
The stream is broadcast continuously for a maximum of 24 hours, and will no longer be accessible once the kMeet meeting is stopped.
Link to this FAQ: https://faq.infomaniak.com/1355
Has this FAQ been helpful?
This guide explains how to use the automatic transcription feature of kMeet, Infomaniak's ethical and free video conferencing solution, which allows you to display real-time subtitles during meetings, making it easier to understand conversations and meeting the needs of accessibility, and even translation at a later stage.
Prerequisites
- At a minimum, the moderator of the virtual meeting must have kSuite (Business or Enterprise plans only).
- If subtitles are activated, all participants (even anonymous users or those without kSuite) can activate the automatic transcription feature.
Automatically transcribe participants' speech
You can display an automatic transcription of the speech of participants in a kMeet meeting:
- Start the kMeet app (Web, desktop, or mobile).
- Create or join a meeting room.
- Allow access to your microphone.
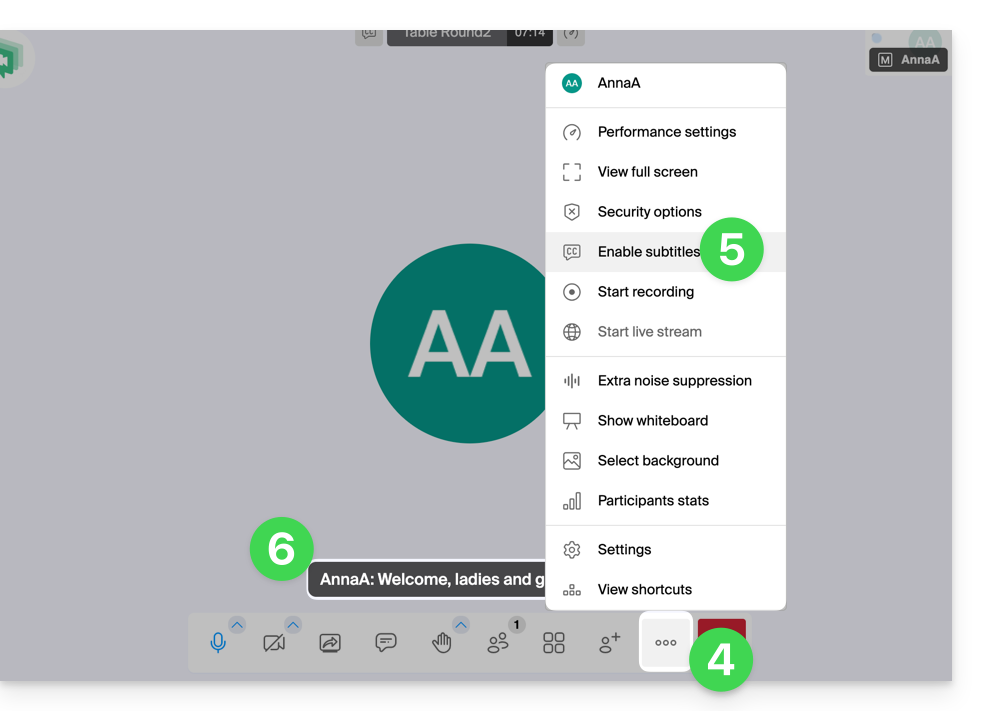
- Click on the ○○○ icon in the toolbar.
- Click on Enable subtitles.
- What is spoken by the participants is displayed at the bottom of your kMeet window:
- To stop displaying the transcription on your screen, click on the appropriate menu again (see point 5 above).
If you encounter any issues, please refer to this other guide.
Link to this FAQ: https://faq.infomaniak.com/1431
Has this FAQ been helpful?
This guide covers the "Breakout Rooms" or “side rooms” that can be configured during an online meeting organized with kMeet the ethical free video conferencing solution by Infomaniak.
Preamble
- These subgroup rooms allow you to divide a main meeting into several simultaneous discussions in distinct virtual spaces.
- Only a moderator can create these rooms and manage participants between the main room and the subgroups.
Create a side room
To add one or more side rooms:
- Start kMeet as a moderator via kmeet.infomaniak.com or from one of the applications for computer or mobile devices.
- Once the participants are in the meeting, click on the multi-user icon in the kMeet toolbar.
- Click the button to add a side room:

- Participants can then join the created room or leave it (by displaying the menu with the same button as in point 2 above):

- The moderator can also force one of the participants to join one of the side rooms by clicking on the action menu on the right in the list:

Link to this FAQ: https://faq.infomaniak.com/2397
Has this FAQ been helpful?
This guide helps you resolve audio issues (microphone and speakers) with kMeet, Infomaniak's ethical video conferencing solution.
Preamble
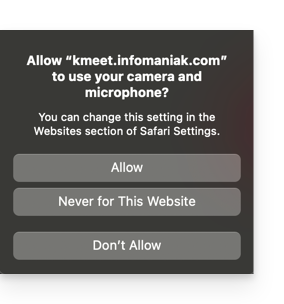
- For kMeet to function, it must obtain your permission to access the microphone.
- This request usually appears via a pop-up window in the top left of your browser or when you first launch the application.
- An audio issue can be of two types:
- either others cannot hear you (microphone issue),
- or you cannot hear others (speaker/output issue).
Steps to resolve an audio issue
1. Check the hardware and basic settings
- Mute button: check that your microphone is not muted in the kMeet interface (red microphone icon) or via a physical button on your headset/microphone:

- Connections: if you are using a headset or an external microphone, unplug it and plug it back in (prefer direct USB ports over hubs).
- System volume: check that the volume of your computer or mobile device is not set to zero or in "Do Not Disturb" mode.
2. Configure audio settings in kMeet (Computer)
Whether on the application or the browser, you can precisely choose your devices:
- Access the Settings:
- Go to the Audio tab:
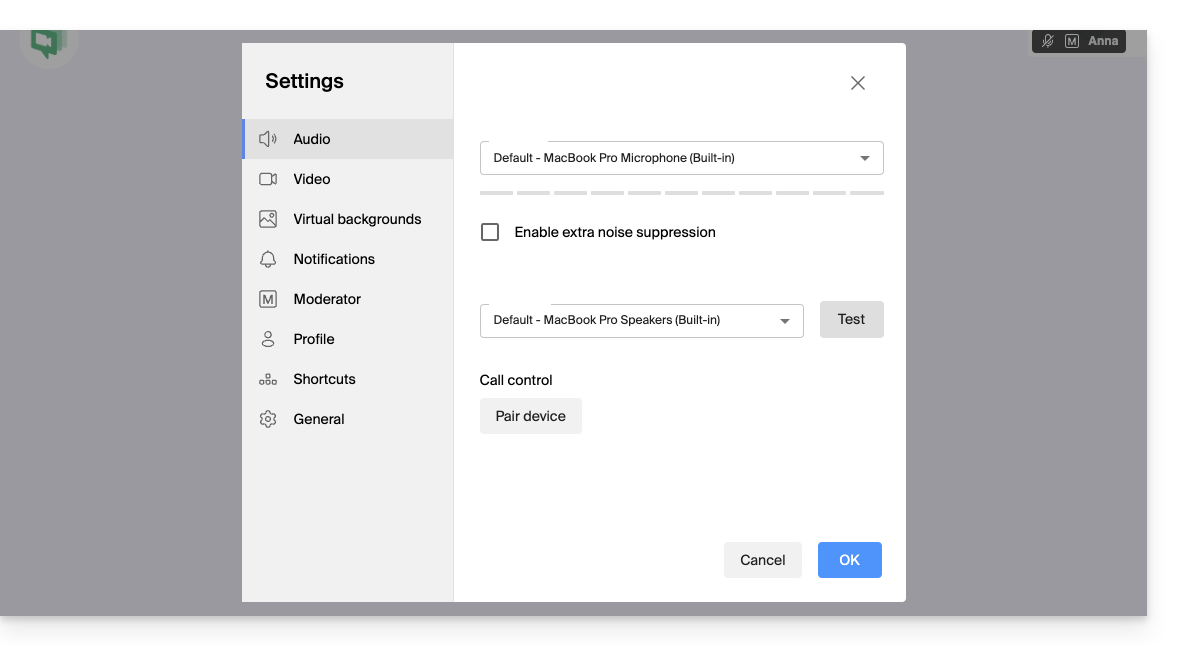
- Microphone: select the correct device from the list.
- Speak: a blue volume bar should move if the microphone picks up sound.
- Audio output: select your speakers or headset.
- Click on "Test" to check that you hear the test sound.
3. (Re)authorize the microphone in the web browser
If you are using kMeet via Chrome, Firefox, Safari, or Edge:

- Click on the lock icon (or site settings) to the left of the URL address (kmeet.infomaniak.com).
- Check that "Microphone" is set to Allow.
- If you change this setting but with no noticeable effect, refresh the page (F5).
4. Check system permissions (Windows, macOS, Mobile)
On macOS (often forgotten):
- Go to the Apple menu > System Settings > Privacy and Security.
- Click on Microphone.
- Check that your browser (Chrome, Firefox) or the kMeet app is checked.
On Windows:
- Go to Settings > Privacy and Security > Microphone.
- Check that the "Microphone access" option is enabled.
- Check that "Allow desktop apps to access your microphone" is also enabled for kMeet or your browser.
On Mobile (iOS and Android):
- iOS: Settings > kMeet > Check that Microphone is enabled. Also check in Settings > Privacy > Microphone.
- Android: Settings > Apps > kMeet > Permissions > Microphone > Allow while using the app.
5. Special case: Disable blocking extensions
Some browser extensions (AdBlockers, privacy protection extensions like uBlock Origin or Privacy Badger) can sometimes block audio/video streams.
- Try disabling your extensions or opening the kMeet link in a private browsing window to test.
6. About Firefox and WebRTC
You can try disabling WebRTC in Firefox to test (via media.peerconnection.enabled = false) but this is not recommended: kMeet uses WebRTC technology to function; if you disable it, the video conference may no longer work at all.
If Firefox is causing issues:
- Check in Firefox settings > Privacy & Security > Permissions.
- Next to 'Microphone', click on Settings and make sure that kmeet.infomaniak.com is not in the 'Block' list.
- Also, check that Autoplay is allowed for audio on kMeet.
7. As a last resort: Switch devices
If the problem persists, it is likely a hardware failure or a driver conflict on the device:
- Join the meeting from another device (switch from computer to smartphone via the kMeet app).
- Get the meeting link/code via shares/invitation:

Link to this FAQ: https://faq.infomaniak.com/2441
Has this FAQ been helpful?
This guide helps you resolve any potential issues accessing the camera with kMeet, the ethical video conferencing solution offered by Infomaniak.
With current security standards, a web browser or an application installed on an operating system like Windows or macOS will necessarily ask for your permission to access the microphone and the camera as soon as a video conference begins.
Authorize camera access
To do this:
- Start kMeet via kmeet.infomaniak.com or from one of the applications for computers or mobile devices.
- Start a new meeting:
- Enter a name for your meeting room.
- Continue, a popup should ask you to authorize the browser to access your microphone + camera:
- If the popup does not appear automatically, check the icons present in the header of your browser:
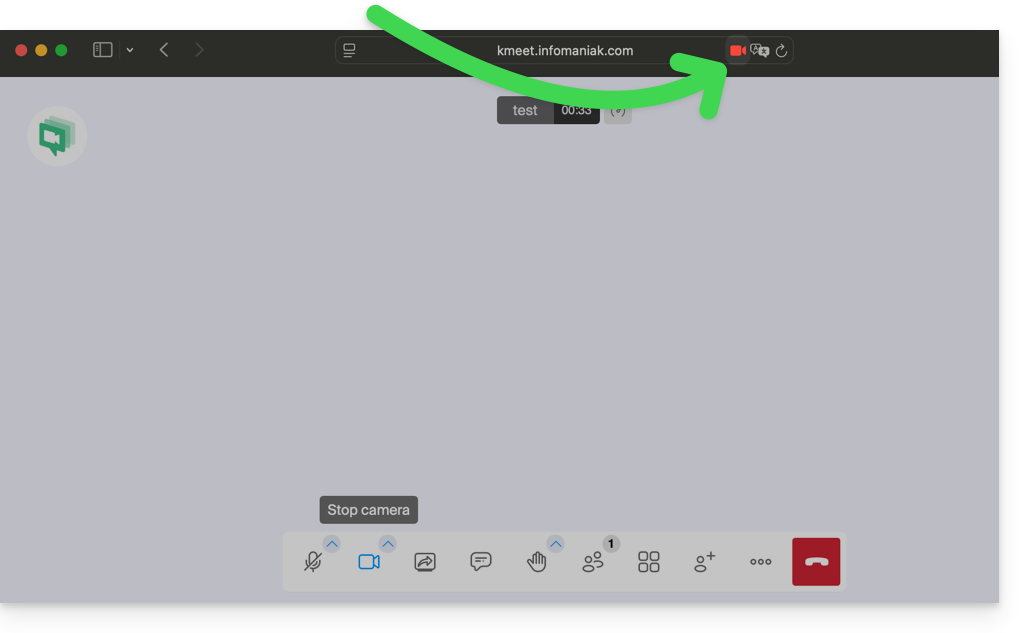
or here: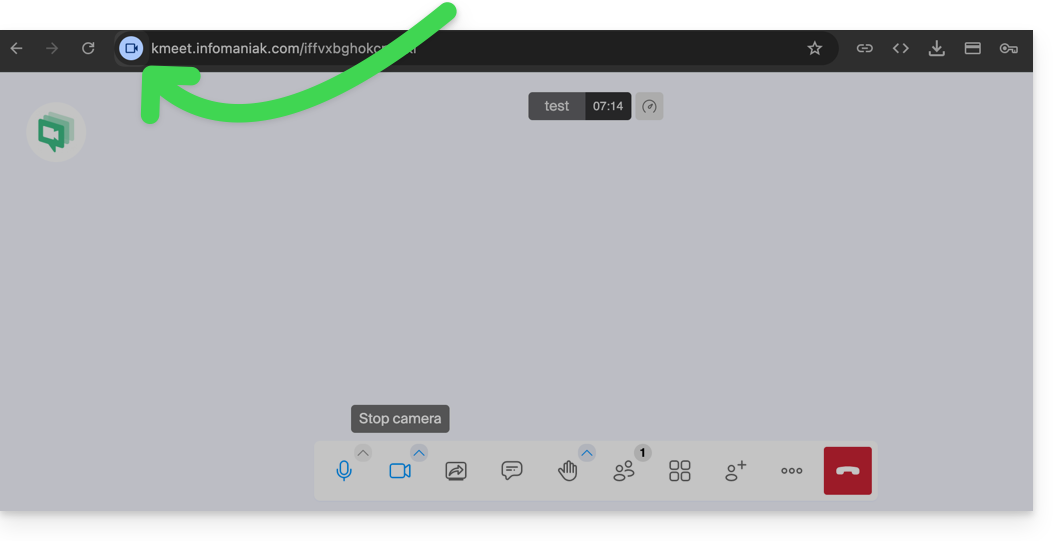
- Your browser settings (here: Chrome) may also allow you to adjust the authorization settings and camera selection if there are multiple cameras available:
Your camera is not working? Check the physical cover
If your image remains black while the camera is activated, the lens may be covered by a built-in privacy shutter.
Many laptops have a small mechanical slider above the screen:
- Observe the camera lens at the top of your screen.
- If you see a red dot or an opaque sticker on the lens, the cover is closed.
- Slide the slider sideways to unblock the image.
Note: Since this device is mechanical, no software setting will activate the image until the cover is manually pushed.
Link to this FAQ: https://faq.infomaniak.com/2452
Has this FAQ been helpful?
This guide explains how to add a password and an encryption key to a kMeet meeting, Infomaniak's ethical free video conferencing solution.
Protect a meeting with a password
When creating your meeting room, you can protect it with a password, which you will need to share with all your participants to allow them to connect:
- Start kMeet via kmeet.infomaniak.com or from one of the applications for computers or mobile devices.
- Start a new meeting:
- Enter a name for your meeting room.
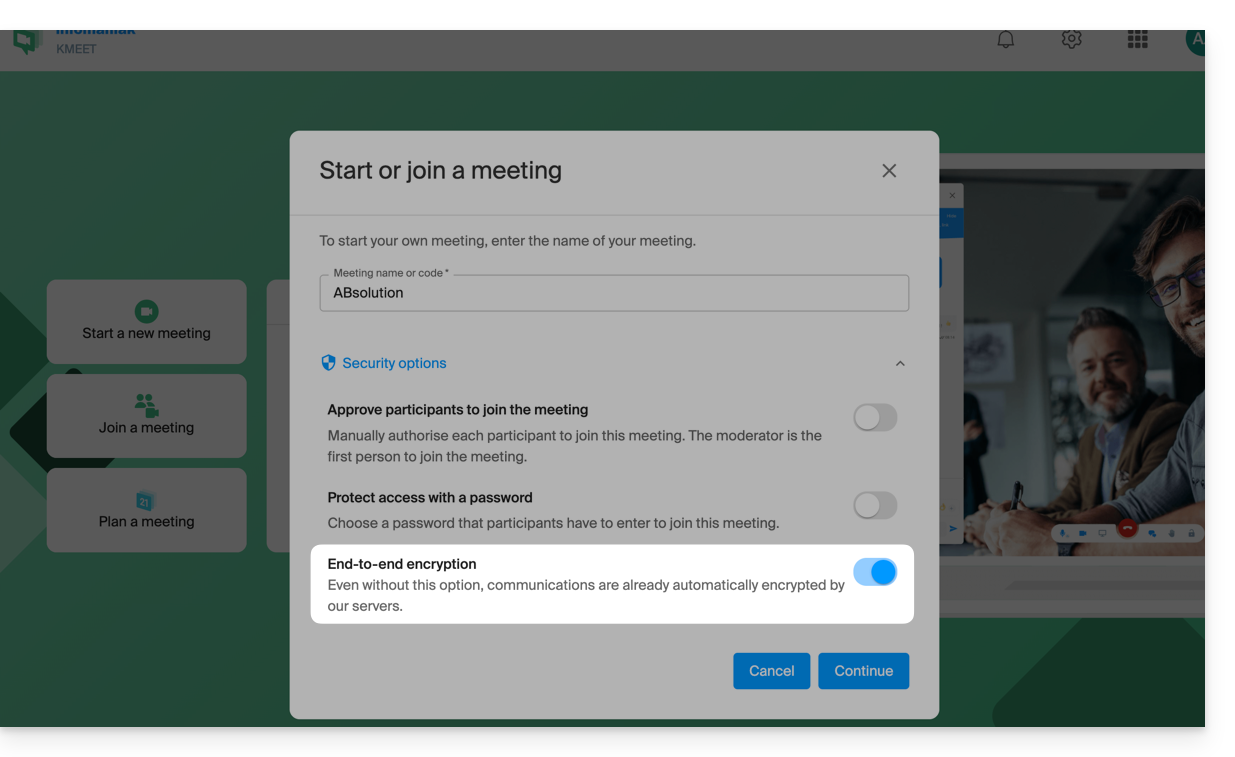
- Click on security options.
- Enable the toggle switch to Protect access.
- Create the password.
- Continue to start the meeting:

- Specify the name you want to use as a participant in the meeting.
- Share the meeting link or code and the password (which you can re-display at this step) with your participants:
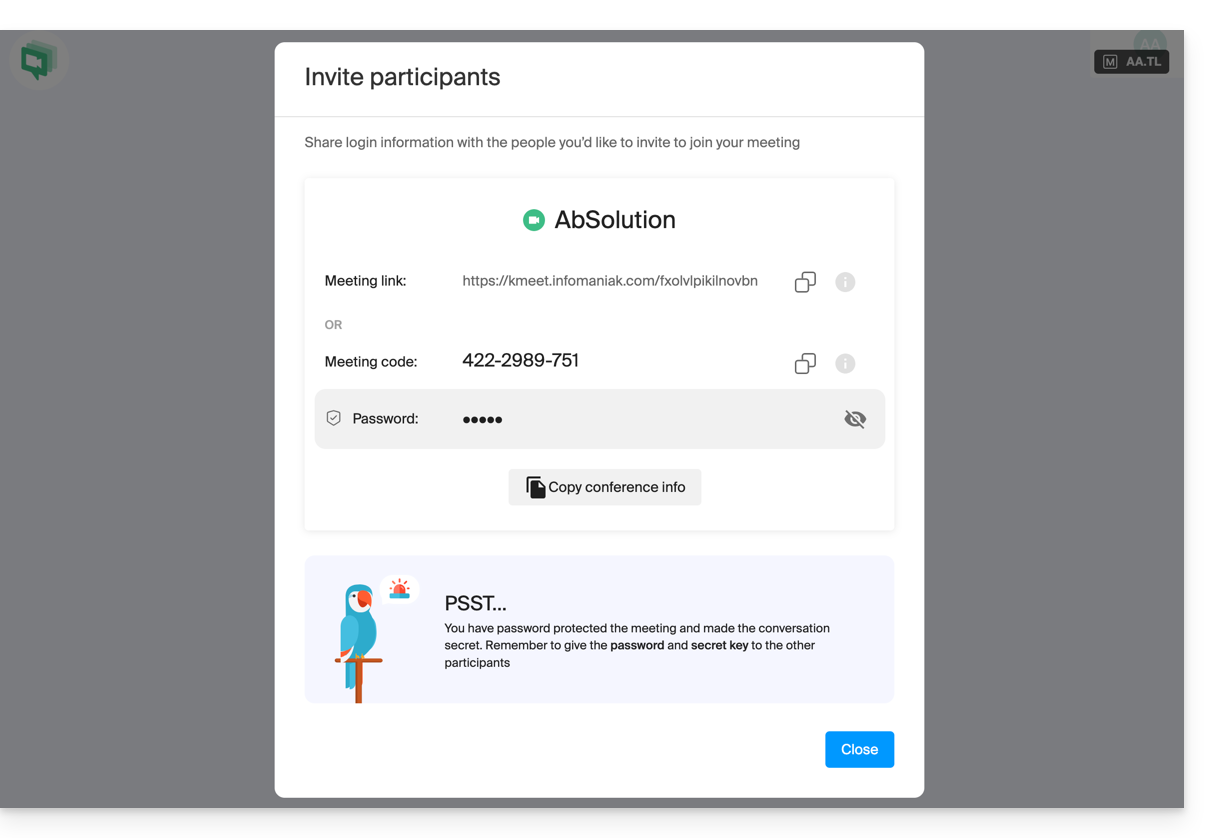
- You can review the password if necessary by inviting participants via the dedicated button:
- You can review the password if necessary by inviting participants via the dedicated button:
Secure a meeting with an encryption key (E2E)
Prerequisites
- This feature works only with desktop apps and up-to-date browsers based on the Chromium architecture (e.g., Opera, Brave, Google Chrome, etc.).
Then follow the procedure above up to step 4. Once in the security options:
- Enable the toggle switch to encrypt end-to-end:
- When starting the video conference, an audio message will be heard to announce end-to-end encryption.
Link to this FAQ: https://faq.infomaniak.com/2464
Has this FAQ been helpful?
This guide explains how to start recording an online meeting organized with kMeet, Infomaniak's ethical and free video conferencing solution, in order to obtain a video recording of the session stored on kDrive, Infomaniak's cloud storage.
Introduction
- Video recording
- takes place on the server side
- does not generate any load on the participant's computer that initiated it
- is in
.mp4video format - has a maximum duration of 3 hours.
- The video will not be available until everyone has left the video conference (including the moderator) or until someone manually stops the recording.
Record a kMeet meeting as a video on kDrive
Prerequisites
- Have a kDrive (standalone or as part of a kSuite, my kSuite offer, etc.).
- Be the moderator of the video conference to be recorded.
- Do not create an encrypted video conference using a custom key.
To record the meeting on kDrive:
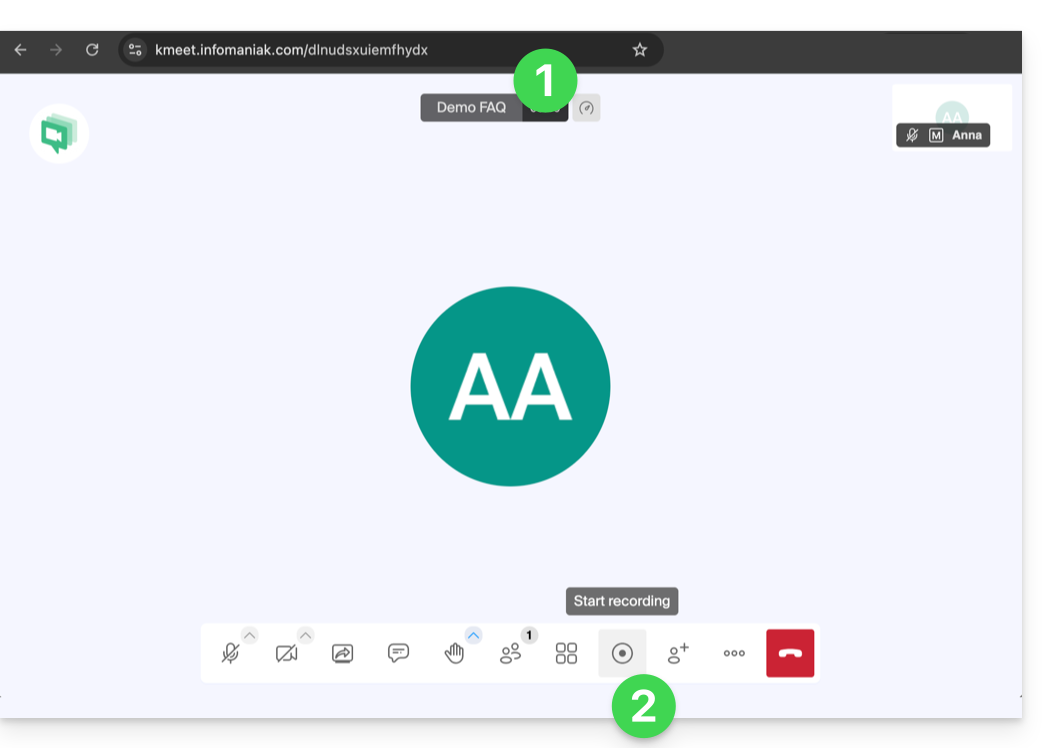
- Start kMeet via kmeet.infomaniak.com or from one of the apps for desktop and mobile devices.
- Click on the ◉ Start recording icon:
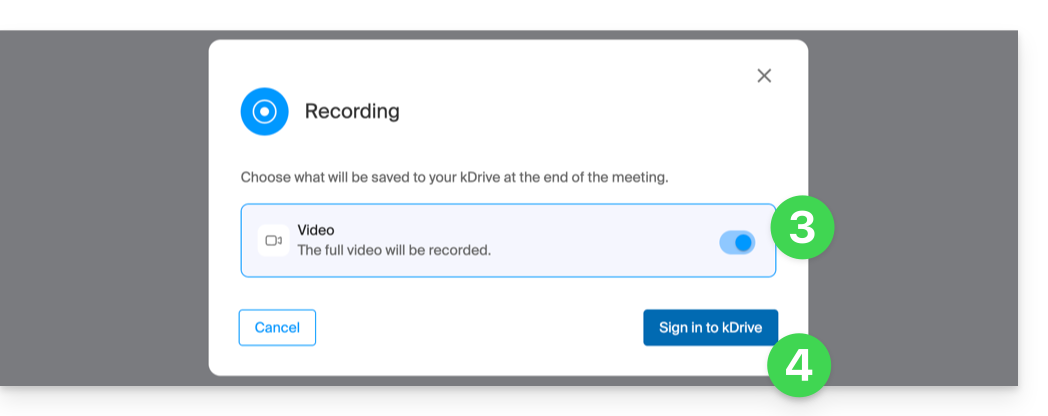
- Enable video recording.
- Log in to your Infomaniak account:
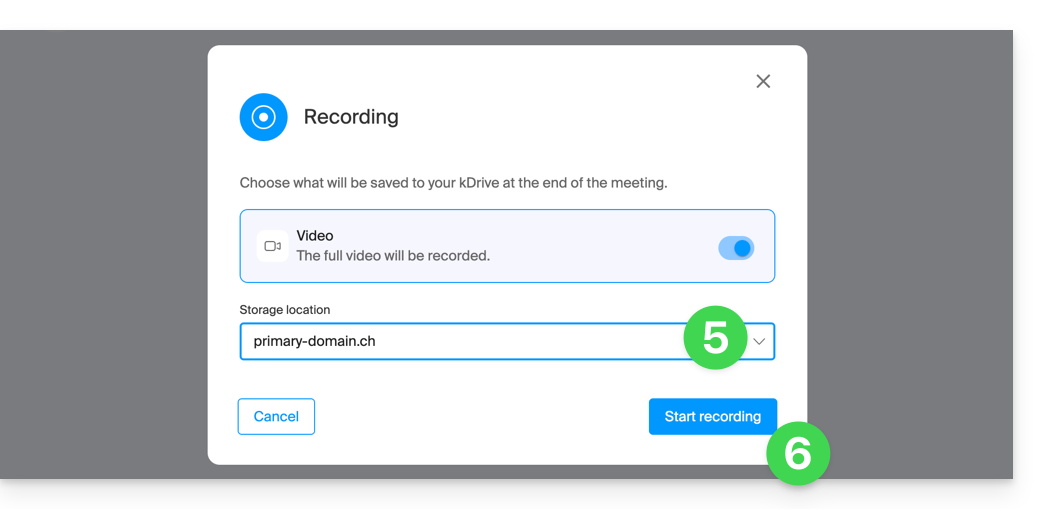
- Select a kDrive to save the video conference to.
- Then, click the button to start the video:
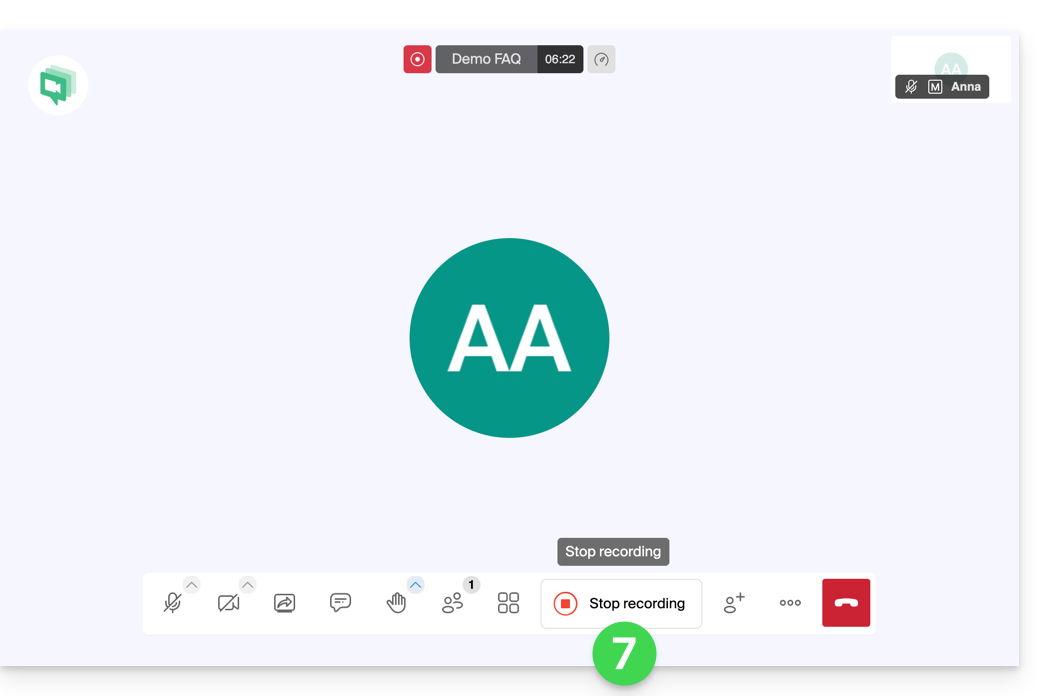
- To stop the video recording, click on Stop recording:
- Confirm:
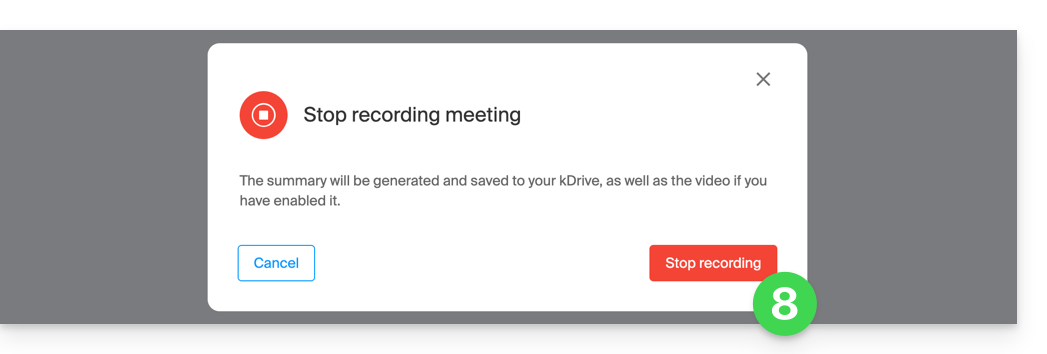
- Choose whether you want the recording to be saved to your kDrive:
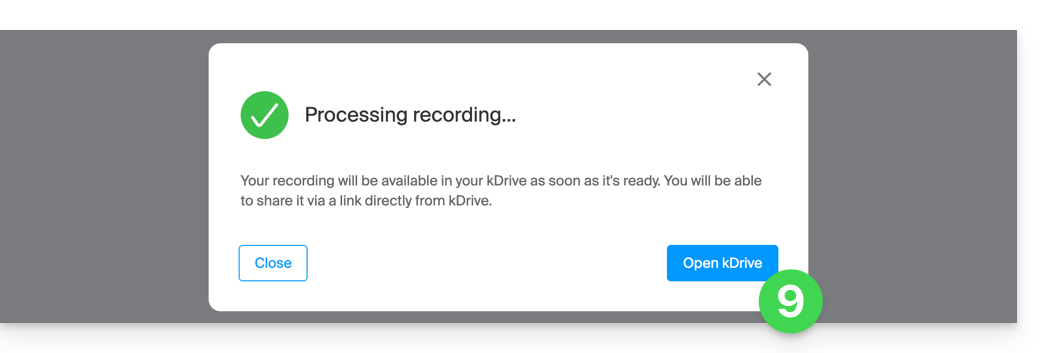
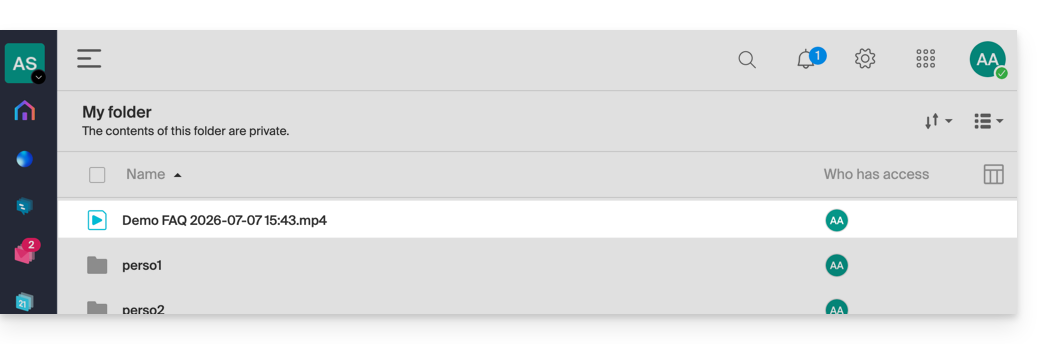
- The recording will be available in the root directory of the selected kDrive once the virtual event in which the meeting took place has ended (as soon as all participants have left the video conference):
Link to this FAQ: https://faq.infomaniak.com/2472
Has this FAQ been helpful?
This guide explains how to join a video conference kMeet, the free video conferencing solution by Infomaniak.
Preamble
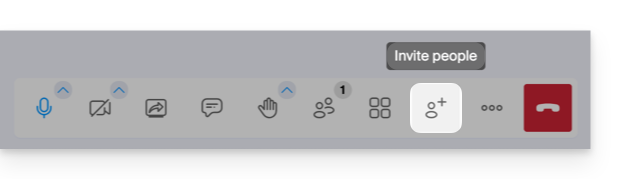
- To quickly obtain and share the link to the current meeting, the creator must click on the user icon with a plus sign (
+):
Connect to a meeting room
To join a kMeet that an administrator has already started:
- Start kMeet via kmeet.infomaniak.com or from one of the applications for computer or mobile devices.
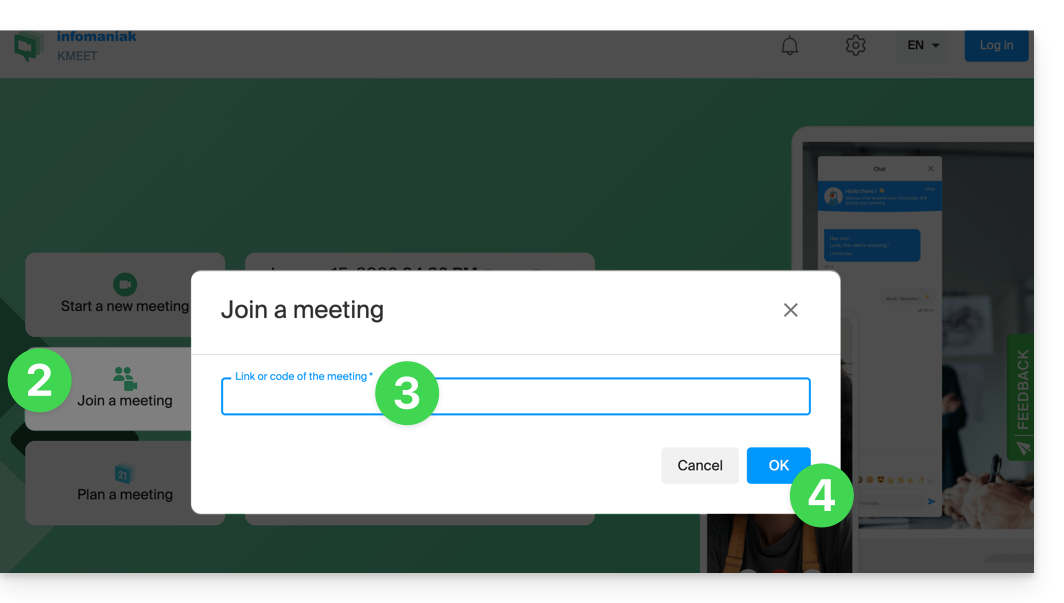
- Click the button to Join a meeting.
- Enter the code for the meeting (e.g.,
001-0002-003) or its link (which you can also open directly) - read the preamble below if you do not know how to obtain the discussion link. - Click the OK button:
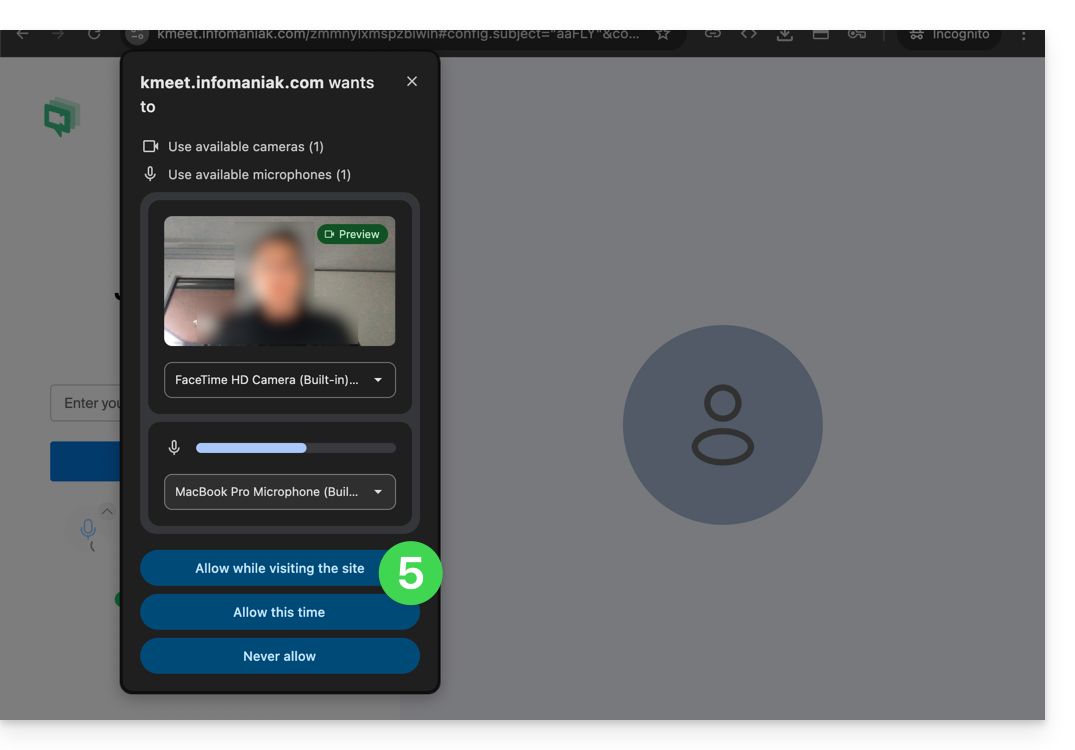
- Allow access to your webcam and microphone from your browser or from one of the applications:
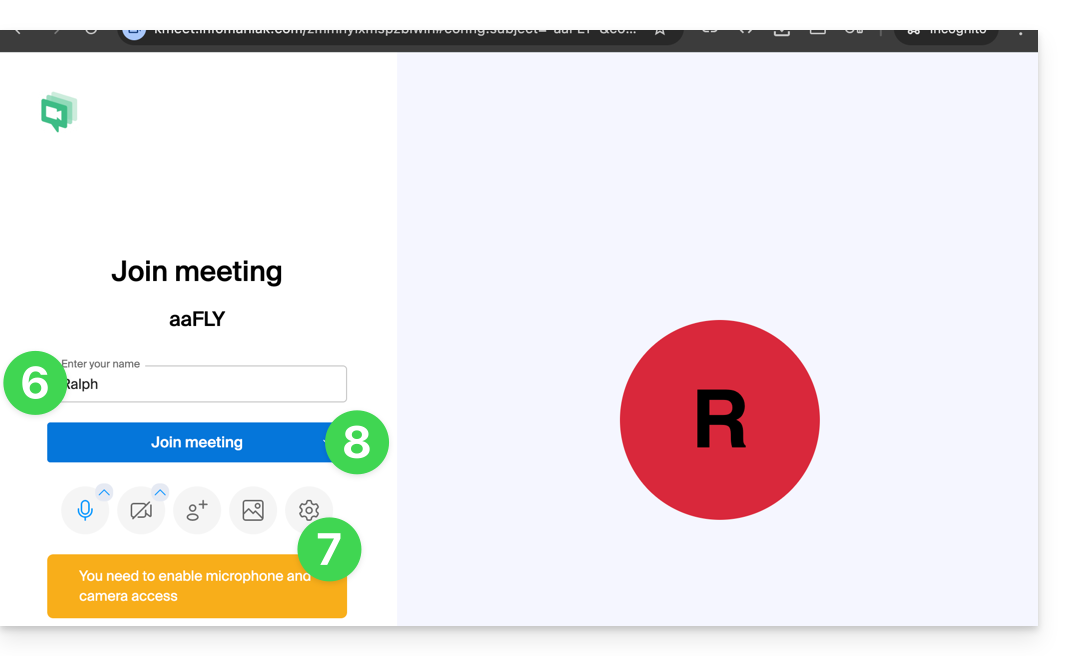
- Enter a pseudonym or your first and last name.
- Adjust the settings according to your preferences (if you want to disable the camera, for example).
- Click the blue button to join the meeting:
- Enter the access password and/or encryption key provided by the meeting organizer if necessary.
Link to this FAQ: https://faq.infomaniak.com/2473
Has this FAQ been helpful?
Thank you for choosing kMeet Infomaniak as your video conferencing solution for individuals & businesses:
- Unlimited audio and video calls
- Access without registration
- Compatibility Web, mobile and desktop
- Integrated chat & reactions (emojis, sounds)
- Screen sharing with drawing, remote control
- Breakout rooms
- Integration with calendar (create video link)
- Integration with kDrive for storing meeting recordings
- Integration with kChat for video calls
- Privacy respect (no ads, hosted in Switzerland)
- Security with AES-256 encryption
- Eco-friendly (renewable energy, CO2 compensation)
What would you like to do?
- Create an online meeting
- Join a meeting
- Download the kMeet app on your macOS, Windows, Linux, iOS (iPhone/iPad) and Android devices.
- Control participants (moderation)
- Create a kMeet breakout room
- Protect meeting access with a password and/or an encryption key
- Record and share a video conference
- Share your screen with participants
- Remotely control a device with kMeet
- Start the chat during an online meeting
- Broadcast the kMeet stream via Video Streaming
- Draw on kMeet
- Replace Skype with kMeet
A question, problem or feedback?
- Solve a problem audio, video, device access permission…
- In case of a problem, please consult the knowledge base before contacting support.
- Click here to share feedback or a suggestion on an Infomaniak product.
Link to this FAQ: https://faq.infomaniak.com/2474
Has this FAQ been helpful?
This guide explains how to start an online meeting with kMeet, Infomaniak's ethical free video conferencing solution.
Preamble
- There is no limit to the number of participants with paid my kSuite offers.
- Participants can write in a common chat, annotate a screen share and even control a remote device.
- To create a meeting room in advance and invite participants by creating an associated event in the Infomaniak calendar, refer to this other guide.
- It is also possible to share the video stream within a Video Streaming Broadcast (for example, to avoid depending on the connection to kMeet).
Create a virtual meeting room
To do this:
- Start kMeet via kmeet.infomaniak.com or from one of the applications for computers or mobile devices.
- Start a new meeting:
- Specify a name for your meeting room.
- Allow access to your webcam and microphone from your browser or from the application (click here if you encounter any issues).
- Enter a pseudonym or your first and last name.
- If necessary, enable participant control, a password or a custom encryption key.
- Click on Join the meeting.
- Share the room link to invite participants to join you:
Link to this FAQ: https://faq.infomaniak.com/2475
Has this FAQ been helpful?
This guide explains how to manually allow or refuse participants in a kMeet meeting.
Preamble
- To approve participants, you must have the status of moderator.
- To be a moderator, you must either be the first connected or designated later.
- Generally, a person generates a kMeet and will therefore be the moderator throughout the meeting.
- However, if a meeting is created from the Infomaniak calendar, a kMeet link can be added, which will be accessible to all event participants; it is therefore recommended that the event initiator connect a little before the participants to configure their meeting (add a waiting room or a password, etc.).
Approve or refuse participants
To be a moderator:
- Start kMeet via kmeet.infomaniak.com or from one of the apps for computers or mobile devices.
- Click the button to start a new meeting:
- Click the chevron below the meeting name to expand the advanced options.
- Enable participant control:
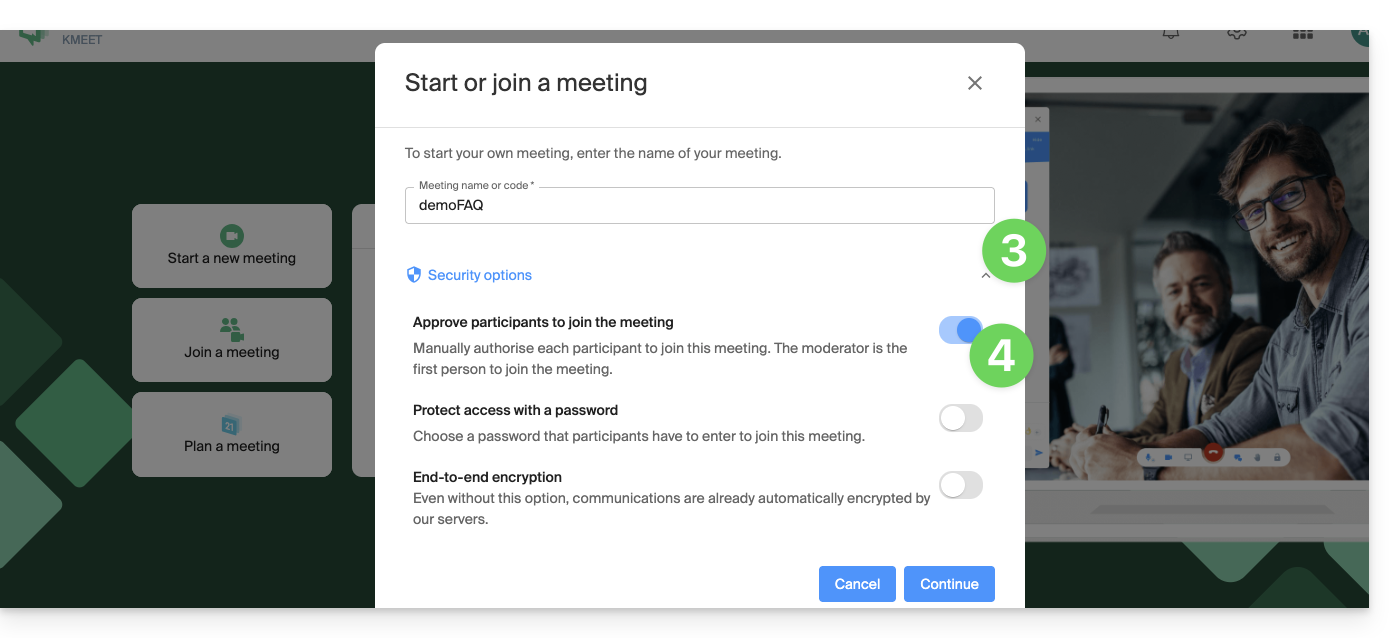
- Start the meeting.
- Share the meeting link or code and if necessary the password and or the encryption key with your participants.
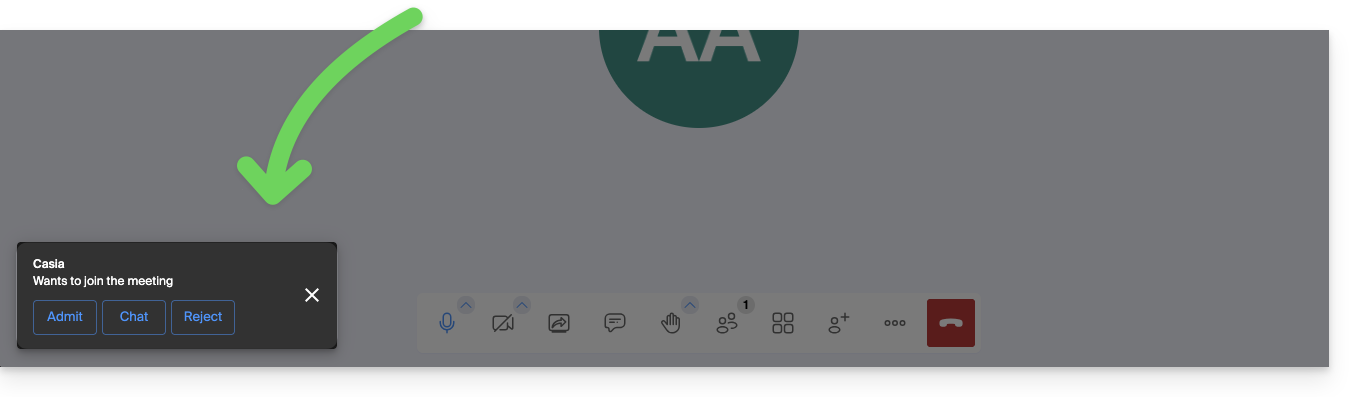
- When your participants try to join the meeting, an audio notification invites you to authorize or not authorize them to join the room:
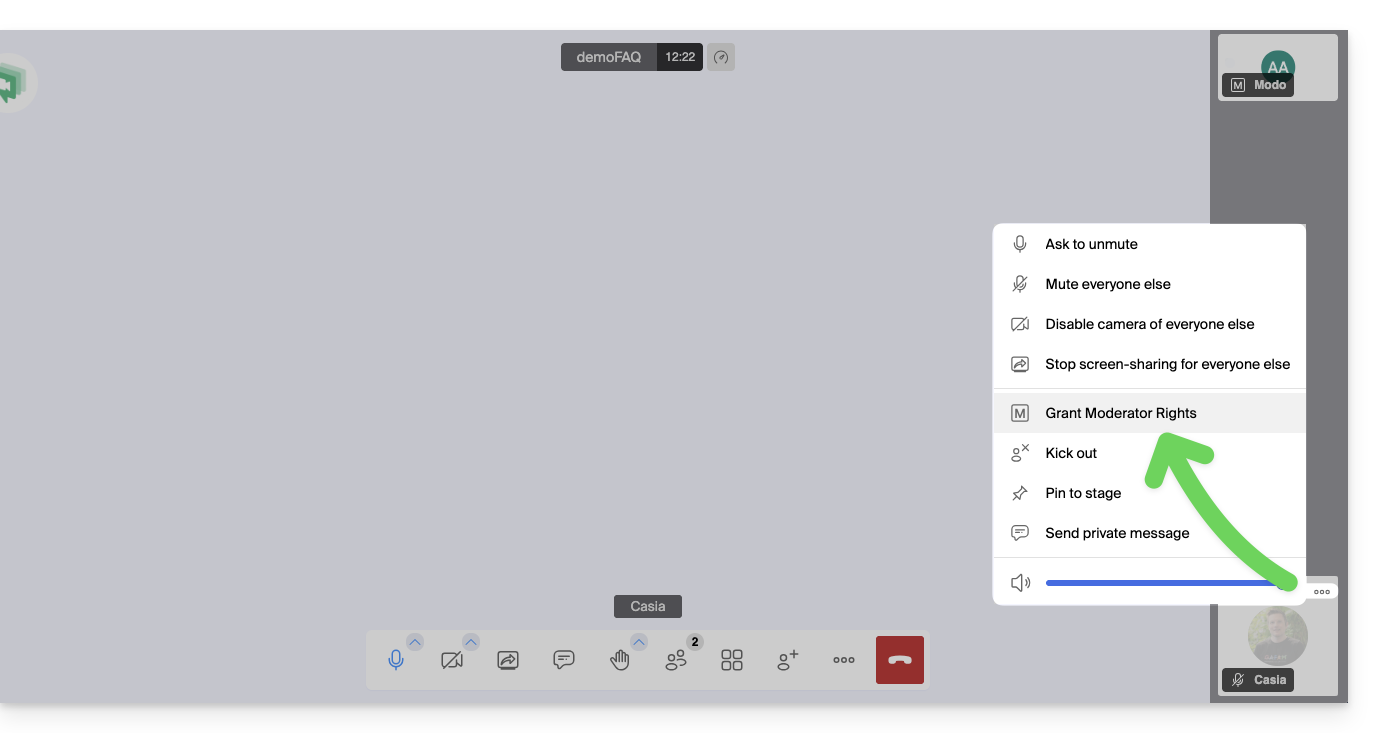
- You can also set a participant as a new moderator during the meeting, or just below, exclude them from the meeting:
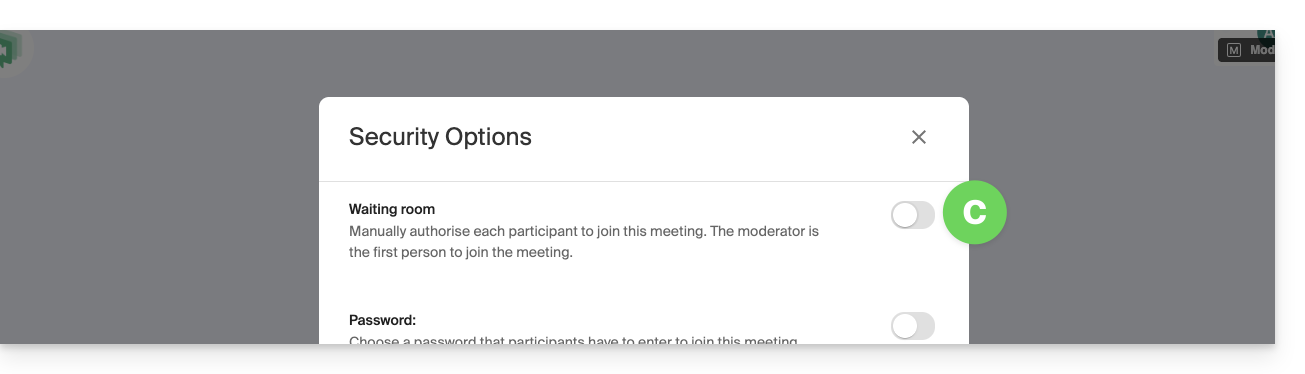
- The moderator can also disable the "waiting room" enabled in point 4 above once the meeting has started:
- Click on the icon ○○○ in the toolbar.
- Click on Security options:
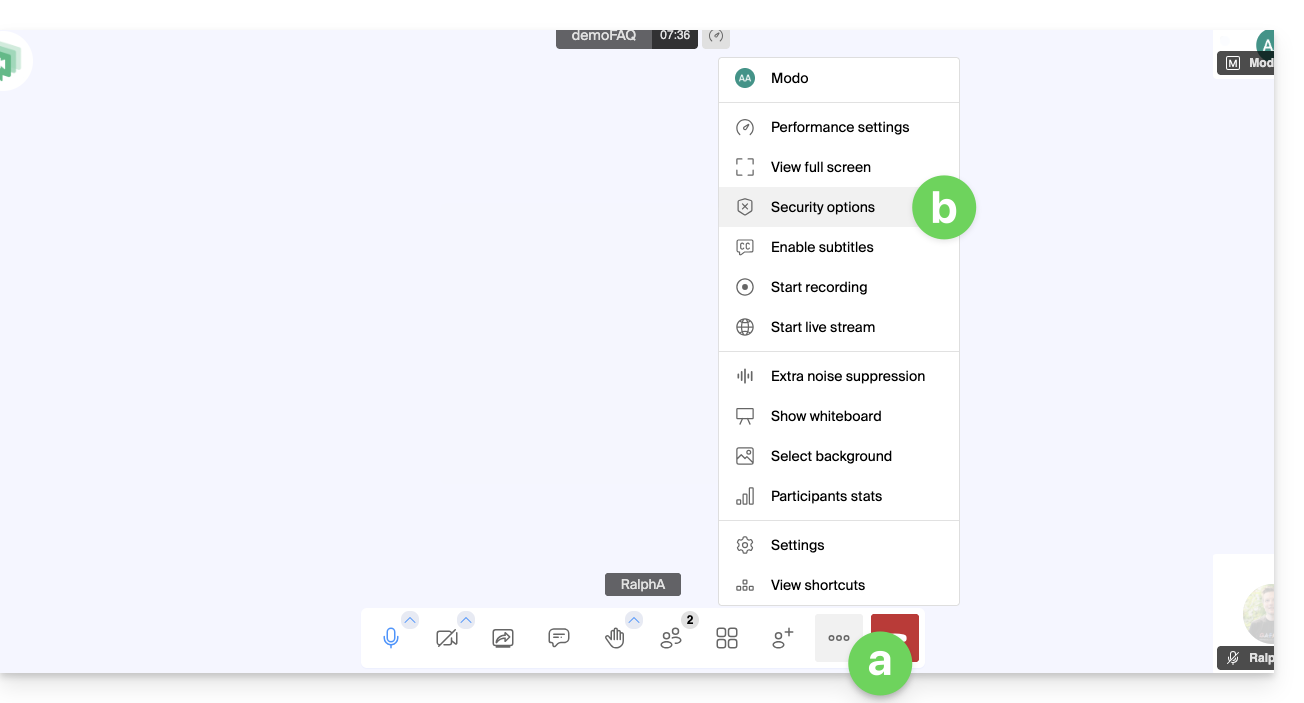
- Disable the option to no longer have to manage new arrivals in the meeting:
Moderation options
Other moderation options are available:
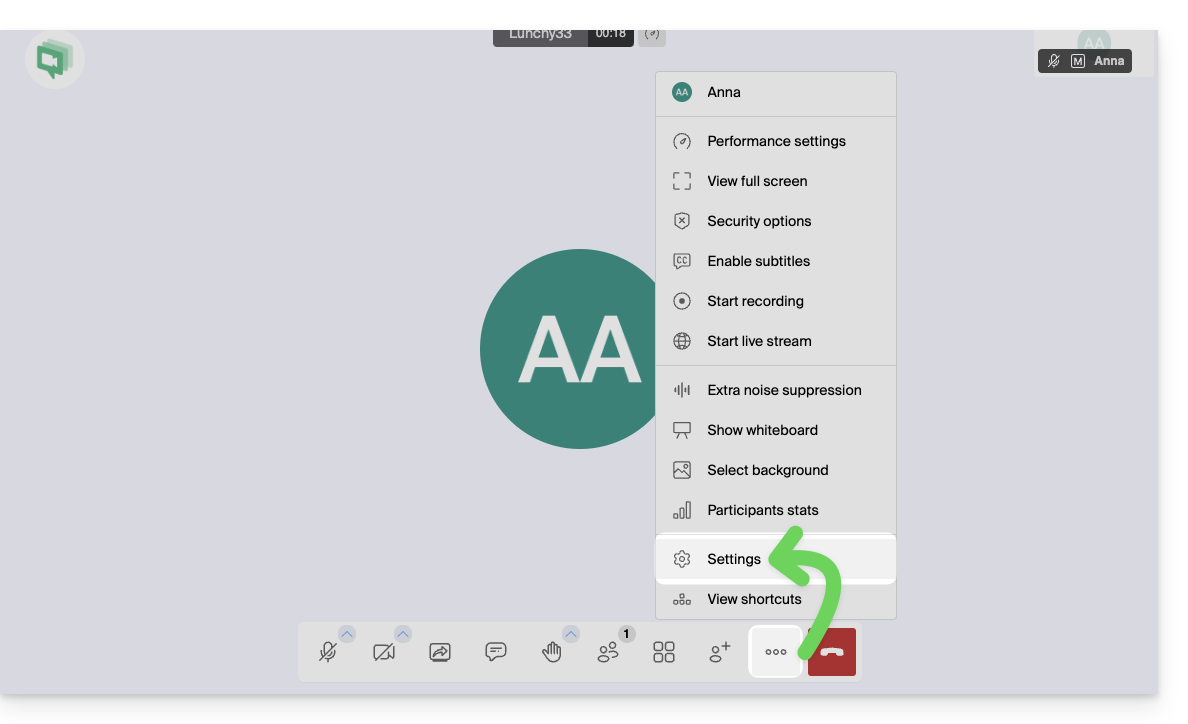
- Click on the icon ○○○ in the toolbar.
- Click on Settings:
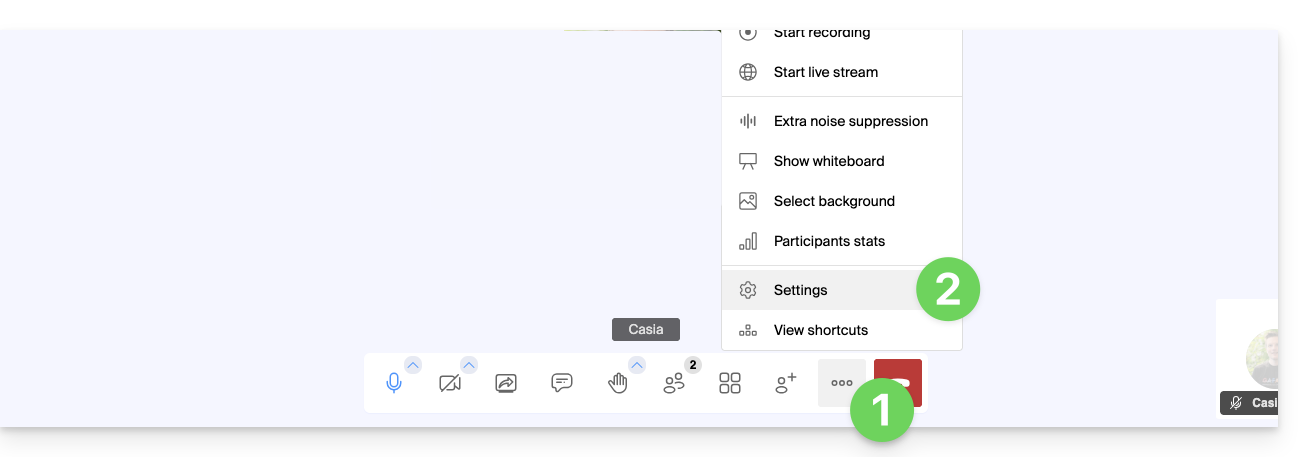
- Click on Moderation.
- The options allow you to manage the expected behavior when new participants connect:
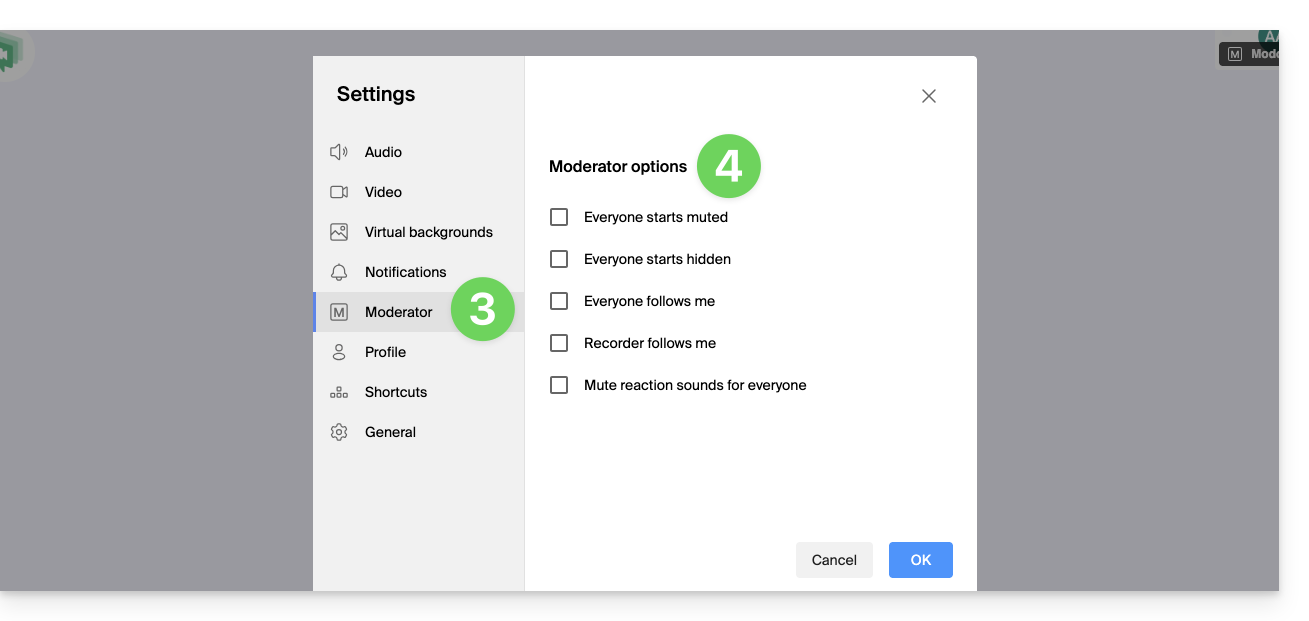
- all participants start with the microphone muted
- all participants start with the camera off
- all participants have the same interface display as the moderator (display of such participant in large on the layout, etc.), modifiable at any time by the users but the moderator can update at any time to enforce compliance
- recording will use the same interface display as the moderator (display of such participant in large on the layout, etc.)
- reaction emojis do not produce any sound
Link to this FAQ: https://faq.infomaniak.com/2476
Has this FAQ been helpful?
This guide explains how to use the screen sharing feature (screen sharing) of kMeet, the ethical free video conferencing solution by Infomaniak.
Prerequisites
- Have the desktop app kMeet (desktop application for macOS / Windows) or the mobile kMeet app (application for Android smartphone or tablet).
- The Web kMeet app (online service kmeet.infomaniak.com) is also compatible.
- Screen sharing is not yet possible with the mobile iOS app.
- If this is your first use or first screen share, the permissions requested by the operating system (macOS, Windows...) or the browser (Chrome, Firefox...) may require a restart of the application and consequently an interruption of the meeting.
It is better to prepare the technical aspects in advance to avoid being in a delicate situation during the broadcast; refer to this other guide on this subject.
Start screen sharing
To start sharing your screen:
- Start kMeet via kmeet.infomaniak.com or from one of the applications for computers or mobile devices.
- Create or join a meeting room.
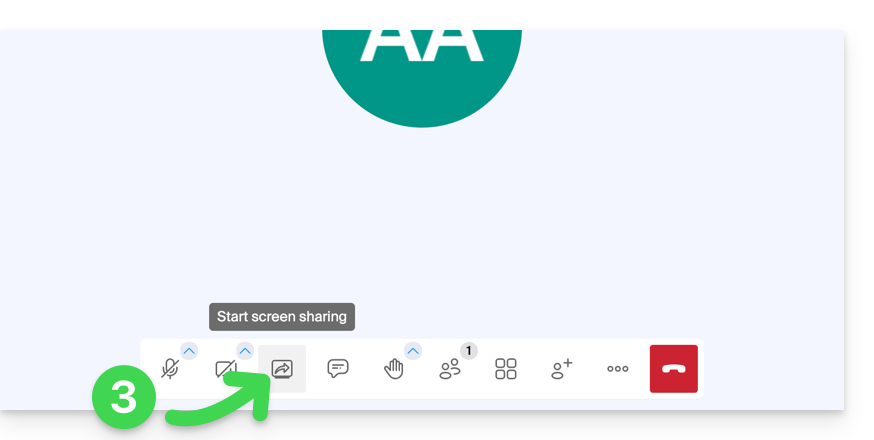
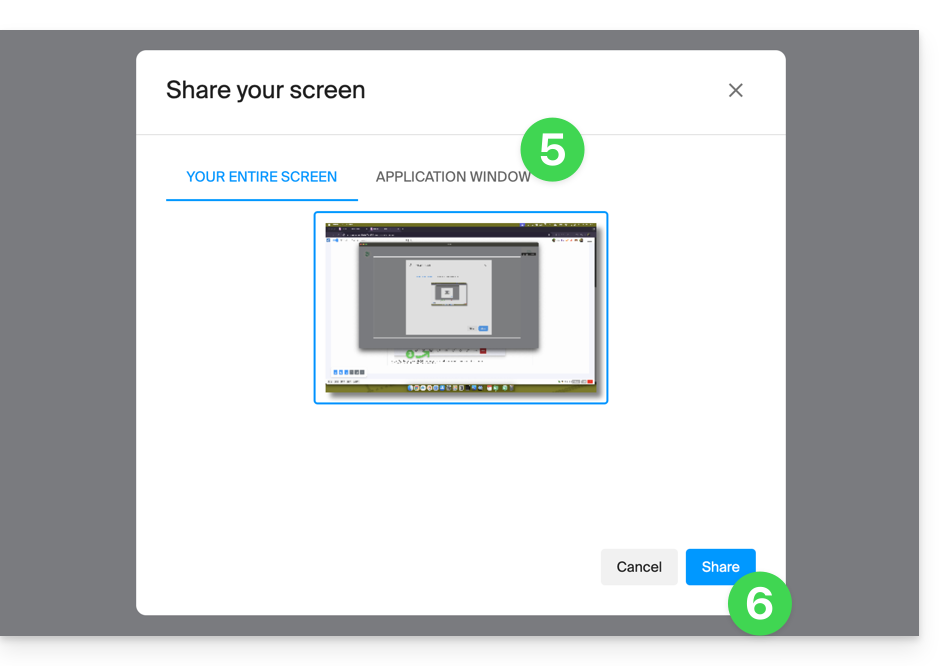
- Click on the screen icon with an arrow to Share your screen:
- Read the warning that may be displayed by your device and validate the authorization to access the screen content.
- By default, it is the entire screen that will be shared in the next step, but you can also choose a specific window, that of an application for example, in order to restrict the participants' view to a specific activity of the device.
- Be careful, if the purpose of the sharing is to then allow participants to interact by drawing, you must choose to share the full screen.
- Click on the button to start the sharing:
- To stop the broadcast, click again on the toolbar icon.
Link to this FAQ: https://faq.infomaniak.com/2477
Has this FAQ been helpful?
This guide explains how to use the chat feature integrated into kMeet, Infomaniak's ethical and free video conferencing solution.
Start a chat between kMeet participants
To do this:
- Start the kMeet app.
- Create or join a meeting room.
- Click on the message bubble icon in the toolbar to Open/Close the chat and chat from a side panel on the left.
- Close the chat/polls panel if necessary:

- Close the chat/polls panel if necessary:
React in real time, create a poll
- The chat supports the use of Emojis.
- It is also possible to:
- request to speak using the hand icon (Raise/Lower hand)
- react with visual (and audible) emojis and GIFs — they will appear in the conversation area
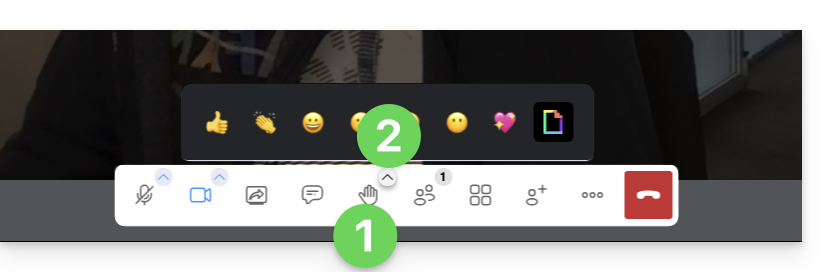
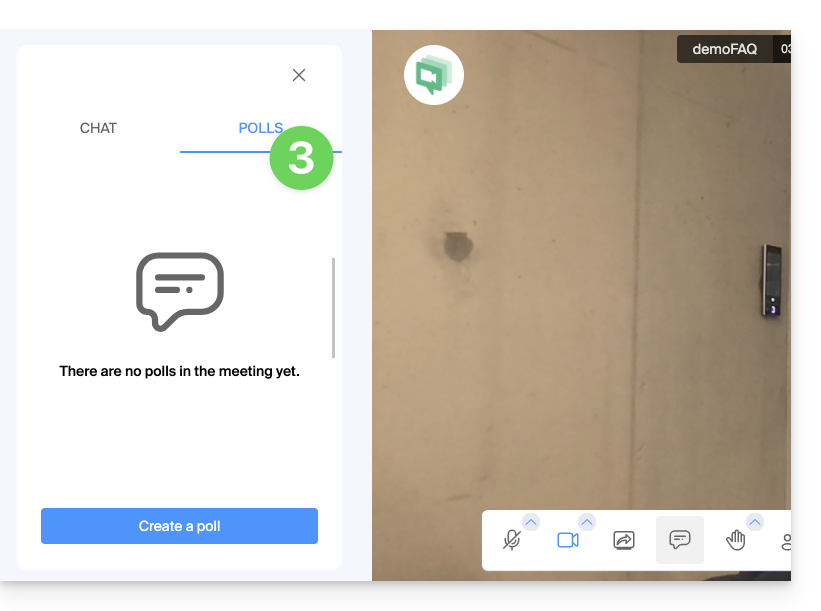
- create a poll among the participants (click on the Polls tab in the chat panel):
Link to this FAQ: https://faq.infomaniak.com/2478
Has this FAQ been helpful?
This guide explains how to use the drawing feature with kMeet, Infomaniak's ethical and free video conferencing solution, which allows for visual collaboration between participants.
Display a collaborative whiteboard
It is possible to display a blank surface where all participants can enter information:
- Start the kMeet desktop app, then create or join a meeting room where the users should be.
- Once in the meeting, click on the action menu ○○○ in the kMeet toolbar.
- Click on Show whiteboard:
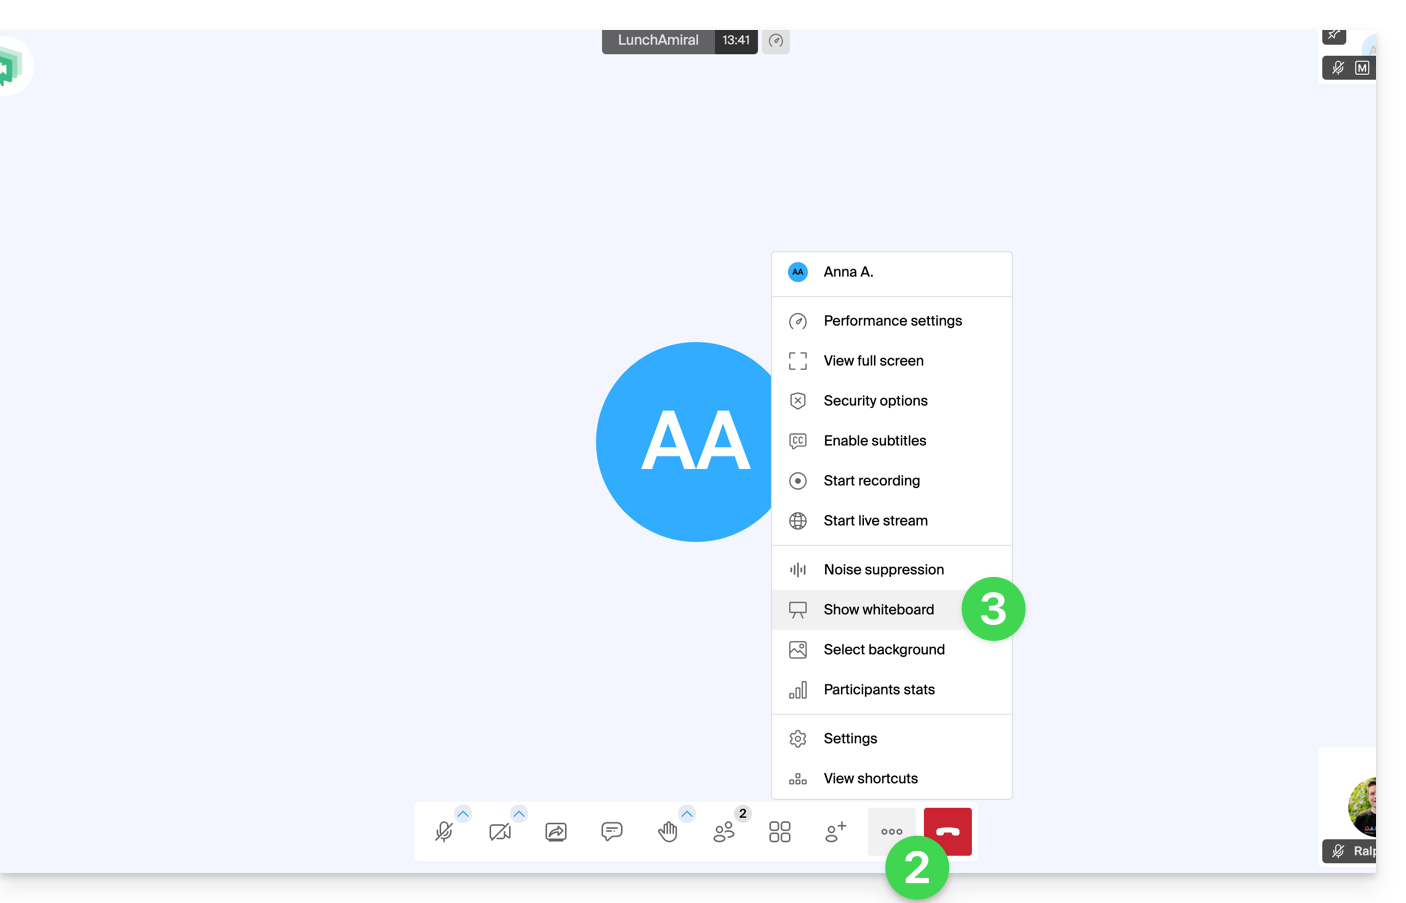
- The drawing surface will be displayed for all participants, and each person can enter what they want.
- Each participant's cursor is displayed:
Draw on a screen share
Prerequisites
- Have the kMeet desktop app (desktop application on macOS / Windows / Linux).
- Share the entire screen and not just an application window (point 2 below).
Then:
- Start the kMeet desktop app, then create or join a meeting room where the users should be.
- One of the participants initiates a screen share (desktop app only - see prerequisites).
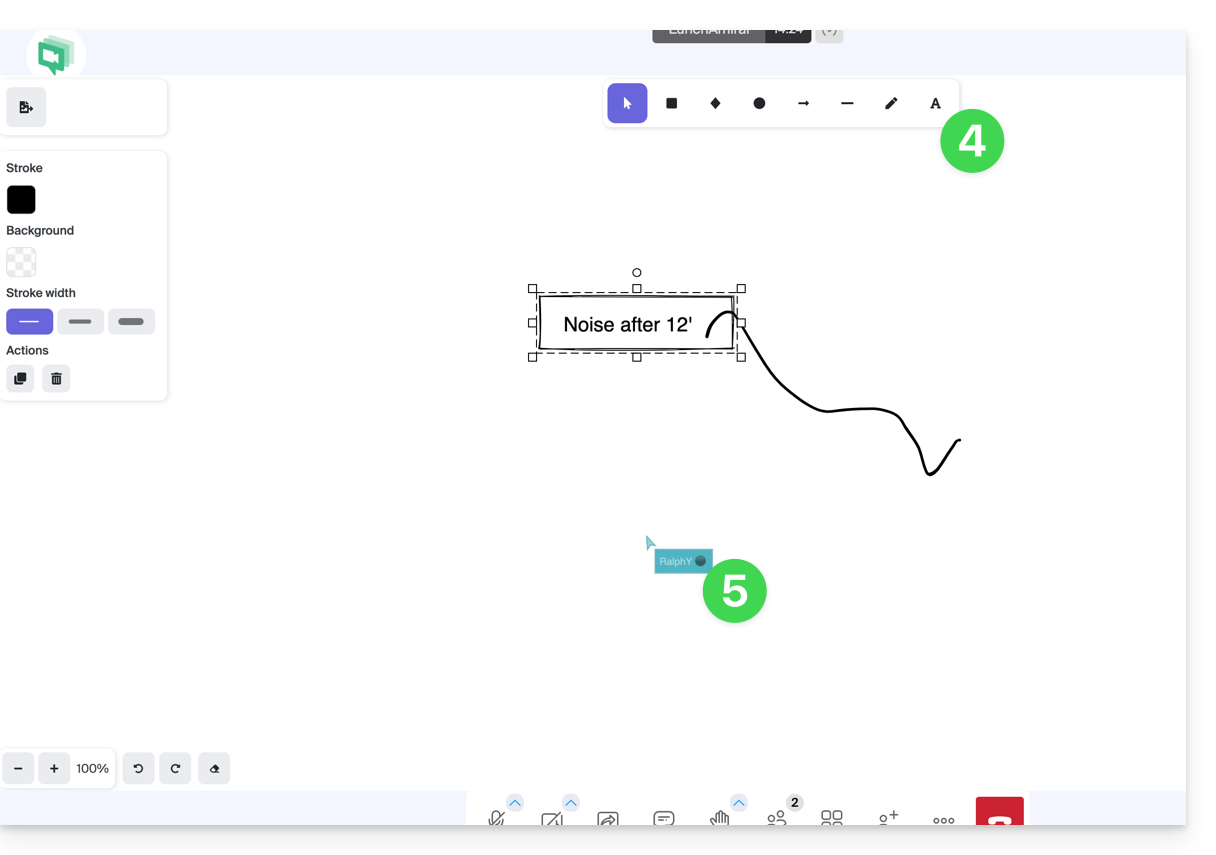
- Other meeting participants can then collaborate by drawing on the screen share:
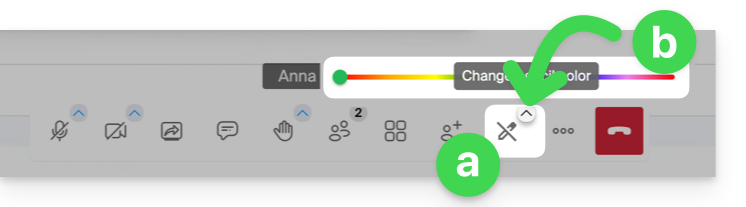
- Click the pencil icon in the bottom toolbar to draw on the screen.
- Change the pen color if needed:
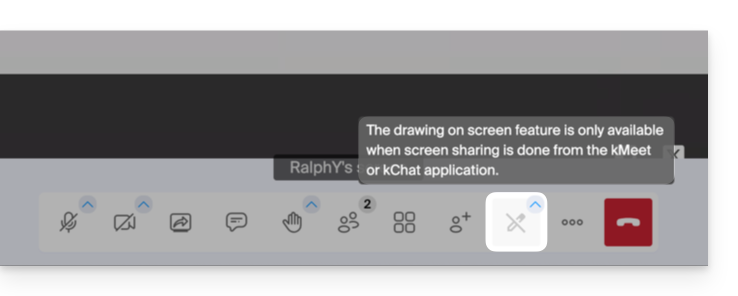
- If the screen share was not initiated from the kMeet application (desktop version), this message will appear for participants who want to enable the drawing feature:
It is also possible to take control of the device during a screen share.
Link to this FAQ: https://faq.infomaniak.com/2620
Has this FAQ been helpful?
This guide explains how to use the remote control feature for a device whose screen is being shared, with kMeet, Infomaniak's ethical and free video conferencing solution.
Prerequisites
- You must have the kMeet desktop app (desktop application on macOS / Windows).
- You must share an entire screen and not just an application window.
Taking Control of a Device
For user A to take control of user B's computer:
- Start the kMeet desktop app and then create or join a meeting room where users A & B will be located.
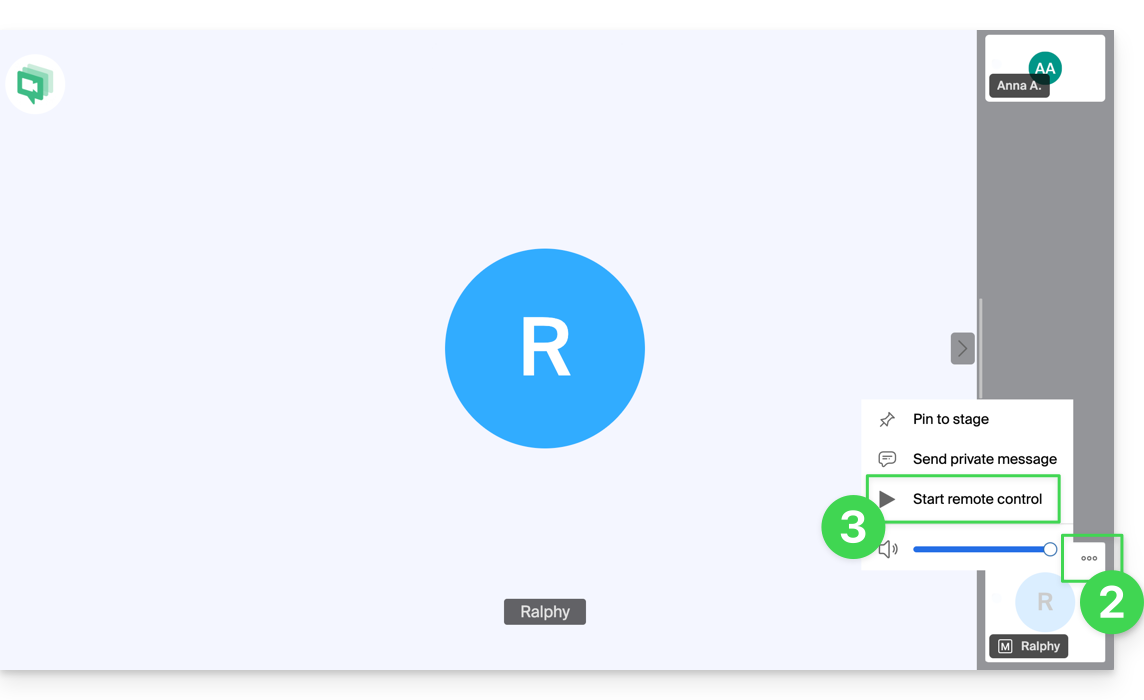
- User A must click on the action menu ○○○ in the upper right corner of user B's thumbnail.
- User A must click on Start Remote Control, and follow the same steps to stop the remote control:
- User B receives a notification in the application to validate and accept the device control request.
It is also possible to simply annotate a screen share without taking control of the device.
Link to this FAQ: https://faq.infomaniak.com/2622
Has this FAQ been helpful?
This guide explains how to start an audio or video conversation between one or more users kChat, with Infomaniak's ethical free video conferencing solution, kMeet.
Preamble
- The call function in kChat is available on all Web (browser), mobile (iOS / Android), and computer (macOS / Windows) versions.
Create a meeting between kChat users
To be able to discuss within a virtual room with the microphone and webcam of your device, simply press the Call button visible on any kChat conversation, private or public channel, via the application or directly on the browser: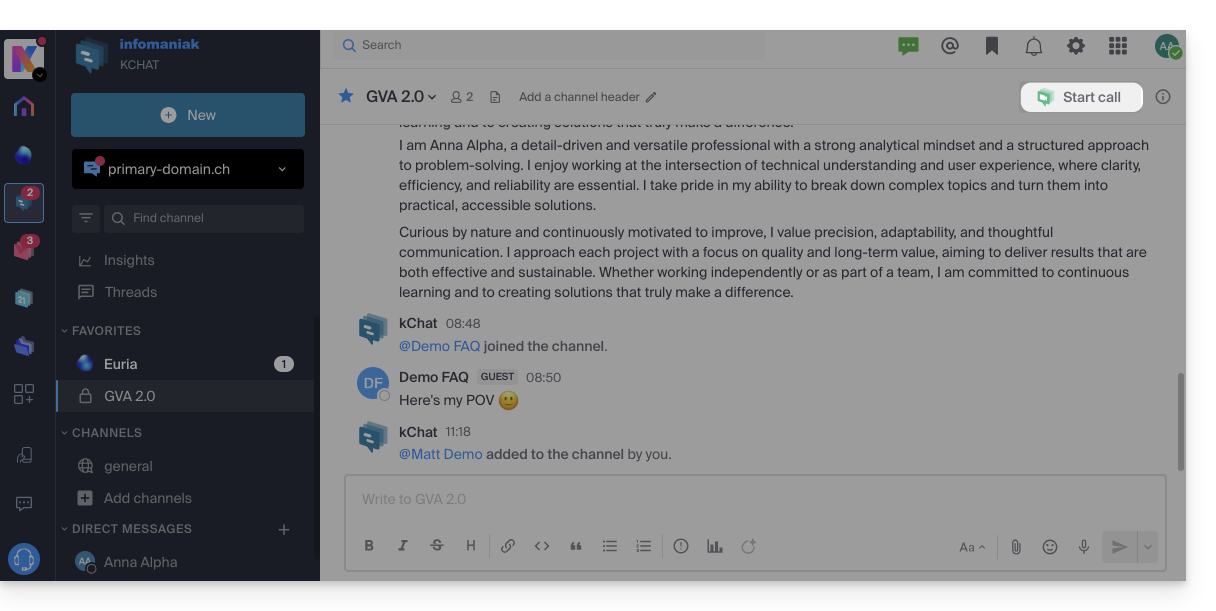
- Call a user directly if you are in a direct discussion with them, or trigger a call to all members of a channel if you start the meeting from the channel.
- Calling a user who is in “Do Not Disturb” will not trigger a ringtone or call modal for them, but they will see the message in the conversation.
- The microphone is enabled by default when the call is accepted, but not the camera.
- View the users of the meeting (who accepted, declined, or missed it) using the avatars in the kChat message.
- Once the call has started, an emoji will appear in your kChat status to indicate that you are busy with the conversation.
- A message sent from the video (kMeet) will also be visible in the kChat conversation (and vice versa).
- Indications related to starting and ending the meeting will automatically appear in the relevant kChat conversation thread:
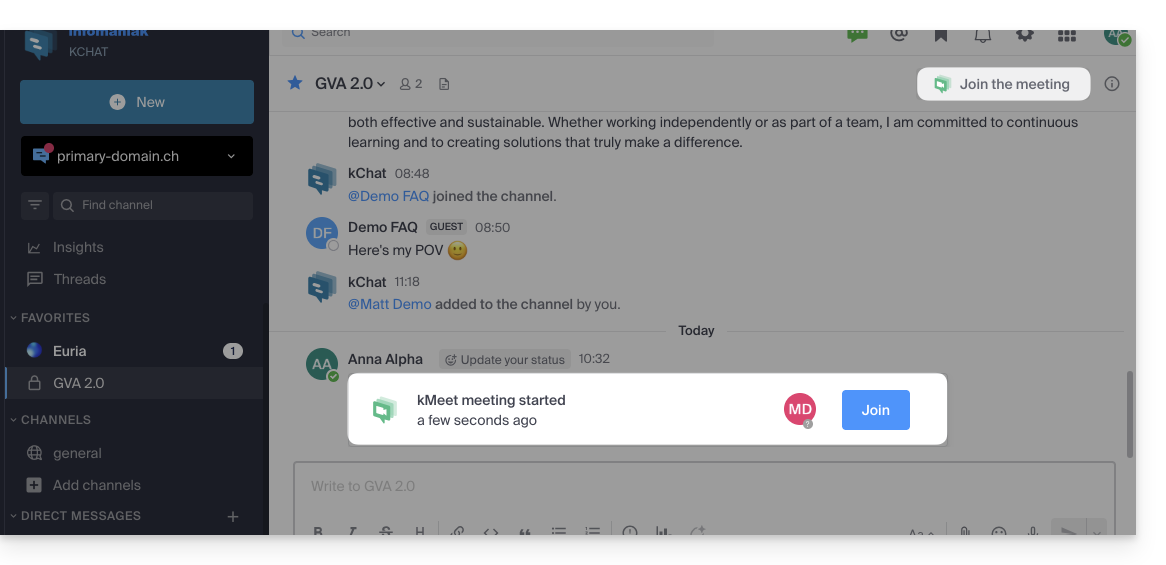
Specifics for calls in channels
- The call will not ring for the recipients, but they will see a message in kChat as well as a notification.
- A message (warning) will appear if you want to start a call in a channel with more than 7 users.
Refer to this other guide if you are looking for information on kMeet.
Link to this FAQ: https://faq.infomaniak.com/2827
Has this FAQ been helpful?
Infomaniak offers you alternatives to Skype with its own solutions, whether for individual calls, remote meetings, or group discussions.
kMeet, the video conferencing solution for individuals & businesses
Despite its initial success, the Skype communication platform has seen its usage decline with the emergence of solutions better integrated into new collaborative practices.
One of the easiest ways to replace Skype is to adopt kMeet:
- Unlimited audio and video calls
- Access without registration
- Compatibility with Web, mobile and desktop
- Integrated chat & reactions (emoticons, sounds)
- Screen sharing with drawing, remote control tools
- Breakout rooms
- Integration with the calendar (video link creation)
- Integration with kDrive for storing meeting recordings
- Integration with kChat for video calls
- Respect for privacy (no advertising, hosting in Switzerland)
- Security with AES-256 encryption
- Eco-friendly (renewable energy, CO₂ compensation)
Replace Skype with kMeet
The kMeet alternative to replace Skype can be implemented in several ways:
1. Quick use without registration
To start a private communication between several people on the Internet, simply have one of them go to kMeet and then share the meeting link with the others. Here is the step-by-step procedure:
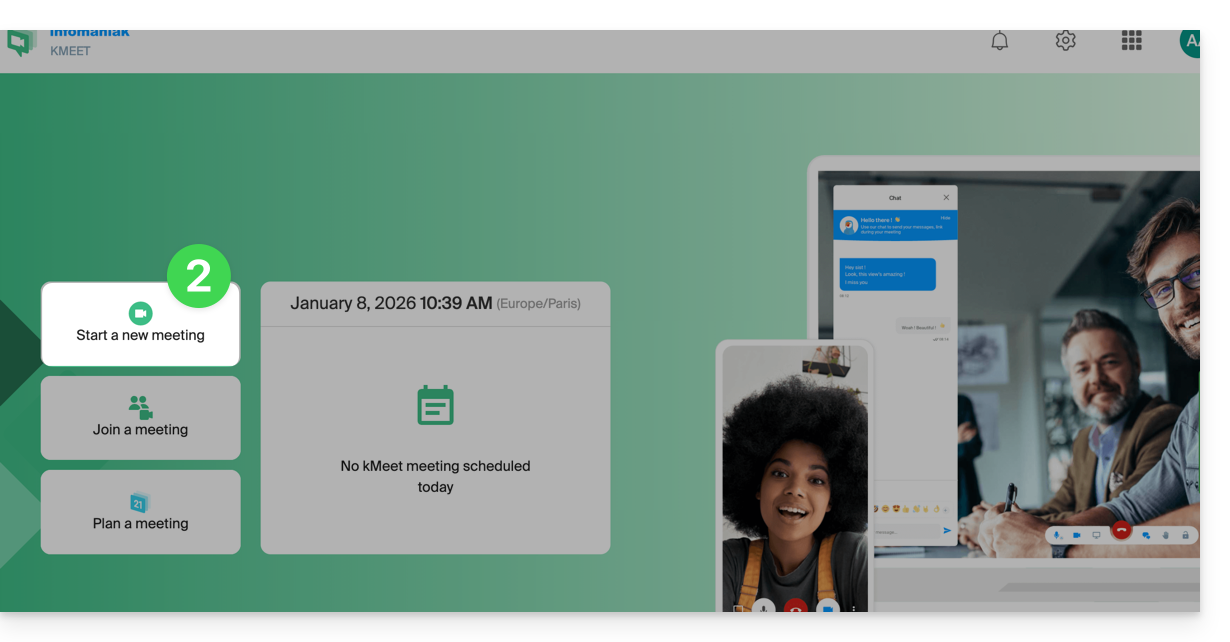
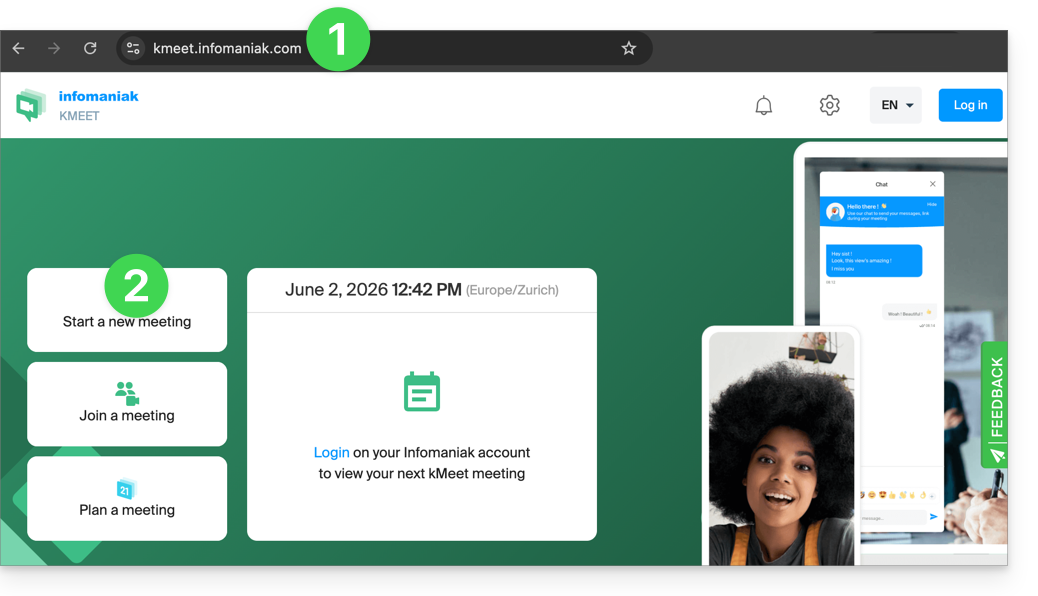
- Enter kmeet.infomaniak.com in a browser such as Chrome or Safari.
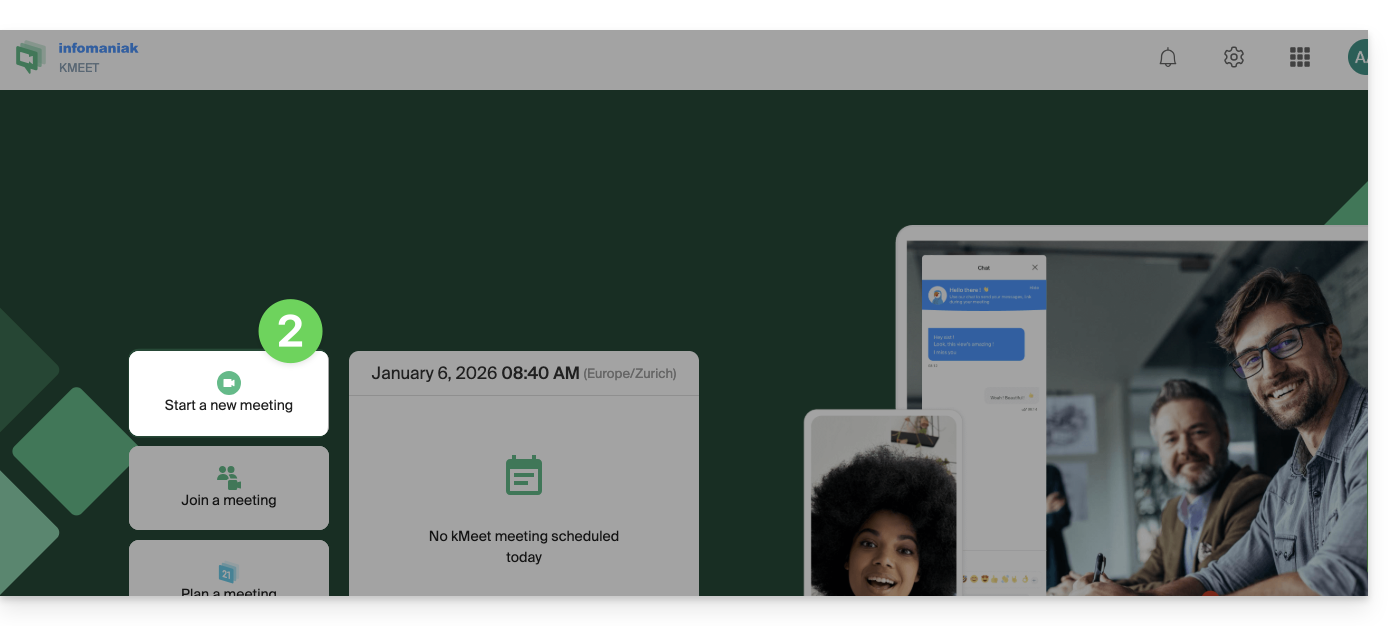
- Click on Start a new meeting:
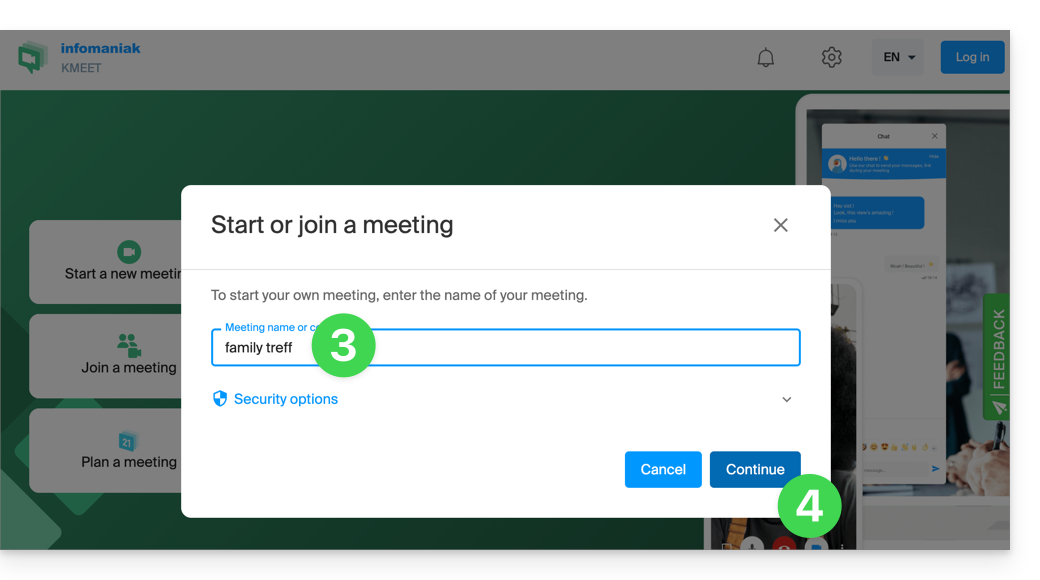
- Enter a name for the meeting, which allows you to indicate to future participants the subject of the discussion they are joining.
- Click the button to Continue:
- Grant the necessary permissions to kMeet:
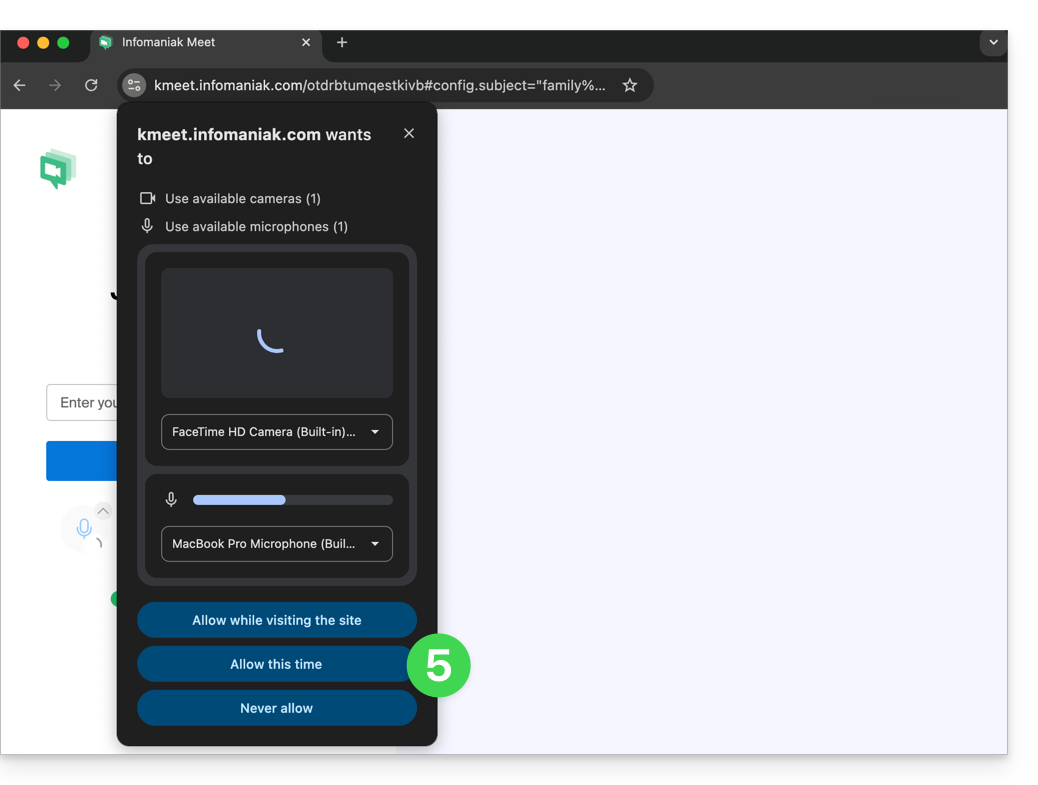
- Enter your name, which is what the other participants will see.
- Enable or disable any communication methods if they should not be used at this time.
- Click the button to join the virtual meeting room (as the first participant since no one else has been invited yet):

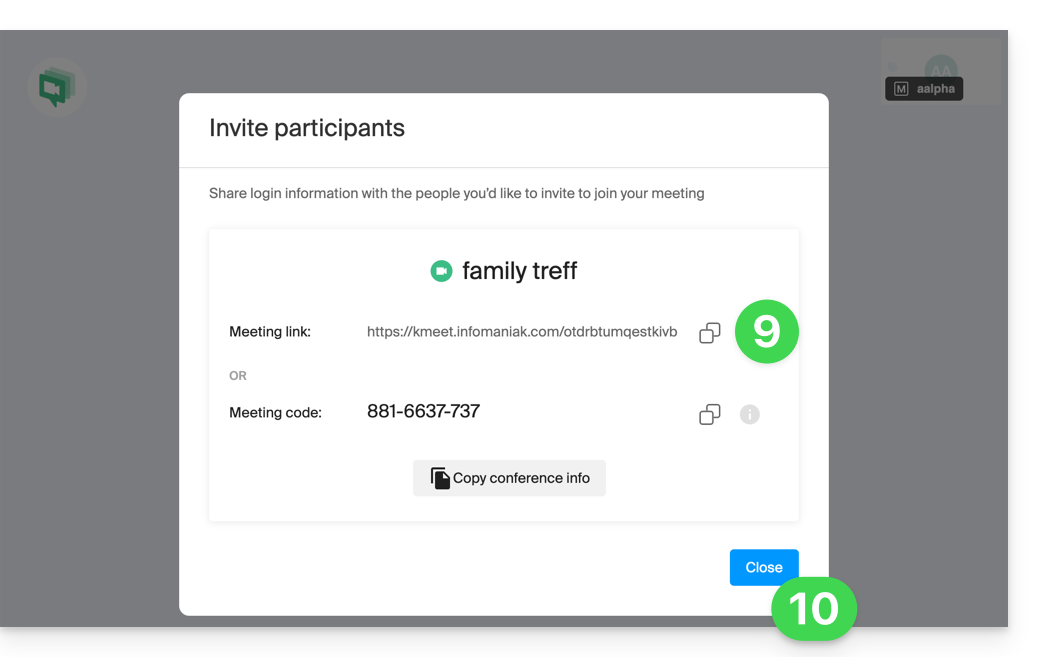
- There you go, the meeting room has been created, and you can now copy the information related to this session and send it to the participants so they can join you (they only need to click on the link you send them).
- Close the information window so you can all chat together:
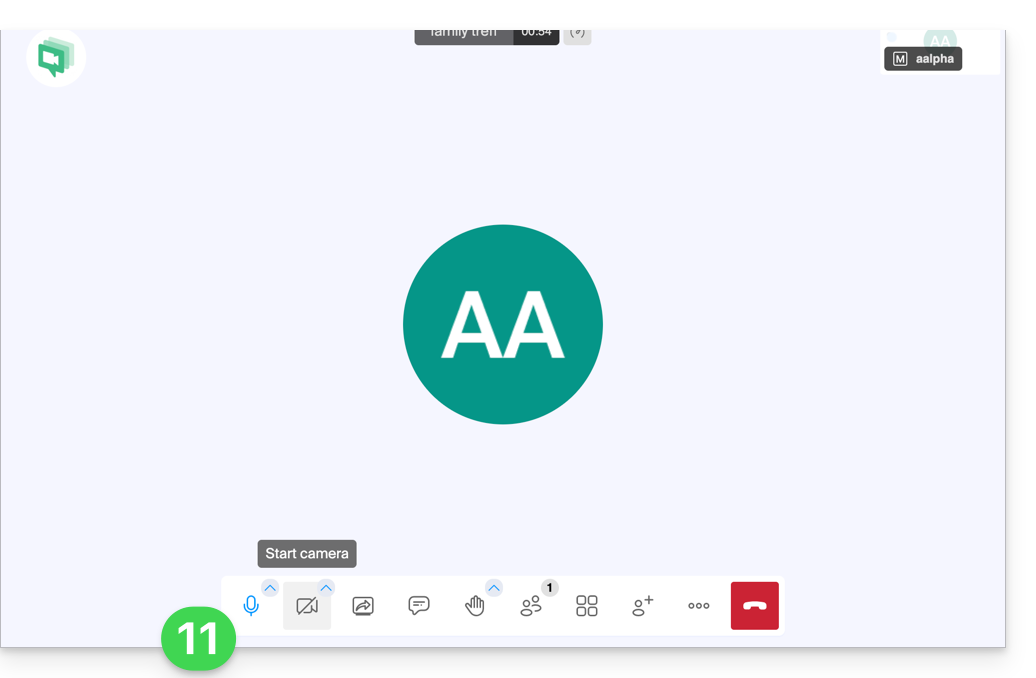
- The toolbar at the bottom of the screen allows you to enable or disable the microphone, camera, etc.:
To discover all the possibilities that kMeet offers, consult this other guide.
2. Scheduling and invitations with my kSuite
To work efficiently, kMeet can be directly linked to your professional calendar. This means that every time you create an event in your calendar…
- … a video conferencing link is automatically generated…
- … participants receive the invitation by email with all the information…
- … and on the day, they can join the meeting with one click, without registration or software to install.
Benefit: you centralize meeting management, reduce forgotten appointments, and simplify organization, all from a single interface.
To set up this solution:
- Sign up for my kSuite for free to have an email address, for example
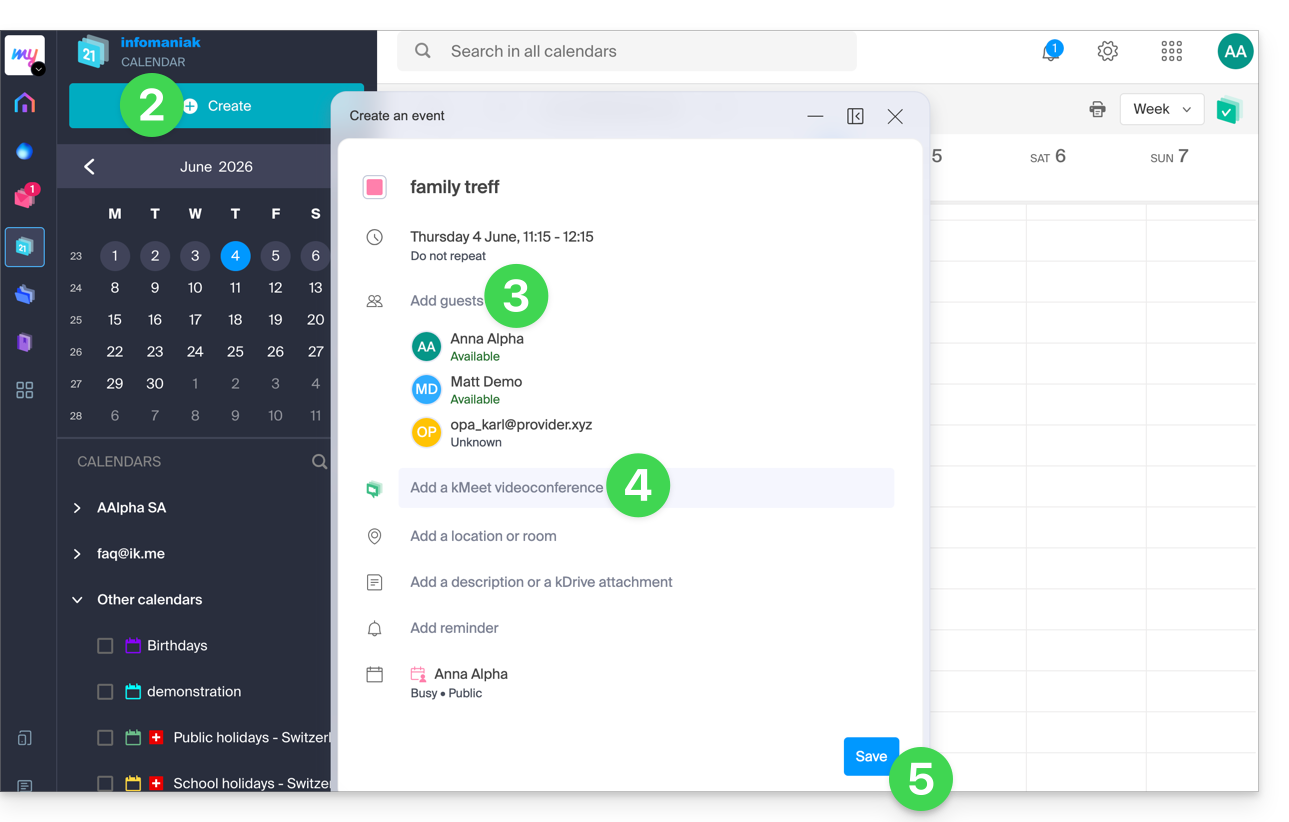
anna.alpha@ikmail.com, and above all, access to Infomaniak services. - Log in to the calendar at ksuite.infomaniak.com/calendar and then create an event on your chosen date.
- Add participants to the event, even if they are not Infomaniak customers.
- Click the green button to automatically generate a kMeet link, which will be added to the event.
- Click the button to save your event:
- Answer YES to the prompt to send notifications to the guests.
- Invitations will then be automatically sent to the participants by email, containing the clickable kMeet link that allows them to join the online discussion at the appropriate time:
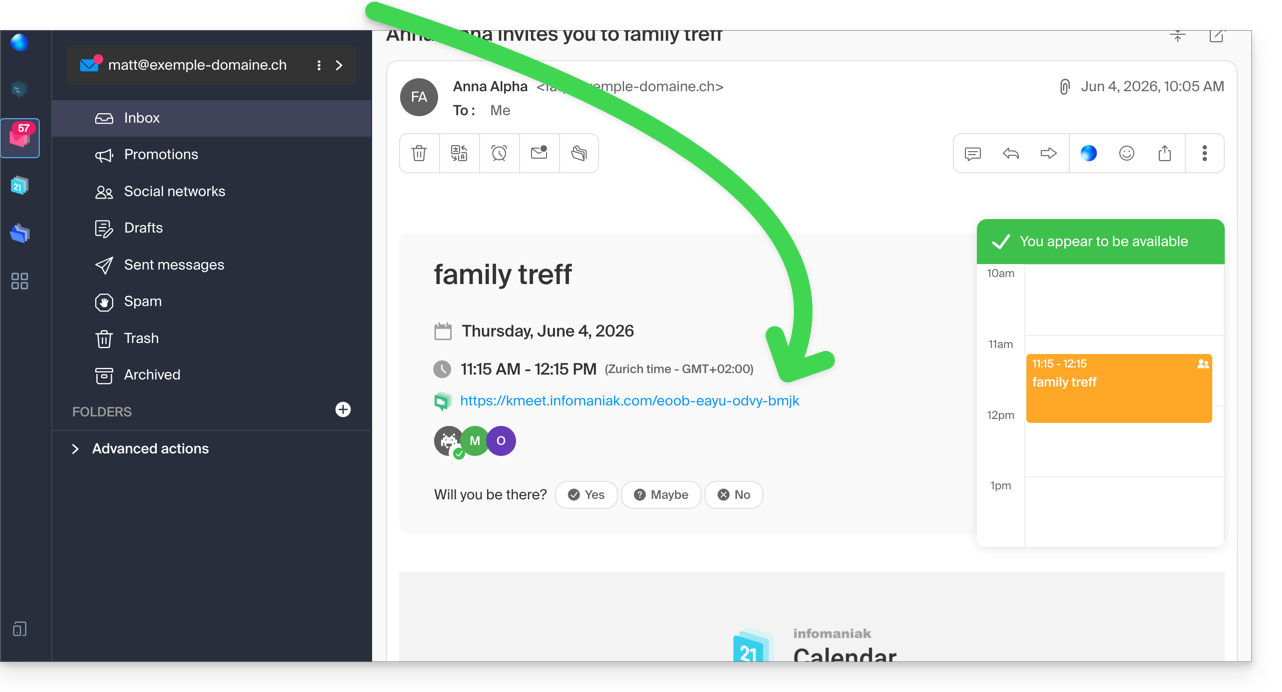
- The kMeet meeting link is also visible on the event in the calendar directly.
3. Call your contact as you would with Skype
To start a conversation at any time with a contact that you have previously saved in your address book, you both need to have kChat, which is available within kSuite Infomaniak. To set up this solution, which can also be extended to an entire group of contacts:
- Sign up for kSuite to gain access to the corresponding Infomaniak services.
- Configure users (they can even be external) on kSuite.
- Install the kChat app or go to the URL https://ksuite.infomaniak.com/kchat
- A user can then be called via kChat, which will ring the recipient's device:
- = Internet browser if the kChat URL is open in it, or computer/mobile device if the kChat app is installed.
- Refer to this other guide to learn more about video calls on kChat.
- Your contact can then answer; the call will be made using kMeet technology within kChat or on the kMeet app if it is installed.
Link to this FAQ: https://faq.infomaniak.com/2890
Has this FAQ been helpful?