
Knowledge base
1000 FAQs, 500 tutorials and explanatory videos. Here, there are only solutions!
This guide explains how to add background images and change the text color of share links and kDrive drop boxes so that it matches the graphic identity of your organization.
Preamble
- Any customization from the share link is applied to the drop box (and vice versa).
- The drop box customization will only be visible when you share access to it via a share link.
Customize share links & drop boxes
To access kDrive customization:
- Click here to access the Infomaniak kDrive Web app (online service ksuite.infomaniak.com/kdrive).
- Click on the chevron to expand the Shares section in the left sidebar:
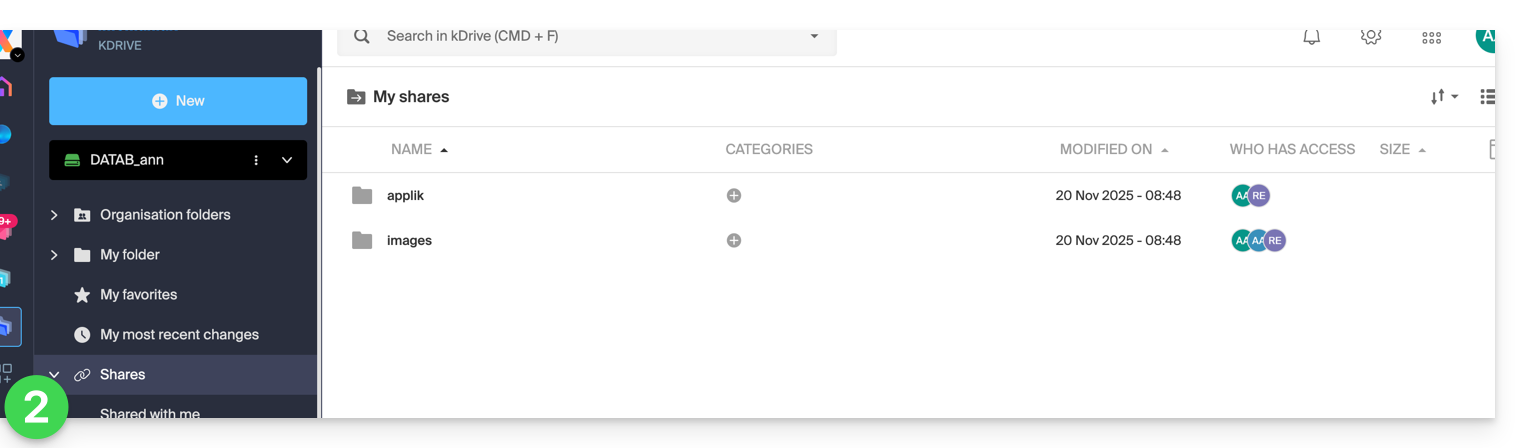
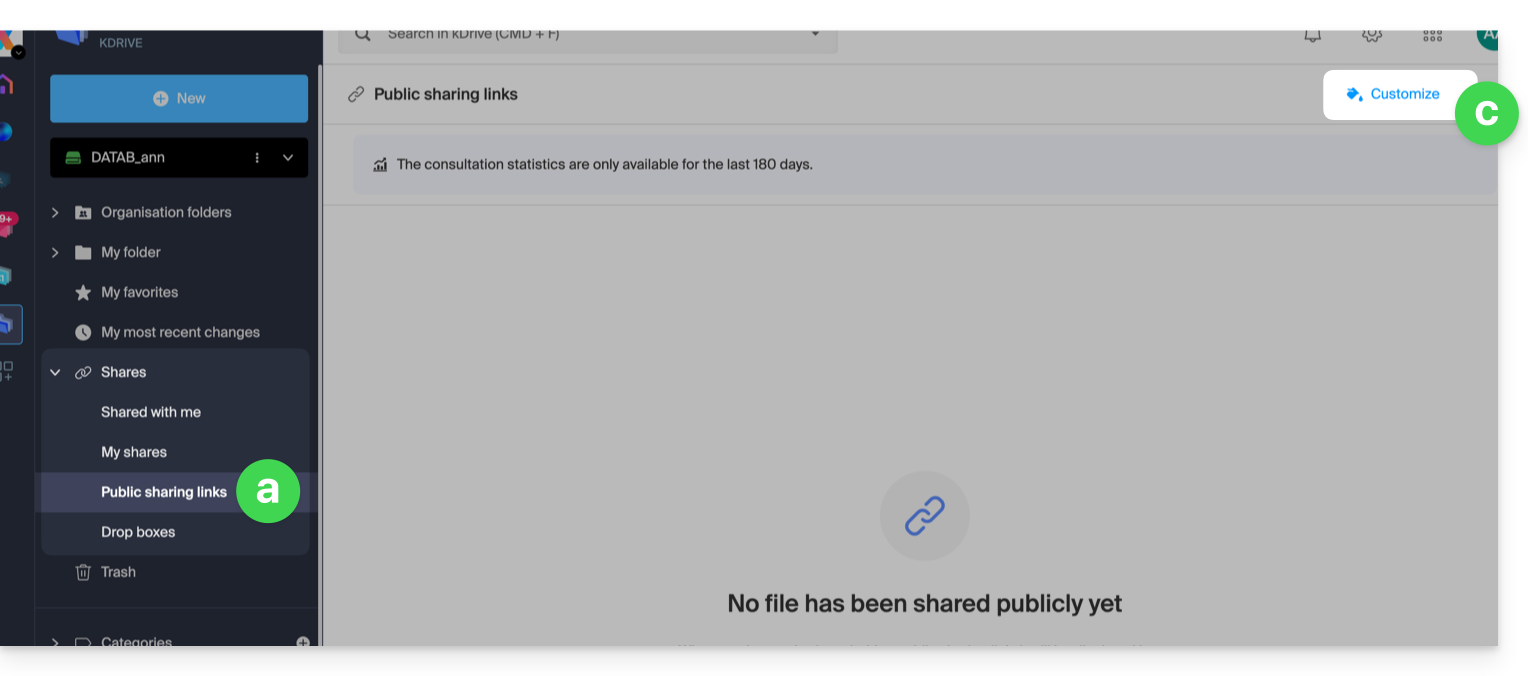
- Click on Public share links:
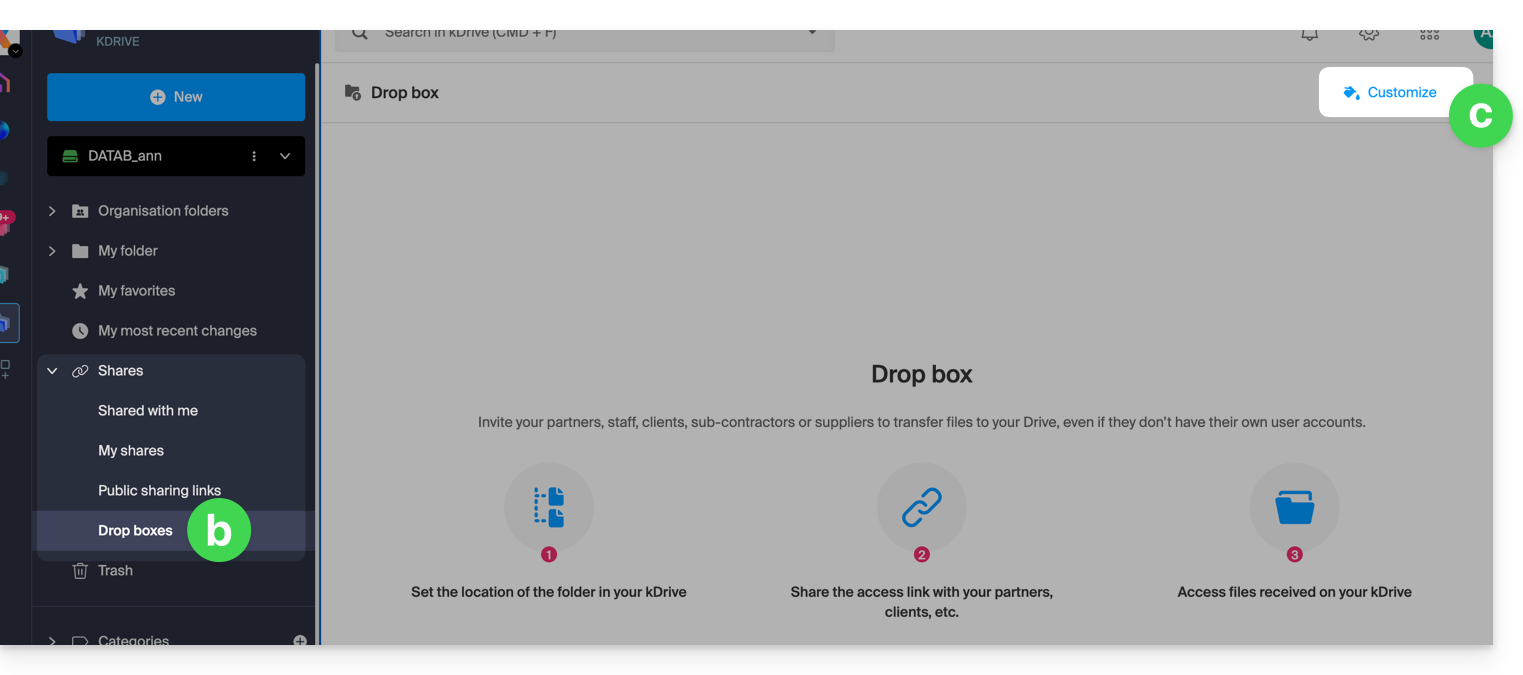
- … or click on Drop boxes.
- Click on Customize:
- Click on Public share links:
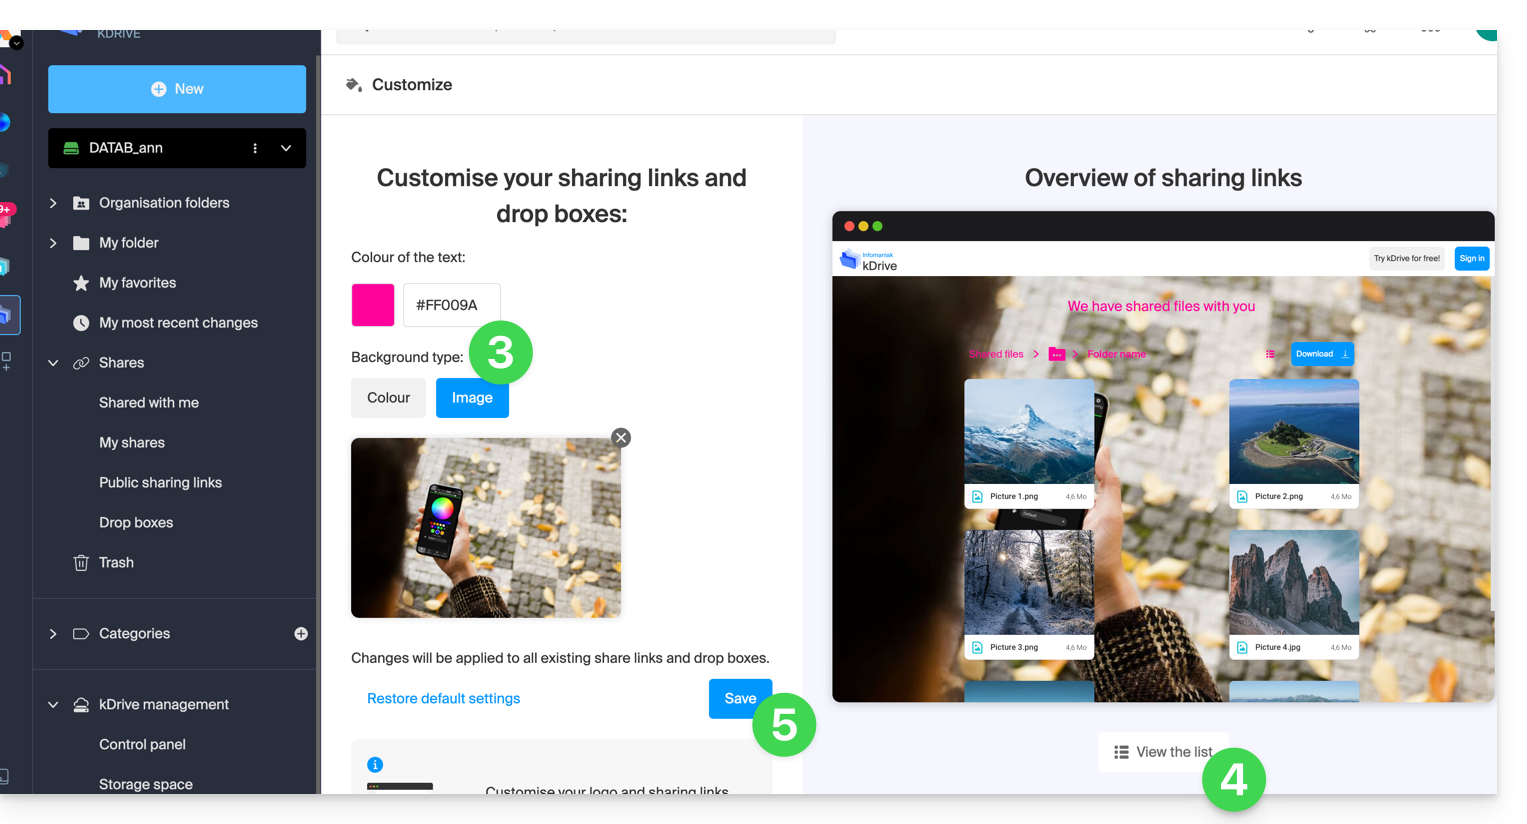
- Modify the text color and add an image (min. 100 KB; it must be on kDrive) or a background color.
- Preview the effects on the 2 display types.
- Click on Save:
This guide helps you get started with kSuite by integrating an existing kDrive in your Organization.
Preamble
- The kDrive will be an integral part of the new kSuite.
- The minimum number of users in the chosen kSuite offer will be based on the number of users in the existing kDrive offer.
- kDrive users will become kSuite users.
- To help you identify the kSuite offer best suited to your needs, refer to this other guide.
Upgrade my kDrive to kSuite
Prerequisites
- Not yet have a kSuite in the Organization.
- Have a paid kDrive offer and be out of the trial period.
- Be the Legal Representative or Administrator of the Organization.
Create a new kSuite from your existing kDrive:
- Click here to access the Infomaniak kDrive Web app (online service ksuite.infomaniak.com/kdrive).
- Click on Manage.
- Click on Upgrade the offer.
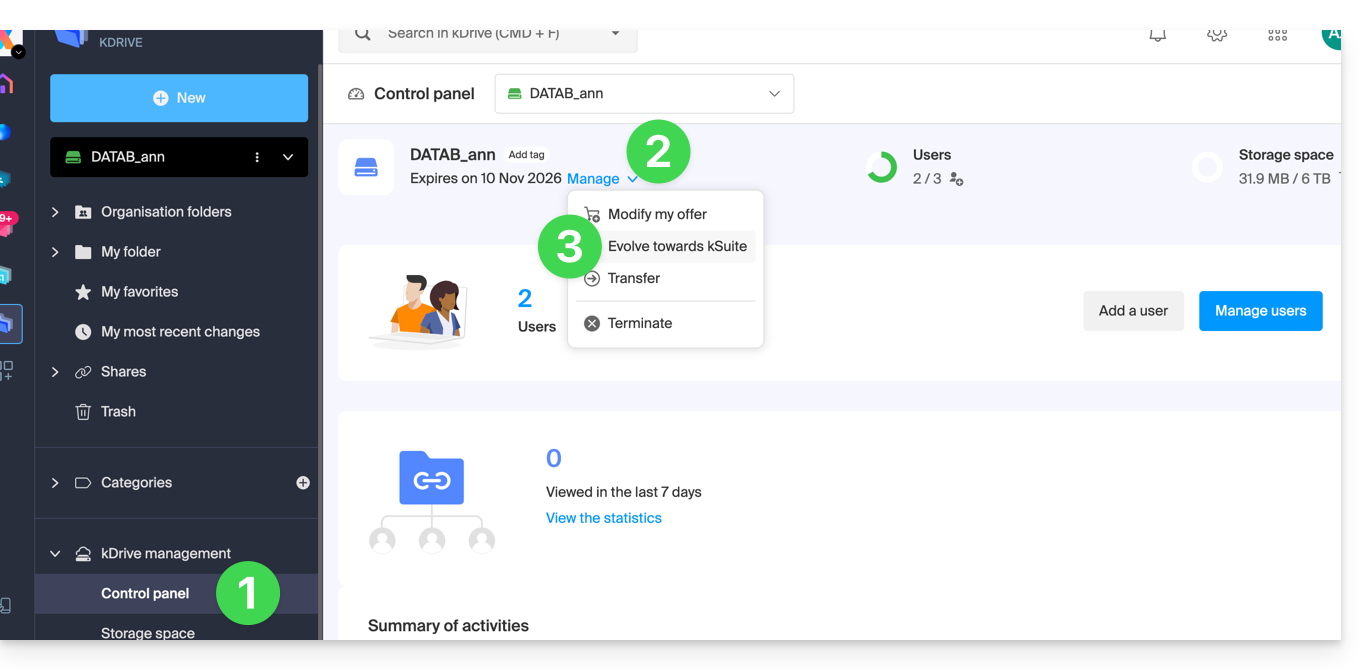
You can also do this from an information banner visible on the homepage of your Manager interface: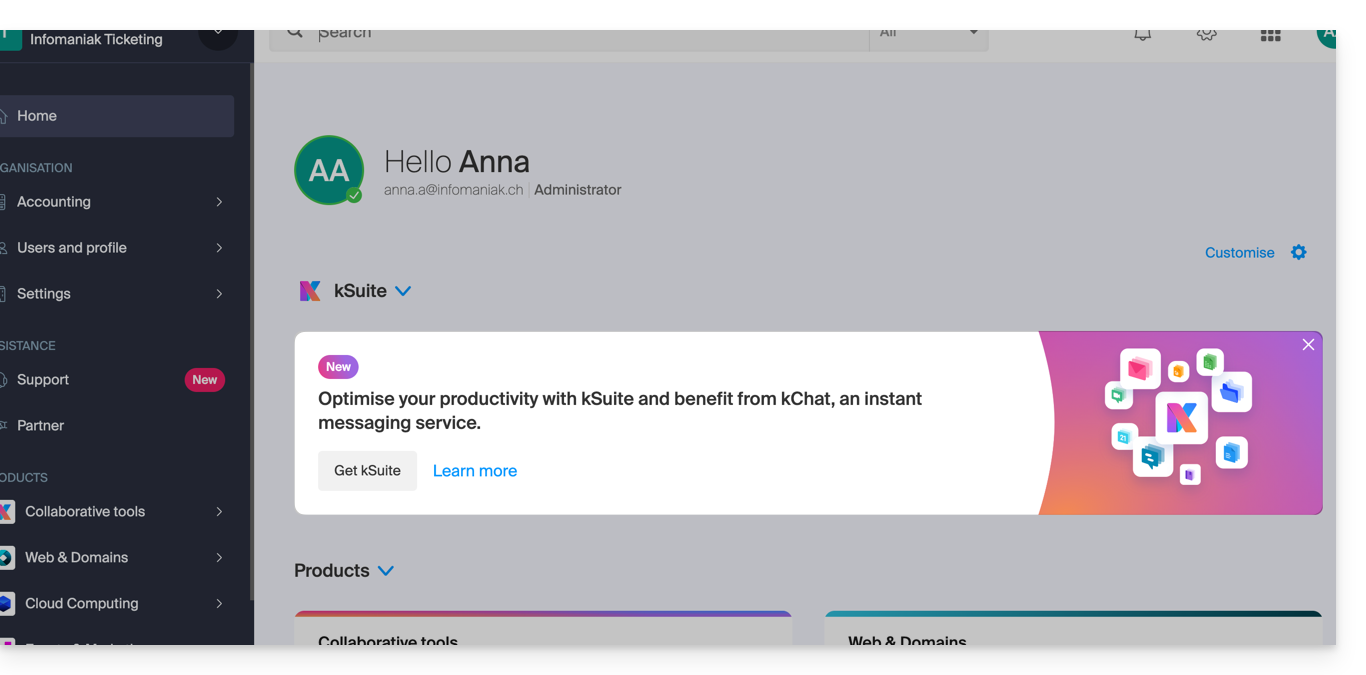
You can also integrate your Mail Service if it is currently outside of kSuite.
This guide concerns kDrive Infomaniak (the Web app kDrive (online service kdrive.infomaniak.com) or the desktop app kDrive (desktop application on macOS / Windows / Linux)) and provides tips by illustrating a few important scenarios.
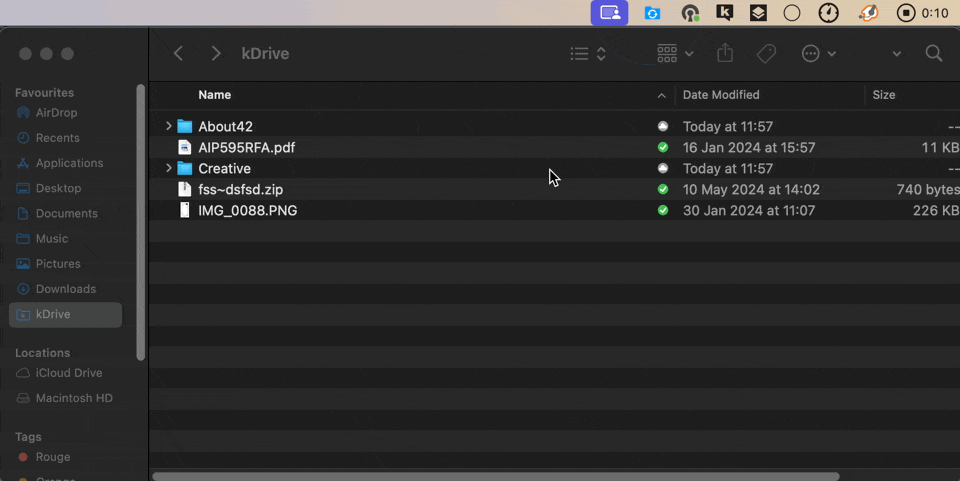
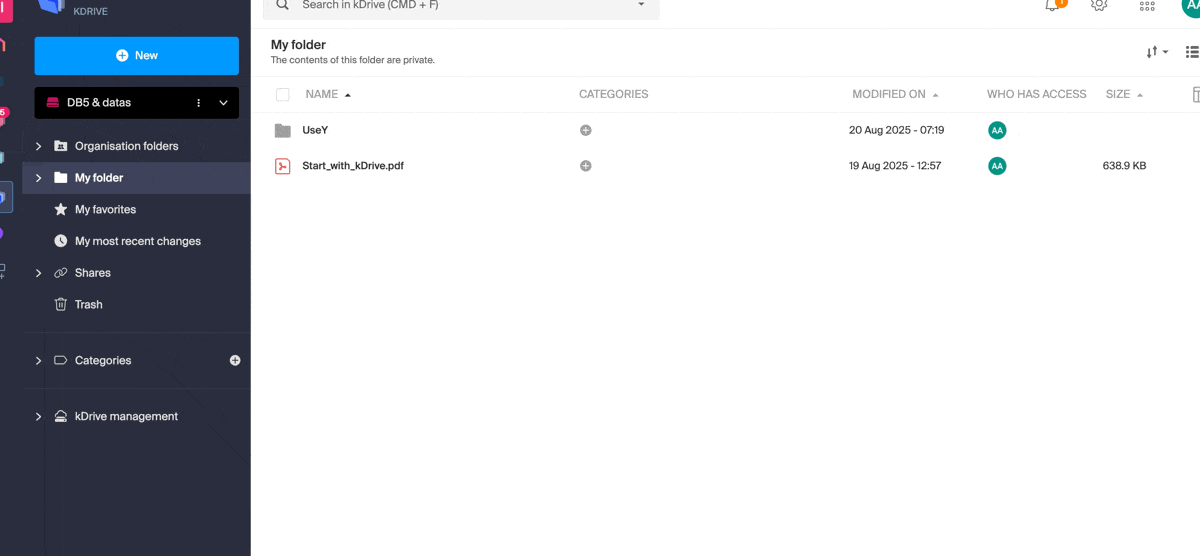
Get information about a folder and its contents
Simply right-click on any folder to get the size and content information:
Restore the shared folder on the computer
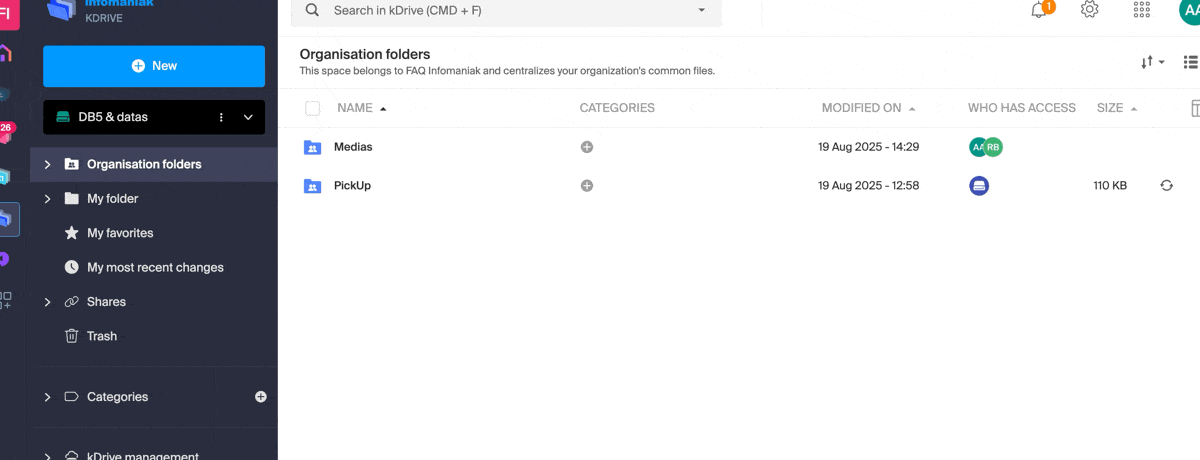
If you accidentally delete the folder corresponding to the data you share with all kDrive users ("Organization Folders"), don't panic: it will come back automatically. This is a special folder that cannot be moved, even on the computer:
If it does not come back immediately, wait for the background tasks already in progress to complete:
Adding a user: what will they have access to?
Imagine a kDrive Pro within a kSuite, with only 1 out of 3 users, data in the shared folder “Organization Folders” and in the personal folder “My Folder”.
If a new user without an Infomaniak account is invited to kSuite as a collaborator, what will they have access to by default on the Manager and on kDrive?
The new user is invited to the Organization as a collaborator, therefore by default they will have no management rights over the Manager products:
The guest executes the link in a browser and creates their Infomaniak account:
and at the end of their registration, they access the Manager, which is as expected completely empty in terms of product management…
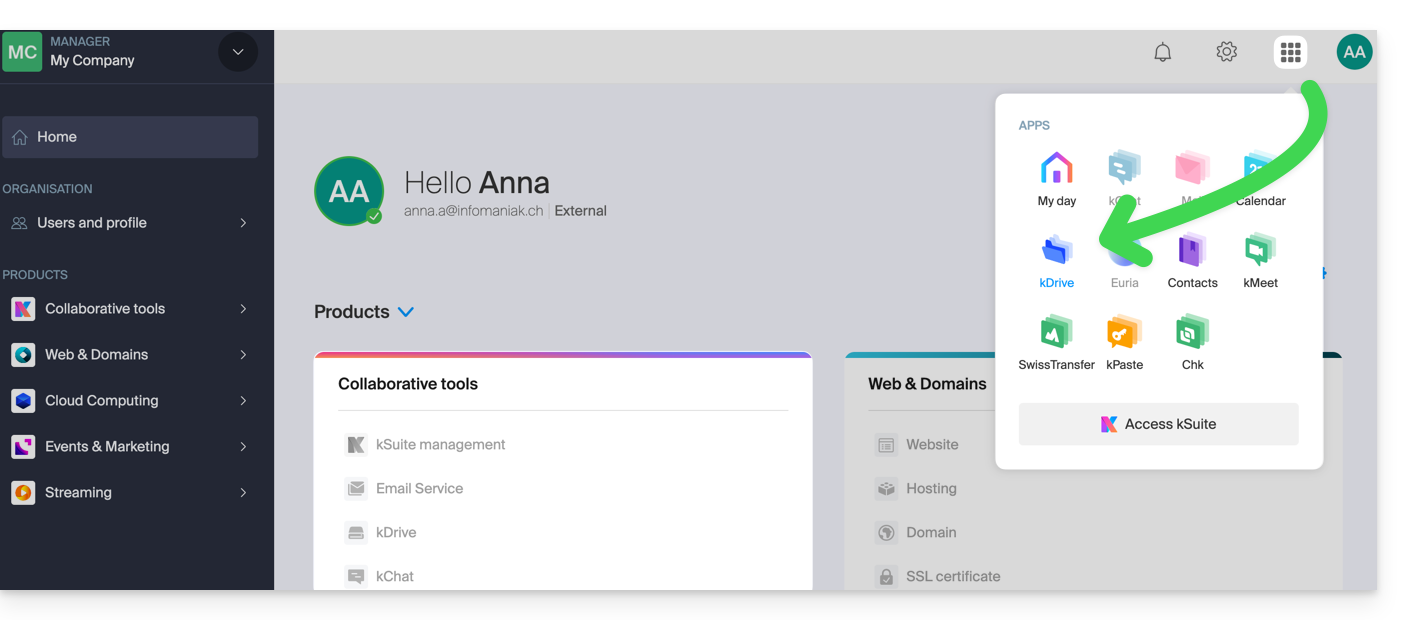
However, they have been invited to use the Web app kDrive (online service kdrive.infomaniak.com), accessible via the icon at the top right, under Applications:
and they access the Organization Folders, already filled by the other users!
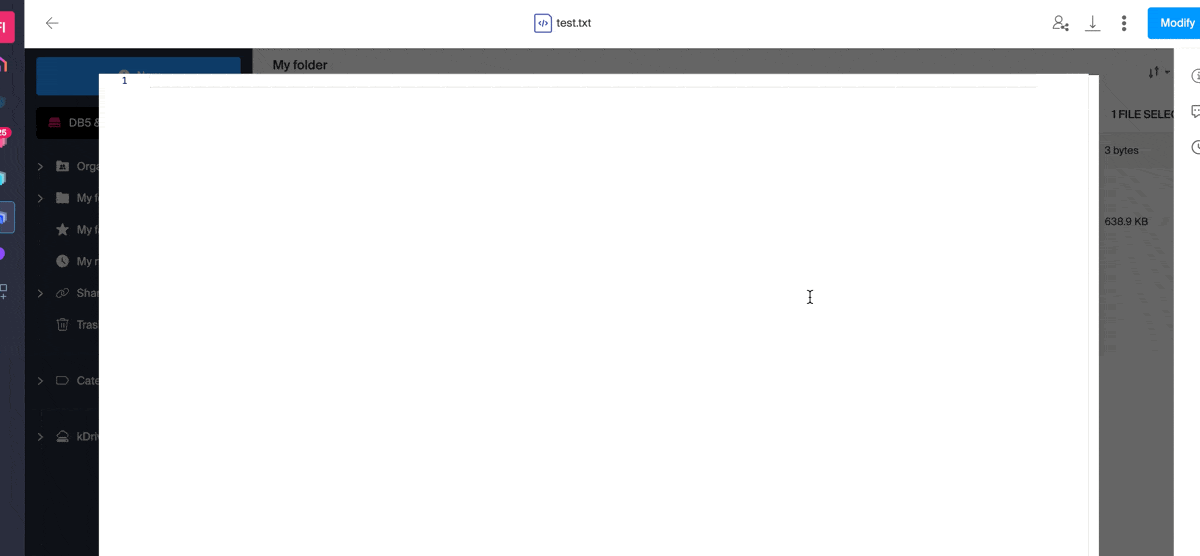
Text editor: search / replace
There is a type of document on kDrive that allows you to work with plain text, without any particular formatting, and to replace all occurrences of a text in a few clicks:
- Create a blank text document:
- Once the document is created, modify it, enter your text, highlight the term to be replaced, and with a right-click, choose to replace the identical occurrences:
This guide explains how to exclude files and folders from synchronization with kDrive on your computer, and which file types are already excluded by default.
Manage files excluded from kDrive
To do this:
- Left-click on the desktop app icon in the notification area of your computer (top right on macOS, bottom right on Windows and a double left-click in the taskbar on Linux).
- Click on the action menu ⋮ at the top right in the application.
- Click on Preferences:

- Click on Files to exclude (in the Advanced section).
- To add files to exclude, click on the icon Add then enter the name.
- To exclude a collection of files, specify for example
*.bak(asterisk "wildcard" preceding the file extension concerned). - If you add the name of a folder, it will not be / no longer synchronized, including its contents, subfolders etc.
- To exclude a collection of files, specify for example
- To remove files/folders that you had added to exclude them from synchronization, click on the Trash icon Delete all the way to the right of the relevant line.
- It is possible to hide synchronization warning messages for excluded files by checking the box to the right of the excluded file.
- Click the blue Save button:

The files that are excluded by default (items in the list that cannot be removed) vary depending on the OS and are excluded because they pose risks of synchronization errors.
Refer to this other guide if you are looking for information about the "Synchronize hidden files" option.
This guide explains how to sign a file in PDF format on the Web app kDrive (online service ksuite.infomaniak.com/kdrive). Refer to this other guide if you are looking for information on other possibilities when editing this type of document.
⚠ Available with:
| kSuite | |
| Standard | |
| Business | |
| Enterprise | |
| my kSuite+ | |
| kDrive | Solo |
| Team | |
| Pro |
Preamble
- The Web app kDrive natively integrates an editor that allows you to sign a PDF document online.
- A user's signatures are personal and can only be used by that user on all kDrive instances they have access to.
- Your files are never analyzed and are exclusively stored in Switzerland.
Create and apply your signature to a PDF
To access kDrive and manage PDF document signatures:
- Click here to access the Web app kDrive (online service ksuite.infomaniak.com/kdrive).
- Open the relevant PDF document:
- Click the Edit button at the top of the document to access the file editor:
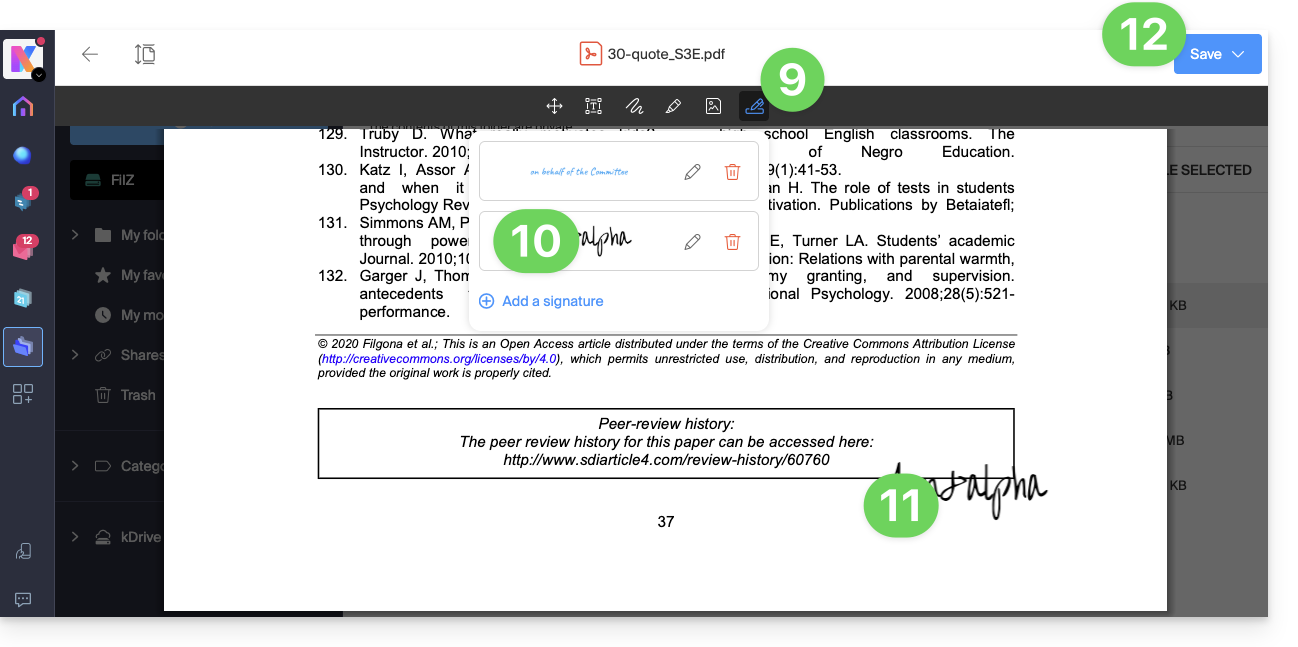
- Click the Signature icon in the toolbar:
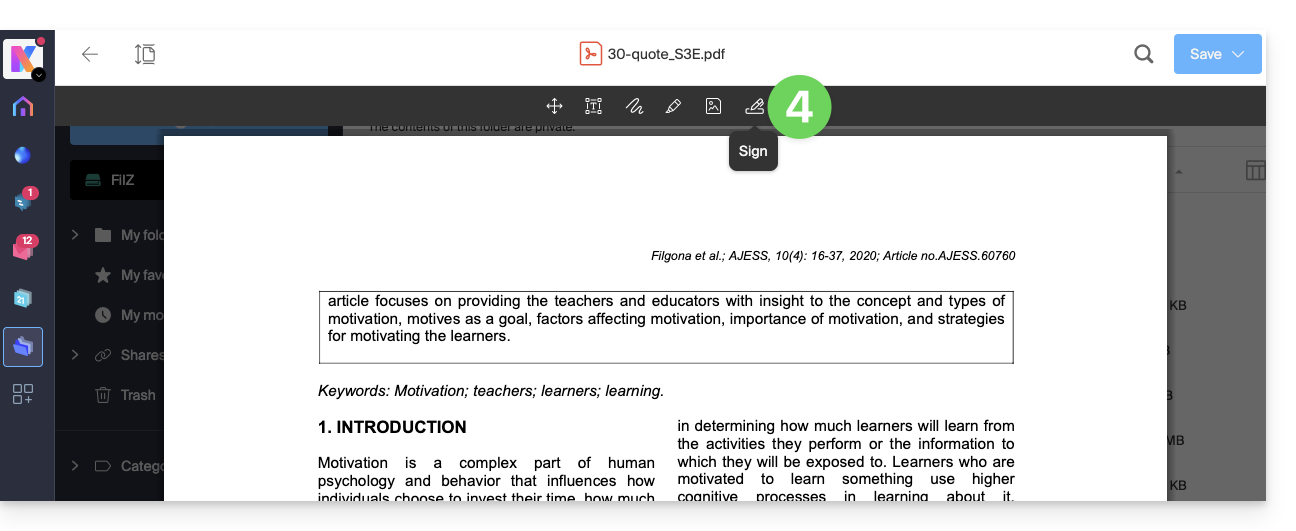
- Click on Add a signature.
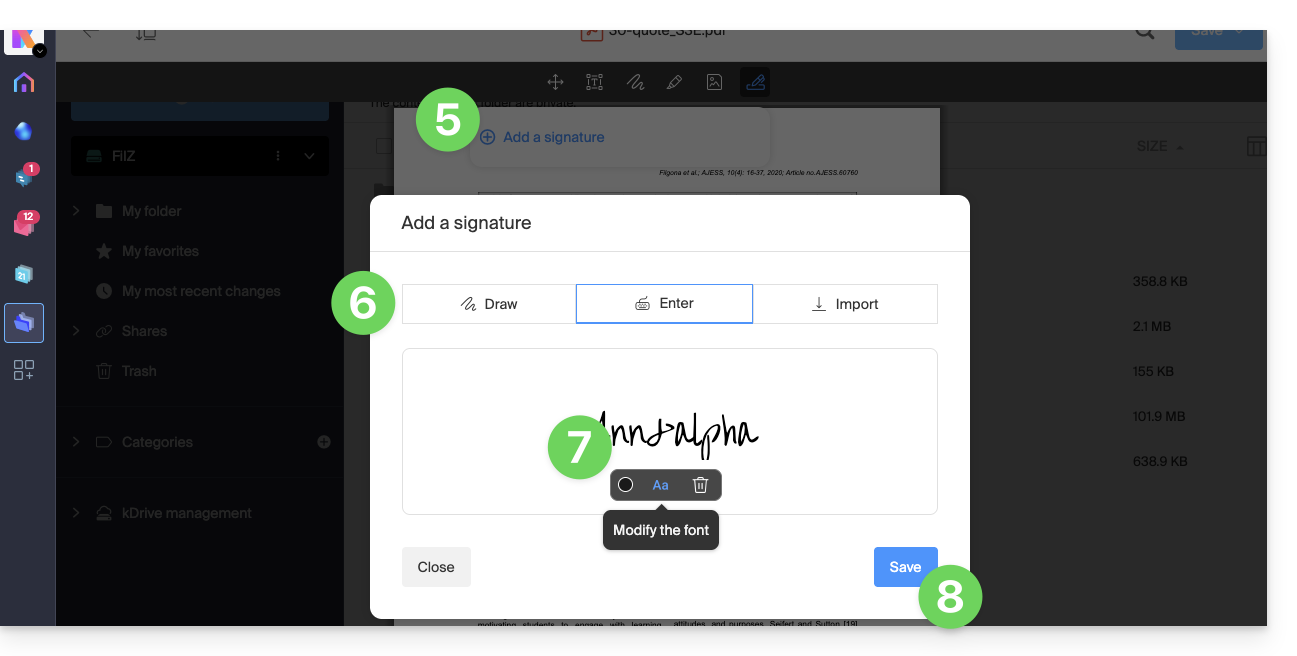
- Choose the signature creation method:
- Draw freehand with the mouse.
- Type text and choose the handwriting font (example below).
- Import an image (scan of your handwritten signature, for example) from your device.
- Type the desired text for the signature and click on the button Aa to choose the handwriting style.
- Click on Save:
- Once a signature is created, simply click again on the Signature icon from any PDF to display your created signatures.
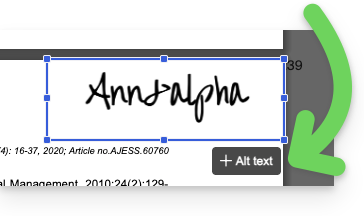
- Click on the signature to insert it transparently into the document.
- Once inserted, alternative text can be added to facilitate document accessibility:
- Once inserted, alternative text can be added to facilitate document accessibility:
- The signature can be moved and resized as desired.
- Once finished, to save, click once on the button at the top right, then choose whether to create a copy of the modified document or overwrite the existing file:
This guide explains how to change your kDrive offer, the collaborative storage solution on a 100% Swiss Made cloud.
Preamble
- kDrive is the name given to the file storage/sharing service offered by Infomaniak in Switzerland.
- kDrive is accessible for free or by subscription depending on whether you are alone using it or if you want collaborators to also access it.
- kDrive exists as an independent product, or as a product among others within the kSuite & my kSuite / my kSuite+ suite.
- To help you identify the offer most suited to your needs, refer to this other guide.
If you have been invited to view/collaborate on a file from a kDrive, it is possible that you do not actually own the kDrive product; you only have access to the kDrive managed by someone else. You cannot therefore interact with the current offer.
Determine the current kDrive offer
From the kDrive Web App
To find out which offer you currently have:
- Click here to access the Infomaniak kDrive Web App (online service ksuite.infomaniak.com/kdrive).
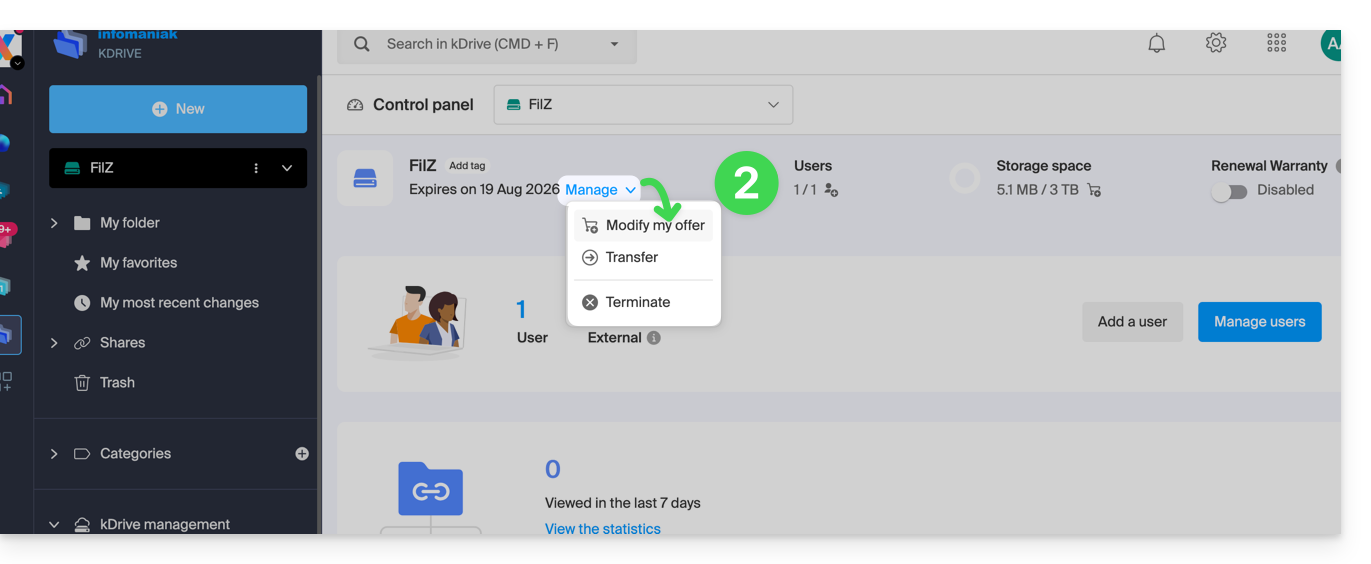
- Click on Manage to go to the offer change and view the current offer:
If no dashboard is accessible at the bottom left, you have limited features (e.g., my kSuite offer) that can be unlocked by upgrading to a higher offer: 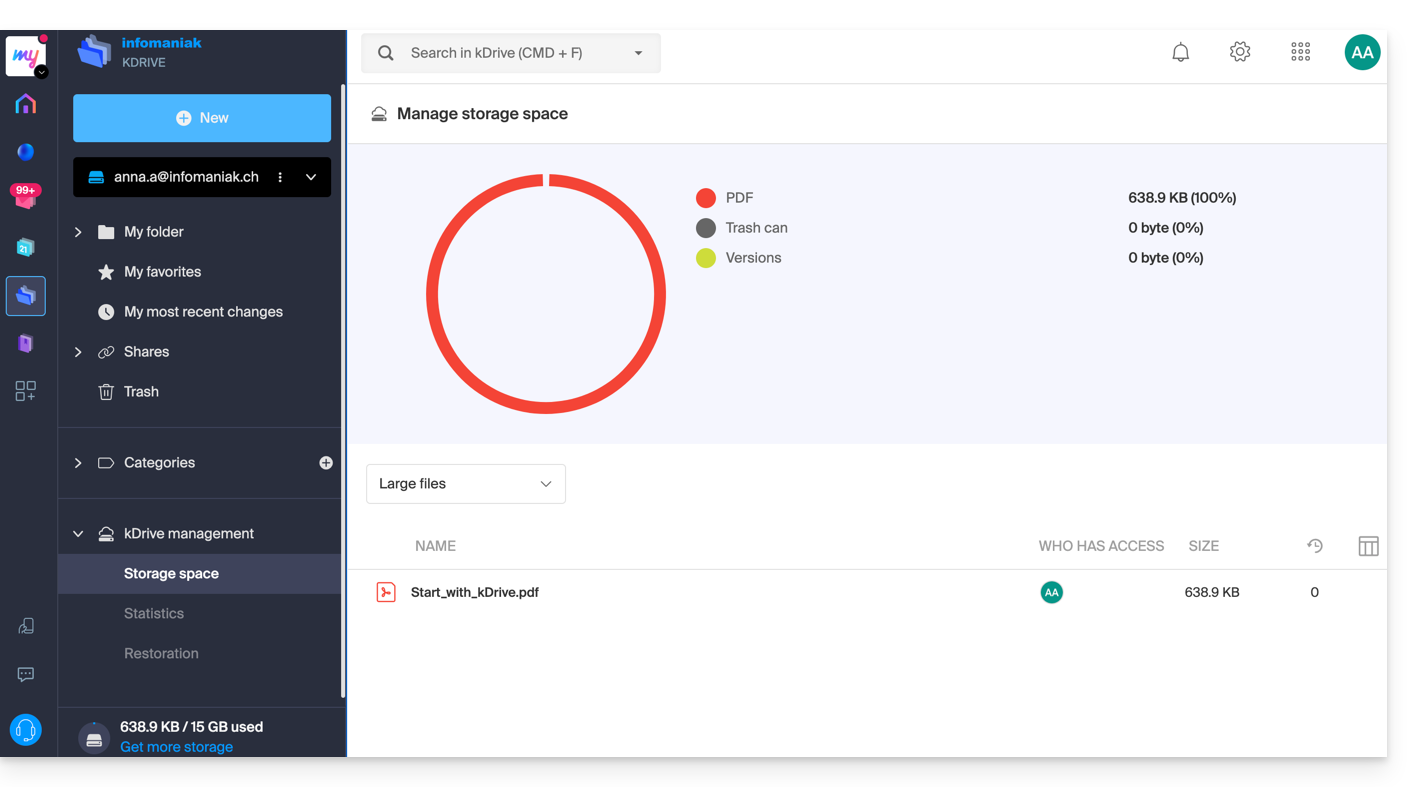
From the Infomaniak Manager
You can also find out about the current offer from the Manager, the dashboard of your products.
If no kDrive product is present in the Manager, the kDrive app is accessible only among the apps at the top right, because you have…
- either a my kSuite / my kSuite+ offer:
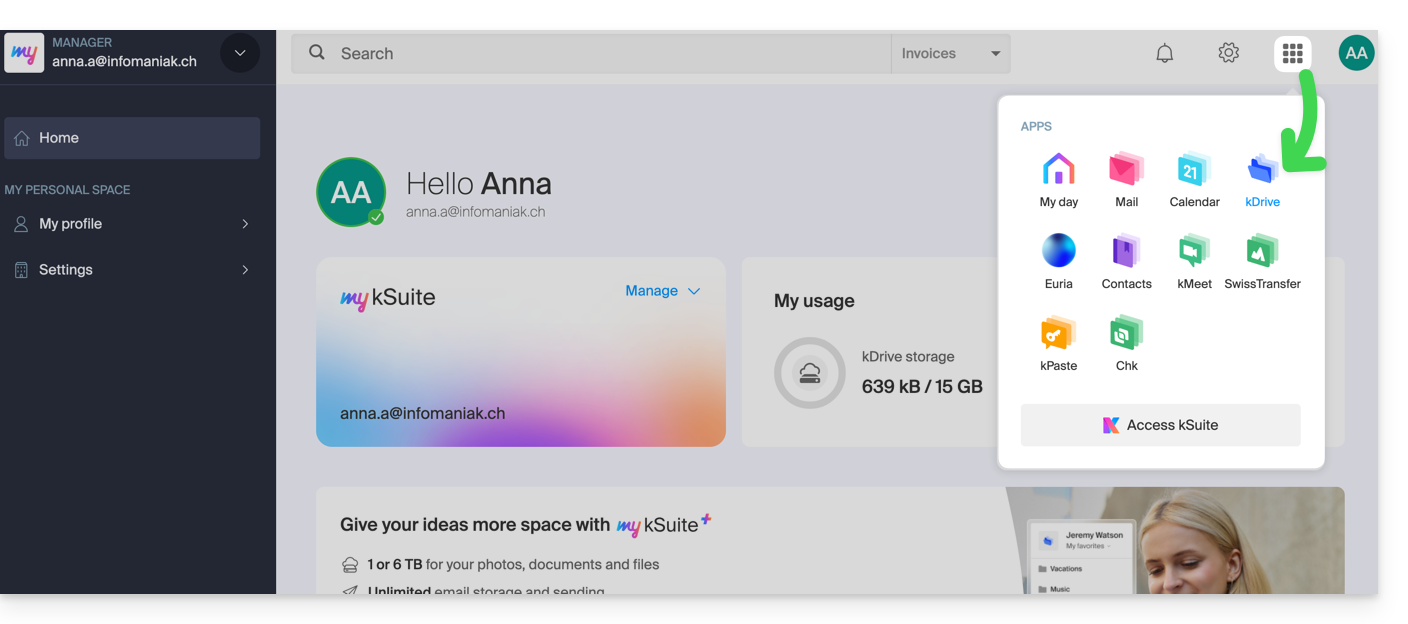
- or you have been invited during a document share (you are therefore an external user of kDrive):
Otherwise, find your kDrive among your collaborative tools: 
Change the current kDrive plan
Your kDrive can evolve with you. When your needs expand — whether to welcome new collaborators, integrate a family member, or store a growing volume of data — easily increase its capacity to unlock its full potential.
Prerequisites
- Have sufficient permissions within the Organization.
To modify your current kDrive offer:
- Click here to access the Infomaniak kDrive Web App (online service ksuite.infomaniak.com/kdrive).
- Click on Manage to go to the offer change and view the current offer:
You can then switch to a higher offer from the Infomaniak Shop: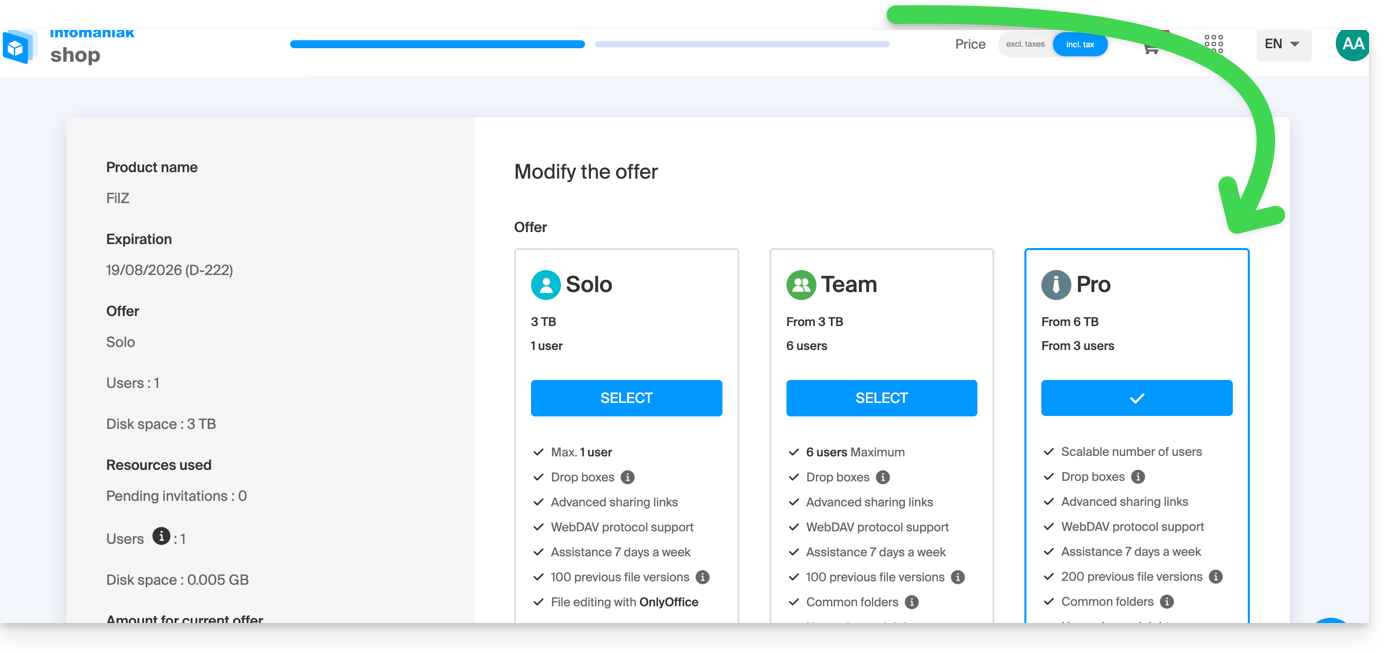
If, for example, by choosing a new offer, you increase the quota of users that can be added to your kDrive, refer to this other guide to invite them to join you.
This guide explains how to resolve certain Lite Sync macOS errors that may occur with the desktop app kDrive (desktop application on macOS).
Sync lock 1/10
Check if macOS permissions are enabled for kDrive and Lite Sync extensions:
- Open macOS settings.
- Under General, click on Open and extensions.
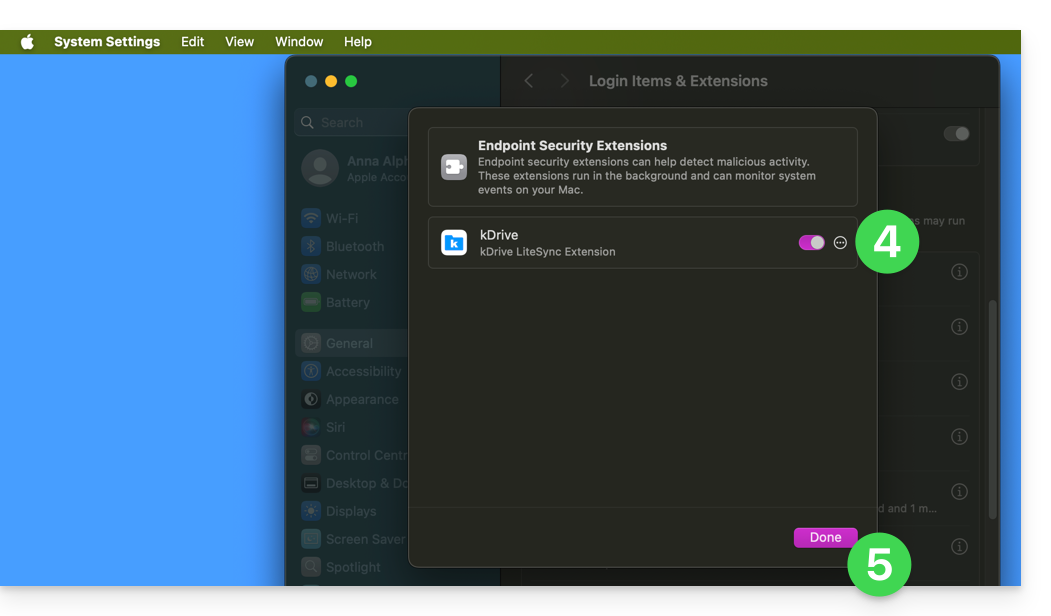
- Scroll down to the Endpoint Security Extensions :: kDrive LiteSync Extension:
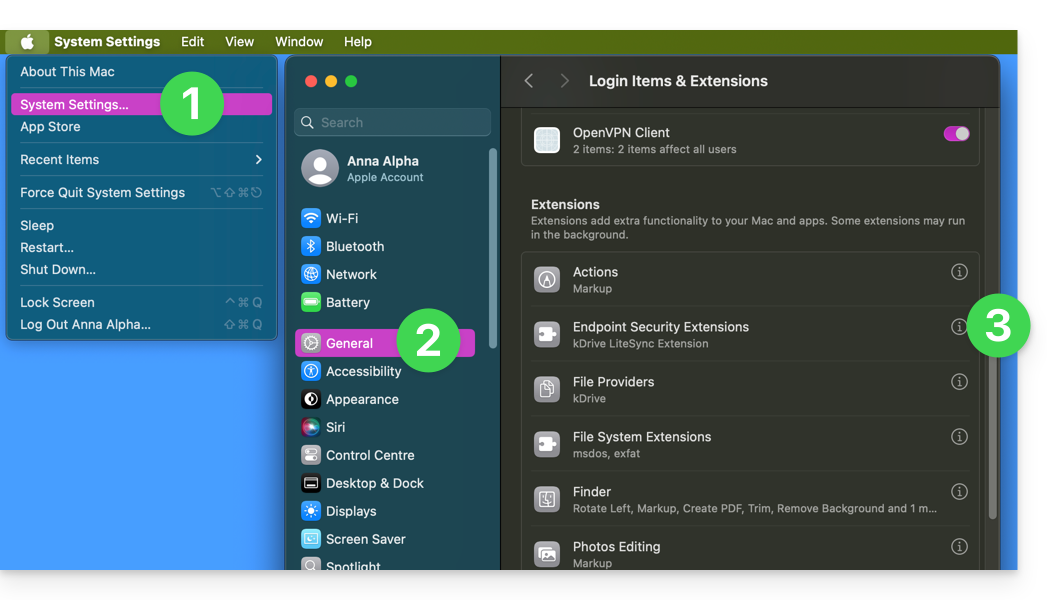
- Check that the permissions are enabled and validate at the bottom:
Take the opportunity to check the other elements related to kDrive to ensure that everything is enabled.
Error of type "Unable to start Lite Sync plugin"
To correct an error of type "Unable to start Lite Sync plugin" which usually occurs when the Lite Sync extension has disappeared or does not have the necessary permissions…
... check the presence of the extension
From an application of type Terminal (command line interface, CLI / Command Line Interface) on a macOS device:
% systemextensionsctl listThe result is similar to:
1 extension(s)
--- com.apple.system_extension.endpoint_security
enabled active teamID bundleID (version) name [state]
* * 864VDCS2QY com.infomaniak.drive.desktopclient.LiteSyncExt (3.5.0/1) kDrive LiteSync Extension [activated enabled]
If the command result does not mention "kDrive LiteSync Extension", the extension is not present:
- Delete the sync and add it again.
If the command result does not have the status [activated enabled]:
- Authorize the extension in the System Settings / Privacy and Security.
... check the extension permissions
In the System Settings / Privacy and Security / Full Disk Access of the macOS device: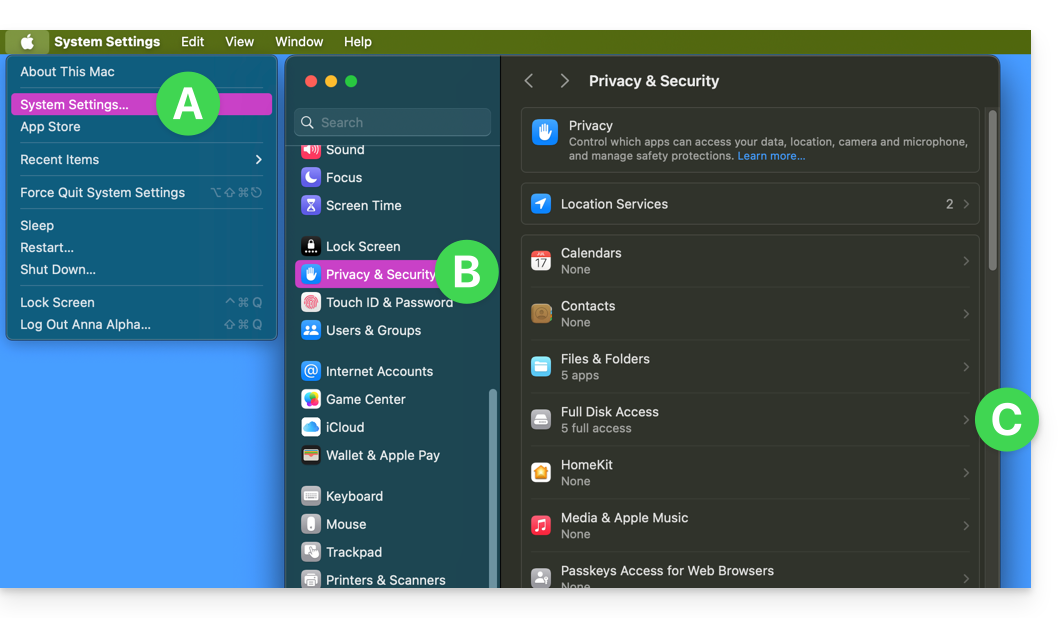
Grant full access to kDrive and the Lite Sync extensions: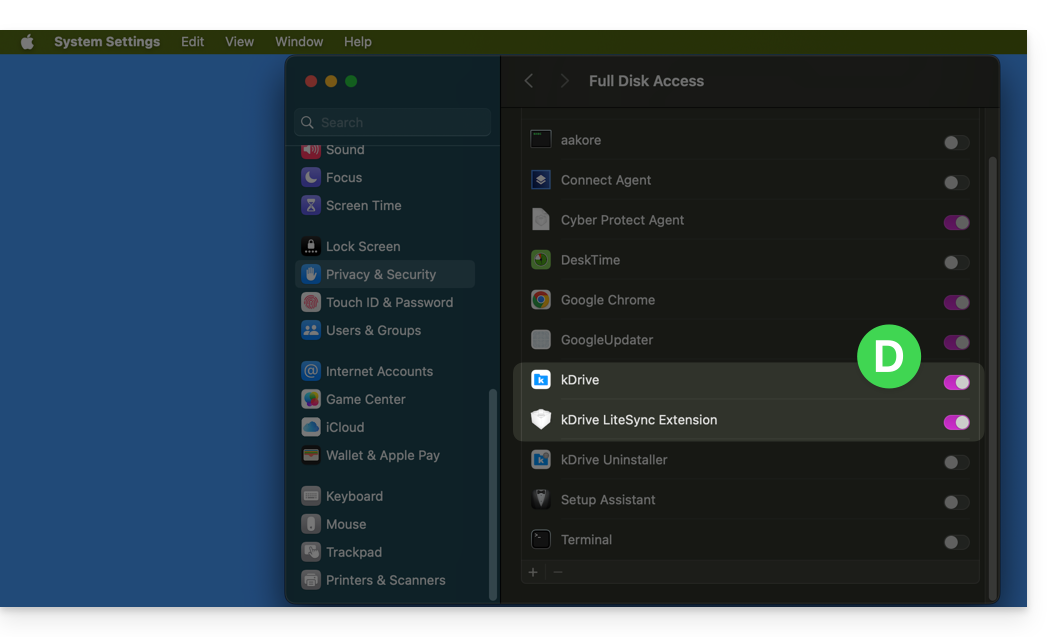
... check the extension's operation
From a Terminal:
% ps -ef | grep LiteSyncExtThe result is similar to:
0 7434 1 0 1:02 ?? 0:25.42 /Library/SystemExtensions/6035BDE4-B7D6-477E-A6AB-C2281E3C7752/com.infomaniak.drive.desktopclient.LiteSyncExt.systemextension/Contents/MacOS/com.infomaniak.drive.desktopclient.LiteSyncExtIf the extension does not seem to be working, try the following actions:
- Restart the app.
- Reboot the Mac.
- Remove/add the sync.
- Uninstall/reinstall the app.
If it is still not OK
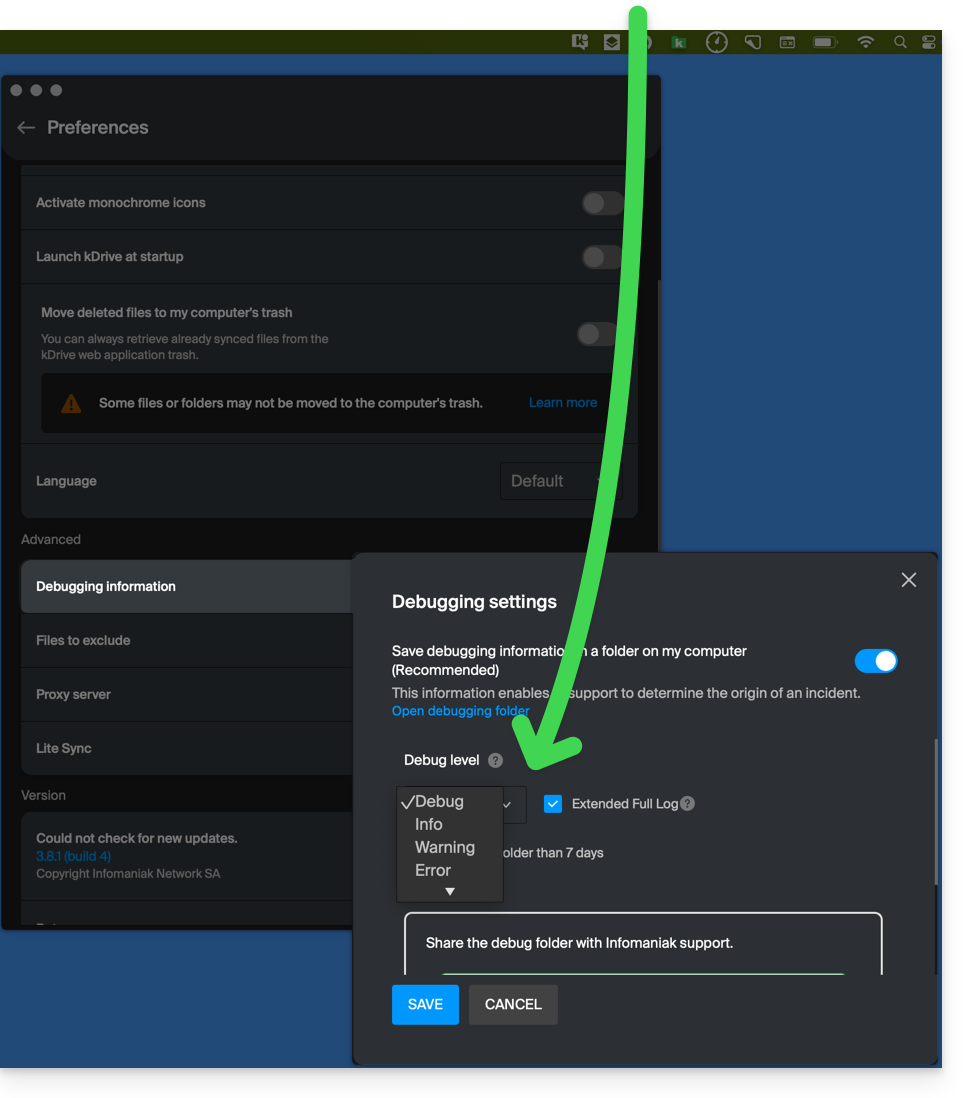
- Request kDrive logs (level Debug):
- Check in the Console for any blockage reports on the date of the last app startup and, if so, send them to Infomaniak:

Retrieve kDrive messages in the Console:
- Quit the app.
- In the Console, select the Mac, filter on
[KD], click on Start:
- Launch the app.
- Click in the list of messages, select them (Ctrl+A), copy them (Ctrl+C) and send them to Infomaniak.
This guide provides instructions to synchronize kDrive with a VPS (or vice versa) via the WebDAV protocol found in the rClone application.
⚠ Available with:
| kSuite | |
| Business | |
| Enterprise | |
| kDrive | Solo |
| Team | |
| Pro |
Prerequisites
- Have a VPS.
- Know your kDrive identifier (kDrive ID).
Synchronize kDrive and VPS via rClone
This operation allows you to retrieve in real-time the files and folders from kDrive and to read, create, or modify these files from your VPS while ensuring they are synchronized back to the kDrive server. An rClone mount point can be created with a folder on your VPS to manipulate these kDrive files.
Refer to the rClone documentation if you are looking for information about the available options:
- Example of an rClone command:
rclone mount kdrive:/My_kDrive_Folder_Path /home/ubuntu/Target_Folder_Path --vfs-cache-mode full --vfs-cache-max-age 24h --vfs-cache-max-size 10G --cache-dir /home/ubuntu/rclone/cache --daemon --allow-other --dir-cache-time 1h --log-file /home/ubuntu/rclone/rclone.log --log-level INFO- The
--daemonattribute of this command allows you to run the synchronization as a background task because without it, the sync stops at each VPS disconnection…
- Example of an rClone configuration file:
[kdrive] type = webdav url = https://***.connect.kdrive.infomaniak.com/*** vendor = other user = *** pass = ***- Server address:
https://IDkDrive.connect.kdrive.infomaniak.com(refer to the prerequisites above) - Username: email address used to log in to your Infomaniak account
- Password: create an application password for this specific use.
This guide helps resolve an issue with statuses (OK, in progress, etc.) that may occur with the files and folders in the kDrive tree in Windows Explorer, in case these indications no longer match reality.
Resolve the issue of incorrect statuses
The problem is visible in the kDrive log as follows:
20240616_2008_kDrive.log:2024-06-16 20:19:01:349 [I] (6732) socketlistener.cpp:46 - Sending SocketAPI message --> STATUS:OK:D:\kDrive\Photos\Personnal\2024\06_June\0616_Bern\HP7A6181.JPG to 0000025197E46A60The application sends the correct file status to the explorer, for example, the status sent here is OK, the status icon displayed should be the green circle, but the displayed status does not match:
Restart Windows Explorer
To do this:
- Access the task manager by pressing
ctrl shift + esc. - In the task manager, search for Windows Explorer.
- Right-click on it and click on End Task.
- In the upper left corner of the task manager, click on File.
- Click on Run a new task.
- Type:
explorer.exe. - Press Enter.
Check and repair system integrity
To do this:
- Open the command prompt with administrator access.
- Type each command below and wait for the analysis to complete:
SFC /scannow
DISM /Online /Cleanup-Image /CheckHealth
DISM /Online /Cleanup-Image /ScanHealth
DISM /Online /Cleanup-Image /RestoreHealthThis guide helps you regain control of a folder present on the Windows operating system in certain problematic cases of kDrive. This scenario is common for system folders belonging to the TrustedInstaller group.
If you encounter a display or access error to kDrive or one of the folders, refer to this other guide.
Taking ownership of a folder
Here's how to regain possession of such a folder:
- Right-click on the folder in question.
- Select Properties.
- Go to the Security tab.
- Click on the Advanced button at the bottom of the window.
- Click on Change next to the Owner field.
- Click on Advanced.
- Click on Find Now.
- Select your user account from the list and click on OK.
- Click OK again, the folder owner has been modified.
- Check the 2 boxes Replace owner on subcontainers and objects to take ownership of the files and subfolders of this folder:

- Click on OK to validate.
This guide details how to import your photos from Google Photos (https://photos.google.com/) to kDrive Infomaniak.
1. Export your Google photos
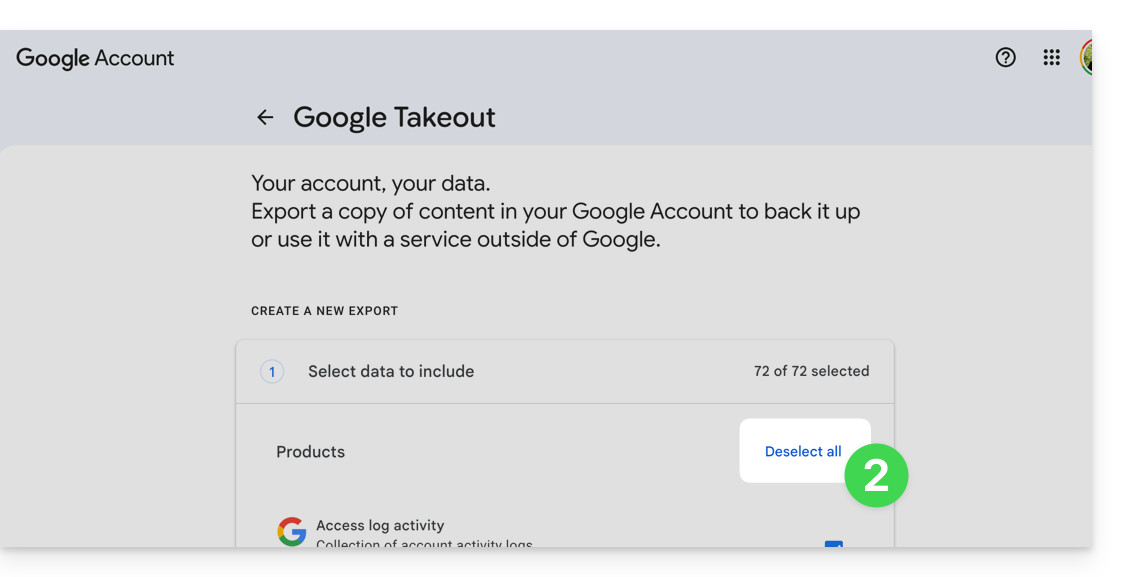
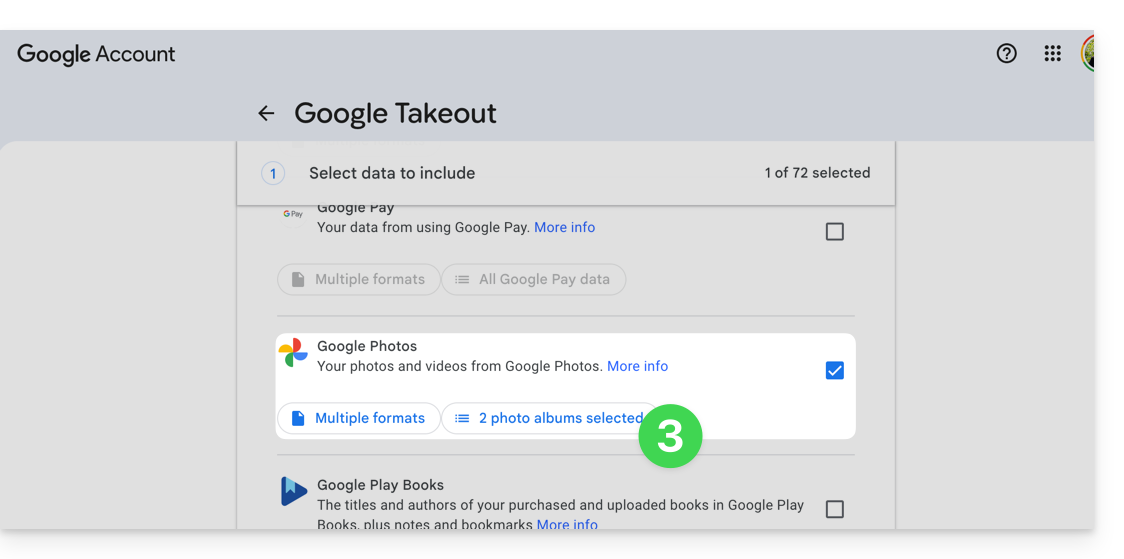
To retrieve all your photos stored on Google Photos on your computer's hard drive, you need to use the Google Takeout service. This allows you to choose which albums to retrieve if you want to proceed in steps:
- Log in to Google Takeout.
- Deselect all products to keep only Google Photos:
- If necessary, deselect the albums not to export:
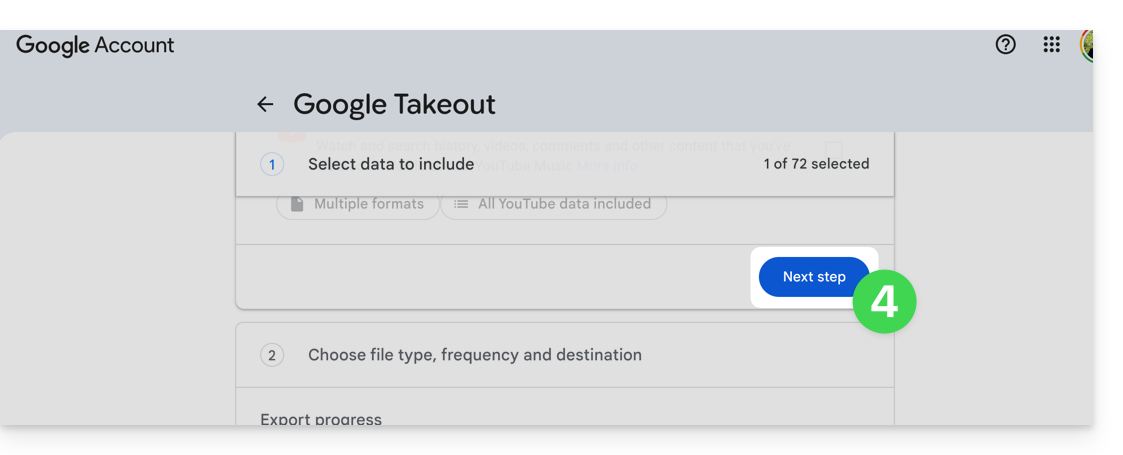
- Move on to the next step at the bottom of the page:
- Configure the export by ZIP archives.
- Click at the bottom on the “Create an export” button to start the export:
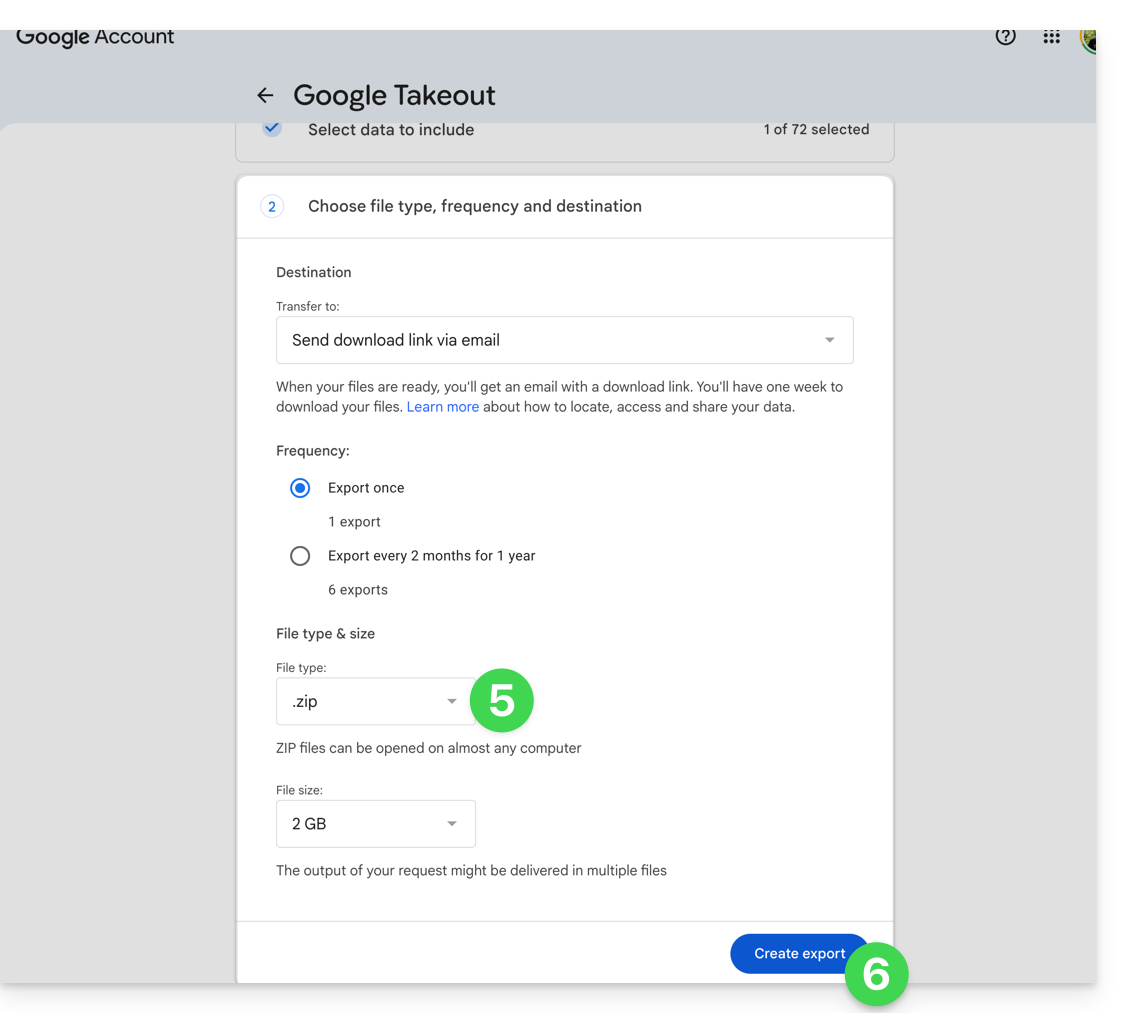
- Wait (several hours or even several days) until you receive an email containing the links to the ZIP exports.
- Download and then decompress the content on your computer:
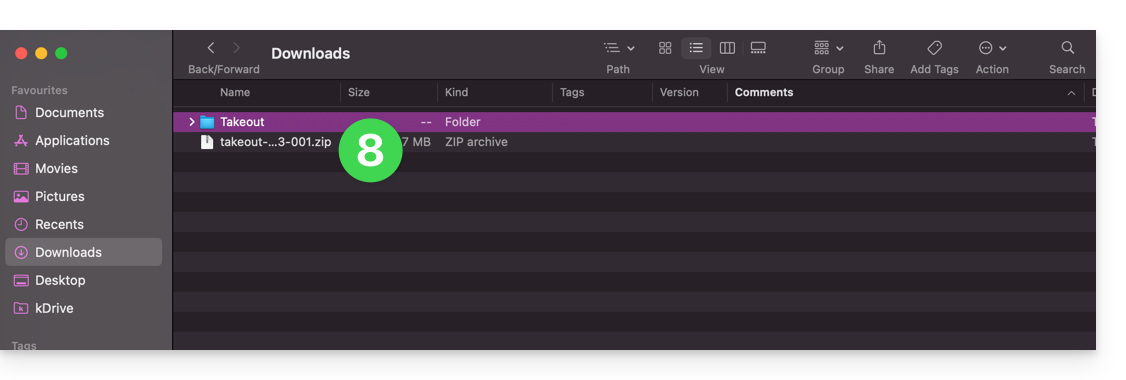
- Clean and merge your different photo folders if necessary.
2. Correct the dates of the exported photos…
During the export, the creation dates of the files are modified and replaced by the export date instead of the original date of capture. You must therefore correct the dates via an appropriate script.
Here is a script for advanced users that allows you to restore the correct data to your files from the EXIF information (it is recommended to process batches of 7000-8000 photos max. to avoid a crash):
… on macOS
- Download ExifTool https://exiftool.org/index.html (macOS Package).
- Install the application by authorizing its opening beforehand if necessary:

- Open Script Editor (located in your Applications > Utilities folder):

- Click on New document.
- Copy and paste the long script provided below into the Script Editor window.
- Click on Run to start the script, a window opens:

- Select the folder to analyze.
- Let the script run, it will modify the dates or write the errors in a file
errors.txton the desktop.
The script to copy and paste entirely:
-- replace file date with EXIF creation date or date from name after the first dash -
tell application "Finder"
    set FolderPath to choose folder with prompt "Select the folder containing the files to update"
    my processFolder(FolderPath)
end tell
on processFolder(aFolder)
    tell application "Finder"
        -- process files:
        set fileList to files of aFolder
        repeat with eachFile in fileList
            -- process a single file

            set theFile to eachFile
            set AppleScript's text item delimiters to {""}
            set fileName to name of eachFile --get the file name

            set eachFile to eachFile as string --file path
            set hasDate to true --initialize date found flag

            try
                --get date if available
                set photoDate to do shell script "/usr/local/bin/exiftool -DateTimeOriginal " & quoted form of POSIX path of eachFile
                if photoDate is "" then set photoDate to do shell script "/usr/local/bin/exiftool -CreationDate " & quoted form of POSIX path of eachFile
                if photoDate is "" then set photoDate to do shell script "/usr/local/bin/exiftool -CreateDate " & quoted form of POSIX path of eachFile

                if photoDate is "" then
                    set hasDate to false --check if date was found
                end if

            on error
                set hasDate to false -- error retrieving date
                set photoDate to ""
            end try

            if length of photoDate > 20 then
                --format extracted date
                set x to (length of photoDate) - 33
                set OriginalDate to text -x thru -1 of photoDate
                set formattedDate to text 1 thru 5 of OriginalDate
                set theYear to formattedDate
                set formattedDate to formattedDate & text 7 thru 8 of OriginalDate
                set theMonth to text 7 thru 8 of OriginalDate
                set formattedDate to formattedDate & text 10 thru 11 of OriginalDate
                set theDay to text 10 thru 11 of OriginalDate
                set formattedDate to formattedDate & text 13 thru 14 of OriginalDate
                set theHour to text 13 thru 14 of OriginalDate
                set formattedDate to formattedDate & text 16 thru 17 of OriginalDate
                set theMinute to text 16 thru 17 of OriginalDate
                set formattedDate to formattedDate & "." & text 19 thru 20 of OriginalDate
                set theSecond to text 19 thru 20 of OriginalDate
                set newName to theYear & "-" & theMonth & "-" & theDay & " " & theHour & "." & theMinute & "." & theSecond

                set testValue to formattedDate as string --check if found date is 000
                if testValue is " 000000000000.00" then
                    set hasDate to false
                else
                    -- set file date to original EXIF date and write to log
                    do shell script "touch -t " & formattedDate & " " & quoted form of POSIX path of eachFile
                    set logFile to open for access ((path to desktop folder as text) & "Date Found.txt") as text with write permission
                    write "Original date found for file: " & OriginalDate & " " & eachFile & return to logFile starting at eof
                    close access logFile
                end if
            end if

            if hasDate is false then
                -- get date from file name after first dash
                set nb to ""
                set nameDate to ""
                set fileName to fileName as string
                set savedDelimiters to AppleScript's text item delimiters --save delimiters
                set AppleScript's text item delimiters to {"-"} --split on "-"
                set nb to offset of "-" in fileName
                if nb is not 0 then
                    set AppleScript's text item delimiters to savedDelimiters --restore delimiters
                    set nameDate to characters (nb + 1) thru (nb + 8) of fileName as string
                    set nameDate to nameDate & "1200.00"
                    set cmd1 to "/usr/local/bin/exiftool -datetimeoriginal=" & nameDate & " " & quoted form of POSIX path of eachFile
                    set cmd2 to "/usr/local/bin/exiftool -createdate=" & nameDate & " " & quoted form of POSIX path of eachFile
                end if
                try
                    -- write date from name to EXIF
                    do shell script cmd1
                    do shell script cmd2
                    do shell script "touch -t " & nameDate & " " & quoted form of POSIX path of eachFile
                    do shell script "rm " & quoted form of POSIX path of (eachFile & "_original")
                on error
                    -- if date from name is invalid, log the error
                    set logFile to open for access ((path to desktop folder as text) & "Date Error.txt") as text with write permission
                    write "No valid date found in file name: " & eachFile & return to logFile starting at eof
                    close access logFile
                end try
            end if
        end repeat

        -- process folders:
        set folderList to folders of aFolder
        repeat with eachSubfolder in folderList
            -- process a subfolder
            my processFolder(eachSubfolder)
        end repeat
    end tell
end processFolder
tell application "Finder"
    display dialog "Done! All files processed." buttons {"Close"}
end tell
… on Windows
- Download ExifTool https://exiftool.org/index.html (Windows executable)
- Place it in an accessible folder (for example
C:\ExifTool). - Rename
exiftool(-k).exetoexiftool.exe. - Note its path (for example
C:\ExifTool\exiftool.exe).- The script looks for the executable in
C:\ExifTool\exiftool.exe. If you place it elsewhere, you need to modify the second line of the script.
- The script looks for the executable in
- Copy and paste the long script provided below into a text file such as Notepad on your computer.
- Modify if necessary the path specified in the file with the one noted in step 4.
- Save it with the
.ps1extension, for exampleUpdateExifDates.ps1. - Right-click on the
.ps1file to run it with PowerShell (a command interpreter and script writing environment, pre-installed on modern versions of Windows). - Select the folder to analyze.
- Let the script run, it will modify the dates or write the errors in a file
DateError.txton the desktop.
PowerShell may block scripts. To allow their execution (if necessary), open PowerShell as an administrator and type Set-ExecutionPolicy RemoteSigned -Scope CurrentUser.
The script to copy and paste entirely:
# === Configuration ===
$exifToolPath = "C:\ExifTool\exiftool.exe"
$desktop = [Environment]::GetFolderPath("Desktop")
$logFound = Join-Path $desktop "DateFound.txt"
$logError = Join-Path $desktop "DateError.txt"

# === Folder Selection Dialog ===
Add-Type -AssemblyName System.Windows.Forms
$folderBrowser = New-Object System.Windows.Forms.FolderBrowserDialog
$folderBrowser.Description = "Select the folder to process"
if ($folderBrowser.ShowDialog() -ne "OK") { exit }
$folder = $folderBrowser.SelectedPath

function Process-Folder {
    param ([string]$path)
    Get-ChildItem -Path $path -Recurse -File | ForEach-Object {
        $file = $_
        $filePath = $file.FullName
        $fileName = $file.Name
        $hasDate = $true

        # Try reading EXIF date
        $photoRaw = & $exifToolPath -DateTimeOriginal -S -n "$filePath"
        if (-not $photoRaw) { $photoRaw = & $exifToolPath -CreateDate -S -n "$filePath" }

        if ($photoRaw -match "\d{4}:\d{2}:\d{2} \d{2}:\d{2}:\d{2}") {
            $photoDate = $matches[0]
            # Nettoyage de la date pour formatage (YYYYMMDDHHMM.SS)
            $dateString = $photoDate -replace '[: ]', ''

            if ($dateString.Length -ge 14) {
                $formattedDate = $dateString.Substring(0, 12) + "." + $dateString.Substring(12, 2)
                try {
                    $newDate = [datetime]::ParseExact($photoDate, "yyyy:MM:dd HH:mm:ss", $null)
                    [System.IO.File]::SetCreationTime($filePath, $newDate)
                    [System.IO.File]::SetLastWriteTime($filePath, $newDate)
                    Add-Content -Path $logFound -Value "EXIF date set for: $fileName → $photoDate"
                } catch {
                    $hasDate = $false
                }
            } else { $hasDate = $false }
        } else { $hasDate = $false }

        if (-not $hasDate) {
            if ($fileName -match "-(\d{8})") {
                $nameDateRaw = $matches[1] + "120000"
                try {
                    & $exifToolPath "-datetimeoriginal=$($matches[1]) 12:00:00" "$filePath"
                    & $exifToolPath "-createdate=$($matches[1]) 12:00:00" "$filePath"
                    $newDate = [datetime]::ParseExact($nameDateRaw, "yyyyMMddHHmmss", $null)
                    [System.IO.File]::SetCreationTime($filePath, $newDate)
                    [System.IO.File]::SetLastWriteTime($filePath, $newDate)
                    Add-Content -Path $logFound -Value "Date from filename set for: $fileName"
                } catch {
                    Add-Content -Path $logError -Value "Invalid date in filename: $fileName"
                }
            } else {
                Add-Content -Path $logError -Value "No valid date found for: $fileName"
            }
        }
    }
}

# Execute processing
Process-Folder -path $folder
[System.Windows.Forms.MessageBox]::Show("Done! All files processed.")
3. Import photos to kDrive
Do not change your passwords until the import is complete.
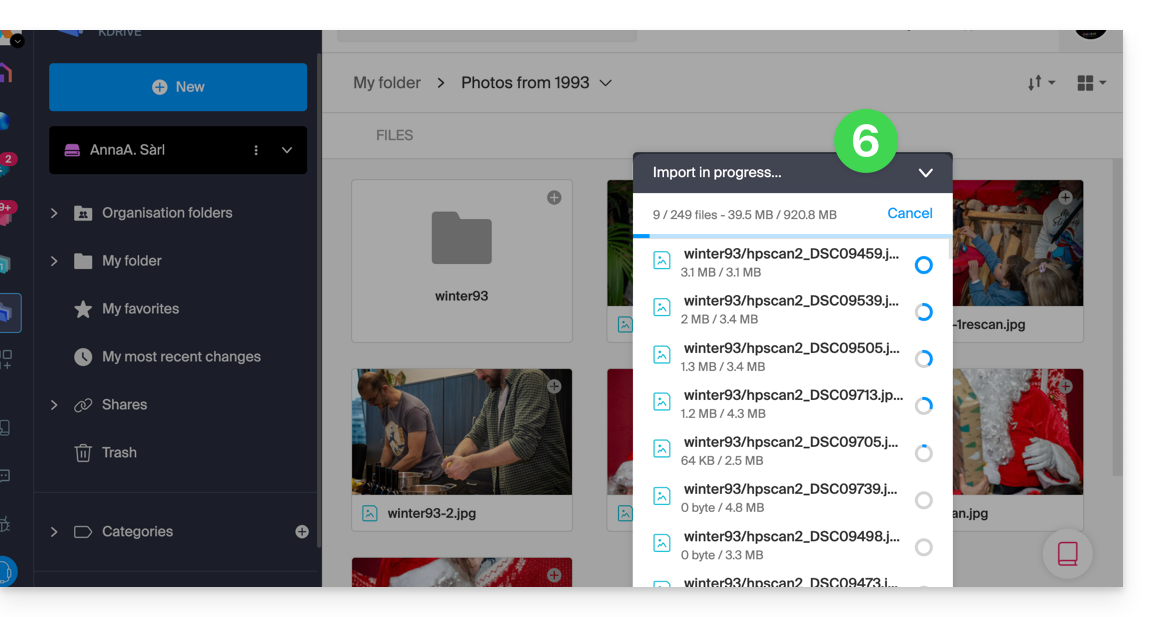
Once your photos are ready, if their number is not too large (a few thousand items) and your Internet connection is suitable, you can simply open the Web app kDrive (online service ksuite.infomaniak.com/kdrive) and choose to import the folder containing your photos to the desired location:
- Click here to access the Web app kDrive Infomaniak (online service ksuite.infomaniak.com/kdrive).
- Navigate to the location where your photos will be stored.
- Click the New button in the top left corner.
- Click on Import a folder
- Select the folder containing your photos on your computer.
- Wait until your data is fully imported (the activity log scrolls at the bottom right):
Otherwise, if you are synchronizing your data using the desktop app, simply place your photos in the folder structure of your kDrive folder on your computer. Synchronization will begin, and your photos will be securely sent to the Infomaniak servers.
4. Access your photos from your devices
You can now access your photos on your various devices connected to kDrive (until they synchronize if it is the kDrive desktop app).
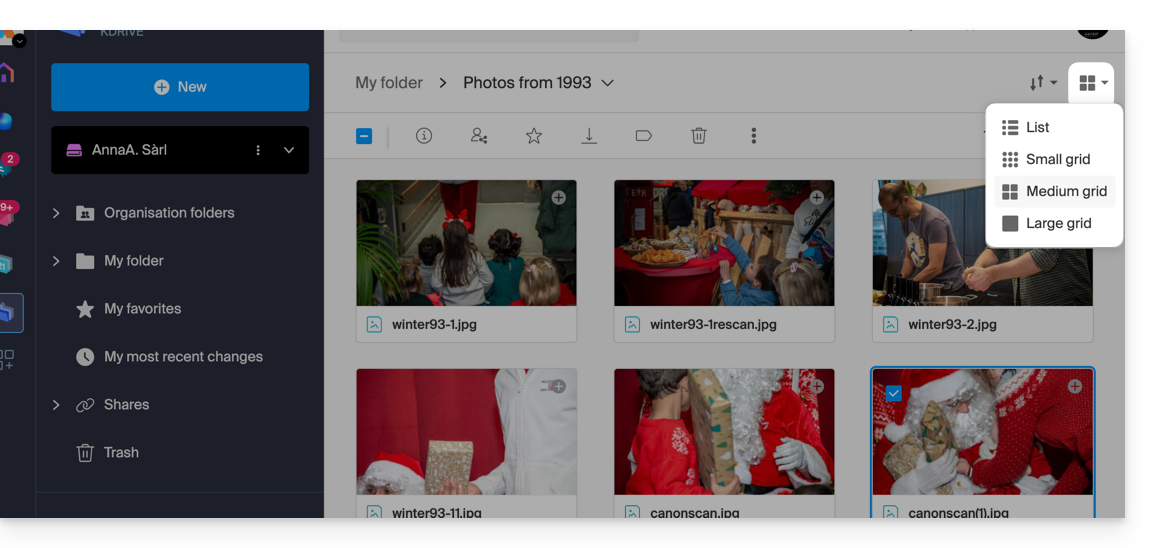
- On the Web app kDrive Infomaniak (online service ksuite.infomaniak.com/kdrive) you can modify the presentation to better view your photos with an enlarged display of thumbnails:
This guide explains how to create, save, and edit an Office-type file (text, spreadsheet, presentation...) on the Web app kDrive (online service ksuite.infomaniak.com/kdrive) and on the mobile app kDrive (application for iOS / Android smartphone or tablet).
Note to LibreOffice file users: to avoid display or formatting bugs on kDrive, always convert your LibreOffice files (ODF: .ods, .odt, .odp) to their Microsoft Office XML equivalents (.xlsx, .docx, .pptx) before online editing.
Using the native editor
kDrive natively integrates the Docs, Grids and Points applications that allow you to create, modify, and collaborate online on Word-type documents .docx, Excel .xlsx and PowerPoint .ppsx. You will thus be able to work with:
- text document
- spreadsheet (worksheet)
- presentation
- notebook
- document draw.io for diagrams, schematics, and wireframes
A feature allows you to add a bookmark (shortcut to a favorite passage in your document or the equivalent of a web page anchor) that you can easily share with your contacts. You will also be able to easily notify a user in your Organization directly on the document.
Refer to the guide on this subject.
Using Microsoft Office Online
Another editing solution is available to you (kDrive Pro or kSuite Business / Enterprise required): the Microsoft Office Online editor.
Refer to the guide on this subject.
Setting the default editor
⚠ Available with:
| kSuite | |
| Business | |
| Enterprise | |
| kDrive | |
To specify in detail which editor to always use by default to open your collaborative Office files (text, spreadsheet, presentation...) among the 2 options presented above:
- Click here to access the Infomaniak kDrive Web app (online service ksuite.infomaniak.com/kdrive).
- Click on the Settings icon at the top right.
- Check or select the relevant kDrive in the dropdown menu of the left sidebar.
- Click on General in the left sidebar.
- Click on Default Editor:
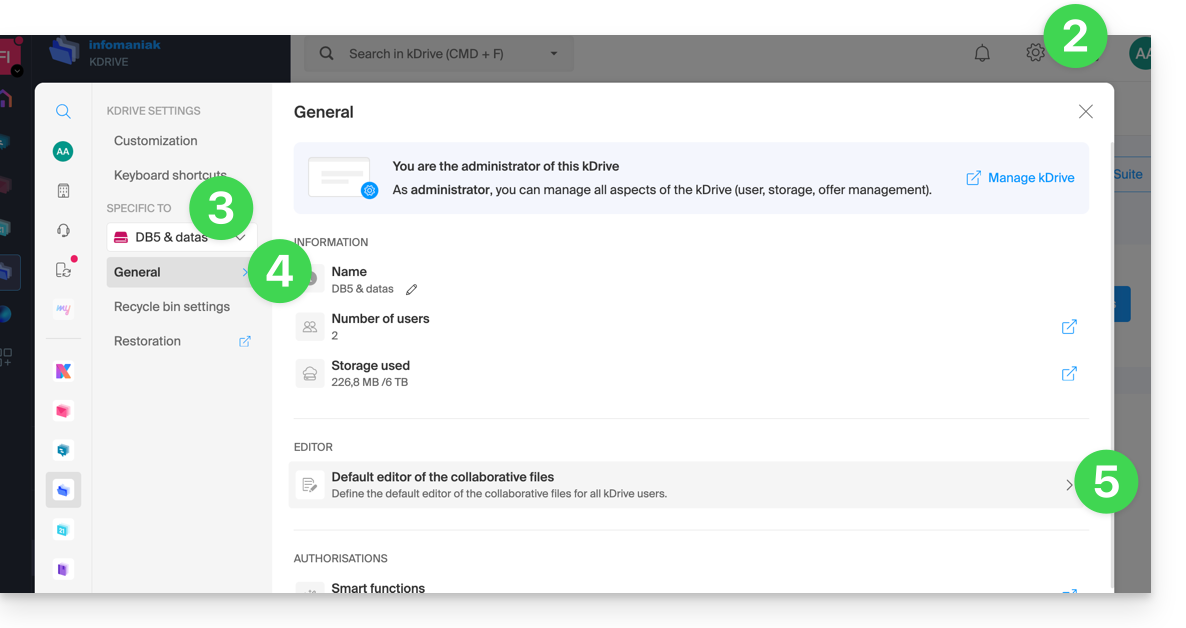
- Choose the default editor for the files:
.docx/.doc.xlsx/.xls.pptx/.ppt
This guide explains how to transfer files from an iPhone to an kDrive Infomaniak.
Prerequisites
- Have a kDrive or kSuite offer.
- Install the mobile app kDrive (application for iOS smartphone or tablet).
Manually send data to kDrive iOS (iPhone, iPad)
To do this:
- Select the data you want to share on kDrive.
- Click on the iPhone share icon:
- Choose kDrive from the options offered:
- Select the kDrive and the backup location - if this does not suit you, press it to change the storage folder:
- Choose another folder or create a new folder:
- Determine the type of folder to create (shared folder with kDrive users or personal & private folder):
- Name the folder, choose the possible shared access and then press the blue button to create the folder:
- Press the newly created folder to select it as the location:
- Create a possible subfolder in it or validate the chosen location with the blue button:
- Press the blue button to start sending your files to kDrive:
- It is possible to follow the progress of the transfer to kDrive:
- The upload takes place in the background:
Once the files are uploaded, you will find them on all devices connected to kDrive…
- … instantly on the Web app kDrive (online service ksuite.infomaniak.com/kdrive).
- … after downloading the list of these new files to the devices where the kDrive desktop app (desktop application on macOS / Windows / Linux) is installed.
Infomaniak tools, such as the Infomaniak Mail web app (online service ksuite.infomaniak.com/mail) or the Calendar, Contacts, kSuite interfaces... can be displayed in light mode or dark mode ("dark mode"), including based on the settings of your current operating system.
Enable manual mode
To manually choose a dark or light display, without relying on a possible different display on the operating system side:
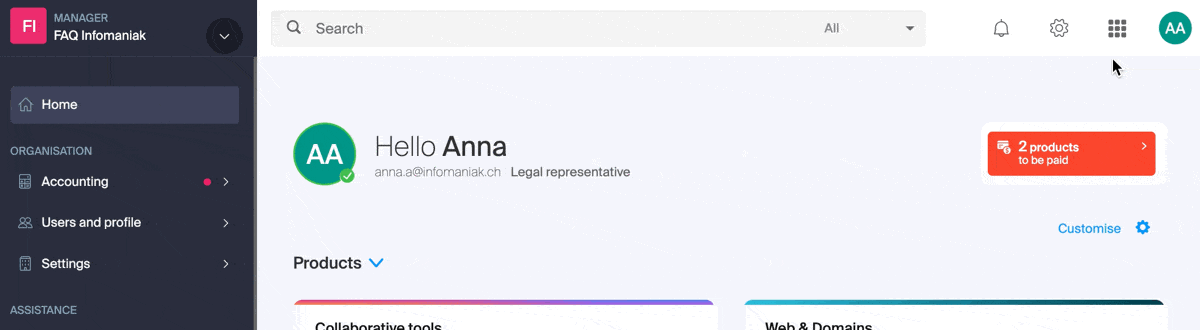
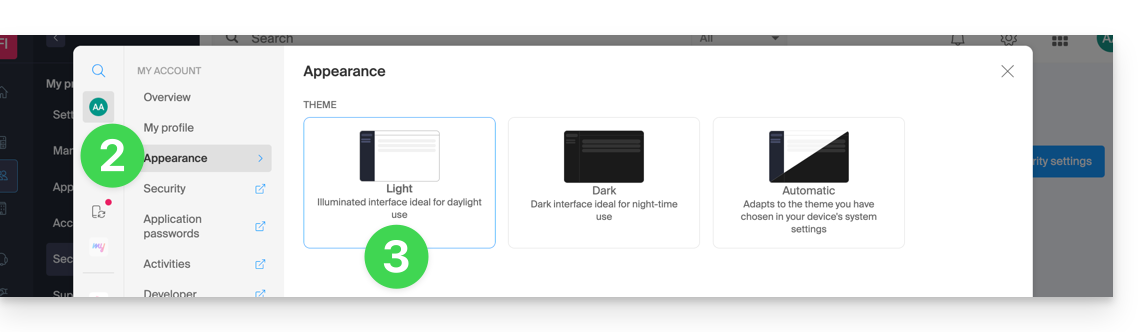
- Click here or on the badge with your initials / avatar in the top right of the Infomaniak Manager) to "Manage my account":
- Then click on Appearance in the left sidebar.
- Click on Light to apply the light mode:
- Click on Dark to enable the "dark mode".
Enable automatic mode
The automatic mode is based on the parameters of your operating system (macOS / Windows...):
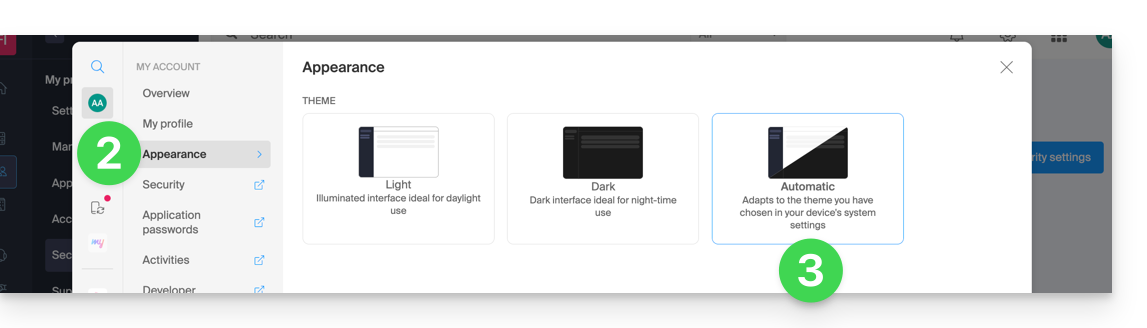
- Click here or on the badge with your initials / avatar in the top right of the Infomaniak Manager) to "Manage my account":
- Click on Appearance in the left sidebar.
- Click on the Automatic mode:
Then if you want to modify the light or dark theme of your computer, so that the Manager's automatic mode takes into account your preferences...
... on macOS
- Click on System Preferences...

- Click on Appearance and choose the dark mode on the right:

... on Windows
- Open the start menu
- Click on Settings:
- Click on Personalize then Colors:
- Click on Dark:
And on mobile?
The dark theme is enabled on mobile devices for Infomaniak login and account creation pages; it automatically adapts to the mobile system preferences, thus providing a consistent visual experience between mobile applications and login / account creation.
This guide explains how to copy within the desktop app kDrive (desktop application on macOS / Windows / Linux) data from a kDrive to which your Infomaniak user has access to another kDrive to which the same Infomaniak user has access.
Preamble
- To be the user of multiple Organizations, you must have been added to them and have obtained access rights to the respective kDrives.
- For example, if the user
abc@domain.xyzhas within their Organization "ABC" a kDrive "ABC" and is invited to the Organization "VWX" which has granted them access to the kDrive "VWX", they will see 2 kDrives on kdrive.infomaniak.com and will be able to send data from one to the other in 1 click.
- For example, if the user
- Without being a user of multiple Organizations, it is also possible to copy data but only by importing an entire kDrive, without being able to choose specific data.
kSuite Configuration
If you are in a kSuite environment (the kDrive app displayed within ksuite.infomaniak.com, you must ensure that all Organizations are displayed, otherwise you will not be able to switch from one kDrive to another and consequently will not have the copy function to other kDrives:
Copying data between multiple kDrives
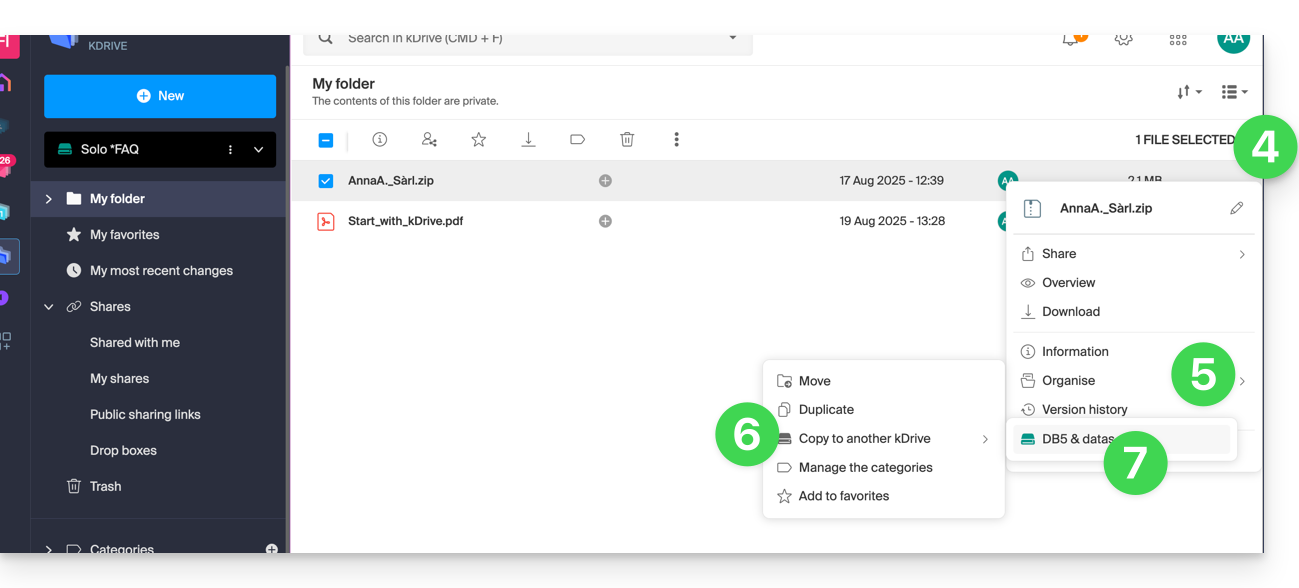
To copy a folder or file to the other kDrive to which you have access from the same user account:
- Click here to access the Infomaniak kDrive Web app (online service kdrive.infomaniak.com).
- Check or select the relevant kDrive in the dropdown menu of the left sidebar.
- Select, if necessary, the other kDrive from which you want to copy files:
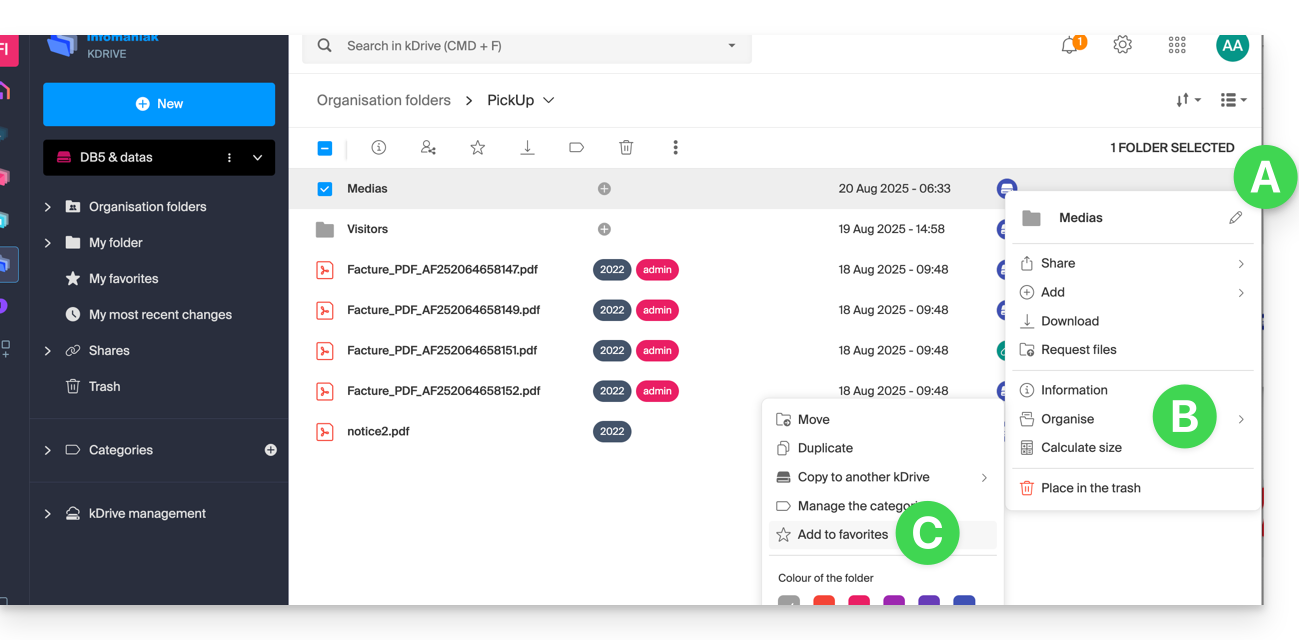
- Right-click or click on the action menu ⋮ to the right of the folder or file you want to copy to the other kDrive.
- Click on Organize.
- Click on Copy to another kDrive.
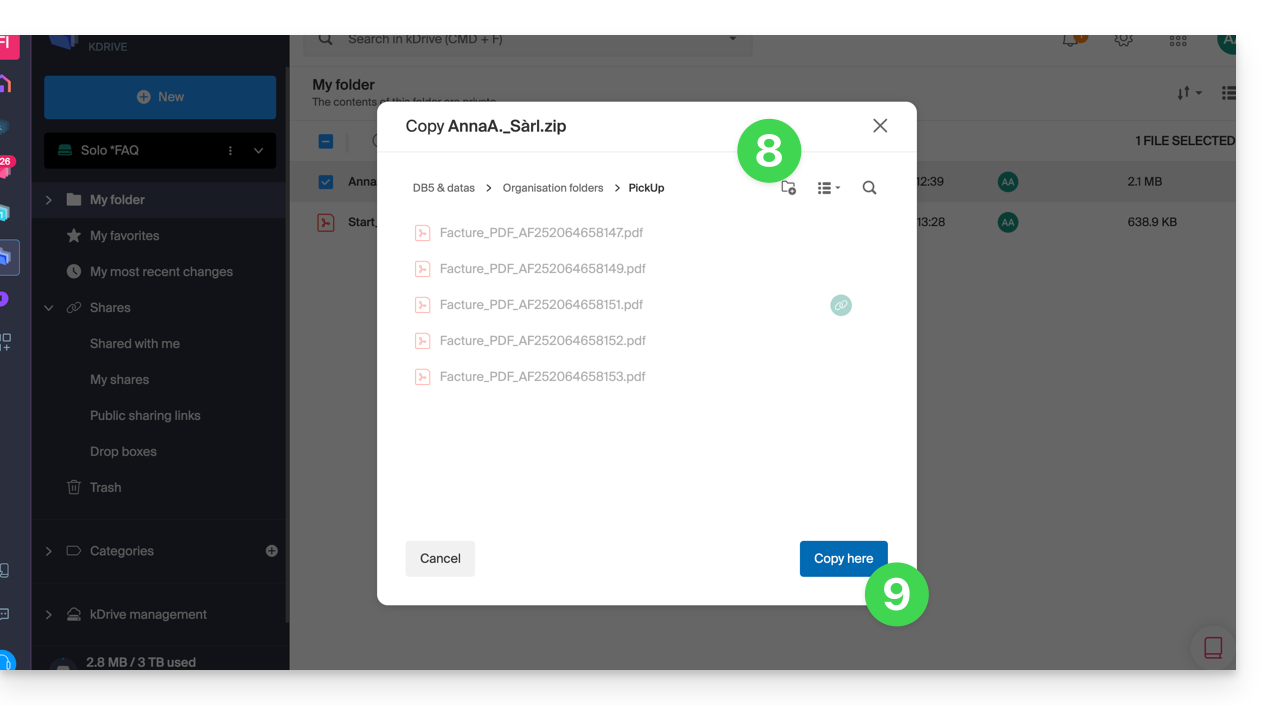
- Choose the relevant kDrive from the list visible in this same dropdown menu:
- Choose the destination location (knowing that the shared folder ("Organization Folders") cannot receive a file or folder at its root but you can create a subfolder using the appropriate icon if the user has the rights).
- Click on the blue button to start the copy:
The copy is not instantaneous or immediate - please wait several minutes!
If you wish to import all the data contained on the other kDrive in one go, refer to this other guide and choose kDrive at point 6.
This guide details some of the operations that can be performed with data stored on kDrive Infomaniak.
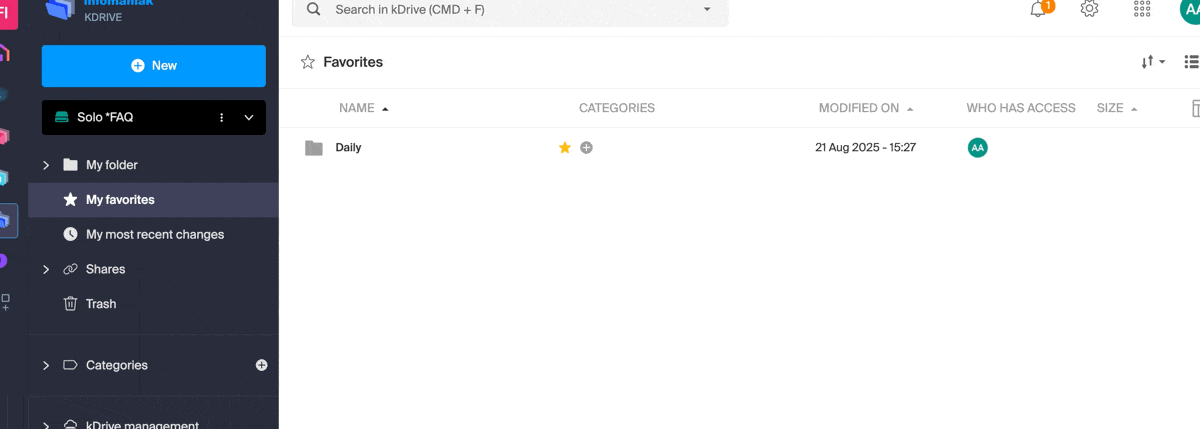
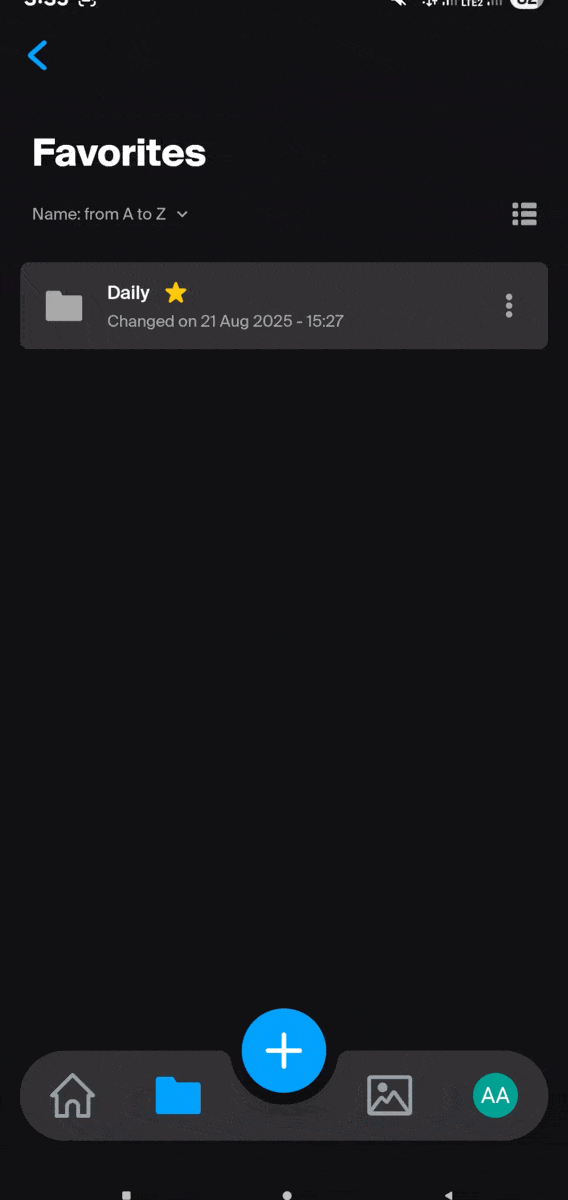
Add to favorites / follow a file
Favorites are synchronized between the Web app kDrive Infomaniak (online service ksuite.infomaniak.com/kdrive)…
… and the mobile app (application for iOS / Android smartphone or tablet):
On the kDrive Web app
To add a file or folder to favorites in the Web app kDrive Infomaniak (online service ksuite.infomaniak.com/kdrive):
- Click here to access the Web app kDrive Infomaniak (online service ksuite.infomaniak.com/kdrive).
- Select a file to mark as a favorite and click on the icon ☆:

- You can also add multiple files to favorites using the top menu…
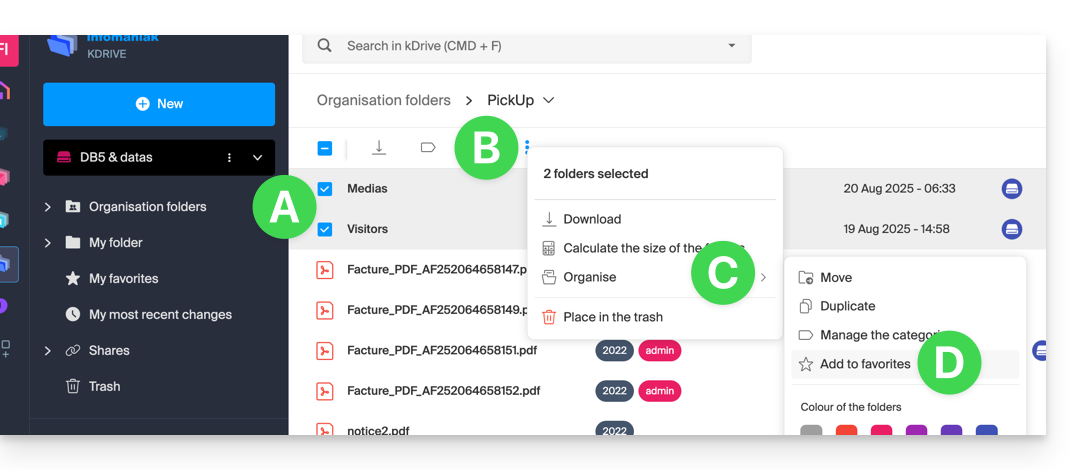
- … or click on the action menu ⋮ located to the right of the item in question:
Unzip an archive
This feature for .zip type files is planned but is not yet available at this time.
This guide explains how to edit a file in PDF format on the Web app kDrive (online service ksuite.infomaniak.com/kdrive).
⚠ Available with:
| kSuite | |
| Standard | |
| Business | |
| Enterprise | |
| my kSuite+ | |
| kDrive | Solo |
| Team | |
| Pro |
Preamble
- The Web app kDrive natively integrates an editor that allows you to modify a PDF document online.
- Your files are never analyzed and are exclusively stored in Switzerland.
- Refer to this other guide if you are looking for information on editing other file formats.
Modify a PDF file
To access kDrive and modify the PDF document:
- Click here to access the Web app kDrive (online service ksuite.infomaniak.com/kdrive).
- Open the relevant PDF document.
- Click the Edit button at the top of the document to access the file editor:

- The PDF editor allows you to:
- insert an image within your document, for example a photo:

- to highlight text or any element:

- to add text at the location, size, and color of your choice:

- to create a signature and then sign documents (refer to this other guide on this subject).
- insert an image within your document, for example a photo:
- Once finished, save the changes and choose whether to create a copy of the modified document or overwrite the existing file.
Rename a file (PDF or other)
It is possible to rename any file by clicking on the action menu ⋮ located to the right of the concerned element:
You can also open the file and rename it directly from the preview. Example with a PDF file:

This guide details the different assignments and access permissions for files/folders in kDrive Infomaniak, including the restoration of inheritance of rights over the content of folders and subfolders.
Preamble
- Refer to this other guide if you are looking for general information about sharing data on kDrive.
- Refer to this other guide for more specific information about sharing the common folder.
- Refer to this other guide regarding the more global permissions of users within the Organization if they are part of it.
Types of access rights
A share (of a document, directory, etc.) on kDrive can be restricted. Choose whether the user…
- … can view:
- View only
- Download
- Add a comment
- … can modify:
- Modify the file
- Download
- Add a comment
- Add and create a file/folder
- Delete a file/folder
- … can manage (only if the share is within the common folder and not in a personal folder):
- Modify the file
- Download
- Add a comment
- Add and create a file/folder
- Delete the file
- Share with other users
- Manage user rights
The permissions granted as well as the information about the beneficiaries of the shares are visible on kDrive in the column “Who has access”:
An eventual public link activated on a file is indicated by a green icon in this column: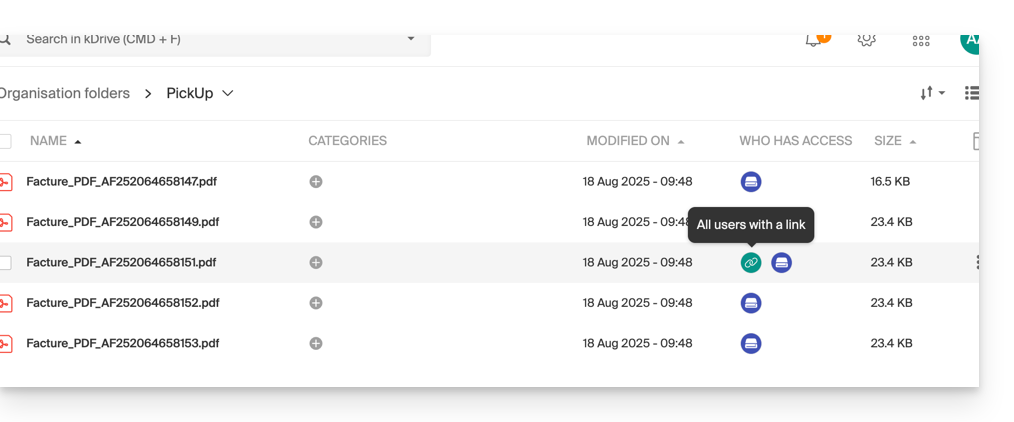
Assigning rights to the content of folders and subfolders
The “Organization Folders” folder (common folder) does not necessarily mean that all kDrive users have access to it.
Indeed, the share can be restricted and only part of the hierarchy can be shared with one or more users. Example of recursion when applying a share or removing it:
- Imagine full access for all users to all the content of folders and subfolders.
- If the share at the level of the parent folder (the folder at the very top of the hierarchy) is deleted, users will no longer have access to the content of the folders and subfolders.
Resolving an inheritance rights issue
In the case where a parent folder is shared with multiple users, and subsequently, one of these users is removed from the share at one of the child folders (i.e., one of the subfolders of the main folder located higher in the hierarchy), then the day a new share with a collaborator is made at the level of the parent folder, this share will not be propagated or inherited at the level of the child folders.
- A share is made with an additional user on a parent folder (SEPT24).
- The share is recursive over all the data contained in the child folders (assoc).
- Sharing is removed from one of these child folders (assoc).
- An additional share is made on the parent folder (SEPT24).
- The child folder does not inherit this share (due to the manual operation in point 2 above).
- The solution is to click on the link present in the sharing window, which informs you of the incomplete share, which will restore the correct access rights according to the inheritance of the parent folder:

This guide details how to import iCloud data using rClone on kDrive Infomaniak.
⚠ Available with:
| kSuite | |
| Business | |
| Enterprise | |
| kDrive | Solo |
| Team | |
| Pro |
Preamble
- Since Apple does not offer an API like its competitors, a solution to retrieve documents from an iCloud Drive is to install the kDrive macOS app to synchronize the icloud folder which must be in your library. The guide below offers a solid alternative.
- kDrive supports rclone streaming upload via WebDAV, up to 50 Go (extendable to 100 Go) to avoid abuse, with automatic error management if the limit is exceeded without prior specification of the size via
Content-Length.
1. Configure rclone for drive access
Install rclone on your computer
There is a version of rclone with a graphical interface (GUI) but it is quite possible to do this via the command line (CLI):
- Install rclone from a
Terminal-type application on your device, by typing the entire following command:sudo -v ; curl https://rclone.org/install.sh | sudo bash - Enter the password for your session on your computer to start the installation:

- Refer to the official installation guide if necessary.
Configure the remote disk (iCloud) on rclone
- Once rclone is installed, enter the command
rclone config.- Refer to the official configuration guide if necessary.
- Then choose to configure a new remote import by answering
nforNew remote. - Name the remote disk, for example
appledrive:
- Then choose the type of disk to import by answering
iclouddrivewhich corresponds to iCloud Drive among the proposed choices. - Indicate to rclone the
apple_idby entering your Apple ID (usually an email address). - Choose to use your own password linked to the Apple ID account (
y). - Enter your password twice as requested:

- Answer “No”
nto the question about “advanced configuration”. - A window on your device should open to warn you of a remote connection; authorize it:

- A window on your device should open with a 2FA code; copy it:
- Paste the code when rclone asks for it.
- Answer “Yes”
yto the last question if all the presented information is correct.
Configuration of the destination disk (kDrive) on rclone
It is possible to act directly on the configuration file of rclone by pasting your kDrive configuration in it in the form for example:
[kDrive]
type = webdav
url = https://kDrive_ID_HERE.connect.kdrive.infomaniak.com/
vendor = other
user = user@email.com
pass = PASSWORD_HERE_OR_APP_PASSWORD_IF_2FA
But here is how to proceed step by step as for the previous configuration:
- Still in the terminal, enter
nfor a new disk configuration and enter the namekDriveto recognize your destination disk:
- Then choose the type of disk to import by answering
webdavwhich corresponds to a WebDAV configuration among the proposed choices. - Enter the following information:
url= direct access to kDrive (refer to this other guide regarding the kDrive ID for the connection URL)vendor= rclone (option #6)user= email address to log in to the Infomaniak user account
- Answer “Yes”
yto the password question, then enter the password:- application password in case of double authentication activated or the one from your Infomaniak user account if you have not activated 2FA.
- Leave the
bearer_tokenblank, then answer “No”nto the question about “advanced configuration”. - Answer “Yes”
yto the last question and your 2 disks will be displayed:
2. Copy data from iCloud to kDrive
Prerequisites
- Consult the available options in the official guide before starting an import.
Example of a command to start copying your iCloud data to the root of your kDrive:
sudo rclone copy appledrive: kDrive:This will immediately start copying your iCloud folders, subfolders, and contents to the personal folder of your Infomaniak kDrive!
Details about the dates of your exported photos
If you export your photos from iCloud to Infomaniak kDrive, be vigilant about the date metadata. During export, the file creation dates may be modified and replaced by the export date instead of the original photo date.
Here is a script for advanced users that allows you to restore the correct data to your files from the EXIF information (it is recommended to process batches of 7000 photos max. to avoid a crash):
- Download ExifTool https://exiftool.org/index.html (macOS Package).
- Install the application by authorizing its opening in advance if necessary:
- Open Script Editor (located in your Applications > Utilities folder):
- Click on New Document.
- Copy and paste the long script provided below into the Script Editor window.
- Click on Run to start the script, a window opens:
- Select the folder to analyze.
- Let the script run afterwards, it will modify the dates or write the errors in a
errors.txtfile on the desktop.
The script to copy-paste entirely:
-- replace file date with EXIF creation date or date from name after the first dash -

tell application "Finder"
    set FolderPath to choose folder with prompt "Select the folder containing the files to update"
    my processFolder(FolderPath)
end tell

on processFolder(aFolder)
    tell application "Finder"
        -- process files:
        set fileList to files of aFolder
        repeat with eachFile in fileList
            -- process a single file

            set theFile to eachFile
            set AppleScript's text item delimiters to {""}
            set fileName to name of eachFile --get the file name

            set eachFile to eachFile as string --file path
            set hasDate to true --initialize date found flag

            try
                --get date if available
                set photoDate to do shell script "/usr/local/bin/exiftool -DateTimeOriginal " & quoted form of POSIX path of eachFile
                if photoDate is "" then set photoDate to do shell script "/usr/local/bin/exiftool -CreationDate " & quoted form of POSIX path of eachFile
                if photoDate is "" then set photoDate to do shell script "/usr/local/bin/exiftool -CreateDate " & quoted form of POSIX path of eachFile

                if photoDate is "" then
                    set hasDate to false --check if date was found
                end if

            on error
                set hasDate to false -- error retrieving date
                set photoDate to ""
            end try

            if length of photoDate > 20 then
                --format extracted date
                set x to (length of photoDate) - 33
                set OriginalDate to text -x thru -1 of photoDate
                set formattedDate to text 1 thru 5 of OriginalDate
                set theYear to formattedDate
                set formattedDate to formattedDate & text 7 thru 8 of OriginalDate
                set theMonth to text 7 thru 8 of OriginalDate
                set formattedDate to formattedDate & text 10 thru 11 of OriginalDate
                set theDay to text 10 thru 11 of OriginalDate
                set formattedDate to formattedDate & text 13 thru 14 of OriginalDate
                set theHour to text 13 thru 14 of OriginalDate
                set formattedDate to formattedDate & text 16 thru 17 of OriginalDate
                set theMinute to text 16 thru 17 of OriginalDate
                set formattedDate to formattedDate & "." & text 19 thru 20 of OriginalDate
                set theSecond to text 19 thru 20 of OriginalDate
                set newName to theYear & "-" & theMonth & "-" & theDay & " " & theHour & "." & theMinute & "." & theSecond

                set testValue to formattedDate as string --check if found date is 000
                if testValue is " 000000000000.00" then
                    set hasDate to false
                else
                    -- set file date to original EXIF date and write to log
                    do shell script "touch -t " & formattedDate & " " & quoted form of POSIX path of eachFile
                    set logFile to open for access ((path to desktop folder as text) & "Date Found.txt") as text with write permission
                    write "Original date found for file: " & OriginalDate & " " & eachFile & return to logFile starting at eof
                    close access logFile
                end if
            end if

            if hasDate is false then
                -- get date from file name after first dash
                set nb to ""
                set nameDate to ""
                set fileName to fileName as string
                set savedDelimiters to AppleScript's text item delimiters --save delimiters
                set AppleScript's text item delimiters to {"-"} --split on "-"
                set nb to offset of "-" in fileName
                if nb is not 0 then
                    set AppleScript's text item delimiters to savedDelimiters --restore delimiters
                    set nameDate to characters (nb + 1) thru (nb + 8) of fileName as string
                    set nameDate to nameDate & "1200.00"
                    set cmd1 to "/usr/local/bin/exiftool -datetimeoriginal=" & nameDate & " " & quoted form of POSIX path of eachFile
                    set cmd2 to "/usr/local/bin/exiftool -createdate=" & nameDate & " " & quoted form of POSIX path of eachFile
                end if
                try
                    -- write date from name to EXIF
                    do shell script cmd1
                    do shell script cmd2
                    do shell script "touch -t " & nameDate & " " & quoted form of POSIX path of eachFile
                    do shell script "rm " & quoted form of POSIX path of (eachFile & "_original")
                on error
                    -- if date from name is invalid, log the error
                    set logFile to open for access ((path to desktop folder as text) & "Date Error.txt") as text with write permission
                    write "No valid date found in file name: " & eachFile & return to logFile starting at eof
                    close access logFile
                end try
            end if
        end repeat

        -- process folders:
        set folderList to folders of aFolder
        repeat with eachSubfolder in folderList
            -- process a subfolder
            my processFolder(eachSubfolder)
        end repeat
    end tell
end processFolder

tell application "Finder"
    display dialog "Done! All files processed." buttons {"Close"}
end tellThis guide explains the operation of the blacklist (blacklisted) in the desktop app kDrive (macOS / Windows / Linux) and in which cases certain local files or folders are no longer taken into account for synchronization.
Preamble
- A file or folder placed on the blacklist by the application has a suffix in its name of the form
_blacklisted.- This means that the application ignores this item during synchronization operations and are therefore not transferred to kDrive Web.
- This mark remains active as long as the cause of the block has not been corrected.
- If an excluded folder cannot be deleted locally, it can be automatically added to the blacklist.
- In this case, you can either delete it manually, or reactivate its synchronization in the application settings.
- Once the problem is resolved (for example after deleting a duplicate, correcting permissions, or reactivating an excluded folder), simply remove the suffix
_blacklistedfrom the name of the item so that it is taken into account again in the synchronization. - These mechanisms ensure the stability of the synchronization process and prevent repeated errors related to inaccessible, duplicate, or system-incompatible files.
Examples of blacklisting
In some cases, a local item may be blacklisted:
- Dehydrated placeholder (Lite Sync only): a placeholder file (not fully downloaded) is added to the blacklist to prevent it from being sent to kDrive Web.
- Already existing creation on the remote drive: if the creation of a file or folder fails because an identical item already exists on kDrive Web, the local item is marked as blacklisted.
- Insufficient server-side permissions: when a file or folder is created locally but the backend refuses to propagate it (for example in Common documents), the local item is blacklisted.
- Folder excluded from synchronization: if a folder has been unchecked in the kDrive desktop interface, the application attempts to delete it locally if it is still present. If this fails, it is blacklisted.
A blacklist can also occur due to incompatible file names: characters such as the tilde ~, the slash /, the backslash \, certain system files such as System Volume Information or certain temporary or technical extensions (.idlk, .parms.db, .directory, ._*, etc.).
Rename these items before restarting the synchronization.
Correct an item blacklisted
To recognize them:
- Identification: the suffix
_blacklistedin the name of the file or folder indicates that the item is ignored by the synchronization. - Resolution: correct the cause of the block (for example access permissions, an existing duplicate on kDrive Web, an exclusion parameter, or a placeholder status), then rename the item to remove
_blacklistedif you want it to be synchronized again.
To avoid them:
- Check your access rights before creating or modifying files in shared spaces, organization folders, or Common documents.
- Avoid duplicates when creating or moving files between your computer and kDrive Web.
- Do not uncheck a folder in the desktop application if you continue to add items to it locally.
- With Lite Sync, download the file completely before modifying it instead of working on a dehydrated placeholder.