
Knowledge base
1000 FAQs, 500 tutorials and explanatory videos. Here, there are only solutions!
This guide explains the main differences between an EV and DV certificate.
SSL EV Certificates: for companies
The Sectigo SSL EV certificate can only be issued to companies registered in an official registry.
It provides the highest level of trust with your clients and offers unique advantages in addition to including the benefits of a DV certificate:
name of your company in thenavigation bar- lock in the navigation bar
- dynamic site seal
- domain name validation
- manual verification of your company's details and identity
- warranty up to $1,750,000 for end users
- 7/7 support
The activation of an EV SSL certificate may take up to 24 hours and will require action on your part.
SSL DV Certificates: for companies and individuals
The Sectigo DV certificate is available to individuals and companies. It does not include some of the advantages mentioned above, but it offers additional benefits compared to free Let's Encrypt SSL certificates:
- dynamic site seal
- domain name validation
- guarantee up to $10,000 for end users
- support 24/7
The activation of a DV SSL certificate is immediate.
And what about Let's Encrypt certificates?
A free Let's Encrypt certificate guarantees the same level of encryption as an EV or DV certificate. However, Let's Encrypt certificates do not offer the following benefits:
- manual validation of your company's credentials and authenticity (EV)
- warranty for end users in case of fraud (EV/DV)
- support in case of questions
In summary, Let's Encrypt certificates ensure the encryption of exchanges between your users and your site, but they do not guarantee to internet users that they are on a legitimate site whose identity has been authenticated by a certification authority.
This guide explains how to access a Sunrise Internet Box connected to the Internet with a dynamic IP via a domain name.
Prerequisites
- Have a Box that allows configuring a custom dynamic DNS provider.
- A dynamic DNS must have been created on the domain in question.
Link a Sunrise Internet Box to a domain name
There are different models of Sunrise Internet Box. Here is an example:
- Log in to the Sunrise Box administration interface (
http://192.168.1.1for example). - Enable expert mode (top right button).
- Go to DynDNS (top left):

- Click on the DynDNS tab.
- Enable the Dynamic DNS client.
- Choose the “Custom” provider:

- Fill in the following fields:
- Username = the identifier defined in the Manager when adding the Dynamic DNS
- Password = the password defined in the Manager when adding the Dynamic DNS
- Hostname = the URL configured in the Manager when adding the Dynamic DNS
- Below, fill in the following fields:

- Server:
infomaniak.com - Port:
443 - Request (to copy-paste as is):
https://infomaniak.com/nic/update?hostname=[DOMAIN]&myip=[IP]&username=[USERNAME]&password=[PASSWORD] - Update interval (seconds):
300 - Retry interval (seconds):
30 - Max attempts:
3
- Server:
The interface may be presented in this form but the principle remains the same: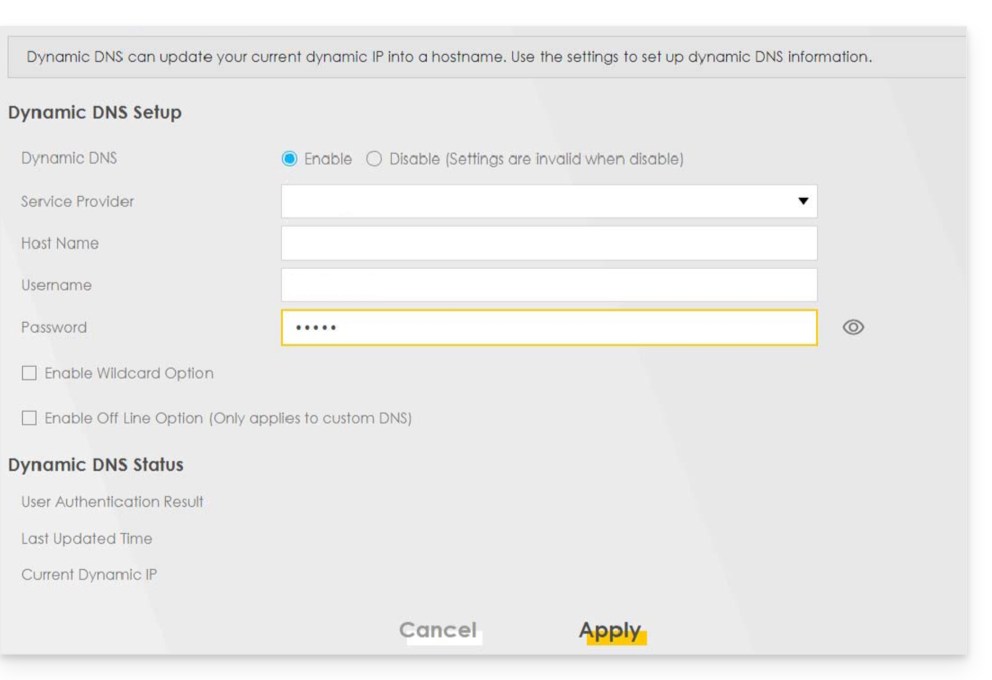
Other routers
It's the same principle for an Omada SDN solution from TP-Link; the Update-URL is https://infomaniak.com/nic/update?hostname=[DOMAIN]&myip=[IP]&username=[USERNAME]&password=[PASSWORD]:
And for other models (type Zyxel USG Flex or ax7501-B1 for example) fill in the fields using the data below:
- Enable DDNS Profile : enable
- DDNS Type :
User custom - HTTPS : enable
- Username : the identifier defined in the Infomaniak Manager when adding the Dynamic DNS (help)
- Password : the password defined in the Infomaniak Manager when adding the Dynamic DNS (help)
- Domain Name : host name with the domain
- Primary Binding Address > Interface : any
- Backup Binding Address > Interface : none
- DYNDNS Server : infomaniak.com
- URL (to copy-paste as is) : /nic/update?password=password(point 5 above)&username=username(point 4 above)&hostname=DomainName
- example
/nic/update?password=abcd1234&username=admin&hostname=abc.domain.xyz
- example
Make your life easier! If needed, local partners referenced by Infomaniak can handle these procedures. Launch a free call for tenders. They take care of everything, freeing you from technical details.
This guide explains how to set up a dynamic DNS record (Dynamic DNS, DDNS) for a domain name whose DNS zone is managed at Infomaniak.
This free alternative to Dyn and DynHost is very useful if you want to access devices connected to the Internet from the outside, whose IP address is dynamic (for example a NAS, a surveillance camera, an Internet router/box/home automation, etc.).
Prerequisites
- The DNS zone of the domain name must be managed at Infomaniak. If necessary, transfer your domains to Infomaniak.
- Your device or application must support dynamic DNS records.
Specific guides
The configuration of dynamic DNS varies from one device to another. The following guides are provided for information and allow you to link a domain name with:
- … a Synology NAS
- … a Qnap NAS
- … Zyxel / Sunrise Internet Box / TP-Link solutions
- … a UniFI device
- … Swisscom Internet Box
- … Fritzbox
- … Jeedom
- … Linux via ddclient
- … potentially anything thanks to the API…
Guides for any other device
To create a dynamic DNS on your domain:
- Click here to access the management of your product on the Infomaniak Manager (need help?).
- Click directly on the name assigned to the product concerned.
- Click on Dynamic DNS in the left sidebar menu.
- Click on the blue Add a Dynamic DNS button.
- Enter the necessary information:

- Choose the desired subdomain or leave the Dynamic DNS Name field empty to use the main domain.
- Enter an IP address; this will then be dynamically updated by your device / app.
- Define a username / password pair (uppercase, lowercase + numbers, no special characters); the latter will need to be entered in the configuration of your device / app.
This guide explains how to add a dynamic trust seal to a secure site with a Sectigo SSL certificate.
Preamble
- Infomaniak, as a host, offers SSL certificates to secure its clients' websites
- Sectigo (formerly known as Comodo) is a recognized SSL certificate provider that offers different levels of security
- The "dynamic trust seal", or "Sectigo Trust Seal" / "Sectigo Trust Logo" is a visual that website owners can display on their pages to indicate to visitors that their connection is secure, a sign of trust that informs users that transactions and information exchanges made on the site are encrypted and protected by an SSL certificate issued by Sectigo.
- By using a Sectigo SSL certificate and displaying the dynamic trust seal, a website at Infomaniak therefore benefits not only from data exchange security, but also from increased user trust, essential for e-commerce and for the protection of personal information.
Adding a trust seal
Here's how a dynamic trust seal works:
- Validation: to obtain such a seal, the site owner must first obtain a valid SSL certificate from Sectigo, which requires a validation process; depending on the level of certificate chosen (Domain Validation - DV, Organization Validation - OV or Extended Validation - EV), this validation may be more or less in-depth
- Installation: once the SSL certificate is obtained and installed on the Infomaniak web server, the website is then able to establish secure HTTPS connections
- Displaying the seal: Sectigo provides an HTML code or script that the site owner can then integrate into their website; this code allows the Sectigo dynamic trust seal to be displayed
- Update: the seal is often updated in real time to reflect the current situation of the SSL certificate; if the certificate were to expire or be revoked, the seal would also reflect this, warning potential visitors that the site may no longer be secure
The trust seal consists of an image and an HTML code. The latter only works if a Sectigo certificate is installed on the site and in this case generates an interactive logo that displays the certificate data.
Save one of the images below
Right-click on the image to save, then click on Save image as...
- Small

- Medium

- Large

Upload the image to your site
Send the image to your web server (via FTP or your CMS) and note the URL to access this image for the next step (for example https://domain.xyz/wp-content/uploads/sectigo.png).
Get the code to integrate into your pages
Enter the full address of your image on the page https://www.trustlogo.com/install/index2.html to check if the image is accessible.
Click the Continue button on the same page to get the 2 codes to copy-paste into the header of your (or your) Web page(s):

Important:
- In the code,
CL1corresponds to aDVSSL certificate; replaceCL1withSC5for anEVtype SSL certificate.
This guide explains how to connect an domain name managed with Infomaniak to an external service.
Specific guides
Click on the link corresponding to the external service you want to connect to your domain name registered with Infomaniak:
- Wix
- Shopify
- Google Sites
- dynamic devices such as a NAS, an Internet box or home automation, etc.
Guide for any other external service
To connect your domain name to any other external service such as Odoo, Microsoft 365, Squarespace, follow the procedures below:
- Click here to access the management of your product on the Infomaniak Manager (need help?)
- Click directly on the name assigned to the product concerned.
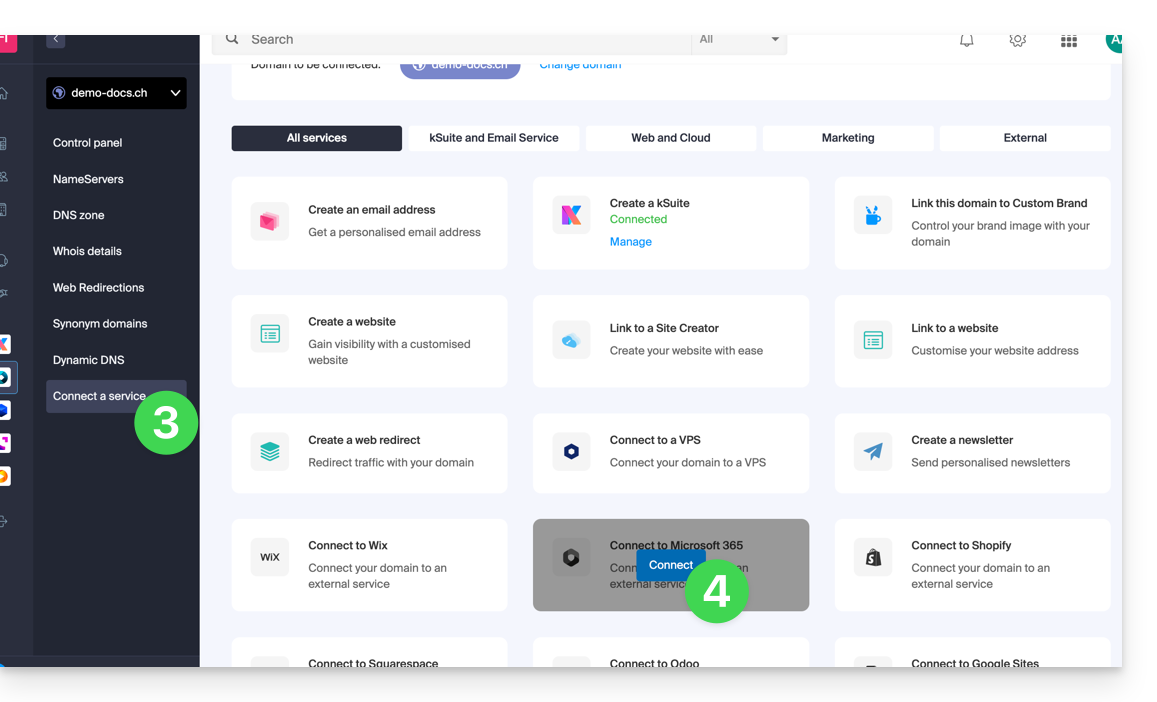
- Click on Connect a service in the left sidebar menu.
- Click on the blue Connect button on the tile corresponding to your external service and follow the procedure:
If the external service you want to connect is not in the list, you will need to manually modify some technical information about your domain name:
- Refer to this other guide to modify all the DNS if that is what you have been asked to do…
- … or this other guide if you only need to modify certain specific DNS records (for example the MX record type if you need to link your domain to an external mail service).
Thank you for choosing Infomaniak to create your PaaS!
This guide helps you quickly use the main features of your new product Jelastic Cloud.
Frequently Asked Questions
- Introduction to Jelastic
- Containers and nodes: how they work
- Jelastic billing and Cloudlet operation
- Technologies compatible with Jelastic Cloud
- Create a VPS with Jelastic Cloud
- Methods for deploying an application
- Differences between Jelastic Cloud and a VPS
- Resources available according to account type
Consult all the FAQs on Jelastic Cloud.
Technical resources
Consult the official Jelastic documentation (in English) for more technical details:
- Deploying applications in a cluster (WordPress, Magento, etc.)
- Creating an environment
- Deploying applications or code
- Configuring servers (Java, PHP, Ruby, etc.)
- Linking a domain name
- Adding a public IP address
- Monitoring application statistics
- SSH access to your environment
- Managing resource consumption alerts
- Dynamic resizing: horizontal and vertical
- Install packages without root access with Yum Packages Installer
For any questions or difficulties, do not hesitate to contact Infomaniak support.
This guide explains how to create galleries with your photos in Site Creator Infomaniak.
Create a photo gallery
Prerequisites
- Access Site Creator:
- Click here to access the management of your product on the Infomaniak Manager (need help?).
- Click directly on the name assigned to the relevant Site Creator.
- Click the Edit my site button to start the editor:

Once in Site Creator:
- Click on the Settings button in the left sidebar, your list of pages will appear.
- Click on the Add a page button below the existing tree structure.
- Enable Show more options to select the page type PHOTO GALLERY:
- Choose a page name.
- Validate.
The new page with the photo gallery module appears on the screen.
Set up the photo gallery
To do this:
- Hover over the module to access the gallery settings.
- Click on Edit:

Photo albums
You can create additional photo galleries for your various albums:

Change the order of the photos
When your gallery is created, each new photo you upload from your computer is added to the end of the photo list; you can easily change this order by dragging the photos with the mouse when you edit a gallery:
Additionally, you can add a description to any of your photos. Under each image, you will notice the "Image Description" field. Start typing your description there and press the green button to save the changes:
Add an image slider widget
To configure one or more dynamic Slider widgets, on which one or more photos will slide laterally (with no connection to the photo galleries described above):
- Click on the Applications button in the left sidebar.
- Click on Slider:

- Configure the widget according to your preferences.
- Insert the configured widget in the desired location by clicking on Content then Apps and choose Slider:

This guide presents the advantages of kSuite (Standard, Business, Enterprise), the suite of productivity and online collaboration tools developed in Switzerland by Infomaniak.
Preamble
- kSuite simplifies user management in the enterprise and groups your products into a single invoice with a single due date.
- It also includes advanced user management for all the applications you need to collaborate online.
- You choose the domain name and kSuite is then established according to your needs in terms of number of users and storage space.
- kSuite is a bundled offer that can be upgraded to a higher offer at any time but it is not possible to change to a lower rate later, nor to transfer kSuite to another Organization.
- The products included in kSuite cannot be moved or canceled independently of each other.
- To help you identify the kSuite offer that best suits your needs, refer to this other guide.
Choosing kSuite over standalone apps
The question of choosing kDrive and/or Mail separately rather than kSuite may indeed arise.
kSuite is more economical, simplifies user management in the enterprise and groups all your products into a single invoice with a single due date. The offer is recommended as soon as you own or wish to have a domain name that will be associated with it.
It also includes advanced and unified user and team management, as well as kChat which cannot be ordered separately.
Here are some other points:
- unlocked features
- 1 single invoice
- address book & dynamic calendar for the Organization
- more important disk storage (per user)
- Custom Brand offered with kSuite Enterprise
In summary, choosing this collection of Web tools rather than individual applications offers advantages in terms of integration, simplified management, real-time collaboration, multi-platform accessibility, and flexibility. These advantages can improve your overall efficiency, productivity, and user experience.
The products included in kSuite
On your interface ksuite.infomaniak.com you access to: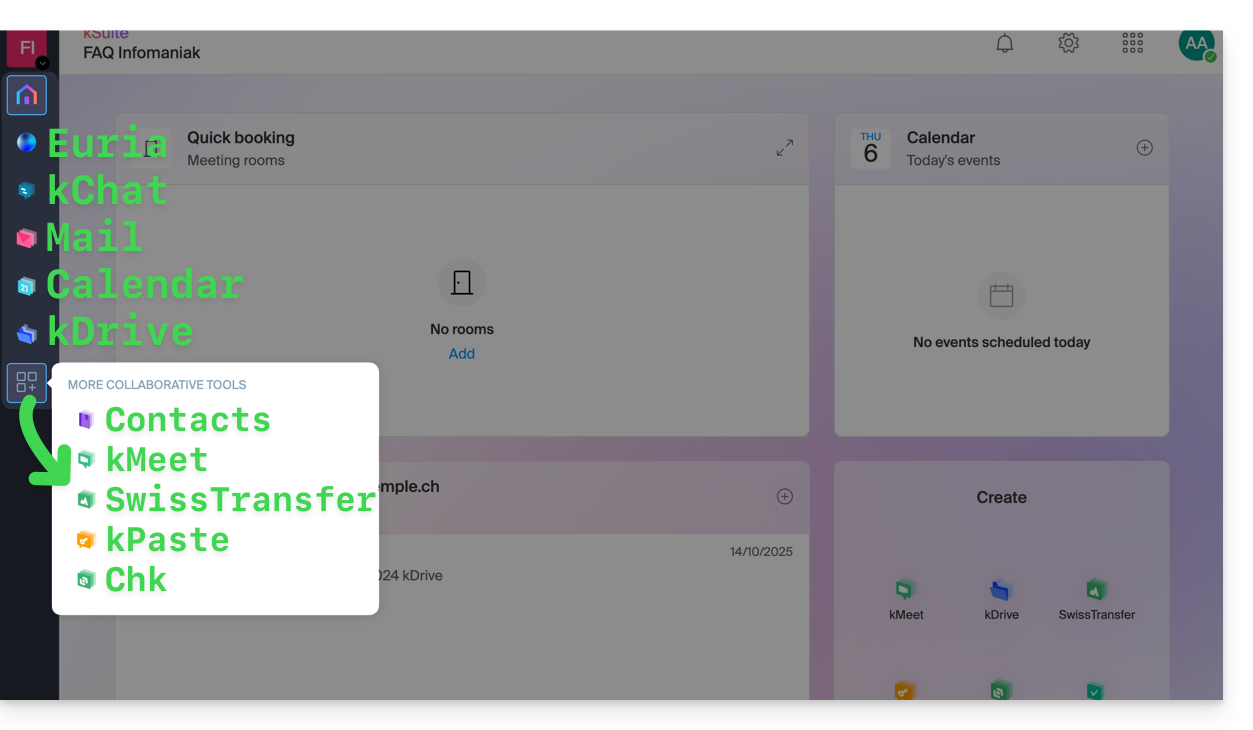
Create, communicate, plan, collaborate, share…
- Euria
- kChat
- A Mail Service (even if you already have a Mail Service)
- Calendar
- kDrive (even if you already have a kDrive)
And also:
Management
- The Manager interface with Custom Brand included or as an option depending on the offer
Are you a Partner or do you wish to become one in order to resell my kSuite?
This guide details the software libraries that allow you to manipulate the PDF format and are compatible with the various Infomaniak web hosting offers.
Preamble
- PHP
PDFextensions allow, among other things, generating a PDF from dynamic data to create customized invoices, for example.
PDF and Cloud Server
On a Cloud Server, you can install apps like PDFtk …
- The PHP class
FPDFis supported. PDFlibfrom the publisher Apryse is no longer offered on the most recent Cloud Servers because thePHP_PDFextension has become paid. If you obtain it, you will need to install it on Cloud VPS / Lite VPS or Public Cloud.
On shared hosting, ImageMagick is active and supports the EPDF, PDF and PDFA formats.
This guide helps you find the public IP address of your device, which can be useful for certain support requests, among other things.
Display the public IP address on the connected device
Click here to obtain the public IP address of your device in IPv4 and IPv6 format.
Alternative methods
Visit ipinfo.io or ifconfig.me.
... on macOS
- From a terminal application (command line interface, CLI) on your device, run the command
curl ifconfig.meand press enter. - The displayed address is the public IP address of the computer.
Do not forget that this address can change periodically, especially if the router restarts or if the internet service provider uses dynamic IP address allocation.
To automate the search for the public IP address, use commands or scripts that query services such as api.ipify.org ...
This guide concerns the activation of cookies and JavaScript on the main web browsers.
Preamble
- Enabling cookies allows websites to identify you and remember your preferences, such as your preferred language or the items you have added to your cart.
- Enabling JavaScript allows websites to be more interactive and dynamic, and offers features such as video playback or game creation.
- Some websites (including mobile apps) may not work properly if cookies or JavaScript are disabled in the device's native browser.
- You can also choose to enable cookies and/or JavaScript only for certain websites.
Manage cookies and JavaScript
The exact location of the options to enable cookies and JavaScript may vary slightly from one browser version to another.
Click to see the corresponding guides:
| Browser | Enable or disable cookies | Enable or disable JavaScript |
|---|---|---|
Chrome | ||
Firefox | ||
Edge | ||
Safari |
Troubleshoot a connection issue with an Infomaniak app
If you encounter a login window like the one below, for example with the mobile app Infomaniak Mail (application for iOS smartphone or tablet) on iPhone:
- Open the advanced settings of Safari on your mobile device.
- Temporarily disable the toggle switch that blocks all cookies:

- It will thus be possible to display the login window in full and log in; you can always block cookies again after logging in if you wish.
This guide covers the use of the Newsletter tool offered by Infomaniak and details the various possibilities for creating and writing targeted mailings to subscribers listed in the contact lists within the tool.
Create and send a newsletter
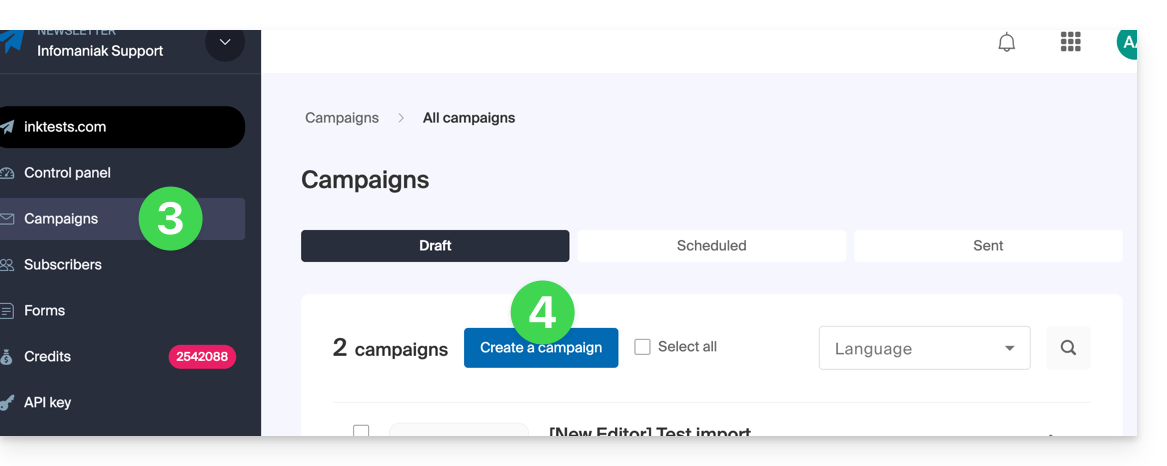
Your newsletters are managed from the left sidebar titled "Campaigns", which allows you to view your previous sends and create others:
- Click here to access the management of your product on the Infomaniak Manager (need help?).
- Click on the domain name concerned in the table that appears:
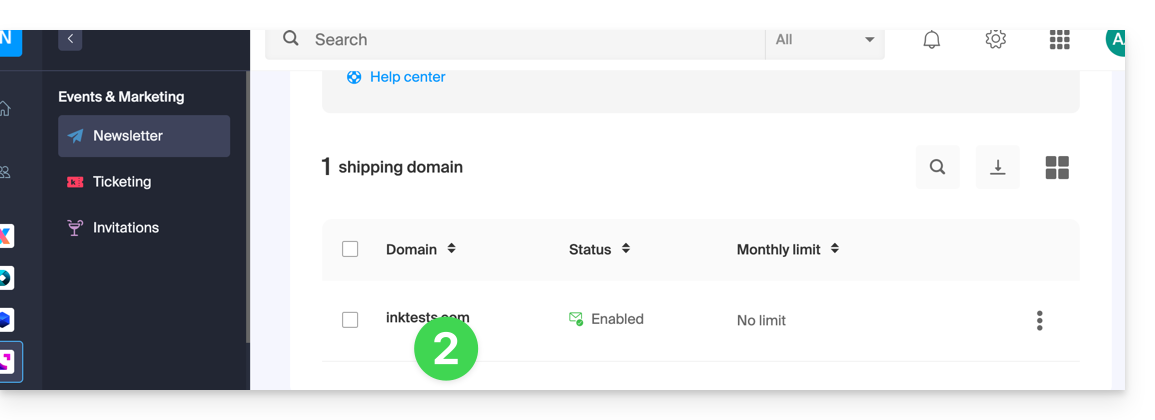
- Click on Campaigns in the left sidebar.
- Click on Create a campaign:
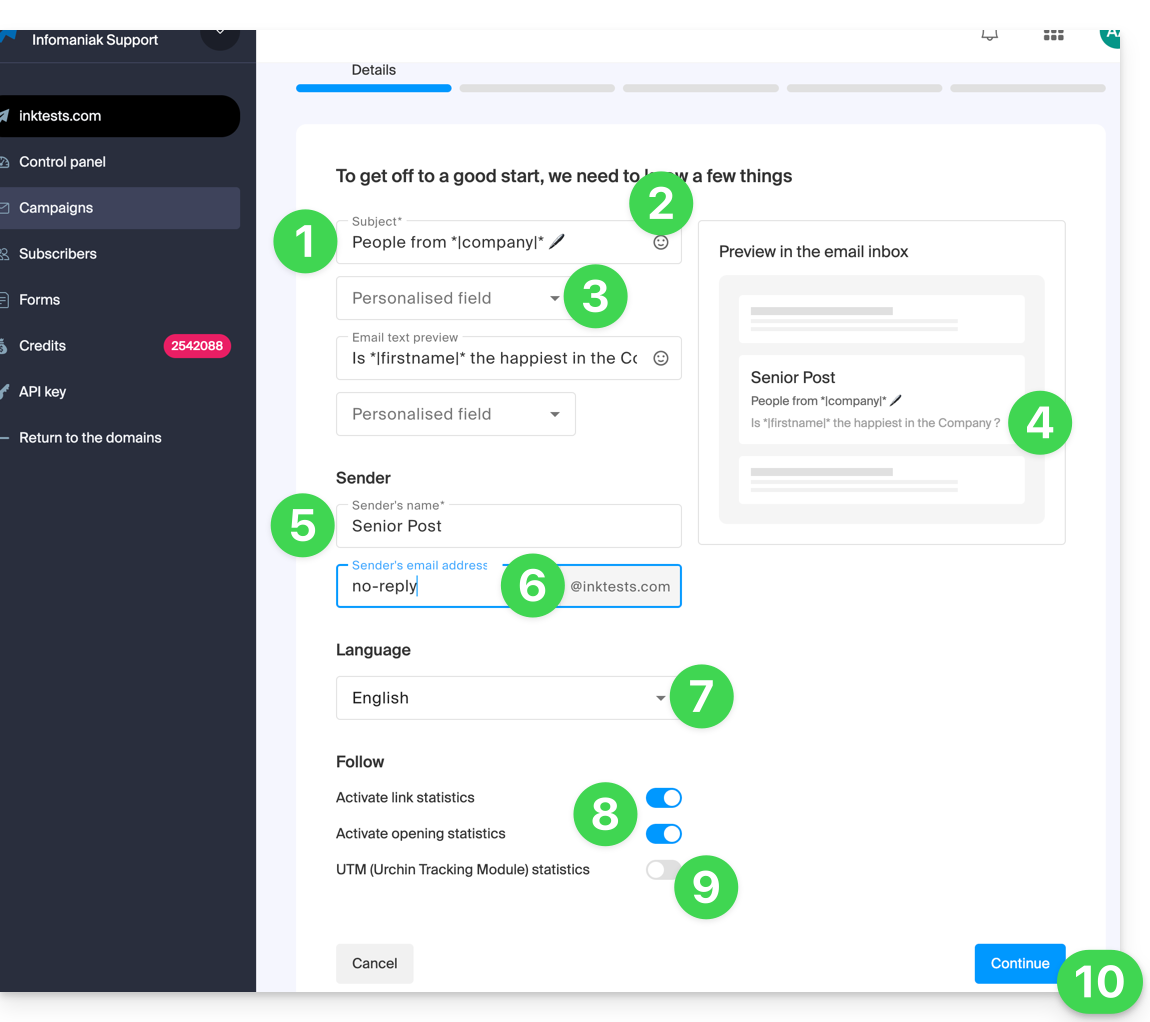
1. Details: configure the shipment
To start writing your Newsletter, complete the required information:
- Enter a subject for the email (visible to the recipient and in the list of your sends).
- Insert an emoticon if necessary.
- Insert variables (custom fields) if necessary.
- It's exactly the same principle for the preview message (which you can preview with the rest on the right side of the window).
- Enter a name corresponding to the sender (visible to the recipient).
- Enter the email address of the sender (from those existing at the domain level corresponding to the Newsletter; the email address must exist and be valid).
- Choose the language (for the language used in the additional sends such as the unsubscription one).
- Enable or disable the tracking.
- Enable or disable the UTM part.
- Click on Continue to proceed to the next step (your Newsletter is now saved in draft mode):
2. Choose the Newsletter theme
- If you have previously saved writing templates (blocks and designs configured to your liking), you can find them under the “My Templates” tab to reuse them.
- Otherwise, click on the Templates tab.
- Hover over a pre-configured design to start editing from this template or preview it.
- Click on the blank template to start a completely new creation from the block editor:

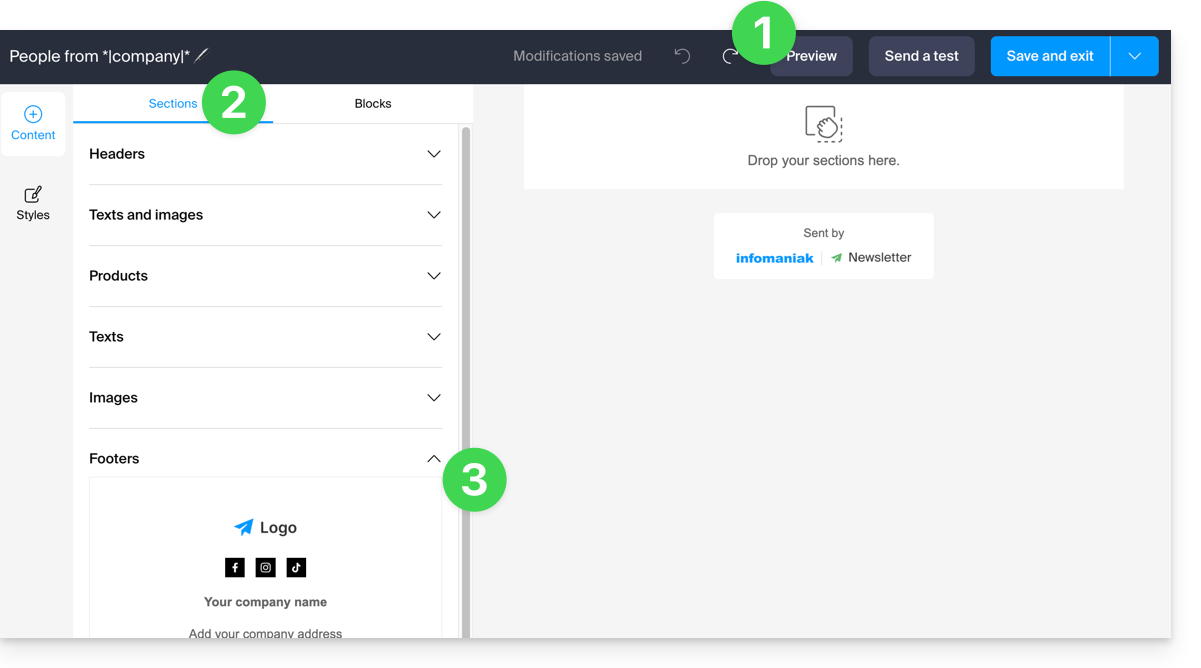
3. Write and edit the content
- At any time, your changes are saved and can be undone; you can also preview the rendering (desktop / mobile) of your Newsletter (and send a test).
- The Sections tab groups different pre-built elements, such as blocks intended for the upper part (header) or lower part (footer), etc.
- Click on the chevron to expand the content and select an element:
- Click on the Blocks tab to get simpler elements that you can use to compose your layout.
- Drag the selected elements into the right-hand side part to the desired location:
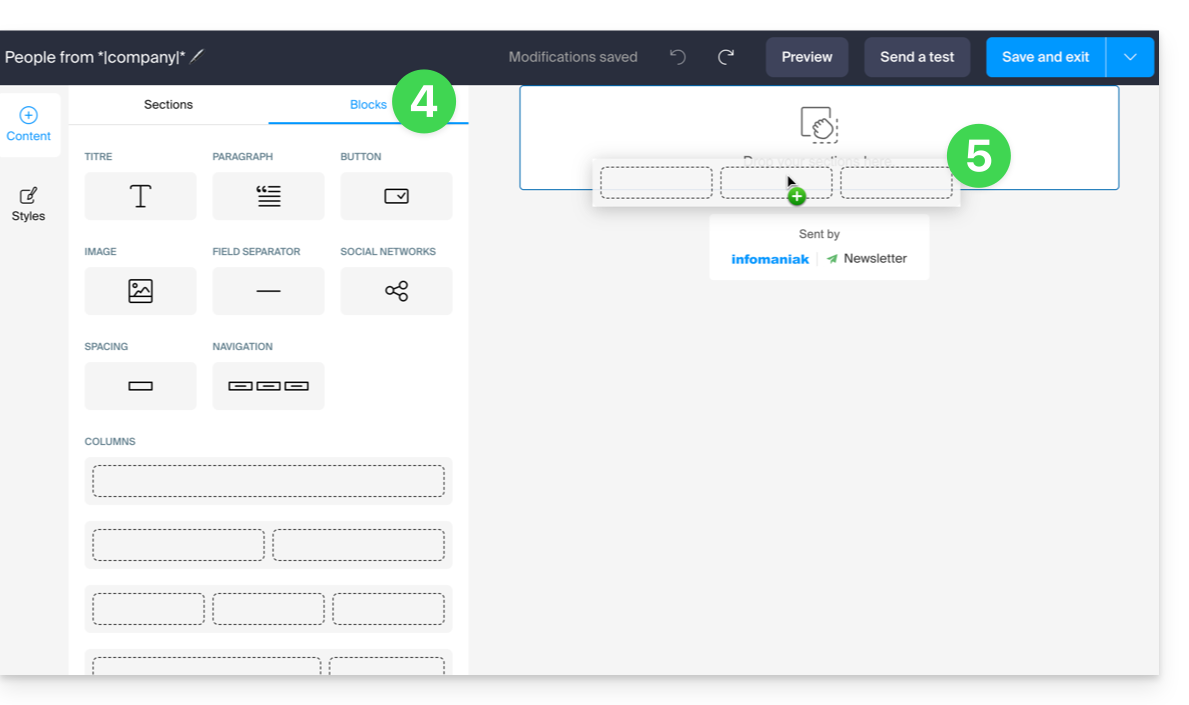
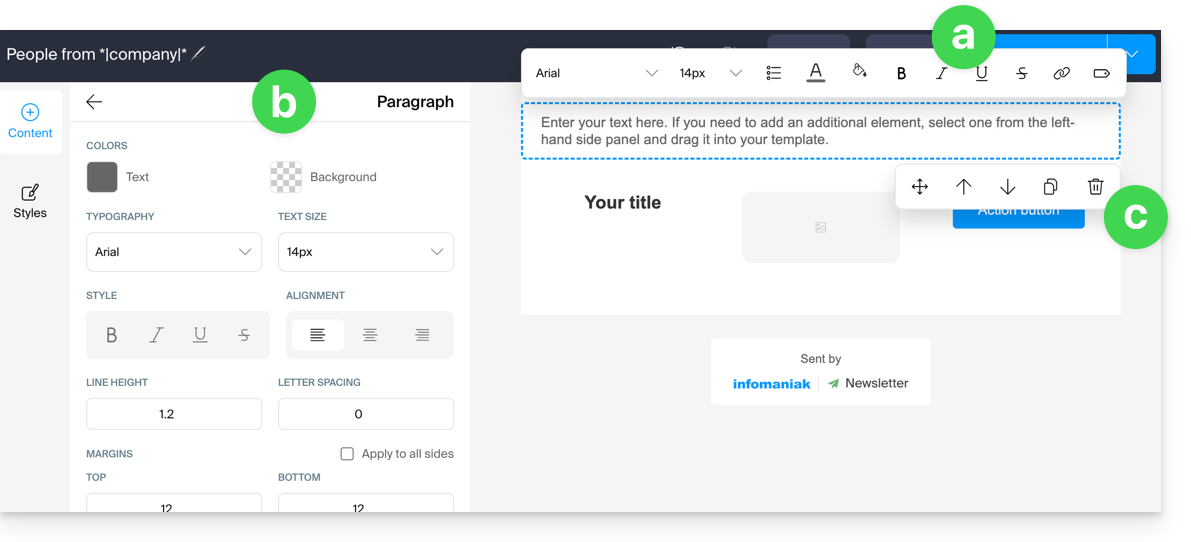
- Each element can still be adjusted when you click on it:
- The text can be formatted using the toolbar that appears above (variables can also be inserted).
- The more global editing of the element will always be found in the left-hand side panel (background color, file selection (5 MB max.) for image blocks, etc.)
- The block itself can be moved on the page, duplicated, or deleted:
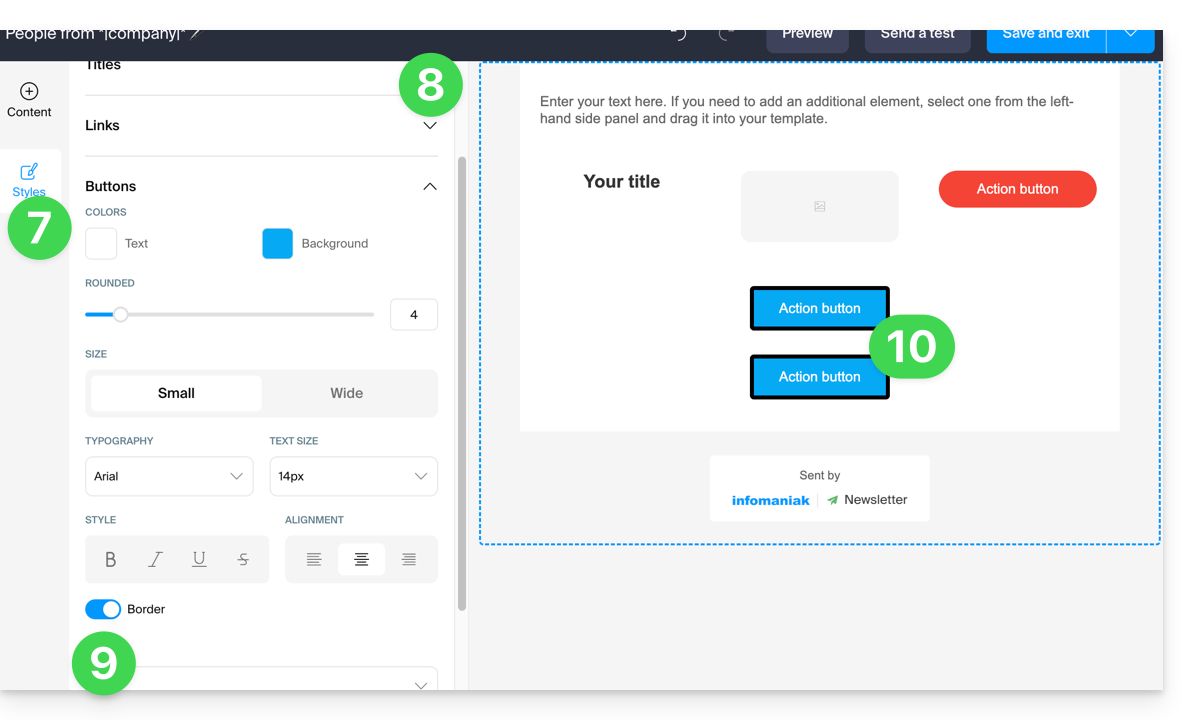
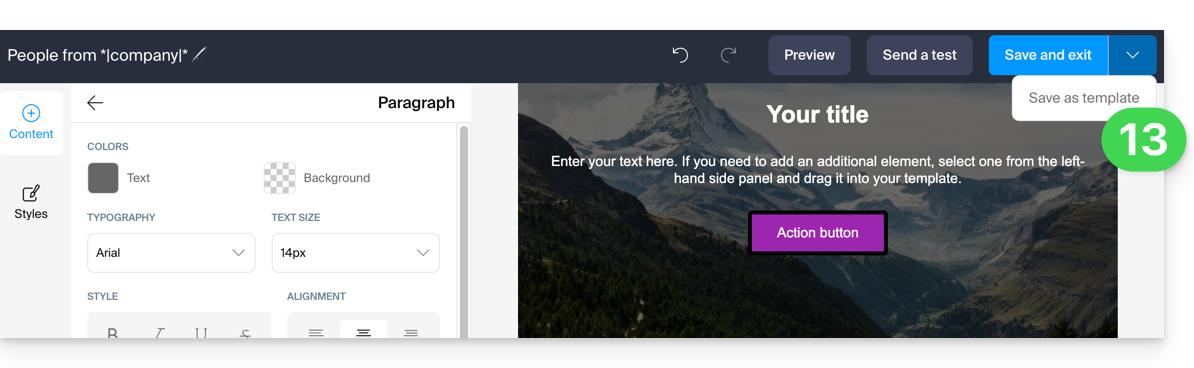
- Click on Styles to manage the characteristics that make up your different elements.
- Choose the elements to customize.
- For example, add a border to the button style.
- All new insertions of buttons and all existing buttons without customization will be affected by the modification:
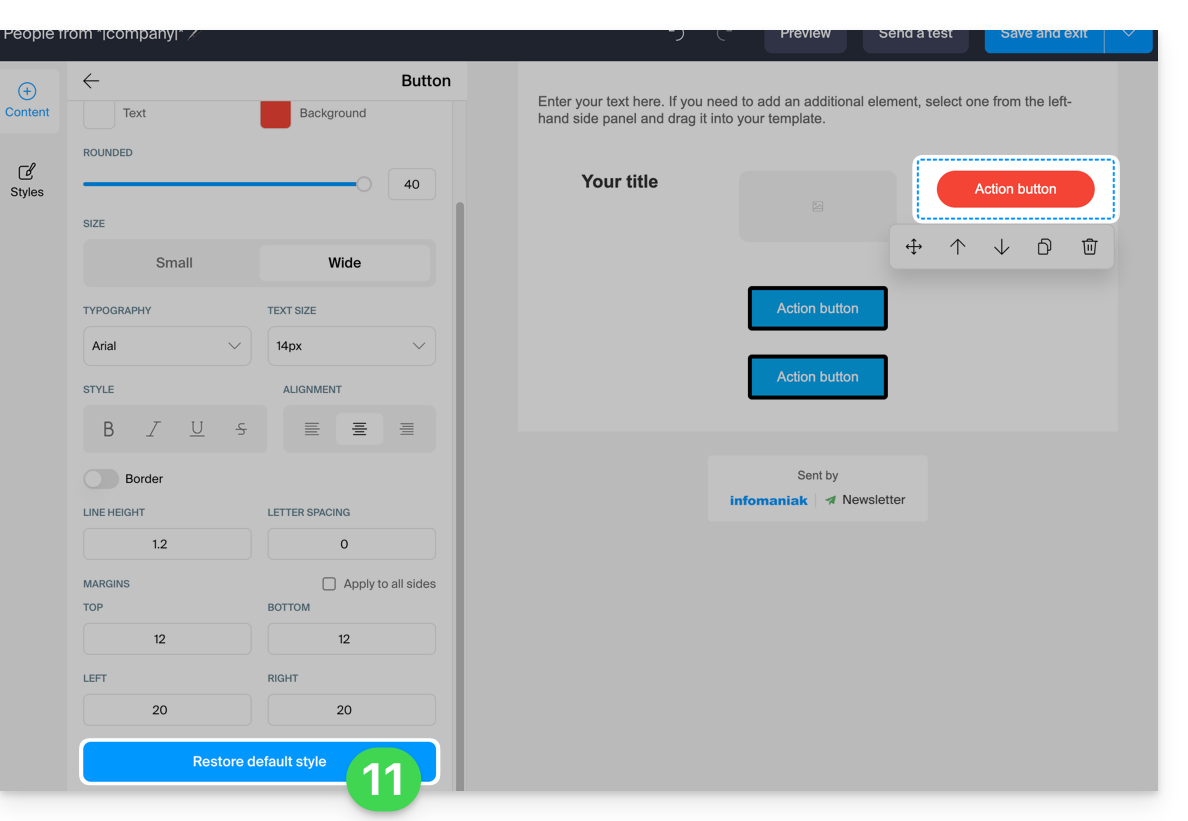
- At any time, it is possible to assign the style that has been decided for the different elements (point 8 above) by applying the default style to the elements that have been customized before:
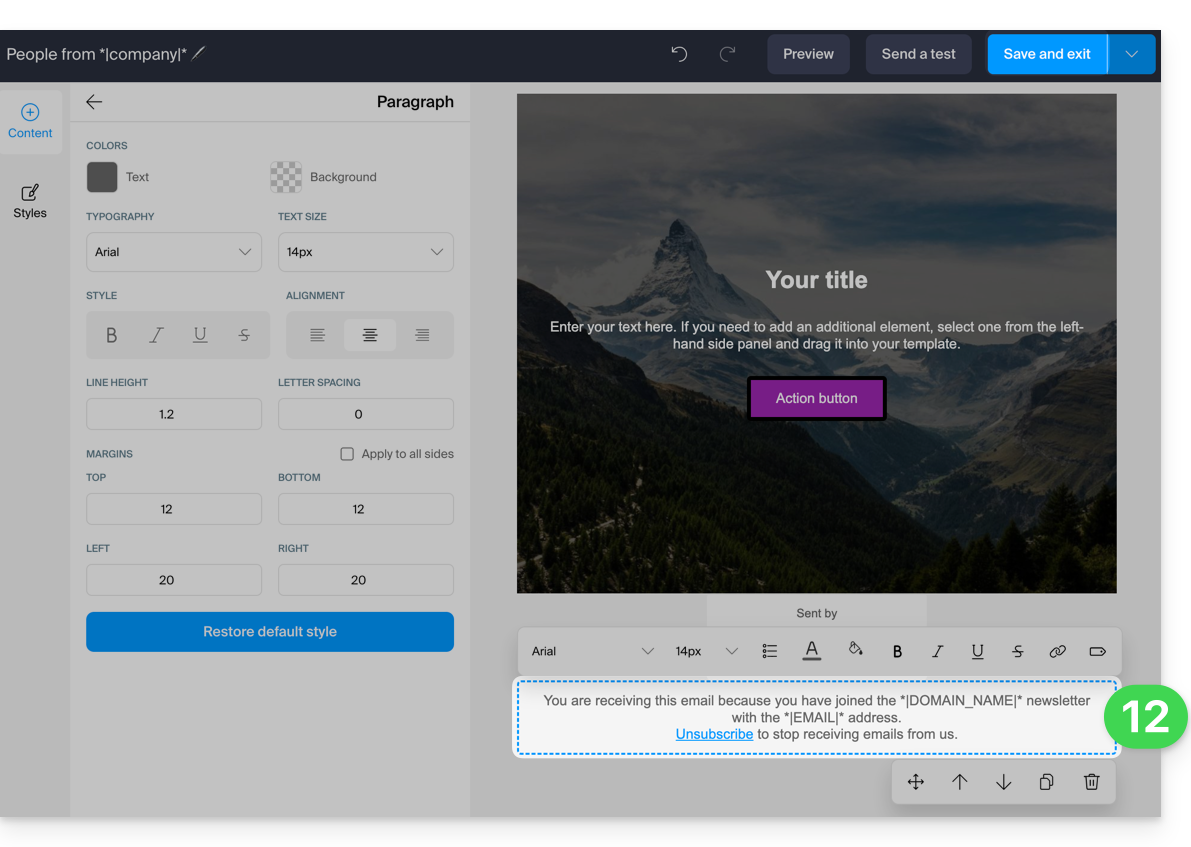
- When saving, if the mandatory information regarding the user's unsubscription is missing, it will be added to your content:
- You can save your template to reuse it for other Newsletter drafts (the template will be visible under the dedicated tab, see point 2.1 above) by clicking on the chevron to the right of the save button:
- Click on the save button at the top right when you have finished drafting your Newsletter.
4. Choosing recipients
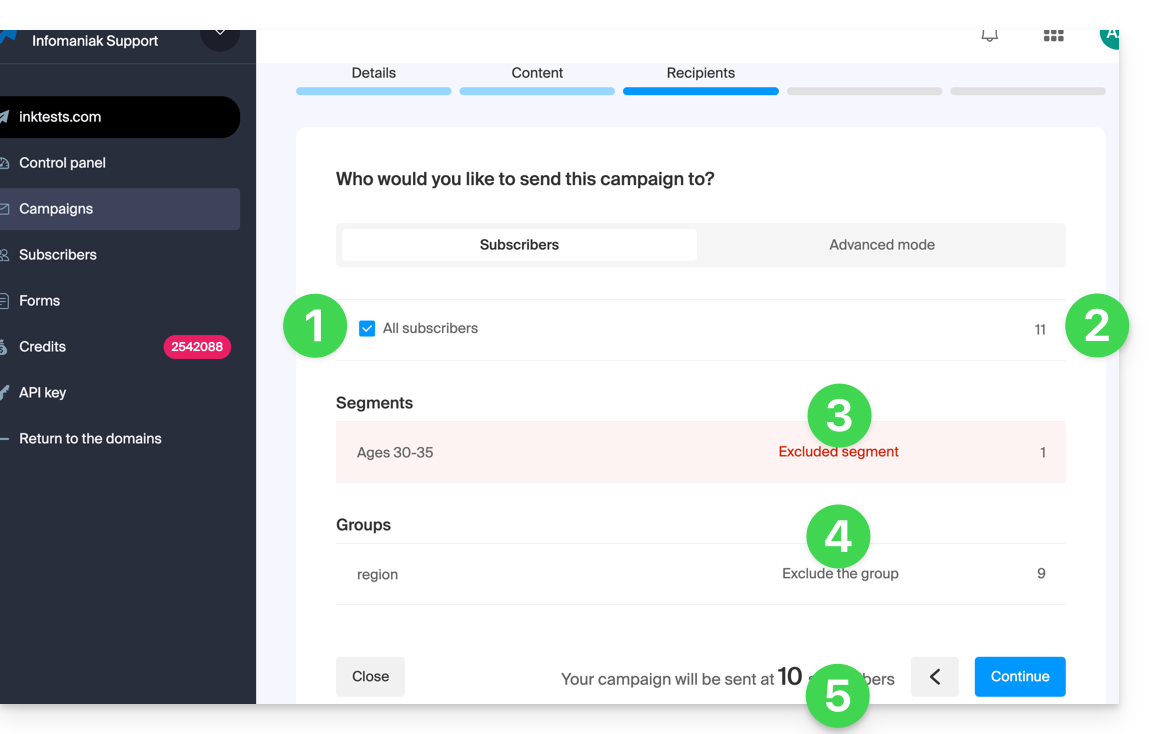
To select your subscribers (simple mode):
- Select all subscribers by checking the box.
- The total number of subscribers represented by this item is displayed on the right, the same applies to the elements detailed below.
- You can subtract from the total number of recipients automatically selected subscribers based on criteria that you have pre-established at the segmentation level; you could also select only this segmentation.
- You can subtract from the total number of recipients grouped subscribers; you could also select only this group.
- The total number of subscribers to whom the Newsletter will be sent is automatically updated based on your choices:
To select recipients based on certain criteria (refer to this other guide):
- Click on the Advanced tab:
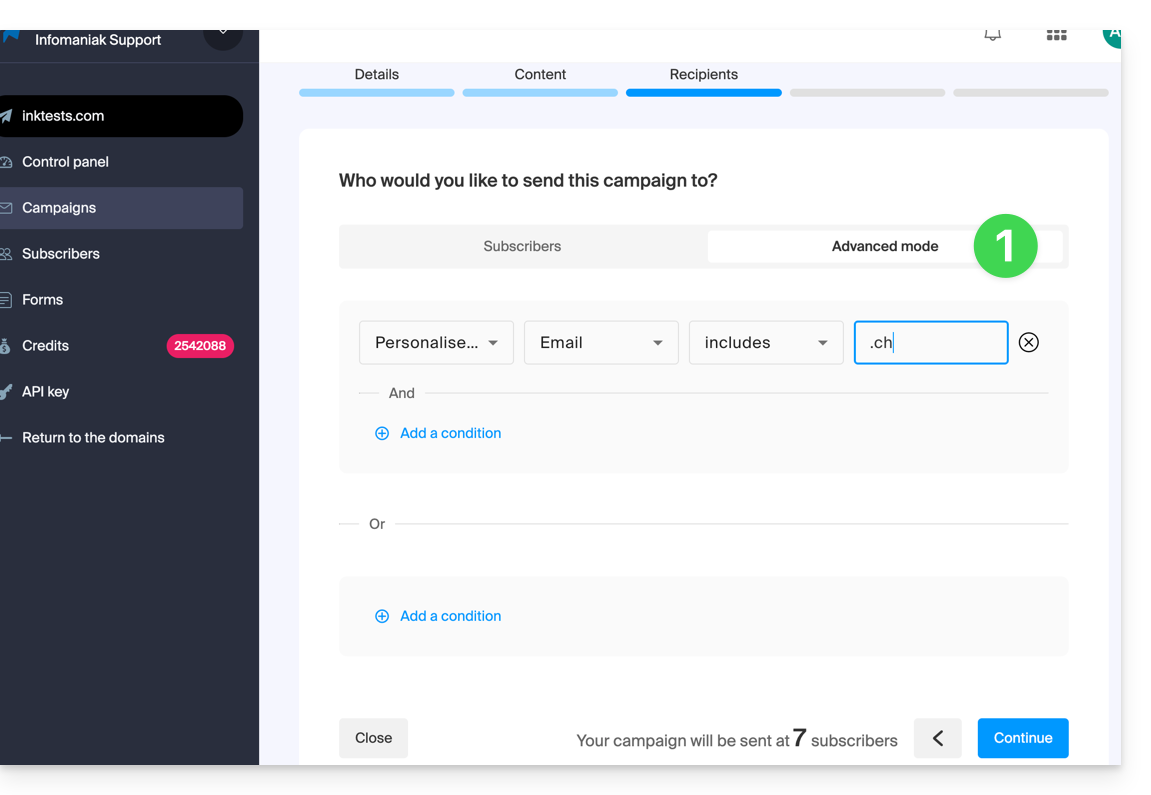
This allows you to add criteria (be careful if you add several, the additional condition can be with “AND” but also with “OR” which can include or exclude a large number of subscribers depending on your criteria).
As with the previous tab, the total number of recipients is updated at the bottom of the page dynamically based on your choices.
5. Preview and test the send
This penultimate step is summarizing: it allows you to verify the main characteristics of your send and modify any information at the last minute.
When you are ready, click on the blue button at the bottom right to proceed to the final step.
6. Trigger an immediate or delayed send
The final step allows you to choose when to send your Newsletter:
- The send can be scheduled for the desired time, or triggered immediately:
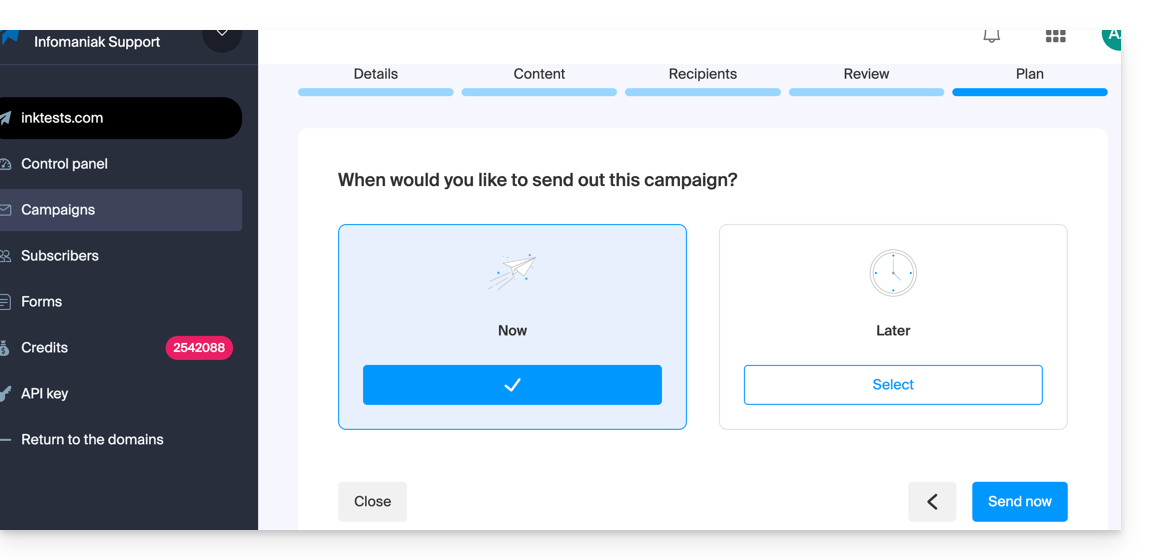
The send will then take place over several hours depending on the overall volume of Newsletters being sent, the number of your recipients, and the hourly quota allowed for your account. You will be informed of the progress of your send.
This guide explains how to connect to an external database from a Cloud Server.
Preamble
- It is possible to connect to MySQL (external or not) via SSL - to be specified when establishing the connection.
- The MySQL port
3306is closed by default - to open it, refer to this other guide. - Infomaniak does not install
PDO_DBLIB.
Install PHP_PDO_ODBC
Prerequisites
- Have the PHP Extensions menu on the Infomaniak Manager in the Cloud Server section (otherwise, it will be necessary to upgrade the Cloud Server).
It is possible to install the PHP_PDO_ODBC extension from the PHP Extensions menu of your Cloud Server:
- Click here to access the management of your product on the Infomaniak Manager (need help?).
- Click directly on the name assigned to the product concerned.
- Click on PHP Extensions in the left sidebar.
- Click on the blue button Install an extension.
- Choose the
PHP_PDO_ODBCextension. - Confirm the installation.
Configure the connector
The driver configuration is already defined in /etc/odbcinst.ini:
[FreeTDS]
Description = MS SQL database access with Free TDS Driver
Driver = /usr/lib/x86_64-linux-gnu/odbc/libtdsodbc.so
Setup = /usr/lib/x86_64-linux-gnu/odbc/libtdsS.so
There is no need to redefine it statically in the .odbc.ini or in the user's home ~~/.odbc.ini~~ or also dynamically in the PHP code.
Example with the FreeTDS driver defined in advance, the version of the driver must also be specified at the end of the pdo object declaration:
$con = new PDO('odbc:Driver=FreeTDS;Server=__SERVER IP__;Port=3306;DATABASE=__DATABASE NAME__;UID=__USERNAME__;PWD=__PASSWORD__;TDS_Version=8.0');This guide explains how to share contacts with other users from address books in the Infomaniak Web app Contacts (online service ksuite.infomaniak.com/contacts).
Share an address book
To share contacts:
- Click here to access the Infomaniak Web app Contacts (online service ksuite.infomaniak.com/contacts).
- Click on the action menu ⋮ to the right of an address book (above any groups, which cannot be shared specifically but will be visible when the share is accepted).
- Click on Share:
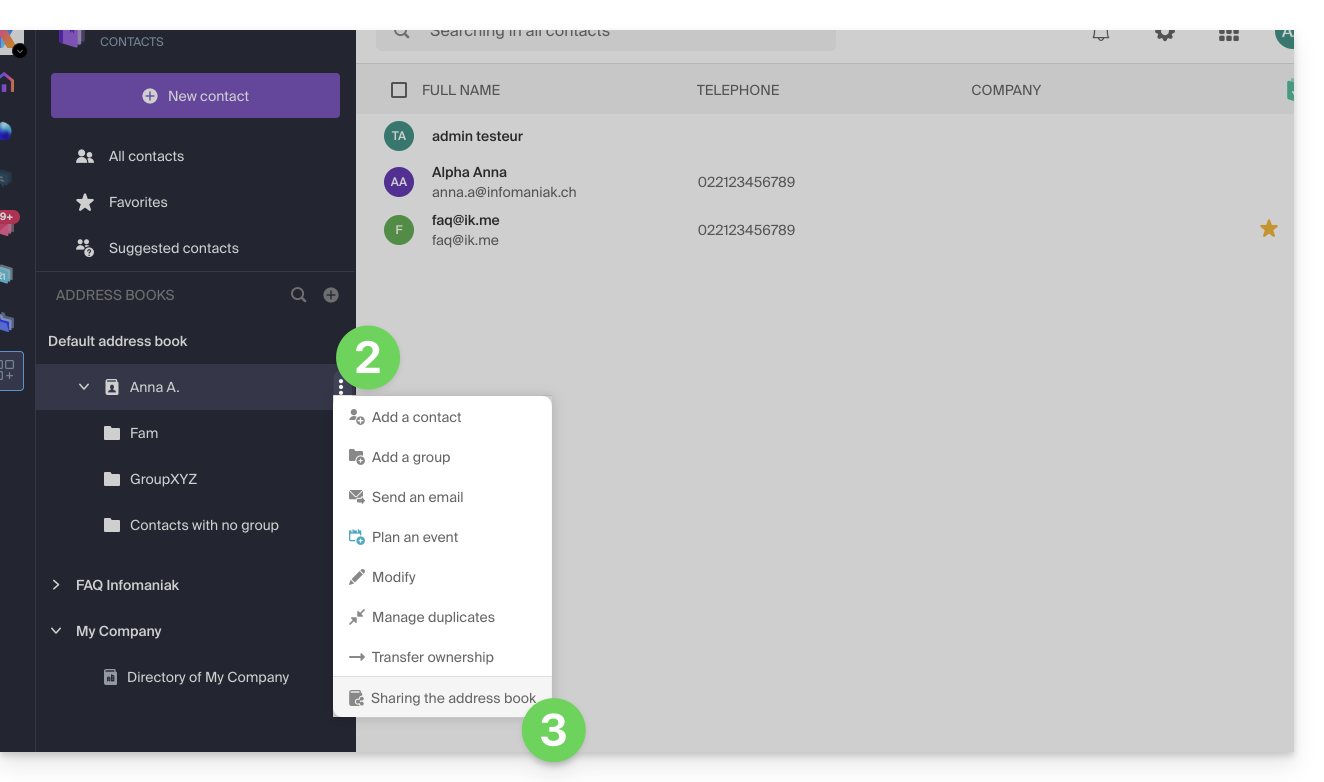
- If there is already a share in progress and you want to start another, click on Share at the top, otherwise click on the Share button below.
- Enter the email address of the user who will access the address book:
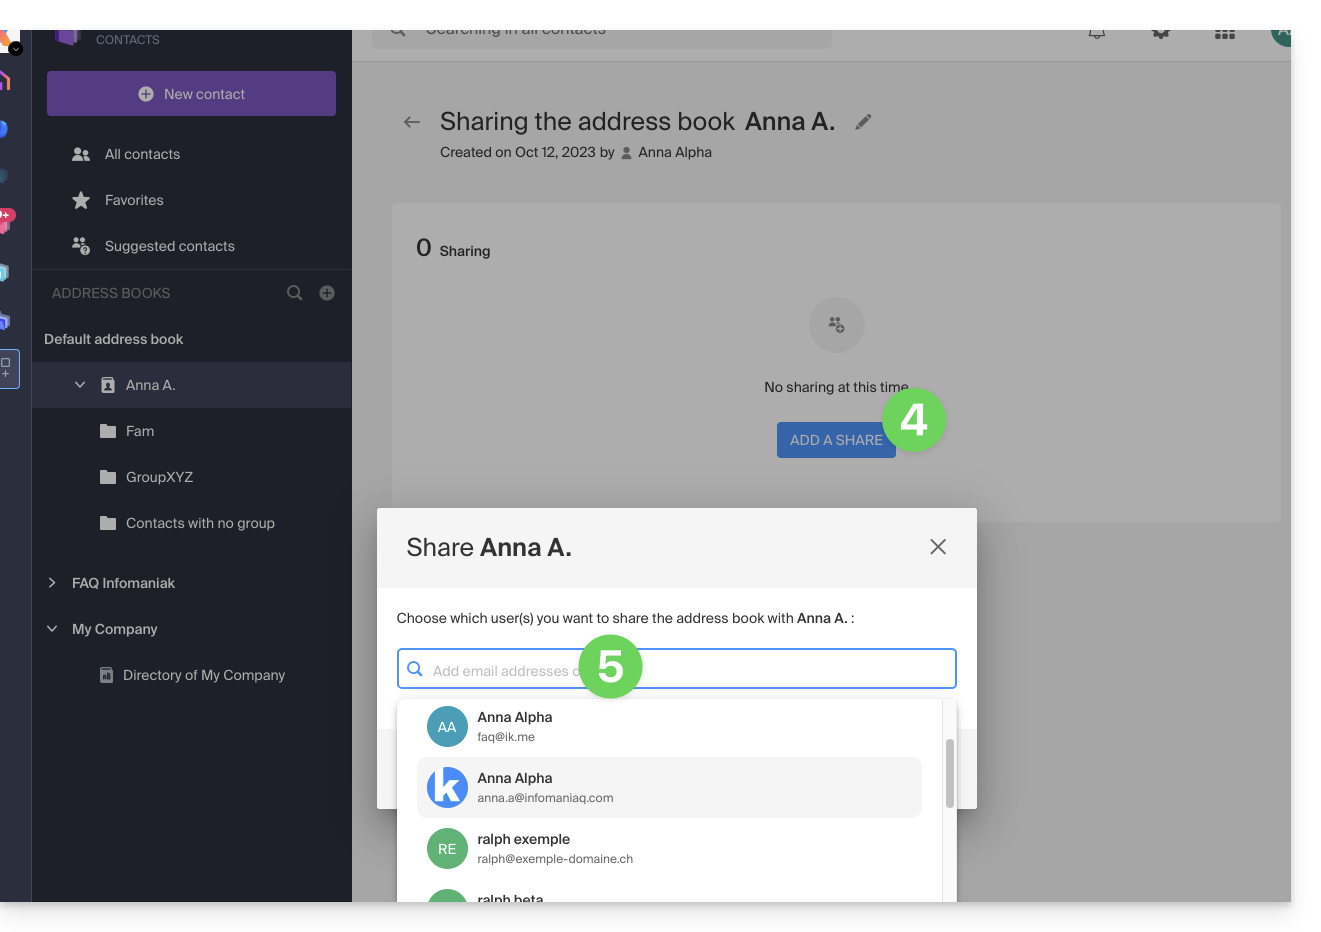
- If the user does not already have one, they can create one for free.
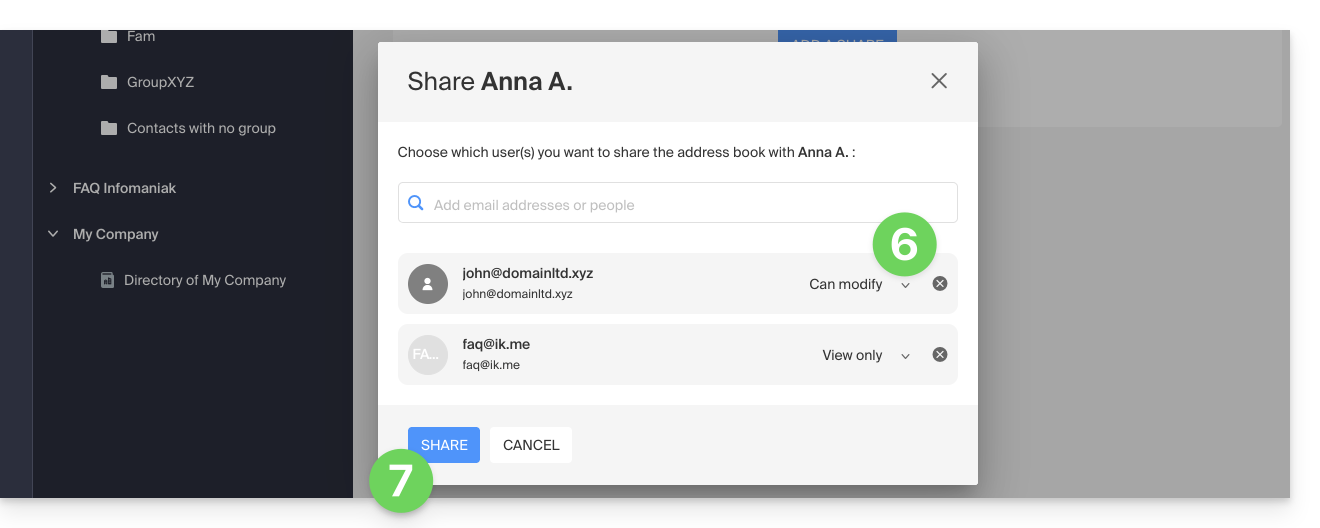
- Specify the user's rights on this address book (Administration, Read only, Read and write).
- Finish by clicking on the share button:
Contacts created or moved/copied to this address book in the future will be visible dynamically to all users with access to the share.
Accept the share
The invited user must accept the share to access the shared data (group names are already visible before acceptance) which will be in a section “Other address books”: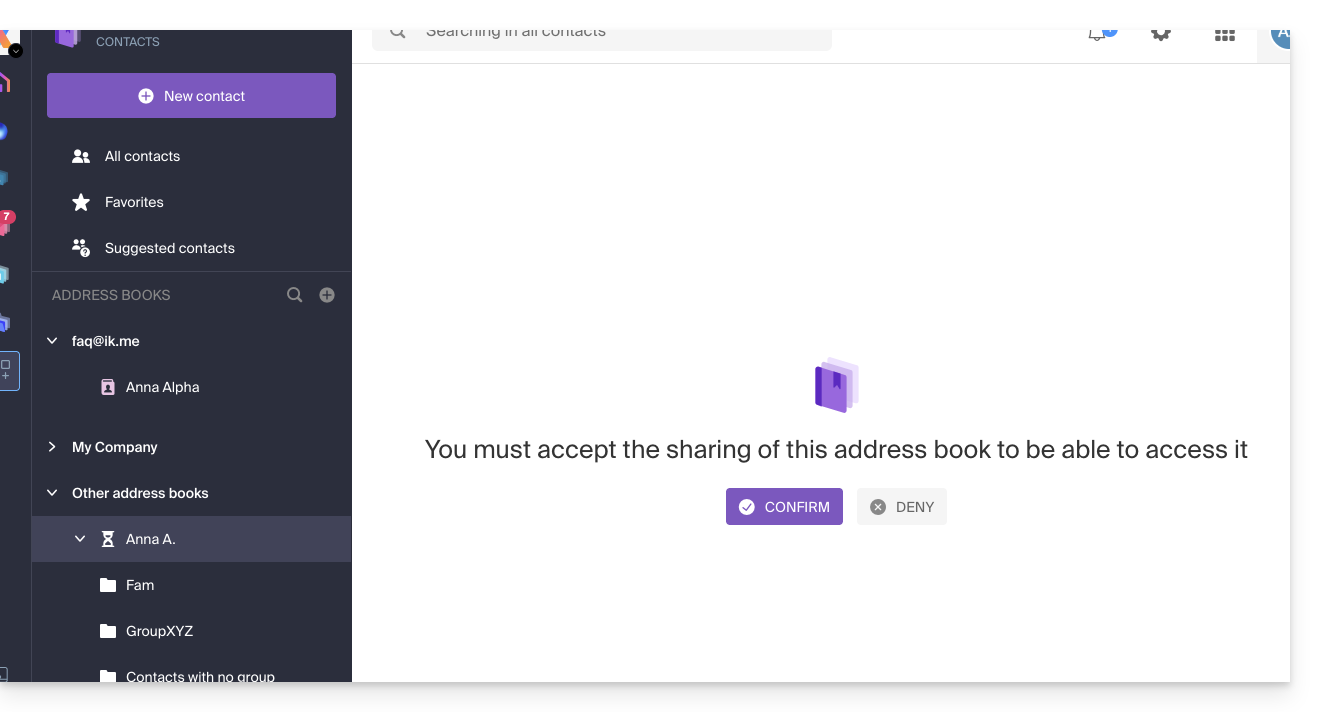
Depending on their permissions, they can perform certain operations on the contacts or simply view them, including when composing a new email:
Leave a share already accepted
A user can leave a share from the action menu ⋮ to the right of the shared address book: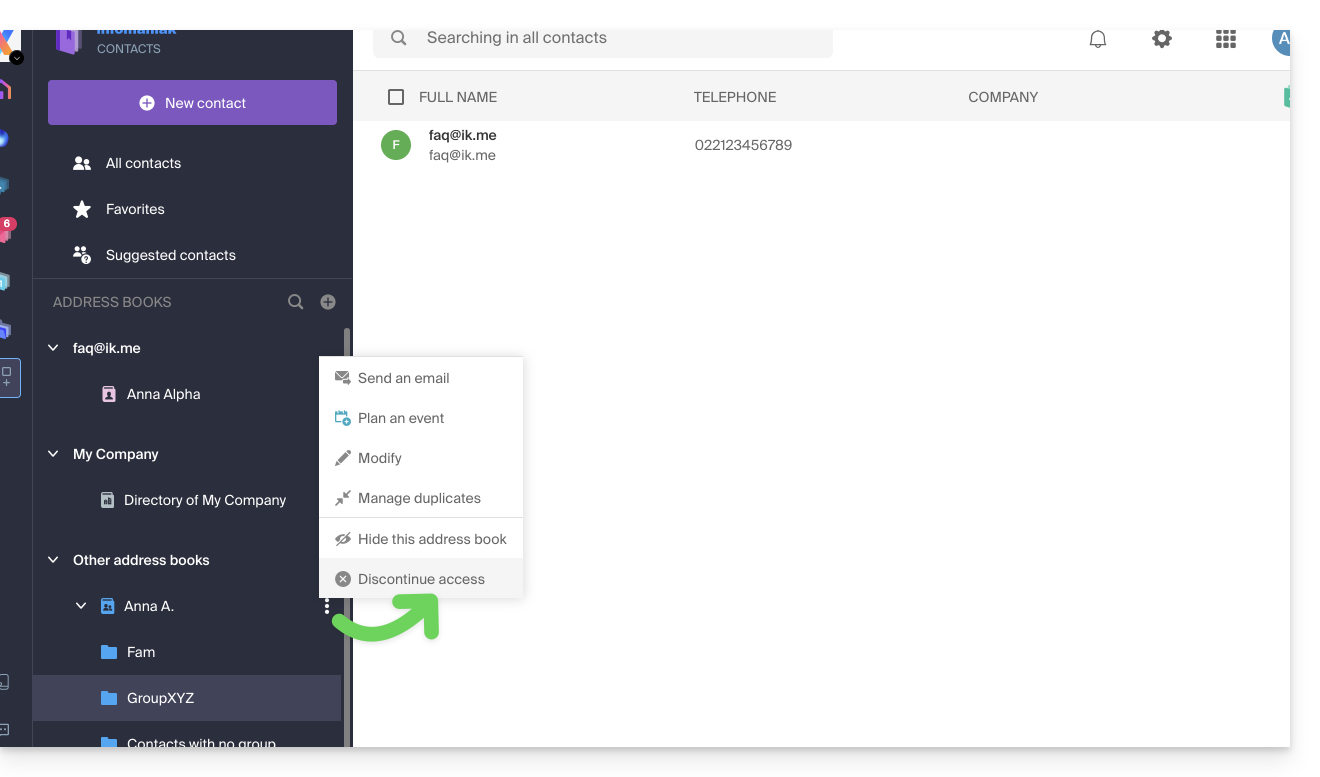
This guide concerns UTM tags, or Urchin Tracking Module, tags added to URLs to track and analyze the performance of online marketing campaigns from the Infomaniak Newsletter tool.
Preamble
- These UTM tags, which are optional, consist of specific parameters such as source, medium, campaign, term, and content, which help identify the origin of the traffic from a link.
- By using UTM tags, marketers can understand which campaigns generate traffic, which channels are the most effective, and which ads or strategies work best, based on the data collected by web analytics tools.
- UTM tags therefore allow you to create a correspondence between the links in your Newsletters and the tracking of a tool like Google Analytics on your site.
Enable the UTM feature
Enable this option in the very first step of creating your Newsletter:
- Click here to access the management of your product on the Infomaniak Manager (need help?).
- Click on the domain name concerned in the table that appears:
- Click on Campaigns in the left sidebar menu.
- Click on Create a campaign:
- Set the UTM parameter to ON using the toggle switch:
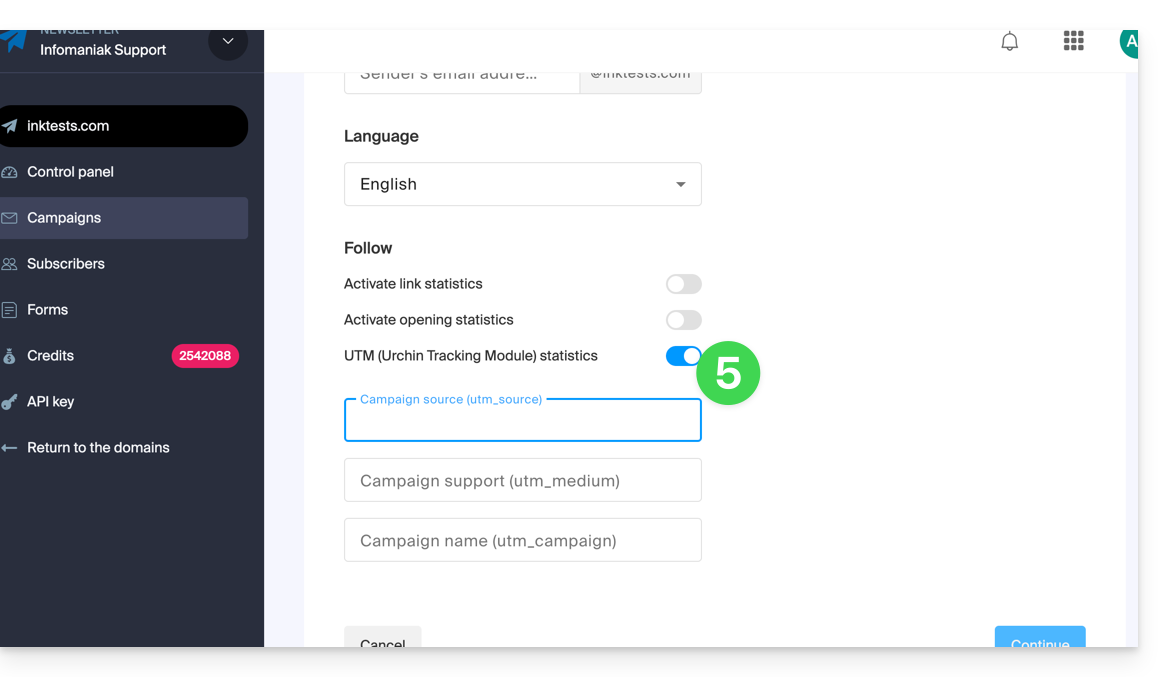
You will then find 3 fields to indicate keywords of type utm_parameters:
- campaign source (
utm_source) - campaign medium (
utm_mediumsuch as e-mail for example) - campaign name (
utm_campaign= the name of your campaign for example)
Therefore:
- Fill in the 3 UTM fields in step 1 of creating a Newsletter.
- Insert a link to the URL of your site (the latter must be properly configured and analyzed by Google Analytics for example) in the body of the Newsletter in step 3.
- When the reader clicks on it, they will arrive at the URL followed by the terms "
?utm_source=...&utm_medium=...&utm_campaign=..." with obviously your keywords in place of "...".
If you enter multiple keywords in these fields, any spaces will be replaced by underscore _ signs.
Later, it is planned to be able to enter dynamic formulas in these fields, such as today's date for example. Also, refer to the article https://news.infomaniak.com/comment-creer-un-objectif-google-analytics.
This guide helps you identify and correct most email errors encountered after sending an email to a recipient. Refer to this other guide if you are looking for information about errors obtained when configuring an email address in a software/email client.
Introduction
- Generally, a mail error message is the result of…
- … an incorrect configuration of the domain name used with your email,
- … an issue with your recipient's (mail provider).
- In any case, a delivery failure report (Mailer Daemon or Mail Delivery Subsystem) containing the explanation is sent to the sender.
Searching for and identifying the email error
When your message does not reach your recipient, an initial failure report (Temporary Delivery Failure Report) is sent and specifies that the server will attempt to resend your message several times.
A final delivery failure report (Final Delivery Failure Report or Undeliverable Mail) issued by the recipient's server is sent to the sender (via a passage through the Infomaniak mail server, hence the mention of Infomaniak at the beginning of most error messages you may receive) to inform them that the email could not be delivered even after several attempts.
The notification always contains the reason for the failure. Example below:
This is the mail system at host smtp-1-1234.mail.infomaniak.ch.
I'm sorry to have to inform you that your message could not be delivered to one or more recipients. It's attached below.
For further assistance, please send mail to postmaster.
If you do so, please include this problem report. You can delete your own text from the attached returned message.
The mail system anna.a@abc.xyz: host mxbw-abc-xyz.abc-ab12.abc.ch[123.456.789.00] said: 550 5.1.1
anna.a@abc.xyz recipient rejected, account administratively disabled (in reply to RCPT TO command)
So here the address of your recipient is visibly suspended by their email provider (account administratively disabled).
Sometimes you need to look for the reason for the error message received among its attachments (often a raw text file). Example:
Reporting-MTA: dns; mxbw.abc.ch [123.456.789.00]
Received-From-MTA: dns; smtp-1-1234.mail.infomaniak.ch [12.345.678.99]
Arrival-Date: Tue, 01 Aug 2023 15:49:22 +0200
Final-recipient: rfc822; anna.a@abc.xyz
Diagnostic-Code: smtp; 552 RCPT TO:anna.a@abc.xyz Mailbox disk quota exceeded
Last-attempt-Date: Tue, 01 Aug 2023 15:49:22 +0200Here the mailbox of your correspondent external to Infomaniak seems to be full (Mailbox disk quota exceeded).
Most common cases
SPF Failure
The SPF (Sender Policy Framework) record is not correctly configured:
Subject: Delivery Status Notification (Failure)
From: Mail Delivery System mailer-daemon@domain.xyz
To: Anna.A anna.a@abc.xyz
This is an automatically generated Delivery Status Notification.
Delivery to the following recipient failed due to SPF failure:
anna.a@abc.xyz
Technical details of SPF failure:
The sender's domain domain.xyz does not have a valid SPF record. Please contact your email administrator to correct the SPF configuration.
Solution: check the configuration of your domain name and especially the SPF record if your website is hosted with Wix or another provider.
User Unknown
The email address specified in the message is invalid or does not exist:
Subject: Delivery Status Notification (Failure)
From: Mail Delivery System mailer-daemon@domain.xyz
To: Anna.A anna.a@abc.xyz
This is an automatically generated Delivery Status Notification.
Delivery to the following recipient failed permanently:
anna.a@abc.xyz
Technical details of permanent failure:
The email address does not exist. Please check the recipient's email address and try again.
Solution: carefully check the recipient's email address and correct it if necessary; ensure that you are using a valid email address for the recipient.
Temporary Failure
Le serveur de messagerie du destinataire rencontre des problèmes temporaires ou est indisponible.Solution: wait for some time, then try sending the message again later. If the problem persists, contact the recipient's technical support for help.
Blocked by SPAM Filter (or Content Rejected)
The recipient's mail server has blocked the message due to anti-spam filtering rules:
Subject: Delivery Status Notification (Failure)
From: Mail Delivery System mailer-daemon@domain.xyz
To: Anna.A anna.a@domain.xyz
This is an automatically generated Delivery Status Notification.
Delivery to the following recipient failed due to the message being rejected as spam:
anna.a@domain.xyz
Technical details of delivery failure:
The content of the message triggered the spam filters of the recipient's email server. Please review the message content and try again.
Solution: check if your message contains elements that may be considered spam (keywords, suspicious links, etc.). Contact the recipient to check if the message has been filtered into the junk mail folder.
Refer to this other guide regarding outgoing spam and this other guide regarding incoming spam.
Bad Reputation
The recipient's mail server has blocked the message due to anti-spam filtering rules:
gmail-smtp-in.l.google.com said: 550-5.7.1
Our system has detected that this message is likely suspicious due to the very low reputation of the sending domain.
To best protect our users from spam, the message has been blocked.
Please visit https://support.google.com/mail/answer/188131 for more information.
Solution: check the reputation of the domain, determine if one of your email addresses has been recently and involuntarily exploited for malicious purposes, for example.
Domain Not Found (or DNS Error)
Le nom de domaine du destinataire n'a pas pu être résolu ou n'existe pas.Solution: check the spelling of the recipient's domain and correct it if necessary; ensure that the domain name and DNS are valid and active.
Mailbox Full
La boîte de réception du destinataire est pleine, empêchant la réception de nouveaux messages.Solution: inform the recipient of the situation and ask them to free up space by deleting emails or archiving items.
This cannot happen with email addresses managed by Infomaniak since they have no storage size limit.
Part of their network is on our block list
If the error message (usually obtained after sending from an online tool, placed on the server where your website is hosted, for example a order confirmation from Prestashop or another online store that you manage) contains this:
host hotmail-com.olc.protection.outlook.com[104.47.30.97] said: 550 5.7.1
Unfortunately, messages from [89.123.456.789] weren't sent. Please contact your Internet service provider since part of their network is on our block list.
Solution: change the email sending method. The sending is unauthenticated and is sent from the server with a specific IP address that is apparently blocked by the recipient for some reason (Infomaniak does not intervene to request unblocking). Therefore, you need to configure the online tool to perform authenticated sendings.
Less frequent errors
Deferred - Delayed
The error message Deferred - Delayed - Warning: message still undelivered after 4 hours, Will keep trying until message is 3 days old means that the Infomaniak mail server tried to connect to your contact's mail server to send the message but was unable to do so for an undetermined reason. This error message specifies that the Infomaniak server will continue to attempt to send your message for the period specified in the error message. If, after this delay, the message has still not been delivered, you will receive a final error message informing you that your message could not be delivered and that your contact did not receive it.
Greylisting Delay
This error Greylisting Delay occurs when the recipient's mail server, like Infomaniak, uses a technique called "greylisting" that imposes a temporary delay on the first delivery attempt of a message from an unknown sender. The Mailer Daemon may possibly send an error report indicating that delivery has been delayed due to greylisting. The error may also mention banned sender. You should try resending your message a few minutes/hours later.
Malware message rejected
This error Malware message rejected occurs when the message contains an attachment, a link to a storage site like Dropbox, or dynamic content, including in the "forwarded" part of the message (in the case of a "forward" message, for example). You should try resending the message from the Web app Mail Infomaniak (online service mail.infomaniak.com) instead of a mail application, and remove any content that may cause this error.
Message Size Exceeded / File Too Large
These errors Message Size Exceeded / File Too Large occur when the size of the message (or attachments) exceeds the limit allowed by the recipient's mail server. The Mailer Daemon will return an error report indicating that delivery failed due to the message size being exceeded.
Rate Limit Exceeded
This error Rate Limit Exceeded occurs when the sender exceeds the allowed frequency or volume limit set by the recipient's mail server. Mail servers may impose these limits to prevent spam or system overload.
Sender denied: auth guards failed
Refer to this other guide if you encounter an error Sender denied: auth guards failed.
The message contains a Unicode character in a disallowed header
This error The message contains a unicode character in a disallowed header may appear if you have inserted a special character like a heart ♥ e.g. in the body of the email, the subject or especially in the full name; the risk of being rejected by providers is very high: it is best to keep the use of signs, characters and fonts as simple as possible.
This guide explains how to attach files and/or images to emails sent from the Infomaniak Web App Mail (online service ksuite.infomaniak.com/mail), the complete online solution for reading and managing your emails.
Preamble
- Refer to this other guide regarding email / attachment sending limitations.
Attach computer files to your message
To add an attachment present on your computer:
- Click here to access the Infomaniak Web App Mail (online service ksuite.infomaniak.com/mail).
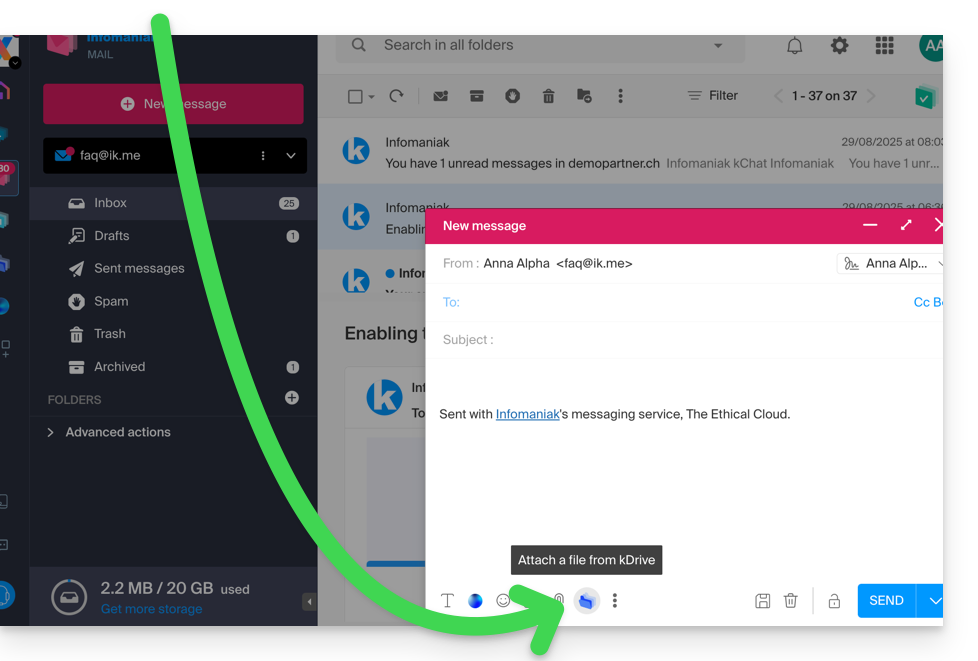
- Click on New message.
- Click on the paperclip icon Attach a file:
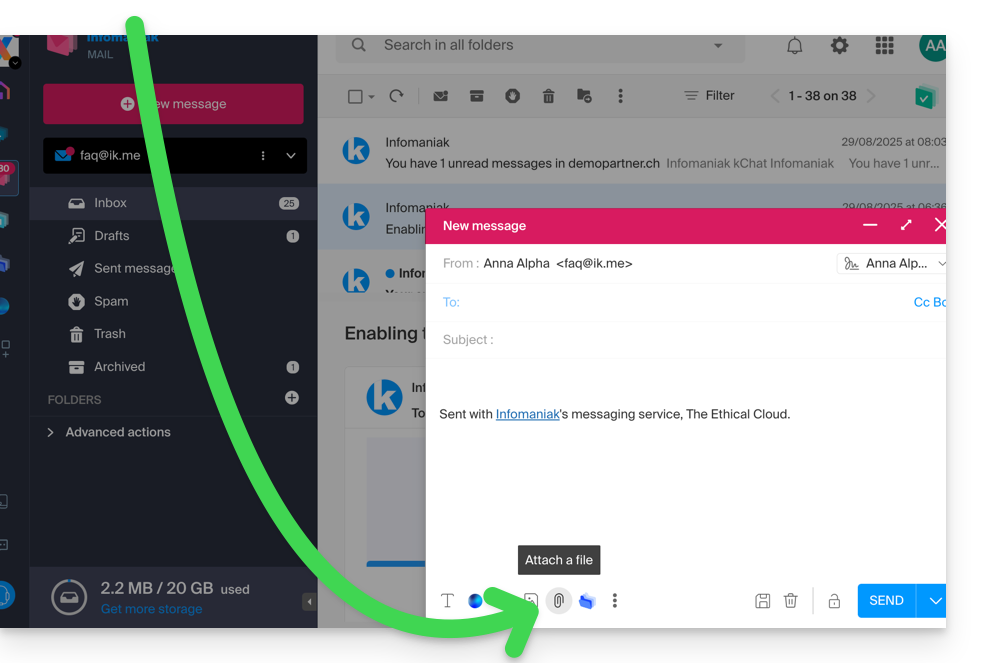
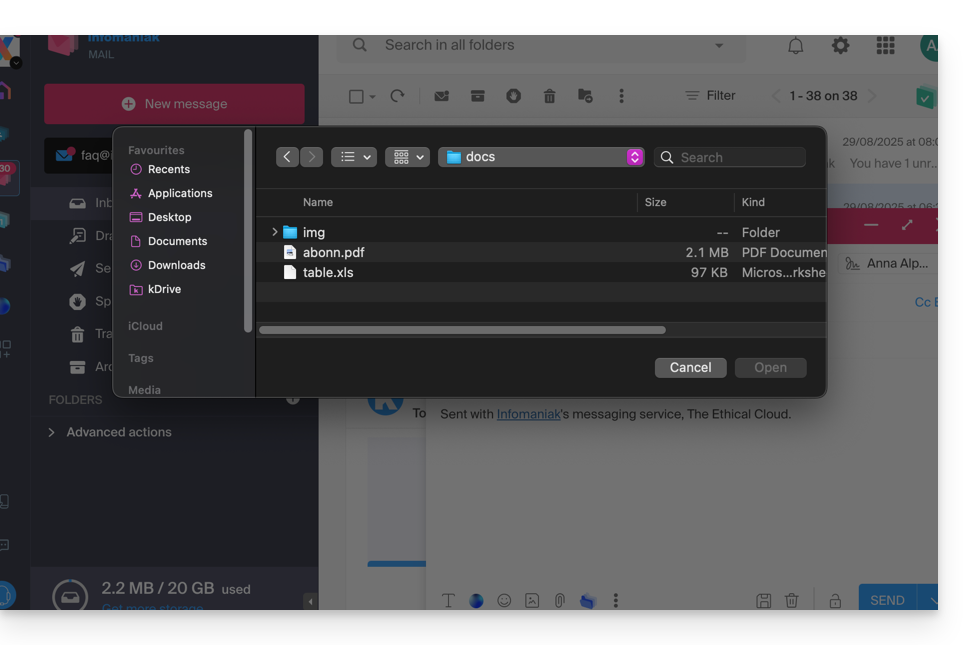
- Browse locations to select the files to attach to the message:
- With the Infomaniak Web App Mail (online service ksuite.infomaniak.com/mail) the size limit for attachments is 25 MB.
- Beyond and up to a limit of 3 GB, a SwissTransfer link is generated and integrated into your message: the data is stored in Switzerland in the Infomaniak Cloud and your recipients will be able to use this link to easily download the attachments during a predefined period.
- Beyond 3 GB (and up to 50 GB), it is recommended to always use SwissTransfer for your sends.
- With the Infomaniak Web App Mail (online service ksuite.infomaniak.com/mail) the size limit for attachments is 25 MB.
Attach kDrive files to your message
To add an existing attachment on kDrive:
- Click here to access the Infomaniak Web App Mail (online service ksuite.infomaniak.com/mail).
- Click on New message.
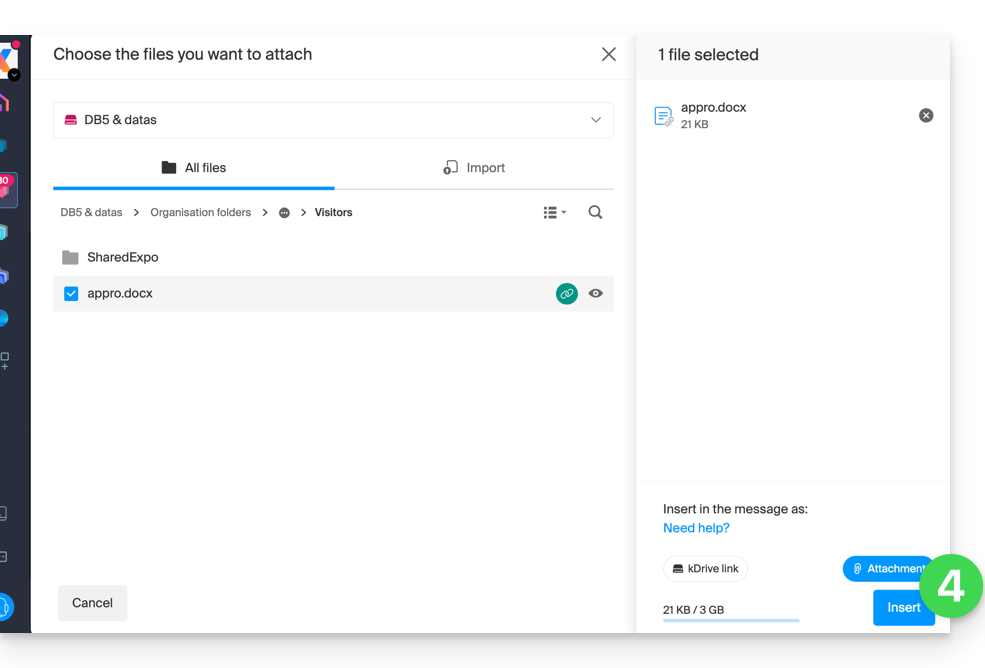
- Click on the kDrive folder icon to browse locations; select the kDrive files to attach to the message:
- Once the data is found and selected, select the Attachment option on the right (to attach the kDrive files to the message rather than sending a simple link to the files) then click on the Insert button:
Include an image in the body of your message
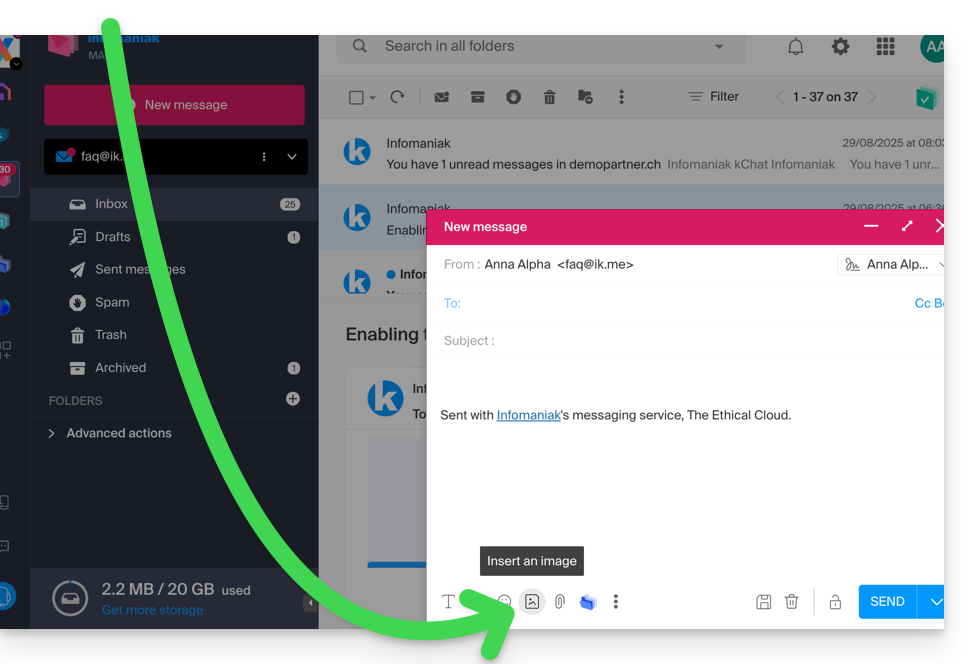
To add an image to the message (in the middle of the text of your message for example), 2 possibilities:
- Drag/drop the image into the input interface (images over 10 MB will not be displayed but will be attached).
- … or Click on the icon representing the frame with the mountains:
- then:

- Click on the button to upload an image (which allows you to choose it from the location of your choice and then insert it into the body of the message)…
- … or enter the URL of the image you want to include dynamically; the image must be somewhere on the Internet (you can use the FTP Manager file manager to send your image to your hosting space if you have one) and must still be there at the time of consultation of the message by your correspondent.
- Click on the button to add the image.
This guide explains the principle of on-the-fly URL rewriting.
Preamble
- On-the-fly URL rewriting is a technique that allows modifying the appearance of a web page's URLs without actually changing the resource's path.
- This process is done through virtual redirects, transforming a visible URL into a more aesthetic one while preserving the initial destination, invisible to visitors.
- This method is often used to make URLs simpler and more readable, by hiding the parameters of dynamic pages.
- In addition to improving aesthetics for visitors, it is beneficial for referencing, as search engines generally prefer URLs without complex parameters.
URL rewriting example
Take the example of the URL: article.php?id=25&categorie=4&page=3. It can be rewritten as: article-25-4-3.html or titre-article-25-4-3.html. Here is how to configure this in a .htaccess file if article.php is located in the web/admin/ directory:
Options +FollowSymlinks
RewriteEngine on
RewriteBase /admin/
RewriteRule ^article-([0-9]*)-([0-9]*)-([0-9]*).html$ article.php?id=$1&categorie=$2&page=$3 [L]- Options +FollowSymlinks: allows the use of symbolic links
- RewriteEngine on: enables Apache's URL rewriting module
- RewriteBase /admin/: specifies the working directory
- RewriteRule: defines the rewrite rule
With this configuration, when a user accesses article-25-4-3.html, they are redirected to article.php?id=25&categorie=4&page=3 without this being visible.
Even if URL rewriting is in place, the old URL remains functional. It is therefore crucial to update all internal links of your site to adopt the new URL format.
Redirect to another domain
If you own multiple domains pointing to the same site, you can redirect all requests to a main domain. For example, if www.domaine.xyz and www.mon-domaine.xyz lead to the same site, but www.mon-domaine.xyz is your main domain, use this rule in the .htaccess of www.domaine.xyz:
RewriteEngine On
RewriteRule ^(.*)$ http://www.mon-domaine.xyz/$1 [R=301]
This will redirect all pages from www.domaine.xyz to www.mon-domaine.xyz transparently, with a permanent redirect (R=301).
Also refer to this other guide on this subject.
This guide explains how to create and then automatically add a signature to messages sent from the Infomaniak Mail Web app (online service ksuite.infomaniak.com/mail).
⚠ Available with:
| kSuite | Free | |
| Standard | ||
| Business | ||
| Enterprise | ||
| my kSuite | * | |
| my kSuite+ | ||
| Mail Service | Starter 1 max. address | |
| Premium 5 min. addresses |
* Read this other guide regarding the limitations of the my kSuite offer.
Preamble
- The signature will also be visible when sending from the Infomaniak Mail app (iOS / Android).
- It will not be present with another sending method (a software like Outlook for example).
- It is also not added to the messages of the answering machine; it is necessary to add one in the out-of-office message directly.
- One or more signatures can be added from Mail and from the Manager where all the addresses of a Mail Service are managed. Choose which signature to use when sending.
Access signatures from the Infomaniak Web Mail app
Prerequisites
- Having permission to manage signatures: if you had been invited to the Infomaniak Web app Mail (online service ksuite.infomaniak.com/mail) to manage your address, it is possible that the Mail Service manager has revoked this right from their admin account.removed this right from their admin account.
To access signature management:
- Click here to access the Infomaniak Web app Mail (online service ksuite.infomaniak.com/mail).
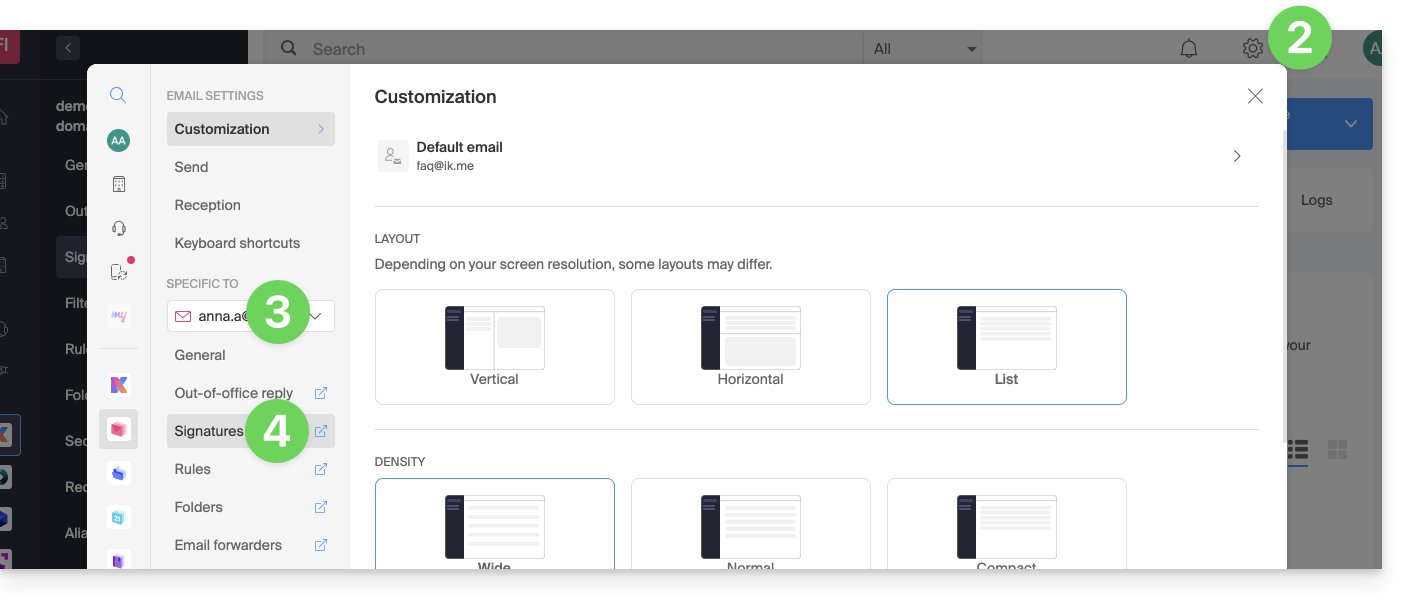
- Click on the Settings icon in the top right of the interface.
- Check or select the email address concerned in the dropdown menu of the left sidebar.
- Click on Signatures:
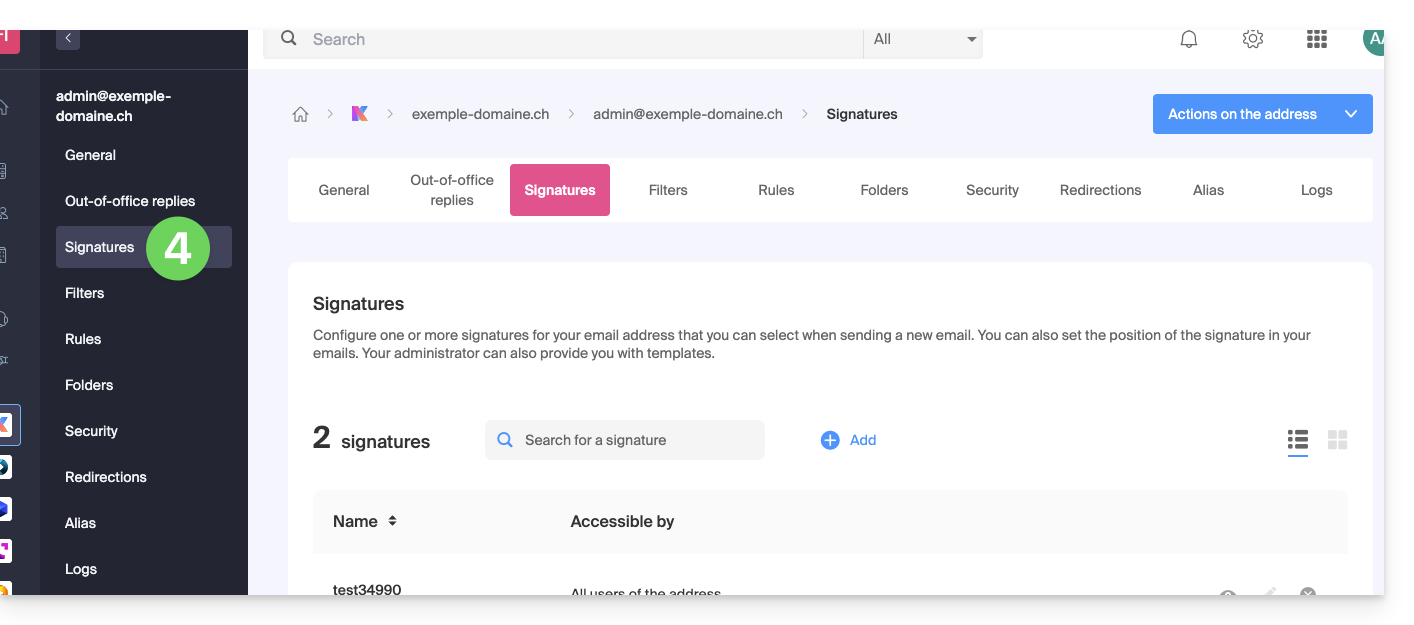
Access signatures from Mail Service
To access the Mail Service and signature management:
- Click here to access the management of your product on the Infomaniak Manager (need help?).
- Click directly on the name assigned to the product concerned.
- Click on the email address concerned in the table that appears
- Click on Signatures in the left sidebar:
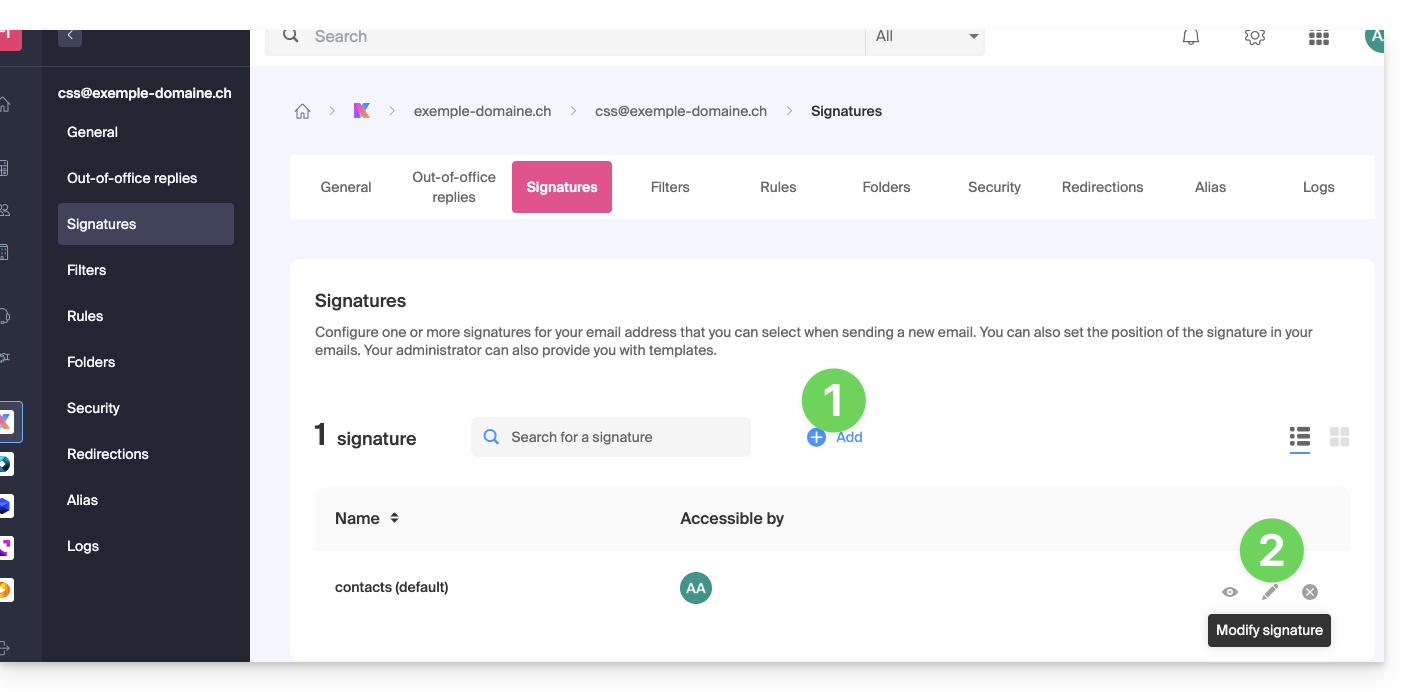
Create and edit the signature
Two options are available to you:
- Click on Add to create a new signature.
- Click on the pencil icon ✎ next to an existing signature to edit it.
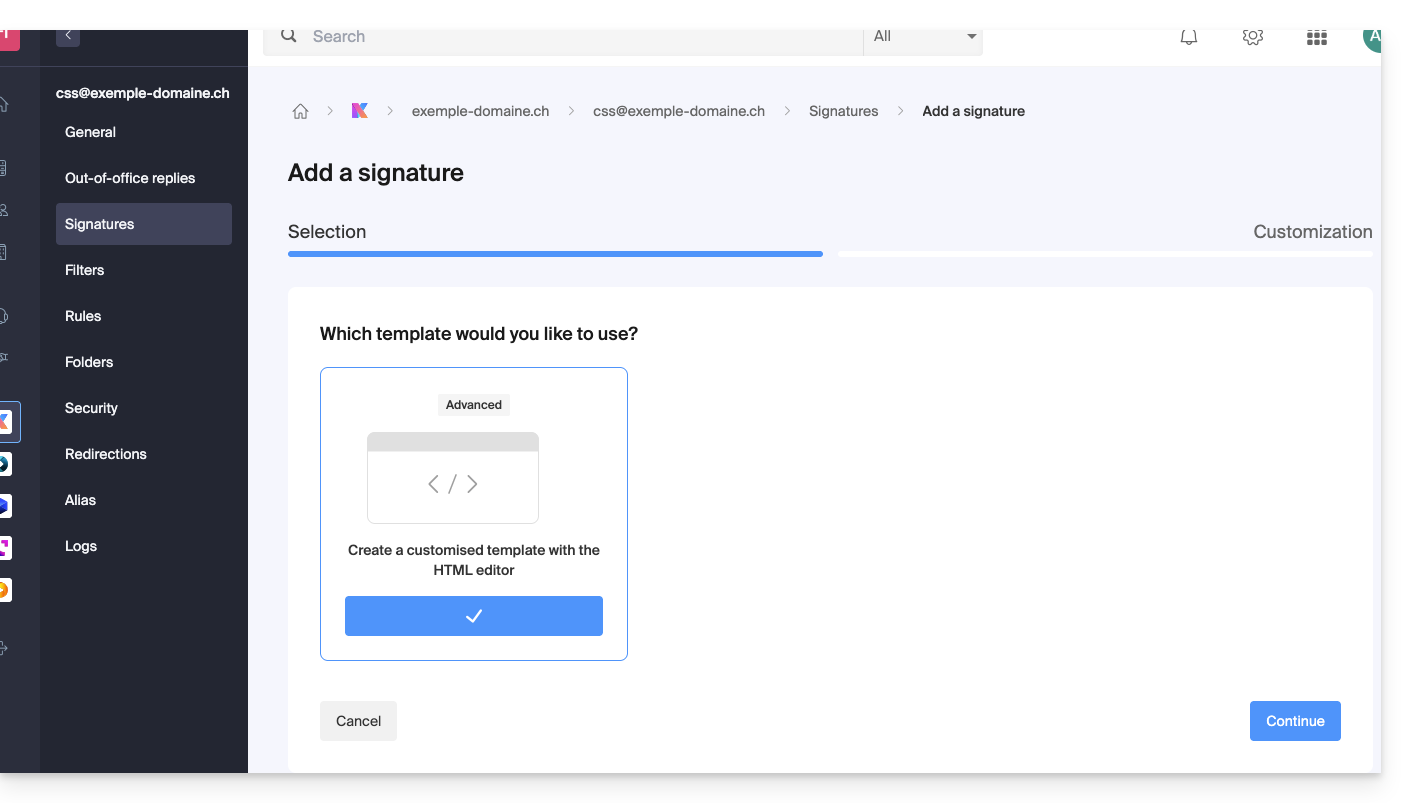
Then:
- Choose an existing template or a new one:
- Give a name to the signature.
- Specify a name for your identity (it will be displayed next to your email address in the messages received by your correspondents).
- Create the content of the signature in the designated frame (see below for formatting options)
- Choose whether or not to share the signature with all users of the Mail address.
- Click on Advanced settings to choose the location to insert your signature: before the message (= header) or after the message (= signature)
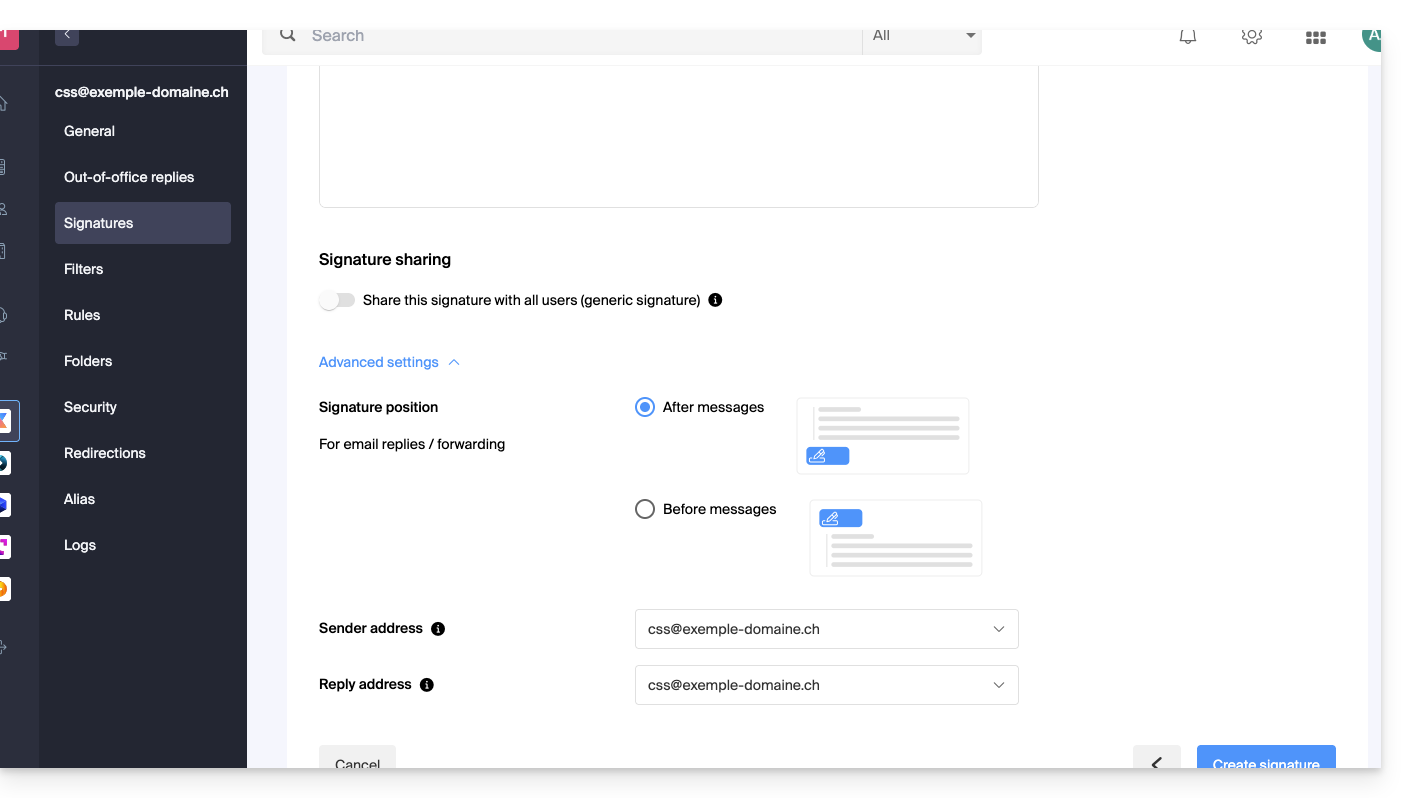
- Refer to this other guide regarding the choice of sending/replying addresses.
- Click the Create signature button.
Signature formatting
You can use an image, edit the HTML source code, and format your text using a tool palette.
To avoid excessive line breaks, use the Shift key in conjunction with the ENTER key on your keyboard, which is equivalent to the HTML tag <br> that causes a line break instead of a new paragraph.
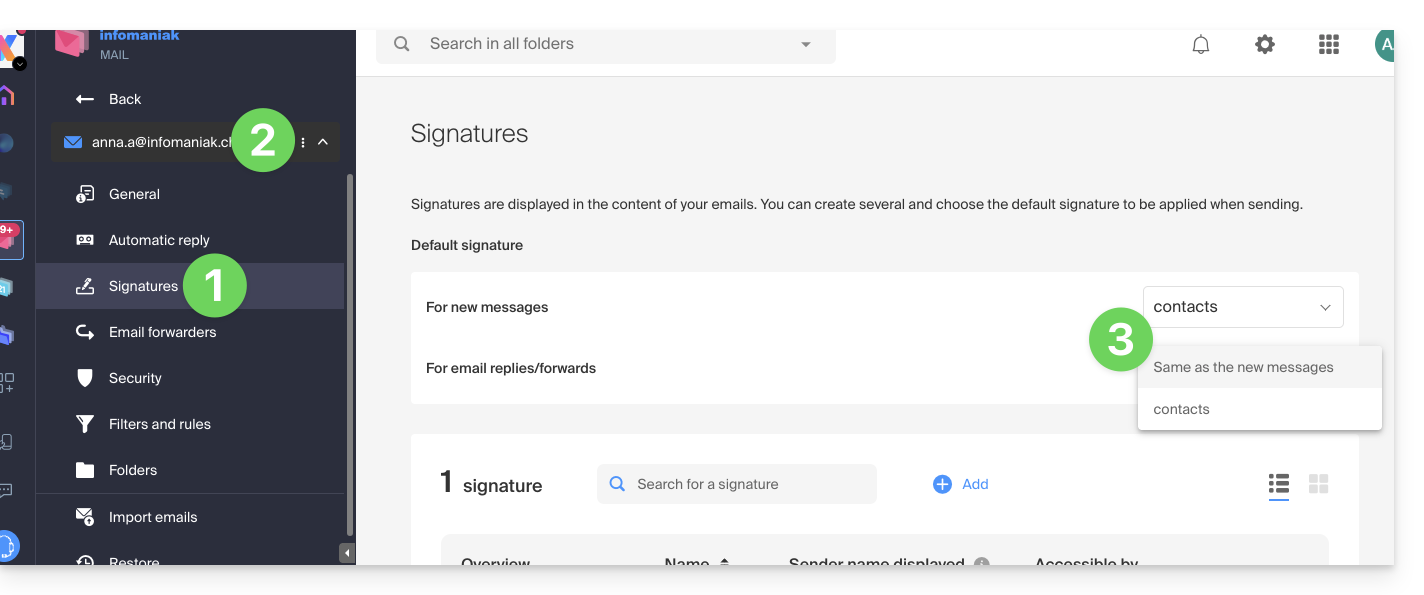
Set a default signature
To choose the signature used by default under certain conditions:
- Click here to access your signatures on the Infomaniak Mail Web app.
- Check or select the email address concerned in the dropdown menu of the left sidebar.
- Choose the signature that will be inserted by default when composing:
- a new message
- a reply/forward
By setting a default signature in my kSuite, it will be automatically displayed in the body of the email when composing. You will still have the option to change the signature.
There is a case where the default signature will not be the one automatically inserted by default when composing a message: refer to point 9 of this other guide.
Select or remove the signature when composing
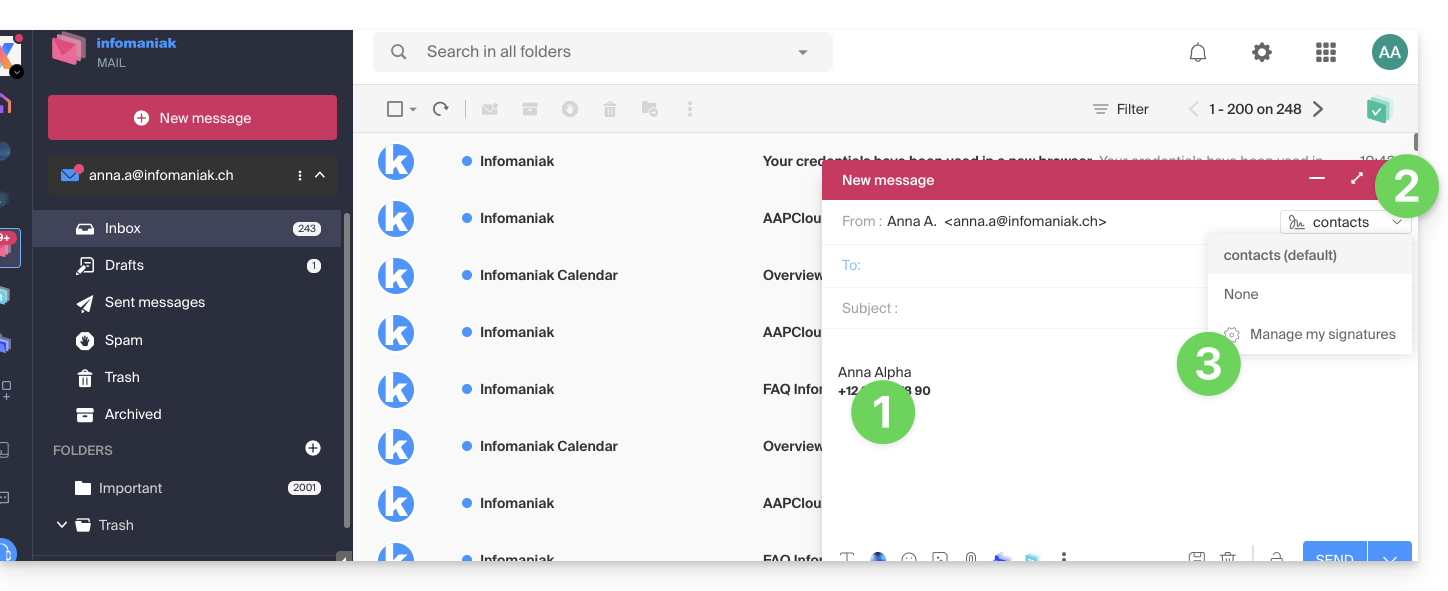
When you start composing a new message:
- The signature is automatically inserted.
- If multiple signatures exist, you can choose another identity via the dropdown menu.
- You can also quickly access the signature settings via the button in the toolbar:
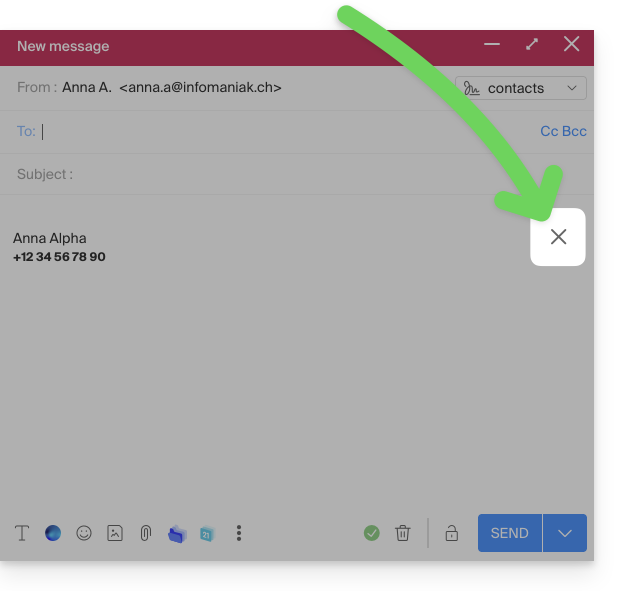
- You can remove the signature by hovering over it and clicking on the cross:
Associated addresses (multiple possible)
When a signature is derived from a template (whether it was created from a model proposed by Infomaniak or generated with the advanced editor):
- users do not have access to the content of the signature in edit mode,
- they can enter dynamic values such as the sender's name or personal data that may be requested such as profession or phone number,
- they can also modify the advanced settings of the signature (such as the position of the signature in the context of a reply/forward) but to date, this setting is common to all users of the signature (1)
When a signature has been created directly without using a template:
- if the signature is created from a predefined model:
- the behavior is the same as for the previous point, i.e., a signature created from a template
- if the signature was created via the advanced editor:
- users have access to the content of the signature in edit mode, but be careful, this content is shared; if Morgane modifies the content, Vanessa will have the same content once she has reloaded her Mail Infomaniak interface,
- only the sender's name is specific to the user and there are no dynamic values in this type of case,
- advanced settings follow the same principle as in other cases: they are common to all users
In all cases, assigning a default signature to an email account is at the user level. For example, within the same email account, the signature chosen by default by Morgane is independent of the one chosen by Vanessa.
Going further with templates
Refer to this other guide if you are looking for how to define custom templates that can be applied as soon as a new email address is created on your Mail Service, for example, or in bulk to all addresses in your domain.
This guide is about IP addresses, those…
- …assigned to sites/housing/servers, dynamic or static, shared or dedicated,
- …assigned by your Internet Service Provider (ISP) when establishing an Internet connection to your Infomaniak product.
Preamble
- A dedicated or static IP address for a website is a permanent IP address specifically assigned to it.
- Unlike a shared IP address, which is used by multiple websites, a dedicated IP address ensures that only this platform is associated with this address.
- Dedicated IP addresses for websites are often used in cases where stability, customization, and security are important, such as server hosting, firewall configuration, or activating SSL certificates (although it is possible to proceed without a dedicated IP address to install an SSL certificate).
- Here are the main advantages:
- Configuring a PTR entry or reverse DNS on dedicated IPs is useful, especially for installing a mail server, as some email providers check the PTR record before accepting emails sent from a server.
- Better connection stability.
- Reduced risk of a bad reputation linked to websites sharing the same IP address.
- Ease of configuring certain technical aspects.
- A dedicated IP can improve a website's referencing (although there are differing opinions among SEO specialists).
- Attention: Infomaniak does not allow access to websites via HTTP(S) by IPs (dedicated) on managed servers; you must use a domain name that points to the IP (or use the preview URL).
Add a dedicated IP to the website
To add a dedicated IP to your website, refer to this guide.
If you encounter issues directing web traffic to a defined port, refer to this other guide.
Blocking the IP address (Internet connection)
If you can no longer access…
- … all your email addresses that you own with Infomaniak (which usually work well) and this with a software/email client from the same Internet network (i.e., from the same IP address provided by your ISP)…
… or if you unfortunately performed this type of operation:
- repeated unsuccessful connection attempts via FTP, SSH, or access points such as the WordPress login…
- requests returning too many errors such as mass 403 errors…
… your access to Infomaniak servers may be blocked following the banning of the IP address (banip / ipban) of your Internet connection.
To unblock the situation, contact Infomaniak support by email and specify the domain concerned and especially your public IP address concerned.
Permanent Unblocking (IP on Whitelist)
With a Cloud Server, you can request to permanently authorize the IP address in question so that the blocking never happens again, regardless of the situation. To do this, you must:
- Have a dedicated IP associated with your Cloud Server.
- Be aware that Infomaniak will no longer block any potential attacks from this IP; attacks or malicious access attempts from this address will no longer be automatically blocked by the security systems.
- Confirm by email and from a contact address associated with the account (owner or administrator) that you understand and accept full responsibility in case of an attack from this IP.