
Knowledge base
1000 FAQs, 500 tutorials and explanatory videos. Here, there are only solutions!
This guide explains how to connect the mobile app Microsoft Outlook (app for smartphone or tablet iOS / Android) to an email address hosted by Infomaniak.
Preamble
- The app Outlook Lite is not compatible with the IMAP protocol… Only install the version offered above.
- Instead of the manual configuration below, it is recommended to use the app Infomaniak Mail (iOS / Android).
- The various services offered by Infomaniak are all compatible with the corresponding standard protocols (IMAP/SMTP for email, for example), therefore if you encounter a problem with third-party software, contact its publisher or a Partner and consult the support policy as well as article 11.9 of the Infomaniak Terms of Service.
Add the email address to the application
Prerequisites
- Create the email address in my kSuite or a Mail Service / kSuite.
- Create a password for the email address for the device you are going to configure.
To configure the email application:
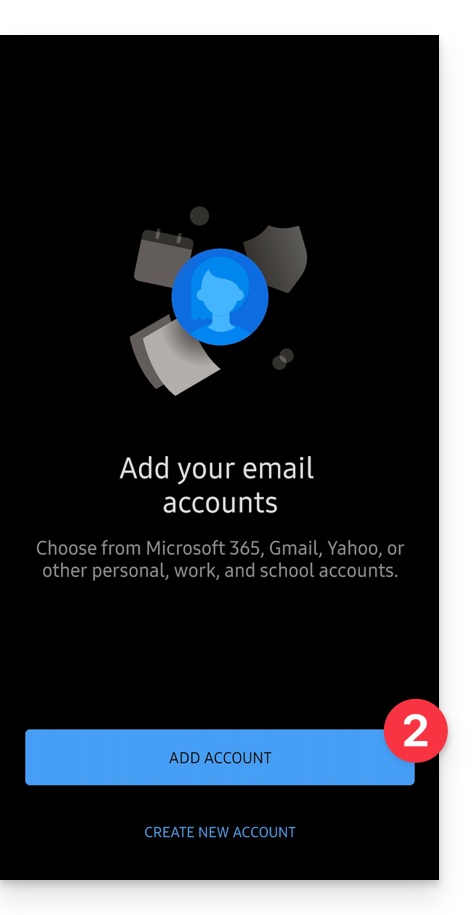
- Open the application.
- Click on Add an account:
- Enter the email address to be linked.
- Click on Continue:

- Click on IMAP:

- Check and complete the missing information.
- Click on the icon ✓ at the top right:

- Click on the left to complete the configuration:

- That's it, your email address is now configured in the application:

Recommended settings
- Incoming IMAP server =
mail.infomaniak.com - IMAP port =
993(with SSL) - Outgoing SMTP server =
mail.infomaniak.com - SMTP port & encryption protocol and command/method to activate this protocol:
587+ STARTTLS - Username = full & complete email address ( ? )
- Password = the one generated for the email address you want to access
- Authentication required to send emails:
- It is activated in the SMTP settings of your application.
- Check "use the same parameters as the incoming server" or depending on the software/email clients, enter a username (= full & complete email address) and the generated password.
Refer to this other guide if you are looking for information about other compatible messaging ports and protocols (SSL / TLS for example).
In case of problem
Check that the Mail Service is configured optimally.
There is no need to contact Infomaniak Support if your email address works well outside the application. The most common error concerns the use of an incorrect password. The troubleshooting guides help you resolve any potential issues:
- Refer to the solutions given in this other guide regarding email in general.
- This other guide is more specifically about Outlook.
… and if your Outlook no longer works since a change of email password, refer to this other guide.
This guide explains how to transfer to Infomaniak email addresses currently hosted by Google (with a custom domain). Refer to this other guide if you are looking for information on importing a simple Gmail address (…@gmail.com).
Preamble
- The operation does not affect either the data already present on the destination address, or that of the source address.
- Any duplicates are managed: identical content will only be copied once.
- If needed, local partners referenced by Infomaniak can handle these procedures: launch a free call for tenders; they take care of everything, freeing you from technical details.
Google Prerequisites
- Activate two-step authentication (2FA):
- It is imperative to activate two-step authentication in Gsuite - if necessary, the organization's administrator must first allow users to activate it from admin.google.com.
- In the settings of your Google account (https://myaccount.google.com/), go to the Security tab and activate Two-Step Verification:

- Read the complete Google guide
- Create an application password:
- Once 2FA is activated, go back to Two-Step Verification and scroll to the bottom of the page to application passwords:

- Follow the complete Google guide:
- Click on Application Passwords.
- Enter your Gmail account password if prompted.
- Click on Select an app and then Mail.
- Click on Select a device and select Other (Custom name).
- Give a name to your password (e.g., Infomaniak), it's just descriptive.
- Click on Generate.
- Copy or note the password that appears on the screen (it does not contain spaces).
- Once 2FA is activated, go back to Two-Step Verification and scroll to the bottom of the page to application passwords:
Infomaniak Prerequisites
- Have a Mail Service on your Infomaniak Manager.
- Have a quota of available addresses or adjust it in advance if necessary.
- Ensure that the email is properly secured
Transfer emails from Gmail to Infomaniak
a. Recreate the email address(es) on Infomaniak
If you have many (10+) email addresses to create, follow this procedure for mass creation.
Access the Infomaniak Mail Service and create the email addresses:
- Click here to access the management of your product on the Infomaniak Manager (need help?).
- Click directly on the name assigned to the product concerned.
- Click the blue button Create an email address in the top right corner.
- Enter the address (what comes before the at sign @) for example contact or michelle.
- Click the blue Continue button.
- Select I will consult the email address alone.
- Click the blue Continue button.
- Enter a password.
- Click the blue Continue button.
- Click the blue Finish button.
- Restart at point 3 above to recreate all email addresses identically.
b. Import Google mail content to Infomaniak
If you have many (10+) email addresses to import, follow this procedure for bulk importation.
Access the Infomaniak Mail Service and import your emails:
- Click here to access the management of your product on the Infomaniak Manager (need help?).
- Click directly on the name assigned to the product concerned.
- Click on the chevron in the right part of the blue Create an email address button.
- Click on Import emails (direct link).
- Click on Import my emails into a single email address.
- Enter the existing email address at Google.
- Enter the password for this email address.
- Click on Advanced settings.
- Enter
imap.gmail.comin IMAP server address (or trymail.gmail.comin case of error). - Enter
993in IMAP port. - Enable SSL and disable TLS.
- Click on the blue Validate and continue button.
- Enter the email address (which was recreated at Infomaniak at point a.10 above).
- Click on the blue Import emails button.
- The import starts and runs in the background, an email is sent once the import is complete.
- Restart at point 3 above to import the rest of the email addresses.
Labels and data volume
The storage space displayed at Infomaniak may not match the one indicated in Gmail, notably due to the different handling of labels/tags.
Indeed, these, present in Gmail, will be converted into folders on the Infomaniak servers (same principle as when using an email retrieval with an IMAP email software/client like Thunderbird):
As a result, an email tagged in multiple Gmail folders may be counted multiple times during the migration, which explains why an account showing, for example, 6 GB in Gmail can occupy 18 GB once transferred to the Infomaniak servers.
Adjust the application settings
As soon as you take the necessary steps for the domain name associated with your email to work with Infomaniak, modify the settings of the email software/clients you use so that they connect correctly to the Infomaniak servers: follow the configuration assistant.
This guide explains how to connect the desktop app Mail (desktop application on Windows 10) to an email address hosted by Infomaniak.
Preamble
- The various services offered by Infomaniak are all compatible with the corresponding standard protocols (IMAP/SMTP for email, for example), therefore if you encounter a problem with third-party software, contact its publisher or a Partner and consult the support policy as well as section 11.9 of the Infomaniak Terms and Conditions.
Add the email address to the application
Prerequisites
- Create the email address in my kSuite or a Mail Service / kSuite.
- Create a password for the email address on the device you are going to configure.
To configure the email application:
- Open the application:
- Click on Settings.
- Click on Manage accounts.
- Click on Advanced setup (at the bottom).
- Choose Internet Mail.
- Check and complete the missing information.
- Leave all boxes checked.
- Click on Connect.
- Click on OK.
- Your email address is now configured in the application.
Recommended settings
- Incoming IMAP server =
mail.infomaniak.com - IMAP port =
993(with SSL) - Outgoing SMTP server =
mail.infomaniak.com - SMTP port & encryption protocol and command/method to activate this protocol:
587+ STARTTLS - Username = full & complete email address ( ? )
- Password = the one generated for the email address you want to access
- Authentication required to send emails:
- It is activated in the SMTP settings of your application.
- Check "use the same parameters as the incoming server" or, depending on the software/email clients, enter a username (= full & complete email address) and the generated password.
Refer to this other guide if you are looking for information about other mail ports and protocols compatible (SSL / TLS for example).
In case of a problem
Check that the Mail Service is configured optimally.
It is not necessary to contact Infomaniak Support if your email address works well outside the application. The most common error concerns the use of an incorrect password. The troubleshooting guides help you resolve any potential issues:
- Refer to the solutions provided in this other guide regarding email in general.
- This other guide is more specifically about Outlook.
… and if your Outlook no longer works since a change of email password, refer to this other guide.
This guide explains how to view and modify the login ID for your user account on the Manager, the management interface and dashboard for your Infomaniak products. This same ID also allows you to log in to Mail Infomaniak and various iOS/Android applications such as kDrive, Infomaniak Mail, etc.
View the currently connected ID
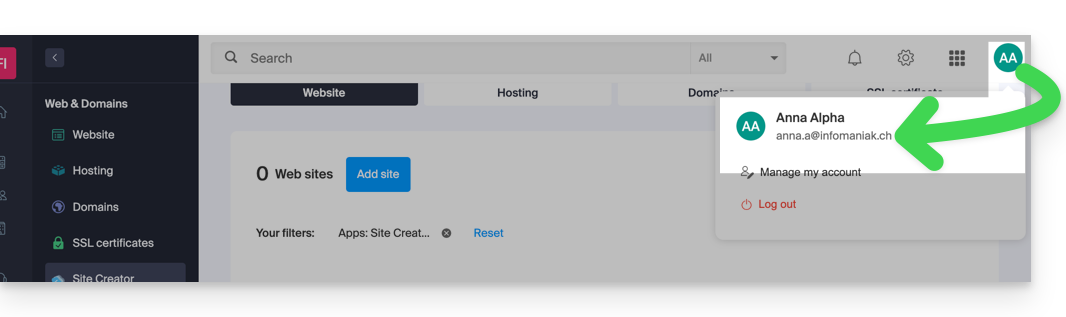
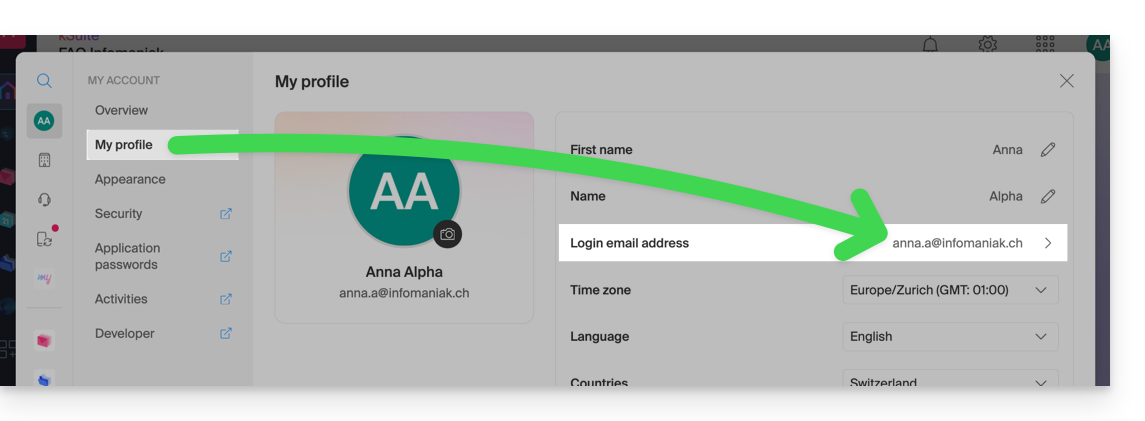
The email address used for the current connection is displayed on your user menu + on the profile page:
- Click on the badge with your initials/avatar in the top right corner of the Manager Infomaniak to note the current login ID in use:
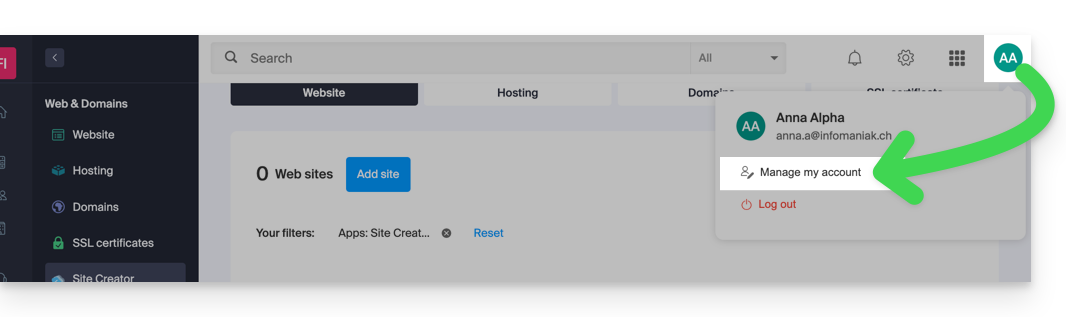
- Click on Manage my account just below to access the management of your profile on the Infomaniak Manager.
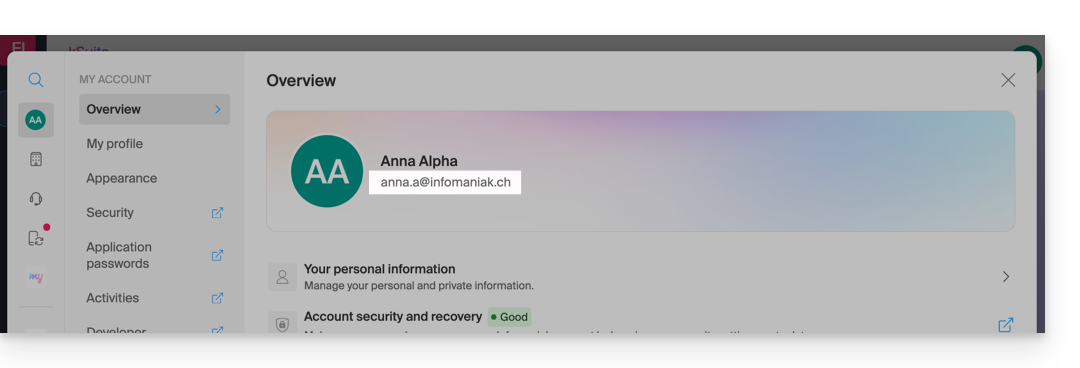
- Your current login ID is also displayed on the page reached:
Modify the ID (login email)
Prerequisites
- The access ID is an email address that must exist and that you must be able to access.
- The new email address must be different from the recovery email address.
- The new email address must not already be used as a login ID on another user account (otherwise, you need to consider inviting it to the Organization first to grant all rights and then remove the old account with the old ID).
To modify the ID of your Infomaniak account:
- Click here (or on the badge with your initials/avatar in the top right corner of the Infomaniak Manager) to "Manage my account":
- From the My Profile menu, click on your login email address:
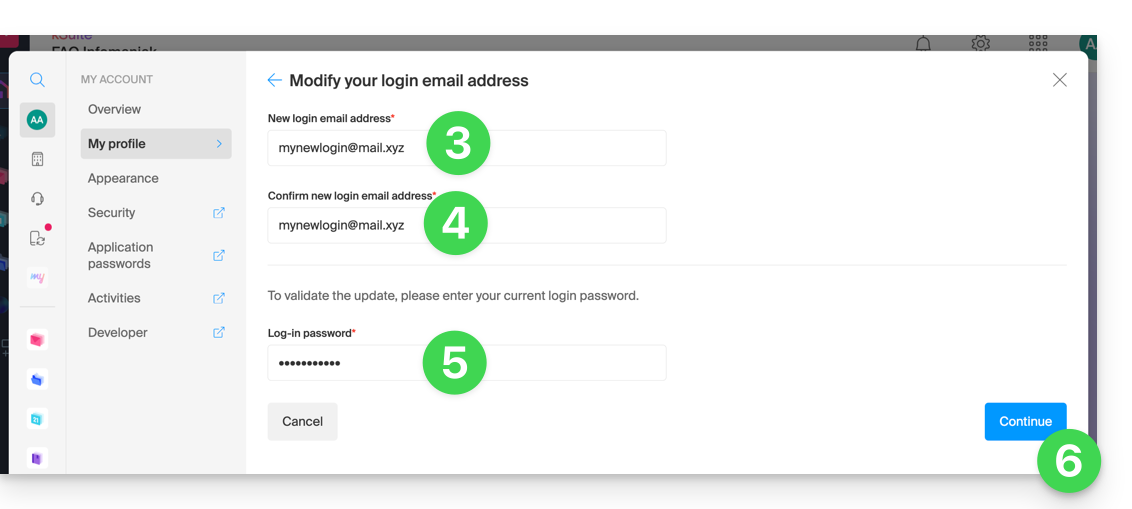
- Enter a new login email address.
- Confirm your new address by specifying it a second time.
- Enter the password to log in to your Infomaniak account.
- Click on Continue:
This guide explains how to add an email address to the Infomaniak Web app Mail (online service ksuite.infomaniak.com/mail) which allows you to manage one or more email addresses hosted by Infomaniak.
Any addition or removal of an email address in your Infomaniak account made from the Infomaniak Web app Mail will be immediately reproduced on the Infomaniak Mail mobile app; this does not affect email software/clients such as Outlook.
Prerequisites
- Have an email address and an Infomaniak account.
or
- Be invited to use an email address and have followed the process below:
- Open the email invitation link.
- Choose the option Create my account (free).
- Enter your First name, Last name and Phone number.
- Choose a login email address (it is possible to use the Infomaniak email address that you are invited to use) and set a password.
- Click on Use my address to access your Infomaniak mailbox.
Reattach an email address
To add and view an email address:
- Click here to access the Infomaniak Web app Mail (online service ksuite.infomaniak.com/mail).
- Check that you are in the Organization where you want to reattach the email address.
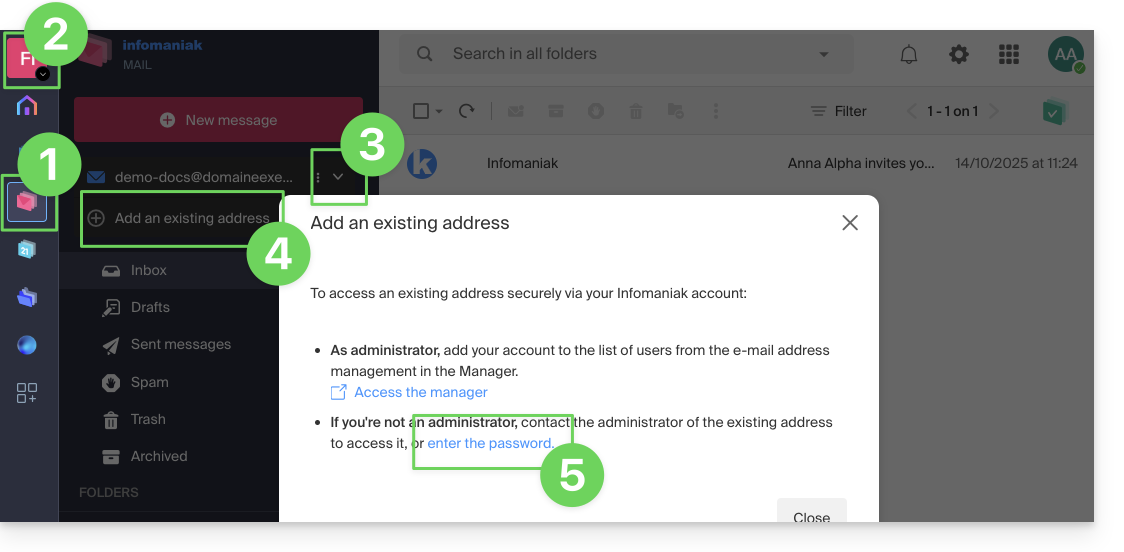
- Click on the chevron to the right of the email address indicated at the top left.
- Click on Add an existing address.
- Click on the last link to enter an email address and its password:
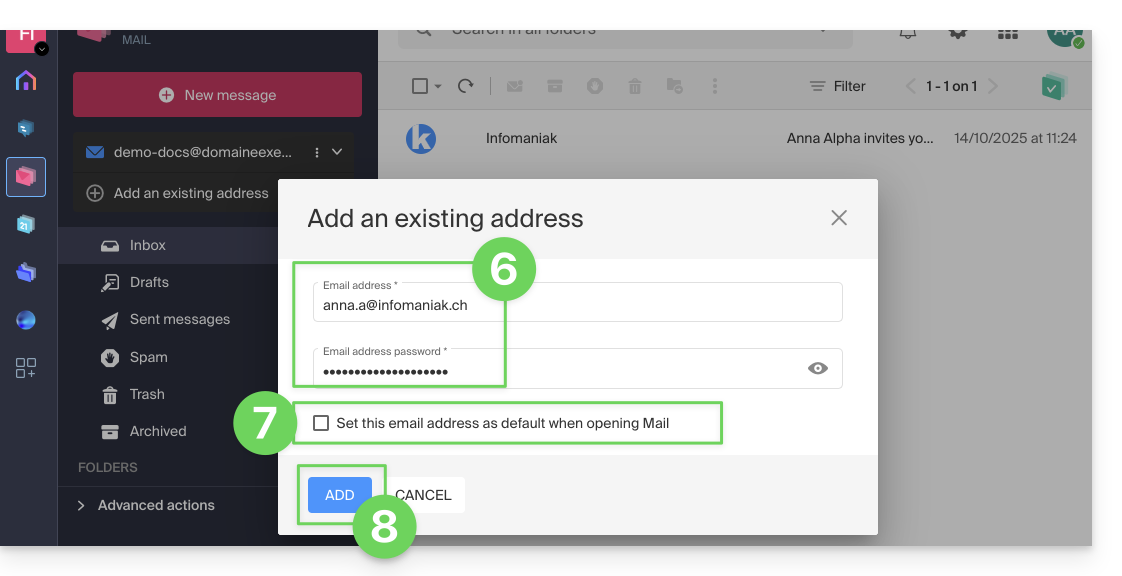
- Enter the information related to the email address (exact and complete name, as well as its password).
- Define if the address should be displayed first by default when you open Mail (also read the next chapter).
- Click on the button to Add the address to your user account:
Refer to this other guide if you are looking for information about the permanent deletion of an email address and its content, and this other guide to unlink an email address.
View the different addresses attached
To switch from one address to another:
- Click here to access the Infomaniak Web app Mail (online service ksuite.infomaniak.com/mail).
- Click on the chevron to the right of the email address indicated at the top left.
- Click on an address from those already attached:
Set the default type of opening for a new address
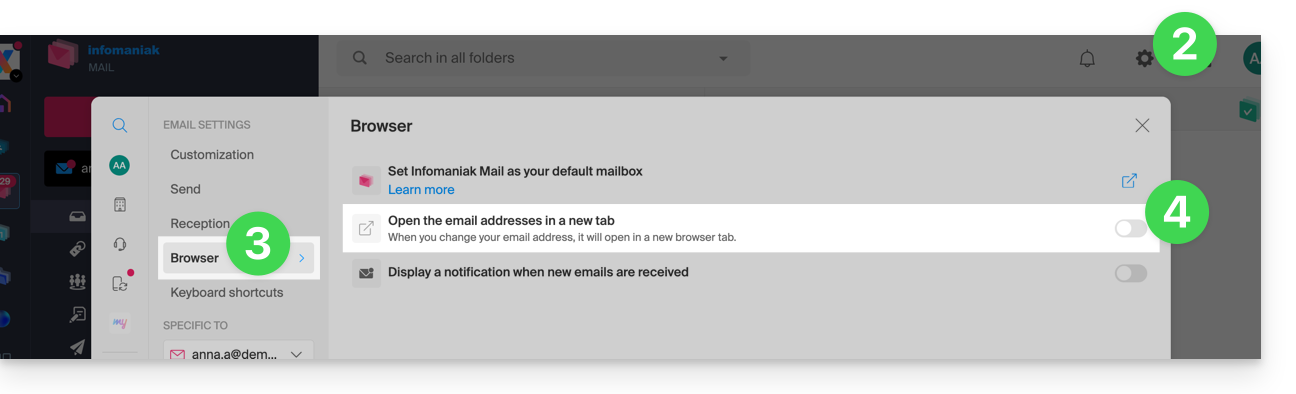
To choose whether the display of a different address should be done by default in a new browser tab, or directly replacing the current display, in the same window:
- Click here to access the Infomaniak Web app Mail (online service ksuite.infomaniak.com/mail).
- Click on the Settings icon at the top right.
- Click on Browser.
- Click on the toggle switch to enable the default opening of an email in a new tab rather than in the current window:
This guide explains how to create and then automatically add a signature to messages sent from the Infomaniak Mail Web app (online service ksuite.infomaniak.com/mail).
⚠ Available with:
| kSuite | Free | |
| Standard | ||
| Business | ||
| Enterprise | ||
| my kSuite | * | |
| my kSuite+ | ||
| Mail Service | Starter 1 max. address | |
| Premium 5 min. addresses |
* Read this other guide regarding the limitations of the my kSuite offer.
Preamble
- The signature will also be visible when sending from the Infomaniak Mail app (iOS / Android).
- It will not be present with another sending method (a software like Outlook for example).
- It is also not added to the messages of the answering machine; it is necessary to add one in the out-of-office message directly.
- One or more signatures can be added from Mail and from the Manager where all the addresses of a Mail Service are managed. Choose which signature to use when sending.
Access signatures from the Infomaniak Web Mail app
Prerequisites
- Having permission to manage signatures: if you had been invited to the Infomaniak Web app Mail (online service ksuite.infomaniak.com/mail) to manage your address, it is possible that the Mail Service manager has revoked this right from their admin account.removed this right from their admin account.
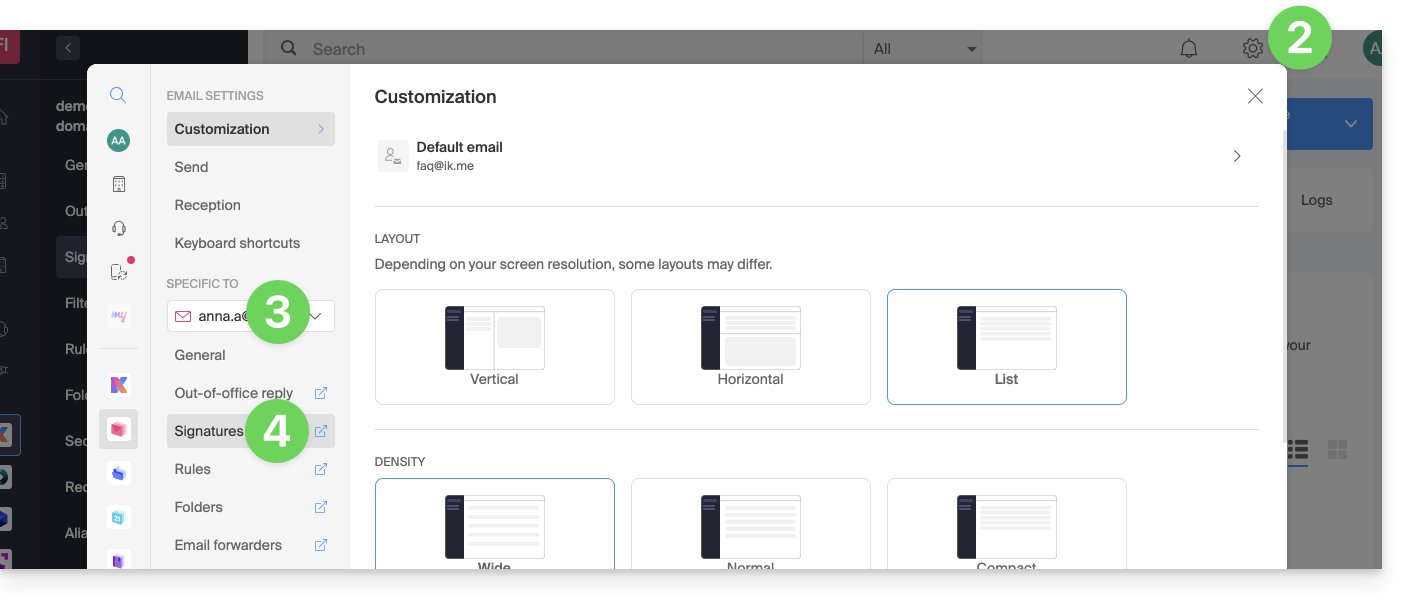
To access signature management:
- Click here to access the Infomaniak Web app Mail (online service ksuite.infomaniak.com/mail).
- Click on the Settings icon in the top right of the interface.
- Check or select the email address concerned in the dropdown menu of the left sidebar.
- Click on Signatures:
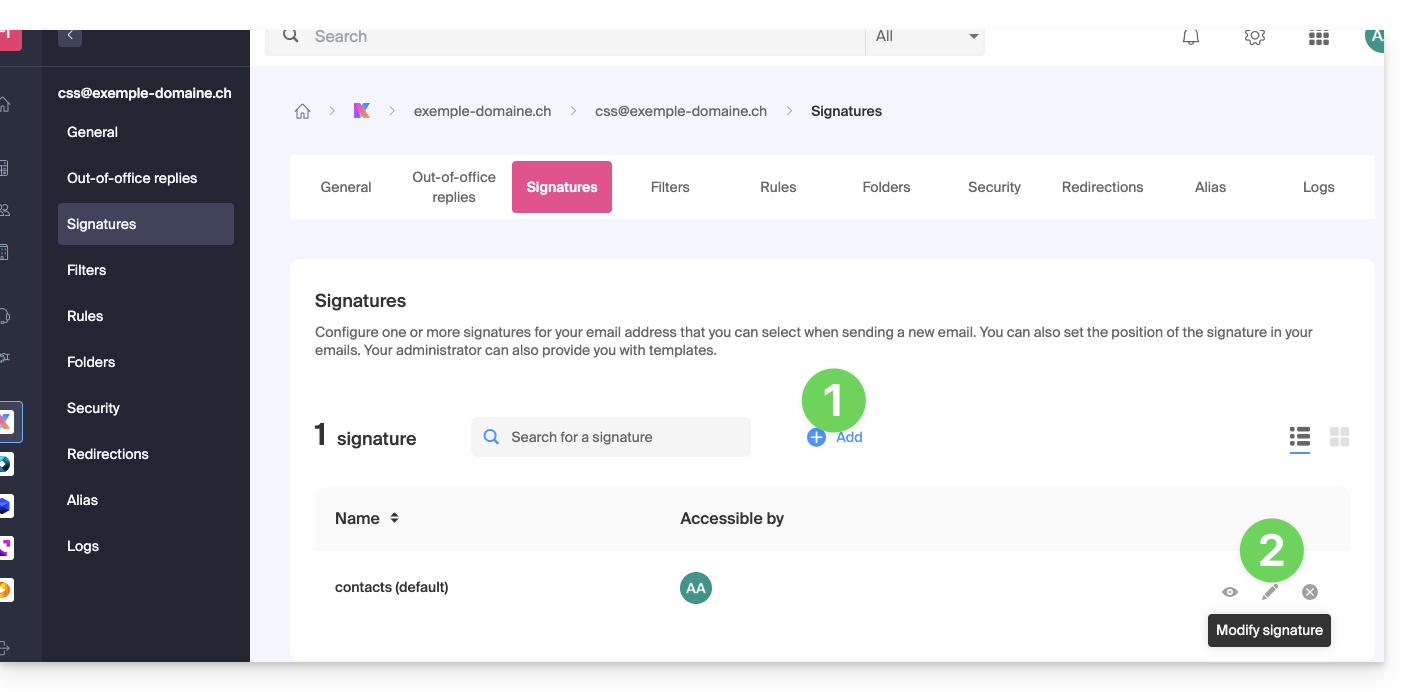
Access signatures from Mail Service
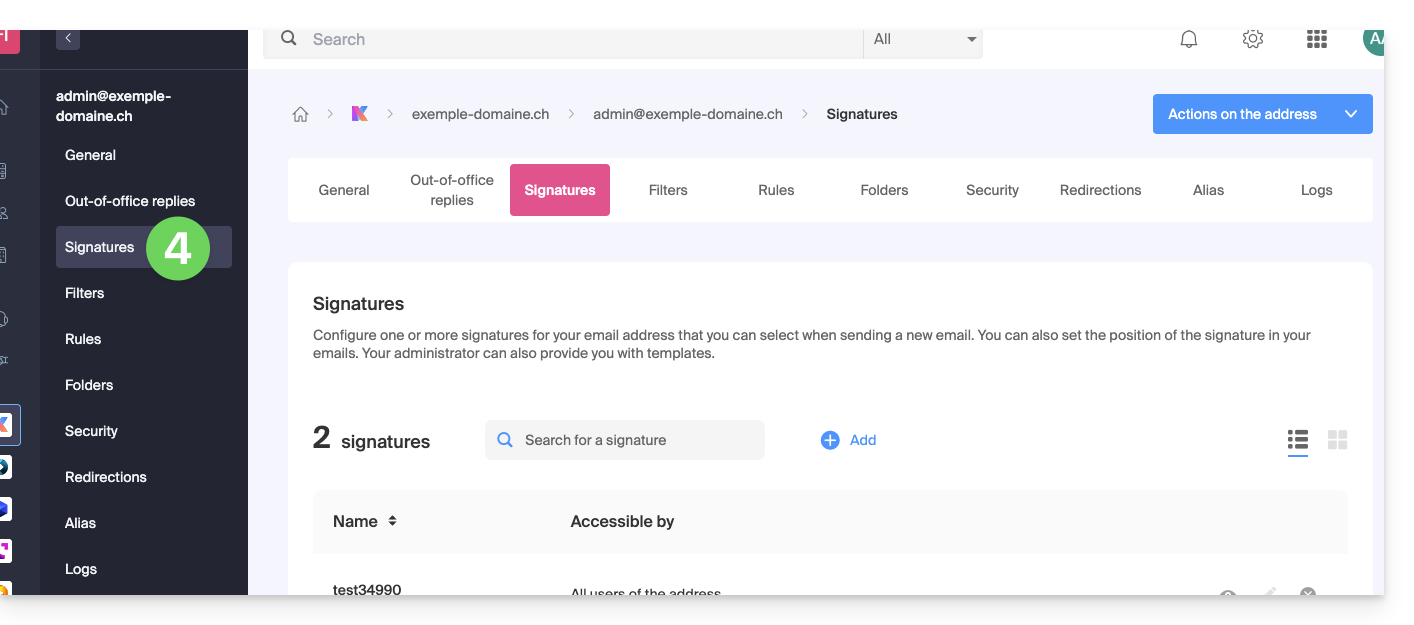
To access the Mail Service and signature management:
- Click here to access the management of your product on the Infomaniak Manager (need help?).
- Click directly on the name assigned to the product concerned.
- Click on the email address concerned in the table that appears
- Click on Signatures in the left sidebar:
Create and edit the signature
Two options are available to you:
- Click on Add to create a new signature.
- Click on the pencil icon ✎ next to an existing signature to edit it.
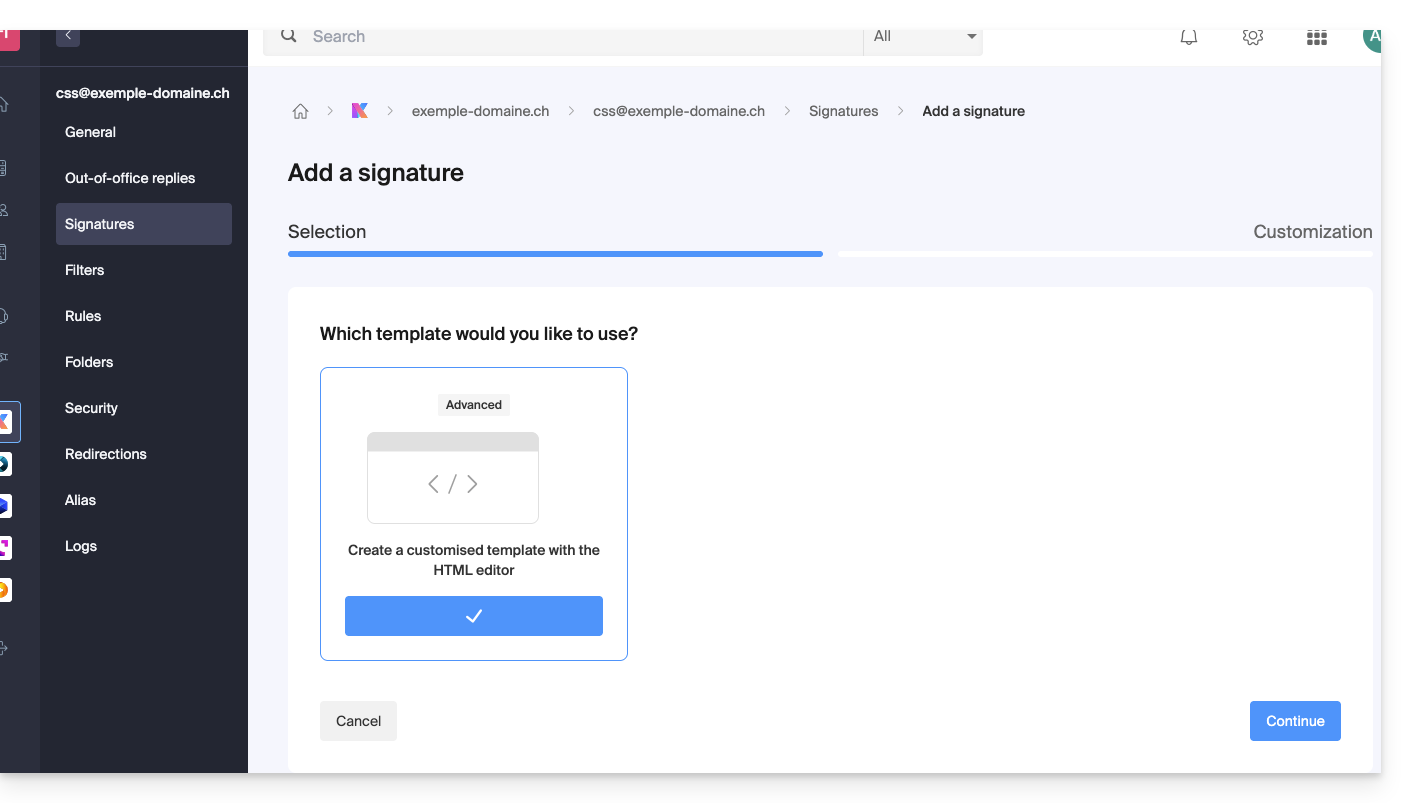
Then:
- Choose an existing template or a new one:
- Give a name to the signature.
- Specify a name for your identity (it will be displayed next to your email address in the messages received by your correspondents).
- Create the content of the signature in the designated frame (see below for formatting options)
- Choose whether or not to share the signature with all users of the Mail address.
- Click on Advanced settings to choose the location to insert your signature: before the message (= header) or after the message (= signature)
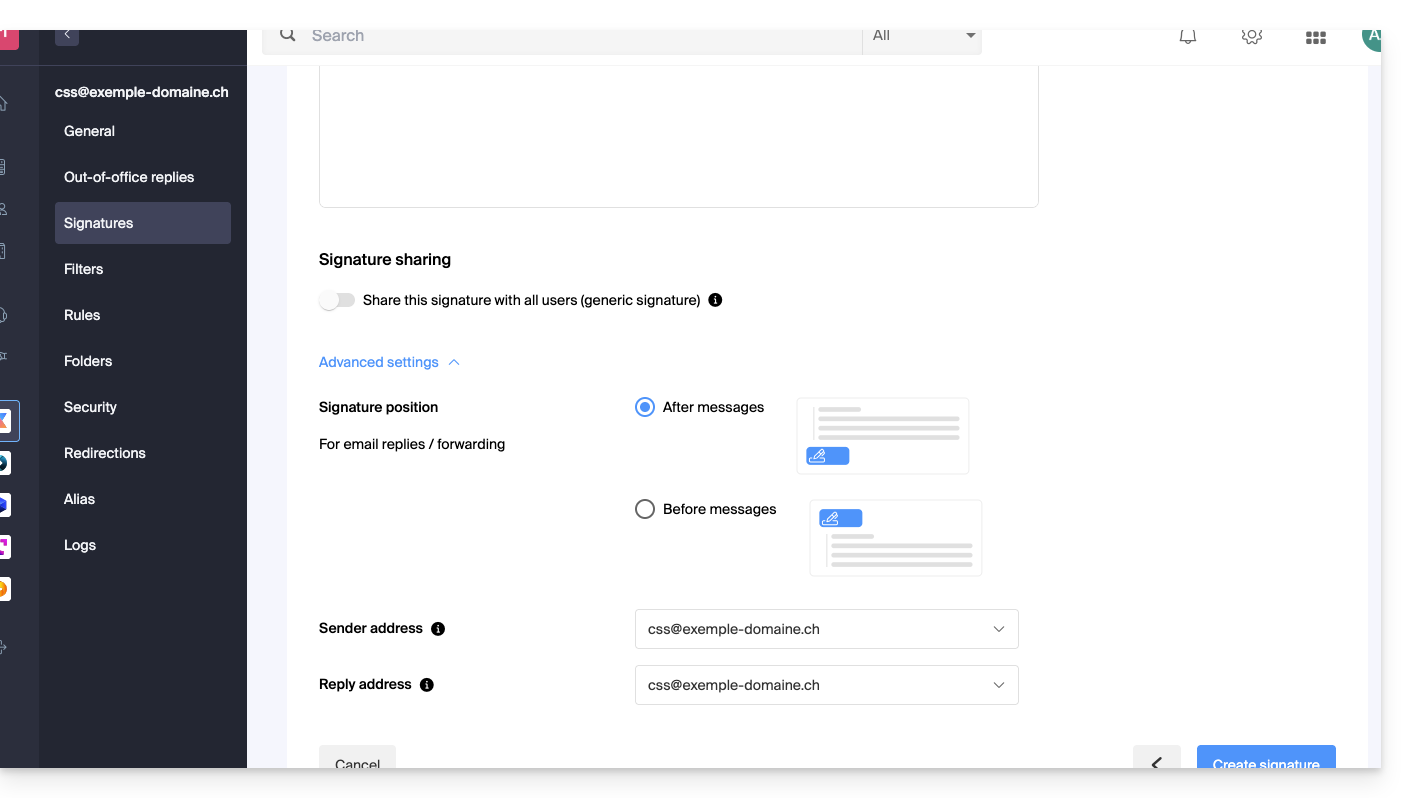
- Refer to this other guide regarding the choice of sending/replying addresses.
- Click the Create signature button.
Signature formatting
You can use an image, edit the HTML source code, and format your text using a tool palette.
To avoid excessive line breaks, use the Shift key in conjunction with the ENTER key on your keyboard, which is equivalent to the HTML tag <br> that causes a line break instead of a new paragraph.
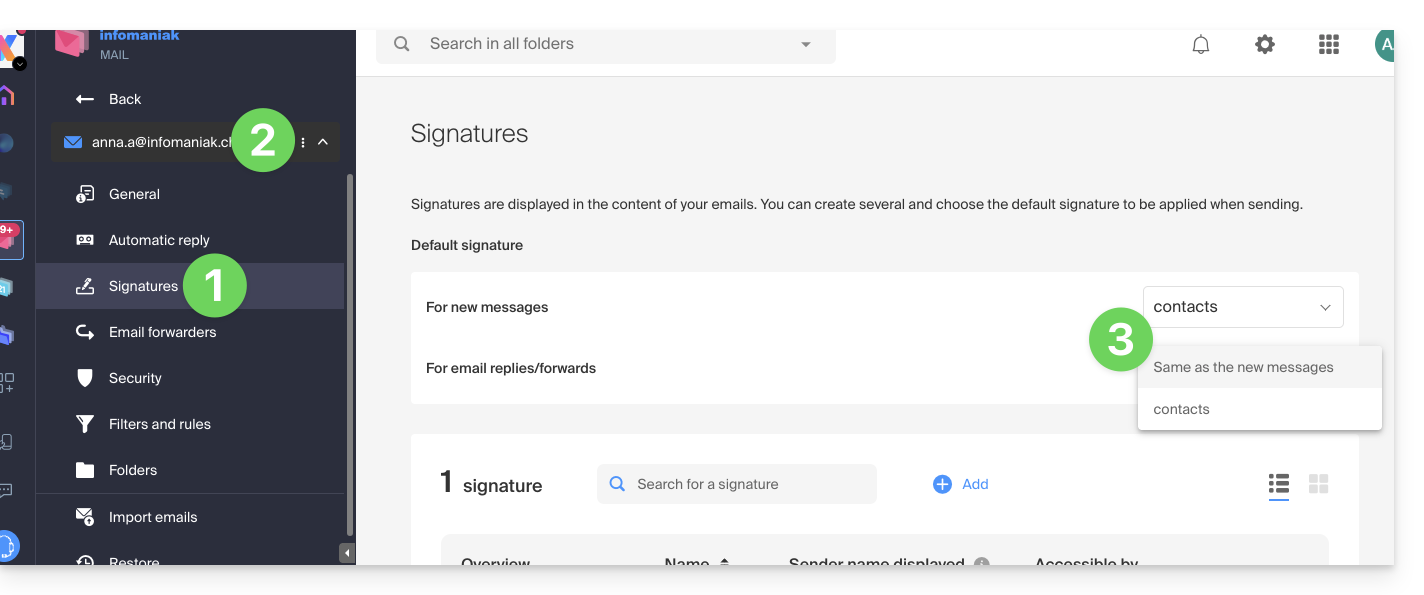
Set a default signature
To choose the signature used by default under certain conditions:
- Click here to access your signatures on the Infomaniak Mail Web app.
- Check or select the email address concerned in the dropdown menu of the left sidebar.
- Choose the signature that will be inserted by default when composing:
- a new message
- a reply/forward
By setting a default signature in my kSuite, it will be automatically displayed in the body of the email when composing. You will still have the option to change the signature.
There is a case where the default signature will not be the one automatically inserted by default when composing a message: refer to point 9 of this other guide.
Select or remove the signature when composing
When you start composing a new message:
- The signature is automatically inserted.
- If multiple signatures exist, you can choose another identity via the dropdown menu.
- You can also quickly access the signature settings via the button in the toolbar:
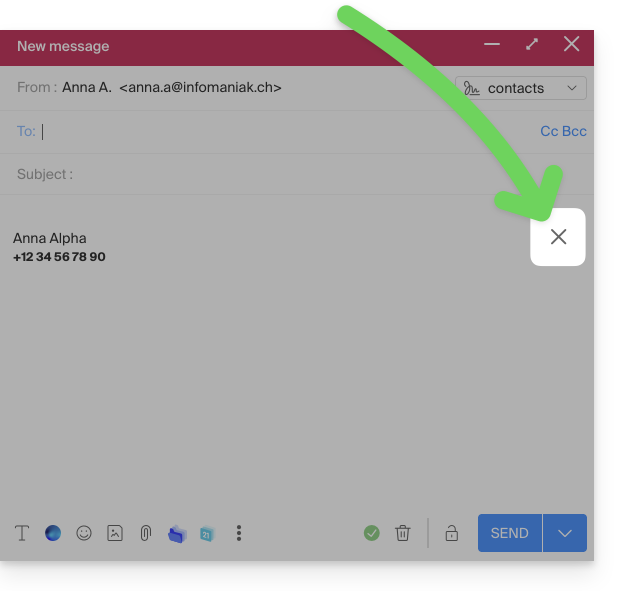
- You can remove the signature by hovering over it and clicking on the cross:
Associated addresses (multiple possible)
When a signature is derived from a template (whether it was created from a model proposed by Infomaniak or generated with the advanced editor):
- users do not have access to the content of the signature in edit mode,
- they can enter dynamic values such as the sender's name or personal data that may be requested such as profession or phone number,
- they can also modify the advanced settings of the signature (such as the position of the signature in the context of a reply/forward) but to date, this setting is common to all users of the signature (1)
When a signature has been created directly without using a template:
- if the signature is created from a predefined model:
- the behavior is the same as for the previous point, i.e., a signature created from a template
- if the signature was created via the advanced editor:
- users have access to the content of the signature in edit mode, but be careful, this content is shared; if Morgane modifies the content, Vanessa will have the same content once she has reloaded her Mail Infomaniak interface,
- only the sender's name is specific to the user and there are no dynamic values in this type of case,
- advanced settings follow the same principle as in other cases: they are common to all users
In all cases, assigning a default signature to an email account is at the user level. For example, within the same email account, the signature chosen by default by Morgane is independent of the one chosen by Vanessa.
Going further with templates
Refer to this other guide if you are looking for how to define custom templates that can be applied as soon as a new email address is created on your Mail Service, for example, or in bulk to all addresses in your domain.
This guide explains how to connect the desktop app Outlook 2013 (desktop application on Windows) to an email address hosted by Infomaniak.
Preamble
- The various services offered by Infomaniak are all compatible with the corresponding standard protocols (IMAP/SMTP for email, for example). Therefore, if you encounter a problem with third-party software, contact its publisher or a Partner and consult the support policy as well as article 11.9 of the Infomaniak Terms of Service.
Add the email address to the application
Prerequisites
- Create the email address in my kSuite or a Mail Service / kSuite.
- Create a password for the email address on the device you are going to configure.
To configure the email application:
- Open the application.
- Click on the File menu:
- Click on Account Settings.
- Click on Add or Remove Accounts:
- Click on New:
- Click on Manual Setup:
- Click on POP / IMAP.
- Click on Next:
- Check and complete the missing information.
- Click on More Settings:
- Click on the Outgoing Server tab.
- Click on My outgoing server requires authentication.
- Click on the Advanced tab:
- Replace the port numbers with the correct information and enable SSL.
- Click on OK:
- Click on Next:
- Click on Close:
- Click on Finish:
- Click on Close:
- There you go, your email address is now configured in the application:
Recommended settings
- Incoming IMAP server =
mail.infomaniak.com - IMAP port =
993(with SSL) - Outgoing SMTP server =
mail.infomaniak.com - SMTP port & encryption protocol and command/method to activate this protocol:
587+ STARTTLS - Username = the complete & full email address ( ? )
- Password = the one generated for the email address you want to access
- Mandatory authentication for sending emails:
- It is activated in the SMTP settings of your application.
- Check "use the same settings as the incoming server" or, depending on the software/email clients, enter a username (= complete & full email address) and the generated password.
Refer to this other guide if you are looking for information about other messaging ports and protocols compatible (SSL / TLS for example).
In case of a problem
Check that the Mail Service is configured optimally.
It is not necessary to contact Infomaniak Support if your email address works well outside the application. The most common error concerns the use of an incorrect password. The troubleshooting guides help you resolve any potential issues:
- Be aware of the solutions provided in this other guide regarding email in general.
- This other guide is more specifically about Outlook.
… and if your Outlook no longer works since a change in your email password, be aware of this other guide.
This guide presents the Global Security tool, which allows you to verify that the relationships between a domain name and an Infomaniak Mail Service are optimal in terms of security. This involves checking the SPF / DKIM / DMARC records, and the Global Security tool allows you to intervene in the configuration if necessary.
Any DNS addition/modification can take up to 48 hours to propagate.
Access the Global Security diagnostic tool
To access Global Security:
- Click here to access the management of your product on the Infomaniak Manager (need help?).
- Click directly on the name assigned to the product in question.
- Click on Global Security in the left sidebar:

Verify the optimal functioning of email
Once you are on Global Security, familiarize yourself with and verify the 3 security mechanisms inherent to emails: SPF, DKIM, and DMARC policy. These indications should display in green:
Otherwise, this may explain why an email that is not spam is treated as spam.
Click on Edit or Create to configure SPF, DKIM, and DMARC according to the recommendations below to secure your Mail Service against potential identity theft:
SPF (Sender Policy Framework)
SPF (click here to configure) allows the owner of a domain name to specify which servers are authorized to send emails on behalf of that domain. This helps to reduce the risk of spam and phishing, as the recipient's mail server can verify if the sender is authorized by consulting the sender domain's DNS records:
The analyses of the Global Security tool are only relevant if the domain name is with Infomaniak and configured to direct mail traffic to Infomaniak.
Under these conditions and in case of a detected problem, you will find a Correct button that will allow you to automatically update your SPF.
If correcting one or the other of the mentioned issues is not possible, it is because it must be done on the configuration set up by the owner or technician of the sender's domain name.
If your domain name points to Wix or another provider, the SPF must be configured with the provider in question.
DKIM (Domain Keys Identified Mail)
DKIM (click here to configure) is a protocol that allows emails to be signed when they are sent.
When your domain name (or its DNS zone) is managed elsewhere, you will find in this section Global Security > DKIM the DKIM record to add in the DNS zone:
You can configure multiple DKIM records on your domain without a fixed limit, unlike DMARC or SPF, which is crucial if you use multiple third-party email providers for your daily communications.
DMARC (Domain-based Message Authentication, Reporting, and Conformance)
DMARC (click here to configure) allows you to indicate to other mail servers (the email providers of the contacts to whom you send an email) the policy to follow in case of receipt of a "suspicious" email (e.g., unauthenticated) from your mail server (hosted by Infomaniak). Additionally, you can be notified of the "incident" by a summary message (called a "DMARC report") providing information on recent email activity related to your domain name.
DMARC requires a valid SPF and DKIM. A wizard allows you to configure DMARC according to Infomaniak's recommendations in simple mode or entirely as you wish in advanced mode (this expert mode allows you to enter the record of your choice): The corresponding necessary entries (type TXT) will then be automatically applied in the DNS zone of the domain concerned (if administratively possible - domain managed in the same Organization, for example).
Infomaniak is neither able to analyze your potential DMARC reports and records, nor able to comment on the validity or compliance of these, as this is entirely your responsibility.
To verify the records within your DNS, you can also use an external and free service like the one mentioned at the bottom of this other guide.
Refer to this other guide if you are looking for information on the fourth point of the Global Security page.
This guide explains how to redirect emails from a Gmail, Bluewin, Outlook, Proton, Yahoo, etc. address to your Infomaniak-managed email address.
Preamble
- By setting up automatic forwarding of all incoming emails from your previous email system, you can immediately start using your new Infomaniak email address with the assurance of not missing any messages.
- By replying to your emails from your new Infomaniak address, your contacts will automatically use it to write to you in the future.
- ⚠️ For additional help, contact the service provider on which you are trying to activate message forwarding; otherwise contact a partner or launch a free tender — also discover the role of the host.
- You can also import content from another Mail provider directly to your Infomaniak address.
Specific guides
Refer to the official guides based on your previous provider:
- Gmail
- iCloud
- Microsoft (Outlook / Hotmail / Live)
- Orange
- Proton Mail (warning, requires a paid plan)
- Sunrise:
- Click here to log in to Sunrise Mail.
- Click on Inbox.
- Click on Settings => Manage Inbox.
- Enter the corresponding email address under 'Forwarding'.
- Yahoo (note, requires Yahoo Mail Pro)
Bluewin
- Bluewin (read also below):
- Click here to log in to Bluewin.
- Click on Settings then Automatic Forwarding.
- Click on Set up automatic forwarding.
- Follow the procedure to set up automatic forwarding.
- Bluewin (alternative method):
- Click here to log in to MySwisscom.
- Click on the "More" menu then “Settings”:

- Then click on “Manage transfers”:

GMX
Click on these elements in order to set up a redirection rule from GMX:
This guide allows you to quickly discover the essential features of Euria, the artificial intelligence at your disposal within kSuite, particularly effective with the Web app Mail Infomaniak (online service ksuite.infomaniak.com/mail). The assistant is also available on the mobile app Infomaniak Mail (application for iOS / Android smartphone or tablet).
Prerequisites
- Have an email address in a paid offer.
- Read and understand this other guide about the model used and the responsibilities of each party.
How to use the assistant?
The writing assistant helps you write a text using artificial intelligence, on the topic of your choice, including if it should be based on elements present in the ongoing email conversation; use it, for example, to write…
- … a new message that must contain specific elements
- … a response to a received message
- … a rephrasing of a text excerpt
- … correct grammatical syntax
- etc.
To access the writing assistant:
- Click here to access the Web app Mail Infomaniak (online service ksuite.infomaniak.com/mail).
- Log in with your user account credentials (not your email password).
- If necessary, reattach the email addresses to manage with Mail Infomaniak.
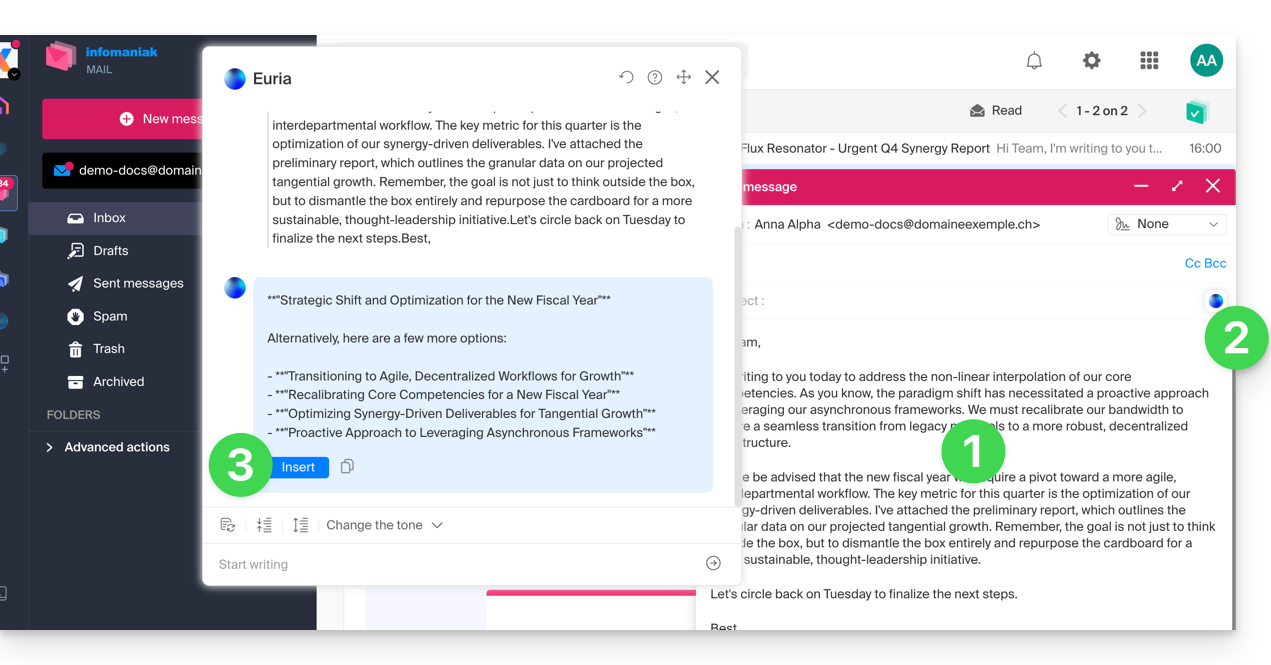
Starting from scratch…
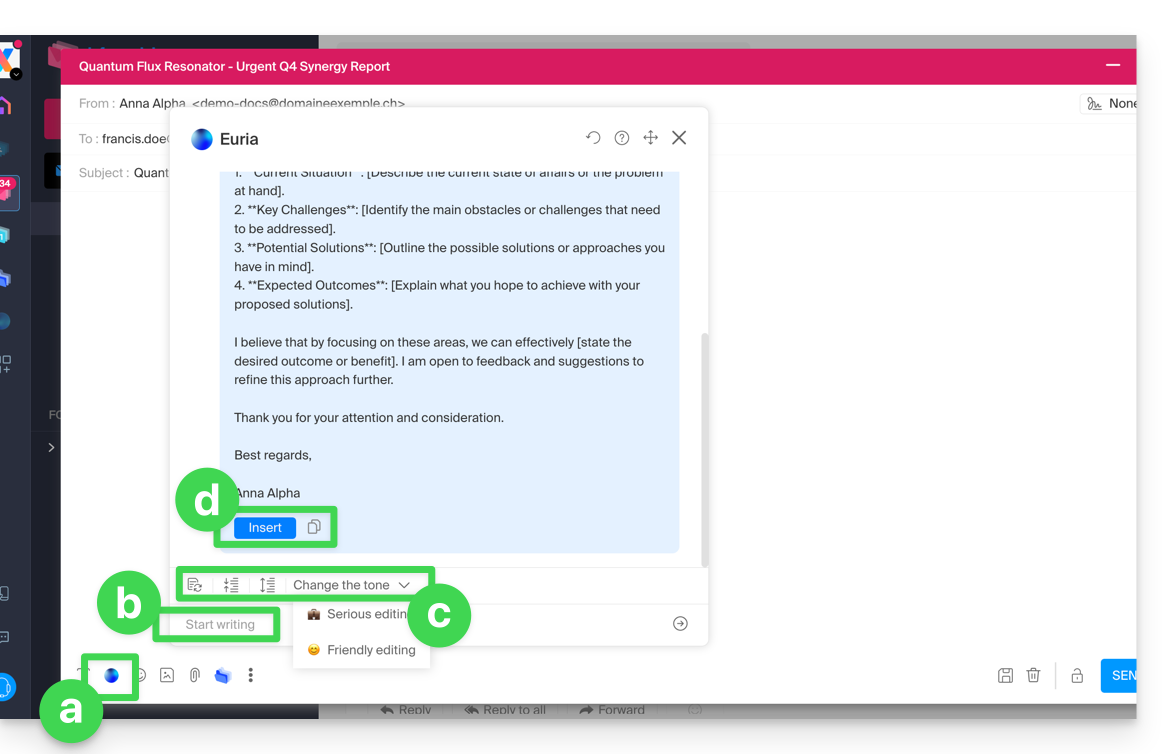
You can ask Euria to write a text according to your ideas that you will need to convey to it:
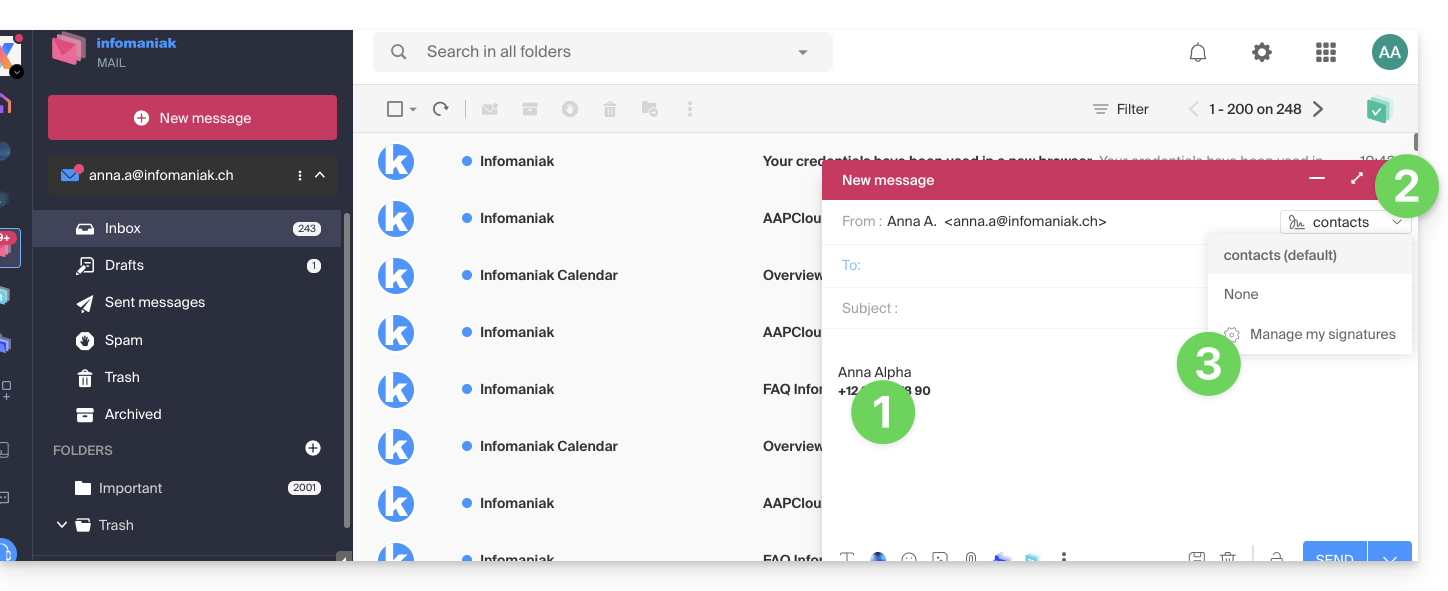
- Click on New message at the top left of the Mail interface.
- Click on the Euria icon in the editing bar to open the assistant.
- Indicate to the assistant what you want to write, as if you were conversing with a human.
- Once the proposal is displayed by the AI, adjust the length, and change the tone if necessary to obtain a more familiar response.
- Insert the proposal into your message or copy the text into the clipboard:
While writing a message…
You can also use the writing assistant by selecting a passage from your text in progress, then choosing the desired option from the contextual menu that appears: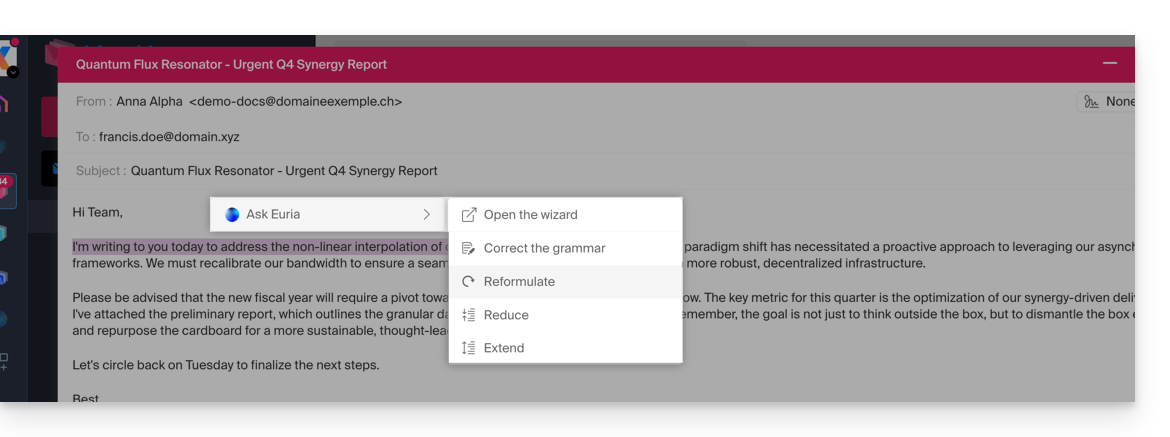
- Open the assistant to request suggestions.
- Correct the grammar.
- Rephrase the proposal to obtain a new one.
- Shorten the suggested text by removing some superfluous elements.
- Write more text, wrap the conversation.
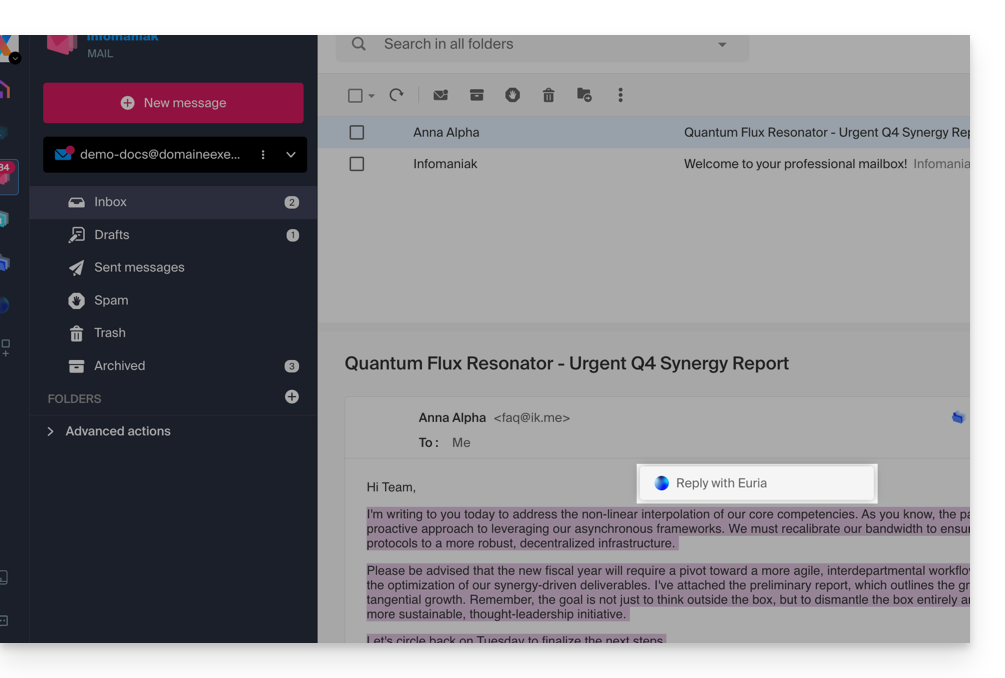
When reading an email…
You can launch Euria by consulting a received message to which you wish to respond quickly:
- Select with the mouse the passage on which to base the response.
- Choose to respond with Euria in the contextual menu that appears:
- Indicate to the assistant what you want to respond, as if you were conversing with a human.
- Insert the proposal that will appear in the automatically composed response message.
- All you have to do is read it over and send it.
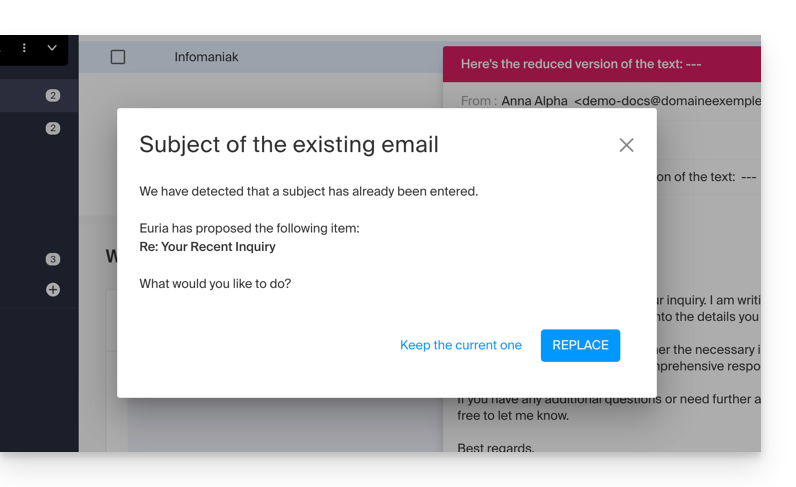
Subject of the message
When you start writing a new message, the assistant can enter a suitable title for your message in the Subject field:
- Enter text.
- Click on the Euria icon to the right of the Subject field.
- Insert the proposal if it suits you:
- If a subject is already entered in the field (for example because you have inserted a new message + subject composed by the assistant and then requested a new message from the assistant) the assistant will propose to replace it with a more appropriate subject:
- If a subject is already entered in the field (for example because you have inserted a new message + subject composed by the assistant and then requested a new message from the assistant) the assistant will propose to replace it with a more appropriate subject:
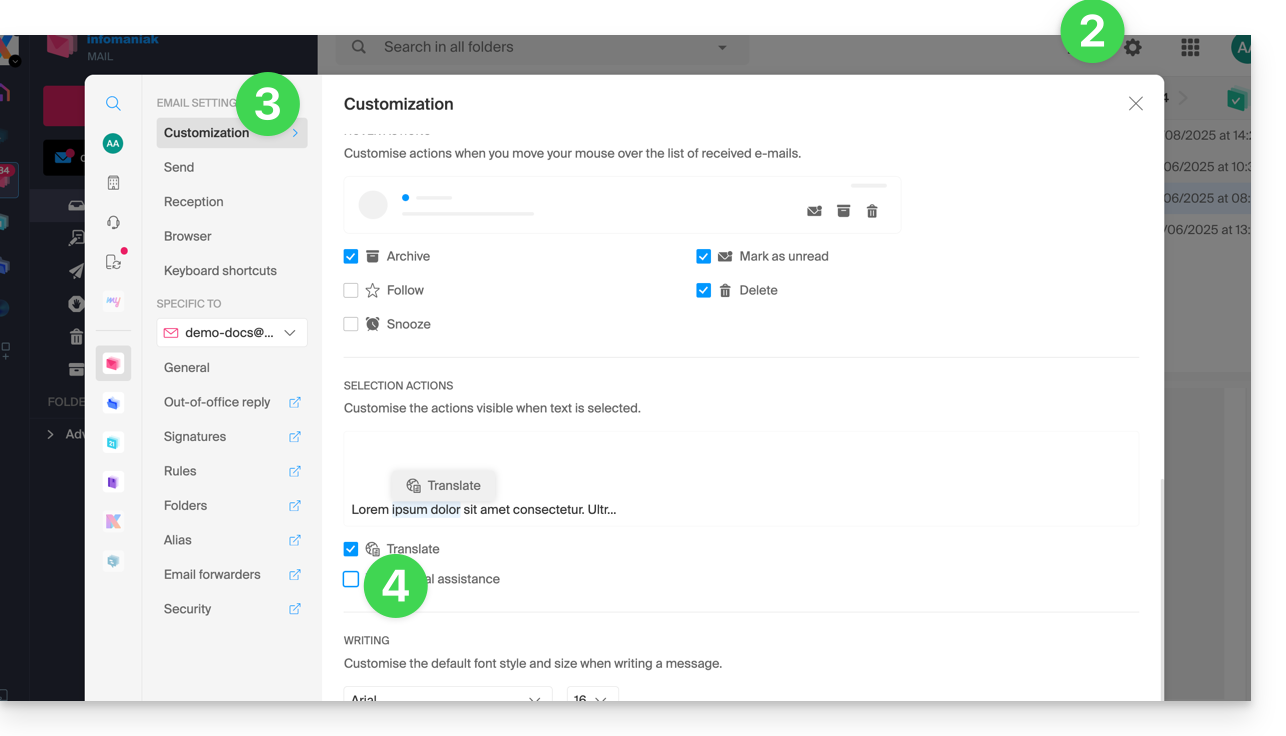
Disable the assistant
You can adjust the elements (translations / Euria) that appear when you click on your message:
- Click here to access the Web app Mail Infomaniak (online service ksuite.infomaniak.com/mail).
- Click on the Settings icon at the top right of the interface.
- Click on Customization in the left sidebar menu.
- Check or uncheck the actions you want to have on click:
This guide explains how to connect the Apple Mail mobile app on iOS to an email address hosted by Infomaniak.
Preamble
- Your iOS device will be automatically configured via .mobileconfig configuration profiles compatible with Apple, unlike a manual configuration.
- It is possible to delete a configuration profile once installed (scroll down to the bottom of this page for the instructions).
- The various services offered by Infomaniak are all compatible with the corresponding standard protocols (IMAP/SMTP for email, for example), therefore if you encounter a problem with third-party software, contact its publisher or a Partner and consult the support policy as well as section 11.9 of the Infomaniak Terms of Service.
Install a configuration profile
Prerequisites
- Create the email address in my kSuite or a Mail Service / kSuite.
- Create a password for the email address on the device you are going to configure.
- Check that the Mail Service is configured optimally.
Download the profile from the relevant iOS device or send it from another device (if you already have a working email address, for example):
- Click here to access the Infomaniak configuration tool (online service https://config.infomaniak.com) — log in if necessary to your Infomaniak account on the Organization on which your email address is managed.
- Choose to install the profile on this device:
- Choose to synchronize emails:
- Choose to synchronize another application than the Infomaniak Mail application:
- Enter the password for the email address (attached to Mail Infomaniak (Webmail)) that you want to synchronize on iOS.
- Press the blue Verify button:
- Press to copy the validated password.
- Download the configuration profile and authorize its opening:
- Open the settings of the iOS device:
- Press the recently downloaded profile:
- Press Install:
- Unlock your iOS device:
- Press Install:
- Paste the password of the previously verified email address (point 7 above).
- Press Next:
- There you go, your email address is now configured in the Apple Mail application that you can open and control:
Delete an Apple profile
Refer to the official documentation by changing the version of your system at the top of the page* if necessary.
*Why is it necessary to choose the guide version that exactly matches your macOS / iOS system version? Apple introduces changes, sometimes subtle, with each new version of its system, for example a path on iOS 15…
… becomes this on iOS 18…
This guide explains why some attachments sent from Microsoft Outlook arrive in winmail.dat format on your email address hosted by Infomaniak, and how to permanently resolve the issue on the sender's side (where it originates).
Preamble
winmail.datis the container used by Outlook/Exchange when a message is sent in RTF / TNEF.- It encapsulates the formatting and attachments.
- Many non-Microsoft email clients do not know how to interpret TNEF:
- The formatting disappears and the attachments become a single
winmail.datfile.
- The formatting disappears and the attachments become a single
Important: the generation of a winmail.dat does not depend on Infomaniak; the issue arises with the sender (Outlook/Exchange) and must be corrected on their device or by their Microsoft 365 administrator.
Solving the problem (actions to request from the sender)
The most effective solution is to modify the Outlook configuration on the sender's side.
Disable RTF/TNEF and resend the message in HTML or plain text
- Classic Outlook for Windows (Microsoft 365/2021/2019, Win32 application)
Menu:File > Options > Mail
Composition:Compose messages in this format:choose HTML (or Plain Text).
Message format: inWhen sending messages in Rich Text format to Internet recipients, select Convert to HTML (or Convert to Plain Text).
Case by case (a single email): in the message window, tabText Format> choose HTML.
- New Outlook for Windows (Outlook on the Web-based application)
Menu:Settings (gear icon) > Mail > Compose and reply
Message format:Compose messages in:choose HTML (or Plain Text).
This client does not expose an RTF option; sending in HTML/text avoidswinmail.dat.
- Outlook on the Web (Exchange Online/Outlook.com)
Menu:Settings > Mail > Compose and reply > Message format> choose HTML (or Plain Text).
- Outlook for Mac
Menu:Outlook > Preferences > Composition> check/uncheck Compose messages in HTML by default.
For a single message: in the composition window, tab Options > switch to HTML or Plain Text.
Notes: if the sender has attached files, they will be readable by all recipients as long as the message is sent in HTML/text. Zipping the attachments (.zip) does not prevent Outlook from encapsulating the message if RTF/TNEF is still active.
Disable RTF for specific recipients (you, for example)
- Classic Outlook Windows: open the Contact card > double-click the email address > Outlook Properties > Internet Format: select Send as plain text only (or Let Outlook decide if the admin already forces the conversion).
- Clear the auto-completion (it may “remember” RTF for a recipient):
File > Options > Mail > Send messages > Empty the Auto-Complete List, then retype the address manually for the next send.
- Microsoft 365 administrators (at the sender's): in the Exchange Admin Center:
Mail flow > Remote domains > Default> Rich Text format: choose Never. In PowerShell:Set-RemoteDomain Default -TNEFEnabled $false.
Failing that: use another client to send (e.g., Thunderbird), or check that Calendar invitations are sent in iCalendar (File > Options > Calendar > enable Use iCalendar format for external recipients).
If you do not wish to recontact the sender
You can extract the content of winmail.dat with TNEF decoding tools (online or desktop applications). Search for “open winmail.dat” and choose a reputable tool for your system (Windows, macOS, Linux). This usually restores the attachments, but it is not a lasting fix. Moreover, privacy and security are in no way guaranteed during these operations.
This guide explains how to create sorting rules to automatically classify your incoming emails on Infomaniak according to certain conditions.
⚠ Available with :
| kSuite | free | * |
| Standard | ||
| Business | ||
| Enterprise | ||
| my kSuite | * | |
| my kSuite+ | ||
| Mail Service | Starter 1 max. address | * |
| Premium 5 min. addresses |
* advanced (expert) mode unavailable
Preamble
- These rules allow the following automatic actions, among others:
- Delete or move messages from email addresses you no longer want to see.
- Forward to your spouse the emails from an email address so that you both receive them.
- Copy messages containing a specific keyword to a folder.
- etc.
- Unlike the sorting rules offered within software/email clients (Microsoft Outlook, Mozilla Thunderbird, Apple Mail...), these rules will act directly on the server of your mailboxes before even the IMAP connection.
- You can make a template for all the addresses of your Mail Service.
- If you use a software/email client configured in POP, in parallel with Mail Infomaniak, the messages classified in folders will no longer be downloaded by your application because the POP protocol only retrieves the messages that are in your main inbox. To view the classified messages, it will be necessary to use the IMAP protocol or Mail only.
Access the rules from the Infomaniak Web Mail app
Prerequisites
- Permission to manage rules: if you had been invited to the Infomaniak Web app Mail (online service ksuite.infomaniak.com/mail) to manage your address, it is possible that the Mail Service manager has revoked this right from their admin account.removed this right from their admin account.
To access the sorting filters for your Infomaniak mailbox:
- Click here to access the Infomaniak Web app Mail (online service ksuite.infomaniak.com/mail).
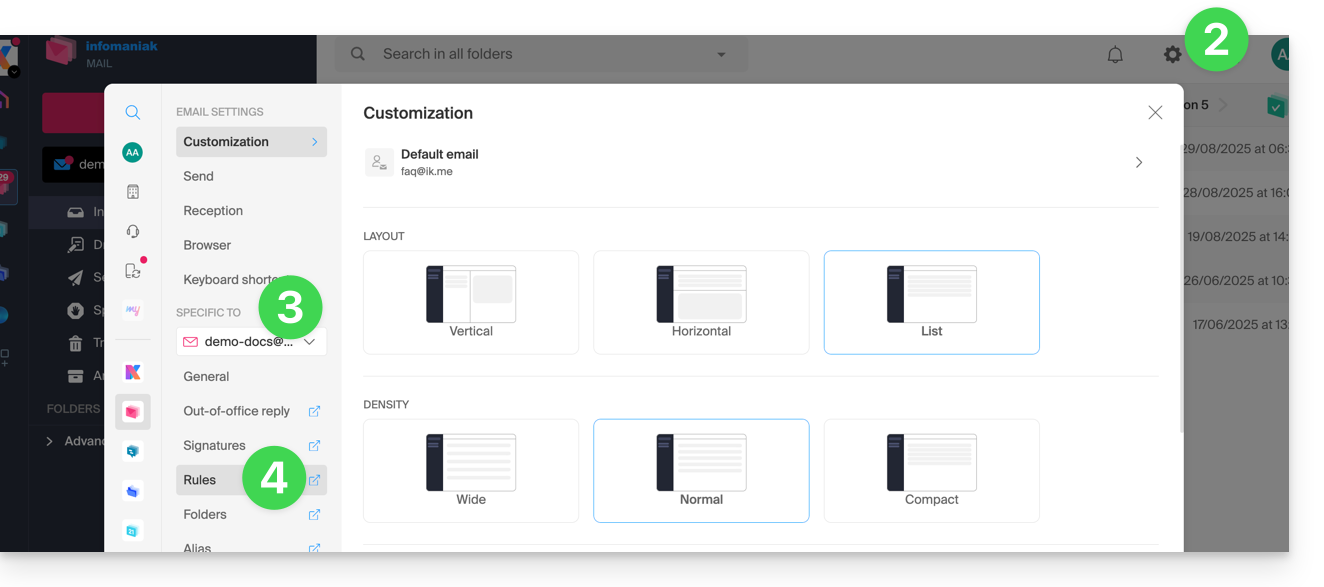
- Click on the Settings icon in the top right corner.
- Check or select the email address concerned in the dropdown menu.
- Click on Filters and rules:
Define a rule based on a received email
You can also create a rule directly from the received email:
- Click here to access the Infomaniak Web app Mail (online service ksuite.infomaniak.com/mail).
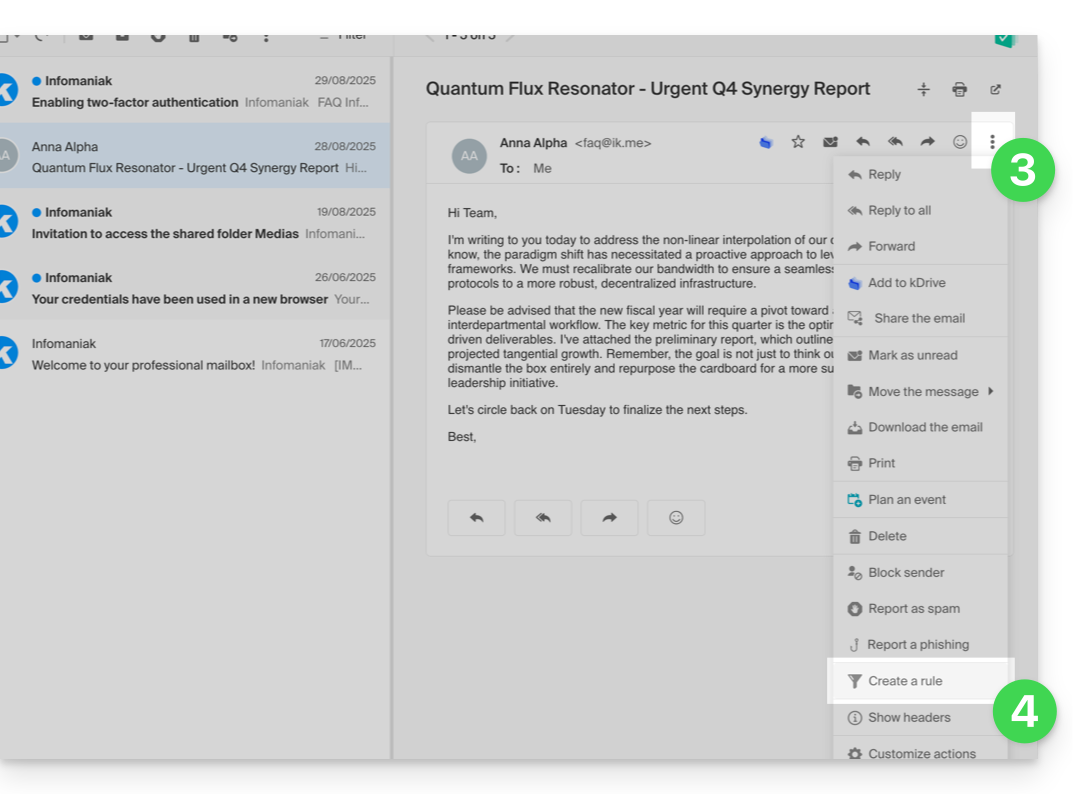
- Open the message from the sender concerned.
- Click on the action menu ⋮ in the top right corner of the open message.
- Choose Create a rule to open the creation assistant which will be pre-filled with the elements of the message:
Access rules from the Mail Service
To access the sorting filters for your Infomaniak mailbox:
- Click here to access the management of your product on the Infomaniak Manager (need help?).
- Click directly on the name assigned to the product concerned.
- Click on the email address concerned in the table that appears.
- Click on the Rules tab from the left sidebar (or top bar):

Configure sorting filters & rules
Create a new rule in Standard mode
- Click on the Add a rule button in Standard mode to create a new rule using a creation assistant/form:

- The different conditions available for sorting filters are presented in this other guide.
- Once a filter is created, click on Continue to activate it.
Add, duplicate, or modify a rule in Standard mode
If there are already sorting filters, the button to add is at the top right of the table:
These settings can be modified at any time by clicking on the pencil icon ✎ located to the right of the concerned element.
It is also possible to duplicate an existing rule to rework it in a copy without affecting the first one: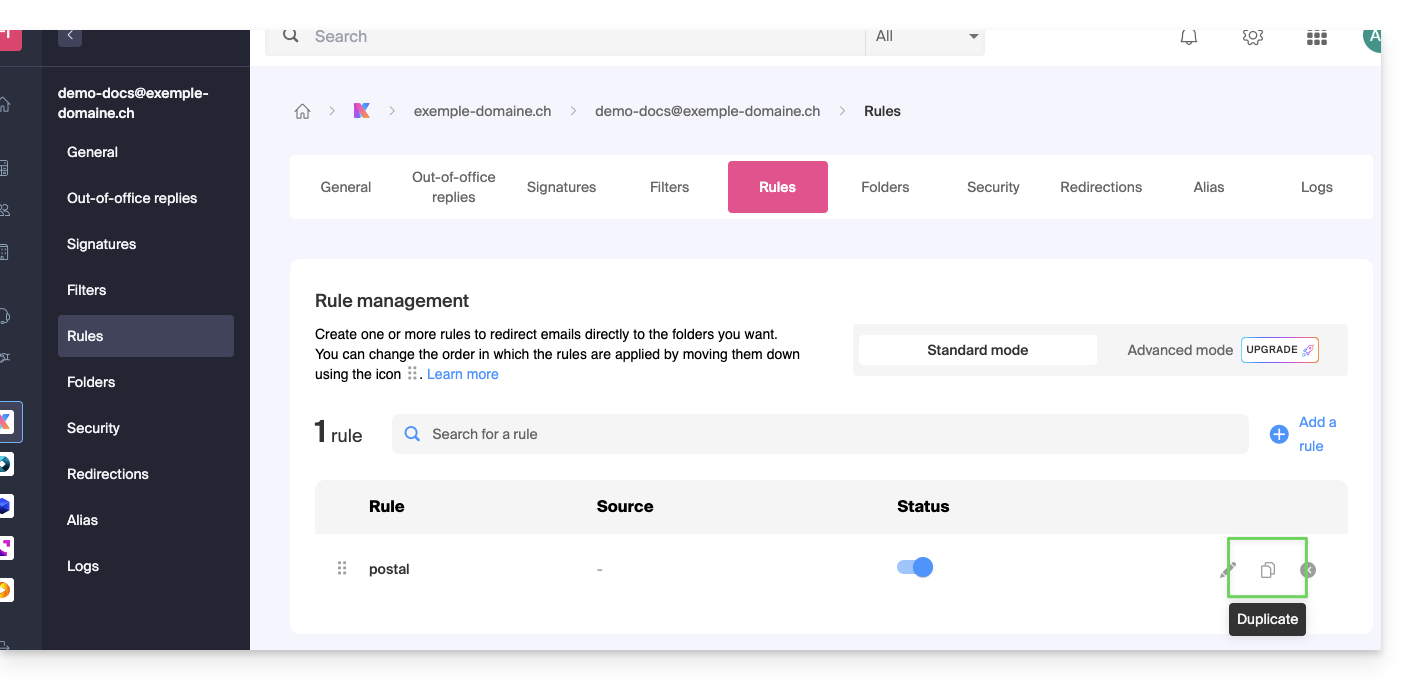
Create a new rule in Advanced (expert) mode
Read the prerequisites
If you do not know what you are doing, it is recommended to stay in Standard mode to avoid disrupting your account's sorting filters ⚠️ No support is provided regarding the Sieve language (refer to this documentation — also discover the role of the host).

- The advanced mode allows you to configure sorting rules directly from a script in Sieve language.
- It is possible to import Sieve files via the button.
- By activating this mode, the existing rules will be kept but deactivated.
First example of advanced sorting
Here is a simple example of a command using this language:
require ["fileinto"];
if address :contains "from" "facebook.com" {
    fileinto "fb";
} elsif header :matches "List-Unsubscribe" "*" {
    fileinto "nl";
} else {
    keep;
}
Explanations:
- Loading required extensions: use
require ["fileinto"];to indicate that you will use thefileintofunction. - Filtering Facebook messages: use
if address :contains "from" "facebook.com"to check if the sender's address contains "facebook.com"; if so, the message is filed in the "fb" folder withfileinto "fb";. - Filtering messages with an unsubscribe link: use
elsif header :matches "List-Unsubscribe" "*"to check if the "List-Unsubscribe" header is present in the message; if so, the message is filed in the "nl" folder withfileinto "nl";. - Keeping other messages: use
else { keep; }to keep all other messages that do not match the previous criteria.
Warning:
- If you need to mention a subfolder, use the separator
/(as in the second example), but it is not necessary to specifyINBOXin your codes - Ensure that the folders
fbandnlalready exist in your inbox; otherwise, messages may not be sorted correctly - The filter
address :contains "from" "facebook.com"works correctly for addresses that contain "facebook.com" in the "from" field - The filter
header :matches "List-Unsubscribe" "*"checks only for the presence of the "List-Unsubscribe" header, not its content
Second example of advanced sorting
This code modifies the subject based on thesender (adds a prefix to the subject when an email passes the filter, for example):
require ["fileinto", "editheader", "variables", "regex"];
if address "sender" "owner-scientific-linux-devel at LISTSERV.FNAL.GOV" {
    if header :regex "subject" "((Re|Fwd): *)\\[SCIENTIFIC-LINUX-DEVEL\\] *(.*)" {
        deleteheader "Subject";
        addheader "Subject" "${1}${3}";
    } else {
        # Ajouter un préfixe si l'objet ne correspond pas déjà au modèle
        deleteheader "Subject";
        addheader "Subject" "[SL-Devel] ${1}";
    }
    fileinto "Mail List/SL-Devel";
}
Explanations:
- Required extensions :
fileinto: to classify messages into folders.editheader: to modify email headers.variables: to use variables in expressions.regex: for regular expressions.
- Condition on the sender :
if address "sender" "owner-scientific-linux-devel at LISTSERV.FNAL.GOV": checks if the sender matches.
- Condition on the subject :
if header :regex "subject" "((Re|Fwd): *)\\[SCIENTIFIC-LINUX-DEVEL\\] *(.*)": checks if the subject matches the specified pattern.deleteheader "Subject";andaddheader "Subject" "${1}${3}";: deletes the existing subject and adds a new subject with the captured parts.
- Adding a prefix if the subject does not already match the pattern :
addheader "Subject" "[SL-Devel] ${1}";: adds a prefix "[SL-Devel]" to the subject if it is not already present.
- Classifying the message :
fileinto "Mail List/SL-Devel";: classifies messages into the "Mail List/SL-Devel" folder.
Warning:
- Ensure that the folder
Mail List/SL-Develalready exists in your inbox. - Check that the script correctly modifies the subject of emails to add or adjust the prefix if necessary.
This guide explains how to set the Infomaniak Mail web app (online service mail.infomaniak.com) as the default email provider on web browsers that offer this option (Brave, Vivaldi, Firefox, etc., except Safari).
Set Infomaniak as the default email client
To configure the browsers to automatically use the Infomaniak email management interface when you click on mail links (for example, "mailto:" links) and/or when you try to send an email from a web page:
- Click here to access the Web app Mail Infomaniak (online service mail.infomaniak.com).
- Click on the Settings icon at the top right.
- Click on Browser.
- Click on Set Mail as default:

- Follow the instructions provided by the browser in use (a notification should appear at the top of the window):

In case of trouble...
To resolve issues using Mail Infomaniak as the default email client, follow the manual instructions for your usual browser:
...on Firefox
- Open Firefox.
- In the menu bar, enter about:preferences
- In the sidebar, go to General, then Applications
- In the "Type and Content" column, select mailto
- Click on Always ask and select «
mail.infomaniak.com» as the email manager:
... on Google Chrome
- Open Google Chrome.
- In the menu bar, enter chrome://settings/handlers.
- In the sidebar, go to Privacy and Security.
- In the Protocol Manager select «
mail.infomaniak.com» as the email handler:
This guide details the various possibilities available to you in the incoming email filtering tool (based on sorting rules) of Mail Infomaniak.
Preamble
- Refer to this other guide if you are looking for information about setting up sorting filters on your Infomaniak mailbox.
Discover the possible conditions
The meaning of these different existing conditions and criteria is detailed below:
From
Allows you to filter messages based on the sender (and decide what to do with emails always coming from the same person or domain, for example).
A
Allows you to filter messages based on the recipient (if you receive an email that is always addressed to a specific main recipient, for example volunteers@domain.xyz).
Cc
Allows you to filter messages based on the recipient mentioned in the Cc field (and who therefore receives the email as a copy in addition to the main recipient).
Subject
Allows you to filter messages based on the subject of the message.
Reply to
Allows you to filter messages by looking at the content of the reply-to field (specific condition - example).
Size
Allows you to filter messages based on their size.
Message content
Allows you to filter messages based on certain words that would appear in the body of the incoming message.
Email type
Allows you to filter messages based on the x-infomaniak-type header whose value can be ham, spam, transactional and bounce.
In the case of using a condition "email type = advertising, social media", then the selected action will be performed before the advertising filtering if the latter was activated.
This guide explains how to connect the desktop app Outlook 2007 (desktop application on Windows) to an email address hosted by Infomaniak.
Preamble
- The various services offered by Infomaniak are all compatible with the corresponding standard protocols (IMAP/SMTP for email, for example), therefore if you encounter a problem with third-party software, contact its publisher or a Partner and consult the support policy as well as article 11.9 of the Infomaniak Terms of Service.
Add the email address to the application
Prerequisites
- Create the email address in my kSuite or a Mail Service / kSuite.
- Create a password for the email address on the device you are going to configure.
To configure the email application:
- Open the application.
- Click on the Tools menu.
- Click on Options:
- Click on the Email Configuration tab.
- Click on Email Accounts...:
- Click on New:
- Click on Configure manually.
- Click on Next:
- Click on the Internet E-mail button to connect to an IMAP server.
- Click on Next:
- Check and complete the missing information.
- Click on Additional settings:
- Click on the Outgoing server tab.
- Click on My outgoing server requires authentication.
- Click on the Advanced tab:
- Replace the port numbers with the correct information and enable SSL.
- Click on OK:
- Click on Next:
- Click on Finish:
- Click on Close:
- Your email address is now configured in the application:
Recommended settings
- Incoming IMAP server =
mail.infomaniak.com - IMAP port =
993(with SSL) - Outgoing SMTP server =
mail.infomaniak.com - SMTP port & encryption protocol and command/method to activate this protocol:
587+ STARTTLS - Username = full & complete email address ( ? )
- Password = the one generated for the email address you want to view
- Authentication required for sending emails:
- It is activated in the SMTP settings of your application.
- Check "use the same settings as the incoming server" or, depending on the software/email clients, enter a username (= full & complete email address) and the generated password.
Refer to this other guide if you are looking for information about other mail ports and protocols compatible (SSL / TLS for example).
In case of a problem
Check that the Mail Service is configured optimally.
It is not necessary to contact Infomaniak Support if your email address works well outside the application. The most common error concerns the use of an incorrect password. The troubleshooting guides help you resolve any potential issues:
- Refer to the solutions provided in this other guide regarding mail in general.
- This other guide is more specifically about Outlook.
… and if your Outlook no longer works since a change of mail password, refer to this other guide.
This guide explains how to report a phishing attempt (Phishing, Fishing, Filoutage...) of which you may be a victim.
Preamble
- Phishing is an attempt at fraud and scam, aiming to obtain sensitive information fraudulently.
- Generally, the victim receives in their inbox a message seemingly from Infomaniak, their bank, or a trusted organization, indicating that a problem has occurred on their account or in their daily life:
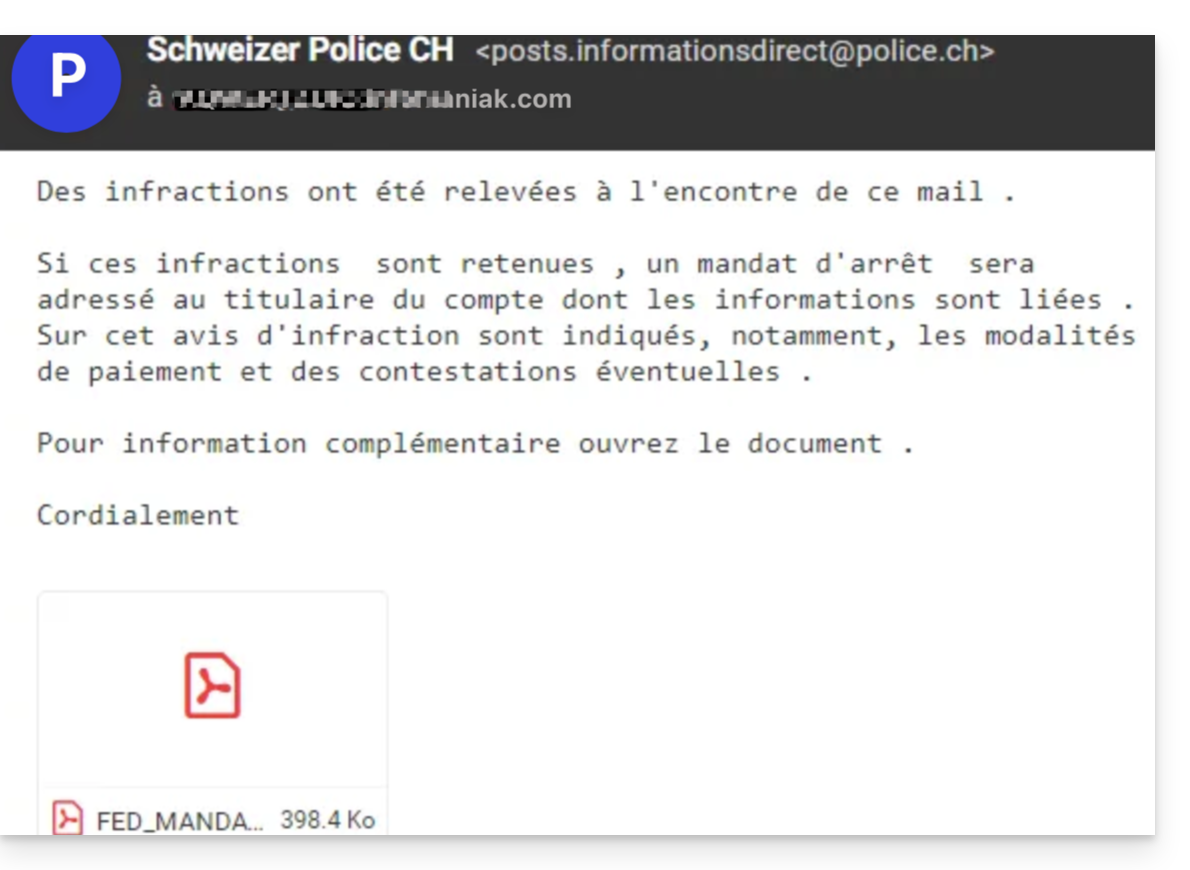
- The goal of this identity theft is generally for the user to voluntarily go to a page and share private information that will then be exploited for various purposes, mainly financial.
- If it is not a message “pretending to be something it is not”, but simply an unsolicited advertising message, it is better to report it as Spam.
Report a Phishing Email
Prerequisites
- Check that the spam filter is active.
- For added security, enable the external mail mention.
Then, if you find an email of this type in your inbox, you have the option to act so that these messages decrease and eventually disappear from the messaging systems:
- Click here to access the Infomaniak Mail Web app (online service ksuite.infomaniak.com/mail).
- Open the phishing message
- Click on the action menu ⋮ on the right.
- From the menu that appears, select
Report as phishing :
- Confirm sending for processing.
- Delete the email
Once you have clicked on Report as phishing, an email is automatically sent to Infomaniak with all the necessary information for processing the scam report.
In case of a more serious problem (when the message is directly addressed to you by an acquaintance or contact without it being a mass mailing) it is recommended to contact an organization such as report.ncsc.admin.ch.
This guide explains how to download an email from the Web app Mail Infomaniak (online service ksuite.infomaniak.com/mail) in order to obtain on your hard drive a file in .eml format compatible with all email software/clients.
It is not possible to reproduce this operation on the mobile app Infomaniak Mail (application for iOS / Android smartphone or tablet) but take note of the alternatives proposed at the end of this guide.
Download an email
To save an email from the Web app Mail Infomaniak (online service ksuite.infomaniak.com/mail):
- Click here to access the Web app Mail Infomaniak (online service ksuite.infomaniak.com/mail).
- Open the message to download.
- Click on the action menu ⋮ to the right of the open email.
- Select Download:
4 alternatives
- The Save as... function of an email software/client such as Thunderbird allows you to achieve the same result:
- Open the software Thunderbird.
- In the inbox, right-click on the message to save.
- Choose the location to save the file
.eml.
- It is also possible to print a message and choose
PDFfrom the available printers, in order to save the message in a simple and universal format. - To download the message to kDrive, refer to this other guide.
- To share it publicly using a simple shortcut to it, refer to this other guide.
This guide explains how to connect the desktop app Outlook 2010 (desktop application on Windows) to an email address hosted by Infomaniak.
Preamble
- The various services offered by Infomaniak are all compatible with the corresponding standard protocols (IMAP/SMTP for email, for example). Therefore, if you encounter a problem with third-party software, contact its publisher or a Partner and consult the support policy as well as article 11.9 of the Infomaniak Terms of Service.
Add the email address to the application
Prerequisites
- Create the email address in my kSuite or a Mail Service / kSuite.
- Create a password for the email address on the device you are going to configure.
To configure the email application:
- Open the application.
- Click on Next:
- Click on Yes to configure a mail account.
- Click on Continue:
- Click on Configure manually.
- Click on Next:
- Click on the Internet E-mail button to connect to an IMAP server.
- Click on Next:
- Check and complete the missing information.
- Click on Additional settings:
- Click on the Outgoing server tab:
- Click on My outgoing server requires authentication.
- Click on the Advanced tab:
- Replace the port numbers with the correct information and enable SSL.
- Click on OK:
- Click on Next:
- Click on Close:
- Click on Finish:
- That's it, your email address is now configured in the application:
Recommended settings
- Incoming IMAP server =
mail.infomaniak.com - IMAP port =
993(with SSL) - Outgoing SMTP server =
mail.infomaniak.com - SMTP port & encryption protocol and command/method to enable this protocol:
587+ STARTTLS - Username = the full & complete email address ( ? )
- Password = the one generated for the email address you want to access
- Authentication required for sending emails:
- It is activated in the SMTP settings of your application.
- Check "use the same settings as the incoming server" or, depending on the software/email clients, enter a username (= full & complete email address) and the generated password.
Refer to this other guide if you are looking for information about other messaging ports and protocols compatible (SSL / TLS for example).
In case of problem
Check that the Mail Service is configured optimally.
It is not necessary to contact Infomaniak Support if your email address works well outside the application. The most common error concerns the use of an incorrect password. The troubleshooting guides help you resolve any potential issues:
- Be aware of the solutions provided in this other guide regarding email in general.
- This other guide is more specifically about Outlook.
… and if your Outlook no longer works since a change of email password, be aware of this other guide.
This guide explains how to connect the desktop app Microsoft Outlook for Mac version 16.80 (desktop app on macOS) to an email address hosted by Infomaniak.
Preamble
- Instead of the manual configuration for Outlook below, it is recommended to use Apple Mail with the .mobileconfig configuration profiles offered by Apple.
- The various services offered by Infomaniak are all compatible with the corresponding standard protocols (IMAP/SMTP for email, for example), therefore if you encounter a problem with third-party software, contact its publisher or a Partner and consult the support policy as well as article 11.9 of the Infomaniak Terms of Service.
Add the email address to the application
Prerequisites
- Create the email address in my kSuite or a Mail Service / kSuite.
- Create a password for the email address on the device you are going to configure.
To configure the email application:
- Open the application.
- Click on Add an account:
- Enter the email address to be linked.
- Click on Continue:
- Click on IMAP:
- Click on Synchronize in IMAP (without Microsoft Cloud):
- Check and complete the missing information.
- Click on Add the account:
- Understand and go through the different Microsoft information windows:
- That's it, your email address is now configured in the application:
Recommended settings
- Incoming IMAP server =
mail.infomaniak.com - IMAP port =
993(with SSL) - Outgoing SMTP server =
mail.infomaniak.com - SMTP port & encryption protocol and command/method to activate this protocol:
587+ STARTTLS - Username = full & complete email address ( ? )
- Password = the one generated for the email address you want to access
- Authentication required to send emails:
- It is activated in the SMTP settings of your application.
- Check "use the same parameters as the incoming server" or, depending on the software/email clients, enter a username (= full & complete email address) and the generated password.
Refer to this other guide if you are looking for information about other compatible messaging ports and protocols (SSL / TLS for example).
In case of problem
Check that the Mail Service is configured optimally.
There is no need to contact Infomaniak Support if your email address works well outside the application. The most common error concerns the use of an incorrect password. The troubleshooting guides help you resolve any potential issues:
- Refer to the solutions given in this other guide regarding email in general.
- This other guide is more specifically about Outlook.
… and if your Outlook no longer works since a change of email password, refer to this other guide.