
Knowledge base
1000 FAQs, 500 tutorials and explanatory videos. Here, there are only solutions!
This guide explains how to create and manage gift vouchers (as part of the Infomaniak ticketing system). Gift vouchers can be purchased directly on your ticketing system and used to buy tickets or passes.

This allows your customers to offer gift vouchers to third parties, who can then use them to buy tickets on your ticketing system.
Gift vouchers can only be used to purchase tickets on the Infomaniak online ticketing platform.
Creating gift vouchers
To do this:
- Click here to access the management of your product on the Infomaniak Manager (need help?).
- Click directly on the name assigned to the ticketing system concerned by the event.
- Click on Programming in the left-hand side menu.
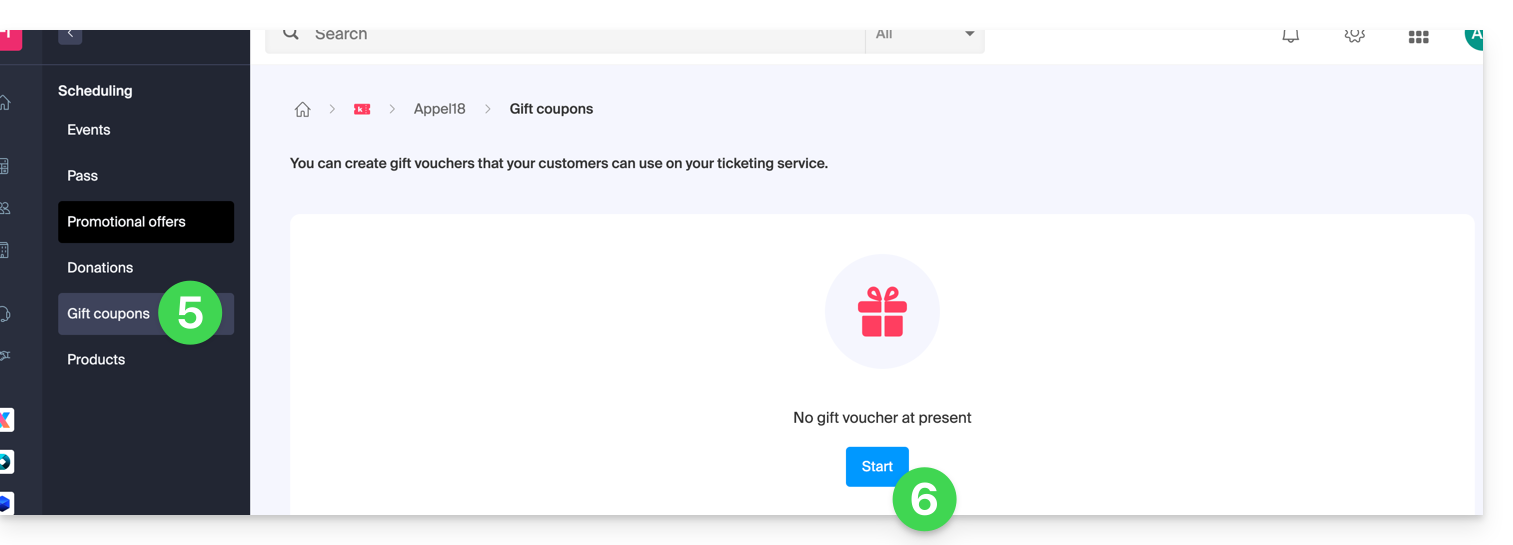
- Click on Gift vouchers in the left-hand side menu.
- Click on the blue button Add a gift voucher:
- Choose the sale price of the gift voucher: this is the price the customer will pay to purchase the gift voucher.
- Define the value of the gift voucher. This can be different from the purchase price and represents the amount that can be used when it is used.
- Define the visibility of the gift voucher. Visible allows purchase on the online ticketing system by customers, while the hidden status allows it to be reserved for exclusive use by resellers or the administrator:
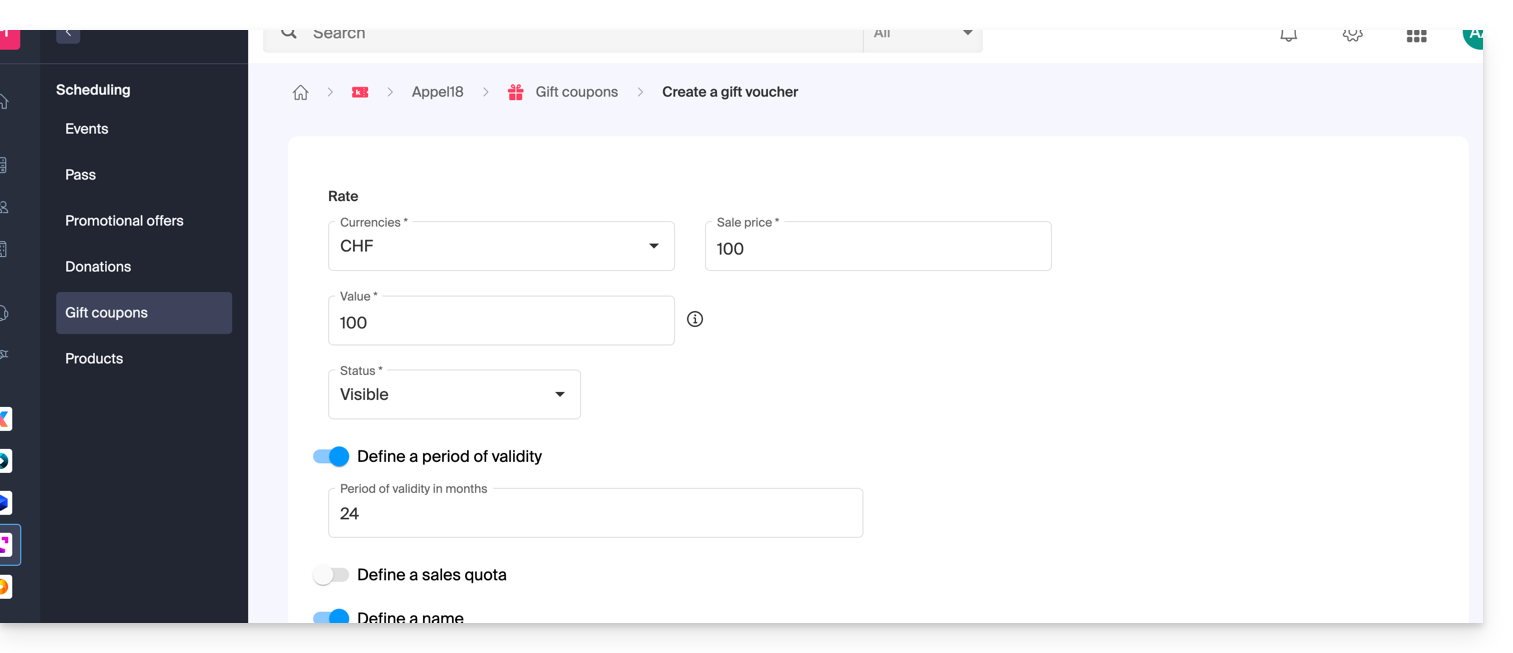
- Define the parameters of the gift voucher:
- The validity period of a gift voucher.
- The number of gift vouchers that will be on sale.
- The name you want to give to the gift voucher.
- The description of the gift voucher.
- The image that will be used for the gift voucher.
Managing gift vouchers
Once the gift voucher has been generated, it will be possible to manage each gift voucher once purchased: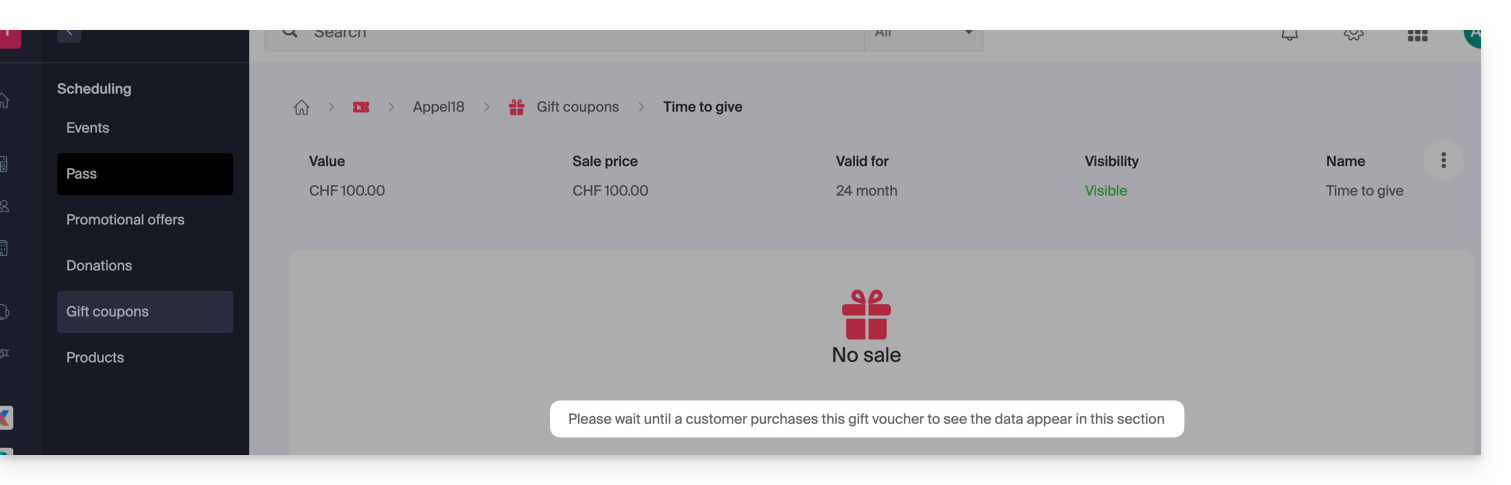
You will be able to:
- Check the balance on a gift voucher.
- View the orders linked to a gift voucher.
- Resend the gift voucher by email to the customer.
- Print the gift voucher.

This guide explains how to exchange tickets at the ticket office (within the framework of the ticketing system Infomaniak).
Preamble
- This feature allows you to select new tickets while canceling the current ones.
- This operation is only possible for individual tickets; for passes, you will need to cancel a ticket and add it again from the pass menu.
Enable exchange mode
To activate the Exchange payment mode, refer to this other guide then:
- Go to the Ticket Office.
- From the ticket office, select the new ticket(s). They will be added to the cart, on the right side of the screen.
- Once all the new tickets have been selected, choose the payment method Exchange:

- On the new window, search for the order or ticket number.
- Select the tickets to cancel and confirm:

- Enter the customer's information, and send the order confirmation to the customer, or print the ticket:

This guide explains how to add and configure the images of your events within the framework of the Infomaniak ticketing system.
Preamble
- The presentation images of your event can be defined in vertical and horizontal format.
- A vertical visual is mandatory, as it will be used on…
- … the administration tool of your ticketing system,
- … at the ticket office,
- … as well as your online store in case there is no horizontal image.
- The horizontal image, on the other hand, will be used on…
- … your online store when there are multiple events,
- … on the infomaniak.events portal.
- It is possible to add custom images or use a default image, as well as an image gallery associated with your event; it can accommodate up to 4 images and will be found on the event page of your online ticketing system below the description:

Add images when creating the event
When creating a new event, you can choose a vertical image, a horizontal image, and an image gallery by selecting the appropriate tab.
- Click here to access the management of your product on the Infomaniak Manager (need help?).
- Click directly on the name of the ticketing system concerned.
- Click on Programming in the left sidebar menu.
- Click on Events in the left sidebar menu.
- Click on the Add an event button.
You can choose a photo from your media library or a royalty-free image from the list provided:
- Portrait:
1000 x 1414px, vertical image - Landscape:
1200 x 630px, horizontal image
Modify the images of an existing event
To modify the images of an existing event
- Click here to access the management of your product on the Infomaniak Manager (need help?).
- Click directly on the name of the ticketing system concerned.
- Click on Programming in the left sidebar menu.
- Click on Events in the left sidebar menu.
- Click on the event in question
- Click on the Modify button:

- Click on the parameter to modify under Visuals:

This guide explains how to create forms that will be linked to the different rates of an event (as part of the Infomaniak ticketing system). This allows you to create forms specific to each rate present at an event.
Create a form per rate
To do this:
- Click here to access the management of your product on the Infomaniak Manager (need help?).
- Click directly on the name assigned to the ticketing concerned by the event.
- Click on Settings in the left sidebar menu.
- Click on Form in the left sidebar menu.
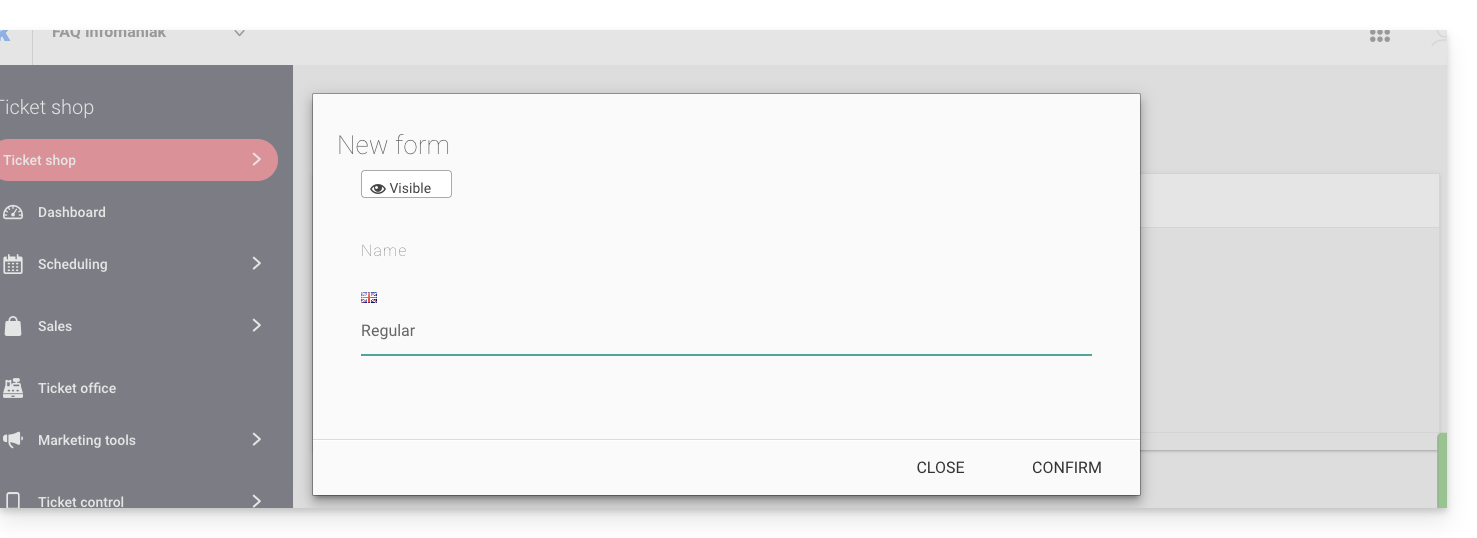
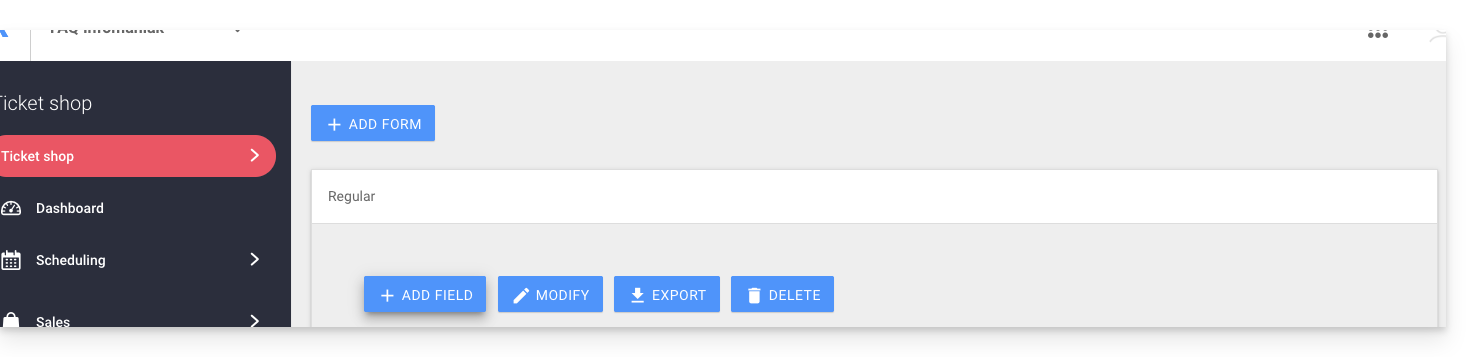
- Click the Add a form button and give a name to the form:
Add fields
Add the elements to include in the form per rate:
- Click the Add button:
Choose the name and type of field:
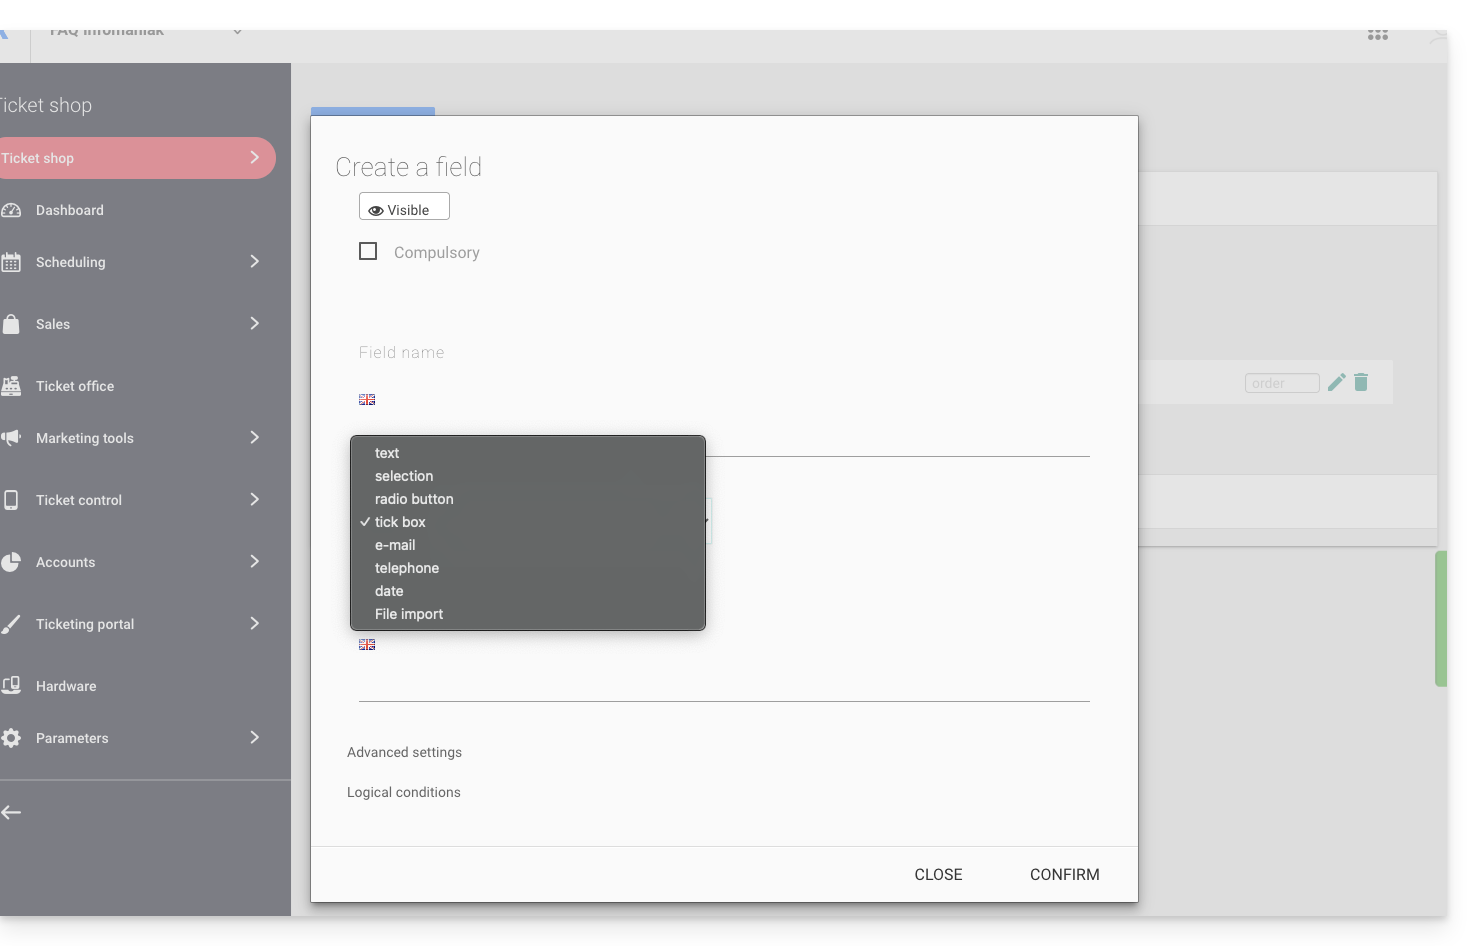
- Text: a free field to insert text
- Selection: dropdown menu allowing you to select an option from those proposed
- Radio button: radio buttons allowing you to select an option from those proposed
- Checkboxes: checkboxes that can be checked or left empty
Warning: if the mandatory option is selected, all boxes must be checked to continue. Example of use: “I have read and accept the terms of use”…
- Email: to provide an email address. Allows you to enter a different email address from the one used by the person who placed the order.
- Phone: for a phone number
- Date: for a date
Advanced options and logical conditions
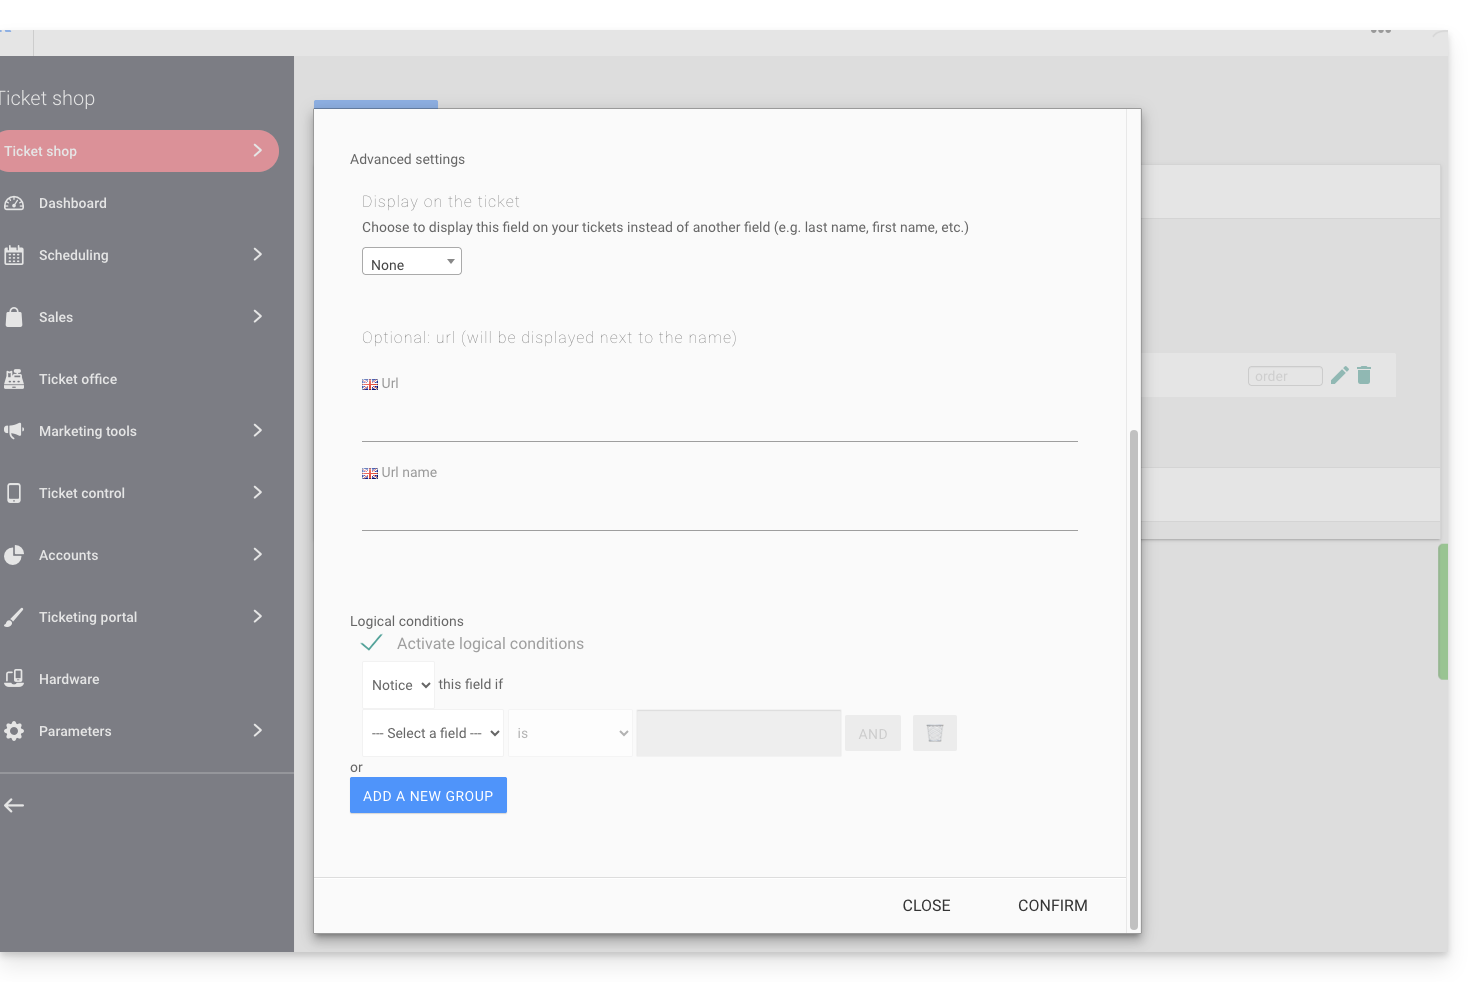
- Display on the ticket: allows you to replace the form information directly. For example, so that the ticket indicates the name of the person who will attend the event instead of the person who made the order…
- Add a URL: URL that will be displayed in the field, then above the field to let the visitor fill it in.
- Logical conditions are to be used when several fields have been created and you want to condition their display/visibility/presence.
Choose the order of the questions
Choose the order of the questions as they will appear on the ticketing: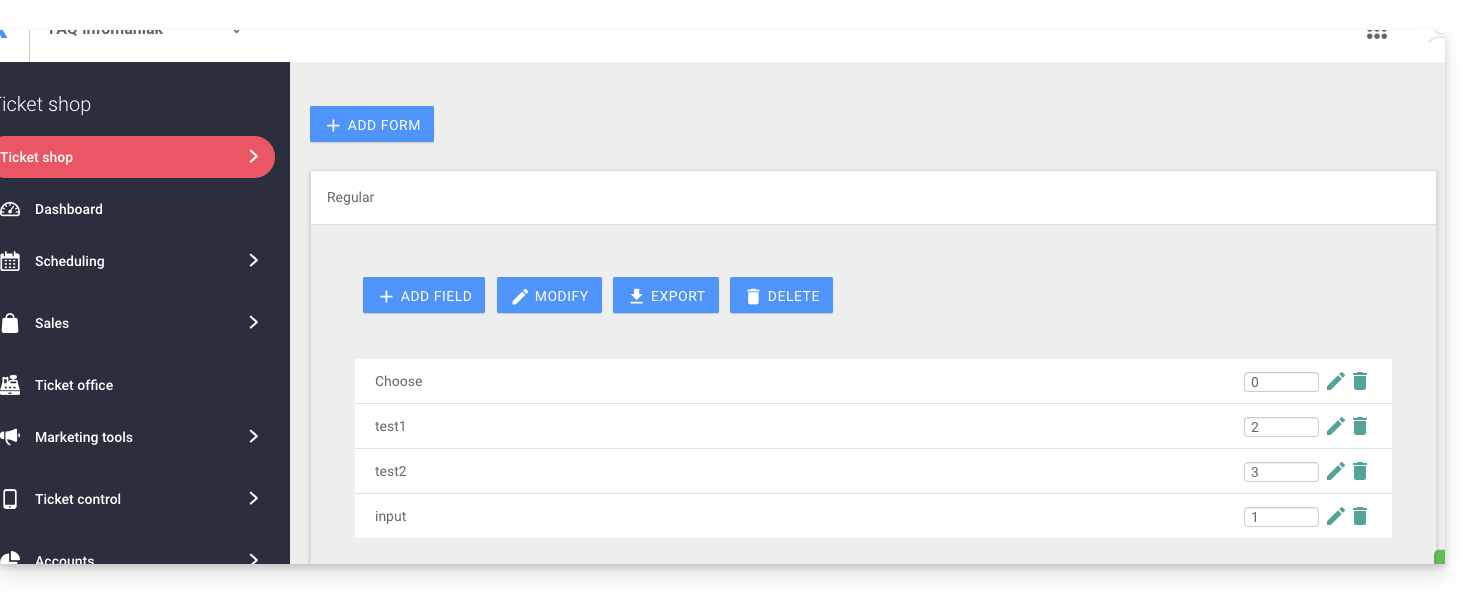
- The numbered positions will be in the order of the numbers: 1, 2, 3, etc.
- Those without a defined order will follow (not recommended)
- Position 0 will appear at the very end
Link the form to a rate
To do this:
- Click here to access the management of your product on the Infomaniak Manager (need help?).
- Click directly on the name assigned to the ticketing concerned by the event.
- Click directly on the name assigned to the event (or if necessary Programming in the left sidebar menu then Events):
- Click on the Pricing tab.
- If the event has multiple dates, this section is replaced by “Dates” which opens a calendar.
- Click on the calendar date to join the pricing…
- Click on the action menu ⋮ located to the right of the rate to which the form is to be associated (by first expanding the Zone using the chevron if necessary).
- Click on Modify:
- Click on the chevron to expand the advanced parameters.
- Activate the option Link a form by rate.
- Choose the form to link.
- Click on the Confirm button:

To retrieve the information related to the forms, refer to this other guide.
This guide explains how to create an event (within the framework of the ticketing system Infomaniak) that will be broadcast via the Infomaniak streaming service.
Prerequisites
- Have a Infomaniak ticketing system to create the event.
- Have a Infomaniak video streaming service to broadcast the event. Do you have doubts about your monthly bandwidth needs?
Stream your event
A dedicated page has been set up to ensure that only those who have purchased a ticket to your event will have access to the event.
Creation of a virtual event
For this:
- Click here to access the management of your product on the Infomaniak Manager (need help?).
- Click directly on the name assigned to the ticketing related to the event.
- Click on Programming in the left sidebar.
- Click on Events in the left sidebar.
- Click on the Add event button.
- Enter the details about your event.
- At the Location step, choose: No location or Virtual, then select: Broadcast the event live (livestreaming) and choose the streaming feed to broadcast your event:

Modification of an already created event
You can modify or add a location to an existing event to offer it as a stream, for example.
- Click here to access the management of your product on the Infomaniak Manager (need help?).
- Click directly on the name assigned to the ticketing related to the event.
- Click on Programming in the left sidebar.
- Click on Events in the left sidebar.
- Click on the relevant event.
- Click on the blue Edit button.
- At the Location step, choose: No location or Virtual, then select: Broadcast the event live (livestreaming) and choose the streaming feed to broadcast your event.
- To activate seats for livestreaming, you will need to:
- Either click on the action menu ⋮ located to the right of the current price, click on Modify and check the box: Live event (livestream) in addition to the box On-site event
- Or click on Add a zone, check the box: Live event (livestream) and indicate the number of seats available for livestreaming

- Click on Save.
The number of seats will influence the consumption of your Streaming Video offer. You can estimate the consumption based on the hours of broadcast, the quality and the number of spectators with the calculator. If you exceed your monthly consumption, the excess will be billed at CHF 0.20 per Go.
This guide explains how to use and customize digital tickets, adapted for mobile devices, within the framework of the Infomaniak ticketing system.
Introduction
- When placing an order, visitors receive a digital ticket by email, with the option, for both ecological and practical reasons, to download a PDF version or save it to the Wallet.
- If you have set up Print@home tickets, you can reuse the event parameters for mobile tickets:
- The event name
- The location and date
- The opening hours (if enabled)
- The first and last name of each ticket holder
- The event poster
- Customers can save their tickets to mobile devices, either on Apple Wallet (download the
pass.pkpassand open it in the Apple iOS “Wallet” app) or on Google Wallet (Android):
Configuration of your mobile tickets
Prerequisites
- You will need to create an event to access the visual options for mobile tickets.
Then:
- Click here to access the management of your product on the Infomaniak Manager (need help?).
- Click directly on the name assigned to the ticketing related to the event.
- Click on Programming in the left sidebar.
- Click on Events in the left sidebar.
- Click directly on the event name.
- Click on the Ticket Templates tab:

A preview appears on the left side of the screen while the mobile ticket settings appear on the right…
A. Customization of the image and promotional texts
You can enable the options to add an image and/or informative text. Each change will be reflected in the preview:
B. Display options
The display options give you access to the basic information that will appear on the ticket:
Don't forget to click on Save each time you make changes to these settings.
C. Enable ticket customization on the online store
By activating this setting, an additional button on the online store will allow the user to customize their ticket:
By clicking on it, the user can choose the type of field to add:
And whether or not the price should be displayed:
This guide explains how to associate products with tickets for your events on Infomaniak Ticketing.
To create products for sale on the ticketing platform, refer to this other guide.
Sale of products associated with tickets
There are two ways to link products and tickets:
- The purchase of the product requires the purchase of a ticket.
- The purchase of the ticket requires the mandatory purchase of the linked product.
1. The purchase of the product requires the mandatory purchase of a ticket
This type of link is configured from the first step of product creation by activating the option:
During the purchase process, adding the product to the cart will require the presence of a linked ticket or tickets already in the cart (5 tickets in the example below).
If the customer has already purchased tickets before, they can log in with their email address and choose the ticket(s) to which to associate the product:
The customer can then pick up their product using the QR code on their ticket.
2. The purchase of the ticket requires the mandatory purchase of the product
This type of link is configured in the final step of product creation (and requires that the option mentioned above has not been selected):
- Click on Add sales rules:

- Select the rates that will be associated with the sale of this product:

- Don't forget to complete the creation of your product.
During the ticket purchase process, these rates will offer the associated products, clearly indicating the additional cost at each step of the order:

This guide explains how to validate your identity to order rental equipment from Infomaniak and receive your statements (as part of the Infomaniak ticketing system).
Preamble
- This identity verification procedure must be performed the first time you want to receive payments or request to appear on the Infomaniak portal.
- Identity verification can only be performed by the legal owner of the account. If the options to start the verification procedure do not appear on your account, this indicates that you do not have the necessary access.
Access your ticketing system
To do this:
- Click here to access the management of your product on the Infomaniak Manager (need help?).
- Click directly on the name assigned to the ticketing system concerned by the event.
Perform the identity verification procedure
The procedure is accessible in two places:
- On the main dashboard:

- If a bank account is provided, in the Accounting menu, then Infomaniak Collections:
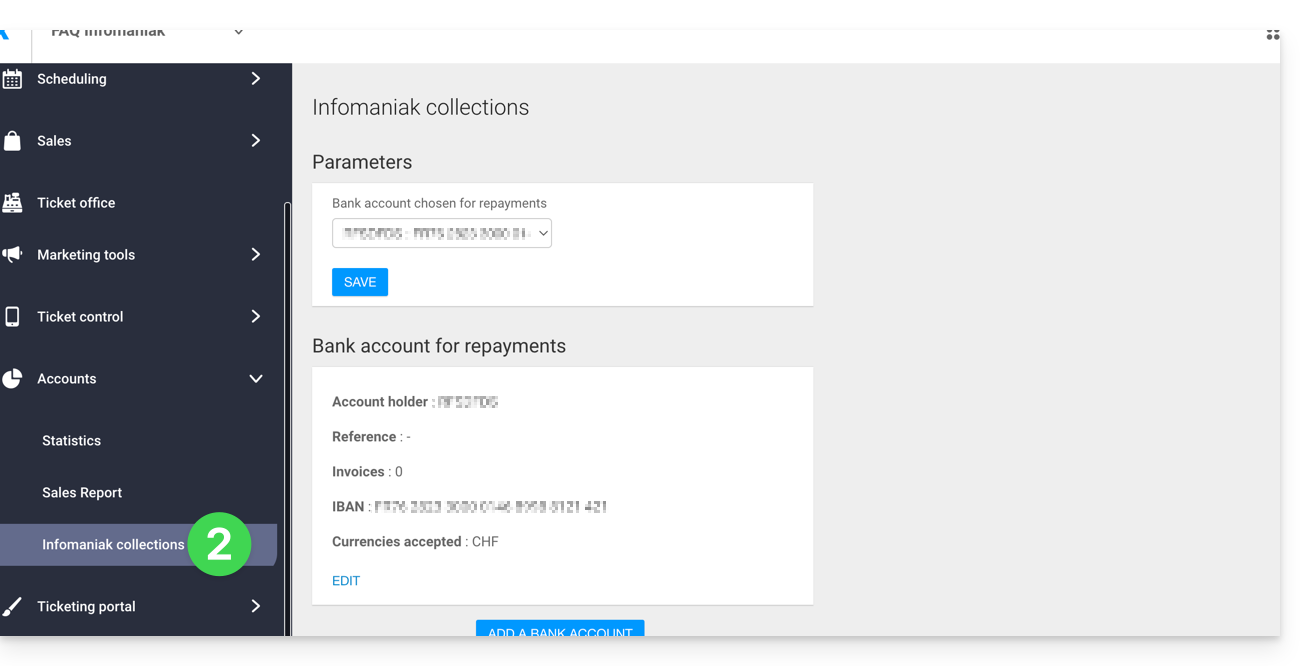
- Refer to this other guide to perform identity verification with kCheck.
This guide explains how to set up the payment method Exchange (within the framework of the ticketing system Infomaniak).
Introduction
- This payment method will allow your customers to exchange the tickets they hold for new ones.
Enable the payment method on Ticketing
To do this:
- Click here to access the management of your product on the Infomaniak Manager (need help?).
- Click directly on the name assigned to the ticketing related to the event.
- Click on Sales in the left sidebar.
- Click on Payment methods in the left sidebar:

- Switch the toggle button to ON to the right of the Échange element:

- Check the client box to enable this option for clients on the online ticketing. They will be able to make exchanges directly from your online ticketing.
- Set the number of days before the event from which the customer will no longer be able to exchange a ticket.
- This value prevents the customer from changing a ticket on the online ticketing system too close to the event date.
- Specify the fees associated with this operation that the customer will have to pay to exchange the tickets:

Once the option is activated, your customers will find the option to exchange tickets at the bottom of the ticketing page.
This guide explains the procedure to follow for creating events taking place in the city of Lausanne (as part of the Infomaniak ticketing system).
Preamble
- In accordance with the tax regulation of the municipality of Lausanne, a tax is levied on the price of admissions, paid seats, and other supplements, notably on the occasion of society evenings, balls, fairs, concerts, conferences, musical, literary, artistic, sporting events, etc.
- The Infomaniak ticketing system is approved by the city of Lausanne, and you can therefore create your ticketing for any event in the city of Lausanne.
- The tax rate is 14%.
- You will need to check with the city of Lausanne if your event is taxable, non-taxable, or exempt…
- The possibilities for exemption from this tax are exhaustively indicated in the tax regulation.
- If your event is subject to tax, note that the procedure will take several days and the waiting period may be extended depending on the number of pending requests.
- Please therefore take this waiting period into consideration for the launch of your ticketing!
Creating your event in Lausanne
Creation will generally proceed in the same way as for any other event, but any information appearing on the ticket will no longer be modifiable once the validation request is sent:
- The name of the event
- The date and time of the event (as well as the opening hours)
- The location of the event
- The prices
- The ticket templates
Make sure these parameters are well defined before the validation request.
Validation request and awaiting the decision
When you set the location as being in the city of Lausanne…
… and once the configuration of your event is complete (you get the proposals below), you can submit the authorization request to the city of Lausanne.
Event status
Subject events clearly indicate the status that will be updated as soon as your event is validated:
Sale of passes and subscriptions in Lausanne
It is possible to sell subscriptions or passes for events taking place in the municipality of Lausanne, subject to certain conditions:
- Non-negotiable: all events in the ticketing system must take place in the municipality of Lausanne and be subject to the entertainment tax.
- You need to create the pass, but leave it empty (do not add events to the pass).
- Contact Infomaniak support (by email only) with the list of events to be added to each pass. The operation will be carried out within 7 days.
- No additional authorization from the city of Lausanne is required for this operation.
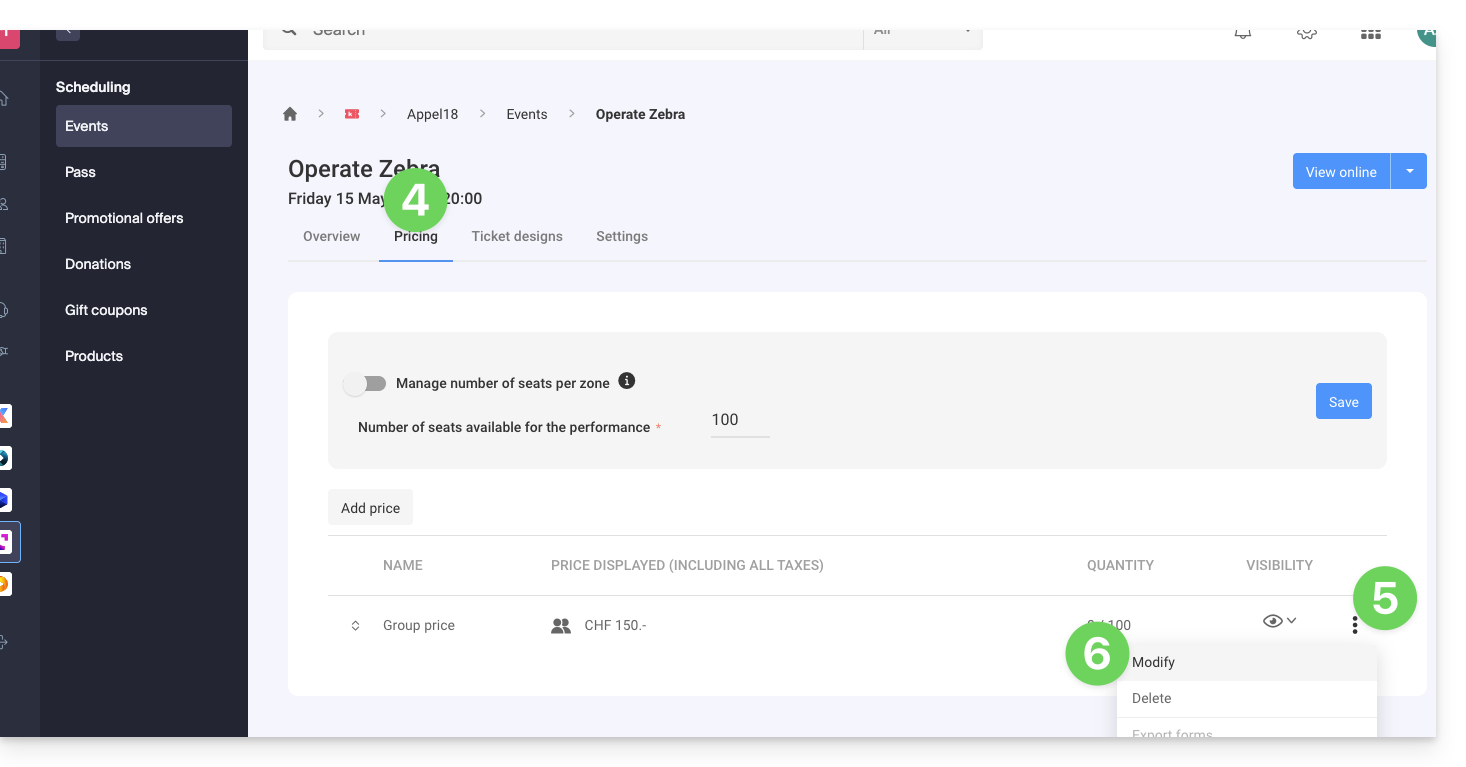
This guide explains how to use zones in the pricing menu (as part of the Infomaniak ticketing system).
Preamble
- Each event can contain one or more zones, each with its own pricing.
- This allows you to group prices in each zone and manage each zone independently:
- Each zone can contain prices, each with its own ticket quantity.
- Each zone can be assigned or not to the seating plan.
- Each zone and each price can have its own online visibility.

Access the pricing menu
To do this:
- Click here to access the management of your product on the Infomaniak Manager (need help?).
- Click directly on the name assigned to the ticketing concerned by the event.
- Click on Programming in the left sidebar menu.
- Click on Events in the left sidebar menu.
- Click on the event concerned.
- Click on the Pricing tab.
- If the event has multiple dates, this section is replaced by “Dates” which opens a calendar.
- Click on the calendar date to join the pricing…
- Enable zone management. This option will be automatically activated if a seating plan is assigned to the event:

This menu is also offered to you when creating an event.
Adding a zone and a price, managing the parameters of each zone
Here are the important buttons to manage your zones and prices:
This guide explains how to connect the Zapier management tool to the Infomaniak ticketing system.
Preamble
- Depending on the volume of customers and/or events you manage, you may need to subscribe to a paid plan for Zapier and/or your CRM.
- Infomaniak cannot be held responsible for these costs.
- For additional help, contact the support of the software used or a partner.
Establish the connection with the Infomaniak Ticketing System
To do this:
- Click here to access Zapier.com.
- Create an account if necessary.
- Create a new Zap (need help?).
- When choosing the applications to use, type Infomaniak Ticketing in the search bar and select the option.
- When Zapier asks you to log in, use the credentials and password of the Infomaniak account linked to the Ticketing System.
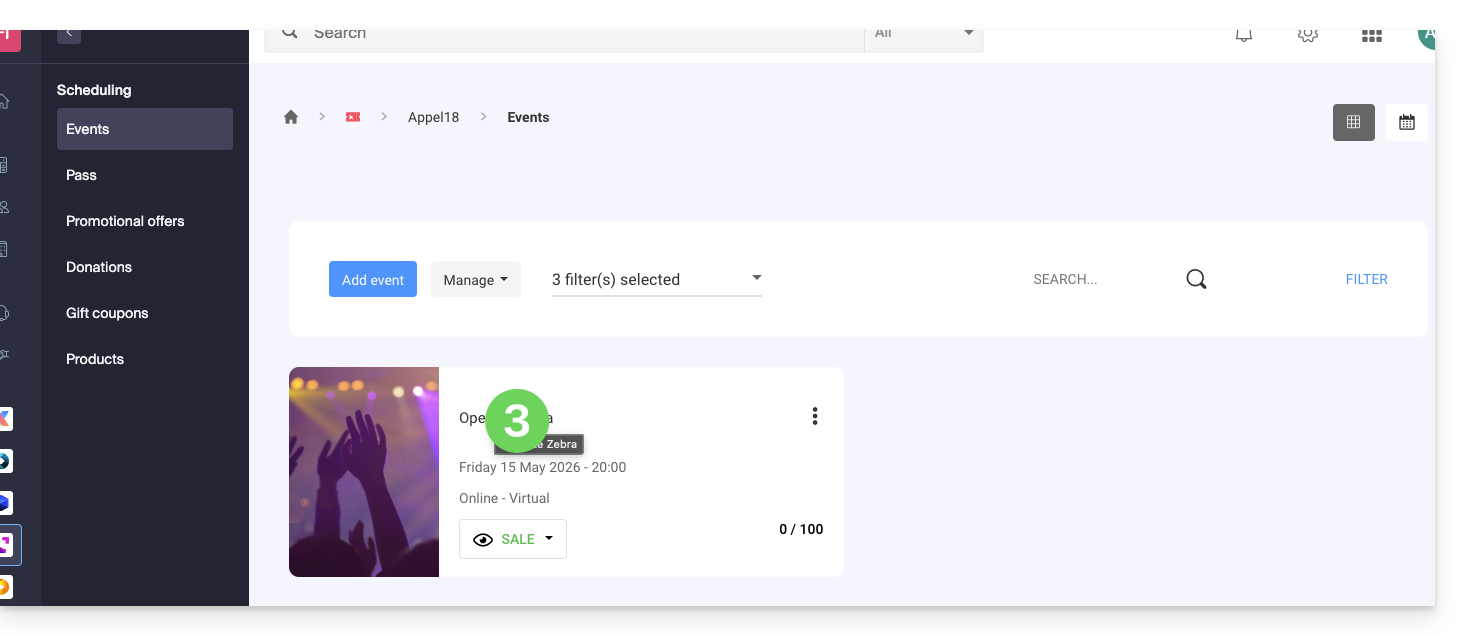
This guide explains how to manage an event (within the framework of the ticketing system Infomaniak).
Access the event page
To do this:
- Click here to access the management of your product on the Infomaniak Manager (need help?).
- Click directly on the name assigned to the ticketing related to the event.
- Click on Scheduling in the left sidebar.
- Click on Event in the left sidebar.
- Click on the name of the event in question:

The overview
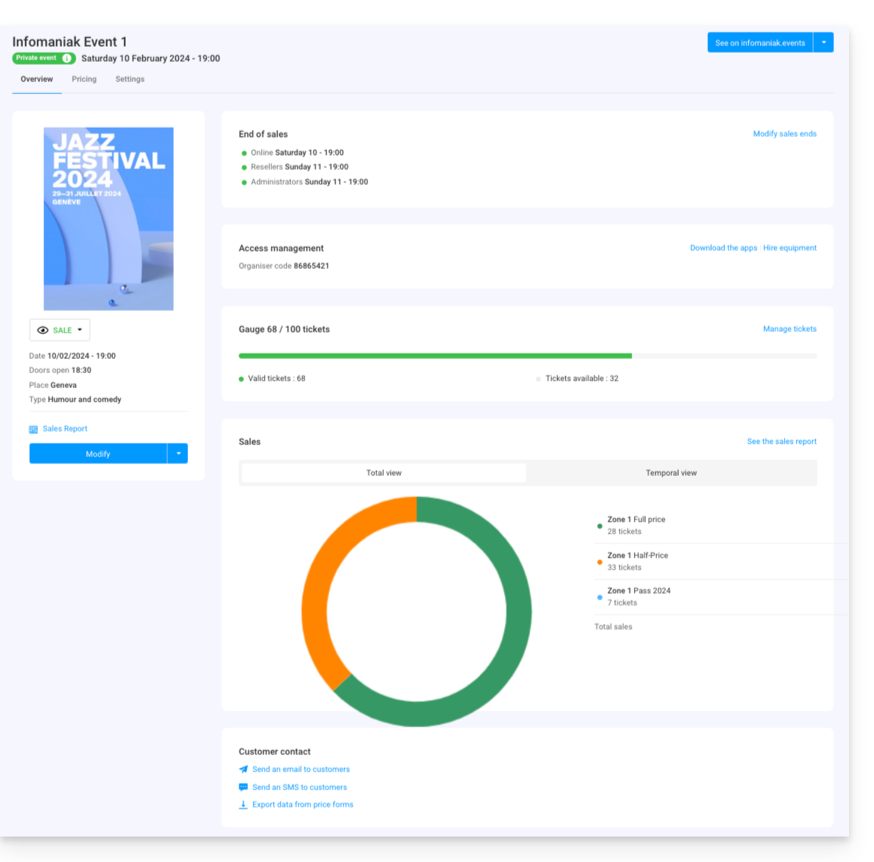
The overview allows you to see an overall preview of your event:
- On the left, the event's information and status. You can change the event's visibility, access the sales report, and make modifications to the event:

- The end of sales information and access codes for ticket control are located at the top of the right column:

- A chart summarizing the number of tickets sold and revenue by rate allows you to track your sales:

- The options related to the event's customers are at the bottom of the page. These allow you to contact customers who purchased tickets for this event and export the results of the forms they might have filled out:

- The button at the top right allows you to view the online version of the event on your ticketing platform and, if you decide to integrate the event on your site, access the integration options:

Differences in case of multi-date events
If your event has multiple performances, the information will be broken down according to the page you are viewing. You will find:
- On the main page, the information and general settings applicable to all dates.
- On each date or performance page, you will find the information for that specific date or performance.
Manage prices, ticket templates, and sales closing times
You can switch to these options in the tabs on the upper part of the event page:
This guide explains how to set up and use your sales pack with the Zebra printer for show and cinema ticket formats (as part of the Infomaniak ticketing system).
Installation and setup of your sales pack
Connecting the machines
- Connect the power supply for the Samsung TabS tablet.
- Connect the power supply for the Zebra printer.
- Connect the Wifi or 4G terminal and ensure the connection with the other machines.
Make sure the tablet is connected to the Infomaniak network.
Video Guide
Setting up the printer
- Open the printer using the opening buttons located on the sides:


- Insert the tickets into the slot at the back of the printer. For the ticket orientation, please consider the Infomaniak logos: the first one exits on the left, and the second one on the right. The ticket should be right-side up when the tickets exit from right to left.
 .
. 
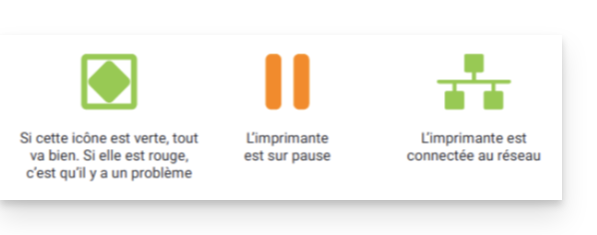
- Close and turn on the printer:

- Press the "Pause" button. There will be two green lights on:
Printing tickets with the printer
Format verification
The printers are already configured for the ordered ticket format. If necessary, it is possible to verify the configuration by opening the menu at the top left and on the Options. The Cinema ticket format option should only be activated if the tickets will use this format (see below for calibration when changing the format).
Printing a ticket
To start printing, you need to log in to the ticketing account from the tablet using the Infomaniak account ID and password. The tablet will automatically connect to the ticket office interface.
- Perform a "test" order or use an order in the "Order" menu.
- The printer should appear (ZEBRAXX) on the right side of the tablet.
- Press the printer icon to start printing:

Set the correct ticket on the printer
This section is only for people who have a stock of tickets ordered before July 2024…
Since July 2024, Infomaniak has provided tickets with new separators in the form of a notch. If you still have old types of tickets, please watch the video below to correctly set up your tickets:
Learn more
This guide explains how to help customers who may be stuck when using a credit card (within the framework of the ticketing system Infomaniak).
Ask the client for information
Infomaniak's online ticketing system allows customers to securely pay for their purchases with a credit card. For this reason, 3-D Secure authentication is mandatory for all credit and debit card payments.
Ask the client what issue they are encountering to try to resolve it. Here are some typical examples that may be encountered:
Blank window or page that appears
The ticketing system attempts to call up the 3D-Secure page of the client's bank. The blank page indicates that the 3D-Secure option is not activated on their card. The client must contact their bank to request activation of this option.
Unable to complete the payment with the credit card
Make sure the client is using a VISA or MasterCard credit card. Some banks issue cards that are not on these networks. Infomaniak does not accept credit cards on the American Express network.
Authentication notification received, but unable to proceed
The client will need to contact their bank or try with another card.
Issues with credit card payment
It is possible to obtain more information about this type of issue from the Infomaniak Manager.
Please find the order using the order number, email address, or any other client-related information:
- Click here to access the management of your product on the Manager Infomaniak (need help?).
- Click directly on the name assigned to the ticketing system related to the event.
- Click on Sales in the left sidebar.
- Click on Order in the left sidebar.
- Search for the order using the information provided by the client.
- Click on the order number:

- Click on the Transactions.
- Check the Notes of failed transactions:

Cases of incomplete transactions with notes
In the case illustrated above, this is a failure of 3D-Secure double authentication, but the reasons can be various. These notes are the error messages transmitted by the client's bank, and are often just an indication of the type of error.
Case of non-existent transactions
If the Transactions tab shows a 0 and has no items, the client was unable to initiate the online payment process. They should therefore check if their card is indeed a VISA or MasterCard.
Problem resolution
There are two ways to assist the customer when there are payment issues with the credit card. They must either…
- … try with another credit card or another payment method.
- … contact his bank to resolve the issue with the card used.
For other cases
Please gather as much information as possible before contacting Infomaniak support who can conduct further investigations.
This guide explains how to collect and retrieve customer information when they order tickets through the Infomaniak ticketing system.
Set up a contact form
To collect information from customers:
- Click here to access the management of your product on the Infomaniak Manager (need help?).
- Click directly on the name assigned to the ticketing concerned by the event.
- Click on Settings in the left sidebar.
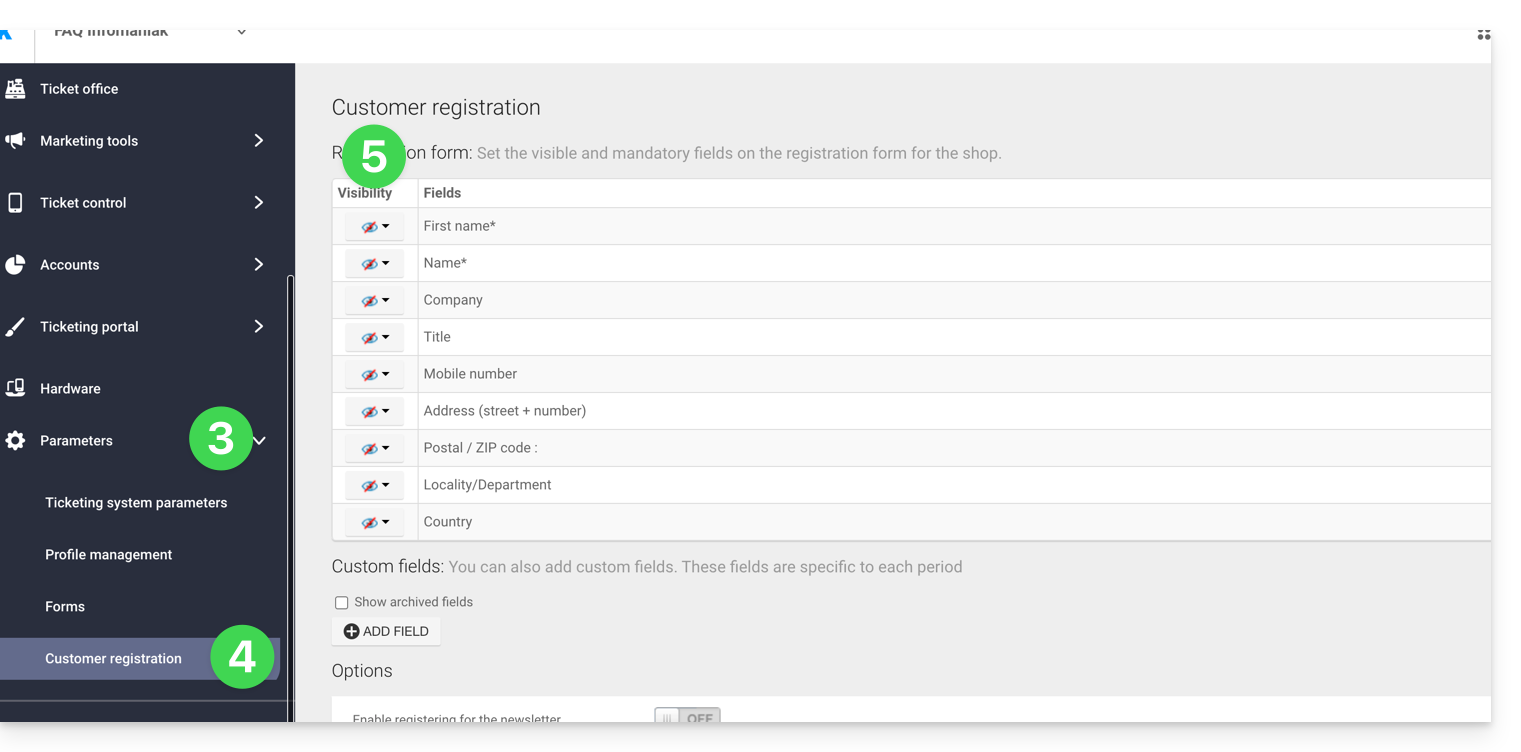
- Click on Customer Registration in the left sidebar.
- Enable the information to be requested from customers and choose the visibility:
Visible and mandatory
Visible, but optional
Invisible (do not ask)
Add additional fields
It is possible to add additional information to this form:
- Click the Add a field button.
- Name the field and choose the field type.
- Depending on the field type, complete with the options from the drop-down menus or checkboxes.
- Click the button to Confirm:

This guide explains how to import tickets that would be generated by another provider or an external reseller for your event within the framework of the Infomaniak ticketing system.
Prerequisites
- The import of third-party tickets requires that the event is already created on your Infomaniak ticketing system.
- You also need the list of tickets in a CSV format file with the barcode field that will be printed on the ticket.
Access import options
To do this:
- Click here to access the management of your product on the Infomaniak Manager (need help?).
- Click directly on the name assigned to the ticketing concerned by the event.
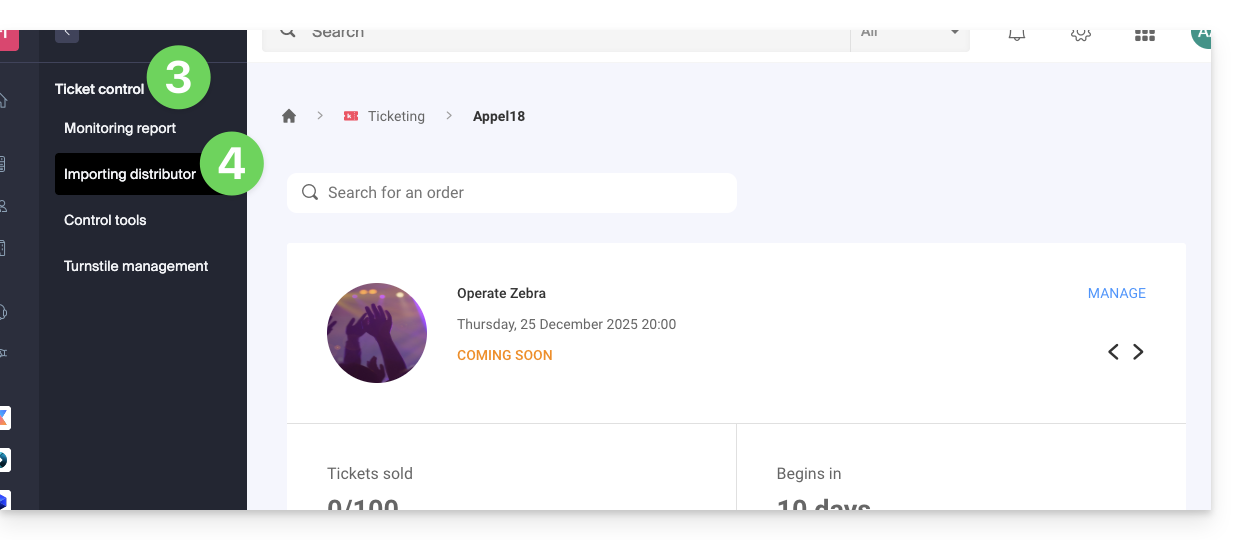
- Click on Ticket Control in the left sidebar.
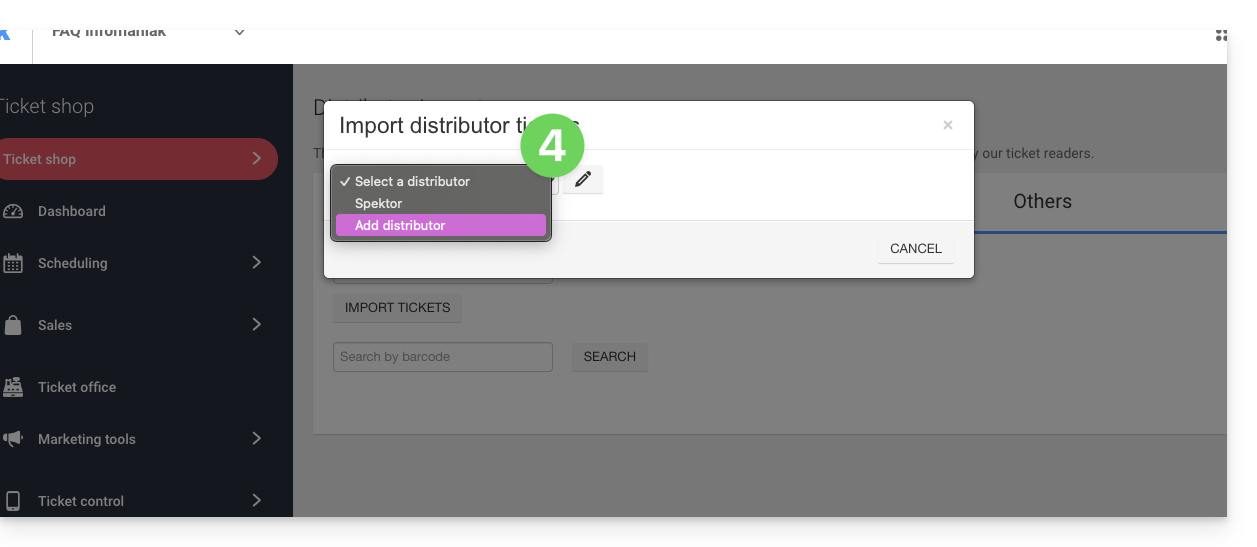
- Click on Distributor Import in the left sidebar:
Import the CSV file
To do this:
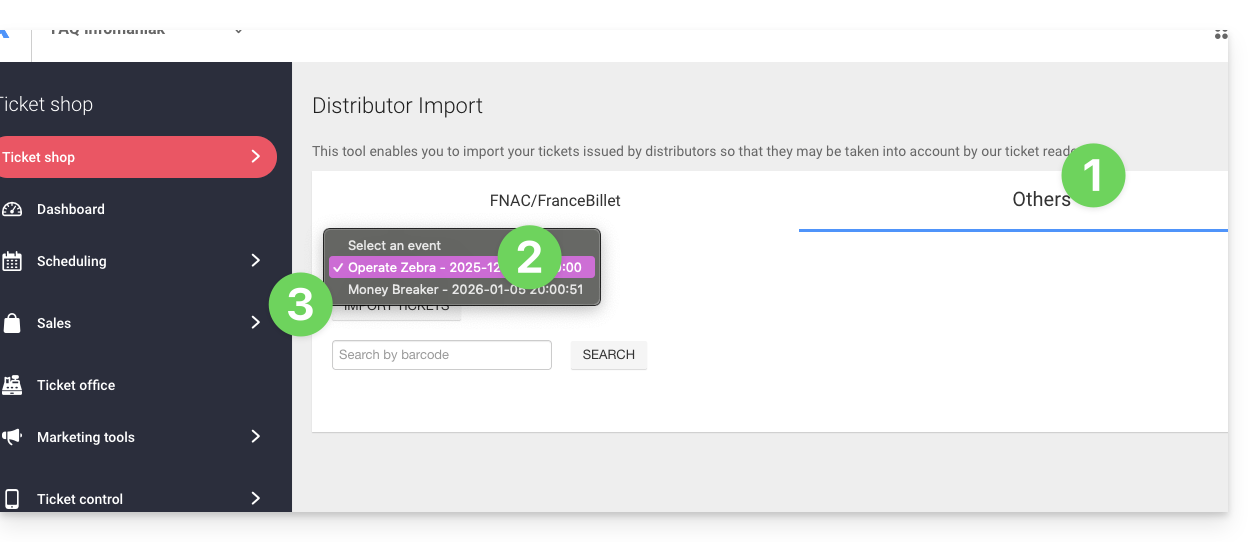
- Click on the tab FNAC/FranceBillet or Others depending on the reseller.
- Choose an event for which to import tickets.
- Click on Import Tickets:
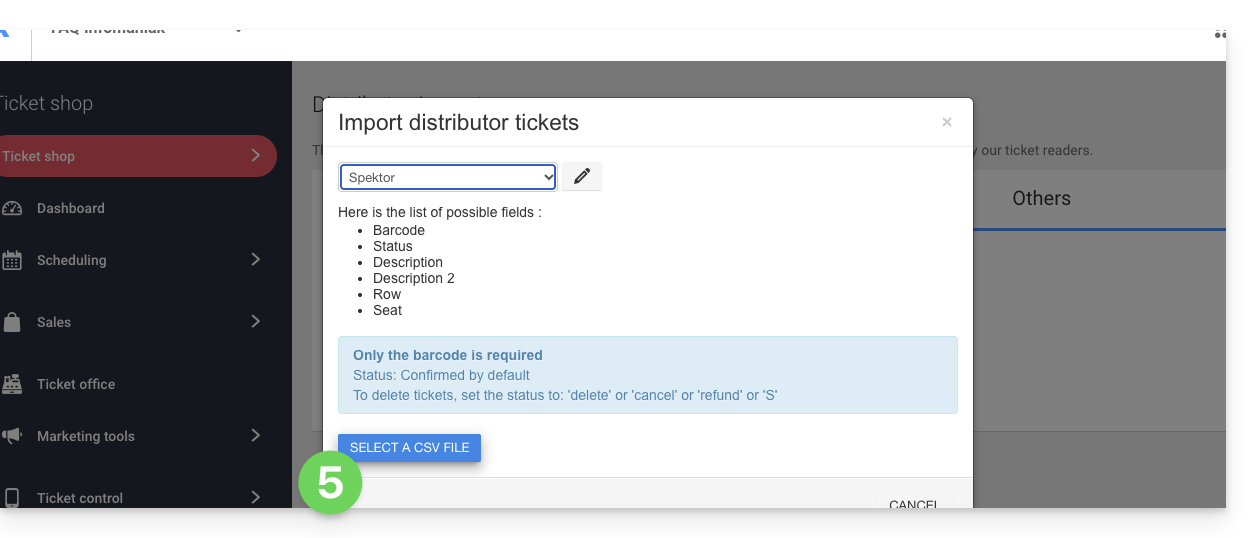
- Choose an existing distributor from the dropdown menu, or create one:
- Click on the button Choose a CSV file and upload the CSV file provided by the distributor:
- Select the rows to import. Warning:
- Check the first and last row of the imported information.
- These may contain headers or blank lines that can cause an error during import.
- Use the options at the top of the page to define the number of first and last rows to ignore:

- Link the columns to the information to be imported.
- The ticket barcode is the only mandatory field.
- If you are importing tickets from another Infomaniak ticketing system, select column 8 which is the QR code (in the form 2000000000A^0^100000000):

- Check the imported information and validate:
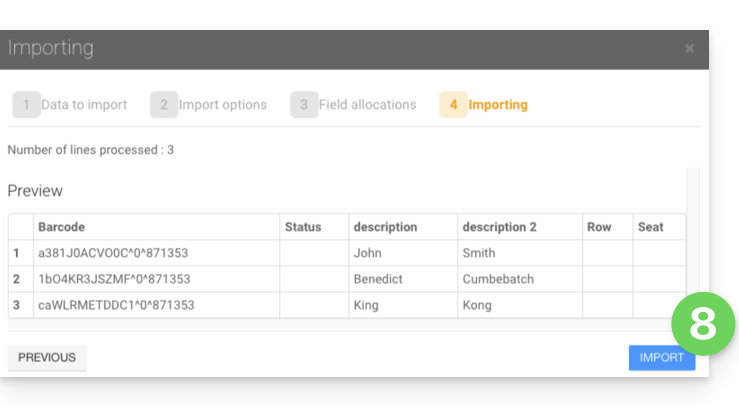
- The imported tickets will appear in a table at the bottom of the page:
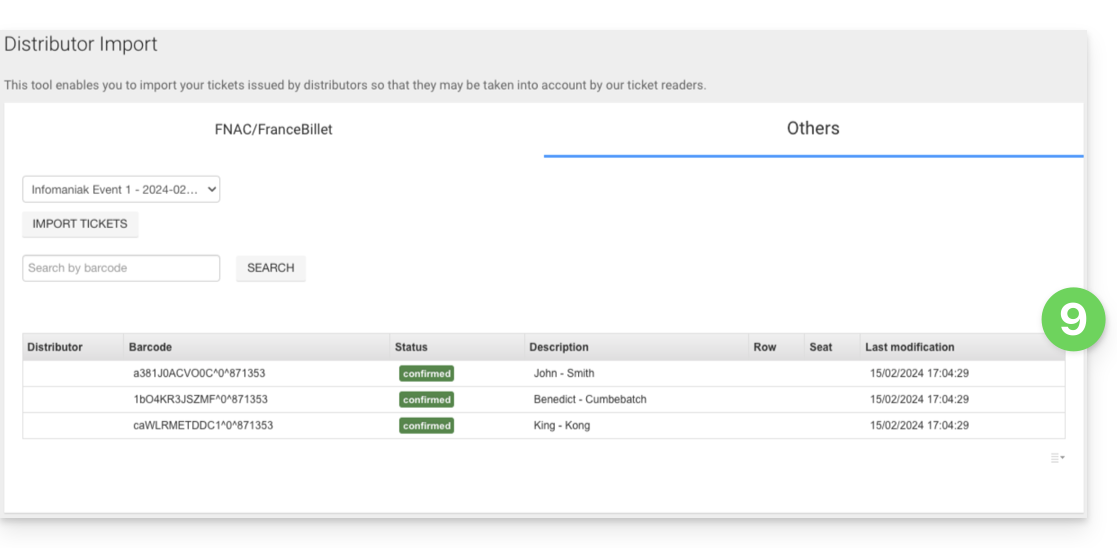
Control of imported tickets
Once the tickets are imported, they can be scanned with the ticket control application (available on iOS and Android).
They will also be deducted in the FNAC or Others column in the control report tool available from the left menu, Ticket Control, Control Report:
This guide explains how to set up the Infomaniak ticketing system by configuring a store whose public version will be published on the infomaniak.events portal.
Preamble
- The Infomaniak.events portal brings together events and activities both local and international headliners.

A simple and fast online tool
To access the online ticketing options:
- Click here to access the management of your product on the Infomaniak Manager (need help?).
- Click directly on the name of the ticketing concerned.
- Click on Ticketing Portal in the left sidebar.
- Click on Online Store in the left sidebar.
- Click on the Manage your store button:

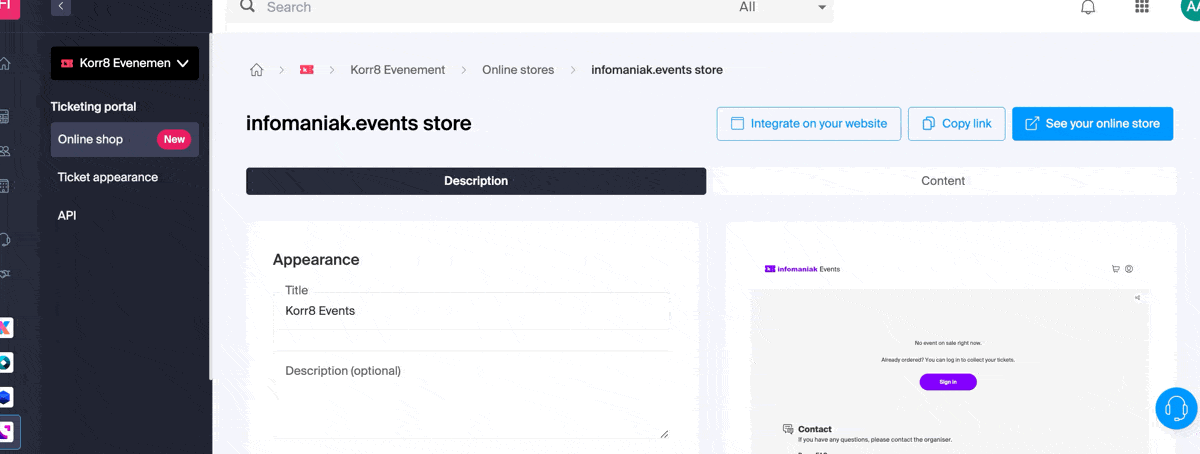
Configure and publish the store
Personalize your online store with a custom image, your own colors, and choose the content of your store. You have two tabs available:
- The first tab allows you to customize the display settings of your online store:
- Customize the ticketing here, change the colors, add an image, etc.
Formats:1000 x 1414px, vertical image, and custom image:2500 x 1000px - The changes are directly visible in real time:

- Customize the order of each category and click on the action menu ⋮ located to the right of the item concerned to rename them if necessary.
- Advanced settings allow you to define the payment methods available in the store and activate and customize the message displayed when there are no tickets for sale:

- Customize the ticketing here, change the colors, add an image, etc.
- The second tab allows you to define the content that will be displayed, such as events, passes or gift certificates:
- Decide on this tab what will be available for sale in your store.
- If you do not need to manage each item, you can of course simply choose the first option to display all contents.
- You can also choose to limit the display of events based on a specific location.
- Otherwise, choose each content individually.

Once configured, your main store will be directly published on the infomaniak.events portal if you leave the option enabled.
Do not publish on Infomaniak.events
If you do not want the event to be published on the infomaniak.events portal, activate the option at the bottom of the first tab, to keep the store private:
- This is useful for personal events, such as birthdays or weddings, or events whose ticket sales should not be available to the general public, such as specialized conferences.
Retrieve the integration links
Your event, once published, will be published directly on infomaniak.events so that all visitors can directly buy tickets there.
You can also place a link directly on your website, share it on social media, or retrieve it to generate a QR code for your posters: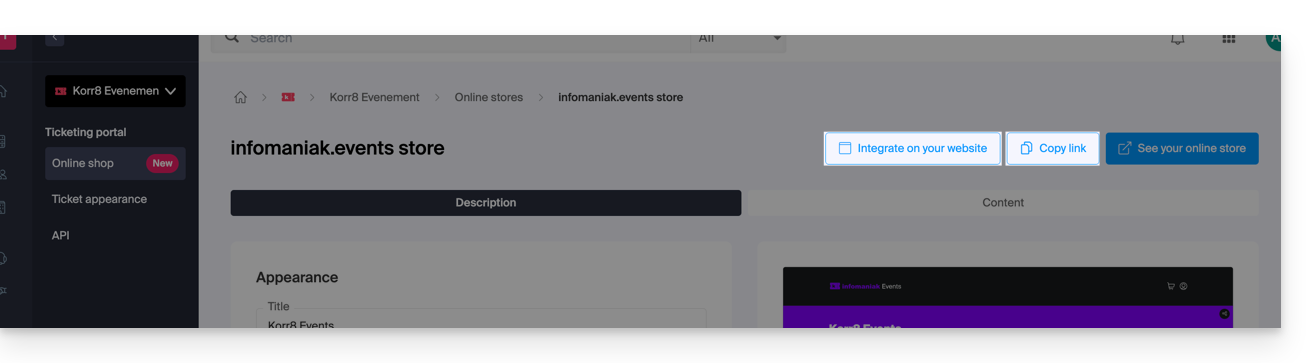
Display only the checkout
The buttons in the top right of your store page also allow you to retrieve the script link for integration on your website:
An option forces the visitor to stay on an event until the end of their order (once the option is activated, the shopping cart is no longer shared between different events and the checkout leads the customer to the payment page without allowing them to purchase other tickets from the rest of your events).
Advanced integration
If you want multiple custom links, or inject HTML, JS code, or use an external CSS, you will need to use a custom store. Refer to this other guide on this subject.
This guide explains how to use scanners to check tickets for your event (as part of the Infomaniak ticketing system).
Configure the control tools
To activate your control tools on your ticketing:
- Click here to access the management of your product on the Infomaniak Manager (need help?).
- Click on Manage to the right of the Control Tools section:

- Choose the ticketing system for your control session.
- Click the Confirm button:

- Choose one of the control methods:

- Infomaniak Etickets scan mobile app (for iOS/Android smartphone or tablet).
- Rent a barcode/QR code reader.
- Paper printout (not recommended for more than a few dozen customers).
Use the scanner
Hardware prerequisites
- Connect the base power supply and place the scanners on it to charge them.
- The scanners are configured to automatically connect to the Infomaniak network generated by the WiFi and 4G access points
- If no connection is detected, check the connection in the device's Settings menu.
To do this:
- Log in to the mobile app using one of the following methods:
- Email and password of the Infomaniak user account with access to the ticketing system.
- Organizer code (see point 2 above).
- Code generated in the Profile management menu (or click on the action menu ⋮ located to the right of the profile concerned to display a QR code replacing the code):

- If necessary, select the dates at the top to display the correct events.
- Select one or more events to scan (long press on each for multi-selection).
- Point the camera at the QR code on the ticket to perform the scan.
- The scanner will indicate whether the ticket is valid or not:
- Refer to this other guide regarding the customization of the display during scanning.
- The different scanner options are in the menu at the top left.
Manage the app's settings
On the main page
- Quick ticket cancellation
- Allows you to scan pre-printed tickets (your unsold items) to quickly put them back on sale without having to consult the orders in the Infomaniak Manager.
- Scan Mode
- Normal - Classic scan, the ticket is allowed to enter only once.
- Entry / Exit - Validates tickets in either mode to allow participants to enter and exit.
- Multiple Entries - Validates and allows entry multiple times, ticket never refused (unless it is an incorrect date).
- Laser Mode
- Bluebird - to make the application compatible with Bluebird devices.
- Zebra - to make the application compatible with Zebra devices.
On the event page
- Search for an order
- Allows you to find an order with the visitor's name or order number.
- Flash
- Allows you to activate the flash on the device.
- Scan by zone
- Allows you to limit the tickets assigned to the selected zones.
This guide explains how to sell products (within the framework of the Infomaniak ticketing system), such as refreshments during intermission, souvenirs, or merchandise related to your events.
Access the product menu to create one
To do this:
- Click here to access the management of your product on the Infomaniak Manager (need help?).
- Click directly on the name assigned to the ticketing concerned by the event.
- Click on Programming in the left sidebar menu.
- Click on Products in the left sidebar menu.
- Click on Create a new product:

- Fill in the Name and Description fields in all the languages of your ticketing:

- This information will be visible on the ticketing page during the purchasing process.
- Associate an image that will be displayed on the site for this product:

- Activate if necessary the association of the product to an event:

- The purchase of a product necessarily implies the purchase of a ticket (5 tickets in the example below); refer to this other guide on this subject:

- The purchase of a product necessarily implies the purchase of a ticket (5 tickets in the example below); refer to this other guide on this subject:
- Associate the attributes of your product.
- Attributes are the parameters that allow you to create different variations of a product.
- The dropdown list allows you to choose existing attributes, and the link below allows you to create new ones:

- For example, the attribute T-shirt size could include the variations XS, S, M, L, XL, and a second attribute will allow you to choose the colors of the T-shirt:

- It is also possible to manage attributes outside the creation form, under the tab dedicated to attribute management:

- Warning: attributes cannot be modified if sales have already taken place; variations can be added or modified at any time, but can only be deleted if there have been no sales.
- In the next step, define the price of each product variant, the VAT to be applied, the quantity put on sale, and the visibility of the product in your store.
- It is possible to remove a variant from the store in case there are no sales of this variation after the finalization of your online store:

- It is possible to remove a variant from the store in case there are no sales of this variation after the finalization of your online store:
- In the next step, define whether you want to add an automatic association rule when purchasing a ticket.
- This option means that the purchase of a specified ticket in this rule necessarily implies the purchase of the linked product (also refer to point 8 above):

- This option means that the purchase of a specified ticket in this rule necessarily implies the purchase of the linked product (also refer to point 8 above):
- Click on the Finish button to save your item.
Track sales and modify product parameters
Once the products are created, it is possible to track their sales and modify the parameters by clicking on the action menu ⋮ located to the right of the concerned element: