
Knowledge base
1000 FAQs, 500 tutorials and explanatory videos. Here, there are only solutions!
This guide explains how to transfer an Infomaniak product from one organization to another.
This allows you to move any product subscribed to Infomaniak to a different Infomaniak Manager interface than the one where the product is currently located. This is an internal transfer.
Furthermore, if your user has access to multiple organizations, it's very easy to send the product of your choice to one of them.
Generate a Transfer Link
To transfer a product:
- Log in to the Infomaniak Manager (manager.infomaniak.com) from a web browser like Brave or Firefox on the organization that contains the product(s) to be transferred (the user must have administrative rights).
- Open this page in the Manager (or click on Product Transfer in the left sidebar).
- Click on the Transfer products button
- Check the product(s) to move.
- Read and accept the terms and conditions.
- Click the Transfer button.
The transfer has started. You can now choose to:
- Copy the transfer link.
- Send it to the email address of your choice.
- Complete the transfer by selecting one of the organizations your user is associated with, and the selected product will be transferred there.
Alternative Method
In the case of a one-time transfer, you can also go directly to the dashboard of the product in question and click on Manage (as shown in the image below). However, this menu is not available everywhere (e.g., in the case of Newsletters), so it's better to use the first method above, which also allows batch transfer.
For Jelastic Cloud, read this guide (click here).
Receiving the Product
Once a transfer has started:
- Log in to the Infomaniak Manager (manager.infomaniak.com) from a web browser like Brave or Firefox on the organization that should receive the product(s) (the user must have administrative rights).
- Execute the link obtained in the first step above.
- If necessary, choose the destination organization from the dropdown menu.
- Read and accept the Terms and Conditions.
- Click the Receive Products button (if the button is not clickable, make sure you have selected the organization).
If needed, you can create a new organization to receive products.
You can always find an ongoing transfer from the left sidebar of the Infomaniak Manager:
In some cases you may realise that a video that is visually in 16/9 format (1024x576 for example) is in fact only a 4/3 video (720x576). This is due to the fact that the file has a L/H ratio in anamorphic type pixels, thus each pixel isn't square but rectangular. In general, you may notice this when opening the file with Quicktime and then VLC, as these programs don't interpret it in the same way.
The problem is that when the video is converted using the VOD tool, it is in square pixels, finally with a 4/3 ratio, even if the encoding is set for 16/9.
Define an encoding rule with a format that "forces the resolution" (dropdown menu under "format") as well as the 16/9 dimensions — 640x360.
The basic conversions use the Letterbox mode, which means that the videos you send in 4/3 will remain in 4/3 even if the requested dimensions are 16/9. If you adjust this setting to the "Force resolution" mode and then specify 16/9 dimensions, you will in the end obtain a file with the desired dimensions.
This guide explains how to restrict access to imported videos on an Infomaniak VOD service based on geographical criteria and/or IP addresses.
Restricting Access via GeoIP
Geographical and IP restrictions are configured at the import folder level and will protect all videos in the folder. To configure this folder:
- Log in to the Infomaniak Manager (manager.infomaniak.com) from a web browser like Brave or Edge
- Click on the icon in the top right corner of the interface (or navigate using the left sidebar menu, for example)
- Choose VOD/AOD (Streaming universe)
- Click on the name of the relevant object in the displayed table
- Click on Media in the left sidebar menu
- Click on Media Management in the left sidebar menu
- Click on the icon to create a New folder
- Give the folder a name
- Click the blue button to Create the folder
- Click on Configuration
- Choose the encoding rules for the videos to be imported and proceed to the next step
- Configure the folder options at this second step and proceed to the next step
- Define the countries that should be allowed or denied
- Define the IP addresses or ranges that should be allowed or denied (the * character is allowed)
- Click the blue button once the desired restrictions have been configured
- Upload new videos to this folder to have them restricted by password when played
Thumbnails to Display in Case of GeoIP Restrictions
To modify the images that should be displayed to the viewer impacted by a restriction you have put in place:
- Log in to the Infomaniak Manager (manager.infomaniak.com) from a web browser like Brave or Edge
- Click on the icon in the top right corner of the interface (or navigate using the left sidebar menu, for example)
- Choose VOD/AOD (Streaming universe)
- Click on the name of the relevant object in the displayed table
- Click on Players in the left sidebar menu
- Add a new player or edit an existing player
- Click on the THUMBNAILS tab
- Upload the desired images for the different situations described on the page:
- Click the blue button at the bottom of the page to Save
Other access restrictions can be activated and involve file access: token + password.
When playing a video embedded on a page, the "Suspended Account" message is displayed when a VOD/AOD product to which the video belongs, has been blocked.
There can be various reasons for this suspension, therefore quickly contact the VOD/AOD space administrator for more information.
Actions to be carried out
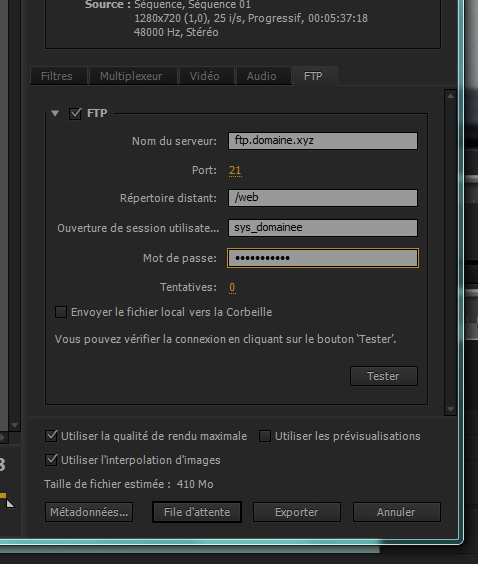
In Adobe Premiere, in the menu click on the File -> Export -> Media...
In the FTP tab (Fig. 1), specify the FTP login details of your hosting plan
Click on the Export button in order to start the export process
Once the export operation is complete, log into your admin interface
Go to your VOD space
Click on Import Media
Click on Import From Another Site
Enter the exact address of your published media and any authentication details where necessary
Confirm to start importing
Illustrated steps
Fig 1.
More information
You may also publish to the FTP space made available to you with every VOD space. To do so, go to Import Media -> Import via FTP and enter the details into your video software. In this case, video encoding will begin automatically once the FTP import is complete. Please read the "Additional Information" given on the same page.
Actions to be carried out
Log into your control panel
Go to your VOD/AOD space in Media
Click on the video in question then go to the Chaptering tab
On the timeline (Fig. 1, pt. 1) or player (Fig. 1, pt. 2), drag the playback position
Once you have reached the desired position, click on 'New Chapter'
You may also double-click on the lower timeline to create a chapter
A chapter can only be positioned on a key frame (Fig. 1, pt. 3)
To view the key frames, click on the symbol (Fig. 1, pt. 4) and zoom in if necessary.
Step from one key frame to another (Fig. 1, pt. 5 and pt. 6) to fine-tune the position
Enter a title, description, set a thumbnail, etc.
Save the chapter and it is automatically added to the chapter list
Once all chapters are ready, click Publish on Line (as well as after any change)
Illustrated steps
Fig. 1

Adding a chapter to a video
More information
The video file must be MP4 encoded in order to edit (create + modify) chapters. Chapter editing will not be possible for FLV videos but these will still display chapters in the video player if the video has also been MP4 encoded alongside. If the MP4 video is deleted, chapters will still remain in place on the FLV but without the option to edit them.
As the iPhone (but not the iPad) handles video playback itself, chapters are not currently visible on iPhone.
It is not possible to use this tool for audio-only media.
For information ont he SOAP API, please read https://statslive.infomaniak.com/vod/api/#exemple7
This guide explains how to manage interactions between your Infomaniak VOD/AOD space and any of your WordPress sites.
Infomaniak WordPress Extension
The WordPress extension developed by Infomaniak allows:
- retrieval and management of all your videos present on an Infomaniak VOD/AOD space
- automatic update when new videos are added
- automatic retrieval of existing players
- import of audio/video files directly from the CMS administration
- playlist management
- search for own videos when writing an article or a page
Installing the Infomaniak VOD Extension
Go to your VOD space to obtain the necessary information for the WordPress external module:
- Log in to the Infomaniak Manager (manager.infomaniak.com) from a web browser like Brave or Edge
- Click on the icon at the top right of the interface (or navigate through the left side menu, for example)
- Choose VOD/AOD (Streaming universe)
- Click on the name of the relevant item in the displayed table
- Click on Extensions CMS/API in the left side menu
- Click on Extensions CMS in the left side menu
- Download the WordPress extension
- It is recommended to create a new user in your organization with only technical rights on the VOD/AOD product and then create the application password from this dedicated account
You can also download the extension directly from the WordPress extension library. There were Joomla and Drupal plugins in the past, but unfortunately they are no longer compatible with the current Infomaniak VOD.
This guide explains how to password protect imported videos on an Infomaniak VOD service.
Playing a video within a player configured on the VOD service will require a password without which viewing will not be possible. It is not possible to specify multiple different passwords for the same video.
Protecting a video with a password
Password protection can be configured in different ways.
1. Password at the import folder level
If the password is set once and for all at the destination folder level, all new media imports will automatically include this password for playback. However, it is still possible to modify the visibility of each individual video (see below). To configure this folder:
- Log in to the Infomaniak Manager (manager.infomaniak.com) from a web browser like Brave or Edge
- Click on the icon in the top right corner of the interface (or navigate through the left sidebar menu, for example)
- Choose VOD/AOD (Streaming universe)
- Click on the name of the relevant object in the displayed table
- Click on Media in the left sidebar menu
- Click on Media management in the left sidebar menu
- Click on the icon to create a New folder
- Give a name to the folder
- Click the blue button to Create folder
- Click on Configuration
- Choose the encoding rules for the videos that will be imported and proceed to the next step
- Configure the folder options in step 2 and proceed to the next step
- Set the password that must be entered to view a protected video
- Click the blue button once the desired restrictions have been configured
- Upload new videos to this folder to have them password protected during playback
2. Password manually set on each video
To change the visibility of a video on a VOD service:
- Log in to the Infomaniak Manager (manager.infomaniak.com) from a web browser like Brave or Edge
- Click on the icon in the top right corner of the interface (or navigate through the left sidebar menu, for example)
- Choose VOD/AOD (Streaming universe)
- Click on the name of the relevant object in the displayed table
- Click on Media in the left sidebar menu
- Click on Media management in the left sidebar menu
- Click on the relevant video
- Click on Edit in the Status section
- Click on Password, set a password
- Click the blue button to Change status
- The video becomes password protected:
Other access restrictions can be enabled and concern file access: token + geoip.
If you use the player (online video player), the logo appears superimposed over the video. The logo is only added by the player at the time it is displayed. The advantage of this method is that the logo can be changed whenever you wish, and this allows you to have several players directed to the same video without any problem. This is the recommended method in order to have a solution that is easy to work with and is upgradeable.
The overlaying of the logo that is present in the folder section is, as its name indicates, an actual overlay in the video. This is far less flexible since once it has been overlaid, you cannot change it at all. It goes without saying that there will be no point in regretting overlaying a logo once it changes a few years later...
These two methods are different and do not work at the same time, and so if you activate them simultaneoulsy, you will have the logo of the player on top of the overlaid logo.