Knowledge base
1000 FAQs, 500 tutorials and explanatory videos. Here, there are only solutions!
This guide details the differences between the IMAP and POP3 protocols on an email software/client (Outlook, Microsoft 365, Thunderbird, Apple Mail, eM Client, etc.) and explains why it is crucial not to use them simultaneously for the same email address managed by Infomaniak.
IMAP (recommended)
IMAP is the synchronization protocol. Messages remain on the server and can be accessed from anywhere.
- Multi-device access: your emails are synchronized between your computer, your smartphone and the Infomaniak Web Mail app.
- Collaborative work: ideal for shared mailboxes. If a user moves or deletes a message, the change is visible to everyone.
- Security: in case of a computer failure, your messages remain saved on the server.
POP3 (specific use)
POP3 is a download protocol. Messages are retrieved on your computer and usually deleted from the server.
- Offline consultation: messages are stored locally on your hard drive.
- Major drawback: once downloaded, messages are no longer visible on the Infomaniak Web Mail app or on your other devices.
- Risks: if you use the option "keep a copy of messages on the server", you risk duplicate downloads and synchronization errors.
Important: never mix POP and IMAP
Using these two protocols simultaneously for the same address causes major technical conflicts:
- Unexplained disappearance of messages on some devices.
- Repeated downloads of old messages already read (especially on Outlook).
- Unnecessary saturation of storage space.
Tip: favor the use of IMAP on all your email software/clients.
Refer to these other guides to configure an IMAP account or to switch from POP to IMAP.
The easiest way to manage your emails is to use the Mail Infomaniak web app (online service ksuite.infomaniak.com/mail).
A mobile app (Infomaniak Mail, app for iOS / Android smartphone or tablet) is available here!
This interface offers many advantages:
- No software to install or configure.
- Email sharing with other users.
- Unified management of all your Infomaniak email addresses.
- Professional anti-spam and antivirus filter on incoming and outgoing mail.
- Automatic sorting of incoming messages (filters).
- Sending large attachments.
- Permanently saved.
- kDrive sharing.
- Secure and respects your privacy, hosted in Switzerland by a neutral and independent company.
How to start Mail Infomaniak?
Whether on ksuite.infomaniak.com/mail or the Infomaniak Mail app, it is essential to log in with your Infomaniak account ID and its password. This will not work by entering an email address and its password directly. Understand the difference
- Click here to access the Infomaniak Mail web app (online service ksuite.infomaniak.com/mail).
- If necessary, reattach the email addresses to manage with Mail Infomaniak.
What do you want to do next?
- Access the app options
- Modify the password of an email address from Mail
- Restore deleted emails
- Add a signature
- Create an email address at Infomaniak
- Invite a user to view an email address
- Modify a user's rights
- Sync your devices (emails and/or contacts and calendars)
This guide explains how to quickly obtain a password when you need to access an Infomaniak email address.
Generate an email address password
Prerequisites
- Order a Mail Service from Infomaniak.
- Create one or more addresses on this Mail Service.
- Be Administrator or Legal Representative within the Organization.
If you cannot complete these steps because you receive different information on the screen, you probably lack the necessary rights if you were not the one who created the email address — refer to this other guide — for example, an administrator can add the email address directly to your Web Mail app or send you a link allowing you to generate a password yourself.
To add a password to the example address demonstration@exemple-domaine.ch:
- Enter the login credentials for your Infomaniak account and its password on the page https://manager.infomaniak.com/:
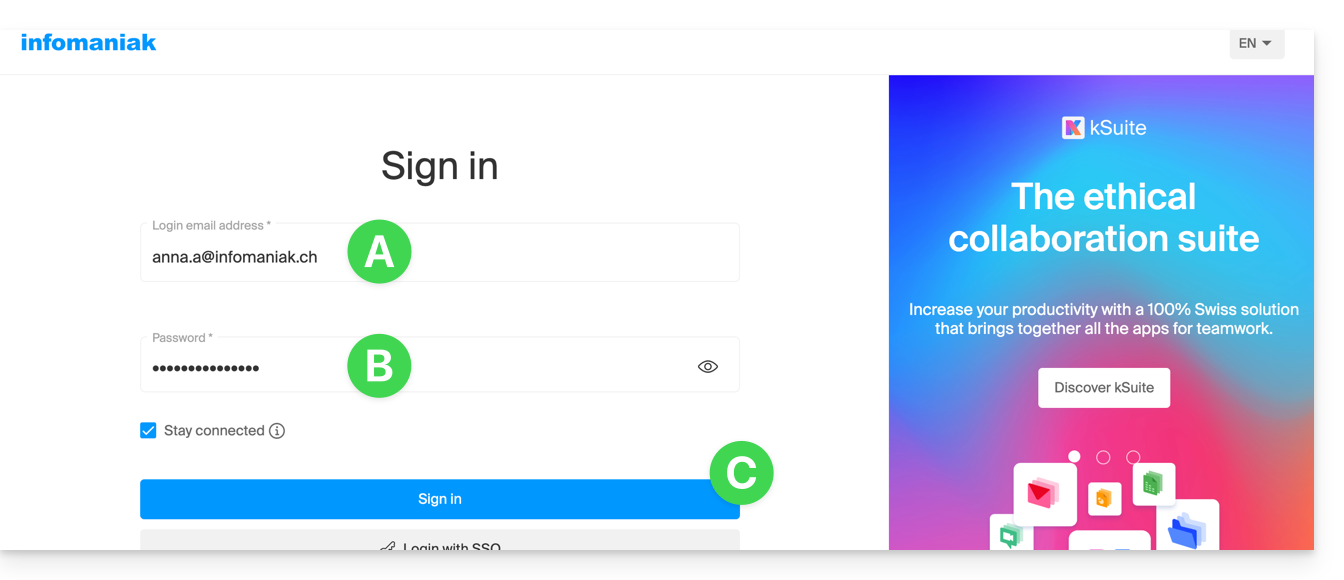
- Validate the entry in the Manager with the 2FA (two-factor authentication) method initially defined:
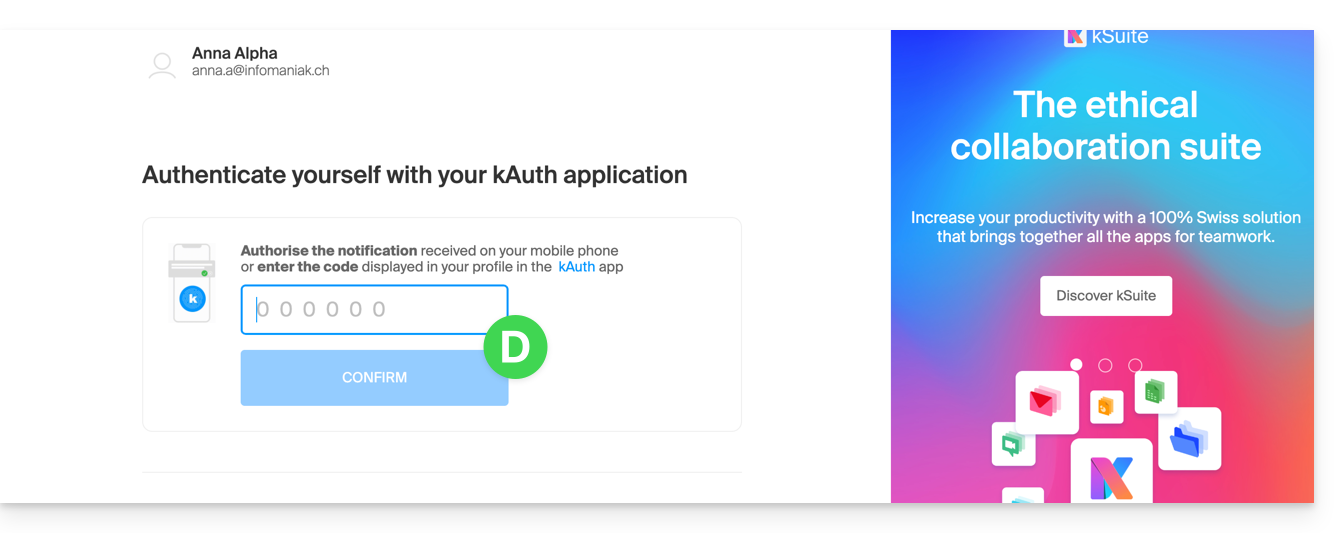
- Once on the dashboard, click on Mail Service:
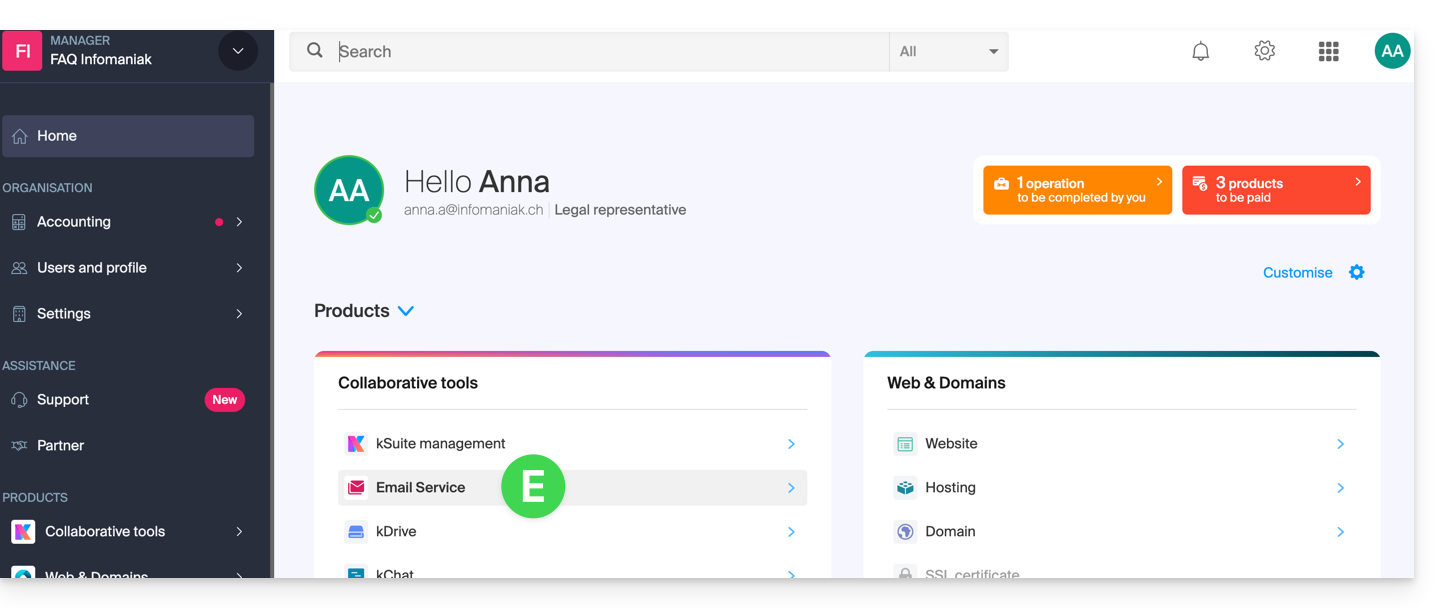
- Once on your Mail Services, click on the name / domain name to which the email address in question belongs:
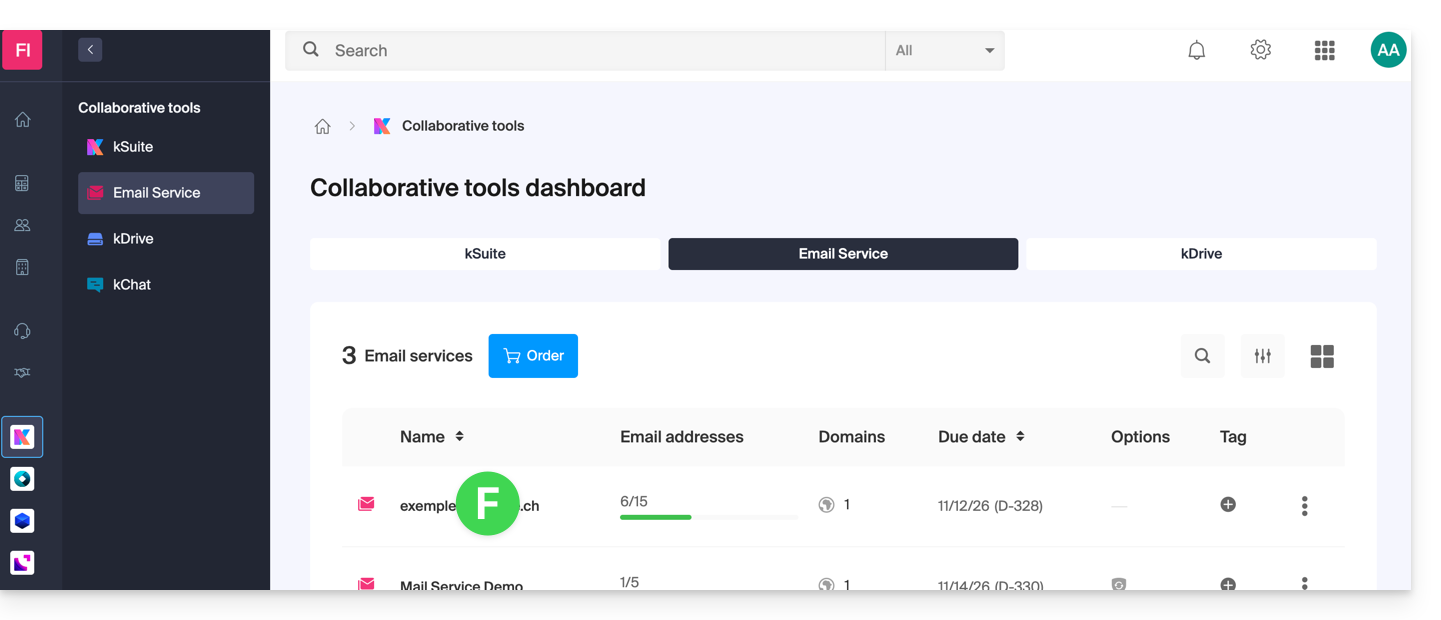
- Once on the Mail Service to which the address belongs, click on the email address in question:
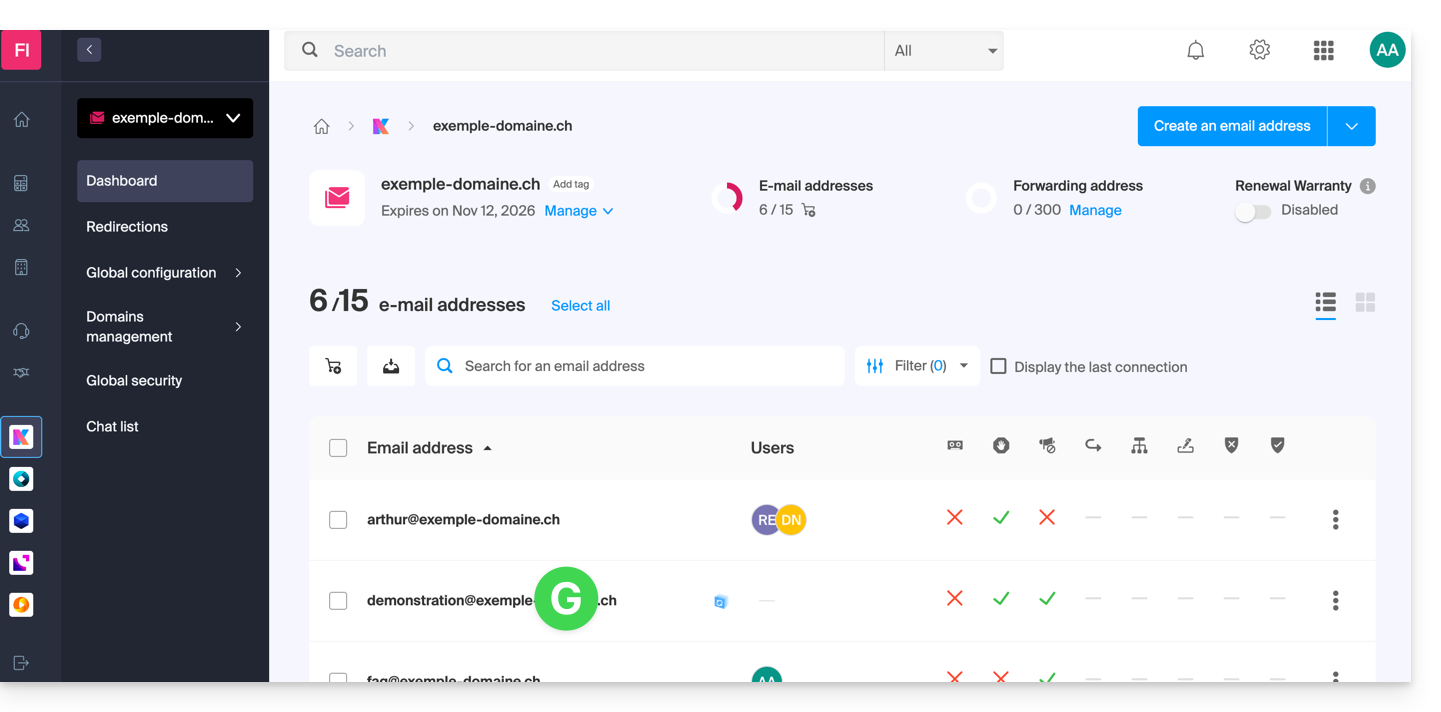
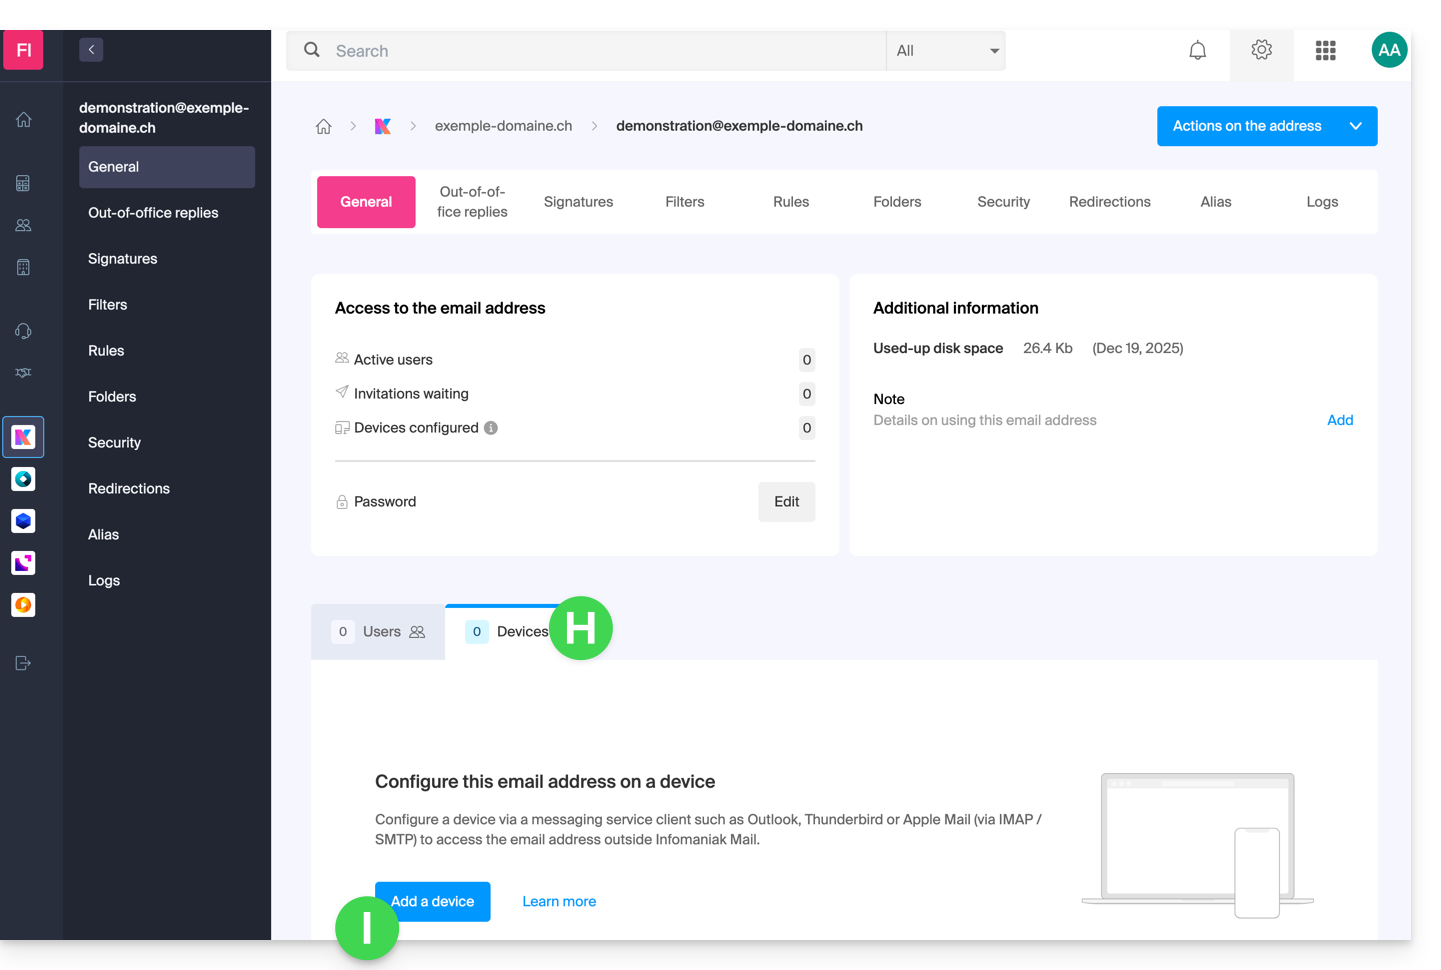
- Once on the email address in question, click on the Devices tab, then on Add a device:
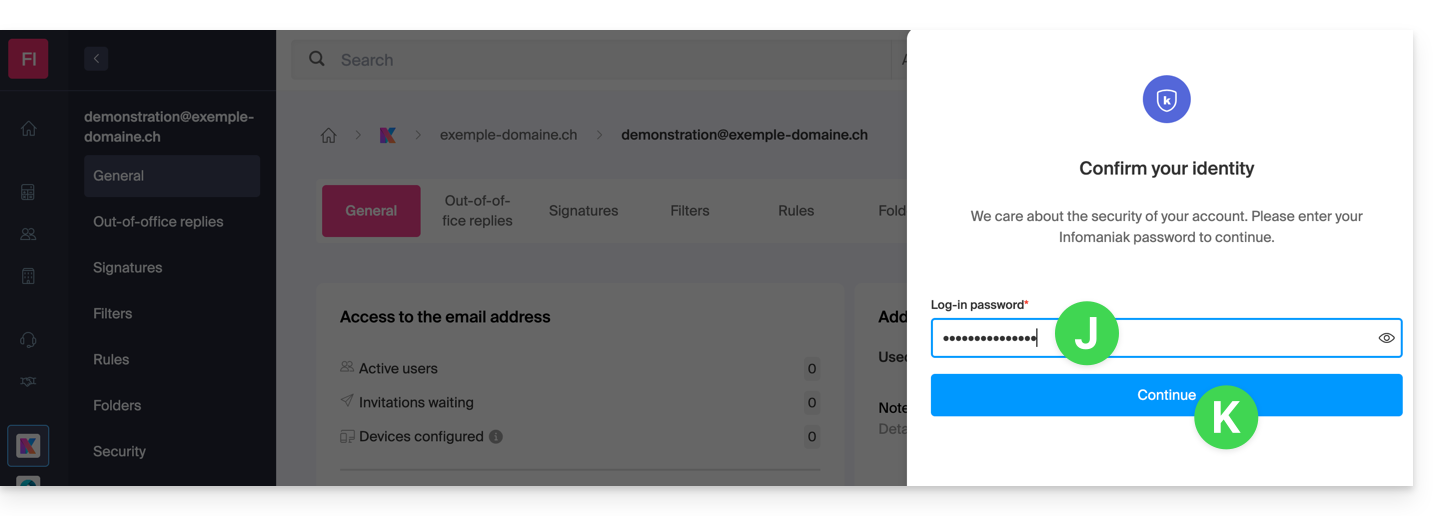
- At this stage, you may need to re-enter the login password (the one from point B above):
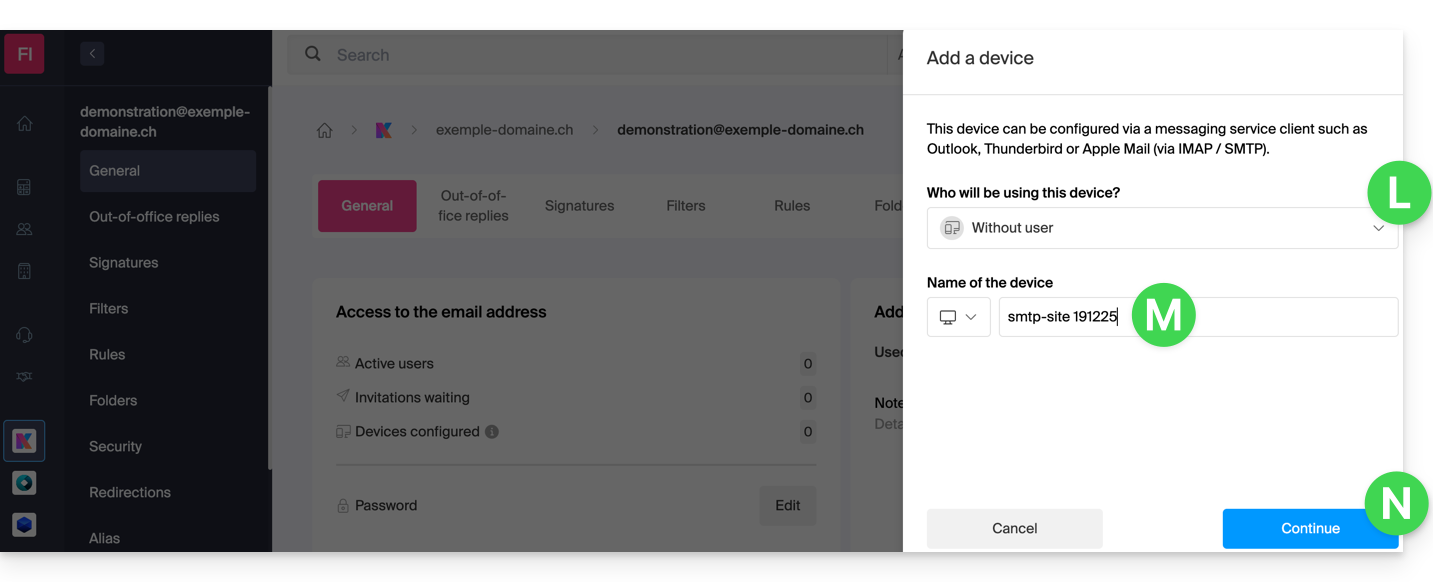
- Then choose not to specify a particular user.
- Enter a name that allows you to identify the reason for creating this device (here, the user needs a password to be able to send emails from a site, and they add the current date as useful information):
- There you go: the future password is displayed, you can change the characters if necessary (be careful, it will not be possible to display it again later).
- Save it at the bottom of the page to use it as you wish:
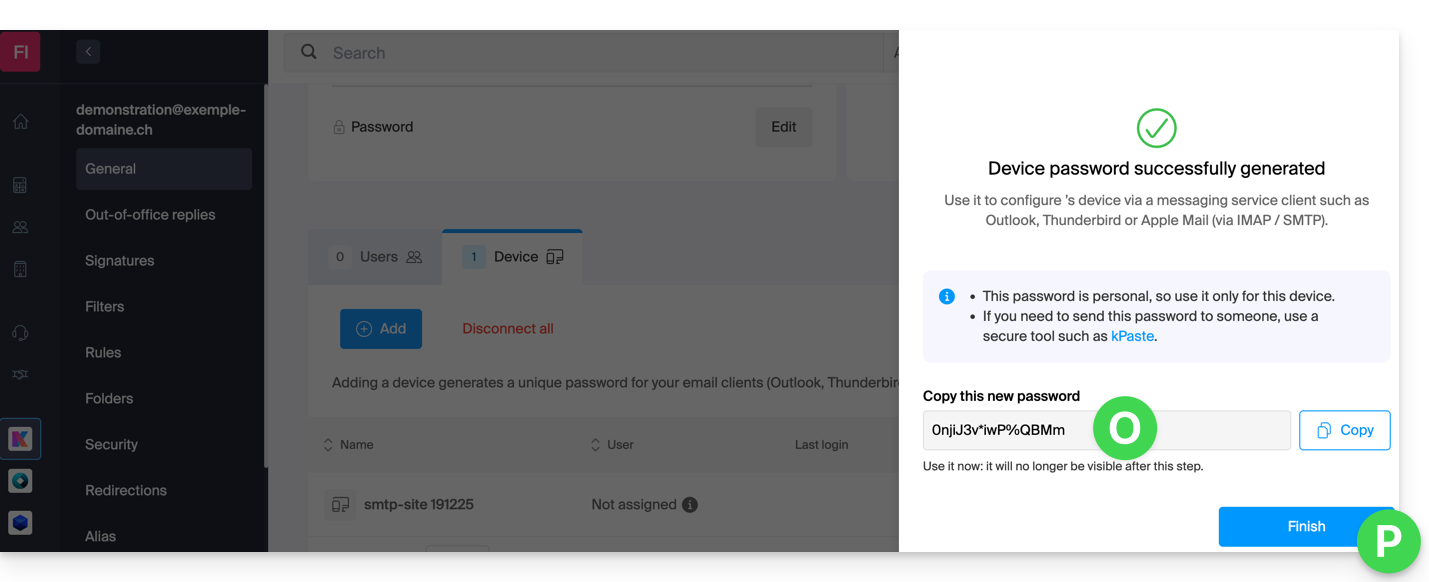
You clicked the “Finish” button (above “P”) without noting the password? No problem, modify or regenerate a new one!
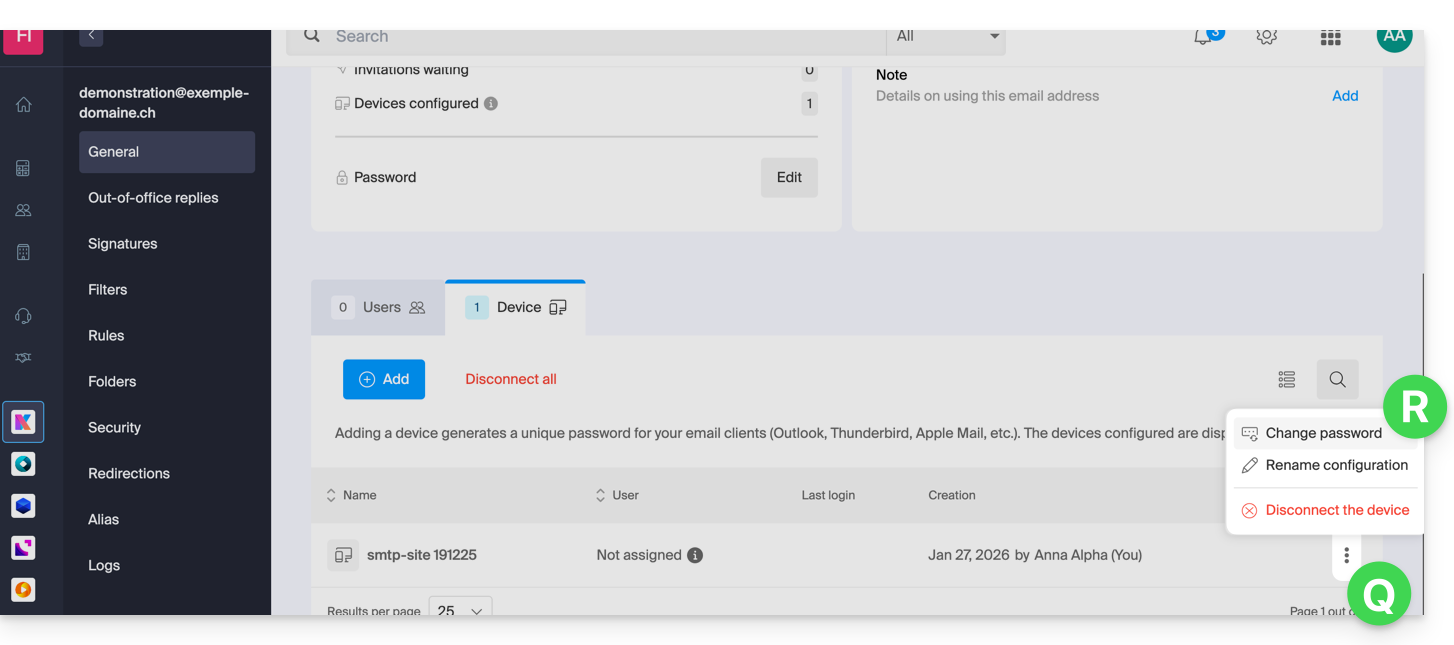
- Click on the action menu ⋮ located to the right of the newly created device and click on Change Password:
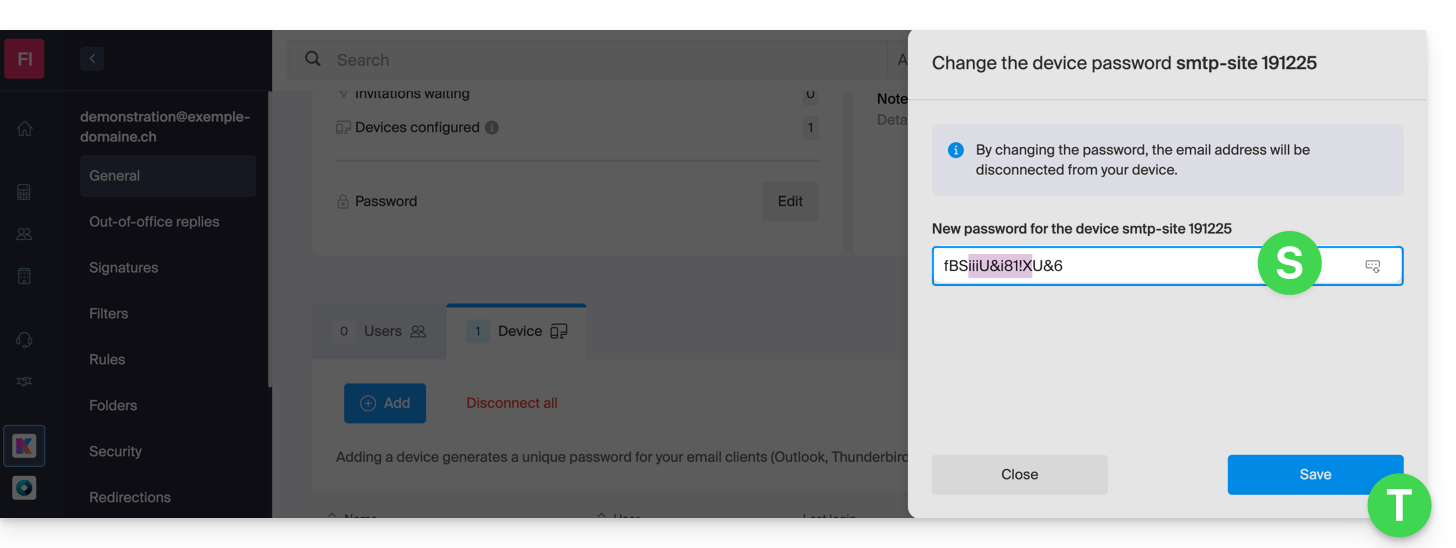
- Click on the button all the way to the right of the field to generate a new random password and/or enter the secure characters you wish to use for the new password, then click on the button to save the change:
- The new password that replaces the old one is now permanently displayed. You can enter it on your device(s) in place of the previous one (note that it will not be possible to display it again afterward).
Do you need a password for a secondary and temporary user? No problem, generate a second one!
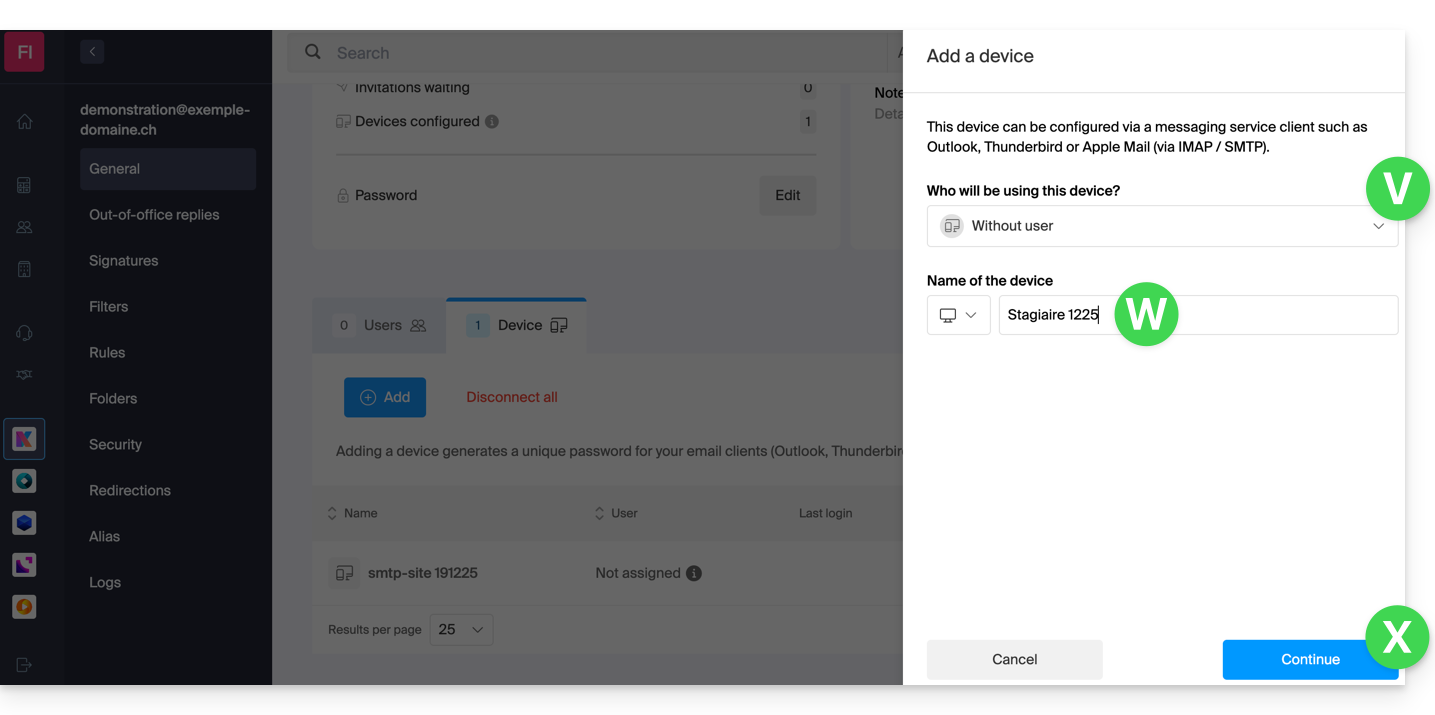
- Click on the button to Add a new additional device:
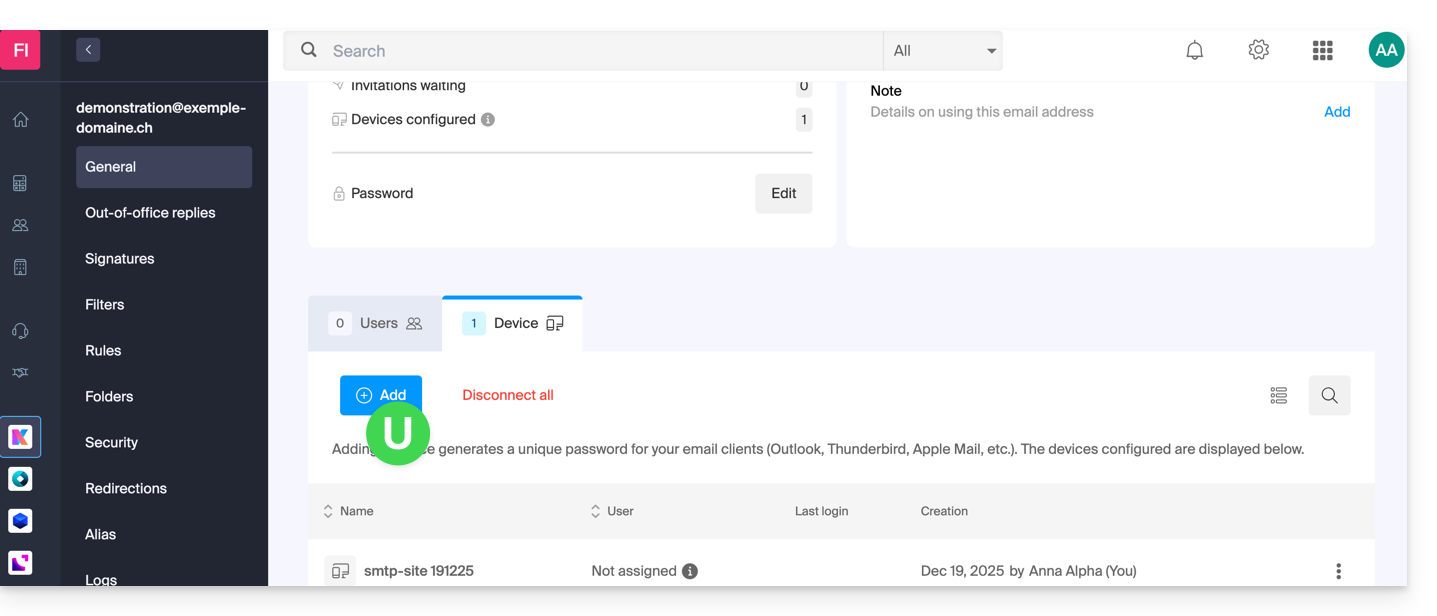
- Then choose to not specify a particular user, and enter a name that allows you to identify the reason for creating this device (here the user needs a password for an intern for a week):
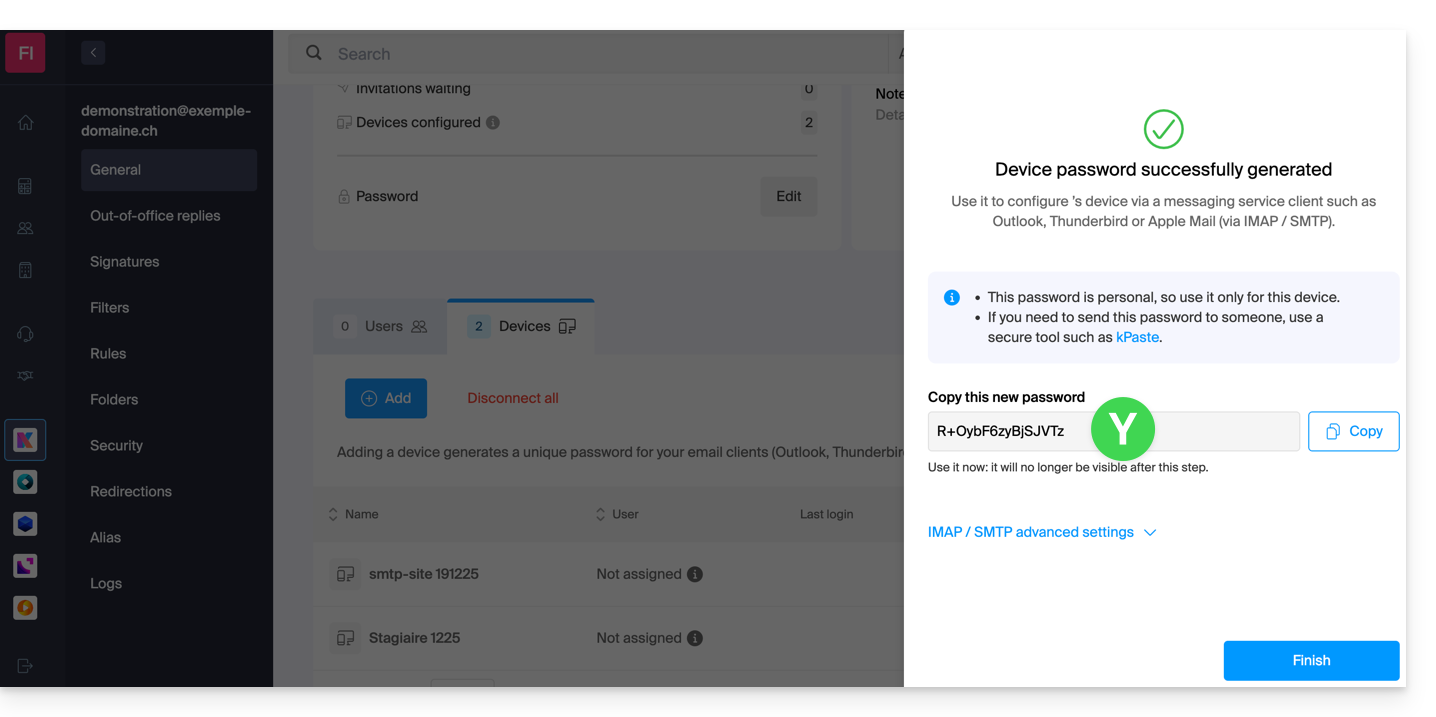
- The password is now displayed. You can use it for your intended purpose (note that it will not be possible to display it again afterward, however, as before, it will obviously be possible to modify it or regenerate a new one):
Also refer to this other guide.
This guide explains how to access your emails with the mobile app Infomaniak Mail (application for iOS/Android smartphone or tablet) designed by Infomaniak.
Download the Infomaniak Mail mobile app
From your iOS or Android mobile device, download the Infomaniak Mail app here:
Other versions and apps can be downloaded from the unified kSuite settings.
On a computer, you can configure your email address with third-party software or use the web app Mail Infomaniak (online service ksuite.infomaniak.com/mail).
Whether on ksuite.infomaniak.com/mail or the Infomaniak Mail app, it is essential to log in with your Infomaniak user account identifier and its password. This will not work by directly entering an email address and its password. Understand the difference
Getting started with the app
- Attach an additional email address in Infomaniak Mail
- Modify the Infomaniak Mail configuration
- Configure Infomaniak Mail notifications
Some features of the web app Mail Infomaniak (online service ksuite.infomaniak.com/mail) are also available on the mobile version:
Limitations of the Infomaniak Mail mobile app
- Only intended for messaging hosted by Infomaniak.
Minimum and supported iOS version: v16.4
No push notifications with the version available on F-Droid.
A question or feedback?
- Contact Infomaniak support
- Click here to share feedback or a suggestion on an Infomaniak product
This guide explains how to recover recently lost emails, especially in case of accidental deletion by the user.
Preamble
- Infomaniak backs up the content of each email address once a day (usually early in the morning).
- It is therefore possible to restore the mailbox as it was by going back to the day of the backup.
- RECOVERED ELEMENTS:
- Emails no longer existing when you request the restoration will be returned to their original location.
- Certain settings related to your email address ("answering machine" and "redirection" in particular) will also be restored if they have changed in the meantime.
- NON-RECOVERED ELEMENTS:
- Emails moved (to a subfolder, including the trash) and not deleted will not necessarily reappear in the expected place since they still exist somewhere in the mailbox hierarchy - you need to search for them.
- The backup restoration does not include the calendar or the address book.
- Emails not yet present or no longer existing at the time of the daily backup (also refer to the POP3 chapter below); example:
- Restoration of a backup (dated 5 AM) requested at 10 AM to retrieve an email that arrived at 8 AM and that the user accidentally deleted at 8:05 AM, while emptying the trash at 9 AM.
- This email, having arrived at 8 AM, was not yet present in the backup made at 5 AM.
- UNMODIFIED ELEMENTS:
- Emails received, created, and stored in the various folders (e.g., sent messages) during the interval (between the date you want to go back to and the date you perform the restoration) are not affected; they remain present.
Backup retention period
Once a complete backup of your mailbox has been made, Infomaniak makes it available to you for a certain number of days depending on your offer.
⚠ Retention period in days:
| kSuite | * | |
| Standard | 30 | |
| Business | 30 | |
| Enterprise | 30 | |
| * | ||
| my kSuite+ | 30 | |
| Mail Service | * | |
| Premium 5 min. addresses | 30 |
* By upgrading a free offer, it will be possible to recover the backup for up to 30 days.
Also refer to this other guide regarding the storage limits of your messages.
Restore from the Infomaniak Web Mail app
Prerequisites
- Ensure that the deletion occurred less than 30 days ago (or within the timeframe included with your offer - see above).
- Have permission to manage backups: if you had been invited to the Infomaniak Web Mail app (online service ksuite.infomaniak.com/mail) to manage your address, it is possible that the Mail Service manager has revoked this right from their admin account.
To restore emails:
- Click here to access the Infomaniak Web Mail app (online service ksuite.infomaniak.com/mail).
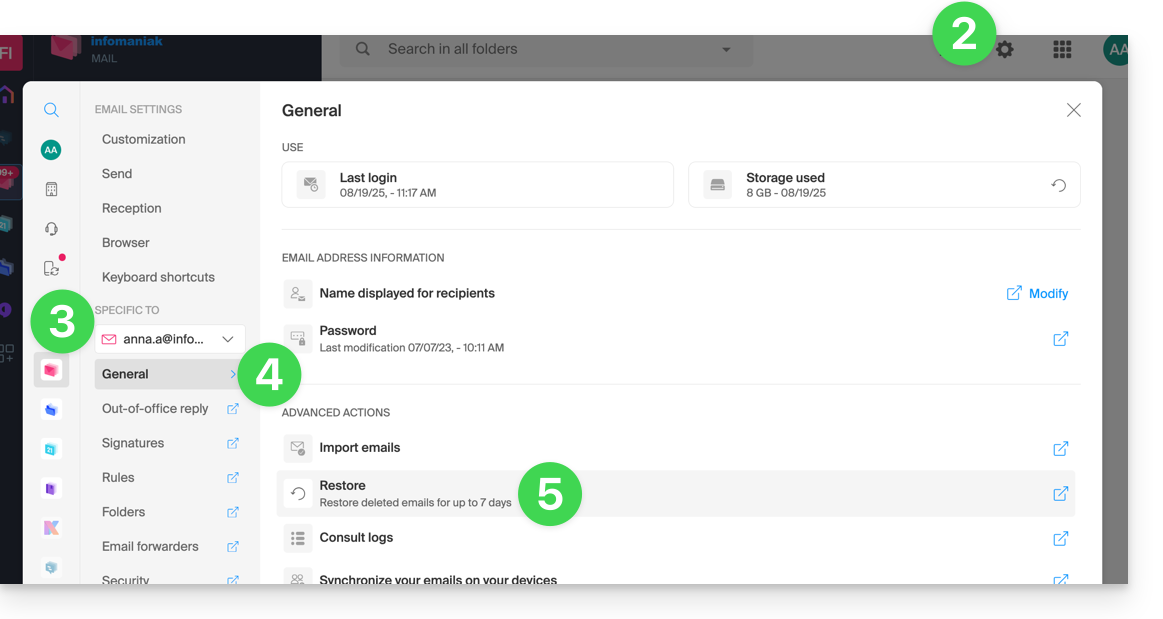
- Click on the Settings icon in the top right corner.
- Check or select the email address concerned in the dropdown menu of the left sidebar.
- Click on General.
- Click on Restore:
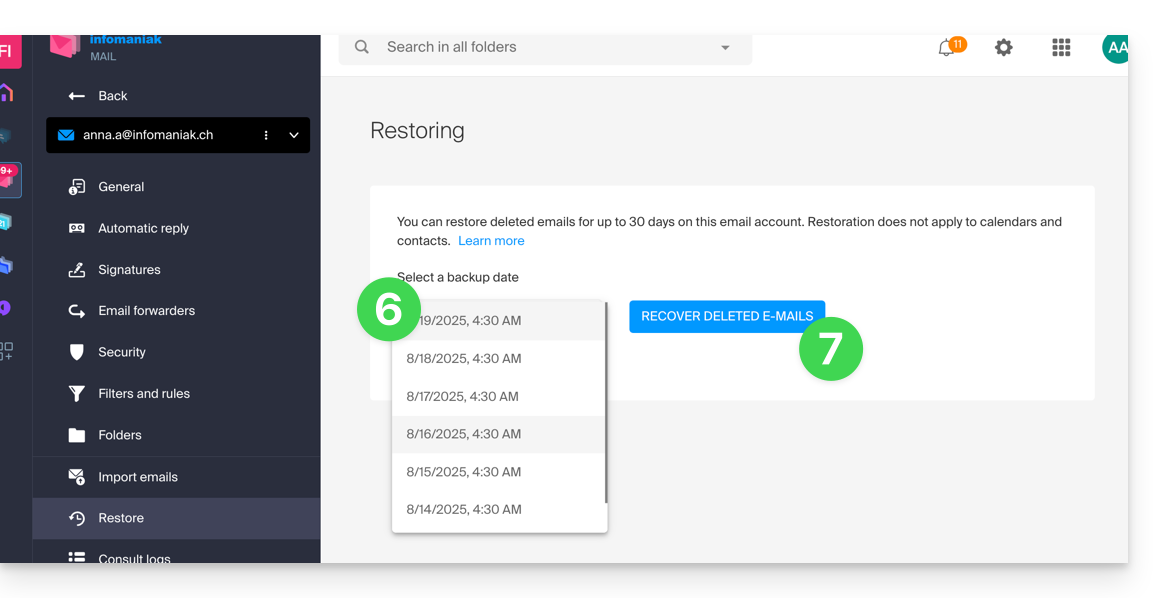
- Choose a Restore date.
- Click on Restore emails:
- Once the restoration is complete, an informational email is sent.
Restore from the Mail Service
Prerequisites
- Be Administrator or Legal Representative within the Organization that manages the Mail Service.
- Ensure that the deletion occurred less than 30 days ago (or within the timeframe included with your offer - see above).
To restore emails from a Mail Service:
- Click here to access the management of your product on the Infomaniak Manager (need help?).
- Click directly on the name assigned to the product concerned.
- Click on the concerned email address in the displayed table.
- Click on the Actions on the address button at the top right.
- Click on Restore emails:
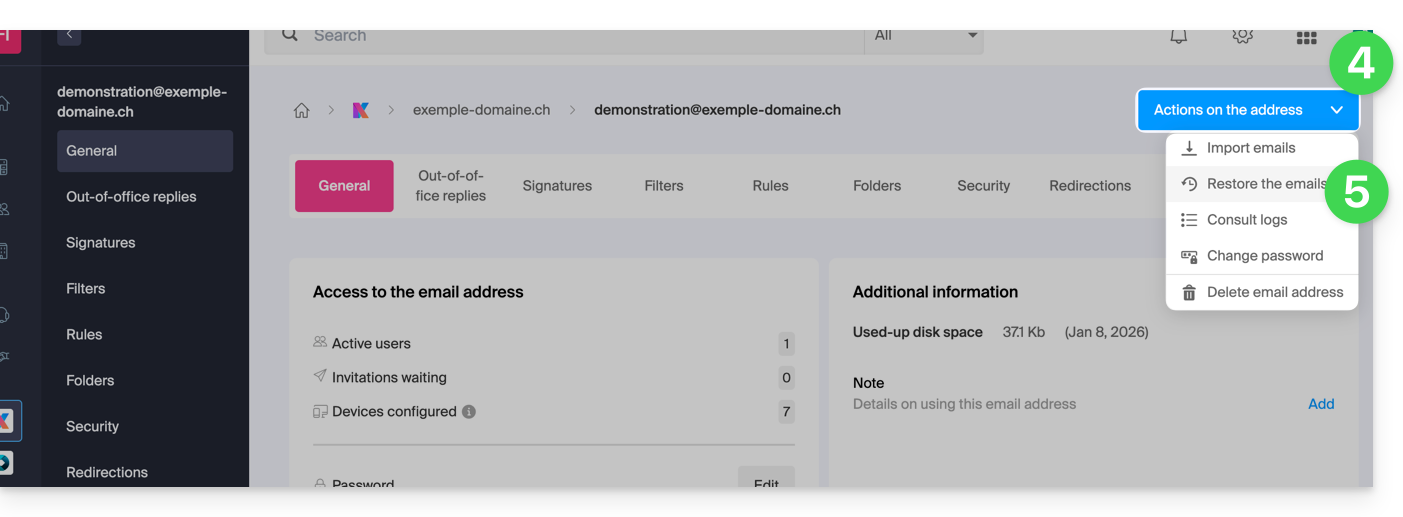
- Choose a Restore date.
- Click on Restore emails.
- Once the restoration is complete, an information email is sent to you.
Emails placed in the trash
Unless otherwise configured, an email deleted by the user is moved to the trash, and it is only after a delay of several days or weeks that the trash is automatically emptied (it can also be emptied by a user click). Therefore, during a restoration operation:
- Emails currently in the trash will remain as they are, regardless of the restoration date.
- Emails deleted from the trash will be restored to their original location, where they were when they were deleted (whether in the inbox folders or in the trash).
Emails placed in non-conventional folders
If you intentionally store your messages in folders with unusual names (for example, folders named Junk or Spam) take note of the important information in this other guide.
Email software/client configured in POP3
If you are used to checking your email with software/email client like Outlook and the latter is configured with the POP / POP3 protocol, it will not be possible to restore everything since the backup is done once a day, it only keeps the messages that were at the time of the backup in the Infomaniak inbox; the same goes for your other folders (Sent messages for example) present in the POP3 application: these are not synchronized with Infomaniak and therefore are not backed up; it is therefore necessary in the future to prefer the IMAP protocol in your email software/client.
This guide explains how to authorize Infomaniak Support to access your online products and more specifically their content, and provide useful details when requesting assistance.
Preamble
- Infomaniak Support may ask you to grant temporary access to part of your content.
- This access is strictly limited to the analysis context and is used solely to identify the source of the problem encountered.
- It saves time in diagnosis by avoiding unnecessary back and forth.
- In accordance with Infomaniak's privacy policy, your data will never be used for other purposes.
Authorize Support to access a type of content
To authorize Infomaniak to access a specific part of your services (authorizing access to content never opens access to others; each authorization is specific and independent):
- Click here to access access management on the Infomaniak Manager.
- Click the toggle switch to authorize access to the content of…
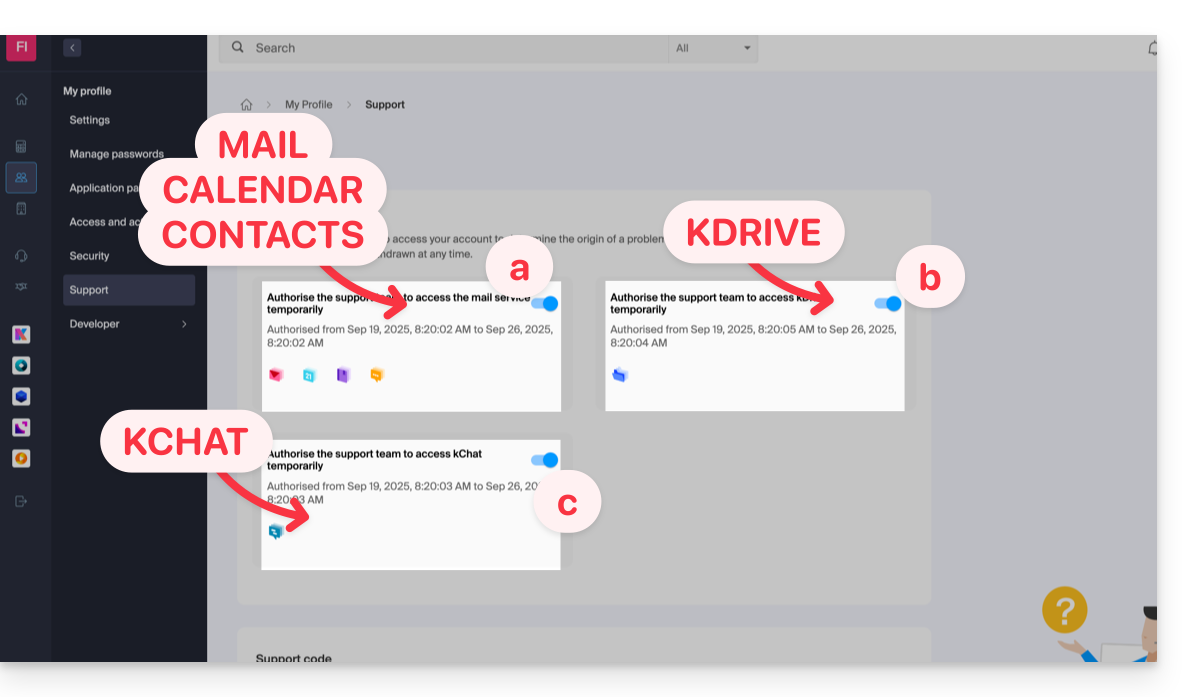
- … email addresses linked to the Web Mail app Infomaniak (online service ksuite.infomaniak.com/mail).
- … folders among the existing kDrive(s) in the Organizations of which the current user is a member.
- … discussions among the existing kChat product(s) in the Organizations of which the current user is a member.
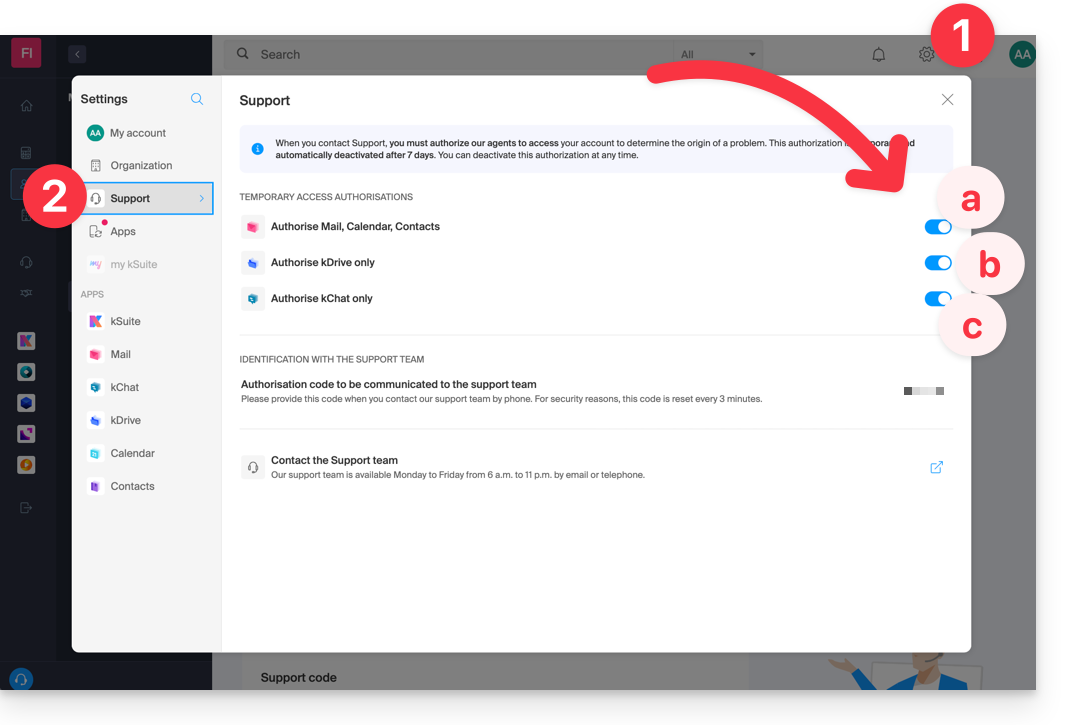
With kSuite, you can also do this by clicking here or proceed as follows to get there:
- Click on the Settings icon at the top right of your kSuite window.
- Click on Support in the left sidebar:
Who can access it?
- Only Infomaniak employees directly handling your support request.
- Access is only from Infomaniak's controlled facilities.
Duration and control of access
- You can revoke this access at any time.
- Otherwise, it expires automatically after 7 days.
You can also share a single specific email very easily.
Taking screenshots…
… on Windows
Microsoft provides a pre-installed software dedicated to screenshots. But to do it manually:
- Display what you want/need to transmit on the screen.
- Press the PRINTSCREEN key on your keyboard (or
PRTSCR,IMPR. ECRAN, etc.) once. - In Microsoft Word (or similar), do "Edit" -> "Paste" to place your image on the page.
- Save your file.
- Repeat the operation from step 1 to step 5 as many times as the number of desired captures.
… on macOS
- Press the "
CMD" + "shift" (the hollow arrow up — caps lock) + the "3" keys simultaneously. - Each press on these keys creates an image file on your computer's desktop.
… on iOS (iPhone, iPad...)
- Press the "
Power" + "Home" (the two only physical buttons) buttons simultaneously. - Retrieve the screenshots in the "Photos" app of your device.
… on Android (e.g. Samsung, LG or Huawei)
- Press the “Volume Down” (on the side) and the lock button simultaneously.
- The captured image is automatically saved in a Screenshots folder in the gallery.
Windows Popup
To copy-paste an error message present in a Windows popup as text, a simple press on the CTRL + C key on your keyboard is enough to copy the message to the clipboard. You will then be able to paste (CTRL + V) it in the body of the message you send to us.
Browser Javascript console…
… on Windows
Chrome, Firefox and Safari: enter the key combination CTRL + SHIFT + i
Internet Explorer and Edge: press the F12 key
… on macOS
Chrome: enter the key combination ⌘ + ⌥ + J
Safari: enter the key combination ⌘ + ⌥ + C
- Then, click on the crossed-out circle icon or similar to reset the log.
- Display the page of your site affected by the issue.
- The console tab displays JavaScript errors and missing online resources.
This guide details the limitations specific to the my kSuite offer and the advantages of the my kSuite+ offer.
my kSuite limits only
The my kSuite offer imposes certain limits that my kSuite+ does not…
Mail, contacts & calendars
- Disk space limited to 20 GB of storage for emails.
- No advanced mode in the message sorting rules.
- "my kSuite" signature imposed.
- No email sharing link.
- 1 address book, 1 calendar.
- Backup retention (30 days) of emails; recoverable by changing the offer.
kDrive
- 1 kDrive drop box.
- 25 kDrive sharing links (and without duration, password settings…).
- Retention of previous versions of your files: 30 versions over 30 days (60 over 120 days for my kSuite+, some of which are lifetime).
- 30-day trash (60 for my kSuite+).
- No statistics.
- No editing/signing of PDF files.
Limitation of my kSuite & my kSuite+ offers
Click on the links below to find out the details:
- Offer limited to one address per account (linked to a European phone number).
- Obligation to indicate a valid mobile phone number to confirm registration.
- Limited number of daily email sends, email redirections and unique recipients per message.
- No possibility to create aliases for your email.
- No customizable email signature.
- Email hold and scheduled sending: restricted features (no customization) on my kSuite and customizable with my kSuite+.
- 15 GB of Cloud storage with my kSuite, 1/2/6/12 TB with my kSuite+.
- Registration only possible for individuals residing in OECD member countries (official list), including:
- Germany
- Australia
- Austria
- Belgium
- Canada
- Chile
- Colombia
- South Korea
- Costa Rica
- Denmark
- Spain
- Estonia
- United States
- Finland
- France
- Greece
- Guadeloupe
- French Guiana
- Hungary
- Ireland
- Iceland
- Israel
- Italy
- Japan
- Latvia
- Lithuania
- Luxembourg
- Martinique
- Mayotte
- Mexico
- Monaco
- New Caledonia
- New Zealand
- Norway
- Netherlands
- Poland
- French Polynesia
- Portugal
- Czech Republic
- Réunion
- United Kingdom
- Saint Barthélemy
- Saint Martin
- Saint Pierre and Miquelon
- Slovakia
- Slovenia
- Sweden
- Switzerland
- French Southern Territories
- Turkey
- Wallis and Futuna
my kSuite+ offer
The my kSuite+ offer allows you to send more messages per day to a larger number of unique recipients at once.
To help you identify the my kSuite / kSuite offer most suited to your needs, refer to this other guide.
For sending emails to a large number of recipients, there is a Newsletter tool.
This guide details the security measures implemented as part of the Infomaniak email offers to detect abusive and abnormal use of an email address.
Preamble
- Upon written request, justified and authenticated, it is possible to modify these security rules for a specific paid email address.
- For sending emails to a large number of recipients, the Newsletter tool is the most suitable.
- These measures protect you from malicious use of your computer or your account.
Sending limits per 24 hours
1 message sent to 2, 42, or 99 people in CC/BCC counts as 2, 42, and 99 messages, respectively.
⚠ Number of outgoing emails possible per 24 hours:
| kSuite | free | 500 |
| Standard | 1440 | |
| Business | 1440 | |
| Enterprise | 1440 | |
| my kSuite | 500 | |
| my kSuite+ | 1440 | |
| Mail Service | Starter 1 max. address | 500 |
| Premium 5 min. addresses | 1440 | |
| Web hosting | sending unauthenticated (PHP Mail()) | 50 |
| sending authenticated | * |
* The maximum number depends on the email offer
Other email limits
This guide details the security measures implemented as part of the Infomaniak email offers to detect abusive and abnormal use of an email address. These measures protect you from malicious use of your computer or your account.
Number of recipients per email
Regardless of the email offer chosen, whether it is free or paid, the total number of recipients per message is limited to 100.
This restriction applies regardless of the field used to insert the email addresses of the recipients (To, CC, or BCC).
For sending emails to a large number of recipients, it is strongly recommended to use a Newsletter tool like the one Infomaniak offers.
Other email limits
This guide details the limits of your email in terms of size (message weight and disk space) implemented as part of Infomaniak's email offers and guides you to check the storage used.
Email box size limit
⚠ Storage space in GB:
| kSuite | free | 20 |
| Standard | * | |
| Business | * | |
| Enterprise | * | |
| my kSuite | 20 | |
| my kSuite+ | * | |
| Mail Service | Starter 1 max. address | 20 |
| Premium 5 min. addresses | * |
* unlimited
Limit on the size and number of emails
- The maximum size of an email in sending and receiving is 210,763,776 bytes, or 201 MB exactly.
- This includes header and body (text, html, attachments, etc.) regardless of the means used to send it.
- Note that an attachment may be encoded in base64, so its size in the email is not necessarily the same as its size on disk.
- With the Infomaniak Mail web app (online service ksuite.infomaniak.com/mail) the size limit of attachments is 25 MB.
- Beyond this and up to a limit of 3 GB, a link SwissTransfer is generated and integrated into your message: the data is stored in Switzerland in the Infomaniak Cloud and your recipients will be able to use this link to easily download the attachments during a predefined period.
- Beyond 3 GB (and up to 50 GB), it is recommended to go directly through SwissTransfer for your sends.
- The number of messages in the respective storage space is not limited.
- However, it is not recommended to keep more than 4,000 to 5,000 messages per folder (slowing down message indexing).
- It is therefore advisable to move your messages into subfolders, which also facilitates their consultation (you can do this manually or set up automatic sorting rules).
Email retention time limit
- There is no time limit for message retention in the inbox or in subfolders, except for an email that would be deleted, or marked as spam, or manually/automatically moved to the "Trash" or "Spam" folder (or one of its equivalent names such as "Deleted Items", "Deleted Messages", "Junk Mail", including spelled in another language, "Junk" for example - non-exhaustive list)… In this case, the email is automatically deleted after 30 days without possibility of recovery.
Therefore, never use a folder named, for example, Trash or Infected to store and keep important messages.
- Backups made by Infomaniak have a retention period.
Display the total size from the Infomaniak Web Mail app
To do this:
- Click here to access the Infomaniak Web Mail app (online service ksuite.infomaniak.com/mail).
- Check or select the email address concerned in the dropdown menu of the left sidebar.
- Click on the action menu ⋮ to the right of the item concerned in the displayed table.
- Click on Email settings:

- Click on Refresh in the Storage box to display the mailbox size:

Other messaging limits
Still having trouble?
If the email address of your recipient is not hosted by Infomaniak, you may receive an error message when sending the email. This can take various forms, such as Recipient address rejected: 5.2.2 Over quota 554 5.0.0 Service unavailable.
This may indicate that your recipient's mailbox is full and they can no longer receive emails, or that the email you are trying to send is too large.
In this case, you need to contact your correspondent to ask them to empty/lighten their mailbox or ask them for the maximum size of the messages you can send them.
This guide details the two main types of identifiers. They are distinct, even if the address format can be identical.
Infomaniak Account vs Email Address
Here is a summary of these 2 types of identifiers:
| Type of Identifier | Usage | Where to Use It | Associated Password |
|---|---|---|---|
| Infomaniak Account (login identifier) | Access all of your Infomaniak services. | Login to: | Password set when creating the user account. ⚠️ Different from the password of your email addresses. |
| Email Address Hosted with Infomaniak | Send and receive emails. | SMTP/IMAP Login…
| Password specific to each email address (there can be multiple). ⚠️ Different from the Infomaniak account password. |
What to do in case of a connection problem?
It is not necessary to contact Infomaniak Support (who does not have any of your passwords)…
- Problem with the Infomaniak account? Reset the account password.
- Problem with an email address? Reset the email password.
Explanations
- Like many other online services, you registered with Infomaniak using a personal email address.
- This personal email address serves as your login identifier when you want to access Infomaniak services.
- This login identifier has its own password (set when creating your Infomaniak user account – your personal email address, see above).
There is no link between…
- … this identifier/password pair described in points 1/2/3 above…
- … and the email addresses you have created or obtained subsequently with Infomaniak.
A link might exist if the address is the same (for example, you signed up with the email address toto@abc.xyz and you also manage this same email address at Infomaniak) but even in this case, the password will probably be different — once for the login identifier toto@abc.xyz and once for the email address toto@abc.xyz.
Other identifiers?
Acquiring other Infomaniak products involves obtaining other identifiers, such as those required for FTP, MySQL, SSH, WebDAV connections, etc., but these identifiers are completely independent of the two types described above.
This guide explains how to create an email address from the Mail Service Infomaniak, the powerful and secure solution for hosting your email addresses.
Preamble
- To create multiple email addresses in bulk, refer to this other guide.
- To create “virtual” addresses serving as redirections, refer to this other guide.
- Refer to this other guide if you are looking for additional information about invitations to use a new address or an existing address.
Create an address on a Mail Service
Prerequisites
- Have a Mail Service on your Infomaniak Manager.
- Have a quota of available free addresses or adjust it in advance if necessary.
Then, the administrator of a Mail Service creates a new email address:
- Click here to access the management of your product on the Infomaniak Manager (need help?).
- Click directly on the name assigned to the product concerned.
- Click on the blue button Create an email address at the top right:
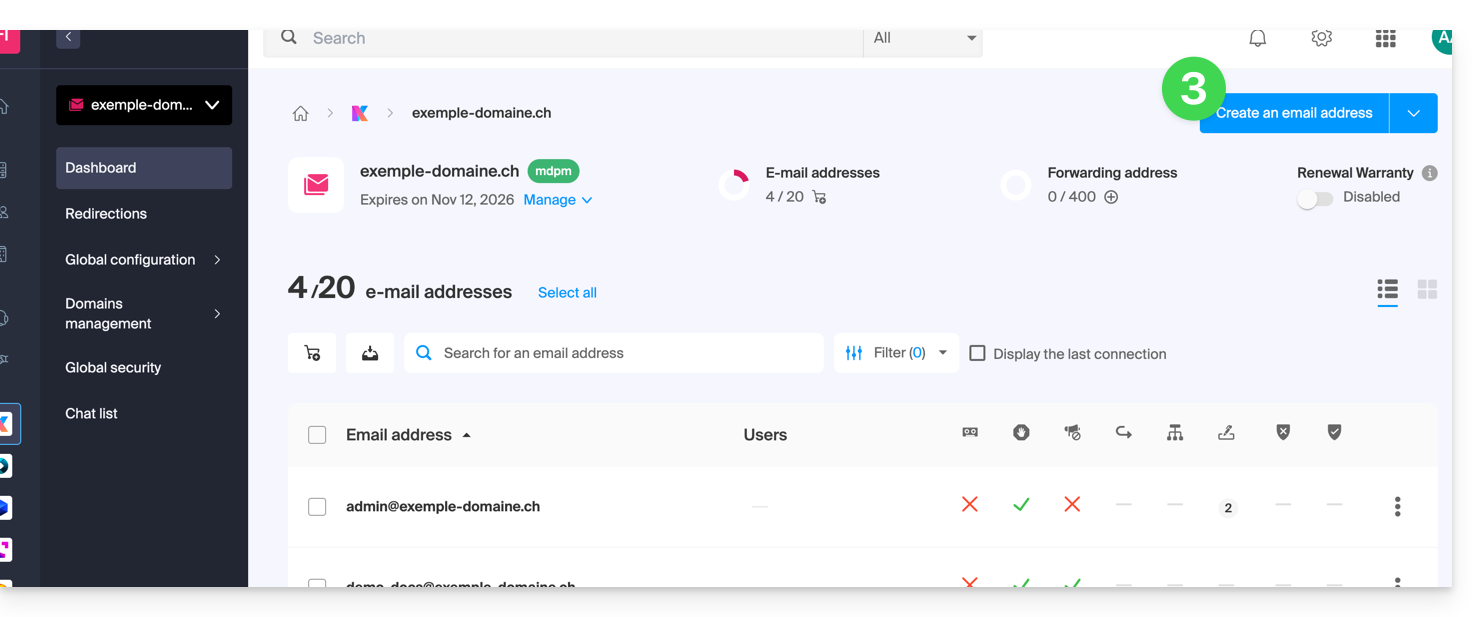
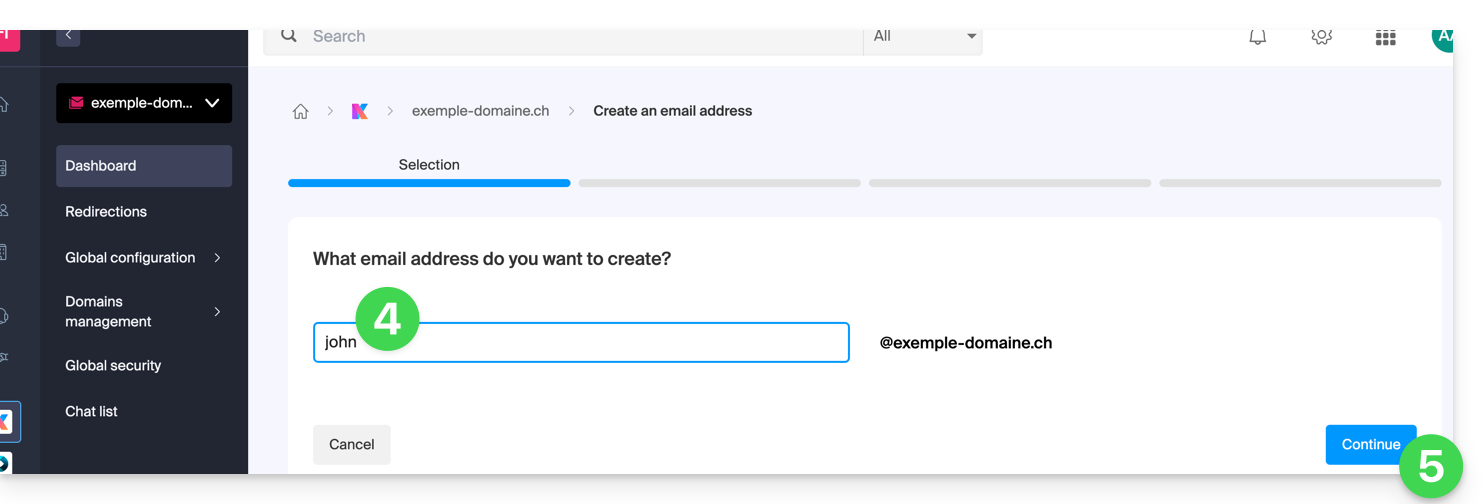
- Enter the name that will compose the email address.
- Click on the button to continue:
- Select the creation mode suitable for your situation:
- An address for yourself (and directly visible on your Mail interface)
- An address for multiple users (sending invitations)
- An address without invitation (no attachment to your Mail interface)
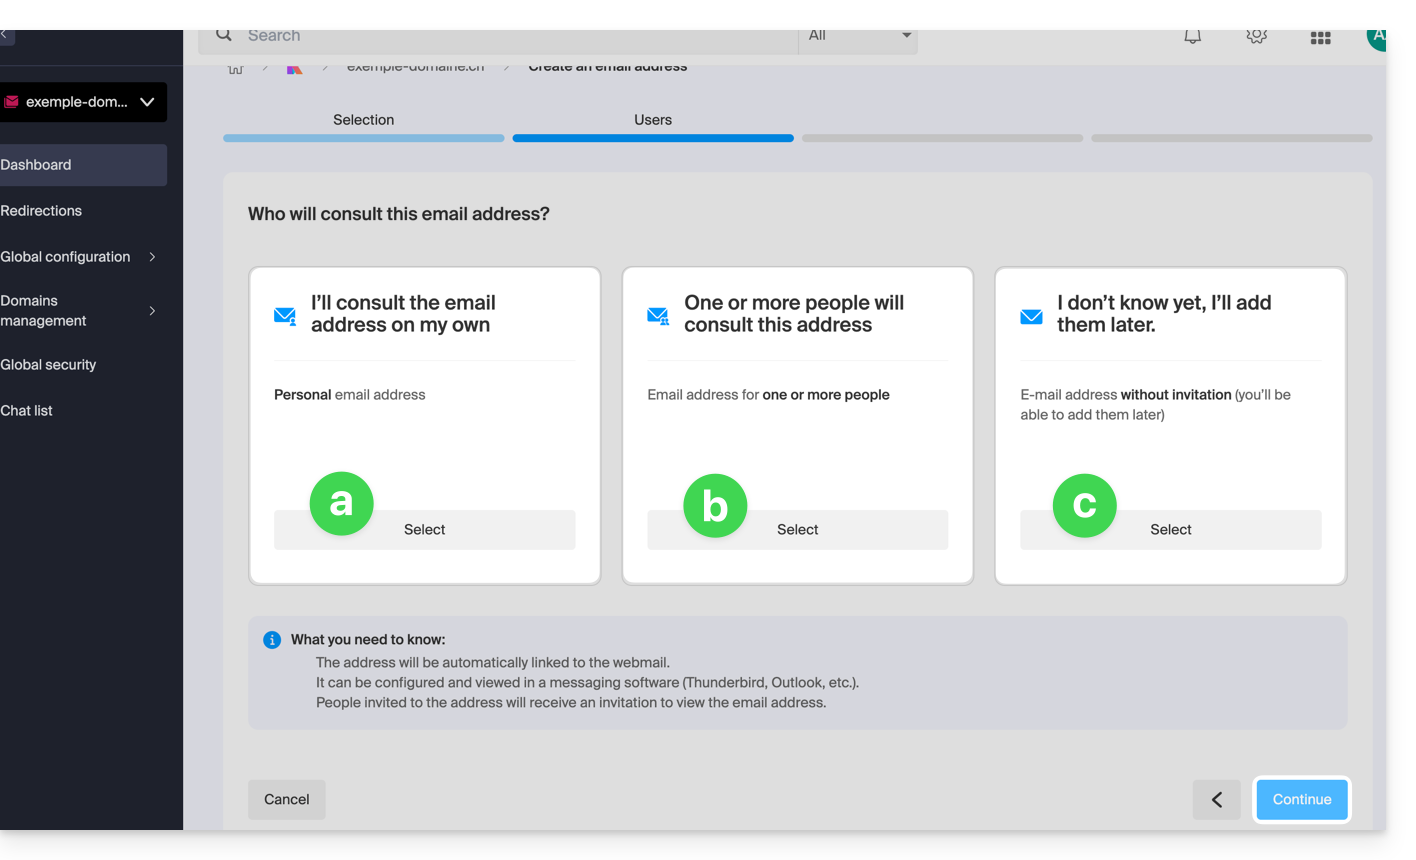
- Click on the button to continue.
Choice [a]
- Choose a possible signature template then click on Continue:

- That's it, the email address is now visible on Mail ksuite.infomaniak.com/mail:

If you need to obtain a password for third-party use, refer to this other guide.
Choice [b]
- Choose who should be able to view the address among:
- existing users on your Organization
- an external email address to whom you send an invitation link to the email address you need to specify in the field
- a new user to whom you will send an invitation link by your own means
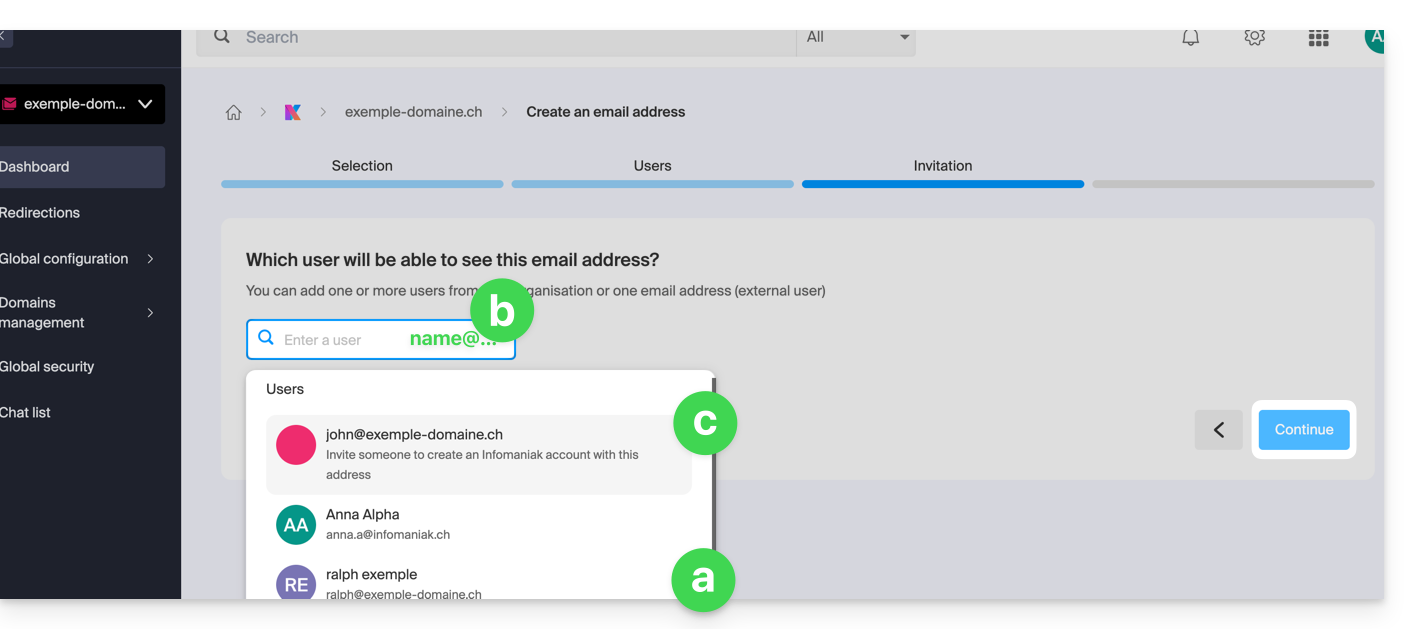
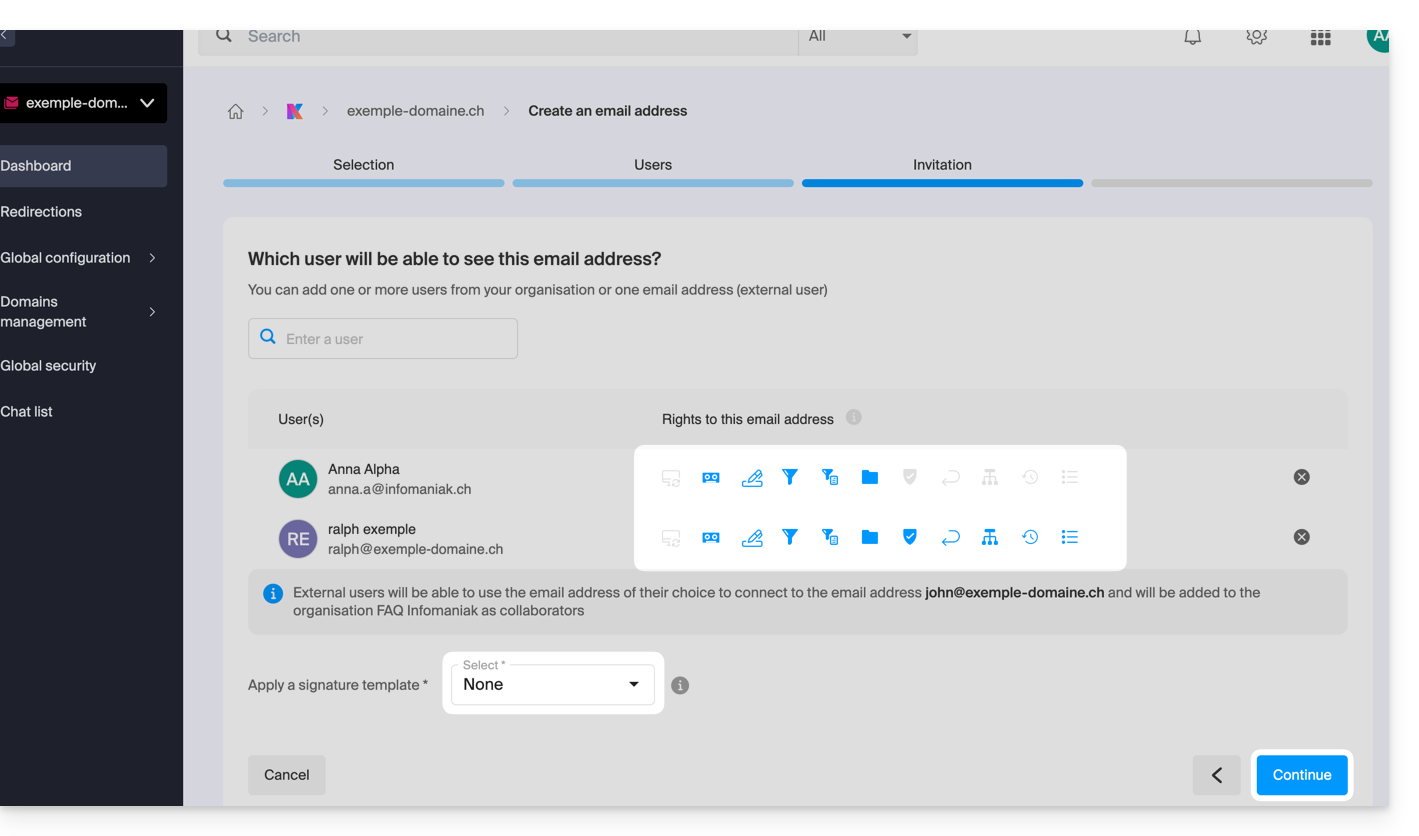
- If you have chosen:
- existing users on your Organization then you can manage their access rights to the answering machine, device addition, etc. by clicking on the small icons, then choose a possible signature template and click on Continue to finish and give them access to the address which will be automatically visible on Mail ksuite.infomaniak.com/mail:
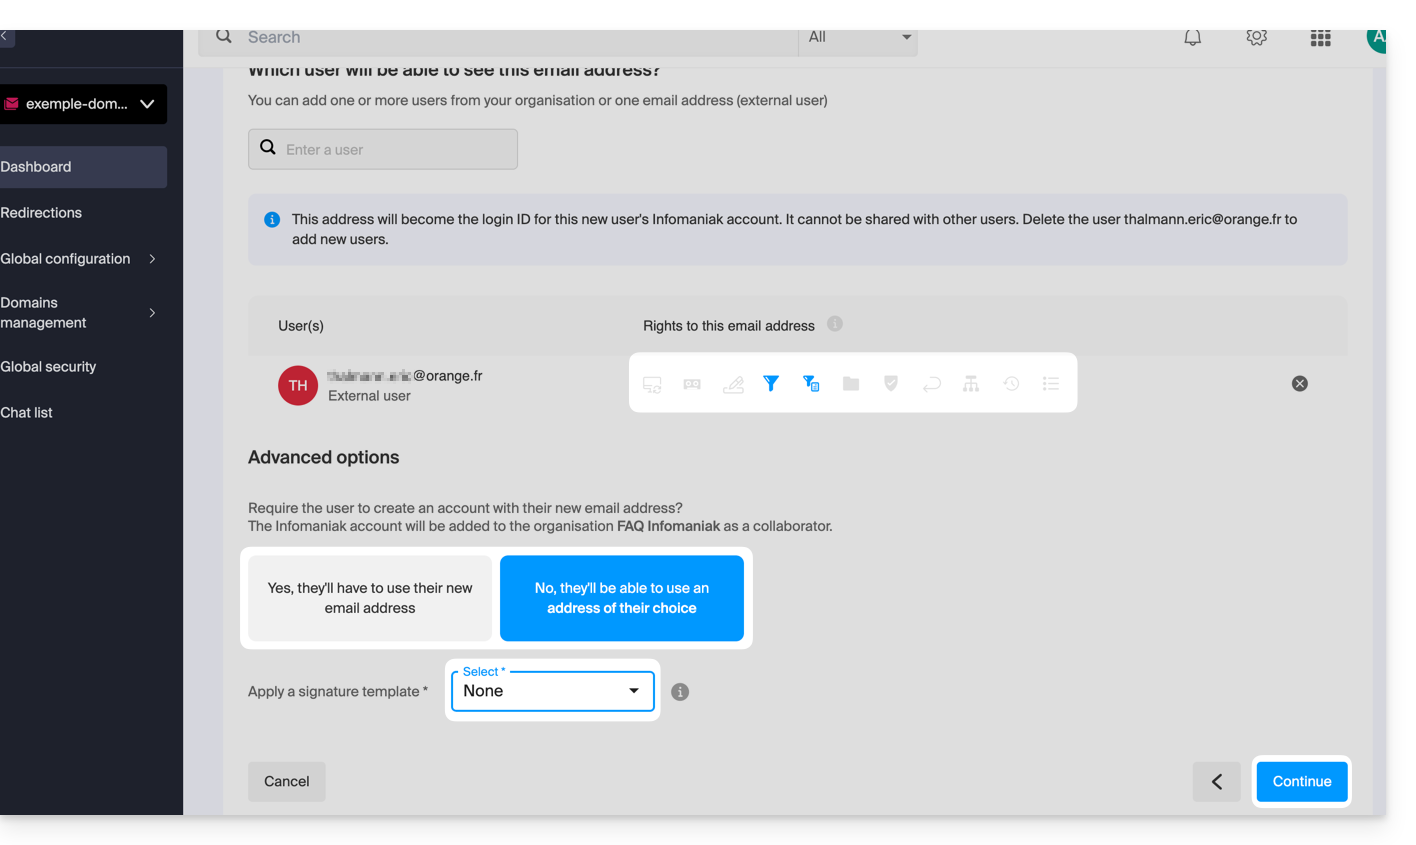
- an external email address then you can manage their access rights to the answering machine, device addition, etc. by clicking on the small icons, then choose whether the user must log in with the new email address or the address of their choice, choose a possible signature template and click on Continue to finish:
 The user receives an invitation to view the email address, valid for 30 days:
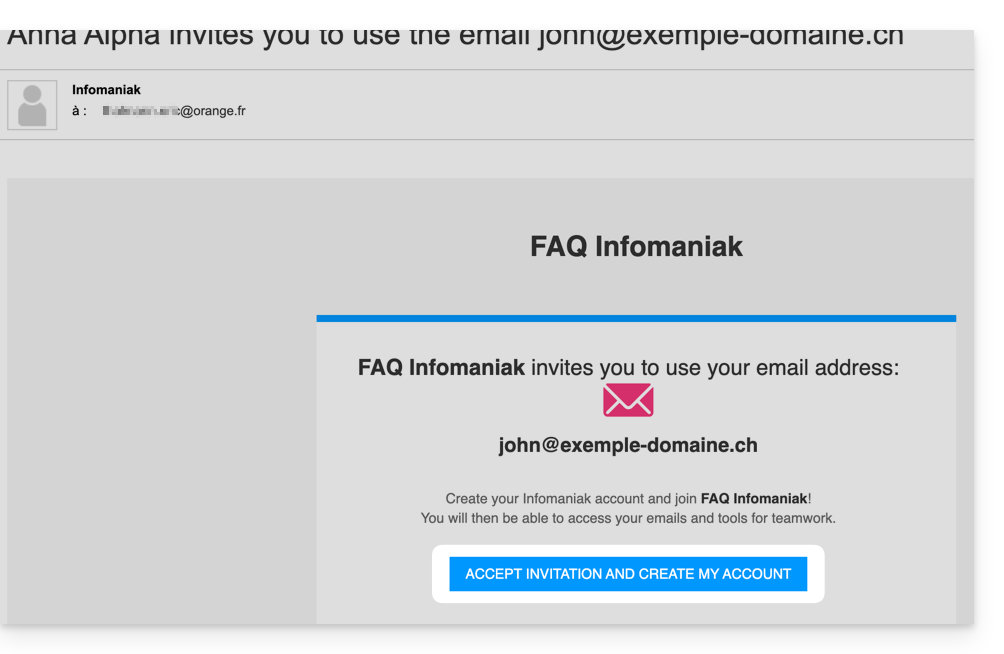
The button takes them to a page where, depending on your initial choices, they can either create a new account or log in to an existing account they may already have with Infomaniak, or create a new account whose identifier must necessarily be the email address created. Once completed, the address will be automatically visible on Mail ksuite.infomaniak.com/mail. - a new user then you can manage their access rights to the answering machine, device addition, etc. by clicking on the small icons, then choose whether the user must log in with the new email address or the address of their choice, choose a possible signature template and click on Continue to finish:
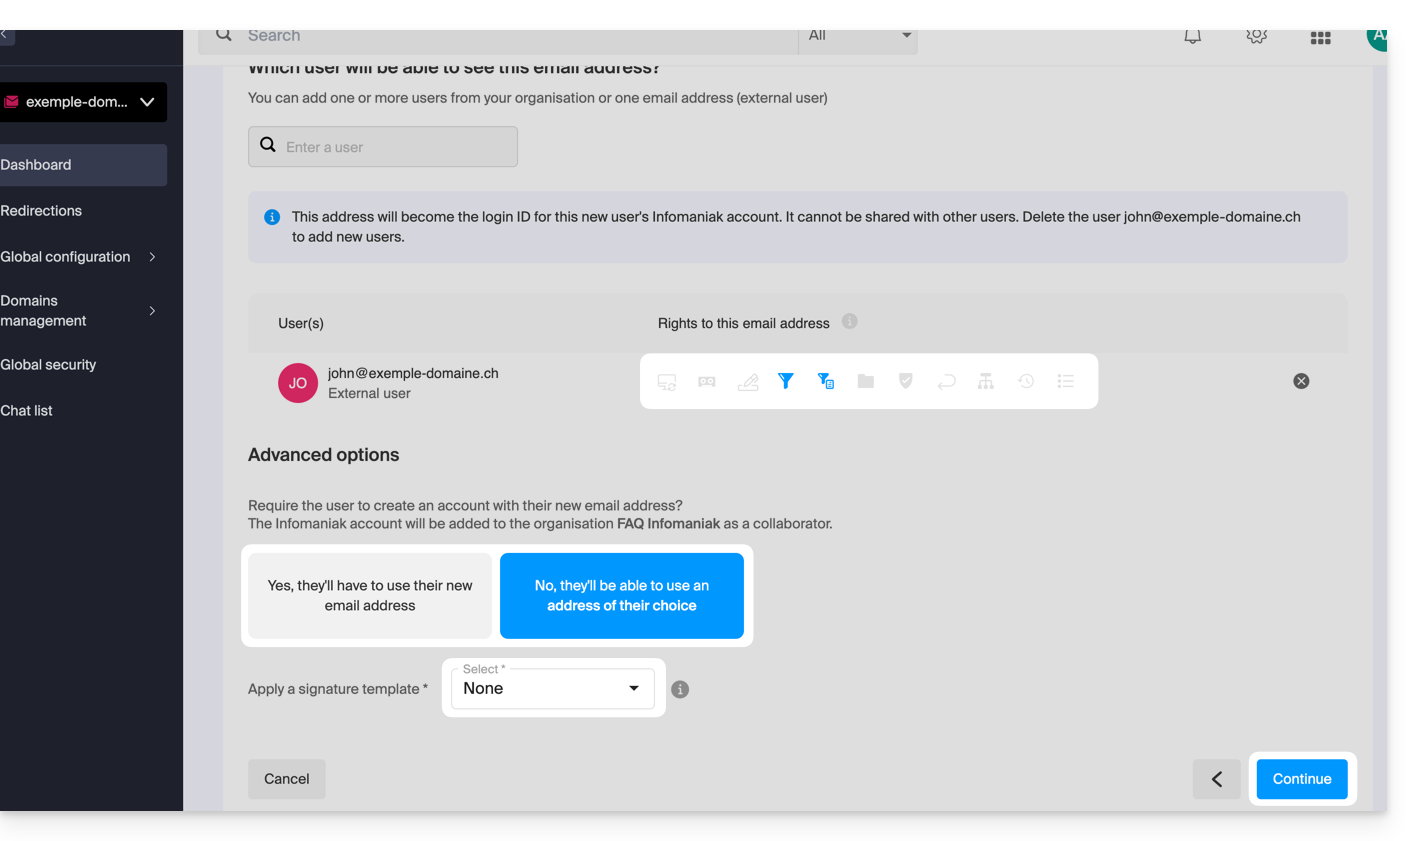
The difference with point b is that the invitation link is directly visible — you can still send it by email if necessary using the link below the invitation URL: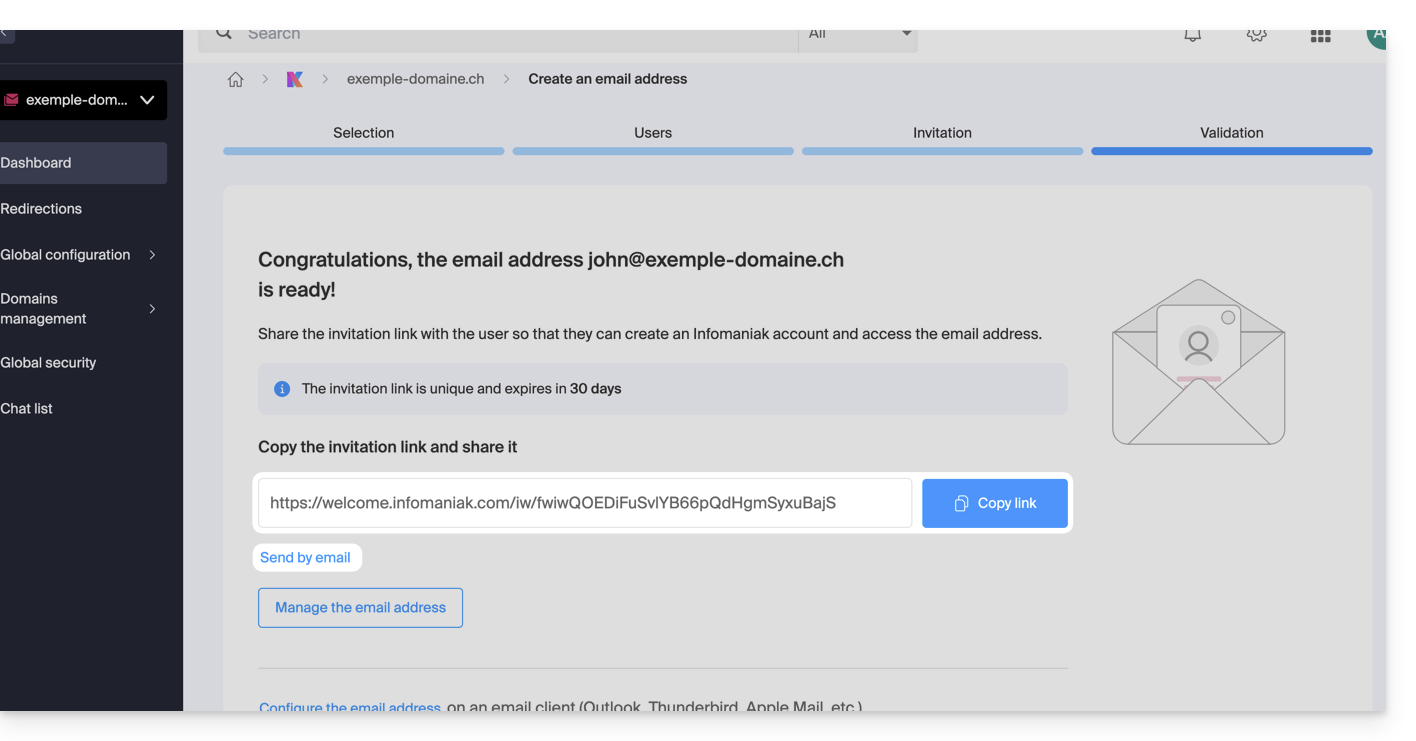
The invitation link valid for 30 days takes them to a page where, depending on your initial choices, they can either create a new account or log in to an existing account they may already have with Infomaniak, or create a new account whose identifier must necessarily be the email address created. Once completed, the address will be automatically visible on Mail ksuite.infomaniak.com/mail.
- existing users on your Organization then you can manage their access rights to the answering machine, device addition, etc. by clicking on the small icons, then choose a possible signature template and click on Continue to finish and give them access to the address which will be automatically visible on Mail ksuite.infomaniak.com/mail:
Choice [c]
- The email address is directly created (always without password, and this time without any user, so the address will not be visible anywhere initially) and works fully.
- You can of course manage the users and the passwords from the email address management directly.
2. Create an Infomaniak account with the created email address
If the user is led to create an Infomaniak account to use the new email address, and this address is specified as the login identifier…
- … this is mainly the case when choosing [ b ] above, when this box is selected:
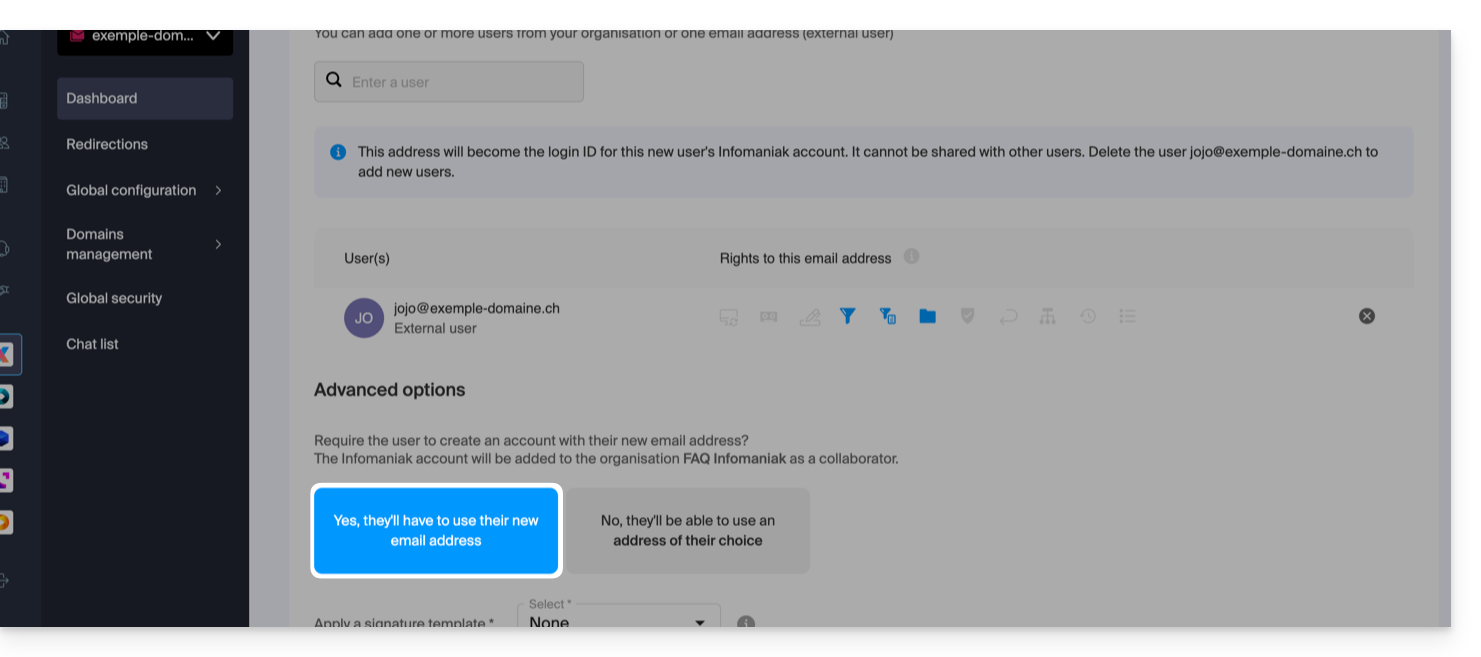
… some restrictions may then exist: refer to this other guide on this subject.
Additional actions (button )
Click on the chevron to the right of the Create an email address button to access additional actions: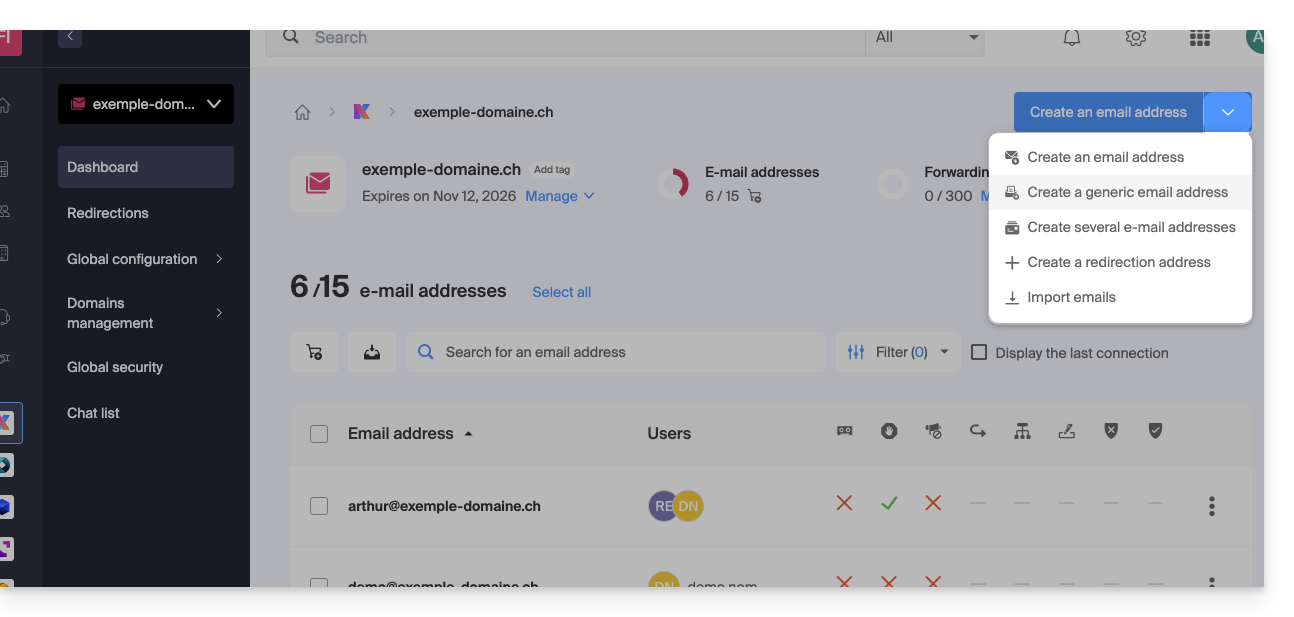
- Create a generic email address of type:
- no-reply (for sending confirmation, validation, invoice, etc.)
- catchall (allows you to receive all messages for which there is no specific email address on your domain)
- Create multiple email addresses: allows you to create multiple email addresses at once using a
CSVfile. - Create “virtual” addresses serving as redirection.
- Import content from other email addresses.
Delete one or more email addresses
To remove an email address (its content will be permanently deleted):
- Click here to access the management of your product on the Infomaniak Manager (need help?).
- Click directly on the name assigned to the product in question.
Once in front of the email address table: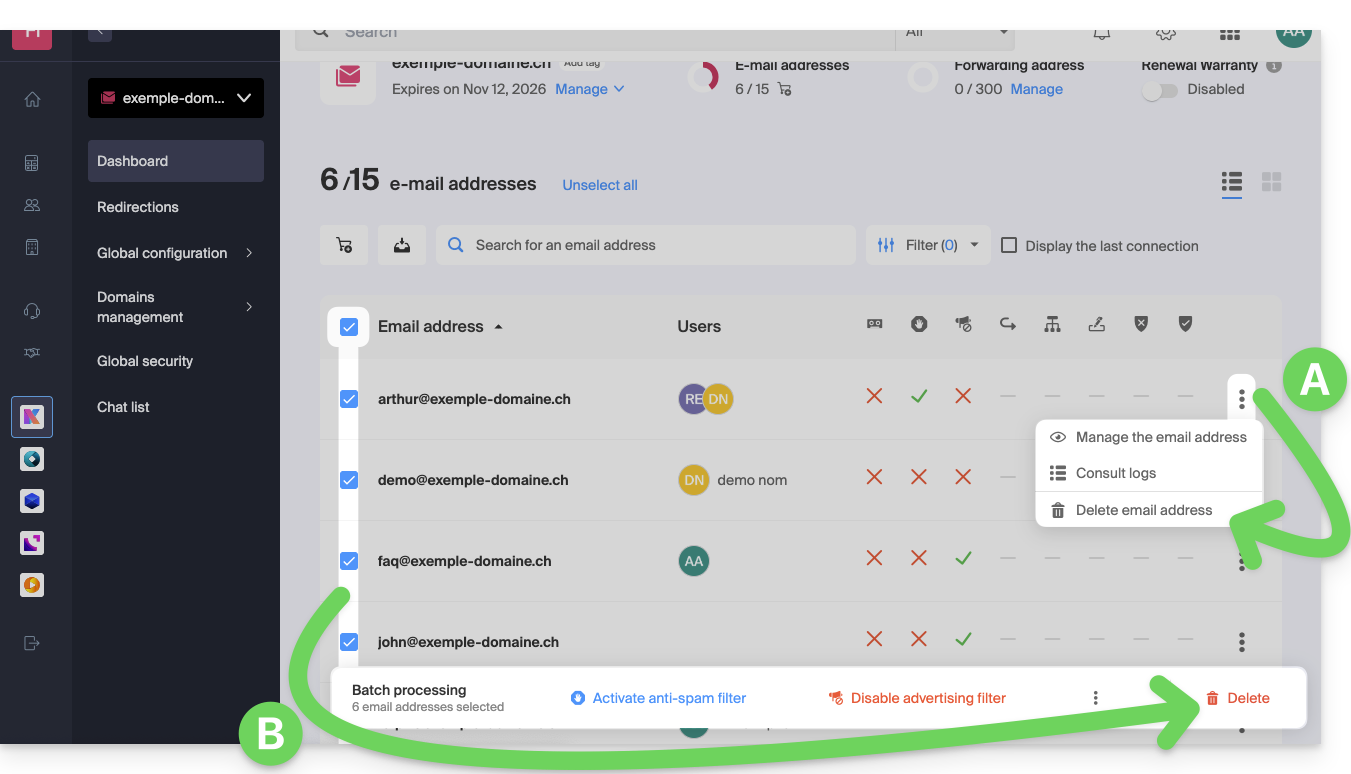
A. Delete one address at a time
- Click on the action menu ⋮ located to the right of the item in question.
- Choose to delete the email address.
B. Delete multiple addresses at once
- Select the addresses to delete by checking the boxes to the left of the line.
- Click on Delete at the bottom of the screen.
This guide explains which protocols and ports can be used with Infomaniak's messaging services (including the Service Mail service).
Recommended ports and parameters for client configuration
When prompted during a software/messaging client configuration (Outlook, Thunderbird, mobile, etc.), prioritize the following parameters:
| IMAPs - Incoming Mail (Recommended) | SMTP - Outgoing Mail (Option 1: Standard IETF) | SMTPs - Outgoing Mail (Option 2: Implicit Encryption) | |
|---|---|---|---|
| Ports | 993 | 587 | 465 |
| Security Mechanism | SSL / TLS (Implicit) | STARTTLS (Explicit) | SSL / TLS (Implicit) |
| Server Name | mail.infomaniak.com | ||
| Authentication | Required (username = full email address) | ||
Technical Note: Port 587 with STARTTLS is the IETF standard practice for secure email submission. Port 465 is a secure alternative using implicit encryption.
If you specify other indications or disable encryption, email errors may occur.
Other supported ports (unencrypted or backward compatibility)
- port
143(Standard port for IMAP reception - unencrypted, use 993) - port
110(Standard port for POP3 reception - unencrypted, use 995) - port
995(Secure port for POP3s reception - secure POP3 option) - port
25(Standard port for server-to-server transfer - may support STARTTLS for submission, but 587 is the standard for clients). - STARTTLS authentication is supported on unencrypted ports (143, 110, 25) to enable TLS encryption.
- SMTP authentication supported (LOGIN or PLAIN methods).
API Usage and Transfer Security
The Infomaniak API does not offer any email connection as IMAP and SMTP are the "APIs". Use a library (such as Python: email.examples and imaplib) that uses IMAP and SMTP.
To display emails from PHP:imap_open("{mail.infomaniak.com:993/imap/ssl}", $email, $password);
The MTA-STS mechanism is not implemented or verified, as Infomaniak uses DANE (DNS-based Authentication of Named Entities) to ensure an encrypted connection between servers when the following conditions are met:
- The client sends an email to a domain that has configured DANE.
- The client receives an email from an SMTP server that uses DANE.
- In all other cases (in the absence of DANE), the encrypted connection remains opportunistic.
This guide explains how to manage the password of an email address from the Infomaniak Web app Mail (online service ksuite.infomaniak.com/mail).
Preamble
- If you cannot log in to Mail / my kSuite, you will not be able to manage the passwords of any email addresses: refer to this other guide in this case.
- You need to determine what you want to do specifically and for what purpose:
- obtain a password to add the address to a device, an external application, etc.
- obtain a password so that a third-party user can add the address to their Infomaniak Web app Mail
- remove an address currently visible in the Infomaniak Web app Mail from a third-party user
Cases 1 & 2
Prerequisites
- Have permission to manage the password: it is possible that the Mail Service manager has removed this right from their admin account.
To manage the password of an already linked email address:
- Click here to access the Infomaniak Web app Mail (online service ksuite.infomaniak.com/mail).
- Click on the action menu ⋮ to the right of the email address concerned.
- Click on Address settings:
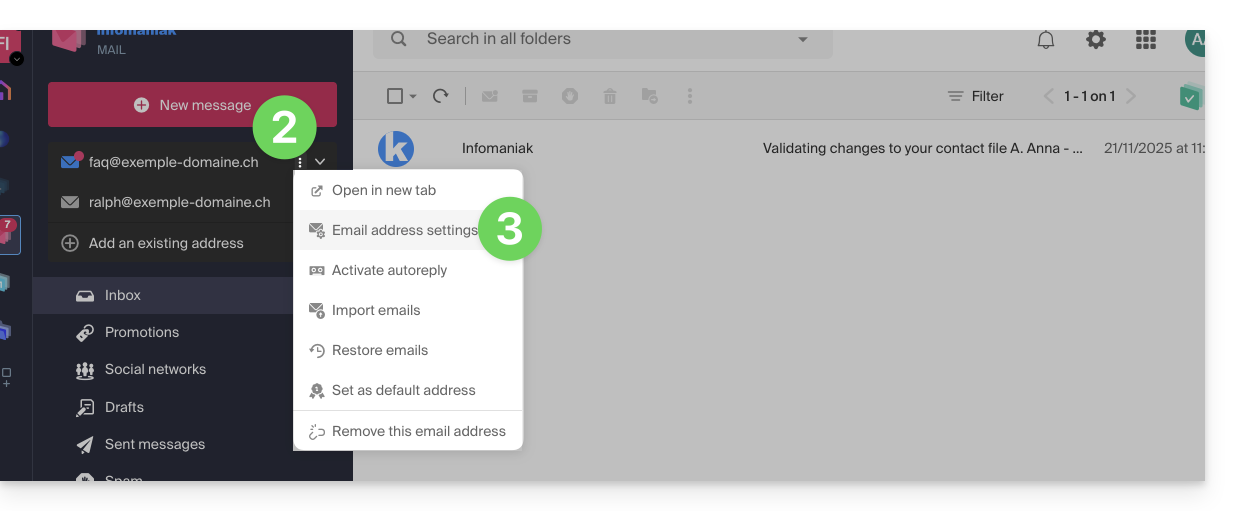
- Click on Manage the password:

- Click on Add a device:
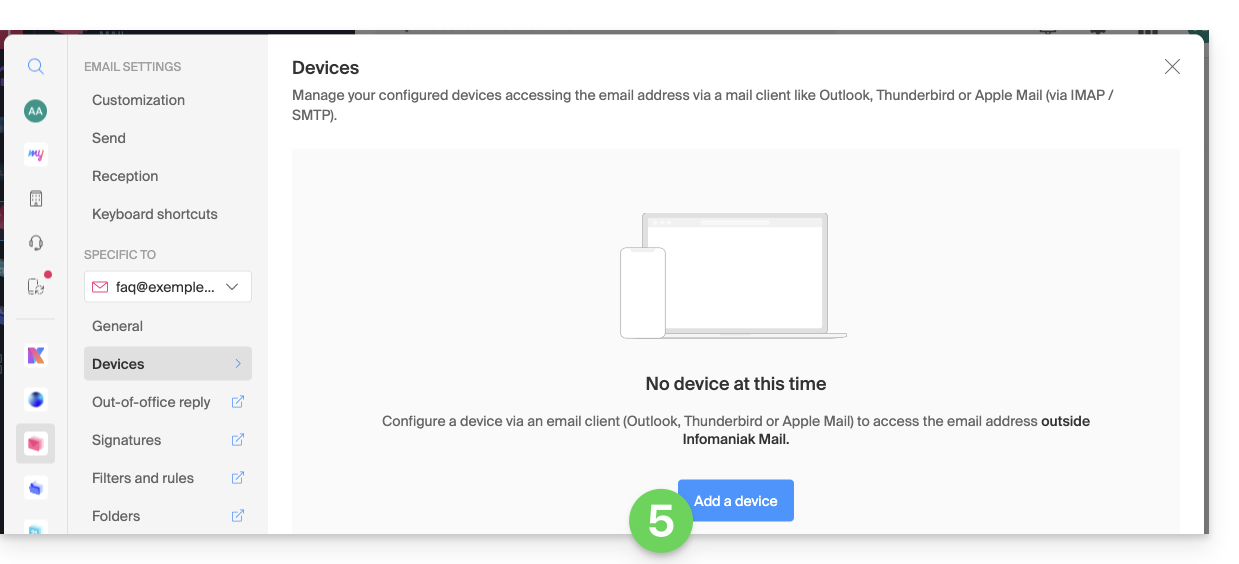
- The setup assistant opens on the MAIL section; check or select the email address concerned in the dropdown menu.
- Select “new device” from the dropdown menu.
- Give a description to the device.
- Click on the Manual configuration tab.
- Click the button to generate a password:
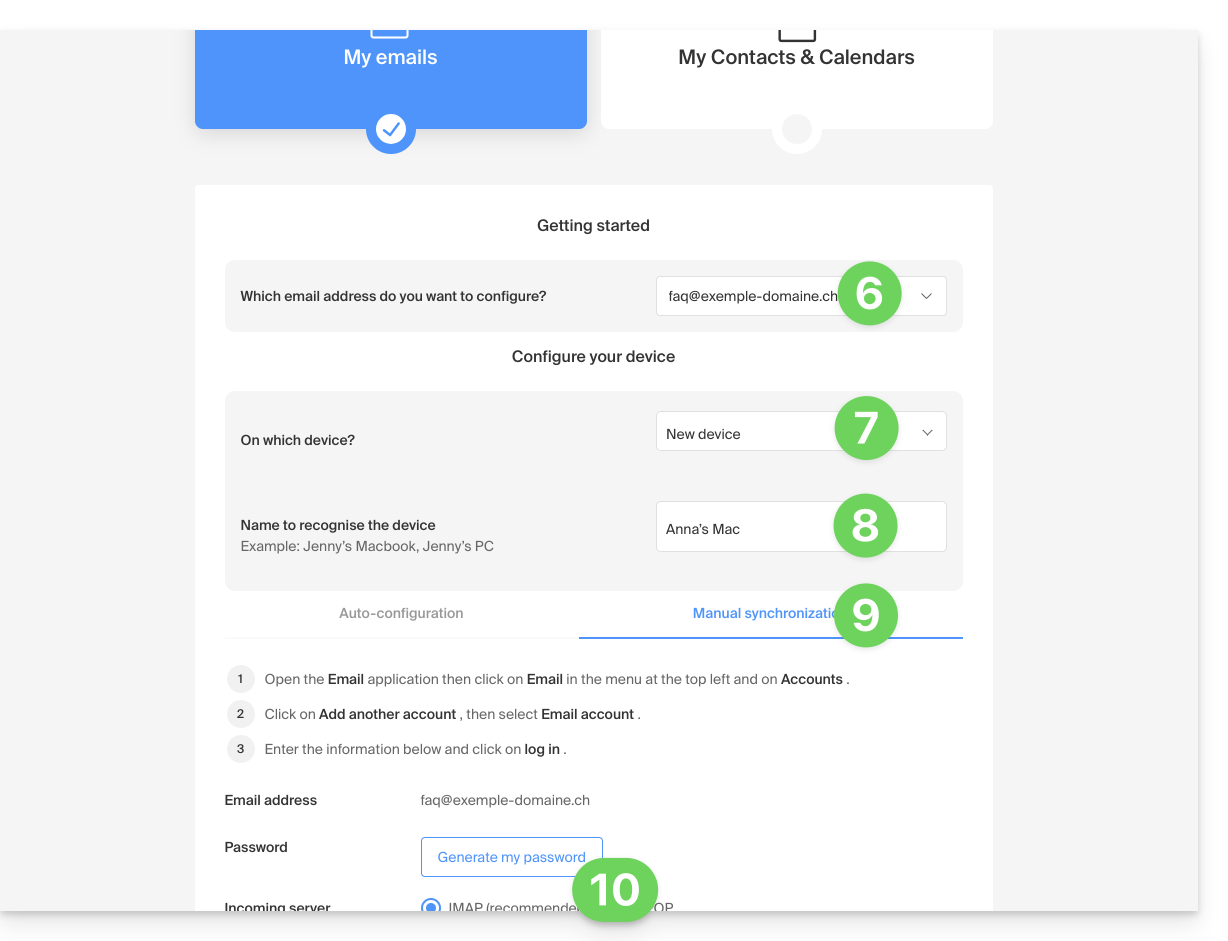
- Enter the password to log in to your Infomaniak account if prompted.
- The new created password is displayed, you can copy it and keep it safe (password manager, for example); it will no longer be displayed afterwards.
Case 1 & 2 & 3
At any time, it is possible to manage the accesses created / used:
- Click on the Settings icon at the top right of the interface.
- Check or select the email address concerned in the dropdown menu of the left sidebar.
- Click on Devices in the left sidebar.
- Click on the device concerned:
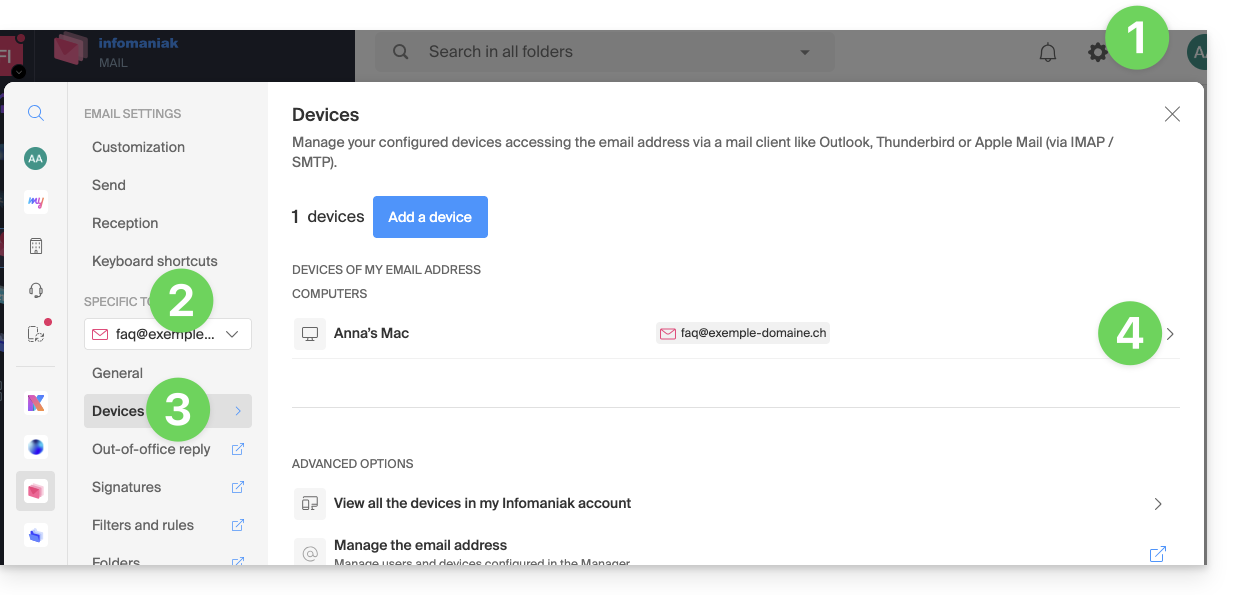
- Click the button to disconnect the device.
- Confirm the disconnection of the device concerned:
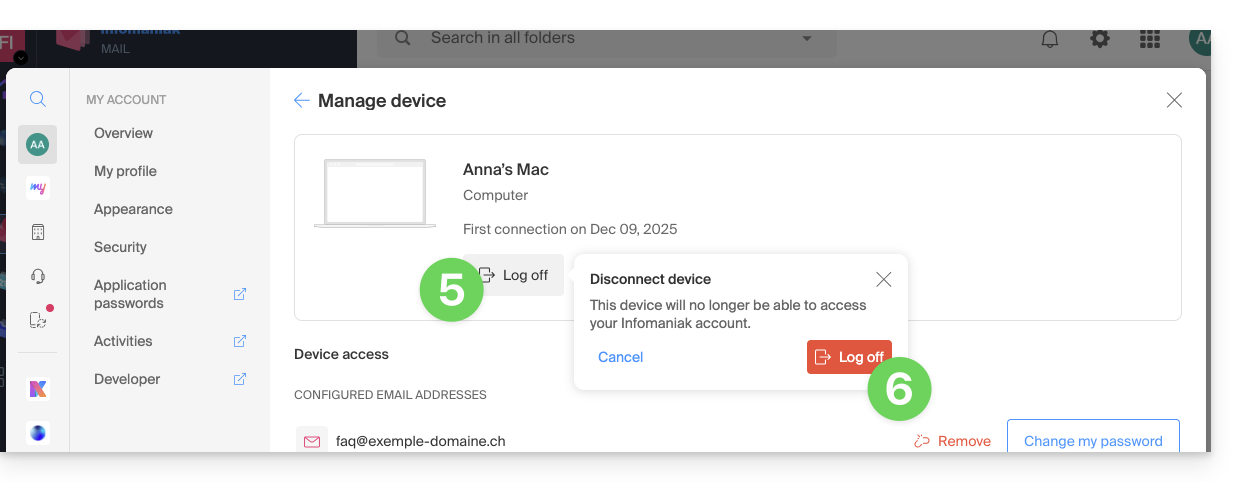
This guide helps you identify and correct most email errors encountered after sending an email to a recipient. Refer to this other guide if you are looking for information about errors obtained when configuring an email address in a software/email client.
Preamble
- In general, a mail error message follows…
- … an incorrect configuration of the domain name used with your email,
- … a problem with (the mail provider of) your recipient.
- In all cases, a delivery failure report (Mailer Daemon or Mail Delivery Subsystem) containing the explanation is sent to the sender.
Finding and identifying the email error
When your message does not reach your recipient, an initial failure report (Temporary Delivery Failure Report) is sent and specifies that the server will attempt to resend your message several times.
A final delivery failure report (Final Delivery Failure Report or Undeliverable Mail) issued by the recipient's server is sent to the sender (via a pass through the Infomaniak mail server, hence the mention of Infomaniak at the beginning of most error messages you may receive) to inform that the email could not be delivered even after several attempts.
The notification always contains the reason for the failure. Example below:
This is the mail system at host smtp-1-1234.mail.infomaniak.ch.
I'm sorry to have to inform you that your message could not be delivered to one or more recipients. It's attached below.
For further assistance, please send mail to postmaster.
If you do so, please include this problem report. You can delete your own text from the attached returned message.
The mail system anna.a@abc.xyz: host mxbw-abc-xyz.abc-ab12.abc.ch[123.456.789.00] said: 550 5.1.1
anna.a@abc.xyz recipient rejected, account administratively disabled (in reply to RCPT TO command)
So here the address of your correspondent is apparently suspended by their email provider (account administratively disabled).
Sometimes you need to look for the reason for the error message received among its attachments (often a plain text file). Example:
Reporting-MTA: dns; mxbw.abc.ch [123.456.789.00]
Received-From-MTA: dns; smtp-1-1234.mail.infomaniak.ch [12.345.678.99]
Arrival-Date: Tue, 01 Aug 2023 15:49:22 +0200
Final-recipient: rfc822; anna.a@abc.xyz
Diagnostic-Code: smtp; 552 RCPT TO:anna.a@abc.xyz Mailbox disk quota exceeded
Last-attempt-Date: Tue, 01 Aug 2023 15:49:22 +0200Here the mailbox of your correspondent outside Infomaniak seems full (Mailbox disk quota exceeded).
Most common cases
SPF Failure
The SPF (Sender Policy Framework) record is not correctly configured:
Subject: Delivery Status Notification (Failure)
From: Mail Delivery System mailer-daemon@domain.xyz
To: Anna.A anna.a@abc.xyz
This is an automatically generated Delivery Status Notification.
Delivery to the following recipient failed due to SPF failure:
anna.a@abc.xyz
Technical details of SPF failure:
The sender's domain domain.xyz does not have a valid SPF record. Please contact your email administrator to correct the SPF configuration.
Solution: check the configuration of your domain name and especially the SPF type record if your website is hosted on Wix or another provider.
User Unknown
The email address specified in the message is invalid or does not exist:
Subject: Delivery Status Notification (Failure)
From: Mail Delivery System mailer-daemon@domain.xyz
To: Anna.A anna.a@abc.xyz
This is an automatically generated Delivery Status Notification.
Delivery to the following recipient failed permanently:
anna.a@abc.xyz
Technical details of permanent failure:
The email address does not exist. Please check the recipient's email address and try again.
Solution: carefully check the recipient's email address and correct it if necessary; make sure to use a valid email address for the recipient.
Temporary Failure
Le serveur de messagerie du destinataire rencontre des problèmes temporaires ou est indisponible.Solution: wait for a certain amount of time, then try sending the message again later. If the problem persists, contact the recipient's technical support for assistance.
Blocked by SPAM Filter (or Content Rejected)
The recipient's mail server has blocked the message due to anti-spam filtering rules:
Subject: Delivery Status Notification (Failure)
From: Mail Delivery System mailer-daemon@domain.xyz
To: Anna.A anna.a@domain.xyz
This is an automatically generated Delivery Status Notification.
Delivery to the following recipient failed due to the message being rejected as spam:
anna.a@domain.xyz
Technical details of delivery failure:
The content of the message triggered the spam filters of the recipient's email server. Please review the message content and try again.
Solution: check if your message contains elements that may be considered spam (keywords, suspicious links, etc.). Contact the recipient to verify if the message was filtered into the spam folder.
Refer to this other guide regarding outgoing spam and this other guide regarding incoming spam.
Bad Reputation
The recipient's mail server has blocked the message due to anti-spam filtering rules:
gmail-smtp-in.l.google.com said: 550-5.7.1
Our system has detected that this message is likely suspicious due to the very low reputation of the sending domain.
To best protect our users from spam, the message has been blocked.
Please visit https://support.google.com/mail/answer/188131 for more information.
Solution: check the reputation of the domain, determine if one of your email addresses has been recently exploited for malicious purposes, for example.
Domain Not Found (or DNS Error)
Le nom de domaine du destinataire n'a pas pu être résolu ou n'existe pas.Solution: check the spelling of the recipient's domain and correct it if necessary; ensure that the domain name and DNS are valid and active.
Mailbox Full
La boîte de réception du destinataire est pleine, empêchant la réception de nouveaux messages.Solution: inform the recipient of the situation and ask them to free up space by deleting emails or archiving items.
This cannot happen with email addresses managed by Infomaniak since they do not have storage size limits.
Part of their network is on our block list
If the error message (obtained in principle following a send operation performed from an online tool, placed on the server where your website is located, for example a Prestashop order confirmation or other online store you manage) contains this:
host hotmail-com.olc.protection.outlook.com[104.47.30.97] said: 550 5.7.1
Unfortunately, messages from [89.123.456.789] weren't sent. Please contact your Internet service provider since part of their network is on our block list.
Solution: change the email sending method. The sending is unauthenticated and comes from the server with a specific IP address that is apparently blocked by the recipient for some reason (Infomaniak does not intervene to request unblocking). Therefore, you need to configure the online tool to perform authenticated sends.
Less Frequent Errors
Deferred - Delayed
The error message Deferred - Delayed - Warning: message still undelivered after 4 hours, Will keep trying until message is 3 days old means that the Infomaniak mail server tried to connect to your correspondent's mail server to send the message but failed for an undetermined reason. This error message specifies that the Infomaniak server will continue to attempt to send your message during the period specified in the error message. If, after this delay, the message has still not been delivered, you will receive a final error message informing you that your message could not be delivered and that your correspondent did not receive it.
Greylisting Delay
This error Greylisting Delay occurs when the recipient's mail server, like Infomaniak, uses a technique called "greylisting" which imposes a temporary delay on the first attempt to deliver a message from an unknown sender. The Mailer Daemon may eventually send an error report indicating that delivery has been delayed due to greylisting. The error may also mention banned sender. You should try sending your message again a few minutes/hours later.
Malware message rejected
This error Malware message rejected occurs when the message contains an attachment, a link to a storage site like Dropbox, or dynamic content, including in the "forwarded" part of the message (in the case of a message "forward", for example). You should try resending the message from the Infomaniak Mail Web app (online service mail.infomaniak.com) instead of a mail application, and remove any content that may cause this error.
Message Size Exceeded / File Too Large
These errors Message Size Exceeded / File Too Large occur when the size of the message (or attachments) exceeds the limit allowed by the recipient's mail server. The Mailer Daemon will return an error report indicating that delivery failed due to the message size being exceeded.
Rate Limit Exceeded
This error Rate Limit Exceeded occurs when the sender has exceeded the frequency or volume limit allowed by the recipient's mail server. Mail servers may impose limits to prevent spam or system overload.
Sender denied: auth guards failed
Refer to this other guide if you encounter an error Sender denied: auth guards failed.
The message contains a unicode character in a disallowed header
This error The message contains a unicode character in a disallowed header may appear if you have inserted a special character like a heart ♥, for example, in the body of the email, the subject, or especially in the full name; the risk of being rejected by providers is very high: it is best to keep the use of signs, characters, and fonts as simple as possible.
This guide explains how to access your emails hosted by Infomaniak from your devices.
Refer to this other guide if you are looking for information on synchronizing your contacts & calendars.
Quickly access your mailbox
- Use directly the mailbox in a web browser thanks to the Web app Mail Infomaniak (online service ksuite.infomaniak.com/mail)…
- Download the mobile app Infomaniak Mail (application for iOS / Android smartphone or tablet)…
Synchronize emails on all your devices
- Click here to open the Infomaniak assistant to configure the synchronization of your devices (macOS, Windows, Linux, Android, iOS) and common mail software/clients (Outlook, Microsoft 365, Thunderbird, Apple Mail, eM Client, etc.).
Specific guides
| OS | Application to synchronize |
|---|---|
| Outlook New / Microsoft 365 MSO / 2019 ( Windows) | |
| Outlook Microsoft 365 MSO ( macOS) | |
| Apple Mail (configuration profile macOS) | |
| Apple Mail (configuration profile iOS: iPhone, iPad, etc.) | |
| Mail ( Android: Huawei, Samsung, Sony, etc.) | |
| Outlook ( iOS + Android) | |
| Gmail ( iOS + Android) | |
| Mozilla Thunderbird |
Recommended settings
- Incoming IMAP server =
mail.infomaniak.com - IMAP port =
993(with SSL) - Outgoing SMTP server =
mail.infomaniak.com - SMTP port & encryption protocol and command/method to enable this protocol:
- Prioritize port
587+ STARTTLS: this is the official technical standard and the most compatible method with the majority of modern systems for authenticated submission. - Tolerate port
465+ SSL/TLS only as a compatibility option or alternative, specifying that it is implicit encryption, but that 587 remains the recommended choice.
- Prioritize port
- Username = full & complete email address ( ? )
- Password = the one generated for the email address you want to access
- Authentication required to send emails:
- It is activated in the SMTP settings of your application.
- Check "use the same parameters as the incoming server" or, depending on the software/email clients, enter a username (= full & complete email address) and its password.
Refer to this other guide if you are looking for information about other compatible email ports and protocols.
In case of a problem
- POP3 protocol not recommended (POP server = mail.infomaniak.com and POP port = 995 with SSL).
- Refer to this other guide if you encounter errors, to check the essential points!
⚠️ The various services offered by Infomaniak are all compatible with the corresponding standard protocols (notably IMAP/SMTP for email, WebDAV for sharing, S3/Swift for storage, etc.). Therefore, if you encounter a problem with third-party software, contact its publisher or a Partner and consult the support policy as well as article 11.9 of the Infomaniak Terms and Conditions.
Modify an email password
Passwords can be multiple, they are generated randomly and can no longer be retrieved after their first display. You must therefore (re)create them as soon as you need them, specifying the device and/or user concerned, in order to distinctly manage the elements on the day you need to handle a specific connection.
Manage passwords:
- from the Manager on the Mail Service
- from the Infomaniak Web Mail app
Apply the new email password
If you have deleted an existing password to create a new one, you will need to update your applications & devices that were using this password. Refer to these specific guides:
- Apple Mail (macOS / iOS)
- Android Mail / Gmail (various versions)
- Microsoft Outlook (different versions)
- Windows Mail / Mail
- Mozilla Thunderbird
Are you not yet managing your emails with Infomaniak?
This guide explains how to regain access to Infomaniak tools (manager.infomaniak.com and Mail / ksuite.infomaniak.com) in case of forgetting your password or Infomaniak account login ID.
Preamble
- To log in within an Organization that manages one or more Infomaniak products, go to manager.infomaniak.com and enter the following information:
- A login email address (ID for the Infomaniak account).
- The password chosen when you signed up.
- A additional code if 2FA (two-factor authentication) is enabled.
- If you can log in to the platform but need a password for one of your email addresses, refer to this other guide.
- If you are having issues displaying the login form, especially on a mobile device, refer to this other guide on the subject.
You have forgotten...
... the password for the Infomaniak account
If you have forgotten this password, follow the reset procedure:
- Click here to reset your password.
- Enter the login email address for your Infomaniak account
- Choose the desired recovery option or follow the identity verification procedure by clicking on “You do not have access to any option”.
... the login email address for the Infomaniak account
When you signed up, you provided a phone number; it is possible to retrieve the login email address for the Infomaniak account using your phone number:
- Click here to retrieve your login email address for the Infomaniak account.
- Enter your mobile number.
- Enter (if necessary) your recovery email address.
Two scenarios are then possible:
- The system can identify your account: choose how to receive your Infomaniak account login ID.
- In the opposite case: follow the on-screen assistant to manually verify your identity or via kCheck:

And if the email address no longer exists...
If you have an Infomaniak account for which the login ID is of the form toto123@yahoo.com, there is no problem if the email address toto123@yahoo.com is deleted or is no longer valid, you just need to log in one last time to the Infomaniak Manager with this ID toto123@yahoo.com and take note of this other guide to modify your Infomaniak account login email address.
On the other hand, if the email address used as an identifier is hosted by Infomaniak (for example anna789@assoziation.ch) and an administrator deletes the email address in question or terminates the “assoziation.ch” Mail Service, the situation is different: you automatically receive an email on the secondary address and an SMS on the mobile phone number specified in your Infomaniak account:

Connection using your old "email address / password" pair will no longer work. You need to follow the SMS instructions:
- Click here to access the login page.
- Enter the username specified in the SMS (usually the initials of your account and a sequence of numbers).
- Enter the usual password (it has not changed).
- Enter the new requested information.
- You will be logged in to your account again.
The following animation shows this procedure called "Infomaniak-Recovery" (or "connection address in the process of changing" at the kSuite user level):
- Connection impossible with the old identifiers…
- Connection mandatory using the SMS information…
- And updating the information for reconnection:

This guide explains how to create an alias, that is, a variant of your usual email address without having to add a new address to your existing Mail Service.
⚠ Number of possible aliases per email address:
| kSuite | free | 1 |
| Standard | 50 | |
| Business | 50 | |
| Enterprise | 50 | |
| 0 | ||
| 0 | ||
| Mail Service | Starter 1 address max. | 1 |
| Premium 5 addresses min. | 50 |
How an alias works
It is possible to create alternative versions of your email addresses by modifying what comes before the at sign @.
For example:
john-peter.smith@domain.xyz is a long email address…
It can be shortened and used as follows:
jps@domain.xyz
In this example, you must therefore create an alias "jps" on the address "john-peter.smith".
Then, if someone writes to jps@domain.xyz:
- their message will arrive in the inbox of the main address (
john-peter.smith@domain.xyz).
If someone writes to john-peter.smith@domain.xyz AND jps@domain.xyz in copy (CC):
- their message will arrive twice in the inbox of the main address (
john-peter.smith@domain.xyz).
An alternative feature is presented here. To modify what comes after the at sign @, use alias domains.
Users of the email address on the Infomaniak Web Mail app receive an email each time an alias is added/removed.
Add an alias from the Infomaniak Web Mail app
Prerequisites
- Having permission to manage aliases: it is possible that the Mail Service manager has removed this right from their admin account.
Next, to add an alias:
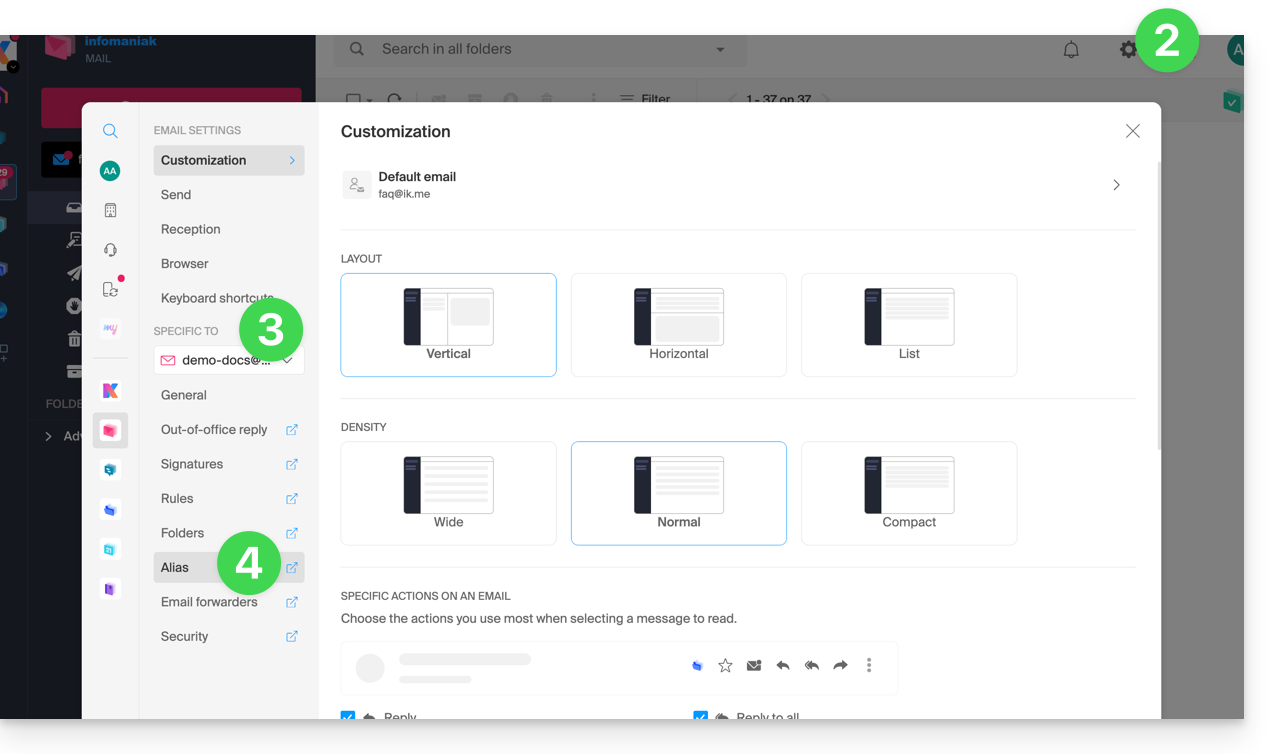
- Click here to access the Infomaniak Web app Mail (online service ksuite.infomaniak.com/mail).
- Click on the Settings icon in the top right corner.
- Check or select the email address concerned in the dropdown menu of the left sidebar.
- Click on Aliases:
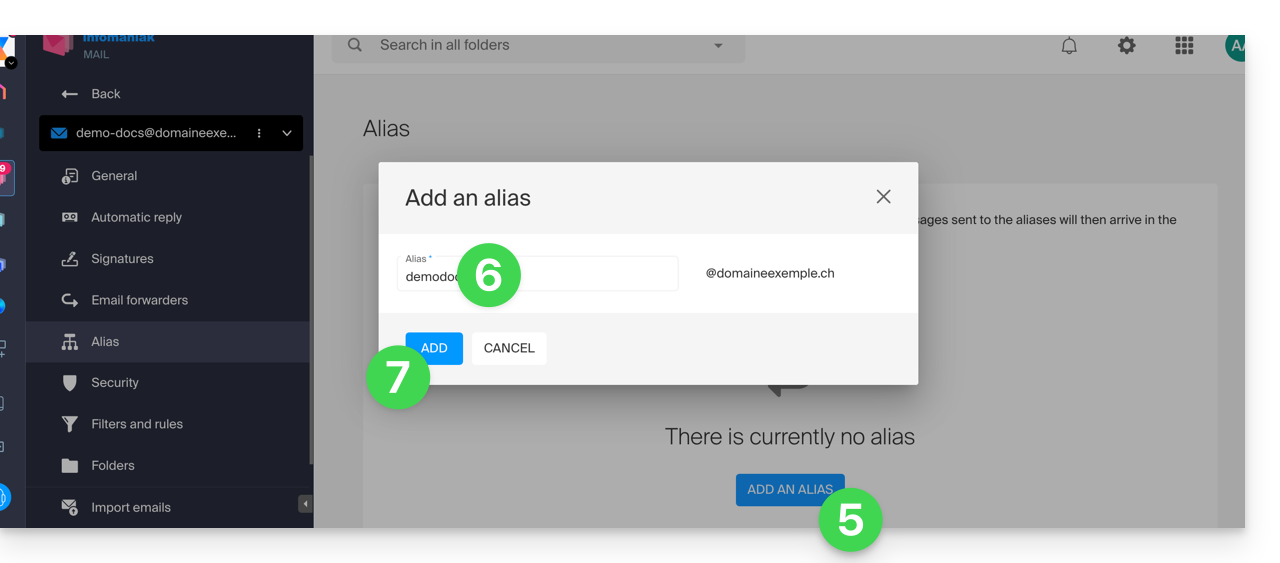
- Click on Add an alias to create a variant of your email address.
- Enter the desired alias (what comes before the at sign @).
- Click on Add:
Add an alias from the Mail Service
To access the Mail Service:
- Click here to access the management of your product on the Infomaniak Manager (need help?).
- Click directly on the name assigned to the product concerned.
- Click on the email address concerned in the table that appears.
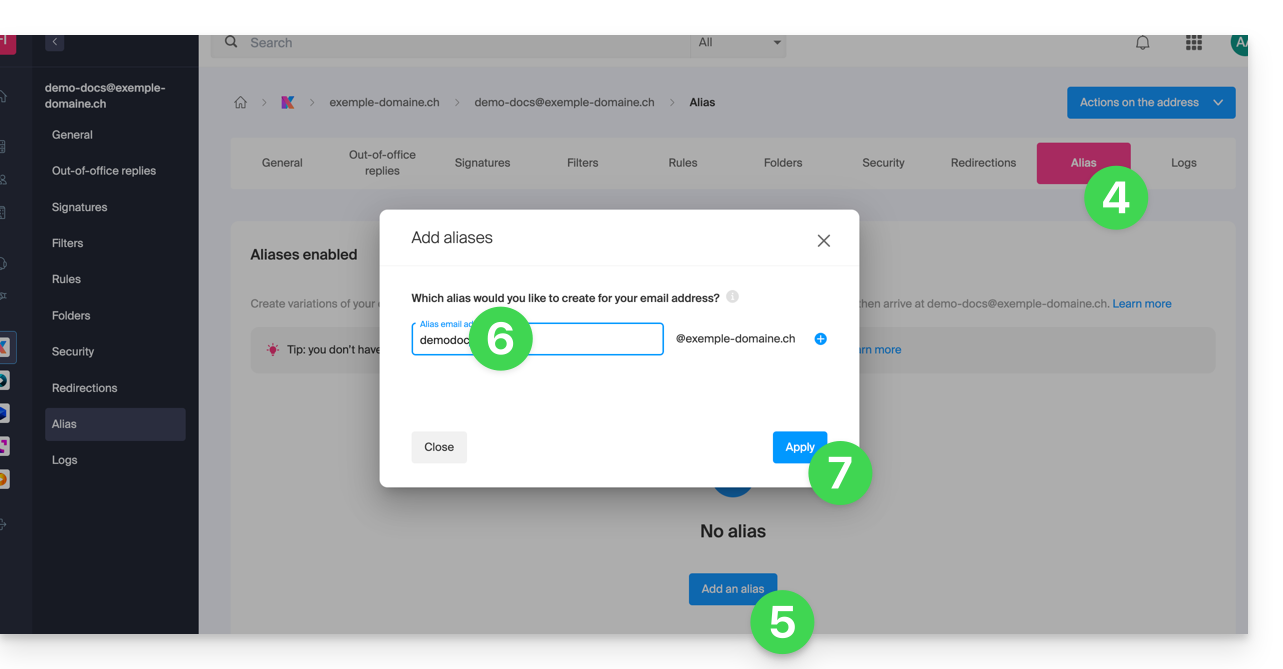
- Click on the Aliases tab or from the left sidebar on Aliases.
- Click on the blue Add an alias button.
- Enter the desired alias (what comes before the at sign @):
- Click on Apply to save the changes:
This guide explains what a web host like Infomaniak is and specifies its role and limits of intervention.
Infomaniak, web host since 1996
According to Wikipedia, a web host is a company that provides Internet hosting for computer systems to individuals or entities who do not wish to do so by their own means.
Infomaniak is also…
- … decades of experience in hosting and online solutions
- … more than a million users in Switzerland and Europe (CHF 36.5 million in revenue in 2022)
- … company certified ISO 27001, ISO 9001, ISO 14001, ISO 50001 and committed to sustainable development
- … 100% of "Swiss made" technological know-how with data hosted in Switzerland
- … a rich knowledge base and a customer support available
Responsibilities and limits of intervention
As a host, Infomaniak installs, secures, and keeps servers up to date, updates its web interfaces (Manager) and assists its customers in using the services.
On the other hand, Infomaniak does not intervene on the content of the servers or the development of websites.
Limits of technical support
The technical support cannot help you to…
- … solve problems related to site development or its updates
- … implement solutions (migrations, complete installations)
- … manually install WordPress
- … take remote control of your computer
but can assist you for…
- … solve problems related to the infrastructure or the Manager
- … clarify certain processes
A Premium assistance and a migration service are available for more demanding needs.
Find external help
For help with the content of your site or the organization of your mailboxes, use the Infomaniak tender platform which lists over 1000 verified professionals, or consult the directory.
This guide addresses Outgoing Spam from Infomaniak infrastructures and helps you identify and resolve potential causes when an email sent from an address hosted by Infomaniak arrives in the Spam (Junk) folder of the recipient.
Important: Infomaniak cannot act directly on the classification of a message as spam by other providers. Solutions must be sought with the administrators of the concerned receiving server.
Use email responsibly
Infomaniak implements enhanced measures to ensure the security and deliverability of emails. By also following the best practices below, you significantly reduce the risk that your messages will be considered unwanted.
1. Use a valid email address
- Check that your email address and associated domain are correct and valid.
- Check the security settings of your domain name (SPF, DKIM, DMARC).
- If you modify a setting, wait approximately 24 hours before sending another test.
2. Avoid suspicious content
- Avoid words, phrases, or presentations frequently associated with spam (excessive promotions, generic phrases, overly complex layout, etc.).
- Do not include non-secure, truncated, or poorly formatted links.
- Personalize your messages (for example, by mentioning the recipient's name) to enhance their credibility.
- Do not attach suspicious or overly large files; use a service like SwissTransfer instead.
3. Test sending from the Infomaniak Web Mail app
- If you use a third-party email software/client, try sending the message from the Infomaniak Web Mail app (ksuite.infomaniak.com/mail).
- Compare the results to identify if the issue comes from your email software/client or a configuration setting.
4. Monitor the reputation of your domain
- If your email address uses a custom domain (for example
@your-domain.xyz), a poor domain reputation can affect the deliverability of your messages. - Analyze and correct potential causes (previous mass mailings, poor configuration, reports, etc.).
5. Obtain the recipient's consent
- Only write to recipients who know you or are expecting your message.
- For group or regular mailings, use a voluntary subscription system (opt-in).
- For information or marketing campaigns, prefer the Infomaniak Newsletter solution.
6. Optimize the frequency and volume of sending
- Avoid sending a large number of identical messages to many recipients simultaneously.
- Respect a reasonable sending frequency to avoid being identified as a suspicious sender.
7. Be added to the Infomaniak whitelist
- If your emails are classified as spam by a recipient also hosted by Infomaniak, they can add your address to their whitelist.
- This action guarantees the receipt of your messages, but does not replace the verification of the causes that initially led to the classification as spam.


