Knowledge base
1000 FAQs, 500 tutorials and instructional videos. Here, there are only solutions!
This guide explains why you might receive an automatic security email regarding your Infomaniak account (= user account).
Preamble
- Warning: fake messages are circulating and imitating the Infomaniak security email.
- If you are unsure about the authenticity of the warning, access the Infomaniak Manager and check recent activity instead of clicking on any potentially malicious link that might be present in the fake message.
Preventive automatic messages
1. Connection from a new location
A security email is automatically sent when a new connection to your Infomaniak account occurs from a new location: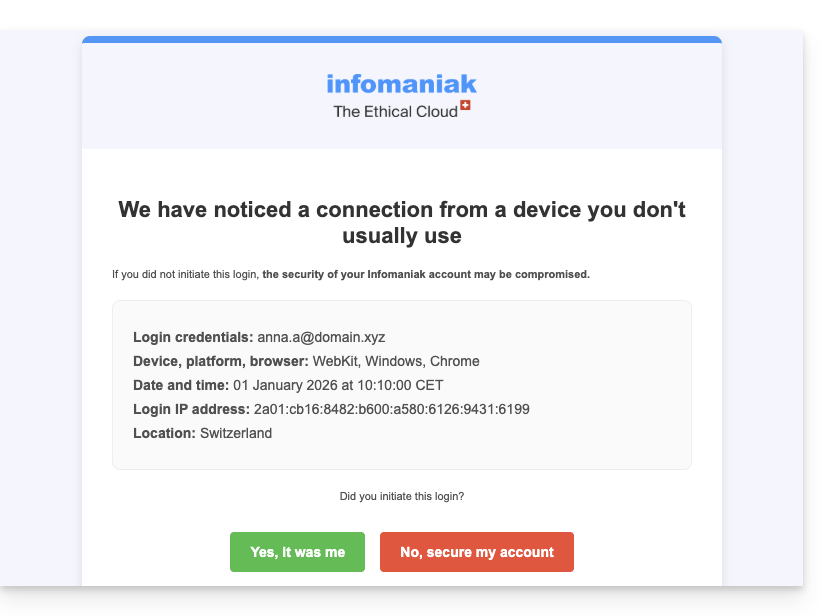
This can happen, for example, if you use your browser's private browsing mode or access your account from a new computer.
If you receive this email immediately after logging into your Infomaniak account yourself, you can safely ignore the connection warning!
2. Connection attempt (wrong password)
A security email is automatically sent when someone enters a wrong password after entering the login email address in the Manager: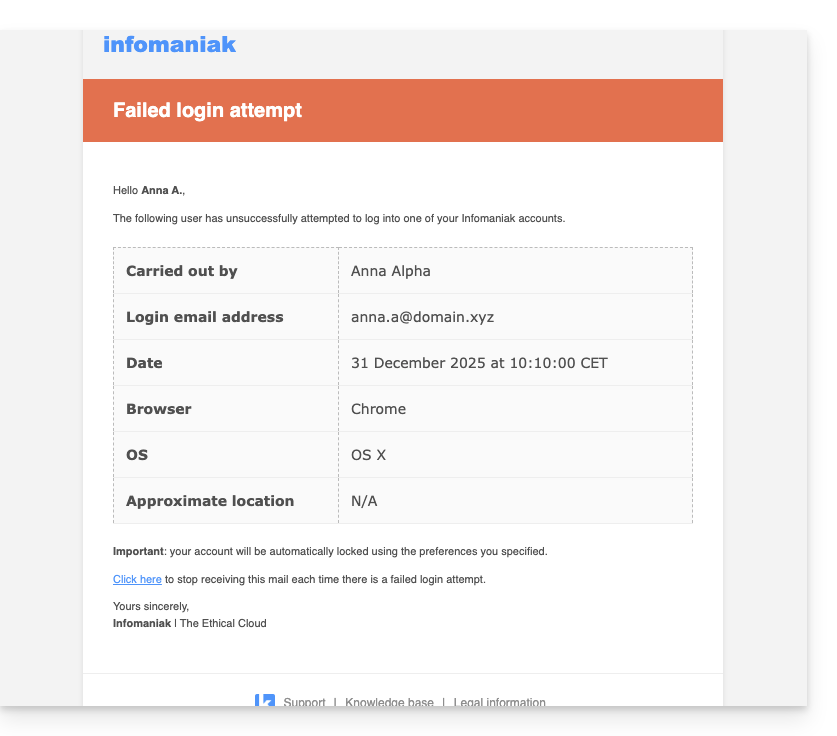
View recent activities on the Manager
You can find the recent activities of the platform and configure them in the Infomaniak account settings: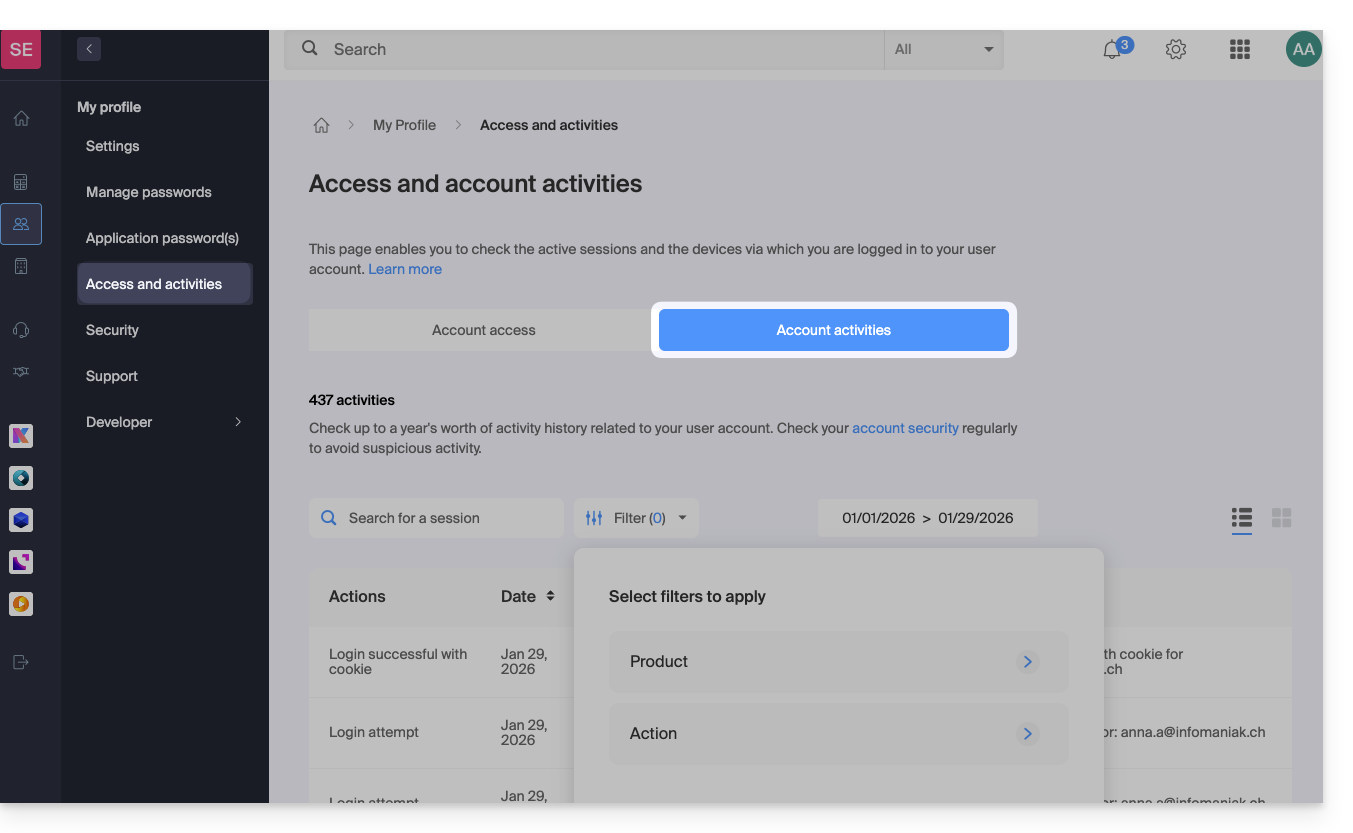
If you notice actions on your Infomaniak account that you do not think you have performed, and/or in case of suspicion of intrusion:
- Refer to this other guide to quickly secure your tools.
- Activate two-factor authentication on your account to enhance its protection and ensure that only you receive a unique code authorizing the connection.
- Change the Manager password.
- Change the passwords of the email addresses associated with Mail Infomaniak.
Link to this FAQ:
Has this FAQ been helpful?
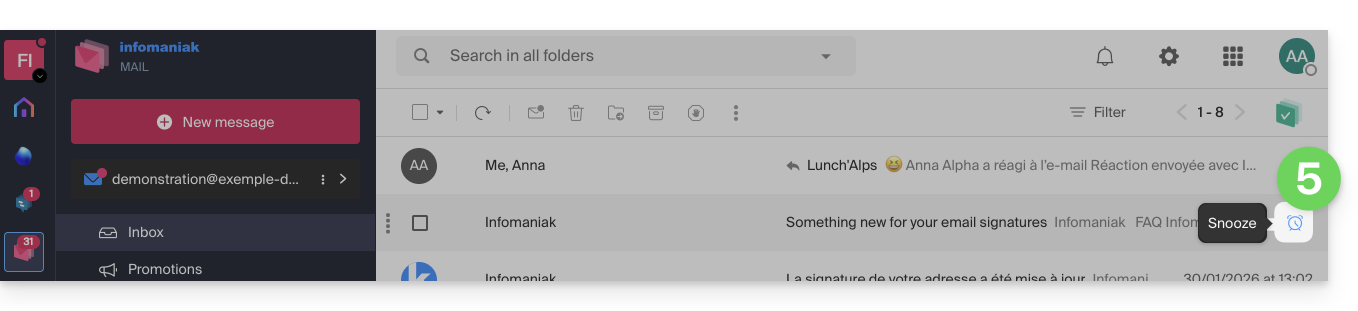
This guide explains how to temporarily set aside an email until a specific date/time, this on the Web app Mail Infomaniak (online service ksuite.infomaniak.com/mail).
Preamble
- The snooze is also possible on the mobile app Infomaniak Mail (application for iOS / Android smartphone or tablet).
- At most a total of 1000 discussions from the inbox only can be snoozed, this up to a maximum of 1 year (this snooze can be stopped or temporarily modified at any time).
- kSuite free / my kSuite / Mail Service Starter do not allow scheduling when snoozing.
Operation
When this snooze (function snooze, or remind):
- The discussion is moved to a folder "Pending" visible on the Mail app and on which the number of pending discussions is displayed.
- If a new message arrives in a snoozed discussion, it will be automatically canceled and the discussion will be visible in the inbox.
- When the deadline arrives:
- The discussion automatically returns to the inbox, in the first position, with a particular notification.
- The message, until it is read, will display an indication "Pending since X" (X being the date on which the message returned to the inbox).
On a mail client software type Outlook in IMAP:
- When snoozing, the discussion will remain in its original place.
- If you manually move a snoozed message, the functionality on this message is no longer effective on the side of the Web app.
- When the deadline arrives, the discussion will move back to the top position as in the Web app and a standard notification of 'new message' will be displayed.
Temporarily archive an email
Prerequisites
- Enable discussions mode for your email addresses in the Infomaniak Web app Mail (online service ksuite.infomaniak.com/mail).
Then, to temporarily hide one of your messages among all your emails and make it reappear in your inbox at a future time that you have scheduled:
- Click here to access the Infomaniak Web app Mail (online service ksuite.infomaniak.com/mail).
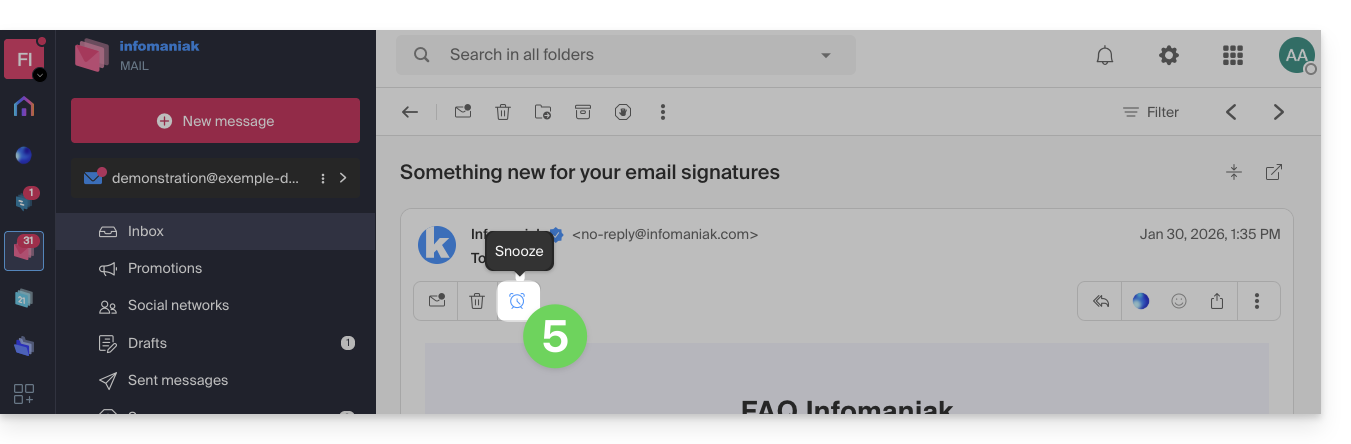
- Open the message to recall later.
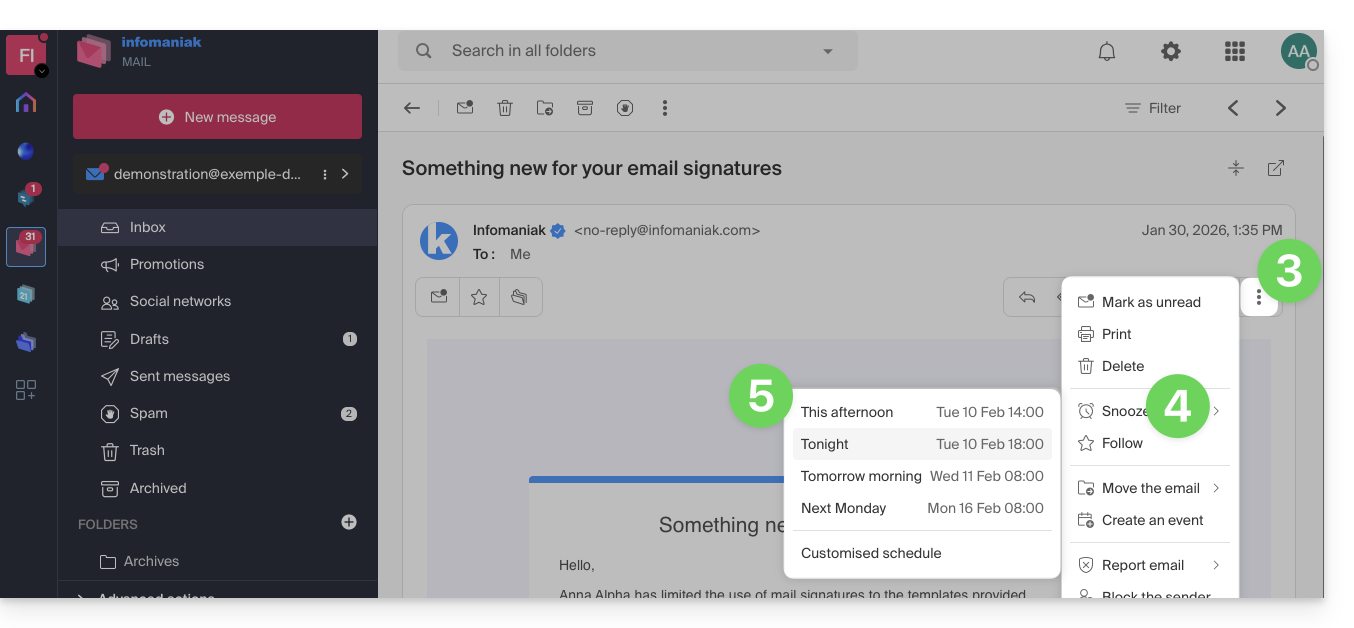
- Click on the action menu ⋮ in the top right corner
- Click on the Recall function.
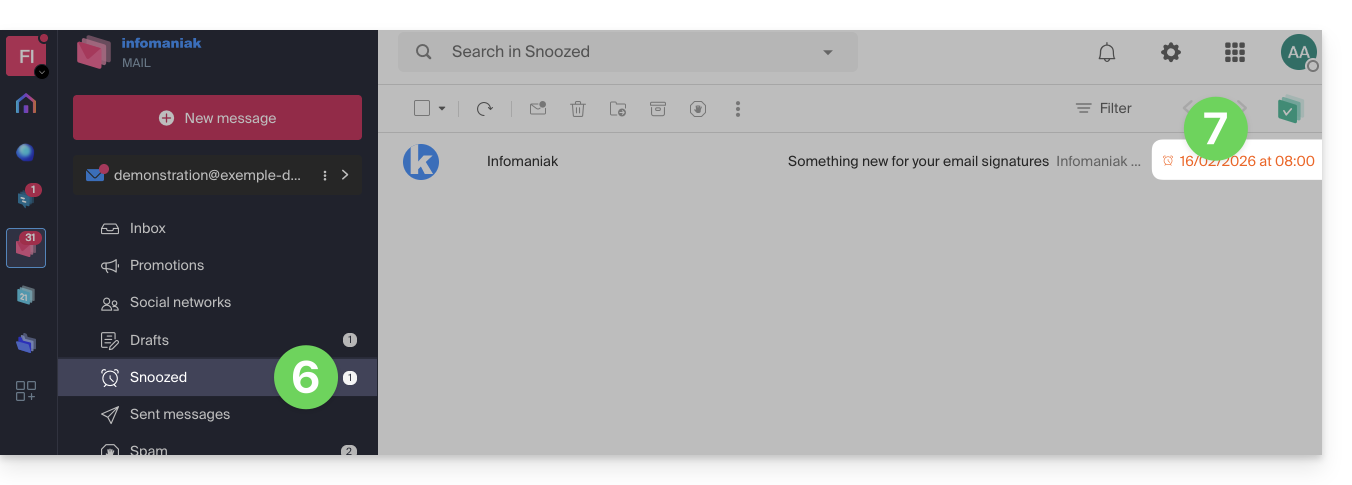
- Choose until when the message should disappear from your inbox, among the predefined choices or by customizing the duration:
- Once on hold, the message is displayed in a new folder dedicated to pending messages.
- The end date/time of the hold is displayed next to each of the messages:
To enable access to this feature directly from the action bar above an email:
- Click here to access the Infomaniak Web app Mail (online service ksuite.infomaniak.com/mail).
- Click on the Settings icon in the top right corner.
- Click on Customization in the left sidebar.
- Enable the message recall feature in the Specific actions on an email section:
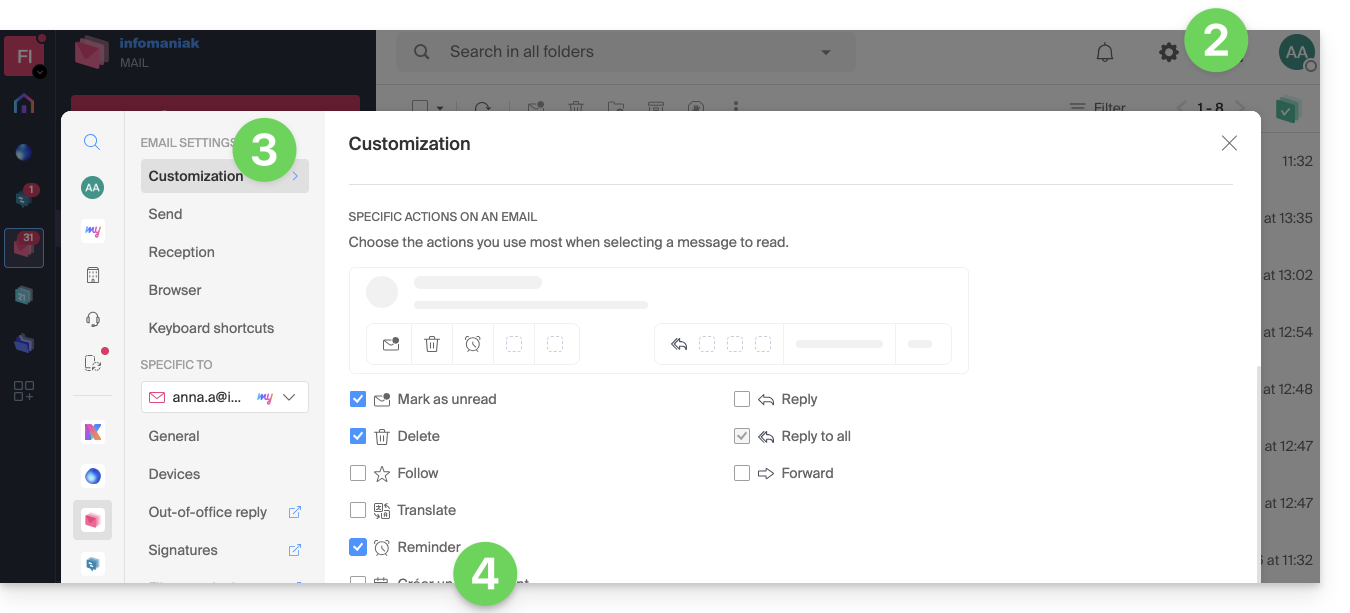
- Go back to your message, you will then have the possibility to put it on hold directly from the action bar:
To enable access to this feature directly from the list of your messages in the inbox:
- Click here to access the Infomaniak Web app Mail (online service ksuite.infomaniak.com/mail).
- Click on the Settings icon in the top right corner.
- Click on Customization in the left sidebar.
- Activate the message reminder feature in the Actions on hover section:
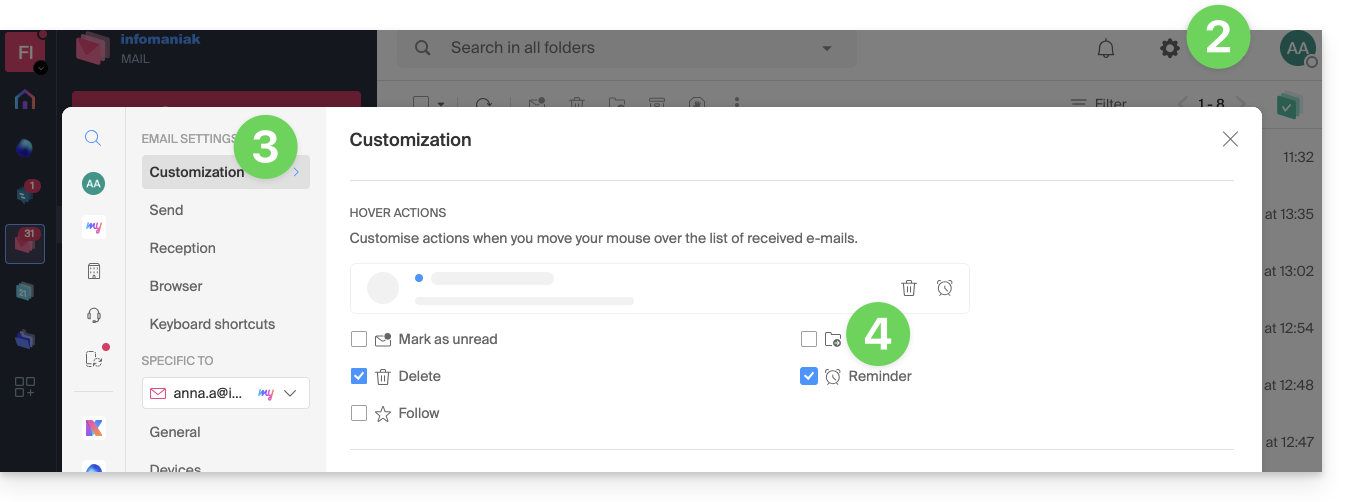
- Go back to the inbox, you will then have the possibility to put one of your emails on hold directly in the list:
- You can put multiple messages on hold at the same time by selecting them (a maximum of 5 messages) then right-clicking to choose the hold option.
Link to this FAQ:
Has this FAQ been helpful?
This guide explains how to change the first and last name that Infomaniak displays when you are logged into your Infomaniak account (= user account) within an Organization in the Manager, as well as the avatar of your account.
Preamble
- To modify the login ID, refer to this other guide.
- To modify the phone number, refer to this other guide.
- To manage the details of the Organization to which you belong, refer to this other guide.
Modify the Infomaniak account details
To edit your personal details:
- Click here (or on the badge with your initials/avatar in the top right of the Infomaniak Manager) to "Manage my account":
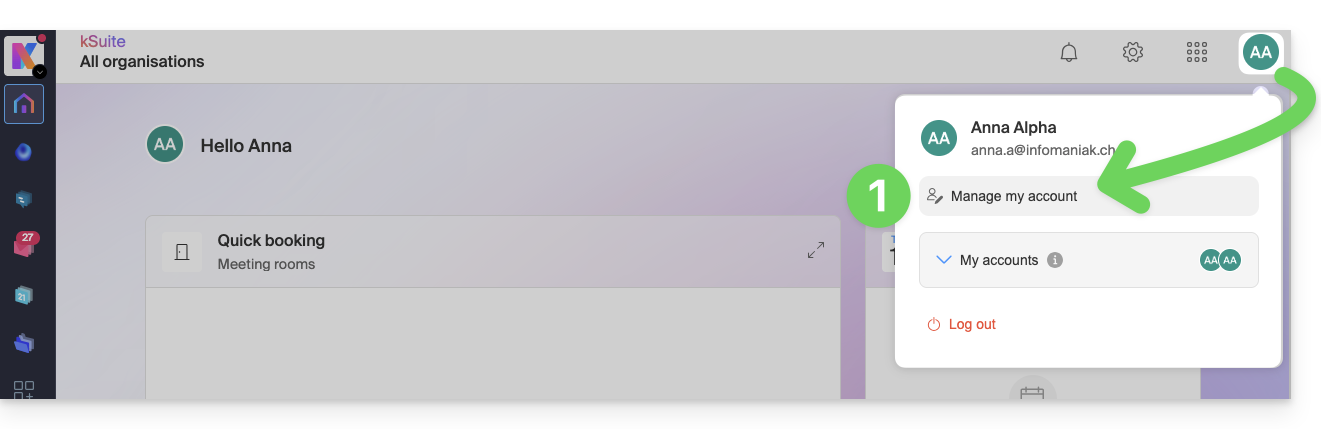
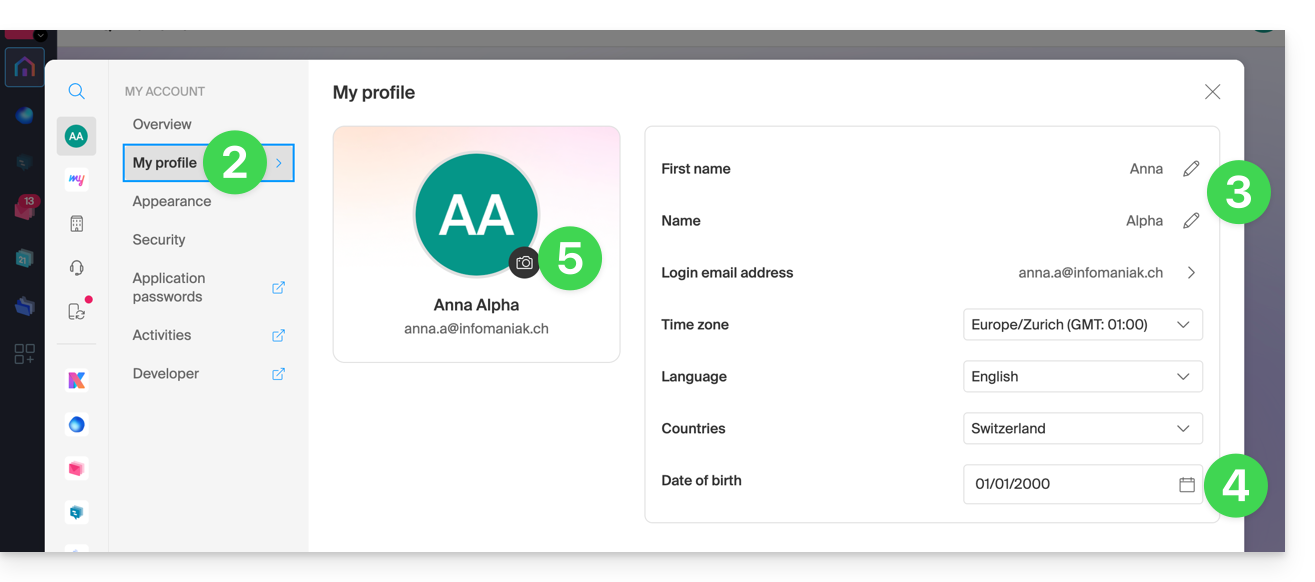
- Click on My profile in the left sidebar.
- Modify your last name and first name on the right side.
- You can also specify your date of birth.
- You can add a profile picture to your Infomaniak account that will replace your initials; it is recommended to import an image of at least 210 pixels on each side:
Link to this FAQ:
Has this FAQ been helpful?
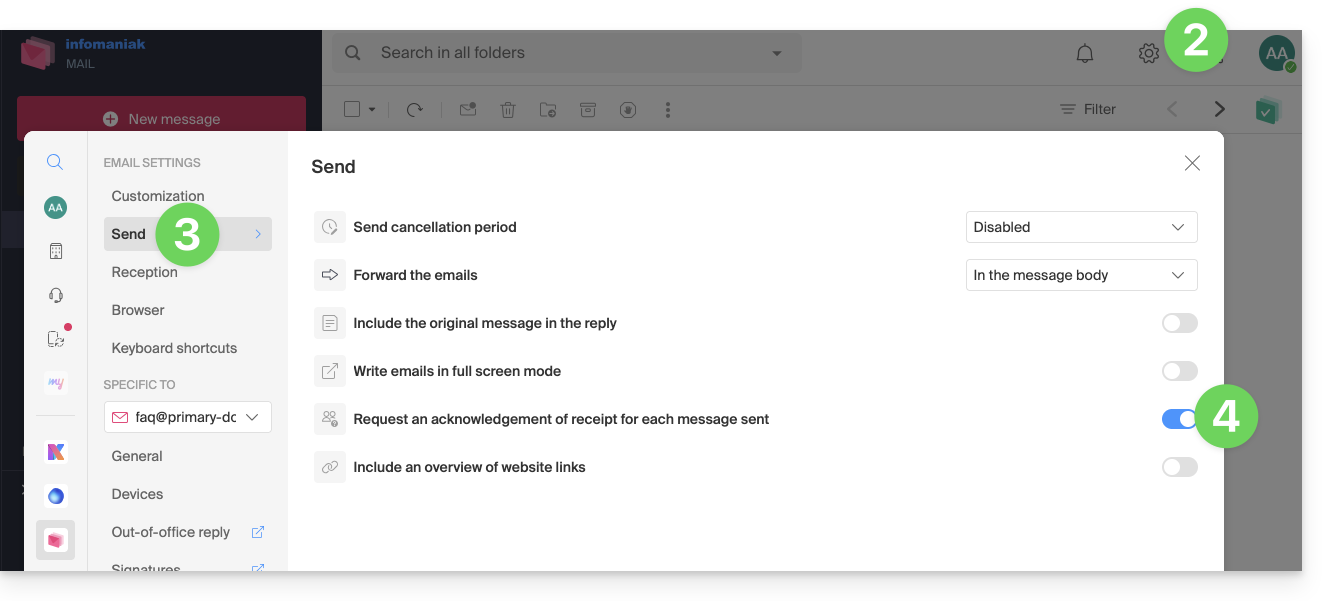
This guide explains how to enable or disable read receipt requests from the Web app Mail Infomaniak (online service ksuite.infomaniak.com/mail).
Preamble
- Read receipt requests are compatible with most email systems.
- However, they depend on the user's actions and the settings of their email system.
- The receipt (or non-receipt) of a read confirmation does not guarantee anything (the logs may be better suited for certain cases).
Request a read receipt
To allow your correspondent to easily confirm the successful receipt of your message sent from the Web app Mail Infomaniak (online service ksuite.infomaniak.com/mail):
- Click here to access the Web app Mail Infomaniak (online service ksuite.infomaniak.com/mail).
- Click on the Settings icon in the top right of the interface.
- Click on Send in the left sidebar.
- Enable the toggle switch to request a read receipt:
Note that it is also possible to enable it on a case-by-case basis when sending your message on Mail, from the composition options by clicking on ⋮ and then on the relevant option: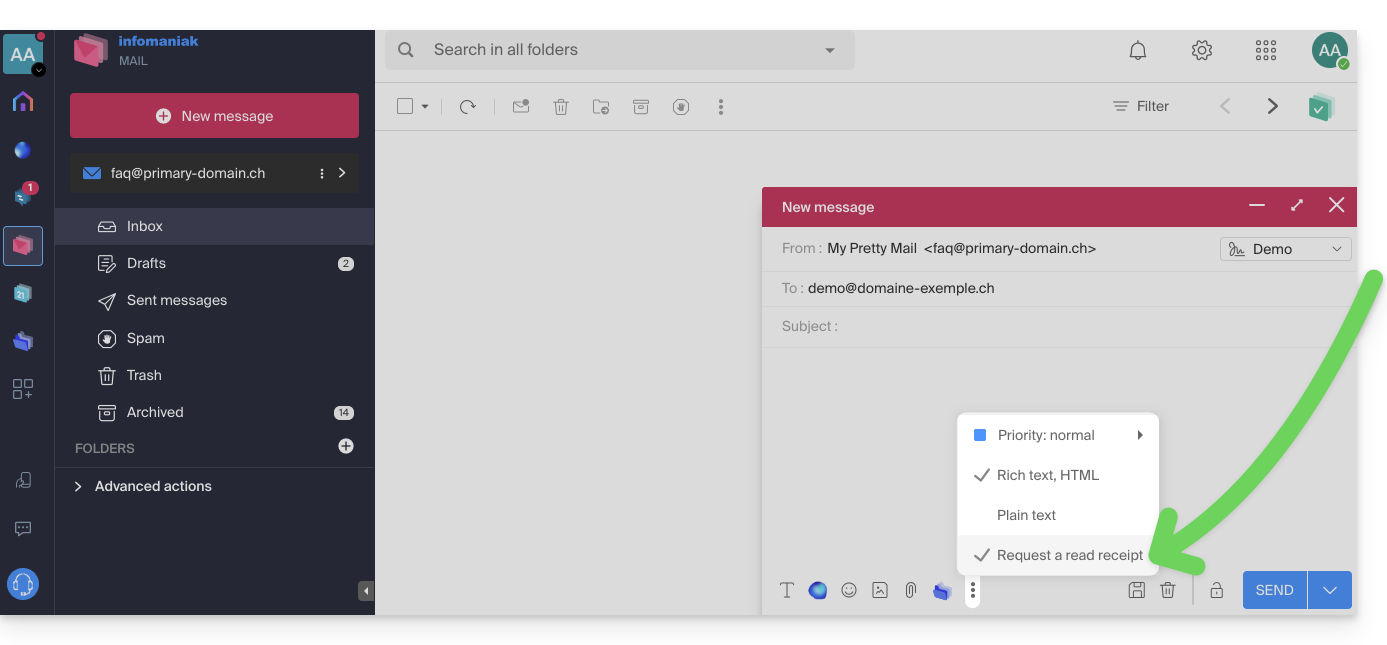
Confirm receipt of the message
If you receive an email and view it on the Web app Mail Infomaniak (online service ksuite.infomaniak.com/mail) while its sender has specifically requested to be notified, you can confirm receipt of the message when reading it:
Link to this FAQ:
Has this FAQ been helpful?
This guide helps you quickly discover the essential functions of Euria, the AI at your disposal within my kSuite, particularly powerful with the Web app Mail Infomaniak (online service ksuite.infomaniak.com/mail). The assistant is also available on the mobile app Infomaniak Mail (application for iOS/Android smartphone or tablet).
Prerequisites
- Have an email address in a paid offer.
- Read and understand this other guide about the model used and the responsibilities of each party.
Access the assistant
The writing assistant helps you write a text using AI, on the topic of your choice, including if it must be based on elements present in the ongoing email conversation; use it, for example, to write…
- … a new message that must contain specific elements
- … a response to a received message
- … a rephrasing of a text excerpt
- … correct grammatical syntax
- etc.
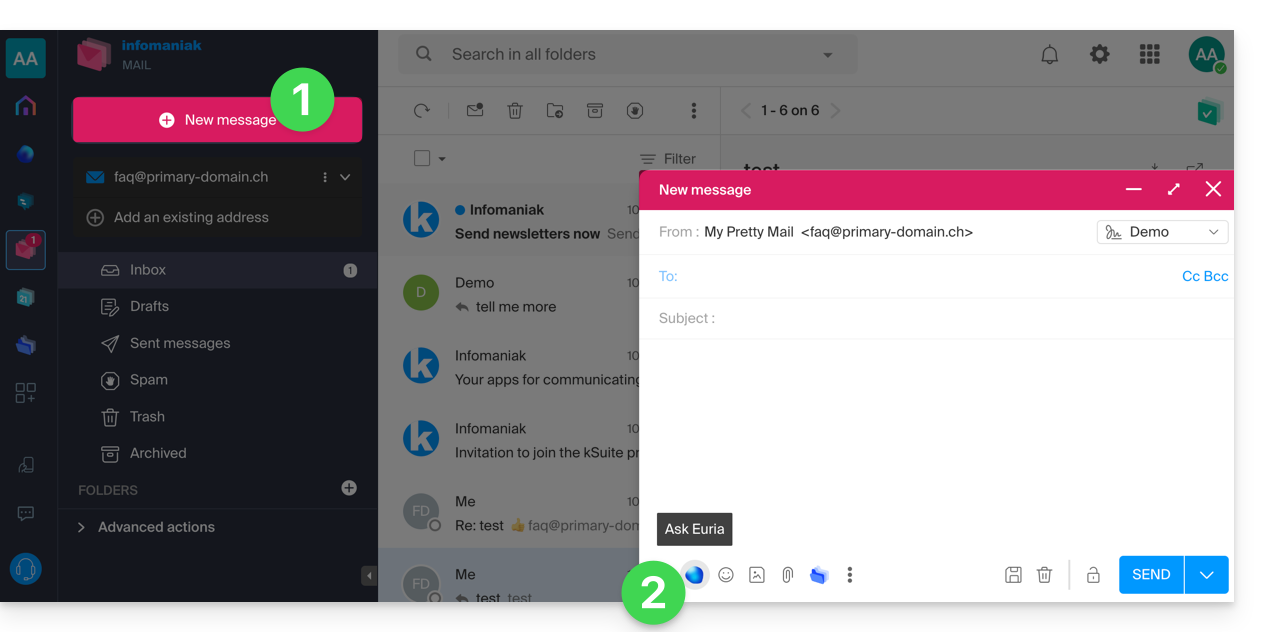
To access the writing assistant:
- Click here to access the Web app Mail Infomaniak (online service ksuite.infomaniak.com/mail).
- Log in with the credentials of your Infomaniak account (and not the password of your email address).
- If necessary, reattach the email addresses to manage with Mail Infomaniak.
Use Euria for a new message
You can ask Euria to write a text according to your ideas that you will need to convey to it:
- Click on New message at the top left of the Mail interface.
- Click on the Euria icon in the editing bar to open the assistant:
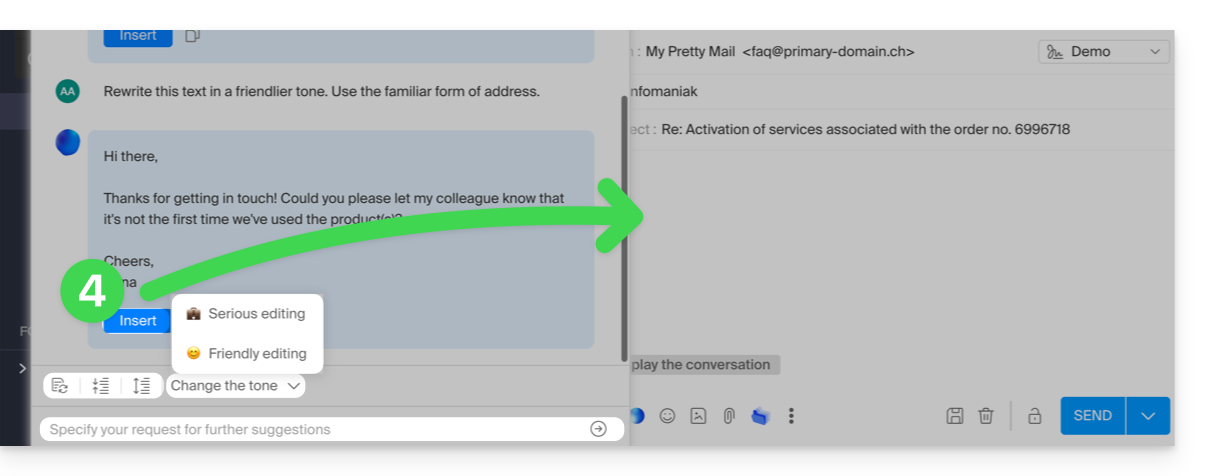
- Tell the assistant what you want to write, as if you were conversing with a human.
- Once the proposal is displayed by the AI, adjust the length, and change the tone if necessary to obtain a more familiar response.
- Insert the proposal into your message or copy the text to the clipboard.
Use Euria while writing the message
You can also use the writing assistant by selecting a passage from your text in progress, then choosing the desired option from the contextual menu that appears: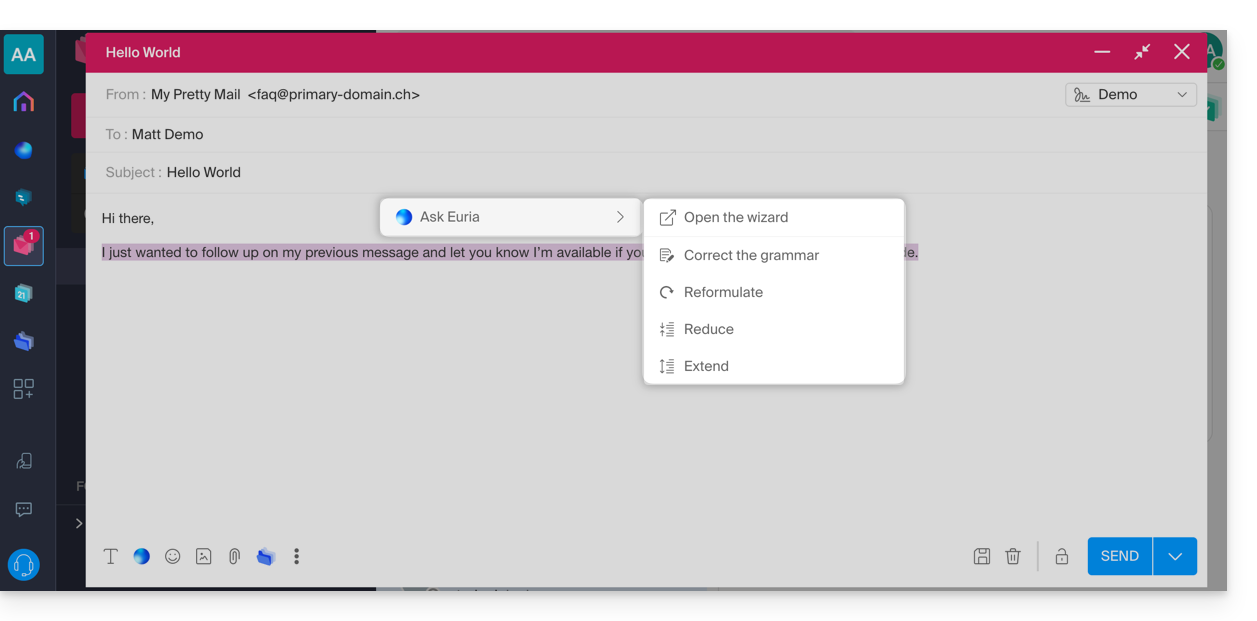
- Open the assistant to request suggestions.
- Correct the grammar.
- Rephrase the proposal to obtain a new one.
- Shorten the suggested text by removing some superfluous elements.
- Write more text, wrap the conversation.
Suggest a response with Euria while reading an email
You can launch Euria by consulting a received message to which you want to respond quickly:
- Select the passage on which to base the response with the mouse.
- Choose to respond with Euria in the contextual menu that appears.
- Indicate to the assistant what you want to respond, as if you were conversing with a human.
- Insert the proposal that will appear in the automatically composed response message:
- All you have to do is read it and send it.
Suggest the subject of the email with Euria
When you start writing a new message, the assistant can take care of entering a title suitable for your message in the Subject field:
- Enter text.
- Click on the Euria icon to the right of the Subject field:
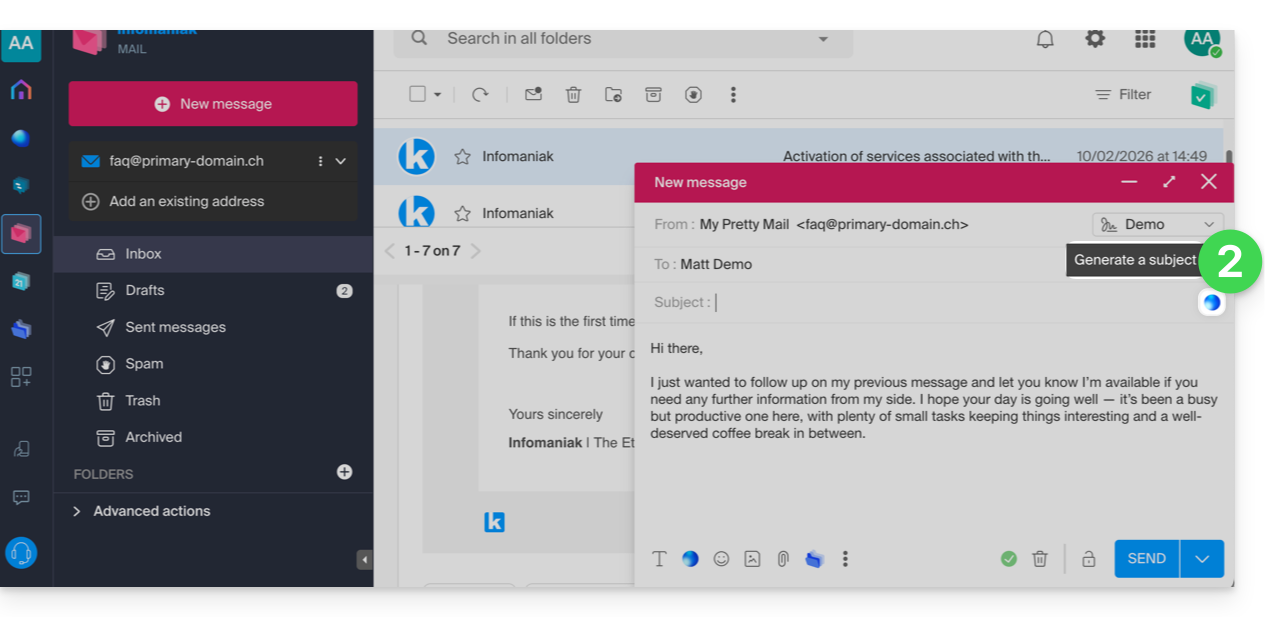
- Insert the proposal if it suits you:
- If a subject is already entered in the field (for example, because you have inserted a new message + subject composed by the assistant and then asked the assistant for a new message), the assistant will suggest replacing it with a more appropriate object.
Disable the assistant
You can adjust the elements (translations / Euria) that appear when you click on your message:
- Click here to access the Web app Mail Infomaniak (online service ksuite.infomaniak.com/mail).
- Click on the Settings icon in the top right of the interface.
- Click on Customization in the left sidebar.
- Check or uncheck the actions you want to have on click:

Link to this FAQ:
Has this FAQ been helpful?
This guide will help you resolve an issue if you received, after sending an email, a message containing the failure reason "Spam Message Rejected" or "5.7.0 AV: Message is rejected by headers rule filter.. 554 Please check the message and try again"...
Must be checked
Check that your email did not contain:
- words or phrases that are often associated with spam, as it could be identified as unwanted and rejected
- any unusual indication in the signature, a link formulated incorrectly (
http//.domain.xyzfor example), etc. - an attachment with one of these forbidden extensions:
.exe,.com,.cmd,.cpl,.hta,.scf,.sct,.lnk,.bat,.js,.jse,.wsh,.ws,.wsf,.wsc,.vbe,.vb,.vbs,.shs,.pif,.scr... including inside a compressed file (.zipfor example)
To send a file (js or exe for example) and confirm that it is virus-free, store it on your hosting space and create a link to it (if the file is large and you are sending it from the Infomaniak Web app Mail (online service ksuite.infomaniak.com/mail), it will be placed on a temporary server allowing it to be sent to your correspondent who will receive a download link in this case) or via Swisstransfer.com.
Also check your SPF record. If your domain does not have an SPF record or if this record is incorrect, this will very likely result in the rejection of your message.
If you believe you are receiving a "Spam Message Rejected" message without reason, contact Infomaniak support.
Link to this FAQ:
Has this FAQ been helpful?
This guide explains why certain attachments sent from Microsoft Outlook arrive in winmail.dat format on your e-mail address hosted by Infomaniak, and how to permanently resolve the issue on the sender's side (where it originates).
Preamble
winmail.datis the container used by Outlook/Exchange when a message is sent in RTF/TNEF.- It encapsulates the formatting and attachments.
- Many non-Microsoft e-mail clients do not know how to interpret TNEF:
- The formatting disappears and the attachments become a single
winmail.datfile.
- The formatting disappears and the attachments become a single
Important: the generation of a winmail.dat does not depend on Infomaniak; the issue arises with the sender (Outlook/Exchange) and must be corrected on their device or by their Microsoft 365 administrator.
Resolve the issue (actions to request from the sender)
The most effective solution is to modify the Outlook configuration on the sender's side.
Disable RTF/TNEF and resend the message in HTML or plain text
- Classic Outlook for Windows (Microsoft 365/2021/2019, Win32 application)
Menu:File > Options > Mail
Composition:Compose messages in this format:select HTML (or Plain text).
Message format: inWhen sending messages in Rich Text format to Internet recipients, select Convert to HTML (or Convert to plain text).
Case by case (single e-mail): in the message window, tabText format> select HTML.
- New Outlook for Windows (Outlook on the Web-based application)
Menu:Settings (gear icon) > Mail > Compose and reply
Message format:Compose messages in:select HTML (or Plain text).
This client does not expose an RTF option; sending in HTML/text avoidswinmail.dat.
- Outlook on the Web (Exchange Online/Outlook.com)
Menu:Settings > Mail > Compose and reply > Message format> select HTML (or Plain text).
- Outlook for Mac
Menu:Outlook > Preferences > Composition> check/uncheck Compose messages in HTML by default.
For a single message: in the composition window, tab Options > switch to HTML or Plain text.
Notes: if the sender has attached files, they will be readable by all recipients as long as the message is sent in HTML/text. Zipping the attachments (.zip) does not prevent Outlook from encapsulating the message if RTF/TNEF is still active.
Disable RTF for specific recipients (you, for example)
- Classic Outlook Windows: open the Contact card > double-click the e-mail address > Outlook Properties > Internet format: select Send as plain text only (or Let Outlook decide if the admin already forces the conversion).
- Clear the auto-completion (it may “remember” RTF for a recipient):
File > Options > Mail > Send messages > Empty the Auto-Complete List, then retype the address manually for the next send.
- Microsoft 365 administrators (on the sender's side): in the Exchange admin center:
Mail flow > Remote domains > Default> Rich text format: select Never. In PowerShell:Set-RemoteDomain Default -TNEFEnabled $false.
Failing that: use another client to send (for example Thunderbird), or verify that Calendar invitations are sent in iCalendar (File > Options > Calendar > enable Use iCalendar format for external recipients).
If you do not wish to recontact the sender
You can extract the content of winmail.dat with TNEF decoding tools (online or desktop applications). Search for “open winmail.dat” and choose a reputable tool for your system (Windows, macOS, Linux). This usually restores the attachments, but it is not a permanent fix. Moreover, privacy and security are not guaranteed during these operations.
Link to this FAQ:
Has this FAQ been helpful?
This guide explains which protocols and ports can be used with Infomaniak's messaging services (including the Service Mail service).
Recommended ports and parameters for client configuration
When prompted during a software/messaging client configuration (Outlook, Thunderbird, mobile, etc.), prioritize the following parameters:
| IMAPs - Incoming Traffic (Recommended) | SMTP - Outgoing Traffic (Option 1: IETF standard) | SMTPs - Outgoing Traffic (Option 2: Implicit Encryption) | |
|---|---|---|---|
| Ports | 993 | 587 | 465 |
| Security Mechanism | SSL / TLS (implicit) | STARTTLS (explicit) | SSL / TLS (implicit) |
| Server Name | mail.infomaniak.com | ||
| Authentication | Mandatory (username = full email address) | ||
Technical Note: Port 587 with STARTTLS is the IETF standard practice for secure email submission. Port 465 is a secure alternative using implicit encryption.
If you specify other indications or disable encryption, email errors may occur.
Other supported ports (unencrypted or backward compatibility)
- port
143(Standard port for IMAP reception - unencrypted, use 993) - port
110(Standard port for POP3 reception - unencrypted, use 995) - port
995(Secure port for POP3s reception - secure POP3 option) - port
25(Standard port for server-to-server transfer - may support STARTTLS for submission, but 587 is the standard for clients). - STARTTLS authentication is supported on unencrypted ports (143, 110, 25) to enable TLS encryption.
- SMTP authentication supported (LOGIN or PLAIN methods).
API Usage and Transfer Security
The Infomaniak API does not offer any email connection as IMAP and SMTP are the "APIs". Use a library (such as Python: email.examples and imaplib) that uses IMAP and SMTP.
To display emails from PHP:imap_open("{mail.infomaniak.com:993/imap/ssl}", $email, $password);
The MTA-STS mechanism is not implemented or verified, as Infomaniak uses DANE (DNS-based Authentication of Named Entities) to ensure an encrypted connection between servers when the following conditions are met:
- The client sends an email to a domain that has configured DANE.
- The client receives an email from an SMTP server that uses DANE.
- In all other cases (in the absence of DANE), the encrypted connection remains opportunistic.
Link to this FAQ:
Has this FAQ been helpful?
This guide helps you find the public IP address of your device, which can be useful for certain support requests, among other things.
Display the public IP address on the connected device
Click here to obtain the public IP address of your device in IPv4 and IPv6 format.
Alternative methods
Visit ipinfo.io or ifconfig.me.
... on macOS
- From a
Terminaltype application (command-line interface,CLI / Command Line Interface) on your device, run the commandcurl ifconfig.meand press enter. - The displayed address is the public IP address of the computer.
Remember that this address may change periodically, especially if the router restarts or if the internet service provider uses dynamic IP address assignment.
To automate the search for the public IP address, use commands or scripts that query services such as api.ipify.org ...
Link to this FAQ:
Has this FAQ been helpful?
This guide explains how to connect the mobile app Microsoft Outlook (application for smartphone or tablet iOS / Android) to an email address hosted by Infomaniak.
Preamble
- The app Outlook Lite is not compatible with the IMAP protocol… Only install the version offered above.
- Instead of the manual configuration below, it is recommended to use the app Infomaniak Mail (iOS / Android).
- The various services offered by Infomaniak are all compatible with the corresponding standard protocols (IMAP/SMTP for email, for example), therefore if you encounter a problem with third-party software, contact its publisher or a Partner and consult the support policy as well as article 11.9 of the Infomaniak Terms of Service.
Add the email address to the application
Prerequisites
- Create the email address within my kSuite or a Mail Service / kSuite.
- Create a password for the email address for the device you are going to configure.
To configure the email application:
- Open the application.
- Click on Add an account:
- Enter the email address to be linked.
- Click on Continue:

- Click on IMAP:

- Check and complete the missing information.
- Click on the icon ✓ at the top right.
- Click on the left to complete the configuration:

- That's it, your email address is now configured in the application:

Recommended settings
- Incoming IMAP server =
mail.infomaniak.com - IMAP port =
993(with SSL) - Outgoing SMTP server =
mail.infomaniak.com - SMTP port & encryption protocol and command/method to activate this protocol:
587+ STARTTLS - Username = full & complete email address ( ? )
- Password = the one generated for the email address you want to access
- Authentication required for sending emails:
- It is activated in the SMTP settings of your application.
- Check "use the same parameters as the incoming server" or, depending on the software/email clients, enter a username (= full & complete email address) and the generated password.
Refer to this other guide if you are looking for information about other compatible messaging ports and protocols (SSL / TLS for example).
In case of problem
Check that the Mail Service is configured optimally.
It is not necessary to contact Infomaniak Support if your email address works well outside the application. The most common error concerns the use of an incorrect password. The troubleshooting guides help you resolve any potential issues:
- Refer to the solutions given in this other guide regarding email in general.
- This other guide is more specifically about Outlook.
… and if your Outlook no longer works since a change of email password, refer to this other guide.
Link to this FAQ:
Has this FAQ been helpful?
This guide details the security measures implemented as part of the Infomaniak email offers to detect abusive and abnormal use of an email address. These measures protect you from malicious use of your computer or your account.
Number of recipients per email
Regardless of the email offer chosen, whether it is free or paid, the total number of recipients per message is limited to 100.
This restriction applies regardless of the field used to insert the email addresses of the recipients (To, CC, or BCC).
For sending emails to a large number of recipients, it is strongly recommended to use a Newsletter tool like the one Infomaniak offers.
Other email limits
Link to this FAQ:
Has this FAQ been helpful?
This guide explains how to quickly create/get a password or reset or delete the passwords of an email address from the Infomaniak Web app Mail (online service ksuite.infomaniak.com/mail).
Prerequisites
- Have permission to manage the password: it is possible that the Mail Service manager has removed this right from their admin account.
Add a device
Determine what you want to do precisely and for what purpose:
- get a password to add the address to a device, an external application, etc.
- get a password so that a third-party user can add the address to their Infomaniak Web app Mail
- remove an address currently visible in the Infomaniak Web app Mail from a third-party user
Cases 1 & 2
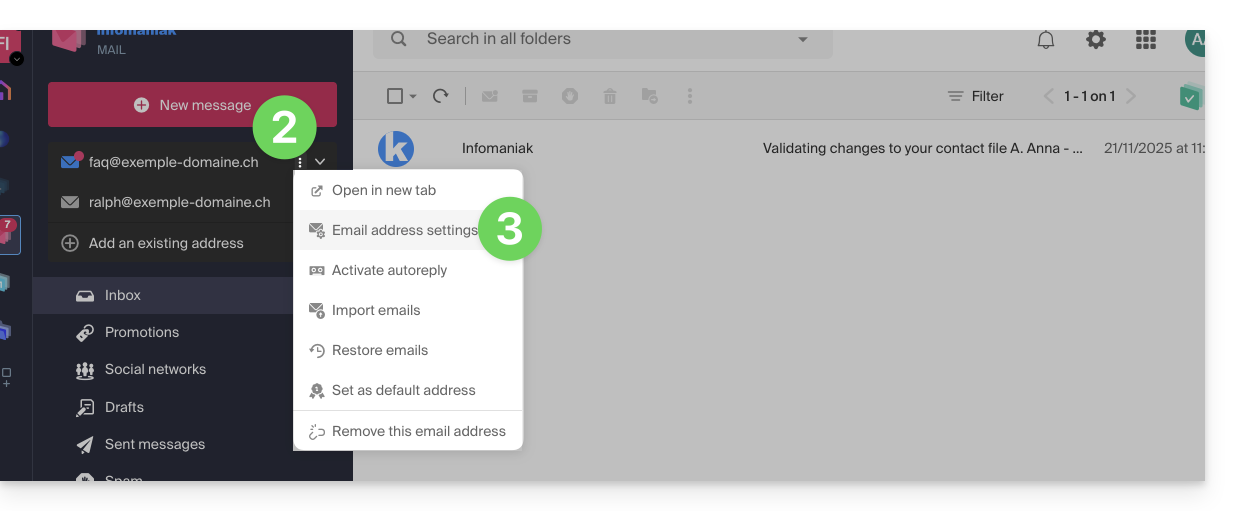
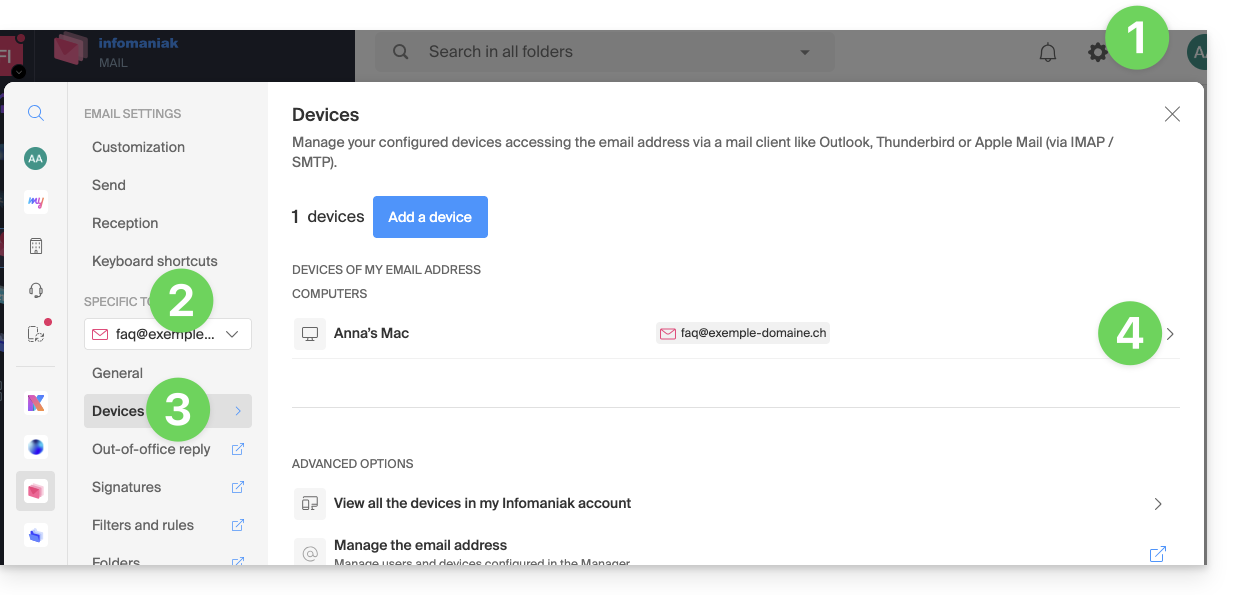
To manage the password of an already associated email address:
- Click here to access the Infomaniak Web app Mail (online service ksuite.infomaniak.com/mail).
- Click on the action menu ⋮ to the right of the email address concerned.
- Click on Address settings:
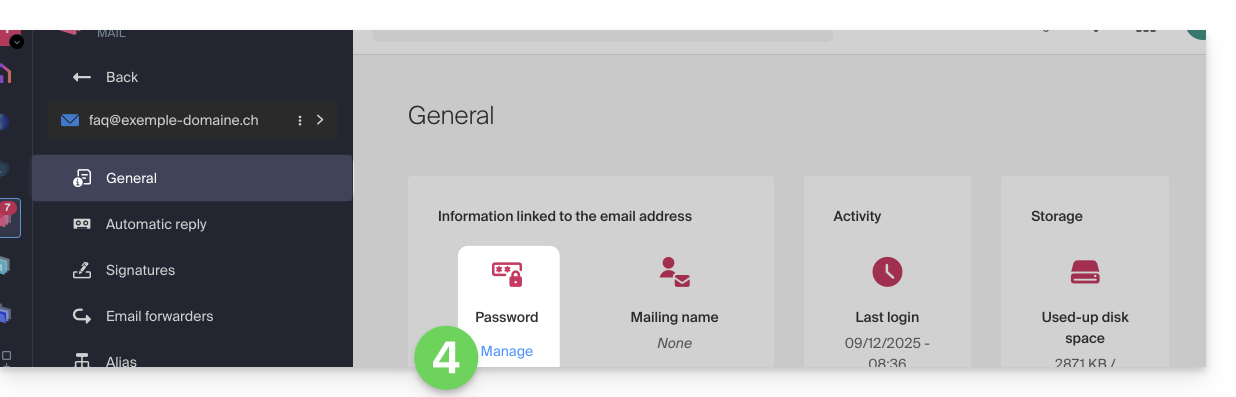
- Click on Manage the password:
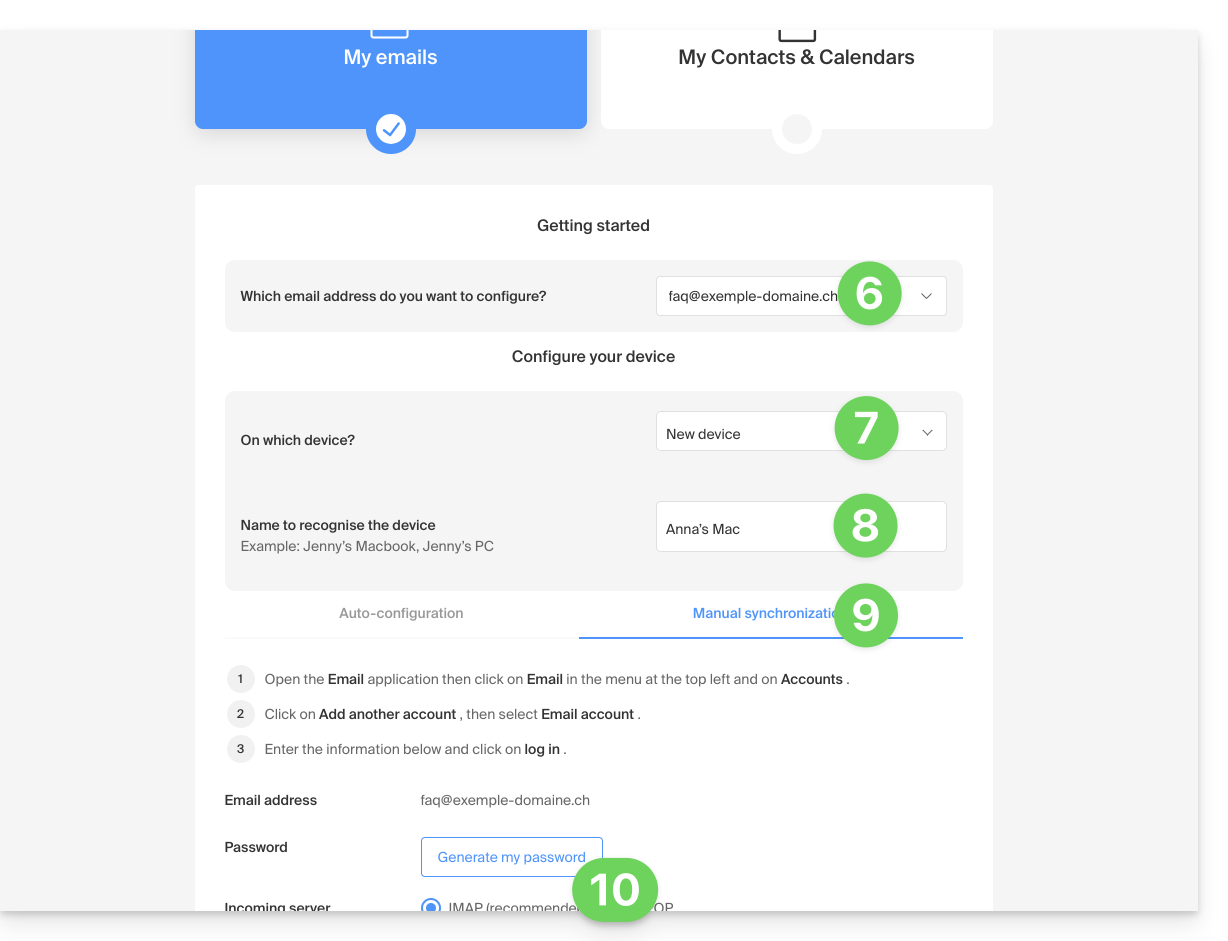
- Click on Add a device:
- The setup assistant opens on the MAIL section; check or select the email address concerned in the dropdown menu.
- Select “new device” from the dropdown menu.
- Give a description to the device.
- Click on the Manual configuration tab.
- Click the button to generate a password:
- Enter the password to log in to your Infomaniak account if prompted.
- The new created password is displayed, you can copy it and keep it safe (password manager for example); it will no longer be displayed afterwards.
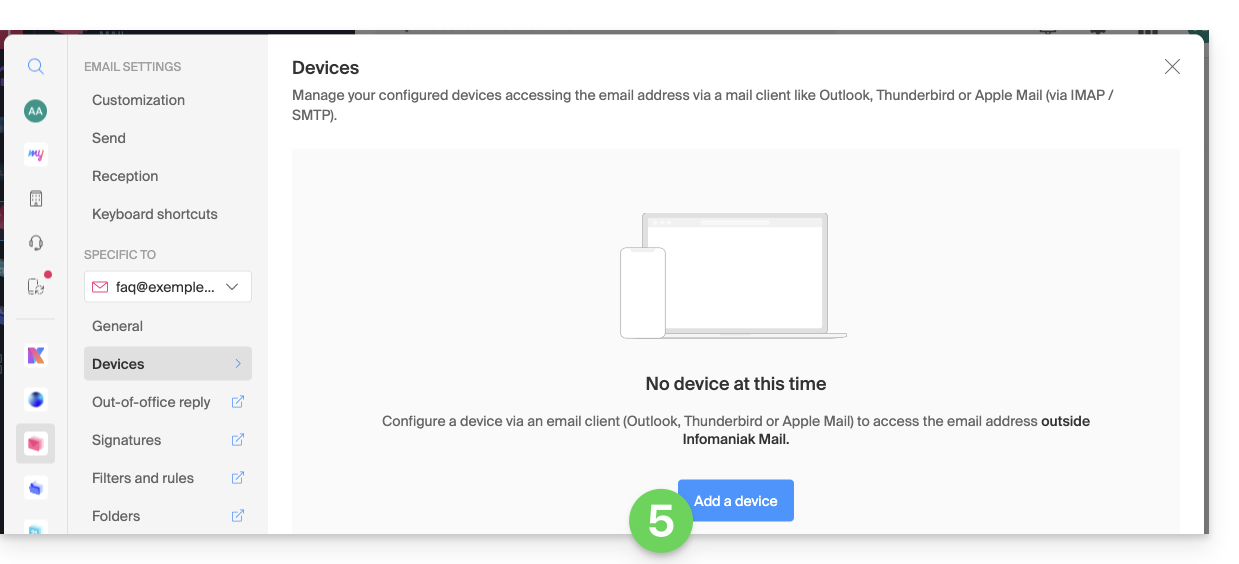
Case 1 & 2 & 3
At any time, it is possible to manage the accesses created / used:
- Click on the Settings icon at the top right of the interface.
- Check or select the email address concerned in the drop-down menu of the left sidebar.
- Click on Devices in the left sidebar.
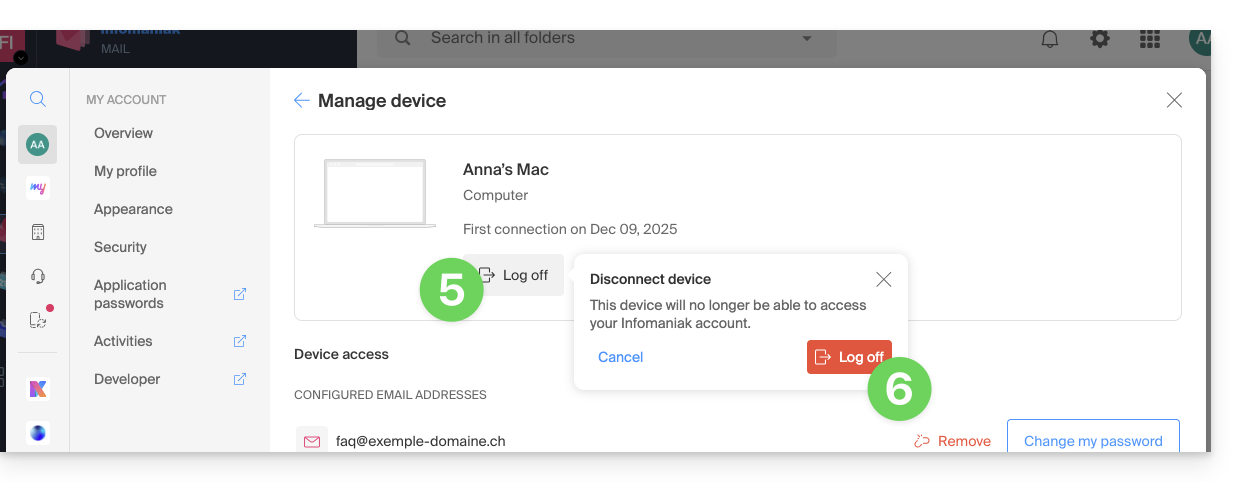
- Click on the device concerned:
- Click on the button to disconnect the device.
- Confirm the disconnection of the device concerned:
Link to this FAQ:
Has this FAQ been helpful?
This guide details the priority actions to take if you do not see any difference between your website after a change you have made to it, and its previous version. These tips are also valid if you encounter issues while using the Infomaniak product interface.
Preamble
- During your browsing, a web browser saves the data consulted in a reserved space, in order to avoid requesting the data already consulted from the server again, to save time and resources.
- Your cache may contain a lot of data and sometimes the browser gets confused. Sites may then display incorrectly or display an outdated version.
- Clearing the cache ensures that you have the very latest version of the page or folder consulted.
Clear the web browser cache …
… on Safari
Choose your macOS version to view the corresponding Apple help.
… on Google tools (Chrome, Android, etc.)
View the Google help.
… on Firefox
View the Mozilla help.
… on Edge / Internet Explorer
View the Microsoft help.
Link to this FAQ:
Has this FAQ been helpful?
This guide explains how to copy the content of one or more email addresses from other providers to one or more email accounts managed by Infomaniak, using the Infomaniak import tool!
Preamble
- The entirety of the external mailbox will be imported.
- Once the import process has started, it is no longer possible to interrupt it.
- A confirmation email is sent once the copy is complete.
- Duplicate removal (in case of successive imports) is handled.
- It is also possible to copy the content of an email address already hosted by Infomaniak (e.g., @ik.me), including via the batch method.
Copy emails from another provider to Infomaniak
Prerequisites
- Order a Mail Service from Infomaniak.
- Create one or more addresses on this Mail Service.
- The email address whose content needs to be copied must have been used (or be compatible) with the IMAP protocol.
- The email address to which the content must be copied must be listed among the addresses associated with the Infomaniak Web App Mail (online service ksuite.infomaniak.com/mail); if it is not listed, the dropdown menu (see point 9 below) will not offer this address.
- This is not a prerequisite for batch import (detailed .csv file) described at the bottom of this guide.
Next, click on the link corresponding to the provider of the email to be imported:
- addresses @ Bluewin
- addresses @ Gmail (or @ custom domain Google address)
- addresses @ GMX
- addresses @ custom domain Microsoft 365
- addresses @ custom domain Swisscom
- addresses @ Yahoo
Guide for any other mail provider such as Gandi, Hotmail, Hostinger, Sunrise, etc:
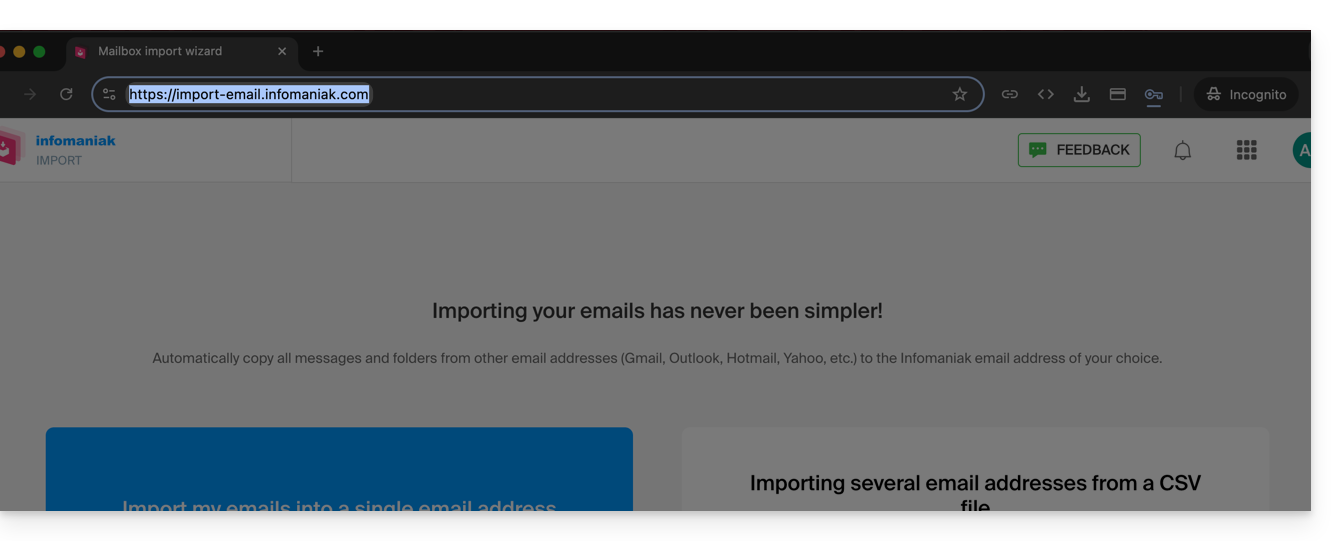
- Click here to access the Infomaniak import tool (online service https://import-email.infomaniak.com).
- Log in if you haven't already to your Infomaniak account on the Organization of your choice (the import will be to an email address linked to the Infomaniak Mail interface of the account you are using).
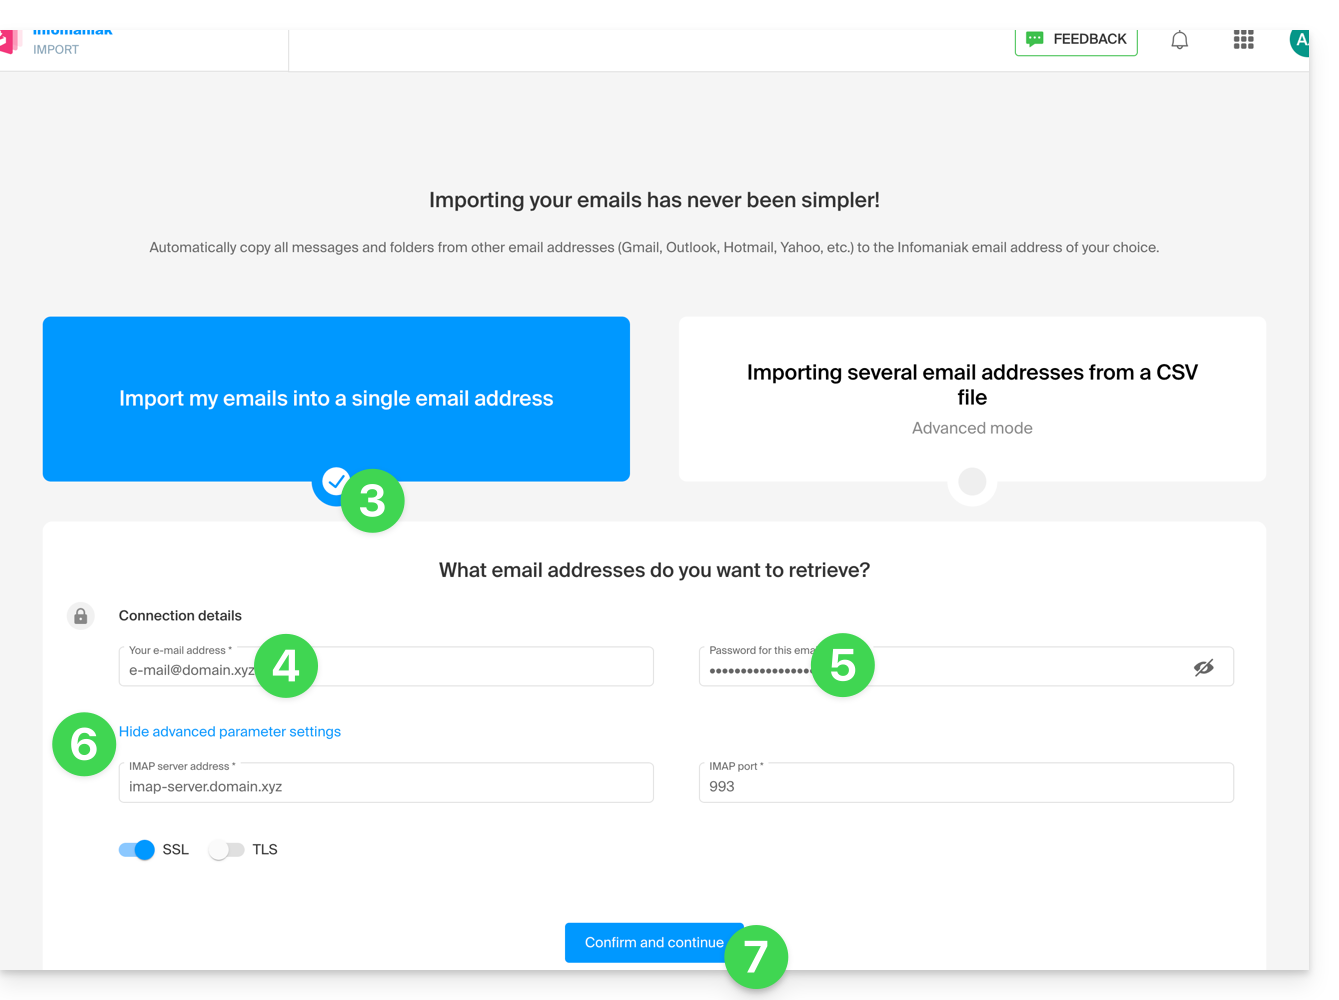
- Click on single import on the left.
- Fill in the left field with your starting email address (whose content is to be copied).
- Fill in the right field with the password of the same email address.
- Modify if necessary the Advanced settings to specify an IMAP server address.
- Click on Confirm:
- If necessary, enter a second email address to be imported at the same time.
- Choose which email address to import emails to; the drop-down menu lists the email addresses currently linked to your Infomaniak Mail interface of the Infomaniak account you are logged into (see prerequisites above)

- After selecting the desired destination address from the list, click the blue Import emails button.
- The copy starts and continues in the background; you can close the window that appears; a confirmation email will be automatically sent to all email addresses concerned by the operation once the import is complete, mentioning the number of messages copied.
Retrieve the content of multiple email addresses in batches
This method via CSV file will not work for Google or Microsoft addresses due to their authentication system.
To import the content of multiple email addresses (maximum 25 at a time):
- Click here to access the batch import tool (online service https://import-email.infomaniak.com).
- Select Import multiple email addresses from a CSV file (format
.csv). - Download the example
CSVtemplate to create one with the necessary information for copying. - Upload the file using the Select a CSV file button:
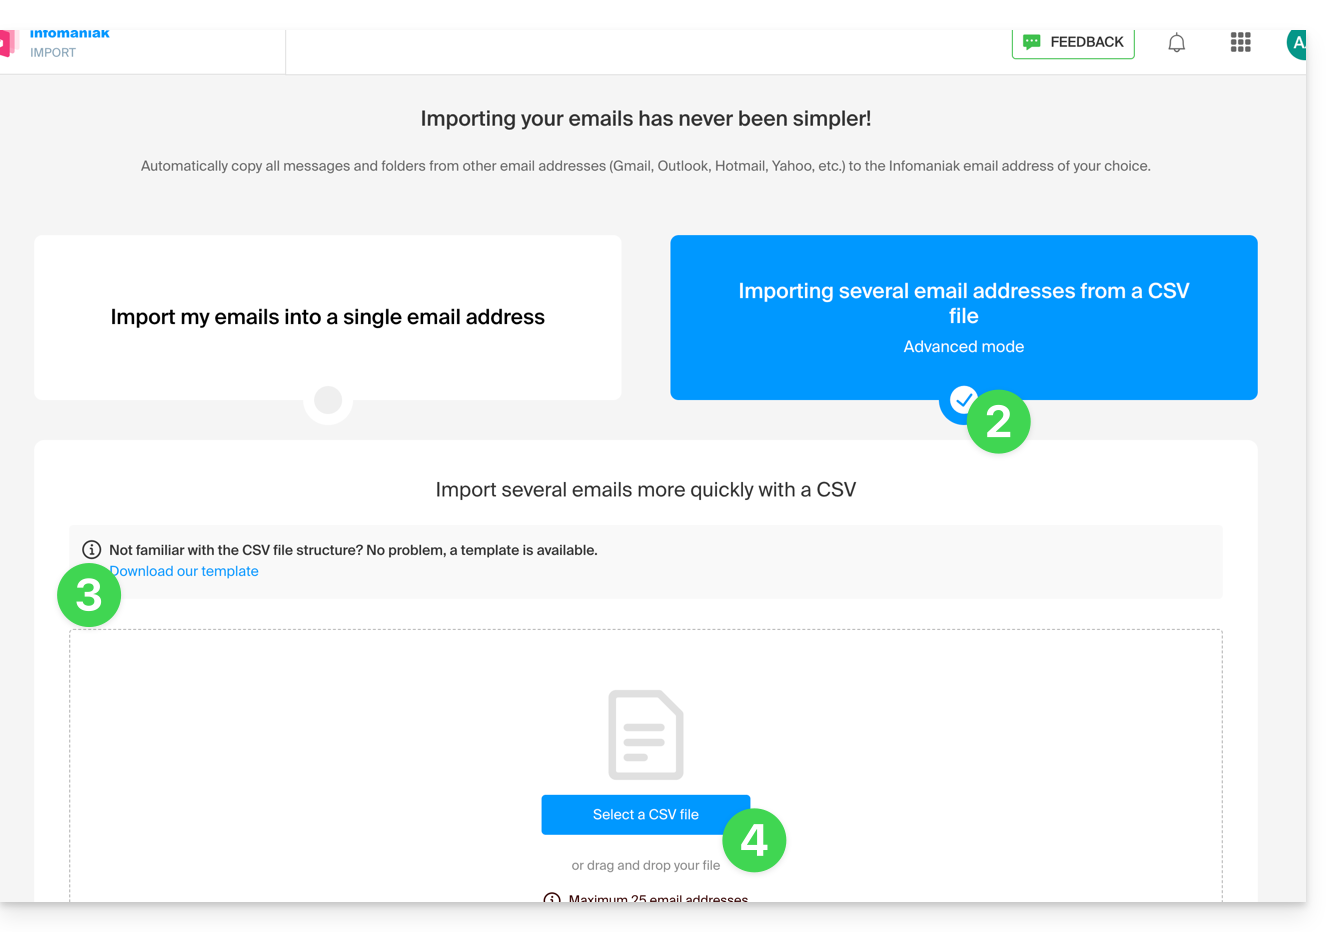
- Once the file is uploaded to the tool's page, select Import email address.
- Wait while the content of the addresses is copied (a confirmation email is sent once the copy is complete).
Link to this FAQ:
Has this FAQ been helpful?
This guide explains how to connect the desktop app Outlook 2007 (desktop application on Windows) to an email address hosted by Infomaniak.
Preamble
- The various services offered by Infomaniak are all compatible with the corresponding standard protocols (IMAP/SMTP for email, for example), therefore if you encounter a problem with third-party software, contact its publisher or a Partner and consult the support policy as well as article 11.9 of the Infomaniak TOS.
Add the email address to the application
Prerequisites
- Create the email address in my kSuite or a Mail Service / kSuite.
- Create a password for the email address for the device you are going to configure.
- Check that the Mail Service is configured optimally.
To configure the email application:
- Open the application.
- Click on the Tools menu.
- Click on Options:
- Click on the Email Configuration tab.
- Click on Email Accounts...:
- Click on New:
- Click on Configure manually.
- Click on Next:
- Click on the Internet E-mail button to connect to an IMAP server.
- Click on Next:
- Check and complete the missing information.
- Click on Additional settings:
- Click on the Outgoing server tab.
- Click on My outgoing server requires authentication.
- Click on the Advanced tab:
- Replace the port numbers with the correct information and enable SSL.
- Click on OK.
- Click on Next:
- Click on Finish:
- Click on Close:
- There you go, your email address is now configured in the application:
Recommended settings
- Incoming IMAP server =
mail.infomaniak.com - IMAP port =
993(with SSL) - Outgoing SMTP server =
mail.infomaniak.com - SMTP port & encryption protocol and command/method to activate this protocol:
587+ STARTTLS - Username = the full & complete email address ( ? )
- Password = the one generated for the email address you want to view
- Authentication required for sending emails:
- It is activated in the SMTP settings of your application.
- Check "use the same parameters as the incoming server" or, depending on the software/email clients, enter a username (= complete & full email address) and the generated password.
Refer to this other guide if you are looking for information about other messaging ports and protocols compatible (SSL / TLS for example).
In case of problem
Check that the Mail Service is configured optimally.
It is not necessary to contact Infomaniak Support if your email address works well outside the application. The most common error concerns the use of an incorrect password. The troubleshooting guides help you resolve any potential issues:
- Refer to the solutions provided in this other guide regarding email in general.
- This other guide is more specifically about Outlook.
… and if your Outlook no longer works since a change of email password, refer to this other guide.
Link to this FAQ:
Has this FAQ been helpful?
This guide helps you identify and correct most email errors encountered after sending an email to a recipient. Refer to this other guide if you are looking for information about errors obtained when configuring a mail address in a software/email client.
Preamble
- Generally, a mail error message follows…
- … an incorrect configuration of the domain name used with your mail,
- … a problem with (the mail provider of) your recipient.
- In all cases, a delivery failure report (Mailer Daemon or Mail Delivery Subsystem) containing the explanation is sent to the sender.
Finding and identifying the mail error
When your message does not reach your recipient, an initial failure report (Temporary Delivery Failure Report) is sent and specifies that the server will attempt to resend your message several times.
A final delivery failure report (Final Delivery Failure Report or Undeliverable Mail) issued by the recipient's server is sent to the sender (via a pass through the Infomaniak mail server, hence the mention of Infomaniak at the beginning of most error messages you may receive) to inform them that the email could not be delivered even after several attempts.
The notification always contains the reason for the failure. Example below:
This is the mail system at host smtp-1-1234.mail.infomaniak.ch.
I'm sorry to have to inform you that your message could not be delivered to one or more recipients. It's attached below.
For further assistance, please send mail to postmaster.
If you do so, please include this problem report. You can delete your own text from the attached returned message.
The mail system anna.a@abc.xyz: host mxbw-abc-xyz.abc-ab12.abc.ch[123.456.789.00] said: 550 5.1.1
anna.a@abc.xyz recipient rejected, account administratively disabled (in reply to RCPT TO command)
So here the address of your correspondent is visibly suspended by their mail provider (account administratively disabled).
Sometimes you need to look for the reason for the error message received among its attachments (often a raw text file). Example:
Reporting-MTA: dns; mxbw.abc.ch [123.456.789.00]
Received-From-MTA: dns; smtp-1-1234.mail.infomaniak.ch [12.345.678.99]
Arrival-Date: Tue, 01 Aug 2023 15:49:22 +0200
Final-recipient: rfc822; anna.a@abc.xyz
Diagnostic-Code: smtp; 552 RCPT TO:anna.a@abc.xyz Mailbox disk quota exceeded
Last-attempt-Date: Tue, 01 Aug 2023 15:49:22 +0200Here the mailbox of your correspondent external to Infomaniak seems full (Mailbox disk quota exceeded).
Most common cases
SPF Failure
The SPF (Sender Policy Framework) record is not correctly configured:
Subject: Delivery Status Notification (Failure)
From: Mail Delivery System mailer-daemon@domain.xyz
To: Anna.A anna.a@abc.xyz
This is an automatically generated Delivery Status Notification.
Delivery to the following recipient failed due to SPF failure:
anna.a@abc.xyz
Technical details of SPF failure:
The sender's domain domain.xyz does not have a valid SPF record. Please contact your email administrator to correct the SPF configuration.Solution: check the configuration of your domain name and especially the SPF type record if your website is hosted on Wix or another provider.
User Unknown
The email address specified in the message is invalid or does not exist:
Subject: Delivery Status Notification (Failure)
From: Mail Delivery System mailer-daemon@domain.xyz
To: Anna.A anna.a@abc.xyz
This is an automatically generated Delivery Status Notification.
Delivery to the following recipient failed permanently:
anna.a@abc.xyz
Technical details of permanent failure:
The email address does not exist. Please check the recipient's email address and try again.Solution: carefully check the recipient's email address and correct it if necessary; ensure you are using a valid email address for the recipient.
Temporary Failure
Le serveur de messagerie du destinataire rencontre des problèmes temporaires ou est indisponible.Solution: wait for a certain amount of time, then try sending the message again later. If the problem persists, contact the recipient's technical support for assistance.
Blocked by SPAM Filter (or Content Rejected)
The recipient's mail server has blocked the message due to anti-spam filtering rules:
Subject: Delivery Status Notification (Failure)
From: Mail Delivery System mailer-daemon@domain.xyz
To: Anna.A anna.a@domain.xyz
This is an automatically generated Delivery Status Notification.
Delivery to the following recipient failed due to the message being rejected as spam:
anna.a@domain.xyz
Technical details of delivery failure:
The content of the message triggered the spam filters of the recipient's email server. Please review the message content and try again.Solution: check if your message contains elements that may be considered spam (keywords, suspicious links, etc.). Contact the recipient to verify if the message was filtered into the spam folder.
Refer to this other guide regarding outgoing spam and this other guide regarding incoming spam.
Bad Reputation
The recipient's mail server has blocked the message due to anti-spam filtering rules:
gmail-smtp-in.l.google.com said: 550-5.7.1
Our system has detected that this message is likely suspicious due to the very low reputation of the sending domain.
To best protect our users from spam, the message has been blocked.
Please visit https://support.google.com/mail/answer/188131 for more information.Solution: check the reputation of the domain, determine if there has been a recent unintentional misuse of one of your email addresses for malicious purposes, for example.
Domain Not Found (or DNS Error)
Le nom de domaine du destinataire n'a pas pu être résolu ou n'existe pas.Solution: check the spelling of the recipient's domain and correct it if necessary; ensure that the domain name and DNS are valid and active.
Mailbox Full
La boîte de réception du destinataire est pleine, empêchant la réception de nouveaux messages.Solution: inform the recipient of the situation and ask them to free up space by deleting emails or archiving items.
This cannot happen with email addresses managed by Infomaniak since they do not have storage size limits.
Part of their network is on our block list
If the error message (obtained in principle following a send operation performed from an online tool, placed on the server where your website is located, for example a Prestashop order confirmation or another online store you manage) contains this:
host hotmail-com.olc.protection.outlook.com[104.47.30.97] said: 550 5.7.1
Unfortunately, messages from [89.123.456.789] weren't sent. Please contact your Internet service provider since part of their network is on our block list.Solution: change the email sending method. The sending is unauthenticated and originates from the server with a specific IP address that is apparently blocked by the recipient for some reason (Infomaniak does not intervene to request unblocking). Therefore, you need to configure the online tool to perform authenticated sends.
Less Frequent Errors
Deferred - Delayed
The error message Deferred - Delayed - Warning: message still undelivered after 4 hours, Will keep trying until message is 3 days old means that the Infomaniak mail server attempted to connect to your correspondent's mail server to send the message but was unsuccessful for an undetermined reason. This error message indicates that the Infomaniak server will continue attempting to send your message during the period specified in the error message. If, after this time, the message has still not been delivered, you will receive a final error message informing you that your message could not be delivered and that your correspondent did not receive it.
Greylisting Delay
This Greylisting Delay error occurs when the recipient's mail server, like Infomaniak, uses a technique called "greylisting" which imposes a temporary delay on the first attempt to deliver a message from an unknown sender. The Mailer Daemon may eventually send an error report indicating that delivery has been delayed due to greylisting. The error may also mention banned sender. You should try sending your message again a few minutes/hours later.
Malware message rejected
This Malware message rejected error occurs when the message contains an attachment, a link to a storage site like Dropbox, or dynamic content, including in the "forwarded" part of the message (in the case of a message "forward", for example). You should try resending the message from the Infomaniak Mail Web app (online service ksuite.infomaniak.com/mail) instead of a mail application, and remove any content that may cause this error.
Message Size Exceeded / File Too Large
These Message Size Exceeded / File Too Large errors occur when the size of the message (or attachments) exceeds the limit allowed by the recipient's mail server. The Mailer Daemon will return an error report indicating that delivery failed due to the message size being exceeded.
Rate Limit Exceeded
This Rate Limit Exceeded error occurs when the sender has exceeded the frequency or volume limit allowed by the recipient's mail server. Mail servers may impose limits to prevent spam or system overload.
Sender denied: auth guards failed
Refer to this other guide if you encounter an error Sender denied: auth guards failed.
The message contains a unicode character in a disallowed header
This The message contains a unicode character in a disallowed header error may appear if you have inserted a special character like a heart ♥ for example in the body of the email, the subject, or especially in the full name; the risk of being rejected by providers is very high: it is best to keep the use of signs, characters, and fonts as simple as possible.
Link to this FAQ:
Has this FAQ been helpful?
This guide explains how to delete folders that appear grayed out in the Web app Mail Infomaniak (online service ksuite.infomaniak.com/mail) or in some email software/clients such as Apple Mail, Mozilla Thunderbird, or Microsoft Outlook.
Ghost folders
Some email software/clients like Microsoft Outlook allow you to create subfolders of non-existent folders. For example, it is possible to create the folder /abc/klm/xyz while the folder "klm" does not exist.
On Mail Infomaniak or in other software, ghost folders like the folder "klm" appear in gray and cannot be deleted directly as they are only "paths" to a real subfolder.
To delete these ghost folders, it is necessary to delete their subfolders first (in this example: xyz).
Stubborn folders
If, when consulting your Infomaniak email address on Outlook, ghost folders persist or reappear instantly after deletion, here are the technical procedures recommended by Microsoft to force synchronization:
1. Force Outlook folders reset
Sometimes, Outlook's local folder table is corrupted. A simple command can often fix this without deleting anything:
- Close Outlook completely.
- Press the
Windows + Rkeys on your keyboard. - Type
outlook.exe /resetfoldersand validate (this restores missing or corrupted folders from the server).
2. Reset the IMAP cache (.ost)
If the problem persists, forcing Outlook to rebuild its local database is often the most effective solution:
- Close Outlook.
- Access the folder:
C:\Users\[Your Username]\AppData\Local\Microsoft\Outlook. - Identify the
.ostfile with the name of your Infomaniak address and delete it (or rename it to.oldfor safety). - Restart Outlook. The software will redownload all your messages and folders properly from the Infomaniak servers.
3. Use the MFCMAPI tool (Advanced Level)
MFCMAPI allows you to access the MAPI structure of your mailbox directly to delete what the standard Outlook interface refuses to touch:
- Download the latest version of MFCMAPI from GitHub (Official Source).
- Launch
MFCMAPI.exeand go toSession > Logon. Select your Outlook profile. - Double-click on your Infomaniak mail account in the list.
- In the new window, expand
Root Container(orRoot - Mailbox), thenIPM_SUBTREE. - Locate the problematic folder. Right-click and select
Delete folder. - Warning: In the dialog box, try simple deletion first. If this fails, retry by checking
DELETE_HARD_DELETE(permanent deletion at the server level).
4. Final verification via Webmail
If a folder is deleted in Outlook but keeps reappearing, check on the Infomaniak Web Mail app if the folder is present, and delete it first via the Web interface, then apply step #1 (resetfolders) in Outlook.
Deleting and immediately reconfiguring an account remains the simplest alternative if MFCMAPI seems too complex.
Link to this FAQ:
Has this FAQ been helpful?
This guide explains how to authorize Infomaniak Support to access your online products and more specifically their content, and provide useful details when requesting assistance.
Preamble
- Infomaniak Support may ask you to grant temporary access to part of your content.
- This access is strictly limited to the analysis context and is used solely to identify the source of the problem encountered.
- It saves time in diagnosing by avoiding unnecessary back and forth.
- In accordance with Infomaniak's privacy policy, your data will never be used for other purposes.
Authorize Support to access a type of content
To authorize Infomaniak to access a specific part of your services (authorizing access to content never opens access to others; each authorization is specific and independent):
- Click here to access the management of accesses on the Infomaniak Manager.
- Click on the toggle switch to authorize access to the content of…
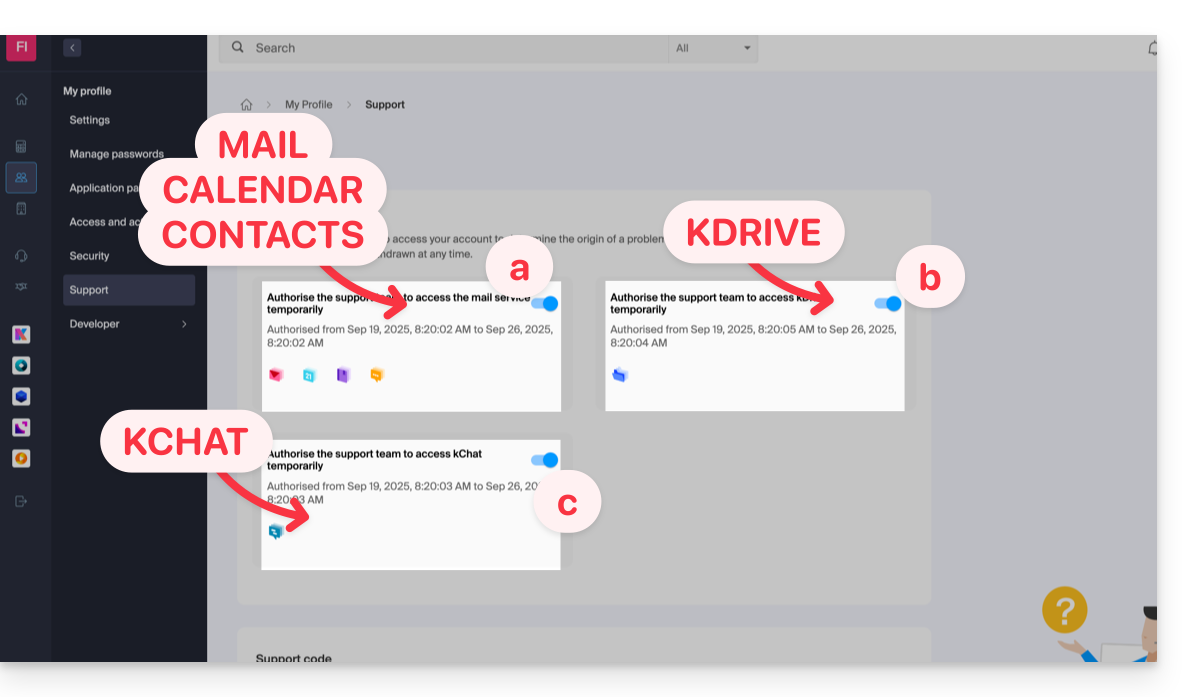
- … email addresses linked to the Web Mail app Infomaniak (online service ksuite.infomaniak.com/mail).
- … folders among the kDrive(s) existing in the Organizations of which the current user is a part.
- … discussions among the kChat product(s) existing in the Organizations of which the current user is a part.
With my kSuite+, you can also do this by clicking here or proceed as follows to get there:
- Click on the Settings icon at the top right of your my kSuite+ window.
- Click on Support in the left sidebar:
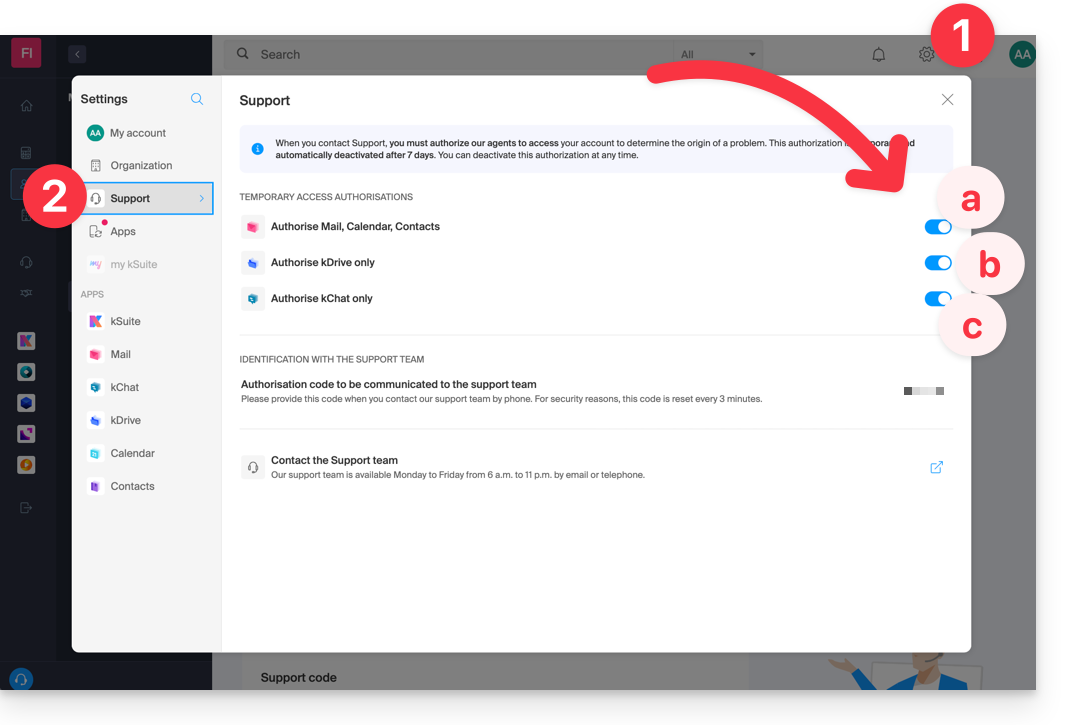
Who can access it?
- Only Infomaniak employees handling your support request directly.
- Access is only from Infomaniak's controlled facilities.
Duration and control of access
- You can revoke this access at any time.
- Otherwise, it expires automatically after 7 days.
You can also share a single specific email very easily.
Taking screenshots…
… on Windows
Microsoft provides a software pre-installed for screenshots. But to do it manually:
- Display what you want/need to send on the screen.
- Press the PRINTSCREEN key on your keyboard (or
PRTSCR,IMPR. ECRAN, etc.) once. - In Microsoft Word (or similar), do "Edit" -> "Paste" to place your image on the page.
- Save your file.
- Repeat the operation from step 1 to step 5 as many times as the number of desired screenshots.
… on macOS
- Press the keys "
CMD" + "shift" (the hollow arrow up — shift) + the key "3". - Each press on these keys creates an image file on your computer's desktop.
… on iOS (iPhone, iPad...)
- Press the buttons "
Power" + "Home" (the only two physical buttons) simultaneously. - Retrieve the screenshots in the "Photos" app on your device.
… on Android (e.g., Samsung, LG, or Huawei)
- Press the "Volume Down" key (on the side) and the lock key simultaneously.
- The captured image is automatically saved in a Screenshots folder in the gallery.
Windows Popup
To copy-paste an error message present in a Windows popup as text, simply press the CTRL + C key on your keyboard to copy the message to the clipboard. You can then paste it (CTRL + V) into the body of the message you send us.
Browser Javascript console…
… on Windows
Chrome, Firefox and Safari: enter the key combination CTRL + SHIFT + i
Internet Explorer and Edge: press the F12 key
… on macOS
Chrome: enter the key combination ⌘ + ⌥ + J
Safari: enter the key combination ⌘ + ⌥ + C
- Then, click on the crossed-out circle icon or similar to reset the log.
- Display the page of your site affected by the issue.
- The console tab displays JavaScript errors and missing online resources.
Link to this FAQ:
Has this FAQ been helpful?
This guide explains what the external mail notice, "External" means, which appears on the Web app Mail (online service ksuite.infomaniak.com/mail) and the mobile app Infomaniak Mail (application for iOS / Android smartphone or tablet) when reading certain messages: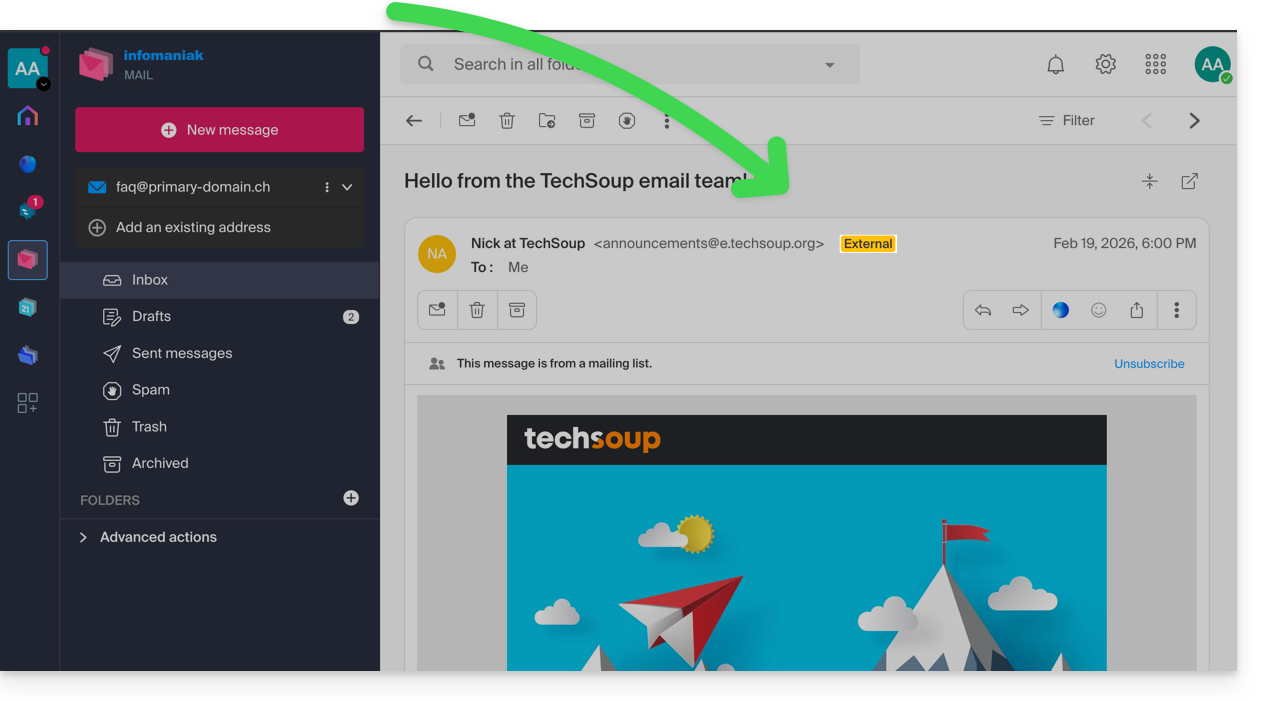
External mail notice
The external mail notice appears in the following cases:
- The sender's domain name (or alias) does not match the one configured in Mail.
- The sender is not part of the contacts (including suggested contacts).
- The email comes from an address hosted outside the Organization.
The notice will appear as unknowninstead of “ external” with some free offers like my kSuite.
Enable or disable the notice
You can enable or disable the notice, the effect is immediate for incoming emails and in the case of a response to an external email. To do this:
- Click here to access the management of your Mail Service on the Infomaniak Manager (need help?).
- Click directly on the name assigned to the Mail Service concerned:
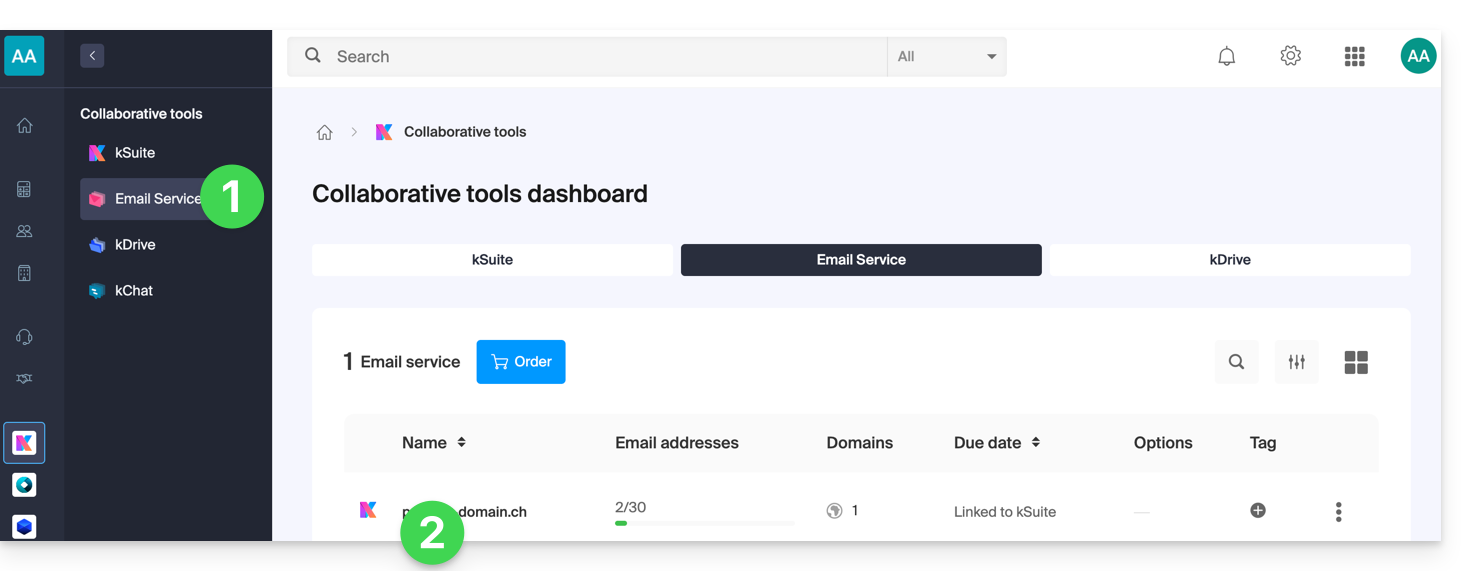
- Click on Global Configuration in the left sidebar:
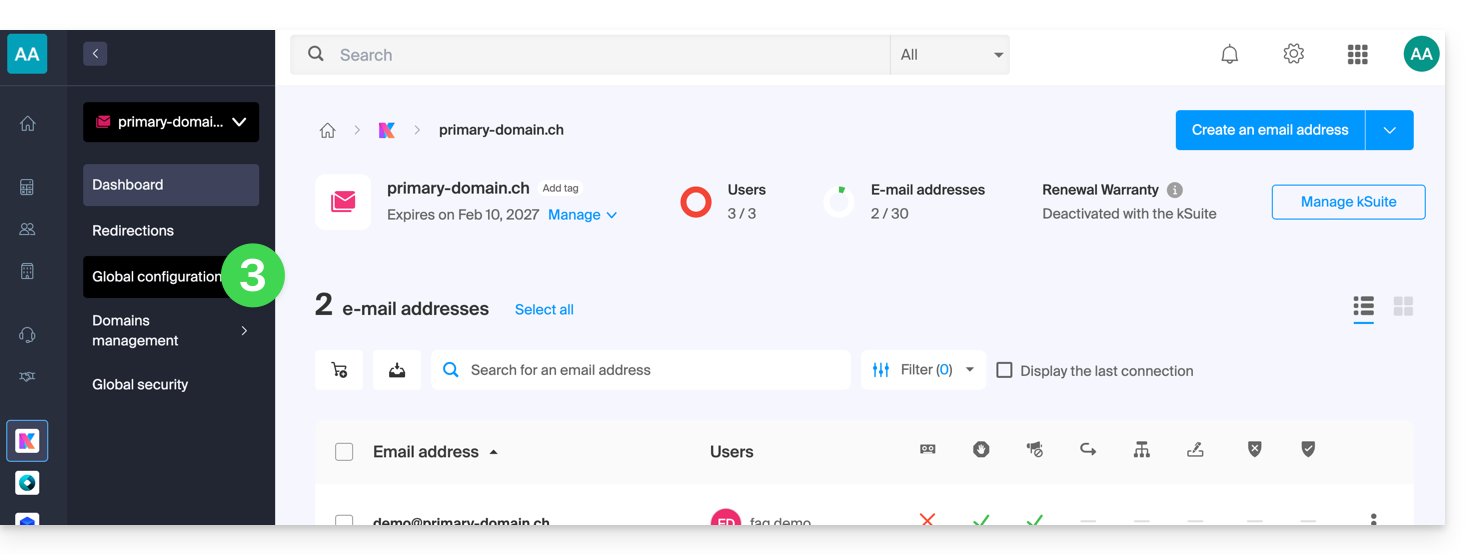
- Click on the Security tab.
- Enable or disable the toggle switch:
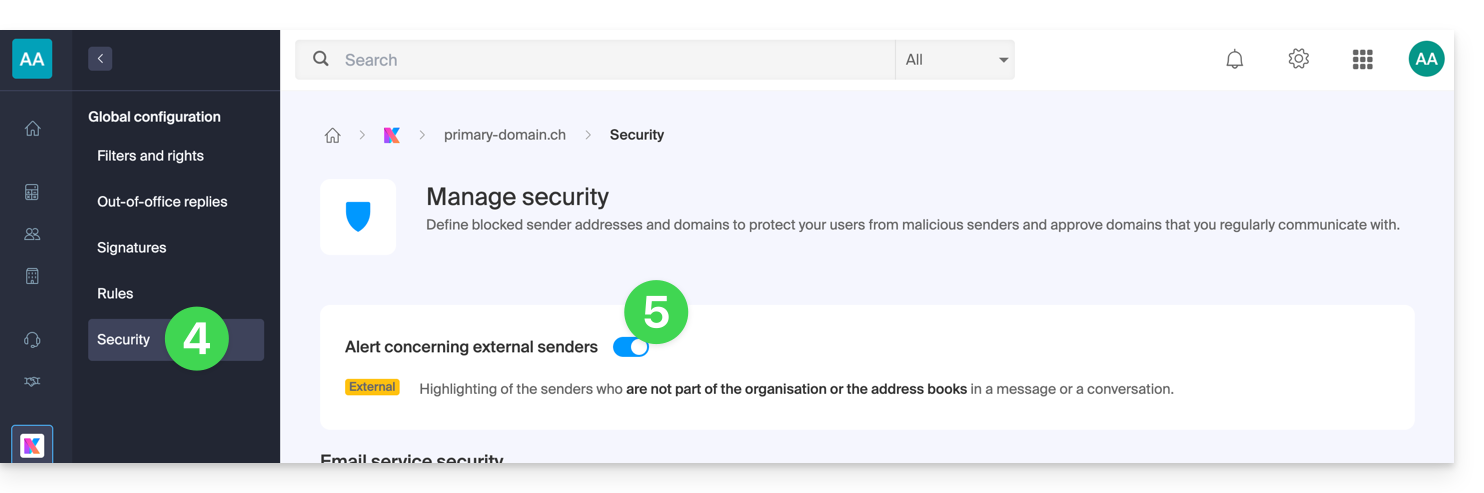
Link to this FAQ:
Has this FAQ been helpful?
This guide explains how to save an email (as if you were downloading) but directly to your kDrive.
Preamble
- Save in a few clicks a message received on an address of your Infomaniak Mail Service, this in
.emlformat readable directly within your kDrive interface. - To export all emails from an email address, refer to this other guide.
- To export email attachments, refer to this other guide.
Add an email to kDrive…
… from the Infomaniak Mail Web App
To export the email message of your choice to your kDrive:
- Click here to access the Infomaniak Mail Web App (online service ksuite.infomaniak.com/mail).
- Open the email you want to save.
- Then click on the share icon at the top of the concerned message to add to kDrive:
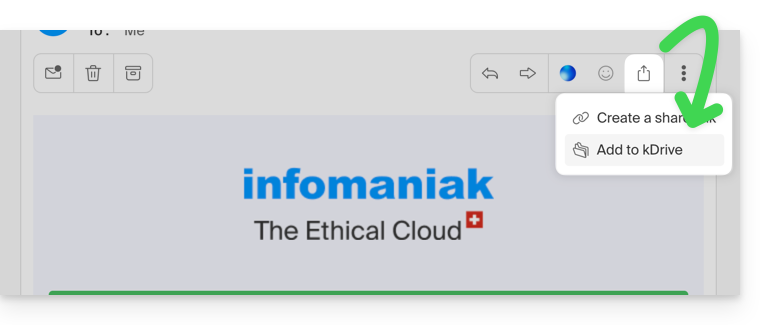
- Then click on the share icon at the top of the concerned message to add to kDrive:
- Otherwise, you can also click on the Add to kDrive icon at the top of the concerned message:
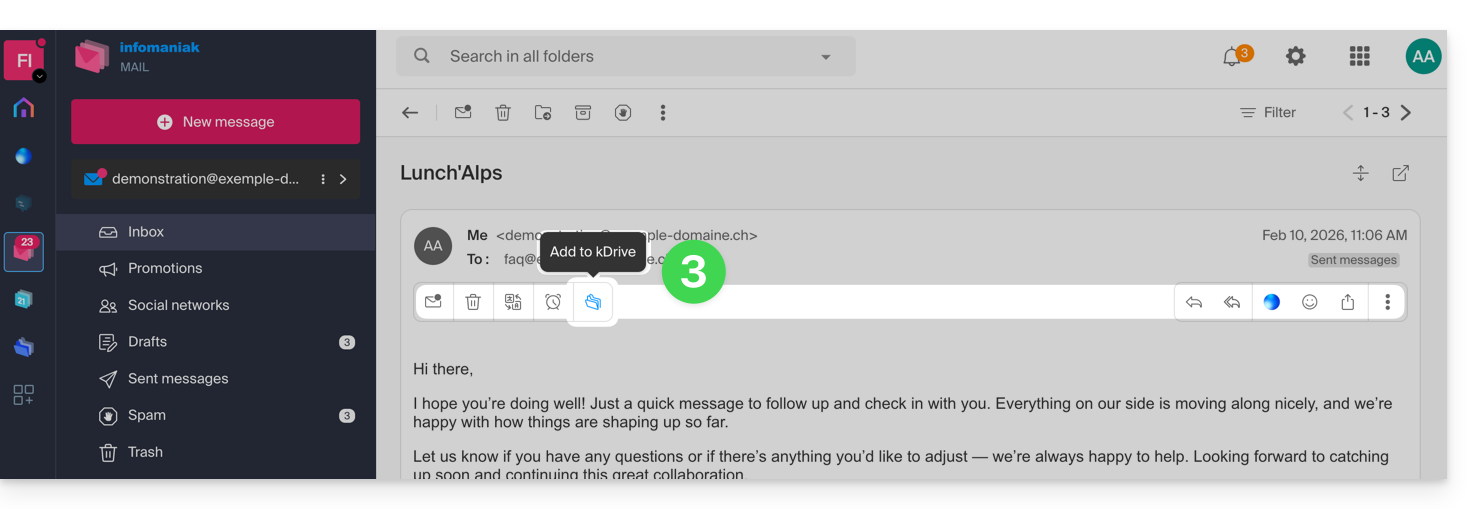
- If the icon is not visible, click on the action menu ⋮ on the right.
- Then choose to customize the actions:
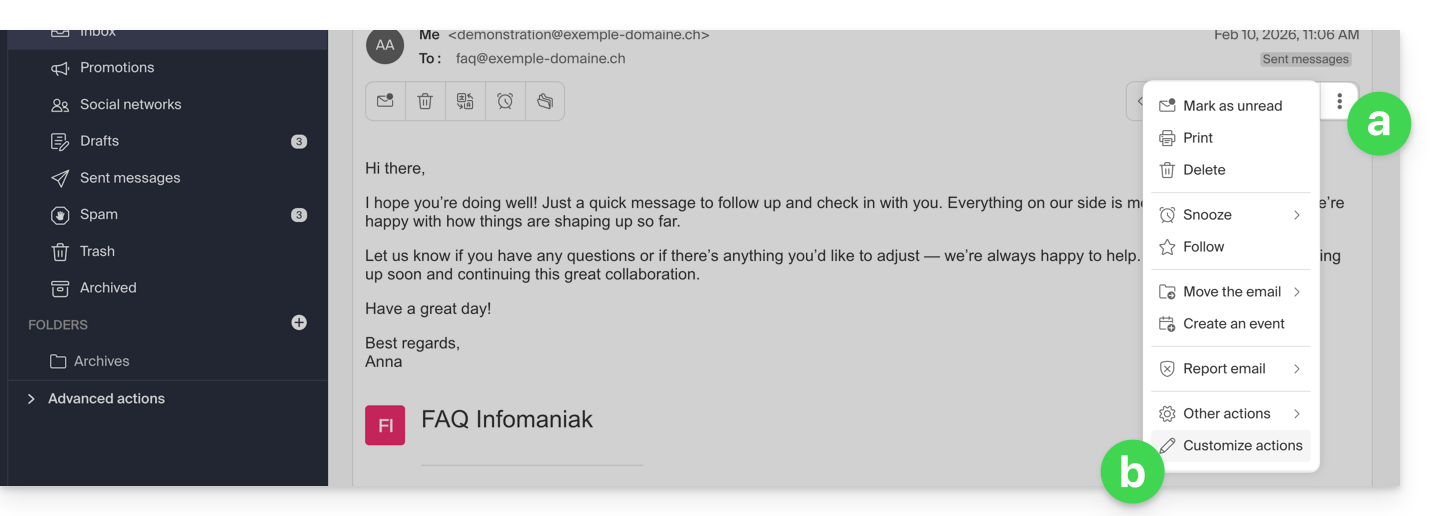
- to add the desired action:
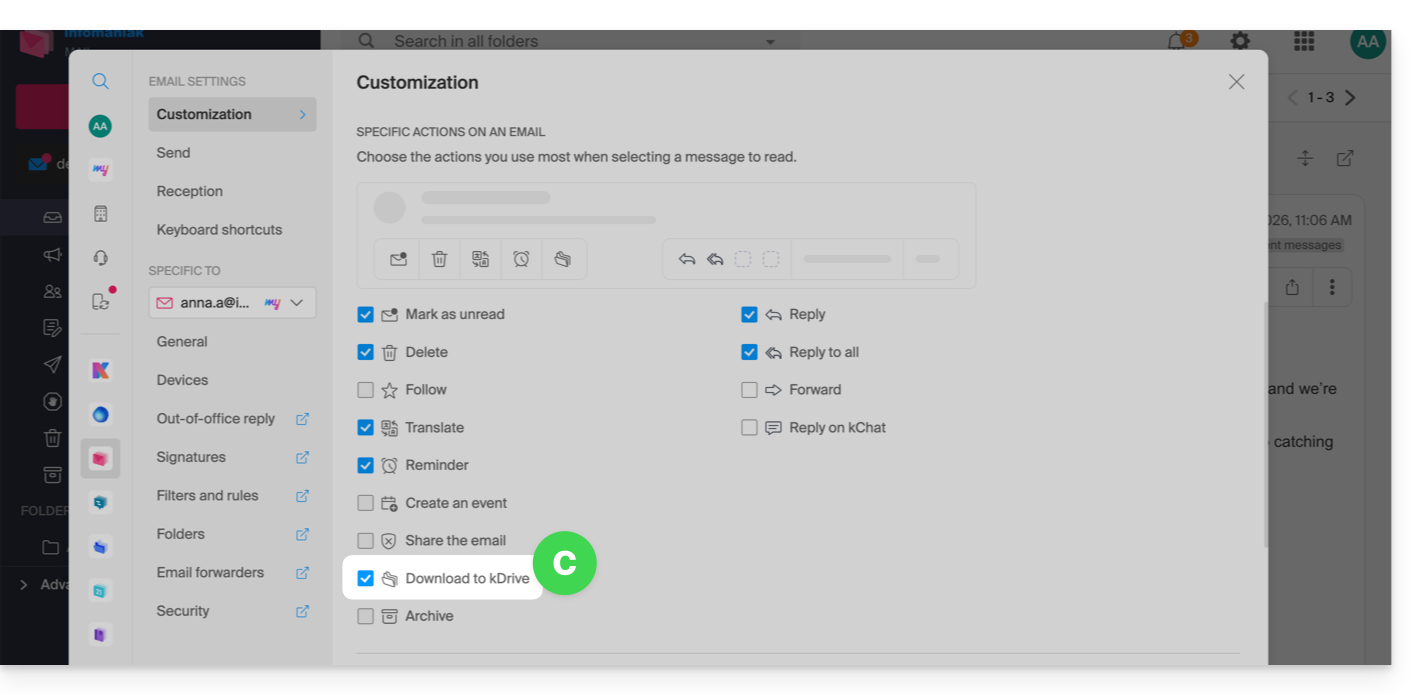
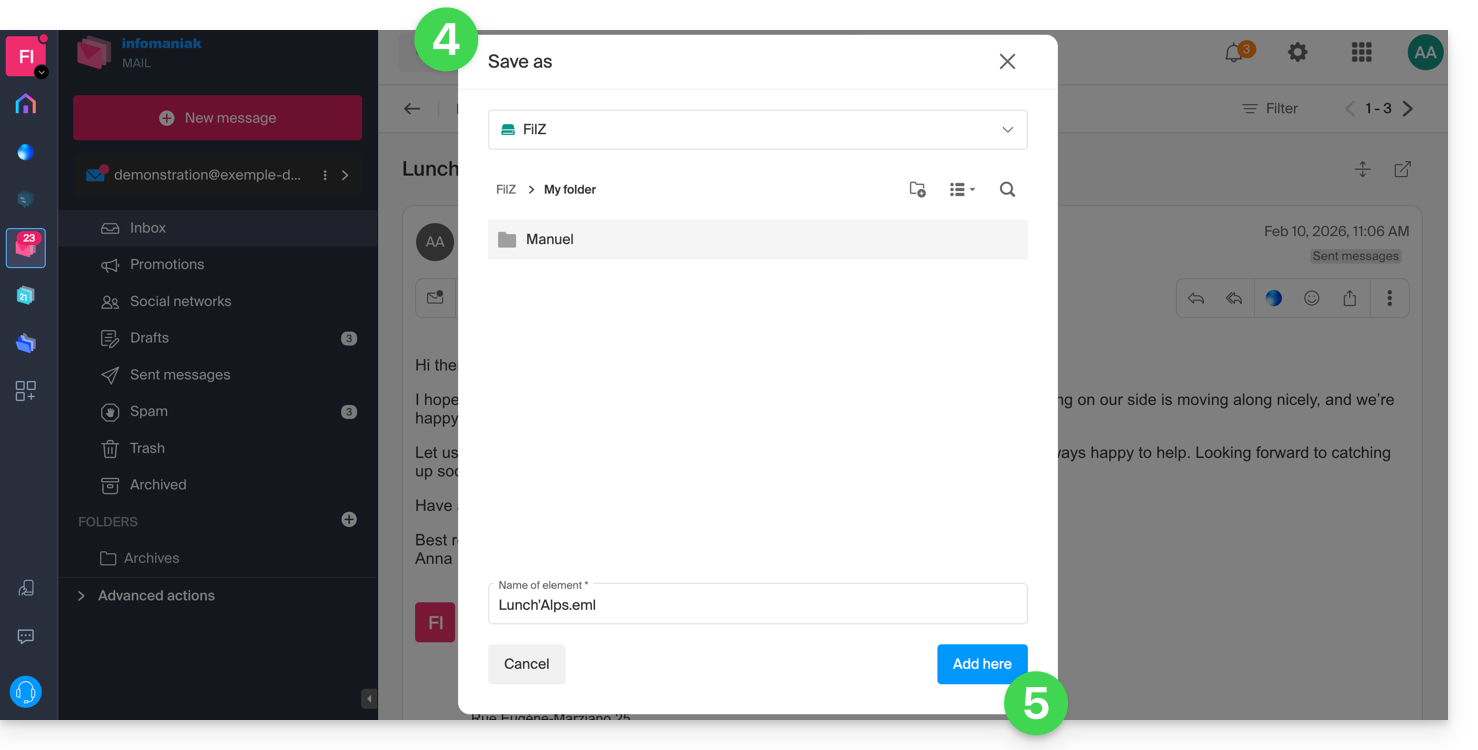
- Choose the kDrive (among those to which you are attached by your Organization) and the desired location on it to save your file - if you rename it, keep the
.emlextension to be able to read it directly in the kDrive interface. - Click on the Add button.
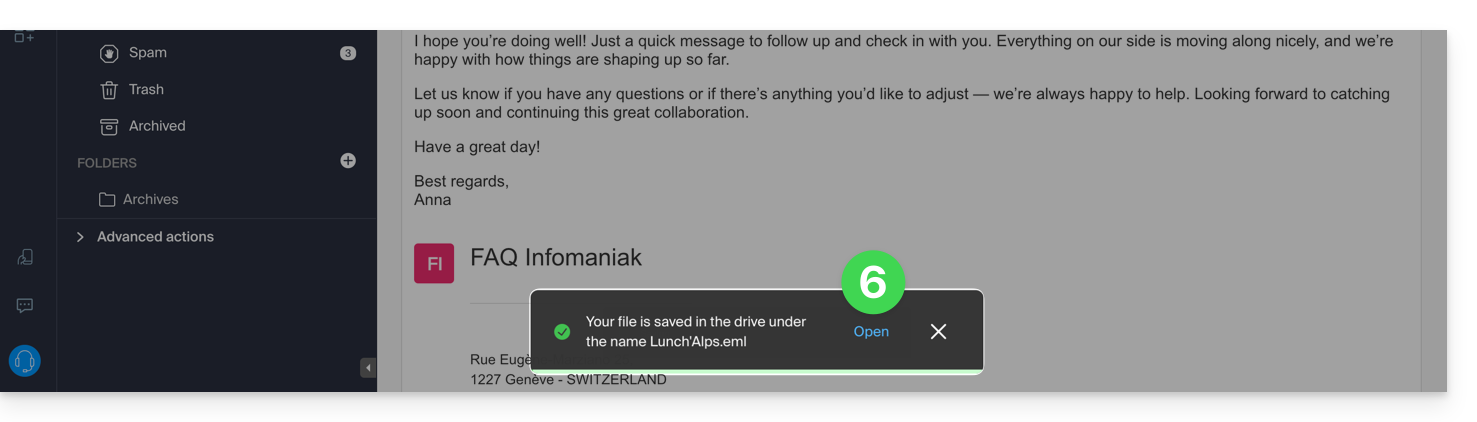
- A message at the bottom of the screen notifies you of the progress of the recording and allows you to go directly to the email save location:
- The saved email can be viewed on kDrive as if you were reading it on Mail directly.
… from the Infomaniak Mail mobile app
To do this:
- Open the email in question on the mobile app Infomaniak Mail (application for iOS / Android smartphone or tablet).
- Click on the action menu ⋮ located at the top right of the displayed email.
- Choose Save to kDrive and follow the same procedure as above in step 4.
Link to this FAQ:
Has this FAQ been helpful?