Knowledge base
1000 FAQs, 500 tutorials and instructional videos. Here, there are only solutions!
This guide explains how to edit an image file on the Web app kDrive (online service ksuite.infomaniak.com/kdrive).
Preamble
- The Web app kDrive natively integrates an editor that allows you to modify an image online.
- Your files are never analyzed and are exclusively stored in Switzerland.
- Refer to this other guide if you are looking for information on editing other file formats.
Edit an image, a photo
To access kDrive and modify files:
- Click here to access the Web app kDrive (online service ksuite.infomaniak.com/kdrive).
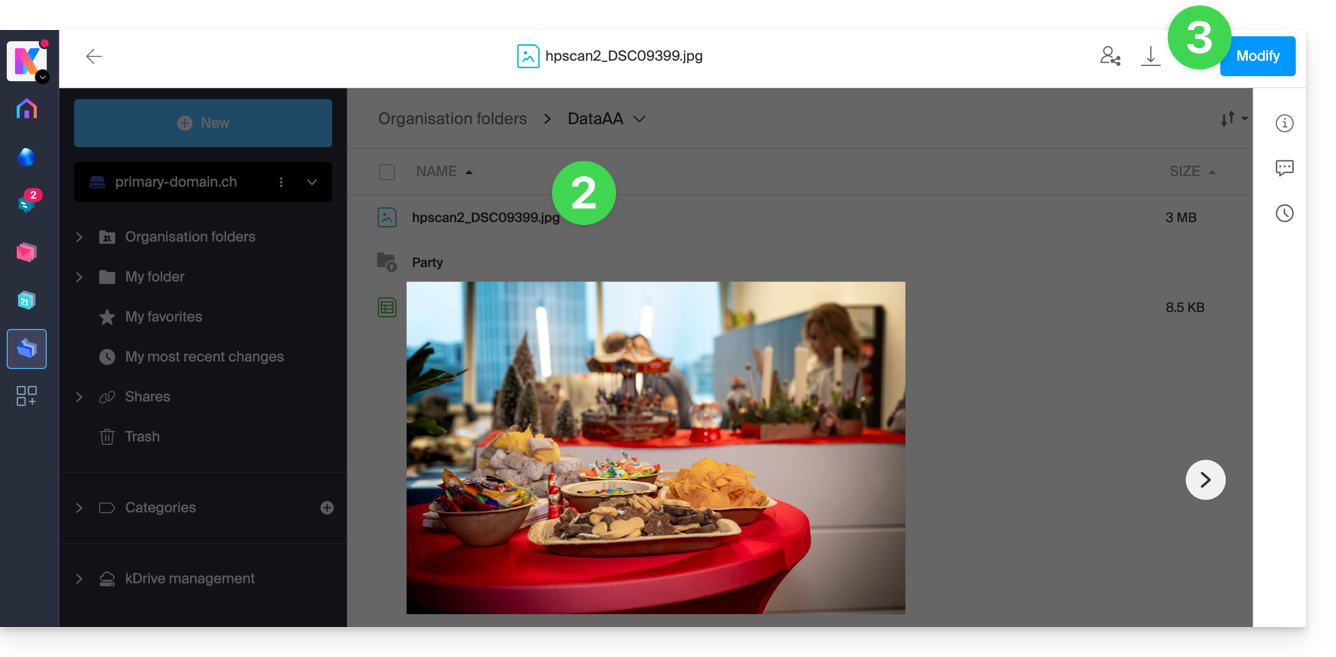
- Open the image file in question.
- Click the Edit button at the top of the document to access the file editor:
- The editor allows you to…
- … rotate the image 90° to the right or left,
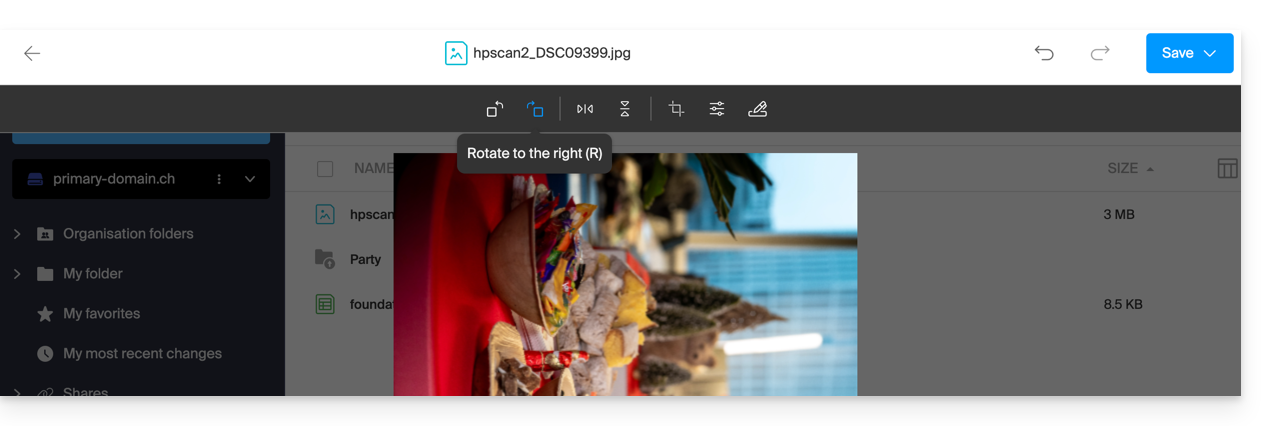
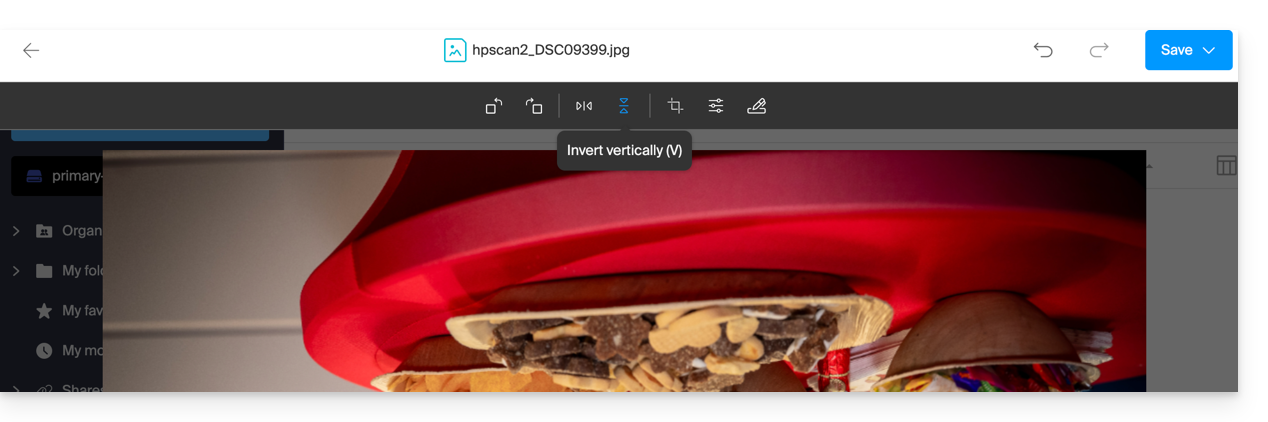
- … flip (mirror) / reverse the image horizontally or vertically:
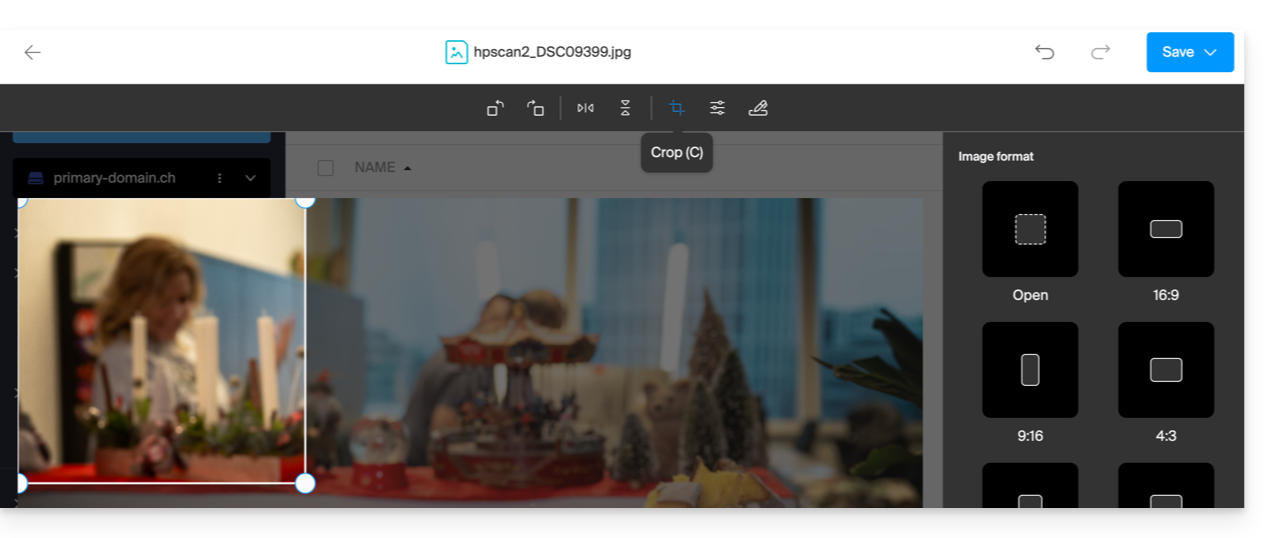
- … crop your image:
- … modify the brightness and contrast of the image:

- … create a signature (only available with paid kDrive offers) and then apply it to the image (refer to this other guide on this subject):

- … rotate the image 90° to the right or left,
- Once finished, save the changes and choose whether to create a copy of the modified document or overwrite the existing file.
Link to this FAQ:
Has this FAQ been helpful?
This guide details the installation of the desktop application kDrive from Infomaniak on a computer equipped with the Linux operating system. This application allows you to automatically synchronize the files on your computer with your online kDrive space.
Preamble
- On this OS, some advanced features of kDrive are not available, such as the Lite Sync option (which allows you to view your files without physically storing them on the disk) or the context menu via right-click (to quickly share a link, for example).
- The kDrive application is officially supported by Infomaniak only on the following configurations:
- Ubuntu 22.04 LTS (and higher versions)
- Desktop environments: GNOME or KDE
- The application may work on other Linux distributions (Debian, Fedora, etc.) or with other desktop environments, but Infomaniak provides no technical assistance for installation or use outside the configurations mentioned above.
Installing kDrive on Linux
Prerequisites
- Download the kDrive application for Linux (this is a .AppImage format file).
- D-Bus (internal communication system present on most versions).
- Gnome-keyring or KWallet (password managers generally included, except on very lightweight Linux versions).
Next:
- Place the downloaded file in a folder of your choice, for example a folder named "Applications" in your personal directory.
- Right-click on the file, select Properties then the Permissions tab.
- Check the box "Allow executing the file as a program".
To have kDrive start automatically when you turn on your computer, add this file to yourApplication startup preferences (or equivalent menu depending on your system).
Known issues and solutions
Synchronization stuck or "Inotify watches" error
If synchronization seems to be stuck (e.g., step 1/10) or if the logs indicate the error Out of memory or limit number of inotify watches reached!, this means that your system limits the number of files it can monitor simultaneously.
- Check the current limit: type the command
cat /proc/sys/fs/inotify/max_user_watchesin a terminal. - Increase the limit: to double the value (for example, to 131072), run:
echo fs.inotify.max_user_watches=131072 | sudo tee -a /etc/sysctl.conf
Then apply the change with:sudo sysctl -p
The application closes upon opening (AppArmor / Wayland)
On some recent versions of Ubuntu (24.04+) or Debian, the AppArmor security feature may block the login window from opening.
- AppArmor solution: install the necessary tools:
sudo apt install apparmor-utils. Then create a rule for kDrive:sudo aa-autodep /path/to/kDrive.AppImageand restart the service:sudo service apparmor restart. - Wayland conflict: if the application crashes under Wayland, try forcing the classic display (X11) by launching the application via the terminal with the following command:
export QT_QPA_PLATFORM=xcb && ./kDrive.AppImage
Icon or window display issues
- Invisible icon (Gnome): install the AppIndicator Support extension. Note that the Dash to Panel extension can make the application menus invisible and is not recommended.
- Window cannot be opened: check that the software libraries
libfuse2andlibdbus-1-devare installed on your system. - KDE Wayland: if the interface is displayed incorrectly, add these lines to your configuration file
~/.config/kdeglobals:[QtQuickRendererSettings]RenderLoop=basicSceneGraphBackend=opengl
Error saving credentials (Keyring)
If kDrive asks for your credentials every time it starts or displays the error Failed to save authentication info to keychain:
- Make sure a password manager (Gnome Keyring or KWallet) is installed and unlocked when you log in.
- Check that the D-Bus service
org.freedesktop.secretsis configured. If you are using KWallet, the file/usr/share/dbus-1/services/org.freedesktop.secrets.servicemust contain:[D-BUS Service]Name=org.freedesktop.secretsExec=/usr/bin/kwalletd5
Using AppImageLauncher
If you are using the AppImageLauncher tool and integration fails, make sure you are using at least version 3.0.0 (beta 2) to support kDrive's compression format.
Diagnostic assistance in case of crash
If the application closes without an error message, you can generate a report for technical analysis by extracting the latest activities from your system with this command:journalctl -r -n 1000 > kdrive_syslog.txt
Link to this FAQ:
Has this FAQ been helpful?
This guide details the priority actions to take if you do not see any difference between your website after a change you made to it, and its previous version before the change. These tips are also valid if you encounter issues while using the Infomaniak product interface.
Preamble
- During your browsing, a web browser saves the data consulted in a reserved space, in order to avoid requesting the data already consulted from the server again, to save time and resources.
- Your cache can contain a lot of data and sometimes the browser gets confused. Sites can then display incorrectly or display an outdated version.
- Clearing the cache ensures that you have the very latest version of the page or folder consulted.
Clearing the web browser cache …
… on Safari
Choose your macOS version to view the corresponding Apple help.
… on Google tools (Chrome, Android, etc.)
View the Google help.
… on Firefox
View the Mozilla help.
… on Edge / Internet Explorer
View the Microsoft help.
Link to this FAQ:
Has this FAQ been helpful?
This guide explains how to save an email (as if you were downloading) but directly to your kDrive.
Preamble
- Save in a few clicks a message received on an address of your Infomaniak Mail Service, this in
.emlformat readable directly within your kDrive interface. - To export all emails from an email address, refer to this other guide.
- To export email attachments, refer to this other guide.
Add an email to kDrive…
… from the Infomaniak Mail Web App
To export the email message of your choice to your kDrive:
- Click here to access the Infomaniak Mail Web App (online service ksuite.infomaniak.com/mail).
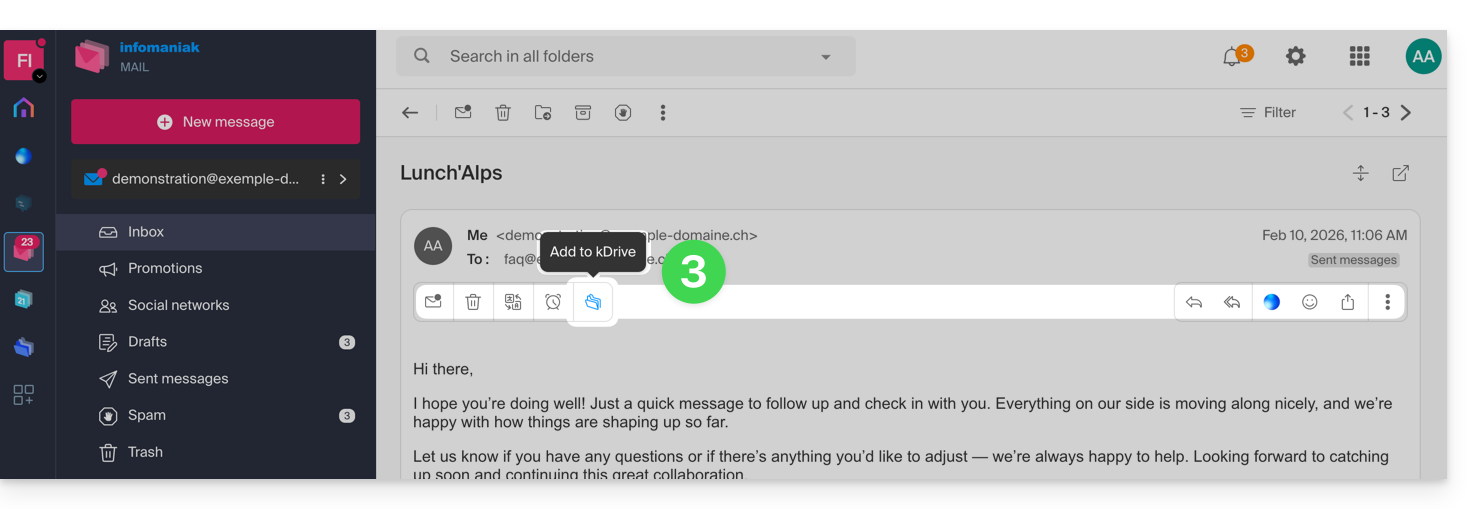
- Open the email you want to save.
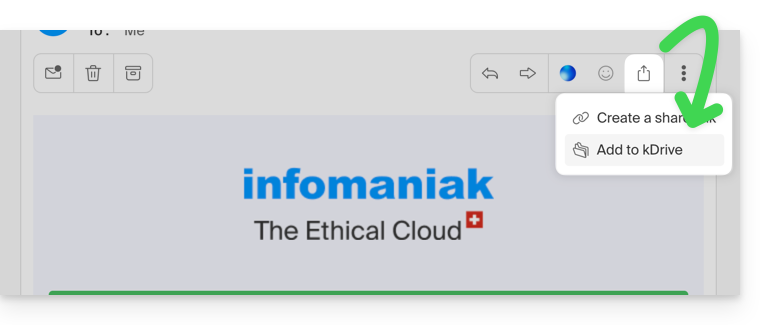
- Then click on the share icon at the top of the concerned message to add to kDrive:
- Then click on the share icon at the top of the concerned message to add to kDrive:
- Otherwise, you can also click on the Add to kDrive icon at the top of the concerned message:
- If the icon is not visible, click on the action menu ⋮ on the right.
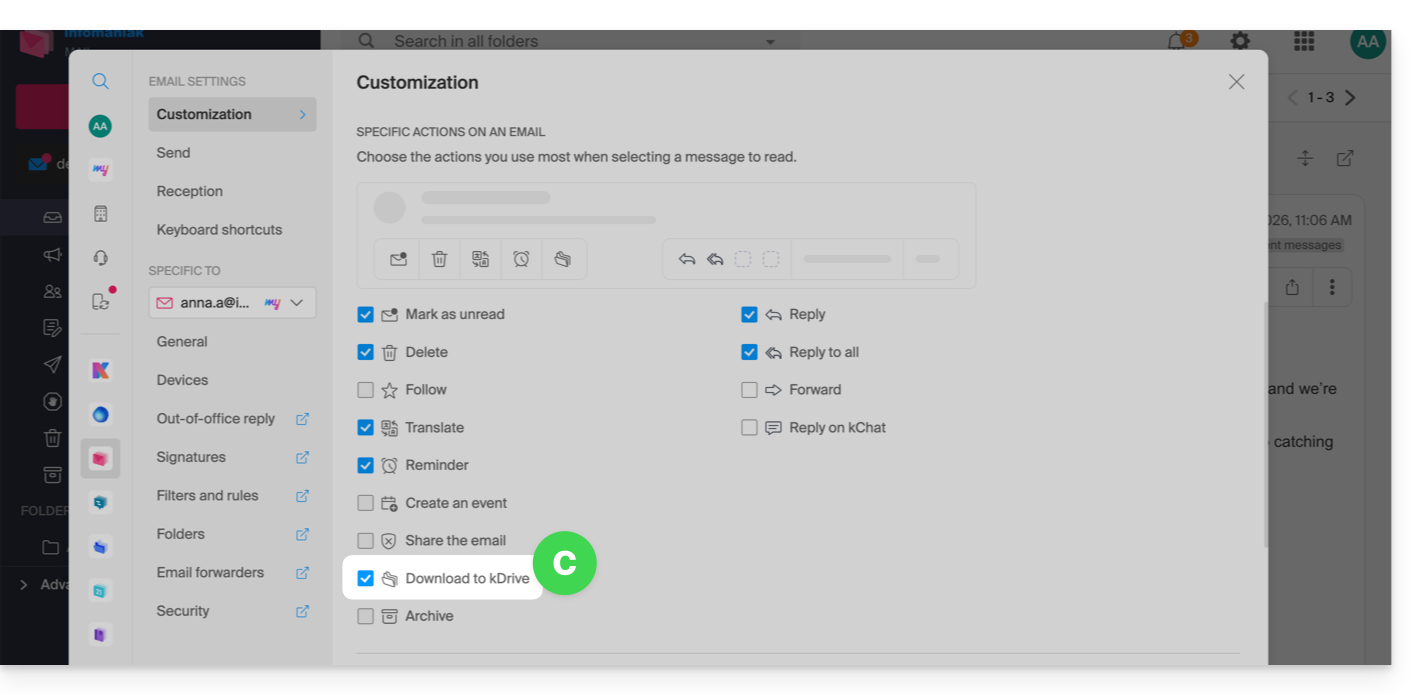
- Then choose to customize the actions:
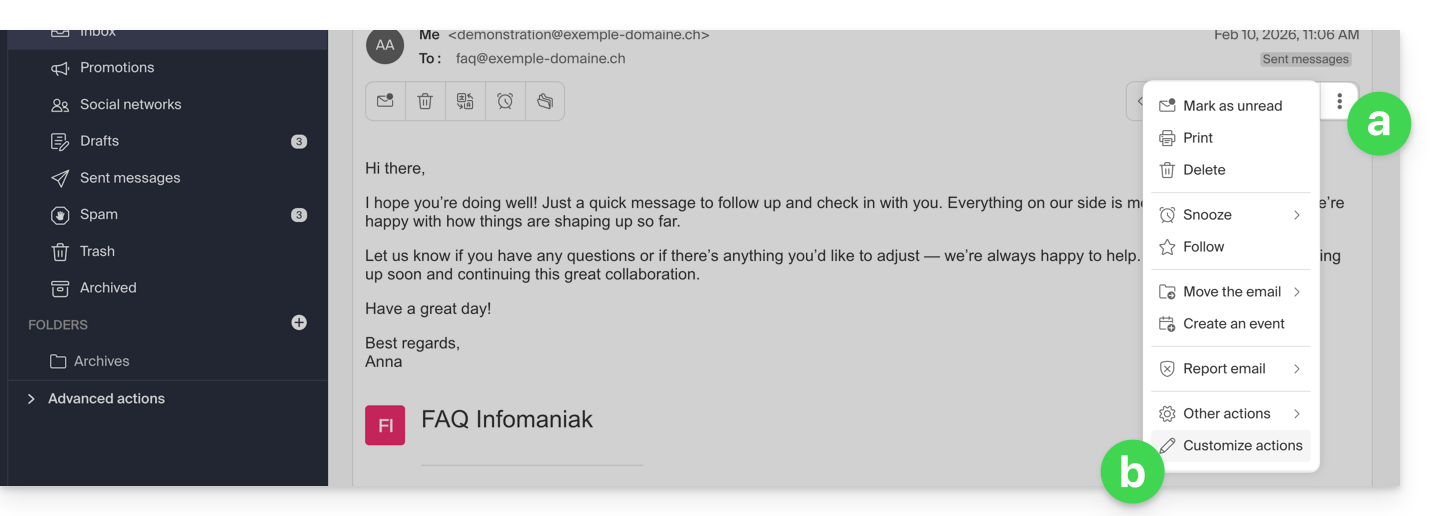
- to add the desired action:
- Choose the kDrive (among those to which you are attached by your Organization) and the desired location on it to save your file - if you rename it, keep the
.emlextension to be able to read it directly in the kDrive interface. - Click on the Add button.
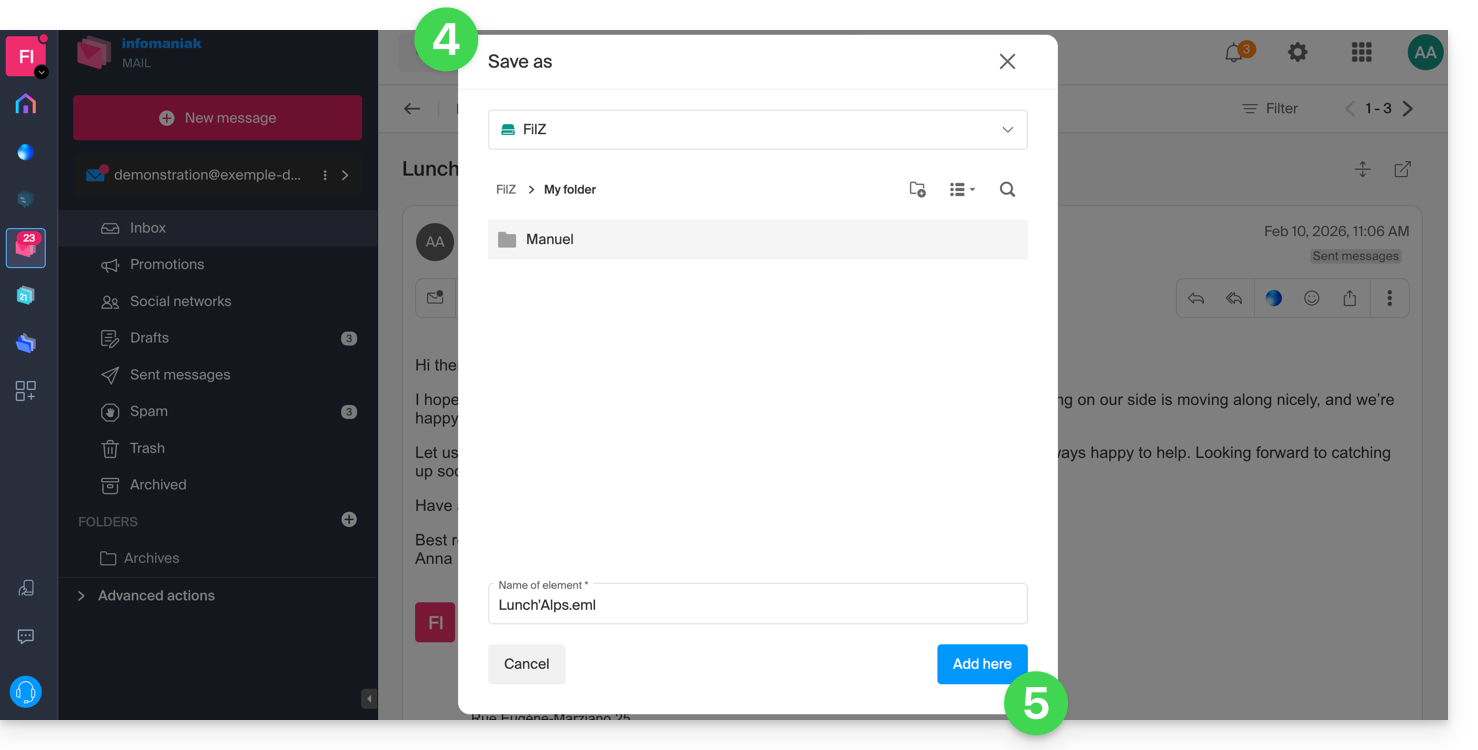
- A message at the bottom of the screen notifies you of the progress of the recording and allows you to go directly to the email save location:
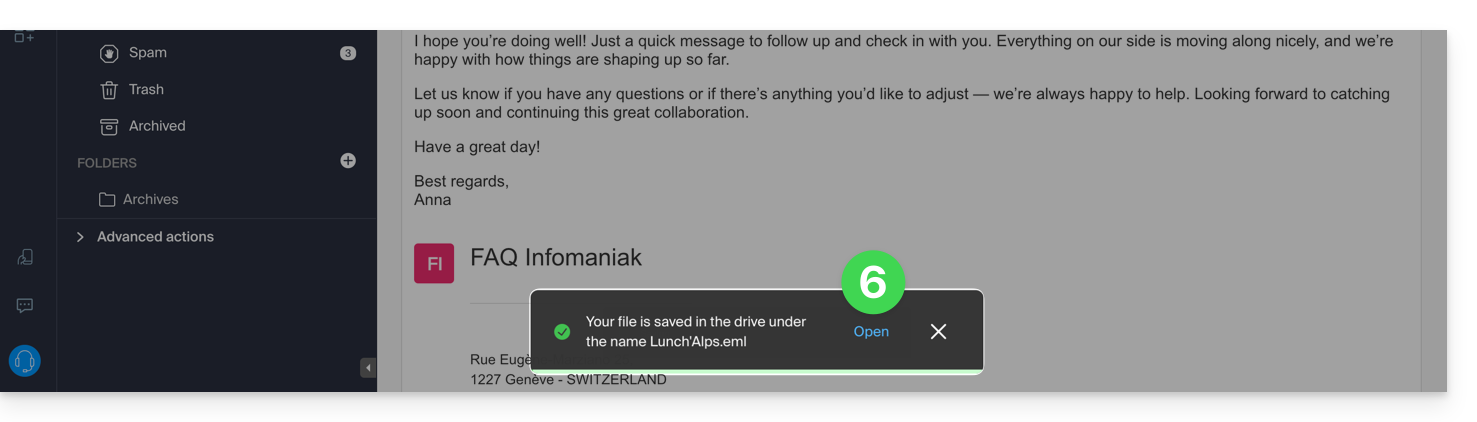
- The saved email can be viewed on kDrive as if you were reading it on Mail directly.
… from the Infomaniak Mail mobile app
To do this:
- Open the email in question on the mobile app Infomaniak Mail (application for iOS / Android smartphone or tablet).
- Click on the action menu ⋮ located at the top right of the displayed email.
- Choose Save to kDrive and follow the same procedure as above in step 4.
Link to this FAQ:
Has this FAQ been helpful?
This guide helps resolve an issue with statuses (OK, syncing, etc.) that may occur with files and folders in the kDrive tree in Windows Explorer, in case these indications no longer match reality.
Resolve the issue of incorrect statuses
The problem is visible in the kDrive log as follows:
20240616_2008_kDrive.log:2024-06-16 20:19:01:349 [I] (6732) socketlistener.cpp:46 - Sending SocketAPI message --> STATUS:OK:D:\kDrive\Photos\Personnal\2024\06_June\0616_Bern\HP7A6181.JPG to 0000025197E46A60The application sends the correct file status to the explorer, for example here the status sent is OK, the status icon displayed should be the green circle, but the displayed status does not match:
Restart Windows Explorer
To do this:
- Access the task manager by pressing
ctrl shift + esc. - In the task manager, search for Windows Explorer.
- Right-click on it and click on End Task.
- In the upper left corner of the task manager, click on File.
- Click on Run a new task.
- Type:
explorer.exe. - Press Enter.
Check system integrity and repair it
To do this:
- Open the command prompt with administrator access.
- Type each command below and wait for the analysis to complete:
SFC /scannow
DISM /Online /Cleanup-Image /CheckHealth
DISM /Online /Cleanup-Image /ScanHealth
DISM /Online /Cleanup-Image /RestoreHealth
Link to this FAQ:
Has this FAQ been helpful?
This guide explains how to sign a file in PDF format on the Web app kDrive (online service ksuite.infomaniak.com/kdrive). Refer to this other guide if you are looking for information on other possibilities when editing this type of document.
⚠ Available with:
| kSuite | |
| Standard | |
| Business | |
| Enterprise | |
| my kSuite+ | |
| kDrive | Solo |
| Team | |
| Pro |
Preamble
- The Web app kDrive natively integrates an editor that allows you to sign a PDF document online.
- A user's signatures are personal and can only be used by that user on all kDrive instances they have access to.
- Your files are never analyzed and are exclusively stored in Switzerland.
Create and apply your signature to a PDF
To access kDrive and manage PDF document signatures:
- Click here to access the Web app kDrive (online service ksuite.infomaniak.com/kdrive).
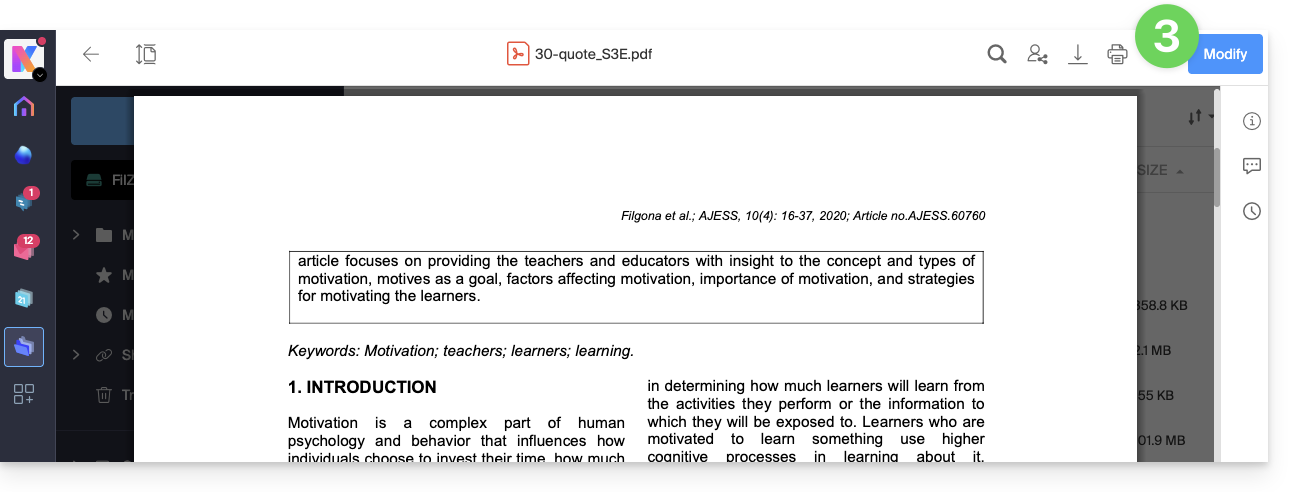
- Open the relevant PDF document:
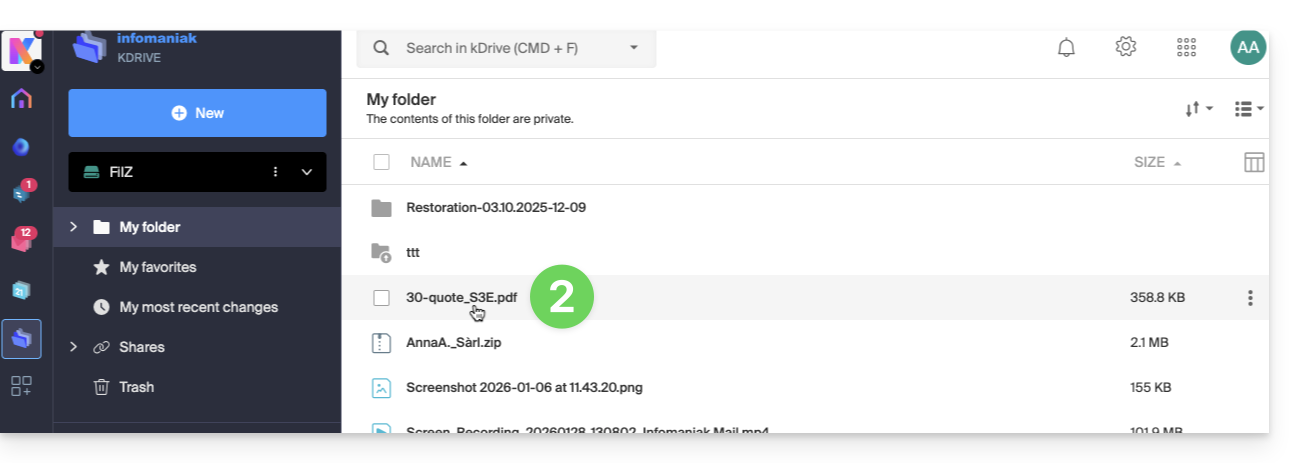
- Click the Edit button at the top of the document to access the file editor:
- Click the Signature icon in the toolbar:
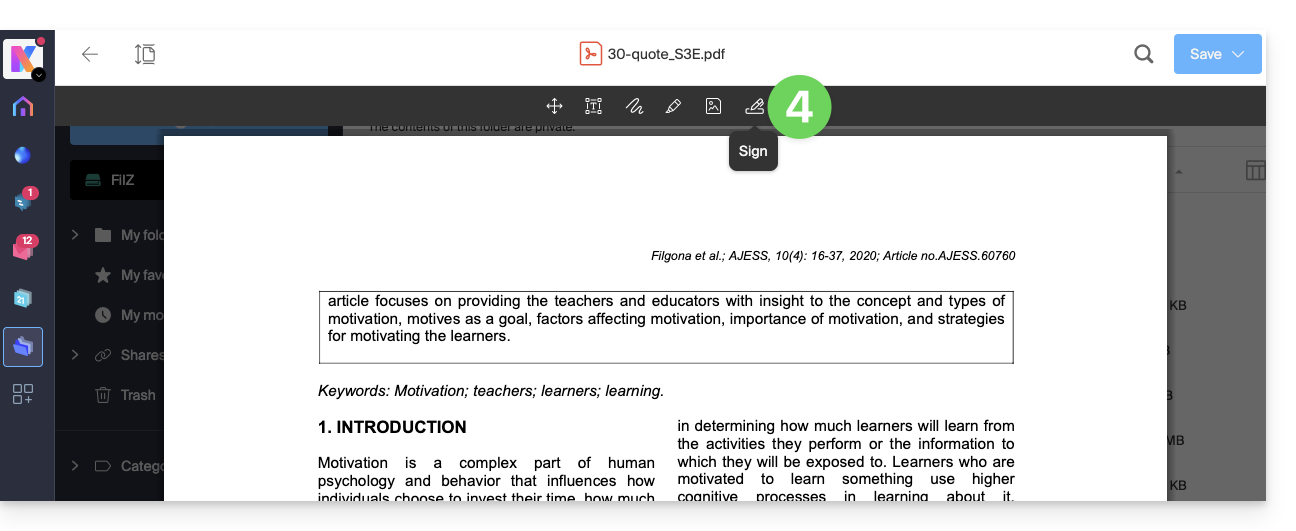
- Click on Add a signature.
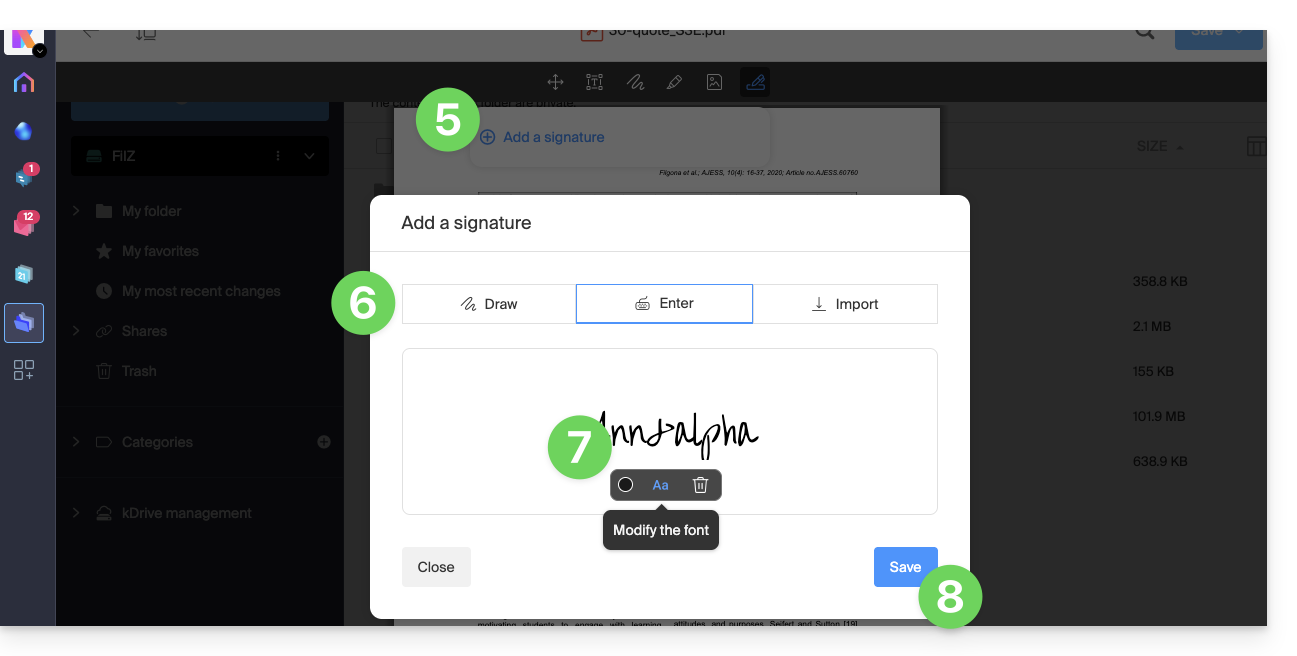
- Choose the signature creation method:
- Draw freehand with the mouse.
- Type text and choose the handwriting font (example below).
- Import an image (scan of your handwritten signature, for example) from your device.
- Type the desired text for the signature and click on the button Aa to choose the handwriting style.
- Click on Save:
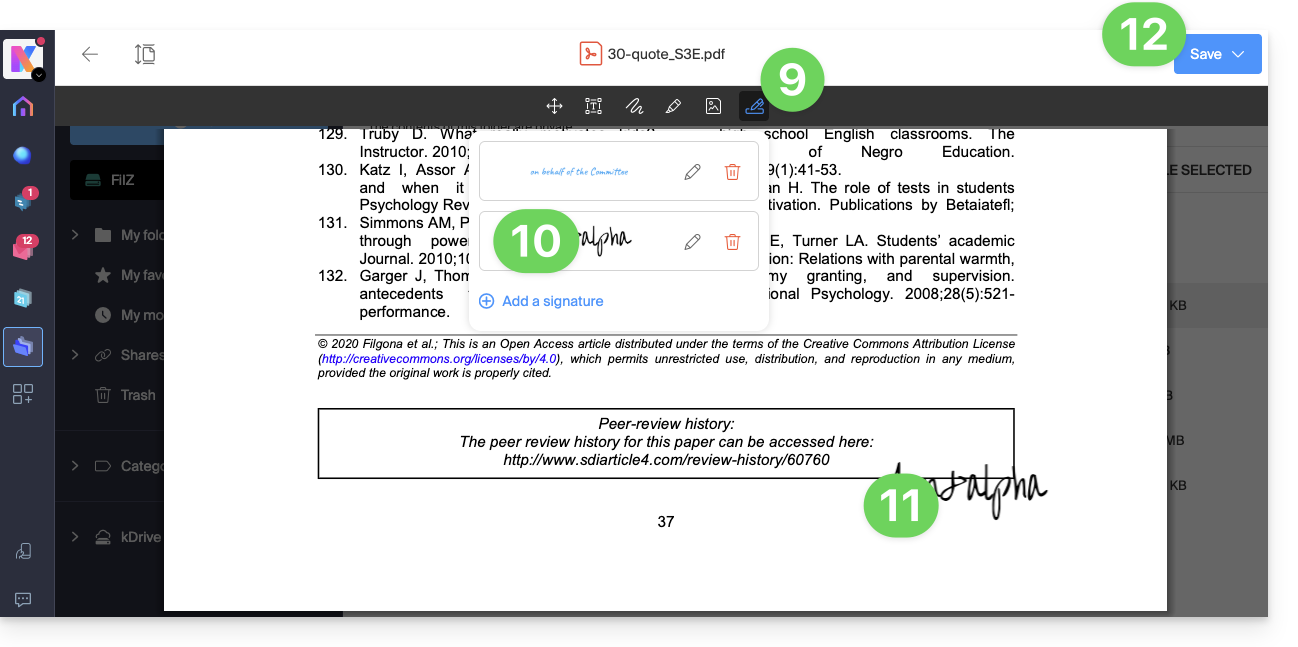
- Once a signature is created, simply click again on the Signature icon from any PDF to display your created signatures.
- Click on the signature to insert it transparently into the document.
- Once inserted, alternative text can be added to facilitate document accessibility:
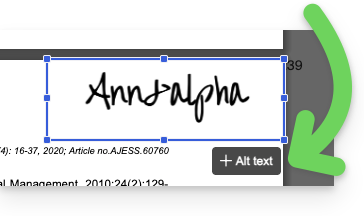
- Once inserted, alternative text can be added to facilitate document accessibility:
- The signature can be moved and resized as desired.
- Once finished, to save, click once on the button at the top right, then choose whether to create a copy of the modified document or overwrite the existing file:
Link to this FAQ:
Has this FAQ been helpful?
This guide explains how to delete the cache (data cached after various operations, unnecessarily taking up storage space on your device) from the mobile app kDrive (app for iOS / Android smartphone or tablet).
Delete the kDrive cache...
... on iOS (iPhone, iPad)
- Open the mobile app kDrive (iOS).
- Tap on the photo/initials at the bottom right.
- Tap on Settings.
- Tap on Local Storage Management.
- Delete the data you want, cache for example (or import which also allows you to unblock any potentially blocked imports)...
... on Android
- Open the settings of the Android phone.
- Go to the Applications or Apps & notifications section for example.
- Tap on Show XX apps if the device does not display them by default.
- Tap on kDrive.
- Go to the Storage or Storage space and cache section for example.
- Tap on Clear cache.
- Be careful if you click on the Clear storage button, you will delete all user data (login credentials for example) in addition to the cache.
Link to this FAQ:
Has this FAQ been helpful?
This guide explains how to change your kDrive offer, the collaborative storage solution on a 100% Swiss Made cloud.
Preamble
- kDrive is the name given to the file storage/sharing service offered by Infomaniak in Switzerland.
- kDrive is accessible for free or by subscription depending on whether you are alone using it or if you want collaborators to also access it.
- kDrive exists as an independent product, or as a product among others within the kSuite & my kSuite / my kSuite+ suite.
- To help you identify the offer most suited to your needs, refer to this other guide.
If you have been invited to view/collaborate on a file from a kDrive, it is possible that you do not actually own the kDrive product; you only have access to the kDrive managed by someone else. You cannot therefore interact with the current offer.
Determine the current kDrive offer
From the kDrive Web App
To find out which offer you currently have:
- Click here to access the Infomaniak kDrive Web App (online service ksuite.infomaniak.com/kdrive).
- Click on Manage to go to the offer change and view the current offer:
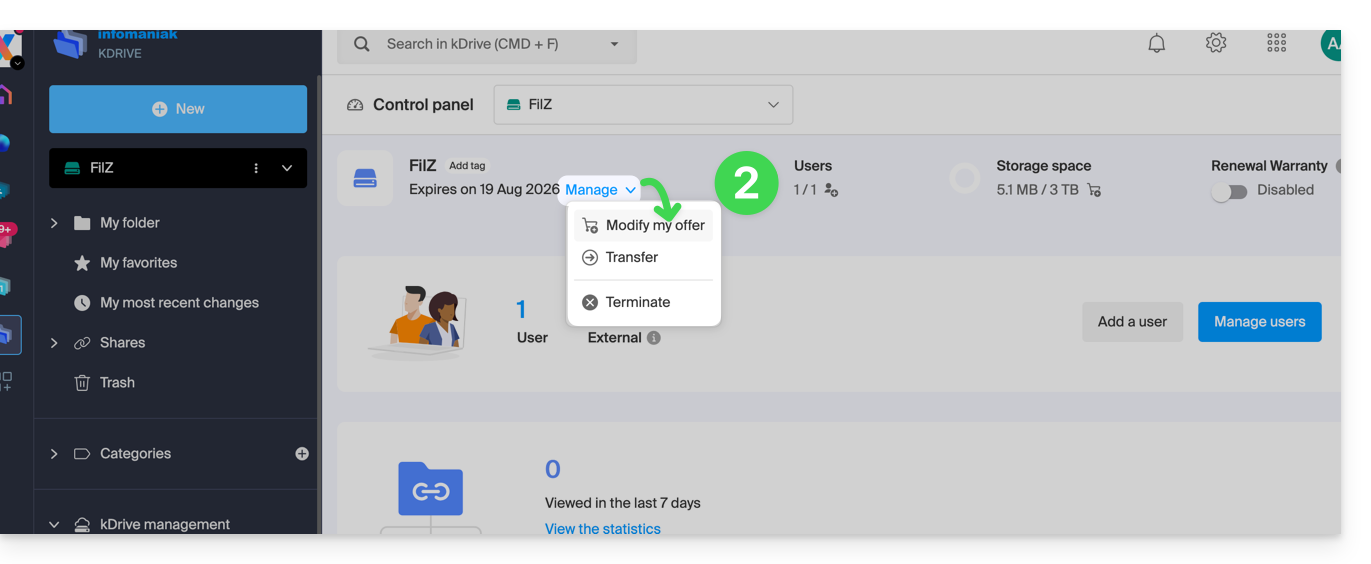
If no dashboard is accessible at the bottom left, you have limited features (e.g., my kSuite offer) that can be unlocked by upgrading to a higher offer: 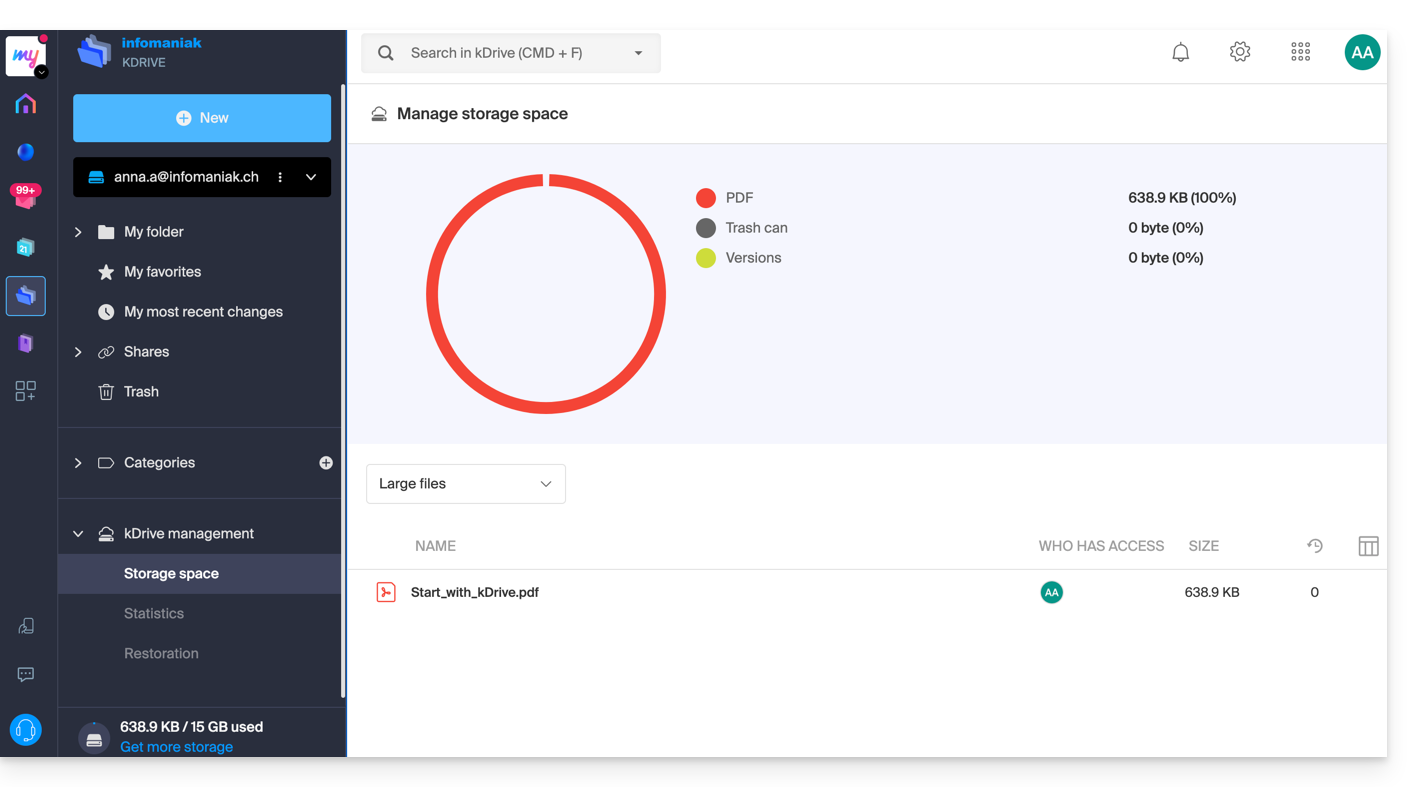
From the Infomaniak Manager
You can also find out about the current offer from the Manager, the dashboard of your products.
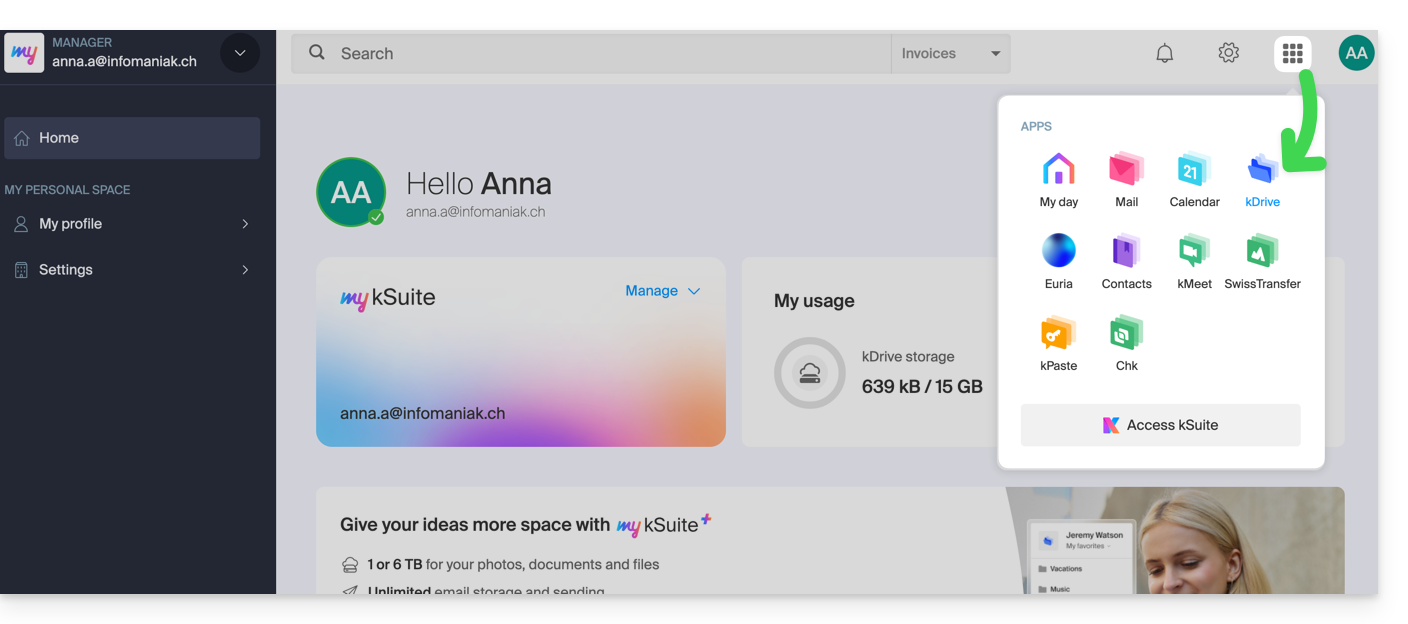
If no kDrive product is present in the Manager, the kDrive app is accessible only among the apps at the top right, because you have…
- either a my kSuite / my kSuite+ offer:
- or you have been invited during a document share (you are therefore an external user of kDrive):
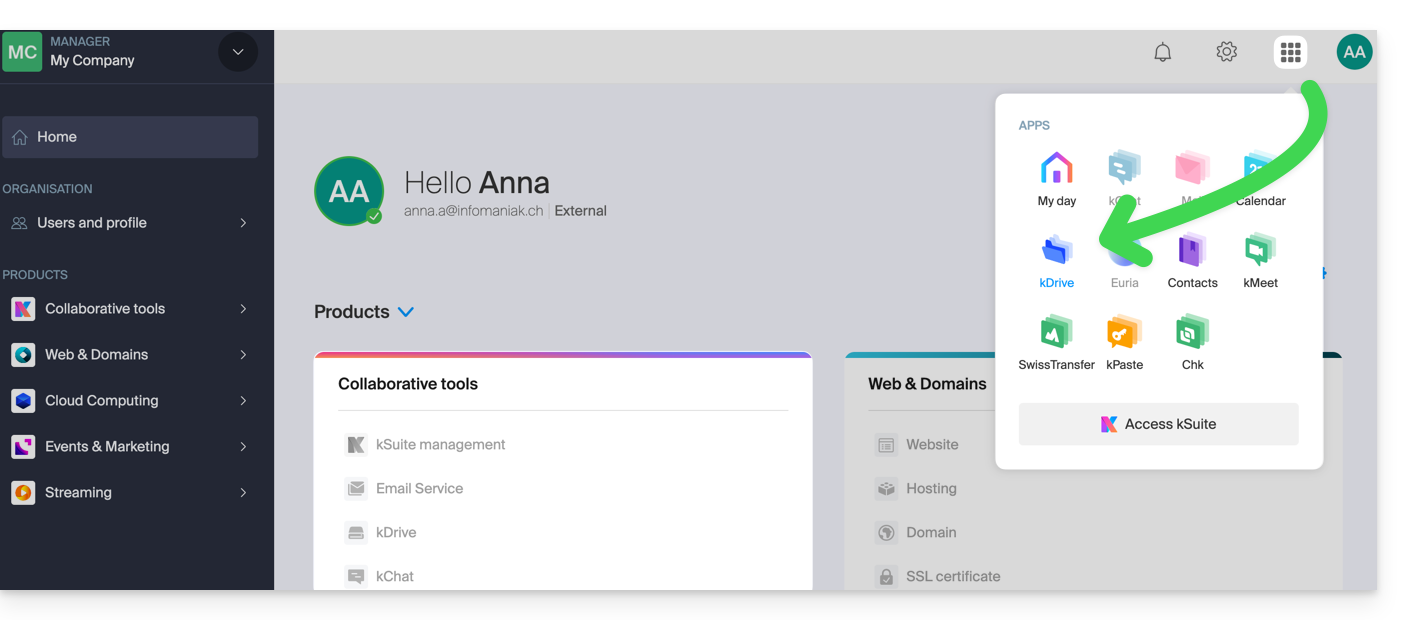
Otherwise, find your kDrive among your collaborative tools: 
Change the current kDrive plan
Your kDrive can evolve with you. When your needs expand — whether to welcome new collaborators, integrate a family member, or store a growing volume of data — easily increase its capacity to unlock its full potential.
Prerequisites
- Have sufficient permissions within the Organization.
To modify your current kDrive offer:
- Click here to access the Infomaniak kDrive Web App (online service ksuite.infomaniak.com/kdrive).
- Click on Manage to go to the offer change and view the current offer:
You can then switch to a higher offer from the Infomaniak Shop: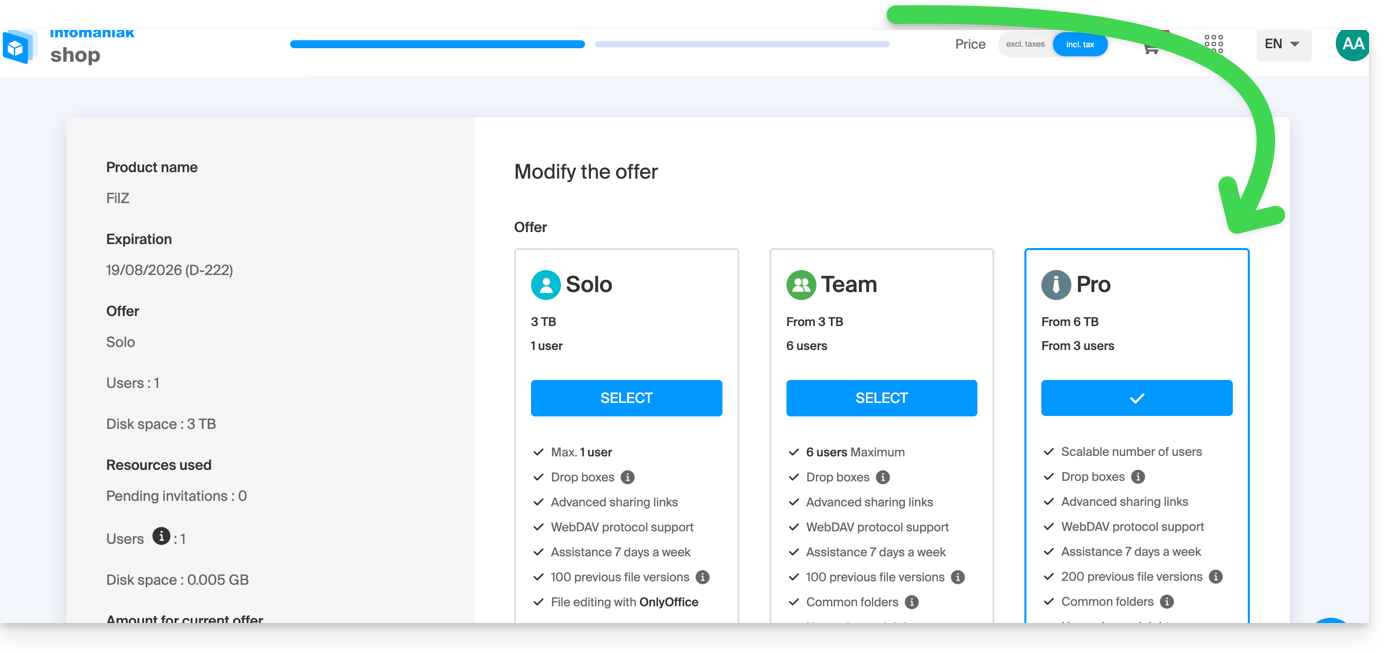
If, for example, by choosing a new offer, you increase the quota of users that can be added to your kDrive, refer to this other guide to invite them to join you.
Link to this FAQ:
Has this FAQ been helpful?
This guide explains how to modify access rights to products for a user in your Organization on the Infomaniak Manager.
Preamble
- Since you opened your account with Infomaniak, you are part of at least one Organization.
- If you were alone and it was not an invitation, an Organization was created in your name and you automatically become the legal representative.
- Otherwise, you belong to the Organization that invited you (to join its kSuite, to manage a product, etc.).
- It is possible to modify a user's role within your Organization.
- You can then define whether a user…
- … is part of your Organization and should become:
- Legal representative
- Administrator
- Collaborator (this is the part that is detailed below…)
- … is external to your Organization (limited rights):
- External users are not included in the sharing of calendars and address books for the entire Organization.
- … is part of your Organization and should become:
Who can access what…
Prerequisites
- Switch beforehand to the desired Organization if you do not find the expected list of users.
- Be Administrator or Legal representative within the Organization.
- Have added a user as a collaborator.
The guide below allows you to manage access to products for collaborators and external users. Indeed, a legal representative or an Administrator already has access to all existing products within the Organization and visible on the Infomaniak Manager.
To modify the product access of an Organization user:
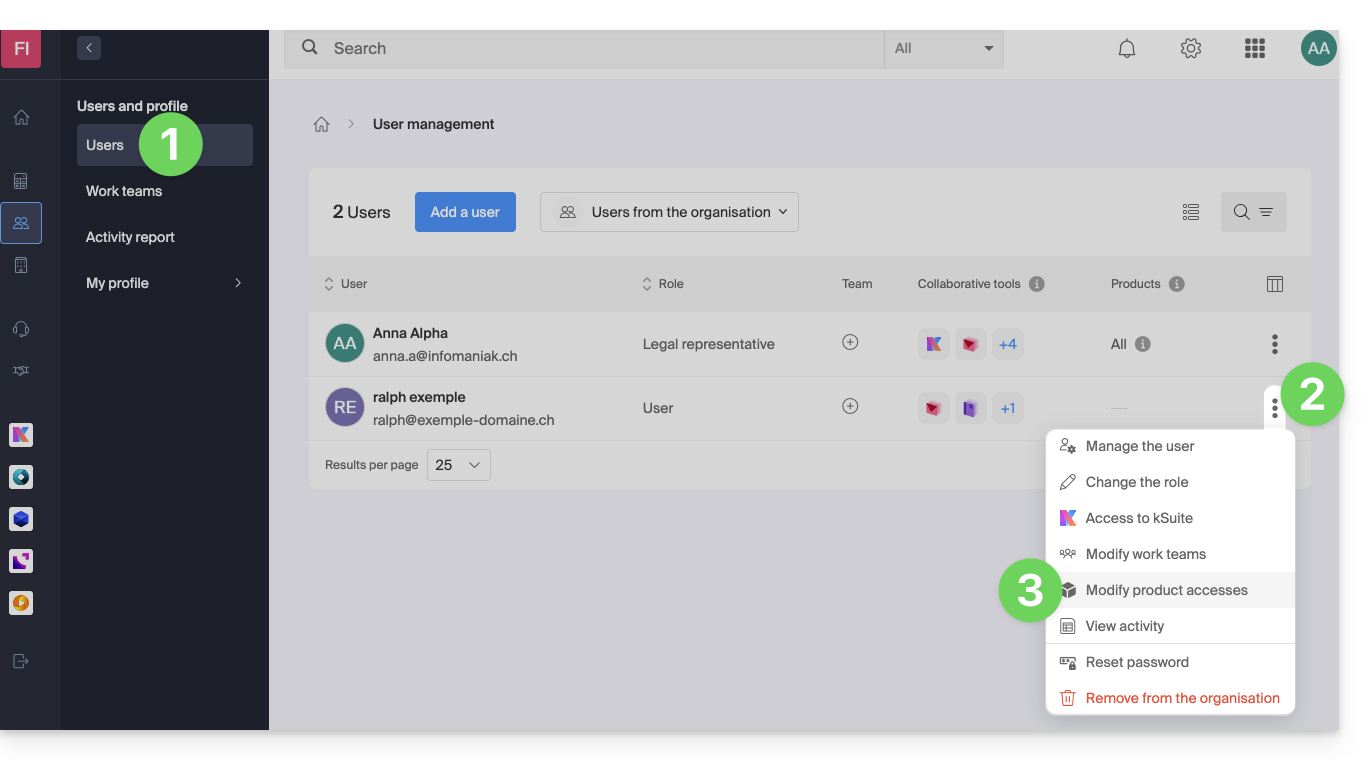
- Click here to access user management on the Infomaniak Manager (need help?).
- Click on the action menu ⋮ located to the right of the user concerned.
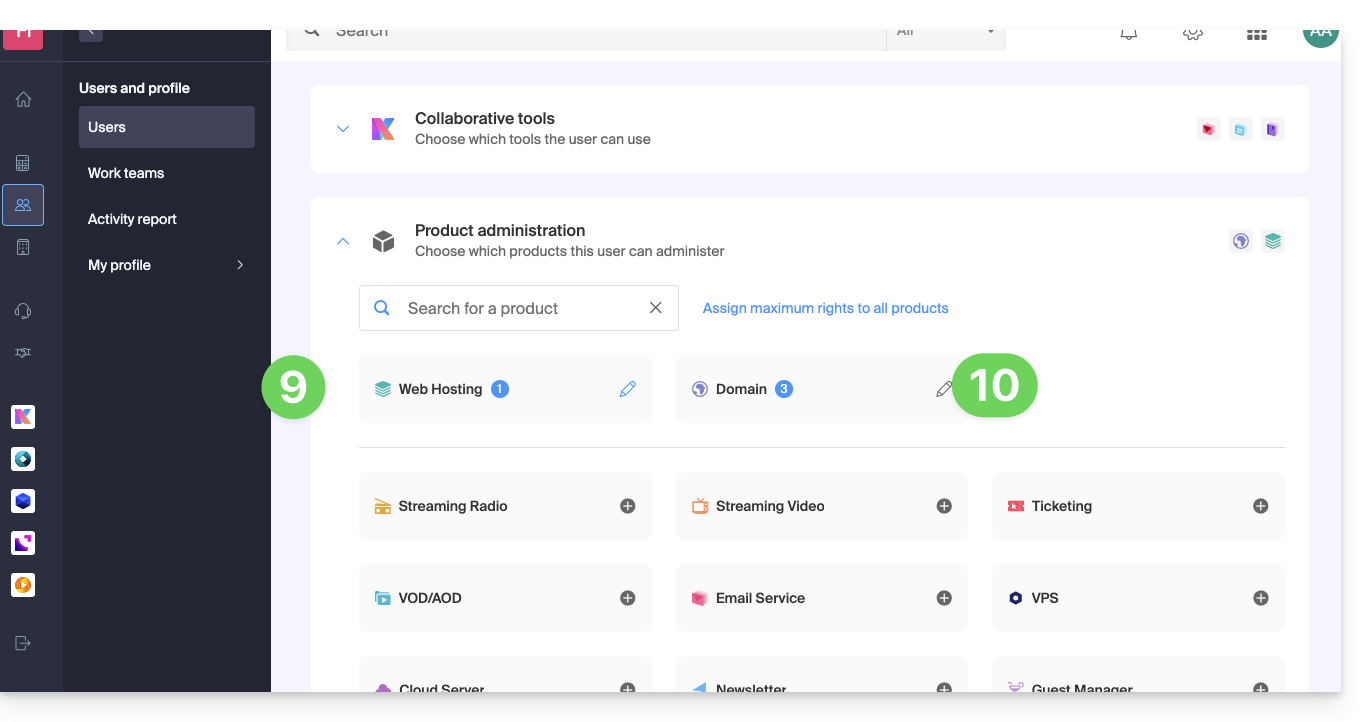
- Click on Modify product access:
- You can grant access to everything with maximum permissions in 1 click.
- Otherwise, click on the product category to which you want to grant access.
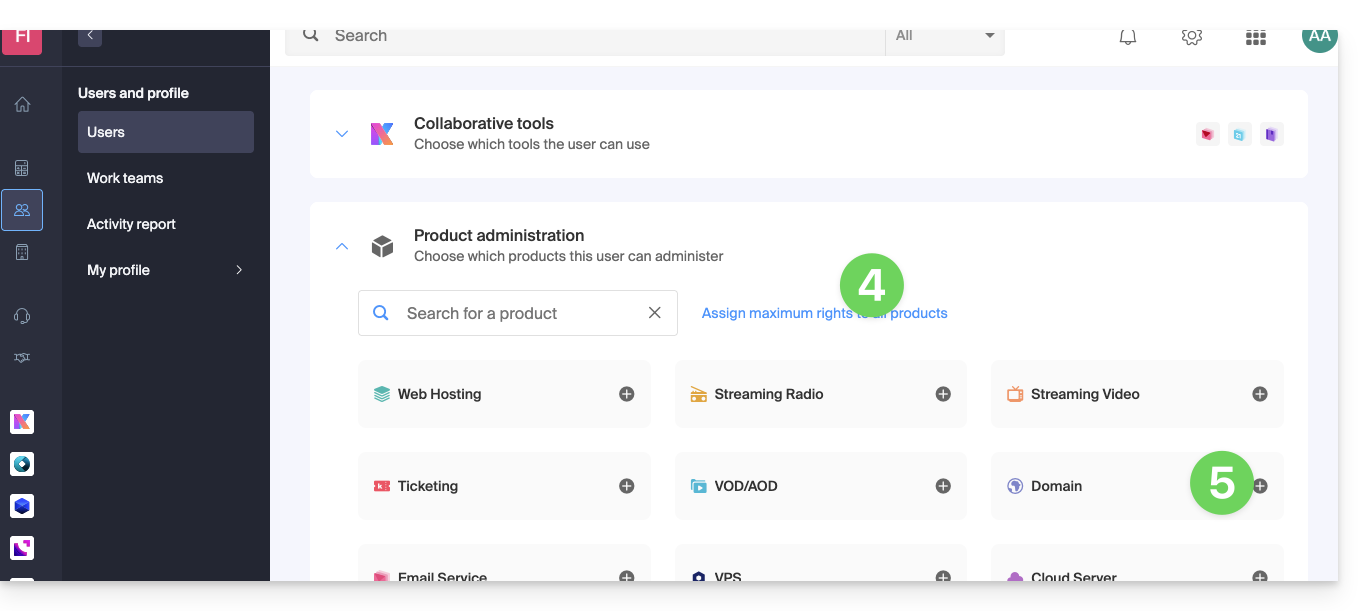
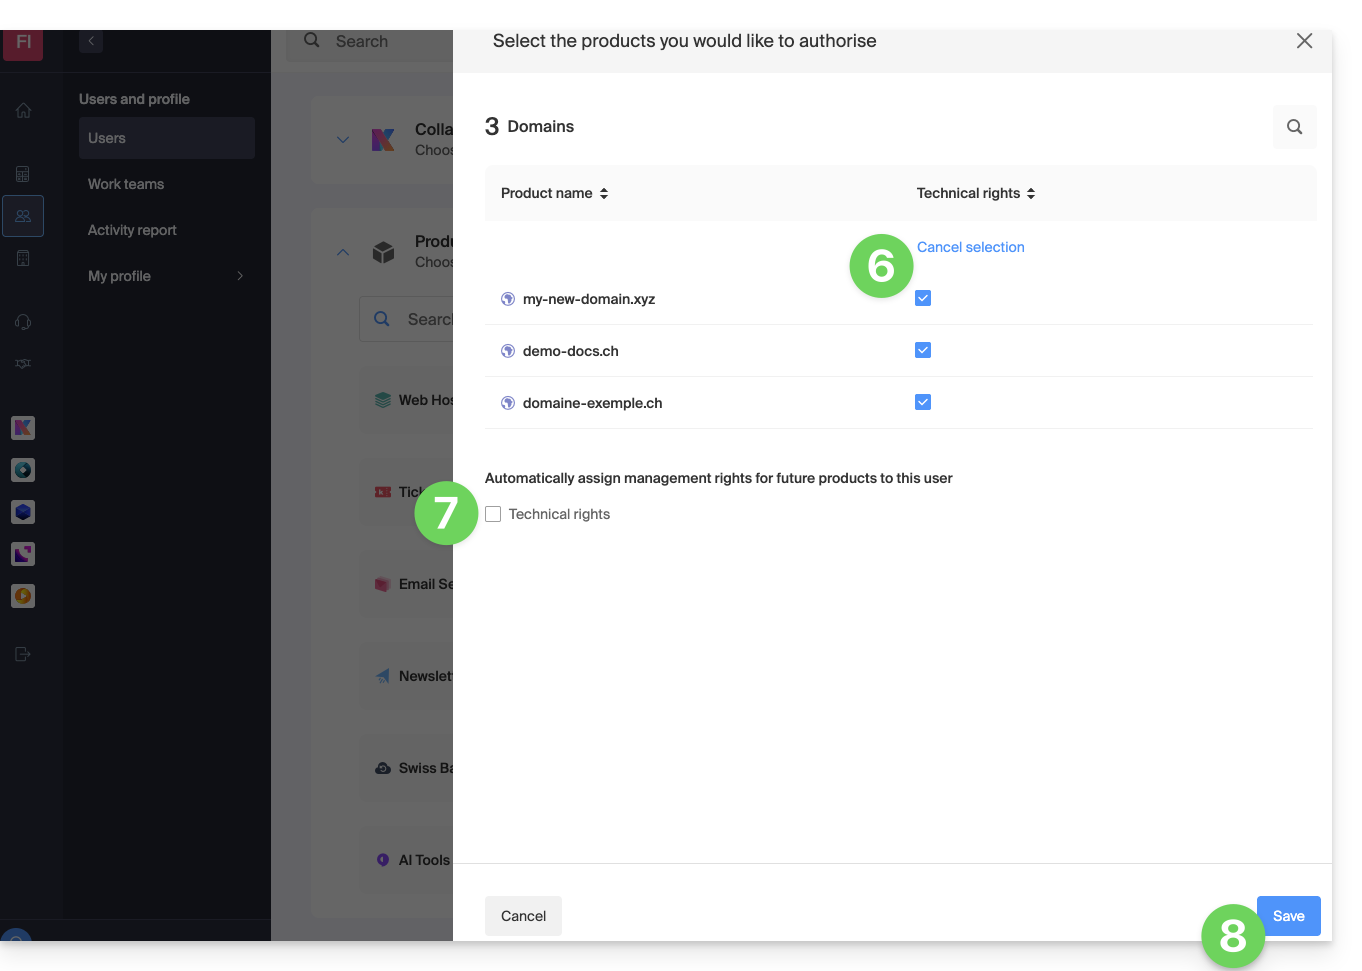
- Select the necessary product(s).
- If you have selected multiple products, decide whether a future additional product should automatically be visible to the user (and with what type of permissions).
- Click the Save button:
- Rights are granted immediately.
- Click the pencil icon ✎ to modify permissions:
- Restart at step 5 if you need to grant access to multiple products.
Service usage / Service management
Be careful, on your product table, it is important to distinguish between product access (type kDrive for example, within the kSuite) and product management access: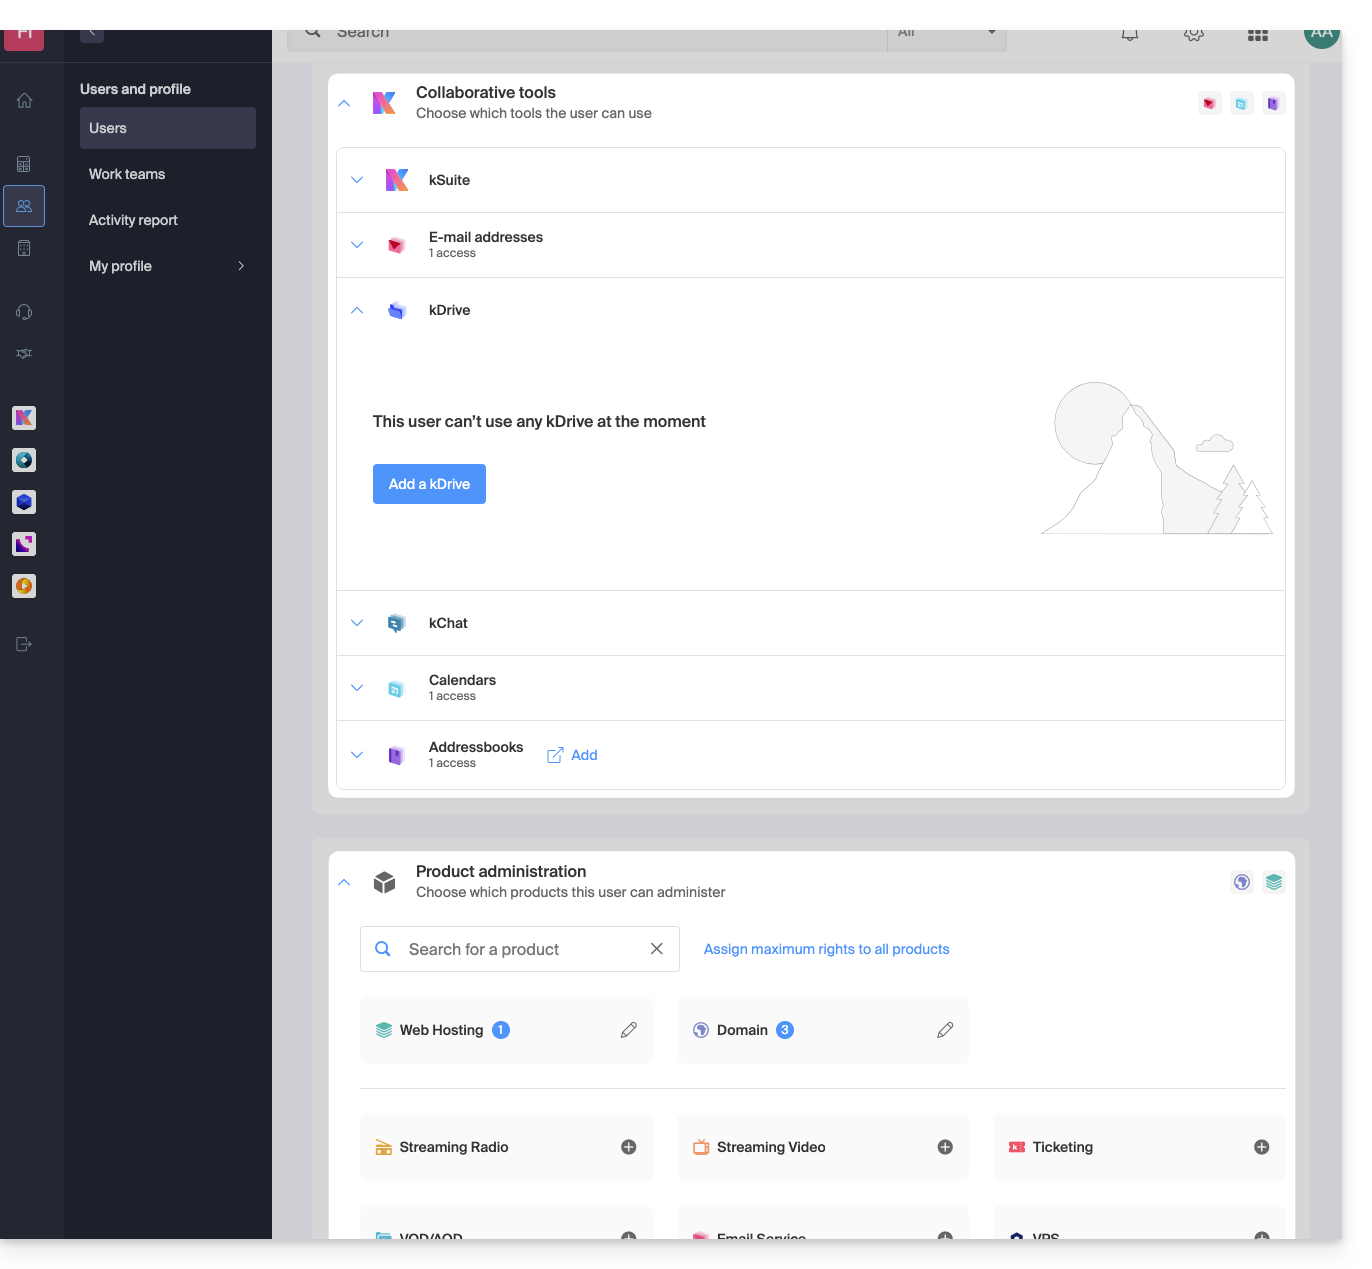
It is possible to authorize a user to use kDrive (they will be able to create a PDF for example) without granting them kDrive service management rights (they will not be able to change the offer, invite a new user, terminate, etc.).
Technical rights / Statistical rights
With certain services like kDrive, it is possible to give a collaborator TECHNICAL and/or STATISTICAL rights (adds access to the dashboard, share links, storage statistics, active users, connected devices, activity on kDrive):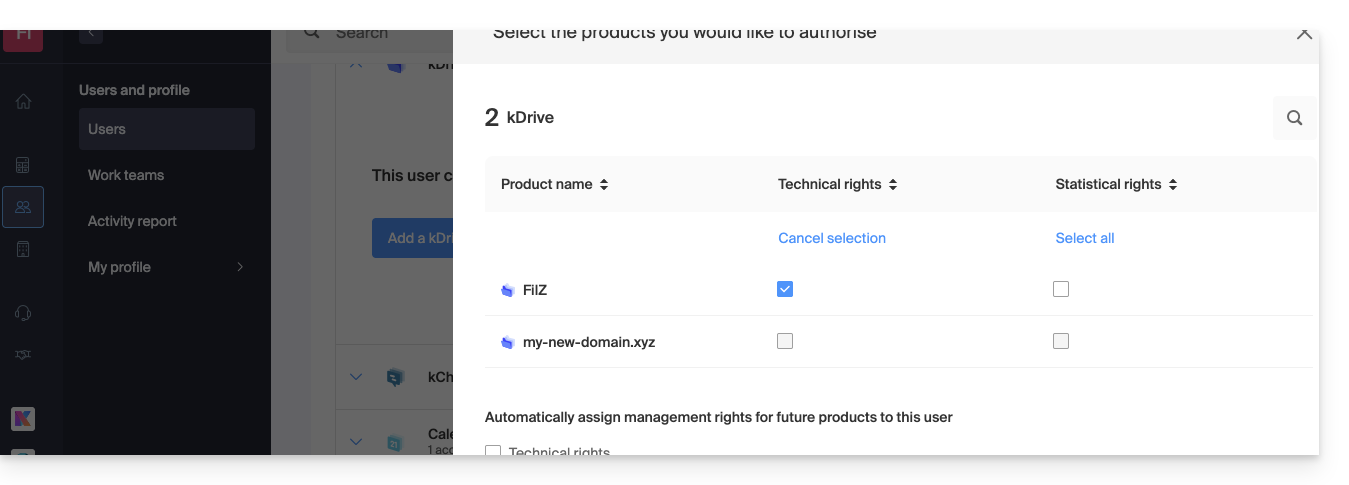
Other services like domain names do not have a STATISTICAL section: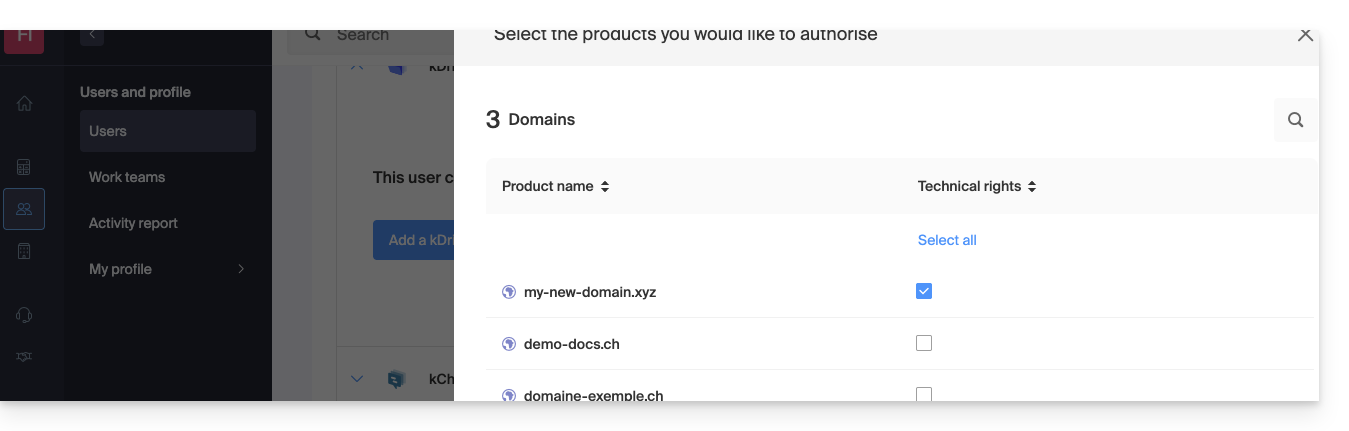
Certain specific services like ticketing allow granting even more detailed rights: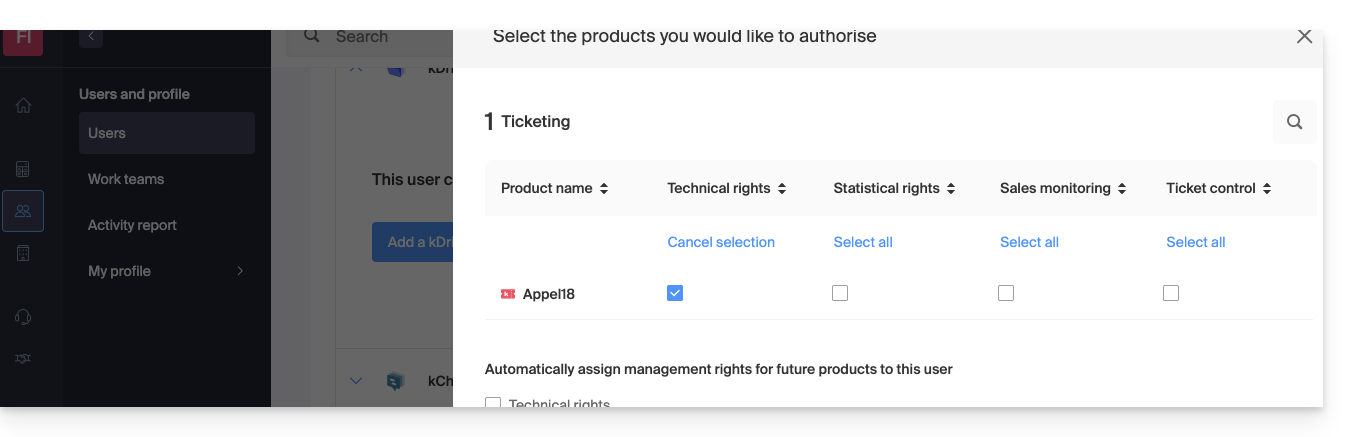
Easier access: Work Teams
To facilitate the addition of access rights to a product that is on your Organization, there are Work Teams. These allow you to create groups that are linked to Infomaniak products with the desired rights, very practical for giving a new collaborator in your Organization access to the products they will need in their daily activities.
Link to this FAQ:
Has this FAQ been helpful?
This guide explains how to modify the role and permissions of a user so that the latter has only a restricted legal role or access to only certain features of your Organization present in the Manager Infomaniak.
Preamble
- Since you opened your account with Infomaniak, you are part of at least one Organization.
- If you were alone and it was not an invitation, an Organization was created in your name and you automatically become the legal representative.
- Otherwise, you belong to the Organization that invited you (to join its kSuite, to manage a product, etc.).
- You can define if a user…
- … is part of your Organization and if they must have the role of:
- Legal representative
- Administrator
- Collaborator
- … is external to your Organization (limited rights):
- External users are not included in the sharing of calendars and address books for the entire Organization.
- … is part of your Organization and if they must have the role of:
Modify the rights/permissions of a user
Prerequisites
- Switch beforehand to the desired Organization if you do not find the expected list of users.
- Be Administrator or Legal representative within the Organization.
- Be aware of the different permissions (access rights to products for example) and administrative contact preferences of a user within an Organization.
- Be careful, it is impossible to remove a legal representative if there is no other legal representative.
To modify the role of a user:
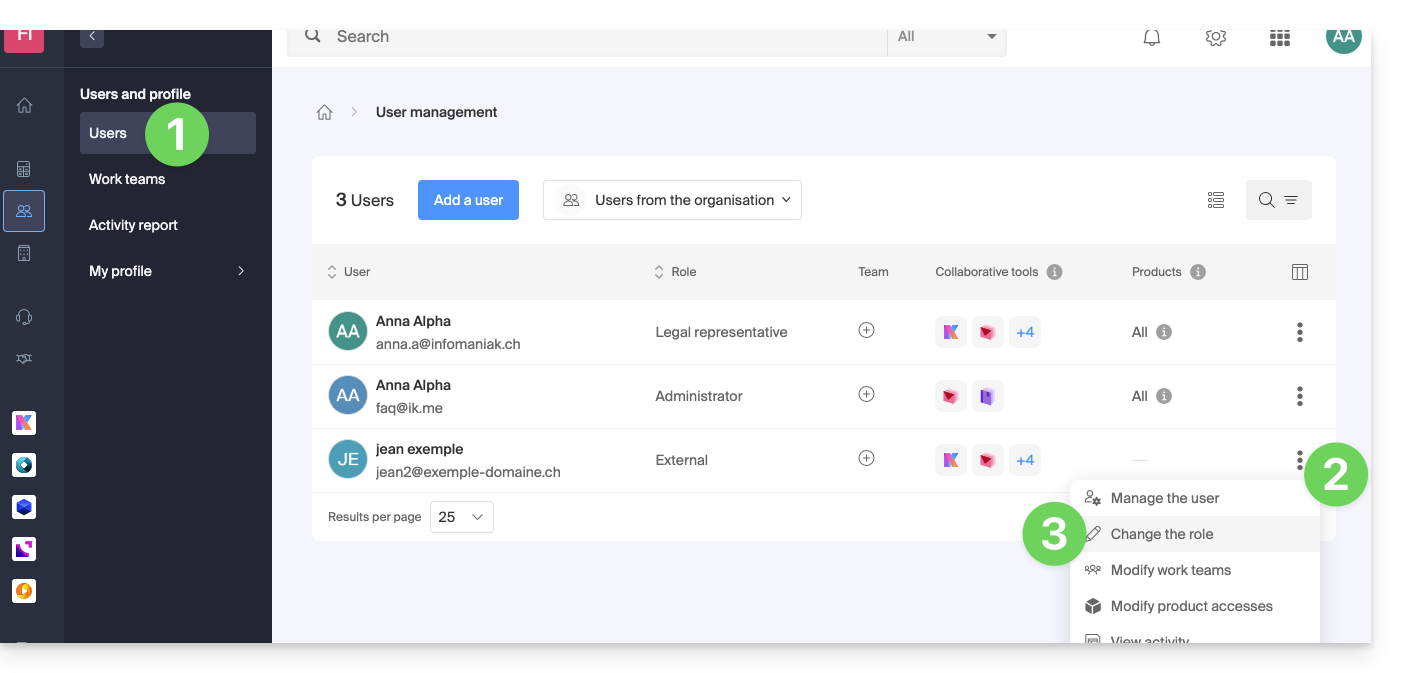
- Click here to access user management on the Infomaniak Manager (need help?).
- Click on the action menu ⋮ located to the right of the user concerned.
- Click on Modify the role:
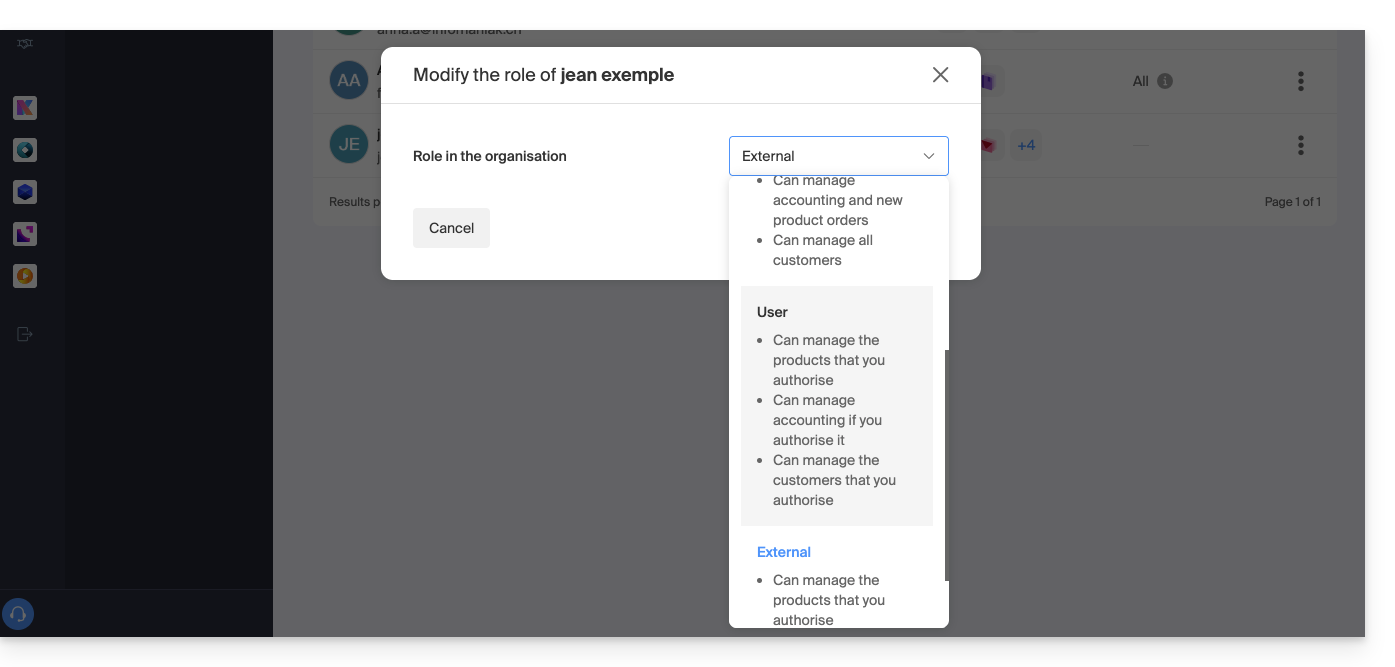
- Modify the desired role:
- Click on the Save button.
A summary email is sent to the user whose role is modified.
If you assign the user the role of a simple collaborator…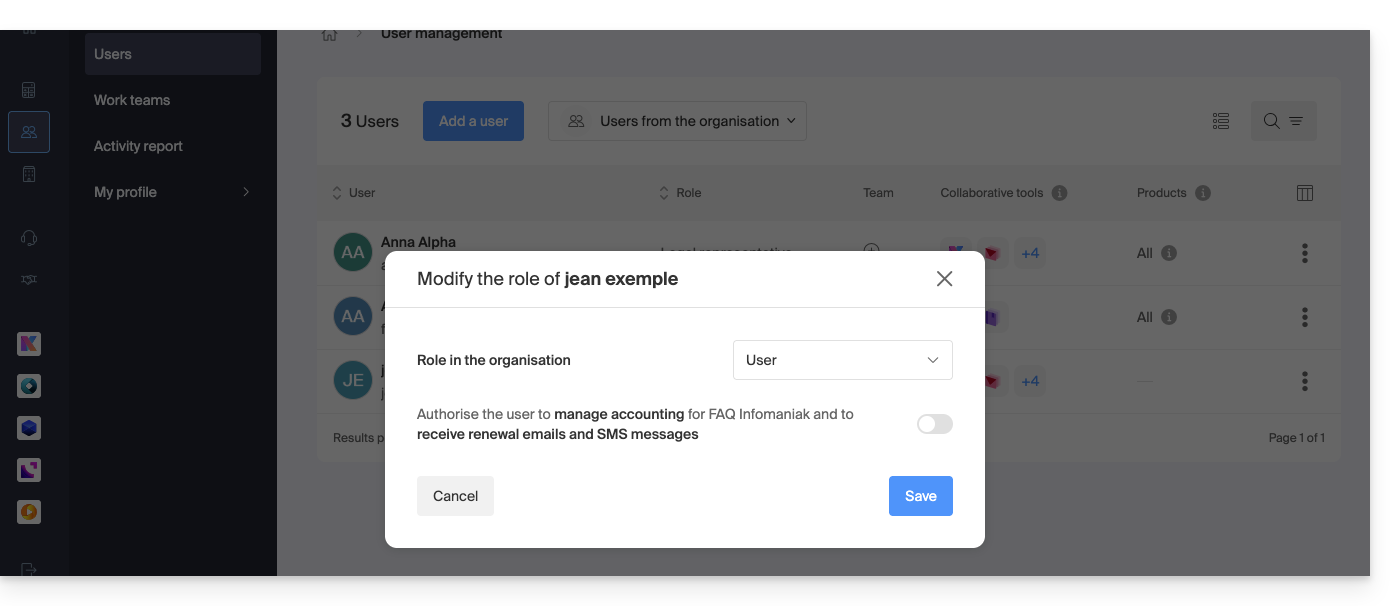
… you will be able to modify the services to which they can access; refer to this other guide: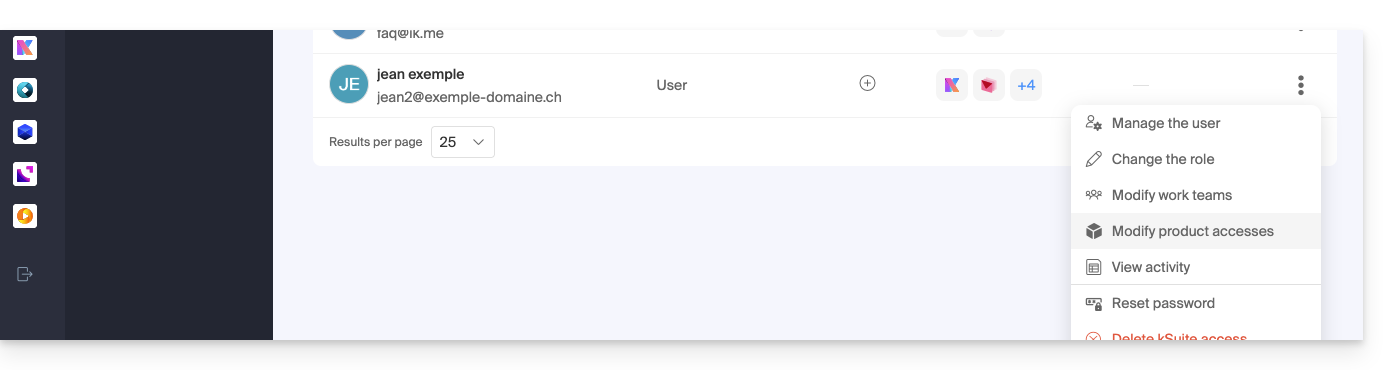
Link to this FAQ:
Has this FAQ been helpful?
This guide explains how to add an attachment from kDrive to an event in a calendar / agenda on the Infomaniak Web app Calendar (online service ksuite.infomaniak.com/calendar).
Preamble
- Some software or applications also allow you to add an attachment, and in this case, if you synchronize the agenda with that of your solution, the attached file is possible up to the maximum size of 64 ko.
Add a kDrive attachment
When you create a new event on the Infomaniak Web app Calendar (online service ksuite.infomaniak.com/calendar), you can add one or more attachments (links to files from kDrive):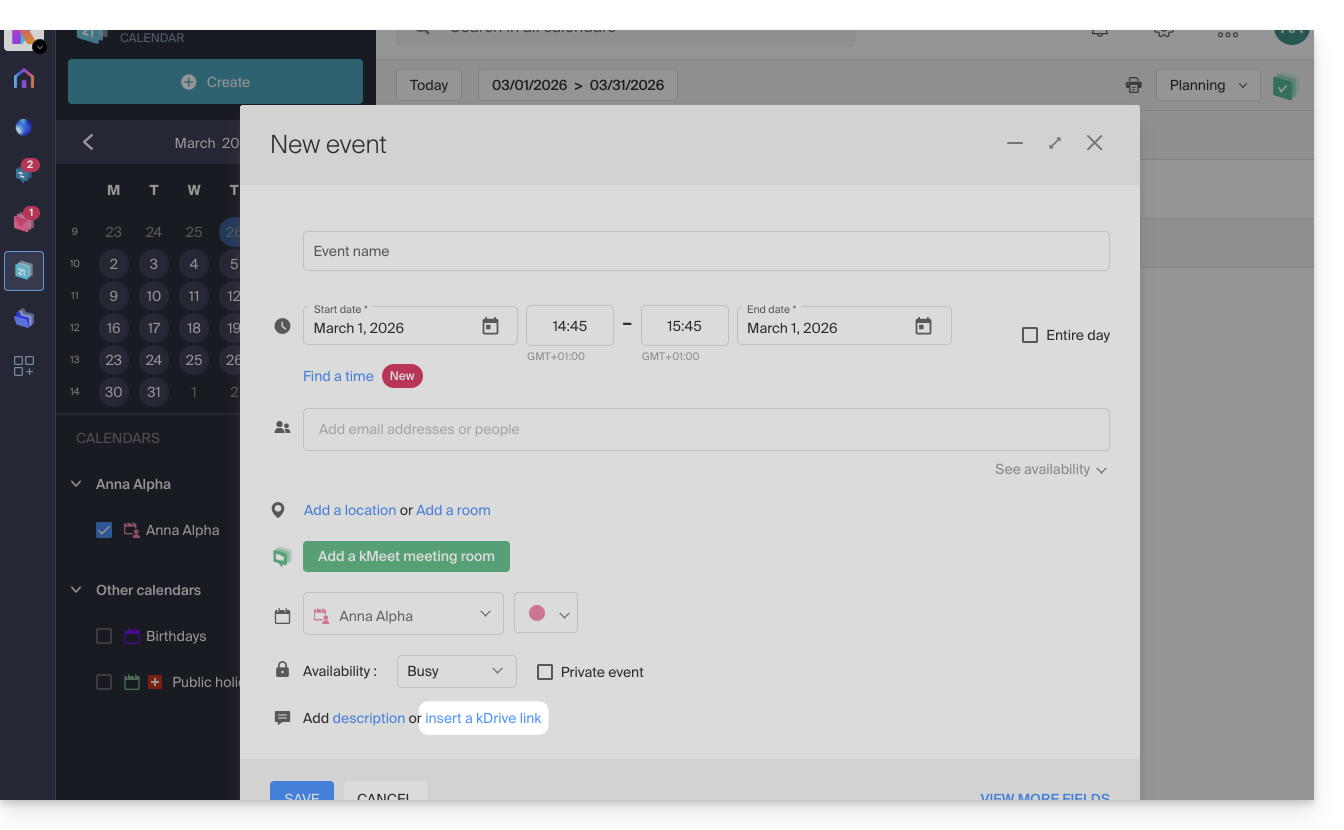
Thanks to this link “Insert a kDrive link”, you can access kDrive directly from the event creation window Calendar: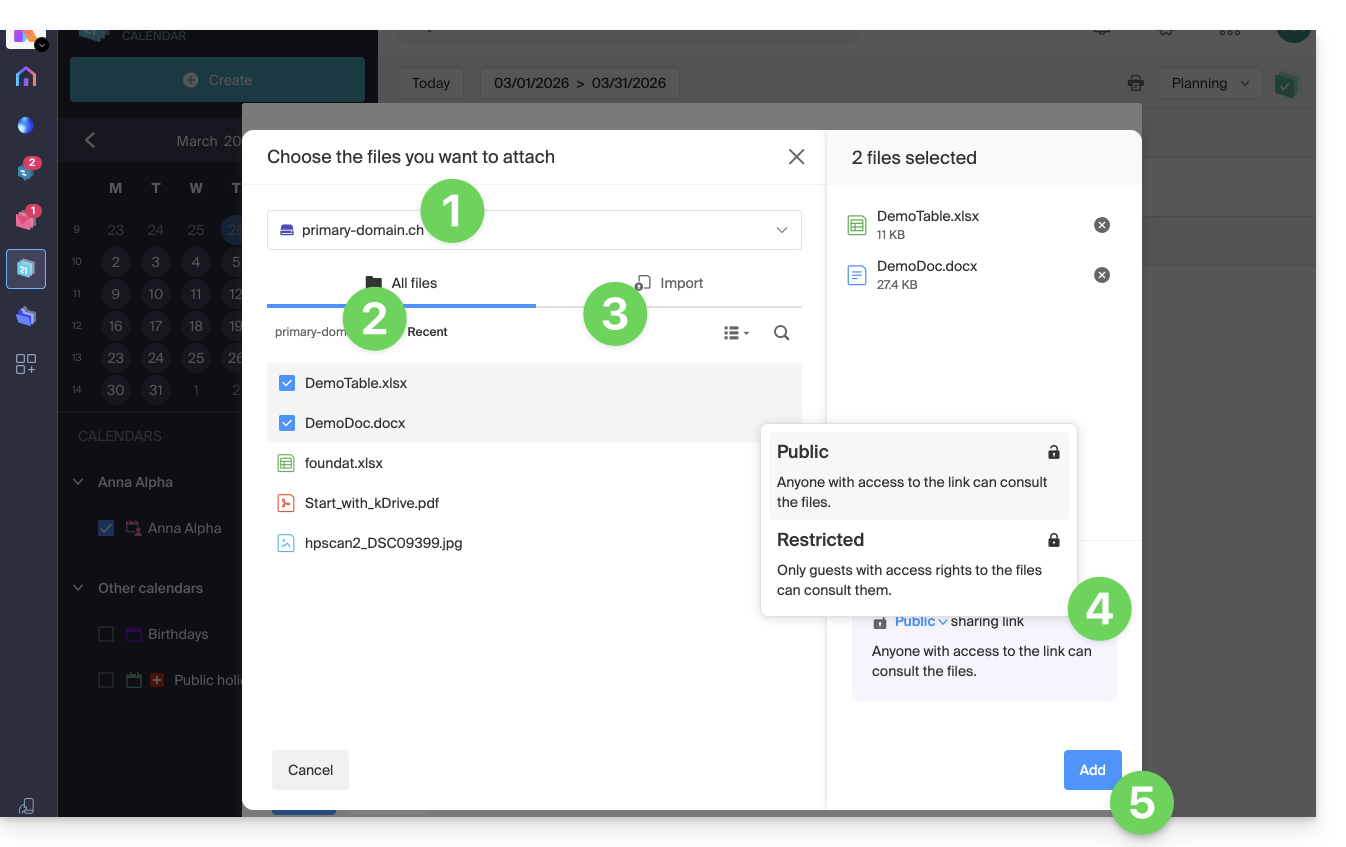
- Select kDrive if necessary.
- Browse and select the files to add to the event.
- Otherwise, import new documents that will be stored on kDrive.
- Once selected, choose whether their link should be:
- a public link (everyone can access it)
- a restricted link (only people with access can access it)
Whether the event is recurring or not, you can add files that will be shared with those who view the event in the calendar: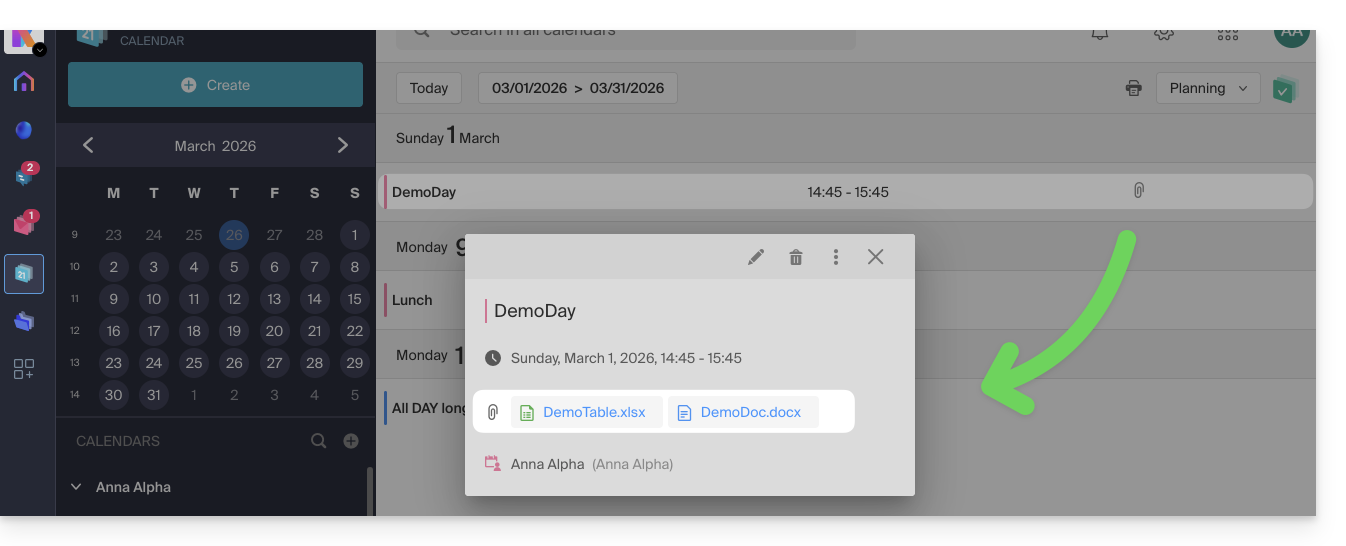
Guests to the event who view the card via a synchronized application, Outlook, Gmail, and others, will see the links in the description (as is the case for the possible kMeet link, for example, if a videoconference is scheduled for the event).
Link to this FAQ:
Has this FAQ been helpful?
This guide helps you regain control of a folder present on the Windows operating system in certain problematic cases of kDrive. This scenario is common for system folders belonging to the TrustedInstaller group.
If you encounter a display or access error to kDrive or one of the folders, refer to this other guide.
Taking ownership of a folder
Here's how to regain possession of such a folder:
- Right-click on the folder in question.
- Select Properties.
- Go to the Security tab.
- Click on the Advanced button at the bottom of the window.
- Click on Change next to the Owner field.
- Click on Advanced.
- Click on Find Now.
- Select your user account from the list and click on OK.
- Click OK again, the folder owner has been modified.
- Check the 2 boxes Replace owner on subcontainers and objects to take ownership of the files and subfolders of this folder:

- Click on OK to validate.
Link to this FAQ:
Has this FAQ been helpful?
This guide explains how to remove one of the users from your Organization on the Manager Infomaniak.
Prerequisites
- Switch to the desired Organization first if you do not find the expected list of users.
- Be Administrator or Legal Representative within the Organization.
- Warning, it is impossible to remove a Legal Representative if there is no other legal representative.
Remove a user from your Organization
If the user had access to kDrive or was invited to view a third-party email address, several intermediate steps will ask you to take actions with their data and inform you, if necessary, about what happens to calendars and address books. To remove one of the users from the Organization
- Click here to access user management for the Organization on the Infomaniak Manager (need help?).
- Click on the action menu ⋮ to the right of the user concerned.
- Click on Remove from Organization:

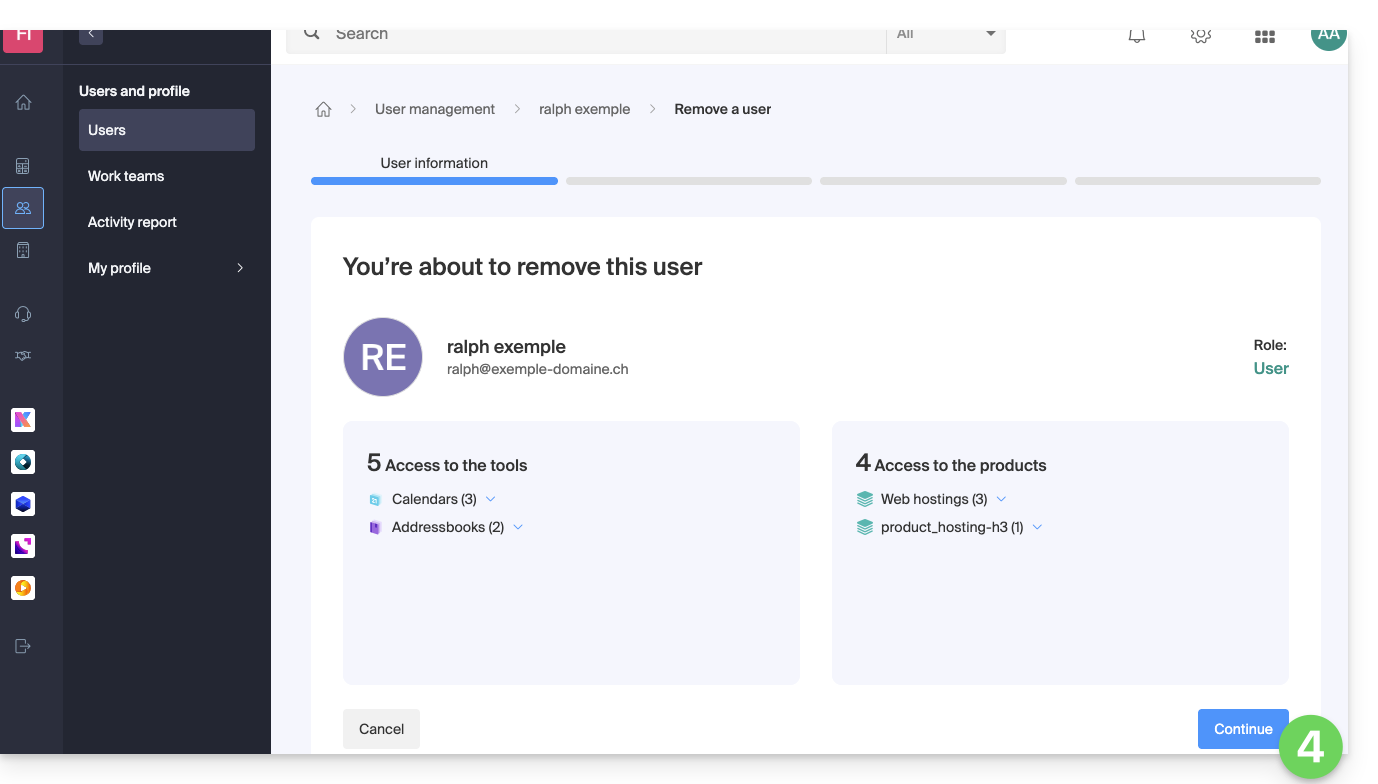
- Review the information (click if necessary on the chevrons to get the details of the deletions) then click on the blue button Continue:
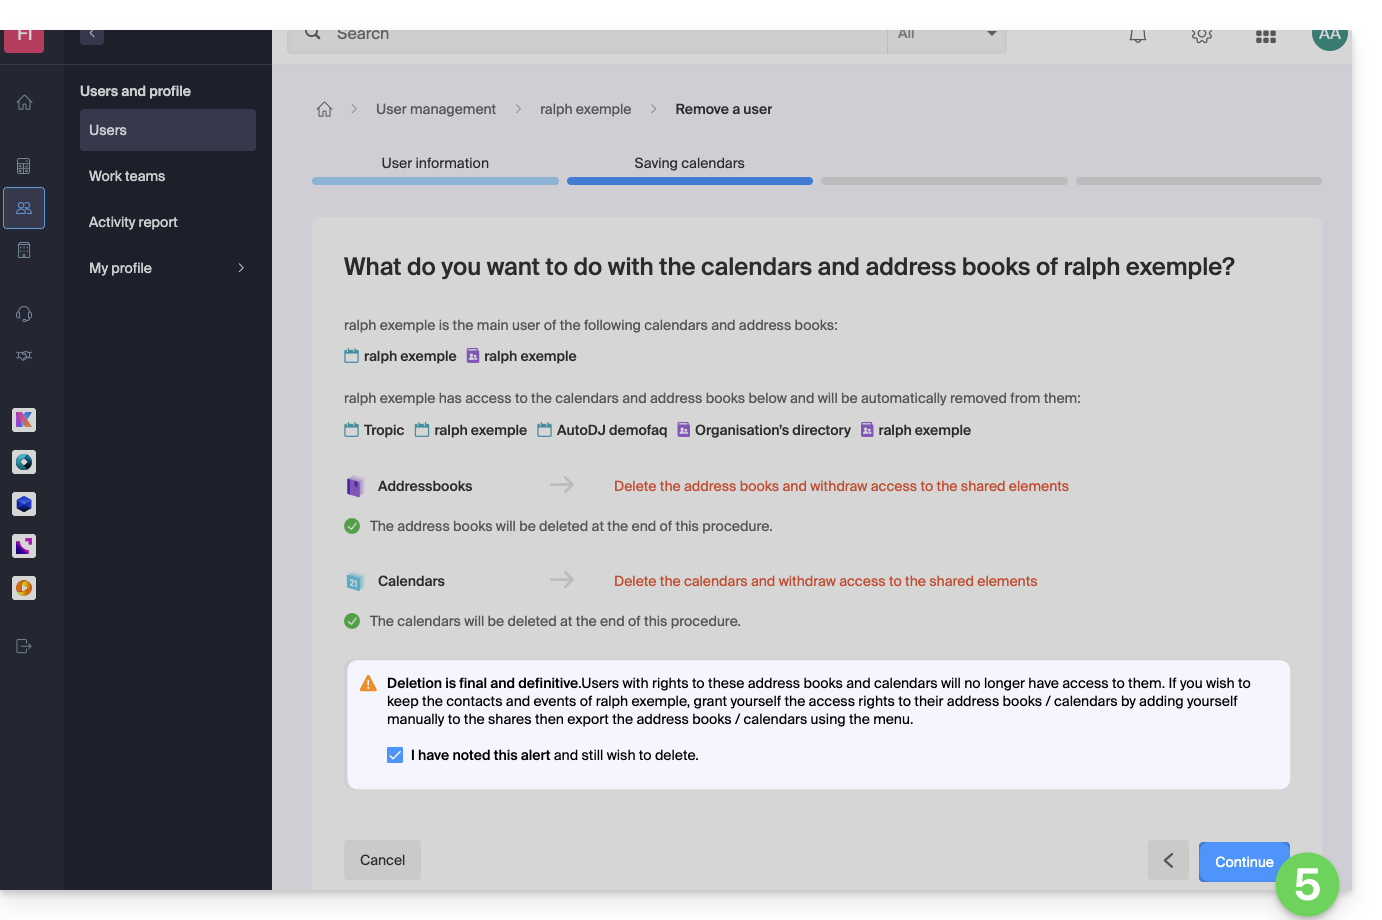
- Review the information, confirm the deletion by checking the checkbox, then click on the blue button Continue:
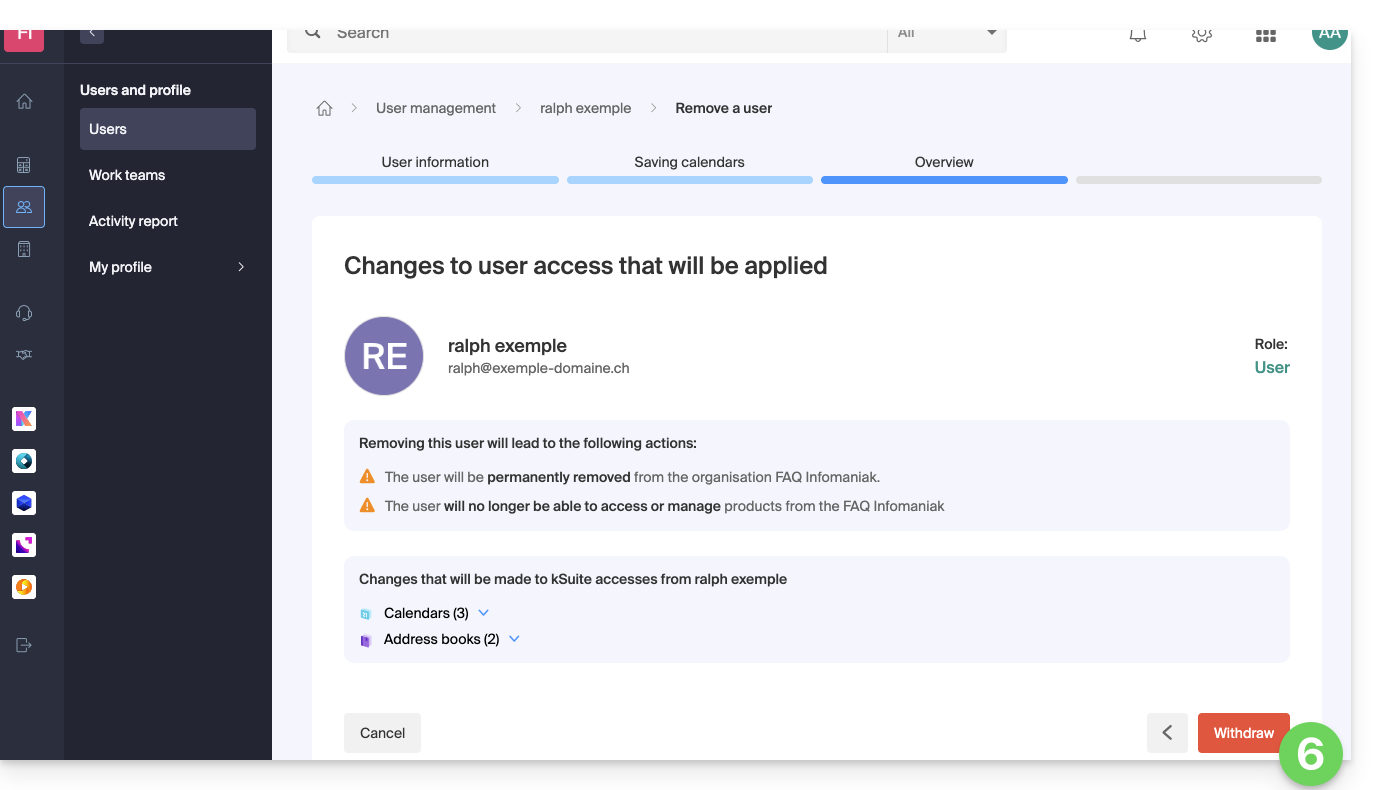
- Review the information (click if necessary on the chevrons to get the details of the deletions) then click on the red button Remove:
- Enter your email address (login identifier for the Manager), check the confirmation box, then click on the red button Remove this user to permanently remove the user without the possibility of undoing it.
Link to this FAQ:
Has this FAQ been helpful?
To ensure the security of your data and the performance of our services, Infomaniak uses several domain names.
Preamble
- These domains are used to host management interfaces, communication tools, as well as the content of your files in an isolated and secure manner.
- If you use a firewall or antivirus, it is recommended to add these domains to your whitelist (examples) to ensure the proper functioning of your tools (notably my kSuite and SwissTransfer).
Main domains and services
- infomaniak.com: the main site and the Manager (product management).
- status.infomaniak.cloud / infomaniak.cloud
- infomaniakstatus.com
File storage
- infomaniakusercontent.com: domain mainly used for file storage/download.
- ksharelink.com: used for public share links created from my kSuite and Infomaniak Mail.
- chk.me: domain allowing the creation of short links and custom QR codes
Messaging and identity
- ik.me: short domain for Infomaniak Mail.
- etik.com / ikmail.com: alternative domains for free and eco-friendly messaging.
- infomaniak.ch: used for certain technical and institutional services.
Transfer tools and events
- swisstransfer.com: service for transferring large files.
- infomaniak.events / ticket-net.ch: ticketing and event management platform.
⚠️ Warning about Phishing attempts: Infomaniak will never ask you for your password by email; always check that the URL in your browser's address bar belongs to one of the domains listed above before entering your credentials.
Link to this FAQ:
Has this FAQ been helpful?
This guide illustrates the different types of sharing that can be done within the shared folder named “Organization Folders” on kDrive and explains how to limit access to the folder if certain users should not have access to everything already in it. It is very easy to modify a share at any time.
Also see this other guide about folder sharing.
Switching from simple sharing to a kSuite invitation
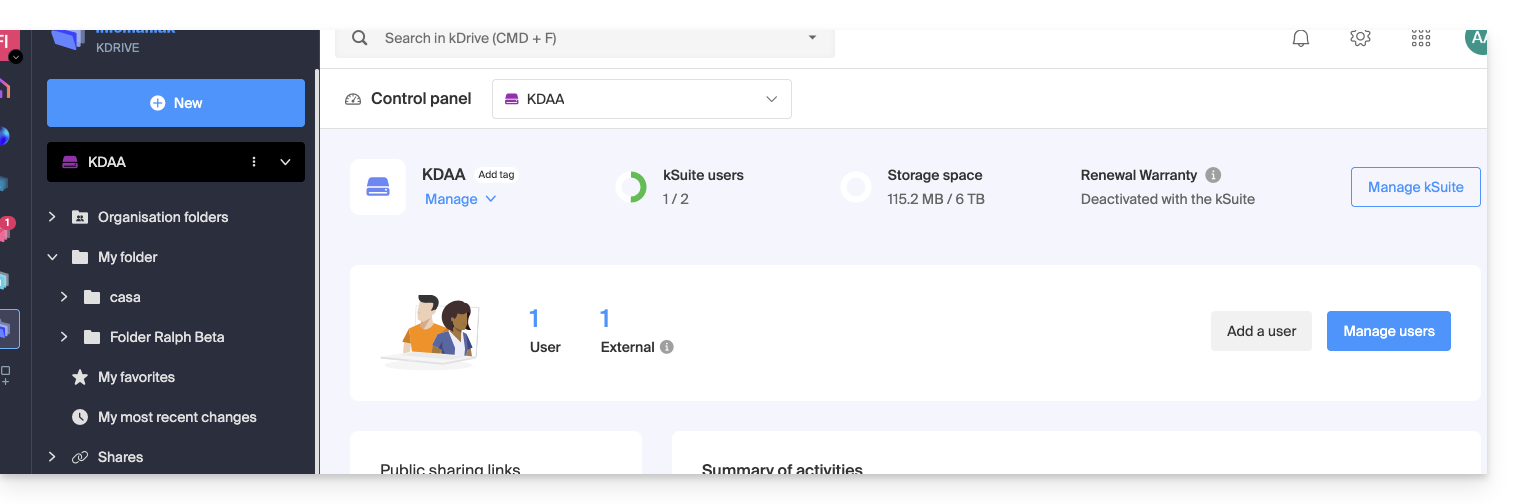
Imagine…
- … a kDrive within a kSuite…
- … with 1 single user out of 2…
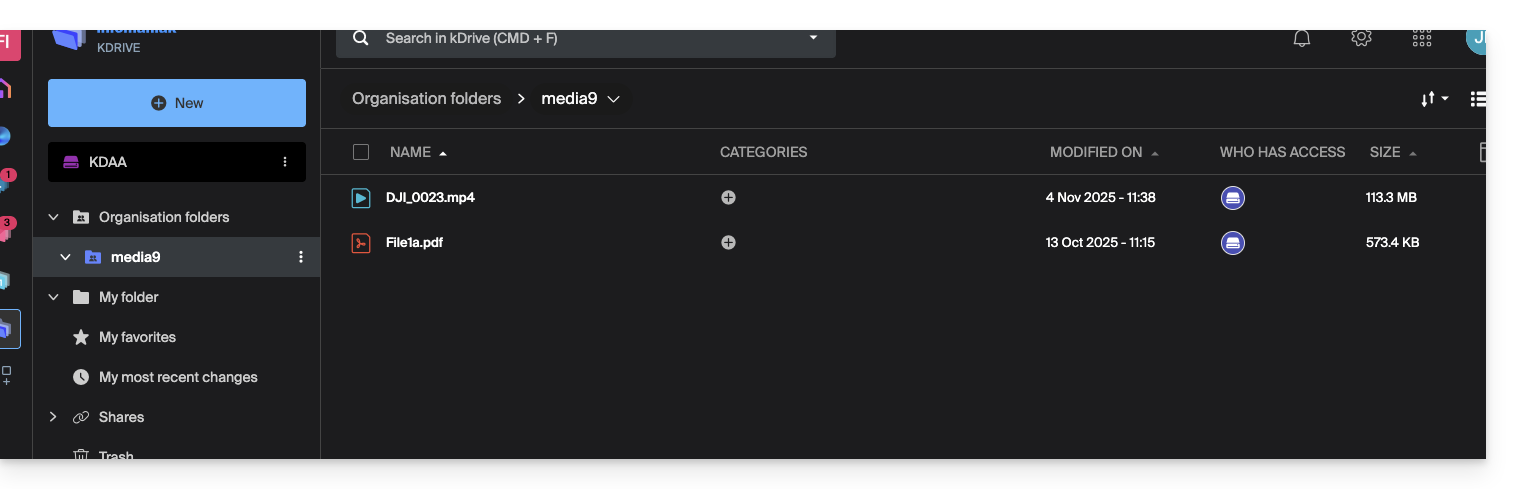
- … data in “Organization Folders” and in “My Folder”:
A. Result of sharing without requiring the invited user to sign up
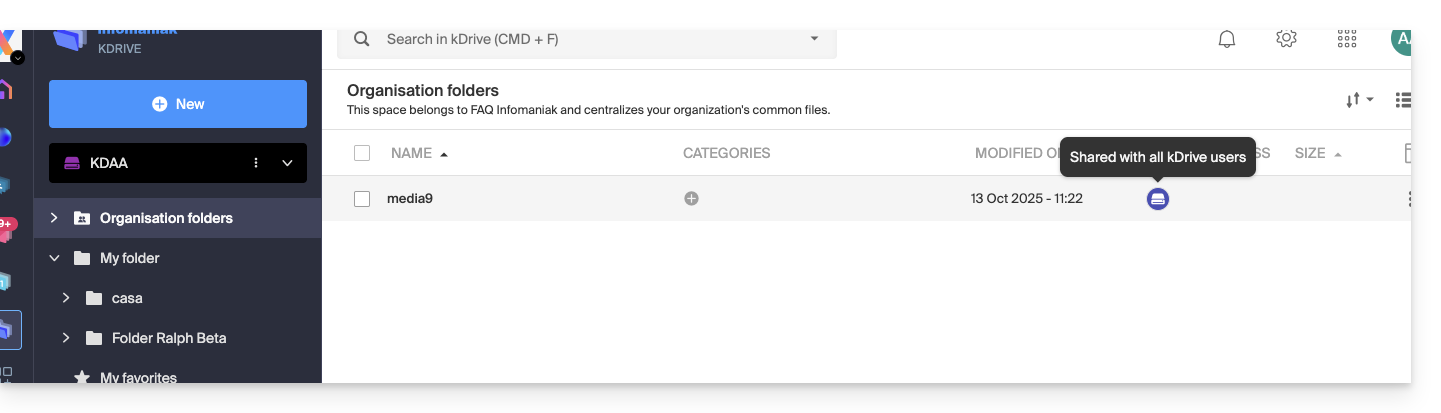
A folder present in Organization Folders is first shared with a completely external new user to this kDrive and to Infomaniak, via a public share link:
- Right-click on the folder or subfolder in question.
- Choose the Share option:
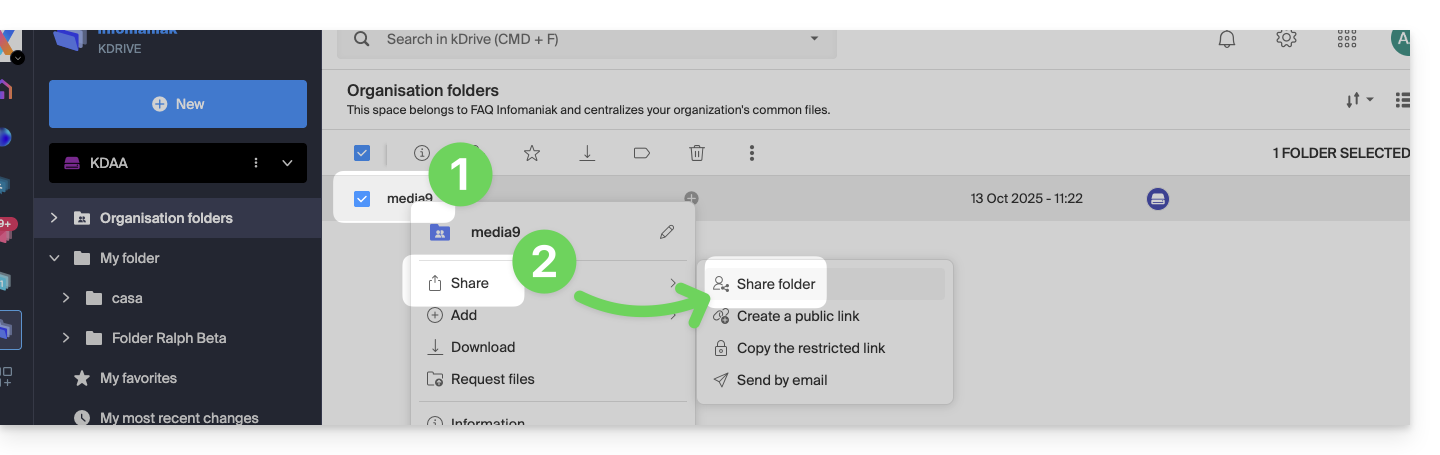
- Then:
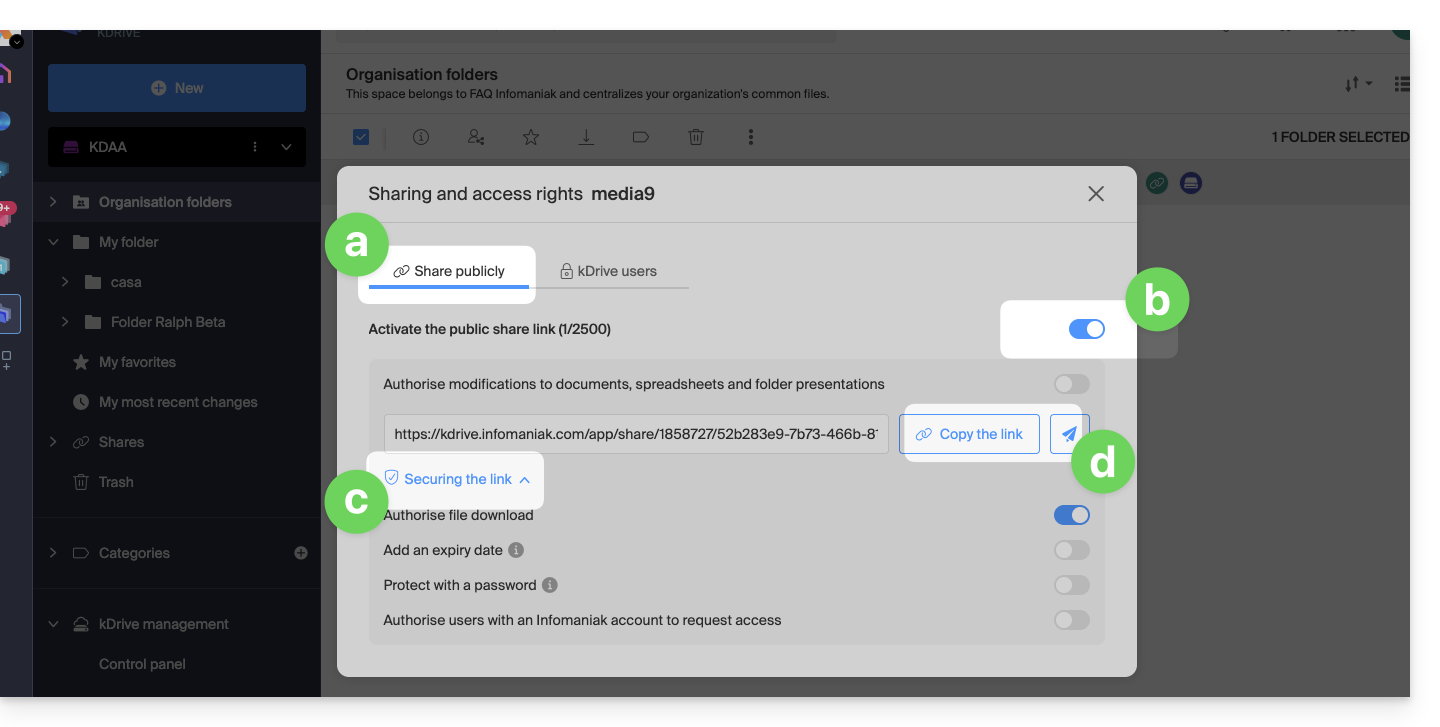
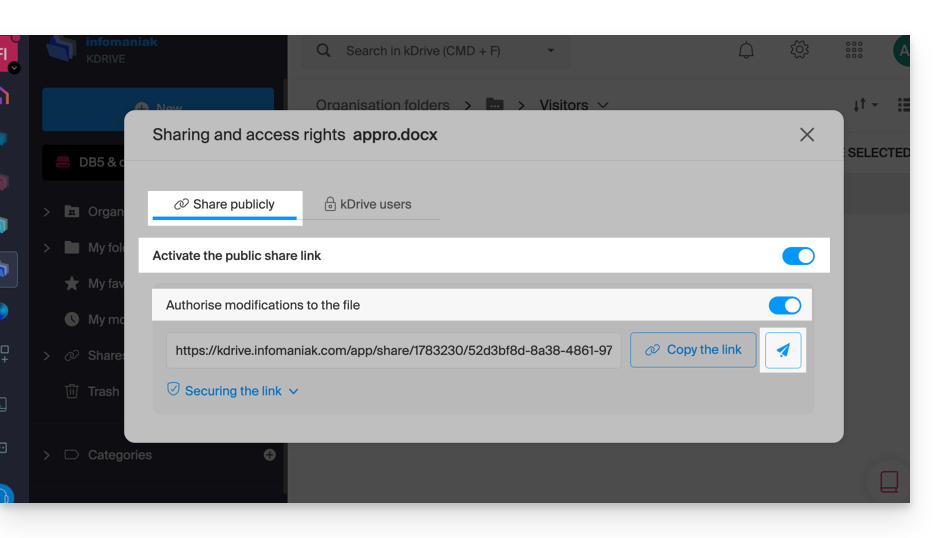
- Stay on the first tab.
- Activate the public share link.
- Adjust the security settings according to your needs.
- Copy the link to send it, or send it directly from the window:
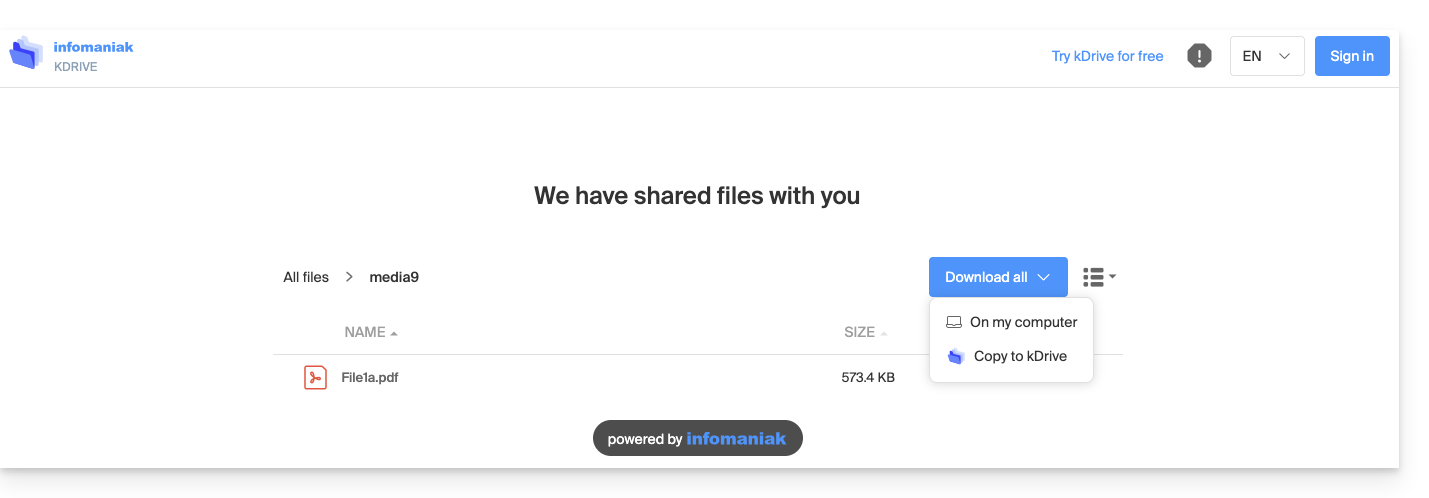
Therefore, the user who views this public link gets this type of view:
- They can navigate, view, and download files, including to their own kDrive, all in read-only mode:
B. Result of sharing with sign-up (but not counted in kSuite)
A folder present in Organization Folders (or any folder in kDrive since this feature is also valid with a Solo kDrive) is now shared with an “external” type user who will need to sign up or at least log in to their account if they already have one, and accept the invitation.
The user must be completely external to Infomaniak or at least not have an email address on the Mail Service linked to the possible kSuite from which the kDrive in question depends.
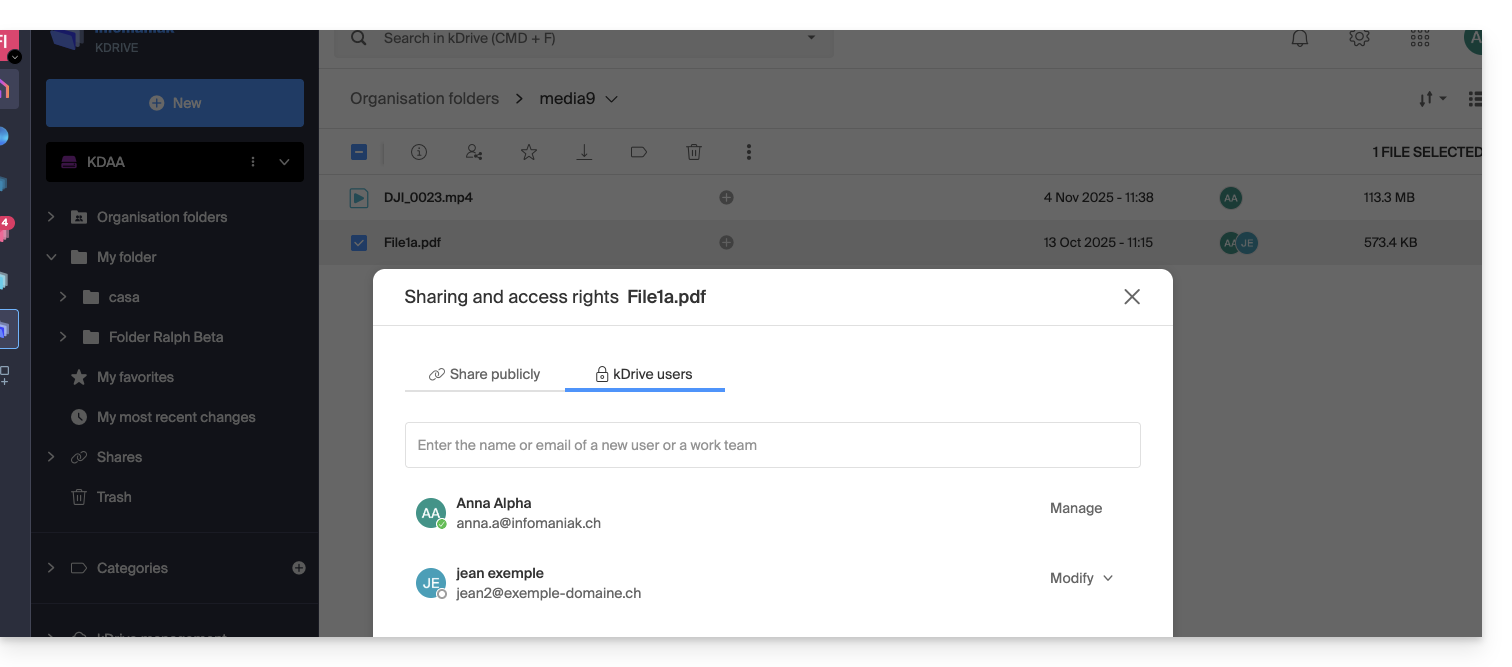
To do this, you need to choose the second sharing tab this time:
- Right-click on the folder or subfolder in question.
- Choose the Share item.
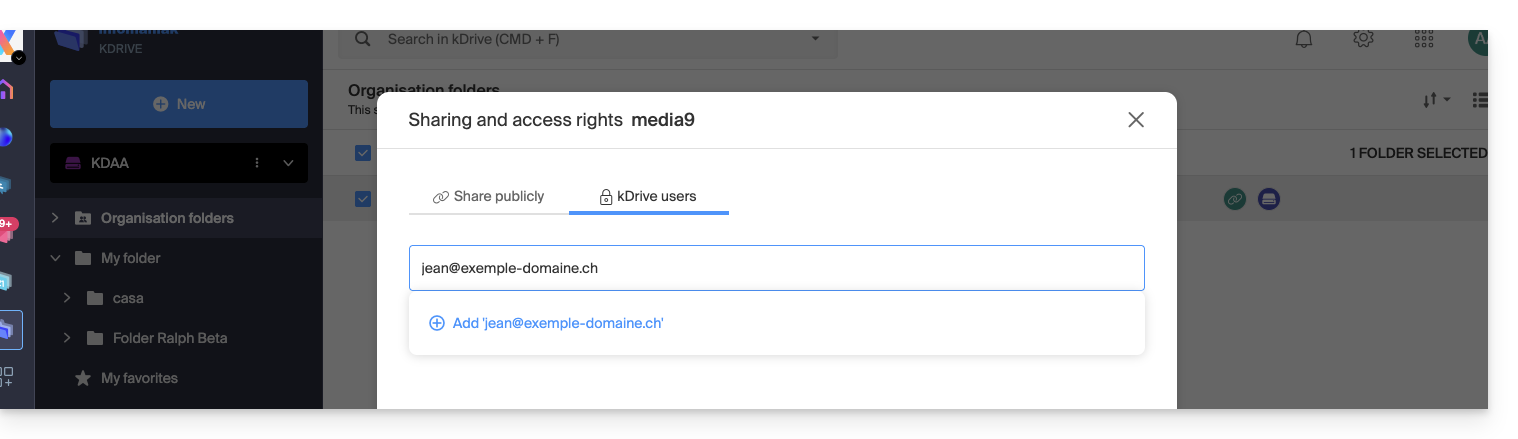
- Click on the second tab.
- Enter the email address of the user concerned.
- Click to add (the operation can be performed for multiple users at the same time):
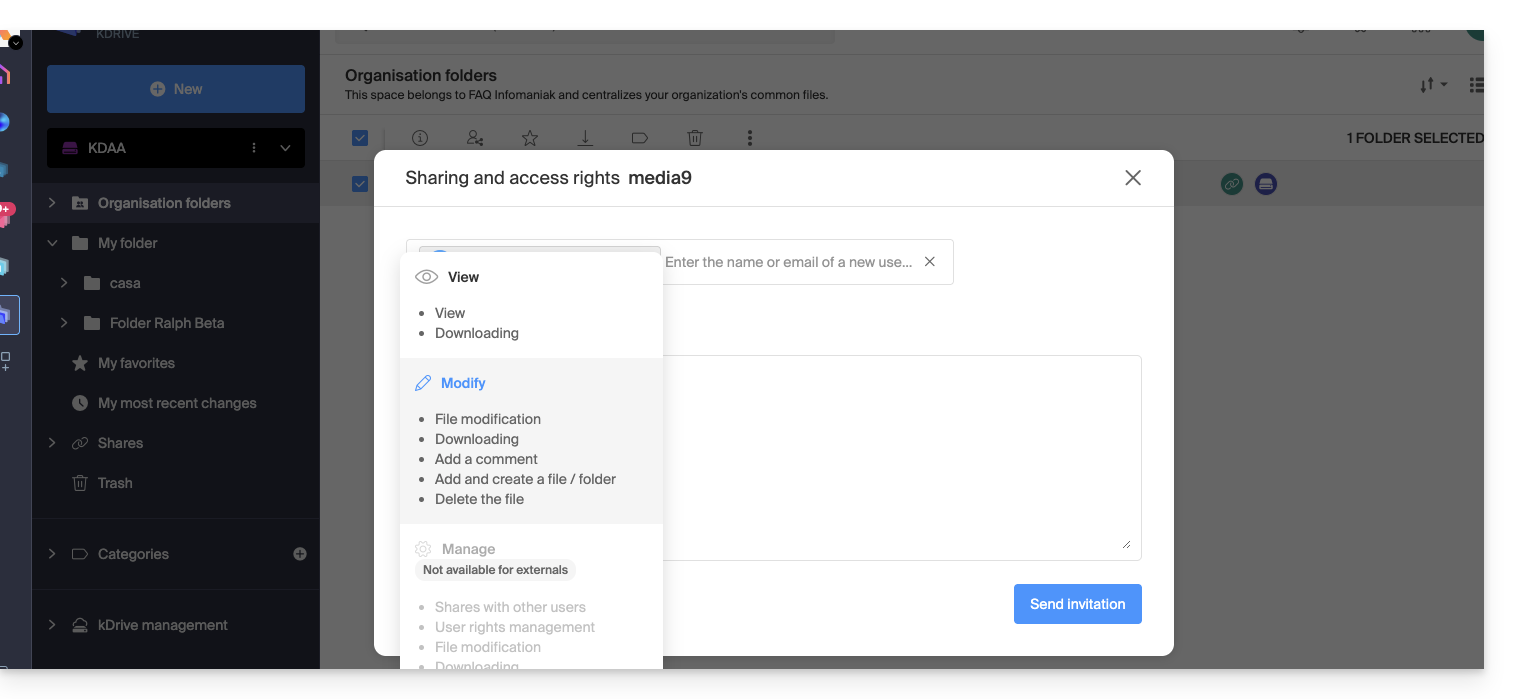
- Regarding the freedom given to the user to modify or not the part of the kDrive to which they will have access, the choice made here is to Modify.
- Click on Send Invitation:
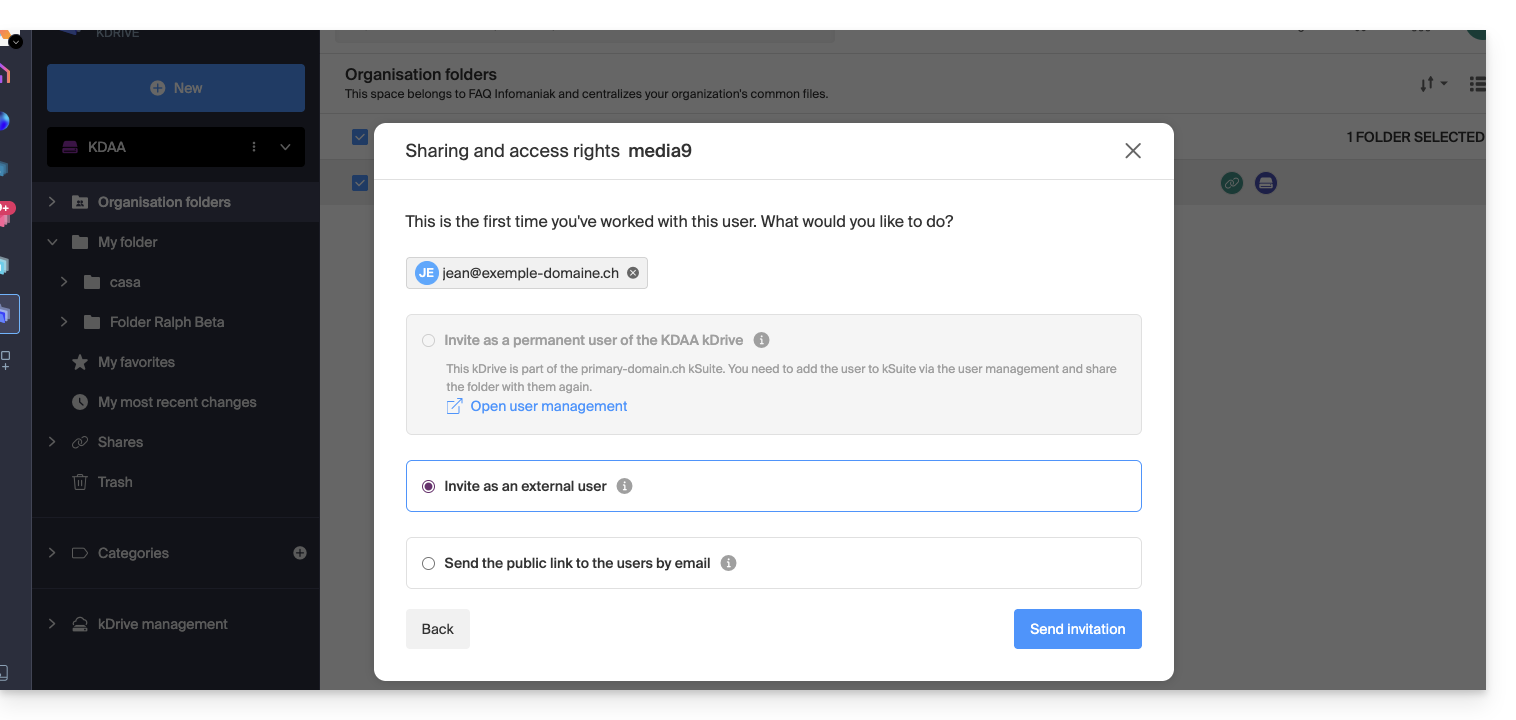
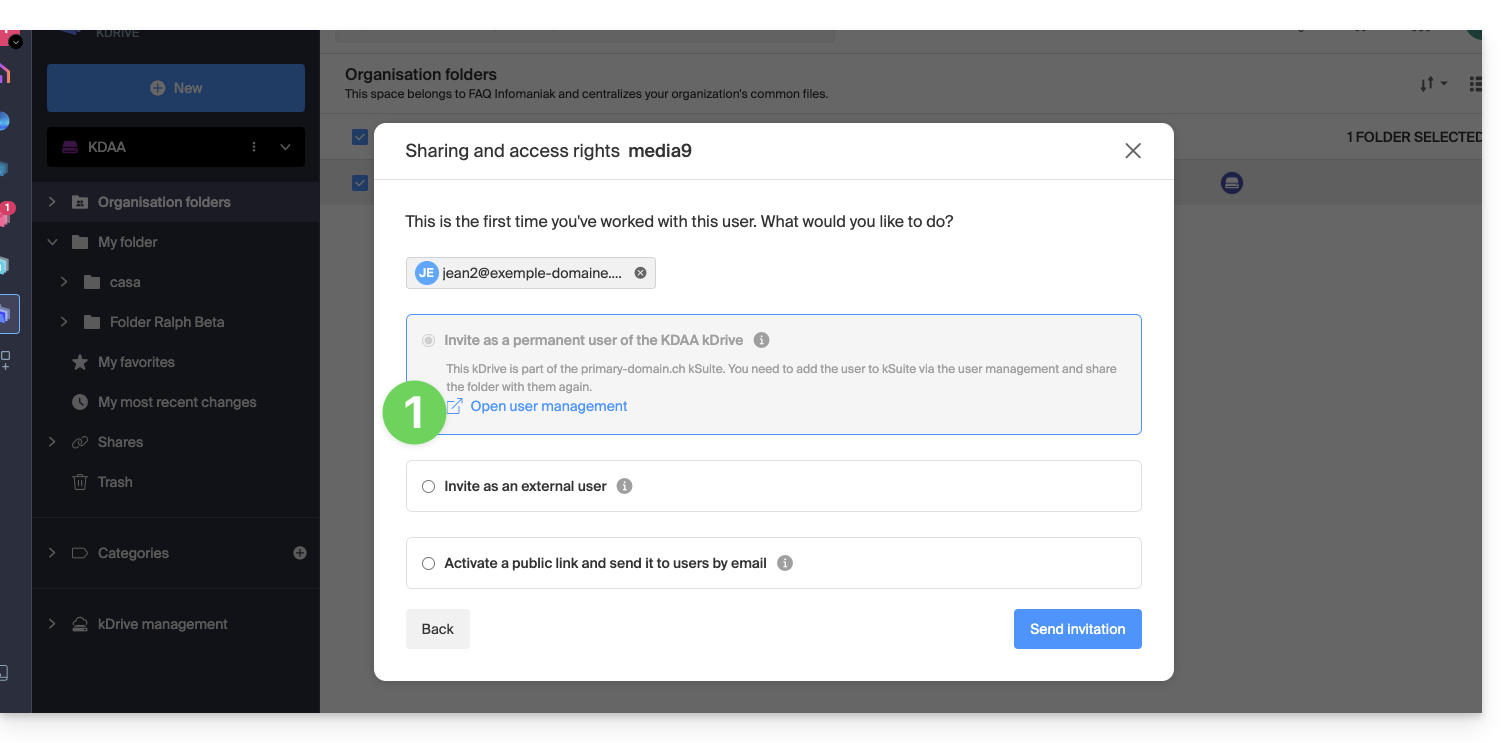
- This choice (see point 6 above) will allow inviting this person as an external user initially — see below for the complete kSuite invitation):
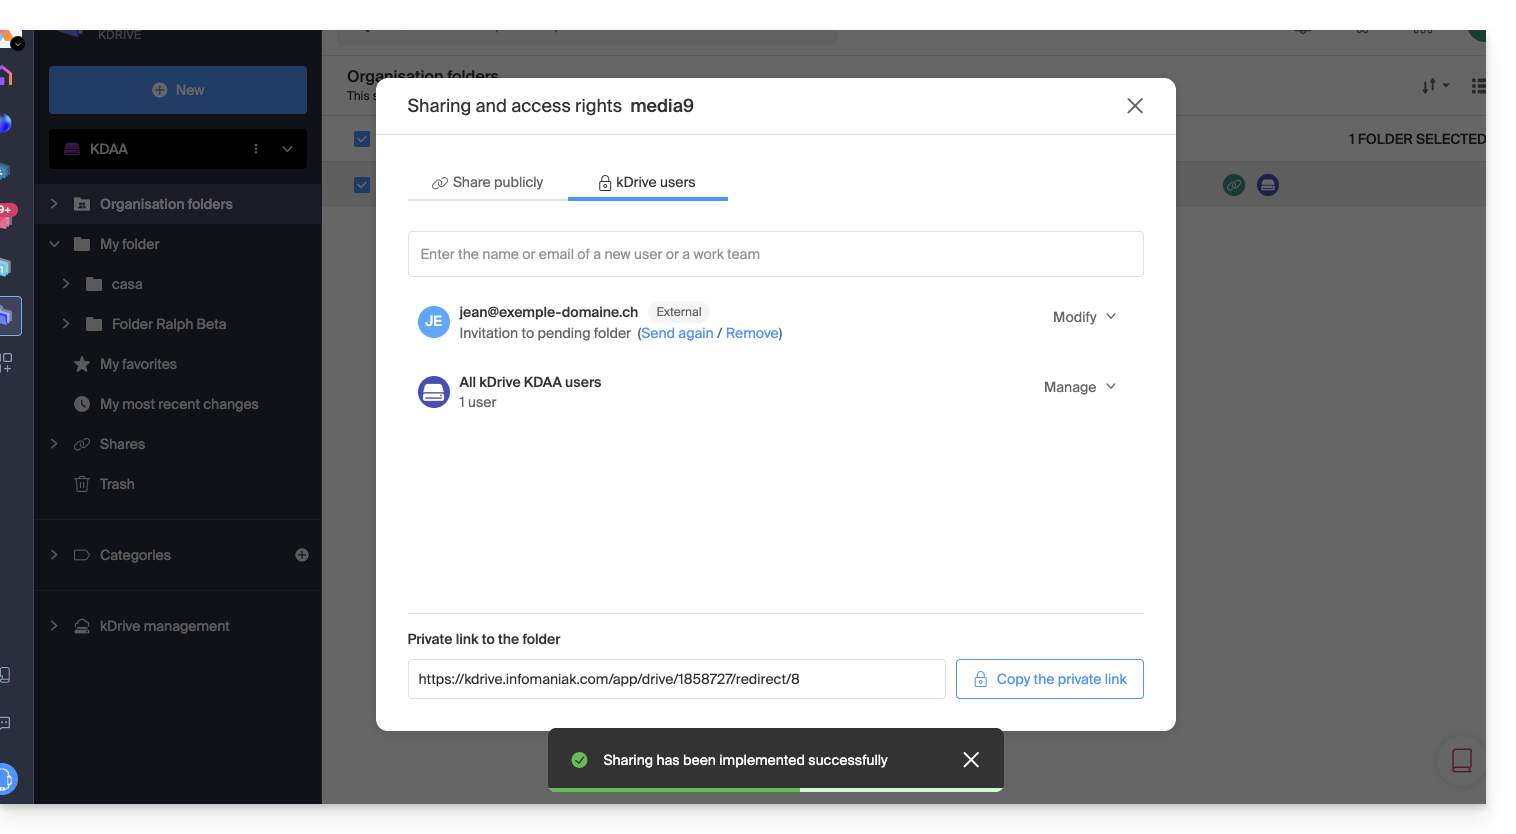
- The administrator can see the pending request and resend the invitation if necessary:
- The invited person receives an email to register as an Infomaniak user:
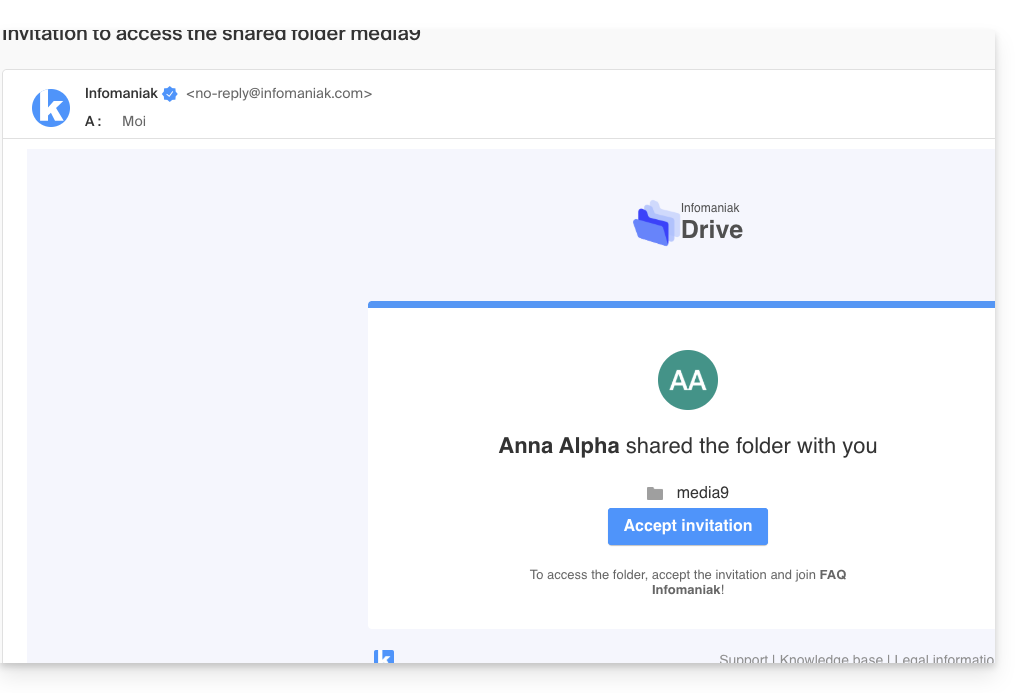
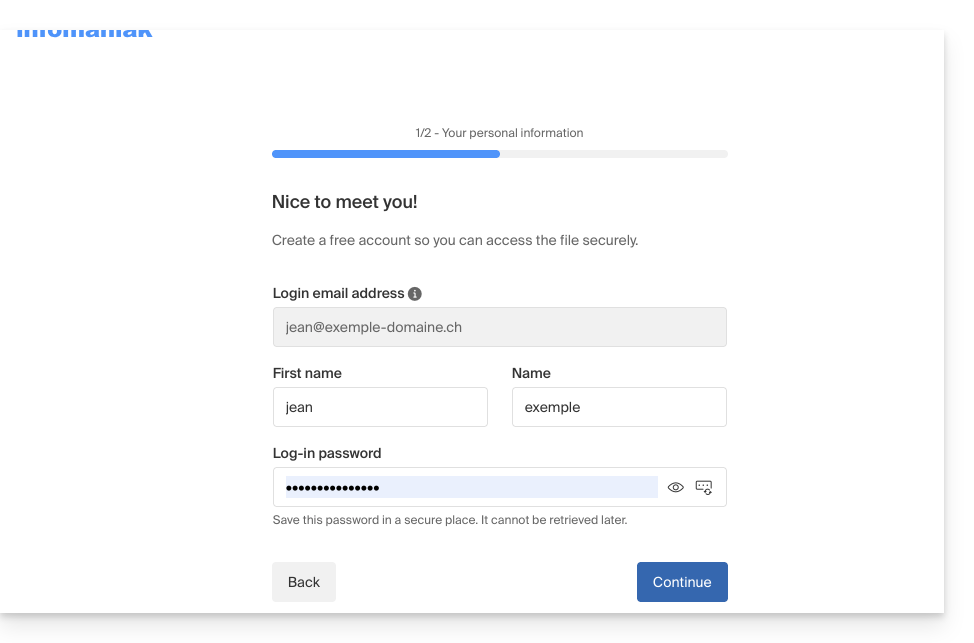
- The person fills out the form with their details and chooses a password, their email address is pre-filled, this will be their Infomaniak account identifier:
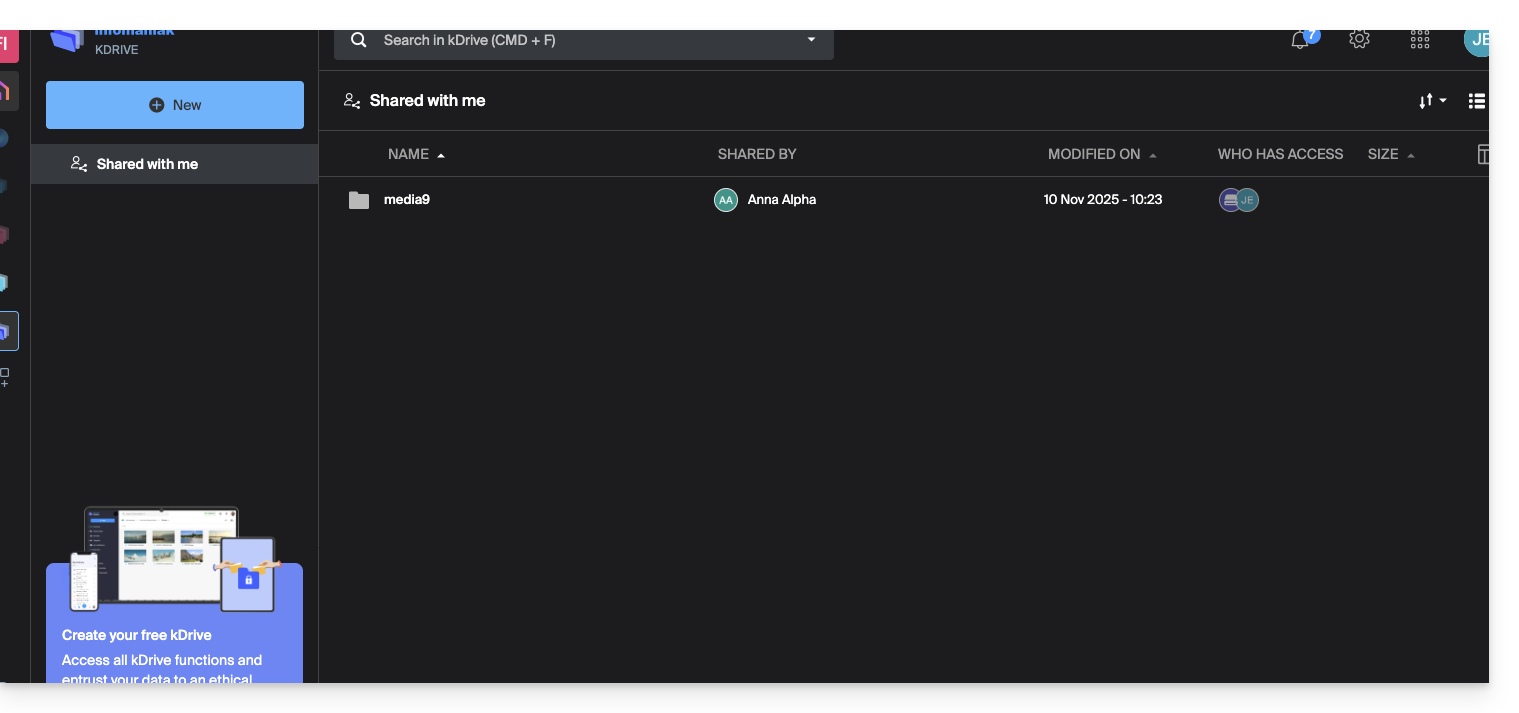
- Once registration is complete, a simplified kDrive interface with “Shared with me” on the left allows:
- accessing the shared content (only the initially shared content, not the entire shared folder)
- modifying the shared content (without the ability to delete the existing content at the time of sharing)
- adding/deleting their own content:
- The possible modifications made are common to all users who have access to this part of this kDrive.
- The user does not have any private/personal space.
- They can install the kDrive mobile/desktop app and log in, but no data will be visible:
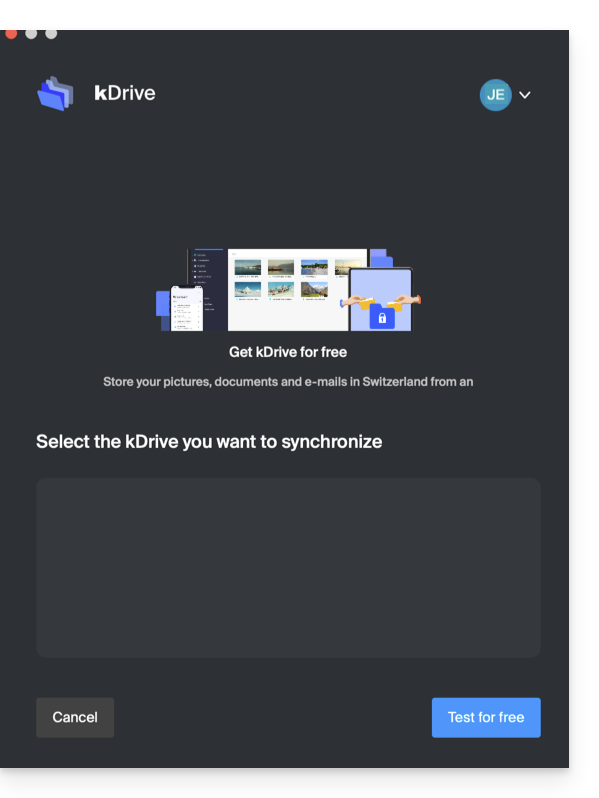
The user will have to go through the online interface to access the files shared with them, as long as they are an external user, even if they have a personal kDrive!
- On the kDrive administrator dashboard, users are presented as follows:
C. Result of a share with registration as a kSuite user
Now imagine that no sharing or invitation has taken place yet. Repeat steps 1 to 7 above…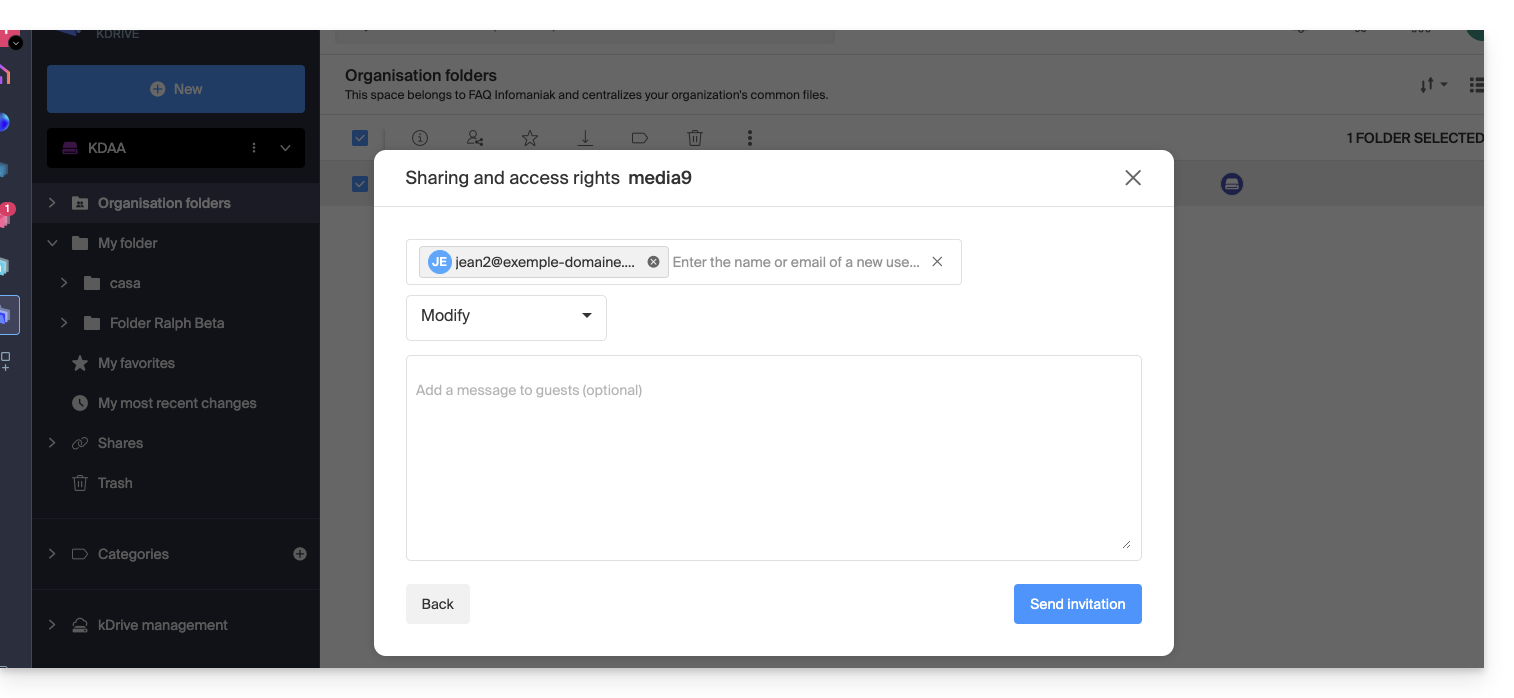 … then at step 8:
- Invite this person as a kSuite user by clicking on the link that opens the user management page in a new tab:
- Create the kSuite user (by following the order A (if necessary) then B and C below):
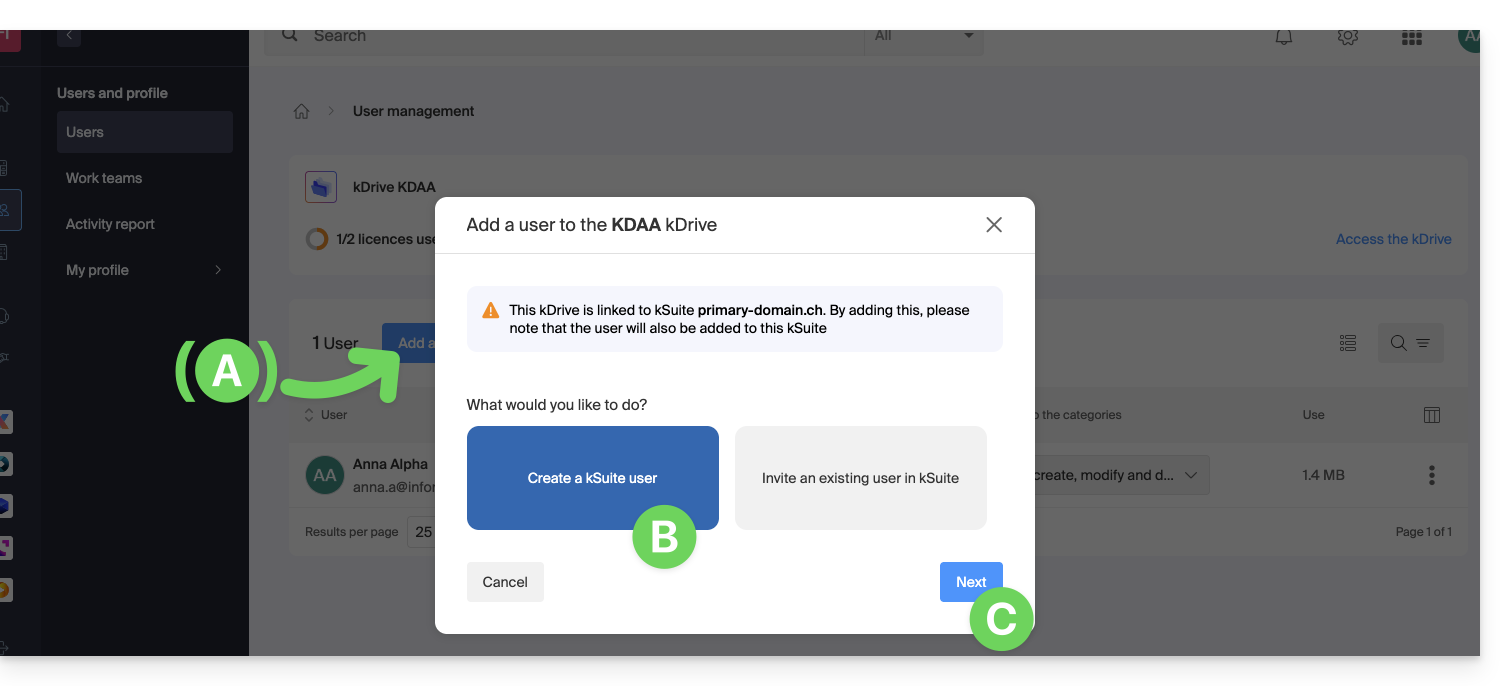
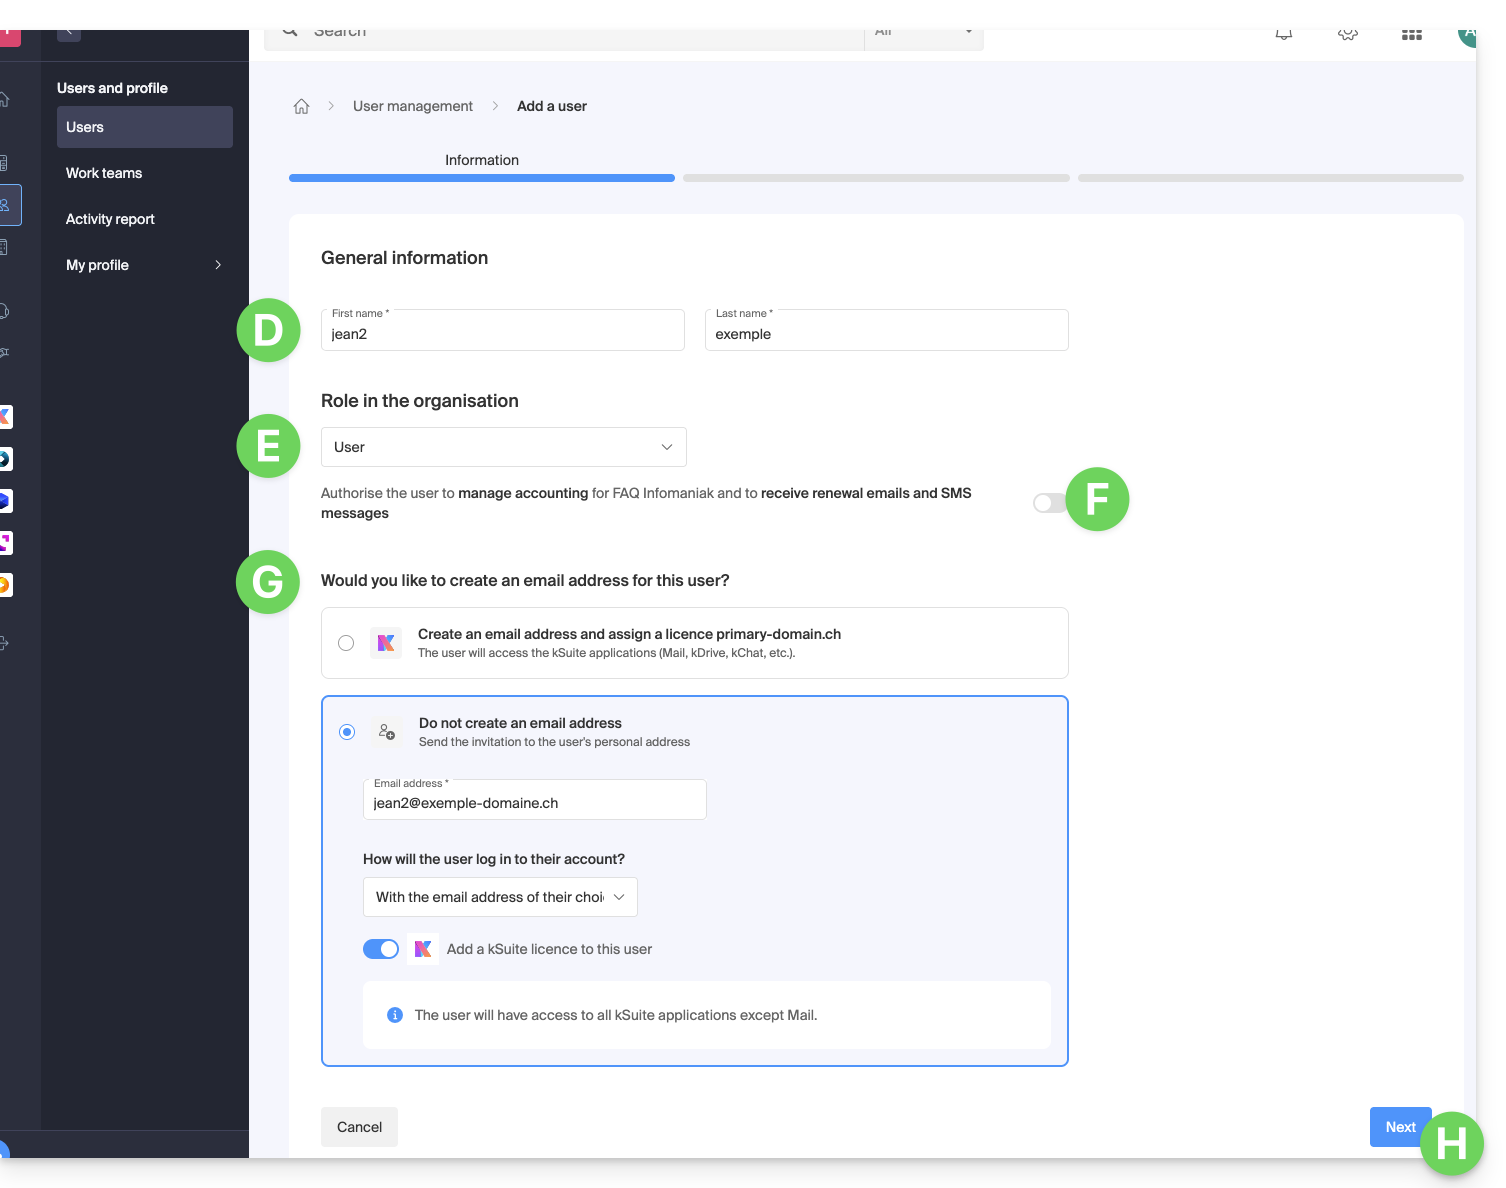
- Start creating the user (by following the order D-E-F-G-H below):
- D — Enter a first name and a last name.
- E & F — Depending on your needs, grant them extended or rather limited rights within the Organization, here a status of user only (be aware of the different permissions (access rights to products for example) and administrative contact preferences of a user within an Organization).
- G — Choose whether or not to create an email address for the user; this influences how you allow the user to log in (here with the email address of their choice - while sending the invitation to another email address).
- H — The next step allows you to integrate the user into a possible work team:
- Once the procedure is complete:
- I — The invited person receives an email to register as an Infomaniak user and you can resend it to them if needed.
- J — Depending on the role assigned to the invited person (see point E above), you can define at any time which products they can manage on the Infomaniak Manager:

D. Restrict the user's access
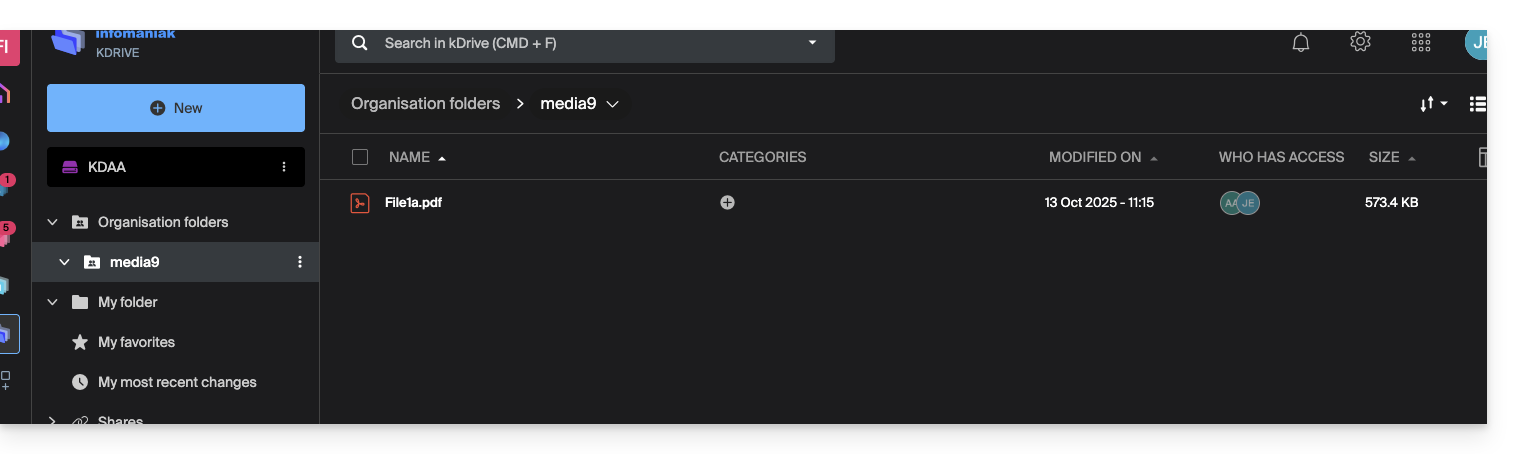
Once registration is complete, the new user's kDrive interface usually allows access to all content that has been shared with all kDrive users.
The Organization's Folders are common folders but do not necessarily imply that all kDrive users have access to them.
If the invited user sees nothing in this shared folder, check from the administrator account if the sharing rights have been extended to all kDrive users: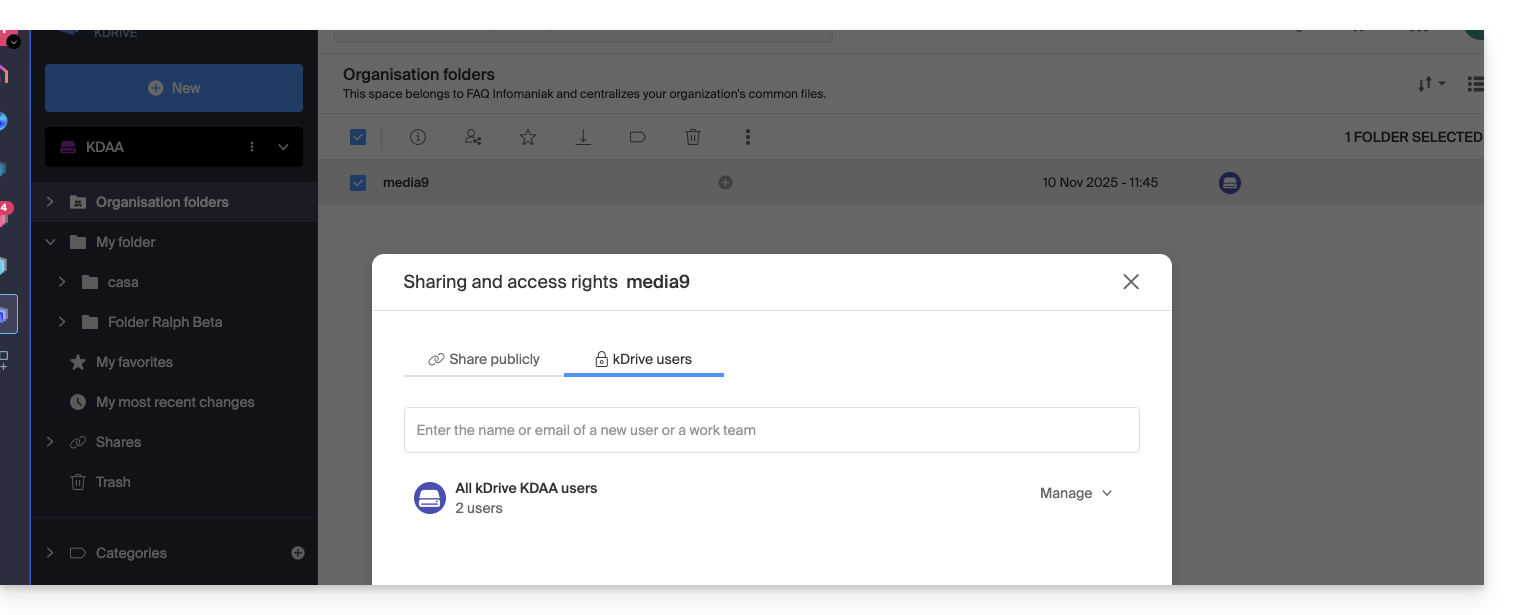
Conversely, it is also possible: if the new kSuite user accesses all Organization's Folders and this is not desired, the administrator must modify the sharing of the parent folder (the folder at the root of the shared folder for example):
- Right-click on the parent folder, select the Share item, then choose the second sharing tab and click on Manage on the right to select the removal of the sharing (the effect is recursive and therefore applies to all elements contained within the parent folder):
- Then share again but more restricted from the folder in question:
- Check the access column in the kDrive tree:
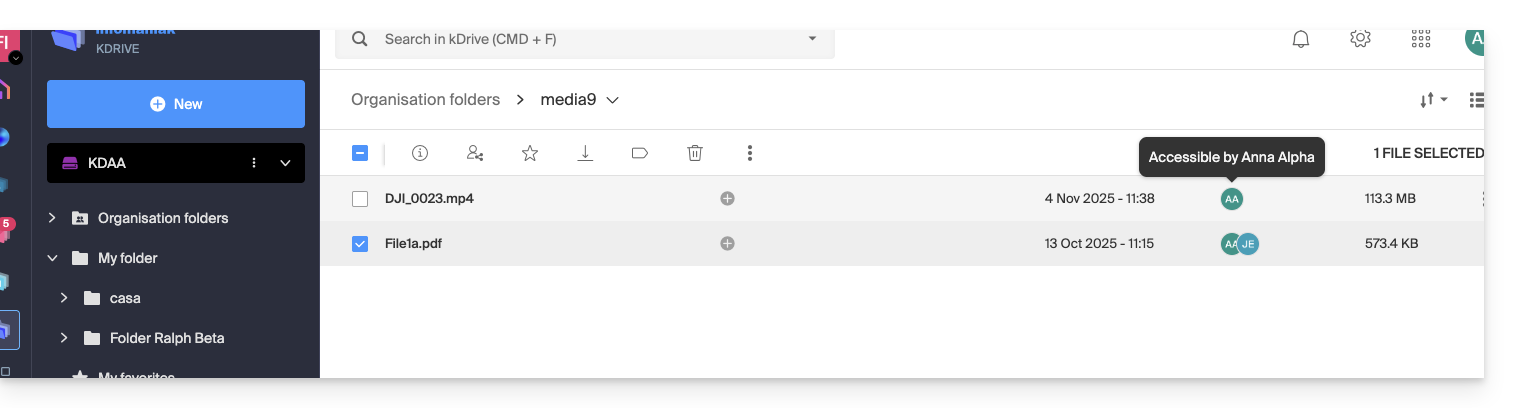
- And there, the user only sees part of the shared folder:
- And this time, if the user installs the kDrive app, they can choose the kDrive in question:
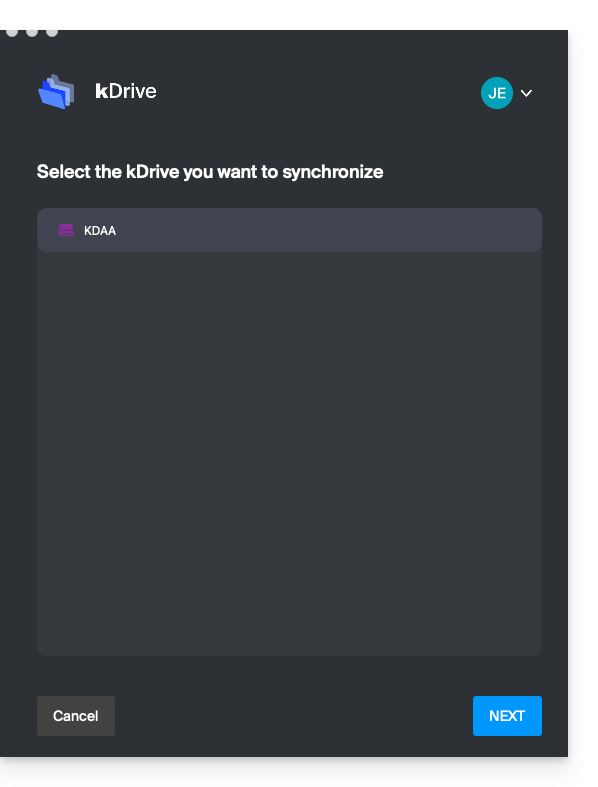
and access the files on the computer: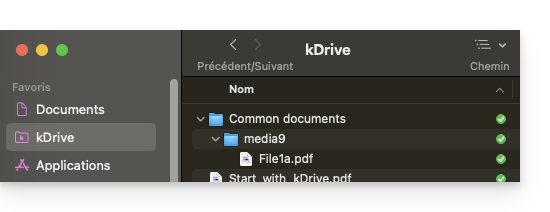
Link to this FAQ:
Has this FAQ been helpful?
This guide explains how to resolve an access or usage issue with kDrive on Windows and macOS when third-party software may interfere with your synchronization.
If you notice a synchronization issue and missing folders, refer to this other guide.
Preamble
- The kDrive application may sometimes encounter interaction issues with Windows or macOS firewalls, as well as with antivirus, VPN, or cleaning software solutions.
- This can result in the inability to correctly synchronize files, failure to open PDFs on the web, or the inability to use Lite Sync mode (on-demand files).
- In case of a problem, you need to authorize kDrive within these applications and whitelist three essential components :
kdrive.exe(orkdrive.appon macOS)kdrive_client.exe- The domain:
*.infomaniakusercontent.com
Authorize kDrive on…
… macOS
- Open System Settings (or System Preferences).
- Click on Privacy and Security (or Security and Privacy).
- Select the Firewall.
- Click on the Firewall Options button (enter your administrator password if prompted).
- Click on the Add an application (+) button.
- Select the kDrive application to allow incoming connections.
- Click on Add then on OK.
… Windows
- Open the Start menu and click on Settings.
- In the search field, enter Firewall.
- Click on Allow an app through Windows Firewall.
- Click on the Change settings button.
- Check the boxes next to the kDrive applications (refer to the preamble).
- Check the boxes under the type of networks (private or public) then click on OK.
… Windows Defender
- Open Windows Security from the notification area.
- Select Virus & threat protection.
- Go to Manage settings.
- Scroll down to Exclusions and click on Add or remove exclusions.
- Click on Add an exclusion and add the kDrive files or folders (see preamble).
… Avast
- Open the Avast interface.
- Go to Menu > Settings.
- Under the General tab, click on Exceptions.
- Click on Add an exception and enter
https://*.infomaniakusercontent.com/* - Also go to File Paths to add the kDrive executable files.
… AVG
- To exclude the executable files (.exe … see preamble above), refer to this other guide (step 5).
… Avira
- Right-click on the Avira icon and temporarily disable the protection.
- Go to Settings > PC Protection > Scan > Exceptions.
- Add the kDrive files (see preamble).
- Repeat the operation in Real-time Protection > Exceptions.
… Bitdefender
- Go to Protection > Online Threat Prevention > Settings.
- Click on Manage exceptions.
- Add the domain
*.infomaniakusercontent.comand check the online prevention option. - If you are using the browser extension TrafficLight, also add this domain to its whitelist.
- To exclude executable files (.exe … see preamble above), refer to this other guide.
… CCleaner
- Go to Options > Exclude.
- Click on Add and select the kDrive files or folders.
… CleanMyMac
- In the analysis results screen, hold down the Ctrl key and click on the kDrive items.
- Select Add to exclusion list.
… ESET
- Open ESET and press F5 (Advanced setup).
- Go to Antivirus > Exclusions.
- Click on Add and insert the paths to kDrive.
… Kaspersky
To resolve kDrive file issues, exclude kdrive.infomaniak.com and *.infomaniakusercontent.com from the analysis:

If the problem persists, uncheck the box (3) below:

… Malwarebytes
- Go to Settings > Exclusions.
- Click on Add an exclusion and select the kDrive files.
… McAfee
- To exclude executable files (.exe … see preamble above), refer to this other guide.
… Norton
- Go to Settings > Antivirus > Scans and threats.
- In Exclusions / Low Risks, configure the "URLs to exclude from the scan".
- Add
*.infomaniakusercontent.com. - To exclude executable files (.exe … see preamble above), refer to this other guide.
... NordVPN
Check within NordVPN and more specifically in Pro Threat Protection (Threat Protection) the list of blocked files or activities to authorize kDrive and the domain *infomaniakusercontent.com.
Link to this FAQ:
Has this FAQ been helpful?
This guide explains how to revert the organization of your files in your kDrive, especially if changes have been made and you have lost track.
✘ UNAVAILABLE with
kSuite free
my kSuite (ik.me, etik.com, ikmail.com)
Preamble
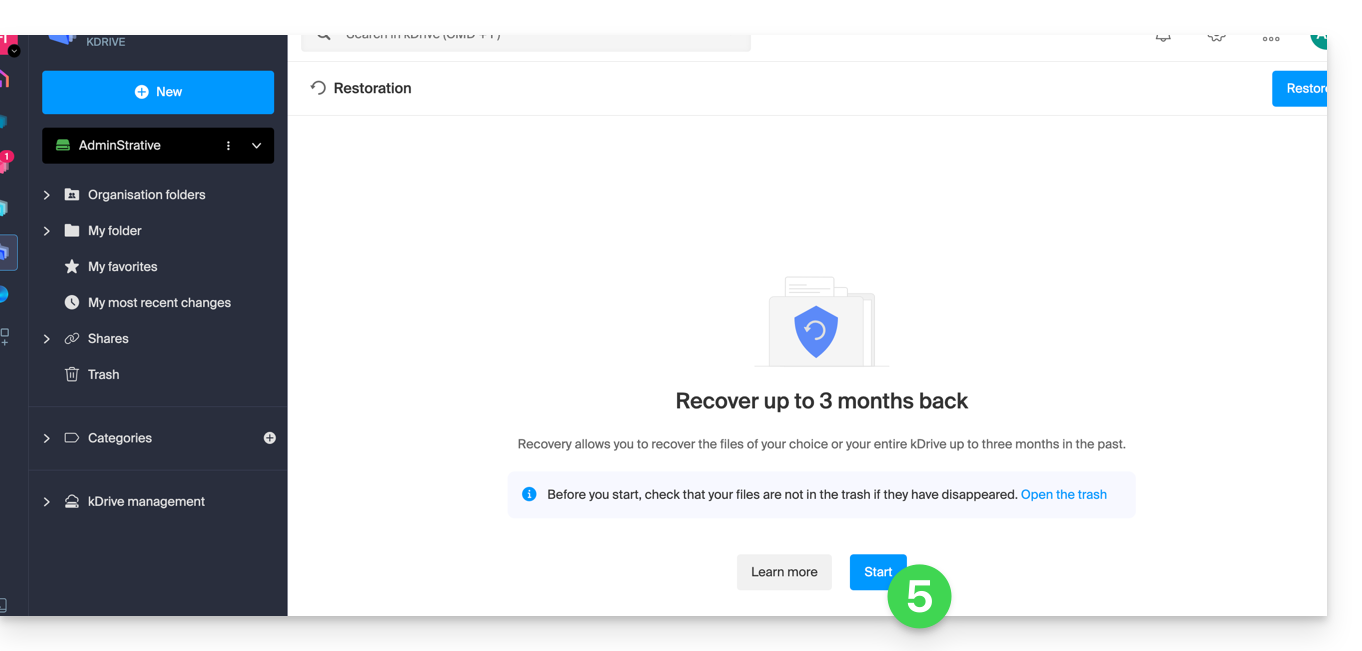
- The restore or Rewind feature allows you to revert to a previous state, like a time machine, and restore the order of your chosen files or your entire kDrive up to 3 months back (linked to the file version retention period).
- Files permanently deleted from your kDrive trash and deleted file versions cannot be restored.
- The restoration may take several minutes, during which kDrive will be inaccessible for all users, depending on the volume of data to be recovered.
- No actions are performed on permissions and shares.
Access the kDrive restore tool
Prerequisites
- Be Administrator or Legal Representative within the Organization.
To open the restore interface:
- Click here to access the Infomaniak kDrive Web app (online service ksuite.infomaniak.com/kdrive).
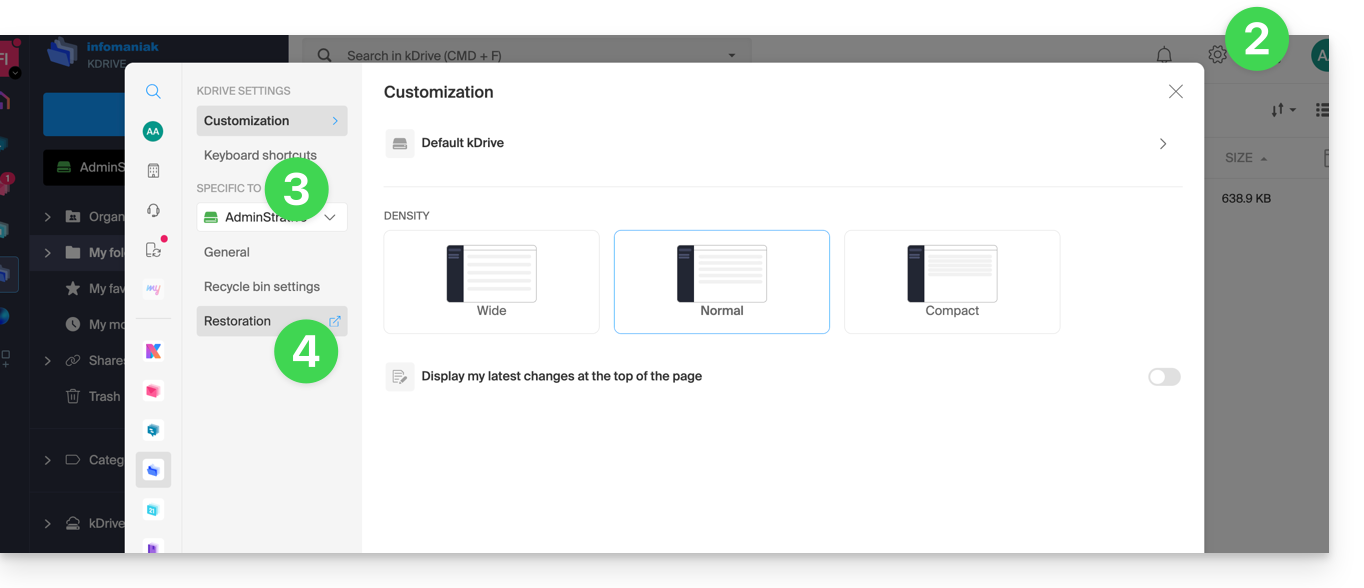
- Click on the Settings icon in the top right corner.
- Check or select the relevant kDrive in the dropdown menu of the left sidebar.
- Click on Restore:
- Read the on-screen information, then click the button to start:
- Review the information in the modal that appears, then click the button to confirm.
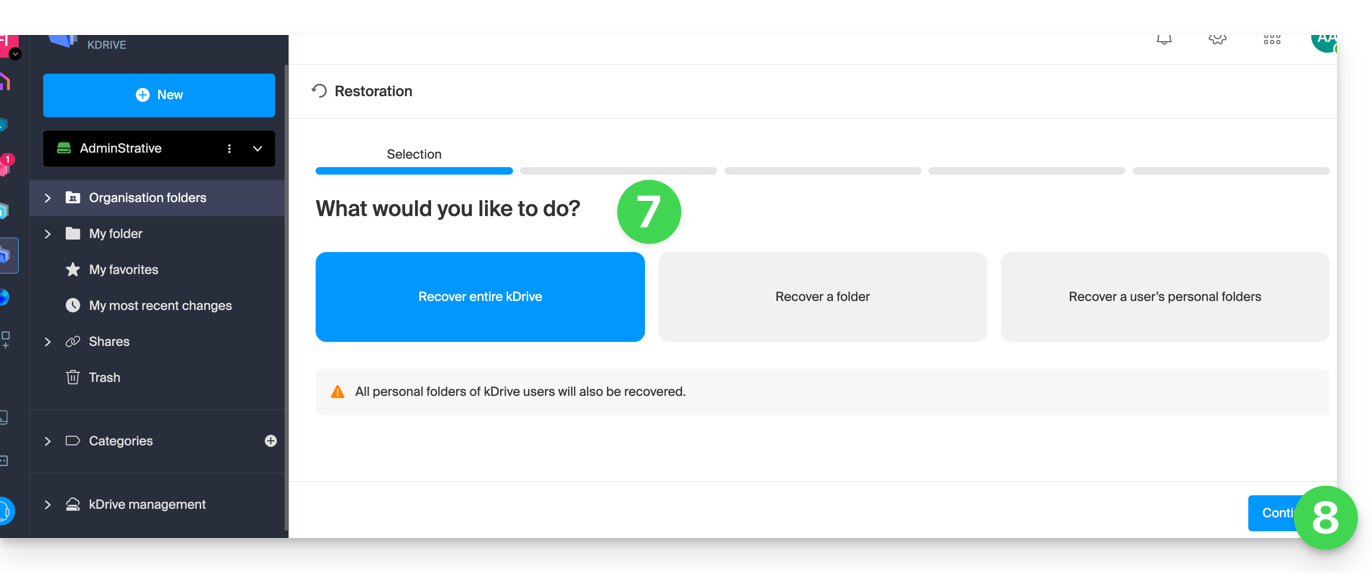
- Choose what will be affected by the rollback (the entire kDrive or just a part, and if applicable, for which user).
- Click on Continue:
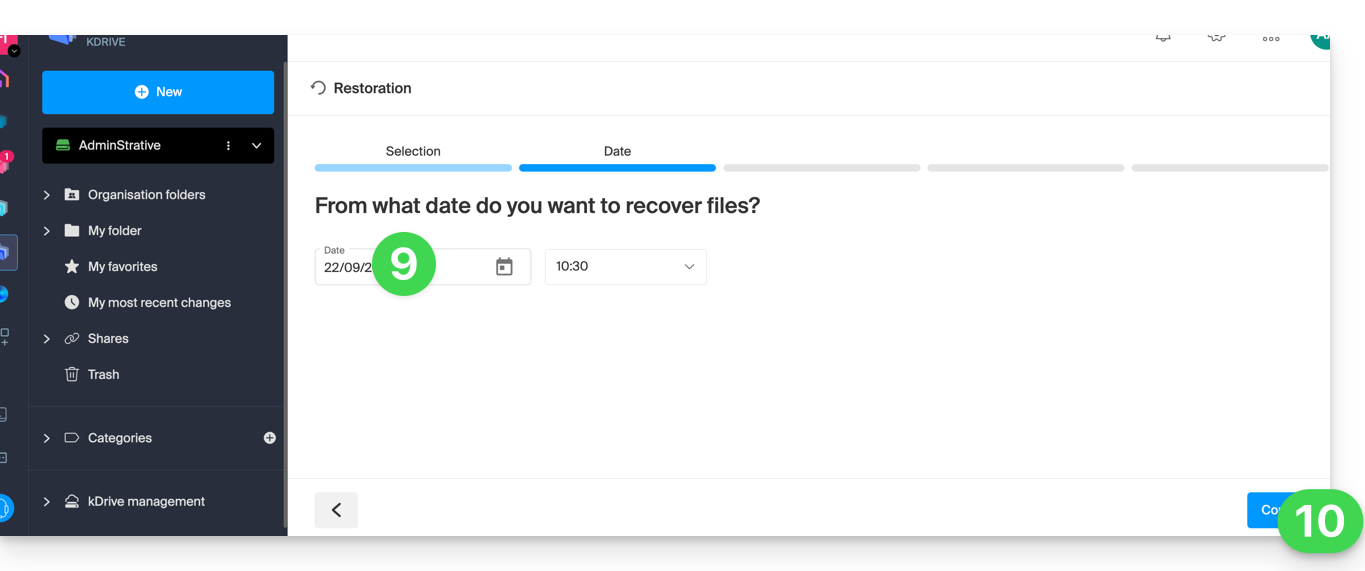
- Choose the date to revert to (maximum 3 months / 90 days).
- Click on Continue:
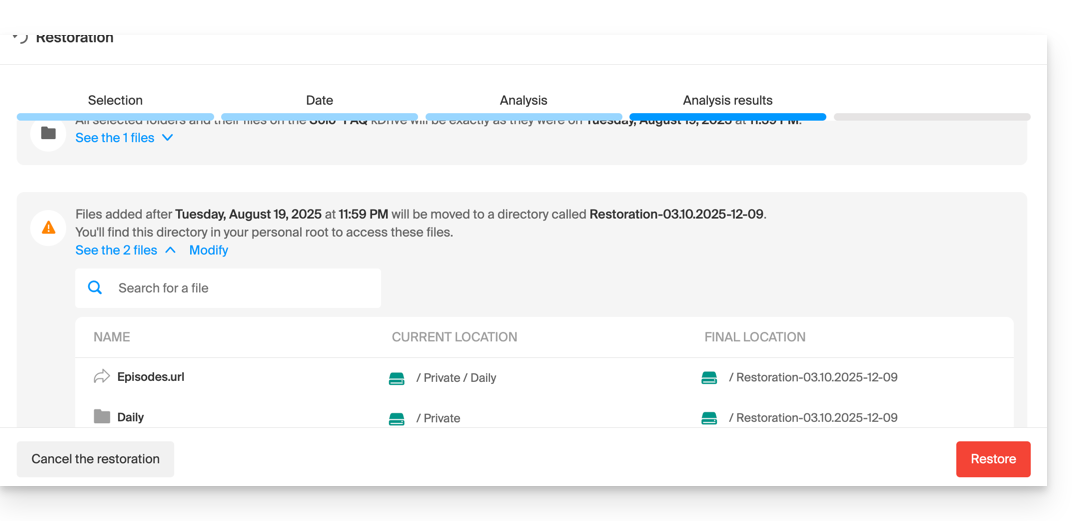
- Launch the analysis in the next step, and determine the next steps based on the proposed result (and if going back does not produce any result, the analysis will indicate it):
- A final security request will appear before the start of the restoration.
After the operation, an email is sent and a notification is displayed on the kDrive online.
Analysis report
An administrator who consults a report of a restoration launched by another administrator will not see everything related to the personal folder of the administrator who launched the restoration: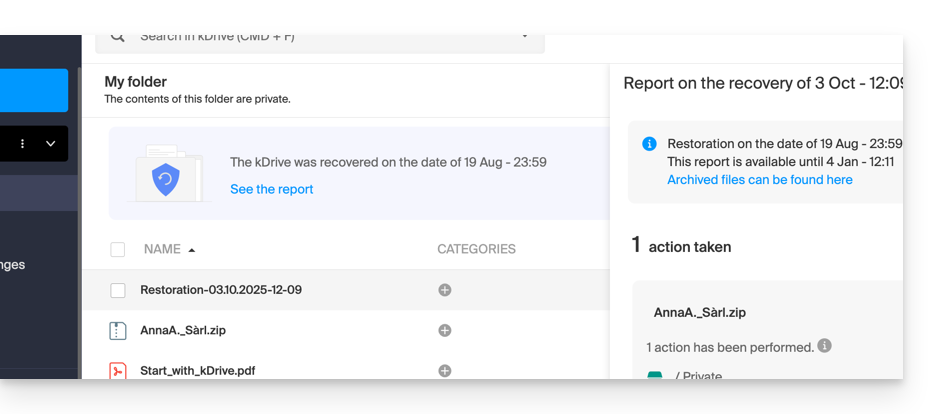
In the analysis report view, the data is listed and grouped according to the current location before the rollback.
In case of conflict
At the root of the kDrive of the administrator who performed the operation (or for the user concerned) a folder "Restoration (date and time)" will be created containing a subfolder with the conflicting files called "Conflict" and another folder for the files currently existing in the target called "Later items":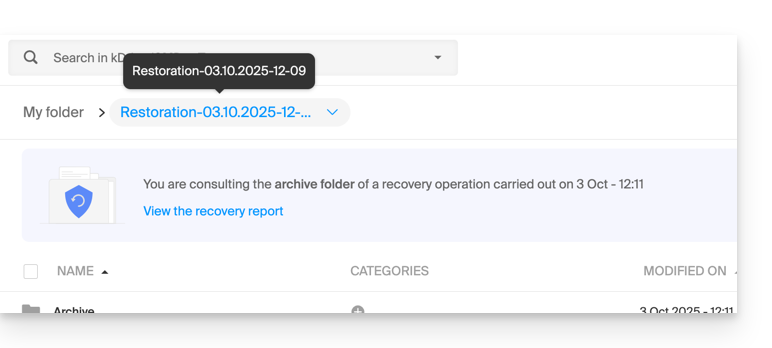
Link to this FAQ:
Has this FAQ been helpful?
This guide explains how to quickly share content from the Web app kDrive Infomaniak (online service ksuite.infomaniak.com/kdrive) by email.
Share by email from kDrive
You can email a file (or rather a link to a file, as the email will not contain an attachment) from your kDrive:
- Click here to access the Web app kDrive (online service ksuite.infomaniak.com/kdrive).
- Right-click on the file/folder in question or click on the action menu ⋮ to the right of the item in question.
- From the dropdown menu that appears, choose to share the item by email:
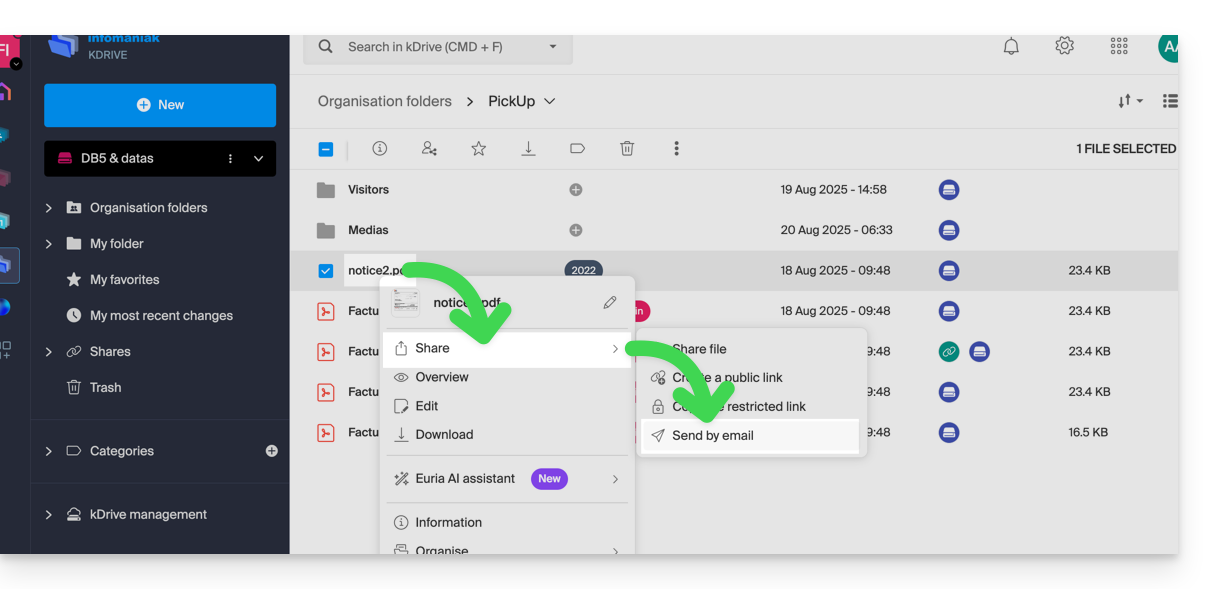
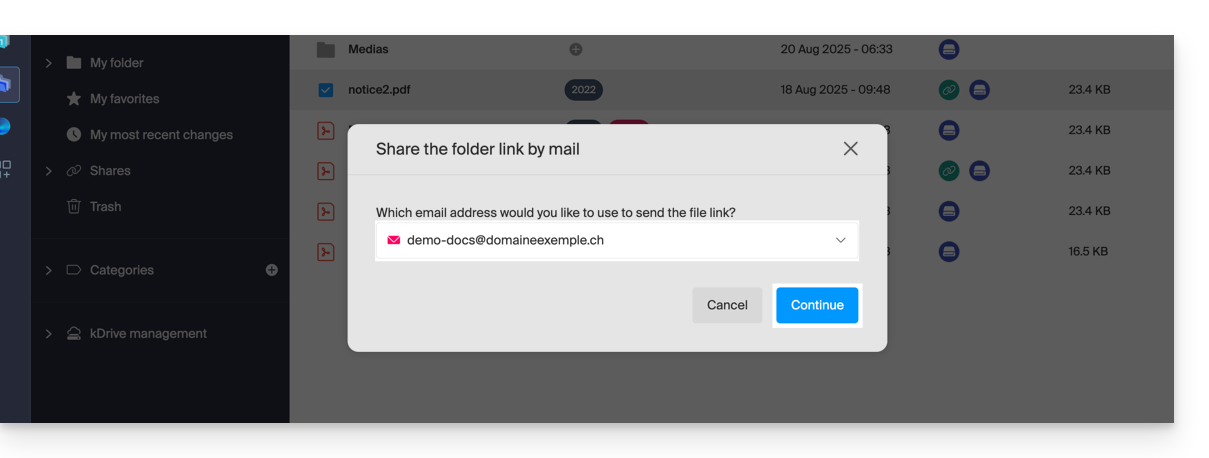
- Choose which address (from those currently linked to your Web app Mail) to send the file from.
- Click on Continue:
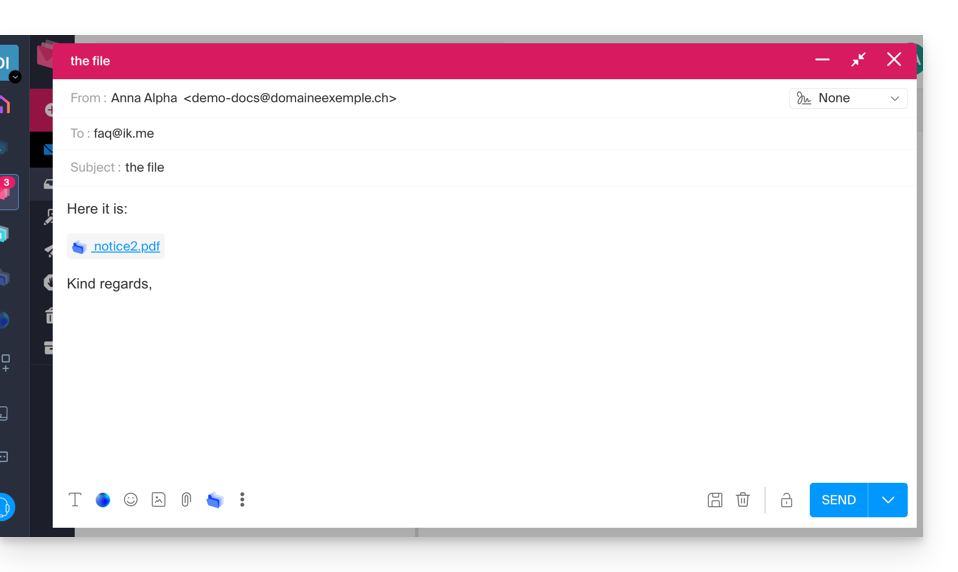
- The Web app Mail opens in the browser and the body of the message automatically contains the links to the shared content:
- This is exactly the same method as if you select the file directly from the kDrive icon on the composition window of the Web Mail app:
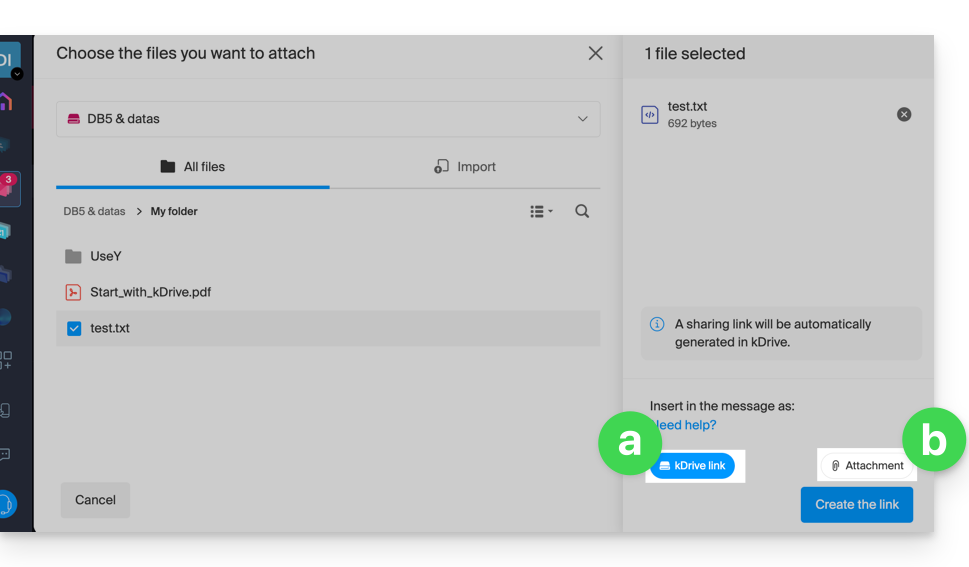
- However, by doing this (linking a kDrive file from Mail directly), an additional choice allows you to attach the file itself, as an attachment (the file will be sent in the state it is in at the moment you select it; there is no longer any notion of collaboration / sharing as is the case with the method explained in this guide and in the choice of point “
a” above).
- This is exactly the same method as if you select the file directly from the kDrive icon on the composition window of the Web Mail app:
Invite to collaborate on the file
For documents with Office-type file extensions .docx, .xls, etc., it is recommended to perform a standard share of the document (see the image below) which allows you to authorize the modification of the document if you wish: 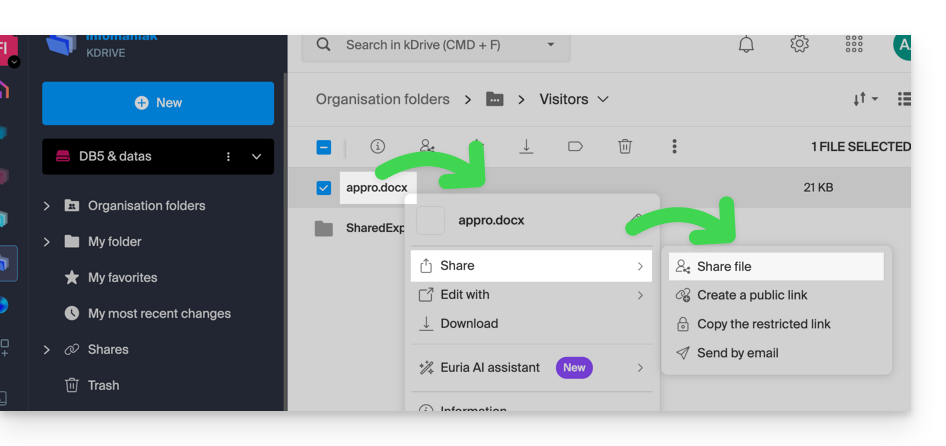
- If you authorize the modification of the document from kDrive, the user will be able to collaborate (with or without prior registration) i.e. modify in their browser and then save the document you have shared:
Link to this FAQ:
Has this FAQ been helpful?
This guide explains how to copy within the desktop app kDrive (desktop application on macOS / Windows / Linux) data from a kDrive to which your Infomaniak user has access to another kDrive to which the same Infomaniak user has access.
Preamble
- To be a user of multiple Organizations, you must have been added to them and have been granted access to the respective kDrives.
- For example, if the user
abc@domain.xyzhas a kDriveABCwithin their OrganizationABCand is invited to the OrganizationVWXwhich grants them access to the kDriveVWX, they will see 2 kDrives on ksuite.infomaniak.com/kdrive and will be able to send data from one to the other in 1 click: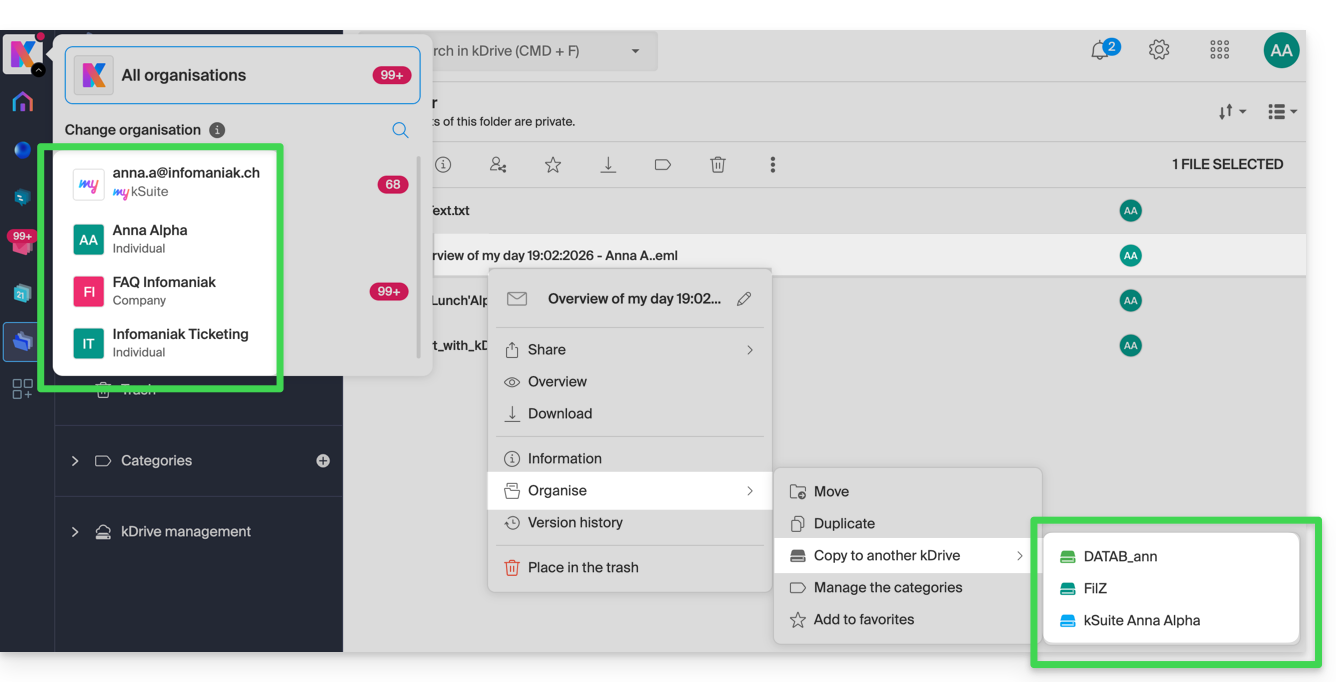
- For example, if the user
- Without being a user of multiple Organizations, it is also possible to copy data but only by importing the entire kDrive, without being able to choose specific data.
- If you wish to import all the data contained on the other kDrive at once, refer to this other guide and choose kDrive at point 6.
Copy data between multiple kDrives
Prerequisites
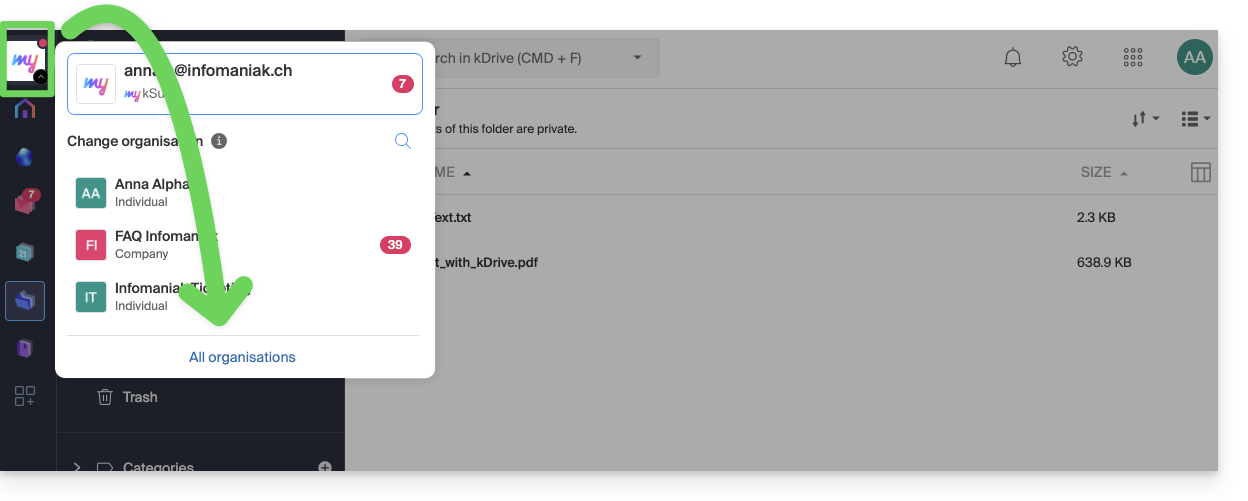
- Ensure that all Organizations are displayed, otherwise you will not be able to switch from one kDrive to another and consequently will not have the copy function to other kDrives:

To copy a folder or file to the other kDrive to which you have access from the same user account:
- Click here to access the Infomaniak Web app kDrive (online service ksuite.infomaniak.com/kdrive).
- Check or select the relevant kDrive in the dropdown menu of the left sidebar.
- If necessary, select the other kDrive from which you wish to copy files:
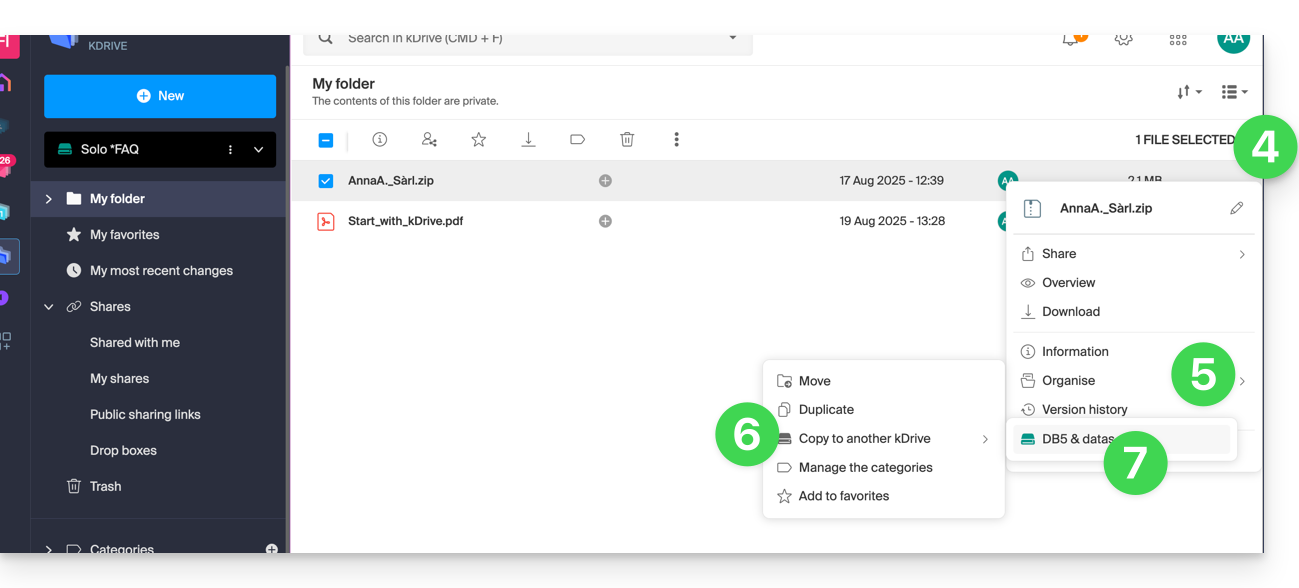
- Right-click or click on the action menu ⋮ to the right of the folder or file you wish to copy to the other kDrive.
- Click on Organize.
- Click on Copy to another kDrive.
- Choose the relevant kDrive from the list visible in this same dropdown menu:
- Choose the destination location (knowing that the shared folder ("Organization Folders ") cannot receive a file or folder at its root but you can create a subfolder using the appropriate icon if the user has the rights).
- Click the blue button to start the copy:
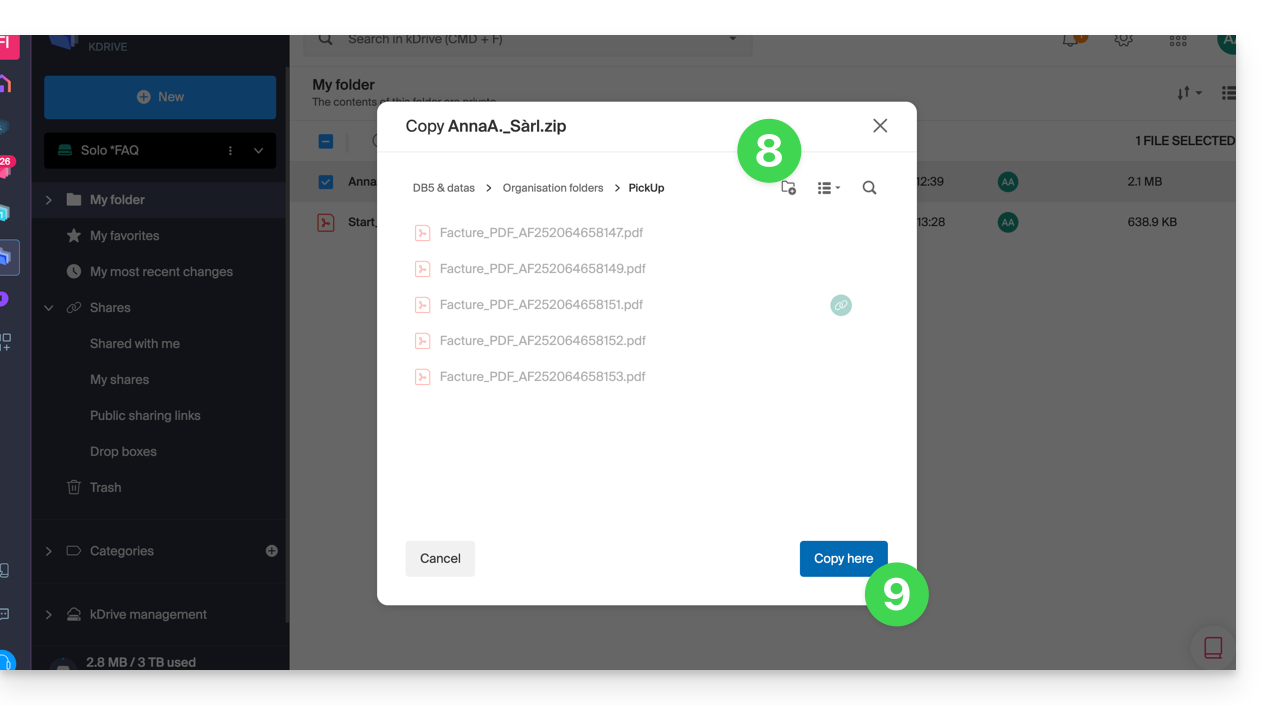
The copy is not instantaneous or immediate - please wait several minutes!
Link to this FAQ:
Has this FAQ been helpful?
This guide explains how to switch from one Organization to another from your Infomaniak Manager when you belong to multiple Organizations.
Preamble
- Since you opened your account with Infomaniak, you are part of at least one Organization.
- If you were alone and it was not an invitation, an Organization was created in your name and you automatically become the legal manager.
- Otherwise, you belong to the Organization that invited you (to join its kSuite, to manage a product, etc.).
- You can leave Organizations.
- It is quite possible to access multiple Organizations from the same login credentials and to switch quickly from one to the other.
Switch to one of the other Organizations
To switch to another Organization among those you belong to:
- Click here to access the management of your products (Infomaniak Manager).
- Click on the chevron at the top left of the Manager interface.
- Click on the Organization you want to access (or display them all to access all the kDrive / email addresses you are attached to).
- The Organization change is immediate, you are automatically switched:
Link to this FAQ:
Has this FAQ been helpful?