Knowledge base
1000 FAQs, 500 tutorials and instructional videos. Here, there are only solutions!
This guide explains how to centralize the display of your different Infomaniak email addresses when you have multiple accounts and messaging offers.
Display email addresses from all Organizations
A first approach is to display the global Mail web app for all Organizations to which your Infomaniak account is linked:
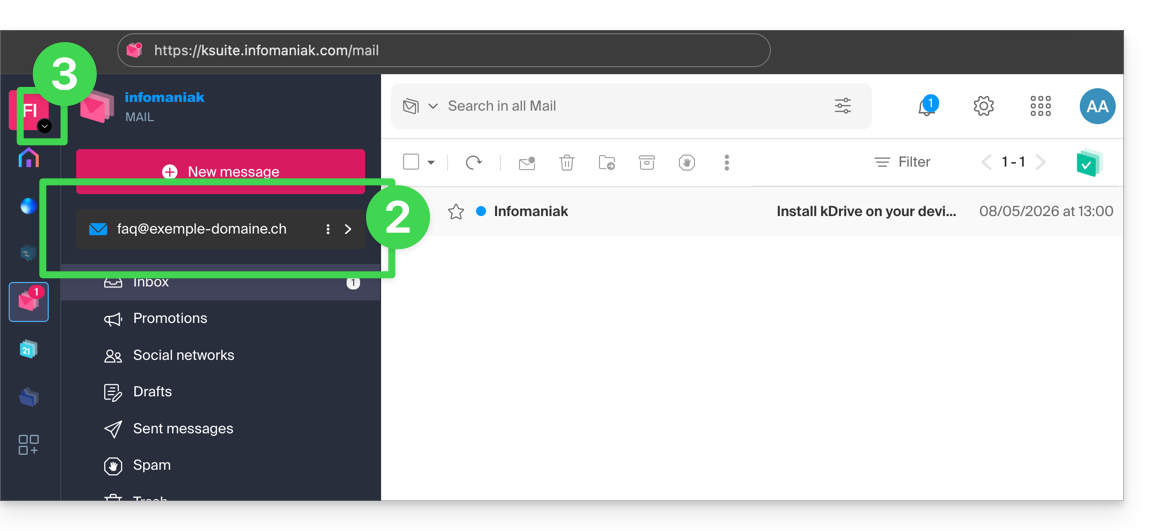
- Click here to access the Infomaniak Mail web app (online service ksuite.infomaniak.com/mail).
- Then click on the chevron to the right of the displayed email address.
- The other addresses of the Organization for which you have permission will be displayed.
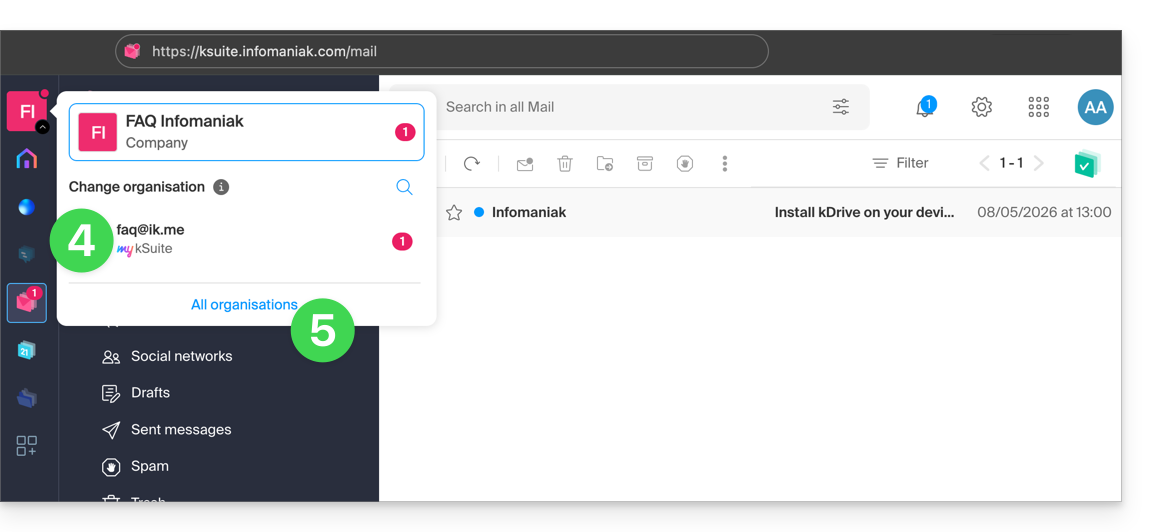
- If you have access to other addresses on other Organizations that your user accesses, click on the chevron to the right of the active Organization:
- Either you click on another Organization (my kSuite for example) to display only the other specific email address…
- Or you click on All Organizations to display all email addresses in the interface:
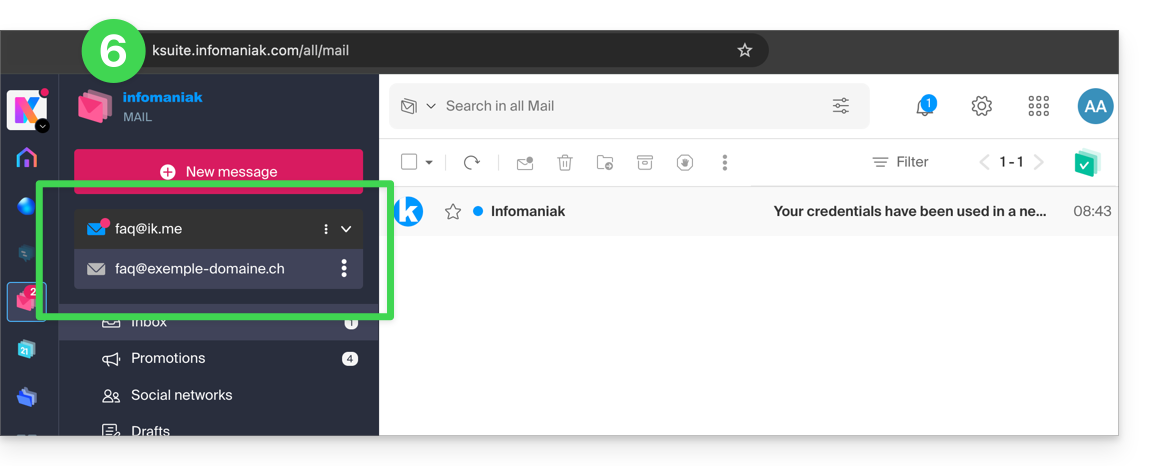
- The shortcut for this common display is https://ksuite.infomaniak.com/all/mail:
If an email address you know is not visible:
- Check at the top right that you are logged in with the correct Infomaniak account.
- Check with the address administrator that you have access to the address in question with your current Infomaniak account login.
If, on the other hand, you want to remove an address from the list, refer to this other guide.
Link to this FAQ:
Has this FAQ been helpful?
This guide explains how to add or modify one or more SRV type records in the DNS zone (of a domain name) managed on the Manager Infomaniak.
Preamble
- This type of record allows you to indicate which services are available for a domain.
- They are often used for XMPP, LDAP protocols or to configure Microsoft Office 365.
Modify the DNS zone
To manage this type of record in a DNS zone:
- Click here to access the management of your domain on the Infomaniak Manager (need help?).
- Click directly on the name assigned to the domain in question.
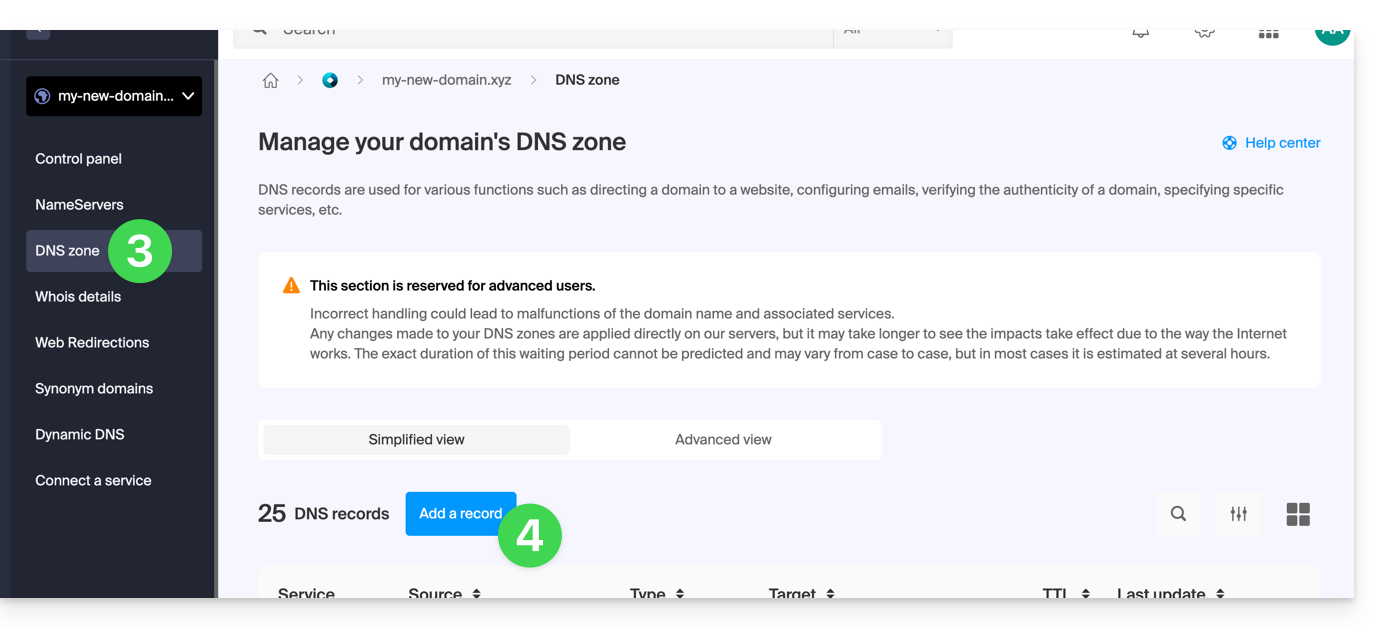
- Click on DNS zone in the left sidebar.
- Click the button to add a record:
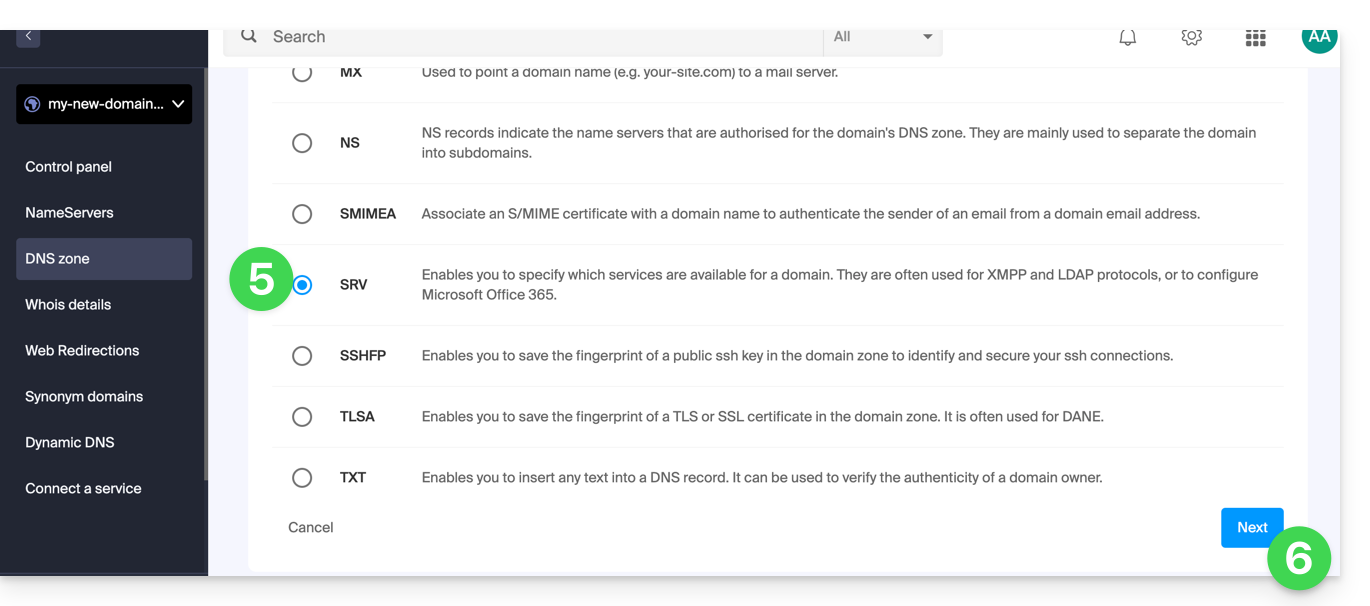
- Click on the radio button SRV to add a record.
- Click on the Next button:
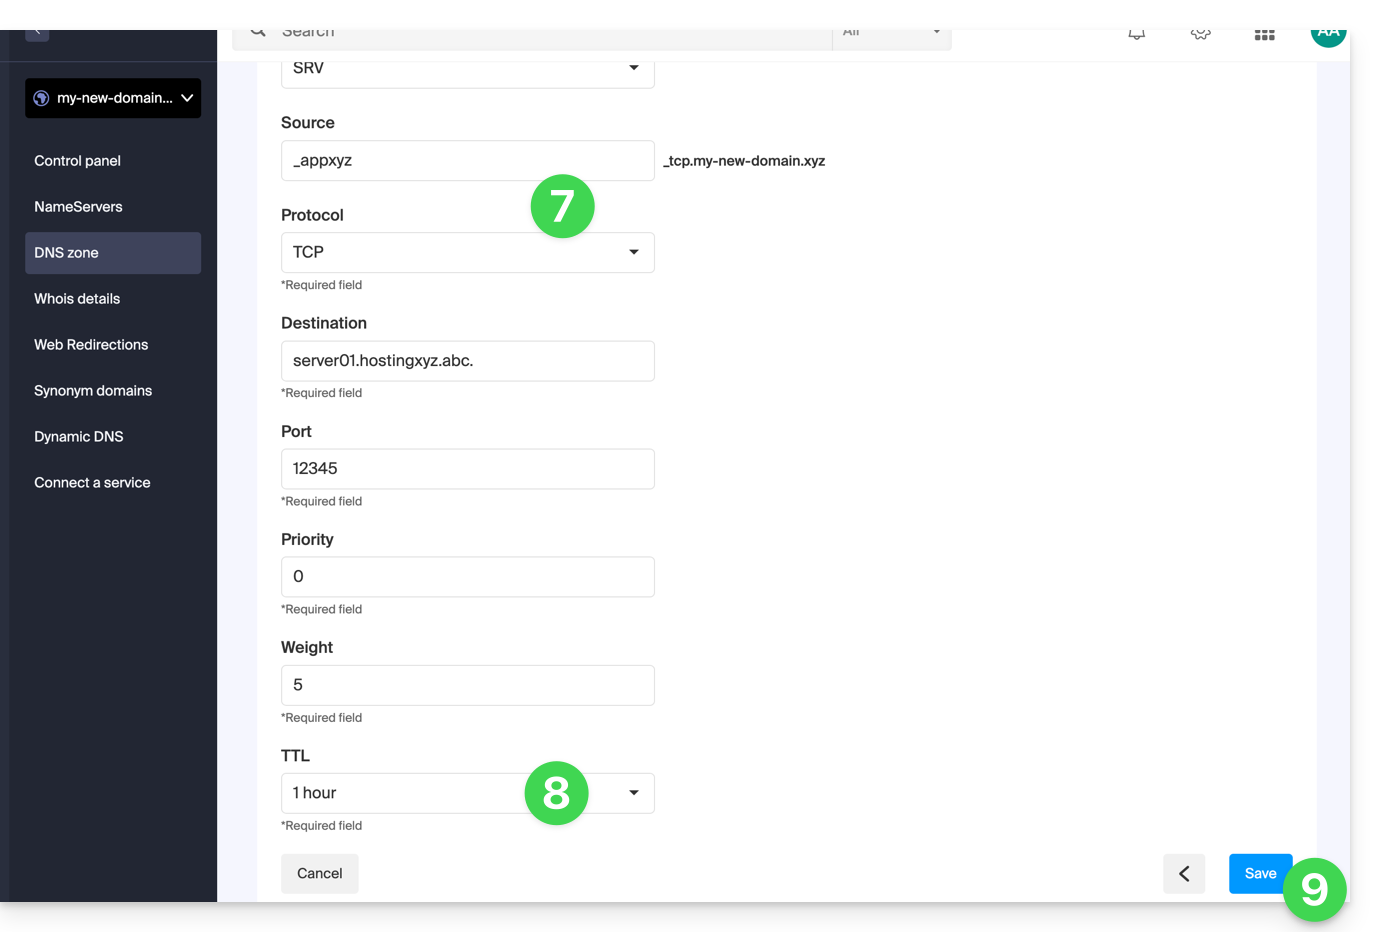
- Enter the values of the SRV required for your DNS zone (the
._tcp.domain…is already entered). - Leave the default value for the TTL.
- Click on the Save button:
Check the correct addition of the complete SRV in the records table: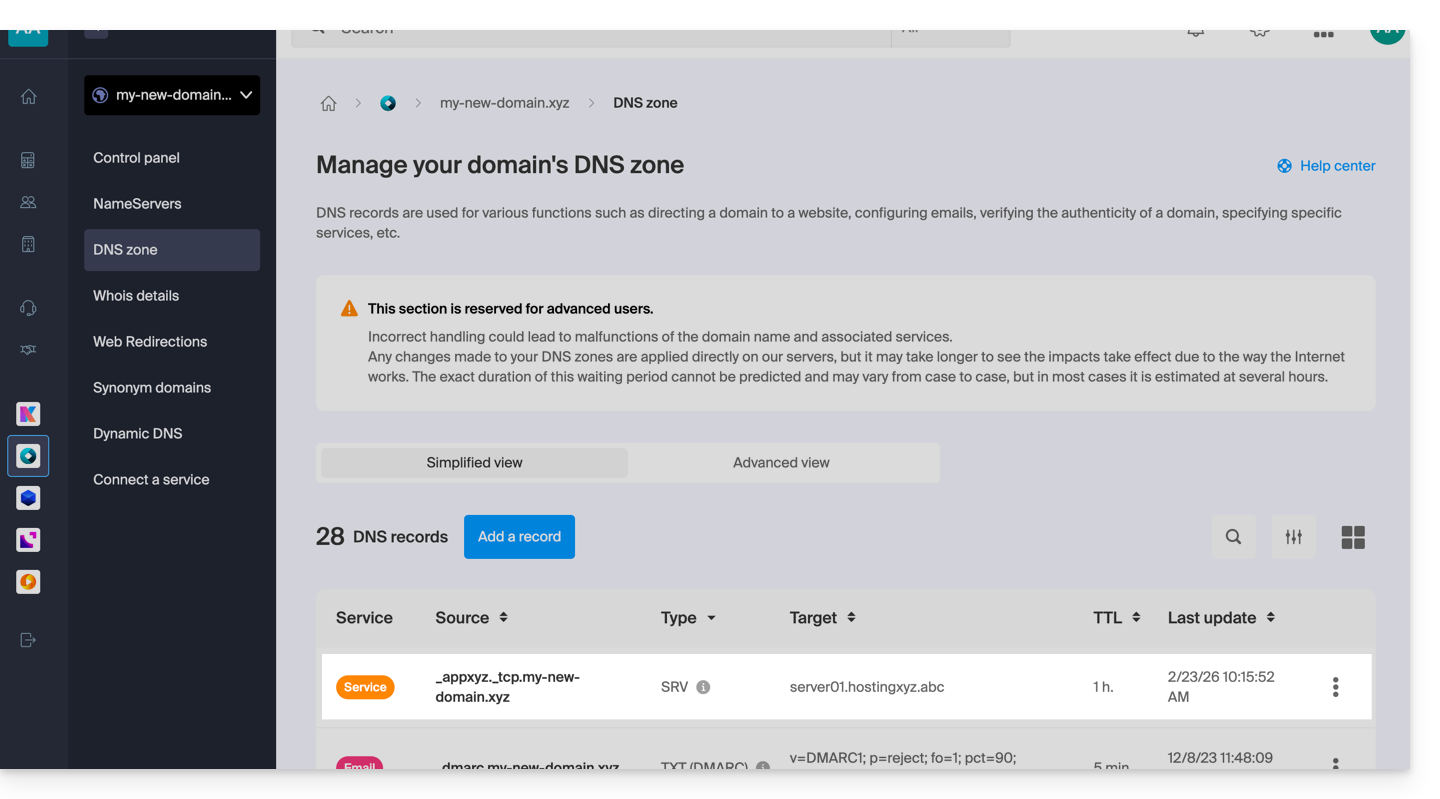
Link to this FAQ:
Has this FAQ been helpful?
This guide explains the steps you need to take to access an email address created on Infomaniak by a third party, whether you are an employee, collaborator, family member, or in any other situation.
Requesting to be a user of the email address
Prerequisites
- If you already have an Infomaniak account, check that the email address is actually inaccessible to your user at the moment.
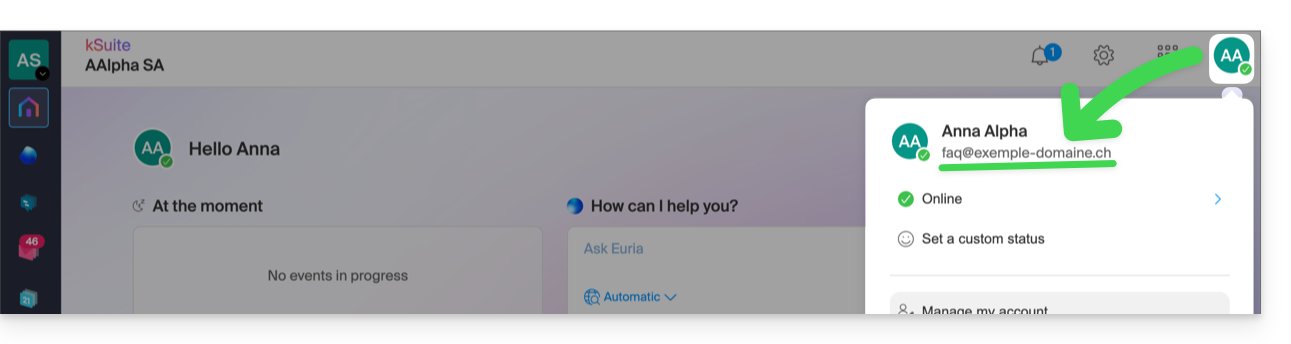
- Note your login ID: click on the pill with your initials / avatar in the top right corner of the Infomaniak Manager:
Then, contact the manager of the email address in question (demo@primary-domain.ch in this example):
- Ask them to follow the instructions provided in this other guide faq.infomaniak.com/1478 to add your login ID as a user of the “
demo” address on the “primary-domain.ch” Mail Service. - Provide them with your login ID, for example
faq@exemple-domaine.ch.
By following the guide, they will be able to add your login ID at step 6 as a user of the email address:
- either directly, because you are already part of the same Organization as them:
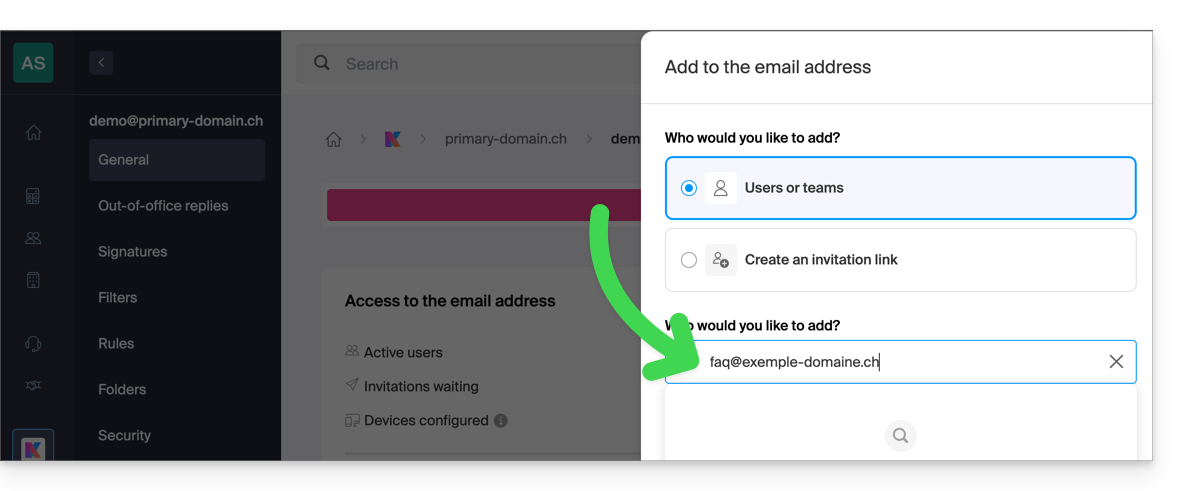
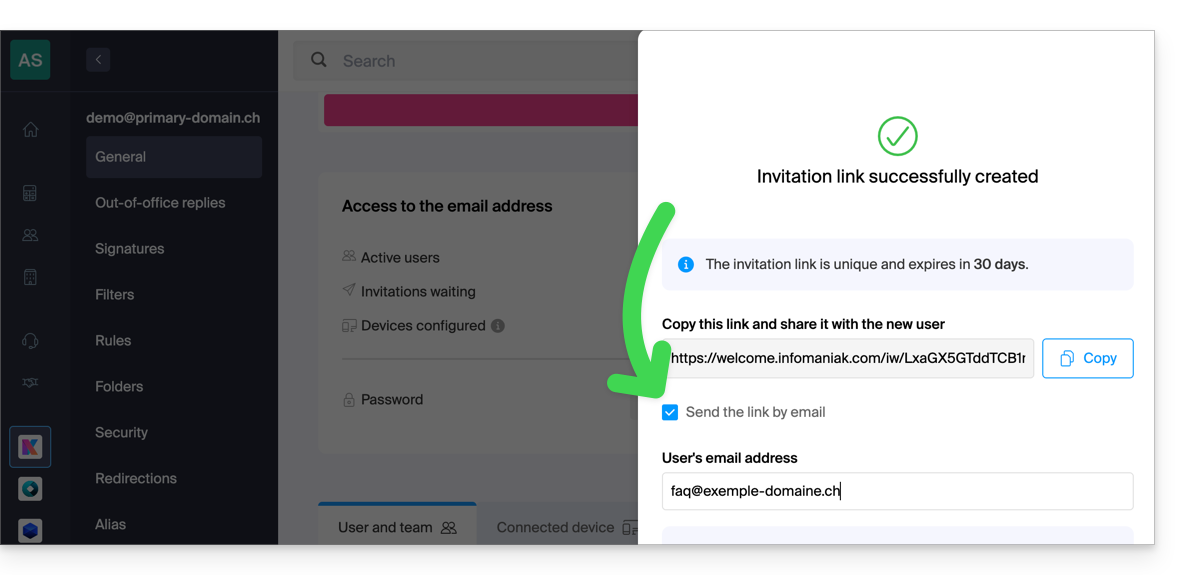
- or via an invitation link system, which they can send to you via message, email, for example:
Once the operation is complete, you will see the content of the relevant mailbox appear on your interface at ksuite.infomaniak.com/all/mail: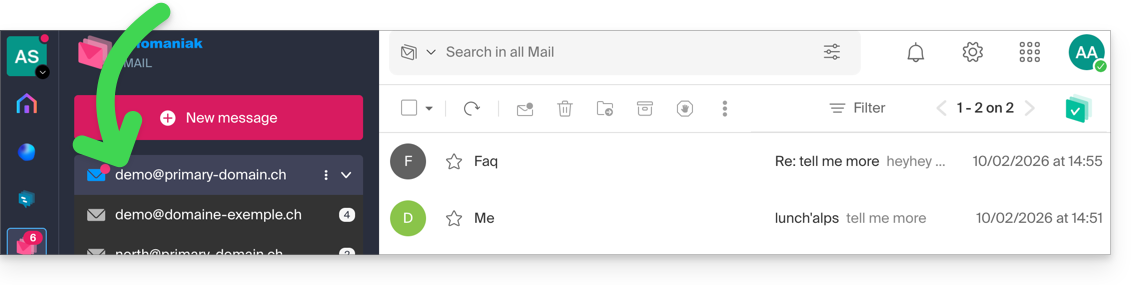
Link to this FAQ:
Has this FAQ been helpful?
This guide explains how to create a "catchall" type email address on a Service Mail.
✘ UNAVAILABLE with
kSuite free
my kSuite / my kSuite+
Service Mail Starter
Preamble
- A "catchall" type email address retrieves all emails sent to non-existent email addresses on the domain.
- This is ideal if you want to receive all messages for which there is no specific address on your domain.
- This type of address cannot be used to send emails.
- If you configure the "Automatic Reply" (out-of-office message) function on a catchall@ address, no automatic reply will be sent to senders who contacted a non-existent address on your domain.
- This restriction notably avoids reply loops and the sending of unwanted messages.
- Also, take note of the important recommendations at the end of this guide.
Create a catchall address
Prerequisites
- Have a Service Mail on your Infomaniak Manager.
- Have a quota of available free addresses or adjust it in advance if necessary.
Then, the administrator of a Service Mail creates a new generic email address:
- Click here to access the management of your product on the Infomaniak Manager (need help?).
- Click directly on the name assigned to the product concerned.
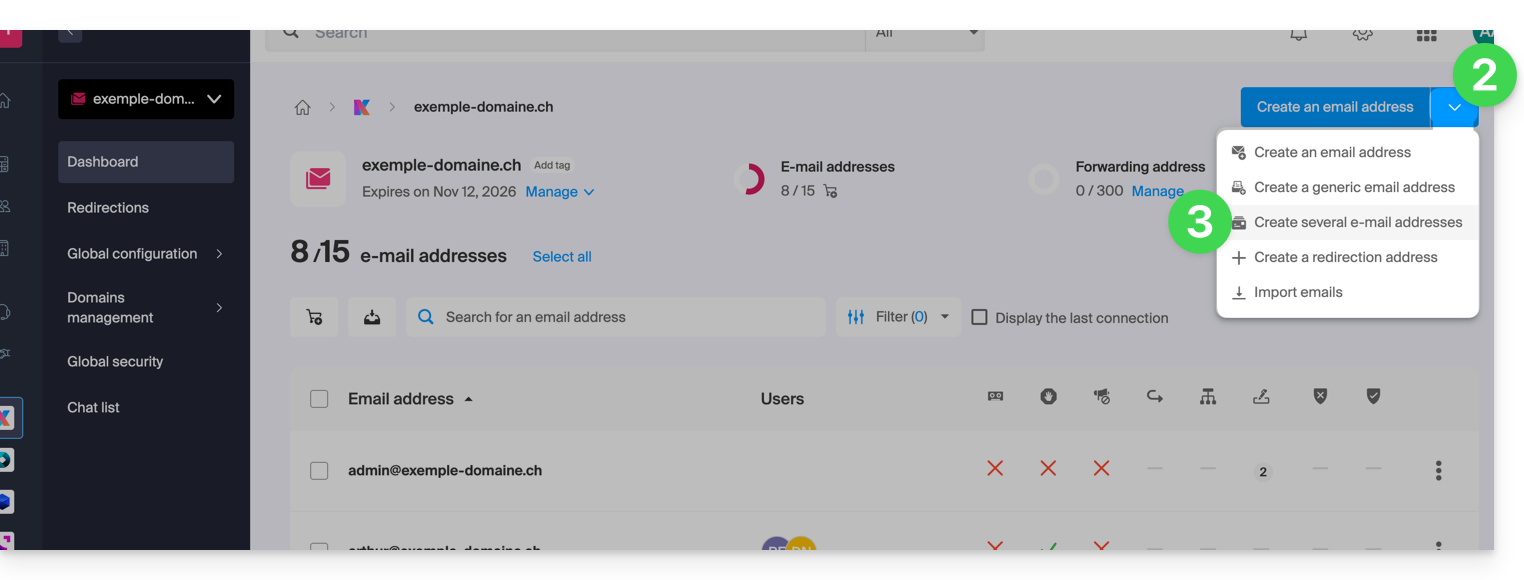
- Click on the chevron to the right of the blue button Create an email address.
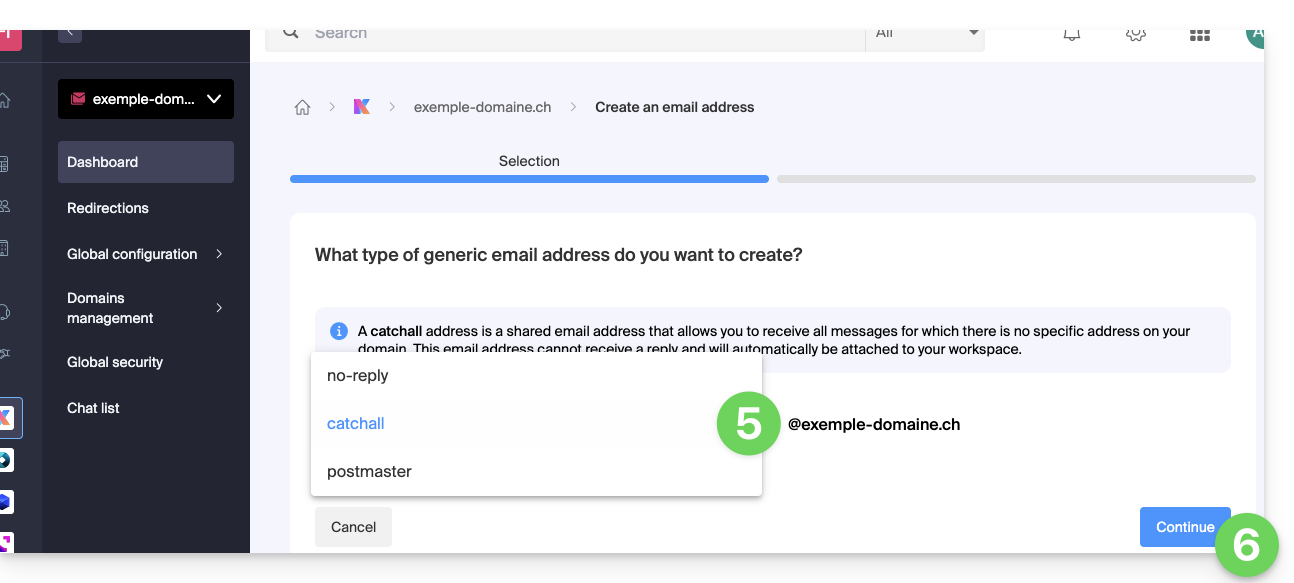
- Click on Create a generic email address:
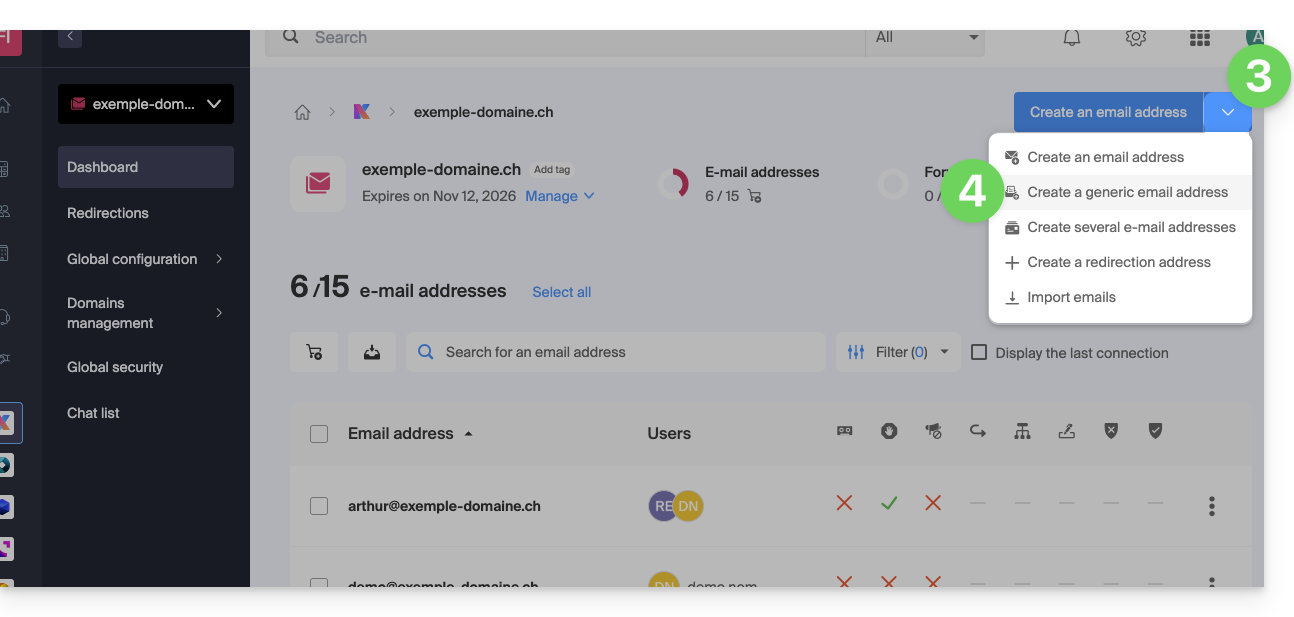
- Choose Catchall.
- Click on Continue:
Once the catchall address is created, it is automatically visible on your Infomaniak Mail web app.
To use it elsewhere, you just need to add a password for your devices/users.
Example of use
Once the address catchall created:
- You are using the email address
jonnie.smith@domain.xyzwhich works and exists on the Mail Servicedomain.xyz.- You have also created an address
catchall@domain.xyzon the Mail Servicedomain.xyz.
- You have also created an address
- An email is sent to
smith.johnny@domain.xyzbecause the sender misspelled the recipient's address. - The email will still arrive in the
catchall@domain.xyzbox which is enough to consult in the Mail interface of your choice. - Same if you delete the address
jonnie.smith@domain.xyzone day; if you keep thecatchalladdress, then it is the latter that will receive everything that is still addressed to the non-existent address...
Important recommendations
Creating this type of account is not recommended:
- Catchall addresses receive all emails sent to any domain address; this means they are often flooded with spam, which can be difficult to manage and filter.
- Due to the high volume of spam, legitimate messages can be drowned out and lost in the mass, which can result in the loss of important communications.
- Catchall addresses can potentially be used by attackers to target your domain with brute force attacks or other methods, as they provide an easy target for testing different address combinations.
In short, managing a catchall address can become tedious and complicated, especially for large organizations with many employees and departments.
Link to this FAQ:
Has this FAQ been helpful?
This guide explains how to create email addresses in bulk instead of adding them one by one within an Infomaniak Mail Service.
Preamble
- To ensure responsible use of the services, a limit of up to 50 email addresses per 24-hour period has been set.
- Contact Infomaniak support to lift this restriction.
Create new email addresses in bulk
Prerequisites
- Have a tool to manage CSV files (format
.csv). - Have a Mail Service on your Infomaniak Manager.
- Have a quota of available addresses or adjust it in advance if necessary.
Obtain the example CSV file
Importing is done using a CSV file (format .csv) which, once filled out, can be imported to add the addresses to your Mail Service in one go.
To download the CSV file to configure the creation of addresses:
- Click here to access the management of your product on the Infomaniak Manager (need help?).
- Click on the chevron to the right of the blue address creation button.
- Click on Create multiple email addresses
- Download the proposed template (CSV file in
.csvformat):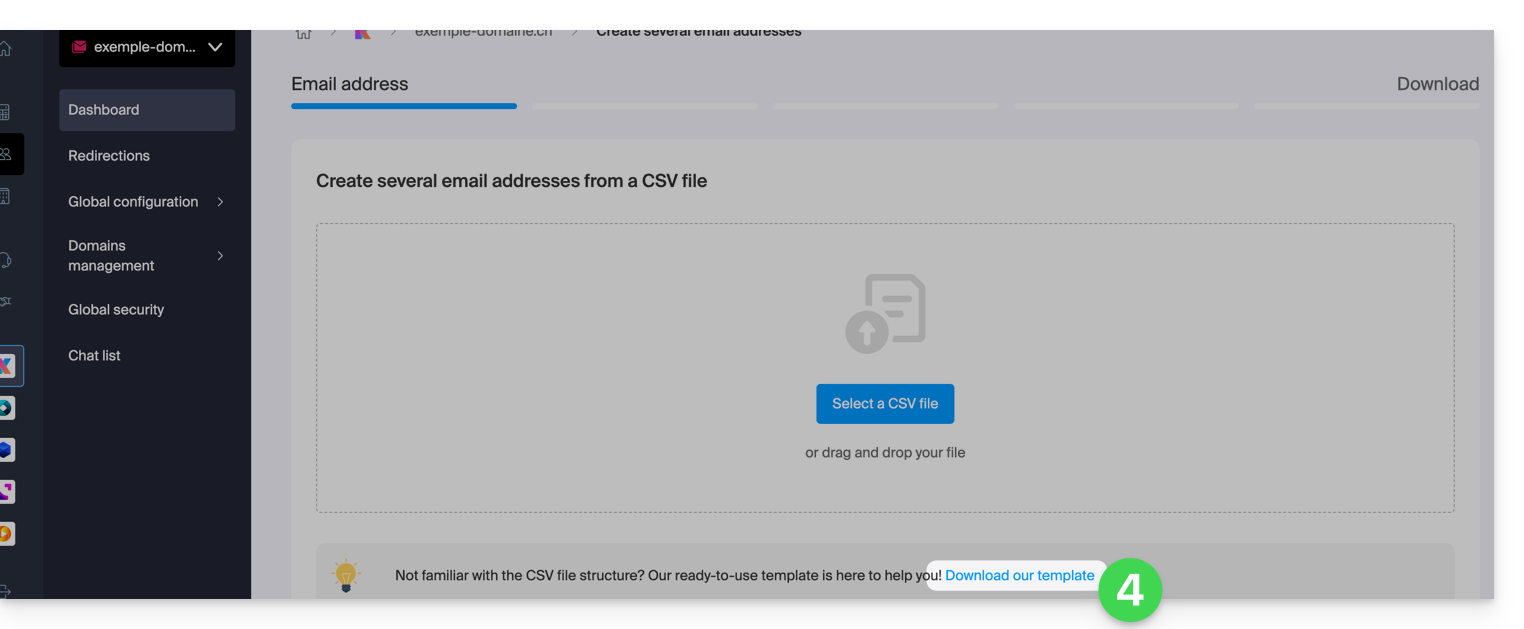
Complete the CSV file
- Open the example CSV file; do not touch the first line, then from the second line on:
- 1st column, specify the address to create (without the domain)… example:
john. - 2nd column, specify if necessary a complete email address to which to redirect emails.
- 3rd column, specify whether to delete (1) messages after redirection.
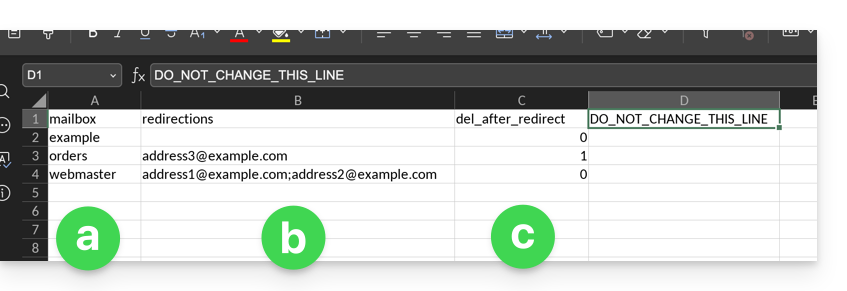
- 1st column, specify the address to create (without the domain)… example:
- The second and third columns are optional (you can leave them completely empty).
Import the CSV file
Once the .csv file is completed, save it in the same format as the proposed model and then:
- Click on the chevron to the right of the blue address creation button.
- Click on Create multiple email addresses.
- Click on Select a CSV file:
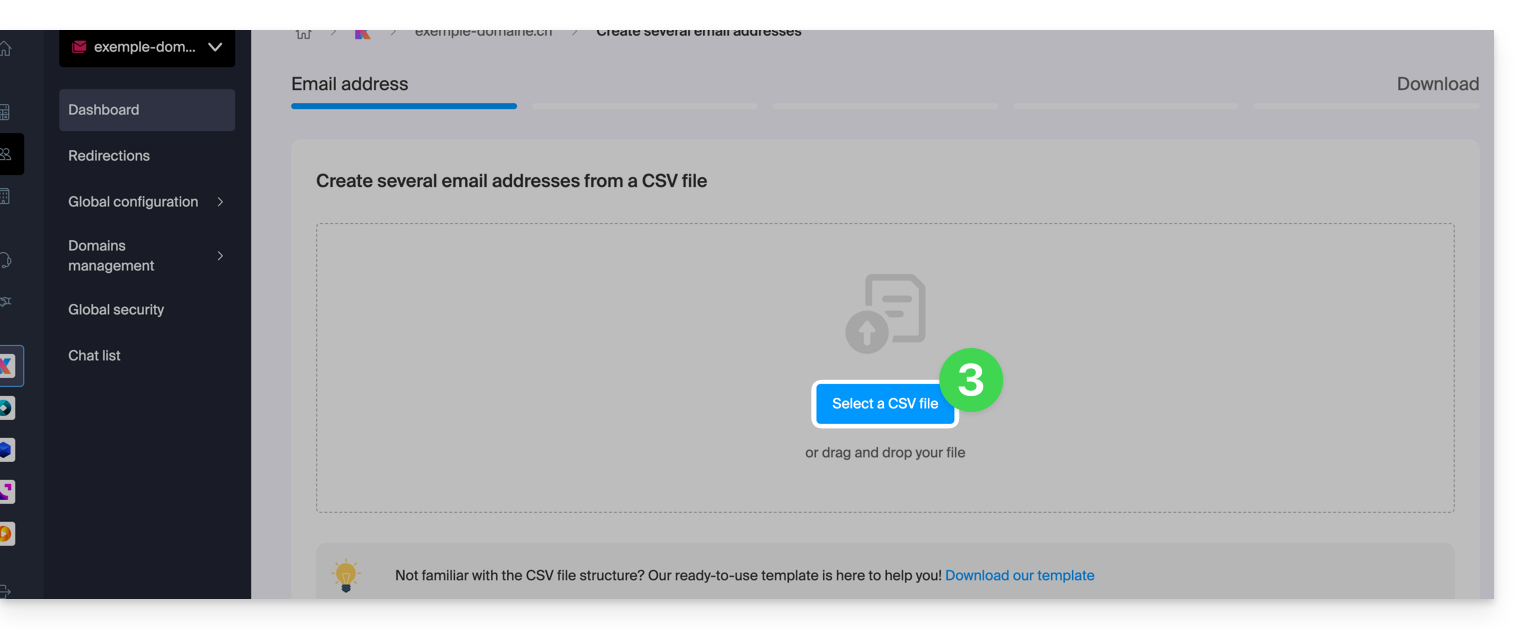
- Browse your device and select your CSV file.
- Click on Continue; after a few minutes, the email addresses will be added (without any password being assigned to them yet), according to the instructions in the imported file.
Link to this FAQ:
Has this FAQ been helpful?
This guide helps you if you receive error mails that mention SPF when you write to gmail, microsoft, or similar addresses.
Are all your services with Infomaniak?
The Global Security tool informs you of any configuration inconsistency regarding your Infomaniak Mail Service.
Are some of your services elsewhere?
To resolve an email sending issue when your email is managed by Infomaniak and your website is with another provider (like Wix for example) and in this situation the DNS zone of the domain name is managed elsewhere, refer to this other guide.
Link to this FAQ:
Has this FAQ been helpful?
This guide explains how to restore backups of previous versions of your files and other web data from your Infomaniak hostings, and how to set up an effective backup policy if the automatically and freely provided backups no longer meet your availability or security needs.
Web Hostings (Starter, Shared, Cloud Server)
Refer to these guides to restore automatic backups:
- of an entire hosting (FTP + MySQL),
- of specific files on the hosting,
- of specific databases,
- of a Web Application (Wordpress & Apps),
- of Cloud Server SSH crons.
Refer to these guides to backup and restore:
- a hosting with Swiss Backup and Restic (advanced),
- WordPress with Swiss Backup,
- WordPress with an extension.
Also refer to https://faq.infomaniak.com/snapshot.
Messaging
- Restore messages from Infomaniak automatic backups.
- Restore contacts or calendar events.
- Backup the current content of an email account:
- by downloading the current content locally,
- by duplicating all current content to a backup box,
- by copying future emails as they arrive to a backup box.
Domains / DNS Zones
- Restore deleted DNS records from Infomaniak automatic backups.
- Restore an expired domain in redemption period.
Link to this FAQ:
Has this FAQ been helpful?
This guide will help you troubleshoot the issue if you receive a message after sending an email indicating that it was rejected due to "Spam Message Rejected" or "5.7.0 AV: Message is rejected by headers rule filter.. 554 Please check the message and try again" ...
Important checks to perform
Make sure your email does not contain:
- words or phrases that are often associated with spam, as it could be identified as unwanted and rejected
- any unusual information in the signature, a link that is incorrectly formatted (
http//.domain.xyzfor example), etc. - an attachment with one of these prohibited extensions:
.exe,.com,.cmd,.cpl,.hta,.scf,.sct,.lnk,.bat,.js,.jse,.wsh,.ws,.wsf,.wsc,.vbe,.vb,.vbs,.shs,.pif,.scr... including inside a compressed file (.zipfor example)
To send a file (js or exe for example) and confirm that it does not contain viruses, store it in your hosting space and link to it (if the file is large and you are sending it from the Infomaniak Mail web app (online service ksuite.infomaniak.com/mail), it will be placed on a temporary server to allow your recipient to receive a download link) or via Swisstransfer.com.
Also, check your SPF record. If your domain does not have an SPF record or if this record is incorrect, your message will most likely be rejected.
If you believe you are receiving a "Spam Message Rejected" message without reason, contact Infomaniak support.
Link to this FAQ:
Has this FAQ been helpful?
This guide helps resolve an email sending error of type "the recipient has been rejected by the server" / "recipient rejected" (code: 550 5.7.1 relaying denied) or "authentication required" / "proper authentication required".
Resolve a Relaying denied error
Check that the parameter "My server requires authentication" / "My outgoing server (SMTP) requires authentication" has been activated in the settings of your outgoing server (SMTP) on the email software used.
You will generally find this setting under one of the following sections:
- "More Settings"
- "Advanced Settings"
- "Outgoing Server (SMTP)"
After correcting this parameter, it is important to delete or move pending messages in your outbox, then try sending a new message.
Use config.infomaniak.com
You can use the Infomaniak configuration tool to help you (log in to your Infomaniak account if necessary).
Also refer to this other guide for resolving errors.
If the error message specifically mentions IP name possibly forged, you will need to contact the person in charge of your internet connection (your internet service provider) to verify the situation with them (or change your IP address by testing from another device/network, etc.).
Link to this FAQ:
Has this FAQ been helpful?
This guide explains how to transfer to Infomaniak email addresses currently hosted by Microsoft, within Microsoft 365, using an IMAP import tool.
Introduction
- This operation does not affect data already present in the destination address or the source address.
- The entire external mailbox will be imported.
- Once the import process has started, it is no longer possible to interrupt it.
- Any duplicates will be managed: identical content will only be copied once.
- Please refer to this other guide if you are looking for alternatives to this IMAP process.
Import your entire email history
1. Microsoft Prerequisites
- Enable POP/IMAP/SMTP features that are disabled by default (need help?).
2. Infomaniak Prerequisites
- Have a Mail Service on your Infomaniak Manager.
- Have a quota of available addresses or adjust it beforehand if necessary.
- Ensure that the email is properly secured.
- Create one or more addresses on this Mail Service.
- If you have many (10+) email addresses to create, please refer to this other guide regarding bulk creations.
- The destination email address must be linked to the user (= the Infomaniak account) you are using.
3. Import email content from Microsoft to Infomaniak
- Click here to access the import tool (online service https://import-email.infomaniak.com).
- If necessary, log in to your Infomaniak account for the relevant organization, as the import will be done to one of the email addresses linked to the Infomaniak Mail web interface (online service ksuite.infomaniak.com/mail) of the Infomaniak account you are using.
- Click on the import via IMAP.
- Click on the one-time import.
- Fill in the field on the left with your source email address (whose content you want to copy).
- Click on the "Connect with Microsoft" button that appears:
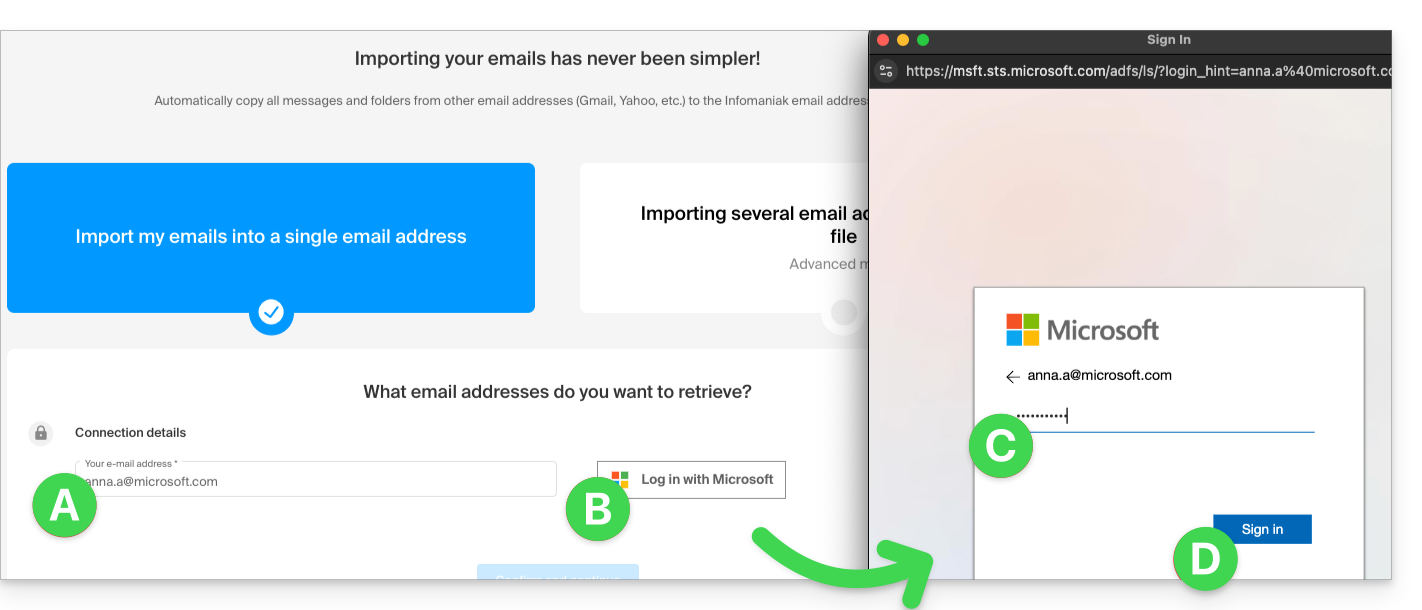
- Make sure you are connecting to the Microsoft account for which you want to copy the emails.
- Confirm that you authorize the Infomaniak tool to connect to your account (automatic process).
- Once you confirm the pop-up, choose the email address to which you want to import the emails. The drop-down menu lists the email addresses currently associated with your Infomaniak Web Mail interface (online service ksuite.infomaniak.com/mail) for the Infomaniak account you are logged into.
- After selecting the desired destination address from the list, click the blue Import Emails button.
- The copy process begins. You can wait and see the result on the page once the import is complete, or close the window (the import continues in the background, and progress can be tracked - see below).
- A confirmation email will be automatically sent to all email addresses involved in the operation once the import is complete, indicating the number of messages copied.
- A tracking feature is available in the settings of the destination email address, on the Web Mail app (online service ksuite.infomaniak.com/mail) only.
- The tracking feature allows you to view the import history for the address in question.
4. Adjust application settings
As soon as you have taken the necessary steps to ensure that the domain name associated with your email works with Infomaniak, modify the settings of the email software/clients you use so that they connect correctly to the Infomaniak servers: follow the configuration assistant.
Link to this FAQ:
Has this FAQ been helpful?
This guide details the “bogus HELO” email error to help you understand its origin and how to fix it.
When and why does this error occur?
The SMTP protocol (used for sending emails) has several phases. The first involves the sender's server introducing itself to the recipient's server using the HELO command (or EHLO for extended SMTP). This command must be followed by a valid hostname.
If you receive an error mentioning “bogus HELO,” it means the identifier provided by the sending server does not comply with RFC 5321. This check is an essential security measure that helps filter out a large number of misconfigured servers, often used for spreading viruses and spam.
Infomaniak rejects any message from a server that identifies itself generically (e.g., “server”) or locally. The server must use a FQDN (Fully Qualified Domain Name), i.e., a complete and resolvable hostname such as “server.domain.xyz.”
Examples of configurations leading to rejection:
Using a local or loopback IP address:
220 mta-gw.infomaniak.ch ESMTP Infomaniak Network Mail Servers; HELO 127.0.0.1
Using an IP address in brackets instead of a domain name:
220 mta-gw.infomaniak.ch ESMTP Infomaniak Network Mail Servers; HELO [192.168.1.1]
Using an unqualified local hostname:
220 mta-gw.infomaniak.ch ESMTP Infomaniak Network Mail Servers; HELO localhost 220 mta-gw.infomaniak.ch ESMTP Infomaniak Network Mail Servers; HELO mon-serveur
Using a banned or obviously fake domain name:
220 mta-gw.infomaniak.ch ESMTP Infomaniak Network Mail Servers; HELO fakedomain.xyz
In these cases, the SMTP transaction will fail with the following code:
MAIL FROM: user@domain.com 250 2.1.0 user@domain.com... Sender ok RCPT TO: recipient@infomaniak.ch 550 5.7.1 recipient@infomaniak.ch... Access denied - bogus HELO [1]
How to resolve this issue?
If you use a programming script (PHP, Python, etc.) to send emails via SMTP, ensure that the library used is configured to send a valid domain name in the HELO command and not the web server's IP address.
Link to this FAQ:
Has this FAQ been helpful?
This guide details the allowed and prohibited characters when creating an email address (up to 64 characters) in an Infomaniak Mail Service.
Introduction
- The allowed characters differ depending on whether they appear before or after the at symbol
@. For example, innom-utilisateur.mail@nom-domaine.xyz:- Before the at symbol: the
nom-utilisateur.mailpart corresponds to the username. - After the at symbol: the
nom-domaine.xyzpart corresponds to the domain name.
- Before the at symbol: the
- To learn about the possibilities offered at the domain name level (the part after the at symbol
@), see this other guide.
Part before the at symbol: nom-utilisateur.mail
The RFC 5321 and RFC 5322 standards define the general syntax of email addresses. However, email providers – including Infomaniak – apply additional restrictions to ensure security, consistency, and compatibility with most software/email clients.
For example, an address such as -@exemple.com is syntactically valid according to RFC 5322, but is not accepted when created on Infomaniak servers.
These additional rules help to:
- prevent abuse (spam, malicious automation, etc.);
- comply with naming conventions (an identifier consisting only of
-does not make sense); - to ensure compatibility with email software/clients that handle certain address formats poorly.
In summary: RFC 5322 defines what is syntactically possible, but each server determines what is actually usable in practice.
Allowed characters before the at sign
The following characters can be used in the part before the at sign of an Infomaniak email address:
| Allowed characters | Examples / Notes |
|---|---|
| Letters | a to z and A to Z |
| Numbers | 0 à 9 |
| Hyphen | - (not allowed as the first or last character) |
| Underscore | _ |
| Period | . (allowed as long as it is not placed at the beginning, at the end, or consecutively) |
Forbidden characters before the at sign
The following characters (at sign, exclamation mark, hash, dollar, percent, caret, ampersand, asterisk, parenthesis, equals sign, bracket, chevron, comma, quotation marks, semicolon, question mark…) cannot be used to create an Infomaniak email address:
| Forbidden characters | Notes |
|---|---|
@ | reserved for separating the username and the domain |
| (space) | |
!, #, $, %, ^, &, * | not supported |
(, ), =, [, ] | not supported |
<, >, ,, ;, ", /, ? | not supported |
| Non-ASCII characters | e.g. accents or non-Latin letters |
| Control characters (ASCII codes < 32) | non-printable, prohibited |
Link to this FAQ:
Has this FAQ been helpful?
This guide explains why some attachments sent from Microsoft Outlook arrive in winmail.dat format on your email address hosted by Infomaniak, and how to permanently resolve the problem on the sender's side (where it is created).
Introduction
winmail.datis the container used by Outlook/Exchange when a message is sent in RTF/TNEF format.- It encapsulates the formatting and attachments.
- Many non-Microsoft software/email clients cannot interpret TNEF:
- the formatting disappears and the attachments become a single
winmail.datfile.
- the formatting disappears and the attachments become a single
Important: the generation of a winmail.dat file does not depend on Infomaniak; the problem originates with the sender (Outlook/Exchange) and must be corrected on their computer or by their Microsoft 365 administrator.
Resolving the problem (actions to request from the sender)
The most effective solution is to have the sender change the Outlook configuration.
Disable RTF/TNEF and resend the message in HTML or plain text
- “Classic” Outlook for Windows (Microsoft 365/2021/2019, Win32 application)
Menu:File > Options > Mail
Compose messages:Compose messages in this format:choose HTML (or Plain Text).
Message format: inWhen sending messages in Rich Text format to Internet recipients, select Convert to HTML (or Convert to plain text).
On a case-by-case basis (for a single email): in the message window,Format Texttab > choose HTML.
- New Outlook for Windows (application based on Outlook on the web)
Menu:Settings (gear icon) > Mail > Compose and reply
Message format:Compose messages in:choose HTML (or Plain text).
This client does not offer an RTF option; sending in HTML/text avoidswinmail.dat.
- Outlook on the web (Exchange Online/Outlook.com)
Menu:Settings > Mail > Compose and reply > Message format> choose HTML (or Plain text).
- Outlook for Mac
Menu:Outlook > Preferences > Compose> check/uncheck Compose messages in HTML by default.
For a single message: in the compose window, Options tab > toggle HTML or Plain text.
Note: if the sender has attached files, they will be readable by all recipients as long as the message is sent in HTML/text. Zipping the attachments (.zip) does not prevent Outlook from encapsulating the message if RTF/TNEF is still active.
Disable RTF for specific recipients (e.g., yourself)
- “Classic” Outlook for Windows: open the Contact card > double-click the email address > Outlook Properties > Internet Format: select Send as plain text only (or Let Outlook decide if the administrator is already forcing the conversion).
- Clear autocomplete (it may “remember” RTF for a recipient):
File > Options > Mail > Send messages > Clear the Auto-Complete List, then retype the address manually the next time you send a message.
- Microsoft 365 administrators (at the sender's end): in the Exchange Admin Center:
Mail flow > Remote domains > Default> Rich text format: choose Never. In PowerShell:Set-RemoteDomain Default -TNEFEnabled $false.
Alternatively: use a different email client for sending (e.g., Thunderbird), or check that Calendar invitations are sent in iCalendar format (File > Options > Calendar > enable Use iCalendar format for external recipients).
If you do not want to contact the sender again
You can extract the content of winmail.dat using TNEF decoding tools (online or desktop applications). Search for “open winmail.dat” and choose a reputable tool for your system (Windows, macOS, Linux). This usually restores the attachments, but it is not a permanent solution. Furthermore, confidentiality and security are in no way guaranteed during these operations.
Link to this FAQ:
Has this FAQ been helpful?
This guide explains which protocols and ports can be used with Infomaniak's messaging services (Service Mail in particular).
Recommended ports and parameters for client configuration
When prompted during a software/messaging client configuration (Outlook, Thunderbird, mobile, etc.), prioritize the following parameters:
| IMAPs - Incoming Traffic (Recommended) | SMTP - Outgoing Traffic (Option 1: IETF standard) | SMTPs - Outgoing Traffic (Option 2: Implicit encryption) | |
|---|---|---|---|
| Ports | 993 | 587 | 465 |
| Security Mechanism | SSL / TLS (implicit) | STARTTLS (explicit) | SSL / TLS (implicit) |
| Server Name | mail.infomaniak.com | ||
| Authentication | Required (username = full email address) | ||
Technical note: Port 587 with STARTTLS is the IETF standard practice for secure email submission. Port 465 is a secure alternative using implicit encryption.
If you specify other indications or disable encryption, email errors may occur.
Other supported ports (unencrypted or backward compatibility)
- port
143(Standard port for IMAP reception - unencrypted, use 993) - port
110(Standard port for POP3 reception - unencrypted, use 995) - port
995(Secure port for POP3s reception - secure POP3 option) - port
25(Standard port for server-to-server transfer - may support STARTTLS for submission, but 587 is the standard for clients). - STARTTLS authentication is supported on unencrypted ports (143, 110, 25) to enable TLS encryption.
- SMTP authentication supported (LOGIN or PLAIN methods).
API Usage and Transfer Security
The Infomaniak API does not provide any connection to the mailbox as IMAP and SMTP are the "APIs". Use a library (such as Python: email.examples and imaplib) that uses IMAP and SMTP.
To display emails from PHP:imap_open("{mail.infomaniak.com:993/imap/ssl}", $email, $password);
The MTA-STS mechanism is not implemented or verified, as Infomaniak uses DANE (DNS-based Authentication of Named Entities) to ensure an encrypted connection between servers when the following conditions are met:
- The client sends an email to a domain that has configured DANE.
- The client receives an email from an SMTP server that uses DANE.
- In all other cases (in the absence of DANE), the encrypted connection remains opportunistic.
Link to this FAQ:
Has this FAQ been helpful?
This guide concerns Greylisting, a protection measure implemented on Infomaniak's mail servers.
How Greylisting Works
Greylisting is a technique used by Infomaniak's mail servers (among others) to combat spam. It is based on the principle of temporarily delaying the delivery of an email to verify the legitimacy of the sender. This method exploits the fact that spam servers often send emails without complying with message relay standards.
1. Initial Reception
When a mail server receives an email, it notes three elements:
- the sender's IP address
- the sender's email address
- the recipient's email address
2. Temporary Rejection
The server temporarily refuses to deliver the email and sends a temporary error message (code 4xx). This means that the message is not permanently rejected, but the sending server must try to send it again later.
3. Retry
Legitimate mail servers are programmed to retry delivering messages after a certain delay. Spam servers, on the other hand, often do not bother to retry.
4. Acceptance
Upon retry, if the email comes from the same trio (sender's IP, sender's address, recipient's address) noted previously, the message is accepted and delivered to the recipient.
Link to this FAQ:
Has this FAQ been helpful?
This guide covers the steps to follow when you are healthcare professionals, Infomaniak customers, and wish to comply with the HIN system.
Preamble
- The acronym HIN stands for "Health Insurance Network".
- A HIN-type email address is an address used to send confidential and sensitive messages, such as medical records or test results, between healthcare professionals who have been authorized to use them.
- These addresses are protected by additional security measures to ensure that sensitive information does not fall into the wrong hands.
Obtain an encrypted HIN email address
For your Infomaniak email address to be HIN-compatible:
- Click here to access the page of services offered by HIN and subscribe to their offer.
- Contact Infomaniak support in writing as soon as a contract is concluded, clearly mentioning the address(es) concerned (pay special attention to the domain name and its extension
.com,.chetc.). - Wait for HIN to notify Infomaniak and for the solution to be implemented (several hours or days).

Link to this FAQ:
Has this FAQ been helpful?
This guide helps you resolve the mail error ‘ The server you are connected to uses a certificate that cannot be verified’.
Solution
The aforementioned error message appears in your email software/client because you are using IMAP/POP/SMTP server names in the form mail.domaine.xyz with the SSL option enabled, while the SSL certificate is only valid for the domain infomaniak.com.
You should therefore only use mail.infomaniak.com as the incoming and outgoing server to use SSL on the connection. Learn more
Link to this FAQ:
Has this FAQ been helpful?
This guide will help you find the public IP address of your device, which can be useful when requesting support.
Display the public IP address on the connected device
Click here to obtain the public IP address of your device in IPv4 and IPv6 format.
Alternative methods
Visit ipinfo.io or ifconfig.me.
… on macOS
- From a
Terminalapplication (command-line interface,CLI) on your device, run the commandcurl ifconfig.meand press Enter. - The address displayed is the public IP address of the computer.
Keep in mind that this address may change periodically, especially if the router restarts or if the internet service provider uses dynamic IP address allocation.
To automate the search for the public IP address, use commands or scripts that query services such as api.ipify.org...
Link to this FAQ:
Has this FAQ been helpful?
This guide helps to resolve a mail error of type '535 5.7.0 authentication failed'
Resolve an Authentication failed error
The mail authentication service on the servers may encounter an issue for a few brief seconds exceptionally, for example during unusual events on the infrastructure.
If an error 535 5.7.0 authentication failed occurs:
- Try sending the email message again and it should go through.
If the problem persists, check the points of this other guide.
Link to this FAQ:
Has this FAQ been helpful?
This guide explains how to connect the Microsoft Outlook mobile app (application for smartphone or tablet iOS / Android) to an email address hosted by Infomaniak.
Introduction
- Rather than using the manual configuration below, it is recommended to use the Infomaniak Mail app (iOS / Android) to benefit from Infomaniak's security features.
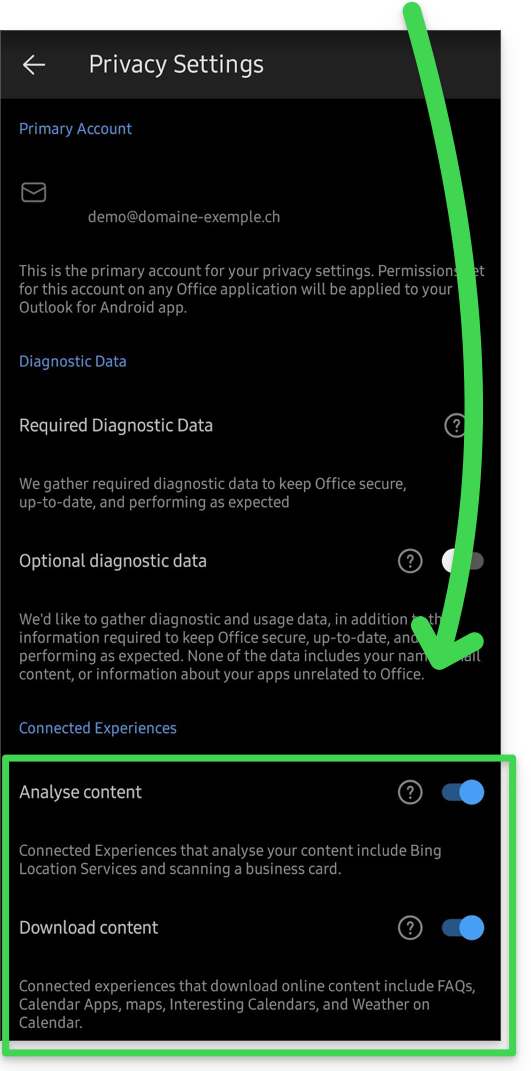
- The Microsoft application is configured by default to analyze your data:
Add the email address to the application
Prerequisites
- Create the email address within my kSuite or a Mail Service / kSuite.
- Create a password for the email address for the device you are going to configure.
- Verify that the Mail Service is configured optimally.
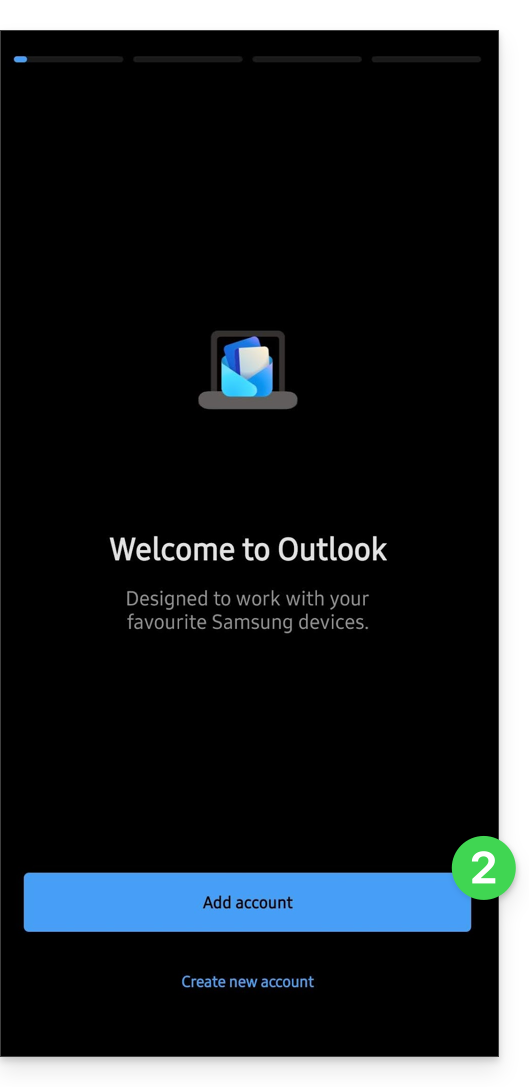
To configure the email application:
- Open the application.
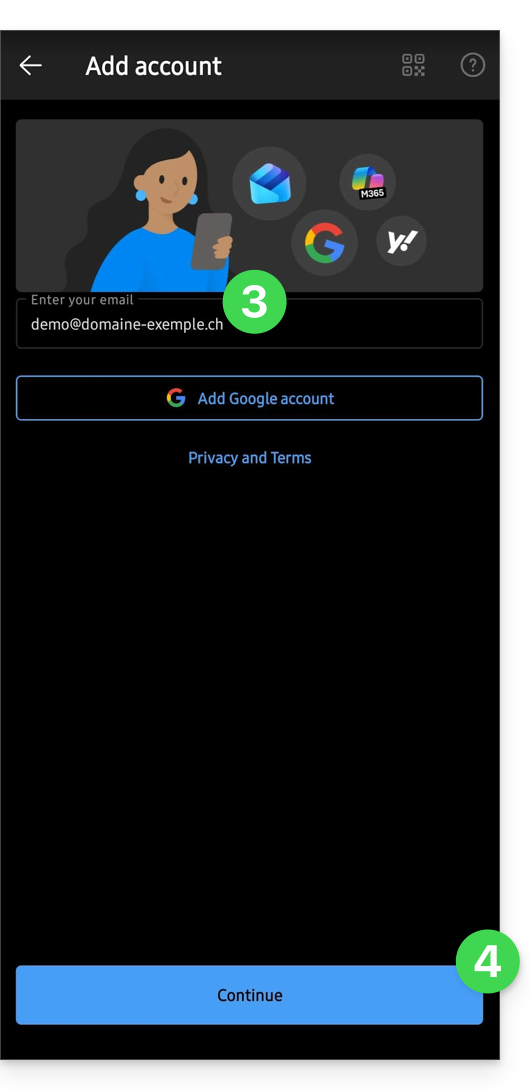
- Click on Add account:
- Enter the email address to be added.
- Click on Continue:
- Click on IMAP:
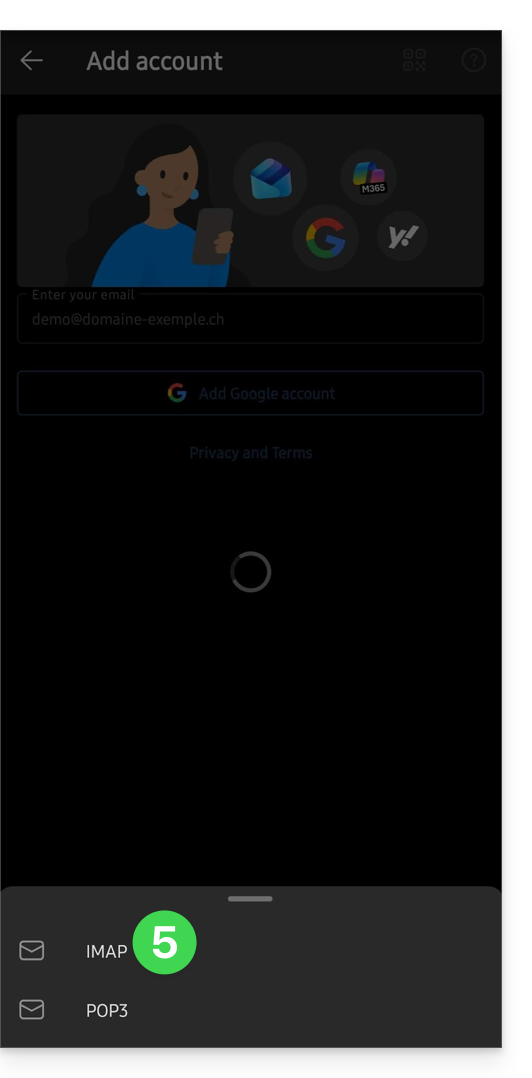
- Activate the toggle switch to enable advanced settings.
- Complete the missing information.
- Click on the ✓ icon in the top right corner.
- If necessary, choose to add an additional account, otherwise Later.
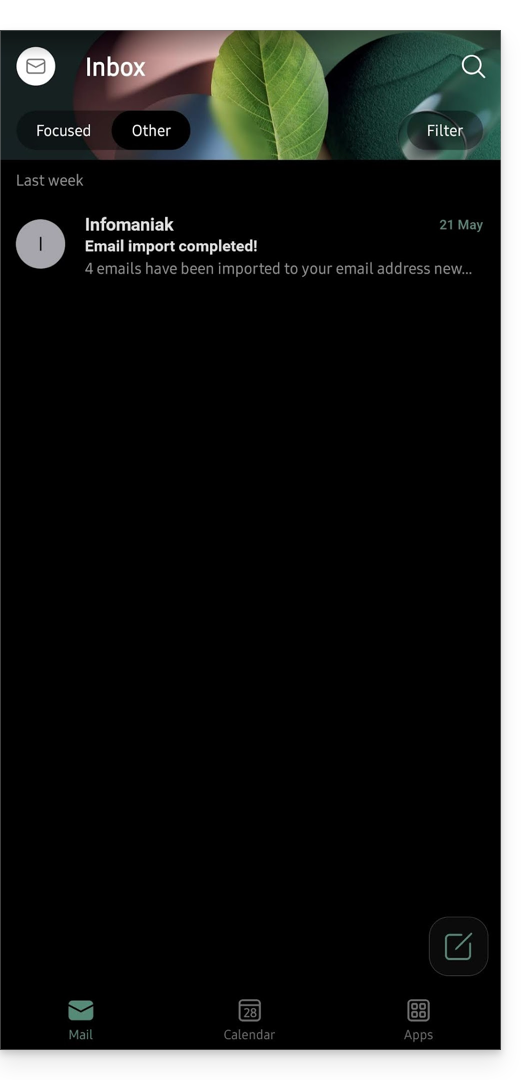
- That's it, your email address is now configured in the application:
Recommended settings
- Incoming IMAP server =
mail.infomaniak.com - IMAP port =
993(with SSL) - Outgoing SMTP server =
mail.infomaniak.com - SMTP port & encryption protocol and command/method to enable this protocol:
587+ STARTTLS - Username = the complete email address
- Password = the one generated for the email address you want to access
- Authentication is required for sending emails:
- It is activated in the SMTP settings of your application.
- Check "use the same settings as the incoming server" or, depending on the software/email client, enter a username (= complete email address) and the generated password.
Refer to this other guide if you are looking for information about other compatible email ports and protocols (SSL / TLS, for example).
In case of a problem
Check that the Mail Service is configured optimally.
It is not necessary to contact Infomaniak Support if your email address works correctly outside the application. The most common error concerns the use of an incorrect password. The troubleshooting guides will help you resolve any potential issues:
- Refer to the solutions provided in this other guide regarding email in general.
- This other guide is specifically about Outlook.
… and if your Outlook is no longer working after a change of email password, refer to this other guide.
Link to this FAQ:
Has this FAQ been helpful?