
Knowledge base
1000 FAQs, 500 tutorials and explanatory videos. Here, there are only solutions!
This guide explains how to create an alias, that is, a variant of your usual email address without having to add a new address to your existing Mail Service.
⚠ Number of possible aliases per email address:
| kSuite | free | 1 |
| Standard | 50 | |
| Business | 50 | |
| Enterprise | 50 | |
| 0 | ||
| 0 | ||
| Mail Service | Starter 1 address max. | 1 |
| Premium 5 addresses min. | 50 |
How an alias works
It is possible to create alternative versions of your email addresses by modifying what comes before the at sign @.
For example:
john-peter.smith@domain.xyz is a long email address…
It can be shortened and used as follows:
jps@domain.xyz
In this example, you must therefore create an alias "jps" on the address "john-peter.smith".
Then, if someone writes to jps@domain.xyz:
- their message will arrive in the inbox of the main address (
john-peter.smith@domain.xyz).
If someone writes to john-peter.smith@domain.xyz AND jps@domain.xyz in copy (CC):
- their message will arrive twice in the inbox of the main address (
john-peter.smith@domain.xyz).
An alternative feature is presented here. To modify what comes after the at sign @, use alias domains.
Users of the email address on the Infomaniak Web Mail app receive an email each time an alias is added/removed.
Add an alias from the Infomaniak Web Mail app
Prerequisites
- Having permission to manage aliases: it is possible that the Mail Service manager has removed this right from their admin account.
Next, to add an alias:
- Click here to access the Infomaniak Web app Mail (online service ksuite.infomaniak.com/mail).
- Click on the Settings icon in the top right corner.
- Check or select the email address concerned in the dropdown menu of the left sidebar.
- Click on Aliases:
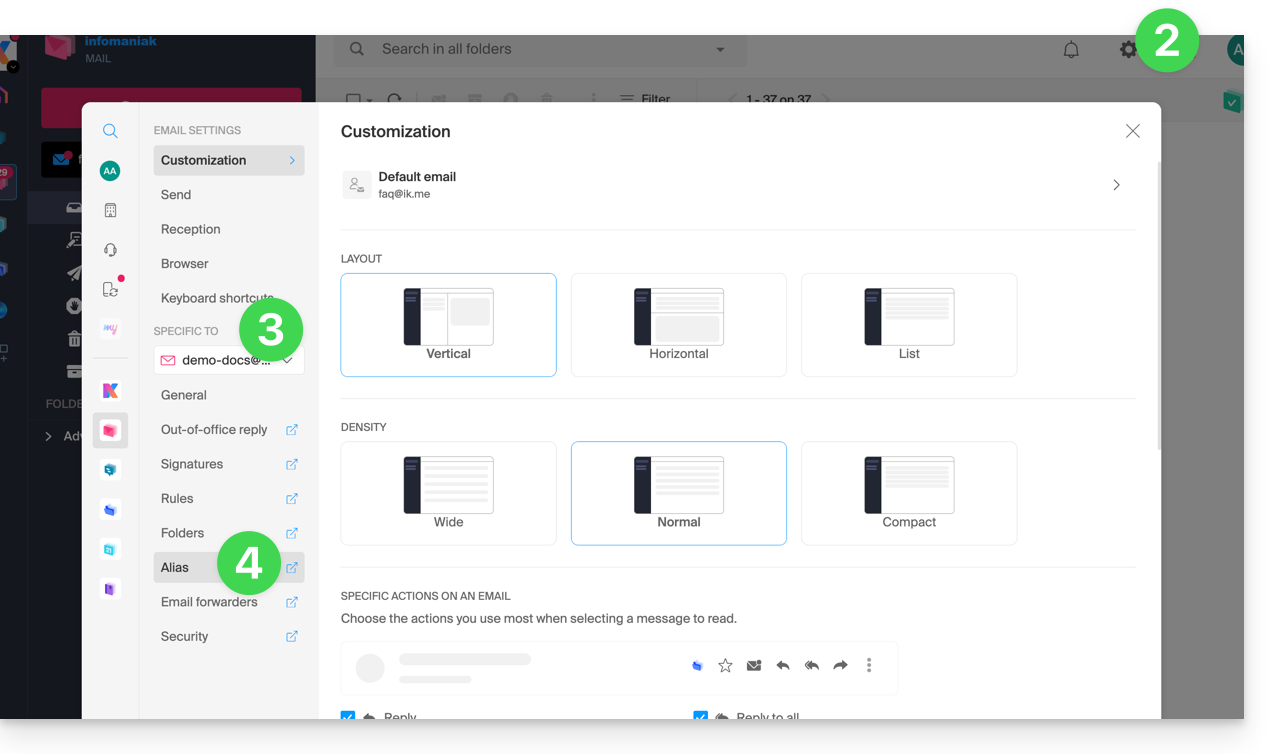
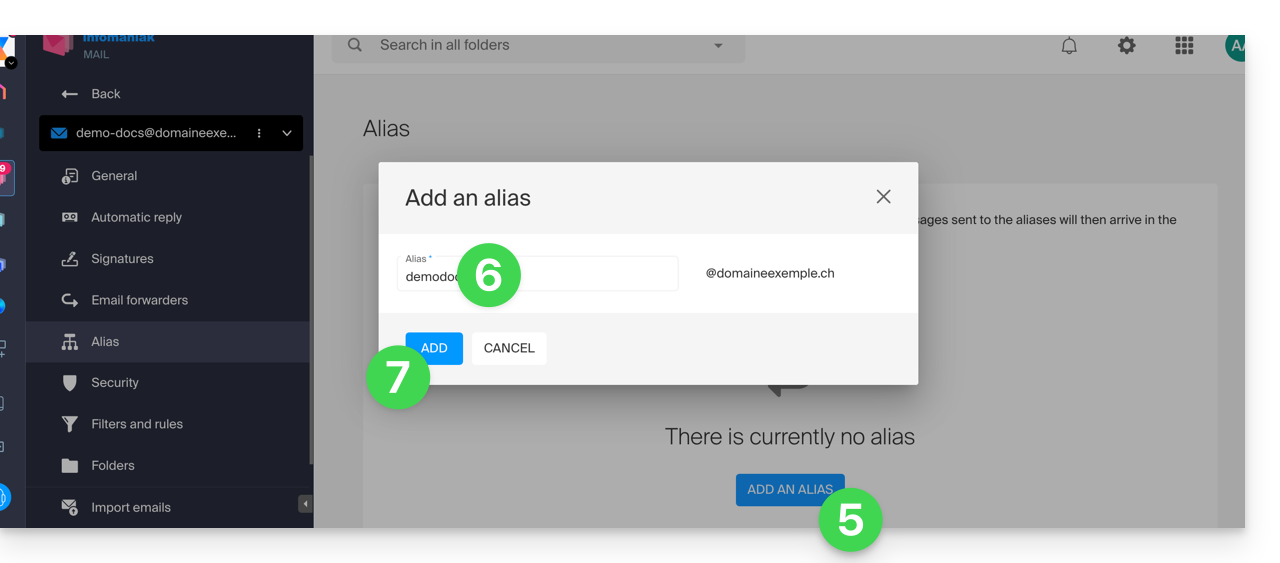
- Click on Add an alias to create a variant of your email address.
- Enter the desired alias (what comes before the at sign @).
- Click on Add:
Add an alias from the Mail Service
To access the Mail Service:
- Click here to access the management of your product on the Infomaniak Manager (need help?).
- Click directly on the name assigned to the product concerned.
- Click on the email address concerned in the table that appears.
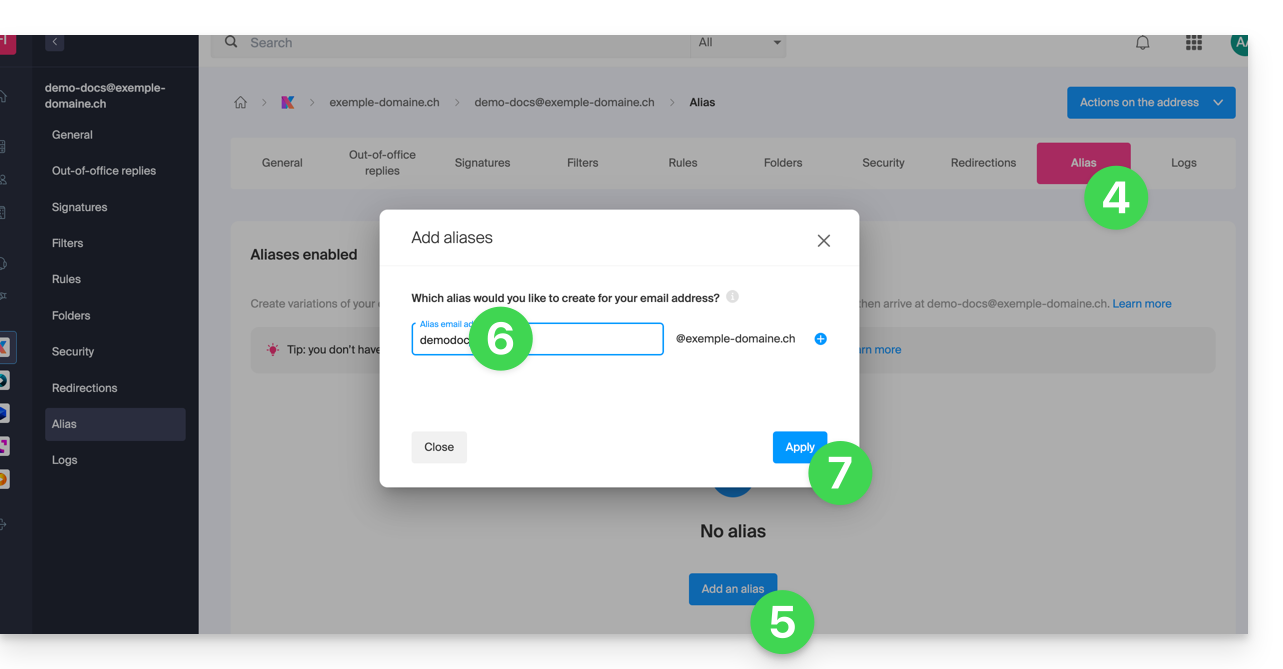
- Click on the Aliases tab or from the left sidebar on Aliases.
- Click on the blue Add an alias button.
- Enter the desired alias (what comes before the at sign @):
- Click on Apply to save the changes:
This guide explains how to transfer an Infomaniak product from one Organization to another.
Preamble
- You can move almost all products subscribed with Infomaniak to a different Infomaniak Manager interface than the one on which the product is currently located; this is therefore an internal transfer.
- If your user has access to multiple Organizations it is even easier to send to one of them the product of your choice.
- This operation does not cause any interruption.
- The users currently having access to the selected products will not be transferred (and therefore may no longer have access to the products).
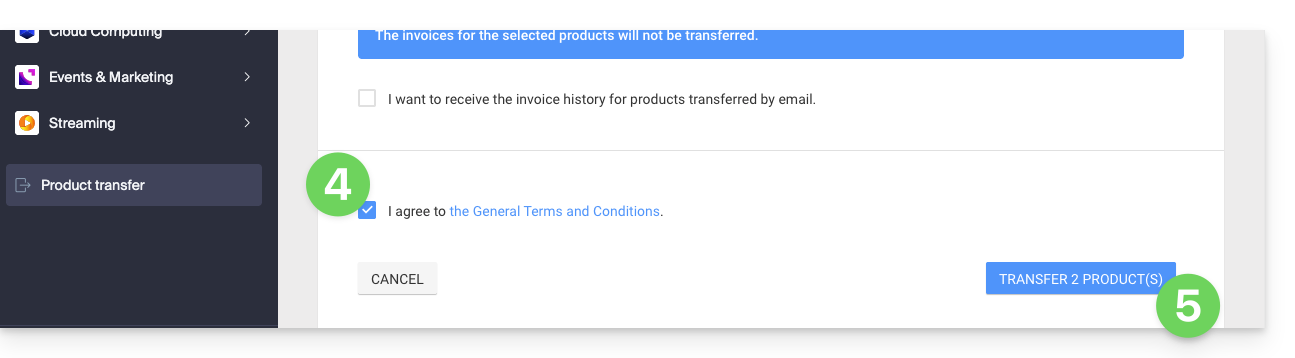
- The invoices of the selected products will not be transferred.
- my kSuite cannot be transferred.
Generate a transfer link
Prerequisites
- Be Administrator or Legal Representative within the Organization.
To transfer a product:
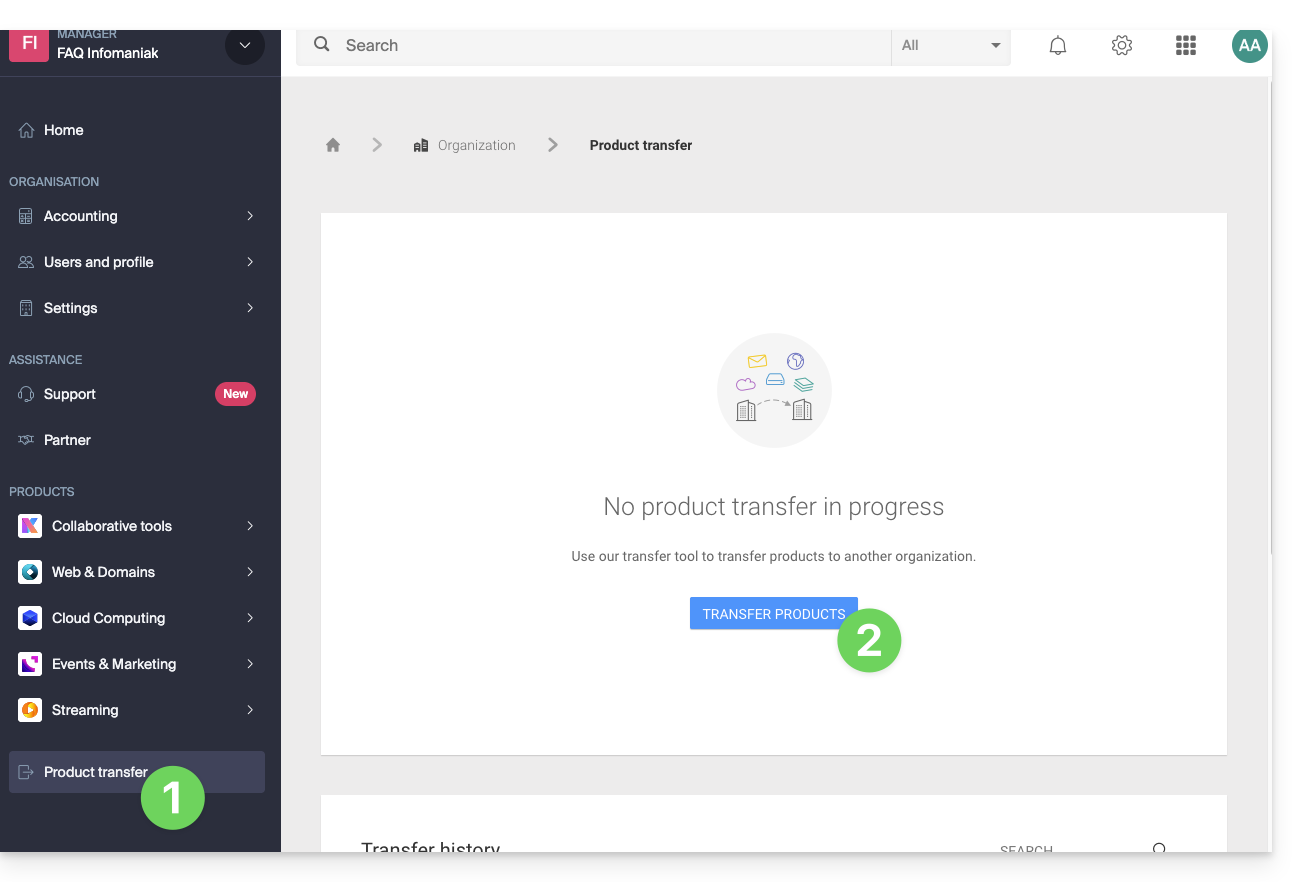
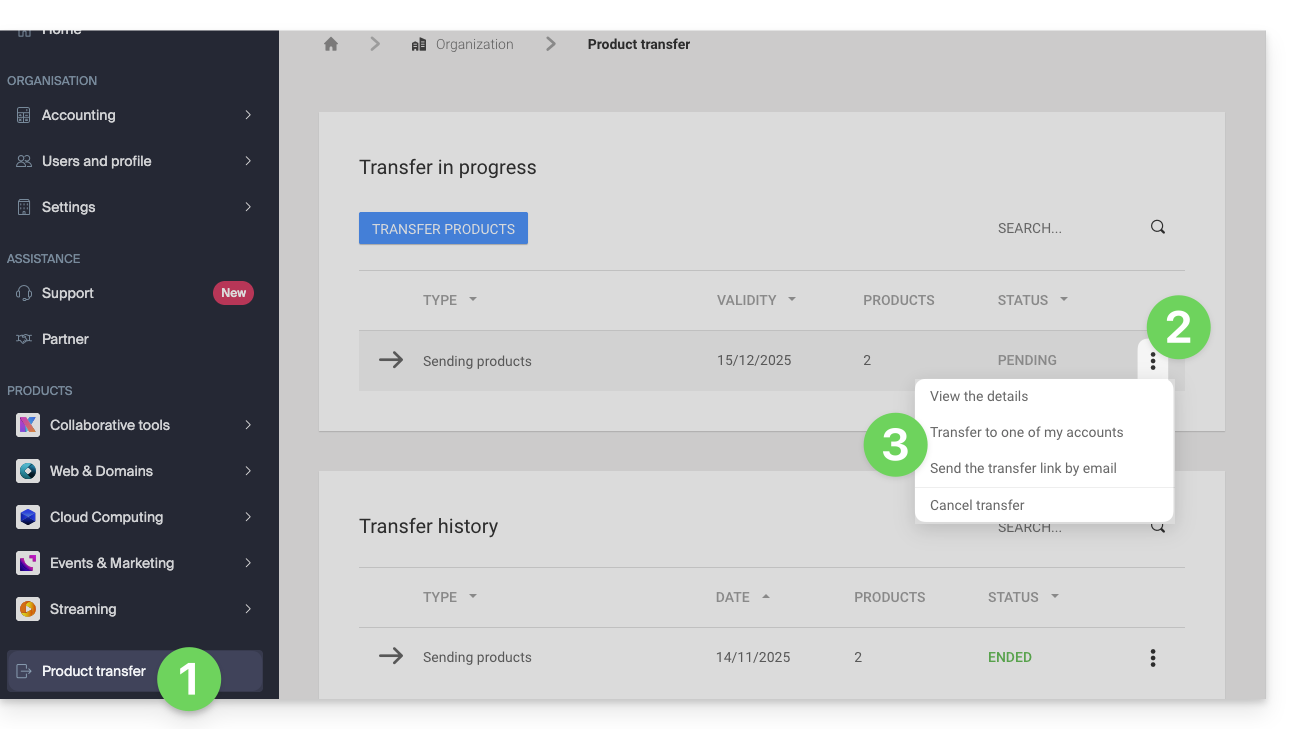
- Click here to access the product transfer management on the Infomaniak Manager (need help?).
- Click on the Transfer products button:
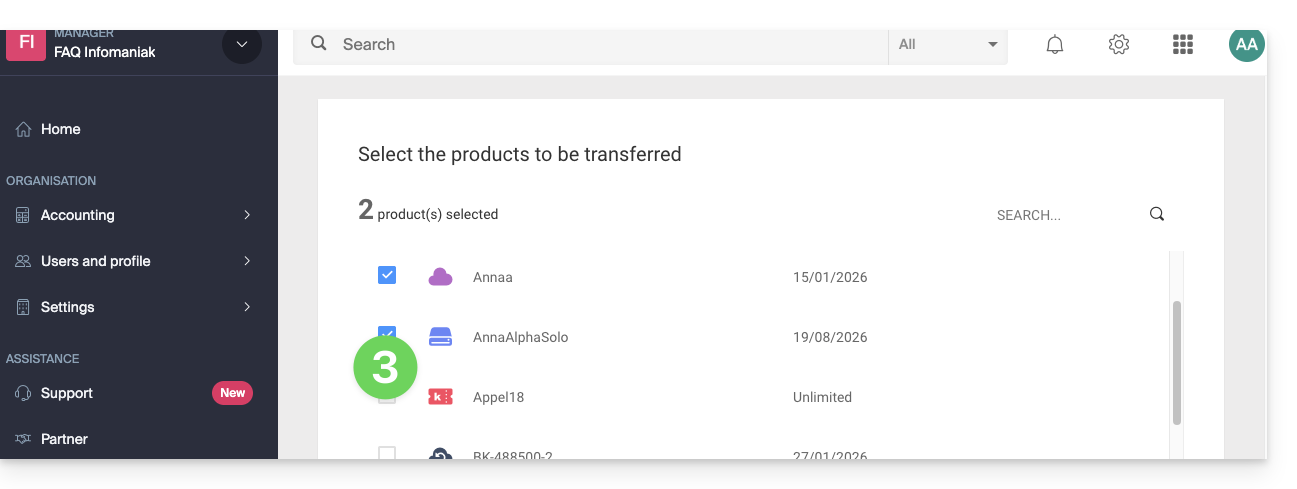
- Check the product(s) to be moved:
- Read and accept the general conditions.
- Click on the Transfer button:
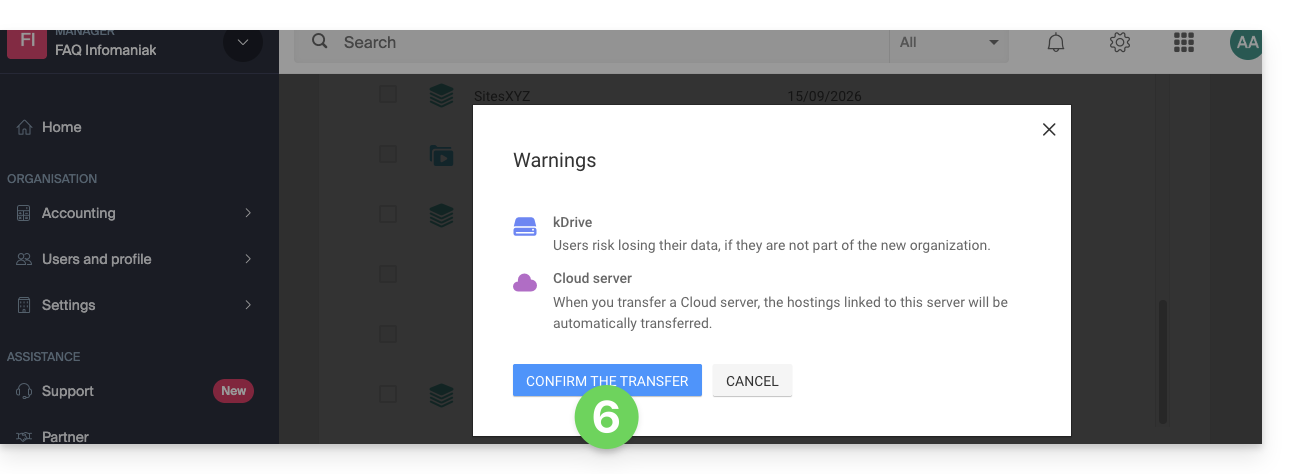
- Read and validate any warnings:
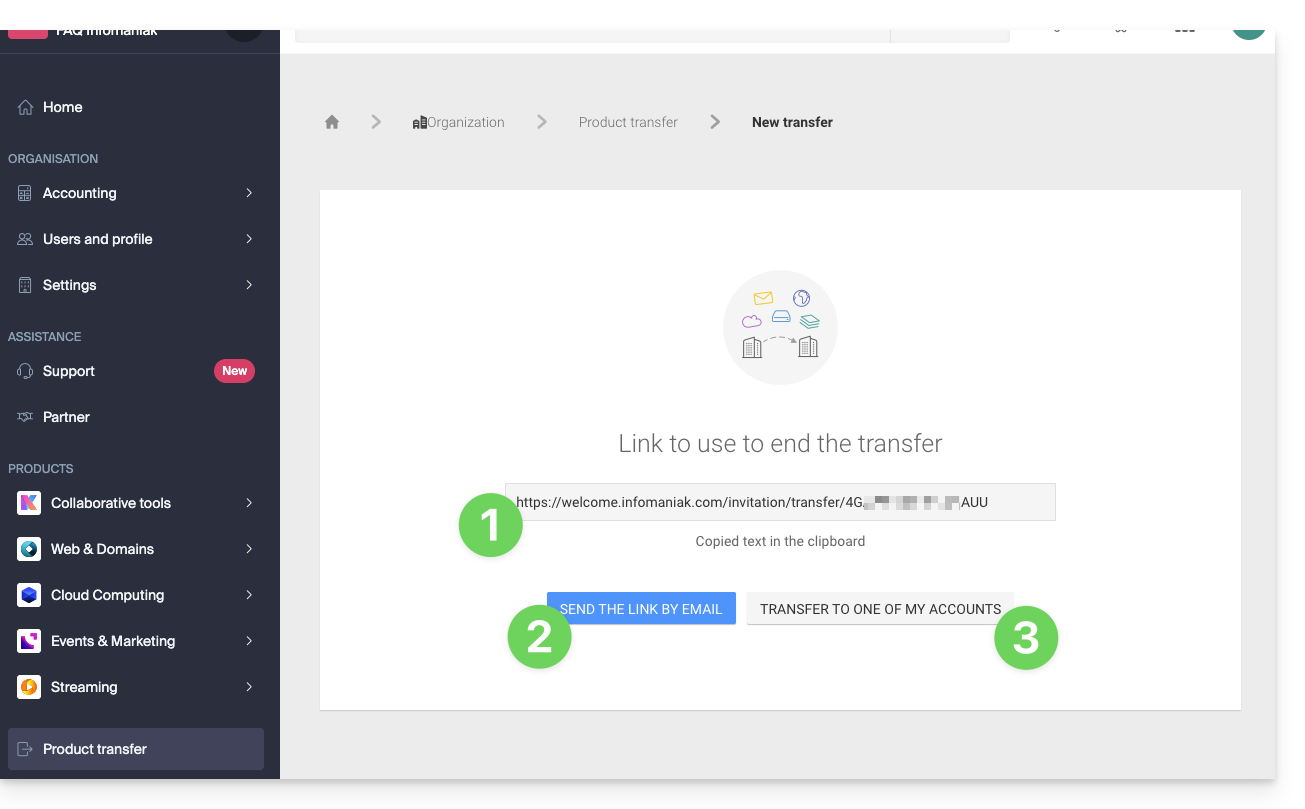
The transfer has started. Now, at your choice, you can:
- Copy the transfer link…
- or send it to the email address of your choice…
- or select directly one of the Organizations to which your user is attached, and the selected product will be transferred there:
At any time, you can return to the product transfer page to find the possibilities listed above:
Alternative method
In the case of one-time transfer, you can also go directly to the dashboard of the product concerned and click on Manage (example in the image below) however, since this menu is not always present, it is better to prioritize the first method above, which also allows bulk transfer: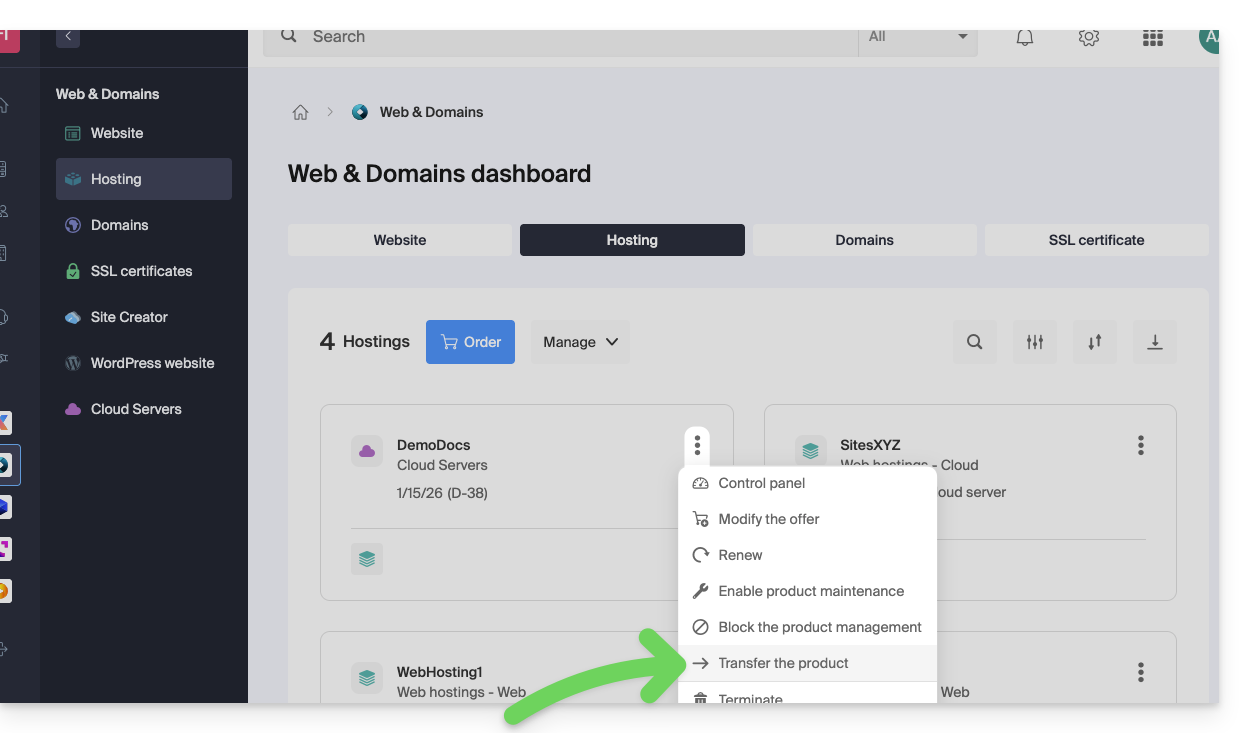
Refer to this other guide regarding Jelastic Cloud.
Receive the product
Once a product transfer is initiated by a user…
1. Be on the Organization that should receive the product
- Click here to log in to the Manager on the Organization that should receive the product(s).
- The user specified when logging in to the Infomaniak account must have administrative rights.
- If necessary, you can create a new Organization to receive products.
2. Execute the obtained link
- Click on the link obtained in the first step above.
- You can also simply paste it into a browser while logged in to the appropriate Infomaniak account.

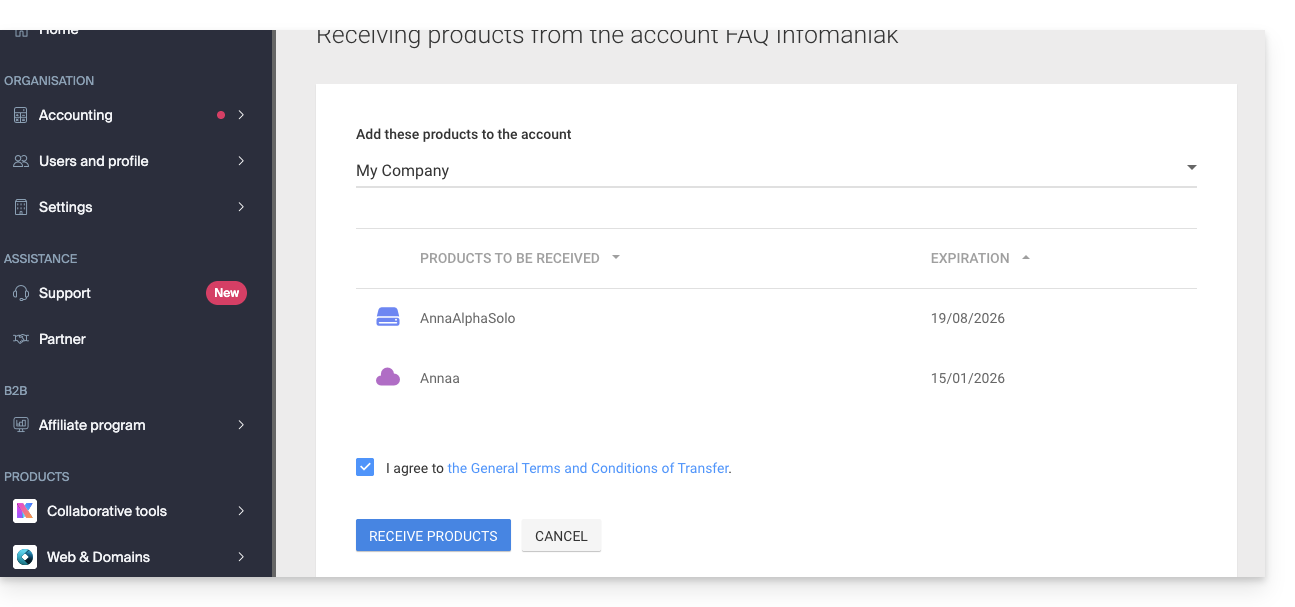
3. Validate the product transfer
- If necessary, choose the destination Organization using the drop-down menu.
- Read and accept the general conditions.
- Click the Receive the product button (if the button is not clickable, make sure you have selected the Organization).
Find the ongoing or completed transfers at any time from the bottom icon on the left sidebar of the Infomaniak Manager: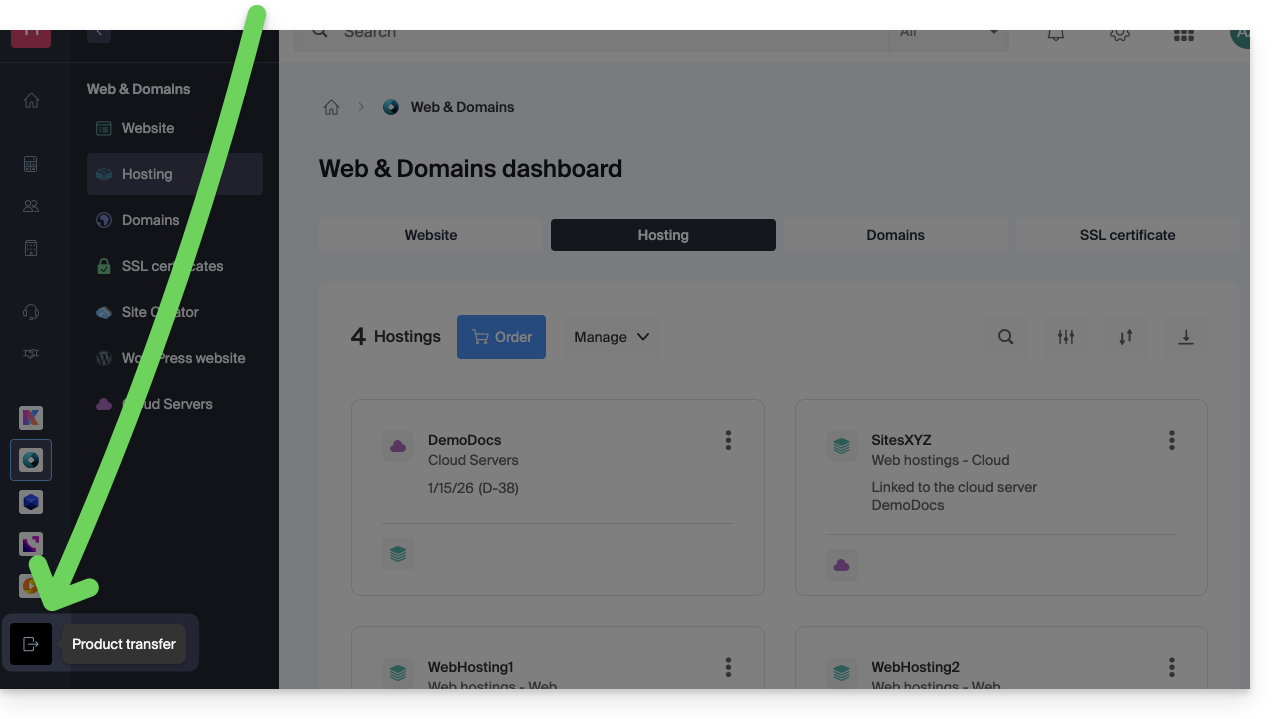
This guide explains what a web host like Infomaniak is and specifies its role and limits of intervention.
Infomaniak, web host since 1996
According to Wikipedia, a web host is a company that provides Internet hosting for computer systems to individuals or entities who do not wish to do so by their own means.
Infomaniak is also…
- … decades of experience in hosting and online solutions
- … more than a million users in Switzerland and Europe (CHF 36.5 million in revenue in 2022)
- … company certified ISO 27001, ISO 9001, ISO 14001, ISO 50001 and committed to sustainable development
- … 100% of "Swiss made" technological know-how with data hosted in Switzerland
- … a rich knowledge base and a customer support available
Responsibilities and limits of intervention
As a host, Infomaniak installs, secures, and keeps servers up to date, updates its web interfaces (Manager) and assists its customers in using the services.
On the other hand, Infomaniak does not intervene on the content of the servers or the development of websites.
Limits of technical support
The technical support cannot help you to…
- … solve problems related to site development or its updates
- … implement solutions (migrations, complete installations)
- … manually install WordPress
- … take remote control of your computer
but can assist you for…
- … solve problems related to the infrastructure or the Manager
- … clarify certain processes
A Premium assistance and a migration service are available for more demanding needs.
Find external help
For help with the content of your site or the organization of your mailboxes, use the Infomaniak tender platform which lists over 1000 verified professionals, or consult the directory.
This guide addresses Outgoing Spam from Infomaniak infrastructures and helps you identify and resolve potential causes when an email sent from an address hosted by Infomaniak arrives in the Spam (Junk) folder of the recipient.
Important: Infomaniak cannot act directly on the classification of a message as spam by other providers. Solutions must be sought with the administrators of the concerned receiving server.
Use email responsibly
Infomaniak implements enhanced measures to ensure the security and deliverability of emails. By also following the best practices below, you significantly reduce the risk that your messages will be considered unwanted.
1. Use a valid email address
- Check that your email address and associated domain are correct and valid.
- Check the security settings of your domain name (SPF, DKIM, DMARC).
- If you modify a setting, wait approximately 24 hours before sending another test.
2. Avoid suspicious content
- Avoid words, phrases, or presentations frequently associated with spam (excessive promotions, generic phrases, overly complex layout, etc.).
- Do not include non-secure, truncated, or poorly formatted links.
- Personalize your messages (for example, by mentioning the recipient's name) to enhance their credibility.
- Do not attach suspicious or overly large files; use a service like SwissTransfer instead.
3. Test sending from the Infomaniak Web Mail app
- If you use a third-party email software/client, try sending the message from the Infomaniak Web Mail app (ksuite.infomaniak.com/mail).
- Compare the results to identify if the issue comes from your email software/client or a configuration setting.
4. Monitor the reputation of your domain
- If your email address uses a custom domain (for example
@your-domain.xyz), a poor domain reputation can affect the deliverability of your messages. - Analyze and correct potential causes (previous mass mailings, poor configuration, reports, etc.).
5. Obtain the recipient's consent
- Only write to recipients who know you or are expecting your message.
- For group or regular mailings, use a voluntary subscription system (opt-in).
- For information or marketing campaigns, prefer the Infomaniak Newsletter solution.
6. Optimize the frequency and volume of sending
- Avoid sending a large number of identical messages to many recipients simultaneously.
- Respect a reasonable sending frequency to avoid being identified as a suspicious sender.
7. Be added to the Infomaniak whitelist
- If your emails are classified as spam by a recipient also hosted by Infomaniak, they can add your address to their whitelist.
- This action guarantees the receipt of your messages, but does not replace the verification of the causes that initially led to the classification as spam.
This guide will help you resolve an issue if you received, after sending an email, a message containing the failure reason "Spam Message Rejected" or "5.7.0 AV: Message is rejected by headers rule filter.. 554 Please check the message and try again"...
Must be checked
Check that your email did not contain:
- words or phrases that are often associated with spam, as it could be identified as unwanted and rejected
- any unusual indication in the signature, a link formulated incorrectly (
http//.domain.xyzfor example), etc. - an attachment with one of these forbidden extensions:
.exe,.com,.cmd,.cpl,.hta,.scf,.sct,.lnk,.bat,.js,.jse,.wsh,.ws,.wsf,.wsc,.vbe,.vb,.vbs,.shs,.pif,.scr... including inside a compressed file (.zipfor example)
To send a file (js or exe for example) and confirm that it is virus-free, store it on your hosting space and create a link to it (if the file is large and you are sending it from the Infomaniak Web app Mail (online service ksuite.infomaniak.com/mail), it will be placed on a temporary server allowing it to be sent to your correspondent who will receive a download link in this case) or via Swisstransfer.com.
Also check your SPF record. If your domain does not have an SPF record or if this record is incorrect, this will very likely result in the rejection of your message.
If you believe you are receiving a "Spam Message Rejected" message without reason, contact Infomaniak support.
This guide explains how to obtain your email address(es) from the Swiss host Infomaniak.
Preamble
- Except for some free offers, an email address at Infomaniak is always created within an Email Service, and this Email Service revolves around a custom domain name that must exist and be configured for the email to work.
- Example: you want the address
jean.dupont@domain.xyzthen you need:- Own the domain name “
domain.xyz”. - Obtain an Email Service “
domain.xyz”. - Create the email address “
jean.dupont”.
- Own the domain name “
- All of this is offered and requested in the ordering process on infomaniak.com (see below), preceded by the creation of a mandatory user account (for which you will need to provide your personal email address, or an address that already exists in any case).
- If the corresponding domain name is already registered with an external registrar, you may need to enter the correct MX record in the DNS zone.
Order email addresses from Infomaniak
Before or after your registration:
- Click here to choose the offer that suits you and let yourself be guided through the process to start using the email services.
- Once the Email Service is ordered, you will be able to create email addresses and associated passwords.
Add an additional Email Service
To add a new Email Service (to obtain new addresses on another domain):
- Click here to access the management of your product on the Infomaniak Manager (need help?).
- Click on the shopping cart icon above the table that appears:
Increase the number of available email addresses on an existing Email Service
To increase if necessary the quota of free addresses available, refer to this other guide.
Once the Email Service is activated
• Create your email addresses.
• Configure your emails on your computer and your devices.
• Synchronize your contacts & calendars on your devices.
• Restore the content (including that from another provider).
This guide helps you in case you receive error emails that mention SPF when you write to gmail or similar addresses.
Are all your services with Infomaniak?
The Global Security tool informs you of any configuration inconsistency regarding your Infomaniak Mail Service.
Are some of your services elsewhere?
To resolve an email sending issue when your email is managed by Infomaniak and your website is with another provider (like Wix for example) and in this situation the DNS zone of the domain name is managed elsewhere, refer to this other guide.
This guide explains how to create email addresses in bulk instead of adding them one by one within an Infomaniak Mail Service.
Preamble
- To ensure responsible use of the services, a limit of up to 50 email addresses per 24-hour period has been set.
- Contact Infomaniak support to lift this restriction.
Create new email addresses in bulk
Prerequisites
- Have a tool to manage CSV files (format
.csv). - Have a Mail Service on your Infomaniak Manager.
- Have a quota of available addresses or adjust it in advance if necessary.
Obtain the example CSV file
Importing is done using a CSV file (format .csv) which, once filled out, can be imported to add the addresses to your Mail Service in one go.
To download the CSV file to configure the creation of addresses:
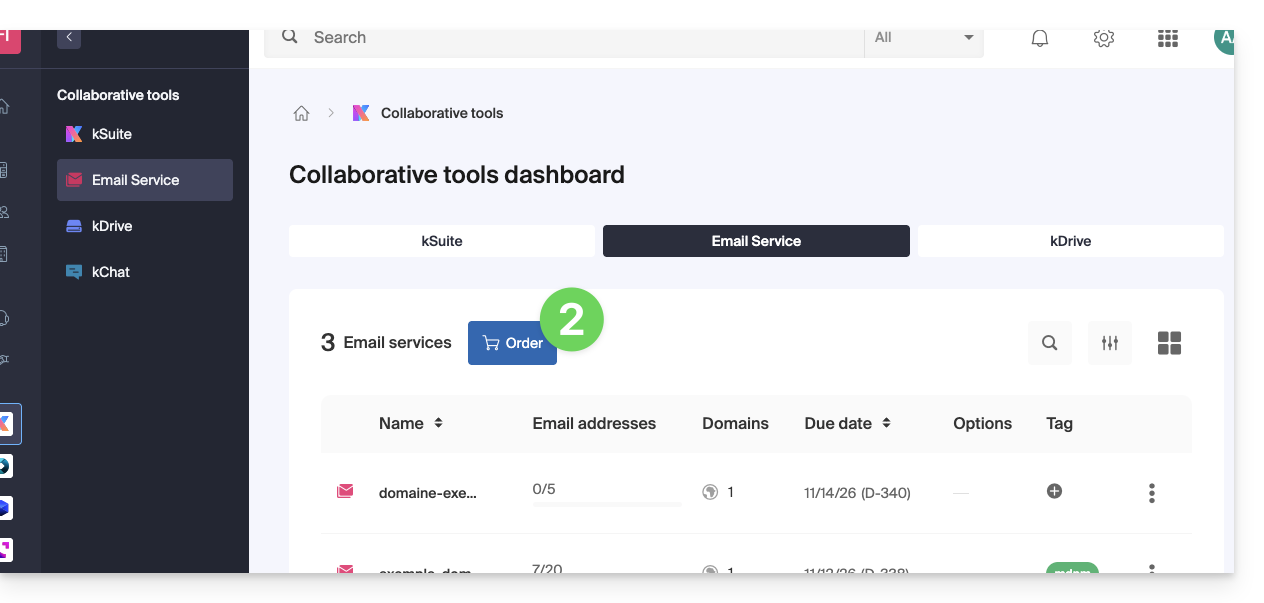
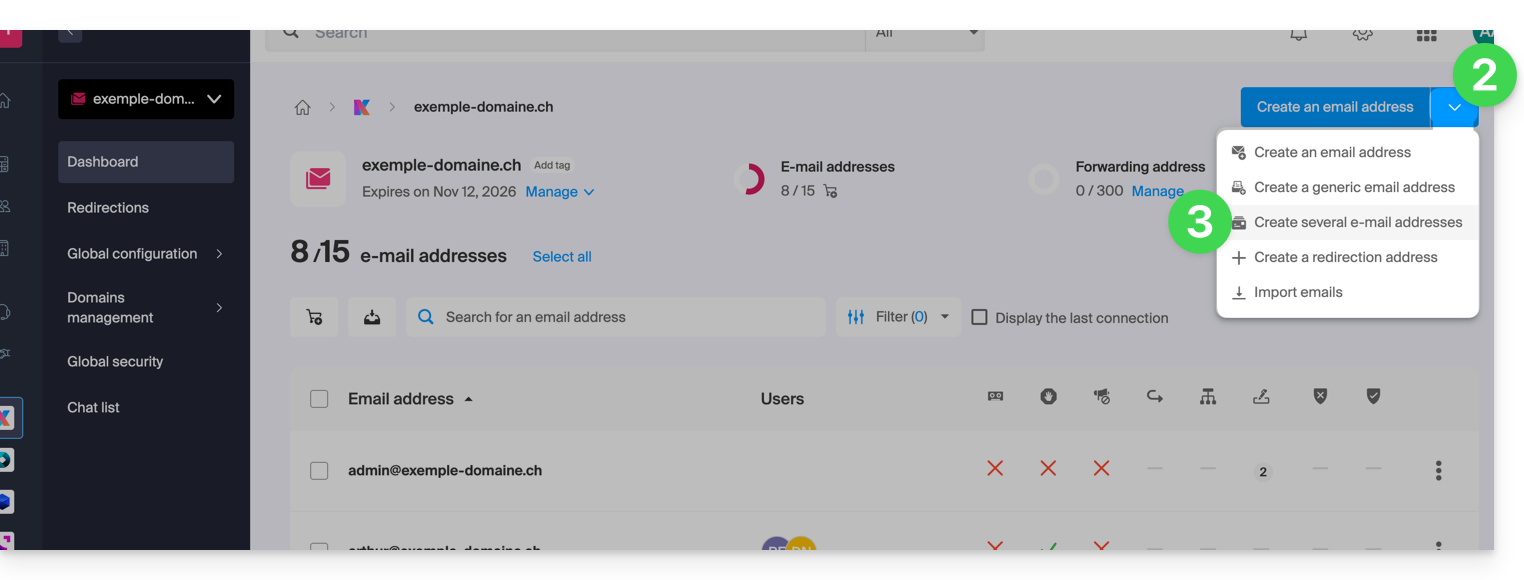
- Click here to access the management of your product on the Infomaniak Manager (need help?).
- Click on the chevron to the right of the blue address creation button.
- Click on Create multiple email addresses
- Download the proposed template (CSV file in
.csvformat):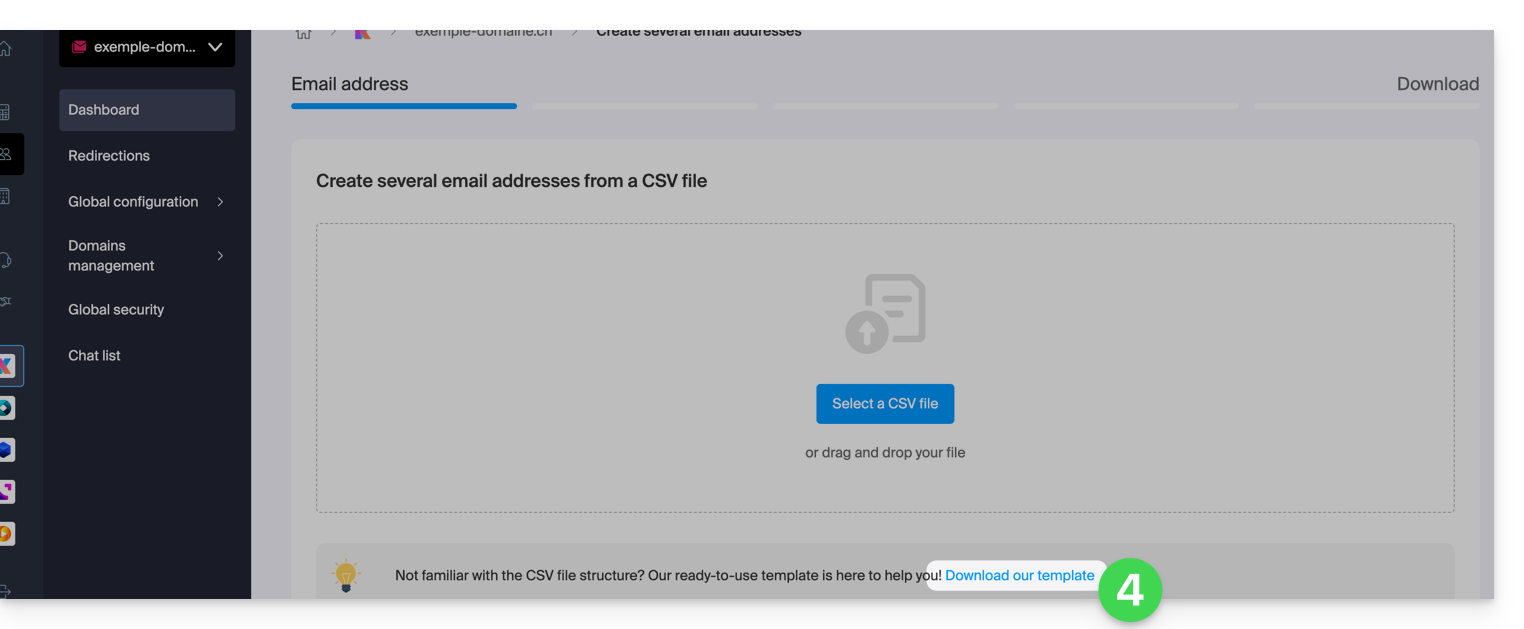
Complete the CSV file
- Open the example CSV file; do not touch the first line, then from the second line on:
- 1st column, specify the address to create (without the domain)… example:
john. - 2nd column, specify if necessary a complete email address to which to redirect emails.
- Third column, specify whether to delete (1) messages after redirection.
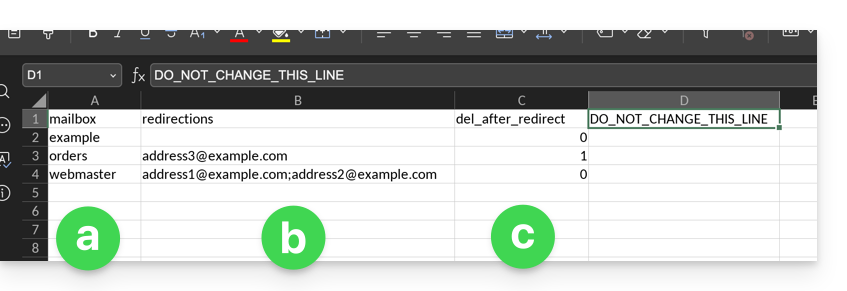
- 1st column, specify the address to create (without the domain)… example:
- The second and third columns are optional (you can leave them completely empty).
Import the CSV file
Once the .csv file is completed, save it in the same format as the proposed model and then:
- Click on the chevron to the right of the blue address creation button.
- Click on Create multiple email addresses.
- Click on Select a CSV file:
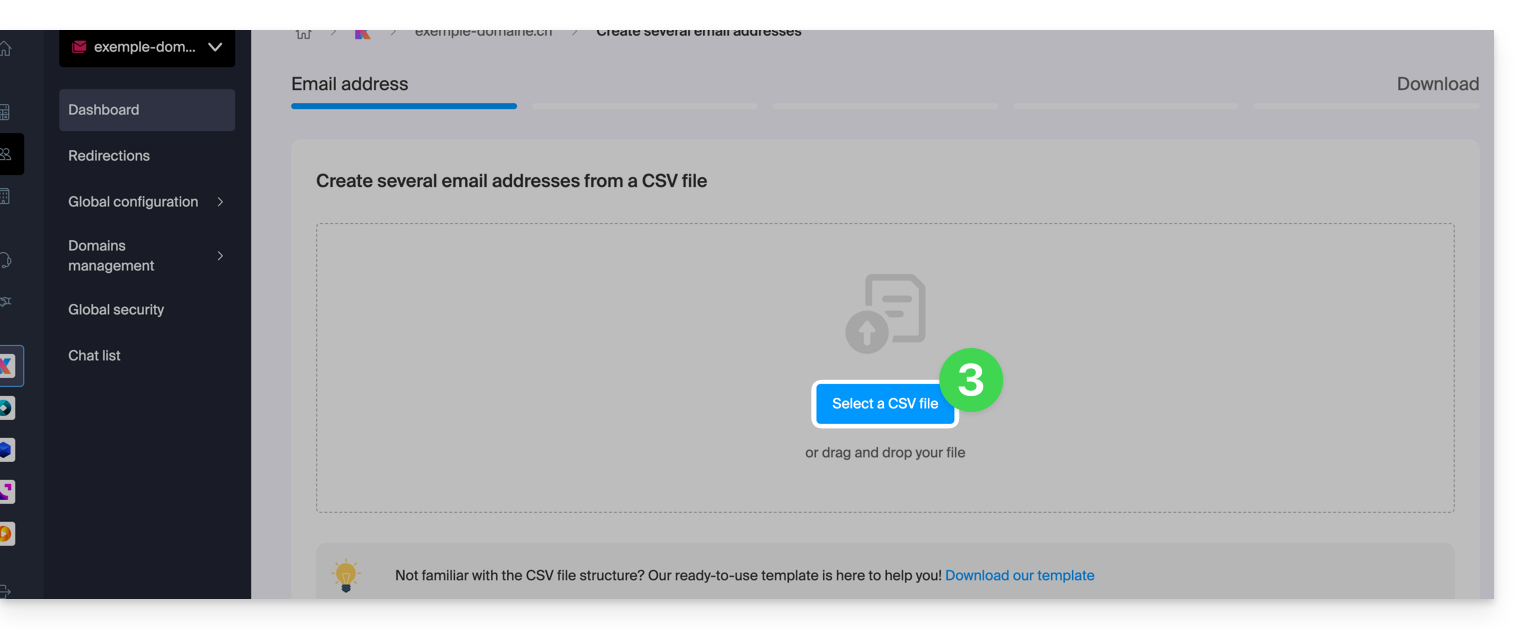
- Browse your device and select your CSV file.
- Click on Continue; after a few minutes, the email addresses will be added (without any password being assigned to them yet), in accordance with the instructions in the imported file.
To attach the address to a user of your Organization or add a password for third-party use, refer to this other guide.
This guide explains how…
- … to enable filtering of incoming mail
- … to automatically sort advertising messages
- … to report certain fraudulent messages
… in order to reduce unwanted or too many messages on an email address managed by Infomaniak.
Solutions to exclude, sort, filter incoming emails
Automatic filtering methods
- Refer to this guide to use the <Spam> folder by activating the spam filter (it is possible to deactivate it).
- Refer to this other guide to use the <Promotions> and <Social Networks> folders by activating the advertising & social networks filter.
Manual methods
- Refer to this guide to report an incoming message not detected as spam (advertising / unsolicited contact).
- Refer to this guide to report an incoming message not detected as phishing (fraud / misleading fake email).
- Refer to this guide to block or allow specific email addresses or even entire domains.
- Refer to this guide to define your own sorting and classification filters ("Sieve language") for incoming mail…
- … which will allow you, among other things, to filter messages addressed to a temporary alias that you can create to protect yourself when registering on the Internet, for example.
If you are facing a wave of spam or unusual messages, refer to this other guide to perform some checks.
If your own sends are often wrongly classified as spam, refer to this other guide to perform some checks.
To sort and clean up a mailbox that has been invaded by messages, refer to this other guide.
This guide helps you resolve various issues related to setting up and using a DMARC policy with your email.
Refer to this other guide if you encounter a DMARC issue specifically when using Google services.
DMARC error or rejection...
...during a redirection while the initial destination address may have received the email (SPF error)
Email redirection without SRS generating an SPF error
Assume you have configured an email redirection from your email address "user@example2.com" to your new address "user@yourdomain3.com", without using SRS. When someone sends an email to "user@example2.com", it is automatically redirected to "user@yourdomain3.com". Example:
- sender: john.doe@gmahoo1.com
- initial recipient: user@example2.com
- final destination: user@yourdomain3.com (SPF error)
In summary: when John sends an email to "user@example2.com", the email is redirected to "user@yourdomain3.com". However, the mail server of "yourdomain3.com" still sees the email as coming from "john.doe@gmahoo1.com".
In detail: when John sends an email to "user@example2.com", the email is redirected to user@yourdomain3.com" that is to say that the sender's envelope address will remain john.doe@gmahoo1.com but the recipient's envelope address will be changed to user@yourdomain3.com.
This will generate an SPF error, as the SPF of the gmahoo1.com domain does not authorize the IP addresses of the example2.com SMTP servers to send emails for its domain.
It is this SPF error that will generate the DMARC rejection.
If you want the redirection to work without error, it is necessary that the provider of the redirecting email address performs the redirections with SRS.
How email redirections work at Infomaniak
When you receive an email on an Infomaniak address and it is redirected to another email address, the sender's email address is rewritten to reflect the redirection. Thus, the recipient's mail server sees the email as coming from your own domain.
In summary, the use of SRS in email redirection helps maintain the integrity and security of emails while ensuring that authentication mechanisms such as SPF and DKIM remain valid.
...related to an incorrect DNS entry
Malformed DMARC Record: if the DMARC record is not correctly formatted, this can cause errors. Make sure that the tags and values are correctly specified.
Invalid DMARC Policy: errors can occur if the specified DMARC policy is not correct. Possible values for the policy are "none", "quarantine", and "reject". An incorrect value can cause problems.
Multiple DMARC Entries: having more than one DMARC entry in the DNS zone is considered an error.
If you have multiple DMARC records, mail servers may interpret this in different ways, which can lead to unpredictable behavior. Fix this by consolidating your DMARC settings into a single entry.
Check your current DMARC entry in dedicated tools like the ones below:
...linked to a send that does not comply with SPF and/or DKIM
A DMARC error or rejection related to SPF or DKIM can occur if the SPF or DKIM authentication mechanisms are not correctly configured or if they are not aligned with the domain's DMARC policy.
This can happen, for example, if you send an email from your Infomaniak email address using another provider's SMTP sending server. To resolve this issue:
- Check the overall security of the Mail Service.
I send an email from my Infomaniak address and I receive a "Reject DMARC" error email
To resolve this issue:
- Check the overall security of the Mail Service.
- Perform a send test from the Webmail mail.infomaniak.com and/or check the server settings of the email software/client.
I send an email from an external email address (Microsoft, Google, Yahoo, Orange, ...) and Infomaniak rejects my email with a DMARC error
To resolve this issue:
- Check with your email provider if the sends are made in accordance with their configuration recommendation and if necessary contact the email sender's provider to get more information.
I want to receive an email on my Infomaniak address but the sender informs me that they receive a DMARC error when sending to my address
To resolve this issue:
- In this case, the email has been blocked due to a violation of the DMARC policy that the sender has set up on their domain; it is necessary for the sender to contact their email provider or the administrator of their service to inform them of the situation.
This guide presents the main features of an Infomaniak Mail Service. Discover the administration interface for your email addresses created and hosted with Infomaniak.
Access the Mail Service
To access the Mail Service:
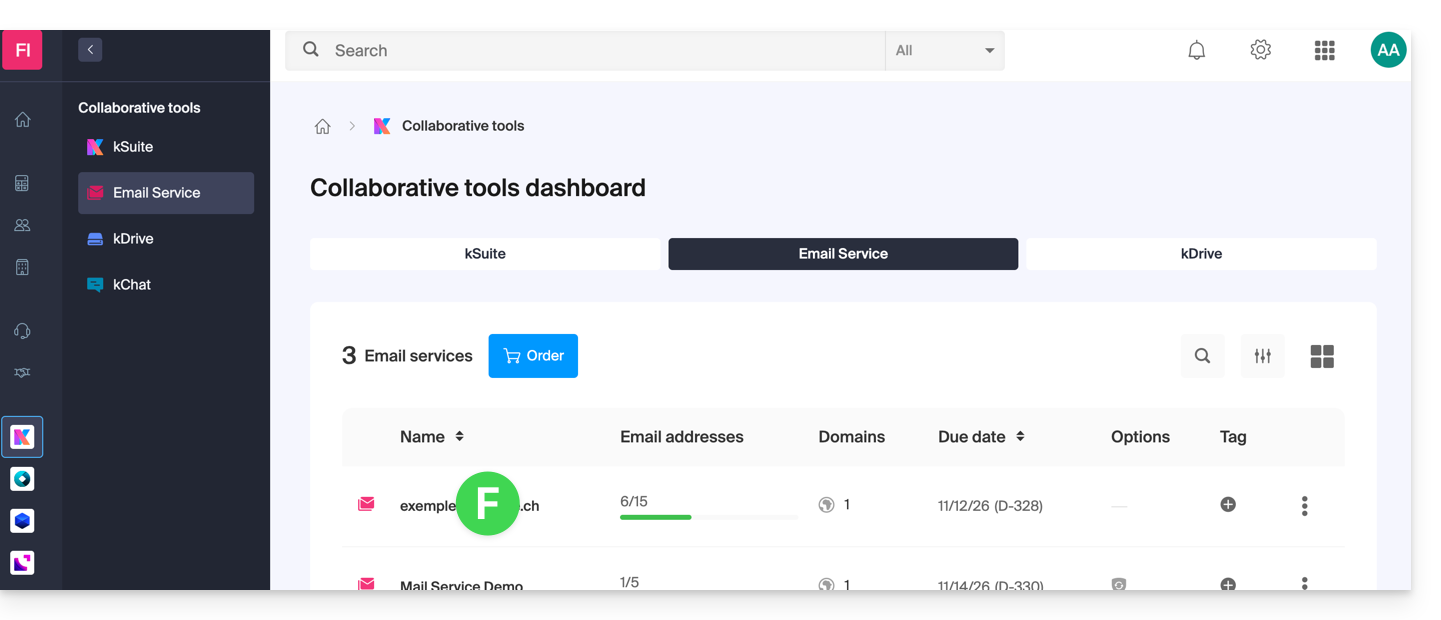
- Click here to access the management of your product on the Infomaniak Manager (need help?):
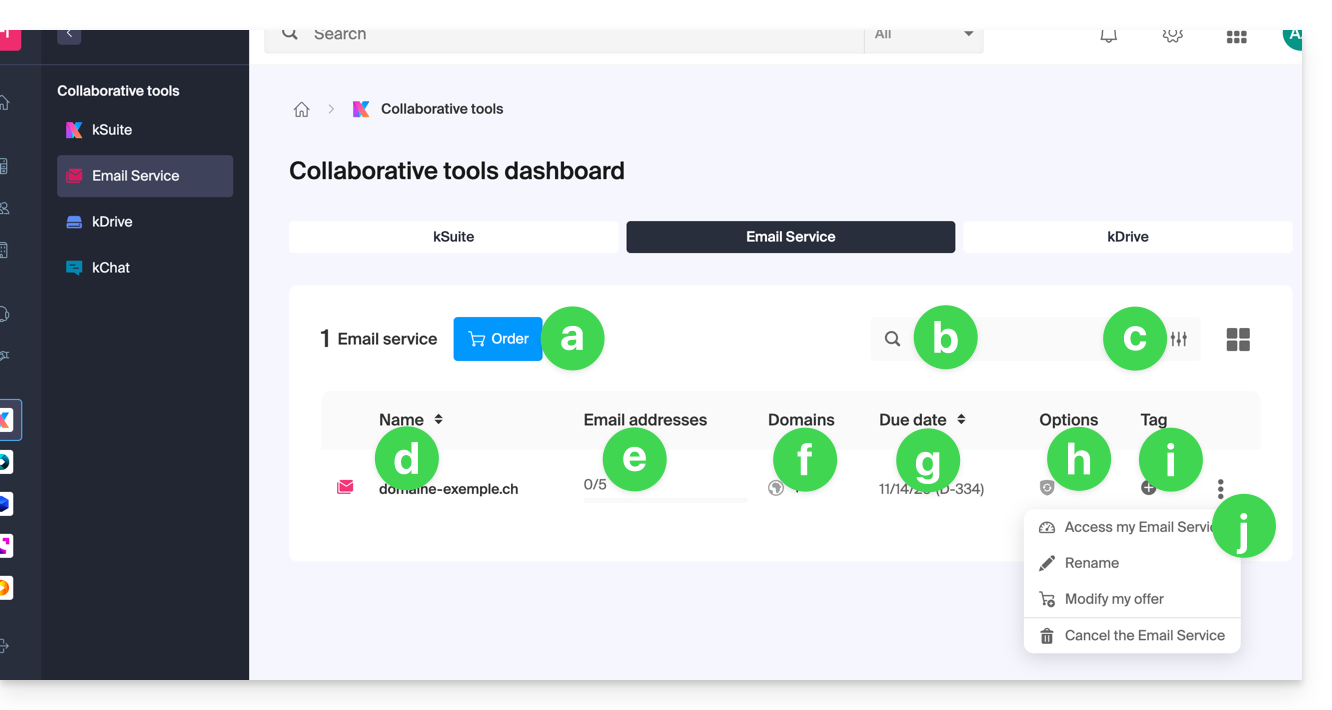
- Order a new Mail Service (to obtain email addresses on a new domain name, for example).
- Search among your Mail Service names.
- Filtering/sorting and table presentation options.
- The name of your Mail Service (note that it can be renamed (see point j) to facilitate its organization, but the associated and visible domain on hover (see point f) will remain the same).
- The number of email addresses created and available (here the quota is 5 but no addresses have been created).
- The domain(s) associated with your Mail Service; refer to this other guide to change the domain name of your Mail Service.
- Service expiration date (may be linked to kSuite).
- Possible option(s) such as Renewal Warranty, for example.
- Label(s)/Tag(s) if any.
- Action menu allowing, among other things, to rename the Mail Service or to modify the offer.
Access email addresses
To access the email addresses contained in this Mail Service:
- Click directly on the name of the Mail Service concerned in the table (see illustration above).
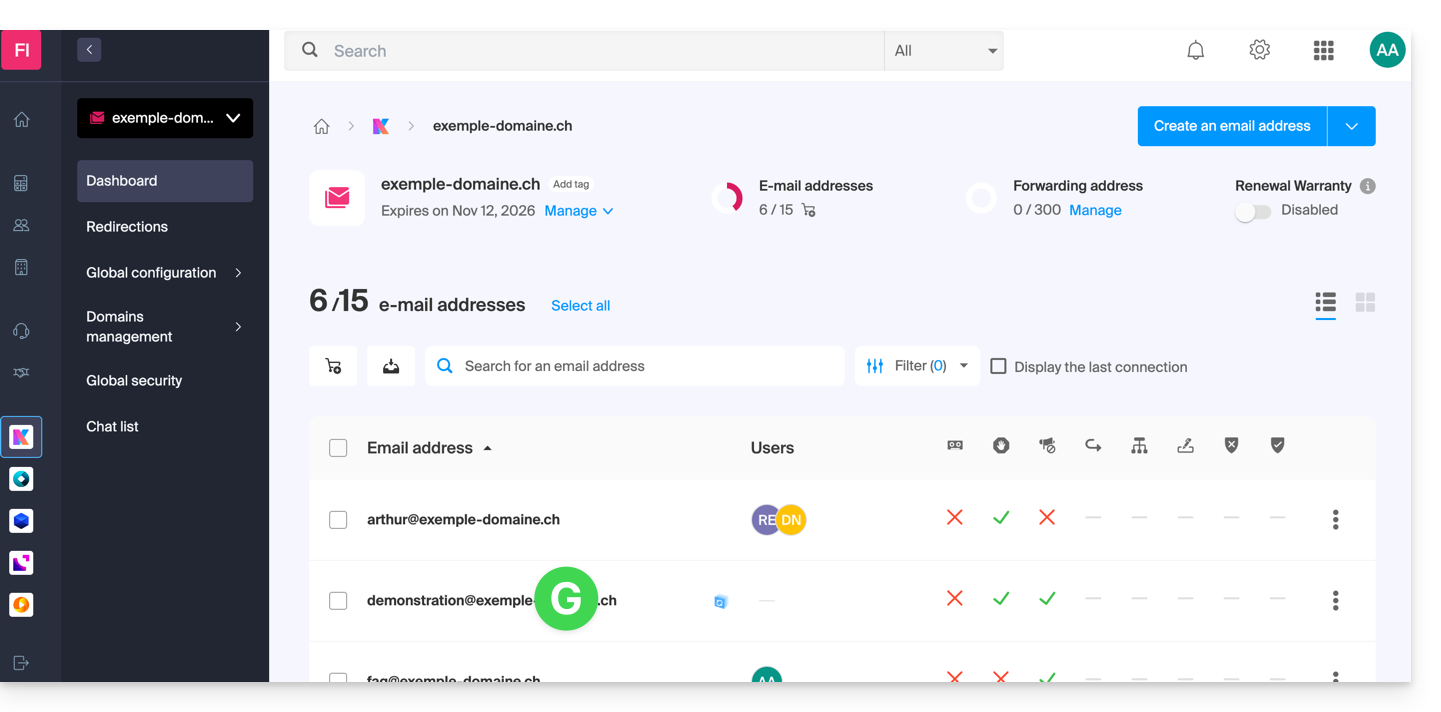
- You arrive on this type of page:
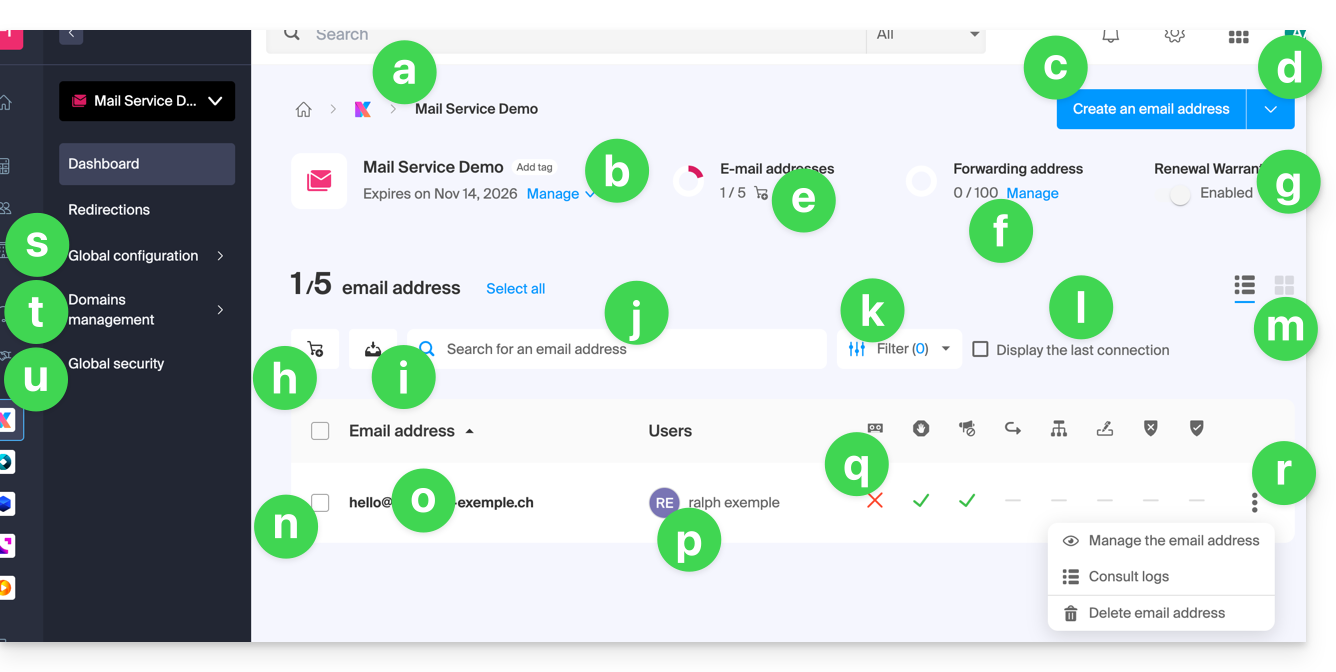
- Breadcrumb and denomination of the Mail Service (possibly renamed as in this example).
- Mail Service management menu, allows actions that the point j of the previous table does not allow.
- Create additional email addresses (or order first if the quota is not sufficient) on the same domain.
- Additional menu to, among other things, create addresses in bulk or generic.
- Current quota (you can modify it).
- Create virtual addresses (redirection addresses).
- See point h of the previous table.
- Order additional email addresses.
- Download the list of addresses in a CSV file (format
.csv). - Search among the addresses of the Mail Service (unlike the search bar above which allows searching among all the products of the Organization).
- Filter the display according to different criteria, including the connection dates of the users.
- Display in the table the last connection of a user to the Infomaniak Mail interface to which the email address in question is attached.
- Table presentation options.
- In front of each email address is a small square that can be clicked and allows selecting multiple addresses at the same time to perform actions (offered at the bottom of the page as soon as the selection is made).
- Click directly on the denomination of the email address to configure it (see next table).
- The user(s) of the Infomaniak Mail interface who have attached the email address in question.
- By clicking on the boxes of the table, it is possible to access the options; a sign indicates if the option in question is not activated.
- Actions on the email address.
- Global configuration (concerns the entire Mail Service in question) to, for example, apply a signature or anti-spam to the entire Mail Service.
- Actions on the domain(s) linked to the Mail Service.
- Global security to perform a technical diagnosis and, if possible, correct the errors automatically.
Access details and settings of an email address
To access the settings and information related to the email address (storage, password, etc.) and the users of the Infomaniak Mail app (i.e., outside of IMAP use) who use the email address:
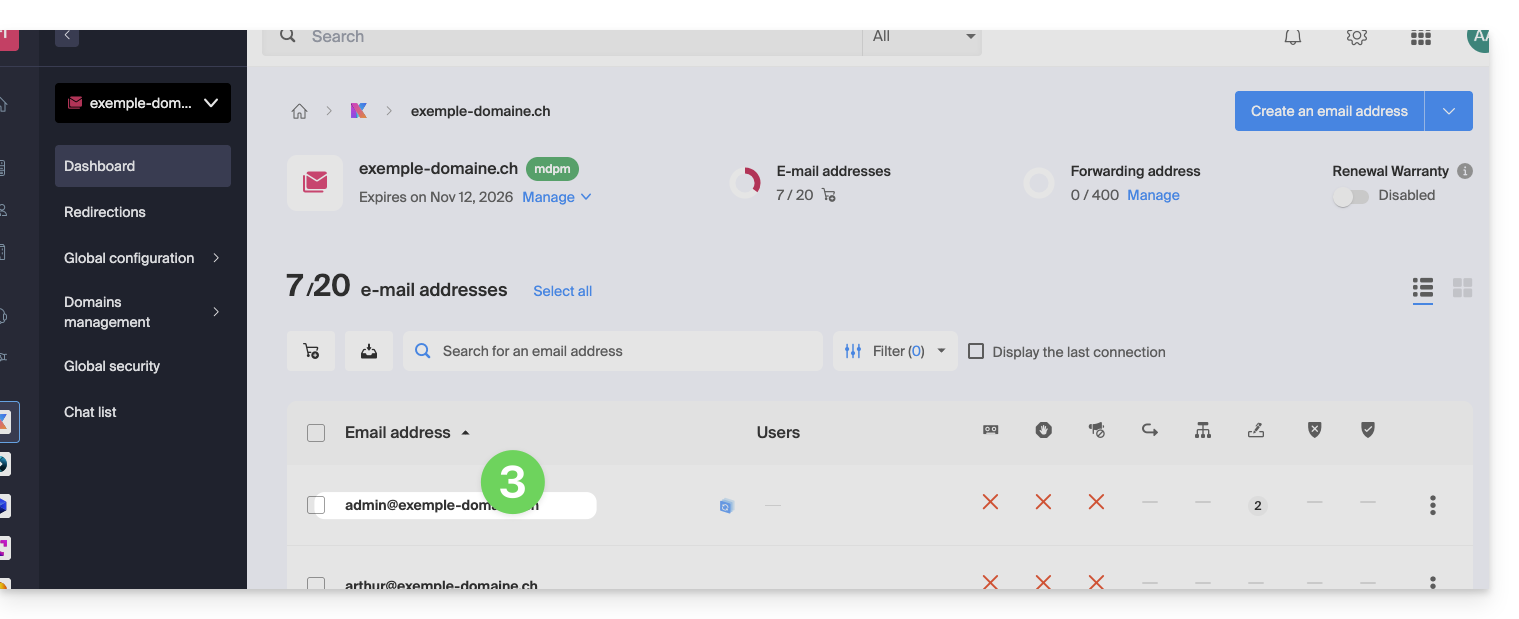
- Click directly on the email address concerned in the table.
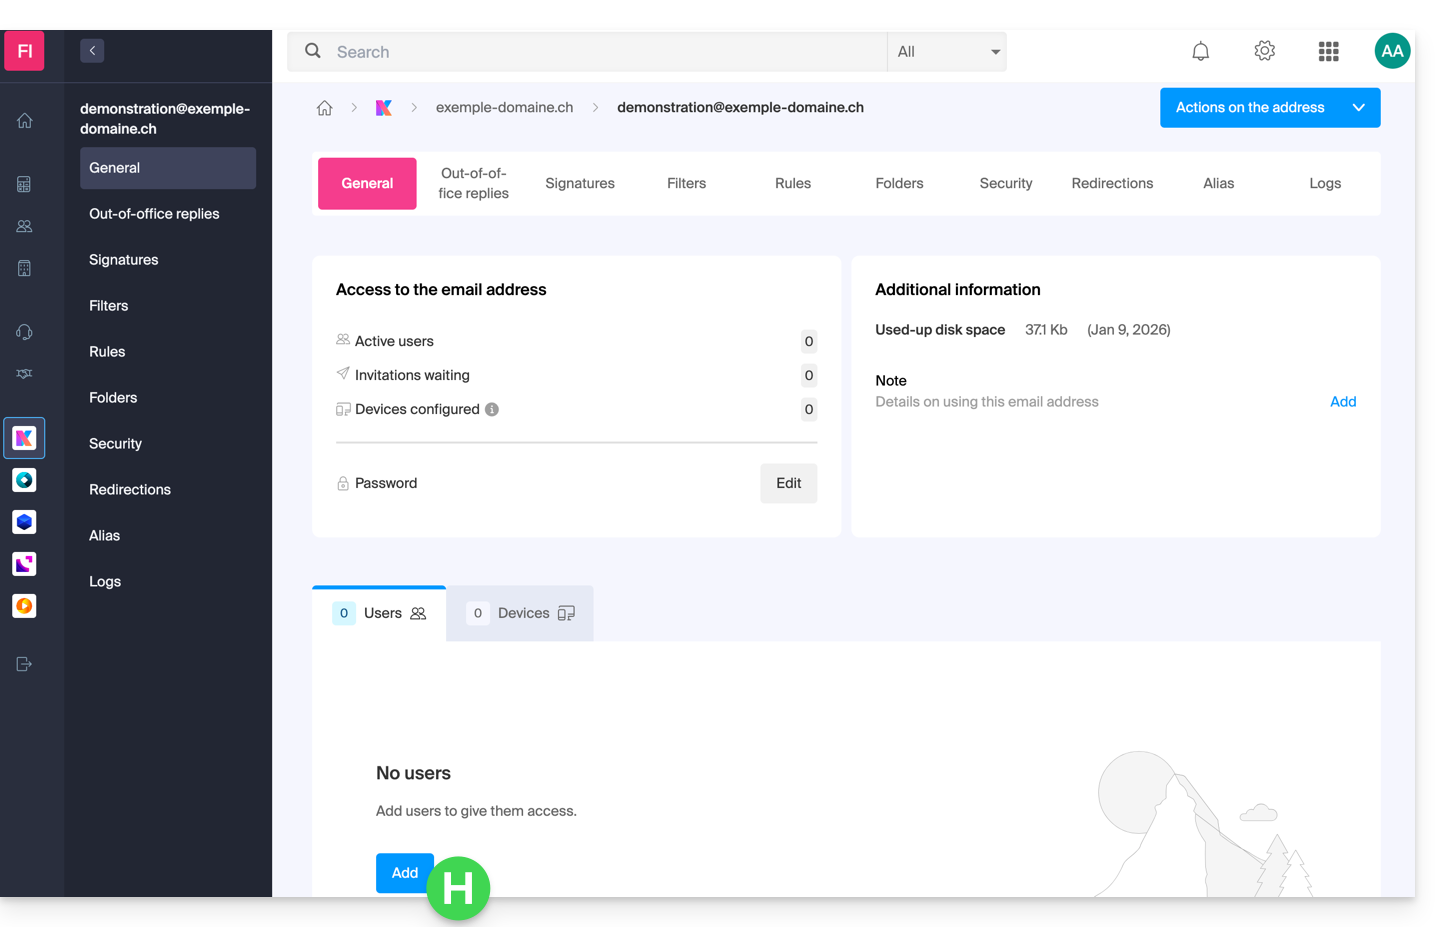
- You arrive on this type of page:
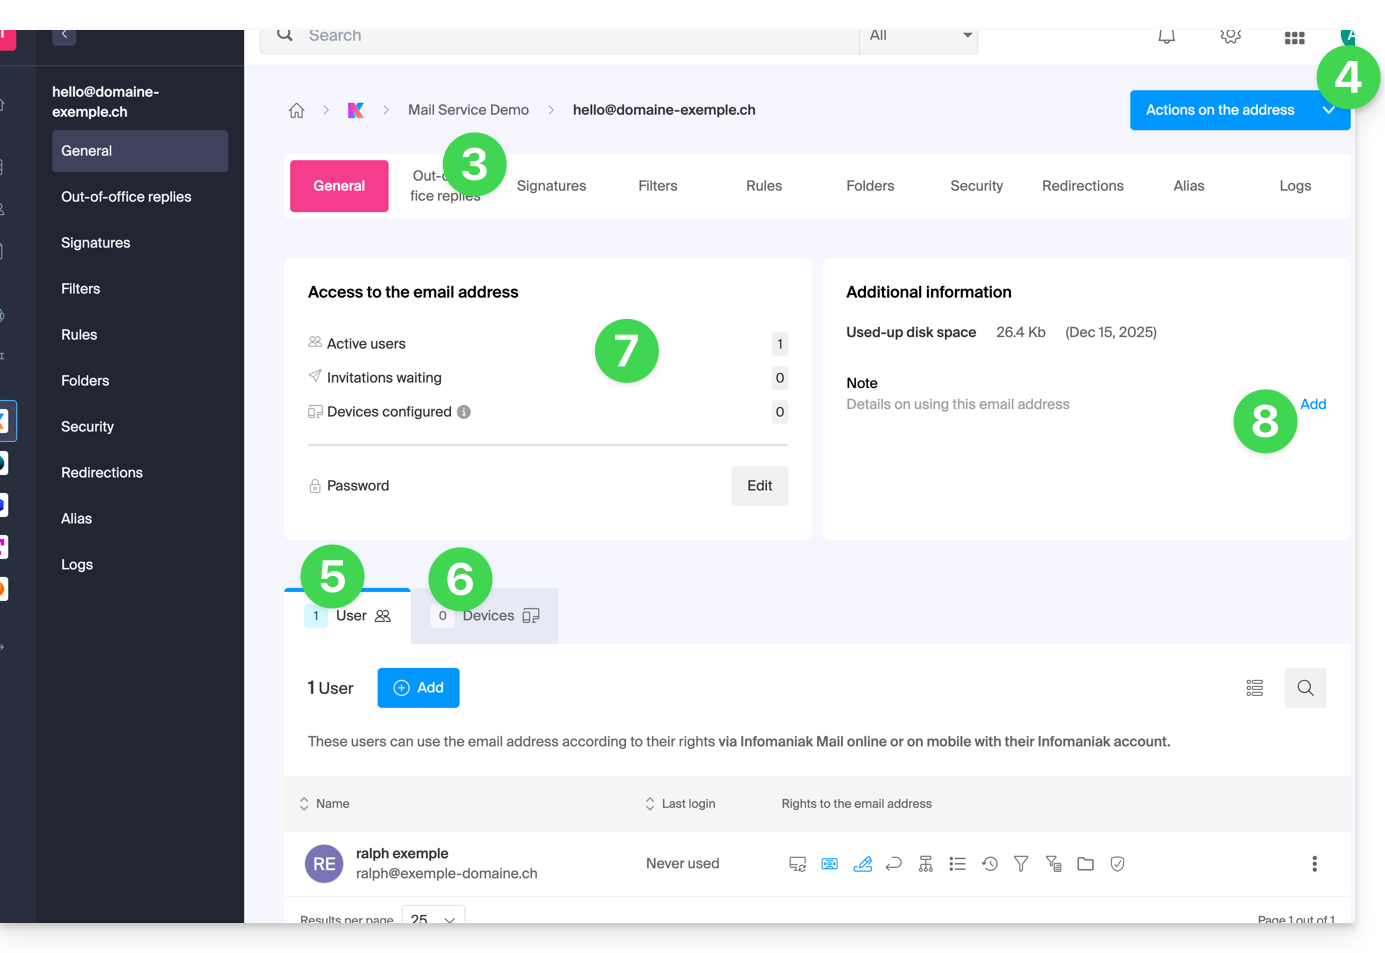
- Click on the different tabs at the top of the page (or in the left sidebar menu) to set the different settings for your email address.
- Additional actions such as restoration are accessible with the Actions button.
- Tab of users of the address (allows inviting and authorizing users to use the address).
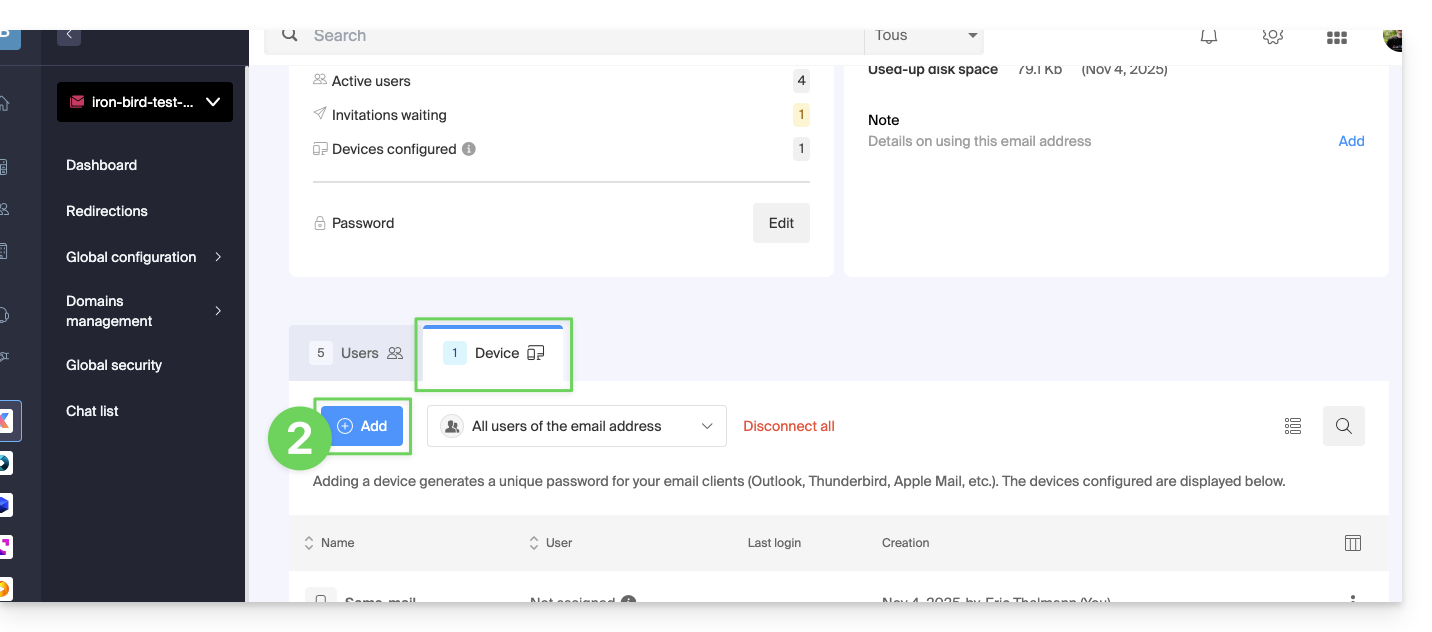
- Tab of devices (allows adding a password to the address to use the address on a specific device).
- Summary of current accesses to the address (see points 5 & 6).
- Allows adding free text that will be displayed on the left.
This guide explains how to manage the password of an email address from an Infomaniak Mail Service.
Preamble
- If you cannot log in to the Manager or Mail / kSuite, you will not be able to manage the passwords of any email addresses: refer to this other guide in this case.
- Changing the password of an email address means changing the IMAP / SMTP password: as soon as the password is changed, you must update your software (Outlook, etc.), mobile devices (iPhone), etc. with the new password (this is your responsibility).
- An email address can be accessed (on the Infomaniak Mail app) without the notion of a password: simply authorize your account or invite an acquaintance to be a user of the email address.
Add a password to an Infomaniak email address
Refer to this other detailed guide on this subject.
Create a password for a user
Instead of creating a password yourself and having to communicate it to the user later, you can directly allow a user who does not have as many permissions as you to obtain the password for the device they need:
- Add the new user (existing in the Organization or not) as described in this other guide:

- Once the user is added, switch to the devices tab to add a new device:
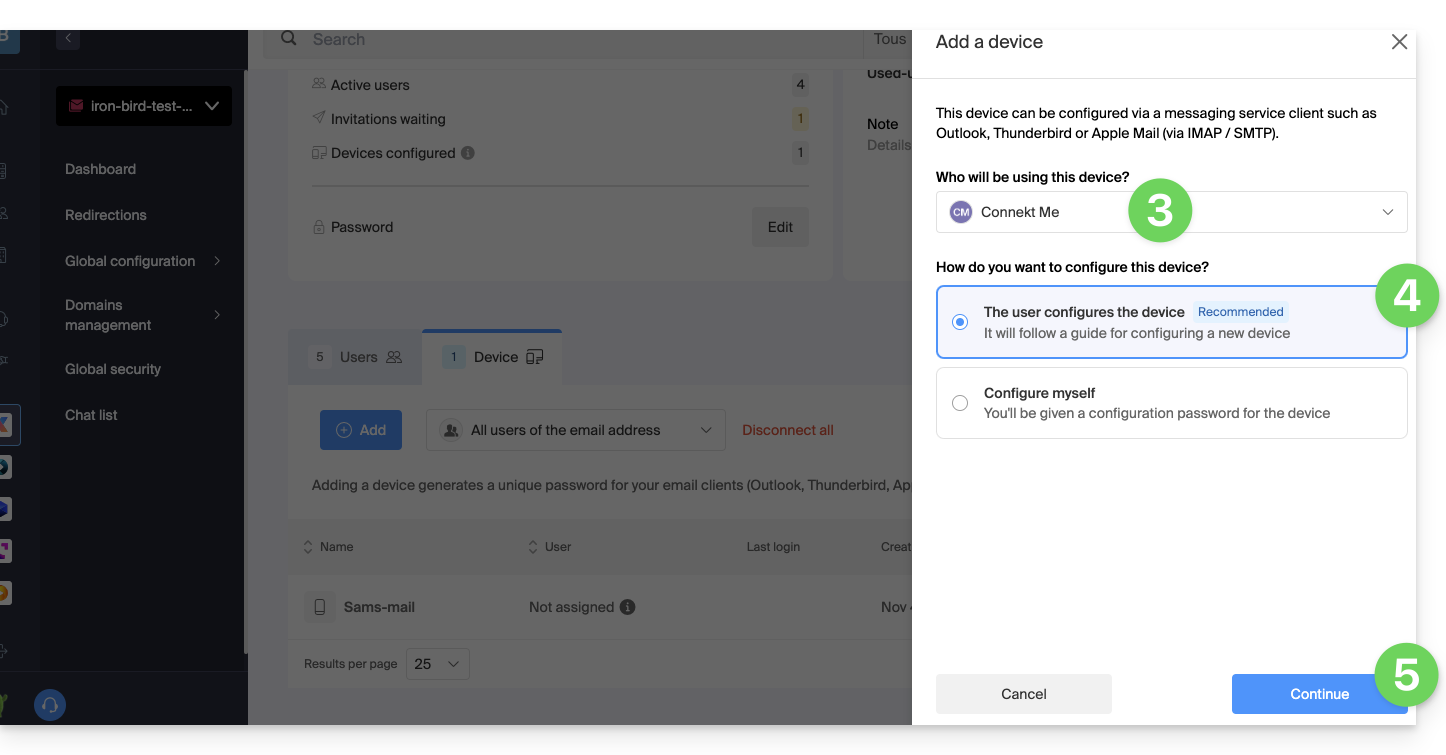
- Enter the password to log in to your Infomaniak account if necessary, then select the user created in step 1.
- Click on the first option to send a setup assistant for the user's device.
- Click the Continue button:
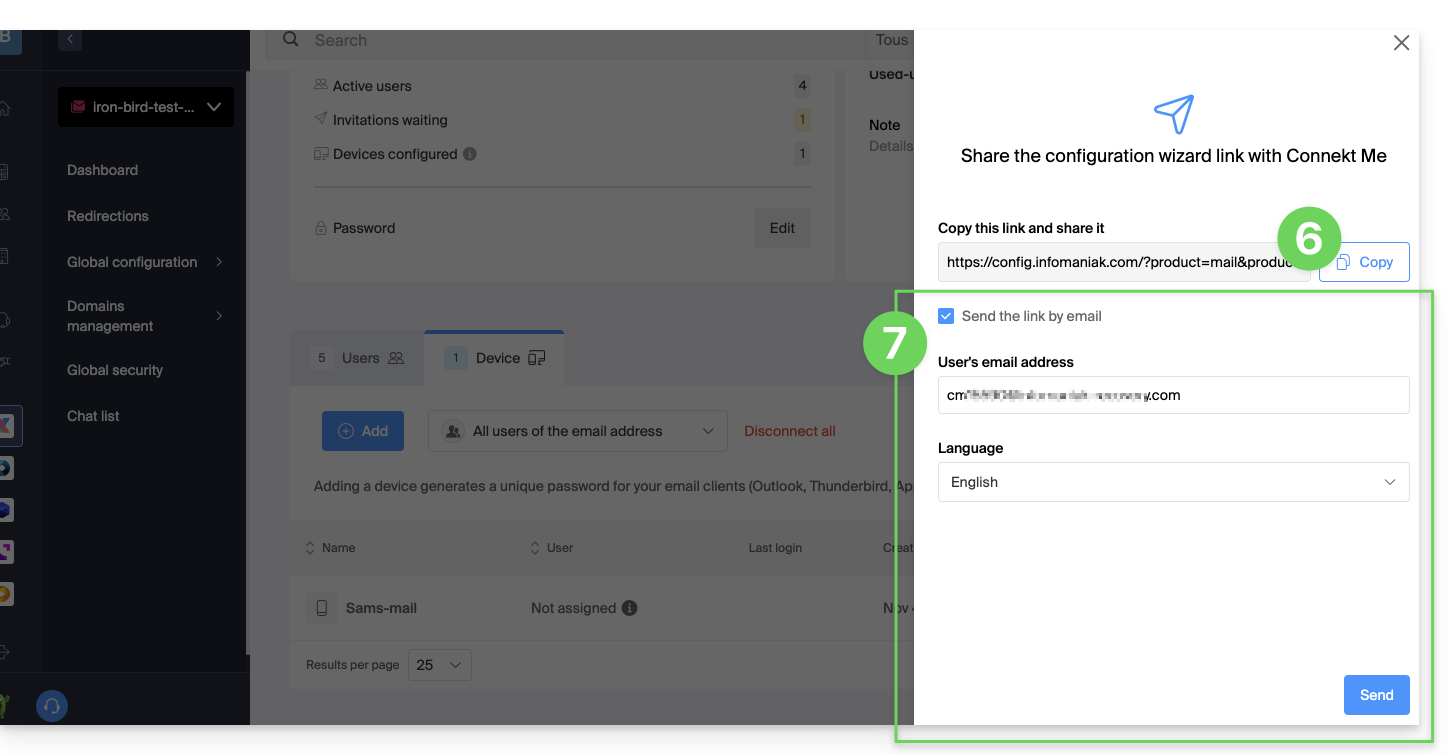
- Copy the invitation link valid for 30 days to be sent to the user.
- If necessary, send the invitation to the user's email address:
In step 4 above, you can also choose to generate a password:
- The created password will be displayed, you can modify it one last time, copy it, and keep it safe (password manager, for example); it will no longer be able to be displayed afterward.
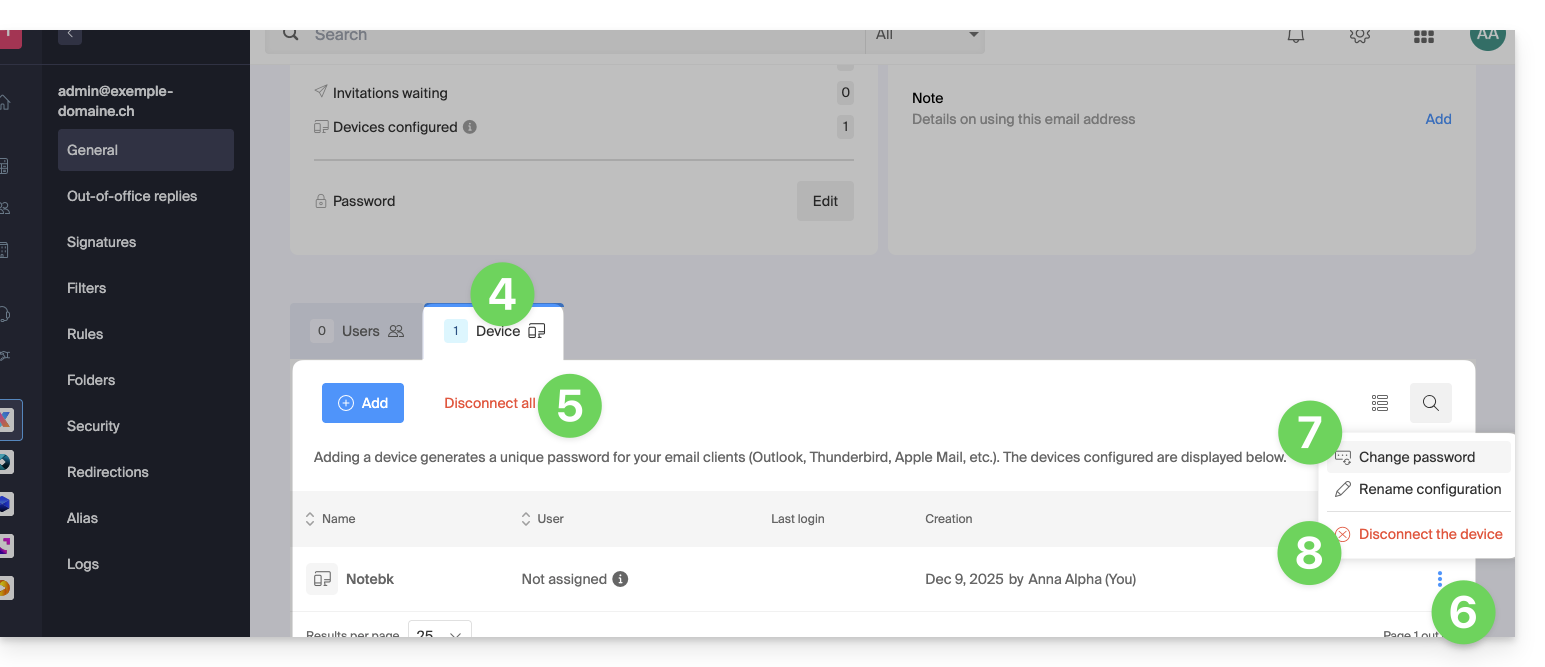
Reset/remove device password(s)
To cut off any current IMAP/POP/SMTP connection that is made using a password generated on this interface (this does not remove the address from the Infomaniak Web App Mail (online service ksuite.infomaniak.com/mail) — you need to administer the users of the email address for this), you can revoke a device, or even delete all existing configurations in 1 click:
- Click here to access the management of your product in the Infomaniak Manager (need help?).
- Click on the product name concerned.
- Click on the email address concerned in the table:
- Click on the Devices tab.
- Click on the red link to disconnect all registered devices (confirmation is required).
- Click on the action menu ⋮ located to the right of the device concerned.
- Click on “Change password” to cut the current connection but allow the device to reconnect with a new password directly.
- Click on “Disconnect the device” to remove it from the list and delete the corresponding connection:
What is a “generic” password?
Some email addresses may display a particular indication in the Devices section: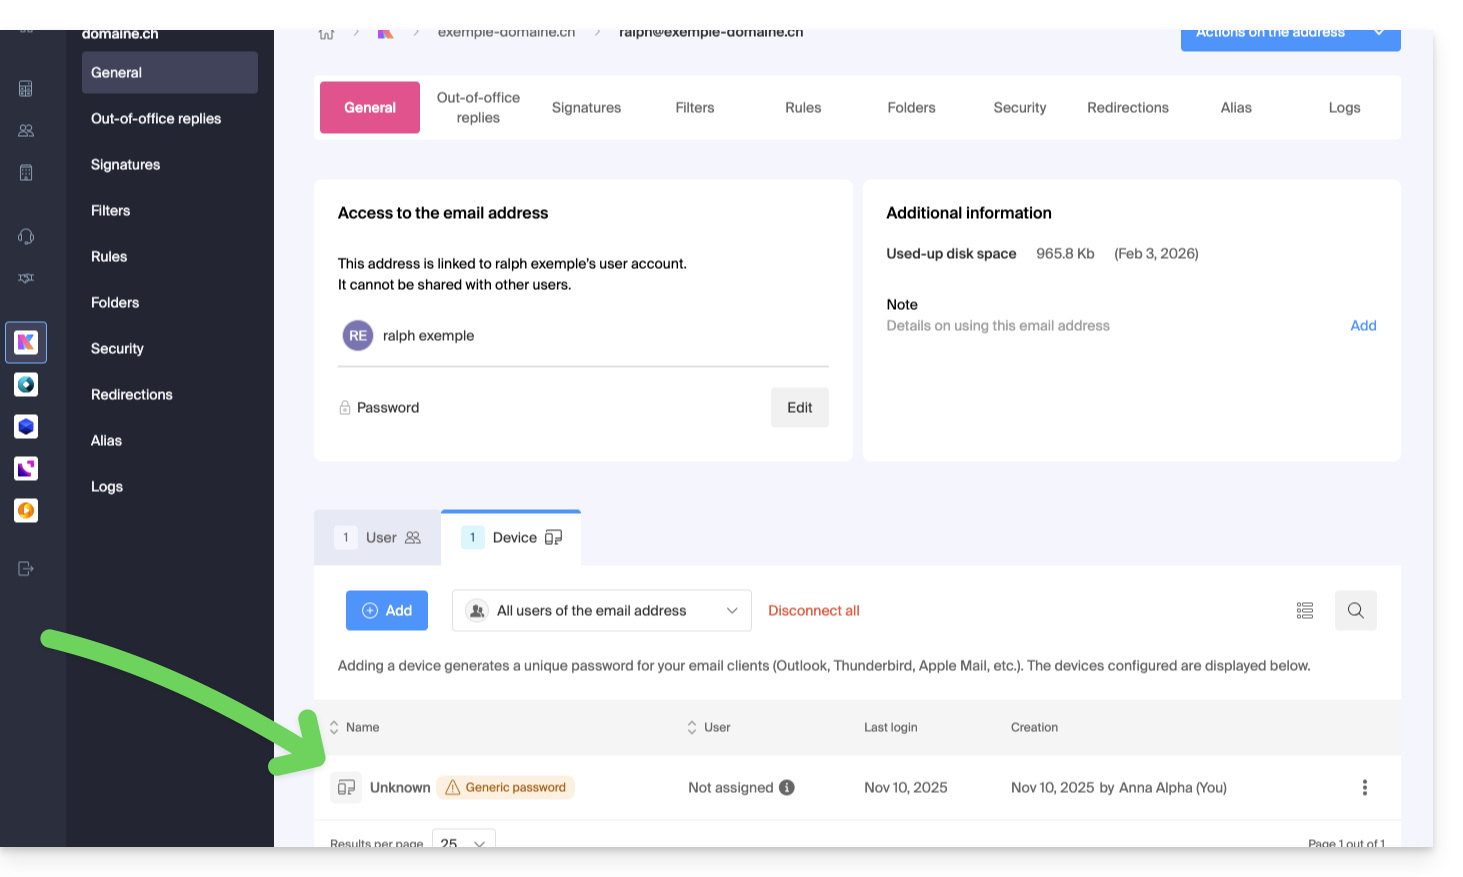
If this is the case, do not worry, this corresponds to the fact that the address has a password assigned to it when it was created (before the year 2026). This remains valid but, like other passwords, it is impossible to display. And unlike other passwords, this one cannot be reset (the option is grayed out, deactivated):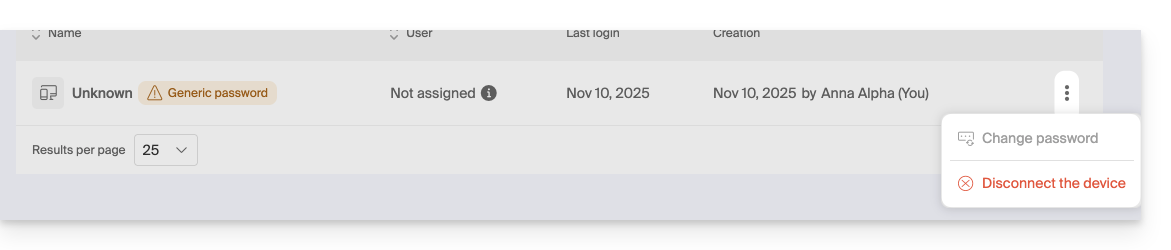
You can add an additional password without any problem.
This guide explains how to modify product access rights for a user in your Organization on the Infomaniak Manager.
Preamble
- Since you opened your account with Infomaniak, you are part of at least one Organization.
- If you were alone and it was not an invitation, an Organization was created in your name and you automatically become the legal representative.
- Otherwise, you belong to the Organization that invited you (to join its kSuite, to manage a product, etc.).
- It is possible to modify a user's role within your Organization.
- You can then define whether a user…
- … is part of your Organization and should become:
- Legal representative
- Administrator
- Collaborator (this is the part that is detailed below…)
- … is external to your Organization (limited rights):
- External users are not included in the sharing of calendars and address books for the entire Organization.
- … is part of your Organization and should become:
Who can access what…
Prerequisites
- Be Administrator or Legal representative within the Organization.
- Switch to the desired Organization first if you do not find the expected user list.
- Have added a user as a collaborator.
The guide below allows you to manage product access for collaborators and external users. Indeed, a legal representative or an Administrator already has access to all existing products within the Organization and visible on the Infomaniak Manager.
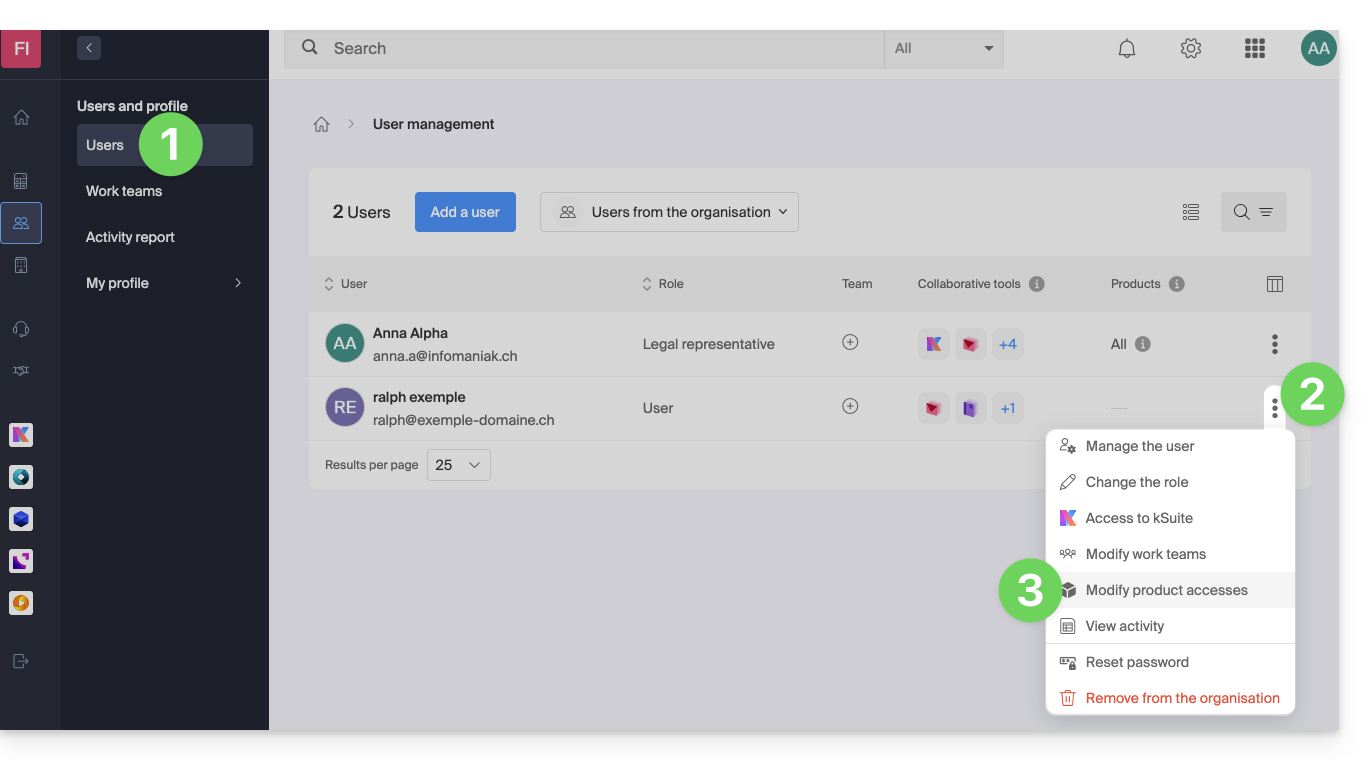
To modify the product access of an Organization user:
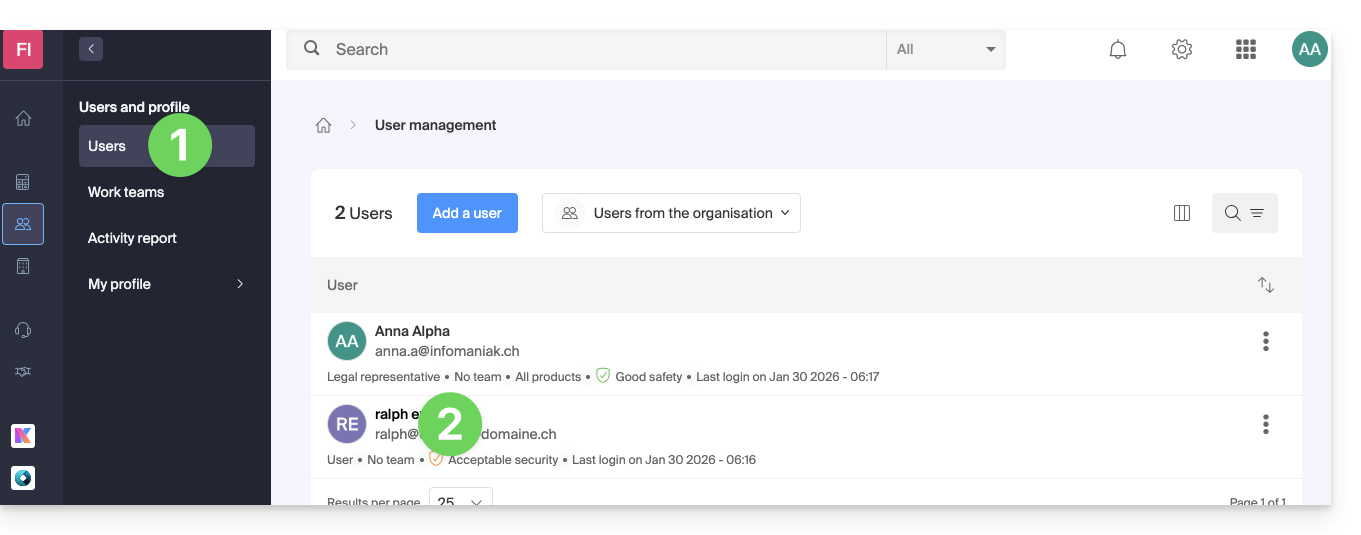
- Click here to access user management on the Infomaniak Manager (need help?).
- Click on the action menu ⋮ located to the right of the user concerned.
- Click on Modify product access:
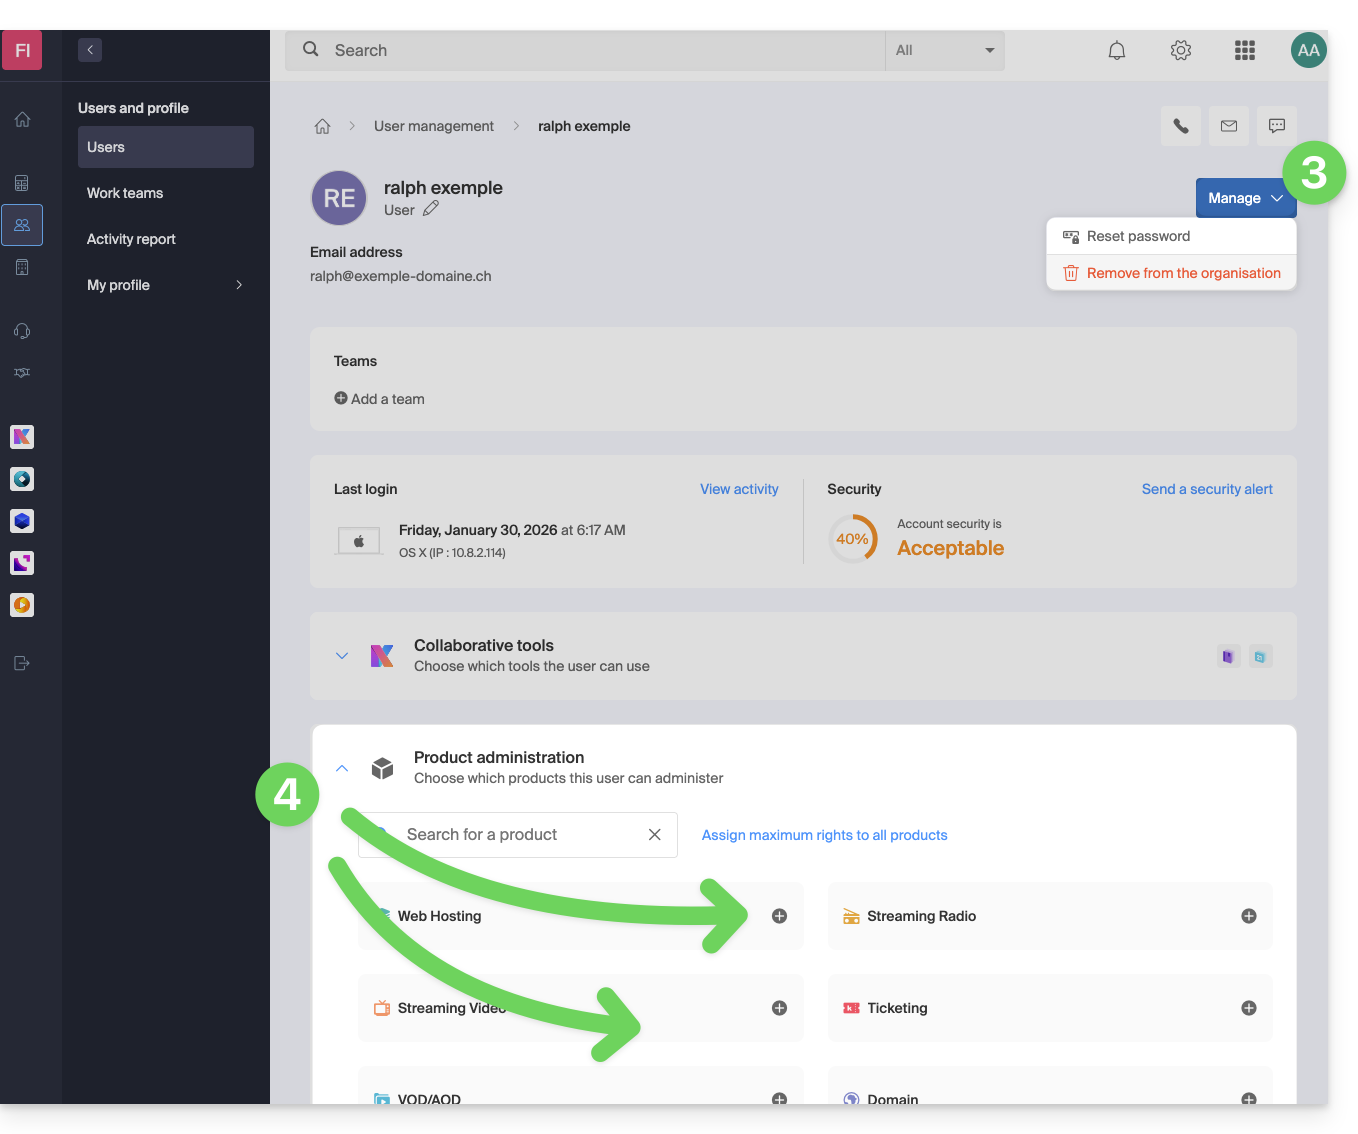
- You can grant access to everything with maximum permissions in 1 click.
- Otherwise, click on the product category to which you want to grant access.
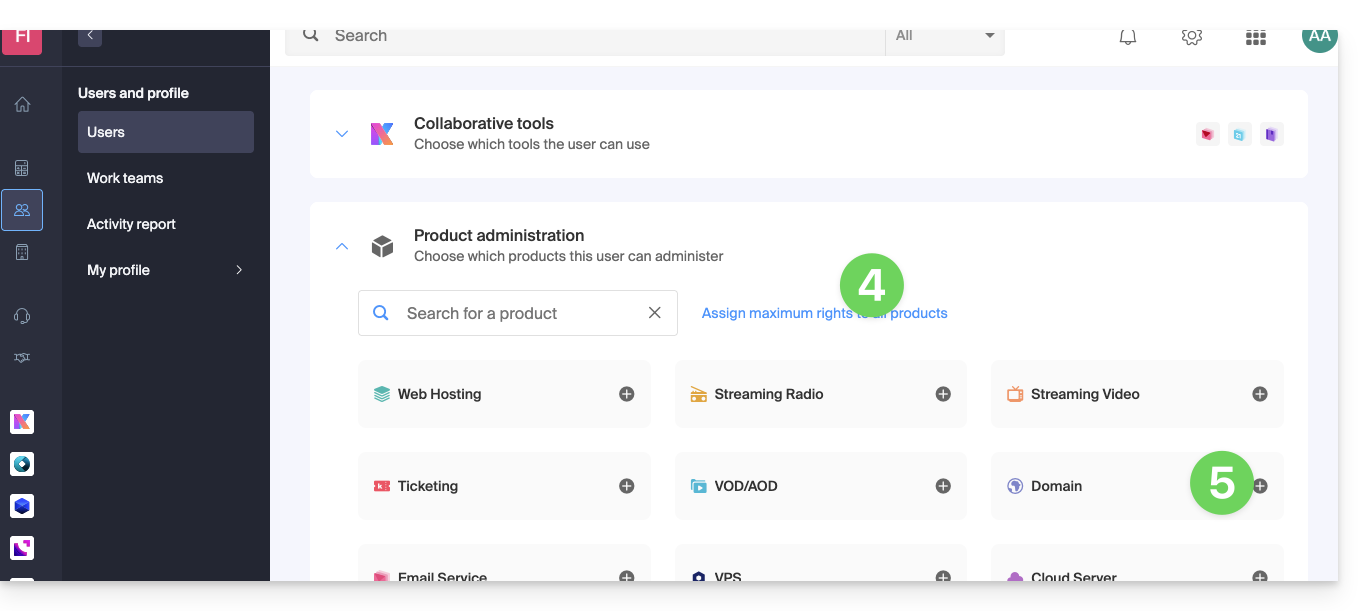
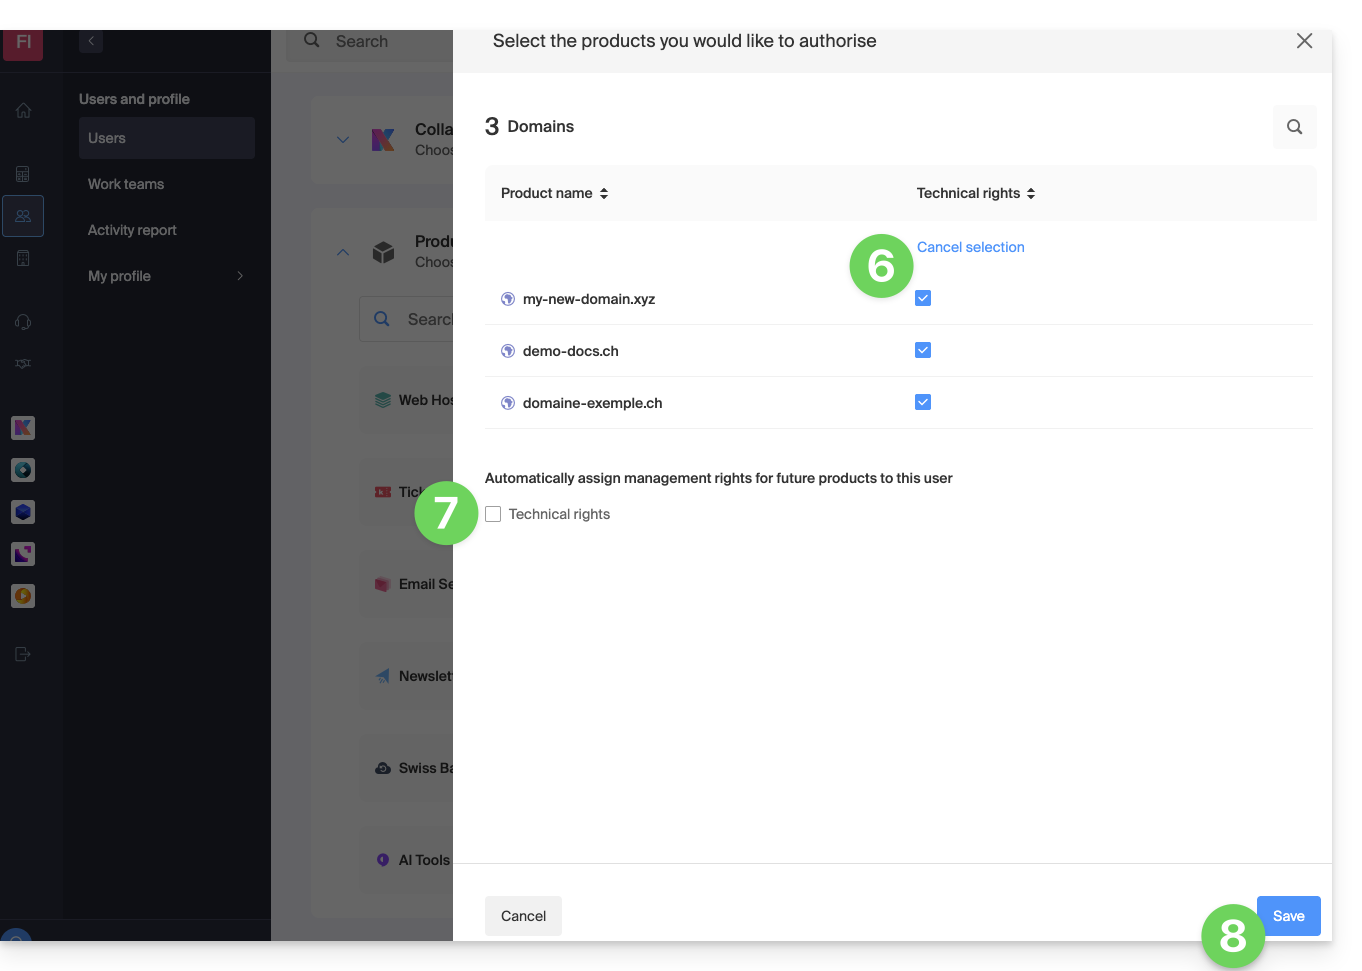
- Select the necessary product(s).
- If you have selected multiple products, decide whether a future additional product should automatically be visible to the user (and with what type of permissions).
- Click on the Save button:
- Rights are granted immediately.
- Click on the pencil icon ✎ to modify permissions:
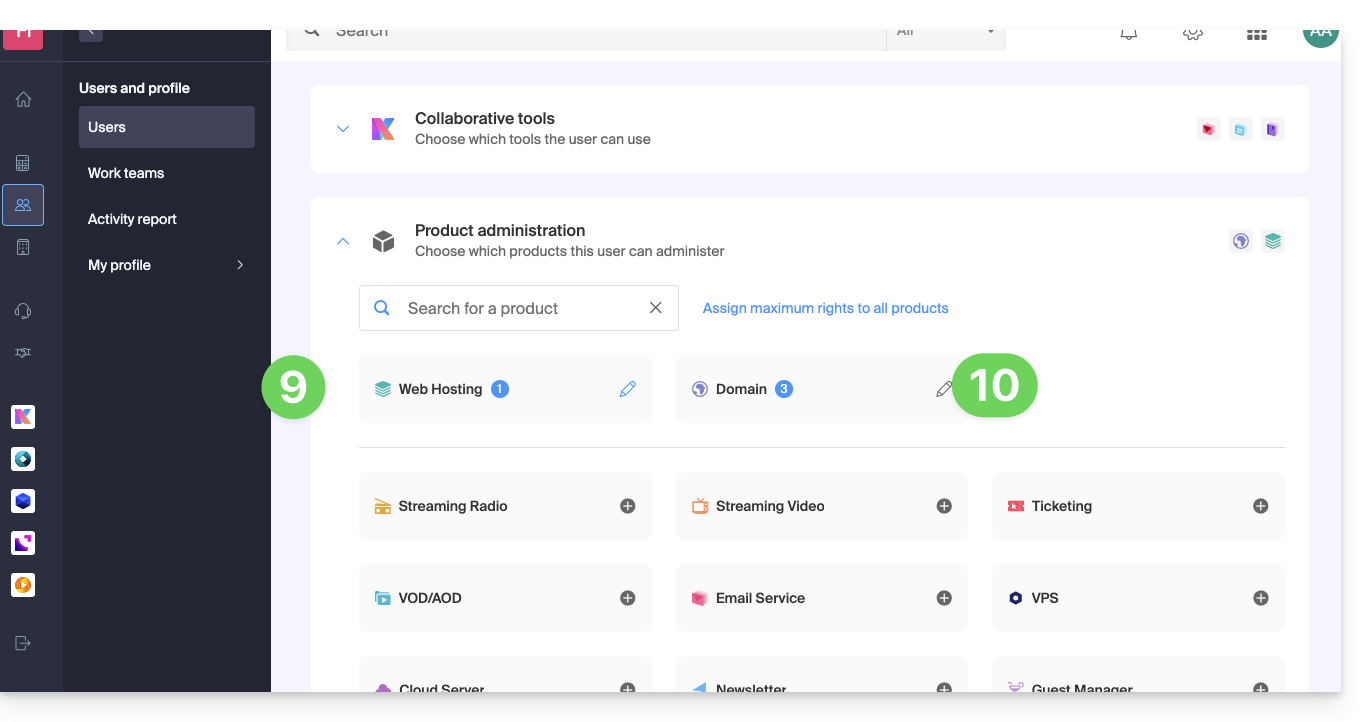
- Restart at step 5 if you need to grant access to multiple products.
Service usage / Service management
Be careful, on your product table, it is important to distinguish between access to products (type kDrive for example, within the kSuite) and access to product management: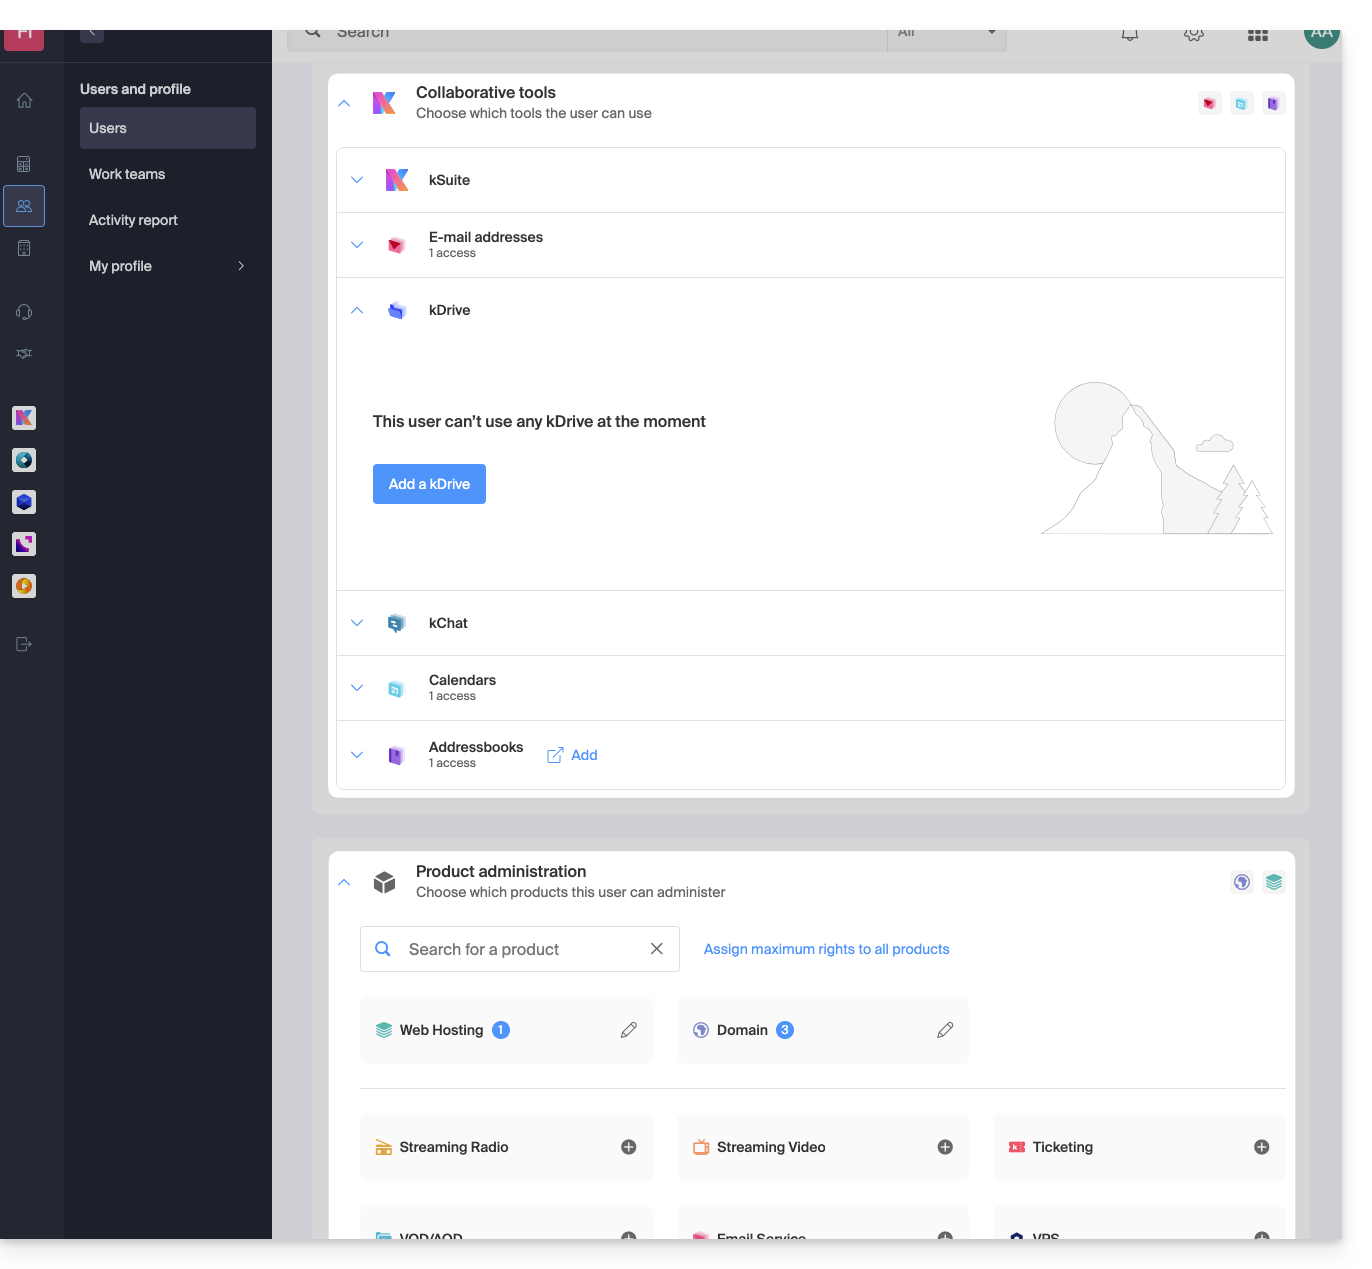
It is possible to authorize a user to use kDrive (they will be able to create a PDF for example) without granting them a service management right for kDrive (they will not be able to change the offer, invite a new user, terminate, etc.).
Technical rights / Statistical rights
With certain services like kDrive, it is possible to give a collaborator TECHNICAL and/or STATISTICAL rights (adds access to the dashboard, share links, storage statistics, active users, connected devices, activity on kDrive):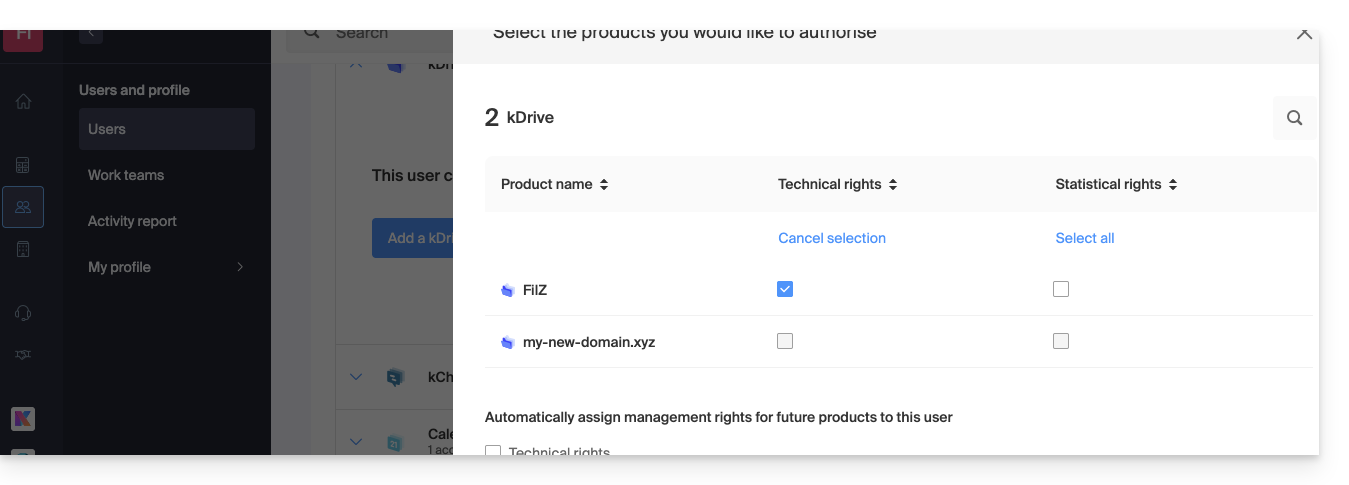
Other services like domain names do not have a STATISTICAL section: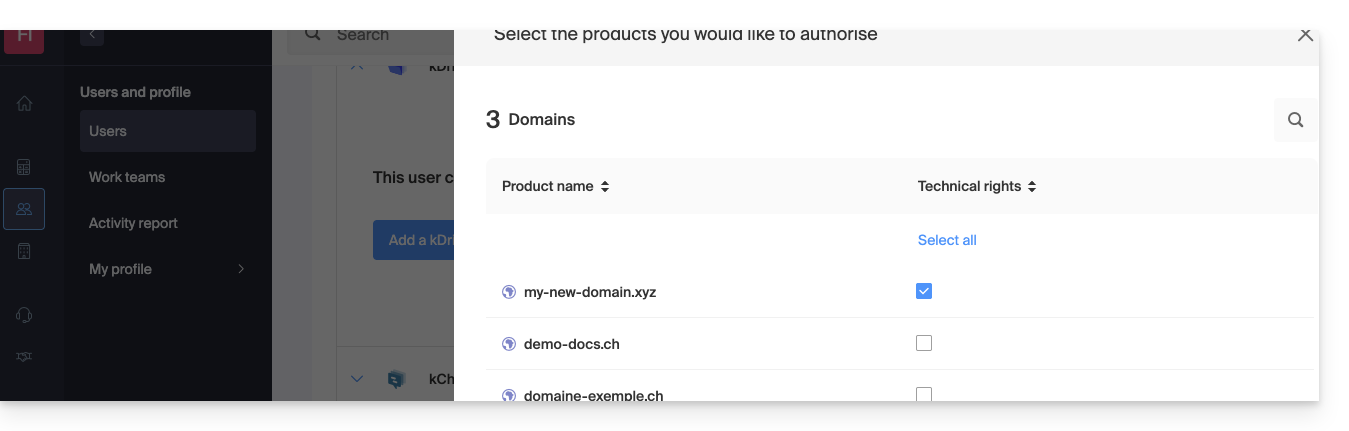
Certain specific services like ticketing allow for even more detailed rights to be granted: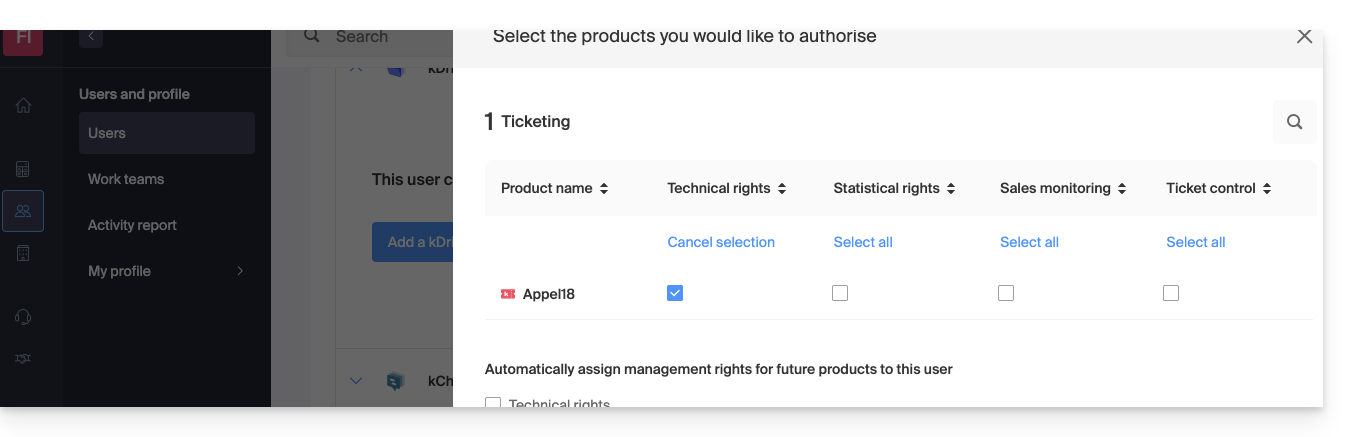
Easier access: Work Teams
To facilitate the addition of access rights to a product that is on your Organization, there are Work Teams. These allow you to create groups that are linked to Infomaniak products with the desired rights, very practical for giving a new collaborator in your Organization access to the products they will need in their daily activities.
This guide is for owners of a domain name on the Infomaniak infrastructure who encounter a DMARC issue when using certain Google tools such as Meet or Calendar.
Resolve a DMARC error
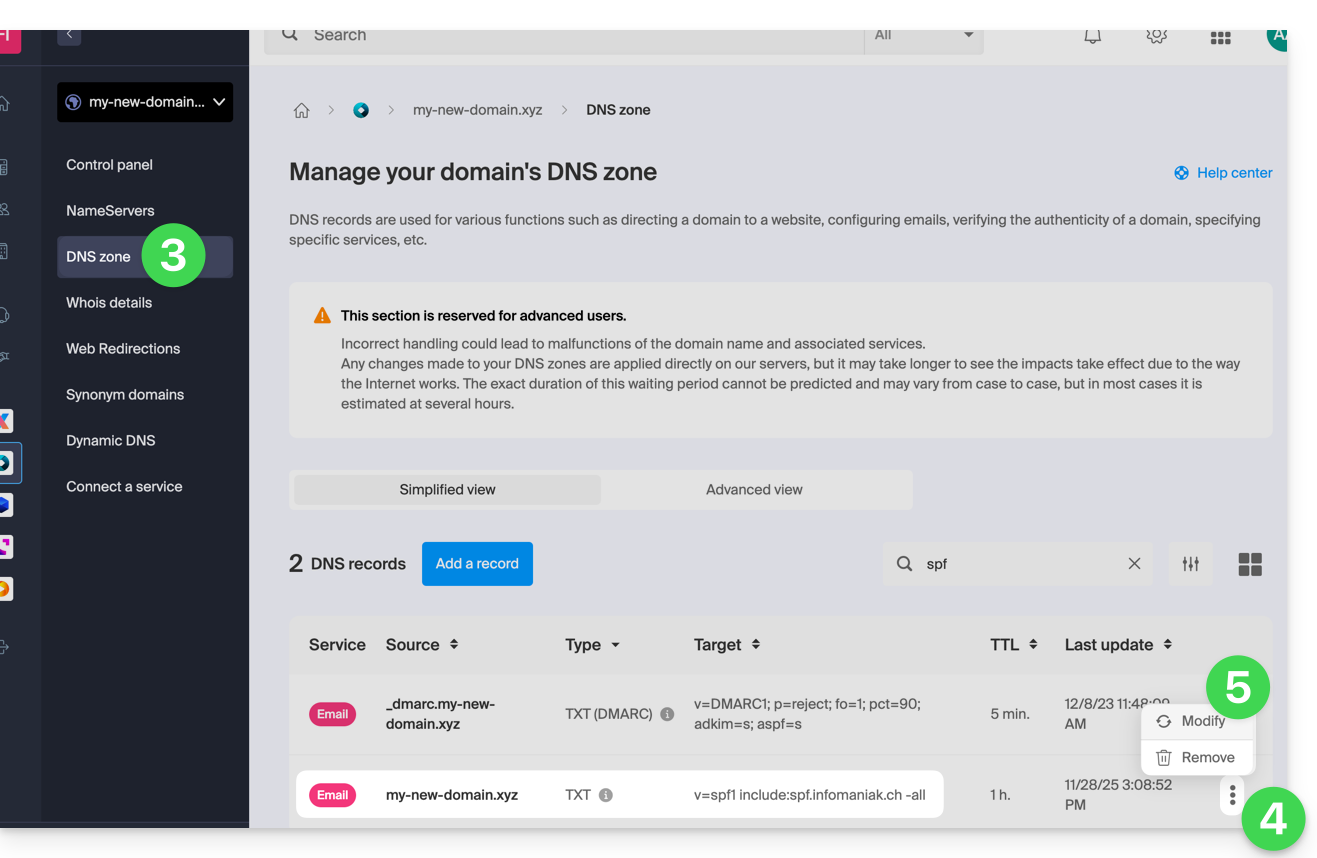
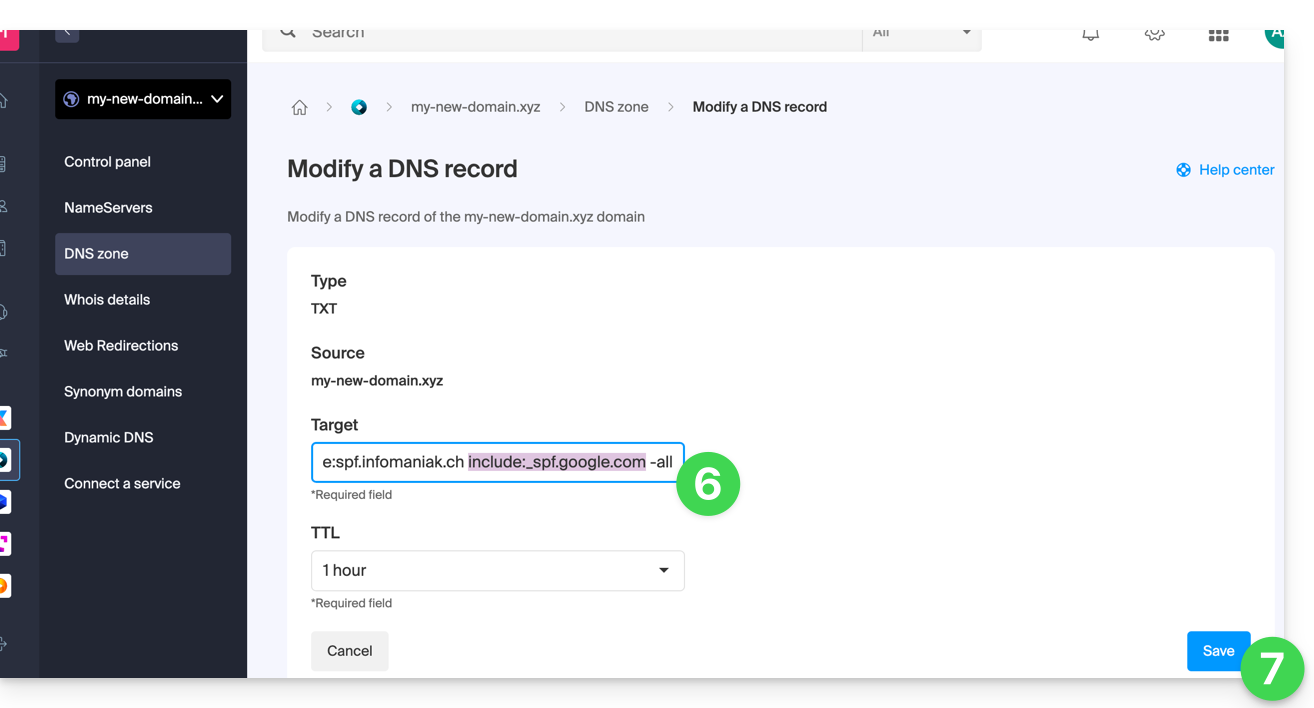
To make your domain name configuration (with a DMARC policy of type reject) compatible with the use of certain Google services, it is necessary to add a corresponding SPF record:
- Before:
v=spf1 include:spf.infomaniak.ch -all - After:
v=spf1 include:spf.infomaniak.ch include:_spf.google.com -all
To edit the SPF currently configured in the DNS zone of your domain name:
- Click here to access the management of your product on the Infomaniak Manager (need help?).
- Click directly on the name assigned to the product concerned.
- Click on DNS Zone in the left sidebar.
- Click on the action menu ⋮ located to the right of the TXT type record containing the value of the SPF concerned.
- Click on Modify:
- Edit the field by adding on the same line
include:_spf.google.comafter the existing Infomaniak include, and this before the final-all. - Click on the Save button:
Any DNS addition/modification can take up to 48 hours to propagate.
Refer to this Google documentation if you are looking for information on configuring Google's SPF.
This guide presents, in the same way as Quickly generate an email password, the quick methods to access an email address with Infomaniak tools.
Access an email address
To use the existing email address demonstration@exemple-domaine.ch:
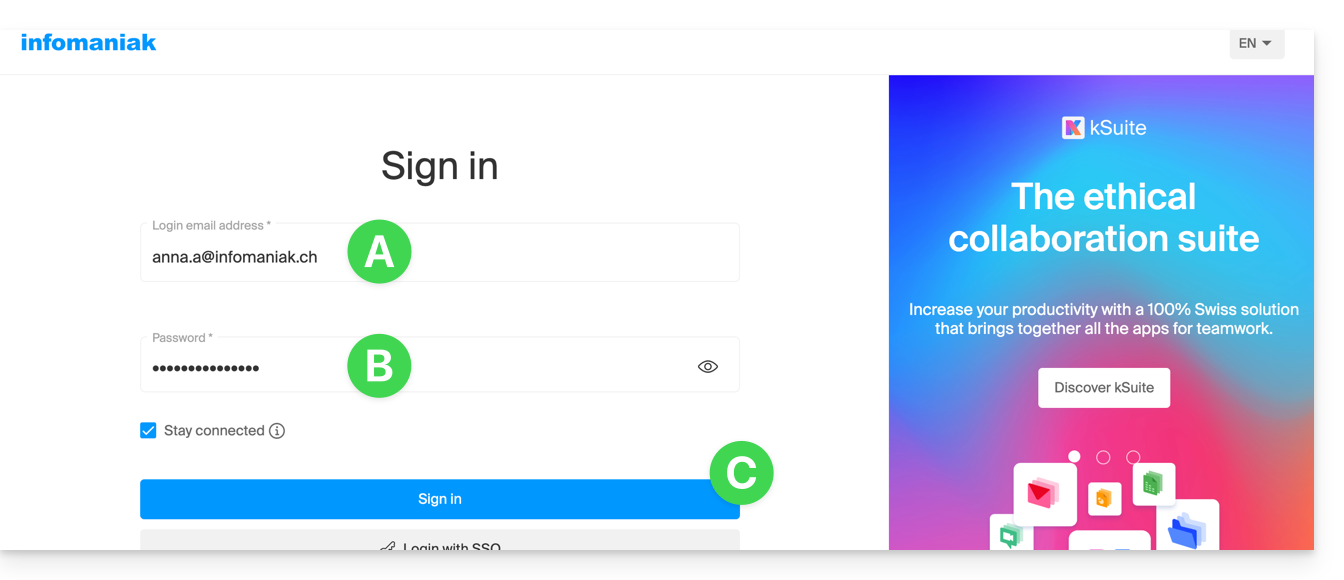
- Enter the login ID for your Infomaniak account and its password on the page https://manager.infomaniak.com/:
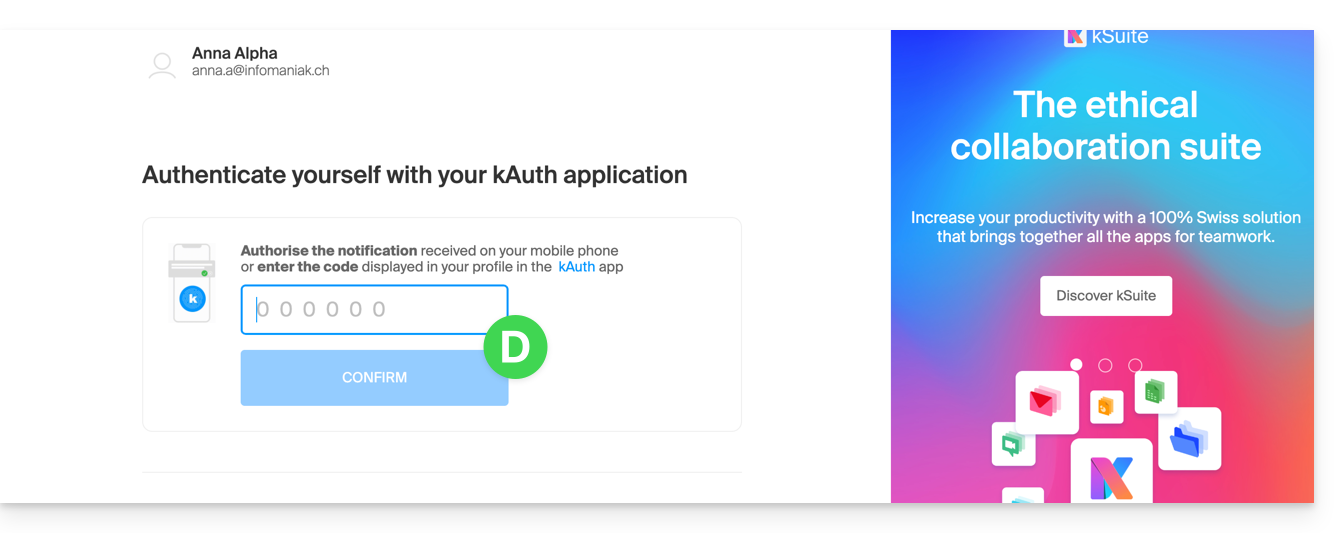
- Validate the entry in the Manager with the 2FA (two-factor authentication) method defined initially:
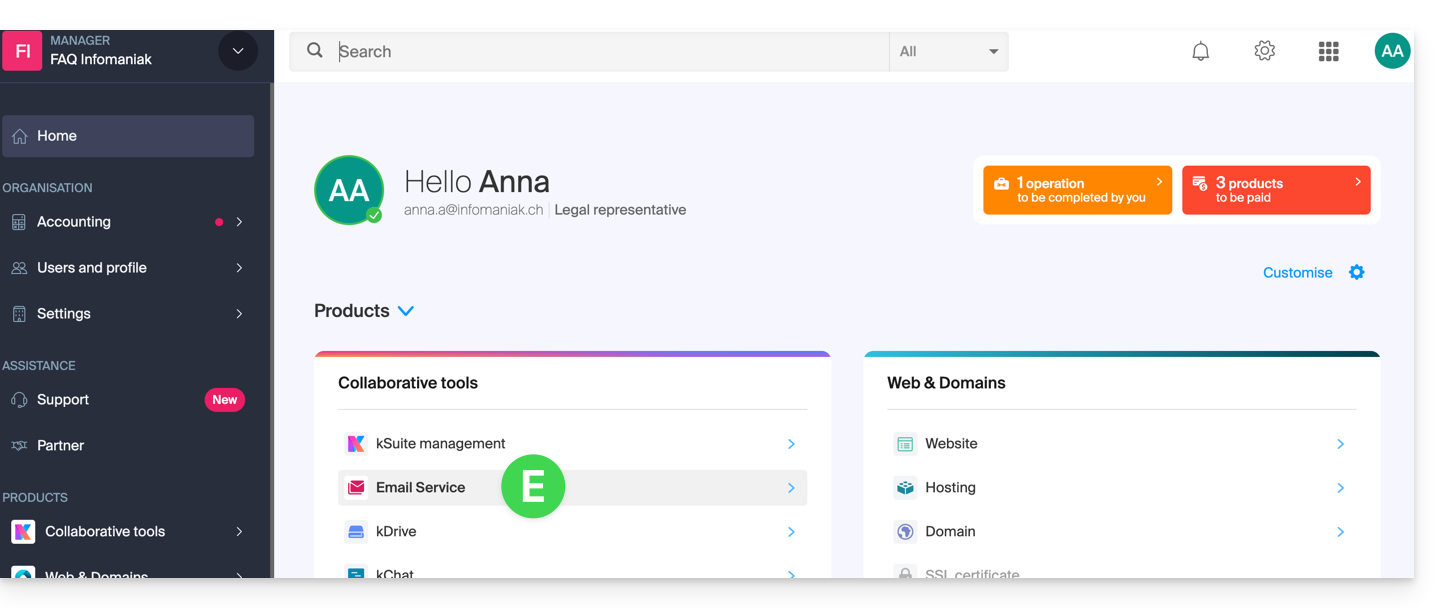
- Once on the dashboard, click on Mail Service:
- Once on your Mail Services, click on the name / domain name to which the email address in question belongs:
- Once on the Mail Service to which the address belongs, click on the email address in question:
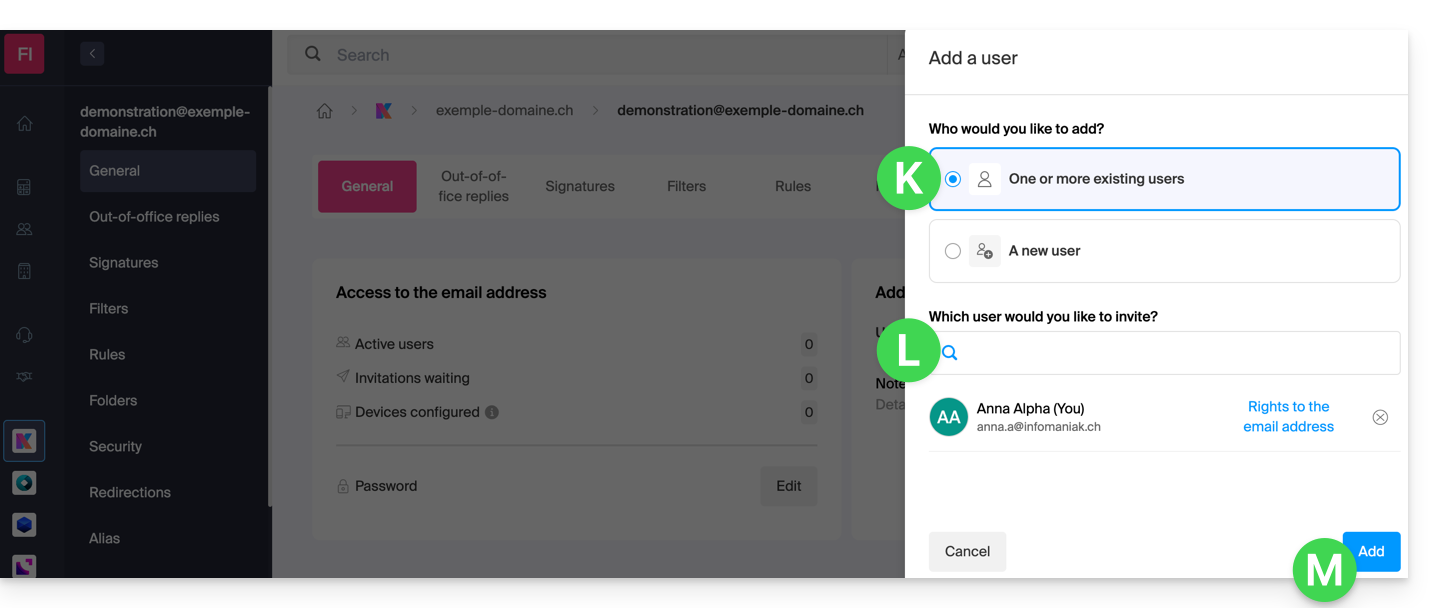
- Once on the email address in question, click the Add user button:
- It may be necessary at this stage to re-enter the login password (the one from point B above):
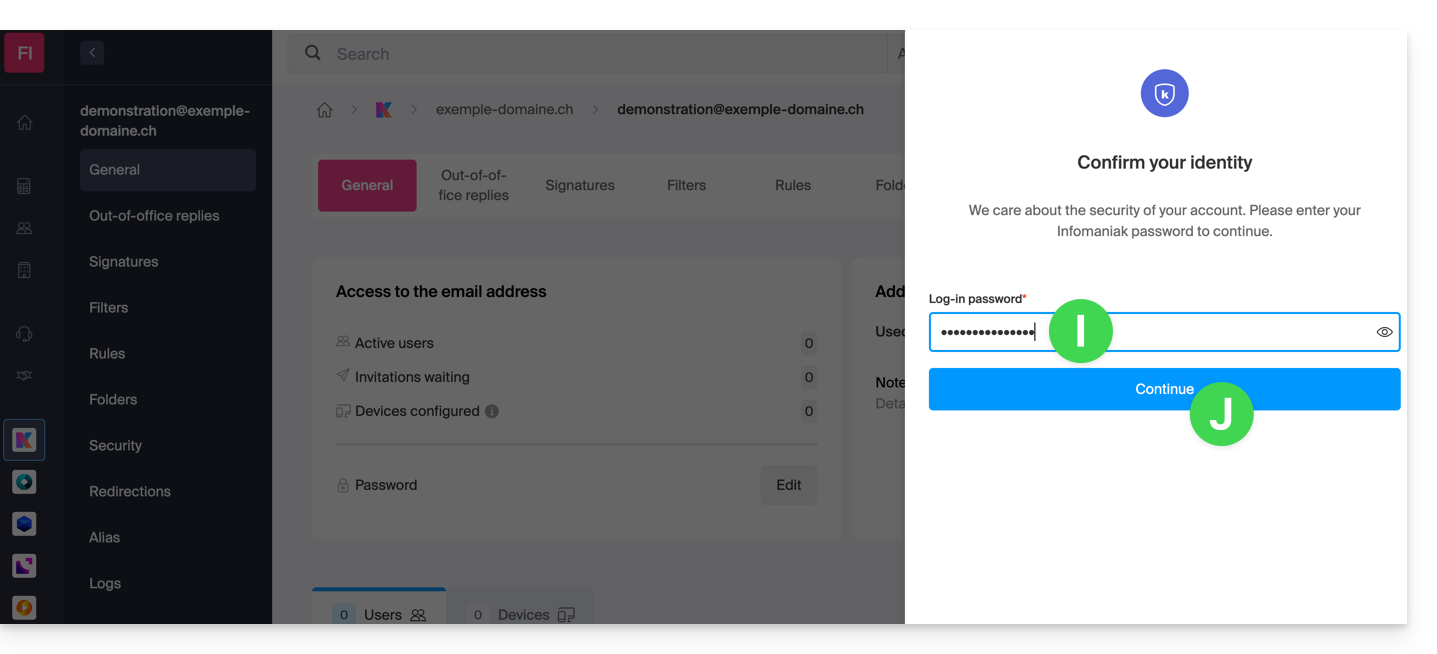
- Then choose the option to add an existing user, then click on the field below, which displays the list of users in the Organization to which you are connected, and click on your user (your login ID for the Infomaniak account). Validate the addition with the button at the bottom right:
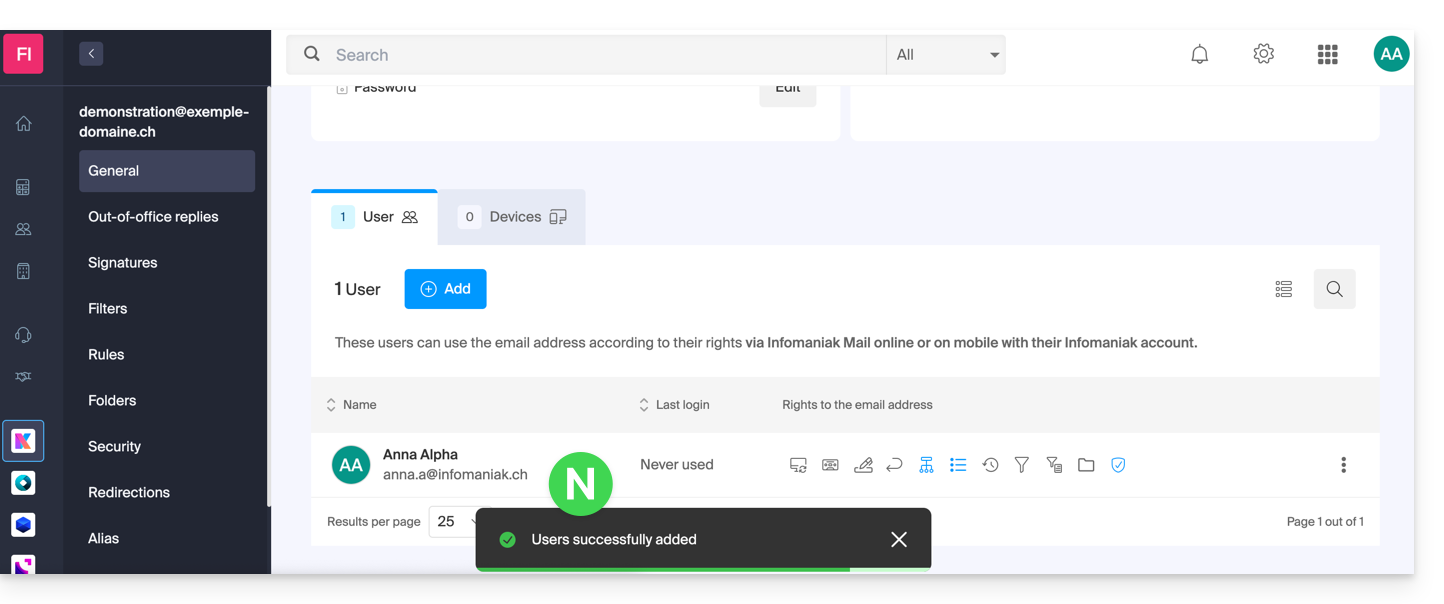
- It's done, your own user has been added:
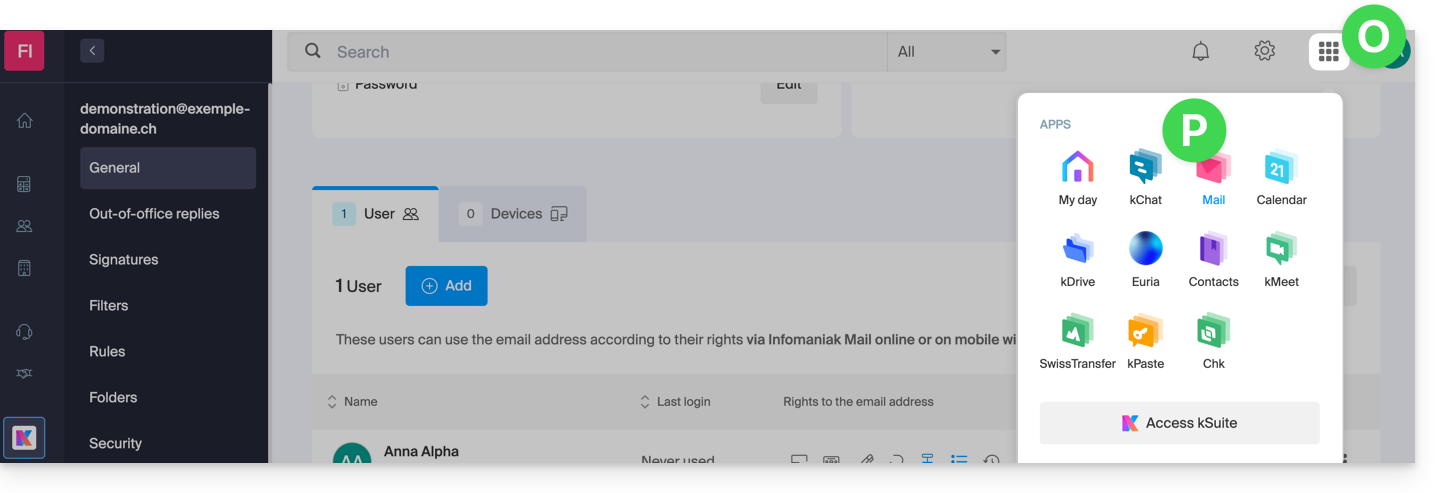
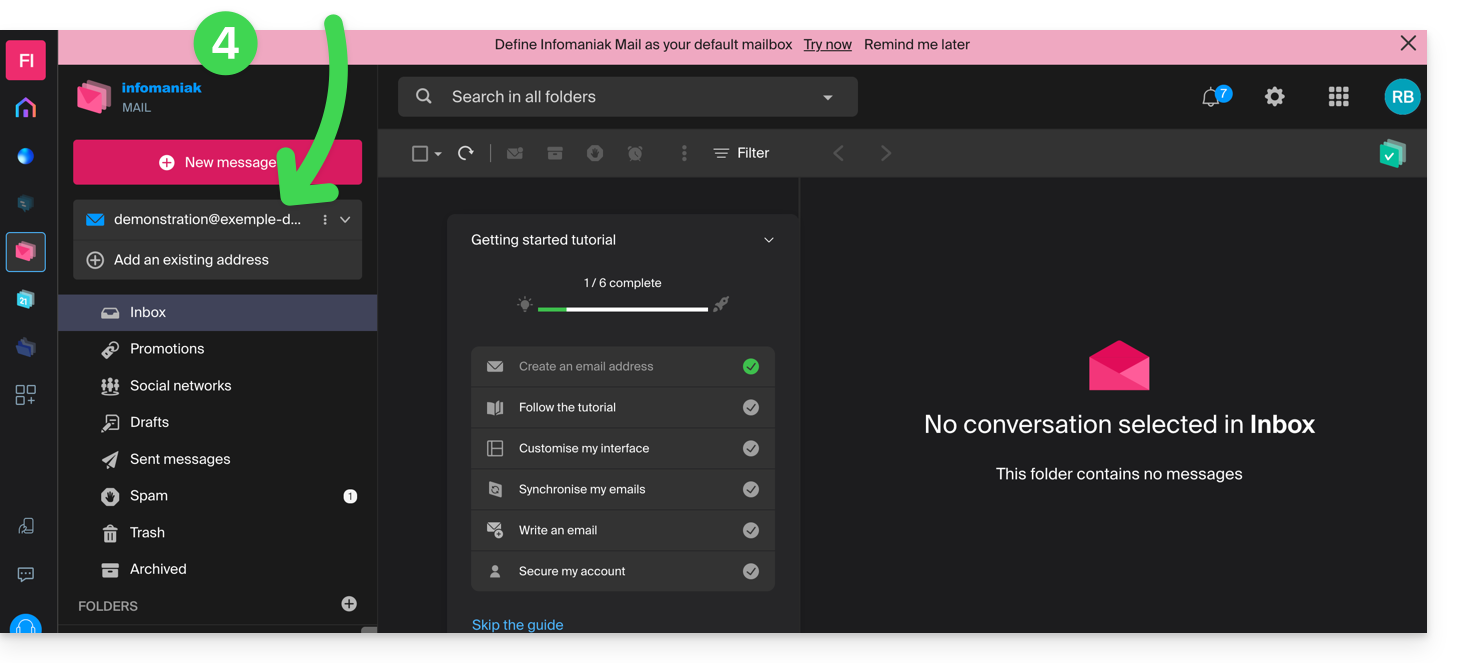
- Then click on the icon at the top of the screen to open the my kSuite tools and click on the Infomaniak Web app Mail:
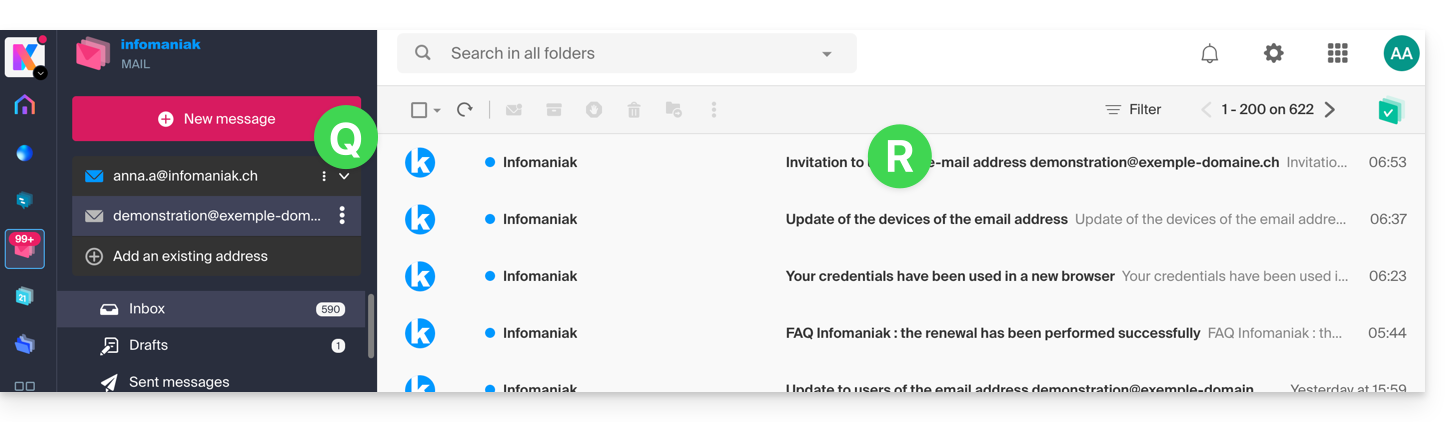
- The email address has been successfully added to the Web app Mail (click if necessary on the chevron to expand the address menu and access it). An information email has been sent to the user (yourself in this case) to notify of the operation:
Grant access to an email address
To quickly allow a third party to use the existing address demonstration@exemple-domaine.ch:
- Follow points 1-7 above.
- At the step below, choose the “New user” option. Validate the addition with the button at the bottom right:

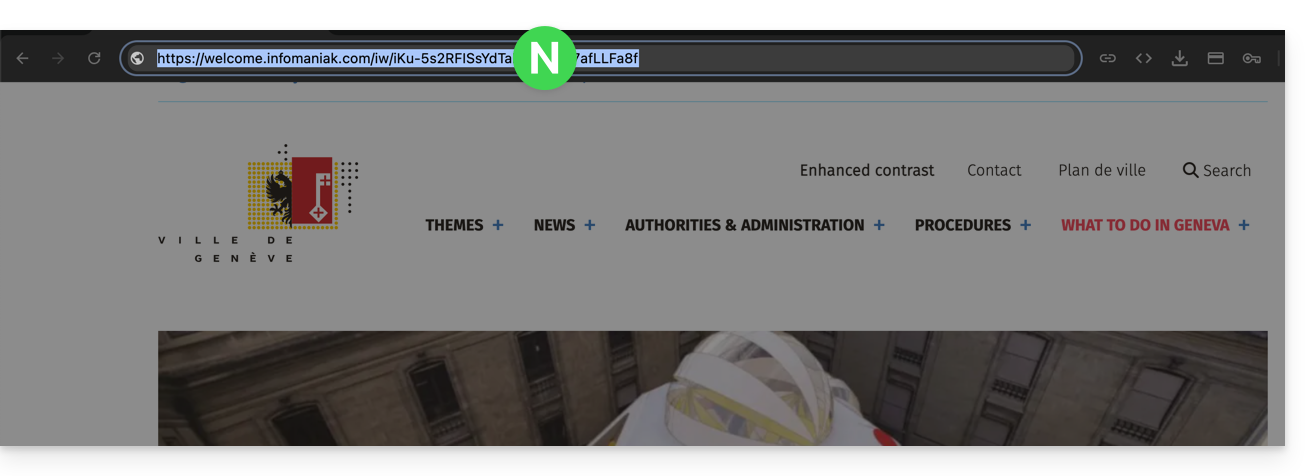
- Copy the invitation link (it is in the form
https://welcome.infomaniak.com/iw/abcdef-12345.....):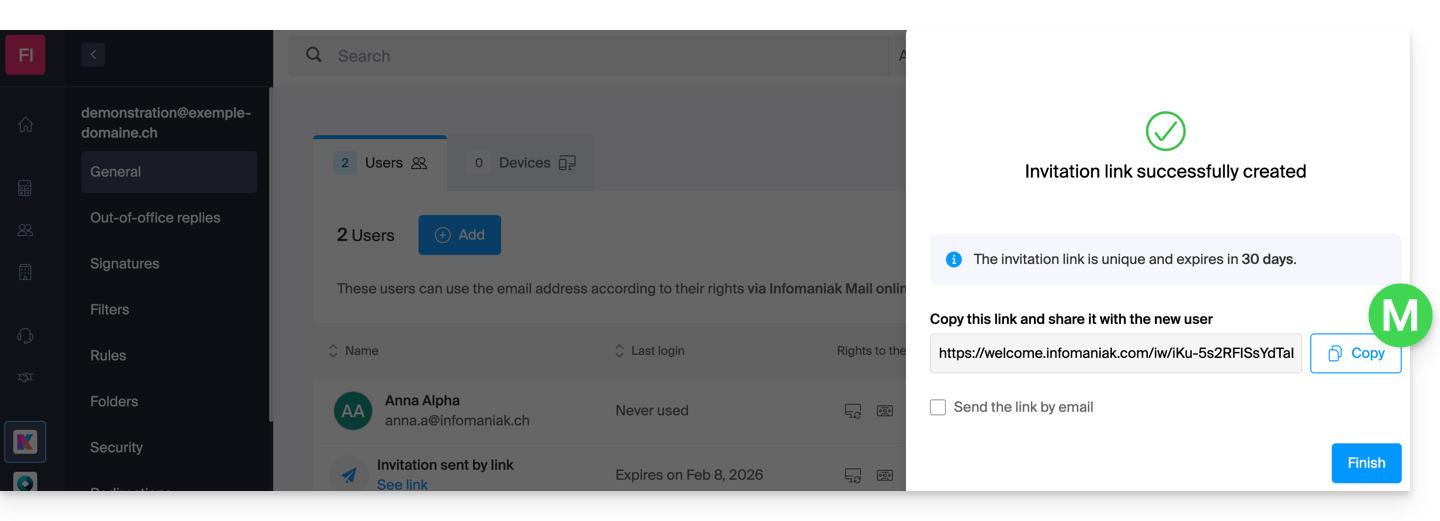
- The third party executes the invitation link in their browser:
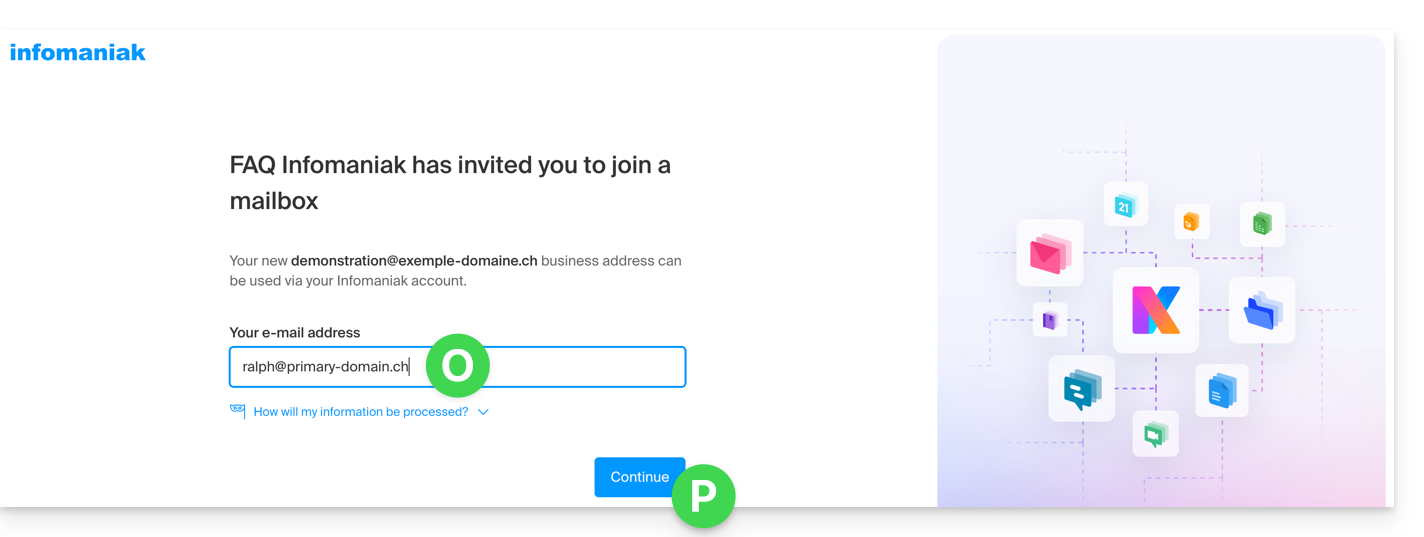
- She enters her email address...
If the third party is already using the Infomaniak Web Mail app...
The email address that the third party indicates in point 5 above must match their Infomaniak account login ID.
That's it: the user is redirected to the Infomaniak Web Mail app, which will display the email address to which the invitation link referred:
If the person was already logged in to their Infomaniak account, then the step 5 above is even shorter as the user only needs to click to be redirected to the new email address to consult: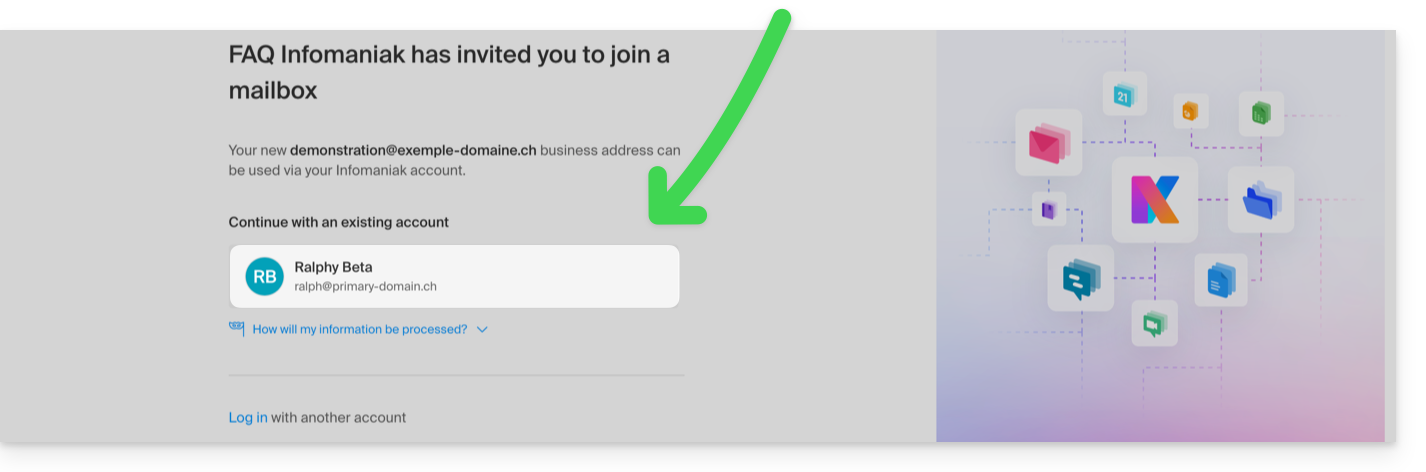
If the address is not immediately visible, check if the Infomaniak account is linked to multiple Organizations, and if so, choose to display emails from all Organizations: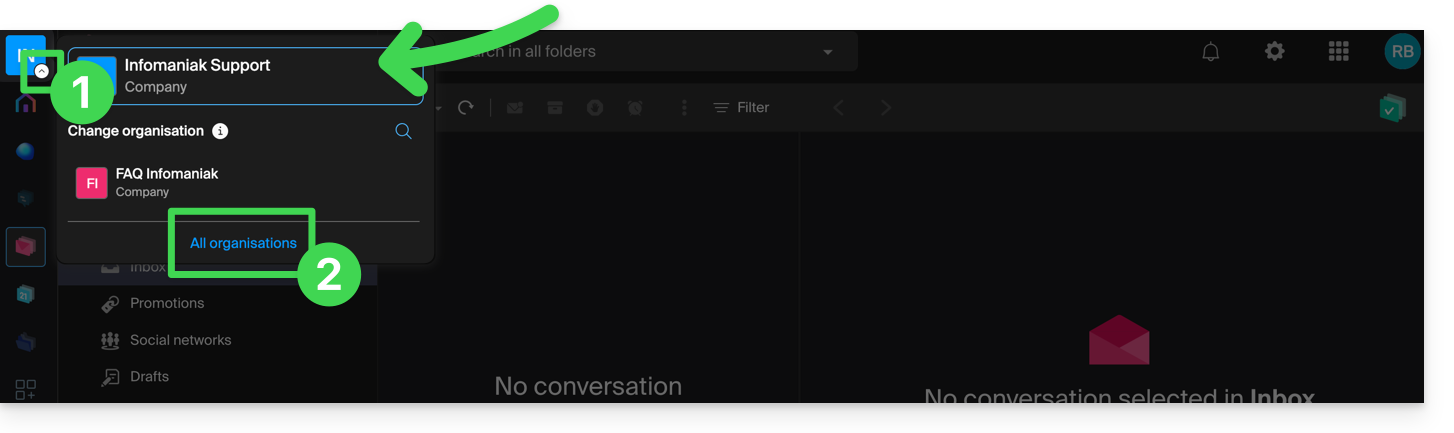
If the address to which the invitation belongs still does not appear, try to refresh the browser page (Command ⌘ + R on macOS and Ctrl + F5 on Windows).
If the third party is not yet using Infomaniak...
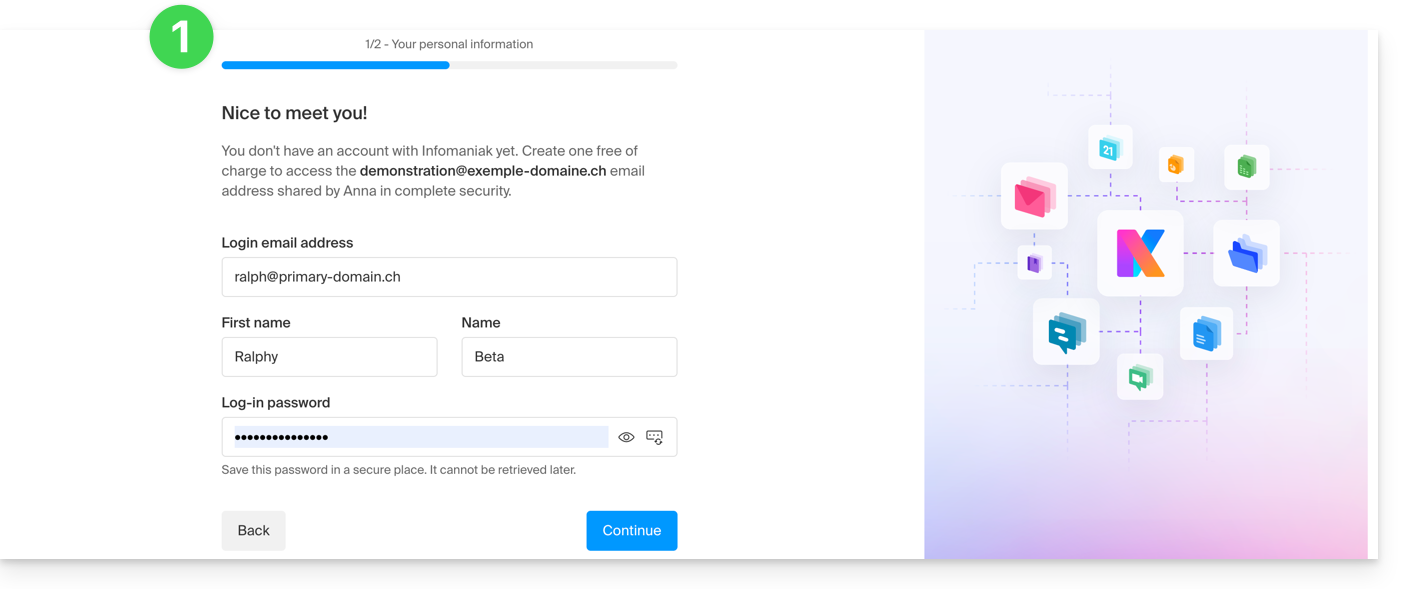
After indicating their email address in point 5 above, the third party will be invited to create an Infomaniak account:
- They will need to provide their details and create a password to log in to their Infomaniak account:
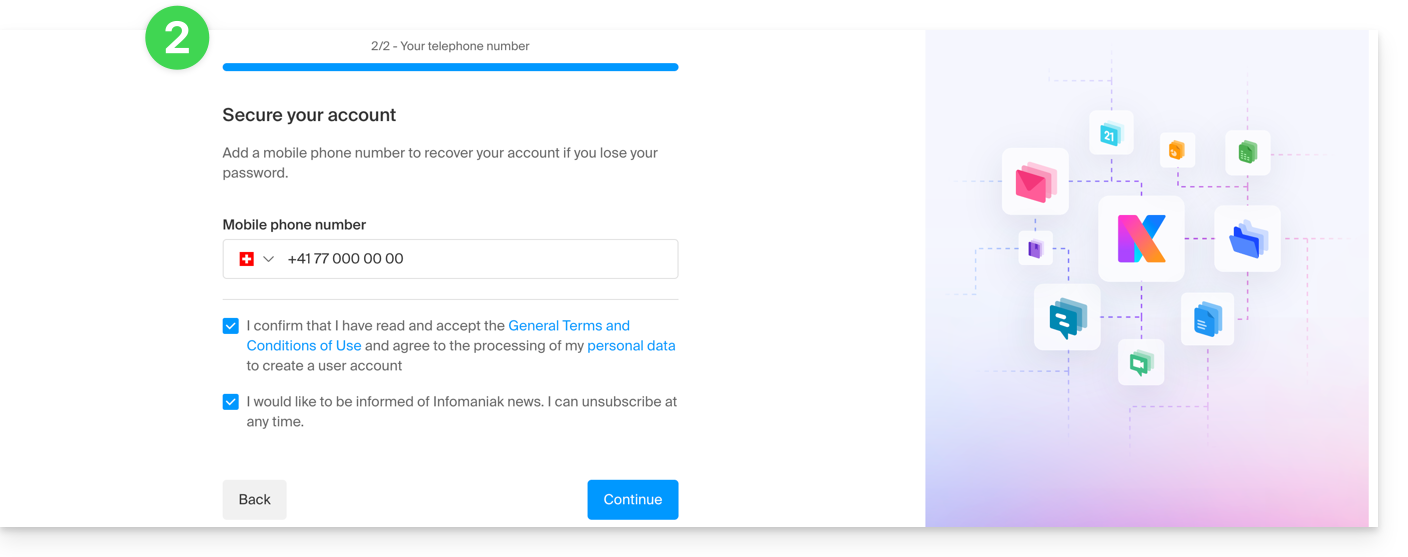
- They will need to provide a phone number and accept the general terms and conditions:
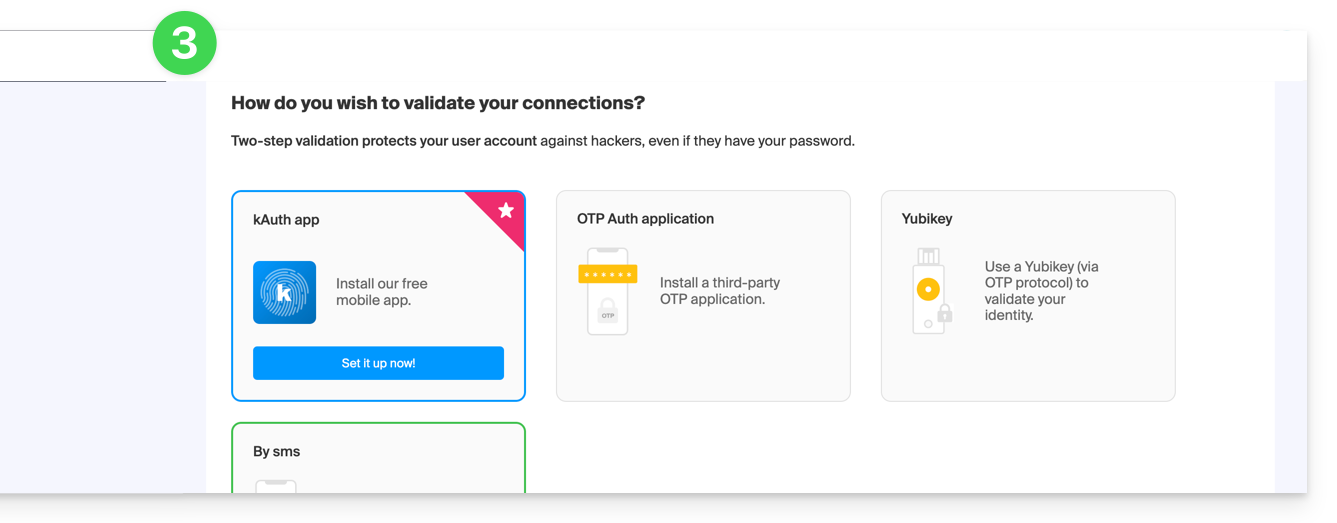
- They will need to add a two-factor authentication (2FA) method to secure access to their Infomaniak account:
- Once the 2FA method is added, that's it: the user is redirected to the Infomaniak Web Mail app, which will display the email address to which the invitation link referred:
Also refer to this other guide.
This guide details the different ways to address an email to multiple recipients, including masking the email addresses of other participants.
Preamble
- When you send emails, it is sometimes necessary to include multiple recipients using the fields:
- À
- CC:
- French: Copie Conforme
- English: Carbon Copy
- BCC:
- French: Copie Conforme Invisible
- English: Blind Carbon Copy
- Do not overload the To and CC fields with recipients who are not directly concerned by the email.
- Use the BCC field to protect the email addresses of recipients when there are multiple people in the list.
- For multiple, recurring and/or important sends, beyond the imposed limits, it is recommended to use more suitable tools instead:
Understanding and using these 3 email fields
The To field
This field is used to indicate the main recipient(s) of the email, those who receive the email as a direct copy.
- Use this field for main recipients who are directly concerned by the content of the email.
- Examples: work meeting, project report, direct communication with a client.
The CC field
Used to send a copy of the email to other people in addition to the main recipients. All recipients can see who received a copy of the email.
- Use this field to include secondary recipients who need to be informed but are not the main actors in the discussion.
- Example: informing a supervisor about a conversation, including colleagues interested in the subject without them needing to intervene.
The BCC field
Used to send a copy of the email to people without the other recipients knowing they have also received the email.
- Use this field to include recipients who need to receive the email without the other recipients knowing.
- Example: sending an email to a group with a supervisor in CCI for follow-up, avoid disclosing email addresses to all recipients (often used in mass emails).
Use the fields available on Mail Infomaniak
To access the appropriate fields in your Infomaniak mailbox:
- Click here to access the Web app Mail Infomaniak (online service ksuite.infomaniak.com/mail).
- Click on New message.
- Click on CC & BCC:

- The additional fields appear, they will allow you to insert the email addresses of your recipients:

Usage examples
Each of these fields has a specific function and can be used strategically depending on the context of your communication. Be transparent and ethical in the use of the BCC field to avoid misunderstandings or conflicts:
- Team communication
- To: main project members
- CC: Project manager, other concerned departments
- BCC: Director for information without direct intervention
- Marketing email
- To: do not use (or simply indicate the sender's email address)
- CC: do not use
- BCC: list of subscribers to protect individual email addresses
- Important announcement
- To: main recipients (e.g.: directors)
- CC: board members, key collaborators
- BCC: other stakeholders for confidential information
- Meeting announcement
- To: John Doe, Jane Smith
- CC: project.manager@company.com
- BCC: director@company.com
- Event invitation
- To: main guests
- CC: coordination@event.com
- BCC: list of secondary guests (to protect email addresses)
This guide explores the concepts of email address hijacking, spoofing, and spam that appears to come from your own email address.
Has my account sent spam?
It is possible that you receive spam that seems to come from your own email address. Rest assured that this spam is only intended for you and will not be sent to your contacts from your address. Your email account remains secure, and its integrity is in no way compromised.
To reduce the presence of these messages in your inbox, check if your own email address is present in the whitelist of your anti-spam filter. If it is, it is necessary to remove it from this list.
I am receiving bulk sending errors
Spammers use various tactics to hide the true source of their messages. They often modify the sender's address, either by creating it or by selecting it at random from lists of existing addresses, making it difficult to trace the real origin of the message. Imagine that anyone could impersonate you by sending a postal letter indicating your address on the back of the envelope. Similarly, spammers can impersonate you by using your email address as the sender, in order to bypass anti-spam filters and reach their target audience.
When you frequently receive error messages indicating the failure to deliver alleged spams, it is possible that these messages were not actually sent from your account, but simply made to appear as if they came from your email address.
These messages can be sent in two ways: either from insufficiently secured mail servers, exploited by spammers until the vulnerability is detected and corrected, or by Trojan horses infecting hundreds of thousands of computers around the world. These computers, often referred to as "zombies," send messages almost automatically, without the knowledge of their owners, at the simple request of a spammer, following the principle of botnets.
Have I been hacked?
This in no way means that your account has been hacked, that your email address has been stolen, or that your identity has been hijacked. It is rather an attempt to bypass anti-spam security measures, called "mail forging" or email falsification. This is an issue to which, unfortunately, Infomaniak and other hosts cannot do anything.
The only solution would be for all mail servers in the world to be secured and require authentication to send emails, which Infomaniak's ethical servers do.
However, as long as all servers on the planet are not secured, "mail forging" will continue to be a persistent challenge.
Additional precautions
Check that no catch-all type address on your mail service is redirected to the overloaded email address, as this could be the cause of an increase in undelivered emails.
Implementing a DMARC protocol can also help you analyze the use of your mail.
This guide explains how to suspend the administrative management of a product so that no user of the Organization can use it within the Manager Infomaniak. It is also possible to block a user of your Organization, without deleting them.
Preamble
- By blocking the management of a product:
- Only administrators and the legal representative will be able to unblock it.
- Users with limited rights (collaborators and clients) who have access to this product will no longer be able to manage it.
- An email is sent to the users of the Organization.
Block a product
Prerequisites
- Be an Administrator or Legal Representative within the Organization (users with limited rights (collaborators and clients) who have access to this product will not be able to do so).
To block or unblock certain products for the entire Organization:
- Click here to access product management on the Infomaniak Manager (need help?).
- Access the service you wish to block.
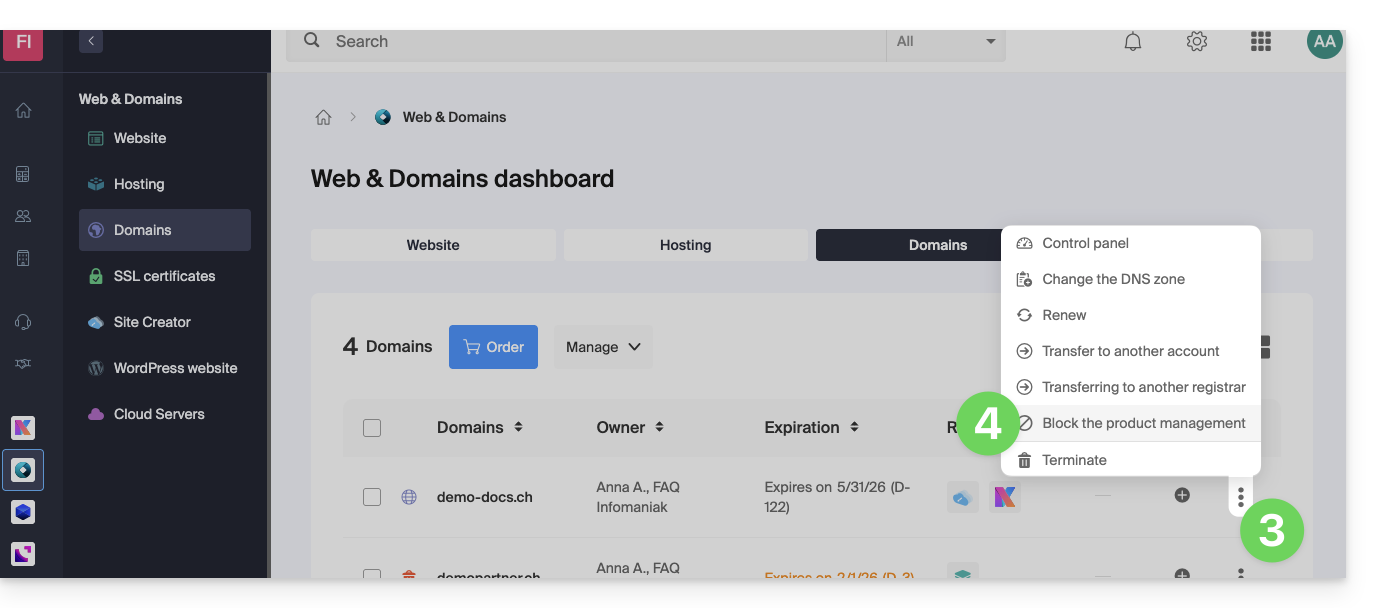
- Click on the action menu ⋮ located to the right of the item concerned.
- Click on Block product management:
- Example 1, Cloud Server:

- Example 2, domain name:
- Example 1, Cloud Server:
- Confirm the suspension.
Suspend emails
A Mail Service cannot be blocked in the way indicated above, but it can be put into maintenance.
Prerequisites
- Be an administrator or legal representative; users with limited rights (collaborators and clients) who have access to this product will not be able to do so.
To suspend email addresses:
- Click here to access the management of your product on the Infomaniak Manager ( need help?).
- Click directly on the name assigned to the product in question.
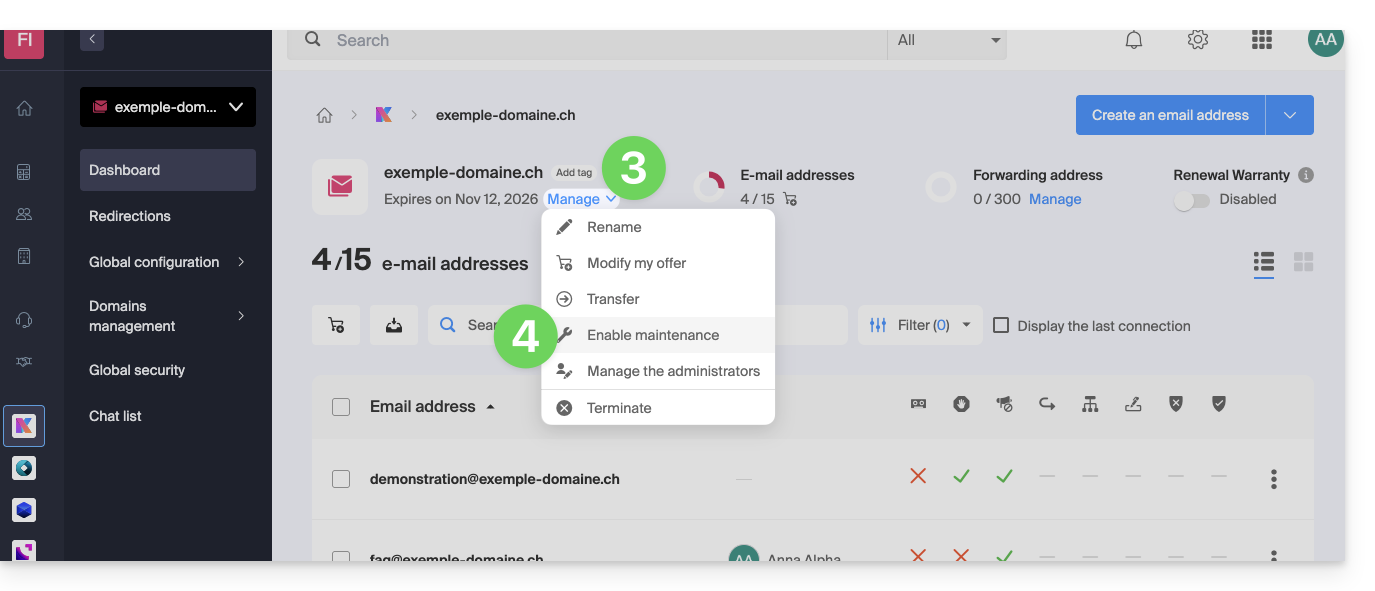
- Click on Manage.
- Click on Activate maintenance:
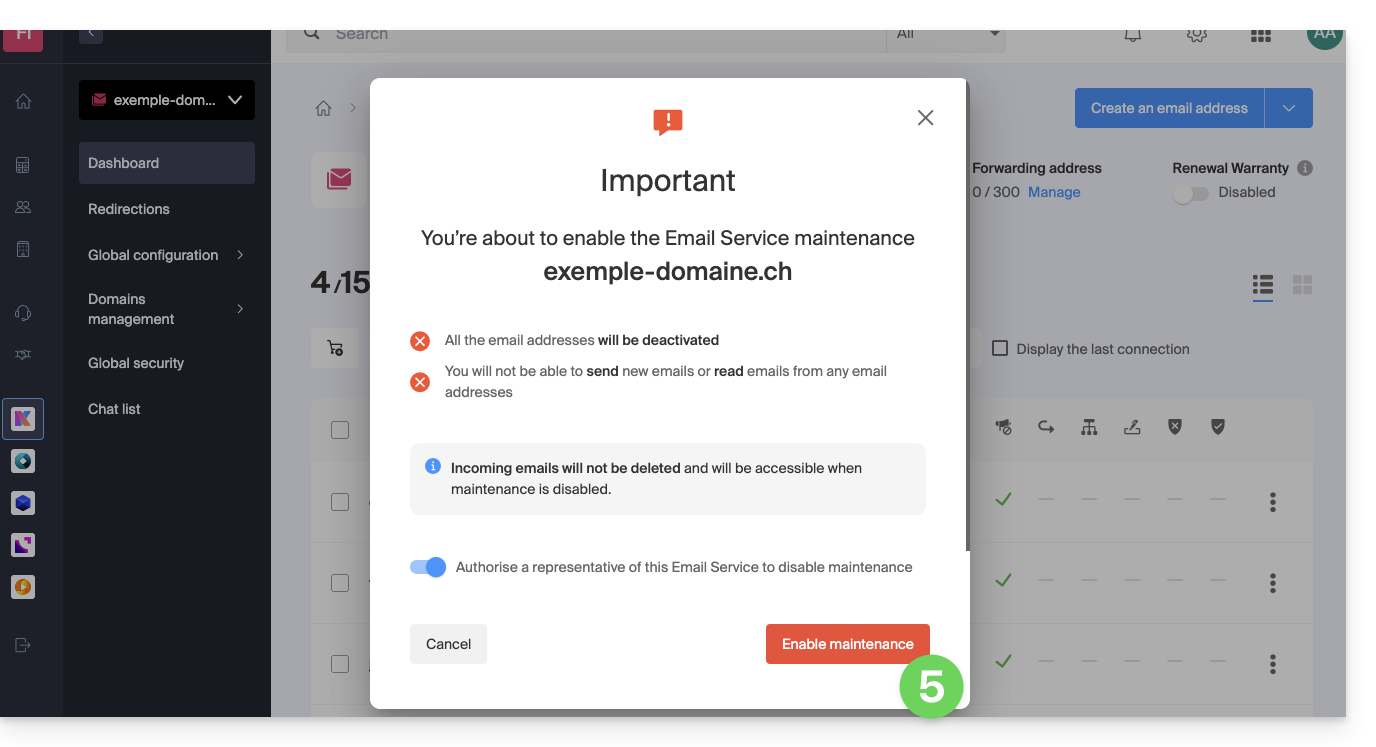
- Confirm by clicking the red button to suspend the use of email addresses (reception is not interrupted but consultation is impossible):
Block a user from the Organization
To quickly block a user from the Organization in case of a security incident, log in to manage your users as an Administrator or Legal Representative of the Organization:
- Click here to access user management on the Infomaniak Manager (need help?).
- Click on the user in question:
- From the Manage button at the top of the page, you can remove the user from the Organization (which also removes their various product management access).
- Further down, you can more finely manage the products to which the user should have access:
Thus, critical services, such as the Manager interface, of your Organization, the Web app kDrive and the Web app Mail may become inaccessible to them.
Depending on the situation, also refer to these links to block other services such as messaging (IMAP / SMTP) or Web services.
To not block the user yourself but to indicate a procedure for them to follow to secure their account, refer to this other guide.
This guide explains how to copy the content of one or more email addresses from other providers to one or more email accounts managed by Infomaniak, using the Infomaniak import tool!
Preamble
- The entirety of the external mailbox will be imported.
- Once the import process has started, it is no longer possible to interrupt it.
- A confirmation email is sent once the copy is complete.
- Duplicate removal (in case of successive imports) is managed.
- It is also possible to copy the content already on an email address for which Infomaniak is the provider (@ik.me for example).
Copy emails from another provider to Infomaniak
Prerequisites
- Order a Mail Service from Infomaniak.
- Create one or more addresses on this Mail Service.
- The email address whose content must be copied must have been used (or be compatible) with the IMAP protocol.
- The email address to which the content must be copied must be among the addresses attached to the Infomaniak Web App Mail (online service ksuite.infomaniak.com/mail); if it is not listed, the drop-down menu (see point 9 below) will not offer this address.
- This is not a prerequisite for bulk import (detailed
.csvfile) at the bottom of this guide.
- This is not a prerequisite for bulk import (detailed
Then, click on the link corresponding to the provider of the email to be imported:
- addresses @ Bluewin
- addresses @ Gmail (or address @ custom domain Google)
- addresses @ GMX
- addresses @ custom domain Microsoft 365
- addresses @ custom domain Swisscom
- addresses @ Yahoo
Guide for any other mail provider type Gandi, Hotmail, Hostinger, Sunrise, etc:
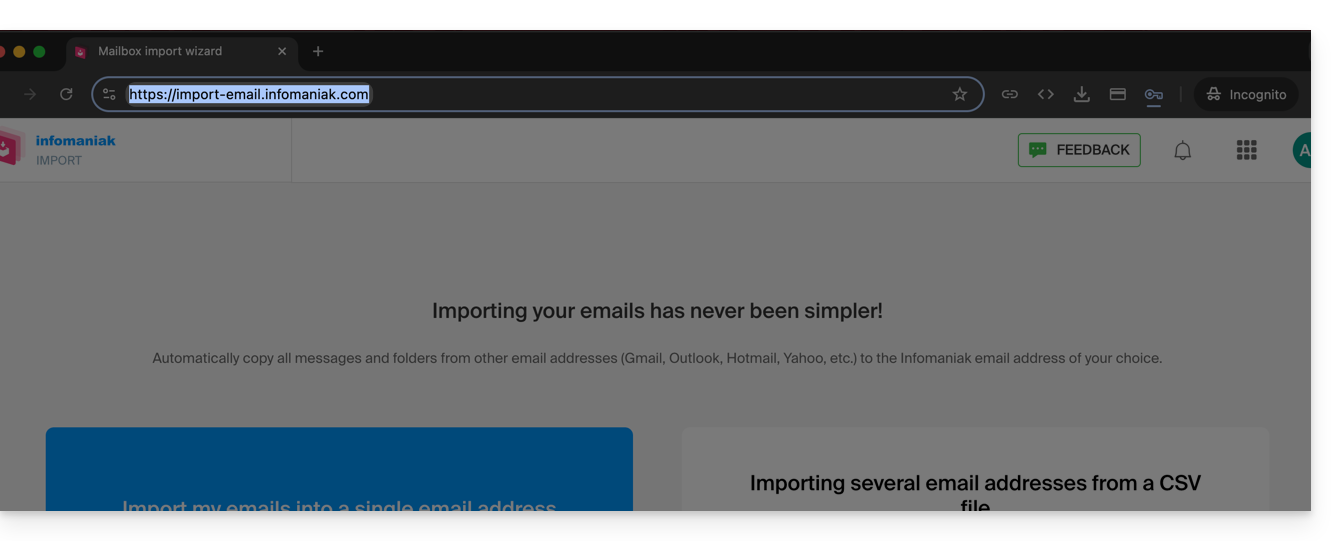
- Click here to access the Infomaniak import tool (online service https://import-email.infomaniak.com).
- Log in if you haven't already to your Infomaniak account on the Organization of your choice (the import will be to an email address linked to the Infomaniak Mail interface of the account you are using).
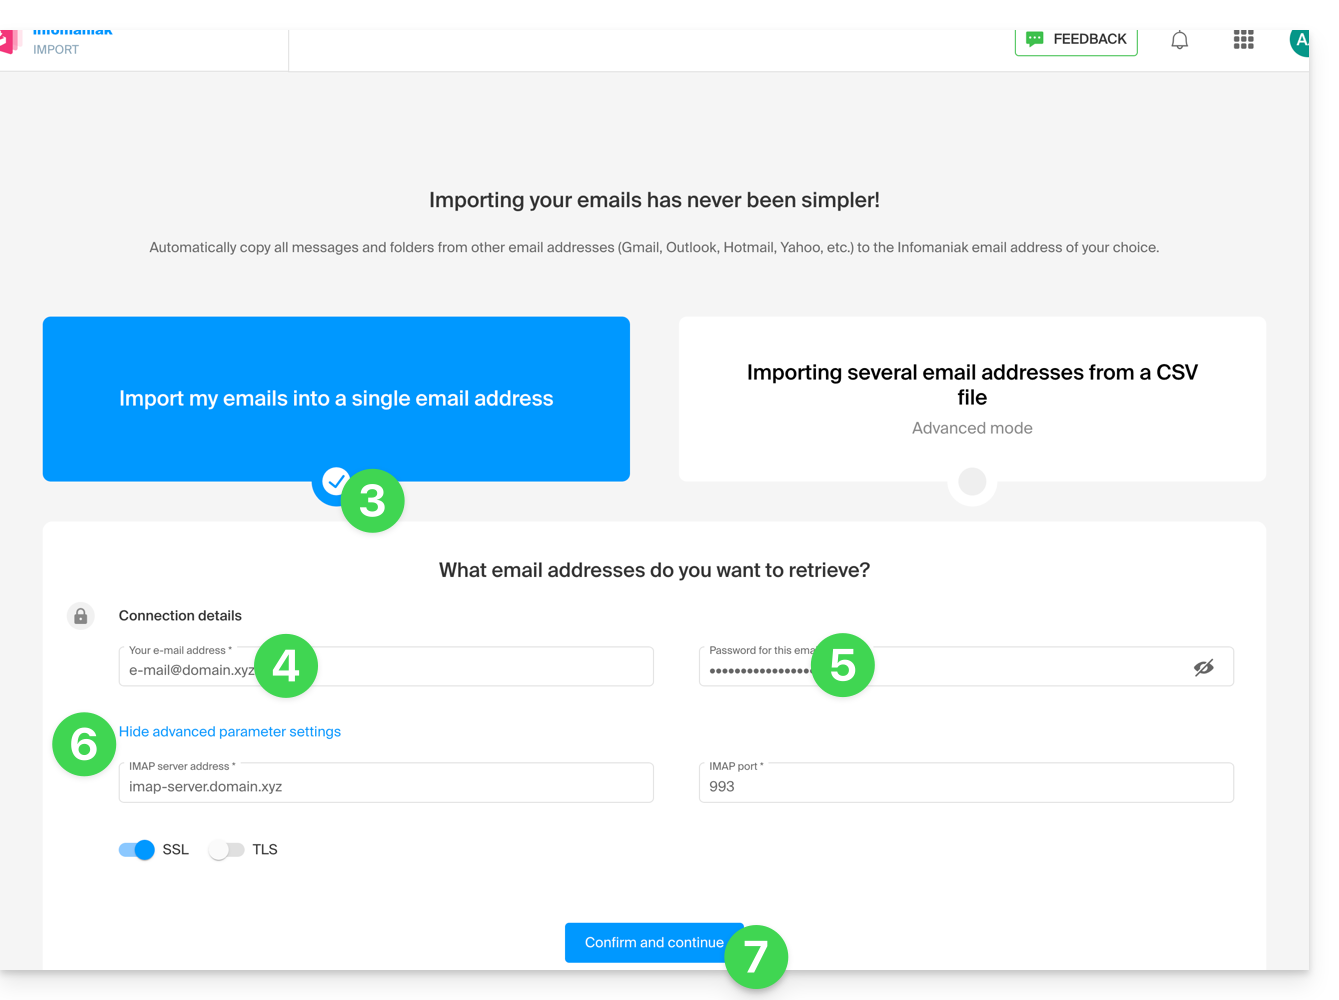
- Click on single import on the left.
- Fill in the left field with your starting email address (whose content is to be copied).
- Fill in the right field with the password of the same email address.
- Modify if necessary the Advanced settings to specify an IMAP server address.
- Click on Confirm:
- Enter if necessary a second email address to be imported at the same time.
- Choose which email address to import emails to; the drop-down menu lists the email addresses currently linked to your Infomaniak Mail interface of the Infomaniak account you are logged in to (read the prerequisites above)

- After selecting the desired destination address from the list, click the blue Import emails button.
- The copy starts and continues in the background, you can close the window that appears; a confirmation email will be automatically sent to all email addresses concerned by the operation once the import is complete, mentioning the number of messages copied.
Retrieve the content of multiple email addresses in bulk
This method via CSV file will not work for Google or Microsoft addresses due to their authentication system.
To import the content of multiple email addresses (maximum 25 at a time):
- Click here to access the bulk import tool (online service https://import-email.infomaniak.com).
- Select Import multiple email addresses from a CSV file (format
.csv). - Download the example
CSVtemplate to create one with the necessary information for the copy. - Upload the file using the Select a CSV file button:
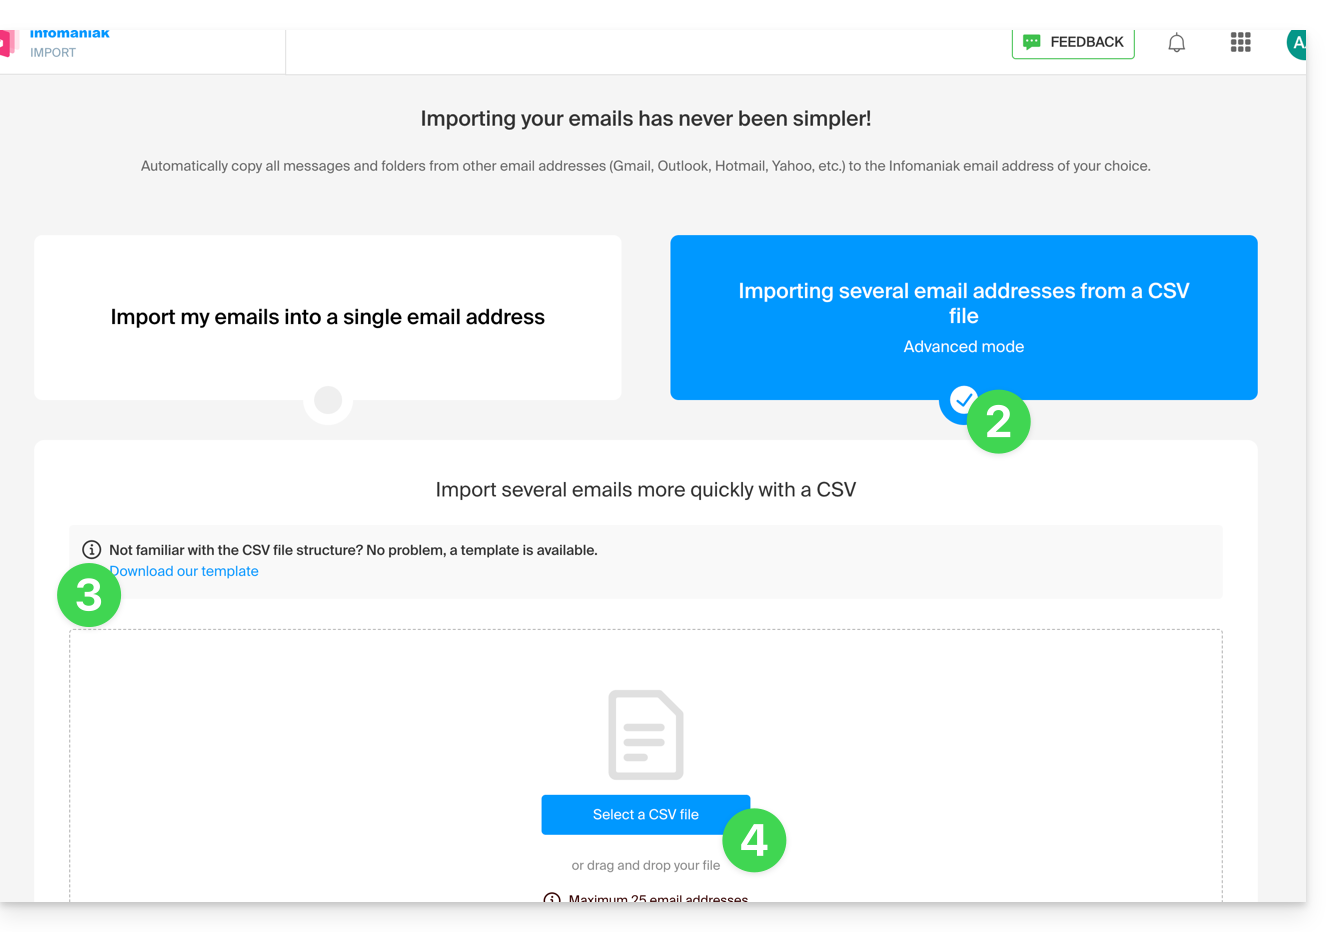
- Once the file is uploaded to the tool's page, select Import email address.
- Wait while the address content is being copied (a confirmation email is sent once the copy is complete).
This guide explains how to activate an out-of-office reply (automatic email message) on an email address managed by Infomaniak. You can thus inform your correspondents that you are unable to respond to them immediately, because you are absent, on vacation, etc.out of officeon an email address managed by Infomaniak.
Preamble
- The automatic reply in case of absence can be activated from the Infomaniak Mail web app (online service ksuite.infomaniak.com/mail) and from the Manager where all the addresses of a Mail Service are managed.
- You can activate or deactivate a previously recorded message, but there can only be one active responder on the same email address: activating a message deactivates another if necessary.
Activate the responder from the Infomaniak Mail web app
Prerequisites
- Have permission to manage the responder: if you had been invited to the Infomaniak Mail web app (online service ksuite.infomaniak.com/mail) to manage your address, it is possible that the Mail Service manager has revoked this right from their admin account.
To activate the out-of-office message:
- Click here to access the Infomaniak Mail web app (online service ksuite.infomaniak.com/mail).
- Click on the Settings icon in the top right corner.
- Check or select the email address concerned in the drop-down menu of the left sidebar.
- Click on Responder:
- Activate the automatic message if necessary or read below.
Activate the responder from the Infomaniak Manager
To activate the out-of-office message from the Manager:
- Click here to access the management of your product on the Infomaniak Manager (need help?).
- Click directly on the name assigned to the product concerned.
- Click on the email address concerned in the table that appears.
- Click on the Answering Machine and Signatures tab.
- Activate the automatic message if necessary or read below.
Compose the out-of-office message
To manage the message that will be automatically sent in response, click on Add:
then:
- A: enter a name for your answering machine (to distinguish it from other messages if you create several).
- B: define whether the automatic response should be provided on a recurring basis on specific days of the week.
- C: define an end date/time if the message should no longer be sent after a certain period.
- D: define a start date/time if the message is scheduled in advance for a specific period in the future.
- E: compose your out-of-office message.
- F: display advanced settings.
- G: define another email address that will be used to send your automatic out-of-office message (the address must be verified in advance).
- H: enter specific email addresses (or
@domain.xyzfor an entire domain) to prevent them from receiving this out-of-office message.
Then click the blue button at the bottom right to Add the message.
Once added, you can activate or deactivate it:
You can also edit a previously saved message using the pencil icon ✎ on the right.
How often is the automatic response sent?
Your response is sent only once to people who send you messages.
However, if the same sender sends you a new email 7 days after the previous one and your automatic reply is still active, an automatic response is sent again to remind them that you do not have access to your mailbox.
Therefore, if you test it on your address, it is normal that it only works the first time. During subsequent tests, the answering machine no longer sends the message when it detects that the message comes from an address that has already sent a message before. You will therefore need to try again from another email address.
You can reset the 7-day counter by clicking on Reset when you edit your message:
Go further with templates
Custom templates can be applied when creating a new email address on your Mail Service, for example, or in bulk to all addresses in your domain. Learn more