
Knowledge base
1000 FAQs, 500 tutorials and explanatory videos. Here, there are only solutions!
This guide explains how to import external data (files, folders, etc.) into your kDrive using the WebDAV protocol.
Preamble
- Refer to this other guide if you are looking for information on how to copy specific data from one kDrive to another when your user has access to both kDrives in question.
- Refer to this other guide if you are looking for information about using your kDrive via the WebDAV protocol in the future.
Importing external data via WebDAV
Prerequisites
- Have a kDrive or kSuite offer (WebDAV not required)
- Have sufficient permissions within kDrive or kSuite.
- Do not change your password until the import is complete!
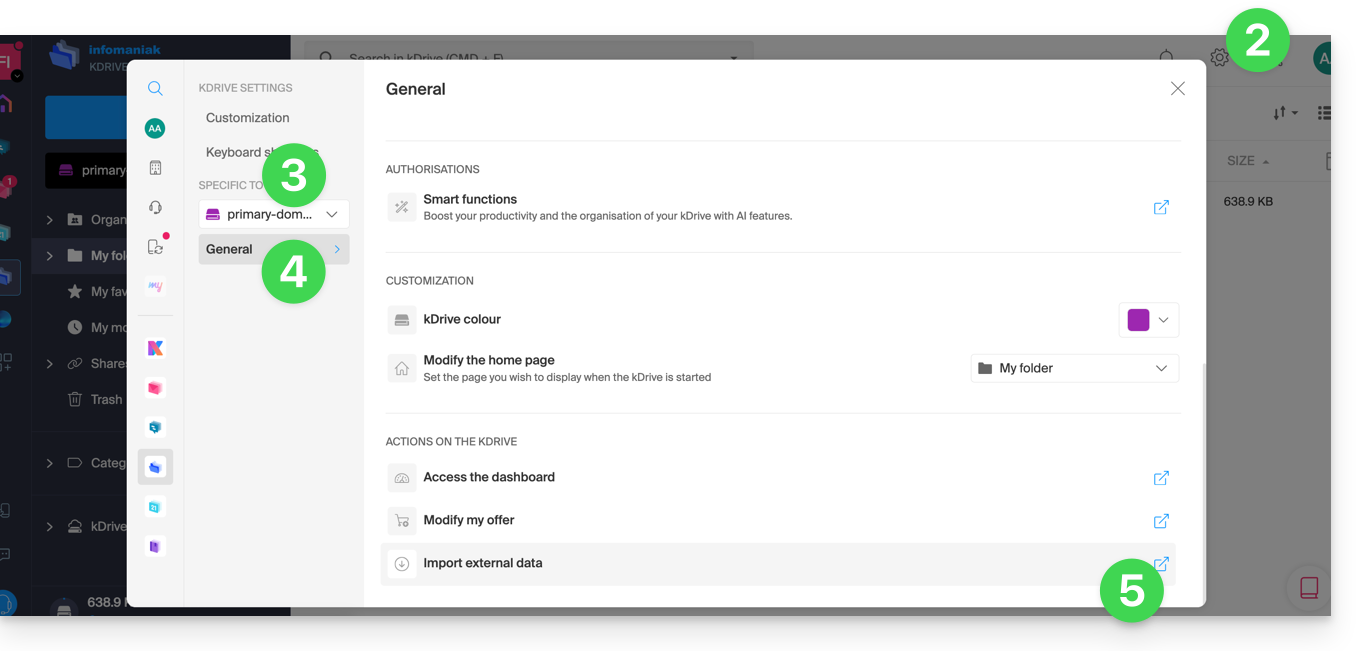
To access the import tool, where the data needs to be imported:
- Click here to access the Infomaniak kDrive web app (online service ksuite.infomaniak.com/kdrive).
- Click on the Settings icon in the top right corner.
- Check or select the relevant kDrive in the dropdown menu of the left sidebar.
- Click on General in the left sidebar.
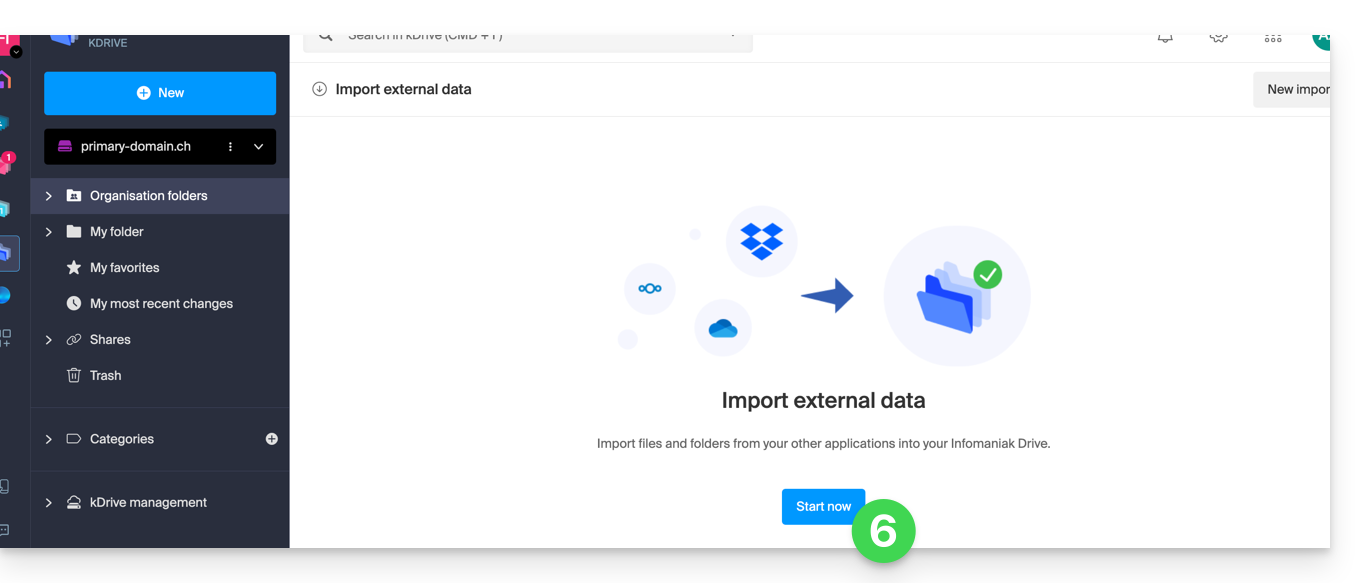
- Click on Import external data:
- Click the blue Start button:
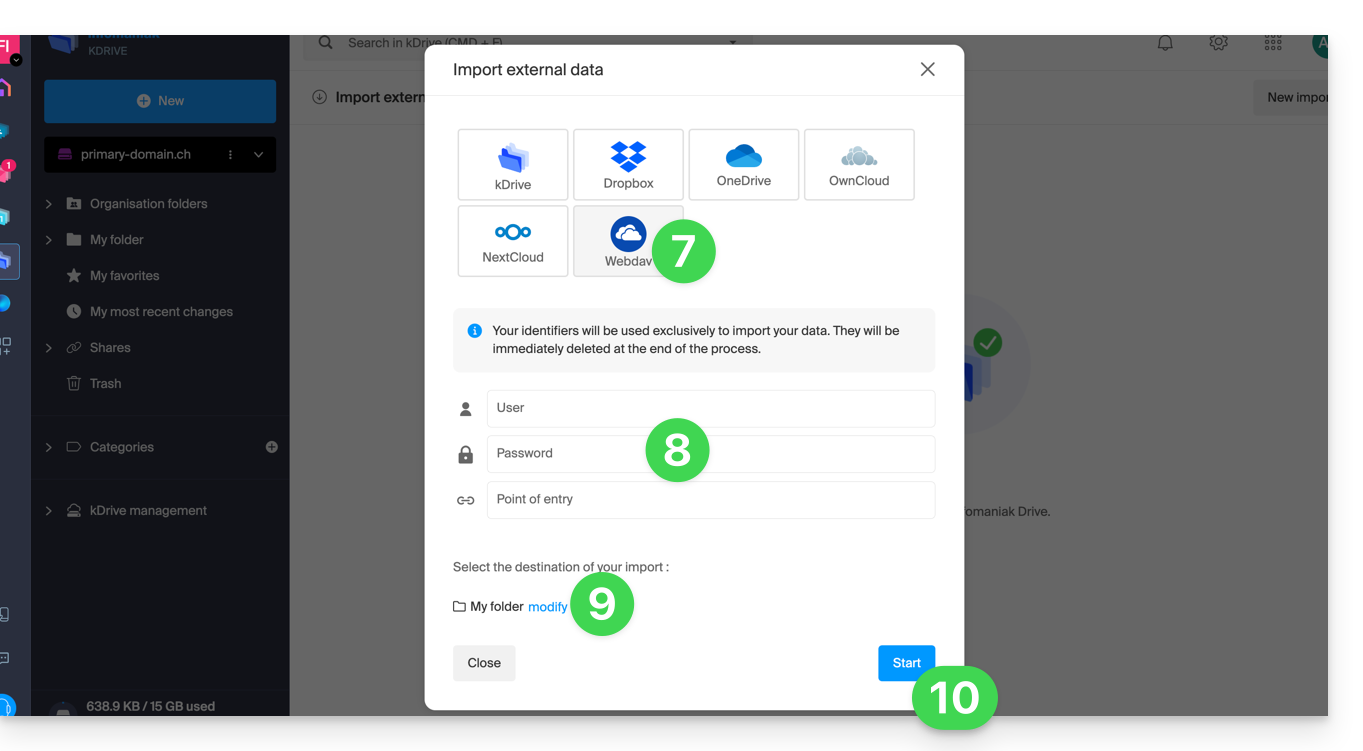
- Click on WebDAV.
- Complete the requested information based on the source (including the WebDAV address you have - obtained from the source).
- Choose the destination kDrive and the desired location to host the imported data.
- Click on Start:
Example: copying data from an external kDrive to the Organization
To import a kDrive that would be outside the Organization in which your destination kDrive is located, you must enter the following information at point 9 above (your credentials will be used exclusively to import your data; they will be immediately deleted at the end of the process):
- Username: email address to log in to the Infomaniak user account
- Password: application password in case of double authentication activated or that of your Infomaniak user account if you have not activated 2FA
- Entry point: the WebDAV login URL with the ID of the source kDrive (starting disk) — refer to this other guide regarding the kDrive ID
- Example:
https://123456.connect.kdrive.infomaniak.comif the ID is “123456” to obtain the entire kDrive; but it is also possible to import only part of it (see below).
- Example:
Specify the name of a specific subfolder
It is possible to choose a subfolder as a source folder, by combining the kDrive ID and the folder path.
Example for a folder in the shared space of the Organization Folders (= "Common documents"):
https://IDkDrive.connect.kdrive.infomaniak.com/Common documents/Nom du dossier
Example for a folder/subfolder that would be in personal folders (therefore outside the Organization Folders):
https://IDkDrive.connect.kdrive.infomaniak.com/Nom du dossier/Nom du sous-dossier
Thank you for choosing kDrive, the independent and privacy-respecting solution for collaborating, sharing, and accessing your data from all your devices. Your data is encrypted, continuously backed up, and exclusively hosted in Switzerland.
Collaborative storage on a 100% Swiss Made cloud
- Discover kDrive in video (the interface has evolved since)
Getting Started
- Synchronize kDrive across different devices
- Manage the kDrive Lite Sync option (macOS)
- Manage the kDrive Lite Sync option (Windows)
- Install kDrive on Linux
- kDrive folders (personal, shared, common)
- Choose the kDrive folders to synchronize
- Edit an Office-type file on kDrive (Word, Excel, PowerPoint)
- kDrive subscription via Apple iOS
- Manage kDrive storage space
- Search for data on kDrive
Share your data
- Manage kDrive drop boxes
- Customize shares and kDrive repositories
- Share data from kDrive (Web interface)
- Share data by email from kDrive (Web interface)
Fill your kDrive
- Import external data to kDrive
- Import data to kDrive (iOS) or just the photos from the iPhone automatically
- Import photos to kDrive (Android)
- Import data to kDrive without the kDrive app
- Import data to kDrive via WebDAV
- Connect to kDrive via WebDAV
- Access kDrive files locally and online
- Scan documents with kDrive (iOS / Android)
With multiple people
- Manage a kDrive user's rights
- Manage folder and subfolder access permissions
- Manage kDrive users
- Manage multiple kDrive (iOS / Android)
- Manage multiple kDrive (macOS / Windows)
- Copy certain data between kDrive you have access to
Go further with kDrive
- Modify an existing kDrive offer
- Manage kDrive categories to classify data
- Sync Joplin notes via WebDAV with kDrive
- Sync Qnap with kDrive
- Sync Synology with kDrive
- Save a kMeet meeting on kDrive
- Export email attachments from Mail
- Export an email to kDrive
- Add an attachment to an event in Calendar
For advanced users
In case of a problem
- Resolve a kDrive blockage (antivirus, firewall, etc.)
- Resolve a kDrive sync conflict
- Resolve a kDrive synchronization issue
- Resolve a kDrive issue on Android device (don't kill my app)
- Resolve a Lite Sync plugin error on macOS
- Clear the browser cache
- Clear the kDrive mobile app cache
- kDrive application version (macOS / Windows / Linux)
- Restore a kDrive file to a previous version
- Restore a deleted kDrive file
- Force kDrive to sync hidden and excluded files
- Authorize access to your products / Complete a support request
- Display kDrive debugging information
Learn more about kDrive
A question or feedback?
- Contact Infomaniak Support
- Click here to share feedback or a suggestion about an Infomaniak product
This guide explains how to store the database of Joplin on your kDrive Infomaniak and connect your various devices via the WebDAV protocol. You thus keep your notes safe in a storage medium located in Switzerland.
⚠ Available with:
| kSuite | |
| Business | |
| Enterprise | |
| kDrive | Solo |
| Team | |
| Pro |
Preamble
- Joplin is a free and open-source note-taking tool that allows you to organize all your notes within folders and access them from any device (computer, mobile device, etc.)
- Joplin will store several of its configuration files, so to avoid cluttering your kDrive directories, it is recommended to create a dedicated folder in your personal directory on kDrive, with a simple folder name like "
joplin" for example, and then specify it at the end of the WebDAV link in step 7 below: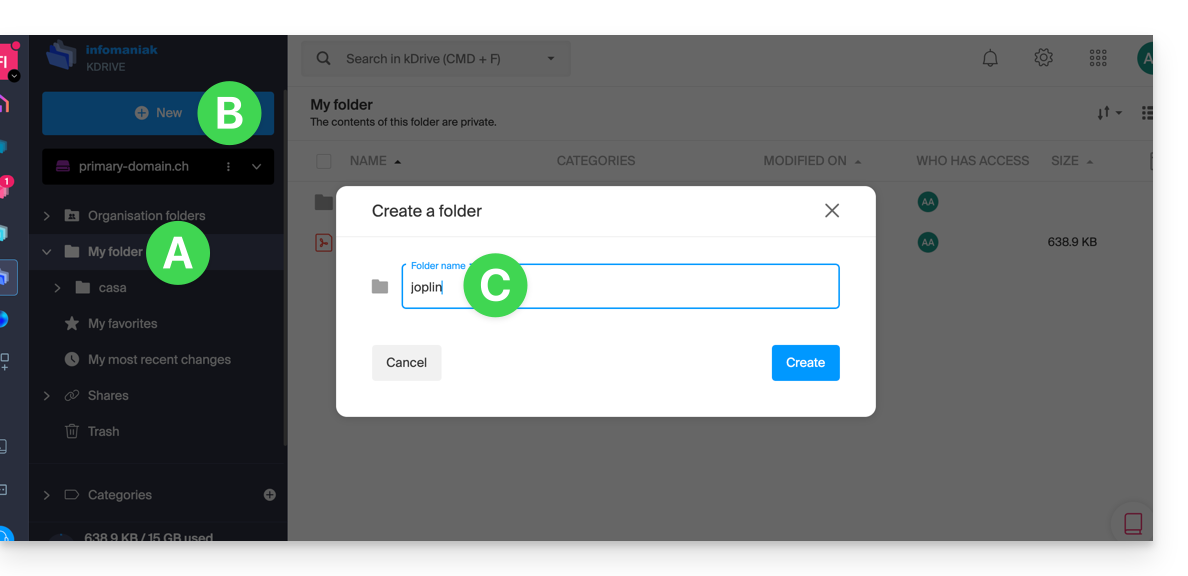
Configure Joplin to use kDrive via WebDAV
Prerequisites
- Download Joplin
- Know your kDrive identifier (kDrive ID).
The example below is substantially the same with all versions of Joplin:
- Open the Joplin application.
- Press the menu at the top left:
- Press Settings:
- Press Synchronization.
- Press the menu to select a target.
- Select the WebDAV mode:
- For the account parameters, use the following information:
- Server address:
https://IDkDrive.connect.kdrive.infomaniak.com/joplin(or /folder-name — read the preamble above) - Username: email address to log in to the Infomaniak user account
- Password: application password in case of double authentication activated or the one from your Infomaniak user account if you have not activated 2FA
- Server address:
- Press the synchronization test and wait for the connection confirmation below:
- Press the top left to return to the previous menu and press Synchronize to create the files on kDrive:
- Go back to the notes to start working.
⚠️ The various services offered by Infomaniak are all compatible with the corresponding standard protocols (notably IMAP/SMTP for email, WebDAV for sharing, S3/Swift for storage, etc.). Therefore, if you encounter a problem with third-party software, contact its publisher or a Partner and consult the support policy as well as article 11.9 of the Infomaniak Terms and Conditions.
This guide provides instructions for connecting to kDrive using the WebDAV connection protocol.
⚠ Available with:
| kSuite | |
| Business | |
| Enterprise | |
| kDrive | Solo |
| Team | |
| Pro |
Preamble
- Connecting via WebDAV allows, among other things:
- to use the WebDAV application of your choice instead of the official kDrive application (only solution if the latter is unavailable on your OS, for example macOS 10.14.6),
- to use kDrive as a synchronization base for a tool that would allow this via WebDAV (Joplin, for example),
- to access kDrive from your operating system's file manager.
Obtaining the identifier (kDrive ID)
To find out your kDriveID, kDrive client ID:
- Click here to access the Infomaniak kDrive web app (online service ksuite.infomaniak.com/kdrive).
- The kDrive directory structure is displayed in the left sidebar menu.
- The URL
https://ksuite.infomaniak.com/kdrive/app/drive/123456/displayed at the top of your browser contains a number: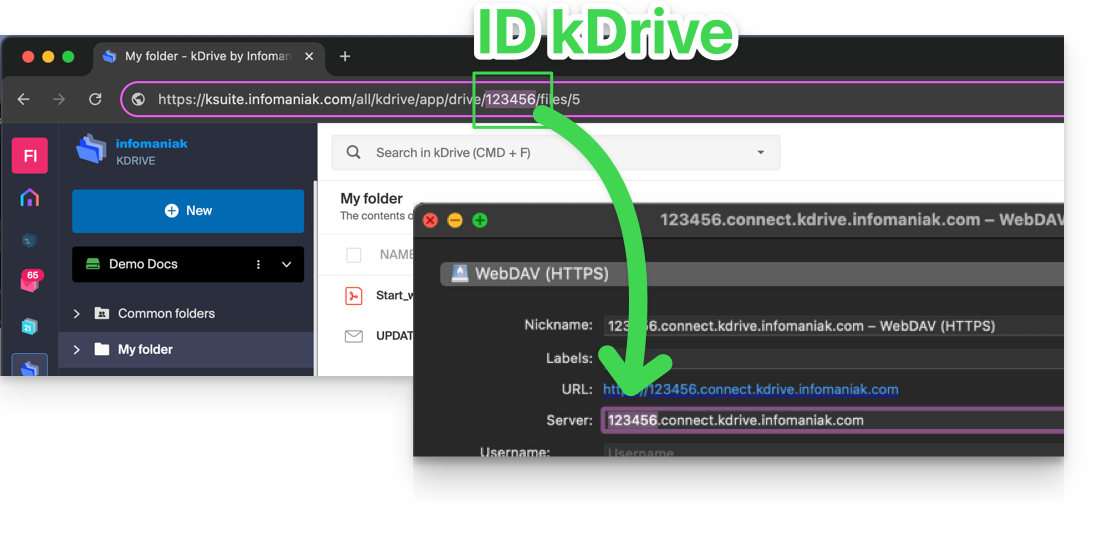
- In some cases, especially when the Organization ID is mentioned in the URL, there may be several series of numbers, but the principle remains the same, you need to take the number displayed after the term “
/drive/”:
This number (in the example 123456) is your kDrive identifier (IDkDrive).
You will therefore need to write https://IDkDrive.connect.kdrive.infomaniak.com each time it is necessary (https://123456.connect.kdrive.infomaniak.com for example as a WebDAV address).
Connect to kDrive via WebDAV…
Not all offers are WebDAV compatible. See the box at the top of the page.
… on Windows
To do this:
- Open the File Explorer from the taskbar or the Start menu.
- Select This PC in the left pane.
- In the Computer tab, select Add a network location:

- Click on Next.
- Click on Choose a custom network location:

- Click on Next.
- Enter the server address: https://IDkDrive.connect.kdrive.infomaniak.com
- Click on Next.
- For account settings, use the following information:
- Server address:
https://IDkDrive.connect.kdrive.infomaniak.com(see the ID kDrive chapter above) - Username: email address to log in to the Infomaniak user account
- Password: application password if double authentication is enabled or the one for your Infomaniak user account if you have not enabled 2FA
- Server address:
- If desired, click the box to save the login information.
- Enter a name for this connection or leave the default indication.
- Click on Finish.
- Two folders will appear, one containing deleted files & folders, the other with the name of your kDrive and containing your data.
… on macOS
For a computer on macOS, follow the Apple instructions, which can result in this:
- Click on the Go menu from the Finder.
- Click on Connect to server:

- Enter the server address:
https://IDkDrive.connect.kdrive.infomaniak.com(read the ID kDrive chapter above) - Click on Connect:

- Confirm the connection by clicking on the blue button.
- Enter the following information:
- Username: email address to log in to the Infomaniak user account
- Password: application password if double authentication is enabled or the one for your Infomaniak user account if you have not enabled 2FA
- If desired, click the box to save the login information.
- Click on the blue button to connect:

- There you go, the kDrive content is displayed on the Finder:

... on Linux (Gnome)
To do this:
- Open Files.
- In the sidebar, click on Other location.
- In the Connect to server field, enter
davs://IDkDrive.connect.kdrive.infomaniak.com - Click on Connect.
- For the account settings, use the following information:
- Server address:
https://IDkDrive.connect.kdrive.infomaniak.com(see the ID kDrive chapter above) - Username: email address to log in to the Infomaniak user account
- Password: application password if double authentication is enabled or the one for your Infomaniak user account if you have not enabled 2FA
- Server address:
- Click on Login.
... with a Windows software
Use the RaiDrive software for quick access to your hosted data. Complete the fields as in the image below:
... with a Windows / macOS software
Use the Cyberduck software for quick access to your hosted data:
- Open Cyberduck.
- In the software menu, go to Bookmark then to New bookmark.
- Select the protocol WebDAV (https).
- Enter the following information:
- Server address:
https://IDkDrive.connect.kdrive.infomaniak.com(see the ID kDrive chapter above) - Username: email address to log in to the Infomaniak user account
- Password: application password if double authentication is enabled or the one for your Infomaniak user account if you have not enabled 2FA
- Download folder: the folder where downloaded files will be stored
- Server address:
Most recent software supporting the WebDAV protocol is compatible with kDrive offers among those also supporting WebDAV. Infomaniak cannot guarantee the compatibility of the service with external applications and does not provide support for this protocol. It is recommended to install the kDrive application to avoid any file loss.
Direct WebDAV connection URL to a specific folder
To facilitate a direct connection via WebDAV to a specific folder, you can use the following URL:
https://IDkDrive.connect.kdrive.infomaniak.com/Common documents/Nom du dossier
This simple method allows you to quickly access the desired folder without manually navigating the directory structure. Simply replace "Folder name" with the exact name of the target folder to establish a direct and secure connection via WebDAV. Also, refer to the last part of this other guide for other examples.
This guide details the different ways to access kDrive once the my kSuite offer is subscribed.
There are three ways to view, add, and modify files on kDrive from a computer:
- From a web browser…
- From the kDrive app available on computer and mobile device…
- By configuring a WebDAV connection.
1. From a web browser
To access the kDrive web app (online service ksuite.infomaniak.com/kdrive):
- Click here to access the Infomaniak Manager.
- Click on the icon at the top right of the interface.
- Choose kDrive.
2. From the kDrive app
To access kDrive from a mobile or desktop app:
- Install kDrive for your device.
- Open the application.
- If it is the desktop app, left-click on the desktop app icon in the notification area of your computer (top right on macOS, bottom right on Windows and a double left-click in the taskbar on Linux).
- Refer to this other guide on this subject.
3. Via WebDAV
⚠ Available with:
| kSuite | |
| Business | |
| Enterprise | |
| kDrive | Solo |
| Team | |
| Pro |
This multiplies the possibilities of connecting to your data, in particular via the WebDAV application of your choice.
This guide explains how to import (one time only) to kDrive data (files, folders, etc.) from an external cloud, such as your previous provider's, for example Dropbox or Microsoft.
Prerequisites
- Have a kDrive or kSuite offer (WebDAV not required)
- Have sufficient permissions within kDrive or kSuite.
- Do not change your passwords until the import is complete!
Specific guides
Click on the link corresponding to your current host:
- Apple iCloud: complete guide to migrate iCloud data to Infomaniak
- Google Drive: complete guide to migrate Google Drive data to Infomaniak
- Google Photos: complete guide to migrate photos from Google Photos to Infomaniak
Guides for any other external cloud provider
For example:
- Dropbox
- OneDrive
- OwnCloud
- NextCloud
- Any device with a WebDAV service including external kDrive (refer to this other guide)
- Another kDrive to which your user account has access (except for "external" type access)
Data not imported
- Data that has been shared with you is not imported.
- Only data that truly belongs to you will be imported.
- Google documents such as Gdocs, Sheets, Slides, etc. …
- … are not imported during a Dropbox import.
- … are converted by Google when these files are downloaded from Google Drive on macOS/Windows.
- … are not converted when they are copied from the local Google Drive directory to the local kDrive directory. Therefore, it is imperative to download the files from the Web version of Google Drive.
- Dropbox Paper documents.
- Dropbox share links, visible here.
- Dropbox files shared individually, visible here (however, shared folders and common documents will be imported).
To proceed with the data import:
- Click here to access the Infomaniak kDrive Web app (online service ksuite.infomaniak.com/kdrive).
- Click on the Settings icon in the top right corner.
- Check or select the relevant kDrive in the dropdown menu of the left sidebar.
- Click on Import external data under General:

- Click on Start.
- Choose the relevant service (refer to the last chapter at the bottom of this guide).
- Choose the location where the imported files will be stored.
- Enter any required information if prompted and click the blue Start button:

- Enter any required information if prompted and click the blue Continue button.
- Complete the wizard.
- Wait while the data is being imported.
Manage the ongoing import
To monitor ongoing imports, return to the page mentioned in point 5 above at any time.
To stop an ongoing import, click on the action menu to the right of the import listed on the page and choose to cancel (in case of voluntary interruption, a report is sent by email to the administrator).
A second consecutive import would re-import all the data (to another kDrive directory), it is not differential synchronization and there is no duplicate management.
Check your imported data immediately after the operation.
This guide provides instructions to synchronize kDrive with a Qnap NAS (or vice versa) via the WebDAV protocol found in the HBS 3 Hybrid Backup Sync application.
⚠ Available with:
| kSuite | |
| Business | |
| Enterprise | |
| kDrive | Solo |
| Team | |
| Pro |
Prerequisites
- Have a Qnap NAS accessible from the Internet.
- Know your kDrive identifier (kDrive ID).
Synchronize kDrive and Qnap via HBS 3
To do this:
- Log in to the Qnap NAS administration interface (QTS).
- If necessary, download and install the app HBS 3 Hybrid Backup Sync.
- Open HBS 3.
- Go to Sync from the left menu.
- Create a synchronization task (Two-way Sync Job).
- Choose WebDAV from the list of Cloud providers:

- For the account settings, use the following information:
- Server address:
https://IDkDrive.connect.kdrive.infomaniak.com(see prerequisites above) - Username: email address to log in to the Infomaniak user account
- Password: application password if two-factor authentication is enabled or the one for your Infomaniak user account if you have not enabled 2FA
- Server address:
- Choose the local and destination folders:

- Customize the task frequency.
- Finish the assistant.
This guide explains how to access your emails hosted by Infomaniak from your devices.
Refer to this other guide if you are looking for information on synchronizing your contacts & calendars.
Quickly access your mailbox
- Use the mailbox directly in a web browser thanks to the Web app Mail Infomaniak (online service ksuite.infomaniak.com/mail)…
- Download the mobile app Infomaniak Mail (app for iOS / Android smartphone or tablet)…
Synchronize emails on all your devices
- Click here to open the Infomaniak assistant to configure the synchronization of your devices (macOS, Windows, Linux, Android, iOS) and common mail software/clients (Outlook, Microsoft 365, Thunderbird, Apple Mail, eM Client, etc.).
Specific guides
| OS | Application to synchronize |
|---|---|
| Outlook New / Microsoft 365 MSO / 2019 ( Windows) | |
| Outlook Microsoft 365 MSO ( macOS) | |
| Apple Mail (configuration profile macOS) | |
| Apple Mail (configuration profile iOS: iPhone, iPad, etc.) | |
| Mail ( Android: Huawei, Samsung, Sony, etc.) | |
| Outlook ( iOS + Android) | |
| Gmail ( iOS + Android + web browser) | |
| Mozilla Thunderbird |
Recommended settings
- Incoming IMAP server =
mail.infomaniak.com - IMAP port =
993(with SSL) - Outgoing SMTP server =
mail.infomaniak.com - SMTP port & encryption protocol and command/method to activate this protocol:
- Prioritize port
587+ STARTTLS: this is the official technical standard and the most compatible method with the majority of modern systems for authenticated submission. - Tolerate port
465+ SSL/TLS only as a compatibility option or alternative, specifying that it is implicit encryption, but that 587 remains the recommended choice.
- Prioritize port
- Username = full & complete email address ( ? )
- Password = the one assigned to the email address you want to access ( ? )
- Authentication required to send emails:
- It is activated in the SMTP settings of your application.
- Check "use the same parameters as the incoming server" or, depending on the software/email clients, enter a username (= full & complete email address) and its password.
Refer to this other guide if you are looking for information about other compatible messaging ports and protocols.
In case of problem
- POP3 protocol not recommended (POP server = mail.infomaniak.com and POP port = 995 with SSL).
- Refer to this other guide if you encounter errors, to check the essential points!
⚠️ The various services offered by Infomaniak are all compatible with the corresponding standard protocols (notably IMAP/SMTP for email, WebDAV for sharing, S3/Swift for storage, etc.). Therefore, if you encounter a problem with third-party software, contact its publisher or a Partner and consult the support policy as well as article 11.9 of the Infomaniak Terms of Service.
Change an email password
You can change a password for an email address:
- from the Manager under Mail Service
- from the Infomaniak Web Mail app (online service mail.infomaniak.com) directly.
Apply the new email password
You will then need to update your applications & devices on which the email address (whose password has been changed) was installed and connected. Refer to these specific guides:
- Apple Mail (macOS / iOS)
- Android Mail / Gmail (different versions)
- Microsoft Outlook (different versions)
- Windows Mail / Mail
- Mozilla Thunderbird
You don't manage your emails at Infomaniak yet?
This guide details the two main types of identifiers. They are distinct, even if the email address can be the same.
Infomaniak Account vs Email Address
Here is a summary of these 2 types of identifiers:
| Type of Identifier | Usage | Where to Use It | Associated Password |
|---|---|---|---|
| Infomaniak Account (login identifier) | Access all of your Infomaniak services. | Password set when the user account was created. ⚠️ Different from the password of your email addresses. | |
| Email address hosted with Infomaniak | Send and receive emails. |
| Password specific to each email address. ⚠️ Different from the Infomaniak account password. |
What to do in case of connection issues?
It is not necessary to contact Infomaniak Support (who does not have any of your passwords)…
- Issue with the Infomaniak account? Reset the account password.
- Issue with an email address? Test the address/password pair and, if necessary, reset the email password.
Explanations
- As with many other online services, you registered with Infomaniak using a personal email address.
- This personal email address serves as your login identifier when you want to access Infomaniak services.
- This login identifier has its own password (set when your Infomaniak user account was created – your personal email address, see above).
There is no link between…
- … this identifier/password pair described in points 1/2/3 above…
- ... and the email addresses you have created or obtained subsequently from Infomaniak.
A link could exist if the address is identical (for example, you signed up with the email address toto@abc.xyz and you also manage this same email address at Infomaniak) but even in this case, the password will very likely be different — once for the login identifier toto@abc.xyz and once for the email address toto@abc.xyz.
Unified passwords?
Assume that within the Mail Service you own in your Infomaniak account, you create an email address named julie@entreprise-familiale.xyz (password 123-Abc).
If then an Infomaniak account…
- … is created with this same address (julie@entreprise-familiale.xyz – regardless of the password)…
- … is the only account to access the email address julie@entreprise-familiale.xyz via ksuite.infomaniak.com/mail…
- … has the necessary permissions to change the password of this email address…
… then the password unification will be proposed when you attempt to change the password of this email address from the relevant Infomaniak account.
Other identifiers?
Acquiring other Infomaniak products involves obtaining other identifiers, such as those required for FTP, MySQL, SSH, WebDAV connections, etc., but these identifiers are entirely independent of the two types described above.
This guide provides instructions to synchronize kDrive with a Synology NAS (or vice versa) via the WebDAV protocol found in the Cloud Sync application.
⚠ Available with:
| kSuite | |
| Business | |
| Enterprise | |
| kDrive | Solo |
| Team | |
| Pro |
Prerequisites
- Have a Synology NAS accessible from the Internet.
- Know your kDrive identifier (kDrive ID).
Synchronize kDrive and Synology via Cloud Sync
To do this:
- Log in to the Synology DiskStation Manager (DSM).
- If necessary, download and install the Cloud Sync app from the Package Center.
- Open Cloud Sync.
- Click on the + at the bottom left to add a Cloud.
- Choose WebDAV at the bottom of the list of available Clouds:

- For the account settings, use the following information:
- Server address:
https://IDkDrive.connect.kdrive.infomaniak.com(see the prerequisites above) - Username: email address to log in to the Infomaniak user account
- Password: application password if two-factor authentication is enabled or the one for your Infomaniak user account if you have not enabled 2FA
- Server address:
- Select the local folder, destination, and desired synchronization type:

- Bidirectional: changes made will be reflected in both directions.
- Download only remote changes: ideal for saving a kDrive to your NAS.
- Download only local changes: ideal for saving data from your NAS to a kDrive.
This guide explains how to securely and easily transfer files between Web Hosting and/or Cloud Server.
Preamble
- The FXP (File Exchange Protocolis a method for transferring files directly between two FTP servers without the data passing through the local client.
- Using the FTP PORT and PASV commands, it allows for a connection to be established between the two servers for faster and more efficient file transfer, thus saving bandwidth.
- However, this method may present security risks if the connections are not secured by FTPS, and it requires a more complex configuration compared to traditional FTP transfers.
Transferring data between servers
FXP is enabled by default on Serveurs Cloud and hébergements Web (excluding Starter).
For example, you can use CrossFTP, a multi-platform software that allows you to perform FXP (as well as FTP, SFTP, WebDav, S3, OpenStack Swift).
This guide provides instructions to synchronize kDrive with a VPS (or vice versa) using the WebDAV protocol found in the rClone application.
⚠ Available with:
| kSuite | |
| Business | |
| Enterprise | |
| kDrive | Solo |
| Team | |
| Pro |
Prerequisites
- Have a VPS.
- Know your kDrive identifier (kDrive ID).
Synchronize kDrive and VPS via rClone
This operation allows you to retrieve in real-time the files and folders from kDrive and to read, create, or modify these files from your VPS while ensuring they are synchronized back to the kDrive server. An rClone mount point can be created with a folder on your VPS to manipulate these kDrive files.
Refer to the rClone documentation if you are looking for information about the available options:
- Example of rClone command:
rclone mount kdrive:/My_kDrive_Folder_Path /home/ubuntu/Target_Folder_Path --vfs-cache-mode full --vfs-cache-max-age 24h --vfs-cache-max-size 10G --cache-dir /home/ubuntu/rclone/cache --daemon --allow-other --dir-cache-time 1h --log-file /home/ubuntu/rclone/rclone.log --log-level INFO- The
--daemonattribute of this command allows you to run the synchronization as a background task because without it, this sync stops with each VPS disconnection…
- Example of rClone configuration file:
[kdrive] type = webdav url = https://***.connect.kdrive.infomaniak.com/*** vendor = other user = *** pass = ***- Server address:
https://IDkDrive.connect.kdrive.infomaniak.com(refer to the prerequisites above) - Username: email address to log in to your Infomaniak user account
- Password: application password if two-factor authentication is enabled or the one from your Infomaniak user account if you have not enabled 2FA
This guide details how to import Google Drive data using rClone on kDrive Infomaniak.
⚠ Available with:
| kSuite | |
| Business | |
| Enterprise | |
| kDrive | Solo |
| Team | |
| Pro |
1. Configure rclone for drive access
Install rclone on your computer
There is a version of rclone with a graphical interface (GUI) but it is quite possible to do this via the command line (CLI):
- Install rclone from a
Terminaltype application on your device by typing the entire following command:sudo -v ; curl https://rclone.org/install.sh | sudo bash - Enter the password for your session on your computer to start the installation:

- Refer to the official installation guide if necessary.
Configure the remote disk (Google Drive) on rclone
- Once rclone is installed, enter the command
rclone config.- Refer to the official configuration guide if necessary.
- Then choose to configure a new remote import by answering
nforNew remote. - Name the remote disk, for example
gdrive:
- Then choose the type of disk to import by answering
drivewhich corresponds to Google Drive among the proposed choices.
You must then authorize the connection to Google Drive from a browser.
By default, rclone uses a shared client ID among all users, which may result in request limitations imposed by Google. It is strongly recommended to use your own client ID to avoid these restrictions.
- Access the Google API Console with your Google account.
- Create or select a project.
- Enable the Google Drive API via the button/link "Enable APIs and Services".
- Search for the keyword
Driveand click onGoogle Drive API:
- Click on the Enable button.
- Click on Credentials in the left sidebar (and not on a similar button).
- Click on Configure the OAuth consent screen (if not already done):
- Enter a name, for example
rclone. - Select "External" (or "Internal" if you are a Google Workspace user).
- Under “Data Access”, add the scopes ("fields of application") required:
https://www.googleapis.com/auth/docs,https://www.googleapis.com/auth/drive,https://www.googleapis.com/auth/drive.metadata.readonly
- Save.
- Add your email account as a test user under "Audience".
- Return to the "Google Auth Platform" section.
- Enter a name, for example
- Create OAuth credentials:
- Click on "Create credentials / OAuth client ID".
- Choose "Desktop app" and leave the default name, then click on the Create button.
- Keep the
client IDand theclient secret codedisplayed.
- If "External" was chosen in step 7 above, return to "Audience" in the left sidebar and click on "Publish the application".
Due to the "enhanced security" recently introduced by Google, you are theoretically supposed to "submit your application for verification" and wait several weeks for their response.
In practice, you can directly use the client ID and client secret with rclone (read the rest of the guide). The only consequence will be a very intimidating confirmation screen when you log in via your browser to allow rclone to obtain its token-id. However, since this only happens during the initial setup of the remote storage, it is not a major issue.
It is also possible to leave the application in "Test" mode, but in this case, any authorization will expire after a week, which can be cumbersome to renew frequently. If a short validity period does not pose a problem for your use, then keeping the application in test mode may be sufficient.
Return to rclone in the terminal:
- Indicate to rclone the
client_idby copying-pasting theClient IDobtained in step 8 above, same for the secret phrase. - Then choose the
scopen°1:
- Press the “
Enter” key to leave theservice_account_file. question blank - Answer “No”
nto the question about “advanced configuration”. - Answer “Yes”
yto the question about the web browser connection:
- A web page opens in your web browser allowing you to connect to Google and authorize the application you created in step 9 above.
- Once permissions are granted, you should receive the following message:

- In the terminal, answer “No”
nto the question about “Shared Drive (Team Drive)”. - Answer “Yes”
yto the last question:
Configuration of the destination disk (kDrive) on rclone
It is possible to act directly on the configuration file of rclone by pasting your kDrive configuration in it, for example:
[kdrive]
type = webdav
url = https://kDrive_ID_HERE.connect.kdrive.infomaniak.com/
vendor = other
user = user@email.com
pass = PASSWORD_HERE_OR_APP_PASSWORD_IF_2FA
But here is how to proceed step by step as for the previous configuration:
- Still in the terminal, enter
nfor a new disk configuration and enter the namekDriveto recognize your destination disk:
- Then choose the type of disk to import by answering
webdavwhich corresponds to a WebDAV configuration among the choices offered. - Enter the following information:
url= direct access to kDrive (refer to this other guide regarding the kDrive ID for the connection URL)vendor= rclone (option number 6)user= email address to log in to the Infomaniak user account
- Answer “Yes”
yto the question about the password, then enter the password:- application password in case of double authentication activated or the one of your Infomaniak user account if you have not activated 2FA.
- Leave
bearer_tokenblank, then answer “No”nto the question about “advanced configuration”. - Answer “Yes”
yto the last question and your 2 disks are displayed:
2. Copy data from Google Drive to kDrive
kDrive supports rclone streaming upload via WebDAV, up to 50 GB (extendable to 100 GB) to avoid abuse, with automatic error handling if the limit is exceeded without prior specification of the size via Content-Length.
Prerequisites
- Consult the available options in the official guide before starting an import, particularly these important commands:
--drive-skip-shortcutsto avoid infinite import loops--drive-shared-with-meto get what has been shared--drive-acknowledge-abuseto force the download of files blocked by Google
Example of a command to start copying your Google Drive to the root of your kDrive:
sudo rclone copy gdrive: kDrive:This will immediately start copying your folders, subfolders, and Google Drive contents to the personal folder of your Infomaniak kDrive!
Google documents such as Gdocs, Sheets, Slides, etc. are converted to Office formats like .docx, .xlsx, etc. and are readable directly on kDrive.
This guide details how to manually back up data using the MSP360 (formerly CloudBerry Windows) application via the S3 Compatible protocol on Swiss Backup the independent Swiss cloud backup solution.
It is also possible to use FileZilla (SFTP): refer to this other guide.
Prerequisites
- Have a Infomaniak Swiss Backup space with at least one available device quota for a Cloud backup.
- Add 1 Cloud device to get the S3 Compatible parameters.
- Download and install MSP360 (Windows).
⚠️ All the services offered by Infomaniak are compatible with the corresponding standard protocols (notably IMAP/SMTP for email, WebDAV for sharing, S3/Swift for storage, etc.). Therefore, if you encounter a problem with third-party software, contact its publisher directly or a Partner and consult the support policy as well as article 11.9 of the Infomaniak Terms and Conditions.
Set up MSP360/CloudBerry
To configure a new backup:
- Click on the CloudBerry icon in the top left corner.
- Select Add Storage Account:

- Select S3 compatible:

- Fill in the fields according to the information specific to your device (refer to this other guide):

Display name= choose a name for the storage.AccessKeyandSecretKey= the access keys generated from the email received from Infomaniak following the creation of the storage space.Service point= https://s3.swiss-backup02.infomaniak.comBucket name= default
- Click on OK.
This guide details how to manually back up data using the MSP360 application (formerly CloudBerry macOS) via the S3 Compatible protocol on Swiss Backup, the backup solution in an independent Swiss cloud.
It is also possible to use FileZilla (SFTP): refer to this other guide.
Prerequisites
- Have a Swiss Backup Infomaniak space with at least one available device quota for a Cloud backup.
- Add 1 device of type Cloud to obtain the S3 Compatible parameters.
- Download and install MSP360 (macOS).
⚠️ All the services offered by Infomaniak are compatible with the corresponding standard protocols (notably IMAP/SMTP for email, WebDAV for sharing, S3/Swift for storage, etc.). Therefore, if you encounter a problem with third-party software, contact its publisher directly or a Partner and consult the support policy as well as article 11.9 of the Infomaniak Terms and Conditions.
Set up MSP360/CloudBerry
To configure a new backup:
- Go to Settings:

- Choose an S3 Compatible storage from the list below:

- Fill in the fields according to the information specific to your device (refer to this other guide):

Display Name: the name of this storage space in the application.AccessKeyandSecretKey: the access keys generated from the email received from Infomaniak following the creation of the storage space.Endpoint(or server URL):https://s3.swiss-backup02.infomaniak.com- The value of "bucket" remains default.
- Validate by clicking on OK.
This guide details how to import iCloud data using rClone on kDrive Infomaniak.
⚠ Available with:
| kSuite | |
| Business | |
| Enterprise | |
| kDrive | Solo |
| Team | |
| Pro |
Preamble
- Since Apple does not offer an API like its competitors, a solution to retrieve documents from an iCloud Drive is to install the kDrive macOS app to synchronize the icloud folder which must be in your library. The guide below offers a solid alternative.
- kDrive supports rclone streaming upload via WebDAV, up to 50 Go (extendable to 100 Go) to avoid abuse, with automatic error management if the limit is exceeded without prior specification of the size via
Content-Length.
1. Configure rclone for drive access
Install rclone on your computer
There is a version of rclone with a graphical interface (GUI) but it is quite possible to do this via the command line (CLI):
- Install rclone from a
Terminal-type application on your device, by typing the entire following command:sudo -v ; curl https://rclone.org/install.sh | sudo bash - Enter the password for your session on your computer to start the installation:
- Refer to the official installation guide if necessary.
Configure the remote disk (iCloud) on rclone
- Once rclone is installed, enter the command
rclone config.- Refer to the official configuration guide if necessary.
- Then choose to configure a new remote import by answering
nforNew remote. - Name the remote disk, for example
appledrive:
- Then choose the type of disk to import by answering
iclouddrivewhich corresponds to iCloud Drive among the proposed choices. - Indicate to rclone the
apple_idby entering your Apple ID (usually an email address). - Choose to use your own password linked to the Apple ID account (
y). - Enter your password twice as requested:

- Answer “No”
nto the question about “advanced configuration”. - A window on your device should open to warn you of a remote connection; authorize it:

- A window on your device should open with a 2FA code; copy it:
- Paste the code when rclone asks for it.
- Answer “Yes”
yto the last question if all the presented information is correct.
Configuration of the destination disk (kDrive) on rclone
It is possible to act directly on the configuration file of rclone by pasting your kDrive configuration in it in the form for example:
[kDrive]
type = webdav
url = https://kDrive_ID_HERE.connect.kdrive.infomaniak.com/
vendor = other
user = user@email.com
pass = PASSWORD_HERE_OR_APP_PASSWORD_IF_2FA
But here is how to proceed step by step as for the previous configuration:
- Still in the terminal, enter
nfor a new disk configuration and enter the namekDriveto recognize your destination disk:
- Then choose the type of disk to import by answering
webdavwhich corresponds to a WebDAV configuration among the proposed choices. - Enter the following information:
url= direct access to kDrive (refer to this other guide regarding the kDrive ID for the connection URL)vendor= rclone (option #6)user= email address to log in to the Infomaniak user account
- Answer “Yes”
yto the password question, then enter the password:- application password in case of double authentication activated or the one from your Infomaniak user account if you have not activated 2FA.
- Leave the
bearer_tokenblank, then answer “No”nto the question about “advanced configuration”. - Answer “Yes”
yto the last question and your 2 disks will be displayed:
2. Copy data from iCloud to kDrive
Prerequisites
- Consult the available options in the official guide before starting an import.
Example of a command to start copying your iCloud data to the root of your kDrive:
sudo rclone copy appledrive: kDrive:This will immediately start copying your iCloud folders, subfolders, and contents to the personal folder of your Infomaniak kDrive!
Details about the dates of your exported photos
If you export your photos from iCloud to Infomaniak kDrive, be vigilant about the date metadata. During export, the file creation dates may be modified and replaced by the export date instead of the original photo date.
Here is a script for advanced users that allows you to restore the correct data to your files from the EXIF information (it is recommended to process batches of 7000 photos max. to avoid a crash):
- Download ExifTool https://exiftool.org/index.html (macOS Package).
- Install the application by authorizing its opening in advance if necessary:

- Open Script Editor (located in your Applications > Utilities folder):

- Click on New Document.
- Copy and paste the long script provided below into the Script Editor window.
- Click on Run to start the script, a window opens:

- Select the folder to analyze.
- Let the script run afterwards, it will modify the dates or write the errors in a
errors.txtfile on the desktop.
The script to copy-paste entirely:
-- replace file date with EXIF creation date or date from name after the first dash -

tell application "Finder"
    set FolderPath to choose folder with prompt "Select the folder containing the files to update"
    my processFolder(FolderPath)
end tell

on processFolder(aFolder)
    tell application "Finder"
        -- process files:
        set fileList to files of aFolder
        repeat with eachFile in fileList
            -- process a single file

            set theFile to eachFile
            set AppleScript's text item delimiters to {""}
            set fileName to name of eachFile --get the file name

            set eachFile to eachFile as string --file path
            set hasDate to true --initialize date found flag

            try
                --get date if available
                set photoDate to do shell script "/usr/local/bin/exiftool -DateTimeOriginal " & quoted form of POSIX path of eachFile
                if photoDate is "" then set photoDate to do shell script "/usr/local/bin/exiftool -CreationDate " & quoted form of POSIX path of eachFile
                if photoDate is "" then set photoDate to do shell script "/usr/local/bin/exiftool -CreateDate " & quoted form of POSIX path of eachFile

                if photoDate is "" then
                    set hasDate to false --check if date was found
                end if

            on error
                set hasDate to false -- error retrieving date
                set photoDate to ""
            end try

            if length of photoDate > 20 then
                --format extracted date
                set x to (length of photoDate) - 33
                set OriginalDate to text -x thru -1 of photoDate
                set formattedDate to text 1 thru 5 of OriginalDate
                set theYear to formattedDate
                set formattedDate to formattedDate & text 7 thru 8 of OriginalDate
                set theMonth to text 7 thru 8 of OriginalDate
                set formattedDate to formattedDate & text 10 thru 11 of OriginalDate
                set theDay to text 10 thru 11 of OriginalDate
                set formattedDate to formattedDate & text 13 thru 14 of OriginalDate
                set theHour to text 13 thru 14 of OriginalDate
                set formattedDate to formattedDate & text 16 thru 17 of OriginalDate
                set theMinute to text 16 thru 17 of OriginalDate
                set formattedDate to formattedDate & "." & text 19 thru 20 of OriginalDate
                set theSecond to text 19 thru 20 of OriginalDate
                set newName to theYear & "-" & theMonth & "-" & theDay & " " & theHour & "." & theMinute & "." & theSecond

                set testValue to formattedDate as string --check if found date is 000
                if testValue is " 000000000000.00" then
                    set hasDate to false
                else
                    -- set file date to original EXIF date and write to log
                    do shell script "touch -t " & formattedDate & " " & quoted form of POSIX path of eachFile
                    set logFile to open for access ((path to desktop folder as text) & "Date Found.txt") as text with write permission
                    write "Original date found for file: " & OriginalDate & " " & eachFile & return to logFile starting at eof
                    close access logFile
                end if
            end if

            if hasDate is false then
                -- get date from file name after first dash
                set nb to ""
                set nameDate to ""
                set fileName to fileName as string
                set savedDelimiters to AppleScript's text item delimiters --save delimiters
                set AppleScript's text item delimiters to {"-"} --split on "-"
                set nb to offset of "-" in fileName
                if nb is not 0 then
                    set AppleScript's text item delimiters to savedDelimiters --restore delimiters
                    set nameDate to characters (nb + 1) thru (nb + 8) of fileName as string
                    set nameDate to nameDate & "1200.00"
                    set cmd1 to "/usr/local/bin/exiftool -datetimeoriginal=" & nameDate & " " & quoted form of POSIX path of eachFile
                    set cmd2 to "/usr/local/bin/exiftool -createdate=" & nameDate & " " & quoted form of POSIX path of eachFile
                end if
                try
                    -- write date from name to EXIF
                    do shell script cmd1
                    do shell script cmd2
                    do shell script "touch -t " & nameDate & " " & quoted form of POSIX path of eachFile
                    do shell script "rm " & quoted form of POSIX path of (eachFile & "_original")
                on error
                    -- if date from name is invalid, log the error
                    set logFile to open for access ((path to desktop folder as text) & "Date Error.txt") as text with write permission
                    write "No valid date found in file name: " & eachFile & return to logFile starting at eof
                    close access logFile
                end try
            end if
        end repeat

        -- process folders:
        set folderList to folders of aFolder
        repeat with eachSubfolder in folderList
            -- process a subfolder
            my processFolder(eachSubfolder)
        end repeat
    end tell
end processFolder

tell application "Finder"
    display dialog "Done! All files processed." buttons {"Close"}
end tellThis guide details how to manually back up data using the Cyberduck application (macOS / Windows) via the S3 Compatible protocol on Swiss Backup the independent Swiss cloud backup solution.
It is also possible to use Cyberduck via Swift or FileZilla (SFTP).
Prerequisites
- Have a Swiss Backup Infomaniak space with at least one available device quota for a Cloud backup.
- Add 1 device of type Cloud to obtain the S3 Compatible parameters.
- Download and install Cyberduck (macOS / Windows).
- Familiarize yourself with the official documentation https://docs.cyberduck.io/protocols/openstack/infomaniak/.
⚠️ All the services offered by Infomaniak are compatible with the corresponding standard protocols (notably IMAP/SMTP for email, WebDAV for sharing, S3/Swift for storage, etc.). Therefore, if you encounter a problem with third-party software, contact its publisher directly or a Partner and consult the support policy as well as article 11.9 of the Infomaniak Terms and Conditions.
Set up Cyberduck
To configure a new backup:
- Open the Cyberduck application.
- Click on Open Connection:

- Click on the dropdown menu and select More options:

- Wait for the additional profiles to load.
- Search for and select the profiles corresponding to Infomaniak S3:

- If necessary, check your cluster number indicated on the Manager in the Cloud Storage information under "Location".
- Close the window and restart Cyberduck if the profiles did not appear in the dropdown menu from step 3 above.
- Select the corresponding profile.
- Fill in the fields according to the information specific to your device:

- Click on the Connect button to establish the S3 connection.
This guide details how to back up a NAS Synology using the application Cloud Sync via the OpenStack Swift protocol on Swiss Backup the independent Swiss cloud backup solution.
It is also possible to use Hyper Backup (recommended): refer to this other guide.
Prerequisites
- Have a Swiss Backup Infomaniak space with at least one available device quota for a Cloud backup.
- Add 1 device of type Cloud to obtain the OpenStack Swift parameters.
⚠️ All the services offered by Infomaniak are compatible with the corresponding standard protocols (notably IMAP/SMTP for email, WebDAV for sharing, S3/Swift for storage, etc.). Therefore, if you encounter a problem with third-party software, contact its publisher directly or a Partner and consult the support policy as well as article 11.9 of the Infomaniak Terms and Conditions.
Set up Cloud Sync
To set up a new backup:
- Log in to the administration interface of your Synology NAS (DSM).
- If necessary, install the application Cloud Sync from the Package Center.
- Open the Cloud Sync application.
- If necessary, click on the + to add a new cloud provider.
- Select OpenStack Swift from the list of providers:
- Fill in the fields according to the information specific to your device (refer to this other guide) and modify the drop-down menus if necessary as shown below:
- After clicking Next, fill in the fields according to the information specific to your device (refer to this other guide) and modify the drop-down menus if necessary as shown below:
- Choose the location (the default choice proposed).
- Choose the container name (this is the domain name in your device information).
- Task configuration: enter...
- … the connection name (e.g., OpenStack Swift)
- … the local path (the content to be backed up)
- … the remote path (the folder where your files will be saved)
- … the synchronization direction (transfer only local changes recommended for a backup)
This guide details how to manually back up data using the Mountain Duck application (macOS / Windows) via the OpenStack Swift protocol on Swiss Backup, the backup solution in an independent Swiss cloud.
Preamble
- Mountain Duck allows file synchronization as an alternative to Dropbox (for this use, Infomaniak also recommends kDrive).
- ⚠️ All the services offered by Infomaniak are compatible with the corresponding standard protocols (notably IMAP/SMTP for email, WebDAV for sharing, S3/Swift for storage, etc.). Therefore, if you encounter a problem with third-party software, contact its publisher directly or a Partner and consult the support policy as well as article 11.9 of the Infomaniak Terms and Conditions.
Set up Mountain Duck with Swiss Backup
Prerequisites
- Have a Swiss Backup Infomaniak space with at least one available device quota for a Cloud backup.
- Add 1 device of type Cloud to obtain the OpenStack Swift parameters.
- Download and install Mountain Duck (macOS / Windows).
To configure a new backup:
- Open Mountain Duck.
- Create a New connection.
- Select the corresponding profile from the list of proposed profiles (according to the information specific to your device — refer to this other guide) or choose more options:

- and search for the corresponding profile:

- Fill in the fields according to the information specific to your device (according to the information specific to your device — refer to this other guide) by combining Project:Domain:Username:

- Click on Connect.
- Enter the password (see point 4 above):

- Click on Open session.
- To automatically start Mountain Duck when you log in, check the box Enable item at startup from the General tab of Preferences:

This guide explains how to set up the synchronization of calendars/agendas and contacts Infomaniak with the desktop app Mozilla Thunderbird (desktop application on macOS / Windows / Linux).
⚠️ All the services offered by Infomaniak are compatible with the corresponding standard protocols (notably IMAP/SMTP for email, WebDAV for sharing, S3/Swift for storage, etc.). Therefore, if you encounter a problem with third-party software, contact its publisher directly or a Partner and consult the support policy as well as article 11.9 of the Infomaniak Terms and Conditions.
Prerequisites
- Get your synchronization information provided by the synchronization assistant Infomaniak:
- account address: https://sync.infomaniak.com
- username: for example
AB12345 - application password in case of double authentication activated or the one of your Infomaniak user account if you have not activated the 2FA
If you encounter any issues with the prerequisites above… and to obtain a more advanced synchronization URL:
- Open the synchronization assistant Infomaniak
- Click on the blue link Select a device

- Choose a GNU/Linux synchronization type:

- Note the full synchronization URL displayed at step 4 of the assistant.
Synchronize calendars and address books
Connect to a CardDAV address book
With the latest versions of Thunderbird, synchronization of your Infomaniak calendars and address books is offered immediately after configuring your email address within the software:
Click on it; the configuration starts:
- Enter the username and the synchronization URL (see above):

- Thunderbird then asks for the password (see above):

Once authentication is successfully completed, the application displays the address books and you can choose which ones to synchronize.
Connect to a remote calendar
Add a new calendar in Thunderbird:
- Choose On the network

- Enter the username and the synchronization URL (see above)

Once authentication is successfully completed, the application displays the calendars and you can choose which ones to synchronize.
Display calendars and address books
Your events are visible by activating the calendar from the Events and Tasks menu in Thunderbird.
Your contacts are visible by activating the address book from the Window menu in Thunderbird.
Refer to this other guide if you need to fix a configuration issue with Thunderbird (email, contacts, calendars)…