
Knowledge base
1000 FAQs, 500 tutorials and explanatory videos. Here, there are only solutions!
Thank you for trusting Infomaniak with the hosting of your WordPress site.
Preamble
- As a reminder, the WordPress site creation tool can be:
- Hosted by the WordPress.com infrastructure (paid) and in this case, Infomaniak is not involved in the hosting
- Installed freely but manually by the user using the archive provided by WordPress.org, Infomaniak is then the web host but does not manage any updates and does not list the application in the Web Applications section of the Infomaniak Manager; you will be in this case if you migrate an external WordPress to Infomaniak
- Installed automatically by the tool available on the Manager and in this case, WordPress is maintained (in terms of security) largely by Infomaniak
- This third and final point is the one developed in this guide.
- The Infomaniak installer automates the installation and security updates of WordPress ...
- For additional help contact a partner or launch a free tender — also discover the role of the host.
Install WordPress & Apps
Infomaniak makes it easy to install the WordPress application (and other applications as well):
Use WordPress
Although WordPress is one of the easiest CMS to use, it is necessary to get used to it. To help you with this, here are external resources in several different languages to get started with WordPress:
- Essential basics to know to get started with WordPress
- Forum of the French-speaking WordPress community
- FAQ about backups / restorations
- Use a theme or extension ElegantThemes
- Free WordPress training provided by the site progresser-en-informatique.com. If you want to get to the point, focus on the following modules:
This guide explains how to install a new Infomaniak WordPress site included in the paid Web Hosting offers. You will find 2 different ways to create a WordPress site as well as explanations about uninstallation.
Create a WordPress site on an existing hosting
To access Web Hosting and add a new site by installing WordPress at the same time:
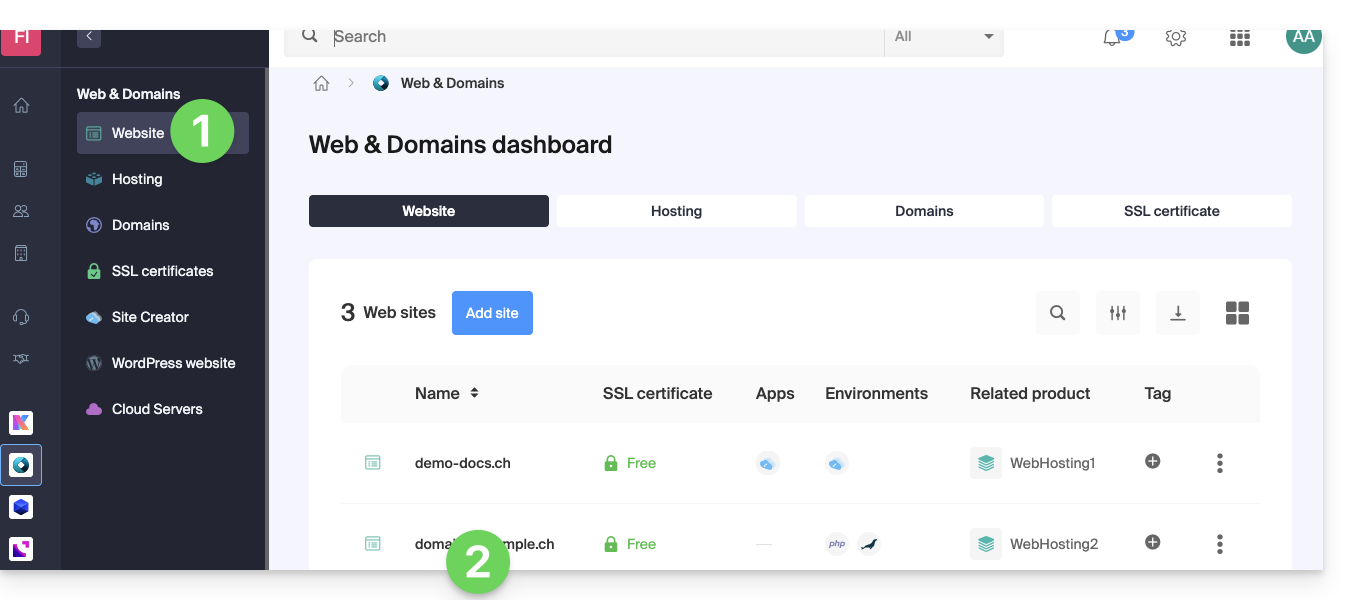
- Click here to access the management of your hosting on the Infomaniak Manager (need help?).
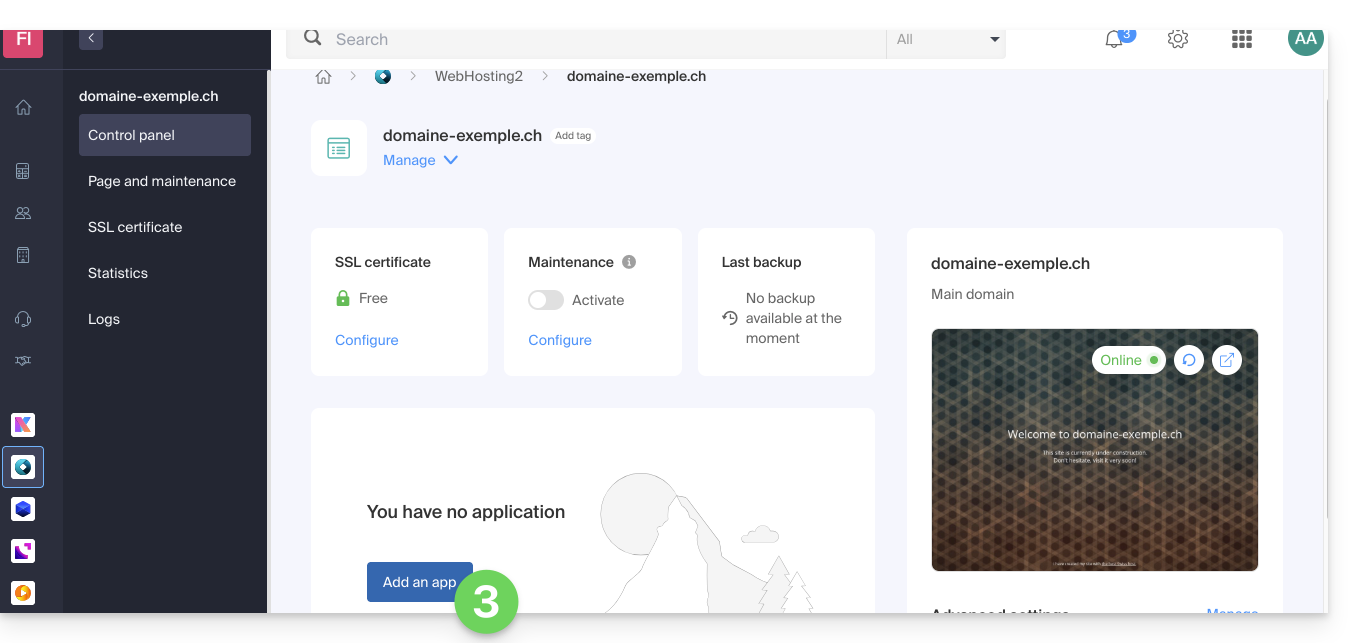
- Click directly on the name assigned to the hosting concerned:
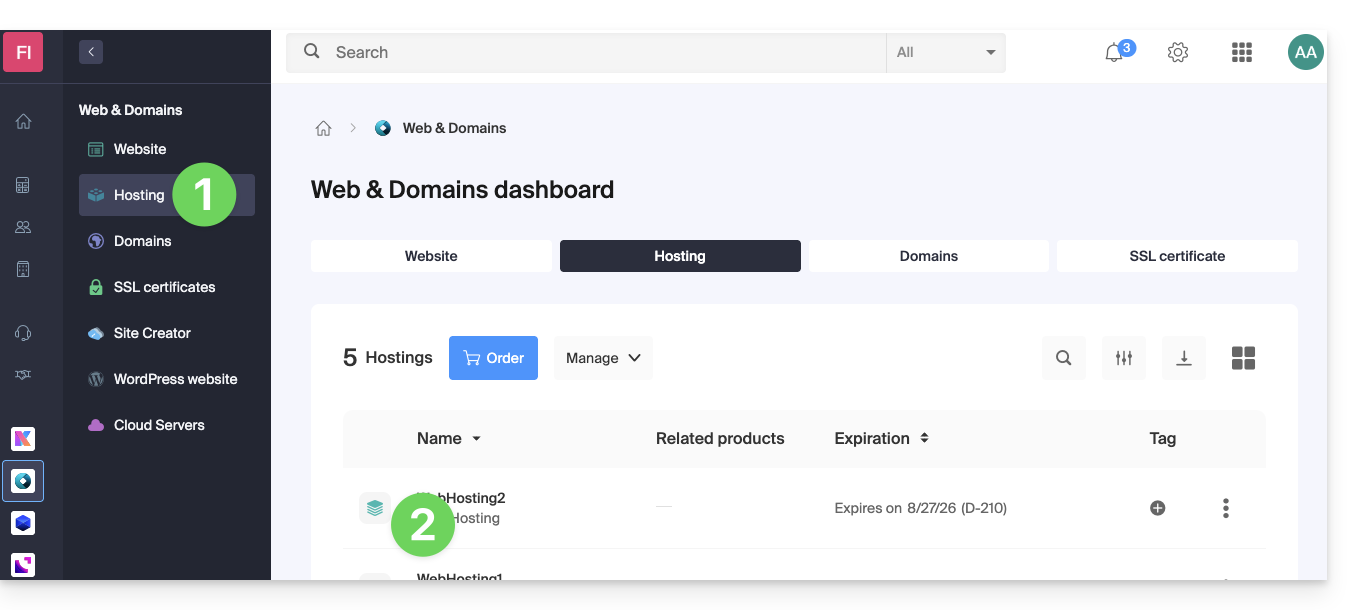
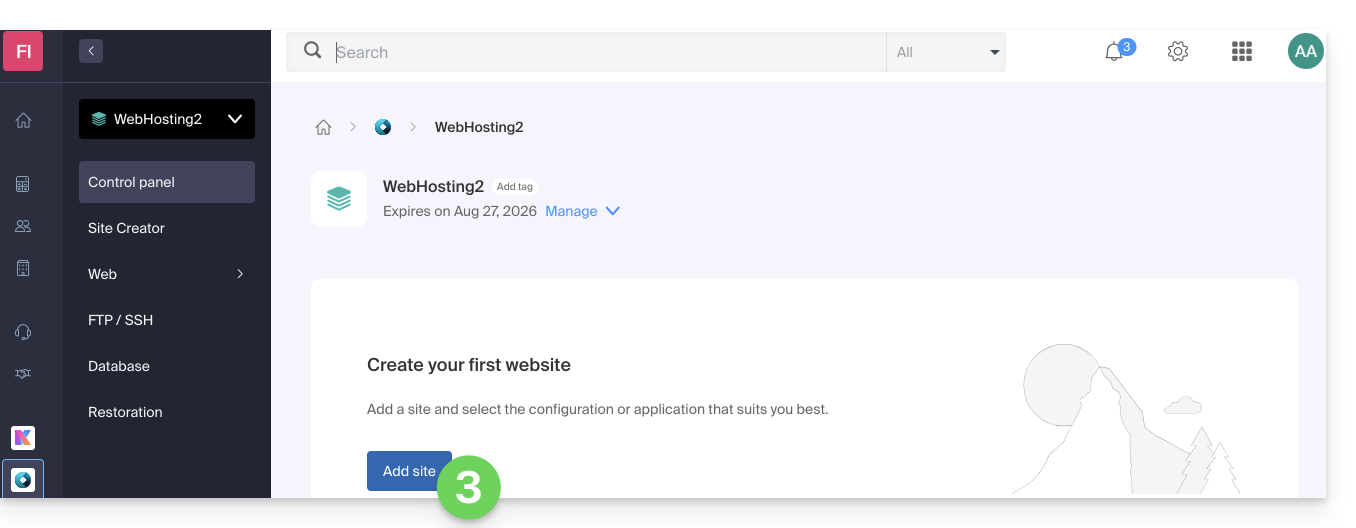
- Click the button to add a site:
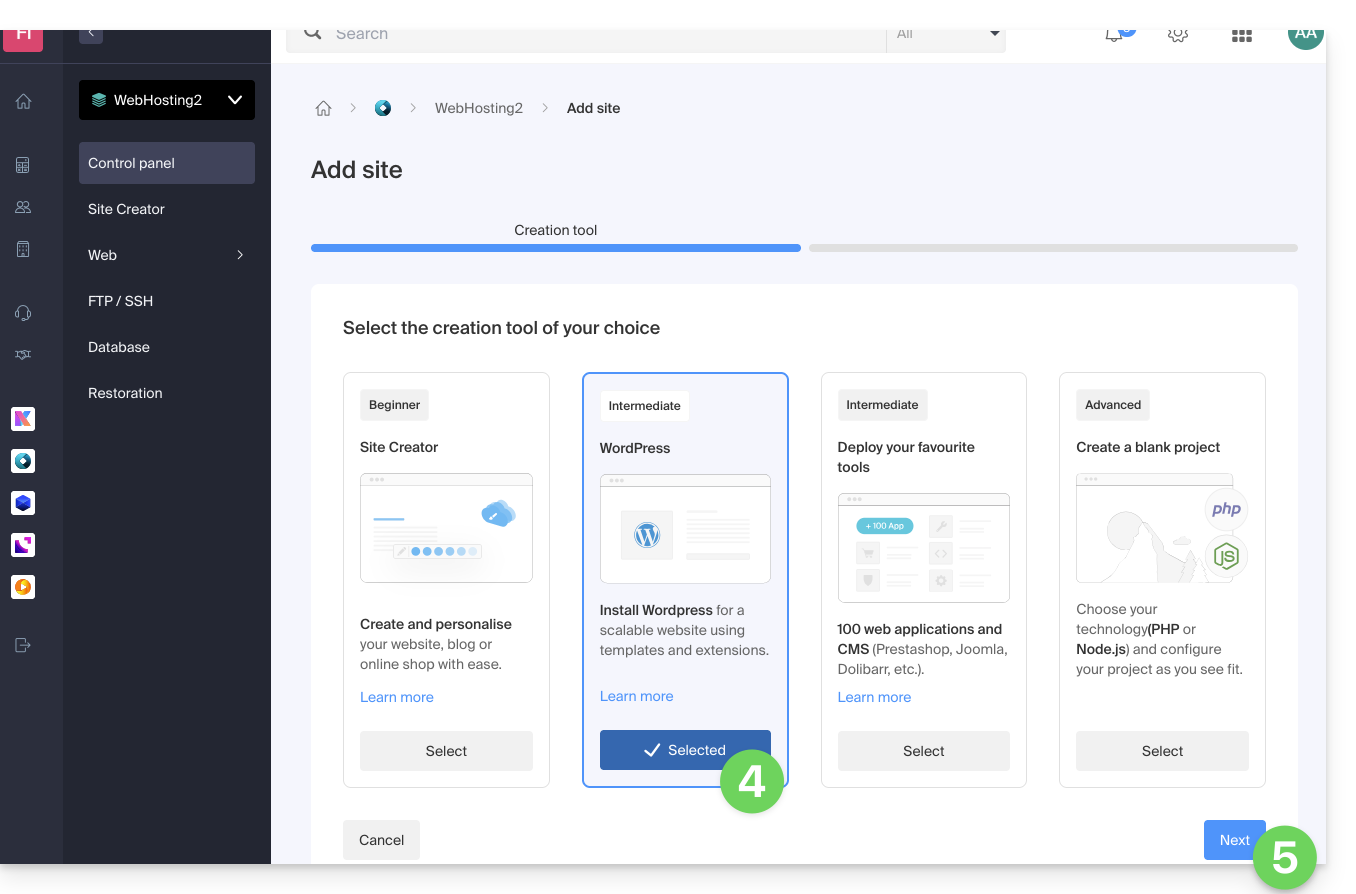
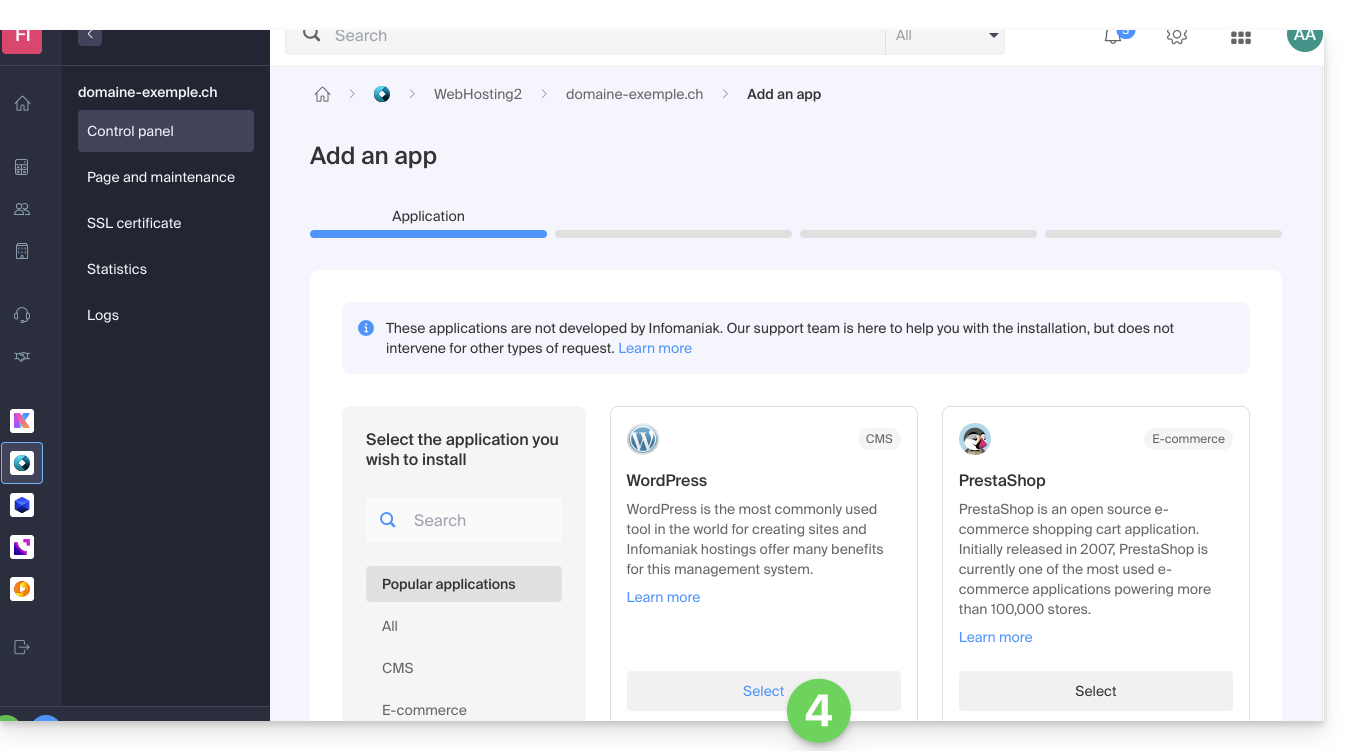
- Choose to install WordPress.
- Click the Next button:
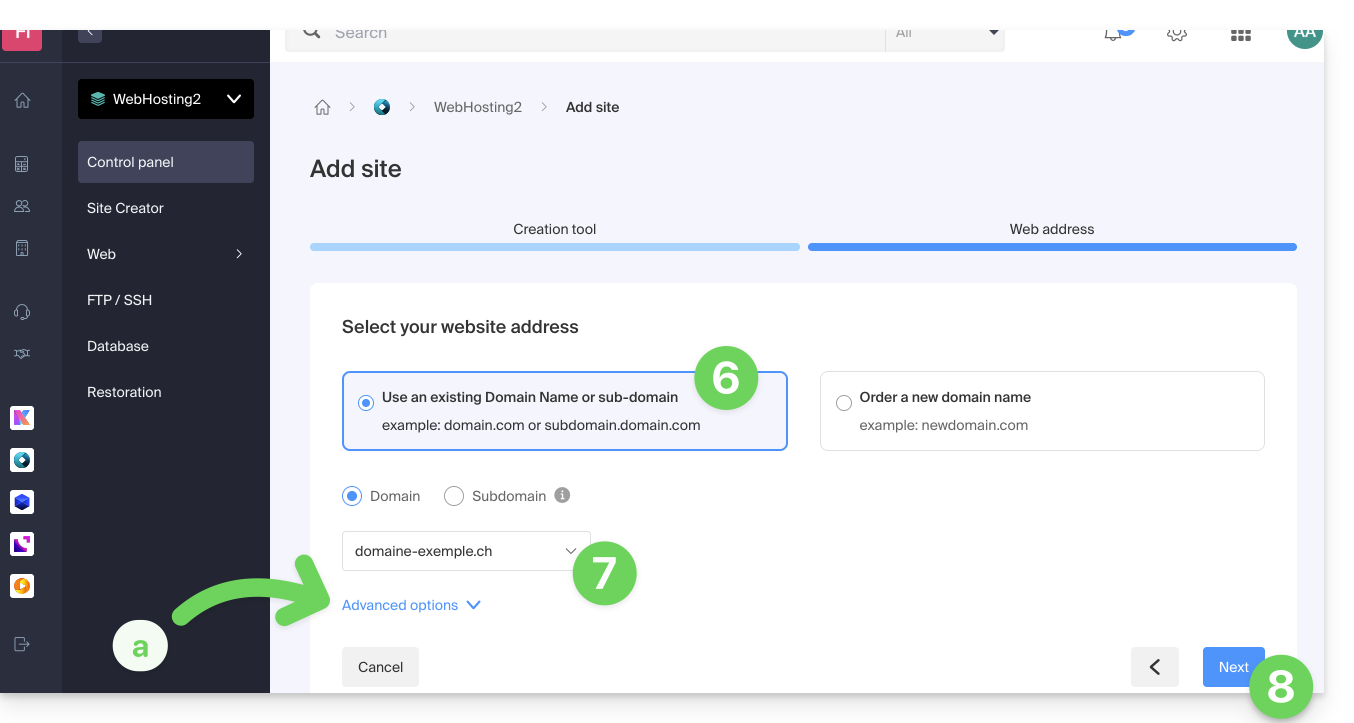
- Click the button to use a domain name already present in your Organization (or on the other button if you need to order a new domain first).
- Select the domain name from your already acquired domains.
- The advanced options allow you to choose a custom location on the hosting server, and an older version of PHP.
- Click the Next button:
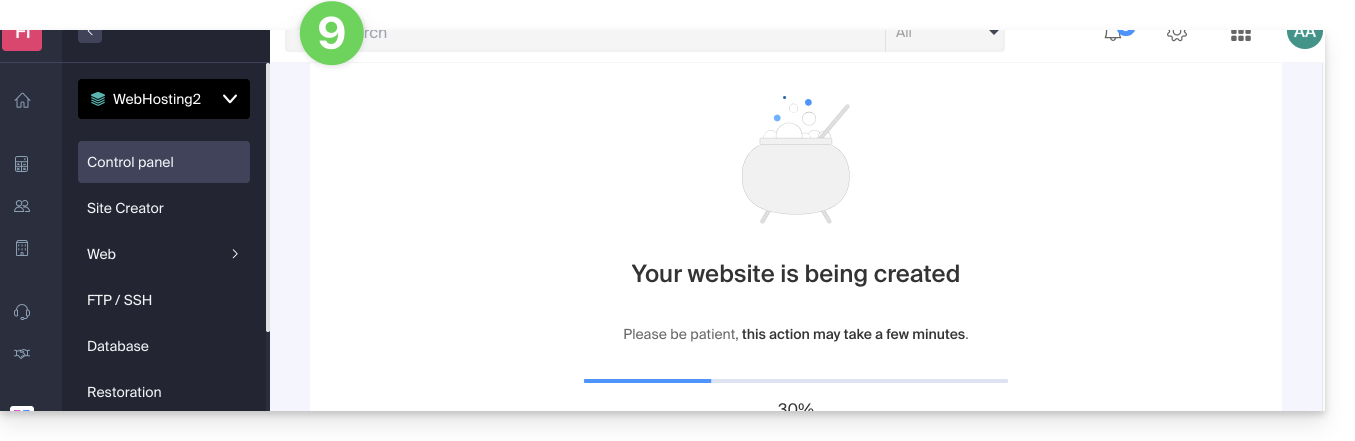
- Wait a few minutes for the site to be created on the hosting:
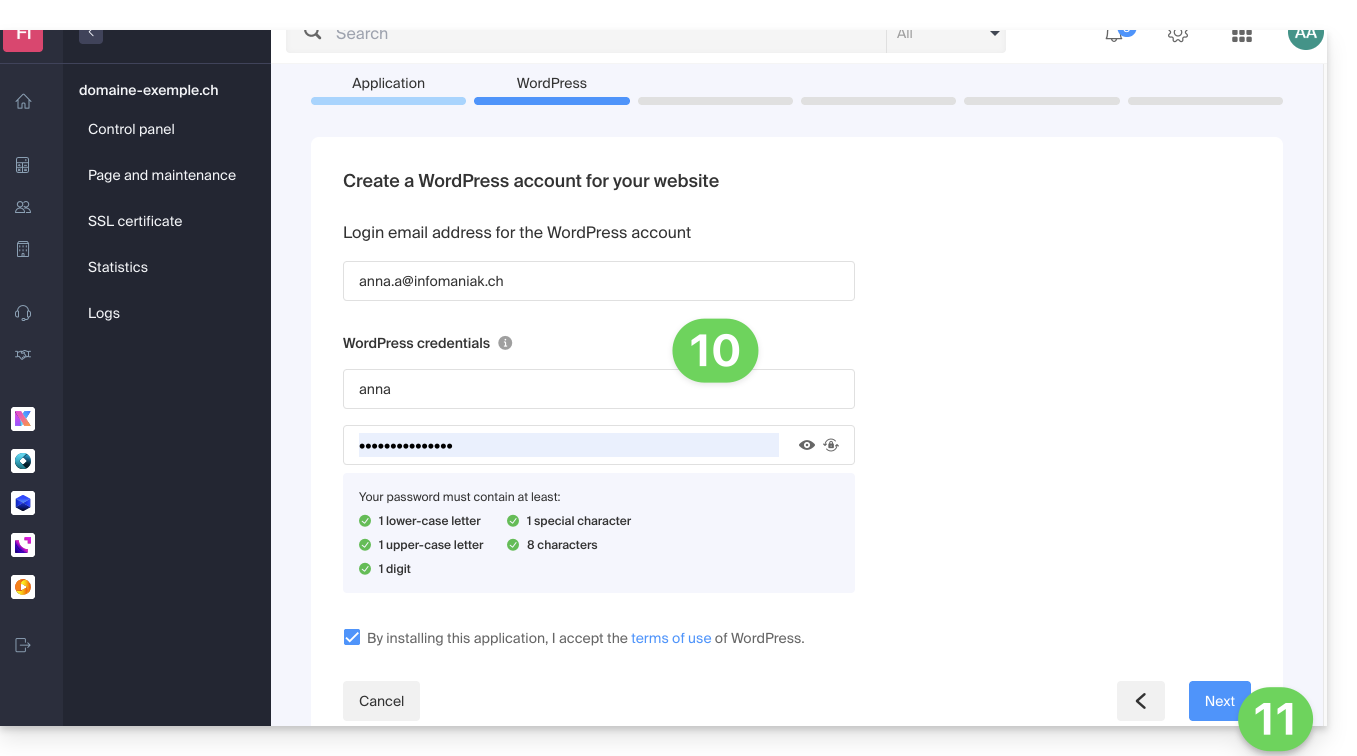
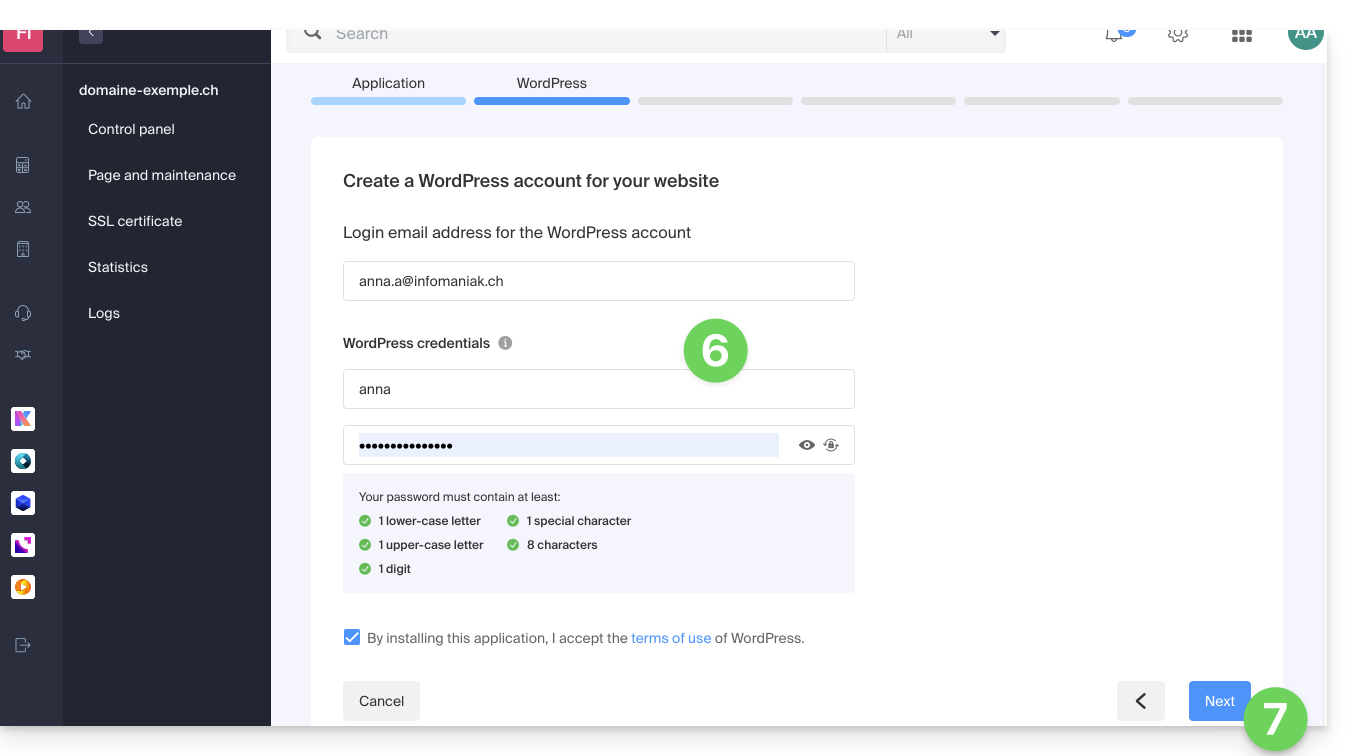
- Enter the requested information, it will be used to log in to the WordPress dashboard (it is possible to modify this information at any time after installation).
- Click the Next button:
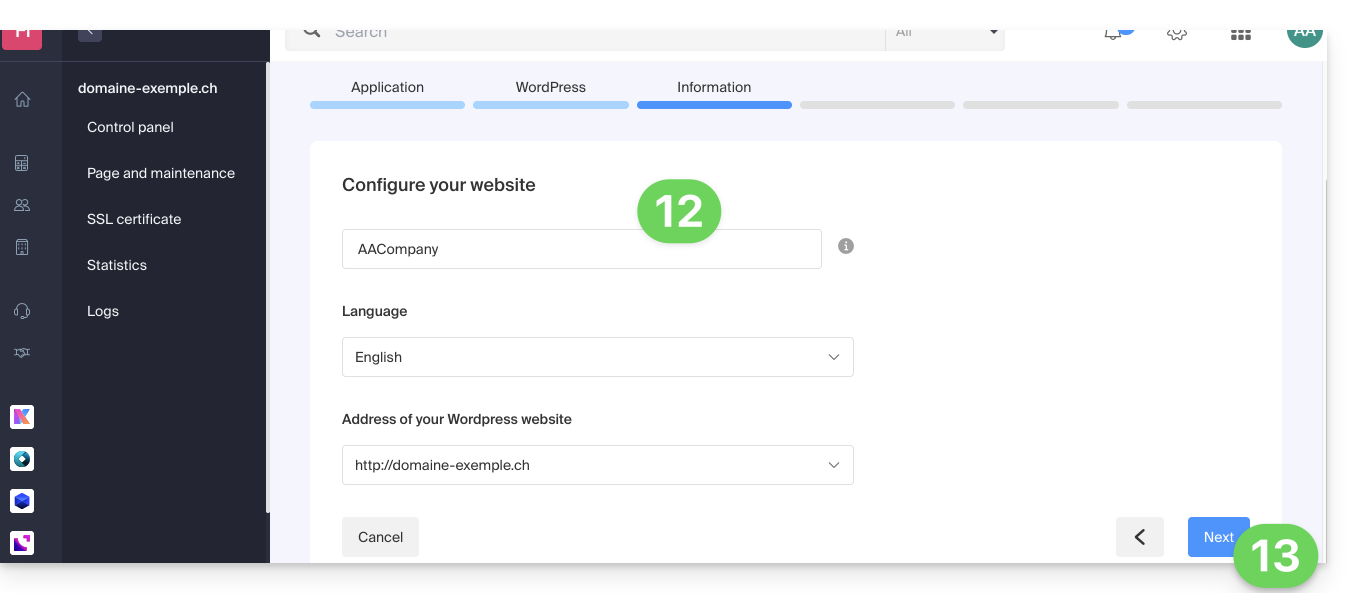
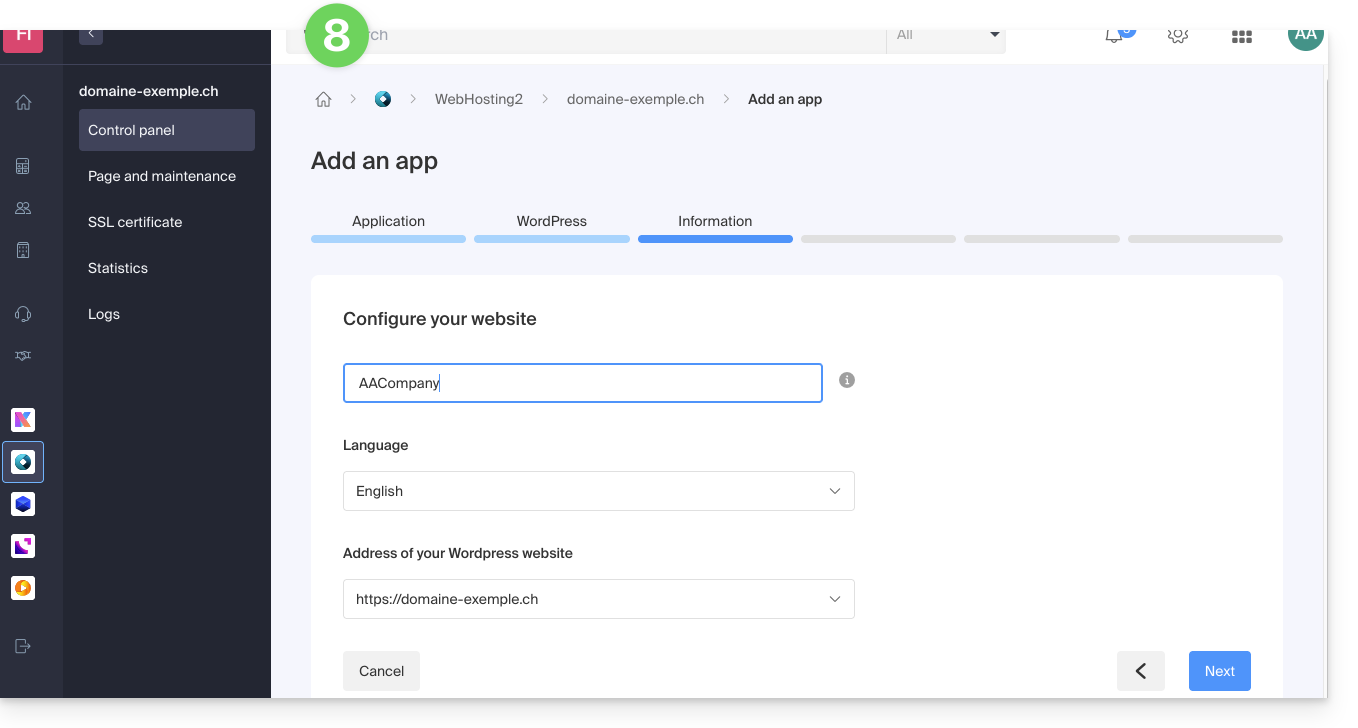
- Enter the information related to your site (it is possible to modify this information at any time after installation).
- Click the Next button:
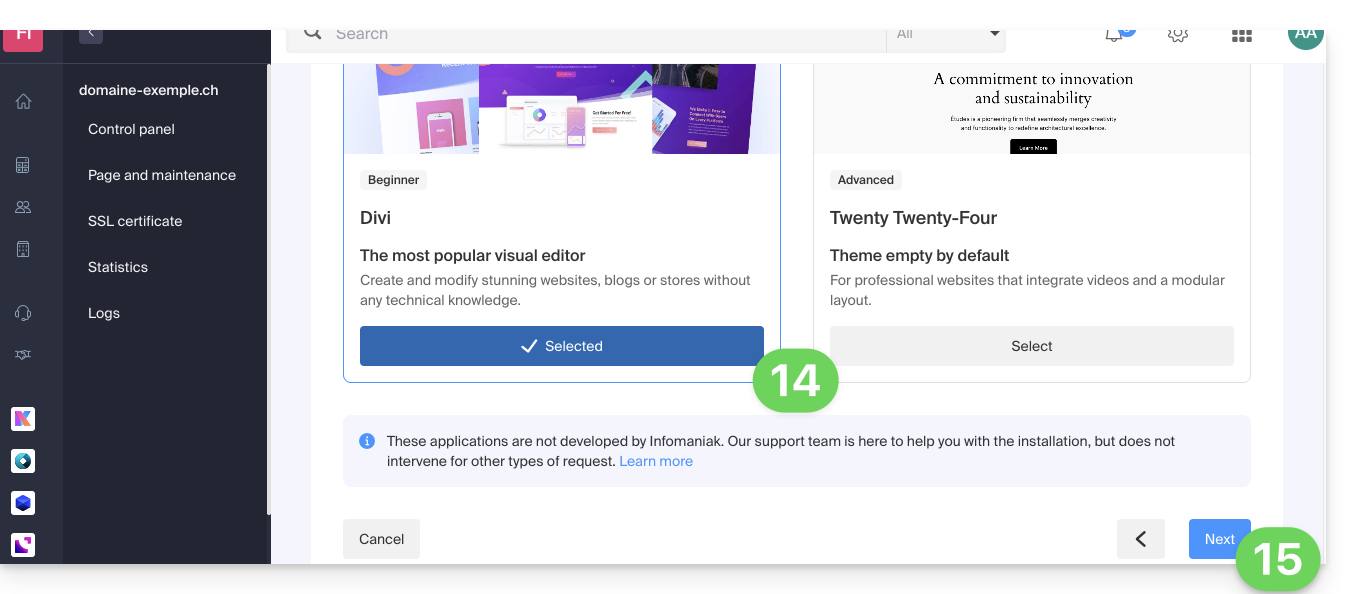
- Choose between the Divi theme and the official theme of the latest WordPress version (it is possible to modify this information at any time after installation).
- Click Next:
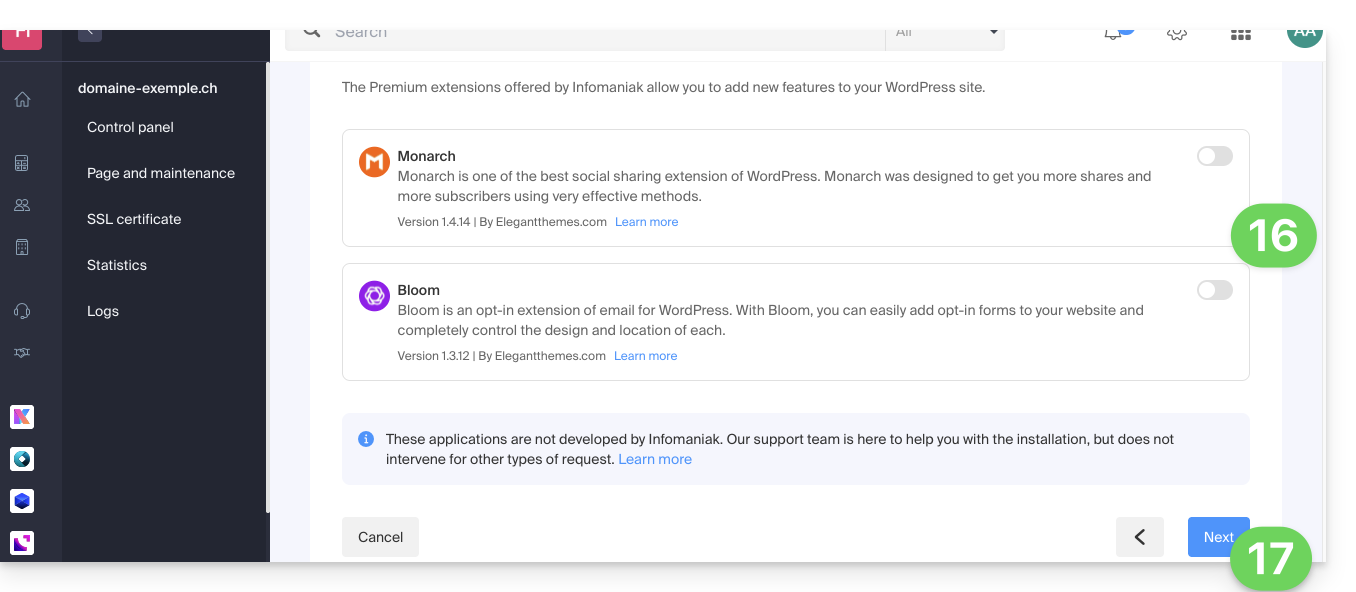
- Choose to install or not two Premium extensions offered with your subscription: Monarch and Bloom.
- Click on Next:
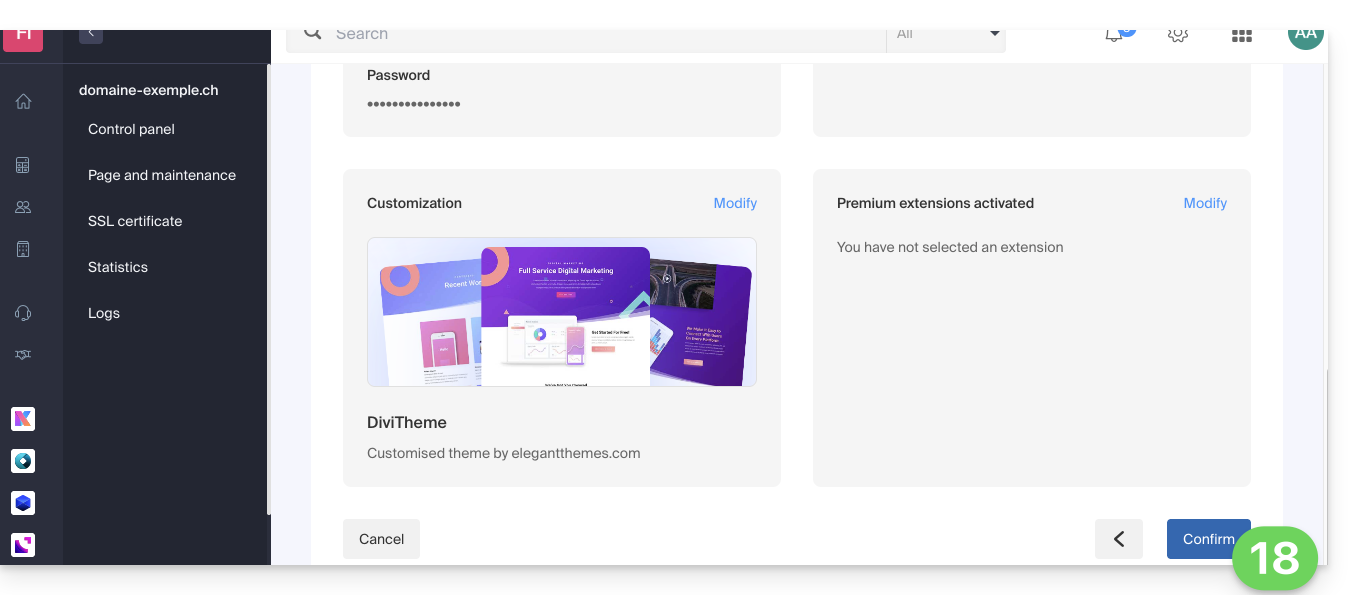
- Confirm the installation from the summary page:
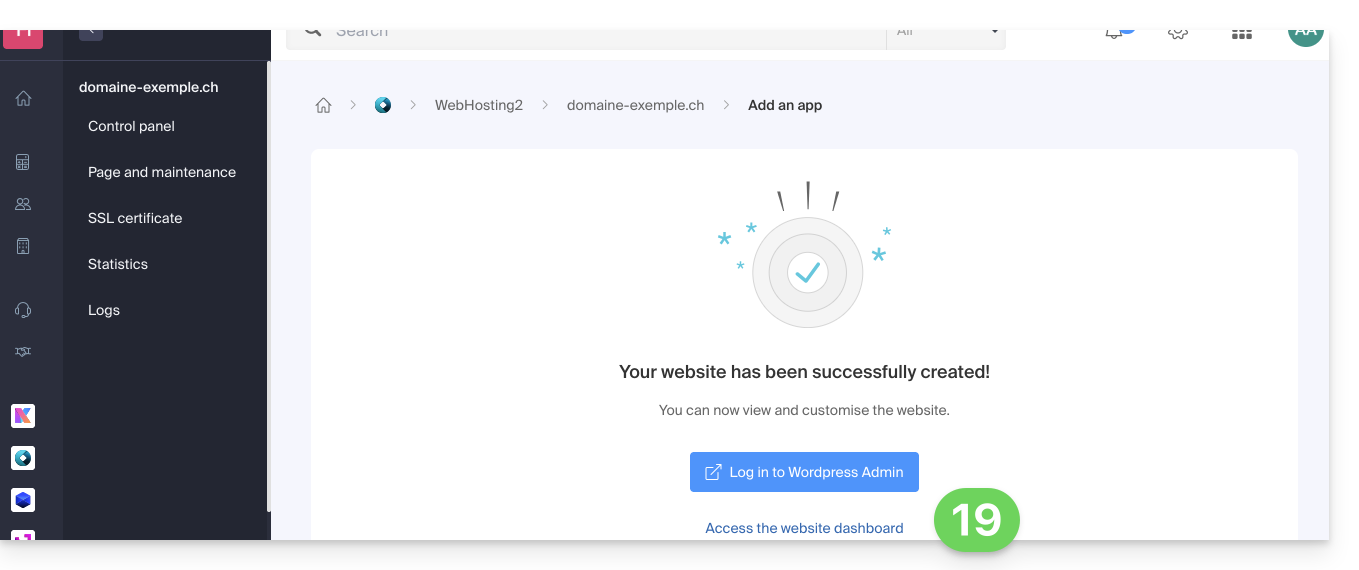
- You can then log in to the WordPress dashboard or return to the Infomaniak site management:
Install WordPress on an existing blank site
To access the existing blank site on the hosting and install WordPress:
- Click here to access the management of your site on the Infomaniak Manager (need help?).
- Click directly on the name assigned to the site concerned:
- Click the button to add an application:
- Choose to install WordPress:
- Click the Next button at the bottom of the page.
- Enter the requested information, it will be used to log in to the WordPress dashboard (it is possible to modify this information at any time after installation).
- Click the Next button:
- Continue as from point 12 of the previous chapter above.
Uninstall Infomaniak WordPress
You can delete a WordPress site:
- by completely removing the website from the hosting (and keeping or not the WordPress data, databases, etc.)
- by keeping the website on the hosting but removing the WordPress app…
Option 1
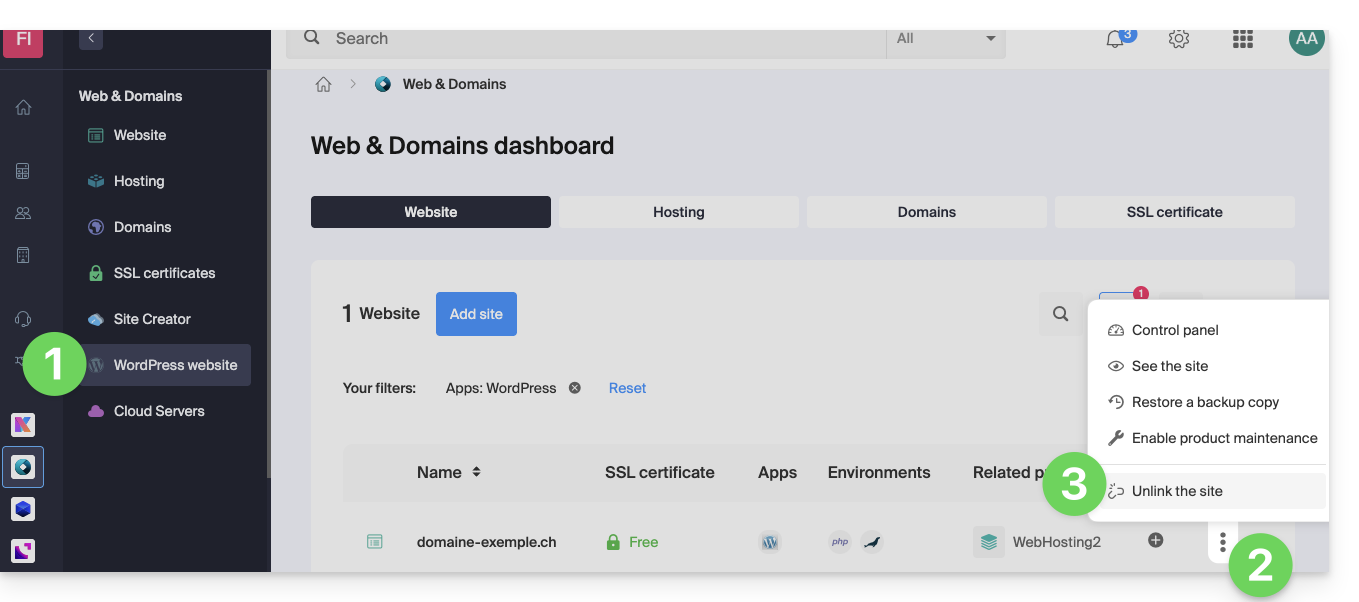
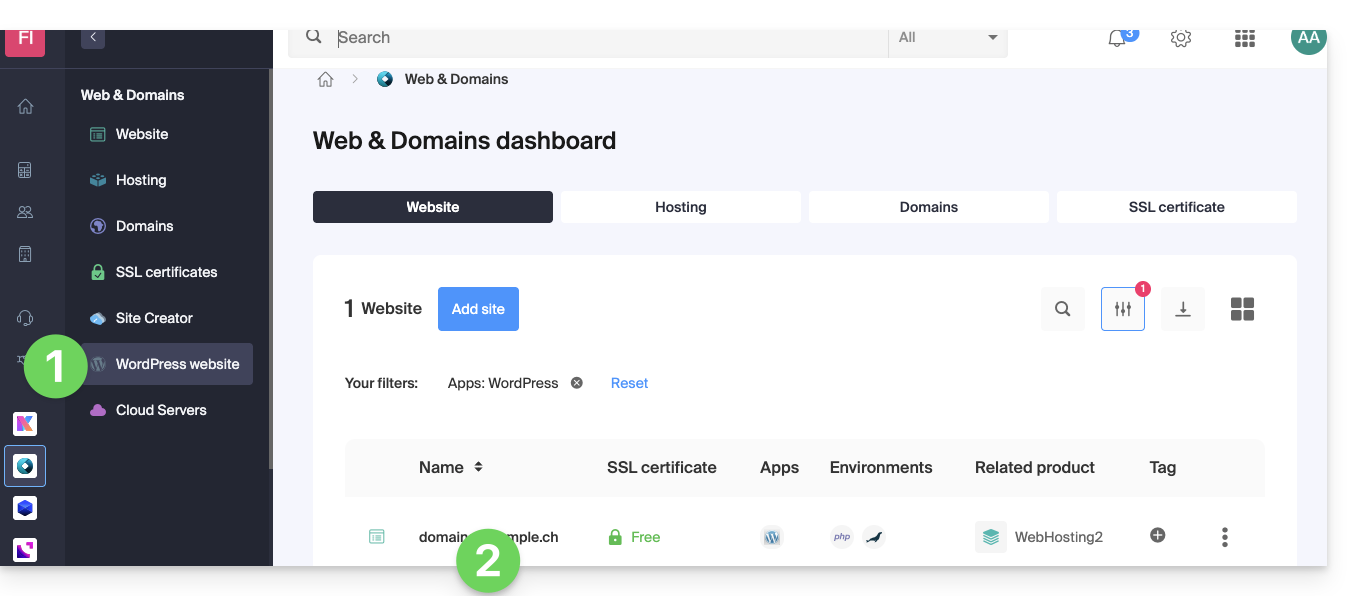
- Click here to access the management of your WordPress site on the Infomaniak Manager (need help?).
- Click on the action menu ⋮ located to the right of the item concerned.
- Click on Unlink the site:
- Choose whether you want to delete everything or keep a trace of the WordPress data on the hosting server anyway:
- If you check the box, nothing will remain in the Manager (except backups):
and nothing on the server: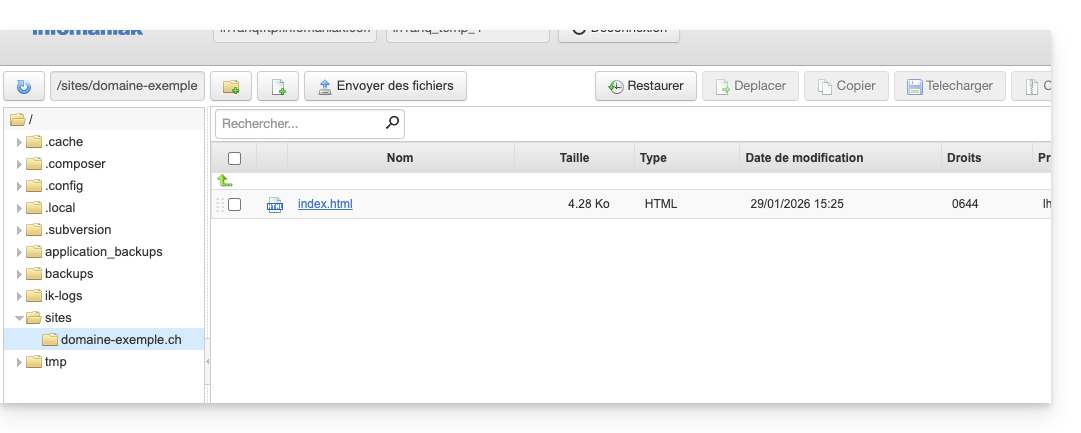
- If you do not check the box, nothing will remain in the Manager (except backups):
but the WordPress files will still be accessible on the server: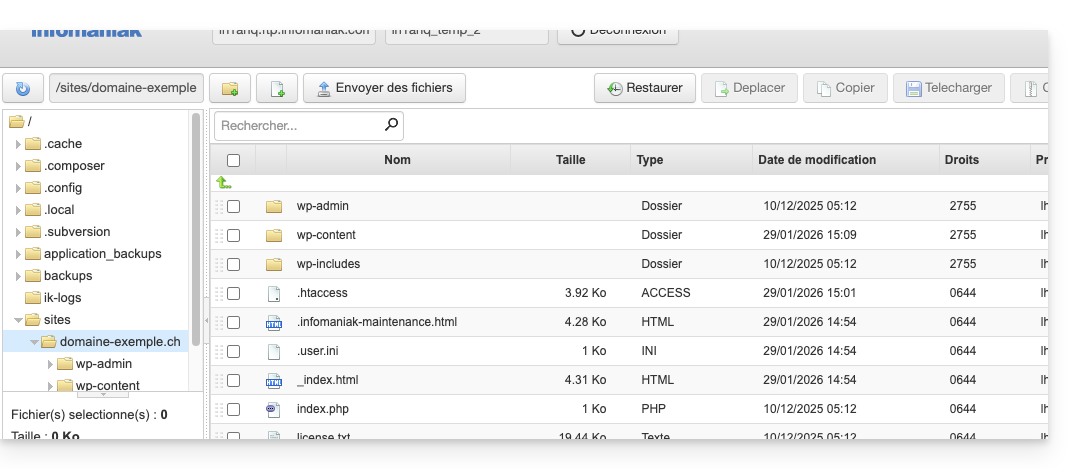
And you will get an error if you later attempt to reinstall a new WordPress site in the same location with the same domain name: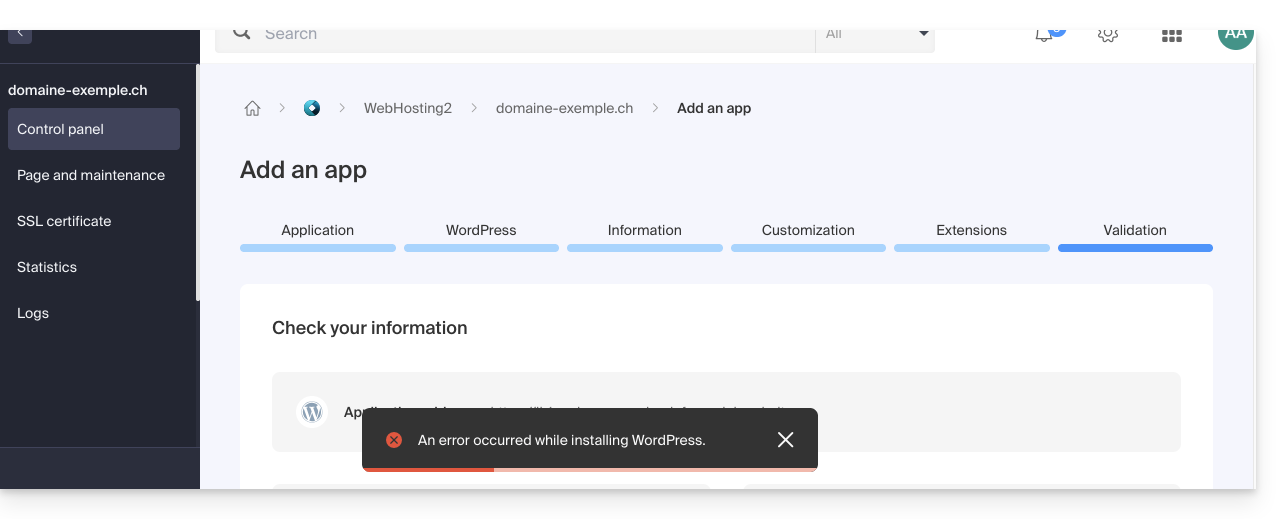
- If you check the box, nothing will remain in the Manager (except backups):
- Confirm the deletion.
- Click to delete and wait.
Option 2
- Click here to access the management of your WordPress site on the Infomaniak Manager (need help?).
- Click directly on the name assigned to the site in question:
- Click on the action menu ⋮ located to the right of the item concerned.
- Click on Delete the app:
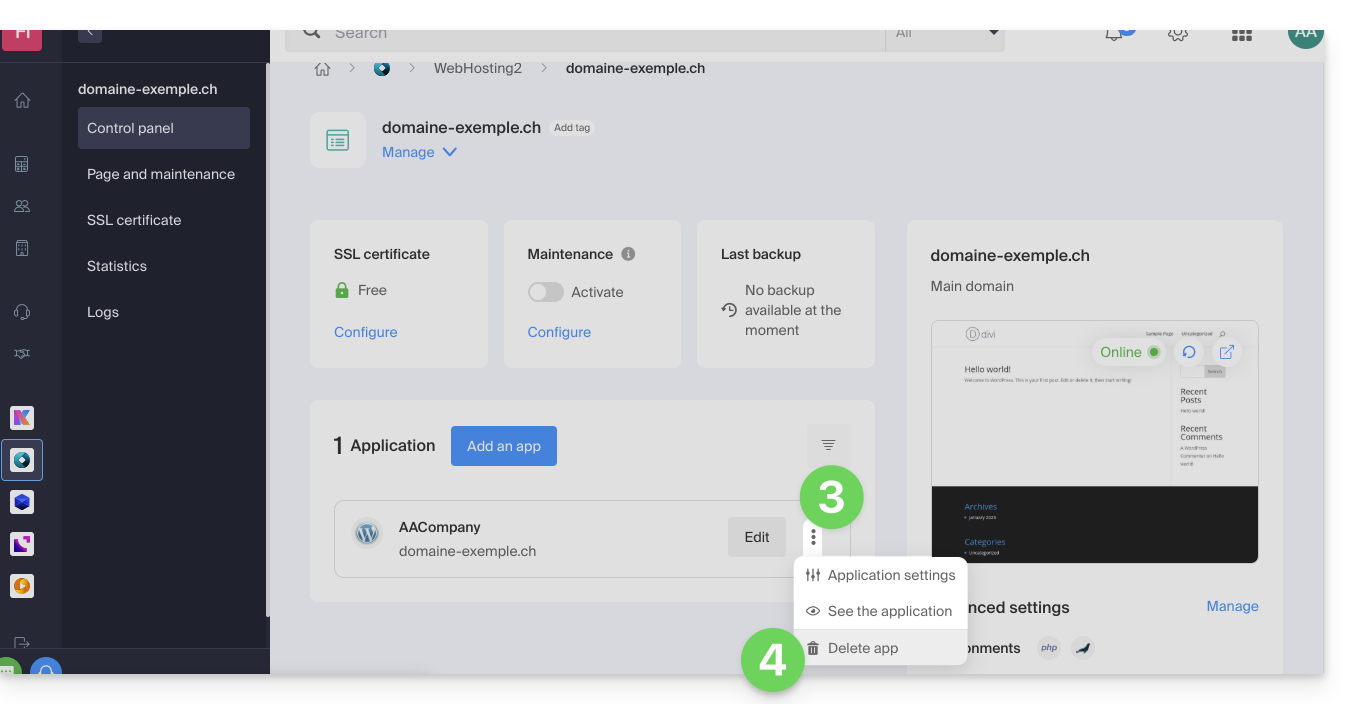
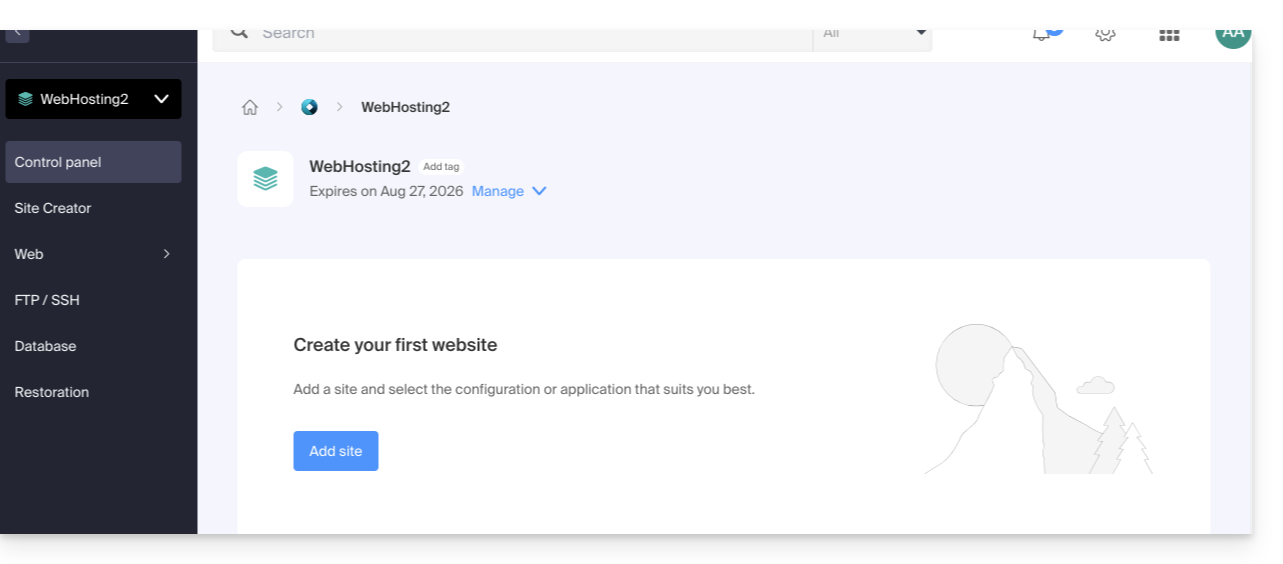
- Confirm the deletion and wait, your hosting will still contain a site but without an installed application:

Learn more
This guide details how to work on a WordPress site with a development environment.
Preamble
- The process can be used at the beginning of a staging process, i.e., the creation of a new version of your live website in a development or test environment:
- This allows website owners to test features, security updates, plugins, themes, WordPress updates, and content changes without risking disruptions or issues on the live site.
- Once the tests have been completed and the changes have been validated on the staging copy, they can be deployed to production (on the live site) using automated deployment tools or by making the changes manually.
- Make your life easier! If needed, local partners referenced by Infomaniak can handle these procedures. Launch a free call for tenders. They take care of everything, freeing you from technical details.
Simple method
To install and prepare a new WordPress site with the Infomaniak installer without overwriting your current website:
1. Install WordPress in a second location
Refer to this other guide to create the new site (in parallel with the old site domain.xyz) by assigning it a domain name in the form new.domain.xyz for example and installing WordPress via Web Applications (Infomaniak WordPress installer).
At this stage, the main site (domain.xyz) remains untouched and you can quietly work on the new site new.domain.xyz. Both work in parallel.
2. Replace the old site with the new one
Once the new site is complete, you can delete the first site to reuse its domain name on the new one:
- Delete the old site to make the domain name available and reuse it.
- Add domain.xyz as an alias of
new.domain.xyz. - Reverse the alias with the main domain.
- Remove (unlink/delete)
new.domain.xyzwhich has become an alias. - As a precaution, check the main URL of the WordPress site via the Web Applications dashboard on the Infomaniak Manager, to ensure it corresponds to the new name and not to the subdomain you had chosen.
Advanced method
To work on an existing WordPress site without modifying its public version, it is recommended to proceed in 3 steps:
- Duplicate the existing site
- Work on its copy afterwards
- Modify the target directory of the production site to the directory of the production environment and modify the URLs of the pre-production site according to the domain name of the production site using a WordPress extension or via phpMyAdmin.
1. Duplicate the site to a second location
- Refer to this other guide to create the new site (in parallel with the old site
domain.xyz) by assigning it a domain name in the formnew.domain.xyzfor example and installing WordPress via Web Applications (Infomaniak WordPress installer). - Copy your existing site and paste it onto the newly created second WordPress site using a WordPress extension.
2. Edit the duplicated site
- At this stage, the main site (
domain.xyz) remains untouched and you can quietly work on the new sitenew.domain.xyz. Both work in parallel. - It is recommended to install a WordPress extension (there are dozens) dedicated to putting the second site into maintenance mode.
- If you modify the structure of your site and the URLs of your articles/pages will change, you can use a free extension like Redirection to automatically create redirects. This will prevent your visitors from encountering 404 pages while search engines re-index your site or if external sites link to your site.
3. Replace the target
- Once you have finished redesigning your site, all you have to do is modify the target directory of the production site to the directory of the production environment and modify the URLs of the pre-production site according to the domain name of the production site using an extension.
- If you are using a caching extension like WP-Rocket, W3 Total Cache, or WP Super Cache, it will be necessary to completely clear all the cache or even deactivate and then reactivate the plugin.
- If you continued to modify your production site during the redesign of your site, it will be necessary to retrieve your modifications (articles, media, pages, etc.).
- After the usual checks (missing images, incorrect links, etc.), all you have to do is deactivate the maintenance mode of your site and admire the result.
This guide explains how to set up a WordPress multisite network to manage multiple sites from a single Infomaniak WordPress installation, with URLs of the type site1.domain.xyz, site2.domain.xyz, or even with domain1.com, domain2.com, etc.
Make your life easier! If needed, local partners referenced by Infomaniak can handle these procedures. Launch a free call for tenders. They take care of everything, freeing you from technical details.
Installing WordPress multisite
To get started:
- Install WordPress via Infomaniak on your hosting space with a main domain name:

- This first WordPress site must be reachable and function correctly:

- This first WordPress site must be reachable and function correctly:
- Connect via FTP.
- Edit the
wp-config.phpfile of this first WordPress site concerned. - Above the line "
/* That's all, stop editing! Happy blogging. */" (#94) copy-paste the codedefine('WP_ALLOW_MULTISITE', true);:
- Save your changes.
- Then log in to the administration of your WordPress site.
- Temporarily disable all WordPress plugins:

- Go to the TOOLS menu to create a Network:
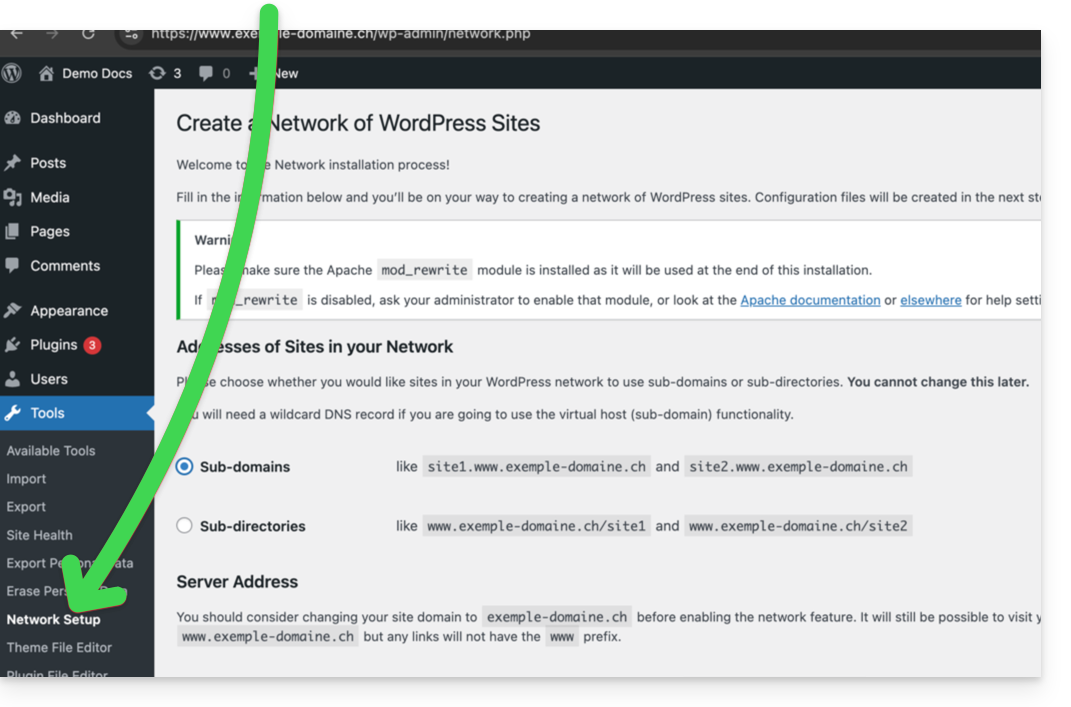
- Choose the method for creating your different WordPress sites (on subdomains)…
- Click the installation button:

- Add the instructions that appear on the screen to the
wp-config.phpand.htaccesson the server. - After reconnecting to your WordPress, you will get a new "My Sites" menu in which you can add and manage your different sites from the same network:

- Re-enable your disabled plugins.
- On the Manager, add an alias to your site in the form
*.your-domain-here (the asterisk allows you to create a wildcard alias) with DNS update so that the correctCNAMEis automatically added to the zone:
- Install or update your SSL certificates:

- When you create a new site within the network, for example by naming it
home2, it will then be accessible viahome2.domain.xyzand so on:
This guide provides tips to perform operations related to a WordPress site, which allows, among other things, to…
- … copy and migrate a WordPress site from a competing host to Infomaniak,
- … modify the domain name of a WordPress site,
- … backup an entire WordPress site…
Preamble
- Depending on the context, instead of doing a WordPress transfer, you can simply…
- … change the site address (the associated domain name) very easily if you have installed WordPress via the Infomaniak installer,
- … duplicate a WordPress site to work in parallel in a development environment…
- Make your life easier! If needed, local partners referenced by Infomaniak can handle these procedures. Launch a free call for tenders. They handle everything, freeing you from technical details.
Transfer a WordPress site…
… with the All-in-One WP Migration extension
- Requires installing a new clean WordPress (for example via the Infomaniak automatic installer) to import the old site onto it.
- —> Be aware of this guide.
… with the Duplicator extension
- Requires connecting to the hosting via FTP to send a
.ziparchive and a PHP file to reinstall the old site.- —> Be aware of this guide.
This guide explains how to add a free Elegant Themes (Divi) theme to an already installed WordPress site via the Infomaniak installer.
Prerequisites
- Your WordPress site must be installed via the Infomaniak WordPress tools to use these themes and extensions.
- The theme can be added during installation (approximately step 14 of this other guide) or activated later.
- To benefit from Elegant Themes support (customer service) you must subscribe to an Elegant Themes offer.
Add an Elegant Themes theme
To do this:
- Click here to access the management of your WordPress site on the Infomaniak Manager (need help?).
- If your site does not appear here, it means it was not installed via the Infomaniak tools… Refer to the prerequisites above.
- Click directly on the name assigned to the product concerned:

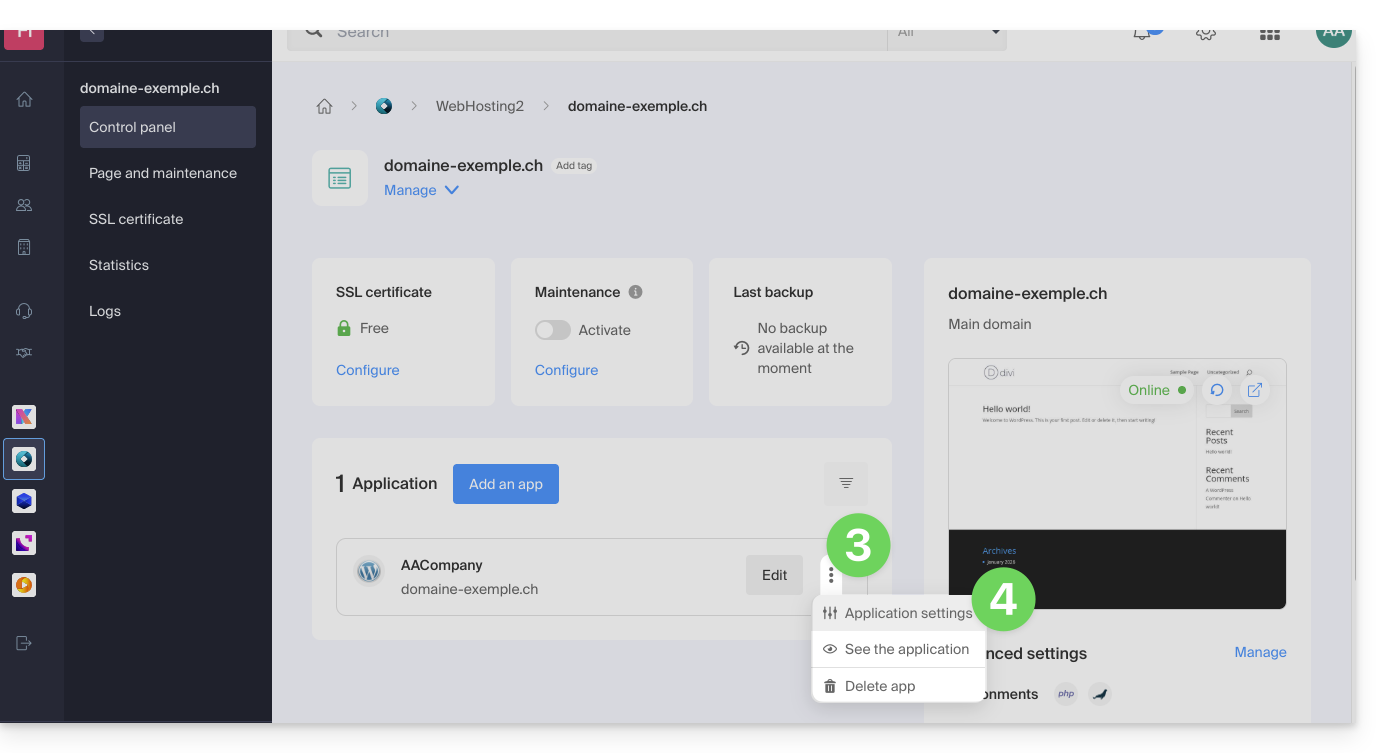
- Click on the action menu ⋮ located to the right of the Web Application concerned.
- Click on Settings of the application:
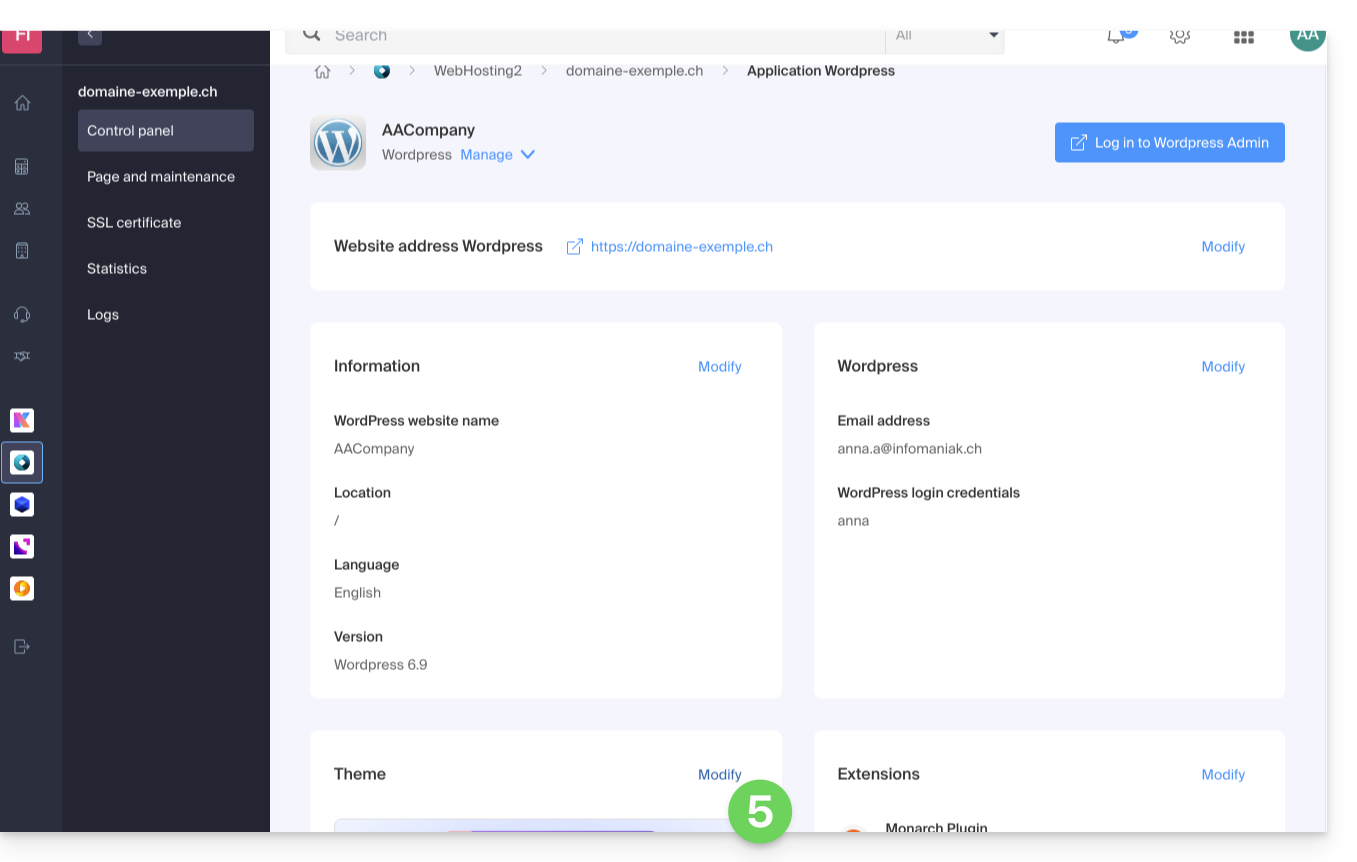
- Click on Modify under Theme:
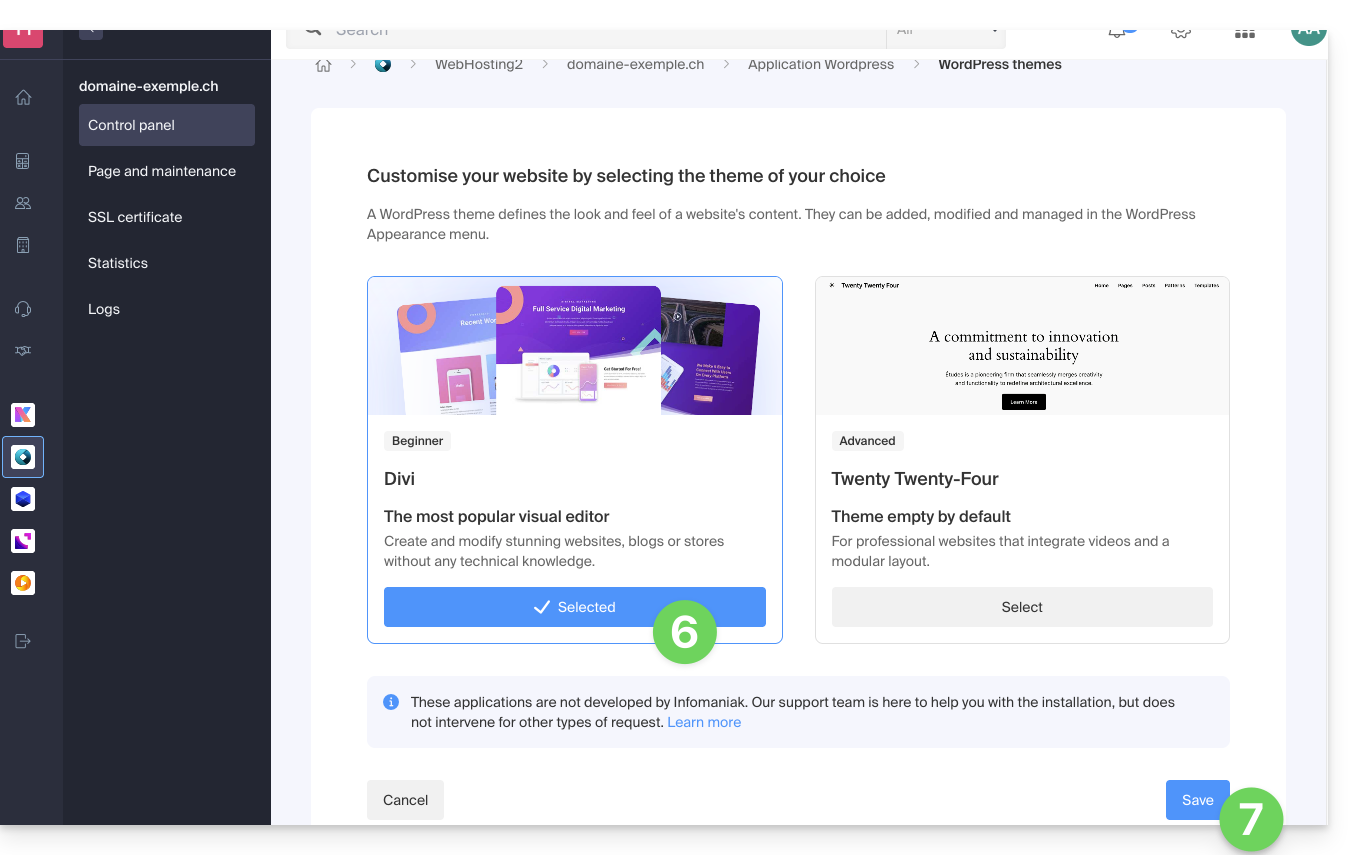
- Select the desired theme.
- Click on the Save button:
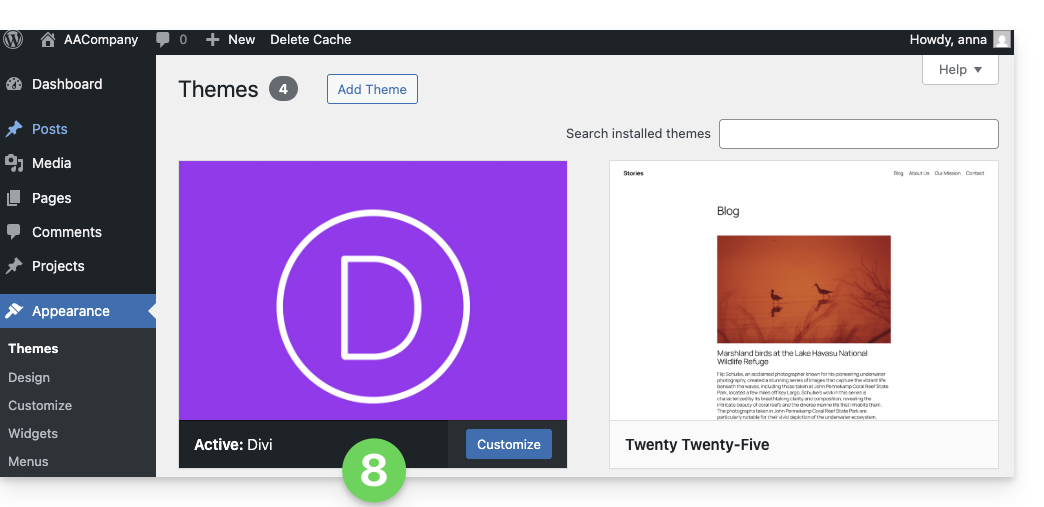
- The theme is applied and available to be configured in your WordPress admin interface:
Use an Elegant Themes extension
Refer to this other guide to install an Elegant Themes extension with Infomaniak.
This guide explains how to install a new Web Application (Joomla, Drupal, Typo3, PrestaShop, etc.) in a few clicks on the paid Web Hosting offers.
Prerequisites
- Have an Infomaniak Web Hosting (order if necessary).
- Add a blank website to the Infomaniak hosting.
Specific guides
Refer to these guides if you are concerned with the specific installation of:
Refer to this other guide regarding additional technologies that can be installed in a few clicks but on Cloud Server only.
Guides for any other Web Application
To access Web Hosting and install a Web Application:
- Click here to access the management of your product on the Infomaniak Manager (need help?).
- Click directly on the name assigned to the product concerned.
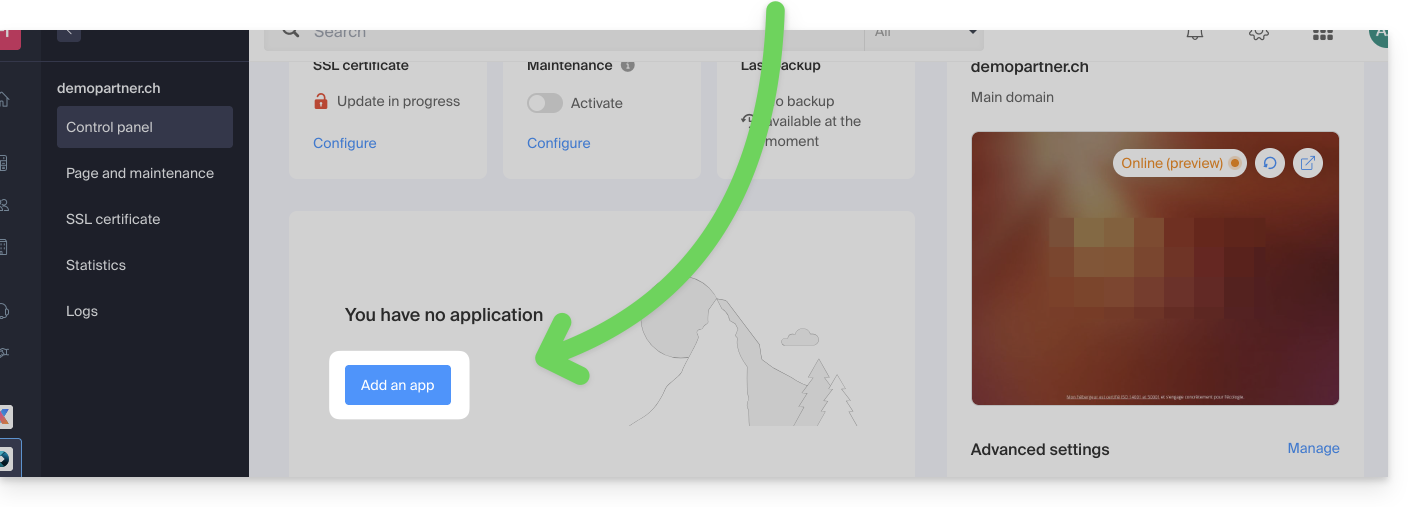
- Click on the button Add an app:
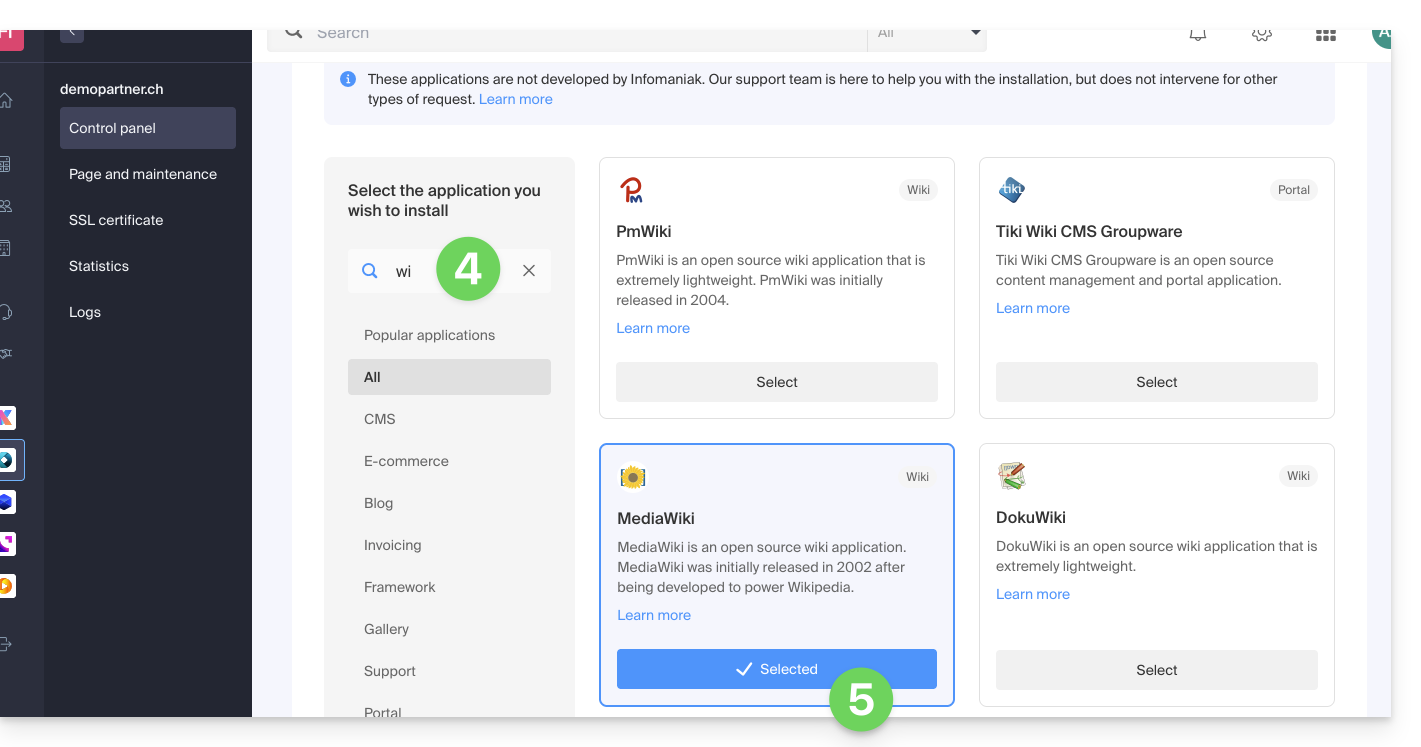
- Choose the desired application (if necessary, filter and search).
- Click on Select:
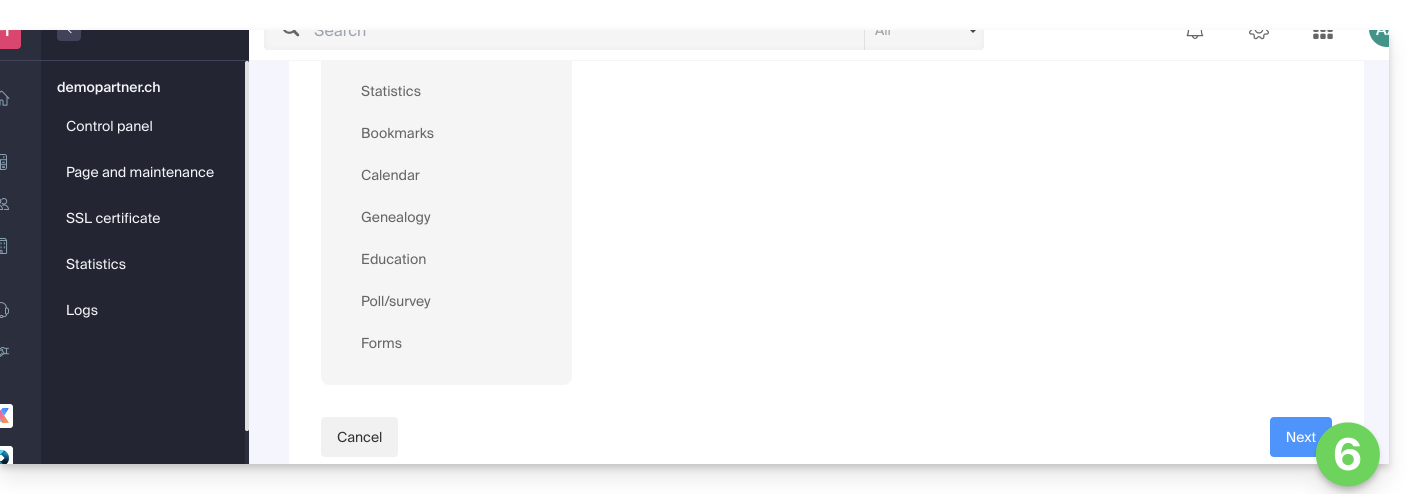
- Click on Next at the bottom of the page:
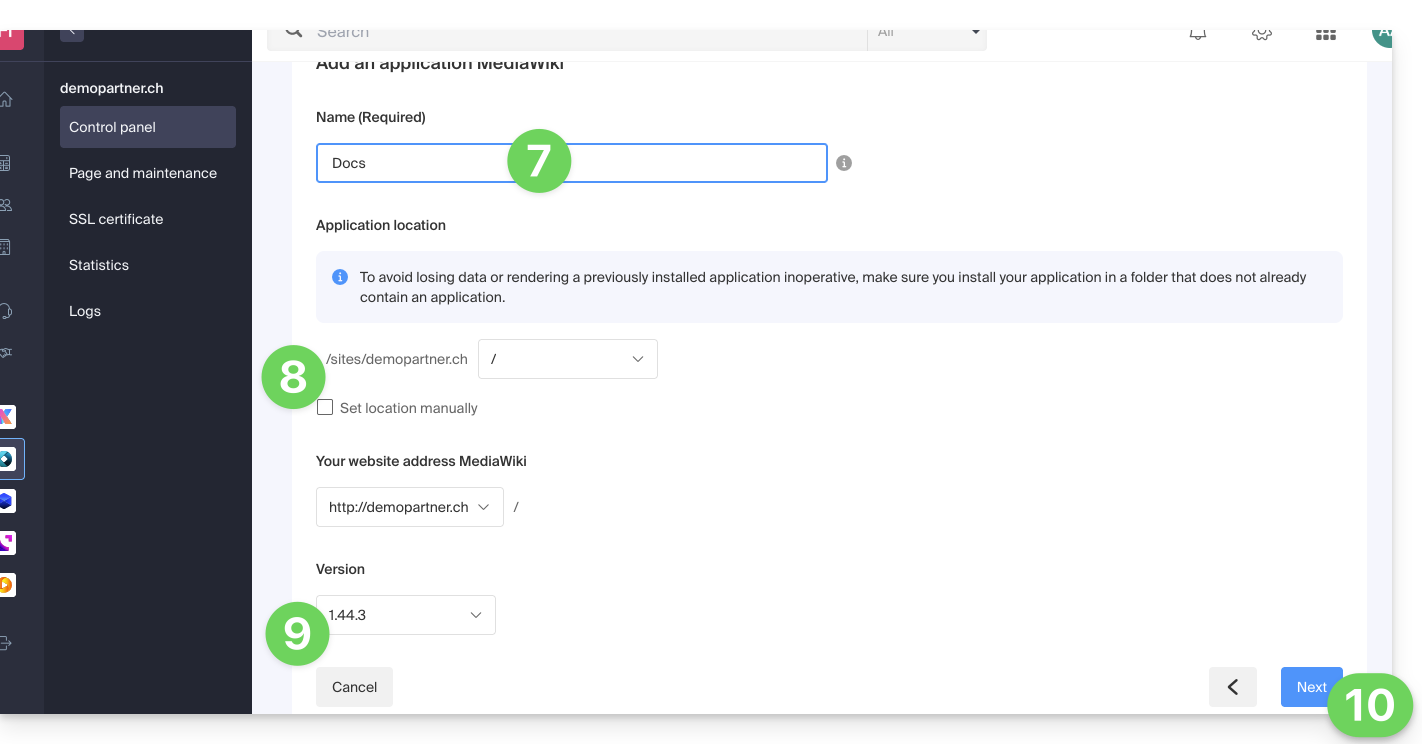
- Enter a name.
- Leave the default location or choose to install the app in a new folder that you can create thanks to an icon visible to the right of point 8 in the image.
- Optionally, choose to install an earlier version if necessary.
- Click on Next:
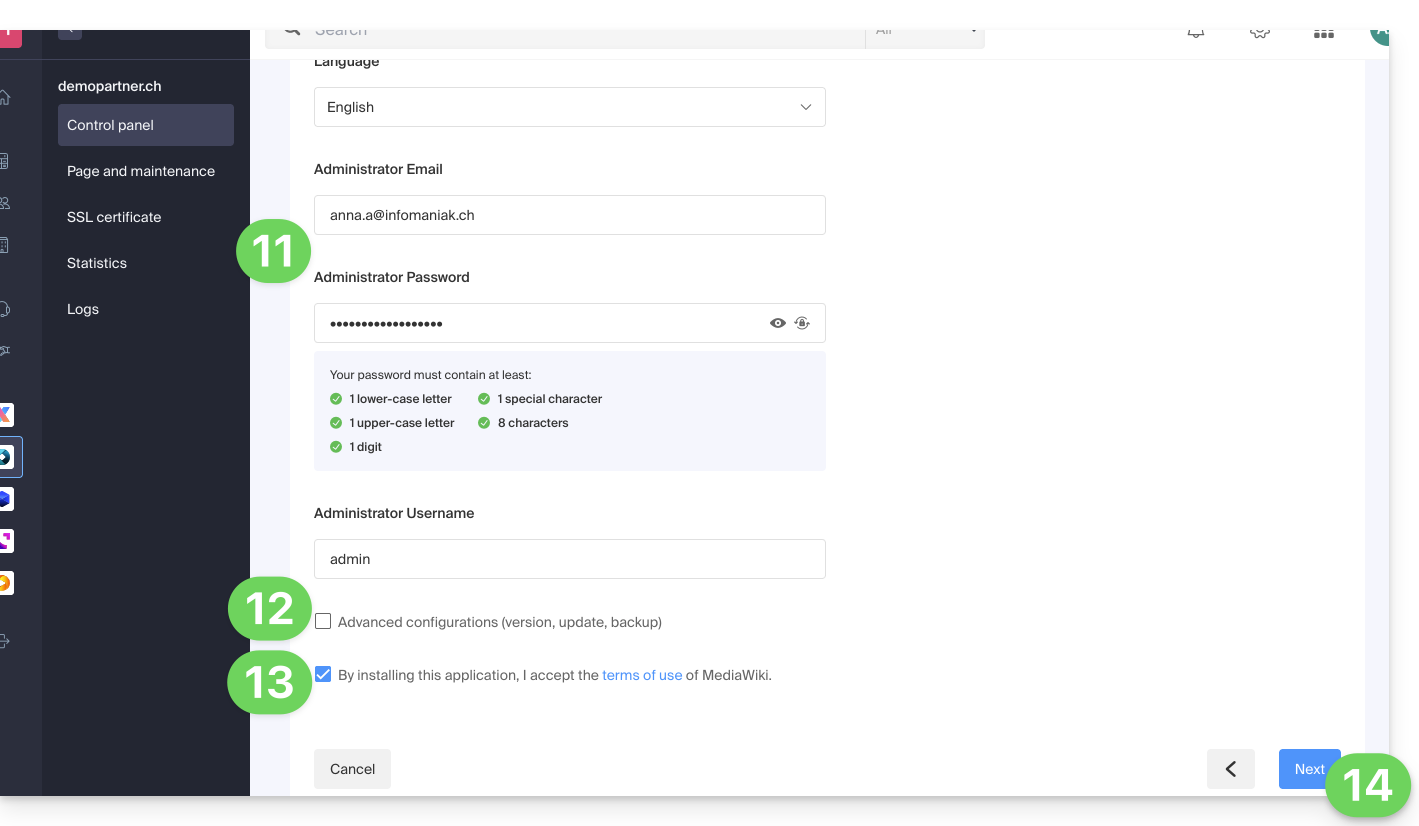
- Configure username and password.
- Specify certain advanced settings if necessary (backup type in particular).
- Read and accept the terms of use of the selected app.
- Click on Next:
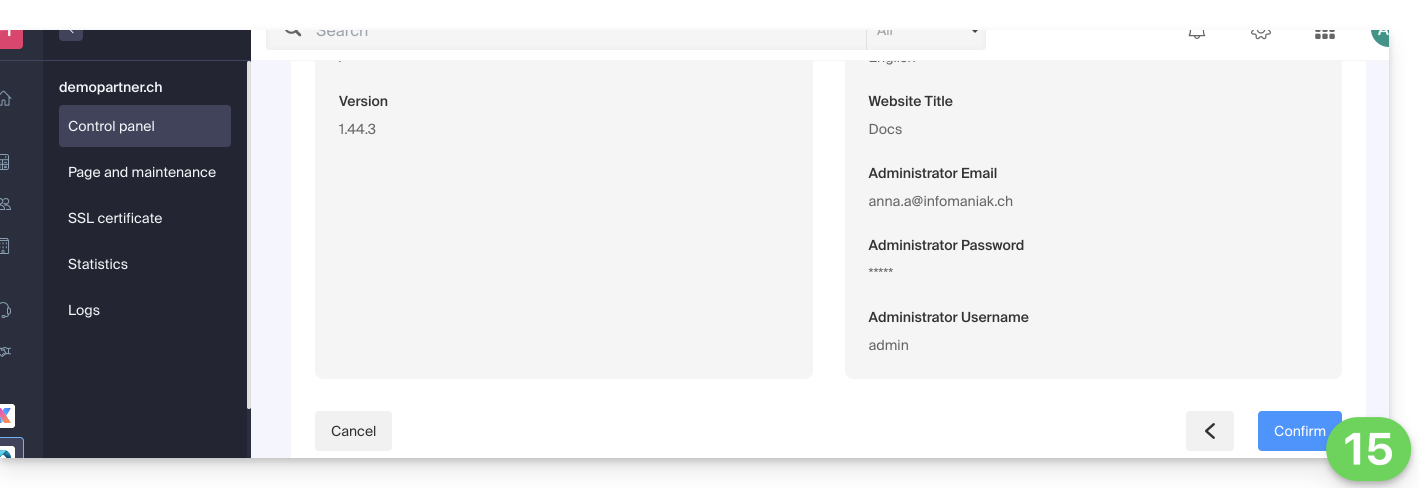
- Confirm the installation of the application in the next step and wait:
- Take note of any error messages on the screen, for example if the chosen installation folder is not empty or if the PHP version of the site on which you are attempting the installation is not compatible.
Uninstall a Web Application
To access Web Hosting and uninstall the previously installed application:
- Click here to access the management of your product on the Infomaniak Manager (need help?).
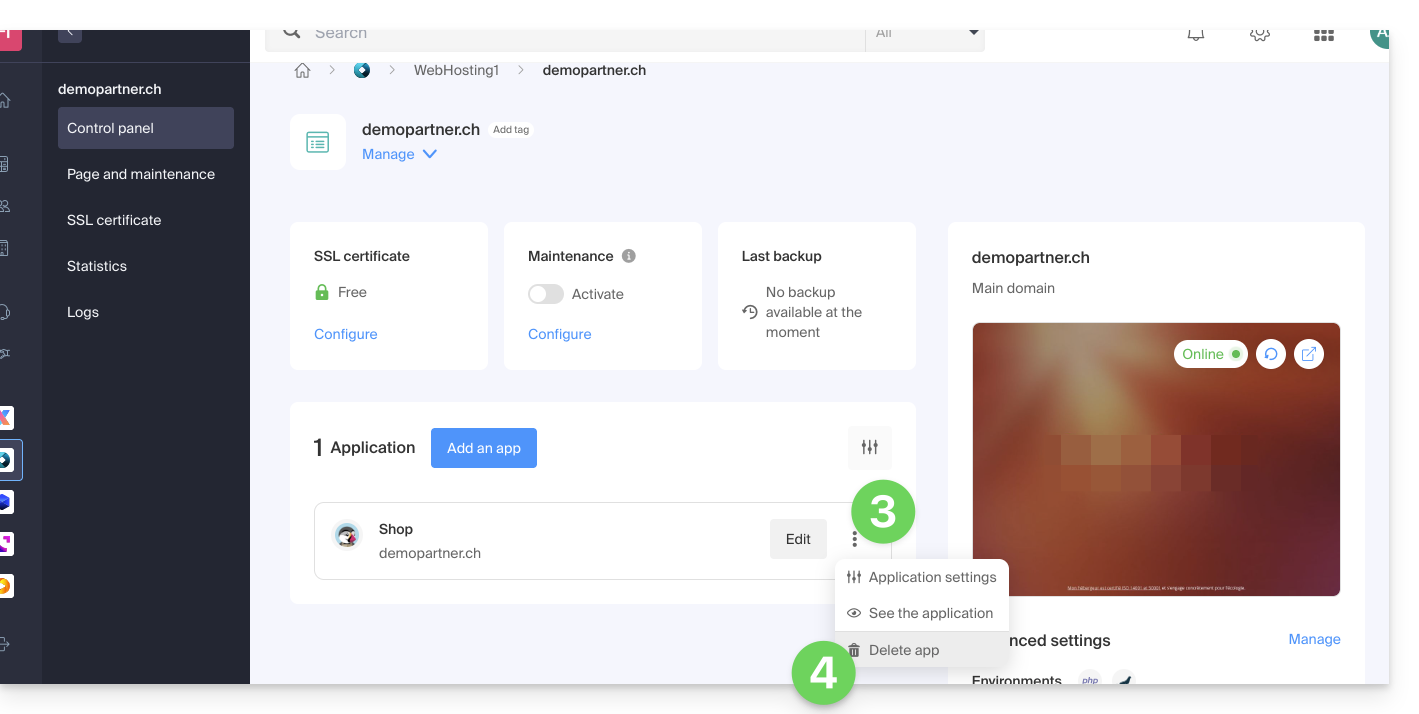
- Click directly on the name assigned to the product concerned.
- Click on the action menu ⋮ located to the right of the application to be uninstalled.
- Click on the trash can icon to delete the application:
- Confirm the deletion.
Conversely, you can also remove an entire site without deleting the application itself; simply do not check the following box when deleting the site: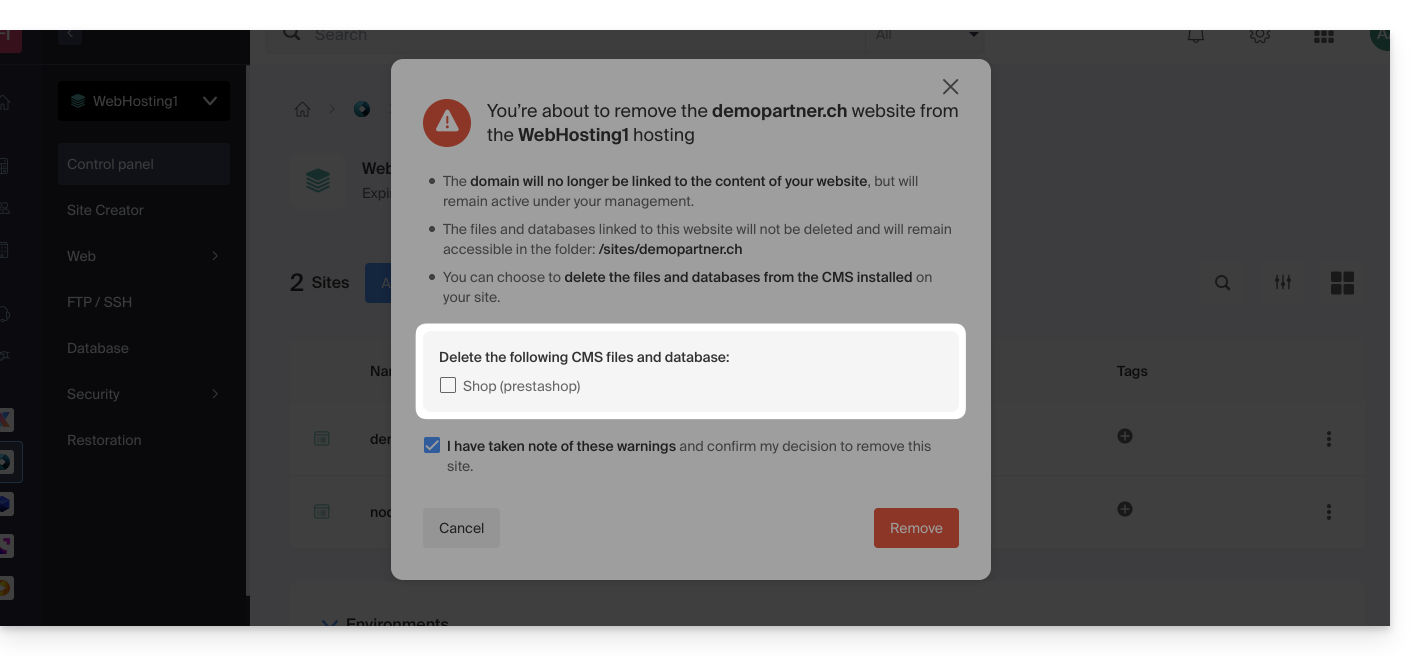
Learn more
- Modify the domain name associated with the Web Application
- Configure Web Application backups
- Restore a Web Application
This guide explains how to replace the main domain name associated with a Website (excluding Starter hosting) hosted on Infomaniak in case you want to change the name of your activity or modify the spelling.
Preamble
- It is not possible to simply modify the spelling of the domain name in question.
- You must own the new domain name and install it in place of the current one by performing a reversal (see below).
- You can also rename your Web Hosting product in the Infomaniak Manager, but changing the name of a hosting has strictly no impact on the URLs of the sites.
- You need to act on the domain name and, if necessary, adapt the content of the site.
Change the domain name of the website
Prerequisites
- Prepare the new domain name (if necessary you need to buy it).
- Install a valid SSL certificate, otherwise the reversal will not be offered.
- If the modification sought is rather of the type "subdomain" to "main domain" (
dev.domain.xyz→domain.xyzfor example) then refer to this other guide.
Then, to replace the domain name assigned to the site with another domain name:
- Click here to access the management of your product on the Infomaniak Manager (need help?).
- Click directly on the name assigned to the product in question:
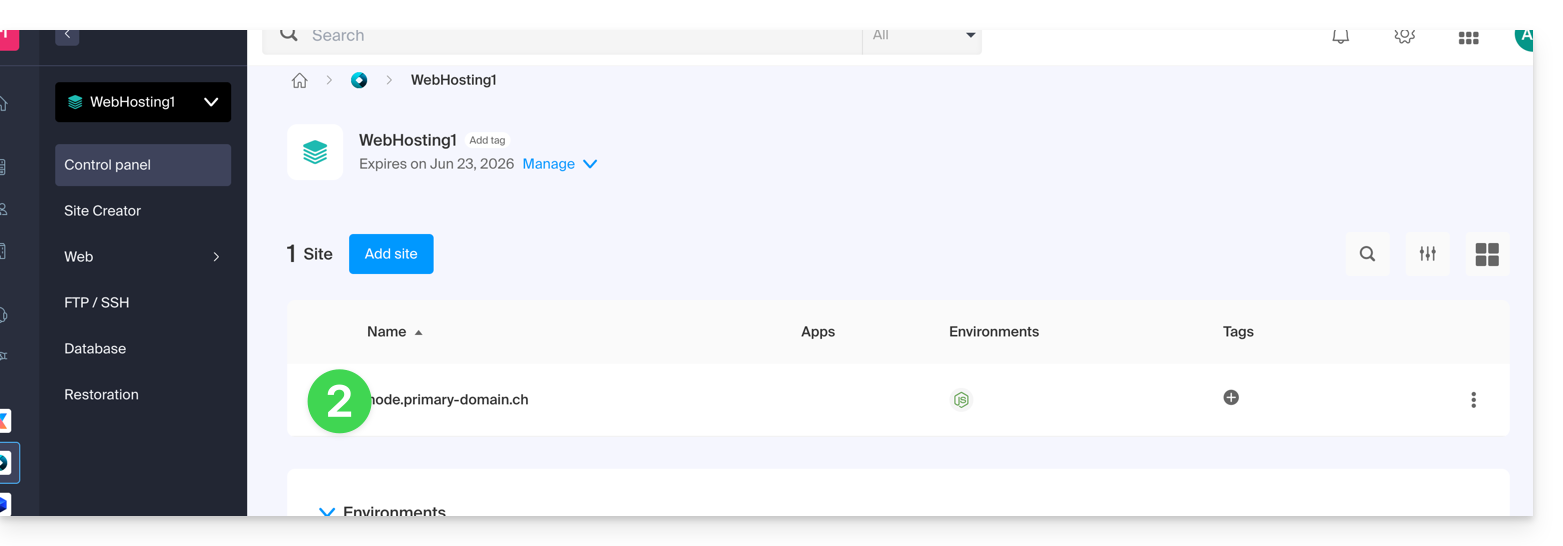
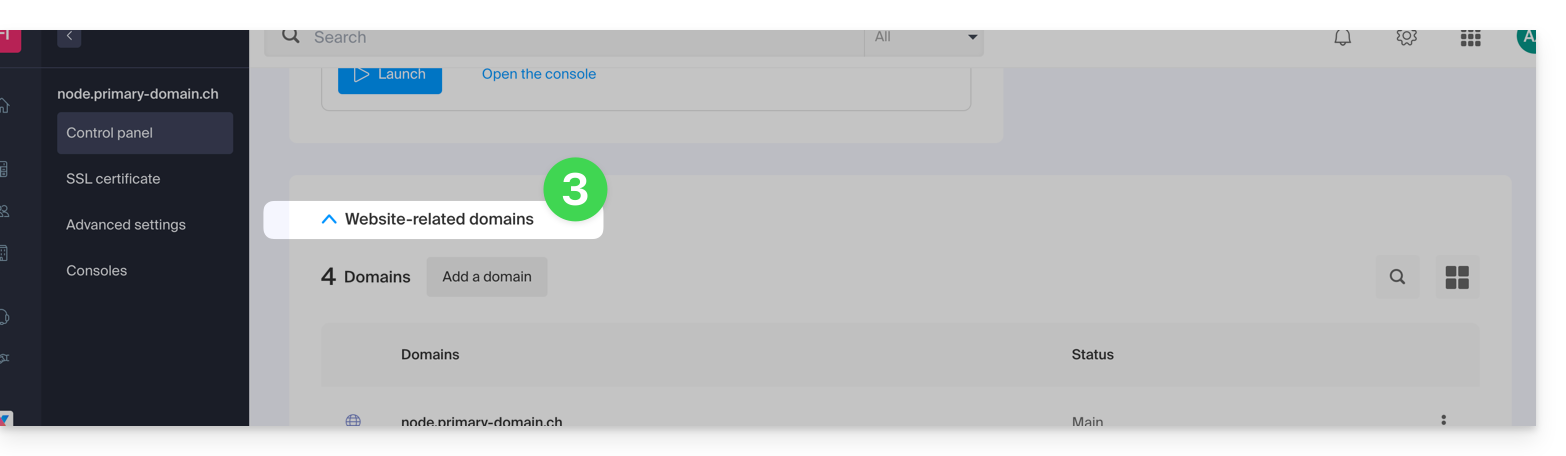
- Click on the chevron to expand the Domains section of this site:
- Refer to this other guide to link the new domain name to your site (read the prerequisites carefully):
- It is this new linked domain that will replace the current main domain name after the reversal you will perform below.
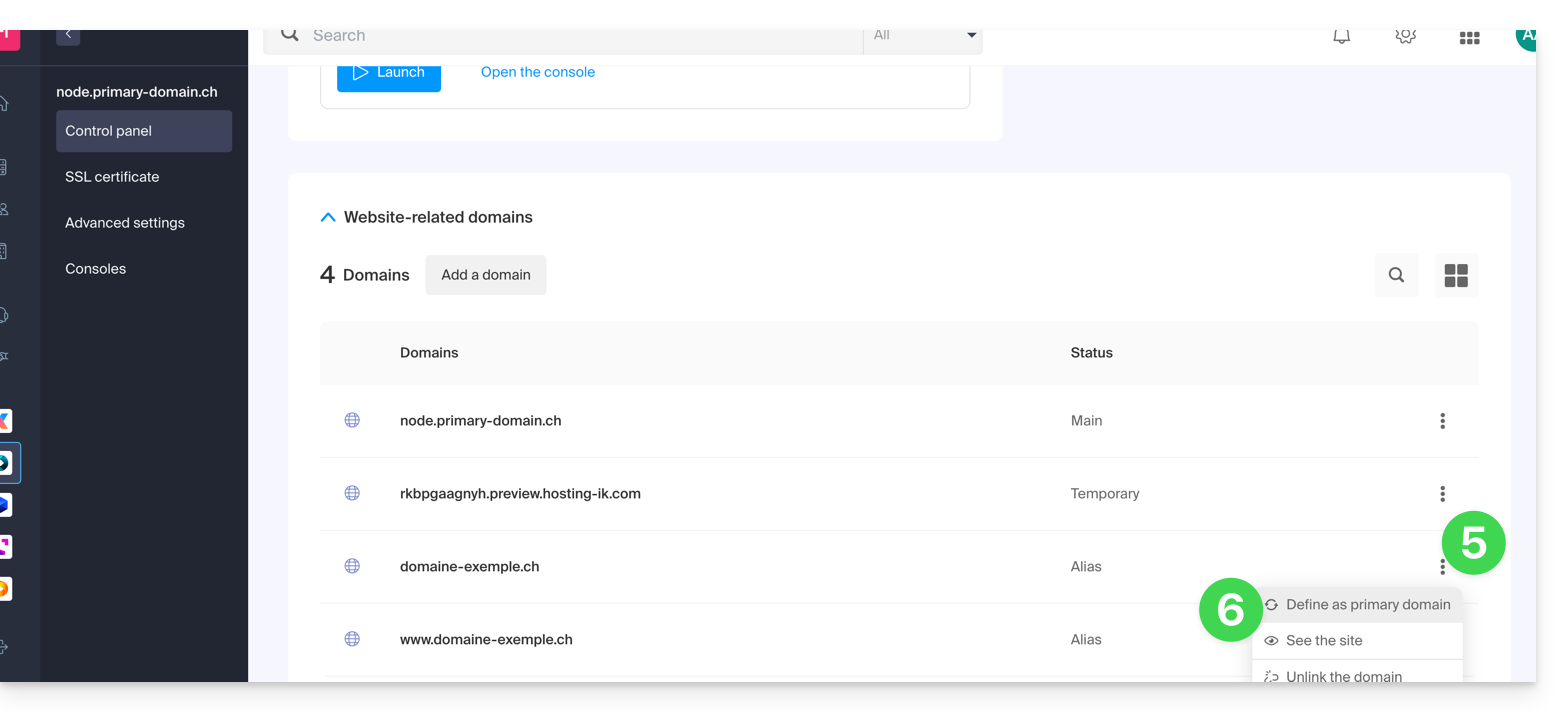
- Once the new domain name is linked to your site, click on the action menu ⋮ to the right of it.
- Choose Set as main domain:
- If necessary, delete the old domain name and its variants that have become alias domains alias (and no longer primary domains).
If you are using an SSL certificate, you will need to update it to include the added aliases.
If you are using the dedicated IP option, you need to uninstall it, and reinstall it after the reversal you are going to perform.
Adapt the site content to the new name
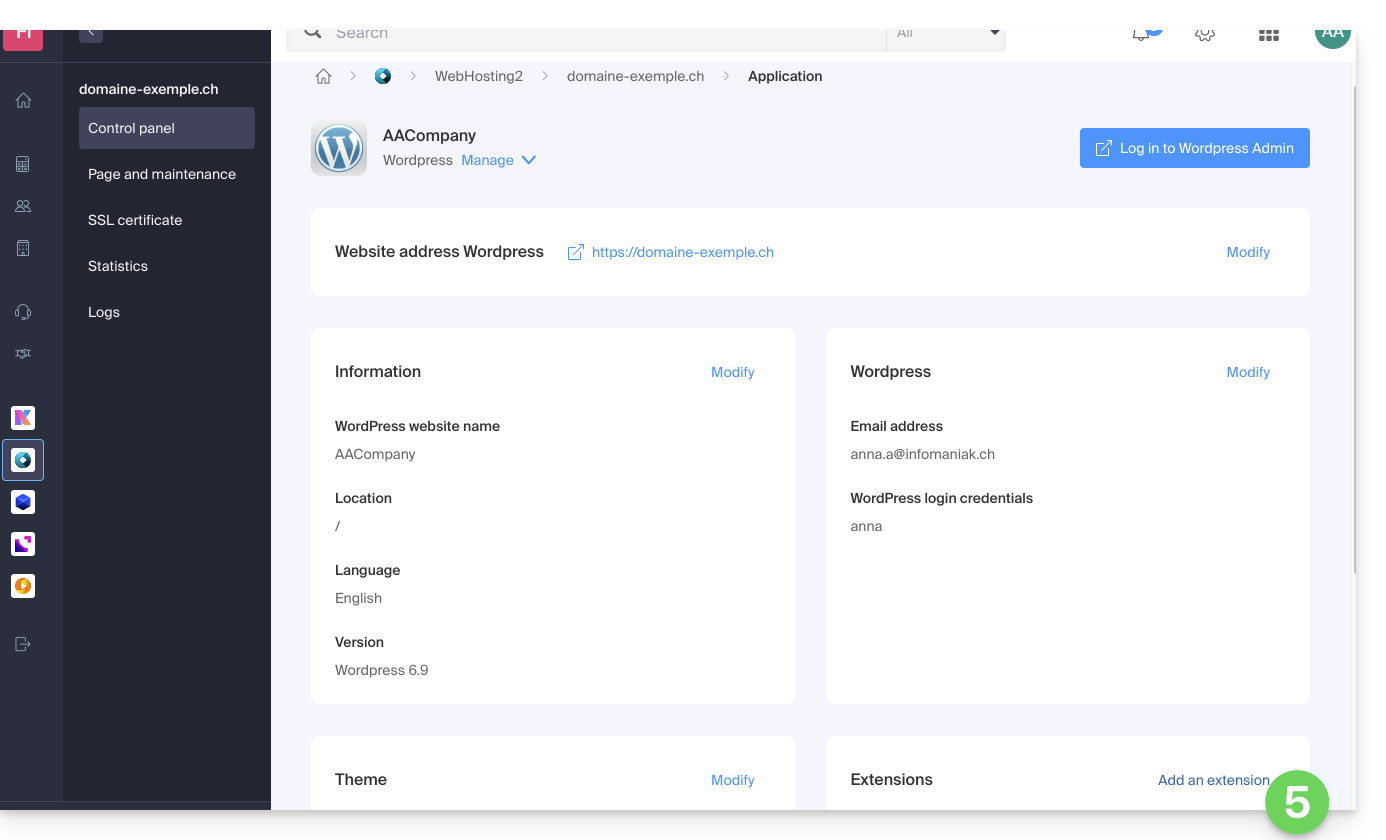
In some cases, the web application used for site development needs to be adjusted to work with the new domain name. Click on the link corresponding to the development of your site to adapt the content:
This guide details the Managed Cloud Server offer from Infomaniak and the VPS offer from Infomaniak, which are intended for different uses.
Preamble
- Infomaniak offers two advanced hosting solutions:
- the Managed Cloud Server, which allows you to create multiple hosts (FTP/SSH spaces) on which you add your sites (Apache vhosts),
- and the VPS (Virtual Private Server), which offers complete administrative freedom and meets different needs.
Managed Cloud Server
The Cloud Server allows you to go beyond the limits of shared hosting. You can create and distribute your sites as you wish, define the root directory of each site, and adjust parameters such as memory_limit and max_execution_time.
Integrated tools are provided: cronjobs, Site Creator, simplified installation of WordPress, access and error logs (logs). It is also possible to add specific Apache modules or install a caching system.
The software environment is managed by Infomaniak (FastCGI, PHP-FPM). You do not have complete freedom to configure the server (no arbitrary software installation), but certain specific programs can be installed.
VPS (unmanaged)
The VPS gives you full control over the server, but it is your responsibility. Infomaniak manages the hardware and installs the version of Linux or Windows chosen at the time of ordering. No software intervention is performed by Infomaniak: you administer the system, install, and configure the software.
You can restart the server via the Infomaniak Manager. A snapshot system is available (excluding the VPS Lite offer).
Video content and alternatives
If your project mainly involves a large volume of videos, it is often preferable to separate video streaming from the main hosting. Associated with shared hosting, the Infomaniak VOD/AOD space allows you to efficiently store and stream videos, support traffic spikes, and obtain detailed viewing statistics.
Migration between Cloud Server and VPS
There is no automatic migration solution between a Managed Cloud Server and a VPS. To switch from one offer to another, you must cancel the product you no longer use and order the new offer. Infomaniak refunds, upon request, any new server if the cancellation occurs within 30 days of the order.
This guide explains how to add a free Elegant Themes extension (Monarch, Divi Builder, Bloom, etc.) or a theme to an already installed WordPress site via the Infomaniak installer.
Prerequisites
- Your WordPress site must be installed via the Infomaniak WordPress tools to use these themes and extensions.
- Extensions can be added during installation (approximately step 16 of this other guide) or activated later.
- To benefit from Elegant Themes support (customer service) you must subscribe to an Elegant Themes offer.
Add an Elegant Themes plugin
To do this:
- Click here to access the management of your WordPress site on the Infomaniak Manager (need help?).
- If your site does not appear here, it means it was not installed via the Infomaniak tools... Refer to the prerequisites above.
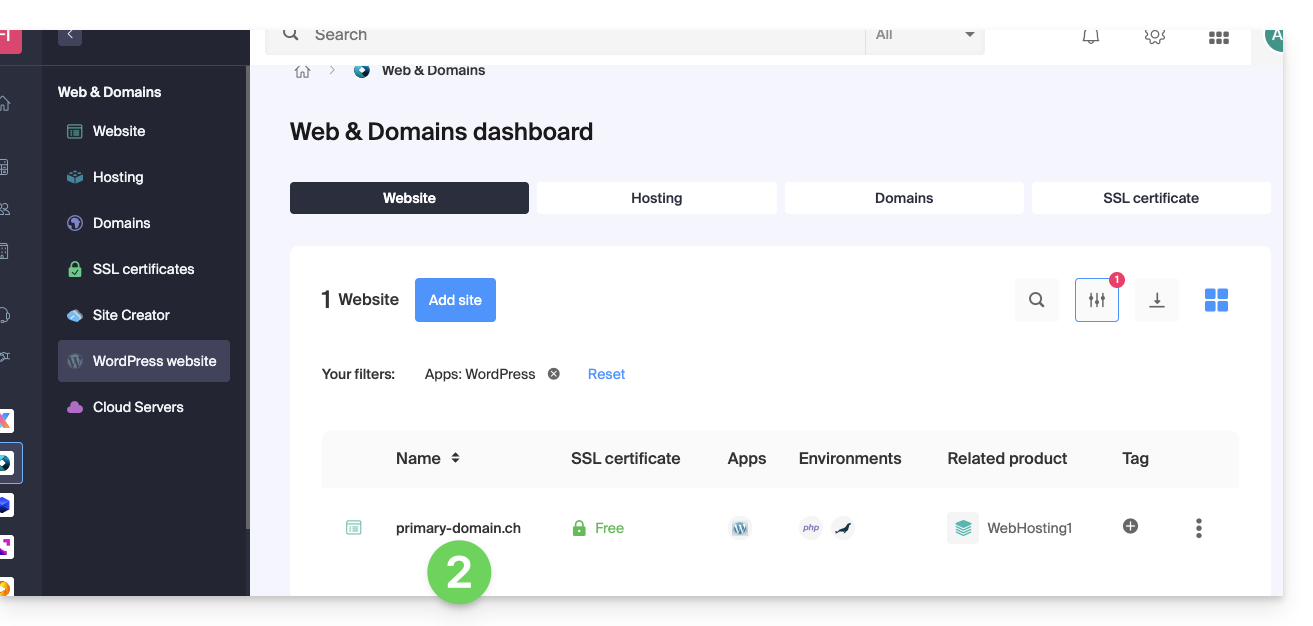
- Click directly on the name assigned to the product concerned:
- Click on the action menu ⋮ located to the right of the Web Application concerned.
- Click on Settings of the application:
- Click on Add under Extensions:
- Activate the desired extensions.
- Click on the Save button:
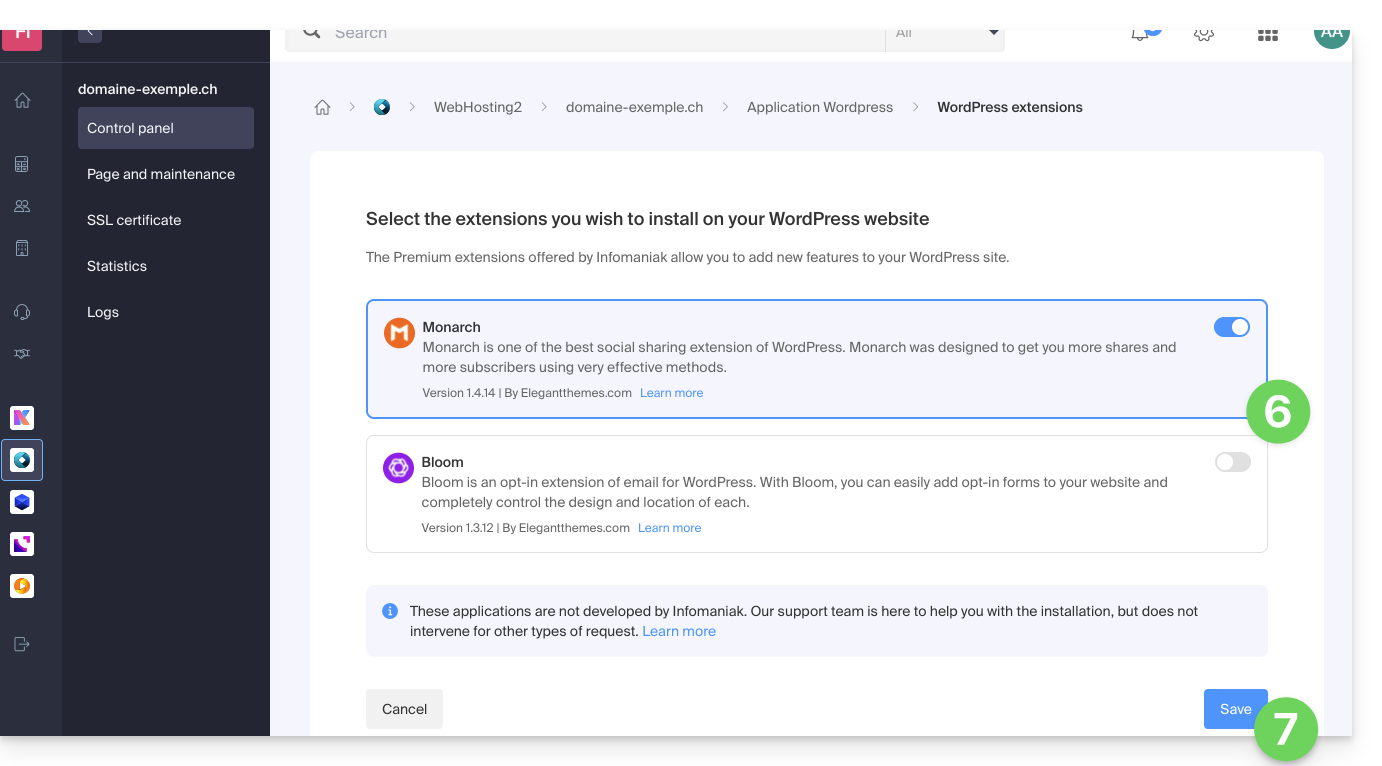
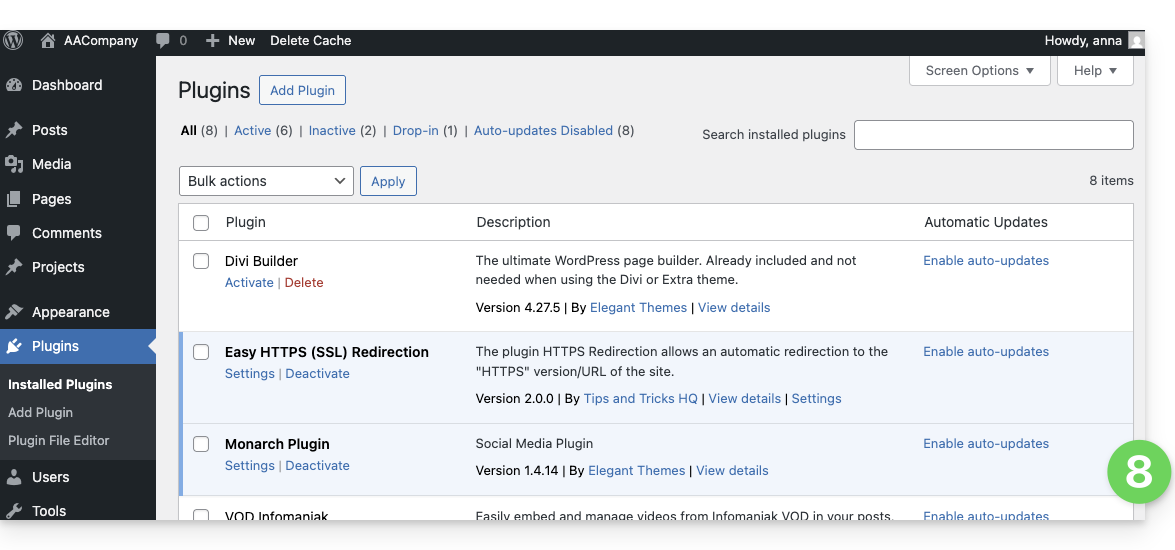
- The extensions are then available in your WordPress administration interface:
Use an Elegant Themes theme
Refer to this other guide to install an Elegant Themes theme with Infomaniak.
Thank you for trusting Infomaniak with the hosting of your website.
Preamble
- A web hosting is a storage space available on a computer, also called a "server", connected to the Internet and managed by a web host, Infomaniak.
- This storage space, made available to professionals and individuals, is used to install websites or other types of tools (CRM, extranet, intranet...) that need to be accessible via the Internet.
- These guides allow you to quickly use the essential functions of your new product, your web hosting, which can accommodate multiple websites.
Where to start?
- Create a WordPress website
- Build the site with Site Creator
- Install a web application (ownCloud, Joomla, Typo3, Drupal, phpBB, Simple Machines Forum, Magento, Prestashop, ...)
- Manage your FTP accounts/users
- Manage and publish files on your hosting via FTP Manager
- Manage your MySQL databases
- Add a site or subdomain to your hosting (multisites/multi domains)
- Link another domain name to an existing website (domain alias)
- Preview your site even if your domain name does not yet point to Infomaniak's servers
IMPORTANT: the domain name...
A web hosting, to be visible to the public on the Internet, must be associated with a domain name!
Your domain name is not managed by Infomaniak? Or is it in a different Organization than that of your web hosting? Then refer to this other guide to configure the DNS or the "A records" in order to link the domain name to your web hosting.
In case of a problem
To resolve a problem, please consult the Web Hosting Knowledge Base before contacting Infomaniak support.
Click here to share a review or suggestion about an Infomaniak product.
This guide explains how to disable all extensions installed on your WordPress on a Web Hosting.
Preamble
- If you encounter a problem with your website, disabling WordPress extensions allows you to quickly identify if one of them is causing the issue and draw the necessary conclusions to repair your site.
- For additional help contact a partner or launch a free tender — also discover the role of the host.
Quickly disable WP extensions
To disable all WordPress extensions:
- Log in to the server via FTP (need help?).
- Go to the site location (folder corresponding to your WordPress site).
- Rename
/wp-content/pluginsto/wp-content/_pluginsfor example.- To disable a specific extension, rename
/wp-content/plugins/PluginNameto/wp-content/plugins/_PluginNamefor example.
- To disable a specific extension, rename
This guide explains how to change the URL of your website from the WordPress app installed on your Infomaniak Web Hosting (only in the case where you have installed WordPress via the dedicated tools offered by Infomaniak).
This allows you to assign a different domain name to your WordPress site.
Prerequisites
- The domain name you wish to use must first be added as an alias to the main domain on the site in question.
Change the address of a WordPress site
To change the address of the site created with Infomaniak WordPress to another domain name that is already in the same Organization:
- Click here to access the management of your WordPress site on the Infomaniak Manager (need help?).
- If your site does not appear here, it means it was not installed via Infomaniak tools… refer to the official documentation.
- Click directly on the name assigned to the product in question:
- Click on the action menu ⋮ located to the right of the Web Application in question.
- Click on Settings of the application:

- Click on Edit to the right of the WordPress:
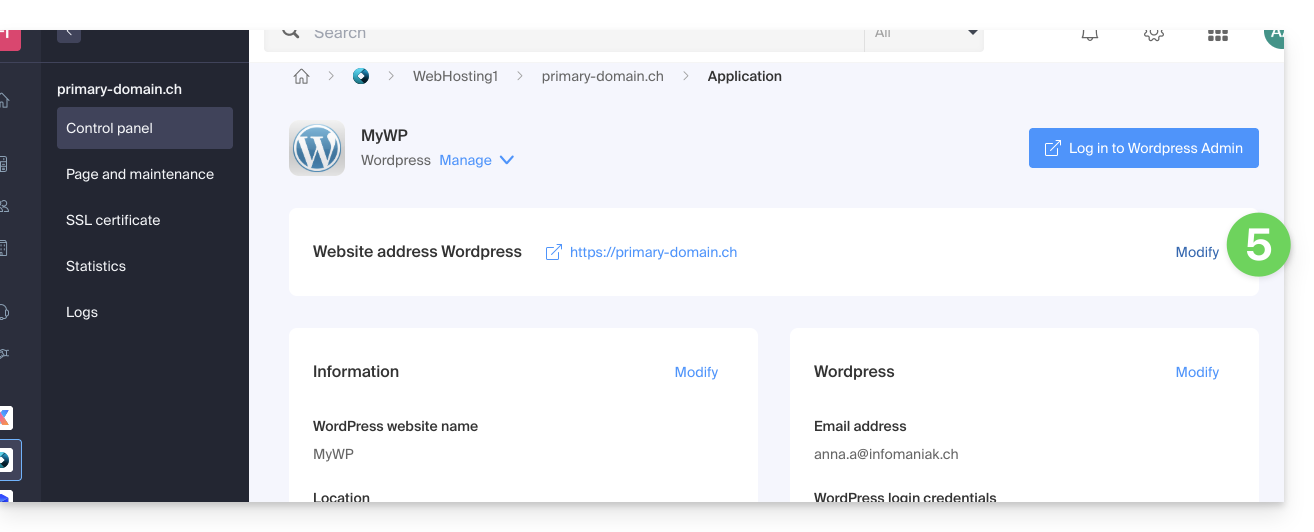
- Under Site URL, select the desired web address from the drop-down menu:
- If you have not followed the prerequisites above, the desired domain will not appear even if it is registered in the same Organization.
- If you have added the domain as an alias to the site, the desired domain will appear and you can select it to replace the previous domain.
- Click on the Save button:

Domain… .preview.infomaniak.website?
Among the URLs present in the drop-down menu, the preview URL allows you to access your WordPress site in case the domain name of the site is not yet correctly configured to point to your WordPress app.
This guide provides two methods to access the administration interface of a WordPress site installed via Infomaniak tools, for example, to update the content.
Prerequisites
- Know your login credentials…
Access the WordPress console…
1. … from the Manager
To access WordPress from the Manager:
- Click here to access the management of your WordPress site on the Infomaniak Manager (need help?).
- If your site does not appear here, it means it was not installed via Infomaniak tools… refer to the official documentation.
- Click directly on the name assigned to the product concerned.
- Click the Edit button to open the WordPress login page:

- Enter the username and password chosen during the WordPress installation.
2. … via the URL /wp-admin
By default, simply add the terms /wp-admin to the end of your domain name's URL in your web browser's address bar to access the WordPress console login page directly.
If your WordPress site address is, for example, https://domain.xyz, the address to access the WordPress administration interface will be https://domain.xyz/wp-admin.
What to do if the ./wp-admin shortcut does not work?
- If the
./wp-adminshortcut does not work, you may be using a security extension that modifies the URL of certain pages to limit attempts to hack your site (example of plugin)… - If you need to access the WordPress console and your domain name is not functional at the moment, you can switch the main domain name to the preview address.
This guide explains how to manage interactions between your Infomaniak VOD/AOD space and any of your WordPress sites, using an extension developed by Infomaniak
Preamble
- This WordPress extension allows you to retrieve and manage all your videos present on an Infomaniak VOD/AOD space, with automatic updates when new videos are added.
- It manages the automatic retrieval of existing Players and playlist management.
- You will be able to search for your videos while writing an article or a page or import media directly from the CMS administration.
- Possible incompatibilities:
- The plugin is not compatible with Elementor.
- Test if the problem persists after installing another editor.
- The plugin is not compatible with WordPress Multisite.
- The plugin is not compatible with Really Simple Security (Really Simple SSL).
- Test if the problem persists by activating or deactivating this setting of the Really Simple Security extension:

- Test if the problem persists after using another similar module.
- If problems persist, refer to this other guide.
- Test if the problem persists by activating or deactivating this setting of the Really Simple Security extension:
- The plugin is not compatible with Elementor.
Get the Infomaniak VOD extension
Go to your VOD space to obtain the information necessary for the WordPress external module:
- Click here to access the management of your product on the Infomaniak Manager (need help?).
- Click directly on the name assigned to the product concerned:
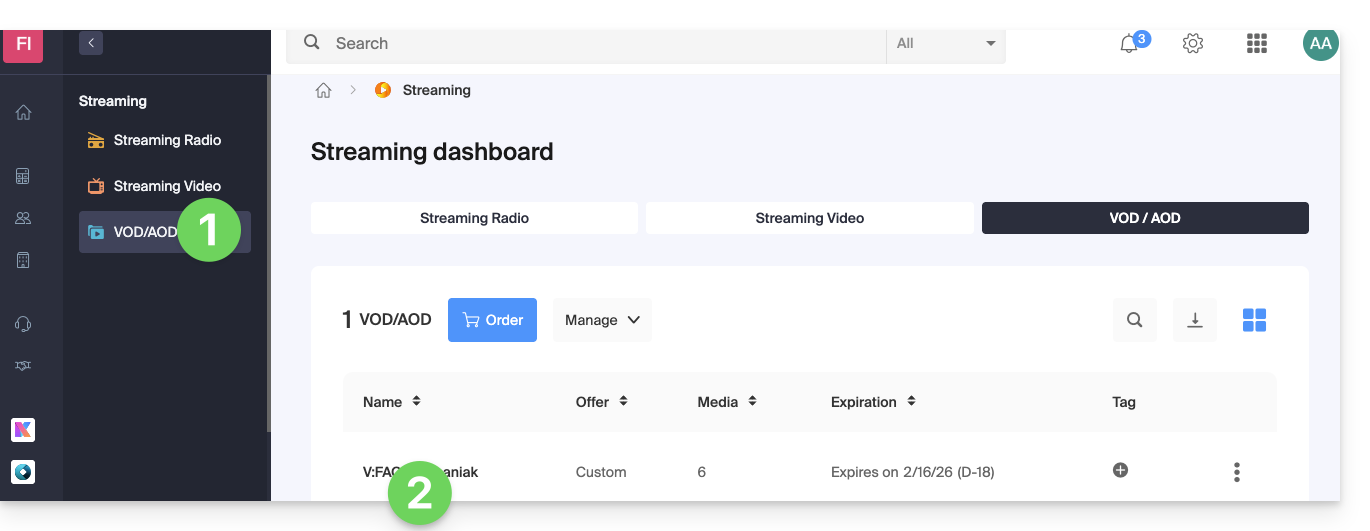
- Click on CMS/Extensions API in the left sidebar menu.
- Click on CMS Extensions in the left sidebar menu.
- Download the WordPress extension.
- Configure the extension using the provided instructions:

- It is recommended to create a new user in your Organization with only technical rights on the VOD/AOD product and then create the application password from this dedicated account.
You can also download the extension directly from the WordPress extension library: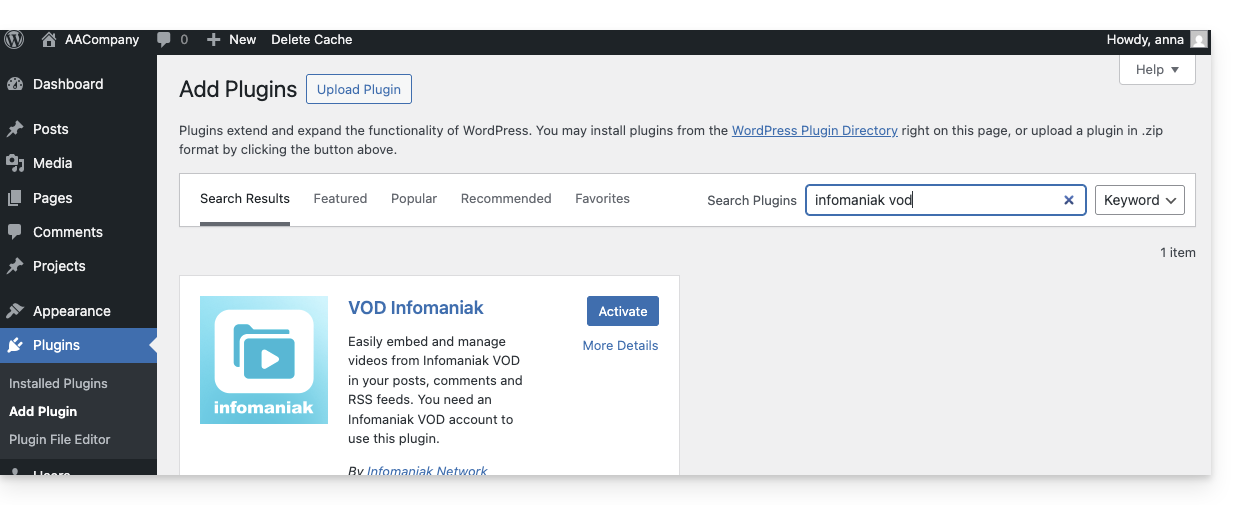
A similar feature exists for Typo3 with the dedicated extension that you can find and install from its extension library: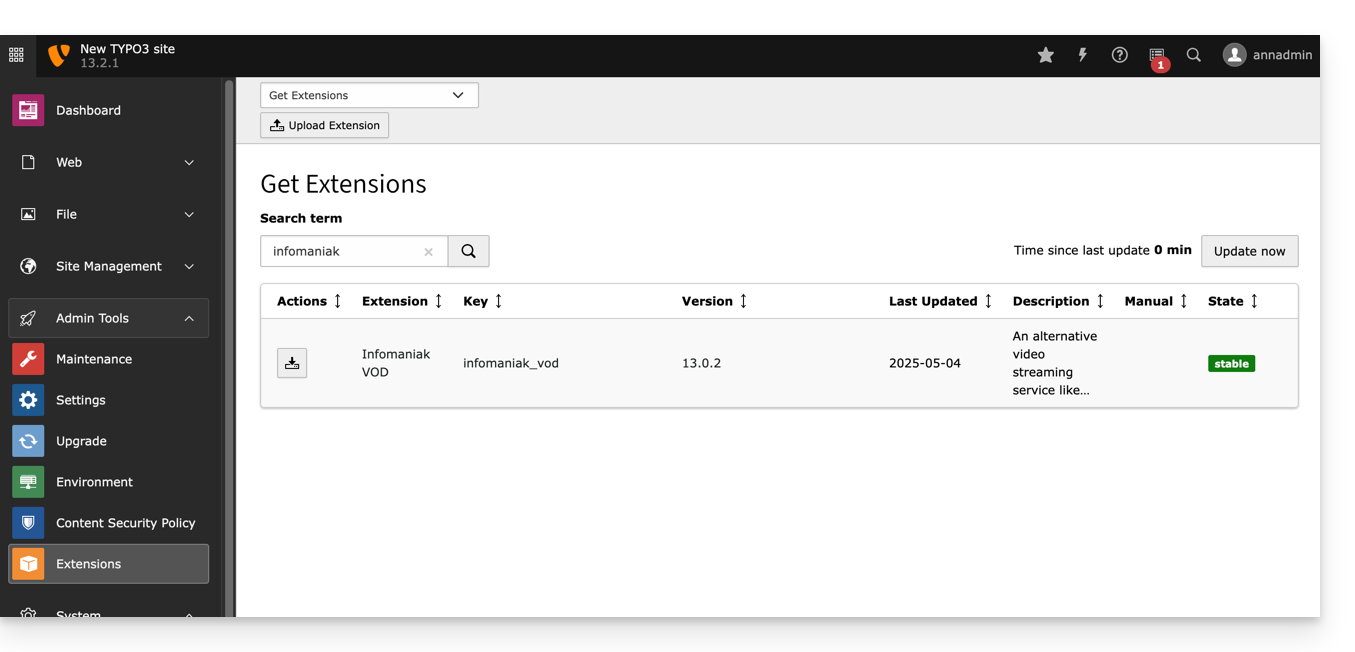
This guide concerns Redis, a PHP module for Infomaniak Cloud Server.
Preamble
Redisis used with PHP to accelerate performance by serving as a cache for temporary data and to manage user sessions, thus improving the efficiency of web applications.Redisalso allows the implementation of queue systems and the temporary storage of data for asynchronous tasks or statistics.
Install Redis
Redis is installed from Fast Installer, applications available in a few clicks on Cloud Server:
- After installation,
Redisis accessible via the IP/portlocalhost:6379or127.0.0.1:6379 - The password for
Redismust be between 15 and 99 characters (inclusive).
This guide explains how to restore backups of previous versions of your files and other web data from your Infomaniak hosting, and how to set up an effective backup policy if the automatically and freely provided backups no longer meet your availability or security needs.
Web Hosting (Starter, Shared, Cloud Server)
Refer to these guides to restore automatic backups:
- of an entire hosting (FTP + MySQL),
- specific files on the hosting,
- specific databases,
- of a Web Application (Wordpress & Apps),
- Cloud Server SSH crons.
Refer to these guides to backup and restore:
- hosting with Swiss Backup and Restic (advanced),
- WordPress with Swiss Backup,
- WordPress with an extension.
Also refer to https://faq.infomaniak.com/snapshot.
Hosting v1 (old 60 Go offer)
- View and/or download the automatic backup (versioning) of your data on your FTP space under
/backupsand/backup_mysqlat the root of the domain (above/web). - Restore this data.
- Restore messages from Infomaniak automatic backups.
- Restore contacts or calendar events.
- Backup the current content of an email account:
- by downloading the current content locally,
- by duplicating all current content to a backup box,
- by copying future emails as they arrive to a backup box.
Domains / DNS Zones
- Restore deleted DNS records from Infomaniak automatic backups.
- Restore an expired domain in the redemption period.
This guide will assist you in installing Ghost on Infomaniak, an ideal platform for blogs (regular writing, editorial format) and content-focused publishing sites, such as Substack or Medium.
Based on Node.js and using Markdown for writing, Ghost stands out for its lightness, whereas WordPress, although more flexible and universal, is heavier.
Prerequisites
- Have installed a blank Node.js type site on Infomaniak Web Hosting.
- Create an SSH access.
- Create a database.
- Have a valid and functional email address (especially the forgotten password features).
- Stop your Node.JS application before performing the following steps!
Installing Ghost
To do this:
- Connect to the server via SSH (need help?).
Clone and run the installation script (execute these commands one by one):
git clone https://github.com/Infomaniak/hosting-tools.git
cd hosting-tools/h3-ghost
bash ./install.sh
The script will now:
- Ask you a few questions (such as the URL of your site, database information, etc.)…
- Download and configure Ghost automatically…
- Take a few minutes — be patient!
Answer the questions carefully using the database details you noted earlier. Do not close the terminal until it has finished!
Configure your hosting (via the Infomaniak Manager)
Once the script is complete, go to your Infomaniak Control Panel:
- Click here to access the management of your product on the Infomaniak Manager (need help?).
- Click directly on the name assigned to the product concerned.
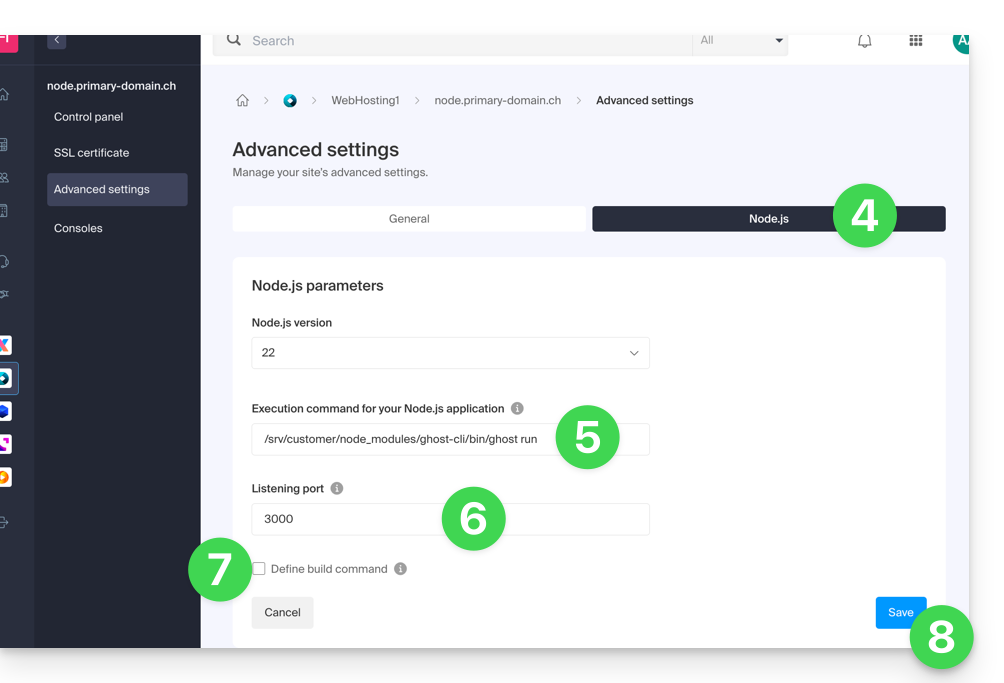
- Click on Manage under Advanced settings:

- Click on the Node.js tab to access the settings.
In the execution command field, enter:
/srv/customer/node_modules/ghost-cli/bin/ghost run- Check that the port number is
3000. - Command case build : disable it.
- Click the Save button at the bottom of the page:
- On the main page, click the Start button (or Restart if already running).
- Observe the logs showing the creation of the database and the startup of the application:

Done! Access your Ghost blog
Then go to the URL of your site to start:
- Open your browser and go to
https://votresite.com/ghost(replacevotresite.comwith your current domain). - The first time:
- You will create an administrator account (your login for the blog)...
- Then, you can start writing articles!
User / mail configuration
To create the first user, add /ghost to the URL of your site (for example https://ghost.domain.xyz/ghost) and follow the assistant.
You can also configure the "member portal support address": when new members want to register, the portal sends the double opt-in confirmation from a specific address. By default, it is the “noreply” address of your domain. To update it, navigate to “Settings”, “Membership”, “Portal settings”, “Customize”, and “Account page”:
Resolve a technical incompatibility between Ghost and MariaDB
There is a compatibility issue between Ghost and the MariaDB database. This results in this type of error:
[2025-01-01 12:54:28] ERROR "GET /ghost/api/admin/posts/6834625e35802b06f1496305/?formats=mobiledoc%2Clexical&include=tags%2Cauthors%2Cauthors.roles%2Cemail%2Ctiers%2Cnewsletter%2Ccount.conversions%2Ccount.clicks%2Csentiment%2Ccount.positive_feedback%2Ccount.negative_feedback" 400 27ms
Could not understand request.
Error ID:
8f2b0d90-3a30-11f0-a25f-fd9c83e1cf02
Error Code:
ER_BAD_FIELD_ERROR
----------------------------------------
Error: select `posts`.*, (with `k` as (select `member_id` from `members_subscription_created_events` where posts.id = members_subscription_created_events.attribution_id union select `member_id` from `members_created_events` where posts.id = members_created_events.attribution_id) select count(*) from `k`) as `count__conversions`, `posts`.*, (select count(distinct `members_click_events`.`member_id`) from `members_click_events` inner join `redirects` on `members_click_events`.`redirect_id` = `redirects`.`id` where posts.id = redirects.post_id) as `count__clicks`, `posts`.*, (select COALESCE(ROUND(AVG(score) * 100), 0) from `members_feedback` where posts.id = members_feedback.post_id) as `count__sentiment`, `posts`.*, (select count(*) from `members_feedback` where posts.id = members_feedback.post_id AND members_feedback.score = 0) as `count__negative_feedback`, `posts`.*, (select sum(`score`) from `members_feedback` where posts.id = members_feedback.post_id) as `count__positive_feedback` from `posts` where (`posts`.`type` = 'post' and `posts`.`status` in ('draft', 'published', 'scheduled', 'sent')) and `posts`.`id` = '2834125e33802b06e1433305' limit 1 - Unknown column 'posts.id' in 'where clause'
at Child.<anonymous> (/srv/customer/sites/ghost.domain.xyz/versions/5.120.2/core/server/models/base/plugins/crud.js:194:31)
at Packet.asError (/srv/customer/sites//versions/5.120.2/node_modules/mysql2/lib/packets/packet.js:740:17)
at Query.execute (/srv/customer/sites//versions/5.120.2/node_modules/mysql2/lib/commands/command.js:29:26)
at Connection.handlePacket (/srv/customer/sites//versions/5.120.2/node_modules/mysql2/lib/base/connection.js:475:34)
at PacketParser.onPacket (/srv/customer/sites//versions/5.120.2/node_modules/mysql2/lib/base/connection.js:93:12)
at PacketParser.executeStart (/srv/customer/sites//versions/5.120.2/node_modules/mysql2/lib/packet_parser.js:75:16)
at Socket.<anonymous> (/srv/customer/sites//versions/5.120.2/node_modules/mysql2/lib/base/connection.js:100:25)
at Socket.emit (node:events:518:28)
at addChunk (node:internal/streams/readable:561:12)
at readableAddChunkPushByteMode (node:internal/streams/readable:512:3)
at Readable.push (node:internal/streams/readable:392:5)
at TCP.onStreamRead (node:internal/stream_base_commons:189:23)
Some SQL queries generated by Ghost, using common table expressions (CTEs) nested in scalar subqueries, cause HTTP 400 errors when executed on MariaDB. These queries are valid in MySQL 8, which supports CTEs in scalar subqueries, but not in MariaDB up to version 10.6.
A patch exists to adapt Ghost's behavior and avoid these errors (refer to the official guide).
To use this patch, enter this command:
cd current
curl -L https://gist.githubusercontent.com/reneluria/8cbbfbc001e542c77d6d5887fbafe5d3/raw/65e0ce31753b4687d0eb67fc030734a35d3ffbad/ghost-post.patch | patch -p0
For additional help contact a partner or launch a free tender — also discover the role of the host.
This guide is for users making changes around a hosting environment where WordPress is installed.
Preamble
- Following a change in your web hosting plan (migration from the old v1 60 Go hosting formula to the current offers), you may need to update the connection between the MySQL/MariaDB database and your WordPress site (to avoid the error "
error establishing a database connection" for example) and thus restore the link between WordPress and the MySQL/MariaDB database.
Modify the important elements
Here is the information to update in the wp-config.php file to ensure your WordPress site works (in most cases, a prefix has simply been added to the existing database name and username):
- the name of the MySQL database (database namebefore, abcd_database name after, for example)
- the MySQL database host server (mysql.domain.xyz before, abcd.myd.infomaniak.com after, for example)
- the username that accesses the MySQL database (userbddbefore, abcd_userbdd after, for example)
Modify the WordPress wp-config.php file
To do this:
- Find and keep your current MySQL information according to the list above.
- Create an FTP account.
- Log in via FTP.
- Edit the
wp-config.phpfile located in the root folder of your WordPress site. - Find the relevant paragraph and update the 3 pieces of information (according to the list above).
- Save the file and that's it, your WordPress will now connect to the correct database!
This guide details the installation of the desktop app kDrive Infomaniak on a computer with a Linux operating system. It will then allow you to synchronize your files with kDrive.
Preamble
- On this OS, some kDrive features are not available, such as the Lite Sync option or the right-click context menu.
- The kDrive app is officially supported by Infomaniak only on the following systems:
- Ubuntu 22.04 LTS (and later)
- Desktop environments: GNOME or KDE
- The application may work on other Linux distributions or with other desktop environments; however, Infomaniak provides no support for installing or running the application outside of the configurations mentioned above.
Installing kDrive on Linux
Prerequisites
- Download the desktop app kDrive for Linux (file of type .AppImage)
- Fuse2 (required to run a appimage):
- Since version 23.04 (and later) of Ubuntu, after double-clicking on the AppImage file, nothing will happen.
- The latest versions of Ubuntu use a "too" recent version of FUSE (the "Filesystem in User Space" interface on which AppImages rely to work) for which AppImages are not designed.
- AppImages need FUSE v2 to work:
sudo apt install libfuse2
- D-Bus
- Gnome-keyring or kwallet (in principle already present on your machine except with some light distributions)
Then:
- Place the file in a folder named for example "Applications".
- Right-click on the file and select Permissions.
- Check the box "Allow executing file as a program"
Additional possible operations
With Ubuntu, to have kDrive run at startup, add the file in “Startup Application Preferences”
With Gnome, if the icon is missing, install AppIndicator.