Knowledge base
1000 FAQs, 500 tutorials and instructional videos. Here, there are only solutions!
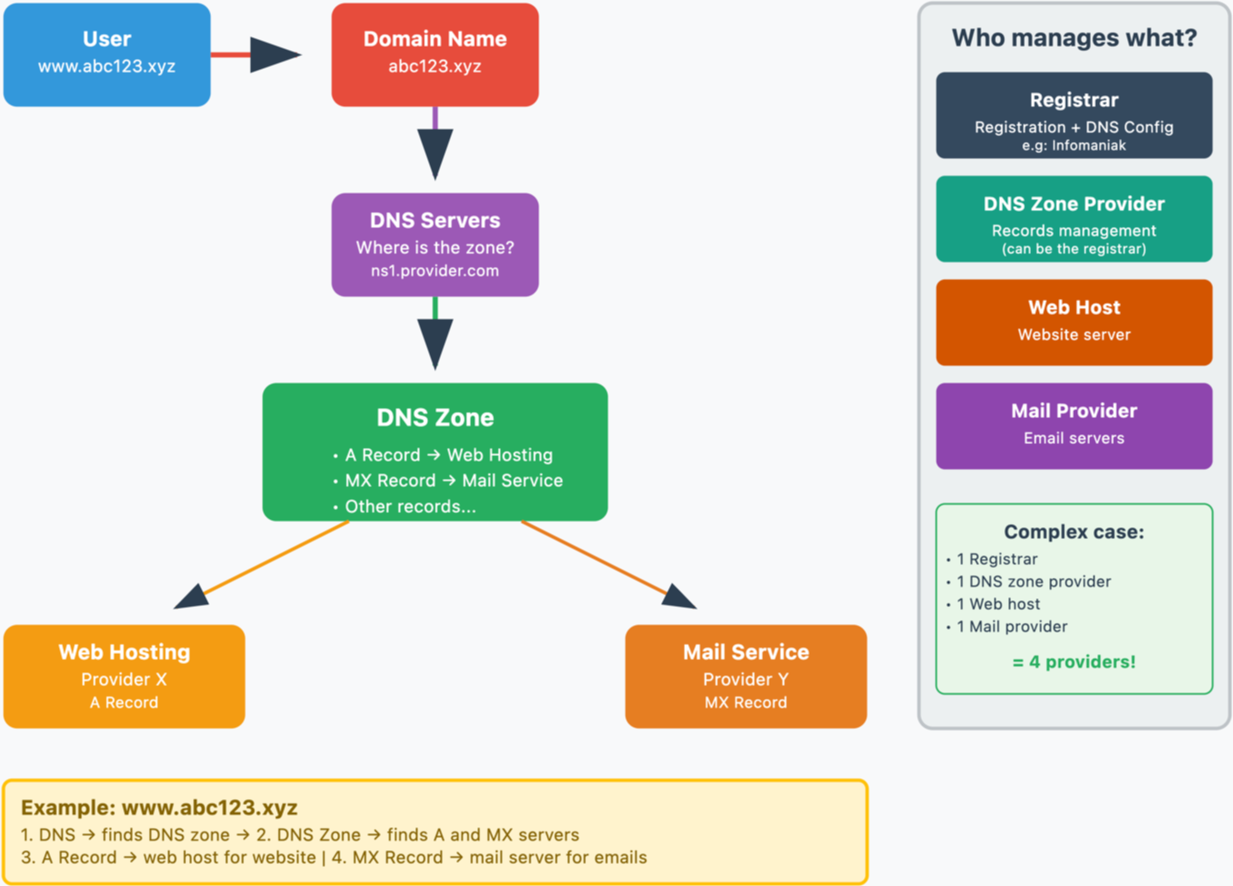
This guide explains how a domain name and a DNS zone work.
Introduction
- When you browse a website such as
https://www.abc123.xyz,abc123.xyzis the domain name. - Each domain name has DNS (Domain Name System), which indicates where the DNS zone is located (e.g., with which provider).
- The DNS zone then allows you to delegate the management of various services related to the domain name to different providers.
- For a single domain name, it is possible to delegate:
- web hosting to provider X (via an "
A" record) - and email service to provider Y (via an "
MX" record)
- web hosting to provider X (via an "
- For a single domain name, it is possible to delegate:
Domain name, DNS and DNS zone, then services
Who manages what?
- Each domain name is registered and managed by a registrar. For example, Infomaniak is a registrar, one of the cheapest in Switzerland.
- The DNS of a domain name is configured with the registrar that manages the domain name.
- The DNS zone can be managed by the registrar or another provider.
- Web hosting and email service can be managed by any hosting provider.
In the most complex case, it is therefore possible to have 1 different provider for the following services: domain name registration and DNS management, DNS zone management, web hosting, email service.
The following diagram summarizes these different possibilities with the involvement of different providers:
Infomaniak
As a registrar and hosting provider, Infomaniak can manage all of these services. This is the simplest solution.
- In the case of Infomaniak, the DNS servers are generally in the form nsXX.infomaniak.com and nsXX.infomaniak.com (XX being 11 or 12, for example).
- You can modify the DNS servers for your domain name, as well as modify the "internal" settings of these DNS servers, i.e., modify the DNS zone of a domain name.
And within these DNS zones, to redirect traffic to services, we distinguish:
- an MX record which allows a domain name (
domain.xyzfor example) to point to a mail server. - an A record which allows a domain name (
domain.xyzfor example) or a subdomain (example.domain.xyzfor example) to point to a web server that has a static IP address (otherwise, you would have to constantly edit the A record to enter the new IP address - see this other guide on this subject).
Possible scenarios
Examples and fictitious names
| All services are with Infomaniak | |||
|---|---|---|---|
| domain name | domain.xyz | registered with -> | Infomaniak |
| DNS of the domain name | ns1.infomaniak.com… | therefore, the DNS zone must exist with -> | Infomaniak |
| site hosted by -> | Infomaniak | therefore, the DNS zone must contain an A record | 123.45.67.8 for example |
| email hosted by -> | Infomaniak | therefore, the DNS zone must contain MX records | mx-mail.maniak for example |
| All services are with Infomaniak except email | |||
|---|---|---|---|
| domain name | domain.xyz | registered with -> | Infomaniak |
| DNS of the domain name | ns1.infomaniak.com… | therefore, the DNS zone must exist with -> | Infomaniak |
| website hosted by -> | Infomaniak | therefore, the DNS zone must contain A records | 123.45.67.8 for example |
| email hosted by -> | Medical Service | therefore, the DNS zone must contain MX records | med-mx.net for example |
| All services are with Infomaniak except the website | |||
|---|---|---|---|
| domain name | domain.xyz | registered with -> | Infomaniak |
| DNS of the domain name | ns1.infomaniak.com… | therefore, the DNS zone must exist with -> | Infomaniak |
| website hosted by -> | Clinic | therefore, the DNS zone must contain A records | 9.87.65.4 for example |
| email hosted by -> | Infomaniak | therefore, the DNS zone must contain MX records | mx-mail.maniak for example |
| All services are with Infomaniak except for the domain name | |||
|---|---|---|---|
| domain name | domain.xyz | registered with -> | GoMamie |
| Domain name DNS | ns1.infomaniak.com… | therefore the DNS zone must exist with -> | Infomaniak |
| website hosted by -> | Infomaniak | therefore the DNS zone must contain an A record | 123.45.67.8 for example |
| email hosted by -> | Infomaniak | therefore the DNS zone must contain an MX record | mx-mail.maniak for example |
| All services are with Infomaniak except for the DNS zone | |||
|---|---|---|---|
| domain name | domain.xyz | registered with -> | Infomaniak |
| Domain name DNS | ns.privateDNS.org… | therefore the DNS zone must exist with -> | Private DNS |
| website hosted by -> | Infomaniak | therefore the DNS zone must contain an A record | 123.45.67.8 for example |
| email hosted by -> | Infomaniak | therefore the DNS zone must contain an MX record | mx-mail.maniak for example |
| No service exists with Infomaniak except for the domain name | |||
|---|---|---|---|
| domain name | domain.xyz | registered with -> | Infomaniak |
| DNS of the domain name | ns.privateDNS.org… | therefore, the DNS zone must exist at -> | Private DNS |
| website hosted by -> | Clinic | therefore, the DNS zone must contain an A record | 9.87.65.4 for example |
| email hosted by -> | Medical Service | therefore, the DNS zone must contain an MX record | med-mx.net for example |
| No service exists with Infomaniak except for the DNS zone | |||
|---|---|---|---|
| domain name | domain.xyz | registered with -> | GoMamie |
| DNS of the domain name | ns1.infomaniak.com… | therefore, the DNS zone must exist at -> | Infomaniak |
| website hosted by -> | Clinic | therefore, the DNS zone must contain an A record | 9.87.65.4 for example |
| email hosted by -> | Medical Service | therefore, the DNS zone must contain an MX record | med-mx.net for example |
| No service exists with Infomaniak except for the email | |||
|---|---|---|---|
| domain name | domain.xyz | registered with -> | GoMamie |
| DNS of the domain name | ns.privateDNS.org… | therefore, the DNS zone must exist at -> | Private DNS |
| website hosted by -> | Clinic | therefore, the DNS zone must contain an A record | 9.87.65.4 for example |
| email hosted by -> | Infomaniak | therefore, the DNS zone must contain MX records | e.g., mx-mail.maniak |
etc.
Link to this FAQ:
Has this FAQ been helpful?
DNS Fast Anycast replicates the DNS of your domain around the world to reduce latency and increase the availability of your websites.
Preamble
- Thanks to DNS Fast Anycast, the DNS of your domain are replicated within several Points of Presence (POP) around the world (list below).
- No matter where your visitors are, they are redirected to the nearest DNS server to them, which on average speeds up by 34% (DNS resolution) the access speed to your site.
- Moreover, if one of your DNS servers were to become unavailable, the nearest server naturally takes over and your visitors can continue to access your site.
- The replication of your domain's DNS is automatic and no modification of your code is required.
Manage DNS Fast Anycast
Prerequisites
- DNS Fast Anycast is compatible with all websites, regardless of your host.
- All you need is a domain name managed at Infomaniak.
- Transfer the management of your domain to Infomaniak if necessary
- Refer to this other guide to manage external domains.
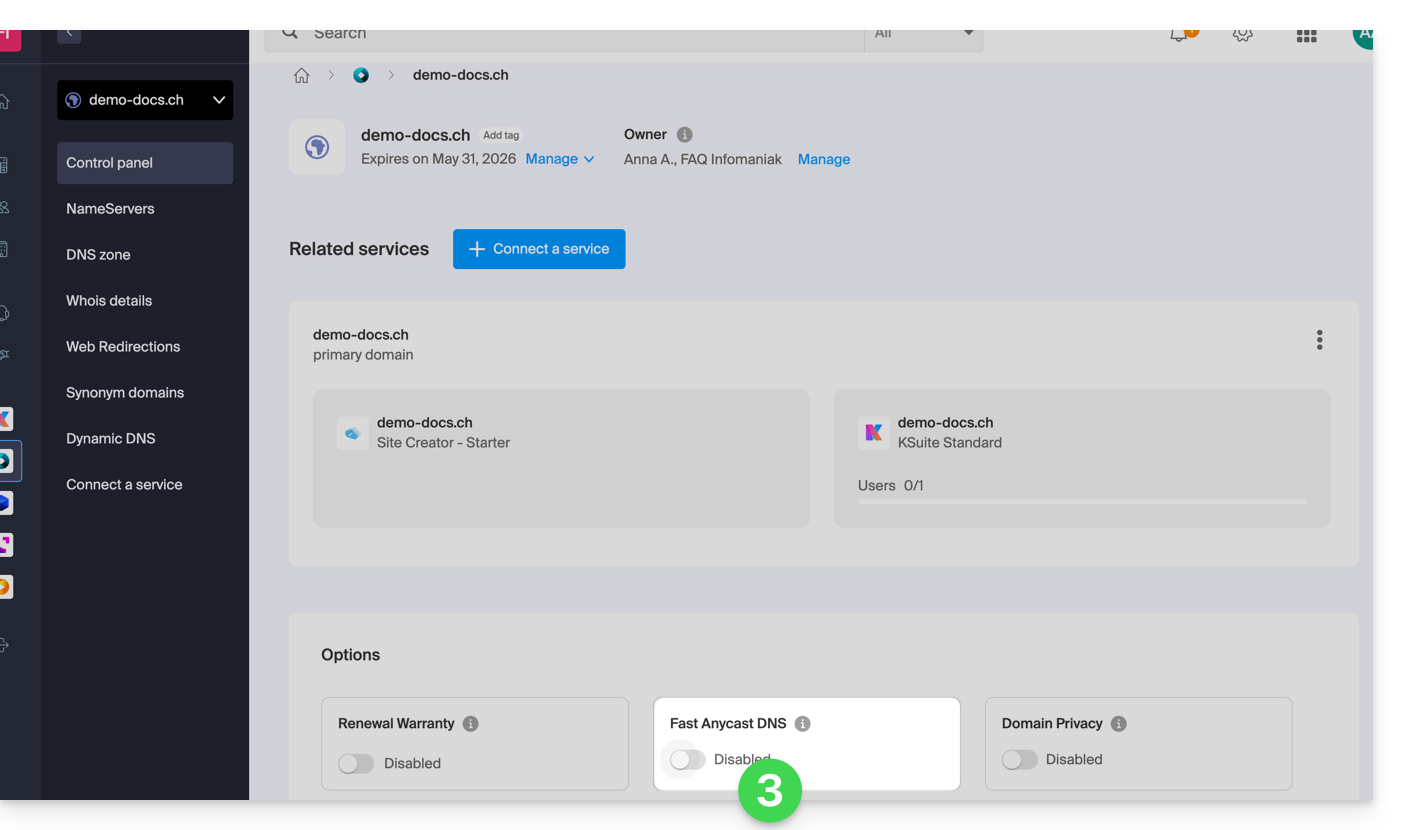
To access the DNS Fast Anycast option:
- Click here to access the management of your product on the Infomaniak Manager (need help?).
- Click directly on the name assigned to the product concerned.
- Enable or disable the DNS Fast Anycast toggle switch on the dashboard:
POP - 'Point of Presence'
By activating DNS Fast Anycast on your domain, your DNS will be automatically replicated in the following points of presence:
Network 1
New York, USA (2x)
Paris, France (2x)
Varsovie , Pologne (2x)
Dublin, Irlande (2x)
Singapour (2x)
Johannesburg, Afrique du Sud
Stockholm, Suède
Vienne , Autriche (2x)
Francfort, Allemagne (2x)
Londres, Royaume-Uni
Dallas, USA
Los Angeles, USA (3x)
Amsterdam, Pays-Bas
Sydney, Australie
Sāo Paulo, Brésil
Miami, USA (2x)
Network 2
Hong Kong, Chine
San José, USA
Dallas, USA
Reston, USA
Chicago, USA
Seattle, USA
Londres, Royaume-Uni
Francfort, Allemagne
Amsterdam, Pays-Bas
Vienne, Autriche
Toronto, Canada
Sydney, Australie
Sāo Paulo, Brésil
Johannesburg, Afrique du Sud
Miami, USA
The points of presence are distributed across two networks that are randomly used when one of your visitors accesses your website.
Link to this FAQ:
Has this FAQ been helpful?
This guide provides important information when activating DNS Fast Anycast and your domain's DNS zone is not managed by Infomaniak.
Introduction
- You may be in the situation described above if your websites and email addresses are hosted elsewhere.
- For DNS Fast Anycast to work, your domain's DNS zone must be managed by Infomaniak.
- If you do not understand these instructions, please refer to this other guide or contact your webmaster or another professional.
Activating DNS Fast Anycast with an external zone
Here are the steps to follow if your services are not hosted by Infomaniak:
- Log in to your hosting provider's control panel and note all the required records (A, MX, TXT, CNAME, etc.).
- Use the Infomaniak DNS servers for your domain name.
- Enter the records noted in the first step above to link your domain with your various services (websites, email addresses, etc.).
- Any DNS addition/modification may take up to 48 hours to propagate.
Link to this FAQ:
Has this FAQ been helpful?
This guide explains how to modify the DNS (Name Servers) of a domain registered with Infomaniak.
Prerequisites
- Have a domain name with Infomaniak or at least a DNS zone.
- Understand:
- the operation of a domain and a DNS zone before modifying the latter.
- that any DNS addition/modification can take up to 48 hours to propagate.
DNS Modification
To modify the DNS of a domain managed by Infomaniak and thus control the direction that Web and Mail traffic should take:
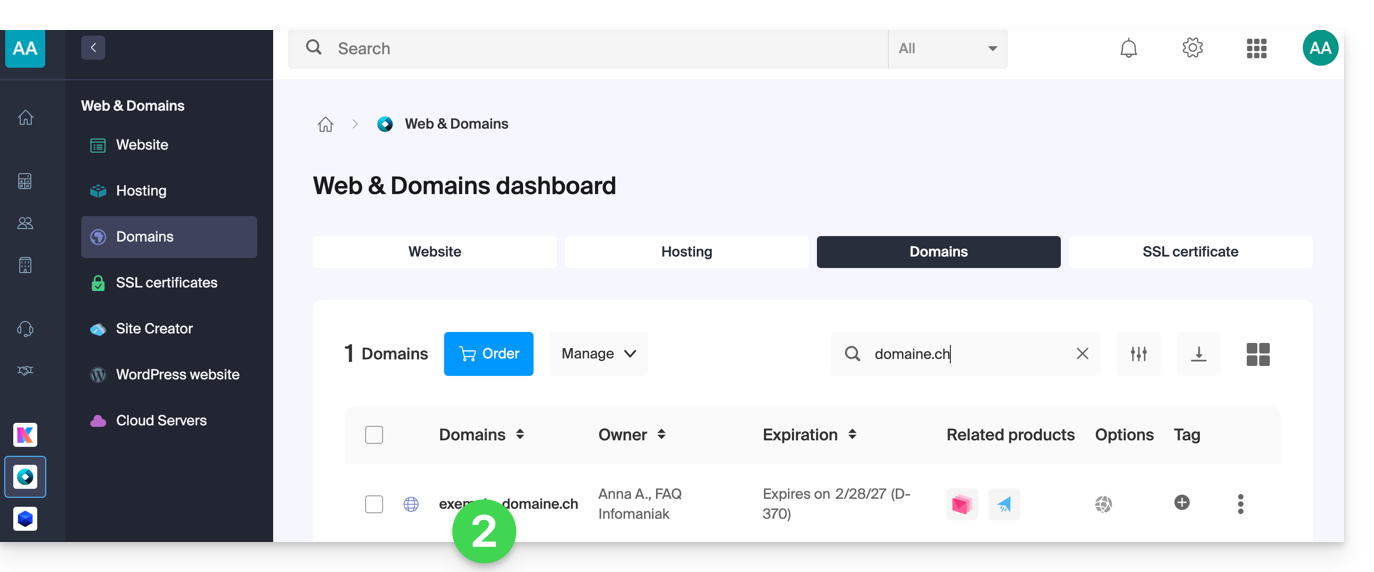
- Click here to access the management of your domain on the Infomaniak Manager (need help?).
- Click directly on the name assigned to the domain in question:
- Click on DNS Servers from the left sidebar.
- Click on the blue button Modify DNS Servers:
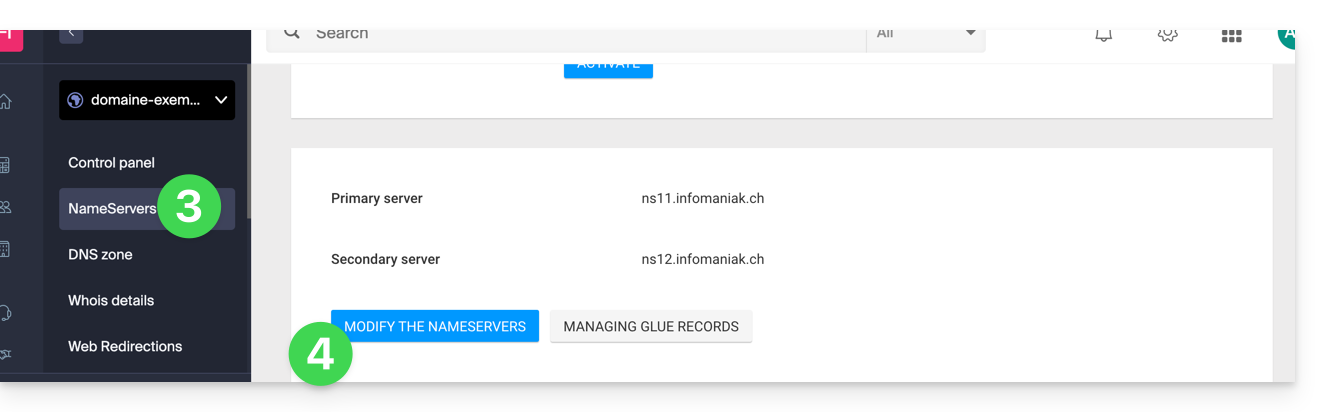
- If your website is hosted with Infomaniak, check Infomaniak Name Servers…
- Otherwise, check Custom Name Servers to enter the server names below and validate at the bottom of the page.
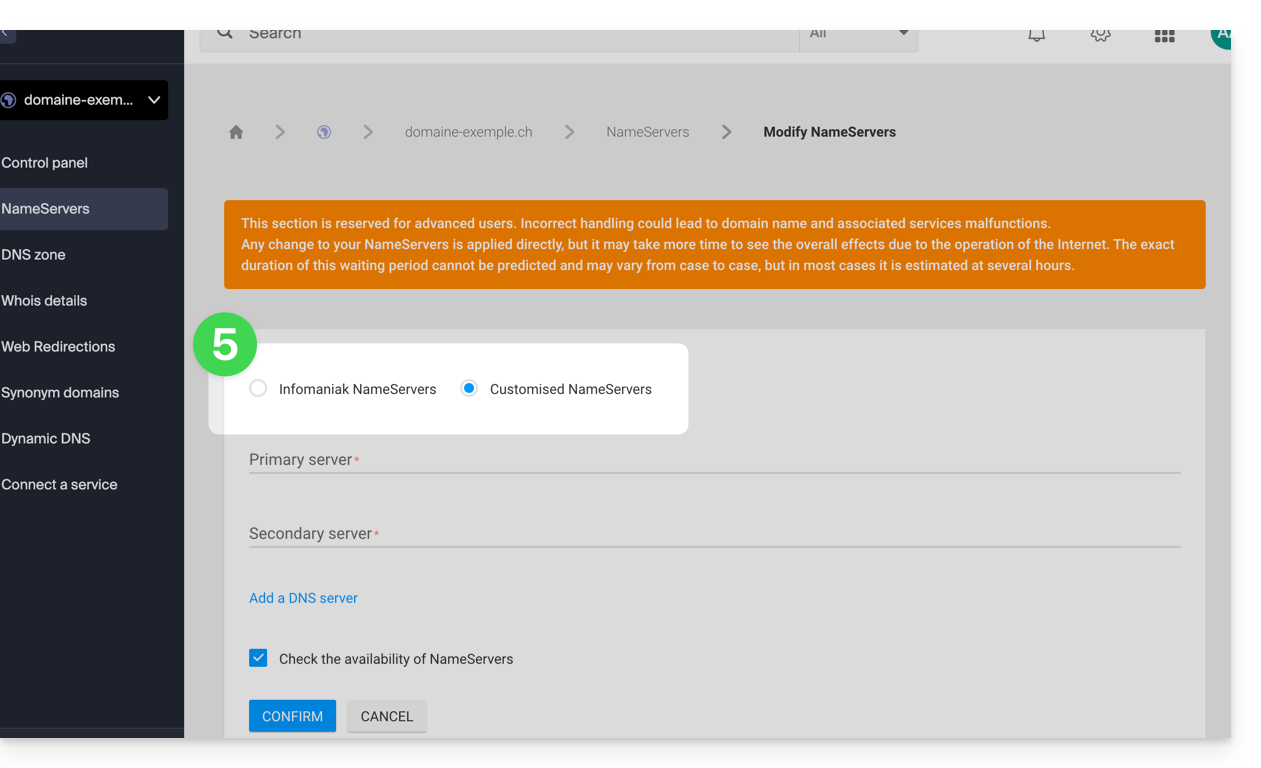
- Otherwise, check Custom Name Servers to enter the server names below and validate at the bottom of the page.
Batch Modification
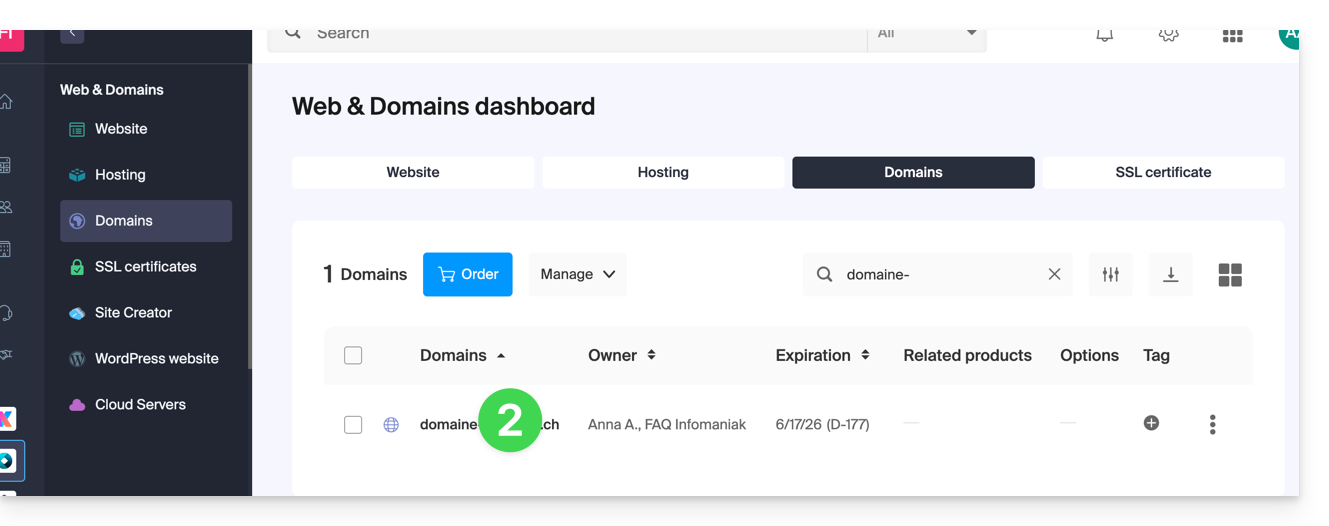
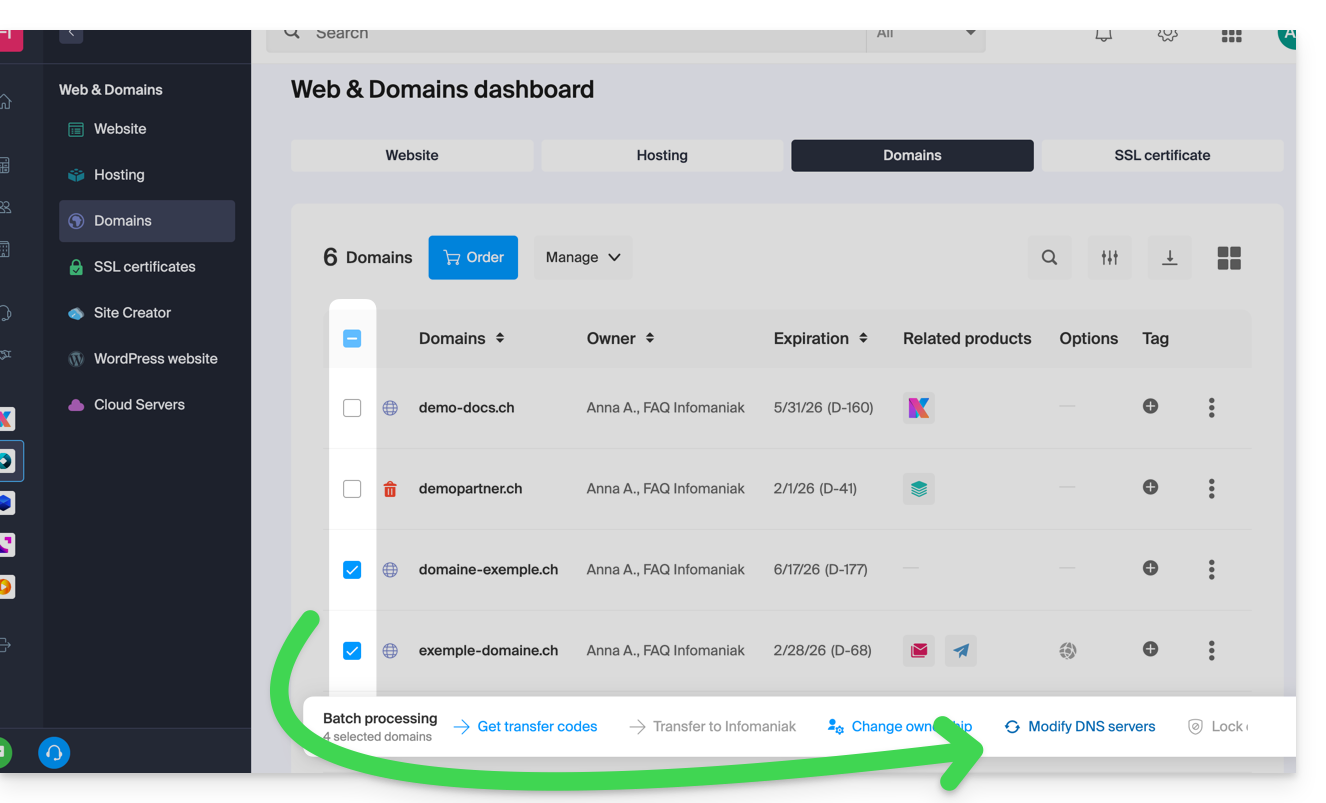
To modify the DNS of multiple domains in bulk:
- Click here to access the management of your domains on the Infomaniak Manager (need help?).
- Select the domains in question.
- If necessary, click on ⋮ at the bottom of the screen.
- Click on Modify DNS servers:
If you would rather modify the inside of the DNS zone and consequently touch the different DNS records contained in the zone, refer to this other guide.
Link to this FAQ:
Has this FAQ been helpful?
This guide concerns the configuration of the Infomaniak product Newsletter in the case where the domain name used to send your emails is not managed by Infomaniak.
Preamble
- For automatic use of the Newsletter tool, it is necessary to manage the domain name from which you send your newsletters (as well as its DNS zone) with Infomaniak.
- For example, if you send your newsletters from the address
news@domain.xyz, the domaindomain.xyzmust be managed with Infomaniak.
Specific DNS configuration
To use the Newsletter tool with a domain not managed by Infomaniak, you will need to add specific entries to your DNS zone provided in your Manager: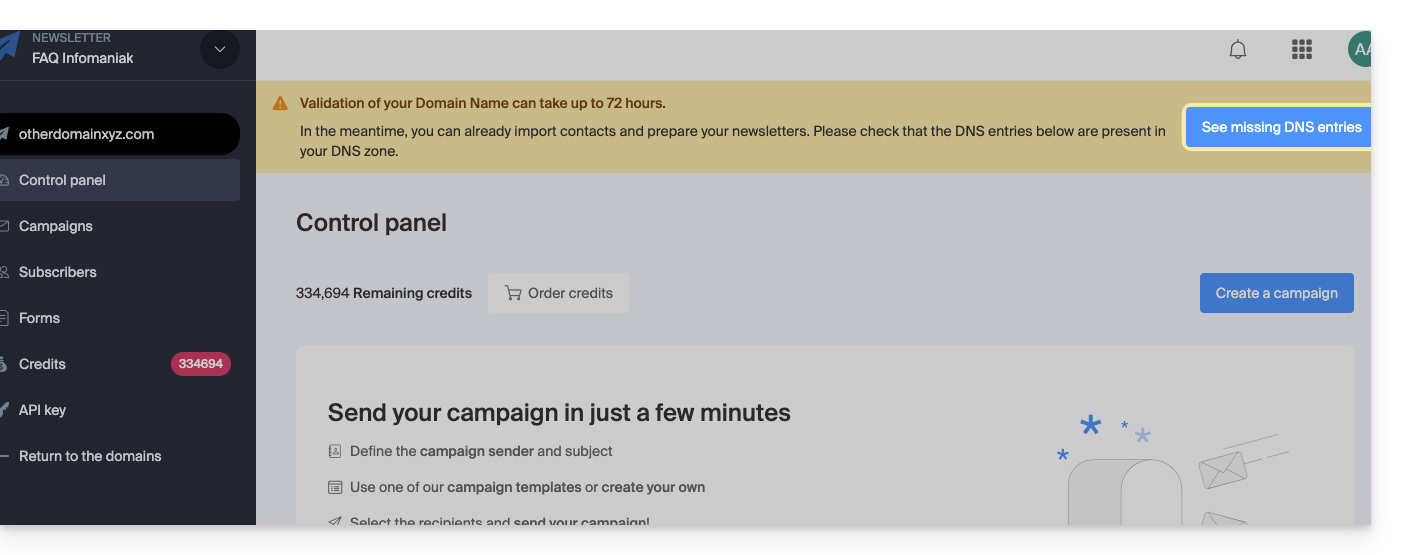
Refer to this other guide to add the DNS entries mentioning ._domainkey making sure to choose the type DKIM first, then the subtype CNAME when adding the DKIM.
In case of outgoing domain transfer
If the domain name currently managed by Infomaniak (and corresponding to the Newsletter) is transferred to another registrar, the Newsletter tool will be deactivated within 30 days if no corresponding DNS modifications are made.
Link to this FAQ:
Has this FAQ been helpful?
This guide explains how to resolve access errors to your Web Hosting following an IP address change (e.g., server migration).
Preamble
- To save time, your system maintains a lookup table between domain names and IP addresses.
- If the site changes "home" (IP), your computer tries to knock on the old door.
- Clearing the cache forces it to request the new address from the DNS servers.
If your computer retains the old address in memory, clearing the DNS cache allows you to restore the connection.
Clear the DNS cache…
… on Windows
Use the command prompt to refresh your network settings:
- Open the Start menu.
- Type cmd and validate.
- In the black window that opens, type the following command and press Enter:
ipconfig /flushdns
… on macOS
On recent versions of macOS, the procedure is done via the Terminal:
- Open the Terminal (via Spotlight or Applications > Utilities).
- Copy and paste the following command:
sudo dscacheutil -flushcache; sudo killall -HUP mDNSResponder - Enter your session password (it will not be displayed during entry) and validate.
… on Linux
Most modern distributions use systemd-resolved. Open your terminal and run:
sudo resolvectl flush-caches
Note: If you are using an older service, the command sudo systemctl restart nscd is still valid.
Link to this FAQ:
Has this FAQ been helpful?
This guide explains how to find and display DNS type information for any domain name registered with Infomaniak (or elsewhere).
Domain with Infomaniak
To access your domain names and view the DNS servers entered:
- Click here to access the management of your domain on the Infomaniak Manager (need help?).
- Click directly on the name assigned to the domain concerned:
- Click on DNS Servers in the left sidebar:

WHOIS Search
To display the DNS information of another domain name, use a WHOIS service such as https://whois.infomaniak.com/ for example or https://who.is (be careful with ads on all these third-party services).
You will thus get a clear answer to the DNS situation of a domain name at a given time.
Often, DNS entries are displayed in pairs and start with ns... followed by numbers and the name of the registrar or host.
Note, the DNS records displayed are not necessarily those chosen recently by the domain manager. Indeed, there is a propagation time that may need to be taken into account if changes are being made to the domain.
Link to this FAQ:
Has this FAQ been helpful?
This guide describes the meaning of TTL, an abbreviation for «Time To Live» as well as the principle of DNS propagation delays, important concepts in the operation of services related to domain names.
Preamble
- The TTL determines how long DNS information is cached before being updated.
- This directly influences the speed of DNS changes propagation across servers worldwide.
- Although reducing the TTL can speed up propagation, the behavior of ISPs and their caches can introduce additional delays.
The TTL (Time to Live)
The TTL (Time to Live) is a key parameter in managing DNS records. It represents the duration, expressed in seconds, during which DNS information can be stored in cache before being updated. When a DNS server or an Internet Service Provider (ISP) queries a DNS zone, it temporarily stores the responses obtained in order to reduce the load on the servers and speed up navigation for users.
For example, if the TTL is set to 24 hours (86400 seconds), the DNS information related to a domain will be cached and will not be updated for the entire duration, even if you have modified parameters such as the domain's IP address. This means that DNS changes will only take effect once this period has elapsed.
It is possible to speed up the application of changes by reducing the TTL before making updates. For example, lowering the TTL to one hour (3600 seconds) allows DNS servers to check new information more quickly after a modification.
DNS propagation
The TTL is directly related to the process of DNS propagation. DNS propagation refers to the time required for changes made to a DNS zone to be distributed across all DNS servers in the world. This delay depends not only on the configured TTL, but also on how ISPs and other DNS servers manage their caches.
When you modify DNS records, DNS servers and ISPs must wait for the TTL delay to expire before retrieving the new information. Thus, the shorter the TTL, the faster the changes propagate through the network. However, some ISPs sometimes ignore the TTL duration and retain the information in cache for a longer period (for example 24 hours or more), which can slow down the propagation of DNS changes, even if you have configured a reduced TTL.
Link to this FAQ:
Has this FAQ been helpful?
This guide explains how to order a DNS zone from Infomaniak.
Preamble
- Having the DNS zone with Infomaniak is useful if your domain name is registered elsewhere (third-party provider/registrar) and you want to easily link this domain with Infomaniak products.
- Indeed, it is not enough to own a site
domain.xyzwith Infomaniak and to indicate the 2 Infomaniak DNS addresses with the domain name registrar (if it is not Infomaniak) for the site to display when you typedomain.xyzin a browser. - You must add a DNS zone in the same place as the hosting to make the site work easily.
- This will also be particularly useful if the service provider managing your domain name does not offer DNS zone management.
Order a DNS zone
To do this:
- Click here to access the Infomaniak domain Shop.
- Start a search with the name of the domain registered elsewhere.
- Click on the action menu ⋮ located to the right of the result obtained.
- Select Order a DNS zone:
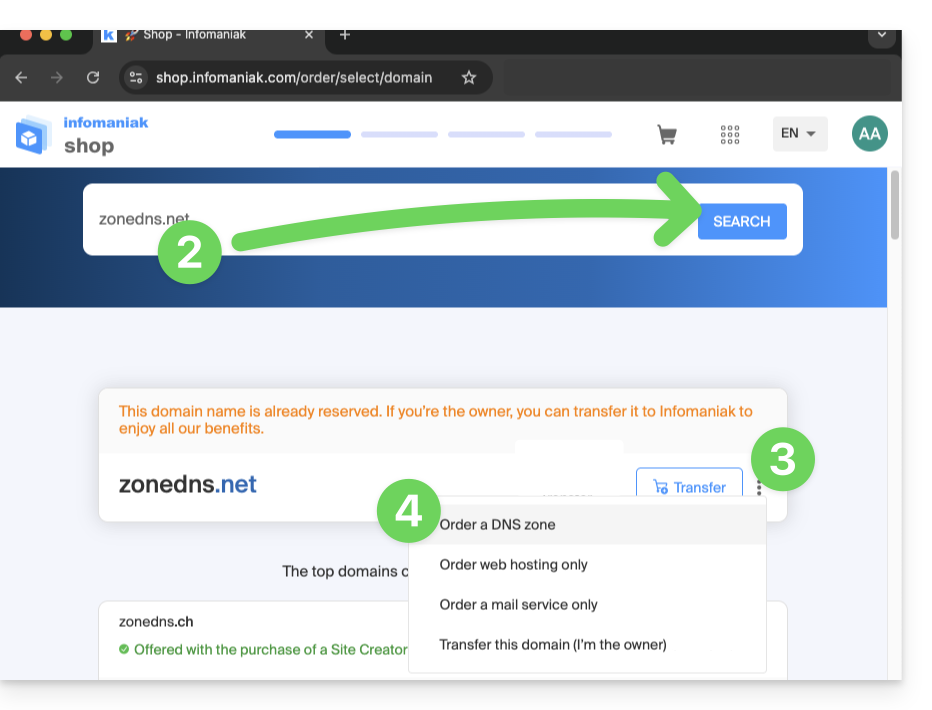
- Complete the purchase.
- Once added to your Manager, the zone can be edited.
Link to this FAQ:
Has this FAQ been helpful?
This guide explains how to generate and automatically renew a wildcard certificate via a DNS challenge using Certbot and the dns-infomaniak plugin.
1. Installation of required tools
The Infomaniak DNS plugin is not included by default. To avoid the plugin does not appear to be installed error, install certbot and its extension by following the official instructions.
Make sure to select the tab Wildcard on the Certbot website after choosing your system.
2. Initial manual generation
Run this command to start the first generation of the certificate:
certbot certonly --manual \
-d *.example.com \
--preferred-challenges dns-01 \
--server https://acme-v02.api.letsencrypt.org/directory
3. DNS challenge validation (TXT Record)
To prove that you own the domain, go to your Infomaniak Manager and create the following TXT record:
- Name:
_acme-challenge - Value: (the one provided by the Certbot command)
4. Preparing the Infomaniak API
To automate the process, generate an API token with the domain scope in your management interface. This token will allow the script to automatically update your DNS.
5. Authentication script (infomaniak-auth.sh)
Create the file /root/infomaniak-auth.sh. This script will be called by Certbot during renewal:
#!/bin/bash
# API Token for Infomaniak
INFOMANIAK_API_TOKEN="YOUR_API_TOKEN_HERE"
# Update DNS record via Infomaniak API plugin
/usr/bin/certbot \
  --authenticator dns-infomaniak \
  --server https://acme-v02.api.letsencrypt.org/directory \
  -d "$CERTBOT_DOMAIN" \
  --agree-tos
Make the script executable:
chmod +x /root/infomaniak-auth.sh
6. Cleanup script (infomaniak-clean.sh)
Create the file /root/infomaniak-clean.sh to finalize the procedure:
#!/bin/bash
# Optional: Cleanup operations after challenge
exit 0
Make the script executable:
chmod +x /root/infomaniak-clean.sh
7. Automatic renewal configuration
Edit or create the following configuration file: /etc/letsencrypt/renewal/example.com.conf.
cert = /etc/letsencrypt/live/example.com/cert.pem
privkey = /etc/letsencrypt/live/example.com/privkey.pem
chain = /etc/letsencrypt/live/example.com/chain.pem
fullchain = /etc/letsencrypt/live/example.com/fullchain.pem
[renewalparams]
authenticator = manual
manual_auth_hook = /root/infomaniak-auth.sh
manual_cleanup_hook = /root/infomaniak-clean.sh
server = https://acme-v02.api.letsencrypt.org/directory
pref_challs = dns-01
account = YOUR_ACCOUNT_ID
key_type = rsa
8. Testing and Automation (Cron)
Before automating, verify that everything works correctly with a simulation:
certbot renew --dry-runIf the test is successful, add this Cron task to check renewal every X days:
0 0 */30 * * /usr/bin/certbot renew --quiet --config /etc/letsencrypt/renewal/example.com.confModify 30 days above according to the desired frequency. The cron will automatically use:
- the file
domain.tld.conf - the authentication script
infomaniak-auth.sh - the plugin
dns-infomaniak
Link to this FAQ:
Has this FAQ been helpful?
This guide introduces the DNS Diagnostic tool, which allows you to verify that the relationships between…
- DOMAIN NAME at Infomaniak
and
- MAIL SERVICE at Infomaniak
… are correct, so that the Mail traffic is directed to the right place.
Preamble
- To verify, the tool checks the MX, SPF records, etc.
- You will thus be able to detect and correct certain Mail issues, especially if they are related to DNS (technical information that, in short, determines where such and such Mail traffic should be directed) by acting at the level of your domain.
- Automatic correction is only possible when the domain name is present in the same Organization as the product to which it must be attached.
- If this is not the case, then the correction must be done manually.
Diagnose a DNS problem
To access the DNS diagnostic of your domain name:
- Click here to access the management of your Mail Service on the Infomaniak Manager (need help?).
- Click directly on the name assigned to the product concerned:
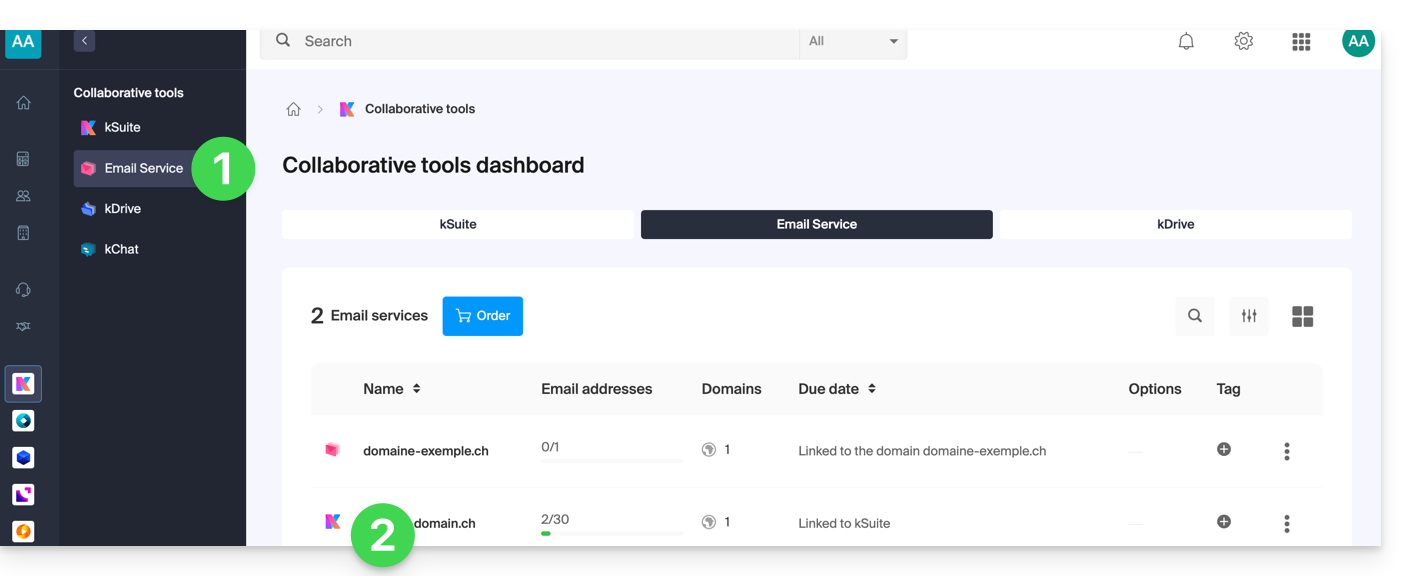
- Click on Domain Management in the left sidebar:
- Click on DNS Diagnostic in the left sidebar.
- Click the button if necessary to refresh the information that should be green.
- If DNS issues are detected, a red display on the dashboard indicates it:
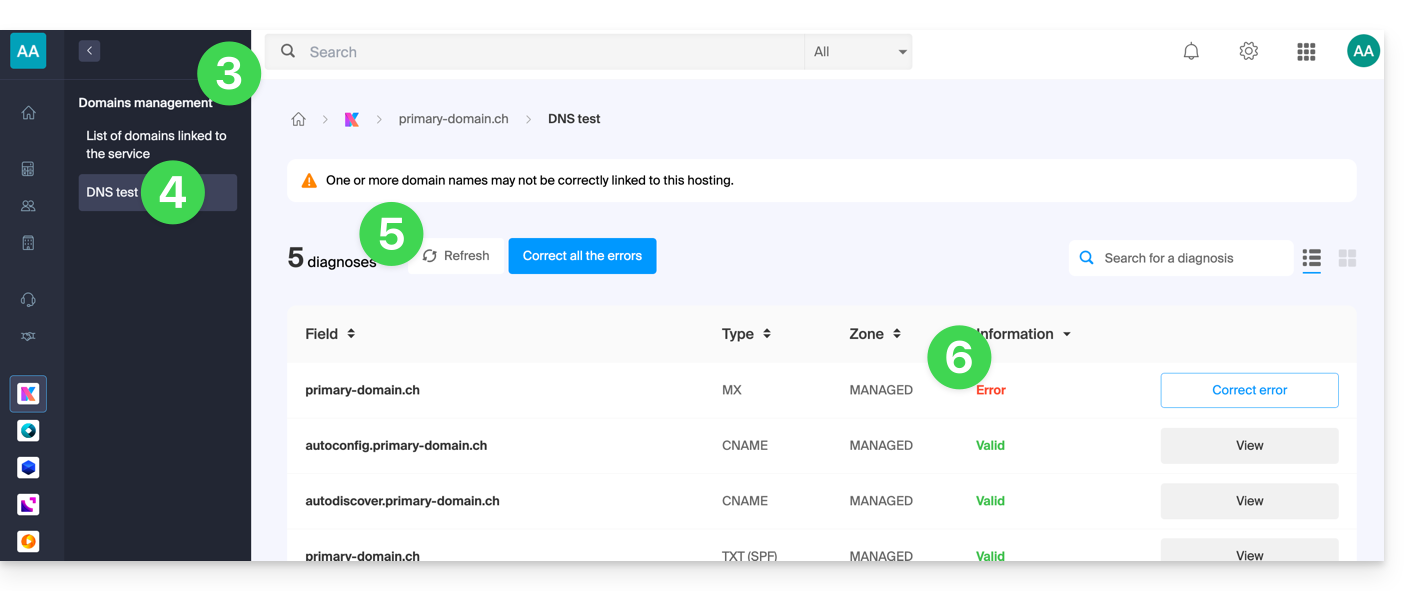
- Correct each error individually by clicking on the button located to the right of the item concerned…
- … or all errors at once with the button located above the dashboard
Refer to this other guide regarding the same automatic verification process but for Web Hosting.
And if necessary, refer to the messaging security diagnostic.
Link to this FAQ:
Has this FAQ been helpful?
This guide introduces the Domain Status tool, which allows you to verify that the relationships between…
- DOMAIN NAME at Infomaniak
and
- WEB HOSTING at Infomaniak
… are correct, so that Web traffic is directed to the right place.
Preamble
- To verify, the tool checks the
A,CNAME, etc. records. - You will thus be able to detect and correct certain Web issues, especially if they are related to DNS (technical information that, in short, determines where such and such Web traffic should be directed) by acting at the level of your domain.
- Automatic correction is only possible when the domain name is present in the same Organization as the product to which it must be attached.
- If this is not the case, then the correction must be done manually.
Diagnose a DNS problem
To access the DNS diagnosis of your domain name:
- Click here to access the management of your product on the Infomaniak Manager (need help?).
- Click directly on the name assigned to the product concerned.
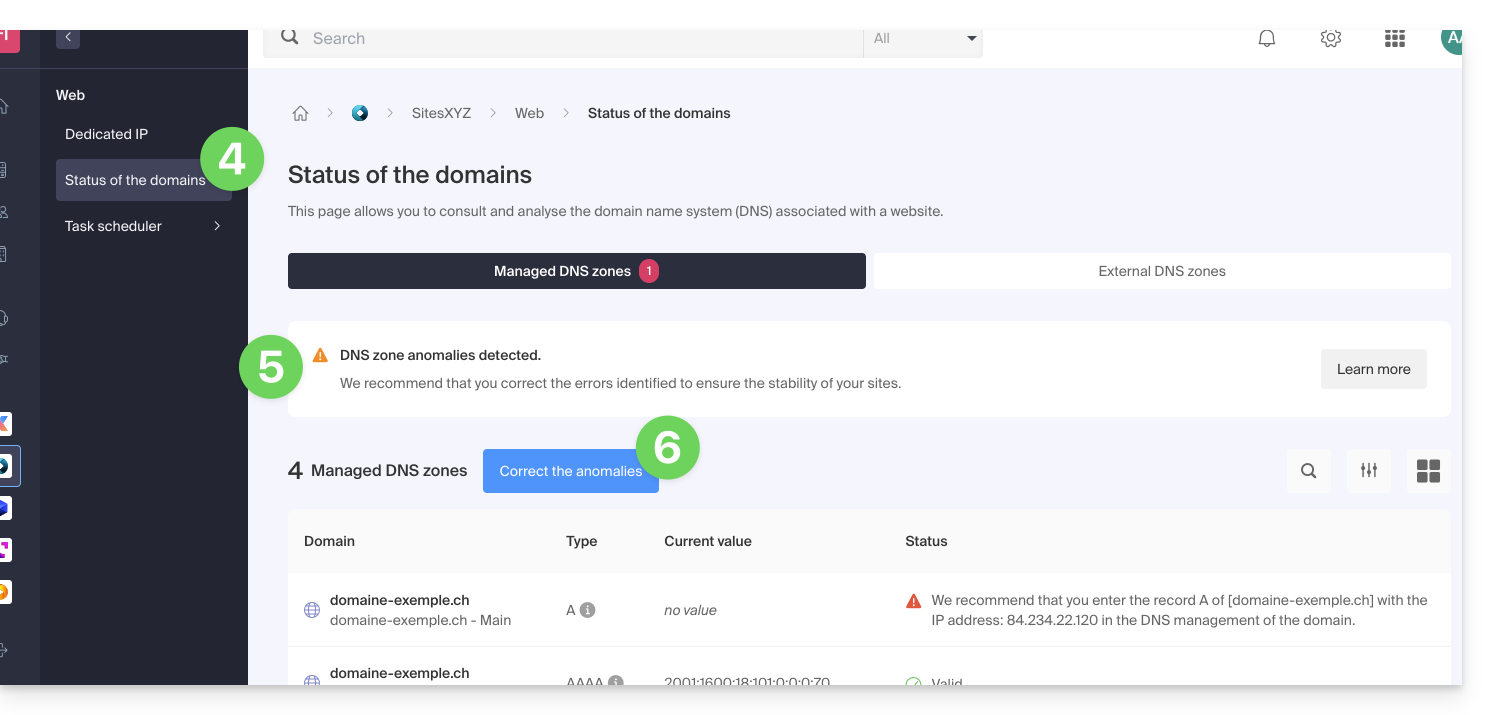
- Click on Web in the left sidebar (or on the possible indication to go directly to point 6):
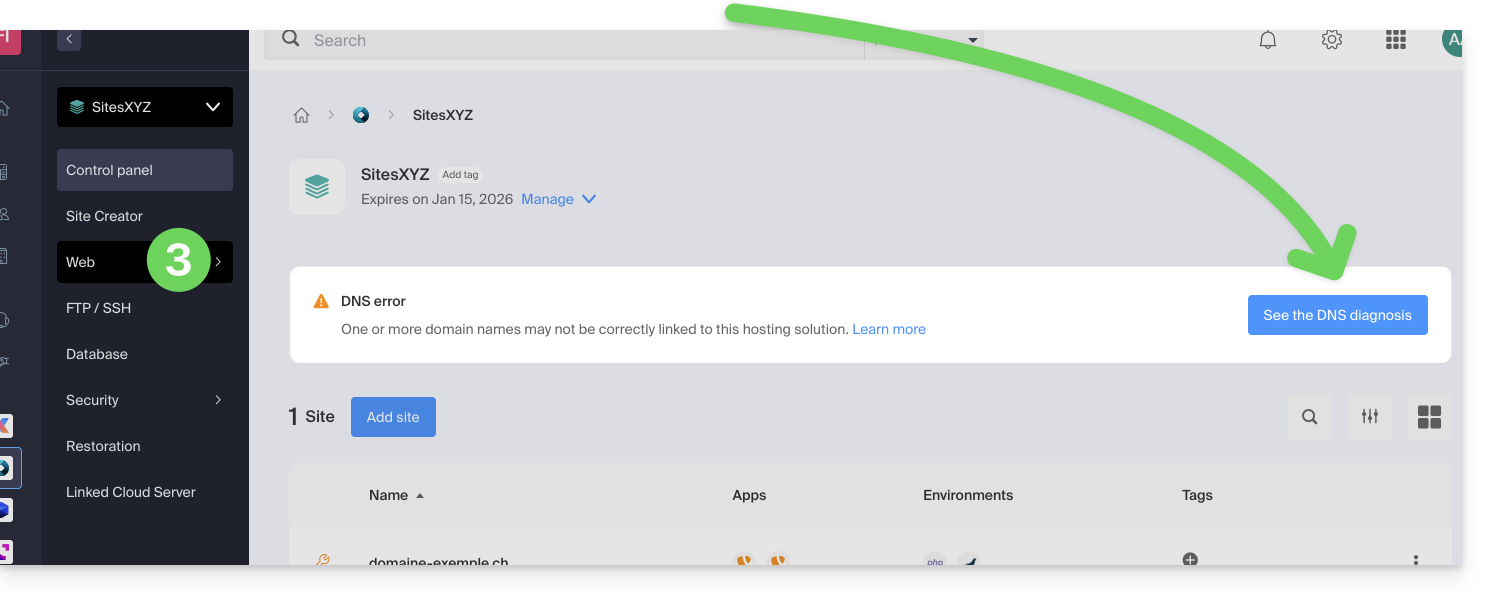
- Click on Domain Status in the left sidebar.
- If DNS issues are detected, the dashboard indicates it.
- Correct all errors at once by clicking on the button:
Refer to this other guide regarding the same automatic verification process but for Mail Services.
Link to this FAQ:
Has this FAQ been helpful?
This guide explains how to modify in advanced (expert) mode specific entries (records of type A & AAAA, MX, TXT, etc.) within the DNS zone of a domain name registered with Infomaniak.
If you are a beginner, prefer the simple mode.
Prerequisites
- Have a domain name with Infomaniak or at least a DNS zone.
- Understand:
- the operation of a domain and a DNS zone before modifying the latter…
- that the DNS zone presented here is valid and used only if the name servers are those of Infomaniak…
- that any DNS addition/modification can take up to 48 hours to propagate.
Modify an existing record
To configure the services associated with the domain and allow the appropriate resolution of domain names to the corresponding resources (such as external websites, third-party mail servers, etc.):
- Click here to access the management of your product on the Infomaniak Manager (need help?).
- Click directly on the name assigned to the product concerned.
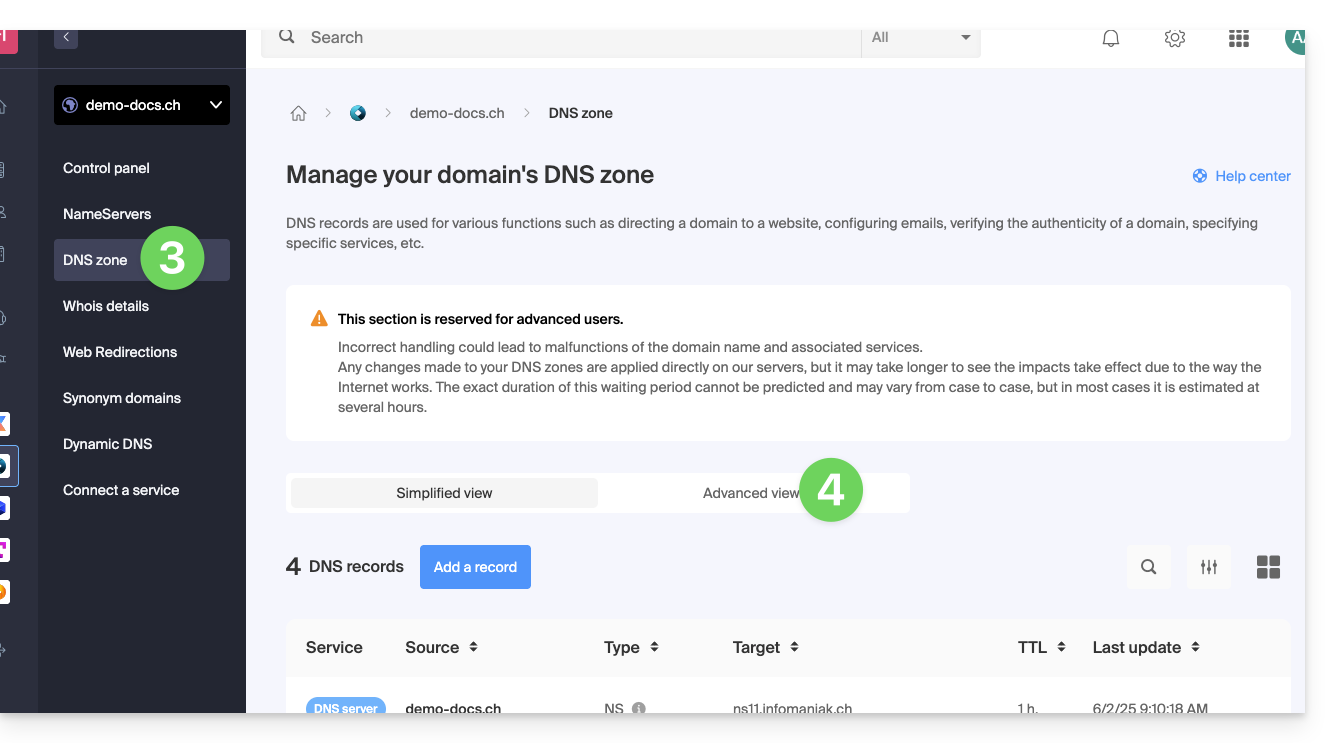
- Click on DNS Zone in the left sidebar
- Click on Advanced View:
- The syntax is accepted in BIND format.
- Proceed with the editing of the desired information.
- Save your changes:

Restore a DNS zone
Thanks to the Expert mode, you can use versioning to find a previous version of the DNS zone of your domain name and thus restore it as it was at a given time:
- Once in the Advanced View tab (see above) click on Current Version to expand the menu containing previous dates.
- Click on the desired date to get a preview of the changes.
- Click on the blue Save button on the right to return to the selected version:
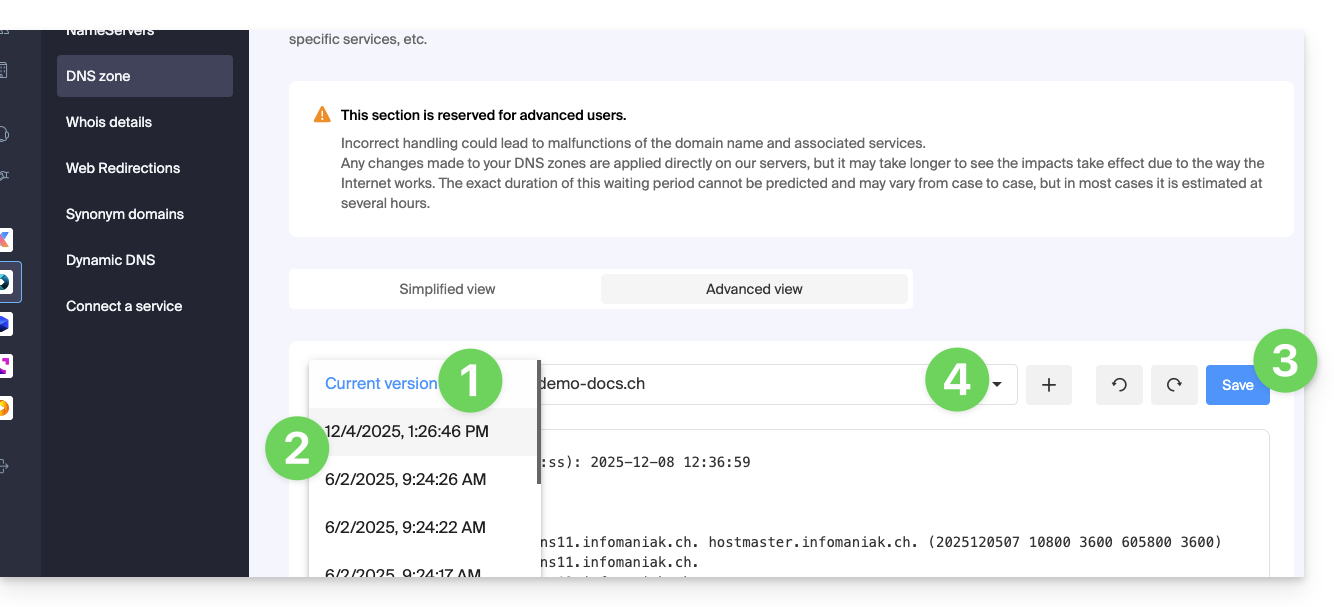
- Click on the second drop-down menu if necessary to access the restoration of delegated subdomain configurations.
DNS Diagnostic
A tool available on your Manager allows you to easily correct certain problematic records.
Link to this FAQ:
Has this FAQ been helpful?
This guide explains how to add, modify, or delete specific entries (records of type A & AAAA, MX, TXT, etc.) within the DNS zone of a domain name registered with Infomaniak.
Prerequisites
- Have a domain name with Infomaniak or at least a DNS zone.
- Understand:
- the operation of a domain and a DNS zone before modifying the latter.
- that the DNS zone presented here is valid and used only if the server names are those of Infomaniak.
- that any DNS addition/modification can take up to 48 hours to propagate.
Add a record (simple mode)
To configure the services associated with the domain and allow the appropriate resolution of domain names to the corresponding resources (such as external websites, third-party mail servers, etc.):
- Click here to access the management of your domain on the Infomaniak Manager (need help?).
- Click directly on the name assigned to the domain concerned.
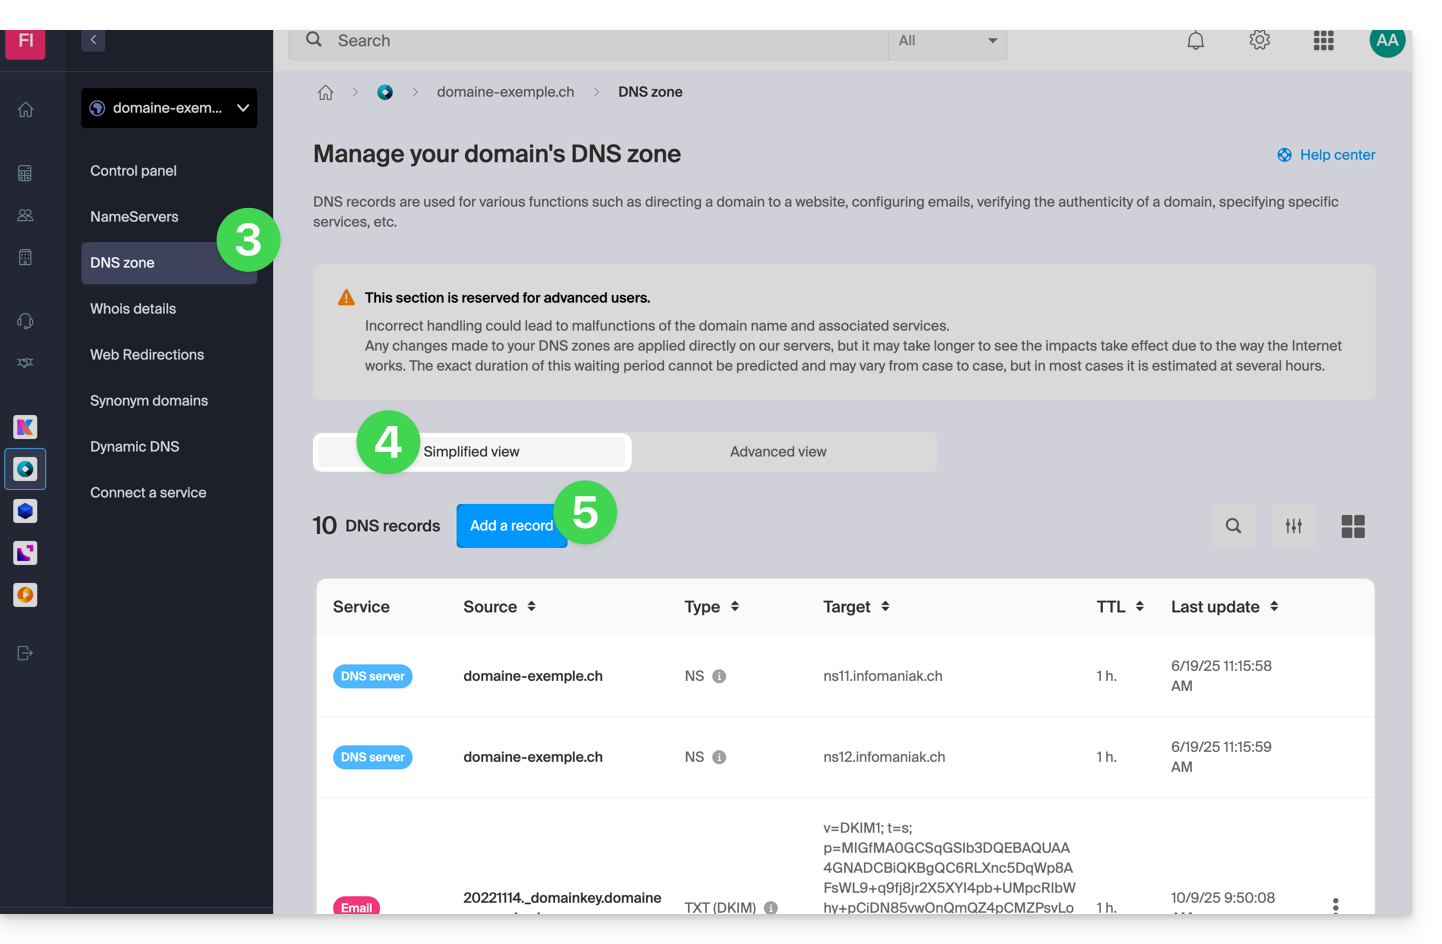
- Click on DNS Zone in the left sidebar.
- The entries currently in place are listed in the Simple Mode table.
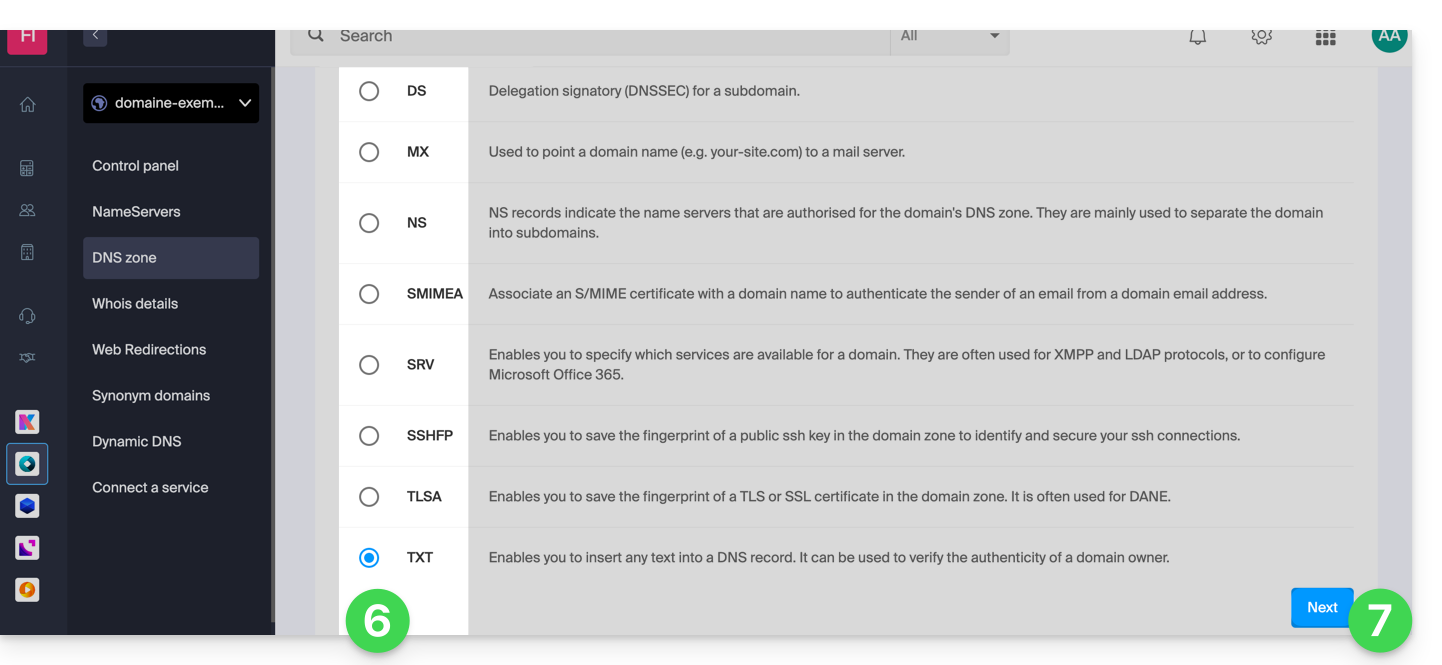
- Click the blue Add an entry button:
- Choose the desired record type (records of type A & AAAA, MX, TXT, etc.)
- Click on Next:
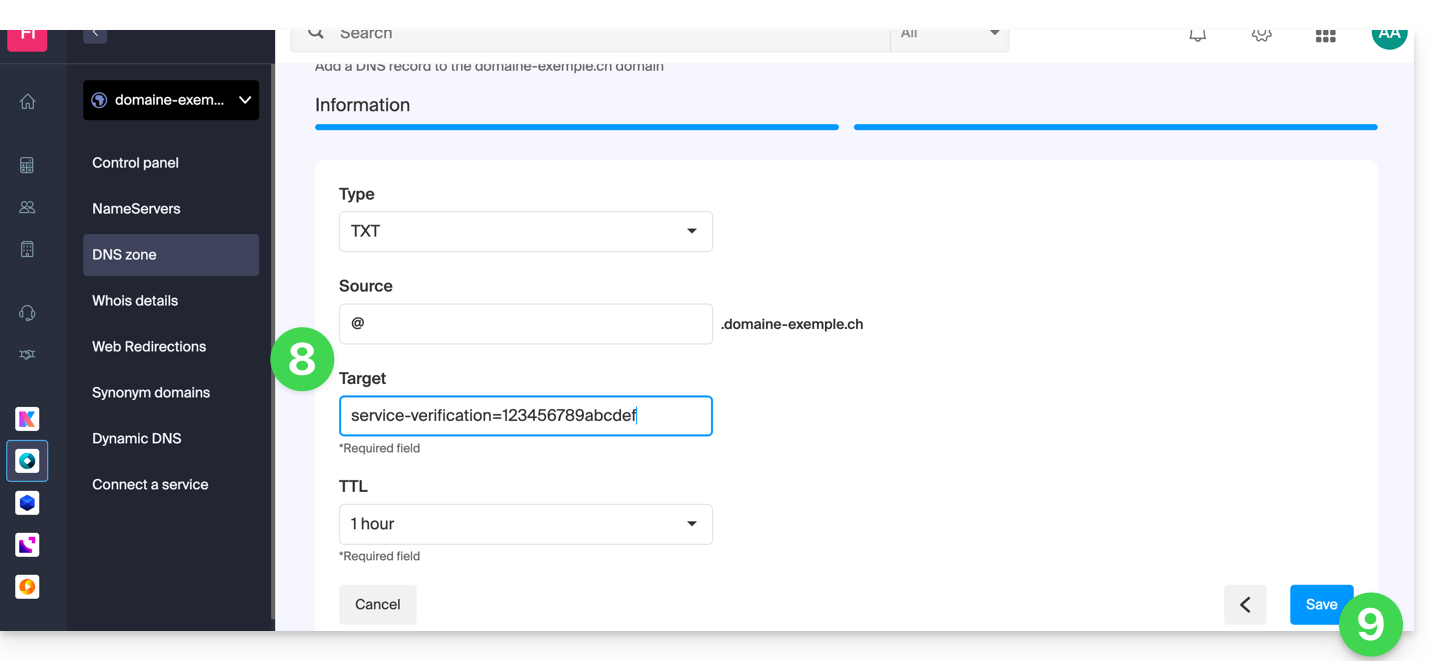
- Complete the different fields according to your information:
- Under Source leave blank or enter any subdomain concerned.
- Under Target enter the information obtained from your external provider or any other useful indication.
- Leave the TTL indicated.
- Save the addition made:
Modify an existing record
To modify an existing DNS record:
- Follow points 1 to 4 above.
- Click on the action menu ⋮ to the right of the record to be modified.
- Click on Modify to access the edit page:
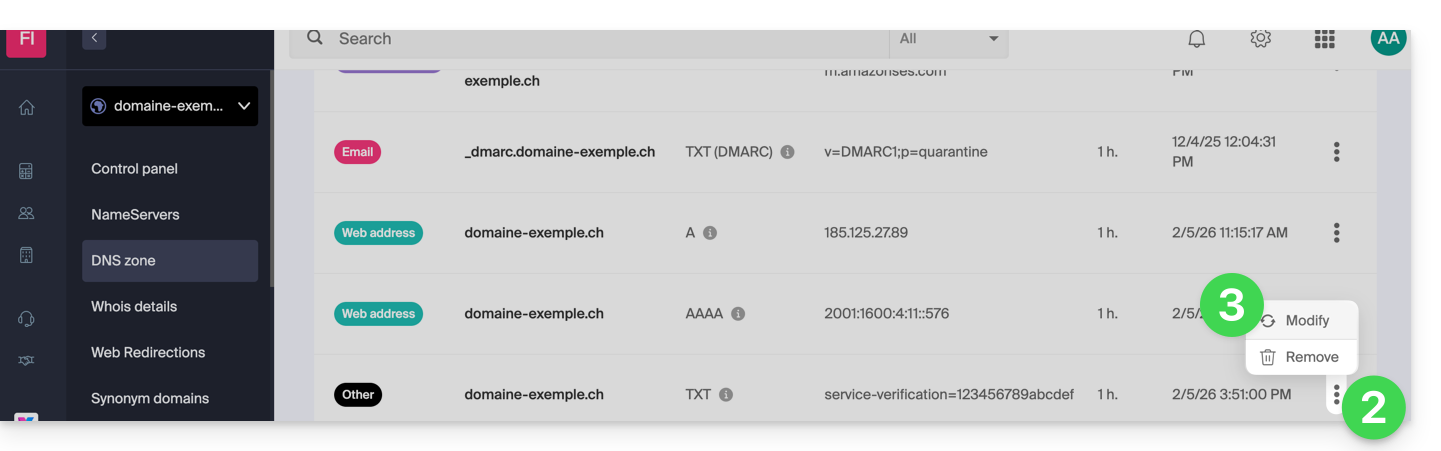
- Proceed with the editing of the desired information and then save your changes.
Delete an existing record
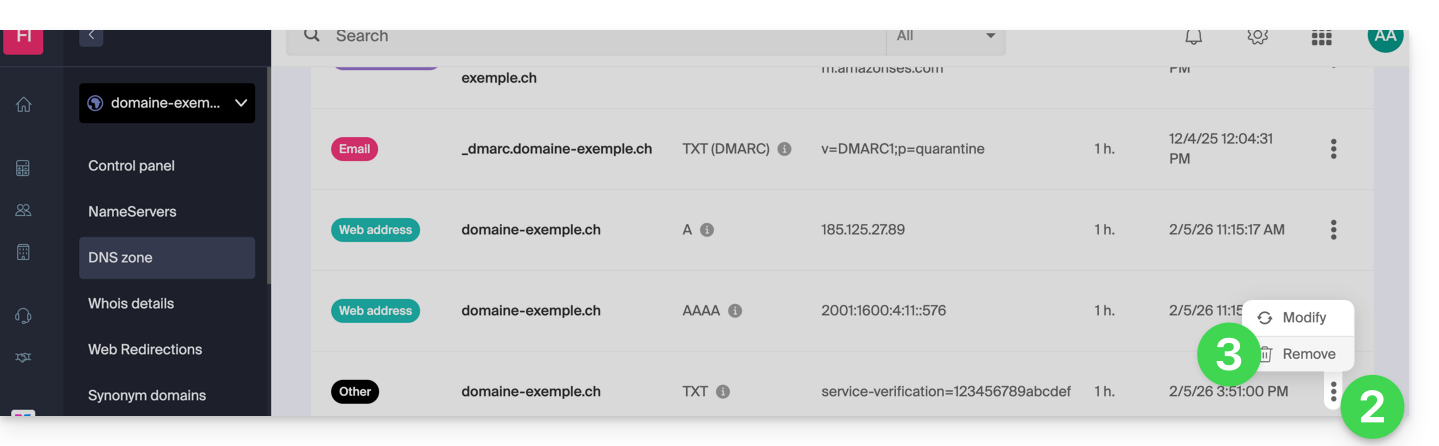
To delete an existing DNS record:
- Follow points 1 to 4 above.
- Click on the action menu ⋮ to the right of the record to be modified.
- Click on Delete and confirm the deletion:
DNS diagnostic
A tool available on your Manager allows you to easily correct certain problematic records. You can also use a free external service like the one mentioned at the bottom of this other guide.
Expert mode
To edit the DNS zone in advanced (expert) mode, which allows you to restore a previous version of the different records, refer to this other guide.
Link to this FAQ:
Has this FAQ been helpful?
This guide explains how to obtain the EPP code for your domain name at Squarespace (formerly Google Domains) so that you can transfer it to Infomaniak and set up this Dynamic DNS (DDNS) service again, free of charge.
Introduction
- Between 2023 and 2024, all domains registered with Google Domains were transferred to Squarespace, which no longer offers Dynamic DNS (DDNS).
- The terms "
EPP", "AuthCode", "AuthInfo", "transfer code", and "authorization code" all refer to alphanumeric sequences specific to the domain, the main purpose of which is to verify the owner's authorization before a transfer between registrars. - Please read the main guide regarding the rest of the transfer process.
- ⚠️ This involves transferring a domain name that you own with a provider other than Infomaniak, so that the future management of this domain is handled by Infomaniak; therefore, this is not an internal transfer from one account to another, and the code to be obtained is not a code for an internal transfer to your current provider.
Transfer the domain name to Infomaniak
To obtain the authorization code from your current provider:
- Click here to log in to the management interface for your products with your current registrar.
- Read the complete procedure provided by Squarespace to obtain the code and keep it in a safe place.
- Once you have obtained the authorization code, consult the main Infomaniak guide regarding the rest of the domain name transfer procedure.
- Once the domain has been transferred to Infomaniak, consult this Infomaniak guide to recreate the Dynamic DNS you had with Google, if necessary.
Link to this FAQ:
Has this FAQ been helpful?
This guide explains how to set up DNSSEC with Cloudflare for a domain registered with Infomaniak.
Prerequisites
- The DNS zone of the domain must be managed by Cloudflare.
Configure DNSSEC with Cloudflare
To do this:
- Click here to access the Cloudflare console.
- Go to the DNS tab.
- Click on Enable DNSSEC.
- Keep the following information handy:
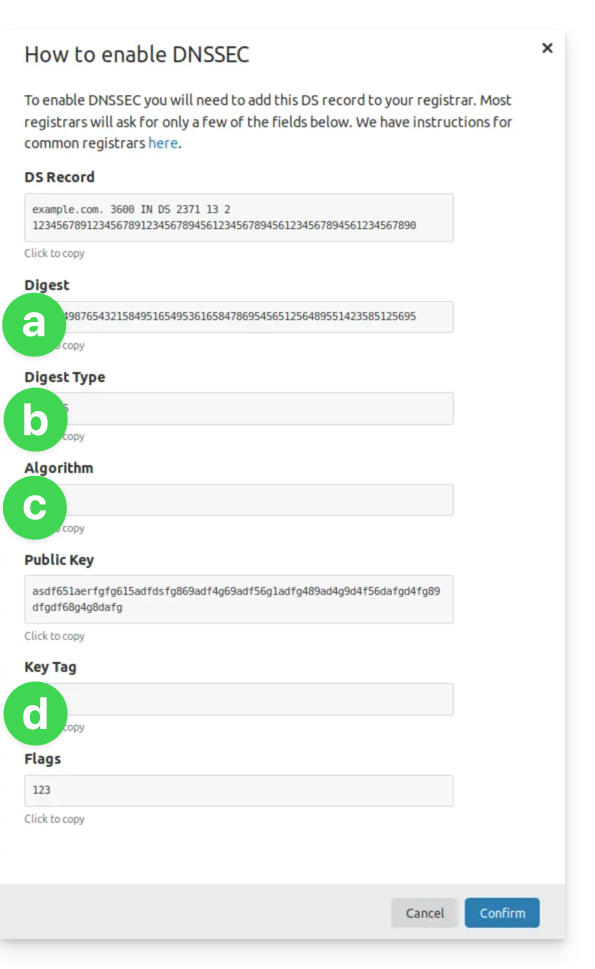
(see points 8 & 10 below)- The details under a will go under HASH
- The details under b will go under HASH TYPE
- The details under c will go under ALGORITHM
- The details under d will go under KEY
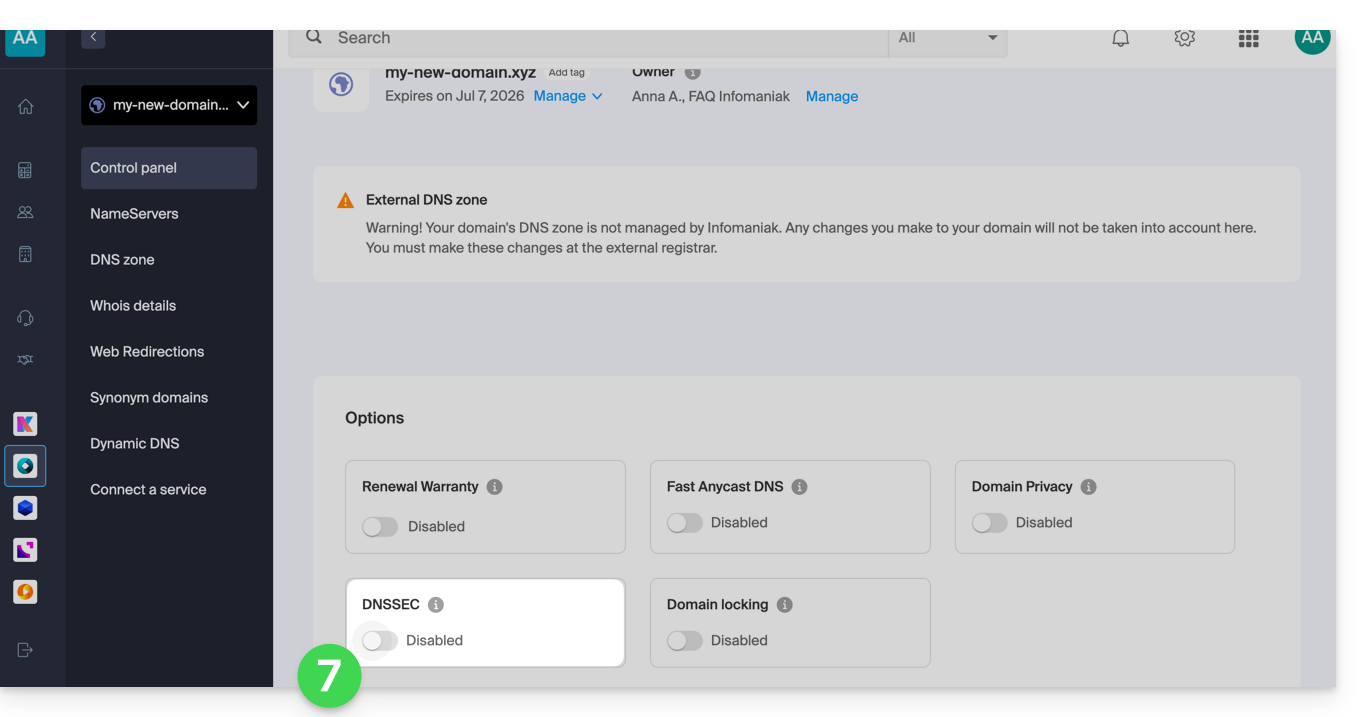
- Click here to access the management of your domain on the Infomaniak Manager.
- Click directly on the name assigned to the domain in question.
- Activate DNSSEC from the Dashboard:
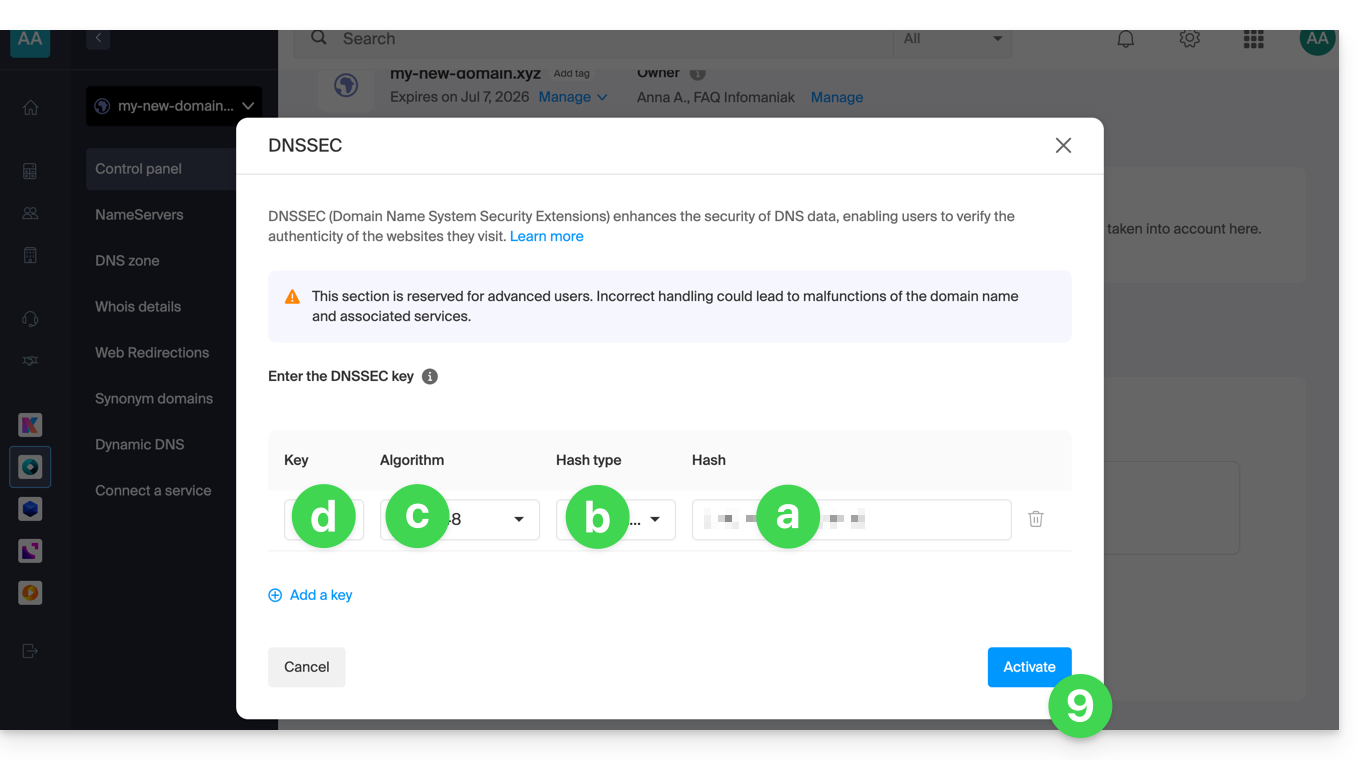
- On the window that appears, enter the requested information with the data provided by Cloudflare (see point 4 above):
- Hash = Digest
- Hash Type = Digest Type
- Algorithm = Algorithm
- Key = Key Tag
- Click on Activate:
- In the case of a domain with extension
.eu, the necessary details may be significantly different (see point 4 above):- The details under FLAGS will go under FLAGS
- The details under PUBLIC KEY will go under PUBLIC KEY
Link to this FAQ:
Has this FAQ been helpful?
This guide explains what DNSSEC is and how this protection enhances the security of Domains at Infomaniak and the traffic they generate.
Preamble
- Each URL corresponds to an IP address, and when an internet user enters the URL of your site in their web browser, they call on a DNS server whose role is to redirect them to the IP address that corresponds to the entered domain (technically, this is known as DNS resolution).
- When DNSSEC is not activated on your domain name, a malicious person could detect a flaw in a DNS server and modify the correspondence between your domain name and the IP address of your site with an IP address of their choice. In such a case, the internet user who enters the URL of your site would then be redirected to another website that does not correspond to the content of your website.
- DNSSEC allows securing the authenticity of the response provided by the DNS server and thus guarantees to internet users that they are viewing the website they actually want to see. If a hacker attempted to modify the IP address of your domain name in a DNS server protected by DNSSEC at the time of resolution, the latter would refuse their requests, as they would not be authenticated.
- DNSSEC is therefore an additional security measure to the SSL certificate of a site, by guaranteeing to the internet user that they are going to the site that corresponds to the entered URL, and the SSL certificate then intervenes to encrypt the exchanges between the internet user's web browser and the web server of the site they are visiting.
Activate or deactivate DNSSEC
To know the availability of DNSSEC for a specific domain, refer to the specifics of the extensions that concern you from this page (under Frequently Asked Questions by first clicking on the extension concerned).
DNSSEC is available and already activated upon purchase for the vast majority of domain name extensions.
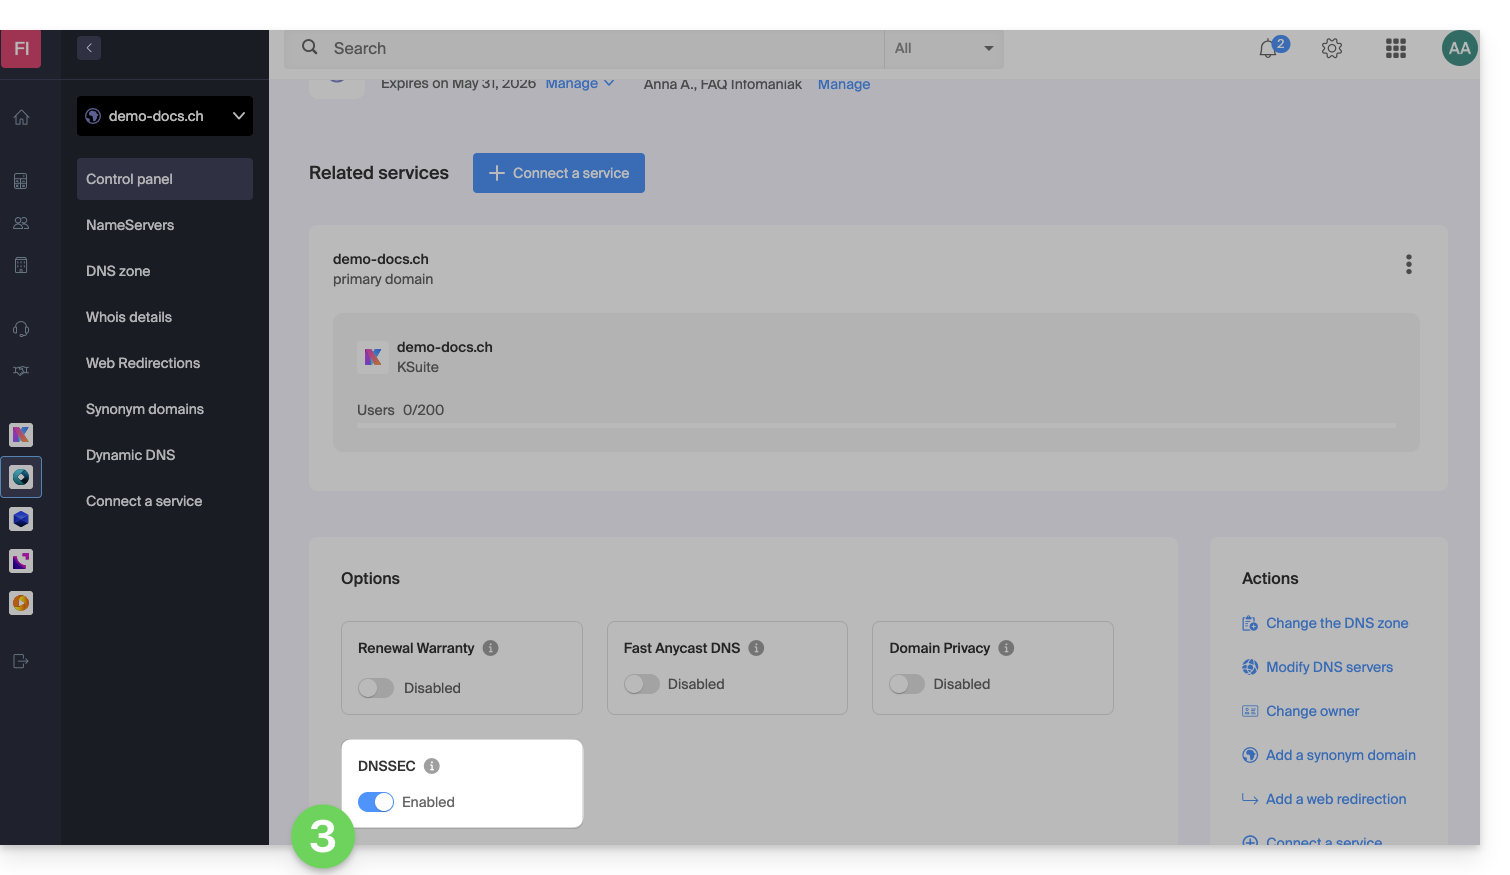
If necessary, DNSSEC is activated in a few clicks on domain names fully managed at Infomaniak:
- Click here to access the management of your product on the Infomaniak Manager (need help?).
- Click directly on the name assigned to the product concerned.
- Activate or deactivate DNSSEC from the Dashboard of the domain:
If the DNS zone of your domain is managed by another registrar, it will be necessary to provide technical information provided by the latter. If the information provided is incorrect, your domain name will no longer be accessible. Therefore, it is recommended to transfer the complete management of your domain to Infomaniak before activating DNSSEC if you are not familiar with these manipulations.
Check if DNSSEC is activated
The propagation of DNSSEC to the registry may take several hours to be effective.
Enter the domain name to be checked on this analysis site.
Specific guide
Link to this FAQ:
Has this FAQ been helpful?
This guide explains the difference between the terms synonym and alias in the context of the Domain Name service offered by Infomaniak.
Synonym domain / alias domain
So-called synonym domain names (i.e., domains that are entirely dependent on the main domain, without their own DNS configuration) and alias (independent domains, with their own DNS configuration) can both serve as secondary domains associated with a main domain.
For example, the domains pomme.xyz (alias) and banane.xyz (synonym) can redirect to a common main domain such as fruits.xyz.
Here is the technical distinction to remember:
- The synonym (also called "linked domain" or "DNS mirror") directly uses the DNS servers of the main domain. It has no DNS zone of its own.
- The alias (also called "redirected independent domain" or "DNS alias") has its own DNS records (independent DNS zone), although it points to the same hosting or services.
| pomme.xyz (domain alias – with custom DNS) ns1.personnalisable.ch ns2.personnalisable.ch | ⇢ | Own DNS zone A records, MX, etc. | Web Hosting Email Service |
| fruits.xyz (domain main) ns1.infomaniak.ch ns2.infomaniak.ch | } | Own DNS zone A records, MX, etc. | |
| banane.xyz (domain synonym – without own DNS) Automatically retrieves the DNS of the main domain (fruits.xyz) |
Learn more
Link to this FAQ:
Has this FAQ been helpful?
This guide explains how to configure a dynamic DNS record (Dynamic DNS, DDNS) for a domain name whose DNS zone is managed by Infomaniak. This free alternative to Dyn and DynHost is very useful if you want to access devices connected to the Internet from outside, devices that have a dynamic IP address (e.g., a NAS, a surveillance camera, an Internet/home automation router/box, etc.).
Prerequisites
- The DNS zone of the domain name must be managed by Infomaniak.
- If necessary, transfer your domains to Infomaniak.
- Your device or application must support dynamic DNS records.
Specific guides
The following guides explain how to link a domain name with:
- … a Synology NAS
- … a Qnap NAS
- … Zyxel / Sunrise Internet Box / TP-Link solutions
- … a UniFI device
- … a Swisscom Internet Box
- … Fritzbox
- … Jeedom
- … Linux via ddclient
- … potentially anything using the API
Add a dynamic DNS
To create a dynamic DNS for your domain:
- Click here to access your domain management in the Infomaniak Manager (need help?).
- Click directly on the name of the domain in question.
- Click on Dynamic DNS in the left-hand menu.
- Click on the blue Add a Dynamic DNS button.
- Enter the required information:
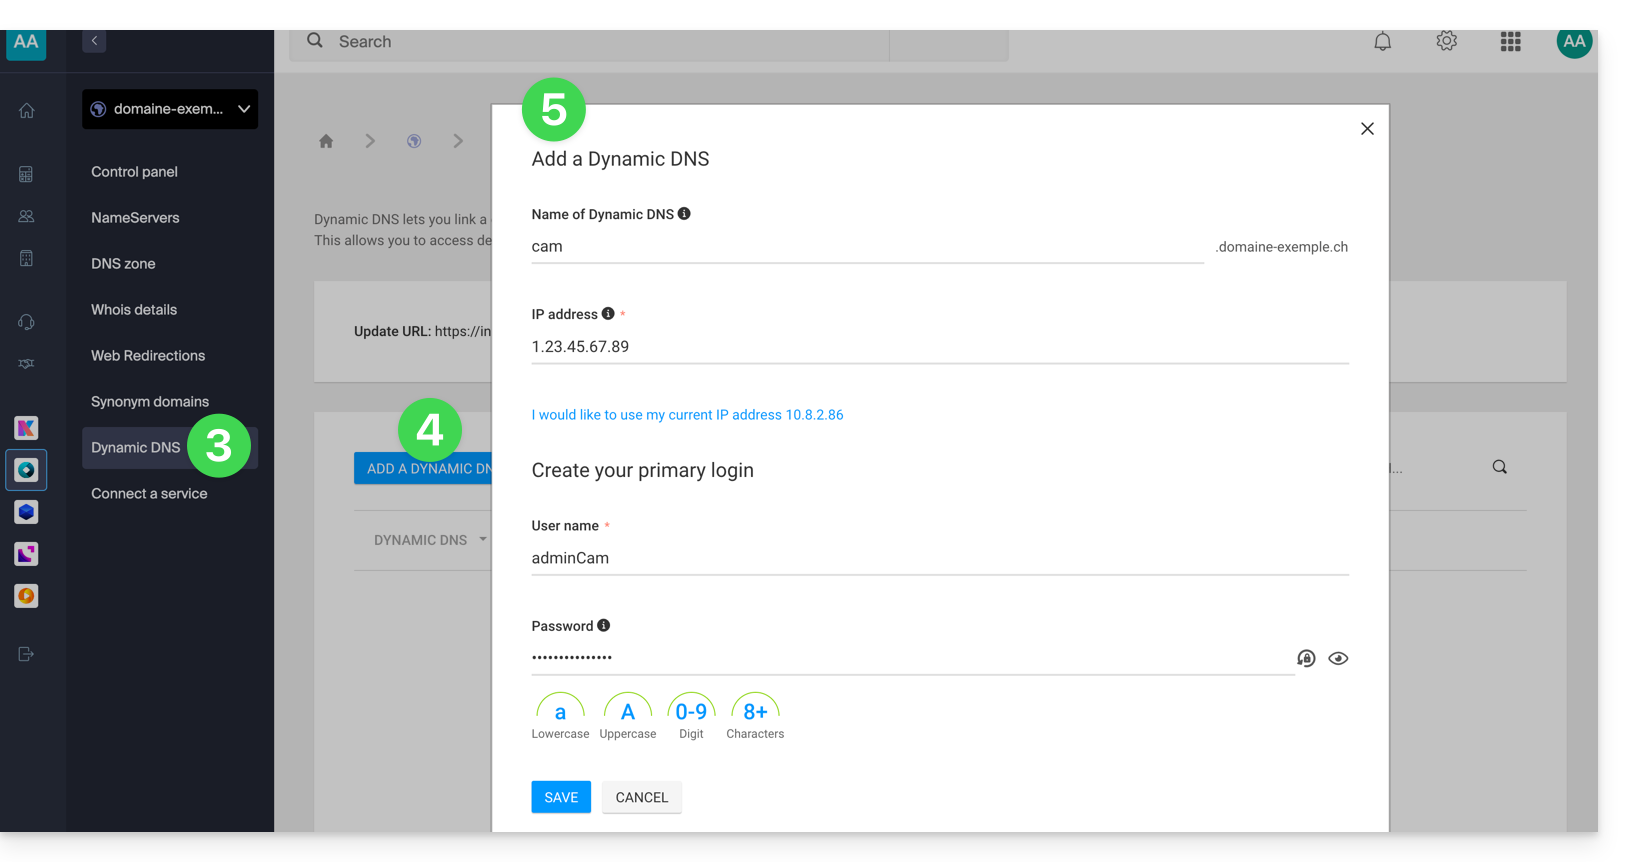
- Choose the desired subdomain or leave the Dynamic DNS Name field blank to use the main domain.
- Enter an IP address; this will then be dynamically updated by your device/app.
- Define an ID / password pair (uppercase, lowercase + numbers, no special characters); this must be entered in the configuration of your device/app.
Link to this FAQ:
Has this FAQ been helpful?
This guide explains how to restore backups of previous versions of your files and other web data from your Infomaniak hostings, and how to set up an effective backup policy if the automatically and freely provided backups no longer meet your availability or security needs.
Web Hostings (Starter, Shared, Cloud Server)
Refer to these guides to restore automatic backups:
- of an entire hosting (FTP + MySQL),
- of specific files on the hosting,
- of specific databases,
- of a Web Application (Wordpress & Apps),
- of Cloud Server SSH crons.
Refer to these guides to backup and restore:
- a hosting with Swiss Backup and Restic (advanced),
- WordPress with Swiss Backup,
- WordPress with an extension.
Also refer to https://faq.infomaniak.com/snapshot.
Messaging
- Restore messages from Infomaniak automatic backups.
- Restore contacts or calendar events.
- Backup the current content of an email account:
- by downloading the current content locally,
- by duplicating all current content to a backup box,
- by copying future emails as they arrive to a backup box.
Domains / DNS Zones
- Restore deleted DNS records from Infomaniak automatic backups.
- Restore an expired domain in redemption period.
Link to this FAQ:
Has this FAQ been helpful?