
Knowledge base
1000 FAQs, 500 tutorials and explanatory videos. Here, there are only solutions!
This guide explains how to order, link or remove a dedicated IP from a website.
Manage dedicated IPs on a hosting plan
Order one or several first dedicated IP addresses
To do this:
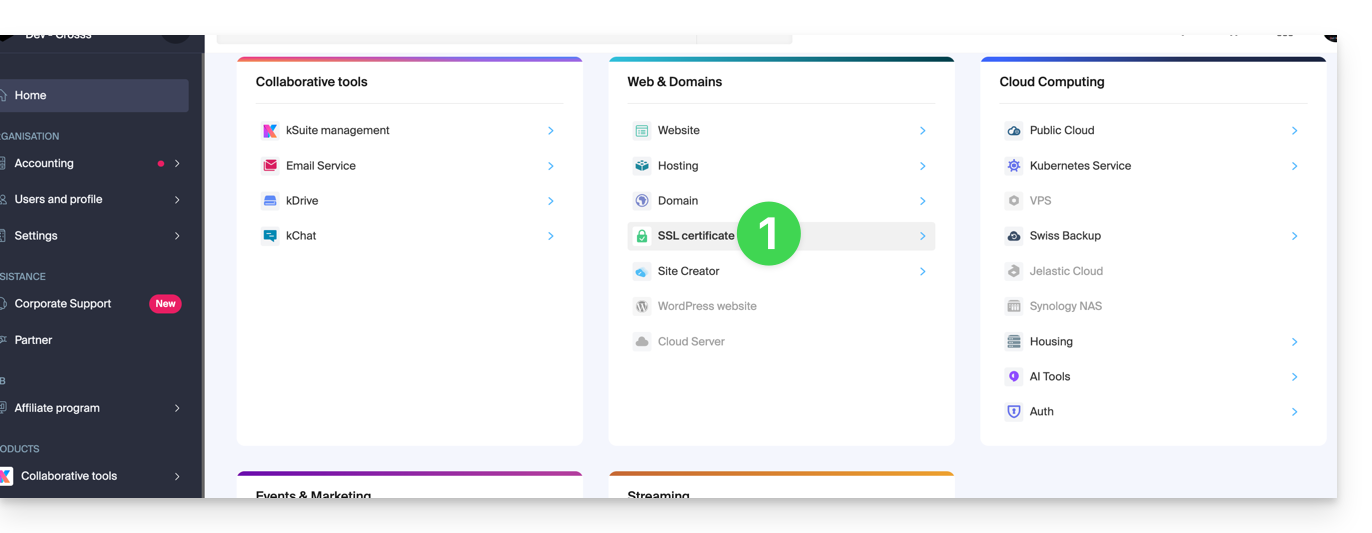
- Click here to access the management of your product on the Infomaniak Manager (need help?).
- Click directly on the name assigned to the relevant product.
- Click on Web in the left sidebar.
- Click on Dedicated IPs in the left sidebar.
- Click on the button to order one or more IP addresses:

Order one or several additional dedicated IP addresses
To do this:
- Click here to access the management of your product on the Infomaniak Manager (need help?).
- Click directly on the name assigned to the relevant product.
- Click on Web in the left sidebar.
- Click on Dedicated IPs in the left sidebar.
- Click on Order :

Associate a dedicated IP address with a website on a hosting plan
Once the IP has been ordered and paid for, familiarize yourself with the prerequisites below, as switching to a dedicated IP address for a website may cause a temporary interruption, especially in the presence of a certificat SSL Let’s Encrypt. To limit the impact:
- Start by reducing the TTL of the DNS records
AandAAAA(for@andwww) to 5 minutes. - Wait for the previous TTL duration before making any changes.
- The change below should be made during a period of low traffic to limit the inconvenience caused by the inevitable interruption.
- At the end of the procedure, you will need to wait for the new TTL to propagate the new configuration and for the SSL certificate to be regenerated, then check the accessibility of the site in HTTPS to ensure that everything is working correctly.
To switch to a dedicated IP address:
- Click here to access the management of your product on the Infomaniak Manager (need help?).
- Click directly on the name assigned to the relevant product.
- Click on Web in the left sidebar.
- Click on Dedicated IPs in the left sidebar.
- Click on the button to dedicate the IP to a site on your hosting:

- Select the site to assign the new IP address to.
- Check the box after reviewing the warnings.
- Click on the Associate button:

Remove a dedicated IP address from a website
Once the IP is installed, to uninstall it:
- Click here to access the management of your product on the Infomaniak Manager (need help?).
- Click directly on the name assigned to the relevant product.
- Click on Web in the left sidebar.
- Click on Dedicated IPs in the left sidebar.
- Click on the action menu ⋮ located to the right of the relevant item.
- Choose Unbind:

- Take note of the warnings and confirm the deletion to complete the IP uninstallation procedure.
Refer to this other guide if you are looking for information on potential issues related to your IP.
This guide explains the main differences between an EV and a DV certificate.
EV SSL Certificates: for companies
The Sectigo EV SSL certificate can only be issued to companies registered in an official registry.
It provides the highest level of trust with your customers and offers unique benefits in addition to including the benefits of a DV certificate:
Your company name in thenavigation bar- padlock in the navigation bar
- dynamic secure site seal
- validation of your domain name
- manual authentication of your company's contact details and identity
- guarantee up to $1,750,000 for end users
- 7/7 support
Activating an EV SSL certificate can take up to 24 hours and will require actions on your part.
DV SSL Certificates: for companies and individuals
The Sectigo DV certificate is open to individuals and companies. It does not include some of the benefits mentioned above, but it offers additional benefits over free Let's Encrypt SSL certificates:
- dynamic secure site seal
- validation of your domain name
- guarantee up to $10,000 for end users
- 7/7 support
Activation of a DV SSL certificate is immediate.
And the Let's Encrypt certificates?
A free Let's Encrypt certificate guarantees the same level of encryption as an EV or DV certificate. However, Let's Encrypt certificates do not offer the following benefits:
- manual validation of your company's contact details and authenticity (EV)
- guarantee for end users in case of fraud (EV/DV)
- support in case of questions
In summary, Let's Encrypt certificates ensure the encryption of exchanges between your users and your site, but they do not guarantee to internet users that they are on a legitimate site whose identity has been authenticated by a certification authority.
This guide explains how to replace the main domain name associated with a Website (excluding Starter hosting) hosted on Infomaniak in case you want to change the name of your activity or modify the spelling.
Preamble
- It is not possible to simply modify the spelling of the domain name in question.
- You must own the new domain name and install it in place of the current one by performing a reversal (see below).
- You can also rename your Web Hosting product in the Infomaniak Manager, but changing the name of a hosting has strictly no impact on the URLs of the sites.
- You need to act on the domain name and, if necessary, adapt the content of the site.
Change the domain name of the website
Prerequisites
- Prepare the new domain name (if necessary you need to buy it).
- Install a valid SSL certificate, otherwise the reversal will not be offered.
- If the modification sought is rather of the type "subdomain" to "main domain" (
dev.domain.xyz→domain.xyzfor example) then refer to this other guide.
Then, to replace the domain name assigned to the site with another domain name:
- Click here to access the management of your product on the Infomaniak Manager (need help?).
- Click directly on the name assigned to the product in question:
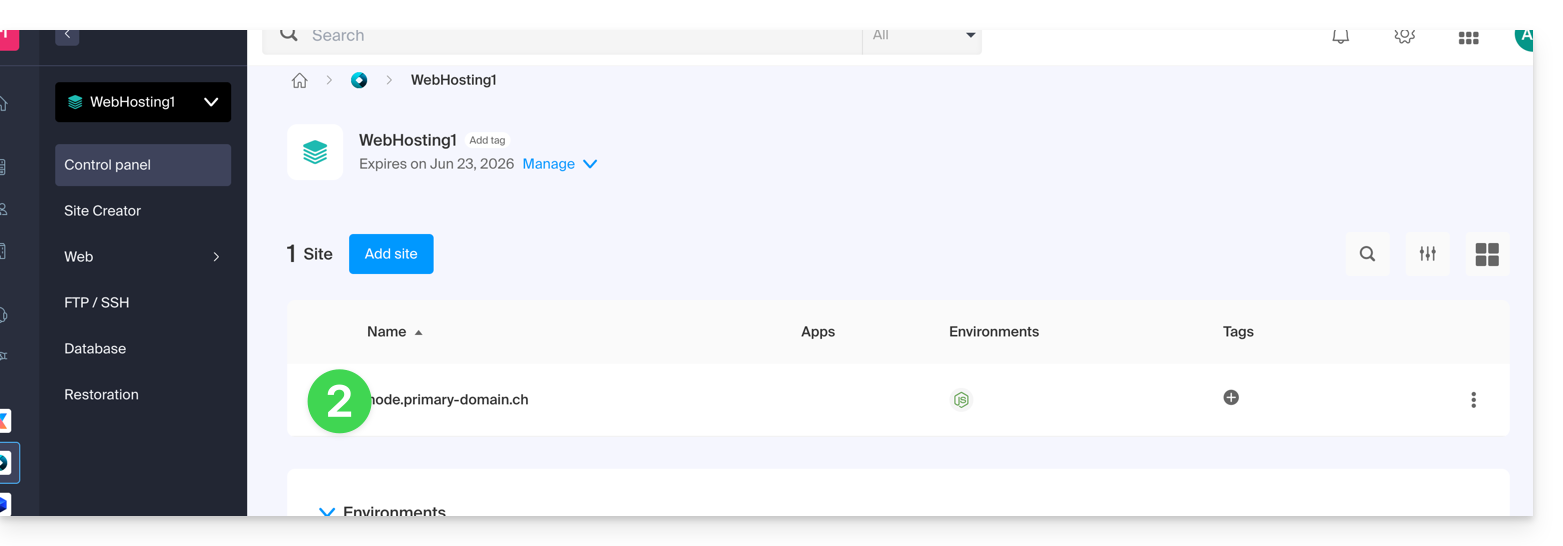
- Click on the chevron to expand the Domains section of this site:
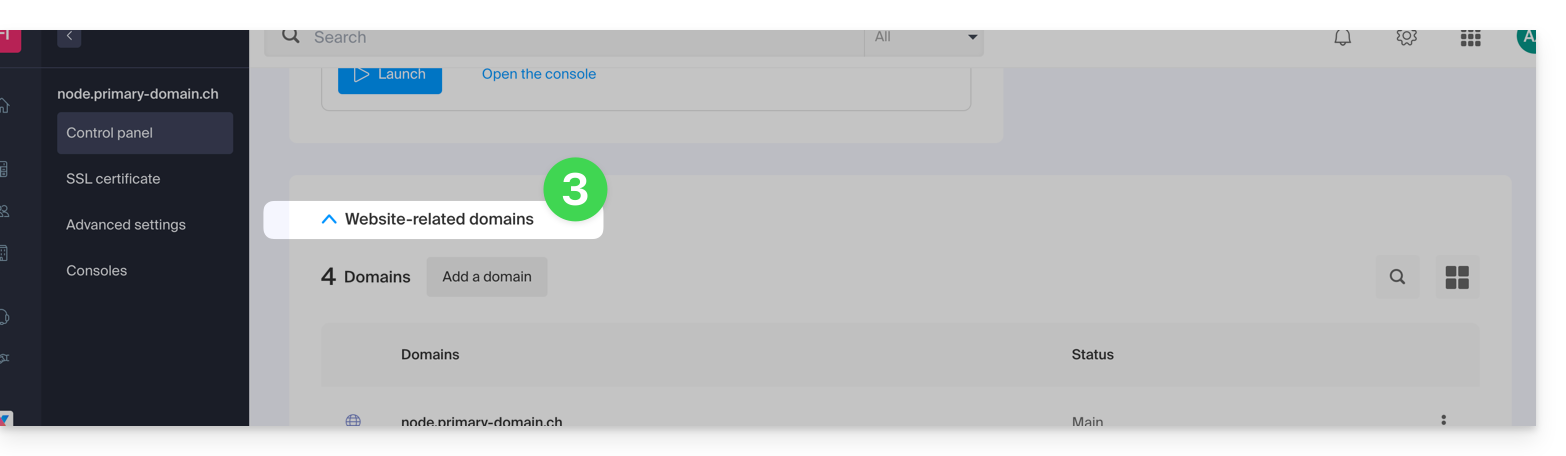
- Refer to this other guide to link the new domain name to your site (read the prerequisites carefully):
- It is this new linked domain that will replace the current main domain name after the reversal you will perform below.
- Once the new domain name is linked to your site, click on the action menu ⋮ to the right of it.
- Choose Set as main domain:
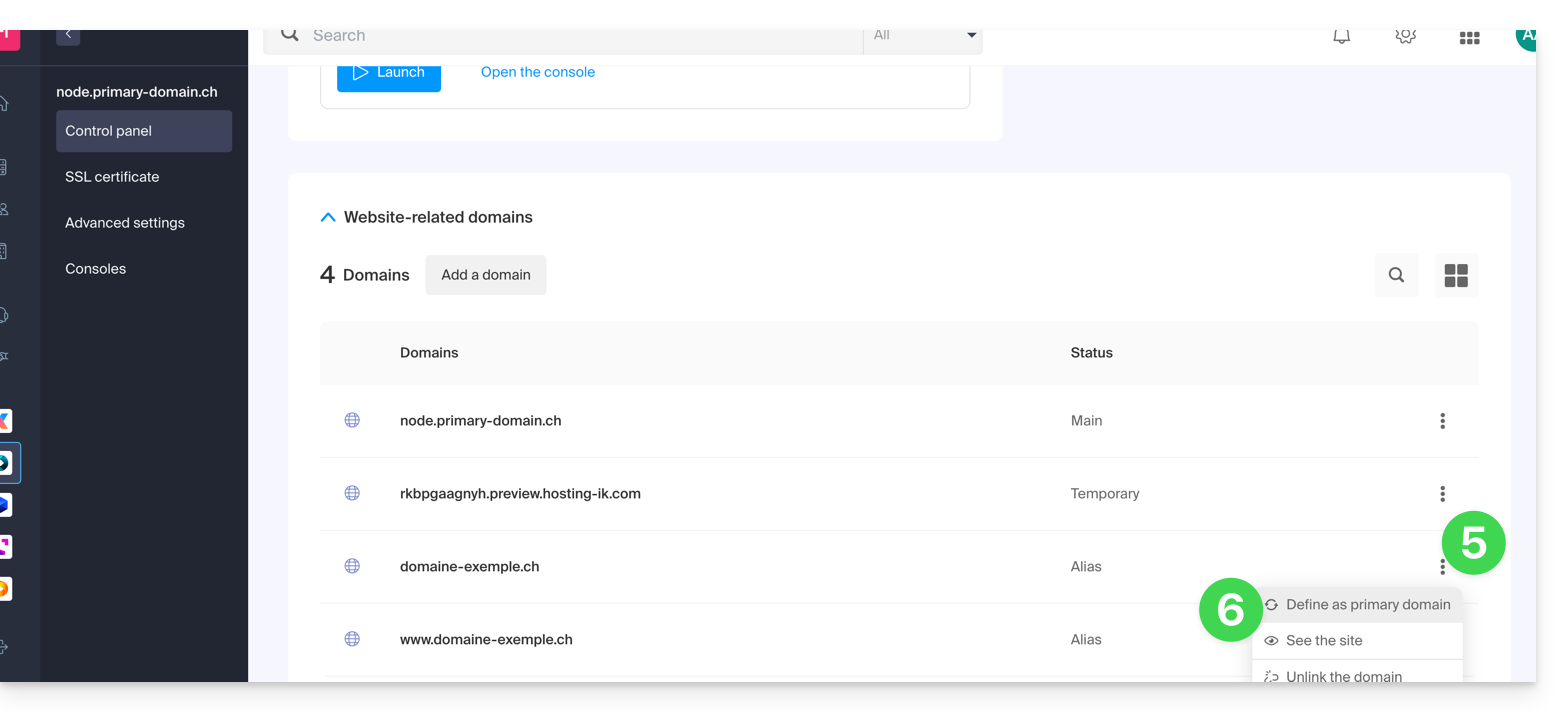
- If necessary, delete the old domain name and its variants that have become alias domains alias (and no longer primary domains).
If you are using an SSL certificate, you will need to update it to include the added aliases.
If you are using the dedicated IP option, you need to uninstall it, and reinstall it after the reversal you are going to perform.
Adapt the site content to the new name
In some cases, the web application used for site development needs to be adjusted to work with the new domain name. Click on the link corresponding to the development of your site to adapt the content:
This guide suggests solutions to resolve common issues and frequent errors that may occur when you try to display your website in https after activating an SSL certificate.
The web browser automatically displays the http version of the site when you try to access it in https
It is recommended to perform the following actions:
- Empty the cache of your applications or your site.
- Check that the pages and scripts of the site do not contain redirects to the
httpversion of the site. - Check that the site's
.htaccessfile does not contain redirects to thehttpversion of the site. - Set the site's
httpsaddress as the default one:
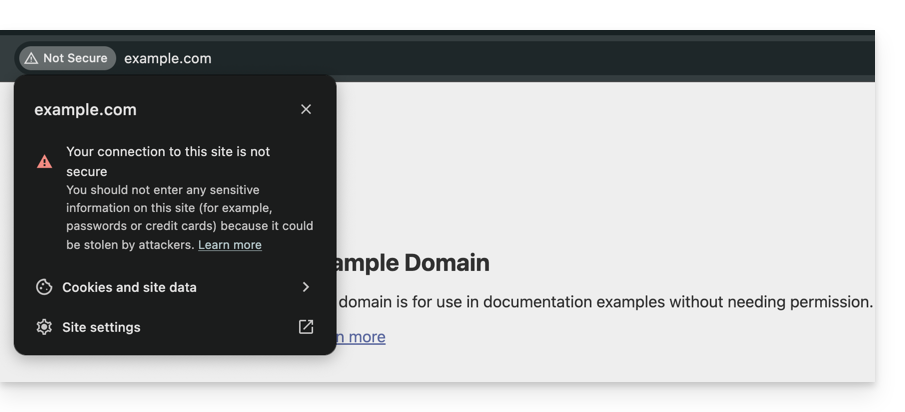
The website is displayed incorrectly (missing images, unsupported stylesheets, etc.) or displays a warning in the address bar
It is recommended to perform the following actions:
- Empty the cache of your applications or your site.
- Check that the pages and scripts do not point to external resources in
http; the site whynopadlock.com can help you identify the unsecured elements of your site. - Also refer to this other guide on this subject.
"This web page has a redirect loop", "ERR_TOO_MANY_REDIRECTS"
If your web browser displays this error, it is recommended to perform the following actions:
- If the site works with a web application like WordPress or Joomla, deactivate the extensions one by one to identify the problematic one.
- Check that the pages and scripts of the site do not contain redirects to the http version of the site.
- Try to deactivate HSTS.
- If Prestashop is used, SSL must be activated on all pages:
- Add your SSL domain:
- Go to Preferences > SEO & URLs.
- In the "Store URL" section, enter your site address in the "SSL Domain" field (without the
https://, justwww.domain.xyz).
- Activate SSL:
- Go to Preferences > General settings.
- At the top of the page, click on "Click here to use the HTTPS protocol before activating SSL mode."
- A new page will open with your site in the secure HTTPS version.
- Force the use of SSL on the entire site:
- Go back to Preferences > General settings.
- Set the "Enable SSL" option to YES.
- Also set "Force the use of SSL for all pages" to YES.
- Add your SSL domain:
An old SSL certificate is displayed - clear the SSL cache
Web browsers cache SSL certificates to speed up navigation. Normally, this is not a problem. However, when you develop pages for your website or install a new certificate, the browser's SSL status may bother you. For example, you might not see the padlock icon in the browser's address bar after installing a new SSL certificate.
The first thing to do in this case is to make sure that the domain points to the server's IP address (A and AAAA records) and if it is still the wrong SSL certificate that is returned, clear the SSL cache:
- Chrome: go to Settings and click on Settings. Click on Show advanced settings. Under Network, click on Change proxy settings. The Internet Properties dialog box appears. Click on the Content tab. Click on Clear SSL state, then click OK. Refer to other tips in this other guide.
- Firefox: go to History. Click on Clear Recent History then select Active Connections and click on Clear Now.
Loss of CSS formatting
If the website is displayed without CSS style, analyze the page loading with the browser Console. There may be mixed content errors (mixed content) related to your styles .css, which you will need to resolve so that they are loaded correctly again.
Cloudflare
If you are using Cloudflare, refer to this other guide on the subject.
This guide explains the differences between Infomaniak's web hosting offers to help you choose the best solution according to your IT needs.
If you are looking to host your email, refer to this other guide.
Starter Web Hosting
Free Web Hosting
The Starter web hosting is offered for free with each domain name registered with Infomaniak. It provides 10 MB of disk space to create a website (basic pages in HTML language only - no PHP, no database) even without any particular knowledge thanks to the Welcome Page tool.
- Register or transfer a domain name with Infomaniak
- Learn more about the benefits included with a domain name
Shared Web Hosting
The flagship offer to create your websites
These web hostings are shared offers (the websites will be hosted on servers whose resources are shared with other customers). To ensure the reliability of these shared services, Infomaniak servers use on average only 40% of the CPU power and are equipped with professional-grade, latest-generation SSD disks.
Web hosting offers a minimum of 250 GB of disk space and allows you to manage multiple websites with multiple domain names. This offer includes all the technologies usually used to create professional websites: PHP, MySQL, FTP and SSH access, SSL certificates and easy installation of WordPress or common CMS, etc. It is also possible to add a Node.js site and/or Site Creator.
Note that without any hosting, it is also possible to obtain and then use Site Creator “standalone / standalone”. Refer to this other guide.
Cloud Server
Professional Web Hosting
With a Cloud Server, the resources allocated to you are not shared with other customers and you can customize the hardware and software configuration of your server according to your needs. A Cloud Server also allows you to use components that are not available on shared web hostings (Node.js, mongoDB, Sol, FFMPEG, etc.).
- A Cloud Server allows you to easily manage your server via the same administration interface as web hostings - you manage the sites in the same way.
- A VPS allows you to manage your server 100% autonomously with the version of Windows or the Linux distribution of your choice (
Debian,Ubuntu,openSUSE, ...) - solid technical skills are required to use a VPS, including VPS Lite.
Public Cloud (and Kubernetes Service)
Open, proven, and secure IaaS solution
For Infomaniak, it is the infrastructure that powers kDrive, Swiss Backup, and the Webmail, services used by several million users. But Public Cloud is accessible to everyone and provides the resources you need to develop your projects.
With personalized and tailored offers, you will have no trouble managing your development budget. No setup fees. No minimum amount. Cancelable at any time. You only pay for the resources actually used with Public Cloud at the end of each month, the same goes for Kubernetes Service.
Jelastic Cloud
Custom web hosting with the technologies of your choice
Jelastic Cloud allows you to create custom development environments with the technologies of your choice (PHP, Java, Docker, Ruby, etc.). It is a flexible cloud offer:
- Horizontal and vertical scaling of resources.
- Payment based on actual resource consumption.
- Easy customization of your infrastructure (redundancy, IP, SSL, load balancing, etc.).
Thank you for choosing Infomaniak to secure your sites with an EV or DV SSL certificate from Sectigo.
An SSL certificate secures all exchanges between your server and your visitors, displays a padlock, and adds the https to your site.
Main SSL guides
- Order a Sectigo EV SSL certificate
- Understand the difference between EV and DV certificates
- Use a Sectigo certificate on an external site (other host)
- Understand the Sectigo guarantee for SSL certificates
- Resolve an SSL/https issue
- Install a free Let's Encrypt SSL certificate on a site
- Install a free "wildcard" SSL certificate
- Uninstall an SSL certificate
- Update a Let's Encrypt SSL certificate (for example, after adding/removing aliases)
Additional help
- Find out about all SSL FAQs
- Contact Infomaniak support
This guide details the validity rules for EV and DV SSL certificates (effective September 1, 2020).
SSL certificate validity period
Following a meeting of the CA/B Forum, which brings together major web players (Safari, Google Chrome, Mozilla Firefox, etc. - learn more), it was decided to set the maximum validity period for SSL certificates to 397 days. This change aims, among other things, to limit the risk of certificate hacking and to increase the security level of certificates. It is not excluded that the maximum validity period of a certificate may be further reduced in the coming years. Some players like Apple, Google, or even Sectigo are pushing in this direction.
The Infomaniak SSL certificates Let's Encrypt are not affected by this change; Infomaniak takes care of everything! The EV and DV certificates from Sectigo issued before August 19, 2020 remain valid, regardless of their duration.
Sectigo SSL DV certificates
Sectigo SSL DV certificates with a duration exceeding 1 year are automatically renewed by Infomaniak (certificate reissued during the month preceding its expiration date).
It is necessary to reinstall the certificate on your site if the latter is not managed by Infomaniak.
Sectigo SSL EV certificates
Sectigo SSL EV certificates will need to be validated each year, regardless of the subscription duration chosen.
It is necessary to reinstall the certificate on your site if the latter is not managed by Infomaniak.
This guide explains how to uninstall an SSL Certificate regardless of its type, initially installed from the Infomaniak Manager. If your certificate is of the paid type and you wish to cancel the current offer instead, refer to this other guide.
Remove an SSL Certificate
To uninstall an Infomaniak certificate:
- Click here to access the management of your product on the Infomaniak Manager (need help?).
- Click directly on the name assigned to the product concerned:

- Click on the action menu ⋮ located to the right of the item concerned.
- Click on Uninstall:

- Confirm the uninstallation of the certificate.
This guide explains how…
- … generate a
CSRand private key to request a third-party certificate from a Certification Authority (CA), - … import this certificate for your Infomaniak site, using the
CRTobtained from theCA.
Preamble
- Although Infomaniak offers all the SSL certificates you might need…
- free Let's Encrypt certs for personal sites (only possible with sites hosted at Infomaniak),
- DV certs from Sectigo for professional/private sites that are not registered in the trade register,
- EV certs from Sectigo for companies registered in the trade register,
- It is also possible to install an SSL certificate obtained elsewhere (intermediate certificate from a certification authority of your choice), custom or self-signed certificates.
1. Generate a CSR (Certificate Signing Request)
A CSR (Certificate Signing Request or Certificate Signing Request) is an encoded file containing the information necessary to request an SSL/TLS certificate.
It must be generated on your side to ensure that the private key remains under your control, using for example OpenSSL.
Adapt and run the following command from a terminal application (command line interface, CLI) on your device:
openssl req -utf8 -nodes -sha256 -newkey rsa:2048 -keyout domain.xyz.key -out domain.xyz.csr -addext "subjectAltName = DNS:domain.xyz, DNS:www.domain.xyz"
Explanations
newkey rsa:2048: Generates a new 2048-bit RSA key.keyout domain.xyz.key: Specifies the file where the private key will be saved.out domain.xyz.csr: Specifies the file where the CSR will be saved.addext “subjectAltName = ...”: Adds additional domains via theSAN (Subject Alternative Name)extension, necessary to include all desired domains in the certificate (the main domain domain.xyz + any other associated domain or subdomain, such as www.domain.xyz).
After generation, you can check the contents of the CSR with the following command:
openssl req -in domain.xyz.csr -noout -textThis allows you to verify that all domains listed in subjectAltName are correctly included.
Once the CSR is generated, you can send it to the certification authority (CA) to obtain your SSL/TLS certificate.
2. Import the external certificate
Once validated, the CA issues a certificate (domain.xyz.crt) and sometimes an intermediate certificate (ca_bundle.crt). To access SSL certificate management:
- Click here to access the management of your product on the Infomaniak Manager (need help?).
- Click directly on the name assigned to the relevant product.
- Click on SSL Certificates in the left sidebar.
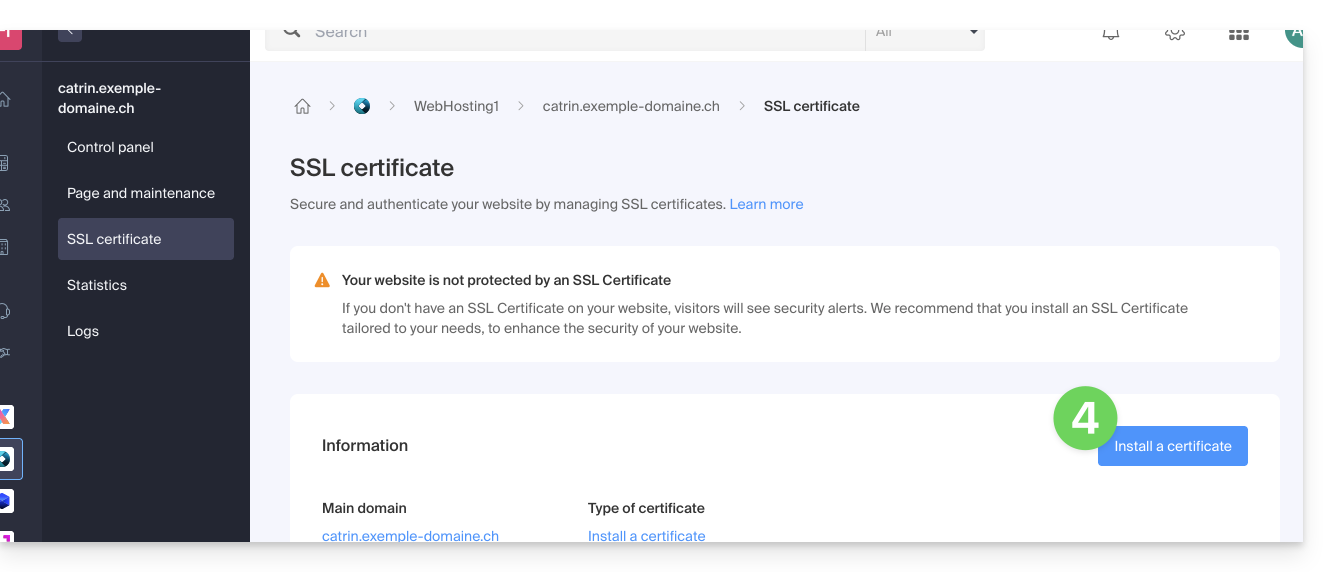
- Click the blue Install a certificate button:

- Choose the custom certificate.
- Click on the Next button:

- Import your certificate and private key, either by importing the
.crtand.keyfiles or by copy-pasting. - Click on Complete:

Alternative command to generate a self-signed certificate (optional)
If you want a local certificate for testing purposes only or without going through a CA (not recommended for production), you can use this command:
openssl req -x509 -nodes -days 365 -newkey rsa:2048 -keyout domain.xyz.key -out domain.xyz.crt -addext “subjectAltName = DNS:domain.xyz, DNS:www.domain.xyz”This generates both a self-signed certificate (domain.xyz.crt) and a private key (domain.xyz.key). However, self-signed certificates are not recognized as valid by public browsers or systems. They are only suitable for internal or development environments.
Import an intermediate certificate
When adding a custom SSL certificate, it is possible to import the intermediate certificate (by importing the .crt file or pasting the data provided by the certification authority):
This guide details the conditions and procedure for obtaining a Sectigo EV SSL certificate with Infomaniak.
Preamble
- Extended validation (EV) SSL certificates can only be issued to organizations, companies, and firms legally registered with a recognized government authority (such as a commercial register).
- Sectigo and Let's Encrypt DV certificates are not subject to this constraint.
- Compare available SSL certificates
- In case of DV or EV certificate validation issues, refer to this other guide.
EV certificate validation procedure
Obtaining an EV SSL certificate can take up to 24 hours and requires valid information from the client.
This procedure is repeated every 12 months, regardless of the subscription duration chosen for the EV certificate.
1. Verification of company details
The data to be added to the certificate must first be verified with an independent source:
- the legal or commercial name
- the legal form
- the address
- the postal code
- the region / canton / department
- the country / country code
Warning:
- The company name must exactly match the one registered with the commercial register or chamber of commerce; the order can only be processed if the name provided is registered and correctly noted.
- Only the registered legal name or the trademark name followed by the legal name in parentheses is allowed [example: Commercial Name (Legal Name)]; for entities without a legal name, all commercial names can be used.
- It is forbidden to use a postal address.
Given the above, a new request with correct data in the CSR is sometimes necessary, and Infomaniak may also need your approval to make changes to the information provided during the order.
2. Verification of data in the WHOIS directory
The WHOIS directory displays the information of the owner of a domain name. This data must match the information provided when ordering the EV SSL certificate.
To update the information of a domain in the WHOIS:
- If your domain is managed at Infomaniak, refer to this other guide.
- If your domain is not managed at Infomaniak, contact your host/registrar.
3. Contract & validation for the EV certificate
After ordering an EV certificate, the designated company contact person at the time of the order will receive an email from the certification authority Sectigo with the following documents:
- the certificate request form
- the certificate contract
These documents are pre-filled and the contact person must validate them online using an additional code. This will be provided by a Sectigo telephone robot (the call number will come from the Netherlands, +31 88 775 77 77 in principle) orally to your number registered with the registry or the chamber of commerce.
Each certificate request is validated by phone, including renewals and reissues of multi-domain certificates.
For any questions regarding validation, contact Sectigo directly.
4. Domain verification (only for external sites)
This step verifies that you have control of the domain (if it is external to Infomaniak) for which the certificate is requested. Domains of sites hosted at Infomaniak are validated automatically.
Each (sub-)domain must be approved individually via one of the methods described in this other guide.
This guide explains how to install a free SSL certificate from Let's Encrypt on a website hosted by Infomaniak.
Preamble
- Once the certificate is installed, your website will be accessible in
httpandhttps… - If you want to include an alias domain name recently added to your site that already had a certificate, you need to update it.
- For multiple subdomains, refer to this other guide.
- Let's Encrypt limits the installation of certificates to:
- 100 subdomains
- 20 certificates for 7 days per registered domain
- 5 unsuccessful requests per account per hostname per hour
Install a free SSL certificate on a site
Prerequisites
- For the installation to be possible, the DNS of the domain name must be correctly configured to point to the site in question.
- If a change has just been made at this level, some operations may not be functional immediately.
To access websites to install an SSL certificate:
- Click here to access the management of your product on the Infomaniak Manager (need help?).
- Click directly on the name assigned to the product in question:

- Click on Configure under SSL Certificate:

- Click on the Install a certificate button:
- Choose the free certificate.
- Click on the Next button:

- Check or select the domains concerned.
- Click on the Install button:
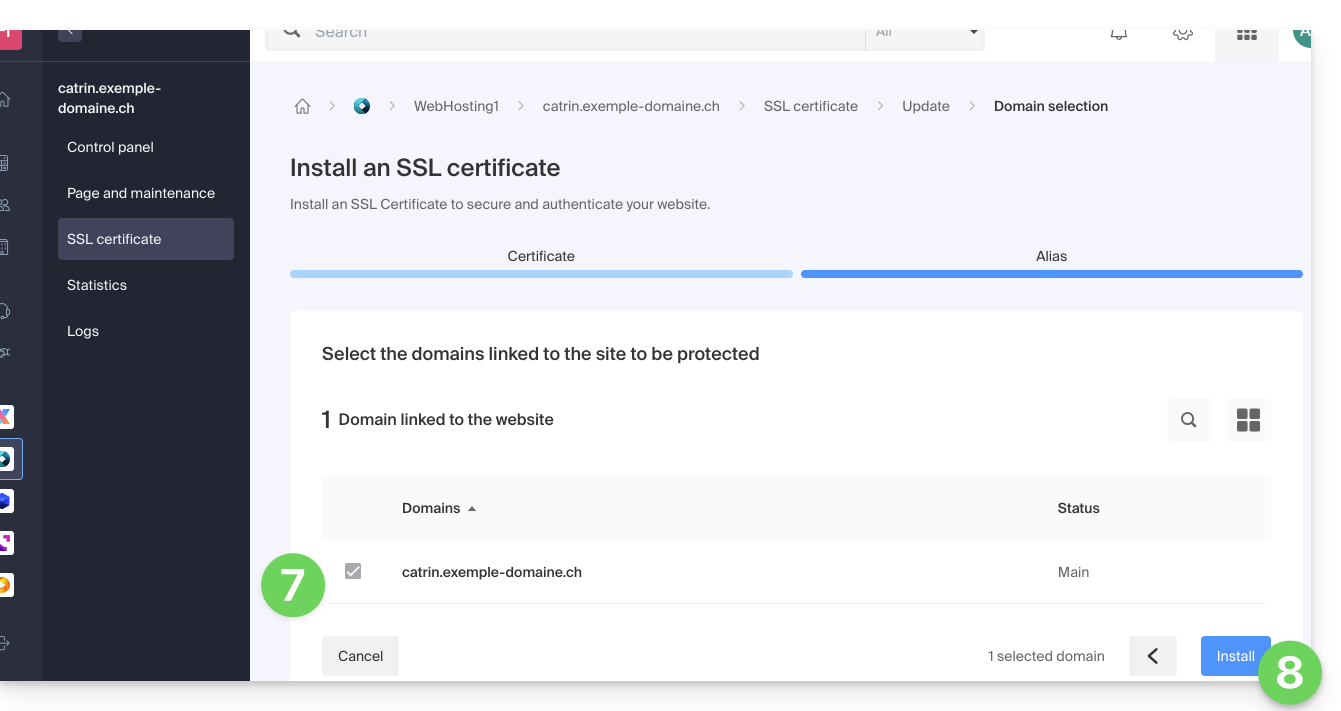
- Wait a few minutes until the certificate is obtained on the site.
Refer to this guide if you encounter SSL errors and to this other guide specifically if you are using Cloudflare.
This guide explains how to add two different EV or DV SSL Certificates to the same site.
Preamble
- Since it is not possible to install two SSL certificates on the same site, it is necessary to create two identical sites.
Creation of the second site
Prerequisites
- Remove any potential alias domain name from your site.
To access the Web Hosting to add a site:
- Click here to access the management of your product on the Infomaniak Manager (need help?).
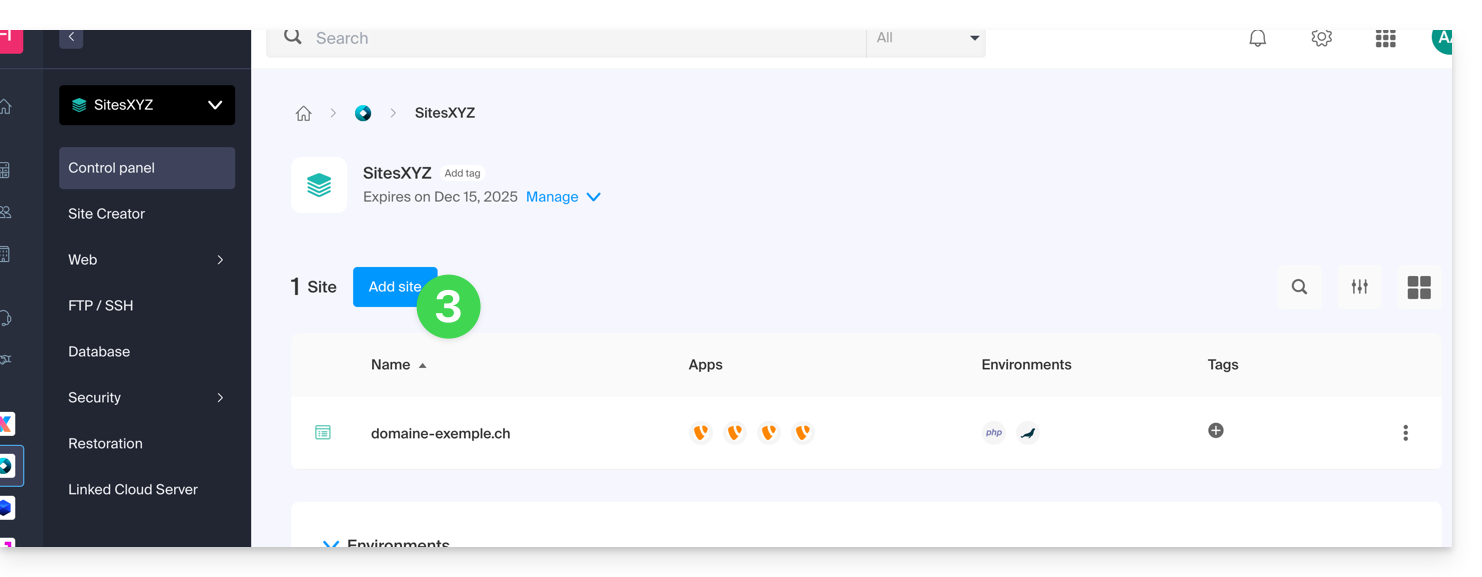
- Click directly on the name assigned to the product in question.
- Click on the button Add a site:
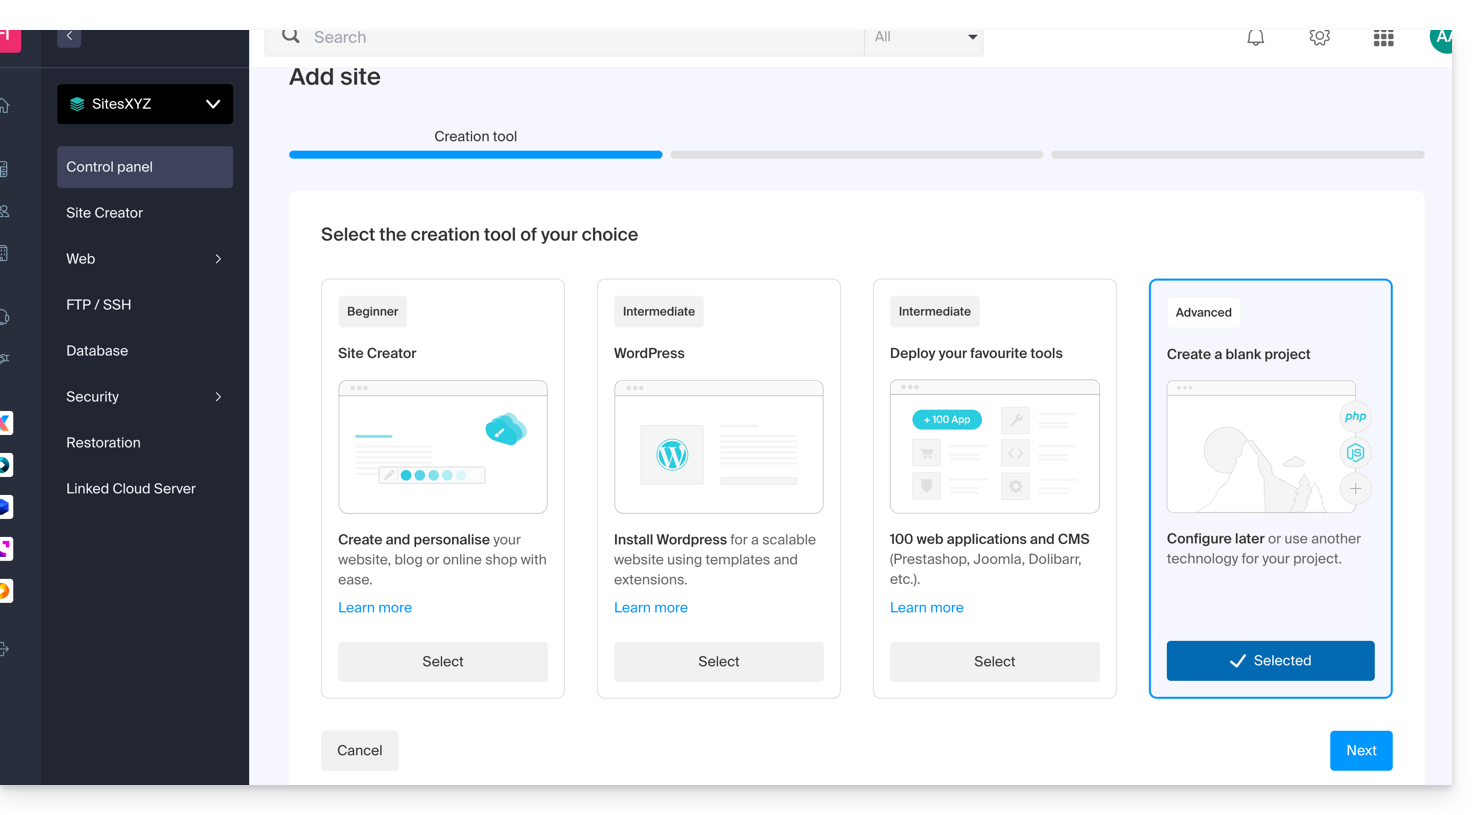
- Continue without installing a tool:
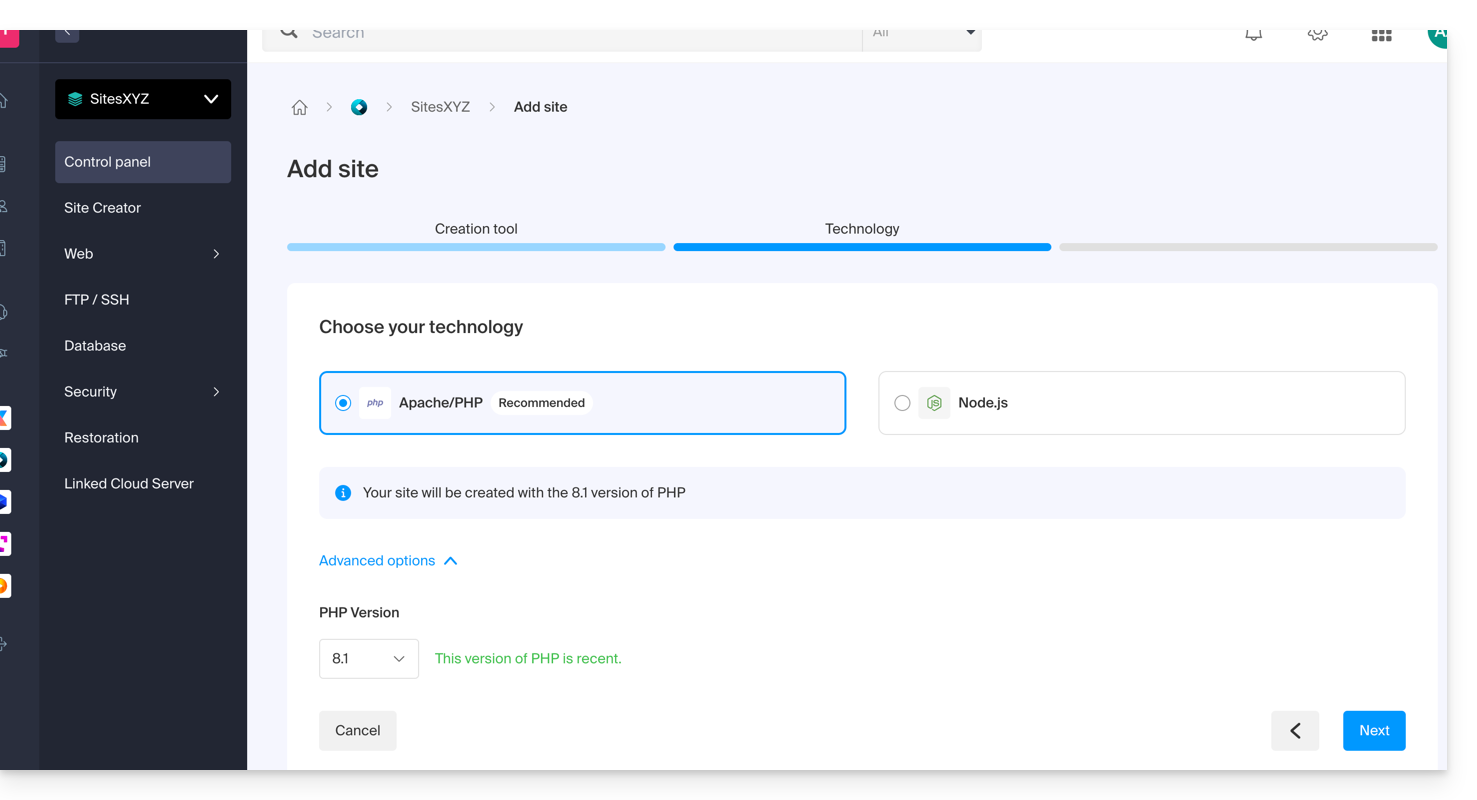
- Click on Apache and choose the same PHP version as the main site::
- Choose between using a domain name or a subdomain.
- Enter the domain or subdomain name.
- Click on Advanced options.
- Activate (or not) the Let's Encrypt SSL certificate on the future site.
- Check the box Manually define the location.
- Choose the same location as the main site:
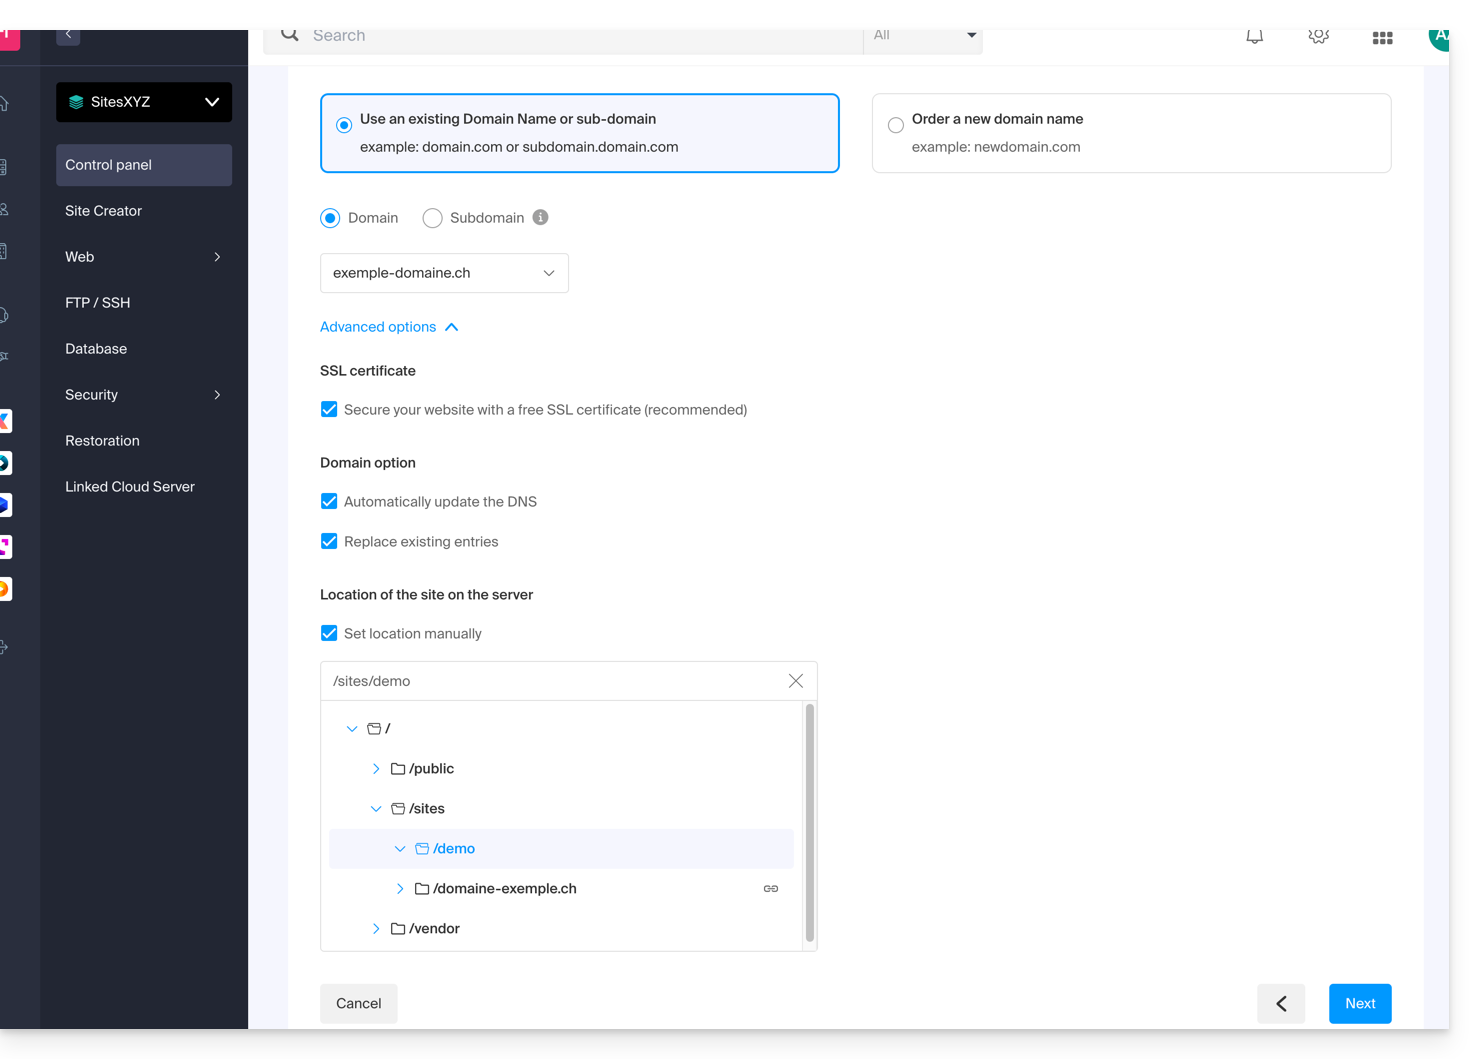
- Click on the blue button Next to start the site creation.
Install the SSL certificate
Once the second site is created (any addition/modification can take up to 48 hours to propagate), you will be able to install an SSL certificate (if you chose not to install the certificate in step 9 above).
To access website management:
- Click here to access the management of your product on the Infomaniak Manager (need help?).
- Click directly on the name assigned to the product in question.
- Click on SSL Certificates in the left sidebar.
- Click on the blue button Install an SSL certificate and follow the procedure.
This guide explains how to update a Let's Encrypt SSL certificate for a website hosted by Infomaniak.
Preamble
- It may be necessary, following the addition or removal of aliases to a website, to regenerate a certificate to include the new domain names linked to the website.
- The dashboard will clearly indicate that one of the domains linked to the site is not included in the current SSL certificate:

Update a Let's Encrypt certificate
To access certificate management:
- Click here to access the management of your product on the Infomaniak Manager (need help?).
- Click directly on the name assigned to the product in question:

- Click on the action menu ⋮.
- Click on Change the certificate:

- Select the type of certificate to update.
- Click on the Next button:

- Check or select the relevant domains.
- Click on the button Install:

This guide explains how to obtain a custom SSL certificate that you can use with Jelastic Cloud from Infomaniak.
Custom SSL certificates are only available with a paid account.
SSL documentation
Refer to these guides:
- It is quite possible to purchase an SSL certificate from Infomaniak in order to install it on Jelastic Cloud afterwards.
- Integrated with Jelastic Cloud, you will also find a valid certificate for domains
xxx.jcloud.ik-server.com. - Let's Encrypt certificates can also be obtained for free and for any domain.
- It is possible to obtain a paid certificate, for any domain.
- For testing purposes, you can also set up a self-signed certificate.
This guide explains how to correctly interpret the detailed information provided by Qualys SSL Labs (https://www.ssllabs.com/ssltest/) which can sometimes seem technical or alarming without the appropriate context.
Preamble
- Qualys SSL Labs is a widely used analysis tool to evaluate the SSL/TLS configuration of websites.
- The warnings in their reports are often just technical details with no impact on the site's security or SEO.
Multiple certificates in SSL Labs reports
When SSL Labs analyzes a site, it may display several numbered certificates (certificate #1, certificate #2, etc.). This happens for several reasons:
- Main certificate (#1): The certificate presented when SNI (Server Name Indication) is used.
- SNI is a TLS extension that allows a server to host multiple SSL certificates for different domains on the same IP address. When a browser connects, it indicates the domain name it wants to join.
- Secondary certificate (#2): The certificate presented when SNI is not used or during a direct IP connection.
An indication "No SNI" in certificate #2 is not an error. It simply means that SSL Labs has tested what happens when a client connects without providing SNI information. In this case:
- The server provides a fallback certificate (often a generic or preview certificate).
- This situation only affects very outdated clients that do not support SNI.
- Modern browsers all use SNI and will therefore receive certificate #1.
Certificate chain issues
Chain issues: Incorrect order, Extra certs, Contains anchor
These warnings do not necessarily mean that the certificate is defective:
Incorrect order: Intermediate certificates are not presented in the optimal order.Extra certs: Unnecessary additional certificates are included.Contains anchor: The root certificate is included in the chain.
The TLS protocol allows omitting the root certificate as it is normally already present in the browsers' certificate stores. Including it is not an error, but a redundancy.
Alternative names mismatch
For the rescue certificate (#2), the "MISMATCH" warning is normal because:
- This certificate is designed for another domain (
preview.infomaniak.website). - It is only presented when SNI is not used.
- The browser receiving this certificate would identify it as not matching the requested domain, but this does not affect normal connections with SNI.
Regarding SEO concerns:
- Google and other search engines use modern browsers that support SNI.
- They receive certificate #1, which is valid for your domain.
- Warnings about certificate #2 have no impact on SEO.
- Only issues with the main certificate (#1) could affect SEO.
This configuration is perfectly suited for shared hosting where multiple sites share the same infrastructure, with a preview certificate serving as a fallback solution.
This guide explains how to download or export an SSL certificate from the Infomaniak Manager.
Preamble
- The download of the certificate produces a file in
.zipformat. - The archive contains the
.keyand.crtfiles (as well as_windows.pfx&.protected.keydepending on the type of certificate):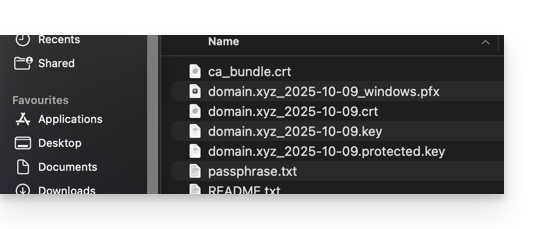
- It is recommended to store this certificate and its private key in a secure location, as the latter could allow access to your encrypted data.
Export or download an SSL certificate
To access the management of your certificates:
- Click here to access the management of your product on the Infomaniak Manager (need help?):
- Filter your certificate types if necessary by clicking on the icon dedicated to this effect.
- Display the different types of certificates such as Let's Encrypt, Sectigo DV & EV...
- Add the certificates that need to be displayed.
- Apply the filters:
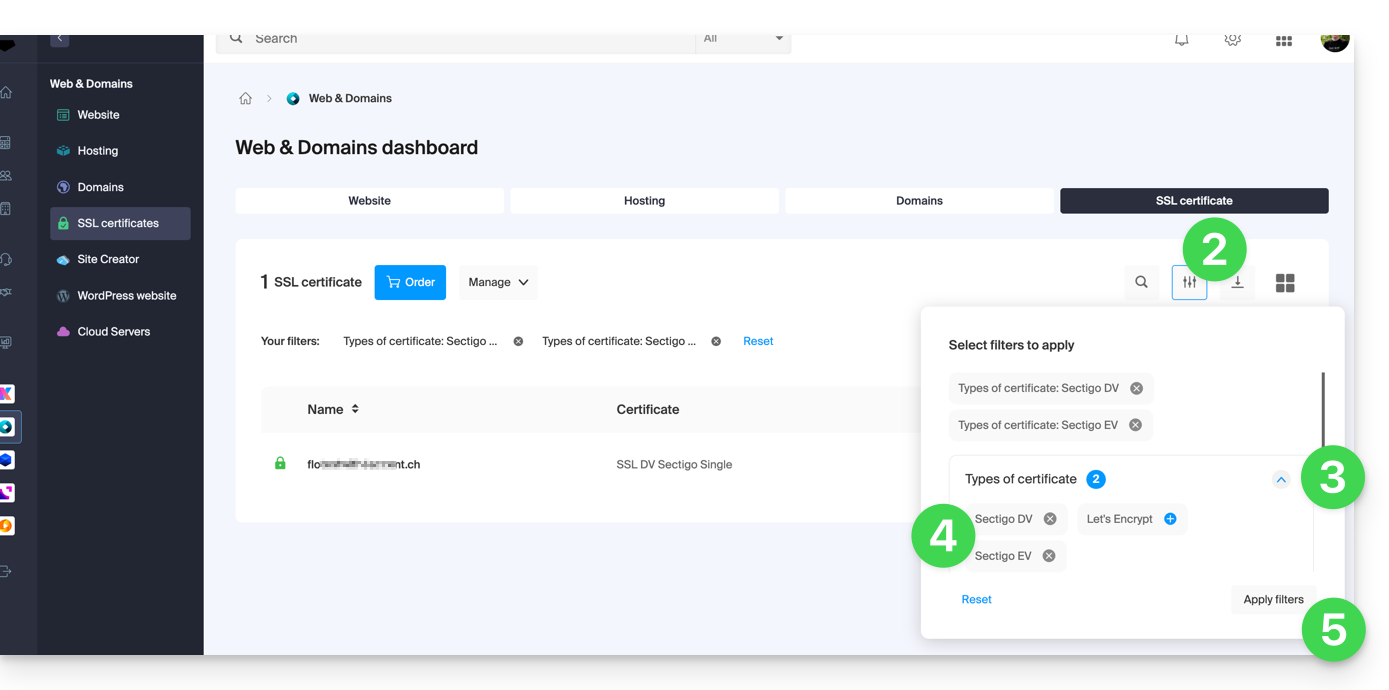
- The table now only displays the types of certificates you have selected.
Export a Let's Encrypt certificate
- Click directly on the name assigned to the certificate Let's Encrypt in the list:
- Click on the action menu ⋮ to the right of the object concerned in the table that appears.
- Choose Export the certificate and follow the instructions to download the archive to your device:

Export a Sectigo certificate
- Click directly on the name assigned to the certificate in the list of certificates.
- Click on the Manage button.
- Click on Download the certificate and follow the instructions to download the archive to your device:

This guide explains how to generate a certificate signing request (CSR) for a domain name and all its subdomains with a Web Hosting (excluding free hosting of type Starter).
This allows you to encrypt the connection to your domain name and all its subdomains via SSL.
Set up a Wildcard certificate
1. Add an alias domain with an asterisk *
To add an alias of type * to your website:
- Click here to access the management of your product on the Infomaniak Manager (need help?).
- Click directly on the name assigned to the product concerned:

- Click on the chevron to expand the Domains section of this site.
- Click on the Add a domain button:

- Enter the domain name to be added in this format:
*.domain.xyz(the asterisk is mandatory, followed by a dot, then the domain name of the website which is domain.xyz in this example)
- Click on the Confirm button to complete the procedure:

2. Install an SSL certificate or update it
Example of updating the existing certificate to include the wildcard subdomain *:
- Click here to access the management of your product on the Infomaniak Manager (need help?).
- Click directly on the name assigned to the product concerned.
- Click on SSL in the left sidebar.
- Click on the action menu ⋮ located on the right.
- Click on Change the certificate:

- Select the same certificate that you already own.
- Click on the Next button:

- Make sure the recently added subdomain is selected.
- Click on the Install button at the bottom:

- Wait for the creation or update to complete.
This guide explains how to redirect to a secure https version (SSL) all visitors to a website on Web Hosting Infomaniak.
Preamble
- This redirection is automatic in principle with a standard configuration and installation.
- For additional help contact a partner or launch a free call for tenders — also discover the role of the host.
Manual redirection via .htaccess file
Prerequisites
- Have a valid and functional SSL certificate for the Infomaniak website.
Then, modify or add the following 3 lines to the .htaccess file of the website concerned so that all its visitors automatically access its secure https version:
RewriteEngine on
RewriteCond %{HTTPS} off
RewriteRule (.*) https://domain.xyz/$1 [R=301,L]
Replace domain.xyz with your domain name with the appropriate extension (.com, .fr, .ch, etc.).
Replace the second line of the code above with RewriteCond %{HTTP:X-Forwarded-Proto} !https in case of a problem.
With a CMS
Most web applications like WordPress and Joomla have extensions/plugins that automatically redirect visitors to the secure https version of a site.
WordPress
If you are using a content management system (CMS) like WordPress to create your site, we recommend installing an extension to perform this redirection:
- Save the site's files and database as a precaution.
- Install the extension Really Simple SSL or similar from the WordPress console and activate it.
- Visitors are now automatically redirected to the https version of the site.
Joomla
Replace domain.xyz with your domain name with the appropriate extension (.com, .fr, .ch, etc.).
Find the line
var $live_site ='';in the Joomla configuration file (
configuration.php) on the server.Replace with
var $live_site = 'https://www.domain.xyz';Add three lines to your
.htaccessfile on the server:RewriteEngine On RewriteCond %{HTTPS} OFF RewriteRule (.*) https://%{HTTP_HOST}%{REQUEST_URI}- Open the Joomla administration panel in "System - Configuration".
- Click on the "Server" tab and under "Force SSL" choose "Admin and Site".
- Save and visitors will now be automatically redirected to the https version of the site.
Prestashop
- Access the general settings in the Prestashop back-office to enable SSL:
- < v1.7 click on "Preferences" then on "General"
- > v1.7 click on "Store Settings" then on "General"
- Enable the toggle switch "Enable SSL" to "YES"
- Click on "Save"
- In the same place, enable the toggle switch "Enable SSL on the entire site" to "YES".
- Click on "Save".
In case a security lock does not appear in the browser or a warning is displayed, check the template or modules as they may not be perfectly compatible with SSL. Your Prestashop then loads elements (images, .css or .js files, fonts...) in "http" while these should now be loaded in "https".
Drupal
Refer to this article (in English) which explains how to switch a Drupal site from http to https.
Alternative solutions
Replace domain.xyz with your domain name with the appropriate extension (.com, .fr, .ch, etc.).
In your .htaccess file, to force the site URL to be https:// but without www:
RewriteEngine On
RewriteCond %{HTTPS} off [OR]
RewriteCond %{HTTP_HOST} ^www. [NC]
RewriteRule (.*) https://domain.xyz/$1 [R=301,L]
In case of a redirection loop, adapt the code above to:
RewriteEngine on
RewriteCond %{HTTP:X-Forwarded-Proto} !https [OR]
RewriteCond %{HTTP_HOST} ^www. [NC]
RewriteRule (.*) https://domain.xyz/$1 [R=301,L]
In your .htaccess file, to force redirection with www
with subdomains:
RewriteEngine On
RewriteCond %{HTTPS} off [OR]
RewriteCond %{HTTP_HOST} !^www. [NC]
RewriteRule (.*) https://www.domain.xyz/$1 [R=301,L]
In case of a redirection loop, adapt the code above to:
RewriteEngine on
RewriteCond %{HTTP:X-Forwarded-Proto} !https [OR]
RewriteCond %{HTTP_HOST} !^www. [NC]
RewriteRule (.*) https://www.domain.xyz/$1 [R=301,L]
and without subdomains:
RewriteEngine on
RewriteCond %{HTTPS} off [OR]
RewriteCond %{HTTP_HOST} ^domain.xyz [NC]
RewriteRule (.*) https://www.domain.xyz/$1 [R=301,L]
In case of a redirection loop, adapt the code above to:
RewriteEngine on
RewriteCond %{HTTP:X-Forwarded-Proto} !https [OR]
RewriteCond %{HTTP_HOST} ^domain.xyz [NC]
RewriteRule (.*) https://www.domain.xyz/$1 [R=301,L]
Common errors following an https redirection
To resolve common issues that may arise after redirecting your website to its secure https version, refer to this other guide.
This guide helps you diagnose and resolve the error "Your connection is not private" (or NET::ERR_CERT_AUTHORITY_INVALID). This security alert can affect both visitors to a site and its administrators.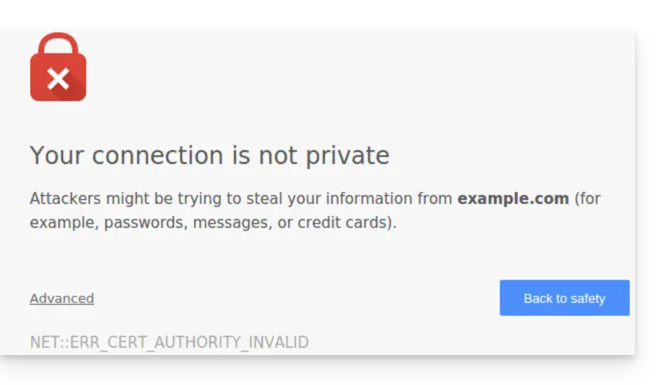
Preamble
- This alert is a protection mechanism of your browser. It indicates that a secure connection could not be established with the server for one of the following reasons:
- The site does not have an SSL/TLS security certificate.
- The installed certificate is expired or misconfigured.
- The connection between your device and the server is intercepted or disrupted.
- Warning: On a site showing this error, the data you enter (passwords, card numbers) are not encrypted and can be intercepted by third parties.
Solutions for visitors
If you encounter this error on a site you do not manage, the problem may sometimes come from your own configuration. Here are the points to check:
- Check the time on your device: If your computer or smartphone is not at the correct date/time, the certificate validation will systematically fail.
- Test in private browsing: If the error disappears, clear the cache and cookies of your browser.
- Check your network: Avoid public Wi-Fi networks that may force their own login portals.
- Antivirus and Firewall: Some security software analyze HTTPS connections and can cause false positives.
Solutions for Infomaniak site owners
If you are the site administrator, you must ensure that your SSL certificate is active and valid to cover all of your domain names.
1. Is the SSL certificate installed?
If your site is still in HTTP, you need to generate a certificate (free via Let's Encrypt or paid). Learn about the certificates available at Infomaniak.
Important: If you have added aliases (secondary domain names) to your site after installing SSL, you must update the certificate to include them.
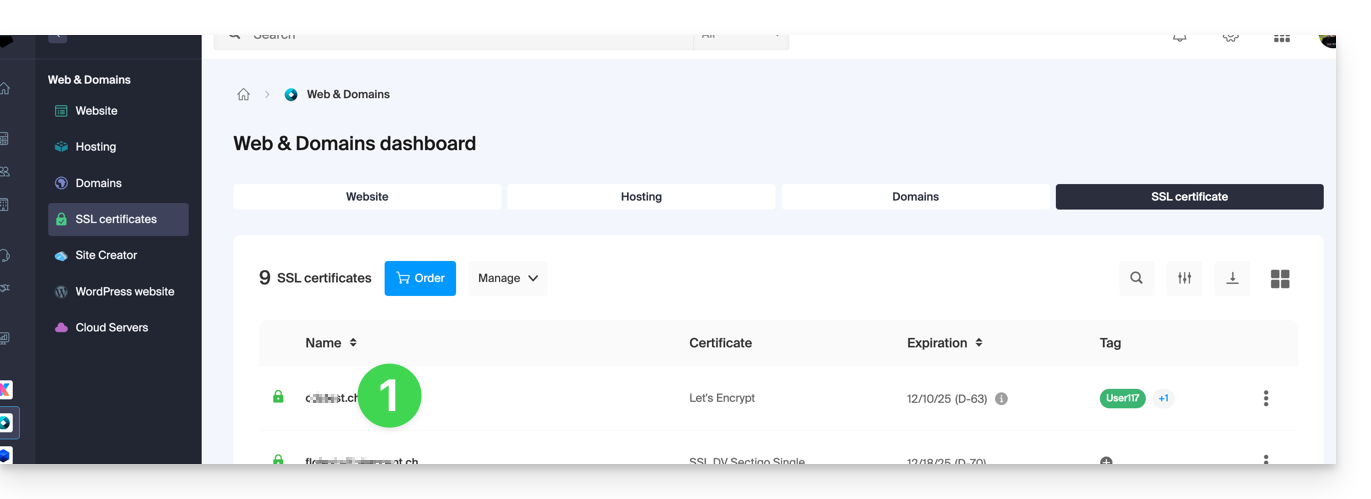
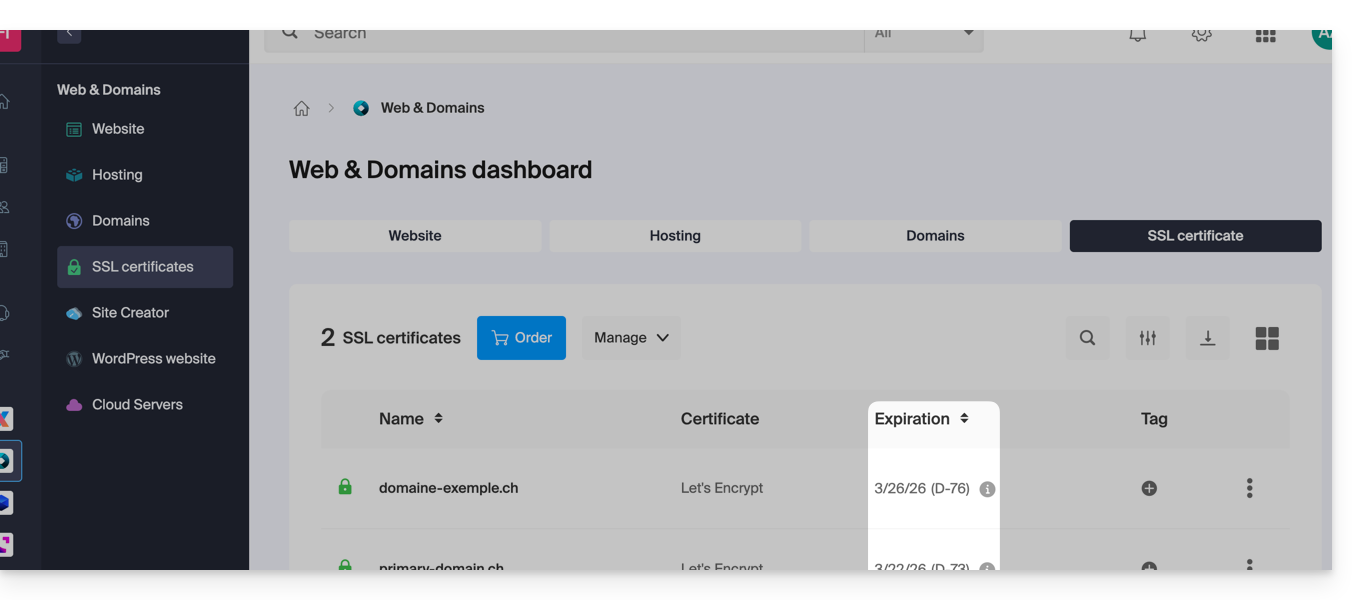
2. Check validity and expiration
At Infomaniak, certificates are renewed automatically, but a technical issue may sometimes occur. To check the status of your certificate:
- Click here to access the management of your certificates in the Manager (need help?).
- Check the status and expiration date in the dashboard:
3. Force HTTPS and fix the "Mixed Content"
If your certificate is valid but the error persists (or the padlock is not green), it is possible that your site is still loading elements (images, scripts) in HTTP. To fix this, refer to this other guide.
This guide explains which protocols and ports can be used with Infomaniak's messaging services (including the Service Mail service).
Recommended ports and parameters for client configuration
When prompted during a software/messaging client configuration (Outlook, Thunderbird, mobile, etc.), prioritize the following parameters:
| IMAPs - Incoming Mail (Recommended) | SMTP - Outgoing Mail (Option 1: Standard IETF) | SMTPs - Outgoing Mail (Option 2: Implicit Encryption) | |
|---|---|---|---|
| Ports | 993 | 587 | 465 |
| Security Mechanism | SSL / TLS (Implicit) | STARTTLS (Explicit) | SSL / TLS (Implicit) |
| Server Name | mail.infomaniak.com | ||
| Authentication | Required (username = full email address) | ||
Technical Note: Port 587 with STARTTLS is the IETF standard practice for secure email submission. Port 465 is a secure alternative using implicit encryption.
If you specify other indications or disable encryption, email errors may occur.
Other supported ports (unencrypted or backward compatibility)
- port
143(Standard port for IMAP reception - unencrypted, use 993) - port
110(Standard port for POP3 reception - unencrypted, use 995) - port
995(Secure port for POP3s reception - secure POP3 option) - port
25(Standard port for server-to-server transfer - may support STARTTLS for submission, but 587 is the standard for clients). - STARTTLS authentication is supported on unencrypted ports (143, 110, 25) to enable TLS encryption.
- SMTP authentication supported (LOGIN or PLAIN methods).
API Usage and Transfer Security
The Infomaniak API does not offer any email connection as IMAP and SMTP are the "APIs". Use a library (such as Python: email.examples and imaplib) that uses IMAP and SMTP.
To display emails from PHP:imap_open("{mail.infomaniak.com:993/imap/ssl}", $email, $password);
The MTA-STS mechanism is not implemented or verified, as Infomaniak uses DANE (DNS-based Authentication of Named Entities) to ensure an encrypted connection between servers when the following conditions are met:
- The client sends an email to a domain that has configured DANE.
- The client receives an email from an SMTP server that uses DANE.
- In all other cases (in the absence of DANE), the encrypted connection remains opportunistic.