
Knowledge base
1000 FAQs, 500 tutorials and explanatory videos. Here, there are only solutions!
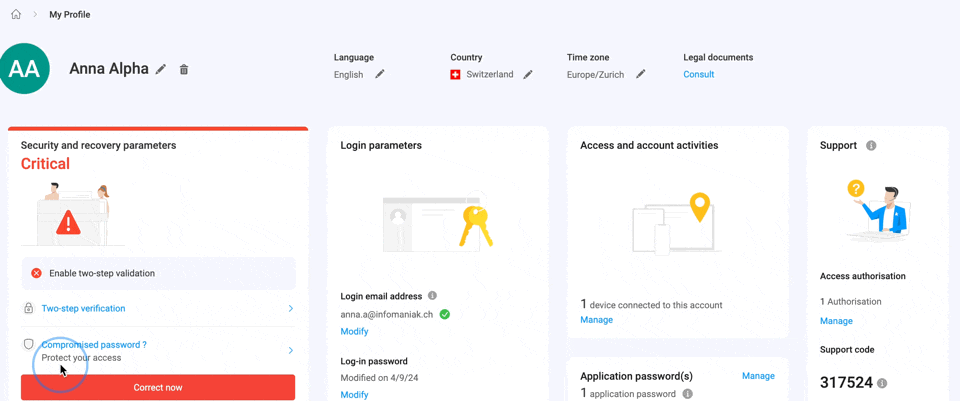
kAuth is a free mobile app that enhances and simplifies the security of Infomaniak accounts protected by two-factor authentication (or two-step verification). It is one of the methods that allows you to secure access to your Infomaniak user account.
Preamble
- Two-step verification protects your account and personal data when logging in to Infomaniak tools (manager.infomaniak.com and ksuite.infomaniak.com) by requesting:
- your password
- and a second security method
The kAuth app is one of these methods (learn more about 2FA)
Install the kAuth app
Prerequisites
- Have an Infomaniak account (know your username and password).
- Have an iOS or Android mobile device.
- From your iOS or Android mobile device, download the Infomaniak kAuth app here:


Install and open the application.
Next, you have two options to link your Infomaniak accounts to kAuth:
- Log in from this mobile (recommended):
- Open the kAuth app from your mobile device.
- Click on Log in from this mobile.
- Enter the credentials of the Infomaniak account to be linked and authenticate your connection if necessary (need help?).
- Click the Authorize button.
- Log in from a computer (if you choose this method, you will need a computer connected to the Internet):
- Open the kAuth app from a mobile device.
- Click on Log in from a computer.
- On your computer, open the page manager.infomaniak.com/2fa
- if two-factor authentication is not yet activated: click on Activate and choose kAuth Application.
- if two-factor authentication is already activated: click on Add an option then choose kAuth Application.
- On your mobile, click on Continue.
- If necessary, allow kAuth to access your camera (only required to scan the identification QR code).
- On your computer, click on Next to display the QR code to be scanned.
- Scan the QR code displayed on the computer.
Save backup codes
If you have just activated two-factor authentication, the application will automatically display your 10 personal backup codes.
Download and keep a copy of these codes as they will be the only way to access your account in case of loss of your credentials or to access your account without access to your phone.
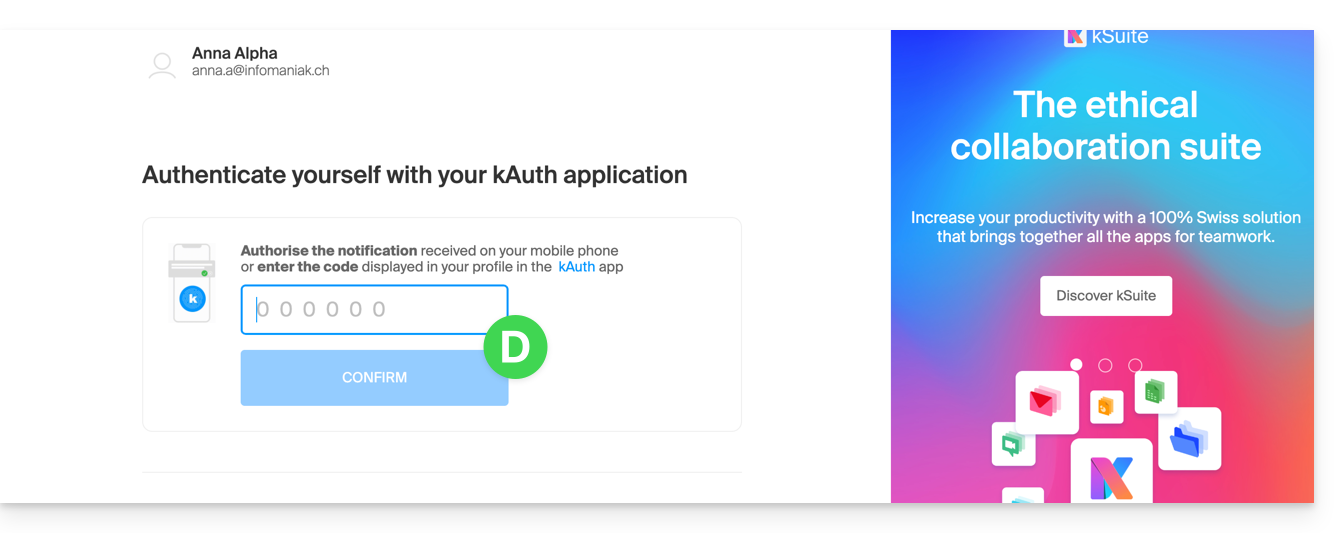
App functionality
When you attempt to log in to your account and after successfully entering your usual password, you receive a push notification on your mobile device asking you to authorize the connection ("YES / NO"), via a notification:
or directly in the application:
If the connection is authorized, the initial page is automatically redirected to the Infomaniak account. You do not need to manually enter a one-time code as with a traditional OTP application or a code sent by SMS.
And without an Internet connection?
Notifications push do not work without an Internet connection, but kAuth also works without an Internet connection and always allows you to display a one-time code in the same way as an application OTP traditional:
- Open kAuth from your mobile device.
- Click on the relevant Infomaniak account.
- Copy the one-time code (each code is valid for 30 seconds) on the login page:
You can thus always access your account while traveling or on vacation.
Add additional accounts
kAuth allows you to manage multiple Infomaniak accounts:
- Open kAuth from your mobile device.
- Click on the blue button :
- Repeat the steps described above to link the account.
Delete a kAuth account
To delete your Infomaniak identity from the kAuth app, you must deactivate the kAuth security method from the 2FA section of the Manager.
This guide explains how to disable two-factor authentication, also known as two-factor authentication (2FA) or two-step verification for logging into Infomaniak Manager (manager.infomaniak.com) or Infomaniak Mail (ksuite.infomaniak.com/mail).
For security reasons, Infomaniak support will never disable an enabled login validation method on an account following a simple request. You must follow the procedures below.
Disable 2FA
If two-step verification is enabled and you want to disable it:
- Click here to access 2FA management on Infomaniak Manager.
- Click the Remove button to remove security:

- If the red button is inactive / grayed out…
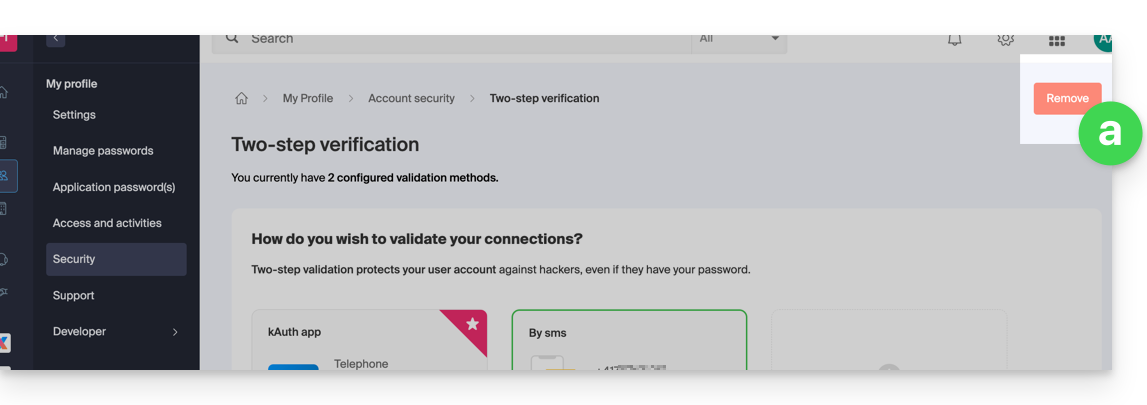
- … you will need to contact your administrator because there is probably an upstream security option that prevents you from disabling 2FA:
- If the red button is inactive / grayed out…
- Enter the password to log in to your account.
Note: if you were using the SMS authentication method, once disabled, you will only be able to re-enable this method if you are resident in CH / FR / BE / DE. Outside these countries, you will need to use kAuth or any OTP application.
In case of a problem
Obviously, the procedure above requires logging in one last time with two-factor authentication in order to then be able to disable it.
If you do not have access to the kAuth application or the device that receives the validation SMS, there is no point in calling Infomaniak; in this case, no choice, you will have to provide a number of security elements manually or via the Infomaniak Check (kCheck) app to regain access to your account:
- Click here to access the Infomaniak Manager login page.
- Enter the username and correct password.
- When prompted for additional authentication, click on alternative methods:

- Choose to enter one of your recovery codes if you had downloaded the sheet when activating 2FA:

- Otherwise select the last option to request help to access the form allowing you to submit your identity documents and recognition selfie:

- Follow the procedure to the end and be patient:

This guide explains how to enable two-factor authentication, also known as two-step verification or multi-factor / two-factor authentication (2FA, in English two-factor authentication, 2FA) to secure your connection to your Infomaniak Manager.
Preamble
- This two-step validation protects your account and your personal data with the password of your choice and a second identity verification method, such as a code obtained on your mobile device, for example.
- If a malicious person managed to decipher or steal your password, they would still need a validation code that only the legitimate user can obtain on their mobile device.
- Refer to this other guide if you are an administrator of an Organization and wish to enforce 2FA on all users who have not yet activated it.
Enable two-step validation
To increase the security level of your Infomaniak account:
- Click here to access the management of two-factor authentication on the Infomaniak Manager.
- Display and choose the authentication method from:
- the app kAuth for iOS / Android devices to simply press a YES / NO push notification to authorize or not the connection
- any OTP application to obtain a unique connection code at a given time
- YubiKey (from Yubico)
- SMS reception (only for CH / FR / BE / DE countries) to obtain a unique connection code at a given time
Follow the on-screen instructions to complete the procedure.
Carefully note the recovery codes.
Attention to existing synchronizations
Once strong authentication is enabled, to access certain tools (such as synchronization), it is necessary to create application passwords.
It is not necessary to call Infomaniak, which does not have any of your codes & passwords in its possession. For any assistance request regarding 2FA, refer to this other guide.
Authenticate each time the browser is opened
To request not to keep cookies when closing browser windows, and therefore request authentication each time you access the Infomaniak Manager when you restart the browser...
… on Chrome
Specify in the Google Chrome settings (chrome://settings/content/siteData to paste into the address bar or refer to the official documentation) the address [*.]infomaniak.com:
This guide explains how to force users in your Organization to enable the two-factor authentication (2FA) feature, and then verify that it remains enabled afterward.
Preamble
- Each Infomaniak user has the option to enable two-step verification for access to their account, which significantly increases the security of all the Organization's services…
- A legal representative can require this activation otherwise, access to the Manager and Web apps will no longer be possible for the user.
- Access to desktop apps (desktop application on macOS / Windows / Linux) and mobile apps (application for iOS / Android smartphone or tablet) will always be possible without 2FA.
- It is recommended to warn users in your Organization in advance, so they can continue to use the services.
- If an external user does not wish to perform the operation requested by an Organization administrator, they can choose to leave instead of activating it.
Identify users without 2FA
You can easily identify people who have not yet enabled this security on their account:
- Click here to access the management of users in your Organization.
- This red symbol means that 2FA is not enabled:

- You can also filter long lists with this specific criterion to display only users who have not yet enabled 2FA:

- To easily alert a user about the security of their account, click on the action menu ⋮ located to their right.
- Click on Send a security alert to send an automatic email to the user informing them of their various settings:

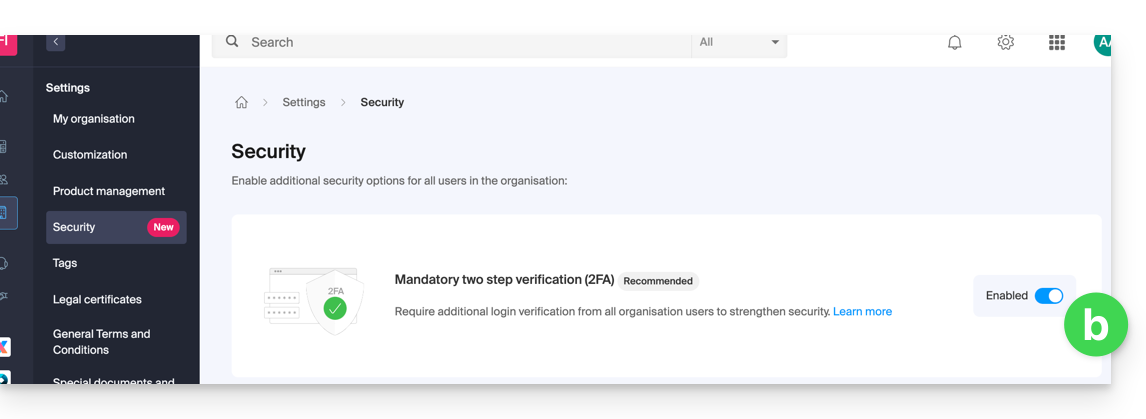
Require 2FA activation
Prerequisites
- Be Administrator or Legal Representative within the Organization.
To access settings:
- Click here to access the management of the Organization's security on the Infomaniak Manager (need help?).
- Click the toggle switch to require an additional login verification for all users in the Organization:

- Confirm the activation of the feature in the window that opens.
- Once the feature is activated, users of the Organization who have not yet activated 2FA receive a message (as soon as the next action on their account) prompting them to set up an additional authentication method from those offered and thus preventing them from performing any other action before this one:

This guide explains how to regain access to Infomaniak tools (manager.infomaniak.com and Mail / ksuite.infomaniak.com) in case of forgetting your password or Infomaniak account login ID.
Preamble
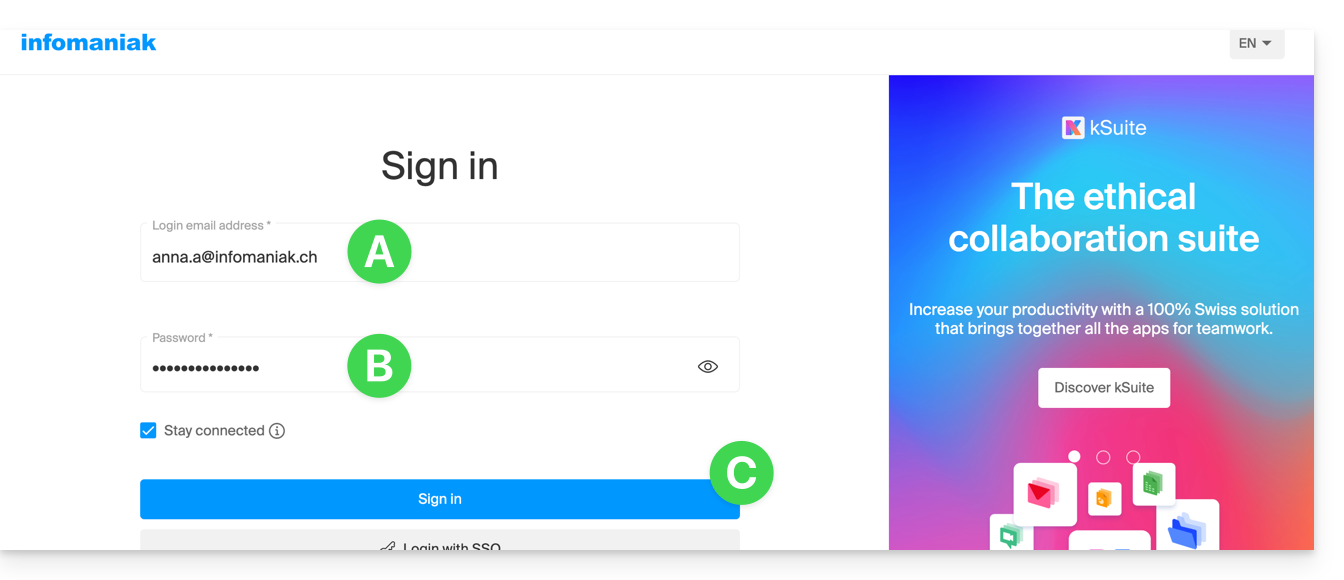
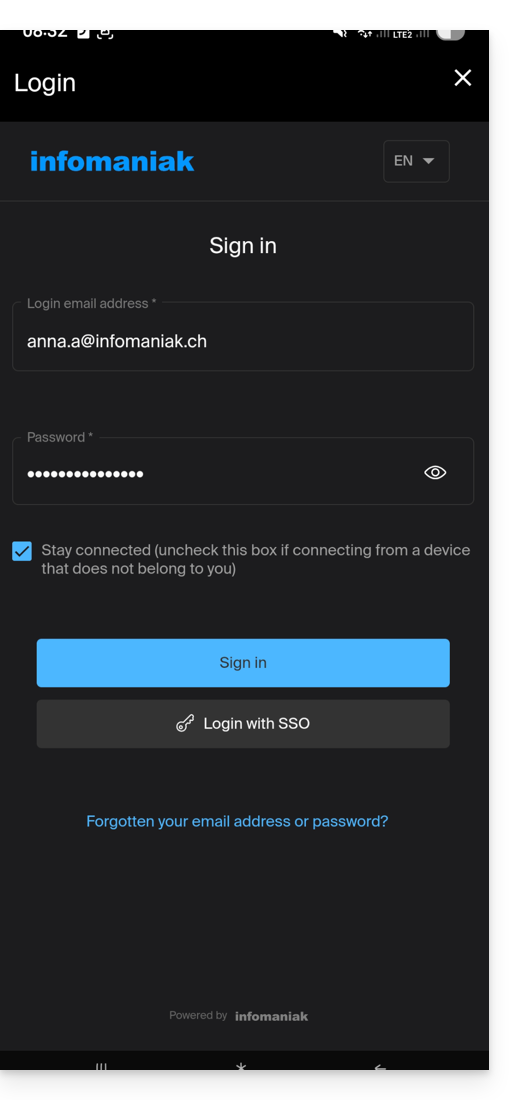
- To log in within an Organization that manages one or more Infomaniak products, go to manager.infomaniak.com and enter the following information:
- A login email address (ID for the Infomaniak account).
- The password chosen when you signed up.
- A additional code if 2FA (two-factor authentication) is enabled.
- If you can log in to the platform but need a password for one of your email addresses, refer to this other guide.
- If you are having issues displaying the login form, especially on a mobile device, refer to this other guide on the subject.
You have forgotten...
... the password for the Infomaniak account
If you have forgotten this password, follow the reset procedure:
- Click here to reset your password.
- Enter the login email address for your Infomaniak account
- Choose the desired recovery option or follow the identity verification procedure by clicking on “You do not have access to any option”.
... the login email address for the Infomaniak account
When you signed up, you provided a phone number; it is possible to retrieve the login email address for the Infomaniak account using your phone number:
- Click here to retrieve your login email address for the Infomaniak account.
- Enter your mobile number.
- Enter (if necessary) your recovery email address.
Two scenarios are then possible:
- The system can identify your account: choose how to receive your Infomaniak account login ID.
- In the opposite case: follow the on-screen assistant to manually verify your identity or via kCheck:

And if the email address no longer exists...
If you have an Infomaniak account for which the login ID is of the form toto123@yahoo.com, there is no problem if the email address toto123@yahoo.com is deleted or is no longer valid, you just need to log in one last time to the Infomaniak Manager with this ID toto123@yahoo.com and take note of this other guide to modify your Infomaniak account login email address.
On the other hand, if the email address used as an identifier is hosted by Infomaniak (for example anna789@assoziation.ch) and an administrator deletes the email address in question or terminates the “assoziation.ch” Mail Service, the situation is different: you automatically receive an email on the secondary address and an SMS on the mobile phone number specified in your Infomaniak account:

Connection using your old "email address / password" pair will no longer work. You need to follow the SMS instructions:
- Click here to access the login page.
- Enter the username specified in the SMS (usually the initials of your account and a sequence of numbers).
- Enter the usual password (it has not changed).
- Enter the new requested information.
- You will be logged in to your account again.
The following animation shows this procedure called "Infomaniak-Recovery" (or "connection address in the process of changing" at the kSuite user level):
- Connection impossible with the old identifiers…
- Connection mandatory using the SMS information…
- And updating the information for reconnection:

This guide concerns the mobile app kCheck (application for iOS / Android smartphone or tablet), created to simplify identity verification procedures and enhance the security of your Infomaniak account.
Preamble
- For security reasons, to ensure the identity of the person making a specific request to Infomaniak, an identity verification procedure may be triggered in the following cases (non-exhaustive list):
- forgetting an Infomaniak account password (user account)
- forgetting a login email address
- deactivating two-factor authentication (2FA)
- unlocking an Infomaniak account
- when the first revenue reversal for the product Ticketing
- when ordering a product (suspicion of spam or fraud, brand name, etc.)
- This application allows you to securely transfer the requested items.
- Infomaniak respects your privacy: the information transmitted via the kCheck application will be kept until your file is fully processed; it will in all cases be automatically deleted after 72 hours if this request is not processed.
Start identity verification
Prerequisites
- A QR code or a link provided by Infomaniak.
- The mobile app kCheck installed on your device iOS (iPhone, etc.) or Android.
- An Internet connection on the mobile device.
You can then have your identity verified with kCheck:
- Launch the kCheck app on your mobile.
- Tap Start.
- Tap Scan a QR code.
- Point the QR code provided with the camera.
- Enter your mobile phone number.
- Enter the confirmation code received.
- Allow geolocation (mandatory to continue the procedure).
- Select the type of ID you have (ID card or passport).
- Follow the steps to photograph your ID.
- Take a selfie (of yourself) with your ID in your hand in front of you.
Your documents will then be securely transmitted to Infomaniak support. These requests are prioritized with an average response time of 2 hours during business hours.
If your order is blocked...
For security reasons, some orders may be automatically blocked.
When you place your order, an e-mail is sent to the e-mail address associated with your Infomaniak Manager account. This e-mail contains the procedure to unblock your order. If you do not find it, you can resend it from your Manager by clicking on Resend the procedure from the red banner informing you of the blockage.
Prerequisites
- Open the e-mail containing the unblocking procedure.
- The mobile app kCheck installed on your device iOS (iPhone, etc.) or Android.
- An Internet connection on the mobile device.
You can then start the unblocking procedure with kCheck:
- Launch the kCheck app on your mobile.
- Tap Start.
- Tap Scan a QR code.
- Scan the QR code present in the e-mail.
- Follow the unblocking procedure to the end.
Special cases
- If there is no response from you within 10 days, the order is automatically canceled and the payment is fully refunded to the payment method used.
- If you do not have a mobile device to follow this procedure, contact Infomaniak support.
This guide explains how to quickly obtain a password when you need to access an Infomaniak email address.
Generate an email address password
If you are unable to complete these steps because you receive different information on the screen, you probably lack the necessary permissions if you are not the original creator of the email address — refer to this other guide — for example, an administrator can add the email address directly to your Web app Mail or send you a link to generate a password yourself.
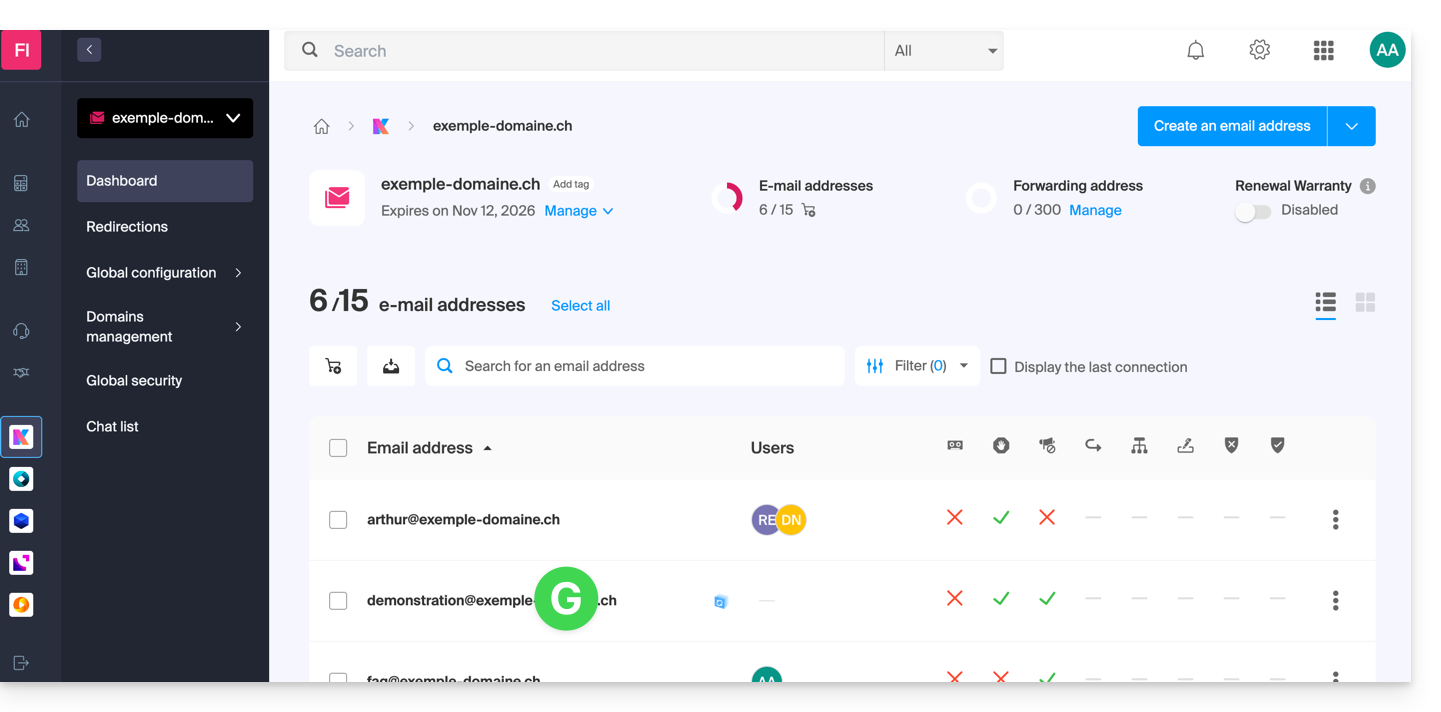
To add a password to the example address demonstration@exemple-domaine.ch:
- Enter your Infomaniak account login and password on the page https://manager.infomaniak.com/:
- Validate the entry in the Manager with the 2FA (two-factor authentication) method initially defined:
- Once on the dashboard, click on Mail Service:
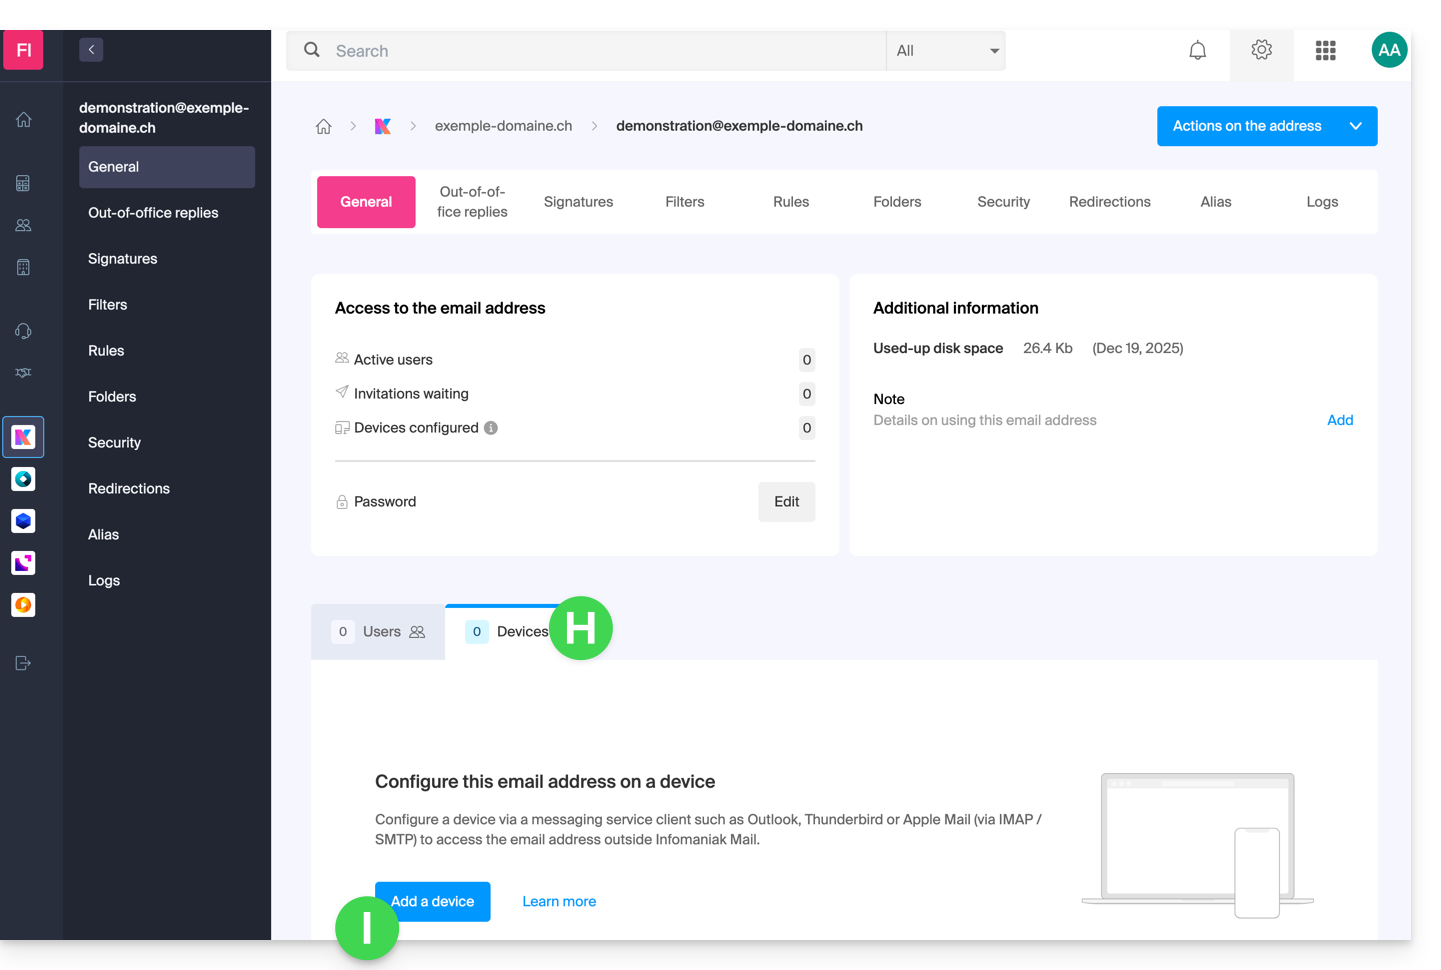
- Once on your Mail Services, click on the name / domain name to which the email address in question belongs:
- Once on the Mail Service to which the address belongs, click on the email address in question:
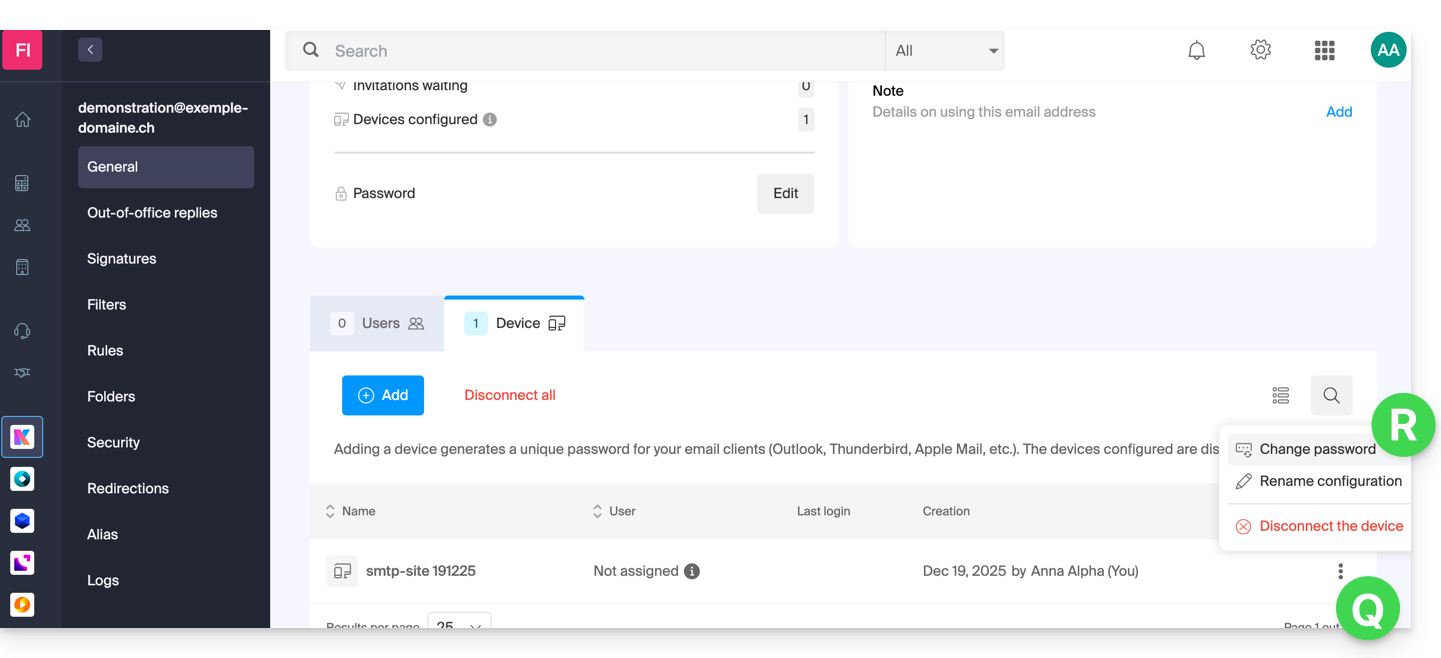
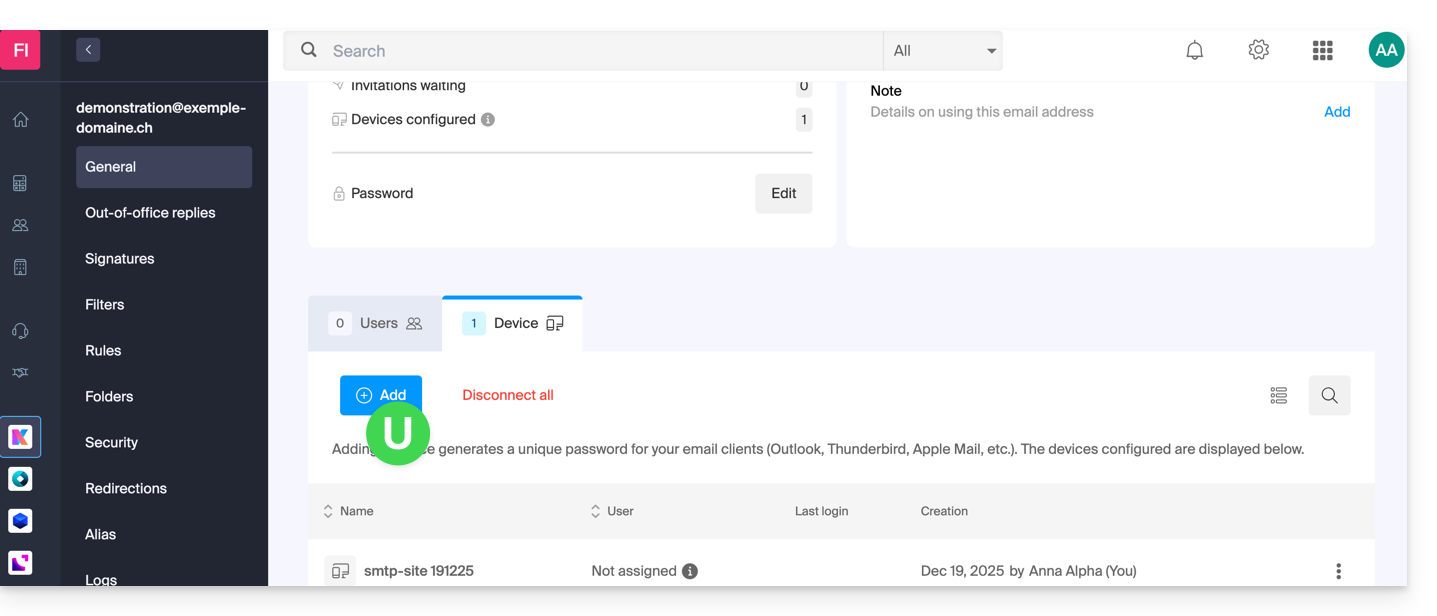
- Once on the email address in question, click on the Devices tab and then on Add a device:
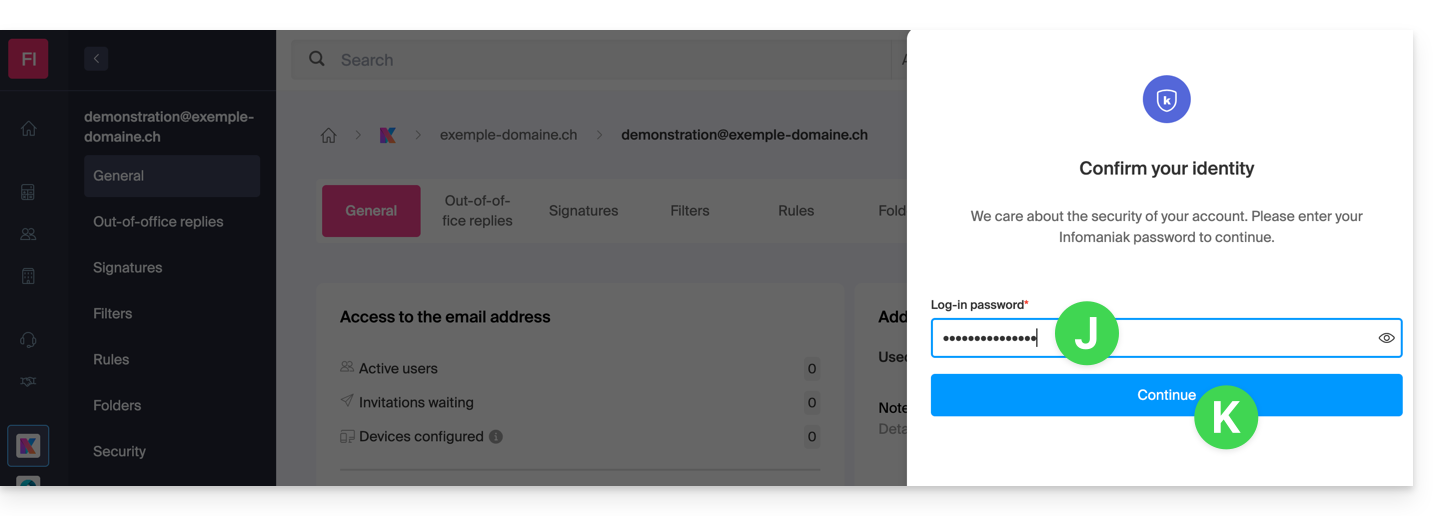
- At this stage, it may be necessary to re-enter the login password (the one from point B above):
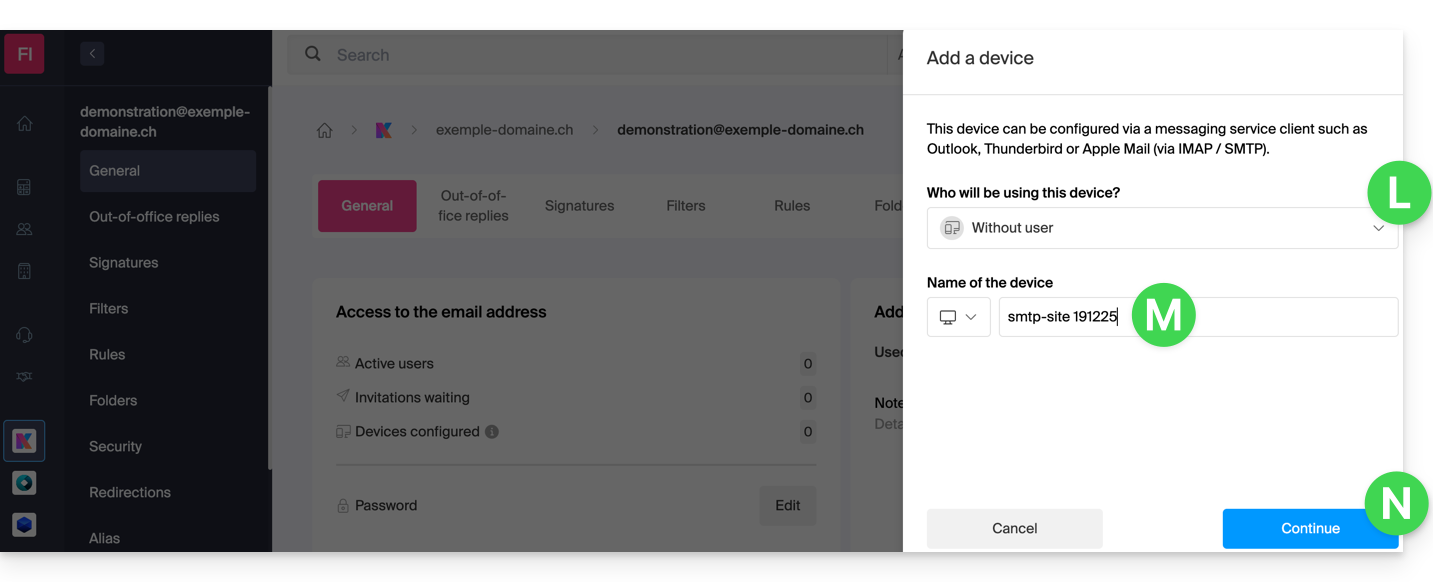
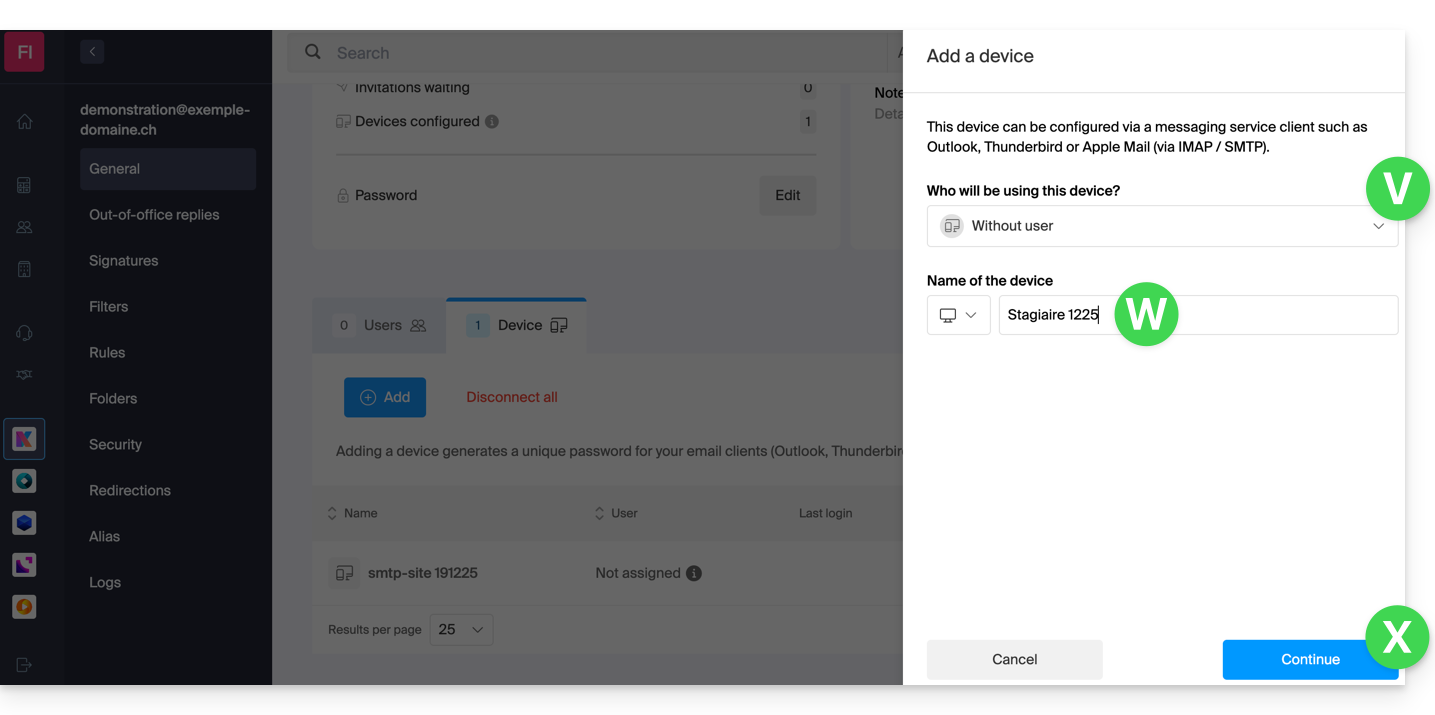
- Then choose not to specify a particular user, and enter a name that allows you to identify the reason for creating this device (here the user needs a password to be able to send emails from a site, and they add the current date as useful information):
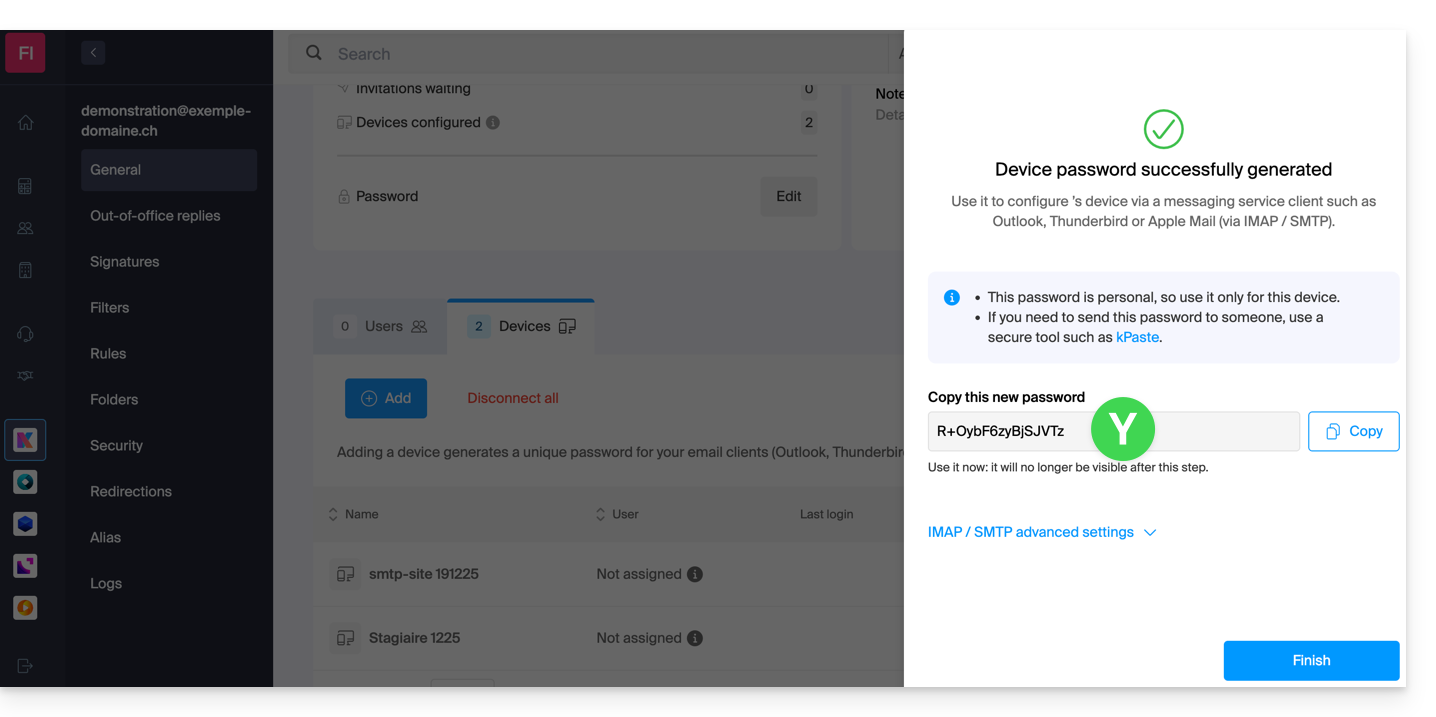
- Here is the password, you can use it for your chosen purpose (note, it will not be possible to display it again later):
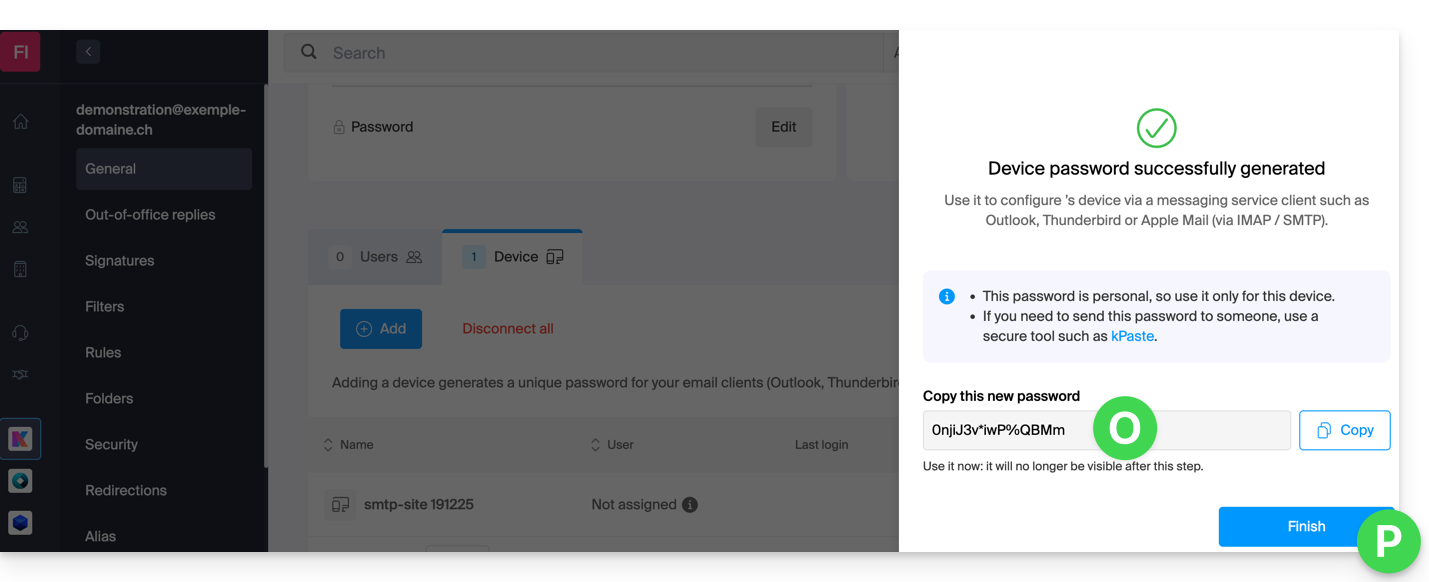
You clicked the “Finish” button (above “P”) without noting the password? No problem, generate a new one!
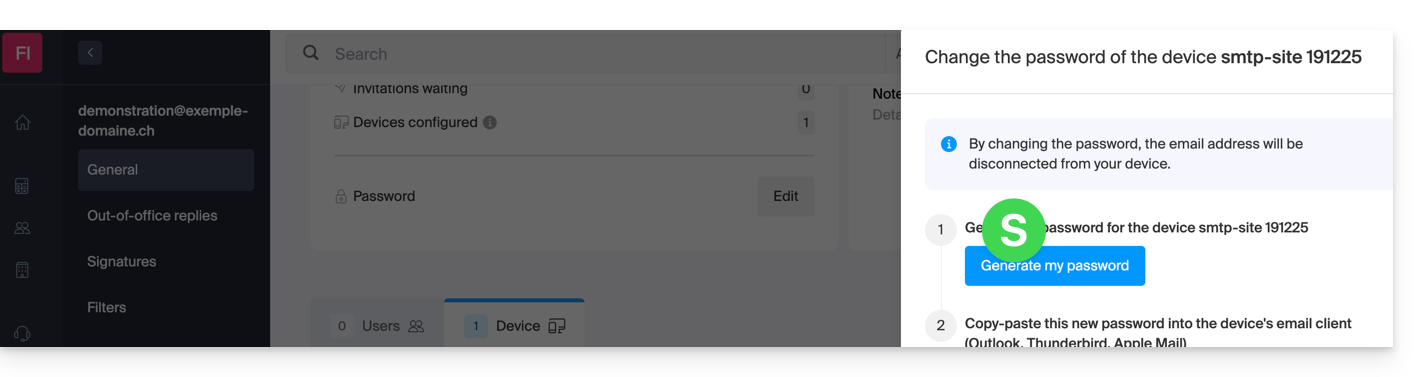
- Click on the action menu ⋮ located to the right of the newly created device to randomly generate a new password that will cancel the old one:
- Click the button to generate a new password:
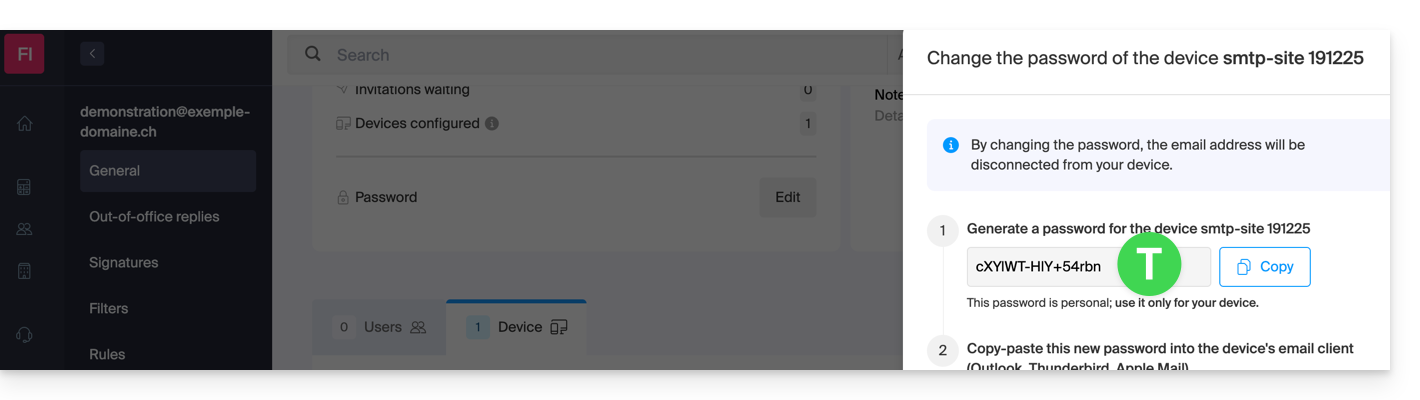
- Here is the password that replaces the old one, you can use it for your chosen purpose (note, it will not be possible to display it again later):
Do you need a password for a secondary and temporary user? No problem, generate a second one!
- Click the button to Add an additional new device:
- Then choose not to specify a particular user, and enter a name that allows you to identify the reason for creating this device (here the user needs a password for an intern for a week):
- Here it is, the password is displayed. You can use it for any purpose (note that it will not be possible to display it again afterwards. However, as before, it will of course be possible to regenerate one):
This guide details how to restore a Windows computer using Acronis on Swiss Backup, the backup solution in an independent Swiss cloud.
Prerequisites
- Have a backup of the computer on Swiss Backup (refer to this other guide).
- Refer to Acronis documentation regarding the recovery of physical machines.
- The computer to be restored must be connected to the Internet via Ethernet cable (or WiFi depending on the computer's capabilities).
Restore the backup
To begin, from the affected computer or any other machine:
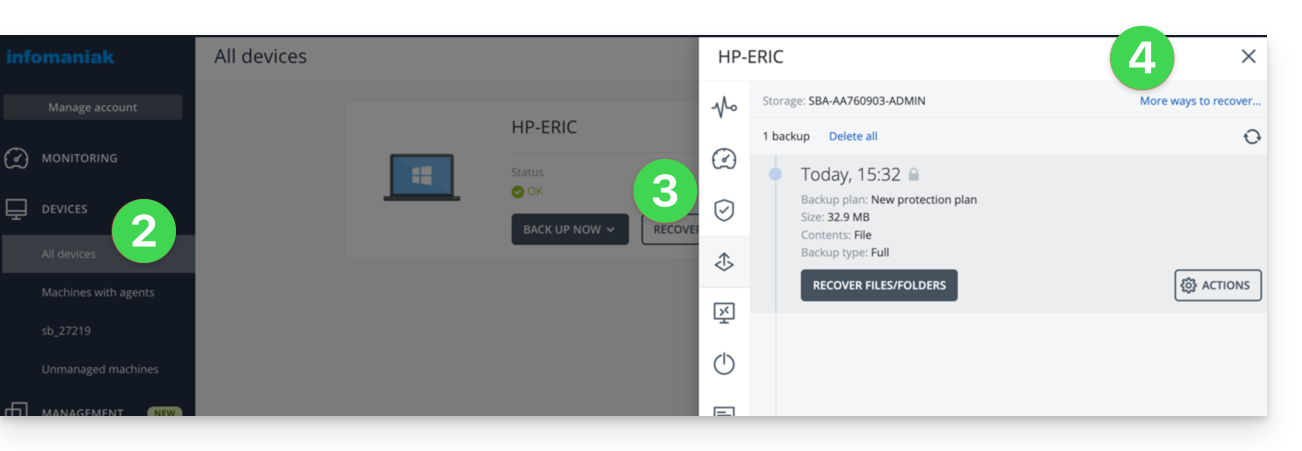
- Click here to access the Acronis Console with the credentials obtained after adding the device (need help?).
- Click on Devices in the left sidebar
- Click the Restore button on your relevant backup plan
- Click on other ways to restore at the top of the interface:
Navigate among the saved files
If necessary, locally or remotely, you can first simply restore the files you need:
- Click the Download files button (in the Browse Cloud Storage section).
- Open the relevant backup.
- Enter the encryption password if necessary.
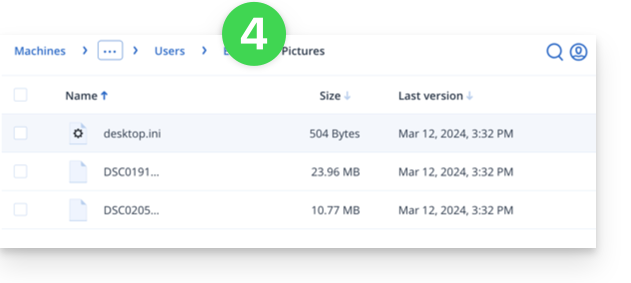
- Browse the directory, select your files:
- Click Download to obtain a
.zipcontaining your selected files.
Also refer to this other guide.
Create a boot disk (on a USB key, for example)
To create a Windows boot disk and allow the restoration of a computer:
- Click the Download ISO Image button (in the Restore an entire machine section):
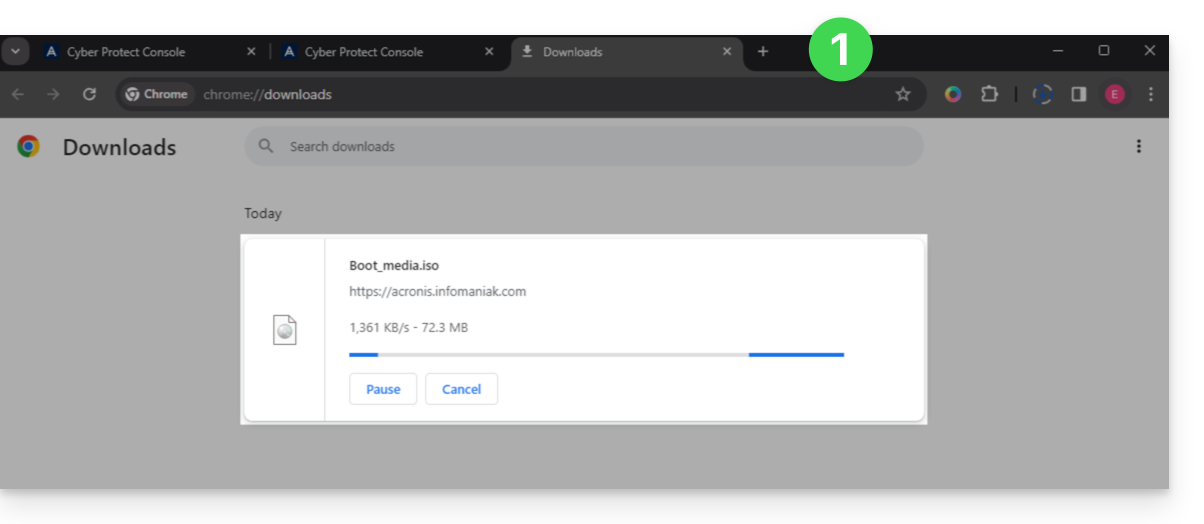
- Note down the code in the form
AA11-BB22-CC33that appears on the screen (more information). - Use software like Etcher to create a boot disk from the downloaded
.isofile.
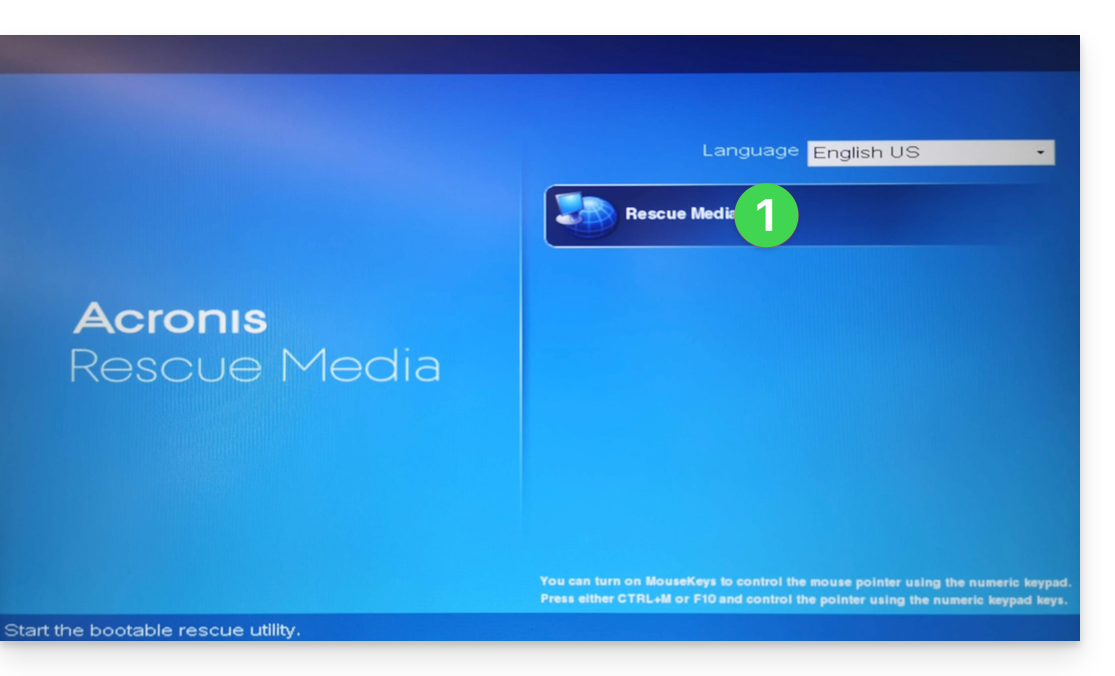
Boot the computer from the removable media
Boot the computer from this boot disk (by pressing the required key according to your machine: F1, F2, F10, F12, DEL, etc.) then follow the steps below:
- Click on Rescue Media:
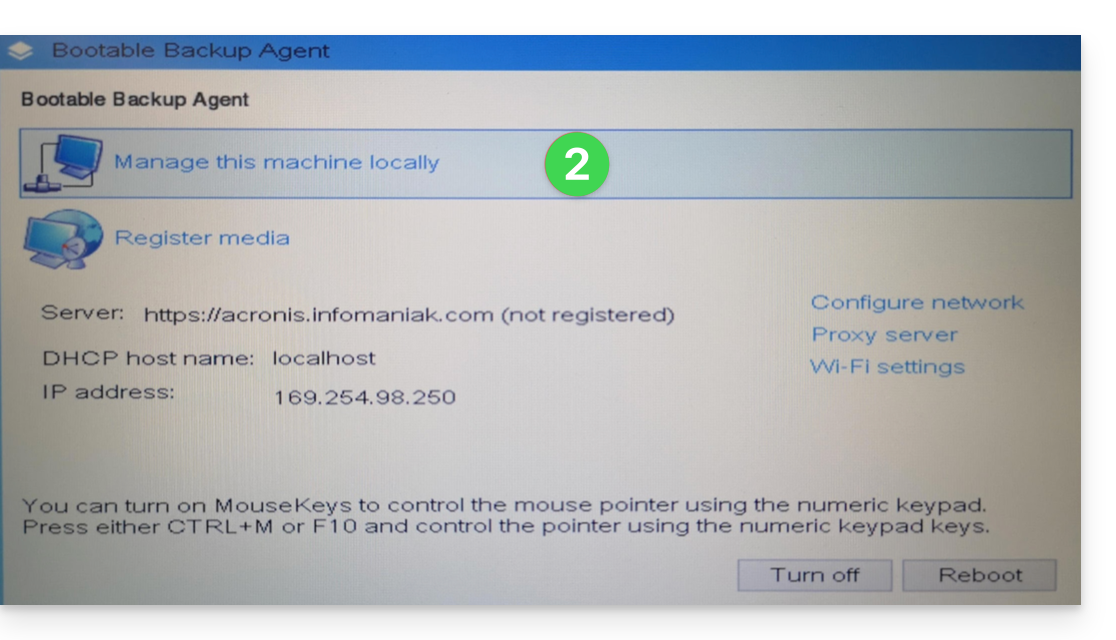
- Connect the computer via Ethernet (or if necessary, configure WiFi from the link on the right side of the interface if the computer allows it) then click on Manage the device locally:
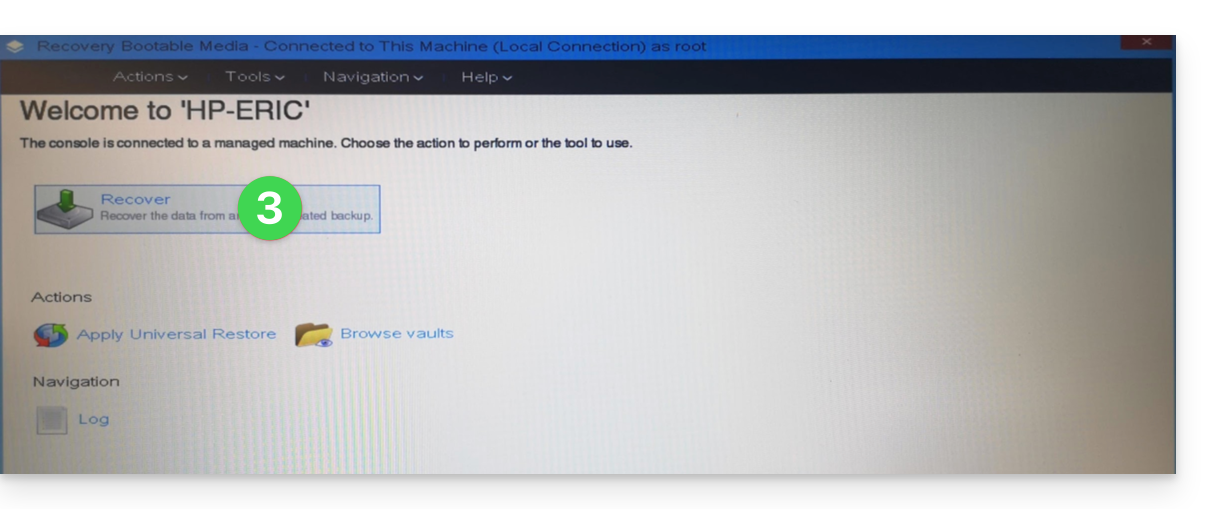
- Click on Restore:
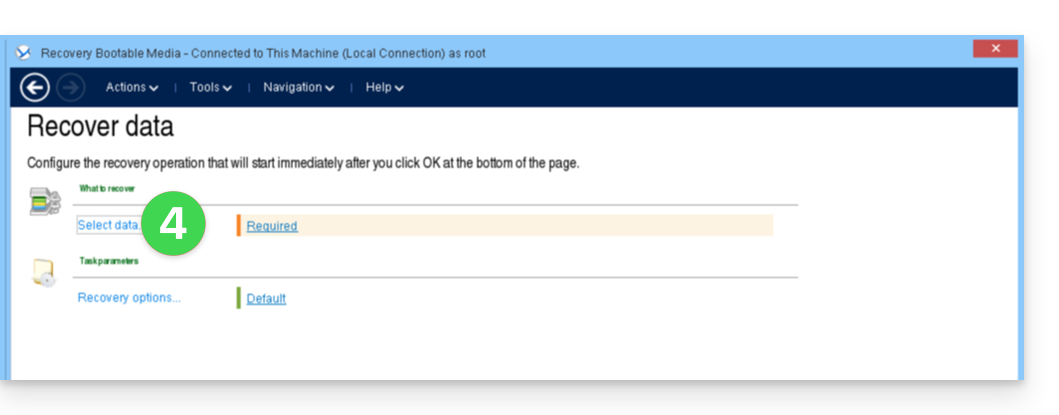
- Click on Select data...
- Click the Browse button:

- Under Cloud Storage click on either:
- Log In and use the Acronis credentials (in the form
SBA-XXXX-ADMIN) to authenticate (the keyboard is set to EN-US by default, make sure to type the word in plain text to verify it if necessary):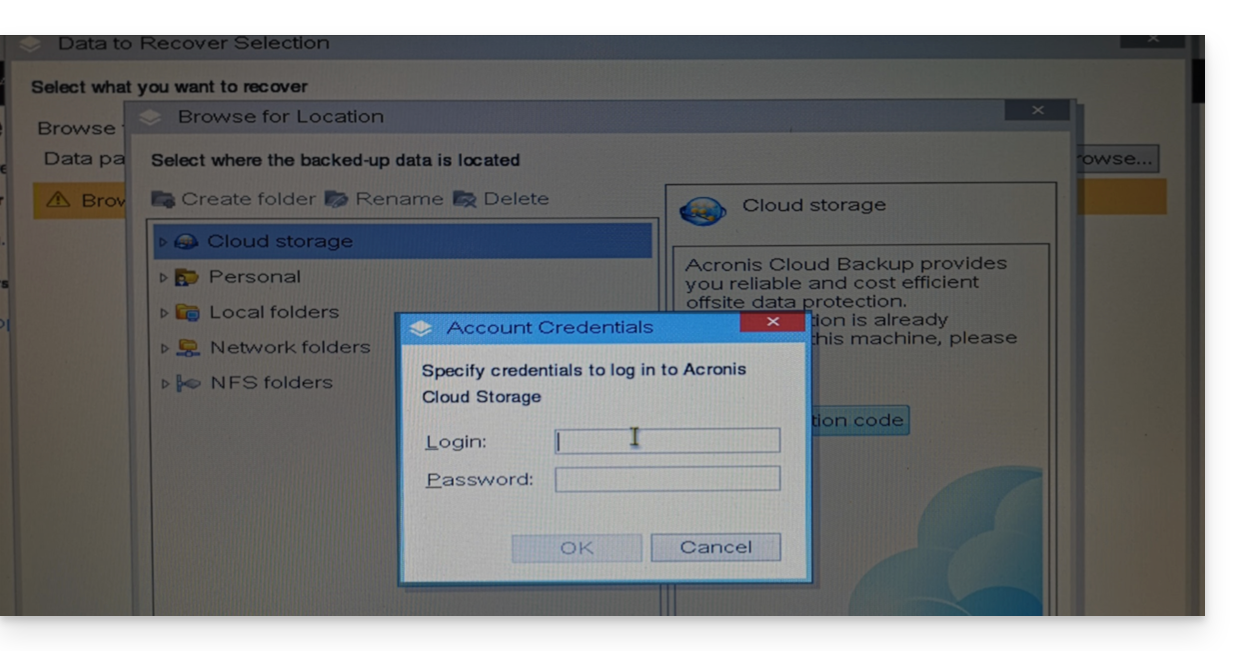
- OR Use the registration code if you have 2FA enabled, by following the proposed procedure (which involves requesting a temporary code (in the form ABCD-ABCD) and then going to the page
https://acronis.infomaniak.com/ui/#w=agentRegistrationto enter this code once logged into your Acronis account):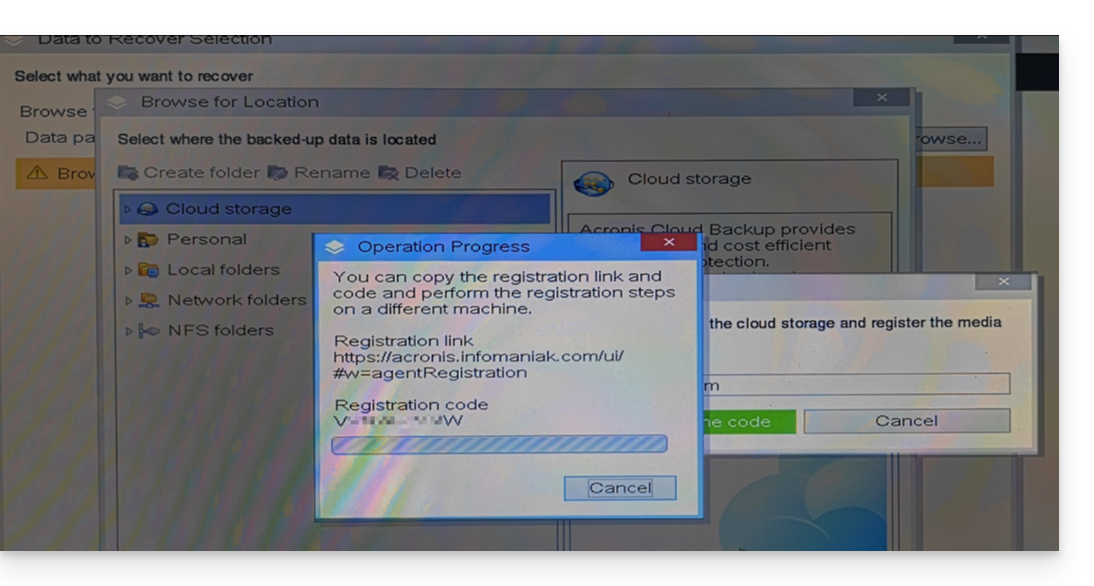
- Log In and use the Acronis credentials (in the form
- Click on your Acronis account identifier and continue to access the backups (the encryption password will be requested if it had been enabled - see point 12 of this guide).
- Choose the workstation, the restore point, and the volumes (disks) to restore:
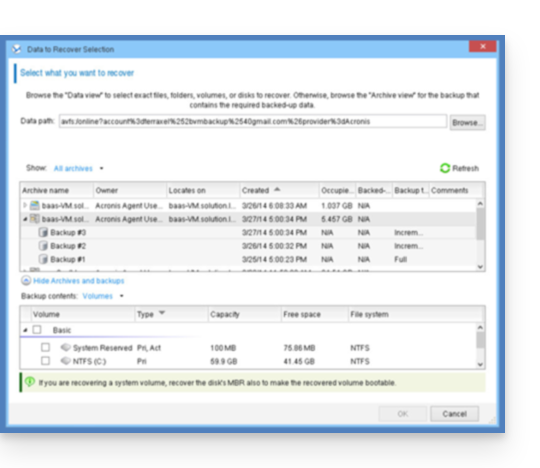
Useful information:- Use the arrow to the left of the workstation names to display the backups...
- The first table at the top allows you to choose the workstation and the backup to restore...
- The second table allows you to choose the content (the disks) of the backup to restore...
- Click OK to continue.
- Match the source and destination volumes:
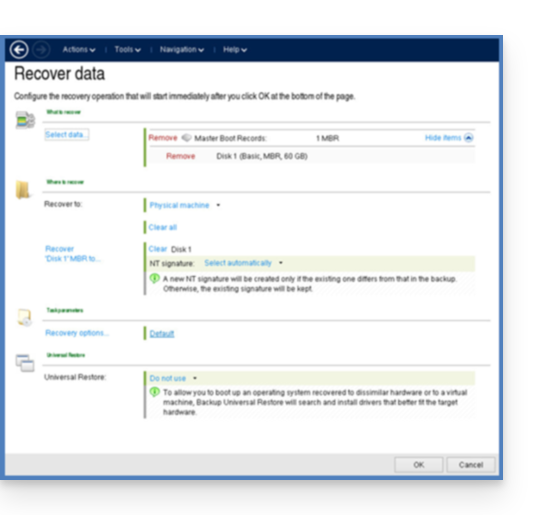
Useful information:- For each volume or disk in the source backup, click Required to choose where to restore the data.
- Under Restore options, it is recommended to check the Automatic restart box.
- Click OK to start the restoration.
This guide explains how to store the database of Joplin on your kDrive Infomaniak and connect your various devices via the WebDAV protocol. You thus keep your notes safe in a storage medium located in Switzerland.
⚠ Available with:
| kSuite | |
| Business | |
| Enterprise | |
| kDrive | Solo |
| Team | |
| Pro |
Preamble
- Joplin is a free and open-source note-taking tool that allows you to organize all your notes within folders and access them from any device (computer, mobile device, etc.)
- Joplin will store several of its configuration files, so to avoid cluttering your kDrive directories, it is recommended to create a dedicated folder in your personal directory on kDrive, with a simple folder name like "
joplin" for example, and then specify it at the end of the WebDAV link in step 7 below: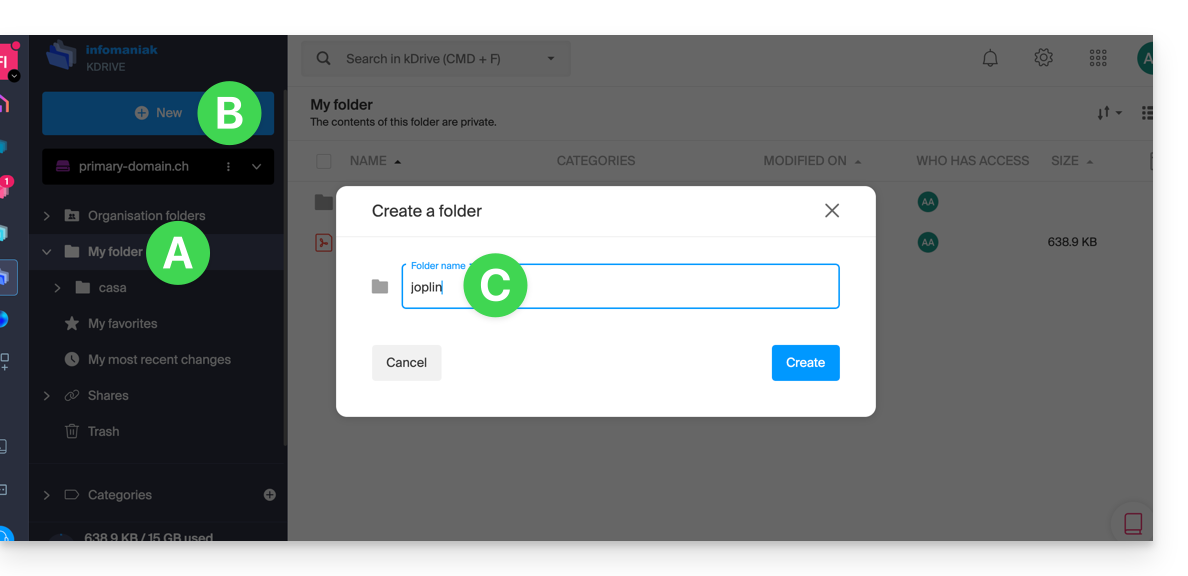
Configure Joplin to use kDrive via WebDAV
Prerequisites
- Download Joplin
- Know your kDrive identifier (kDrive ID).
The example below is substantially the same with all versions of Joplin:
- Open the Joplin application.
- Press the menu at the top left:
- Press Settings:
- Press Synchronization.
- Press the menu to select a target.
- Select the WebDAV mode:
- For the account parameters, use the following information:
- Server address:
https://IDkDrive.connect.kdrive.infomaniak.com/joplin(or /folder-name — read the preamble above) - Username: email address to log in to the Infomaniak user account
- Password: application password in case of double authentication activated or the one from your Infomaniak user account if you have not activated 2FA
- Server address:
- Press the synchronization test and wait for the connection confirmation below:
- Press the top left to return to the previous menu and press Synchronize to create the files on kDrive:
- Go back to the notes to start working.
⚠️ The various services offered by Infomaniak are all compatible with the corresponding standard protocols (notably IMAP/SMTP for email, WebDAV for sharing, S3/Swift for storage, etc.). Therefore, if you encounter a problem with third-party software, contact its publisher or a Partner and consult the support policy as well as article 11.9 of the Infomaniak Terms and Conditions.
This guide explains how to connect the desktop apps Contacts and Calendar (desktop applications on macOS) with the contacts & calendars hosted at Infomaniak.
Preamble
- Your macOS computer will be automatically configured using .mobileconfig configuration profiles compatible with Apple, unlike a manual configuration.
- Infomaniak contacts & calendars are linked to your Infomaniak user account. When you log in to contacts.infomaniak.com or calendar.infomaniak.com you will likely have to perform double validation (2FA) during login.
- In this case, an application password is required to establish synchronization between your device and Infomaniak tools.
- But don't worry, creating such a password is offered by following the configuration assistant (point 4 below).
- It is possible to delete a configuration profile once installed (scroll to the bottom of this page for explanations).
- The Infomaniak tools are compatible with any application supporting CardDAV/CalDAV.
- For additional help, contact the support of the software used or a Partner — also discover the role of the host.
Install a configuration profile
For this:
- Click here to access the Infomaniak configuration tool (online service https://config.infomaniak.com) — log in if necessary to your Infomaniak account on the Organization managing your email address.
- Choose to install the profile on this device.
- Choose to synchronize the contacts & calendars.
- Generate an application password dedicated to synchronization (in order to maintain the usual 2FA connection of your user account):

- Copy the generated application password (it will be requested during the installation of the Apple profile).
- Download the Apple profile:

- Open the System Settings of the computer.
- Click on General in the sidebar, then click on Device Management (for macOS Sequoia 15 version). If you have a lower version or cannot find the profile, refer to the official documentation by changing the system version at the top of the page if necessary:

- Click on +:

- Locate and then open the previously downloaded file:

- Click on Continue:

- Enter the application password twice (contacts + calendars).
If your macOS applications Contacts and Calendar were already open, you need to restart them. You will then see the information added by the synchronization.
Contacts Features
Display shared address books
The Sync server applies a restriction to the macOS Contacts application because this application does not support multiple address books for the same account. Synchronization therefore only returns the default address book. You need to use another CardDAV software (e.g., Thunderbird) to access all address books.
Contact list/group/folder
In the macOS Contacts app, you can add contact lists (or groups), but the information indicating which contacts belong to which list will not be synchronized with contacts.infomaniak.com:
Therefore, if you want to remove these lists, you must press the DEL key on your keyboard after selecting the list to delete (this does not delete the contacts).
On the other hand, a folder (or group) that you can configure on **contacts.infomaniak.com** from the editing of a contact card (see below) is not synchronized with the **Contacts** application on macOS:
Calendar Features
Display shared calendars
By default, only your personal calendars are displayed in the Calendar application. Here is an example of synchronization between multiple calendars from multiple Organizations (to which the user account specified in the macOS application is linked).
Calendar Infomaniak:
macOS:
To display calendars shared by another user:
- Open the Calendar application.
- Open the Calendar menu.
- Click on Preferences.
- Go to the Accounts tab.
- Go to the Delegation tab:

- Check the shared calendars to display.
Delete a CardDAV or CalDAV account
Refer to the chapter "Stop using an account" by changing the system version at the top of the page* if necessary.
Delete an Apple profile
Refer to the official documentation by changing the system version at the top of the page* if necessary.
*Why is it necessary to choose the guide version that exactly matches your macOS / iOS system version? Apple introduces sometimes subtle changes with each new version of its system, for example a path on iOS 15…
… becomes this on iOS 18…
This guide explains how to enable two-factor authentication, also known as two-factor authentication (2FA) or two-step verification for logging in to the Acronis application used with Swiss Backup.
Configure two-factor authentication
Two-factor authentication (2FA) is a type of multi-factor authentication that verifies a user's identity by using a combination of two different factors:
- something the user knows (a PIN code or password)
- something the user has (a token)
- something that is part of the user (biometrics)
Two-factor authentication provides additional protection against unauthorized access to your account.
The platform is compatible with time-based one-time password (TOTP). If TOTP authentication is enabled in the system, users must enter their usual password along with the unique TOTP code to access the system. In other words, a user provides the password (first factor) and the TOTP code (second factor). The TOTP code is generated in the authentication application of the device that applies the second factor, based on the current time and the secret code (QR code or alphanumeric code) provided by the platform.
How it works
How 2FA works:
- You enable two-factor authentication at the organization level.
- All users in the organization must install an authentication application on the device that applies the second factor (mobile phone, laptop or desktop computer, or tablet) and that will be used to generate unique TOTP codes, for example:
- Users must ensure that the time displayed on the device where the authentication application is installed is correctly set and reflects the current time.
- Users in your organization must log back into the system.
- After entering their username and password, they will be prompted to set up two-factor authentication for their user account.
- They must scan the QR code using their authentication application. If it is not possible to scan the QR code, they can use the displayed TOTP secret code below and add it manually in the authentication application:
- It is strongly recommended to save it (print the QR code, write down the TOTP secret code, use an application compatible with code backup in the Cloud). You will need the TOTP secret code to reset two-factor authentication if you lose the device that applies the second factor.
- The unique TOTP code will be generated in the authentication application. It is automatically regenerated every 30 seconds.
- On the "Set up two-factor authentication" screen, users must enter the TOTP code after entering their password.
- As a result, two-factor authentication will be set up for the users.
From now on, when users log in to the system, they will be prompted to provide the identifier and password, then the unique TOTP code generated in the authentication application. Users can indicate that the browser is a trusted browser when they log in to the system. The TOTP code will not be requested for subsequent logins performed with this browser.
Two-factor authentication
Two-factor authentication provides additional protection against unauthorized access to your account. When two-factor authentication is set up, you must enter your password (first factor) and a unique code (second factor) to log in to the service console. The unique code is generated by a special application that must be installed on your mobile phone or another device you own. Even if someone discovers your identifier and password, they still won't be able to log in without accessing the device that applies the second factor.
The unique code to set up two-factor authentication for your account is generated based on the current time of the terminal, as well as the secret code provided by the Cyber Protection service in the form of a QR code or an alphanumeric code. When you first log in, you must enter this secret code in the authentication application.
Set up two-factor authentication for your account
You can and should set up two-factor authentication for your account when two-factor authentication has been enabled by an administrator for your organization. If two-factor authentication was enabled while you were logged in to the Cyber Protection service console, you will need to set it up at the end of your current session.
Prerequisites
- Two-factor authentication must be enabled for your organization.
- You must be logged out of the Cyber Protection service console.
Next:
- Choose a device for the second factor. This is often a mobile phone, but you can also use a tablet, laptop, or desktop computer.
- Make sure the time displayed on the device is correctly set and reflects the current time, and that the device locks itself after a period of inactivity.
- Install the authentication application on the device. Possible applications are Google Authenticator, Authy, etc.
- Go to the Cyber Protection service console login page and set your password. The service console displays the QR code and the alphanumeric code.
- Save the QR code and the alphanumeric code in a convenient way (e.g., print the screen, write down the code, or save the screenshot in cloud storage). If you lose the device that applies the second factor, you can reset two-factor authentication using these codes.
- Open the authentication application, then perform one of the following actions:
- scan the QR code
- manually enter the alphanumeric code in the application (the authentication application generates a unique code; a new code will be generated every 30 seconds).
- Return to the Cyber Protection service console login page and enter the generated code. A unique code is valid for 30 seconds. If you wait more than 30 seconds, use the code generated right after.
When you log in next time, you can select the Trust this browser checkbox. If you do, the unique code will not be required for your login with this browser on this machine.
And if...
... I have lost the device that applies the second factor?
If you have a reliable browser, you will be able to log in using it. However, when you have a new device, repeat steps 1 to 3 and 6 to 7 of the procedure above using the new device and the stored QR code or alphanumeric code.
If you have not saved the code, ask your administrator or Infomaniak support to reset two-factor authentication for your account, then repeat steps 1 to 3, and 6 and 7 of the procedure above using the new device.
... I want to change the device that applies the second factor?
When logging in, click on the Reset two-factor authentication link, confirm the operation by entering the unique code, then repeat the procedure above using the new device.
This guide explains how to find a solution if the Acronis Agent for Swiss Backup asks you to register your machine and then returns an error when you click on "Register the Machine".
Manual registration…
In some situations, especially if you have (re)installed Acronis on your device, the application may ask you to register your machine and then display an error. In this case, you need to perform a manual Acronis registration according to your OS.
… on macOS
Refer to this other guide to uninstall the application.
Otherwise, run the following commands from a Terminal type application (command line interface, CLI /Command Line Interface) on your macOS device:
To unregister, enter the following command:
sudo "/Library/Application Support/BackupClient/Acronis/RegisterAgentTool/RegisterAgent" -o unregister -t cloud -a acronis.infomaniak.comTo reregister, enter:
sudo "/Library/Application Support/BackupClient/Acronis/RegisterAgentTool/RegisterAgent" -o register -t cloud -a acronis.infomaniak.com -u SBA-XXXX-XX -p "PASSWORD_HERE"- Replace and complete the information specific to your account in the commands above, then enter your computer password when prompted.
… on Windows
Use the Acronis Cleanup Utility to uninstall the application.
Otherwise, run the following commands from a Terminal type application (command line interface, CLI /Command Line Interface) on your Windows device:
Open the Start menu by typing the following command:
cmd
- In the search results, right-click on
cmdand select Run as administrator. To unregister, enter:
cd "C:\Program Files\BackupClient\RegisterAgentTool\"Then:
.\register_agent.exe -o unregister -t cloud -a acronis.infomaniak.comTo reregister, enter:
cd "C:\Program Files\BackupClient\RegisterAgentTool\"Then:
.\register_agent.exe -o register -t cloud -a acronis.infomaniak.com -u SBA-XXXX-XX -p "PASSWORD_HERE"- Replace and complete the information specific to your account in the commands above.
If you have Acronis 2FA enabled…
If Acronis two-factor authentication is enabled, then the commands change slightly:
- Generate a registration token from https://acronis.infomaniak.com (need help?).
- Run the
unregistercommand (see above depending on your OS). - Run the
registercommand as above but adapting to…… macOS
sudo "/Library/Application Support/BackupClient/Acronis/RegisterAgentTool/RegisterAgent" -o register -t cloud -a acronis.infomaniak.com --token TOKEN_HERE… Windows
.\register_agent.exe -o register -t cloud -a acronis.infomaniak.com --token TOKEN_HERE
Was the registration successful?
If you get a message 200 or "success", the command executed successfully.
If the result is different, take a screenshot of the error message then contact Infomaniak support.
This guide explains how to manually create a mailing list system with your Mail Service, using Mailman and Infomaniak's Public Cloud!
⚠️ This guide is exclusively for users with advanced technical skills. No responsibility is assumed in case of damage or loss — be sure to back up your data before any manipulation. For assistance, contact a partner or launch a free tender. Also discover the role of the host.
Preamble
Mailmanis a free application for managing mailing lists, discussion lists, and newsletters.- The provided files allow you to easily set up
Mailman. - The server and its firewall are deployed with
Terraform, anInfrastructure as Code (IaaC)tool, and its configuration is done withAnsible. - This system allows you to create discussion lists for your various contacts (direction@, ecommerce@…).
Preparation…
… of your environment
- Having an Infomaniak Mail Service is essential to follow this tutorial.
- Download the files necessary for deploying
Mailmanon the Public Cloud via this GitHub repository.
… of the Mail Environment
- Create an address
mailman@domain.xyz(help) and keep the password safe (used to configure the server). - Add the following aliases (help) :
- postorius
- mylist
- mylist-bounces
- mylist-confirm
- mylist-join
- mylist-leave
- mylist-owner
- mylist-request
- mylist-subscribe
- mylist-unsubscribe
Your mail environment is ready, time to deploy Mailman!
… of the Public Cloud
- Create a Public Cloud project and a user (help).
- Note: The Public Cloud password must be secure. 2FA authentication on your Infomaniak account is strongly recommended.
- Click here to access the OpenStack dashboard and use the identifier
PCU-XXXXXXwith the defined password. - Download your
openrcfile. It allows you to authenticate as an administrator in the command line (it contains information such as the identifier, password, and datacenter).
You are ready to connect to the OpenStack administration.
... of the instance
To make your future instance accessible via SSH, HTTP, and HTTPS, create a security group with the following command:
openstack security group create --description "Ports 22 - 80 - 443 pour Mailman" mailman-secAdd the necessary rules:
openstack security group rule create --dst-port 80 --protocol TCP mailman-sec
openstack security group rule create --dst-port 443 --protocol TCP mailman-sec
openstack security group rule create --dst-port 22 --protocol TCP mailman-sec
These steps can also be performed from the Horizon dashboard, in the Network → Security Groups tab. Refer to the Cloud documentation on this topic.
Deploy the instance that will host Mailman with the command:
openstack server create --flavor a1-ram2-disk20-perf1 --security-group mailman-sec --network ext-net1 --key-name <votre-clé> --image "Debian 11.5 bullseye" mailman3Once connected to the machine, update it:
sudo apt update && sudo apt upgrade -yInstall the openstack client:
sudo apt install python3-openstackclient -yInstall Ansible to automatically deploy Mailman:
sudo apt install ansible -yDeploying Mailman
To deploy Mailman, import your SSH key and the OpenRC file via SFTP to the installation machine.
Use tools like putty, termius, or mobaxterm (or any SSH/SFTP client) with the following information:
- IP: IP address of the created machine
- Port:
22 - SSH Key:
.pemfile - User:
debian
In this guide, Termius was used for the SFTP transfer.
Download the necessary files:
wget https://github.com/reneluria/mailman-cloudMove the files:
mv cle.pem mailman/
mv PCP-XXXX.sh mailman/
Access the folder:
cd mailman/Protect the key by assigning the correct permissions:
sudo chmod 600 tf-keypair.pemCreate an inventory file to configure SMTP, the domain, etc.:
nano inventoryFill in this template with your information:
mailman ansible_host=xxx.xxx.xxx.xxx
[all:vars]
ansible_python_interpreter=/usr/bin/python3
ansible_user=debian
ansible_ssh_private_key_file=id_tf_keypair
fqdn=mailman.<yourdomain>
mail_host=mail.infomaniak.com
mail_account=mailman@<yourdomain>
mail_password=<email_password>
mailman_user=mailman
mailman_password=<interface_password>
mailman_domain=<yourdomain>
mailman_email=<your_email>
Save with Ctrl + S, then exit with Ctrl + X.
Start the deployment:
ansible-playbook playbook.yml -DMailman is now accessible at your IP address: X.X.X.X/mailman3
Log in
Log in with the credentials defined in the inventory file for:
- Create a domain then a list « maliste »
In the list settings, it is recommended:
- DMARC Attenuations: « Replace de with the list address »
- Modify messages: « Reply to the list » and « Reply to the first band »
This guide details how to import Google Drive data using rClone on kDrive Infomaniak.
⚠ Available with:
| kSuite | |
| Business | |
| Enterprise | |
| kDrive | Solo |
| Team | |
| Pro |
1. Configure rclone for drive access
Install rclone on your computer
There is a version of rclone with a graphical interface (GUI) but it is quite possible to do this via the command line (CLI):
- Install rclone from a
Terminaltype application on your device by typing the entire following command:sudo -v ; curl https://rclone.org/install.sh | sudo bash - Enter the password for your session on your computer to start the installation:

- Refer to the official installation guide if necessary.
Configure the remote disk (Google Drive) on rclone
- Once rclone is installed, enter the command
rclone config.- Refer to the official configuration guide if necessary.
- Then choose to configure a new remote import by answering
nforNew remote. - Name the remote disk, for example
gdrive:
- Then choose the type of disk to import by answering
drivewhich corresponds to Google Drive among the proposed choices.
You must then authorize the connection to Google Drive from a browser.
By default, rclone uses a shared client ID among all users, which may result in request limitations imposed by Google. It is strongly recommended to use your own client ID to avoid these restrictions.
- Access the Google API Console with your Google account.
- Create or select a project.
- Enable the Google Drive API via the button/link "Enable APIs and Services".
- Search for the keyword
Driveand click onGoogle Drive API:
- Click on the Enable button.
- Click on Credentials in the left sidebar (and not on a similar button).
- Click on Configure the OAuth consent screen (if not already done):
- Enter a name, for example
rclone. - Select "External" (or "Internal" if you are a Google Workspace user).
- Under “Data Access”, add the scopes ("fields of application") required:
https://www.googleapis.com/auth/docs,https://www.googleapis.com/auth/drive,https://www.googleapis.com/auth/drive.metadata.readonly
- Save.
- Add your email account as a test user under "Audience".
- Return to the "Google Auth Platform" section.
- Enter a name, for example
- Create OAuth credentials:
- Click on "Create credentials / OAuth client ID".
- Choose "Desktop app" and leave the default name, then click on the Create button.
- Keep the
client IDand theclient secret codedisplayed.
- If "External" was chosen in step 7 above, return to "Audience" in the left sidebar and click on "Publish the application".
Due to the "enhanced security" recently introduced by Google, you are theoretically supposed to "submit your application for verification" and wait several weeks for their response.
In practice, you can directly use the client ID and client secret with rclone (read the rest of the guide). The only consequence will be a very intimidating confirmation screen when you log in via your browser to allow rclone to obtain its token-id. However, since this only happens during the initial setup of the remote storage, it is not a major issue.
It is also possible to leave the application in "Test" mode, but in this case, any authorization will expire after a week, which can be cumbersome to renew frequently. If a short validity period does not pose a problem for your use, then keeping the application in test mode may be sufficient.
Return to rclone in the terminal:
- Indicate to rclone the
client_idby copying-pasting theClient IDobtained in step 8 above, same for the secret phrase. - Then choose the
scopen°1:
- Press the “
Enter” key to leave theservice_account_file. question blank - Answer “No”
nto the question about “advanced configuration”. - Answer “Yes”
yto the question about the web browser connection:
- A web page opens in your web browser allowing you to connect to Google and authorize the application you created in step 9 above.
- Once permissions are granted, you should receive the following message:

- In the terminal, answer “No”
nto the question about “Shared Drive (Team Drive)”. - Answer “Yes”
yto the last question:
Configuration of the destination disk (kDrive) on rclone
It is possible to act directly on the configuration file of rclone by pasting your kDrive configuration in it, for example:
[kdrive]
type = webdav
url = https://kDrive_ID_HERE.connect.kdrive.infomaniak.com/
vendor = other
user = user@email.com
pass = PASSWORD_HERE_OR_APP_PASSWORD_IF_2FA
But here is how to proceed step by step as for the previous configuration:
- Still in the terminal, enter
nfor a new disk configuration and enter the namekDriveto recognize your destination disk:
- Then choose the type of disk to import by answering
webdavwhich corresponds to a WebDAV configuration among the choices offered. - Enter the following information:
url= direct access to kDrive (refer to this other guide regarding the kDrive ID for the connection URL)vendor= rclone (option number 6)user= email address to log in to the Infomaniak user account
- Answer “Yes”
yto the question about the password, then enter the password:- application password in case of double authentication activated or the one of your Infomaniak user account if you have not activated 2FA.
- Leave
bearer_tokenblank, then answer “No”nto the question about “advanced configuration”. - Answer “Yes”
yto the last question and your 2 disks are displayed:
2. Copy data from Google Drive to kDrive
kDrive supports rclone streaming upload via WebDAV, up to 50 GB (extendable to 100 GB) to avoid abuse, with automatic error handling if the limit is exceeded without prior specification of the size via Content-Length.
Prerequisites
- Consult the available options in the official guide before starting an import, particularly these important commands:
--drive-skip-shortcutsto avoid infinite import loops--drive-shared-with-meto get what has been shared--drive-acknowledge-abuseto force the download of files blocked by Google
Example of a command to start copying your Google Drive to the root of your kDrive:
sudo rclone copy gdrive: kDrive:This will immediately start copying your folders, subfolders, and Google Drive contents to the personal folder of your Infomaniak kDrive!
Google documents such as Gdocs, Sheets, Slides, etc. are converted to Office formats like .docx, .xlsx, etc. and are readable directly on kDrive.
This guide explains how to regain access to Infomaniak services (manager.infomaniak.com and ksuite.infomaniak.com/mail in particular) in case of issues with the kAuth mobile app (application for iOS/Android smartphones or tablets) if this is the security method you chose during 2FA activation (two-factor authentication).
Before changing your mobile device
If you plan to change your iOS/Android device where the kAuth app is installed, before doing so:
- Log in one last time with 2FA on the Infomaniak Manager.
- Remove security temporarily (or modify the verification method to receive a code by SMS, for example).
- Then on the new device, install and open the kAuth mobile app to re-authenticate with 2FA via kAuth!
After changing your mobile device
If it's too late and you haven't followed the method above, check in the kAuth mobile app if your account is still present; it may be that you no longer receive the authorization request notification YES/NO and in this case:
- Open the mobile app kAuth (application for iOS/Android smartphones or tablets) on your device.
- Press on the account in question.
- Note the temporary code displayed.
- Enter this code on the login page for the Manager.
- Once logged in, deactivate two-factor authentication.
- Then reconfigure two-factor authentication by choosing kAuth and adding your account to the mobile device which will reactivate the notifications.
If it's too late, and no accounts are displayed in the kAuth mobile app, there's no need to call Infomaniak or add your account in the app (without having followed the first explanation at the top of this guide), the registration will loop since a code will be requested...
And in this case, no choice, you will need to provide a number of security elements manually or via the Infomaniak Check (kCheck) app to regain access to your account:
- Click here to access the Infomaniak Manager login page.
- Enter the username and correct password.
- When prompted for additional authentication, click on alternative methods:
- Choose to enter one of your recovery codes if you had downloaded the sheet during 2FA activation:
- Otherwise select the last help request option to access the form for submitting your identity documents and recognition selfie:
- Follow the procedure to the end and wait:
This guide explains how the mobile app Infomaniak Mail (app for iOS/Android smartphone or tablet) works when you open it for the first time after installation and during subsequent connections.
Start the setup assistant
When you open the app for the first time, a step-by-step assistant suggests you choose the theme (pink or blue accent color) that you can also modify later: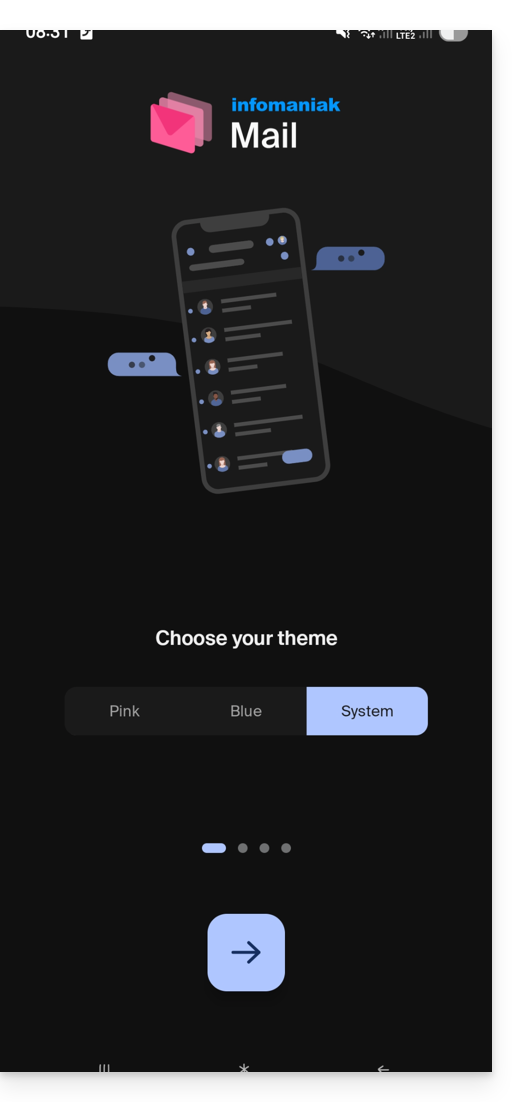
It also shows you the main ergonomic functions available with the app (long press, swipe).
In the last step, you can…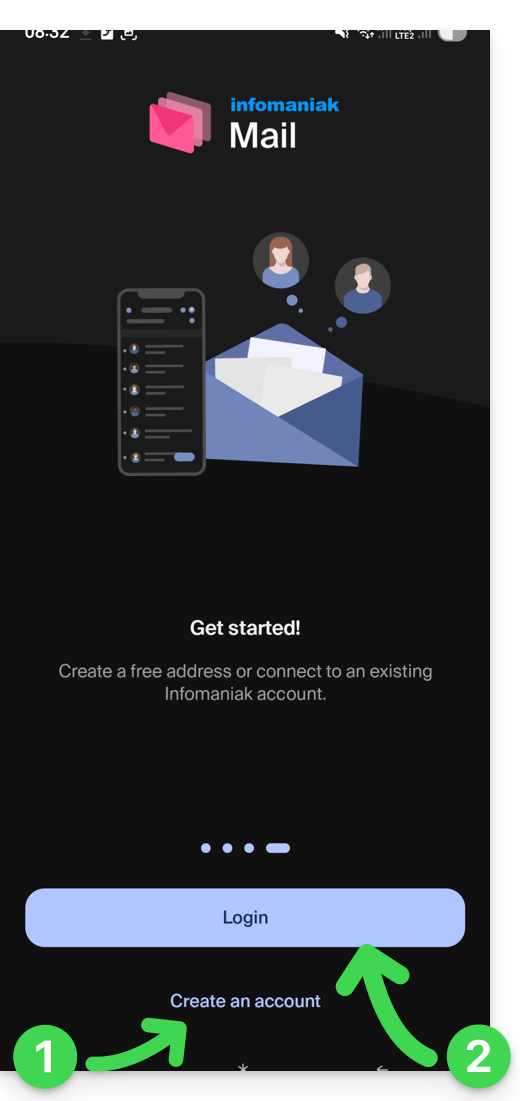
- … create an account i.e. get a new free email address…
- … or simply log in to your Infomaniak account with your usual credentials (your email address to log in to Infomaniak):
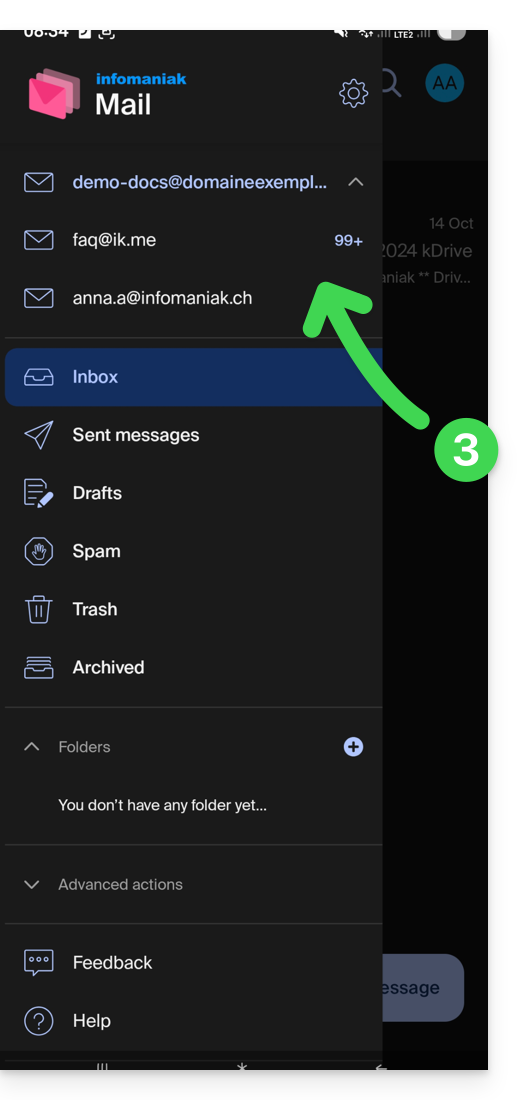
Multiple email addresses
Once logged in, after two-factor authentication (2FA) is completed, you still need to authorize access to your device's contacts and notifications:
You will then find all the email addresses already linked to Infomaniak Mail that you used to check on your web browser via the address ksuite.infomaniak.com/mail.
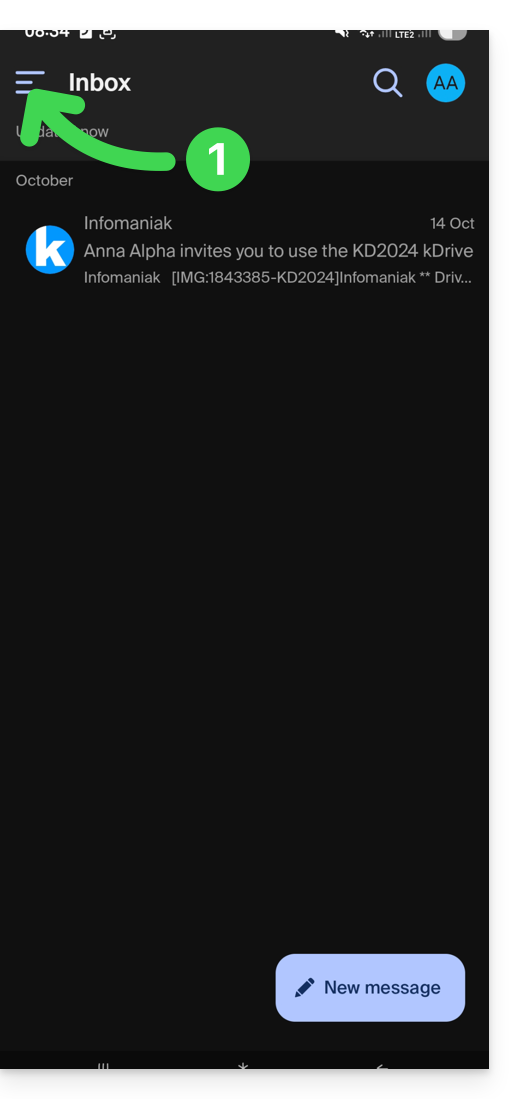
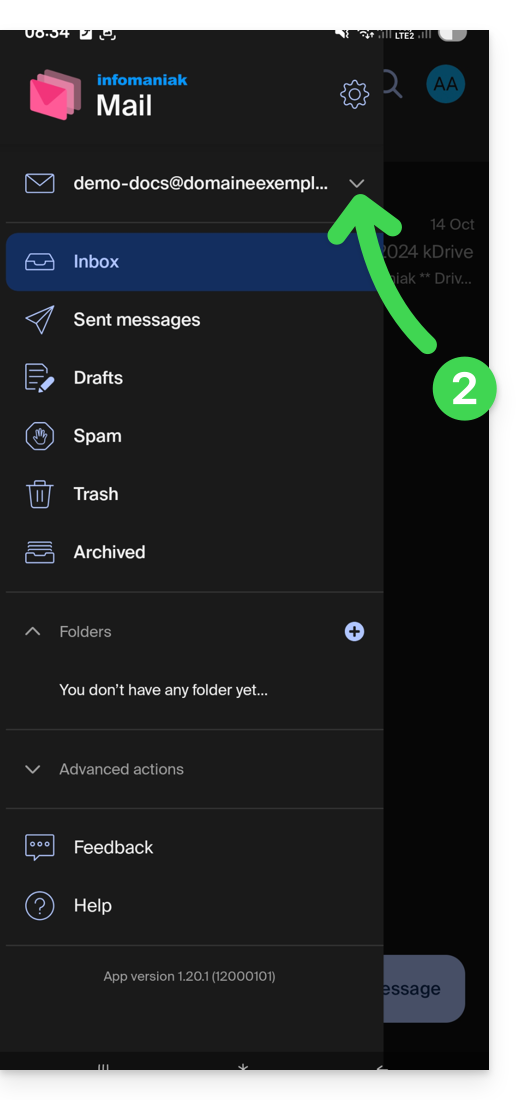
You can switch from one address to another…
- … by tapping at the top left of your inbox:
- … then on the chevron to the right of your displayed email address:
- … then on the address to view:
To link an additional one, refer to this other guide.
To remove one, refer to this other guide.
Multiple Infomaniak accounts
Imagine that in addition to your personal Infomaniak account with your favorite email addresses linked, you get a login from your employer to a user account with different company email addresses within this professional account…
To add the additional Infomaniak account:
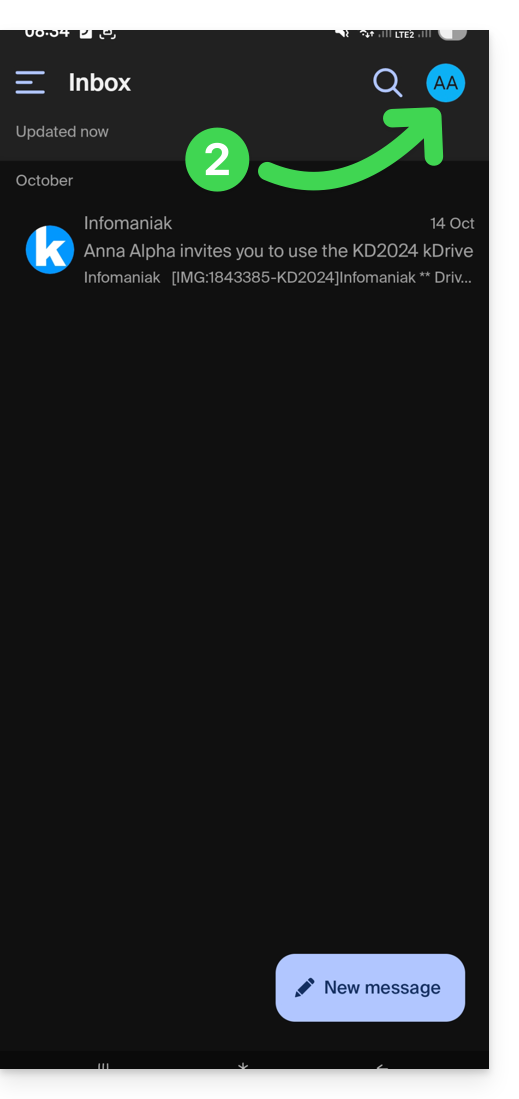
- Tap at the top right of the inbox:
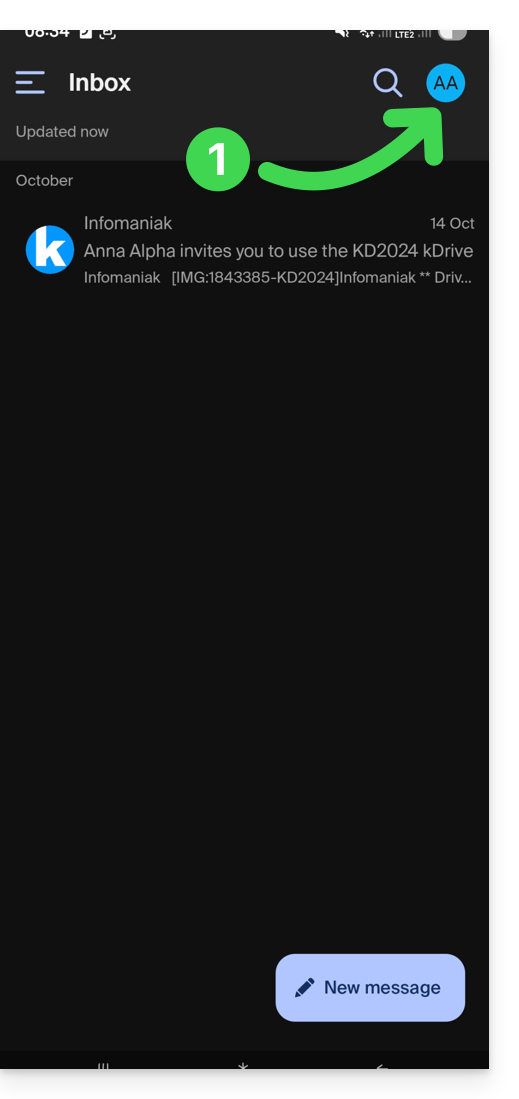
- Click on Add an account to connect to the desired Infomaniak user account:
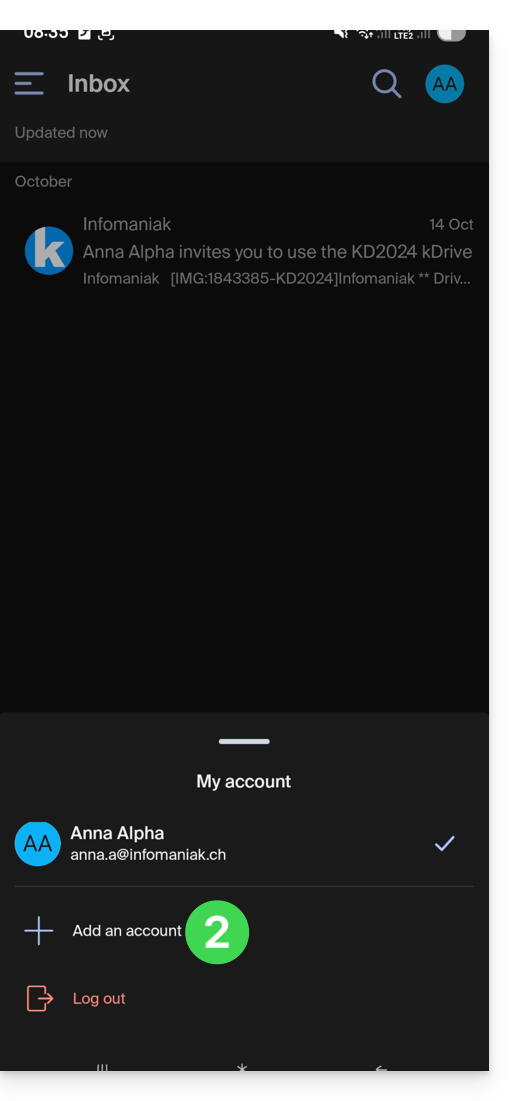
- Click the button to enter the login information for the Infomaniak account:
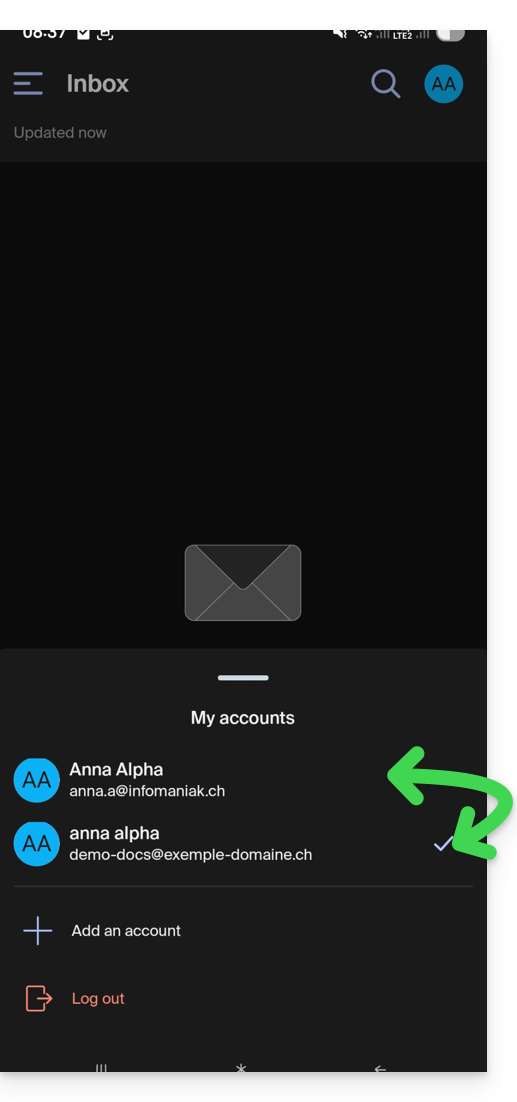
To easily switch from one user account to another:
- Click on one or the other of the attached user accounts, and thus view the email addresses attached within these accounts:
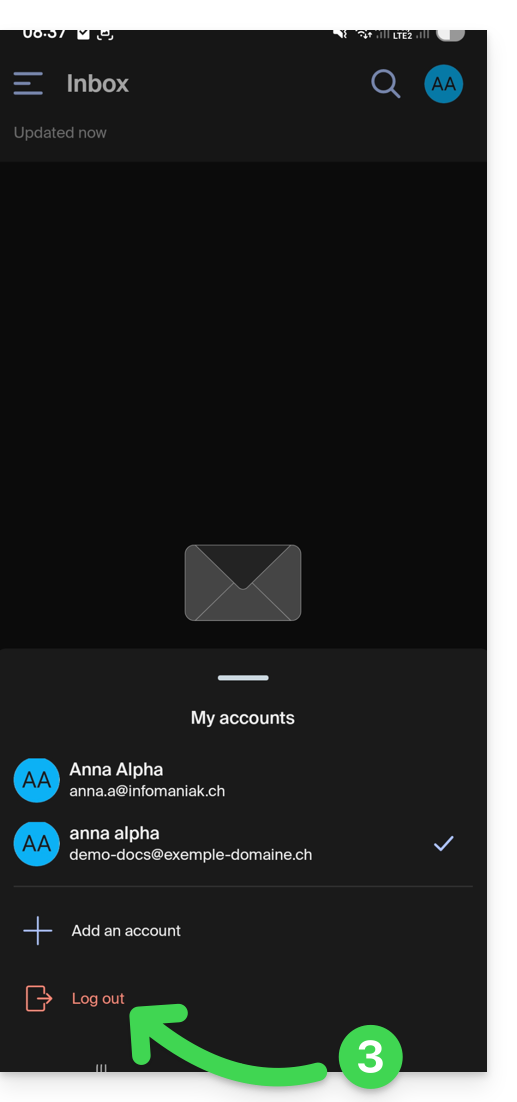
To detach an attached Infomaniak account in the application and no longer be able to view the email addresses attached within this account, simply...
- ... go there one last time
- ... then click on the user menu at the top right:
- ... to then log out at the bottom of the screen:
You will be automatically switched to one of the remaining accounts.
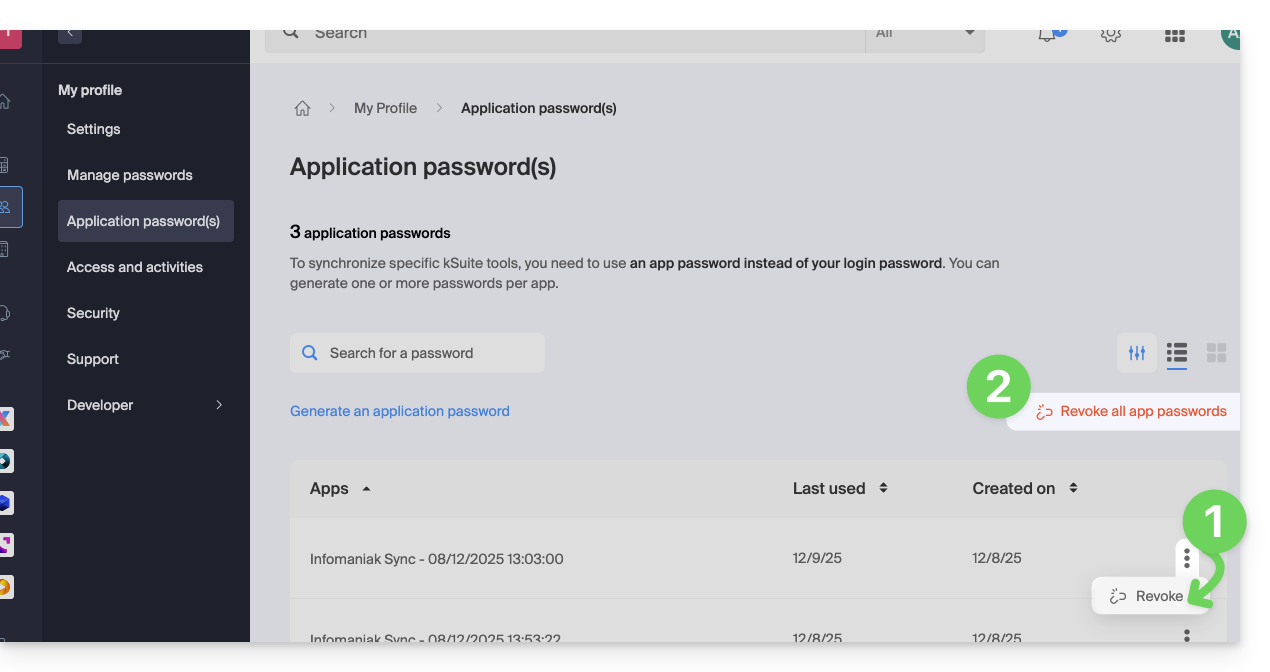
This guide covers the management of application passwords from the Infomaniak Manager.
Preamble
- Application passwords allow you to establish an authenticated connection between certain tools & services, even if two-step verification (2FA authentication) is enabled.
- To synchronize, for example, contacts & calendars from your Infomaniak account with a mobile device or email software/client, perform the actions presented in the guide below to generate a new password specific to this application.
- It is possible to generate multiple specific passwords (for example, 1 for contacts and 1 for calendars) or to use the same one for synchronizing both services.
Create an application password
To do this:
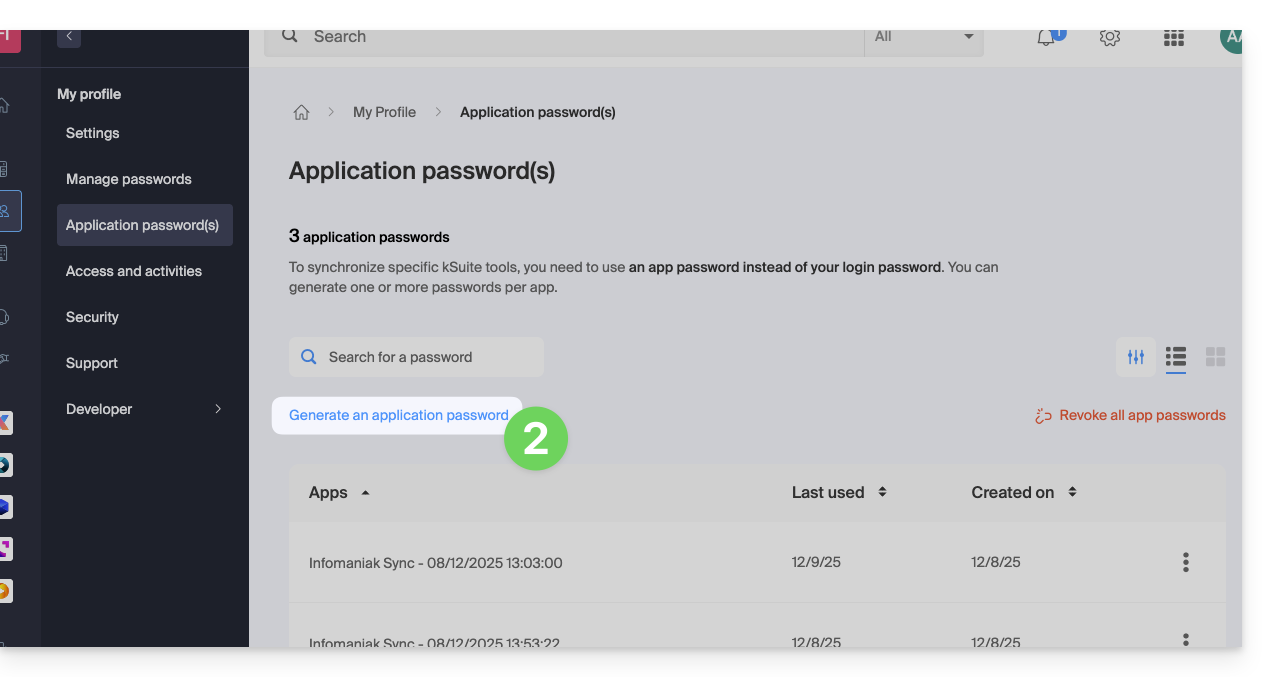
- Click here to access the management of application passwords on the Infomaniak Manager.
- Click on Generate an application password:
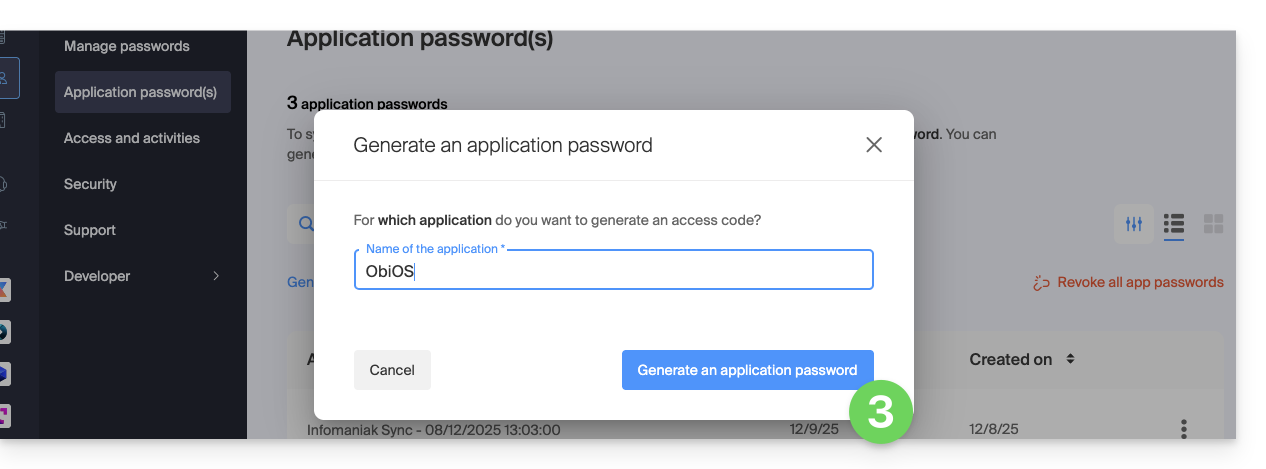
- Enter a name for the application password in the dialog box, then click on Generate an application password:
- Copy and save the generated application password in a safe but accessible place, it will no longer be accessible once the window is closed.
Revoke application passwords
In the same place, you can delete one or more application passwords when they are no longer useful:
- Click on the action button ⋮ to the right of each password, then revoke them…
- or on Revoke all at the top of the table:
This guide explains how to synchronize eM Client contacts & calendars with contacts & calendars hosted by Infomaniak.
Preamble
- Infomaniak contacts & calendars are linked to your Infomaniak account; when you log in to ksuite.infomaniak.com/contacts or /calendar you will likely have to perform two-factor authentication (2FA) when logging in.
- In this case, an application password is required to establish synchronization between your device and Infomaniak tools.
- But don't worry, creating such a password is offered to you by following the setup assistant.
- The various services offered by Infomaniak are all compatible with the corresponding standard protocols (CalDAV/CardDAV for contacts & calendars, for example), therefore if you encounter a problem with third-party software, contact its publisher or a Partner and consult the support policy as well as section 11.9 of the Infomaniak Terms of Service.
Synchronize contacts & calendars (eM Client 10 macOS)
Prerequisites
- Obtain your synchronization information provided by the Infomaniak synchronization assistant:
- account address:
https://sync.infomaniak.com - username: for example
AB12345 - application password if two-factor authentication is enabled or the one of your Infomaniak user account if you have not enabled 2FA
- account address:
Next:
- Open eM Client
- Click on the eM Client Menu
- Click on Accounts
- Click on Add an account
- Click on Calendar
- Click on CalDAV
- Click on Next

- Choose a title for the account name (e.g., Infomaniak agenda) and complete the procedure
You can start the Contacts part if you wish, but in any case, 1 CalDAV procedure configures CardDAV at the same time, and vice-versa.
This guide explains how to synchronize Microsoft Outlook Windows contacts & calendars (Office 365 / 2019, 2016, 2013, 2010, 2007) with contacts & calendars hosted by Infomaniak, using an extension for Outlook available on caldavsynchronizer.org.
Preamble
- The various services offered by Infomaniak are all compatible with the corresponding standard protocols (CalDAV/CardDAV for contacts & calendars, for example), therefore if you encounter a problem with third-party software, contact its publisher or a Partner and consult the support policy as well as article 11.9 of the Infomaniak Terms of Service.
- There is a paid alternative for Windows, Evo Collaborator, which offers a pre-configured profile for Infomaniak.
Configure Outlook CalDav Synchronizer
Outlook CalDav Synchronizer allows you to synchronize contacts & calendars via CalDAV and CardDAV protocols, including multiple calendars (non-shared only):
- Download CalDav Synchronizer for Outlook.
- Close Outlook and launch the installation of the plugin downloaded above:

- Once the plugin is installed, open Outlook and click on the new CalDav Synchronizer tab.
- Click on Synchronization Profiles.
- Click on the + icon to create a first profile (for the calendar or contacts - you will need to create a second profile later to synchronize both).
- Choose a generic profile type (first radio button):

- Enter a profile name (name of the Infomaniak calendar or address book you want to synchronize, for example).
- Check the synchronization box.
- Click on the [ ▪ ▪ ▪ ] button.
- Click on the New… button:

- Enter a new folder name.
- Choose the type of items the folder will contain (Calendar or Contacts).
- Click on the parent folder “Outlook” to create the folder in its hierarchy.
- Confirm with the OK button:

- Confirm with OK:

- Open the assistant https://config.infomaniak.com/ to obtain the information regarding synchronization with Outlook.
- Click the button to generate an application password (allows you to bypass the 2FA of your user account for synchronization only):

- Copy the information (password, URL, and username) obtained on config.infomaniak.com.
- Enter the email address, that of your user account.
- Click the button to Test the settings:

- Choose the Infomaniak calendar to synchronize from the window that opens.
- Click the OK button:

- Additional information may then automatically appear in certain fields.
- Save a second profile if necessary (in this case, go back to step 4).
- Finish with OK at the bottom right.

- A restart of Outlook may be required to update the added information.
Resolve event duplicates
If you notice duplicated events in your Outlook calendar that are not duplicated on ksuite.infomaniak.com/calendar, apply these settings:
- Click to Show Advanced Settings.
- Click on Event Mapping Configuration.
- Check the box Use GlobalAppointmentID for UID attribute.
- Check the box Cleanup duplicate events.
- Save the changes by clicking the OK button:

This deletion of duplicate events and therefore potentially duplicate invitations, may trigger a notification of event refusal to the organizer, however, this has no impact on the initial choice of the participant.
And on macOS?
There is an alternative to Outlook / Exchange on macOS, via the ews-caldav-sync python script:
- Unlike an ICS file import provided by Outlook Web, which only includes the last few weeks of events, the script will import all calendar events, including event series, but not tasks.
- Synchronization via this script is one-way, from Microsoft Exchange to the CalDAV server. It is recommended to run it at regular intervals.
This guide explains how to connect the mobile apps Contacts and Calendar iOS (iPhone, iPad, etc.) with the contacts & calendars hosted by Infomaniak.
Preamble
- Your iOS device will be automatically configured via configuration profiles .mobileconfig compatible with Apple, unlike a manual configuration.
- It is possible to delete a configuration profile once installed (scroll to the bottom of this page for the explanations).
- Infomaniak contacts & calendars are linked to your Infomaniak account; when you log in to ksuite.infomaniak.com/contacts or /calendar you probably have to perform double validation (2FA) when logging in.
- In this case, an application password is required to establish synchronization between your device and Infomaniak tools.
- But don't worry, creating such a password is offered by following the configuration assistant.
- The various services offered by Infomaniak are all compatible with the corresponding standard protocols (CalDAV/CardDAV for contacts & calendars for example), therefore if you encounter a problem with third-party software, contact the publisher or a Partner and consult the support policy as well as article 11.9 of the Infomaniak Terms and Conditions.
Install a configuration profile
To do this:
- Click here to access the Infomaniak configuration tool (online service https://config.infomaniak.com) — log in if necessary to your Infomaniak account on the Organization on which your email address is managed.
- Choose to install the profile on this device:
- Choose to synchronize contacts & calendars:
- Generate a dedicated application password for synchronization (to keep the usual 2FA connection of your user account):
- Copy the generated application password (it will be requested during the installation of the Apple profile).
- Download the Apple profile:
- Authorize the download on the device:
- Open the settings of the iOS device:
- Press the recently downloaded profile:
- Press Install:
- Unlock your iOS device:
- Press Install:
- Enter (or paste) the application password twice in a row (contacts + calendars).
- Tap on Finish:
If your iOS Contacts and Calendar applications were already open, you need to relaunch them. You will then see the information added by the synchronization.
Contacts Specifics
If you add new contacts from the iPhone after a synchronization, they will be added locally, in the iPhone's address book ("On My iPhone") instead of going to the synchronized address book. You must change this default setting in your application's settings.
Unfortunately, you cannot retrieve information about contact groups. Indeed, iOS does not really use folders or groups. Apple tags/marks each contact with one or more categories, but this is not a group membership.
Calendars Specifics
By default, only your personal calendar is displayed in the Calendar application. To display calendars shared by another user:
- Open the Calendar application.
- Tap Calendar at the bottom of the screen.
- Check the shared calendars to display.
Also, refer to Apple's documentation on this subject.
To manage notifications regarding activated or deactivated calendars, click on the ⓘ on the right:
Delete an Apple profile
Refer to the official documentation by changing the version of your system at the top of the page* if necessary.
*Why is it necessary to choose the guide version that exactly matches your version of the macOS / iOS system? Apple introduces changes, sometimes subtle, with each new version of its system, for example a path on iOS 15…
…becomes this on iOS 18…