
Knowledge base
1000 FAQs, 500 tutorials and explanatory videos. Here, there are only solutions!
This guide details the Lite Sync option of the kDrive desktop app (desktop application on Windows).
Preamble
- The Lite Sync feature saves space by virtually storing your kDrive files on your computer, only downloading them when necessary.
- The files are always accessible from the kDrive web app (online service kdrive.infomaniak.com) but locally they are present in a "dehydrated" way, requiring a loading time to be fully accessible.
- This allows you to view, complete, and synchronize the content of kDrive without saturating the hard drive.
- The Lite Sync option always acts:
- on a specific kDrive (in the case where you synchronize several on the application).
- and on the entirety of the kDrive (or the entirety of an advanced synchronization).
- and via a specific kDrive app (another user of the same kDrive can make a different Lite Sync choice than yours).
Enable the Lite Sync option
Prerequisites & scope of use of Lite Sync
- OS Windows version ≥ 10 (21h2)
- not available with Linux
- 64-bit processor (ARM64 compatible)
- File storage system under NTFS / APFS
The Lite Sync option can be enabled during the installation of the application (this is offered to you) or subsequently:
- Left-click the app icon in the notification area of your computer (bottom right on Windows).
- Click the action menu ⋮ to the right of the kDrive window.
- Select kDrive Settings.
- Click the button in the Synchronization section to enable Lite Sync.
The cloud icon will appear to the far right of a sync name on the application, indicating that Lite Sync is enabled. If the crossed-out cloud icon
is displayed, this means that Lite Sync is not enabled:

Keep on this device
Once Lite Sync is enabled, you can still make a folder and its subfolders or only one or more subfolders available locally:
- From the Windows Explorer, navigate to a folder synchronized with kDrive and right-click.
- Select the Keep on this device option under kDrive:

Free up space
Conversely, once Lite Sync is enabled, you can free up space in a folder and its subfolders or only in one or more subfolders.
Warning: "free up space" is not applied by default to new files or folders added locally.
- From the Windows Explorer, navigate to a folder synchronized with kDrive and right-click
- Select the Free up space option under kDrive:

The action Free up space will free up storage space on your computer. Files will remain visible but will no longer be accessible without an internet connection.
Usage example #1 (required storage space)
If you enable Lite Sync, the space occupied (e.g. 900 GB) on the Infomaniak server will be freed up on your hard drive, but the reverse is also true (e.g. 900 GB of free space required on your hard drive if the Lite Sync option is activated along the way).
Therefore, it is recommended to keep the initial choice of activating or not activating Lite Sync, and not to change it along the way.
File "dehydration"
As explained in the preamble, a dehydrated file is a kDrive file whose complete version is not present on the hard drive and instead a 1 KB "shortcut" is displayed, which is normal behavior when Lite Sync is activated.
In some cases (e.g. if you copy the files from your hard drive while Lite Sync is activated, and then start a new synchronization to a new kDrive) the application will block the import of this type of file. To resolve these errors, you can download the complete file from the kDrive web app (online service kdrive.infomaniak.com).
Usage example #2 (icon summary)
Files on the hard drive synchronized with the Lite Sync option, everything is in the cloud (on your remote online kDrive):
Deactivation of the LiteSync option, the "physical" synchronization starts:
Synchronization complete, the files have been downloaded to your computer and then have the appropriate icon:
To summarize, here are the status icons used in your Windows Explorer:
| Status icons | Files | Folders |
|---|---|---|
| The file exists on online kDrive and is only virtually on your hard drive; to view it locally, you will need to download it | The folder contains at least one file or subfolder not physically present | |
| Lite Sync is not working properly (contact Infomaniak support) | Lite Sync is not working properly (contact Infomaniak support) | |
| The file exists on kDrive online and is also physically on your hard drive | The folder contains only files and subfolders without Lite Sync | |
| The file exists on kDrive online and is only virtually on your hard drive for reasons decided by Windows (for example lack of space) | The folder contains local and temporary files and subfolders | |
| Synchronization is in progress or pending | Synchronization is in progress or pending | |
| The progress bar indicates an ongoing download | The progress bar indicates an ongoing download |
Disable the Lite Sync option
To do this:
- Left-click on the app icon in the notification area of your computer (bottom right on Windows).
- Click on the action menu ⋮ to the right of the kDrive window.
- Select kDrive Settings.
- Click on the button in the Synchronization section to disable Lite Sync.
- Two scenarios may occur:
- If there is enough space on your computer, a message confirming the deactivation is displayed; simply click on Continue.
- If there is not enough space on your computer, a message will indicate the missing space to allow the deactivation of Lite Sync; the synchronization of your kDrive will be paused until you select the files to synchronize on your computer.
This guide details the Lite Sync option of the desktop app kDrive (desktop application on macOS).
Preamble
- The Lite Sync feature saves space by virtually storing your kDrive files on your computer, downloading them only when necessary.
- The files are always accessible from the Web app kDrive (online service ksuite.infomaniak.com/kdrive) but locally they are present in a "dehydrated" way, requiring a loading time to be fully accessible.
- This allows you to view, complete, and synchronize the content of kDrive without saturating the hard drive.
- The Lite Sync option always acts:
- on a specific kDrive (in the case where you synchronize several on the application).
- and on the entirety of the kDrive (or the entirety of an advanced synchronization).
- and via a specific kDrive app (another user of the same kDrive can make a different Lite Sync choice from yours).
- In case of a problem, consult this other guide on the subject.
Activating the Lite Sync option
Prerequisites & scope of use of Lite Sync
- macOS version ≥ 10.15 — not available with Linux
- File storage system under NTFS / APFS
The Lite Sync option can be activated during the installation of the application (this is offered to you) or subsequently:
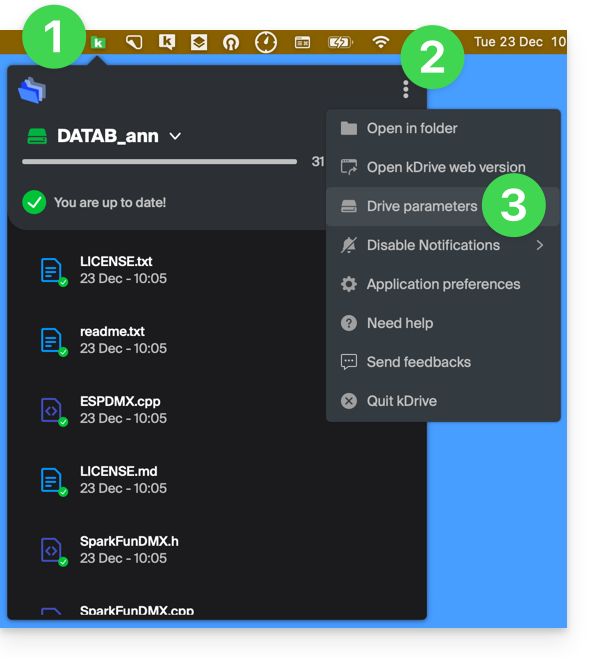
- Perform a left-click on the app icon in the notification area of your computer (top right on macOS).
- Click on the action menu ⋮ to the right of the kDrive window.
- Select kDrive Settings:
- Click on the action menu ⋮ to the right of the current synchronization and the cloud symbol:
- If the cloud is crossed out, you can activate Lite Sync as it was not yet active:

- In the same place, you can deactivate Lite Sync if the cloud was not crossed out (also read at the end of this guide):

- If the cloud is crossed out, you can activate Lite Sync as it was not yet active:
Actions on data synchronized on the disk
Always keep on this device
Once Lite Sync is activated (and therefore the data on the disk has become “virtual”), it is possible to nevertheless make available locally a folder and its subfolders or only one or more files:
- From the macOS Finder, place yourself on a folder synchronized with kDrive and right-click.
- Select the option Always keep available locally under kDrive:
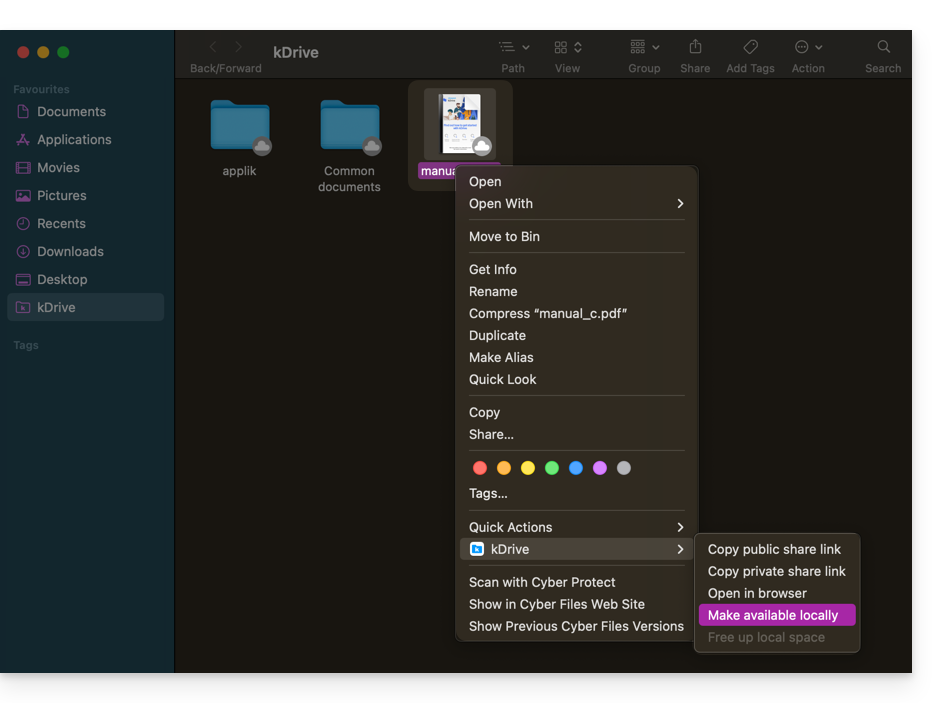
- The symbol visible on the icon of the files concerned will change to indicate that the file is no longer "in the cloud" but fully present on your disk:

Free up space
Conversely, once Lite Sync is activated, it is possible to free up space, file by file or in a folder and its subfolders.
Attention: "free up space" is not applied by default to new files or folders added locally.
- From the macOS Finder, place yourself on a folder synchronized with kDrive and right-click.
- Select the option free up local space under kDrive:
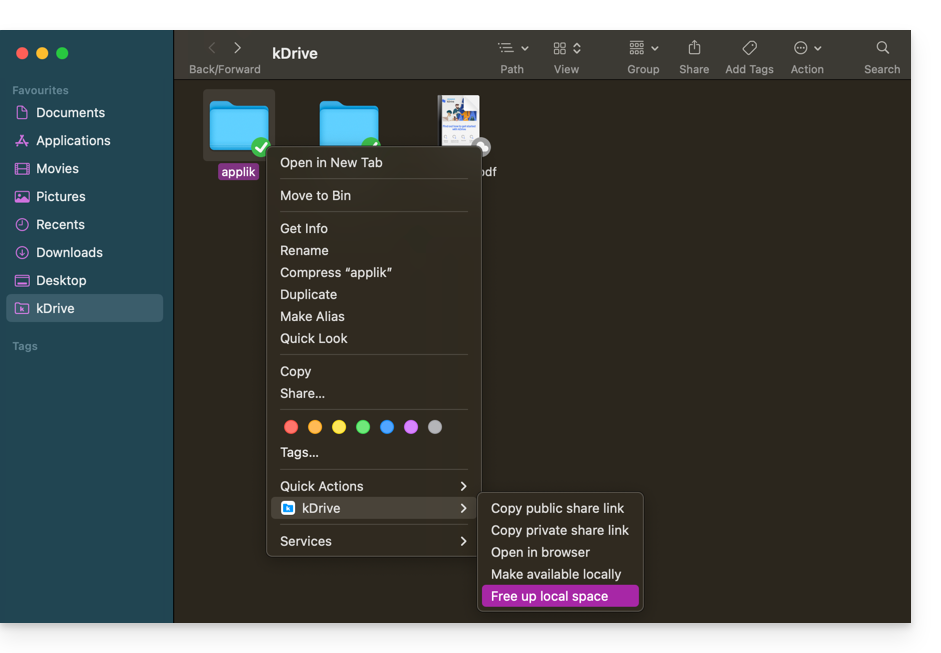
- The symbol visible on the icon of the files/folders concerned will change to indicate that the data is “in the cloud” and no longer fully present on your disk:

- The action Free up space will have the effect of freeing up storage space on your computer.
- The files will remain visible but will no longer be accessible without an internet connection.
Example of use (necessary storage space)
If you activate Lite Sync, the space occupied (900 GB for example) on the Infomaniak server will be freed up on your hard drive but the opposite is also true (for example 900 GB of free space required on your hard drive in case of activation of the Lite Sync option along the way).
Therefore, it is recommended to keep the initial choice of activating or not Lite Sync, and not change along the way.
File "dehydration"
As explained in the preamble, a dehydrated file is a kDrive file whose complete version is not present on the hard drive and instead a 1 KB "shortcut" is displayed, normal behavior when Lite Sync is activated.
In some cases (for example if you copy the files from your hard drive while Lite Sync is activated, and you restart synchronization to a new kDrive) the application will block the import of this type of file. To resolve these errors, you can download the complete file from the Web app kDrive (online service ksuite.infomaniak.com/kdrive).
Here are the status icons that are used and their explanations:
| Status icons | Description |
|---|---|
| |
| |
| kDrive encounters a synchronization conflict with the file/folder. | |
| An error occurred during the transfer of the file/folder and it was interrupted. | |
| The progress circle indicates a download in progress. |
Disable the Lite Sync option
To do this, follow the steps at the top of this guide (point 4.b in particular). When disabling Lite Sync, two scenarios may occur depending on the remaining space on your device's storage:
- If there is sufficient space on your computer, a message confirming the deactivation will appear; simply click on Continue.
- If there is not enough space on your computer, a message will indicate the missing space to allow the deactivation of Lite Sync; the synchronization of your kDrive will be paused until you select the files to synchronize on your computer.
This guide explains how to resolve certain Lite Sync macOS errors that may occur with the desktop app kDrive (desktop application on macOS).
Synchronization lock 1/10
Check if macOS permissions are enabled for kDrive and Lite Sync extensions:
- Open macOS settings:

- Under General, click on Open and extensions:

- Scroll down to the Endpoint Security Extensions :: kDrive LiteSync Extension:

- Check that the permissions are enabled and validate at the bottom:

Take the opportunity to review the other elements related to kDrive to ensure that everything is enabled.
Error of type "Unable to start Lite Sync plugin"
To correct an error of type "Unable to start Lite Sync plugin" that usually occurs when the Lite Sync extension is missing or does not have the necessary permissions…
... check the presence of the extension
From a Terminal type application (command line interface, CLI / Command Line Interface) on a macOS device:
% systemextensionsctl listThe result is similar to:
1 extension(s)
--- com.apple.system_extension.endpoint_security
enabled active teamID bundleID (version) name [state]
* * 864VDCS2QY com.infomaniak.drive.desktopclient.LiteSyncExt (3.5.0/1) kDrive LiteSync Extension [activated enabled]
If the command result does not mention "kDrive LiteSync Extension", the extension is not present:
- Delete the synchronization and add it again.
If the command result does not have the status [activated enabled]:
- Authorize the extension in the System Settings / Privacy and Security.
... check the extension's permissions
In the System Settings / Privacy and Security / Full Disk Access of the macOS app:
... check the extension's operation
From a Terminal:
% ps -ef | grep LiteSyncExtThe result is similar to:
0 7434 1 0 1:02 ?? 0:25.42 /Library/SystemExtensions/6035BDE4-B7D6-477E-A6AB-C2281E3C7752/com.infomaniak.drive.desktopclient.LiteSyncExt.systemextension/Contents/MacOS/com.infomaniak.drive.desktopclient.LiteSyncExtIf the extension does not seem to be working, try the following actions:
- Restart the app.
- Reboot the Mac.
- Remove / add the sync.
- Uninstall / reinstall the app.
If it is still not OK
- Request kDrive logs (Debug level):

- Check in the Console if there is a blockage report on the date of the last app startup and if so, send them to Infomaniak:

Retrieve kDrive messages in the Console:
- Quit the app.
- In the Console, select the Mac, filter on
[KD], click on Start:
- Launch the app.
- Click in the list of messages, select them (Ctrl+A), copy them (Ctrl+C) and send them to Infomaniak.
Thank you for choosing kDrive, the independent and privacy-respecting solution for collaborating, sharing, and accessing your data from all your devices. Your data is encrypted, continuously backed up, and exclusively hosted in Switzerland.
Collaborative storage on a 100% Swiss Made cloud
- Discover kDrive in video (the interface has evolved since)
Getting Started
- Sync kDrive across different devices
- Manage kDrive Lite Sync option (macOS)
- Manage kDrive Lite Sync option (Windows)
- Install kDrive on Linux
- kDrive folders (personal, shared, common)
- Choose the kDrive folders to sync
- Edit an Office-type file on kDrive (Word, Excel, PowerPoint)
- kDrive subscription via Apple iOS
- Manage kDrive storage space
- Search for data on kDrive
Share your data
- Manage kDrive drop boxes
- Customize kDrive shares and deposits
- Share data from kDrive (web interface)
- Example of internal/external shares
- Share data by email from kDrive (web interface)
Fill your kDrive
- Import external data to kDrive
- Import data to kDrive (iOS) or just automatically import iPhone photos
- Import photos to kDrive (Android)
- Import data to kDrive without the kDrive app
- Import data to kDrive via WebDAV
- Connect to kDrive via WebDAV
- Access kDrive files locally and online
- Scan documents with kDrive (iOS / Android)
With multiple users
- Manage a kDrive user's rights
- Manage access permissions to folders and subfolders
- Manage kDrive users
- Manage multiple kDrive (iOS / Android)
- Manage multiple kDrive (macOS / Windows)
- Copy certain data between kDrive you have access to
Go further with kDrive
- Modify an existing kDrive offer
- Manage kDrive categories to classify data
- Synchronize Joplin notes via WebDAV with kDrive
- Synchronize Qnap with kDrive
- Synchronize Synology with kDrive
- Save a kMeet meeting on kDrive
- Export email attachments from Mail
- Export an email to kDrive
- Add an attachment to an event in Calendar
For advanced users
In case of a problem
- Resolve a kDrive blockage (antivirus, firewall, etc.)
- Resolve a kDrive sync conflict
- Resolve a kDrive synchronization issue
- Resolve a kDrive issue on Android device (don't kill my app)
- Resolve a Lite Sync plugin error on macOS
- Clear the browser cache
- Clear the mobile app kDrive cache
- kDrive application version (macOS / Windows / Linux)
- Restore a kDrive file to a previous version
- Restore a deleted kDrive file
- Force kDrive to synchronize hidden and excluded files
- Authorize access to your products / Complete a support request
- Display kDrive debugging information
Learn more about kDrive
A question or feedback?
- Contact Infomaniak support
- Click here to share feedback or a suggestion on an Infomaniak product
This guide contains essential resources to get you started with your VPS Cloud or VPS Lite offered by Infomaniak.
In case of a problem, refer to the knowledge base. Contact Infomaniak support for questions concerning only the hardware part of the VPS.
Preamble
- It is not planned to support
UEFIandSecure bootin the VPS Cloud / VPS Lite offer. - It is not possible to migrate a
vmdkfile to make it work on OpenStack becauseKVMis used for virtualization. - Regarding the opening of ports, refer to this other guide.
Which VPS version to choose?
- The configurations (vCPU / Ram / disk space) differ according to the VPS offers, starting at 1 vCPU with very competitive prices - make your choice according to your needs; the evolution from a VPS Lite to a VPS Cloud is not yet feasible automatically and reducing a subscribed offer is not possible.
- The same Linux distributions & Windows versions are offered (Windows is not available on the smallest configurations).
- On VPS Lite, the bandwidth is limited to 500 mbit/s and the guaranteed SLA + snapshots are not available.
- Refer to this other guide if you wish to migrate from VPS Lite to VPS Cloud (the migration is irreversible).
VPS Cloud / VPS Lite Linux
VPS Cloud / VPS Lite Windows
This guide explains how to synchronize files stored in kDrive to access them easily on all your macOS, Windows, Linux, iOS and Android devices.
Preamble
- For any modification made to your files & folders on your workstation (Finder / Explorer) to be automatically synchronized…
- on the kDrive Web app Infomaniak (online service ksuite.infomaniak.com/kdrive),
- on the kDrive mobile app (application for iOS / Android smartphone or tablet),
- this for all collaborators who access the data,
- and this in all directions,
- … you need to install the kDrive desktop app (desktop application on macOS / Windows / Linux).
- You have the option to customize the kDrive folders that need to be synchronized on your computer.
- You can also automatically back up photos from your mobile:
- Refer to this other guide for iOS and for Android.
- Note, there is no automatic synchronization between the rest of the content of your mobile device and kDrive; this functionality is identical to competing apps that do not offer it either, as the restrictions of mobile OSs are too significant to allow it (alternative solutions generally paid for exist via third-party apps using the WebDAV protocol).
Download the kDrive desktop app…
… on macOS
Requires macOS 10.15 minimum, ARM OK.
Open the kDrive download page to download kDrive (other versions and apps can be downloaded from the unified kSuite settings).
… on Windows
Requires Windows 10 minimum (Windows 10 1709 to benefit from Lite Sync).
Open the kDrive download page to download kDrive (other versions and apps can be downloaded from the unified kSuite settings).
… on Linux
Requires Ubuntu 20.04 minimum, ARM OK. Unfortunately, neither Lite Sync nor the kDrive context menu on right-click are available on Linux.
The kDrive application is officially supported by Infomaniak only on the following systems:
- Ubuntu 22.04 LTS
- Desktop environments: GNOME or KDE
Refer to this other guide for installing kDrive on Linux.
… on mobile
Minimum and supported iOS version: v16.4
The download page offers the mobile versions of kDrive, including an iOS version optimized for iPad, adapted to the screens of these tablets, and the version for Android.
Install the kDrive app
To do this:
- Open the downloaded application to start the installation on your device.
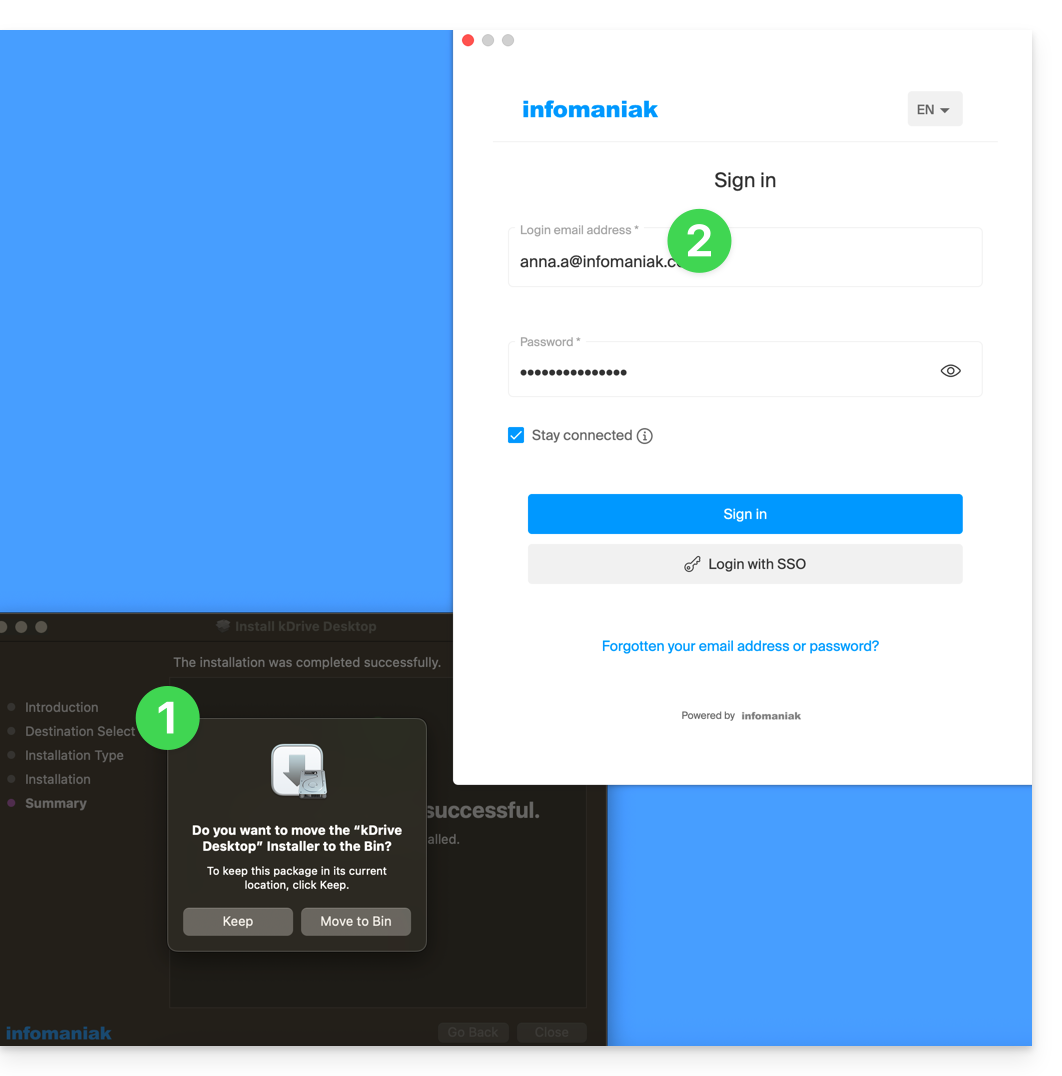
- At the end of the installation, the application should open and a form will ask you to log in to your Infomaniak account (need help?):
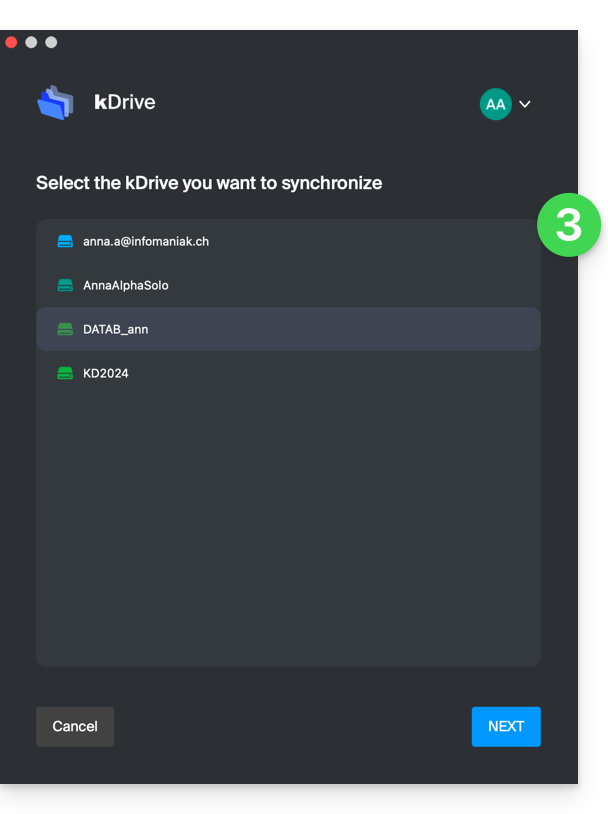
- Then, choose from the list the kDrive you want to synchronize (if your account allows access to multiple kDrives — you can link others later if necessary):
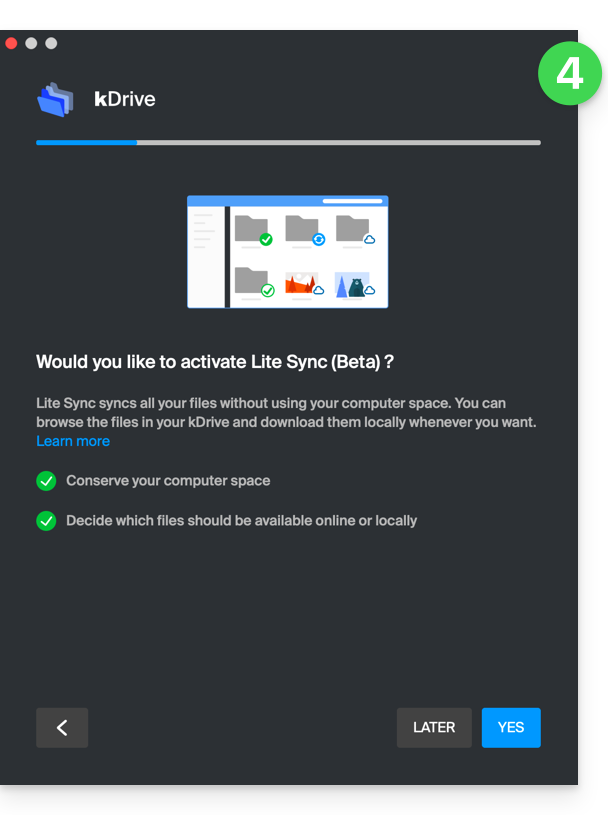
- Enable or disable the Lite Sync option (feature of the Windows and macOS app that saves space by virtually storing your kDrive files on your computer, only downloading them when necessary):
- A kDrive folder is created on your hard drive at the indicated location (a location that is recommended not to be modified, but if necessary you can do so by clicking on the pencil icon ✎):
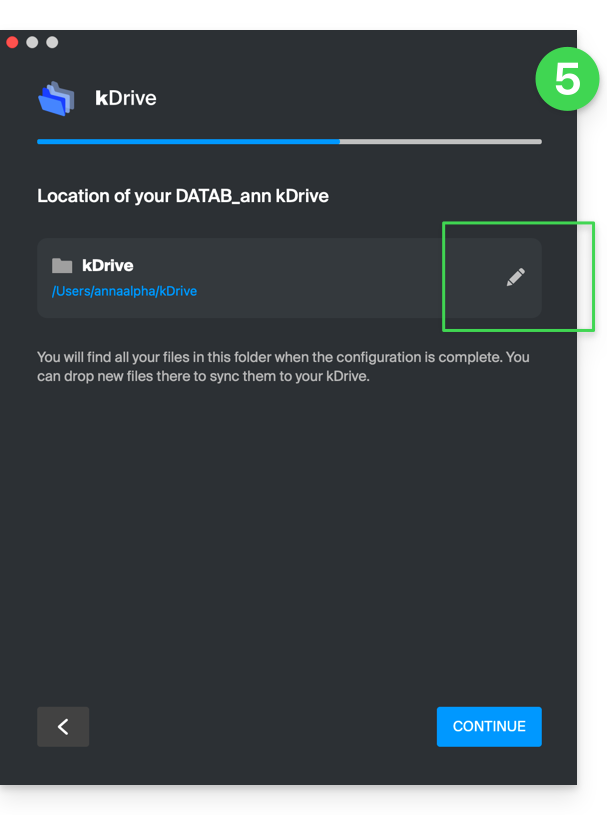
- It will contain the files that may already exist on your kDrive (some folders may be ignored - read below) and will send to the kDrive server all the files you place there in the future.
- During installation, pay attention to the permissions that may be requested (especially on macOS) and that must be granted for the proper functioning of the application:
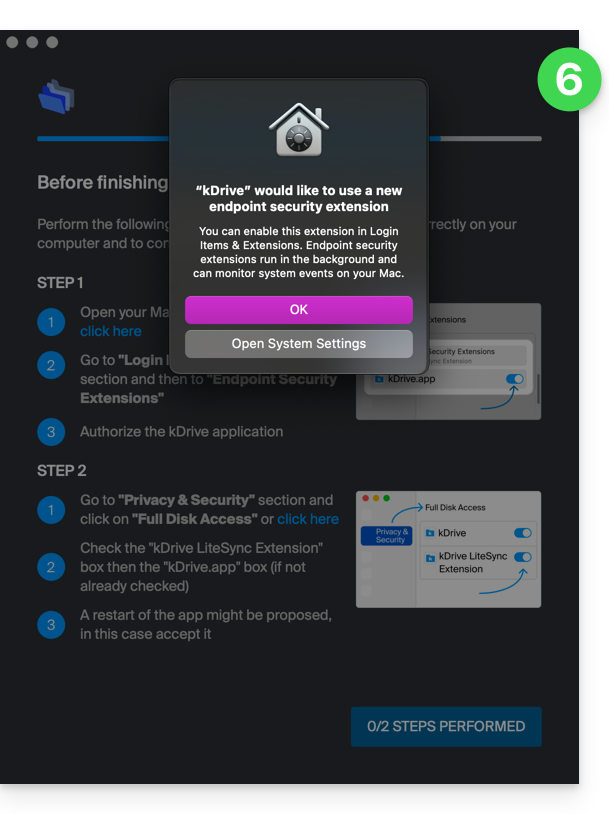
- You need to enable this on macOS:
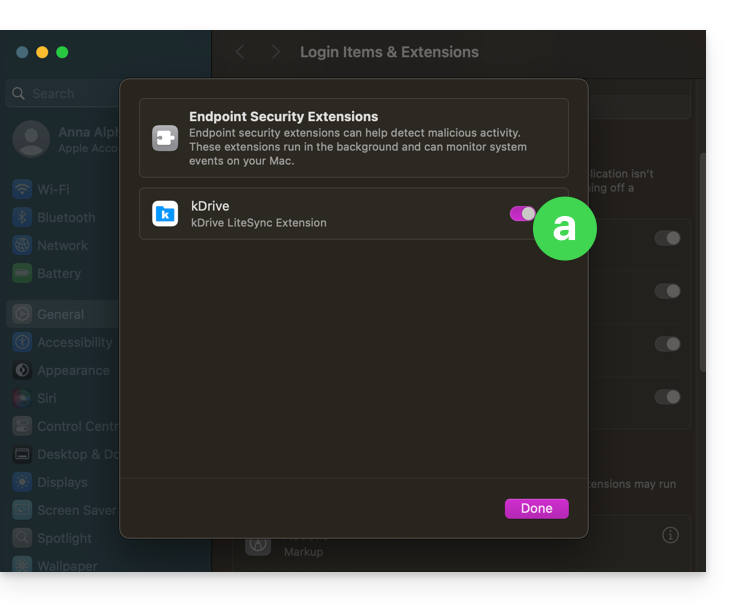
- but also this:
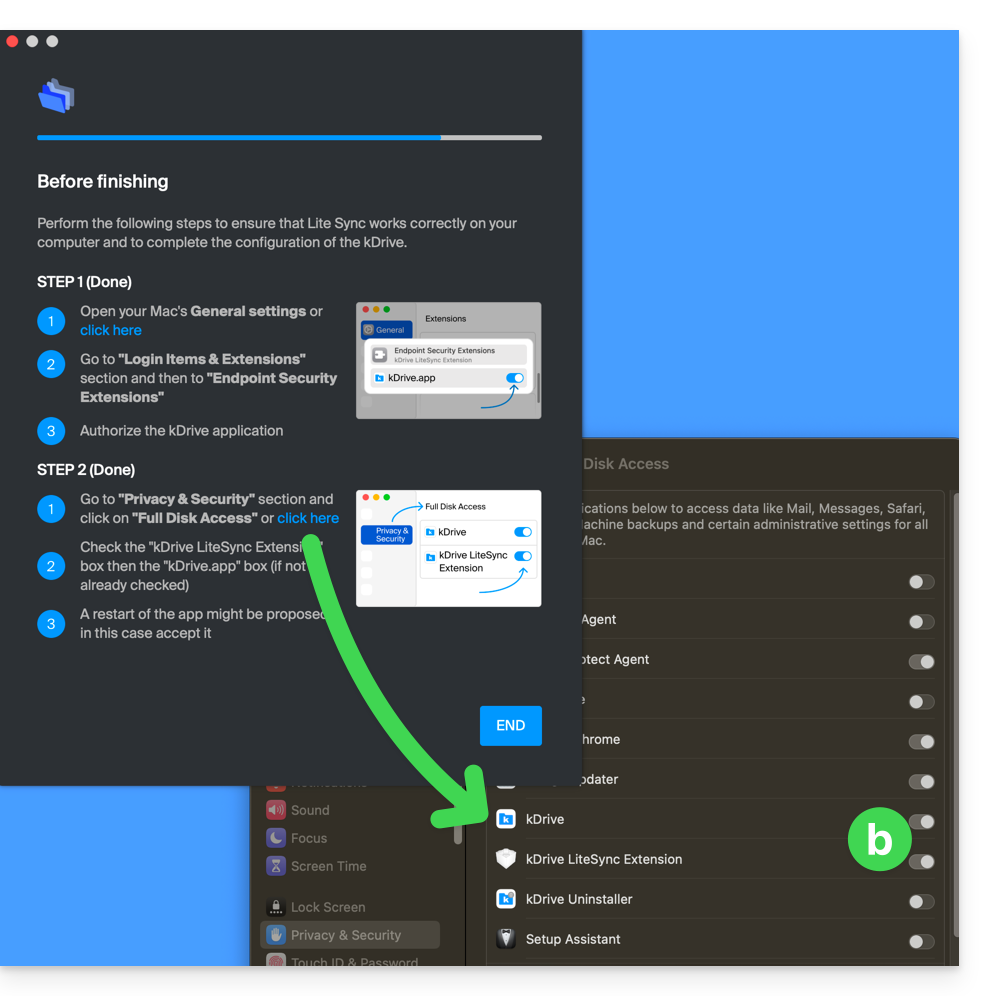
- You need to enable this on macOS:
- Once the installation is complete, you can choose to open the location of the kDrive files on your hard drive:
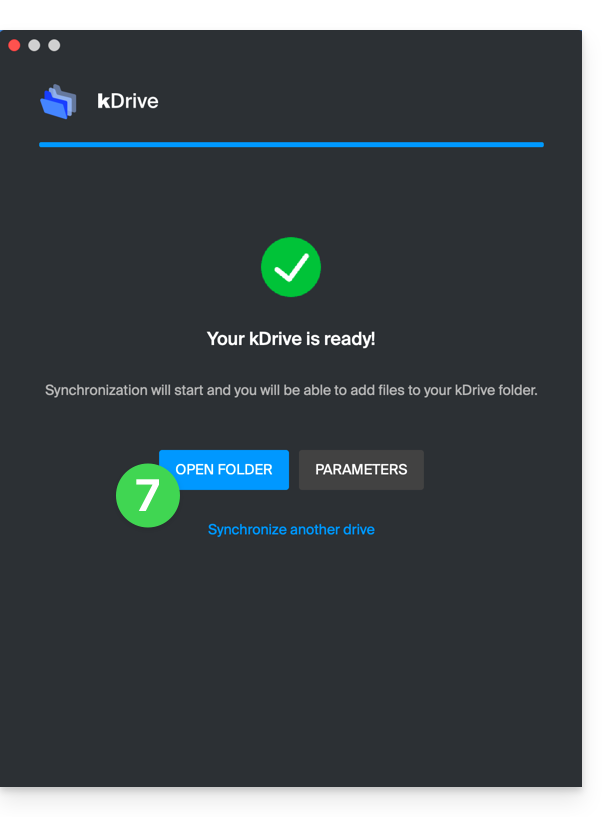
- On a macOS device, for example, it looks like this:
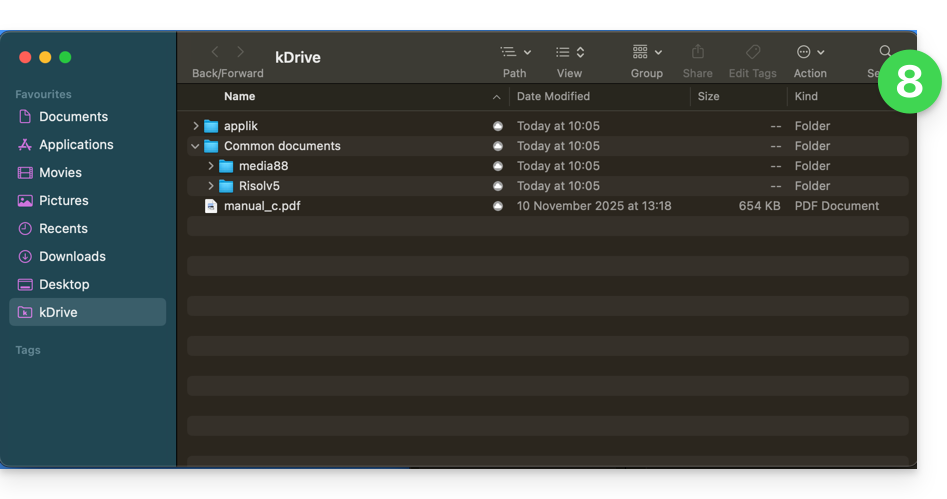
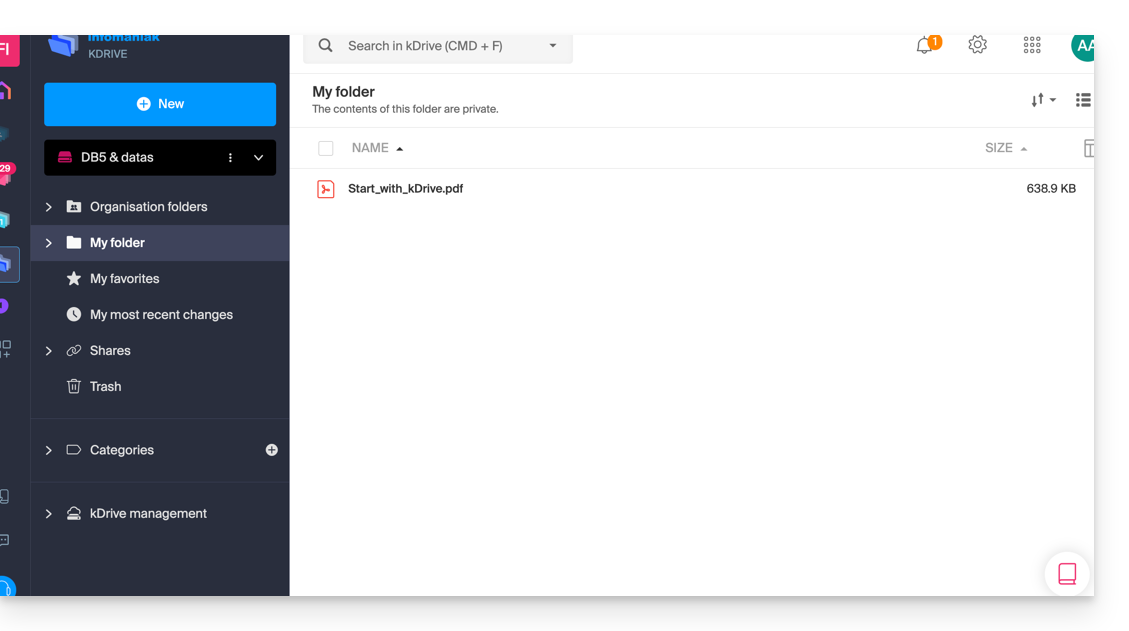
- And you can compare the data present on your hard drive with the data from the kDrive Web app Infomaniak (online service ksuite.infomaniak.com/kdrive):
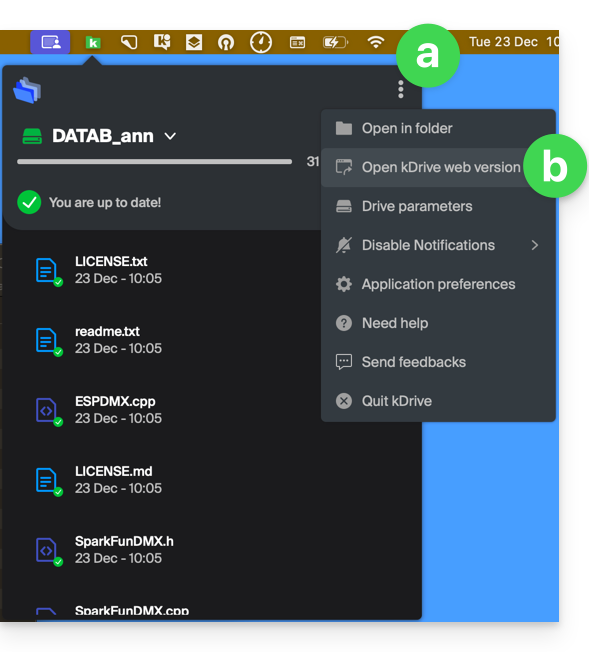
- Click on the action menu ⋮ to the right of the kDrive window.
- Click to open the web version:
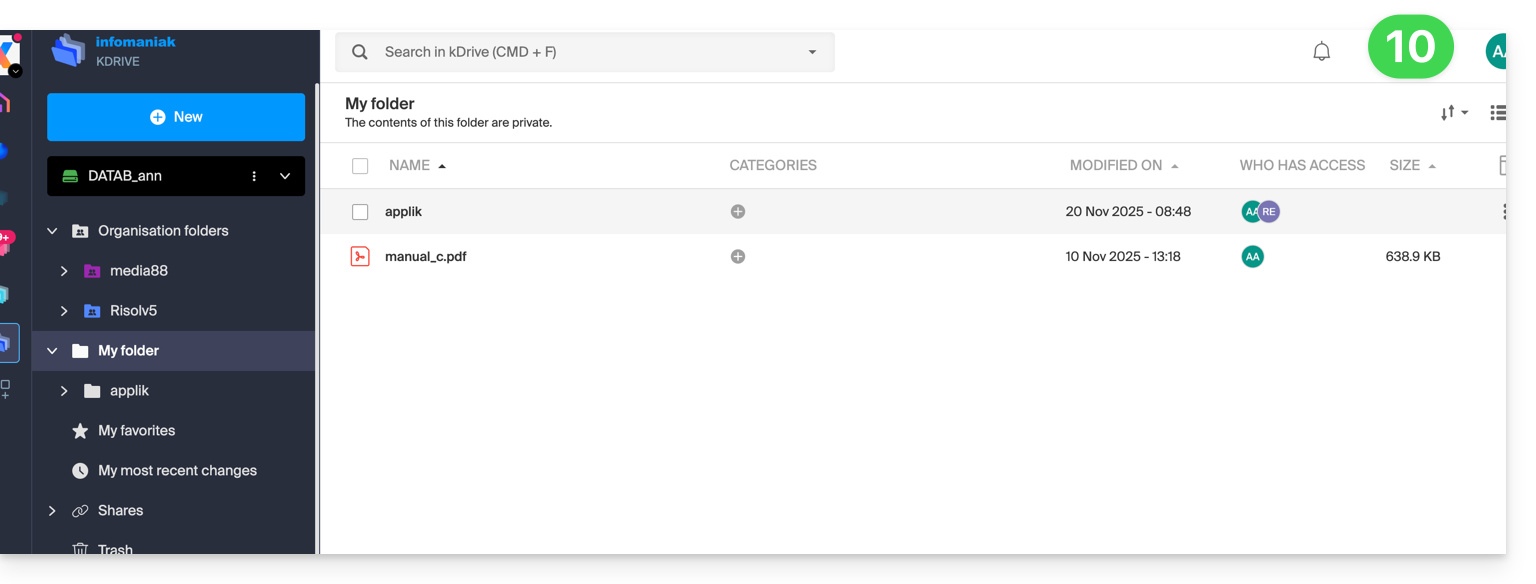
- The data appears, you can compare it with point 8 above:
Synchronize files with kDrive
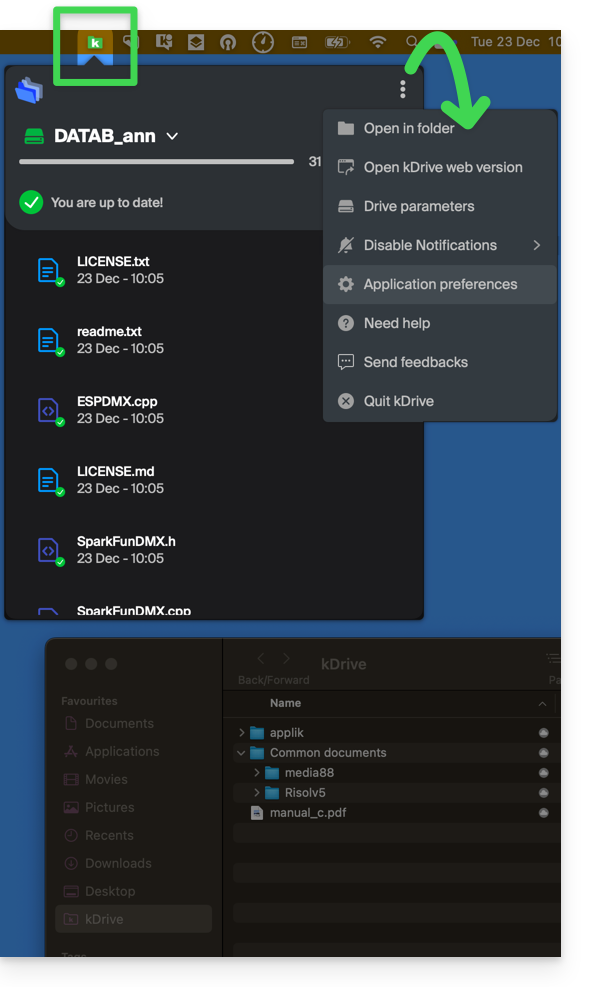
Once the application is installed and connected to your account, you have the kDrive app on your device:
- On a computer, the app icon appears in the notification area of your computer (top right on macOS, bottom right on Windows and a double left click in the taskbar on Linux).
- Take the opportunity to browse the application preferences and the Drive preferences, from the action menu ⋮ on the right of the kDrive window.
This guide explains how to migrate from a VPS Lite to a VPS Cloud while keeping all your data and without having to reconfigure your installation.
It is not possible to cancel this change or to revert. Switching from a VPS Cloud to a VPS Lite is not possible.
Perform a migration from VPS Lite to VPS Cloud
To start the operation, access your VPS Lite:
- Click here to access the management of your product on the Infomaniak Manager (need help?).
- Click directly on the name assigned to the product in question.
- Click on Upgrade my offer:
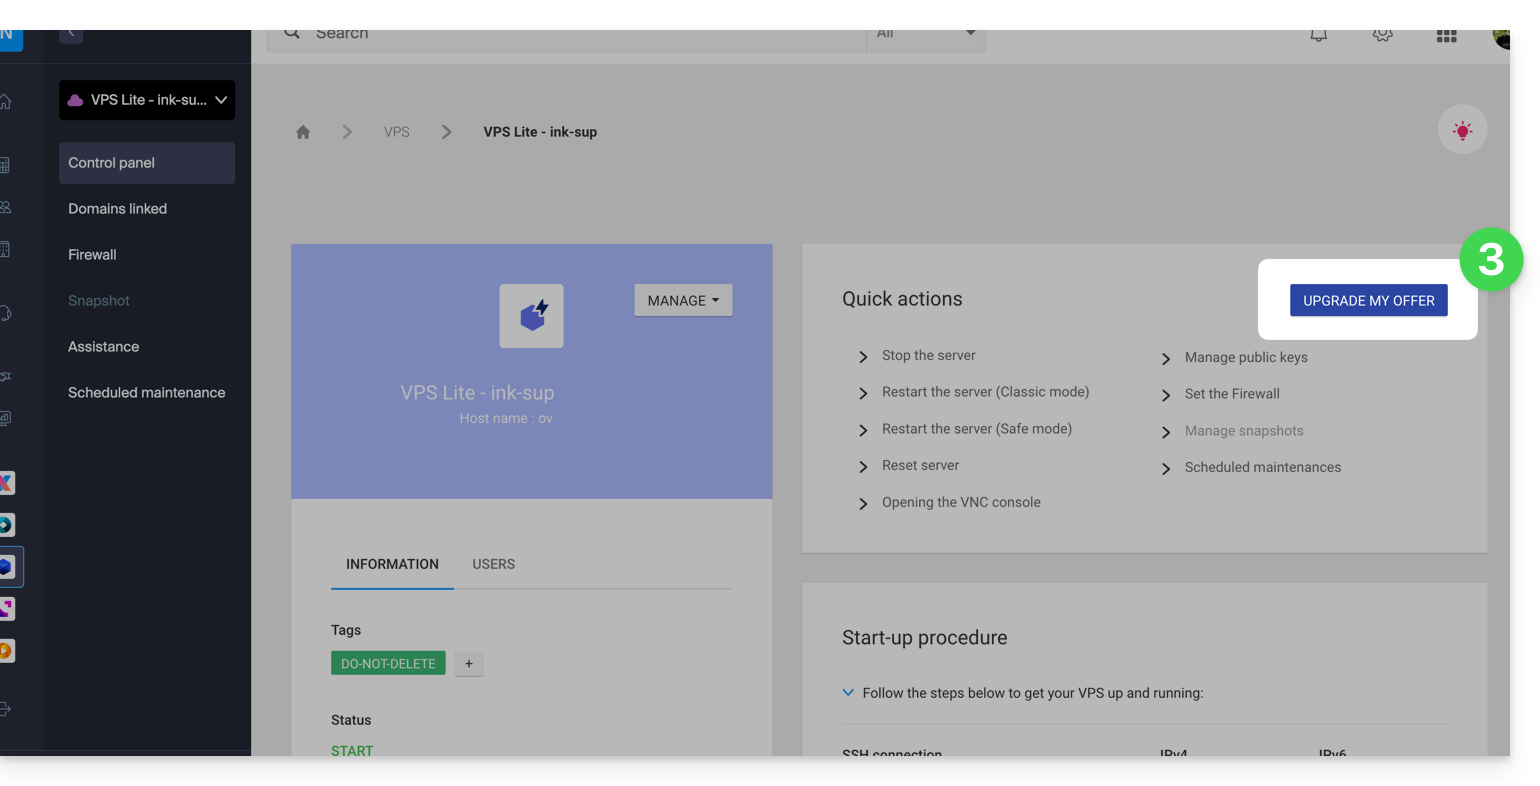
- Click on the Upgrade button on the modal that appears.
- Complete the order to upgrade your VPS Lite.
- Wait during the migration, a service interruption will be felt during the process.
This guide explains how to modify the configuration of a VPS Cloud / VPS Lite.
Configuration changes (CPU/RAM) or storage make the service unavailable for approximately 20 minutes.
Modify storage size on VPS Cloud / VPS Lite
To access the VPS Cloud / VPS Lite:
- Click here to access the management of your product on the Infomaniak Manager (need help?).
- Click on the action menu ⋮ to the right of the object concerned in the table that appears.
- Click on Modify the offer:
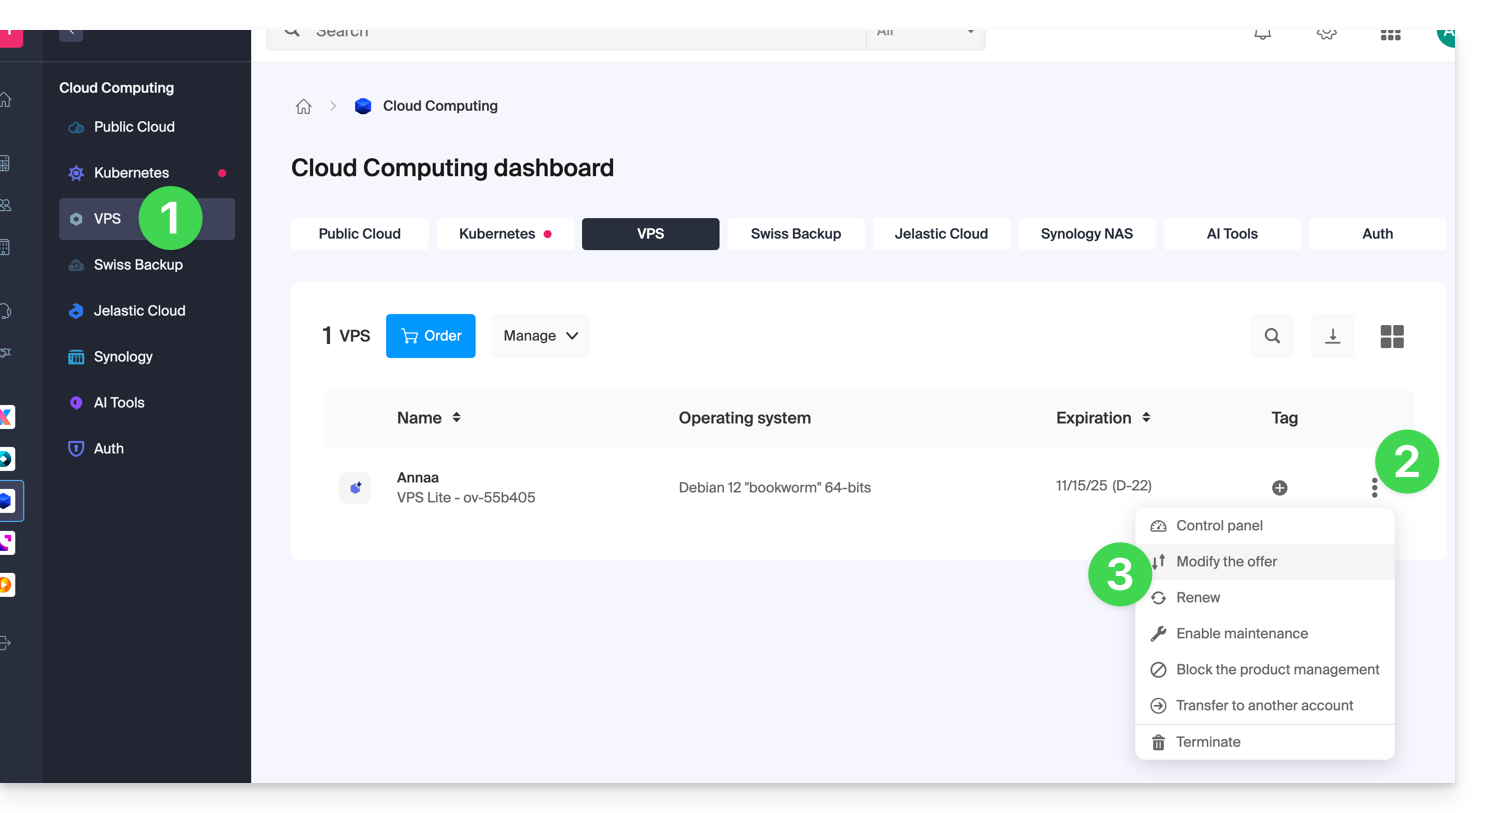
- Make the desired adjustments from the shop's proposals and complete the procedure at the bottom:
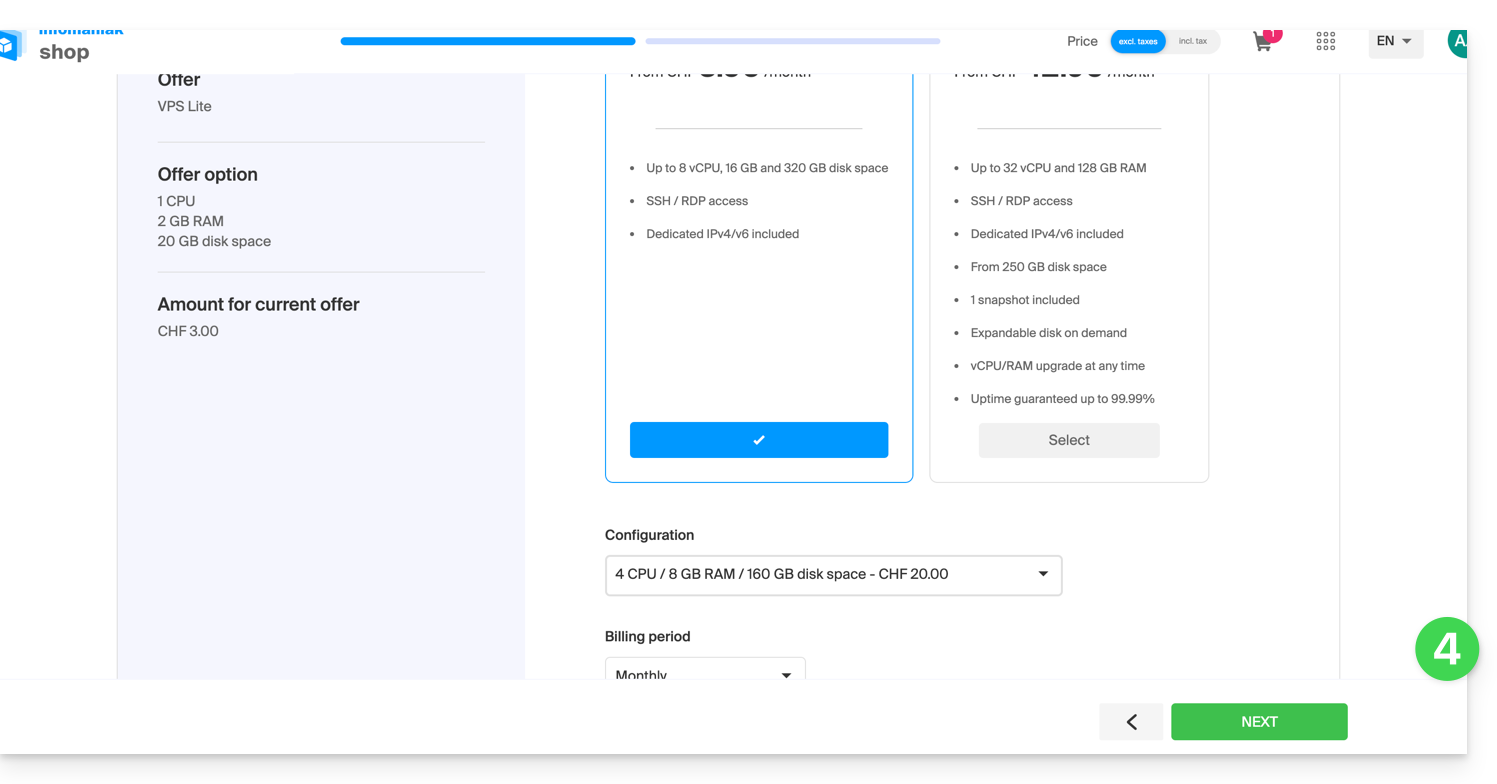
- It is necessary to extend the volume after an increase in storage volume.
This guide explains how to allow certain incoming and/or outgoing ports in the firewall of a VPS Cloud / VPS Lite server.
Access the management tool
To manage the VPS Cloud / VPS Lite firewall:
- Click here to access the management of your product on the Infomaniak Manager (need help?).
- Click directly on the name assigned to the product concerned.
- Click on Firewall in the left sidebar:

Rule to allow ping on VPS Cloud / VPS Lite
To add a rule to the firewall:
- Click the blue button to Add a rule.
- Click on Manual selection.
- Select ICMP:
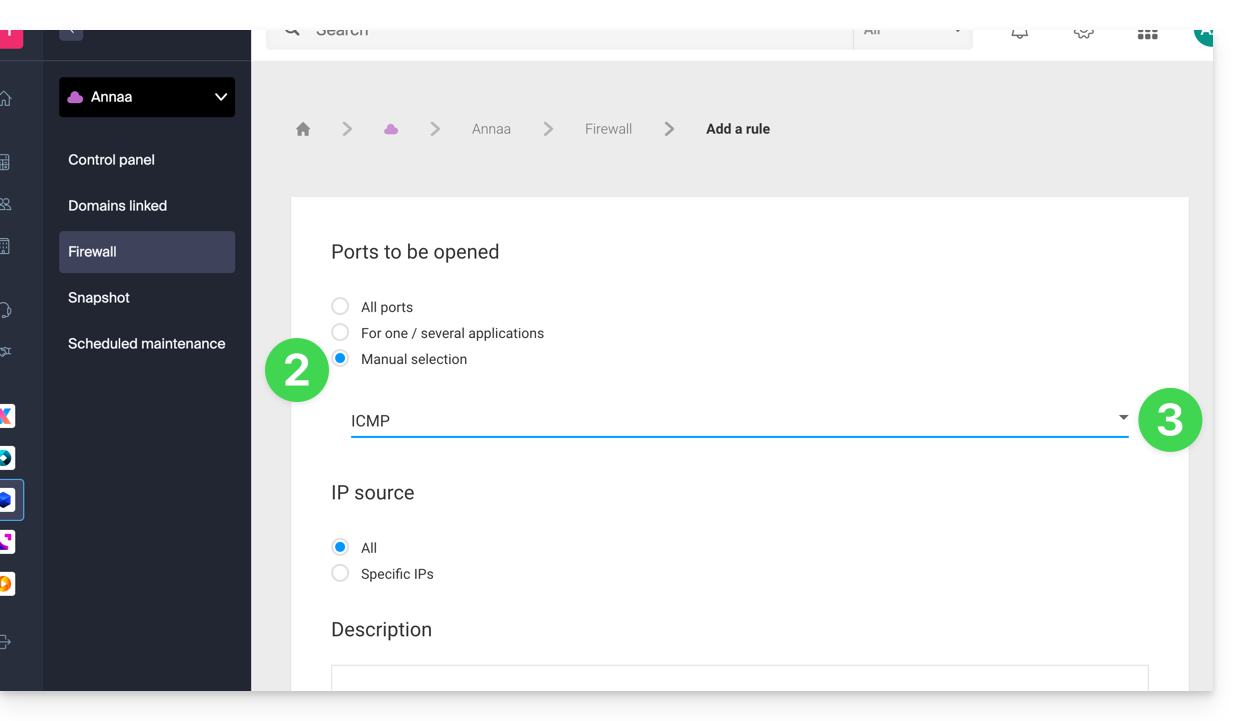
- Validate at the bottom of the page.
Open the outgoing port 25 globally
The outgoing port 25 (SMTP Mail port) is blocked by default. It is recommended to use an authenticated mail sending solution. To open this port, contact Infomaniak support and justify your request.
This guide explains how to create a PTR record on the dedicated IPs of VPS Cloud / VPS Lite.
Preamble
- A PTR (Pointer Record) is a type of DNS record used to resolve IP addresses into domain names.
- The PTR record is used to associate an IP address with a domain name or subdomain.
- It is the opposite of the A record which is used to resolve domain names into IP addresses.
Create a PTR on the VPS Cloud / VPS Lite IP
If you have a VPS Cloud / VPS Lite and you want to create a PTR record for your dedicated IP address, follow these steps:
- Make sure your domain or subdomain points to the IP address (v4 or v6) of your VPS Cloud / VPS Lite server.
- You can do this by creating an A record for your domain or by modifying the existing record to point to the IP address of your VPS Cloud / VPS Lite.
- Check that your domain points to the IP address of your VPS Cloud / VPS Lite (see 1).
- Contact Infomaniak support to request the creation of a PTR record for your dedicated IP address.
- Specify the IP address of your VPS Cloud / VPS Lite server (you can find this IP address in your server management dashboard or by using a command line command such as "
ifconfig" or "ipconfig" depending on the operating system you are using).
- Specify the IP address of your VPS Cloud / VPS Lite server (you can find this IP address in your server management dashboard or by using a command line command such as "
- Once the PTR record is created, use an online verification tool to ensure that the PTR record points to your domain or subdomain.
Infomaniak does not perform any backups of the Cloud VPS / VPS Lite.
However, you can…
- … create a server snapshot (non-automated backup)
- … backup the server to Swiss Backup (automated backup)
This guide explains how to access the bootloader of a Cloud VPS / Lite VPS from the Infomaniak Manager.
The bootloader (or bootloader) is the software that allows you to launch one or more operating systems (multi-boot) on your Cloud VPS / Lite VPS.
Display the bootloader of a Cloud VPS / Lite VPS
The following procedure allows you to display the bootloader of GRUB:
- Click here to access the management of your product on the Infomaniak Manager (need help?).
- Click directly on the name assigned to the product concerned.
- Click on Open VNC console.
- Click on Restart the server while keeping the new window with the VNC console displayed.
- Refresh the VNC console as soon as the server restarts to display the server's bootloader; GRUB then appears and you can leave it displayed by pressing a key on your keyboard:

This guide explains how to access kDrive files locally on your hard drive via the desktop app kDrive (desktop application on macOS / Windows / Linux), as well as files from the Web app kDrive (online service kdrive.infomaniak.com).
Prerequisites
- Install the kDrive desktop app on your device.
View kDrive files
When the kDrive app is installed and launched:
- Perform a left-click on the app icon in the notification area of your computer (top right on macOS, bottom right on Windows and a double left-click in the taskbar on Linux).
- Click on the action menu ⋮ at the top right.
- Click on Open kDrive Web to access the files stored on the kDrive server:
- Click on the item above to open the disk folder on your computer containing your kDrive files, physically present or virtually present (depending on whether Lite Sync is enabled).
If your files are not all present / synchronized, refer to this other guide.
The Infomaniak infrastructure does not transmit virtualization instructions to Cloud VPS / Lite VPS; it is therefore not possible to perform nested virtualization (virtualization that would run within an already virtualized environment) as this causes issues, particularly during live migrations.
This guide explains how to reset a VPS Cloud / VPS Lite.
Preamble
- This procedure erases all the content of the volume dedicated to the operating system (
/dev/vda). - In the case of a VPS Cloud, the volume dedicated to data storage (
/dev/vdb) is not affected by the reset.
Warning: depending on the installed operating system, the system volume may be named /dev/sda, /dev/sda1 or /dev/vda… same for the data volume /dev/sdb, /dev/sdb2 or /dev/vdb … It is therefore necessary to replace these indications with those corresponding to your situation.
Reset of the VPS Cloud / VPS Lite OS
To access the VPS:
- Click here to access the management of your product on the Infomaniak Manager (need help?).
- Click directly on the name assigned to the product concerned.
- Click the Reset button.
- Follow the displayed instructions to complete the reset.
It is not possible to order and obtain more IP addresses on a VPS Cloud / VPS Lite.
The possible alternatives would be to use…
- … a Public Cloud hosting (it is possible to add as many IP addresses as desired),
- … the Newsletter tool according to your needs.
This guide lists the versions of the Windows operating system that can be installed when ordering a VPS Cloud / VPS Lite.
Supported Windows Versions
When ordering your Server, you will be able to choose the version of Windows to install.
Windows Server
Possible variations with Windows Server 2025, 2022 or 2019:
- Windows Server Standard designed for low-density or non-virtualized environments
- Windows Server Datacenter ideal for datacenter-defined and highly virtualized environments
Note:
- As a Microsoft partner, Infomaniak provides VPS Cloud / VPS Lite Windows Server 2025, 2022 or 2019 containing a Microsoft Windows Server license. In case of activation failure, refer to this other guide.
- As a Microsoft partner, Infomaniak does not offer the possibility to use your own Windows Server license (or Bring Your Own License).
- If you use Microsoft software within Windows Server that requires a Mobility License, such as Microsoft SQL Server, Microsoft Sharepoint Server or Microsoft Exchange Server, you must submit the Software Assurance document via the Infomaniak contact form.
Windows 11 Pro Evaluation
Windows 11 Professional has all the features of Windows 11 Home, as well as professional features for encryption, remote connection, virtual machine creation, and much more.
The version 10 of Windows Professionnel Evaluation is also available.
Note:
- It will be necessary to activate Windows, Infomaniak provides only an evaluation version.
Infomaniak does not offer virtual disk encryption on VPS Cloud / VPS Lite but provides a block device that you can format and encrypt if you wish.
Jelastic Cloud is a platform as a service (PaaS) that allows you to easily create development environments on the fly. This solution is particularly advantageous if your resource consumption (CPU, RAM) varies greatly depending on the time of year.
A Cloud Server allows you to manage applications and websites as easily as shared hosting while giving you the advantage of being able to install additional software as needed. This solution is very advantageous if your resource consumption (CPU, RAM) is stable and predictable.
A VPS Cloud or VPS Lite allows you to manage your entire server with the Linux distribution of your choice. Solid technical skills are required. This solution is very advantageous if your resource consumption (CPU, RAM) is stable and predictable.
In all three cases, you benefit from fully dedicated resources that you can freely adjust according to your needs.
Also, check out the Public Cloud offer.
This guide explains how to restart an Infomaniak VPS Cloud / VPS Lite and what you can do in case you no longer have access to the server.
Reboot VPS Cloud / VPS Lite
The classic mode allows you to restart your server normally. To access the VPS Cloud / VPS Lite:
- Click here to access the management of your product on the Infomaniak Manager (need help?).
- Click directly on the name assigned to the product concerned.
- Click on the Manage button.
- Click on Restart (classic mode):

Enable/disable safe mode
If you have lost your SSH key, or made a configuration error, etc.
You have the possibility to restart in rescue mode. This consists of restarting from a base image from which you can mount the partitions of your cloud. In this way, you will be able to modify/repair your configuration.
Warning: depending on the operating system installed, the system volume may be named /dev/sda, /dev/sda1 or /dev/vda; the same for the data volume /dev/sdb, /dev/sdb2 or /dev/vdb! It is therefore necessary to replace these indications with those corresponding to your situation.
To activate rescue mode:
- Click here to access the management of your product on the Infomaniak Manager (need help?).
- Click directly on the name assigned to the product concerned.
- Click on the Manage button.
- Click on Restart (safe mode):

Warning: Your data disk is not accessible when your VPS Cloud / VPS Lite is in safe mode. Only the system disk is accessible.
Perform operations
Once safe mode is active, access your Cloud via SSH, either with your ssh key, or with the temporary password available in the interface.
Once connected, do:
sudo -ithen list the available partitions (replace ov-abcdby your hostname):
[root@ov-abcd ~]# lsblk
NAME MAJ:MIN RM SIZE RO TYPE MOUNTPOINT
vda 253:0 0 8G 0 disk
└─vda1 253:1 0 8G 0 part /
vdb 253:16 0 20G 0 disk
└─vdb1 253:17 0 20G 0 part
vdb corresponds to your cloud disk.
To access it in write mode, you must mount it:
[root@ov-abcd ~]# mount /dev/vdb1 /mnt/You can then modify the files:
[root@ov-abcd ~]# ls /mnt/
bin boot dev etc home initrd.img initrd.img.old lib lib64 lost+found media mnt opt proc root run sbin srv sys tmp usr var vmlinuz vmlinuz.old
Depending on the operating system of your cloud, you can also perform a chroot to reproduce your usual environment:
[root@ov-abcd ~]# chroot /mnt/
bash: ls: command not found
root@ov-abcd:/# export PATH="$PATH:/usr/sbin:/sbin:/bin"
root@ov-abcd:/# ls
bin boot dev etc home initrd.img initrd.img.old lib lib64 lost+found media mnt opt proc root run sbin srv sys tmp usr var vmlinuz vmlinuz.old
Once the necessary modifications have been made, disable safe mode to restart your cloud on the original disk.