
Knowledge base
1000 FAQs, 500 tutorials and explanatory videos. Here, there are only solutions!
This guide explains how to connect the desktop app Apple Mail (desktop application on macOS) to an email address hosted by Infomaniak.
Preamble
- It is recommended to configure your macOS computer automatically via configuration profiles .mobileconfig compatible with Apple.
- ⚠️ The various services offered by Infomaniak are all compatible with the corresponding standard protocols (notably IMAP/SMTP for email, WebDAV for sharing, S3/Swift for storage, etc.).
- Therefore, if you encounter a problem with third-party software, contact its publisher or a Partner and consult the support policy as well as article 11.9 of the Infomaniak TOS.
Manually add the email address to the application
Prerequisites
- Create the address within my kSuite or on a Mail Service (Mail Service only, or existing within a kSuite).
- Test the email address password (do not confuse it with the one used to log in to the Infomaniak interface).
- Check on the Mail Service that the automatic diagnosis is correct.
- Have added the email address in question to Mail Infomaniak to use the synchronization assistant and for the Apple profile to work on your devices.
To configure the messaging application:
- Open the application.
- Click on Other account.
- Click on Continue:

- Enter the account name.
- Enter the email address to be linked.
- Enter the email address password.
- Click the blue Connect button:

- Check and complete the missing information.
- Click on Log in:

- There you go, your email address is now configured in the application:

Recommended settings
- Incoming IMAP server = mail.infomaniak.com
- IMAP port = 993 (with SSL)
- Outgoing SMTP server = mail.infomaniak.com
- SMTP port & encryption protocol and command/method to activate this protocol:
- Prioritize port
587+ STARTTLS: this is the official technical standard and the most compatible method with the majority of modern systems for authenticated submission. - Tolerate port
465+ SSL/TLS only as a compatibility option or alternative, specifying that it is implicit encryption, but that 587 remains the recommended choice.
- Prioritize port
- Username = full & complete email address ( ? )
- Password = the one assigned to the email address you want to access ( ? )
- Authentication required to send emails:
- It is activated in the SMTP settings of your application.
- Check "use the same parameters as the incoming server" or according to the software/email clients, enter a username (= full & complete email address) and its password.
Refer to this other guide if you are looking for information about other compatible email ports and protocols.
In case of problem
There is no need to contact Infomaniak Support if your email address works well outside the application. The most common error concerns the use of an incorrect password. The troubleshooting guides help you resolve any potential issues:
- Refer to the solutions given in this other guide regarding email in general.
- Delete any Apple configuration profiles linked to your Infomaniak email before starting the configuration again.
And if your Apple Mail no longer works since a change of email password, refer to this other guide.
This guide details what can be searched on the Web app Mail Infomaniak (online service ksuite.infomaniak.com/mail) or other kSuite services. To search on kDrive refer to this other guide.
Search for an email
Regarding the scope of searches:
- The mention "Search in all folders" does not include by default neither the Trash, nor the Spam folder.
- If a global search yields no results, the email may be in one of these two folders.
- You will then need to go specifically to the Trash or Spams to perform the search there.
- If you want to find a message in a specific directory, select it first.
You can search for content…
- either in the body of the message,
- or in its subject,
- or among its senders/recipients, large attachments, etc.
The advanced search is accessible from the chevron to the right of the search field at the top of your Mail: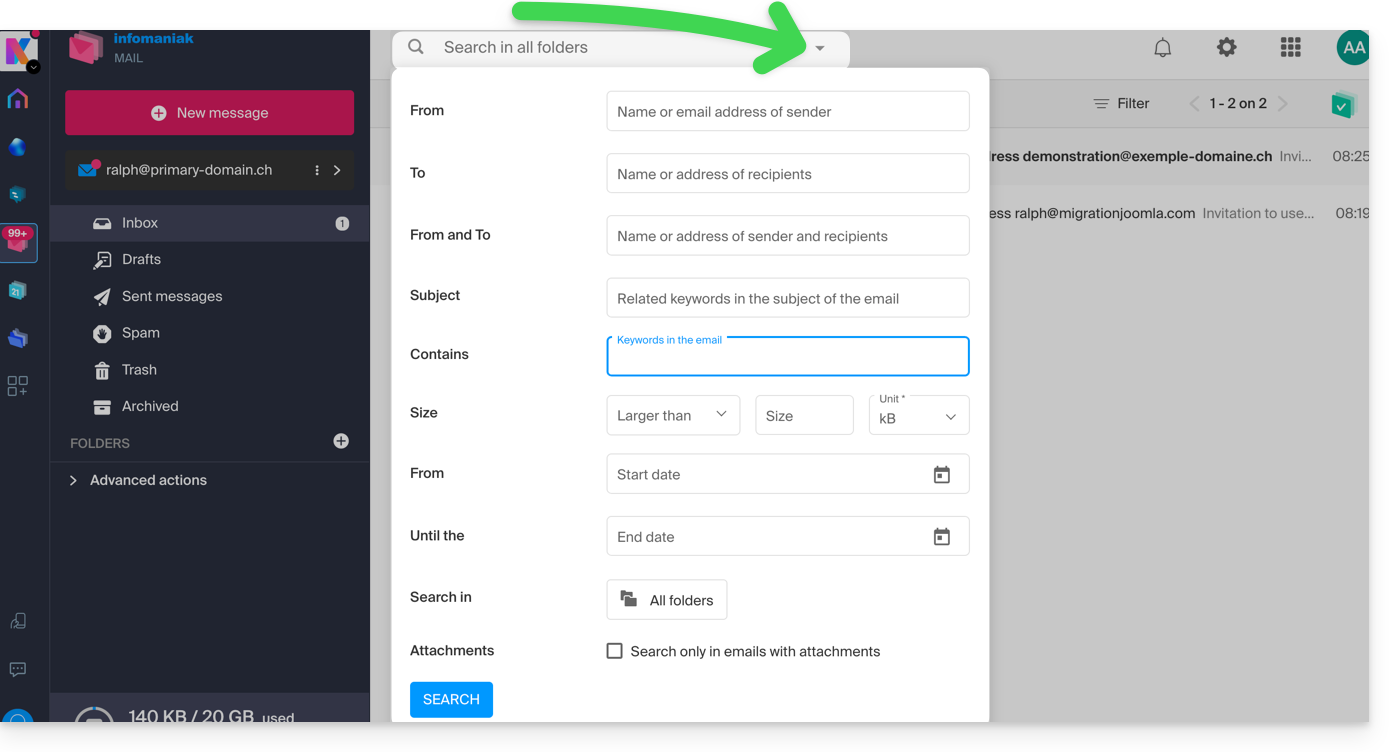
To search for the trace of an email or know its activity, you can also search in the logs of an email address.
Email search with a software/messaging client
To know how your specific messaging application performs searches, consult its documentation. For example, desktop apps (desktop application) Thunderbird and Outlook can synchronize messages locally and perform local searches, while other applications may prefer to search on the IMAP server and in this case, the software/messaging client sends a search command to the server, which then searches through all messages stored on the server and returns the results to the software/messaging client.
Search for a contact
You can search for an address book, a group, a person among your contacts thanks to the search field at the top of your Infomaniak address book: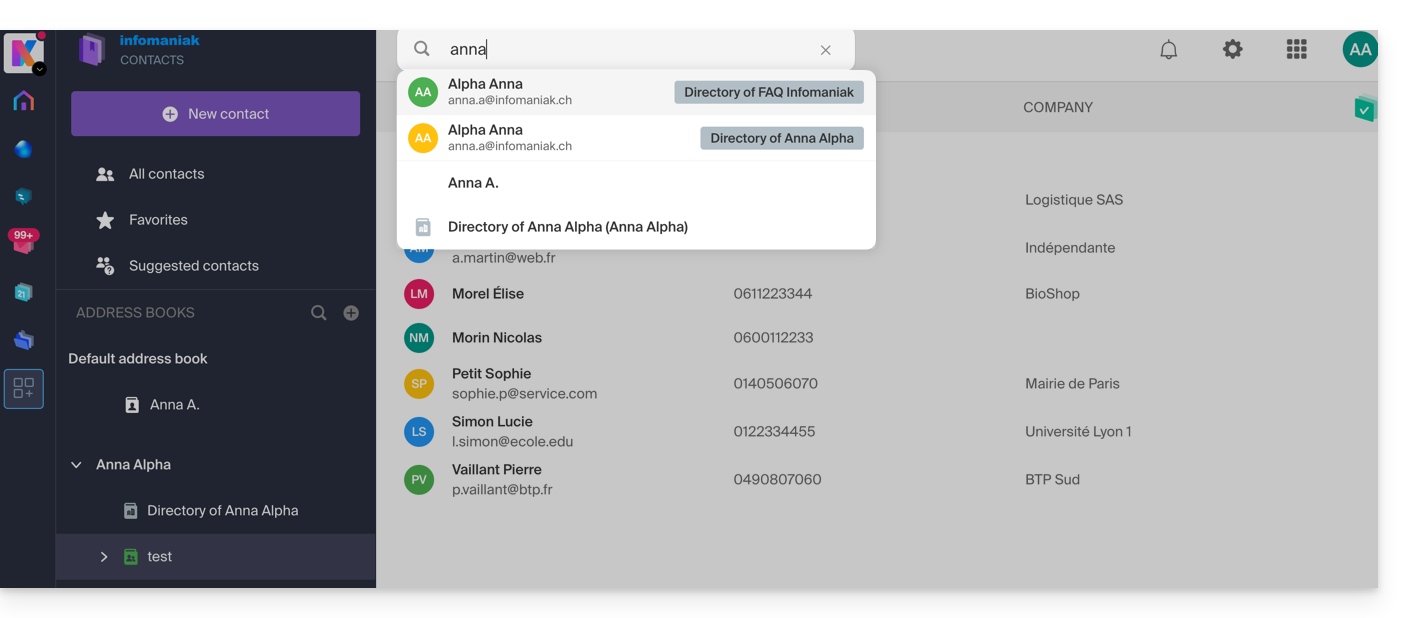
Search for an event
You can search for calendars, events, rooms, including among the description of these and the people who were linked to them: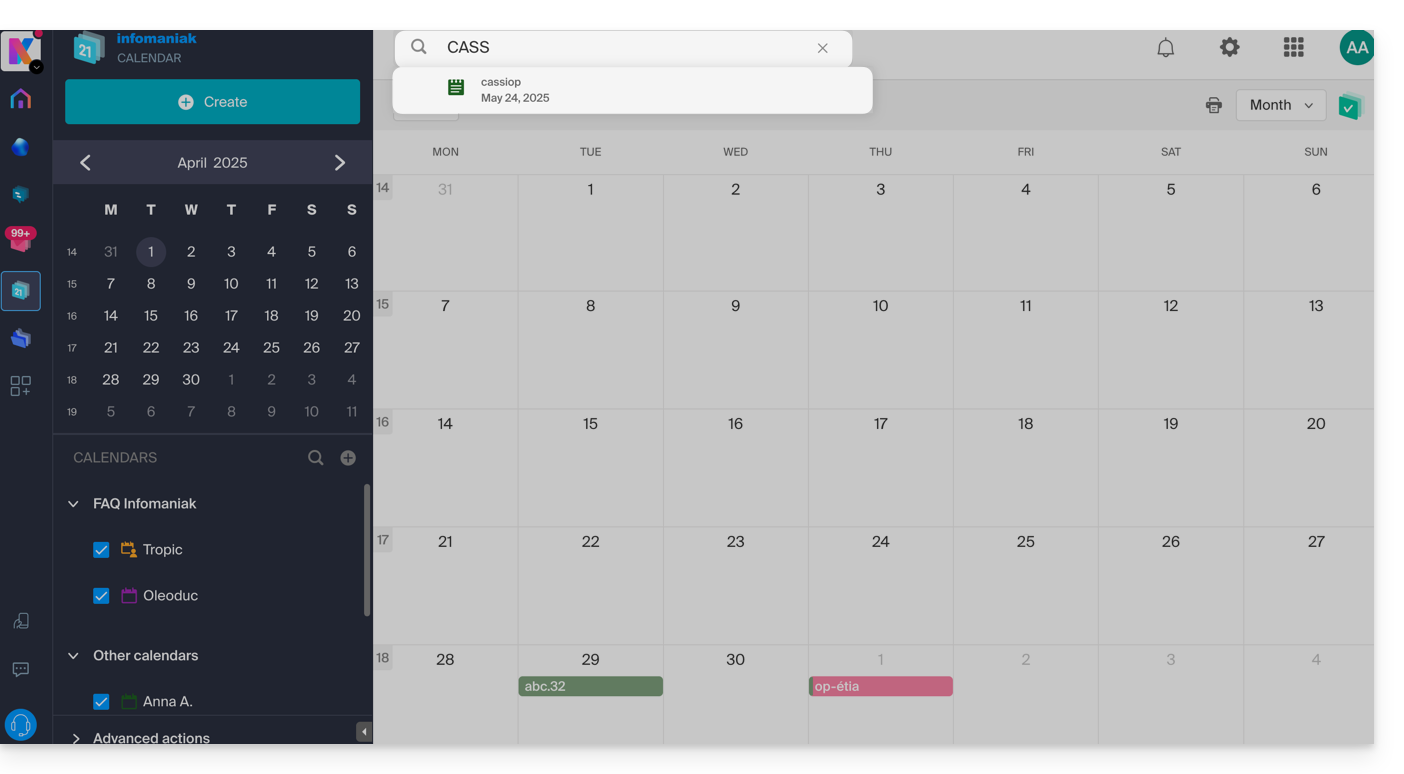
This guide explains how to create a template for the signature tool for all your email on the Infomaniak Web app Mail (online service ksuite.infomaniak.com/mail).
Preamble
- A template allows you to create the neutral base of a tool that can then be used by multiple users of the same Infomaniak Mail service, or even customized according to the person who will use it.
- In the case of a signature template, the template creator creates the signature style, also chooses the element(s) that must be present, and it is up to the end user, from their Mail, to complete certain details of their signature.
- You can also hide a template so that it is no longer used.
Choose the type of signature template
To start creating a template:
- Click here to access the management of your product on the Infomaniak Manager (need help?).
- Click directly on the name assigned to the product concerned:
- Click on Global Configuration in the left sidebar.
- Click on the Signature tab.
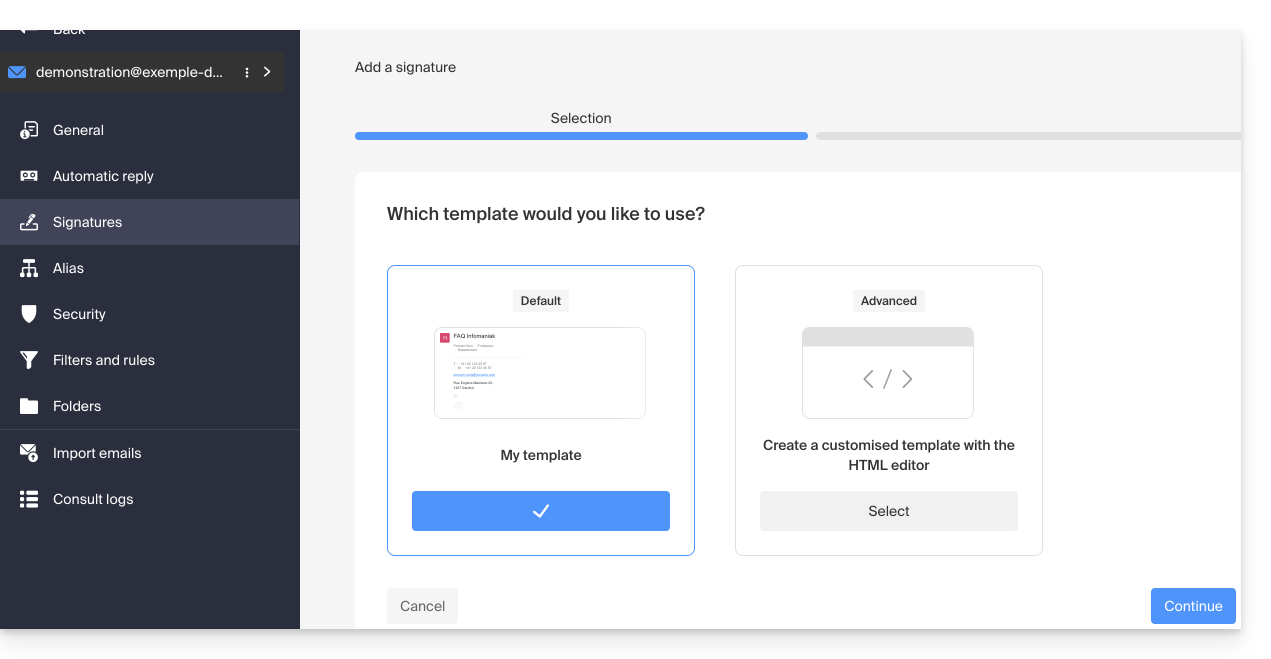
- Click on Add a signature template:
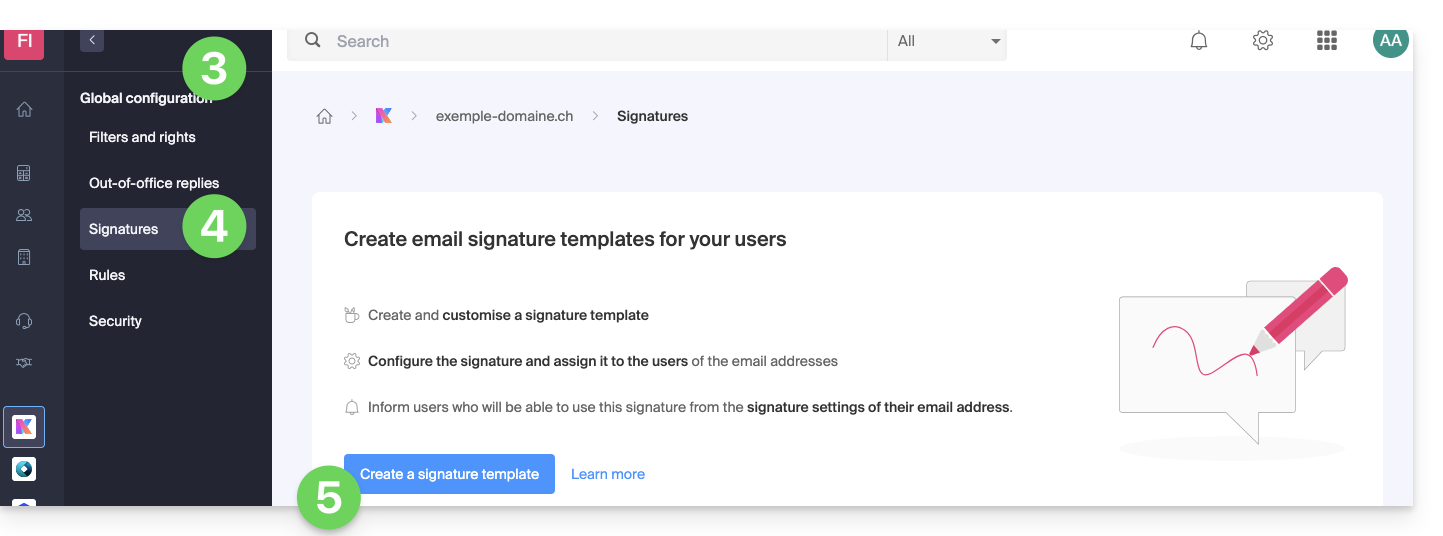
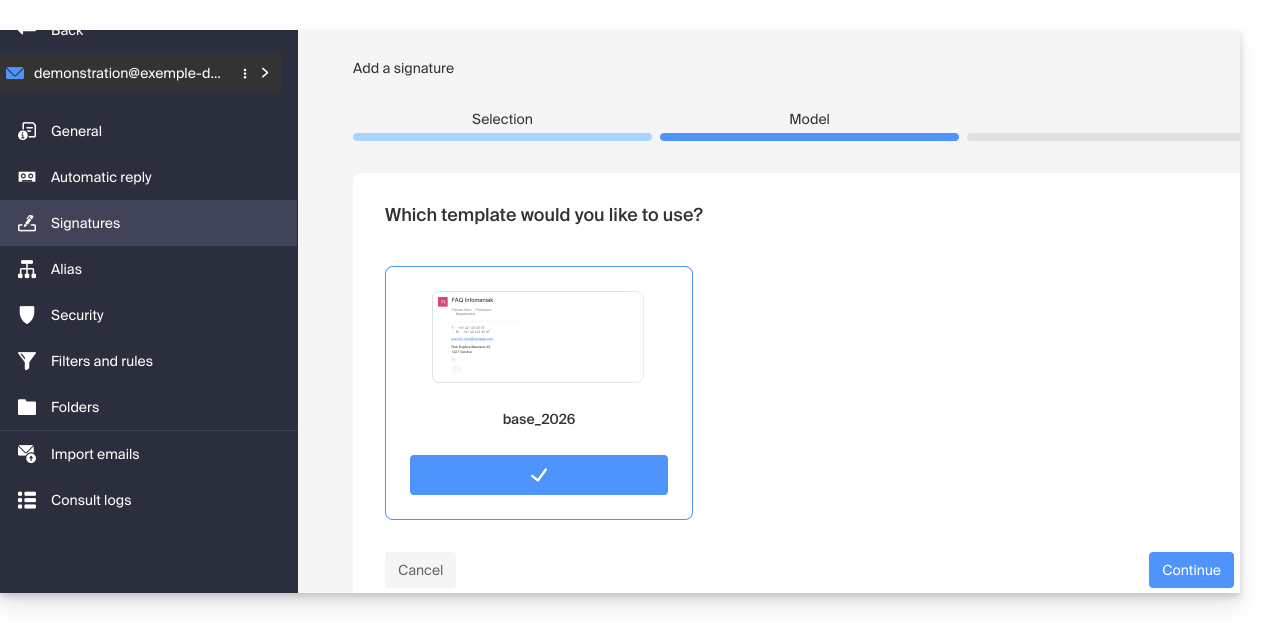
- Select the type of template (details below) and click the Continue button (
d) to access the template: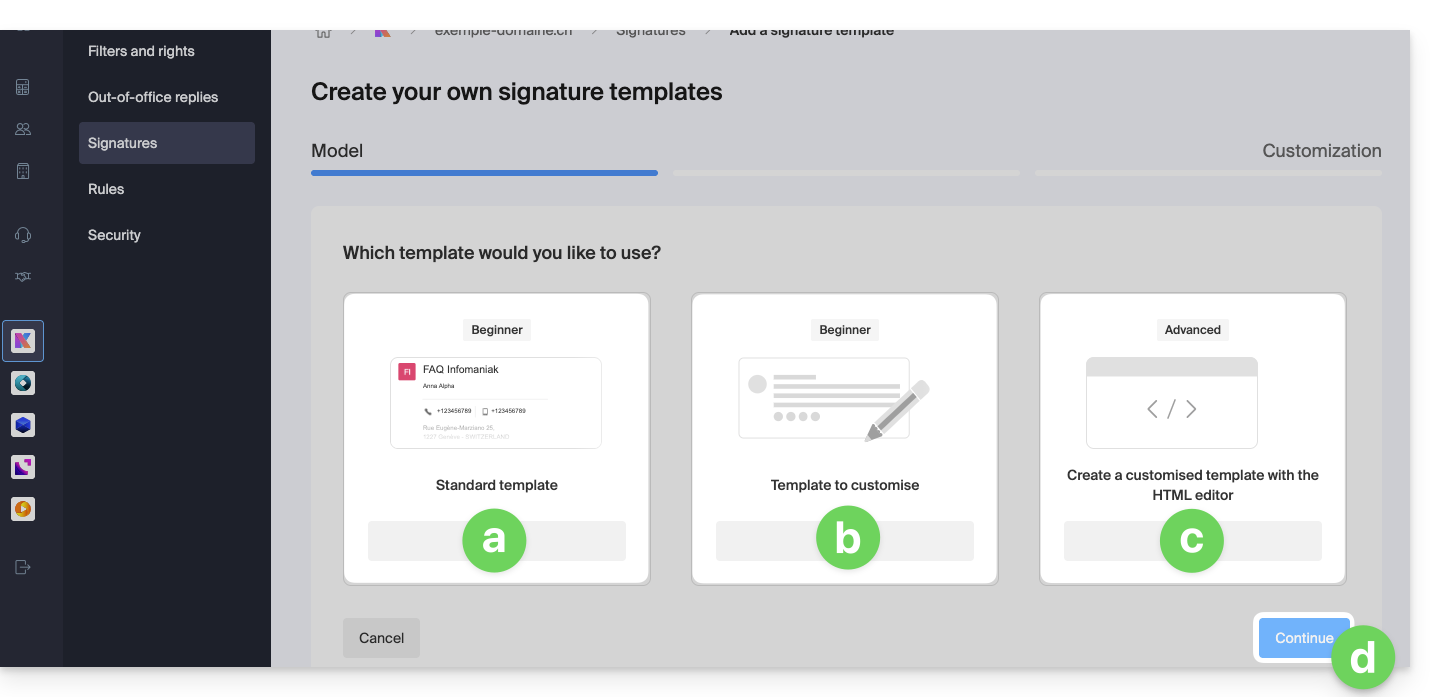
- Allows you to configure the signature block with the usual information; the elements are detailed further down in this guide:
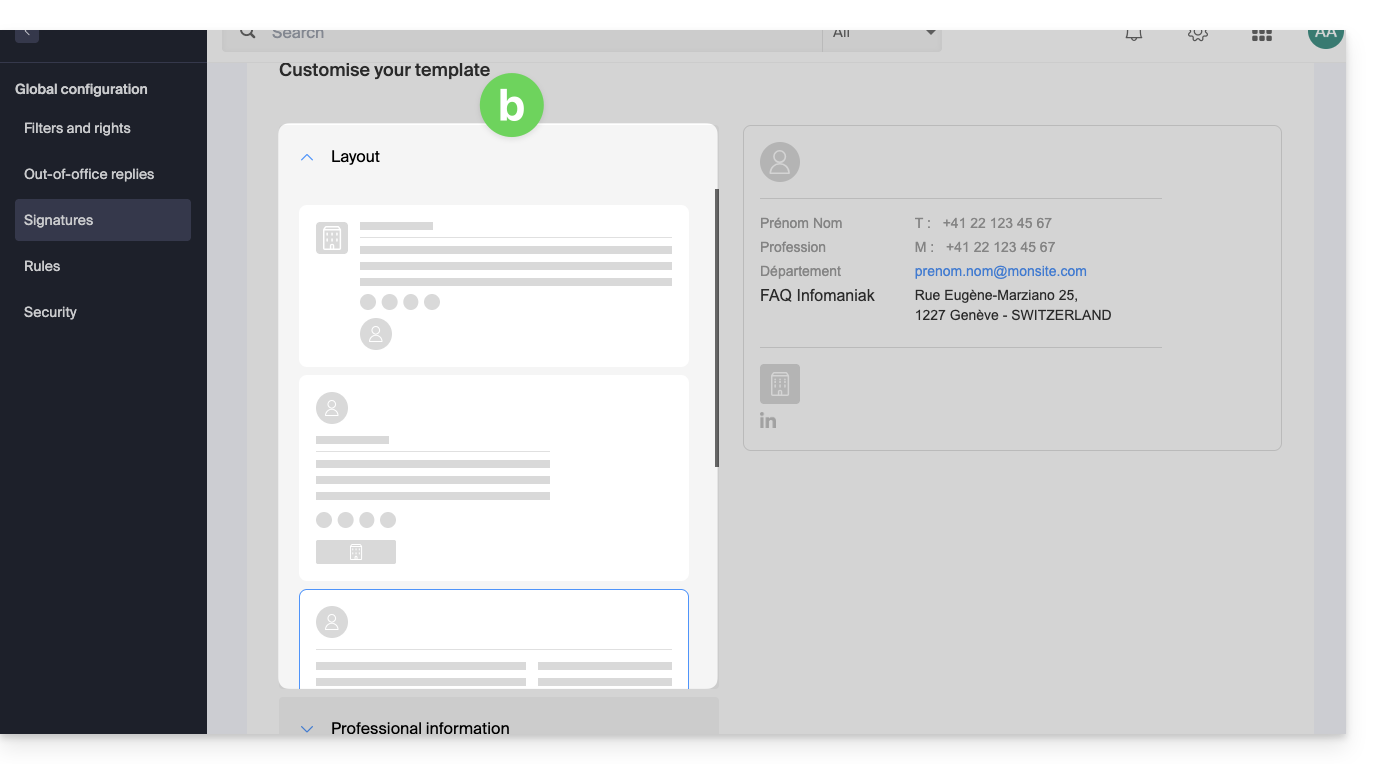
- Allows you to configure the signature block with the usual information and the layout of the elements can be modified using predefined settings; the elements are detailed further down in this guide:
- Allows you to configure the signature block starting from an empty block, and the information can be inserted in the form of variables:
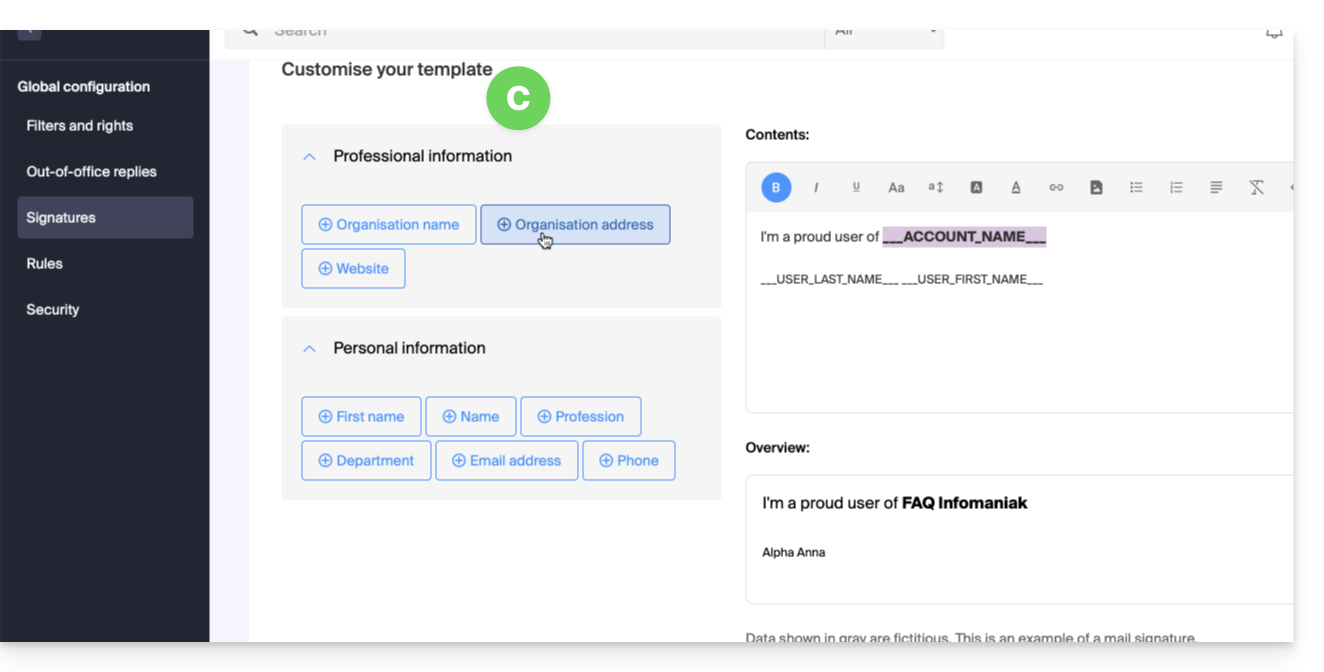
- It is also possible in this mode to work on the HTML code directly:
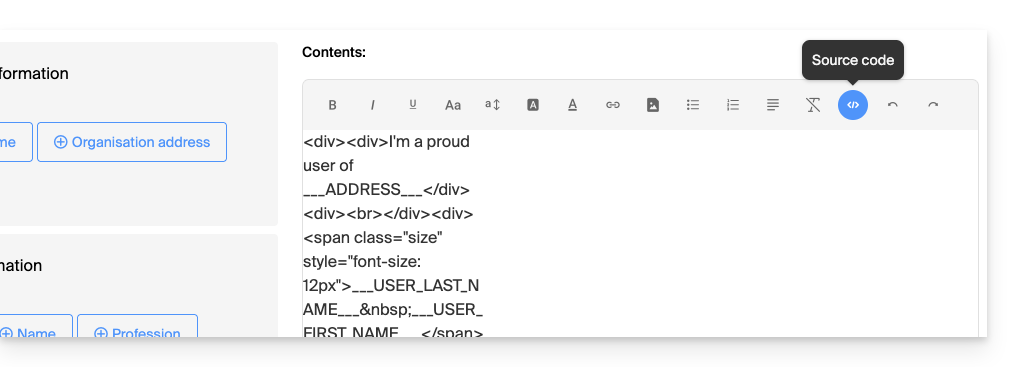
- It is also possible in this mode to work on the HTML code directly:
- Allows you to configure the signature block with the usual information; the elements are detailed further down in this guide:
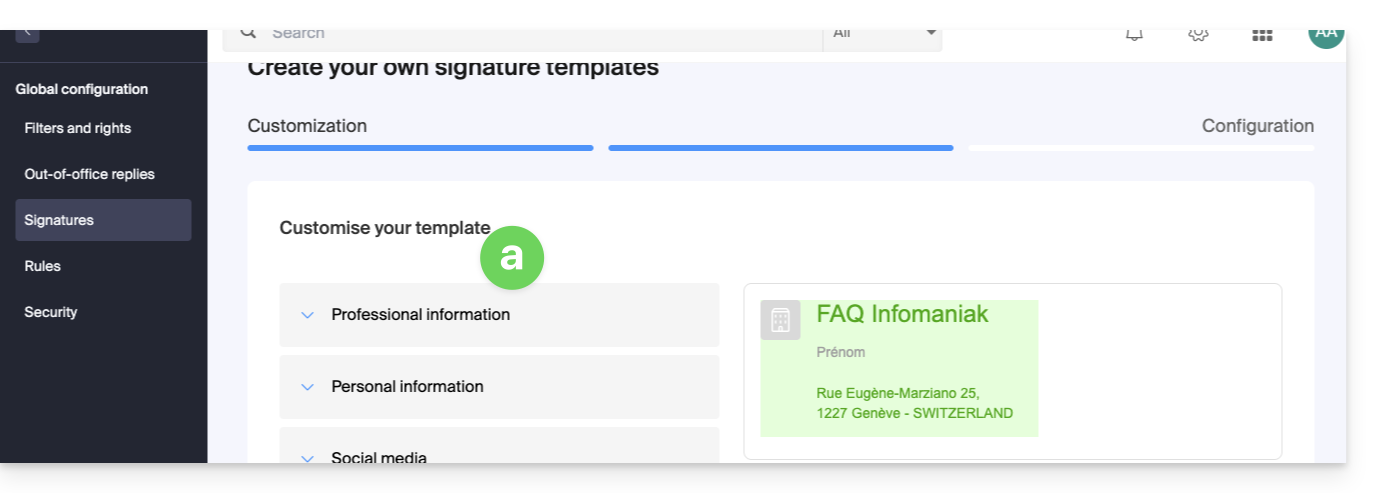
Configure the base of the signature
Depending on the selected template:
- Define the fields to keep and insert using the checkboxes.
- Set the display preferences for certain information such as the order
First Name - Last Name. - Some fields can be:
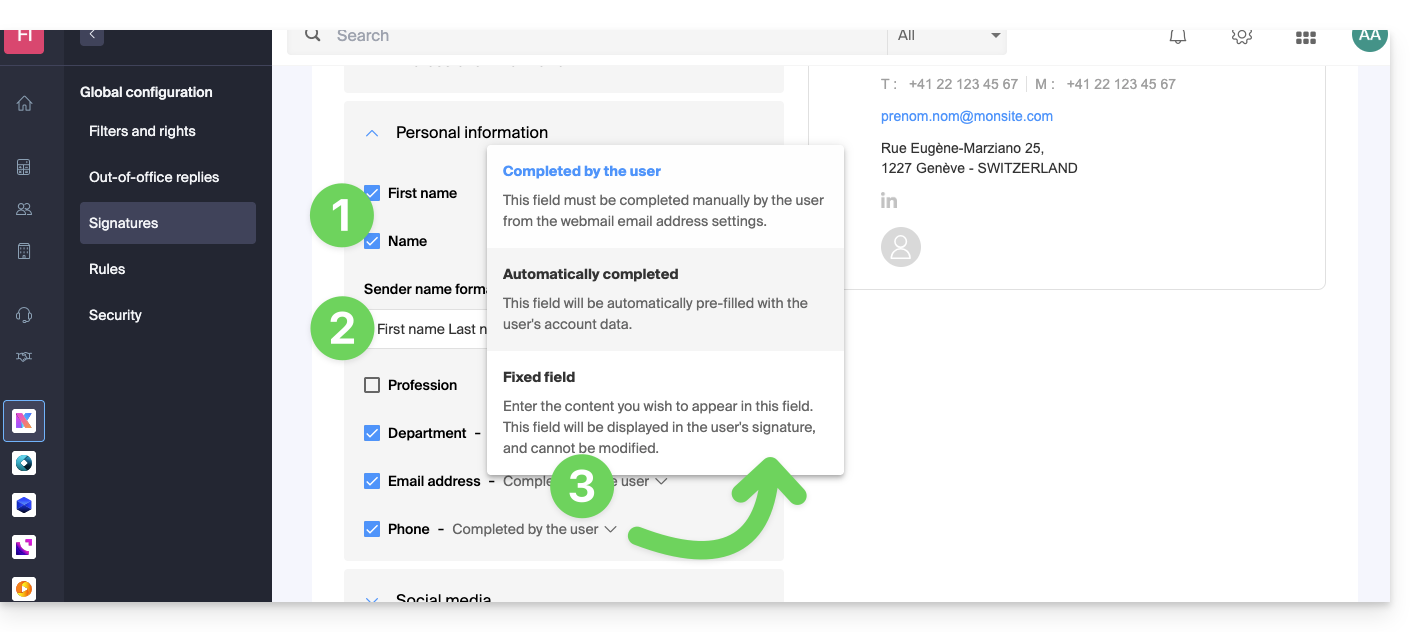
- filled in by the user in their Mail app settings,
- automatically filled in based on the information present in their Infomaniak account,
- determined here and will therefore be fixed and common to all users.
- Click the Continue button at the bottom of the page.
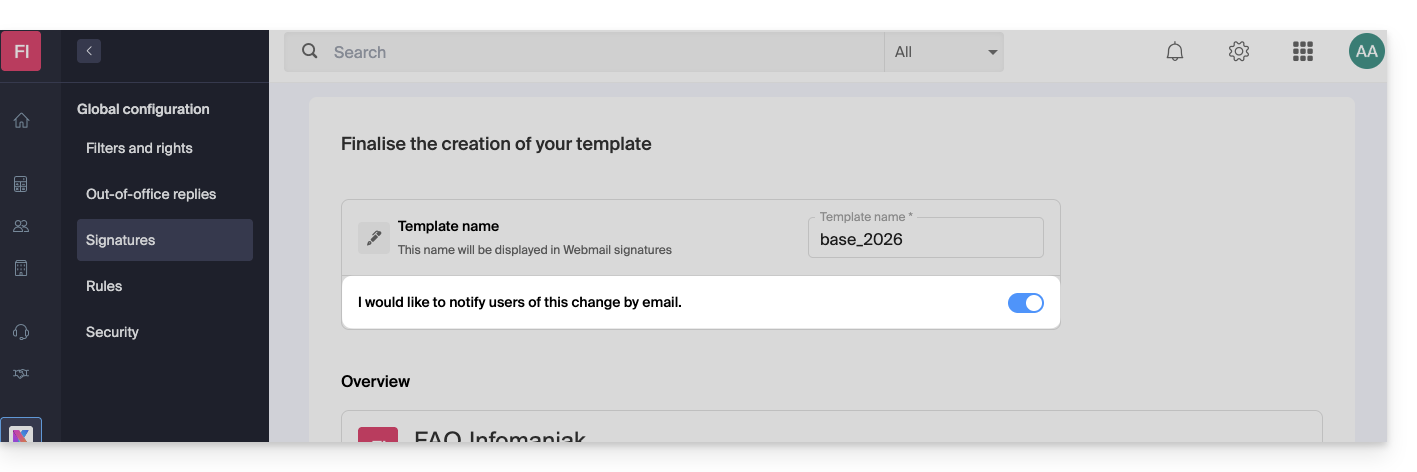
- Give a name to the template.
- Decide whether this model should be accessible and applied to users of existing addresses on the Mail Service.
- Click the blue Finish button or save as a draft:
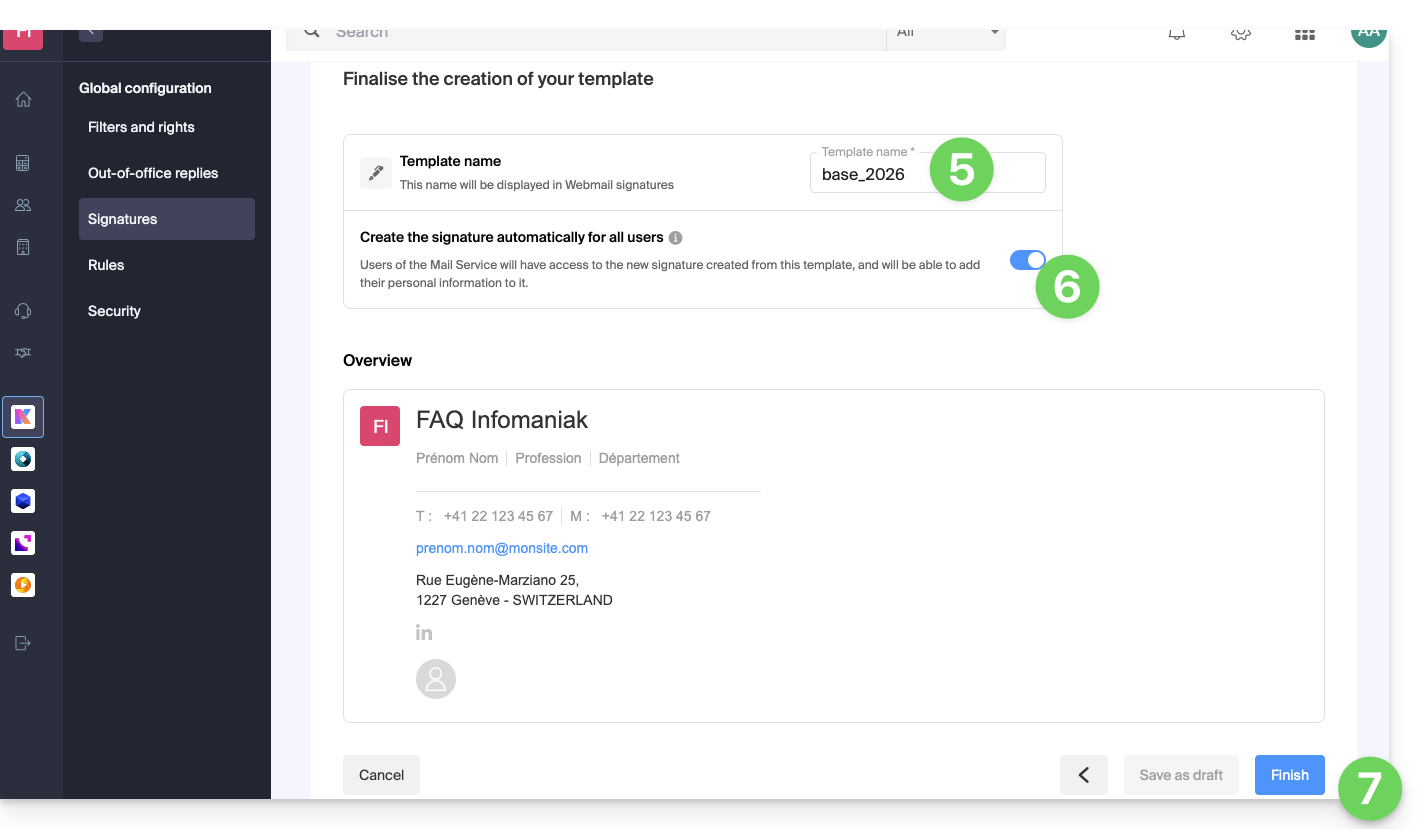
An email is sent to users affected by the creation of this model, inviting them to go to signature management to complete the information if necessary.
- When editing a signature model, you can decide whether or not to notify users of the changes that have occurred:
Complete the information used by the signature
Depending on the model used, the end user can add their personalized information on the Mail app so that the signature display is complete: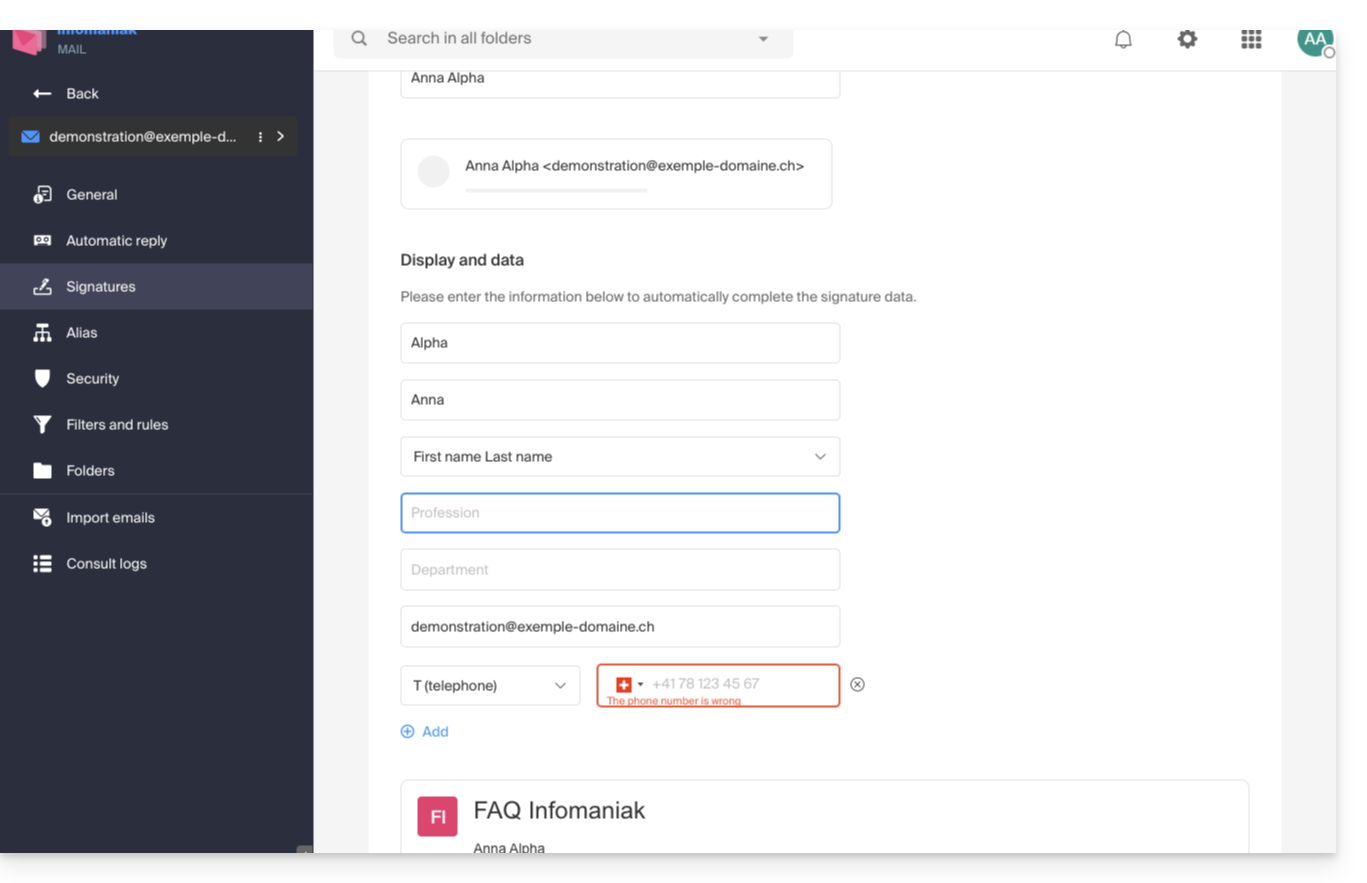
Apply signatures to users from this model
From the Signatures section of the Global Configuration, click on the action menu ⋮ located to the right of the signature model: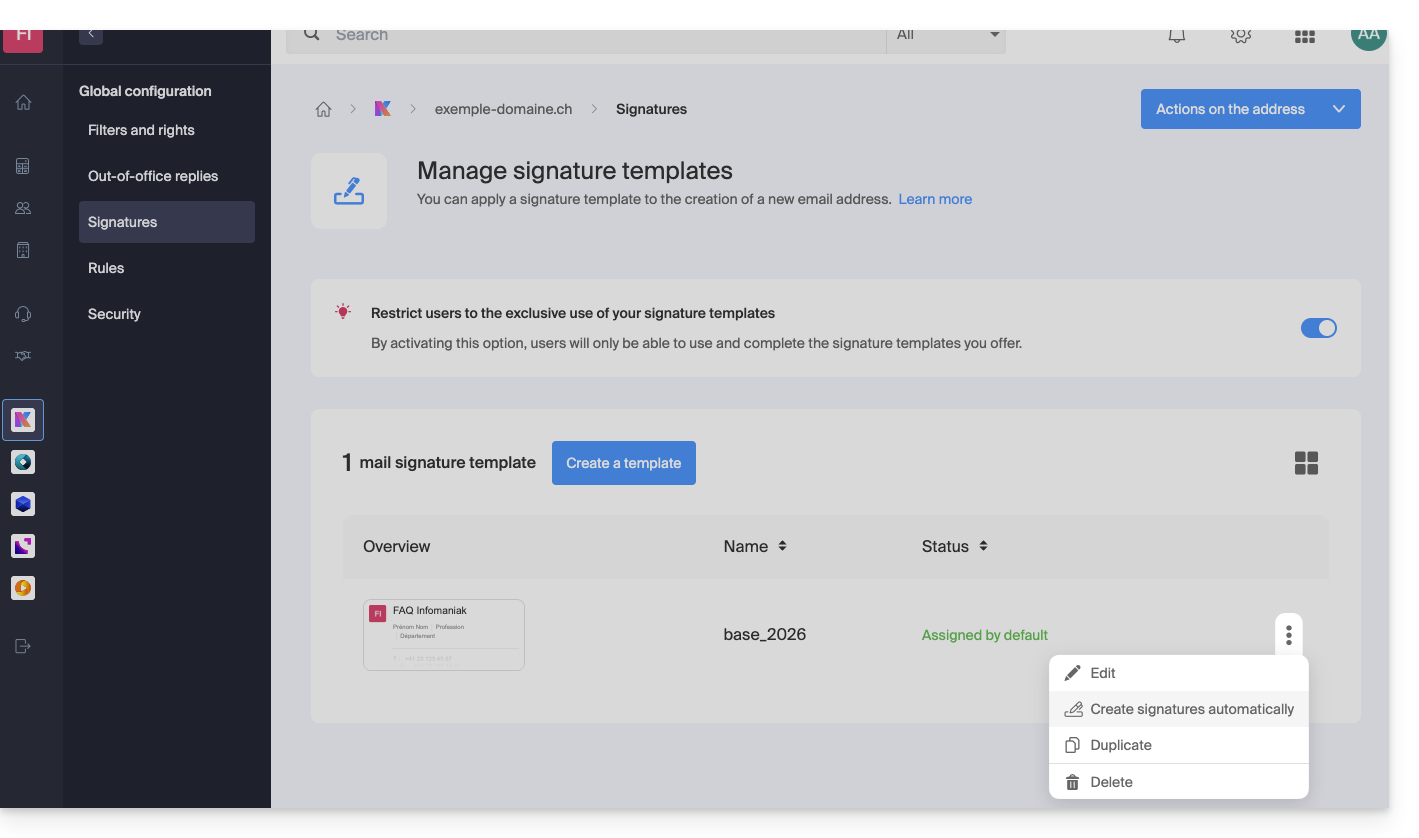
You can edit the signature, duplicate it to create a different signature for certain people from this model, and delete it.
Another option allows you to create signatures for the different users using the domain's email addresses:
- They will be notified by email that a new signature is available.
- For shared email addresses, if you want a generic signature that uses this model, without it being associated with a specific user, you must configure it yourself from the Infomaniak Web Mail app or the Mail Service.
Users of the Mail Service will then…
- … use the new signature created from this model
- … add their personal information
Force this model for new signatures
From the Signatures section of the Global Configuration, activate the toggle switch to no longer allow Mail Service users to create a free signature: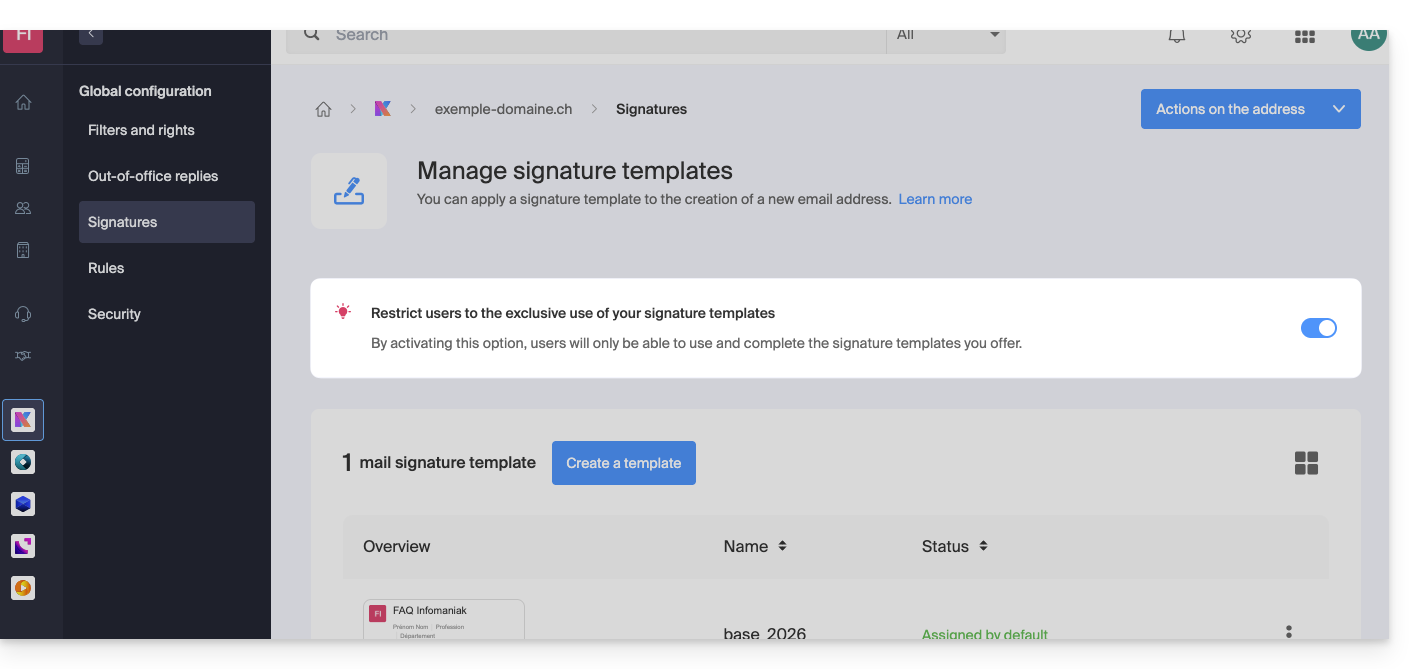
- The previously created model will then serve as the basis for any new signature created by the user:
- If the option is disabled, the choice is left to the user:
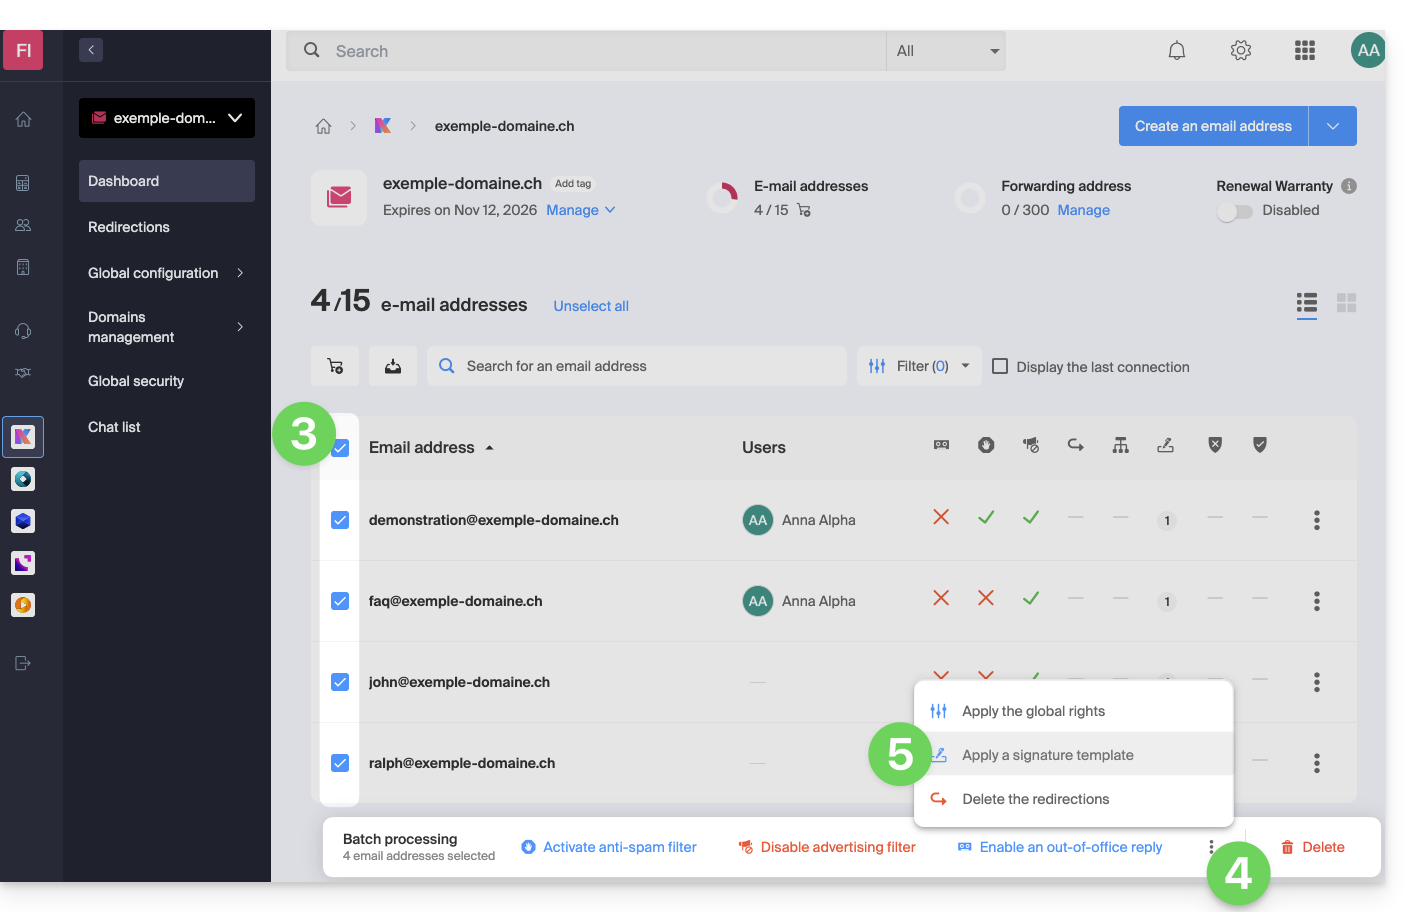
Activate a model on an existing email address
It is necessary to have an existing template to activate it on one or more email addresses. This can be useful when the template is created after existing addresses:
- Click here to access the management of your product on the Infomaniak Manager (need help?).
- Click directly on the name assigned to the product concerned.
- Click on the boxes to select one or more email addresses in the table that appears.
- Click on the action menu ⋮ at the bottom of the page.
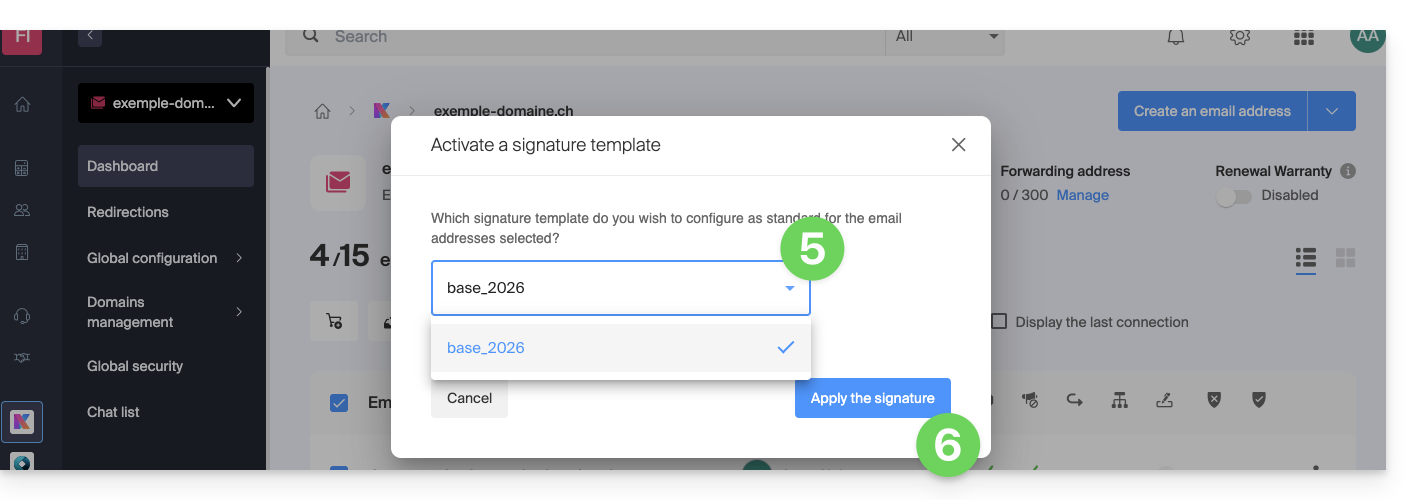
- Click on Apply a signature template:
- Select the template of your choice.
- Click on the button Activate:
This guide explains how to export the content of an email address hosted by Infomaniak.
Preamble
- Infomaniak does not offer an export (e.g.,
PST). - Infomaniak keeps your emails for the duration of your contract, and depending on your offer, with integrated backups without size limits in the context of normal use of a shared service, in accordance with Article 1 of the Mail Service's specific terms and conditions.
- The manual export proposed below works on Windows: you will thus be able to save your emails within a single easily restorable archive.
- For additional help, contact the support of the software/email client used, or a partner.
Manual export
To export all messages contained in your email address hosted by Infomaniak:
- Install the free application Thunderbird.
- Configure the email address in question in IMAP (to include subfolders).
- Make sure that all desired content is present (synchronize the mailbox from always - not just the last 30 days, for example).
Then...
- ...either you install the free application BackupThunderbird which allows the creation of an archive (encrypted if necessary) and subsequent restoration...
- ...or you can simply display the hidden files of Windows and then find and save this folder profile
C:\Users{USER}\AppData\Roaming\Thunderbird\Profiles{PROFIL_USER}\
as it contains all your mail.
Download emails locally
Another solution (not recommended) could be to configure a software/email client by choosing to receive via the POP3 protocol, which will have the effect of downloading the messages locally and only the inbox will be affected.
This guide explains how to replace the main domain name associated with a Mail Service in case you want to modify the spelling of everything that comes after the at sign @ of your email address (= the domain name). If your Mail Service is part of a kSuite, then you will need to act on the kSuite domain directly.
Preamble
- You can also follow this procedure if the goal is to have completely new email addresses while keeping the history of your emails in Mail (since the email address will continue to exist, for example info@first-domain.xyz will become info@new-domain.xyz without modifying its content).
- Indeed, it is not possible to simply modify the spelling of the domain name concerned; it is therefore necessary to replace the current domain name associated with your email addresses with another domain name.
- To simply add an additional domain name, refer to this other guide.
- To rather modify the part of your email address that comes before the at sign
@, refer to this other guide. - Note also that you can rename your product (example) on the Infomaniak Manager, but changing the name of a Mail Service has strictly no impact on its addresses; you need to act on the domain name.
If your Mail Service is part of a kSuite, then you will need to act on the kSuite domain directly.
Modify the domain name of the Mail Service
Prerequisites
- Have the new domain name (if necessary, create it in advance).
- Refer to the instructions of this other guide by applying the instructions corresponding to your situation (this is so that the domain name works when it is linked to your Mail Service).
Once the new domain name is ready to be used in place of the old one, you need to add it to the Mail Service and then perform a swap:
- Click here to access the management of your product on the Infomaniak Manager (need help?).
- Click directly on the name assigned to the product in question.
- Click on Domain Management in the left sidebar
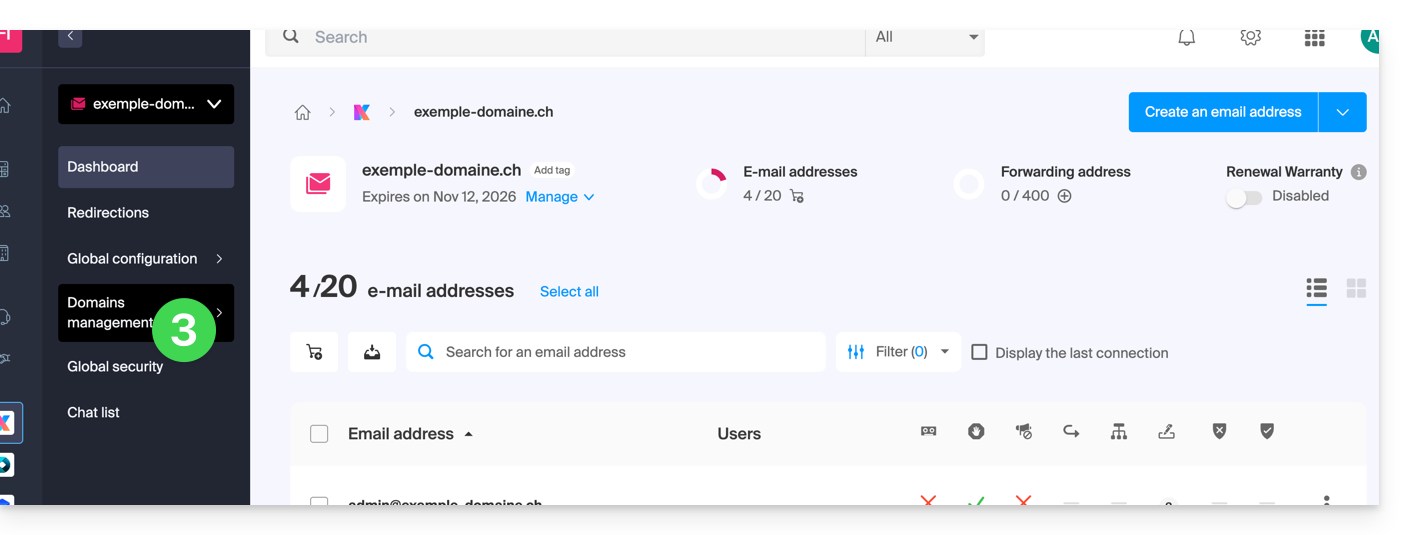
- Click on Service-related domains in the left sidebar menu.
- Click the blue button Add a linked domain:
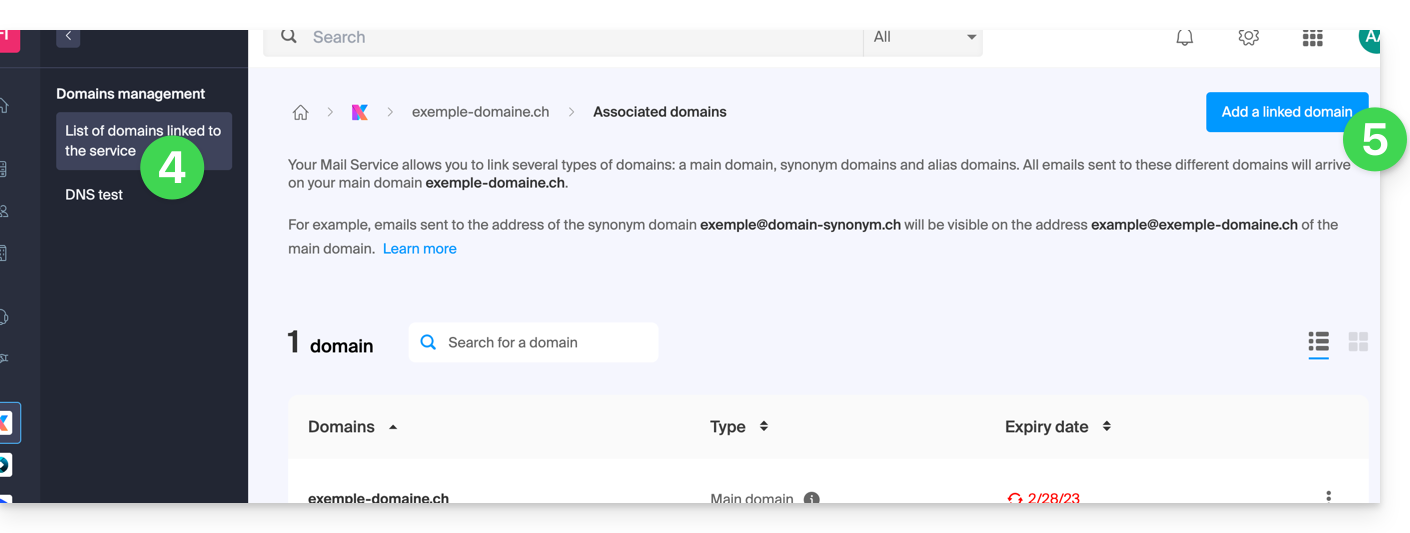
You can:
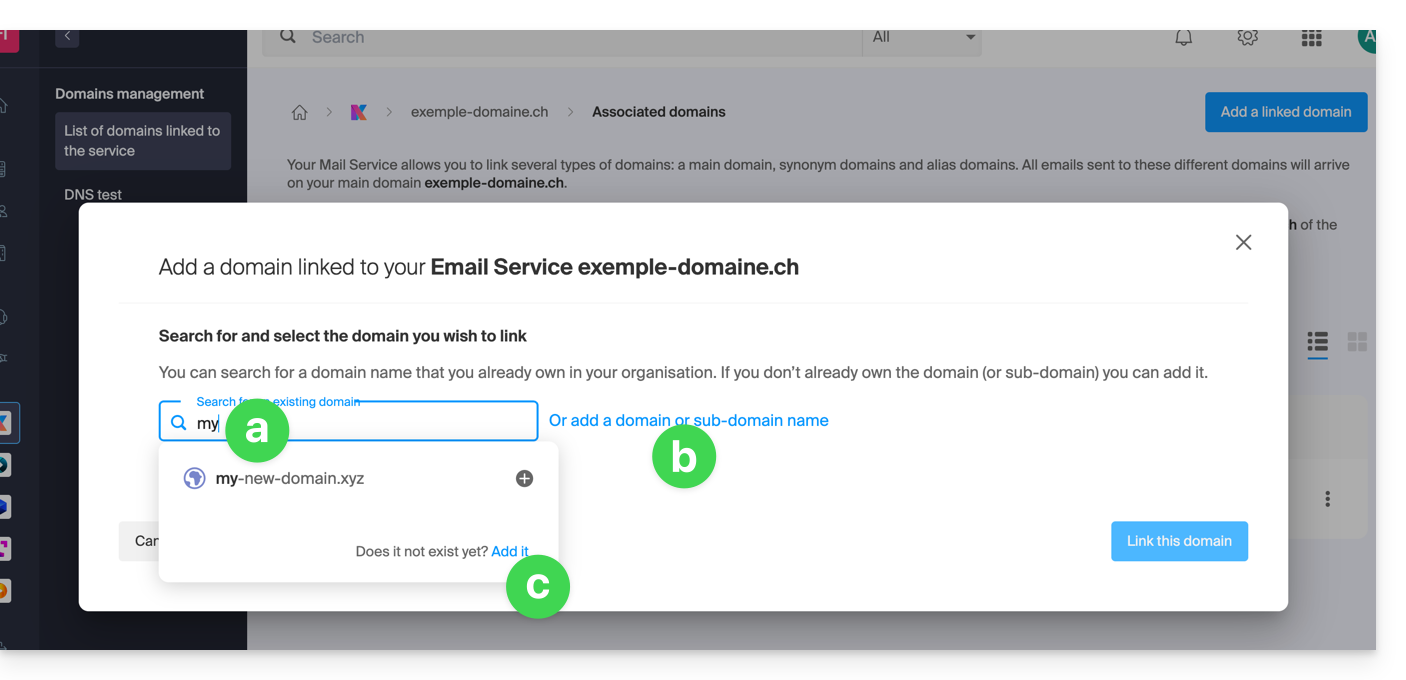
- Search for an existing domain within the Organization to which you are connected; this will link and automatically update the DNS zone of the added domain.
- Add a domain name or subdomain to manually specify the domain name or subdomain to be used (ideal if the domain name is hosted elsewhere).
- Purchase a new domain name (read the prerequisites above).
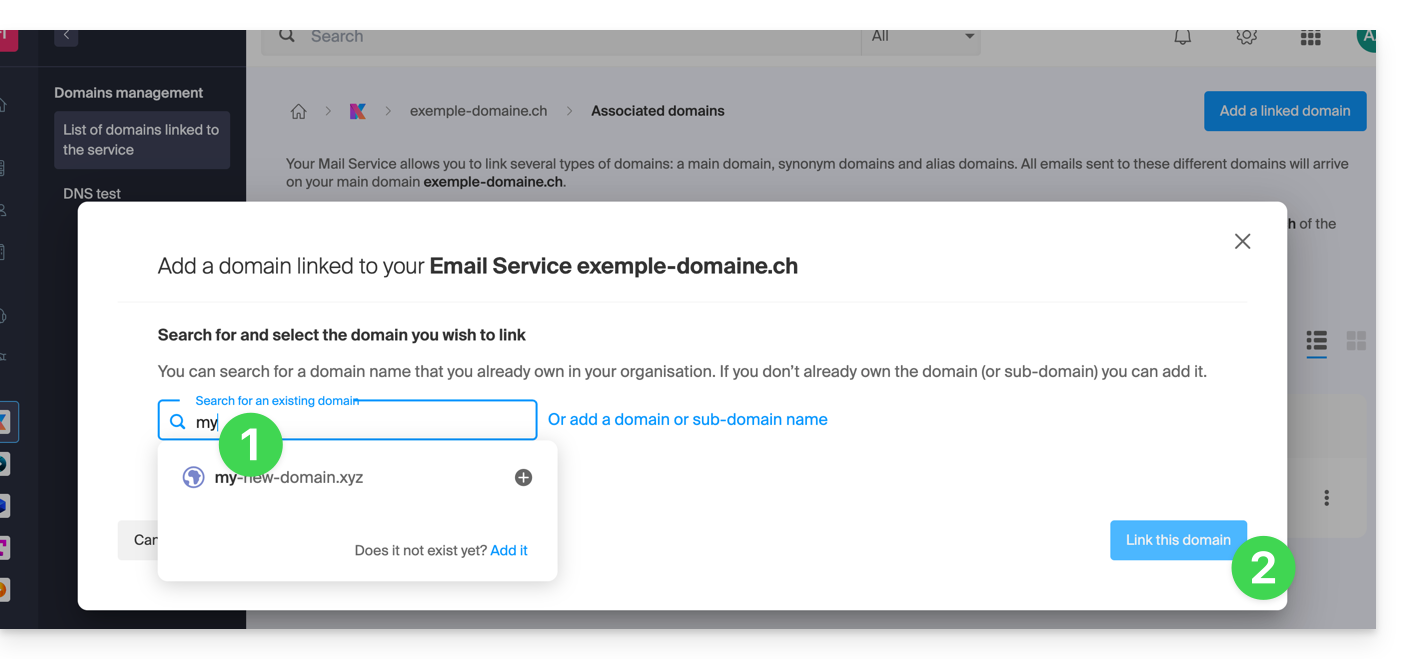
a: The domain exists within the Organization
Before proceeding, make sure to disassociate the domain name if it had been defined as an alias domain previously.
- Click on the proposed domain name.
- Click the blue button Link this domain:
- Click on the icon ⋮ to the right of the newly added domain name.
- Click on Set as primary domain (you must have disassociated the alias domain name from the primary domain name if there was a previous association):

- Confirm the reversal and then wait for the operation to complete.
- Click on the icon ⋮ to the right of the old domain name.
- Click on Unlink the domain:
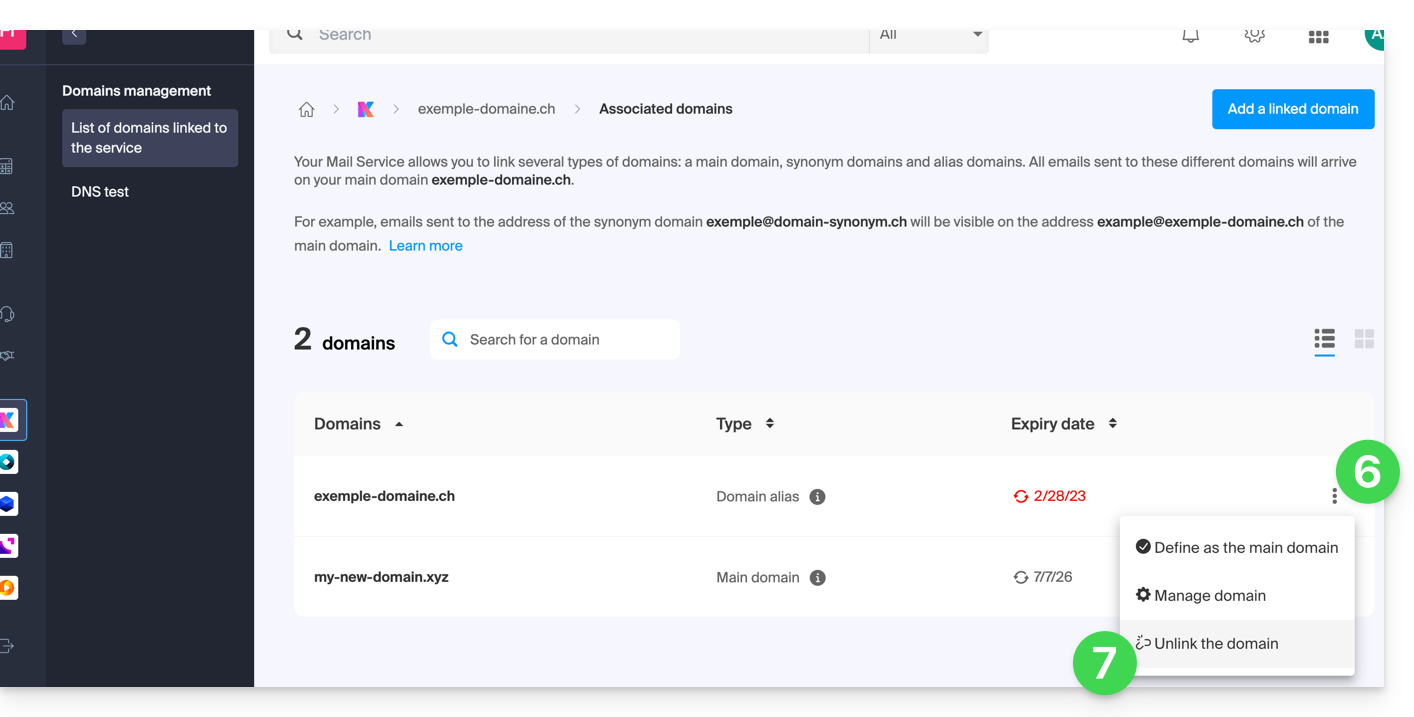
- Confirm the detachment by checking if you want to delete the associated DNS records during the detachment operation.
That's it, the Mail Service now responds to a new domain name.
b: The domain exists but elsewhere
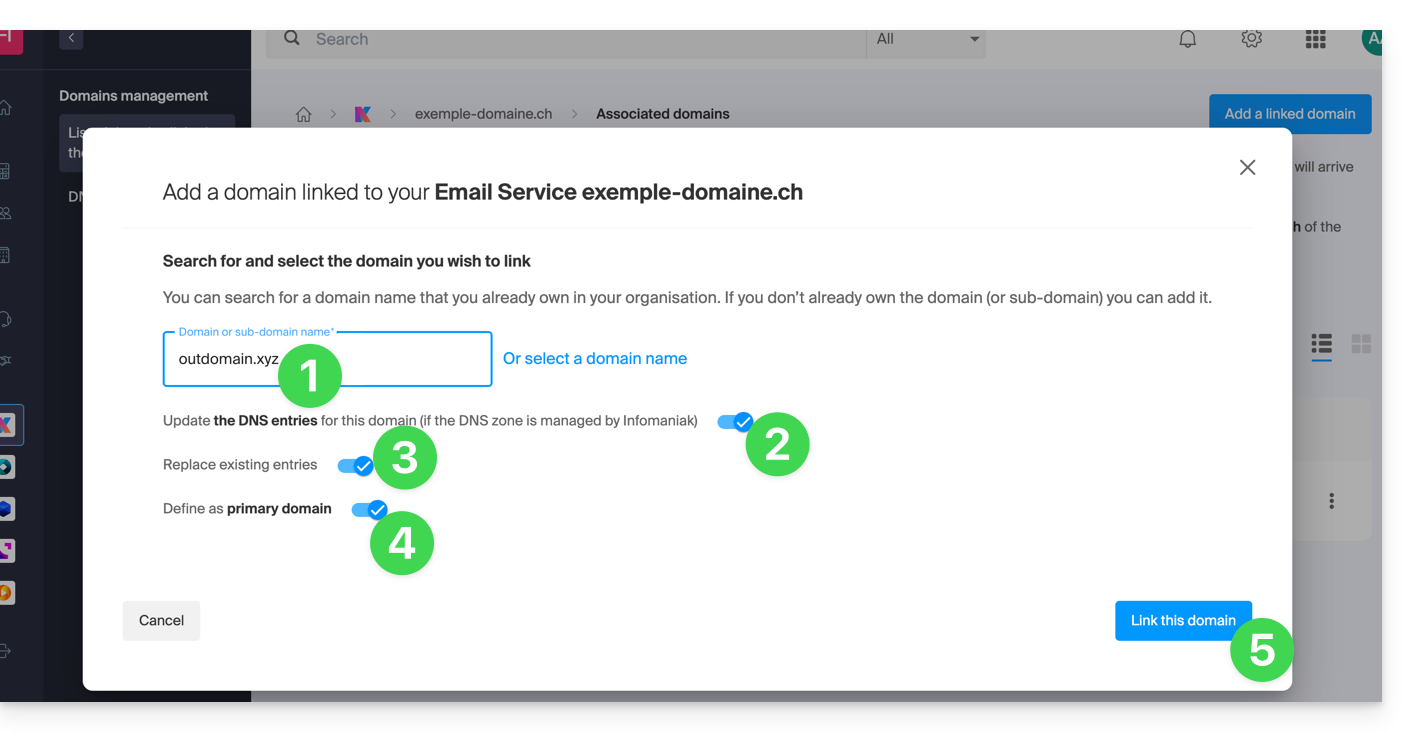
- After clicking on Add a domain or subdomain, enter the domain name that will replace the current one.
- Enable the DNS entry update (if the domain name situation allows it, the DNS zone of the domain name will be automatically updated).
- If the point 2 above is active, then activate the replacement of any existing entries.
- Activate the reversal of the domain name (to avoid additional steps as in point "a" above).
- Click on the blue button Link this domain:
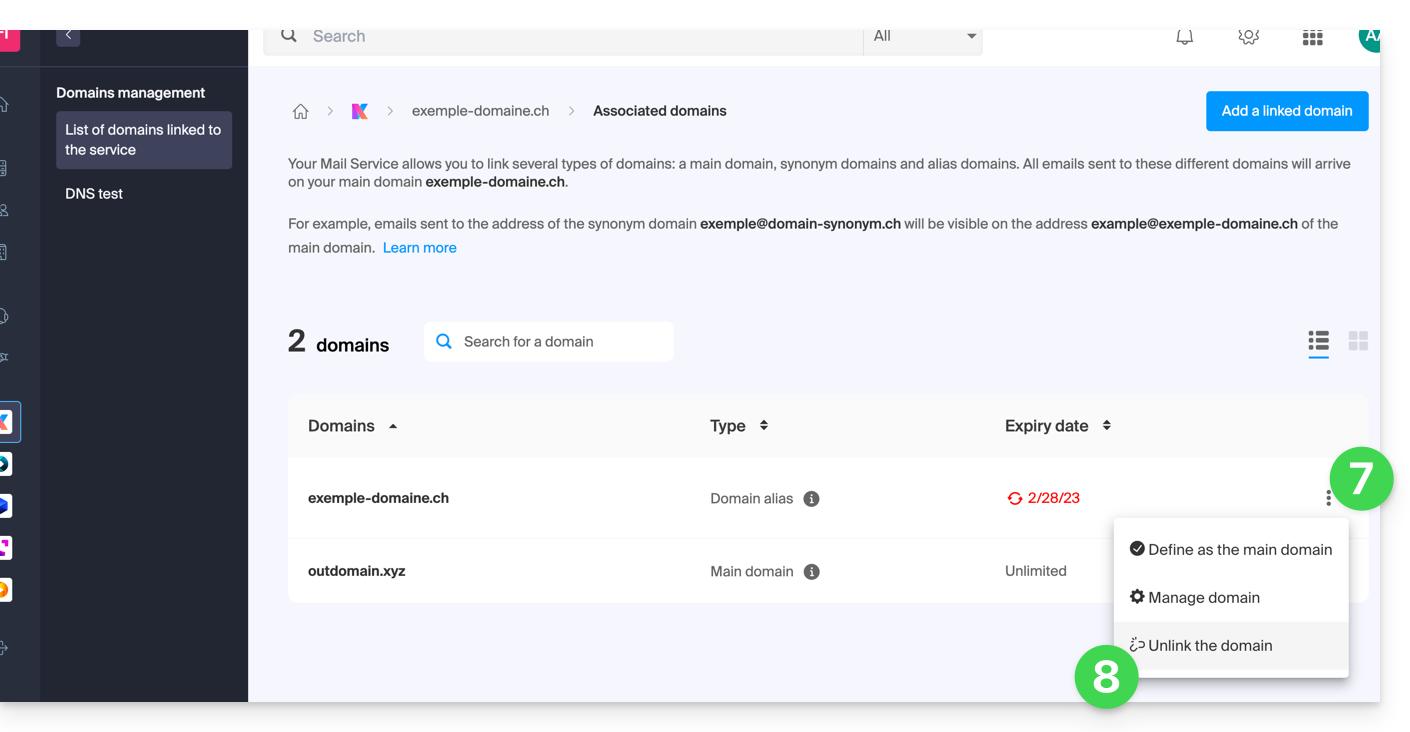
- Wait for the operation to complete.
- Click on the icon ⋮ to the right of the old domain name.
- Click on Unlink the domain:
This guide explains how, after purchasing a domain name from Infomaniak, you can get for free an Email Service + Web Hosting.
Preamble
- For each domain name registered or transferred to Infomaniak, you can benefit from the following for free:
- an email address that gives you access to the Infomaniak Mail app, among other things
- and a 10 MB Web space for a basic page.
- It is also possible to have a free Email Service while having a paid Web offer, or vice versa.
- Instead of a Starter type Email Service, there is also kSuite.
Activate the Starter Mail + Web Offer
Prerequisites
- Own a domain name with Infomaniak (a DNS zone is not sufficient).
- Depending on the desired type (Mail or Web), do not have a corresponding product already associated with the domain name and this in any existing Infomaniak Organization.
To order a Starter Mail Service and Starter Web Hosting included with each domain:
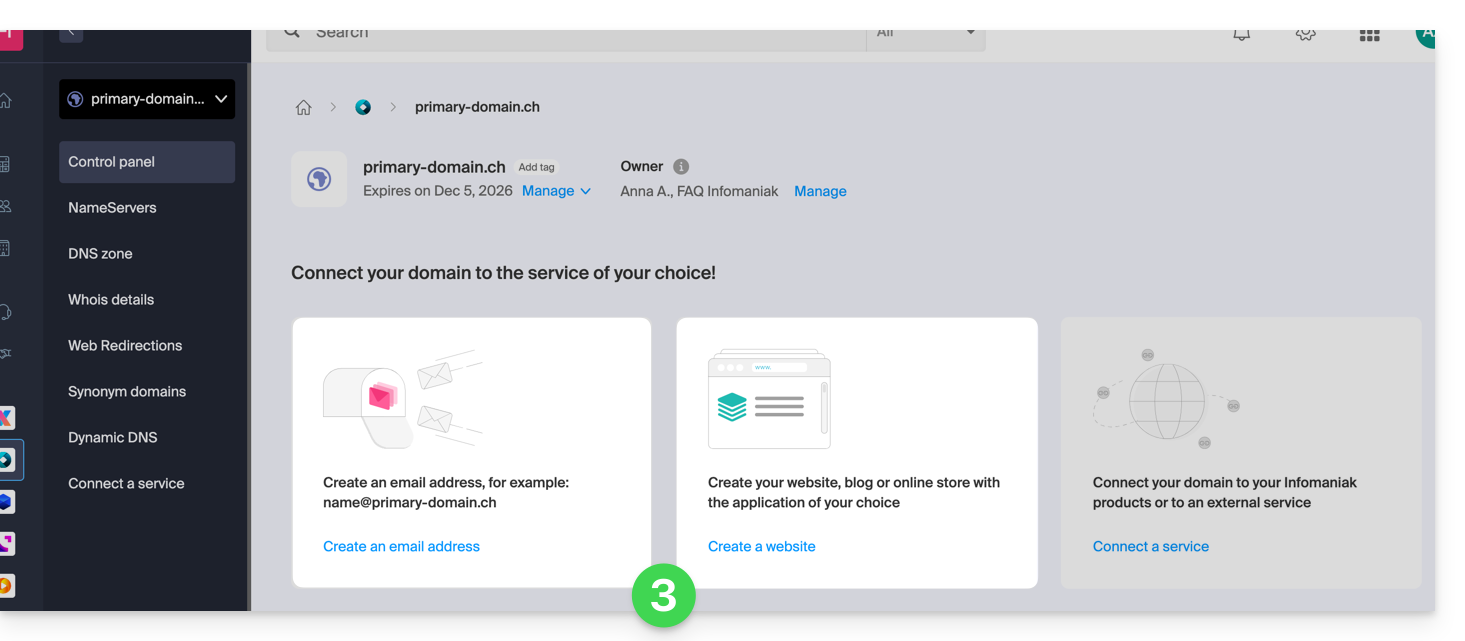
- Click here to access the management of your product on the Infomaniak Manager (need help?).
- Click directly on the name assigned to the product concerned:
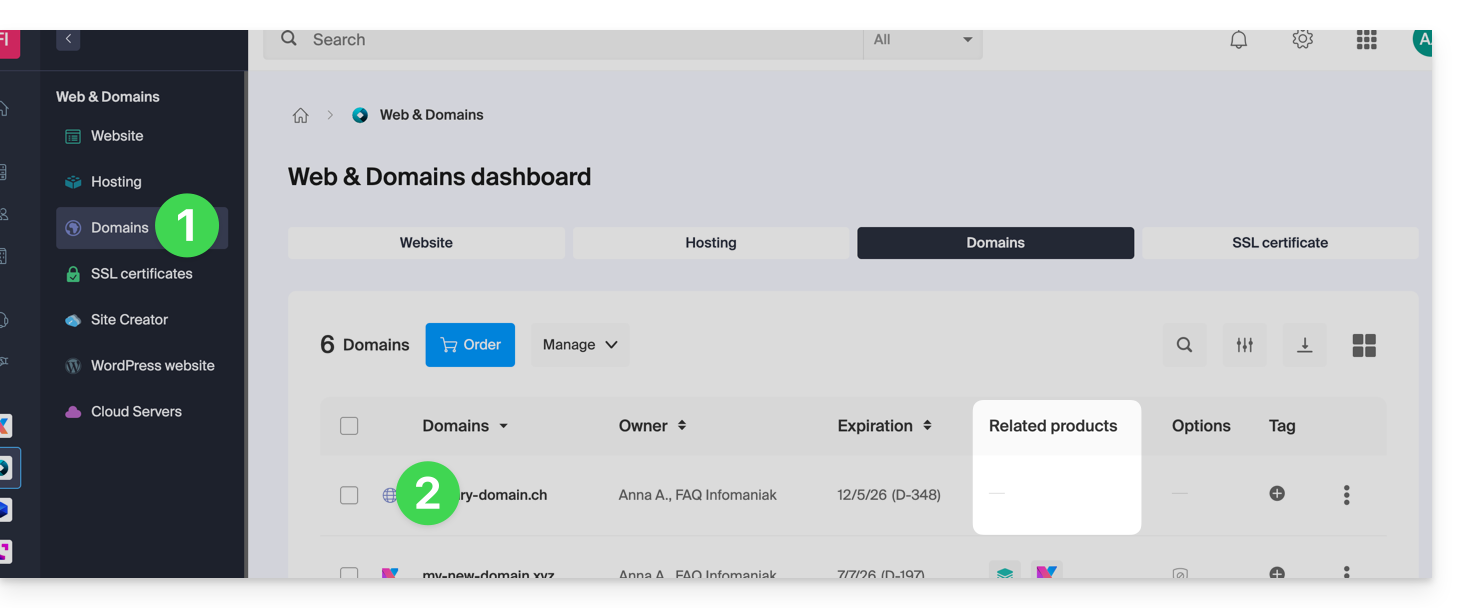
- It is necessary that no product is linked to the domain at the moment (visible in the column of linked products).
- Click on one of the shortcuts to Connect a service (mail or web):
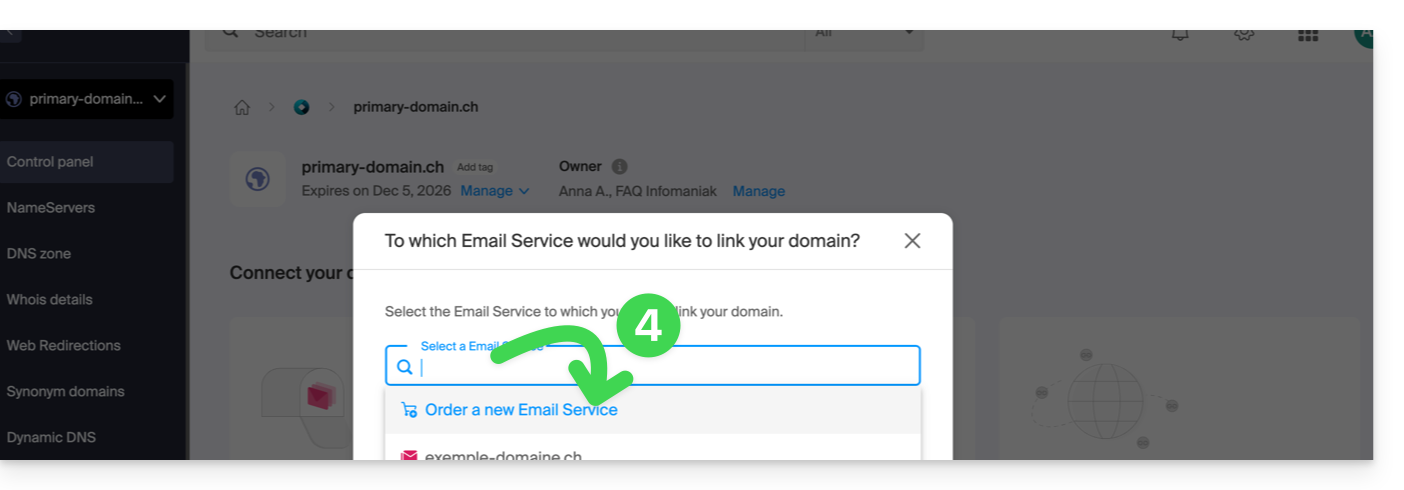
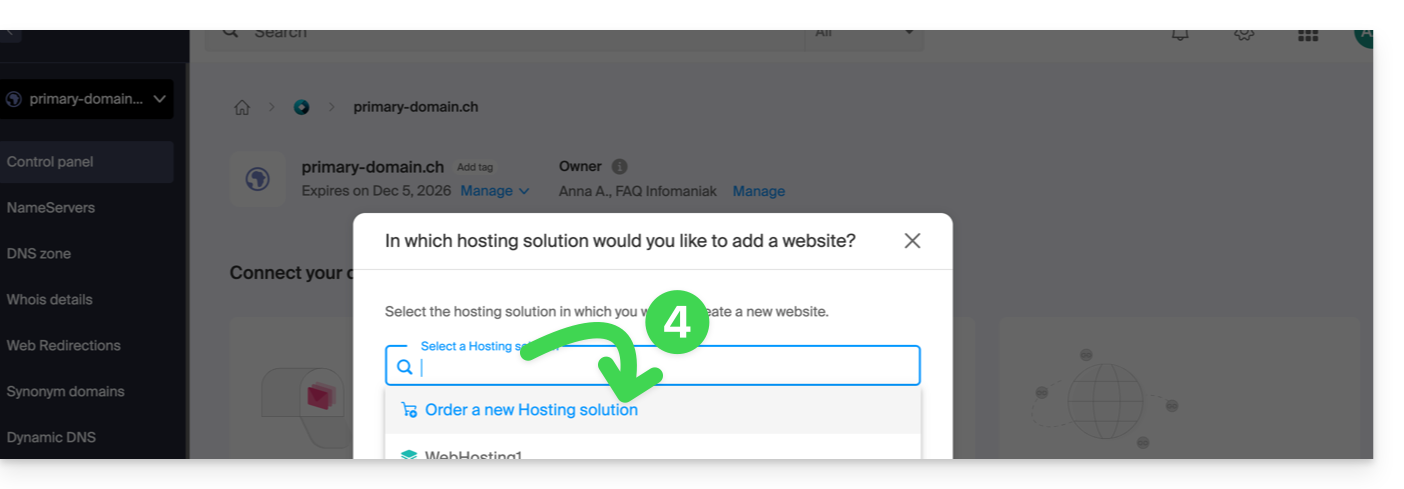
- In both cases, click on Order …:
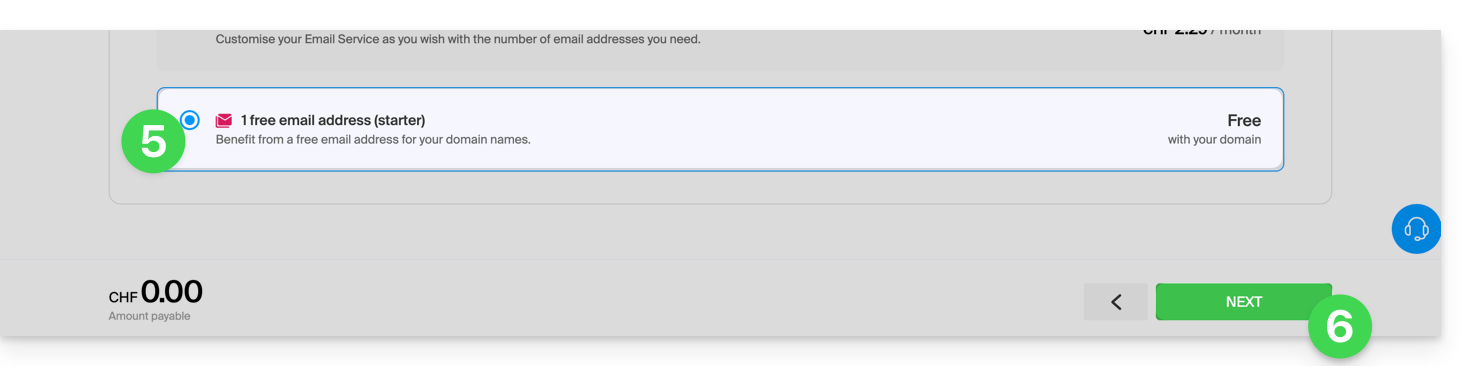
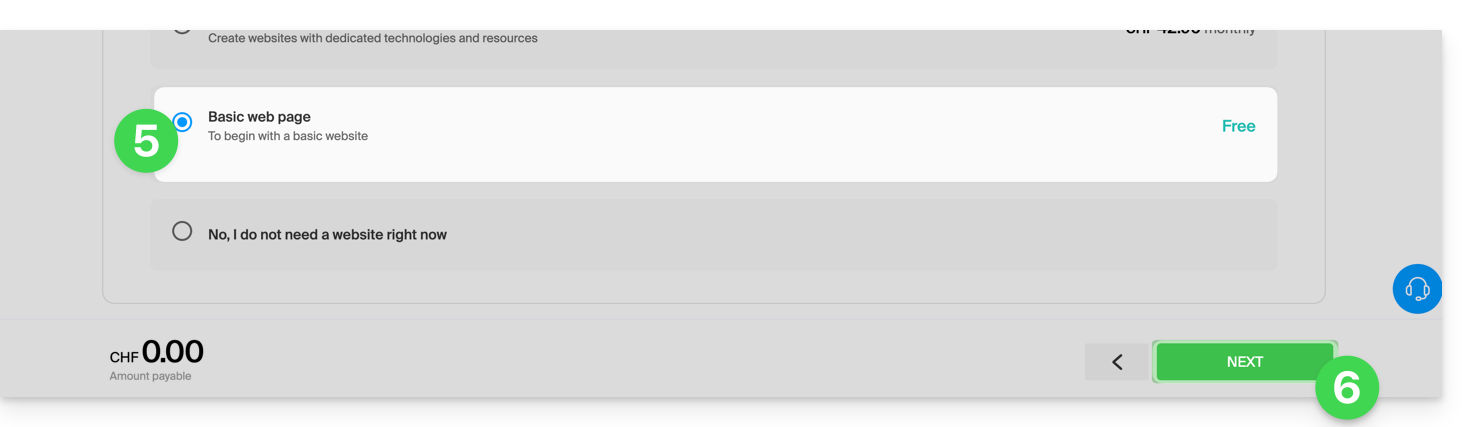
- You will be able to choose the corresponding free service (mail or web) and the next step will offer you the choice of the other (mail or web) if desired.
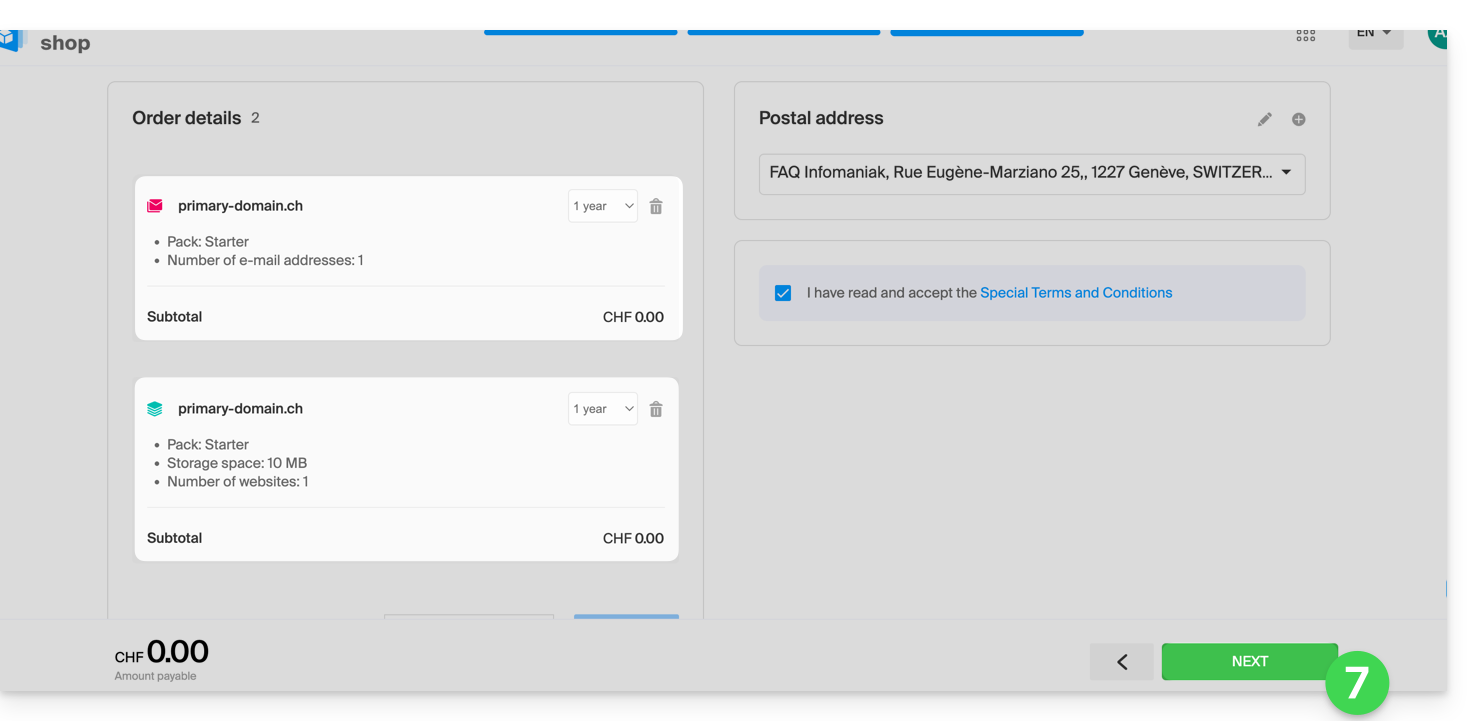
- Click at the bottom of the page to continue:
- Confirm the order:
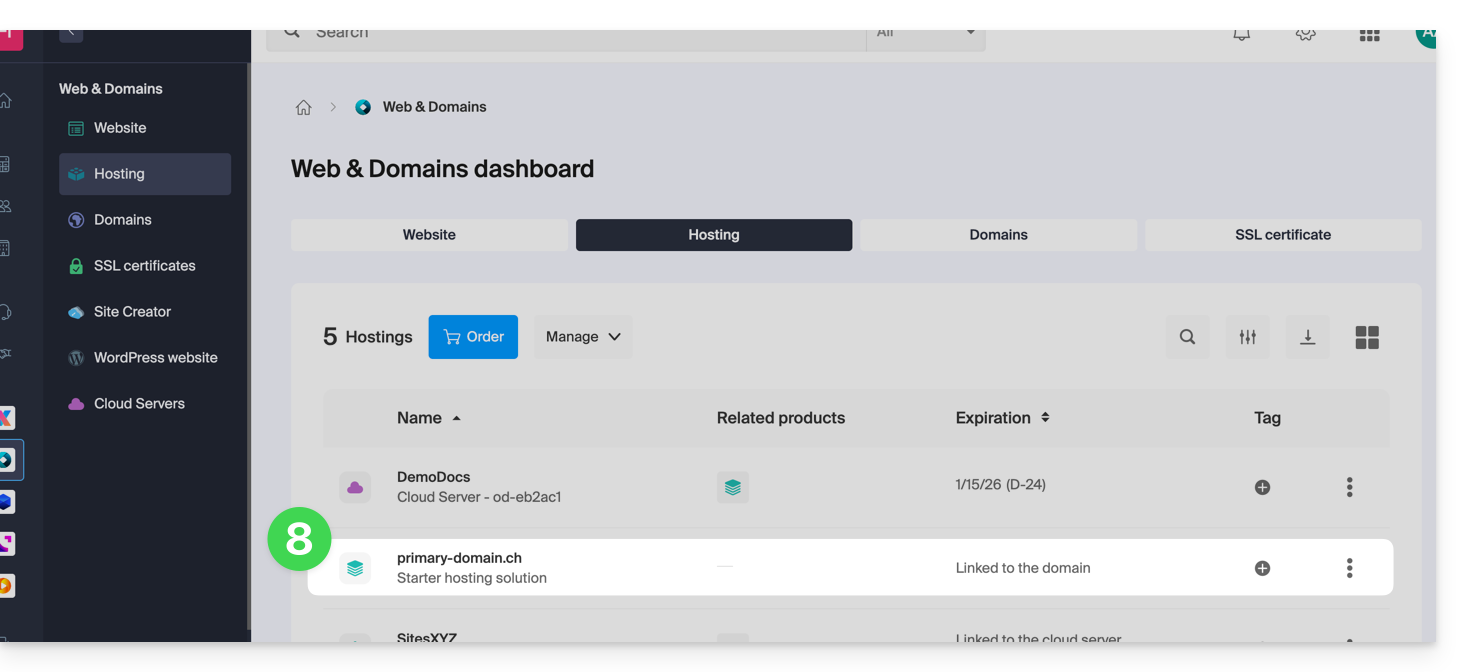
- Go back to your Infomaniak Manager to discover and use your new products:
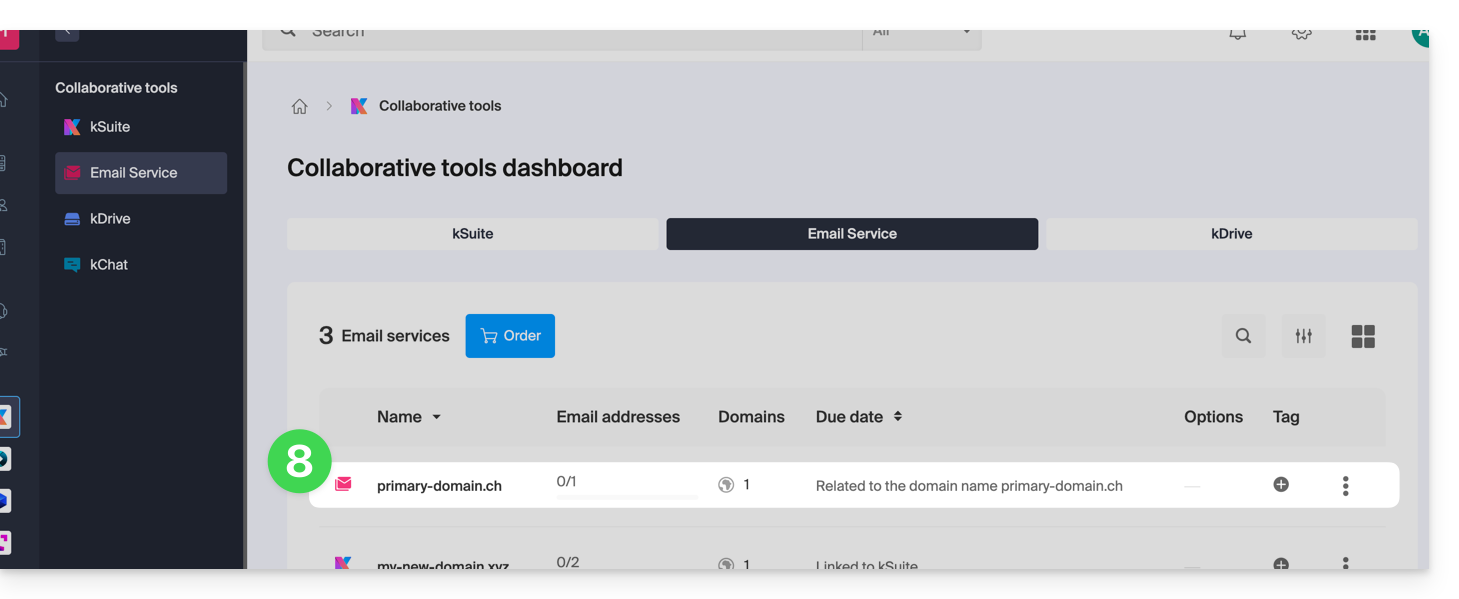
Use your Starter products
- Create the desired email address on your Starter Mail Service.
- To use the 10 MB web space and create a basic web page on your Starter Web Hosting, use:
- the page editor
- or the FTP file manager to manage your HTML pages
- or any FTP software/client with the classic FTP protocol
Upgrade a Starter offer
- Modify a Mail offer (click here).
- Modify a Web offer (click here).
In case of a problem with a Starter hosting
A Starter type web hosting does not offer IPv6. Be careful with AAAA records in the DNS zone of the concerned domain name that can prevent you from activating SSL; also refer to this other guide.
This guide explains how to convert a free Mail Starter offer to a more comprehensive and enhanced offer, for example, free or paid my kSuite.
Preamble
- By purchasing a domain name from Infomaniak, you get 1 free email address and a basic 10 Mo Web space: this is the Starter offer.
- In a few clicks, it is possible to upgrade these offers to unlock the limits and benefit from an enriched experience.
- To help you identify the Mail offer best suited to your needs, refer to this other guide.
Modify the Starter offer - Free Mail service
To upgrade the Starter offer:
- Click here to access the management of your product on the Infomaniak Manager (need help?).
- Click on the action menu ⋮ located to the right of the item concerned.
- Click on Modify the offer:
- Adjust if necessary the number of email addresses to add to the Mail service using the order assistant that will allow you to complete the offer change until the end.
This guide explains how to change an email address within a Mail Service in case you want to edit the spelling of the part coming before the at sign @ of your email address (= the prefix).
Preamble
- This can be useful for addresses “firstname.lastname” in case of a change of surname (marriage for example) or simply a spelling change.
- To rather modify the part of your email address coming after the at sign @, refer to this other guide.
Modify the prefix of an email address
To change from an email address of the form address1@domain.xyz …
… to a renamed address address2@domain.xyz…
… and given that it is not possible to simply modify the spelling of an email address, you need to:
… either create a mail alias
- then in case of using a software/email client, reconfigure your email settings
- and possibly in Mail modify the sending address in the Signature section
… or create a second email address with the new formulation
- then move the messages from one address to the other
- and delete the first address if necessary.
This guide explains how to connect the native Android messaging app to an email address hosted by Infomaniak.
Preamble
- Instead of the manual configuration below, it is recommended to use the Infomaniak Mail app (Android).
- The various services offered by Infomaniak are all compatible with the corresponding standard protocols (IMAP/SMTP for email, for example), therefore if you encounter a problem with third-party software, contact its publisher or a Partner and consult the support policy as well as section 11.9 of the Infomaniak Terms of Service.
Manually add the email address to the application
Prerequisites
- Create the email address in my kSuite or a Mail Service / kSuite.
- Create a password for the email address on the device you are going to configure.
To configure the messaging app:
- Open the native messaging app on your device.
- Click on Add an account.
- Select Other as the email type.
- Enter your email address.
- Select the Personal IMAP type.
- Check and complete the missing information.
- Complete the procedure.
- That's it, your email address is now configured in the app on your device.
Recommended settings
- Incoming IMAP server =
mail.infomaniak.com - IMAP port =
993(with SSL) - Outgoing SMTP server =
mail.infomaniak.com - SMTP port & encryption protocol and command/method to activate this protocol:
587+ STARTTLS - Username = full & complete email address ( ? )
- Password = the one generated for the email address you want to access
- Authentication required to send emails:
- It is activated in the SMTP settings of your application.
- Check "use the same parameters as the incoming server" or, depending on the software/email clients, enter a username (= full & complete email address) and the generated password.
Refer to this other guide if you are looking for information about other compatible messaging ports and protocols (SSL / TLS for example).
In case of a problem
Check that the Mail Service is configured optimally.
There is no need to contact Infomaniak Support if your email address works well outside of the application. The most common error concerns the use of an incorrect password. The troubleshooting guides help you resolve any potential issues:
- Refer to the solutions given in this other guide regarding email in general
- … and if your application no longer works at the sending level (disconnected or absent SMTP server, for example) or after a change of email password, refer to this other guide.
This guide explains how to change the location of certain folders automatically present in the directory of your Infomaniak email address.
Preamble
- The directory of a classic mailbox can contain certain special folders such as the one that stores emails…
- … once they have been sent (= "Sent messages" or "Sent").
- … for a few days before their final deletion (= "Trash" or "Bin").
- Everything is already configured so that by default it is synchronized between the different messaging interfaces around the globe.
- If you wish to make adjustments for various reasons, sometimes linguistic, then refer to the guide below to modify these special folders:
- drafts
- sent
- bin
- archives
- This allows you to personalize the synchronization of these folders with IMAP clients such as Outlook, Mail iOS, Thunderbird, Spark, etc.
- Note that this does not change the email retention period placed in some of these special folders.
Access from the Infomaniak Web Mail app
Prerequisites
- Have a valid access to the Web Mail app Infomaniak (online service ksuite.infomaniak.com/mail) to which the email address is attached.
- Have permission to modify special folders: it is possible that the Mail Service manager has removed this right from their admin account:
To modify these special folders:
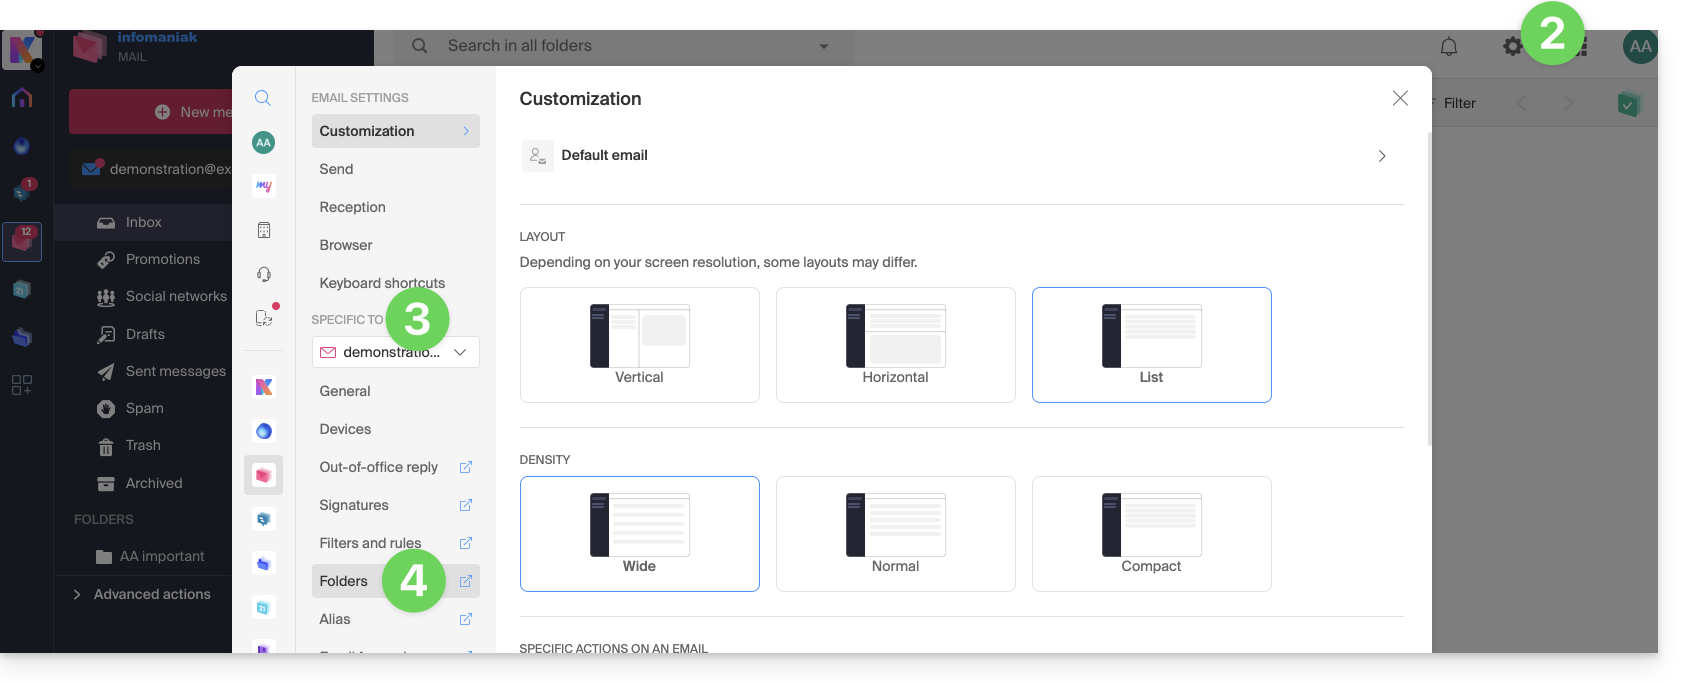
- Click here to access the Web Mail app Infomaniak (online service ksuite.infomaniak.com/mail).
- Click on the Settings icon at the top right.
- Check or select the email address concerned in the dropdown menu of the left sidebar.
- Click on Folders:
Access from the Mail Service
To access this option from a Mail Service:
- Click here to access the management of your product on the Infomaniak Manager (need help?).
- Click directly on the name assigned to the product concerned.
- Click on the email address concerned in the table that appears:
- Click on the tab/menu Folders:
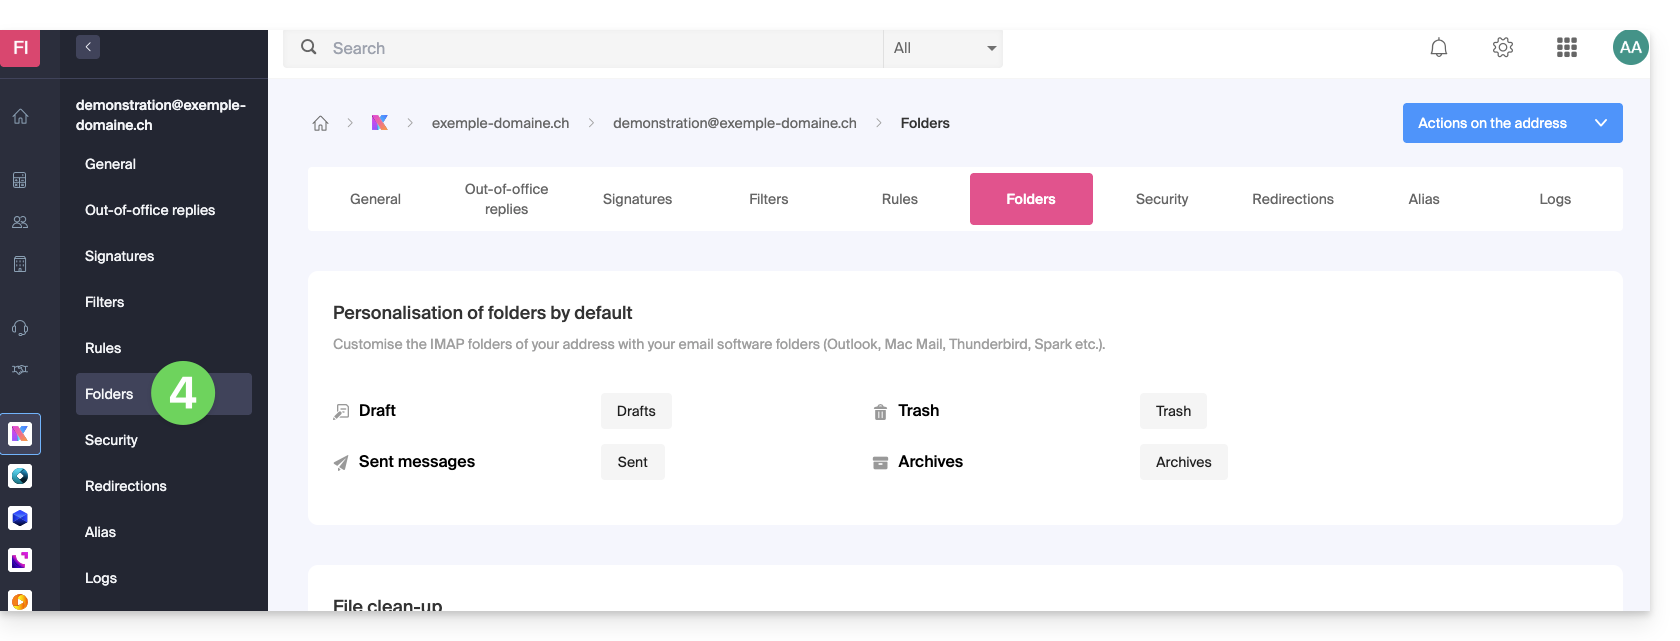
Configure special folders
For security reasons, folder management is confidential and reserved for users added to the email address concerned.
Select the desired folders to store by default your drafts, archives, sent messages, and your trash by clicking on the area to the right of each item: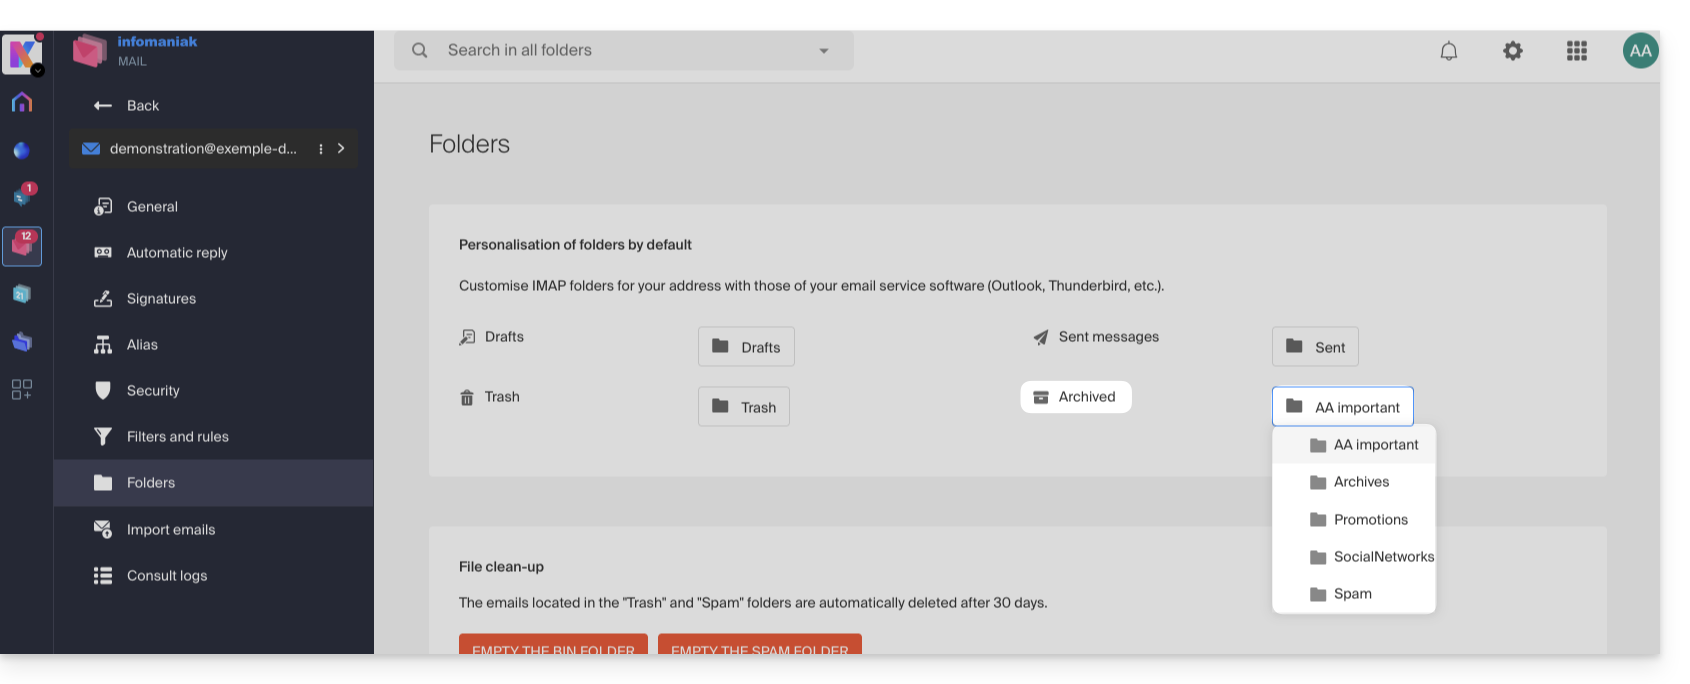
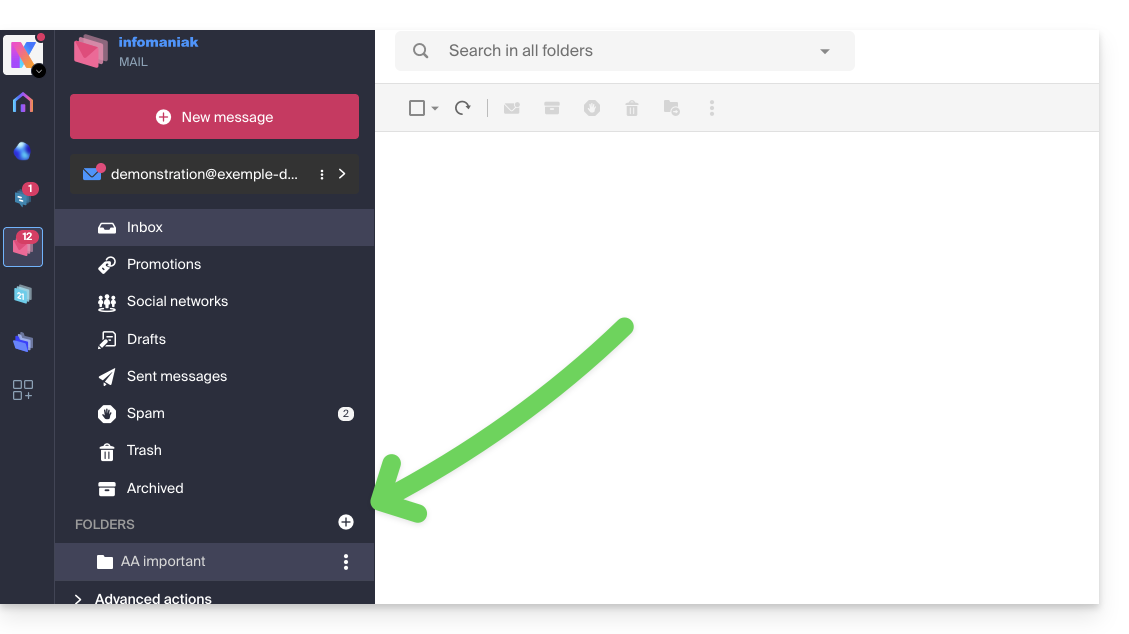
This will display the list of folders already present in the hierarchy of your mailbox.
- If necessary, create the desired folder in advance from Mail or an IMAP software:
To modify the default folders that receive spam and advertising messages & social network notifications, you need to do this directly from the Spam Filter and Advertising Filter sections: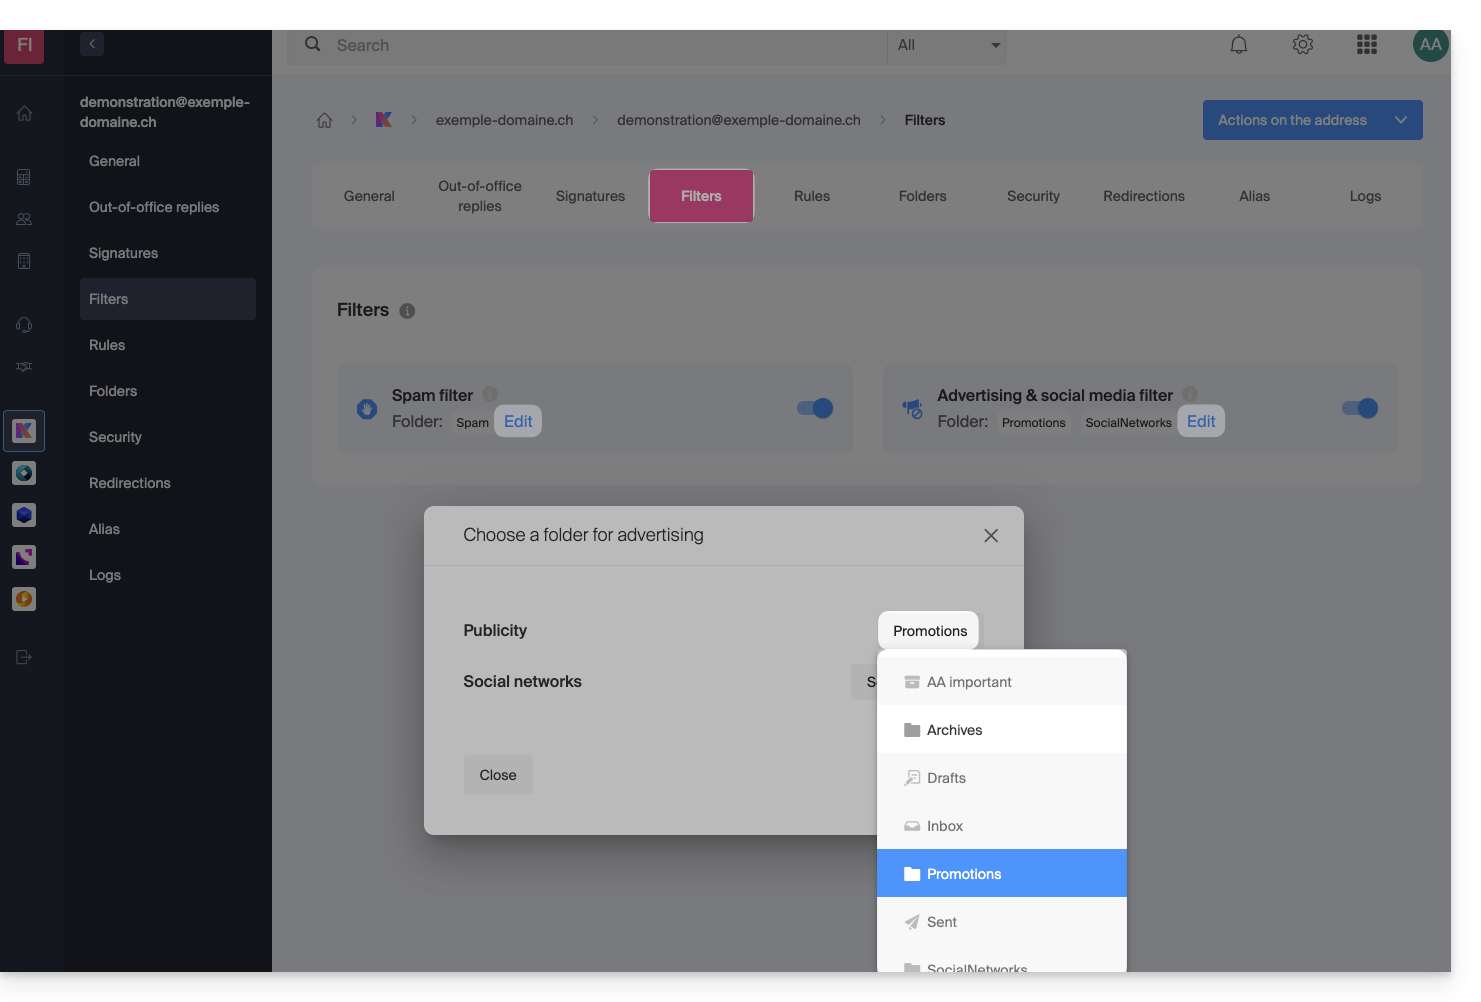
Alternative solutions for…
Some email software/clients also allow you to change the location of special folders. Refer to the official documentation of your application if needed. The following links are provided for information:
… Mozilla Thunderbird
Refer to this other guide if you are looking for information on assigning specific folders (such as Trash, Drafts, Sent Mail) to the IMAP account and synchronizing them with Infomaniak.
… Microsoft Outlook 2013
Refer to this other guide if you are looking for information on how the use of the IMAP protocol in the application can lead to a configuration where messages are stored only locally and not synchronized with the server, which contradicts the main goal of IMAP to maintain consistency across devices.
… Microsoft Outlook 2021
Refer to this other guide if you are looking for information on how to save sent emails in the “Sent” folder rather than “Sent Items” in the application.
… Apple iOS
Refer to this other guide if you are looking for information on how to configure the sent, draft, and deleted mail folders on an iPhone to be synchronized with the mail server, by accessing the advanced settings of the Mail app and selecting the corresponding folders on the IMAP server.
This guide explains how the Infomaniak Mail mobile app (for iOS/Android smartphones or tablets) works when you first open it after installation and during subsequent logins.
Start the setup assistant
When you first open the app, a step-by-step assistant suggests you choose the theme (pink or blue accent color) that you can also modify later: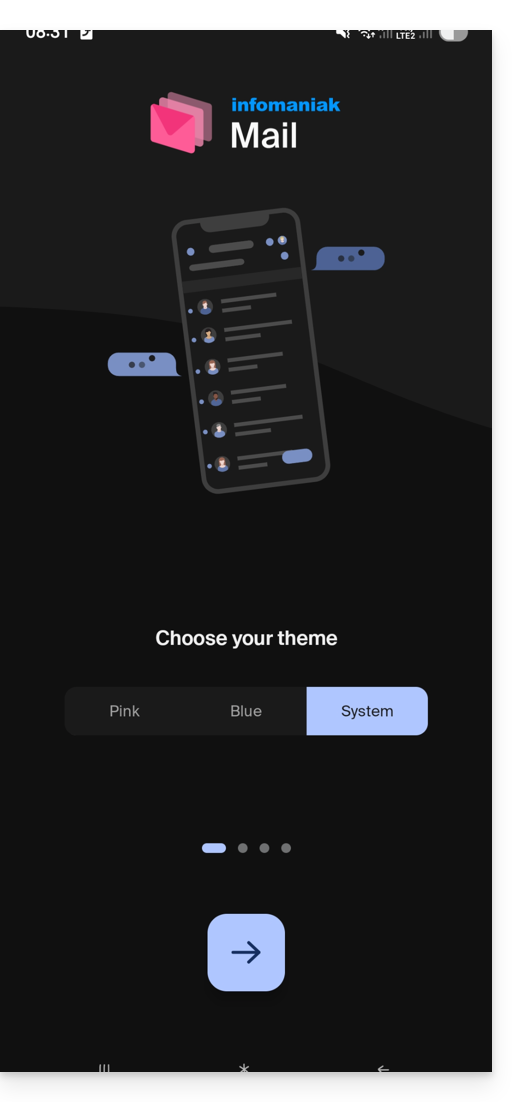
It also shows you the main ergonomic features available with the app (long press, swipe).
In the final step, you can…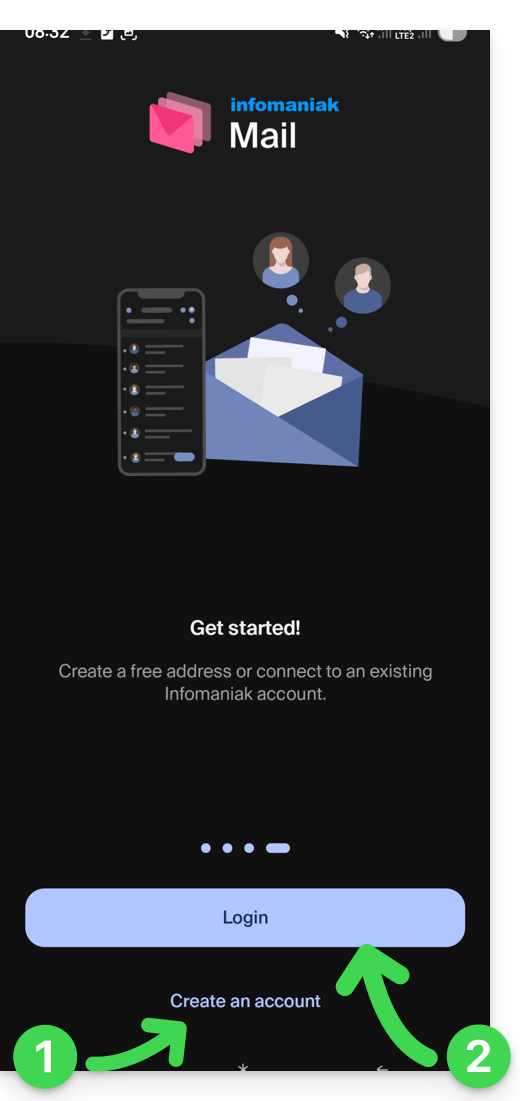
- … create an account, that is, get a new free email address…
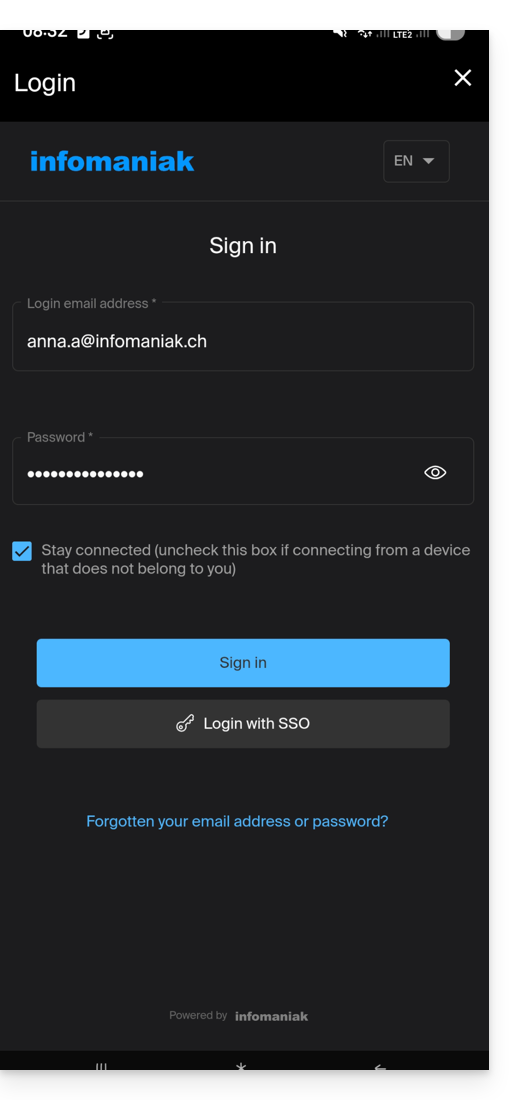
- … or simply log in to your Infomaniak account with your usual credentials (your email address to log in to Infomaniak):
Multiple email addresses
Once logged in, after two-factor authentication (2FA) is completed, you still need to authorize access to your device's contacts and notifications:
You will then find all the email addresses already linked to Infomaniak Mail that you used to check on your web browser via the address ksuite.infomaniak.com/mail.
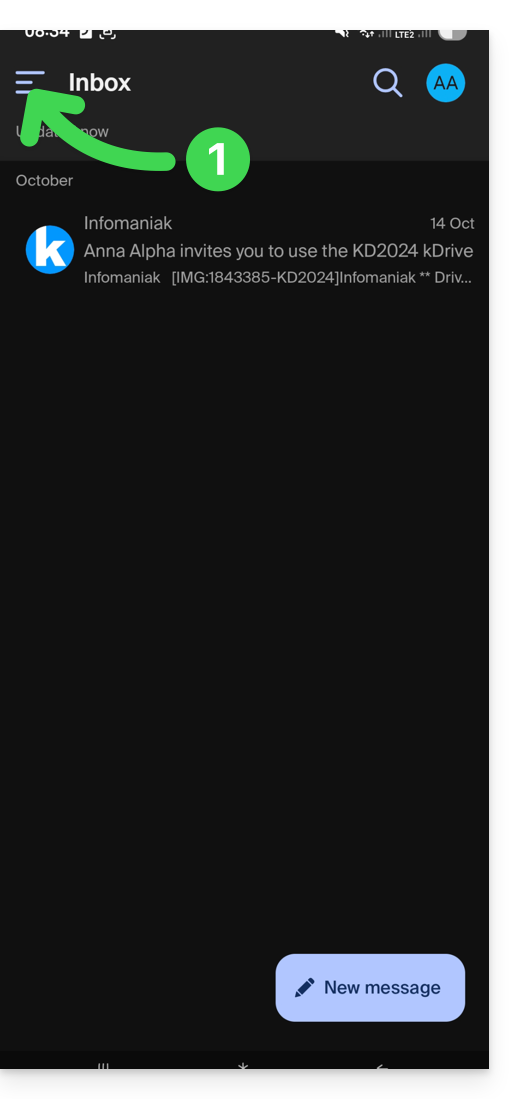
You can switch from one address to another…
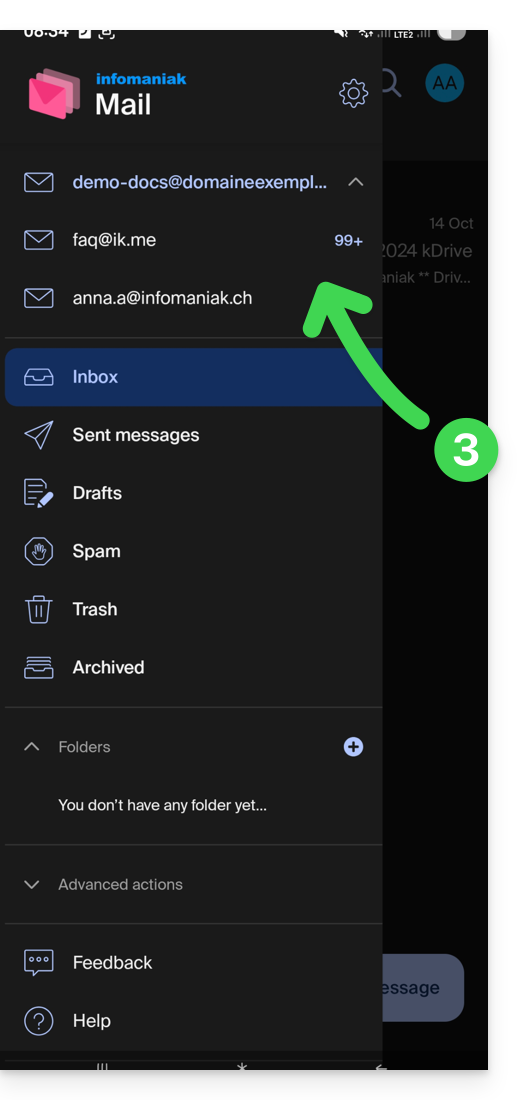
- … by tapping at the top left of your inbox:
- … then on the chevron to the right of your displayed email address:
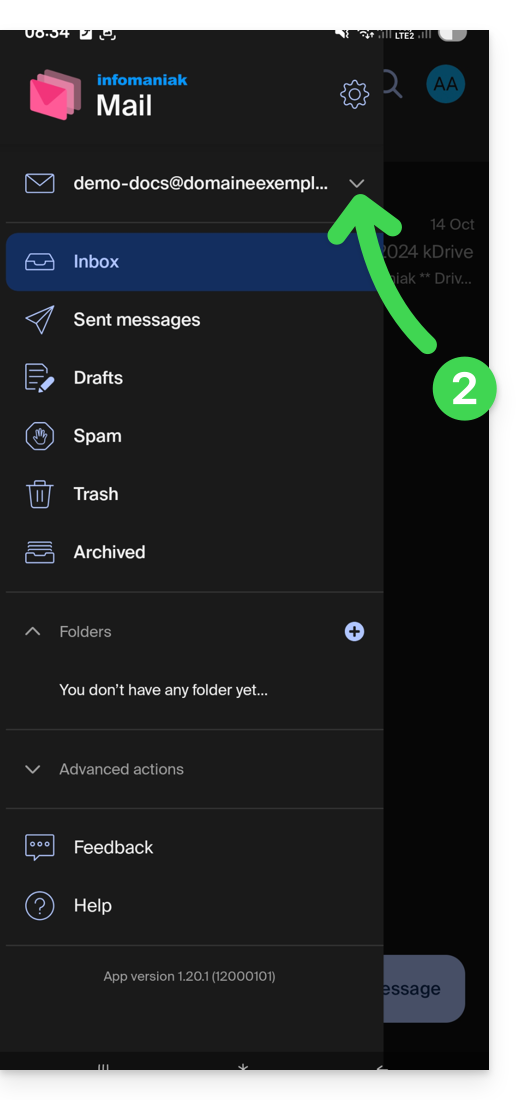
- … then on the address to view:
To add another one, refer to this other guide.
To remove one, refer to this other guide.
Multiple Infomaniak accounts
Imagine that in addition to your personal Infomaniak account with your favorite email addresses linked, you get a login from your employer to a user account with different company email addresses within this professional account…
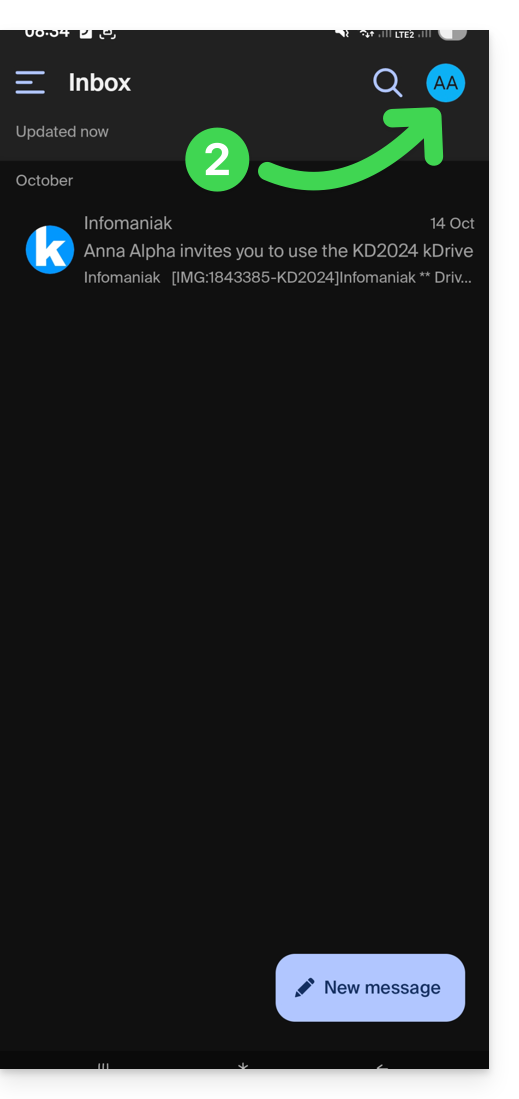
To add the additional Infomaniak account:
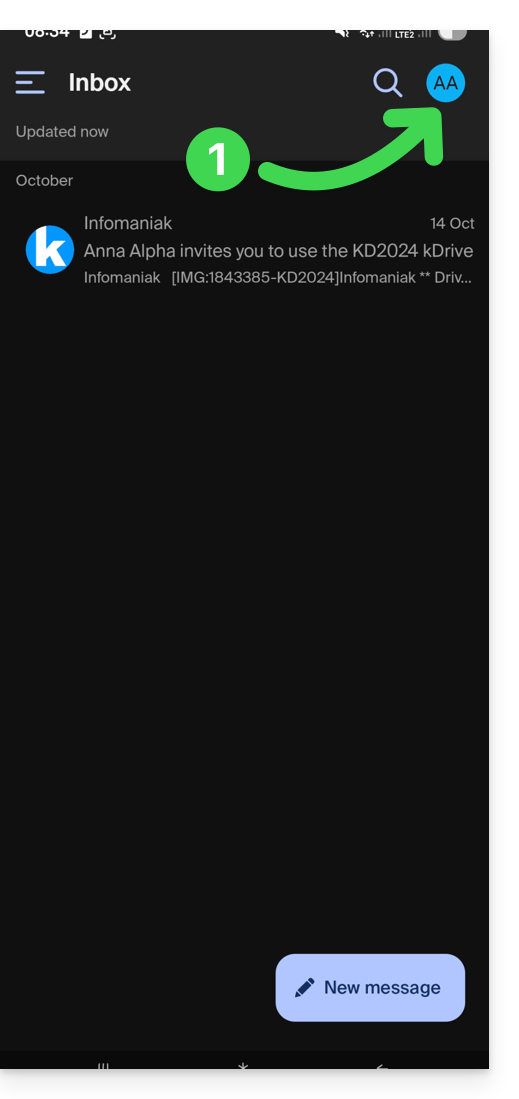
- Tap at the top right of the inbox:
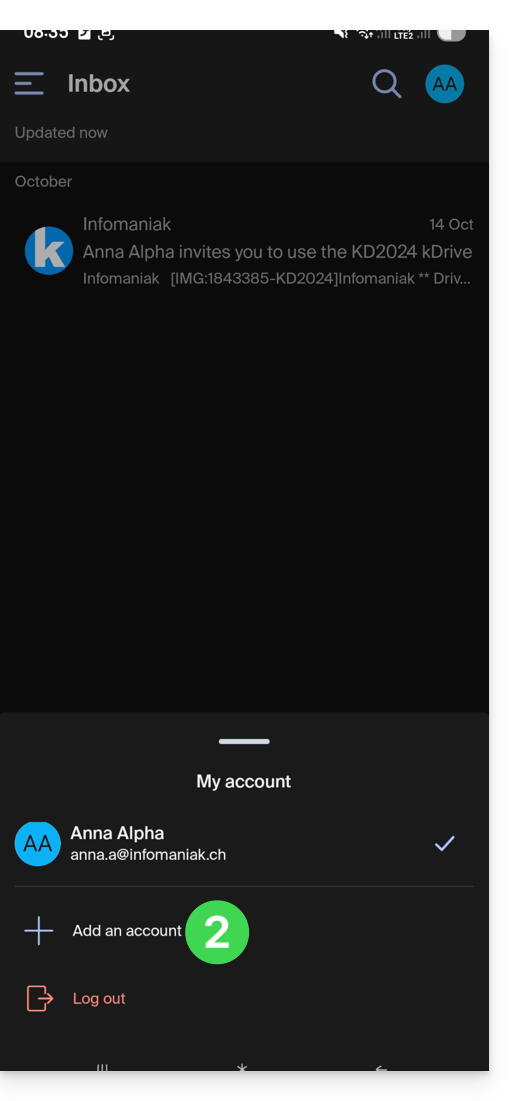
- Press Add an account to log in to the desired Infomaniak user account:
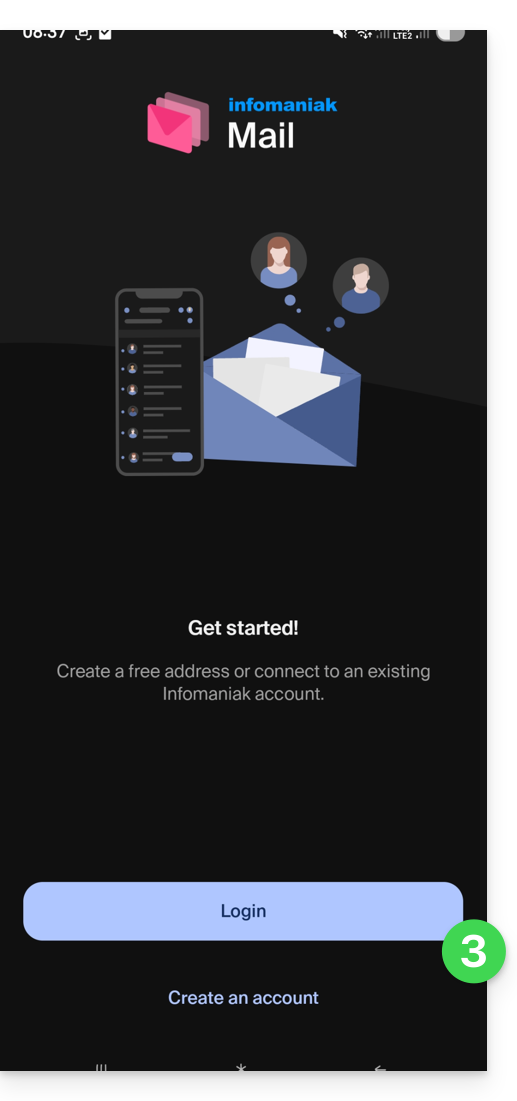
- Press the button to enter the Infomaniak account login information:
To easily switch from one user account to another:
- Click on one or the other of the attached user accounts, and thus view the email addresses attached within these accounts:
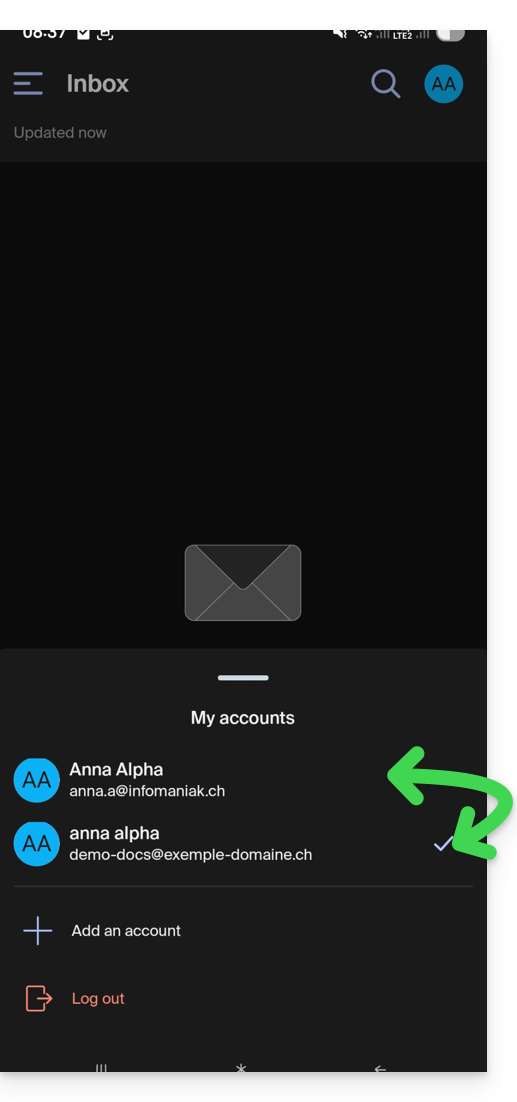
To detach an attached Infomaniak account in the application and no longer be able to view the email addresses attached within this account, simply…
- … go there one last time
- … then press the user menu at the top right:
- … to then log out at the bottom of the screen:
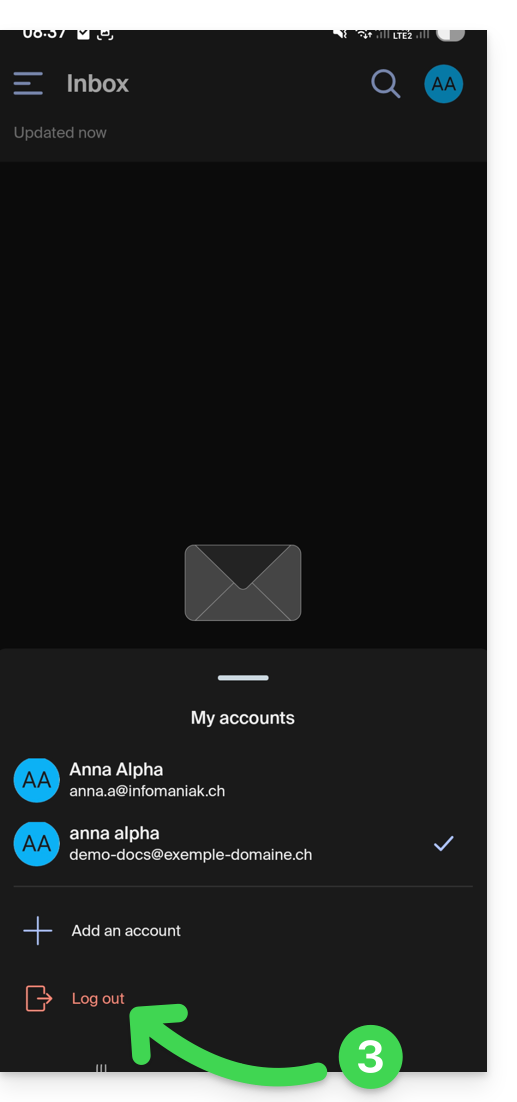
You will be automatically switched to one of the remaining accounts.
This guide explains how to connect the desktop app Thunderbird (desktop application on macOS / Windows / Linux) to an email address hosted by Infomaniak.
Preamble
- The different services offered by Infomaniak are all compatible with the corresponding standard protocols (IMAP/SMTP for email, for example), therefore if you encounter a problem with third-party software, contact its publisher or a Partner and consult the support policy as well as article 11.9 of the Infomaniak TOS.
Add the email address to the application
Prerequisites
- Create the email address in my kSuite or a Mail Service / kSuite.
- Create a password for the email address for the device you are going to configure.
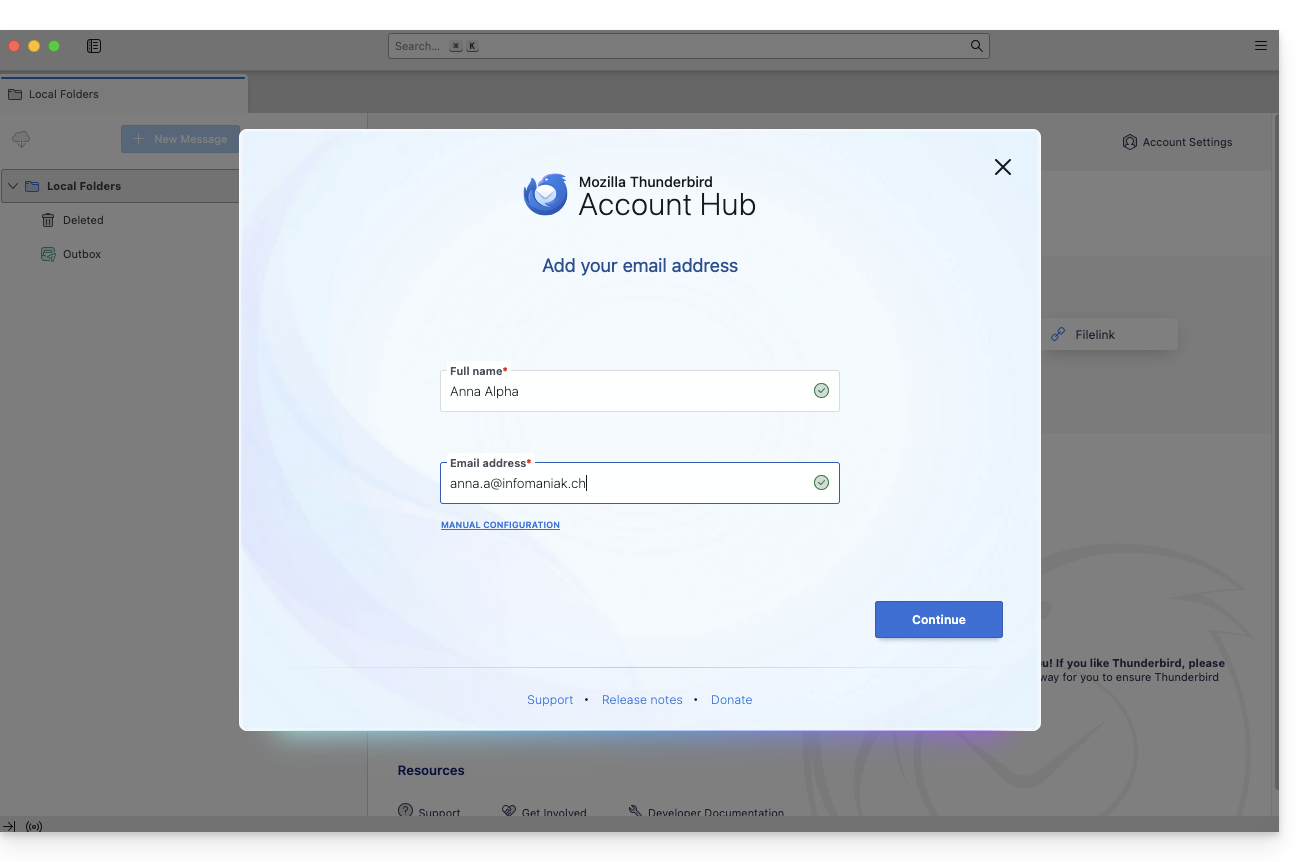
To configure the email application:
- Download the latest version of Thunderbird.
- Open the application.
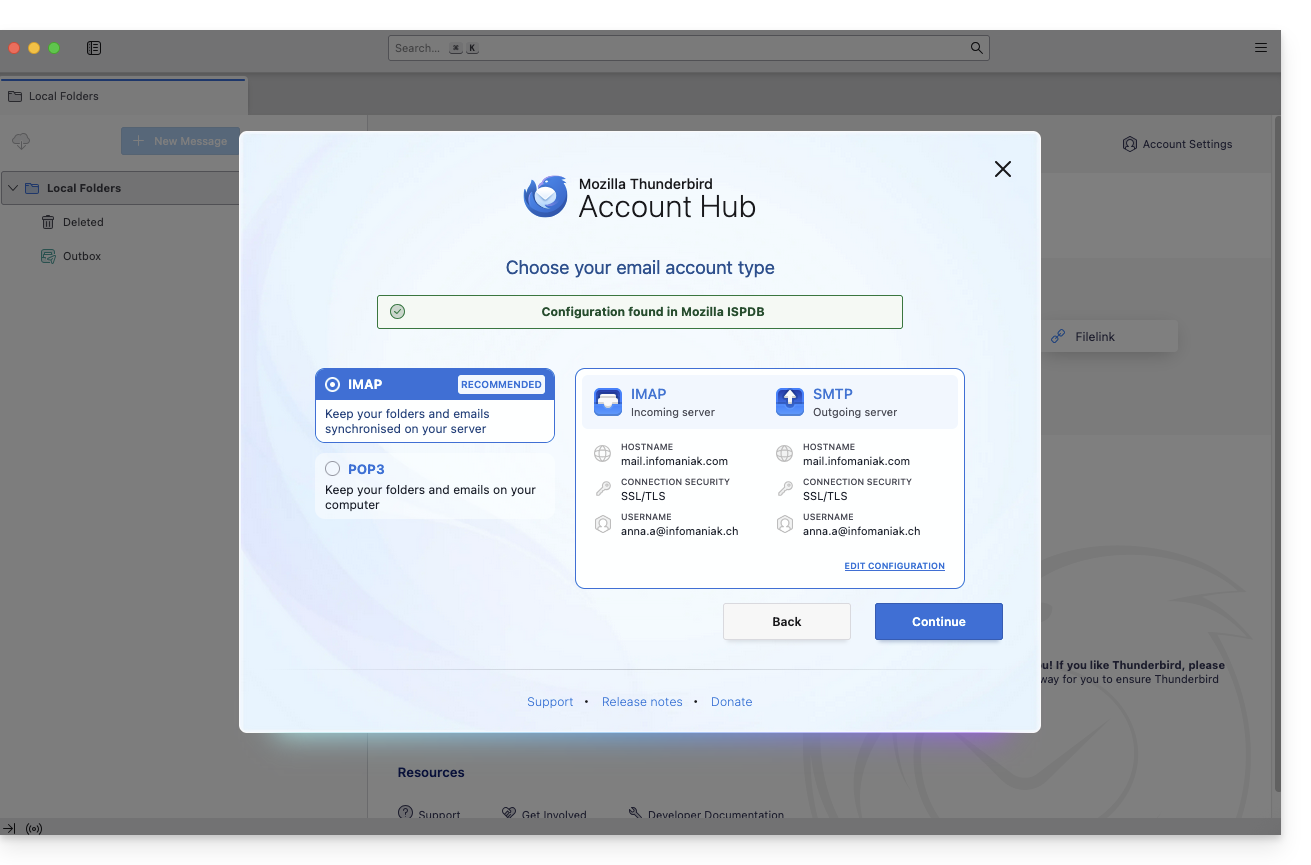
- Enter your account information and click on Continue:
- Stay in IMAP and click on Continue:
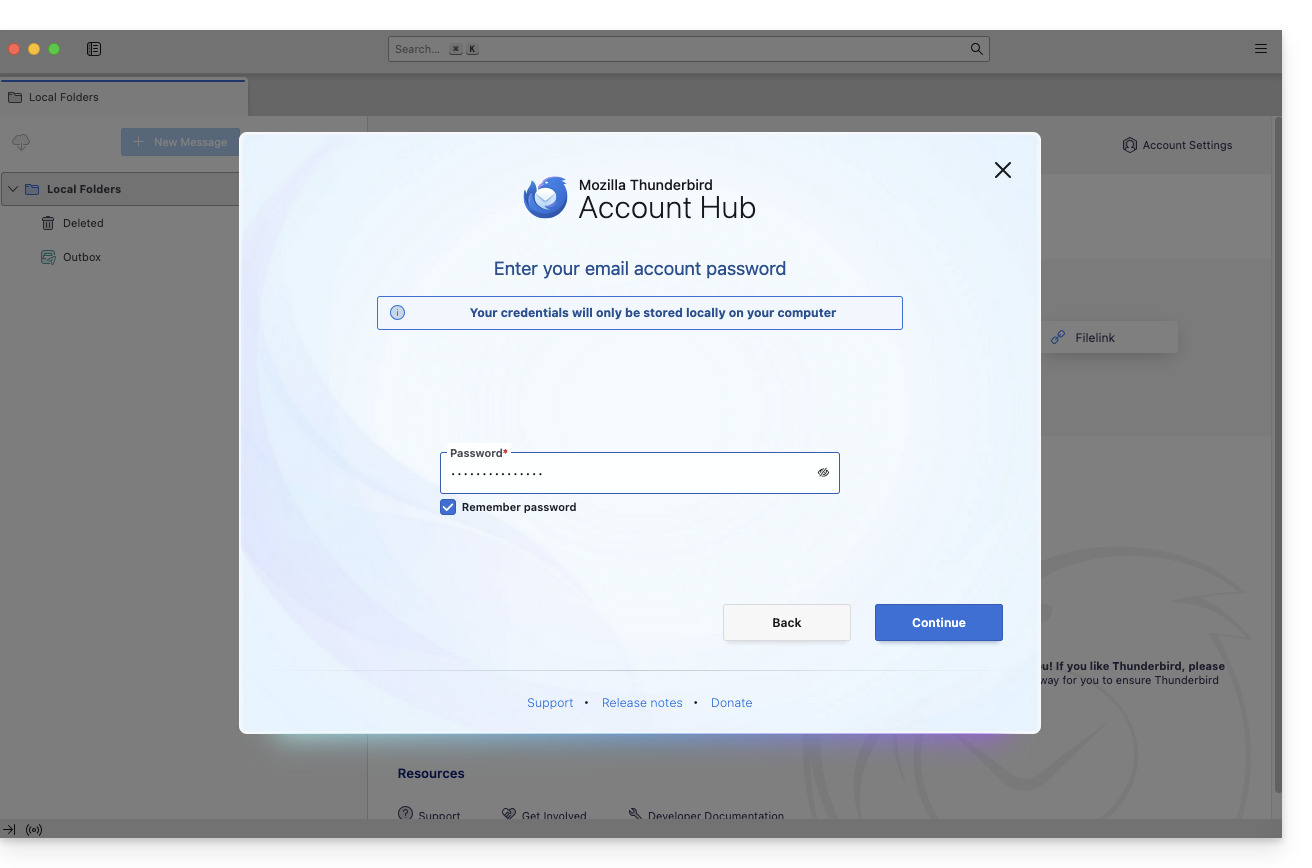
- Enter your password and click on Continue:
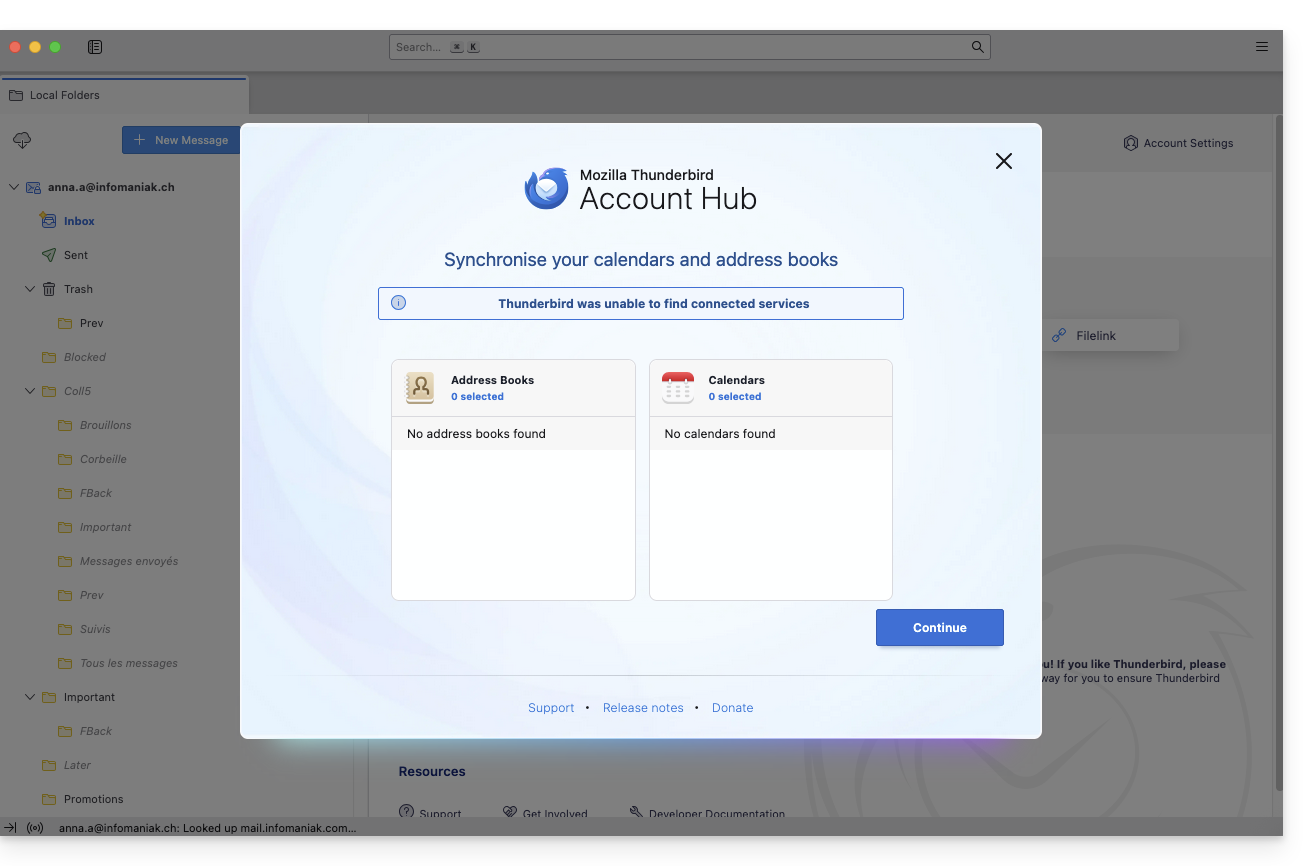
- Click on Continue:
- The summary of your registration appears, click on Finish to add the address (or configure other services from there):
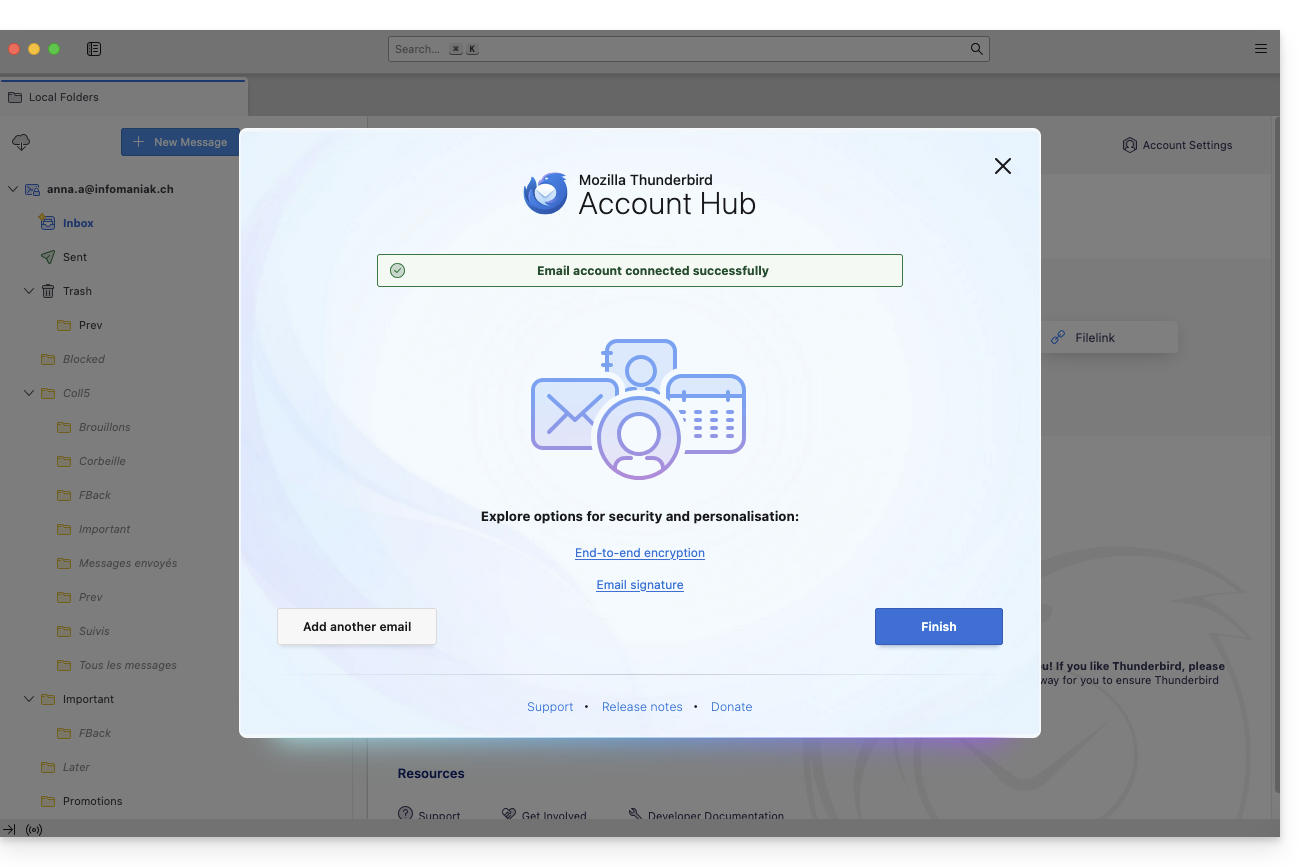
- There you go, your email address is now configured in the application:
Recommended settings
- Incoming IMAP server =
mail.infomaniak.com - IMAP port =
993(with SSL) - Outgoing SMTP server =
mail.infomaniak.com - SMTP port & encryption protocol and command/method to activate this protocol:
587+ STARTTLS - Username = full & complete email address ( ? )
- Password = the one generated for the email address you want to access
- Authentication required for sending emails:
- It is activated in the SMTP settings of your application.
- Check "use the same parameters as the incoming server" or, depending on the software/email clients, enter a username (= full & complete email address) and the generated password.
Refer to this other guide if you are looking for information about other compatible messaging ports and protocols (SSL / TLS for example).
If you encounter any issues
Check that the Mail Service is configured optimally.
There is no need to contact Infomaniak Support if your email address works well outside of the application. The most common error concerns the use of an incorrect password. The troubleshooting guides help you resolve any potential issues:
- Refer to the solutions provided in this other guide regarding email in general.
- This other guide is more specifically about Thunderbird.
… and if Thunderbird no longer works since a change of email password, refer to this other guide.
This guide details the 'bogus HELO' email error to help you avoid it.
When and why does this error occur?
To put it simply, the SMTP protocol (used to send emails) has several phases, the first of which involves the sender announcing who they are via a command called HELO, which must be followed by a valid address.
If you receive errors mentioning bogus HELO, it means that parameters (used by the person trying to write to you or by the software you are trying to use) are not compliant with the RFC (point 4.1.1.1). This prevents the spread of viruses and spam.
Infomaniak, for example, refuses any message from a mail server that would be named 'server' instead of having a full name like 'server.domain.xyz' (= FQDN, 'Fully Qualified Domain Name' or 'fully qualified hostname'). An IP address cannot simply define the server. Examples of rejection:
The mail service of the remote server has not been configured with a valid FQDN:
220 mta-gw1.infomaniak.ch ESMTP Infomaniak Network Mail Servers;HELO 127.0.0.1
or the mail server is not configured to use a real FQDN:
220 mta-gw1.infomaniak.ch ESMTP Infomaniak Network Mail Servers;HELO [127.0.0.1]
or the mail server is not configured to use a real FQDN:
220 mta-gw1.infomaniak.ch ESMTP Infomaniak Network Mail Servers;HELO localhost
or the mail server returns a host that is not in canonical form (FQDN):
220 mta-gw1.infomaniak.ch ESMTP Infomaniak Network Mail Servers;HELO www
or it is on a list of banned HELOs at Infomaniak:
220 mta-gw1.infomaniak.ch ESMTP Infomaniak Network Mail Servers;HELO fakedomain.xyz
This will always result in an error:
250 mta-gw1.infomaniak.ch Hello, pleased to meet youMAIL FROM: user123@infomaniak.ch250 2.1.0 user123@infomaniak.ch... Sender okRCPT TO: user123@infomaniak.ch550 5.7.1 user123@infomaniak.ch... Access denied - bogus HELO [1] …
Check the configuration of your mail server so that it uses a correct HELO parameter when establishing the SMTP connection.
This guide presents the operation of RBLs, the questionable policy of some of them, and the means to resolve a potential email block.
Preamble
- The RBL (Realtime Blackhole List) or DNSBL (Black List DNS) are lists containing addresses / IP / provider names / servers, reputed to be major spam senders.
- These are often large generalized blacklists, allowing to spot messages considered as unwanted and those who send them, that some providers maintain (smtpcheck, uceprotect: non-exhaustive list)…
Adding the email address to the RBL
When an email address is identified as belonging to an unwanted sender, it is blocked to prevent the receipt of unsolicited mail. A block in the RBL does not expire. Addresses will be listed indefinitely.
If you receive a message indicating that your email address is blocked by RBL, this means that the Infomaniak security system has detected suspicious or unwanted activities associated with this email address. This can include mass sending of unsolicited mail, participation in phishing campaigns or other malicious behaviors.
Resolving an email block (RBL)...
...if the error mentions your address and RBL
If you get errors of the type
anna.a@domain.xyz is rbl blacklisted - http://chk.me/rbl
when sending an email and you think it is a false positive, contact Infomaniak support.
To avoid having your email address blocked by the RBL blocking system in the future, follow best practices for using email:
- Do not send unsolicited mail or mass messages to unknown recipients.
- Regularly sort the list of recipients used.
- Do not participate in phishing or cybercrime activities.
- Ensure the best level of security where your emails are used:
- strong password
- up-to-date software
- up-to-date operating system (iOS, Android, Windows, macOS, etc.)
- up-to-date associated domain configuration
... if the error mentions an organization like Sorbs or Barracuda
If you get errors of the type
554 5.7.1 Client host blocked using sorbs
or similar:
- Follow the procedure of the mentioned organization (e.g. http://www.barracudacentral.org) to have your address removed from the list.
- Temporarily change your Internet service provider or connection method - WIFI vs 4G/5G - to send your messages.
- Inform your correspondent and their email provider to take the necessary steps and/or to stop using an unreliable RBL.
- Wait a few hours and try again.
Fewer and fewer professionals (ISP, hosts, etc.) use service providers like Backscatterer / UCEPROTECT, which are primarily for profit, and there are many other very effective lists, such as ABUSIX or SPAMCOP, which are well-maintained and whose real goal is to fight spam, one of the priorities of Infomaniak.
This guide provides the most common IMAP server addresses. These can be used to perform the copy of the content of your old email addresses to your Infomaniak email address.
If necessary, do not hesitate to contact your previous email provider to ask for the mail server to specify.
IMAP server addresses
| Provider | IMAP Hostname / Server |
|---|---|
| 1&1 (IONOS) | imap.1and1.fr |
| 9 Business | imap.9business.fr |
| 9 Telecom | imap.neuf.fr |
| Alice | imap.aliceadsl.fr |
| Altern.org | imap.altern.org |
| AOL | imap.fr.aol.com |
| Bouygues Telecom | imap4.bbox.fr |
| Caramail (GMX) | imap.gmx.com |
| Cegetel | imap.cegetel.net |
| Club Internet | imap.club-internet.fr |
| Free | imap.free.fr |
| Freesurf | imap.freesurf.fr |
| Gawab | imap.gawab.com |
| Gmail (Google) | imap.gmail.com |
| GMX | imap.gmx.com (.net, .ch…) |
| La Poste | imap.laposte.net |
| NetCourrier | mail.netcourrier.com |
| Noos | imap.noos.fr |
| Numericable | imap.numericable.fr |
| o2switch | qqch.o2switch.net (see the welcome email from o2switch to obtain the exact server) |
| Online.net | imap.online.net |
| Orange | imap.orange.fr |
| OVH | ssl0.ovh.net |
| Proton Mail | copying to Infomaniak does not seem/ no longer possible |
| Skynet (Belgacom) | imap.skynet.be |
| Tele2 | imap.tele2.com |
| Telenet | imap.telenet.be |
| Videotron | imap.videotron.ca |
| Voila.fr | imap.voila.fr |
| Yahoo | imap.mail.yahoo.com |
| Hotmail (Microsoft) | imap-mail.outlook.com |
This guide explains how to add or modify a DKIM record in a DNS zone (domain/subdomain) managed on the Manager Infomaniak.
Preamble
- The DKIM (Domain Keys Identified Mail) protocol authenticates your emails with a unique digital signature.
- It ensures that your messages have not been modified during transit and certifies the sender's identity, thus preventing spoofing by spammers.
- DKIM is enabled by default for all Mail Services whose DNS zone is managed at Infomaniak.
- All your emails are automatically signed, whether they are sent from the app Mail Infomaniak or the email software/client of your choice.
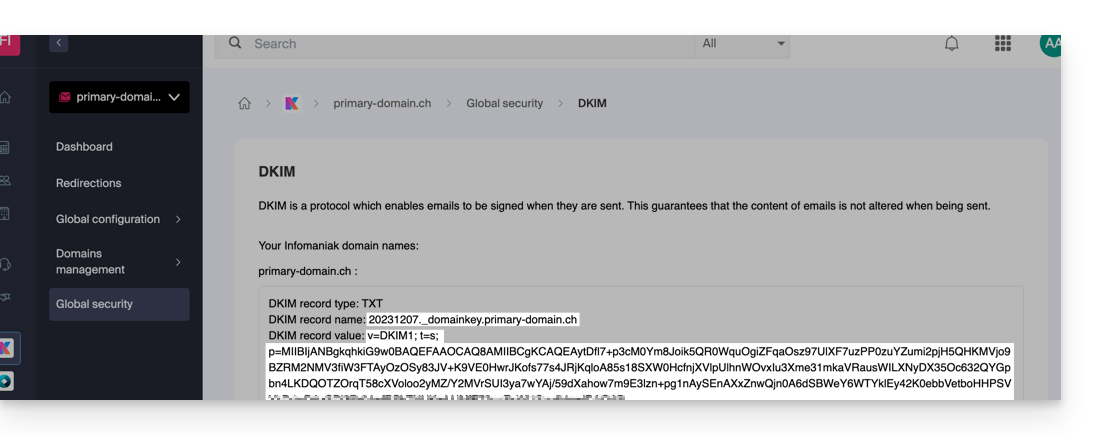
Check the DKIM record
If you have a Mail Service with Infomaniak, the simplest way is to go to the Global Security tool to easily verify and correct certain problematic records.
And when your domain name is managed elsewhere, you will find the DKIM record to add in the DNS zone: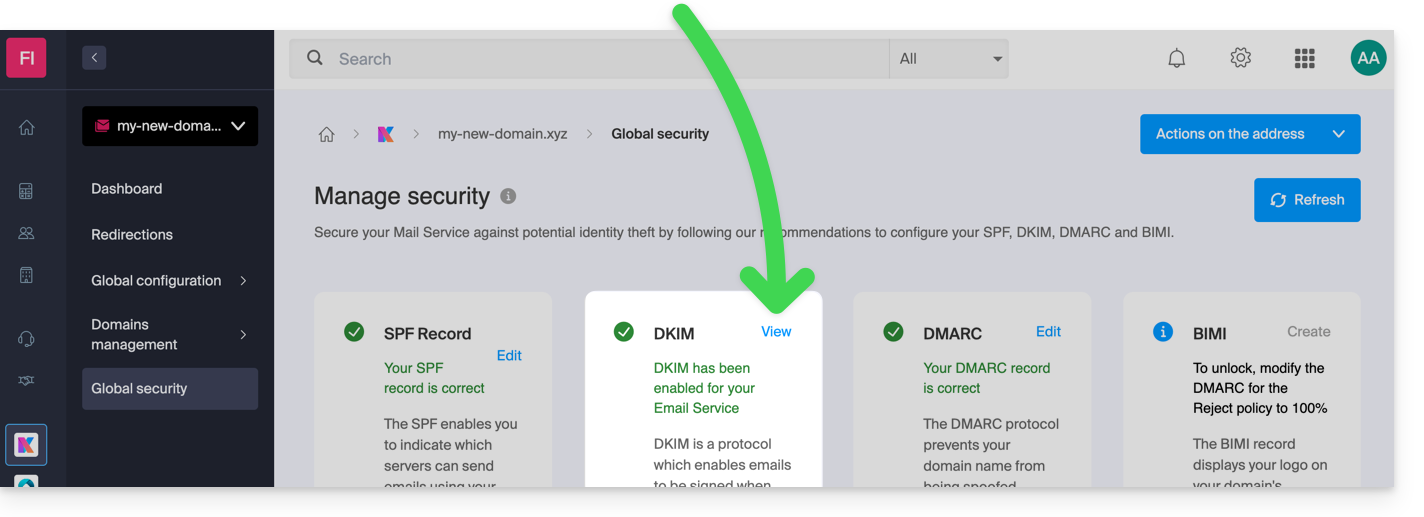
Manually modify the DNS zone (not recommended)
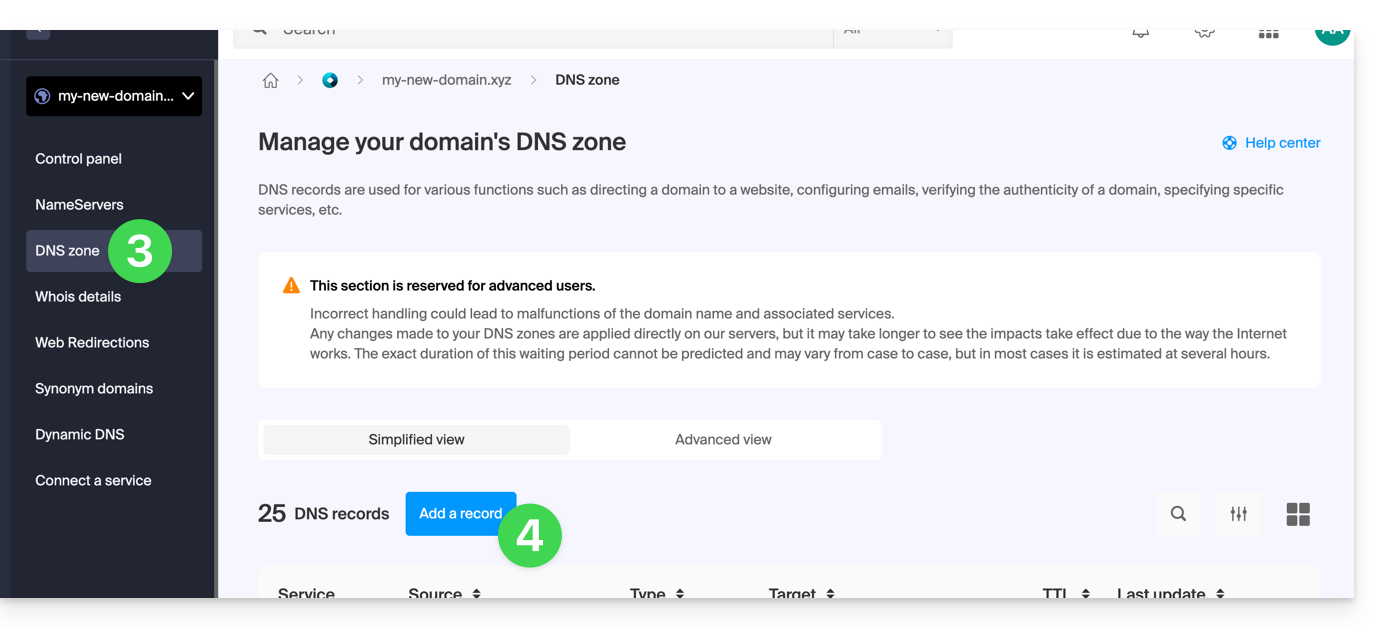
To manage this type of record in a DNS zone:
- Click here to access the management of your domain on the Infomaniak Manager (need help?).
- Click directly on the name assigned to the domain in question.
- Click on DNS Zone in the left sidebar.
- Click the button to add a record:
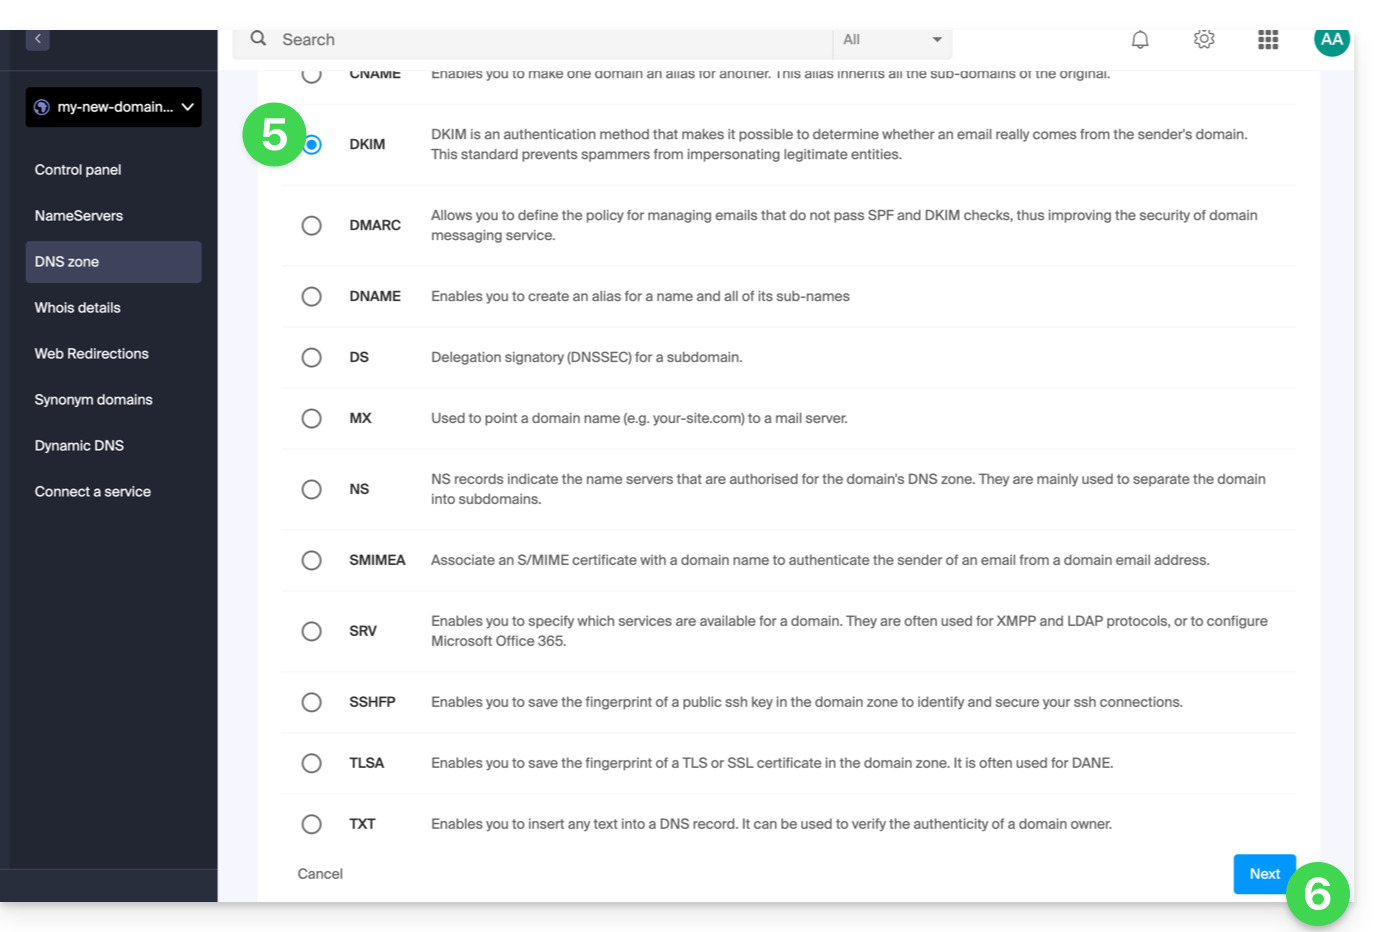
- Click the radio button DKIM to add a record.
- Click the Next button:
- Enter the DKIM values required for your DNS zone.
- Leave the default value for the TTL.
- Click the Save button:

Add multiple DKIM
You can have multiple DKIM records on your domain/subdomain without limit, unlike DMARC or SPF, as long as your DNS host allows it.
If you use multiple third-party email providers, for example the ERP Odoo, it is necessary to add a DKIM for Odoo in addition to Infomaniak's.
Use unique DKIM selectors to avoid conflicts with existing records.
This guide explains which DKIM to add to secure Infomaniak messaging if it revolves around a domain name whose DNS is that of Cloudflare.
Preamble
- If you manage your emails at Infomaniak, as well as the associated domain name, but the DNS management is with Cloudflare, then you need to add the DKIM on the Cloudflare interface.
Add a DKIM on Cloudflare
Prerequisites
- Refer to this other guide to allow you to display the DKIM corresponding to your Infomaniak messaging.
- Display the DKIM to be able to copy-paste it. Example:
Follow the procedure below to correctly activate DKIM, thereby improving the security and deliverability of emails for the domain in question:
- Click here to access your Cloudflare account.
- Select the domain in question.
- In the DNS section, search for and delete any NS records for "
_domainkey" pointing to Infomaniak. - Click the Add a record (
Add record) button to open the input form. - Fill in the fields using the data obtained from the Infomaniak Manager, respecting the standard configuration for a TXT type DKIM record:
| Cloudflare Field | Value to Enter | Important Notes |
|---|---|---|
| Type | TXT (text) | Choose the standard type for DKIM keys. |
| Name (Host) | The DKIM selector (e.g. 20240112) | Enter only the selector as Cloudflare automatically adds the domain name and the suffix ._domainkey for you. Refer to the Cloudflare documentation if necessary. |
| Content (Value) | The public key (the long string) | Paste the entire DKIM public key provided (what comes after p=) |
| TTL | Auto | Leave the default value for optimal management by Cloudflare. |
Make sure the Proxy Status (cloud) is set to DNS Only (grayed out) for email authentication records.
Save and Propagation
After carefully verifying the accuracy of the Selector and Public Key, click the Save button. This validates the addition of your DKIM record to the Cloudflare DNS zone.
Any DNS addition/modification can take up to 48 hours to propagate.
Once the waiting period has elapsed, you can use online verification tools to confirm that the DKIM record is published and valid. This validation ensures that your Infomaniak emails will be properly signed and their deliverability will be optimal.
This guide concerns the email redirection addresses feature, a function available on the Mail Services and used to create addresses intended solely for redirecting emails.
To manage the redirection of existing email addresses on your Mail Service, refer to this other guide!
Preamble
- This feature allows you to create a "virtual" email address without affecting the available quota of email addresses on the paid Mail Service.
- It does not store any received messages, it is impossible to access and view them, or to restore or view the logs of messages that have passed through.
- It is solely intended to redirect incoming emails to one or more (max. 10 users per redirection) other actually existing addresses.
- Recipients registered to receive redirected emails must first accept their addition for the redirection to work (see point 3 below).
- Emails considered as spam by Infomaniak will not be redirected (bounce to the sender — and refer to this other guide regarding possible Gmail to Gmail redirections).
Number of possible “virtual” redirections
⚠ Redirection addresses that can be created, per available address (depending on the Mail Service quota):
| kSuite | free | 1 |
| Standard | 20 | |
| Business | 20 | |
| Enterprise | 20 | |
| my kSuite | 0 | |
| my kSuite+ | 0 | |
| Mail Service | Starter 1 address max. | 1 |
| Premium 5 addresses min. | 20 |
For example: Mail Service paid for 10 addresses = 200 redirection addresses available
Create the address intended to redirect emails
1. Open the redirection address management page
To access the feature:
- Click here to access the management of your product on the Infomaniak Manager (need help?).
- Click directly on the name assigned to the product in question.
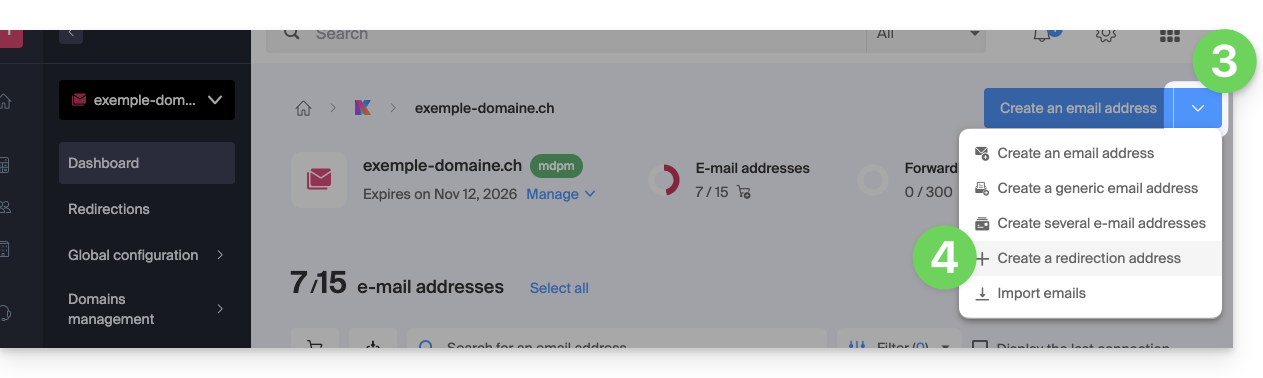
- Click on the chevron to the right of the blue button Create an email address.
- Choose to Create a redirection address:
- You can also click on Redirection mail in the left sidebar:
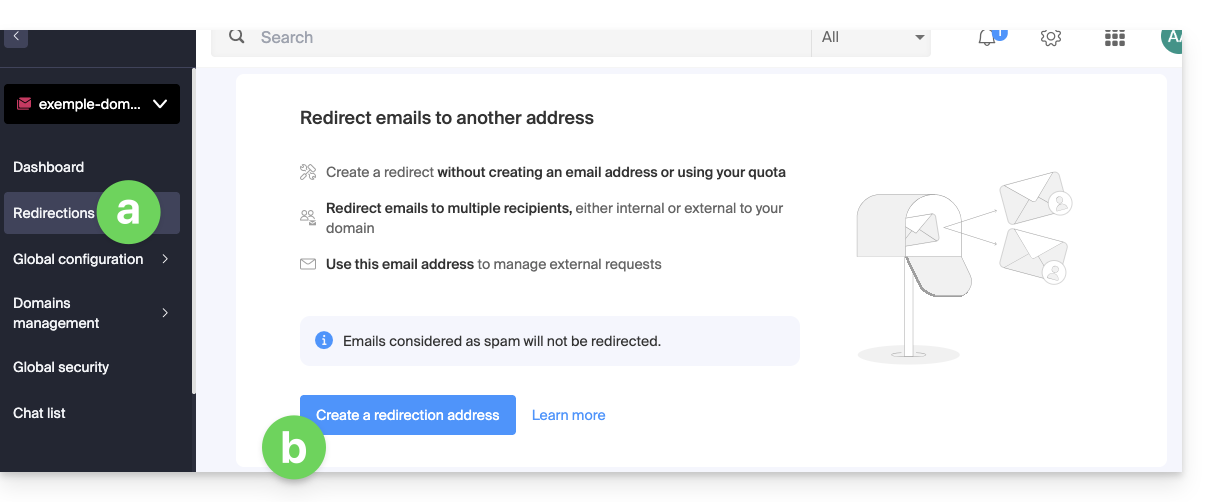
- You can also click on Redirection mail in the left sidebar:
2. Add a new redirection address
Once on the redirection page:
- Click the button to Create a redirection address.
- Name the email address that will receive the redirected emails (it will be valid on the main domain and its linked domains).
- Specify an email address that will receive the emails.
- Click the button to add the valid email address to the table below.
- Delete, if necessary, an address added to the table by clicking on the trash can icon.
- Click the Create button:

3. Confirm the addition as a redirection recipient
The receiving addresses entered in the table automatically receive an email requesting confirmation of the addition.
As long as the addition is not confirmed by at least 1 user mentioned, the entire redirection will not work! As soon as 1 user has confirmed their addition, the redirection works (to the one or those who have confirmed the addition).
- The user must click on the link in the email to validate the addition.
- As long as the addition is not confirmed, the status Pending will remain displayed next to the destination address (visible if you modify the redirection address - read below).
Modify or delete the redirection
You cannot rename a redirection address after its creation. But to modify the list of redirection recipients, or resend a confirmation request, or delete the redirection email address:
- Once on the redirection page:
- Recipients who have not yet confirmed their addition are preceded by a gray icon.
- Click on the action menu ⋮ to the right of the redirection address concerned:
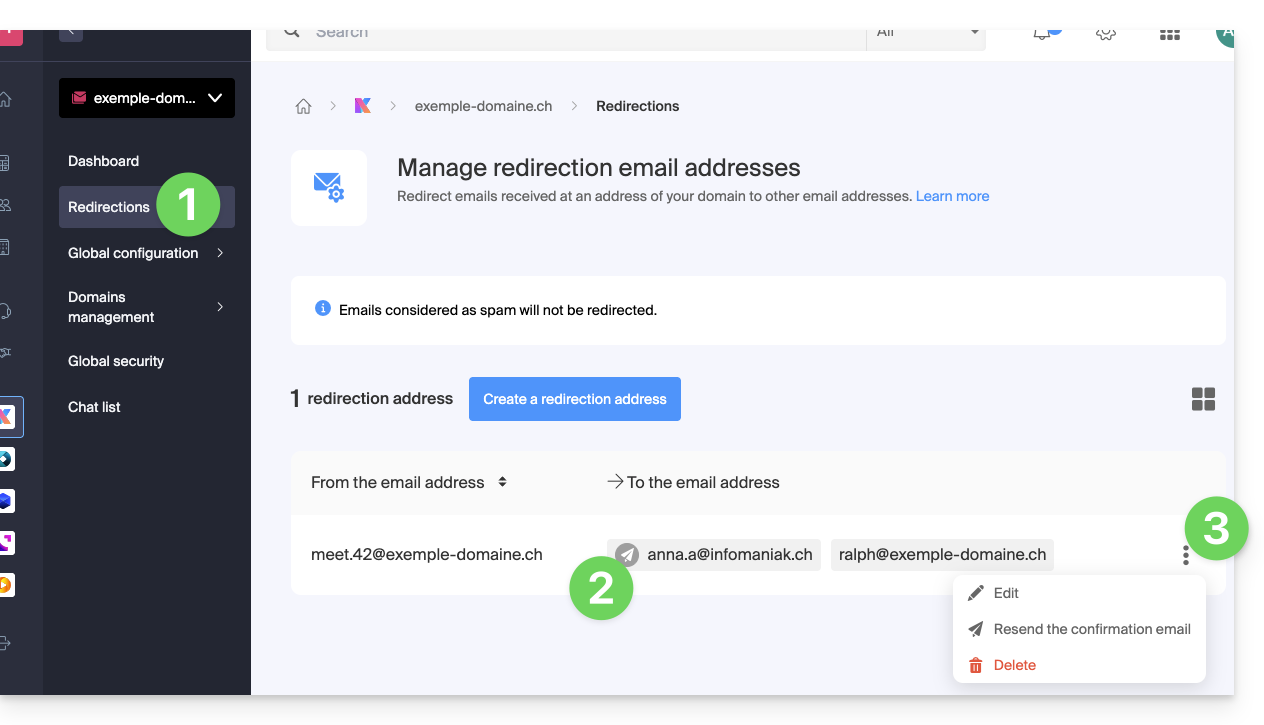
From this action menu ⋮ click on:
- Modify to add recipient email addresses:
- Click on the button to add the valid email address to the table below.
- Save the modification.
- Otherwise, click on the trash icon to remove a recipient email address from the list.
- The acceptance status details are displayed to the right of the recipient address.
- Resend to immediately request by email that the user accept their addition to the list (a second reminder will only be possible after 24 hours, otherwise the button remains grayed out).
- Delete to remove the entire address (click on the confirmation modal to execute the deletion):

This guide explains how to manage and modify permissions (assigning an additional password, setting up an alias, etc. see below for the full list) for an Infomaniak user, so that they can manage more or fewer configuration items on the Infomaniak Web app Mail (online service ksuite.infomaniak.com/mail).
Preamble
- The email address is first created within a Mail Service and can then be used within one or more Infomaniak Mail interfaces by one or more users.
- The creator (or manager) of the address may want to limit the possible actions for one or the other of the users who will use the email address.
- This fine-grained permission management can be done when creating an address or afterwards, and you can also define what the default rights should be for any new address created (read Global Configuration below).
List of mail user permissions
| Type / Icon | Description of the permission granted to the user |
|---|---|
| Configure a device | Manage devices (create a dedicated password) |
| Manage responders | Create an out-of-office message (automatic reply) |
| Manage signatures | Add signatures and manage reply email addresses |
| Manage redirections | Redirect emails to one or more other addresses |
| Manage aliases | Create variants of your email address (by modifying what is before the @) |
| Manage action history | Access logs of the email address |
| Manage restorations | Access backups and restorations |
| Manage filters | Access SPAM filters and others |
| Manage rules | Automatically sort and classify incoming emails |
| Manage folders | Customize IMAP folders |
| Manage security | Manage blocked and approved addresses |
Manage permissions granted to a user
Attention: the password to access your Infomaniak account may be required to modify permissions.
… from the Mail Service
- Click here to access the management of your product on the Infomaniak Manager (need help?).
- Click directly on the name assigned to the product concerned.
- Click on the email address concerned in the table that appears.
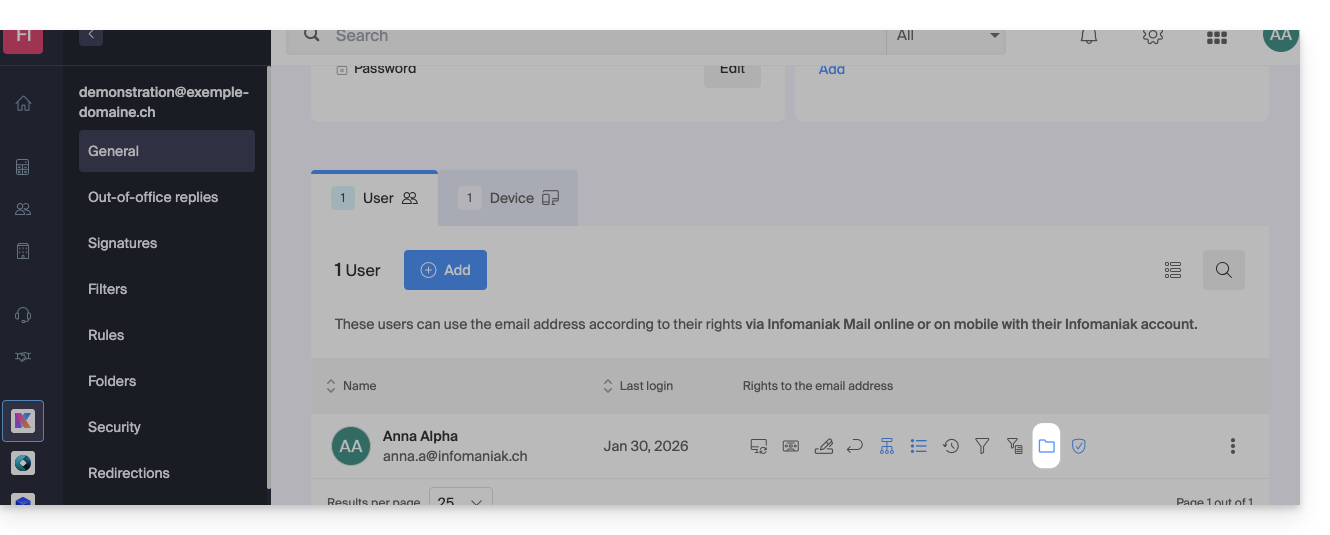
- There are several ways to modify the permissions of an email address:
- When adding a user to an email address:
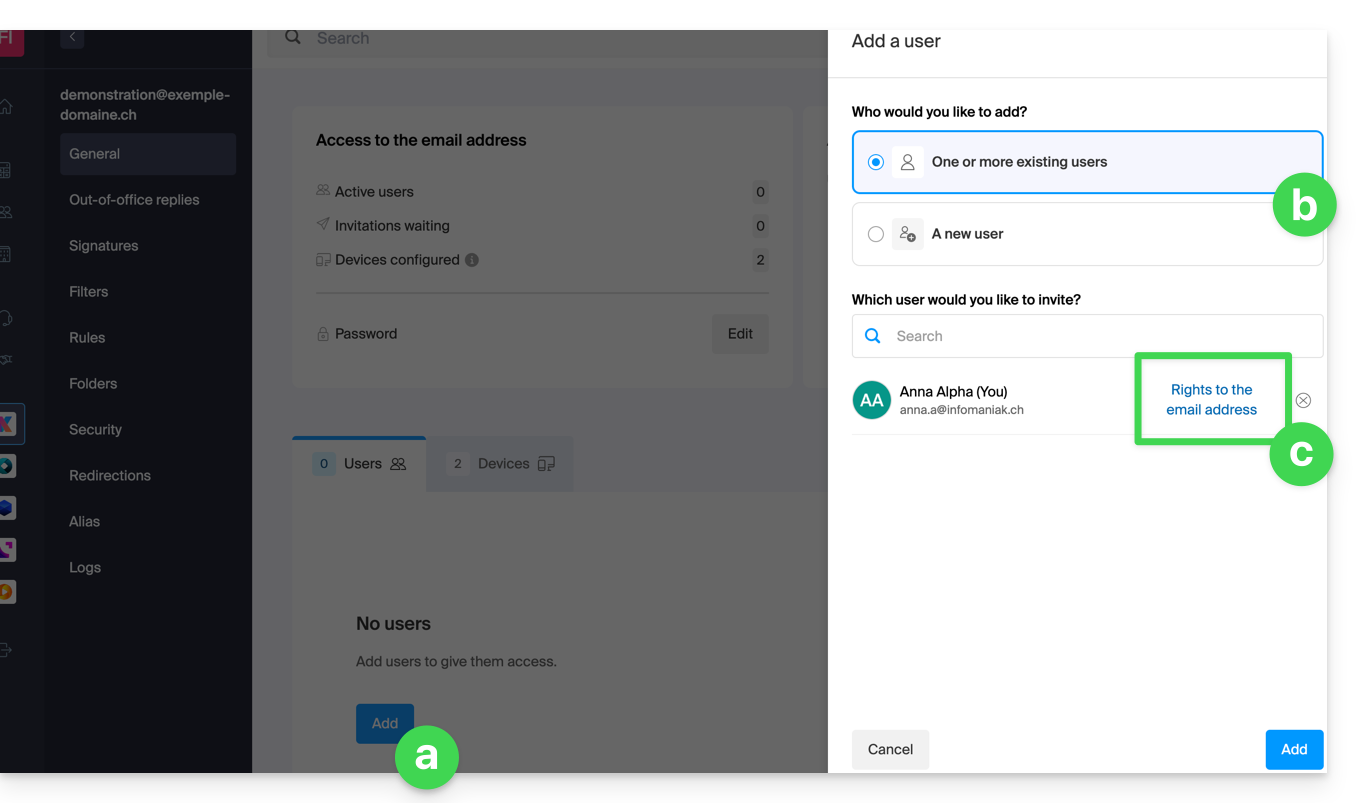
- Once the user has been added:
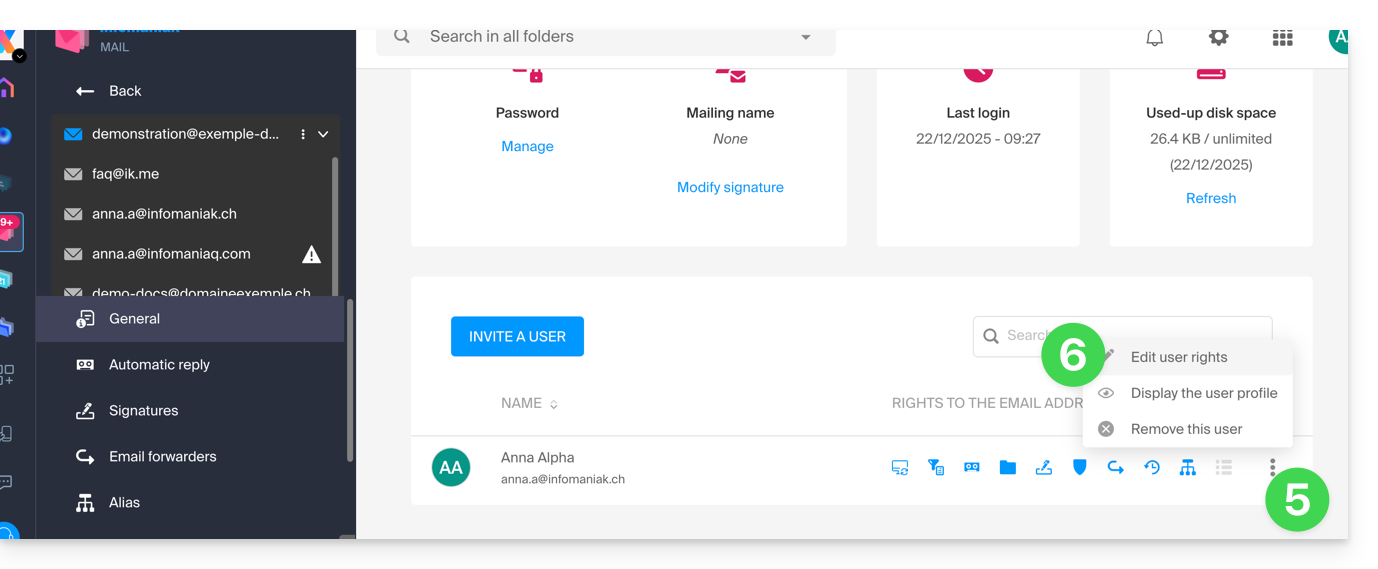
- Click on the action menu ⋮ located to the right of the user's name of the email address.
- Select ✎ Modify rights:
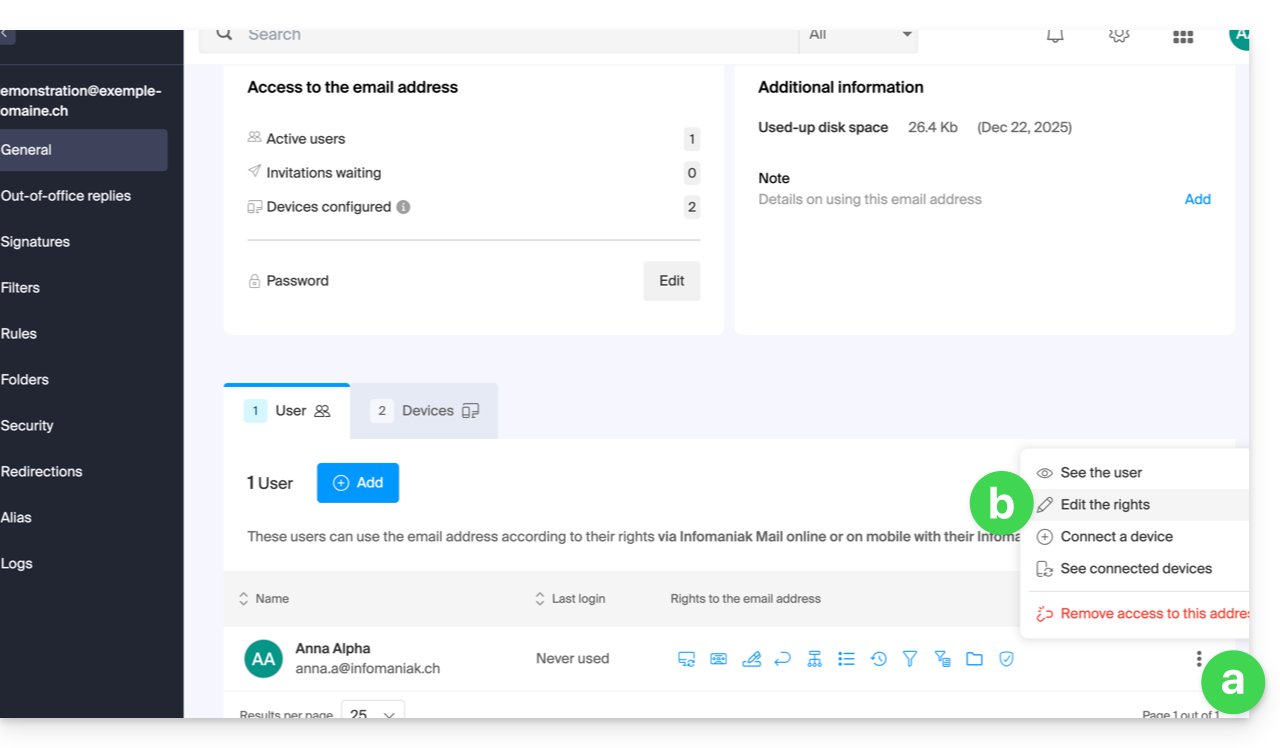
- Or click directly on the icons visible in the table:
- When adding a user to an email address:
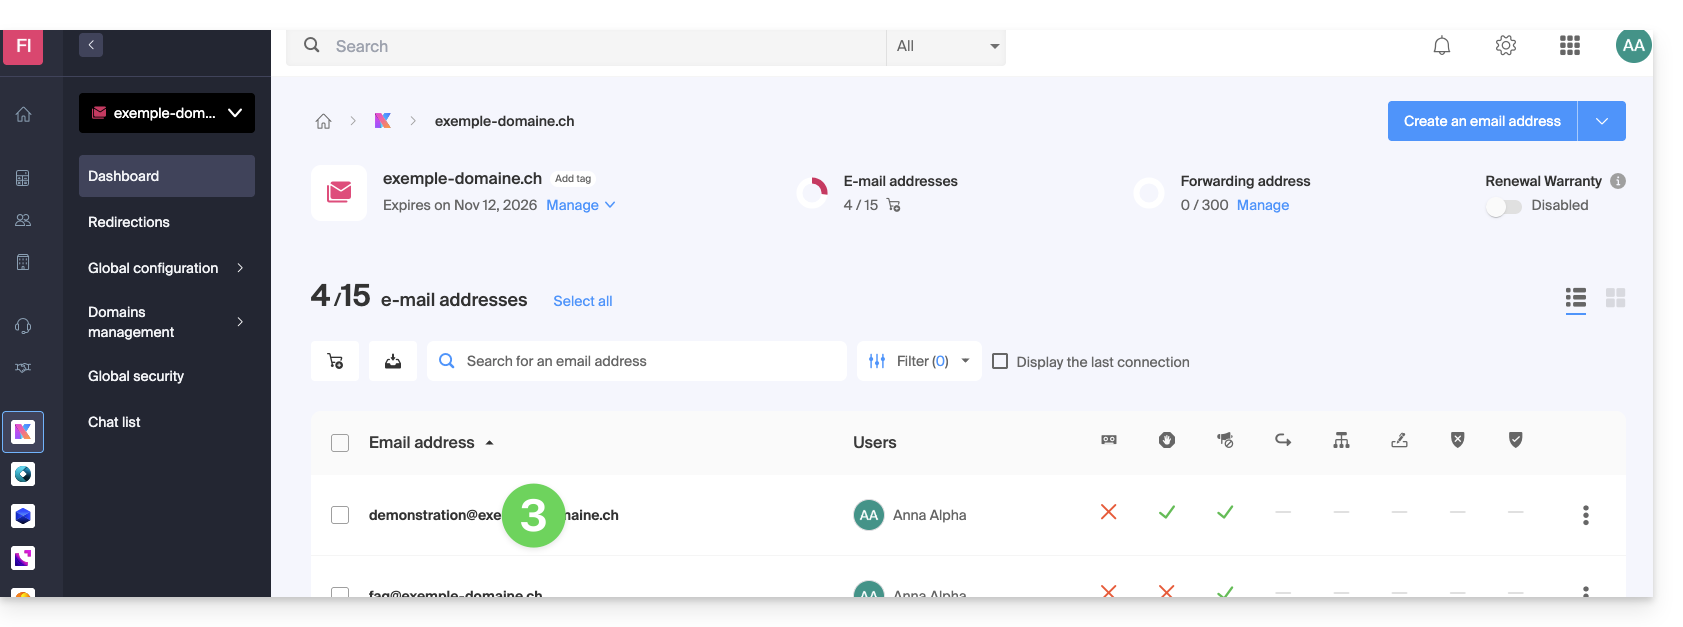
… from the Manager (user management)
- Click here to access user management on the Infomaniak Manager (need help?).
- Click on the user concerned in the table that appears.
- Expand the collaborative tools section by clicking on the chevron .
- Expand the section of email addresses accessed by the user by clicking on the chevron .
- Click on the action menu ⋮ located to the right of the email address concerned.
- Select Modify rights:
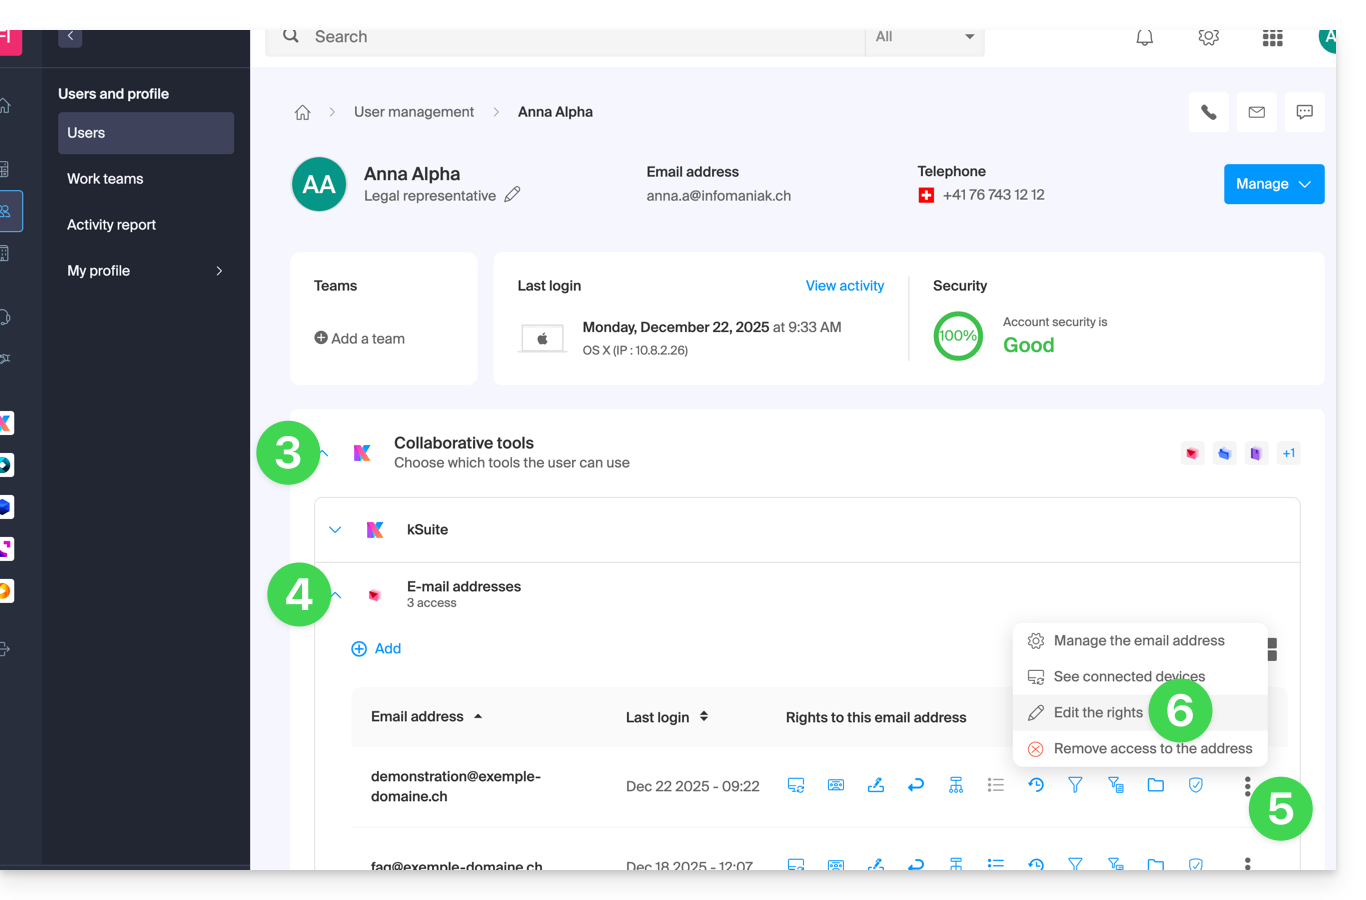
- Or click directly on the icons visible in the table:
… from the Web Mail app
- Click here to access the Infomaniak Web Mail app (online service ksuite.infomaniak.com/mail).
- If necessary, click on the chevron to the right of the email address currently visible on the Infomaniak Web Mail app.
- Click on the action menu ⋮ to the right of the email address you wish to configure.
- Click on Email address settings:
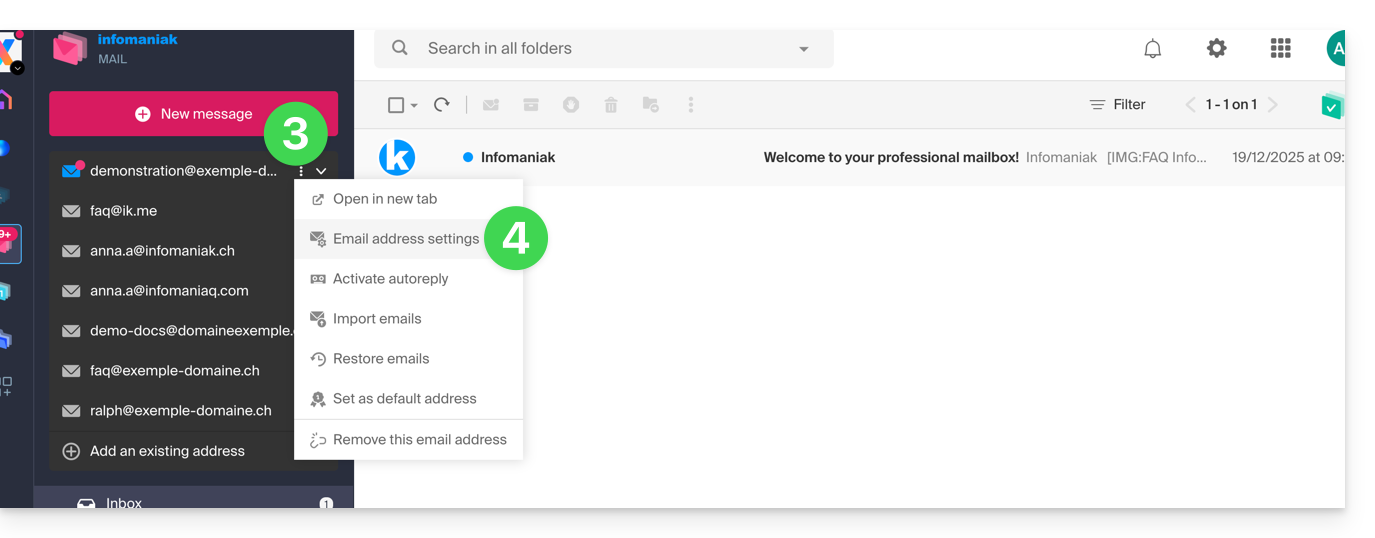
- Click on the action menu ⋮ located to the right of the user's name of the email address.
- Select ✎ Edit rights:
- Or click directly on the icons visible in the table:
Result for the user
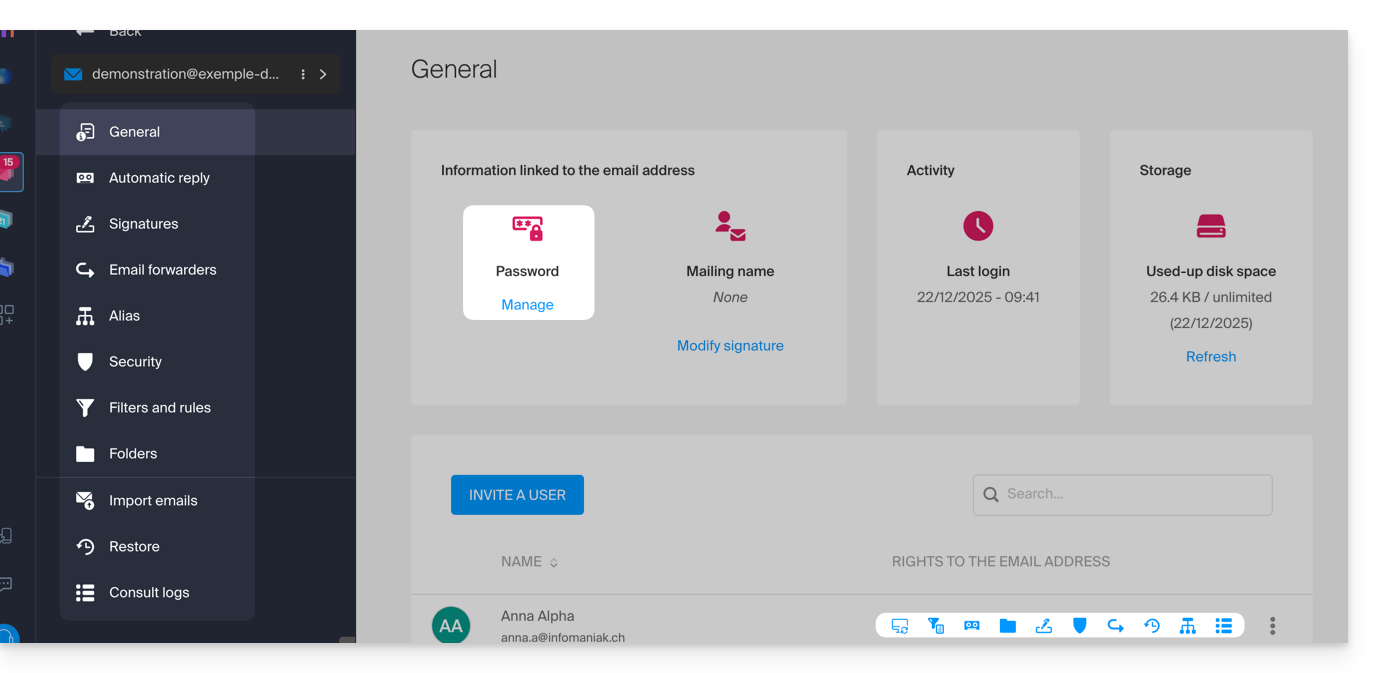
The user who has permissions removed will no longer see certain corresponding menus in their email address settings: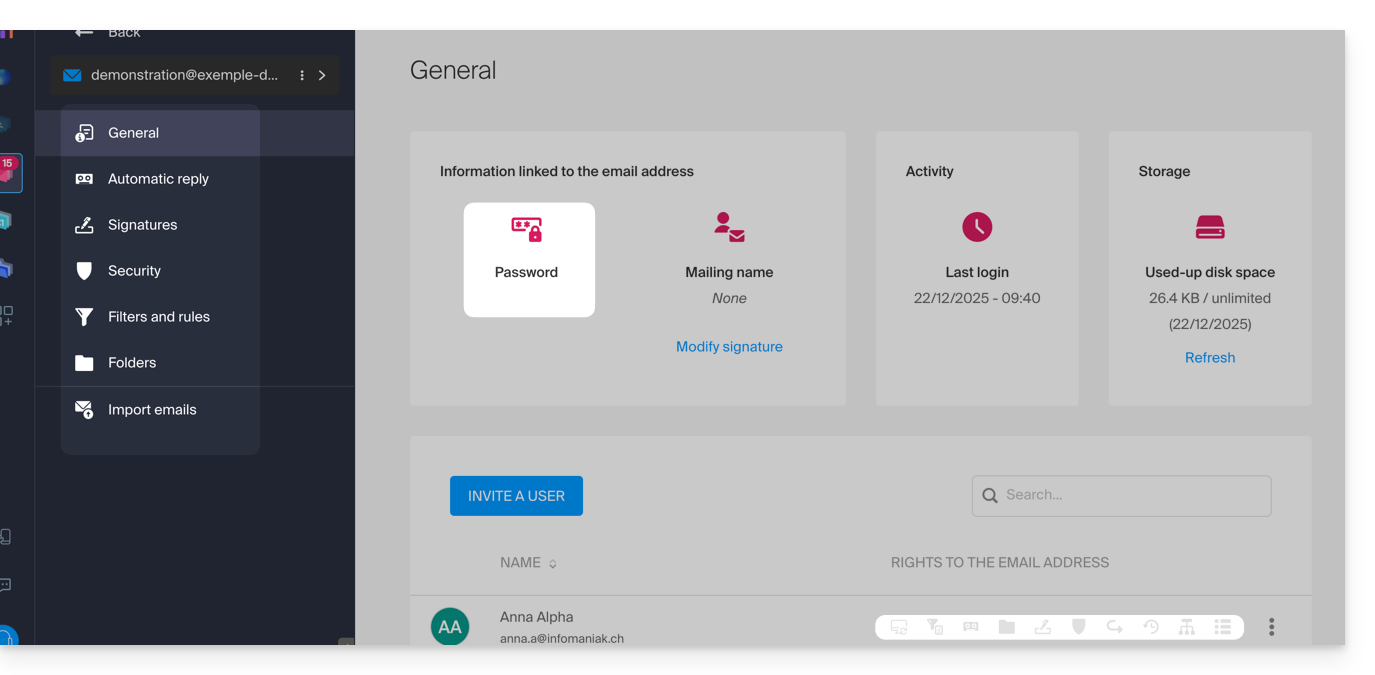
For some features, even if the menu is still accessible, it's the buttons that will be inoperative or grayed out: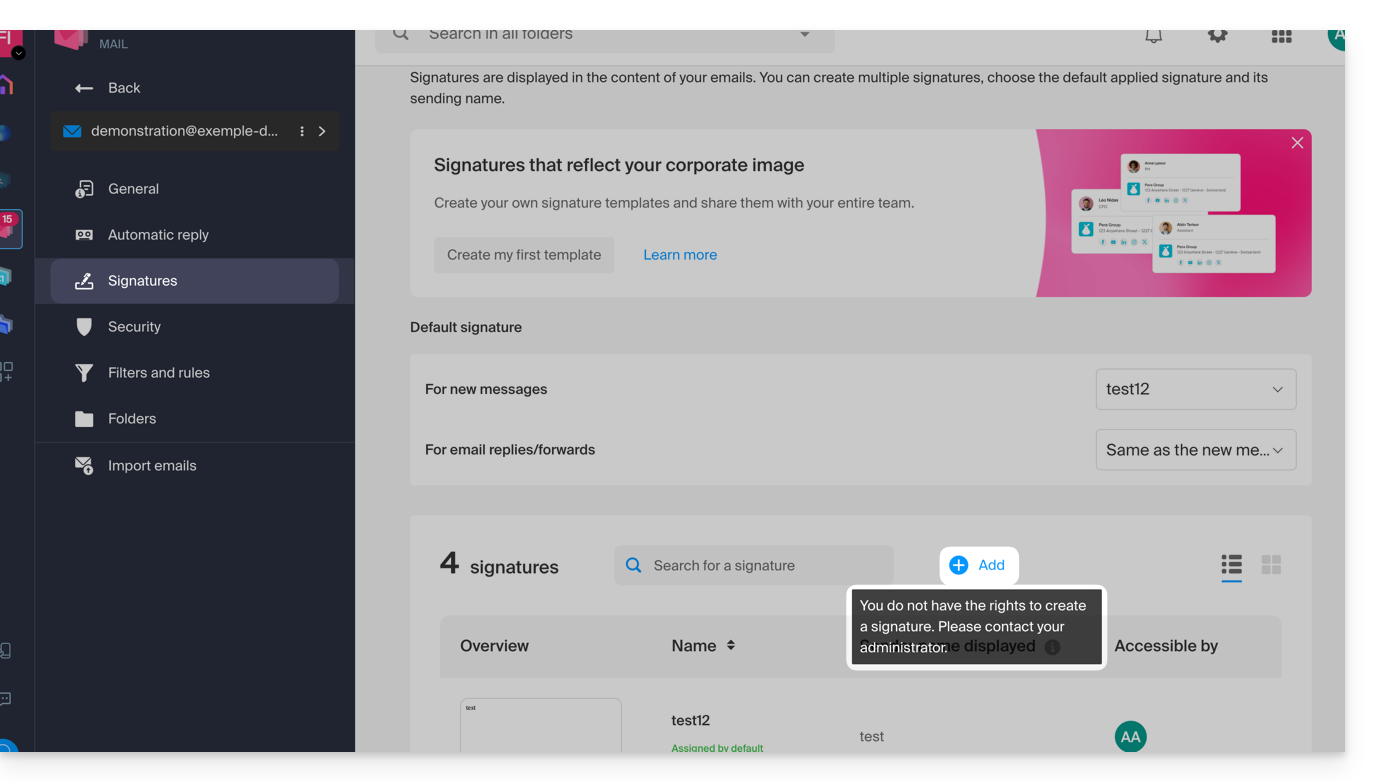
Global configuration
Set default parameters
To set the default rights that will be automatically selected when the “global configuration” is applied by the administrator:
- Click here to access the management of your product on the Infomaniak Manager (need help?).
- Click directly on the name assigned to the product concerned.
- Click on Global configuration in the left sidebar:
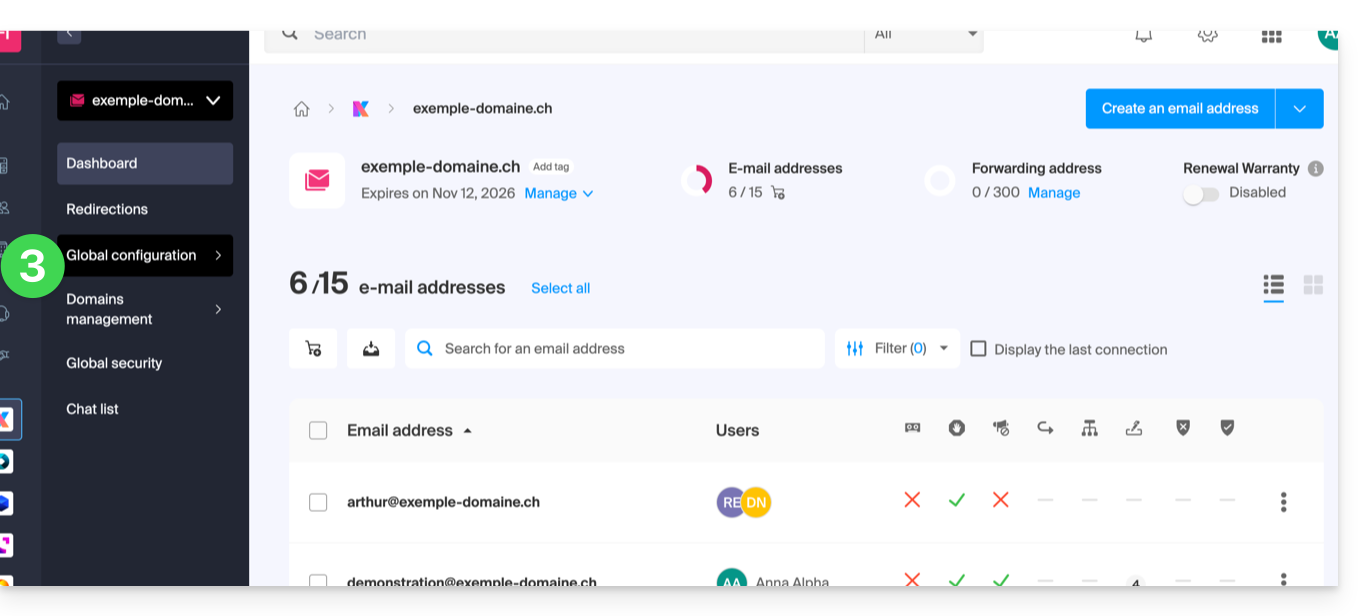
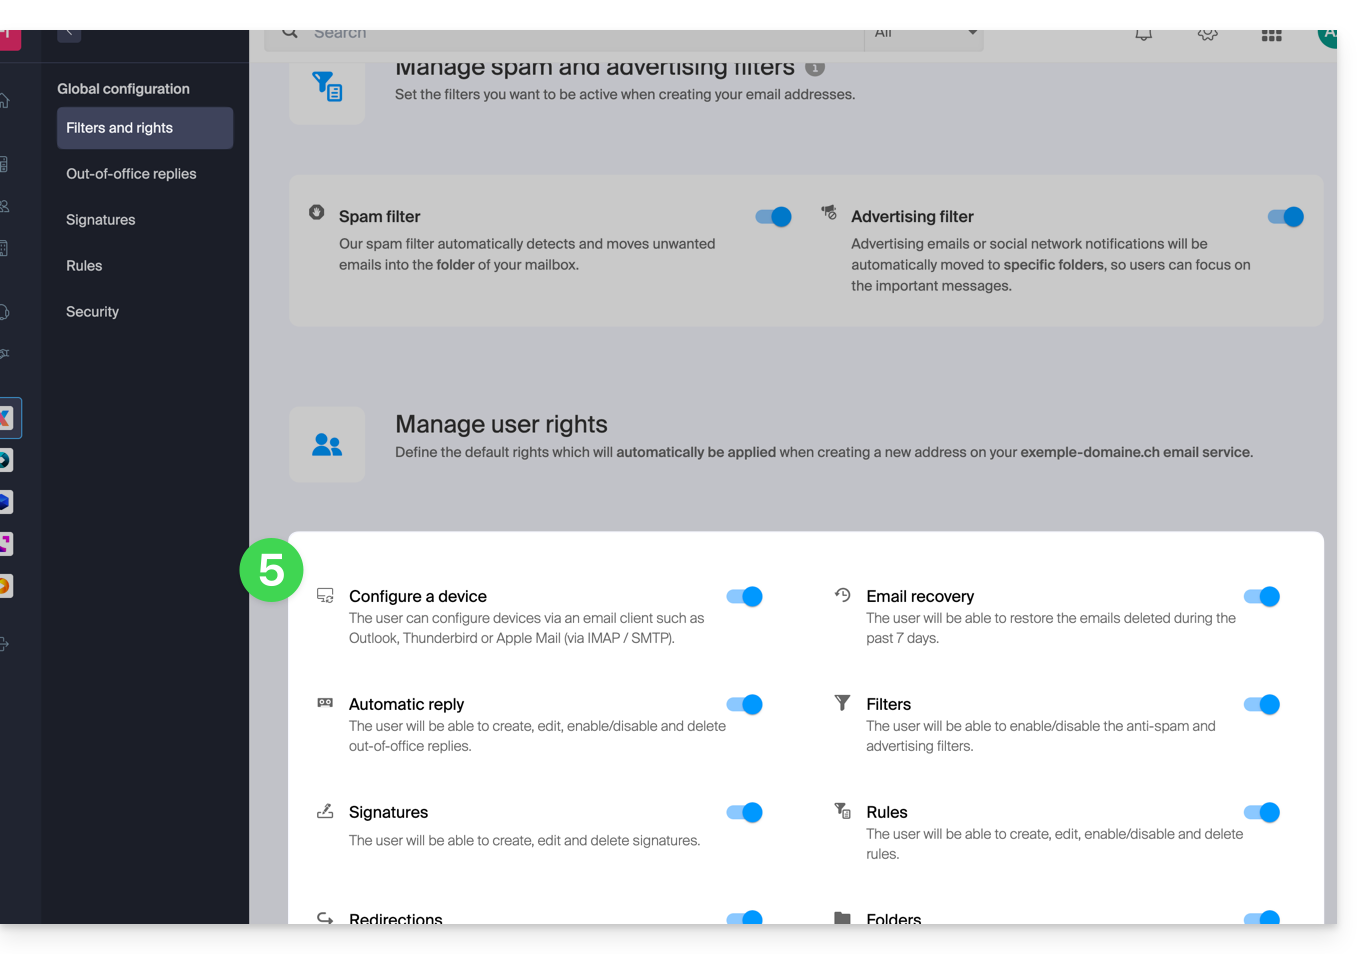
- Then click on Filters and permissions.
- At the bottom, enable or disable the rights to be granted during future email address creations:
Global configuration when creating an email address
If a new email address is created for one or more third-party users, the permissions defined in the Global configuration are automatically pre-selected during the assistant step: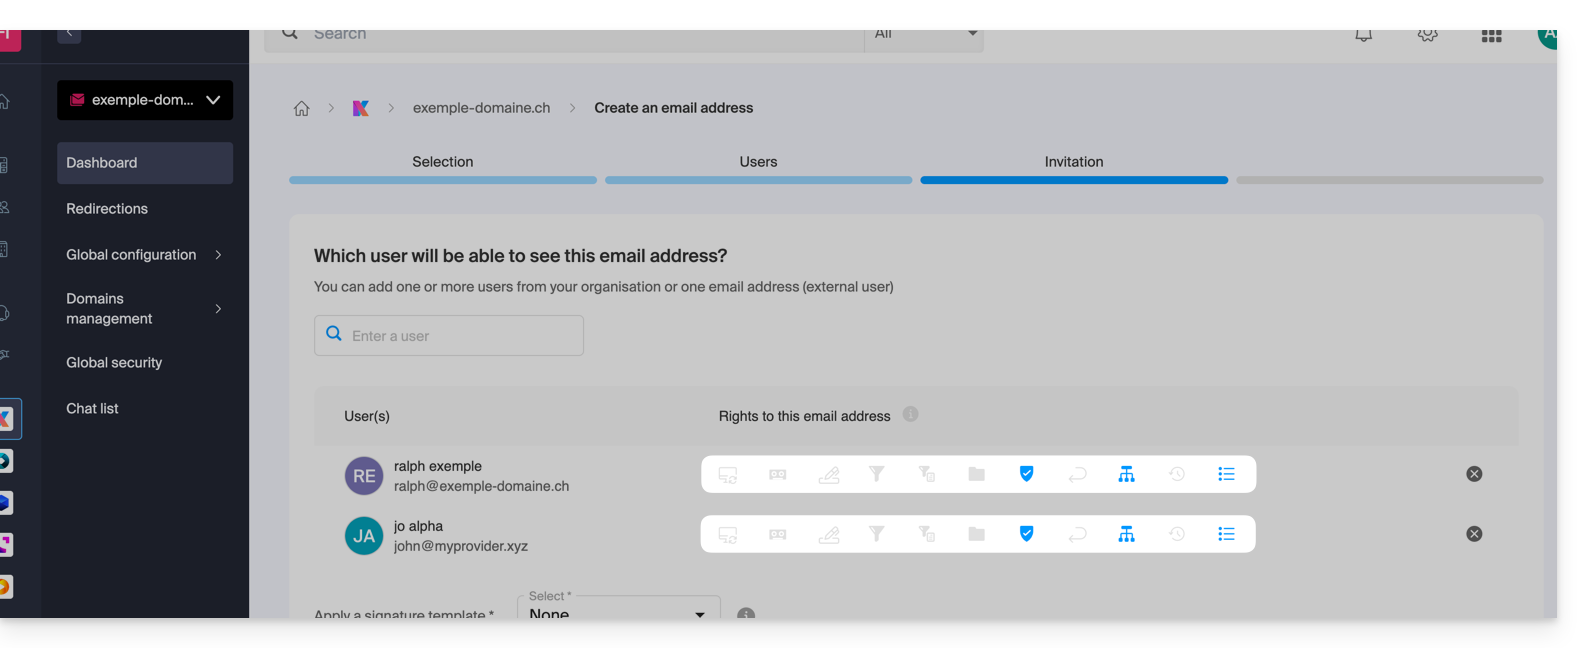
It is of course possible to modify the different permissions of the different users on a case-by-case basis.
Apply the global configuration to existing addresses
To apply this global configuration to the existing email addresses of a Mail Service (which will then apply to all users concerned, listed in the Users column):
- Click here to access the management of your product on the Infomaniak Manager (need help?).
- Click directly on the name assigned to the product concerned.
- Select the email addresses concerned by checking the boxes to the left of the line.
- Click on Apply the global configuration at the bottom of the screen (by first clicking on the action menu ⋮ if necessary):
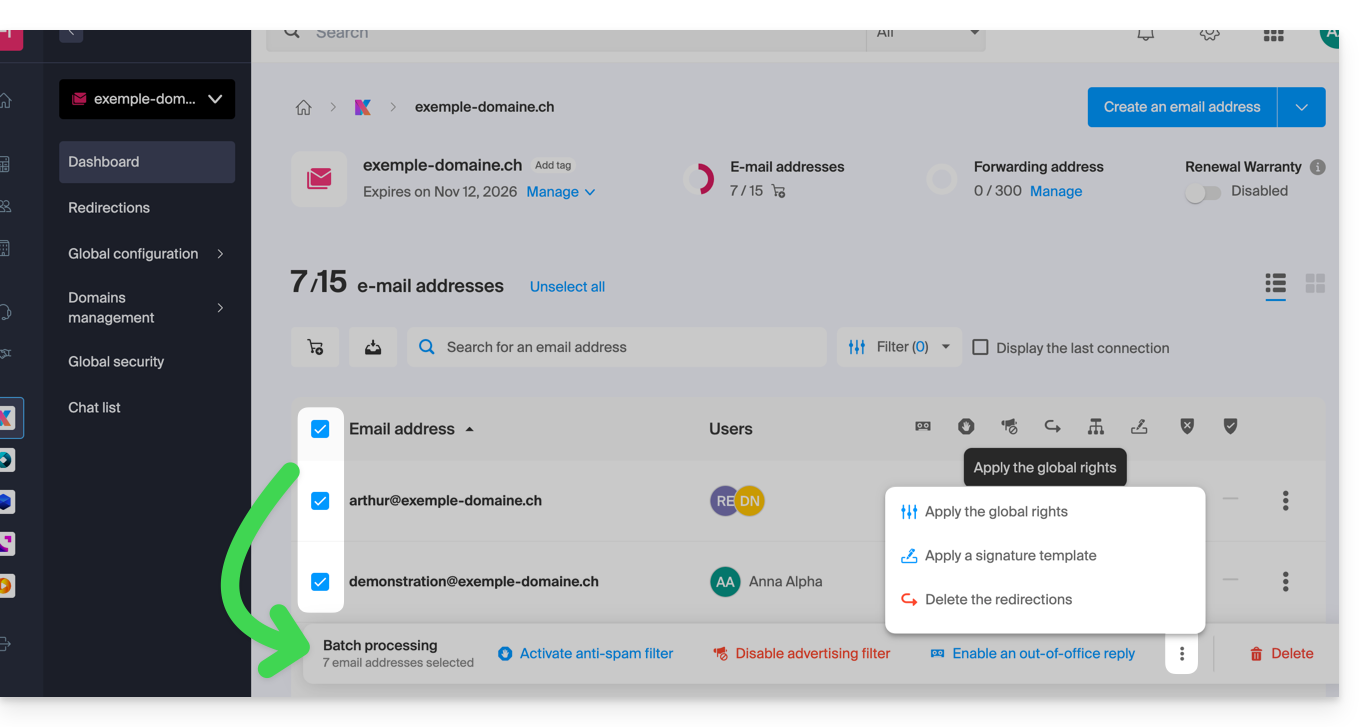
Apply the global configuration when managing the permissions granted to a user
To apply this global configuration when you edit the rights of a user on an email address (refer to the chapter “Managing permissions granted to a user” at the top of this guide), click on the button dedicated to this use: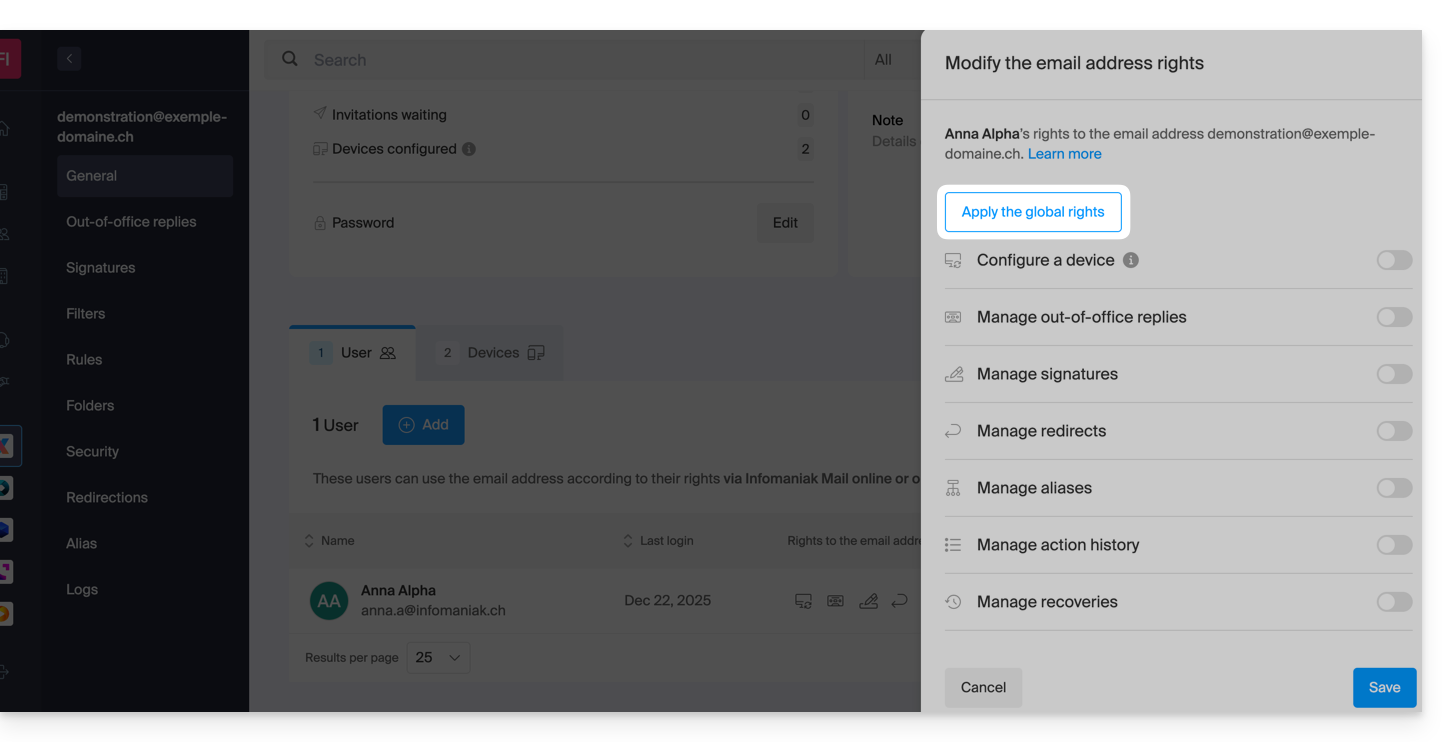
This guide explains how to automatically transfer new messages from an existing email address, managed by Infomaniak, to the email account of your choice, even if it is completely external to Infomaniak, while keeping (or not) the messages.
It is also possible to create addresses intended solely for redirecting incoming emails (refer to this other guide on this subject).
Preamble
- The emails detected by Infomaniak as being spam…
- … ARE REDIRECTED when all redirection addresses are hosted by Infomaniak.
- … ARE NOT REDIRECTED AT ALL from the moment when one of the redirection addresses is not hosted by Infomaniak (and even if all other redirection addresses are).
- Emails not considered as spam ARE REDIRECTED, including to Gmail but beware in this case of this particular situation.
⚠ Redirection addresses that can be added per email address:
| kSuite | free | 1 |
| Standard | 100 | |
| Business | 100 | |
| Enterprise | 100 | |
| my kSuite | 0 | |
| my kSuite+ | 100 | |
| Mail Service | Starter 1 address max. | 1 |
| Premium 5 addresses min. | 100 |
Add a redirection from the Infomaniak Web Mail app
Prerequisites
- Have permission to manage redirections: if you had been invited to the Infomaniak Web Mail app (online service ksuite.infomaniak.com/mail) to manage your address, it is possible that the Mail Service manager has revoked this right from their admin account.
To access your Infomaniak mailbox:
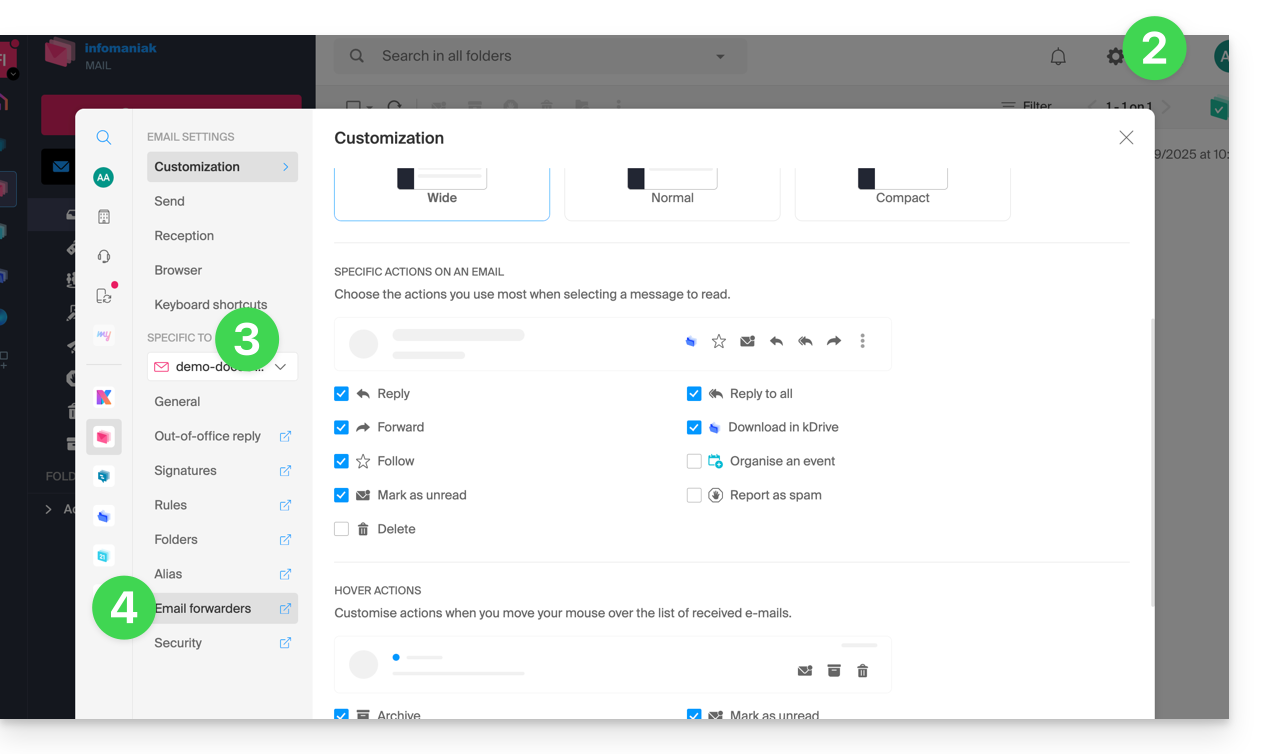
- Click here to access the Infomaniak Web App Mail (online service ksuite.infomaniak.com/mail).
- Click on the Settings icon at the top right of the interface.
- Check or select the email address concerned in the drop-down menu of the left sidebar.
- Click on Redirections:
- Click on the blue button Add a redirection.
- Enter a destination email address per line.
- Click on Add.
Add a redirection from a Mail Service
To access the Mail Service:
- Click here to access the management of your product on the Infomaniak Manager (need help?).
- Click directly on the name assigned to the product concerned.
- Click on the email address concerned in the table that appears.
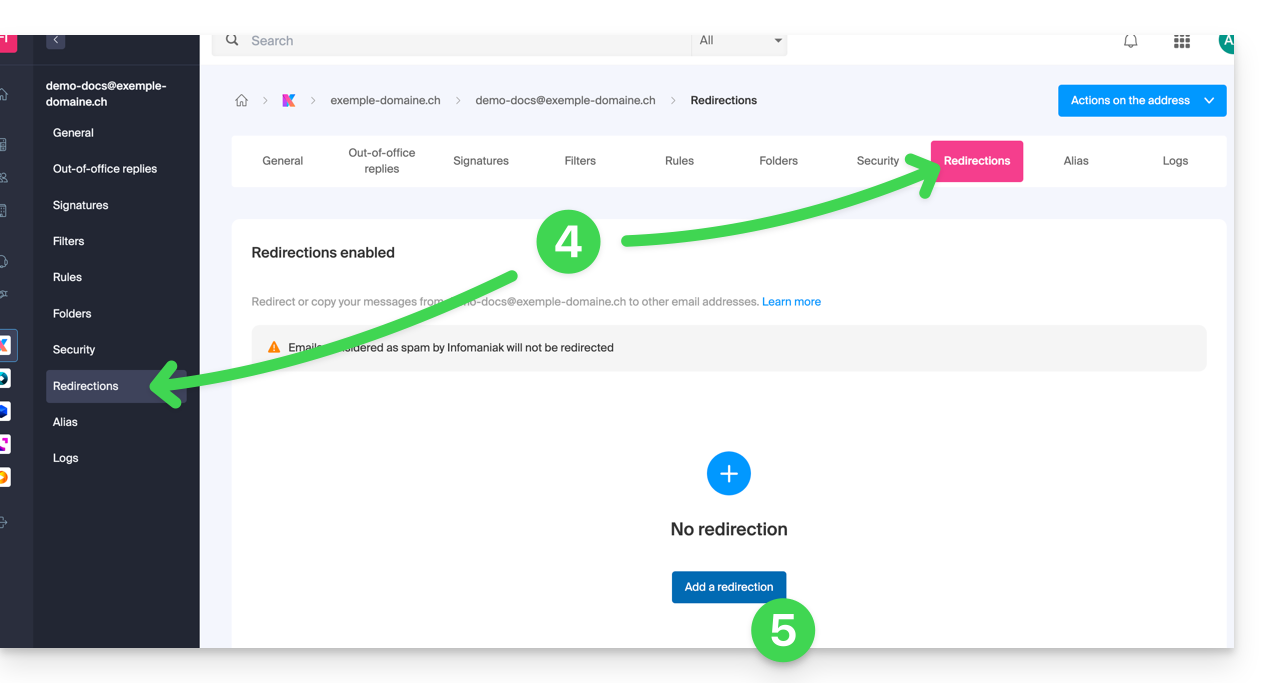
- Click on the Redirection tab or from the left sidebar.
- Click on the blue button Add a redirection:
- Enter a destination email address.
- Click on the blue button + to add other email addresses.
- Click on Confirm to complete the addition.
- Click on the toggle switch button to Keep or not a copy of emails on the email address after redirection.
Copy or move?
Once a redirection email address is added, it is possible to check the box to delete emails from the server after forwarding, the deviation then becomes a move and no longer a copy.
Remove email redirections
You cannot apply the redirection service to multiple email addresses in a domain in a single operation. However, the reverse is possible and you will therefore be able to select all the addresses of a Mail Service and remove their possible redirection.