
Knowledge base
1000 FAQs, 500 tutorials and explanatory videos. Here, there are only solutions!
This guide explains how to transfer to Infomaniak a Gmail email address hosted by Google. Refer to this other guide if you are looking for information on importing custom domain addresses.
Preamble
- The operation does not affect either the data already present on the destination address or that of the source address.
- Any duplicates are managed: identical content will only be copied once.
- If necessary, local partners referenced by Infomaniak can handle these procedures: launch a free call for tenders; they take care of everything, freeing you from technical details.
Transferring emails from Gmail to Infomaniak
Prerequisites
- Have a Mail Service on your Infomaniak Manager.
- Have a quota of free addresses available or adjust it in advance if necessary.
- Ensure that the email is properly secured
a. Recreate the email address(es) on Infomaniak
If you have many (10+) email addresses to create, follow this procedure for bulk creation.
Access the Infomaniak Mail Service and create the email addresses:
- Click here to access the management of your product on the Infomaniak Manager (need help?).
- Click directly on the name assigned to the product concerned.
- Click the blue button Create an email address in the top right corner.
- Enter the address (what comes before the at sign @) for example contact or michelle.
- Click the blue Continue button.
- Select I will consult the email address alone.
- Click the blue Continue button.
- Enter a password.
- Click the blue Continue button.
- Click the blue Finish button.
- Restart at point 3 above to recreate all email addresses identically.
b. Import Gmail mail content to Infomaniak
Access the Infomaniak Mail Service and import your emails:
- Click here to access the management of your product on the Infomaniak Manager (need help?).
- Click directly on the name assigned to the product concerned.
- Click on the chevron in the right part of the blue Create an email address button.
- Click on Import emails (direct link).
- Click on Import my emails into a single email address.
- Enter the existing email address at Google.
- By specifying that your previous address is a @gmail.com address, the assistant will offer to connect to your Gmail account.
- Click on the "Sign in with Google" button that has appeared.
- Make sure you are logging into the Gmail account concerned by the email copy.
- Confirm that you authorize the Infomaniak tool to connect to your account (automatic procedure).
- Once the popup is validated, you will be able to choose which Infomaniak address to import your Gmail emails (if necessary, refer to this other guide from point 7).
Labels and data volume
The storage space displayed at Infomaniak may not correspond to the one indicated in Gmail, notably due to the different management of labels / tags.
Indeed, these, present in Gmail, will be converted into folders on the Infomaniak servers (same principle as when fetching mail with an IMAP email software/client like Thunderbird):
Therefore, an email labeled in several Gmail folders can be counted several times during the migration, which explains why an account displaying for example 6 GB in Gmail can occupy 18 GB once transferred to the Infomaniak servers.
Be patient when importing a large volume of emails; Gmail and Microsoft imports are intentionally slowed down (e.g., 1 GB/day bandwidth for Google) to avoid rejections from their side.
Adjust the application settings
As soon as you have taken the necessary steps to ensure that the domain name associated with your email works with Infomaniak, modify the settings of the email software/clients you use so that they connect correctly to the Infomaniak servers: follow the configuration assistant.
This guide explains how to display the folders of your Infomaniak mailbox with a mail software/client, using the IMAP protocol.
Preamble
- The different generic folders are created by Mail Infomaniak upon the very first connection to the interface.
- It may therefore happen that some IMAP mail software/clients do not show any folders if no connection has been made beforehand on Mail.
- And if they are indeed present in Mail, it may still happen that some folders do not appear on your IMAP-configured mail software/client.
Force the synchronization of IMAP folders...
...on Microsoft Outlook
It may happen in some cases, after having configured an Infomaniak address in the Outlook mail software/client, that some folders do not appear. It is necessary in this case to check the synchronization with the subscription folders in Outlook:
- Start the Outlook software on your computer.
- Under your Infomaniak mail address, without selecting it first, right-click on the inbox folder.
- Select IMAP Folders in the menu that appears:

- If the IMAP Folders item is not present, deselect the address beforehand.
- If the IMAP Folders item is not present, deselect the address beforehand.
- Deactivate the option
When displaying the hierarchy in Outlook, show only the folders that are the subject of a subscriptionby unchecking the box: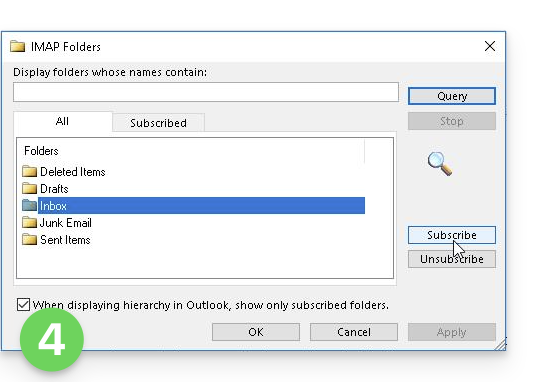
- Click on Apply.
The menu may with certain versions be found here: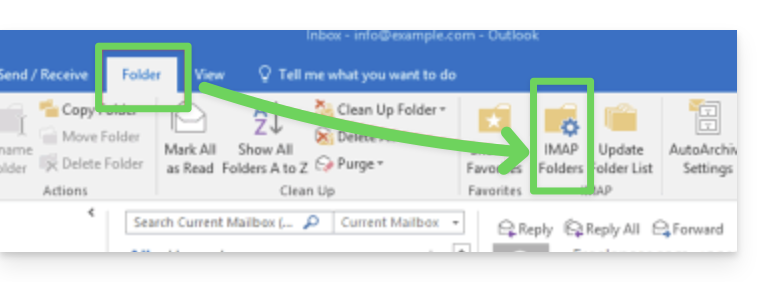
or here: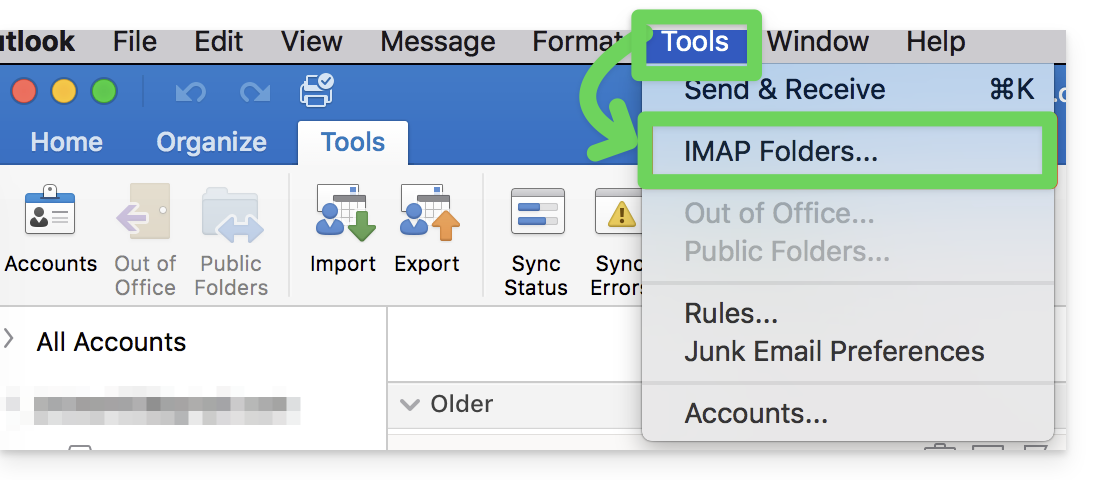
...on Thunderbird
It may happen in some cases, after having configured an Infomaniak address in the Thunderbird mail software/client, that some folders do not appear. It is necessary in this case to manually check these folders from the subscription menu of Thunderbird:
- Start the Thunderbird software on your computer.
- Right-click on the Infomaniak address concerned.
- Select the menu Subscribe:
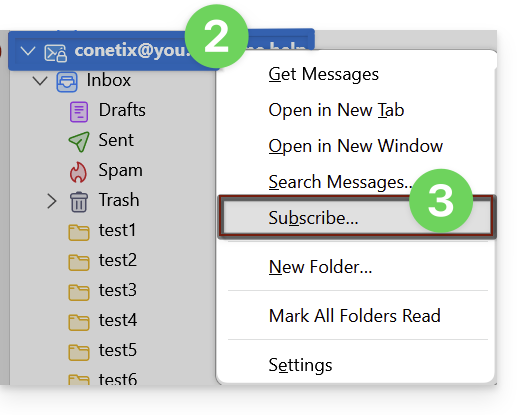
- Check the missing folders.
- Click on Ok to validate the selection.
... elsewhere
In your usual software/email client, find the designation "IMAP folders" and/or "subscribe", "IMAP subscription" etc.
Modify synchronized folders
Refer to this other guide to modify the location of certain generic folders.
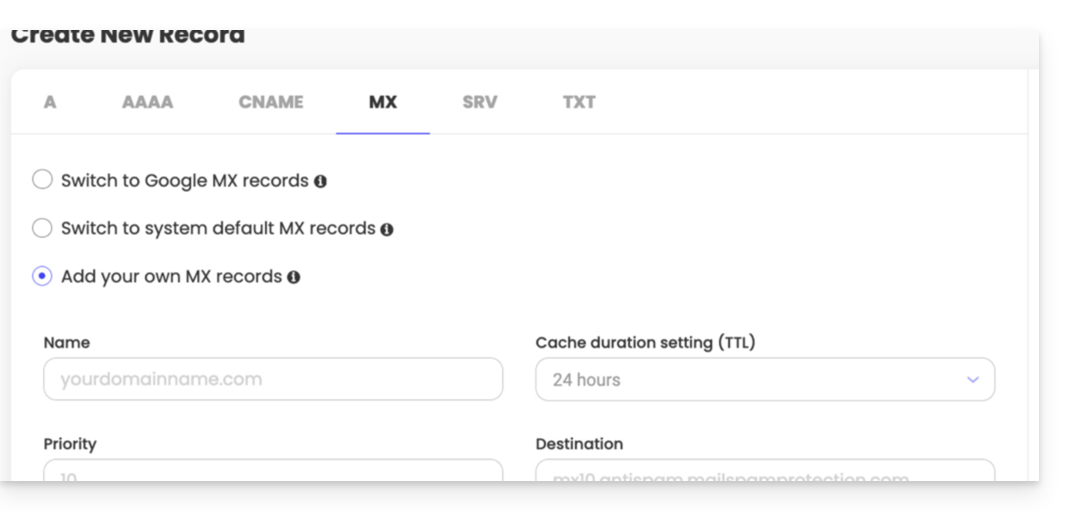
This guide explains how to add or modify an MX record in the DNS zone (of a domain name) managed on the Manager Infomaniak.
Preamble
- The “MX” record type allows you to specify which provider should manage the email (= the target).
- You should only modify this type of record if you have a specific configuration to implement (e.g., domain name with Infomaniak and email service with an external provider).
- There can be multiple MX records (so that a second email service can take over in case the first one fails) and in this case a number designates the priority of each of them (the smaller the number, the higher the priority).
MX for Infomaniak email
Infomaniak automatically provides the MX record needed to link your domain name and your email, if both are managed within the same organization at the Manager level.
If your configuration requires you to add an MX record yourself to direct mail traffic to Infomaniak, then specify the following MX record:
mta-gw.infomaniak.ch
with the priority 5.
A correct SPF record is also required for the proper functioning of Infomaniak email.
Variant specific to certain operators
On the interface of some providers like Gandi, it is necessary to add a dot at the end of the MX record:
mta-gw.infomaniak.ch.
Modify the DNS zone
Refer to this other guide to manage this type of record in a DNS zone on the Infomaniak Manager:
Learn more
- Link a domain to an Infomaniak Mail Service
- Specify the Infomaniak MX with a third-party web provider
This guide details the rules to follow to send emails from Infomaniak to multiple recipients without it being considered as spam.
Preamble
- Infomaniak is a Swiss host governed by Swiss laws, federal laws (and general terms of use) which stipulate that before being added to an email mailing list, potential recipients must have given their consent.
Obtaining the recipient's consent
For a user's subscription to a newsletter to be considered voluntary, the latter must:
- Have entered their email address in a form dedicated to a specific subject.
- Have clicked on a validation link automatically sent after registration (point 1); this registration must only concern the subject specified at the time of registration.
- Be registered by the Newsletter system with their IP address and date.
This is called a double opt-in registration.
The term "double opt-in" refers to a registration process in which a user takes two distinct actions to confirm their intention to receive communications, usually newsletters or marketing emails.
The owner of an email address can at any time report any message received as spam. Collecting subscriber registrations by double opt-in is therefore the only way to protect against a potential spam complaint.
What to do in case of a spam complaint?
As an email provider, Infomaniak must demonstrate its cooperation in the fight against spam and ensure that all of its customers are not blocked/blacklisted by the email providers of potential complainants.
In the event of a spam complaint, Infomaniak can therefore temporarily suspend shipments and ask the sender of the message for proof of registration of the complaining person; if so, the complaint will become void.
On the other hand, the complaint will be justified if no proof of registration is provided and Infomaniak may be forced to take measures: suspension of the email address, domain name or termination of the contract in case of recurrence.
How to be compliant?
If you wish to carry out email campaigns, make sure you have the information from point 3 above (IP address and registration date of each subscriber). This process ensures that the user has explicitly confirmed their desire to receive communications, thus strengthening the legitimacy of the subscriber list and reducing the risk of spam or unauthorized sign-up.
It is therefore advisable to build your list by inserting a contact form on your website that will ensure the collection of your subscribers' email addresses via double opt-in.
An unsubscribe link must also be visible and appear at the bottom of each of your newsletters.
This guide explains how to set up a DMARC policy for your email hosted by Infomaniak, an essential element to prevent potential delivery issues.
Preamble
- The DMARC (Domain-based Message Authentication, Reporting, and Conformance) protocol enhances the security of your domain by relying on SPF and DKIM checks.
- It instructs recipient servers on how to handle emails that fail these authenticity tests, with three protection policies (None, Quarantine, Reject) detailed below.
- In case of authentication failure, the recipient can send you a DMARC report; this data is essential to identify configuration errors or stop phishing attempts using your domain name.
DMARC Policy and Acceptance Percentage
For the instructions that can be given to recipient servers when a suspicious message is detected, 3 policies (p = policy) exist and can be refined with a percentage (pct):
None (none): The email is delivered normally (observation mode)
With "p=none", no email is rejected or quarantined based on the DMARC verification. However, the reception percentage can be used to collect data on unauthenticated emails, indicating how many of these emails should be subject to the DMARC policy. For example, "p=none; pct=10" means that 10% of unauthenticated emails will be subject to the DMARC policy, while the remaining 90% will be accepted.
Quarantine (quarantine): The email is sent to spam
With "p=quarantine", unauthenticated emails can be quarantined, but the reception percentage determines the proportion actually subject to this policy. For example, "p=quarantine; pct=50" means that 50% of unauthenticated emails will be quarantined, while the remaining 50% will be accepted.
Reject (reject): The email is purely and simply blocked/deleted
With "p=reject", unauthenticated emails are rejected. The reception percentage determines the proportion of unauthenticated emails that will actually be rejected. For example, "p=reject; pct=20" means that 20% of unauthenticated emails will be rejected, while the remaining 80% will be accepted.
Create a DMARC Record
There are 2 ways to manage DMARC.
If you have a Mail Service with Infomaniak, the simplest way is to go to the Global Security tool to manage your DMARC security policy and reports: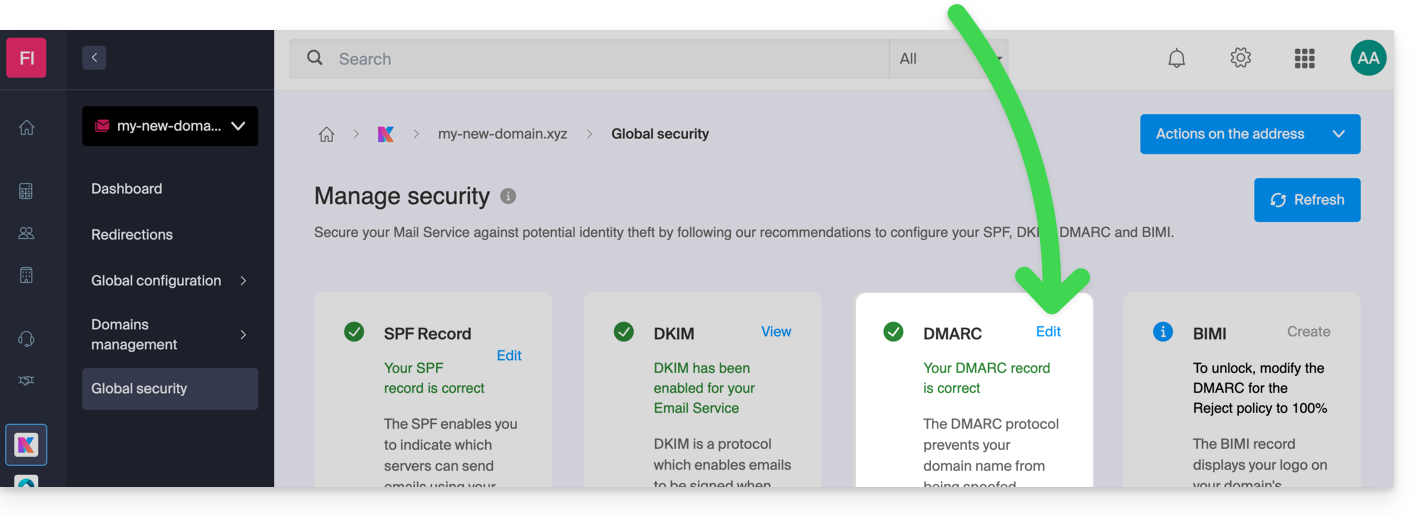
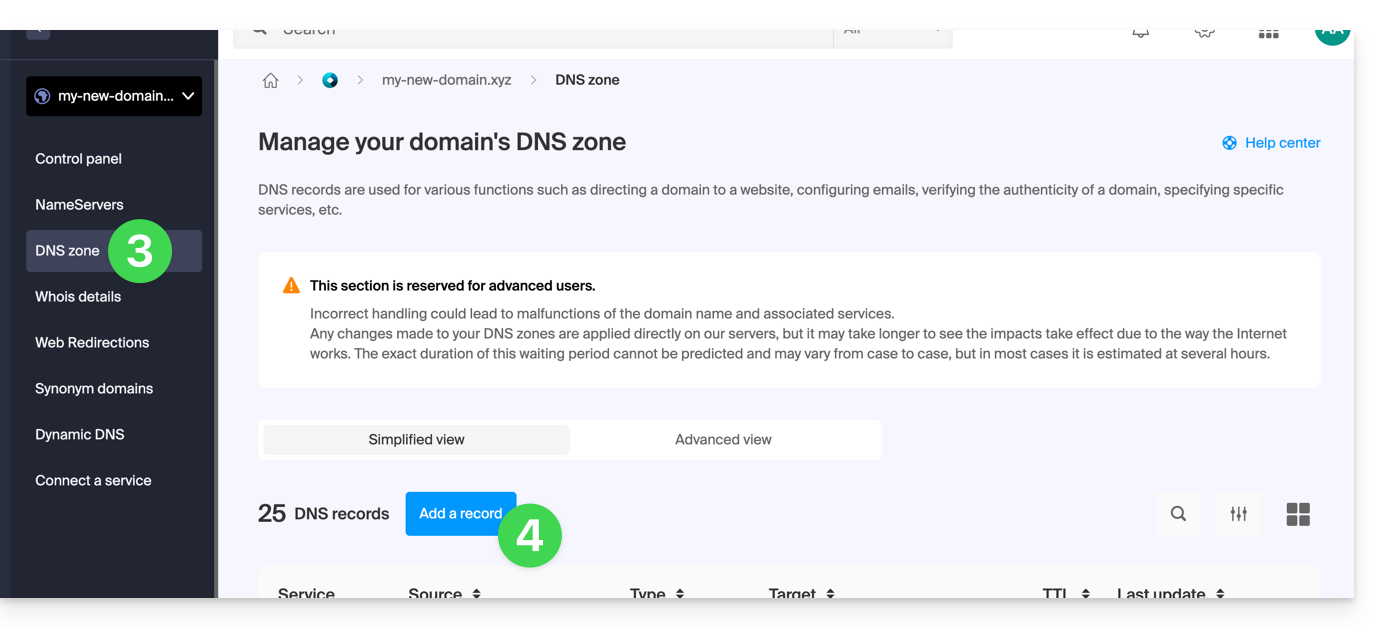
However, since the DMARC record is a type of DNS record, usually of type TXT, you can also manage it from the DNS zone of the domain name:
- Click here to access the management of your domain on the Infomaniak Manager (need help?).
- Click directly on the name assigned to the domain in question.
- Click on DNS Zone in the left sidebar menu.
- Click the button to add a record:
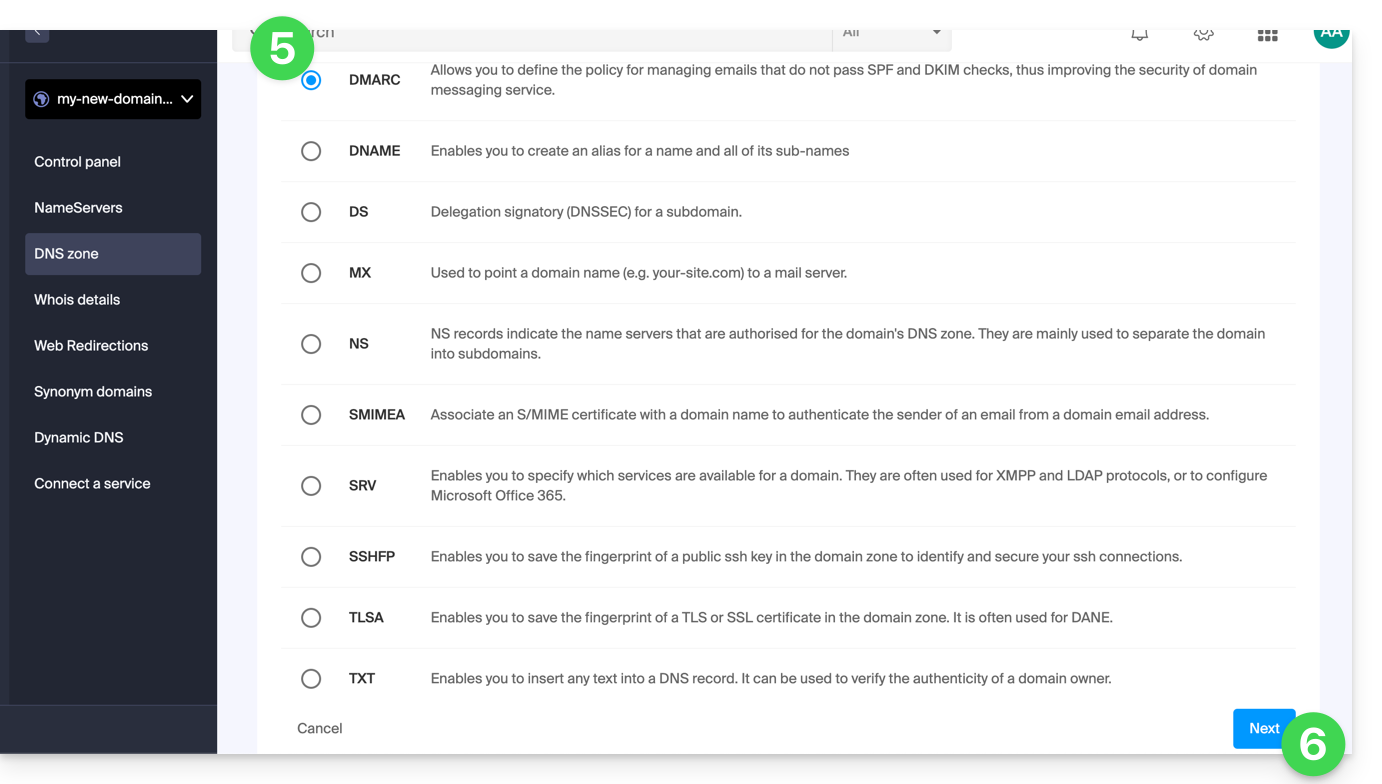
- Click the radio button DMARC to add a record.
- Click the Next button:
- Leave (or add if necessary) the value
_dmarcin the Source field. The Target field must contain the parameters you wish to use, separated by
;:Tag Name Purpose Example v Protocol version v=DMARC1pct Percentage of messages subject to filtering pct=20ruf URI report for forensic reports ruf=mailto:authfail@domain.xyzrua URI report for aggregated reports rua=mailto:aggrep@domain.xyzp Policy for the organizational domain p=quarantinesp Policy for the subdomains of the organizational domain sp=rejectadkim Alignment mode for DKIM adkim=saspf Alignment mode for SPF aspf=rwhich can give for example
v=DMARC1;p=reject;pct=100;rua=mailto:postmaster@dmarcdomain.com(source)- Leave the default value for TTL.
- Click the Save button:
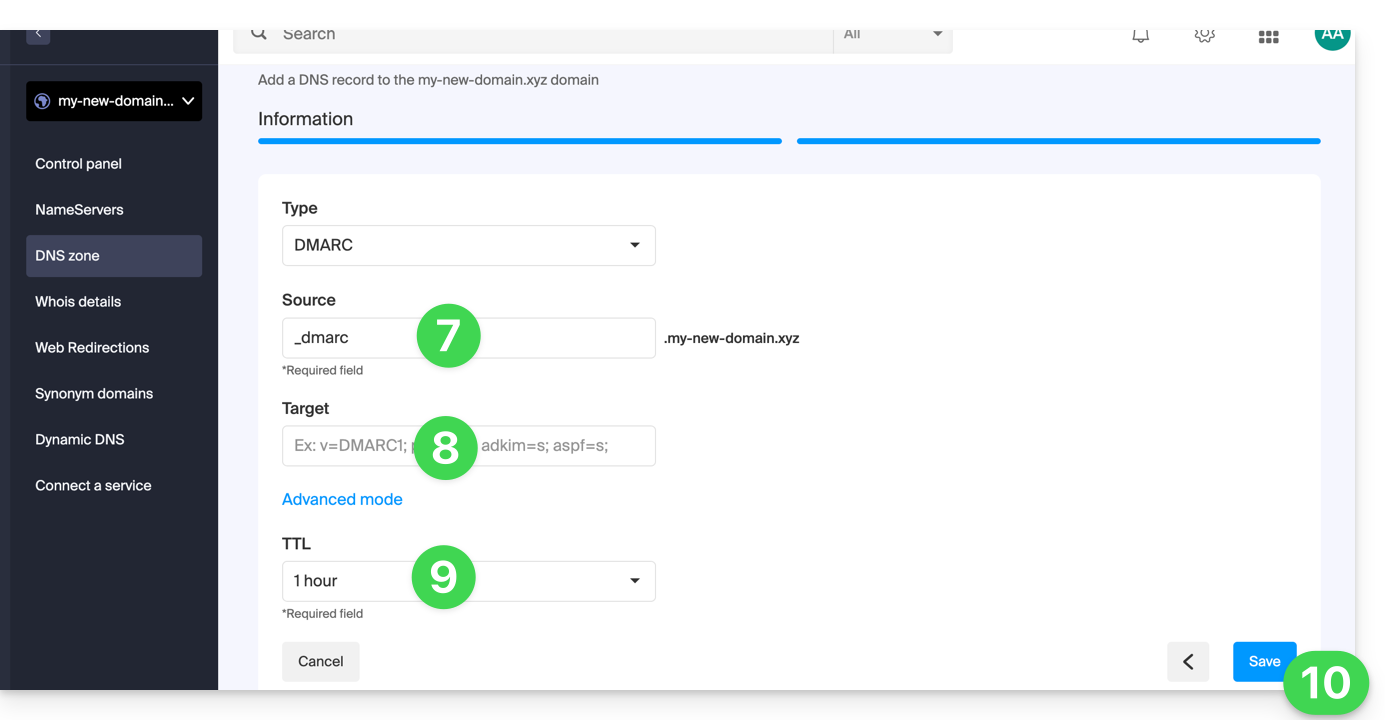
Any DNS addition/modification can take up to 48 hours to propagate.
This guide concerns the notifications you can receive with the mobile app Infomaniak Mail (app for iOS / Android smartphone or tablet).
Be notified according to the specific email address
The mobile app Infomaniak Mail allows you to manage multiple email addresses and you can choose to receive notifications only for some of your email addresses and not others.
To access the notification settings of the application, refer to point C of this other guide.
Resolve an issue…
… on iOS
Check in the settings of the mobile app Infomaniak Mail that notifications are enabled for the email address in question: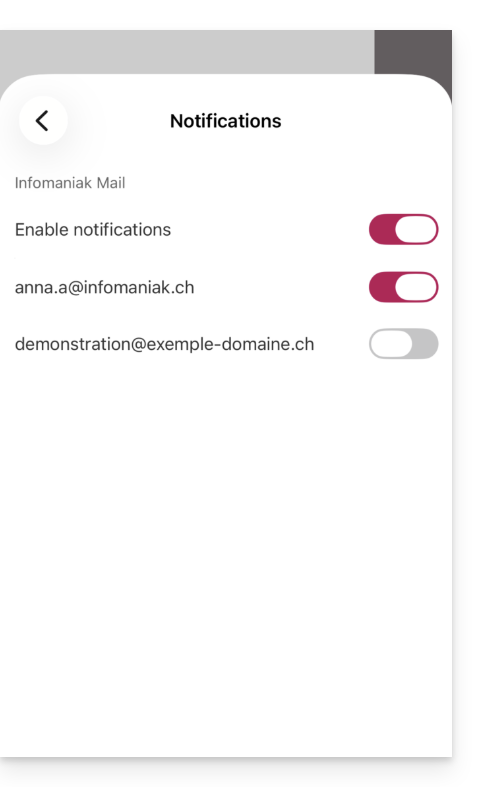
… on Android
On Android devices, particularly Samsung with One UI 6.1 and above, the system settings screen for notifications no longer allows you to specify by default which of your email addresses should trigger a notification: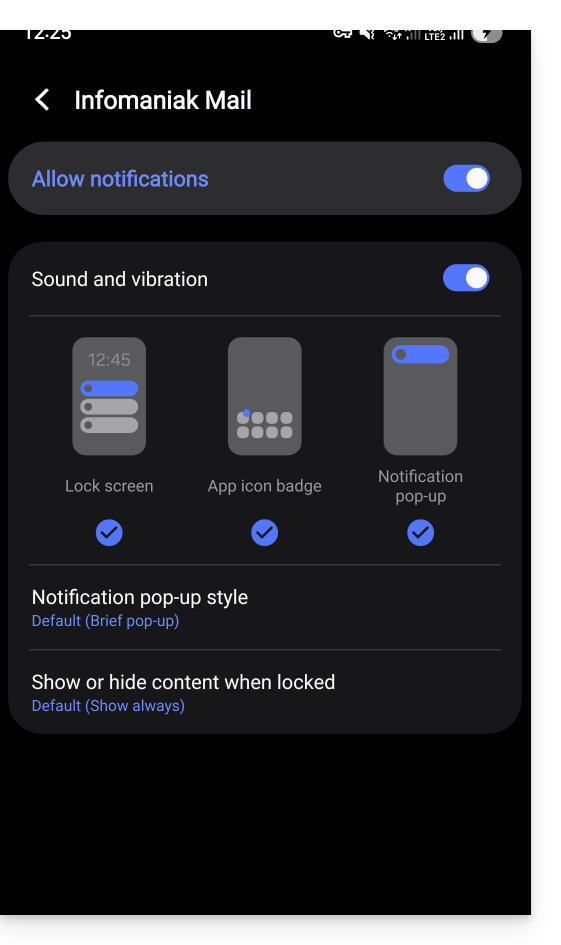
The solution is to enable, from the main page of Android notifications, by clicking on “Advanced settings” at the bottom of the window…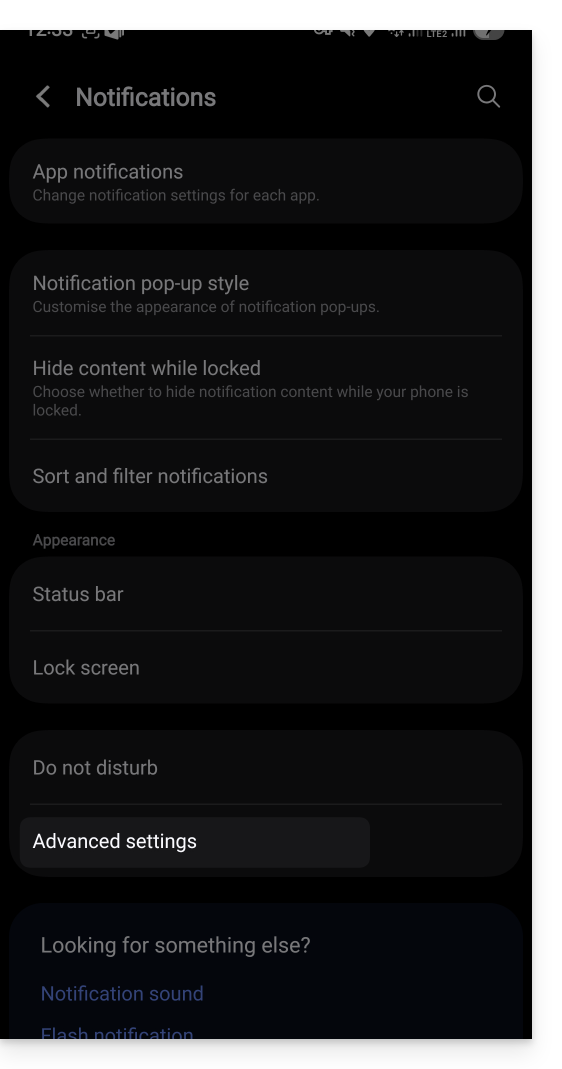
… the option “Manage notification categories for each application”: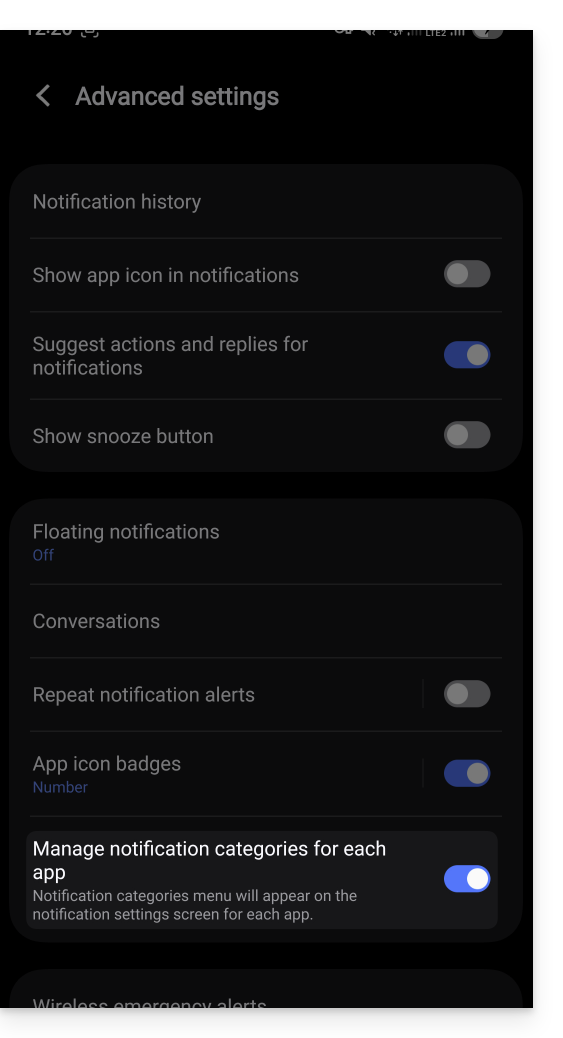
Then go back to the notification page of the Infomaniak app and you can tap on “Notification categories”…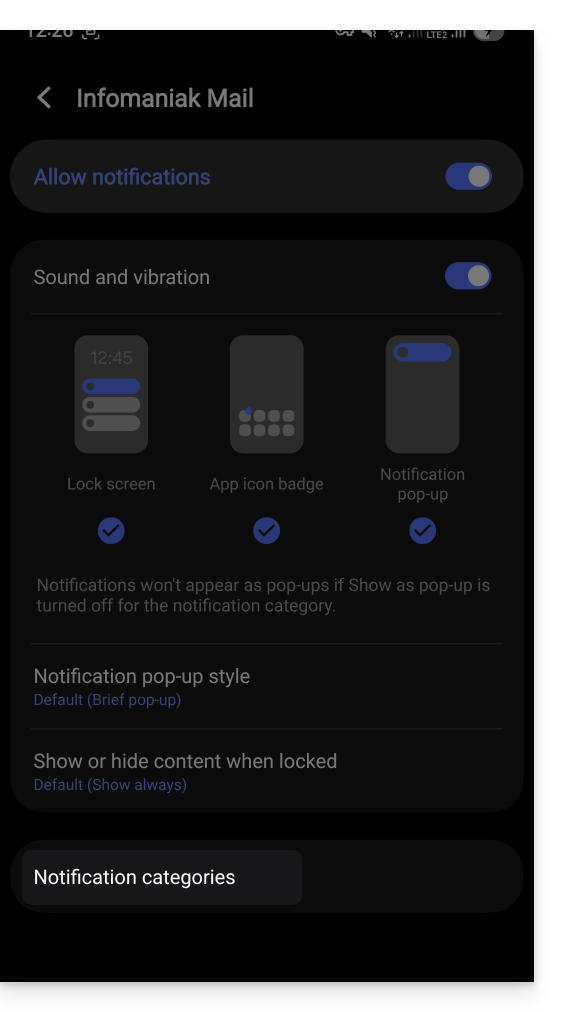
… to find the specific notification choice by email address: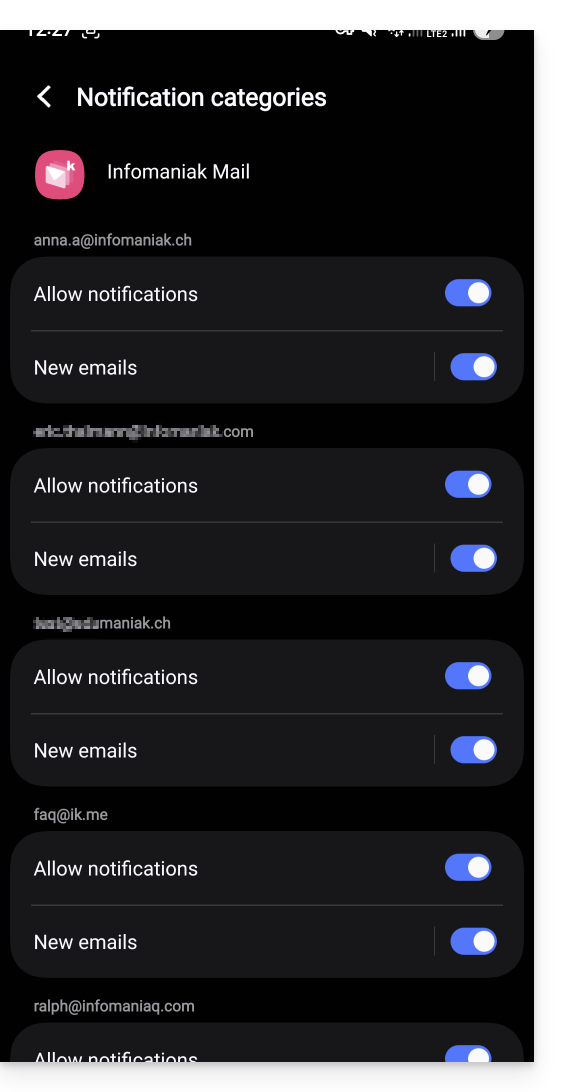
Receive all notifications
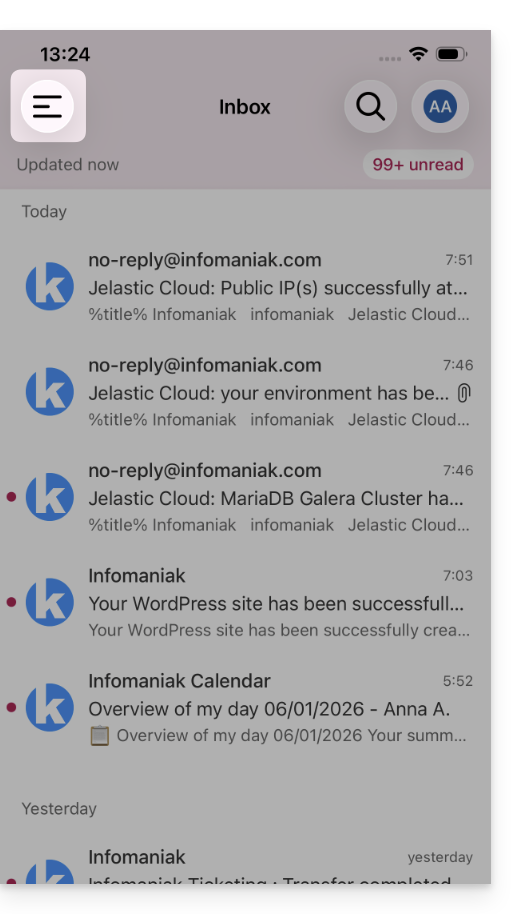
If you have authorized the application's notifications on your mobile device, you will receive a notification for each new message that arrives.
Resolve an issue…
If you see a new message arriving in your inbox, but this one has not triggered any notification on your device, there may be several reasons.
- Start by opening the application to make sure it is working, update it if necessary.
- Open another application or turn off the device screen (if the Infomaniak Mail app is open, in the foreground, screen on, the device may not emit any notification).
- Send a new test message to your email address to trigger a notification.
- Is the test message in the inbox? Indeed, a message going to spam or another folder may not trigger any notification.
… on Android
- Have you waited for several dozen minutes? Indeed, fast notifications (push type) require going through a Google service to work, but some devices that do not go through Google services (such as Fairphone), notifications can arrive at much longer intervals.
This guide concerns Greylisting, a protective measure that is implemented on Infomaniak's mail servers.
How Greylisting Works
Greylisting is a technique used by Infomaniak's mail servers (among others) to combat spam. It relies on the principle of temporarily delaying the delivery of an email to verify the legitimacy of the sender. This method exploits the fact that spam servers often send emails without complying with message retransmission standards.
1. Initial Reception
When a mail server receives an email, it records three elements:
- the sender's IP address
- the sender's email address
- the recipient's email address
2. Temporary Rejection
The server temporarily rejects the delivery of the email and sends a temporary error message (4xx code). This means that the message is not permanently rejected, but the sending server must try to send it again later.
3. Retry
Legitimate mail servers are programmed to retry delivering messages after a certain delay. Spam servers, on the other hand, often do not bother to retry.
4. Acceptance
Upon retry, if the email comes from the same trio (sender's IP, sender's address, recipient's address) noted previously, the message is accepted and delivered to the recipient.
This guide concerns the configuration of the mobile app Infomaniak Mail (app for iOS/Android smartphone or tablet).
The language of the application is based on the language of your device on which the Infomaniak Mail mobile app is installed and not on the configured language on your user account.
Access the application settings
To open the settings of the mobile app Infomaniak Mail (app for iOS/Android smartphone or tablet) on your device:
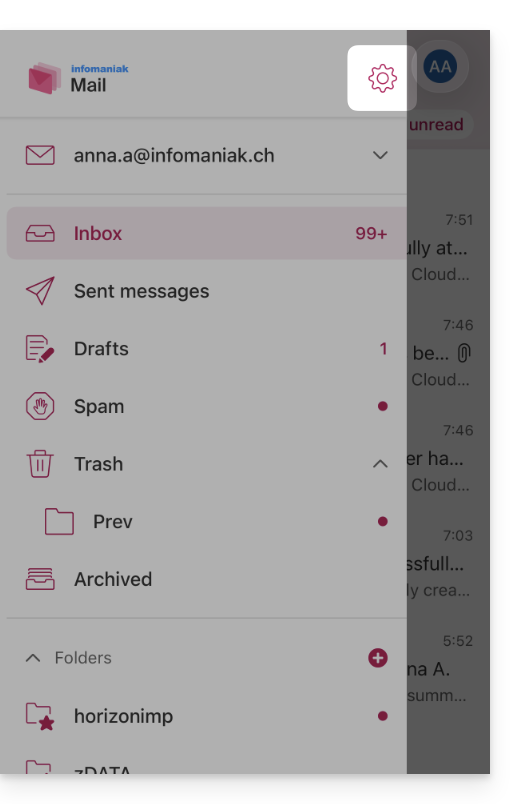
- Tap at the top left of your inbox:
- Click on the Settings icon at the top right of the pane that has opened:
- You can manage the settings from the screen that is displayed:
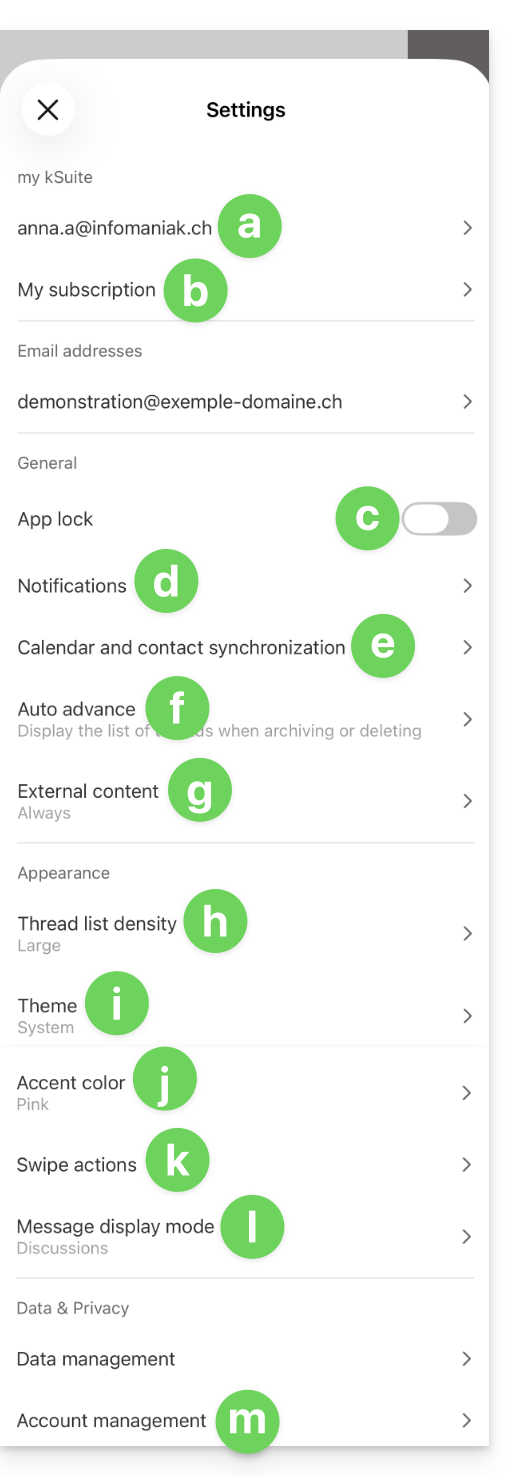
a. Signature selection
If you have multiple email addresses linked to your account, tap on the email address for which you want to change the signature. Then choose another signature from those configured.
On iOS, you can also manage your read receipt requests.
b. my kSuite only
Provides information about the current subscription.
c. Application lock
This option allows you to protect the application with one of the locking methods of your device, which allows you to stay connected to Infomaniak messaging with your user account but prevents access to Infomaniak Mail by a third party when the app is no longer in the open applications.
If your device has a fingerprint reader, you can use this method to activate the lock. The same applies to Face ID on iOS: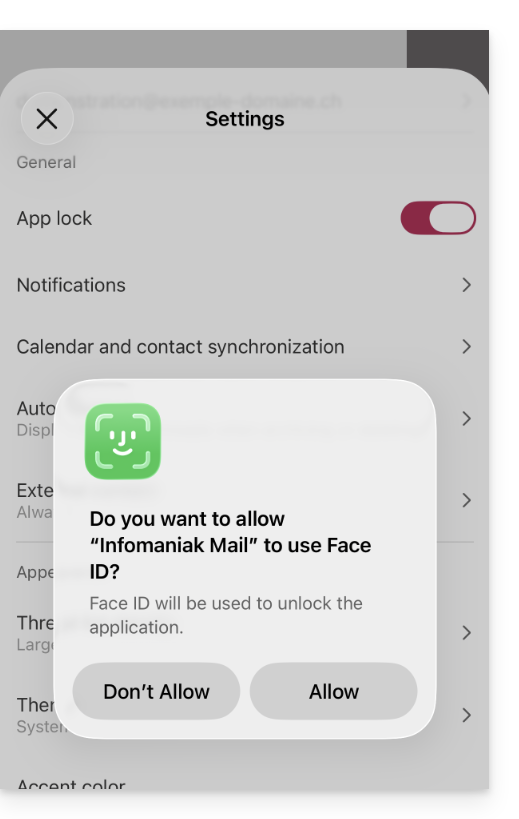
Upon reopening the application, authentication will be required.
d. Notifications on the device
You can configure the notifications for each of the email addresses linked in the application.
e. Synchronization of contacts & calendars
For now, this synchronization is managed externally; refer to the assistant https://config.infomaniak.com/.
f. Automatic advance
This section allows you to choose the action to be taken after archiving or deleting an email: open the next message, or the previous one, or return to the message list.
g. External content
This section allows you to choose whether to automatically display all external content present in an incoming email you are reading, or whether you prefer to hide it and only display it on demand.
h. Conversion list density
The display mode can be compact, normal, or large.
i. Theme
The theme allows you to choose a display type dark mode (dark) or conversely, a bright display in black and white. This display can also be defined based on the device's theme (thus allowing for any system setting that might vary the display based on the time of day).
j. Accent color
The accent color is either blue or pink.
k. Swipe actions
Swipe actions allow you to define which operation my kSuite Mail must perform if you swipe your finger across a message from right to left or left to right: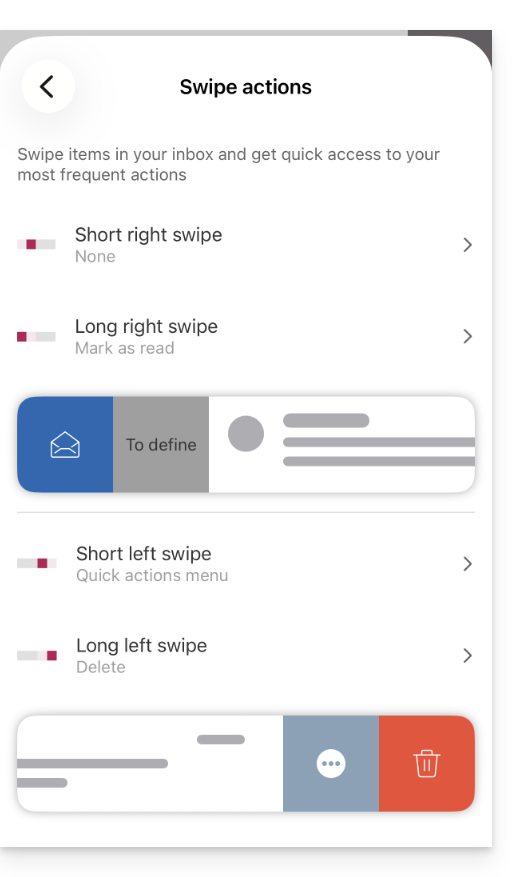
Possible actions are:
- delete the message (it goes to the trash)
- archive the message (it goes to an archive folder)
- mark it as read or unread
- move the message (and in this case, the folder list is displayed after a swipe)
- favorites (to activate a follow-up on the message)
- report as spam
- quick action menu (also accessible from reading the message and which offers to write a response, perform a transfer, deletion, printing, etc.)
and it is also possible to choose "none" to avoid operations that would not be desired if your device is not suitable for swiping: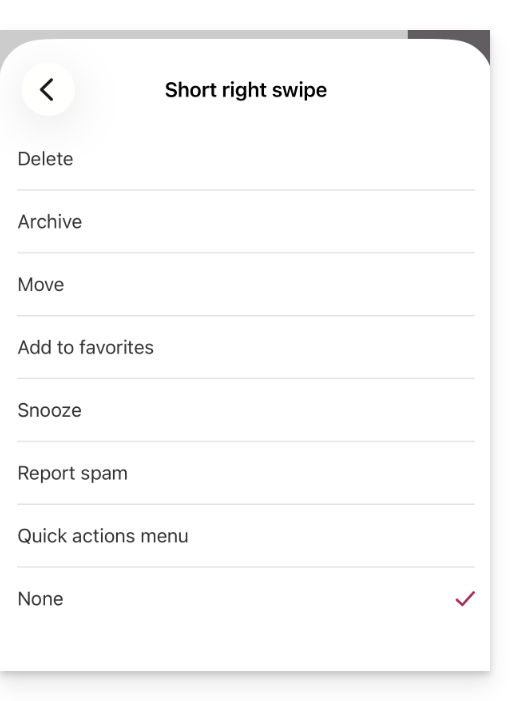
l. Message display mode
Choose between an individual display of messages or a “discussion” / “conversation” mode, which allows you to group your emails by subjects/senders, i.e., group the received emails based on the discussion topic, thus making the inbox display lighter and easier to follow the messages from the different participants in the conversation:
Account management
Allows you to delete the Infomaniak account (after confirming you have read the important warning). Also refer to this other guide.
This guide offers several solutions to quickly delete a large number of emails contained in an email address hosted by Infomaniak. Note that the size of your mailbox is not limited.
Bulk delete emails…
… from the Infomaniak Web Mail app
- Click here to access the Infomaniak Web Mail app (online service ksuite.infomaniak.com/mail).
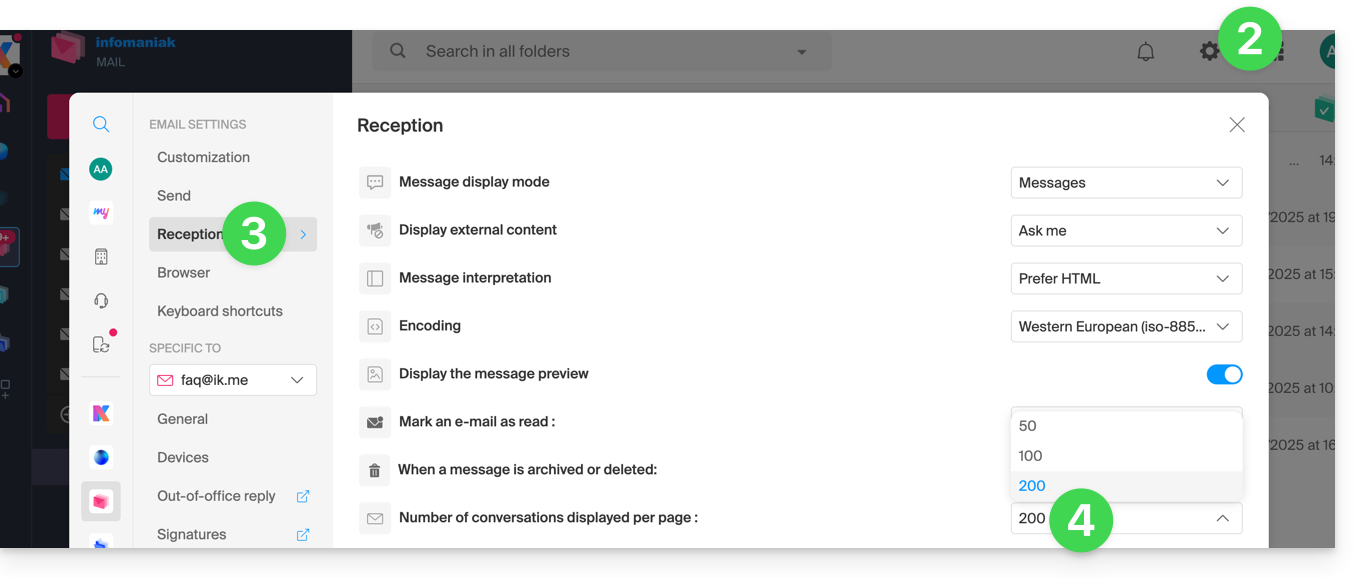
- Click on the Settings icon in the top right of the interface.
- Click on Reception.
- Display the maximum number of items loaded at once:
- To empty the inbox, select all [
A] visible items on the screen (a finer selection is possible [B]) and click on the Trash icon [C] to send them to the trash: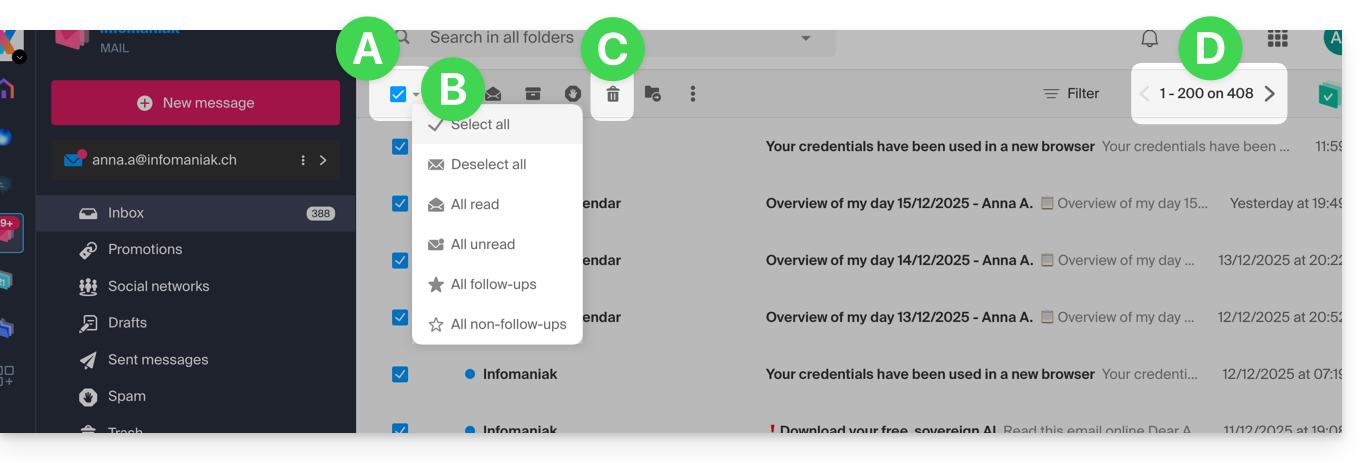
- Repeat this process on all pages [
D].
- Repeat this process on all pages [
- Apart from the inbox, folders can be emptied in a few clicks:
- Click on the action menu ⋮ to the right of the folder in question.
- Click on Empty folder:
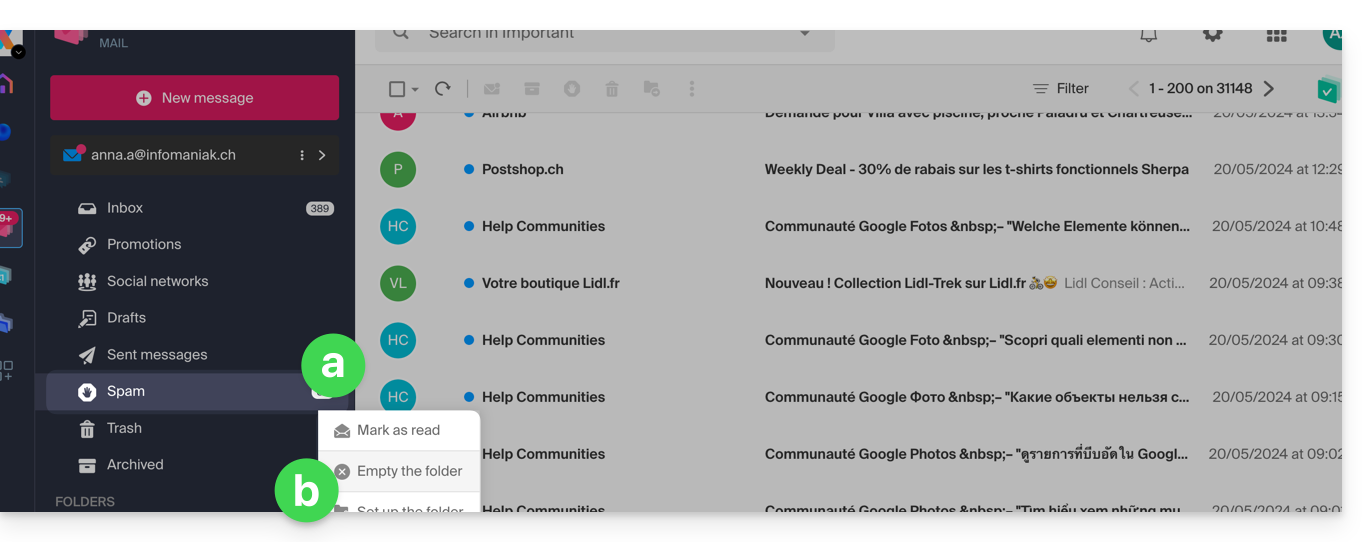
- Be careful, emails are deleted without going through the trash, as if you were deleting the folder itself — only a restoration can allow possible recovery.
You can also delete the email address found within a Mail Service, then recreate it. It will then be completely empty.
… from an IMAP email software/client
A solid solution is to configure the email address in an IMAP email software/client, which will allow the selection of all messages (without pagination…) consequently, deletion is easy and quick:
- Install Thunderbird (or any other messaging app on your device).
- Add your email address by indicating its password.
- Wait for the inbox to load.
- Select all messages.
- Click on Delete.
- It's done, you can remove the application if you wish.
Special case: crossed-out messages
To permanently delete any tracked / struck-through emails appearing in your software/email client or on Mail Infomaniak: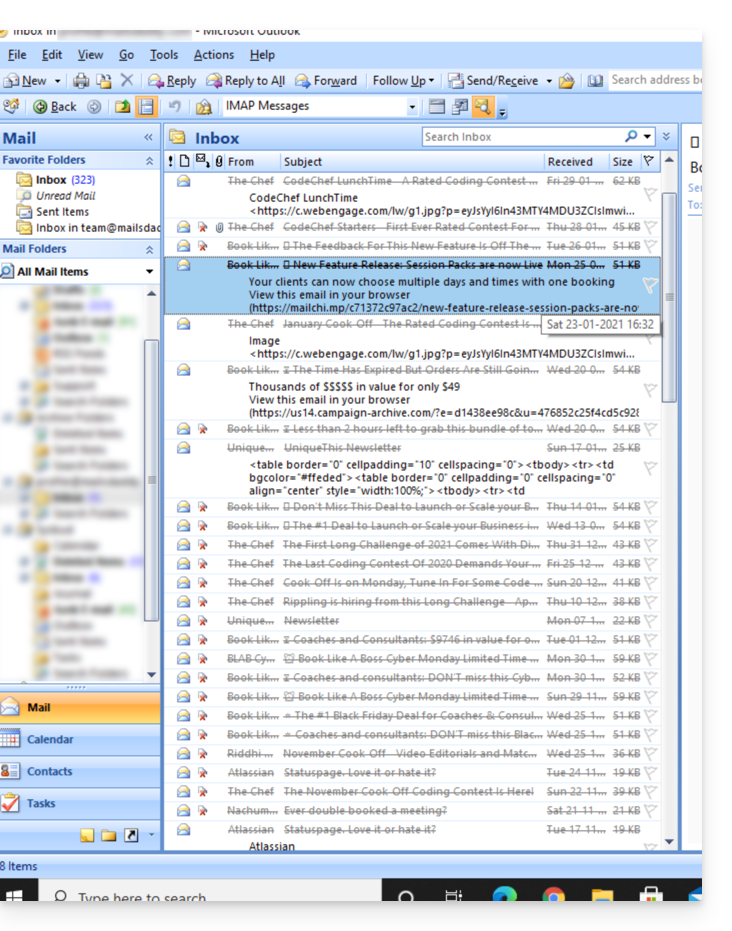
- Microsoft Outlook
- go to the Edit menu -> Empty Deleted Items (in English, you should have a menu Purge)
- Apple Mail
- go to the Mailbox menu -> Erase Deleted Items
They will then also disappear from the Mail Infomaniak interface.
This guide explains how to manage Soft Bounce & Hard Bounce errors that may occur when sending emails, particularly when using the Infomaniak Newsletter.
Hard Bounce
A hard bounce is an email that cannot be delivered for permanent reasons.
- email sent to a false address
- recipient's email domain that is not a real domain
- recipient's server that does not accept emails
- etc.
Soft Bounce
A soft bounce is an error message indicating that the email is not delivered to its recipient and corresponds to a presumably temporary delivery issue: the email address is valid, the sender can resend the email.
Several reasons can explain a soft bounce and therefore why the recipient's server temporarily refuses the email:
- the recipient's inbox is full: due to insufficient storage capacity, the recipient no longer receives messages
- there is a problem with the recipient's mail server: the server is temporarily unavailable or down, or the user has inadvertently set filters that prevent the receipt of certain messages
- when the content of the email, particularly its attachments, is too large, the delivery issue occurs at the time of sending
Unless the recipient has permanently abandoned their inbox without deleting their account, the soft bounce is a temporary issue.
Example of the Infomaniak Newsletter tool after a send with a good score of 0% "Permanent Bounces" and 0.31% "Temporary Bounces":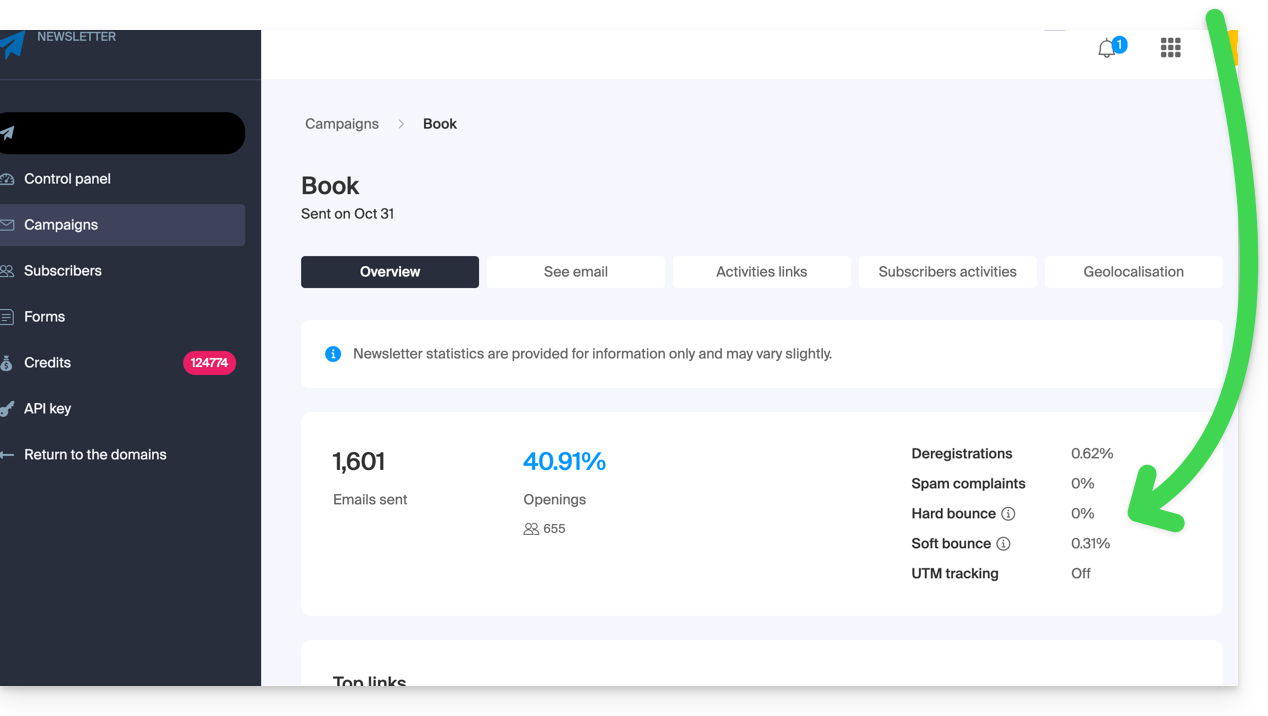
Also refer to this other guide.
This guide helps you better understand the peculiarities that may arise in the display of emails when using different messaging applications and Infomaniak Mail apps.
Preamble
- It may happen that inconsistencies occur in the display of a list of emails contained in a folder (example: the Sent folder) and that the messages sorted and considered as the most recent by one device will not be the same as those displayed when using another tool. Sent Messages)
Understanding Unique Identifiers (UID)
UIDs (Unique Identifiers) are unique identifiers assigned to each message in an IMAP mailbox. They are used to uniquely identify each message, regardless of changes made to folders or messages themselves. UIDs are particularly useful for managing and synchronizing emails across multiple IMAP email software/clients:
- Each email is assigned a unique UID at the time of its creation in a mailbox; this UID never changes in principle as long as the email exists, even if its content or metadata is modified.
- UIDs are generally sequential, which means that more recent messages have higher UIDs in principle.
- During email synchronization, IMAP email software/clients can use UIDs to determine which messages are new, modified, or deleted since the last synchronization; this allows for efficient email management without having to download and compare all messages.
- Depending on the tool used, to display them in the order in which they were received, messages can be sorted by their reception date or by UID.
Not to be confused with:
- Message Sequence Number (used for temporary operations based on the current position of messages)...
- Message-ID (RFC 5322) (used to uniquely identify messages across different servers and email software/clients)...
- X-Message-Id (server-specific and used for internal tracking needs)...
- Thread-Index and Thread-Topic (used by Microsoft applications to track conversation threads)...
- GMail Unique Identifiers (used specifically by Gmail to manage messages and discussion threads)...
IMAP Applications and Infomaniak Mail App
The issue may appear in this form at the server command level:
758 - date.sent: 2017-10-11 23:15:26 (+0100)
757 - date.sent: 2017-10-11 15:00:55 (+0100)
756 - date.sent: 2017-10-11 14:39:28 (+0100)
(...)
742 - date.sent: 2018-01-17 00:40:21 (+0000)
741 - date.sent: 2018-01-17 00:30:33 (+0000)
740 - date.sent: 2018-01-17 00:26:07 (+0000)
(...)
51 - date.sent: 2022-10-07 16:39:16 (+0100)
50 - date.sent: 2023-06-13 10:15:00 (+0100)
49 - date.sent: 2023-06-07 12:11:35 (+0100)
Here, it can be seen that emails from 2017 have a UID (758, 757, ...) higher than emails from 2023. UIDs must have been reassigned for one reason or another during the existence of this entire email account (moves, copies, imports, etc.).
Depending on how the messaging tool sorts emails, a message from 2017 may appear among recent messages while the 2018 message will not be loaded immediately. This is particularly true for Mail Infomaniak which only loads a series of emails at a time based on the UID (this is subject to change).
Therefore, to resolve any inconsistencies, it is recommended to use an IMAP messaging software/client such as Thunderbird on a computer, which will allow you to quickly and efficiently sort all messages in a specific folder based on the email date, as the application will display all messages present on the Infomaniak server.
This guide explains how to set up a sending and reply address different from the email address used on the Infomaniak platform.
⚠ Available with:
| kSuite | free |
| Standard | |
| Business | |
| Enterprise | |
| Mail Service | Starter 1 max. address |
| Premium 5 min. addresses |
Preamble
- This is useful for working with one of your email aliases or synonym domains.
- This will work with the Infomaniak Mail Web app (online service ksuite.infomaniak.com/mail) as well as with most email software/clients.
- However, note: there is no link between the settings entered in the Signature section of Infomaniak Mail and the email software/clients.
- Each email software/client has its own settings and you can, for example, define a different reply address within each of the respective tools (read at the bottom of this guide).
Set up the sending address on the Infomaniak Web Mail app
Prerequisites
- The secondary email address that can be used must have been added as:
- … either an email alias (example:
aa@instead ofanna.alpha@) but special aliases excluded: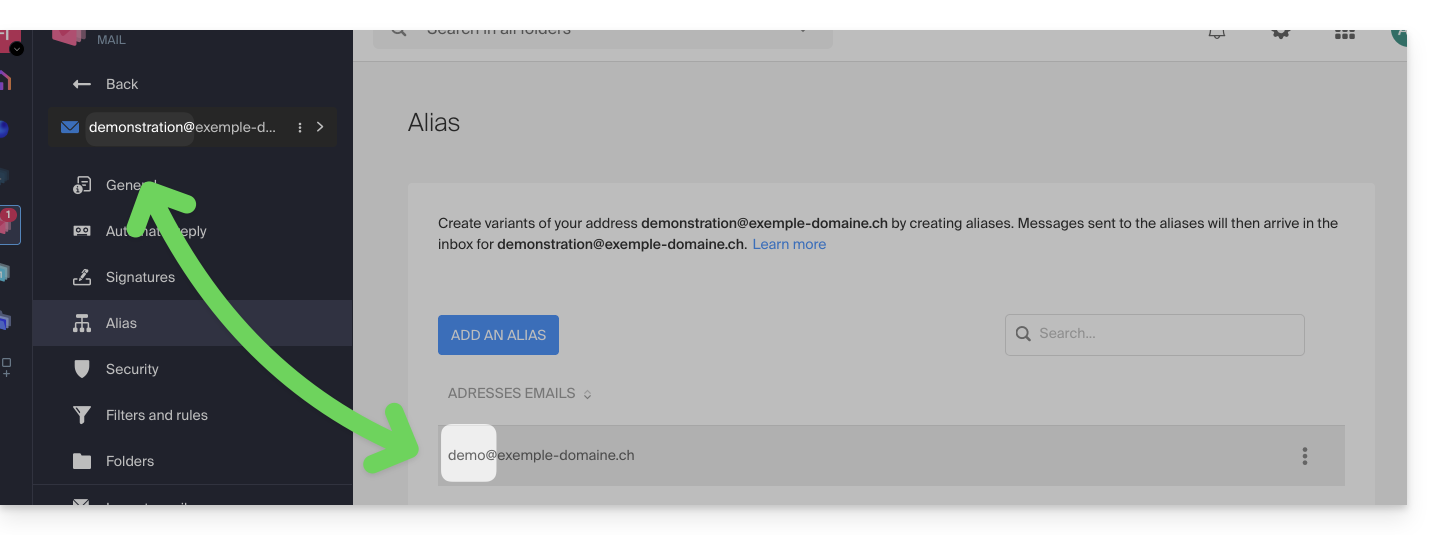
- … or synonym domains (example:
@short-dom.xyzinstead of@my-super-long-domain.xyz).
- … either an email alias (example:
To access the sending address options:
- Click here to access the Infomaniak Web app Mail (online service ksuite.infomaniak.com/mail).
- Click on the Settings icon at the top right of the interface.
- Check or select the email address concerned in the dropdown menu of the left sidebar.
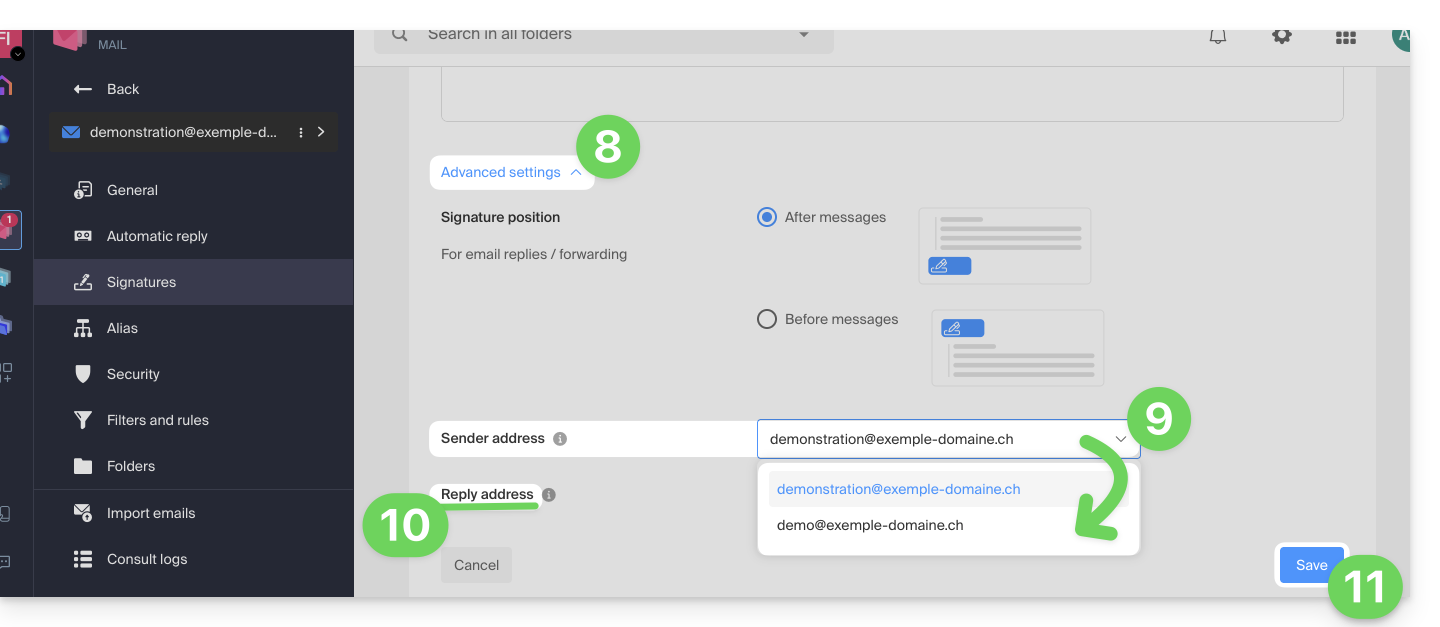
- Click on Signature:
- Click on the action menu ⋮ to the right of the current signature.
- Click on the pencil icon ✎ to edit the current signature.
- OR ELSE create a new signature:
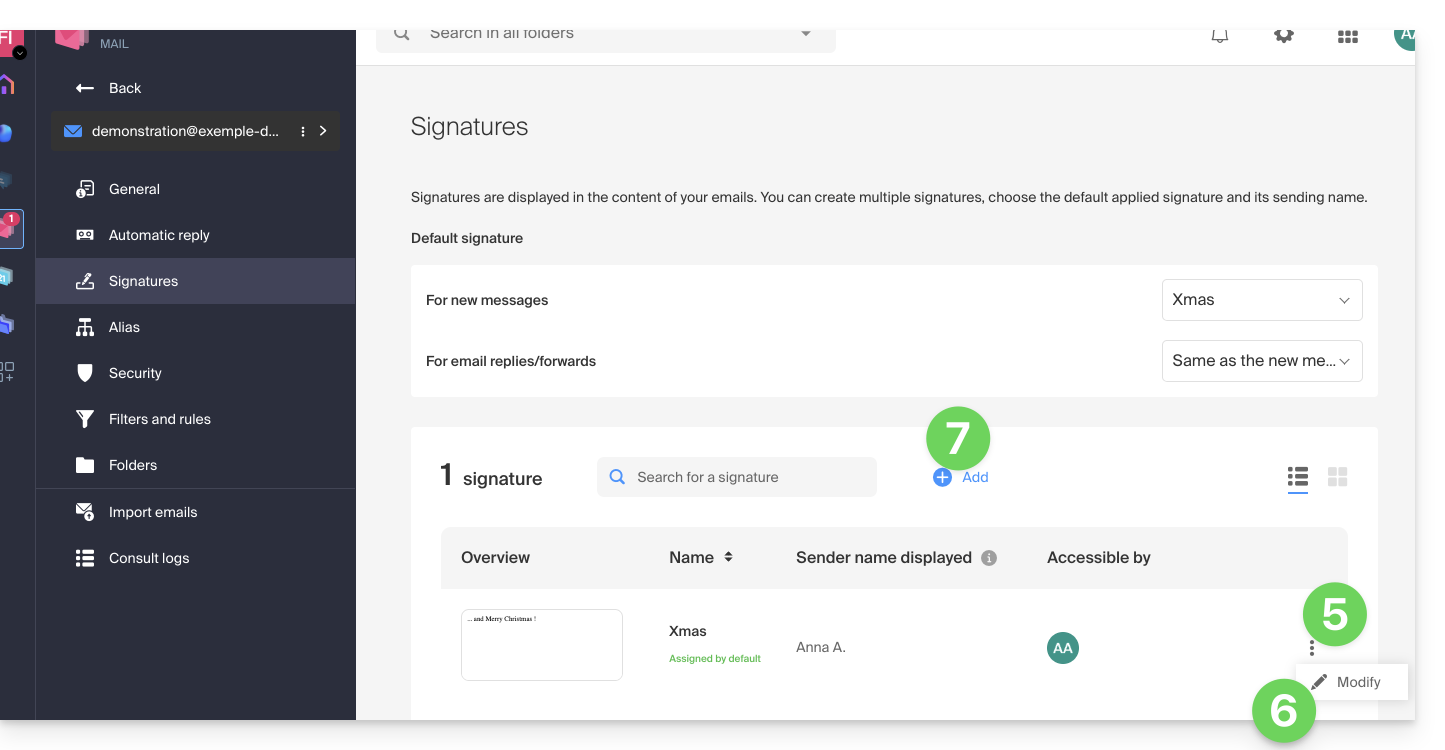
- Click on the chevron to expand the Advanced Settings section at the bottom of the page.
- The sending address allows you to define the address that will be mentioned as the sender in the inbox of your recipients.
- The reply address allows you to receive future replies to your emails (return-path) to a different address (among the choices specified in the prerequisites above)…
- …and if you write a message in response to a reply received on this alias, the signature allowing sending with this alternative identity will be applied instead of the signature defined by default.
- Confirm with the Save button (if this remains grayed out, make sure all fields are filled in, especially the full name field):
- Compose a new message by selecting the corresponding signature:
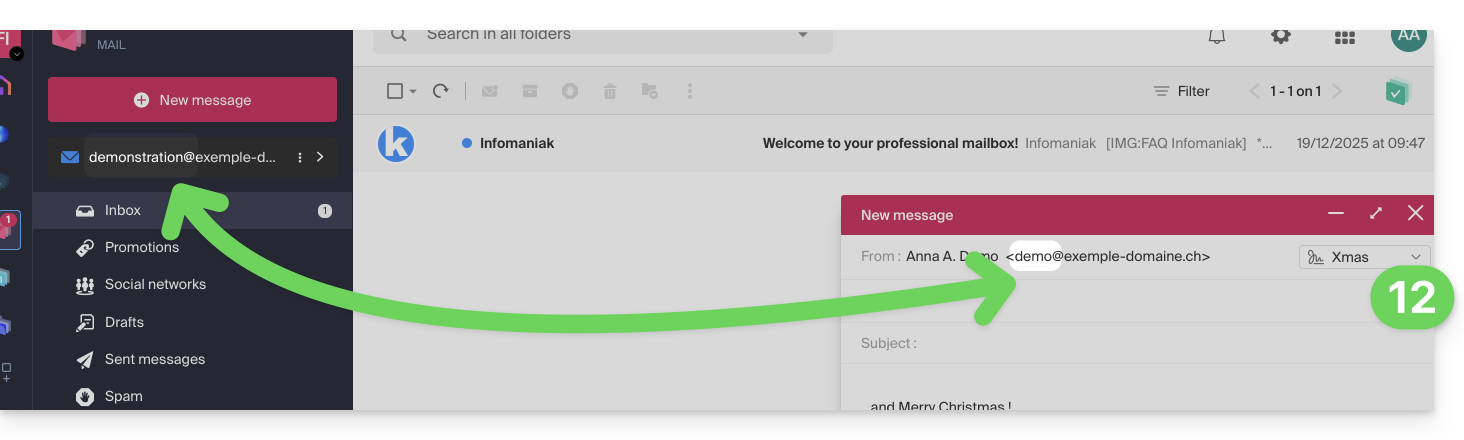
In the example above, the sending address has been changed but not the reply address. This gives the expected result with the recipient (it is sufficient to look at the headers of the received message to prove it).
Now add the same secondary address in an email software/client, the effect will be the same.
Set up the sending address on an email software/client
Prerequisites
- The secondary email address that can be used must have been added as:
- … or email alias (example:
aa@instead ofanna.alpha@) including alias special. - … or synonym domains (example:
@short-dom.xyzinstead of@my-super-long-domain.xyz).
- … or email alias (example:
It is possible to configure an email software/client with any existing email address even if it exists as an alias in your Mail Service. Sending will be done in the same way as with an address defined as "main" email.
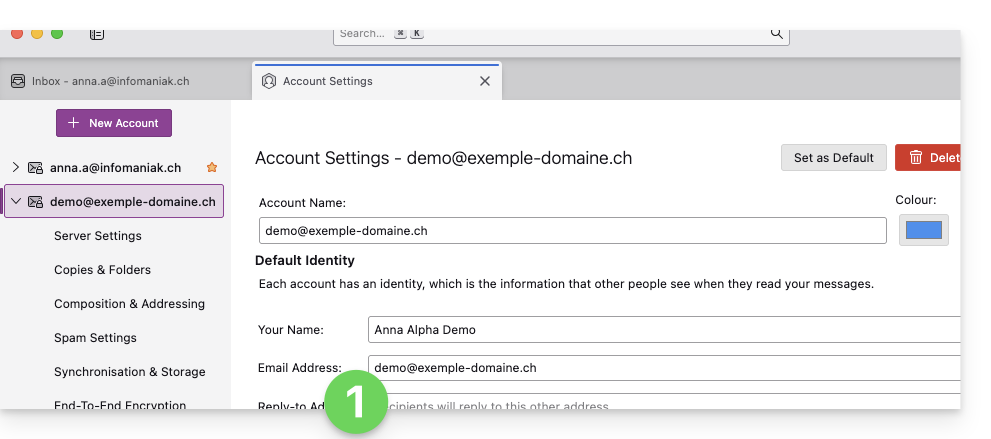
Example in the Thunderbird software:
- Add an account with the correct email parameters related to the alias:
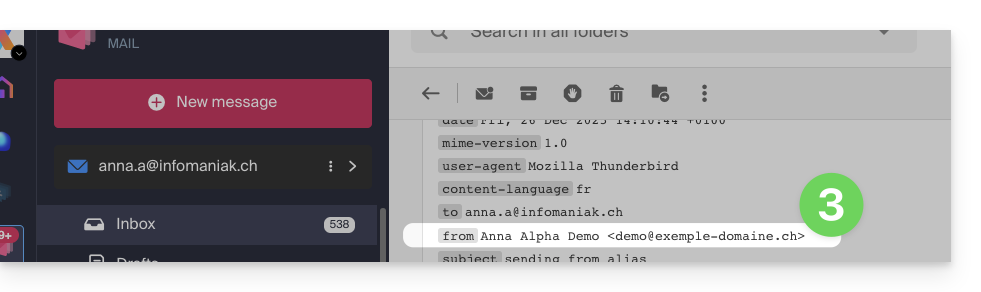
- Compose a new message from the software/email client.
- Once received, the message is well described, even in its headers, as being sent from an address that you will know to be an alias:
This guide explains how to remove additional designations from an existing Mail Service (everything that comes after the @ sign in your email address), by detaching its linked domain names linked.
Preamble
- Once removed, the domain name is available again to order a new Mail Service or to be attached to another existing Mail Service.
- Note also that you can rename your product in the Infomaniak Manager, but changing the name of a Mail Service has no effect on its addresses. You need to act on the domain name.
Remove the linked domain
Prerequisites
- Have dissociated the synonym domain name from the main domain name if there was a previous association.
- Have defined the domain name to be detached as a secondary domain (instead of a main) — this inversion can be done by following this other guide in the chapter named "a" from point 3 onwards.
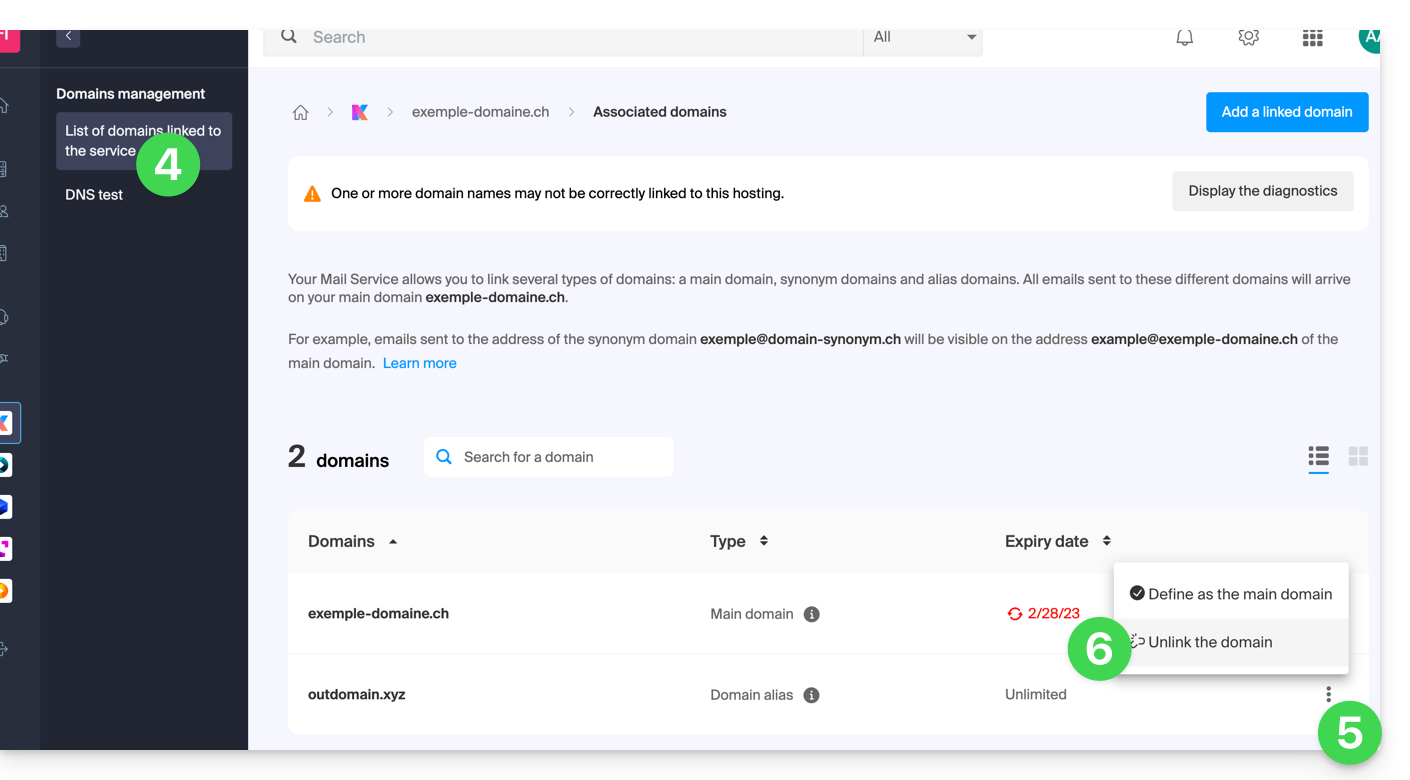
To detach a domain name from your Mail Service:
- Click here to access the management of your product on the Infomaniak Manager (need help?).
- Click directly on the name assigned to the product concerned:
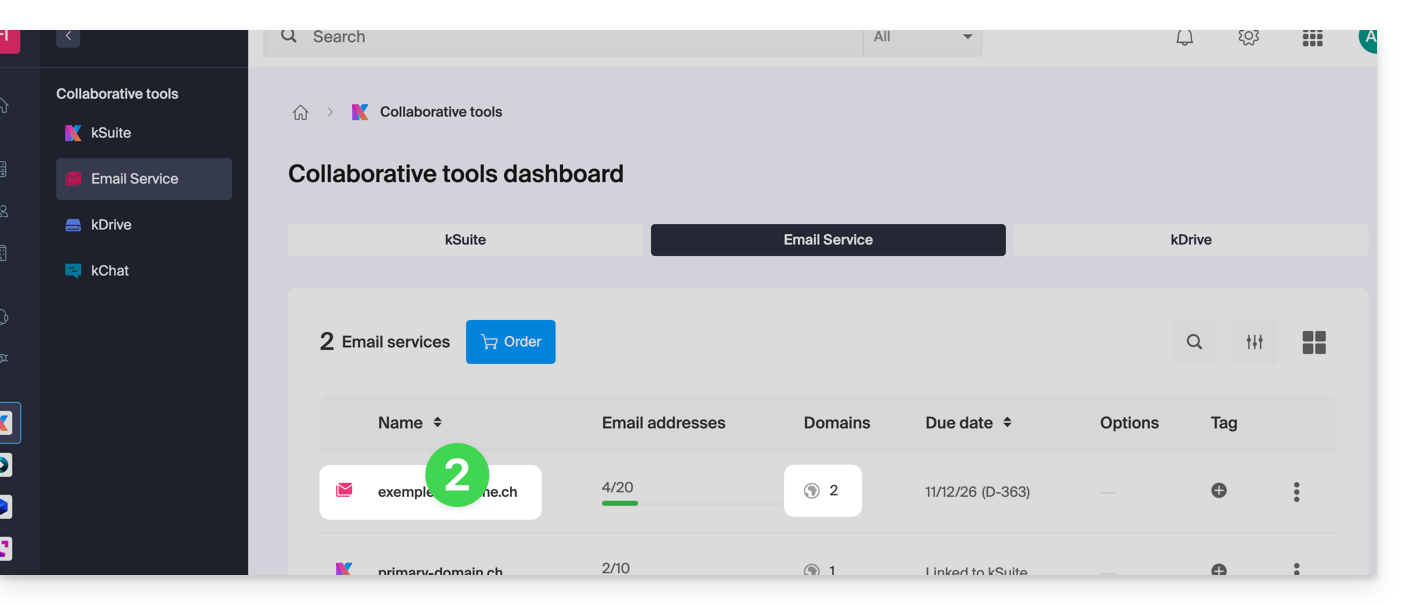
- Click on Domain Management in the left sidebar:
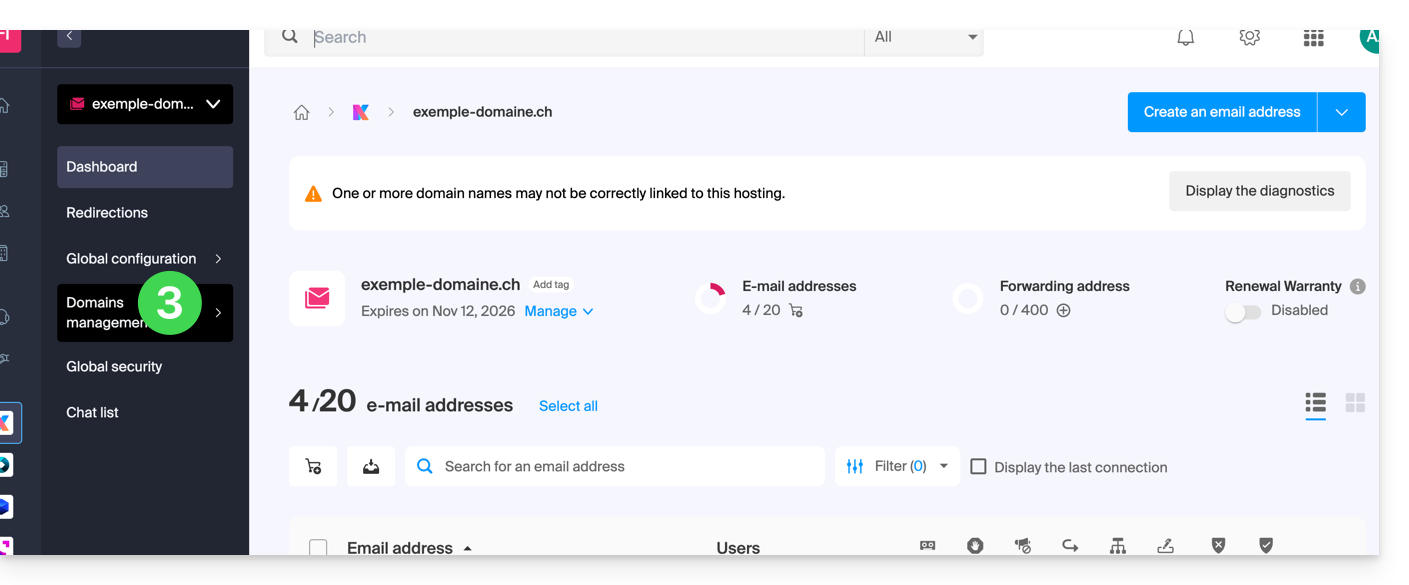
- Click on List of Domains Linked to the Service in the left sidebar.
- Click on the icon ⋮ to the right of the domain name to be detached.
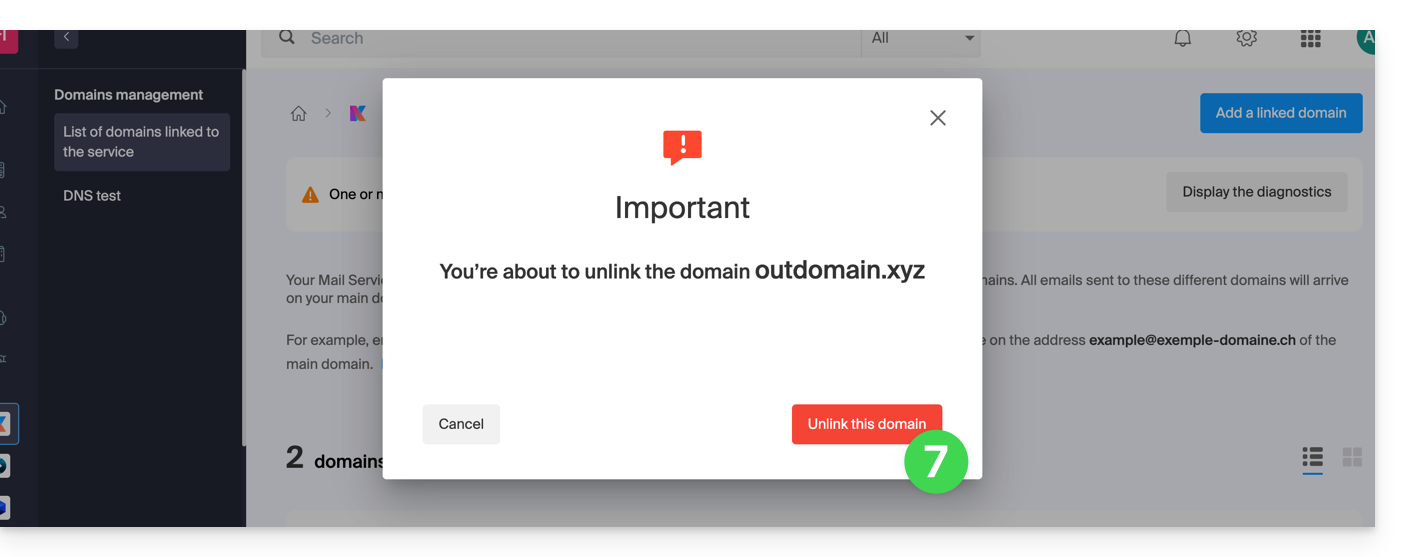
- Click on Detach the Domain (read the prerequisites above if the item is not offered):
- Confirm the detachment:
This guide shows you how to export and save the contacts from the "Discussion List" tool into a CSV file (.csv) format.
The Discussion List tool is currently available only to users who have activated it in the past. Discover a simpler and more powerful emailing (Newsletter) solution. You will be able to easily import your existing contacts.
Export contacts to a file
The discussion list tool is accessible within your Mail Service:
- Click here to access the management of your Mail Service on the Infomaniak Manager (need help?).
- Click directly on the domain name assigned to the product concerned.
- Click on Discussion List in the left sidebar menu.
- Click on the name of your list.
- Click on the Subscribers tab.
- Click on Download the list in CSV format:
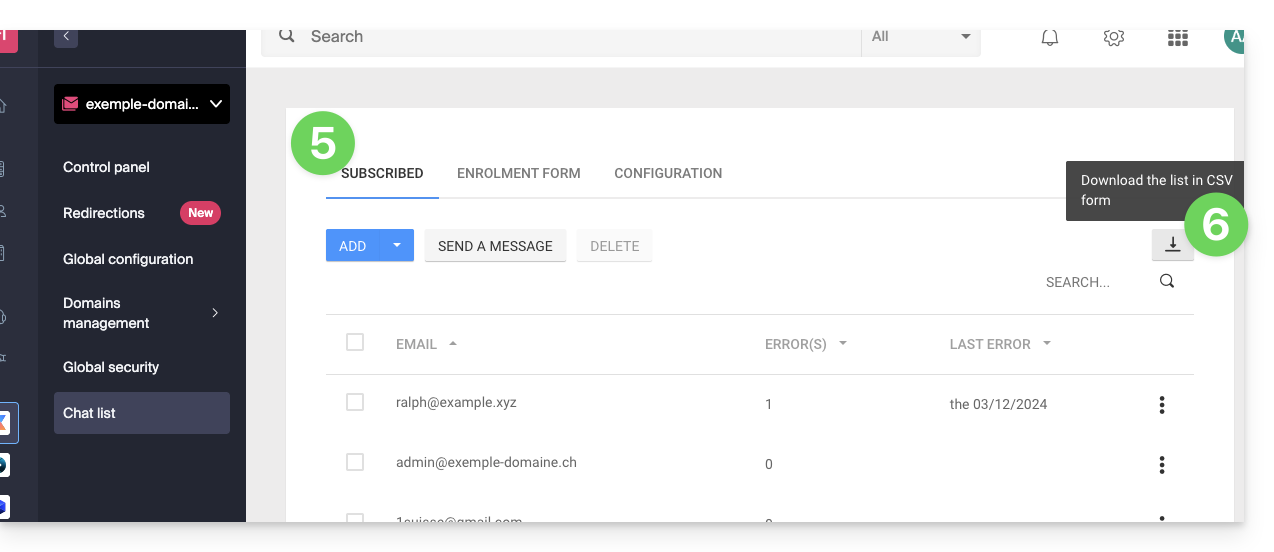
The CSV file will be downloaded to your computer's hard drive.
To import these contacts into the Newsletter tool:
- Modify the possible
.txtextension of the file to.csv. - Refer to this other guide.
This guide explains how to connect the desktop app New Outlook (desktop application on Windows, replacing Microsoft Mail and Windows Mail) to an email address hosted by Infomaniak.
Preamble
- Although the emails themselves remain stored on the Infomaniak server, the experience in New Outlook is very integrated with the Microsoft cloud:
- Some information from your account may be used by Microsoft for centralized management and better synchronization experience.
- According to some users, it may even be mandatory to have a Microsoft Cloud account to use classic IMAP.
- If you want to have full and local control over your emails, consider using third-party email software/clients (such as Thunderbird, for example) that allow for more direct storage.
- The various services offered by Infomaniak are all compatible with the corresponding standard protocols (IMAP/SMTP for email, for example). Therefore, if you encounter a problem with a third-party software, contact its publisher or a Partner and consult the support policy as well as article 11.9 of the Infomaniak Terms of Service.
Add the email address to the application
Prerequisites
- Create the email address within my kSuite or a Mail Service / kSuite.
- Create a password for the email address on the device you are going to configure.
To configure the email application:
- Open the application.
- If necessary, click on the gear icon in the top right corner (otherwise, skip to step 4):
- Click on Add an account:
- Enter the email address to be linked.
- Click on Continue:
- Enter the password for the email address.
- Click on the See more button.
- Check and complete the missing information by scrolling down if necessary:
- Check and complete the missing information.
- Click on Continue:
- Read and go through the different Microsoft information windows:
- There you go, your email address is now configured in the application:
Recommended settings
- Incoming IMAP server =
mail.infomaniak.com - IMAP port =
993(with SSL) - Outgoing SMTP server =
mail.infomaniak.com - SMTP port & encryption protocol and command/method to activate this protocol:
587+ STARTTLS - Username = the complete & full email address ( ? )
- Password = the one generated for the email address you want to check
- Mandatory authentication for sending emails:
- It is activated in the SMTP settings of your application.
- Check "use the same settings as the incoming server" or, depending on the software/email clients, enter a username (= complete & full email address) and the generated password.
Refer to this other guide if you are looking for information about other compatible messaging ports and protocols (SSL / TLS for example).
In case of a problem
Check that the Mail Service is configured optimally.
If you are unsure of your email password, the troubleshooting guides help you resolve any potential issues:
- Refer to the solutions given in this other guide regarding email in general.
- This other guide is more specifically about Outlook.
… and if your Outlook no longer works since a change of email password, refer to this other guide.
This guide explains how to import emails contained in an archive in MBOX format to an Infomaniak mail address.
Prerequisites
- Have a valid and functional email address with Infomaniak.
- Have an archive of your previous mailbox in .mbox format.
Importing MBOX format emails…
… with Thunderbird
Install Thunderbird and configure the Infomaniak address in IMAP. Then, to add MBOX file import support:
- Open Thunderbird.
- Click on the Tools menu.
- Click on Add-ons and Themes.
- Search for the ImportExportTools extension:

- Click the button to install the ImportExportTools NG extension.
- Confirm the addition of the extension to Thunderbird:

- Create a new folder by right-clicking in the local part of your account tree:

- Right-click on this new folder and choose to import a mbox file from the new menu of the ImportExportTools NG extension:

- Select the
.mboxfile on your hard drive and import it. - The import of your emails is done in the local folder.
- This local folder can be moved to the main tree to be synchronized with the Infomaniak server via IMAP:

- The sending of emails to the server is done and you will find your content if you consult the mailbox from another system, such as the Infomaniak Mail web app (online service ksuite.infomaniak.com/mail) for example (or even Apple Mail or Microsoft Outlook - see below):

… with Outlook
There is no free solution to convert a .mbox file to a .pst file for Outlook, for example. However, by following the solution above, which is entirely free, you will get your emails from the .mbox archive to your Infomaniak address.
You can then choose to stop using Thunderbird and continue with Microsoft Outlook in IMAP since all your messages will have been stored on the Infomaniak servers.
This guide explains how to link an external website (hosted by an all-in-one website creation service, for example) to your Infomaniak mailbox.
This will be useful in cases where, for example, your webmaster has modified the technical information (DNS) of your domain name to direct it to your external website and this has interrupted your mailbox.
Prerequisites
- Your domain name includes the DNS corresponding to the provider of your external web service (as this is the DNS zone with this provider that you will edit).
- Note the Infomaniak MX
mta-gw.infomaniak.chor sometimesmta-gw.infomaniak.ch.(presence of a final point). - Note the Infomaniak SPF
v=spf1 include:spf.infomaniak.ch -all. - Note the Infomaniak DKIM.
- Understand that any DNS addition/modification can take up to 48 hours to propagate.
Specific guides
Click on the link corresponding to the web site provider:
- Wix
- Wordpress.com
- Shopify
- Jimdo (guide A | guide B)
Guide for any other web provider
In general, you need to find the place on your web provider's dashboard where you can add the technical information (the 3 indications listed in the prerequisites above) to make your Infomaniak mailbox work while your domain name directs all traffic to this web provider:
- The MX of Infomaniak.
- The SPF is a verification method that ensures an email is sent by the sender it claims to be, helping to combat spam and fraudulent emails; this is often added in the form of a TXT record addition.
- The presence of a DKIM has become essential for the optimal functioning of your Infomaniak mailbox.
If necessary, contact the technical service of the provider in question so that they can help you set up the information specified in the prerequisites above — local partners referenced by Infomaniak can handle these procedures: launch a free call for tenders, they take care of everything, freeing you from the technical details.
This guide explains how to block email addresses or entire domains to no longer receive unwanted mail, or conversely allow addresses to bypass the anti-spam filter of your Infomaniak mailbox to always receive their emails.
Preamble
- In addition to the Infomaniak anti-spam filter which eliminates the majority of unwanted emails as it evolves, Infomaniak offers two distinct lists that you can fill as you wish:
- blocked senders:
- blocked emails and domains (blacklist) are then directly treated as spam…
- allowed senders:
- allowed senders and domains (whitelist) will no longer be filtered by the anti-spam filter…
- the list of allowed senders is only active on the original recipient of each message; if the message is addressed to an address abc@domain.xyz and this is then redirected to def@domain.xyz, the anti-spam filter and the list of allowed senders must be configured for the address abc.
- blocked senders:
- These lists are specific to the email address on which the operation is performed, but a Mail Service administrator can also apply these lists to the entire Mail Service, via the Global Configuration of a Mail Service.
- These lists are also automatically filled based on your actions on emails at the anti-spam filter level.
Formats that can be used
Replace the example domain (the-spam-domain.xyz) with the one that bothers you and that you want to send directly to the Spam folder:
Block a specific email address
john.example@the-spam-domain.xyz
Block all email addresses from a specific domain
*@the-spam-domain.xyz
Block certain email addresses from a specific domain
*example@the-spam-domain.xyz or john*@the-spam-domain.xyz
Block all incoming emails
*
Manage blocks or authorizations from the Infomaniak Web Mail app
Prerequisites
- Have permission to manage security: if you had been invited to the Infomaniak Web Mail app (online service ksuite.infomaniak.com/mail) to manage your address, it is possible that the Mail Service manager has removed this right from their admin account.
To block or allow senders:
- Click here to access the Infomaniak Web Mail app (online service ksuite.infomaniak.com/mail).
- Click on the Settings icon at the top right.
- Check or select the email address concerned in the dropdown menu of the left sidebar.
- Click on Security:
- To add a blocked sender (blacklisted), click the Add an address button in the Blocked address box:
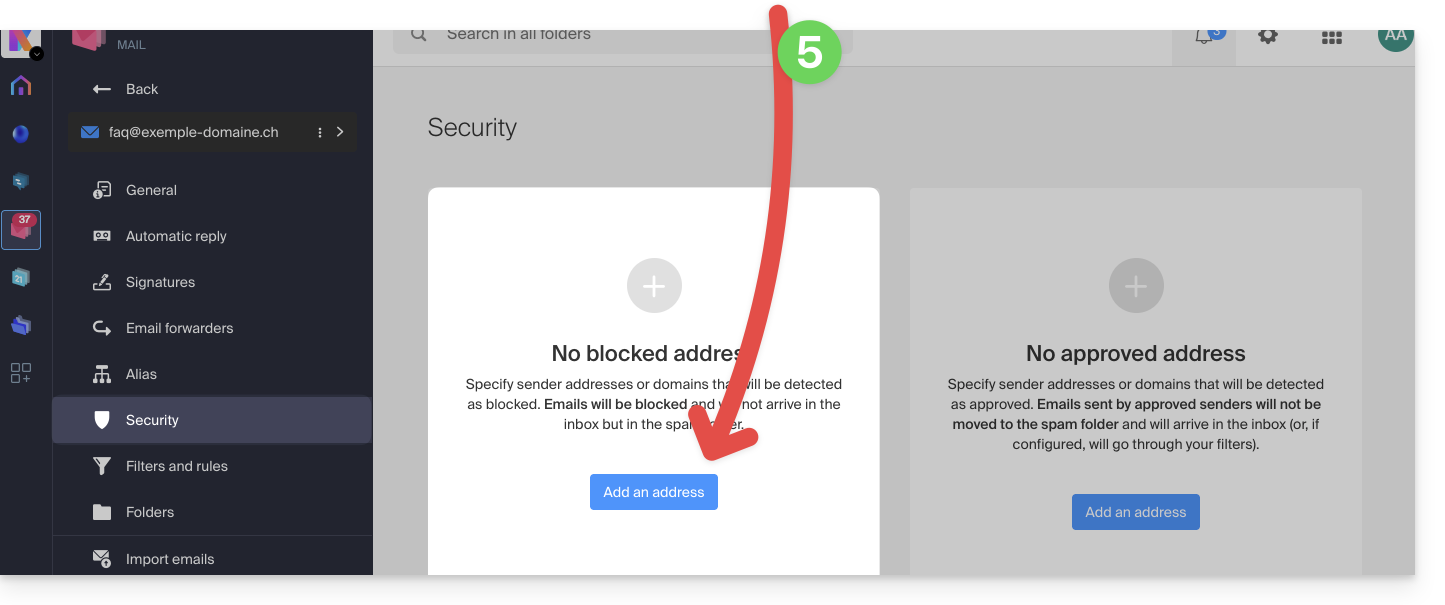
- To add an authorized sender (whitelisted), click the Add an address button in the Approved address box:
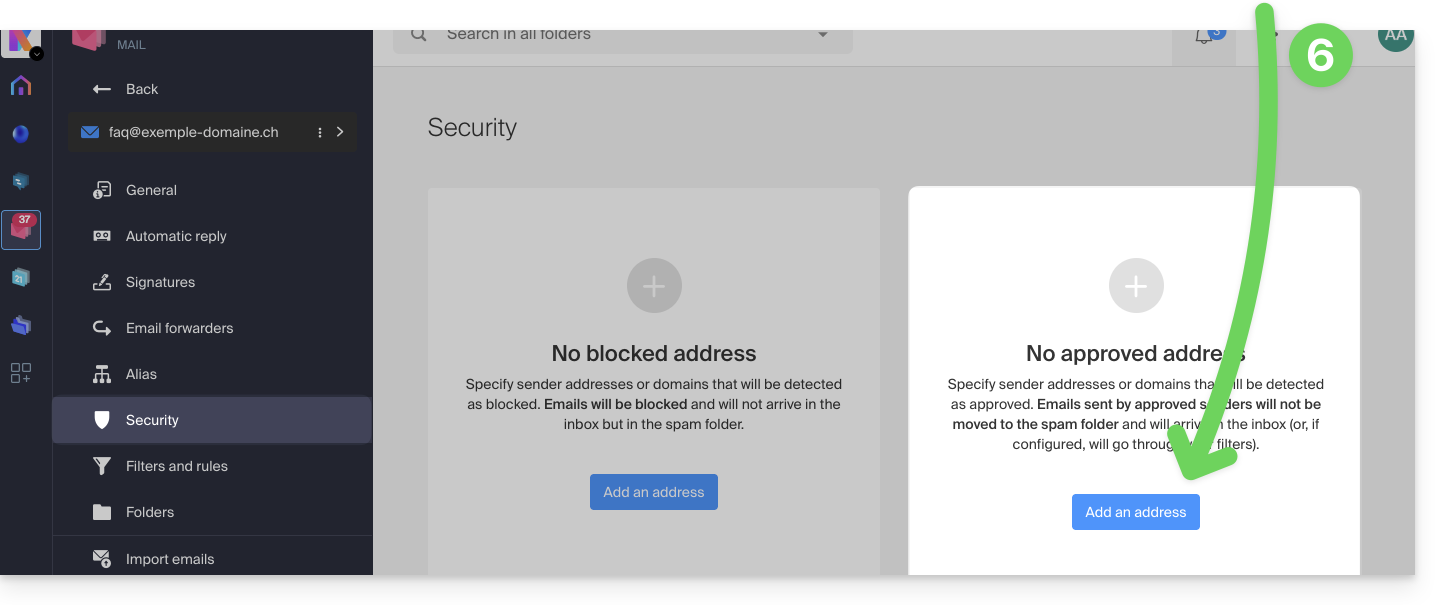
- Fill in the fields as desired and/or according to the formats indicated above.
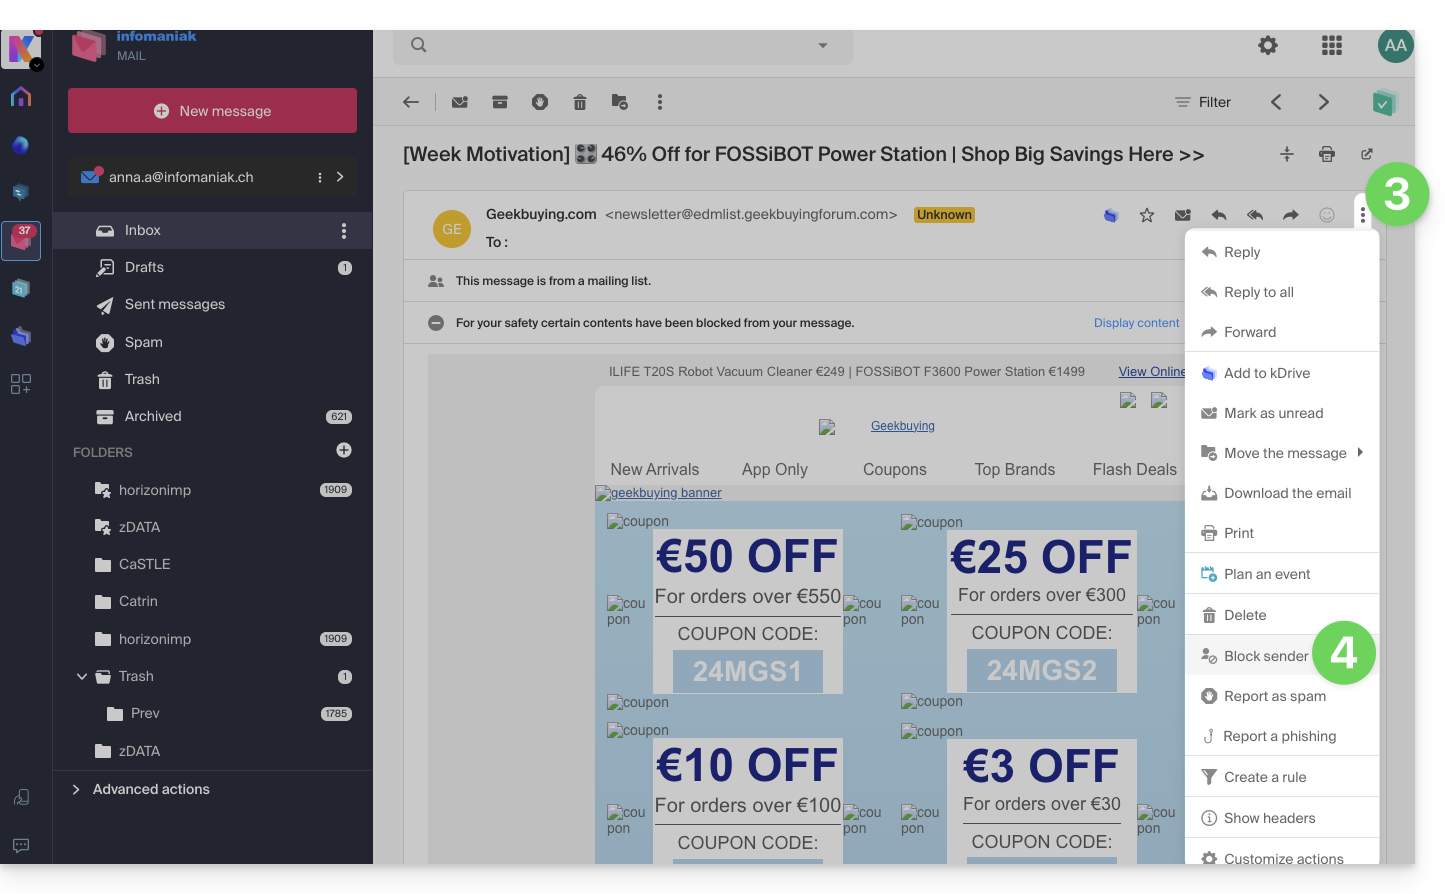
You can also block a sender directly from the received e-mail:
- Click here to access the Infomaniak Mail Web app (online service ksuite.infomaniak.com/mail).
- Open the message from the unwanted sender.
- Click on the ⋮ icon at the top right of the open message.
- Choose Block the sender to add it directly to the list of blocked addresses:
If necessary, remove the address by returning to the Security tab.
Manage blocks or authorizations from a Mail Service
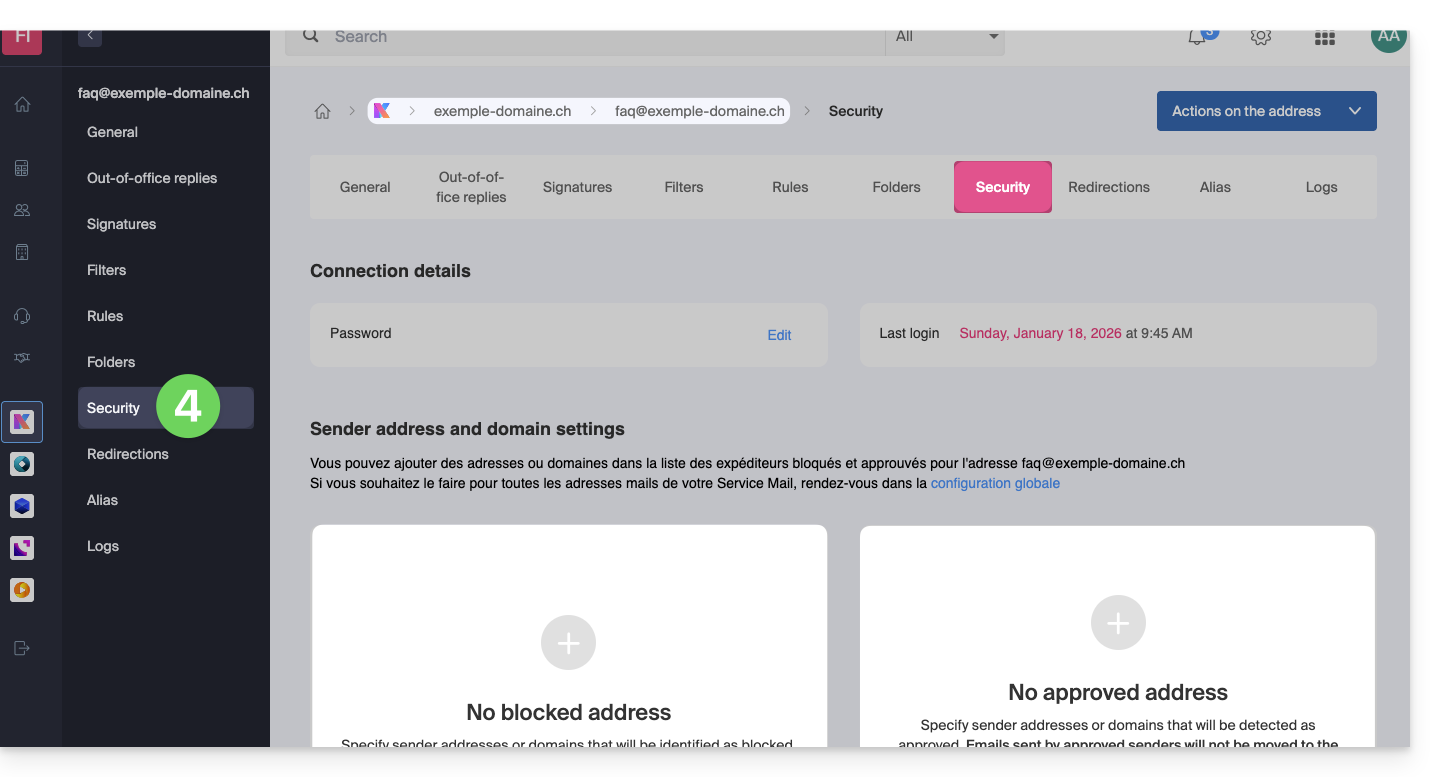
To block or authorize senders from a Mail Service:
- Click here to access the management of your product on the Infomaniak Manager (need help?).
- Click directly on the name assigned to the product in question.
- Click on the e-mail address in question.
- Click on the Security tab or from the left sidebar on Security:
- To add a blocked sender, click the Add an address button in the Blocked address box:
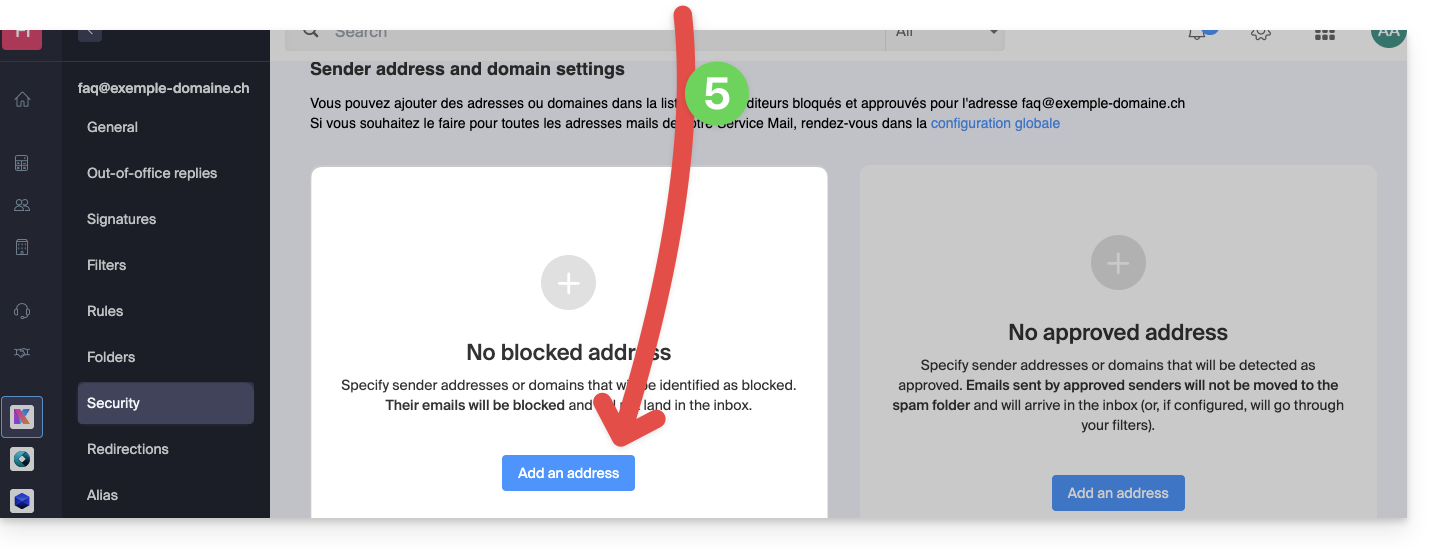
- To add an authorized sender, click the Add an address button in the Approved address box:
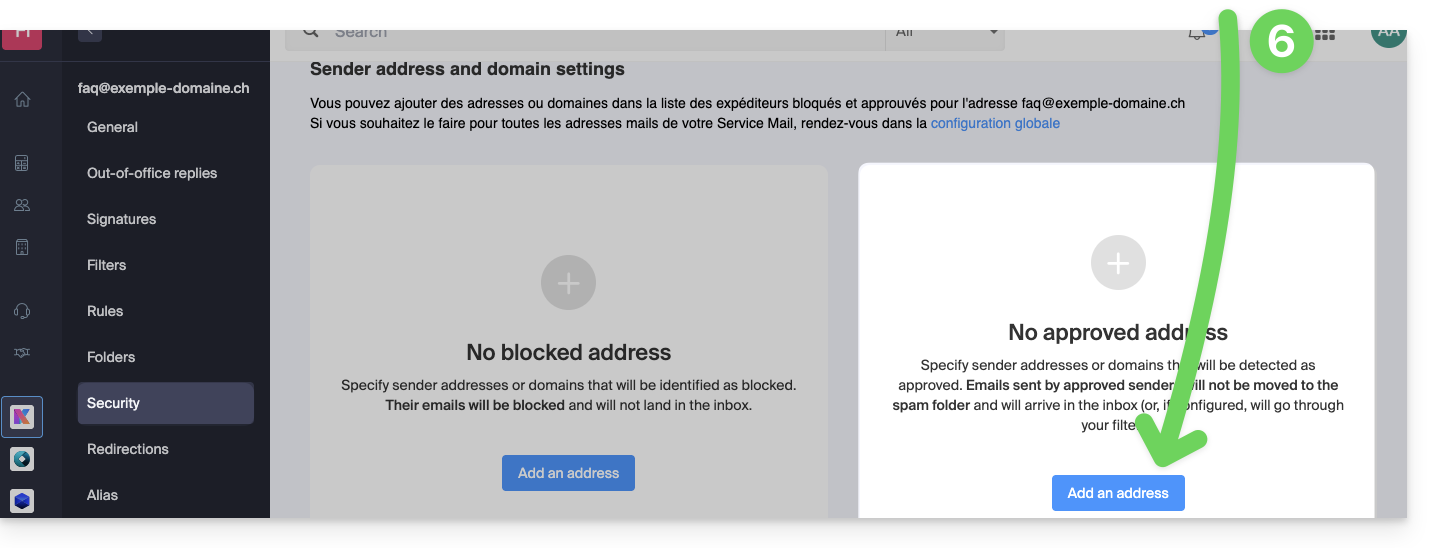
- Fill in the fields as desired and/or according to the formats indicated above.
Alternative
To act on your incoming mail, you can also use mail filters. It is also possible to disable mail usage for an entire domain (mail will continue to arrive).
This guide explains what the external email label, "External" on the Web app Mail (online service ksuite.infomaniak.com/mail) and the mobile app Infomaniak Mail (application for iOS/Android smartphone or tablet) means when reading certain messages:
External email label
The external email label appears in the following cases:
- The sender's domain name (or alias) does not match the email address configured in Mail.
- The sender is not part of the contacts (including suggested contacts).
- The email comes from an address hosted outside the Organization.
The label will appear as " unknown" instead of " external" with some free offers like my kSuite.
Enable or disable the label
You can enable or disable the label, the effect is immediate for incoming emails and in the case of a response to an external email. To do this:
- Click here to access the management of your product on the Infomaniak Manager (need help?).
- Click directly on the name assigned to the product concerned.
- Click on Global Configuration in the left sidebar
- Click on the Security tab.
- Enable or disable the toggle switch:

This guide is about the DMARC policy and the optional security reports sent by email that can be activated or deactivated upon request.
Optional DMARC reports
The DMARC reports are optional and provide the following information:
- Third-party senders or servers that send emails on behalf of your domain.
- The percentage of messages from your domain that pass the DMARC verification process.
- The servers or services that send emails failing DMARC verifications.
- The DMARC actions performed by the receiving server for unauthenticated messages from your domain (none, quarantine, or reject).
When the reports indicate that most emails pass DMARC verifications successfully, it is recommended to strengthen your DMARC settings by imposing stricter measures. This will enhance the protection of your domain against spoofing.
The written report is sent by email to the address you specify in the configuration, and will come from dmarc@infomaniak.com or other providers such as Microsoft, Google, Yahoo, etc. It is delivered as a ZIP archive containing the report in XML format:
It is also possible to receive copies of problematic emails.
Analyzing a DMARC report
Infomaniak is neither able to analyze your potential DMARC reports and records, nor able to comment on the validity or compliance of these, as this is entirely your responsibility.
It is recommended to use an external service to analyze a DMARC report, such as e.g. https://dmarcadvisor.com/dmarc-analyzer/.
Deactivating a DMARC report...
...from a Mail Service
To deactivate the sending of a DMARC report if you still have a Mail Service (otherwise, see below):
- Click here to access the management of your product on the Infomaniak Manager (need help?).
- Click directly on the name assigned to the product concerned.
- Click on Global Security in the left sidebar.
- Click on Edit (in the DMARC section).
- Remove the registered addresses and Apply the changes:
... from the DNS zone of a domain
If the Mail Service is no longer in operation but you continue to receive email reports, you need to act directly on the domain name and delete the dmarc record from its DNS zone: