Knowledge base
1000 FAQs, 500 tutorials and instructional videos. Here, there are only solutions!
The easiest way to manage your calendars is to use the Infomaniak Calendar web app (online service ksuite.infomaniak.com/calendar).
This interface offers many advantages:
- No software to install or configure.
- Sharing calendars with other users.
- Permanently saved.
- Synchronization of calendars (+ tasks) between devices.
- Attachment / kDrive.
- Secure and respects your privacy, hosted in Switzerland by a neutral and independent company.
How to get started with Infomaniak Calendar?
Whether on kSuite or the Mail app, it is essential to log in with your Infomaniak account ID and its password. This will not work if you directly enter an email address hosted that is not an Infomaniak account. Understand the difference
- Click here to access the Infomaniak Calendar web app (online service ksuite.infomaniak.com/calendar).
What would you like to do?
- Synchronize calendars on all your devices
- Customize the app's display
- Display public holidays
- Create a task
- Create a single event
- Create a recurring event
- Create an event reminder
- Schedule a meeting
- Schedule a meeting from the Mail web app
- Manage room bookings
- Print a calendar
- Import a calendar
- Import tasks
- Export a calendar
- Share a calendar
- Share a calendar publicly
- Restore deleted events
- Add an attachment to an event
- Set a default calendar in the app
- Create a desktop app (from the Calendar web app, for example) using Chrome
Have a question or feedback?
- Contact Infomaniak support
- Click here to share feedback or a suggestion about an Infomaniak product
Link to this FAQ:
Has this FAQ been helpful?
This guide explains how to add a simple new, one-time event to a calendar in the Infomaniak Web app Calendar (online service ksuite.infomaniak.com/calendar).
Introduction
- To create a recurring event, please refer to this other guide.
- To schedule a meeting with multiple users and find the best time slot, please refer to this other guide about the meeting scheduler.
Add a new event
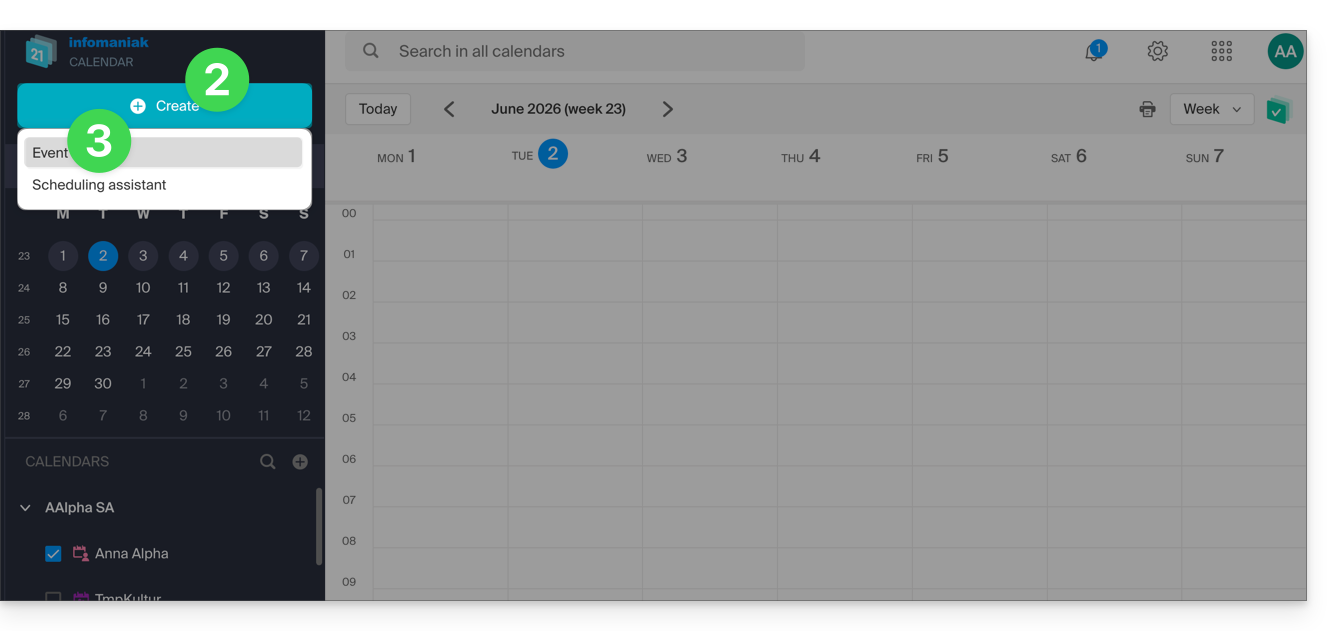
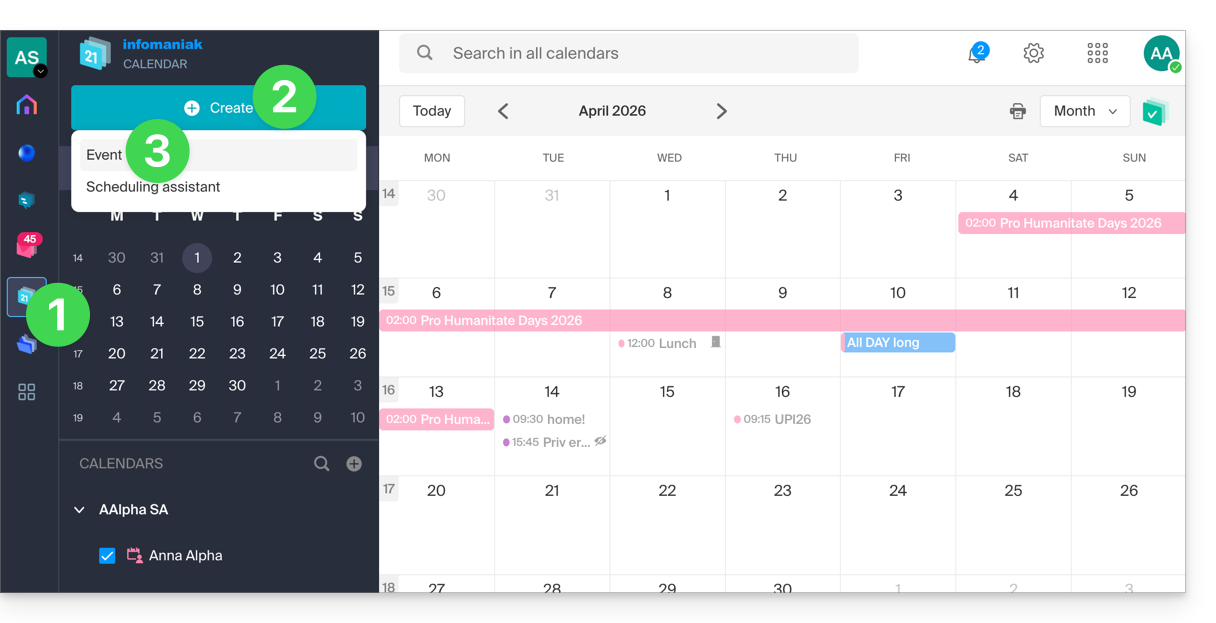
To schedule a one-time event in a calendar managed by Infomaniak:
- Click here to access the Infomaniak Web app Calendar (online service ksuite.infomaniak.com/calendar).
- Click on the Create button in the top left corner.
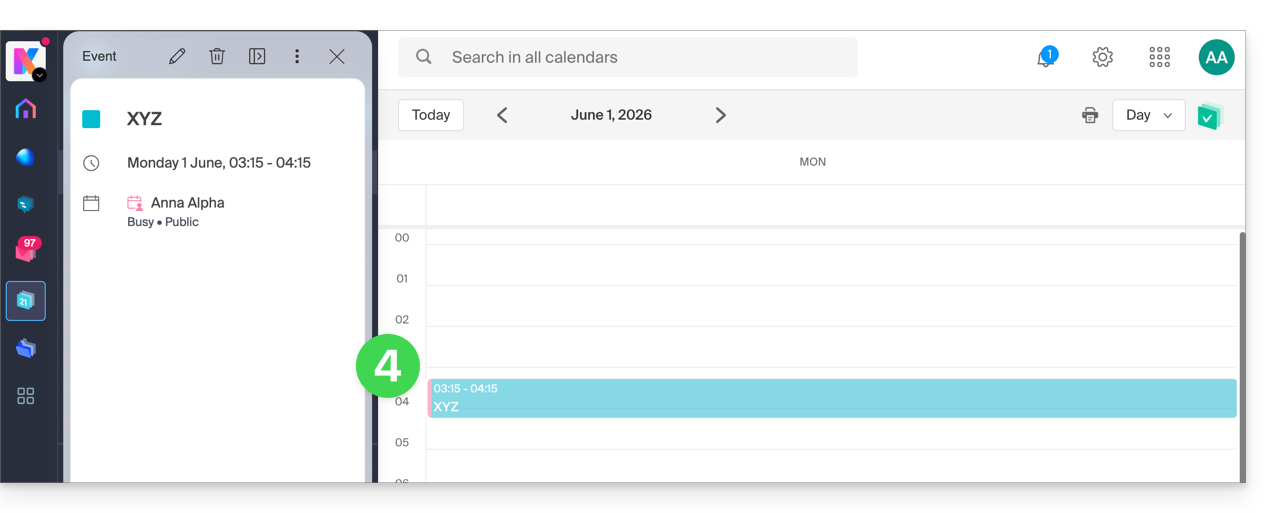
- Click on Event:
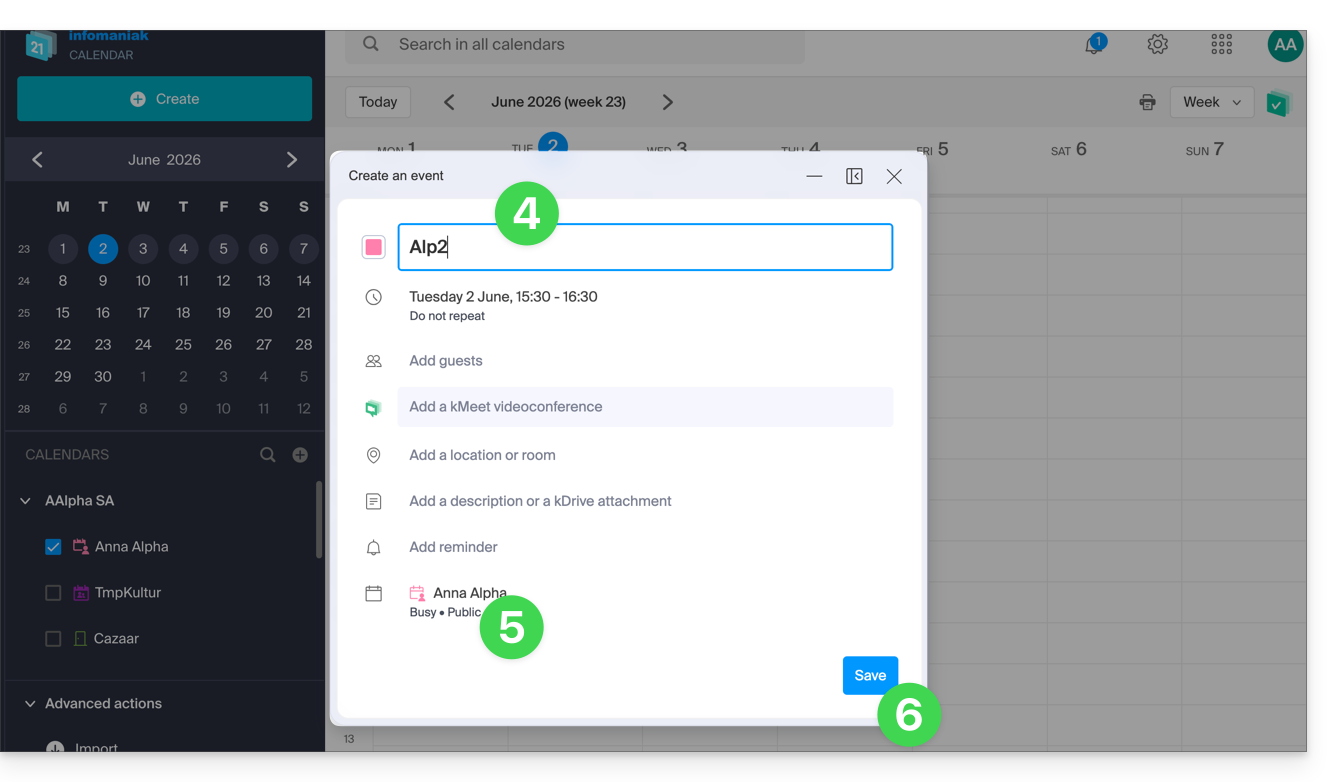
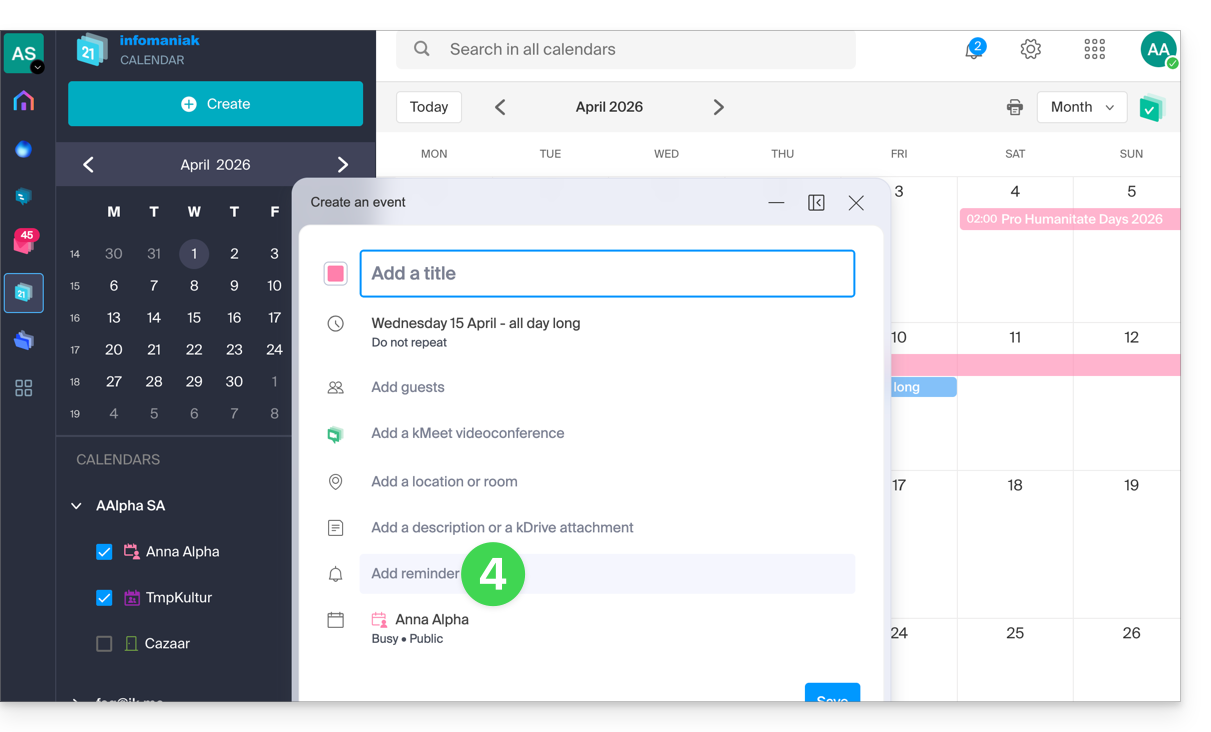
- Fill in the various fields:
- Color and title (subject) of the event
- Date/time or duration, possible recurrence
- Possible participants (see below)
- kMeet link if the event corresponds to a meeting between several people
- Geographical location or meeting room
- Description or attachment from kDrive
- Reminder (notification) deadline
- Calendar concerned
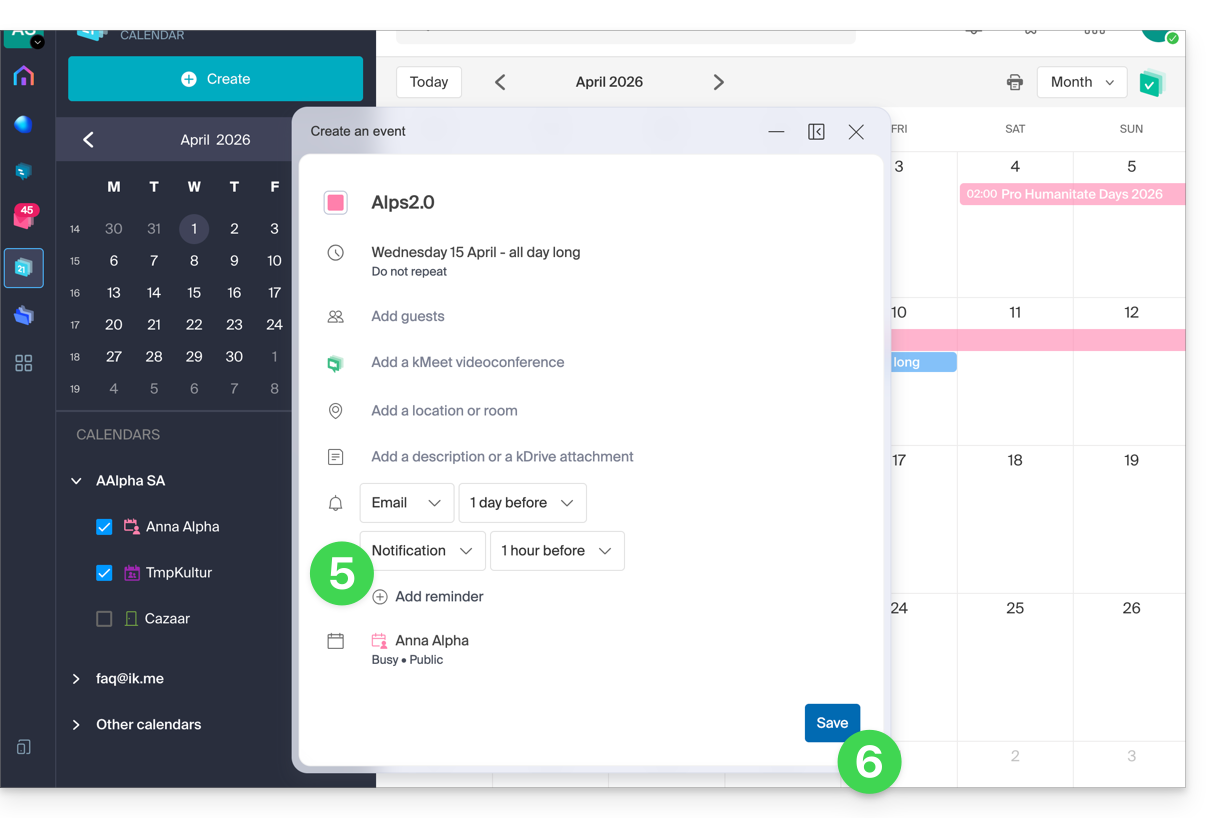
- Choose:
- the calendar concerned
- whether the event should have a busy or free status (in order not to block any possible appointment scheduling)
- whether it should be public or private (and in this case, no one will see the event in your calendar unless they have editing rights)
- Click SAVE to add the event to the selected calendar:
You can also click directly on the calendar to add a new event by dragging the mouse pointer over the desired time period. The editing window can be moved on the screen or even inserted into the left sidebar for better calendar visibility:
Add participants to the event
To invite users, add their name or email address when creating the event or later: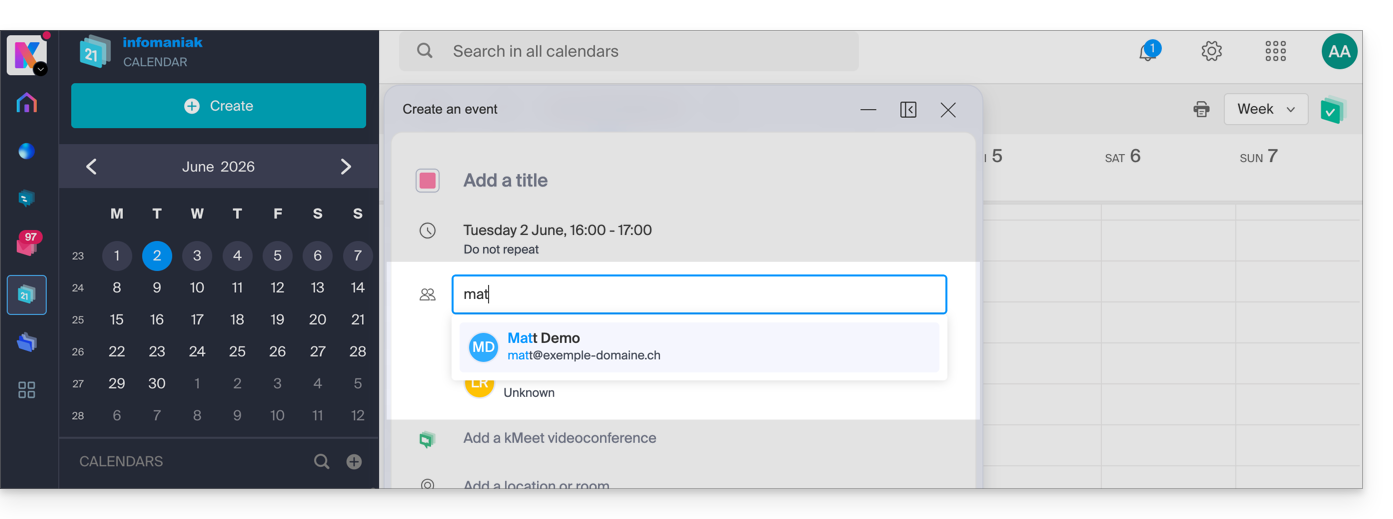
You will be notified of their attendance or their refusal if they follow the procedure sent to them by email when the event is created.
Any update to a scheduled event is also sent by email to all participants.
Link to this FAQ:
Has this FAQ been helpful?
This guide explains how reminders and event alerts work in the Infomaniak Calendar web app (online service ksuite.infomaniak.com/calendar).
Adding a Reminder or Alert to an Event
To add a reminder to an event (e.g., an appointment):
- Click here to access the Infomaniak Calendar web app (online service ksuite.infomaniak.com/calendar).
- Click the Create button in the upper left corner.
- Click on Event:
- You can also click on an existing event in the calendar to edit it.
- Click Add Reminder to configure it:
- To receive multiple notifications, you need to add multiple reminders (press ).
- Save the event at the bottom of the page:
Types of Reminders
You can be notified through 3 different channels:
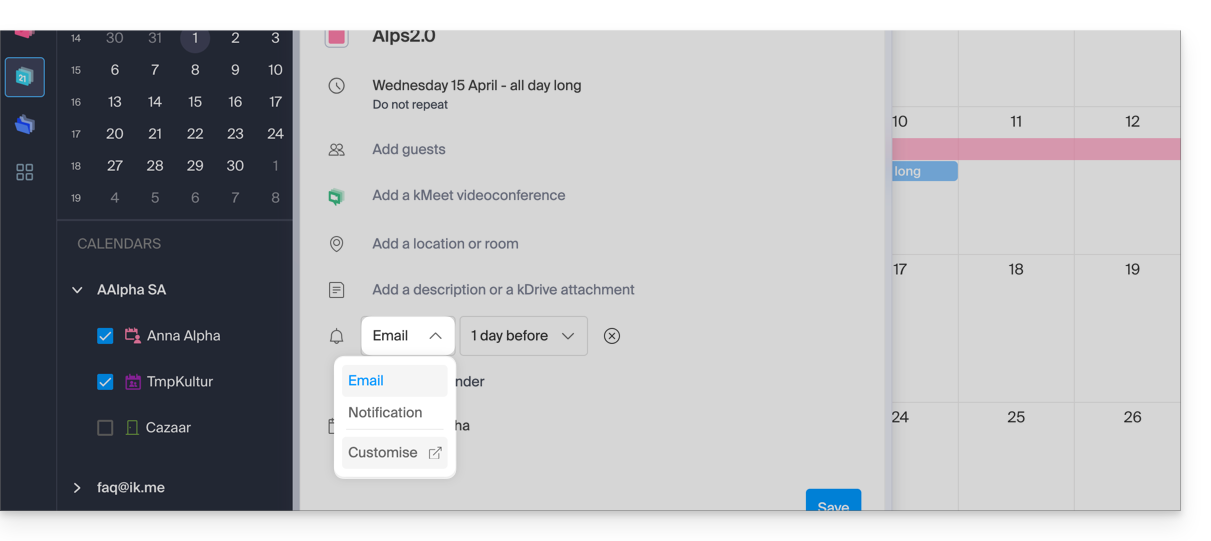
- Via email: the reminder will be sent by email at the chosen time.
- Via a browser notification: the reminder will be displayed through a notification managed by your web browser, provided that kSuite is connected; this is also the option to choose if you synchronize your calendar with your phone to receive an alert on your device.
- Via a chat system like kChat: the reminder will be sent to the chosen chat thread.
Any guests invited to an event will not be notified by the reminders.
Link to this FAQ:
Has this FAQ been helpful?
This guide explains how to import a calendar into the Infomaniak Calendar web app (online service ksuite.infomaniak.com/calendar).
Introduction
- Refer to this other guide if you only want to display an Infomaniak calendar in read-only mode on Google Calendar (web and mobile app).
- Refer to this other guide if you want to edit calendar events on both sides, but only on the mobile version of the Google Calendar app.
- It is also possible to import tasks into the dedicated section of the calendar.
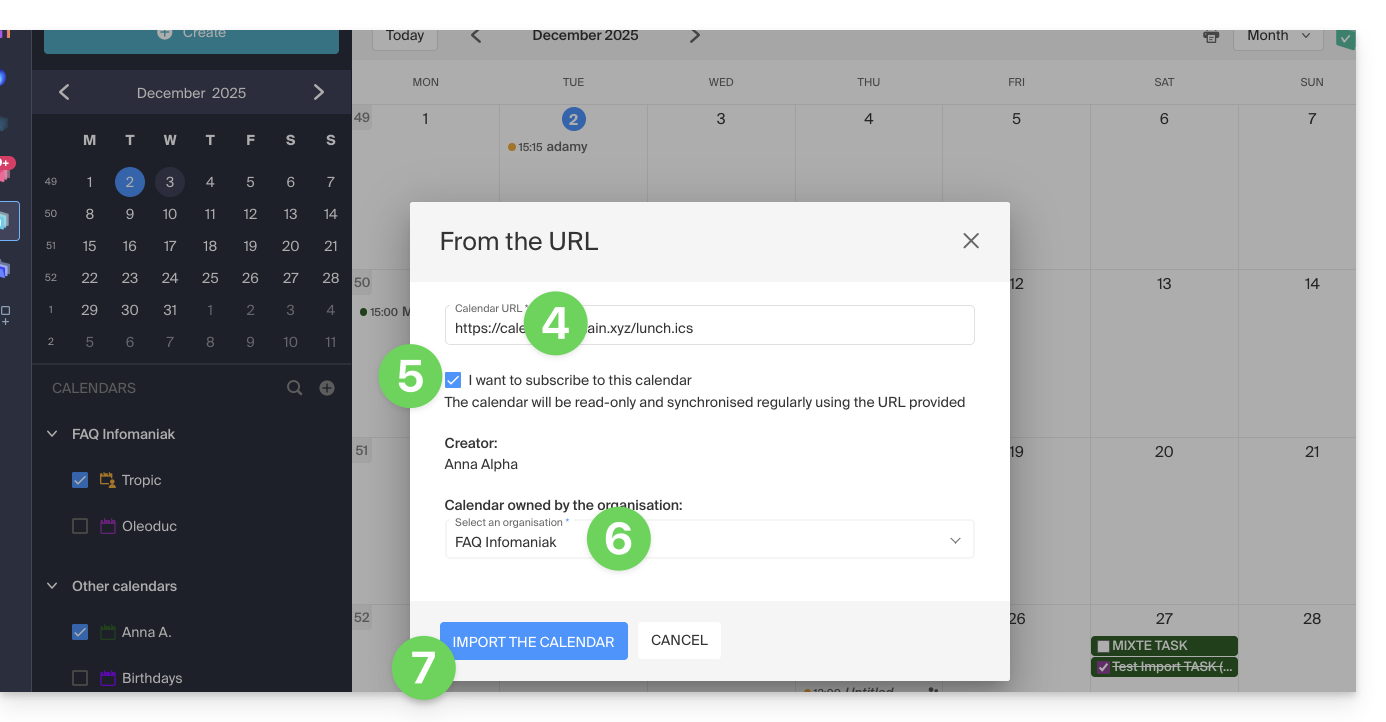
Import a calendar via a URL
It is possible to display an existing calendar managed externally in Calendar. It will be automatically updated every hour via the URL you specify.
Please note that this is not a calendar synchronization, but a read-only, one-way display.
To do this:
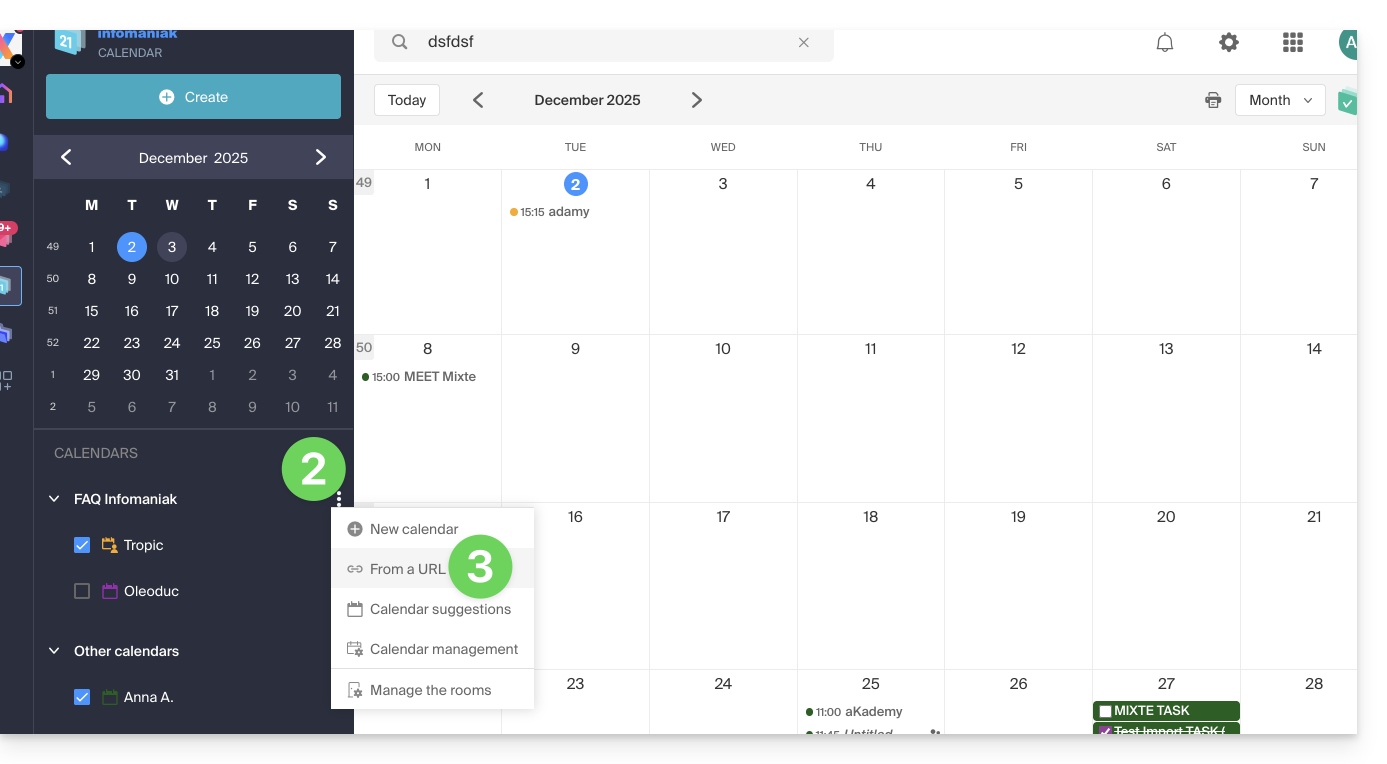
- Click here to access the Infomaniak Calendar web app (online service ksuite.infomaniak.com/calendar).
- Click on in the left-hand menu.
- Click on "From a URL":

- Enter the URL of the calendar to import.
- Check the box I want to subscribe to this calendar.
- If necessary, select the Organization in which the calendar will be imported.
- Click on Import calendar:
You can also go directly through one of the Organizations you belong to:
- Click here to access the Infomaniak Calendar web app (online service ksuite.infomaniak.com/calendar).
- Click on the action menu ⋮ to the right of the Organization in the table that appears.
- Click on "From a URL":
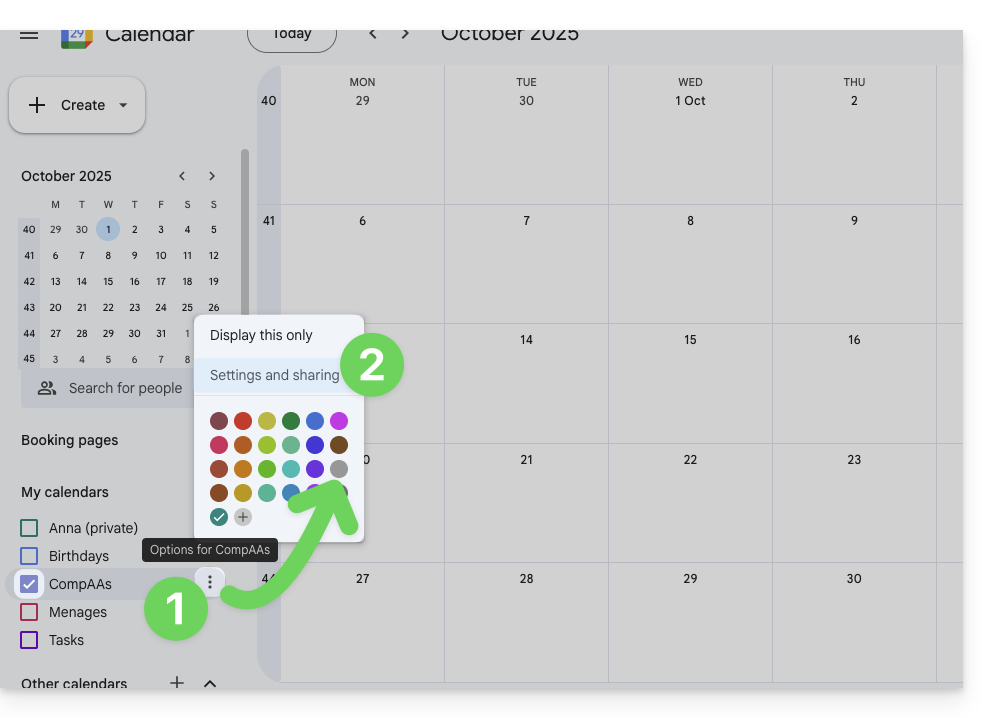
Link a Google calendar using its "secret" URL
The "secret" URL of a Google calendar, which you can paste in step 3 above, can be found in the Google calendar settings:
- Click on the action menu ⋮ to the right of the Google calendar in question.
- Click on Settings and sharing:
- Scroll down the page until you find the secret iCal URL and click on the icons to view and/or copy the URL:
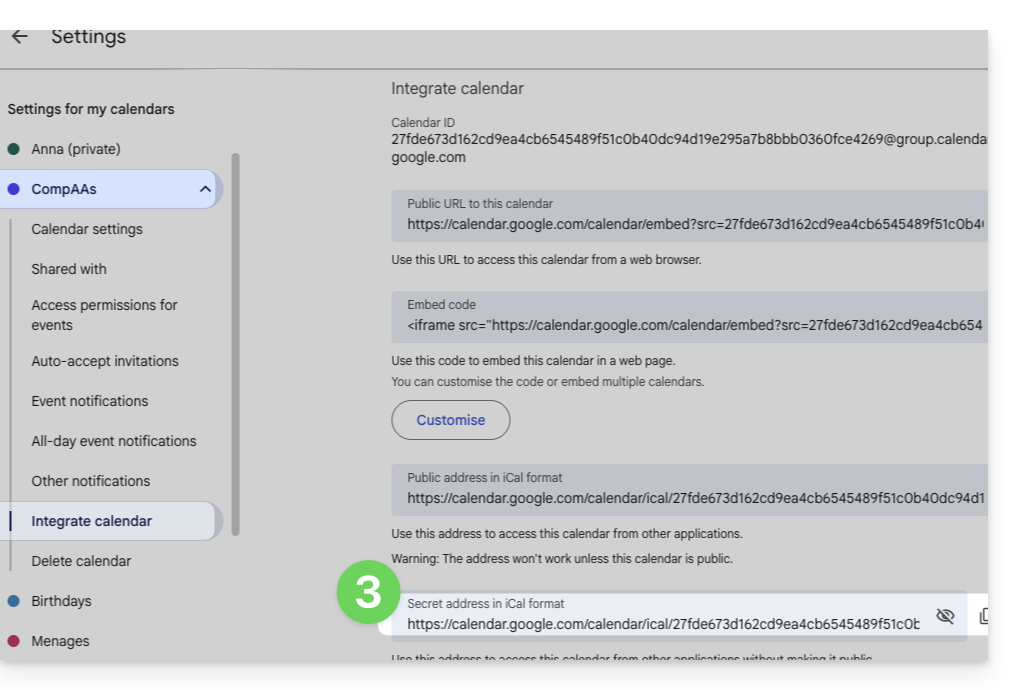
- Paste the URL according to the procedure in step 3 of the previous chapter above.
Please note that this is not a calendar synchronization but a read-only, one-way link.
The calendar will be visible and will regularly display any updates made, but it will not be possible to edit it directly from the Infomaniak interface; this is a "one-way synchronization" with Google.
However, you can force synchronization to immediately display any new events or changes:
- Click on the action menu ⋮ to the right of the imported calendar in Infomaniak.
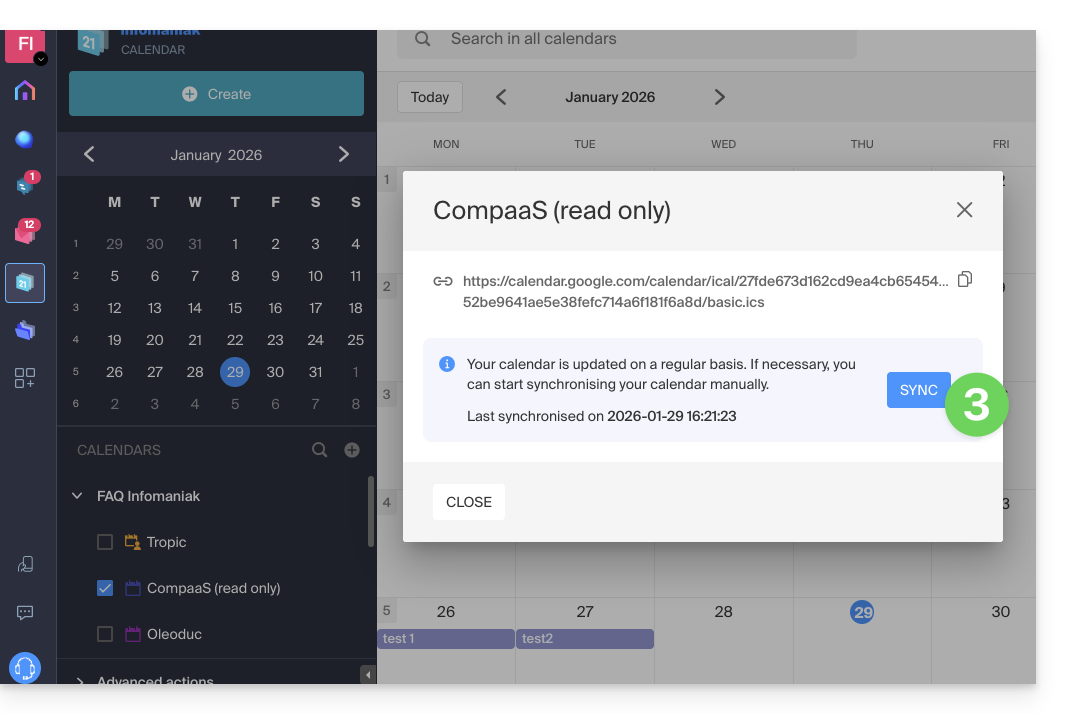
- Click on Display information:
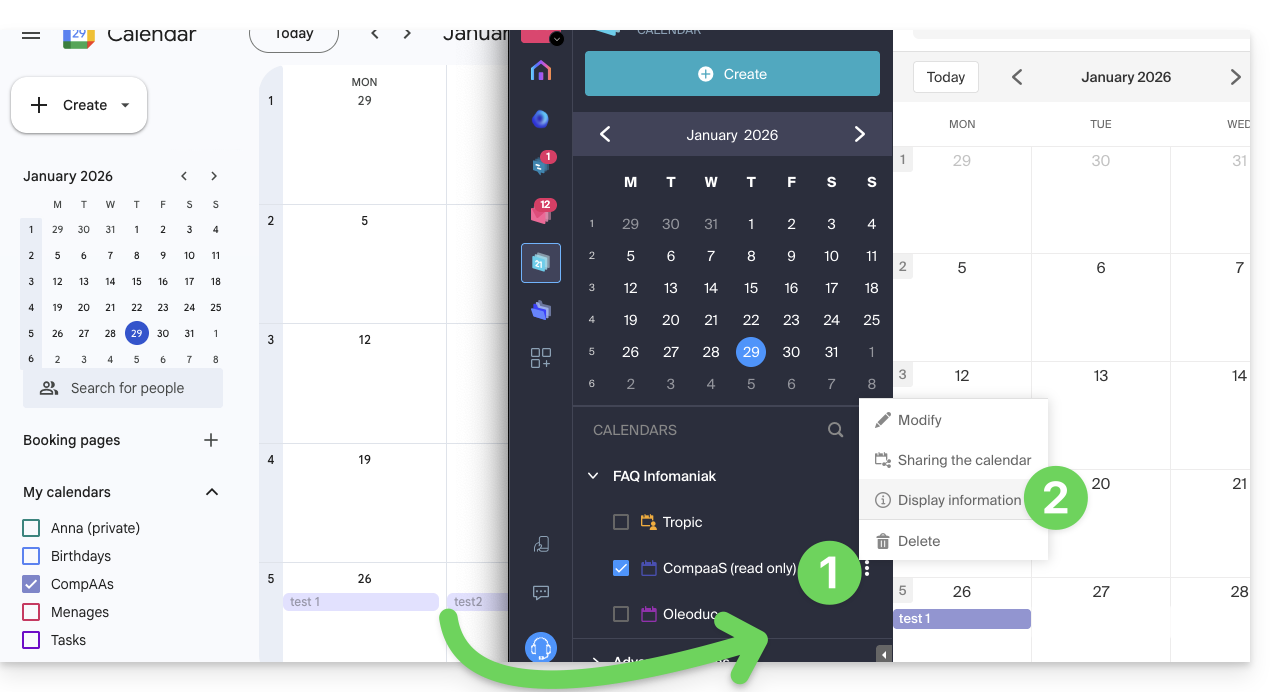
- Click the SYNC button to synchronize the imported content, then wait a few seconds:
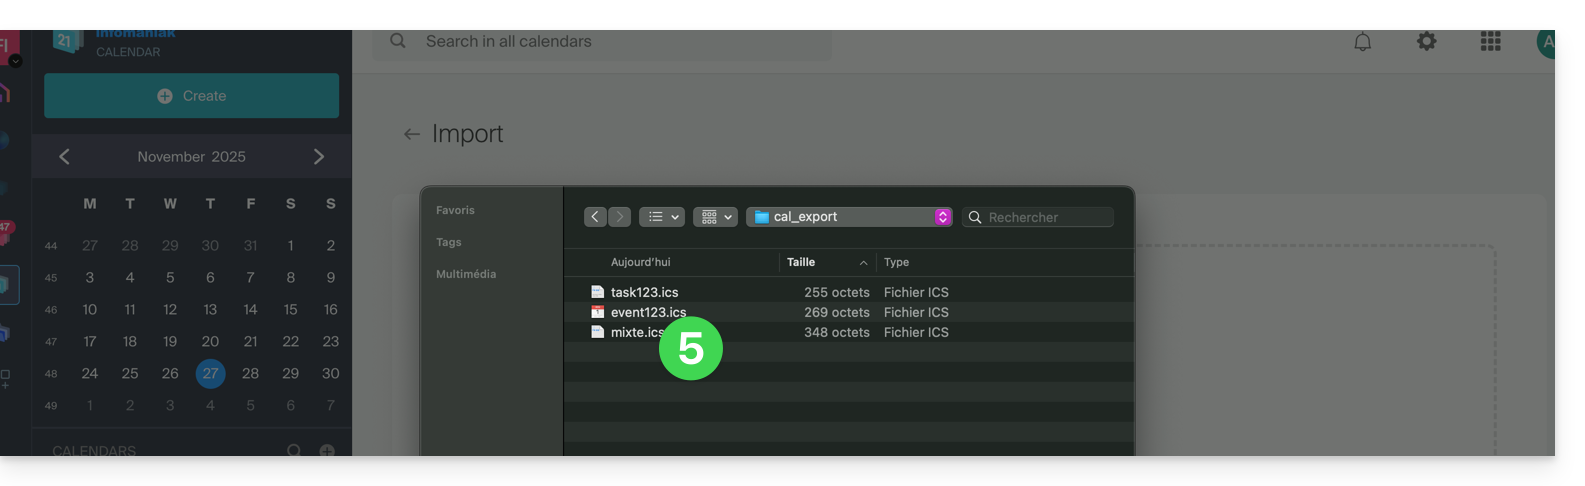
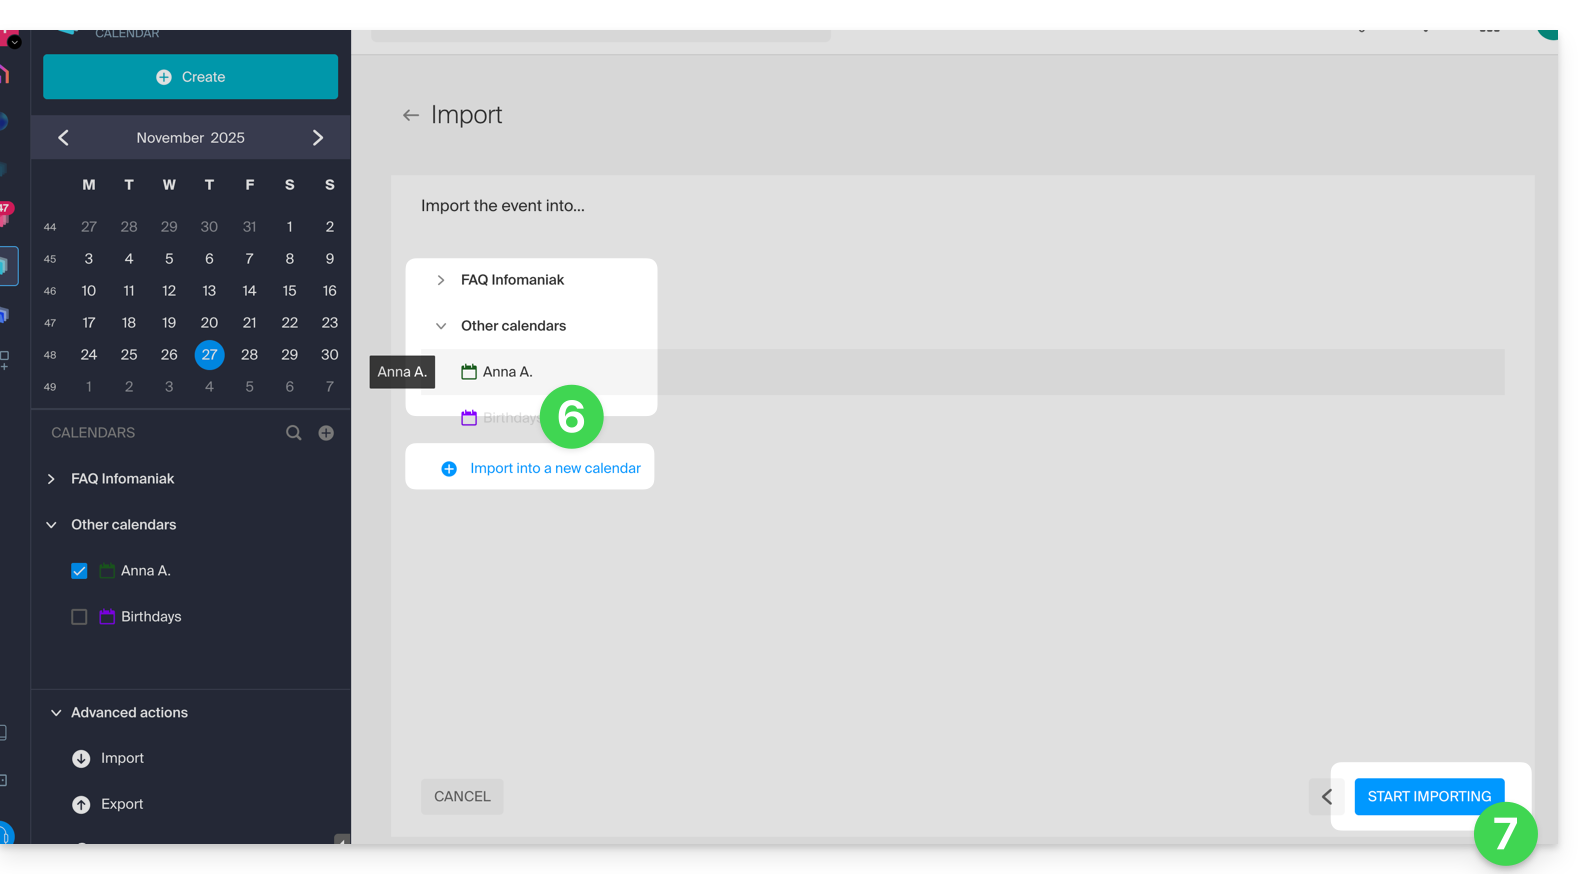
Import events via .ics file
To access the Advanced actions that allow you to import, export, and restore calendars:
- Click here to access the Infomaniak Calendar web app (online service ksuite.infomaniak.com/calendar).
- Click on Advanced actions in the left-hand menu.
- Click on Import.
- Upload the
.icsfile corresponding to the export made from your previous provider: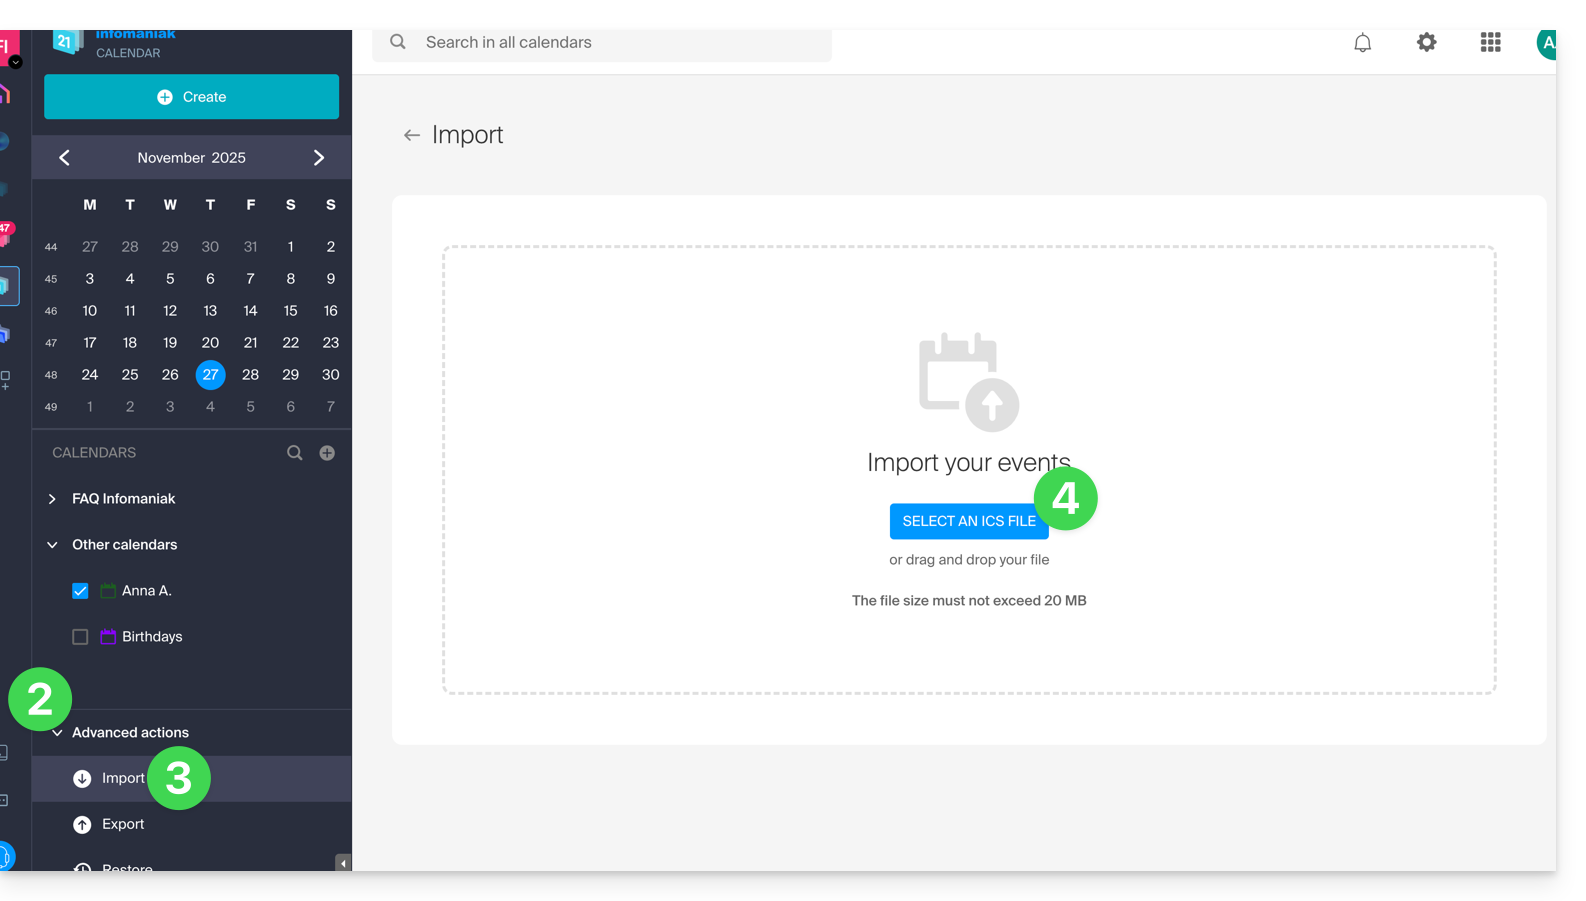
You can choose which existing calendar to import the events into, or create a new calendar (tasks are also imported if the .ics file contains them).
Please note that this is not a calendar synchronization, but a one-time, one-way import.
Export data from your previous provider
Here are some specific guides provided for reference to export the calendar from a third-party provider, which will allow you to re-import this data into Infomaniak:
- Apple Mail
- Gmail
- Outlook (section Publish > ICS link)
- Yahoo
- Proton
- Thunderbird
Link to this FAQ:
Has this FAQ been helpful?
This guide explains how to share one of your calendars with other Infomaniak users, collaborators, from the Infomaniak Web app Calendar (online service ksuite.infomaniak.com/calendar).
Introduction
- Refer to this other guide to configure the synchronization of your calendars, or this other guide to integrate a read-only calendar into a third-party tool.
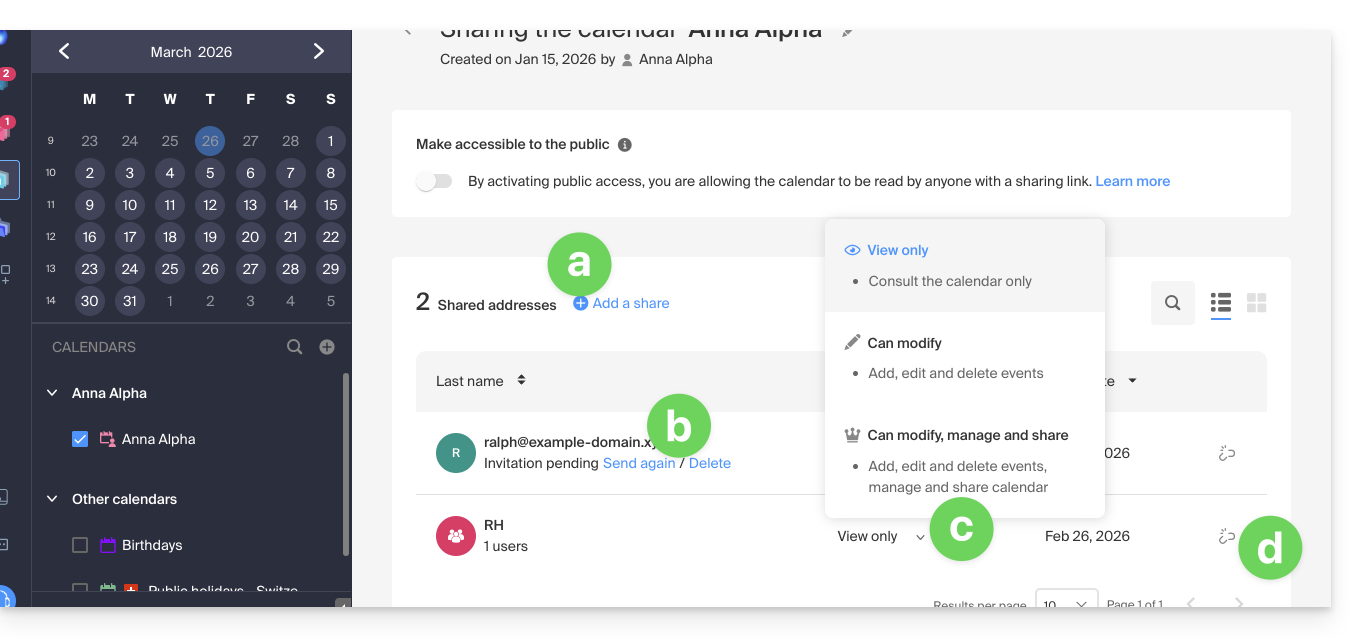
Share an Infomaniak Calendar
To enable sharing of one of your calendars:
- Click here to access the Infomaniak Web app Calendar (online service ksuite.infomaniak.com/calendar).
- Click on the action menu ⋮ to the right of a calendar.
- Click on Share calendar.
- Click on the button to Add a share:
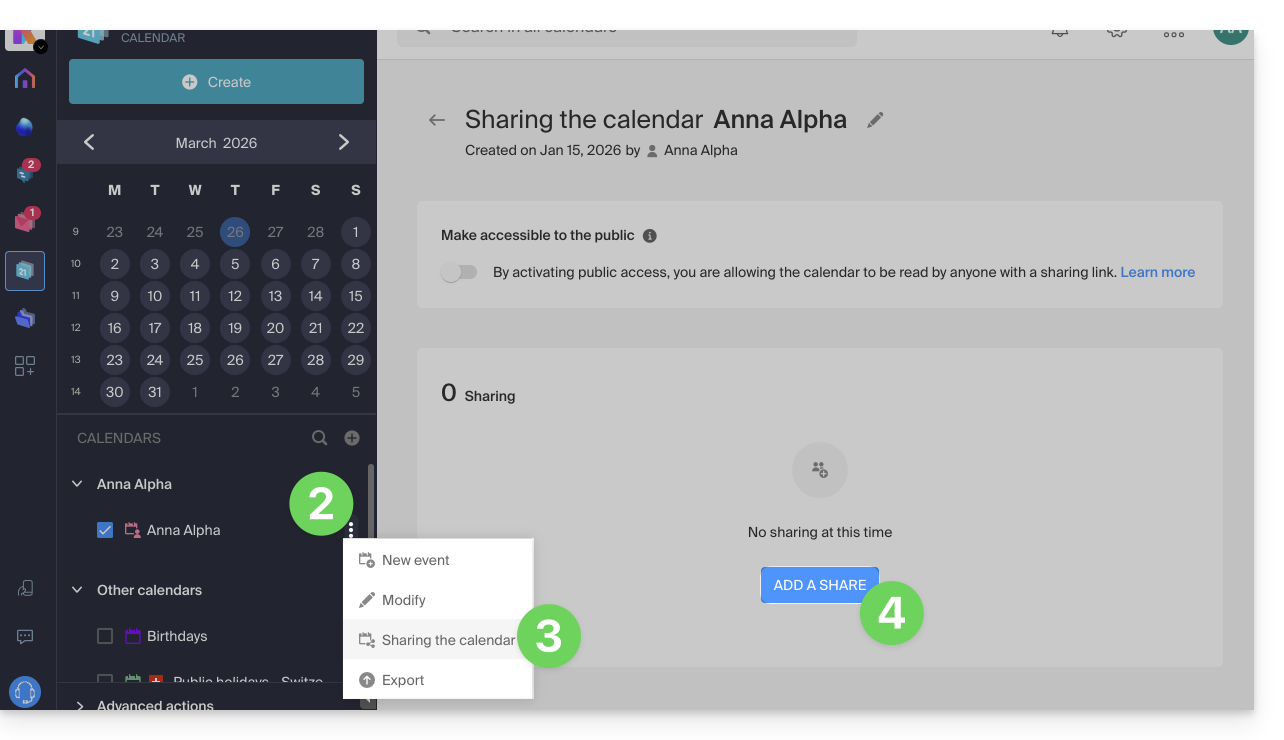
- Enter the Organization, group, or email address corresponding to the Infomaniak user account that will access the calendar (if the user does not yet have an account, they can create one for free with the invitation they receive).
- Determine the user's permissions for this calendar (Can view, Can edit, Can edit and share).
- Finish by clicking the button:
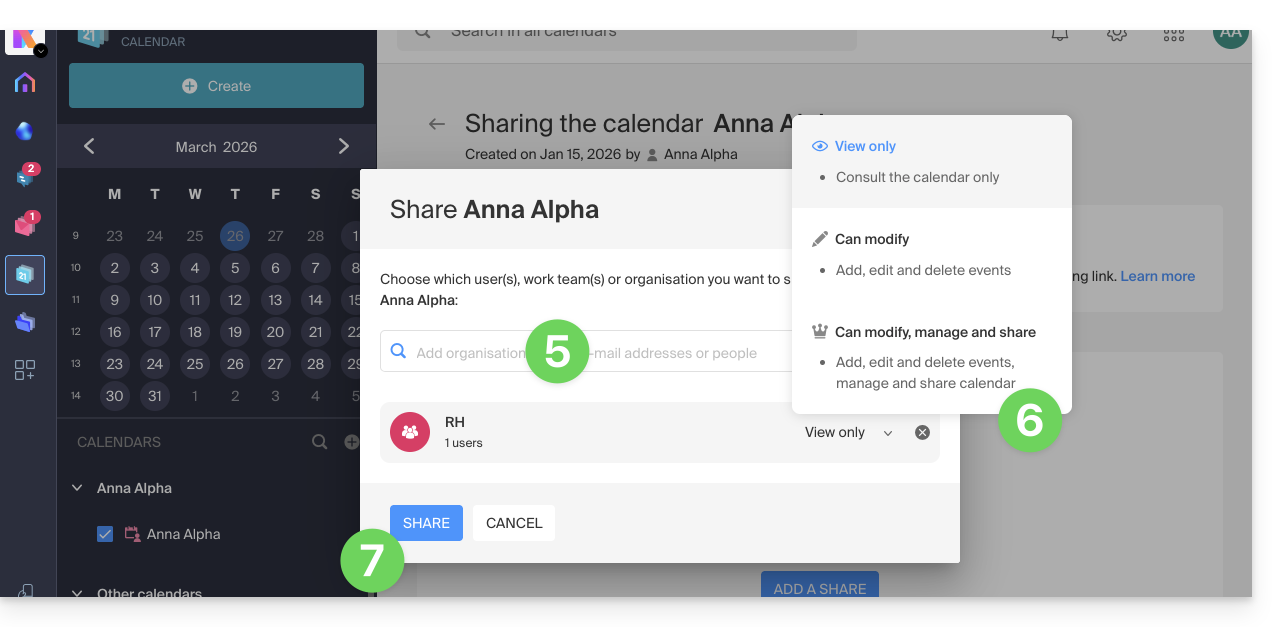
- You can perform other actions from the same page at any time:
- add an additional share
- resend or delete an access invitation
- modify the permissions related to calendar sharing
- delete / revoke the share
Share a meeting room calendar
To share the calendar of meeting rooms, the principle of sharing and assigning rights is based on the same principle as above: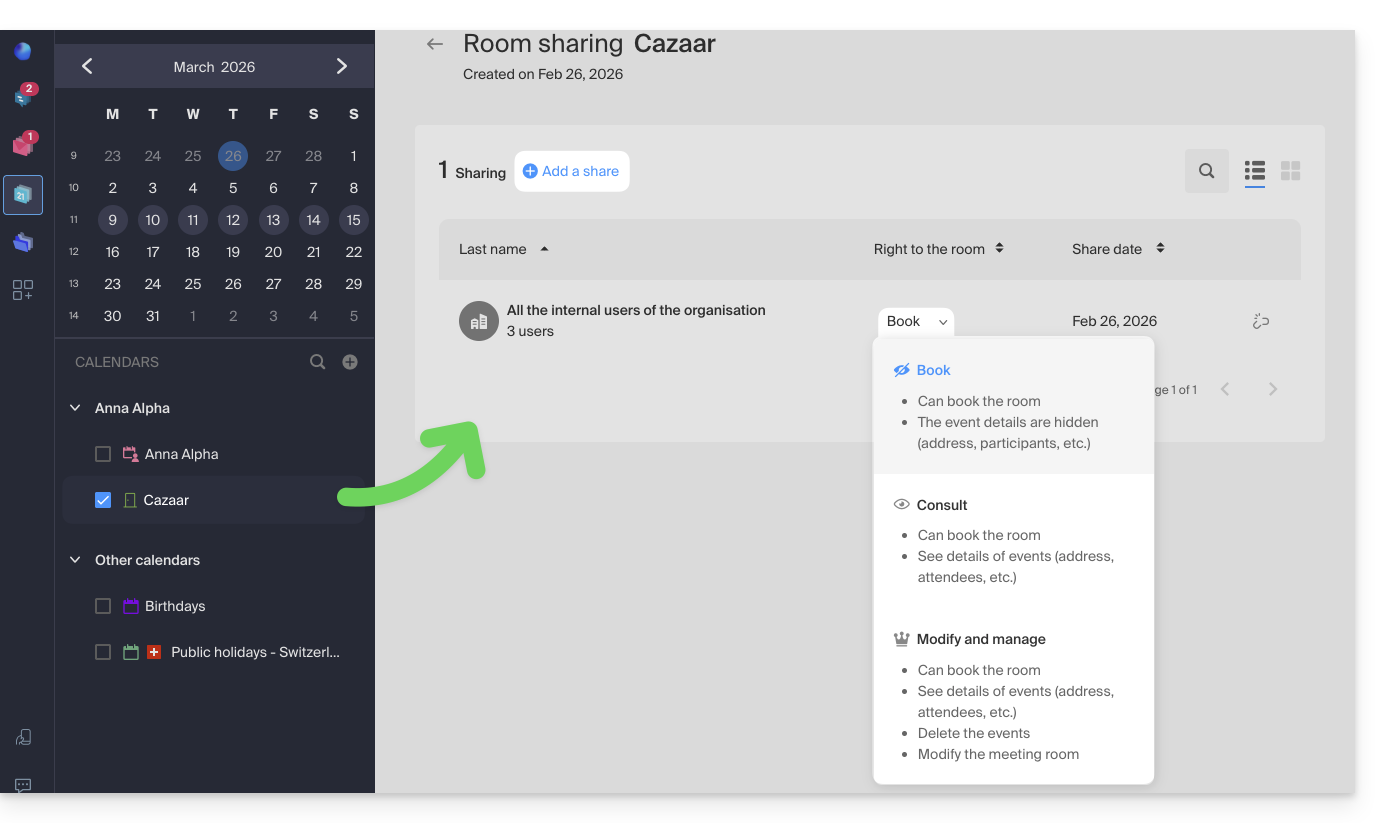
Link to this FAQ:
Has this FAQ been helpful?
This guide explains how to make one of your calendars public from the Infomaniak Calendar web app (online service ksuite.infomaniak.com/calendar).
Introduction
- You will obtain a specific URL for your calendar in the format
.icsthat Calendar (formerly iCal Apple), Calendrier (formerly iCalendar Microsoft), Thunderbird (formerly Lightning Mozilla), or even Google Calendar can recognize to display your calendar:
- The data contained in the shared calendar will no longer be private but will only be available in read-only mode to users who "subscribe" to it.
- The frequency of the updates made by the application that subscribes to the URL of your calendar must be defined within that application.
- PHP scripts (not provided) can also be used to parse such files, allowing you, for example, to include events on a website.
- Refer to this other guide to configure the synchronization of your calendars, or to this other guide to share a calendar with your colleagues with different permissions.
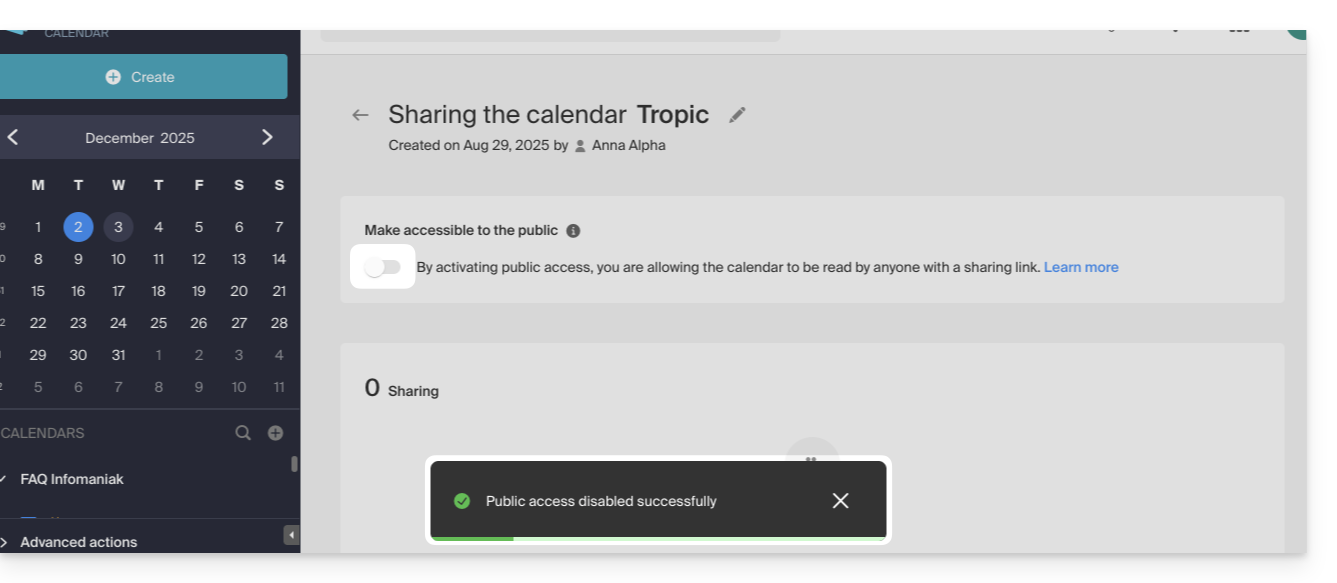
Enable public sharing of an Infomaniak calendar
To share a calendar publicly:
- Click here to access the Infomaniak Calendar web app (online service ksuite.infomaniak.com/calendar).
- Click on the action menu ⋮ to the right of a calendar.
- Click on Share calendar.
- Activate the toggle switch for public sharing.
- Click on the icon to copy the address to the clipboard:
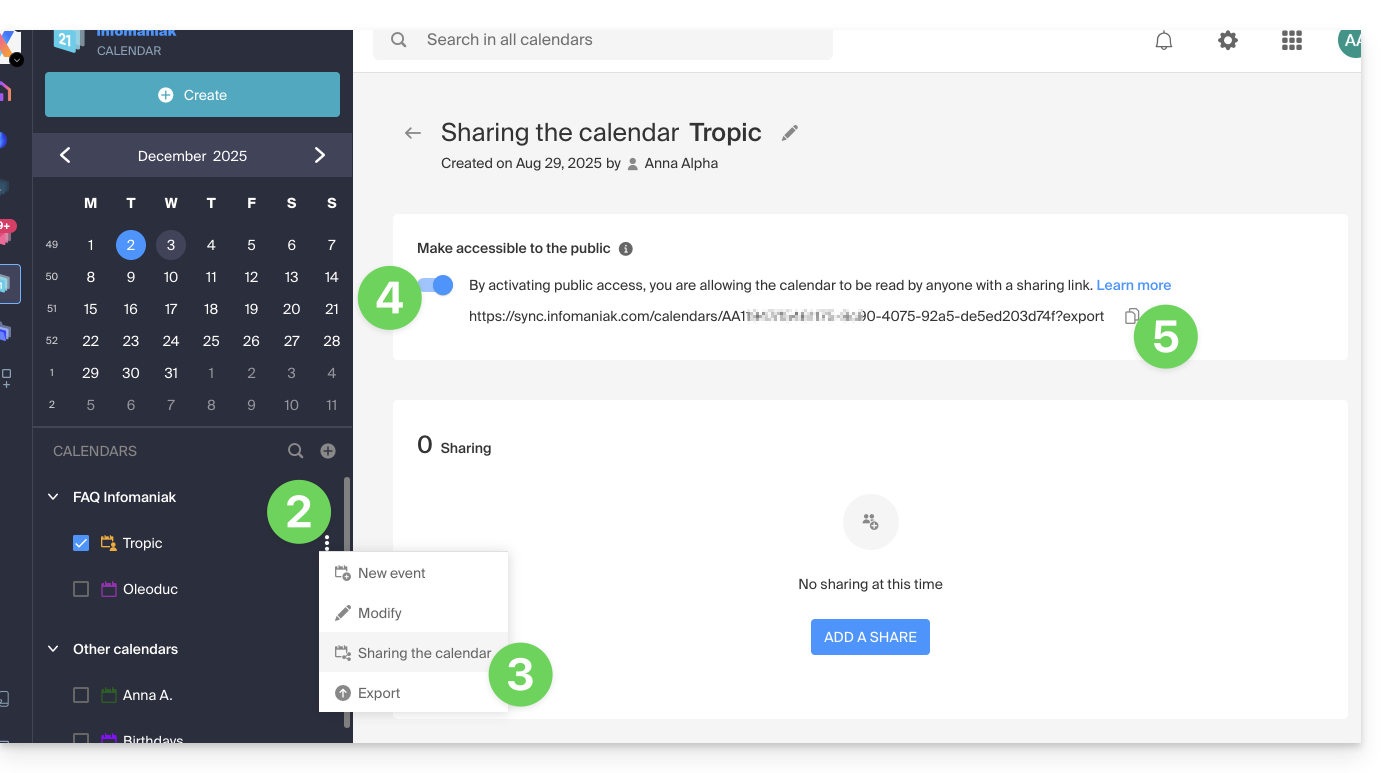
- You can always remove public access from this sharing page (see point 4 above):
- You can always remove public access from this sharing page (see point 4 above):
Link to this FAQ:
Has this FAQ been helpful?
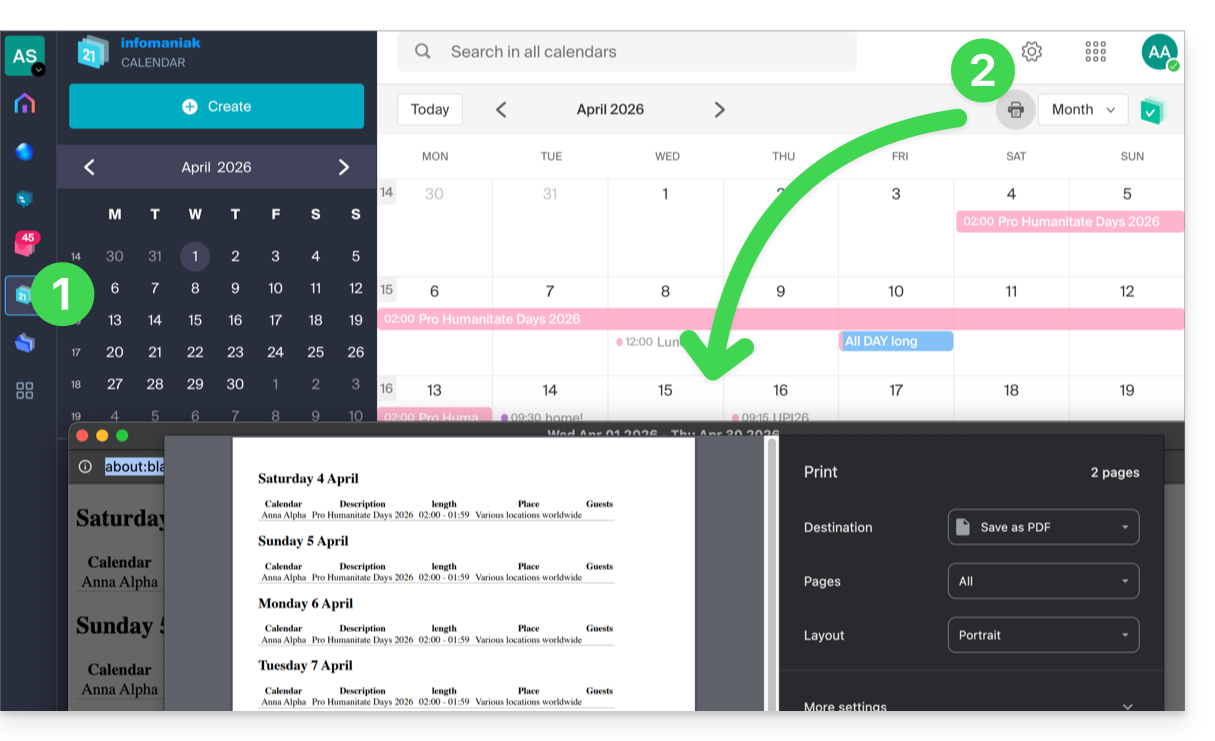
This guide explains how to print a calendar from the Infomaniak Calendar web app (online service ksuite.infomaniak.com/calendar).
Printing the content of a calendar
If you only use your browser's print function with Calendar, you will print the interface and not necessarily the calendar content. To print the list of your schedule (regardless of the display mode usually selected):
- Click here to access the Infomaniak Calendar web app (online service ksuite.infomaniak.com/calendar).
- Click on the printer icon located in the top right corner:
Link to this FAQ:
Has this FAQ been helpful?
This guide explains how to save and export a calendar from the Infomaniak Web app Calendar (online service ksuite.infomaniak.com/calendar) in .ics format.
Exporting a calendar
To export the calendar in .ics format:
- Click here to access the Infomaniak Web app Calendar (online service ksuite.infomaniak.com/calendar).
- Click on Advanced Actions in the left-hand menu.
- Click on Export in the left-hand menu.
- Check the box next to the calendar(s) you want to export.
- Click on Export:
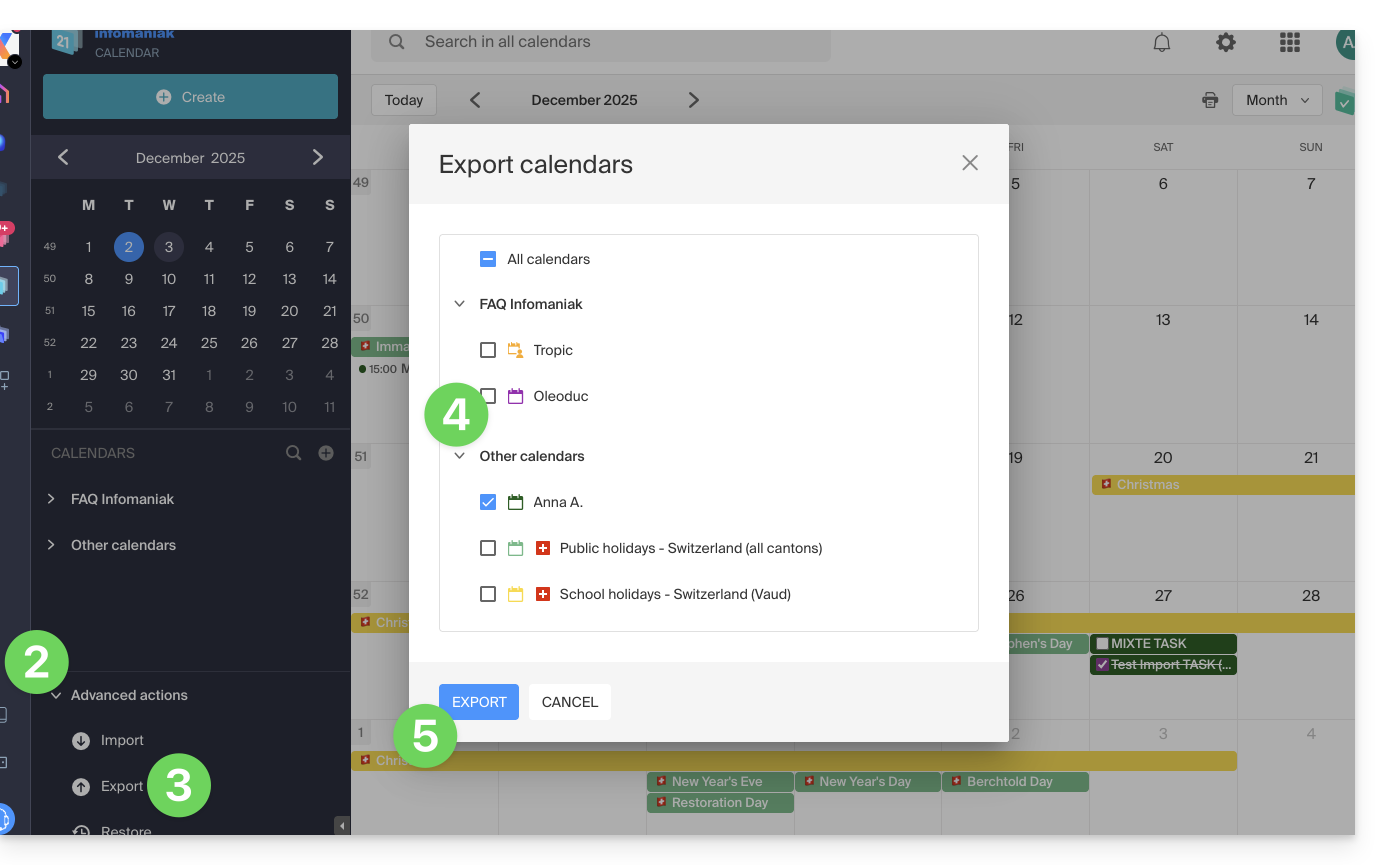
- Save the file to your computer.
Refer to this other guide if you are looking for information about importing events.
Link to this FAQ:
Has this FAQ been helpful?
This guide explains how to access your Infomaniak address books and Infomaniak calendars from your devices.
Refer to this other guide if you are looking for information on synchronizing your emails.
Introduction
- The web app Contacts (management of your Infomaniak address books for all your professional and personal contacts) and the web app Calendar (management of your Infomaniak calendars for all your events and appointments) can be synchronized so that their content (hosted on Infomaniak servers) appears on your personal devices.
- If your current contacts & calendars are not yet managed within these Infomaniak applications, you will need to import your data first so that synchronization can work afterwards.
- The suggested calendars can also be synchronized with your mobile and desktop devices.
- The birthday calendar (calendar that displays the birthdays of your contacts when the date is entered in their address book entry) is only visible through the web app and cannot be synchronized with CalDAV tools.
Synchronize contacts & calendars (CardDAV/CalDAV)
Click here to open the Infomaniak wizard, which allows you to configure the synchronization of your devices (macOS, Windows, Linux, Android, iOS) and common software (Outlook, Microsoft 365, Thunderbird, Apple Mail, eM Client, etc.).
Specific guides
| OS | Application to synchronize |
| Outlook via CalDav Synchronizer (Windows) | |
| Contacts & Calendars (macOS) | |
| Contacts & Calendars (iOS: iPhone, iPad, etc.) | |
| Contacts & Calendars via kSync (Android: Huawei, Samsung, Sony, etc.) | |
| Google Calendar via kSync | |
| Mozilla Thunderbird |
You can also turn the Calendar or Contacts Infomaniak web app into an application to use on your device.
Link to this FAQ:
Has this FAQ been helpful?
This guide explains how to create an additional calendar in the Infomaniak Calendar web app (online service ksuite.infomaniak.com/calendar) and then set it as the default.
Introduction
- Setting a default calendar, for example, allows you to speed up the creation of new events because you will no longer need to change the calendar each time you create a new event.
- You can only set calendars that you directly own as the default.
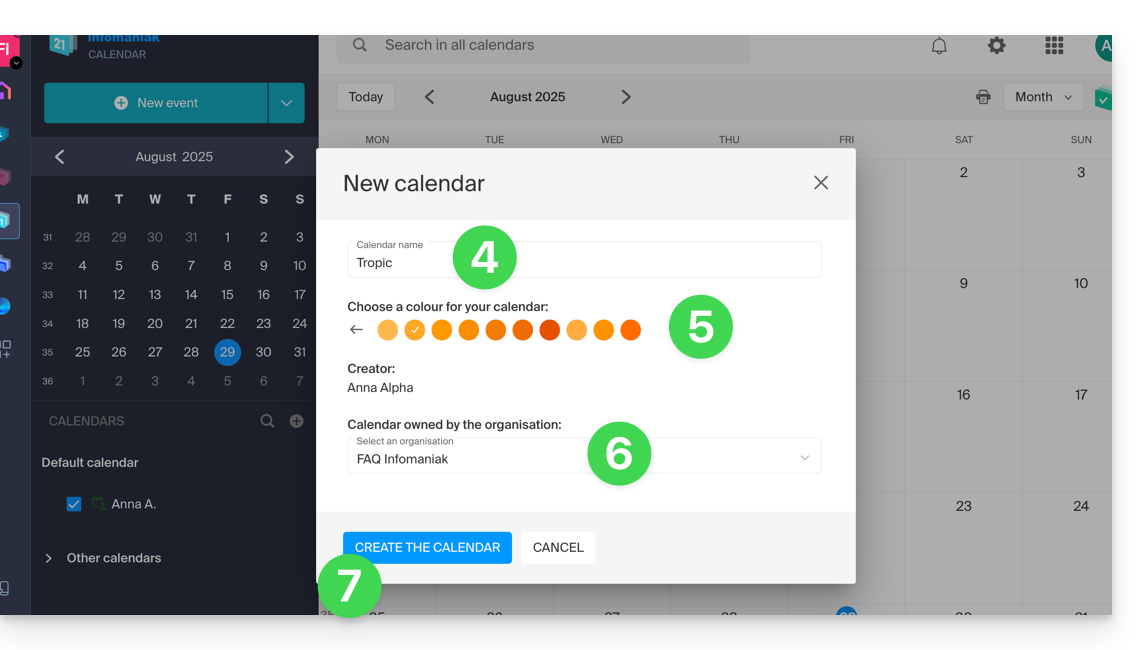
Add a new calendar
To create an additional calendar:
- Click here to access the Infomaniak Calendar web app (online service ksuite.infomaniak.com/calendar).
- Click on in the left-hand menu.
- Click on New calendar:
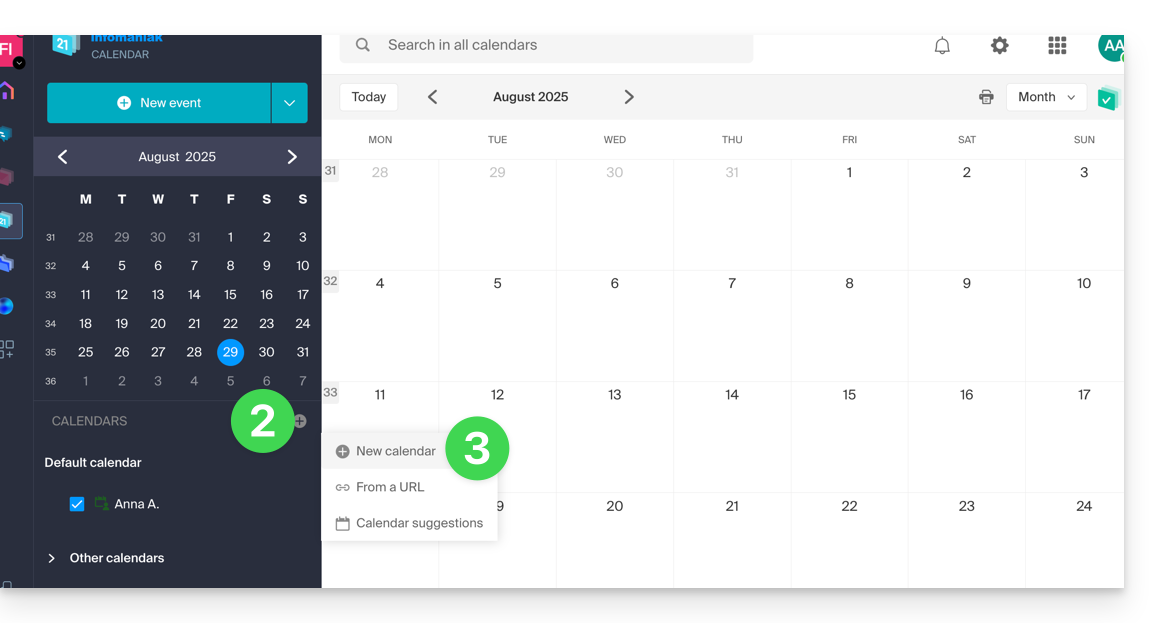
- Enter a name for the calendar.
- Choose a color.
- Choose one of your Organizations in which to create the calendar.
- Click the button to create the calendar:
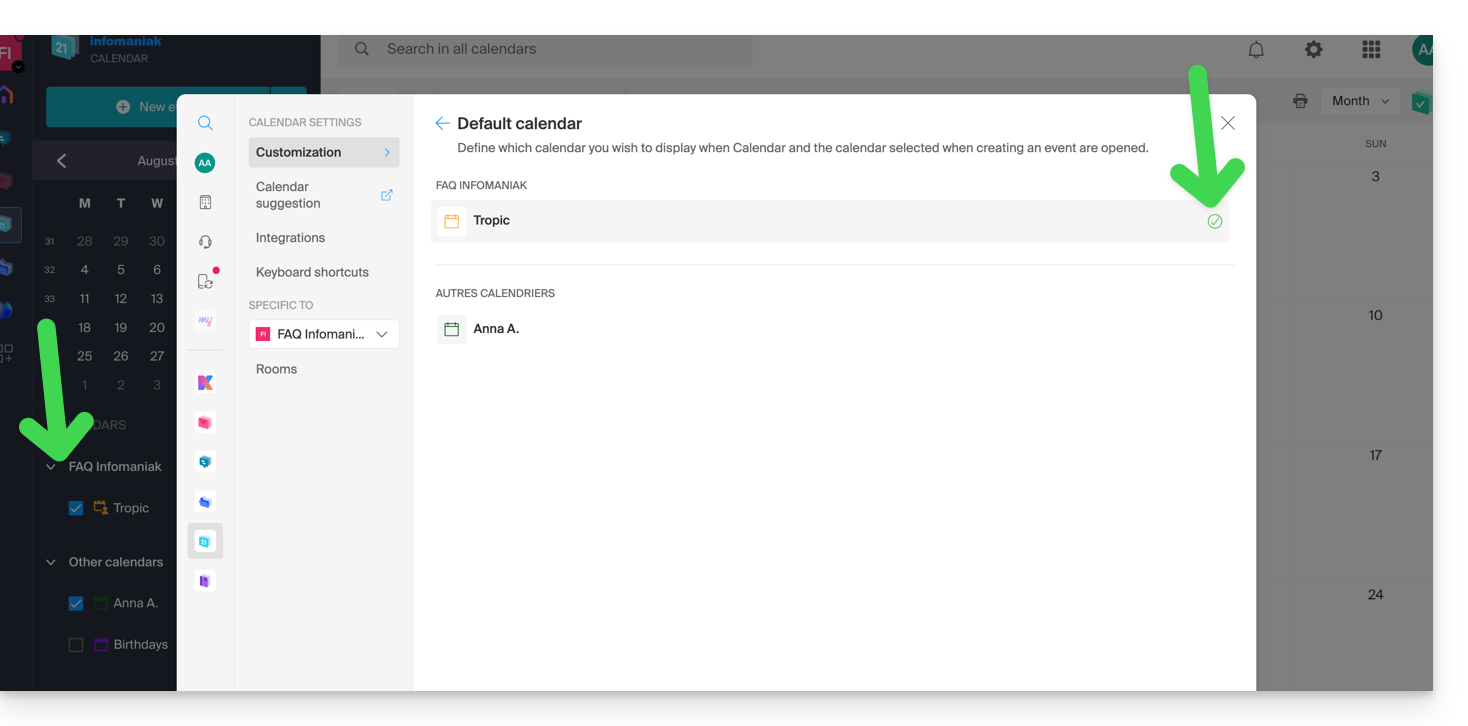
Change the default calendar
To set one of your calendars as the default:
- Click here to access the Infomaniak Calendar web app (online service ksuite.infomaniak.com/calendar).
- Click on the Settings icon in the top right corner.
- Click on Customization in the left-hand menu.
- Click on the default calendar to open the options menu:
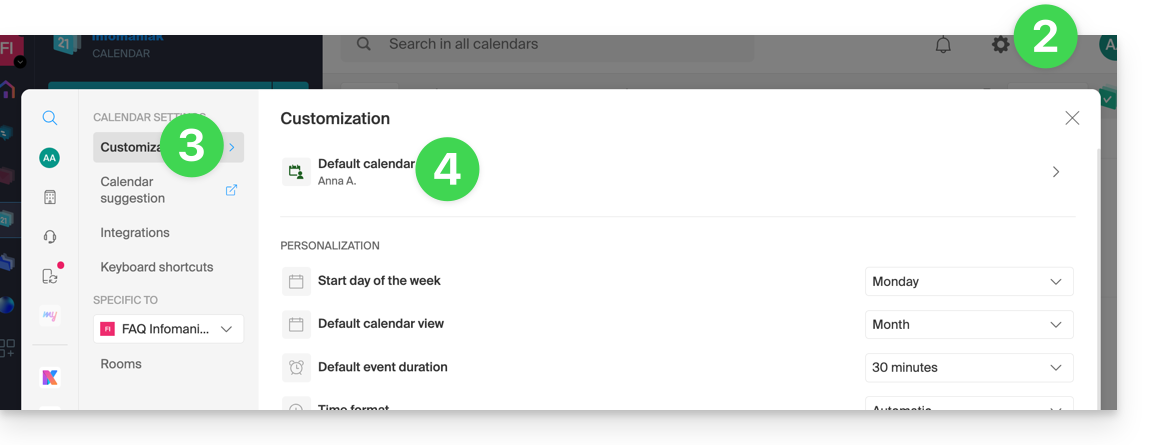
- Choose the desired calendar in the Default Calendar field; it will be placed in the first position in your calendar lists:
Link to this FAQ:
Has this FAQ been helpful?
This guide explains how to import tasks into the dedicated section of the Infomaniak Calendar web app (online service ksuite.infomaniak.com/all/calendar/tasks).
Introduction
- The
.icsfile is a standard container (RFC 5545), and within this file, you will find “components”:VEVENT(Event): this is what you see on the calendar grid, with a notion of occupied time (start timeDTSTARTand end timeDTENDor duration).VTODO(Task): this is an action to be performed, often with a due date (DUE), but not necessarily a duration, and a binary status (done or not done).
- Therefore, when importing a
.icsfile into the Infomaniak Calendar app, the system imports the data into the calendar and its “Tasks” section based on their type.
Importing tasks
If you have a .ics file to import:
- Click here to access the Infomaniak Calendar web app (online service ksuite.infomaniak.com/calendar).
- Click on the chevron to expand the Advanced actions section.
- Click on Import.
- Click on the button to select an ICS file (20 MB max):
- Select the file containing the tasks (and/or events):
- Choose the calendar in which to import the data (or create a new calendar for this purpose).
- Click the button to start the import:
- If the
.icsfile contained tasks, you will find them in the Tasks section (and any events present in the file will be displayed on the calendar):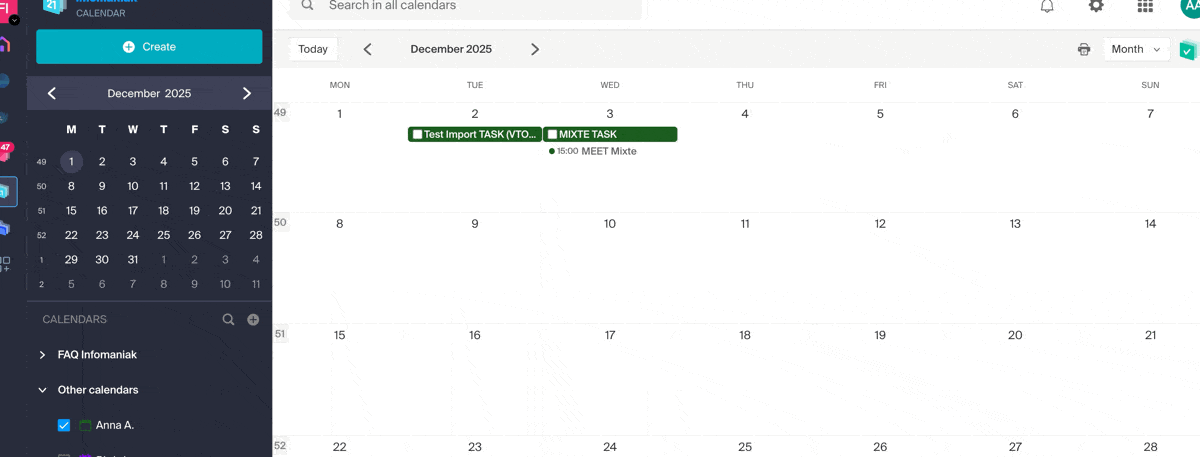
Link to this FAQ:
Has this FAQ been helpful?
This guide explains how to use the task manager in the Infomaniak Calendar web app (online service ksuite.infomaniak.com/calendar/tasks).
Managing Your Tasks
To add a task to the task manager:
- Click here to access the Tasks web app (online service ksuite.infomaniak.com/calendar/tasks)…
- … also accessible from your calendar by clicking on the Tasks icon in the right-hand side menu:
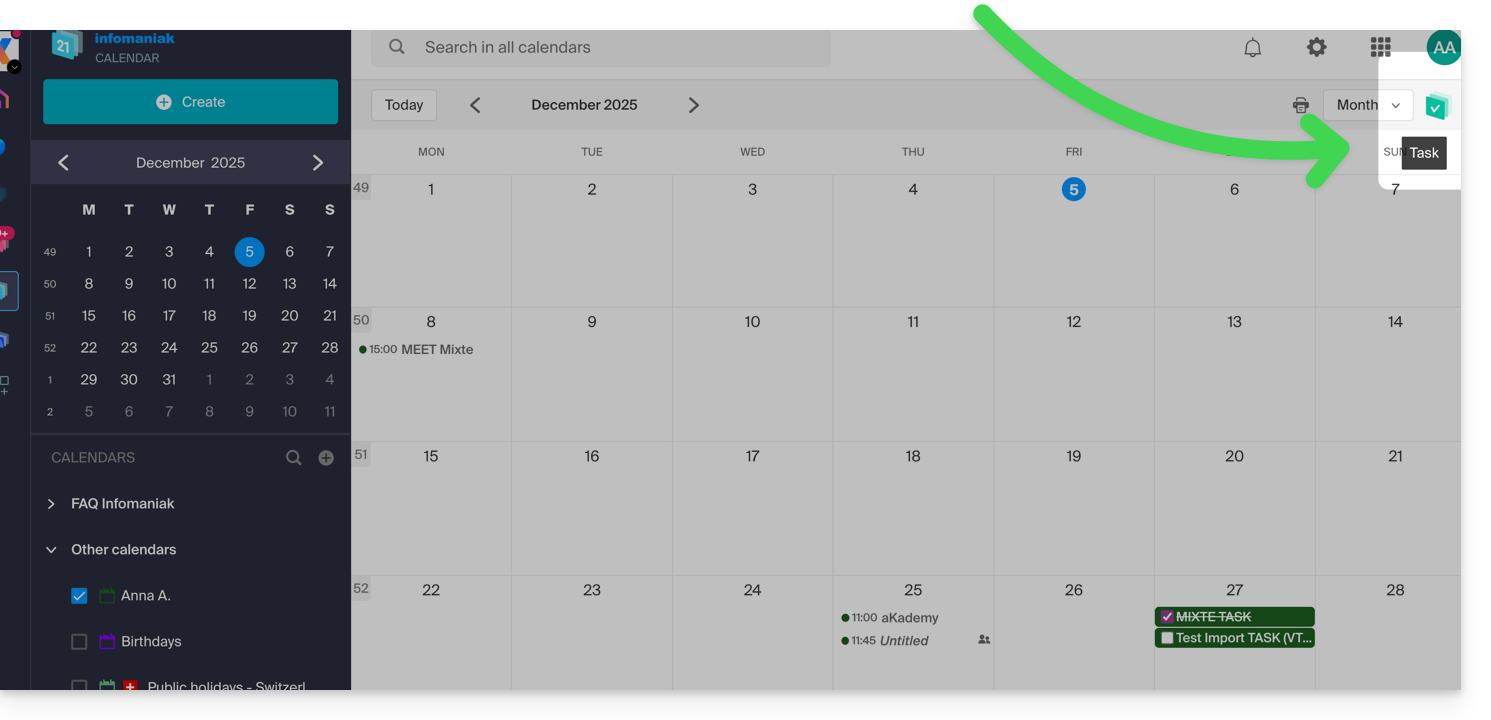
- … also accessible from your calendar by clicking on the Tasks icon in the right-hand side menu:
Once the manager is open, you can Create a task in the upper left corner, linked to the calendar specified to the right of the button: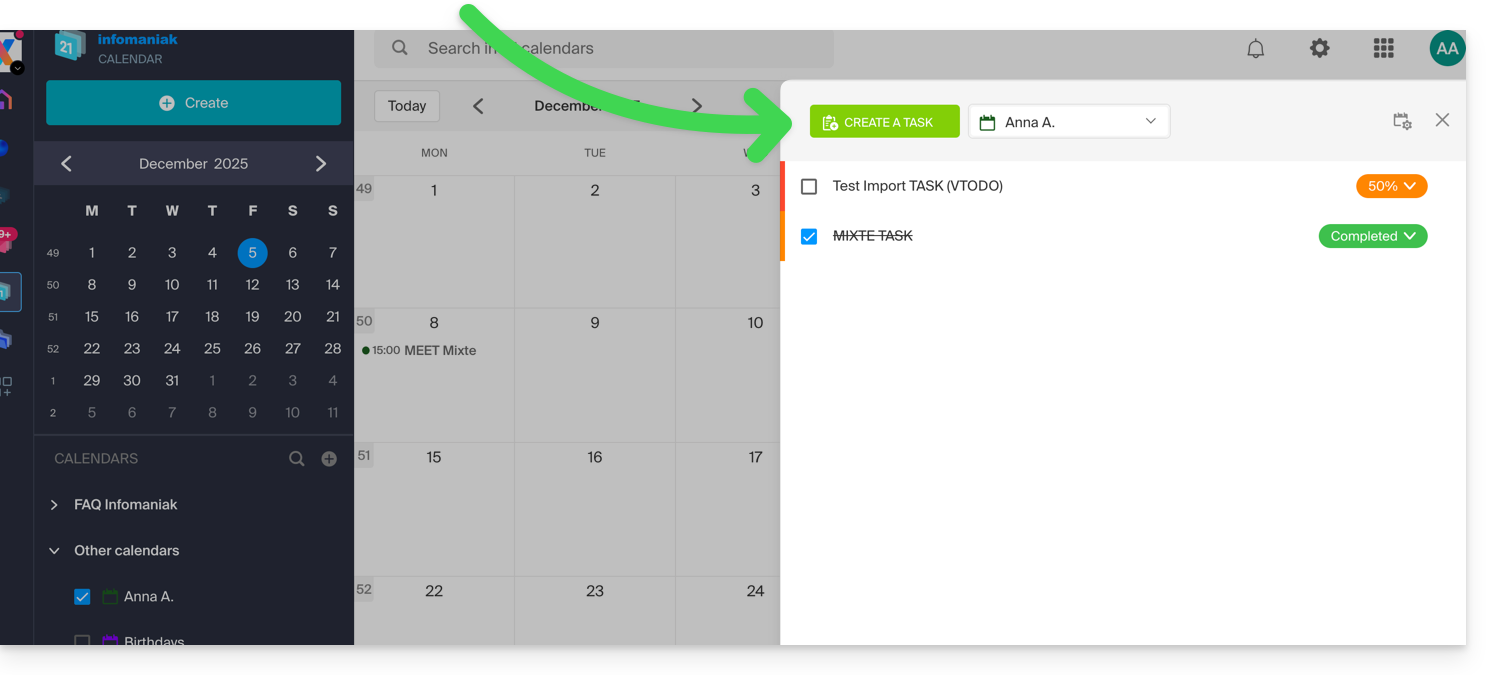
If you add a due date to your task, it will be displayed on the corresponding calendar: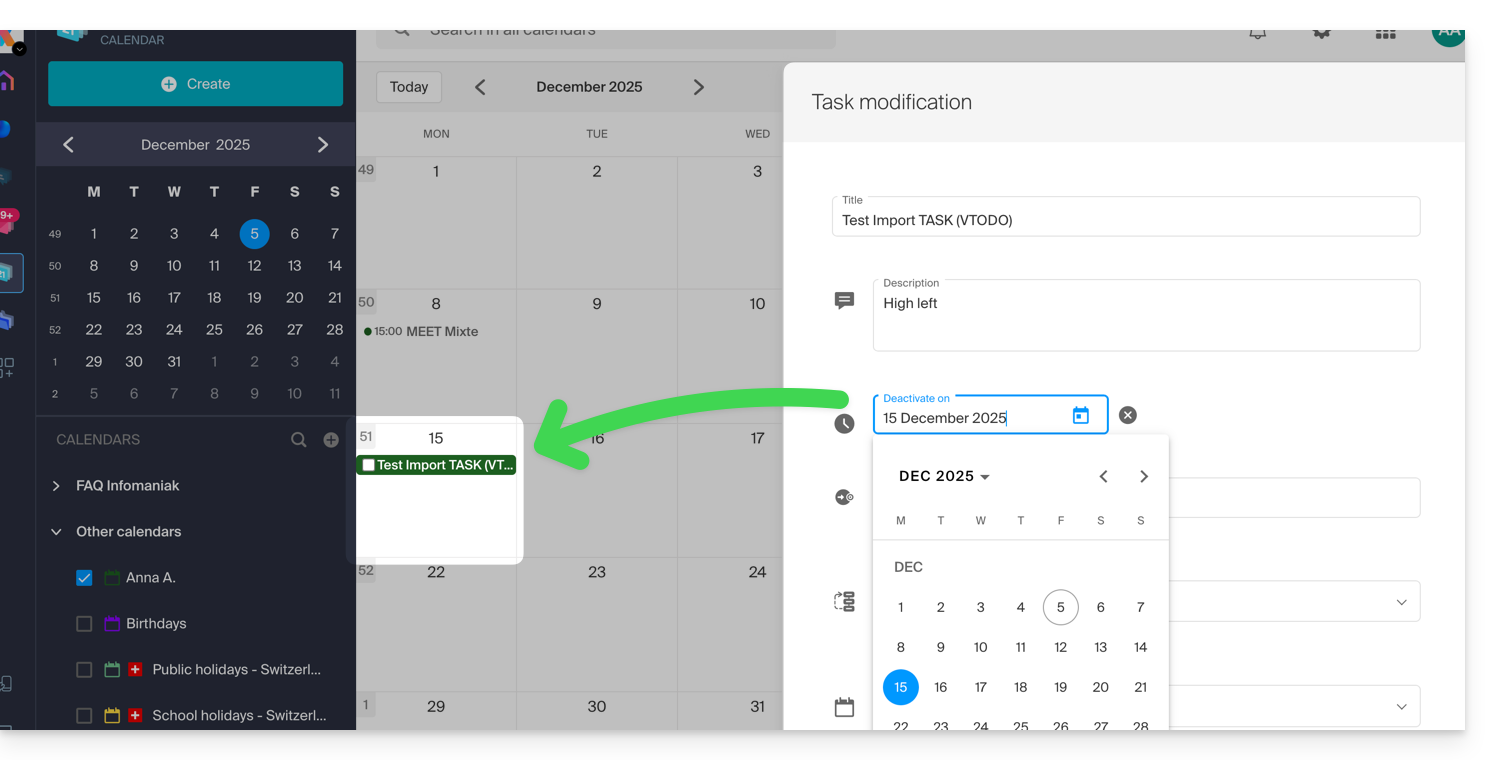
You can also filter and sort your displayed tasks using the button located in the upper right corner of the manager, next to the cross that allows you to close it: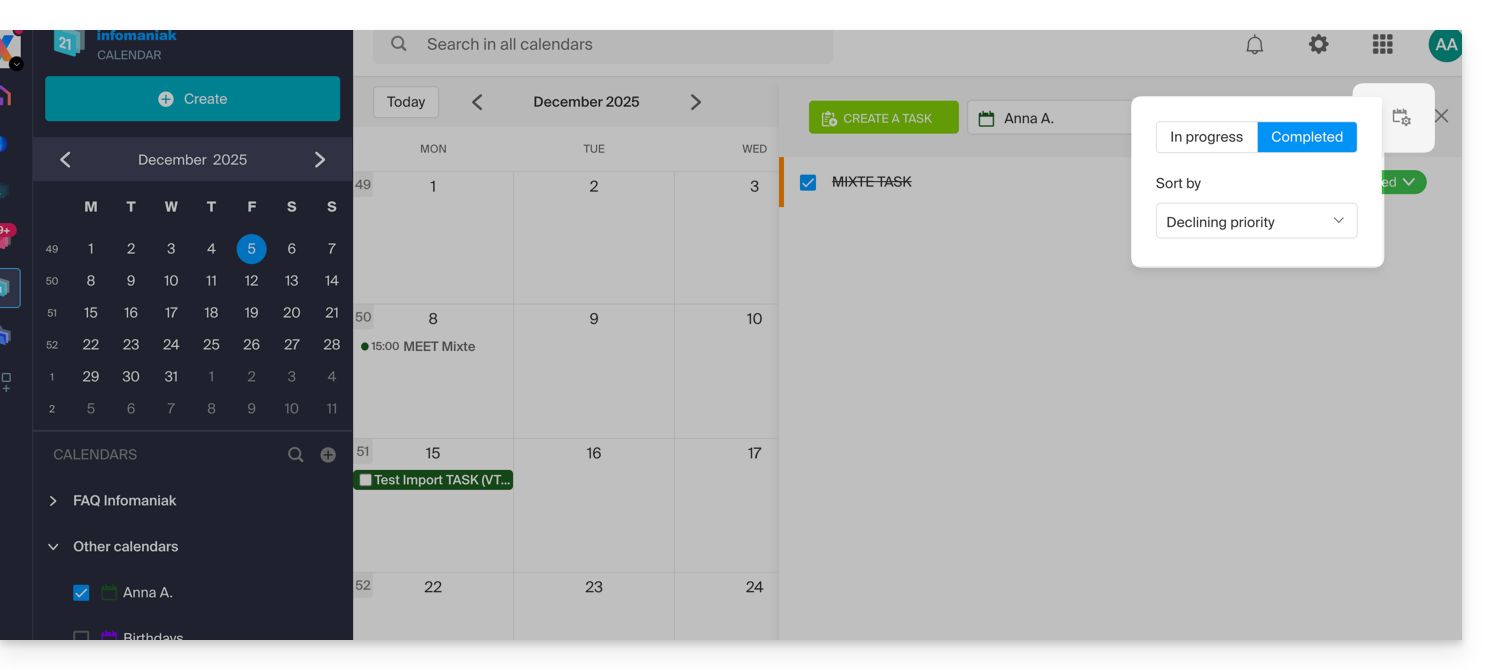
You can import tasks into your calendar.
To synchronize tasks with an Android device, please refer to this other guide.
Link to this FAQ:
Has this FAQ been helpful?
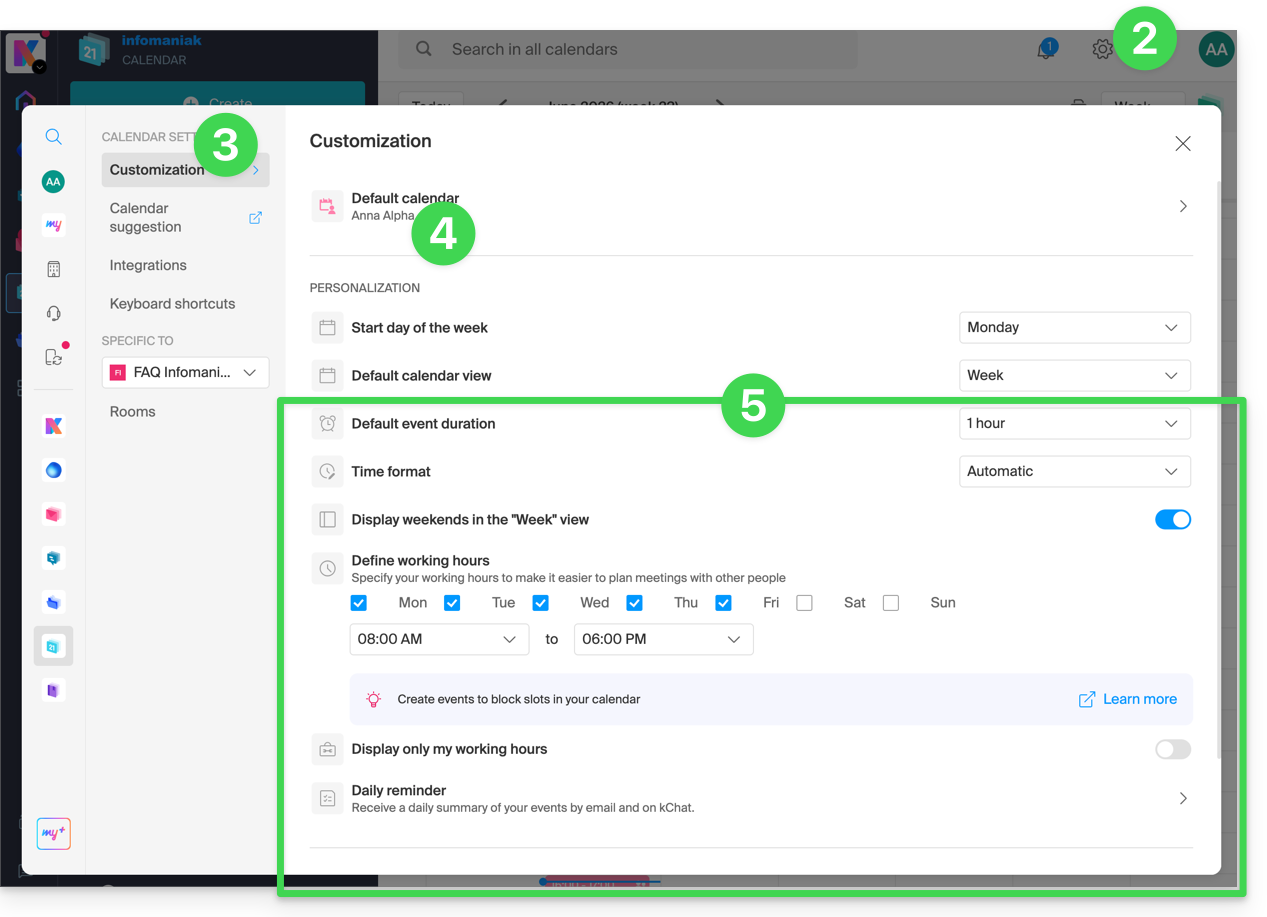
This guide explains how to change the color of events in your calendars within the Infomaniak Calendar web app (online service ksuite.infomaniak.com/calendar) and customize the displayed period.
Define Default Settings
To do this:
- Click here to access the Infomaniak Calendar web app (online service ksuite.infomaniak.com/calendar).
- Click on the Settings icon in the top right corner.
- Click on Customization.
- Refer to this other guide regarding the default calendar setting.
- Settings such as the default event duration or the working hours to display on the calendar will help improve the use of the appointment scheduling assistant:
- Regarding these menu items:
Refer to this other guide.
Refer to this other guide.
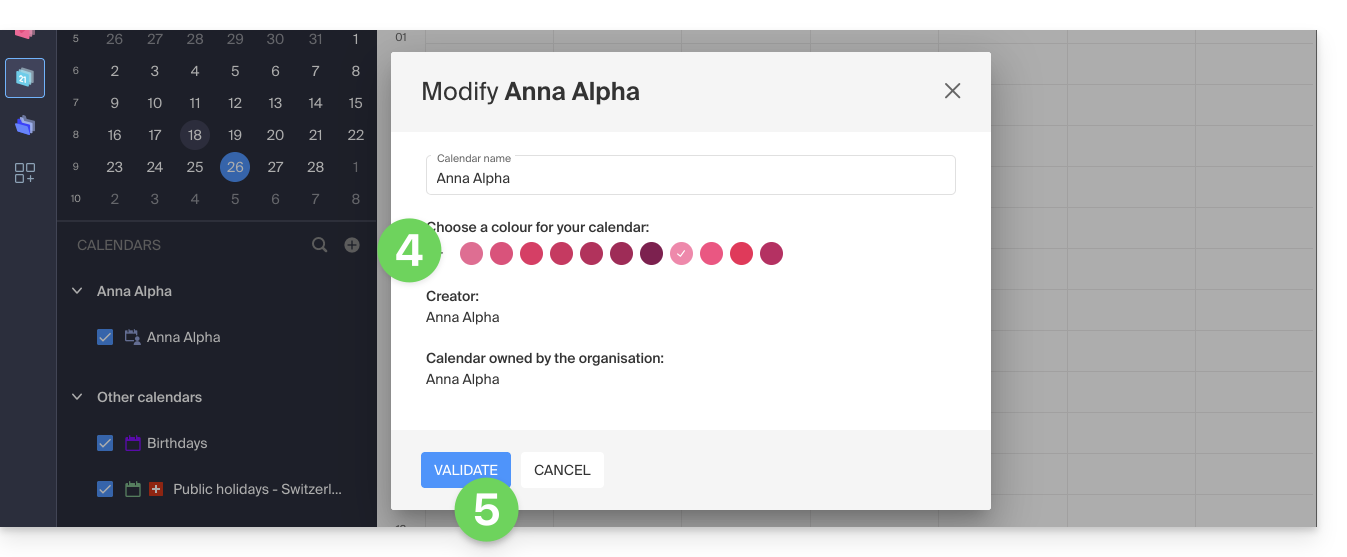
Define the Color of a Calendar
To do this:
- Click here to access the Infomaniak Calendar web app (online service ksuite.infomaniak.com/calendar).
- Click on the action menu ⋮ to the right of the calendar in question.
- Click on Edit:
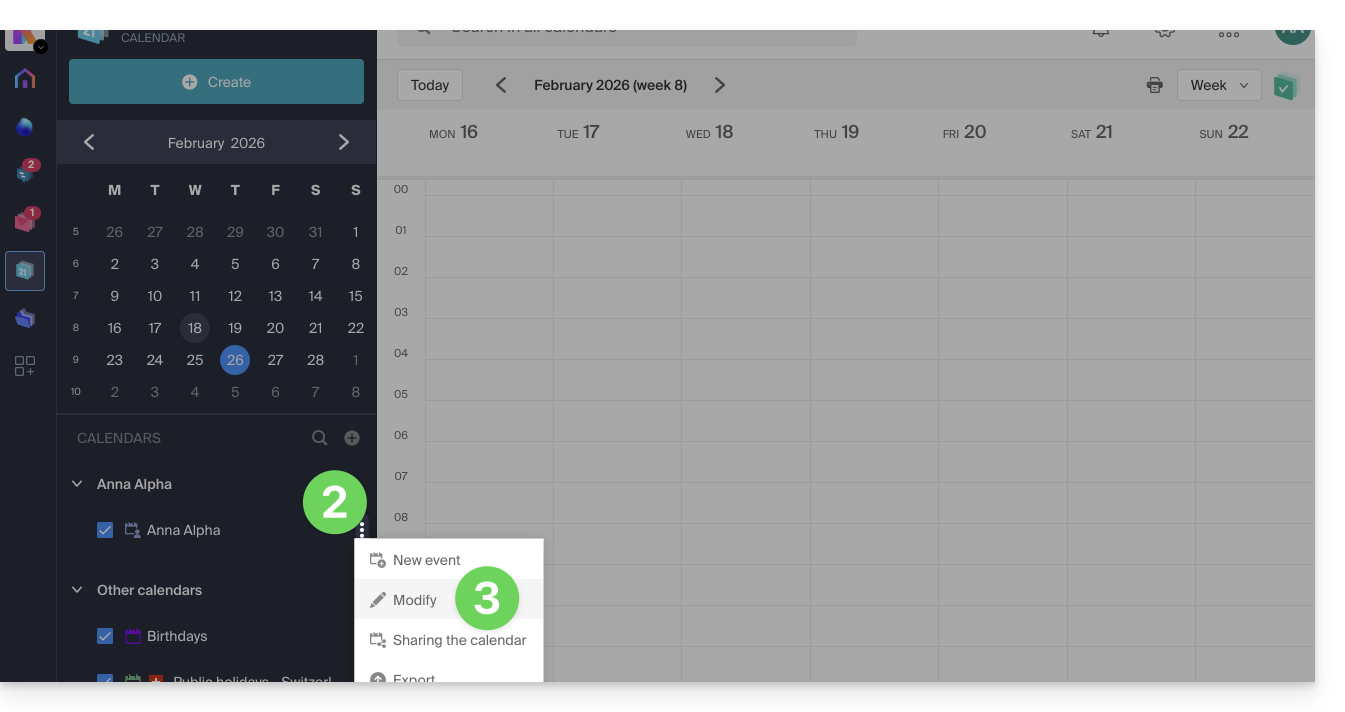
- Choose the desired color.
- Click the button to Save:
- The specified color will then be visible:
- at the level of the Calendar name,
- for fixed-time events in the monthly view,
- for all-day events in the monthly view,
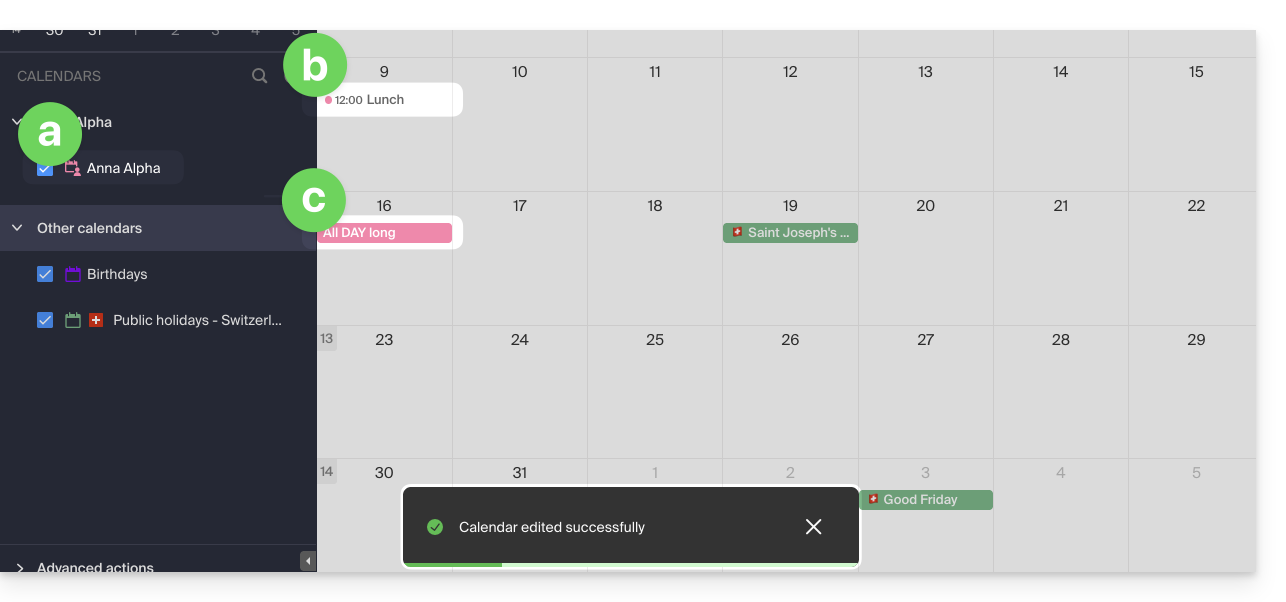
- in the daily view:

- in the agenda view:
etc.
Define the color of an event
To manually change the color of a specific event, a color that will override the calendar's color:
- Click here to access the Infomaniak Calendar web app (online service ksuite.infomaniak.com/calendar).
- Create an event and choose its color, or click on an existing event and then on the pencil ✎ icon to edit the details, including its color:

- Confirm at the bottom of the page.
- The specified color will then be visible on the event itself:
Customize the displayed period
To do this:
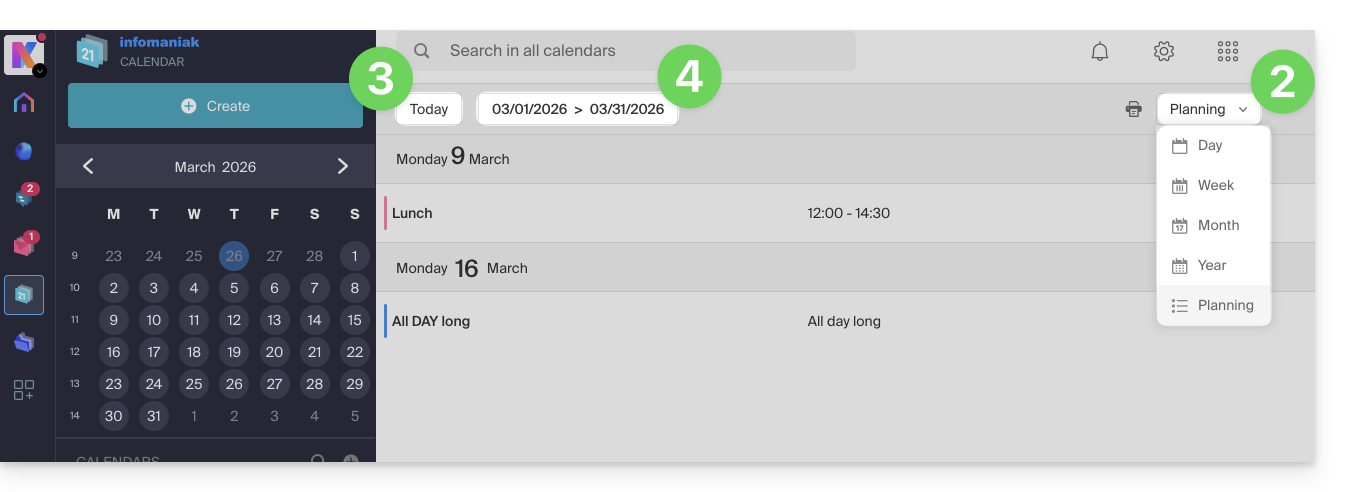
- Click here to access the Infomaniak Calendar web app (online service ksuite.infomaniak.com/calendar).
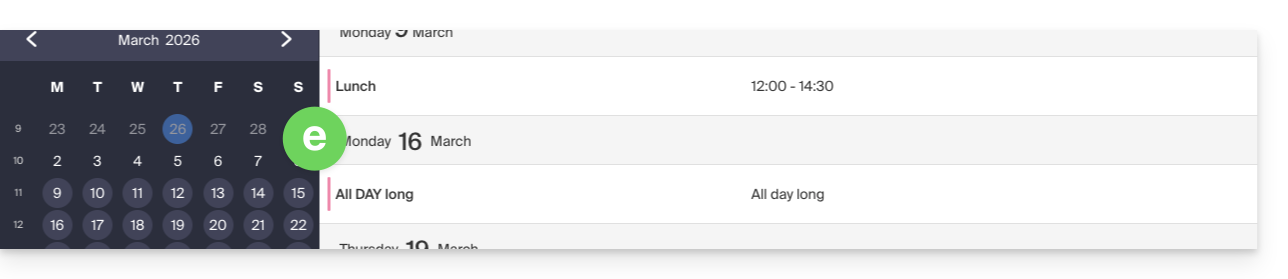
- Choose to display the calendar in: Day, Week, Month, Year, or Planning view.
- At any time, click on Today to reset the current view.
- In Planning view, you can choose the period to display ("this week", "next month", etc.):
Link to this FAQ:
Has this FAQ been helpful?
This guide explains how to force synchronization of Infomaniak contacts & calendars when they are synchronized by the kSync app on an Android device.
Preamble
- The kSync app only synchronizes contacts & calendars that are selected in the application.
- If you subsequently add calendars/agendas from Calendar or address books from Contacts, it is therefore necessary to add them to the synchronization in the kSync application.
Add an agenda / address book to synchronization
To force synchronization if necessary:
- Open the mobile app kSync on your Android device and tap on the synchronized account concerned.
- Tap Refresh list to update the address books / agendas:
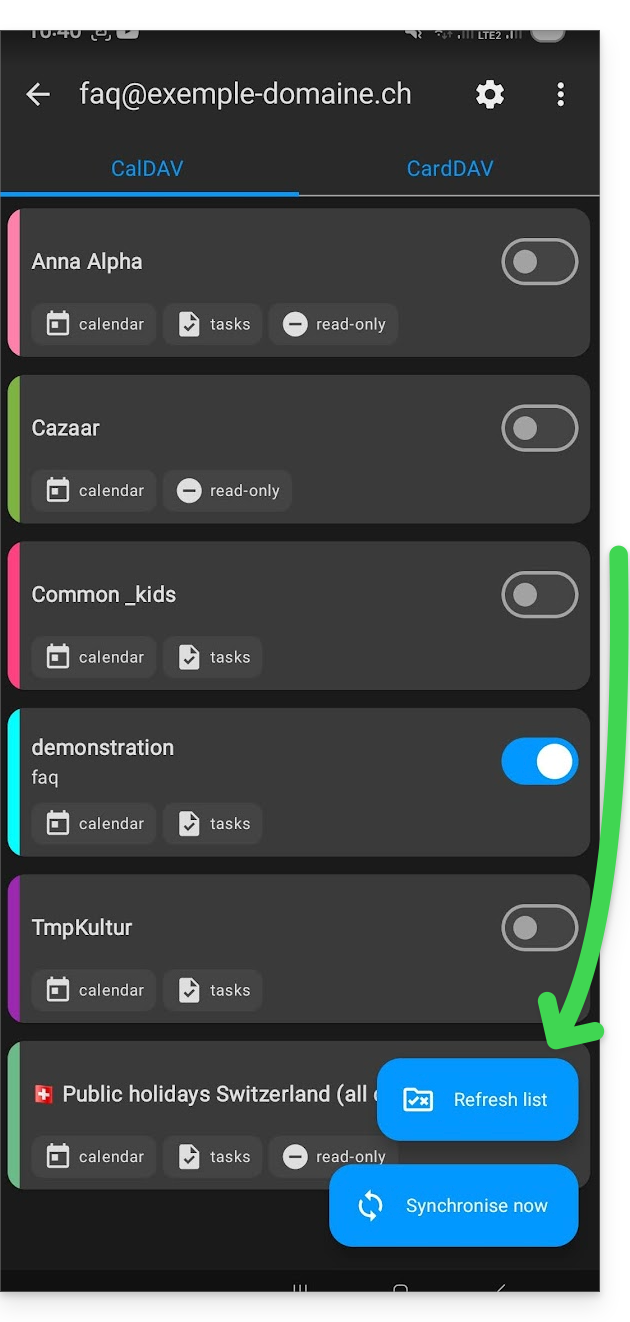
The new address books and agendas appear in the list. Configure those you want to synchronize.
Link to this FAQ:
Has this FAQ been helpful?
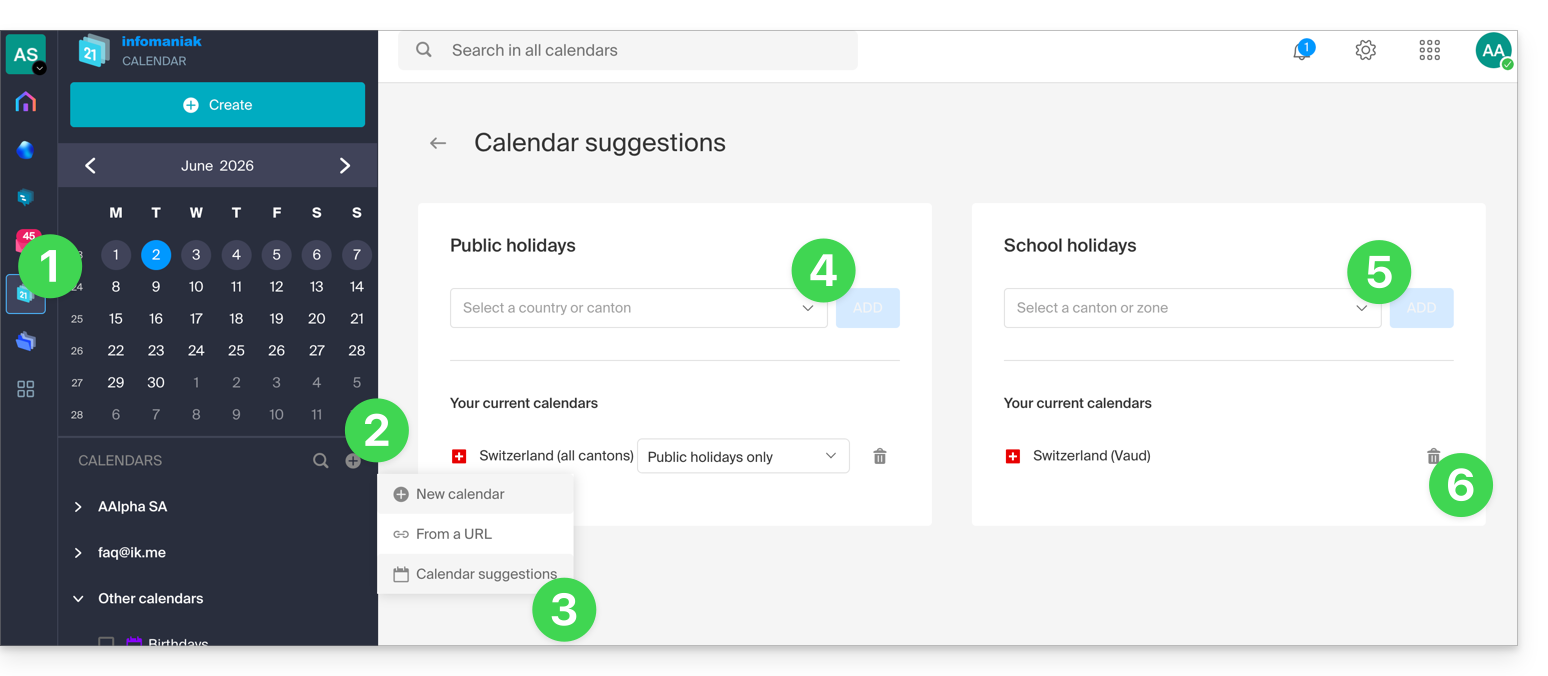
This guide explains how to display a calendar with the dates of public holidays for the canton or country of your choice in the Infomaniak Calendar web app (online service ksuite.infomaniak.com/calendar).
Introduction
- These suggested calendars can be synchronized with your mobile and desktop devices.
- The birthday calendar (the calendar that displays the birthdays of your contacts when the date is entered in their address book entry) is only visible in the Infomaniak Calendar web app (online service ksuite.infomaniak.com/calendar) and cannot be synchronized with CalDAV tools.
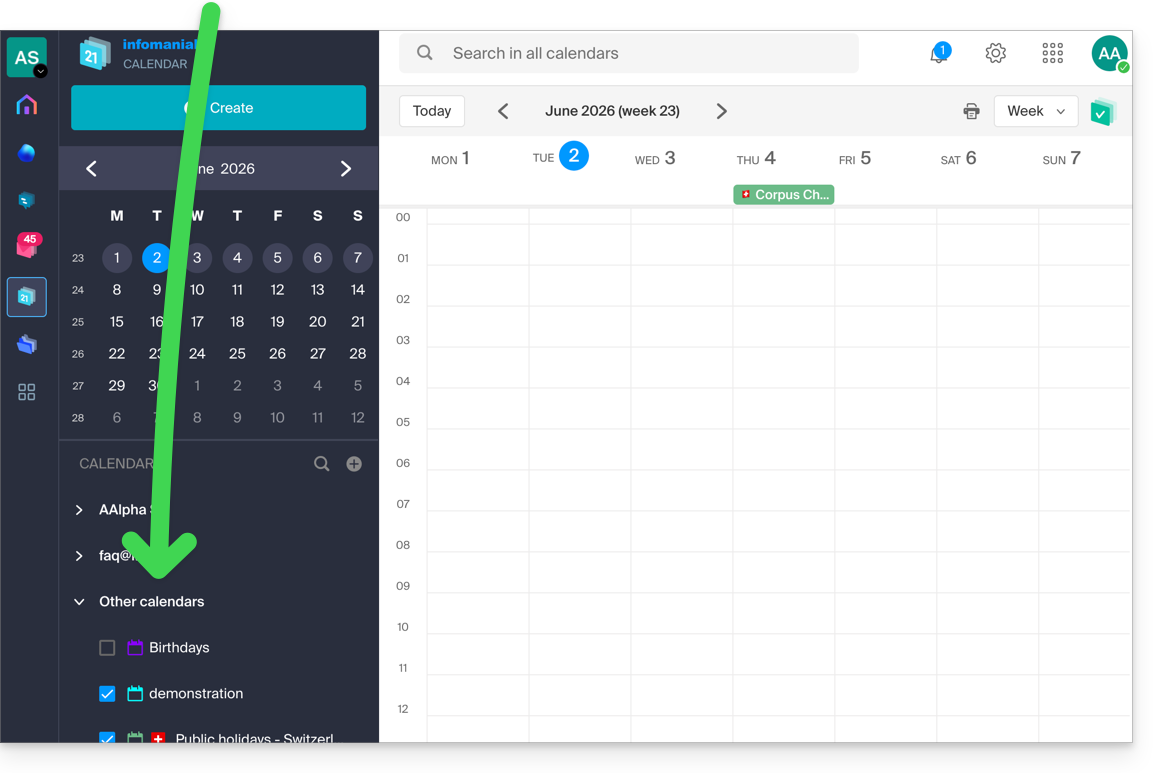
Display additional official calendars
To add the public holiday or school holiday calendar:
- Click here to access the Infomaniak Calendar web app (online service ksuite.infomaniak.com/calendar).
- Click on the button in the left-hand menu.
- Click on Suggested Calendars.
- Choose from the calendars of national public holidays (by canton or country).
- You can also add the official calendar of national school holidays (France, Switzerland, etc.).
- Once added, you can also remove them from here:
Link to this FAQ:
Has this FAQ been helpful?
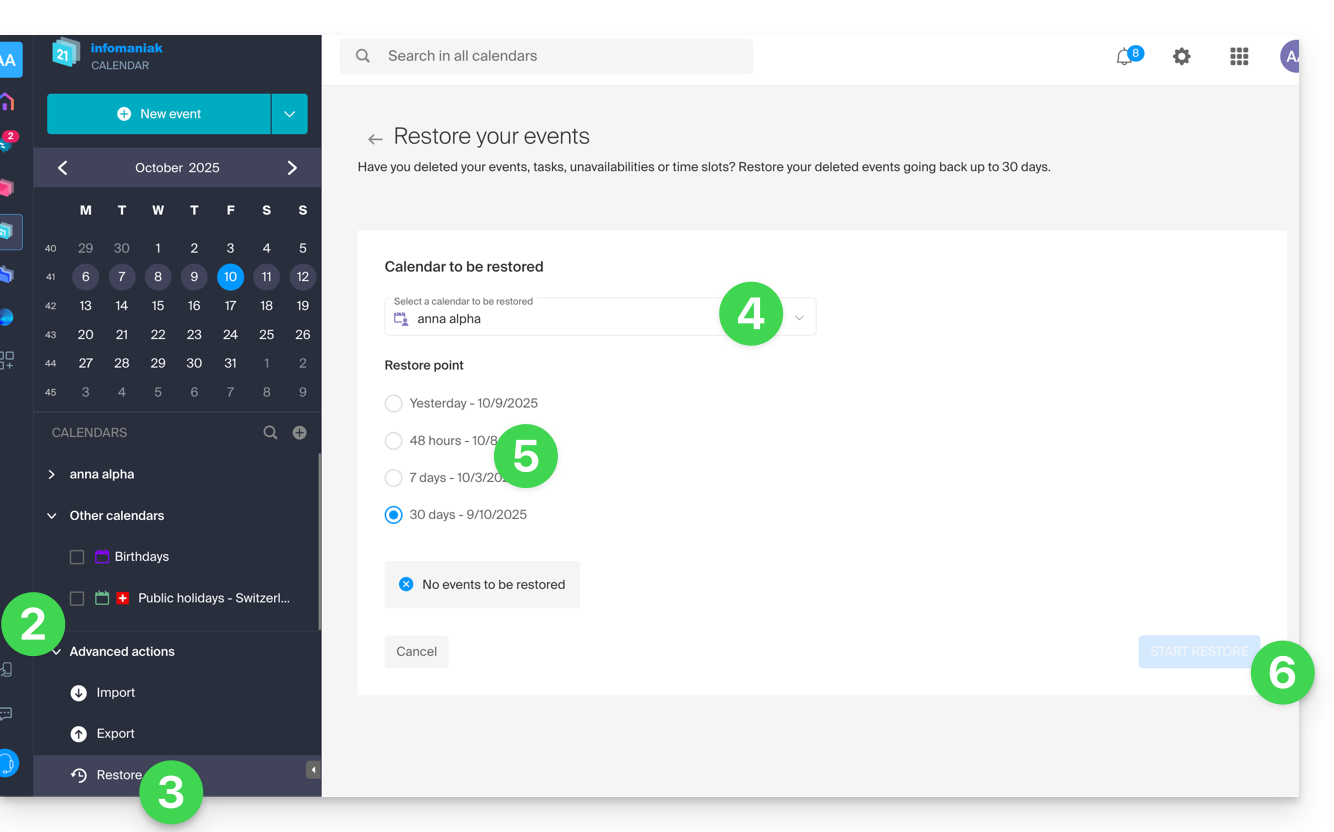
This guide explains how to recover events, tasks, unavailable time slots, and deleted time slots from one of your calendars in the Infomaniak Calendar web app (online service ksuite.infomaniak.com/calendar for managing your events and appointments).
✘ NOT AVAILABLE with
kSuite free
my kSuite (ik.me, etik.com, ikmail.com)
Mail Starter service
By upgrading one of these free plans, you will be able to recover the backup for up to 30 days.
Calendar/Agenda Restoration
Backup Retention Period
Restore points are created every day. Once a backup of the complete state of your calendar has been created, Infomaniak makes it available to you for 30 days.
If events can be restored, you can revert to the point from 24 hours, 48 hours, 7 days, and 30 days ago:
- Click here to access the Infomaniak Calendar web app (online service ksuite.infomaniak.com/calendar).
- Click on Advanced Actions from the left-hand menu.
- Select Restore.
- Choose the calendar to restore.
- Choose the desired version (1/2/7/30 days).
- Start the restoration using the button at the bottom of the page, which becomes active if events can be restored:
Link to this FAQ:
Has this FAQ been helpful?
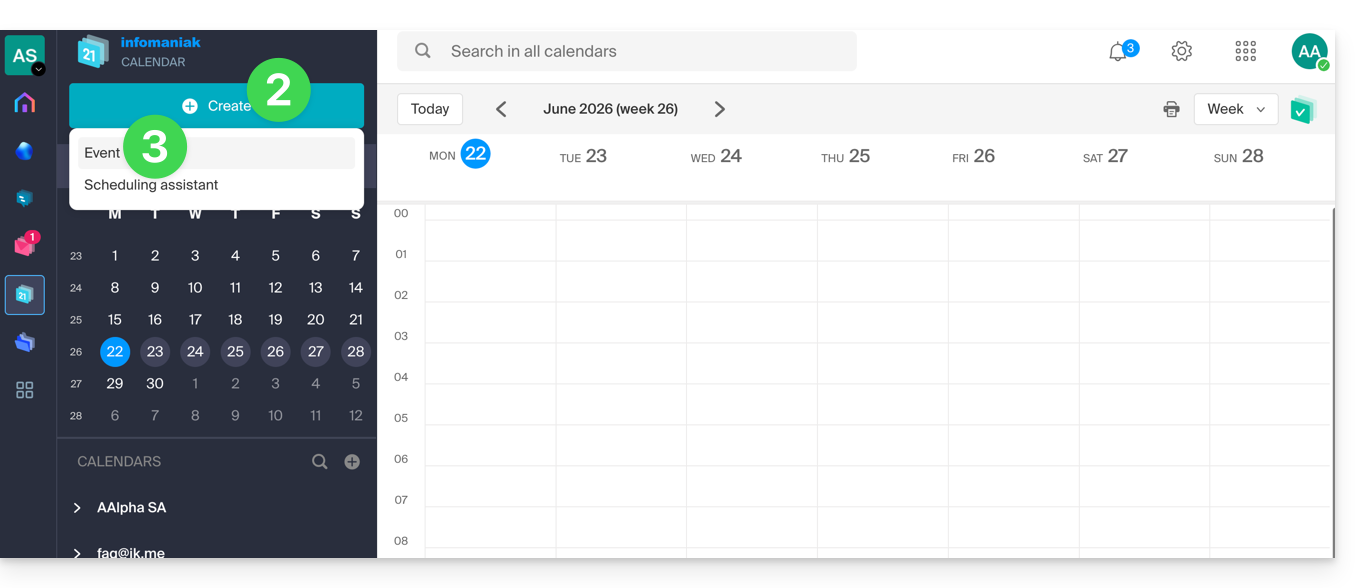
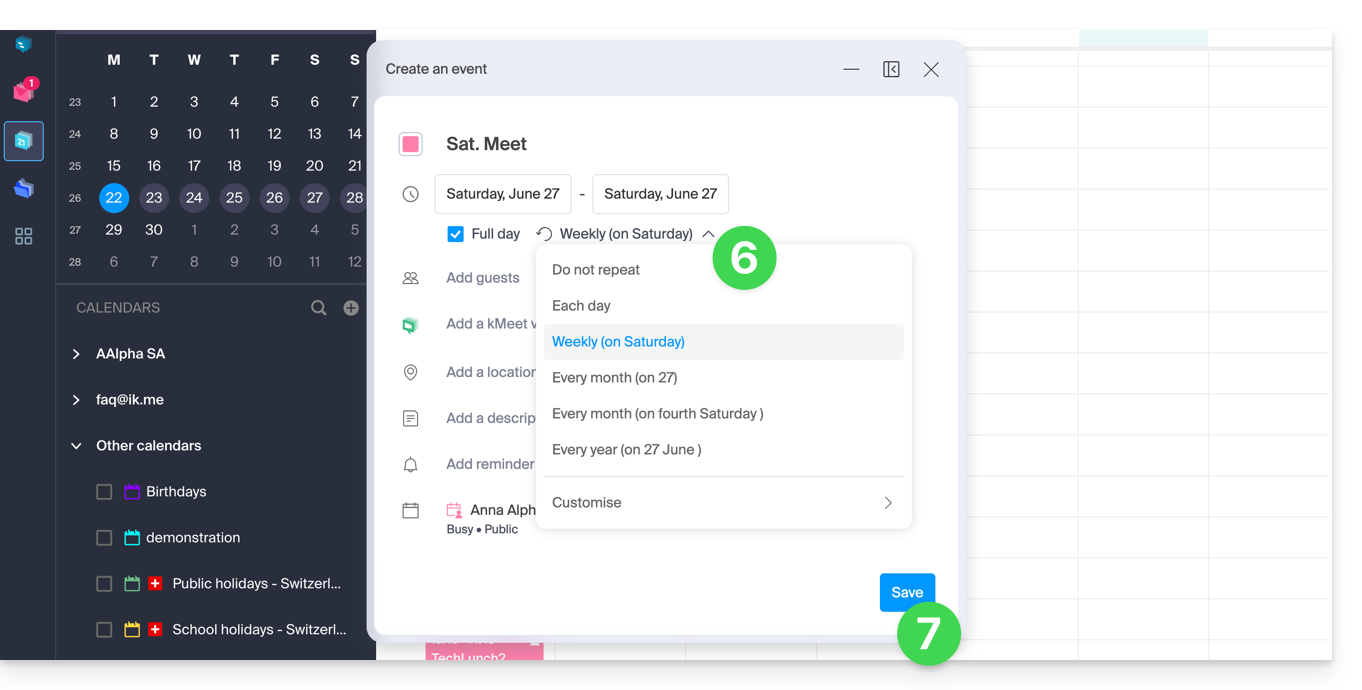
This guide explains how to add a new recurring event to the calendar/agenda of the Infomaniak Web app Calendar (online service ksuite.infomaniak.com/calendar).
Introduction
- To create a simple one-time event, please refer to this other guide.
- To schedule a meeting between multiple users and find the best time slot, please refer to this other guide regarding the meeting scheduling assistant.
- It is possible to modify (move/delete) a single occurrence of a recurring event in the Infomaniak agenda without affecting the entire series, allowing you to adjust the time, participants, location, or duration of a specific meeting while preserving the original configuration for all other occurrences.
Add a recurring event
To add an event that will be repeated in the future:
- Click here to access the Infomaniak Web app Calendar (online service ksuite.infomaniak.com/calendar).
- Click on the Create button in the top left corner.
- Click on Event:
- Enter the event details.
- Click on the time/date section:
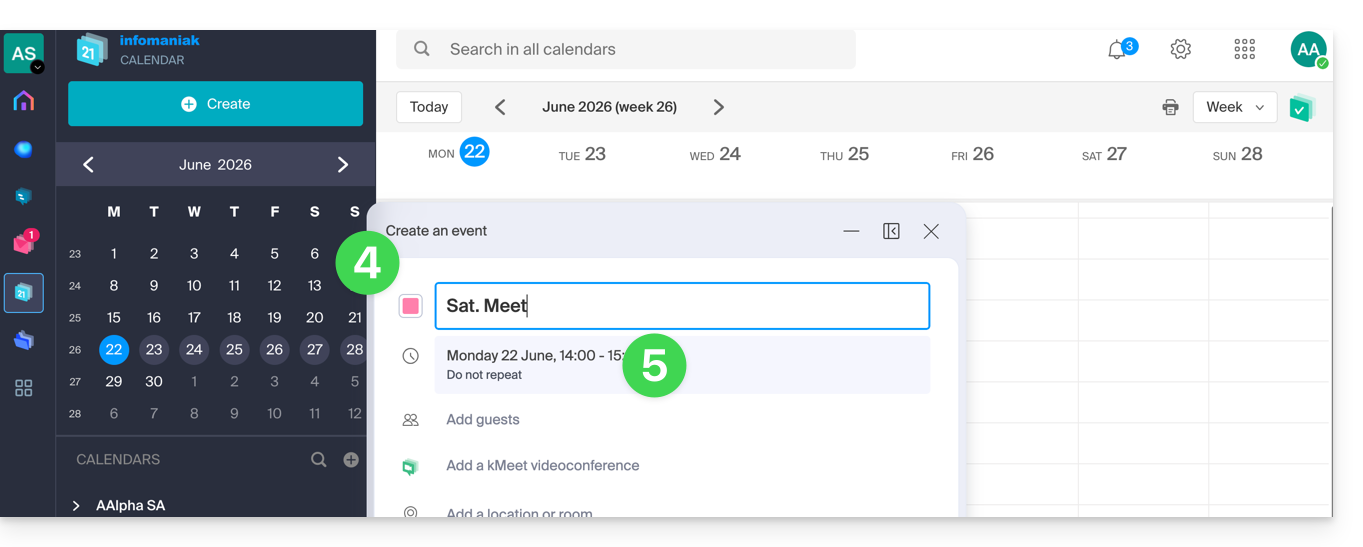
- Enable recurrence and customize it as needed.
- Save the recurring event at the bottom of the page:
Link to this FAQ:
Has this FAQ been helpful?
This guide explains how to add an attachment from kDrive to an event in the Infomaniak Calendar web app (online service ksuite.infomaniak.com/calendar).
Introduction
- Some software or applications also allow you to add an attachment, and in this case, if you synchronize the calendar with your solution, the attached file can be up to a maximum size of 64 KB.
Adding a kDrive attachment
When you create a new event in the Infomaniak Calendar web app (online service ksuite.infomaniak.com/calendar), you can add one or more attachments (links to files in kDrive):
Then, click on the “Insert kDrive link” link, and you will be taken to kDrive directly from the event creation window in Calendar: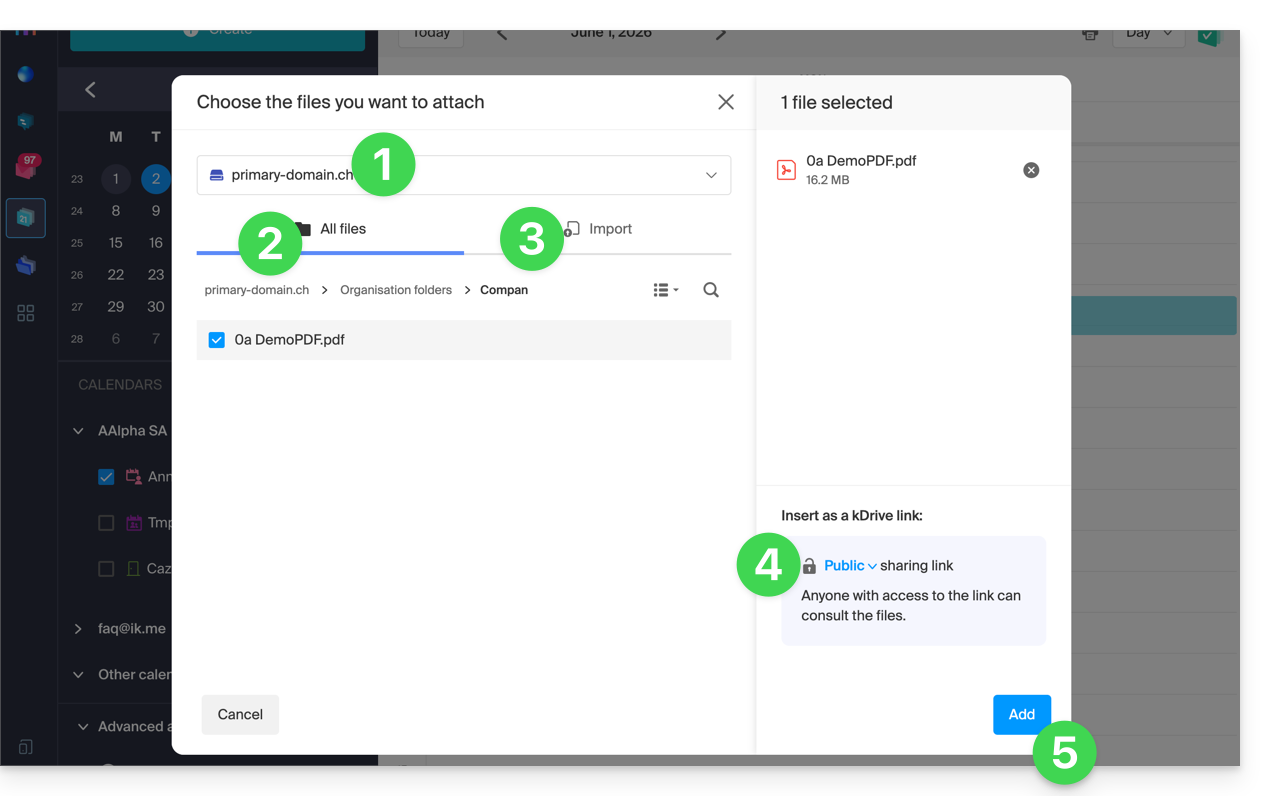
- Choose the kDrive if necessary.
- Browse and select the files to add to the event.
- Alternatively, import new documents that will be stored on kDrive.
- Once selected, choose whether their link should be:
- a public link (everyone can access it)
- a restricted link (only people with access can access it)
- Click on Add.
Whether the event is recurring or not, you can add files that will be shared with those who view the event in the calendar:
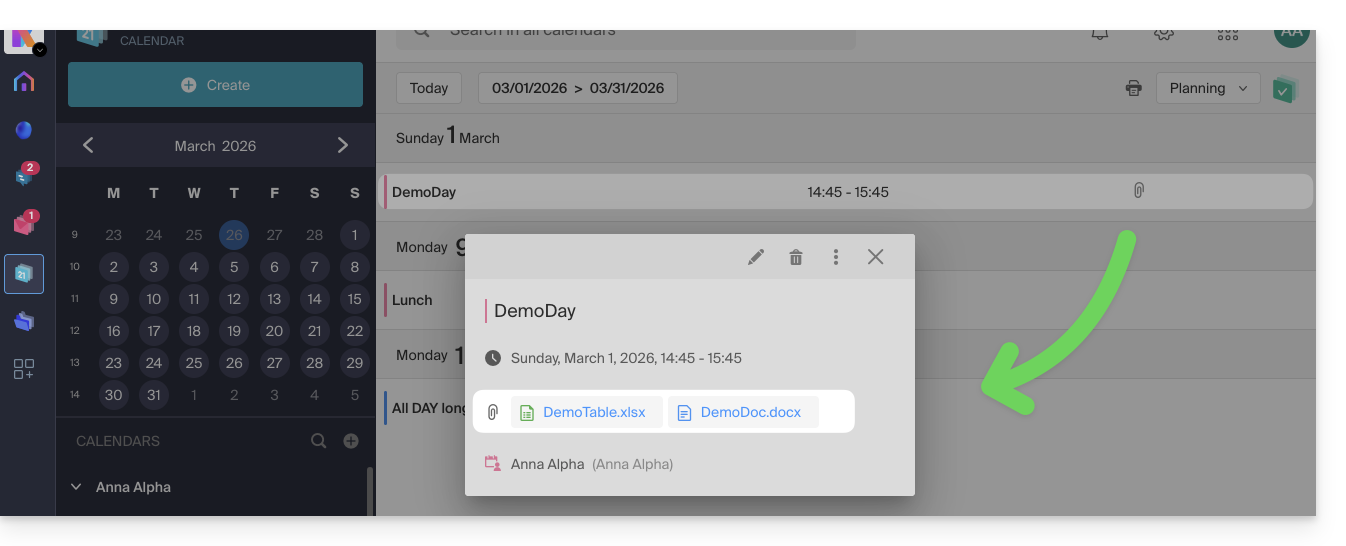
Link to this FAQ:
Has this FAQ been helpful?
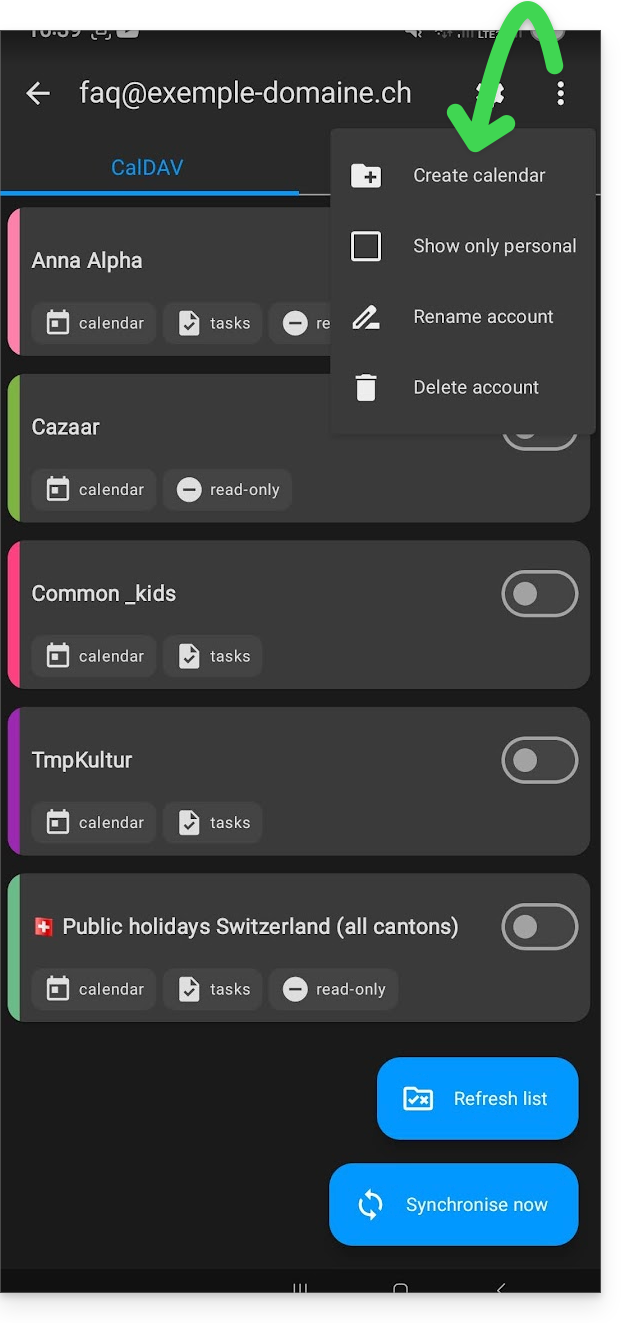
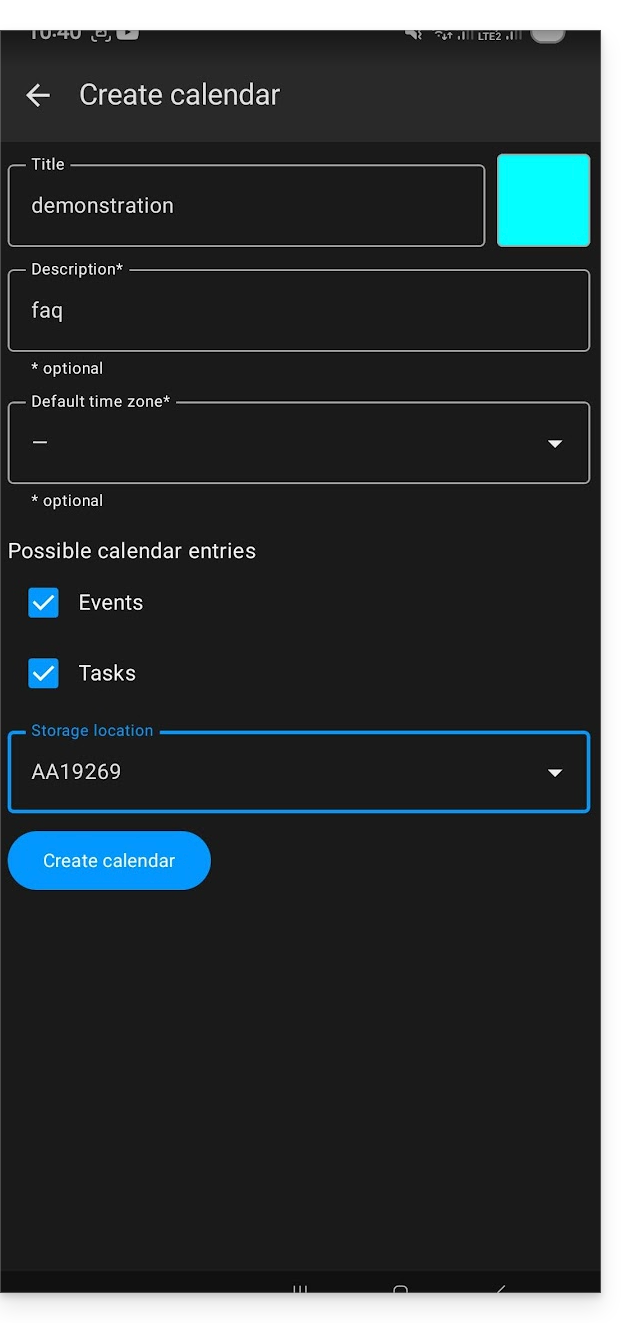
This guide concerns kSync which allows you to create a new calendar or a new address book directly from an Android device.
Create a calendar or address book from the app
To do this:
- Open the mobile app kSync on the Android device.
- Once logged in, click on the action menu ⋮ located at the top right.
- Press Create a new address book / Calendar:
- Enter the name of the address book or calendar and a color.
- Click on Create:
- If necessary, click on the icon to refresh the list, your new item appears in the list after a few seconds:
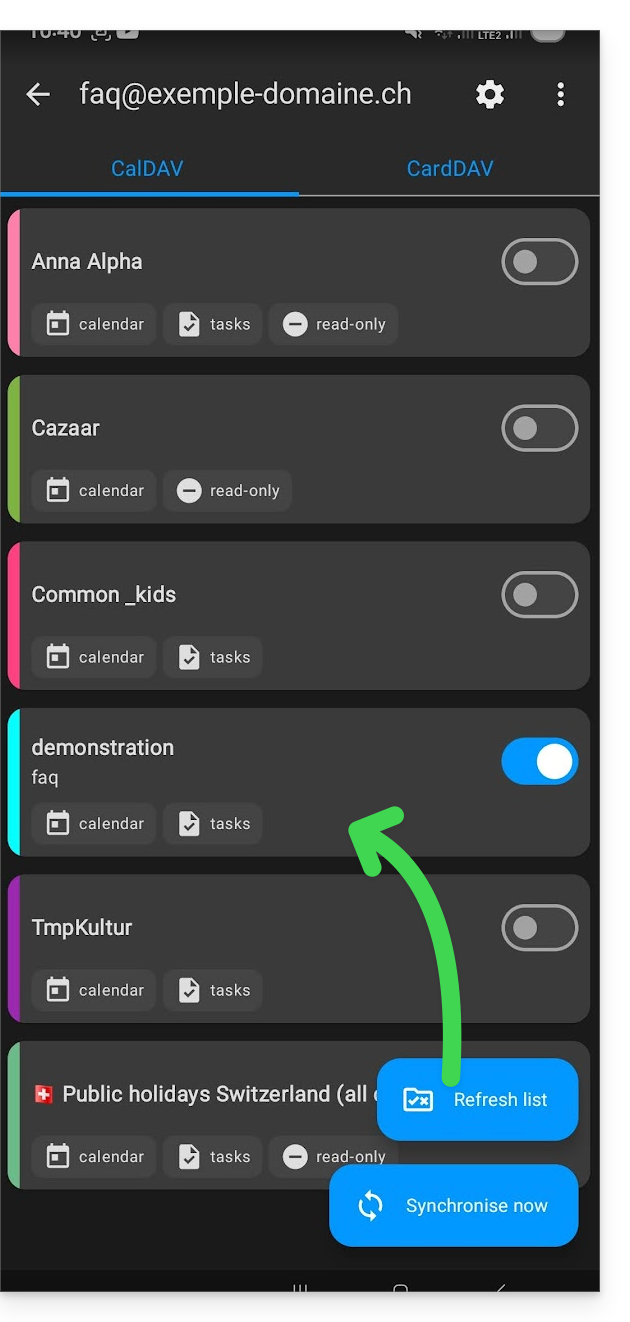
Your service will then be synchronized with the corresponding web app, here Calendar Infomaniak (online service ksuite.infomaniak.com/calendar):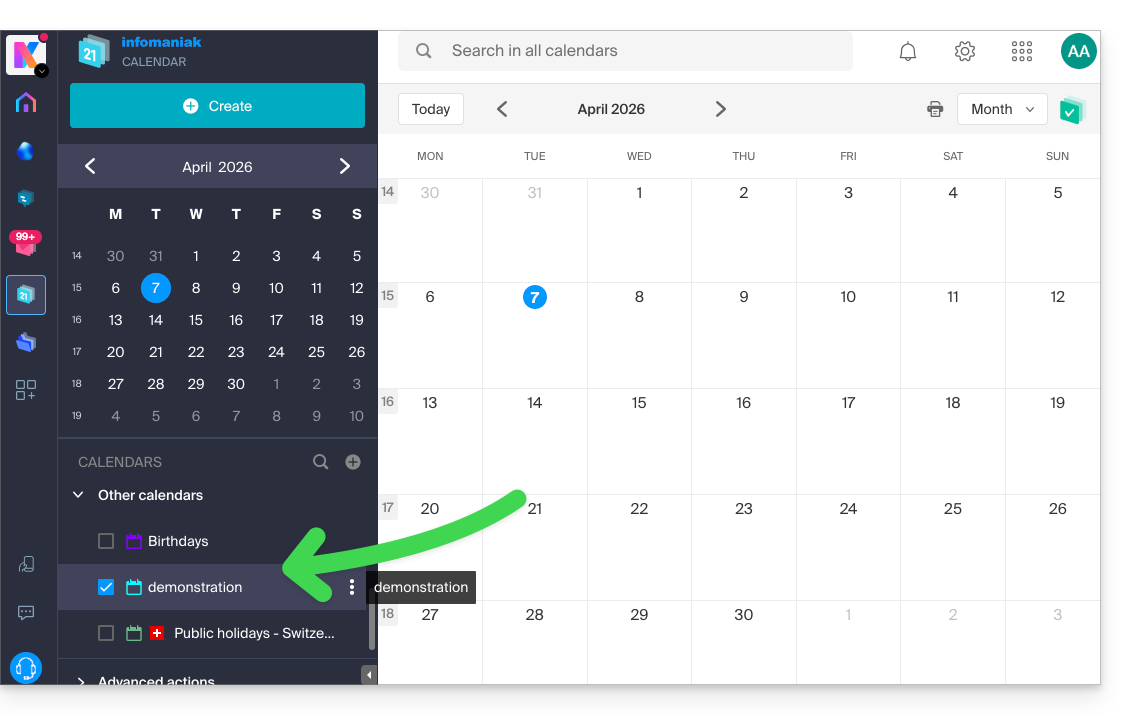
Link to this FAQ:
Has this FAQ been helpful?