Knowledge base
1000 FAQs, 500 tutorials and explanatory videos. Here, there are only solutions!
This guide explains how to transfer to Infomaniak data (Web, Mail, Domain, and even Cloud) currently hosted elsewhere. You remain the obvious owner of your data, without loss or interruption!
Preamble
- By consolidating your domain names, websites, and email addresses with Infomaniak, you simplify the management of your invoices and services.
- Additionally, the linking of your domains will be done automatically with your site and your email address.
- You will not need to manually configure the DNS of your domains with another registrar.
- Don't have time to migrate your services? Launch a free tender to find an Infomaniak partner who will take care of everything.
- Infomaniak, the Ethical Cloud | Infomaniak's eco-responsible approach
Specific guides
Click on the link corresponding to your current host:
- Swisscom: complete guide to migrate Web, Mail and domain name data
Guides for any other host
To not interrupt your site and emails and not lose any content when importing your existing data, migrate your services in the indicated order:
Import Web data (all PHP, HTML sites, etc.)
- For WordPress specifically, refer to this other guide…
- For WordPress specifically, refer to this other guide…
Copy Mail data (addresses and mailbox content, etc.) to kSuite or a simple Mail Service
Transfer the domain name (domain management, DNS zone, etc.)
You can also bring other types of data to the Infomaniak servers:
- Dropbox, Google Drive content, etc.: refer to this other guide
- Data on Synology or QNAP NAS: refer to this other guide
Thank you for trusting Infomaniak with the hosting of your website.
Preamble
- A web hosting is a storage space available on a computer, also called a "server", connected to the Internet and managed by a web host, Infomaniak.
- This storage space, made available to professionals and individuals, is used to install websites or other types of tools (CRM, extranet, intranet...) that need to be accessible via the Internet.
- These guides allow you to quickly use the essential functions of your new product, your web hosting, which can accommodate multiple websites.
Where to start?
- Create a WordPress website
- Build the site with Site Creator
- Install a web application (ownCloud, Joomla, Typo3, Drupal, phpBB, Simple Machines Forum, Magento, Prestashop, ...)
- Manage your FTP accounts/users
- Manage and publish files on your hosting via FTP Manager
- Manage your MySQL databases
- Add a site or subdomain to your hosting (multisites/multi domains)
- Link another domain name to an existing website (domain alias)
- Preview your site even if your domain name does not yet point to Infomaniak's servers
IMPORTANT: the domain name...
A web hosting, to be visible to the public on the Internet, must be associated with a domain name!
Your domain name is not managed by Infomaniak? Or is it in a different Organization than that of your web hosting? Then refer to this other guide to configure the DNS or the "A records" in order to link the domain name to your web hosting.
In case of a problem
To resolve a problem, please consult the Web Hosting Knowledge Base before contacting Infomaniak support.
Click here to share a review or suggestion about an Infomaniak product.
This guide details the technical and administrative aspects of hosting multiple websites on the same platform.
Technically
A hosting includes different websites. It is therefore possible to add multiple websites to a hosting (multi-site / multi-domain management). In this case, the resources of the hosting (disk space, databases, script execution time and memory, etc.) are shared among the different websites of the hosting.
The base Cloud Server plan contains a certain number of hostings (for example 5) and a higher number of websites (for example 20). In this example, this means that you can create 20 websites (with 20 different domain names/subdomains) that you can organize freely on your 5 hostings.
Administratively
At the Organization level on the Infomaniak Manager, management and access rights cannot be assigned to a specific website on a hosting. A user that you add to the Organization cannot have a right limited to a single site; they will always access the entire hosting.
At the server data level, however, it is possible to create an FTP user restricted to a specific folder (in this case, it will need to be limited to the folder where the site is located).
Limited management of one site among others on the same hosting can also be considered directly within the tool used for the site (WordPress user management for example).
The Student Program from Infomaniak allows you to get 1 Web Hosting and 1 kSuite Standard for free to develop your digital skills during higher education.
Preamble
- A domain name is required for the proper functioning of the products and this one remains paid.
- Offer valid only in the following countries: Switzerland, France, Belgium, Germany, Italy, Austria, Spain, Canada.
- Offer reserved for new hosting orders (does not apply to orders already in progress or renewed orders).
- 1 web hosting (= storage of 20 websites on 250 GB of SSD space) and 1 standard kSuite offered per person.
- The student must be of legal age (or have parental authorization).
- The student must be able to justify their situation with a valid registration card and identity card:
- student card or school certificate: it must be up-to-date and show the school, the current school year as well as your first and last name
- identity card (front/back): it must be valid with a clear and legible photo
- your official student email address: it is provided by your school, for example firstname.lastname@your-school.com
- The duration of the offer depends on the validity period of the registration card and cannot exceed 4 years in total.
Get the free online hosting
To benefit from this offer, familiarize yourself with the offer page by preparing the required documents.
Requests are processed in the order they are received in the days following your message. You will receive a response by email in all cases.
Discover other free Infomaniak services!
This guide details the security measures implemented as part of the Infomaniak email offers to detect abusive and abnormal use of an email address.
Preamble
- Upon written request, justified and authenticated, it is possible to modify these security rules for a specific paid email address.
- For sending emails to a large number of recipients, the Newsletter tool is the most suitable.
- These measures protect you from malicious use of your computer or your account.
Sending limits per 24 hours
1 message sent to 2, 42, or 99 people in CC/BCC counts as 2, 42, and 99 messages, respectively.
⚠ Number of outgoing emails possible per 24 hours:
| kSuite | free | 500 |
| Standard | 1440 | |
| Business | 1440 | |
| Enterprise | 1440 | |
| my kSuite | 500 | |
| my kSuite+ | 1440 | |
| Mail Service | Starter 1 max. address | 500 |
| Premium 5 min. addresses | 1440 | |
| Web hosting | sending unauthenticated (PHP Mail()) | 50 |
| sending authenticated | * |
* The maximum number depends on the email offer
Other email limits
This guide explains how to replace the main domain name associated with a Website (excluding Starter hosting) hosted on Infomaniak in case you want to change the name of your activity or modify the spelling.
Preamble
- It is not possible to simply modify the spelling of the domain name in question.
- You must own the new domain name and install it in place of the current one by performing a reversal (see below).
- You can also rename your Web Hosting product in the Infomaniak Manager, but changing the name of a hosting has strictly no impact on the URLs of the sites.
- You need to act on the domain name and, if necessary, adapt the content of the site.
Change the domain name of the website
Prerequisites
- Prepare the new domain name (if necessary you need to buy it).
- Install a valid SSL certificate, otherwise the reversal will not be offered.
- If the modification sought is rather of the type "subdomain" to "main domain" (
dev.domain.xyz→domain.xyzfor example) then refer to this other guide.
Then, to replace the domain name assigned to the site with another domain name:
- Click here to access the management of your product on the Infomaniak Manager (need help?).
- Click directly on the name assigned to the product in question:
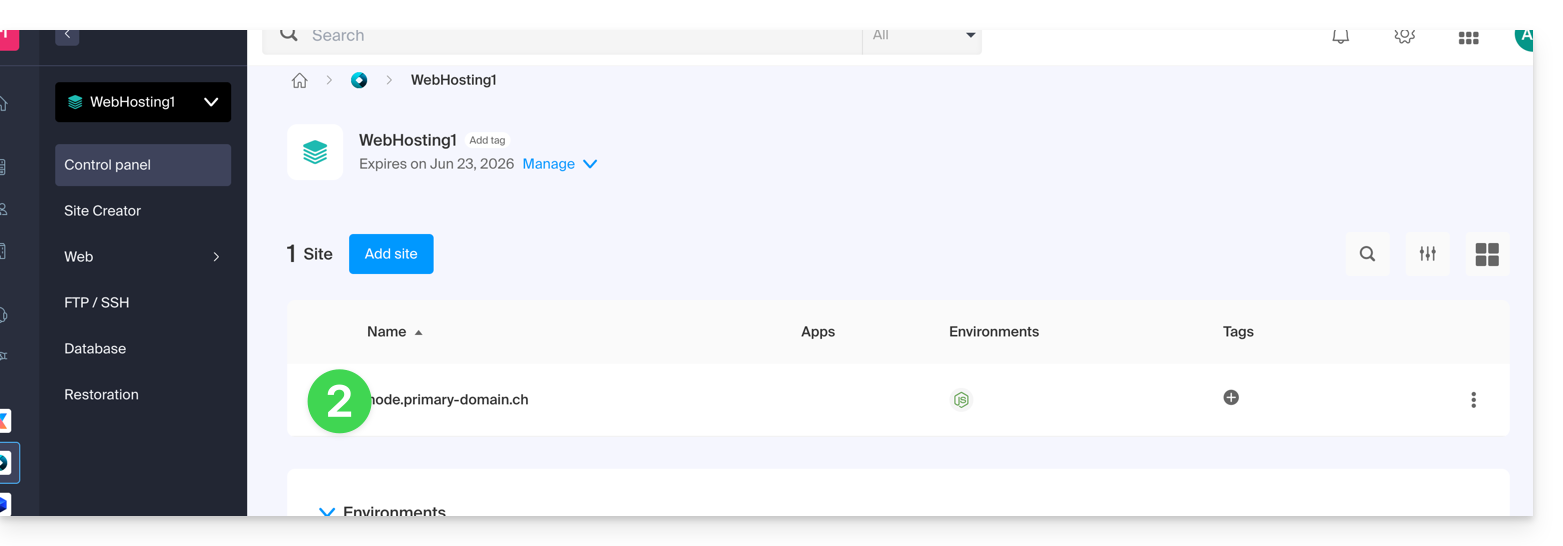
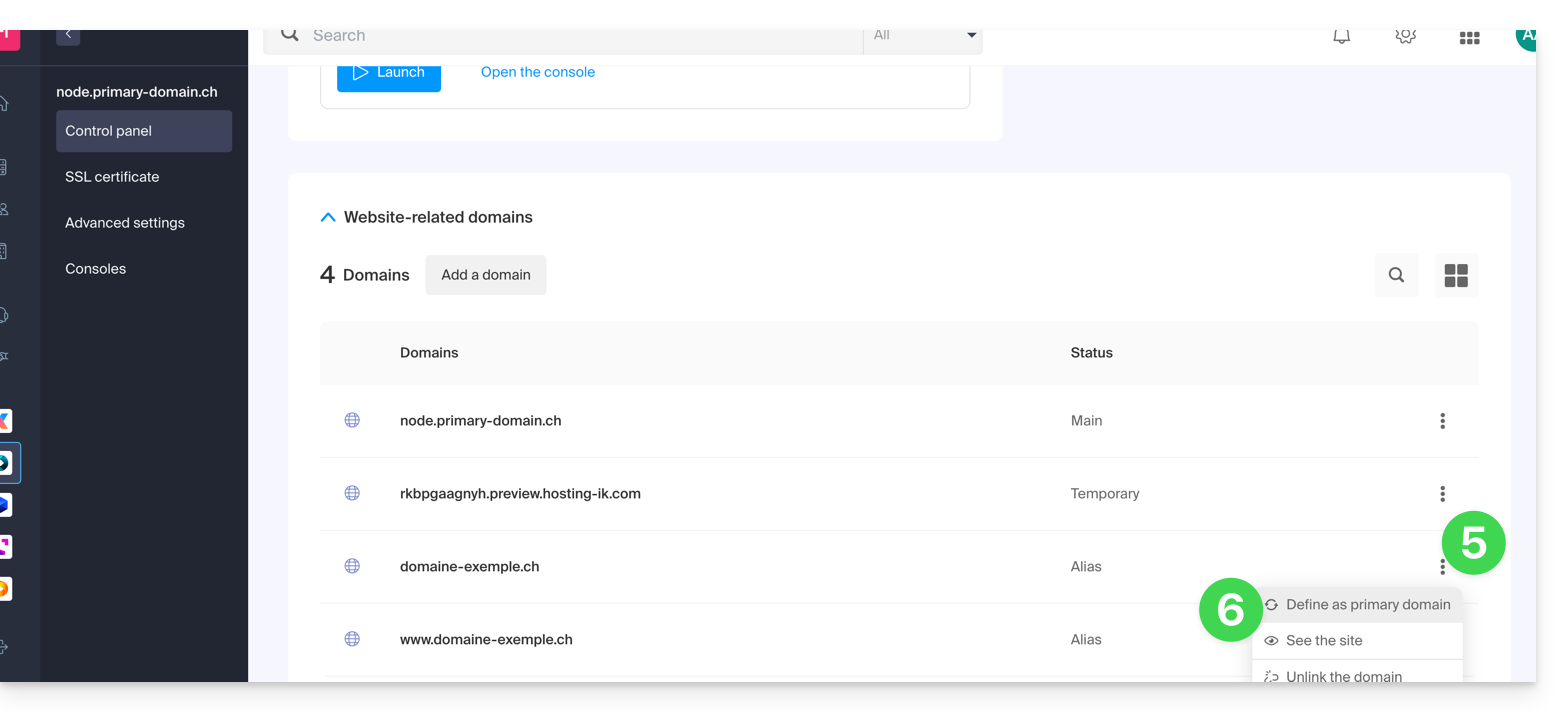
- Click on the chevron to expand the Domains section of this site:

- Refer to this other guide to link the new domain name to your site (read the prerequisites carefully):
- It is this new linked domain that will replace the current main domain name after the reversal you will perform below.
- Once the new domain name is linked to your site, click on the action menu ⋮ to the right of it.
- Choose Set as main domain:
- If necessary, delete the old domain name and its variants that have become alias domains alias (and no longer primary domains).
If you are using an SSL certificate, you will need to update it to include the added aliases.
If you are using the dedicated IP option, you need to uninstall it, and reinstall it after the reversal you are going to perform.
Adapt the site content to the new name
In some cases, the web application used for site development needs to be adjusted to work with the new domain name. Click on the link corresponding to the development of your site to adapt the content:
This guide explains the differences between Infomaniak's web hosting offers to help you choose the best solution according to your IT needs.
If you are looking to host your email, refer to this other guide.
Starter Web Hosting
Free Web Hosting
The Starter web hosting is offered for free with each domain name registered with Infomaniak. It provides 10 MB of disk space to create a website (basic pages in HTML language only - no PHP, no database) even without any particular knowledge thanks to the Welcome Page tool.
- Register or transfer a domain name with Infomaniak
- Learn more about the benefits included with a domain name
Shared Web Hosting
The flagship offer to create your websites
These web hostings are shared offers (the websites will be hosted on servers whose resources are shared with other customers). To ensure the reliability of these shared services, Infomaniak servers use on average only 40% of the CPU power and are equipped with professional-grade, latest-generation SSD disks.
Web hosting offers a minimum of 250 GB of disk space and allows you to manage multiple websites with multiple domain names. This offer includes all the technologies usually used to create professional websites: PHP, MySQL, FTP and SSH access, SSL certificates and easy installation of WordPress or common CMS, etc. It is also possible to add a Node.js site and/or Site Creator.
Note that without any hosting, it is also possible to obtain and then use Site Creator “standalone / standalone”. Refer to this other guide.
Cloud Server
Professional Web Hosting
With a Cloud Server, the resources allocated to you are not shared with other customers and you can customize the hardware and software configuration of your server according to your needs. A Cloud Server also allows you to use components that are not available on shared web hostings (Node.js, mongoDB, Sol, FFMPEG, etc.).
- A Cloud Server allows you to easily manage your server via the same administration interface as web hostings - you manage the sites in the same way.
- A VPS allows you to manage your server 100% autonomously with the version of Windows or the Linux distribution of your choice (
Debian,Ubuntu,openSUSE, ...) - solid technical skills are required to use a VPS, including VPS Lite.
Public Cloud (and Kubernetes Service)
Open, proven, and secure IaaS solution
For Infomaniak, it is the infrastructure that powers kDrive, Swiss Backup, and the Webmail, services used by several million users. But Public Cloud is accessible to everyone and provides the resources you need to develop your projects.
With personalized and tailored offers, you will have no trouble managing your development budget. No setup fees. No minimum amount. Cancelable at any time. You only pay for the resources actually used with Public Cloud at the end of each month, the same goes for Kubernetes Service.
Jelastic Cloud
Custom web hosting with the technologies of your choice
Jelastic Cloud allows you to create custom development environments with the technologies of your choice (PHP, Java, Docker, Ruby, etc.). It is a flexible cloud offer:
- Horizontal and vertical scaling of resources.
- Payment based on actual resource consumption.
- Easy customization of your infrastructure (redundancy, IP, SSL, load balancing, etc.).
Thank you for trusting Infomaniak with the hosting of your WordPress site.
Preamble
- As a reminder, the WordPress site creation tool can be:
- Hosted by the WordPress.com infrastructure (paid) and in this case, Infomaniak is not involved in the hosting
- Installed freely but manually by the user using the archive provided by WordPress.org, Infomaniak is then the web host but does not manage any updates and does not list the application in the Web Applications section of the Infomaniak Manager; you will be in this case if you migrate an external WordPress to Infomaniak
- Installed automatically by the tool available on the Manager and in this case, WordPress is maintained (in terms of security) largely by Infomaniak
- This third and final point is the one developed in this guide.
- The Infomaniak installer automates the installation and security updates of WordPress ...
- For additional help contact a partner or launch a free tender — also discover the role of the host.
Install WordPress & Apps
Infomaniak makes it easy to install the WordPress application (and other applications as well):
Use WordPress
Although WordPress is one of the easiest CMS to use, it is necessary to get used to it. To help you with this, here are external resources in several different languages to get started with WordPress:
- Essential basics to know to get started with WordPress
- Forum of the French-speaking WordPress community
- FAQ about backups / restorations
- Use a theme or extension ElegantThemes
- Free WordPress training provided by the site progresser-en-informatique.com. If you want to get to the point, focus on the following modules:
Infomaniak continuously improves its products and customer service by prioritizing your suggestions shared via support, social media, or the Web. These suggestions are then discussed during the meetings of the relevant service.
Provide feedback on...
INFOMANIAK SERVICE | [FR] | [EN] | [DE] | [IT] | [ES] |
|---|---|---|---|---|---|
| Euria [ ☍ ] | ✎__ | ✎__ | ✎__ | ✎__ | ✎__ |
| Domains [ ☍ ] | ✎__ | ✎__ | ✎__ | ✎__ | ✎__ |
| Hosting / Site Creator [ ☍ ] | ✎__ | ✎__ | ✎__ | ✎__ | ✎__ |
| Cloud Server [ ☍ ] | ✎__ | ✎__ | ✎__ | ✎__ | ✎__ |
| Public Cloud [ ☍ ] | ✎__ | ✎__ | ✎__ | ✎__ | ✎__ |
| Jelastic Cloud [ ☍ ] | ✎__ | ✎__ | ✎__ | ✎__ | ✎__ |
| Synology [ ☍ ] | ✎__ | ✎__ | ✎__ | ✎__ | ✎__ |
| Housing [ ☍ ] | ✎__ | ✎__ | ✎__ | ✎__ | ✎__ |
| Swiss Backup [ ☍ ] | ✎__ | ✎__ | ✎__ | ✎__ | ✎__ |
| kSuite / my kSuite [ ☍ ] | ✎__ | ✎__ | ✎__ | ✎__ | ✎__ |
| Mail [ ☍ ] | ✎__ | ✎__ | ✎__ | ✎__ | ✎__ |
| Mail iOS app [ ☍ ] | ✎__ | ✎__ | ✎__ | ✎__ | ✎__ |
| Mail Android app [ ☍ ] | ✎__ | ✎__ | ✎__ | ✎__ | ✎__ |
| kDrive [ ☍ ] | ✎__ | ✎__ | ✎__ | ✎__ | ✎__ |
| Calendar [ ☍ ] | ✎__ | ✎__ | ✎__ | ✎__ | ✎__ |
| Contacts [ ☍ ] | ✎__ | ✎__ | ✎__ | ✎__ | ✎__ |
| Newsletter [ ☍ ] | ✎__ | ✎__ | ✎__ | ✎__ | ✎__ |
| SwissTransfer [ ☍ ] | ✎__ | ✎__ | ✎__ | ✎__ | ✎__ |
| Streaming Radio [ ☍ ] | ✎__ | ✎__ | ✎__ | ✎__ | ✎__ |
| Streaming Video [ ☍ ] | ✎__ | ✎__ | ✎__ | ✎__ | ✎__ |
| VOD / AOD [ ☍ ] | ✎__ | ✎__ | ✎__ | ✎__ | ✎__ |
| Guest Manager [ ☍ ] | ✎__ | ✎__ | ✎__ | ✎__ | ✎__ |
| kChat [ ☍ ] | ✎__ | ||||
| kMeet [ ☍ ] | ✎__ | ||||
Infomaniak support is also at your disposal by email, chat, or phone if needed.
This guide details the Managed Cloud Server offer from Infomaniak and the VPS offer from Infomaniak, which are intended for different uses.
Preamble
- Infomaniak offers two advanced hosting solutions:
- the Managed Cloud Server, which allows you to create multiple hosts (FTP/SSH spaces) on which you add your sites (Apache vhosts),
- and the VPS (Virtual Private Server), which offers complete administrative freedom and meets different needs.
Managed Cloud Server
The Cloud Server allows you to go beyond the limits of shared hosting. You can create and distribute your sites as you wish, define the root directory of each site, and adjust parameters such as memory_limit and max_execution_time.
Integrated tools are provided: cronjobs, Site Creator, simplified installation of WordPress, access and error logs (logs). It is also possible to add specific Apache modules or install a caching system.
The software environment is managed by Infomaniak (FastCGI, PHP-FPM). You do not have complete freedom to configure the server (no arbitrary software installation), but certain specific programs can be installed.
VPS (unmanaged)
The VPS gives you full control over the server, but it is your responsibility. Infomaniak manages the hardware and installs the version of Linux or Windows chosen at the time of ordering. No software intervention is performed by Infomaniak: you administer the system, install, and configure the software.
You can restart the server via the Infomaniak Manager. A snapshot system is available (excluding the VPS Lite offer).
Video content and alternatives
If your project mainly involves a large volume of videos, it is often preferable to separate video streaming from the main hosting. Associated with shared hosting, the Infomaniak VOD/AOD space allows you to efficiently store and stream videos, support traffic spikes, and obtain detailed viewing statistics.
Migration between Cloud Server and VPS
There is no automatic migration solution between a Managed Cloud Server and a VPS. To switch from one offer to another, you must cancel the product you no longer use and order the new offer. Infomaniak refunds, upon request, any new server if the cancellation occurs within 30 days of the order.
This guide explains how to restore backups of previous versions of your files and other web data from your Infomaniak hosting, and how to set up an effective backup policy if the automatically and freely provided backups no longer meet your availability or security needs.
Web Hosting (Starter, Shared, Cloud Server)
Refer to these guides to restore automatic backups:
- of an entire hosting (FTP + MySQL),
- specific files on the hosting,
- specific databases,
- of a Web Application (Wordpress & Apps),
- Cloud Server SSH crons.
Refer to these guides to backup and restore:
- hosting with Swiss Backup and Restic (advanced),
- WordPress with Swiss Backup,
- WordPress with an extension.
Also refer to https://faq.infomaniak.com/snapshot.
Hosting v1 (old 60 Go offer)
- View and/or download the automatic backup (versioning) of your data on your FTP space under
/backupsand/backup_mysqlat the root of the domain (above/web). - Restore this data.
- Restore messages from Infomaniak automatic backups.
- Restore contacts or calendar events.
- Backup the current content of an email account:
- by downloading the current content locally,
- by duplicating all current content to a backup box,
- by copying future emails as they arrive to a backup box.
Domains / DNS Zones
- Restore deleted DNS records from Infomaniak automatic backups.
- Restore an expired domain in the redemption period.
This guide explains how to customize the limits of a site hosted on a Web Hosting or a Cloud Server.
Unlock or adjust the limits of a site
To access the website management:
- Click here to access the management of your product on the Infomaniak Manager (need help?).
- Click directly on the name assigned to the product concerned:
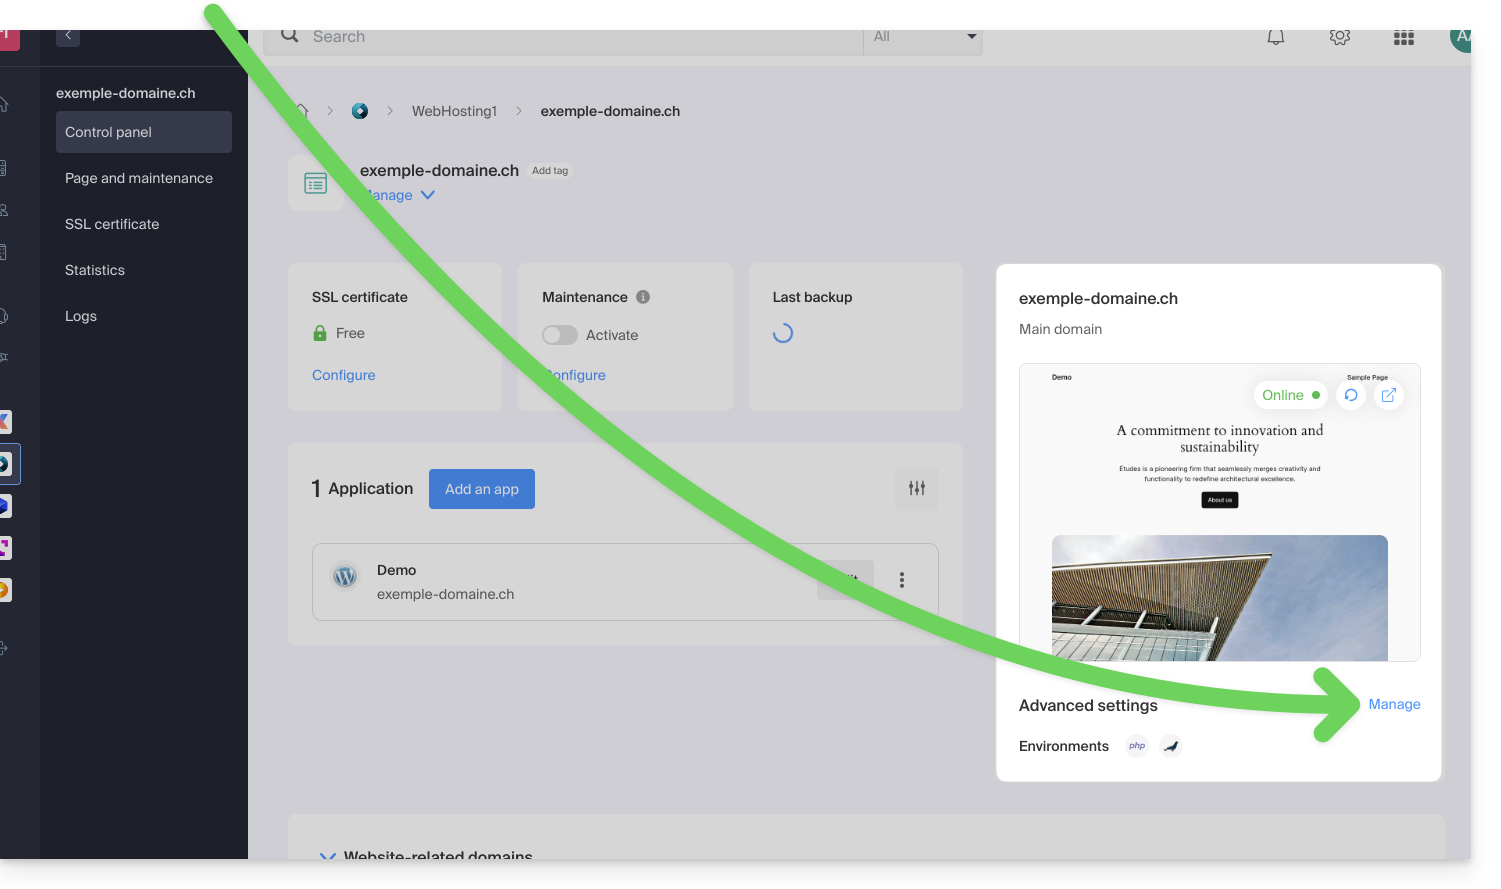
- Click on Manage under Advanced settings:
- Click on the PHP / Apache tab.
You can, for example...
- ... unlock for 60 minutes the memory limit (
memory_limit= 1280 MB) and the maximum script execution time (max_execution_time= 60 minutes):
- This unlock is possible up to 10 times per year.
- ... customize the limits of:
max_execution_time(in seconds)memory_limit(in MB)post_max_size&upload_max_filesize(maximum file size for upload, in MB)- Cloud Server only:
Max children(see this other guide) - Cloud Server only:
Max input time
Do not forget to save the changes at the bottom of the page.
Maximum values by hosting type
| Limits | Shared | Cloud Server | CLI (Cloud Server only) |
|---|---|---|---|
| max_execution_time | 300 s | 3600 s | 0 (unlimited) s max |
| memory_limit | 1280 MB | 2048 MB max | 512 MB max |
| post_max_size + upload_max_filesize | 9223372036854775807 MB max | 9223372036854775807 MB max | 48 MB max |
| max_children | 20 max | 20 (default, modifiable) | |
| simultaneous connections per IP | 30 max | 30 (default, modifiable) | |
| max_input_time | 0 (unlimited) | 0 (default, modifiable) | 0 (unlimited) |
| files (inodes) | no limit on the number of files per hosting | ||
This guide explains which protocols and ports can be used with Infomaniak's messaging services (including the Service Mail service).
Recommended ports and parameters for client configuration
When prompted during a software/messaging client configuration (Outlook, Thunderbird, mobile, etc.), prioritize the following parameters:
| IMAPs - Incoming Mail (Recommended) | SMTP - Outgoing Mail (Option 1: Standard IETF) | SMTPs - Outgoing Mail (Option 2: Implicit Encryption) | |
|---|---|---|---|
| Ports | 993 | 587 | 465 |
| Security Mechanism | SSL / TLS (Implicit) | STARTTLS (Explicit) | SSL / TLS (Implicit) |
| Server Name | mail.infomaniak.com | ||
| Authentication | Required (username = full email address) | ||
Technical Note: Port 587 with STARTTLS is the IETF standard practice for secure email submission. Port 465 is a secure alternative using implicit encryption.
If you specify other indications or disable encryption, email errors may occur.
Other supported ports (unencrypted or backward compatibility)
- port
143(Standard port for IMAP reception - unencrypted, use 993) - port
110(Standard port for POP3 reception - unencrypted, use 995) - port
995(Secure port for POP3s reception - secure POP3 option) - port
25(Standard port for server-to-server transfer - may support STARTTLS for submission, but 587 is the standard for clients). - STARTTLS authentication is supported on unencrypted ports (143, 110, 25) to enable TLS encryption.
- SMTP authentication supported (LOGIN or PLAIN methods).
API Usage and Transfer Security
The Infomaniak API does not offer any email connection as IMAP and SMTP are the "APIs". Use a library (such as Python: email.examples and imaplib) that uses IMAP and SMTP.
To display emails from PHP:imap_open("{mail.infomaniak.com:993/imap/ssl}", $email, $password);
The MTA-STS mechanism is not implemented or verified, as Infomaniak uses DANE (DNS-based Authentication of Named Entities) to ensure an encrypted connection between servers when the following conditions are met:
- The client sends an email to a domain that has configured DANE.
- The client receives an email from an SMTP server that uses DANE.
- In all other cases (in the absence of DANE), the encrypted connection remains opportunistic.
This guide explains how to easily set up a redirection of your domain name managed by Infomaniak.
Preamble
- A Web redirection allows you to redirect a domain name or subdomain to the Internet address of your choice.
- This procedure is only valid if the DNS of the domain is managed by Infomaniak and if Custom Brand is not activated.
- Any addition/modification may take up to 48 hours to propagate.
- If necessary, create a redirection of your domain with and without the www (
domain.xyzandwww.domain.xyz).
Redirect a domain to the URL of your choice
To do this:
- Click here to access the management of your product on the Infomaniak Manager (need help?).
- Click directly on the name assigned to the product concerned.
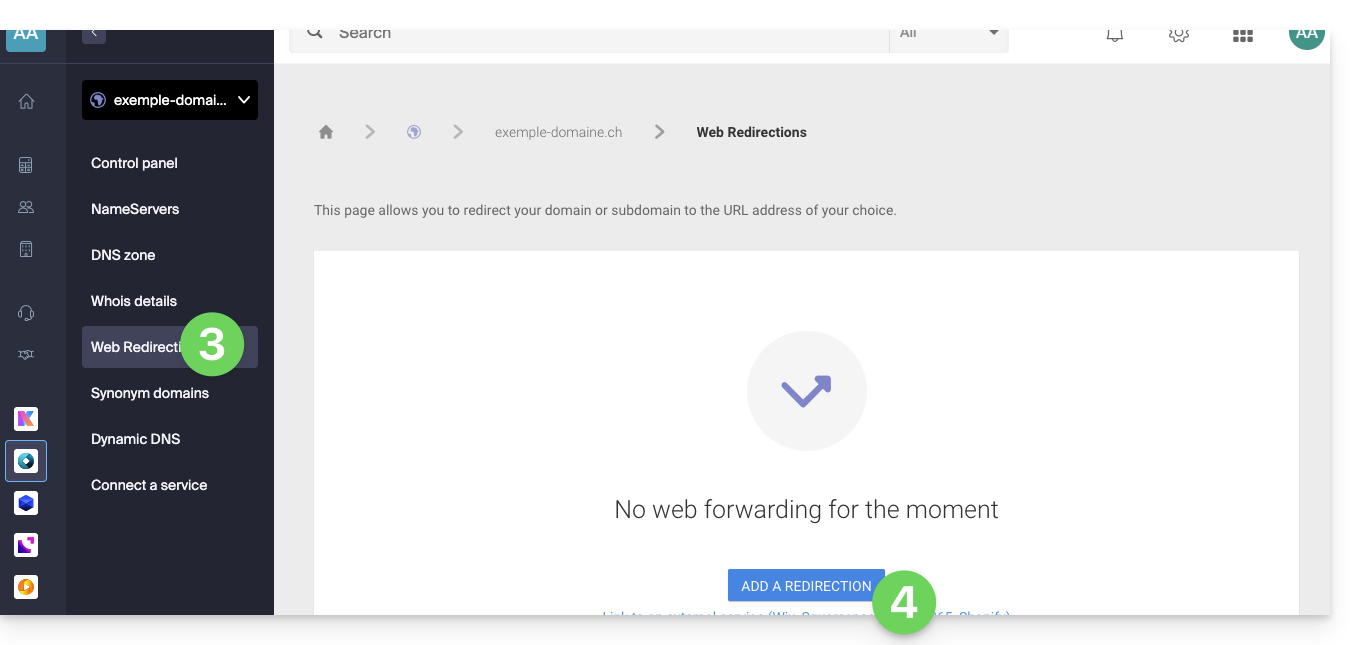
- Click on Web Redirections in the left sidebar.
- Click on the Add a redirection button:
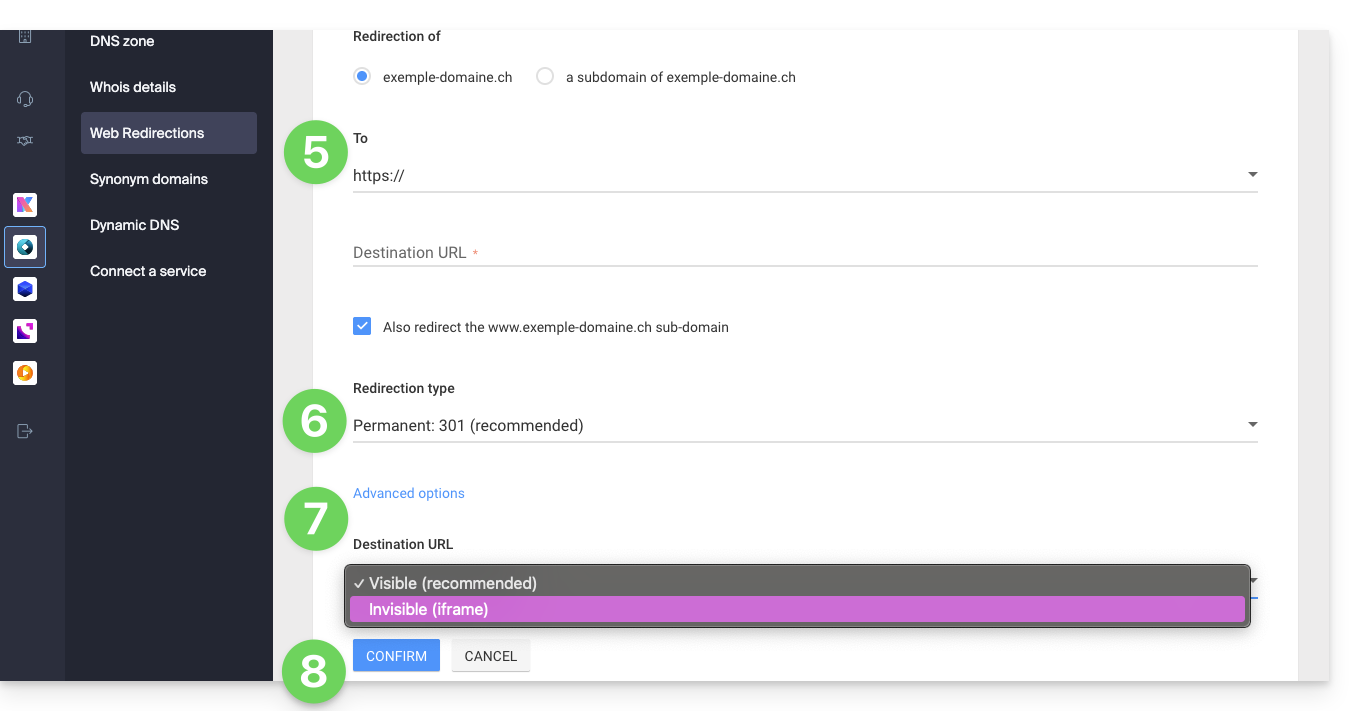
- Enter the destination address (under To).
- Choose between a 301 or 302 type redirection.
- The advanced options allow you to specify a redirection in the form of an iframe (invisible, but not recommended).
- Click on the button to Confirm:
This guide explains what you need to determine as a website visitor if you encounter a 403 error to resolve this issue.
What is the 403 error?
The HTTP 403 error code generally means that access to a resource is denied to the client by the server.
In what case does this error occur?
The user is not authenticated: the server requires the user to identify themselves to access the resource. This can be the case for private pages requiring authentication, for example.
The user is authenticated but does not have the necessary permissions: the server recognizes the user but does not authorize them to access the requested resource due to permission or role restrictions. This cause of 403 error may be an incorrect permission issue on a folder or file. For a folder, the error message is of type "403 Forbidden", for a file, "failed to open stream: Permission denied". In this case, you must verify that the permissions of your folders/files are correct, i.e., a minimum of 644 for a file and 755 for a folder. Refer to this other guide.
The user's IP address is blocked or restricted: the server may block access to a specific IP address for security reasons, protection against attacks... Refer to this other guide.
The requested resource does not exist on the server: in this case, the server returns a 403 error instead of a 404 error to avoid disclosing confidential information. If you are simply trying to access your homepage or a part of your site by indicating an address of type www.domain.xyz or www.domain.xyz/folder/ make sure there is a homepage named "index.html or .htm or .php" placed in the correct location (at the root of your FTP space, in the /web directory, or in the /folder/ directory). Refer to this other guide.
Additionally, check that there are no uppercase letters in the file name; all file or folder names present must be in lowercase, without accents or spaces.
Script-related error: if you were running a script, filling out a form, uploading a file online, and you get this type of message:
Accès interdit!
Vous n'avez pas le droit d'accéder à l'objet demandé.
Soit celui-ci est protégé, soit il ne peut être lu par le serveur.
Si vous pensez qu'il s'agit d'une erreur du serveur, veuillez contacter le gestionnaire du site.
Error 403
the cause may be a filter that prevents the unwanted use of scripts by spammers. Indeed, the Infomaniak antivirus blocks the uploading of files via scripts or via FTP. This concretely means that when a hacker sends a file identified as a virus via a form, an insecure script, or via FTP, its installation is directly blocked, the file is not uploaded to the server, and the upload generates a 403 error.
In case of a false positive, contact Infomaniak support by providing the URL of the page where you encounter this error message to precisely diagnose the origin of the problem.
However, there are many other cases in which you might receive a "403 forbidden" message and for very diverse reasons (PHP, perl, mod_security, .htaccess scripts, ...).
This guide explains how to transfer an Infomaniak product from one Organization to another.
Preamble
- You can move almost all products subscribed with Infomaniak to a different Infomaniak Manager interface than the one on which the product is currently located; this is therefore an internal transfer.
- If your user has access to multiple Organizations it is even easier to send to one of them the product of your choice.
- This operation does not cause any interruption.
- The users currently having access to the selected products will not be transferred (and therefore may no longer have access to the products).
- The invoices of the selected products will not be transferred.
- my kSuite cannot be transferred.
Generate a transfer link
Prerequisites
- Be Administrator or Legal Representative within the Organization.
To transfer a product:
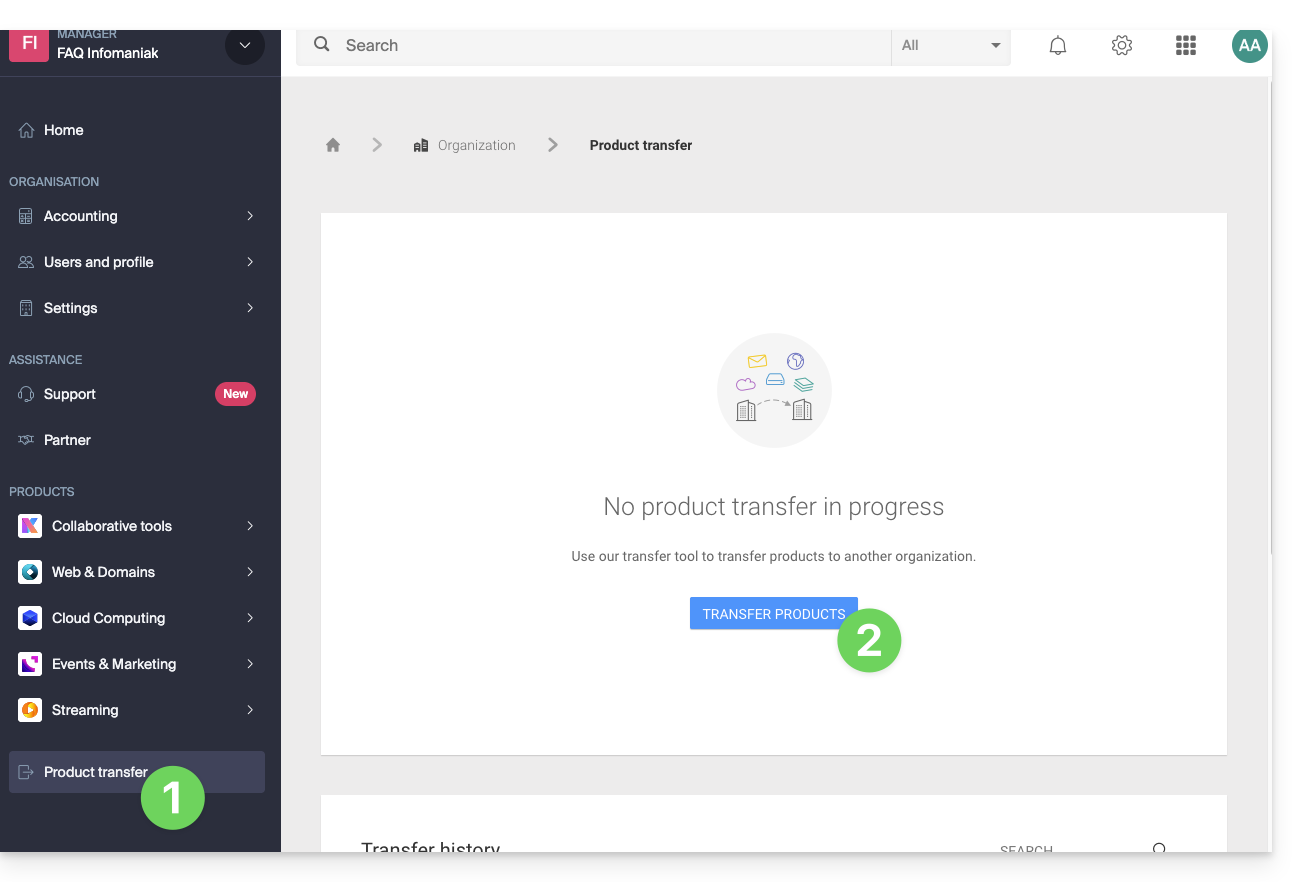
- Click here to access the product transfer management on the Infomaniak Manager (need help?).
- Click on the Transfer products button:
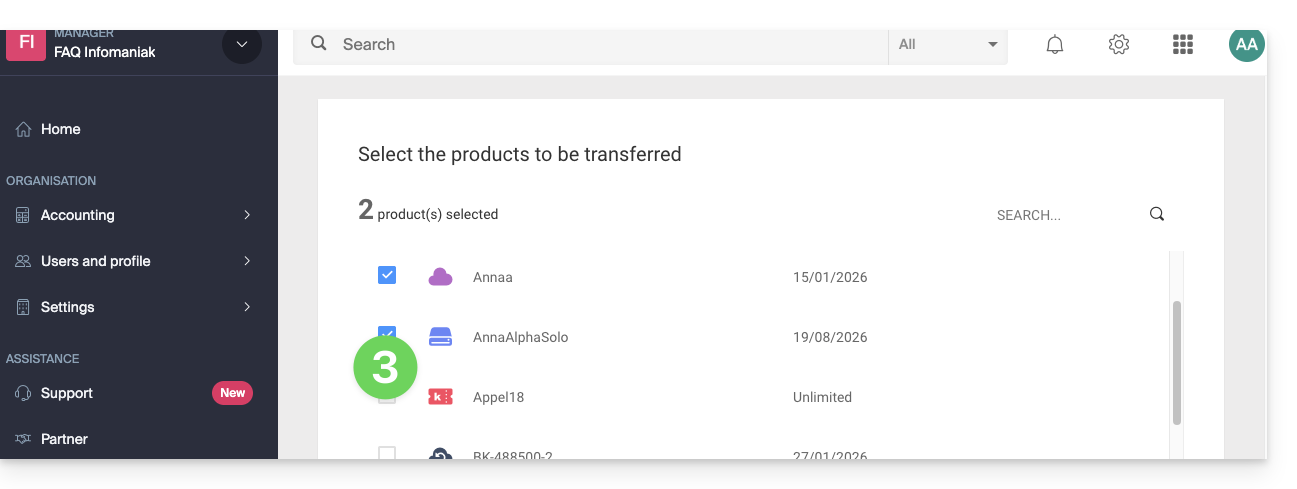
- Check the product(s) to be moved:
- Read and accept the general conditions.
- Click on the Transfer button:

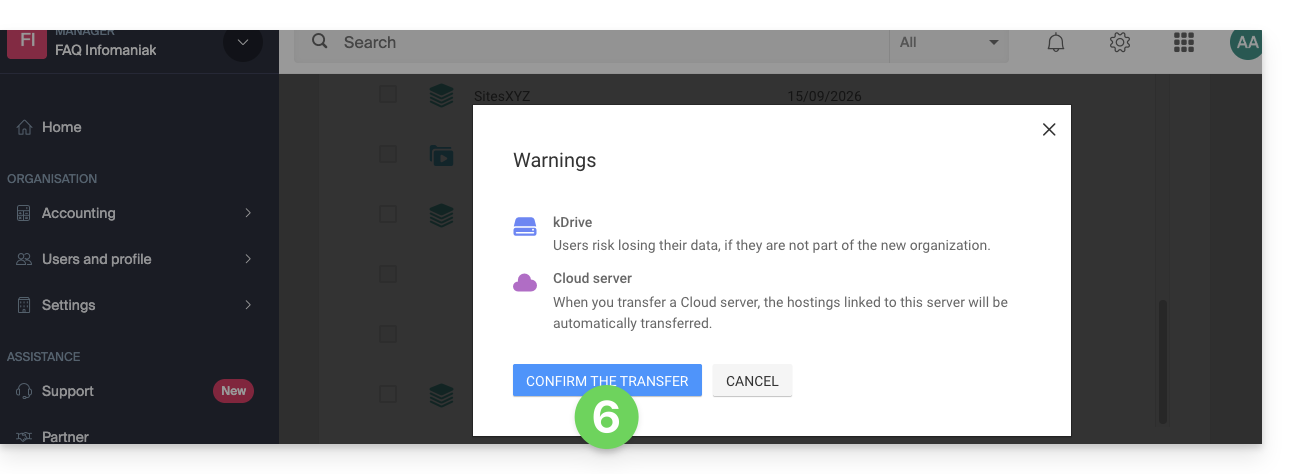
- Read and validate any warnings:
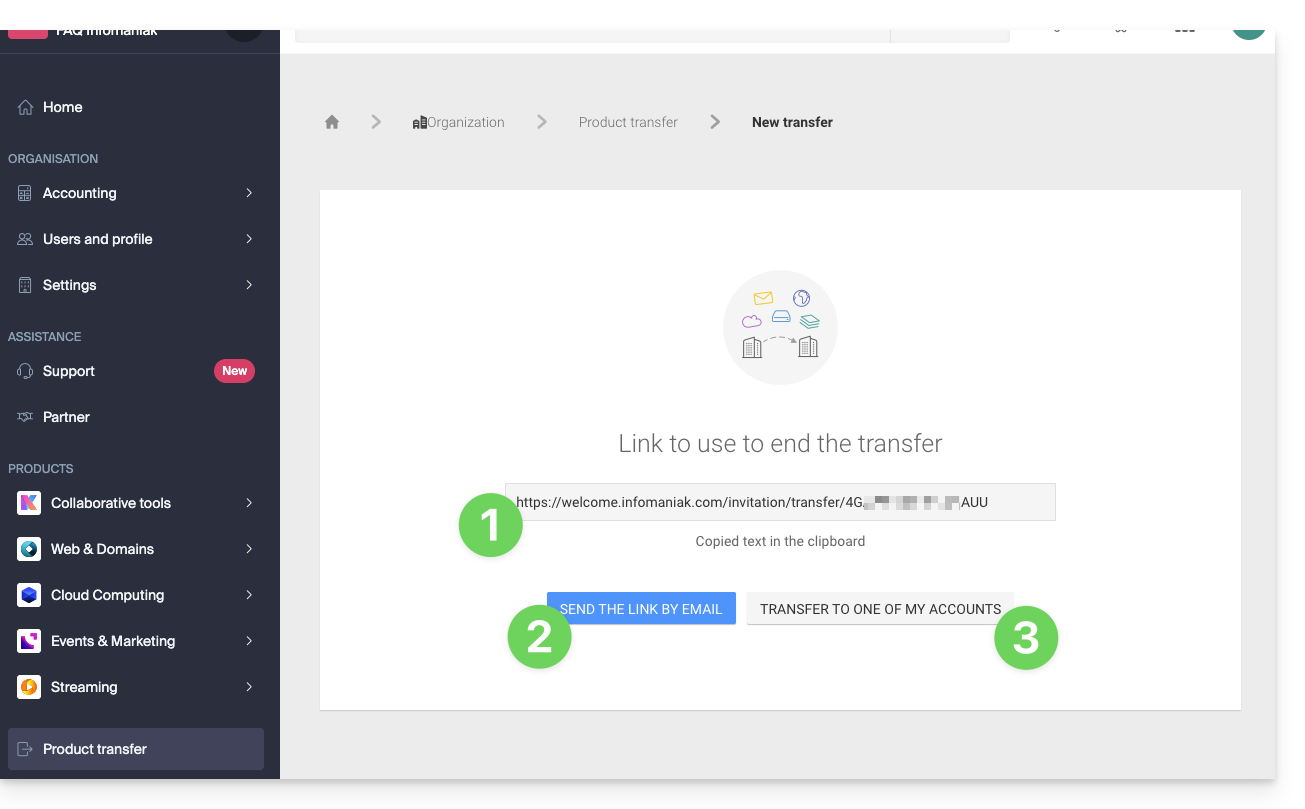
The transfer has started. Now, at your choice, you can:
- Copy the transfer link…
- or send it to the email address of your choice…
- or select directly one of the Organizations to which your user is attached, and the selected product will be transferred there:
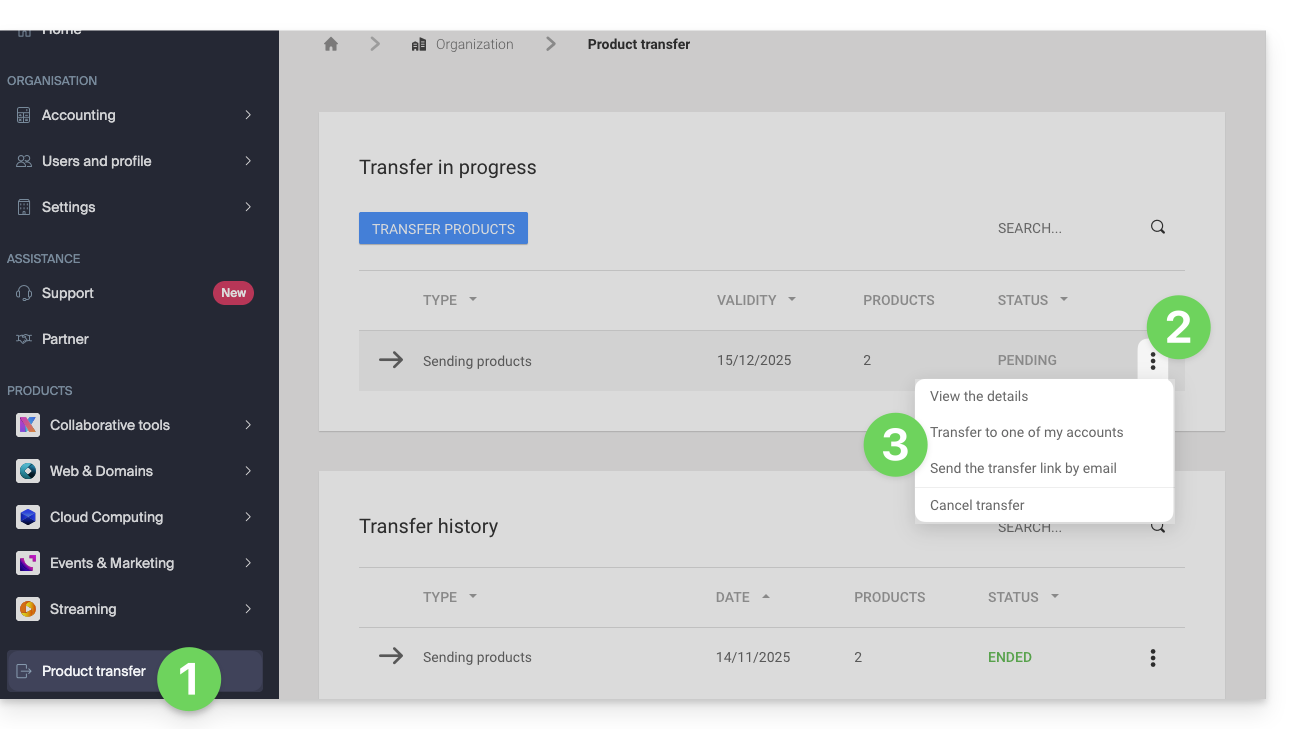
At any time, you can return to the product transfer page to find the possibilities listed above:
Alternative method
In the case of one-time transfer, you can also go directly to the dashboard of the product concerned and click on Manage (example in the image below) however, since this menu is not always present, it is better to prioritize the first method above, which also allows bulk transfer: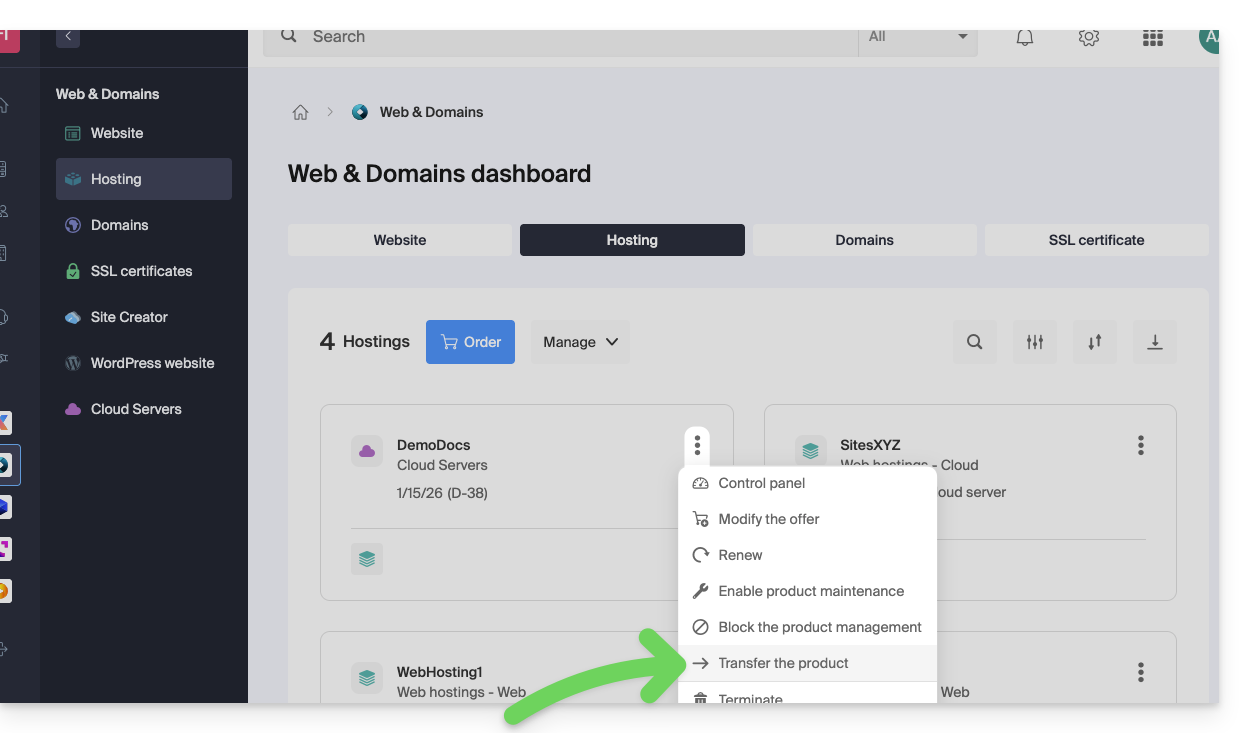
Refer to this other guide regarding Jelastic Cloud.
Receive the product
Once a product transfer is initiated by a user…
1. Be on the Organization that should receive the product
- Click here to log in to the Manager on the Organization that should receive the product(s).
- The user specified when logging in to the Infomaniak account must have administrative rights.
- If necessary, you can create a new Organization to receive products.
2. Execute the obtained link
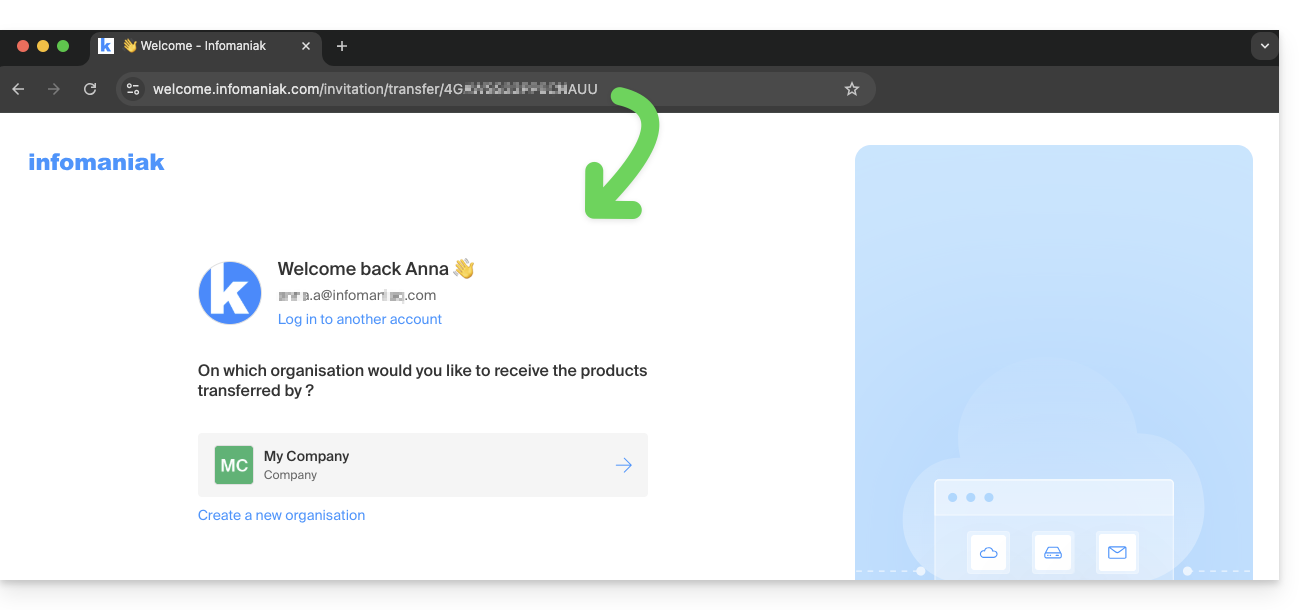
- Click on the link obtained in the first step above.
- You can also simply paste it into a browser while logged in to the appropriate Infomaniak account.
3. Validate the product transfer
- If necessary, choose the destination Organization using the drop-down menu.
- Read and accept the general conditions.
- Click the Receive the product button (if the button is not clickable, make sure you have selected the Organization).
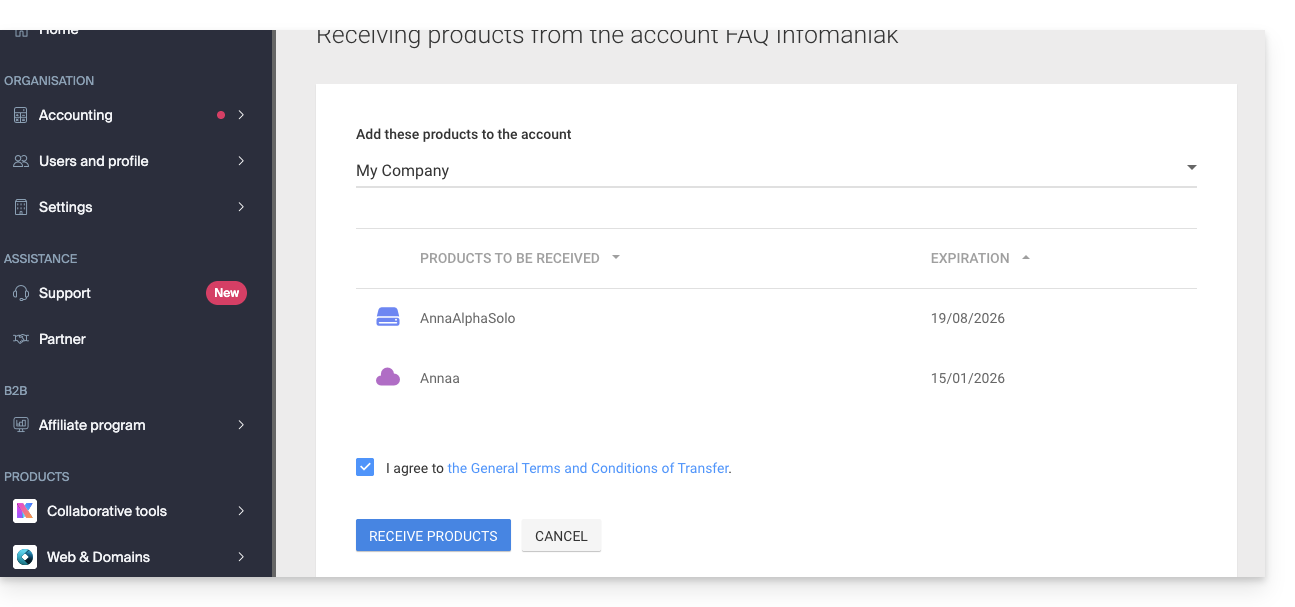
Find the ongoing or completed transfers at any time from the bottom icon on the left sidebar of the Infomaniak Manager: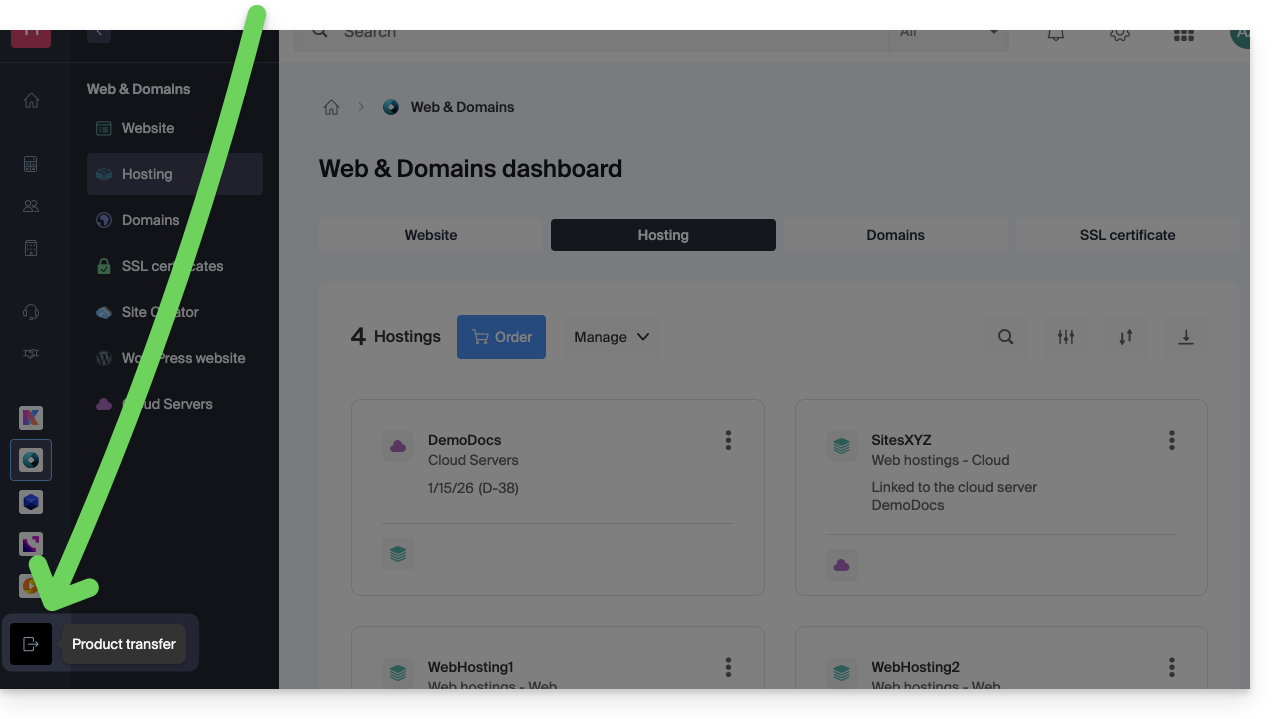
DNS Fast Anycast replicates the DNS of your domain around the world to reduce latency and increase the availability of your websites.
Preamble
- Thanks to DNS Fast Anycast, the DNS of your domain are replicated within several Points of Presence (POP) around the world (list below).
- No matter where your visitors are, they are redirected to the nearest DNS server to them, which on average speeds up by 34% (DNS resolution) the access speed to your site.
- Moreover, if one of your DNS servers were to be unavailable, the nearest server naturally takes over and your visitors can continue to access your site.
- The replication of your domain's DNS is automatic and no modification of your code is required.
Manage DNS Fast Anycast
Prerequisites
- DNS Fast Anycast is compatible with all websites, regardless of your host.
- All you need is a domain name managed at Infomaniak.
- Transfer the management of your domain to Infomaniak if necessary
- Refer to this other guide to manage external domains.
To access the DNS Fast Anycast option:
- Click here to access the management of your product on the Infomaniak Manager (need help?).
- Click directly on the name assigned to the product in question.
- Enable or disable the DNS Fast Anycast toggle switch on the dashboard:
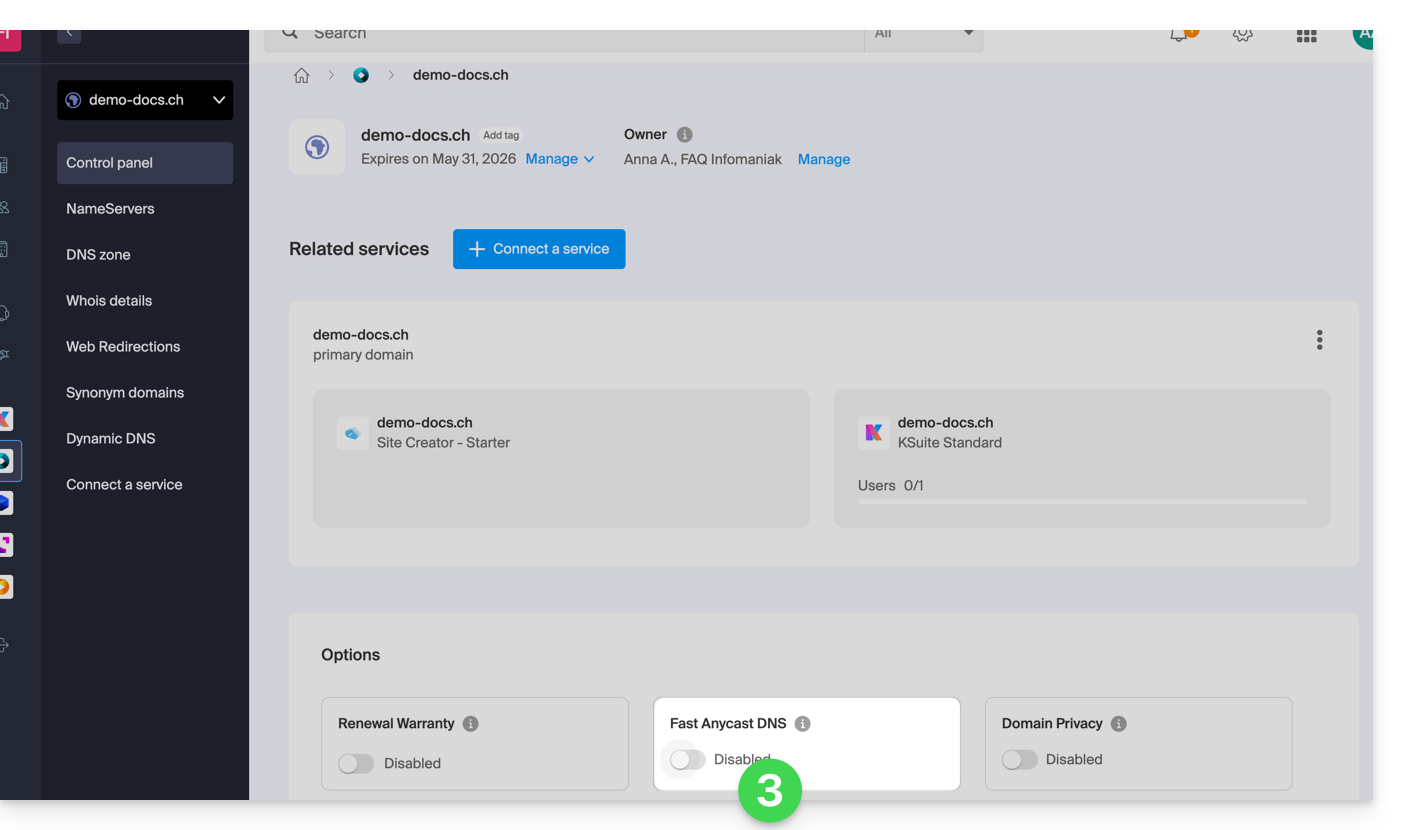
POP - 'Point of Presence'
By activating DNS Fast Anycast on your domain, your DNS will be automatically replicated in the following points of presence:
Network 1
New York, USA (2x)
Paris, France (2x)
Varsovie , Pologne (2x)
Dublin, Irlande (2x)
Singapour (2x)
Johannesburg, Afrique du Sud
Stockholm, Suède
Vienne , Autriche (2x)
Francfort, Allemagne (2x)
Londres, Royaume-Uni
Dallas, USA
Los Angeles, USA (3x)
Amsterdam, Pays-Bas
Sydney, Australie
Sāo Paulo, Brésil
Miami, USA (2x)
Network 2
Hong Kong, Chine
San José, USA
Dallas, USA
Reston, USA
Chicago, USA
Seattle, USA
Londres, Royaume-Uni
Francfort, Allemagne
Amsterdam, Pays-Bas
Vienne, Autriche
Toronto, Canada
Sydney, Australie
Sāo Paulo, Brésil
Johannesburg, Afrique du Sud
Miami, USA
The points of presence are distributed across two networks that are used randomly when one of your visitors accesses your website.
This guide explains what a web host like Infomaniak is and specifies its role and limits of intervention.
Infomaniak, web host since 1996
According to Wikipedia, a web host is a company that provides Internet hosting for computer systems to individuals or entities who do not wish to do so by their own means.
Infomaniak is also…
- … decades of experience in hosting and online solutions
- … more than a million users in Switzerland and Europe (CHF 36.5 million in revenue in 2022)
- … company certified ISO 27001, ISO 9001, ISO 14001, ISO 50001 and committed to sustainable development
- … 100% of "Swiss made" technological know-how with data hosted in Switzerland
- … a rich knowledge base and a customer support available
Responsibilities and limits of intervention
As a host, Infomaniak installs, secures, and keeps servers up to date, updates its web interfaces (Manager) and assists its customers in using the services.
On the other hand, Infomaniak does not intervene on the content of the servers or the development of websites.
Limits of technical support
The technical support cannot help you to…
- … solve problems related to site development or its updates
- … implement solutions (migrations, complete installations)
- … manually install WordPress
- … take remote control of your computer
but can assist you for…
- … solve problems related to the infrastructure or the Manager
- … clarify certain processes
A Premium assistance and a migration service are available for more demanding needs.
Find external help
For help with the content of your site or the organization of your mailboxes, use the Infomaniak tender platform which lists over 1000 verified professionals, or consult the directory.
This guide suggests solutions to resolve common issues and frequent errors that may occur when you try to display your website in https after activating an SSL certificate.
The web browser automatically displays the http version of the site when you try to access it in https
It is recommended to perform the following actions:
- Empty the cache of your applications or your site.
- Check that the pages and scripts of the site do not contain redirects to the
httpversion of the site. - Check that the site's
.htaccessfile does not contain redirects to thehttpversion of the site. - Set the site's
httpsaddress as the default one:
The website is displayed incorrectly (missing images, unsupported stylesheets, etc.) or displays a warning in the address bar
It is recommended to perform the following actions:
- Empty the cache of your applications or your site.
- Check that the pages and scripts do not point to external resources in
http; the site whynopadlock.com can help you identify the unsecured elements of your site. - Also refer to this other guide on this subject.
"This web page has a redirect loop", "ERR_TOO_MANY_REDIRECTS"
If your web browser displays this error, it is recommended to perform the following actions:
- If the site works with a web application like WordPress or Joomla, deactivate the extensions one by one to identify the problematic one.
- Check that the pages and scripts of the site do not contain redirects to the http version of the site.
- Try to deactivate HSTS.
- If Prestashop is used, SSL must be activated on all pages:
- Add your SSL domain:
- Go to Preferences > SEO & URLs.
- In the "Store URL" section, enter your site address in the "SSL Domain" field (without the
https://, justwww.domain.xyz).
- Activate SSL:
- Go to Preferences > General settings.
- At the top of the page, click on "Click here to use the HTTPS protocol before activating SSL mode."
- A new page will open with your site in the secure HTTPS version.
- Force the use of SSL on the entire site:
- Go back to Preferences > General settings.
- Set the "Enable SSL" option to YES.
- Also set "Force the use of SSL for all pages" to YES.
- Add your SSL domain:
An old SSL certificate is displayed - clear the SSL cache
Web browsers cache SSL certificates to speed up navigation. Normally, this is not a problem. However, when you develop pages for your website or install a new certificate, the browser's SSL status may bother you. For example, you might not see the padlock icon in the browser's address bar after installing a new SSL certificate.
The first thing to do in this case is to make sure that the domain points to the server's IP address (A and AAAA records) and if it is still the wrong SSL certificate that is returned, clear the SSL cache:
- Chrome: go to Settings and click on Settings. Click on Show advanced settings. Under Network, click on Change proxy settings. The Internet Properties dialog box appears. Click on the Content tab. Click on Clear SSL state, then click OK. Refer to other tips in this other guide.
- Firefox: go to History. Click on Clear Recent History then select Active Connections and click on Clear Now.
Loss of CSS formatting
If the website is displayed without CSS style, analyze the page loading with the browser Console. There may be mixed content errors (mixed content) related to your styles .css, which you will need to resolve so that they are loaded correctly again.
Cloudflare
If you are using Cloudflare, refer to this other guide on the subject.
This guide helps to identify and correct 404 errors, blank pages or websites that do not display when it is impossible to reach the hosting from your browser.
Points to check
It is strongly recommended to perform the following steps:
- Check the Internet connection: visit a third-party site like https://www.ch.ch or https://www.microsoft.com. If these addresses are inaccessible, contact your Internet Service Provider (ISP) as the problem comes from your connection.
- Clear the browser cache to force the page to refresh; learn more.
- Test the site's visibility by third parties: ask acquaintances outside your local network to test access or use the service https://downforeveryoneorjustme.com to know if the site is down for everyone or just for you.
- Use a proxy to simulate a connection to your site from another geographical location.
- Check that the domain name has not expired: hosting and domain are two distinct entities. Your hosting may be active at Infomaniak (check it on the Manager) while the domain has expired. Perform a WHOIS and contact the registrar if necessary.
- Check the configuration file of your script or CMS to verify the database connection information (name, address, user, and password); learn more.
If the problem persists
Please contact Infomaniak support in writing by providing the following information:
- Name of the site concerned.
- Your public IP address at the time of the tests (available on https://www.infomaniak.com/ip).
Make your life easier! If needed, local partners referenced by Infomaniak can handle these procedures. Launch a free call for tenders to delegate these technical aspects.

