
Knowledge base
1000 FAQs, 500 tutorials and explanatory videos. Here, there are only solutions!
This guide provides you with the list of triggers to use for your Google Tags and Meta (Facebook) pixel trackers in your store (as part of the Infomaniak ticketing system).
These triggers must be inserted in the “HEAD” section of the advanced options on your store.
Examples of Meta and Google Tags pixels
Refer to the external documentation for the Meta pixel:
!function(f,b,e,v,n,t,s){
    if(f.fbq)return;
    n=f.fbq=function(){n.callMethod?
    n.callMethod.apply(n,arguments):n.queue.push(arguments)};
    if(!f._fbq)f._fbq=n;
    n.push=n;n.loaded=!0;
    n.version='2.0';
    n.queue=[];
    t=b.createElement(e);
    t.async=!0;
    t.src=v;
    s=b.getElementsByTagName(e)[0];
    s.parentNode.insertBefore(t,s)
}(window,document,'script','https://connect.facebook.net/en_US/fbevents.js');

document.addEventListener("ike_event_view", function( e ) {
  fbq('init', '14085424191xxxxx');
  fbq('track', "PageView");
  fbq('track', 'InitiateCheckout');
});

document.addEventListener("ike_cart_payment_launched", function( e ) {
  fbq('init', '14085424191xxxxx');
  fbq('track', "PageView");
  fbq('track', 'Purchase', {value: e.detail.topaid, currency: e.detail.currency.name});
});
… and for the Google Tag Manager (GTM) + gtag.js:
window.dataLayer = window.dataLayer || [ ];
function gtag(){dataLayer.push(arguments);}
gtag('js', new Date());
gtag('config', 'UA-xxxxxxx-x');
document.addEventListener("ike_event_view", function( e ) {
  gtag('event', 'view_item', {
    'event_category' : e.name,
    'event_label' : e.date
  });
});

document.addEventListener("ike_cart_add", function( e ) {
  gtag('event', 'add_to_cart');
});

document.addEventListener("ike_cart_confirm", function( ) {
  gtag('event', 'checkout_progress', {
  'event_category' :'valid cart'
  });
});

document.addEventListener("ike_cart_payment_launched", function( e ) {
  gtag('event', 'add_payment_info', {
     'event_category' : 'paiement',
     'event_label' : e.detail.currency.name,
     'value': e.detail.topaid
  });
});
On the Google Tag Manager, make sure the format for the tags is respected:
(view_item|add_cart|add_payment_info)
CSP and its impact on conversion tracking
The “Content Security Policy” (CSP) is a web security policy that protects pages against certain attacks such as Cross-Site Scripting (XSS) and malicious content injection. However, it can also block certain legitimate scripts, such as Meta or Google Tag Manager tracking pixels, thus preventing proper conversion tracking.
Why are some pixels not working?
If your website displays an error related to the Content Security Policy (CSP), particularly in the console or network tab of the browser’s developer tools, this means that certain third-party scripts — such as Google tags or Meta (Facebook) pixels — are blocked. To ensure proper conversion tracking on your store, it is necessary to add a specific exception in the CSP configuration of your site to allow the resources used by the Infomaniak ticketing system.
Main CSP directives impacting tracking
script-src: defines the authorized sources for scripts.img-src: controls images (including the<img>tags used for tracking pixels).connect-src: manages tracking requests sent to the servers of marketing tools.
For example, if you are using Google Tag Manager or Facebook Pixel, make sure your CSP policy explicitly allows the loading of scripts and the sending of data to their domains. Here is an example of directives to include in your CSP, to be adapted according to your configuration:
script-src 'self' https://www.googletagmanager.com https://www.google-analytics.com https://connect.facebook.net;
img-src 'self' https://www.google-analytics.com https://www.facebook.com;
connect-src 'self' https://www.google-analytics.com https://www.facebook.com;
Google provides a detailed guide on configuring CSP compatible with its tracking tools.
Also, check that your security management system (application firewall, CDN, CMS) does not block these resources, and apply the necessary adjustments to allow proper triggering of tracking events.
If your CSP is too restrictive, it can prevent the loading of third-party scripts such as:
- Facebook Pixel (connect.facebook.net)
- Google Tag Manager (GTM) (www.googletagmanager.com)
- Google Analytics (www.google-analytics.com)
Errors visible in the developer console (Developer tools) of the browser:
Refused to load the script 'https://connect.facebook.net/en_US/fbevents.js'
because it violates the following Content Security Policy directive: "script-src 'self'"- Absence of data in Google Analytics or Facebook Ads Manager.
- Failure to trigger events defined in GTM.
When the CSP blocks these resources, they cannot collect data on visitors or record conversion events.
Complete list of triggers
Home page:
trigger : ike_home_view
Data : none
document.addEventListener("ike_home_view", function(e) {
  //send to your tracking tool
});
Event page:
Page of an event with multiple dates
trigger : ike_event_view
Data : detail.name
document.addEventListener("ike_home_view", function(e) {
  console.log(e.detail.name);
  //send to your tracking tool
});
Date page:
Page of a date of an event
trigger : ike_date_view
Data : detail.name, detail.date
document.addEventListener("ike_home_view", function(e) {
  console.log(e.detail.name, e.detail.date);
  //send to your tracking tool
});
Pass page:
Page of a pass category
trigger : ike_abo_view
Data : detail.name
document.addEventListener("ike_abo_view", function(e) {
  console.log(e.detail.name);
  //send to your tracking tool
});
Pass selection page:
Page of passes dates selection
trigger : ike_abo_selection
Data : detail (cart details)
document.addEventListener("ike_abo_selection", function(e) {
  console.log(e.detail.name, e.detail.date);
//send to your tracking tool
});
User login:
Triggered login success
trigger : ike_user_login
Data : detail (cart details)
document.addEventListener("ike_user_login", function(e) {
  console.log(e.detail);
  //send to your tracking tool
});
User logout:
trigger : ike_user_logout
Data : detail (cart details)
document.addEventListener("ike_user_logout", function(e) {
  console.log(e.detail);
  //send to your tracking tool
});
Cart add:
Triggered when element added to cart
trigger : ike_cart_add
Data : detail (cart details)
document.addEventListener("ike_cart_add", function(e) {
  console.log(e.detail);
  //send to your tracking tool
});
Cart page:
trigger : ike_cart_view
Data : detail (cart details)
document.addEventListener("ike_cart_view", function(e) {
  console.log(e.detail);
  //send to your tracking tool
});
Cart update:
Triggered when a cart element is updated
trigger : ike_cart_update
Data : detail (cart details)
document.addEventListener("ike_cart_update", function(e) {
  console.log(e.detail);
  //send to your tracking tool
});
Cart empty:
Triggered when empty button pressed
trigger : ike_cart_empty
Data : detail (cart details)
document.addEventListener("ike_cart_empty", function(e) {
  console.log(e.detail);
  //send to your tracking tool
});
Cart confirm:
Triggered when confirm button pressed
trigger : ike_cart_confirm
Data : detail (cart details)
document.addEventListener("ike_cart_confirm", function(e) {
  console.log(e.detail);
  //send to your tracking tool
});
Cart delivery page:
trigger : ike_cart_delivery_view
Data : detail (cart details)
document.addEventListener("ike_cart_delivery_view", function(e) {
  console.log(e.detail);
  //send to your tracking tool
});
Cart form page:
trigger : ike_cart_form_view
Data : detail (cart details)
document.addEventListener("ike_cart_form_view", function(e) {
  console.log(e.detail);
  //send to your tracking tool
});
Cart payment page:
trigger : ike_cart_payment_view
Data : detail (cart details with paymentMethodSelected)
document.addEventListener("ike_cart_payment_view", function(e) {
  console.log(e.detail);
  //send to your tracking tool
});
Cart payment changed:
trigger : ike_cart_payment_changed
Data : detail.path
document.addEventListener("ike_cart_payment_changed", function(e) {
  console.log(e.detail);
  //send to your tracking tool
});
Cart payment launched:
trigger : ike_cart_payment_launched
Data : detail (cart details)
document.addEventListener("ike_cart_payment_launched", function(e) {
  console.log(e.detail);
  //send to your tracking tool
});
Cart payment success page:
trigger : ike_cart_payment_success
Data : detail (cart details)
document.addEventListener("ike_cart_payment_success", function(e) {
  console.log(e.detail);
  //send to your tracking tool
});
Cart delete item:
trigger : ike_cart_delete
Data : detail (previousCart and newCart)
document.addEventListener("ike_cart_delete", function(e) {
  console.log(e.detail);
  //send to your tracking tool
});
Page Changed:
trigger : ike_page_changed
Data : detail.path
document.addEventListener("ike_page_changed", function(e) {
  console.log(e.detail);
  //send to your tracking tool
});This guide explains how to replace the IDP SMART 51 badge printer ribbon (as part of the ticketing system Infomaniak).
Replace ribbons
If the quality of your impressions starts to deteriorate, you have to change the tape.
Video Guide
- Open the printer by pressing the location shown on the image below
- Replace the old ribbon with the new one in the order shown in the image below: First insert the part without gears into the hole and press the part with the wheels to get it into the notches provided for that purpose.
- Remove the protective film by pulling well on the tab provided for this purpose.
- Insert the ribbon into the printer, hook to the front of the printer, as shown in the picture below
- Close Printer
Read more
- Start Guide : Ticket
- Installation and use of the printer for passes
- Setting up and using the sales package
- Create a pass for subscriptions
This guide explains how to configure the general settings of the Infomaniak ticketing system.
General settings
The general settings are organized into 3 tabs:
- Ticketing: the general parameters used on your ticketing system
- Organizer's Contact Details: information displayed on the online ticketing system and on the Infomaniak portal so that visitors can contact the organizer
- General Terms: allows you to define the general terms of your online ticketing system
1. Ticketing tab
- The "Ticketing Visibility" button allows you to make your ticketing system visible once everything has been configured and after activating the online store; it allows you to quickly make your ticketing system accessible or not online.
- The Test mode allows you to reactivate the test mode. This option will no longer be accessible once an order is placed in real mode.
- The name of the ticketing system that you enter in this field will be visible on the online store as well as on the tickets and the emails that will be sent to your customers.
- Your website URL will be displayed in the Terms and Conditions (T&C) of the gift vouchers, instead of your organization's legal name, if you do not want your legal name to be visible to your customers.
- To choose your logo, click on the pencil icon; the chosen logo will appear on your customers' invoice. The dimensions of your logo must be 600 x 160 pixels:

- By default, the currency of your ticketing system is the Swiss franc (CHF). To give your customers the option to pay for their purchases in euros (EUR), check the box "I want to activate another currency" and then check the box "EUR". The ticketing system only offers transactions in CHF and EUR.
- VAT Liability: Does your organization have to pay VAT? To ensure this, please contact your legal or financial representative, or inquire with the town hall of your commune. Check the box "I am subject to VAT" once you have confirmed this information:

- You can choose between several languages for your ticketing system: French - English - German - Spanish - Italian… If you check more than one language box, don't forget to translate the content of your ticketing system (e.g. the description of your events) into all the selected languages.
- In this space, enter your organization's signature, which will be visible on all communications sent to your clients:

2. Organizer Details tab
The details you enter in this tab will be used for billing and on your online ticketing platform.
- Organization name: Enter the name of your organization, company, association, or NGO.
- Address - Zip code - City - Country: Make sure to enter the exact address of your legal entity that will be used for accounting/billing.
- Email address: The email address you enter in this field will be used for order confirmations, tickets, and event-related information.
- Phone: The number you enter in this field will allow your customers to contact you in case of questions or issues. Make sure to select the appropriate country code for the number you wish to display.
- SMS sender name: Enter the name you want to display as a signature at the end of SMS messages:

You can leave the phone number field empty if you do not wish to communicate it to your customers.
3. General Terms and Conditions
In this tab, you have the possibility to edit the general conditions. These must be accepted by your clients in their shopping cart before they can proceed with the online payment. In this tab, default general conditions are proposed for consultation and modification as you see fit.
In case you have modified the general conditions, you can always revert to the base version by clicking on the blue text "Restore default general conditions" located below the general conditions space.
This guide explains how to activate and set up promotions for visitors to thank them or to retain them (as part of the Infomaniak ticketing system).
Preamble
- This option allows you to offer a function acting as loyalty cards, for example "buy 4 tickets and the 4th is free".
- The x=y promotion allows you to automatically apply, on the shop/counter basket, a promotion according to a number of tiered tickets, without going through a promotional code.
- Example:
- This offer is activated for the following condition: For 3 tickets purchased, one of these tickets benefits from a 50% discount.
- In the case where the customer buys three tickets at once, they receive the promotion directly on the tickets in their basket.
- If the customer first makes a first order of a single ticket, then a second order of two tickets, the offer will be activated on the ticket of this second order; the total number of tickets purchased will be kept in memory!
- It is possible to modify all the parameters later by clicking on modify on the promotional offer page:

Activate the option in your ticketing
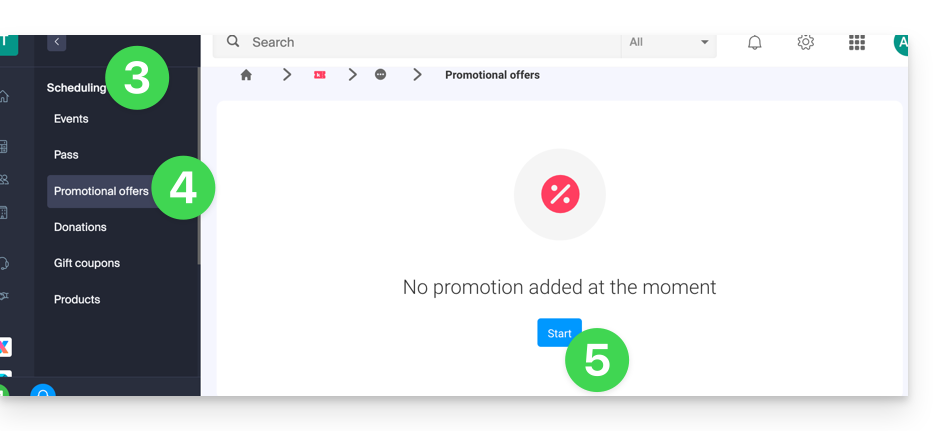
To do this:
- Click here to access the management of your product on the Infomaniak Manager (need help?).
- Click directly on the name assigned to the ticketing concerned by the event.
- Click on Programming in the left sidebar menu.
- Click on Promotional Offers in the left sidebar menu:
- Click on the blue button Add:
Configure the offer
Promotional Offer
- Indicate a name for the offer to be proposed; this name will be visible to the customer (when using a promo code, for example).
- In Reduction choose the type of promotion, for example: Tickets purchased, tickets offered.
- Then indicate the number of tickets required to activate the offer…
- …followed by the number of tickets that can benefit from the offer.
- Finally, indicate the type of promotion applied to these tickets, as a percentage or fixed price.
Once an order is placed, it is no longer possible to modify the type of reduction, the number of tickets to be purchased and those reduced, or the value of the reduction.
- Indicate the value of the reduction:
- If the reduction value is higher than the ticket price, the ticket will be free.
- Indicate the application strategy; this allows you to define the priority of tickets benefiting from the offer: most expensive first or least expensive first.
- Indicate the validity dates:
The start date of validity is mandatory for the promotion to work; tickets purchased before the defined date will not count towards this promotion.
- Click the button to Continue:
10. Prices
This step allows you to configure the events, zones, and prices for which this promotion will be applicable (it is also possible to set maximum quotas and limits per order per item).
11. Target
This step allows you to configure the following conditions for which this promotion will be applicable:
- Limit to certain customers (limit to customers who have already ordered on the ticket office and who are therefore already on the customer list on the ticket office, to those who have subscribed to the newsletter, or to a manually selected customer list…)
- Limit to certain box office profiles
Once activated, the promotion will be immediately applied from the start date of validity.
This guide explains how to set up a pass or subscription renewal system (as part of the Infomaniak ticketing system). This feature will allow visitors with subscriptions to renew them for the new season.
Preamble
- It is not mandatory to have seasonal or annual subscriptions to use the pass renewal, but it is imperative to have a new period with configured passes.
- If the subscriptions are configured with fixed numbered seats on an unchanged seating plan, the renewed subscriptions will keep the same seats for the new season.
- Renewed subscriptions will keep the same QR codes from season to season.
Create a renewal
Prerequisites
- For renewals to be activated on your ticketing system, you will need to create the passes for the new period.
Next:
- Click here to access the management of your product on the Infomaniak Manager (need help?).
- Click directly on the name assigned to the ticketing system concerned by the event (go to the period on which the renewals will be offered).
- Click on Programming in the left sidebar.
- Click on Pass in the left sidebar.
- Click on Subscription renewal:
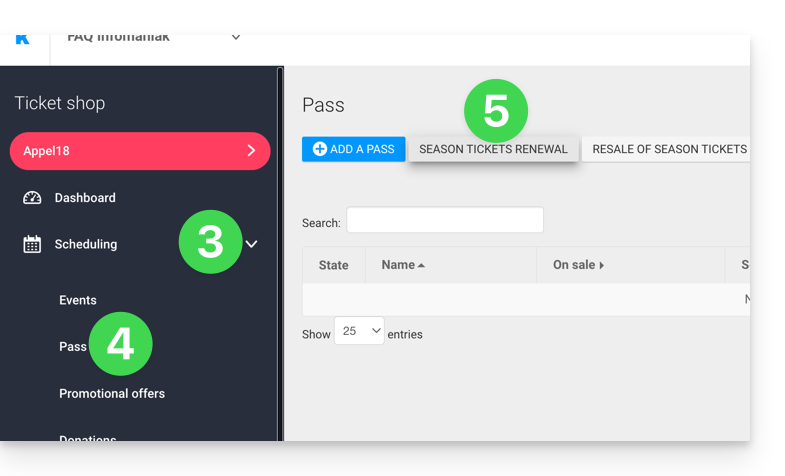
- Click on Create a renewal.
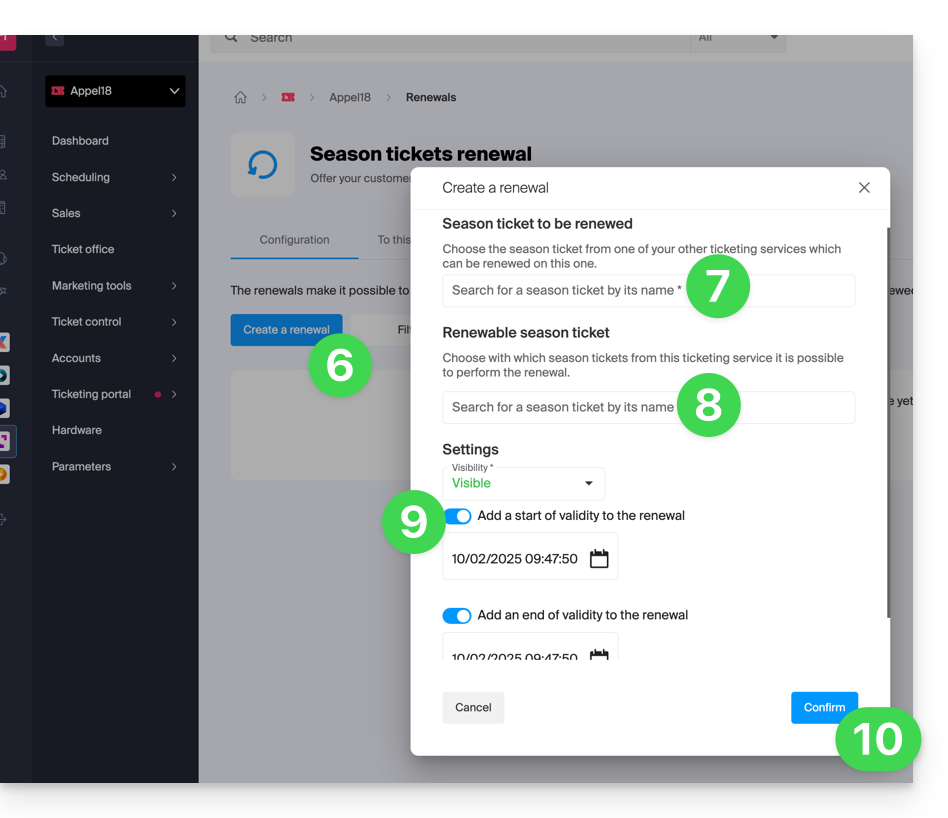
- On the pop-up, enter, in order, the subscription from the previous period…
- …then the subscriptions that visitors can take during the renewal; several subscriptions can be offered at this stage.
- If you wish, indicate a validity period for the renewal.
- Click the button to Confirm:
Renewal procedure for the visitor
The visitor can renew their subscription by following this procedure from the pass renewal link that will be located by default at the bottom of your ticketing page.
For direct integration, it is possible to use the URL of the desired ticketing system, and add /pass-renew at the end. For example: https://infomaniak.events/shop/abcABC4242I/pass-renew
Renewal tracking
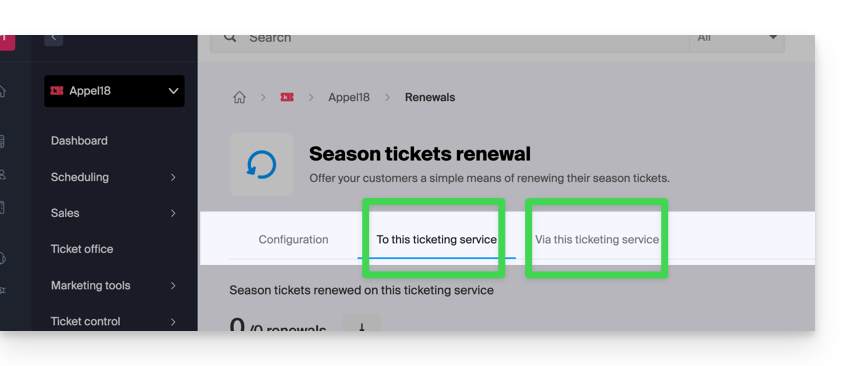
It is possible to track each renewal via the renewal tabs:
- To this ticketing system: indicates the renewals made from a previous season to the one you are currently on
- From this ticketing system: indicates the subscriptions renewed from the chosen ticketing system to a new period
This guide shows you an example of a pass configured as a subscription where all events are included upon purchase (within the Infomaniak ticketing system).
For an overview of the pass and everything it can do, please refer to this guide
Subscription with all events included
The example below allows you to have a pass that acts as a subscription for a single entry to all events included. Typical uses of this type of pass would include:
- Subscriptions for a season or a year of a sports club or a theater
- A 2, 3, 4, 5, 6, or 7-day subscription for a week-long festival
- A ticket sales pack, if the event is broken down, e.g., a conference during the day, a meal, and a concert. A pack could be created for a conference entry + meal, another for meal + concert, etc.
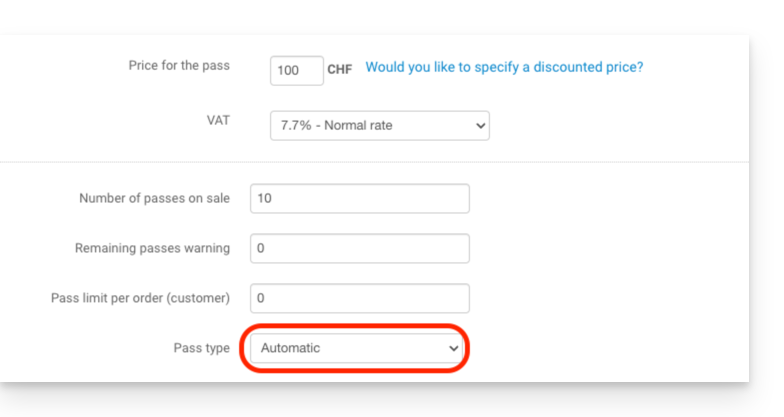
Pass creation
After filling in the information, such as the pass name, price, or quantity of passes available, the pass must be set to Automatic.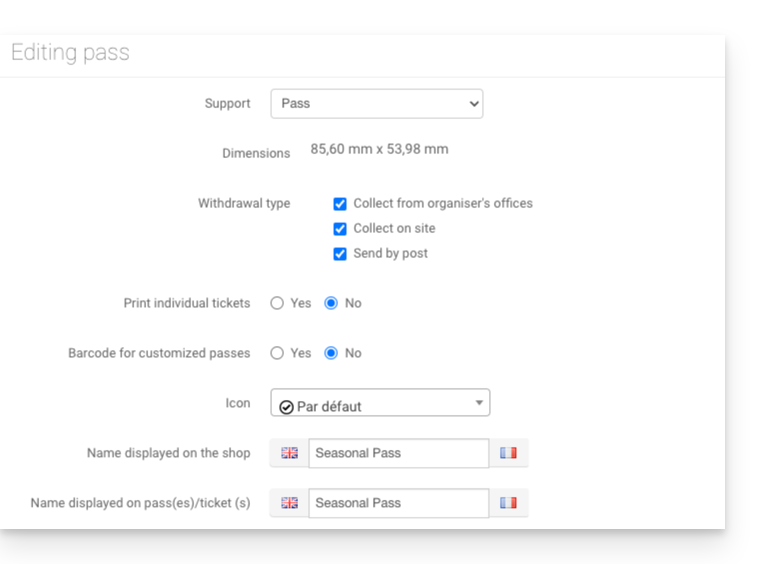
Event association
Events are associated with the pass, with a limit of one ticket per event and no additional cost: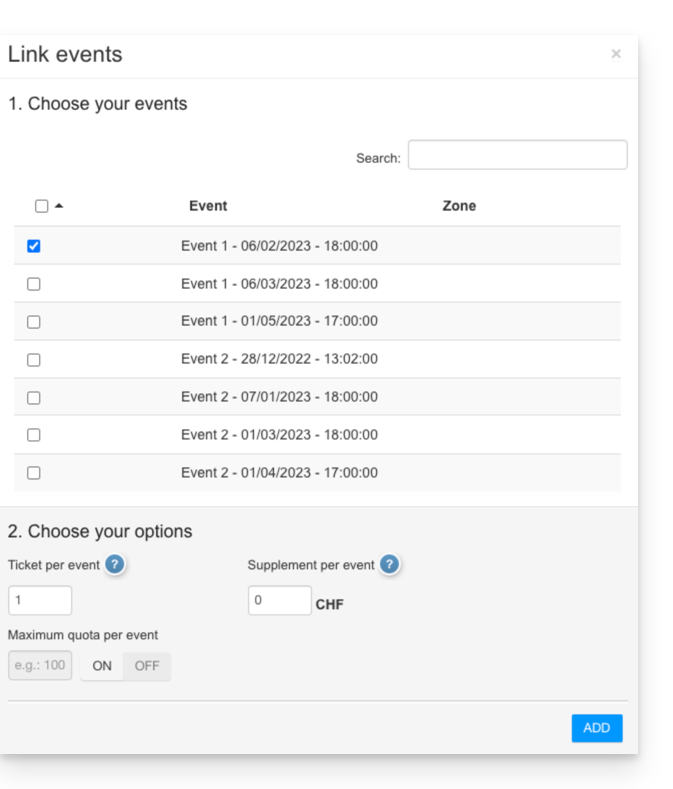
Pass visual
This pass will be used as a vertical badge and will therefore be printed on a PVC badge whose visual will be configured as follows: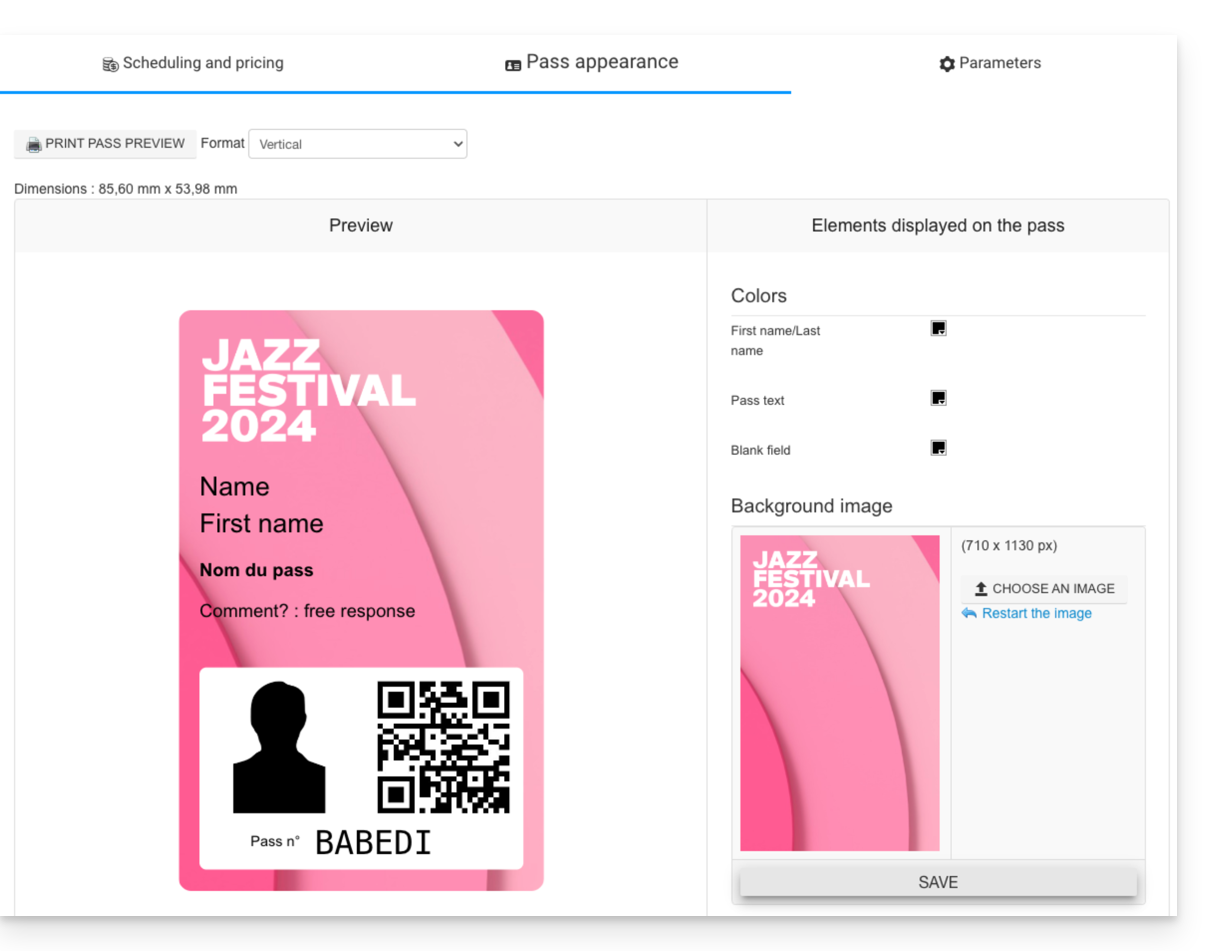
Requested information
Since this pass is nominative, the name and first name fields are mandatory, as well as a photo of the person: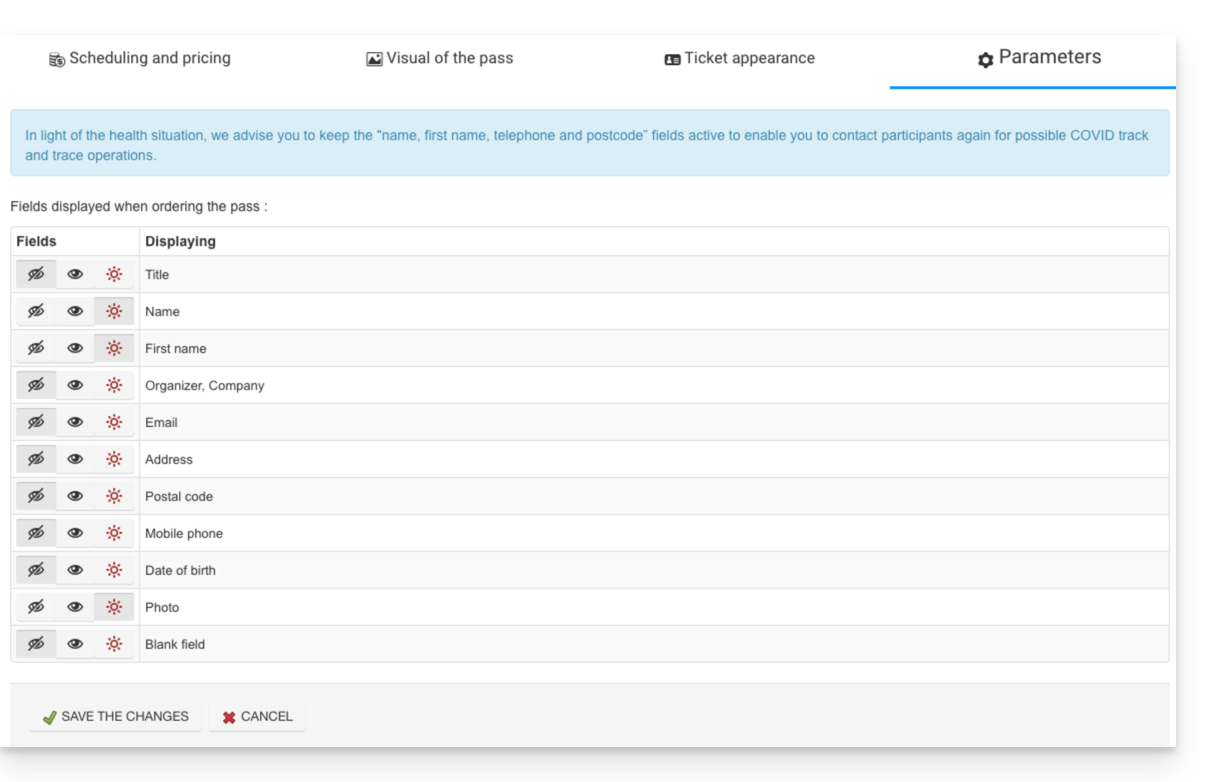
Learn more
This guide explains how to print passes from the Infomaniak tablet counter (as part of the Infomaniak ticketing system).
Preamble
- The equipment is already configured to automatically connect to the network and the tablet.
- It will thus be automatically detected when a pass is ready to be printed.
- It is recommended to use printing with a computer if possible.
Connect the printer to the network
To do this:
- Turn on the printer.
- Connect the printer to your internet network using the RJ45 Ethernet cable.
- Connect the Wi-Fi access point to the network.
Printing passes from the tablet
To do this:
- Log in to the ticketing account from the tablet using the Infomaniak account ID and password.
- The tablet will automatically connect to the counter interface.
- Create an order on the tablet or search for an existing order.
- Click on the printer icon:
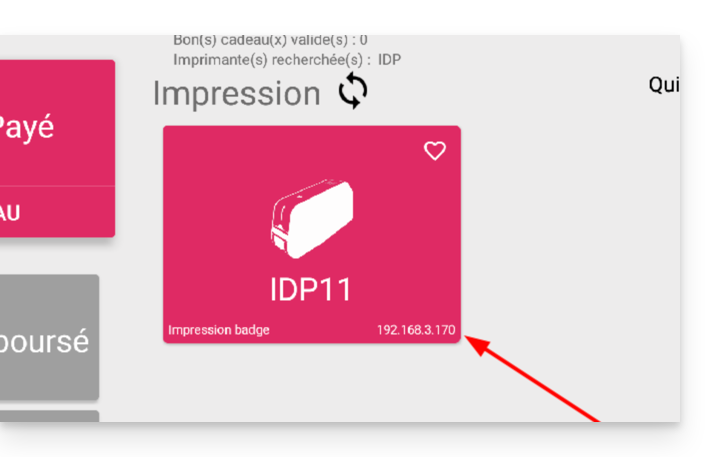
In case the printer does not appear in the list on the right
- Try refreshing the list by clicking on the rotating arrows.
- Ensure that the printer is properly connected to your network with the RJ45 cable
- Ensure that the Infomaniak Wi-Fi access point is properly connected and turned on.
- Ensure that the printer and the tablet are connected to the Infomaniak network.
- To ensure that the printer is properly connected to the network, click on the button on the left side of the printer's screen and check if it has been assigned an IP address.
- Otherwise, restart the printer.
Warning: if two Wi-Fi access points are connected nearby, this may cause interference. Please ensure that only one access point is connected when using the printer
Learn more
This guide explains how to order rental equipment for on-site sales and access control (as part of the Infomaniak ticketing system).
Ordering Equipment
To do this:
- Click here to access the management of your product on the Infomaniak Manager (need help?).
- Click directly on the name assigned to the ticketing concerned by the event.
- Click on Equipment in the left sidebar:

Overview of current orders and order history
If you have already placed orders, you can see the status of the order on the main page. You will see the status of the current order, with details of its contents and, in the case of postal shipments, the package number allowing you to track its journey:
Placing a new equipment order
To order rental equipment, simply click the New Request button and follow the assistant.
Choose the quantity of equipment needed. Additional information is available in the form of tooltips:
Once the rental period is entered, the estimated rental costs will be indicated just below.
Please indicate the total desired rental period, taking into account the necessary installation and testing time.

If the assistant does not offer the desired dates, contact Infomaniak support.
Choose wisely whether the equipment should be sent to you or if you will pick it up on-site:

If the equipment is available on the dates you have indicated, you will receive a confirmation and tracking email for your order.
Learn more
- Getting Started Guide: Ticketing
- Setting up and using the sales pack
- Setting up and using the pass printer
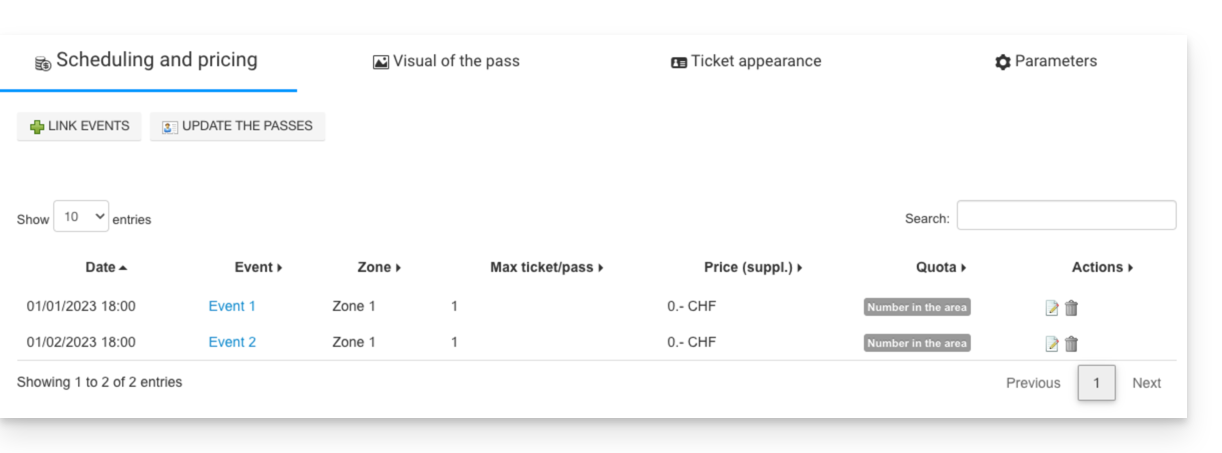
This guide explains how to associate events with passes (within the framework of the Infomaniak ticketing system).
Preamble
- These parameters will be available once the pass has been created.
- For an overview of the pass and everything it can do, refer to this other guide.
2. Associate events with the pass
Once the pass is created, you will need to associate the events that will be linked to it.
- Click here to access the management of your product on the Infomaniak Manager (need help?).
- Click directly on the name assigned to the ticketing concerned by the event.
- Click on Programming in the left sidebar menu.
- Click on Pass in the left sidebar menu.
- Click on the name of the pass concerned.
- Click on Associate events:

- Choose the events that will be linked to the pass.
- Choose the number of tickets that can be associated with this pass.
- Choose whether this event will cost extra when added to the pass:
- A price of 0 in this field allows you to define tickets included in the price of the pass.
- Choose whether you want a limit on the total number of tickets on a pass:
- If the event has, for example, 100 seats, but only 10 can be associated, for any visitor, it is at the quota level that you need to set 10.

- If the event has, for example, 100 seats, but only 10 can be associated, for any visitor, it is at the quota level that you need to set 10.
Once the events are associated, you can view the list of events and make corrections by clicking on the pencil icon ✎ to the right of the event or delete it by clicking on the Trash icon.
Next steps:
- Set up the visual and information related to the pass.
- Define the information of the subscribers that will be linked to the pass.
This guide covers the various possibilities of using the pass (within the framework of the Infomaniak ticketing system).
Pass types
A pass is a versatile tool for grouping events:
The all-inclusive subscription
- It provides access to all associated events.
- This is the solution to prioritize if you want a seasonal subscription where everything is directly included, with numbered or unnumbered seats.
- These can be renewed year after year.
Subscription with discounts on each ticket
- Like the half-fare subscription of the CFF, it is possible to create a pass on which each added ticket will have a reduced price.
The pack of entries to multiple events
- A 2-day pass, the 10-entry pass, etc.
- This type of pass allows the customer to attend events taking place over several days, whether to all events or a selection.
Accreditation
- Allows you to create passes giving access to certain areas or certain dates.
Pass format
The pass can be:
- Used in digital format directly on the phone
- or with an email containing a QR code
- or by downloading the PDF version to save on the phone
- Printed on a PVC card of type CR80 (credit card format) using an appropriate printer available for rent
- Printed in A4 or A6 format, like a normal ticket
Creating a pass
For detailed procedures and explanations, refer to the following guides:
- How to create a pass and configure it
- Associate events with passes
- Define the appearance of the pass
- Define the information of subscribers that will be linked to the passes
This guide explains how to manage and modify the contents of the cart for your direct ticket sales on the mobile kiosk (within the framework of the ticketing system Infomaniak).
Preamble
- For an overview of the mobile ticket office, refer to this other guide.
3. Manage and modify the cart content
The cart content is located on the left side of the screen in the Cart tab, and you can modify it at any time by performing the following actions:
- Add additional items: You can add tickets, subscriptions, or gift vouchers at any time by selecting the desired tab.
- Modify the quantity of items: For tickets and gift vouchers, you can modify the quantity of items in the cart by using the numbers that indicate the quantities:

- Modify the content of a pass with selectable tickets: If the pass content requires ticket selection, you can view the tickets already on the pass and add tickets by clicking on the relevant menus

- Delete items from the cart: By clicking on the Trash icon next to the cart items, you can delete these items. Warning: If you have taken an existing reservation from the orders, this operation will modify the order.

- Empty the cart : You can also empty the cart by clicking on the blue trash can at the bottom of the page

For reservations: If you wish to remove an item from a reservation, please use the Trash icon. If you wish to remove items while keeping the original order, prefer the reservation splitting method.
Using a promotional code
If the customer has a promotional code, or if you want to apply a promotional code to them, you can click on the % icon on the right side of your screen:
Validate the cart
Once the cart is filled with all the desired items, you can choose the payment method that the visitor wants to use to validate the cart and place the order.
To do this, you have, on the right side of the screen, the payment methods available to you at the ticket office. To modify the available payment methods, please refer to the guide on this subject:
In the case where the cash payment method is chosen, it is possible to enter the amount given by the customer and the change to be given will be indicated on the order validation pop-up:
Next steps
- Print tickets and manage orders from the mobile kiosk
- Send the cash report (Coming Soon)
- The mobile ticket office settings (Coming Soon)
This guide explains how to add event tickets, passes and gift vouchers to the mobile box office (within the framework of the ticketing system Infomaniak).
Preamble
- For an overview of the mobile ticket office, refer to this other guide.
2. Add items to the cart
From the Event, Pass or Gift Certificate tabs, you can select the items to add to the cart. Depending on the item, the procedure will vary slightly.
At any time, you can click on one of the tabs **Event, Pass or Gift Certificates** to select other items to add to the cart.
Event ticket sales
- Select the event, date, or performance you want from the left column.
- Choose the quantity of tickets to add to the cart using the + and - icons for the desired prices.
- Click on Add to Cart to proceed:

Pass sales
The pass page is divided into 2 parts. The left column allows you to generate new passes. The right column allows you to manage existing passes:
- Select the pass to generate on the left column.
- Enter the subscriber's information.
- Once the pass is in the cart, you can add tickets for associated events for passes with selectable events:


Sale of gift voucher
As for gift cards, they are listed for you. You just need to select the cards to add to your cart:
Next steps
- Manage and validate the mobile kiosk cart
- Print tickets and manage orders from the mobile kiosk
- Send the cash report (Coming Soon)
- Mobile counter settings (Coming soon)
This guide explains how to use the group rates feature (as part of the Infomaniak ticketing system).
Preamble
- This rate allows visitors to purchase multiple entries in one click.
- This option is particularly useful for families, school classes, or even grouped special offers.
- Although the buyer makes only one purchase, the group rate groups several tickets into a single purchase.
- Several tickets will therefore be issued, and each member of the group can then present their own ticket at the time of the event.
Manage the group rates of your event
To do this:
- Click here to access the management of your product on the Infomaniak Manager (need help?).
- Click directly on the name assigned to the ticketing concerned by the event.
- Click on Programming in the left sidebar menu.
- Click on Events in the left sidebar menu.
- Click directly on the name of the event.
- Then click the Rates tab.
- Click on Add a rate:
- Choose to Add a rate.
- Choose the group rate.
- Specify:
- the name
- the number of tickets included in the rate
- the price of each individual entry (the price of the group rate will be equal to the individual price multiplied by the number of tickets)
- Activate any advanced settings.
- Click on Confirm:

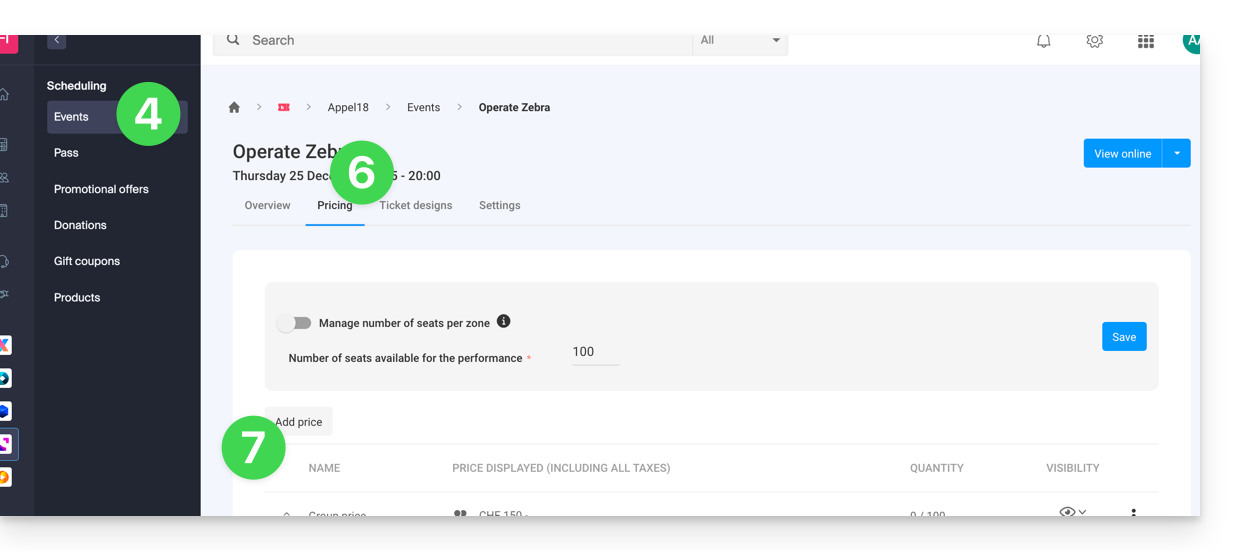
The display of pricing varies depending on the type of event: for a multi-date event, it is managed via an action menu on the "Modify" button, while for a single-date event, it appears directly in the "Prices" tab at the top of the page.
This guide shows you an example of a pass configured as a subscription where customers can choose events (within the framework of the Infomaniak ticketing system).
For an overview of the pass and everything they can do, refer to this other guide.
The pass with the choice of events
The example below allows you to have a pass that acts like a pack of multiple tickets, but the customer can choose events from the list of proposed events. It is a versatile type of pass that can be configured in many ways to achieve the desired behavior:
- A pass with entries to multiple sites, but only on a chosen day.
- A pass with 10 entries for shows over a season.
- A free pass that allows you to choose multiple discounted tickets.
- A pass with the choice of film sessions for each day of the festival, but limited to one session per day.
For this example, imagine a pass that allows access to two events on the same day, choosing from a list of 3 possible sessions per event. The pass itself will be free, but each session will have a different cost. The customer can thus choose to participate in both events or only one of the two depending on their budget.
Pass creation
After filling in the information, such as the pass name, price, or quantity of passes available, you need to set the pass to Custom.
The pass is configured as a ticket, and the pass will be printed, not the individual tickets (for strategic choice). The customer will not have multiple tickets, but only one, with a QR code on which all their events will be displayed.
Once the pass is configured in Custom, the parameters will be indicated as in the screenshot so that the customer can only choose one session per event.
Event association
The events are associated with the pass, with a limit of one ticket per event and the ticket cost of 20.- for the first event and 30 for the second.

The event list will be as follows, with the maximum number of tickets and the price per event for the chosen event.
The customer will have, when purchasing the pass, the interface to choose their events, and it is possible to see in the cart that the price of the tickets is correctly calculated per unit when adding the latter.
Pass visual
This pass will be printed in A4 format and will therefore take on a ticket visual. You will therefore need to define the visual of these tickets.
Requested information
As this pass is not nominative, no information will be linked to the pass, but customer information will be requested when placing the order.
Learn more
This guide explains how to publish your event on the Swiss platform leprogramme.ch.
Reference an event on the leprogramme.ch website
Prerequisites
- To have this addition possibility, the event must be one of these types:
- concerts
- theater and performing arts
- humor and comedy
- culture and shows
- festivals
- classical music
- dance
- The online posting on
leprogramme.chalso depends on the acceptance of your request byleprogramme.ch(no guarantee).
Then to request its publication, click on the Publish button present on the event management page as in the example below:
The box will then be modified to show the correct implementation of your request:
This guide shows you how to add events to passes that have already been created and sold, but for which dates need to be added (as part of the Infomaniak ticketing system).
For an overview of the pass and everything it can do, please refer to this guide.
Prerequisites
- The passes in question must be of the automatic type and have associated free events.
When to use the pass update
When purchasing or creating a pass, it retrieves the list of events associated at the programming level (Programming, Pass). If an event is associated after sales have been made, only new passes will have this new event.
This function allows you to add this new event to existing passes so that subscribers can access it as well.
How to update existing passes
When adding new events to a pass, the Update Pass button will be available.
By clicking on this button, a message will indicate the number of passes that will be updated:
Learn more
This guide explains how to configure the appearance of a pass (as part of the Infomaniak ticketing system).
Preamble
- These settings will be available once the pass has been created.
- For an overview of the pass and everything it can do, refer to this other guide.
3. Set up a visual for the passes
To do this:
- Click here to access the management of your product on the Infomaniak Manager (need help?).
- Click directly on the name assigned to the ticketing concerned by the event.
- Click on Programming in the left sidebar.
- Click on Pass in the left sidebar.
- Click on the name of the pass concerned.
- Click on the tab Pass Appearance:

For PVC format passes

PVC format passes have a format that allows visitors to use them in digital format on their phone and the organizer to print them on a PVC card using a printer available for rent.
When selecting the visual, you will need to choose between vertical and horizontal mode. It will then be possible to choose the elements to display on the pass, as well as a background image:
For phone / paper format passes

For phone / paper formats, the visitor can use the digital version directly on their phone or choose to download the PDF version to print on an A4 sheet.
There will be no configuration to do for the digital version, but it is possible to assign a ticket template. To configure a ticket visual, refer to this other guide.

Next step:
This guide explains how to add tickets to your passes, ticket packs, and subscriptions (as part of the Infomaniak ticketing system).
Prerequisites
- Obtain the pass or subscription code. This is provided in the confirmation email received upon ordering, or on your customer account.
- Go to the organizer's ticketing system.
Add tickets to the pass
To do this:
- Click on the Subscribers Access button at the top right:

- Enter the code for your pass or subscription in the indicated field and click on Next:

- Select the tickets to add to the pass by clicking on the button and confirm your choice by clicking on Add to Cart:

- Continue with the ordering process.
You will receive a confirmation email for this new order at the specified address.
This guide explains how to rename a ticketing system (within the framework of the ticketing system Infomaniak).
Preamble
- The name of the ticketing system appears, among other places, when publishing stores on the infomaniak.events portal.
- In the case of displaying multiple stores on the same page, it will be the name entered in the organizer's details on the last ticket office created that has events for sale.
Edit the details of a ticketing system
To do this:
- Click here to access the management of your product on the Infomaniak Manager (need help?).
- Click directly on the name of the ticket office concerned:

- Click on Settings in the left sidebar:

- Click on Ticketing Settings in the left sidebar.
- Click on the tab for the Organizer's Details.
- Change the name in the first field of the form:

- Click on the Save button at the bottom of the page.
Example of name change
The display before modification:
Modification of the organizer's name according to the procedure above:
The display is modified and becomes: