
Knowledge base
1000 FAQs, 500 tutorials and explanatory videos. Here, there are only solutions!
This guide details how to manually save data using the MSP360 application (formerly CloudBerry Windows) via the S3 Compatible protocol on Swiss Backup, the backup solution in an independent Swiss cloud.
Preamble
- It is also possible to use FileZilla (SFTP): refer to this other guide.
- The various services offered by Infomaniak are all compatible with the corresponding standard protocols (S3/Swift for storage, for example). Therefore, if you encounter a problem with third-party software, contact its publisher or a Partner and consult the support policy as well as article 11.9 of the Infomaniak Terms and Conditions.
Configure MSP360/CloudBerry
Prerequisites
- Have an Infomaniak Swiss Backup space with available device quota (minimum 1) for a Cloud backup.
- Add 1 Cloud type device to obtain the S3 Compatible parameters.
- Download and install MSP360 (Windows).
To configure a new backup:
- Click on the CloudBerry icon in the top left corner.
- Choose Add Storage Account:

- Select S3 compatible:

- Fill in the fields according to the information specific to your device (refer to this other guide):

Display name= choose a name for the storage.AccessKeyandSecretKey= the access keys generated from the email received from Infomaniak following the creation of the storage space.Service point= https://s3.swiss-backup02.infomaniak.comBucket name= default
- Click OK.
This guide explains how to delete a Swiss Backup backup with Acronis, and the various scenarios that may be encountered during deletion. Also refer to this other Acronis guide on the subject.
Prerequisites
- At least one device must be registered (and online) with the same credentials used to create the backup:
- For example, if the goal is to delete a backup made by SBA-XXXX-ADMIN but no device is online, simply download Acronis on another device and register it with the same user:

- For example, if the goal is to delete a backup made by SBA-XXXX-ADMIN but no device is online, simply download Acronis on another device and register it with the same user:
- Deletion requires free space:
- Please consider increasing your user quota (help), once the deletion is complete, you can return the quota to the agreed level:

- Please consider increasing your user quota (help), once the deletion is complete, you can return the quota to the agreed level:
- Refresh the storage:
- If a deletion was recently performed, please be patient, as the deletion may take some time depending on the size of the archive to be deleted; if the used storage space has not changed, refresh the backup location:

- If a deletion was recently performed, please be patient, as the deletion may take some time depending on the size of the archive to be deleted; if the used storage space has not changed, refresh the backup location:
Delete an Acronis backup
To do this:
- Access Backup Storage on the Cyber Protect console.
- Select the location from which you want to delete the backups.
- Select the backup archive from which you want to delete the backups.
Delete the entire backup archive
- Click on Delete.
- Deleting an archive of backups deletes all the backups in that archive.
Delete a specific backup from the backup archive
- Click on Show backups.
- Select the backup (restore point) that you want to delete.
- Click on Actions > Delete:
- When deleting a backup archive, check the box then click on Delete to confirm your decision.
- When deleting a specific backup, click on Delete to confirm your decision.
Delete all backups related to a user
- Even if no device is online, you can Disable > Delete (refer to this Acronis guide for more information).
Delete incomplete backups (if any)
- Refer to this guide for detailed instructions.
Certificate
If the storage quota/deletion issue persists even after increasing the storage quota of the user in question, it is recommended to reinstall Acronis.
When Acronis is completely uninstalled, it deletes the certificate that may be causing this bug.
To manually delete the certificate without uninstalling Acronis:
- Check its location and delete/move the certificate - refer to this other guide.
- Restart Acronis Managed Machine Service - refer to this guide.
- Run a backup or refresh the storage.
- This will generate a new certificate and resolve the storage quota issue.
This guide explains how to install the Acronis Backup Agent for Swiss Backup on Apple Macs equipped with M1, M2... processors using an ARM architecture instead of the usual x86 architecture.
Refer to this other guide if you are looking for information about uninstallation.
Install the specific ARM Acronis Agent
To access the Acronis management interface:
- Click here to access the Acronis Console with the credentials obtained after adding the device (need help?).
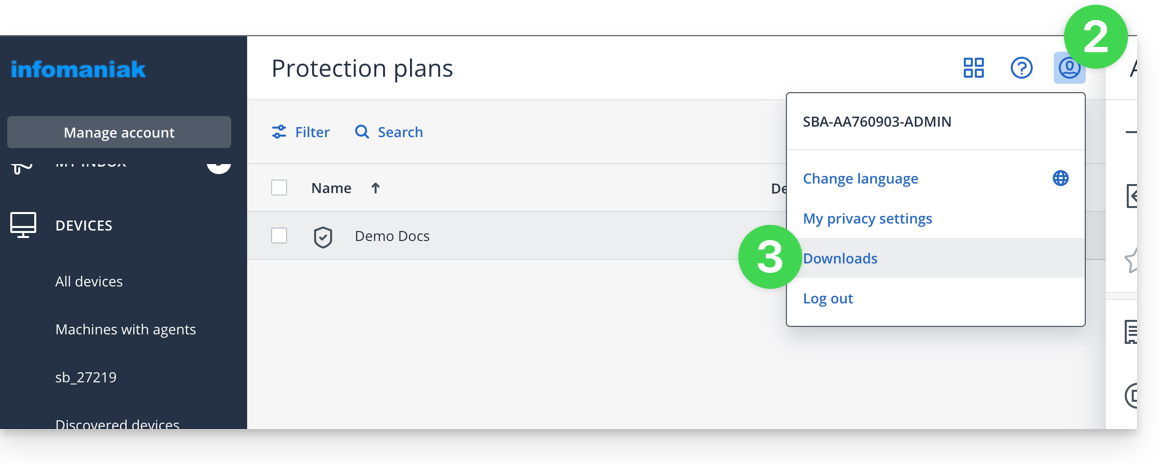
- Click on the user icon at the top right.
- Click on Downloads:
- Choose the client suitable for your machine:
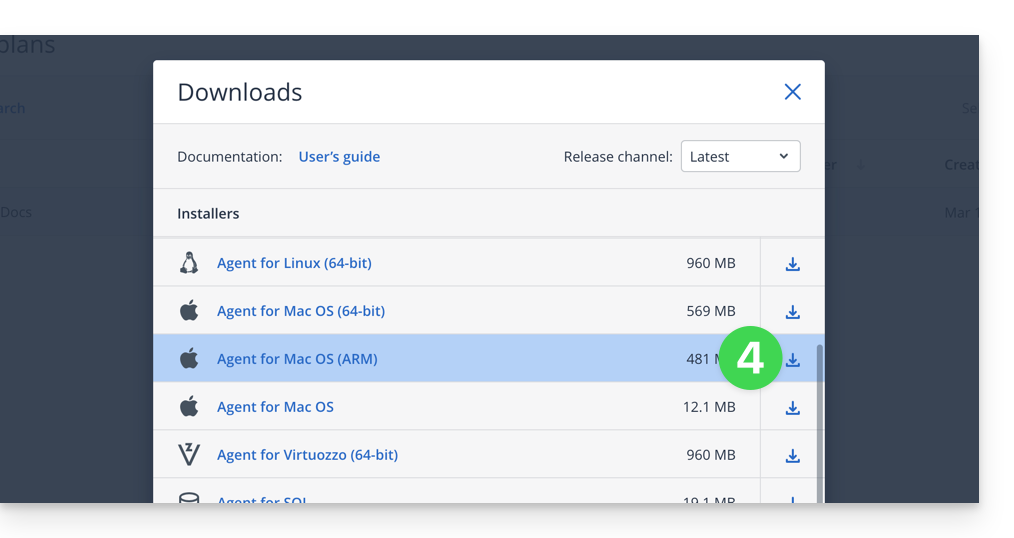
Warning
If you take the version available from the left sidebar, it will not be compatible:
- Do not follow this method below as the version obtained will not be the correct one (Intel version):
This guide explains how to delete a device (such as a Cloud Backup) on Swiss Backup, the solution for backup in an independent Swiss cloud.
Delete a device (Swift, S3, etc.)
To access Swiss Backup and remove one of the free backup locations:
- Click here to access the management of your product on the Infomaniak Manager (need help?).
- Click directly on the name assigned to the product concerned:

- Click on the blue button Manage my devices (in the Cloud Backup Space section):

- Click on the action menu ⋮ to the right of the object concerned in the displayed table.
- Click on Delete the device:

- Confirm the deletion by entering the login password for the Manager and by activating the confirmation box.
The deletion of the device is irreversible and all the backed-up data will be deleted from the Infomaniak servers without the possibility of obtaining a restoration.
To choose a new device on Swiss Backup, refer to this other guide.
This guide details how to manually save data using the MSP360 application (formerly CloudBerry macOS) via the S3 Compatible protocol on Swiss Backup, the independent Swiss cloud backup solution.
Preamble
- It is also possible to use FileZilla (SFTP): refer to this other guide.
- The various services offered by Infomaniak are all compatible with the corresponding standard protocols (S3/Swift for storage, for example). Therefore, if you encounter a problem with third-party software, contact its publisher or a Partner and consult the support policy as well as section 11.9 of the Infomaniak Terms of Service.
Configure MSP360/CloudBerry
Prerequisites
- Have a Swiss Backup Infomaniak space with an available device quota (minimum 1) for a Cloud Backup.
- Add 1 Cloud type device to obtain the S3 Compatible parameters.
- Download and install MSP360 (macOS).
To configure a new backup:
- Go to Settings:

- Choose an S3 Compatible storage from the list below:

- Fill in the fields according to the information specific to your device (refer to this other guide):

Display Name: the name of this storage space in the application.AccessKeyandSecretKey: the access keys generated from the email received from Infomaniak after creating the storage space.Endpoint(or server URL):https://s3.swiss-backup02.infomaniak.com- The "bucket" value remains by default.
- Validate by clicking on OK.
To restore a Swiss Backup on a virtual machine, refer to the Acronis documentation on the subject.
This guide helps you if your SFTP software/client suddenly displays a request to accept a new fingerprint (digital fingerprint) when using the Swiss Backup Infomaniak service.
SFTP software/client alert
If your SFTP software suddenly displays a message asking you to accept a new fingerprint (digital fingerprint), this does not necessarily indicate a security issue. This request may occur following planned technical changes to Infomaniak's infrastructure (if you have received an email about this).
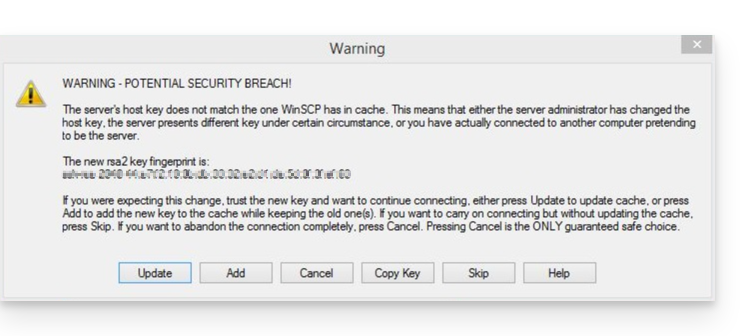
Indeed, as part of the evolution of its services, Infomaniak has recently changed the SFTP gateway used to access hosted files. These changes involve the deployment of new SSH keys on the server side. However, for security reasons, SFTP software/clients systematically compare the server key with the one they have in memory.
If a difference is detected, even if legitimate, they alert you to request confirmation. Therefore, it is normal for an alert to appear and for you to be asked to approve a new fingerprint.
Check if necessary
You can check the official new fingerprints of Infomaniak's SSH keys below. If they match what is displayed in your software, you can accept them with confidence:
4096 SHA256:p4QkBc70lkIpDZpjJAZ4VbPEIaOv54lWxd/DRCMfwgg sftp.swiss-backup.infomaniak.com (RSA)
4096 MD5:a3:6b:fa:7c:0e:22:da:42:ca:82:c7:cc:7e:1f:0a:4a sftp.swiss-backup.infomaniak.com (RSA)
4096 SHA256:gMiEH8oVwWhq8ByQWQP8xMEVy3URi2omZNSMCc0n8z0 sftp.swiss-backup02.infomaniak.com (RSA)
4096 MD5:d2:1a:11:9a:06:4c:55:98:df:38:cd:70:be:08:dd:ca sftp.swiss-backup02.infomaniak.com (RSA)4096 SHA256:EcQDR+VNUCbK1Zz/eDoa295c0+7JGQD7EP6n+ro5G0U sftp.swiss-backup03.infomaniak.com (RSA)
4096 MD5:bf:5e:92:f7:ed:81:de:84:9e:43:48:f3:1a:9c:3e:8d sftp.swiss-backup03.infomaniak.com (RSA)4096 SHA256:xRU5RakUZ/yJYg3CDi9JiSRymodbPgM4S3FXvVHqK2s sftp.swiss-backup04.infomaniak.com (RSA)
4096 MD5:16:ce:56:02:c3:ab:80:7b:31:99:a6:cd:a8:00:0e:79 sftp.swiss-backup04.infomaniak.com (RSA)This change has no impact on the security of your data. If you use scripts or automated software for your transfers or backups, make sure they take this new fingerprint into account.
This guide details how to manually save data using the Cyberduck application (macOS / Windows) via the S3 Compatible protocol on Swiss Backup, the independent Swiss cloud backup solution.
Preamble
- It is also possible to use Cyberduck via Swift or FileZilla (SFTP).
- The various services offered by Infomaniak are all compatible with the corresponding standard protocols (S3/Swift for storage, for example). Therefore, if you encounter a problem with third-party software, contact the publisher directly or a Partner and consult the support policy as well as section 11.9 of the Infomaniak Terms of Service.
Configure Cyberduck
Prerequisites
- Have a Swiss Backup Infomaniak space with available device quota (minimum 1) for a Cloud Backup.
- Add 1 device of type Cloud to obtain the S3 Compatible parameters.
- Download and install Cyberduck (macOS / Windows).
- Review the official documentation https://docs.cyberduck.io/protocols/openstack/infomaniak/.
To configure a new backup:
- Open the Cyberduck application.
- Click on Open Connection:

- Click on the drop-down menu and choose More options:

- Wait for the additional profiles to load.
- Search for and select the profiles corresponding to Infomaniak S3:

- If necessary, check your cluster number indicated in the Manager under Cloud Storage Information in "Location".
- Close the window and restart Cyberduck if the profiles do not appear in the drop-down menu in step 3 above.
- Choose the corresponding profile.
- Fill in the fields according to the information specific to your device:

- Click the Connect button to establish the S3 connection.
This guide explains the procedure to modify a Swiss Backup offer, the secure backup solution in an independent Swiss cloud.
Modify your Swiss Backup offer
To access the modification of your Swiss Backup offer, follow these steps:
- Click here to open the management of your product in the Infomaniak Manager (need help?).
- In the list of your products, click on the action menu ⋮ located to the right of the name of your Swiss Backup space.
- Select Modify the offer:
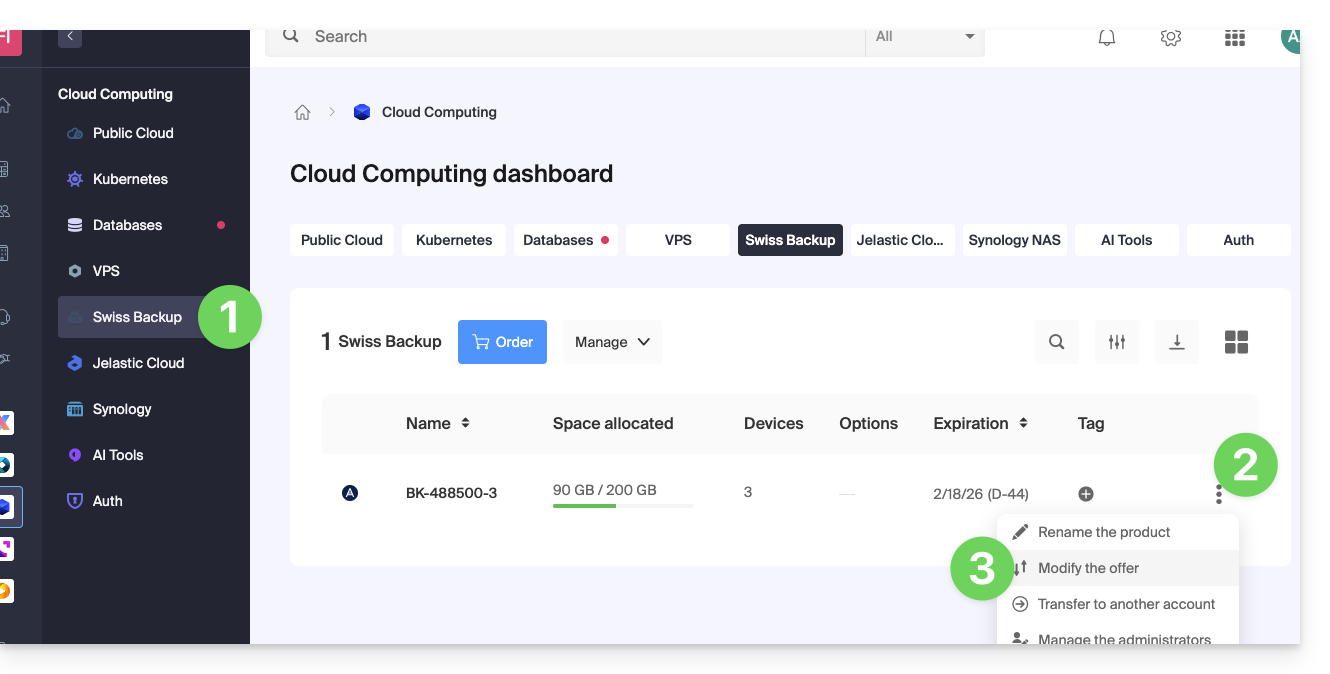
- Adjust the parameters of your offer according to your needs by modifying:
- the storage space
- the number of devices
- the number of virtual machines via Acronis
- the number of Linux/Windows servers via Acronis
- etc.
- Click on Next and proceed to payment to validate the modification.
You can also manage your offer directly from the product dashboard: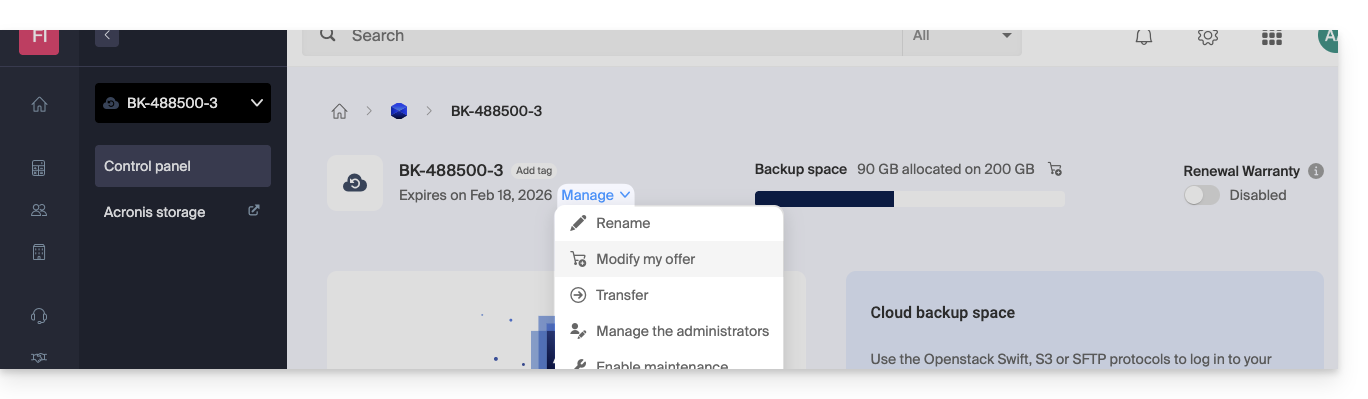
Examples of offer modification
Initially, the user wanted to:
- back up an iOS/Android mobile device with Acronis
- and have a free backup of the Cloud type accessible by SFTP or similar method.
They now want to:
- back up two devices via Acronis (still the mobile device and a Windows computer), without keeping the free backup.
It modifies the quotas: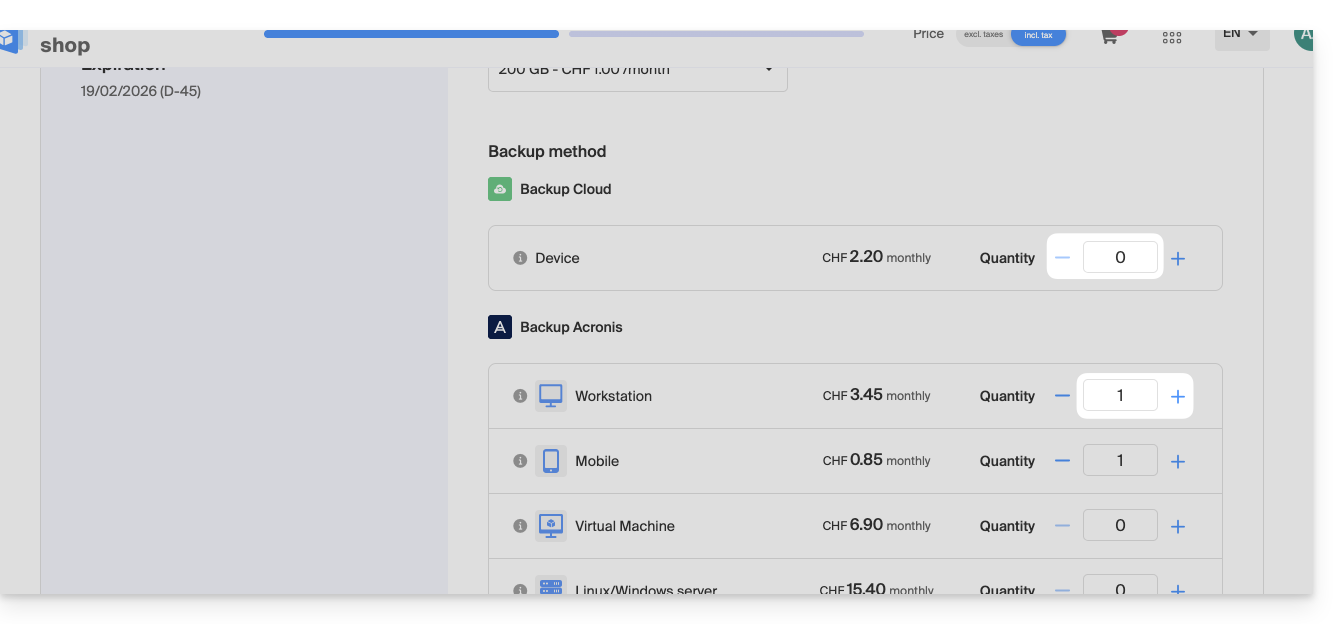
All that is left is to validate the payment to apply the modification.
Warning:
To remove a device type that you no longer wish to have, this device must have been previously deleted from your Acronis console, which means that the quota displayed on the offer modification page must be zero.
For example, if you want to remove a website backup, you must first delete it from your Acronis dashboard.
Indeed, to completely modify the offer (for example, to keep only a single backup of a Windows computer), the command cannot be finalized as long as the following message appears:
"The number of selected licenses is less than the current usage of your product"
This message occurs when you try to reduce to zero the quantity of an active backup type.
In this case, proceed as follows:
- Click here to access the Acronis console with the credentials obtained when adding the device (need help?).
- Delete the device in question from the "Devices" menu.
- Wait about ten minutes for the quotas to update.
The quota of your devices displayed in the Infomaniak Manager should then go to zero. You will then be able to modify the offer without encountering a blocking error.
As an Infomaniak Partner, it is recommended to manage your Swiss Backup clients within a single Acronis account/access, and to define groups/units in the Acronis console.
It is not possible to migrate end clients or end client backups between 2 Swiss Backup accounts.
This guide details how to back up a Google Workspace (Gmail, Google Drive, Google Calendar, …) using Acronis on Swiss Backup, the backup solution in an independent Swiss cloud.
It is also possible to back up other types of data.
Prerequisites
- Have a Swiss Backup Infomaniak space with available device quota (minimum 1) for a Google Workspace backup (1 license per Workspace user to back up):

- If necessary, increase the device quota according to your needs.
- Add the device to the Infomaniak Manager to receive the login credentials.
- Create a new project on Google Cloud Platform (console.cloud.google.com) as a super administrator:

- Review the Acronis documentation on this subject:
- Plan 20 to 30 minutes to set everything up.
Make your life easier! If needed, local partners referenced by Infomaniak can handle these steps. Launch a free call for tenders. They handle everything, freeing you from technical details.
Authorize Acronis to access Google Cloud Platform
In the Google Cloud Platform console:
- Select your new project.
- In the navigation menu, select APIs and services > Enabled APIs and services:

- Disable one by one all the APIs enabled by default in this project:
- Scroll through the Enabled APIs and services page
- Click on the name of an enabled API.
- On the API/Service details page that opens, click on Disable and confirm:

- Go back to the previous page and do the same with the next API.
- From the navigation menu, select APIs and services > Library.
- In the API library, activate the following APIs, one by one, using the search bar to find the required APIs:

- Gmail API
- Google Drive API
- Admin SDK
- Google Calendar API
- Google People API
- Click on its name, then on Activate.
- To search for the next API, return to step 5.
- From the Google Cloud Platform navigation menu, select APIs and services > OAuth consent screen.
- In the window that opens, select Internal for the user type, then click on Create:

- In the App name field, indicate a name for your application.
- In the User support email field, enter the super administrator's address.
- In the Developer contact information field, enter the super administrator's address.
- Leave all other fields blank, then click on Save and continue.
- On the Scopes page, click on Save and continue without making any changes.
- On the Summary page, check your settings, then click on Back to dashboard.
- In the Google Cloud Platform navigation menu, select Credentials > Service account.
- Click on Create a service account:

- Specify a name, a description, and click on Create and continue:

- Do not modify anything in the Grant this service account access to the project and Grant users access to this service account steps.
- Click on Done; the Service accounts page opens.
- Select the new service account, then under Actions, click on Manage keys.
- Under Keys, click on Add key > Create new key, then select the JSON key type:

- Click on Create; a JSON file containing the service account's private key is automatically downloaded to your machine: keep this file in a safe place as you will need it to add your Google Workspace organization to the Cyber Protection service as described later in this guide.
- In the Google Cloud Platform navigation menu, select Credentials > Service account.
- In the list, search for the service account you created, then copy its client ID which is displayed in the OAuth 2.0 Client ID column (OAuth 2.0 Client ID):

- Click here to access the Google administration interface as a super administrator.
- In the navigation menu, select Security > Access and data control > API controls:

- Scroll down the API controls page, then under Domain-wide delegation, click on Manage domain-wide delegation; the Domain-wide delegation page opens.
- On this page, click on Add:

- The Add a new client ID window opens.
- In the Client ID field, enter the client ID of your service account.
- In the OAuth scopes field, add the following "scopes":
- https://mail.google.com
- https://www.googleapis.com/auth/contacts
- https://www.googleapis.com/auth/calendar
- https://www.googleapis.com/auth/admin.directory.user.readonly
- https://www.googleapis.com/auth/admin.directory.domain.readonly
- https://www.googleapis.com/auth/drive
- https://www.googleapis.com/auth/gmail.modify
- Click on Authorize.
Your new Google Cloud project can therefore access the data from your Google Workspace account.
Creation of the backup space
To configure the backup of Google Workspace with Acronis:
- Click here to access the Acronis Console with the credentials obtained after adding the device (need help?).
- Click on the device addition button to add a Google Workspace type device:
- Enter the address of a super administrator of your Google Workspace account (it doesn't matter if two-step verification is activated for the super administrator's email account).
- Search for the JSON file that contains the private key of the service account you created in your Google Cloud project (or paste the content of the file as text).
- Click on Confirm:

Your Google Workspace organization then appears under the Devices tab of the service console:
This guide details how to back up a Microsoft 365 space using Acronis on Swiss Backup, the backup solution in an independent Swiss cloud.
Preamble
- What you can back up:
- Office
- OneDrive
- Exchange
- Teams
- SharePoint
- Emails
- By default, OneNote notebooks are included in OneDrive file backups, Microsoft Teams, and SharePoint sites.
- It is also possible to back up other types of data.
Adding a Microsoft 365 organization
Prerequisites
- Have a Swiss Backup Infomaniak space with an available device quota (minimum 1) for an Acronis Microsoft 365 backup (1 license per Office 365 user (seat) to back up):

- If necessary, increase the device quota according to your needs.
- Add the device to the Infomaniak Manager to receive the login credentials.
- Your account must have the global administrator role in Microsoft 365
- Read the Acronis documentation on this subject.
An administrator can add one or more Microsoft 365 organizations to a Swiss Backup account.
To add a Microsoft 365 organization:
- Click here to access the Acronis Console with the credentials obtained after adding the device (need help?).
- Click the add device button to add a Microsoft 365 Business type device:

- The software redirects you to the Microsoft 365 login page:

- Log in using the Microsoft 365 global administrator credentials.
- Microsoft 365 displays a list of the permissions required to back up and restore your organization's data:

- Confirm that you are granting these permissions to the Cyber Protection service.
The Cloud Agent does not connect to Microsoft 365. The agent obtains the necessary permissions directly from Microsoft 365. You only need to confirm the granting of these permissions once while logged in as a global administrator. The agent does not store your account credentials and does not use them to perform backups and restores. Changing the password of this account or deactivating or deleting this account in Microsoft 365 does not affect the operation of the agent.
Your Microsoft 365 organization then appears under the Devices tab in the Cyber Protect console:
Backup / Synchronization Frequency
The Cloud Agent synchronizes with Microsoft 365 every 24 hours, starting from the moment the organization is added to the Cyber Protection service. If you add or delete a user, group, or site, this change will not be immediately visible in the Cyber Protect console.
Immediate Synchronization
To synchronize the change immediately, select the organization on the Microsoft 365 page and then click Refresh.
If you have applied a protection plan to the All Users, All Groups, or All Sites group, recently added items will only be included in the backup once synchronization has been performed.
In case of slowdowns
If the Microsoft 365 Cloud-to-Cloud (C2C) backup or restore tasks are running slower than expected and taking a long time to complete, refer to this other guide to temporarily disable the Exchange Web Services API throttling to improve performance when restoring Microsoft 365 items.
Deleted Items
In accordance with Microsoft's policy, when a user, group, or site is deleted from the Microsoft 365 graphical interface, it remains available for a few days via the API. During this period, the deleted item is inactive (grayed out) in the Cyber Protect console and is not backed up.
When the deleted item is no longer available via the API, it will disappear from the Cyber Protect console. Its backups (if any) are located under Backup Storage > Cloud Application Backups.
Learn More
- Microsoft 365 Resource Discovery
- Backup frequency configuration
- Exchange Online data protection
- OneDrive file protection
- SharePoint Online site protection
- Microsoft 365 Teams data protection
- OneNote notebook protection
This guide explains how to customize the resources (CPU and bandwidth) used by Acronis software to back up your computer with Swiss Backup.
Preamble
- This procedure is particularly useful if your Internet connection or your computer slows down when backups are in progress.
- Also refer to the Acronis documentation on this subject.
- Warning: by limiting the resources allocated to your backups, these may take longer to complete.
Customize the resources dedicated to backups
To access the Acronis management interface:
- Click here to access the Acronis Console with the credentials obtained after adding the device (need help?).
- Click on Settings in the left sidebar.
- Click on System settings in the left sidebar.
- Click on Performance and backup time slot.
- Click on YES to enable performance customization.
- Define the resources dedicated to Acronis:
- CPU priority: allows you to limit the power allocated to your backups.
- Output speed: allows you to limit the bandwidth allocated to your backups; on macOS, enter this parameter in Ko/second as the % value is only taken into account under Windows.
- Define a time slot during which the resources will be lower: this allows you to allocate all resources to your backups when you are not using your computer e.g. reduced resources from 6am to 6pm while Acronis can use all resources during the night.
- Click on Save:
