Knowledge base
1000 FAQs, 500 tutorials and instructional videos. Here, there are only solutions!
This guide explains how to download or export an SSL certificate from the Infomaniak Manager.
Preamble
- The download of the certificate produces a file in
.zipformat. - The archive contains the
.keyand.crtfiles (as well as_windows.pfx&.protected.keydepending on the type of certificate):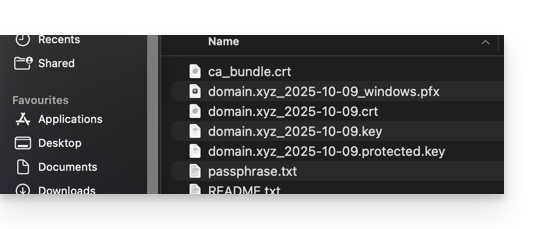
- It is recommended to store this certificate and its private key in a secure location, as the latter could allow access to your encrypted data.
Export or download an SSL certificate
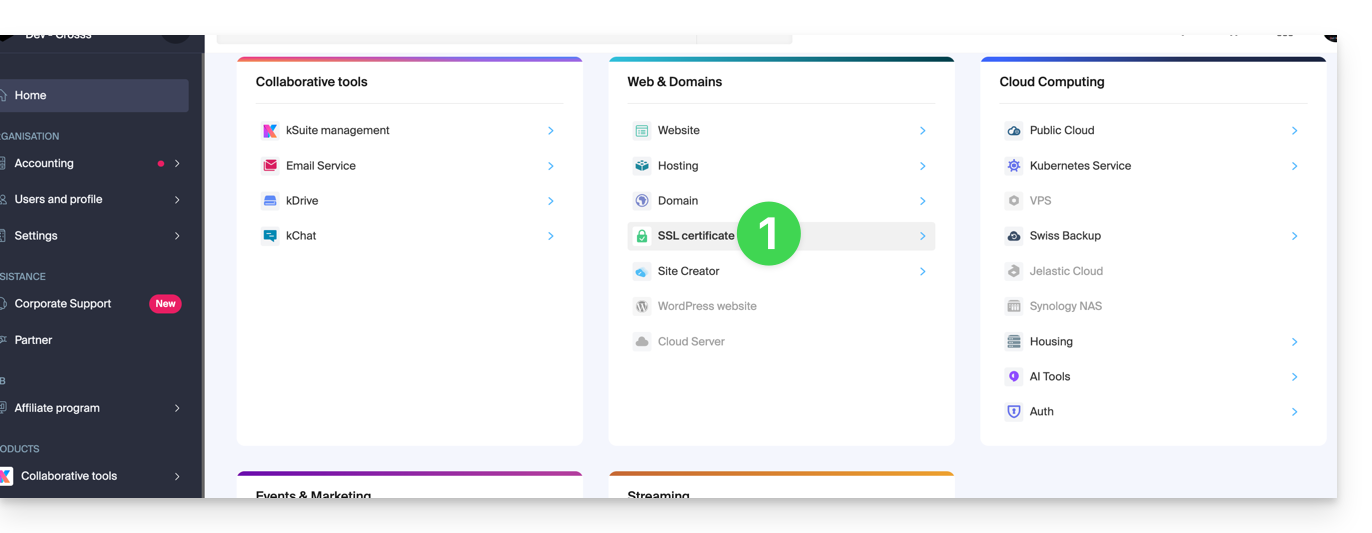
To access the management of your certificates:
- Click here to access the management of your product on the Infomaniak Manager (need help?):
- Filter your certificate types if necessary by clicking on the icon dedicated to this effect.
- Display the different types of certificates such as Let's Encrypt, Sectigo DV & EV...
- Add the certificates that need to be displayed.
- Apply the filters:
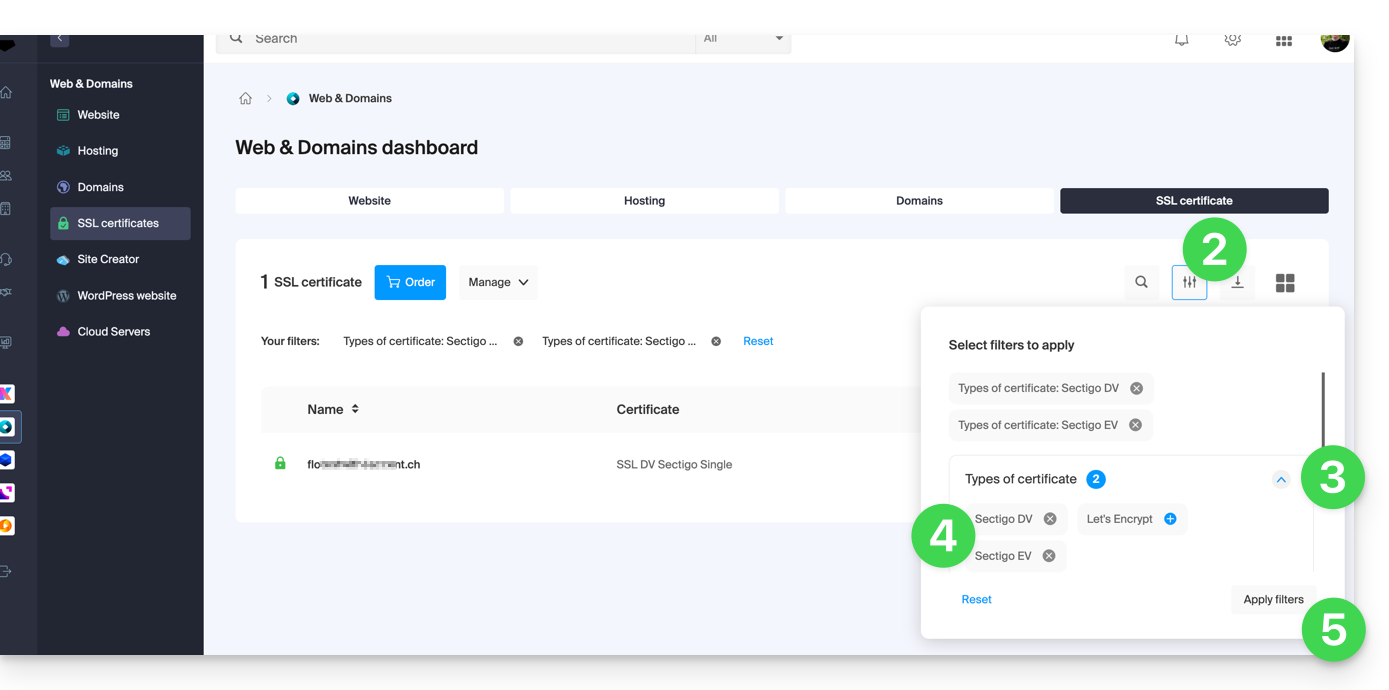
- The table now only displays the types of certificates you have selected.
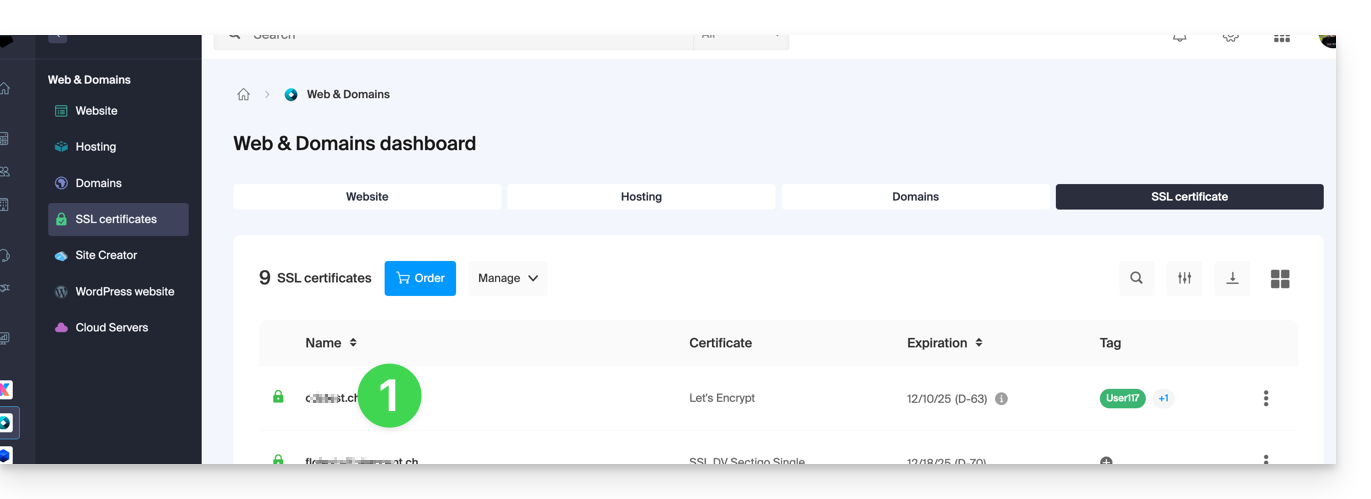
Export a Let's Encrypt certificate
- Click directly on the name assigned to the certificate Let's Encrypt in the list:
- Click on the action menu ⋮ to the right of the object concerned in the table that appears.
- Choose Export the certificate and follow the instructions to download the archive to your device:

Export a Sectigo certificate
- Click directly on the name assigned to the certificate in the list of certificates.
- Click on the Manage button.
- Click on Download the certificate and follow the instructions to download the archive to your device:

Link to this FAQ: https://faq.infomaniak.com/1034
Has this FAQ been helpful?
This guide explains how to add or modify one or more CAA records in the DNS zone (of a domain name) managed on the Manager Infomaniak.
Preamble
- A CAA record allows you to specify a certification authority authorized to issue certificates for a domain.
Add a CAA
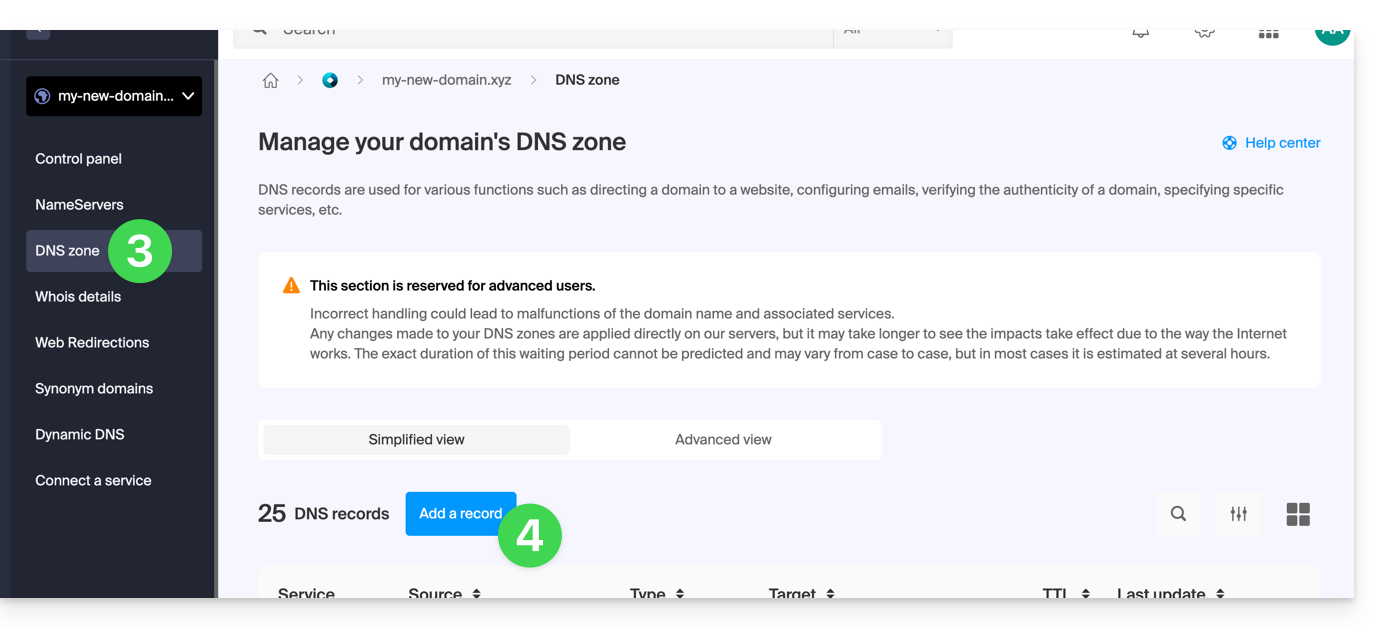
To manage this type of record in a DNS zone:
- Click here to access the management of your domain on the Infomaniak Manager (need help?).
- Click directly on the name assigned to the domain concerned.
- Click on DNS Zone in the left sidebar.
- Click the button to add a record:
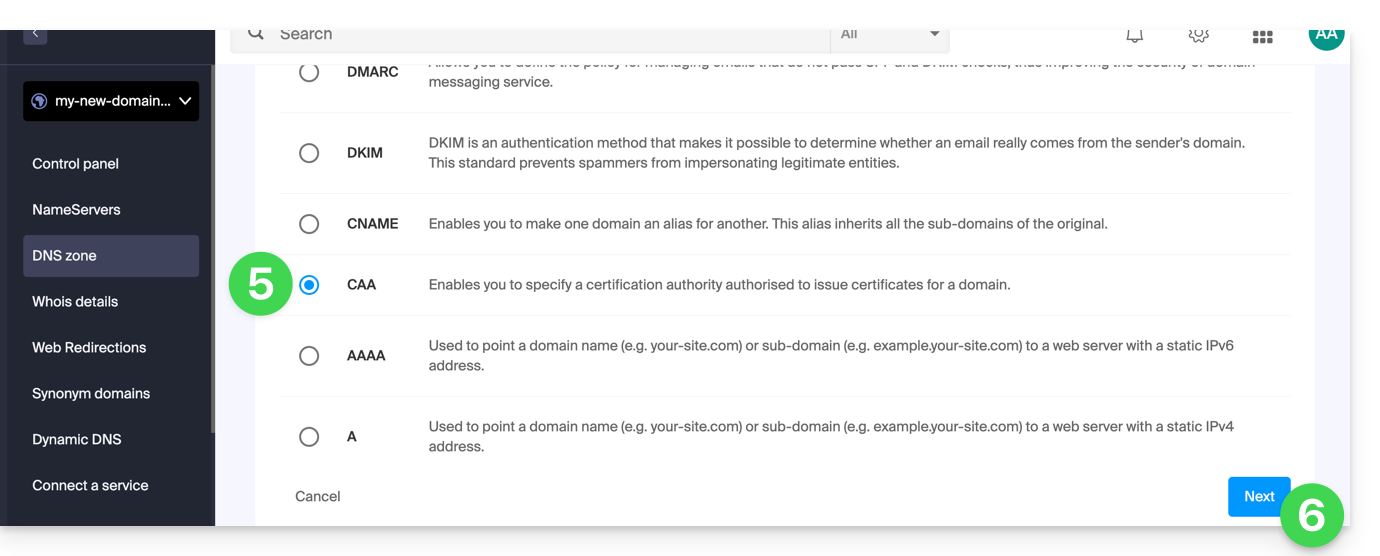
- Click on the radio button CAA to add a record.
- Click on the Next button:
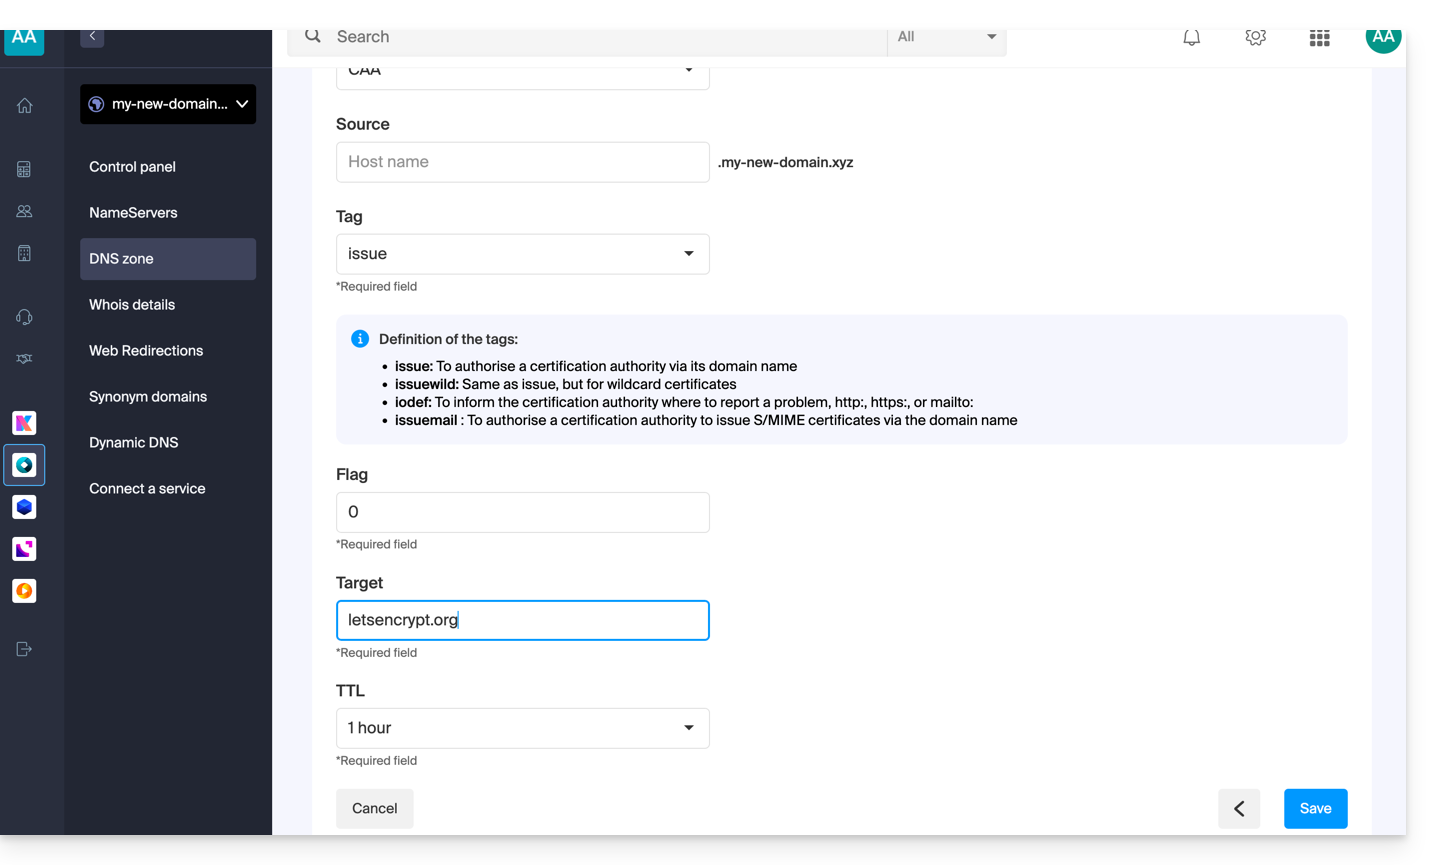
- Enter the CAA values required for your DNS zone: if you are validating an SSL certificate, refer to the information below.
- Save your information by clicking on the button at the bottom of the page.
Adding CAA to validate an SSL certificate...
... Sectigo
In the case of an SSL certificate validation Sectigo, follow the generic guide but specifically enter the following data:
- Choose “Issue for certification authority”.
- Enter the flag:
0. - Specify
sectigo.com.
... Let's Encrypt
In the case of a Let's Encrypt SSL certificate validation, follow the generic guide but specifically enter the following data:
- Choose “Issue for certification authority”.
- Enter the flag:
0. - Specify
letsencrypt.org.
Link to this FAQ: https://faq.infomaniak.com/1394
Has this FAQ been helpful?
This guide explains how to correctly interpret the detailed information provided by Qualys SSL Labs (https://www.ssllabs.com/ssltest/) which can sometimes seem technical or alarming without the appropriate context.
Preamble
- Qualys SSL Labs is a widely used analysis tool to evaluate the SSL/TLS configuration of websites.
- The warnings in their reports are often just technical details with no impact on the site's security or SEO.
Multiple certificates in SSL Labs reports
When SSL Labs analyzes a site, it may display several numbered certificates (certificate #1, certificate #2, etc.). This happens for several reasons:
- Main certificate (#1): The certificate presented when SNI (Server Name Indication) is used.
- SNI is a TLS extension that allows a server to host multiple SSL certificates for different domains on the same IP address. When a browser connects, it indicates the domain name it wishes to join.
- Secondary certificate (#2): The certificate presented when SNI is not used or during a direct IP connection.
An indication "No SNI" in certificate #2 is not an error. It simply means that SSL Labs has tested what happens when a client connects without providing SNI information. In this case:
- The server provides a fallback certificate (often a generic or preview certificate).
- This situation only affects very outdated clients that do not support SNI.
- Modern browsers all use SNI and will therefore receive certificate #1.
Certificate chain issues
"Chain issues: Incorrect order, Extra certs, Contains anchor"
These warnings do not necessarily mean that the certificate is defective:
Incorrect order: Intermediate certificates are not presented in the optimal order.Extra certs: Unnecessary additional certificates are included.Contains anchor: The root certificate is included in the chain.
The TLS protocol allows omitting the root certificate as it is normally already present in the browsers' certificate stores. Including it is not an error, but a redundancy.
"Alternative names mismatch"
For the rescue certificate (#2), the warning "MISMATCH" is normal because:
- This certificate is designed for another domain (
preview.infomaniak.website). - It is only presented when SNI is not used.
- The browser receiving this certificate would identify it as not matching the requested domain, but this does not affect normal connections with SNI.
Regarding SEO concerns:
- Google and other search engines use modern browsers that support SNI.
- They receive certificate #1, which is valid for your domain.
- Warnings about certificate #2 have no impact on SEO.
- Only issues with the main certificate (#1) could affect SEO.
This configuration is perfectly suited for shared hosting where multiple sites share the same infrastructure, with a preview certificate serving as a fallback solution.
Link to this FAQ: https://faq.infomaniak.com/1569
Has this FAQ been helpful?
This guide explains how to generate and automatically renew a wildcard certificate via a DNS challenge using Certbot and the dns-infomaniak plugin.
1. Installation of required tools
The Infomaniak DNS plugin is not included by default. To avoid the plugin does not appear to be installed error, install certbot and its extension by following the official instructions.
Make sure to select the tab Wildcard on the Certbot website after choosing your system.
2. Initial manual generation
Run this command to start the first generation of the certificate:
certbot certonly --manual \
-d *.example.com \
--preferred-challenges dns-01 \
--server https://acme-v02.api.letsencrypt.org/directory
3. DNS challenge validation (TXT Record)
To prove that you own the domain, go to your Infomaniak Manager and create the following TXT record:
- Name:
_acme-challenge - Value: (the one provided by the Certbot command)
4. Preparing the Infomaniak API
To automate the process, generate an API token with the domain scope in your management interface. This token will allow the script to automatically update your DNS.
5. Authentication script (infomaniak-auth.sh)
Create the file /root/infomaniak-auth.sh. This script will be called by Certbot during renewal:
#!/bin/bash
# API Token for Infomaniak
INFOMANIAK_API_TOKEN="YOUR_API_TOKEN_HERE"
# Update DNS record via Infomaniak API plugin
/usr/bin/certbot \
  --authenticator dns-infomaniak \
  --server https://acme-v02.api.letsencrypt.org/directory \
  -d "$CERTBOT_DOMAIN" \
  --agree-tos
Make the script executable:
chmod +x /root/infomaniak-auth.sh
6. Cleanup script (infomaniak-clean.sh)
Create the file /root/infomaniak-clean.sh to finalize the procedure:
#!/bin/bash
# Optional: Cleanup operations after challenge
exit 0
Make the script executable:
chmod +x /root/infomaniak-clean.sh
7. Automatic renewal configuration
Edit or create the following configuration file: /etc/letsencrypt/renewal/example.com.conf.
cert = /etc/letsencrypt/live/example.com/cert.pem
privkey = /etc/letsencrypt/live/example.com/privkey.pem
chain = /etc/letsencrypt/live/example.com/chain.pem
fullchain = /etc/letsencrypt/live/example.com/fullchain.pem
[renewalparams]
authenticator = manual
manual_auth_hook = /root/infomaniak-auth.sh
manual_cleanup_hook = /root/infomaniak-clean.sh
server = https://acme-v02.api.letsencrypt.org/directory
pref_challs = dns-01
account = YOUR_ACCOUNT_ID
key_type = rsa
8. Testing and Automation (Cron)
Before automating, verify that everything works correctly with a simulation:
certbot renew --dry-runIf the test is successful, add this Cron task to check renewal every X days:
0 0 */30 * * /usr/bin/certbot renew --quiet --config /etc/letsencrypt/renewal/example.com.confModify 30 days above according to the desired frequency. The cron will automatically use:
- the file
domain.tld.conf - the authentication script
infomaniak-auth.sh - the plugin
dns-infomaniak
Link to this FAQ: https://faq.infomaniak.com/1708
Has this FAQ been helpful?
This guide explains how…
- … generate a
CSRand private key to request a third-party certificate from a certification authority (CA), - … import this certificate for your Infomaniak site, using the
CRTobtained from theCA.
Preamble
- Although Infomaniak offers all the SSL certificates you might need…
- free Let's Encrypt certs for personal sites (only possible with sites hosted by Infomaniak),
- DV certs from Sectigo for professional/personal sites that are not registered in the trade register,
- EV certs from Sectigo for companies registered in the trade register,
- … it is also possible to install an SSL certificate obtained elsewhere (intermediate certificate from a certification body of your choice), custom or self-signed certificates.
1. Generate a CSR (Certificate Signing Request)
A CSR (Certificate Signing Request or Certificate Signing Request) is an encoded file containing the information necessary to request an SSL/TLS certificate.
It must be generated on your side to ensure that the private key remains under your control, using OpenSSL, for example.
Adapt and run the following command from a Terminal type application (command line interface, CLI / Command Line Interface) on your device:
openssl req -utf8 -nodes -sha256 -newkey rsa:2048 -keyout domain.xyz.key -out domain.xyz.csr -addext "subjectAltName = DNS:domain.xyz, DNS:www.domain.xyz"
Explanations
newkey rsa:2048: Generates a new 2048-bit RSA key.keyout domain.xyz.key: Specifies the file where the private key will be saved.out domain.xyz.csr: Specifies the file where the CSR will be recorded.addext “subjectAltName = ...”: Adds additional domains via theSAN (Subject Alternative Name)extension, necessary to include all desired domains in the certificate (main domain domain.xyz + any other associated domain or subdomain, such as www.domain.xyz).
After generation, you can check the contents of the CSR with the following command:
openssl req -in domain.xyz.csr -noout -textThis allows you to verify that all domains listed in subjectAltName are correctly included.
Once the CSR is generated, you can send it to the certification authority (CA) to obtain your SSL/TLS certificate.
2. Import the external certificate
Once validated, the CA issues a certificate (domain.xyz.crt) and sometimes an intermediate certificate (ca_bundle.crt).
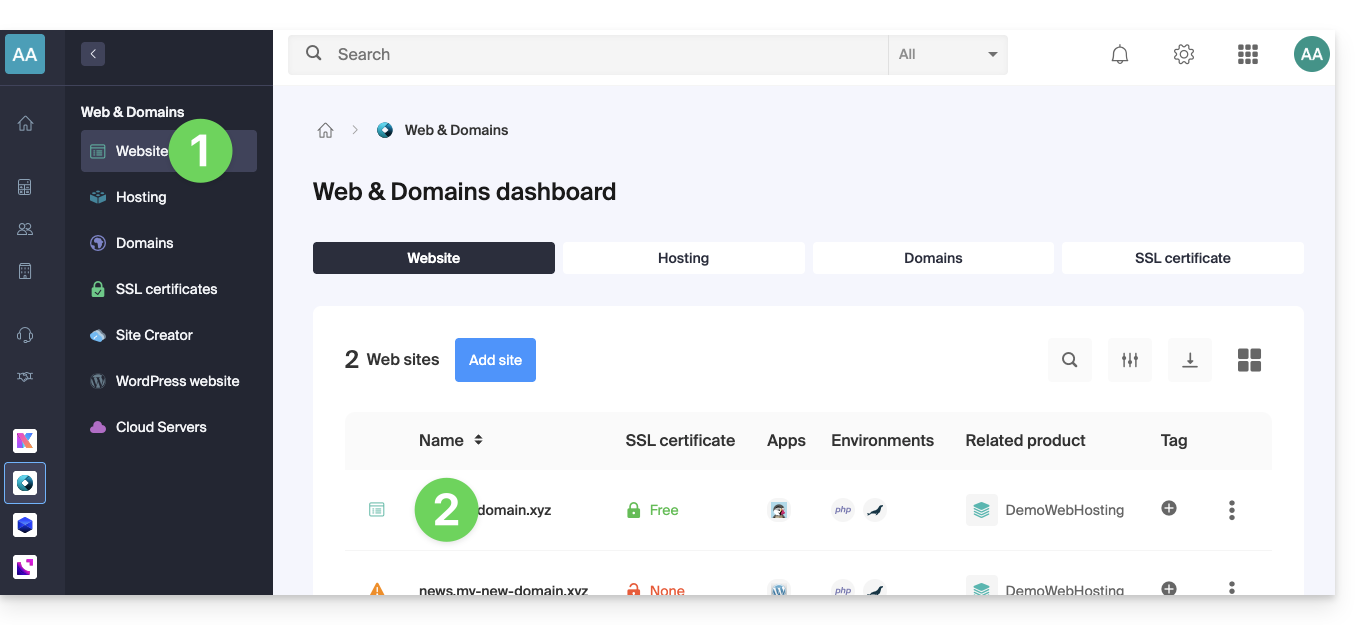
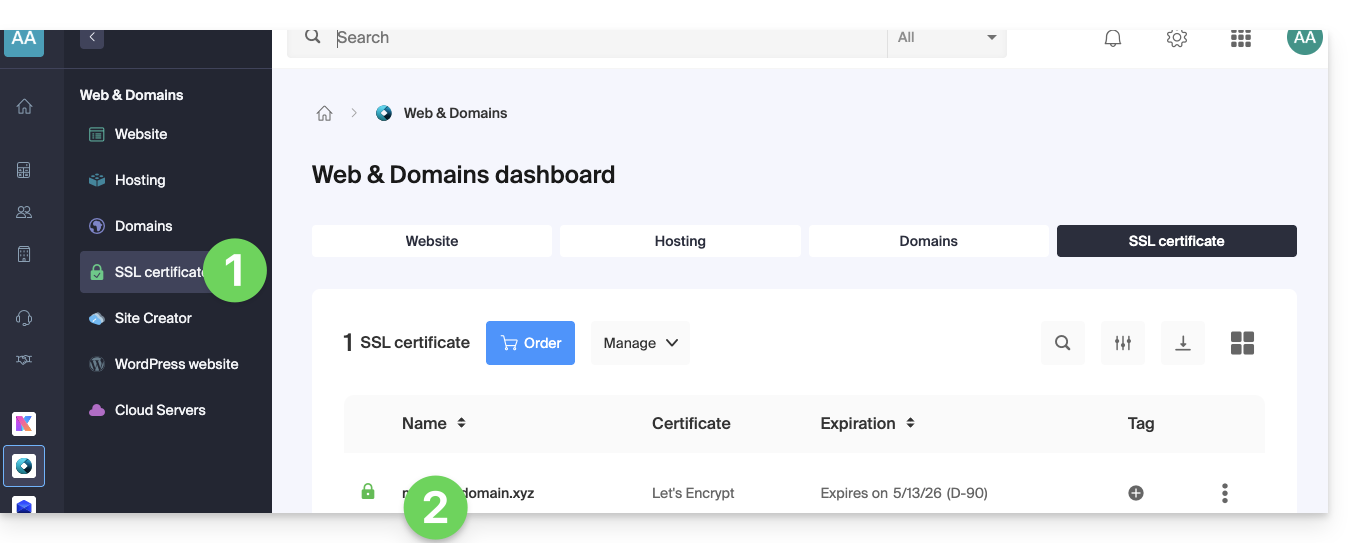
To access SSL certificate management:
- Click here to access your site management on the Infomaniak Manager (need help?).
- Click directly on the name assigned to the site concerned:
- Click on SSL Certificates in the left sidebar menu.
- Click the blue button Install a certificate:
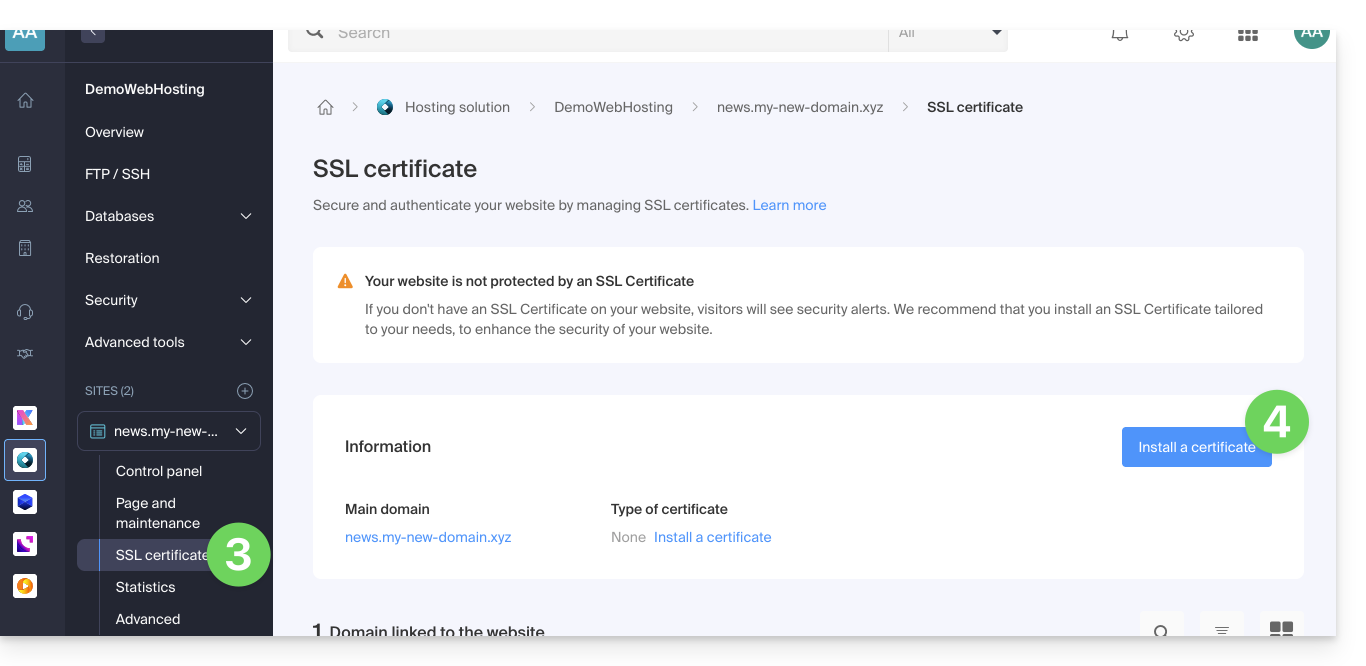
- Choose the custom certificate.
- Click the Next button:

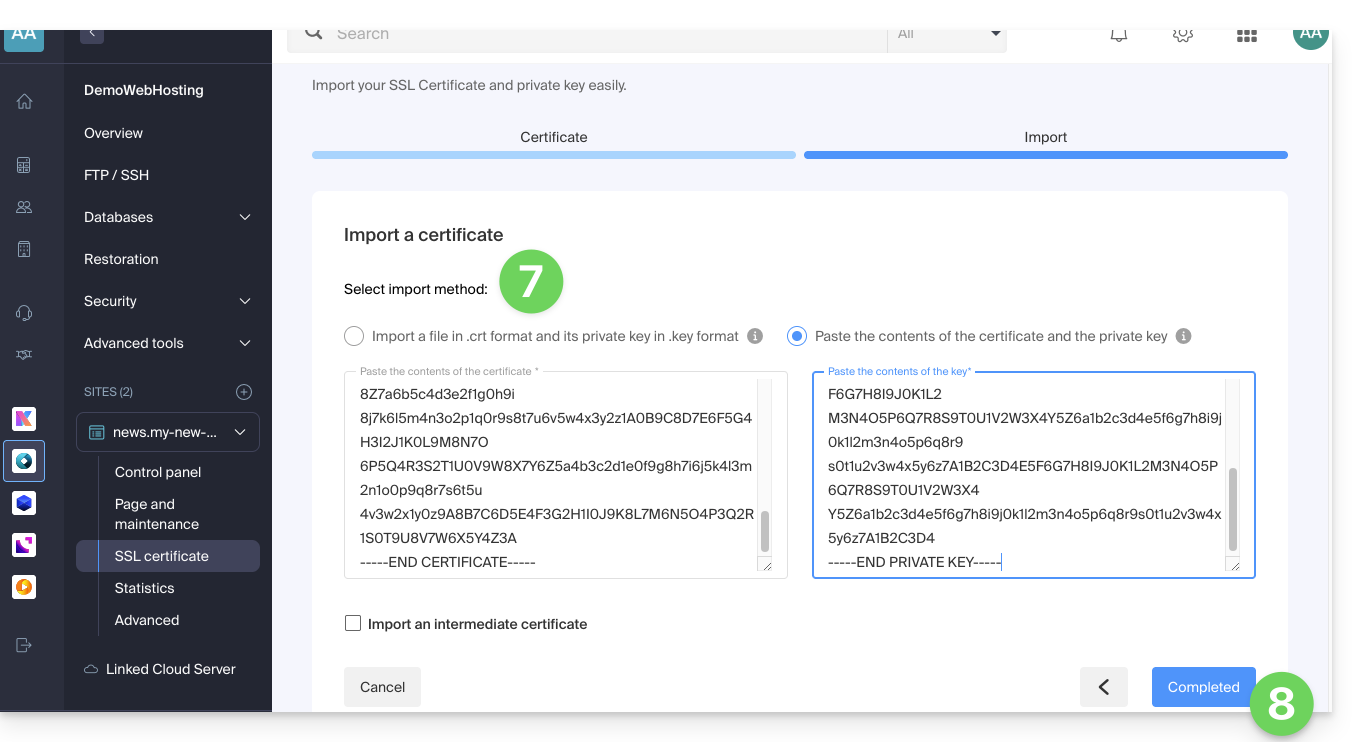
- Import your certificate and private key, either by importing the
.crtand.keyfiles or by copy-pasting. - Click Complete:
Alternative command to generate a self-signed certificate (optional)
If you want a local certificate only for testing or without going through a CA (not recommended for production), you can use this command:
openssl req -x509 -nodes -days 365 -newkey rsa:2048 -keyout domain.xyz.key -out domain.xyz.crt -addext “subjectAltName = DNS:domain.xyz, DNS:www.domain.xyz”This generates both a self-signed certificate (domain.xyz.crt) and a private key (domain.xyz.key). However, self-signed certificates are not recognized as valid by public browsers or systems. They are only suitable for internal or development environments.
Import an intermediate certificate
When adding a custom SSL certificate, it is possible to import the intermediate certificate (by importing the .crt file or copy-pasting the data provided by the certification authority):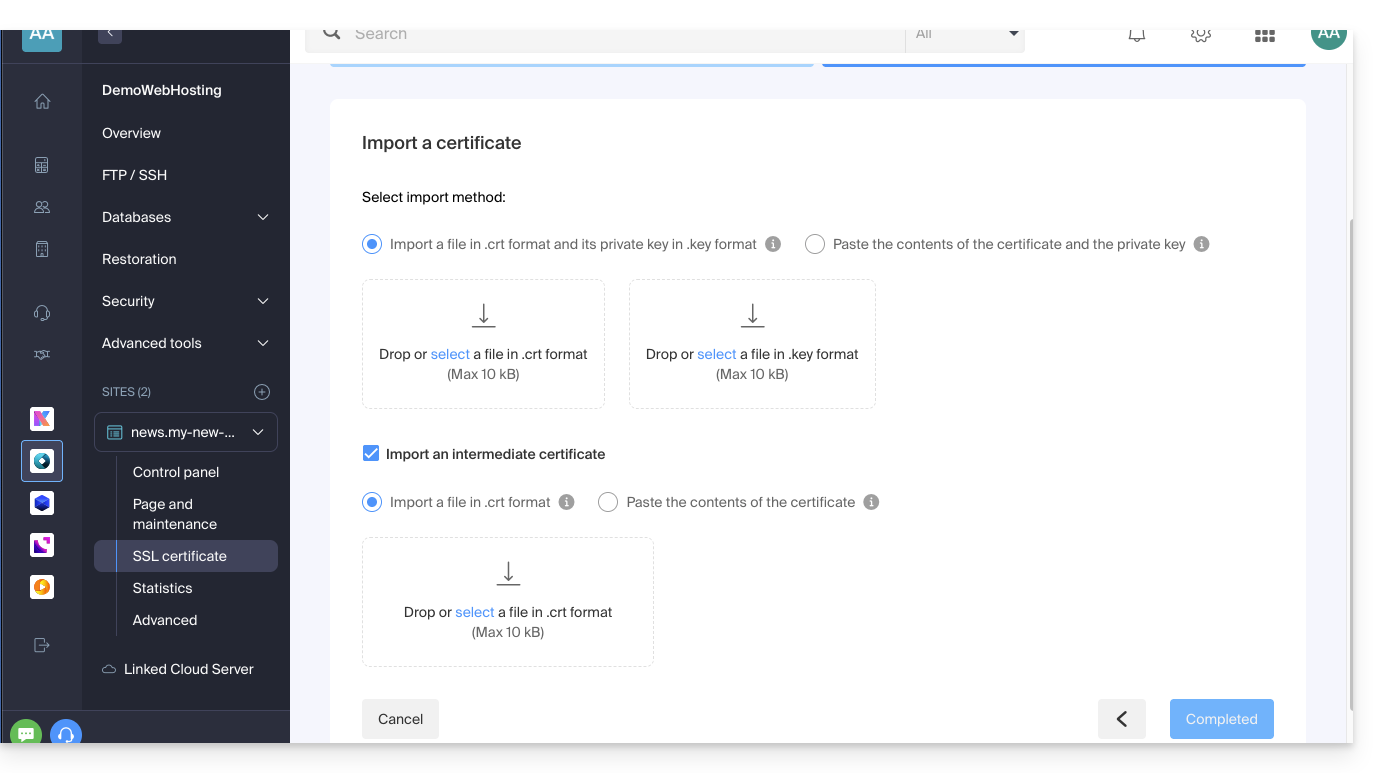
Link to this FAQ: https://faq.infomaniak.com/2027
Has this FAQ been helpful?
This guide explains how to generate a certificate signing request (CSR) for a domain name and all its subdomains with a Web Hosting (excluding free hosting of type Starter), thus allowing you to encrypt the connection to your domain name and all its subdomains via a single SSL certificate.
Preamble
- The configuration allows for a "named site" and a "backup site"; to ensure this works without conflict, make sure that the wildcard and your specific subdomains do not overlap on the same web hosting:
- DNS Level the priority is natural: if a specific subdomain exists (e.g.,
private.domain.xyz), it is the one that is requested; otherwise, the request is redirected to the wildcard (*.domain.xyz). - Server Level it is necessary to be vigilant: if the wildcard and the specific subdomain are on the same server, it is the software implementation (Apache) that decides; Apache processes requests according to the evaluation order of the configuration files.
- The risk: if the wildcard is evaluated first, it "captures" all the traffic, making your specific subdomain inaccessible, even if it exists elsewhere.
- Therefore, do not place the wildcard on the same hosting as a more specific overlapping subdomain.
- DNS Level the priority is natural: if a specific subdomain exists (e.g.,
Setting up a Wildcard Certificate
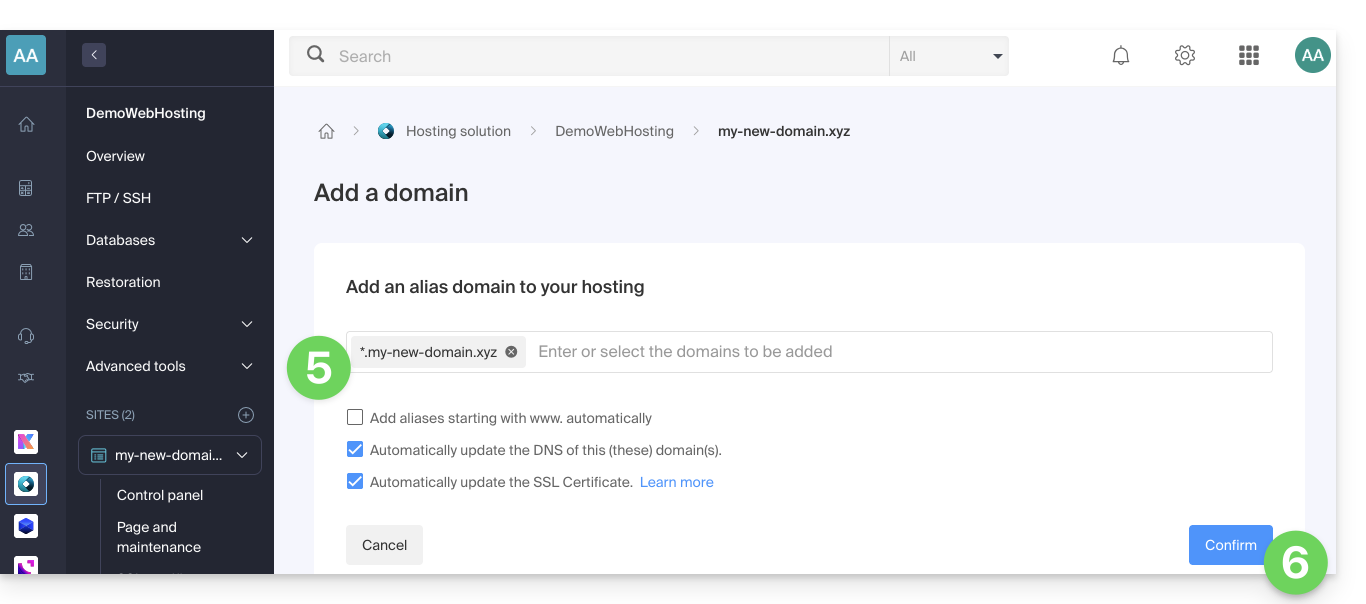
1. Add an alias domain with an asterisk *
To add an alias of type * to your website:
- Click here to access the management of your site on the Infomaniak Manager (need help?).
- Click directly on the name assigned to the site concerned:
- Click on the chevron to expand the Domains section of this site.
- Click on the Add a Domain button:
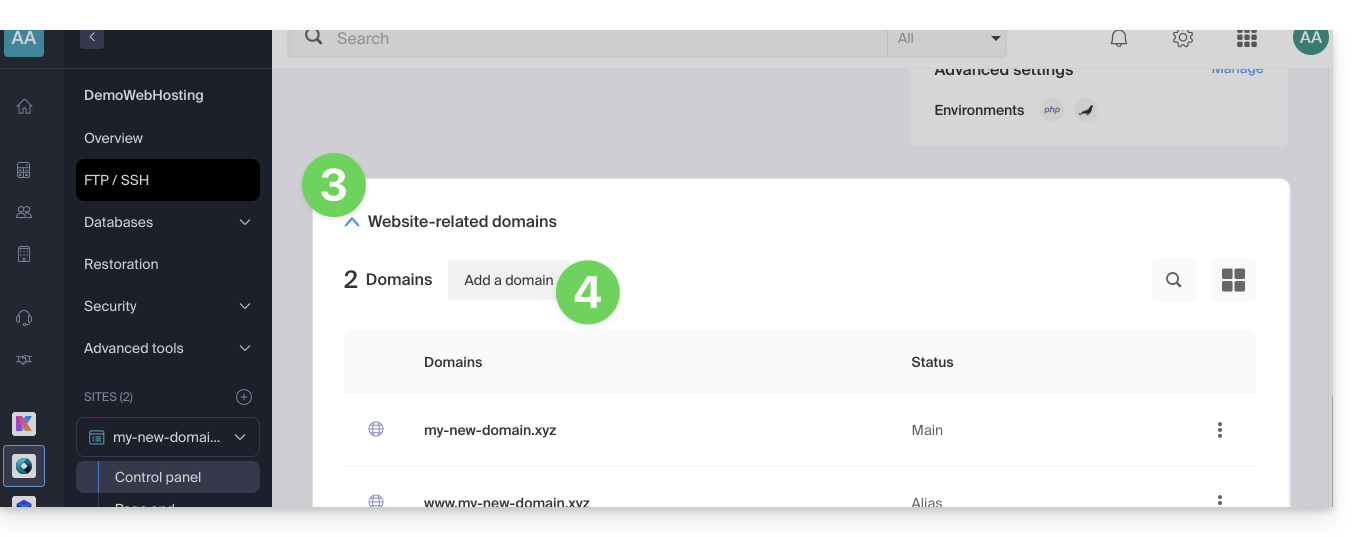
- Enter the domain name to be added in this form:
*.domain.xyz(the asterisk is mandatory, followed by a dot, then the domain name of the website which is domain.xyz in this example)
- Click on the Confirm button to complete the procedure:
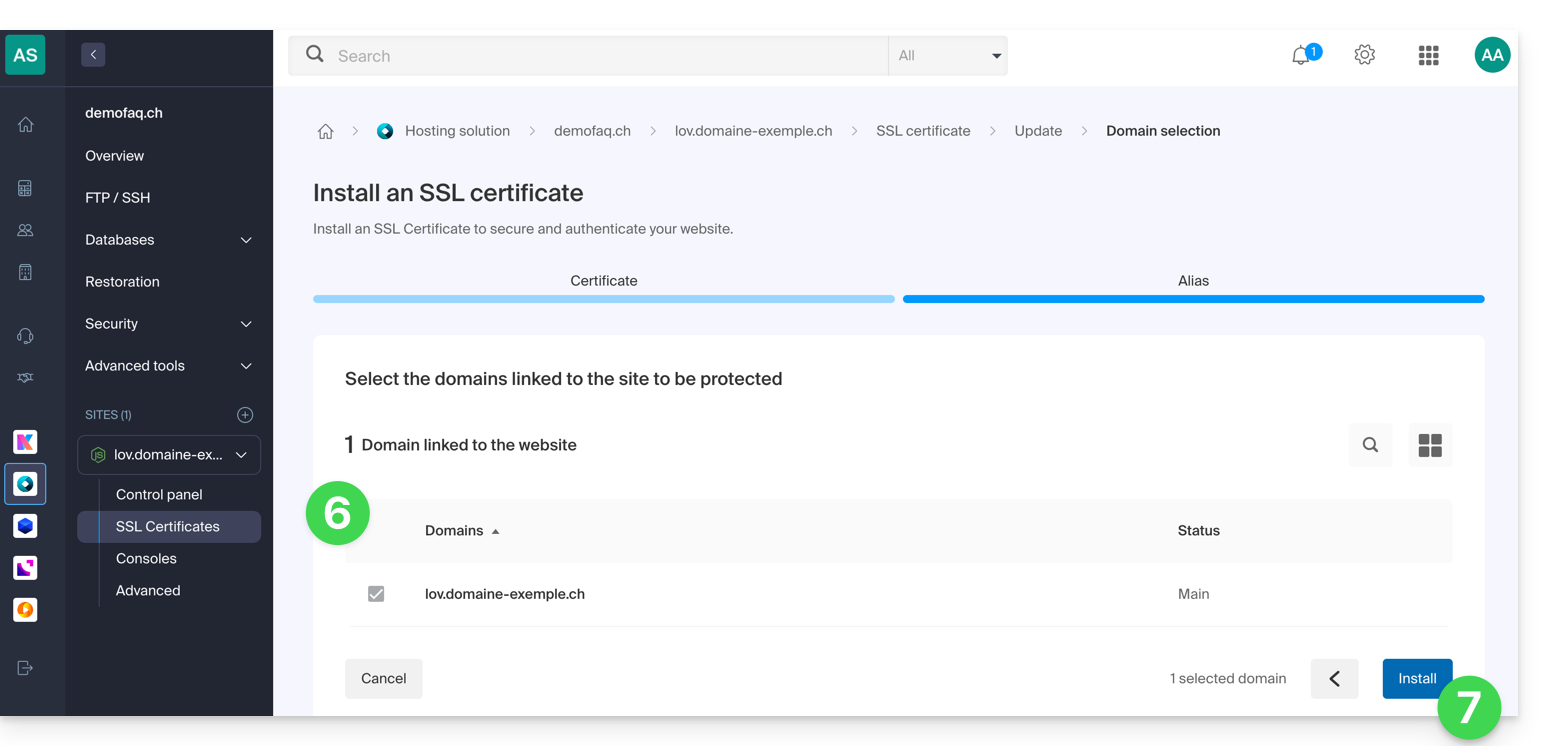
2. Install or update an SSL certificate
Example of updating the existing certificate to include the * wildcard subdomain:
- Click here to access the management of your site on the Infomaniak Manager (need help?).
- Click directly on the name assigned to the site concerned.
- Click on SSL Certificate in the left sidebar menu.
- Click on the action menu ⋮ located on the right.
- Click on Update the certificate:

- Make sure the recently added subdomain is selected.
- Click on the Install button at the bottom:

- Wait for the creation or update to complete.
Link to this FAQ: https://faq.infomaniak.com/2096
Has this FAQ been helpful?
This guide explains how to install a free SSL certificate from Let's Encrypt on a website hosted by Infomaniak.
Introduction
- Once the certificate is installed, your website will be accessible via
httpandhttps… - If you want to include a domain alias that was recently added to your site, which already had a certificate, you need to update it.
- For multiple subdomains, please refer to this other guide.
- Let's Encrypt limits certificate installation to:
- 100 subdomains
- 20 certificates per 7 days per registered domain
- 5 unsuccessful requests per account per hostname per hour
Install a free SSL certificate on a site
Prerequisites
- For the installation to be possible, the DNS records for the domain name must be correctly configured to point to the site in question.
- If a change has just been made at this level, some operations may not be functional immediately.
To access the websites to install an SSL certificate:
- Click here to access the management of your site on the Infomaniak Manager (need help?).
- Click on the action menu ⋮ located to the right of the website in question.
- Click on Install an SSL certificate:
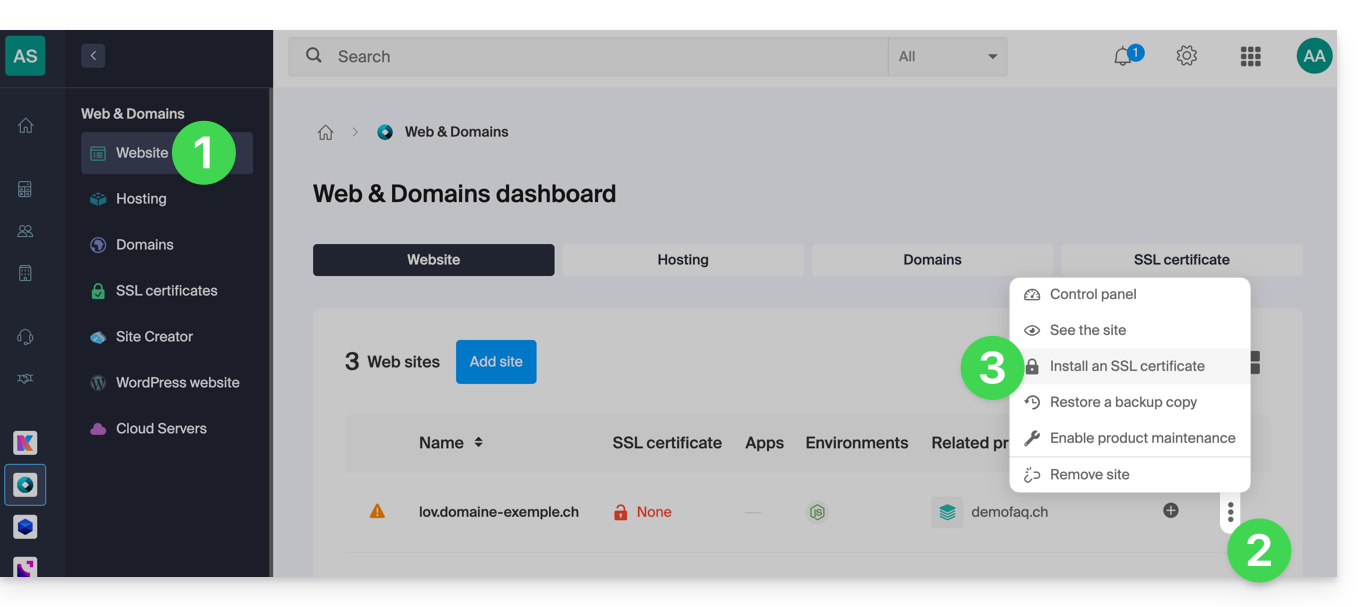
- Choose the free certificate.
- Click on the Next button:
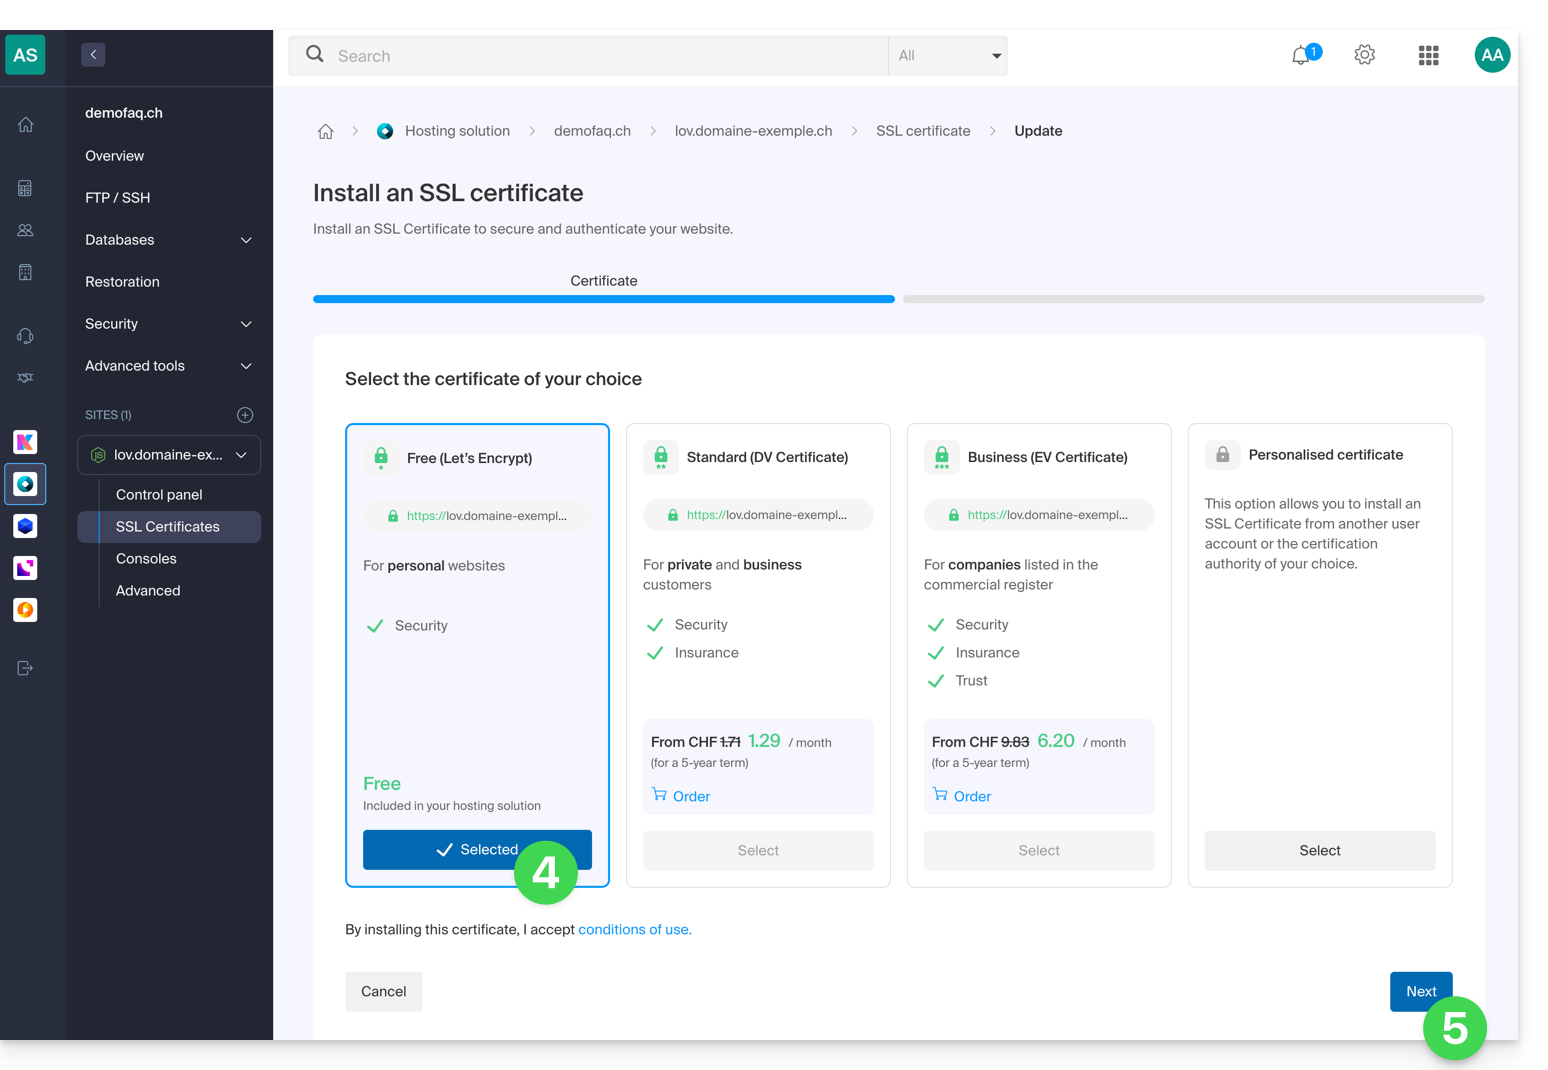
- Check or select the domains concerned.
- Click on the Install button:
- Wait a few minutes for the certificate to be obtained for the website.
Refer to this other guide if you encounter SSL errors and to this other guide specifically if you are using Cloudflare.
Link to this FAQ: https://faq.infomaniak.com/2130
Has this FAQ been helpful?
This guide suggests solutions to resolve common issues and frequent errors that may occur when you try to display your website in https after activating an SSL certificate.
The web browser automatically displays the http version of the site when you try to access it in https
It is recommended to perform the following actions:
- Clear the cache of your applications or your site.
- Check that the pages and scripts of the site do not contain redirects to the
httpversion of the site. - Check that the site's
.htaccessfile does not contain redirects to thehttpversion of the site. - Set the site's
httpsaddress as the default one:
The website is displayed incorrectly (missing images, unsupported stylesheets, etc.) or displays a warning in the address bar
It is recommended to perform the following actions:
- Clear the cache of your applications or your site.
- Check that the pages and scripts do not point to external resources in
http; the site whynopadlock.com can help you identify the unsecured elements of your site. - Also refer to this other guide on this subject.
"This web page presents a redirection loop", "ERR_TOO_MANY_REDIRECTS"
If your web browser displays this error, it is recommended to perform the following actions:
- If the site works with a web application like WordPress or Joomla, disable the extensions one by one to identify the problematic one.
- Check that the pages and scripts of the site do not contain redirects to the http version of the site.
- Try to disable HSTS.
- If Prestashop is used, SSL must be activated on all pages:
- Add your SSL domain:
- Go to Preferences > SEO & URLs.
- In the "Store URL" section, enter your site's address in the "SSL Domain" field (without the
https://, justwww.domain.xyz).
- Activate SSL:
- Go to Preferences > General settings.
- At the top of the page, click on "Click here to use the HTTPS protocol before activating SSL mode."
- A new page will open with your site in the secure HTTPS version.
- Force the use of SSL on the entire site:
- Go back to Preferences > General settings.
- Set the "Enable SSL" option to YES.
- Also set "Force the use of SSL for all pages" to YES.
- Add your SSL domain:
An old SSL certificate is displayed - clear the SSL cache
Web browsers cache SSL certificates to speed up navigation. Normally, this is not a problem. However, when you develop pages for your website or install a new certificate, the browser's SSL state can hinder you. For example, you might not see the padlock icon in the browser's address bar after installing a new SSL certificate.
The first thing to do in this case is to make sure that the domain points to the server's IP address (A and AAAA records) and if it is still the wrong SSL certificate that is returned, clear the SSL cache:
- Chrome: go to Settings and click on Settings. Click on Show advanced settings. Under Network, click on Change proxy settings. The Internet Properties dialog box appears. Click on the Content tab. Click on Clear SSL state, then click OK. Refer to other leads in this other guide.
- Firefox: go to History. Click on Clear Recent History then select Active Connections and click on Clear Now.
Loss of CSS formatting
If the website displays without CSS style, analyze page loading with the browser Console. There may be mixed content errors (mixed content) related to your styles .css, which you will need to resolve for them to be loaded correctly again.
Cloudflare
If you are using Cloudflare, refer to this other guide on the subject.
Link to this FAQ: https://faq.infomaniak.com/2131
Has this FAQ been helpful?
This guide explains how to uninstall an SSL Certificate regardless of its type, initially installed from the Infomaniak Manager. If your certificate is of the paid type and you wish to cancel the current offer instead, refer to this other guide.
Remove an SSL certificate
To uninstall an Infomaniak certificate:
- Click here to access the management of your SSL certificate on the Infomaniak Manager (need help?).
- Click directly on the name assigned to the product concerned:
- Click on the action menu ⋮ located to the right of the item concerned.
- Click on Uninstall:
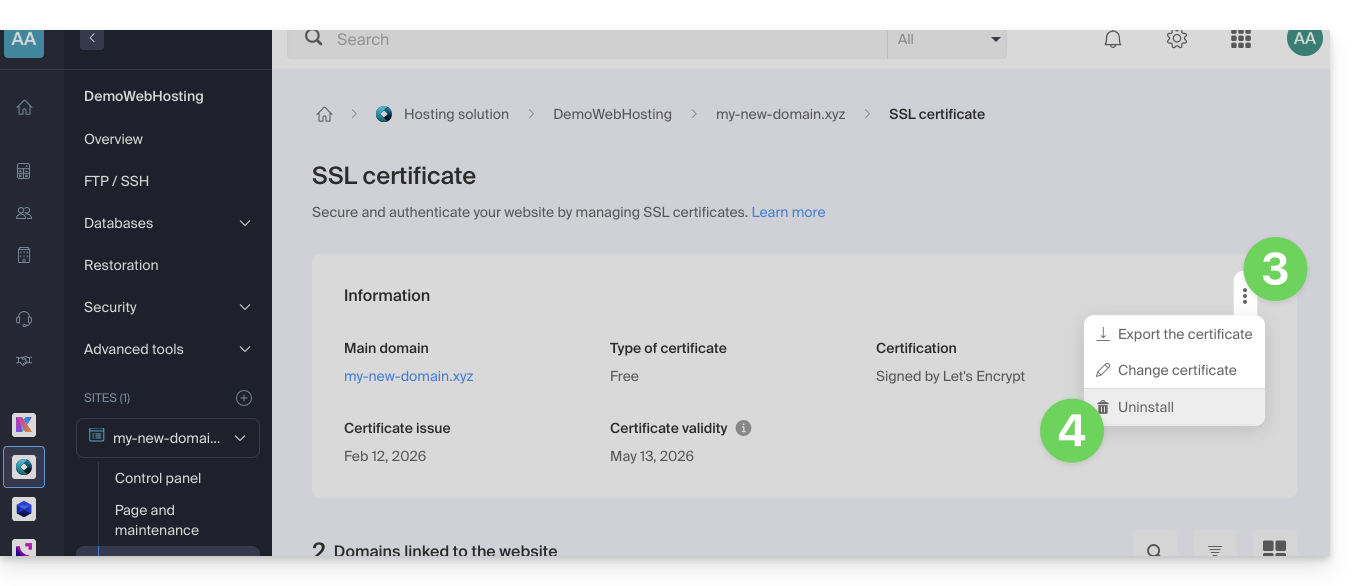
- Confirm the uninstallation of the certificate.
Link to this FAQ: https://faq.infomaniak.com/2250
Has this FAQ been helpful?
This guide details the conditions and the procedure for obtaining a Sectigo EV SSL certificate via Infomaniak.
Preamble
- Extended Validation (EV) SSL certificates are exclusively reserved for organizations, companies, and entities legally registered with a recognized government authority (such as a commercial register).
- DV certificates from Sectigo and Let's Encrypt are not subject to this constraint.
- Compare available SSL certificates
- If you encounter difficulties during the validation of a DV or EV certificate, refer to this other guide.
EV Certificate Validation Procedure
Obtaining an EV SSL certificate may take up to 24 hours and depends on the accuracy of the information provided by the client.
This procedure is renewed at regular intervals (refer to this other guide for more details), regardless of the subscription duration chosen for the certificate.
1. Verification of company details
The data included in the certificate must be previously verified with an independent source:
- Legal name (legal name) or commercial name
- Legal form
- Physical address of the headquarters
- Postal code
- Region / Canton / Department
- Country / Country code
Points of attention:
- The legal name must exactly match the one registered in the commercial register; the request can only be processed if the name is officially registered.
- Only the legal name or the brand name followed by the legal name in parentheses is authorized [ex: Commercial name (Legal name)]. For entities without a distinct legal name, the commercial name can be used.
- The use of a simple post office box (BP) is prohibited; a physical address is required.
Given these requirements, a new request with corrected data in the CSR is sometimes necessary. Infomaniak may also request your approval to modify the information provided during the order.
2. Verification of data in the WHOIS directory
The WHOIS directory lists the information of the owner of a domain name. This data must imperatively match the information provided when ordering the EV SSL certificate.
To update the WHOIS information of a domain:
- If your domain is managed by Infomaniak, refer to this other guide.
- If your domain is managed by another provider, contact your current registrar.
3. Signing of the contract and final validation
Once the EV certificate order is finalized, the designated contact person will receive an email from the certification authority Sectigo containing the following documents:
- The certificate application form
- The subscription contract
These documents are pre-filled. Validation is done online via a verification code transmitted orally by an automated calling system from Sectigo (usually from the Dutch number +31 88 775 77 77).
The call is made to the phone number officially registered with the trade register.
Each certificate request is subject to telephone validation, including for renewals and reissues of multi-domain certificates.
For any questions regarding the validation process, please contact Sectigo directly.
4. Domain verification (external sites only)
This step confirms your control over the domain in question (if it is not hosted with Infomaniak — domains pointing to sites hosted with Infomaniak benefit from automatic validation).
Each domain or subdomain must be approved individually according to one of the methods described in this other guide.
Link to this FAQ: https://faq.infomaniak.com/2303
Has this FAQ been helpful?
This guide details the conditions and procedure for using a Sectigo Infomaniak certificate on a site hosted elsewhere, with a third-party host.
Preamble
- You have the possibility to benefit from Infomaniak's advantageous rates for your SSL certificates while managing your sites with another host.
Install a Sectigo certificate
Due to the different providers, the installation of your certificate will not be automatic:
1. Obtain the CSR
Export the CSR configuration file from your host and enter it when ordering your certificate with Infomaniak.
2. Confirm domain ownership
Validate the domains included in the certificate via one of the following methods:
- Enter a validation code received at one of the following email addresses (the full email address must exist on the domain to be validated, here “
domain.xyz” for example):- admin@domain.xyz
- administrator@domain.xyz
- hostmaster@domain.xyz
- postmaster@domain.xyz
- webmaster@domain.xyz
- Creation of a unique CNAME record in the domain's DNS.
- Validation txt file to upload via FTP to your site.
Link to this FAQ: https://faq.infomaniak.com/2305
Has this FAQ been helpful?
This guide explains the main differences between an EV and a DV certificate.
EV SSL Certificates: for companies
The Sectigo EV SSL certificate can only be issued to companies registered in an official registry.
It provides the highest level of trust with your customers and offers unique benefits in addition to including the benefits of a DV certificate:
Your company name in thenavigation bar- padlock in the navigation bar
- dynamic secure site seal
- validation of your domain name
- manual authentication of your company's contact details and identity
- guarantee up to $1,750,000 for end users
- 7/7 support
Activating an EV SSL certificate can take up to 24 hours and will require actions on your part.
DV SSL Certificates: for companies and individuals
The Sectigo DV certificate is open to individuals and companies. It does not include some of the benefits mentioned above, but it offers additional benefits over free Let's Encrypt SSL certificates:
- dynamic secure site seal
- validation of your domain name
- guarantee up to $10,000 for end users
- 7/7 support
Activation of a DV SSL certificate is immediate.
And the Let's Encrypt certificates?
A free Let's Encrypt certificate guarantees the same level of encryption as an EV or DV certificate. However, Let's Encrypt certificates do not offer the following benefits:
- manual validation of your company's contact details and authenticity (EV)
- guarantee for end users in case of fraud (EV/DV)
- support in case of questions
In summary, Let's Encrypt certificates ensure the encryption of exchanges between your users and your site, but they do not guarantee to internet users that they are on a legitimate site whose identity has been authenticated by a certification authority.
Link to this FAQ: https://faq.infomaniak.com/2306
Has this FAQ been helpful?
The Sectigo guarantee is a financial commitment from Sectigo, the Certification Authority (CA), aimed at protecting the end user.
It applies only if the user suffers a financial loss due to a validation error by Sectigo when issuing the certificate.
It does not cover security vulnerabilities in your server or misconfigurations on your part.
The higher the validation level (DV < OV < EV), the higher the amount of the Sectigo guarantee is generally.
Link to this FAQ: https://faq.infomaniak.com/2307
Has this FAQ been helpful?
Thank you for choosing Infomaniak to secure your sites with a Sectigo EV or DV SSL certificate.
An SSL certificate secures all exchanges between your server and your visitors, displays a padlock, and adds the https to your site.
Main SSL guides
- Order a Sectigo EV SSL certificate
- Understand the difference between EV and DV certificates
- Use a Sectigo certificate on an external site (other host)
- Understand the Sectigo guarantee for SSL certificates
- Resolve an SSL/https issue
- Install a free Let's Encrypt SSL certificate on a site
- Install a free 'wildcard' SSL certificate
- Uninstall an SSL certificate
- Update a Let's Encrypt SSL certificate (for example after adding/removing aliases)
Additional help
- Learn about all SSL FAQs
- Contact Infomaniak support
Link to this FAQ: https://faq.infomaniak.com/2312
Has this FAQ been helpful?
This guide explains how to cancel a paid SSL certificate. If your certificate is a Let's Encrypt (free) certificate, please refer to this other guide.
Introduction
- For most products, confirm the cancellation request by email; otherwise, no data will be deleted.
- Any fees incurred and exceeding the included services remain due.
- A cancellation confirmation is sent to any other administrators of the Organization.
SSL Cancellation Procedure
To access the cancellation process:
- Click here to access the management of your certificate in the Infomaniak Manager (need help?).
- Click on the action menu ⋮ located to the right of the item in question.
- Choose Cancel:
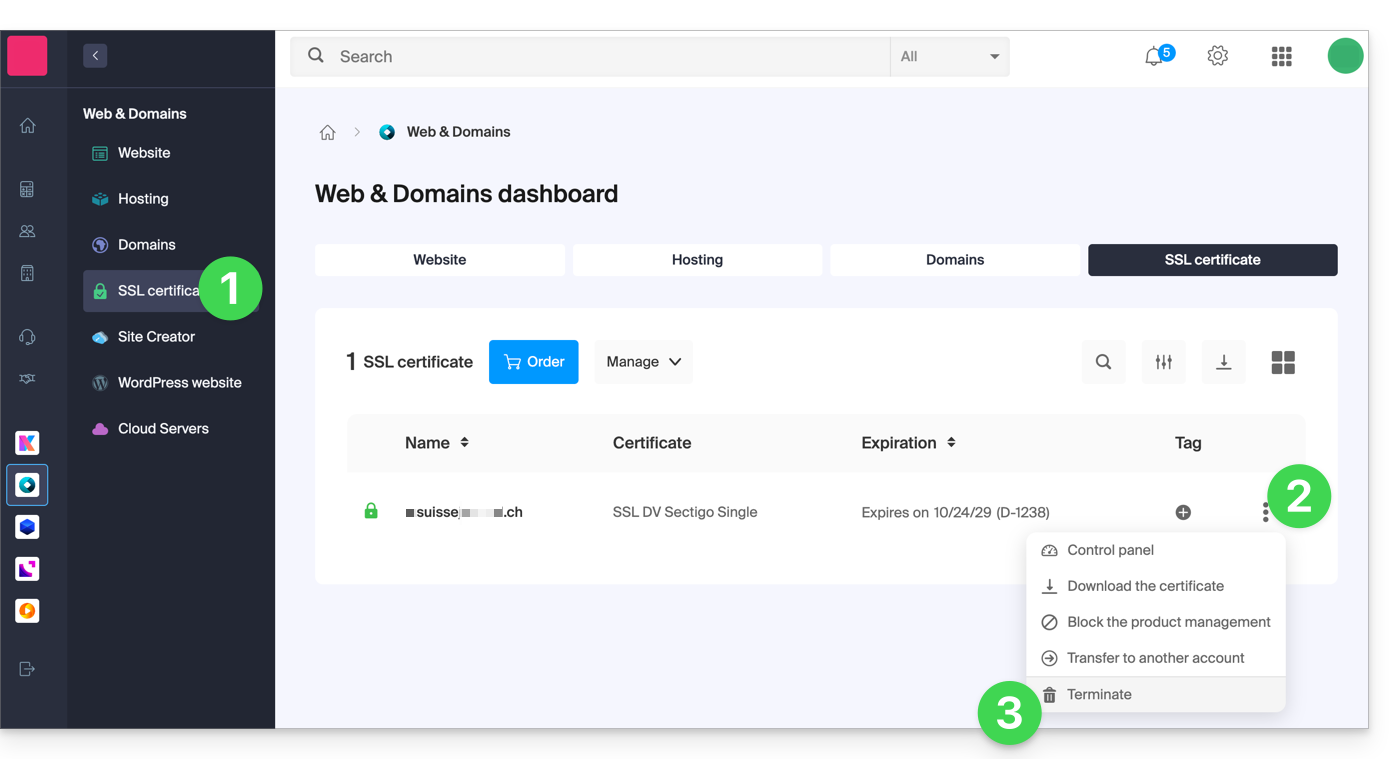
- Follow the procedure to the end.
Link to this FAQ: https://faq.infomaniak.com/2335
Has this FAQ been helpful?
This guide explains how to add a dynamic trust seal to a secure site with a SSL certificate from Sectigo.
Preamble
- Infomaniak, as a host, offers SSL certificates to secure its clients' websites
- Sectigo (formerly known as Comodo) is a recognized SSL certificate provider that offers different levels of security
- The "dynamic trust seal", or "Sectigo Trust Seal" / "Sectigo Trust Logo" is a visual that website owners can display on their pages to indicate to visitors that their connection is secure, a sign of trust that informs users that transactions and information exchanges made on the site are encrypted and protected by an SSL certificate issued by Sectigo.
- By using a Sectigo SSL certificate and displaying the dynamic trust seal, a website at Infomaniak benefits not only from data exchange security but also from increased user trust, essential for e-commerce and personal information protection.
Adding a trust seal
Here's how a dynamic trust seal works:
- Validation: to obtain such a seal, the site owner must first obtain a valid SSL certificate from Sectigo, which requires a validation process; depending on the level of certificate chosen (Domain Validation - DV, Organization Validation - OV or Extended Validation - EV), this validation may be more or less in-depth
- Installation: once the SSL certificate is obtained and installed on the Infomaniak web server, the website is then able to establish secure HTTPS connections
- Displaying the seal: Sectigo provides an HTML code or script that the site owner can then integrate into their website; this code allows the Sectigo dynamic trust seal to be displayed
- Update: the seal is often updated in real-time to reflect the current status of the SSL certificate; if the certificate were to expire or be revoked, the seal would also reflect this, warning potential visitors that the site may no longer be secure
The trust seal consists of an image and an HTML code. The latter only works if a Sectigo certificate is installed on the site and in this case generates an interactive logo that displays the certificate data.
Save one of the images below
Right-click on the image to save, then click on Save image as...
- Small

- Medium

- Large

Upload the image to your site
Send the image to your web server (via FTP or your CMS) and note the URL to access this image for the next step (for example https://domain.xyz/wp-content/uploads/sectigo.png).
Get the code to integrate into your pages
Enter the full address of your image on the page https://www.trustlogo.com/install/index2.html to check if the image is accessible.
Click the Continue button on the same page to get the 2 codes to copy-paste into the header of your (or your) web page(s):

Important:
- In the code,
CL1corresponds to aDVSSL certificate; replaceCL1withSC5for anEVtype SSL certificate.
Link to this FAQ: https://faq.infomaniak.com/2338
Has this FAQ been helpful?
This guide details the validity rules for EV and DV SSL certificates, following the latest directives from the cybersecurity sector.
Validity period of SSL certificates
At the initiative of the CA/B Forum (which brings together major Web players such as Apple, Google, and Mozilla) and in order to strengthen overall security of exchanges, the maximum validity period of SSL certificates has been reduced. As of mid-March 2026, any new certificate issued by Sectigo has a maximum validity period of 200 days (approximately 6 months), compared to 397 days previously.
This shortening of the certificate lifecycle aims to limit risks related to hacking and to ensure that company identity information is verified more frequently. This change does not affect the price or the commitment period of your product.
The Let's Encrypt SSL certificates are not affected by this change (Infomaniak automatically manages their renewal). Certificates issued before the change remain valid until their initial expiration date.
Sectigo SSL DV certificates
For SSL DV (Domain Validation) certificates, Infomaniak ensures automatic renewal every 6 months (the new certificate is generated during the month preceding its expiration).
- If your site is hosted with Infomaniak: the installation of the new certificate is completely transparent and automatic.
- If your site is hosted outside of Infomaniak: you will need to manually reinstall the certificate on your server with each renewal (every 6 months).
Sectigo SSL EV certificates
Due to their higher level of security, SSL EV (Extended Validation) certificates require manual validation of the company every 6 months, regardless of the subscription period chosen.
- This procedure involves a new verification of your data and a validation call (as described in this other guide).
- As with DV certificates, manual reinstallation is imperative if the certificate is used on a server external to Infomaniak.
Link to this FAQ: https://faq.infomaniak.com/2470
Has this FAQ been helpful?
This guide explains how to resolve an SSL certificate (Let's Encrypt or Sectigo) installation issue if you are using Cloudflare with strict security rules, such as country or IP address filtering.
Adjust SSL / geoblocking settings
When an SSL certificate is requested via Infomaniak (free Let's Encrypt or Sectigo), the certification authority must verify that you are the owner of the domain. This verification can be done via HTTP (using special files placed on your site), DNS, or email:
- Let's Encrypt uses
/.well-known/acme-challenge/. - Sectigo usually uses
/.well-known/pki-validation/(or DNS / email depending on the option chosen).
If these verifications fail (for example, because Cloudflare blocks access), the certificate cannot be issued or renewed. However, Let's Encrypt no longer checks from a single location. For some time (and even more since March 2024), it performs its checks from multiple countries at the same time – including new ones like Sweden or Singapore. Result: if one of these countries is blocked by your Cloudflare settings, the certificate request may fail, even if everything else is correctly configured.
Worse still: even if you try to make an exception only for the challenge address (.well-known/acme-challenge), this does not always work with certain Cloudflare rules. Indeed, country or IP blocking rules are applied before any URL path-based exception.
Adjust SSL/TLS mode
In Cloudflare, use the Full or Full (strict) mode. These modes temporarily tolerate an expired or self-signed certificate, until the validation is complete:
Allow validation paths
Avoid blocking "IP Access Rules" and prefer "Custom Rules" that allow unrestricted paths:
/.well-known/acme-challenge/(Let's Encrypt)/.well-known/pki-validation/(Sectigo)
Temporarily disable geoblocking
If necessary, temporarily disable geographic or IP blocking for the duration of the validation, then reactivate your protections after the certificate is issued or renewed.
Link to this FAQ: https://faq.infomaniak.com/2517
Has this FAQ been helpful?
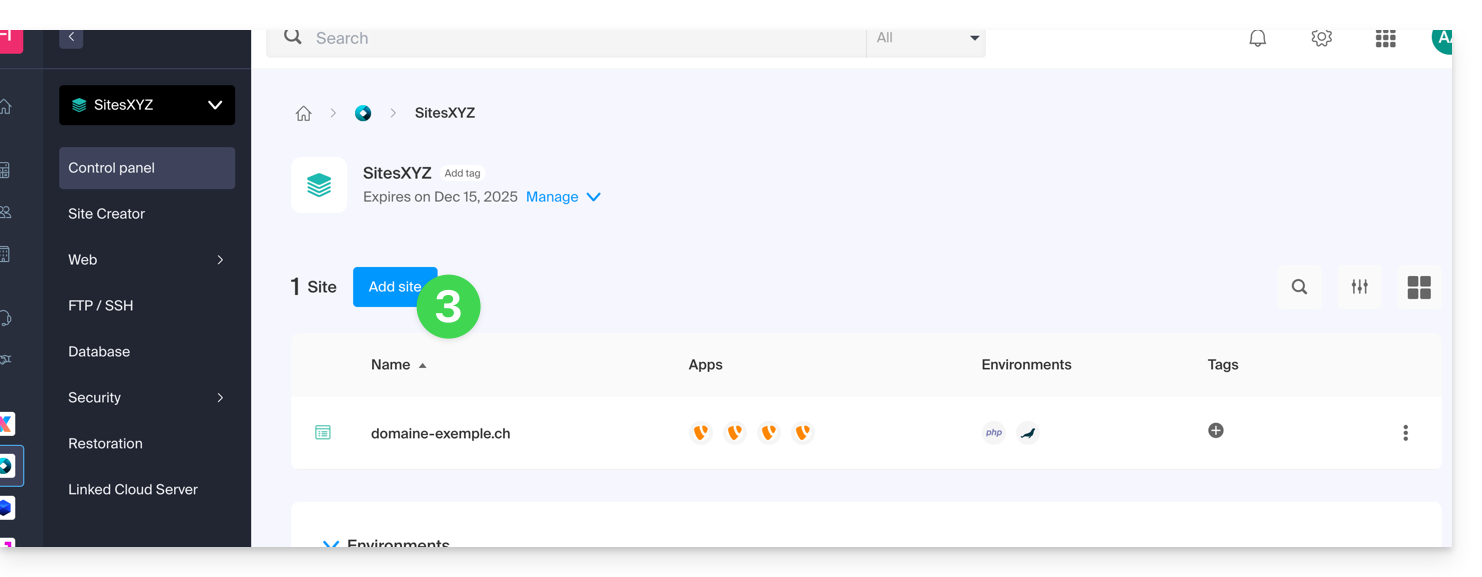
This guide explains how to add two different EV or DV SSL Certificates to the same site.
Preamble
- Since it is not possible to install two SSL certificates on the same site, it is necessary to create two identical sites.
Creation of the second site
Prerequisites
- Remove any potential alias domain name from your site.
To access the Web Hosting to add a site:
- Click here to access the management of your product on the Infomaniak Manager (need help?).
- Click directly on the name assigned to the product in question.
- Click on the button Add a site:
- Continue without installing a tool:
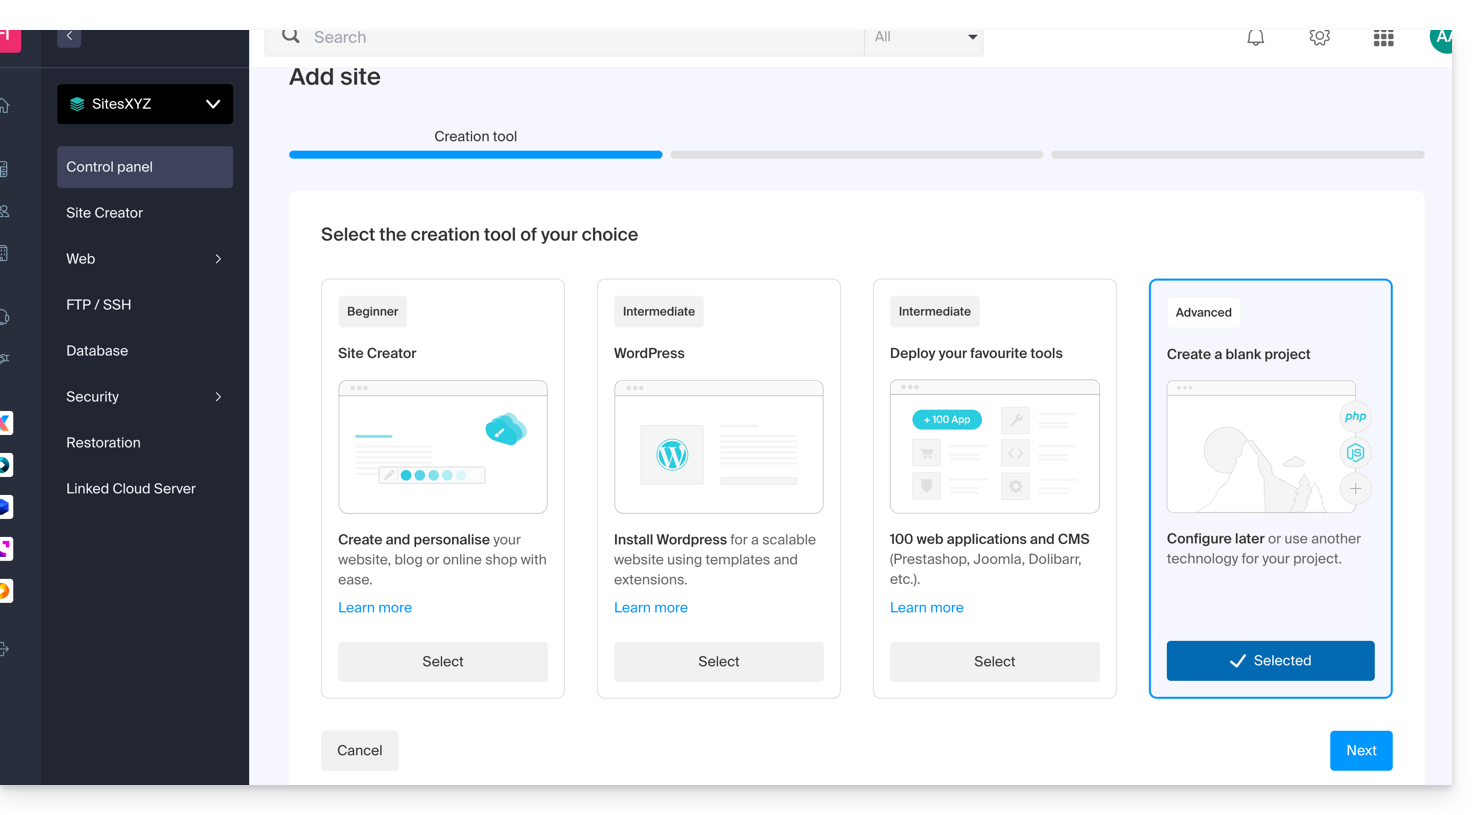
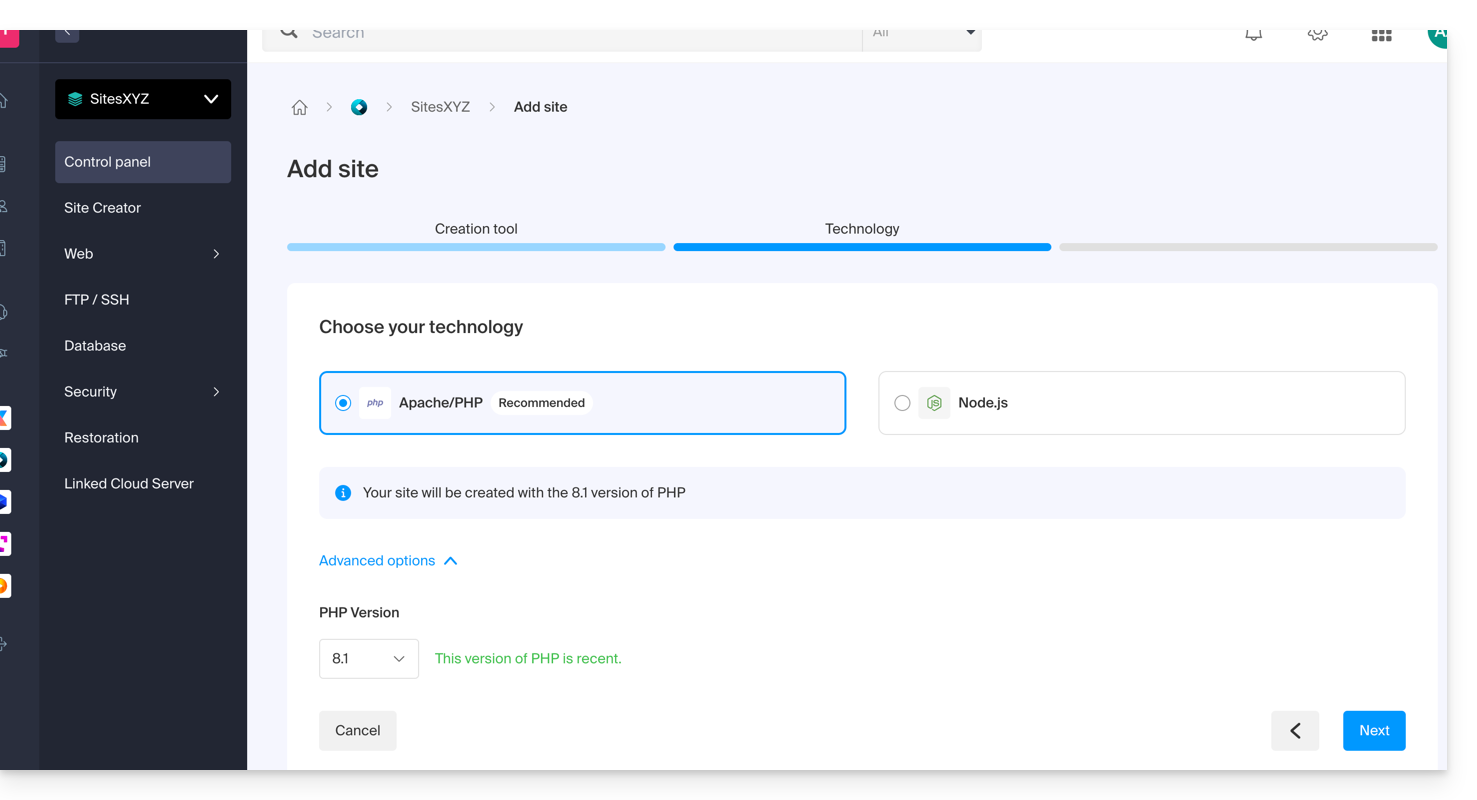
- Click on Apache and choose the same PHP version as the main site::
- Choose between using a domain name or a subdomain.
- Enter the domain or subdomain name.
- Click on Advanced options.
- Activate (or not) the Let's Encrypt SSL certificate on the future site.
- Check the box Manually define the location.
- Choose the same location as the main site:
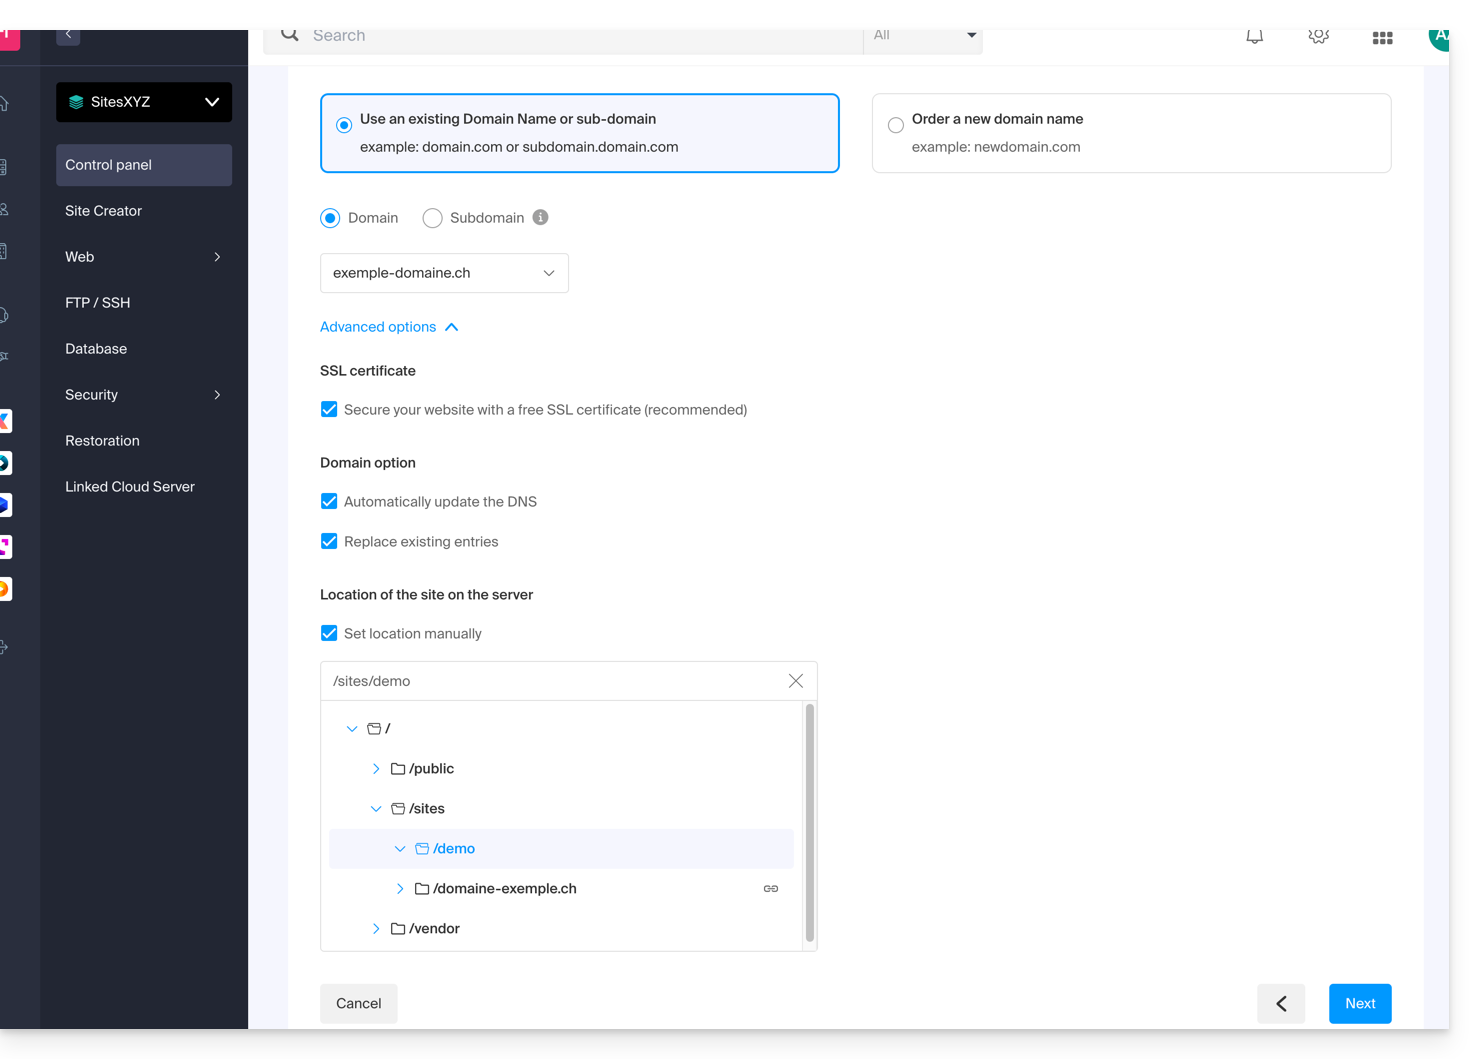
- Click on the blue button Next to start the site creation.
Install the SSL certificate
Once the second site is created (any addition/modification can take up to 48 hours to propagate), you will be able to install an SSL certificate (if you chose not to install the certificate in step 9 above).
To access website management:
- Click here to access the management of your product on the Infomaniak Manager (need help?).
- Click directly on the name assigned to the product in question.
- Click on SSL Certificates in the left sidebar.
- Click on the blue button Install an SSL certificate and follow the procedure.
Link to this FAQ: https://faq.infomaniak.com/2522
Has this FAQ been helpful?
This guide is for you if you encounter issues with a Sectigo SSL certificate of type DV or EV.
Sectigo Change (June 2025)
Since June 2025, Sectigo uses a new validation infrastructure called MPIC, which performs the necessary checks to issue SSL certificates (including EV and OV) from servers located around the world, and no longer solely from the United States.
A challenge is a method used by the certification authority to verify that the applicant controls the domain. This can be done through an HTTP request, a DNS record, or an email. For EV and OV certificates, this challenge is combined with checks on the organization's identity.
With this new method, validation requests can come from any country or provider. If your site or server uses geoblocking rules, a web application firewall (WAF), or a service like Cloudflare with access restrictions by country or ASN, these checks may be blocked, causing validation to fail.
Even though Sectigo primarily discusses OV and EV certificates, this change can also indirectly affect DV certificates, as domain validation still relies on the ability to access the necessary resources.
⚠️ To avoid any issues, it is therefore recommended to temporarily disable any geographic restrictions or network filtering during certificate validation.
Link to this FAQ: https://faq.infomaniak.com/2790
Has this FAQ been helpful?