Knowledge base
1000 FAQs, 500 tutorials and instructional videos. Here, there are only solutions!
This guide helps you resolve any issues with activating your Windows Server license.
Preamble
- Check for any ongoing issues on https://infomaniakstatus.com/.
- For Public Cloud specifically, the list of scheduled maintenance and ongoing issues is available at https://status.infomaniak.cloud/.
Modify the registered key
Open the Run utility (key Windows logo + R).
Remove the registered key
Run the following command:
cscript.exe c:\windows\system32\slmgr.vbs -upk
Add a new key
Restart the Run utility, then run the following command:
cscript.exe c:\windows\system32\slmgr.vbs -ipk {CLE/KEY}Replace {CLE/KEY} with the key from your configuration below:
| Operating system | KMS key |
|---|---|
| Windows Server 2019 Datacenter | WMDGN-G9PQG-XVVXX-R3X43-63DFG |
| Windows Server 2019 Standard | N69G4-B89J2-4G8F4-WWYCC-J464C |
| Windows Server 2022 Datacenter | WX4NM-KYWYW-QJJR4-XV3QB-6VM33 |
| Windows Server 2022 Standard | VDYBN-27WPP-V4HQT-9VMD4-VMK7H |
| Windows Server 2025 Standard | TVRH6-WHNXV-R9WG3-9XRFY-MY832 |
| Windows Server 2025 Datacenter | D764K-2NDRG-47T6Q-P8T8W-YP6DF |
Activate Windows
Restart the Run utility, then run the following command to associate the key with the Infomaniak activation robot:
cscript.exe c:\windows\system32\slmgr.vbs -skms kms.infomaniak.cloudRestart the Run utility, then finally run the following command to activate your Windows system:
cscript.exe c:\windows\system32\slmgr.vbs -atoLink to this FAQ: https://faq.infomaniak.com/267
Has this FAQ been helpful?
This guide explains the process for withdrawing and restoring assets when a Public Cloud product is terminated.
Withdrawing and Restoring Assets on Public Cloud
It is recommended to manually export and delete all resources before terminating the product.
When a voluntary termination is performed, the resources associated with the Public Cloud are gradually deactivated and then deleted.
DNS resources of the DNSaaS (Designate) type are immediately deleted upon termination.
Other resources are deactivated across all Public Cloud regions:
- users and projects are deactivated;
- access to the remaining resources is no longer possible;
- resources that are still exposed are deactivated:
- S3 buckets and Swift containers (Object Storage);
- stopped Compute instances (power-off);
- automatic exit from pause mode before instance shutdown;
- automatic exit from rescue mode before instance shutdown;
- deactivation of Load Balancers (LBaaS);
- deactivation of orchestrations and alarms (Heat).
Resources that are not exposed are not immediately modified, including:
- volumes;
- images;
- backups;
- snapshots;
- public keys;
- private networks;
- secrets.
Asset Retention Period
With the exception of DNS resources, assets are retained for a period of 7 days after termination.
On the 7th day at 3:00 AM, all remaining resources are permanently deleted, with no possibility of restoration.
Restoring Assets After Termination
After the product is terminated, a request for restoration can be made within a maximum period of 3 calendar days.
This request requires:
- an active subscription to a Public Cloud product;
- an up-to-date billing status;
- compliance with the applicable contractual terms.
Provided that the data is still available on the storage infrastructure, suspended services can be reactivated within a maximum period of 4 days after the request is approved.
Stopped instances are not restarted automatically. However, they can be restarted manually if necessary.
Exporting assets remains your responsibility.
Link to this FAQ: https://faq.infomaniak.com/1052
Has this FAQ been helpful?
This guide explains how to transfer an instance to another physical machine within the Infomaniak Public Cloud.
Preamble
- This operation can be performed at any time and offers several advantages:
- anticipate or avoid scheduled maintenance;
- distribute the load among multiple hosts;
- improve the stability or performance of an instance.
Migrate the instance to another physical machine…
… from Horizon
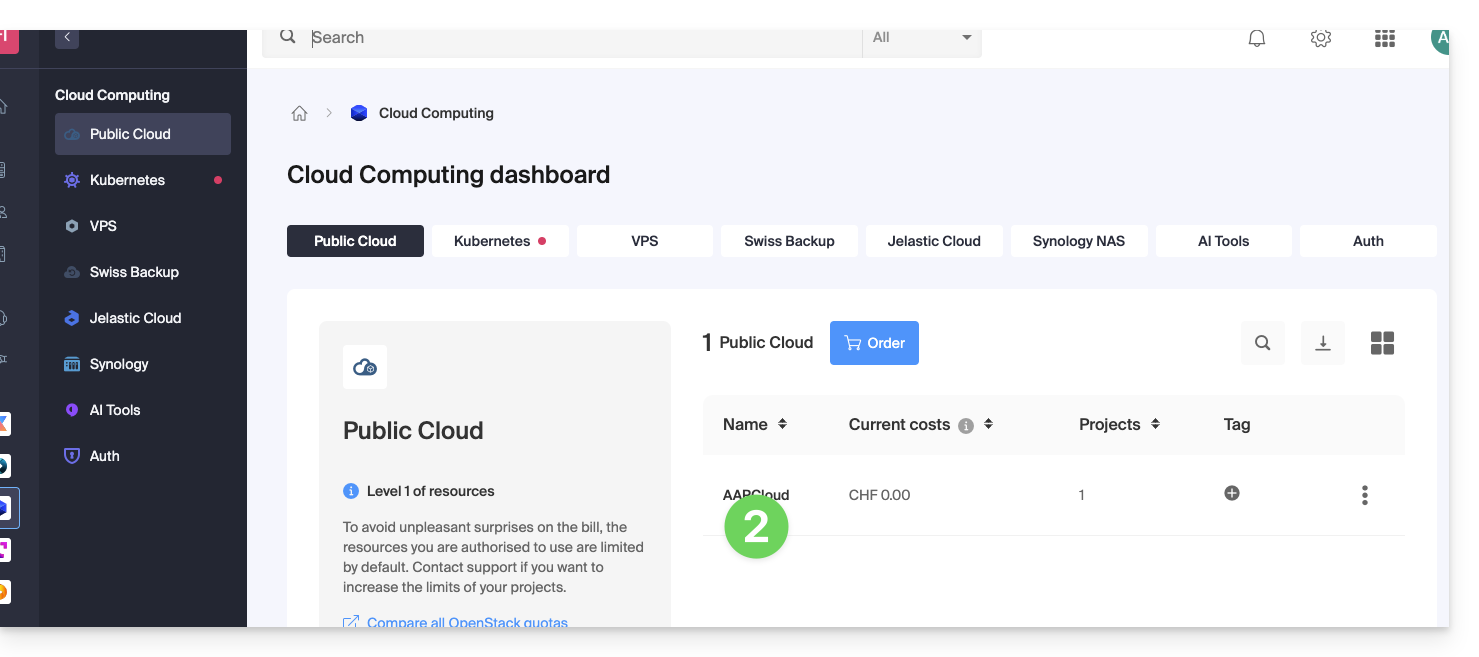
- Click here to access the management of your product on the Infomaniak Manager (need help?).
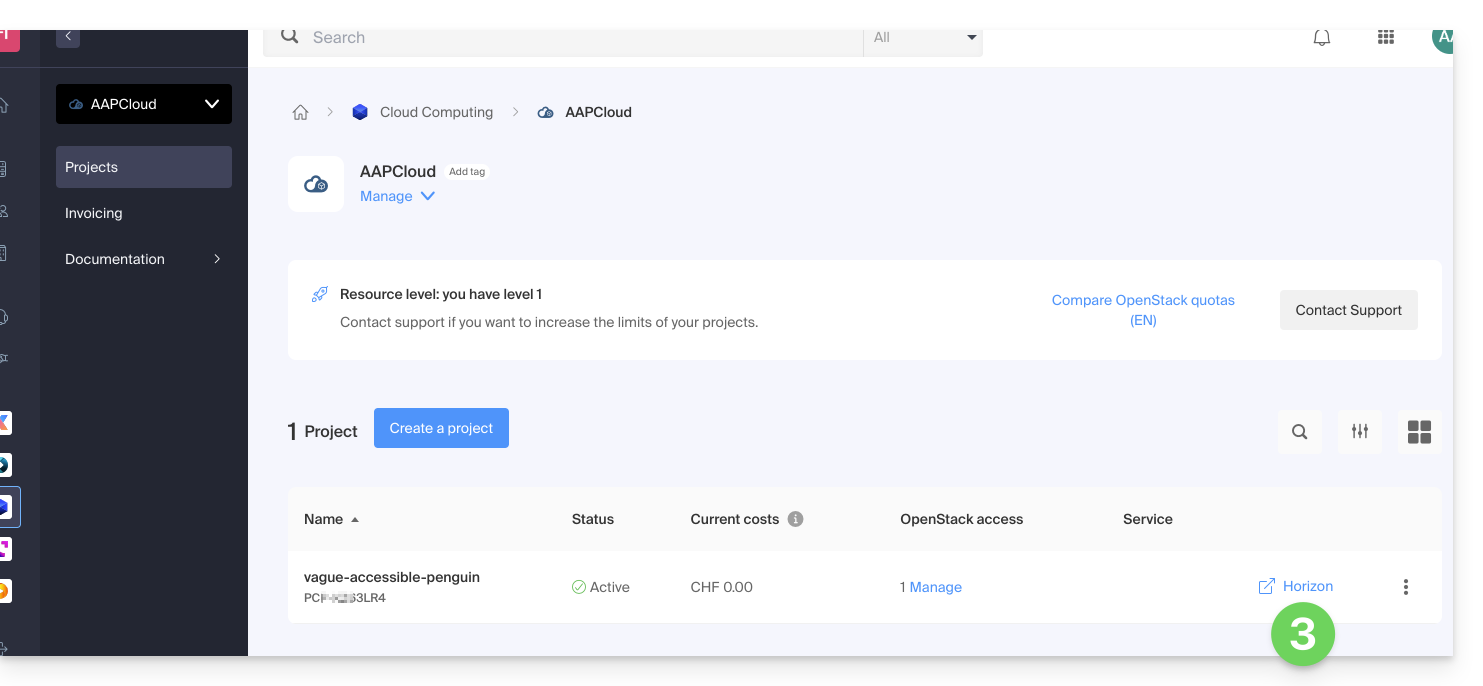
- Click directly on the name assigned to the product concerned:
- Click on the shortcut Horizon to connect:
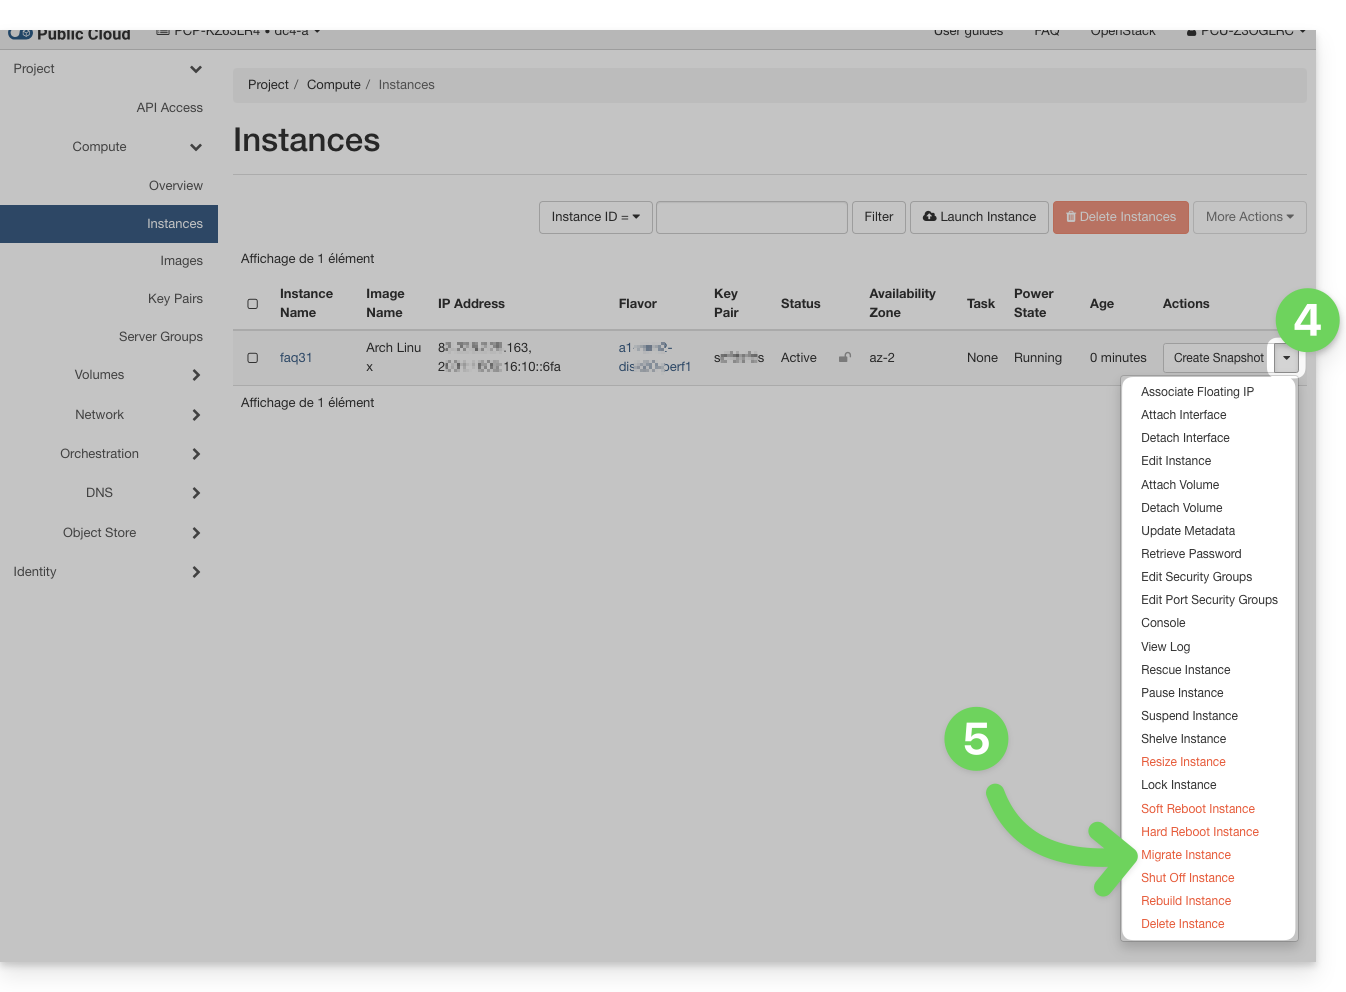
- In the Instances menu, click on the action menu ⋮ located to the right of the instance to be transferred.
- Click on Transfer an instance (Migrate):
- Confirm the transfer:
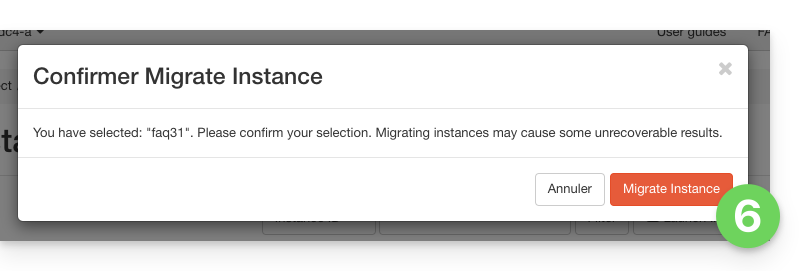
- Check the current status and wait a few minutes:
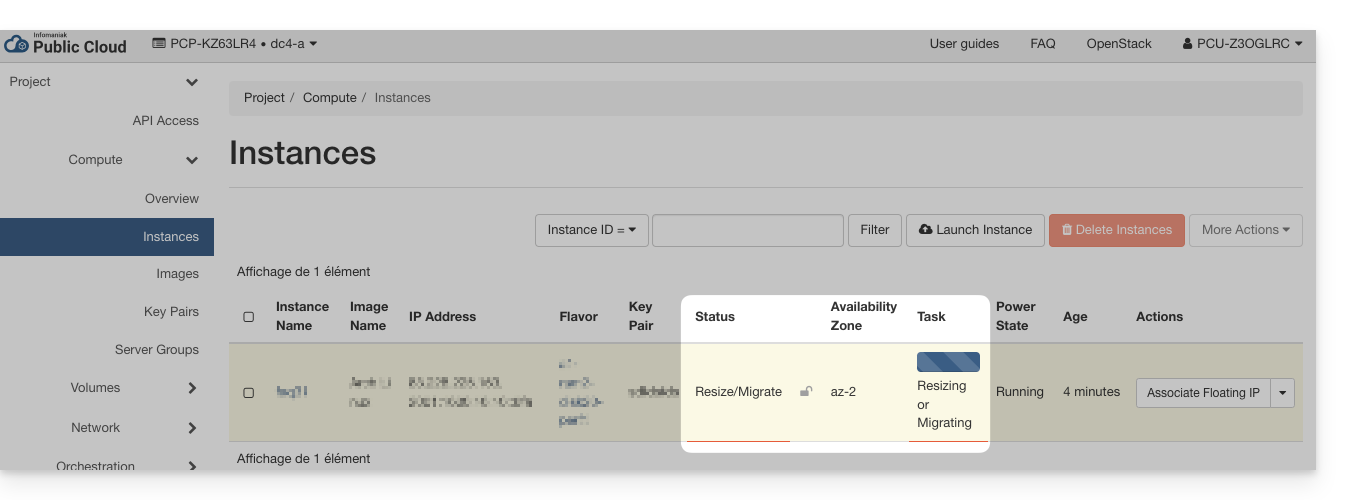
- Confirm the migration:
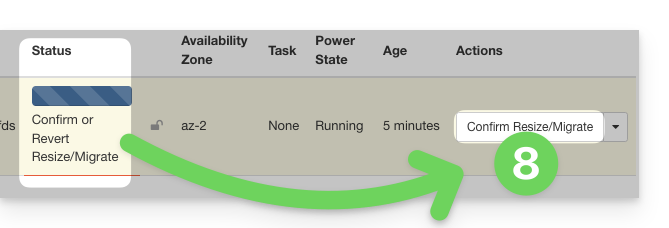
- Wait for the operation to complete before restarting or modifying the instance.
… via command line (CLI)
- List your available instances:
openstack server list - Identify the ID of the instance to be transferred (column
ID). - Start the migration to another physical host:
openstack server migrate <instance_ID>
This command triggers the movement of the instance to a new host within the cluster. - Check the status of the migration:
openstack server show <instance_ID>
The instance then goes into theRESIZEDstate when the migration is complete but not yet confirmed. - Once the migration is complete and validated, confirm the transfer:
openstack server resize --confirm <instance_ID>
or, depending on the version of the OpenStack client:openstack server migration confirm <instance_ID>
- If the
server migration confirmcommand displays a warning indicating that it is deprecated, the process is nevertheless executed in the background and the confirmation is taken into account. - If you get an error of type:
Cannot 'confirmResize' instance ... while it is in vm_state active (HTTP 409)
this means that the migration has already been confirmed (manually or automatically).
- If the
- You can also cancel the migration if a problem is detected before confirmation:
openstack server resize --revert <instance_ID>
or:openstack server migration revert <instance_ID> - If no manual action is taken, the migration is automatically confirmed after 24 hours. The instance state then returns to
ACTIVE.
The transfer is transparent to the operating system and instance data. A brief interruption may occur during the migration.
Link to this FAQ: https://faq.infomaniak.com/1327
Has this FAQ been helpful?
Infomaniak does not provide a direct VPN, tunnel, or secure network built between two points (VPN = Virtual Private Network, virtual private network). However, you can consider an alternative solution using Infomaniak services such as Public Cloud. This guide explains how to use this Infomaniak hosting product to create a VPN.
Create a VPN with Infomaniak Public Cloud
Infomaniak does not provide the OpenStack VPNaaS (Virtual Private Network-as-a-Service), unfortunately very limited in terms of features and security, to create a VPN.
Infomaniak offers to use one of the following alternatives to allow you to manually create a VPN VM:
Link to this FAQ: https://faq.infomaniak.com/1350
Has this FAQ been helpful?
This guide lists the different Linux distributions and Windows versions that you can deploy with one click when launching a new instance of your Public Cloud.
Available operating systems
The images of the different operating systems offered by Infomaniak in the Images section and used in the Source section when launching a new instance of your Public Cloud are currently as follows:
- Alpine Linux 3.17
- Amazon Linux 2
- Arch Linux
- CentOS 7
- CentOS 8 Stream
- CentOS 9 Stream
- CirrOS 0.6.1
- Debian 10.13 buster
- Debian 11.6 bullseye
- Fedora Cloud OS 37
- Fedora Core OS 37
- FreeBSD 13.1
- Infomaniak Rescue Image
- OPNsense 22.1.2_2-amd64
- Oracle Linux 9
- RancherOS 1.5.8
- RedHat Enterprise Linux 9
- Rocky Linux 9
- Ubuntu 18.04 LTS Bionic Beaver
- Ubuntu 20.04 LTS Focal Fossa
- Ubuntu 22.04 LTS Jammy Jellyfish
- openSUSE Leap 15.4 JeOS
- Microsoft Windows Server 2019 Standard
- Microsoft Windows Server 2019 Datacenter
- Microsoft Windows Server 2022 Standard
- Microsoft Windows Server 2022 Datacenter
- Microsoft Windows Server 2025 Standard
- Microsoft Windows Server 2025 Datacenter
When deploying, be sure to always prioritize the image ID over its name.
Link to this FAQ: https://faq.infomaniak.com/1748
Has this FAQ been helpful?
This guide addresses an issue that may occur when starting an instance on Public Cloud Infomaniak.
Preamble
- Check for any ongoing issues on https://infomaniakstatus.com/.
- For Public Cloud specifically, the list of scheduled maintenances and ongoing issues is available at https://status.infomaniak.cloud/.
Using Image IDs
The images of the different operating systems, offered by Infomaniak in the Images section and listed in the Source section when you launch a new instance of your Public Cloud, are regularly updated but without changing their name: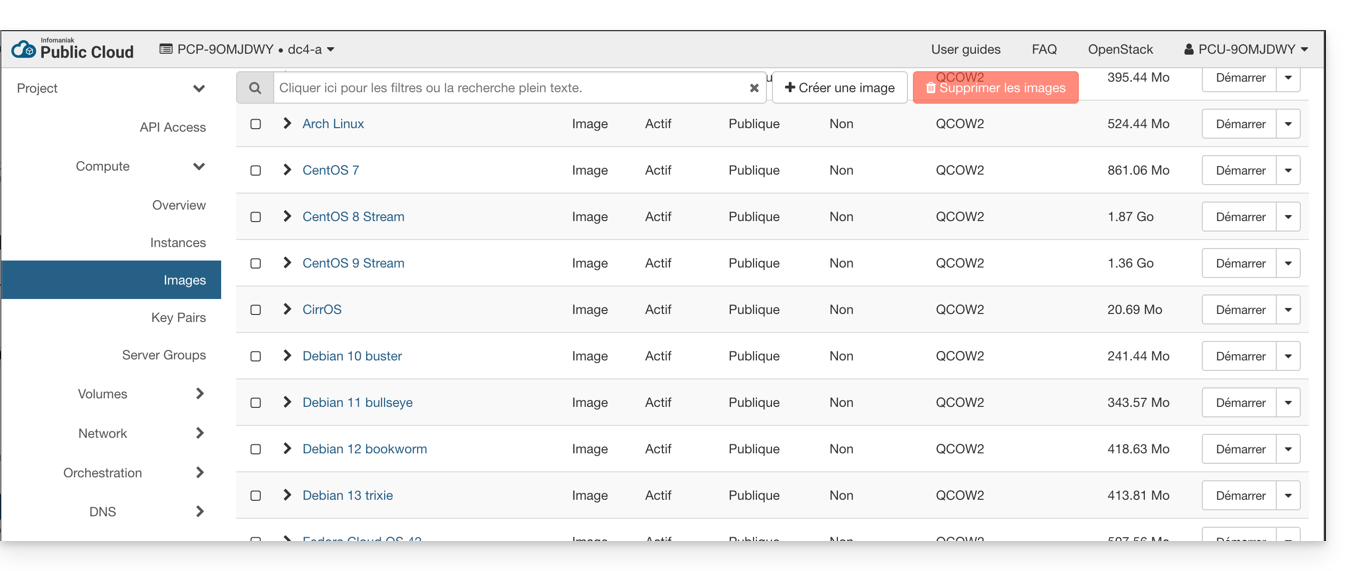
Having a stable name can cause issues with automation tools like heat or terraform with the risk that they recreate the VMs unintentionally.
This issue can be avoided by using the image ID or a personal image: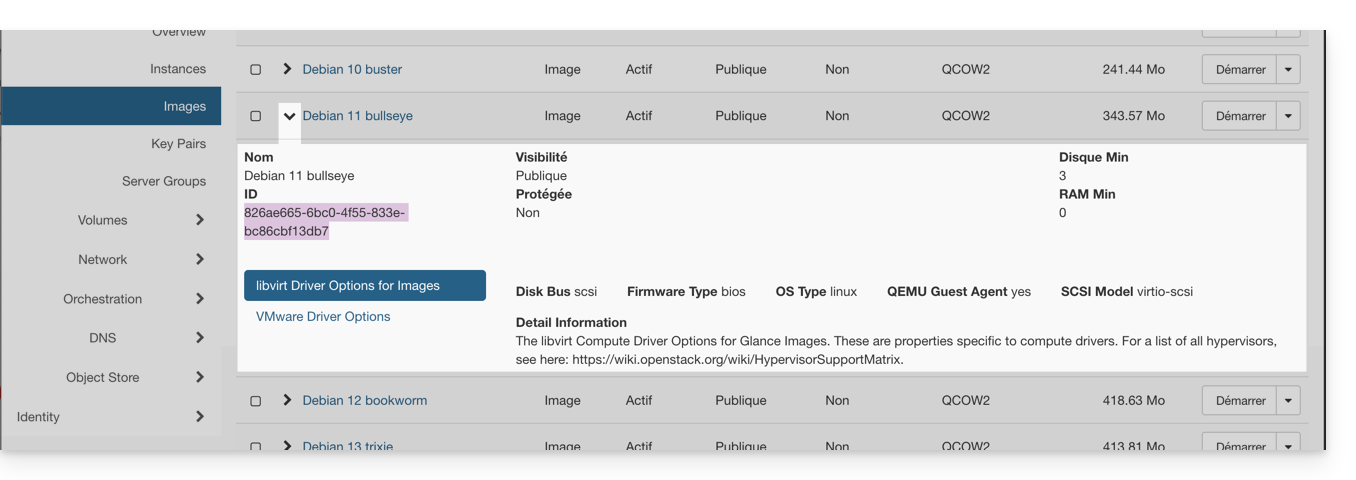
Link to this FAQ: https://faq.infomaniak.com/1781
Has this FAQ been helpful?
This guide explains the differences between Infomaniak's web hosting offers to help you choose the best solution according to your IT needs.
If you are looking to host your email, refer to this other guide.
Web Hosting Starter
Free web hosting
The Web Starter hosting is offered for free with each domain name registered with Infomaniak. It provides 10 MB of disk space to create a site (basic pages in HTML language only - no PHP, no database) even without particular knowledge thanks to the Welcome Page tool.
- Register or transfer a domain name with Infomaniak
- Learn more about the benefits included with a domain name
Shared Web Hosting
The flagship offer to create your sites
These web hostings are shared offers (the websites will be hosted on servers whose resources are shared with other customers). To ensure the reliability of these shared services, Infomaniak servers use on average only 40% of the CPU power and are equipped with professional last-generation SSD disks.
Web hosting offers a minimum of 250 GB of disk space and allows you to manage multiple websites with multiple domain names. This offer includes all the technologies usually used to create professional sites: PHP, MySQL, FTP and SSH access, SSL certificates and easy installation of WordPress or common CMS, etc. It is also possible to add a Node.js site and/or Site Creator.
Note that without any hosting, it is also possible to obtain and then use Site Creator “autonomous / standalone”. Refer to this other guide.
Cloud Server
Professional web hosting
With a Cloud Server, the resources allocated to you are not shared with other customers and you can customize the hardware and software configuration of your server according to your needs. A Cloud Server also allows you to use components that are not available on shared web hostings (Node.js, mongoDB, Sol, FFMPEG, etc.).
- A Cloud Server allows you to easily manage your server via the same administration interface as web hostings - you manage the sites in the same way.
- A VPS allows you to manage your server 100% autonomously with the version of Windows or the Linux distribution of your choice (
Debian,Ubuntu,openSUSE, ...) - solid technical skills are required to use a VPS, including VPS Lite.
Public Cloud (and Kubernetes Service)
Open, proven and secure IaaS solution
For Infomaniak, it is the infrastructure that powers kDrive, Swiss Backup and the Webmail, services used by several million users. But Public Cloud is accessible to everyone and provides the resources you need to develop your projects.
With the help of personalized and tailored offers, you will have no trouble managing your development budget. No setup fees. No minimum amount. Cancelable at any time. You only pay for the resources actually used with Public Cloud at the end of each month, the same goes for Kubernetes Service.
Jelastic Cloud
Custom web hosting with the technologies of your choice
Jelastic Cloud allows you to create custom development environments with the technologies of your choice (PHP, Java, Docker, Ruby, etc.). It is a flexible cloud offer:
- Horizontal and vertical scaling of resources.
- Payment based on actual resource consumption.
- Easy customization of your infrastructure (redundancy, IP, SSL, load balancing, etc.).
Link to this FAQ: https://faq.infomaniak.com/2019
Has this FAQ been helpful?
This guide is for users of their own Windows Server Evaluation image in Windows Server Standard or Datacenter with a license on Public Cloud.
Preamble
- As a Microsoft partner, Infomaniak provides and automatically bills Windows Server licenses to customers using these OS versions on instances, Standard or Datacenter.
- Infomaniak offers ready-to-use images for Public Cloud, pre-activated with a license; in case of activation failure, refer to this other guide.
Using your own Windows Server image
If you decide to upload your own Windows Server image, Standard or Datacenter, you must follow the activation procedure.
180-day Evaluation Version
You need to precede the above procedure with a few additional commands in case it is a 180-day evaluation version:
Open a command prompt (cmd.exe) via the Start menu, and run this as an administrator to switch to…
- … Windows Server 2019 Standard:
dism /online /set-edition:serverstandard /productkey:N69G4-B89J2-4G8F4-WWYCC-J464C /accepteula - … Windows Server 2019 Datacenter:
dism /online /set-edition:serverdatacenter /productkey:WMDGN-G9PQG-XVVXX-R3X43-63DFG /accepteula - … Windows Server 2022 Standard:
dism /online /set-edition:serverStandard /productkey:VDYBN-27WPP-V4HQT-9VMD4-VMK7H /accepteula - … Windows Server 2022 Datacenter:
dism /online /set-edition:ServerDatacenter /productkey:WX4NM-KYWYW-QJJR4-XV3QB-6VM33 /accepteula - … Windows Server 2025 Standard:
dism /online /set-edition:serverstandard /productkey:TVRH6-WHNXV-R9WG3-9XRFY-MY832 /accepteula - … Windows Server 2025 Datacenter:
dism /online /set-edition:serverdatacenter /productkey:D764K-2NDRG-47T6Q-P8T8W-YP6DF /accepteula
Once the command is complete, restart the instance and follow the normal activation procedure via the corresponding FAQ.
Link to this FAQ: https://faq.infomaniak.com/2236
Has this FAQ been helpful?
This guide explains how to manage users for your Public Cloud project.
Introduction
- To access the resources of a project, it is necessary to create OpenStack type users (read more below).
- These OpenStack users have no relation to Infomaniak Manager users.
- The name (username) of the user is generated automatically and is communicated after its creation.
- These OpenStack users are linked to a project, so they cannot access multiple projects.
- All operations on users (addition, modification, deletion, etc.) are asynchronous and may sometimes take several minutes to complete.
Create a user for your Public Cloud
To create an OpenStack user once your Public Cloud is ordered:
- Click here to access the management of your product on the Infomaniak Manager (need help?).
- Click directly on the name assigned to the product concerned:
- Create a new Project:
- The user defined at the creation of your project will be in the form
PCU-XXXXand you can assign it a description for your convenience.
User Password Management
The password of the OpenStack user can be either defined immediately at creation or generated later using a link that is sent by email to the address of your choice.
To modify it later:
- Click here to access the management of your product on the Infomaniak Manager (need help?).
- Click directly on the name assigned to the product concerned.
- Click on Manage in the Users column of the project concerned:
- Click on the menu to the right of the user concerned to access the password change.
Add a new user to a project
To add other users to your project:
- Click here to access the management of your product on the Infomaniak Manager (need help?).
- Click directly on the name assigned to the product concerned.
- Click on Manage in the Users column of the relevant project.
- Click on Add OpenStack access:
Delete a user
To delete an existing user:
- Click here to access the management of your product on the Infomaniak Manager (need help?).
- Click directly on the name assigned to the product concerned.
- Click on Manage in the Users column of the relevant project.
- Click on the menu to the right of the relevant user to delete them:
The deletion of the OpenStack user is immediate and definitive.
Find out more
- Getting started guide: Public Cloud
- Public Cloud: Action on an existing project
- Complete product documentation: https://docs.infomaniak.cloud
Link to this FAQ: https://faq.infomaniak.com/2492
Has this FAQ been helpful?
This guide presents the Infomaniak Public Cloud, an Infrastructure as a Service (IaaS) solution based on OpenStack that provides the resources you need to develop your projects.
Preamble
- Infomaniak's Public Cloud, a platform powered by open source and free OpenStack technology, offers virtual instances with several performance profiles:
- IOPS-optimized instances
- RAM-optimized instances
- Instances with latest generation GPU
- Panel of tools available:
- Object storage (S3 compatible)
- Managed Kubernetes service
- Managed databases
- Load balancers
- DNS management
- Private network services
- Many integrations, including:
- A unified API
- A Terraform/OpenTofu connector
- An Ansible collection
- The infrastructure is available in several regions in Switzerland, with several availability zones.
To get started
- The Infomaniak Public Cloud user guide presents many tutorials, step-by-step guides, and best practices to follow.
- Also consult all Public Cloud FAQs and in particular:
- The list of scheduled maintenance and current issues is available at https://status.infomaniak.cloud/.
- Discover the presentation of the Public Cloud (replay of the Infomaniak 2022 Webinar):
Pricing
Community space & Feedback
- Click here to share an opinion or suggestion on an Infomaniak product.
- Consult the Reddit page created to facilitate technical exchanges with the user community.
Link to this FAQ: https://faq.infomaniak.com/2601
Has this FAQ been helpful?
This guide explains how to navigate the Public Cloud interface from the Infomaniak Manager and presents the different limits of this service.
Discovering Public Cloud
The list of scheduled maintenance and current issues can be found at https://status.infomaniak.cloud/.
To access the homepage of your Public Cloud:
- Click here to access the management of your product on the Infomaniak Manager (need help?).
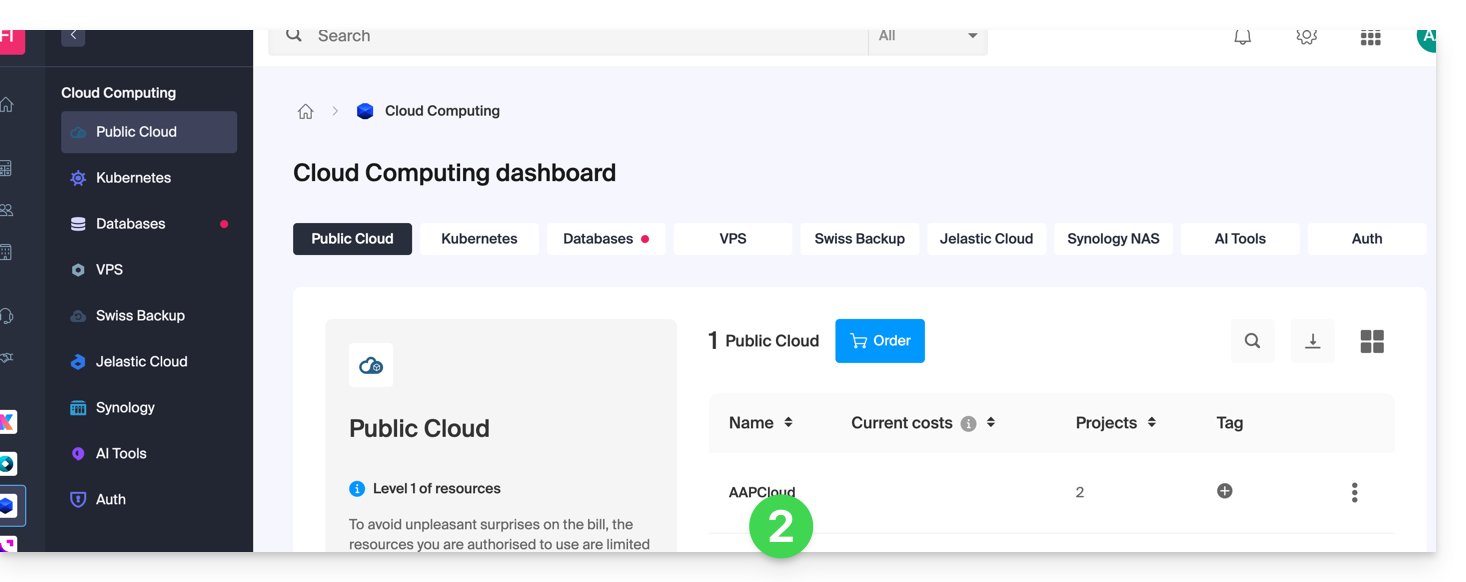
- You arrive on a page where all the Public Clouds you have ordered are listed:
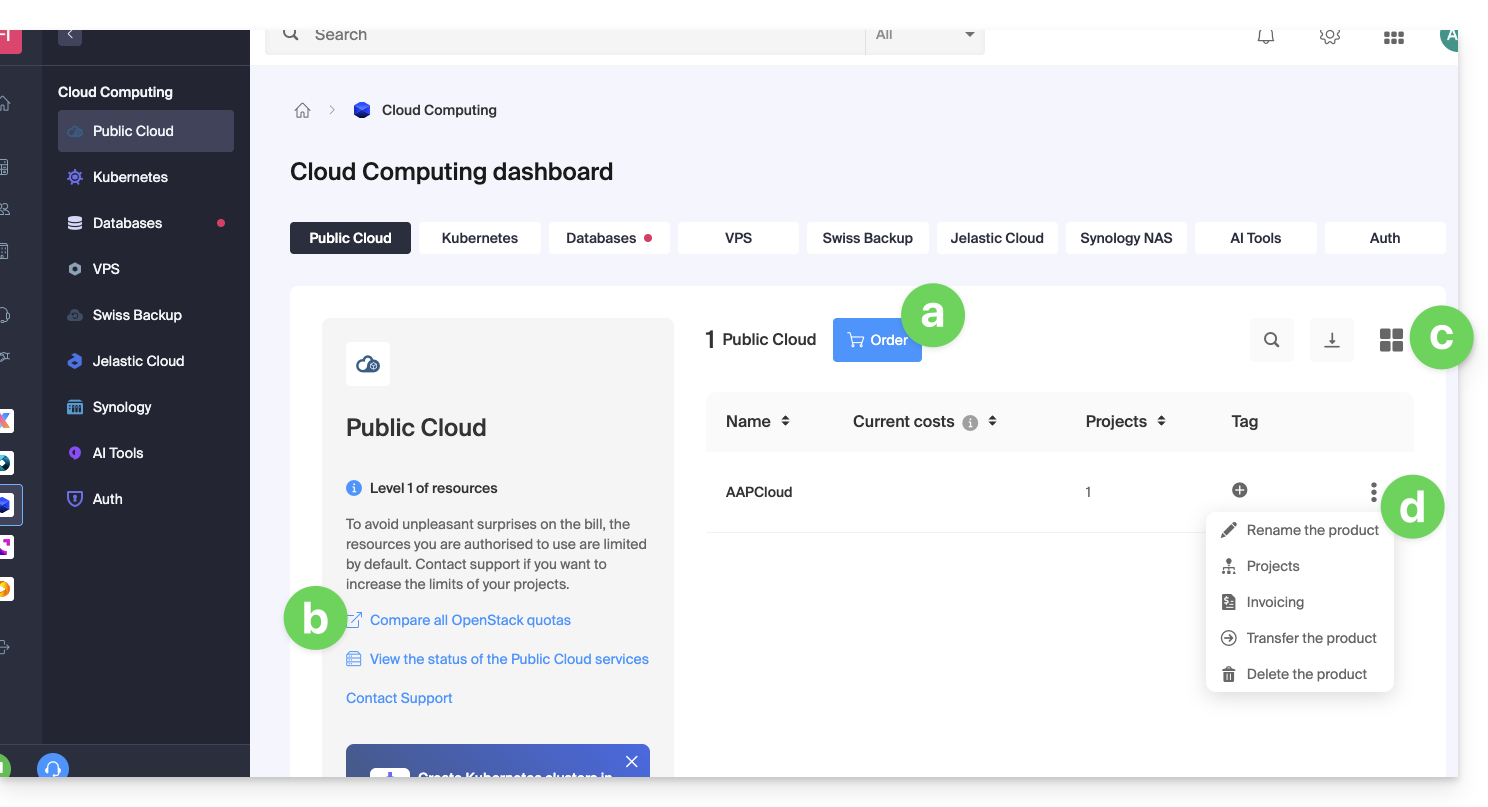
- This button allows you to order a new Public Cloud.
- This link allows you to access the comparison page of the different subscription formulas for Public Cloud.
- This button allows you to switch from a list or thumbnail view.
- Click on the action menu ⋮ to the right of the concerned object to access the options:
- The pencil icon ✎ allows you to rename your Public Cloud
- The tree icon allows you to access the projects page linked to the selected Public Cloud
- From this projects page linked to the Public Cloud, you will have access to all your projects:
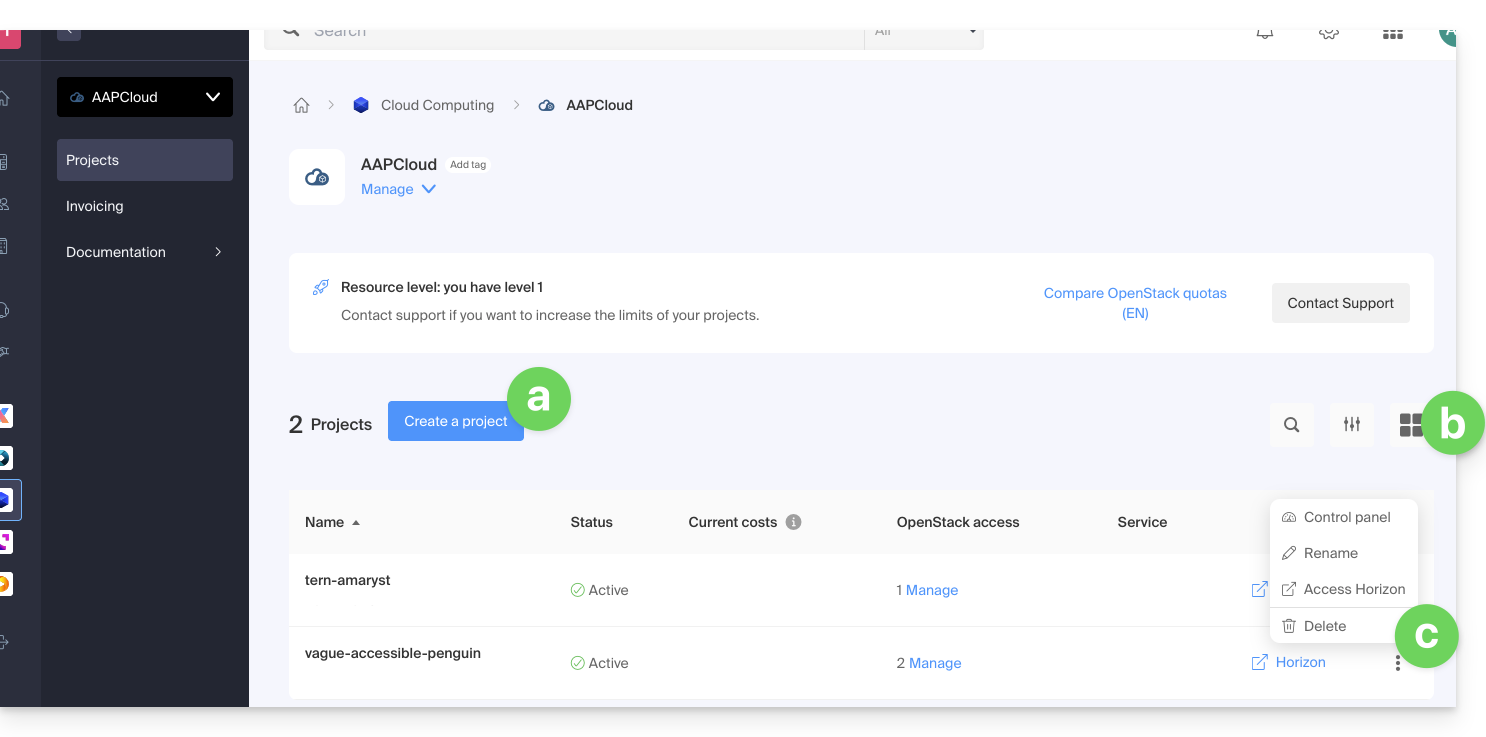
- This button allows you to create a new project that will be linked to the Public Cloud.
- This button allows you to switch from a list or thumbnail view.
- Click on the action menu ⋮ to the right of the concerned object to access the options:
- The first element allows you to access the dashboard of the project
- The pencil icon ✎ allows you to rename your project
- The right arrow icon allows you to access the OpenStack Horizon dashboard directly.
Additional options are accessible from the left sidebar and under Manage: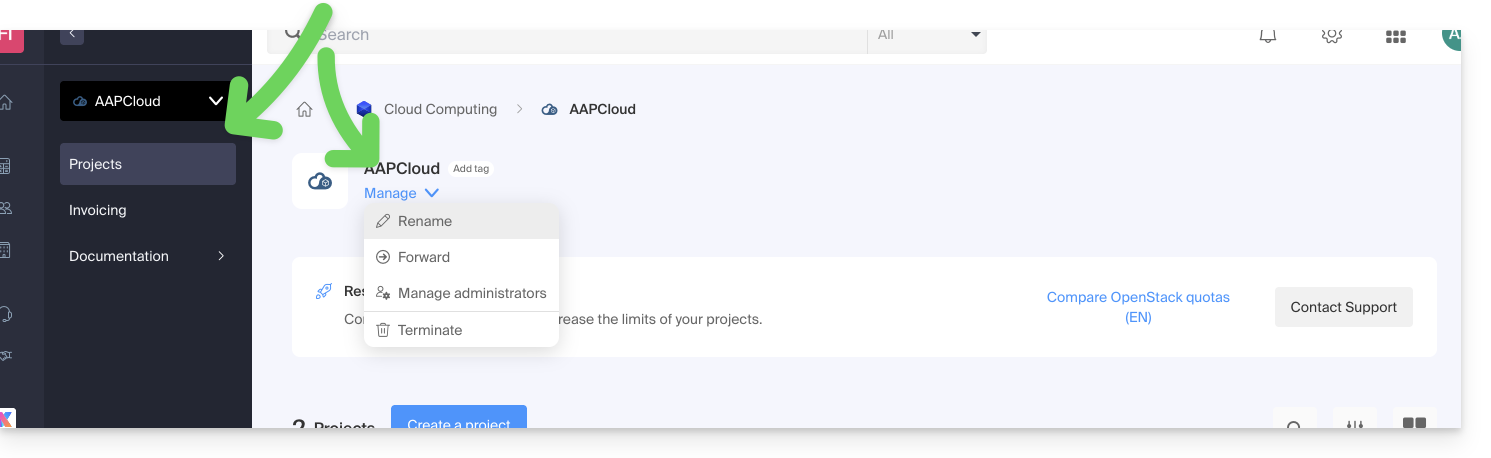
To invite new users to your project, you must go directly through the OpenStack administration interface.
Public Cloud Limits
By default, the resources that can be used in a project are limited (for security reasons - to avoid ending up with a high bill at the end of the month, for example).
Learn about the 3 levels of limits detailed in this other guide.
The Manager indicates the limit level assigned to the Organization: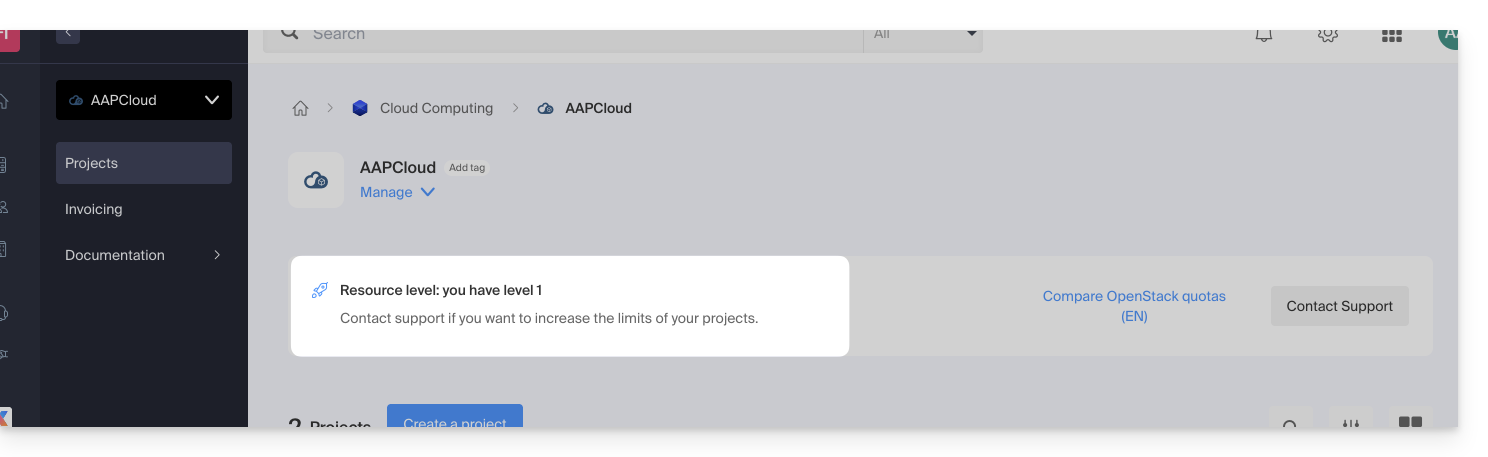
To increase the project limits, contact Infomaniak support.
The limits apply to all projects in the Organization. In an Organization with 5 projects, including 1 that requires level 3, the other 4 projects will inherit a level 3 limit.
Link to this FAQ: https://faq.infomaniak.com/2602
Has this FAQ been helpful?
This guide explains how to create a new project with Public Cloud Infomaniak.
Prerequisites
- Have read and understood the Getting Started Guide.
- Have Public Cloud on your Infomaniak Manager.
It is perfectly possible to create several projects on the same Public Cloud.
Create a new project
To access Public Cloud:
- Click here to access the management of your product on the Infomaniak Manager (need help?).
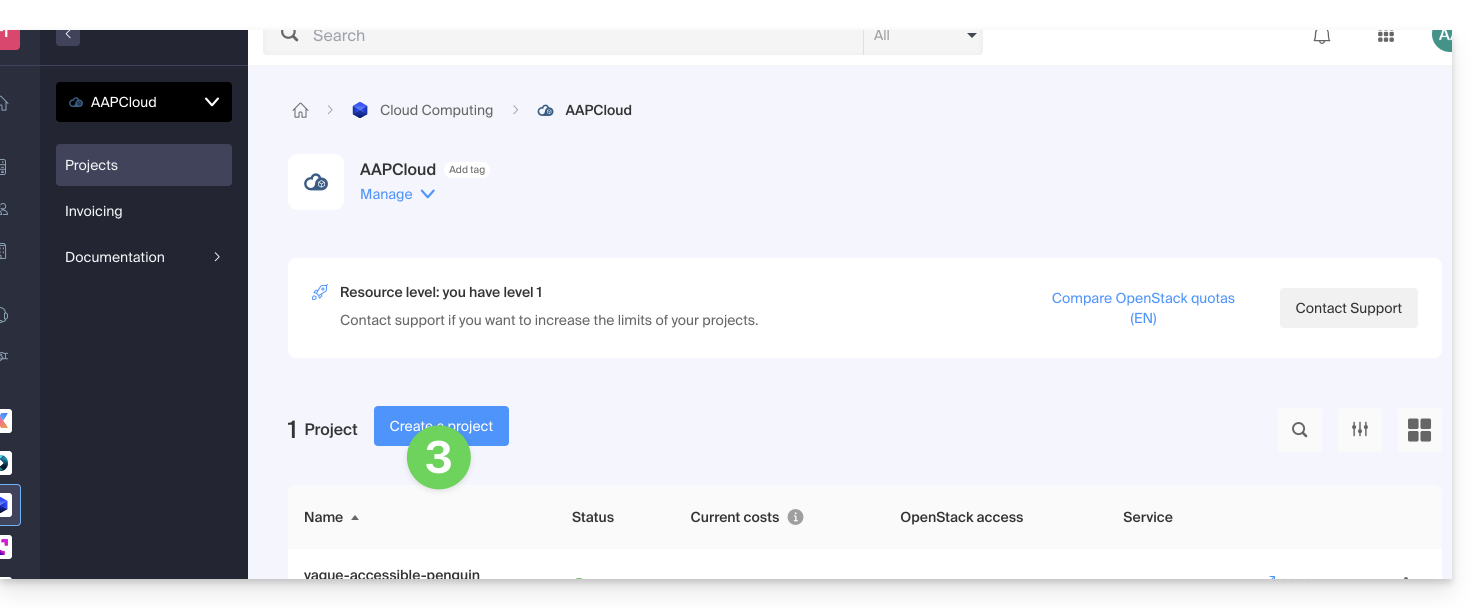
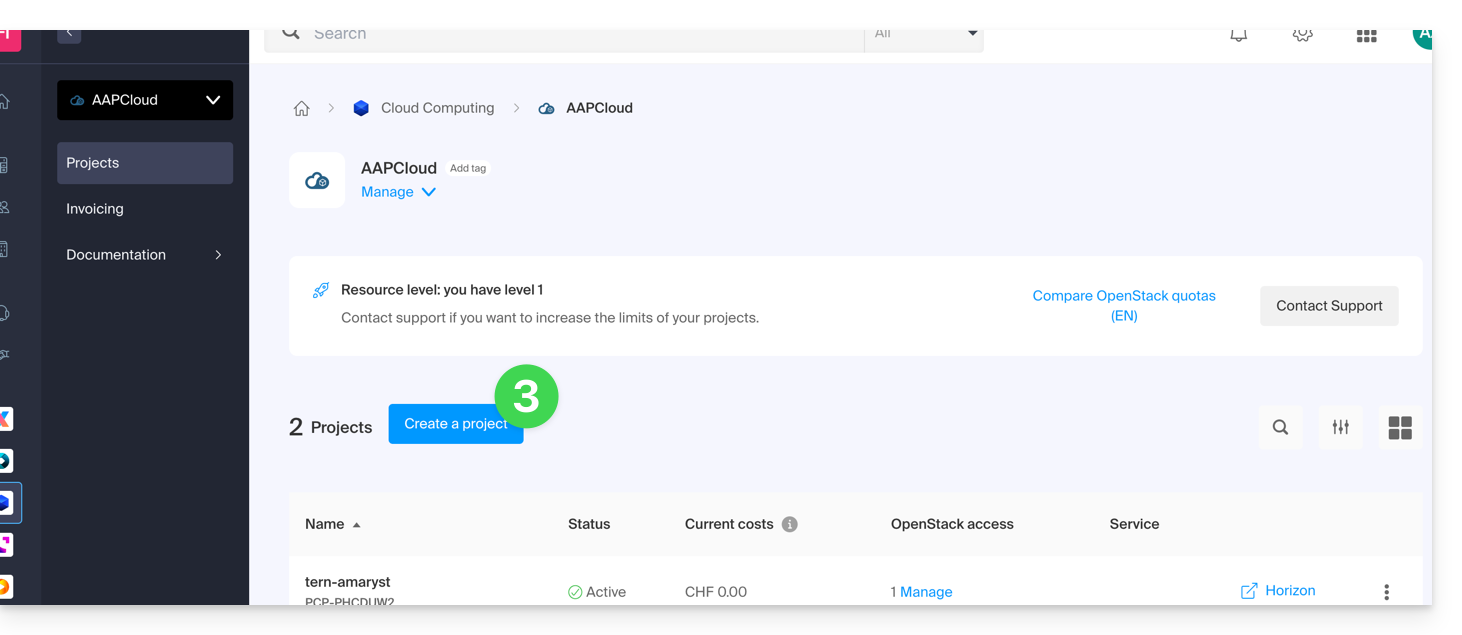
- Click directly on the name assigned to the product on which a new project will be created
- Click the Create a project button:
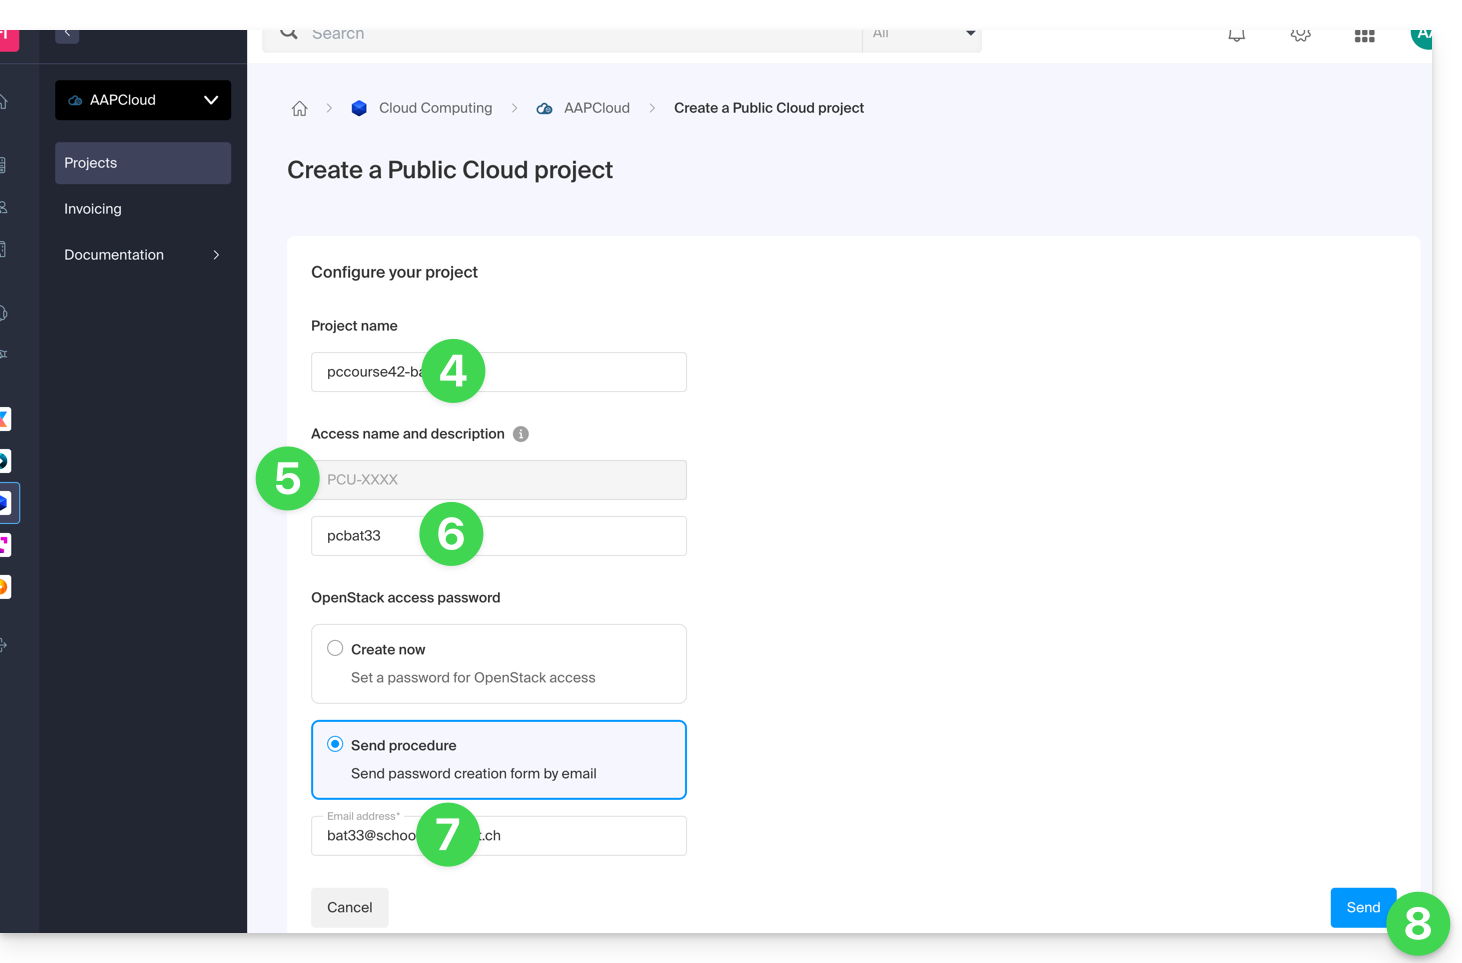
- Name your project.
- An OpenStack identifier is automatically created (in the form
PCU-XXXX). - It is possible to add a description (to specify who the identifier is intended for, for example).
- Set a password (or send the procedure by email).
- Click Create to complete the project creation:
Resource level
The highest level of resources to which your organization has access is automatically assigned to the project. You can modify it at any time once the project is created.
Also refer to this other guide if you are looking for information about actions on an existing project.
Link to this FAQ: https://faq.infomaniak.com/2603
Has this FAQ been helpful?
This guide explains the different actions that can be performed from the Manager with Public Cloud.
Access additional options on a project
To access the Public Cloud:
- Click here to access the management of your product on the Infomaniak Manager (need help?).
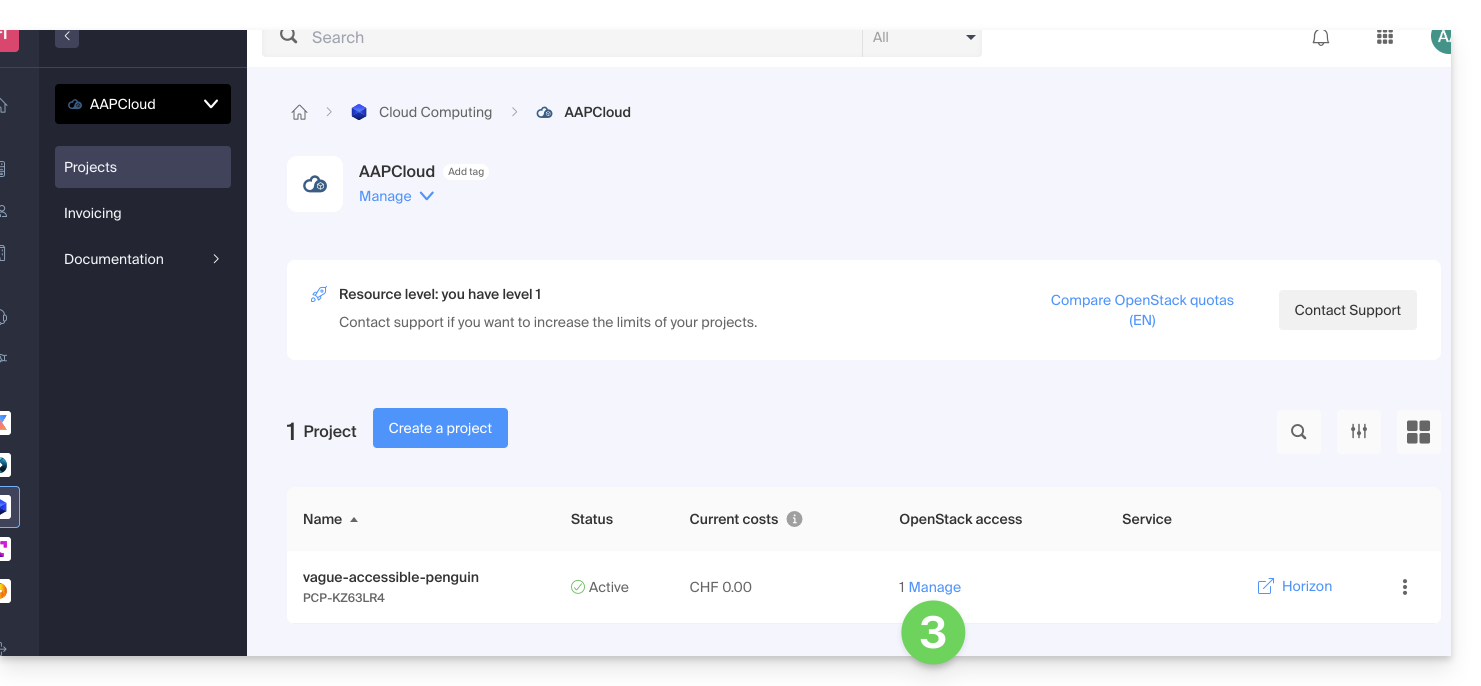
- Click directly on the name assigned to the product concerned:
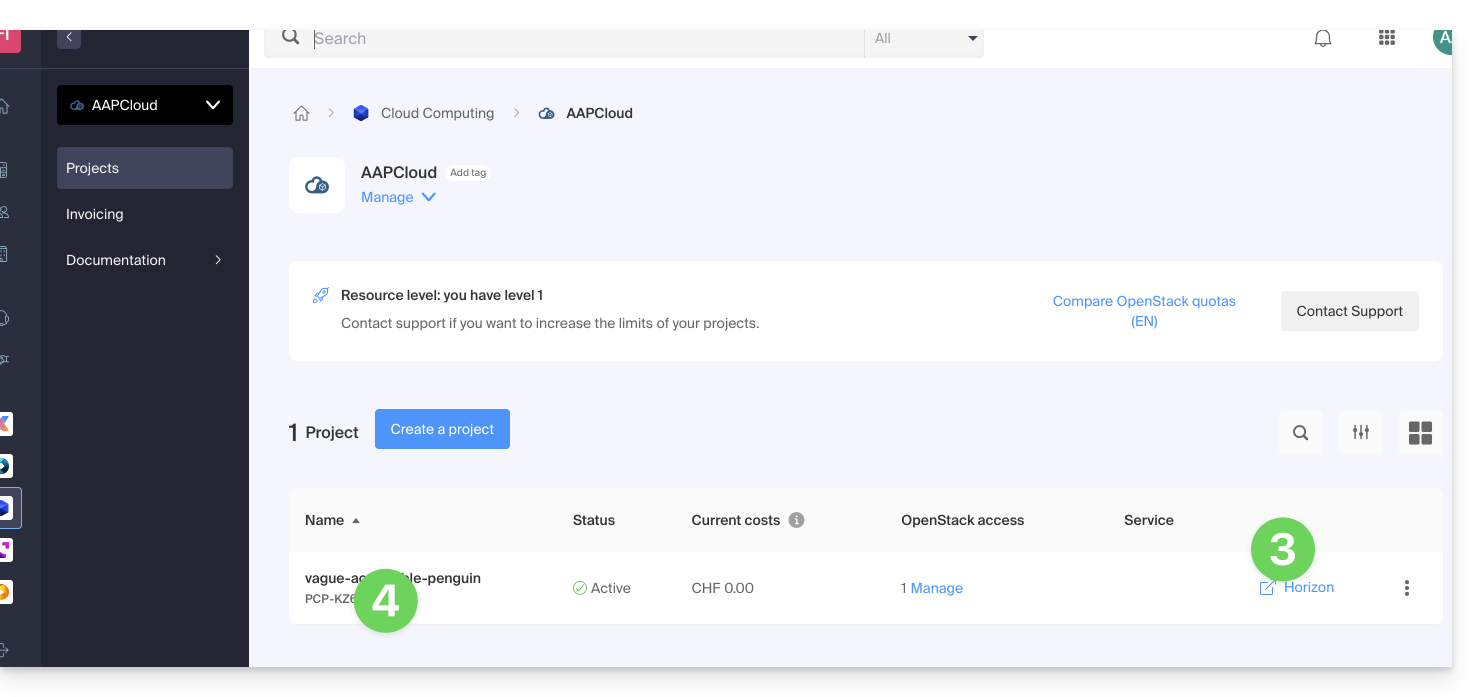
- Click on the Horizon shortcut to connect to it if necessary, or…
- … click directly on the name of the project concerned to access additional actions:
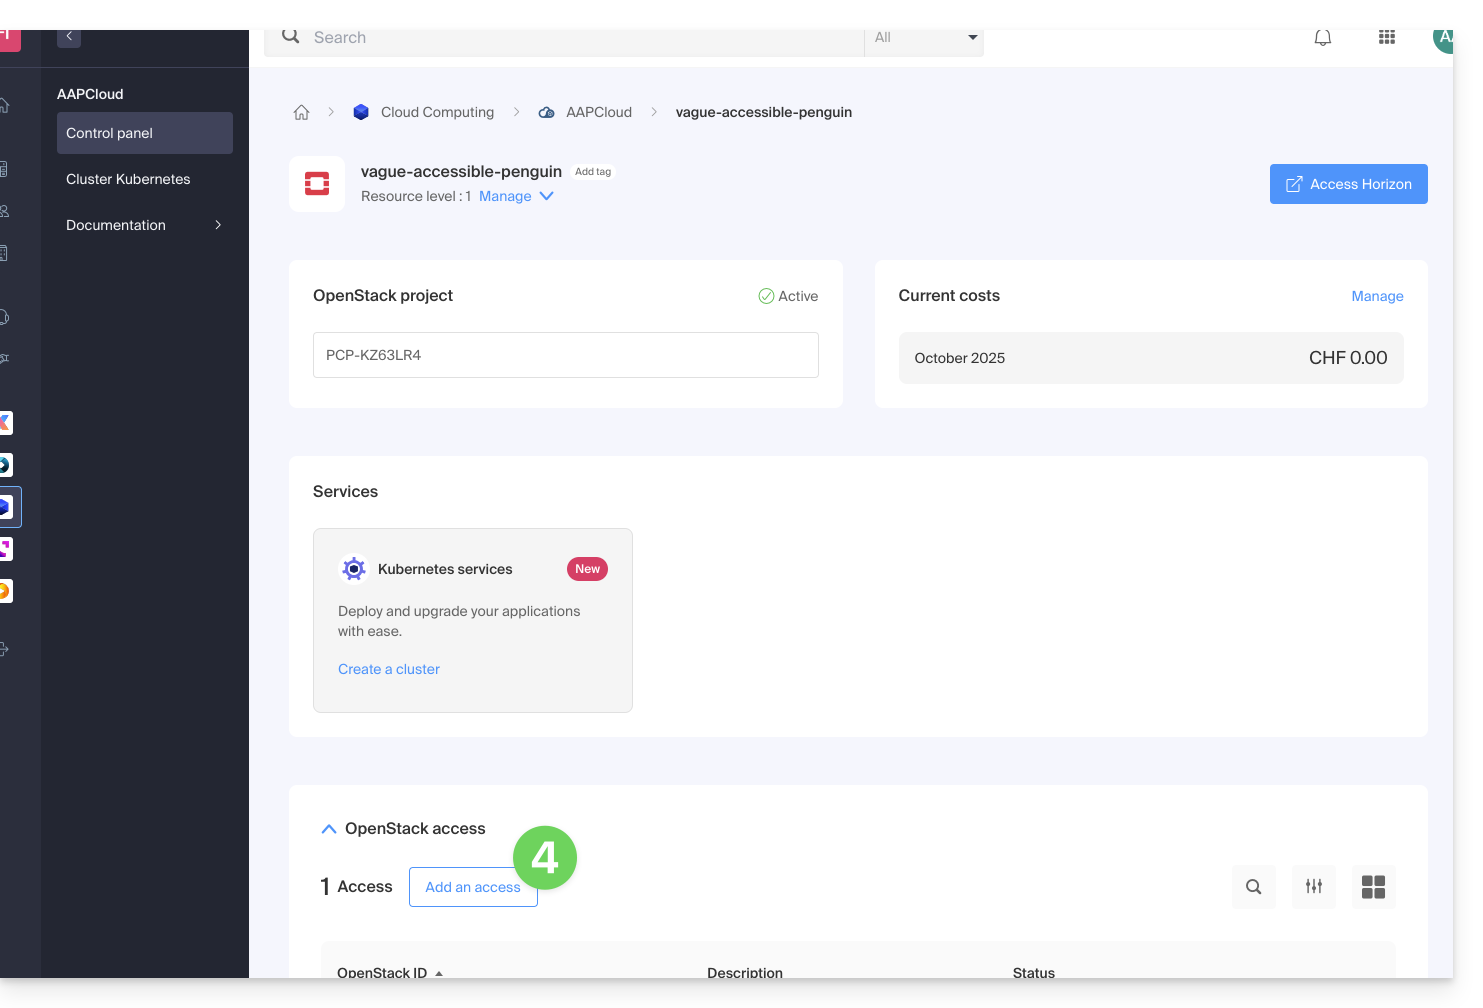
- You can:
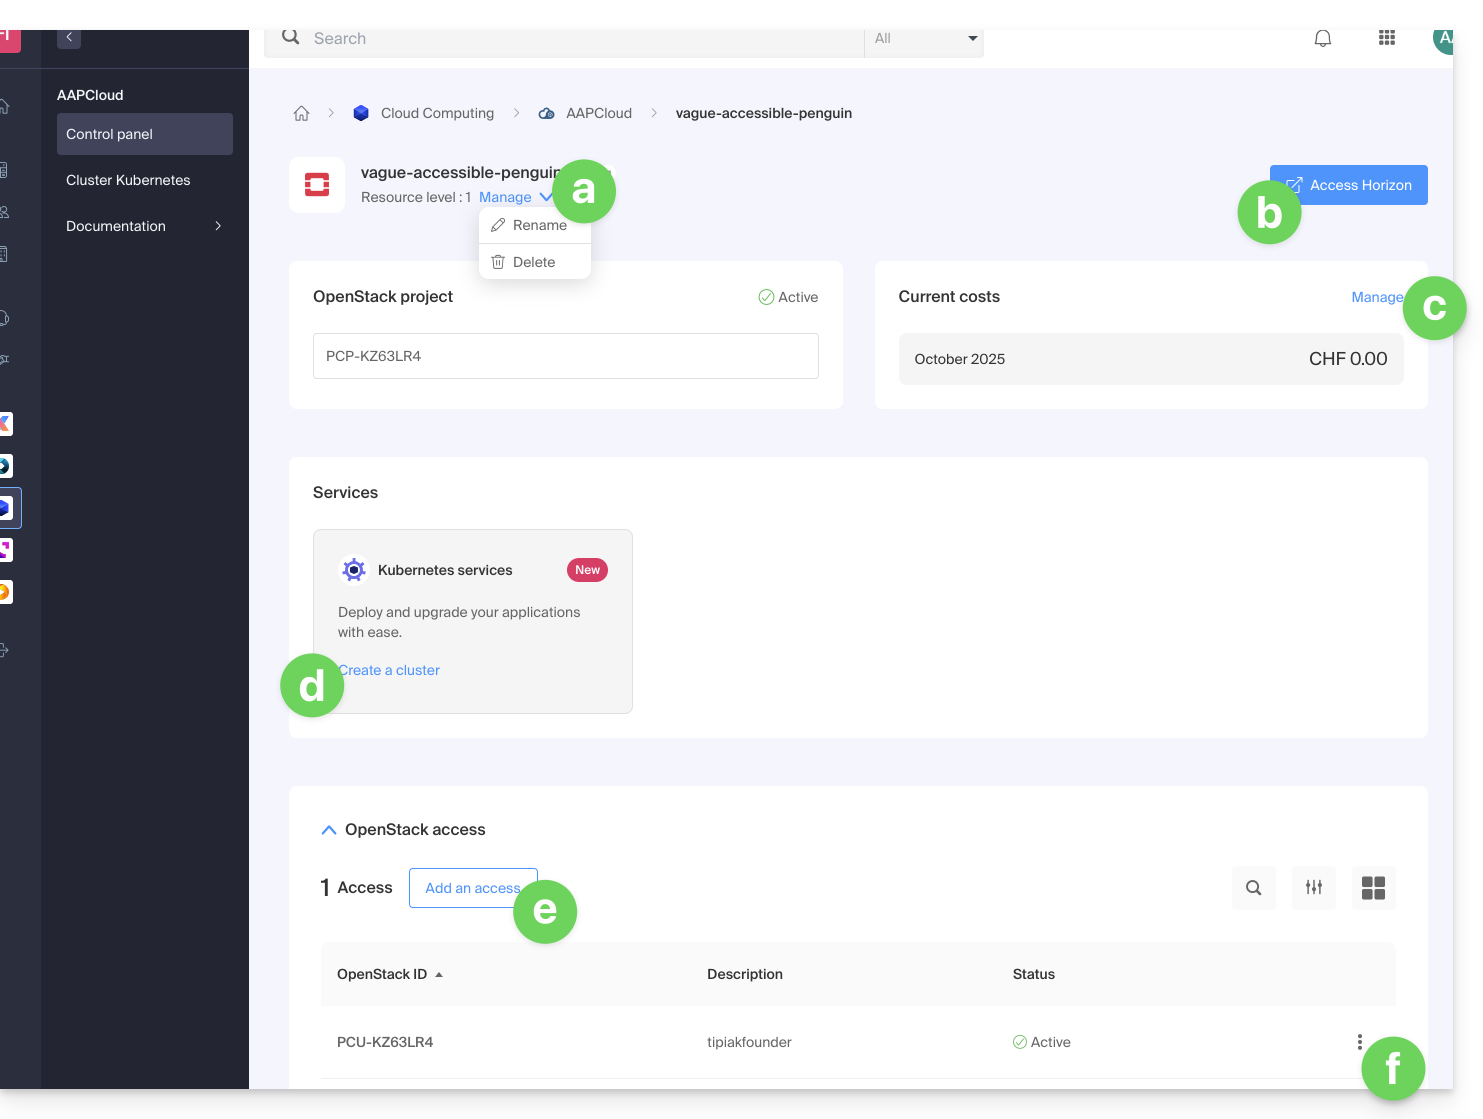
- rename or delete the project
- access the OpenStack Horizon dashboard
- manage the billing
- access the Kubernetes services
- add a new user access
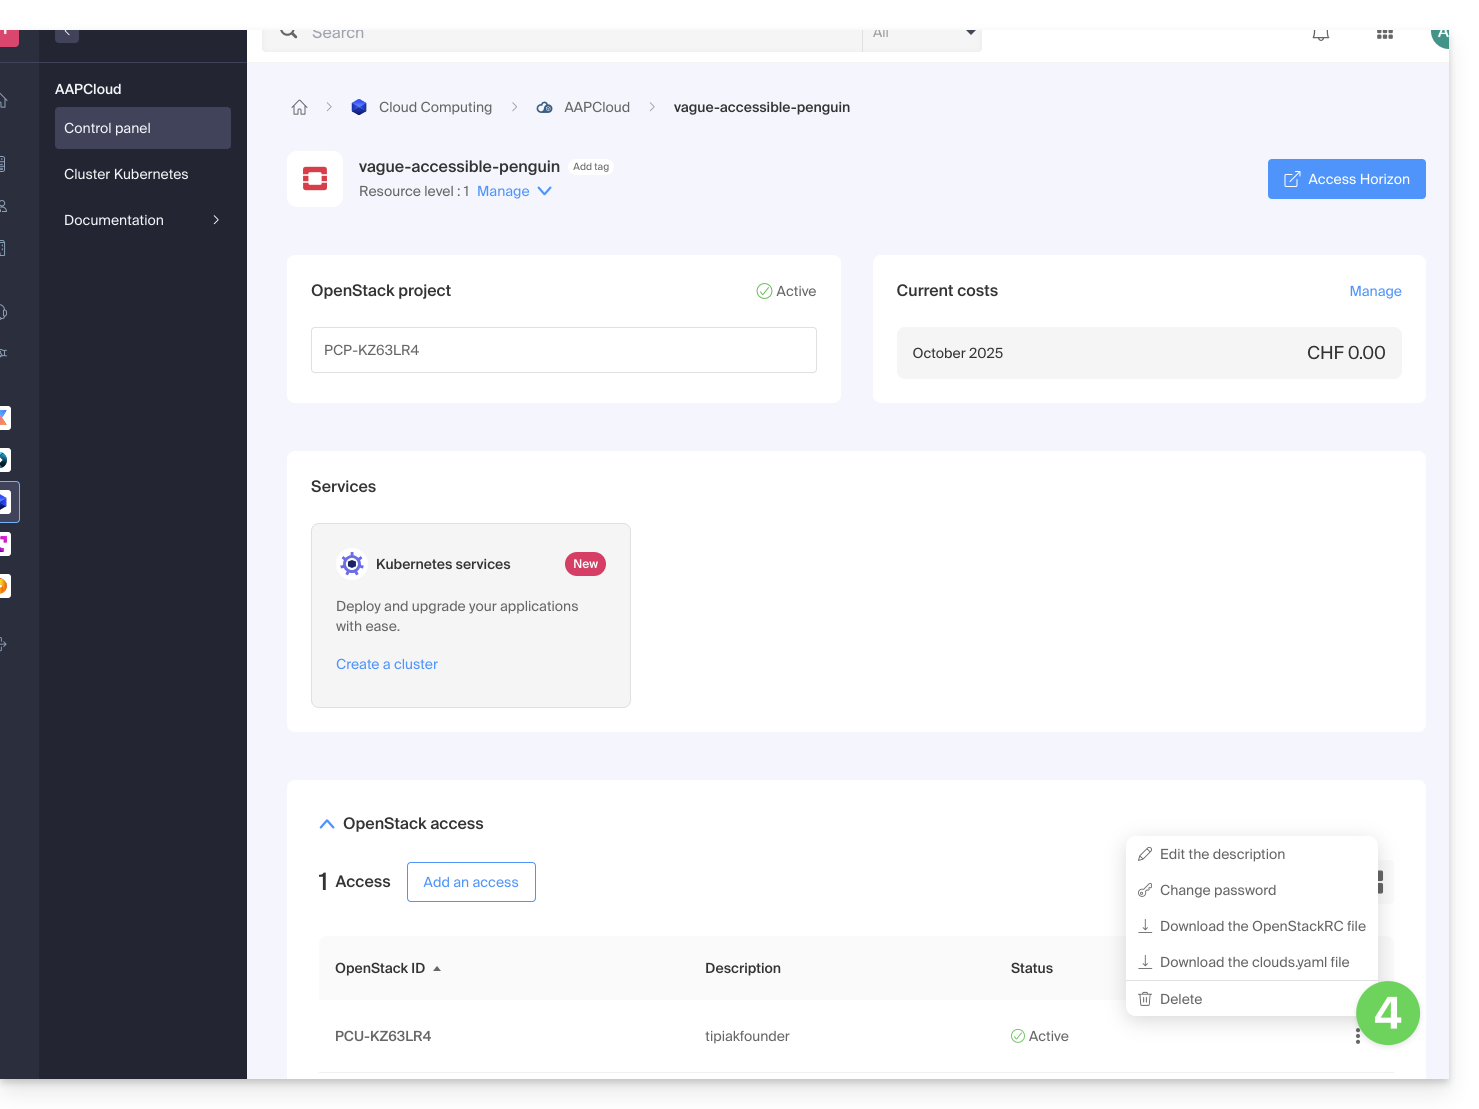
- manage the access information of the user concerned:
- add or modify the description of the user
- modify the password for accessing the project for the user
- download configuration files (1 OpenStackRC file or 1 clouds.yaml file) to access your project from the CLI
- delete the user from the project
Link to this FAQ: https://faq.infomaniak.com/2604
Has this FAQ been helpful?
This guide details how billing works for your Infomaniak Public Cloud.
Billing Process
What payment methods are accepted?
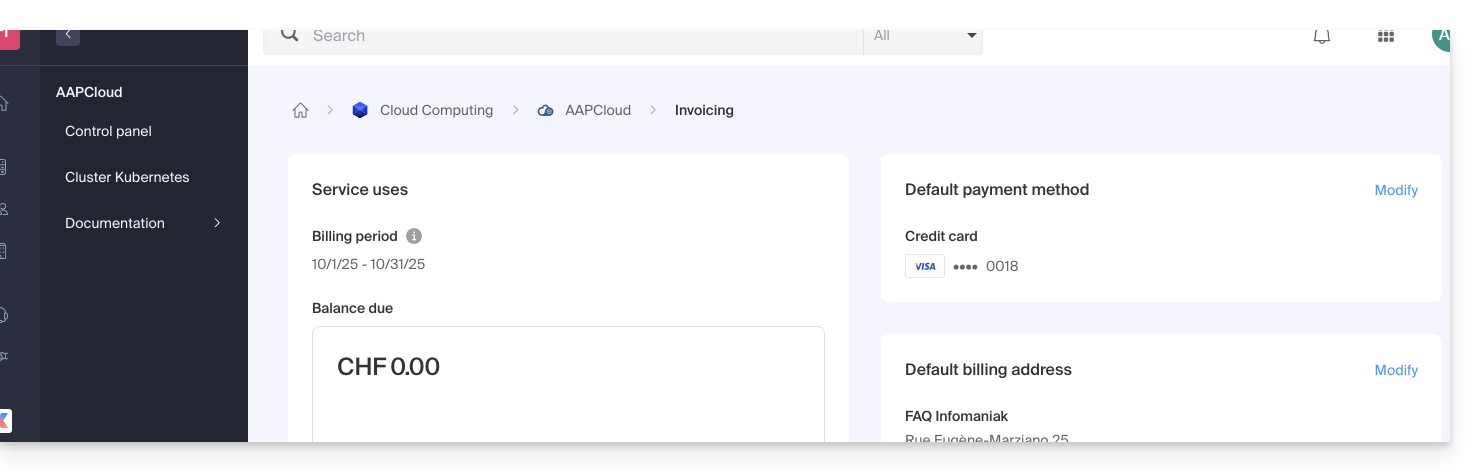
You can only pay for Public Cloud service invoices with a credit card.
When is the credit card charged?
The billing period runs from the first day of the month to the last day of the month. The credit card is usually charged on the first day of the following month (depending on your bank, there may be a few days' delay in the charge). An invoice is issued at the time the card is charged.
Are stopped instances billed?
Stopped instances are not billed, except for:
- storage, which continues to use space even if it is unused
- the GPU and IPv4 address of instances placed on a public network
I started an instance for less than an hour; how will I be charged?
Any partial hour is charged.
For example, if an instance is billed at CHF 10 per hour and runs for part of the last hour, CHF 10 will be charged for that hour.
What are Infomaniak ICUs?
Openstack bases its billing on tokens, and therefore the Infomaniak Cloud Unit or ICU was created. This token converts the cost of resource usage on Openstack into CHF or EUR.
ICU to CHF or EUR conversion table:
| Currencies | Value | Infomaniak Cloud Unit (ICU) |
|---|---|---|
| CHF (Swiss Franc) | 1 | 50 |
| EUR (Euro) | 1 | 55,5 |
To learn more about ICUs and conversion methods, please refer to these Infomaniak guides.
Learn more
- Getting Started Guide: Public Cloud
- Public Cloud: Performing Actions on an Existing Project
- Complete product documentation: https://docs.infomaniak.cloud
Link to this FAQ: https://faq.infomaniak.com/2605
Has this FAQ been helpful?
This guide provides some information about Windows licenses for Infomaniak Public Cloud.
Windows license information
As a Microsoft Partner, Infomaniak provides and automatically bills Microsoft licenses for the following operating systems:
- Windows Server 2019 standard and datacenter
- Windows Server 2022 standard and datacenter
- Windows Server 2025 standard and datacenter
Billing is based on the number of VCPU of the instance.
The license belongs to Infomaniak and is not the property of the client. It starts when the client uses one of these versions of Windows Server and stops when the instance is destroyed.
There is no license billing in case of pause or stop of the instance.
Microsoft Partner
- As a Microsoft partner, Infomaniak provides pre-activated corresponding images on Public Cloud, via Horizon or the Openstack CLI.
- In case of activation failure, refer to this other guide on the subject.
- As a Microsoft partner, Infomaniak does not allow the use of a personal client license (Bring Your Own License); in the case of using its own license, Infomaniak provides and automatically bills the licenses provided by Infomaniak.
- The client can then activate their OS via the activation procedure.
- As a Microsoft partner, the non-use of licenses (i.e., a 180-day Evaluation version) is also not allowed.
- These versions are for testing in an internal environment.
- In the case of using an evaluation version, Infomaniak provides and automatically bills the licenses provided by Infomaniak.
- The client can then activate their OS via the procedure for converting an evaluation version to a normal activated version.
- If you use Microsoft software within Windows Server that requires a License Mobility, such as Microsoft SQL Server, Microsoft Sharepoint Server, or Microsoft Exchange Server, you must submit the Software Assurance document via the Infomaniak contact form.
Link to this FAQ: https://faq.infomaniak.com/2797
Has this FAQ been helpful?
This guide concerns the creation of private networks between different Infomaniak hosting offers, such as Cloud VPS / VPS Lite, Public Cloud, Synology NAS, etc.
Create a VLAN between VPS
It is not possible to create a private network (VLAN) between Cloud VPS / VPS Lite and other products, such as Synology NAS, because they are installed on separate networks.
However, it is possible to create a VLAN between a minimum of 10 Cloud VPS / VPS Lite that you own (contact Infomaniak support); however, a dedicated private network will not be able to communicate with another.
It is recommended to migrate to the Public Cloud offer to create such private networks between VMs.
Link to this FAQ: https://faq.infomaniak.com/2808
Has this FAQ been helpful?
This guide concerns Public Cloud and the possibility in some cases to increase resources by requesting the activation of certain services.
Prerequisites
- You will be required to provide certain information via kCheck as well as to reload, if necessary, the available credits.
Activate performance levels and special services
In order to obtain the possibility to create instances with a higher performance level and/or specific resources such as the possibility to use instances with GPU, contact the support department of Infomaniak by email specifying the Public Cloud project ID (PCP-XXXXX) and the desired resources.
For example:
I would like to increase the quotas for the PCP-XXXXX project, can you activate resource level 2 and large sizes (XXL).
Link to this FAQ: https://faq.infomaniak.com/2809
Has this FAQ been helpful?
This guide concerns the recovery of a Windows image password (any version) on Public Cloud.
Connecting to the Windows instance
By default, the username is Administrator.
The password, on the other hand, is generated during the first startup sequence of the instance.
If you are unable to establish the first connection to your Windows instance, you need the private key used during the deployment process. Enter this command to install or check that nova-client is installed:
pip3 install python-novaclientThen to recover the instance password:
nova get-password <INSTANCE_ID> <PRIVATE_KEY_FILE>Refer to the official documentation.
Also, be aware of any ongoing issues on status.infomaniak.com.
For Public Cloud specifically, the list of scheduled maintenance and ongoing issues is available at status.infomaniak.cloud.
Link to this FAQ: https://faq.infomaniak.com/2817
Has this FAQ been helpful?
This guide details the Kubernetes system of Public Cloud that you can order and install directly on your Manager:
Interfaces and pricing of the Infomaniak Kubernetes Service
Infomaniak offers a complete Kubernetes solution with several management interfaces and flexible pricing tailored to your needs.
Available interfaces
The Infomaniak Kubernetes service offers you several methods of access and management:
- Native Kubernetes API: Interact directly with your cluster via the standard Kubernetes API
- Kubeconfig file: Easily configure your command-line tools such as kubectl
- Terraform/OpenTofu: Manage your infrastructure as code (IaC)
- Kubernetes Manager: Intuitive web interface to manage your clusters
- Infomaniak CLI: Automate your operations via command line
Pricing structure
The Infomaniak Kubernetes service offers several plans that correspond to the price of the control plane. It is important to note that resources including network, instances, etc. are not included in this base rate.
The instances necessary for the operation of your applications are billed at the standard rates of Infomaniak's Public Cloud. You automatically benefit from Infomaniak's pricing advantages, including included traffic and low-cost instances, available on the Prices page.
- Instances (VMs): from an amount billed per hour depending on the configuration chosen
- Block Storage: from an amount billed per GB per month
- Snapshot: from an amount billed per GB per month
This structure allows you to pay only for the resources you actually use, while benefiting from a Kubernetes control plane fully managed by Infomaniak.
Link to this FAQ: https://faq.infomaniak.com/2819
Has this FAQ been helpful?
This guide addresses an issue accessing the API Server that may occur when using Kubernetes as a Service (KaaS) on Infomaniak Public Cloud.
Preamble
- As part of Kubernetes as a Service, the SSL certificate allowing connection to the API Server (the management interface for the client) is renewed once a year.
- Check for any ongoing issues on https://status.infomaniak.cloud/.
API Server inaccessible
If the certificate has been renewed, you may no longer be able to connect to your cluster. If you are using the CLI tool kubectl, the following error may appear:
"Unhandled Error" err="couldn't get current server API group list: the server has asked for the client to provide credentials"
Resolution of the issue
To resolve this issue, you must update your access credentials according to your deployment method.
1. Via the Infomaniak Manager (manual use)
It is necessary to re-download the updated Kubeconfig file:
- Click here to access the management of your cluster on the Infomaniak Manager (need help?).
- Click directly on the name assigned to the product concerned:
- Download the new
Kubeconfigfile. - Replace your old local file (usually
~/.kube/config).
2. Via Terraform (Infrastructure as Code)
If you manage your infrastructure with Terraform, the expected behavior is as follows:
- Enter the command
terraform refresh. - The provider should normally automatically retrieve the new
Kubeconfigduring the read step (read). - The tool will refresh the data and download the new version of the certificate from the Infomaniak API.
Also refer to the official Public Cloud documentation for more information on managing your resources.
Link to this FAQ: https://faq.infomaniak.com/2906
Has this FAQ been helpful?