
Knowledge base
1000 FAQs, 500 tutorials and explanatory videos. Here, there are only solutions!
This guide explains how to redirect emails from a Gmail, Bluewin, Outlook, Proton, Yahoo, etc. address to your Infomaniak-managed email address.
Preamble
- By setting up automatic forwarding of all incoming emails from your previous email system, you can immediately start using your new Infomaniak email address with the assurance of not missing any messages.
- By replying to your emails from your new Infomaniak address, your contacts will automatically use it to write to you in the future.
- ⚠️ For additional help, contact the service provider on which you are trying to activate message forwarding; otherwise contact a partner or launch a free tender — also discover the role of the host.
- You can also import content from another Mail provider directly to your Infomaniak address.
Specific guides
Refer to the official guides based on your previous provider:
- Gmail
- iCloud
- Microsoft (Outlook / Hotmail / Live)
- Orange
- Proton Mail (warning, requires a paid plan)
- Sunrise:
- Click here to log in to Sunrise Mail.
- Click on Inbox.
- Click on Settings => Manage Inbox.
- Enter the corresponding email address under 'Forwarding'.
- Yahoo (note, requires Yahoo Mail Pro)
Bluewin
- Bluewin (read also below):
- Click here to log in to Bluewin.
- Click on Settings then Automatic Forwarding.
- Click on Set up automatic forwarding.
- Follow the procedure to set up automatic forwarding.
- Bluewin (alternative method):
- Click here to log in to MySwisscom.
- Click on the "More" menu then “Settings”:

- Then click on “Manage transfers”:

GMX
Click on these elements in order to set up a redirection rule from GMX:
This guide explains how to connect the desktop app Outlook 2013 (desktop application on Windows) to an email address hosted by Infomaniak.
Preamble
- The various services offered by Infomaniak are all compatible with the corresponding standard protocols (IMAP/SMTP for email, for example). Therefore, if you encounter a problem with third-party software, contact its publisher or a Partner and consult the support policy as well as article 11.9 of the Infomaniak Terms of Service.
Add the email address to the application
Prerequisites
- Create the email address in my kSuite or a Mail Service / kSuite.
- Create a password for the email address on the device you are going to configure.
To configure the email application:
- Open the application.
- Click on the File menu:
- Click on Account Settings.
- Click on Add or Remove Accounts:
- Click on New:
- Click on Manual Setup:
- Click on POP / IMAP.
- Click on Next:
- Check and complete the missing information.
- Click on More Settings:
- Click on the Outgoing Server tab.
- Click on My outgoing server requires authentication.
- Click on the Advanced tab:
- Replace the port numbers with the correct information and enable SSL.
- Click on OK:
- Click on Next:
- Click on Close:
- Click on Finish:
- Click on Close:
- There you go, your email address is now configured in the application:
Recommended settings
- Incoming IMAP server =
mail.infomaniak.com - IMAP port =
993(with SSL) - Outgoing SMTP server =
mail.infomaniak.com - SMTP port & encryption protocol and command/method to activate this protocol:
587+ STARTTLS - Username = the complete & full email address ( ? )
- Password = the one generated for the email address you want to access
- Mandatory authentication for sending emails:
- It is activated in the SMTP settings of your application.
- Check "use the same settings as the incoming server" or, depending on the software/email clients, enter a username (= complete & full email address) and the generated password.
Refer to this other guide if you are looking for information about other messaging ports and protocols compatible (SSL / TLS for example).
In case of a problem
Check that the Mail Service is configured optimally.
It is not necessary to contact Infomaniak Support if your email address works well outside the application. The most common error concerns the use of an incorrect password. The troubleshooting guides help you resolve any potential issues:
- Be aware of the solutions provided in this other guide regarding email in general.
- This other guide is more specifically about Outlook.
… and if your Outlook no longer works since a change in your email password, be aware of this other guide.
This guide explains how to connect the Apple Mail mobile app on iOS to an email address hosted by Infomaniak.
Preamble
- Your iOS device will be automatically configured via .mobileconfig configuration profiles compatible with Apple, unlike a manual configuration.
- It is possible to delete a configuration profile once installed (scroll down to the bottom of this page for the instructions).
- The various services offered by Infomaniak are all compatible with the corresponding standard protocols (IMAP/SMTP for email, for example), therefore if you encounter a problem with third-party software, contact its publisher or a Partner and consult the support policy as well as section 11.9 of the Infomaniak Terms of Service.
Install a configuration profile
Prerequisites
- Create the email address in my kSuite or a Mail Service / kSuite.
- Create a password for the email address on the device you are going to configure.
- Check that the Mail Service is configured optimally.
Download the profile from the relevant iOS device or send it from another device (if you already have a working email address, for example):
- Click here to access the Infomaniak configuration tool (online service https://config.infomaniak.com) — log in if necessary to your Infomaniak account on the Organization on which your email address is managed.
- Choose to install the profile on this device:
- Choose to synchronize emails:
- Choose to synchronize another application than the Infomaniak Mail application:
- Enter the password for the email address (attached to Mail Infomaniak (Webmail)) that you want to synchronize on iOS.
- Press the blue Verify button:
- Press to copy the validated password.
- Download the configuration profile and authorize its opening:
- Open the settings of the iOS device:
- Press the recently downloaded profile:
- Press Install:
- Unlock your iOS device:
- Press Install:
- Paste the password of the previously verified email address (point 7 above).
- Press Next:
- There you go, your email address is now configured in the Apple Mail application that you can open and control:
Delete an Apple profile
Refer to the official documentation by changing the version of your system at the top of the page* if necessary.
*Why is it necessary to choose the guide version that exactly matches your macOS / iOS system version? Apple introduces changes, sometimes subtle, with each new version of its system, for example a path on iOS 15…
… becomes this on iOS 18…
This guide explains how to synchronize Microsoft Outlook Windows contacts & calendars (Office 365 / 2019, 2016, 2013, 2010, 2007) with contacts & calendars hosted by Infomaniak, using an extension for Outlook available on caldavsynchronizer.org.
Preamble
- The various services offered by Infomaniak are all compatible with the corresponding standard protocols (CalDAV/CardDAV for contacts & calendars, for example), therefore if you encounter a problem with third-party software, contact its publisher or a Partner and consult the support policy as well as article 11.9 of the Infomaniak Terms of Service.
- There is a paid alternative for Windows, Evo Collaborator, which offers a pre-configured profile for Infomaniak.
Configure Outlook CalDav Synchronizer
Outlook CalDav Synchronizer allows you to synchronize contacts & calendars via CalDAV and CardDAV protocols, including multiple calendars (non-shared only):
- Download CalDav Synchronizer for Outlook.
- Close Outlook and launch the installation of the plugin downloaded above:

- Once the plugin is installed, open Outlook and click on the new CalDav Synchronizer tab.
- Click on Synchronization Profiles.
- Click on the + icon to create a first profile (for the calendar or contacts - you will need to create a second profile later to synchronize both).
- Choose a generic profile type (first radio button):

- Enter a profile name (name of the Infomaniak calendar or address book you want to synchronize, for example).
- Check the synchronization box.
- Click on the [ ▪ ▪ ▪ ] button.
- Click on the New… button:

- Enter a new folder name.
- Choose the type of items the folder will contain (Calendar or Contacts).
- Click on the parent folder “Outlook” to create the folder in its hierarchy.
- Confirm with the OK button:

- Confirm with OK:

- Open the assistant https://config.infomaniak.com/ to obtain the information regarding synchronization with Outlook.
- Click the button to generate an application password (allows you to bypass the 2FA of your user account for synchronization only):

- Copy the information (password, URL, and username) obtained on config.infomaniak.com.
- Enter the email address, that of your user account.
- Click the button to Test the settings:

- Choose the Infomaniak calendar to synchronize from the window that opens.
- Click the OK button:

- Additional information may then automatically appear in certain fields.
- Save a second profile if necessary (in this case, go back to step 4).
- Finish with OK at the bottom right.

- A restart of Outlook may be required to update the added information.
Resolve event duplicates
If you notice duplicated events in your Outlook calendar that are not duplicated on ksuite.infomaniak.com/calendar, apply these settings:
- Click to Show Advanced Settings.
- Click on Event Mapping Configuration.
- Check the box Use GlobalAppointmentID for UID attribute.
- Check the box Cleanup duplicate events.
- Save the changes by clicking the OK button:

This deletion of duplicate events and therefore potentially duplicate invitations, may trigger a notification of event refusal to the organizer, however, this has no impact on the initial choice of the participant.
And on macOS?
There is an alternative to Outlook / Exchange on macOS, via the ews-caldav-sync python script:
- Unlike an ICS file import provided by Outlook Web, which only includes the last few weeks of events, the script will import all calendar events, including event series, but not tasks.
- Synchronization via this script is one-way, from Microsoft Exchange to the CalDAV server. It is recommended to run it at regular intervals.
This guide explains how to share one of your calendars/schedules with other Infomaniak users, collaborators, using the Infomaniak Web app Calendar (online service ksuite.infomaniak.com/calendar).
Preamble
- Refer to this guide to configure the synchronization of your calendars or this guide to integrate a read-only calendar into a third-party tool.
Share an Infomaniak Calendar
To enable sharing of one of your calendars/schedules:
- Click here to access the Infomaniak Web app Calendar (online service ksuite.infomaniak.com/calendar).
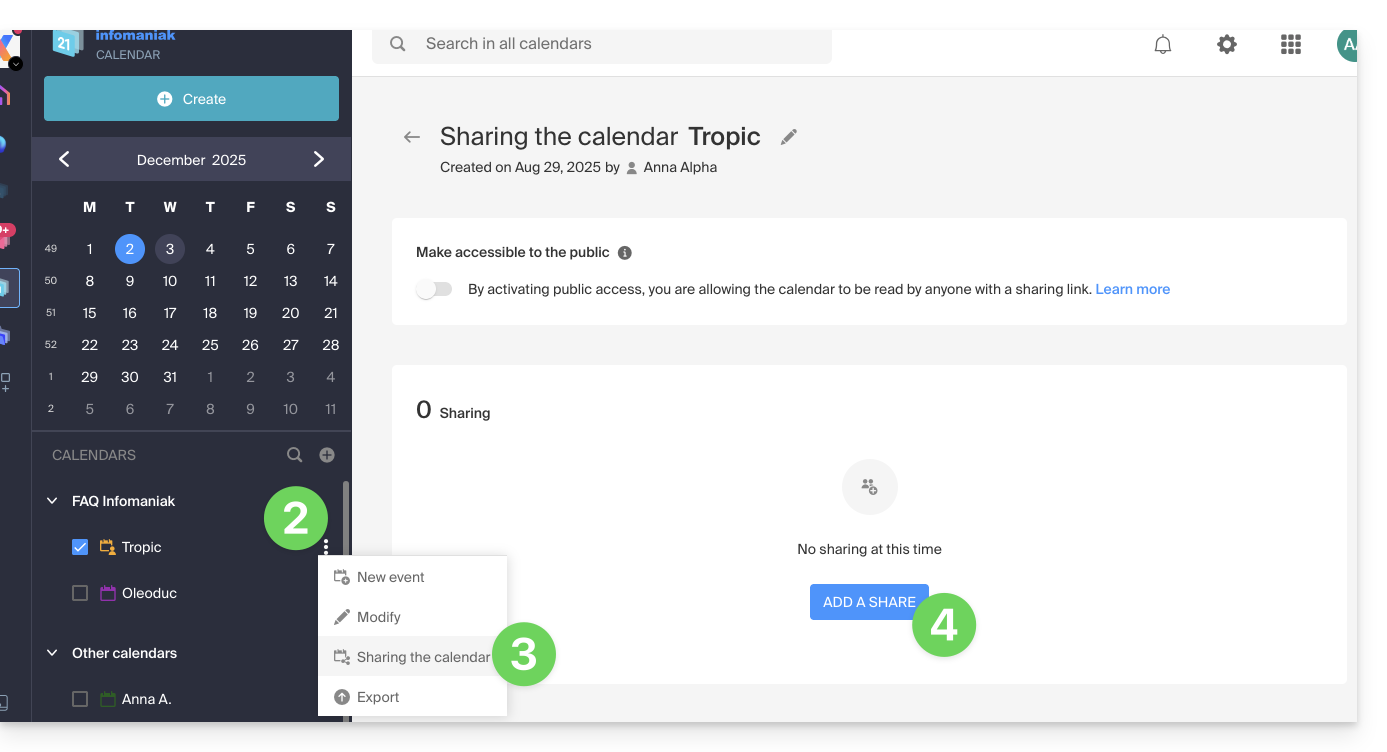
- Click on the action menu ⋮ to the right of a calendar.
- Click on Share the calendar.
- Click the button to Add a share:
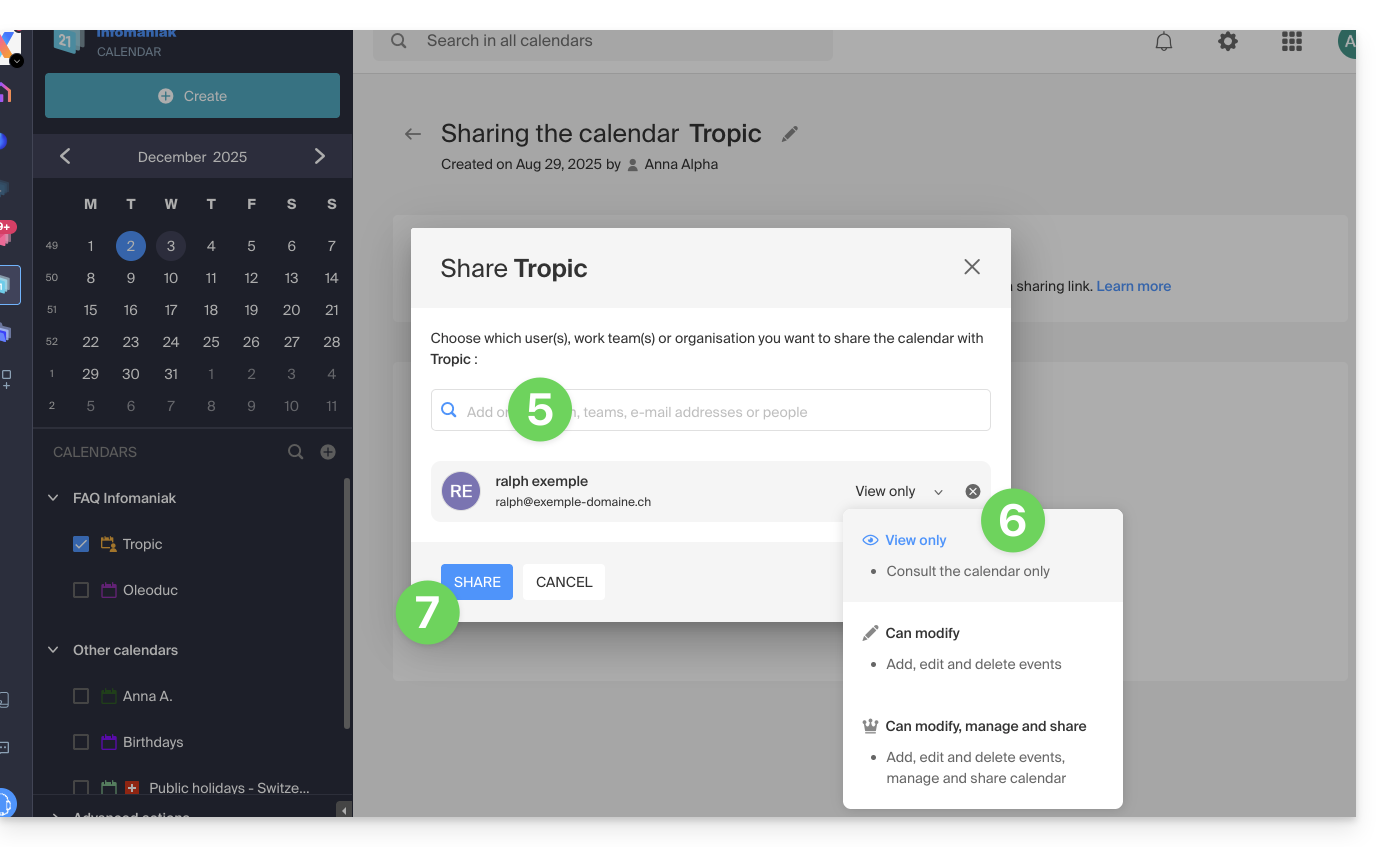
- Enter the Organization, group or email address corresponding to the Infomaniak user account that will access the schedule (if the user does not yet have an account, they can create one for free with the invitation they receive).
- Determine the user rights on this calendar (Can view, Can modify, Can modify and share).
- Finish by clicking on the button:
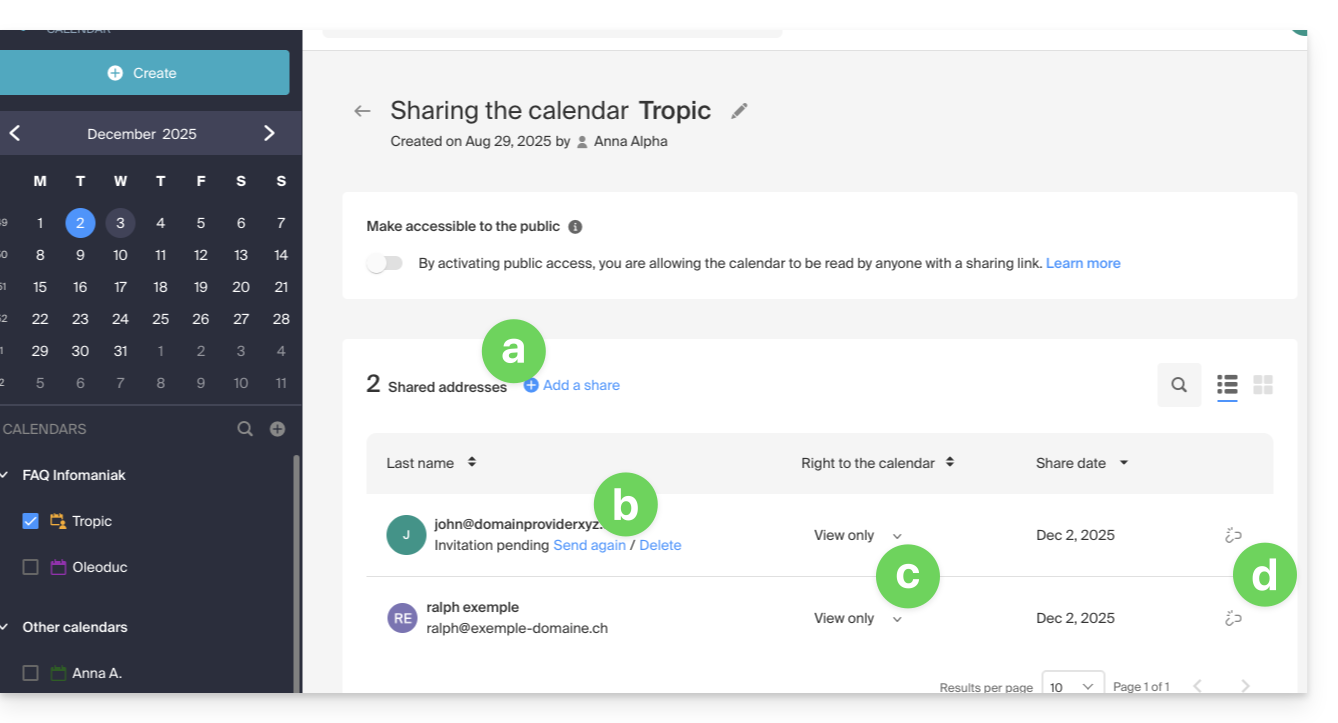
- It is always possible to perform other actions from the same page:
- add an additional share
- resend or delete an access invitation
- modify the permissions related to calendar sharing
- delete/revoke the share
Share the meeting room calendar
To share the calendars of meeting rooms, the sharing principle and the assignment of rights are the same: 
This guide explains how to remove one of the users from your Organization on the Manager Infomaniak.
Prerequisites
- Be Administrator or Legal Representative within the Organization.
- Know the login password; it will be requested during the process.
Warning, it is impossible to remove a legal representative if there is no other legal representative.
Remove a user from your Organization
To remove one of the users from the Organization:
- Click here to access the management of the Organization's users on the Infomaniak Manager (need help?).
- Click on the action menu ⋮ to the right of the user concerned.
- Click on Remove from the Organization:

- Click on the blue button Continue:

- Enter your login password for the Manager.
- Check the confirmation box.
- Click on the red button Remove this user

If the user had access to kDrive or was invited to view a third-party email address, several intermediate steps will ask you to perform actions with their data and inform you, if necessary, of what happens to the calendars and address books:
This guide explains how to download and use the mobile app Infomaniak kSync for Android devices (Samsung, Huawei, Google Pixel, etc.) that allows you to synchronize calendars & contacts between Android devices (with data stored at Infomaniak).
Preamble
- Refer to this other guide for an example of using kSync: synchronize an Infomaniak calendar with a Google agenda.
Configure kSync
Prerequisites
- Download the mobile app Infomaniak kSync (app for Android smartphone or tablet) here:

- The kSync app is also available on F-droid.
- Install kSync.
Next:
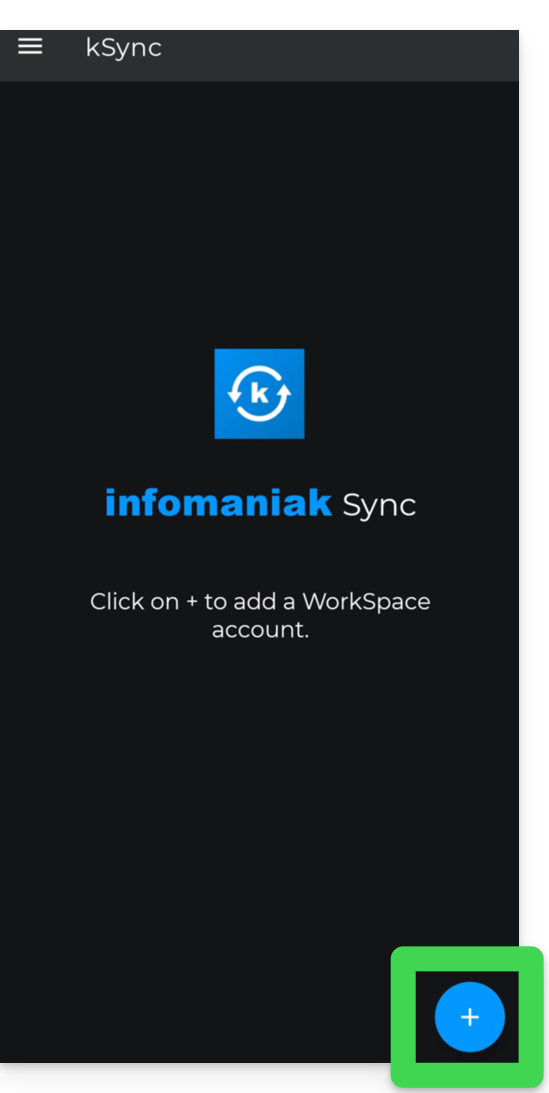
- Open kSync from your Android device, a step-by-step assistant will help you configure the app according to your needs.
- Decide if you want to synchronize tasks.
- Allow kSync to access the required elements.
- Allow the app to run in the background for better synchronization (uses more battery).
Once the app is open and pre-configured:
- Press the button to open the login window to your Infomaniak user account:
- Enter your login information for the Infomaniak account containing your Infomaniak agenda(s) to synchronize with your Android device.
- Under the Address Books CARDDAV tab, choose the address book(s) that should appear on your device.
- Under the Calendars CALDAV tab, choose the calendar(s) that should appear on your device.
- Start the synchronization with the button located at the bottom right.
Synchronization settings
After pressing the account to synchronize, click on the Settings icon at the top right of the interface to adjust some important settings:
- Synchronization interval: you can modify the frequency of synchronizations (15, 30, 60 minutes, etc.) for each type of information (address books, calendars, tasks).
- Synchronization only via WiFi (and if so, with which networks...).
- Limit of display of past events.
- Display of colors.
- Display of contact groups.
kSync general settings
Press the back arrow at the top left of the screen to return to the home page.
Press the menu button with three horizontal lines ☰ then on Settings.
How synchronization works
Once the kSync application is configured, the selected items are automatically synchronized with the Contacts and Calendar applications, installed by default on an Android device.
These applications will allow you to display or hide the address books currently synchronized with Infomaniak: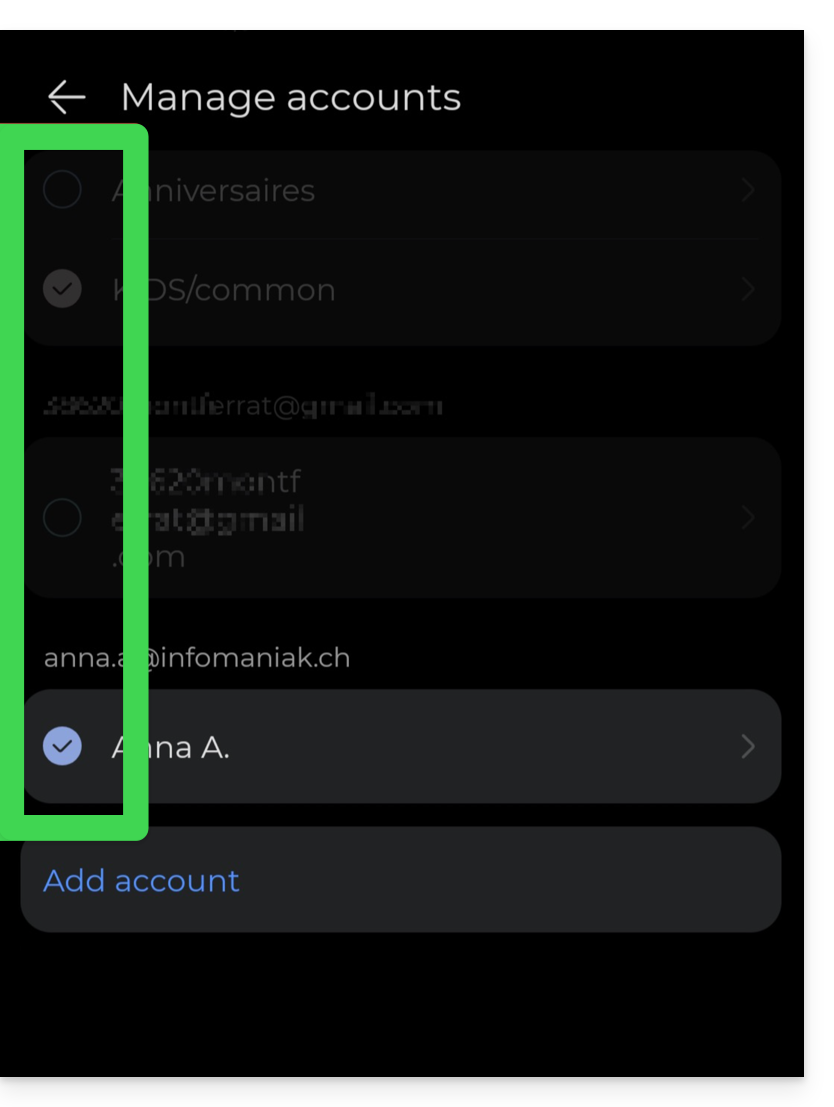
Synchronization is bidirectional by default, which means that without any particular setting on your part (read below) the modifications made on your phone in this or these new address books and calendars will be reflected in your Infomaniak interface (Calendar and Contacts) and vice versa. Add a contact in the address book currently synchronized with Infomaniak, same for an event on the calendar::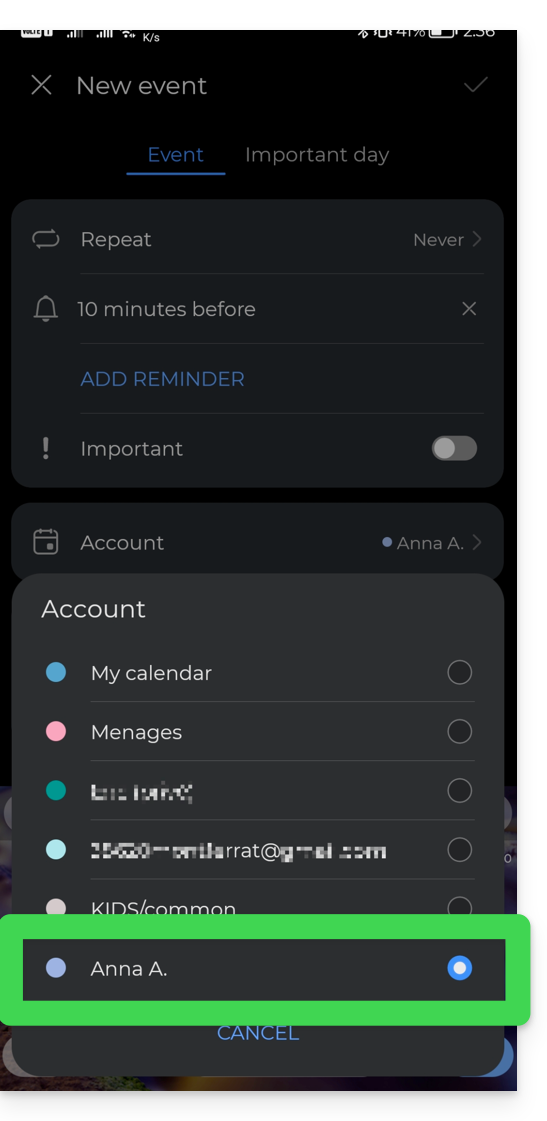
Once added on one side or the other, the information is synchronized at the scheduled interval.
Do not allow modification on the device
It is possible to force read-only via kSync which means that the items are synchronized but cannot be modified by the device.
To do this, on the settings page of the Infomaniak account that interests you, in the Address Books CARDDAV or Calendars CALDAV tab, press the action menu ⋮ to the right of the line of your synchronized items. Check the box "Force read-only":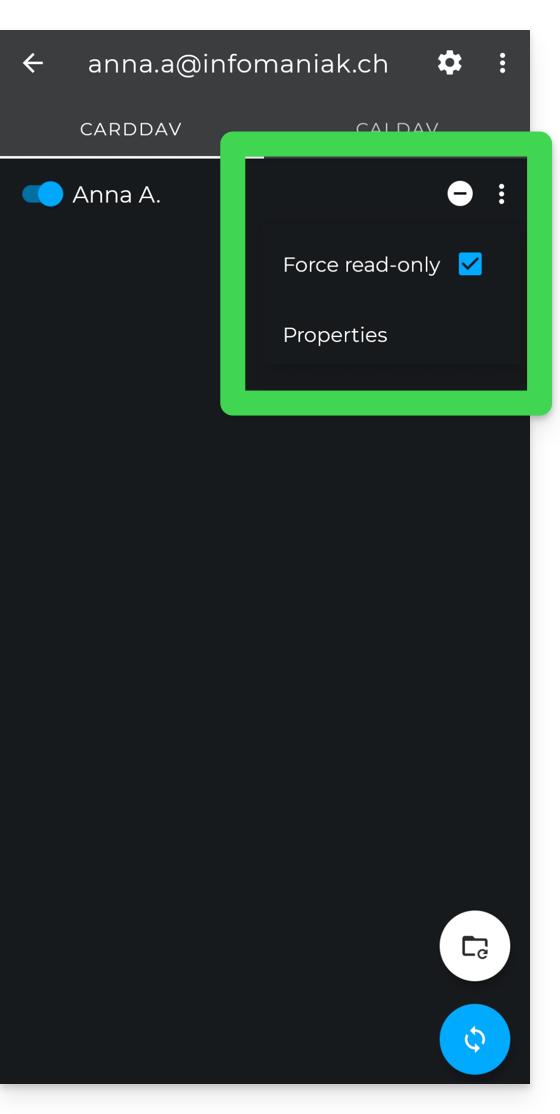
This guide explains how to connect the desktop app Outlook 2007 (desktop application on Windows) to an email address hosted by Infomaniak.
Preamble
- The various services offered by Infomaniak are all compatible with the corresponding standard protocols (IMAP/SMTP for email, for example), therefore if you encounter a problem with third-party software, contact its publisher or a Partner and consult the support policy as well as article 11.9 of the Infomaniak Terms of Service.
Add the email address to the application
Prerequisites
- Create the email address in my kSuite or a Mail Service / kSuite.
- Create a password for the email address on the device you are going to configure.
To configure the email application:
- Open the application.
- Click on the Tools menu.
- Click on Options:
- Click on the Email Configuration tab.
- Click on Email Accounts...:
- Click on New:
- Click on Configure manually.
- Click on Next:
- Click on the Internet E-mail button to connect to an IMAP server.
- Click on Next:
- Check and complete the missing information.
- Click on Additional settings:
- Click on the Outgoing server tab.
- Click on My outgoing server requires authentication.
- Click on the Advanced tab:
- Replace the port numbers with the correct information and enable SSL.
- Click on OK:
- Click on Next:
- Click on Finish:
- Click on Close:
- Your email address is now configured in the application:
Recommended settings
- Incoming IMAP server =
mail.infomaniak.com - IMAP port =
993(with SSL) - Outgoing SMTP server =
mail.infomaniak.com - SMTP port & encryption protocol and command/method to activate this protocol:
587+ STARTTLS - Username = full & complete email address ( ? )
- Password = the one generated for the email address you want to view
- Authentication required for sending emails:
- It is activated in the SMTP settings of your application.
- Check "use the same settings as the incoming server" or, depending on the software/email clients, enter a username (= full & complete email address) and the generated password.
Refer to this other guide if you are looking for information about other mail ports and protocols compatible (SSL / TLS for example).
In case of a problem
Check that the Mail Service is configured optimally.
It is not necessary to contact Infomaniak Support if your email address works well outside the application. The most common error concerns the use of an incorrect password. The troubleshooting guides help you resolve any potential issues:
- Refer to the solutions provided in this other guide regarding mail in general.
- This other guide is more specifically about Outlook.
… and if your Outlook no longer works since a change of mail password, refer to this other guide.
This guide details the possibility of grouping contacts within Infomaniak address books of the Infomaniak Web app Contacts (online service ksuite.infomaniak.com/contacts).
Preamble
- Creating a contact group allows you to reach them more easily.
- This also facilitates the sending of emails intended for a specific type of contact.
Form the group
To manage contact groups:
- Click here to access the Infomaniak Web app Contacts (online service ksuite.infomaniak.com/contacts).
- Click on the action menu ⋮ located to the right of the item concerned.
- Click on Add a group:

- Enter the group name.
- Click the blue button to validate (and thus create automatically the “folder” with the name of the group chosen, as well as a second “folder” mandatory that will group all contacts that will not be classified in your new group):

- Drag or create inside the contacts that need to be associated with this new group:

- The display of all contacts shows which address book they belong to, but not in which group precisely; however, when editing a contact, you can manage the address books and groups:

- To modify the membership of a contact in an address book or group, simply check/uncheck the corresponding boxes; the effect is immediate.
Group sending
To send an email to the entire group:
- Click here to access the Infomaniak Web app Mail (online service ksuite.infomaniak.com/mail).
- Compose a new message.
- Type the beginning of the address book name to make it appear and select it:

You can also click on the "A" to the left of the recipient address field to access your address book and its subfolders (contact groups):
Of course, it is possible to use the contacts currently in your address book to send them an individual or group message by typing their first letters.
You can share an entire address book with other users (users you have invited and selected, of course)…
… but not just a specific group:
This guide explains how to connect the desktop app Outlook 2010 (desktop application on Windows) to an email address hosted by Infomaniak.
Preamble
- The various services offered by Infomaniak are all compatible with the corresponding standard protocols (IMAP/SMTP for email, for example). Therefore, if you encounter a problem with third-party software, contact its publisher or a Partner and consult the support policy as well as article 11.9 of the Infomaniak Terms of Service.
Add the email address to the application
Prerequisites
- Create the email address in my kSuite or a Mail Service / kSuite.
- Create a password for the email address on the device you are going to configure.
To configure the email application:
- Open the application.
- Click on Next:
- Click on Yes to configure a mail account.
- Click on Continue:
- Click on Configure manually.
- Click on Next:
- Click on the Internet E-mail button to connect to an IMAP server.
- Click on Next:
- Check and complete the missing information.
- Click on Additional settings:
- Click on the Outgoing server tab:
- Click on My outgoing server requires authentication.
- Click on the Advanced tab:
- Replace the port numbers with the correct information and enable SSL.
- Click on OK:
- Click on Next:
- Click on Close:
- Click on Finish:
- That's it, your email address is now configured in the application:
Recommended settings
- Incoming IMAP server =
mail.infomaniak.com - IMAP port =
993(with SSL) - Outgoing SMTP server =
mail.infomaniak.com - SMTP port & encryption protocol and command/method to enable this protocol:
587+ STARTTLS - Username = the full & complete email address ( ? )
- Password = the one generated for the email address you want to access
- Authentication required for sending emails:
- It is activated in the SMTP settings of your application.
- Check "use the same settings as the incoming server" or, depending on the software/email clients, enter a username (= full & complete email address) and the generated password.
Refer to this other guide if you are looking for information about other messaging ports and protocols compatible (SSL / TLS for example).
In case of problem
Check that the Mail Service is configured optimally.
It is not necessary to contact Infomaniak Support if your email address works well outside the application. The most common error concerns the use of an incorrect password. The troubleshooting guides help you resolve any potential issues:
- Be aware of the solutions provided in this other guide regarding email in general.
- This other guide is more specifically about Outlook.
… and if your Outlook no longer works since a change of email password, be aware of this other guide.
This guide explains how to connect the desktop app Microsoft Outlook for Mac version 16.80 (desktop app on macOS) to an email address hosted by Infomaniak.
Preamble
- Instead of the manual configuration for Outlook below, it is recommended to use Apple Mail with the .mobileconfig configuration profiles offered by Apple.
- The various services offered by Infomaniak are all compatible with the corresponding standard protocols (IMAP/SMTP for email, for example), therefore if you encounter a problem with third-party software, contact its publisher or a Partner and consult the support policy as well as article 11.9 of the Infomaniak Terms of Service.
Add the email address to the application
Prerequisites
- Create the email address in my kSuite or a Mail Service / kSuite.
- Create a password for the email address on the device you are going to configure.
To configure the email application:
- Open the application.
- Click on Add an account:
- Enter the email address to be linked.
- Click on Continue:
- Click on IMAP:
- Click on Synchronize in IMAP (without Microsoft Cloud):
- Check and complete the missing information.
- Click on Add the account:
- Understand and go through the different Microsoft information windows:
- That's it, your email address is now configured in the application:
Recommended settings
- Incoming IMAP server =
mail.infomaniak.com - IMAP port =
993(with SSL) - Outgoing SMTP server =
mail.infomaniak.com - SMTP port & encryption protocol and command/method to activate this protocol:
587+ STARTTLS - Username = full & complete email address ( ? )
- Password = the one generated for the email address you want to access
- Authentication required to send emails:
- It is activated in the SMTP settings of your application.
- Check "use the same parameters as the incoming server" or, depending on the software/email clients, enter a username (= full & complete email address) and the generated password.
Refer to this other guide if you are looking for information about other compatible messaging ports and protocols (SSL / TLS for example).
In case of problem
Check that the Mail Service is configured optimally.
There is no need to contact Infomaniak Support if your email address works well outside the application. The most common error concerns the use of an incorrect password. The troubleshooting guides help you resolve any potential issues:
- Refer to the solutions given in this other guide regarding email in general.
- This other guide is more specifically about Outlook.
… and if your Outlook no longer works since a change of email password, refer to this other guide.
This guide explains how to add a user to an existing email address on Infomaniak without sharing a password.
If the email address in question is used as a login identifier for an Infomaniak account, it cannot be shared for security reasons.
Prerequisites
- Order a Mail Service from Infomaniak.
- Create one or more addresses on this Mail Service.
- Be Administrator or Legal Representative within the Organization.
Add a new user to an email address
The current email access management model allows each user to log in independently and securely to the same email address, without sharing a global password:
- Click here to access the management of your product in the Infomaniak Manager (need help?).
- Click on the product name concerned.
- Select the email address concerned in the table.
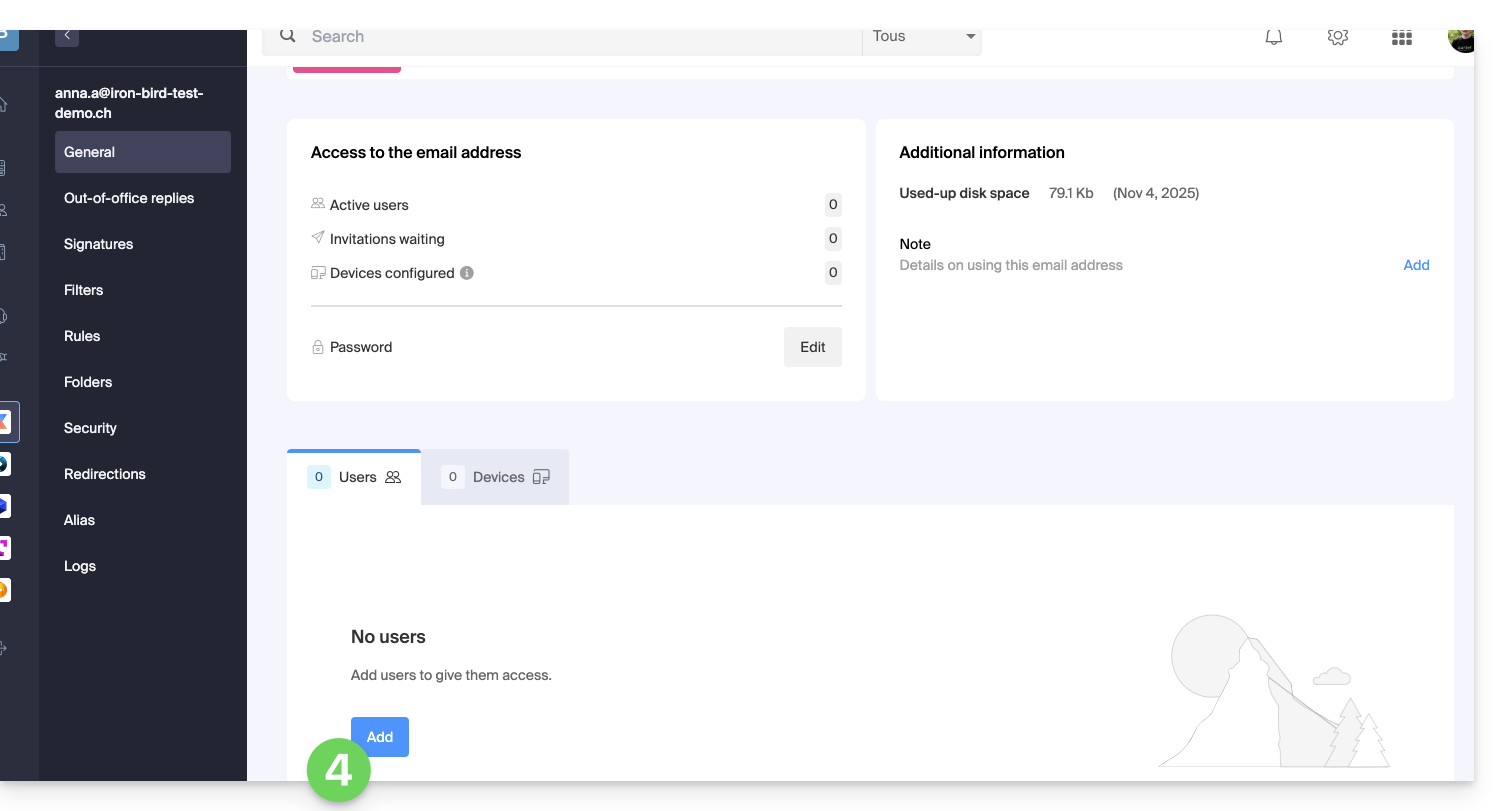
- In the user section, click on Add:
- Enter the password to log in to your Infomaniak account if necessary.
- Click on New user.
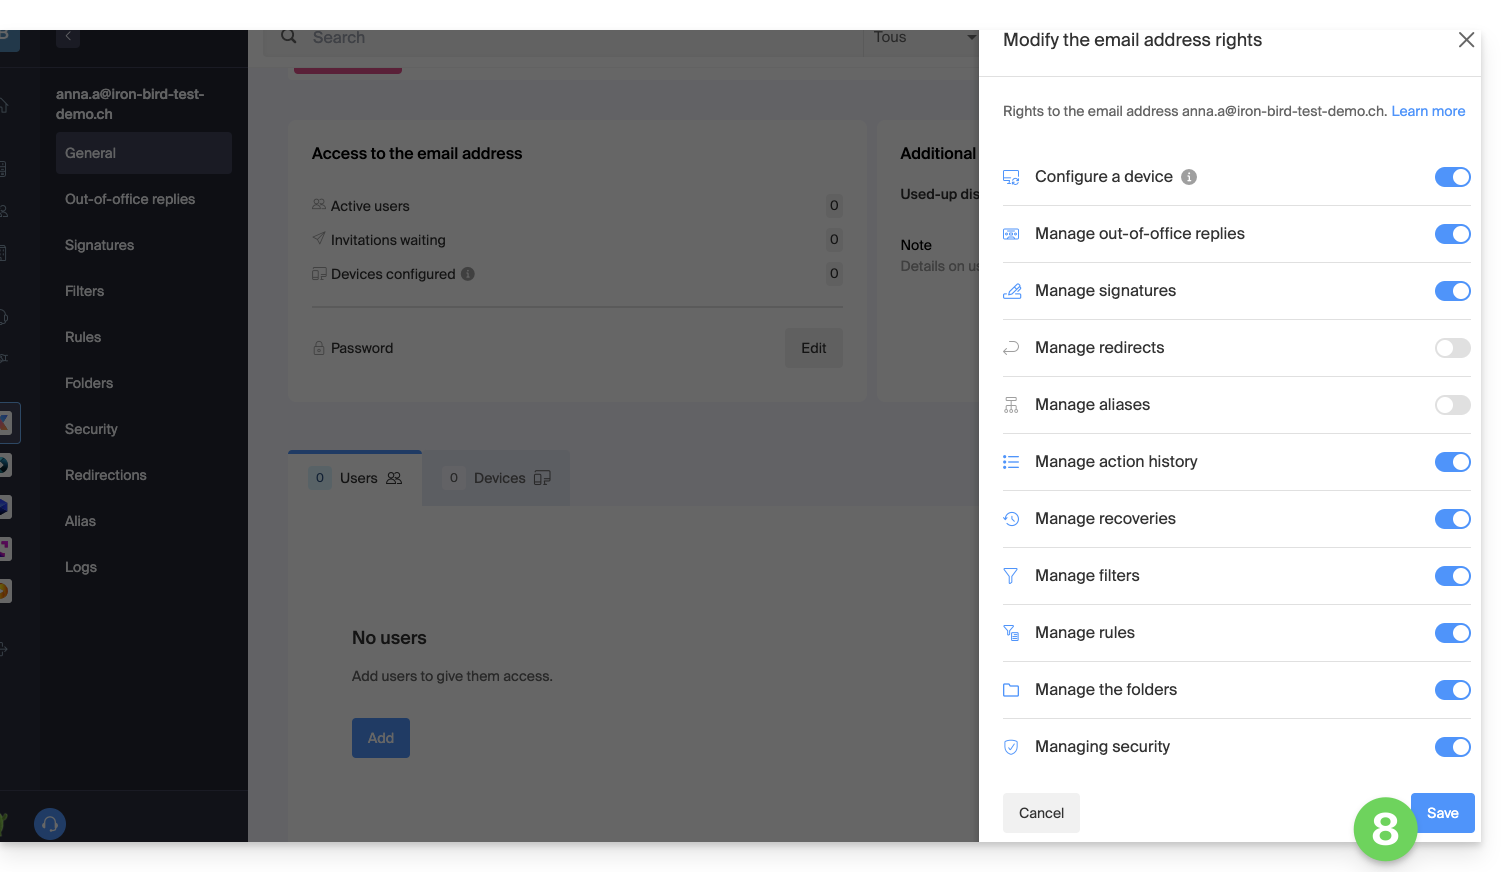
- Click to check or set the access permissions that the user will need according to the requirements:
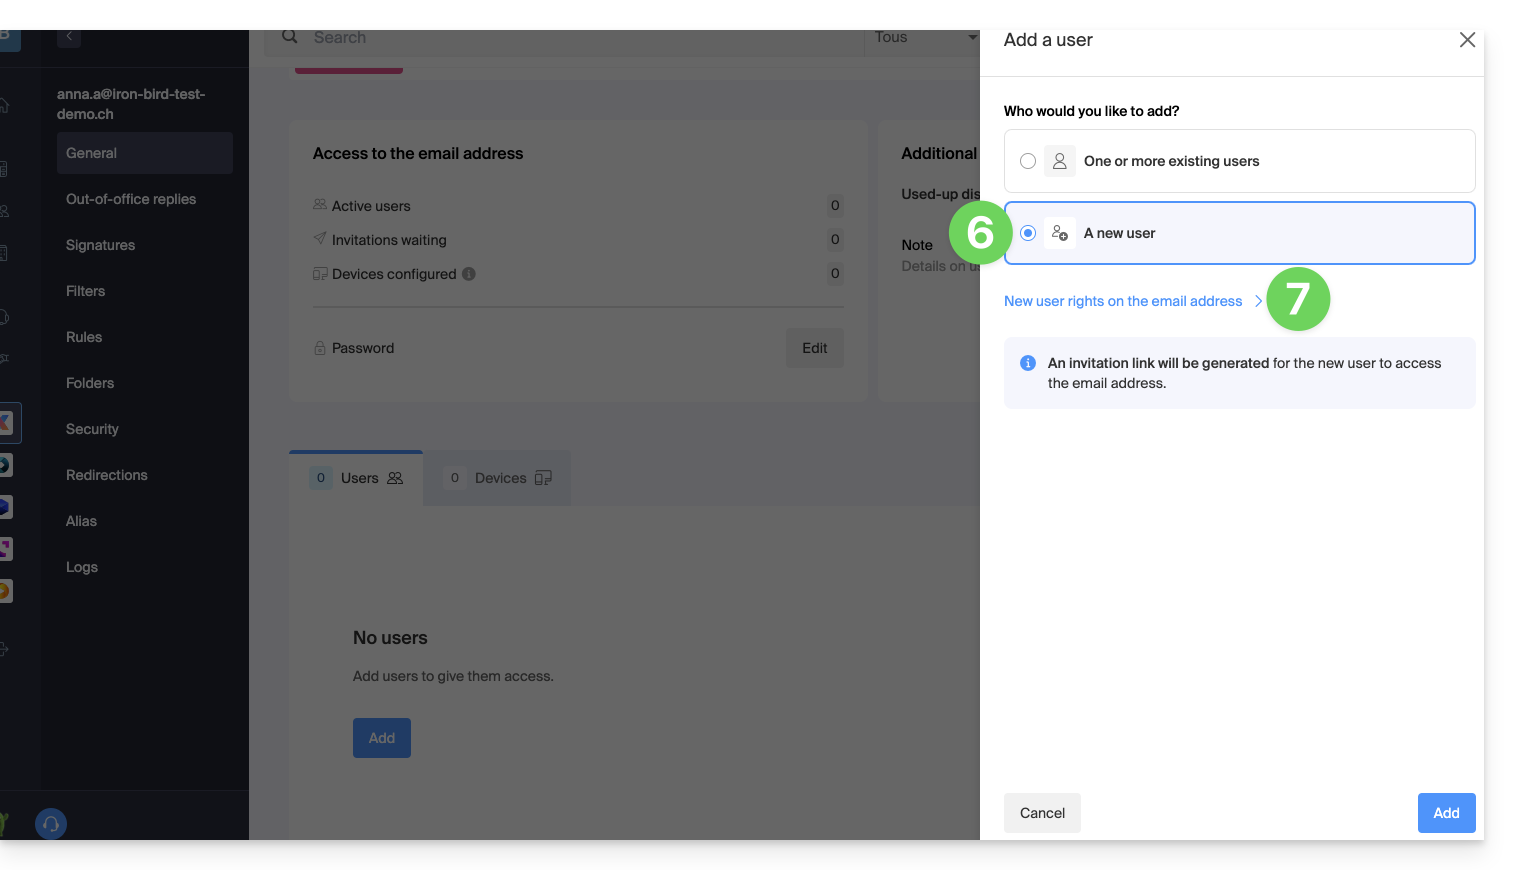
- Once the permissions are configured, click the button to Save (or Cancel to return without modifying the default permissions):
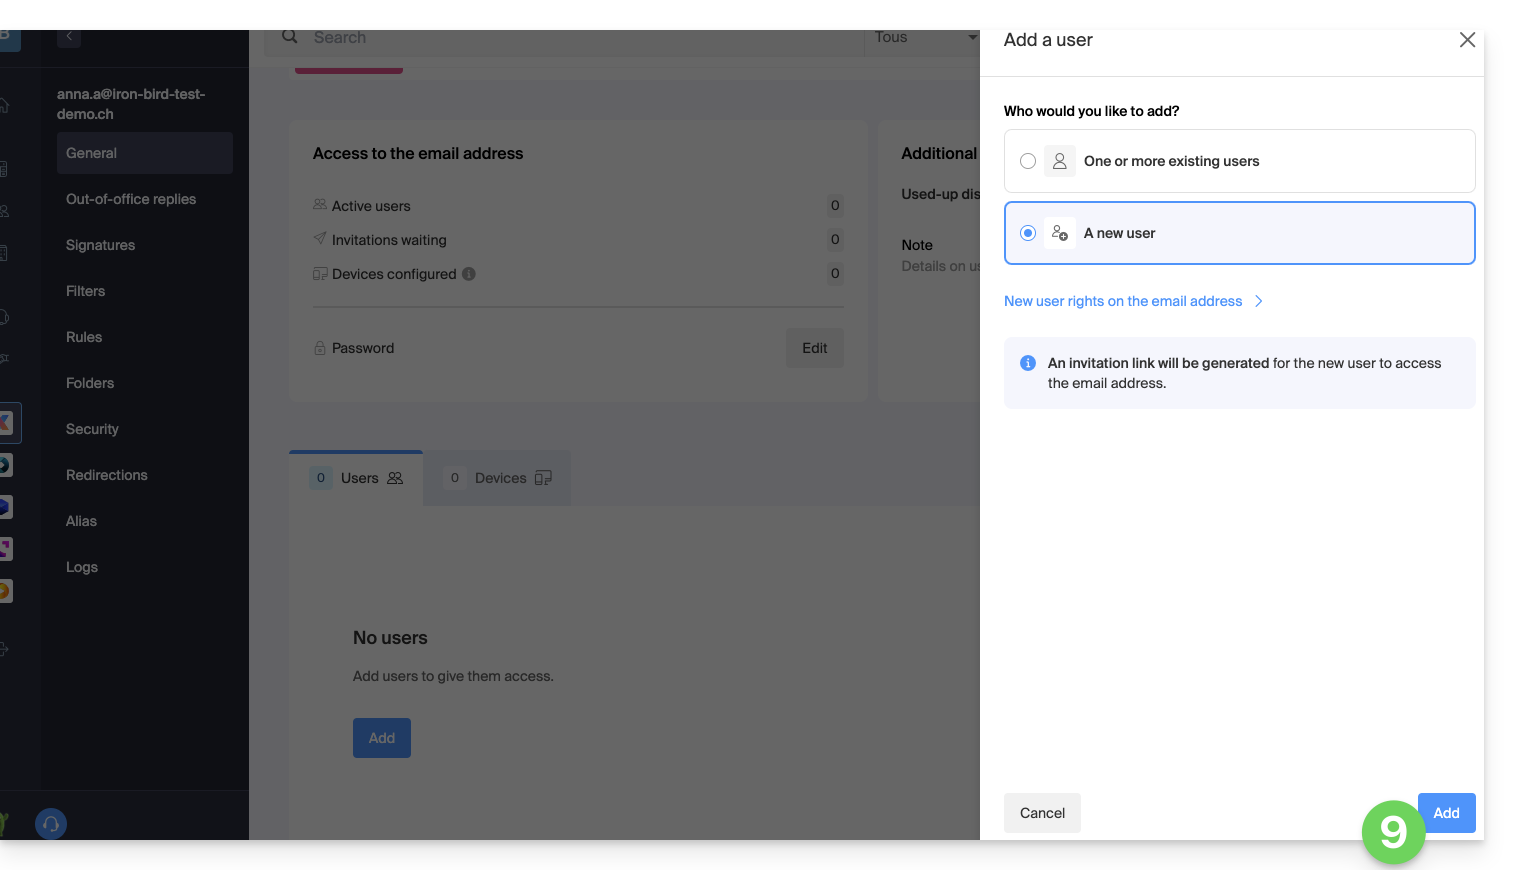
- Click on Add:
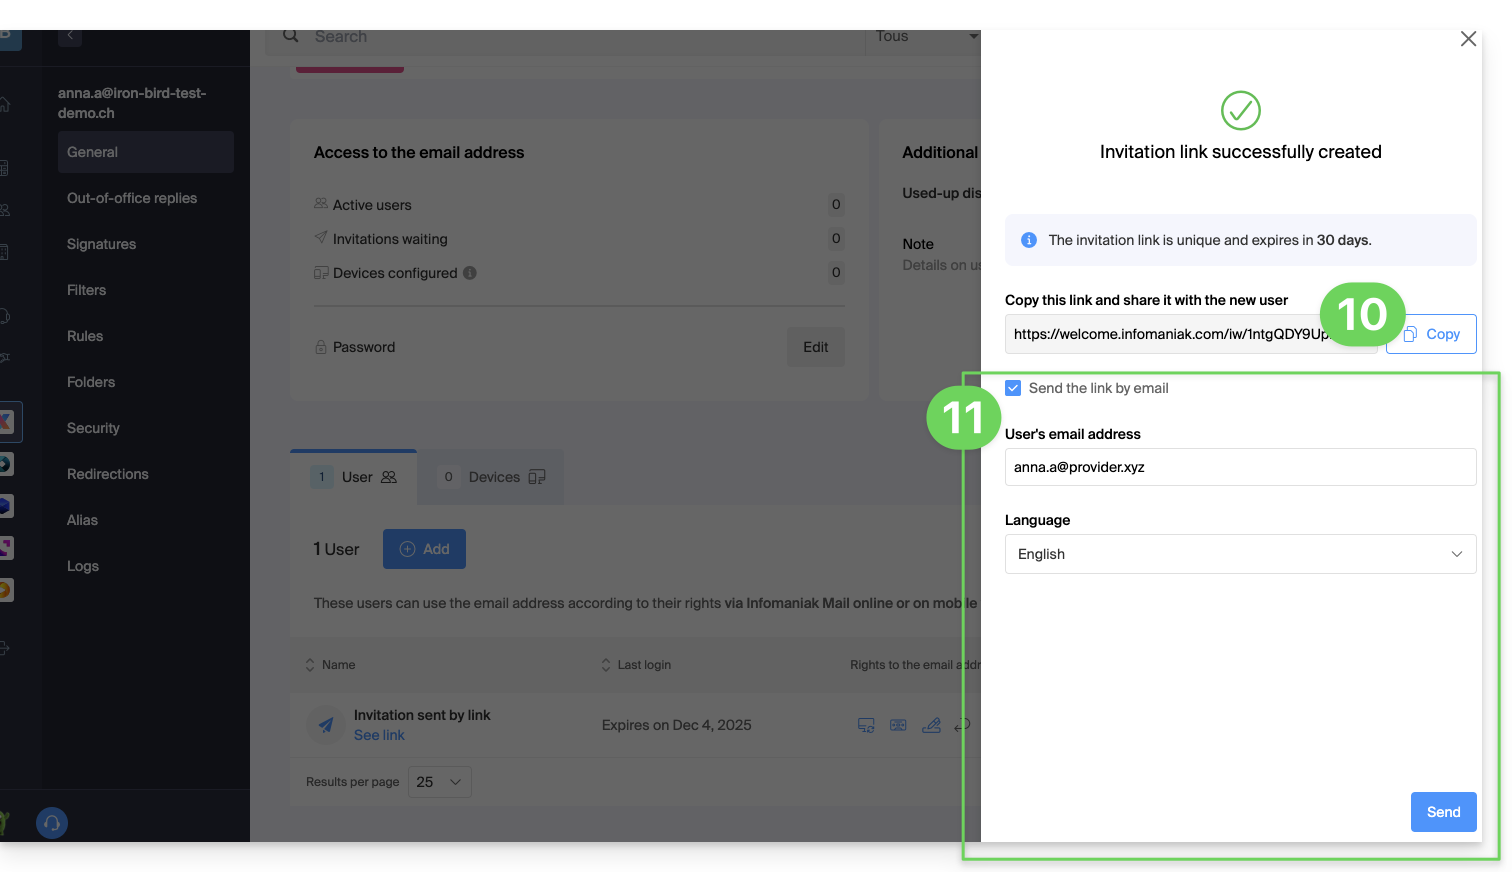
- Copy the invitation link valid for 30 days to be sent to the user.
- If necessary, send the invitation to the user's personal email address:
Acceptance of the invitation (by the new user)
To do this:
- The user clicks on the link received (by e-mail or other means).
- They create an Infomaniak account (or log in if they already have one).
- The email address is automatically added to their Mail Infomaniak interface.
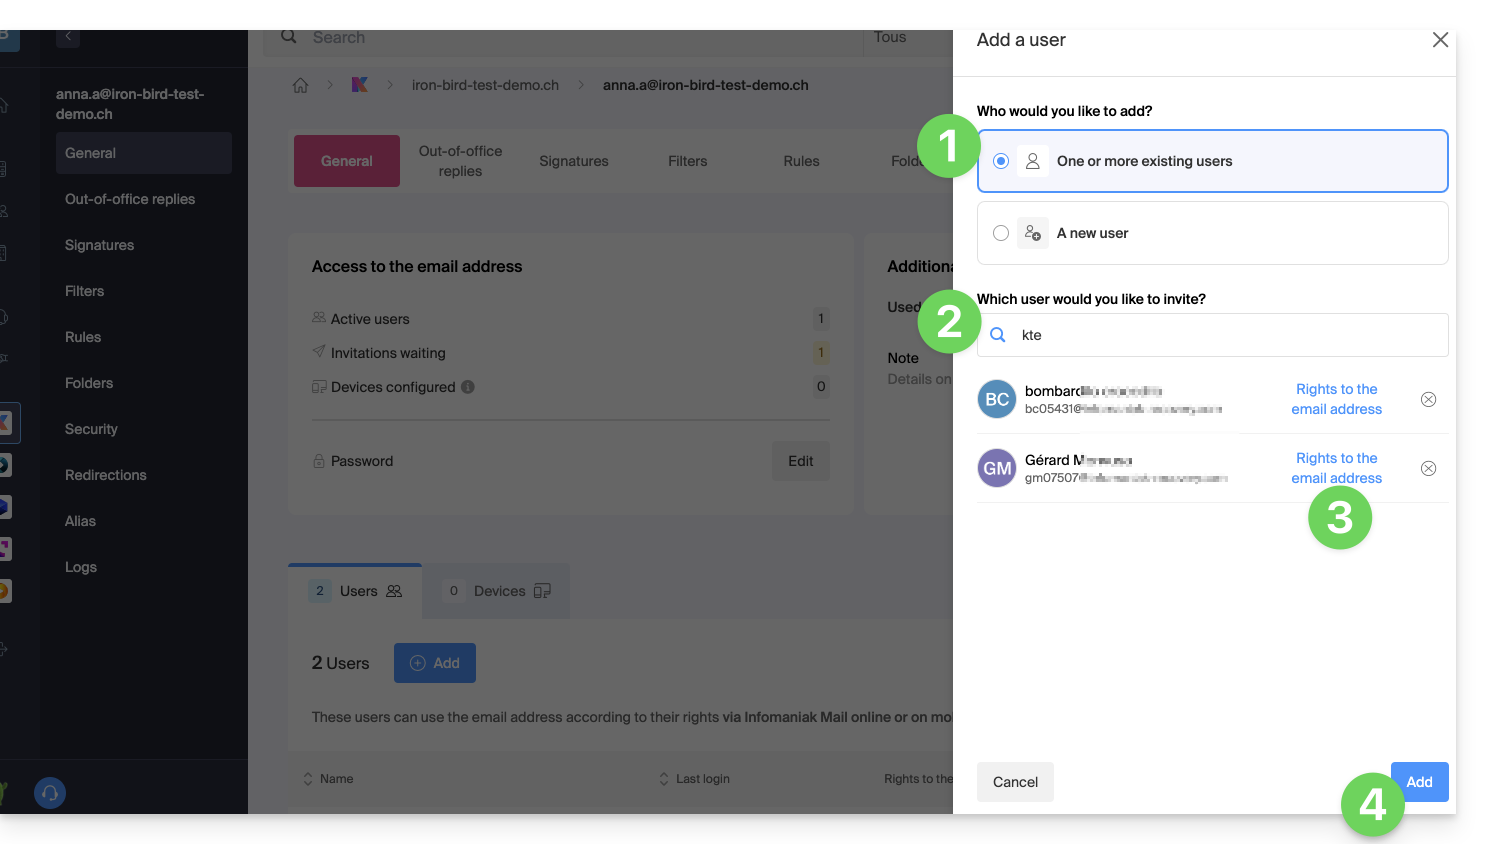
Add one or more existing users
In the case of one or more existing users already in the Organization, the email address will be automatically added to their Mail Infomaniak interface:
- Select One or more existing users in the Organization.
- Search for and choose the desired users.
- Define the permissions (read, write, etc.).
- Click on Add to validate access:
Manage and remove a user
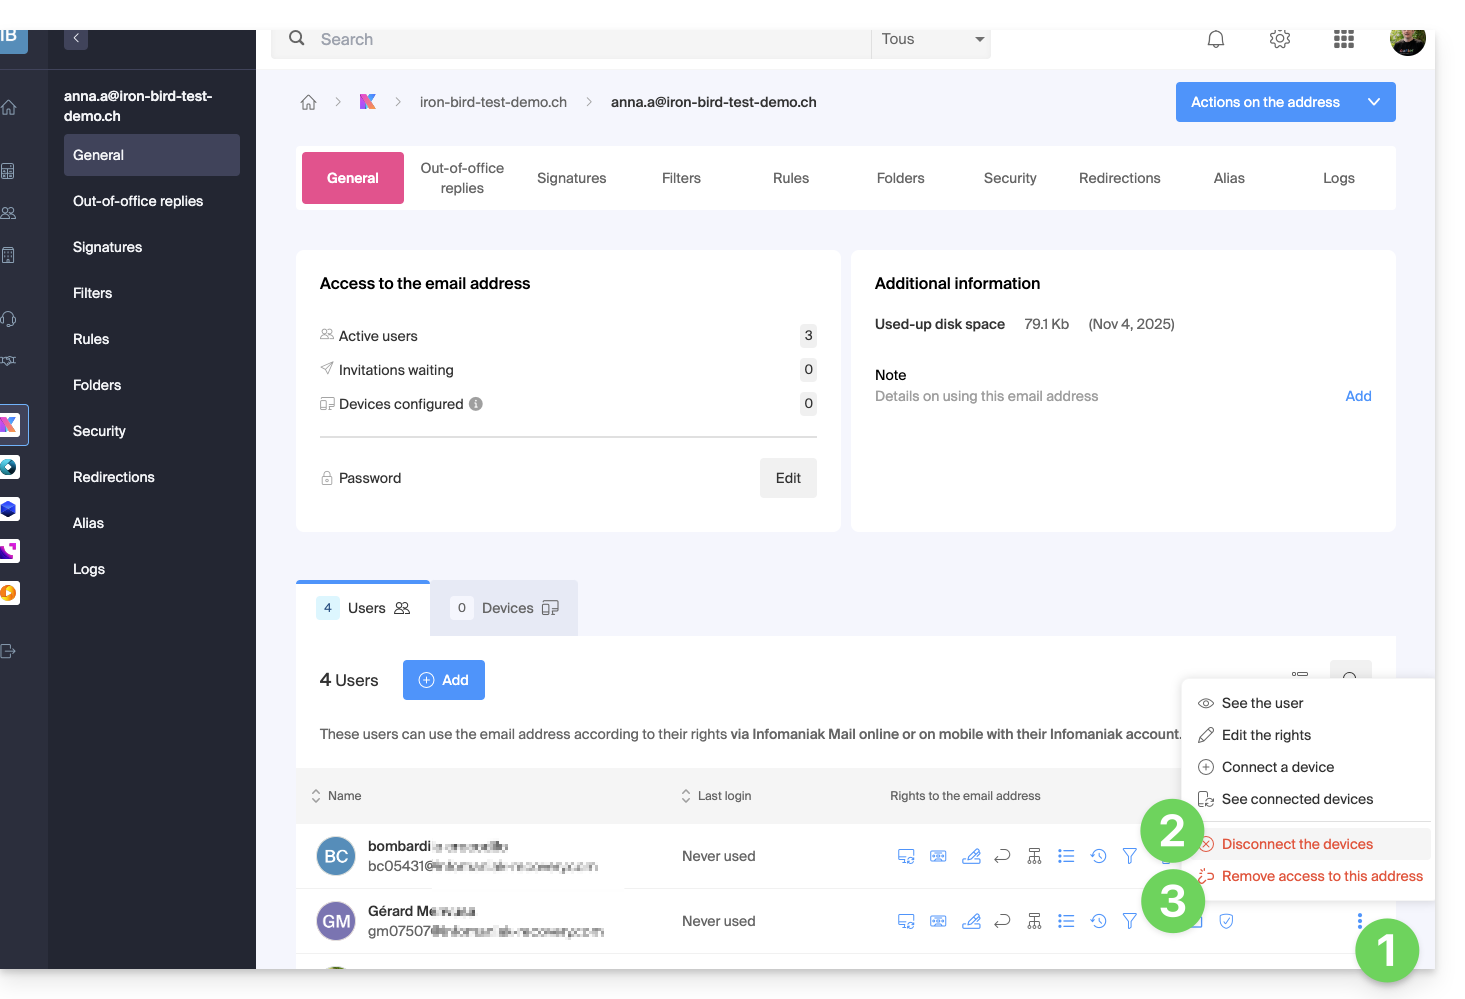
If a user should no longer have access to an email address and its content, simply remove them from the same interface, but there are 2 possibilities:
- Click on the action menu ⋮ to the right of the user concerned.
- Choose whether you want to disconnect all of the user's devices: they will no longer have access to the email address on software/messaging clients but will continue to have access to the address on the Infomaniak app (Web, mobile…).
- You can choose to remove all their access to the address, and they will never be able to view it again:
Their password is then immediately revoked, with no impact on other users. You can then:
- ... assign access to another person
- ... keep full management of the address
- ... create new accesses without service interruption
Management of individual accesses and passwords
Each added user has their own password, generated automatically when their access is configured. This password is unique to their account and device:
- The owner of the address no longer needs to share a main password.
- Each access is isolated and can be revoked without disrupting the others.
- A password is never visible after its creation; if needed, a new access can be created.
Multiple accesses can coexist for the same address, allowing different devices or software to connect without interruption. Each password is entered once per application or device and remains independent: you can revoke a specific access (for example, if a device is lost or replaced) without affecting the others.
For more information, refer to this other guide on the subject.
On the Mail Infomaniak mobile app
When a user is added, the email address is automatically added to their Mail Infomaniak mobile app. They can switch between their addresses at any time via the chevron located at the top left of the screen.
This guide explains how to import a calendar / agenda on the Infomaniak Web app Calendar (online service ksuite.infomaniak.com/calendar).
Preamble
- Refer to this other guide if you only want to display a read-only Infomaniak calendar on Google Calendar (web & mobile app).
- Refer to this other guide if you want to edit the events of the calendar on both sides but only on the mobile version of the Google Calendar app.
- It is also possible to import tasks in the dedicated section of the calendar.
Import a calendar via a URL
It is possible to display in Calendar an existing calendar managed externally. It will be automatically updated every hour via the URL you specify.
Note that this is not a calendar synchronization but a read-only, one-way display.
To do this:
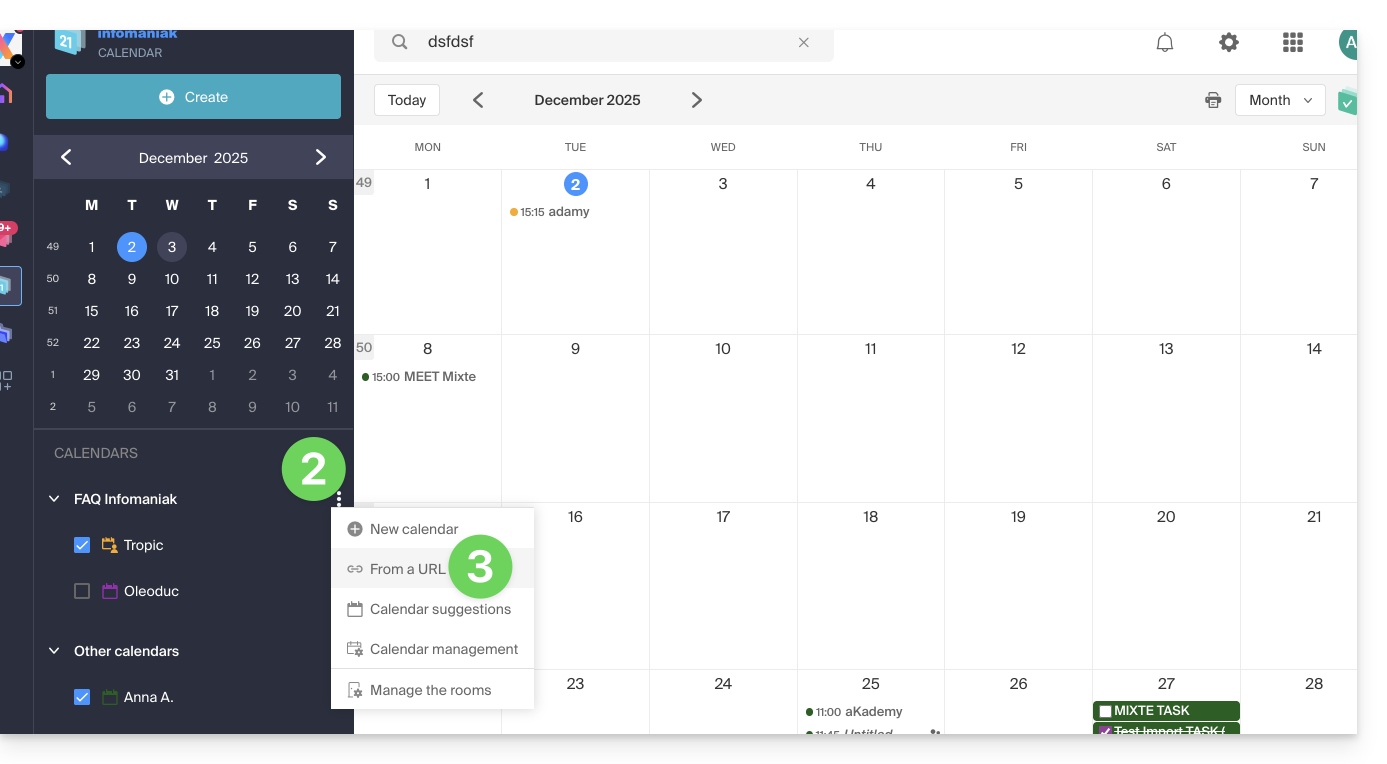
- Click here to access the Infomaniak Web app Calendar (online service ksuite.infomaniak.com/calendar).
- Click on in the left sidebar menu.
- Click on "From a URL":

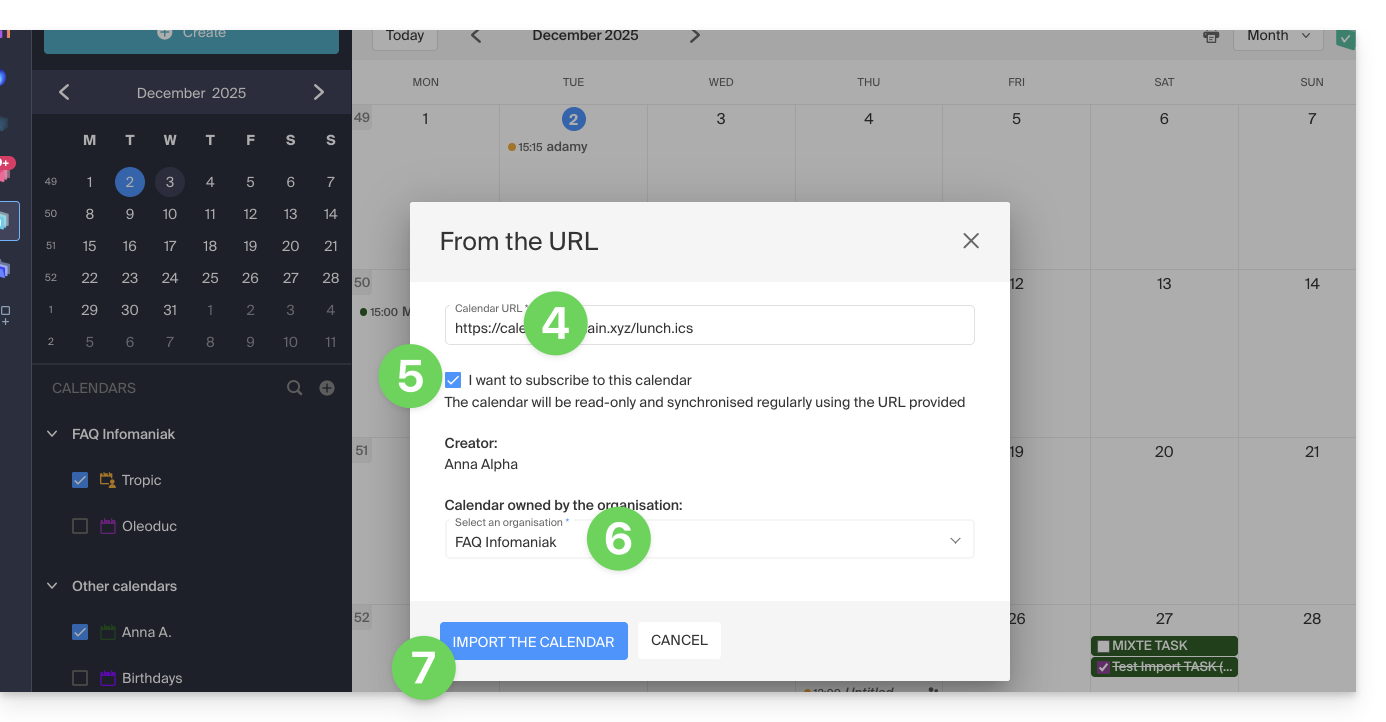
- Enter the URL of the calendar to import.
- Check the box I want to subscribe to this agenda.
- If necessary, choose the Organization in which the calendar will be imported.
- Click on Import the calendar:
You can also go directly through one of the Organizations you are part of:
- Click here to access the Infomaniak Web app Calendar (online service ksuite.infomaniak.com/calendar).
- Click on the action menu ⋮ to the right of the Organization in the displayed table.
- Click on "From a URL":
Link a Google calendar by its “secret” URL
The "secret" URL of a Google calendar, which you will be able to paste in step 3 above, is found in the Google calendar settings:
- Click on the action menu ⋮ to the right of the Google calendar concerned.
- Click on Settings and sharing:

- Scroll down the page to obtain the secret iCal URL and click on the icons to view the URL and/or copy it:

- Paste the URL according to the procedure in step 3 of the previous chapter above.
Note that this is not a calendar synchronization but a read-only, one-way display.
The calendar will be visible and will regularly display any updates made, but it will not be possible to edit it directly from the Infomaniak interface; this is a "one-way synchronization" with Google.
Import events via .ics file
To access the Advanced actions that allow the import, export, and restoration of the calendar:
- Click here to access the Infomaniak Web app Calendar (online service ksuite.infomaniak.com/calendar).
- Click on Advanced actions in the left sidebar menu.
- Click on Import.
- Upload the
.icsfile corresponding to the export performed from your previous provider: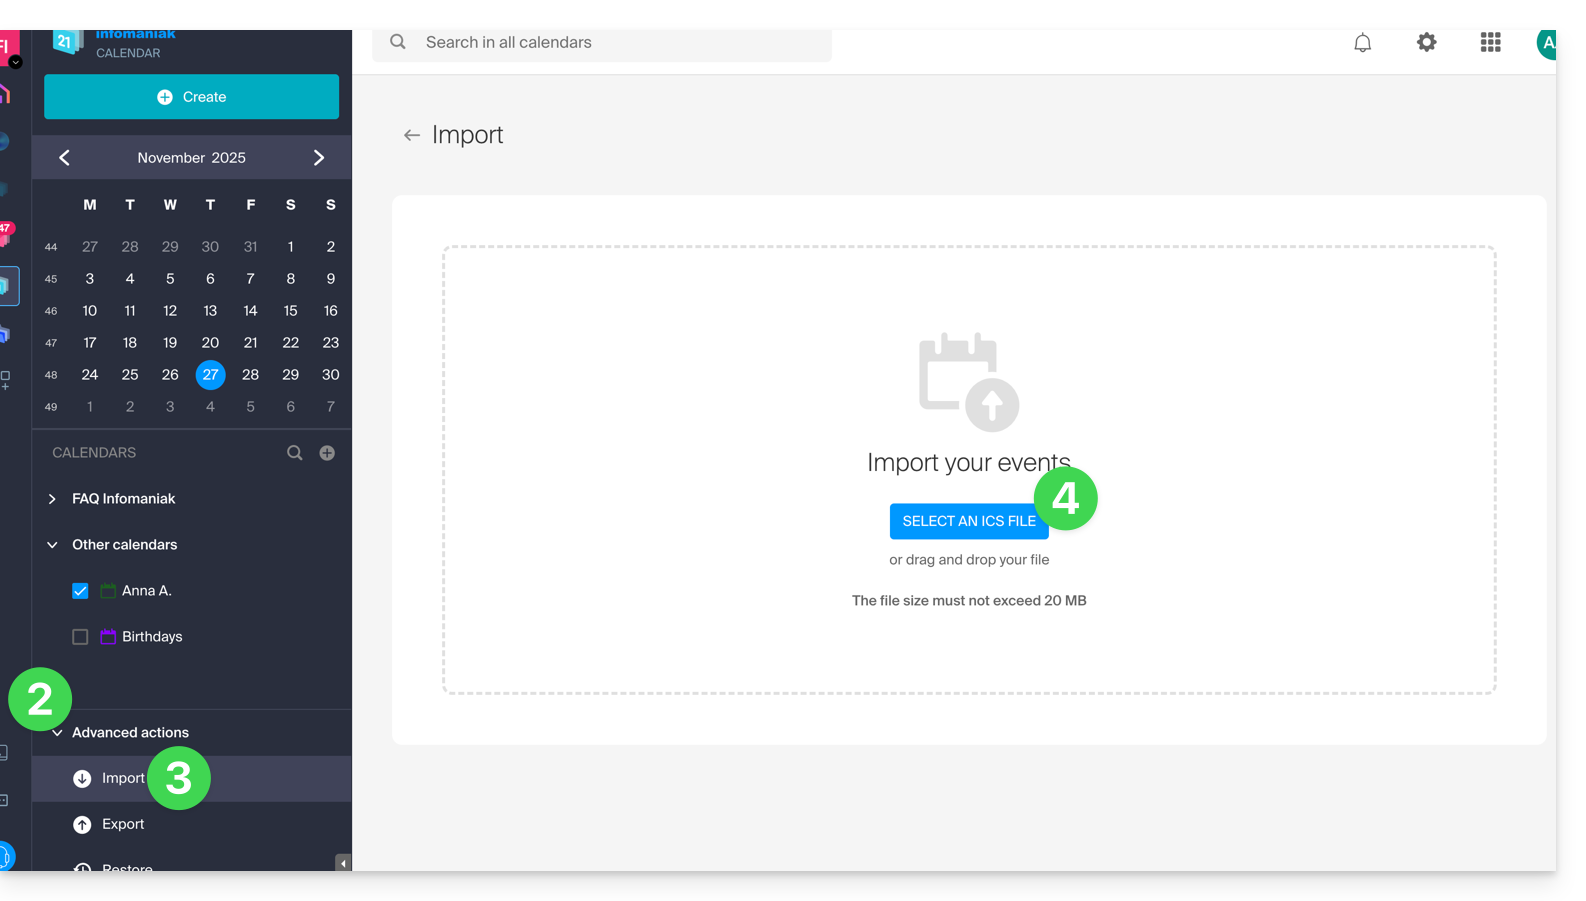
You will be able to choose which existing calendar to import the events into or create a new agenda (tasks are also imported if the .ics file contains them).
Note that this is not a calendar synchronization but a one-time, one-way import.
Export data from the previous service provider
Here are some guides provided for reference to export the agenda from a third-party provider, which will allow you to re-import this data with Infomaniak:
- Apple Mail
- Gmail
- Outlook (section Publish > ICS link)
- Yahoo
- Proton
- Thunderbird
This guide explains how to connect the desktop app Outlook 2019 (desktop application on Windows) to an email address hosted by Infomaniak.
Preamble
- The various services offered by Infomaniak are all compatible with the corresponding standard protocols (IMAP/SMTP for email, for example), therefore if you encounter a problem with third-party software, contact its publisher or a Partner and consult the support policy as well as article 11.9 of the Infomaniak TOS.
Add the email address to the application
Prerequisites
- Create the email address in my kSuite or a Mail Service / kSuite.
- Create a password for the email address on the device you are going to configure.
To configure the email application:
- Open the application.
- Click on the File menu:
- Click on Account Settings.
- Click on Add or remove accounts:
- Click on New:
- Enter the email address to connect.
- Click on Advanced options.
- Click on Manual configuration.
- Click on the blue Connect button:
- Click on IMAP:
- Enter the password of the email address to connect.
- Click on the blue Connect button:
- Uncheck the additional mobile device configuration box if necessary.
- Click on the blue Finish button:
- Click on Repair to correct some automatically added but incorrect information:
- Click on Advanced options.
- Click on Manual Repair.
- Click on the blue Repair button:
- Check and complete the missing information by scrolling down if necessary.
- Click on Outgoing Mail:
- Check and complete the missing information.
- Click on Next:
- Click on Finish:
- Click on Close:
- There you go, your email address is now correctly configured in the application:
Recommended settings
- Incoming IMAP server =
mail.infomaniak.com - IMAP port =
993(with SSL) - Outgoing SMTP server =
mail.infomaniak.com - SMTP port & encryption protocol and command/method to activate this protocol:
587+ STARTTLS - Username = the complete & full email address ( ? )
- Password = the one generated for the email address you want to access
- Authentication required for sending emails:
- It is activated in the SMTP settings of your application.
- Check "use the same parameters as the incoming server" or, depending on the software/email clients, enter a username (= complete & full email address) and the generated password.
Refer to this other guide if you are looking for information about other messaging ports and protocols compatible (SSL / TLS for example).
In case of a problem
Check that the Mail Service is configured optimally.
There is no need to contact Infomaniak Support if your email address works well outside the application. The most common error concerns the use of an incorrect password. The troubleshooting guides help you resolve any potential issues:
- Refer to the solutions provided in this other guide regarding email in general.
- This other guide is more specifically about Outlook.
… and if your Outlook no longer works since a change in your email password, refer to this other guide.
This guide explains how to connect the desktop app Microsoft 365 Outlook MSO (desktop application on Windows) to an email address hosted by Infomaniak.
Preamble
- The various services offered by Infomaniak are all compatible with the corresponding standard protocols (IMAP/SMTP for email, for example). Therefore, if you encounter a problem with third-party software, contact its publisher or a Partner and consult the support policy as well as section 11.9 of the Infomaniak Terms and Conditions.
Add the email address to the application
Prerequisites
- Create the email address in my kSuite or a Mail Service / kSuite.
- Create a password for the email address on the device you are going to configure.
To configure the email application:
- Open the application.
- Click on File.
- Click on Add an account.
- Enter the email address to be linked.
- Click on Connect.
- Select IMAP:
- Click on Next.
- Enter the password for your email address.
- Your email address is now configured in the application.
Recommended settings
- Incoming IMAP server =
mail.infomaniak.com - IMAP port =
993(with SSL) - Outgoing SMTP server =
mail.infomaniak.com - SMTP port & encryption protocol and command/method to activate this protocol:
587+ STARTTLS - Username = full & complete email address ( ? )
- Password = the one generated for the email address you want to access
- Authentication required to send emails:
- It is activated in the SMTP settings of your application.
- Check "use the same parameters as the incoming server" or, depending on the software/email clients, enter a username (= full & complete email address) and the generated password.
Refer to this other guide if you are looking for information about other messaging ports and protocols compatible (SSL / TLS for example).
If you encounter any issues
Check that the Mail Service is configured optimally.
There is no need to contact Infomaniak Support if your email address works well outside the application. The most common error concerns the use of an incorrect password. The troubleshooting guides help you resolve any potential issues:
- Refer to the solutions given in this other guide regarding email in general.
- This other guide is more specifically about Outlook.
… and if your Outlook no longer works since a change of email password, refer to this other guide.
This guide explains how to switch from one Organization to another from your Infomaniak Manager or how to remove yourself from an Organization to which you belong.
Preamble
- Since you opened your account with Infomaniak, you are part of at least one Organization.
- If you were alone and it was not an invitation, an Organization was created in your name and you automatically become the legal manager.
- Otherwise, you belong to the Organization that invited you (to join its kSuite, to manage a product, etc.).
- Only an owner/legal manager can make changes.
- It is quite possible to access several Organizations from the same login credentials, and to switch quickly from one to the other.
- You can also switch between your Organizations on ksuite.infomaniak.com; if you own my kSuite, it will always be offered first.
Display another Organization
To switch to one of the other Organizations to which you belong:
- Click here to access the management of your products (Infomaniak Manager).
- Click on the chevron at the top left of the Manager interface.
- Click on the Organization to which you want to access.
- The change of Organization is immediate, you are automatically switched:

Manage Organizations / Leave an Organization
To view all the Organizations to which you belong (because you created them with your user account or because you were invited to them) and possibly remove your membership (if you are not the last user or the only legal manager):
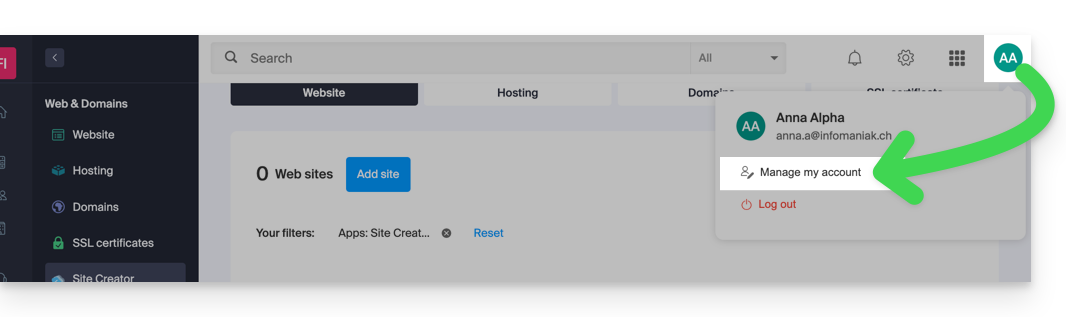
- Click here (or on the badge with your initials / avatar at the top right of the Infomaniak Manager) to "Manage my account":
- Click on Organizations in the left sidebar.
- Click on the icon located to the right of the Organization's name to leave it:
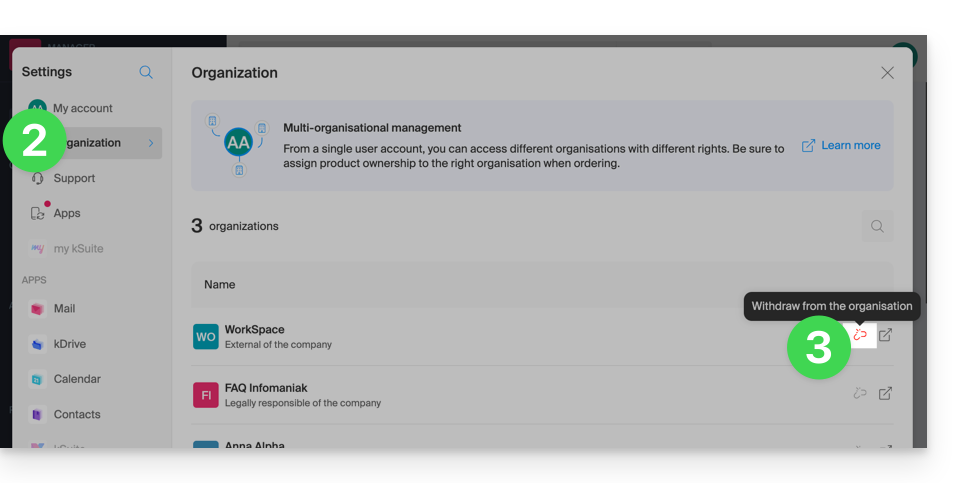
A user can leave any Organization on their own as long as…
- ... this user does not belong to the Organization's kSuite
- ... this user's login address is not in an Organization Mail Service
- ... this user is not the last owner of the Organization
This guide explains how to connect the mobile apps Contacts and Calendar iOS (iPhone, iPad, etc.) with the contacts & calendars hosted by Infomaniak.
Preamble
- Your iOS device will be automatically configured via configuration profiles .mobileconfig compatible with Apple, unlike a manual configuration.
- It is possible to delete a configuration profile once installed (scroll to the bottom of this page for the explanations).
- Infomaniak contacts & calendars are linked to your Infomaniak account; when you log in to ksuite.infomaniak.com/contacts or /calendar you probably have to perform double validation (2FA) when logging in.
- In this case, an application password is required to establish synchronization between your device and Infomaniak tools.
- But don't worry, creating such a password is offered by following the configuration assistant.
- The various services offered by Infomaniak are all compatible with the corresponding standard protocols (CalDAV/CardDAV for contacts & calendars for example), therefore if you encounter a problem with third-party software, contact the publisher or a Partner and consult the support policy as well as article 11.9 of the Infomaniak Terms and Conditions.
Install a configuration profile
To do this:
- Click here to access the Infomaniak configuration tool (online service https://config.infomaniak.com) — log in if necessary to your Infomaniak account on the Organization on which your email address is managed.
- Choose to install the profile on this device:
- Choose to synchronize contacts & calendars:
- Generate a dedicated application password for synchronization (to keep the usual 2FA connection of your user account):
- Copy the generated application password (it will be requested during the installation of the Apple profile).
- Download the Apple profile:
- Authorize the download on the device:
- Open the settings of the iOS device:
- Press the recently downloaded profile:
- Press Install:
- Unlock your iOS device:
- Press Install:
- Enter (or paste) the application password twice in a row (contacts + calendars).
- Tap on Finish:
If your iOS Contacts and Calendar applications were already open, you need to relaunch them. You will then see the information added by the synchronization.
Contacts Specifics
If you add new contacts from the iPhone after a synchronization, they will be added locally, in the iPhone's address book ("On My iPhone") instead of going to the synchronized address book. You must change this default setting in your application's settings.
Unfortunately, you cannot retrieve information about contact groups. Indeed, iOS does not really use folders or groups. Apple tags/marks each contact with one or more categories, but this is not a group membership.
Calendars Specifics
By default, only your personal calendar is displayed in the Calendar application. To display calendars shared by another user:
- Open the Calendar application.
- Tap Calendar at the bottom of the screen.
- Check the shared calendars to display.
Also, refer to Apple's documentation on this subject.
To manage notifications regarding activated or deactivated calendars, click on the ⓘ on the right:
Delete an Apple profile
Refer to the official documentation by changing the version of your system at the top of the page* if necessary.
*Why is it necessary to choose the guide version that exactly matches your version of the macOS / iOS system? Apple introduces changes, sometimes subtle, with each new version of its system, for example a path on iOS 15…
…becomes this on iOS 18…
This guide explains how to get event reminders from the Infomaniak Web app Calendar (online service ksuite.infomaniak.com/calendar) on a chat system like kChat or Slack.
⚠ Available with:
| kSuite | Free | * |
| Standard | ||
| Business | ||
| Enterprise | ||
| my kSuite | ||
| my kSuite+ | ||
| Mail Service | Starter 1 max. address | |
| Premium 5 min. addresses |
*limited to 1 webhook
Preamble
- This feature will allow you to be notified in the chat of your choice when an event is approaching.
- The webhook system is a method for an application or service to send information to another application or service in real-time, securely, and authenticated.
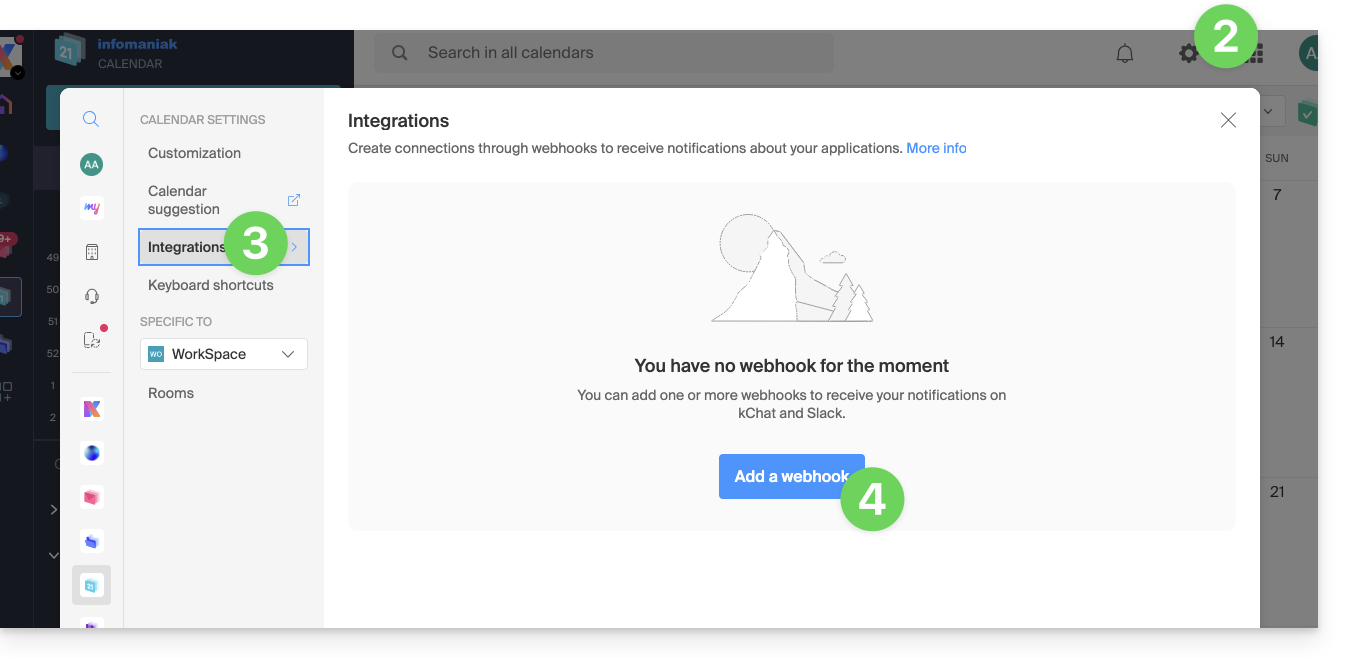
Announce the webhook to Calendar
To add the webhook from your chat system to Calendar:
- Click here to access the Infomaniak Web app Calendar (online service ksuite.infomaniak.com/calendar).
- Click on the Settings icon at the top right.
- Click on Integrations in the left sidebar.
- Click on the Add a webhook button:
- Define:
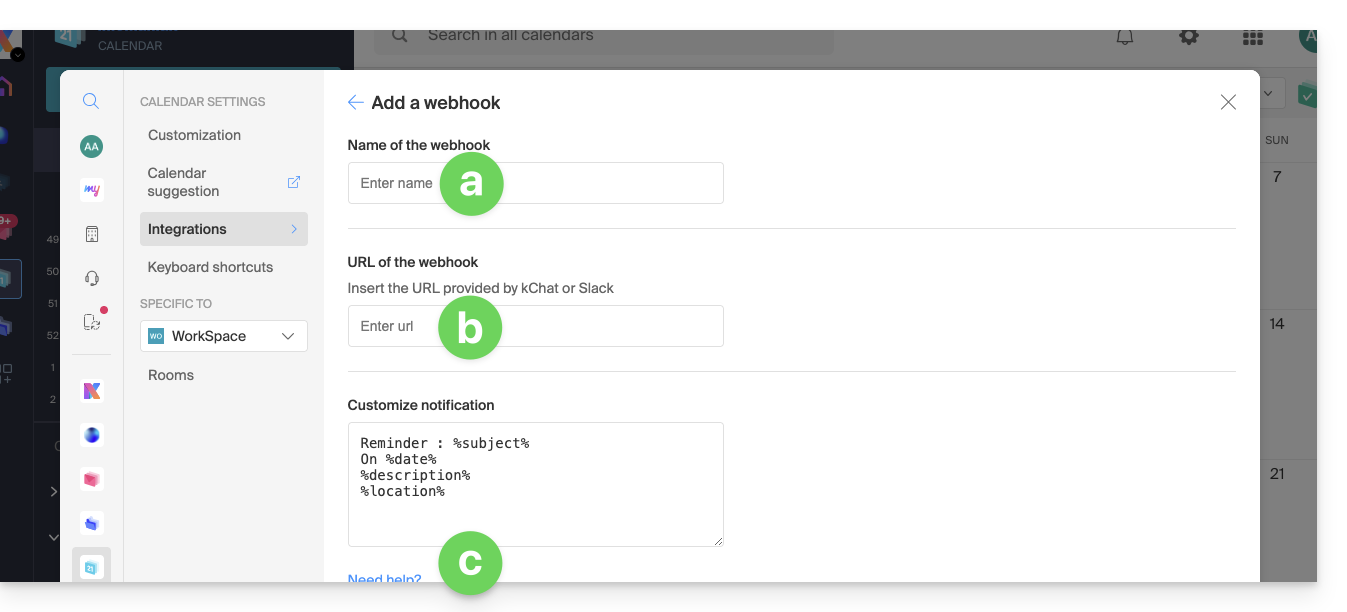
- A name to easily identify the Webhook when you add reminders.
- The webhook URL (obtained from your chat system - examples are presented further down in the FAQ).
- The elements (automatically taken from your event and/or added manually here) and their arrangement in the message to be sent:
- Insert %subject% to include the event subject.
- Insert %date% to include the event date.
- Insert %description% to include the event description.
- Insert %location% to include the possible location of the event.
- Click on Add.
Create an event with a chat reminder
Now that Calendar is linked to your chat account, you can choose to be notified in a chat when you add a reminder to an event:
- Click here to access the Infomaniak Calendar Web app (online service ksuite.infomaniak.com/calendar).
- Click on the Create button in the top left corner.
- Click on Event:
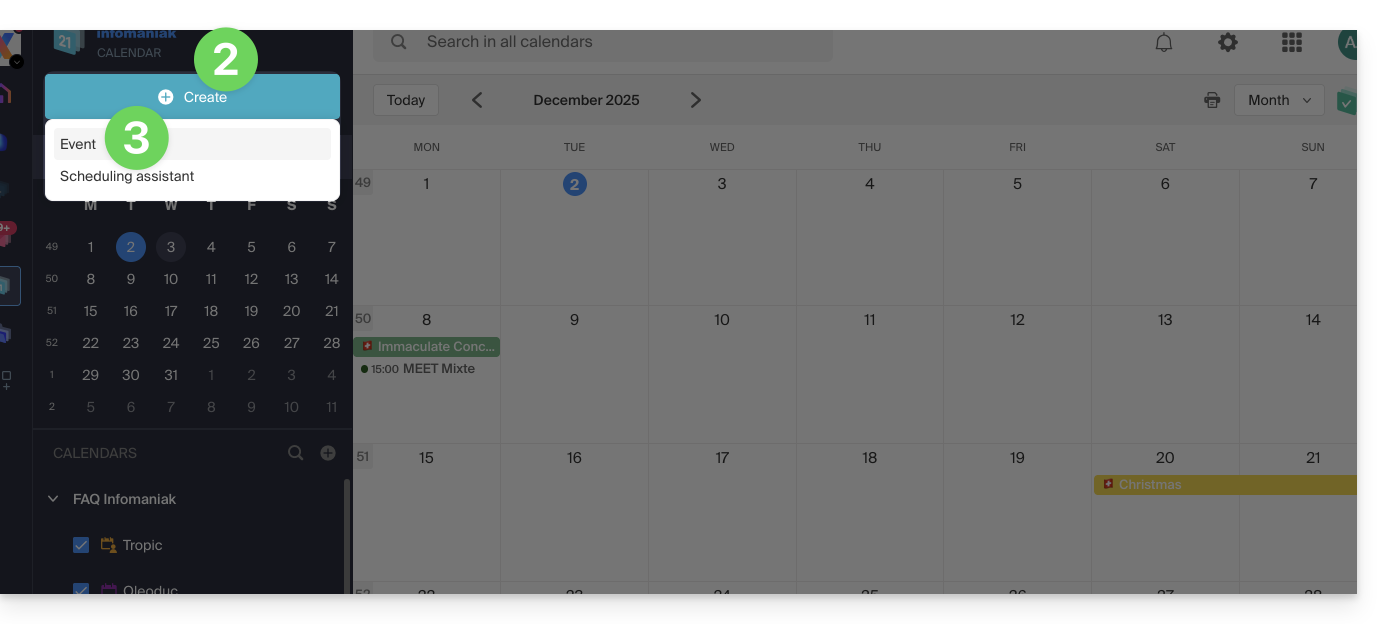
- You could also click on an existing event on the calendar to modify it.
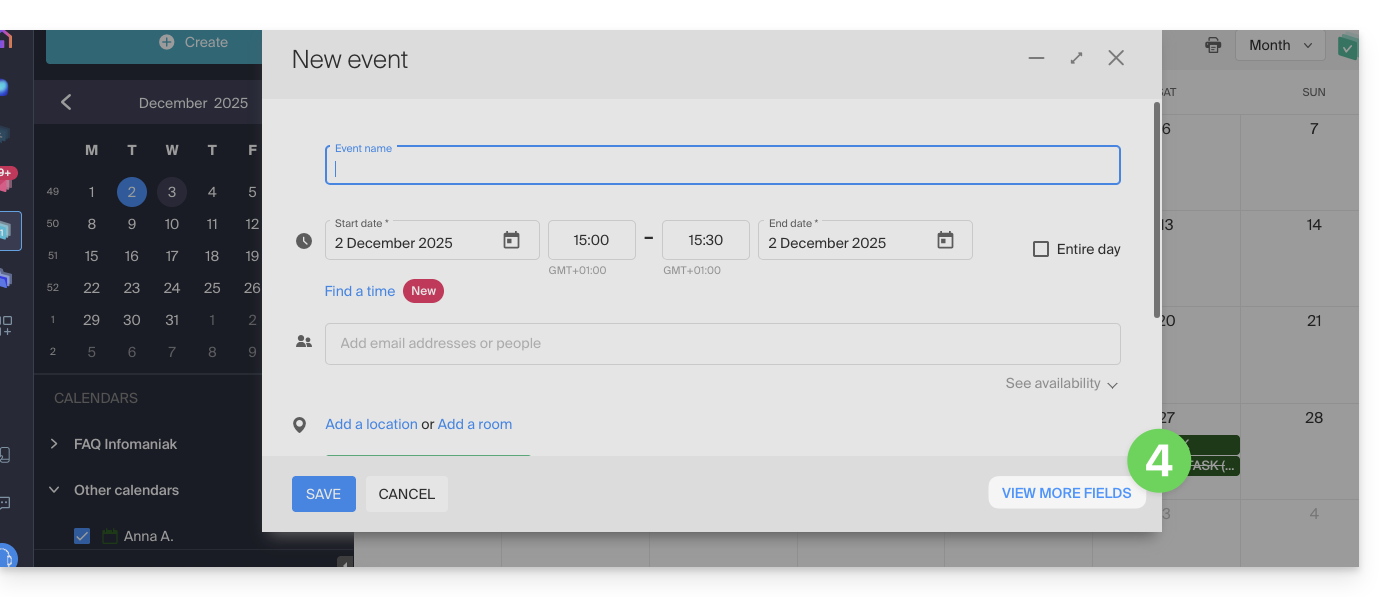
- Display the additional fields:
- Click on Add a reminder to configure it:
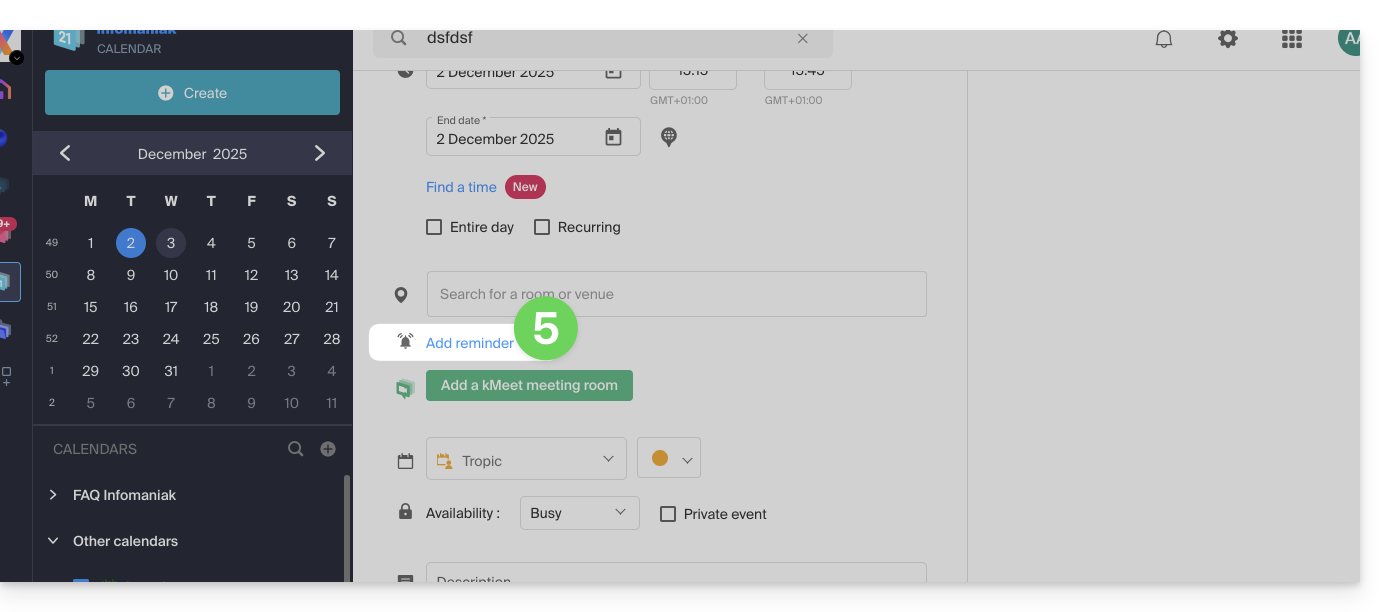
- In the reminder type dropdown menu, choose the configured webhook.
- Save the event at the bottom of the page.
You will now receive a reminder in the chat corresponding to the webhook.
Examples for obtaining a webhook
kChat
- Click here to access the kChat Web app (online service ksuite.infomaniak.com/kchat) or open the kChat desktop app (desktop application on macOS / Windows / Linux).
- Go to the Integrations section.
- Click on Incoming Webhooks:

- Click on Add in the top right corner.
- Complete the required information to create the "bot" that will post follow-up messages in kChat in the channel of your choice:

- Save to obtain the webhook URL:

- Create the custom notification in Calendar (read above if necessary):

- Select your custom notification when adding a reminder to your event:

Slack
- Click here to access Slack WebHooks.
- Choose the discussion thread where your reminders will appear (for example @slackbot or #general):

- Save to get the webhook URL.
Create other webhooks to set reminders in other discussion threads.
Customize Slack reminder follow-ups
You can freely use Slack formatting options in your notifications. Example in French:
N'oubliez pas de %subject% pour le %date%.
À prendre avec le jour J : %description%.
Lieu de l'évènement : %location%This guide explains how to add a synonym domain to a domain name.
Preamble
- A synonym domain is a domain name that can serve as a secondary name for another domain.
- When a synonym domain is added, it automatically inherits the content of the DNS zone of the main domain (including
MX,A, etc. records), as well as its Web and Mail hosting. - Alternatively, you can also add a (domain) alias to a website or add a (domain) alias to a Mail Service.
Add a synonym domain to a domain
Prerequisites
- The domain name of the future synonym or the management of its DNS zone…
- … must be reserved with Infomaniak,
- … must be configured with the Infomaniak DNS,
- … must not be linked to any product yet.
- The domain name on which the synonym will be placed…
- … must not be associated with the Infomaniak Newsletter product.
To access your domain names:
- Click here to access the management of your product on the Infomaniak Manager (need help?).
- Click directly on the name assigned to the product in question.
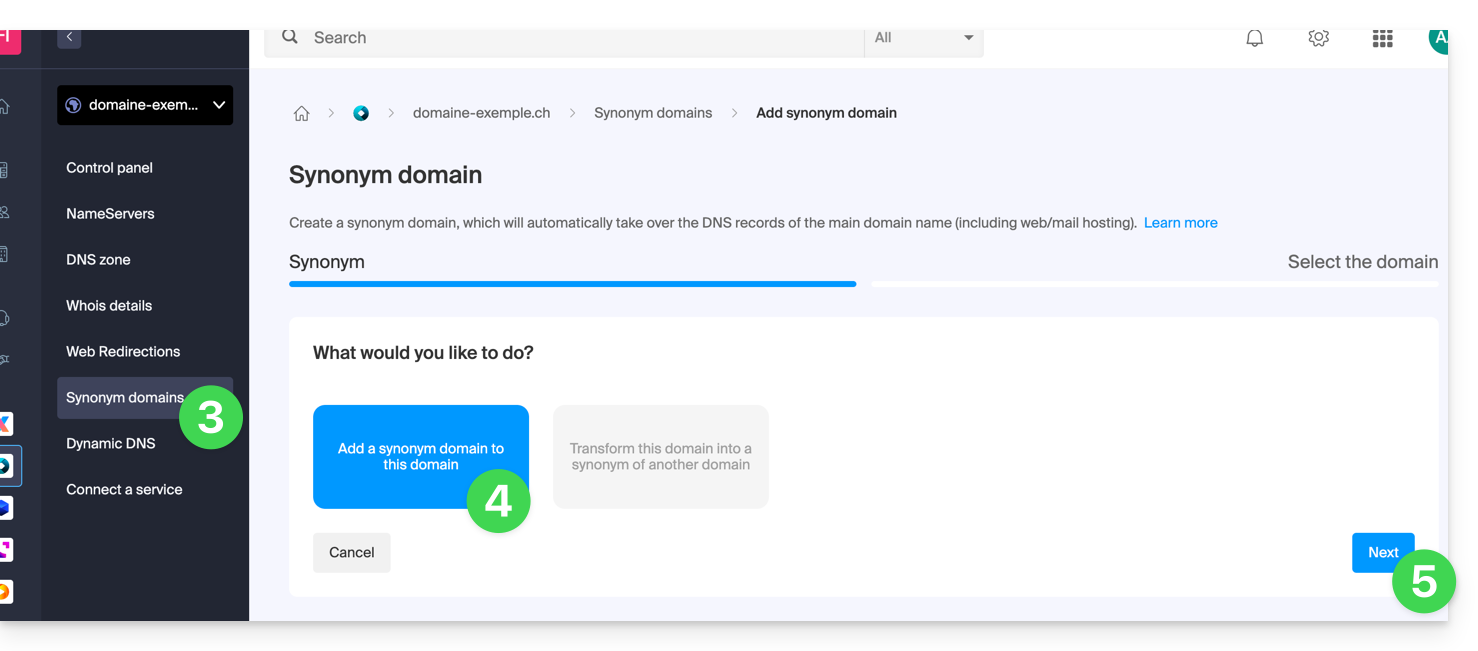
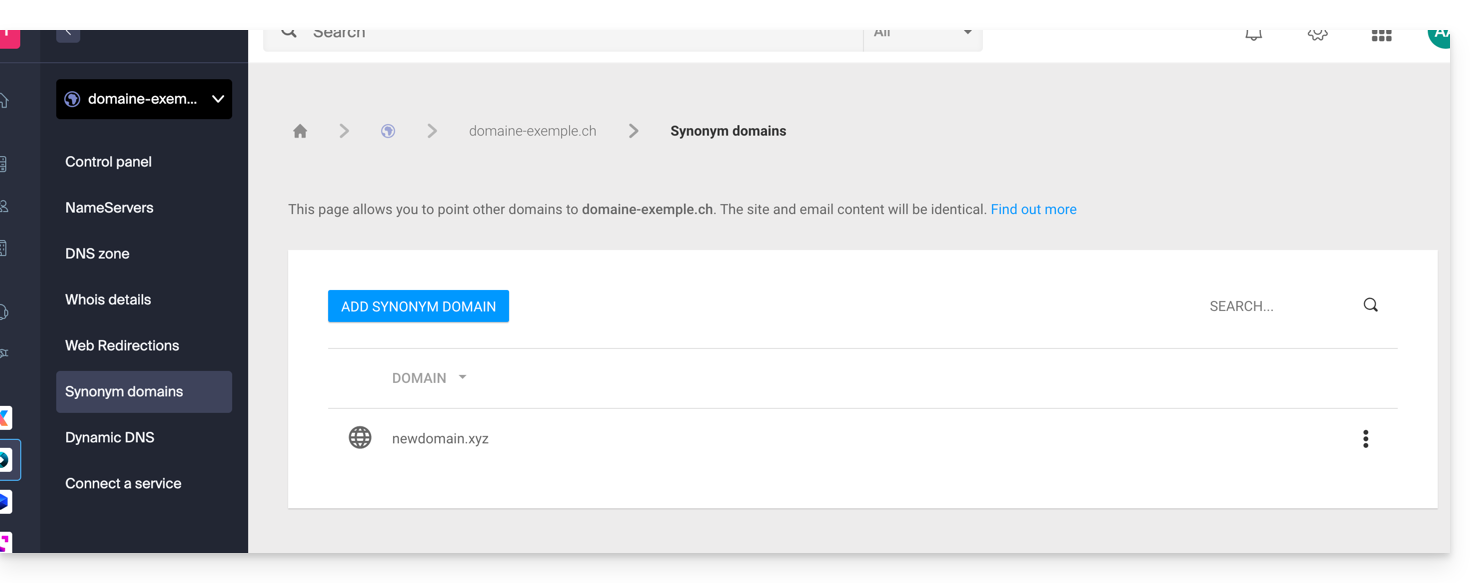
- Click on Synonym Domains in the left sidebar.
- Choose to add a synonym.
- Click on Next:
- Choose an existing domain in the current Organization, or order a new domain in advance.
- Click the button to Confirm:

- That's it:
Refer to this other guide if you are looking for information to dissociate a synonym domain name.
This guide explains how to copy or move contacts to address books in the Infomaniak Web app Contacts (online service ksuite.infomaniak.com/contacts).
Preamble
- Contacts can also be managed within groups, i.e., subfolders of your address book.
Copy or move a contact
To do this:
- Click here to access the Infomaniak Web app Contacts (online service ksuite.infomaniak.com/contacts).
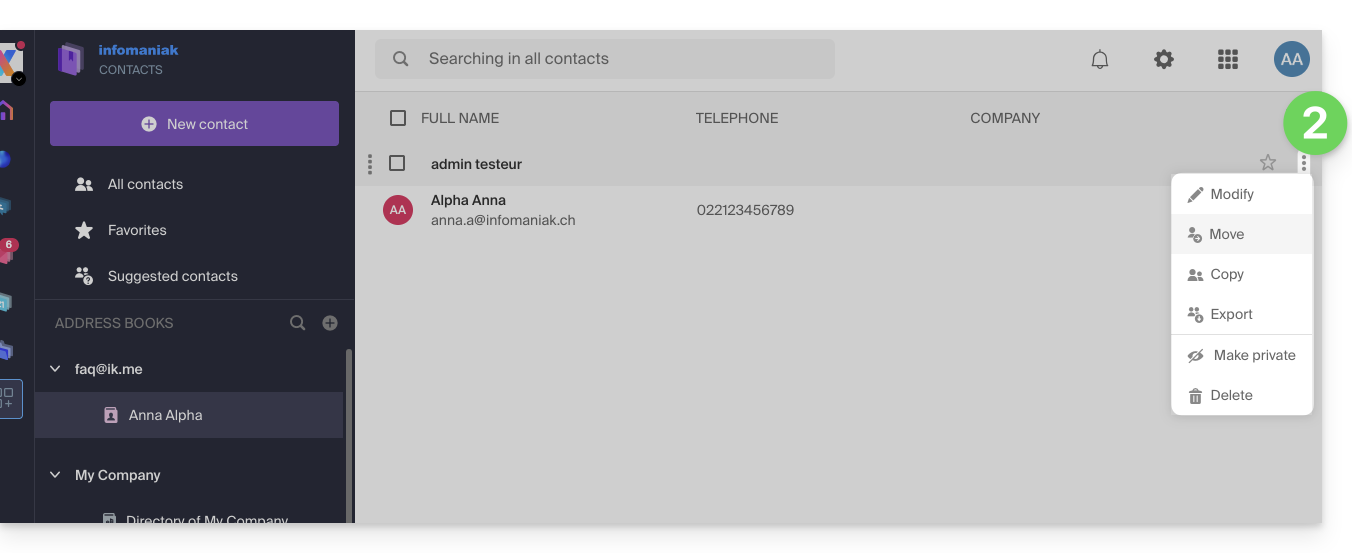
- Click on the action menu ⋮ to the right of a contact to choose to copy or move the contact to the desired location using a wizard:
You can also click and hold the mouse all the way to the left of a contact line to copy or move a contact (or multiple contacts if you select them in advance) to the desired address book in the left sidebar: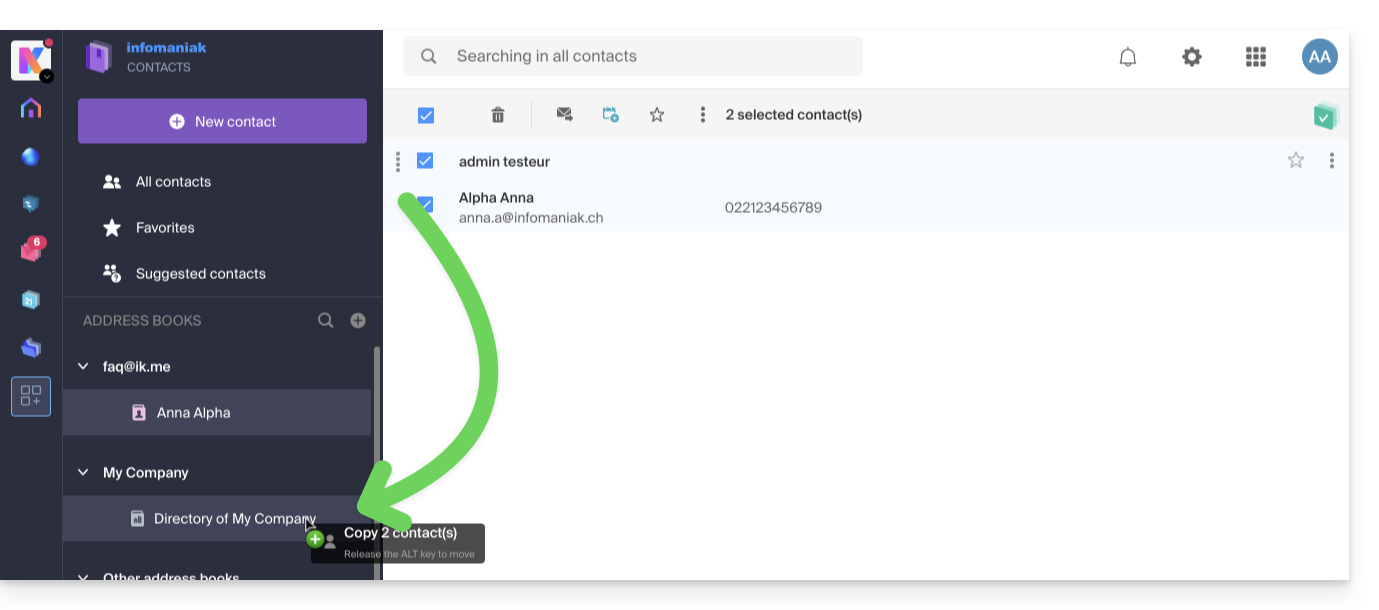
The default behavior when moving a contact card from the address book to another folder or address book is "move".
By pressing the keyboard key that usually allows you to copy files from your computer (the ALT key in principle) by dragging them from one place to another, you can "copy" contacts instead of moving them.