
Knowledge base
1000 FAQs, 500 tutorials and explanatory videos. Here, there are only solutions!
This guide explains how to set up the synchronization of calendars/agendas and contacts Infomaniak with the desktop app Mozilla Thunderbird (desktop application on macOS / Windows / Linux).
Preamble
- The various services offered by Infomaniak are all compatible with the corresponding standard protocols (CalDAV/CardDAV for contacts & calendars, for example), therefore if you encounter a problem with third-party software, contact its publisher or a Partner and consult the support policy as well as article 11.9 of the Infomaniak TOS.
Obtain the advanced URL
Prerequisites
- Obtain your synchronization information provided by the Infomaniak synchronization assistant:
- account address:
https://sync.infomaniak.com - username: for example
AB12345 - application password if double authentication is enabled or the one from your Infomaniak account if you have not enabled 2FA
- account address:
To obtain a more elaborate synchronization URL, usually requested for synchronization with Thunderbird:
- Open the Infomaniak synchronization assistant.
- Click on the blue link Select a device:
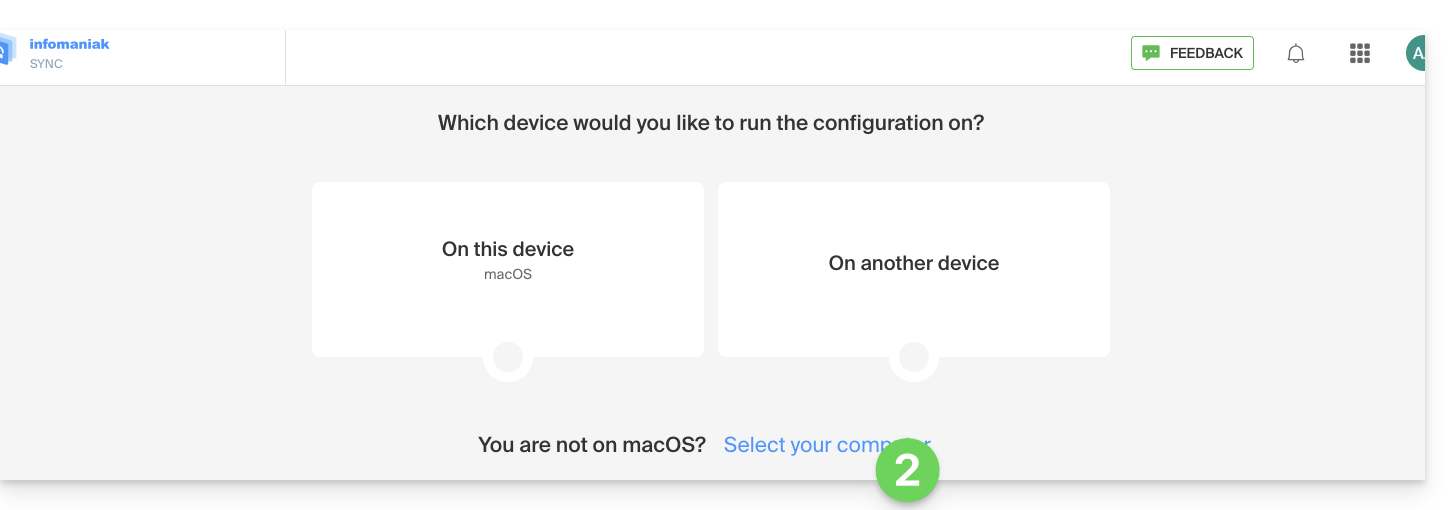
- Choose a GNU/Linux synchronization.
- Note the complete synchronization URL displayed in step 4 of the assistant:

Synchronize calendars and address books
Connect to a CardDAV address book
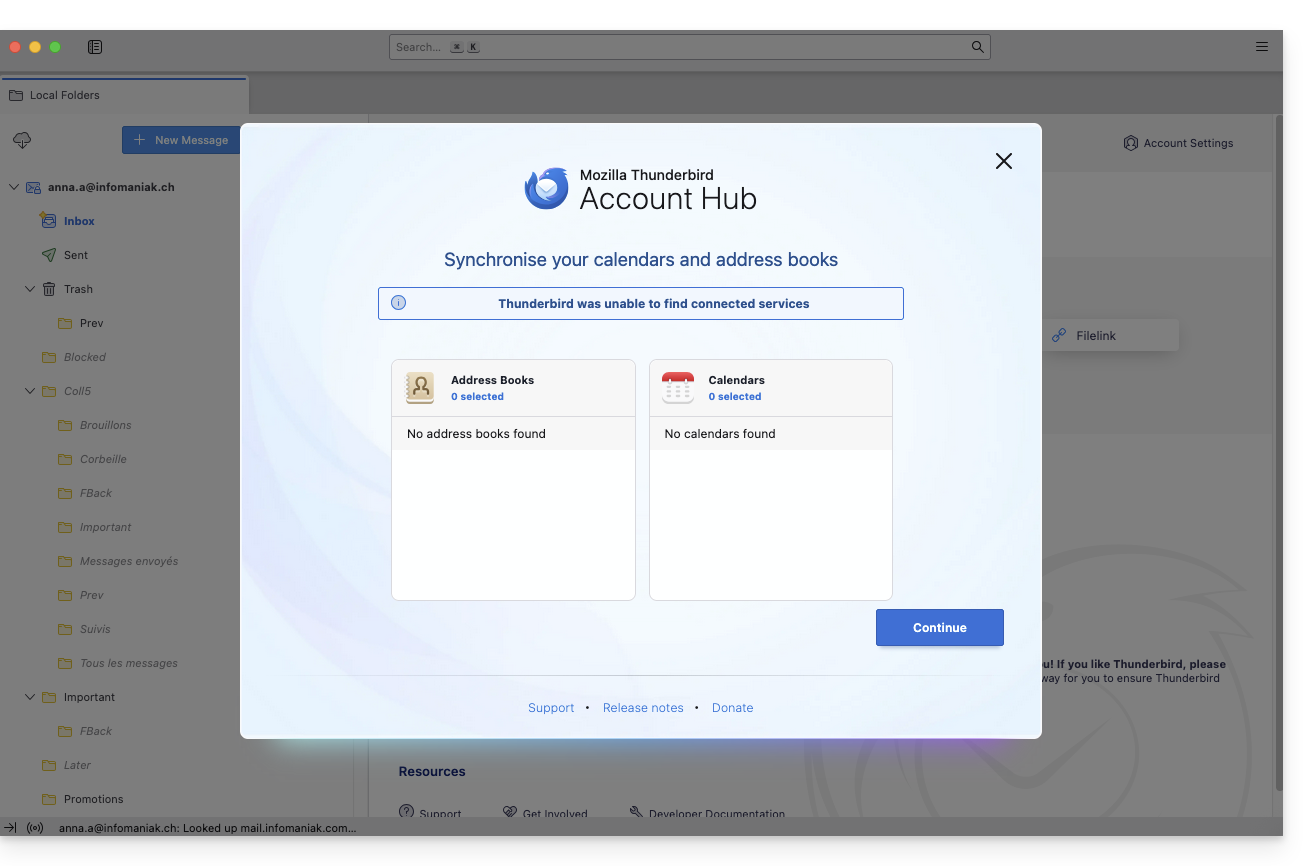
With the latest versions of Thunderbird, the synchronization of your Infomaniak calendars and address books is offered to you right after configuring your email address within the software: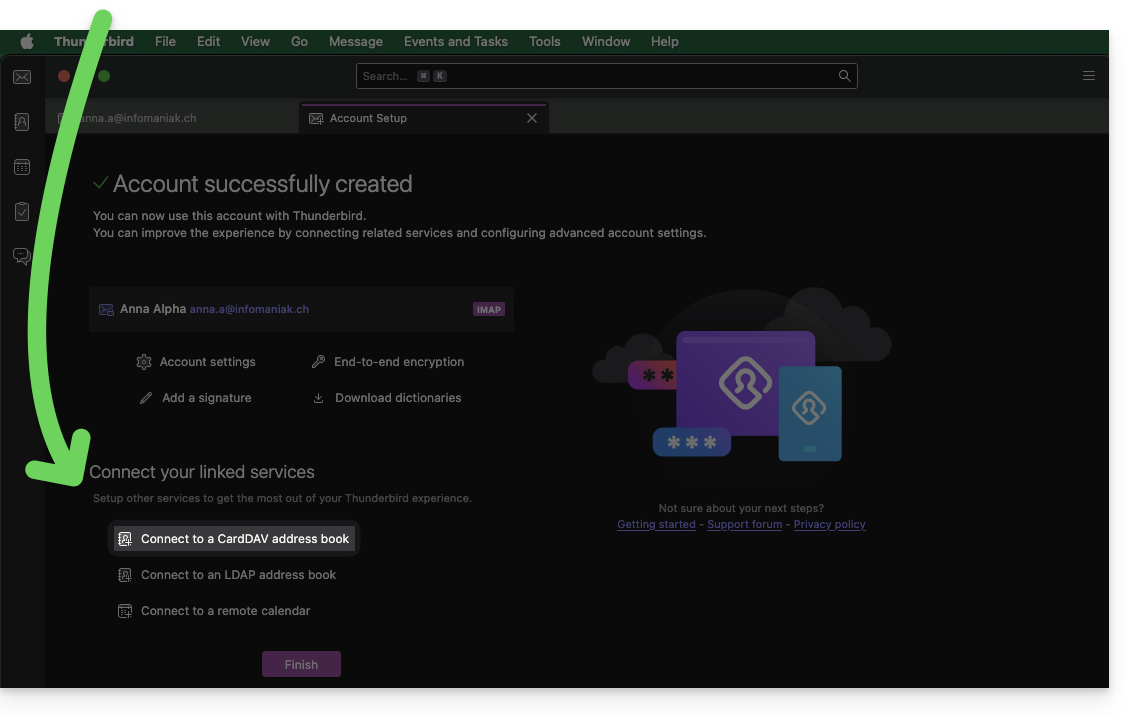
Click on it; the configuration starts:
- Enter the short username and the advanced URL (see above).
- Press Continue.
- Thunderbird then asks for the password (see above).
- Press OK:

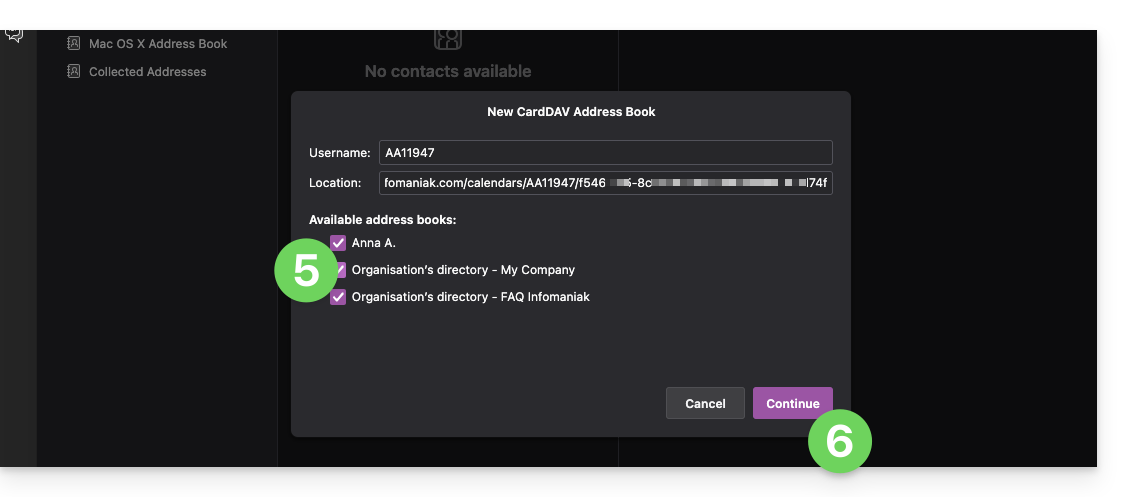
- Once the authentication is successfully completed, the application shows you the address books linked to your Infomaniak account; choose which ones to synchronize.
- Press Continue to finish:
Connect to a remote calendar
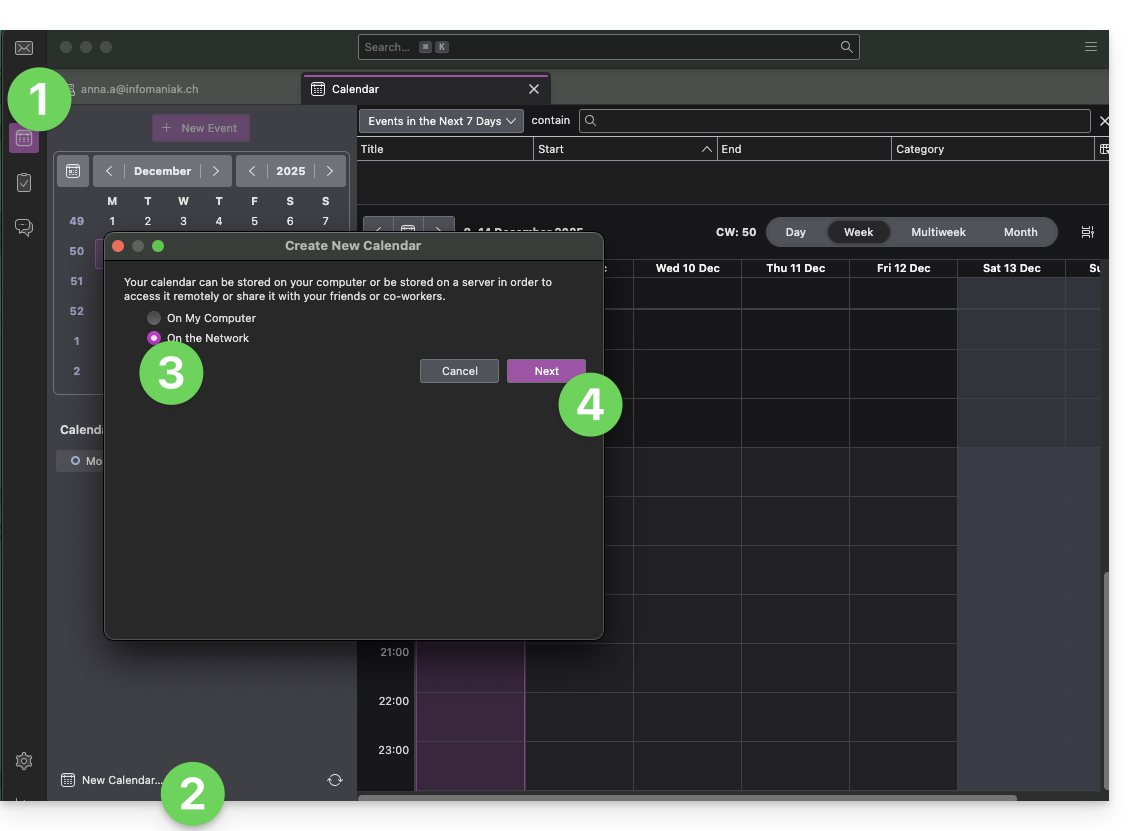
Add a new calendar in Thunderbird:
- Switch to Calendars if necessary.
- Click on New Calendar…
- Choose On the network.
- Click on Next:
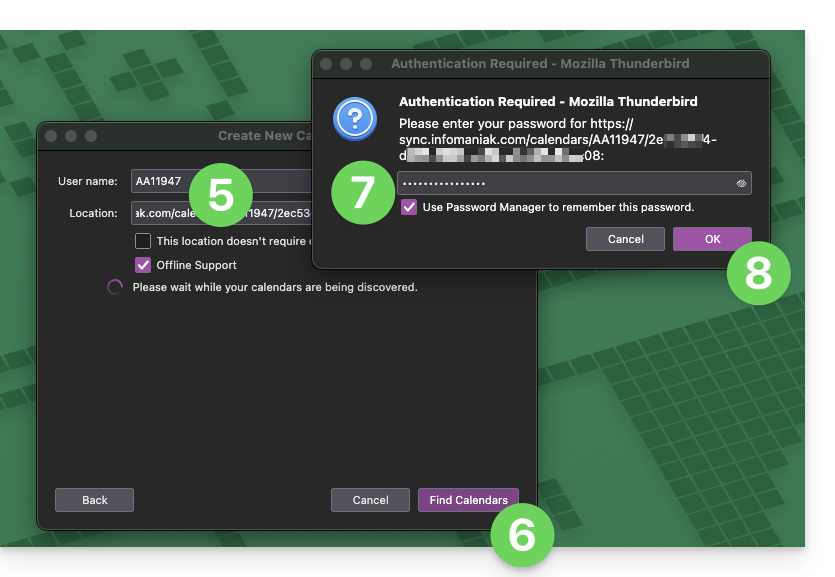
- Enter the short username and the advanced URL (see above).
- Press the button to find the Calendars associated.
- Thunderbird then asks for the password (see above).
- Press OK:
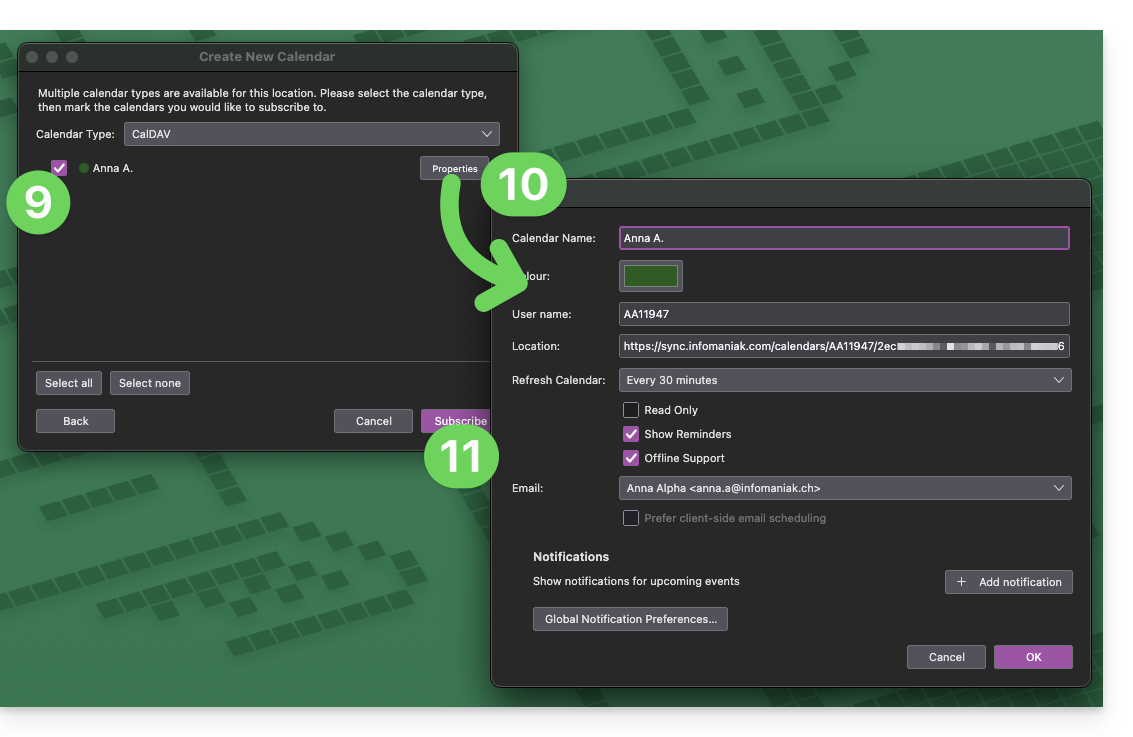
- Once authentication is successfully completed, the application shows you the schedules linked to your Infomaniak account; choose which ones to synchronize.
- You can manage advanced properties of your calendars in Thunderbird if necessary.
- Press the button to Subscribe and finish:
Refer to this other guide if you need to fix a configuration issue with Thunderbird (email, contacts, schedules)…
This guide explains how to connect the desktop app Apple Mail (desktop application on macOS) to an email address hosted by Infomaniak.
Preamble
- It is recommended to configure your macOS computer automatically via configuration profiles .mobileconfig compatible with Apple.
- ⚠️ The various services offered by Infomaniak are all compatible with the corresponding standard protocols (notably IMAP/SMTP for email, WebDAV for sharing, S3/Swift for storage, etc.).
- Therefore, if you encounter a problem with third-party software, contact its publisher or a Partner and consult the support policy as well as article 11.9 of the Infomaniak TOS.
Manually add the email address to the application
Prerequisites
- Create the address within my kSuite or on a Mail Service (Mail Service only, or existing within a kSuite).
- Test the email address password (do not confuse it with the one used to log in to the Infomaniak interface).
- Check on the Mail Service that the automatic diagnosis is correct.
- Have added the email address in question to Mail Infomaniak to use the synchronization assistant and for the Apple profile to work on your devices.
To configure the messaging application:
- Open the application.
- Click on Other account.
- Click on Continue:

- Enter the account name.
- Enter the email address to be linked.
- Enter the email address password.
- Click the blue Connect button:

- Check and complete the missing information.
- Click on Log in:

- There you go, your email address is now configured in the application:

Recommended settings
- Incoming IMAP server = mail.infomaniak.com
- IMAP port = 993 (with SSL)
- Outgoing SMTP server = mail.infomaniak.com
- SMTP port & encryption protocol and command/method to activate this protocol:
- Prioritize port
587+ STARTTLS: this is the official technical standard and the most compatible method with the majority of modern systems for authenticated submission. - Tolerate port
465+ SSL/TLS only as a compatibility option or alternative, specifying that it is implicit encryption, but that 587 remains the recommended choice.
- Prioritize port
- Username = full & complete email address ( ? )
- Password = the one assigned to the email address you want to access ( ? )
- Authentication required to send emails:
- It is activated in the SMTP settings of your application.
- Check "use the same parameters as the incoming server" or according to the software/email clients, enter a username (= full & complete email address) and its password.
Refer to this other guide if you are looking for information about other compatible email ports and protocols.
In case of problem
There is no need to contact Infomaniak Support if your email address works well outside the application. The most common error concerns the use of an incorrect password. The troubleshooting guides help you resolve any potential issues:
- Refer to the solutions given in this other guide regarding email in general.
- Delete any Apple configuration profiles linked to your Infomaniak email before starting the configuration again.
And if your Apple Mail no longer works since a change of email password, refer to this other guide.
This guide details what can be searched on the Mail Infomaniak web app (online service ksuite.infomaniak.com/mail) or other kSuite services. To search on kDrive, refer to this other guide.
Search for an email
You can perform a global search (among all directories of the Infomaniak Mail web app) either in the body of the message, or in its subject, or among its senders/recipients, large attachments, etc. If you want to find a message in a specific directory, select it first.
Advanced search is accessible from the chevron to the right of the search field at the top of your Mail: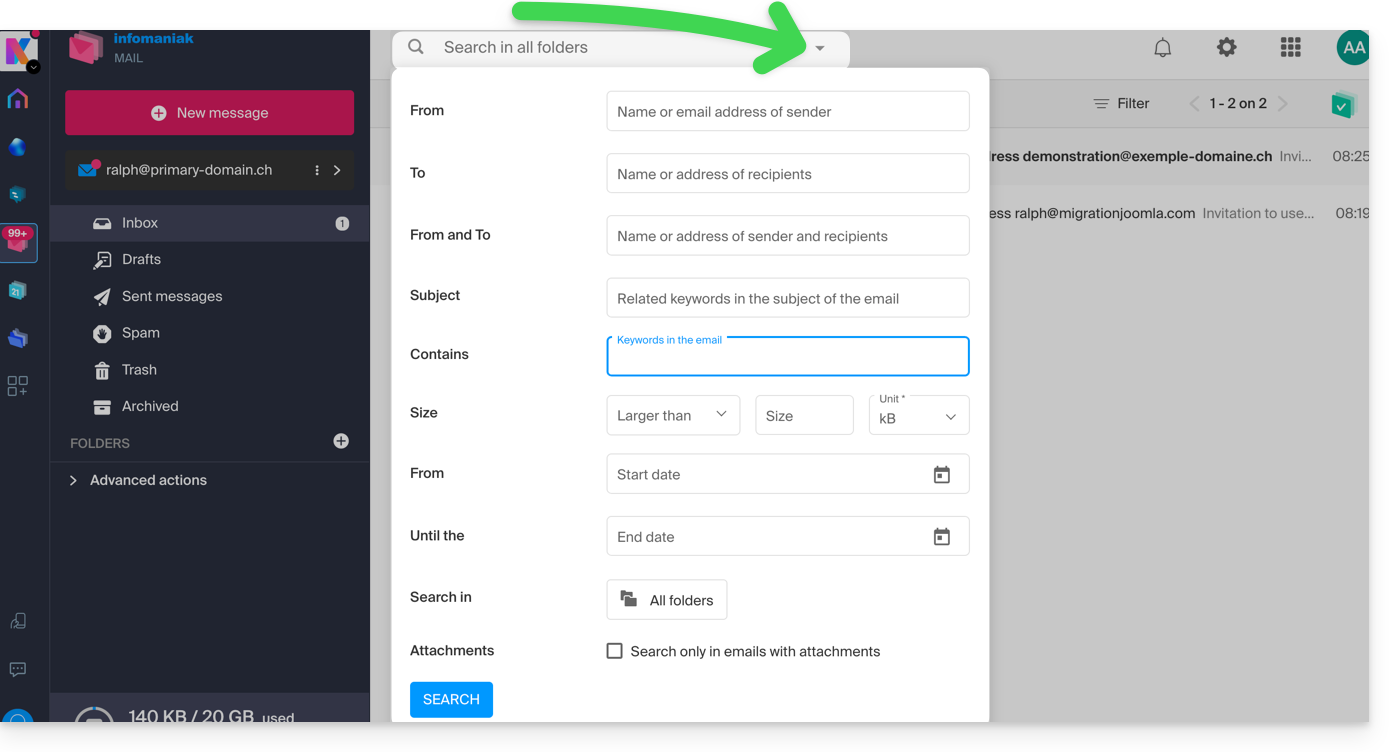
To search for the trace of an email or know its activity, you can also search in the logs of an email address.
Email search with a software/messaging client
To find out how your specific messaging application performs searches, consult its documentation. For example, desktop apps (desktop application) Thunderbird and Outlook can synchronize messages locally and perform local searches, while other applications may prefer to search on the IMAP server and in this case, the software/messaging client sends a search command to the server, which then searches among all messages stored on the server and returns the results to the software/messaging client.
Search for a contact
You can search for an address book, a group, a person among your contacts thanks to the search field at the top of your Infomaniak address book: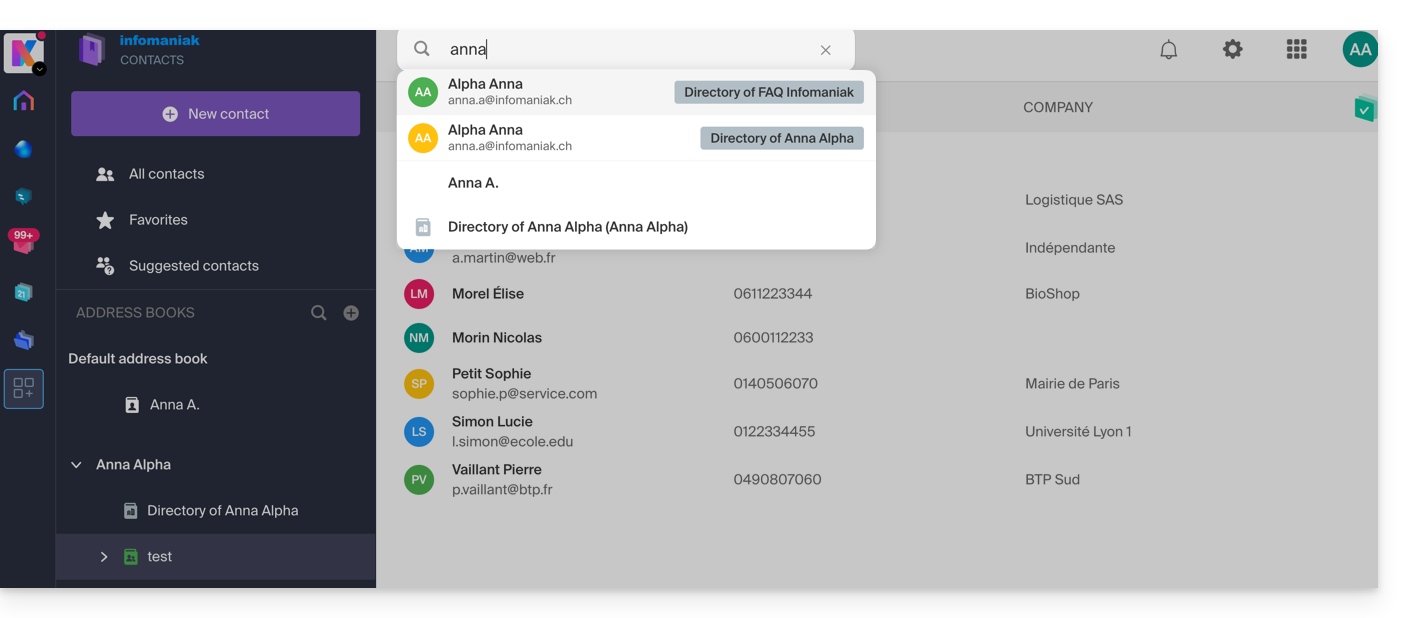
Search for an event
You can search for calendars, events, rooms, including among the description of these and the people who were linked to them: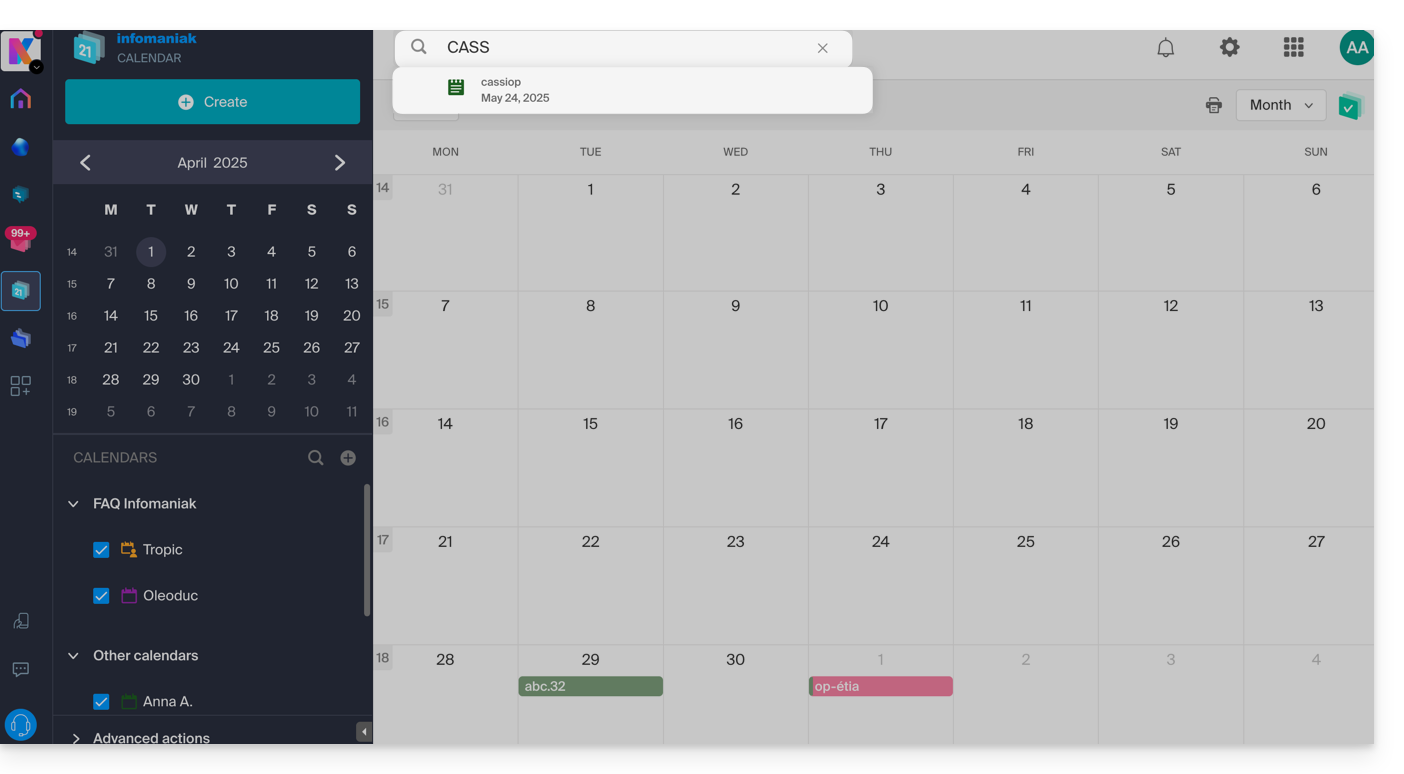
This guide explains how to force a synchronization of contacts & calendars Infomaniak when they are synchronized by the kSync app on an Android device.
Preamble
- The kSync app only synchronizes contacts & calendars that are selected in the application.
- If you subsequently add calendars/agendas from Calendar or address books from Contacts, it is therefore necessary to add them to the synchronization in the kSync application.
Add an agenda / address book to the synchronization
To force synchronization:
- Open the mobile app kSync on your Android device.
- Press Refresh address books / agendas.
The new address books and agendas appear in the list.
This guide explains how to modify the kSuite offer.
Preamble
- kSuite is a bundled offer that can be modified to a higher offer at any time (increase the number of users and the size of the disk space for data storage)
- It is not possible to subsequently change to a lower rate, nor to transfer kSuite to another Organization.
- The products included in kSuite cannot be moved or terminated independently of each other.
- To help you identify the kSuite offer best suited to your needs, refer to this other guide.
Modify the kSuite offer
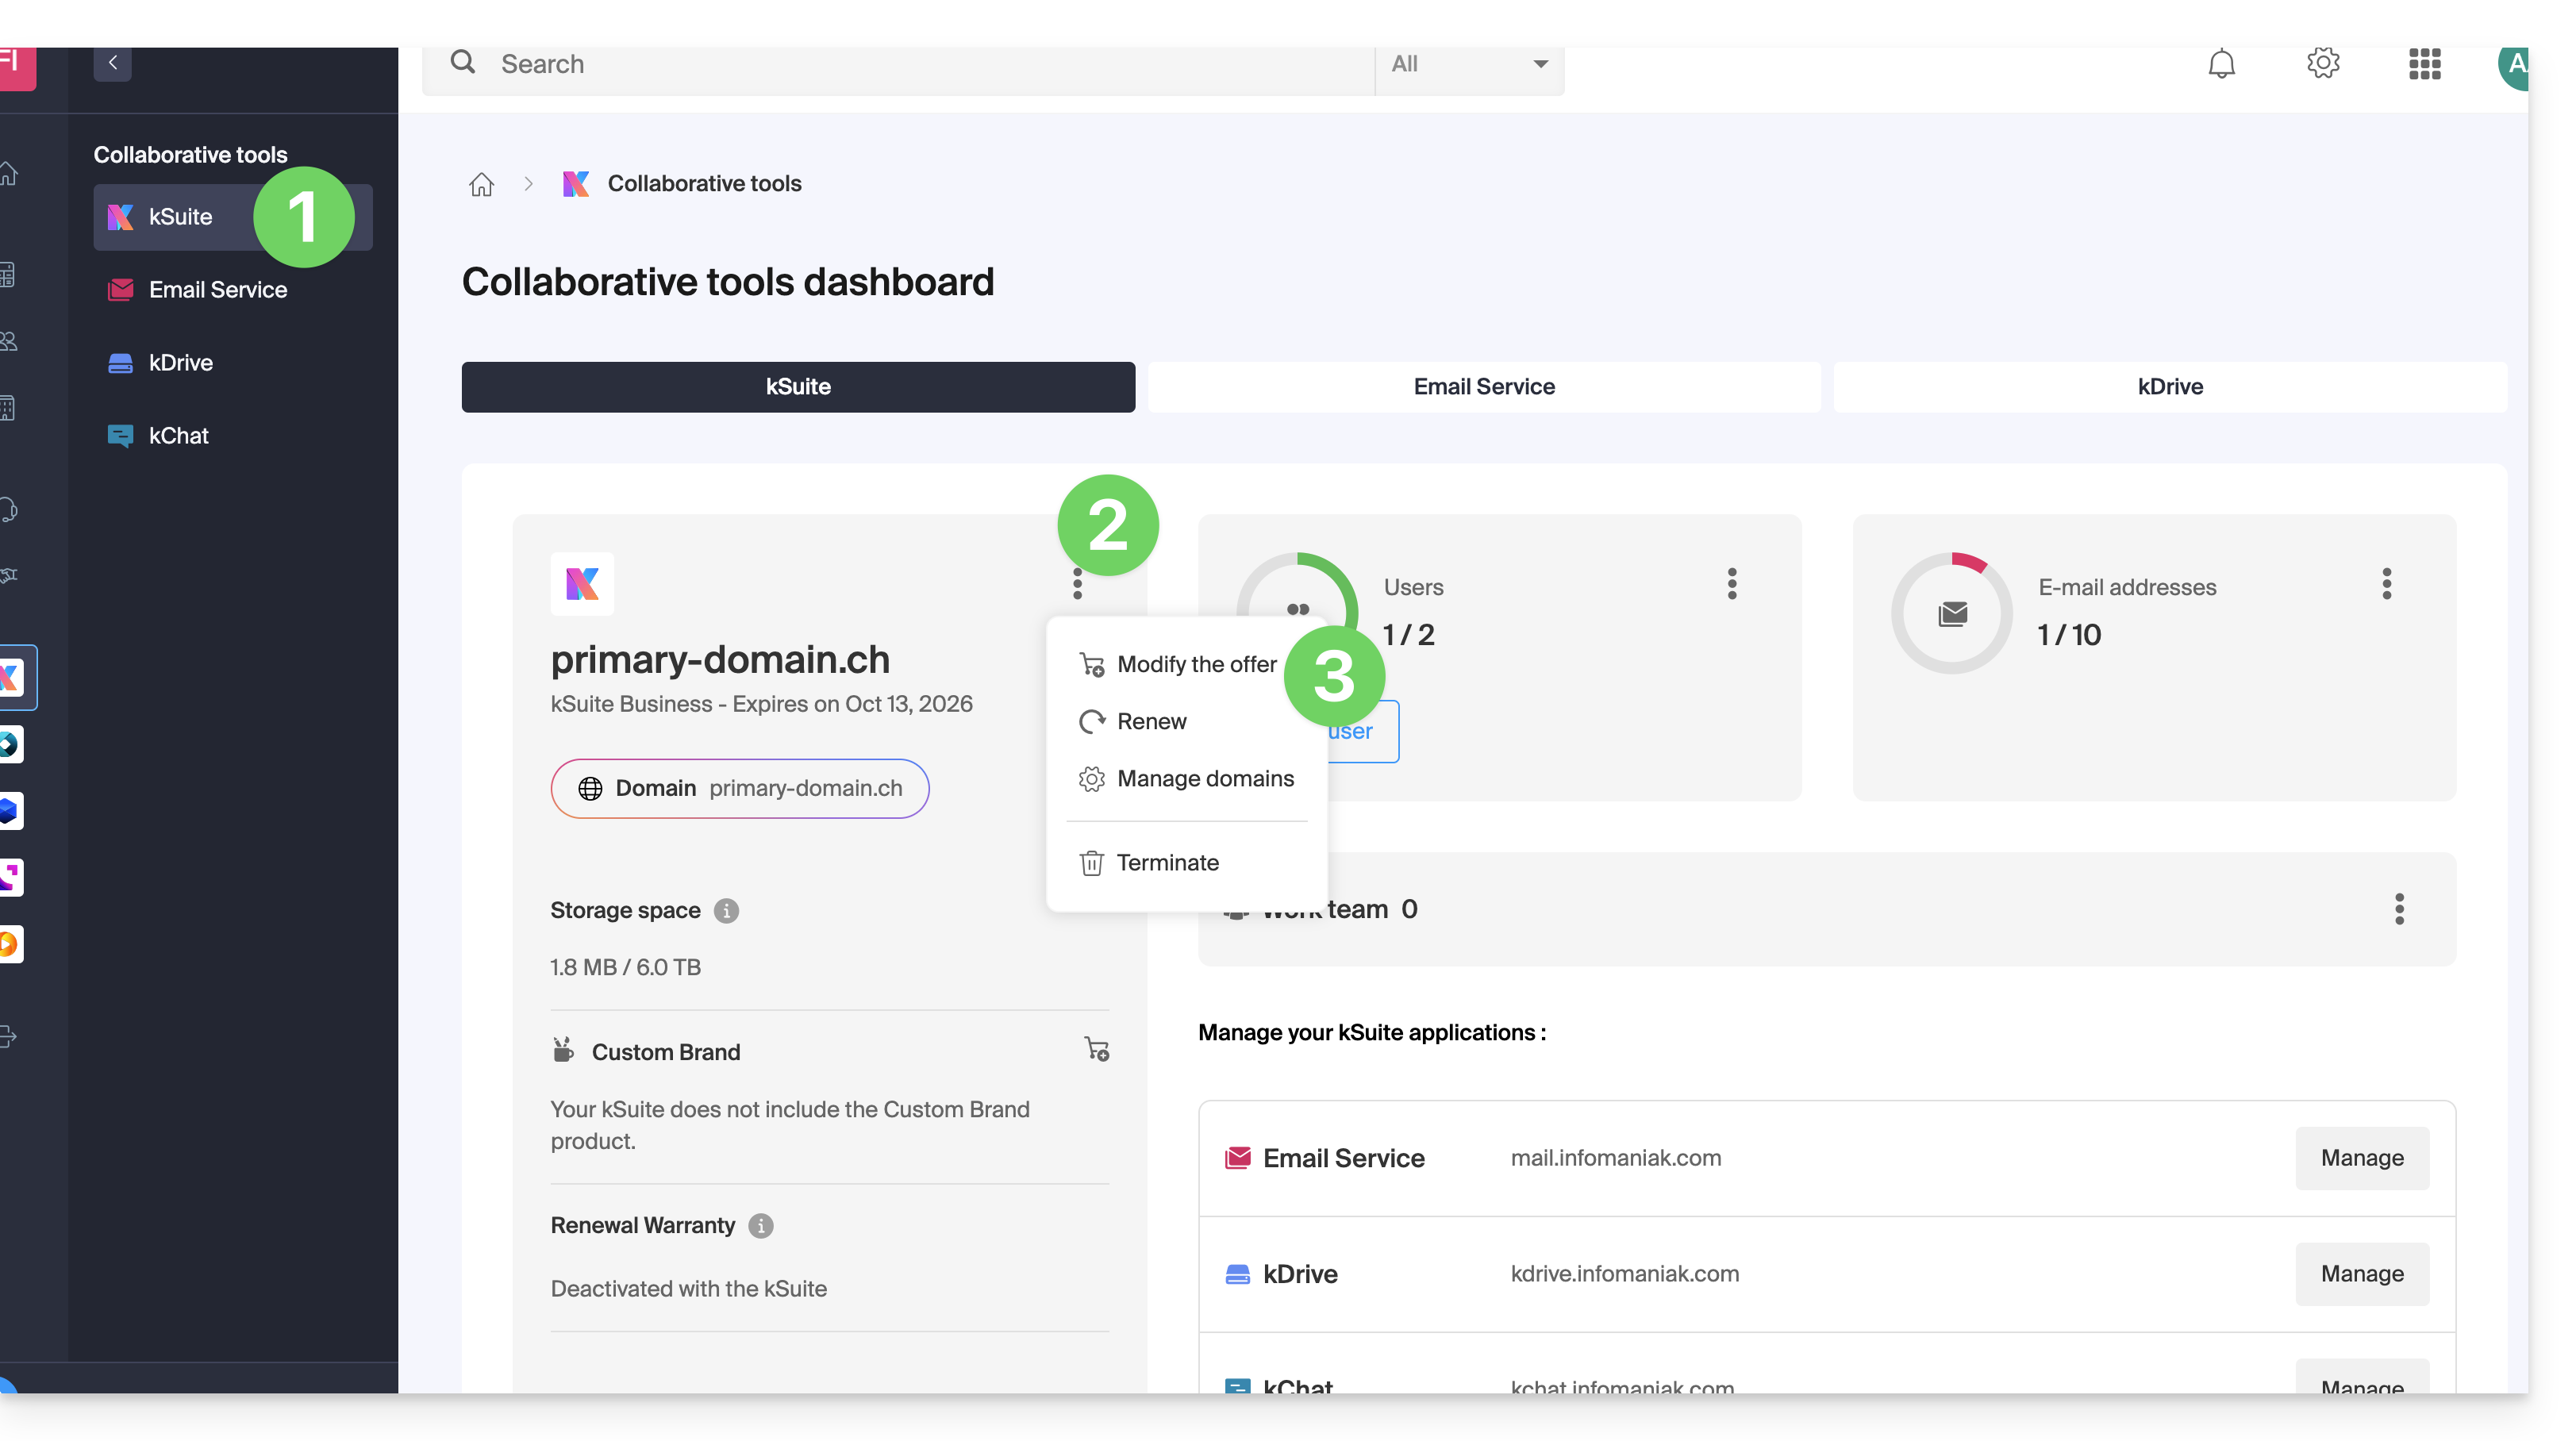
To access the modification of the kSuite offer:
- Click here to access the management of your product on the Infomaniak Manager (need help?).
- Click on the action menu ⋮ to the right of the kSuite name.
- Click on Modify the offer:
This guide explains how to convert a free Mail Starter offer to a more comprehensive and enhanced offer, for example, free or paid my kSuite.
Preamble
- By purchasing a domain name from Infomaniak, you get 1 free email address and a basic 10 Mo Web space: this is the Starter offer.
- In a few clicks, it is possible to upgrade these offers to unlock the limits and benefit from an enriched experience.
- To help you identify the Mail offer best suited to your needs, refer to this other guide.
Modify the Starter offer - Free Mail service
To upgrade the Starter offer:
- Click here to access the management of your product on the Infomaniak Manager (need help?).
- Click on the action menu ⋮ located to the right of the item concerned.
- Click on Modify the offer:
- Adjust if necessary the number of email addresses to add to the Mail service using the order assistant that will allow you to complete the offer change until the end.
This guide explains how to connect the native Android messaging app to an email address hosted by Infomaniak.
Preamble
- Instead of the manual configuration below, it is recommended to use the Infomaniak Mail app (Android).
- The various services offered by Infomaniak are all compatible with the corresponding standard protocols (IMAP/SMTP for email, for example), therefore if you encounter a problem with third-party software, contact its publisher or a Partner and consult the support policy as well as section 11.9 of the Infomaniak Terms of Service.
Manually add the email address to the application
Prerequisites
- Create the email address in my kSuite or a Mail Service / kSuite.
- Create a password for the email address on the device you are going to configure.
To configure the messaging app:
- Open the native messaging app on your device.
- Click on Add an account.
- Select Other as the email type.
- Enter your email address.
- Select the Personal IMAP type.
- Check and complete the missing information.
- Complete the procedure.
- That's it, your email address is now configured in the app on your device.
Recommended settings
- Incoming IMAP server =
mail.infomaniak.com - IMAP port =
993(with SSL) - Outgoing SMTP server =
mail.infomaniak.com - SMTP port & encryption protocol and command/method to activate this protocol:
587+ STARTTLS - Username = full & complete email address ( ? )
- Password = the one generated for the email address you want to access
- Authentication required to send emails:
- It is activated in the SMTP settings of your application.
- Check "use the same parameters as the incoming server" or, depending on the software/email clients, enter a username (= full & complete email address) and the generated password.
Refer to this other guide if you are looking for information about other compatible messaging ports and protocols (SSL / TLS for example).
In case of a problem
Check that the Mail Service is configured optimally.
There is no need to contact Infomaniak Support if your email address works well outside of the application. The most common error concerns the use of an incorrect password. The troubleshooting guides help you resolve any potential issues:
- Refer to the solutions given in this other guide regarding email in general
- … and if your application no longer works at the sending level (disconnected or absent SMTP server, for example) or after a change of email password, refer to this other guide.
This guide concerns Euria, the sovereign artificial intelligence assistant, a full-fledged kSuite service, also available within an app.
Preamble
- The use of AI at Infomaniak is based on a transparent and ethical approach.
- Each AI-integrated service follows strict principles to ensure reliable and respectful use:
- information protection is guaranteed by full data processing within infrastructures located exclusively in Switzerland, thus ensuring complete control over digital sovereignty,
- the generated results are never used to train models or for advertising purposes,
- and AI is not intended to replace humans, but to assist them.
What is Euria?
Designed to offer a European alternative to American tech giants, the sovereign artificial intelligence assistant Euria stands out for its deep integration into the Infomaniak productivity ecosystem, while ensuring absolute confidentiality of user data.
Euria's strength lies in its local infrastructure:
- Unlike solutions based on foreign public cloud, Infomaniak's AI is hosted exclusively on its own servers in Switzerland.
- This approach ensures strict compliance with data protection standards and guarantees that no processed information is used to train third-party models or shared outside the secure infrastructure of the host.
Euria uses state-of-the-art language models (LLM) selected for their efficiency and performance, while being optimized to minimize their energy footprint. Infomaniak is committed to full transparency regarding the algorithms used, aligning with a technological independence and environmental sustainability approach specific to the company.
Usage limits
⚠ Number of messages per day:
| kSuite | free | 20 |
| Standard | 100 | |
| Business | 500 | |
| Enterprise | unlimited | |
| my kSuite | 20 | |
| my kSuite+ | 100 |
⚠ Web searches per day:
| kSuite | free | 5 |
| Standard | 30 | |
| Business | 50 | |
| Enterprise | 100 | |
| my kSuite | 5 | |
| my kSuite+ | 30 |
⚠ Number of projects:
| kSuite | free | 2 |
| Standard | 10 | |
| Business | unlimited | |
| Enterprise | unlimited | |
| my kSuite | 2 | |
| my kSuite+ | unlimited |
⚠ Number of conversations per project:
| kSuite | free | 5 |
| Standard | 50 | |
| Business | unlimited | |
| Enterprise | unlimited | |
| my kSuite | 5 | |
| my kSuite+ | unlimited |
The daily message quota is global: each request sent to Euria is deducted from your daily limit, regardless of the project or conversation in which you are interacting.
The transcriptions are unlimited. The image upload is limited to 10 MB. The file upload is limited to 100 MB (except for my kSuite/my kSuite+ to 20 MB).
Some Infomaniak services integrate Euria
- kChat
- The AI Euria integrated into kChat saves time in exchanges: it can rephrase sentences, generate quick responses, correct spelling, or adjust the tone of a message. The user retains full control over the suggestions, which are local to each session only.
- Mail Infomaniak
- In the Mail app, Euria assists in writing emails. It can generate content from a few keywords, rephrase or structure a message, adapting to different registers. Nothing is sent automatically, and the user can modify the texts at any time.
- Site Creator
- An AI-based writing assistant allows Site Creator to quickly generate content tailored to different types of web pages. This service is useful for those launching a site and looking to produce clear, optimized, and relevant texts.
- kDrive
- On kDrive, artificial intelligence is used at two complementary levels to simplify document management. Euria allows interaction with text files stored in the drive. This module can answer questions about the content of a document, summarize, translate, or extract useful information. It is particularly effective for reading reports, understanding complex texts, or quickly generating an overview of a file.
Responsibilities of the parties
Data provided to the AI
- The Infomaniak AI is currently based by default on these models.
- Among them, Mistral, Whisper, DeepSeek, Llama, granite…
- By using a writing assistant, the messages and requests addressed to the AI are exclusively processed in Switzerland by the Infomaniak infrastructure.
- No data is processed or shared with a third party.
Data provided by the AI
- The language model generates text based on the data it has assimilated during its training, devoid of consciousness, intentions, or moral responsibilities.
- It is crucial that the user is aware that the information generated by the model is not always accurate and should not be considered an infallible source of information.
- The user must exercise critical discernment and verify the information provided by the assistant from reliable sources when necessary.
- For example, if a person uses the model for crucial tasks such as medical, legal, or financial advice, they must take additional precautions to confirm the information coming from the model.
- In case of inappropriate or dangerous use of this assistant, the responsibility lies with the user who takes these actions.
Discover also AI Tools: Infomaniak provides a platform allowing easy integration of open-source models into custom projects. It is possible to leverage text analysis, content generation, translation, or other AI uses via on-demand calls. These services enable developers to benefit from a powerful AI, without relying on closed or proprietary solutions.
This guide explains how to link a domain name to the offer kSuite Infomaniak.
Manage the kSuite domain
To get started:
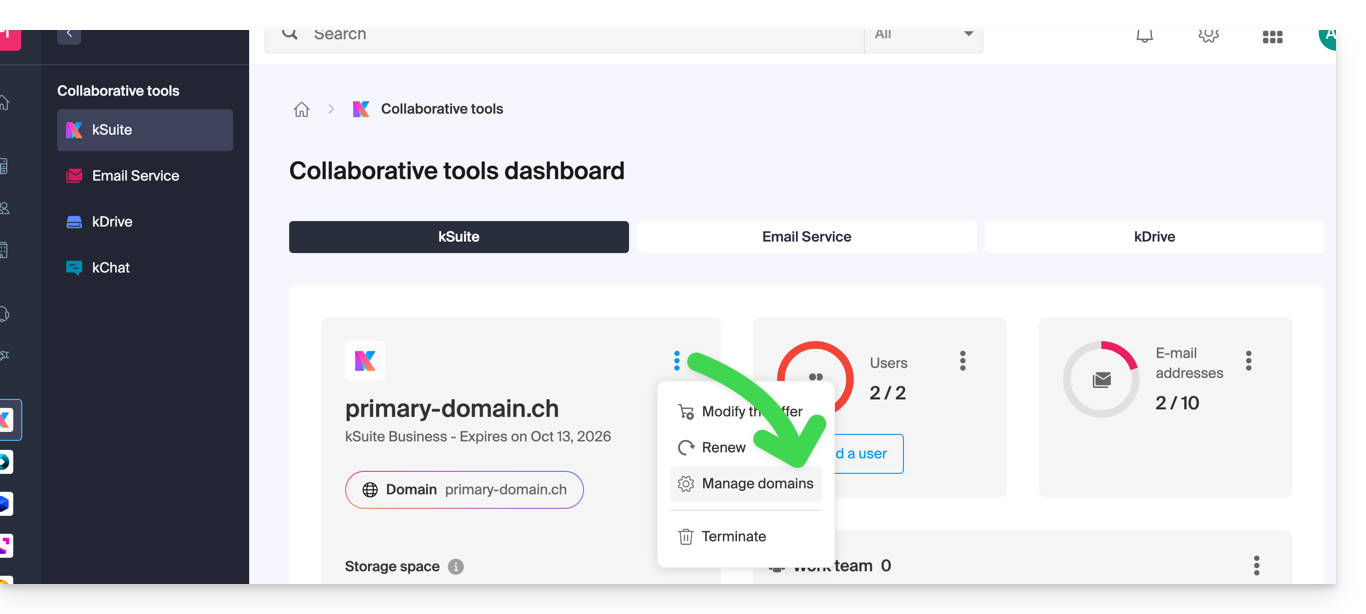
- Click here to access the management of your kSuite on the Infomaniak Manager (need help?).
- If a domain is already linked, you can manage it by clicking on the action menu ⋮ to the right of the kSuite name, then Manage domains:
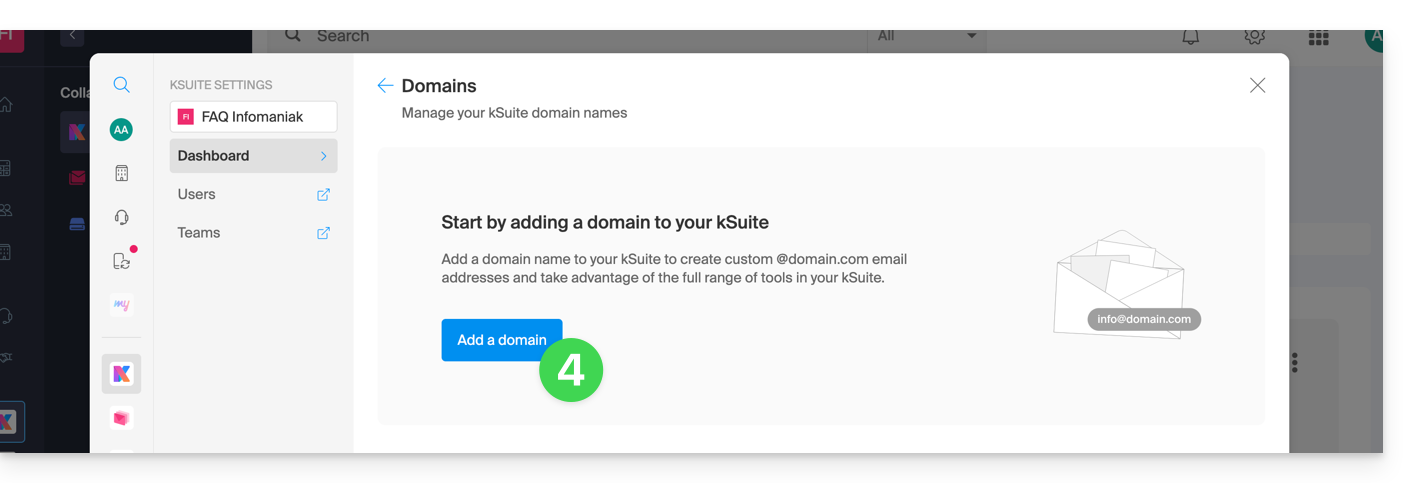
- If no domain is linked yet, you can add 1 by clicking on the button:
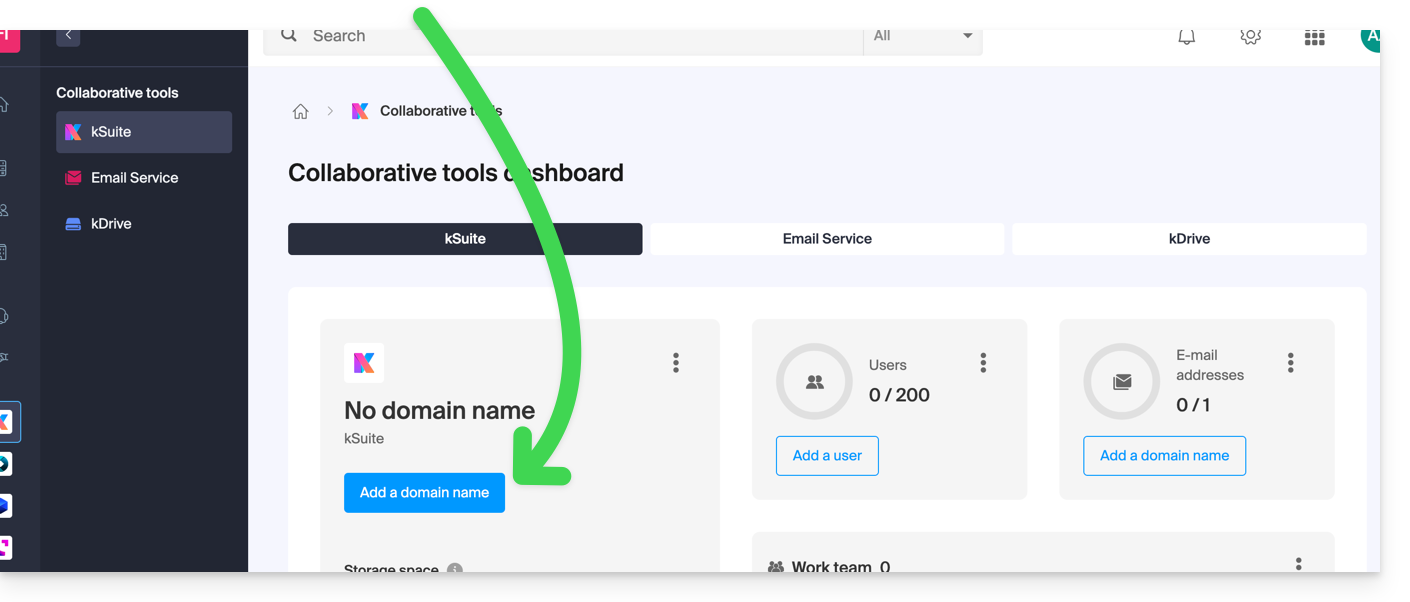
- Click the button to add a domain:
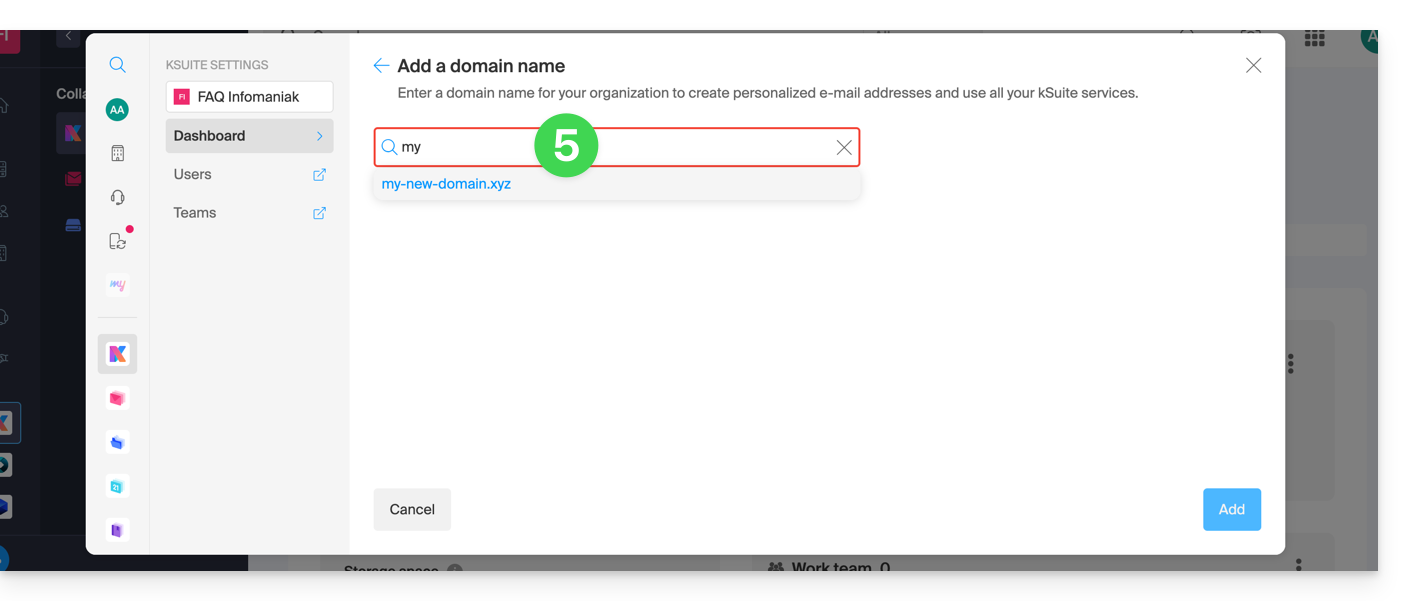
- Choose the domain to attach from those in your Organization (still available, i.e., not attached to any service) or enter an external domain name:
- Depending on the situation of your domain (also refer to the information below), you will need to perform some manipulations beforehand…
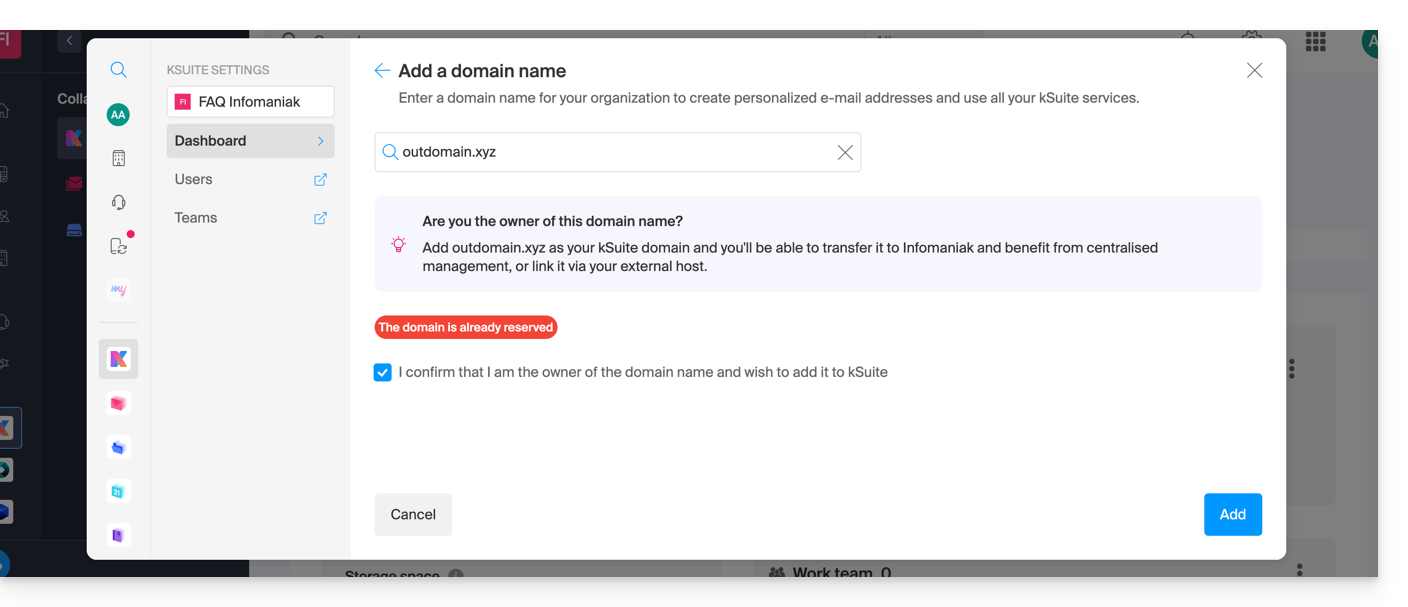
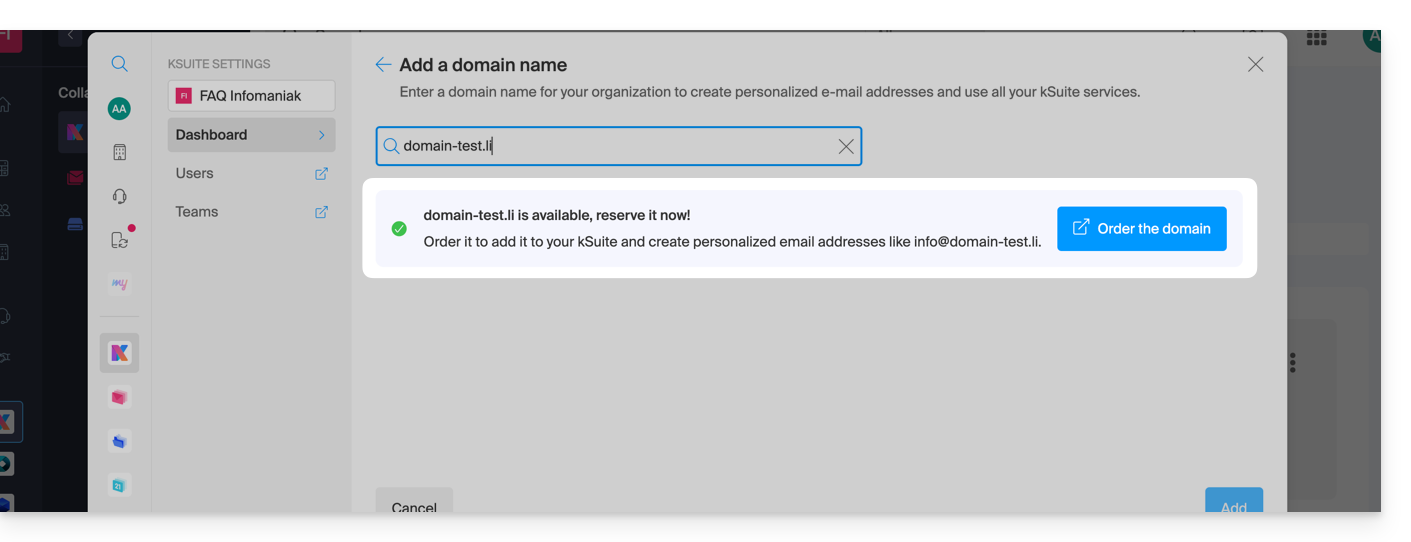
- … or even purchase a domain if necessary:
- Depending on the situation of your domain (also refer to the information below), you will need to perform some manipulations beforehand…
If the domain name is…
… with Infomaniak, same Organization
If your domain name is registered with Infomaniak and is in the same user account or Organization as the email, then there is nothing to do.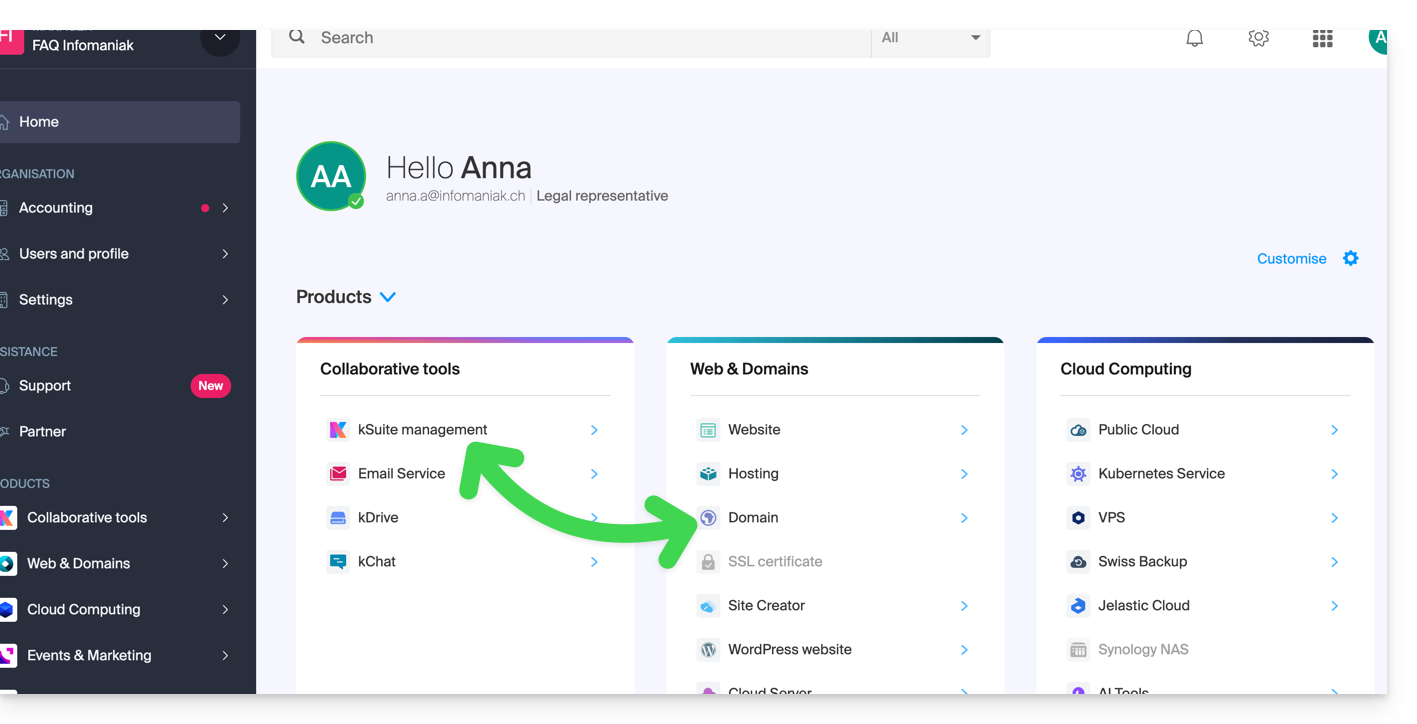
Simply add it to your kSuite: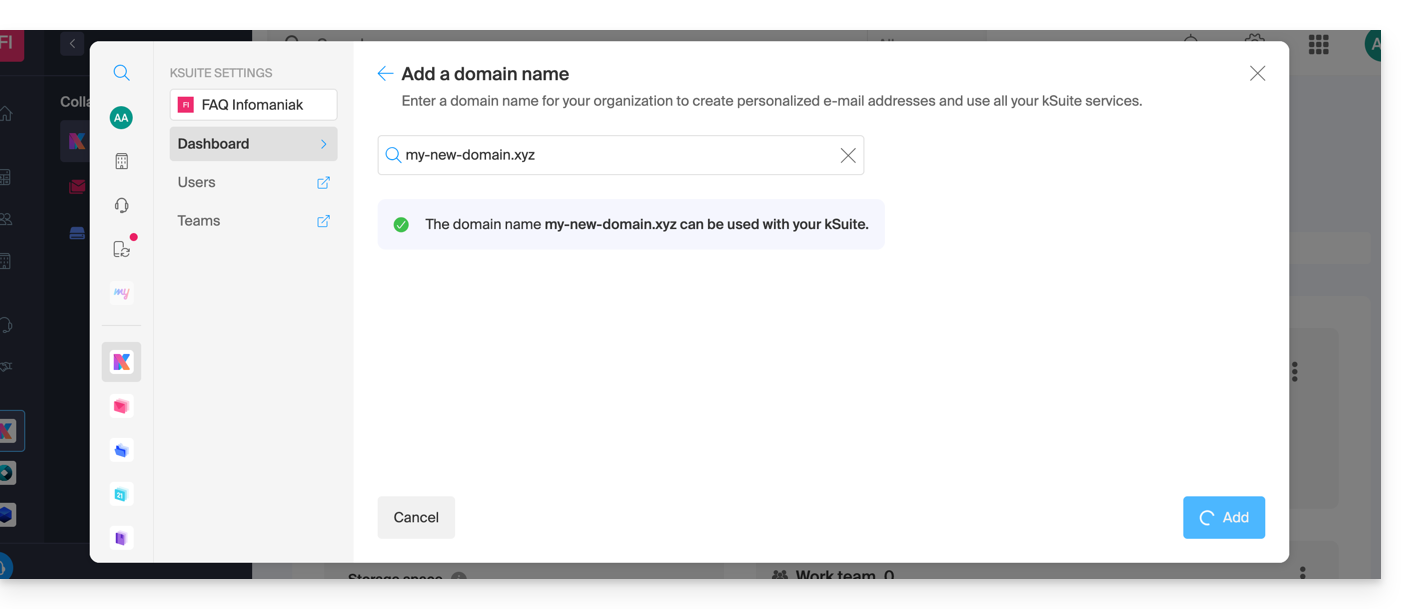
The domain will be added and visible on the dashboard: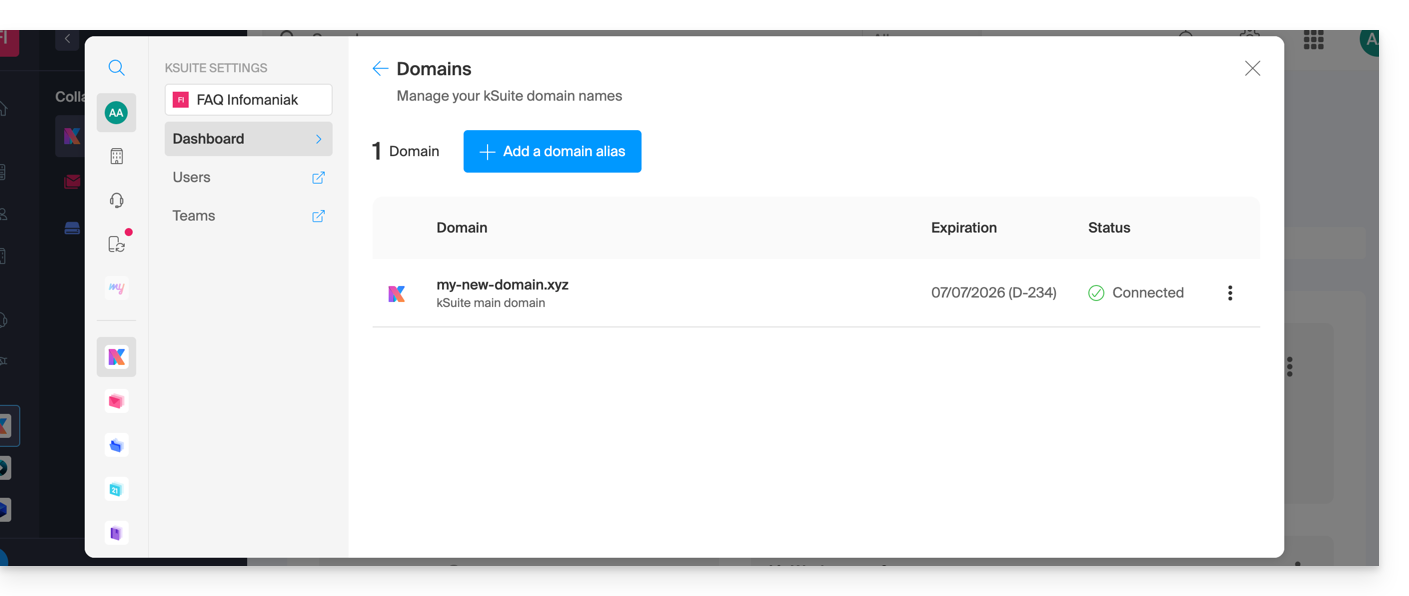
- Refer to this other guide to verify and correct any potential configuration errors.
… with Infomaniak, same Organization and already linked to a Mail Service or kDrive
No problem, you can convert your existing products to kSuite.
… with Infomaniak, different Organization
If your domain name is registered with Infomaniak but in a different user account or Organization, then:
- Edit its DNS zone by specifying Infomaniak's MX (+ SPF & DKIM).
- Any DNS addition/modification can take up to 48 hours to propagate.
OR
- Move it within the same Organization.
Generally, a message will alert you to this situation: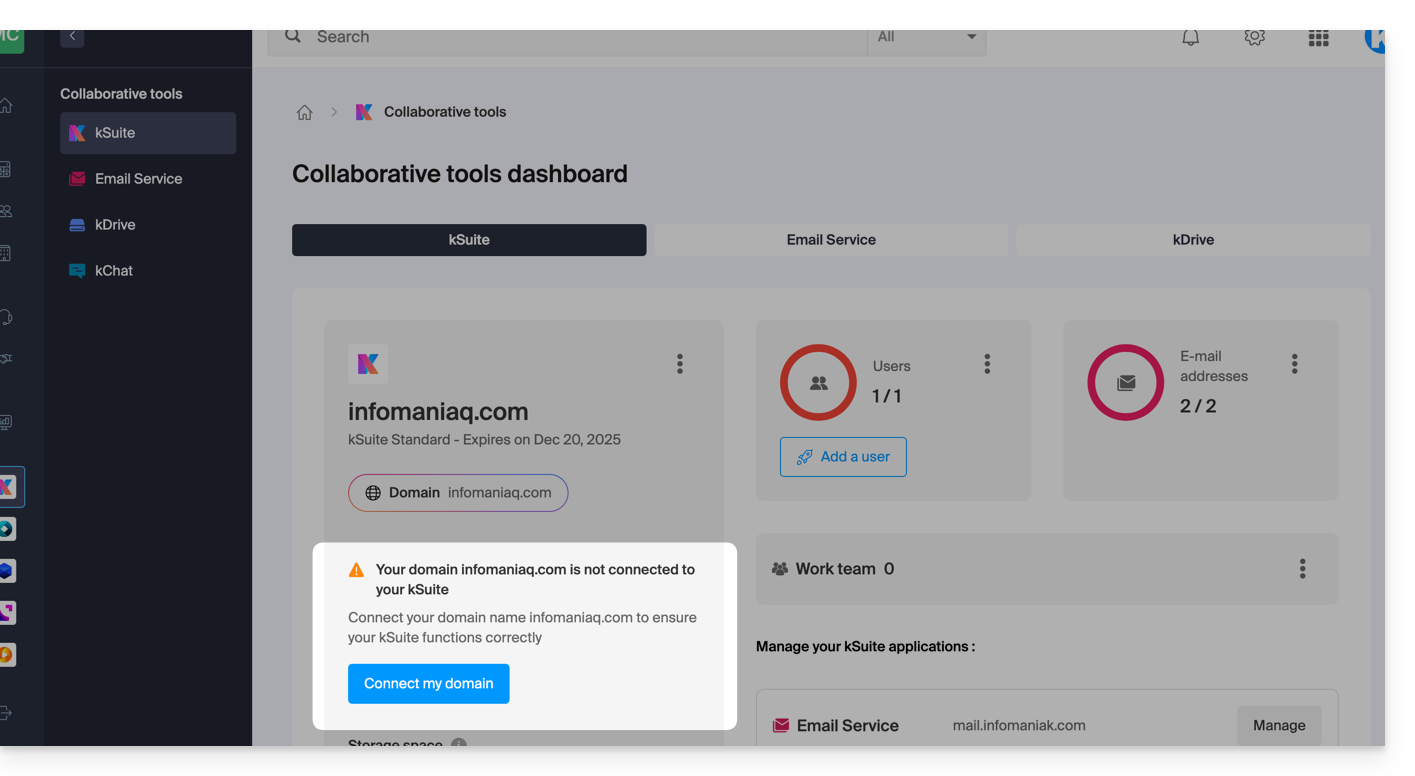
… and the technical information to be reported where the domain is located will be proposed: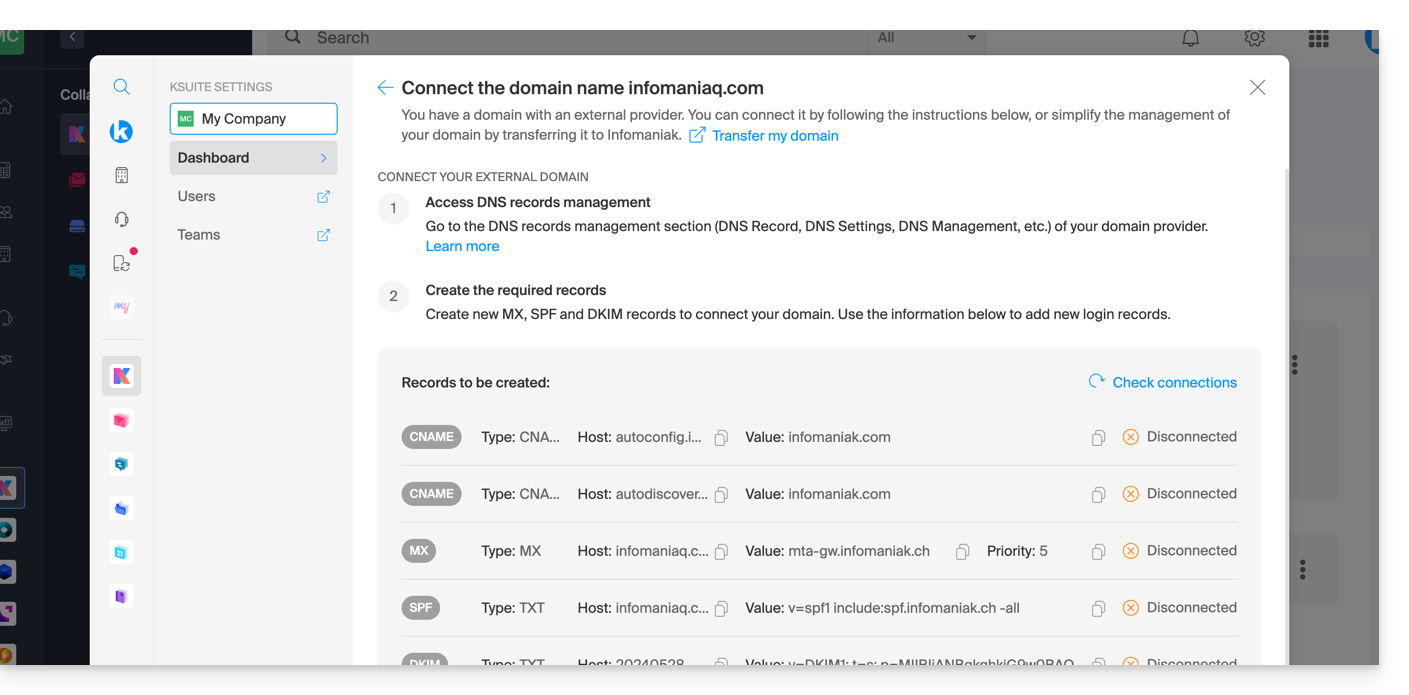
... with Infomaniak using external DNS
If your domain name includes DNS that are not Infomaniak's, then:
- Edit the current DNS zone where it is located (if necessary, consult the help of the relevant provider) by specifying Infomaniak's MX (+ SPF & DKIM).
- Any DNS addition/modification can take up to 48 hours to propagate.
OR
- Change the current DNS and select the use of Infomaniak DNS.
- Any DNS addition/modification can take up to 48 hours to propagate.
- Refer to this other guide to verify and correct any potential configuration errors.
This will be indicated to you (see the images above).
... elsewhere with external DNS
If your domain name is registered with another registrar and includes DNS that are not Infomaniak's, then:
- Edit the current DNS zone where it is located (if necessary, refer to the help of the relevant provider) by specifying Infomaniak's MX (+ SPF & DKIM).
- Any DNS addition/modification can take up to 48 hours to propagate.
OR
- Change the current DNS (if necessary, refer to the help of the relevant provider) by specifying Infomaniak's (this implies having a DNS zone with Infomaniak.
- Any DNS addition/modification can take up to 48 hours to propagate.
- This DNS zone with Infomaniak will be configured correctly, but refer to this other guide to verify and correct any configuration errors.
This will be indicated to you (see the images above).
... elsewhere but you are bringing it back
If your domain name is registered with another registrar and you wish to bring it to the same place as your Infomaniak email, then:
- Transfer the domain name to Infomaniak (it will be configured correctly, but refer to this other guide to verify and correct any configuration errors).
Otherwise, consider ordering a new domain name if necessary.
This guide explains how to connect the desktop app Thunderbird (desktop application on macOS / Windows / Linux) to an email address hosted by Infomaniak.
Preamble
- The different services offered by Infomaniak are all compatible with the corresponding standard protocols (IMAP/SMTP for email, for example), therefore if you encounter a problem with third-party software, contact its publisher or a Partner and consult the support policy as well as article 11.9 of the Infomaniak TOS.
Add the email address to the application
Prerequisites
- Create the email address in my kSuite or a Mail Service / kSuite.
- Create a password for the email address for the device you are going to configure.
To configure the email application:
- Download the latest version of Thunderbird.
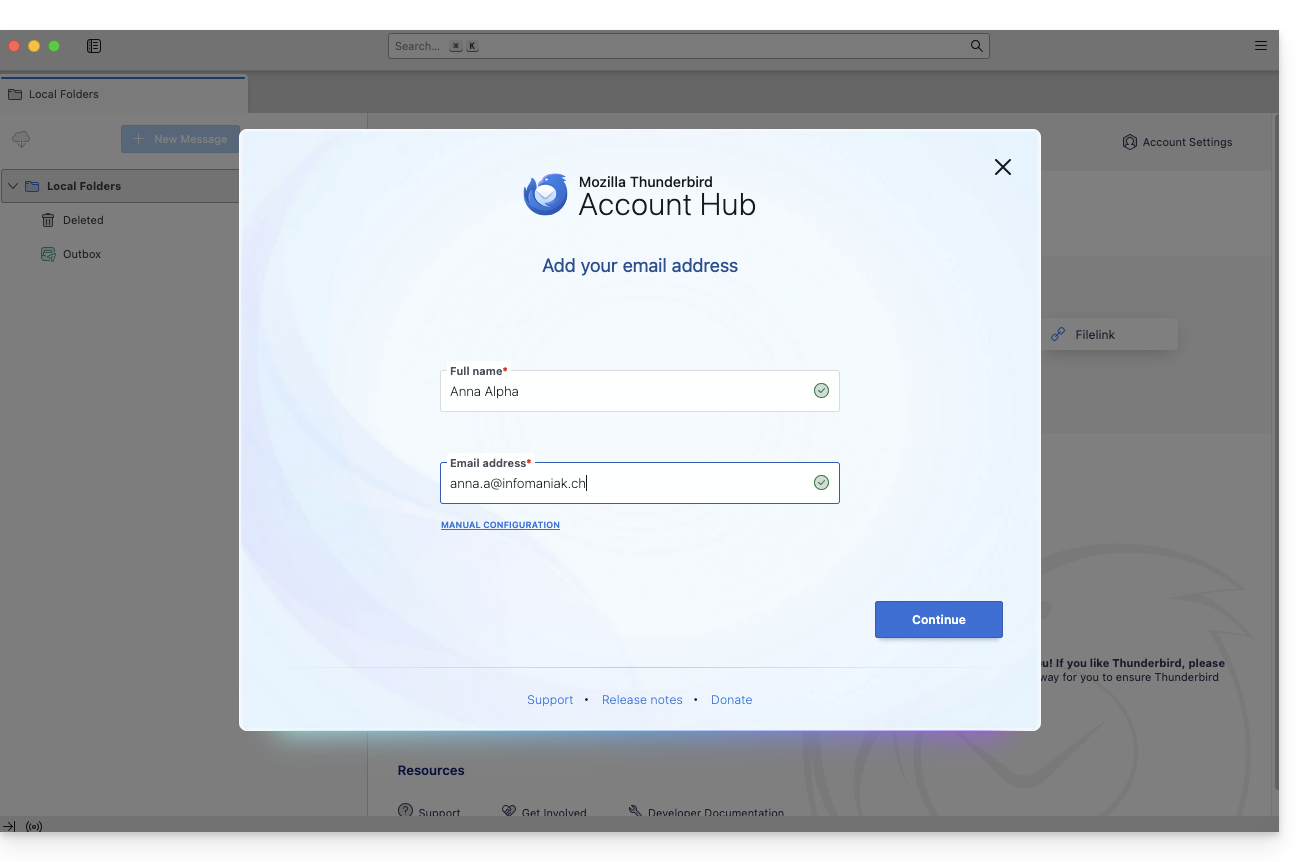
- Open the application.
- Enter your account information and click on Continue:
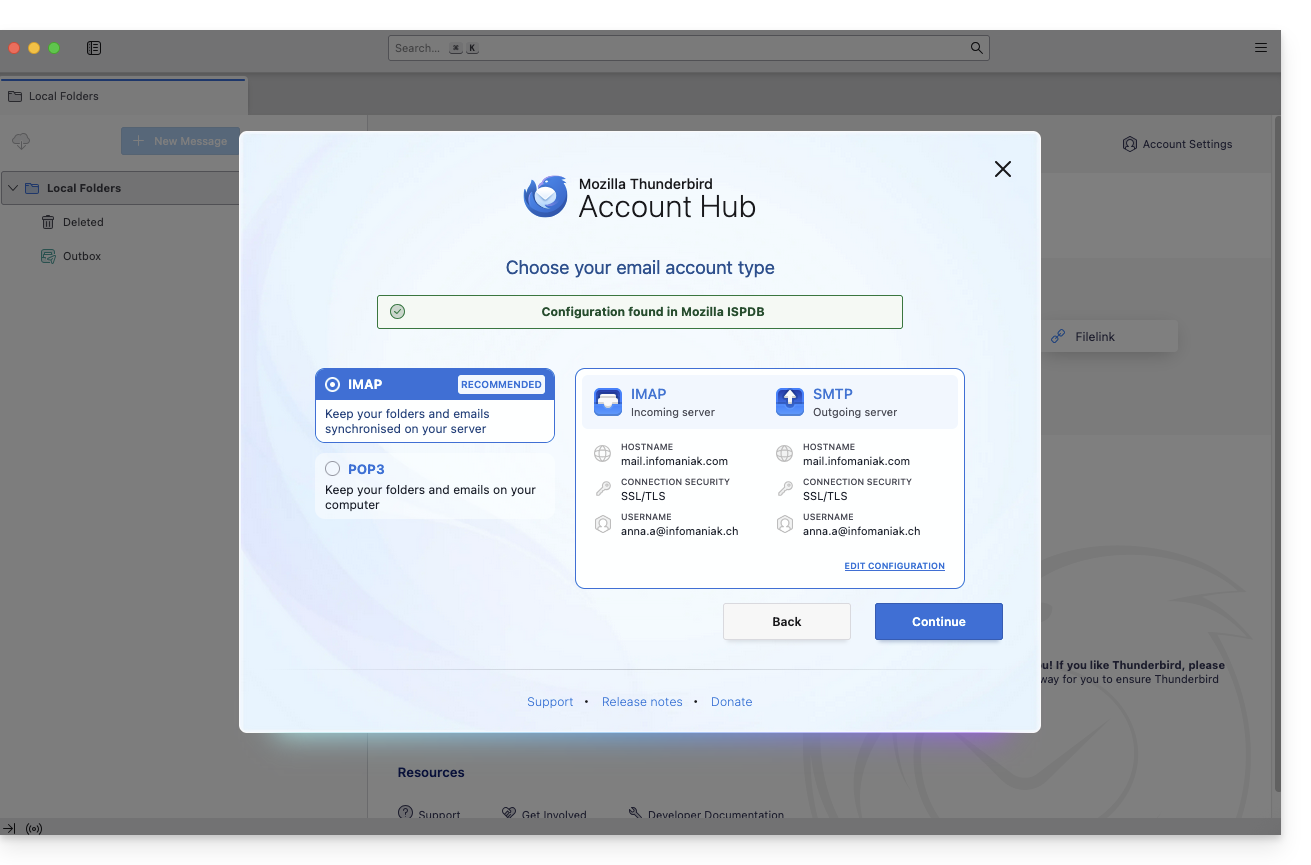
- Stay in IMAP and click on Continue:
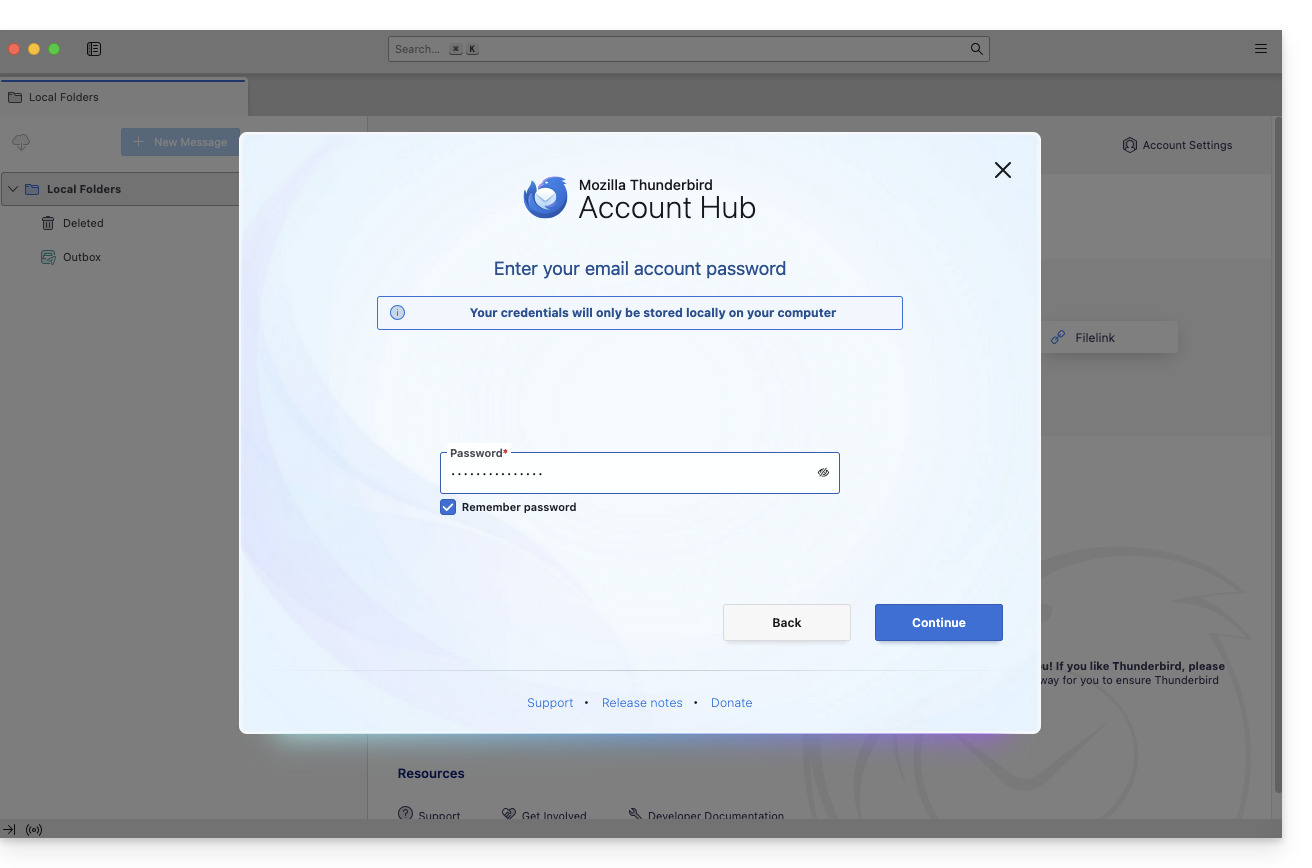
- Enter your password and click on Continue:
- Click on Continue:
- The summary of your registration appears, click on Finish to add the address (or configure other services from there):
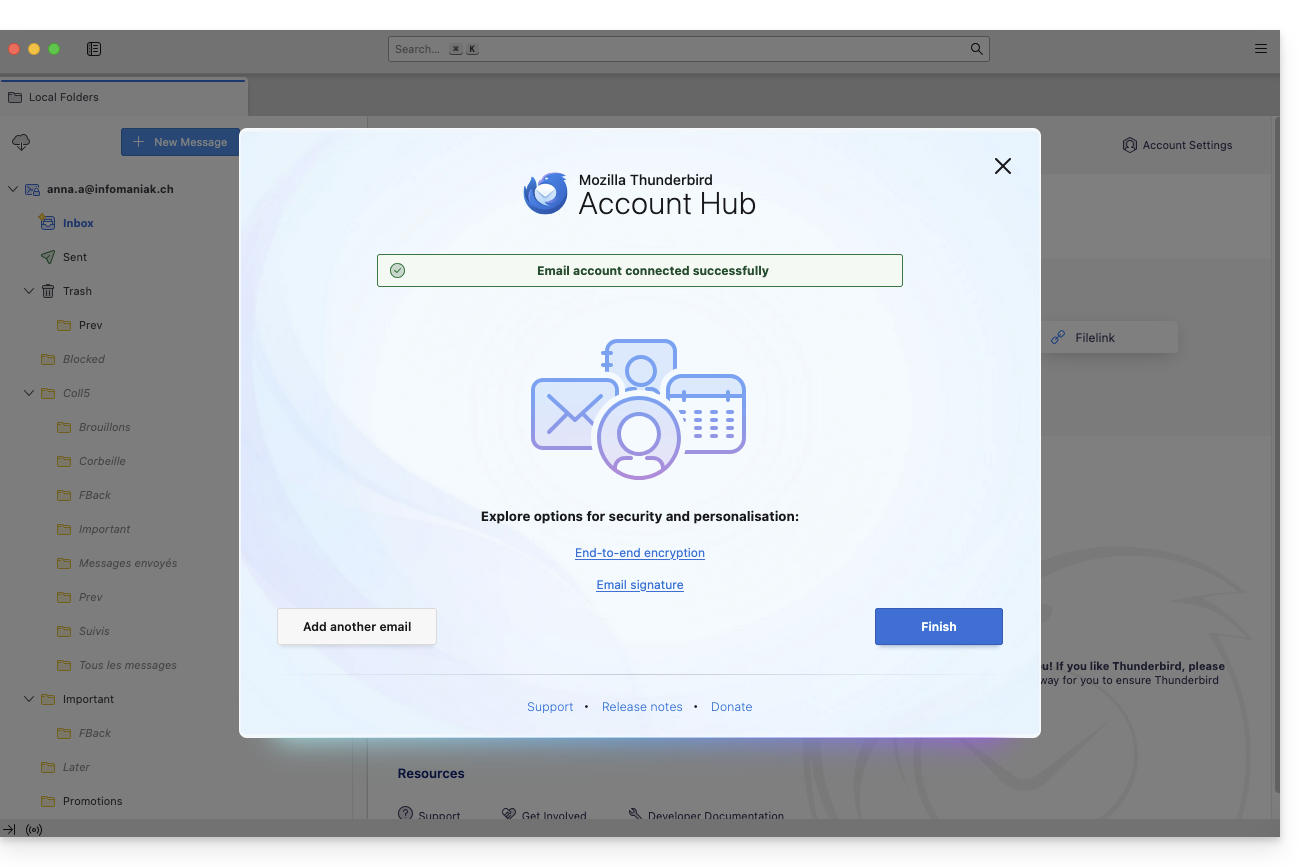
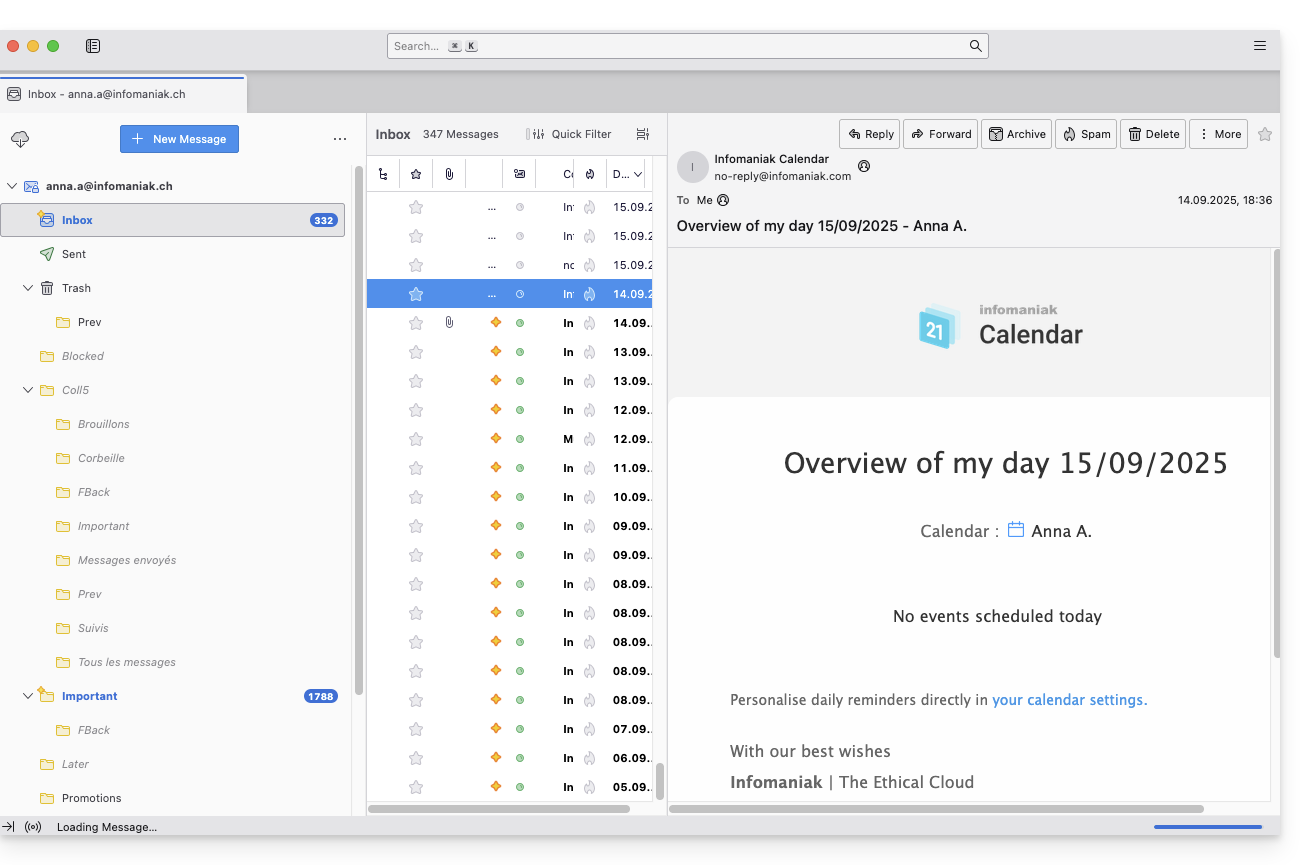
- There you go, your email address is now configured in the application:
Recommended settings
- Incoming IMAP server =
mail.infomaniak.com - IMAP port =
993(with SSL) - Outgoing SMTP server =
mail.infomaniak.com - SMTP port & encryption protocol and command/method to activate this protocol:
587+ STARTTLS - Username = full & complete email address ( ? )
- Password = the one generated for the email address you want to access
- Authentication required for sending emails:
- It is activated in the SMTP settings of your application.
- Check "use the same parameters as the incoming server" or, depending on the software/email clients, enter a username (= full & complete email address) and the generated password.
Refer to this other guide if you are looking for information about other compatible messaging ports and protocols (SSL / TLS for example).
If you encounter any issues
Check that the Mail Service is configured optimally.
There is no need to contact Infomaniak Support if your email address works well outside of the application. The most common error concerns the use of an incorrect password. The troubleshooting guides help you resolve any potential issues:
- Refer to the solutions provided in this other guide regarding email in general.
- This other guide is more specifically about Thunderbird.
… and if Thunderbird no longer works since a change of email password, refer to this other guide.
This guide provides the most common IMAP server addresses. These can be used to perform the copy of the content of your old email addresses to your Infomaniak email address.
If necessary, do not hesitate to contact your previous email provider to ask for the mail server to specify.
IMAP server addresses
| Provider | IMAP Hostname / Server |
|---|---|
| 1&1 (IONOS) | imap.1and1.fr |
| 9 Business | imap.9business.fr |
| 9 Telecom | imap.neuf.fr |
| Alice | imap.aliceadsl.fr |
| Altern.org | imap.altern.org |
| AOL | imap.fr.aol.com |
| Bouygues Telecom | imap4.bbox.fr |
| Caramail (GMX) | imap.gmx.com |
| Cegetel | imap.cegetel.net |
| Club Internet | imap.club-internet.fr |
| Free | imap.free.fr |
| Freesurf | imap.freesurf.fr |
| Gawab | imap.gawab.com |
| Gmail (Google) | imap.gmail.com |
| GMX | imap.gmx.com (.net, .ch…) |
| La Poste | imap.laposte.net |
| NetCourrier | mail.netcourrier.com |
| Noos | imap.noos.fr |
| Numericable | imap.numericable.fr |
| o2switch | qqch.o2switch.net (see the welcome email from o2switch to obtain the exact server) |
| Online.net | imap.online.net |
| Orange | imap.orange.fr |
| OVH | ssl0.ovh.net |
| Proton Mail | copying to Infomaniak does not seem/ no longer possible |
| Skynet (Belgacom) | imap.skynet.be |
| Tele2 | imap.tele2.com |
| Telenet | imap.telenet.be |
| Videotron | imap.videotron.ca |
| Voila.fr | imap.voila.fr |
| Yahoo | imap.mail.yahoo.com |
| Hotmail (Microsoft) | imap-mail.outlook.com |
This guide explains how to manage and modify permissions (assigning an additional password, setting up an alias, etc. see below for the full list) for an Infomaniak user, so that they can manage more or fewer configuration items on the Infomaniak Web app Mail (online service ksuite.infomaniak.com/mail).
Preamble
- The email address is first created within a Mail Service and can then be used within one or more Infomaniak Mail interfaces by one or more users.
- The creator (or manager) of the address may want to limit the possible actions for one or the other of the users who will use the email address.
- This fine-grained permission management can be done when creating an address or afterwards, and you can also define what the default rights should be for any new address created (read Global Configuration below).
List of mail user permissions
| Type / Icon | Description of the permission granted to the user |
|---|---|
| Configure a device | Manage devices (create a dedicated password) |
| Manage responders | Create an out-of-office message (automatic reply) |
| Manage signatures | Add signatures and manage reply email addresses |
| Manage redirections | Redirect emails to one or more other addresses |
| Manage aliases | Create variants of your email address (by modifying what is before the @) |
| Manage action history | Access logs of the email address |
| Manage restorations | Access backups and restorations |
| Manage filters | Access SPAM filters and others |
| Manage rules | Automatically sort and classify incoming emails |
| Manage folders | Customize IMAP folders |
| Manage security | Manage blocked and approved addresses |
Manage permissions granted to a user
Attention: the password to access your Infomaniak account may be required to modify permissions.
… from the Mail Service
- Click here to access the management of your product on the Infomaniak Manager (need help?).
- Click directly on the name assigned to the product concerned.
- Click on the email address concerned in the table that appears.
- There are several ways to modify the permissions of an email address:
- When adding a user to an email address:
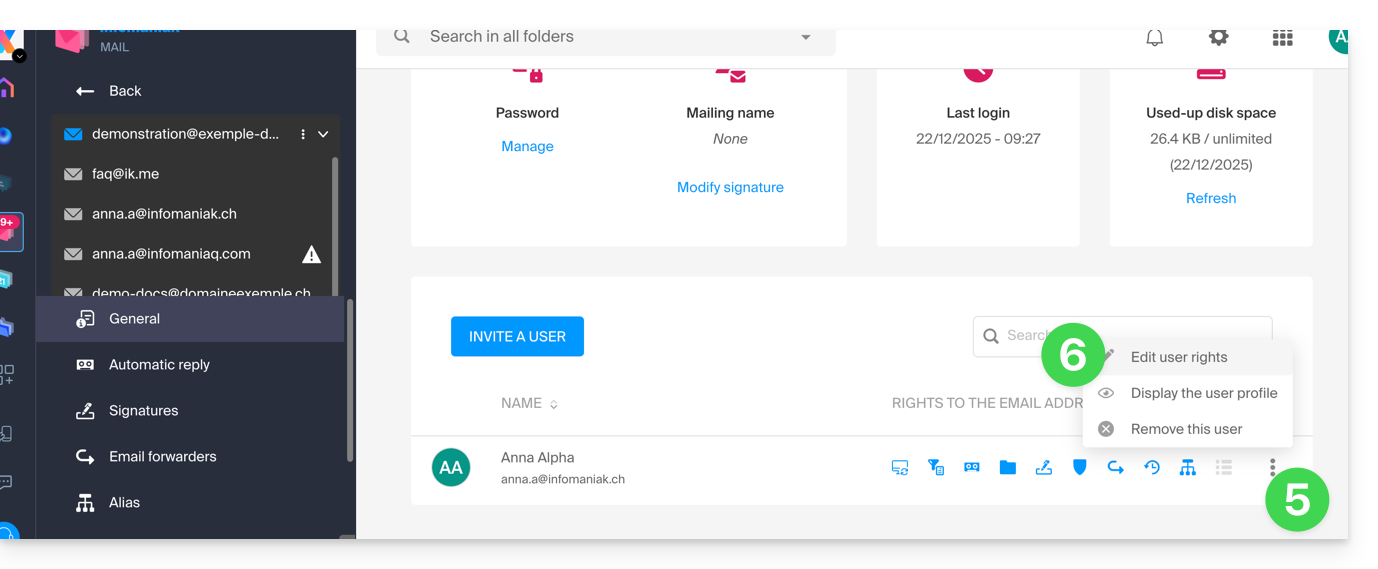
- Once the user has been added:
- Click on the action menu ⋮ located to the right of the user's name of the email address.
- Select ✎ Modify rights:
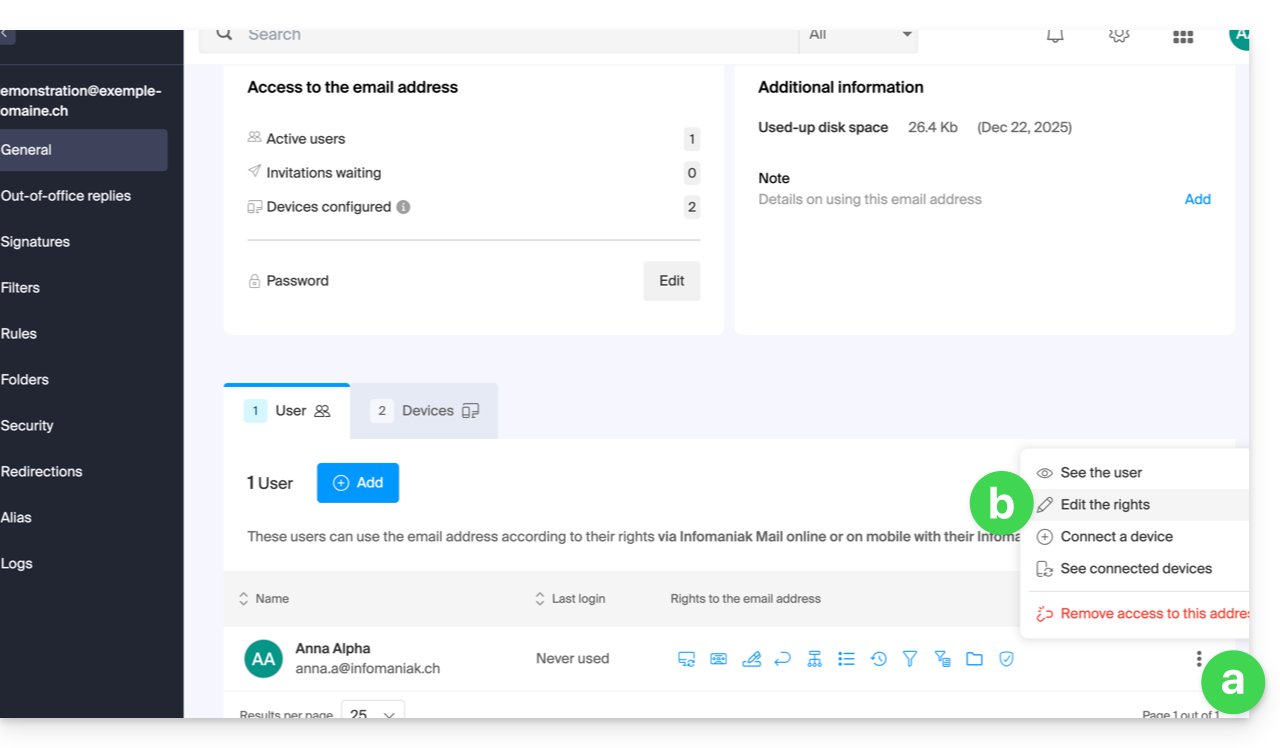
- Or click directly on the icons visible in the table:
- When adding a user to an email address:
… from the Manager (user management)
- Click here to access user management on the Infomaniak Manager (need help?).
- Click on the user concerned in the table that appears.
- Expand the collaborative tools section by clicking on the chevron .
- Expand the section of email addresses accessed by the user by clicking on the chevron .
- Click on the action menu ⋮ located to the right of the email address concerned.
- Select Modify rights:
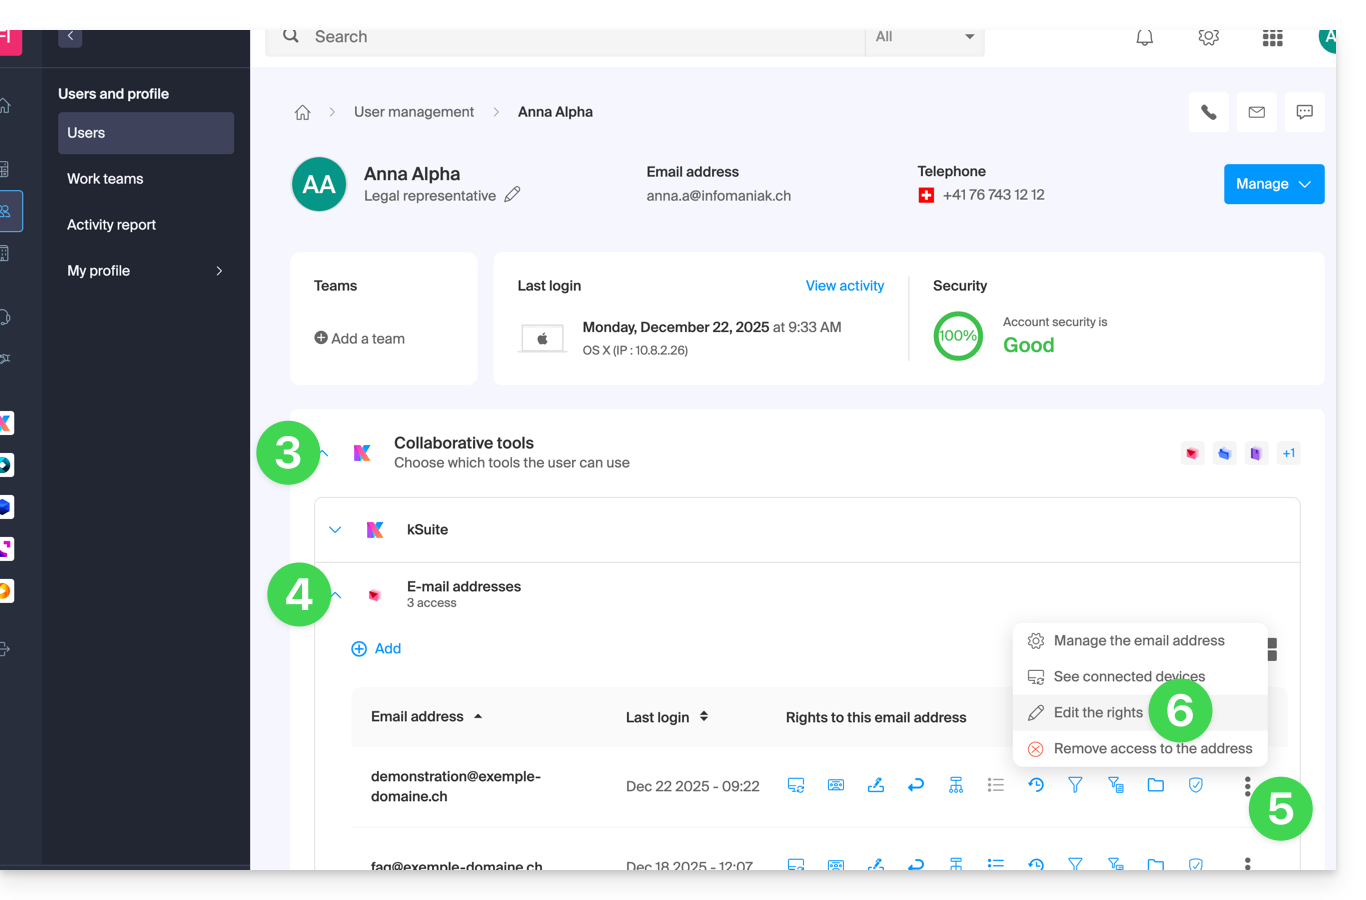
- Or click directly on the icons visible in the table:
… from the Web Mail app
- Click here to access the Infomaniak Web Mail app (online service ksuite.infomaniak.com/mail).
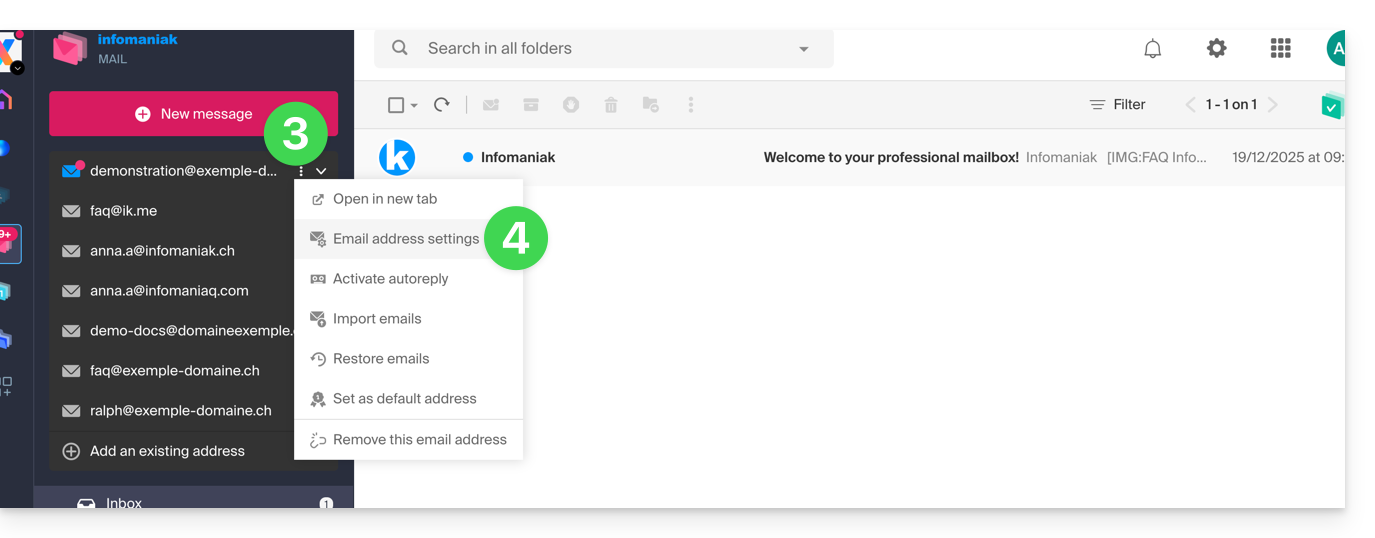
- If necessary, click on the chevron to the right of the email address currently visible on the Infomaniak Web Mail app.
- Click on the action menu ⋮ to the right of the email address you wish to configure.
- Click on Email address settings:
- Click on the action menu ⋮ located to the right of the user's name of the email address.
- Select ✎ Edit rights:
- Or click directly on the icons visible in the table:
Result for the user
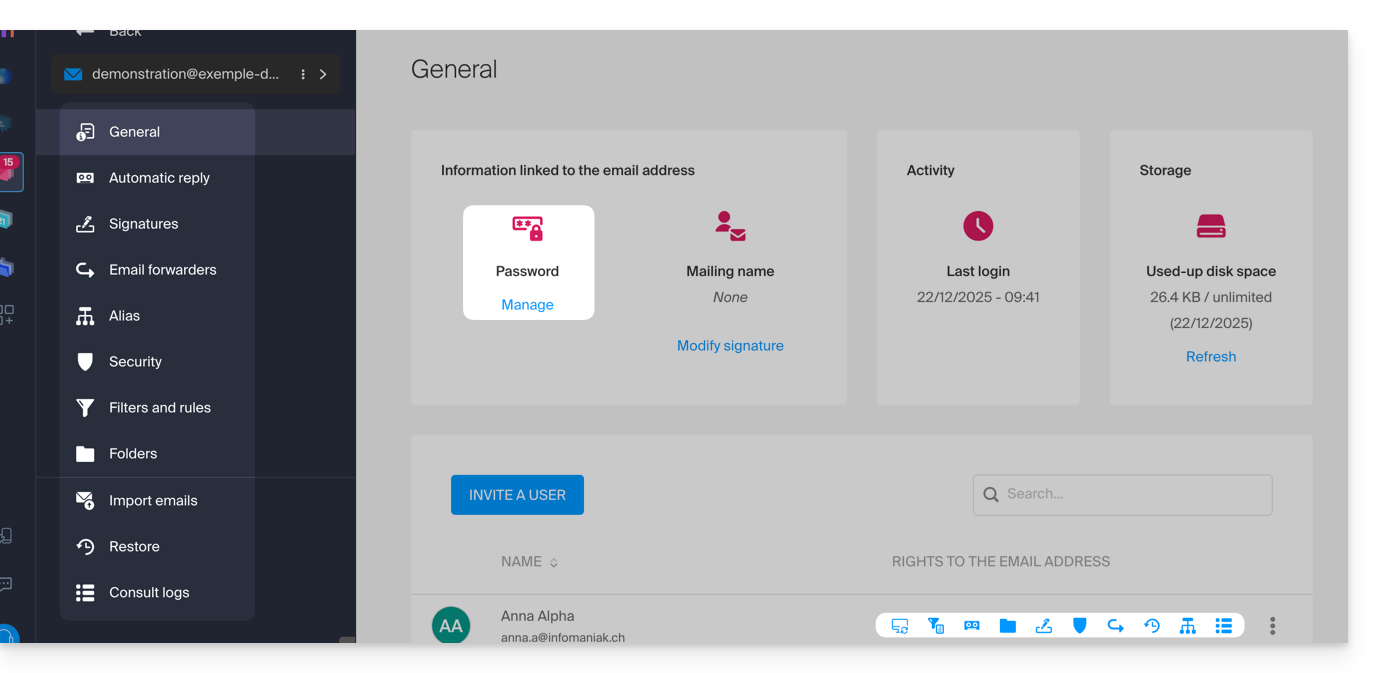
The user who has permissions removed will no longer see certain corresponding menus in their email address settings: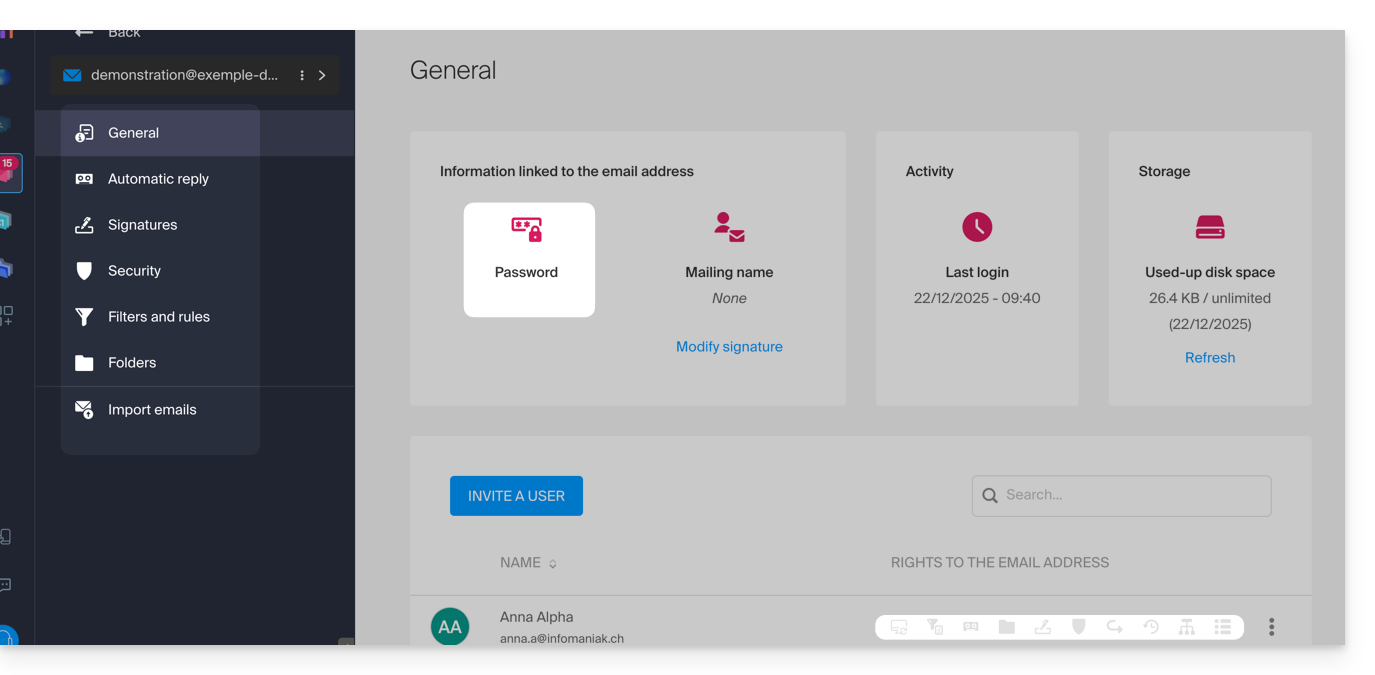
For some features, even if the menu is still accessible, it's the buttons that will be inoperative or grayed out: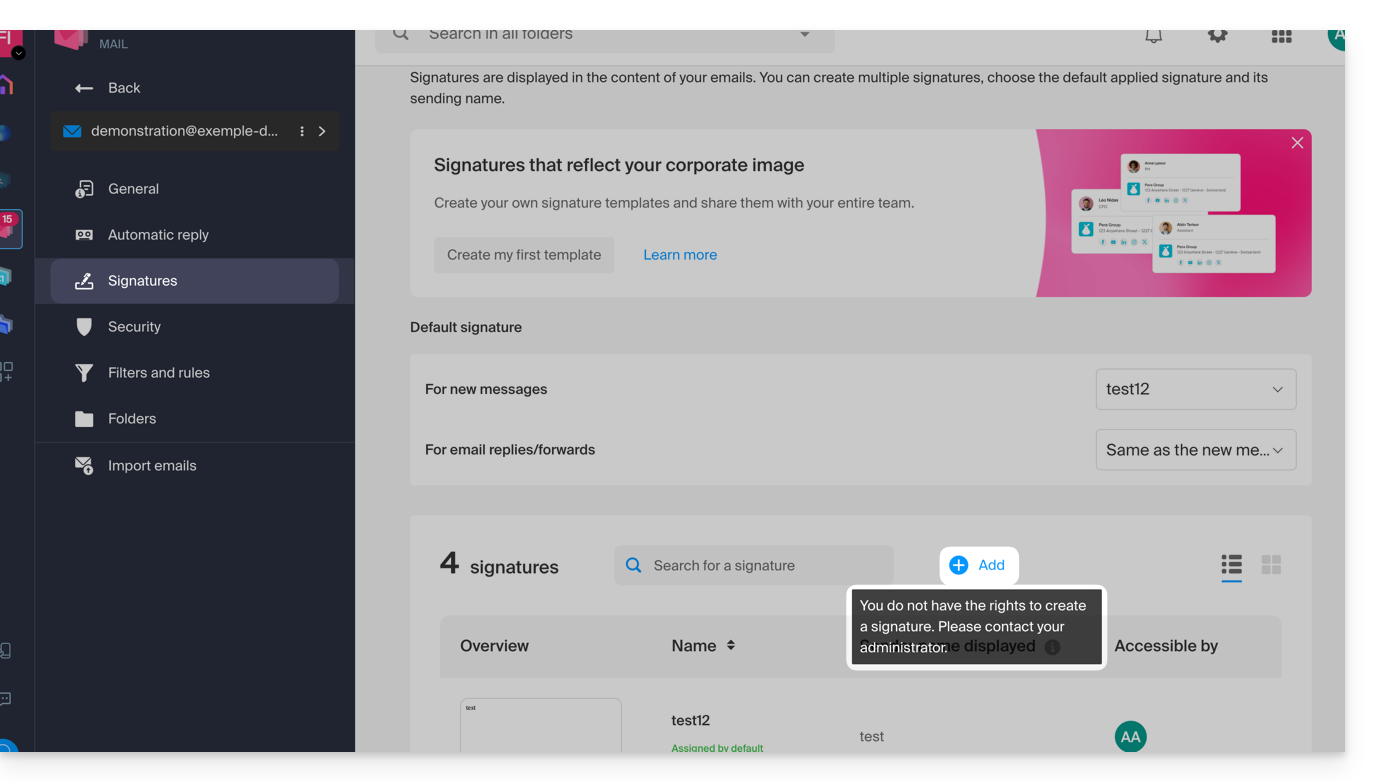
Global configuration
Set default parameters
To set the default rights that will be automatically selected when the “global configuration” is applied by the administrator:
- Click here to access the management of your product on the Infomaniak Manager (need help?).
- Click directly on the name assigned to the product concerned.
- Click on Global configuration in the left sidebar:
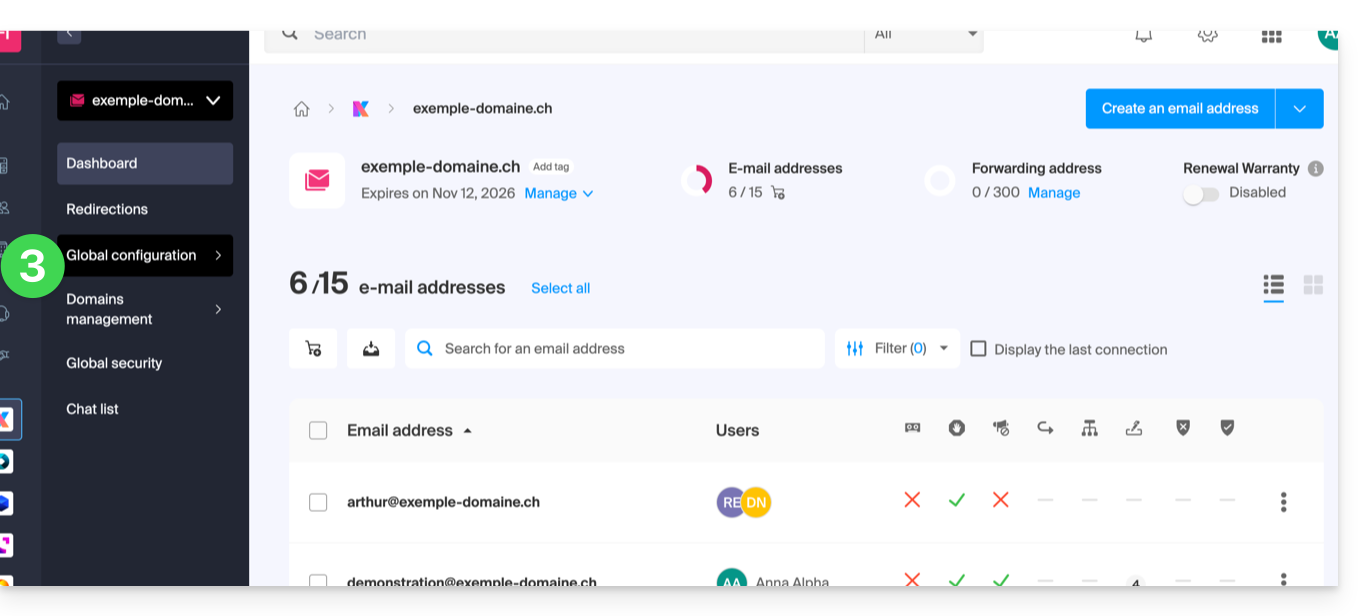
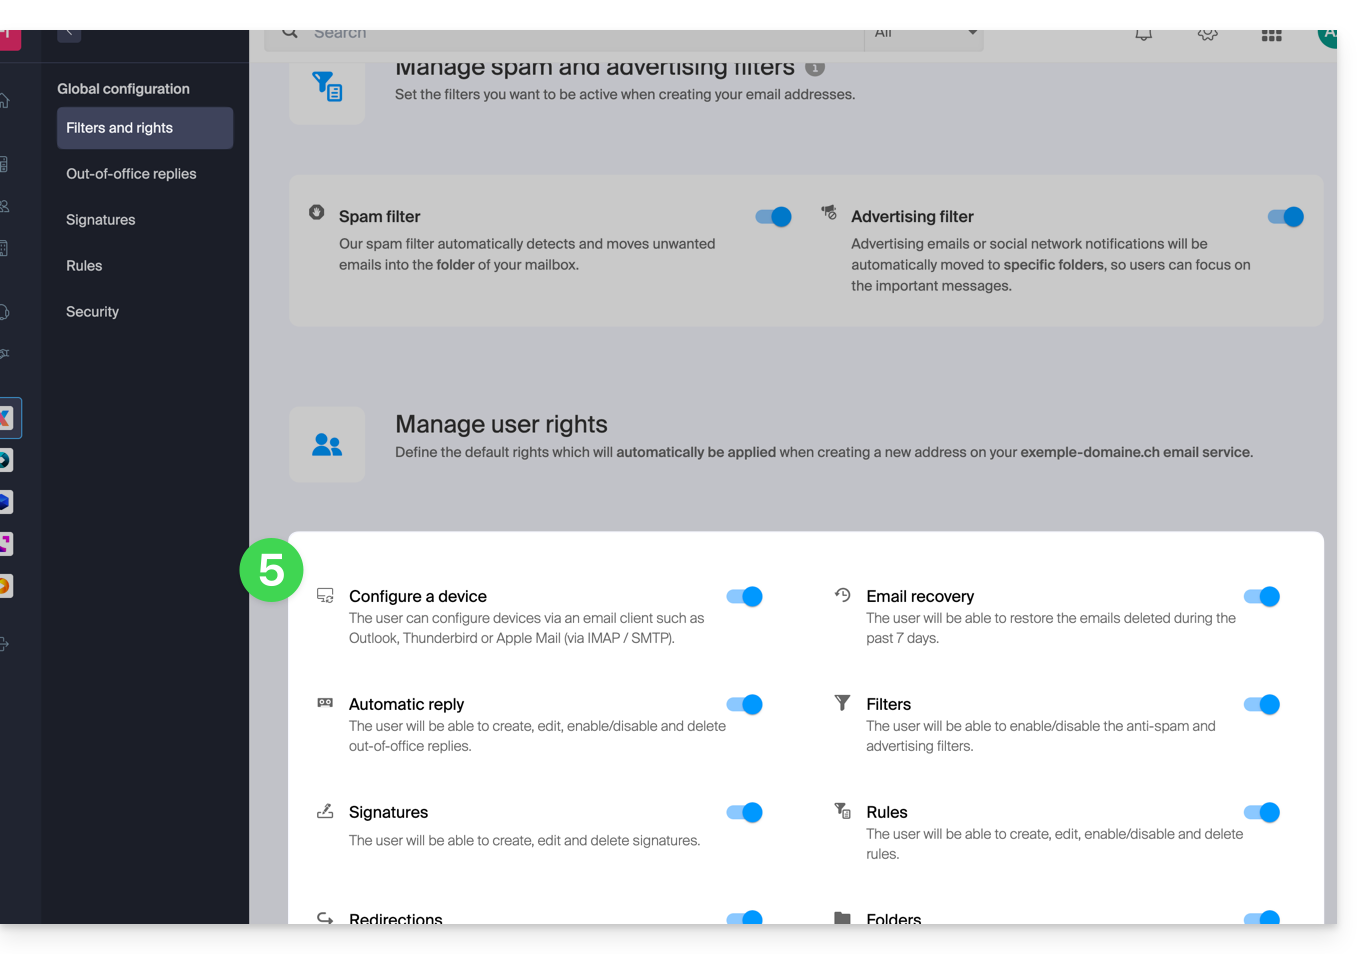
- Then click on Filters and permissions.
- At the bottom, enable or disable the rights to be granted during future email address creations:
Global configuration when creating an email address
If a new email address is created for one or more third-party users, the permissions defined in the Global configuration are automatically pre-selected during the assistant step: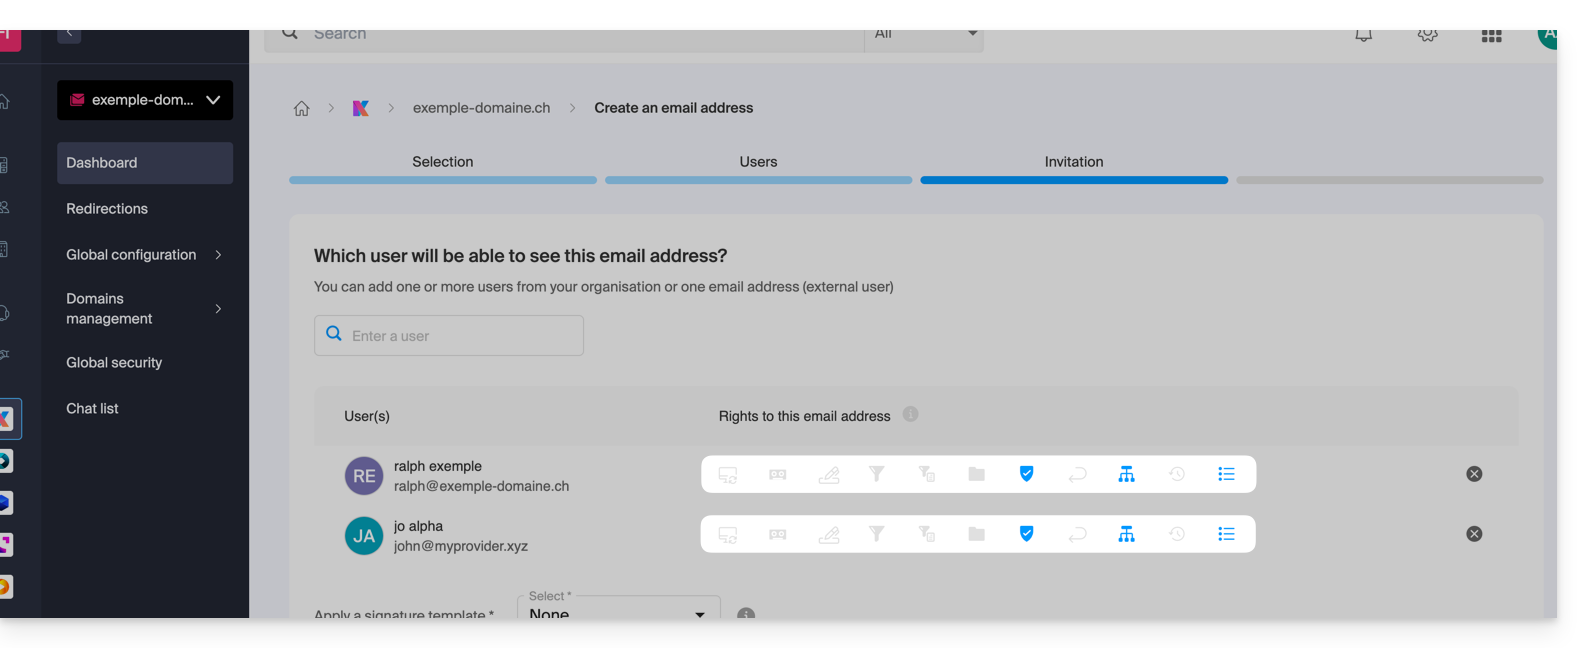
It is of course possible to modify the different permissions of the different users on a case-by-case basis.
Apply the global configuration to existing addresses
To apply this global configuration to the existing email addresses of a Mail Service (which will then apply to all users concerned, listed in the Users column):
- Click here to access the management of your product on the Infomaniak Manager (need help?).
- Click directly on the name assigned to the product concerned.
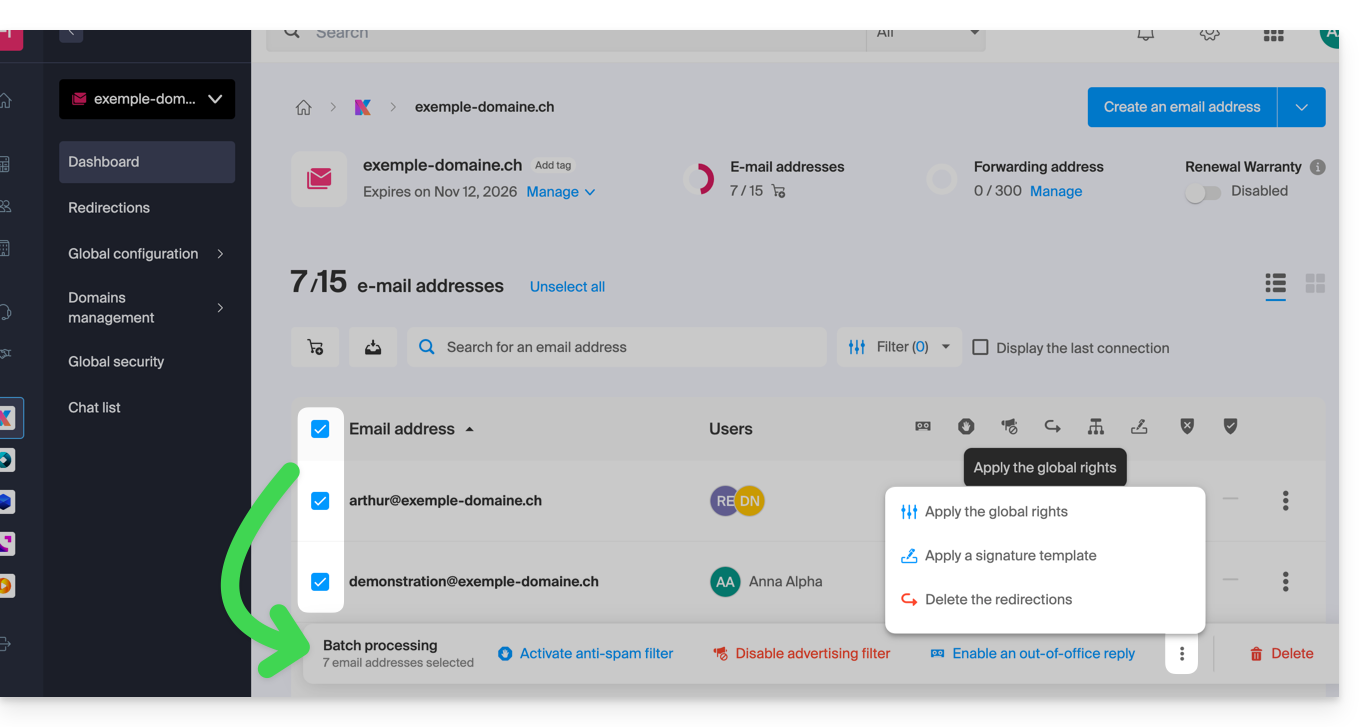
- Select the email addresses concerned by checking the boxes to the left of the line.
- Click on Apply the global configuration at the bottom of the screen (by first clicking on the action menu ⋮ if necessary):
Apply the global configuration when managing the permissions granted to a user
To apply this global configuration when you edit the rights of a user on an email address (refer to the chapter “Managing permissions granted to a user” at the top of this guide), click on the button dedicated to this use: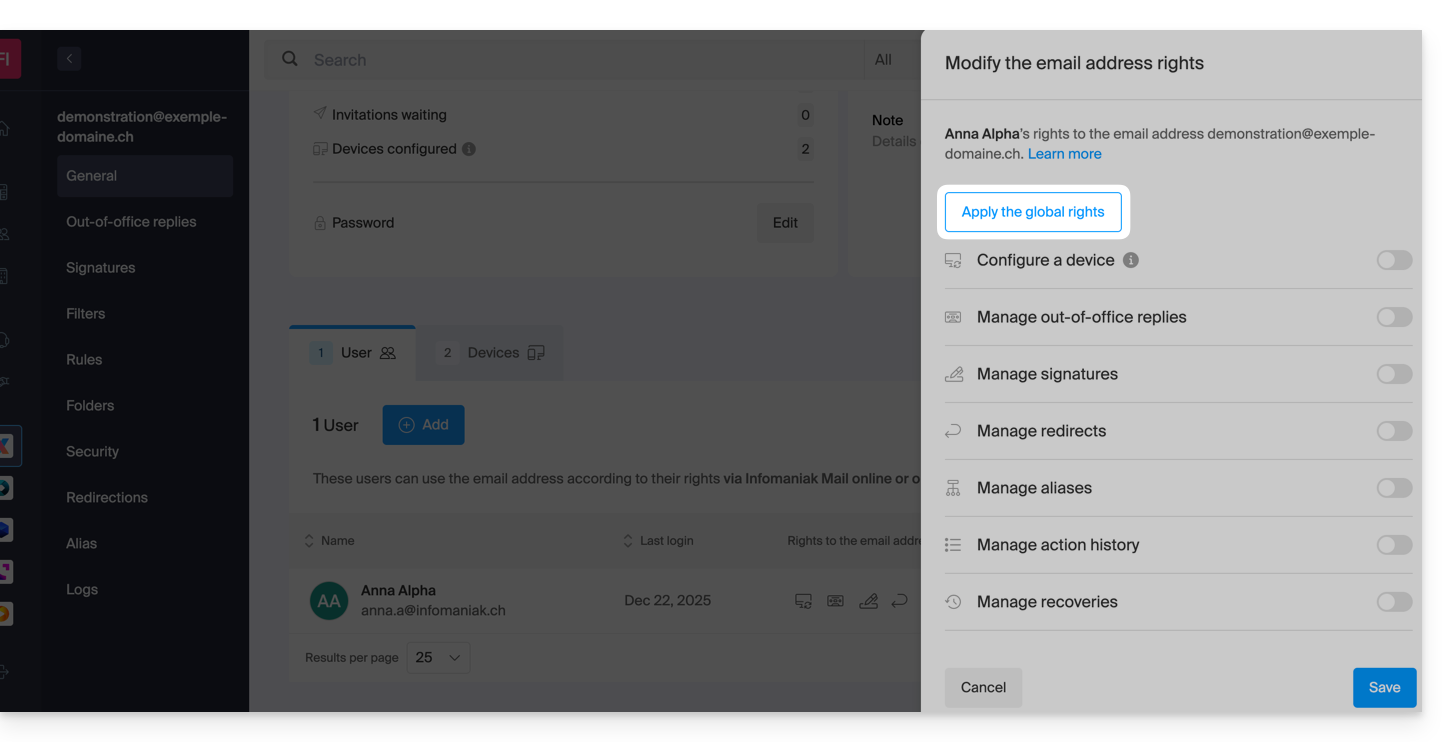
This guide covers kSuite and user management, as well as the different types of access.
Preamble
- Each kSuite offer includes 1 first user proposed at the time of subscription:
- offer Standard presented with 1 free user for life and additional paid users with reduced management; storage space (excluding mail volume since it is unlimited) is 15 GB per user
- offer Business presented with 1 paid user, with a storage space of 3 TB (3000 GB; excluding mail volume since it is unlimited) per user
- offer Enterprise presented with 1 paid user, with a storage space of 6 TB (6000 GB; excluding mail volume since it is unlimited) per user
- You can include up to 300 users per kSuite.
- Each user is entitled to their email address on the domain name around which your kSuite revolves, without any limit on mail storage volume. The email address quota will depend on the offer and the number of users:
- Standard: 1 user = 2 email addresses (2 = 4, etc.)
- Business: 1 user = 5 email addresses (2 = 10, etc.)
- Enterprise: 1 user = 10 email addresses (2 = 20, etc.)
- You can assign a kSuite email address to a user who is not part of kSuite.
- To obtain more email addresses, you must modify the offer to increase the number of users. Example:
- You order a Business kSuite with 5 users, you benefit from a quota of 5x5=25 email addresses in total in your kSuite, which you can use (for any use - the creation of an email address within the kSuite Mail Service is identical to that of a Mail Service outside kSuite).
Add a user to kSuite
Prerequisites
- The quota of users that can be added to kSuite must be sufficient; adjust the kSuite offer if necessary.
Then:
- Click here to access the management of your product on the Infomaniak Manager (need help?).
- Click on the action menu ⋮ in the Users section.
- Click on Add a user:

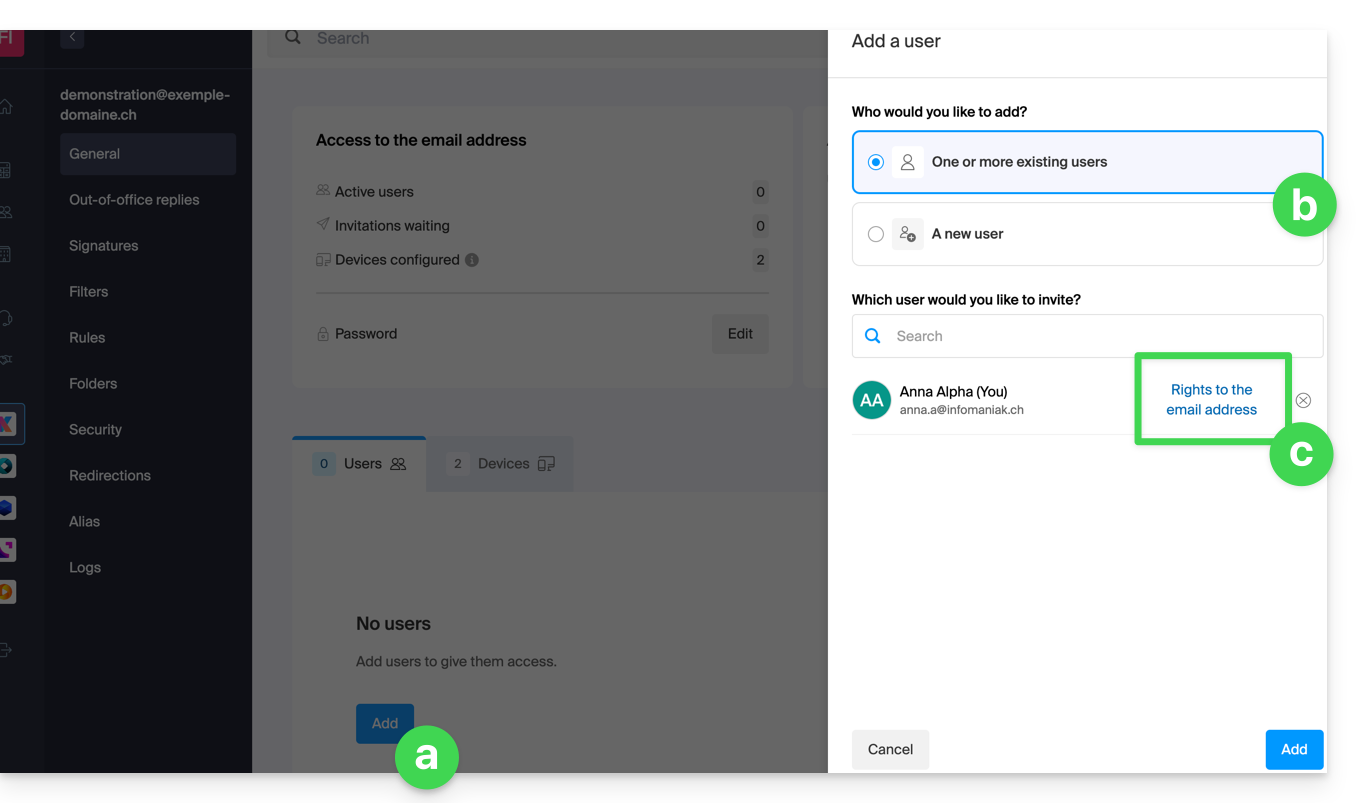
2 possibilities are offered:
a. Add a user who has no connection with the Organization on which kSuite is located
b. Add a user who is already part of the Organization on which kSuite is located
In both cases follow the assistant by carefully reading the instructions.
kChat and kDrive examples
Refer to this other guide to add an external user to the Organization so that they can use kChat and kDrive without visibility of the products themselves in the Manager directly.
Refer to this other guide for examples of adding a user to kDrive / kSuite.
It is not possible to add a user so that they only access kDrive or kChat separately. In this case, you should rather use, for example, the sharing functions so that third parties can join kDrive temporarily.
This guide explains how to transfer to Infomaniak a Gmail email address hosted by Google. Refer to this other guide if you are looking for information on importing custom domain addresses.
Preamble
- The operation does not affect either the data already present on the destination address or that of the source address.
- Any duplicates are managed: identical content will only be copied once.
- If necessary, local partners referenced by Infomaniak can handle these procedures: launch a free call for tenders; they take care of everything, freeing you from technical details.
Transferring emails from Gmail to Infomaniak
Prerequisites
- Have a Mail Service on your Infomaniak Manager.
- Have a quota of free addresses available or adjust it in advance if necessary.
- Ensure that the email is properly secured
a. Recreate the email address(es) on Infomaniak
If you have many (10+) email addresses to create, follow this procedure for bulk creation.
Access the Infomaniak Mail Service and create the email addresses:
- Click here to access the management of your product on the Infomaniak Manager (need help?).
- Click directly on the name assigned to the product concerned.
- Click the blue button Create an email address in the top right corner.
- Enter the address (what comes before the at sign @) for example contact or michelle.
- Click the blue Continue button.
- Select I will consult the email address alone.
- Click the blue Continue button.
- Enter a password.
- Click the blue Continue button.
- Click the blue Finish button.
- Restart at point 3 above to recreate all email addresses identically.
b. Import Gmail mail content to Infomaniak
Access the Infomaniak Mail Service and import your emails:
- Click here to access the management of your product on the Infomaniak Manager (need help?).
- Click directly on the name assigned to the product concerned.
- Click on the chevron in the right part of the blue Create an email address button.
- Click on Import emails (direct link).
- Click on Import my emails into a single email address.
- Enter the existing email address at Google.
- By specifying that your previous address is a @gmail.com address, the assistant will offer to connect to your Gmail account.
- Click on the "Sign in with Google" button that has appeared.
- Make sure you are logging into the Gmail account concerned by the email copy.
- Confirm that you authorize the Infomaniak tool to connect to your account (automatic procedure).
- Once the popup is validated, you will be able to choose which Infomaniak address to import your Gmail emails (if necessary, refer to this other guide from point 7).
Labels and data volume
The storage space displayed at Infomaniak may not correspond to the one indicated in Gmail, notably due to the different management of labels / tags.
Indeed, these, present in Gmail, will be converted into folders on the Infomaniak servers (same principle as when fetching mail with an IMAP email software/client like Thunderbird):
Therefore, an email labeled in several Gmail folders can be counted several times during the migration, which explains why an account displaying for example 6 GB in Gmail can occupy 18 GB once transferred to the Infomaniak servers.
Be patient when importing a large volume of emails; Gmail and Microsoft imports are intentionally slowed down (e.g., 1 GB/day bandwidth for Google) to avoid rejections from their side.
Adjust the application settings
As soon as you have taken the necessary steps to ensure that the domain name associated with your email works with Infomaniak, modify the settings of the email software/clients you use so that they connect correctly to the Infomaniak servers: follow the configuration assistant.
This guide explains how to change the color of events related to your calendars/agendas in the Infomaniak Web app Calendar (online service ksuite.infomaniak.com/calendar).
You can also globally customize the period displayed in these.
Set certain default settings
To do this:
- Click here to access the Infomaniak Web app Calendar (online service ksuite.infomaniak.com/calendar).
- Click on the Settings icon at the top right.
- Click on Customization.
- Refer to this other guide regarding the default calendar element.
- Settings such as the default event duration or the working hours to display on the calendar will notably help improve the use of the appointment scheduling assistant:

Set the color of a calendar/agenda
To do this:
- Click here to access the Infomaniak Web app Calendar (online service ksuite.infomaniak.com/calendar).
- Click on the action menu ⋮ to the right of the calendar in question.
- Click on Edit:

- The color choice will apply to these locations:

Set the color of an event
To do this:
- Click here to access the Infomaniak Web app Calendar (online service ksuite.infomaniak.com/calendar).
- Create an event and choose its color:

- The individual color choice will apply to these locations:

If the event is already created:
- Click on the event, then on the pencil icon ✎ to edit the details and notably its color:

Customize the displayed period
To do this:
- Click here to access the Infomaniak Web app Calendar (online service ksuite.infomaniak.com/calendar).
- Choose to display the agenda by: Day, Week, Month, Year, or in Schedule view

This guide allows you to quickly discover the essential functions of Euria, the artificial intelligence at your disposal within kSuite, particularly performant with the Web app kDrive Infomaniak (online service ksuite.infomaniak.com/kdrive).
⚠ Available with:
| kSuite | |
| Business | |
| Enterprise | |
| kDrive | |
Use AI for your files on kDrive
Prerequisites
- Be Administrator or Legal Representative within the Organization that manages the kDrive.
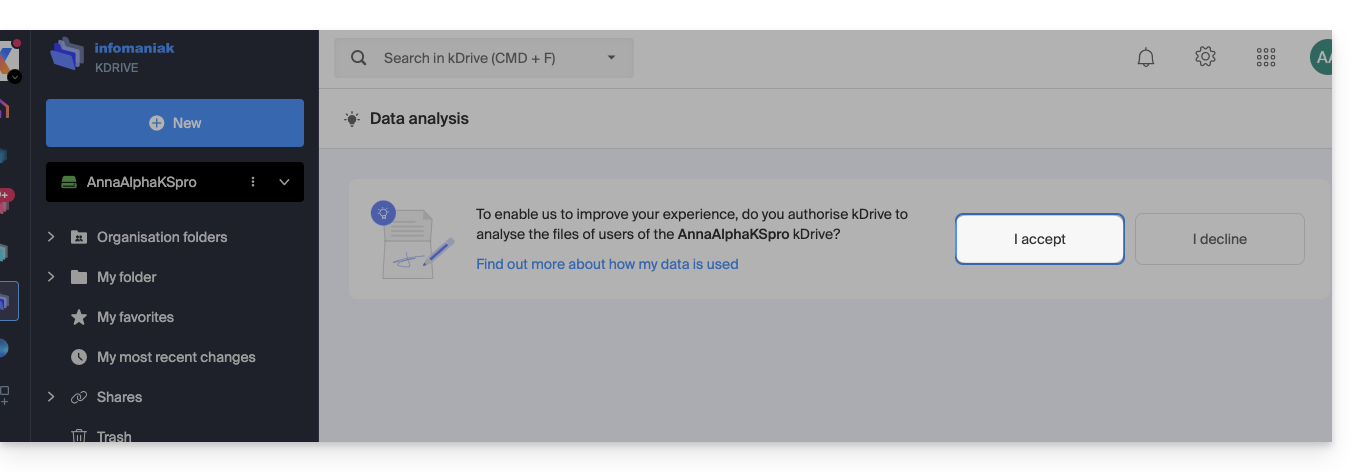
- To activate Euria for all users of your relevant kDrive, follow the assistant that opens when connecting to kDrive.
- Read and understand this other guide about the model used and the responsibilities of each.
- You can also activate (or deactivate) Euria by going to the unified settings:
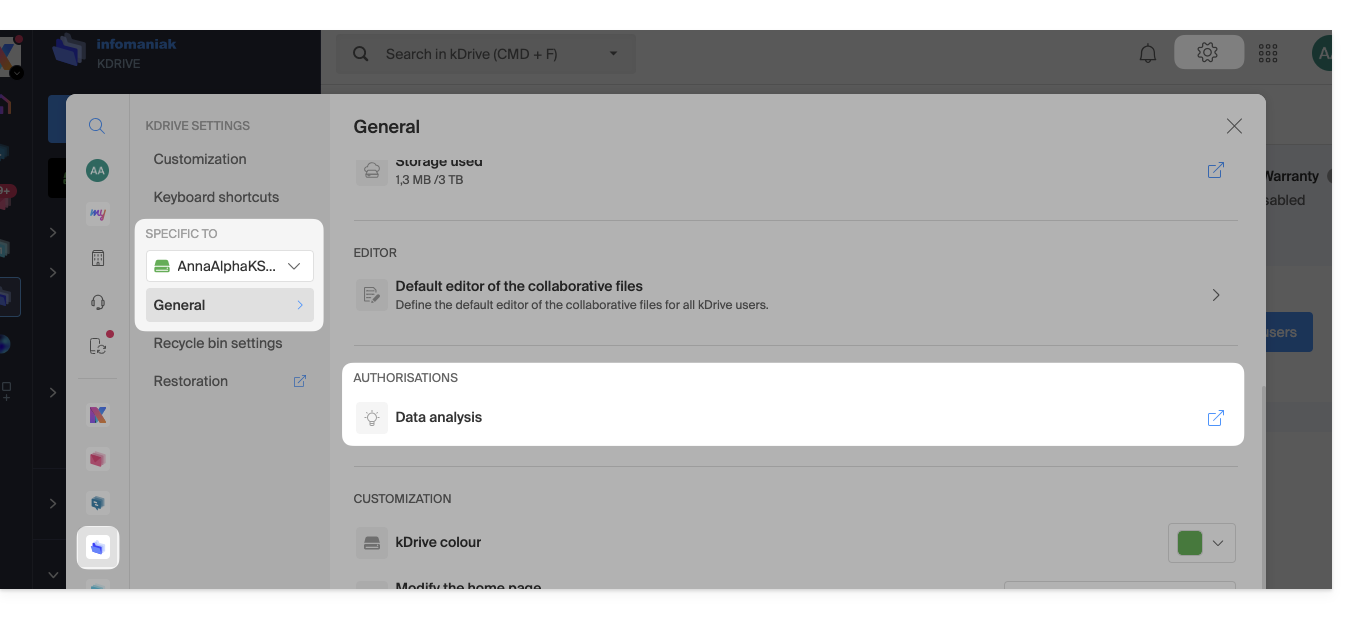
- It is then necessary to accept (or revoke) the content search features on documents:
To access Euria on kDrive:
- Click here to access the Web app kDrive Infomaniak (online service ksuite.infomaniak.com/kdrive).
- Open a PDF document (Euria is also available with other text/code file types:
.md,.txt,.json,.php, etc.) or right-click on the file in question: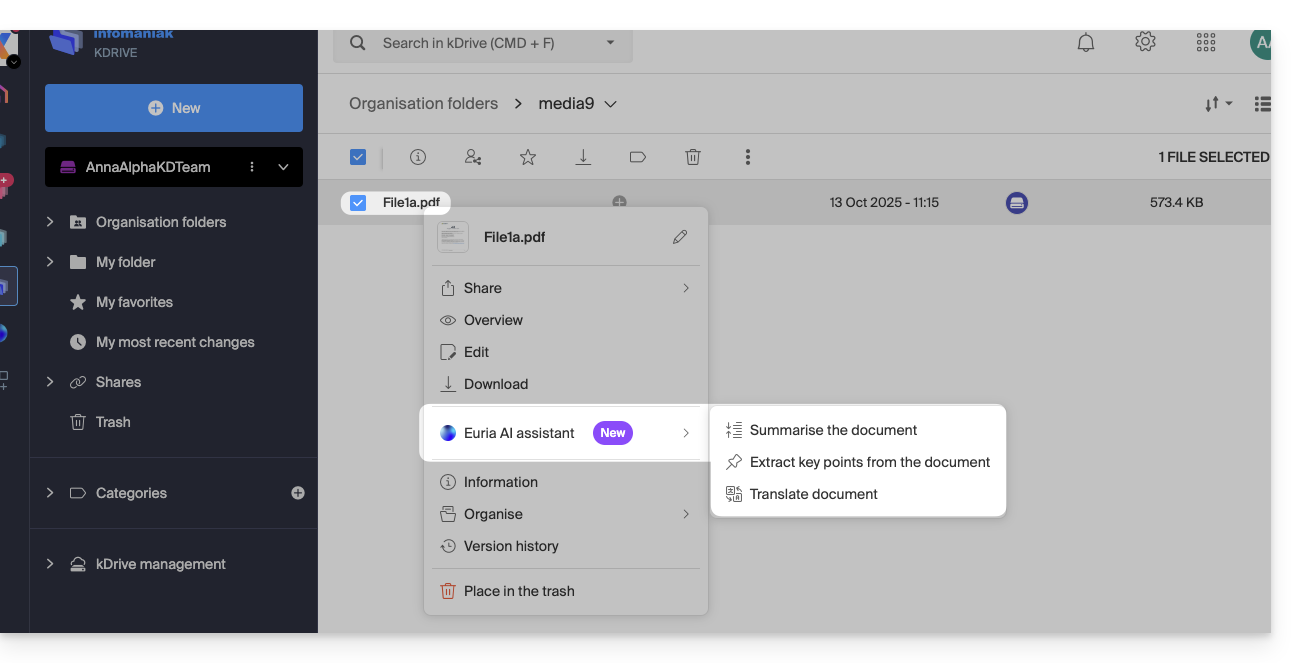
- Euria will open in a right sidebar; if you close it, Euria remains accessible via the round icon located at the top right:
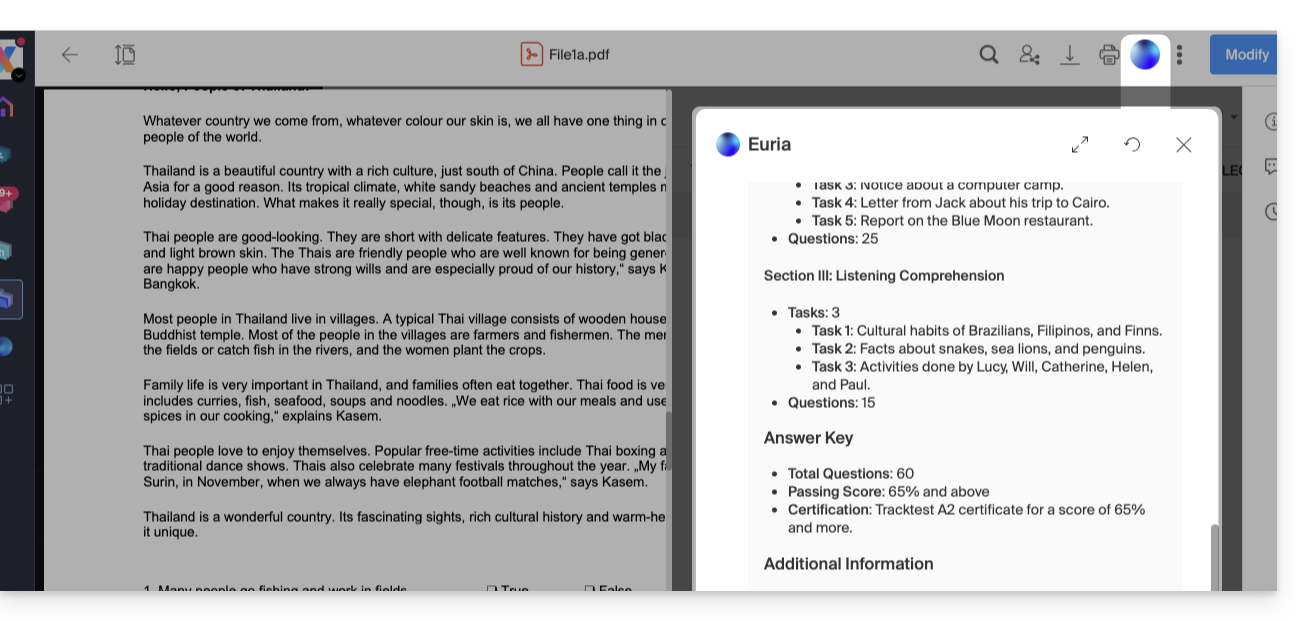
How can Euria help?
Euria helps you to effectively use the document you have opened (and only that one); it can notably:
- answer your questions about its content (details, statistics, changes)
- summarize the key points (or even simplify and even more if you specify “for a 10-year-old child”…)
- translate it
- provide metadata (size, creation or modification date)
- explain the terms or acronyms that appear in it
For example, if the document is a long company report on the past year, you can ask for the current size of the Development department, what the top-priority projects are, or the last date the document was modified…
Create an event for your agenda
With a document mentioning an appointment (medical, for example), you can ask Euria to create a piece of code that, once copied and pasted into an appropriate file, will allow you to add an event to your calendar. Example of phrasing: “Create an ics format event taking the details of this appointment”.
Euria can also extract events from a more complex document:
Euria will explain what it has done (a VCALENDAR code) and what you will need to do (create a new file with the .ics extension containing the code it has generated, and open it on your computer to import it into your usual agenda app or import it into your kSuite calendar):
Create a family tree of characters
With a book stored on your kDrive, you can ask Euria to create a precise and complete family tree to show the relationships between all the characters. You will thus obtain a list of names/first names with their relationships.
But you can take the experience further by then asking for a “Mermaid” diagram based on this list. You will just need to copy and paste the code proposed by Euria into a tool like mermaid.live:
Analyze a survey, write a blog article
From a survey/report-type document, you can ask Euria to write a new article in the tone you want and addressed to the desired target. Example: “From all this, write a blog article with a catchy title and a text of max 400 words, for a target audience of women aged 30 to 40”.
But you can also ask it to find “what are the biases of this survey” or “which elements would deserve to be deepened or verified”. Euria can thus help you to adopt a critical stance towards a survey or a report, by pointing out potential gaps, exaggerations or biases.
It can also rephrase the conclusions of the survey for different audiences (professionals, teenagers, curious readers…), suggest alternative angles for a derived article, or even generate titles, introductions or summaries according to the desired level of complexity.
The goal is to extract as much editorial value as possible from the same source content, by diversifying the forms, tones and viewpoints.
This guide explains how to share contacts with other users from address books in the Infomaniak Web app Contacts (online service ksuite.infomaniak.com/contacts).
Share an address book
To share contacts:
- Click here to access the Infomaniak Web app Contacts (online service ksuite.infomaniak.com/contacts).
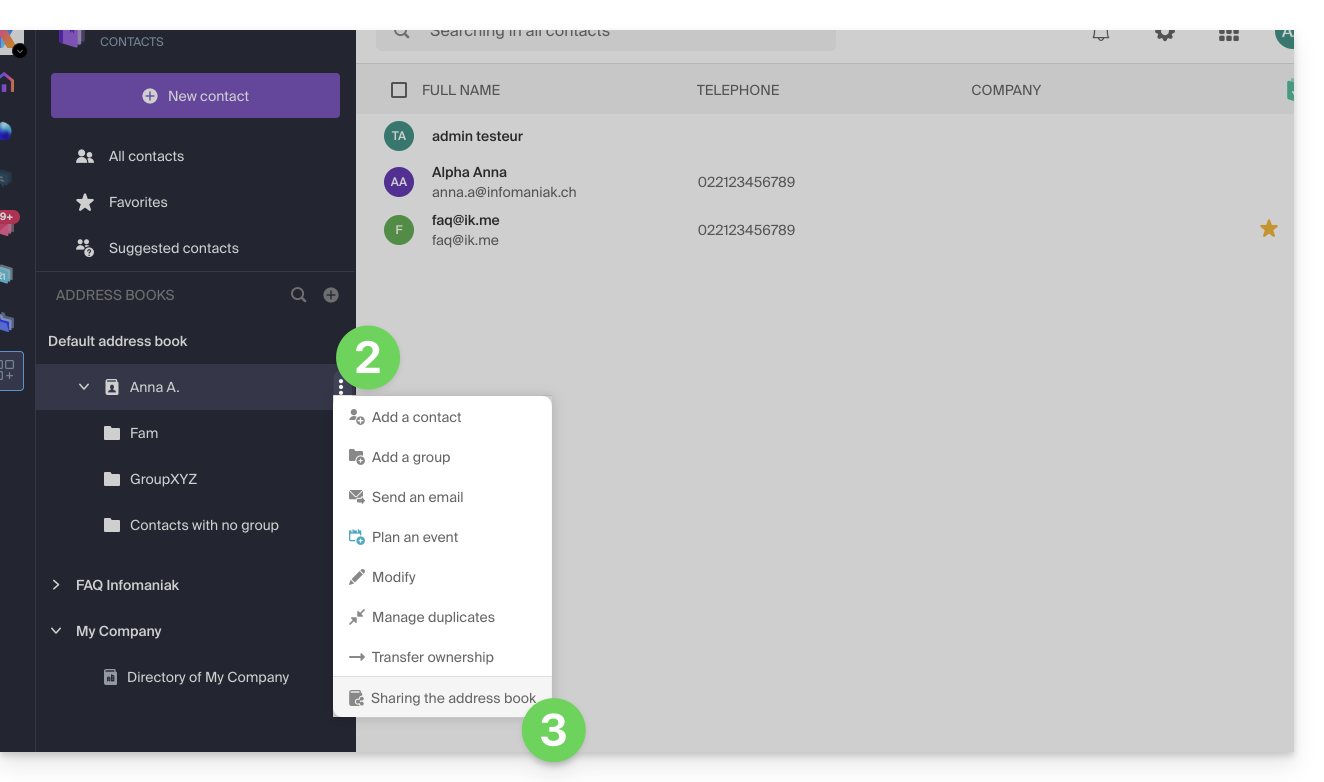
- Click on the action menu ⋮ to the right of an address book (above any groups, which cannot be shared specifically but will be visible when the share is accepted).
- Click on Share:
- If there is already a share in progress and you want to start another, click on Share at the top, otherwise click on the Share button below.
- Enter the email address of the user who will access the address book:
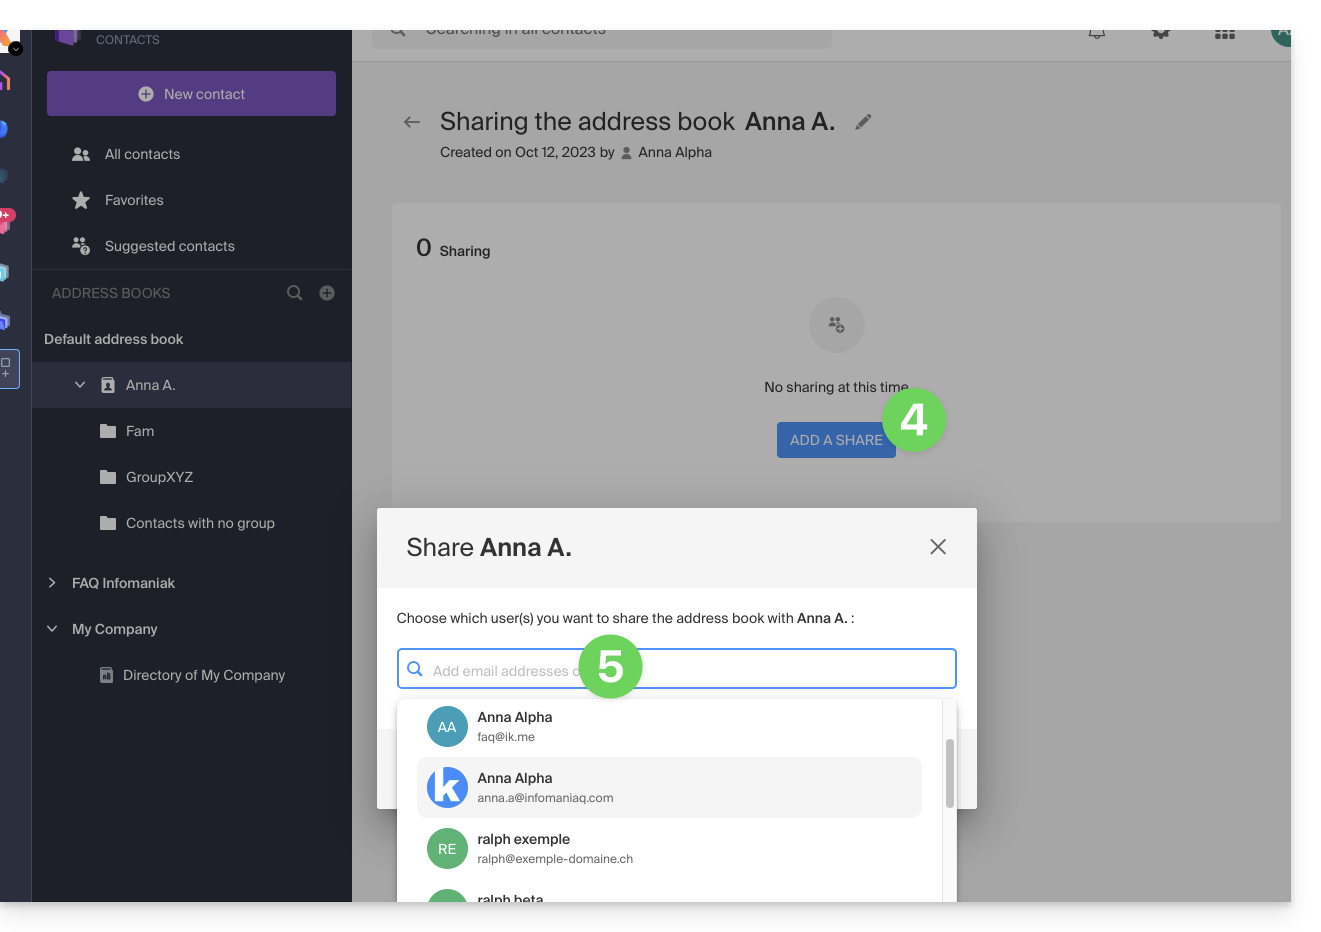
- If the user does not already have one, they can create one for free.
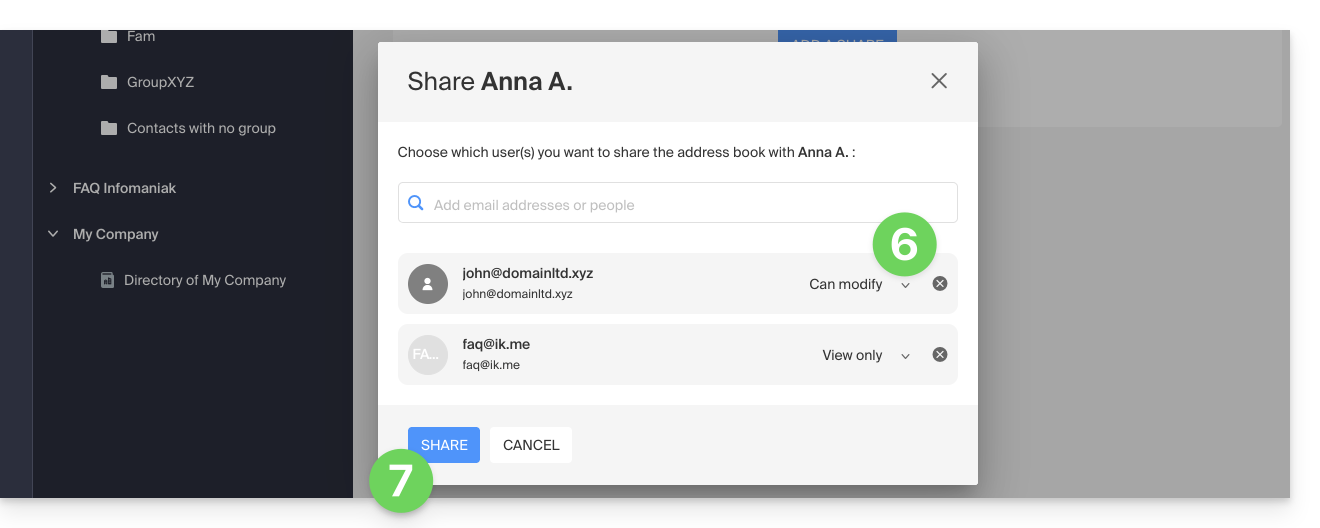
- Specify the user's rights on this address book (Administration, Read only, Read and write).
- Finish by clicking on the share button:
Contacts created or moved/copied to this address book in the future will be visible dynamically to all users with access to the share.
Accept the share
The invited user must accept the share to access the shared data (group names are already visible before acceptance) which will be in a section “Other address books”: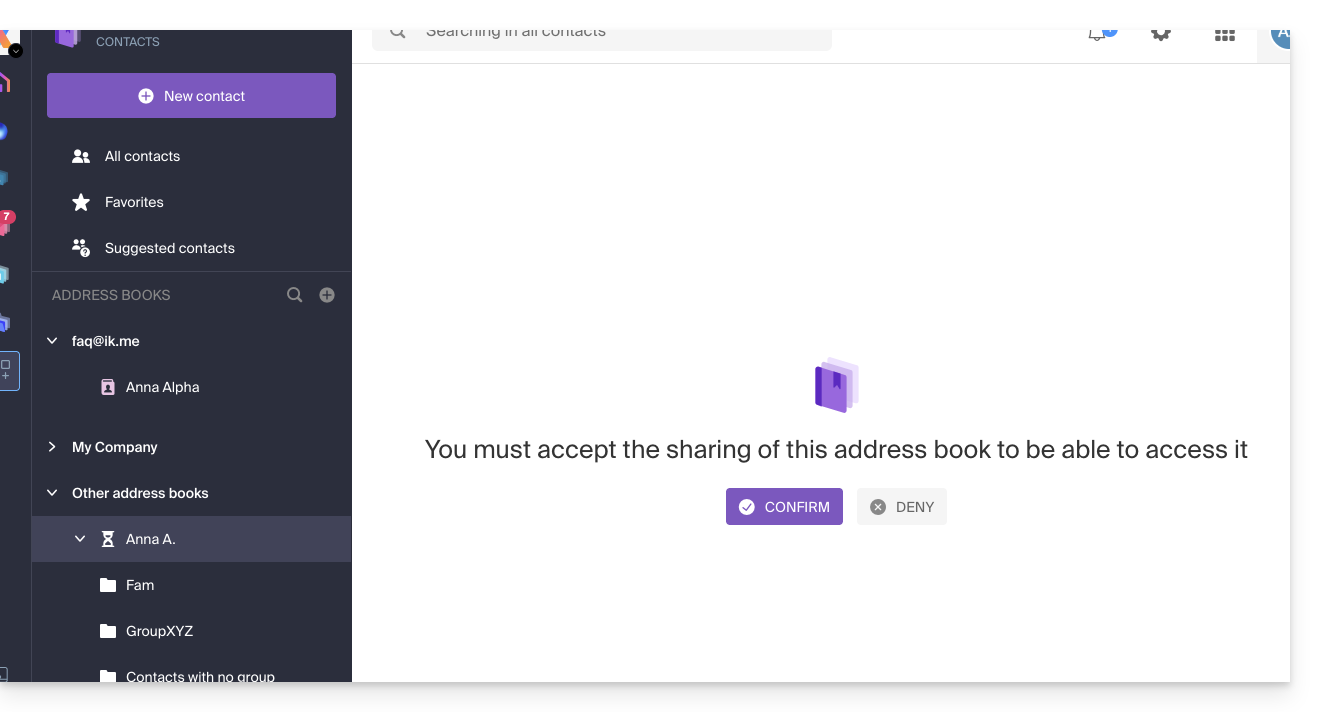
Depending on their permissions, they can perform certain operations on the contacts or simply view them, including when composing a new email:
Leave a share already accepted
A user can leave a share from the action menu ⋮ to the right of the shared address book: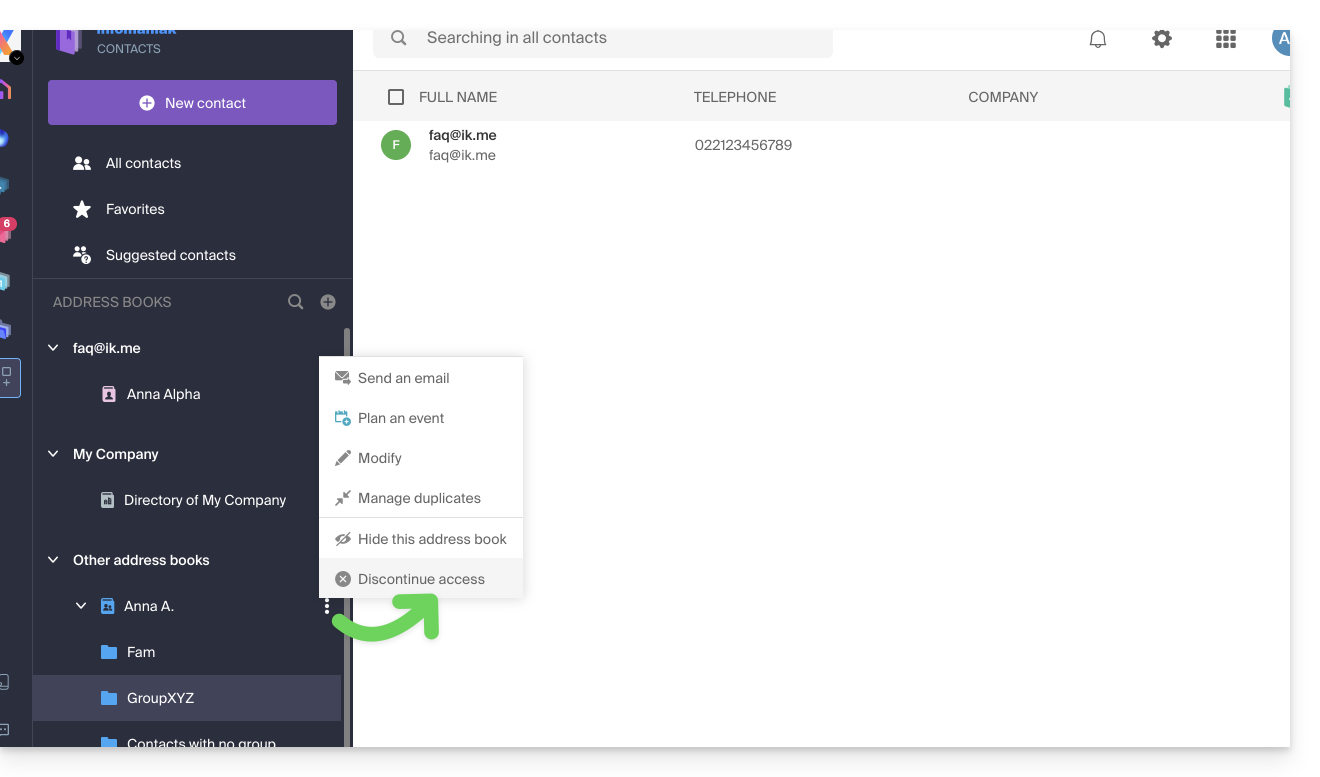
This guide explains how to restore accidentally deleted contacts on the address books of the Web app Contacts Infomaniak (online service ksuite.infomaniak.com/contacts).
Backup retention period
Once a full backup of your address book has been made, Infomaniak makes it available to you for a certain number of days depending on your offer.
⚠ Retention period in days:
| kSuite | Free | 0 |
| Standard | 30 | |
| Business | 30 | |
| Enterprise | 30 | |
| my kSuite | 0 | |
| my kSuite+ | 30 | |
| Mail Service | Starter 1 max. address | 0 |
| Premium 5 min. addresses | 30 |
By upgrading a free offer, it will be possible to recover the backup for up to 30 days.
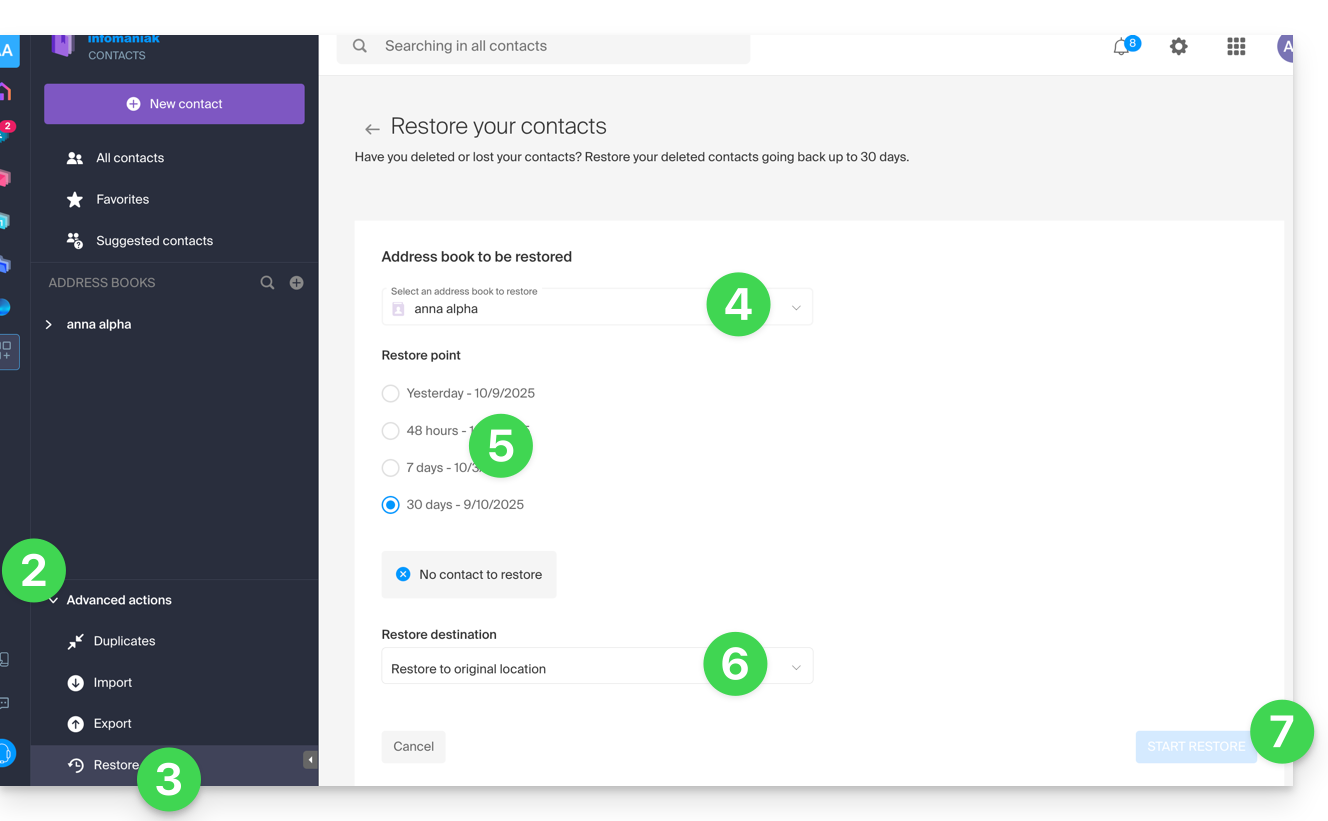
Contact restoration
It is possible to recover deleted contacts from the last 24 hours, 48 hours, 7 days or 30 days:
- Click here to access the Web app Contacts Infomaniak (online service ksuite.infomaniak.com/contacts).
- Click on the chevron to expand the Advanced Actions section.
- Click on Restore.
- Select the address book to restore.
- Select the version from yesterday, 48 hours or 7 and 30 days ago.
- Select the destination (in the original location or in another address book if available).
- Start the restoration using the button at the bottom of the page that activates if contacts can be restored:
This guide explains how to upgrade your my kSuite offer and switch to a paid offer my kSuite+ to, for example, increase your maximum storage size. You will keep the email address created when you subscribed to the free offer.
Preamble
- To help you identify the most suitable my kSuite / kSuite offer for your needs, refer to this other guide.
- Refer to this other guide regarding the limitations specific to the my kSuite offer and the advantages of the my kSuite+ offer.
Switch to my kSuite+
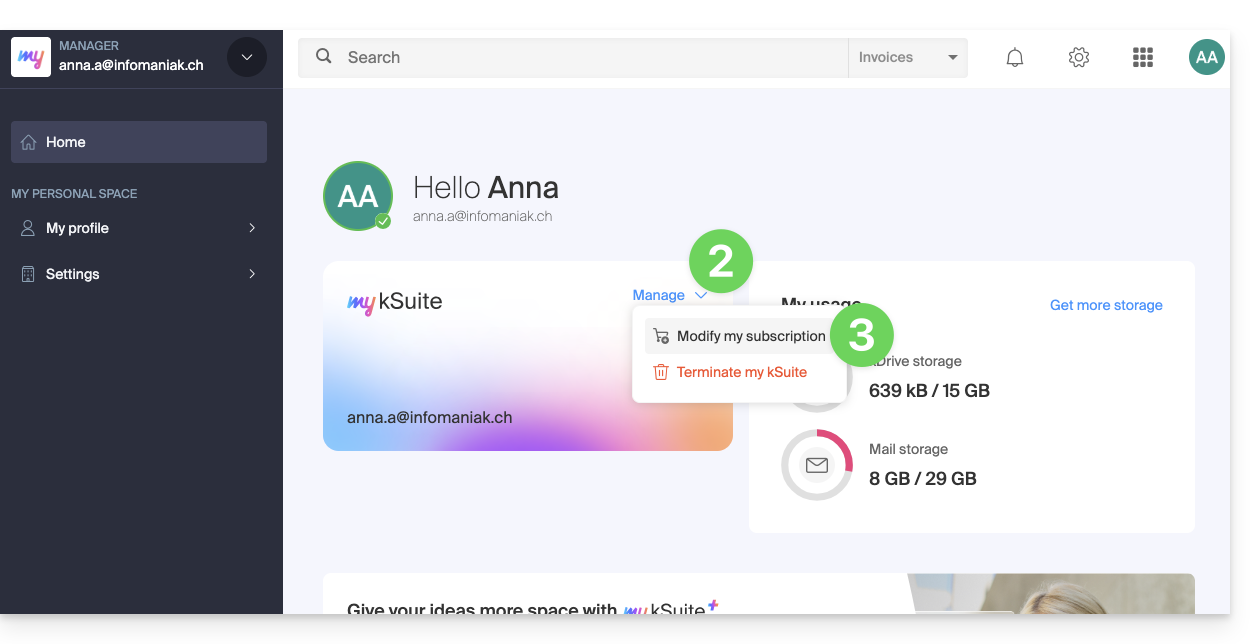
To access your current my kSuite offer and switch to a higher offer:
- Click here to access the Manager of your my kSuite offer.
- Click on the chevron to the right of Manage.
- Choose Modify my offer to convert the free offer to a paid and more comprehensive offer:
Order a new kDrive
There is no limit to the number of kDrive (paid) you can add to your Infomaniak account. Order a new kDrive if necessary.
This guide details how the storage of data from your various kSuite products works.
Preamble
- The space used for data storage is:
- shared among the different users of your kSuite,
- and shared with certain products that make it up (kDrive and kChat for example).
- The total amount of storage space available depends on your subscription and the number of users chosen:
- It corresponds to the maximum amount of storage space that can be used by all of your users.
- There is no quota per user.
Data from the Mail Service is not counted in the kSuite storage.
Increase or decrease kSuite storage space
Do you need more space to store your kSuite data?
- Modify the offer and add users or switch to a higher offer including more users.
- The more users included in your offer, the more storage space will increase.
You can also recover storage space by permanently deleting files from kDrive or kChat.
It is not possible to:
- reduce the storage space,
- go below a certain number of kSuite users depending on the available and already used storage.