Knowledge base
1000 FAQs, 500 tutorials and explanatory videos. Here, there are only solutions!
This guide explains how to transfer an Infomaniak product from one Organization to another.
Preamble
- You can move almost all products subscribed with Infomaniak to a different Infomaniak Manager interface than the one on which the product is currently located; this is therefore an internal transfer.
- If your user has access to multiple Organizations it is even easier to send to one of them the product of your choice.
- This operation does not cause any interruption.
- The users currently having access to the selected products will not be transferred (and therefore may no longer have access to the products).
- The invoices of the selected products will not be transferred.
- my kSuite cannot be transferred.
Generate a transfer link
Prerequisites
- Be Administrator or Legal Representative within the Organization.
To transfer a product:
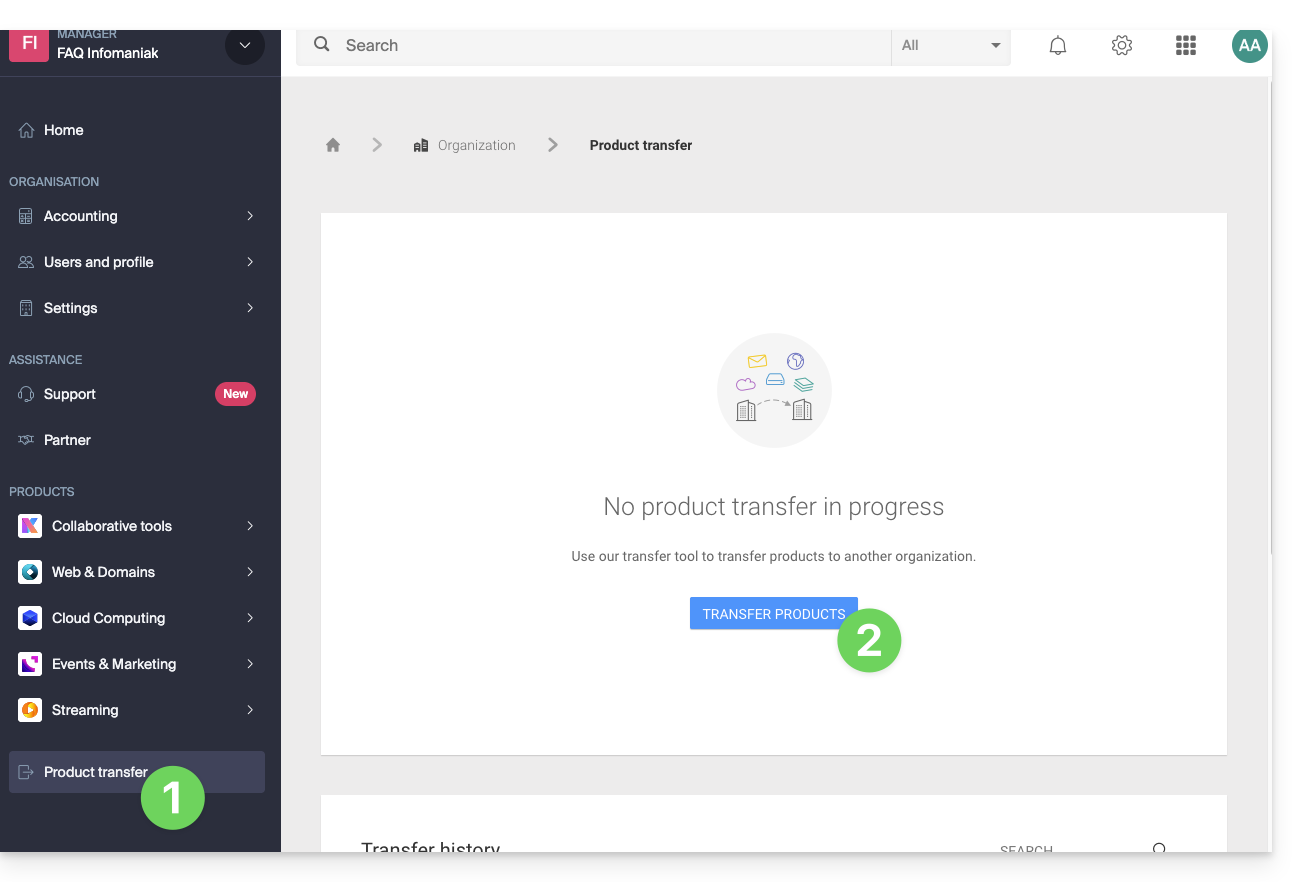
- Click here to access the product transfer management on the Infomaniak Manager (need help?).
- Click on the Transfer products button:
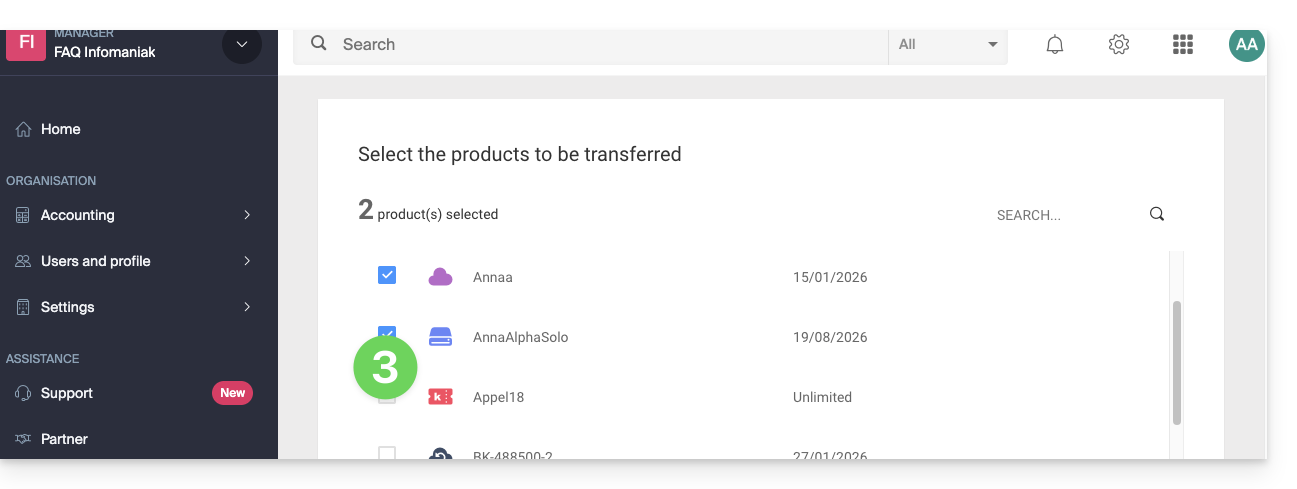
- Check the product(s) to be moved:
- Read and accept the general conditions.
- Click on the Transfer button:

- Read and validate any warnings:
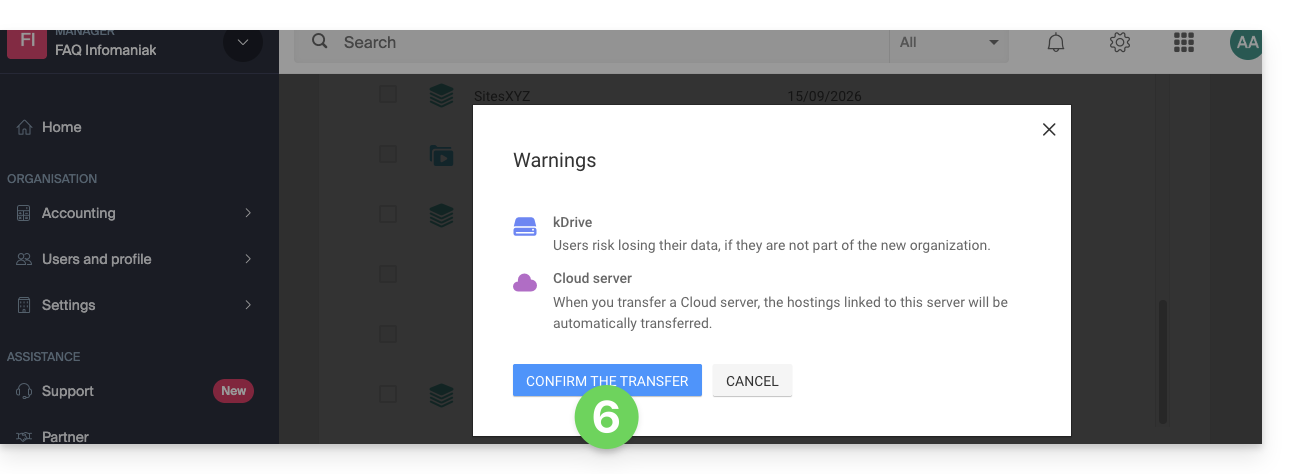
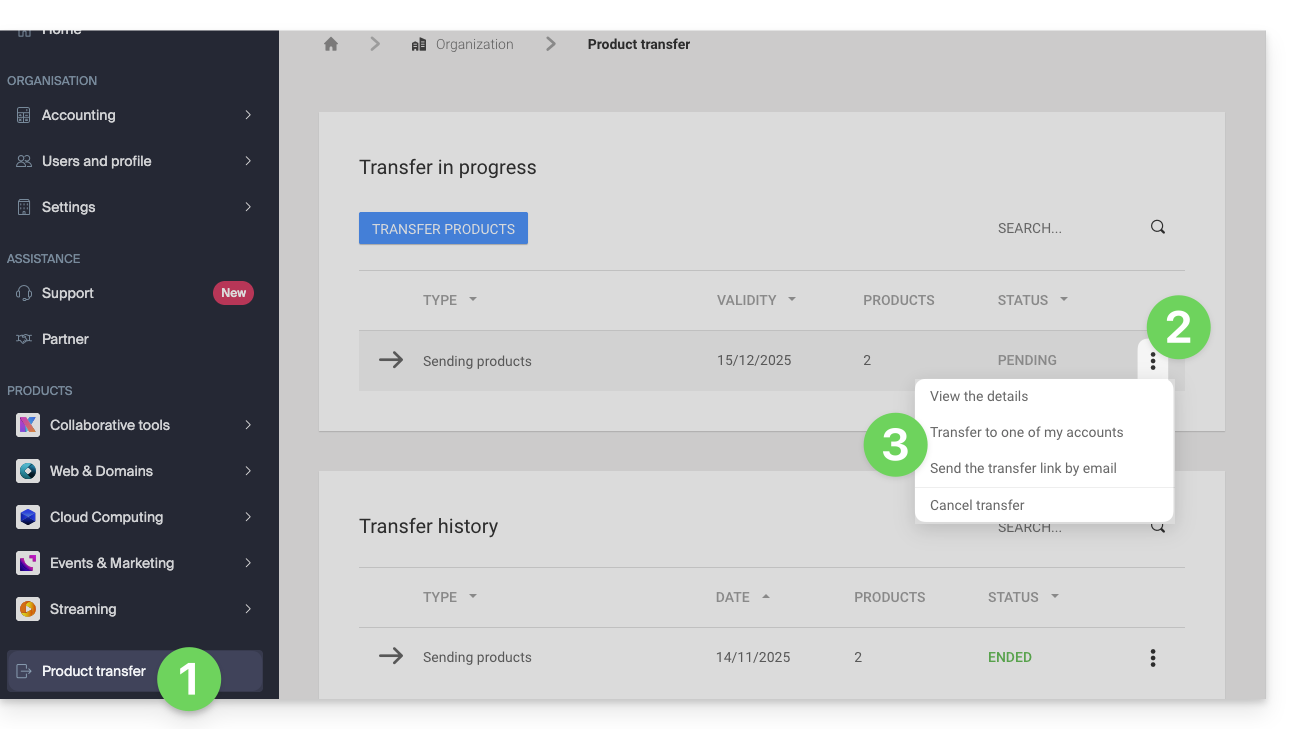
The transfer has started. Now, at your choice, you can:
- Copy the transfer link…
- or send it to the email address of your choice…
- or select directly one of the Organizations to which your user is attached, and the selected product will be transferred there:
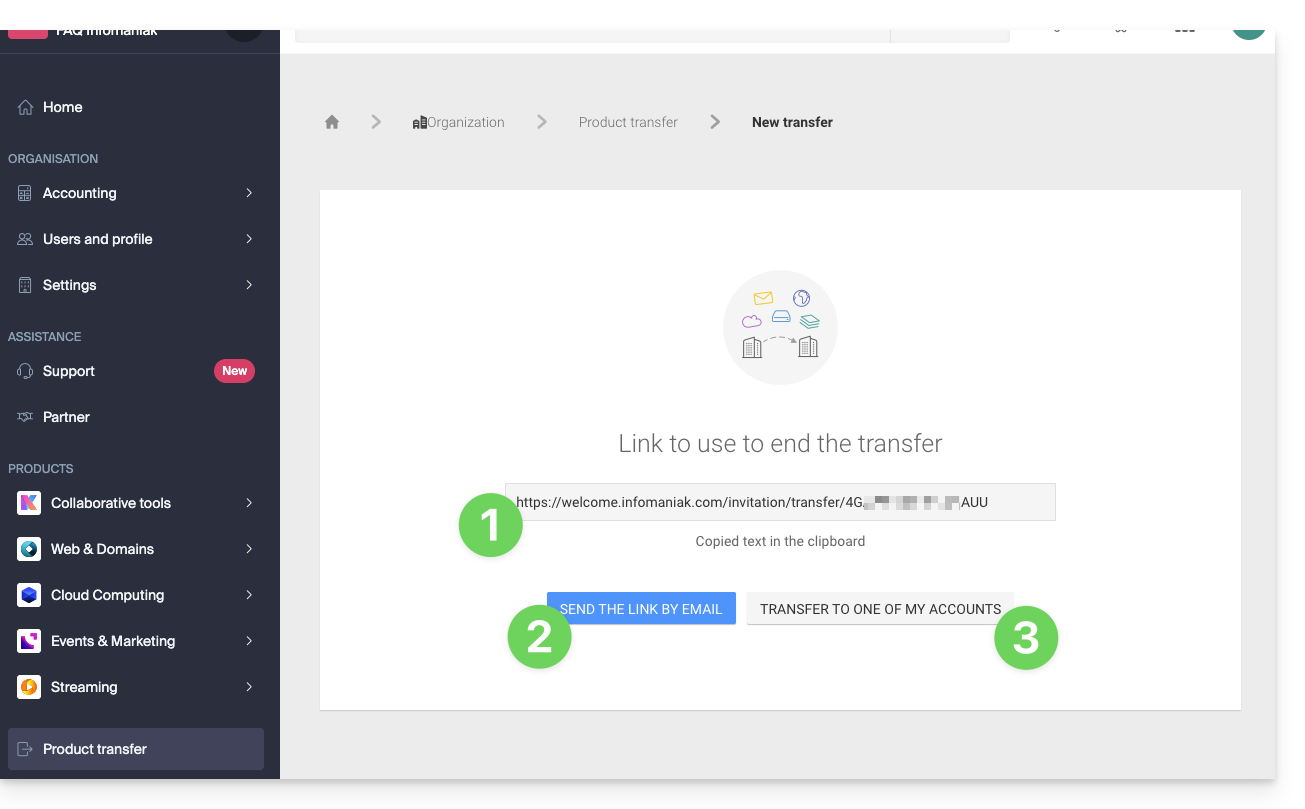
At any time, you can return to the product transfer page to find the possibilities listed above:
Alternative method
In the case of one-time transfer, you can also go directly to the dashboard of the product concerned and click on Manage (example in the image below) however, since this menu is not always present, it is better to prioritize the first method above, which also allows bulk transfer: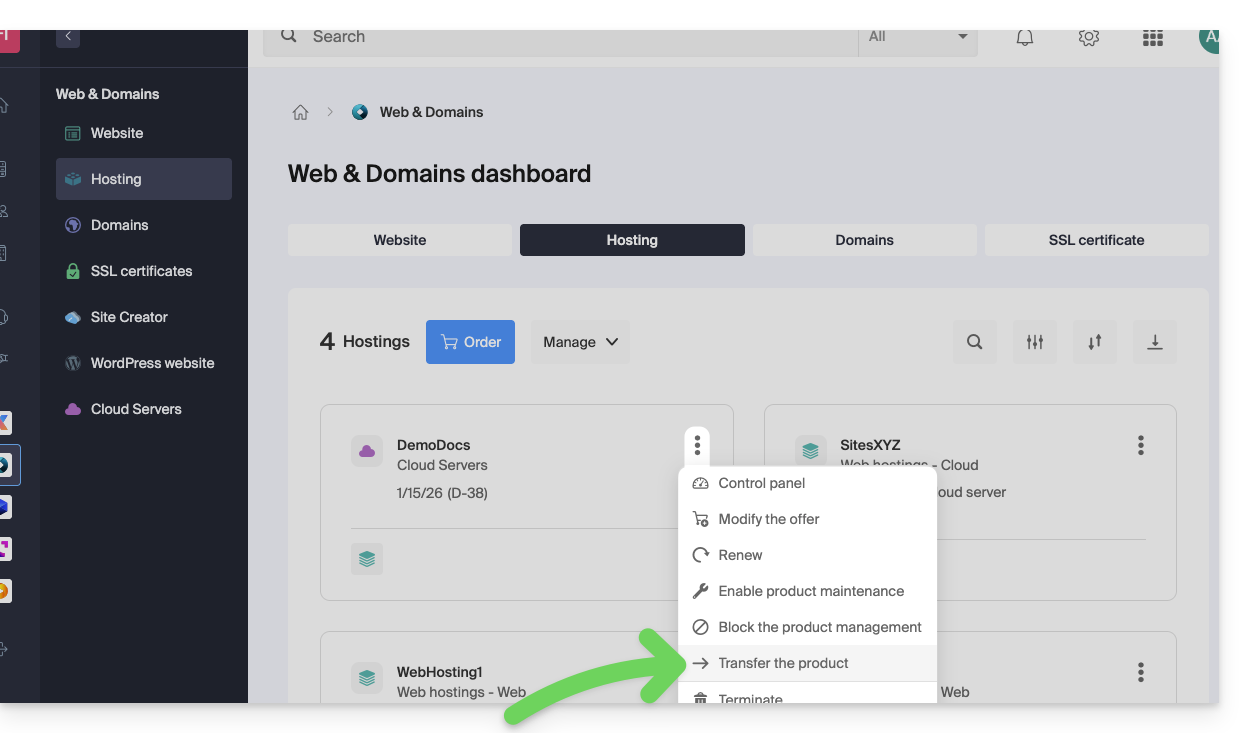
Refer to this other guide regarding Jelastic Cloud.
Receive the product
Once a product transfer is initiated by a user…
1. Be on the Organization that should receive the product
- Click here to log in to the Manager on the Organization that should receive the product(s).
- The user specified when logging in to the Infomaniak account must have administrative rights.
- If necessary, you can create a new Organization to receive products.
2. Execute the obtained link
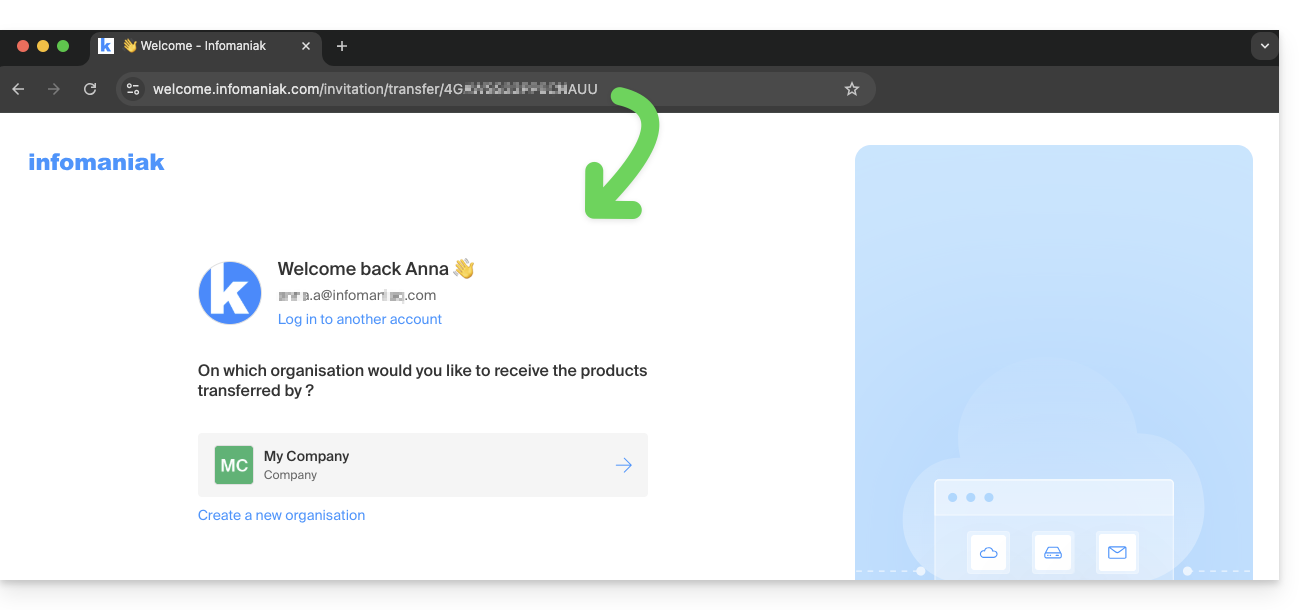
- Click on the link obtained in the first step above.
- You can also simply paste it into a browser while logged in to the appropriate Infomaniak account.
3. Validate the product transfer
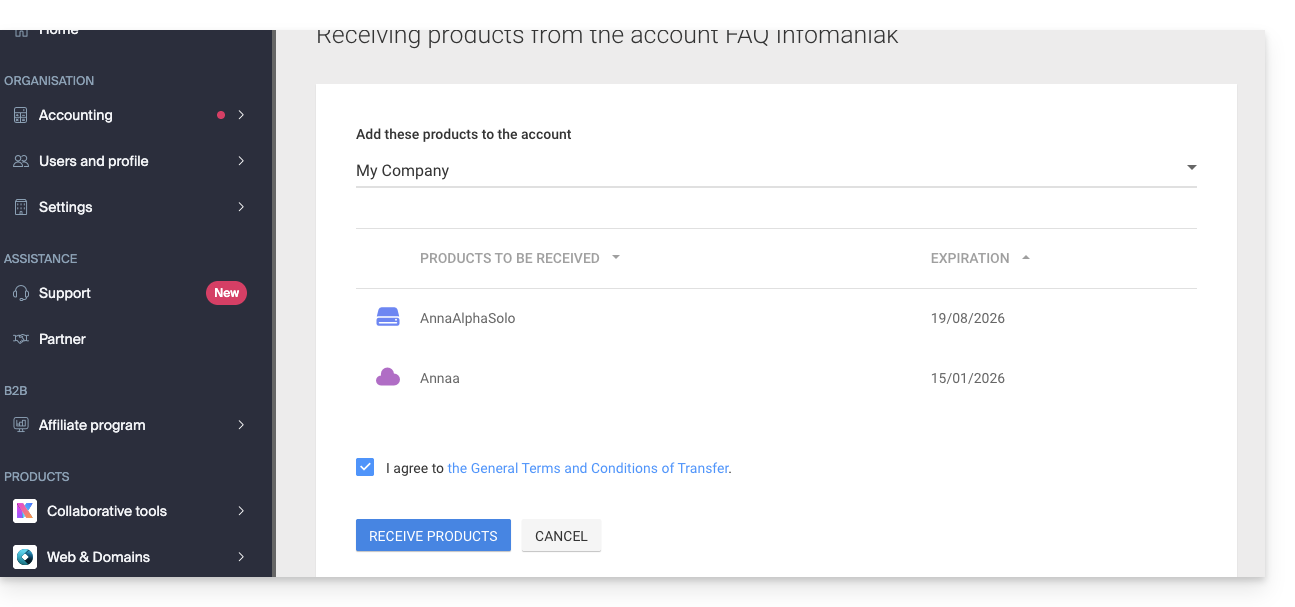
- If necessary, choose the destination Organization using the drop-down menu.
- Read and accept the general conditions.
- Click the Receive the product button (if the button is not clickable, make sure you have selected the Organization).
Find the ongoing or completed transfers at any time from the bottom icon on the left sidebar of the Infomaniak Manager: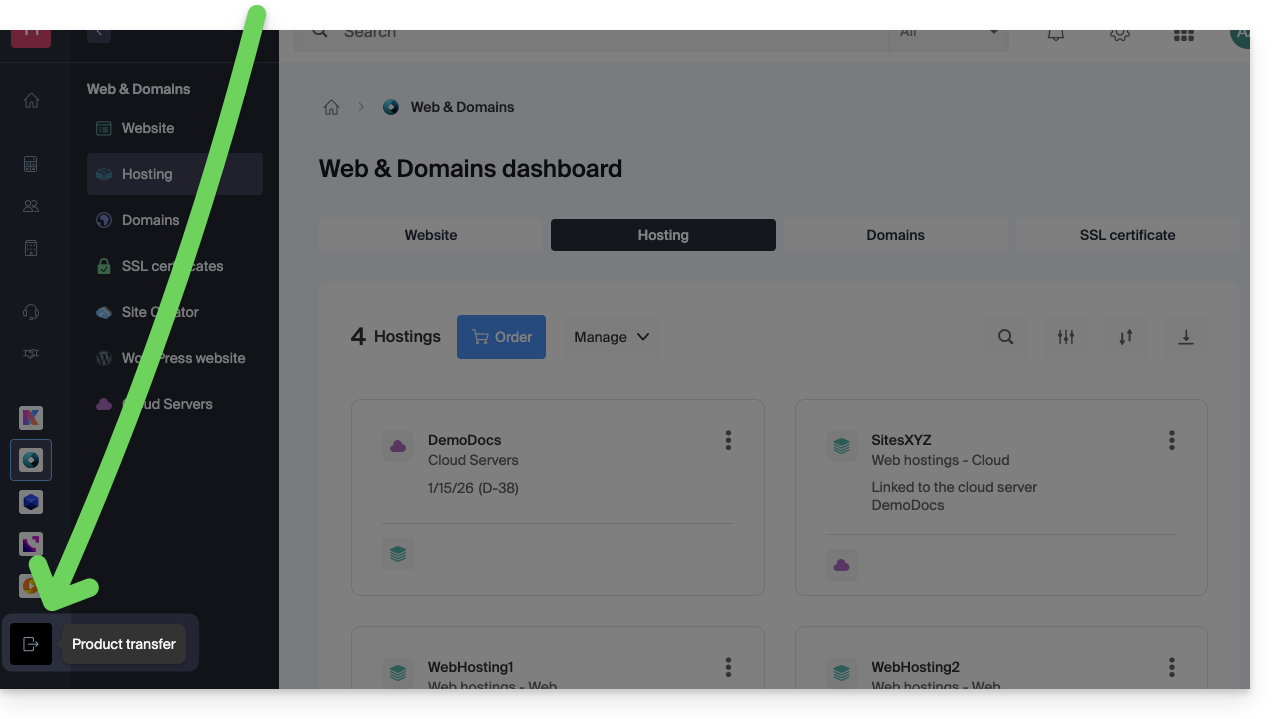
This guide helps you quickly use the essential functions of the Infomaniak Streaming Radio (or audio broadcast, live audio streaming... different names used to refer to the same technology: sending content in "live" or slightly delayed, allowing playback as it is broadcast).
Configure Radio Streams
- Add a Streaming Radio Stream
- Add an Audio Stream Relay
- Add a Backup Audio Stream
- Configure an encoder (example with the Butt application)
- Create an Audio Player to Broadcast the Stream
- Delete a Stream
To go further...
- Secure an MP3/AAC or HLS Stream with a Unique Key
- Secure an Audio Stream by GeoIP Restriction
- View Listening Statistics
- Export Streaming Radio Logs via FTP
- Export Logs to ACPM (France)
- Export Logs to Mediapulse (Switzerland)
- Resolve a Broadcast Issue
- Transfer the complete product | Transfer streams
A question or feedback?
- In case of a problem, please consult the knowledge base before contacting support.
- Click here to share feedback or a suggestion about an Infomaniak product.
This guide details the Auto DJ feature of the Infomaniak Streaming Radio service, which allows you to generate a 24/7 live radio station from your own audio content (music, shows, podcasts, jingles, etc.) previously uploaded to your storage space.
Preamble
- The Auto DJ relies on the files stored in your Infomaniak AOD (Audio on Demand) space to create a linear stream.
- You can use this same space for your on-demand file storage needs.
- You organize your media, create your playlists, and schedule their broadcast via an intuitive calendar interface.
- This allows for continuous broadcasting without the need for an active encoder at all times.
Activate Auto DJ
To start Auto DJ:
- Click here to access the management of your product on the Infomaniak Manager (need help?).
- Click directly on the name assigned to the product in question.
- Click on the name of the audio stream in question:
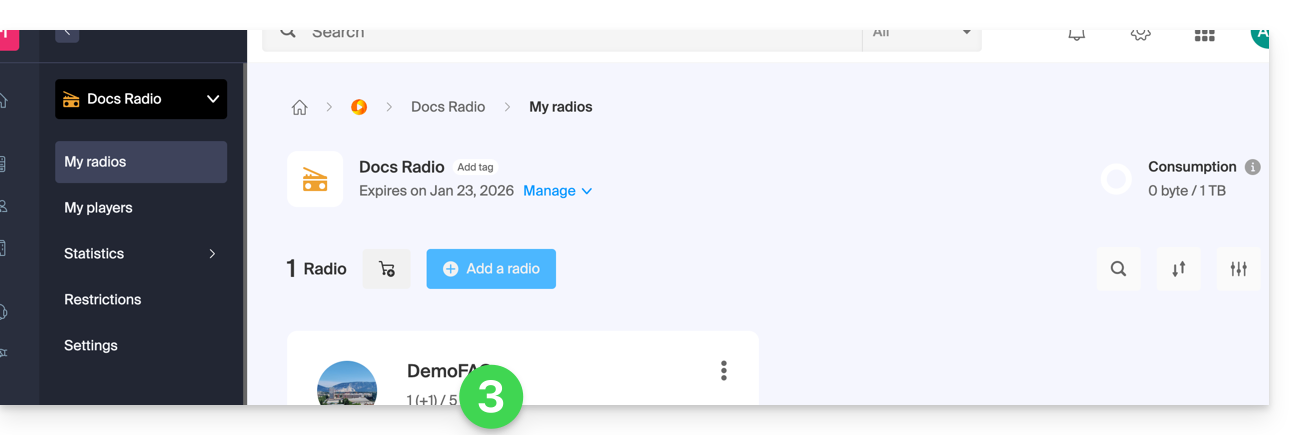
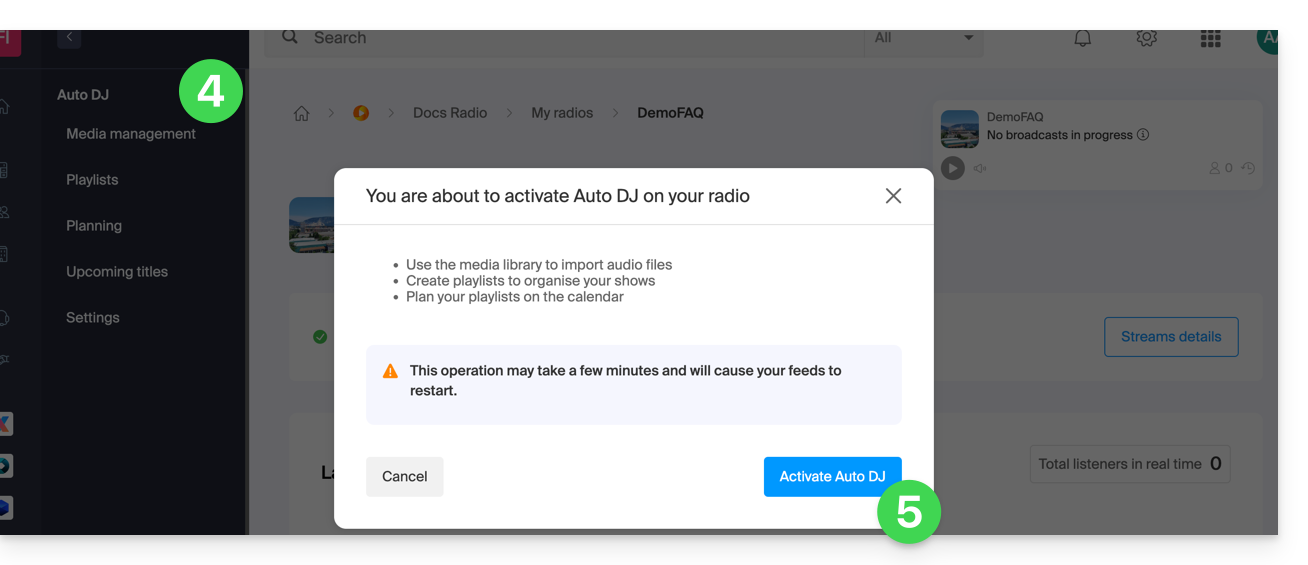
- Click on Auto DJ in the left sidebar menu.
- Read the warnings and click the button to Activate Auto DJ when you are ready:
- Select the AOD space to use if you already have one.
- Apply your choice by clicking at the bottom right:
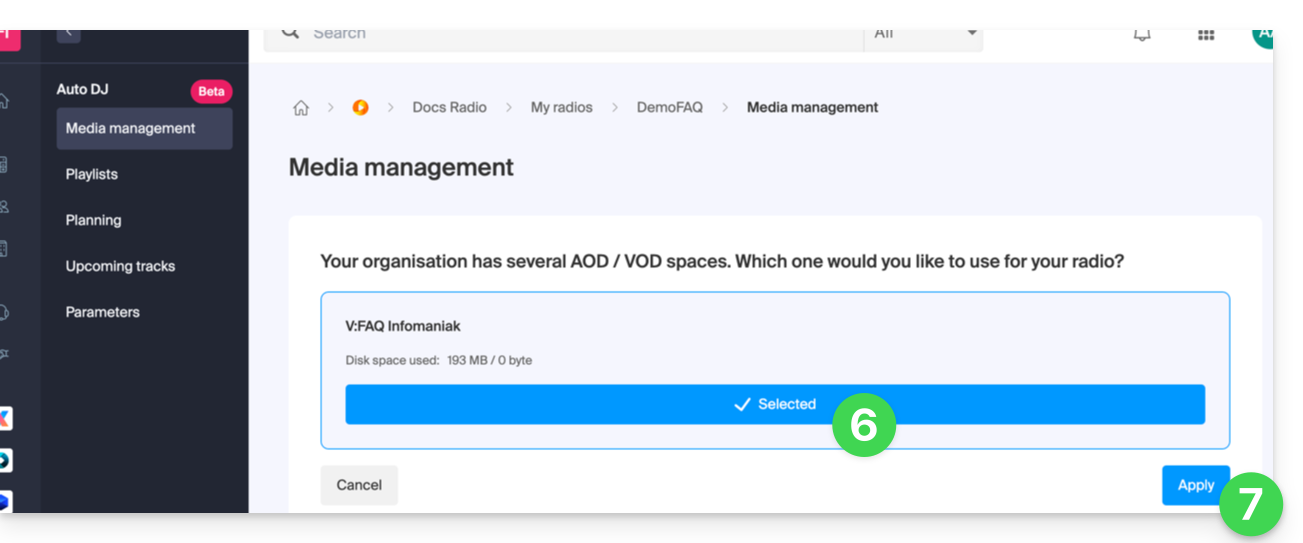
- There you go, the AOD space for your audio files to broadcast is at your disposal:
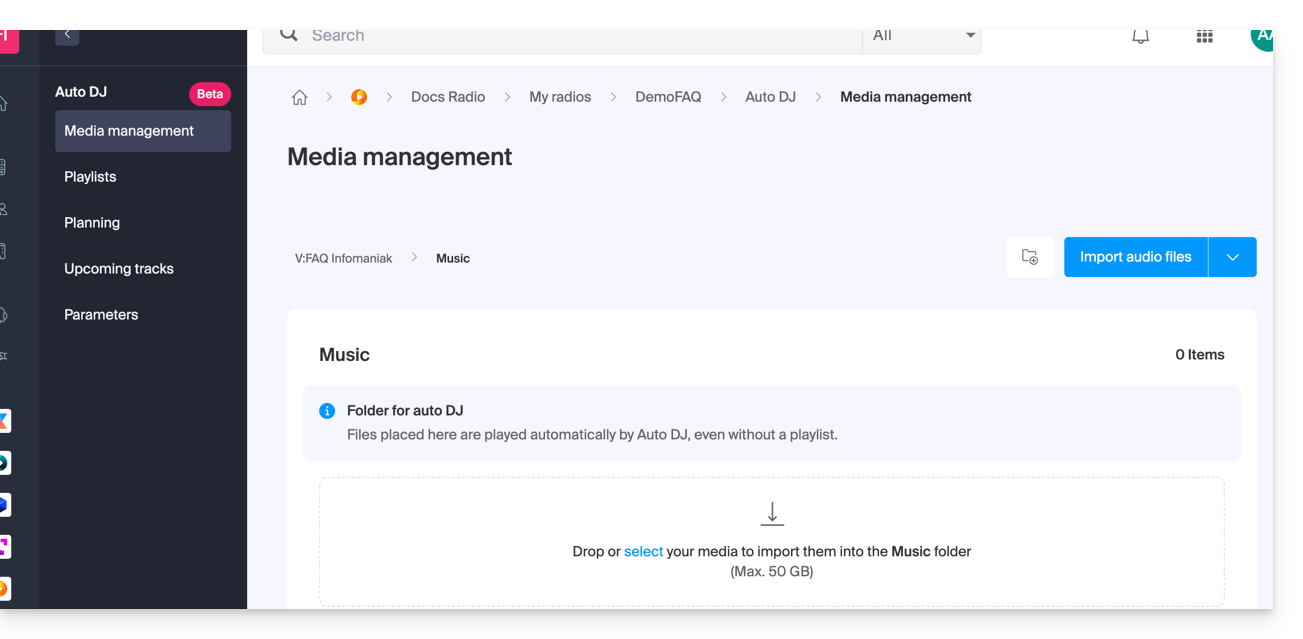
Organize, import your audio files
The first step is to prepare your content. The tool currently accepts files in .mp3 and .aac formats. You can import an entire folder containing your audio files: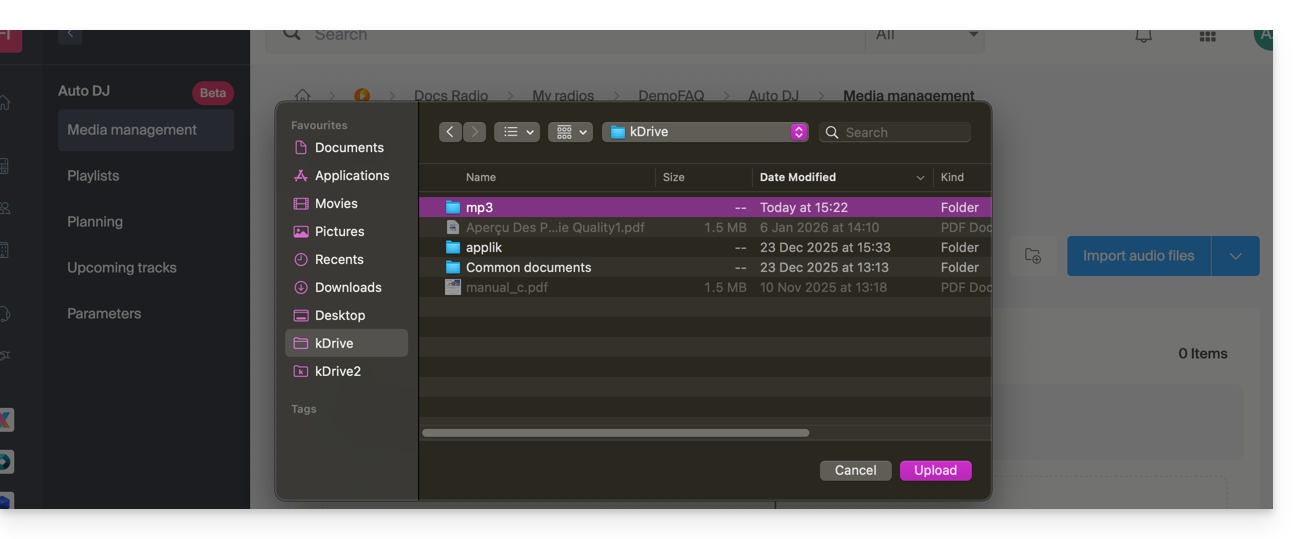
Once imported, you can organize your files into dedicated folders within your storage space to facilitate the management of your library: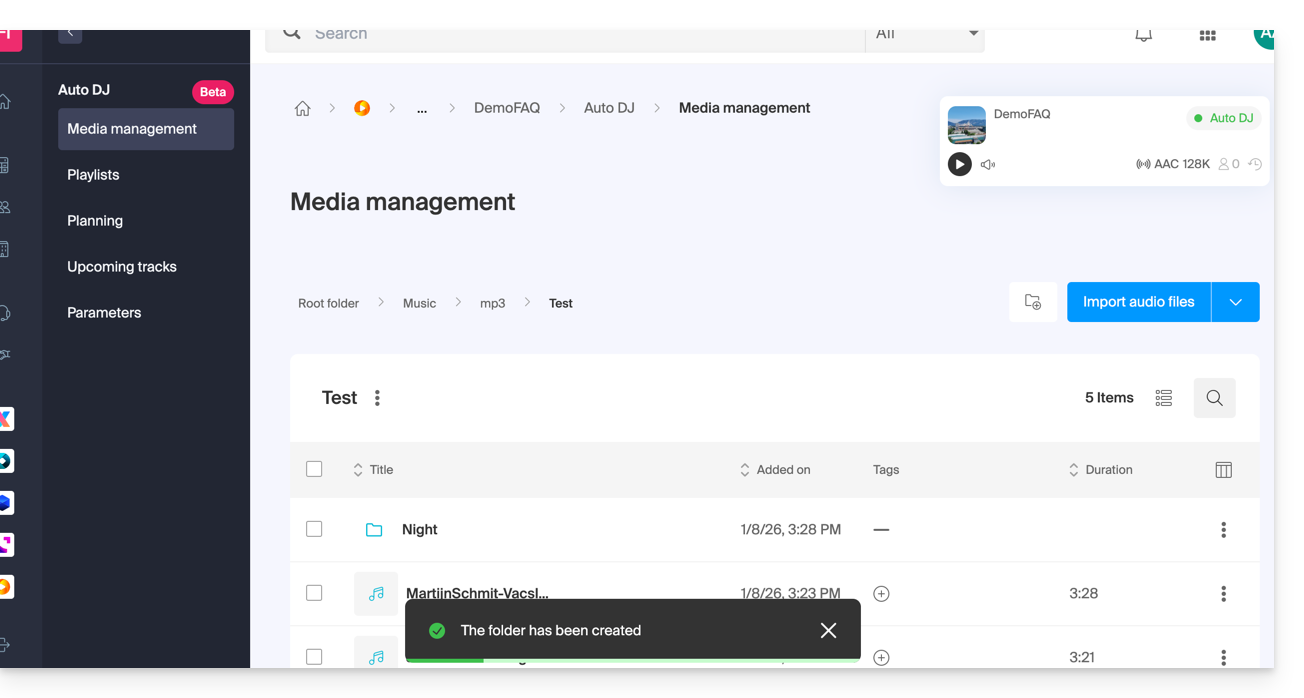
Metadata management
It is possible to modify the ID3 tags (title, artist, album, cover) directly from the interface so that this information is displayed correctly on your listening devices: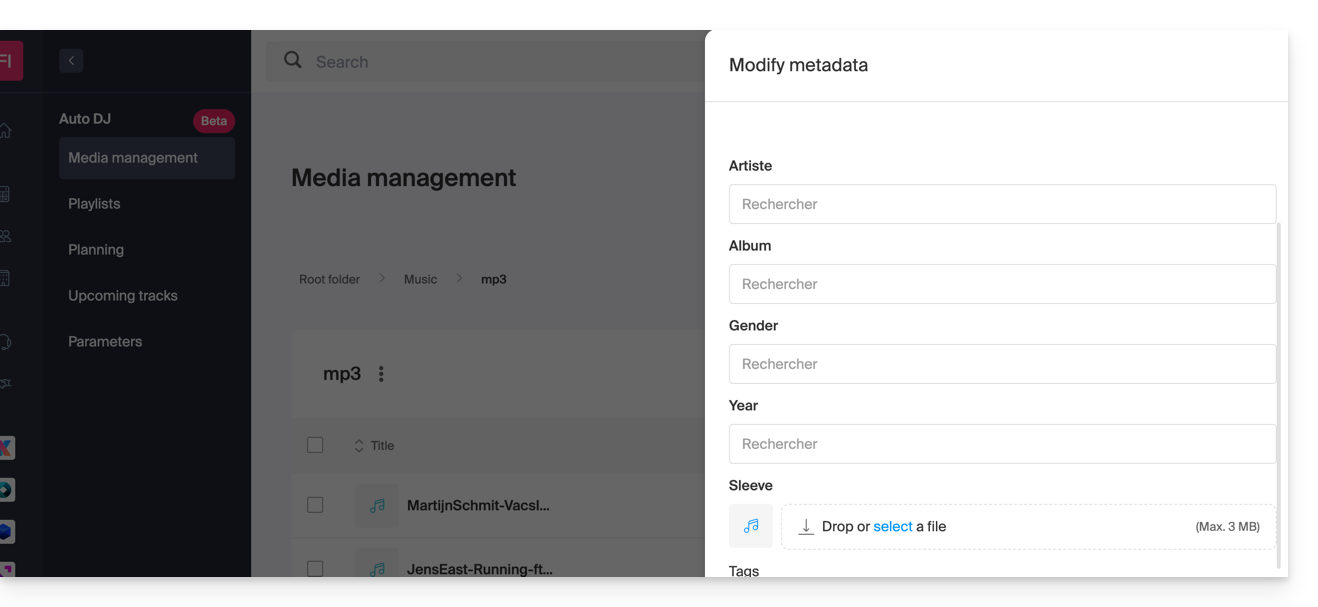
Create playlists
Once your files are imported, you can group them into playlists:
- Manual playlists: precisely select the tracks and their order of play.
- Automatic playlists: set smart criteria (by tags, styles, or artists) to let the system dynamically generate the playlist:
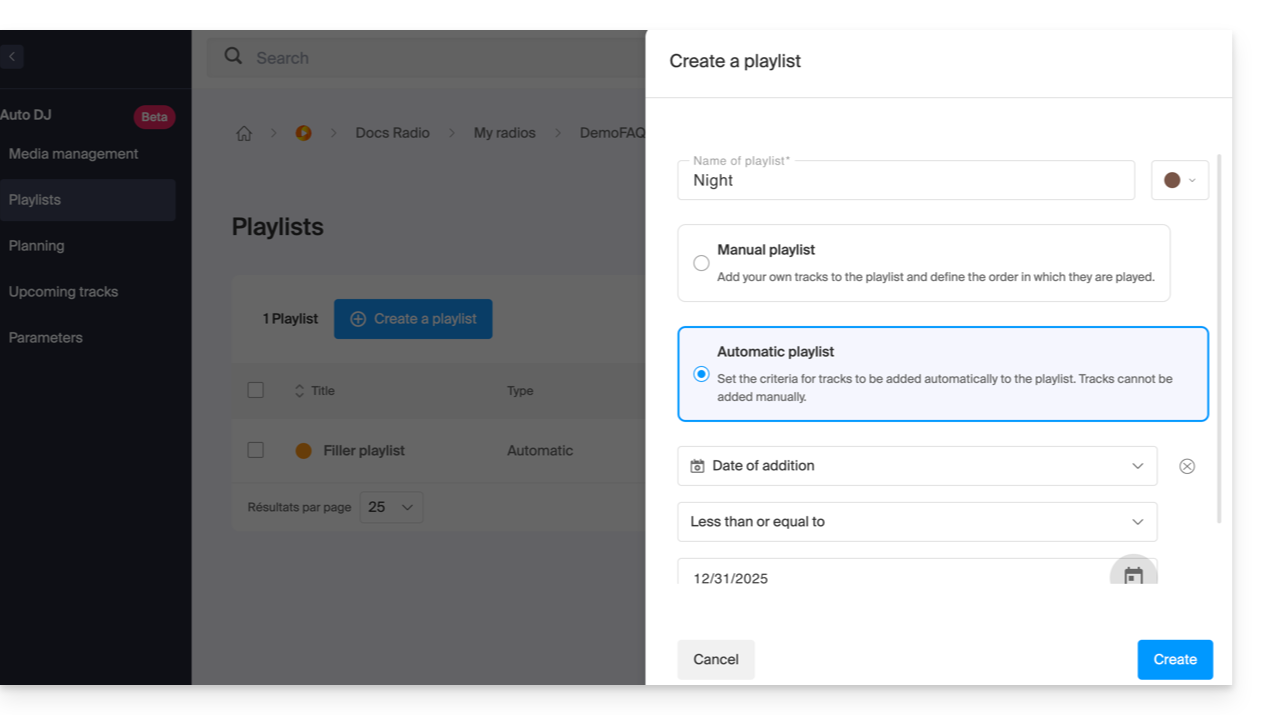
Schedule broadcasting (Planning)
The scheduling tool allows you to manage your program grid in a very detailed way:
- Slot programming: arrange your broadcasts by playlist or by folder on a weekly calendar:
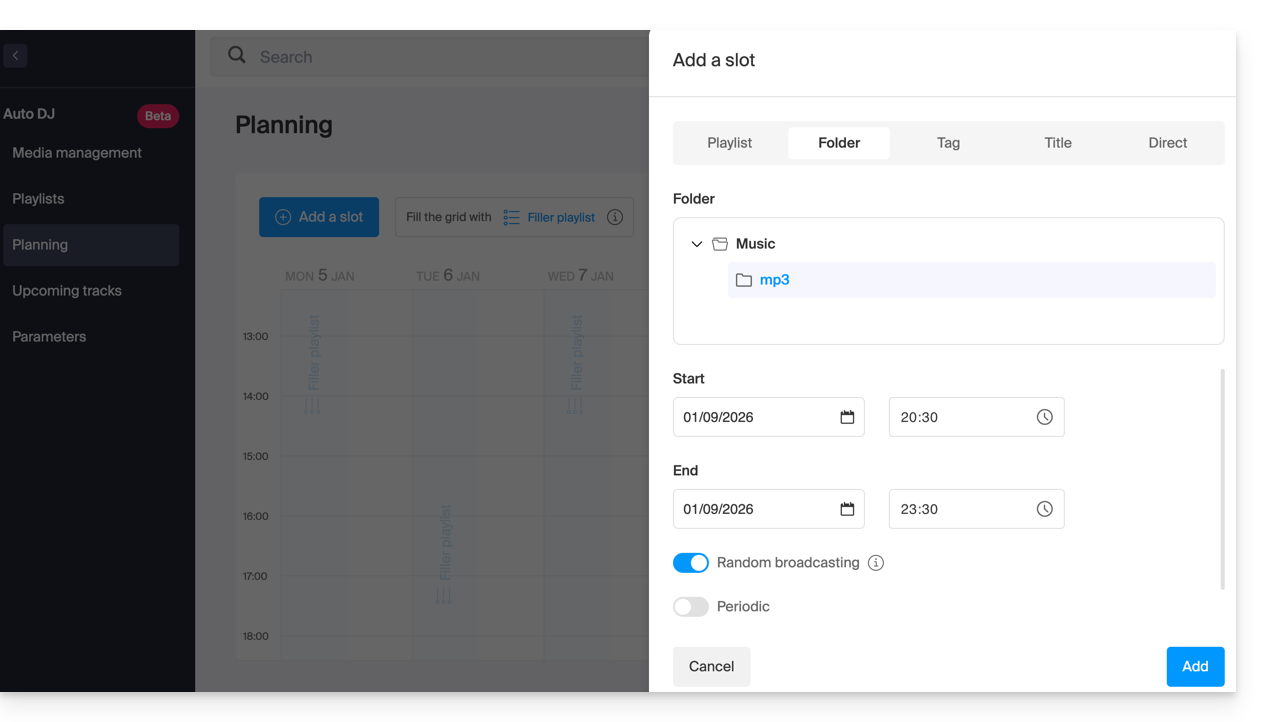
- Filler playlist: configure a backup playlist that will be broadcast automatically when no specific program is scheduled, thus ensuring an uninterrupted stream.
- Live / AutoDJ Transition: you can schedule time slots or automate the resumption of the Auto DJ stream as soon as an encoder (external source) stops pushing its stream.
Advanced audio settings
To ensure professional listening quality, several processing options are available:
- Audio normalization: standardizes the volume level of all your files to avoid volume differences between two tracks.
- Transitions: set crossfades and overlaps between tracks:
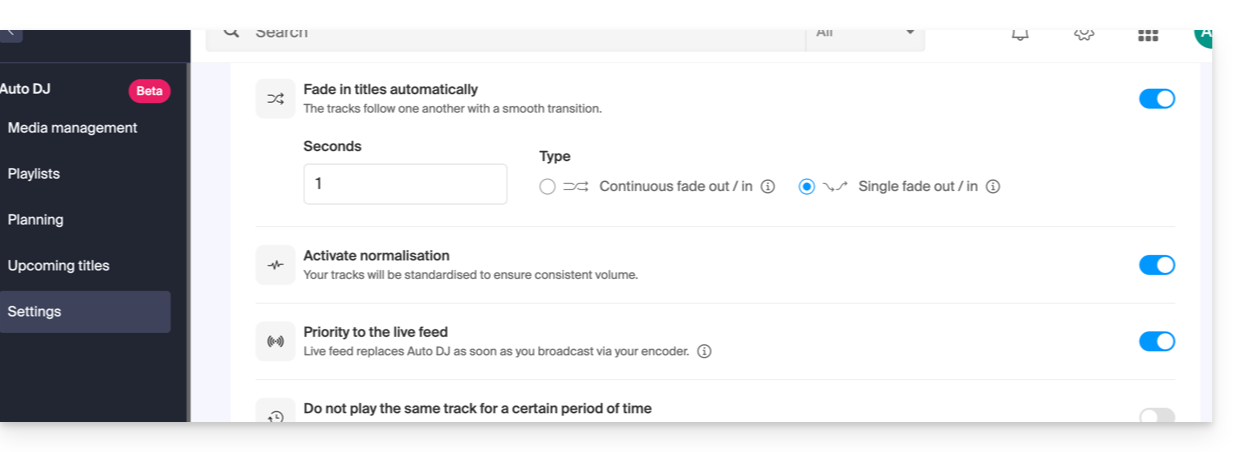
Integration and statistics
The stream generated by the Auto DJ is a standard streaming stream that benefits from all the tools of the Infomaniak ecosystem:
- Infomaniak Player: automatic display of current titles and broadcast history.
- Multi-format broadcasting: support for HLS and stream transcoding.
- Advanced statistics: Precise tracking of your audience in real-time and detailed reports.
This guide explains how to create a stream relay on the Infomaniak Radio Streaming.
Preamble
- First, to create a standard stream, you must have a radio encoder.
- The configuration parameters provided at the end of the stream creation procedure allow you to configure your encoder.
- Once this operation is complete, the stream will be sent from your encoder to the Infomaniak servers.
- Next, you have the option to specify the relay of any stream (e.g., any webradio).
- In this case, Infomaniak no longer receives the radio via an encoder that connects to the master server but relays the stream broadcast by another server.
- If you create this stream relay, your stream is already available and accessible via a host address (domain name or IP address).
- This address must be specified in the Manager so that the Infomaniak servers can retrieve your stream.
- In the same place, you can enable the backup stream option.
- Thus, if your main stream becomes unavailable, the backup stream will automatically take over.
Create a stream relay
To access the Radio Streaming service:
- Click here to access the management of your product on the Infomaniak Manager (need help?).
- Click directly on the name assigned to the product in question:
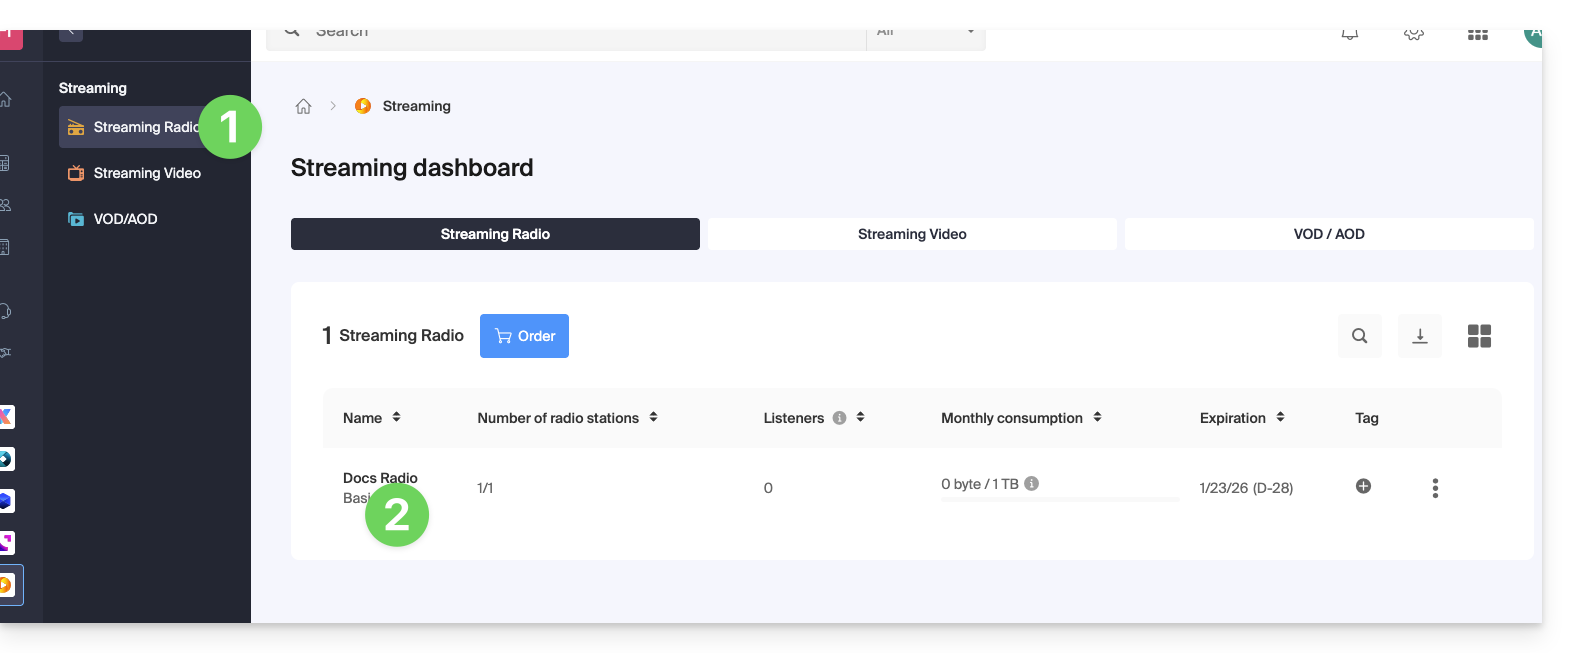
- Click on the radio name:

- Click on the Configure streams button:
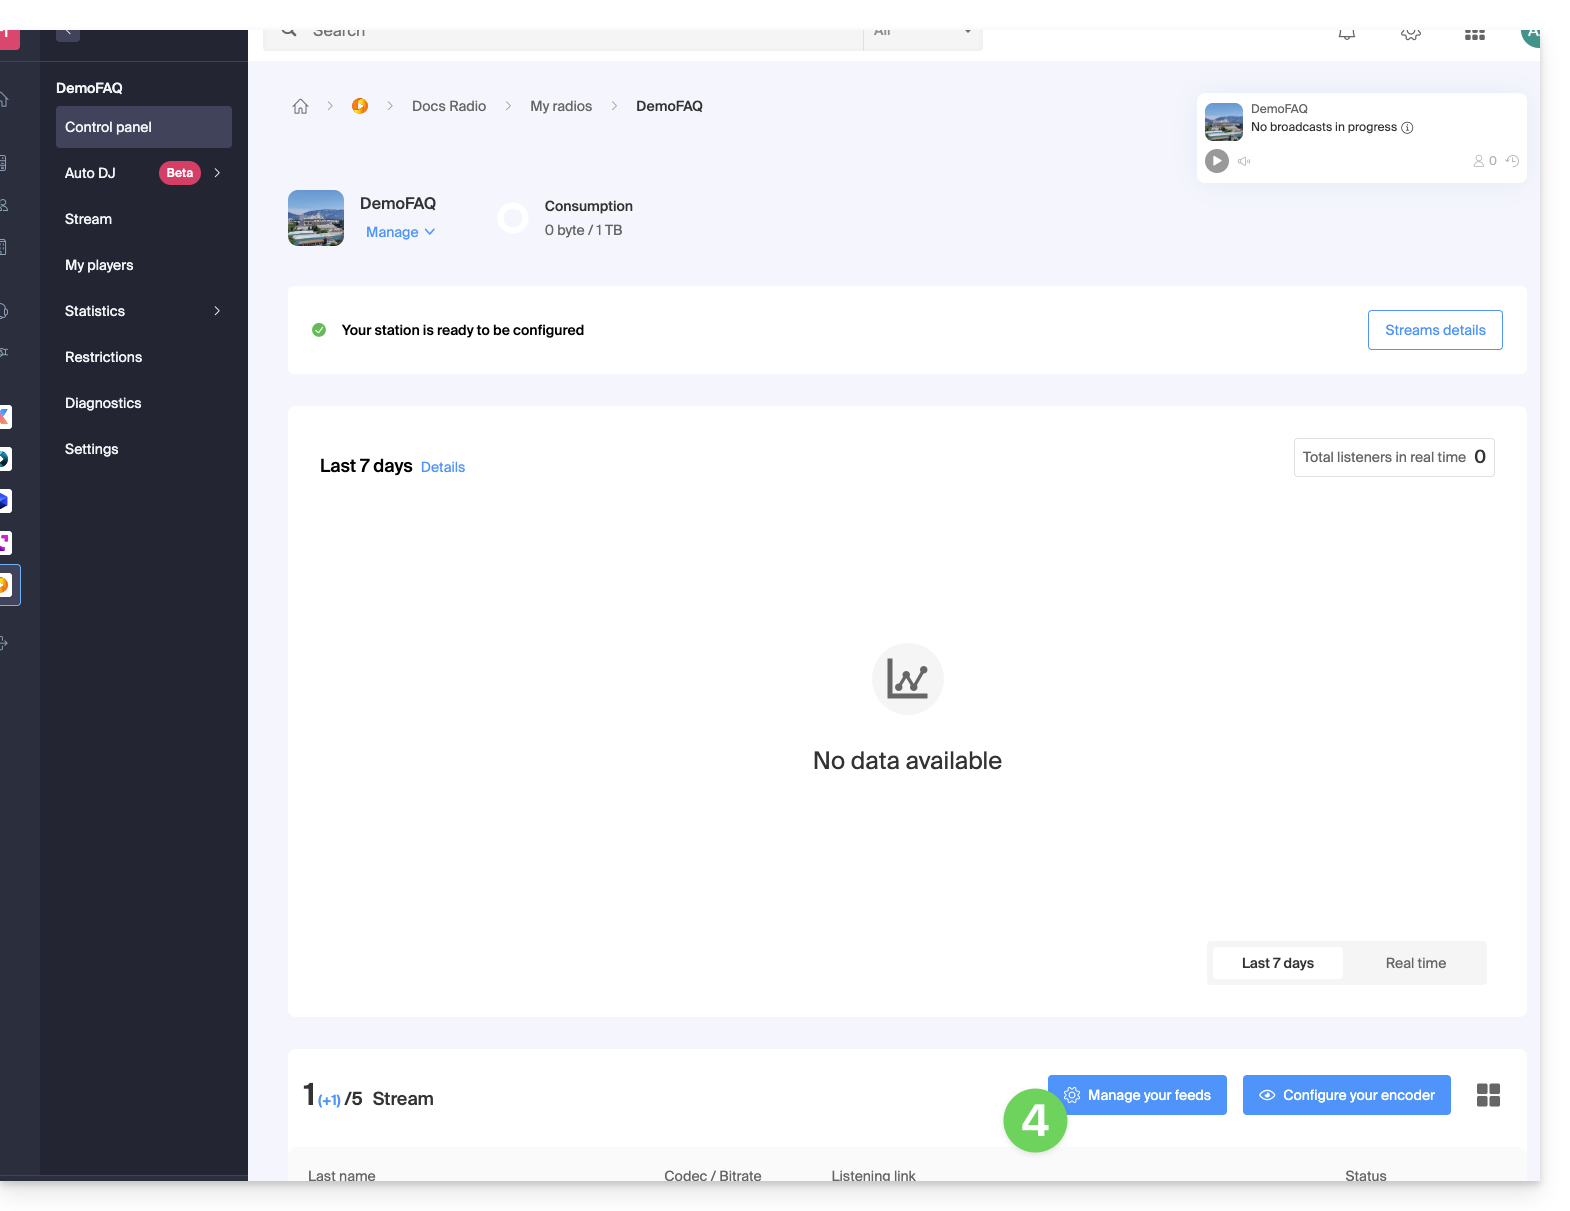
- Click on the Add a stream button:

- Select Stream relay.
- Click on the Continue button:
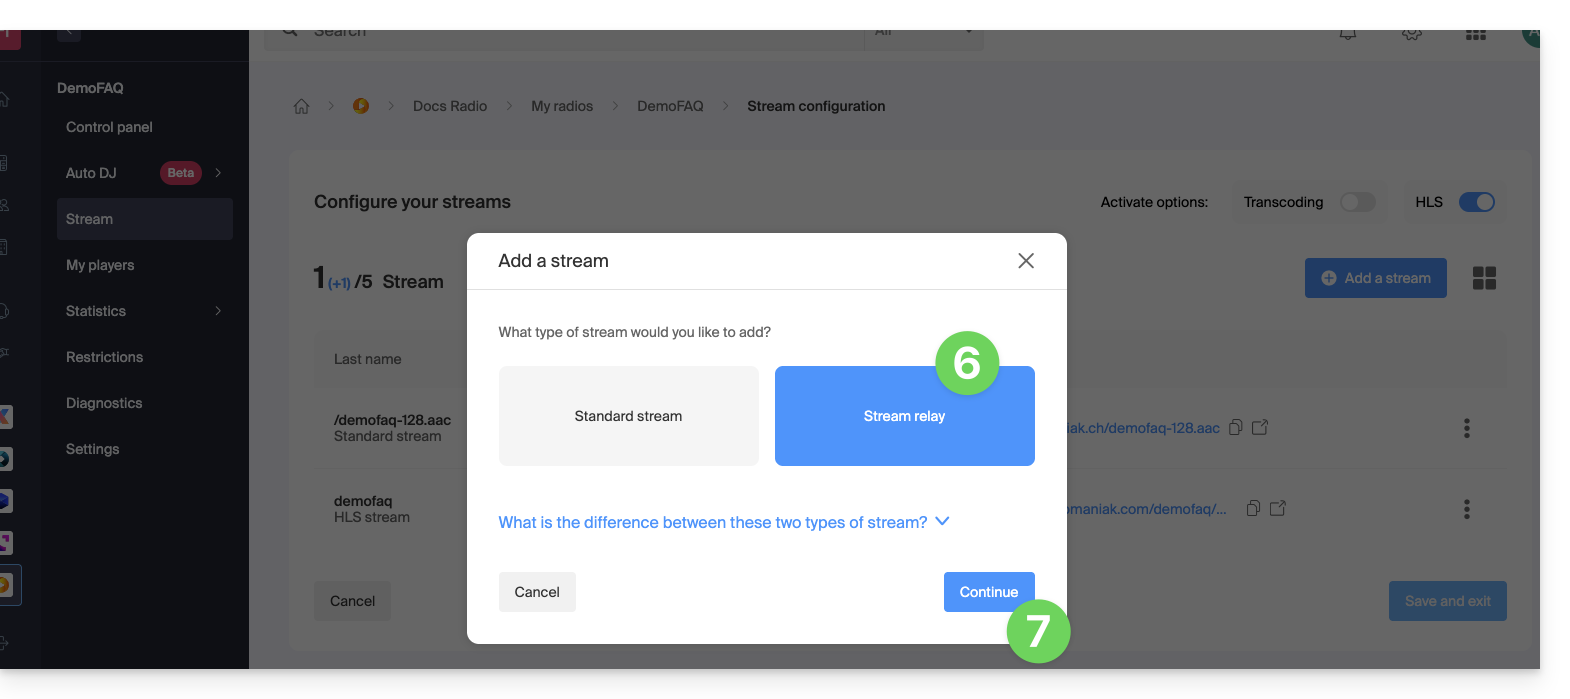
The configuration requires 3 fields:
- server name
- port
- mount point
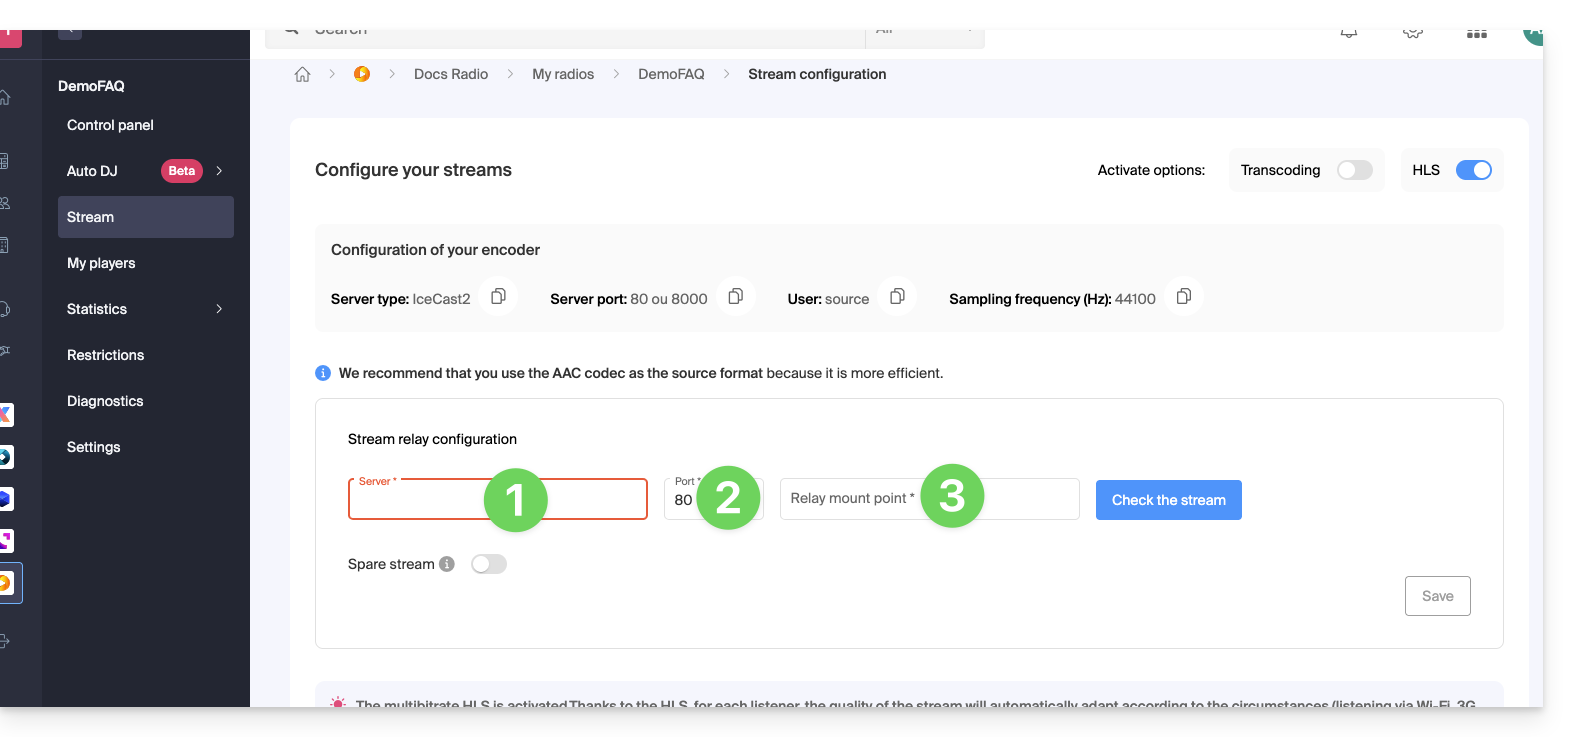
If the stream you need to relay is composed as follows: http://server.com:82/music.mp3 then indicate:
server.com82music.mp3
That said, in some cases the mount point field can be empty and the extension not necessarily required. If there is no port in the URL with http, you need to put simply "80".
Click on the blue button to validate the stream, then click on Save at the bottom right.
You can also add a stream relay as a backup stream if you activate this option when adding a standard stream: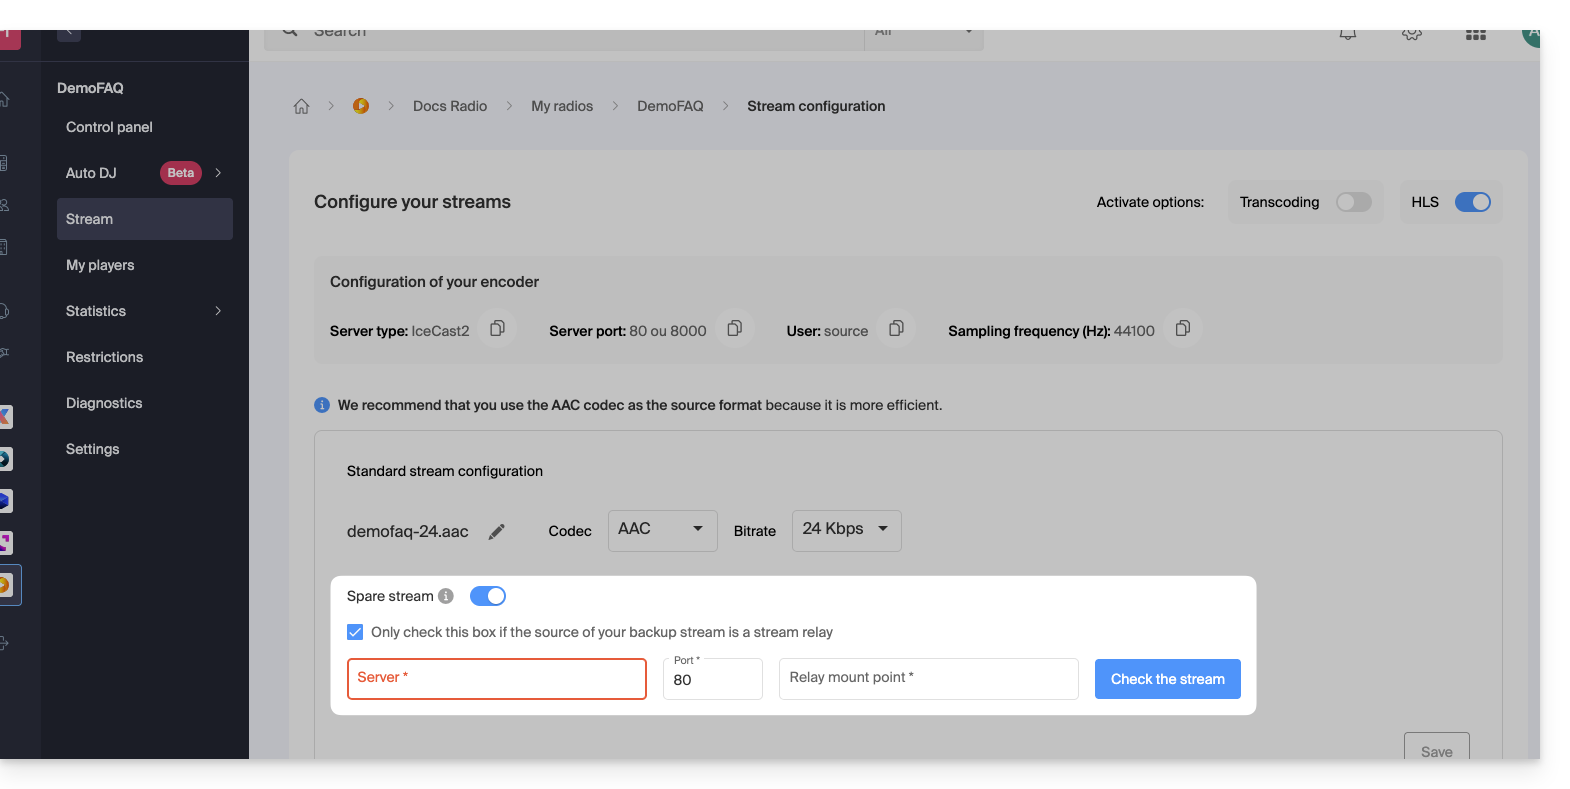
This guide allows you to perform a diagnosis of your Streaming Radio to find the source of any potential issues, causes of disconnections, etc.
Preamble
- If you are broadcasting your FM radio, check that the acquisition card is working properly.
- If you are broadcasting a Webradio, make sure your broadcasting software is working properly.
- Be mindful of the CPU load on your computer: ensure that it is not saturated, and that you have enough memory if you are performing operations in addition to AAC stream encoding, which is very memory-intensive.
- It is possible that your Fibre/ADSL line can no longer keep up with the data sent to the server.
- You must have an upload speed (i.e., upload) of at least the total of the streams sent to the server (for example, a radio that sends a 128kbs stream + a 48kbs stream, which gives 130 + 50 = 180kbit/s at minimum).
- Generally, radios dedicate a line exclusively to the broadcasting of audio streams to avoid any bandwidth saturation in case of simultaneous sending, such as sending a large email with an attachment. This precaution ensures that the upload does not monopolize the bandwidth, which could cause interruptions in the broadcasting of audio streams during listening.
- Your ISP can also cause a line cut, even if it is minimal, but this will have the effect of cutting the radio stream.
- If your encoder is configured to send metadata to the servers via a text file hosted by another provider, and the latter experiences disruptions, the stream can also be disrupted!
Analyze recent statistics
Statistics allow you to view any potential stream interruptions. To access this information:
- Click here to access the management of your product on the Infomaniak Manager (need help?).
- Click directly on the name assigned to the product concerned.
- Click on Statistics in the left sidebar:

- Statistics are detailed in this other guide.
Check the proper functioning of the elements
The radio diagnostics page allows you to access various information. To access these diagnostics:
- Click here to access the management of your product on the Infomaniak Manager (need help?).
- Click directly on the name assigned to the product concerned:
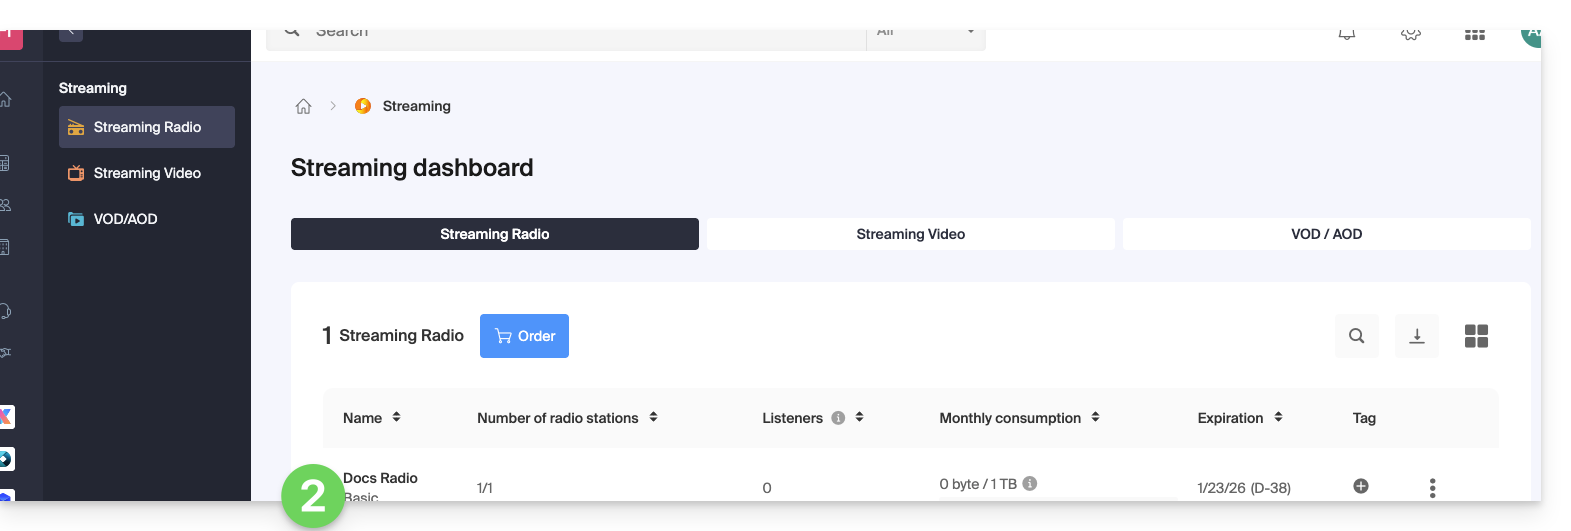
- Click on the name of the audio stream concerned:

- Click on Diagnostics in the left sidebar.

- The Network and Stream tab allows you to test the connection between your server and the Infomaniak infrastructures.
- The Encoders tab displays a history of encoder connections to analyze whether the streams were operational.
- The Servers tab provides information on the general status of the network infrastructures to verify the proper functioning of the reception and broadcasting servers.
- Note that in the event of a general broadcast stream outage, the Infomaniak teams are notified and intervene immediately.
- The Buffer Stability tab is detailed in this other guide.
This guide explains how to link a stream added to your Infomaniak Streaming Radio with your installation that will broadcast the desired content.
Preamble
- In general, Infomaniak is compatible with all the software listed here: https://www.icecast.org/apps/ but not all support AAC streaming, for example.
- An example configuration is given below for the free and multi-platform application Butt.
- Refer to the information for Edcast (standalone version) / Sam Broadcaster / SpacialAudio SAM Cast… There are also (without guide) StreamDiffusion / MB Recaster …
Obtain connection information
To find the information necessary for configuring your encoder:
- Click here to access the management of your product on the Infomaniak Manager (need help?).
- Click directly on the name assigned to the product concerned:

- Click on the name of the audio stream concerned to get its details:

- The useful information is displayed on the page:

Example of encoder configuration
You want to broadcast audio content from a computer. As specified in the preamble above, there are multiple software solutions. Example with the tool Butt available on macOS, among others:
- Download Butt:

- Open the downloaded application on your computer.
- Install the application:

- Launch the application to use it:

- Click on Settings:

- Click on Add a server:

- Select the Icecast type.
- Copy the information from your stream to the encoder (for the password, you will first need to enter your Manager login password, then the stream password will be copyable (and visible with the eye icon):

- Validate your settings by clicking on Add at the bottom right:

- Close the settings and click on the Play button to start the broadcast:

- You can hear the broadcast of your stream from the Infomaniak dashboard by starting the demo Player:

This guide explains how to obtain and configure notifications when the Streaming Radio stream(s) experience an outage (short and/or long duration).
Introduction
- Every minute, a script checks for outages and only sends an email and creates an event if the outage has lasted at least 5 minutes.
- It sends an email if the outage lasts more than 30 minutes.
- If the stream resumes and an alarm has been sent to you, a confirmation email is sent.
- All outages are logged and kept for 30 days but you will not be disturbed in case of a minor outage.
- Regarding the possible reasons for these outages, refer to this other guide.
- All outages are recorded by the system and visible in the events of the Manager.
Email Alert
To set up notifications:
- Click here to access the management of your product on the Infomaniak Manager (need help?).
- Click directly on the name assigned to the product in question.
- Click on the name of the audio stream in question.
- Click on Settings in the left sidebar.
- Click on the Notifications tab.
- Enable notifications with the toggle switch.
- Set up the monitoring schedule (days of the week / hours).
- Save your changes.
- Add the Organization's users to be notified by email or SMS (according to the settings above):

This guide covers the listening information of Streaming Radio that can be exported to Mediapulse.
Preamble
- Mediapulse, an independent organization in Switzerland, measures the audiences of radio, television, and online platforms.
- These data, recognized as the official reference, help the media and advertising market to analyze, compare, and structure their activities.
- Subject to the supervision of the DETEC via OFCOM, Mediapulse ensures transparency, independence, and scientific rigor; it guarantees reliable measurements adapted to the evolution of the media.
- It is possible to export your radio logs to this service.
- Also refer to this other guide regarding a similar service but intended for France.
Manage Mediapulse certification
Prerequisites
- The Organization in which the Streaming service is located must be established with an address in Switzerland.
- To activate Mediapulse certification, please contact this service by email:
info@mediapulse.ch. - Once the contract is established with them, contact Infomaniak support by indicating the information related to your Mediapulse and Infomaniak contract.
To manage the activation or deactivation of the service:
- Click here to access the management of your product on the Infomaniak Manager (need help?).
- Click directly on the name assigned to the product concerned.
- Click on the name of the audio stream concerned.
- Click on Settings in the left sidebar.
- Activate or deactivate the export of logs to Mediapulse with the toggle switch:

This guide explains how to prevent a Streaming Radio from requesting a password when connecting to the audio stream.
Restricted streams
If the stream protection is enabled and the token is not generated or is incorrectly generated, the prompt (password request) will be visible. The same applies to users outside the geographical restriction criteria that may have been activated on the stream.
Less common: a failure
The reception server is the server to which your encoder connects to broadcast your stream. The broadcasting servers connect to the reception server and broadcast your stream to the listeners. If the reception server fails, another backup server takes over. This architecture ensures the broadcasting of thousands of streams to several tens of thousands of listeners while preventing failures as much as possible.
In case of a failure, the Infomaniak teams are automatically notified (no need to call) and strive to restore the situation as quickly as possible. If necessary, Infomaniak sends an email to all its radio clients with information about the causes of the failure.
The failure of a single broadcasting server causes the disconnection of thousands of listeners at the same time, who then attempt to reconnect. This then causes an overload and results in a password request being displayed to the listeners. It is then necessary to attempt a connection again about thirty seconds later.
Generally, the situation returns to normal after a few minutes.
A Player (that is, an audio stream player) is essential for your radios on the Streaming Radio Infomaniak when you want to broadcast them to your listeners & internet users.
Prerequisites
- Add at least 1 Radio and 1 audio stream.
Create an audio player
To create a Player and offer the audio stream to your users:
- Click here to access the management of your product on the Infomaniak Manager (need help?).
- Click directly on the name assigned to the relevant product.
- Click on My players in the left sidebar.
- Click on the blue button to add an audio player:

You can then choose between automatic configuration or, if you have your own Player or application, use the information/URL provided for browser, external player/app/Android, or iOS…
Familiarize yourself with this other guide regarding the additional configuration of radio players:
This guide explains how to maintain control over your radio streaming flows, for example, to decide whether a listener can listen to your radio by activating geo-location protection.
Protect an audio stream by GeoIP
The principle is simple and you just need to go to the restriction settings:
- Click here to access the management of your product on the Infomaniak Manager (need help?).
- Click directly on the name assigned to the product concerned.
- Click on the name of the audio stream concerned.
- Click on Restrictions in the left sidebar menu.
- Click on the action menu ⋮ to the right of the stream concerned in the table that appears.
- Click on Geo-location restriction:

Then configure the restrictions:
- Choose whether the listed countries will be allowed or forbidden.
- Search for a country to add it to the list.
- Activate the advanced configuration if necessary.
- Copy or paste a list of countries (useful for restricting other streams with a simple copy-paste).
- Click to remove all the countries listed on the page.
- Click on the blue button to save:

Activating the restriction implies a change in the stream configuration that may take a few minutes to be replicated on the servers.
This guide concerns the listening information of Infomaniak Streaming Radio that can be exported using the FTP protocol; these logs (from which the listening statistics are also derived after “cleaning” or “purification”) are then automatically transferred by FTP to be processed afterward.
Preamble
- The logs of your radio will be provided in the form of a compressed file
xyz.mp3-20140805.log.gz(the log date is in the formatYYYYMMDD). - Each log starts at 04:00 Swiss time and ends at 03:59:59 the next day.
- The log is in the form
ip user-identifier authuser [date-time] "request" status octets "referer" "useragent" listening-time:81.56.215.98 - - [09/Apr/2019:08:23:18 +0200] "GET /toto.mp3 HTTP/1.1" 200 1211297 "-" "Mozilla/5.0 (X11; U; Linux i686; en-US; rv:1.9.0.8) Gecko/2019032711 Ubuntu/8.10 (intrepid) Firefox/3.0.8" 69- It may happen that the log line is malformed, due to a too long referer, for example; this behavior of Icecast cannot be modified.
- The IP addresses in the range 84.16.67.128/25 must be ignored as they are the streaming servers.
- From the settings page on the Manager, you can request the logs of past days.
- You can also directly export them to ACPM or Mediapulse.
Enable FTP log sending
To do this:
- Click here to access the management of your product on the Infomaniak Manager (need help?).
- Click directly on the name assigned to the product concerned.
- Click on the name of the audio stream concerned.
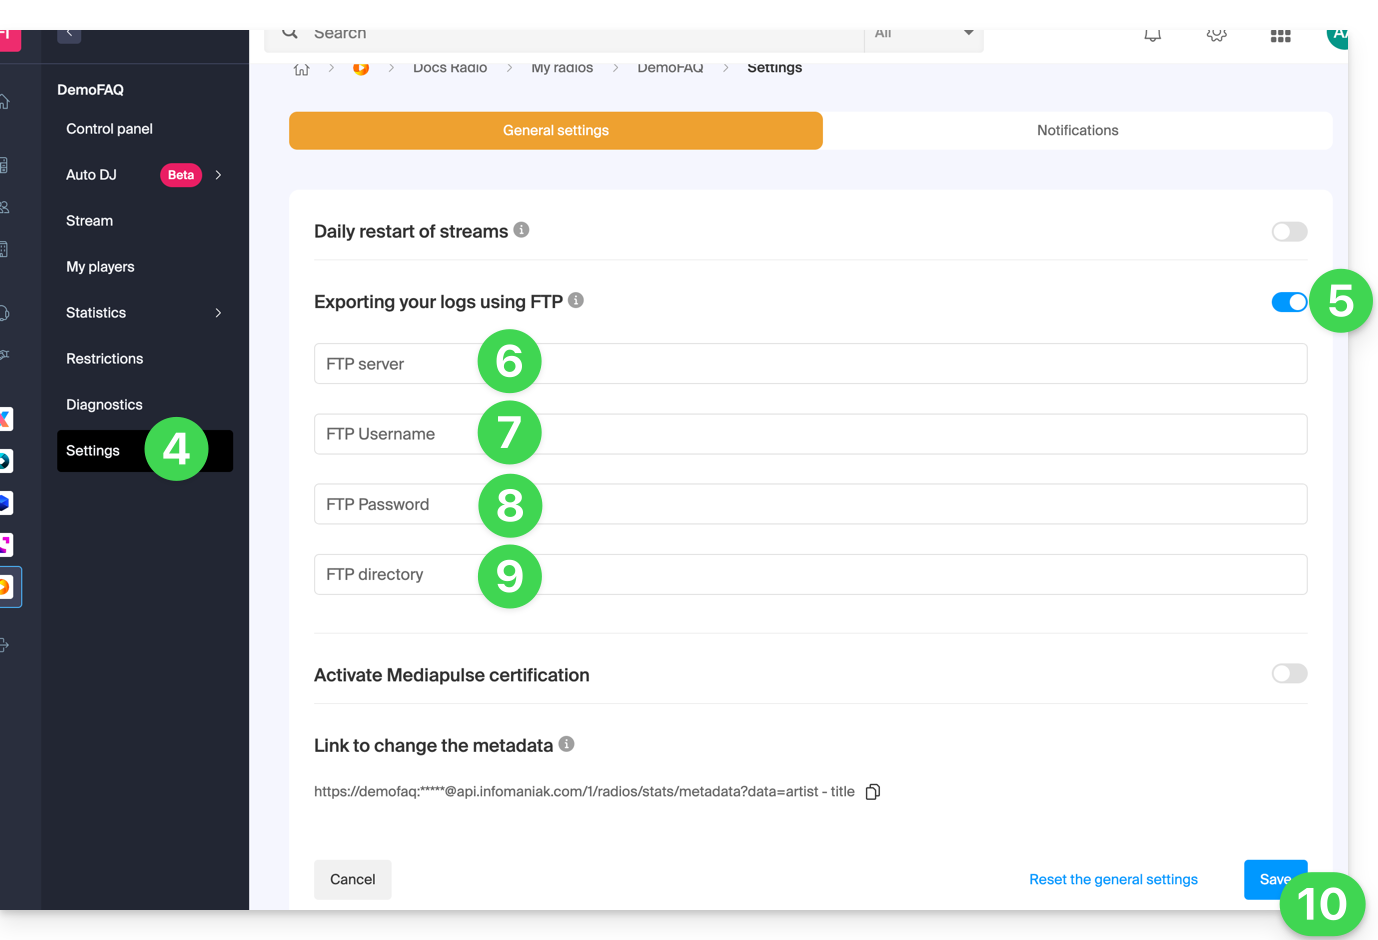
- Click on Settings in the left sidebar.
- Enable FTP log export with the toggle switch.
- Enter a hostname: FTP server address.
- Enter a username: FTP account name.
- Enter a password: that of the FTP account.
- Enter the directory on the server where to store the logs.
- Click the Save button at the bottom of the page:
To retrieve your logs, use only the standard FTP protocol in Passive mode. The service is not compatible with SFTP, FTPS, or SSH keys. The system allows 3 connection attempts in case of interruption.
Process the logs
The best approach is to use a regular expression like the one below:
"/^(\S+)\s(.+)\s(\S+)?\s\[((\d\d)\/([a-zA-Z]{3,3})\/(\d\d\d\d)\:(\d\d)\:(\d\d)\:(\d\d)\s\+\d\d\d\d)\]\s"GET\s\/([\-a-z0-9]{1,40}(\.)?(mp3|aac|ogg){0,1})(.*)?"\s(\d{3,3})\s(\d+)\s"(.+)"\s"(.+)"\s(\d+)$/i";This syntax is for the PHP function preg_match and will need to be adapted if other functions/languages are used.
The function preg_match returns an array with the following significant positions:
| 1 | ip |
| 4 | full date - time |
| 5 | day |
| 6 | month |
| 7 | year |
| 8 | hour |
| 9 | min |
| 10 | seconds |
| 11 | mount point |
| 15 | result (HTTP code) |
| 16 | length in bytes |
| 18 | user agent |
| 19 | listening duration (seconds) |
This guide explains how to transmit metadata for the radio stream sent from your radio streaming encoder.
Use the URL provided
You just need to make a GET request to a URL of the following type:
https://[flux]:[password]@api.infomaniak.com/1/radios/stats/metadata?data=artist - titleThe complete URL is available in the administration interface:
- Click here to access the management of your product on the Infomaniak Manager (need help?).
- Click directly on the name assigned to the product concerned.
- Click on the name of the audio stream concerned.
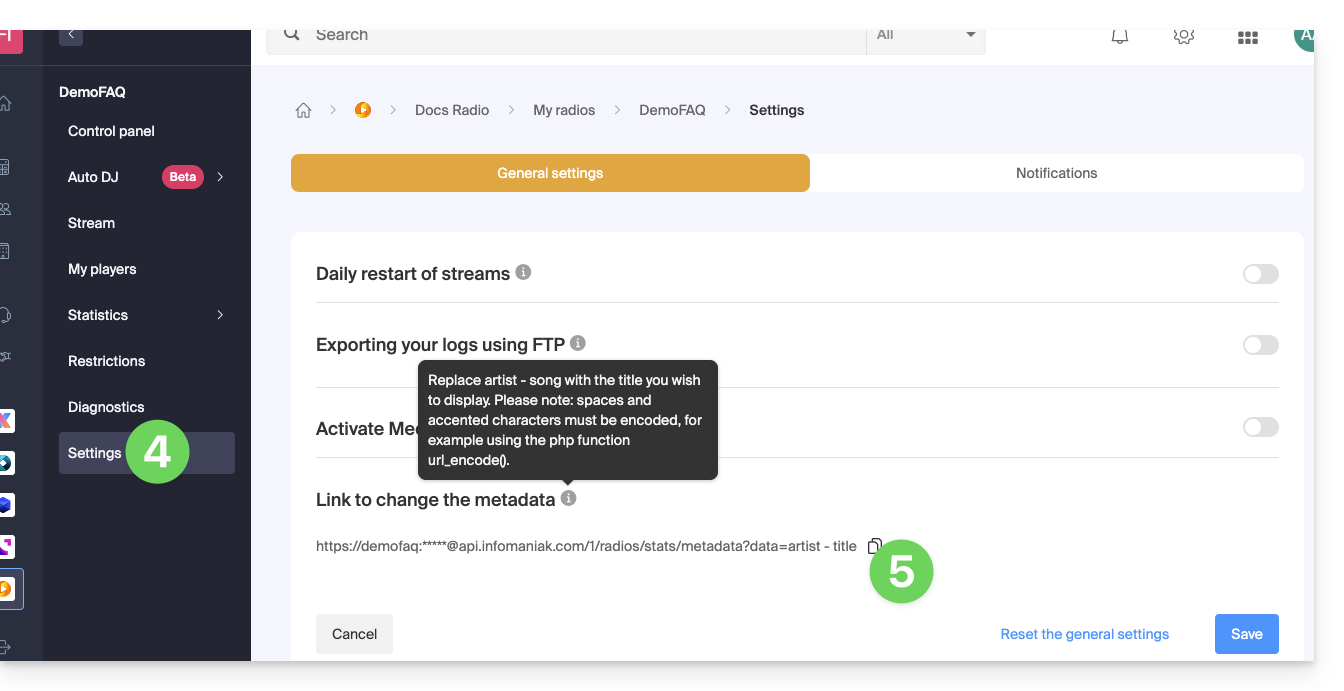
- Click on Settings in the left sidebar menu.
- Click on the button to copy the metadata link:
Learn more
For developers who code a Player, there are libraries that can search for the transmitted information and display it because the data is transmitted in the stream data. The other possibility is to retrieve the stream information from the server itself.
This guide covers the listening and audience statistics of Streaming Radio which allow you to view all information about your radio stream listeners and different audiences.
Preamble
- Refer to this other guide if you wish to process the raw logs yourself.
Access listening statistics
To access this information:
- Click here to access the management of your product on the Infomaniak Manager (need help?).
- Click directly on the name assigned to the product concerned.
- Click on Statistics in the left sidebar:

- Click on the different menus in the left sidebar:
Overview

Real-time audience
Refer to this other guide on this subject.
Listeners

Listening time

Consumption

Geolocation
Exporting in .csv format is possible:
Players

This guide details the monetization possibilities for Radio Streaming and the management of advertising for your streams.
Enable advertising for Radio Streaming
Prerequisites
- Contact one of the 2 approved advertising partners:
- Once the contract is established, if necessary, ensure that the selected agency informs Infomaniak of the effective activation.
- This step will allow you to proceed with the migration of streams to the corresponding cluster.
Then, you will be able to manage pre-roll and/or mid-roll advertisements directly from the agency's platform, independently.
Types of Advertising Insertions
The type of advertising called in-stream pre-roll consists of broadcasting an advertisement just before the start of the live audio stream. In concrete terms, the advertisement is automatically triggered when the listener clicks the Play button, before switching to the live program.
The pre-roll differs from the jingle: the first is an advertisement, while the second is part of the station's branding or sound identity.
Finally, the mid-roll – that is, the insertion of advertisements between two program segments – corresponds to the standard operating mode offered by the two partners mentioned above.
It is important to note that post-roll (advertisement broadcast after the content) is not applicable in the context of live broadcasting, since the latter does not have a determined end.
Technical Conditions
When integrating in-stream pre-roll advertisements into a live radio stream, it is imperative to ensure the perfect match of audio parameters between the advertisement and the main stream:
- The bitrate (binary rate) and sampling frequency must be identical to avoid any interruption, latency, or desynchronization at the time of transition between the advertisement and the live broadcast.
- This requirement guarantees smooth and stable broadcasting, an essential condition for maintaining listening quality and real-time service continuity.
This guide explains how to modify a Streaming Radio offer to, for example, increase the maximum monthly consumption limit or the quality of broadcast (max bitrate).
Modify the existing offer
To modify your existing radios:
- Click here to access the management of your product on the Infomaniak Manager (need help?).
- Click directly on the name assigned to the product in question:

- Click on the chevron to manage the product.
- Click on Modify the offer in the dropdown menu:

- Choose the new offer that best suits your needs:

The change is made after payment, with a prorated calculation of fees based on the remaining time until the initial expiration date.
This guide explains how to remove an audio stream from your Streaming Radio, without deleting the entire product.
Delete a radio
To access the Streaming service and delete one of the streams:
- Click here to access the management of your product on the Infomaniak Manager (need help?).
- Click directly on the name assigned to the product concerned:
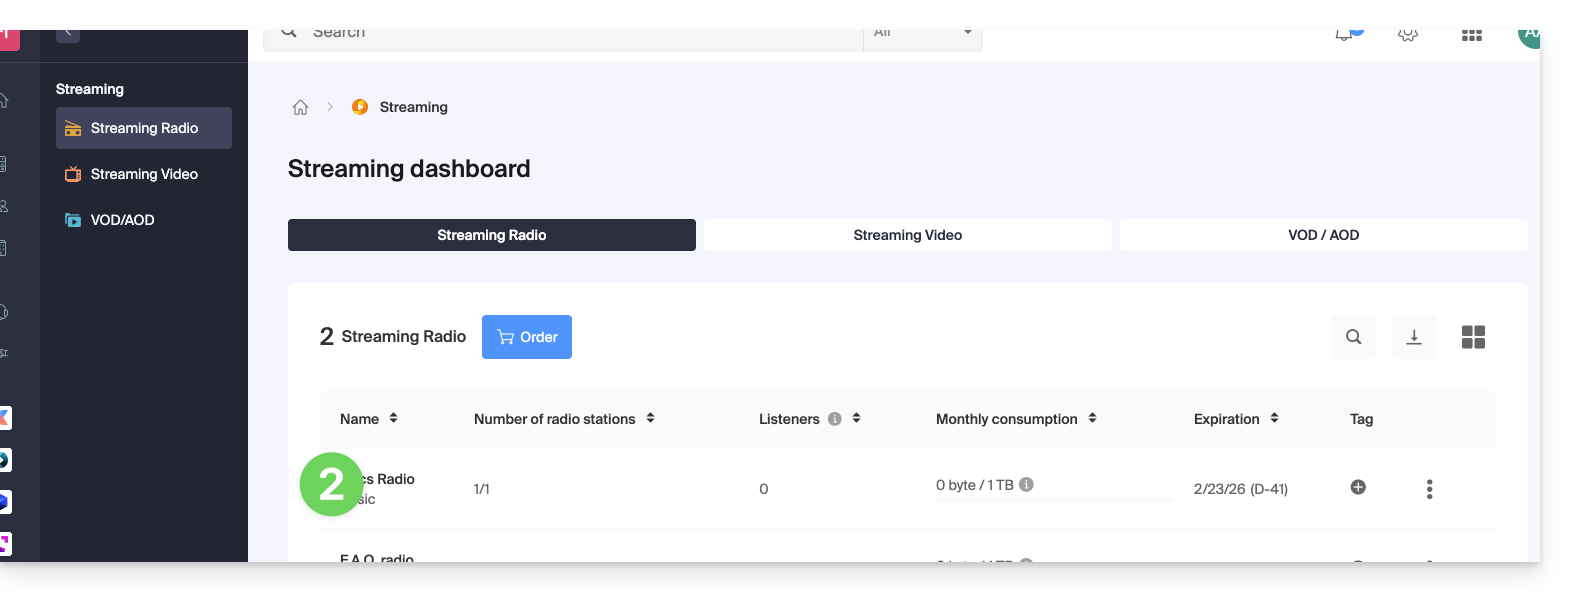
- Click on the name of the radio concerned:
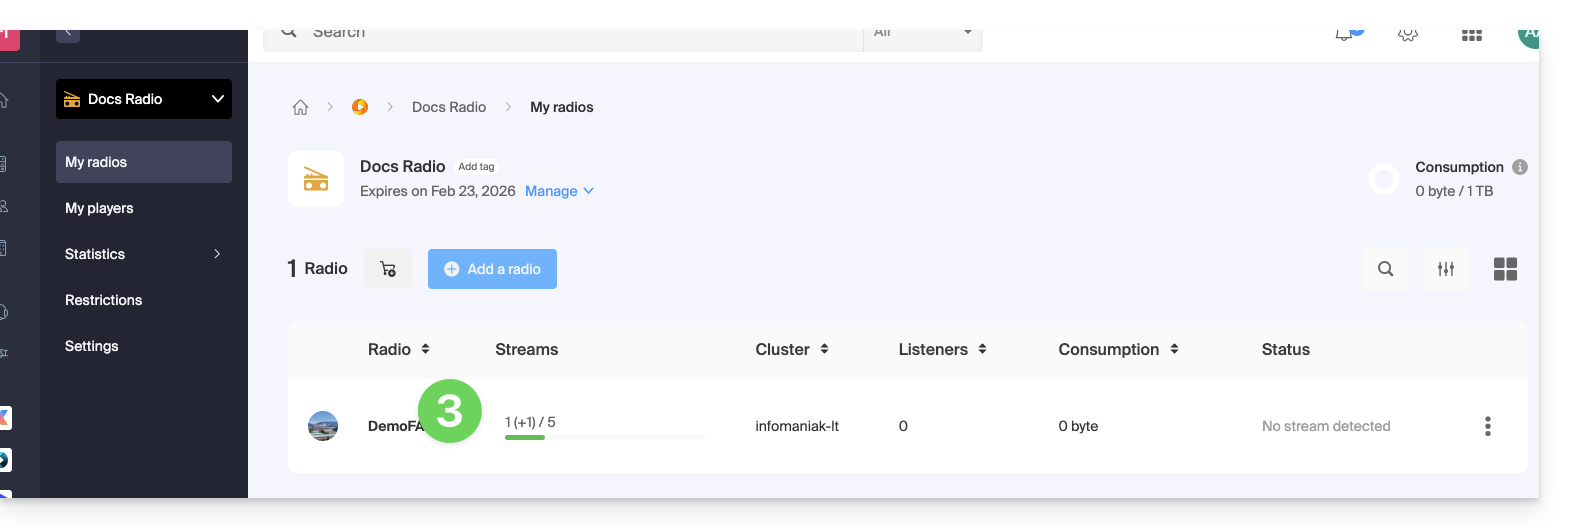
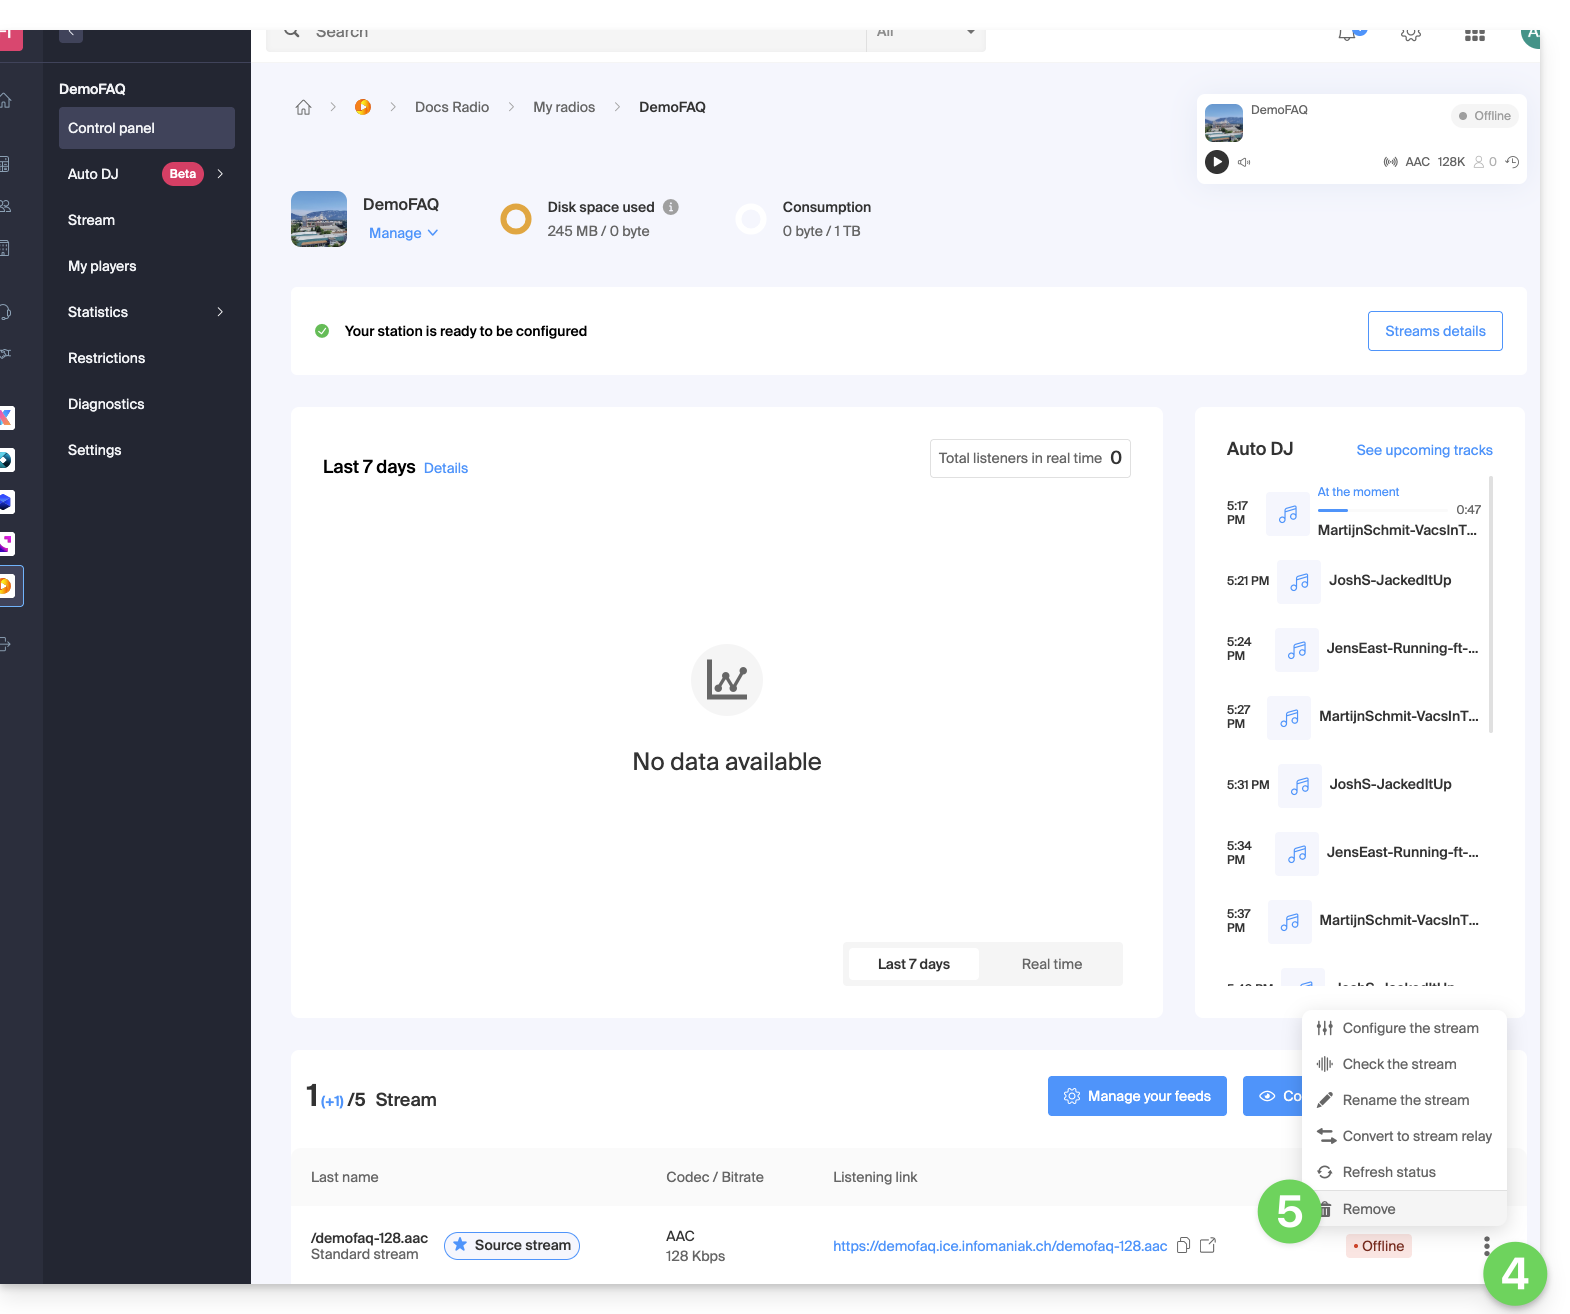
- Click on the action menu ⋮ located to the right of the item concerned.
- Click on Delete:
- Enter the name of the radio to confirm the deletion.
This guide explains how to properly configure a stream on the Infomaniak Radio Streaming.
Configure radio stream broadcasting
To access the Radio Streaming service:
- Click here to access the management of your product on the Infomaniak Manager (need help?).
- Click directly on the name assigned to the product concerned.
- Click on the radio name.
- Click on the Configure Streams button:
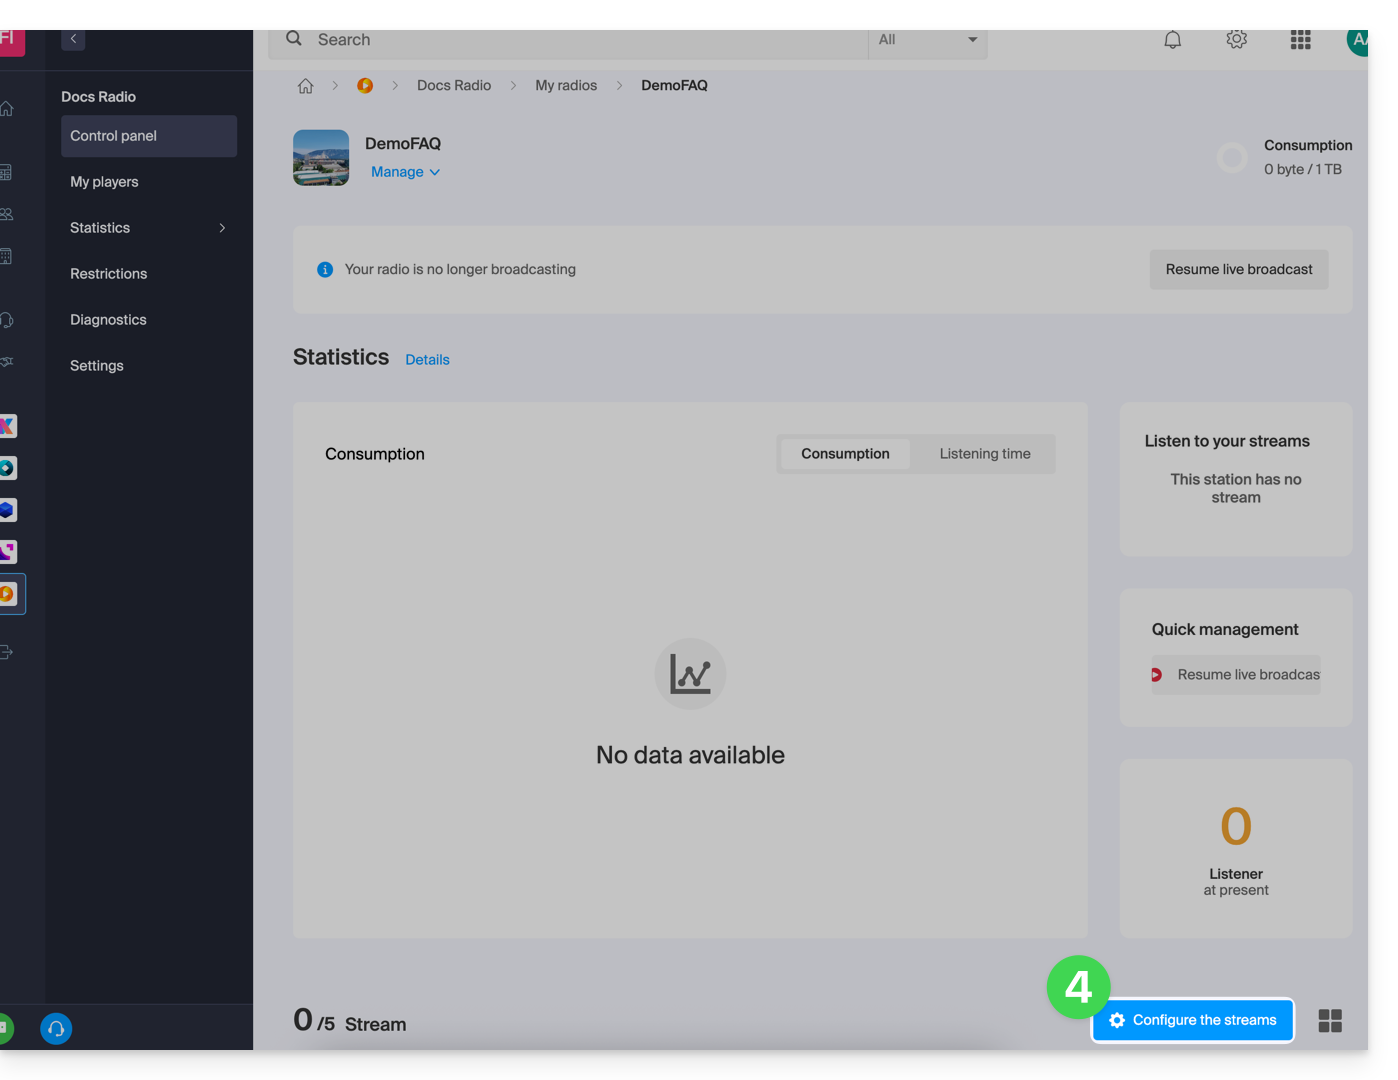
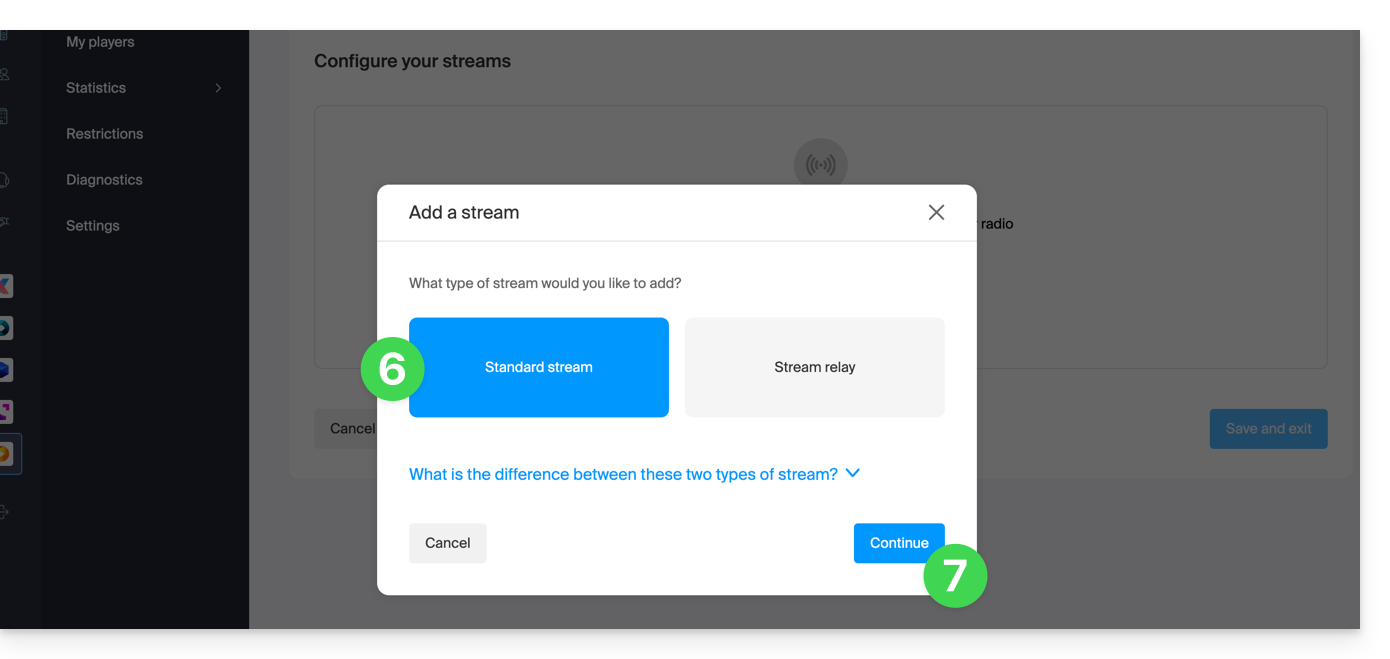
- Click on the Add a Stream button:
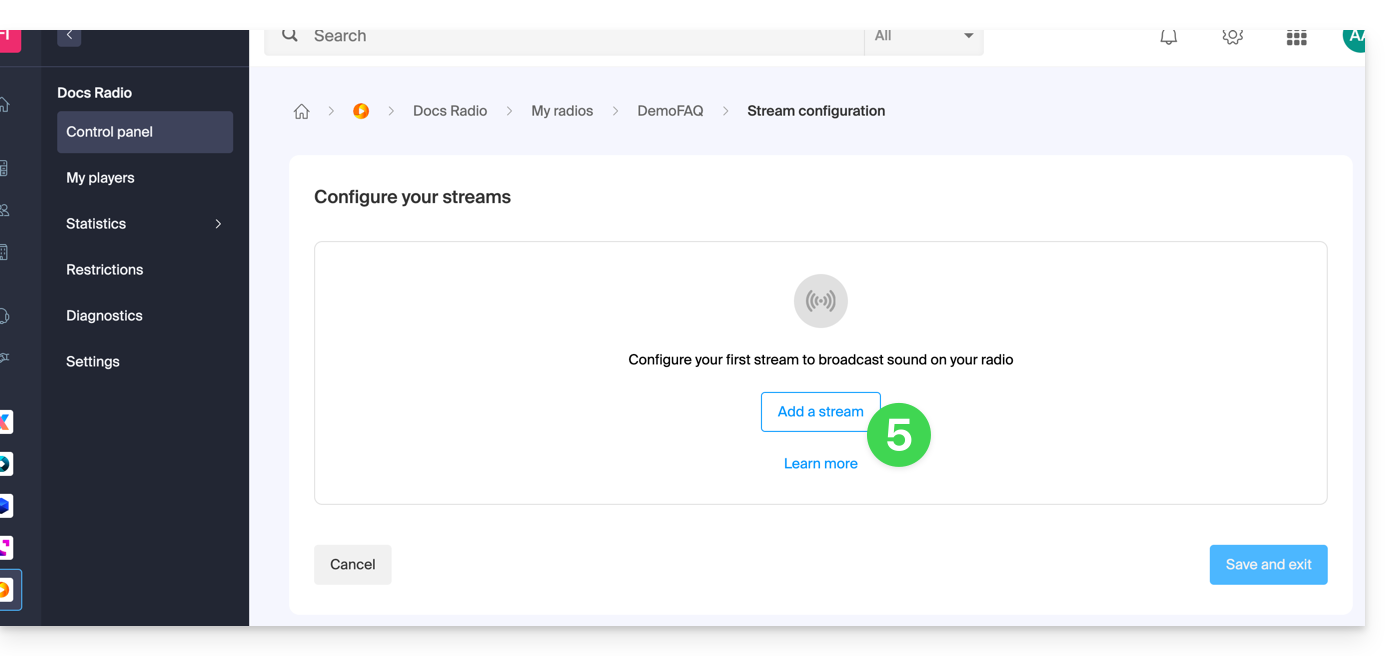
- Add a standard stream (refer to this other guide regarding stream relays).
- Click on the button to Continue:
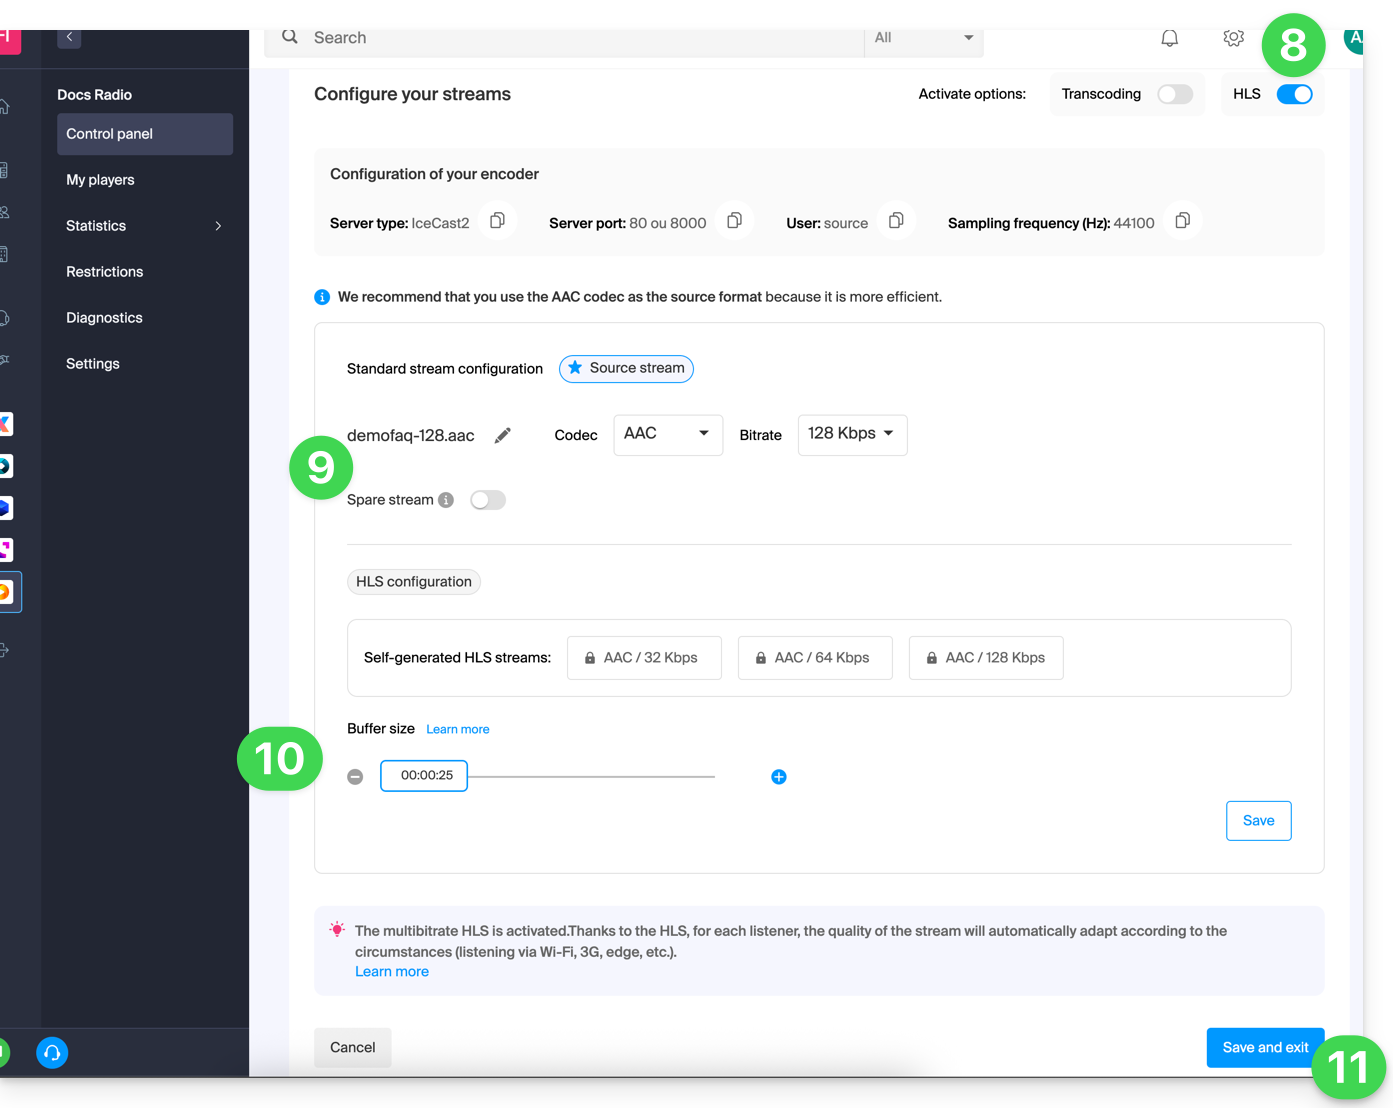
- Choose the desired options, including you can enable HLS which will not be counted in the total number of streams.
- Configure the desired quality and refer to this other guide if you are looking for information about the type of stream.
- Adjust the buffer size if necessary (do not forget to save if necessary).
- Click on the button to Save and Exit:
You can now configure an application with the parameters obtained at the end of this procedure.
This guide explains how to specify a backup audio stream on the Infomaniak Radio Streaming.
Thus, if your main stream becomes unavailable, the backup stream will automatically take over the broadcast.
Create a backup stream
To access the Radio Streaming service:
- Click here to access the management of your product on the Infomaniak Manager (need help?).
- Click directly on the name assigned to the product concerned:

- Click on the name of the radio concerned:

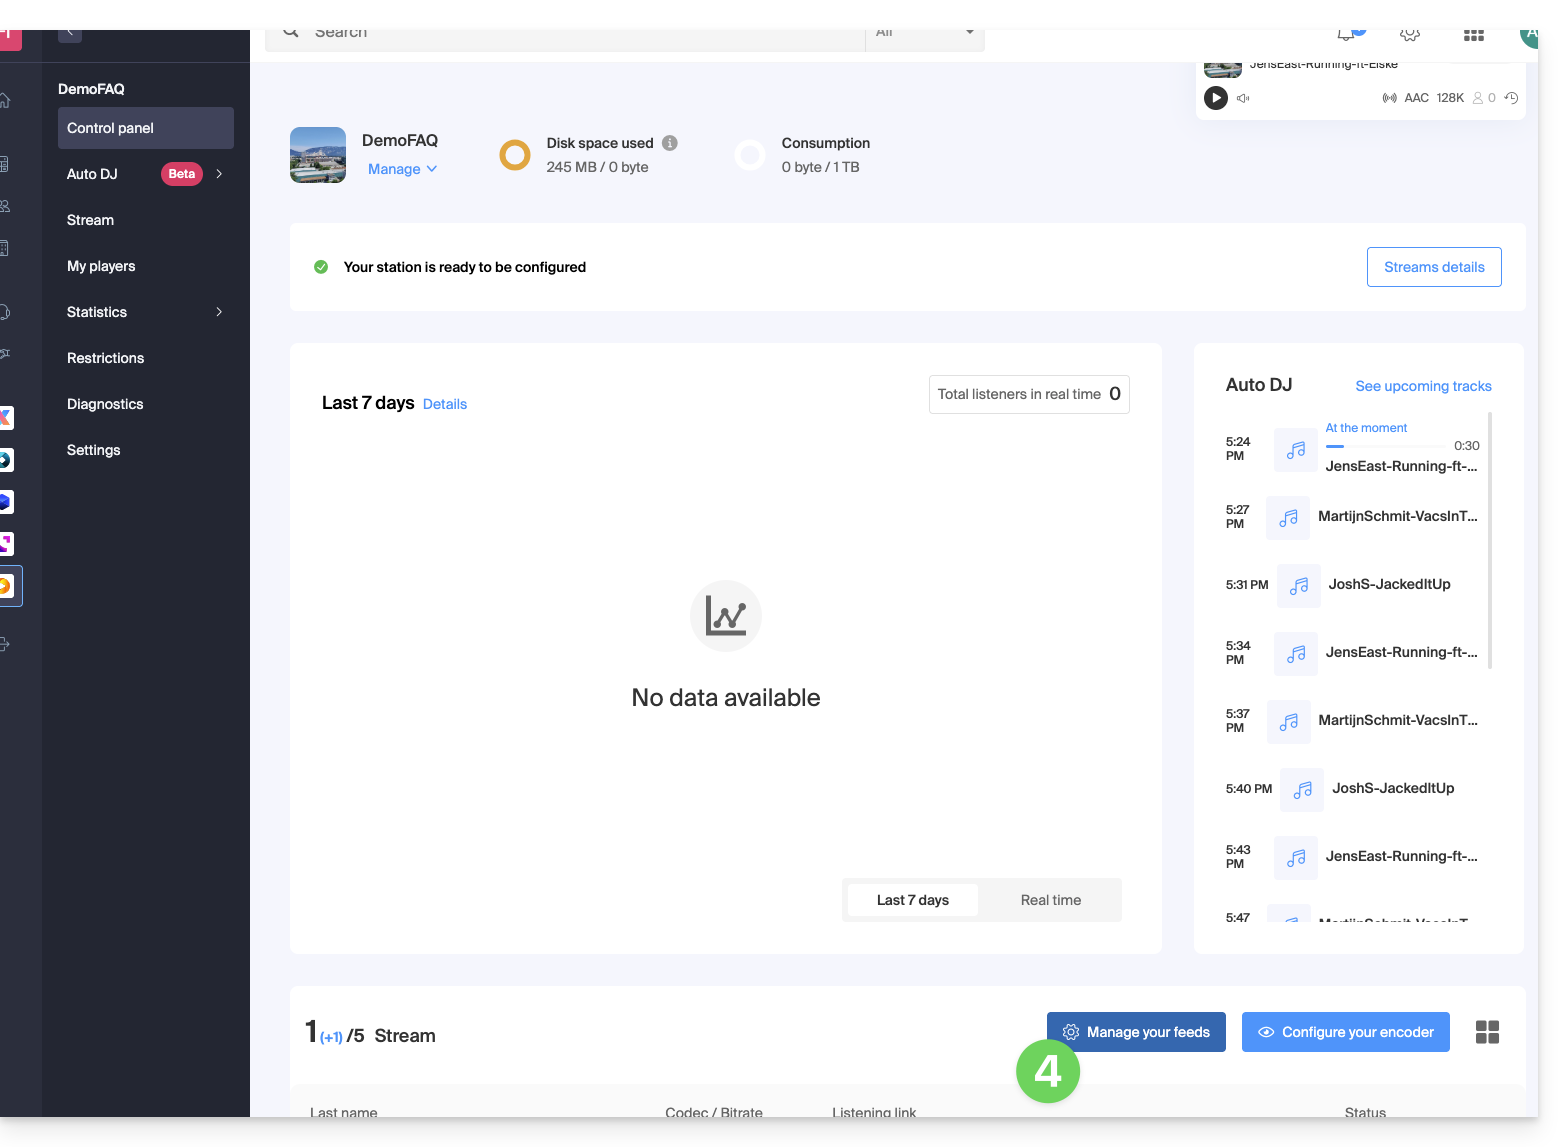
- Click on the button to manage your streams:
- Either:
- Add a stream to create a new stream and attach a backup stream,
- Configure an existing stream to enable the option:
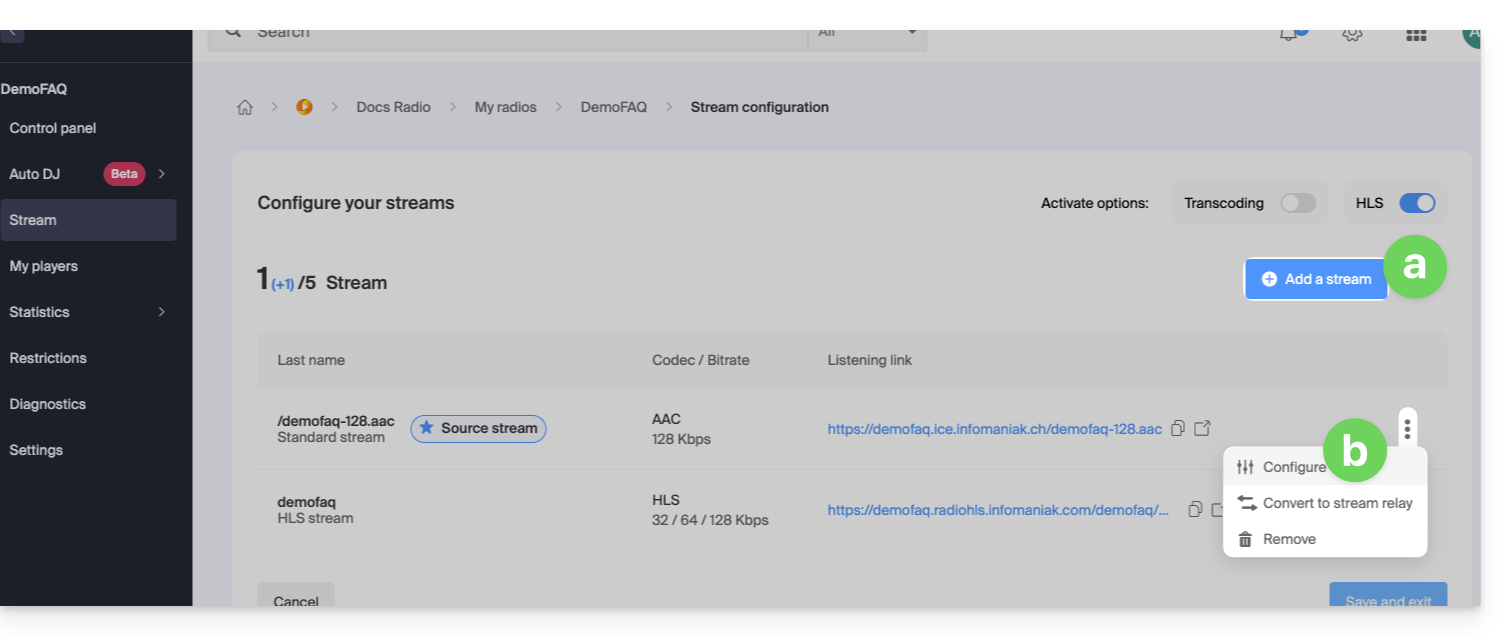
- Click on the toggle switch to enable the backup stream on your stream:
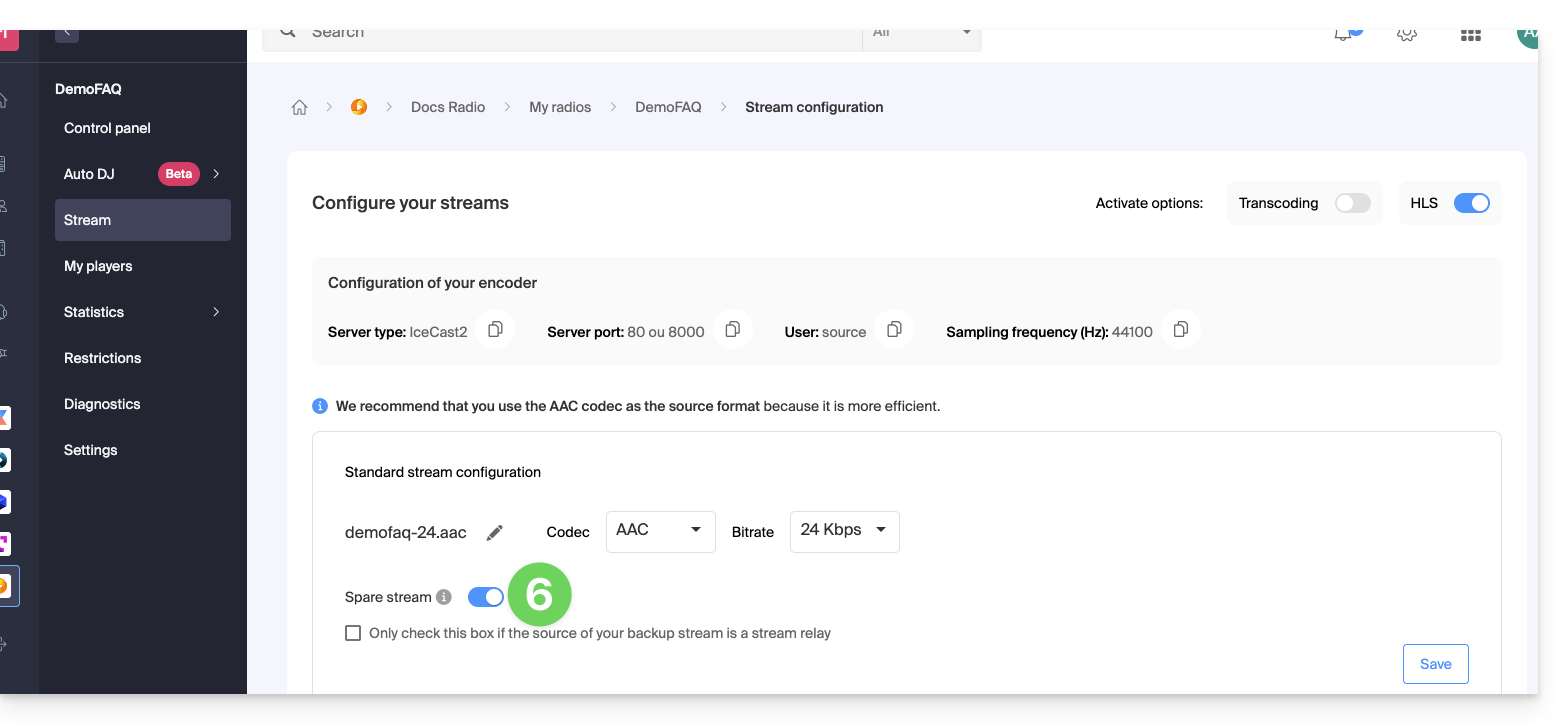
- Copy the information available to you to configure your backup encoder.
- Save the activation of the backup stream at the bottom right of the page.
- In the same place, you can set the backup stream as a stream relay to manually enter the parameters corresponding to the backup audio stream:
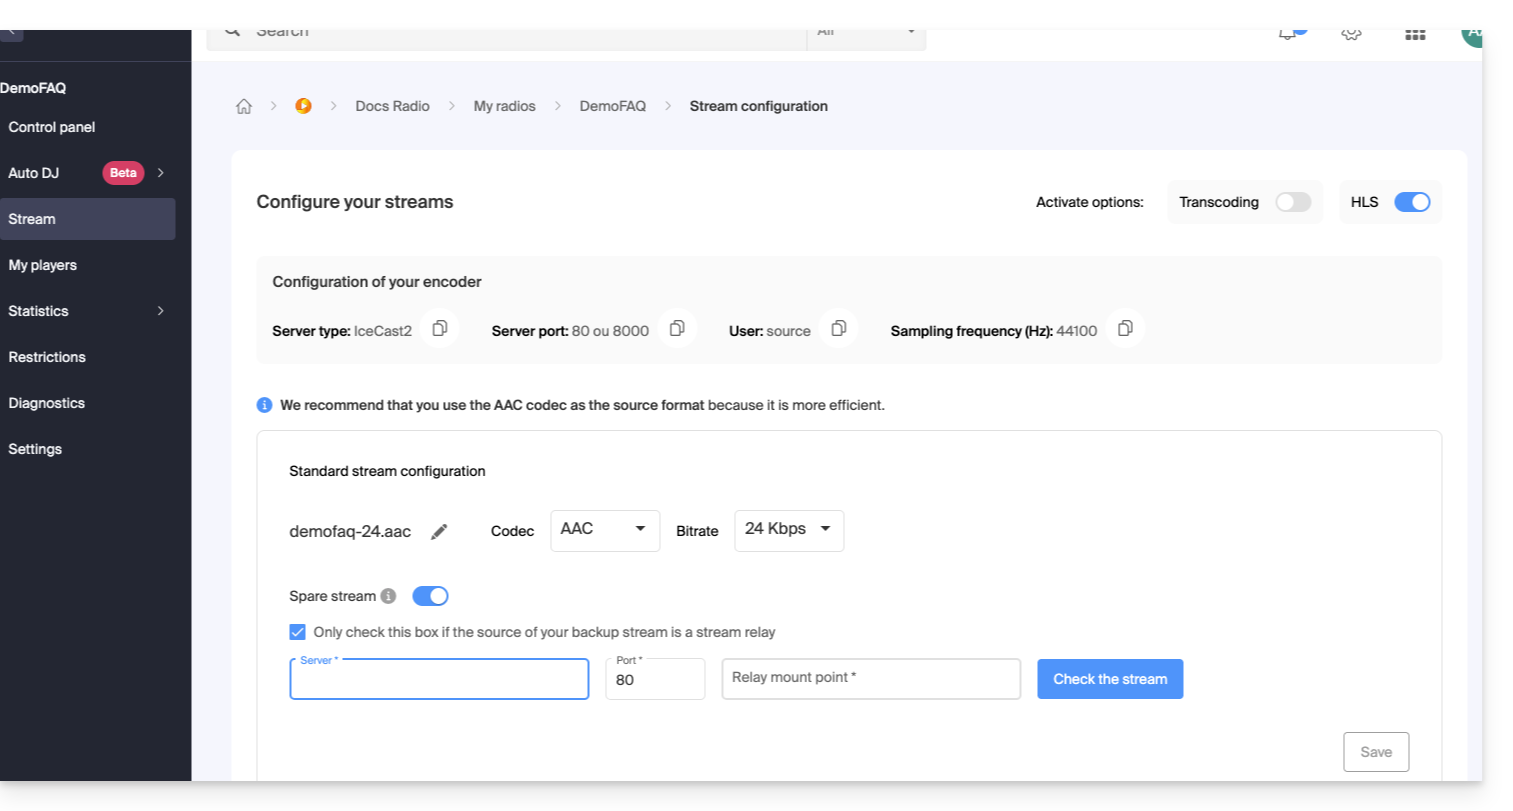
- In the same place, you can set the backup stream as a stream relay to manually enter the parameters corresponding to the backup audio stream:
Save the new information at the bottom right of the page.
This guide concerns the listening information of Streaming Radio that can be exported to ACPM (formerly OJD Numérique).
Preamble
- ACPM, the Alliance for Press and Media Figures, is an independent organization in France that certifies data related to the distribution, audience, and traffic of media.
- These data, recognized as the official reference, support market players in the media and advertising sectors in analyzing, comparing, and structuring their strategies.
- Under the governance of its bodies composed of media professionals, ACPM ensures transparency, independence, and methodological rigor; it provides reliable certifications in line with the evolution of the media sector.
- Also refer to this other guide regarding a similar service but intended for Switzerland.
Manage ACPM Certification
Prerequisites
- The organization in which the Streaming service is located must be established with an address in France.
- To activate ACPM certification, please contact this service by email:
equipe-ojdnumerique@acpm.fr. - Once the contract is established with them, contact Infomaniak support by providing the information related to your ACPM and Infomaniak contract.
To manage the activation or deactivation of the service:
- Click here to access the management of your product on the Infomaniak Manager (need help?).
- Click directly on the name assigned to the product concerned.
- Click on the name of the audio stream concerned.
- Click on Settings in the left sidebar.
- Activate or deactivate the export of logs to ACPM with the toggle switch:


