
Knowledge base
1000 FAQs, 500 tutorials and explanatory videos. Here, there are only solutions!
This guide provides the steps to obtain one or more Infomaniak invoices before and after payment, view, download and print all or part of the billing documents history for your accounting.
Prerequisites
- To be Administrator or Legal Representative within the Organization…
- … or a simple user account but with permission to manage accounting:

- … or a simple user account but with permission to manage accounting:
Final invoices can only be printed after they have been paid.
Access the invoice history
To access the invoicing documents page:
- Click here to access the invoice history on the Infomaniak Manager.
The table automatically displays the most recent invoices.
The top section allows you to filter documents based on status Paid, Refunded, etc., and based on the desired period (start and end calendar):
Export one of the invoices
To view one of these documents in PDF format and then obtain it on your device:
- On the same page, click on the invoice in question in the table that appears.
- Click on the Download button below the displayed document:

Export a set of invoices
To download a set of documents in a CSV file in .csv format or receive it by email:
- On the same page, click on the blue button at the top right of the table and choose the desired type of export:

- Filter the documents by status Paid, Refunded, etc. and based on the desired period (start and end calendar).
- Click on the blue Confirm button:

Print a Pro Forma invoice
Pro Forma invoices have no legal, judicial, tax or accounting value:
- Click here to access payment management on the Infomaniak Manager.
- Select the relevant products.
- Click on **Generate a Pro Forma Invoice** at the bottom of the table

- Once displayed, it is then possible to download the Pro Forma invoice.
This guide explains how to add a billing address so that the products of your Organization can be billed in the future under new coordinates, for example to assign invoices to different people.
Add billing addresses
To create additional billing addresses:
- Click here to access billing address management.
- Click the Add button.
- Enter the desired coordinates for the additional billing address
- Click Confirm

When renewing a product, choose the desired billing address.
Refer to this other guide if you are looking for information about the billing address currently defined.
This guide is for you if you have received a payment reminder for an Infomaniak invoice even though everything seems to be in order.
Reminder email from Infomaniak?
Check that the reminder received is not a phishing attempt (fake email / message not from Infomaniak / scam).
Standing order
If you have set up a standing order, the reference number will not match the invoice number.
Since each invoice has an individual reference number, check the invoice for the month or payment period in question.
Difference in amount / currency
The amount of your payment does not match the invoice. Please always pay the exact amount of the invoice, and in the currency of the latter.
Money on the prepaid account
The payment you made has been received, but due to an issue that occurred while linking your payment to the outstanding invoice, this initial payment has been deposited into the prepaid account.
Check your prepaid account balance and pay the invoice using this method.
Payment reminder that crosses with the payment
A payment has indeed been made, but if it was by bank transfer, a reminder may have been sent before the invoice was settled.
You can change how payments should be made:
This guide explains how to switch from one Organization to another from your Infomaniak Manager or how to remove yourself from an Organization to which you belong.
Preamble
- Since you opened your account with Infomaniak, you are part of at least one Organization.
- If you were alone and it was not an invitation, an Organization was created in your name and you automatically become the legal manager.
- Otherwise, you belong to the Organization that invited you (to join its kSuite, to manage a product, etc.).
- Only an owner/legal manager can make changes.
- It is quite possible to access several Organizations from the same login credentials, and to switch quickly from one to the other.
- You can also switch between your Organizations on ksuite.infomaniak.com; if you own my kSuite, it will always be offered first.
Display another Organization
To switch to one of the other Organizations to which you belong:
- Click here to access the management of your products (Infomaniak Manager).
- Click on the chevron at the top left of the Manager interface.
- Click on the Organization to which you want to access.
- The change of Organization is immediate, you are automatically switched:

Manage Organizations / Leave an Organization
To view all the Organizations to which you belong (because you created them with your user account or because you were invited to them) and possibly remove your membership (if you are not the last user or the only legal manager):
- Click here (or on the badge with your initials / avatar at the top right of the Infomaniak Manager) to "Manage my account":
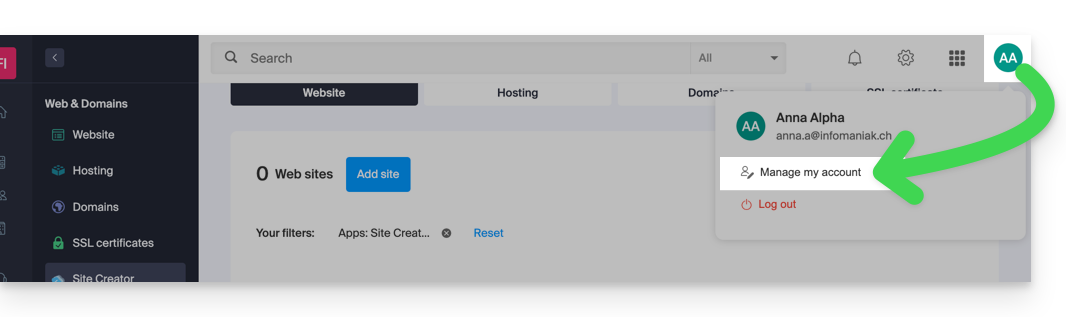
- Click on Organizations in the left sidebar.
- Click on the icon located to the right of the Organization's name to leave it:
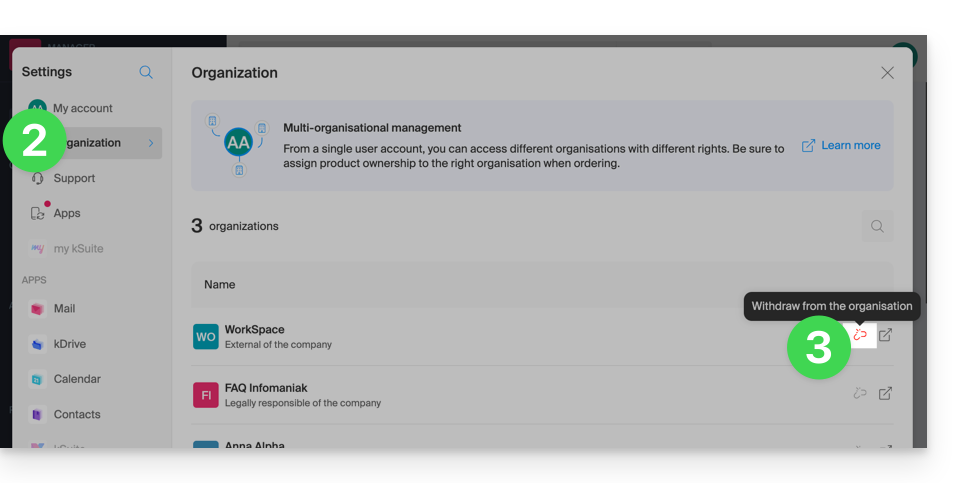
A user can leave any Organization on their own as long as…
- ... this user does not belong to the Organization's kSuite
- ... this user's login address is not in an Organization Mail Service
- ... this user is not the last owner of the Organization
This guide explains how to enable or disable the Renewal Warranty option for Infomaniak products.
Preamble
- Renewal Warranty is an additional security measure to ensure the continuity of your products in case you were unable to renew the products on time or if an automatic renewal did not work; it allows you to avoid any service interruption.
- Infomaniak will renew the products for you and issue an invoice that you will find in your account.
- This option is available at the time of purchase (except for the NAS Synology product) or after purchase.
Enable the Renewal Warranty option
One product at a time
To enable Renewal Warranty on the product of your choice:
- Click here to access the management of payments on the Infomaniak Manager (need help?).
- Click on the action menu ⋮ located to the right of the item concerned.
- Choose to enable the option:

- Follow the instructions of the modal that has opened.
All products at once
To enable Renewal Warranty on several of your products:
- Click here to access the management of renewals on the Infomaniak Manager (need help?).
- Click on the checkbox at the top of the column to select all your products in 1 click.
- Click on the Manage renewals button.
- Choose to enable the option:

- Follow the instructions of the modal that has opened.
Disable the Renewal Warranty option
One product at a time
To disable Renewal Warranty on the product of your choice:
- Click here to access the management of payments on the Infomaniak Manager (need help?).
- Click on the action menu ⋮ located to the right of the item concerned.
- Choose to deactivate the option:

- Follow the instructions of the modal that has opened.
All products at once
To deactivate Renewal Warranty on multiple of your products:
- Click here to access the management of renewals on the Infomaniak Manager (need help?).
- Click on the checkbox at the top of the column to select all your products in 1 click.
- Click on the Manage renewals button.
- Choose to deactivate the option:

- Follow the instructions of the modal that has opened.
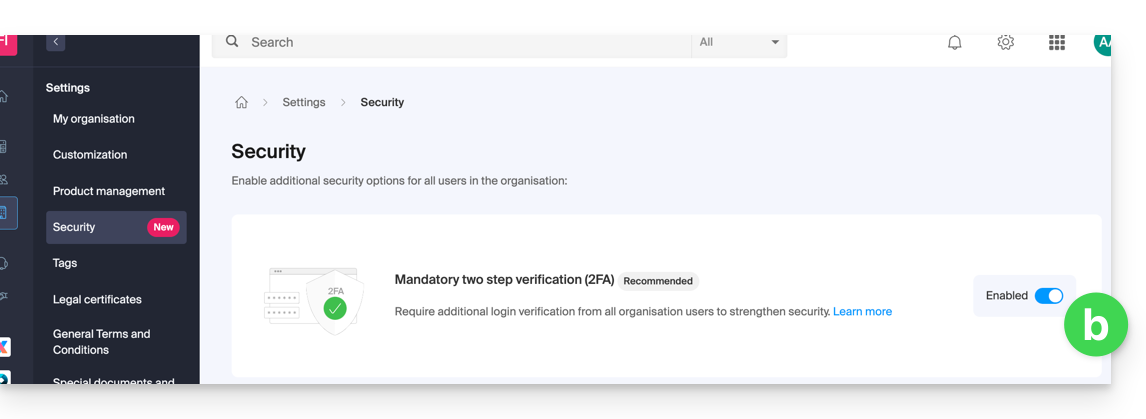
This guide explains how to disable two-factor authentication, also known as two-factor authentication (2FA) or two-step verification for logging into Infomaniak Manager (manager.infomaniak.com) or Infomaniak Mail (ksuite.infomaniak.com/mail).
For security reasons, Infomaniak support will never disable an enabled login validation method on an account following a simple request. You must follow the procedures below.
Disable 2FA
If two-step verification is enabled and you want to disable it:
- Click here to access 2FA management on Infomaniak Manager.
- Click the Remove button to remove security:

- If the red button is inactive / grayed out…
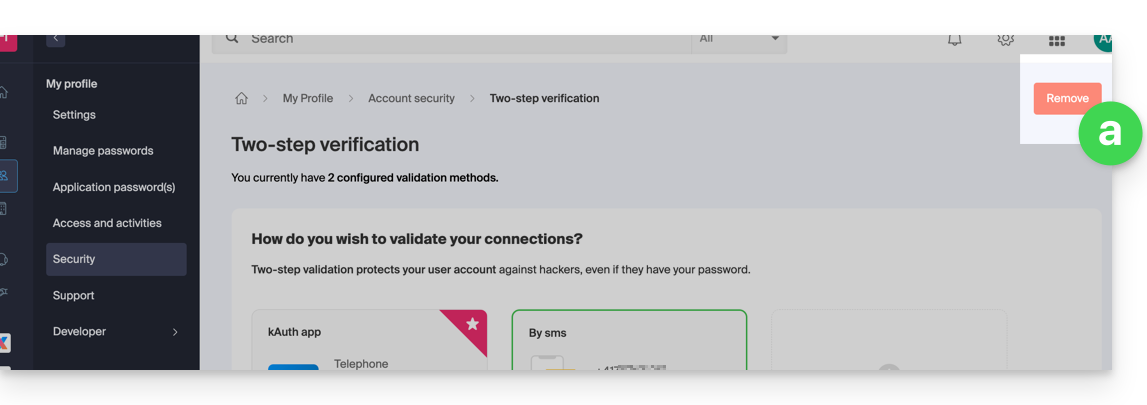
- … you will need to contact your administrator because there is probably an upstream security option that prevents you from disabling 2FA:
- If the red button is inactive / grayed out…
- Enter the password to log in to your account.
Note: if you were using the SMS authentication method, once disabled, you will only be able to re-enable this method if you are resident in CH / FR / BE / DE. Outside these countries, you will need to use kAuth or any OTP application.
In case of a problem
Obviously, the procedure above requires logging in one last time with two-factor authentication in order to then be able to disable it.
If you do not have access to the kAuth application or the device that receives the validation SMS, there is no point in calling Infomaniak; in this case, no choice, you will have to provide a number of security elements manually or via the Infomaniak Check (kCheck) app to regain access to your account:
- Click here to access the Infomaniak Manager login page.
- Enter the username and correct password.
- When prompted for additional authentication, click on alternative methods:

- Choose to enter one of your recovery codes if you had downloaded the sheet when activating 2FA:

- Otherwise select the last option to request help to access the form allowing you to submit your identity documents and recognition selfie:

- Follow the procedure to the end and be patient:

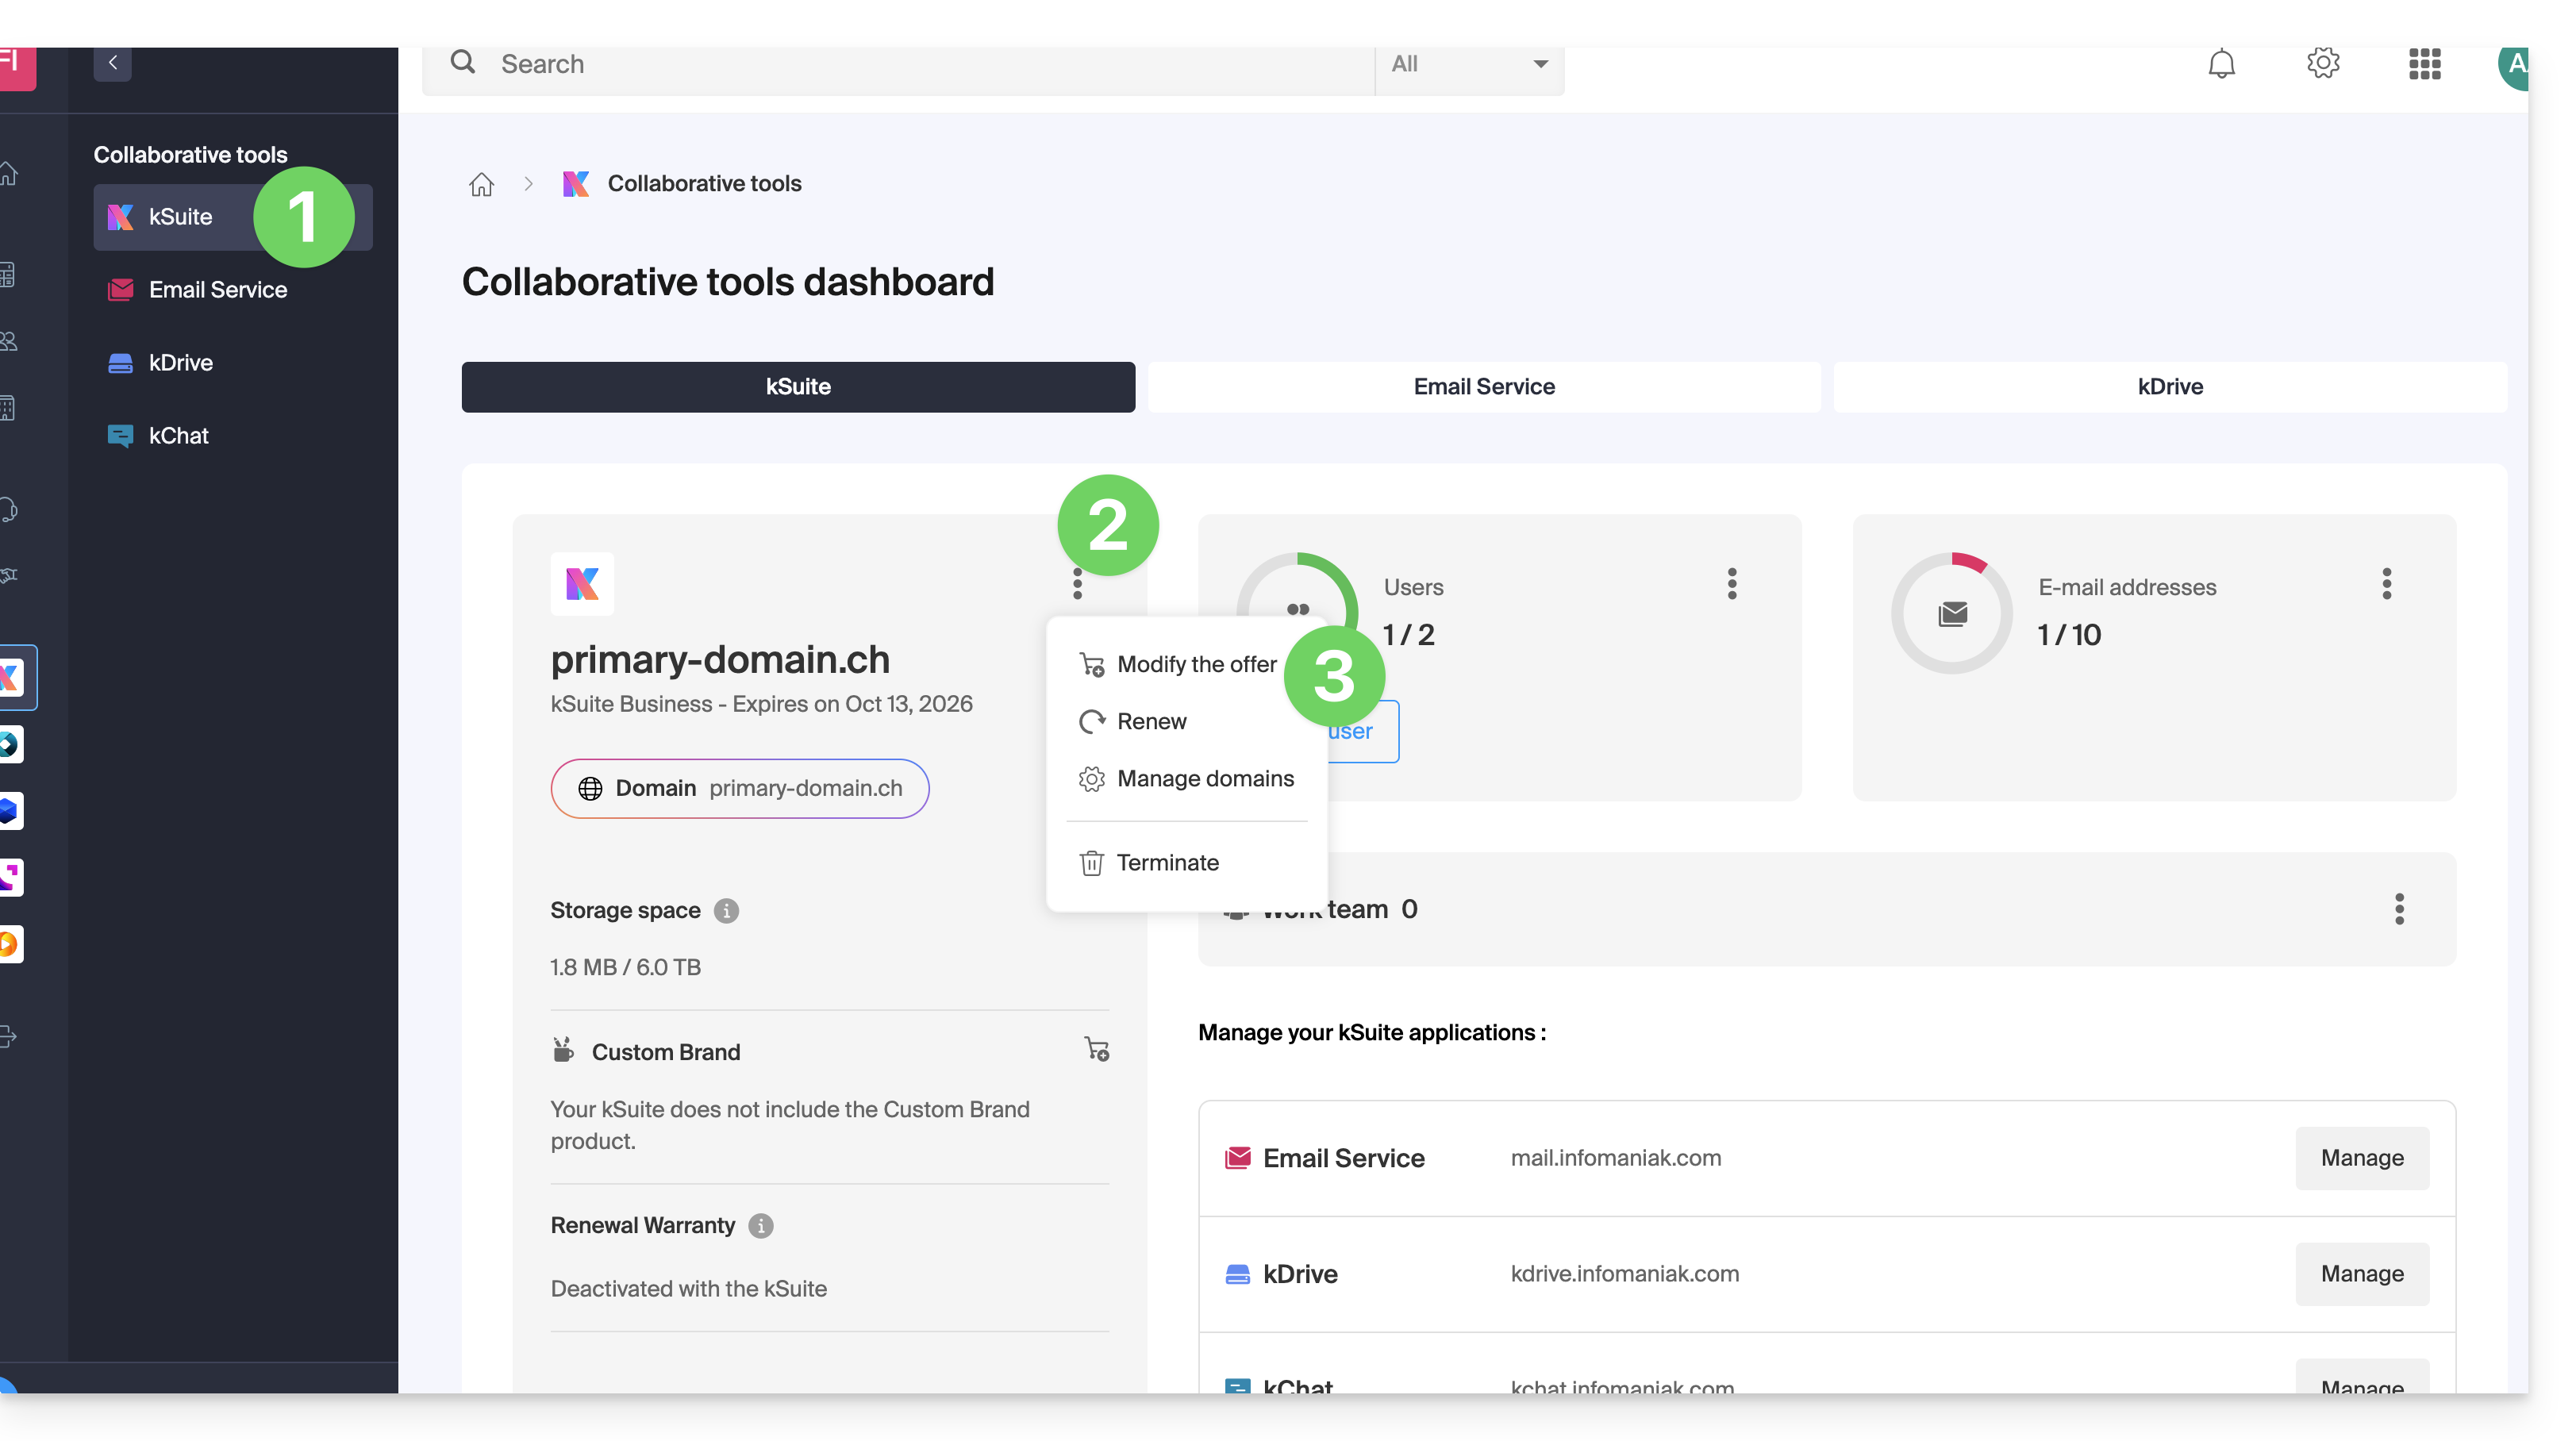
This guide explains how to modify the kSuite offer.
Preamble
- kSuite is a bundled offer that can be modified to a higher offer at any time (increase the number of users and the size of the disk space for data storage)
- It is not possible to subsequently change to a lower rate, nor to transfer kSuite to another Organization.
- The products included in kSuite cannot be moved or terminated independently of each other.
- To help you identify the kSuite offer best suited to your needs, refer to this other guide.
Modify the kSuite offer
To access the modification of the kSuite offer:
- Click here to access the management of your product on the Infomaniak Manager (need help?).
- Click on the action menu ⋮ to the right of the kSuite name.
- Click on Modify the offer:
This guide explains how to manage the reception of Infomaniak Newsletters based on the desired topics.
Modify the Infomaniak news subscription
To select Infomaniak topics to receive newsletters based on them:
- Click here to access the management of your settings (Infomaniak Manager).
- Click on Manage (in the box Infomaniak News):

- Click on the toggle switch to the left of the news to subscribe or unsubscribe.
- Click on Save.
Also find Infomaniak News on https://news.infomaniak.com !
This guide explains how to change the email address used to recover access to your Infomaniak account.
Preamble
- When you forget your Infomaniak password, the procedure you can follow includes resetting the password via a link that will be sent to your secondary email address.
- You can specify or change it by following this guide.
Change the password recovery email
To change the password recovery email:
- Click here to access the management of your security information on the Infomaniak Manager.
- Click on Modify in the Recovery email box:
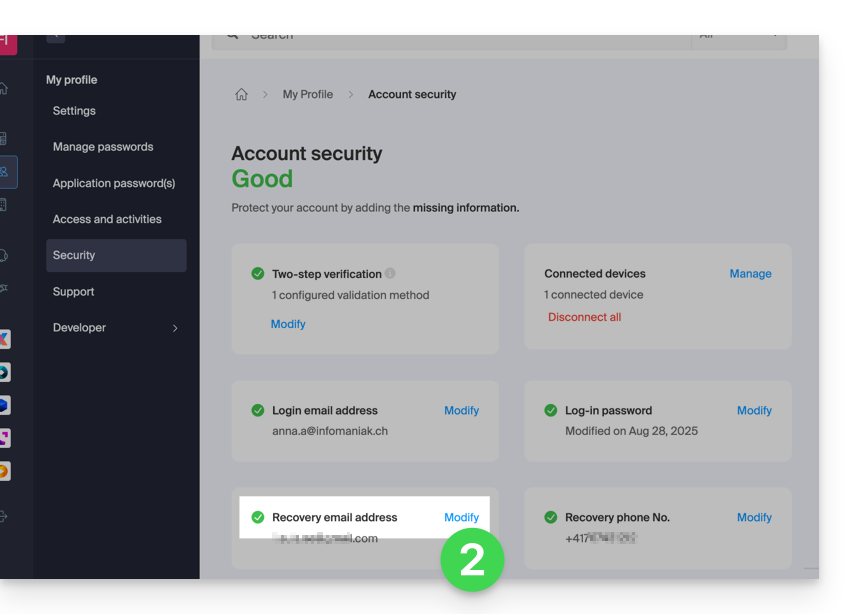
- Enter the new recovery email address and then click on Save.
This guide explains how to update a payment profile on the Manager to facilitate your Infomaniak service orders and renewals.
Preamble
- Having a payment profile allows you to speed up your payments.
- Payment data is securely saved.
- The funds available in the prepaid account can, for example, serve as the default payment profile, but other payment methods can be registered.
Add or modify a payment profile
To access payment method management:
- Click here to access payment profile management on the Infomaniak Manager (need help?).
- Update or add the desired payment method:

This guide explains how to obtain information on…
- … the connections made to the Manager Infomaniak with your Infomaniak account login (= user account),
- … the activities performed within the Manager by your Infomaniak account.
Obtain the log of connections to the Infomaniak account
To view a connection log (active sessions) made to the Manager Infomaniak with your Infomaniak account login:
- Click here to access the summary of accesses to the Infomaniak Manager by your user account.
- From the Account Access tab, view the list of devices connected to your Infomaniak account:

- You can end an open session by clicking on the icon
to the far right of the name of the device connected to your account, which will log it out.
Be notified in case of successful or unsuccessful connection
To be notified by email when connecting or attempting to connect to your Infomaniak account:
- Click here to access the security summary of your account on the Infomaniak Manager.
- Click on Security Settings:

- Select the cases for which you want to be alerted by email (warning upon successful connection, or only in case of failed connection).
In the same place, you can choose from how many minimum unsuccessful attempts to lock your Infomaniak account.
Once locked, the account can be unlocked by an Organization administrator or by a secure form.
Obtain the activity log of the user account
To view recent activities performed within the Manager by your user account:
- Click here to access the activity summary of your account on the Infomaniak Manager.
- From the Account Activities tab, view the latest activities and actions of your Infomaniak account:

- Log search and filtering options are available to you: date, product, or type of action.
This guide explains how to customize the display of the Organization you are in within the Manager Infomaniak.
Preamble
- You can, for example, add a logo to the Organization's name and completely replace the name display with a small banner.
- For advanced customization of URLs and certain interfaces, including login pages, discover Custom Brand.
Access the customization page
Prerequisites
- Be the legal representative or administrator in the Organization concerned.
- Be in the correct Organization (or switch to another if necessary).
To customize the Manager interface:
- Click here to access the Organization customization on the Infomaniak Manager.

The left button Customize allows you to edit the visible part at the top left of the Manager:
- Choose a square logo only (in this case, no rectangular logo).
- Choose to put initials in the square (in this case, it is possible to have a rectangular logo in addition or no rectangular logo).
The right button Customize allows you to add a rectangular logo (only) to applications such as kDrive and Mail:
- Note that the rectangular logo will also be taken into account on the Manager side (it is not possible to have a different rectangular logo between these different services).
- If no rectangular logo is configured on the Manager, it simply will not be displayed.
This guide explains how to delete an Infomaniak account (= user account), i.e. delete your access to the Manager and/or the Infomaniak Mail Web app ksuite.infomaniak.com/mail.
Preamble
- This operation results in the immediate deletion of your calendars and address books.
- All access to the Manager with this identifier will be lost.
- This operation does not result in the deletion of email addresses consulted from the account in question (except for some free offers, but in this case, it is specified to you before the deletion operation).
- If the account you are using is the only existing account within an Organization, you must first delete the Organization or appoint someone else in order to be able to delete your account.
Delete an Infomaniak / Mail account
To access the user profile section:
- Click here to access the My profile menu on the Infomaniak Manager.
- Click on the trash can to the right of your name to delete account and data:

- Enter the login password one last time, then the Infomaniak account will be deleted.
This guide explains how to restart the domain name transfer to Infomaniak in case of failure.
Manually restart a domain transfer
When a domain name transfer fails, you receive an email with the possible reason for the problem.
The message also contains a link to restart the transfer request without paying the transfer fees again.
In case of a problem:
- Click here to access the management of your product on the Infomaniak Manager (need help?).
- Click directly on the name assigned to the product in question.
- Follow the instructions displayed in red at the top of the page.
This guide helps you understand the concepts of recurring rebates and cashback (revenue) within the framework of the Infomaniak Partner Program.
Prerequisites
- Understand the differences between the 2 types of authorizations linking a Client to the Partner, which can be defined from the Manager.
- Understand the differences between the 2 types of payment methods linking a Client to the Partner, which can be defined from the Manager.
Cashback
This is an amount equal to the difference between the public price and the preferential price that the Partner benefits from as an Infomaniak reseller.
This amount is refunded as cashback to the Partner's prepaid account in the following cases:
Full access partnership (Client's payment methods)
- When the Client places an order or renews a product.
- When the Partner places an order or renews a product on behalf of their client using the client's payment methods.
Full access partnership (Partner's payment methods)
- When the Client places an order or renews a product.
Limited access partnership
- The Client places an order or renews a product that the Partner manages.
Rebate
A Partner benefits from rebates on orders and renewals due to their status as an Infomaniak reseller. The rebate applies in the following case:
Full access partnership (Partner's payment methods)
- When the Partner places an order or renews a product on behalf of their client using their payment methods.
Accumulation
The rebate is combined with the degressive rate of Web/Mail hosting.
With 35 web hostings, you pay for example only CHF 208.32 / month excl. VAT per hosting instead of CHF 347.20, which represents a total reduction of -40%.
Details of the calculation in CHF (excl. VAT):
- Regular price for 35 Web Hostings: CHF 347.20
- With 20% Partner Discount: CHF 277.76
- Final partner rate with 25% decreasing rate: CHF 208.32
Calculation details in euros (excl. VAT):
- Regular price for 35 Web Hostings: 201.25 €
- With 20% Partner Discount: 161 €
- Final partner rate with 25% decreasing rate: 120.75 €
The decreasing rate (- 25%) is therefore applied to the remaining amount after the partner discount (- 20%).
This guide explains how to add a Client as part of the Infomaniak Partner Program.
Prerequisites
- Only the legal representatives of the Partner Organization are authorized to add Clients.
Add a "managed" Client
To add a Client as part of your Partner activity:
- Click here to access your managed Clients on the Infomaniak Manager Reseller Space (need help?).
- Click the blue “Add a client” button at the top right:

- Follow the procedure to complete.
The client will receive an email with the request for different accesses and will have the option to decide to grant different access rights from those requested by the Partner.
Once the invitation is accepted by a Client, verify the access rights granted as well as the payment methods used (if applicable) on your Client's profile.
Access the Client's account and their products…
… as a legal representative or Partner administrator
- Click here to access your managed Clients on the Infomaniak Manager Reseller Space (need help?).
- Click on the icon to the right of the Client concerned in the table that appears to access their Manager.
- Click on the action menu ⋮ to the right of the Client concerned in the table that appears to access more options (such as exporting data to a CSV file (format .csv) for example):

… as a Partner Organization collaborator
- Click here to access the Infomaniak Manager.
- Click on the chevron at the top left of your left sidebar menu.
- Click on the Clients tab.
- Click on the Client concerned in the menu that appears to access their Infomaniak Manager:

This guide explains what a Single Sign-On (SSO) connection is, a mechanism that allows users to log in to multiple applications with a single set of credentials.
The "Log in with SSO" button is for users whose companies have enabled this feature. If you don't know what SSO is and/or if you are already a private Infomaniak customer, log in as usual via the blue button.
Preamble
- Infomaniak offers businesses/advanced users a connection on the page login.infomaniak.com via SSO, a connection system including Active Directory (AD) and OpenID Connect (OIDC) for Infomaniak users:

- Active Directory (AD): Microsoft directory service, often used to manage identities and access within an organization.
- OpenID Connect (OIDC): Authentication protocol based on OAuth 2.0, allowing standardized SSO connection via access tokens (token).
- For the moment, only Entra ID (formerly Azure AD) is compatible, this is not the case for a local AD or other Identity Providers similar to Entra.
Connecting to Infomaniak services via SSO
Infomaniak has recently introduced the possibility for its users to connect to its services via SSO. This means that in addition to its classic login system with username and password, you can now log in using your company or organization's credentials. This new feature is specifically designed to improve your experience and enhance security.
The "Log in with SSO" button is intended for users whose companies have enabled this feature:
- No need to remember an additional password for Infomaniak services: once authenticated with your professional credentials, you access your Infomaniak services directly.
- Your organization already applies security policies to your accounts (complex passwords, multi-factor authentication, etc.): by using SSO, these protections automatically extend to your access at Infomaniak.
- Do you change your password or account? These changes are made solely through your internal system, and they apply immediately to your connection at Infomaniak.
Talk to your system administrator or IT manager to find out if you can activate this option at Infomaniak. If your organization uses a centralized authentication system like AD or OIDC, SSO allows you to save time and simplify the management of your accesses. Infomaniak will provide the necessary information to connect its platform to your identity system.
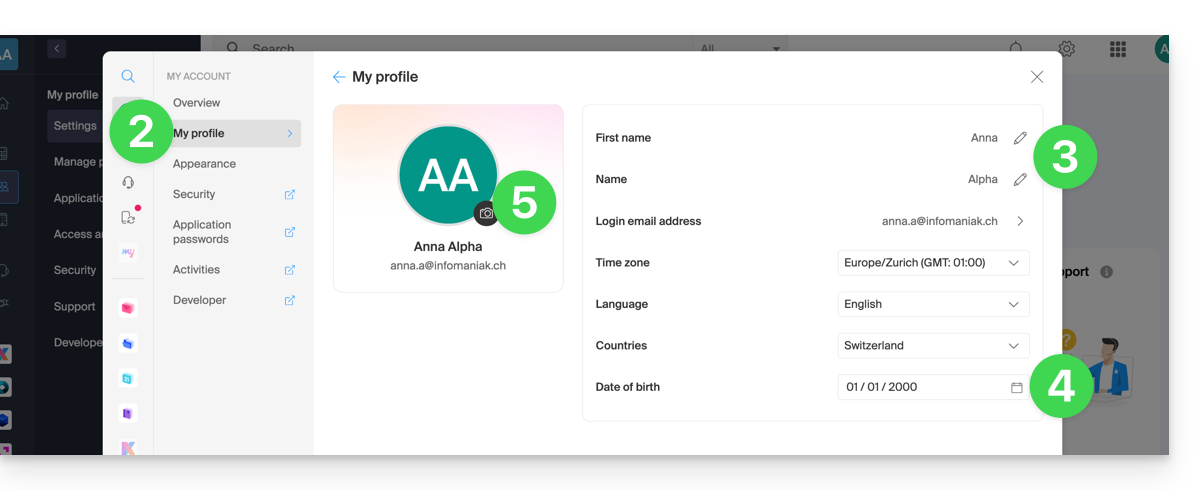
This guide explains how to change the first and last name that Infomaniak displays when you are logged into your Infomaniak account (= user account) within an Organization in the Manager, as well as the avatar of your account.
Edit the Infomaniak account details
To edit your personal details:
- Click here (or on the badge with your initials/avatar in the top right of the Infomaniak Manager) to "Manage my account":
- Click on My profile in the left sidebar.
- Modify your last name and first name on the right side.
- You can also specify your date of birth.
- You can add a profile picture to your Infomaniak account that will appear instead of your initials; it is recommended to import an image of at least 210 pixels on each side:
Learn more
If the order of an Infomaniak service is interrupted and cancelled before its end, while a bank transfer is in progress, the money will be deposited into your prepaid account.
You can then place a new order and pay using the amount available in the prepaid account.
This guide explains how to remove an Infomaniak account set up in the Infomaniak mobile app kAuth (app for iOS/Android smartphone or tablet).
Removing an account from the kAuth mobile app
To delete one of the accounts, you must use a web browser, preferably on a computer:
- Click here to access the management of two-factor authentication on the Infomaniak Manager.
- Click on the trash can in the box corresponding to the Infomaniak kAuth application:

- Enter the password to log in to your Infomaniak account.
- A notification is sent to the mobile device:

Warning: if no other method is configured to secure your account access (such as SMS), the double authentication system is therefore deactivated; it is strongly recommended to re-secure your account with double authentication!