
Knowledge base
1000 FAQs, 500 tutorials and explanatory videos. Here, there are only solutions!
This guide details the customization options for the Infomaniak Organization, including custom URLs (Custom Brand addresses) for the Manager and kSuite tools such as kDrive or Euria.
Custom Brand is a service already included with kSuite Enterprise.
Creating custom URLs
To obtain Custom Brand:
- Click here to access Custom Brand on the Infomaniak Manager (need help?).
- Click the blue Try for Free button (in the Custom Brand section)

- Enter the domain name to use in your custom web address:
- If you do not yet have a domain name, you will be able to order one at this step.
- If your domain name is already in use for another service, you will be able to choose another one, or use a subdomain (example:
my.domain.xyz).
- When choosing the domain name, the interface will present examples of custom web addresses (example: manager.domain.xyz).
- Click the blue “This web address suits me” button or select another domain name or subdomain until you find a custom web address that suits you.
- The preparation of custom web addresses may take a few minutes, a confirmation email will be sent to the email address of the account owner.
To disable access via custom URLs, click the blue Disable button at the top right of the Custom Brand section:
You can reactivate the addresses later via the same button.
Customizing the interface
In addition to customizing the web addresses of your Infomaniak products, you can add a logo. You will also be able to customize your login page via a slideshow of 3 images:
- Click here to access Custom Brand on the Infomaniak Manager (need help?).
- Click the blue Customize button (in the Custom Brand section).
- Upload an image or click Select an image to add it as a logo.
- Resize the image with the tool if it exceeds the maximum size of 270 x 70 pixels.
- The tool allows you to preview the rendering of your logo on a dark or light theme.
- Click on Validate.
- To customize your login page, click on the blue Next button all the way to the right.
- From the two color selection fields, choose the color of the text and login buttons.
- Drop or click on Select an image to create a slideshow of 3 images to the right of the login page (the images must be at least 865 x 1200 pixels).
- Click on Add then on Finish to save the changes.
Thank you for choosing to customize your account with Custom Brand!
As an option with any Infomaniak offer or already included with kSuite Enterprise, discover this customization tool to make your web addresses unique, add a logo or an image slideshow on your login page to your Infomaniak Organization.
Prerequisites
- Own a domain name with Infomaniak (transfer it if necessary).
- Its extension must be among those supported by Custom Brand.
- Note that this also works with a subdomain.
- Configure the domain to use Infomaniak's DNS servers.
⚠️ The Web Redirection tool will no longer be usable on your domain after activating Custom Brand on it.
Custom Brand customization guides
- Access Custom Brand, customize URLs & interface
- Troubleshoot an issue:
Customize your web addresses with your domain
| Access to … | without Custom Brand | with Custom Brand |
|---|---|---|
| kSuite | ksuite.infomaniak.com | ksuite.domain.xyz |
| Manager | manager.infomaniak.com | manager.domain.xyz |
| e-mails ( Mail) | mail.infomaniak.com | mail.domain.xyz |
| calendars / agendas | calendar.infomaniak.com | calendar.domain.xyz |
| contacts | contacts.infomaniak.com | contacts.domain.xyz |
| kDrive | kdrive.infomaniak.com | kdrive.domain.xyz |
| videoconferences kMeet | kmeet.infomaniak.com | kmeet.domain.xyz |
| Euria | euria.infomaniak.com | euria.domain.xyz |
Customize the interface of your Organization
The following interface options are modifiable from the kSuite settings:
- Adding your logo to the interface of your Organization.
- Adding a 3-image panorama on the login page.
- Change the text and button color on the login page.
- Customization of kDrive pages.

This guide details the various elements that can be configured and customized on kChat to best suit your usage preferences.
Change the language of the kChat interface
kChat displays in the language chosen for the Manager and, like your avatar/profile picture, these settings are managed within your Infomaniak profile.
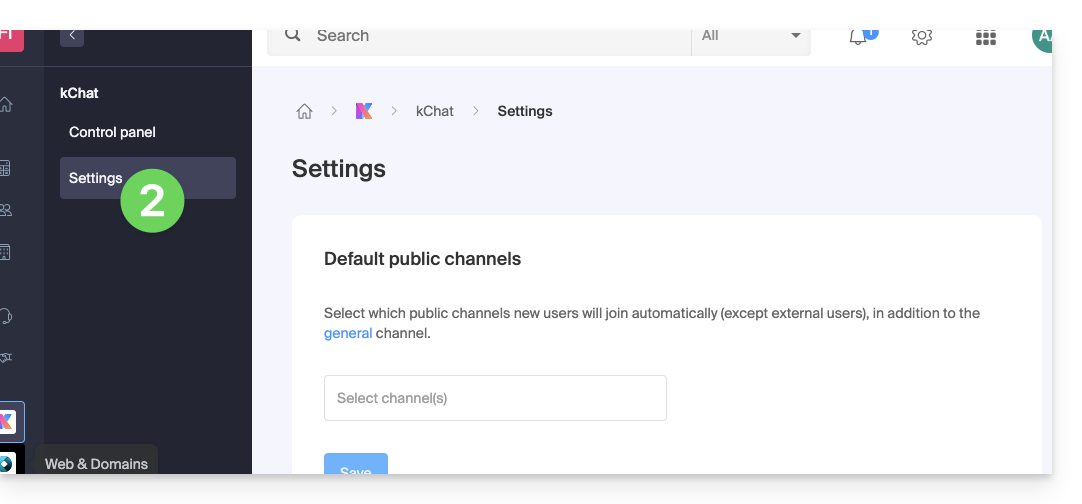
Configure kChat on the Manager
To access kChat preferences and, in particular, to define which channel(s) (one or more possible channels) new users (excluding external users) will be automatically added to, in addition to belonging to the General channel:
- Click here to access the management of your product on the Infomaniak Manager (need help?).
- Click on Settings in the left sidebar:
Customize the general display of kChat
To access the settings of the kChat applications:
- Click here to access the kChat web app (online service ksuite.infomaniak.com/kchat) or open the mobile app kChat (app for iOS/Android smartphone or tablet) or the desktop app kChat (desktop app on macOS/Windows/Linux).
- Click on the icon in the top right of the interface.
You can choose:
- a display density, and an optional color display in compact density
- whether or not to display previews in your conversations
- the size of a channel (width)
- the starting position when you return to an unread channel
- the number of personal messages to display
The Notifications tab allows you to customize kChat notifications.
The Shortcuts tab indicates the list of keyboard shortcuts available to work faster with kChat.
Resolve a display zoom issue
To zoom in or out of the display that has become unreadable, you need to use the following keyboard shortcuts:
- As in a browser,
CTRL/CMDand-to zoom out CTRL/CMDand+to zoom inCTRL/CMDand0to reapply the default size
Dark Mode / Light Mode
The light or dark theme of the web app is configured globally (refer to this other guide).
However, the desktop app can be configured independently of the rest; this is set from the icon at the top right of the interface: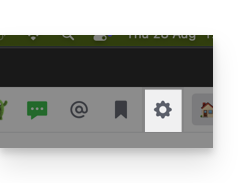
Customize a discussion, a channel, etc.
Next to each element of the left sidebar is an action menu ⋮ allowing you to define the sorting order (alphabetical, by recent activity, manual):
Set a status
To enhance your profile and its display, in kChat discussions as well as on the various kSuite pages and tools, you can set a status in the form of text and/or emoji, with an optional expiration date:
- Click on your avatar or initials at the top right of the interface.
- Click on Choose a custom status.
- Enter a custom status or choose one from the suggestions.
- Enter an expiration date if necessary:

- Click on the smiley icon if you want to choose an emoji next to your name.
- Confirm with the Set status button.
⚠ Max. number of custom emojis:
| kSuite | free | 5 |
| Standard | 100 | |
| Business | 500 | |
| Enterprise | Unlimited | |
Use kChat with your domain and brand
With Custom Brand (included in the kSuite Enterprise offer, otherwise optional), you can customize kChat with your logo, your colors, and the URL of your domain name. Your collaborators are fully immersed in your brand. Refer to this other guide on this subject.
This guide explains how to customize the display of the Organization you are in within the Manager Infomaniak.
Preamble
- You can, for example, add a logo to the Organization's name and completely replace the name display with a small banner.
- For advanced customization of URLs and certain interfaces, including login pages, discover Custom Brand.
Access the customization page
Prerequisites
- Be the legal representative or administrator in the Organization concerned.
- Be in the correct Organization (or switch to another if necessary).
To customize the Manager interface:
- Click here to access the Organization customization on the Infomaniak Manager.

The left button Customize allows you to edit the visible part at the top left of the Manager:
- Choose a square logo only (in this case, no rectangular logo).
- Choose to put initials in the square (in this case, it is possible to have a rectangular logo in addition or no rectangular logo).
The right button Customize allows you to add a rectangular logo (only) to applications such as kDrive and Mail:
- Note that the rectangular logo will also be taken into account on the Manager side (it is not possible to have a different rectangular logo between these different services).
- If no rectangular logo is configured on the Manager, it simply will not be displayed.
This guide explains how to customize the limits of a site hosted on a Web Hosting or a Cloud Server.
Unlock or adjust the limits of a site
To access the website management:
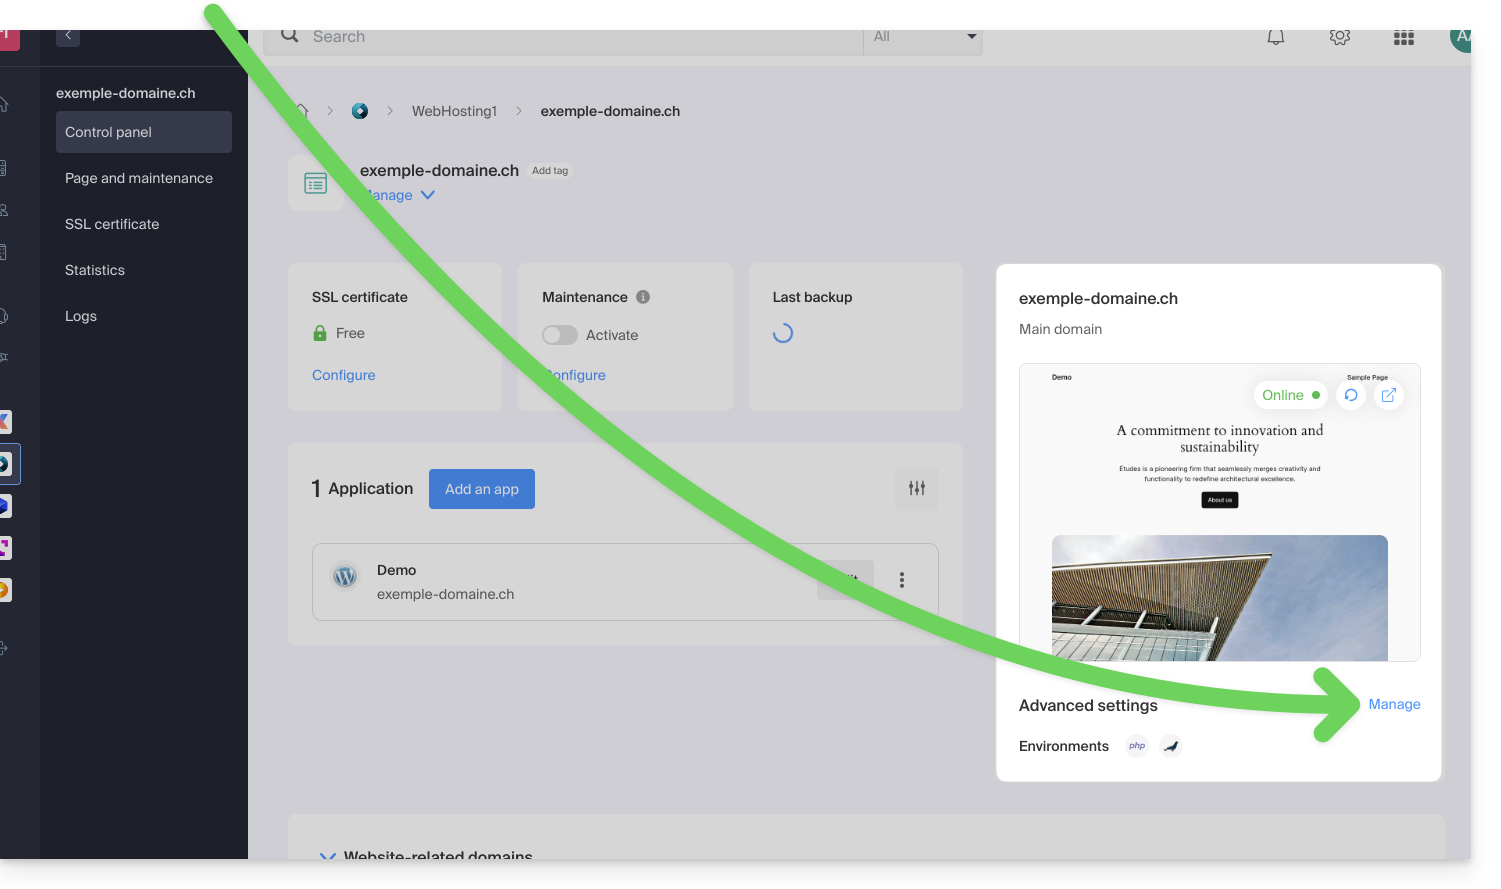
- Click here to access the management of your product on the Infomaniak Manager (need help?).
- Click directly on the name assigned to the product concerned:
- Click on Manage under Advanced settings:
- Click on the PHP / Apache tab.
You can, for example...
- ... unlock for 60 minutes the memory limit (
memory_limit= 1280 MB) and the maximum script execution time (max_execution_time= 60 minutes):
- This unlock is possible up to 10 times per year.
- ... customize the limits of:
max_execution_time(in seconds)memory_limit(in MB)post_max_size&upload_max_filesize(maximum file size for upload, in MB)- Cloud Server only:
Max children(see this other guide) - Cloud Server only:
Max input time
Do not forget to save the changes at the bottom of the page.
Maximum values by hosting type
| Limits | Shared | Cloud Server | CLI (Cloud Server only) |
|---|---|---|---|
| max_execution_time | 300 s | 3600 s | 0 (unlimited) s max |
| memory_limit | 1280 MB | 2048 MB max | 512 MB max |
| post_max_size + upload_max_filesize | 9223372036854775807 MB max | 9223372036854775807 MB max | 48 MB max |
| max_children | 20 max | 20 (default, modifiable) | |
| simultaneous connections per IP | 30 max | 30 (default, modifiable) | |
| max_input_time | 0 (unlimited) | 0 (default, modifiable) | 0 (unlimited) |
| files (inodes) | no limit on the number of files per hosting | ||
This guide explains the differences between Infomaniak's web hosting offers to help you choose the best solution according to your computer needs.
If you are looking to host your email, refer to this other guide.
Starter Web Hosting
Free Web Hosting
Web Starter hosting is offered for free with each domain name registered with Infomaniak. It offers 10 MB of disk space to create a site (basic pages in HTML language only - no PHP, no database) even without particular knowledge thanks to the Welcome Page tool.
- Register or transfer a domain name with Infomaniak
- Learn more about the benefits included with a domain name
Shared Web Hosting
The flagship offer to create your sites
These web hostings are shared offers (the websites will be hosted on servers whose resources are shared with other customers). To ensure the reliability of these shared services, Infomaniak servers use on average only 40% of the CPU power and are equipped with professional last-generation SSD disks.
Web hosting offers a minimum of 250 GB of disk space and allows you to manage multiple websites with multiple domain names. This offer includes all the technologies usually used to create professional sites: PHP, MySQL, FTP and SSH access, SSL certificates and easy installation of WordPress or common CMS, etc. It is also possible to add a Node.js site and/or Site Creator.
Note that without any hosting, it is also possible to obtain and then use Site Creator “autonomous / standalone”. Refer to this other guide.
Cloud Server
Professional Web Hosting
With a Cloud Server, the resources allocated to you are not shared with other customers and you can customize the hardware and software configuration of your server according to your needs. A Cloud Server also allows you to use components that are not available on shared web hostings (Node.js, mongoDB, Sol, FFMPEG, etc.).
- A Cloud Server allows you to easily administer your server via the same administration interface as web hostings - you manage the sites in the same way.
- A VPS allows you to manage your server 100% autonomously with the version of Windows or the Linux distribution of your choice (
Debian,Ubuntu,openSUSE, ...) - solid technical skills are required to use a VPS, including VPS Lite.
Public Cloud (and Kubernetes Service)
Open, proven and secure IaaS solution
For Infomaniak, it is the infrastructure that powers kDrive, Swiss Backup and the Webmail, services used by several million users. But Public Cloud is accessible to everyone and provides the resources you need to develop your projects.
With personalized and tailored offers, you will have no trouble managing your development budget. No setup fees. No minimum amount. Cancellable at any time. You only pay for the resources actually used with Public Cloud at the end of each month, the same goes for Kubernetes Service.
Jelastic Cloud
Custom web hosting with your choice of technologies
Jelastic Cloud allows you to create custom development environments with your choice of technologies (PHP, Java, Docker, Ruby, etc.). It is a flexible cloud offer:
- Horizontal and vertical scaling of resources.
- Payment based on actual resource consumption.
- Easy customization of your infrastructure (redundancy, IP, SSL, load balancing, etc.).
The easiest way to manage your calendars / agendas is to use the Infomaniak Web app Calendar (online service ksuite.infomaniak.com/calendar).
This interface offers many advantages:
- No software to install or configure.
- Sharing calendars with other users.
- Saved permanently.
- Synchronization of calendars (+ tasks) between devices.
- Attachment / kDrive.
- Secures and respects your privacy, hosted in Switzerland by a neutral and independent company.
How to get started with Infomaniak Calendar?
Whether it's on kSuite or the Mail app, it is essential to log in with your Infomaniak user account identifier and its password. This will not work by directly entering an email address and its password. Understand the difference
- Click here to access the Infomaniak Web app Calendar (online service ksuite.infomaniak.com/calendar).
What do you want to do?
- Synchronize calendars on all your devices
- Customize the app display
- Display public holidays
- Create a task
- Create a unique event
- Create a recurring event
- Create an event reminder
- Schedule a meeting
- Schedule a meeting from the Web app Mail
- Manage room bookings
- Print a calendar
- Import a calendar
- Import tasks
- Export a calendar
- Share a calendar
- Publicly share a calendar
- Restore deleted events
- Add an attachment to an event
- Set a default calendar on the app
- Create a desktop app (from the Web Calendar app for example) from Chrome
A question or feedback?
- Contact Infomaniak support
- Click here to share feedback or a suggestion on an Infomaniak product
This guide explains the difference between the terms synonym and alias in the context of the Domain Name service offered by Infomaniak.
Synonym domain / alias domain
So-called synonym domain names (i.e., domains that are entirely dependent on the main domain, without their own DNS configuration) and alias (independent domains, with their own DNS configuration) can both serve as secondary domains associated with a main domain.
For example, the domains pomme.xyz (alias) and banane.xyz (synonym) can redirect to a common main domain such as fruits.xyz.
Here is the technical distinction to remember:
- The synonym (also called "linked domain" or "DNS mirror") directly uses the DNS servers of the main domain. It has no DNS zone of its own.
- The alias (also called "redirected independent domain" or "DNS alias") has its own DNS records (independent DNS zone), although it points to the same hosting or services.
| pomme.xyz (domain alias – with custom DNS) ns1.personnalisable.ch ns2.personnalisable.ch | ⇢ | Own DNS zone A records, MX, etc. | Web Hosting Email Service |
| fruits.xyz (domain main) ns1.infomaniak.ch ns2.infomaniak.ch | } | Own DNS zone A records, MX, etc. | |
| banane.xyz (domain synonym – without own DNS) Automatically retrieves the DNS of the main domain (fruits.xyz) |
Learn more
- How to add a domain as a synonym
- How to dissociate a synonym domain
- Understanding the difference between domains and DNS zones
Thank you for entrusting the hosting of your emails to Infomaniak.
This guide allows you to quickly use the essential functions of your new Mail Service. If you encounter any issues, consult the knowledge base before contacting Infomaniak support.
If your domain name is not managed by Infomaniak or if your Mail Service is not managed in the same user account as your domain name, refer to this other guide to link the domain name to your Mail Service.
Create email addresses
- Get started with the interface
- Create email addresses
- Create email addresses in bulk
- Create email addresses used solely for redirection
- Copy Gmail, OVH, etc. email content to Infomaniak
Use your created email addresses
- Synchronize your devices
- Check the log of incoming and outgoing emails
- Hide the recipient addresses of an email
- Discover the Infomaniak Mail mobile app
- Use the email service even if the domain name points to Wix or similar
- Use the email service with your website
- Use Euria (Infomaniak AI) on your email service
Learn important information
- Sending limits
- Size limits
- Recipient limit
- The different identifiers
- Troubleshoot an error with an email software/client
Customize your email service
- Add a signature
- Add an alias
- Add an out-of-office message
- Add a domain name
- Automatically sort incoming emails
Secure your email address
- Guide to filtering solutions
- Secure a send with message encryption
- Manage security warnings
- Change the password of an email address
- Manage SPF, DKIM, DMARC, etc.
- Report a phishing email
This guide explains how to easily set up a redirection for your domain name managed with Infomaniak.
Introduction
- A web redirection allows you to redirect a domain name or subdomain to the Internet address of your choice.
- This procedure is only valid if the domain's DNS are managed by Infomaniak and if Custom Brand is not activated.
- Any addition/modification may take up to 48 hours to propagate.
- If necessary, create a redirection for your domain with and without the www (
domain.xyzandwww.domain.xyz).
Redirect a domain to the URL of your choice
To do this:
- Click here to access the management of your product on the Infomaniak Manager (need help?).
- Click directly on the name assigned to the product in question.
- Click on Web Redirections in the left sidebar.
- Click on the button Add a redirection.
- Enter the destination address (under To).
- Click on Validate.
This guide details the limitations specific to the my kSuite offer and the advantages of the my kSuite+ offer.
my kSuite limits only
The my kSuite offer imposes certain limits that my kSuite+ does not…
Mail, contacts & calendars
- Disk space limited to 20 GB of storage for emails.
- No advanced mode in the message sorting rules.
- "my kSuite" signature imposed.
- No email sharing link.
- 1 address book, 1 calendar.
- Backup retention (30 days) of emails; recoverable by changing the offer.
kDrive
- 1 kDrive drop box.
- 25 kDrive sharing links (and without duration, password settings…).
- Retention of previous versions of your files: 30 versions over 30 days (60 over 120 days for my kSuite+, some of which are lifetime).
- 30-day trash (60 for my kSuite+).
- No statistics.
- No editing/signing of PDF files.
Limitation of my kSuite & my kSuite+ offers
Click on the links below to find out the details:
- Offer limited to one address per account (linked to a European phone number).
- Obligation to indicate a valid mobile phone number to confirm registration.
- Limited number of daily email sends, email redirections and unique recipients per message.
- No possibility to create aliases for your email.
- No customizable email signature.
- Email hold and scheduled sending: restricted features (no customization) on my kSuite and customizable with my kSuite+.
- 15 GB of Cloud storage with my kSuite, 1/2/6/12 TB with my kSuite+.
- Registration only possible for individuals residing in OECD member countries (official list), including:
- Germany
- Australia
- Austria
- Belgium
- Canada
- Chile
- Colombia
- South Korea
- Costa Rica
- Denmark
- Spain
- Estonia
- United States
- Finland
- France
- Greece
- Guadeloupe
- French Guiana
- Hungary
- Ireland
- Iceland
- Israel
- Italy
- Japan
- Latvia
- Lithuania
- Luxembourg
- Martinique
- Mayotte
- Mexico
- Monaco
- New Caledonia
- New Zealand
- Norway
- Netherlands
- Poland
- French Polynesia
- Portugal
- Czech Republic
- Réunion
- United Kingdom
- Saint Barthélemy
- Saint Martin
- Saint Pierre and Miquelon
- Slovakia
- Slovenia
- Sweden
- Switzerland
- French Southern Territories
- Turkey
- Wallis and Futuna
my kSuite+ offer
The my kSuite+ offer allows you to send more messages per day to a larger number of unique recipients at once.
To help you identify the my kSuite / kSuite offer most suited to your needs, refer to this other guide.
For sending emails to a large number of recipients, there is a Newsletter tool.
Thank you for choosing kDrive, the independent and privacy-respecting solution for collaborating, sharing, and accessing your data from all your devices. Your data is encrypted, continuously backed up, and exclusively hosted in Switzerland.
Collaborative storage on a 100% Swiss Made cloud
- Discover kDrive in video (the interface has evolved since)
Getting Started
- Sync kDrive across different devices
- Manage kDrive Lite Sync option (macOS)
- Manage kDrive Lite Sync option (Windows)
- Install kDrive on Linux
- kDrive folders (personal, shared, common)
- Choose the kDrive folders to sync
- Edit an Office-type file on kDrive (Word, Excel, PowerPoint)
- kDrive subscription via Apple iOS
- Manage kDrive storage space
- Search for data on kDrive
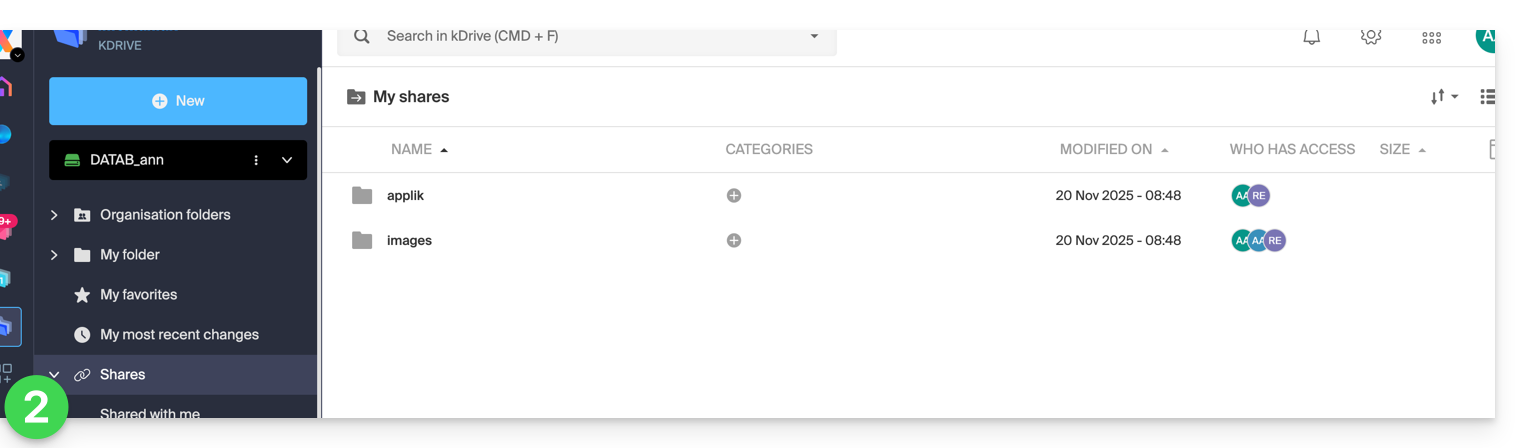
Share your data
- Manage kDrive drop boxes
- Customize kDrive shares and deposits
- Share data from kDrive (web interface)
- Example of internal/external shares
- Share data by email from kDrive (web interface)
Fill your kDrive
- Import external data to kDrive
- Import data to kDrive (iOS) or just automatically import iPhone photos
- Import photos to kDrive (Android)
- Import data to kDrive without the kDrive app
- Import data to kDrive via WebDAV
- Connect to kDrive via WebDAV
- Access kDrive files locally and online
- Scan documents with kDrive (iOS / Android)
With multiple users
- Manage a kDrive user's rights
- Manage access permissions to folders and subfolders
- Manage kDrive users
- Manage multiple kDrive (iOS / Android)
- Manage multiple kDrive (macOS / Windows)
- Copy certain data between kDrive you have access to
Go further with kDrive
- Modify an existing kDrive offer
- Manage kDrive categories to classify data
- Synchronize Joplin notes via WebDAV with kDrive
- Synchronize Qnap with kDrive
- Synchronize Synology with kDrive
- Save a kMeet meeting on kDrive
- Export email attachments from Mail
- Export an email to kDrive
- Add an attachment to an event in Calendar
For advanced users
In case of a problem
- Resolve a kDrive blockage (antivirus, firewall, etc.)
- Resolve a kDrive sync conflict
- Resolve a kDrive synchronization issue
- Resolve a kDrive issue on Android device (don't kill my app)
- Resolve a Lite Sync plugin error on macOS
- Clear the browser cache
- Clear the mobile app kDrive cache
- kDrive application version (macOS / Windows / Linux)
- Restore a kDrive file to a previous version
- Restore a deleted kDrive file
- Force kDrive to synchronize hidden and excluded files
- Authorize access to your products / Complete a support request
- Display kDrive debugging information
Learn more about kDrive
A question or feedback?
- Contact Infomaniak support
- Click here to share feedback or a suggestion on an Infomaniak product
Thank you for entrusting the management of your services to Infomaniak, hoping that you enjoyed using them.
Preamble
- For most products, confirm the cancellation request by email, otherwise no data will be deleted.
- Outstanding and out-of-package fees remain due.
- A cancellation confirmation is sent to any other administrators of the Organization.
- Backups will be irrevocably deleted upon cancellation, making any restoration impossible.
Which product/service to cancel?
Collaborative Tools
Web & Domains
Cloud Computing
Events & Marketing
Streaming
Close your Infomaniak account.
Do not hesitate to share your personal experience with Infomaniak. Feedback from satisfied and less satisfied customers is useful and helps improve the quality of services and propose solutions tailored to needs!
This guide presents the advantages of kSuite (Standard, Business, Enterprise), the suite of productivity and online collaboration tools developed in Switzerland by Infomaniak.
Preamble
- kSuite simplifies user management in the enterprise and groups your products into a single invoice with a single due date.
- It also includes advanced user management for all the applications you need to collaborate online.
- You choose the domain name and kSuite is then established according to your needs in terms of number of users and storage space.
- kSuite is a bundled offer that can be upgraded to a higher offer at any time but it is not possible to change to a lower rate later, nor to transfer kSuite to another Organization.
- The products included in kSuite cannot be moved or canceled independently of each other.
- To help you identify the kSuite offer that best suits your needs, refer to this other guide.
Choosing kSuite over standalone apps
The question of choosing kDrive and/or Mail separately rather than kSuite may indeed arise.
kSuite is more economical, simplifies user management in the enterprise and groups all your products into a single invoice with a single due date. The offer is recommended as soon as you own or wish to have a domain name that will be associated with it.
It also includes advanced and unified user and team management, as well as kChat which cannot be ordered separately.
Here are some other points:
- unlocked features
- 1 single invoice
- address book & dynamic calendar for the Organization
- more important disk storage (per user)
- Custom Brand offered with kSuite Enterprise
In summary, choosing this collection of Web tools rather than individual applications offers advantages in terms of integration, simplified management, real-time collaboration, multi-platform accessibility, and flexibility. These advantages can improve your overall efficiency, productivity, and user experience.
The products included in kSuite
On your interface ksuite.infomaniak.com you access to: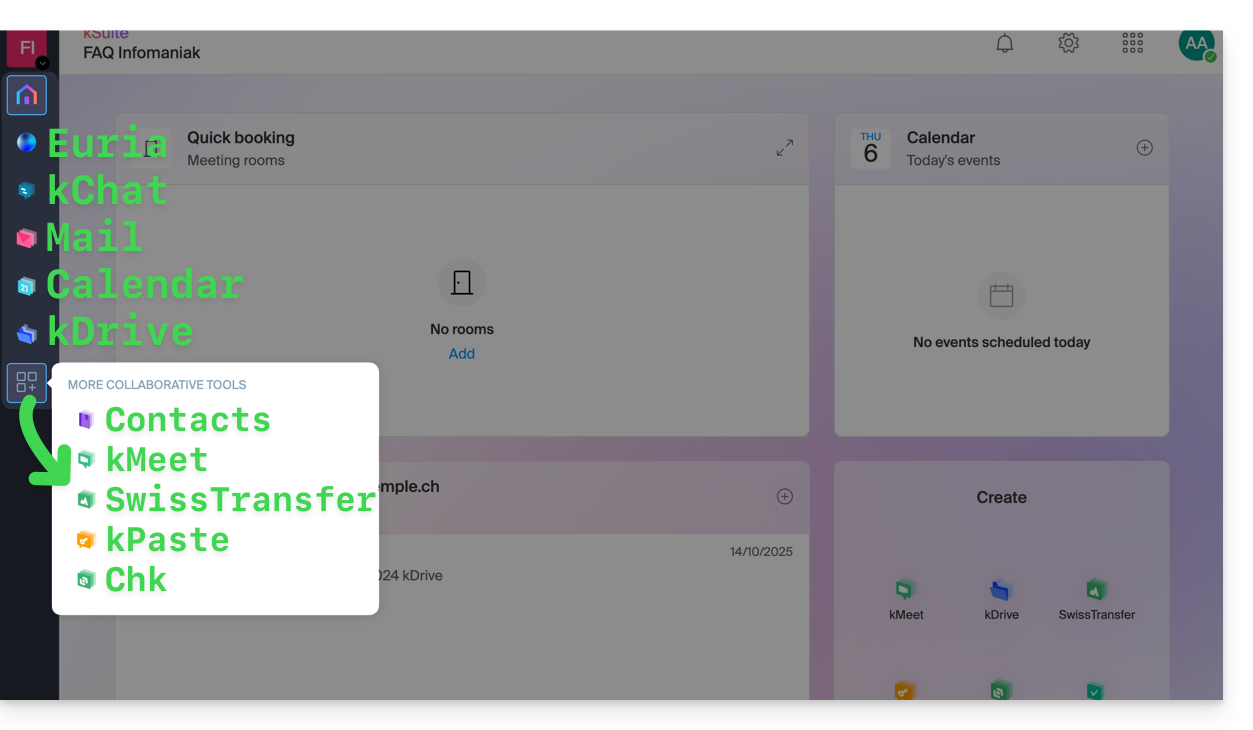
Create, communicate, plan, collaborate, share…
- Euria
- kChat
- A Mail Service (even if you already have a Mail Service)
- Calendar
- kDrive (even if you already have a kDrive)
And also:
Management
- The Manager interface with Custom Brand included or as an option depending on the offer
Are you a Partner or do you wish to become one in order to resell my kSuite?
This guide explains how to configure the information and images that will appear on the tickets that visitors to your events will receive (as part of the ticketing system Infomaniak).
Prerequisites
- Create an event to access the mobile ticket visual options.
Access the ticket visuals
For this:
- Click here to access the management of your product on the Infomaniak Manager (need help?).
- Click directly on the name assigned to the ticketing related to the event.
- Click on Ticketing Portal in the left sidebar.
- Click on Ticket Design:

Customization of basic information
The tickets will display the following information, retrieved from the event settings and the information provided by the customer:
- Designation: the name of the event.
- This option cannot be disabled, but the text can be modified at the event level in the Ticket Template option for the relevant event.
- The event date.
- The event time.
- The door opening time if it is set in the event.
- The event address.
- The first and last name of the client and/or reseller, if provided.
- The reservation number.
- The ticket number (for pre-printed tickets).
- The company name, if provided.
Change the ticket design
Default image size
The minimum image size is 1138x524 px but what is recommended: 1307x605 px (+ ratio 9:4.17).
The print@home tickets
These tickets are intended to be printed directly by customers using a standard printer. To modify the ticket content:
- Top image: the background image of the ticket can be modified here. It is important to note that the text may not be readable if the image has contrasts that do not allow the letters to be distinguished.
- Text in the middle of the ticket: it is possible to modify the text in the middle of the ticket. If the text overflows onto the image at the bottom of the page, it will not be displayed.
- Bottom image: this will contain the general terms and conditions by default, but they can be replaced with a custom image.

The other formats

The other formats are intended for use by the organizer and therefore cannot be sent to customers automatically by email:
- Show Format: For printing with a thermal printer (available for rent).

- Cinema Format: The format used in cinemas for printing with a thermal printer (available for rent).

Save and use ticket templates
It is possible, and recommended, to save the ticket design as a new template. The save button is at the bottom of the ticket design customization page:
It will then be possible to select it for further editing, or set it as the default ticket:
apply a default template for ALL ticketing
apply a default template for a specific event
apply a default template for a specific PRICE
Also, refer to this other guide regarding the pass.
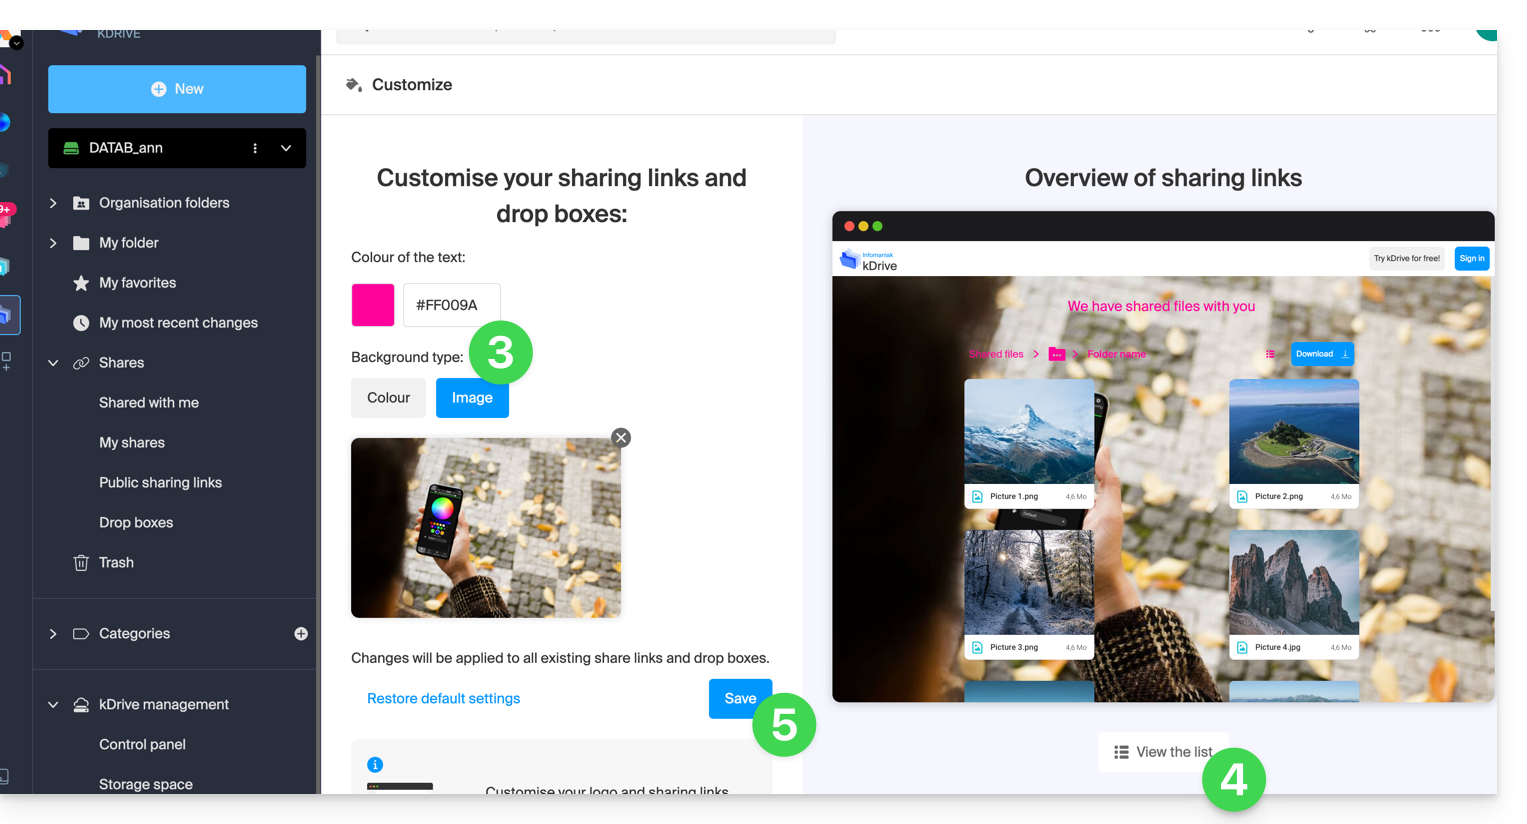
This guide explains how to add background images and change the text color of share links and kDrive drop boxes so that it matches the graphic identity of your organization.
Preamble
- Any customization from the share link is applied to the drop box (and vice versa).
- The drop box customization will only be visible when you share access to it via a share link.
Customize share links & drop boxes
To access kDrive customization:
- Click here to access the Infomaniak kDrive Web app (online service ksuite.infomaniak.com/kdrive).
- Click on the chevron to expand the Shares section in the left sidebar:
- Click on Public share links:
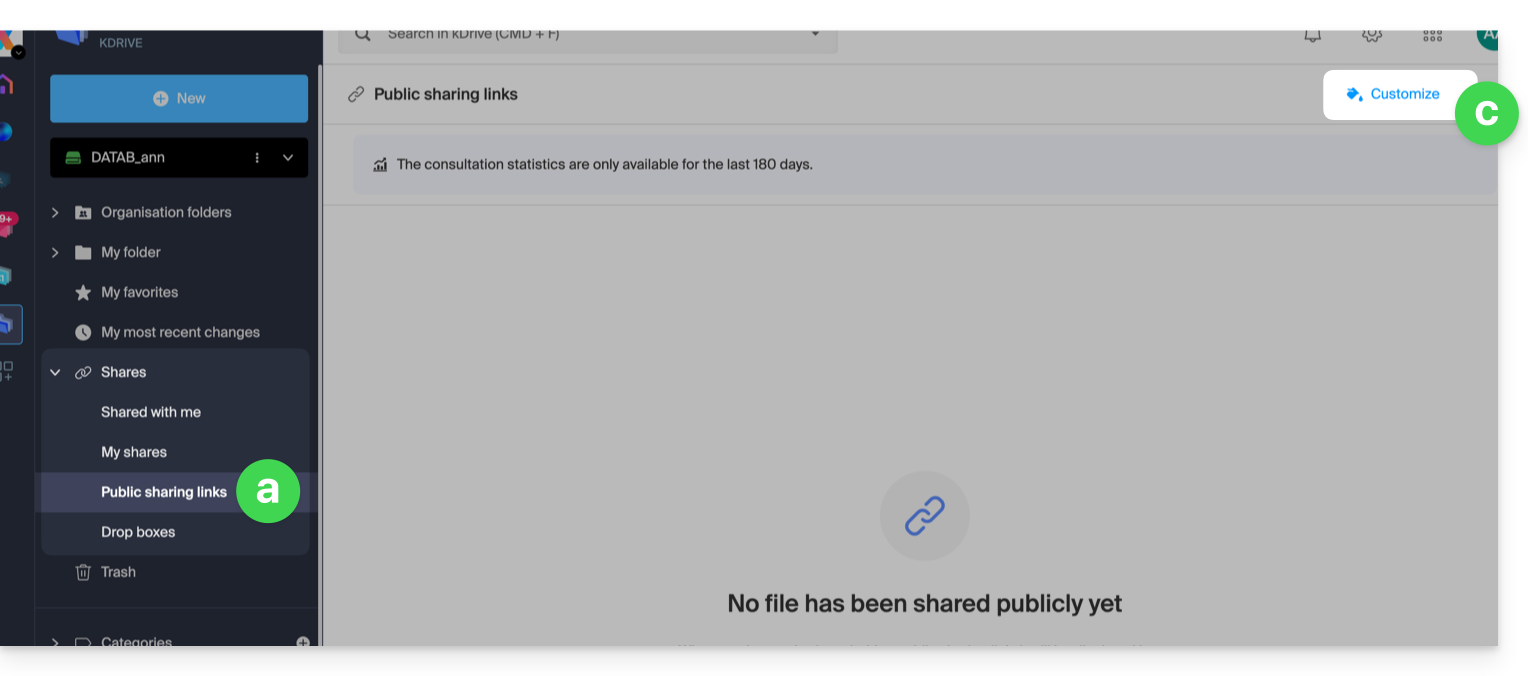
- … or click on Drop boxes.
- Click on Customize:
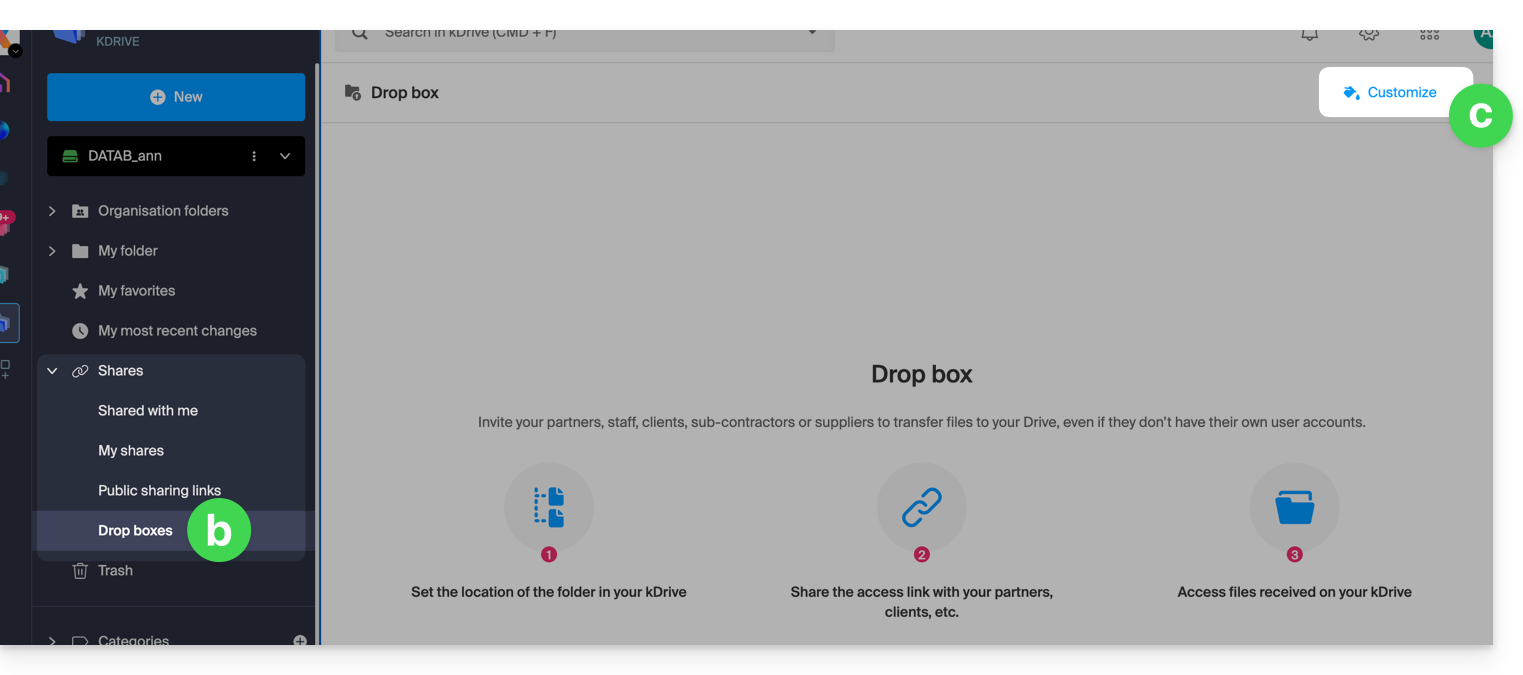
- Click on Public share links:
- Modify the text color and add an image (min. 100 KB; it must be on kDrive) or a background color.
- Preview the effects on the 2 display types.
- Click on Save:
This guide helps you customize a website created with Site Creator Infomaniak.
To customize the homepage or page types of your site, refer to this other guide.
Prerequisites
- Access Site Creator:
- Click here to access the management of your product on the Infomaniak Manager (need help?).
- Click directly on the name assigned to the relevant Site Creator.
- Click the Edit my site button to start the editor:

Change the site's colors
To manage themes, colors, and fonts in Site Creator:
- Click on the Design button in the left sidebar.
- Click on Site Colors.
You can choose from the available color palettes or create your own custom color set.
Below there are more specific settings, where you can specify which elements a color should be applied to.
Manage the background (image/color) of blocks
On the editing page of your site:
- Hover over a block and click on the gear to access the settings:
Load a website template
You can completely modify the design of your website by changing its theme, and deciding what should be overwritten or not on the current site during the change:
- Click on the Design button in the left sidebar.
- Click on Theme Selection:

This is where you can choose from the available website themes.
Once you have found your new theme, click on Install and then you can choose which parts of the new template you want to import (by default, only colors, fonts, or menu style) to avoid overwriting the content of your website.
If your website is new, you can choose more options during import.
Change the website fonts
For this:
- Click on the Design button in the left sidebar.
- Click on Fonts:

You can easily change the main fonts of the website, the first font being used for headings and the second font for content.
Below there are more specific settings, where you can specify which elements a font should be applied to.
It is not possible to import or add a custom font but you can change the provider (the list of fonts will be the same) for privacy reasons, for example:
- Click on Settings in the left sidebar.
- Click on General settings
- Select the font provider:

Solving an issue with missing/invisible text
If you think your text block has disappeared or is invisible
then select all the content of the website (ctrl + a or cmd + a on Mac); if you see that your content is there, this probably means that the block settings are set for a dark background:
In this case, go to the block settings and make sure that the "Dark Background" option is not checked. This should solve this problem:
This guide explains how to set up and customize the global display of the Web app Mail Infomaniak (online service ksuite.infomaniak.com/mail).
Preamble
- The general settings affect all email addresses currently attached to your account on Mail.
- They are specific to your user only and do not affect other users (of the same Organization, for example).
- The same email address retrieved on Mail from another user will have its own settings independently of yours.
Accessing general settings
To do this:
- Click here to access the Web app Mail Infomaniak (online service ksuite.infomaniak.com/mail).
- Click on the Settings icon in the top right of the interface.
- Navigate through the different menus on the left:
To manage the light/dark theme of the interface: refer to this other guide on the subject.
Customization: default email address
This section allows you to choose which email address, among all your attached addresses, should be considered the main one, and open by default when accessing the Web app Mail Infomaniak (online service ksuite.infomaniak.com/mail).
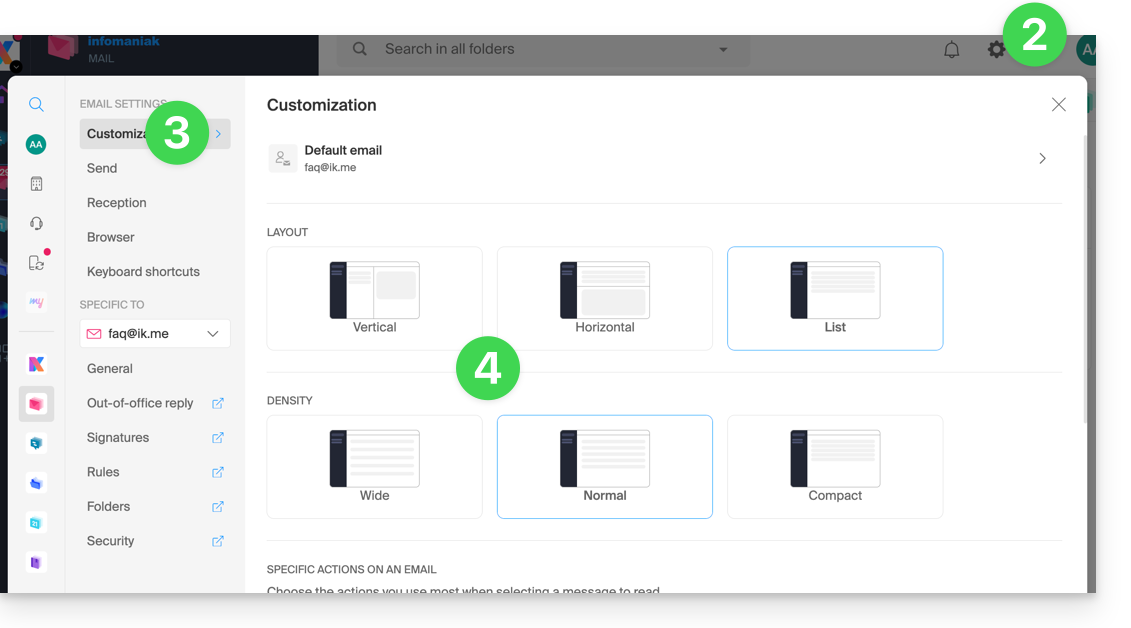
Customization: modify the density of your inbox display
- Click here to access the Web app Mail Infomaniak (online service ksuite.infomaniak.com/mail).
- Click on the Settings icon in the top right of the interface.
- Click on Customization in the left sidebar menu.
- Choose the desired display types and density:
Customization: manage the buttons visible on the page of an email
This section allows you to choose the icons that should be displayed in the email reading window, allowing you to take quick action rather than through the dropdown menu:
- Reply
- Forward
- Follow
- Mark as unread
- Delete
- Reply to all
- Download to kDrive
- Organize an event
- Report as spam
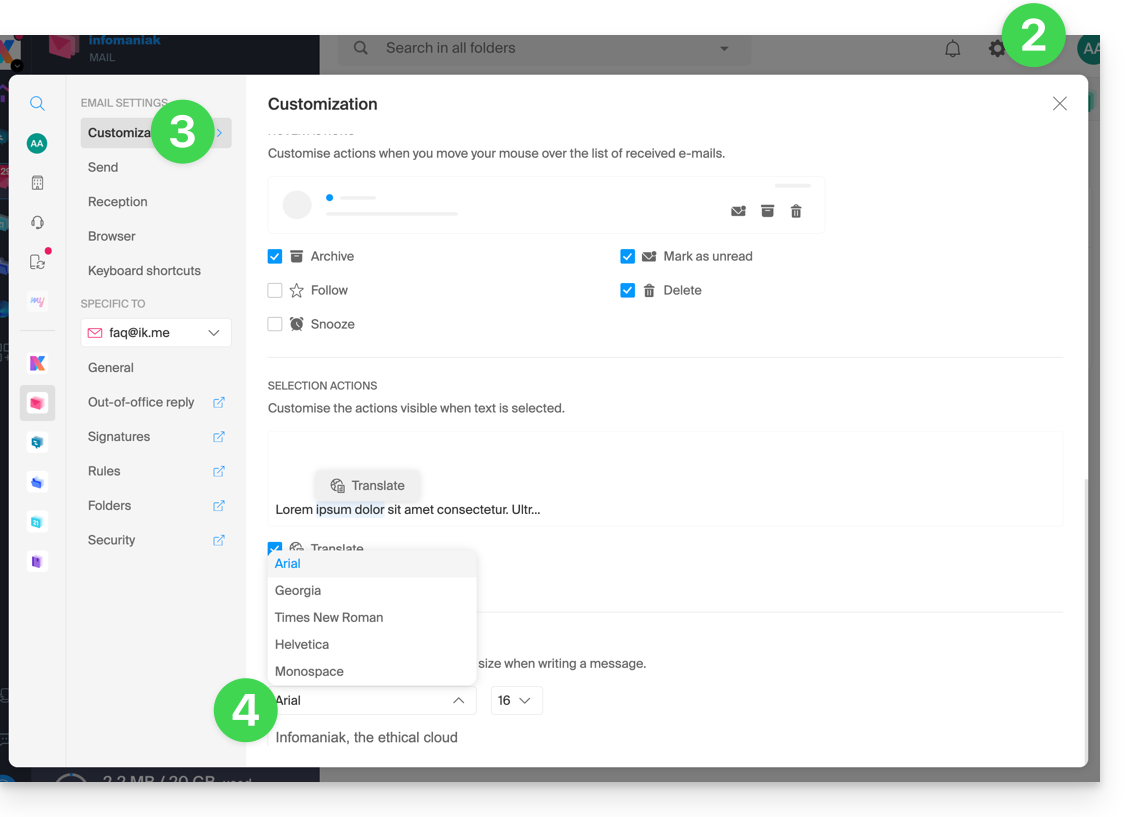
Customization: manage buttons visible when hovering over an email list
This section allows you to choose the icons that should be displayed when you hover over an email within a list (e.g., emails in the inbox):
- Archive
- Follow
- Put on hold
- Mark as unread
- Delete
Customization: manage buttons visible when selecting text
Refer to this other guide on this topic as well as this other guide.
Customization: set the default font for all new messages
- Click here to access the Web app Mail Infomaniak (online service ksuite.infomaniak.com/mail).
- Click on the Settings icon in the top right of the interface.
- Click on Customization in the left sidebar menu.
- Choose the desired font:
Sending: cancellation delay
Refer to this other guide on this topic.
Sending: forward emails in the body of the message or as an attachment
Refer to this other guide on this topic.
Sending: include the original message when replying
Refer to this other guide on this topic.
Sending: always write in a full-screen window
- Click here to access the Web app Mail Infomaniak (online service ksuite.infomaniak.com/mail).
- Click on the Settings icon in the top right of the interface.
- Click on Sending in the left sidebar menu.
- Activate the toggle switch to the right of the item “Compose emails in full screen”:
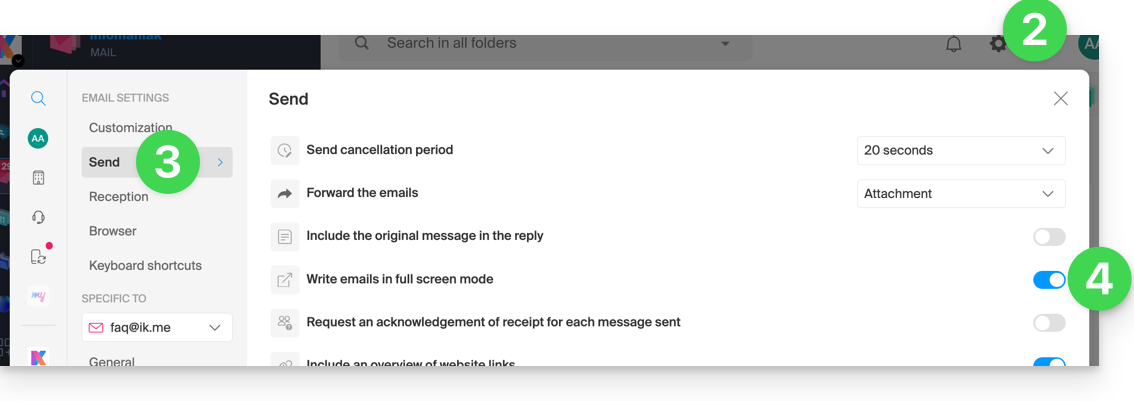
Sending: request a read receipt
Refer to this other guide on this topic.
Sending: include a preview of website links
To enable or disable a link preview (a feature that automatically generates a visual box (with title, description, and image) when you insert a URL in an email):
- Click here to access the Web app Mail Infomaniak (online service ksuite.infomaniak.com/mail).
- Click on the Settings icon in the top right of the interface.
- Click on Sending in the left sidebar menu.
- Activate the toggle switch to the right of the “Include website link previews” element:
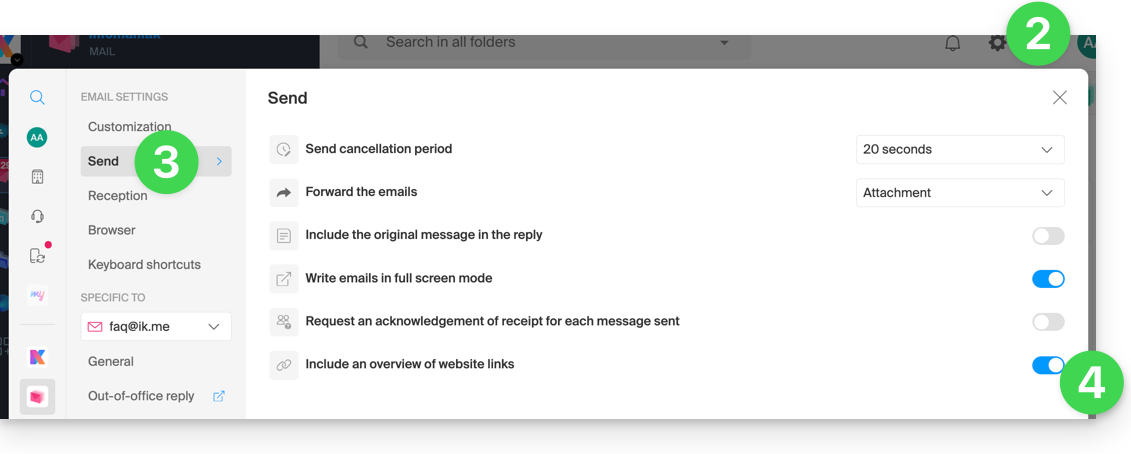
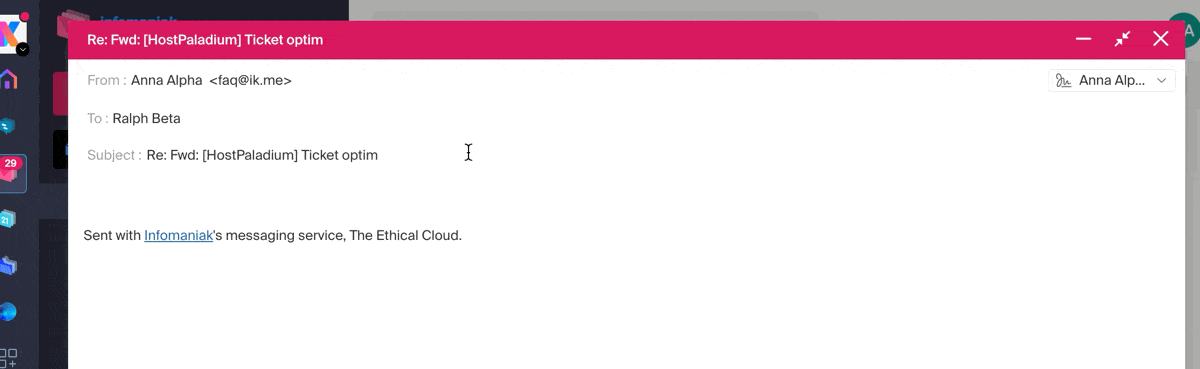
Once enabled, here is the result when writing content with a URL:
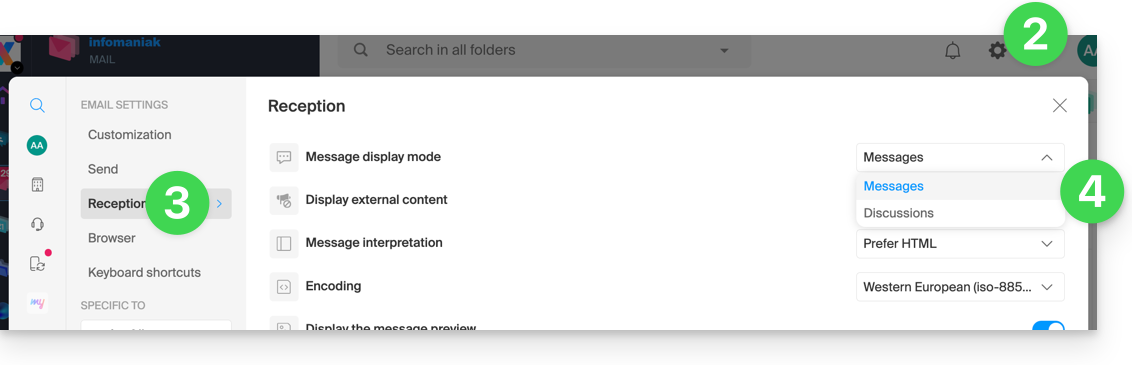
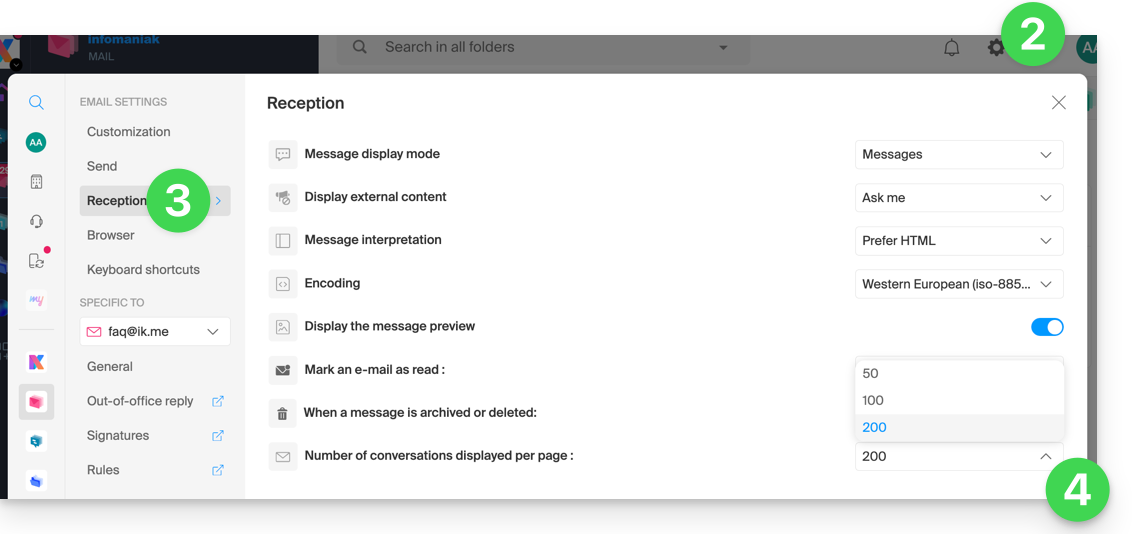
Inbox: Message display mode
This mode allows you to group your emails by subjects/senders, i.e., group the received emails based on the subject of the discussion, so the inbox display is lighter and it is easier to follow the messages from the different participants in the conversation:
- Click here to access the Web app Mail Infomaniak (online service ksuite.infomaniak.com/mail).
- Click on the Settings icon in the top right of the interface.
- Click on Inbox in the left sidebar.
- Choose a Message display mode:
When the Conversations mode is not enabled, you read your emails one by one:
When it is enabled, you read the different messages in the same window chronologically one below the other:
In your inbox, you can directly see the number of emails contained in a single conversation:
Inbox: Display external content
This section allows you to choose whether to automatically display all external content present in an incoming email you are reading, or if you prefer to hide it and only display it on demand: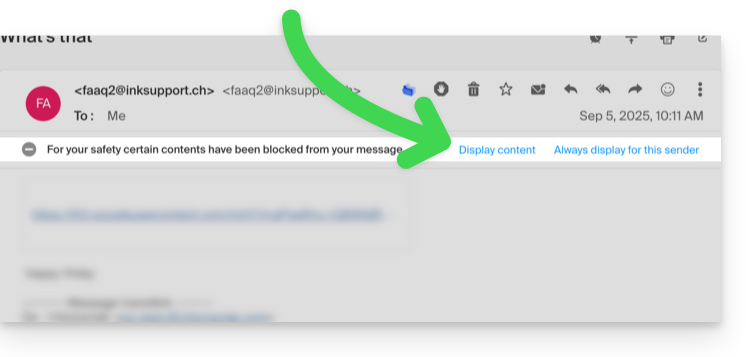
Inbox: Message interpretation
This section allows you to define the display priority of a received message: either in its simplified version in plain text, or in its enriched version in HTML (this setting only applies when both formats are present in the email; if only one version is available, it will be displayed by default).
Inbox: Encoding
This section allows you to modify the encoding of received messages (it is recommended to leave Unicode (utf-8)).
Inbox: Display message preview
This section allows you to display or hide the first few words contained in the email on all message lists (inbox, for example). Example with the preview enabled, the beginning of the message is visible on the same line next to its subject:
If the preview is hidden, only the subject of each email is displayed:
Inbox: Mark an email as read…
This section allows you to choose after how much reading time a message should be considered as read (immediately, after 3 seconds, or 5, or 20, or never).
Inbox: When a message is archived or deleted…
This section allows you to choose the action to be taken after archiving or deleting an email: open the next message, or the previous one, or return to the message list.
Reception: number of emails displayed on a single page
You can increase or decrease the number of emails displayed on a single page up to a maximum of 200 items:
- Click here to access the Infomaniak Mail Web app (online service ksuite.infomaniak.com/mail).
- Click on the Settings icon in the top right of the interface.
- Click on Inbox in the left sidebar.
- Choose the number of items to display:
Browser: set Infomaniak as the default mailbox
Refer to this other guide on this subject.
Browser: email address on new tab
Refer to this other guide on this subject.
Browser: message reception notification
Refer to this other guide on this subject.
Keyboard shortcuts
Refer to this other guide on this subject.
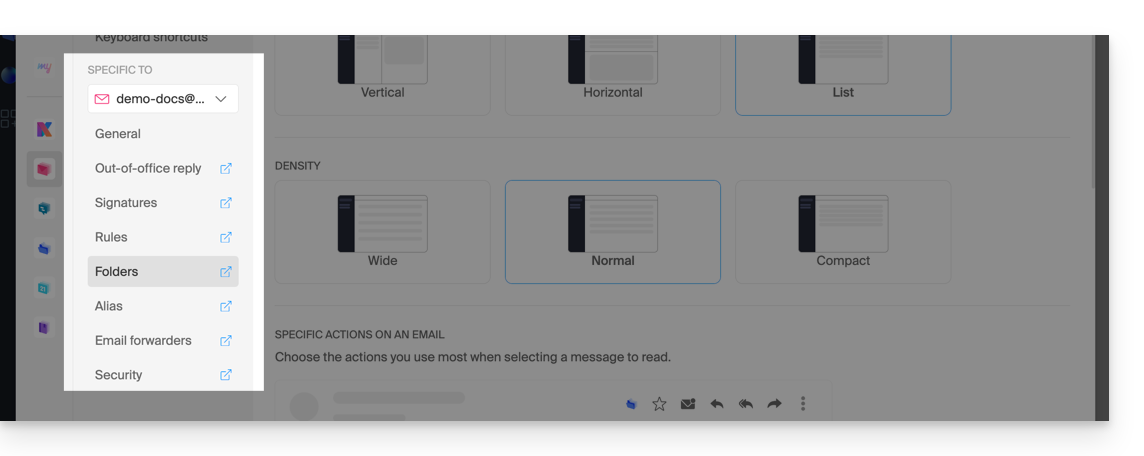
Modify email-specific settings
To access the signature, alias, etc. settings specific to each of your Infomaniak email addresses:
- Click here to access the Web app Mail Infomaniak (online service ksuite.infomaniak.com/mail).
- Click on the Settings icon in the top right of the interface.
- Check or select the email address concerned in the dropdown menu of the left sidebar:
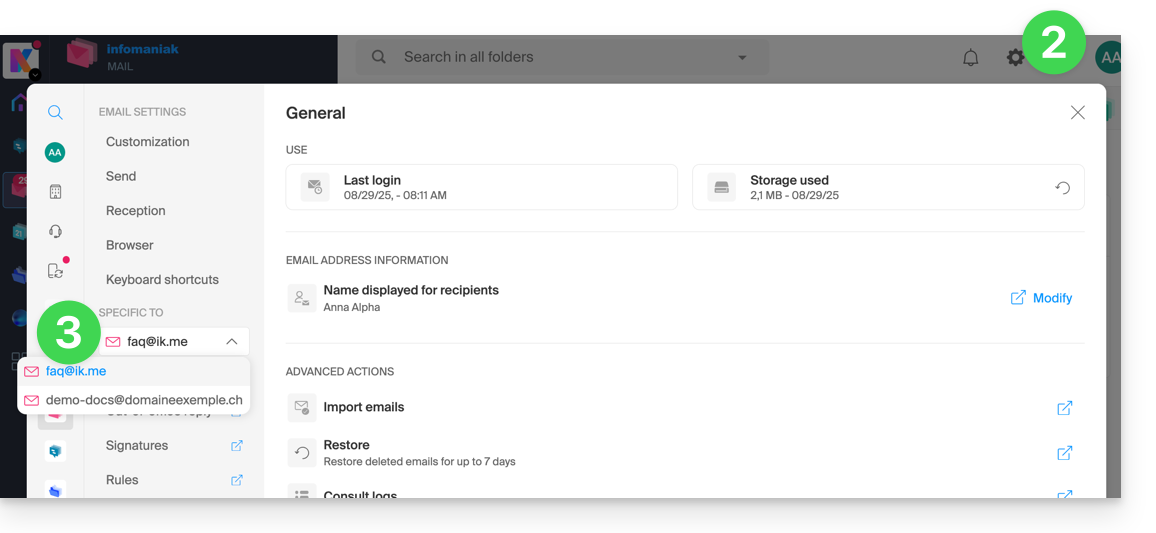
- Click on the different items of the secondary left sidebar menu to configure your email address:
Do not hesitate to browse the FAQ to find the corresponding guides.
This guide explains how…
- … generate a
CSRand private key to request a third-party certificate from a Certification Authority (CA), - … import this certificate for your Infomaniak site, using the
CRTobtained from theCA.
Preamble
- Although Infomaniak offers all the SSL certificates you might need…
- free Let's Encrypt certs for personal sites (only possible with sites hosted at Infomaniak),
- DV certs from Sectigo for professional/private sites that are not registered in the trade register,
- EV certs from Sectigo for companies registered in the trade register,
- It is also possible to install an SSL certificate obtained elsewhere (intermediate certificate from a certification authority of your choice), custom or self-signed certificates.
1. Generate a CSR (Certificate Signing Request)
A CSR (Certificate Signing Request or Certificate Signing Request) is an encoded file containing the information necessary to request an SSL/TLS certificate.
It must be generated on your side to ensure that the private key remains under your control, using for example OpenSSL.
Adapt and run the following command from a terminal application (command line interface, CLI) on your device:
openssl req -utf8 -nodes -sha256 -newkey rsa:2048 -keyout domain.xyz.key -out domain.xyz.csr -addext "subjectAltName = DNS:domain.xyz, DNS:www.domain.xyz"
Explanations
newkey rsa:2048: Generates a new 2048-bit RSA key.keyout domain.xyz.key: Specifies the file where the private key will be saved.out domain.xyz.csr: Specifies the file where the CSR will be saved.addext “subjectAltName = ...”: Adds additional domains via theSAN (Subject Alternative Name)extension, necessary to include all desired domains in the certificate (the main domain domain.xyz + any other associated domain or subdomain, such as www.domain.xyz).
After generation, you can check the contents of the CSR with the following command:
openssl req -in domain.xyz.csr -noout -textThis allows you to verify that all domains listed in subjectAltName are correctly included.
Once the CSR is generated, you can send it to the certification authority (CA) to obtain your SSL/TLS certificate.
2. Import the external certificate
Once validated, the CA issues a certificate (domain.xyz.crt) and sometimes an intermediate certificate (ca_bundle.crt). To access SSL certificate management:
- Click here to access the management of your product on the Infomaniak Manager (need help?).
- Click directly on the name assigned to the relevant product.
- Click on SSL Certificates in the left sidebar.
- Click the blue Install a certificate button:

- Choose the custom certificate.
- Click on the Next button:

- Import your certificate and private key, either by importing the
.crtand.keyfiles or by copy-pasting. - Click on Complete:

Alternative command to generate a self-signed certificate (optional)
If you want a local certificate for testing purposes only or without going through a CA (not recommended for production), you can use this command:
openssl req -x509 -nodes -days 365 -newkey rsa:2048 -keyout domain.xyz.key -out domain.xyz.crt -addext “subjectAltName = DNS:domain.xyz, DNS:www.domain.xyz”This generates both a self-signed certificate (domain.xyz.crt) and a private key (domain.xyz.key). However, self-signed certificates are not recognized as valid by public browsers or systems. They are only suitable for internal or development environments.
Import an intermediate certificate
When adding a custom SSL certificate, it is possible to import the intermediate certificate (by importing the .crt file or pasting the data provided by the certification authority):
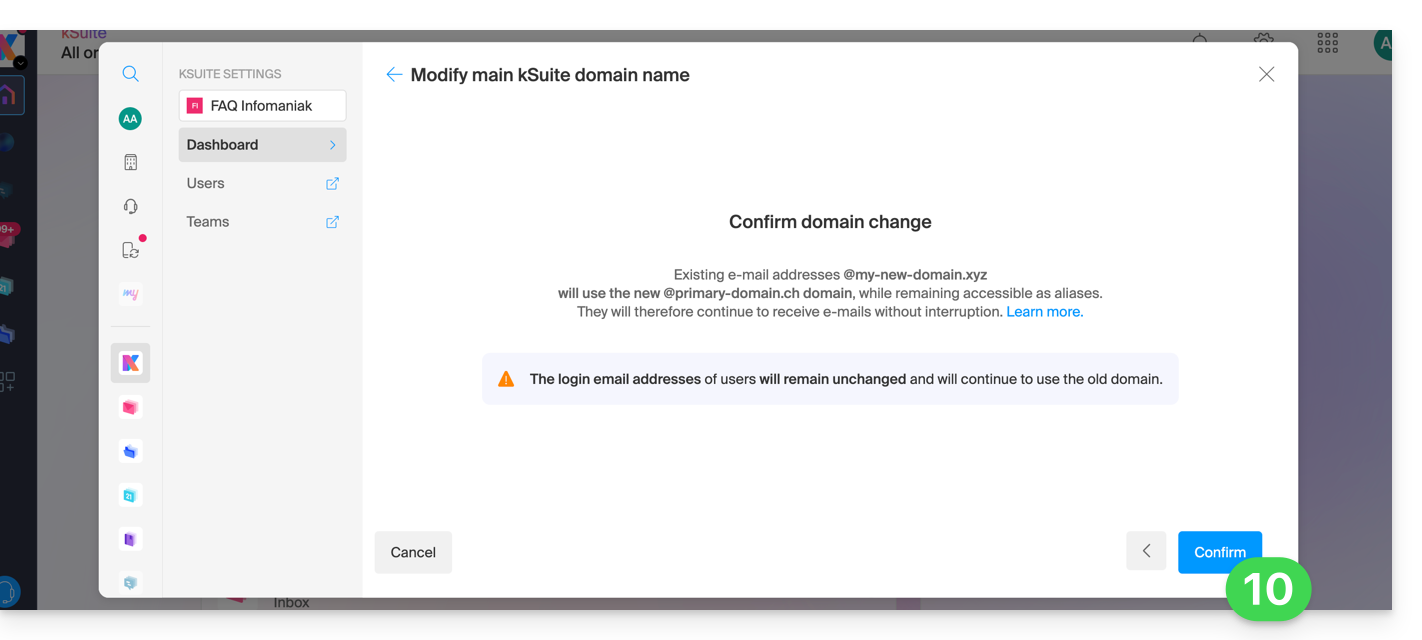
This guide explains how to replace the main domain name associated with a kSuite.
Preamble
- Switching the domain linked to kSuite is useful if your activities change name.
- This affects:
- Custom Brand (i.e. the custom URLs leading to your tools such as kDrive or Euria)
- Mail Service (i.e. your email addresses)
Modify the kSuite domain name
Prerequisites
- Own the new domain name (if necessary, create it in advance).
- Be aware of the instructions in this other guide by applying the instructions corresponding to your situation (so that the domain name works when it is linked to your kSuite).
- Add the domain name to kSuite.
Once the new domain name is ready to be used in place of the old one:
- Click here to access the management of your kSuite (need help?).
- Click on the Settings icon at the top right.
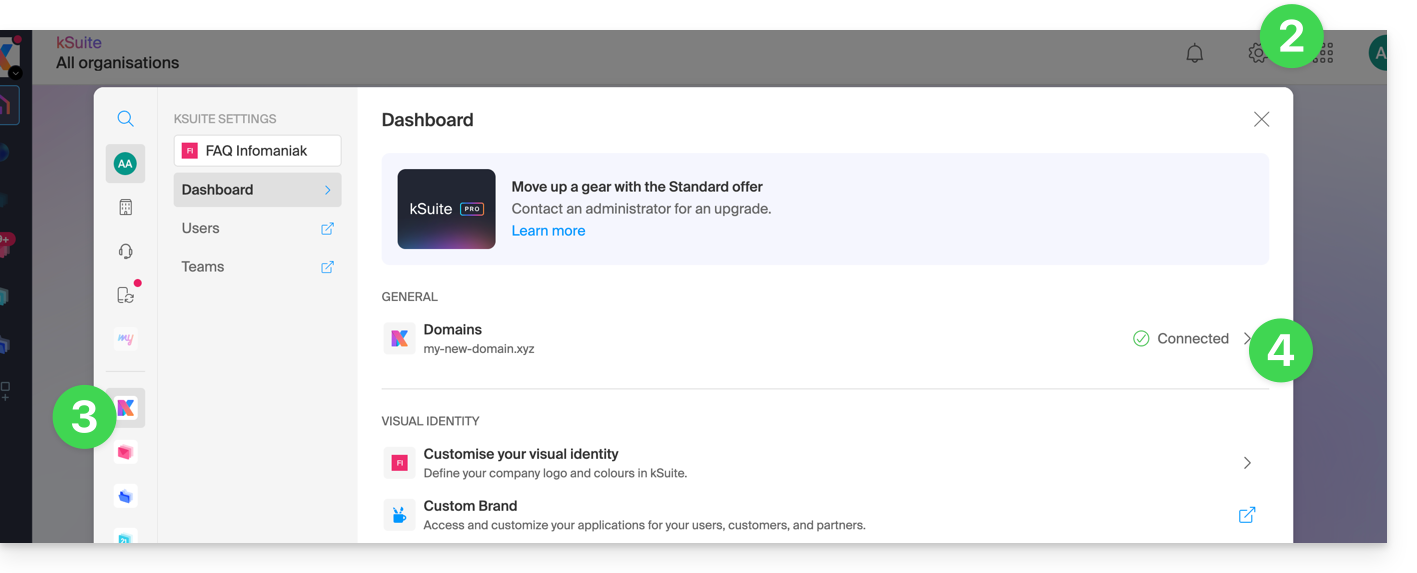
- Click on kSuite in the left sidebar menu.
- Click on Domains:
- Click on the action menu ⋮ located to the right of the domain intended to replace the current domain.
- Click on Set as main domain:
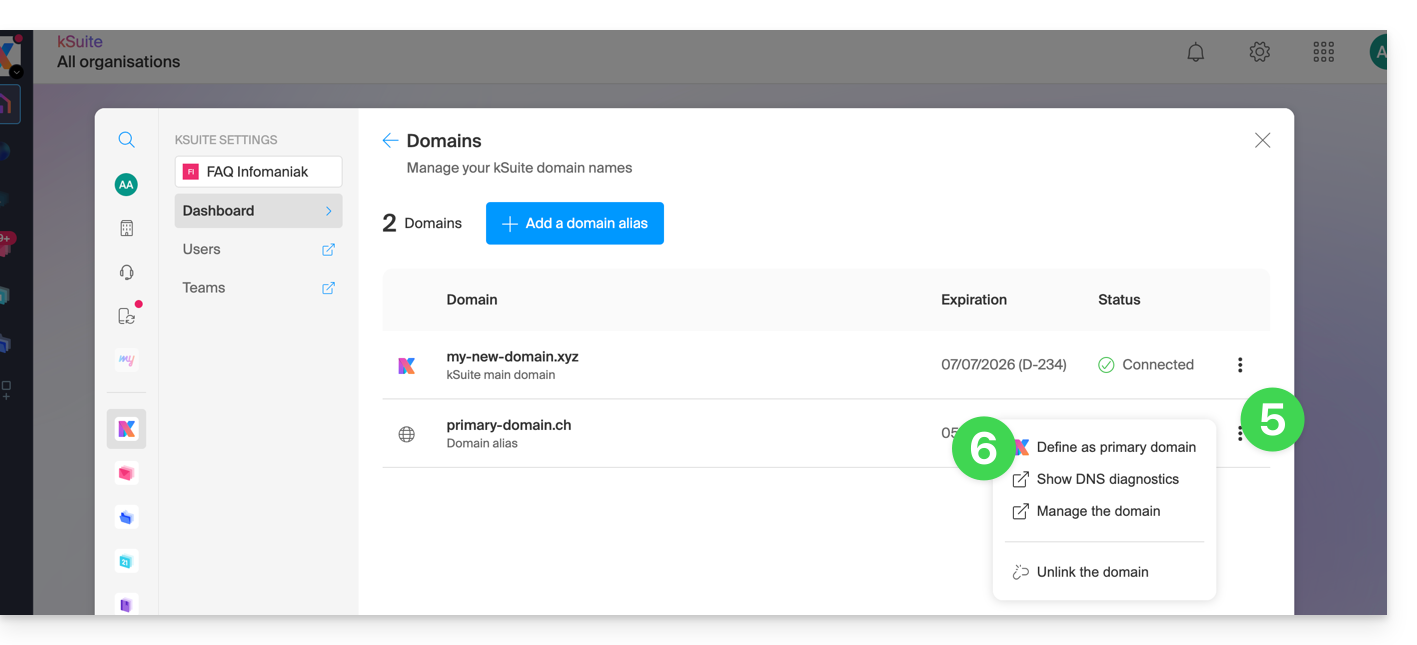
- Information is displayed, click on the Continue button.
- Be aware of the information on the screen and then confirm you have read it.
- Click on the Continue button:

- Click on the Confirm button:
Impact on the Mail Service
By reversing the domain name of the kSuite above, the Mail Service within kSuite is automatically updated. You switch from:
... to this: