Knowledge base
1000 FAQs, 500 tutorials and instructional videos. Here, there are only solutions!
This guide explains how to perform an online speed test from the command line (iPerf CLI) between your computer and your Synology NAS. These tests can help you evaluate the download and upload speeds of your Internet connection to and from your NAS.
Configuration of the Speedtest tool
To install the SynoCli Monitor Tools package:
- From the
DSMinterface, go to the Package Manager. - Click the Settings button in the taskbar, then go to the Package Source tab.
- Click the Add button.
- Fill in the fields as follows:
- Name:
SynoCommunity - Location:
https://packages.synocommunity.com/
- Name:
- Confirm both windows by clicking OK.
- A new tab titled Community will appear in the left menu.
- Select it, then install the SynoCli Monitor Tools package.
Activation of the SSH connection
To activate the SSH service:
- In the
DSMinterface, open the Control Panel. - Click on the Terminal & SNMP tab in the left menu.
- Check the box Enable SSH service.
- Click Apply to confirm.
- If you no longer need the SSH connection after the test, you can uncheck this box to disable the service.
Starting the iPerf server
To connect to the NAS via SSH, from a Terminal type application (command line interface, CLI / Command Line Interface) on your device:
Run the following command:
ssh nom_utilisateur_dsm@ip_du_synology- Enter the password for your
DSMaccount, then validate with the Enter key. Once connected via SSH, start the
iPerfserver with the following command:iperf3 -s
Starting the speed test
To download and run the iPerf3 client:
- Download the
iPerf3executable for your operating system from the official site. - Open a new console.
- Navigate to the folder where the
iPerf3executable is located. Run the following command:
iperf3 -c ip_du_synology- The test results will be displayed after a few seconds. You will then be able to view the upload and download bandwidth between your computer and your Synology NAS.
Link to this FAQ: https://faq.infomaniak.com/1707
Has this FAQ been helpful?
This guide explains how to create a custom MX record (mx.domain.xyz assuming that domain.xyz belongs to you) to be used later in the MX configuration of your NAS.
An MX record cannot be declared directly as an IP address, for example 178.123.456.789
Custom MX record
To access your domain names:
- Click here to access the management of your domain on the Infomaniak Manager (need help?).
- Click directly on the name assigned to the domain in question.
- Click on DNS Zone in the left sidebar.
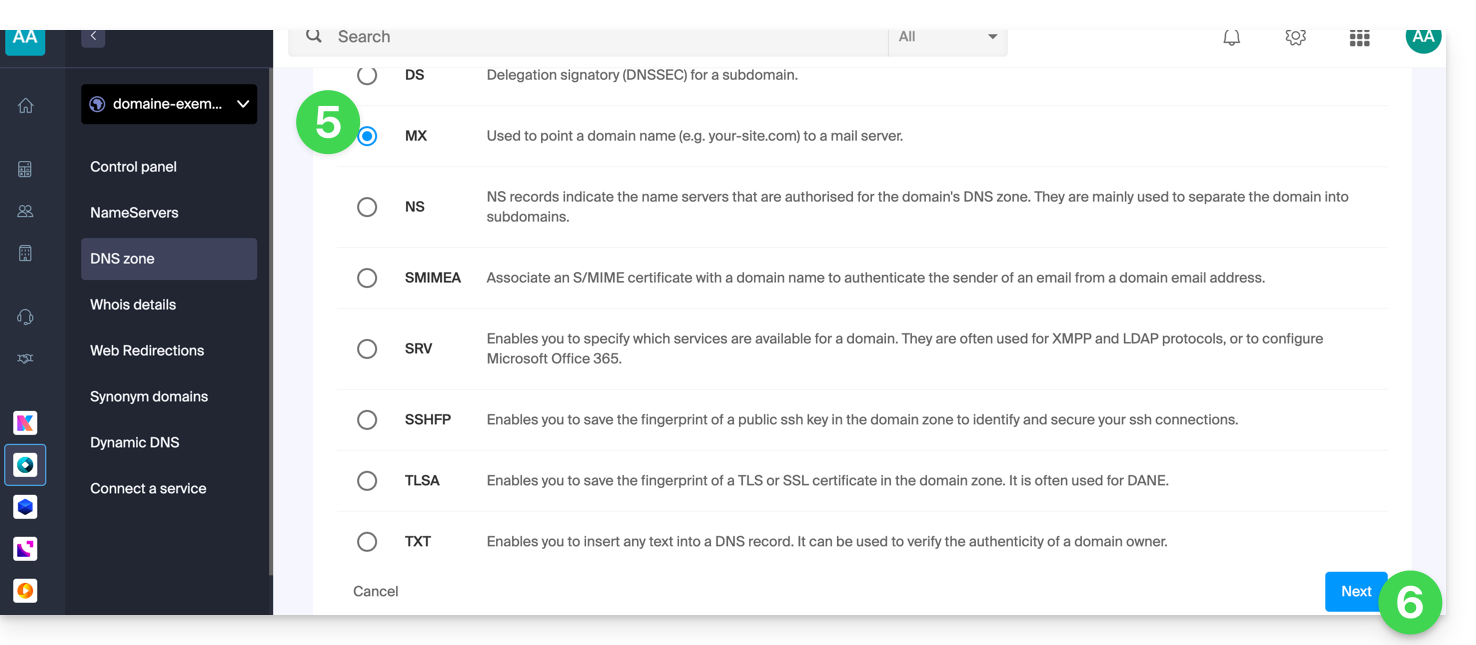
- Click on the blue button Add a record:

- Select MX as the record type.
- Click on Next:
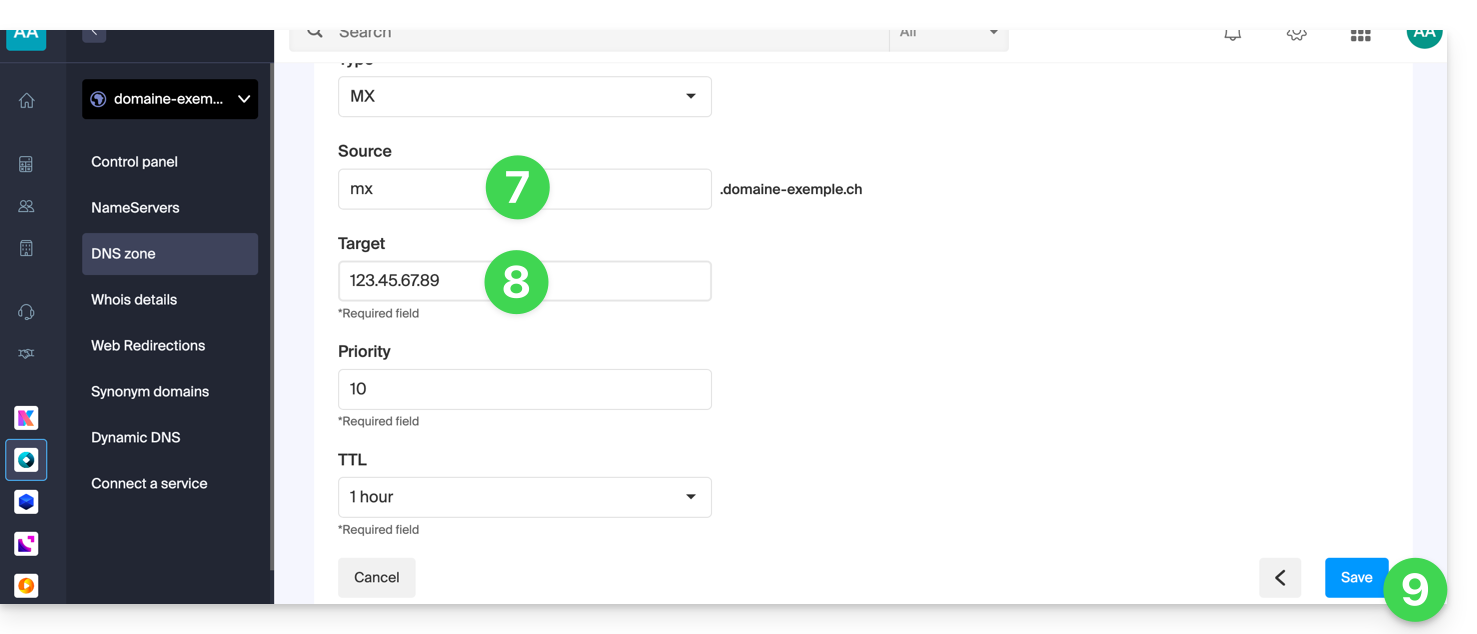
- Enter the desired MX record ("
mx.domain.xyz" for example). - Point the record to the desired IP address (target).
- Click on the Save button:
Link to this FAQ: https://faq.infomaniak.com/1896
Has this FAQ been helpful?
This guide details the areas of intervention regarding the Infomaniak NAS Synology offer.
In case of difficulty, the Infomaniak support intervenes exclusively on the hardware part; for any question related to the use of the DSM operating system or software, consult the official Synology help.
Distinction between Hardware and Software
A clear distinction exists between Infomaniak services and those of Synology. Infomaniak ensures the physical management and maintenance of the servers, while Synology is responsible for the development and support of its operating system. Any software malfunction therefore requires direct assistance from the manufacturer.
Infomaniak Intervention Scope (Hardware)
Infomaniak's expertise focuses on hardware management and the physical sustainability of infrastructures:
- Setup in datacenter: installation of the server in data centers optimized for security and high availability.
- Hard drive management: initial installation, replacement in case of hardware failure or upgrade to increase storage capacity. The system configuration is then adjusted to ensure service continuity.
- Physical reboot (Hardware Reboot): manual intervention on the server in case of a lockup requiring a power outage, performed according to secure protocols to preserve data.
- Reset: complete reset of the NAS to its factory settings, involving the deletion of data to resolve major technical issues or prepare for new use.
Link to this FAQ: https://faq.infomaniak.com/1968
Has this FAQ been helpful?
Thank you for entrusting Infomaniak with the management of your Synology NAS storage server. This guide will help you quickly use the essential functions of your new product.
Preamble
- In case of a problem, the Infomaniak support can only answer questions regarding the hardware part of Synology storage servers.
- For questions related to the use of DSM (operating system), consult Synology help directly ; (learn more).
Manage Synology
- What can you do with a Synology NAS?
- 10 methods to secure access to the Synology NAS
- Data security of Synology NAS
- Restart and reset a Synology NAS
- Perform a speed test on Synology NAS
Backup your data
- Install an SSL Let's Encrypt certificate on a Synology NAS
- Configure a Synology NAS with Time Machine
and also…
- Backup Synology with Cloud Sync on Swiss Backup (Swift)
- Backup Synology with Hyper Backup on Swiss Backup (Swift)
Extend functionalities
- Link a domain name to Synology Infomaniak
- Create a custom MX (for Synology NAS for example)
- Configure DynDNS with a Synology NAS
- Create a private network between servers
- Synology NAS High Availability in a Swiss datacenter
and also…
Click here to share feedback or a suggestion on an Infomaniak product.
Link to this FAQ: https://faq.infomaniak.com/2005
Has this FAQ been helpful?
This guide provides instructions to enhance the security of a Synology NAS.
Need to secure your Synology
Synology NAS devices are highly popular and, consequently, face numerous hacking attempts. It is crucial to properly configure your Synology and protect it with a strong password; otherwise, it could be vulnerable to automated scans that search for and detect all connected Synology devices worldwide with easily exploitable vulnerabilities.
Some best practices to enhance the security of your Synology:
- Always update the Synology operating system (DSM).
- Open the application Security Advisor and run a scan to detect security issues; apply all recommended suggestions.
- Change the default port, which is set to 5000 (e.g., 26753 or 38000).
- Enable and configure the firewall.
- Disable services and modules that are not used and not necessary for your usage.
- If possible, avoid using MyDS.
- Apply these Synology recommendations.
Learn more: https://news.infomaniak.com/securiser-acces-synology/
Link to this FAQ: https://faq.infomaniak.com/2069
Has this FAQ been helpful?
This guide explains how to completely cancel a Synology NAS rented from Infomaniak.
Introduction
- For most products, confirm the cancellation request by email; otherwise, no data will be deleted.
- Any outstanding fees or charges exceeding the included allowance will still be due.
- A cancellation confirmation will be sent to any other administrators of the Organization.
- Backups will be permanently deleted upon cancellation, making any restoration impossible.
Cancel the Synology offer
To access the cancellation process:
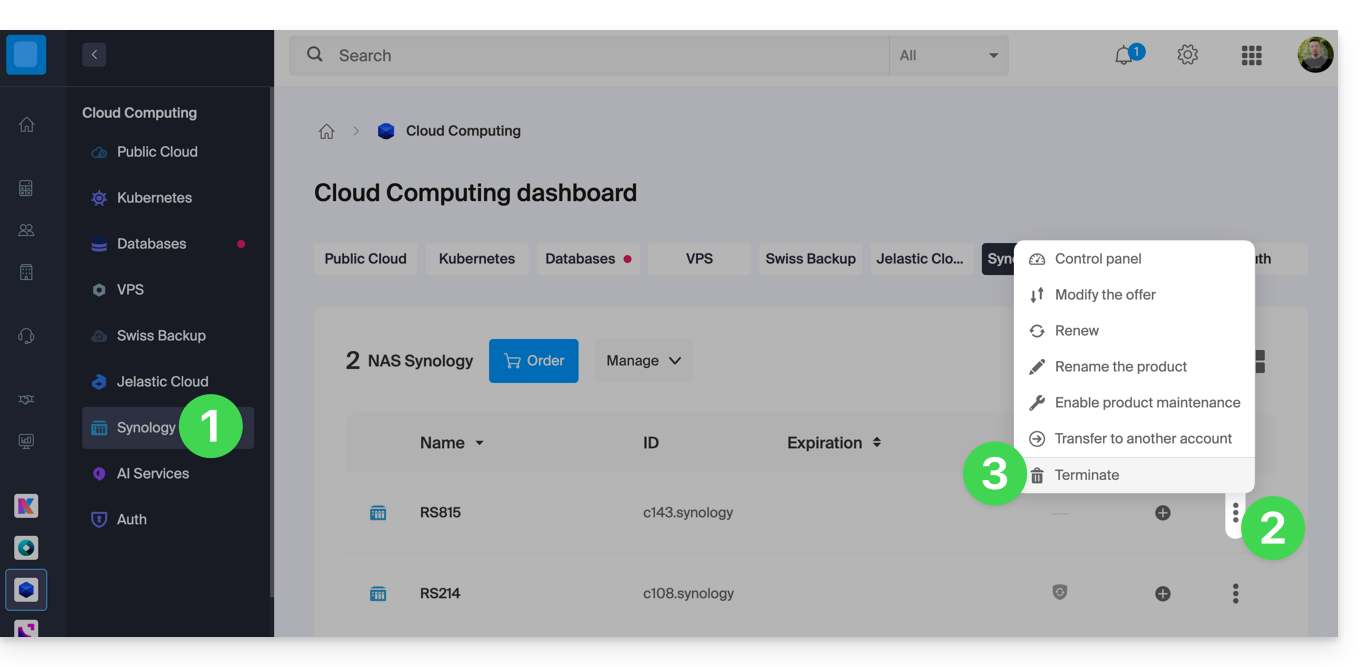
- Click here to access the management of your product on the Infomaniak Manager (need help?).
- Click on the action menu ⋮ located to the right of the relevant item.
- Choose Cancel:
- Follow the procedure to the end.
Link to this FAQ: https://faq.infomaniak.com/2085
Has this FAQ been helpful?
This guide explains how to link a domain name to the Synology NAS that you rent from Infomaniak.
Link an existing domain
To connect your existing domain name to Synology with Infomaniak:
- Click here to access the management of your product on the Infomaniak Manager (need help?).
- Click directly on the name assigned to the Synology concerned.
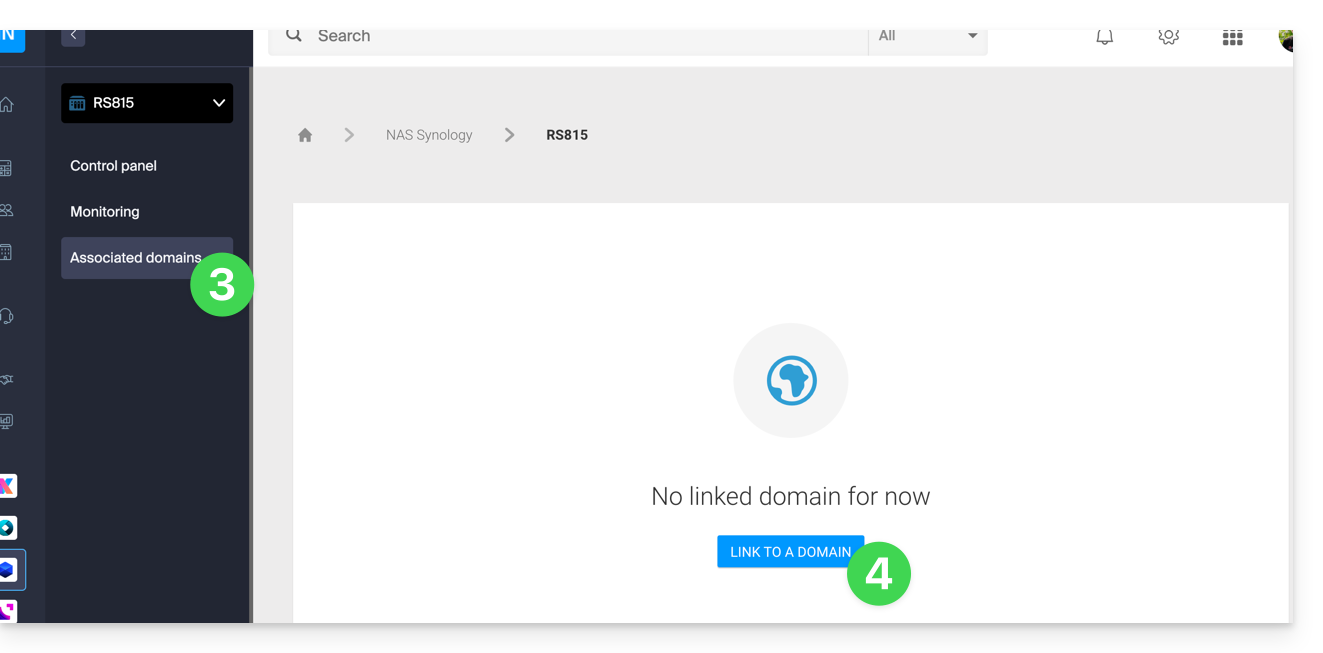
- Click on Linked Domains in the left sidebar menu.
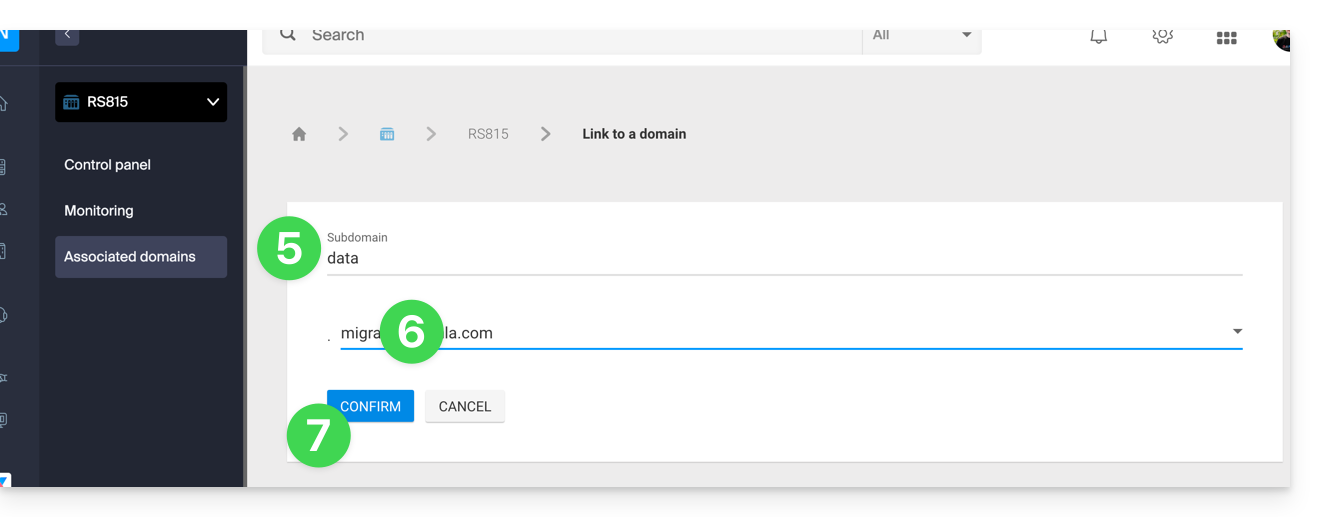
- Click on Link a domain name (in the Associated Domains section):
- Enter any subdomain.
- Choose one of the domain names registered with your Organization.
- Click the button to Confirm:
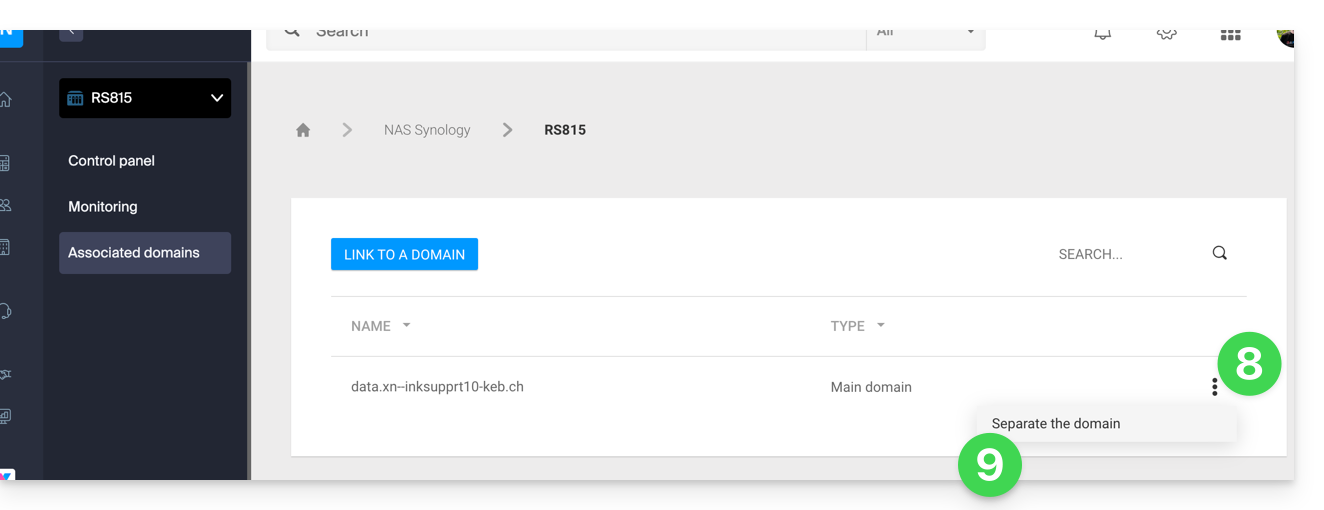
- The domain is linked to the device; to remove the link, click on the action menu ⋮ to the right of the item concerned in the displayed table.
- Click on Unlink the domain and confirm:
Link to this FAQ: https://faq.infomaniak.com/2106
Has this FAQ been helpful?
This guide explains how to connect to the operating system of a Synology NAS hosted by Infomaniak.
DSM Access
To activate and manage an Infomaniak Synology NAS:
- Click here to access the management of your product on the Infomaniak Manager (need help?).
- Click directly on the name assigned to the product in question.
- Click on the button Activate my Synology:
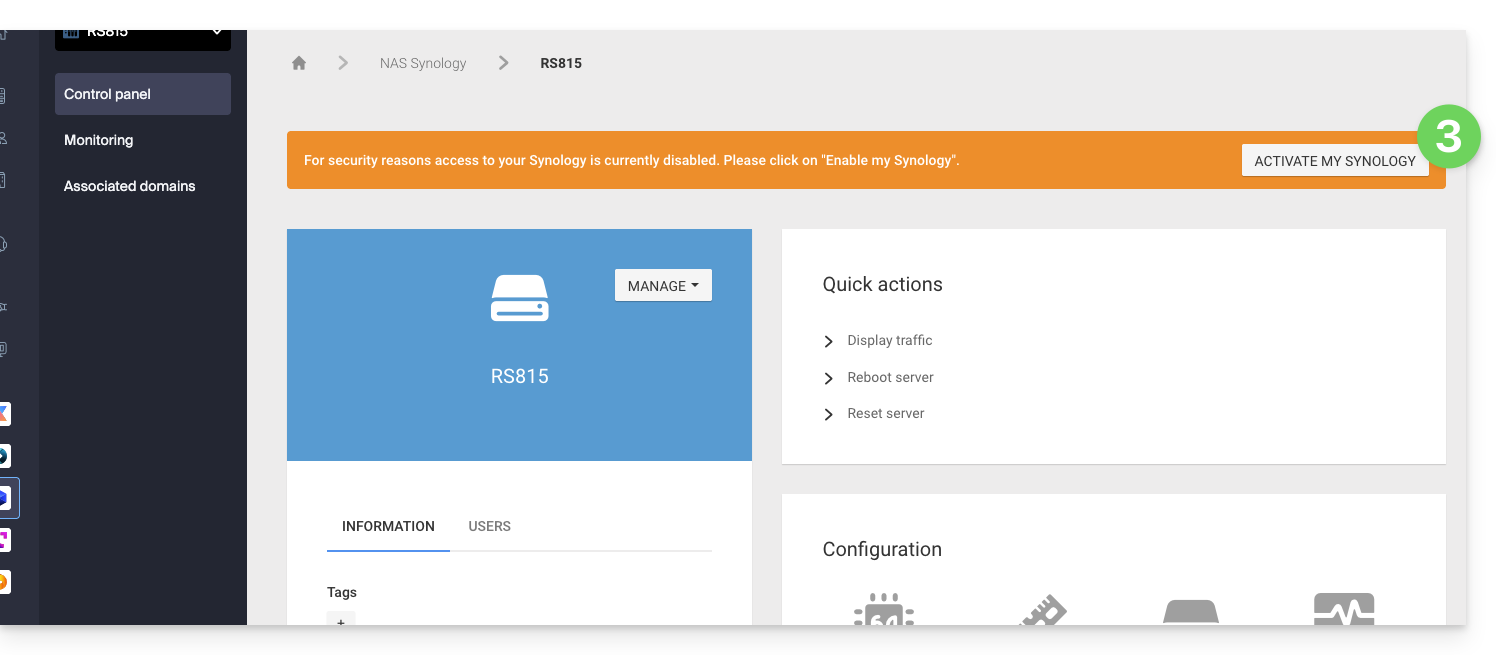
- Wait while your Synology is being activated.
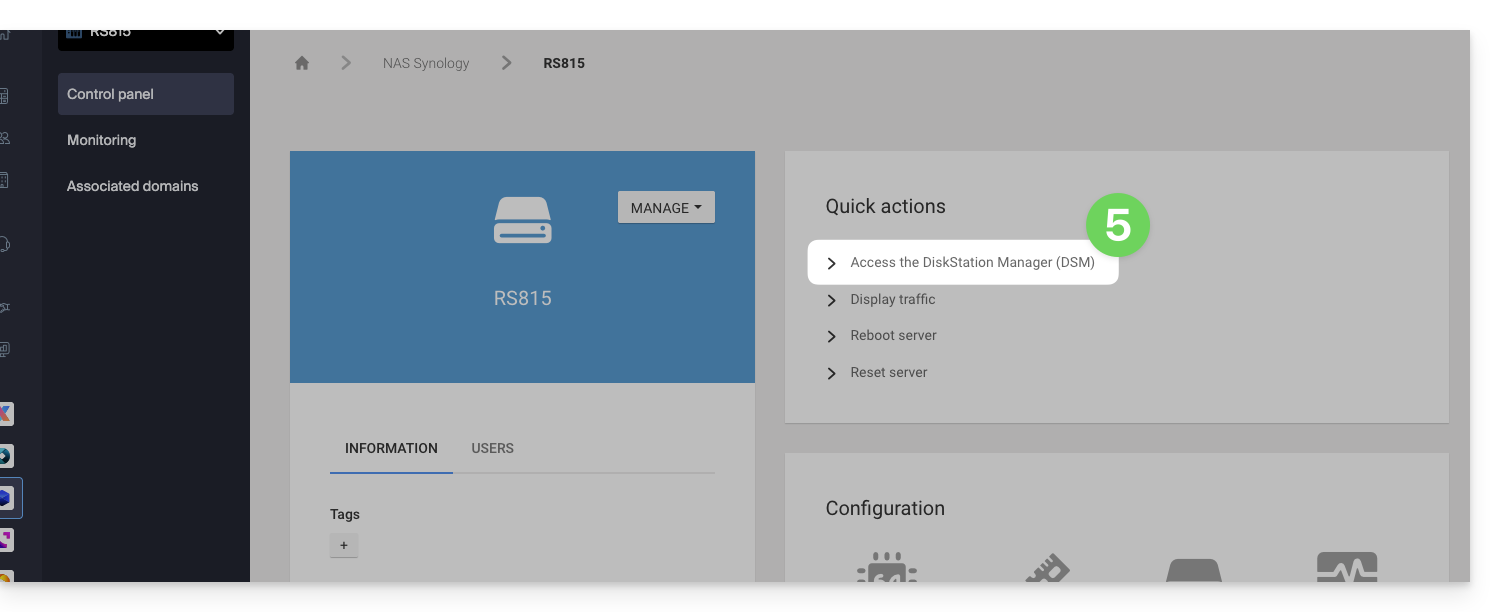
- Click on the DSM Access / Manage my Synology from the Quick Actions block:
It is recommended to read this other guide to secure your Synology NAS.
Link to this FAQ: https://faq.infomaniak.com/2238
Has this FAQ been helpful?
This guide details how to back up a Synology NAS using the Cloud Sync application via the OpenStack Swift protocol on Swiss Backup, the backup solution in an independent Swiss cloud.
Preamble
- It is also possible to use Hyper Backup (recommended): refer to this other guide.
- The various services offered by Infomaniak are all compatible with the corresponding standard protocols (S3/Swift for storage, for example), therefore if you encounter a problem with third-party software, contact its publisher or a Partner and consult the support policy as well as section 11.9 of the Infomaniak Terms of Service.
Configure Cloud Sync
Prerequisites
- Have a Swiss Backup Infomaniak space with an available device quota (minimum 1) for a cloud backup.
- Add 1 device of type Cloud to obtain the OpenStack Swift parameters.
To configure a new backup:
- Log in to the administration interface of your Synology NAS (DSM).
- If necessary, install the Cloud Sync application from the Package Center.
- Open the Cloud Sync application.
- If necessary, click on the + to add a new cloud provider.
- Choose OpenStack Swift from the list of providers:
- Fill in the fields according to the information specific to your device (refer to this other guide) and modify the drop-down menus if necessary as follows:
- After clicking Next, fill in the fields according to the information specific to your device (refer to this other guide) and modify the drop-down menus if necessary as follows:
- Choose the location (the default choice proposed).
- Choose the container name (this is the domain name in your device information).
- Task configuration: enter...
- … the connection name (e.g. OpenStack Swift)
- … the local path (the content to be backed up)
- … the remote path (the folder in which your files will be backed up)
- … the synchronization direction (transfer only local changes recommended for a backup)
Link to this FAQ: https://faq.infomaniak.com/2277
Has this FAQ been helpful?
This guide details how to back up a Synology NAS using the Hyper Backup application via the OpenStack Swift protocol on Swiss Backup, the backup solution in an independent Swiss cloud.
Preamble
- In the event of a disaster, it is possible to order a Synology directly from Infomaniak. You can then restore your data easily using the Hyper Backup tool, thus ensuring the continuity and security of your information.
- It is also possible to use Cloud Sync: refer to this other guide.
- The various services offered by Infomaniak are all compatible with the corresponding standard protocols (S3/Swift for storage, for example). Therefore, if you encounter a problem with third-party software, contact its publisher or a Partner and refer to the support policy as well as Article 11.9 of the Infomaniak T&Cs.
Configure Hyper Backup for Synology NAS
Prerequisites
- Have a Swiss Backup space from Infomaniak with an available device quota (minimum 1) for a Cloud backup.
- Add 1 device of type Cloud to obtain the OpenStack Swift parameters.
To configure a new backup:
- Log in to the administration interface of your Synology NAS (DSM).
- If necessary, install the Hyper Backup application from the Package Center:

- Open the Hyper Backup application.
- Click on the to add a new Cloud provider.
- Choose OpenStack Swift from the list of providers:

- Fill in the fields according to the information specific to your device (refer to this other guide) and modify the drop-down menus if necessary as shown below:

Warning: make sure to specify “name” in the drop-down menus shown above, as these usually indicate “id” by default…
- Choose the volumes and applications to back up:

- Define the frequency of the backup and check the box to enable encryption (keep the encryption key safe so you can use your backup if necessary):

- Backup rotation allows you to avoid overloading your backup location by limiting the maximum number of backups to keep:

If you have insufficient backup quota on Hyper Backup or if you want to delete the historical versions of backup data, refer to this other guide.
Restore / view backups
To restore / view your backups:
- You can use any Swift compatible Keystone V3 client, for example Cyberduck.
- If your backups are in a
.hbkformat (Synology proprietary format)…- … and you no longer have a NAS, download the
.hbkfile and use their software Hyper Backup Explorer. - Refer to their official guide to restore on another Synology NAS.
- … and you no longer have a NAS, download the
Link to this FAQ: https://faq.infomaniak.com/2341
Has this FAQ been helpful?
This guide explains how to restart and reset a Synology NAS (resetting is equivalent to restoring the device to its factory settings) that you are renting from Infomaniak.
Introduction
- You can choose one of the following two reset modes:
- SOFT RESET: reset the administrator password and network settings
- A partial reset may be necessary if you no longer have access to the "
admin" account. - It allows you to create a new password for the "admin" account…
- A partial reset may be necessary if you no longer have access to the "
- HARD RESET: reset the operating system
- A full reset is necessary when there is no access to the admin account due to an incorrect configuration in the DSM firewall, etc.
- Resetting the DSM allows you to return to the factory settings. This operation generally does not affect the data on the disks.
- SOFT RESET: reset the administrator password and network settings
- Refer to the official guide for more information.
Restarting the Synology NAS
You can restart the NAS directly from the Manager:
- Click here to access the management of your product on the Infomaniak Manager (need help?).
- Click directly on the name assigned to the product in question.
- Click on the Restart server button (in the Quick Actions section).
Resetting the Synology NAS
You can request a reset of your NAS from the Manager:
- Click here to access the management of your product on the Infomaniak Manager (need help?).
- Click directly on the name assigned to the product in question.
- Click on the Reset server button (in the Quick Actions section).
Once the reset is complete, reconnect using the "admin" user without entering a password, and then set a password immediately afterward.
Cancel the reset request
Once the reset has been requested, you need to wait, and a "in progress" indicator will appear on your dashboard. At the same location, you can request the cancellation of this reset if necessary.
Link to this FAQ: https://faq.infomaniak.com/2367
Has this FAQ been helpful?
This guide explains how to access a Synology NAS connected to the Internet with a dynamic IP address from Infomaniak via a domain name.
Prerequisites
- Have a Synology NAS connected to the Internet with a dynamic IP address.
- A Dynamic DNS must have been created on the domain in question.
Link a Synology NAS to a domain name
1. Add Infomaniak as a service provider
- Open the Synology NAS management interface (DSM).
- Go to the Control Panel.
- Click on External Access (under the Connectivity section).
- Click the Customize button (under the DDNS tab):
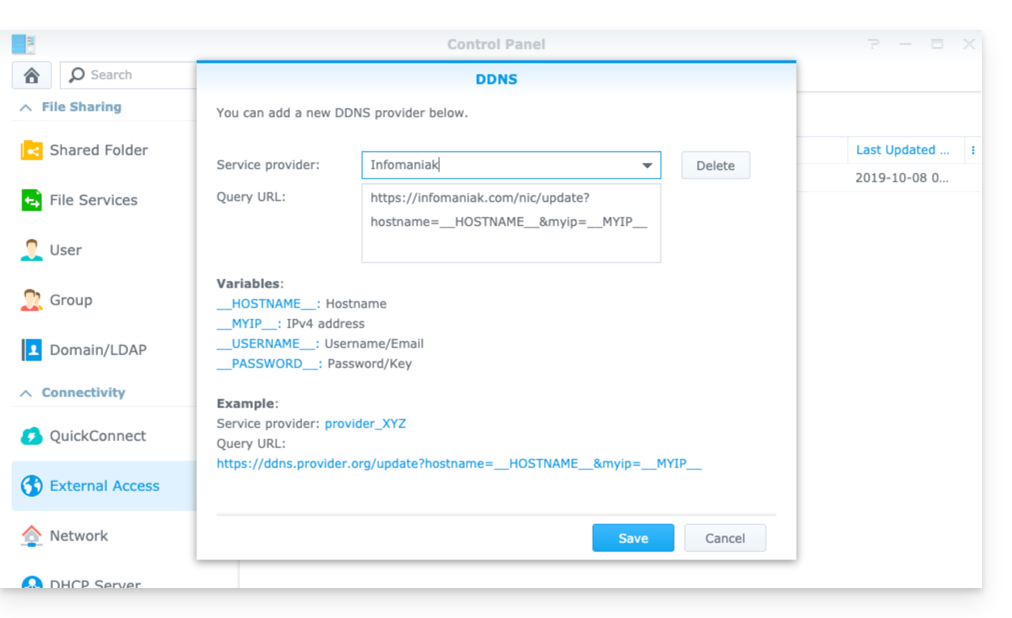
- Service provider:
Infomaniak - Query URL:
https://infomaniak.com/nic/update?hostname=__HOSTNAME__&myip=__MYIP__ - Click on Save.
2. Add the Dynamic DNS to Synology
Now that Infomaniak has been added as a service provider:
- Open the Synology NAS management interface (DSM).
- Go to the Control Panel.
- Click on External Access (under the Connectivity section).
- Click the Add button:
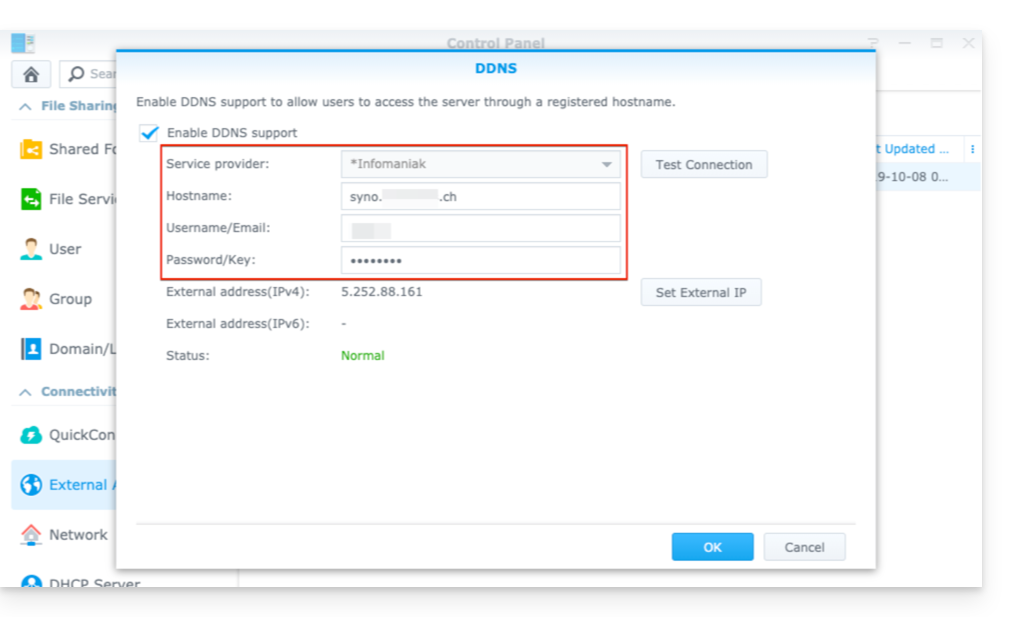
- Service provider:
Infomaniak(the profile created in the previous step) - Hostname:
the URLconfigured in the Manager when adding the Dynamic DNS - Username:
the identifierdefined in the Manager when adding the Dynamic DNS - Password:
the passworddefined in the Manager when adding the Dynamic DNS
From this stage on, the dynamic IP address of your Synology NAS will be automatically synchronized with your domain name.
3. NAT configuration for Synology DDNS
To make your NAS accessible from the outside, you need to configure its NAT. By default, Synology NAS uses ports 5000 and 5001.
You can access your NAS using the following syntax: http://your-domain:5000 or https://your-domain:5001.
Refer to the official Synology documentation for more information.
4. Configuration of a “Reverse Proxy”
If you do not want to specify ports :5000 or :5001 in your URLs, you can configure a Reverse Proxy from your Synology NAS, and thus redirect the URLs to port 443 for port 5001 and port 80 for port 5000 (official Synology documentation for this configuration).
Link to this FAQ: https://faq.infomaniak.com/2368
Has this FAQ been helpful?
This guide explains how to obtain a Synology High Availability NAS from Infomaniak to ensure perfect data redundancy in case of an unexpected incident.
Preamble
- A Synology High Availability NAS combines two Synology NAS servers into a single high-availability cluster.
- One server assumes the role of the active server, while the other becomes a passive standby server.
- The active server handles all data requests and services, while everything is continuously replicated to the passive server.
- When the active server is unavailable, the passive server automatically takes over to ensure the resumption of file services and applications in a few minutes.
Order a Synology High Availability (SHA)
To do this:
- Order 2 identical Synology NAS from the site (all models are compatible)
- Contact Infomaniak support specifying…
- …the email address associated with your Infomaniak account,
- …the two NAS you wish to link.
- Infomaniak support will send you an email confirmation when everything is ready.
Link to this FAQ: https://faq.infomaniak.com/2421
Has this FAQ been helpful?
This guide concerns the creation of private networks between different Infomaniak hosting offers such as VPS Cloud / VPS Lite, Public Cloud, NAS Synology, etc.
Create a VLAN between VPS
It is not possible to create a private network (VLAN) between VPS Cloud / VPS Lite and other products, such as NAS Synology for example, as they are installed on separate networks.
However, it is possible to create a VLAN between a minimum of 10 VPS Cloud / VPS Lite that belong to you (contact Infomaniak support) however a dedicated private network will not be able to communicate with another.
It is recommended to migrate to the Public Cloud offer to create such private networks between VM.
Link to this FAQ: https://faq.infomaniak.com/2808
Has this FAQ been helpful?