
Knowledge base
1000 FAQs, 500 tutorials and explanatory videos. Here, there are only solutions!
This guide allows you to quickly discover the essential functions of Euria, the artificial intelligence at your disposal within kSuite, particularly powerful for summarizing discussions on the kChat app.
Preamble
- Euria can help you perform all kinds of calculations, translations, provide information on various subjects, and answer your questions.
- Be aware of this other guide regarding the model used and the responsibilities of each party.
- As soon as a new user is added, they receive a welcome message from Euria.
- Be aware of this other guide regarding the possibilities of discussing with the AI in kChat.
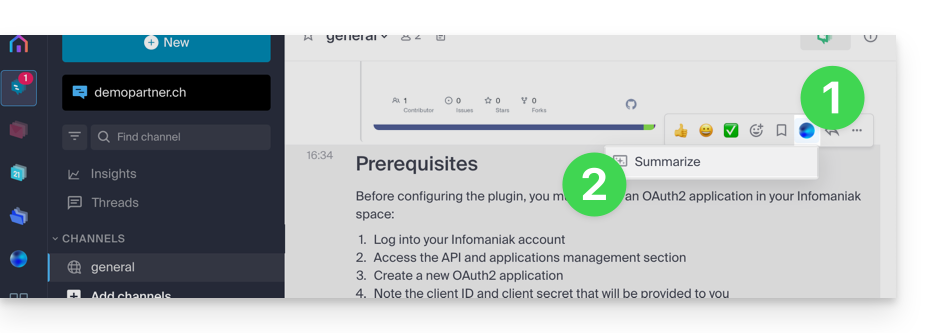
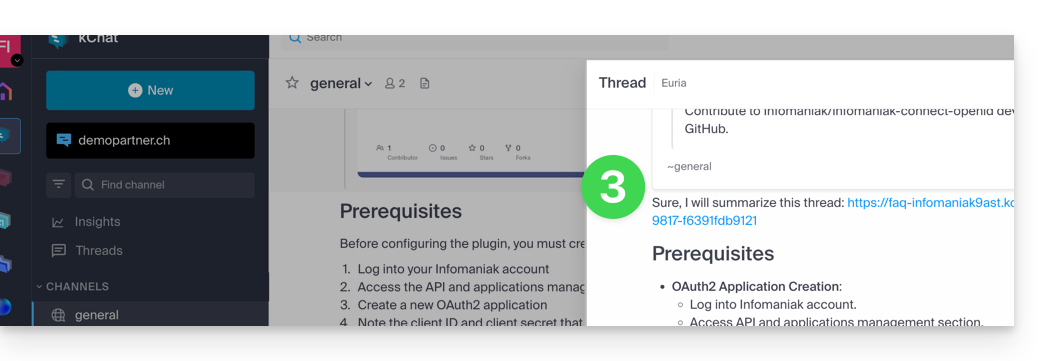
Automatically summarize a kChat message
To get the summary of a kChat message:
- Hover over the message and select the Euria actions icon in the top right.
- Click on Summarize the discussion thread:
- Get the summary, generated by AI and sent by kChat Bot in the right sidebar:
This guide explains how to manage a calendar and its events within the mobile app Google Calendar (app for iOS/Android smartphone or tablet) and/or the web app Calendar Infomaniak (online service ksuite.infomaniak.com/calendar) while keeping all data fully synchronized thanks to the mobile app Infomaniak kSync (app for Android smartphone or tablet).
Preamble
- Refer to this other guide if you only want to display a read-only Infomaniak calendar on Google Calendar (web & mobile app).
- The reverse is also possible if you only want to display a read-only Google calendar on the web app Calendar Infomaniak (online service ksuite.infomaniak.com/calendar).
- The procedure below allows you to edit the calendar events on both sides but only on the mobile version of the Google Calendar app.
- The various services offered by Infomaniak are all compatible with the corresponding standard protocols (CalDAV/CardDAV for contacts & calendars, for example), therefore if you encounter a problem with third-party software, contact its publisher or a Partner and consult the support policy as well as article 11.9 of the Infomaniak TOS.
Synchronize the Infomaniak calendar and the mobile device
Prerequisites
- Download the Android mobile app Google Calendar.
- Download the mobile app Infomaniak kSync (app for Android smartphone or tablet) here:

- The kSync application is also available on F-droid.
- Install kSync.
Next:
- Open kSync on your Android device, a step-by-step assistant will help you configure the application according to your needs.
- Allow kSync to access the required items on the device, mainly the calendar:

- Allow the application to run in the background for better synchronization (uses more battery).
- Log in to your Infomaniak user account:

- Activate the calendar to be synchronized from the CALDAV tab:

At this stage, it is the native application of your Android device (Samsung Calendar, for example, on Samsung-branded devices) that will be synchronized and display the events of your Infomaniak calendar (sometimes you need to activate the account on the application in question):
An event added and/or modified on one or the other of the interfaces will be automatically synchronized everywhere:
Activate the calendar on Google Calendar
To find your Infomaniak calendar on Google Calendar and be able to edit its events:
- Open Google Calendar on your Android device.
- Press the three horizontal line menu button ☰ at the top left of the interface.
- Press Settings at the bottom of the menu:

- Press Manage accounts:

- Activate the account corresponding to your Infomaniak calendar:

- Go back to the previous page and check that the Infomaniak calendar appears among the accounts and modify the color if necessary:

- That's it, Google Calendar is synchronized with the Infomaniak calendar, an event added and/or modified on one or the other of the interfaces will be automatically synchronized everywhere:

This guide explains how to retrieve events, tasks, unavailability, and time slots that have been accidentally deleted in one of your calendars/agendas in the Web app Calendar by Infomaniak (online service ksuite.infomaniak.com/calendar for managing your events and appointments).
Backup retention period
Once a full backup of your calendar has been made, Infomaniak makes it available to you for a certain number of days depending on your offer.
⚠ Available with:
| kSuite | * | |
| Standard | 30 | |
| Business | 30 | |
| Enterprise | 30 | |
| * | ||
| my kSuite+ | 30 | |
| Mail Service | * | |
| Premium 5 min. addresses | 30 |
* By upgrading a free offer, it will be possible to retrieve the backup for up to 30 days.
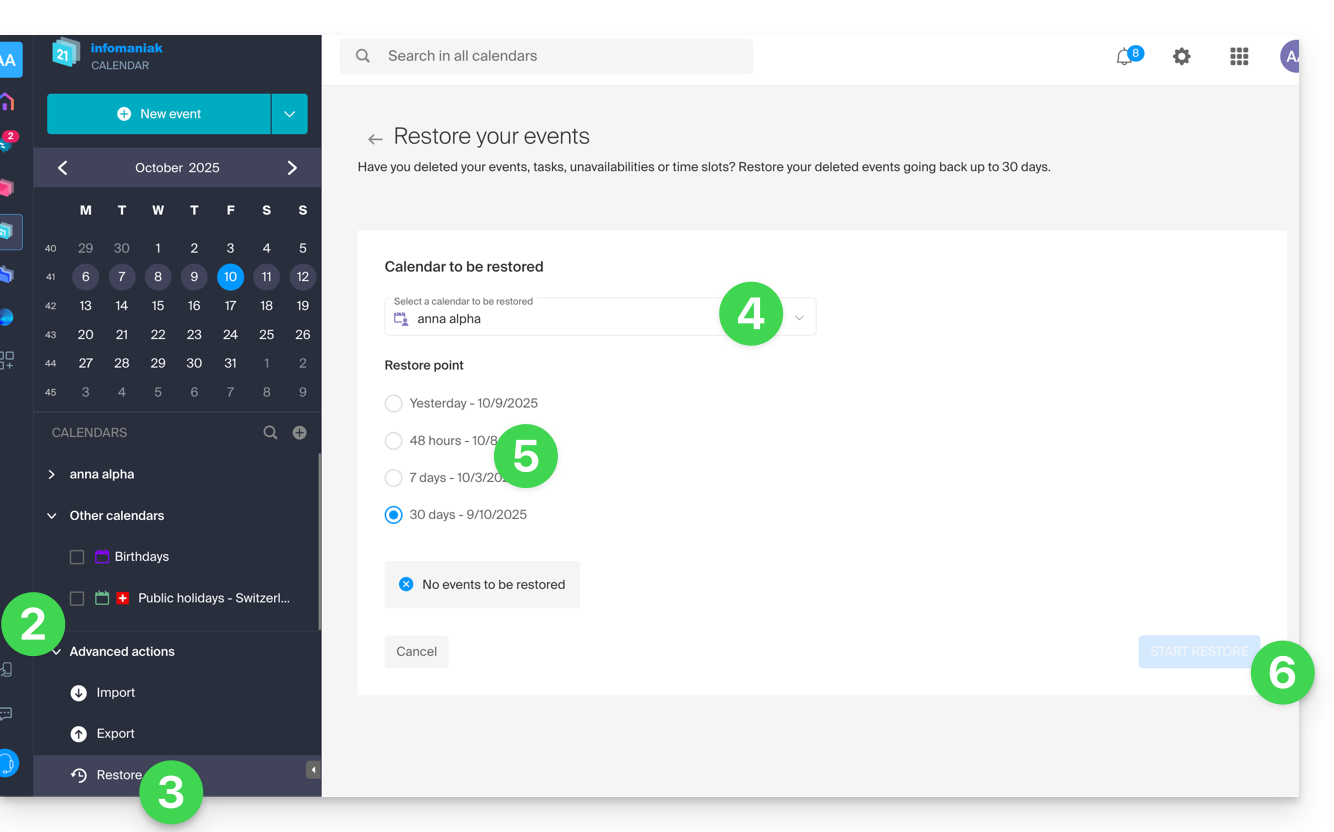
Calendar/agenda restoration
Restoration points are performed every day. If events can be restored, then you can go back to the point 24 hours, 48 hours, 7 days, and 30 days ago:
- Click here to access the Web app Calendar by Infomaniak (online service ksuite.infomaniak.com/calendar).
- Click on Advanced actions from the left sidebar.
- Select Restore.
- Choose the calendar to restore.
- Choose the desired version (1/2/7/30 days).
- Start the restoration using the button at the bottom of the page that activates if events can be restored:
This guide explains how to save and export a calendar / agenda from the Infomaniak Web app Calendar (online service ksuite.infomaniak.com/calendar) in .ics format.
Export a calendar
To export the agenda in .ics format:
- Click here to access the Infomaniak Web app Calendar (online service ksuite.infomaniak.com/calendar).
- Click on Advanced actions in the left sidebar.
- Click on Export in the left sidebar.
- Check the calendar(s) to export.
- Click on Export:
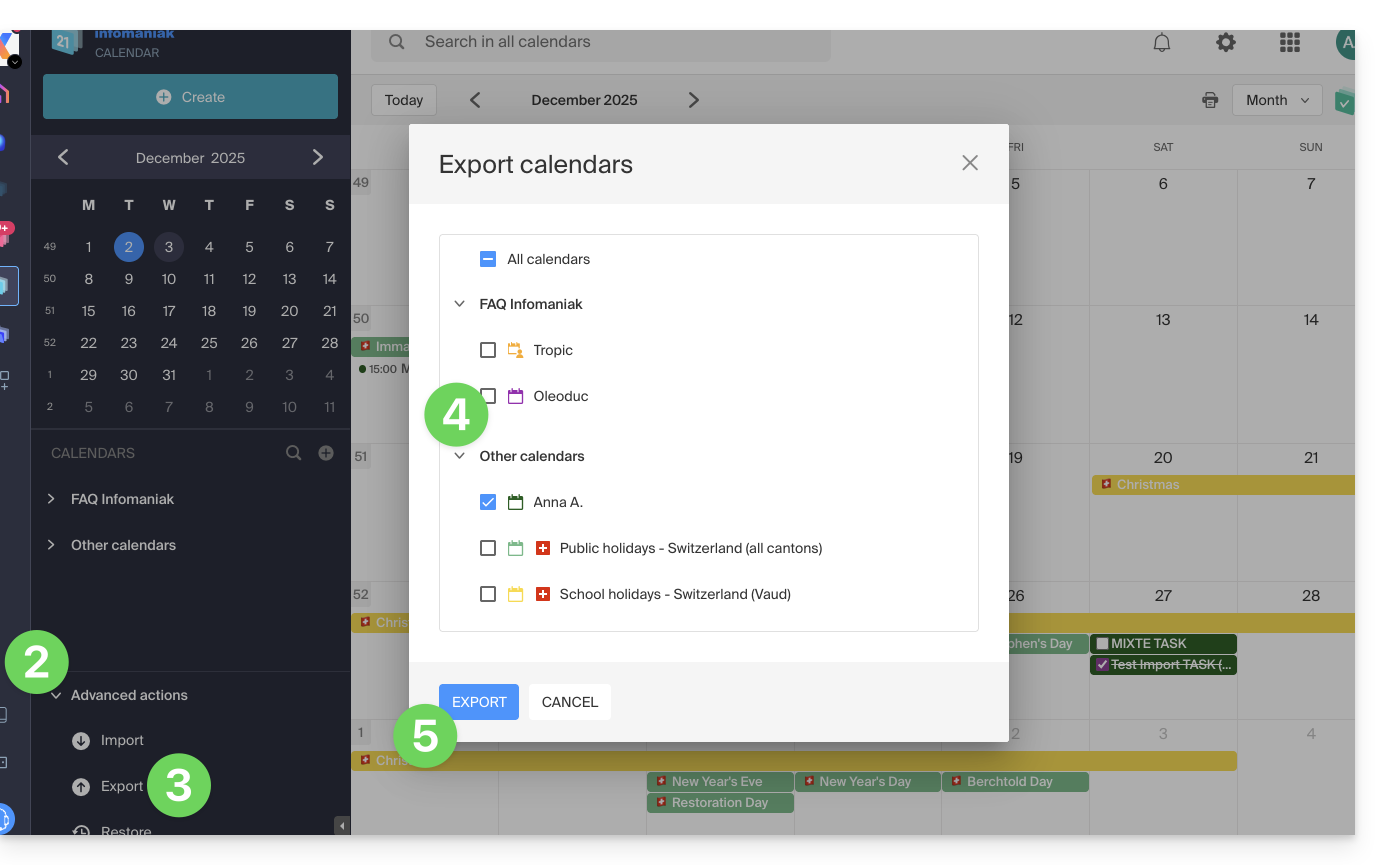
- Save the file on your computer.
Refer to this other guide if you are looking for information about importing events.
This guide explains how to connect the desktop app New Outlook (desktop application on Windows, replacing Microsoft Mail and Windows Mail) to an email address hosted by Infomaniak.
Preamble
- Although the emails themselves remain stored on the Infomaniak server, the experience in New Outlook is very integrated with the Microsoft cloud:
- Some information from your account may be used by Microsoft for centralized management and better synchronization experience.
- According to some users, it may even be mandatory to have a Microsoft Cloud account to use classic IMAP.
- If you want to have full and local control over your emails, consider using third-party email software/clients (such as Thunderbird, for example) that allow for more direct storage.
- The various services offered by Infomaniak are all compatible with the corresponding standard protocols (IMAP/SMTP for email, for example). Therefore, if you encounter a problem with a third-party software, contact its publisher or a Partner and consult the support policy as well as article 11.9 of the Infomaniak Terms of Service.
Add the email address to the application
Prerequisites
- Create the email address within my kSuite or a Mail Service / kSuite.
- Create a password for the email address on the device you are going to configure.
To configure the email application:
- Open the application.
- If necessary, click on the gear icon in the top right corner (otherwise, skip to step 4):
- Click on Add an account:
- Enter the email address to be linked.
- Click on Continue:
- Enter the password for the email address.
- Click on the See more button.
- Check and complete the missing information by scrolling down if necessary:
- Check and complete the missing information.
- Click on Continue:
- Read and go through the different Microsoft information windows:
- There you go, your email address is now configured in the application:
Recommended settings
- Incoming IMAP server =
mail.infomaniak.com - IMAP port =
993(with SSL) - Outgoing SMTP server =
mail.infomaniak.com - SMTP port & encryption protocol and command/method to activate this protocol:
587+ STARTTLS - Username = the complete & full email address ( ? )
- Password = the one generated for the email address you want to check
- Mandatory authentication for sending emails:
- It is activated in the SMTP settings of your application.
- Check "use the same settings as the incoming server" or, depending on the software/email clients, enter a username (= complete & full email address) and the generated password.
Refer to this other guide if you are looking for information about other compatible messaging ports and protocols (SSL / TLS for example).
In case of a problem
Check that the Mail Service is configured optimally.
If you are unsure of your email password, the troubleshooting guides help you resolve any potential issues:
- Refer to the solutions given in this other guide regarding email in general.
- This other guide is more specifically about Outlook.
… and if your Outlook no longer works since a change of email password, refer to this other guide.
This guide explains how to connect the desktop apps Contacts and Calendar (desktop applications on macOS) with the contacts & calendars hosted at Infomaniak.
Preamble
- Your macOS computer will be automatically configured using .mobileconfig configuration profiles compatible with Apple, unlike a manual configuration.
- Infomaniak contacts & calendars are linked to your Infomaniak user account. When you log in to contacts.infomaniak.com or calendar.infomaniak.com you will likely have to perform double validation (2FA) during login.
- In this case, an application password is required to establish synchronization between your device and Infomaniak tools.
- But don't worry, creating such a password is offered by following the configuration assistant (point 4 below).
- It is possible to delete a configuration profile once installed (scroll to the bottom of this page for explanations).
- The Infomaniak tools are compatible with any application supporting CardDAV/CalDAV.
- For additional help, contact the support of the software used or a Partner — also discover the role of the host.
Install a configuration profile
For this:
- Click here to access the Infomaniak configuration tool (online service https://config.infomaniak.com) — log in if necessary to your Infomaniak account on the Organization managing your email address.
- Choose to install the profile on this device.
- Choose to synchronize the contacts & calendars.
- Generate an application password dedicated to synchronization (in order to maintain the usual 2FA connection of your user account):

- Copy the generated application password (it will be requested during the installation of the Apple profile).
- Download the Apple profile:

- Open the System Settings of the computer.
- Click on General in the sidebar, then click on Device Management (for macOS Sequoia 15 version). If you have a lower version or cannot find the profile, refer to the official documentation by changing the system version at the top of the page if necessary:

- Click on +:

- Locate and then open the previously downloaded file:

- Click on Continue:

- Enter the application password twice (contacts + calendars).
If your macOS applications Contacts and Calendar were already open, you need to restart them. You will then see the information added by the synchronization.
Contacts Features
Display shared address books
The Sync server applies a restriction to the macOS Contacts application because this application does not support multiple address books for the same account. Synchronization therefore only returns the default address book. You need to use another CardDAV software (e.g., Thunderbird) to access all address books.
Contact list/group/folder
In the macOS Contacts app, you can add contact lists (or groups), but the information indicating which contacts belong to which list will not be synchronized with contacts.infomaniak.com:
Therefore, if you want to remove these lists, you must press the DEL key on your keyboard after selecting the list to delete (this does not delete the contacts).
On the other hand, a folder (or group) that you can configure on **contacts.infomaniak.com** from the editing of a contact card (see below) is not synchronized with the **Contacts** application on macOS:
Calendar Features
Display shared calendars
By default, only your personal calendars are displayed in the Calendar application. Here is an example of synchronization between multiple calendars from multiple Organizations (to which the user account specified in the macOS application is linked).
Calendar Infomaniak:
macOS:
To display calendars shared by another user:
- Open the Calendar application.
- Open the Calendar menu.
- Click on Preferences.
- Go to the Accounts tab.
- Go to the Delegation tab:

- Check the shared calendars to display.
Delete a CardDAV or CalDAV account
Refer to the chapter "Stop using an account" by changing the system version at the top of the page* if necessary.
Delete an Apple profile
Refer to the official documentation by changing the system version at the top of the page* if necessary.
*Why is it necessary to choose the guide version that exactly matches your macOS / iOS system version? Apple introduces sometimes subtle changes with each new version of its system, for example a path on iOS 15…
… becomes this on iOS 18…
This guide explains how to synchronize tasks with kSync, the Infomaniak mobile app used to link your calendars & contacts stored at Infomaniak with the data on your Android devices.
Prerequisites
- Install and download the free application jtx Board.
Synchronize tasks
To synchronize data between the tasks of Infomaniak Calendar and your Android devices, jtx Board will, using kSync, synchronize the tasks based on one or more Infomaniak calendars at regular intervals.
- Here is a task present on Infomaniak:

- After synchronization, it appears on jtx Board:

- Example of task validation when it is executed, then adding a second task from the application:

- Result on Infomaniak:

To go further, it may be necessary to purchase the Pro version of the jtx Board application.
Recommended settings
It is recommended to improve the readability of your tasks in the application by disabling these 2 parameters in the settings of the jtx Board application...
... then remove "local" from the list of locations to keep only the possibility of saving in your synchronized account(s).
This guide explains what the external email label, "External" on the Web app Mail (online service ksuite.infomaniak.com/mail) and the mobile app Infomaniak Mail (application for iOS/Android smartphone or tablet) means when reading certain messages:
External email label
The external email label appears in the following cases:
- The sender's domain name (or alias) does not match the email address configured in Mail.
- The sender is not part of the contacts (including suggested contacts).
- The email comes from an address hosted outside the Organization.
The label will appear as " unknown" instead of " external" with some free offers like my kSuite.
Enable or disable the label
You can enable or disable the label, the effect is immediate for incoming emails and in the case of a response to an external email. To do this:
- Click here to access the management of your product on the Infomaniak Manager (need help?).
- Click directly on the name assigned to the product concerned.
- Click on Global Configuration in the left sidebar
- Click on the Security tab.
- Enable or disable the toggle switch:

This guide explains how to create an additional calendar on the Web app Calendar Infomaniak (online service ksuite.infomaniak.com/calendar) and then set it as default.
Preamble
- Setting a default calendar, for example, speeds up the creation of new events as you will no longer need to modify the calendar in which your next event will be recorded each time.
- You can only set calendars that you own directly as default.
Add a new calendar/schedule
To create an additional calendar:
- Click here to access the Web app Calendar Infomaniak (online service ksuite.infomaniak.com/calendar).
- Click on in the left sidebar menu.
- Click on New calendar:
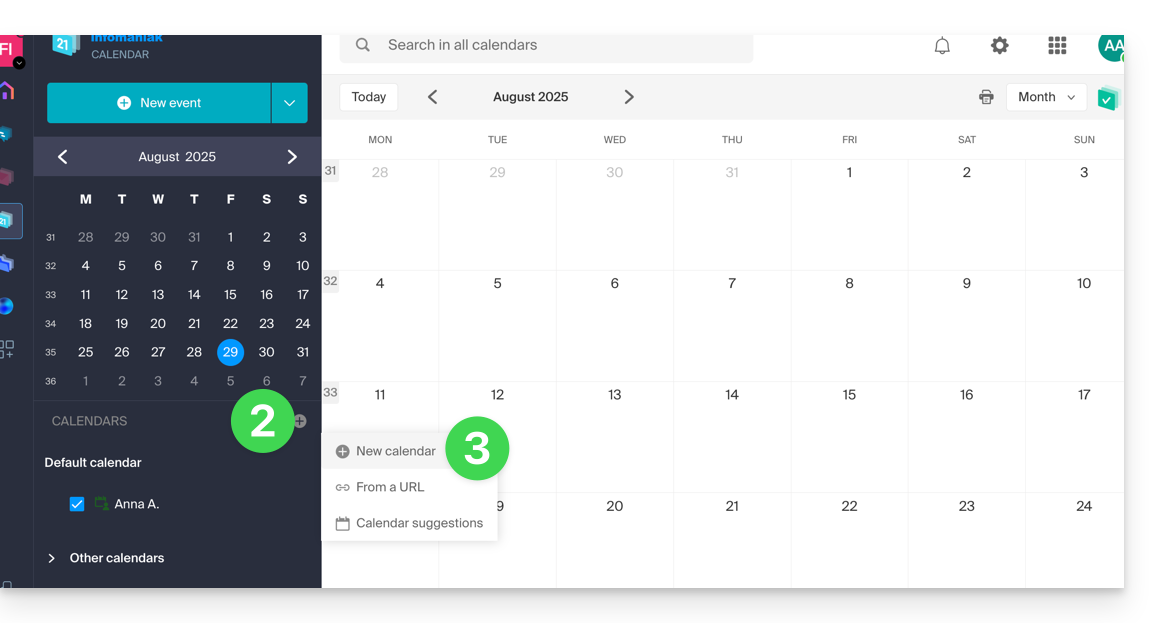
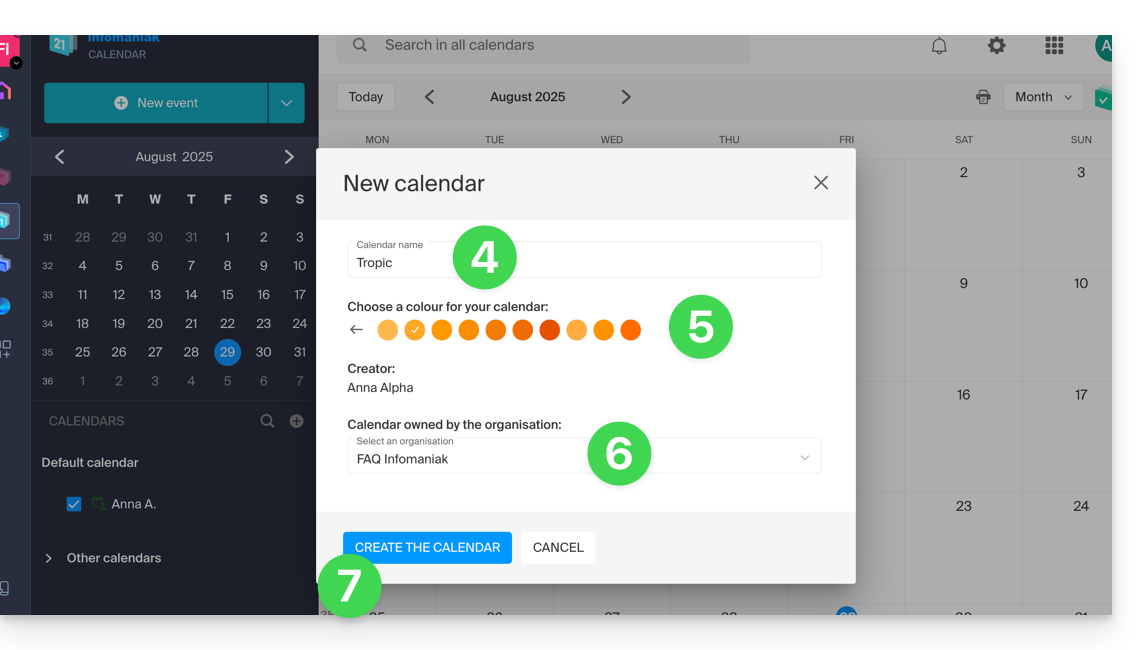
- Enter a name for the calendar.
- Choose a color.
- Choose one of your Organizations in which to create the calendar.
- Click the button to create the calendar:
Modify the default calendar
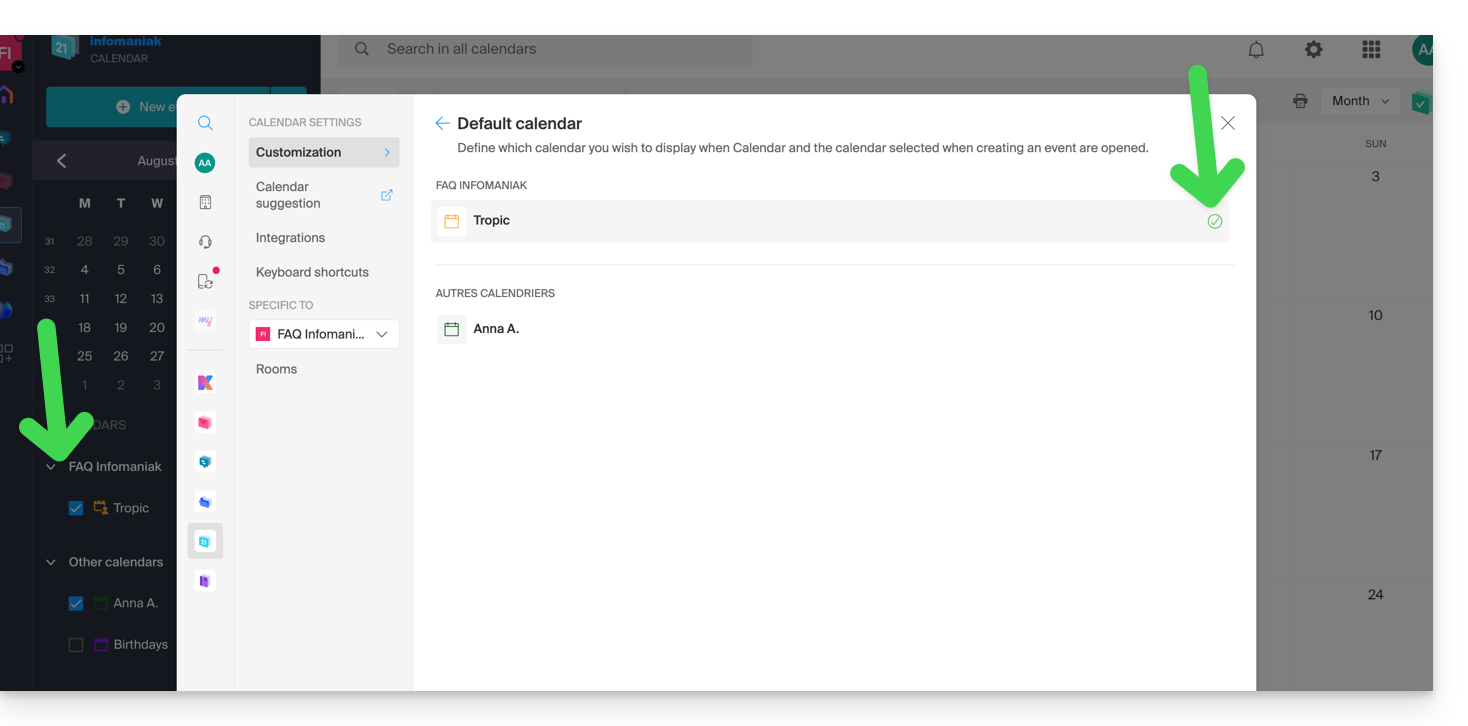
To set one of your calendars as default:
- Click here to access the Web app Calendar Infomaniak (online service ksuite.infomaniak.com/calendar).
- Click on the Settings icon in the top right corner.
- Click on Customization in the left sidebar menu.
- Click on the default calendar to open the selection menu:
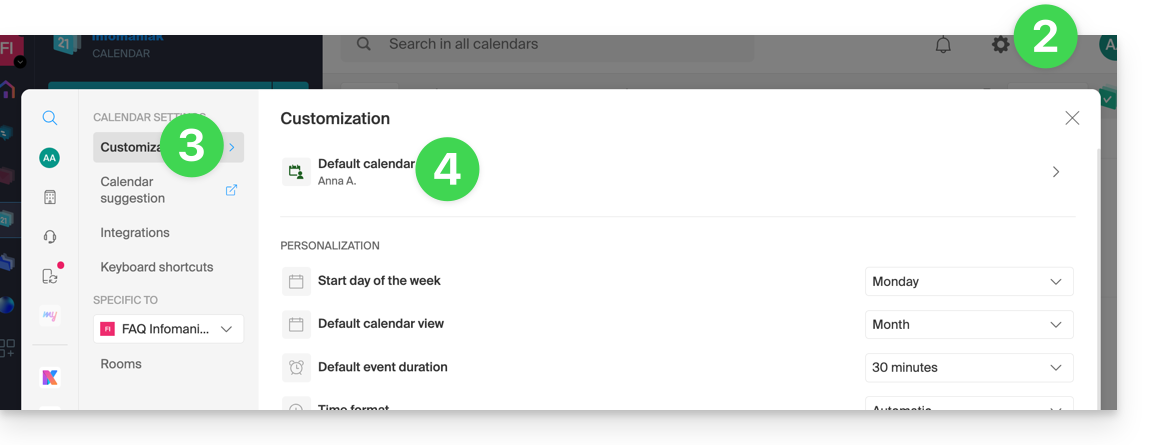
- Choose the desired calendar in the Default calendar field; it will be placed first in your calendar lists:
This guide explains how to use the appointment scheduling assistant on a calendar / agenda of the Web app Calendar Infomaniak (online service ksuite.infomaniak.com/calendar) and thus schedule a meeting between several users.
⚠ Available with:
| kSuite | Free | * |
| Standard | ||
| Business | ||
| Enterprise | ||
| my kSuite | * | |
| my kSuite+ | ||
| Mail Service | Starter 1 max. address | * |
| Premium 5 min. addresses |
* limited to 7 days
Preamble
- To create and easily configure a new event, refer to this other guide.
Scheduled programming: scheduling a meeting
To create a new shared event using the scheduling assistant:
- Click here to access the Web app Calendar Infomaniak (online service ksuite.infomaniak.com/calendar).
- Click on the chevron to the right of the new event creation button.
- Click on Scheduling Assistant:

The assistant appears on the right of the screen while the left part allows you to choose the day of the event.
The principle is to find the best time to schedule a meeting between several users of the Organization.
To do this, each person's availability (based on their schedule and the parameters defined in the calendar preferences) is displayed in a column:
- When you create a new event for a team of users:
- The meeting title is automatically generated but can be modified.
- The duration of the event (and its placement within the day) can be modified, including on the left side with the mouse cursor.
- A potential room is automatically selected but can be modified.
- Participants can be added up to a maximum of 25:

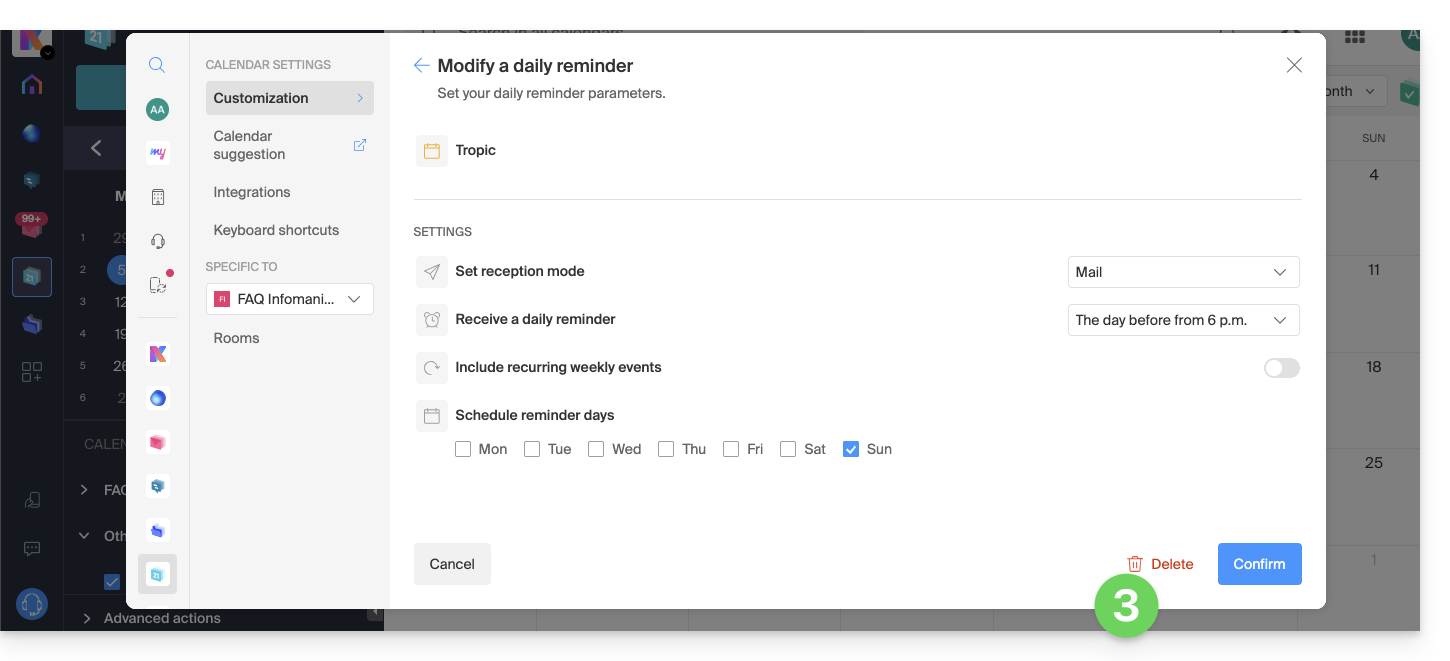
This guide explains how to automatically receive a summary of your activities scheduled on Calendar Infomaniak in your Mail and/or kChat inbox every morning.
Preamble
- This feature is disabled by default on all calendars.
- This summary is sent to your email address (the one used to log in to your Infomaniak account).
- It contains a list of all the day's events with their most important information (possible kMeet link, location, times, etc.).
- You can even imagine forwarding this daily schedule to your team or assistant so they know the best times to contact you, including creating a rule for automatic forwarding based on the criteria corresponding to the received email.
Obtain a schedule automatically and daily
Prerequisites
- Sending a summary on kChat requires having kChat within your Organization.
To start the day by consulting a message in your Infomaniak inbox containing the schedule based on your Infomaniak agenda:
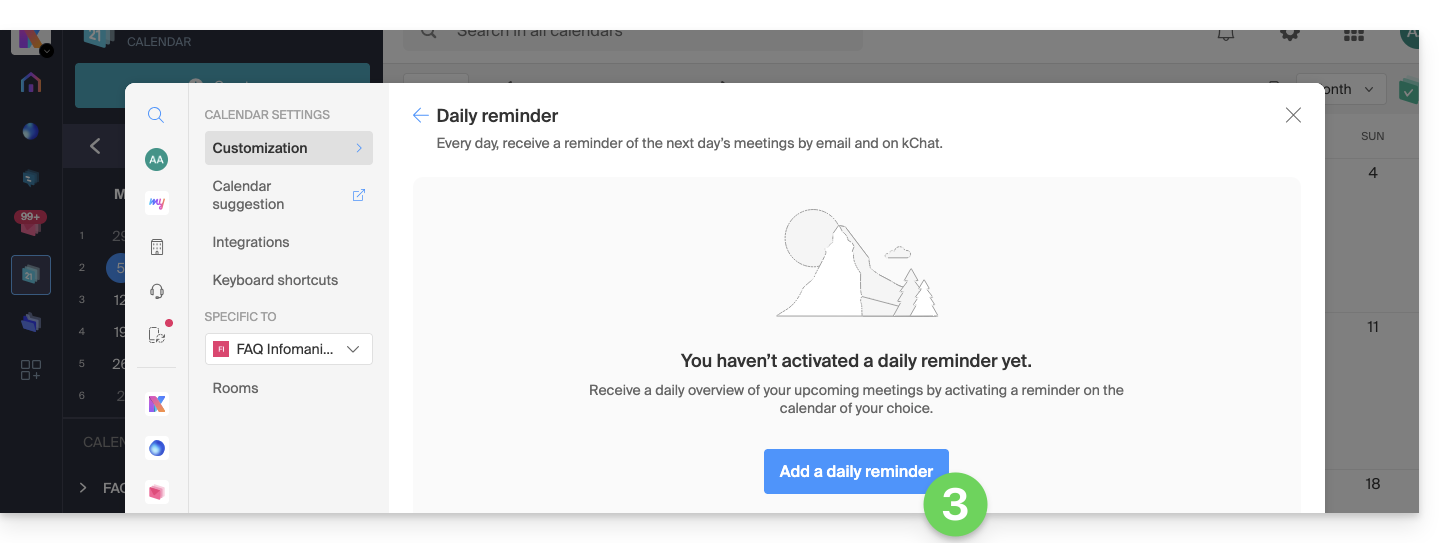
- Click here to log in to the unified settings of your Infomaniak Web apps and more specifically to the settings of the daily reminder of the Calendar app.
- Check or select the relevant Organization in the dropdown menu of the left sidebar.
- If you modify it, return to the settings by clicking on the daily reminder item to access the settings:
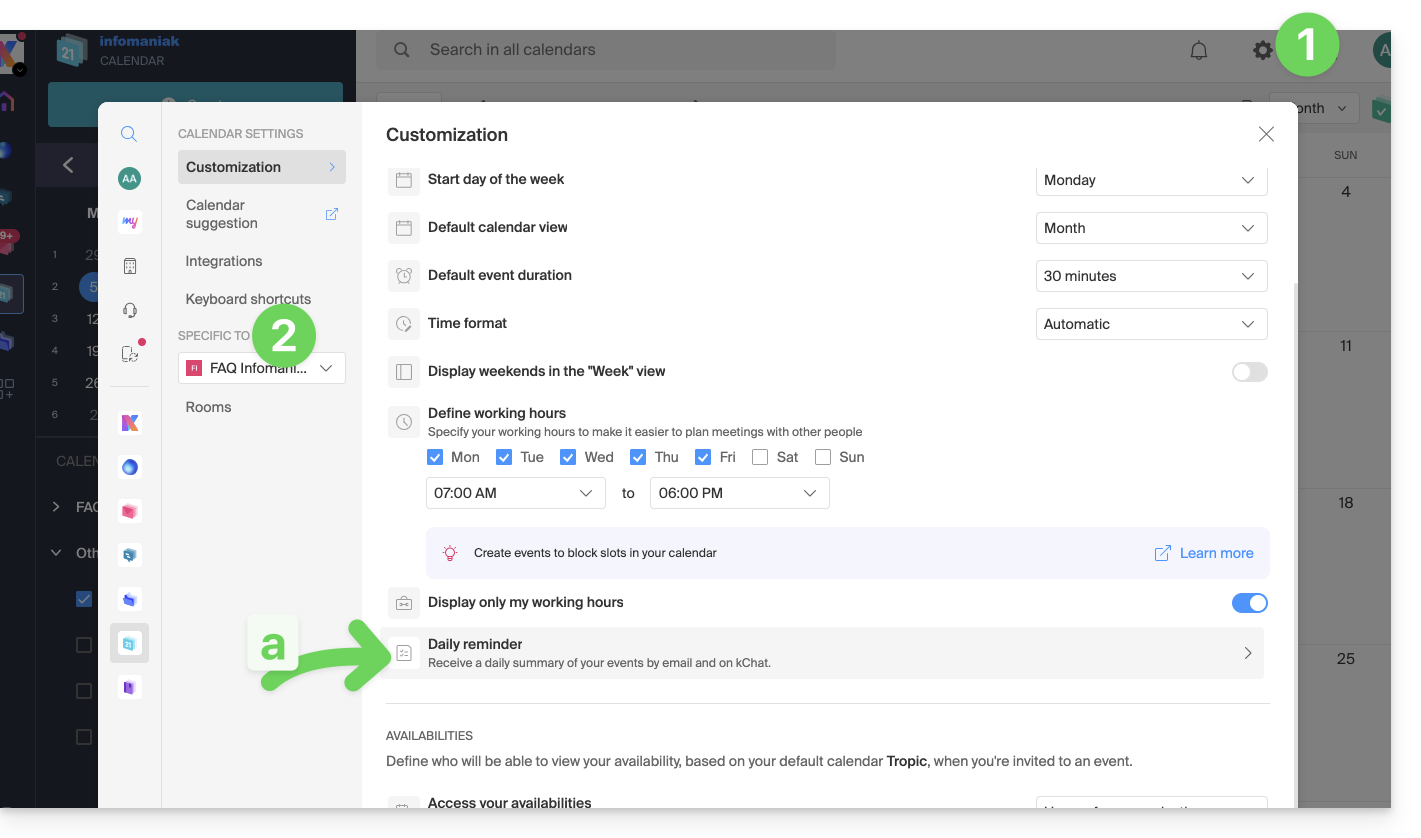
- If you modify it, return to the settings by clicking on the daily reminder item to access the settings:
- Click the button to Add a daily reminder and configure it:
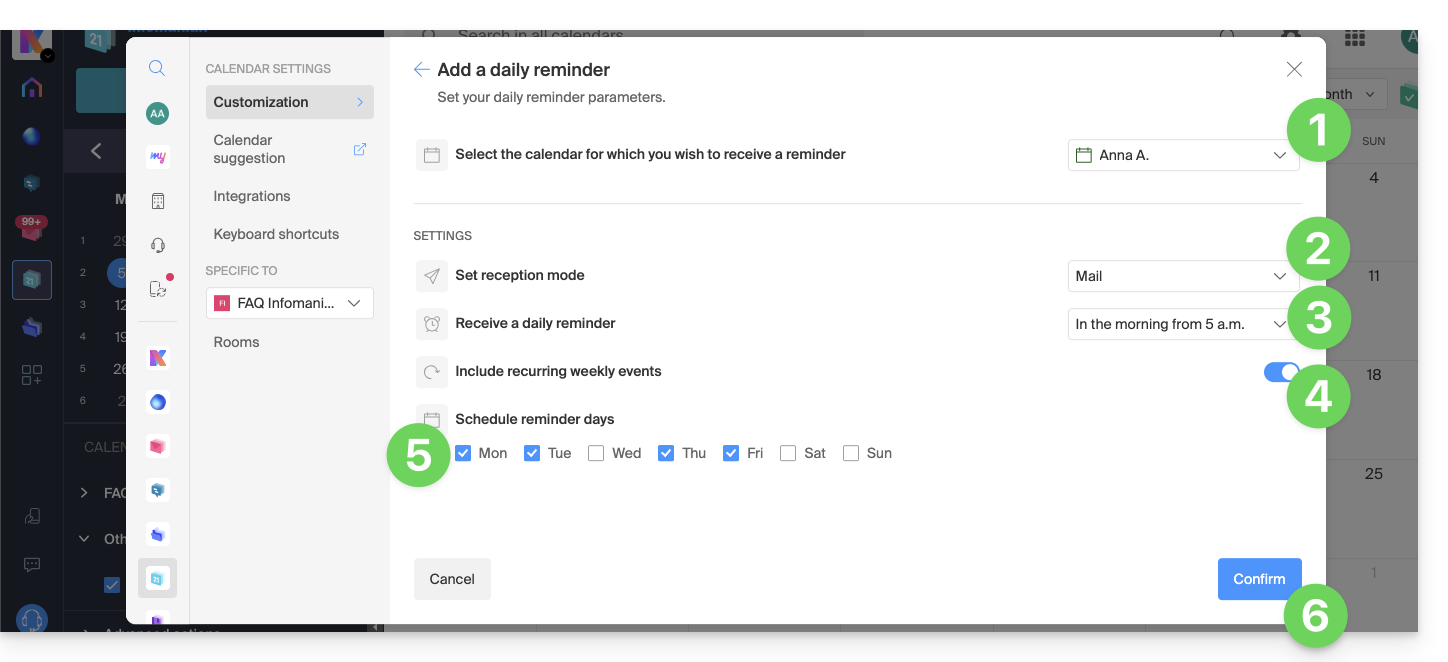
To customize your reminder according to your needs:
- Select the relevant calendar.
- Choose the reception mode (Mail, kChat, or both).
- Choose the time you want to receive the reminder (the night before or early the same day).
- Choose whether or not to include recurring events.
- Choose the days on which the daily reminder will be sent.
- Confirm your choices at the bottom of the page:
Disable the daily reminder
To stop receiving the daily summary by email or by Euria on kChat:
- Click on the link located at the bottom of the received notification:

- Click on the reminder to delete:
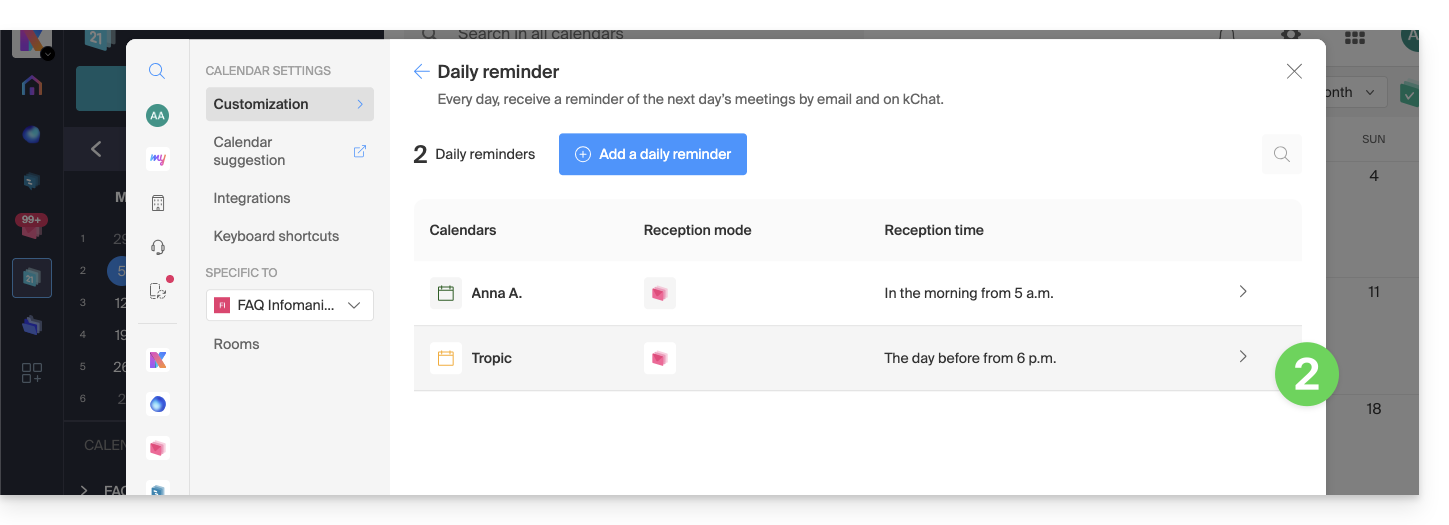
- Delete the reminder from the edit page:
This guide explains how to display a calendar / agenda with the dates of public holidays from the canton or country of your choice on the Infomaniak Web app Calendar (online service ksuite.infomaniak.com/calendar).
Preamble
- These suggested calendars can be synchronized with your mobile and desktop devices.
- The birthday calendar (calendar that displays the birthdates of your contacts when the date is entered in their address book entry) is only visible through the Infomaniak Web app Calendar (online service ksuite.infomaniak.com/calendar) and cannot be synchronized with CalDAV tools.
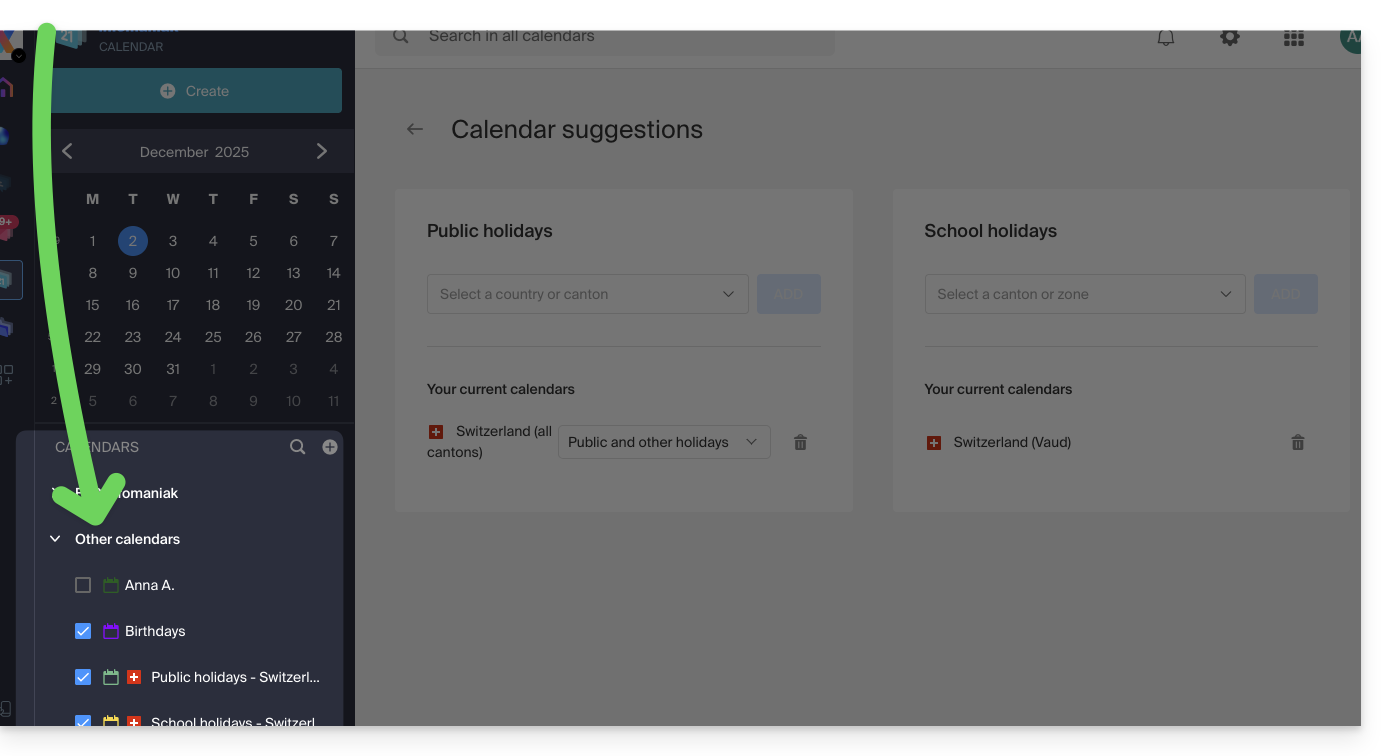
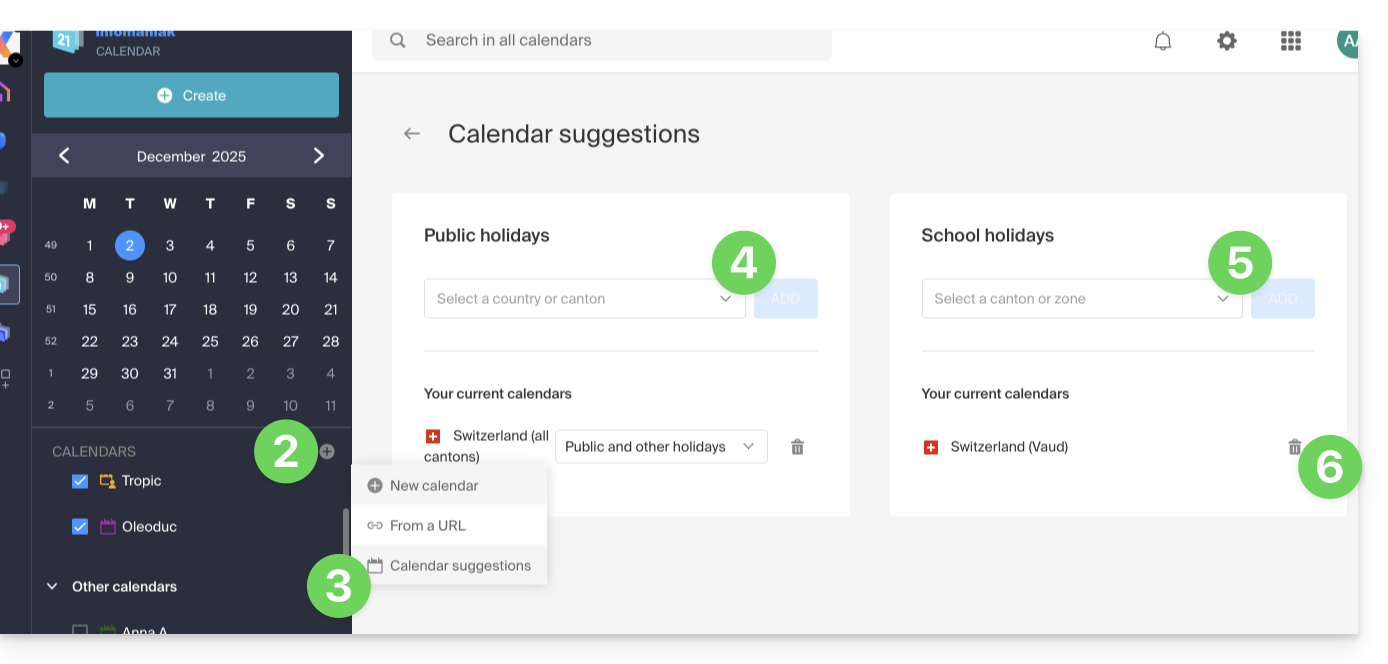
Display additional official calendars
To add the public holiday or school holiday calendar:
- Click here to access the Infomaniak Web app Calendar (online service ksuite.infomaniak.com/calendar).
- Click on the button in the left sidebar.
- Click on Calendar suggestions.
- Choose from the national public holiday calendars (by canton or country).
- You can also add the official calendar of national school holidays (France, Switzerland, etc.).
- Once added, this is also where you can remove them:
This guide explains how to add an attachment from kDrive to an event in a calendar / agenda on the Infomaniak Web app Calendar (online service ksuite.infomaniak.com/calendar).
Preamble
- Some software or applications also allow you to add an attachment, and in this case, if you synchronize the agenda with that of your solution, the attached file is possible up to the maximum size of 64 KB.
Add a kDrive attachment
When you create a new event on the Infomaniak Web app Calendar (online service ksuite.infomaniak.com/calendar), you can add one or more attachments (links to files from kDrive):
Thanks to this link “Insert a kDrive link”, you can access kDrive directly from the event creation window Calendar:
You can add:
- a public link (everyone can access it); this will create a public link to the kDrive file
- a restricted link (only people with access can access it)
Whether the event is recurring or not, you can add files that will be shared with those who view the event in the calendar:
The guests at the event who would view the card via a synchronized application, Outlook, Gmail, and others, will see the links in the description (as is the case for the possible kMeet link for example if a videoconference is planned for the event).
To help you identify the most suitable kSuite offer for your needs, refer to this other guide.
The kSuite offer provided by Infomaniak does not include a web hosting service for a page or a website on the Internet.
It is of course possible to subscribe to an Infomaniak Web Hosting from the same user account and/or the same Organization and to build your website with the tool of your choice such as WordPress or Site Creator.
To help you identify the most suitable hosting offer for your needs, refer to this other guide.
This guide explains how to broadcast an online meeting kMeet in a separate stream accessible via a unique URL thanks to Infomaniak Video Streaming.
⚠ Available with:
| kSuite | |
| Business | |
| Enterprise | |
Preamble
- Broadcasting a conference-type meeting in a Video Streaming stream rather than within the kMeet application has several advantages:
- Large-scale public broadcasting without having to restrict access to an audience limited to invited people.
- Attract a wider audience, such as conferences, webinars or live events where hundreds or thousands of viewers can follow the event without joining a private call.
- Allows reaching an unlimited number of viewers.
- No need to manage access for each participant, the stream is simply viewable via a link.
- A simple web browser is sufficient to access the streaming stream.
- Passive access: viewers are not forced to actively participate or interact; they can simply watch the event without registering or logging in, which is better suited for large events.
- No vocal interruptions or disruptions related to microphone management; this allows for a more fluid stream focused on the speaker.
- Higher broadcast resolution when kMeet can be limited by bandwidth constraints and lower video quality to avoid network overload.
Create the Video Streaming share link
Prerequisites
- You must be a moderator of kMeet to be able to create a live broadcast link but it is not necessary to own an Infomaniak Video Streaming offer.
Next:
- Start kMeet via ksuite.infomaniak.com/kmeet or from one of the applications for computer or mobile devices.
- Once in the meeting, click on the action menu ○○○ in the kMeet toolbar.
- Choose to Start live broadcast:

- Click the button to Start:

- Wait for the Video Streaming stream to be created:

- In the same place, once the stream link is displayed, click on the icon on the right to copy the URL corresponding to the live stream; paste the URL in a message to the participants or to anyone who needs to attend the live broadcast.
- A symbol displayed on kMeet as well as an audible alert indicates the start of the broadcast via Video Streaming:

The stream is broadcast continuously for a maximum of 24 hours, and will no longer be accessible as soon as the kMeet meeting is stopped.
This guide details the room booking feature (meeting, sports, classes, etc.) available on the Web app Calendar Infomaniak (online service ksuite.infomaniak.com/calendar).
Preamble
- It is possible to create and associate physical meeting rooms with events from Calendar, for example to organize an event in a specific location with limited equipment and seating.
- Each room created displays a dedicated calendar on the app, which can be shared.
- Double (or more) room booking is possible.
⚠ Number of rooms possible per resource:
| kSuite | free | 1 |
| Standard | 2 | |
| Business | 6 | |
| Enterprise | 50 | |
| 0 | ||
| 0 | ||
| Mail Service | 0 | |
| 0 |
Configure meeting rooms
Prerequisites
- Creating rooms requires the “Administrator” and “Legal Representative” rights.
To create rooms accessible for booking by employees:
- Click here to access the Web app Calendar Infomaniak (online service ksuite.infomaniak.com/calendar).
- Click on the Settings icon at the top right.
- Check or select the relevant Organization in the dropdown menu of the left sidebar.
- Click on Rooms in the left sidebar.
- Click on the Create a room button:

- Provide essential information such as the name, precise location (full address, floor), a color, the maximum number of people who can be accommodated:

- Add any equipment available in the room and the floor in question.
- Click on Save to save the equipment linked to the room:

- Click on Save to create the meeting room.
Actions on the created room
If you have multiple similar rooms, you can speed up their creation by duplicating the first one:
- Click on the action menu ⋮ to the right of the room in question in the displayed table:

Create an event by associating a room with it
Once the room is created and configured, simply create an event to associate the desired room with it:
- Click here to access the Infomaniak Web app Calendar (online service ksuite.infomaniak.com/calendar).
- Click on the More button at the top left of the interface to create a New event.
- Click in the Search for a room or location field to display the available rooms during the time slot (the 3 most recently reserved, from the most recent to the least recent).
- The equipment available in each room is displayed on the right.
- Click on Save to publish the event and its room in the calendar:

- You can find all the information about the chosen location and the available equipment on the event page in the calendar:

Global view of rooms and their occupancy
It is possible to have a global view of each room's calendar to see its occupancy. Indeed, when a room is created, a calendar associated with it is created in the Organization's calendars:
Your dedicated kSuite space (ksuite.infomaniak.com) also displays a view of the availability of your rooms in real-time, with the possibility of booking one in a few clicks, which will save you time in organizing your meetings:
This guide helps you get started with kSuite by integrating an existing kDrive in your Organization.
Preamble
- The kDrive will be an integral part of the new kSuite.
- The minimum number of users in the chosen kSuite offer will be based on the number of users in the existing kDrive offer.
- kDrive users will become kSuite users.
- To help you identify the kSuite offer best suited to your needs, refer to this other guide.
Upgrade my kDrive to kSuite
Prerequisites
- Not yet have a kSuite in the Organization.
- Have a paid kDrive offer and be out of the trial period.
- Be the Legal Representative or Administrator of the Organization.
Create a new kSuite from your existing kDrive:
- Click here to access the Infomaniak kDrive Web app (online service ksuite.infomaniak.com/kdrive).
- Click on Manage.
- Click on Upgrade the offer.
You can also do this from an information banner visible on the homepage of your Manager interface:
You can also integrate your Mail Service if it is currently outside of kSuite.
The kSuite offer from Infomaniak simplifies the creation and use of various Infomaniak products (kDrive, Mail Service, kChat...) centered around a domain name.
Migrate to kSuite
If you subscribe to kSuite, you will receive products separate from your existing products.
However, if you already own a kDrive or a Mail Service, you can upgrade your products to kSuite:
- Refer to this guide to upgrade a kDrive to a kSuite…
- Refer to this other guide to upgrade a Mail Service to a kSuite…
To help you identify the most suitable kSuite offer for your needs, refer to this other guide.
And the reverse?
You cannot separate kSuite products into distinct products from the offer.
If you wish to cancel a product from your kSuite, you must cancel kSuite in its entirety, after having previously saved the information to keep, then reorder the products corresponding to this information.
This guide explains how to mark your chosen emails as "favorite" in the Infomaniak mail service to keep a "track" of these messages and display them separately if you wish.
Monitor one or several messages…
… from the Infomaniak Web Mail app
To add a message as a favorite:
- Click here to access the Web Mail Infomaniak app (online service mail.infomaniak.com).
- Click on the ☆… icon
- … to the left of a message in the message list
- … at the top right of the message reading window
- Once tracking is enabled, a dropdown menu in the top right corner allows you to display only a selection of your received messages according to several criteria: All, Read, Unread, Followed, Unfollowed.
… from the Infomaniak Mail mobile app
In the message list:
- Press and hold your finger on a message.
- Press the ☆ icon at the bottom of the screen.
- If necessary, exit the message selection by pressing the Cancel button at the top of the screen:
While reading a message:
- Press the ☆ icon at the top right of the message reading window:
It is also possible to set up a swipe gesture that would mark the swiped message as a favorite.
This guide explains how to use the task manager available on the Infomaniak Web app Calendar (online service ksuite.infomaniak.com/calendar/tasks).
Manage your tasks to be done
To add a task to the task manager:
- Click here to access the Web app Tasks (online service ksuite.infomaniak.com/calendar/tasks)…
- … also accessible from your agenda by clicking on the Tasks icon in the right sidebar:
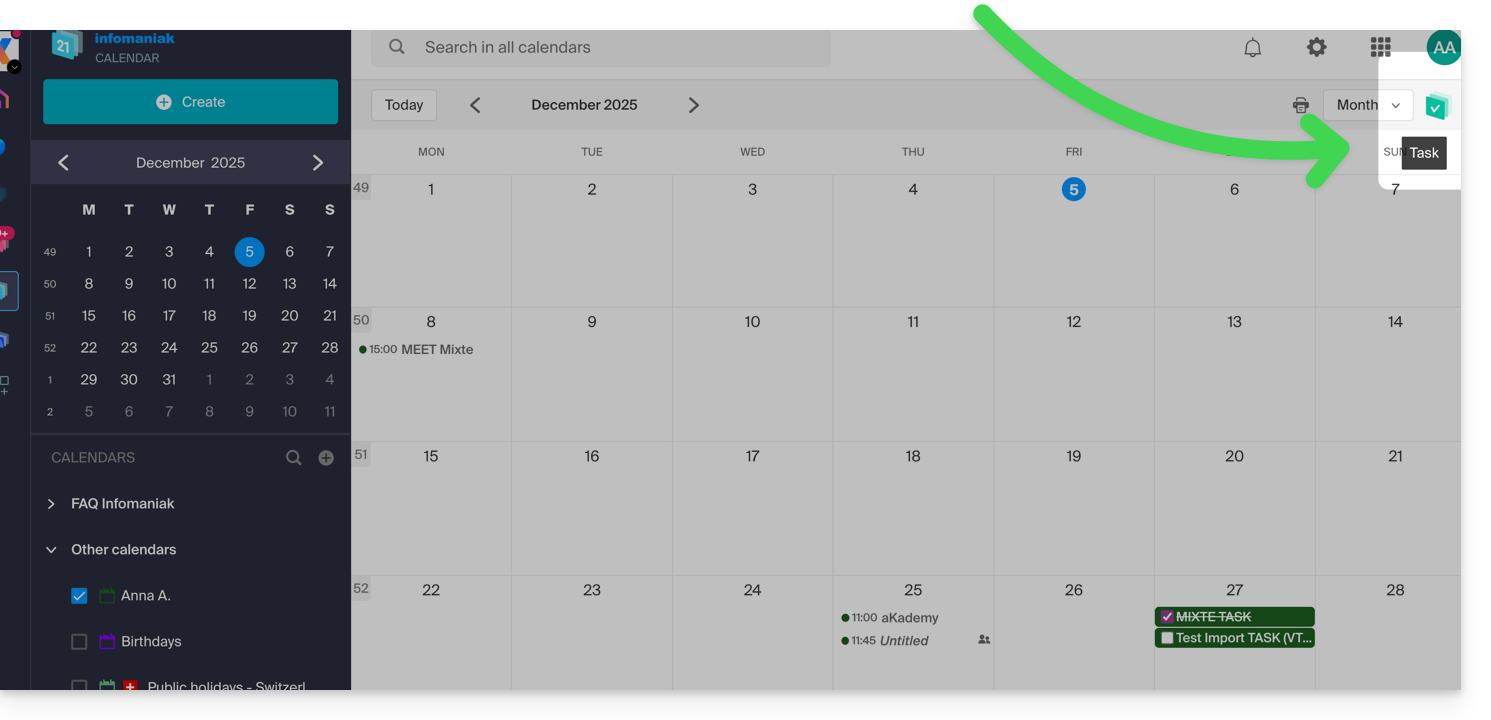
- … also accessible from your agenda by clicking on the Tasks icon in the right sidebar:
Once the manager is open, you can Create a task in the top left, linked to the calendar specified to the right of the button: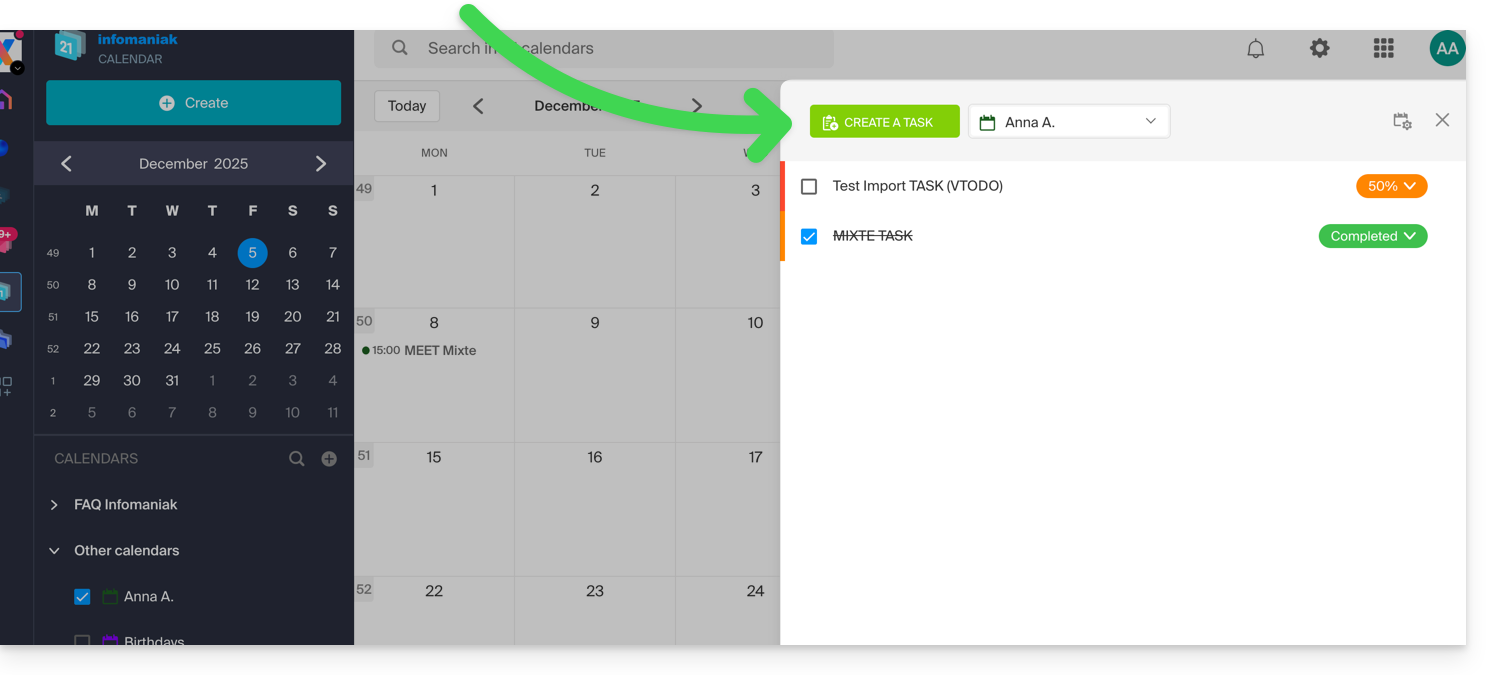
If you add a due date to your task, it will appear on the corresponding agenda: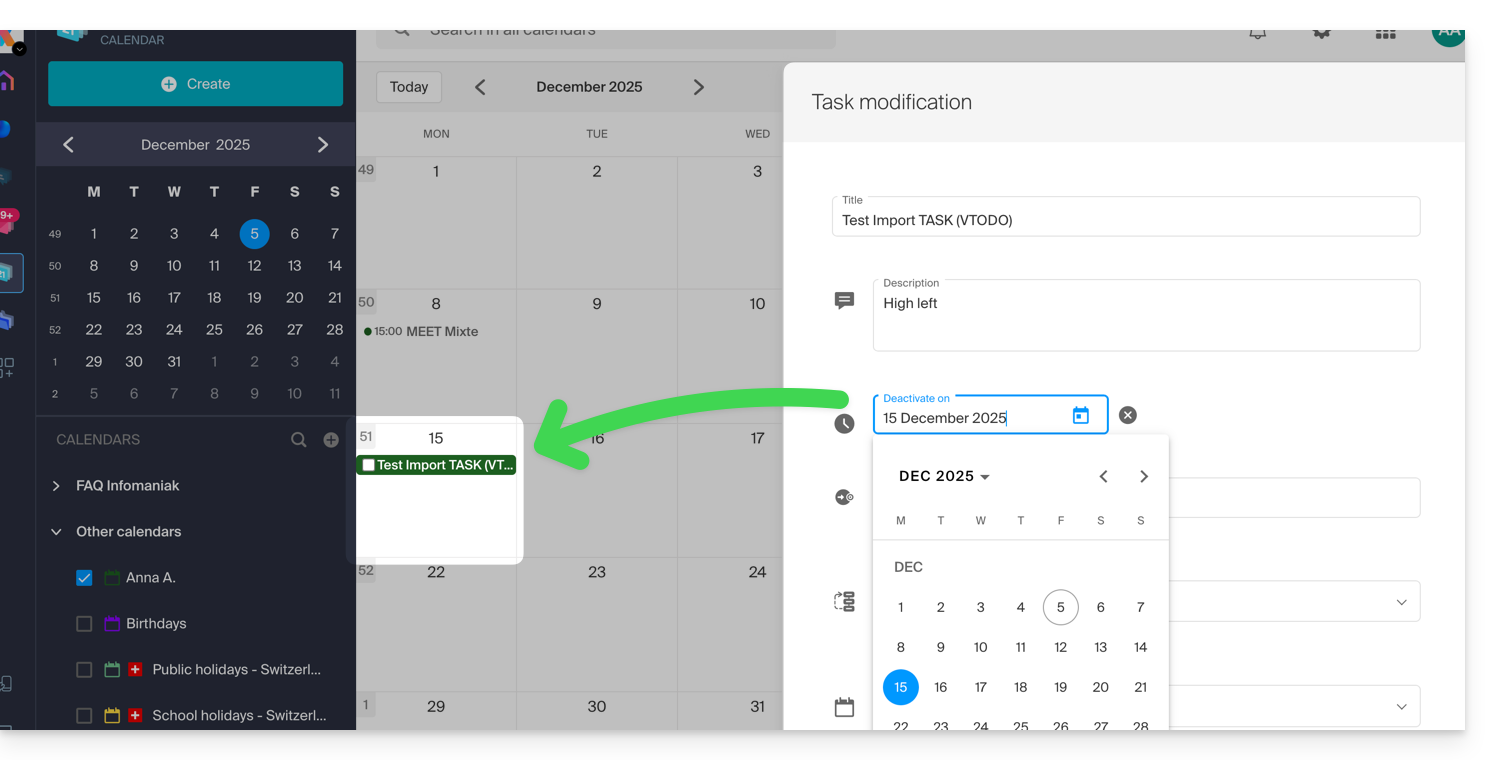
You can also filter and sort your displayed tasks using the button located at the top right of the manager, next to the cross that allows you to close it: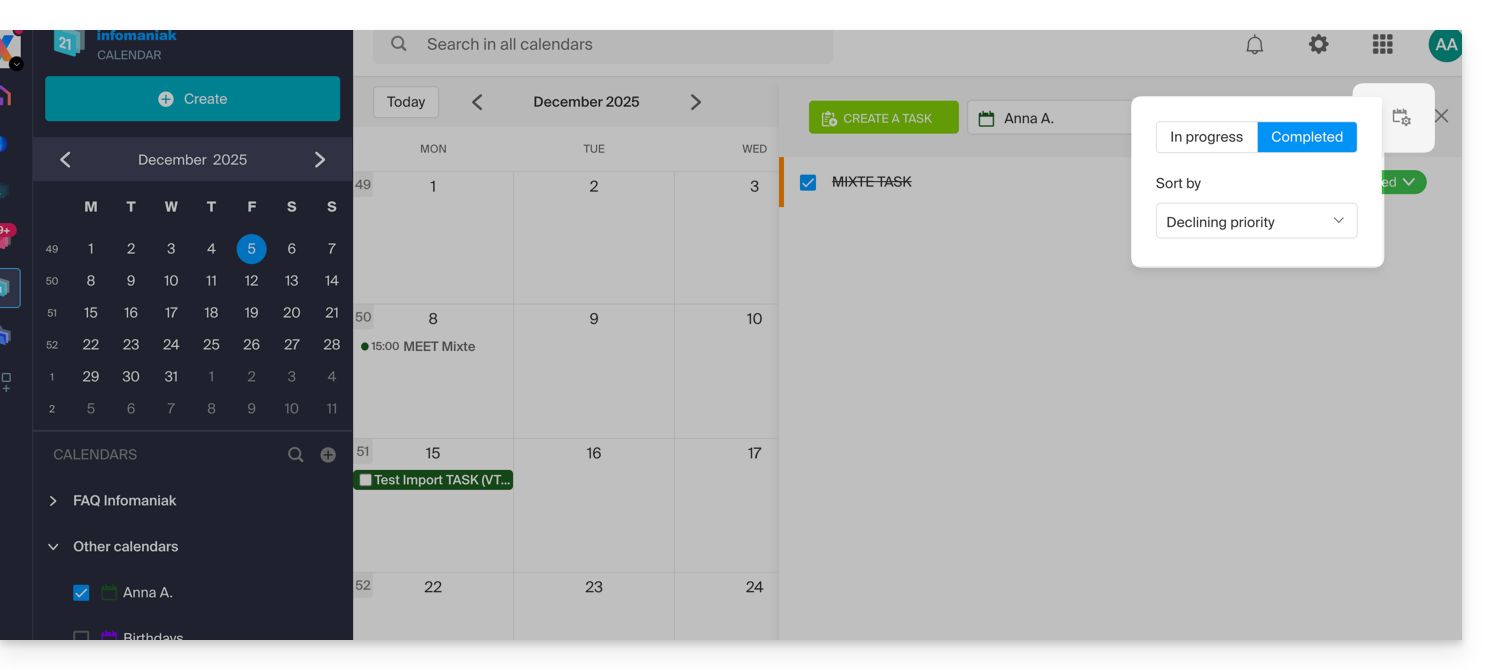
You can import tasks to your calendar.
To synchronize tasks with an Android device, refer to this other guide.