
Knowledge base
1000 FAQs, 500 tutorials and explanatory videos. Here, there are only solutions!
This guide for the Web app Mail Infomaniak (online service ksuite.infomaniak.com/mail) or the mobile app Infomaniak Mail (application for iOS / Android smartphone or tablet) explains how to enable encryption for emails sent from the Infomaniak Web and mobile services.
Preamble
- When encryption is enabled, emails and attachments are encrypted as soon as they are received on the Infomaniak servers, via the public keys of the senders and recipients.
- Each email address generates a key at its first use, stored securely in the Infomaniak data centers.
- The keys are based on elliptic curve cryptography (ECC) and use the OpenPGP standard.
- They are themselves encrypted in AES-256-GCM with automatic decryption via Infomaniak authentication.
- In search results, only the subject of encrypted messages will be visible, while their content will remain secure during storage.
Enable email encryption…
… from the Infomaniak Web Mail app
To automatically encrypt a message sent to an email address:
- Click here to access the Web app Mail Infomaniak (online service ksuite.infomaniak.com/mail).
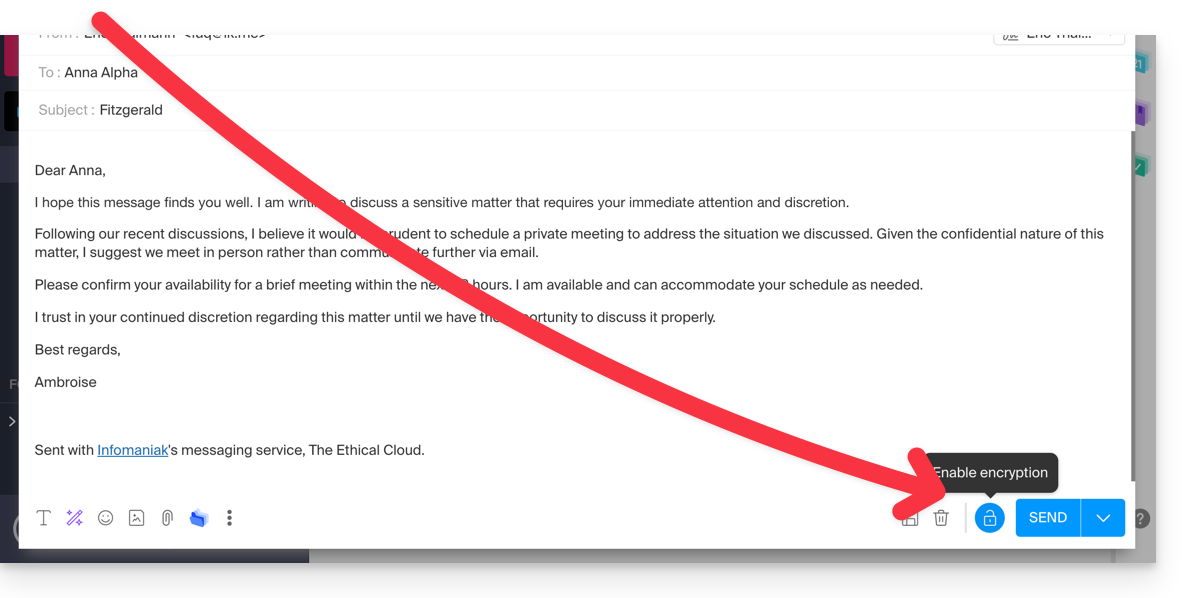
- Compose a new message as usual.
- Click on the lock icon to the left of the Send button to enable encryption:
- Confirm the action if a confirmation window appears.
- The icon now represents a closed lock and the color of the whole is changed.
- Press the Send button.
The action must be performed for each new send.
A. Recipient whose email is managed with Infomaniak
If the recipient of the encrypted email has an email address managed with Infomaniak, the encryption is done in a completely transparent manner for the sender as well as for the recipient. A mention will indicate the encryption of the message…
- … in the recipient's inbox:

- … when opening the received message:

- … and in the folder of sent messages by the sender:

B. External recipient
If the recipient of the encrypted email has an email address managed outside of Infomaniak services, encryption is always possible, but it requires the definition of a password:
- Click here to access the Infomaniak Mail app (online service ksuite.infomaniak.com/mail).
- Write a new message as usual, but addressed to an email address outside of Infomaniak.
- Click on the padlock icon to the left of the Send button to activate encryption.
- A modal opens to allow you to create a password.
- Enter a password and copy it to send it to the recipient by your own means (kPaste for example):

- The icon now represents a closed padlock and you can send the email as usual.
The recipients will then receive a message informing them that an encrypted email is waiting for them:
By clicking on the provided button, they will be redirected to a secure web page where the password must be entered.
Once the password is validated, the encrypted message can be viewed on the same page valid for 30 days.
… from the Infomaniak Mail mobile app
To automatically encrypt a message sent to an email address:
- Open the mobile app Infomaniak Mail (application for iOS / Android smartphone or tablet).
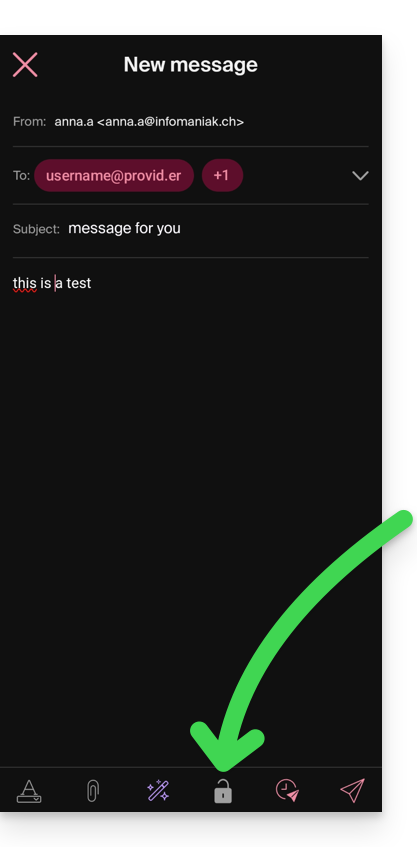
- Compose a new message as usual.
- Press the padlock icon at the bottom of the composition window to activate encryption:
A. Recipient whose email is managed with Infomaniak
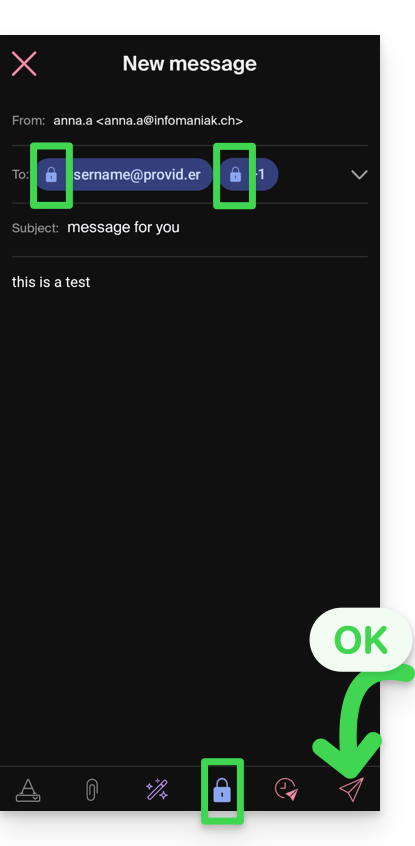
If the recipient of the encrypted email has an email address managed by Infomaniak, encryption is done completely transparently for both the sender and the recipient:
- Closed padlocks are displayed on the screen.
- Press the send icon:
B. External recipient
If the recipient of the encrypted email has an email address managed outside of Infomaniak services, encryption is always possible, but it requires the definition of a password:
- Sending will not be possible as the send icon will remain grayed out and symbols will appear on the padlocks:
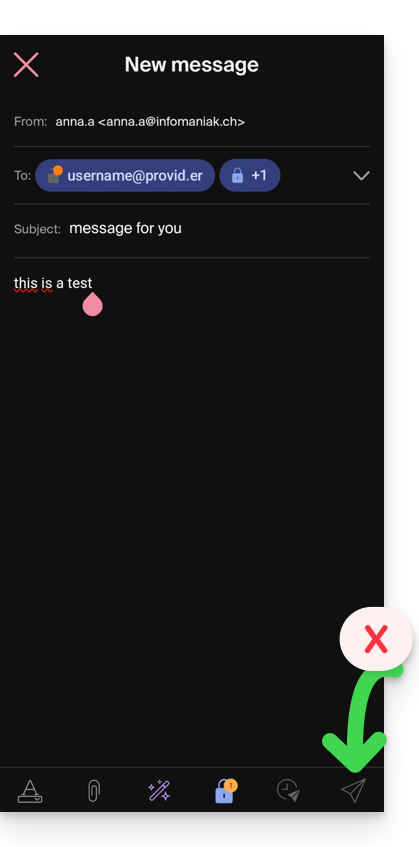
- Press the padlock icon.
- A modal opens to allow you to create a password.
- Leave the suggested password or enter a new password and copy it to send it by your own means (kPaste for example) to the recipient (you can agree on a password in advance so the recipient is already informed).
- Click on the cross in the top left if you have finished managing the password.
- There you go, the sending can now be done in an encrypted way:
This guide explains how to switch, in an email software/client, from a POP configuration to an IMAP configuration for the same email account. Indeed, for many reasons, it is strongly recommended to use the IMAP protocol instead of POP.
Switching from the POP protocol to the IMAP protocol…
If your email address is already configured with the POP protocol in your email software/client (Mozilla Thunderbird, Microsoft Outlook, etc.), it is impossible to switch to the IMAP protocol directly on the account. Indeed, the most common email software/clients do not allow modifying an existing POP3 account and setting it to IMAP instead.
The solution is to add the same email account but with the IMAP protocol in your email software/client and then to move your messages and folders from the POP account (from your computer) to the IMAP account (on the mail server).
⚠️ Warning: a POP3 account on your email software/client usually means that Infomaniak does not have any backups. Therefore, it is important to back up your messages on your side before any critical operation.
… with Microsoft Outlook
Some versions of Outlook, such as 2016, prevent the simple addition of a second account with the same name (identical email address).
To work around this, you need to add the account from the Profiles:
And from there, you will be able to add the additional account, in IMAP:
- Configure the new email account with the IMAP protocol (the same account as the one configured in POP but this time in IMAP):
- Move one folder at a time by dragging them to the inbox of the new account configured in IMAP:
- Wait during the transfer of the items (this can take a long time depending on the volume to be transferred to the server); the activity is indicated at the bottom of the window:
If your POP account kept a copy of the messages on the server (disrecommended option present in the advanced settings of your Outlook), you may have duplicate messages.
… with Apple Mail
Deleting the email account configured in POP deletes the messages it contains. It is therefore recommended to deactivate the POP account instead of deleting it!
Once the POP account is deactivated, refer to this other guide to configure your email address in Apple Mail, in IMAP.
Once you have finished, all you have to do is drag the messages present in your POP account hierarchy to the hierarchy of the new IMAP account.
This guide explains the behavior of messaging in the case of a redirection activated on an email address managed with Infomaniak, and whose target is a Gmail address.
Message not displayed on Gmail
If you send an email…
- … from
abc@gmail.com… - … to
xyz@domain.xyz(domain that you have with Infomaniak)…
… and this email address xyz@domain.xyz with Infomaniak has an automatic redirection…
- … to
abc@gmail.com…
… then abc@gmail.com will never display your email as a new message in the inbox. Nothing will happen on Gmail.
Why?
The problem is not that the redirection does not work: it is rather a peculiarity of Gmail: an email from Gmail to an email address with Infomaniak redirected to the same Gmail address as the sender, will cause a problem on Gmail, in the way it handles the mail.
Your message will never arrive (because in fact, for it, it is already in the box, in the sent items). In this case, you need to remove the redirection of emails.
This guide explains how to connect the Apple Mail mobile app (for iOS smartphone or tablet) to an email address hosted by Infomaniak.
Preamble
- Instead of the manual configuration below, it is recommended to use the .mobileconfig configuration profiles offered by Apple or the Infomaniak Mail app (iOS) to benefit from a Push type update method.
- The various services offered by Infomaniak are all compatible with the corresponding standard protocols (IMAP/SMTP for email, for example), therefore if you encounter a problem with third-party software, contact its publisher or a Partner and consult the support policy as well as section 11.9 of the Infomaniak Terms of Service.
Manually add the email address to the application
Prerequisites
- Create the email address in my kSuite or a Mail Service / kSuite.
- Create a password for the email address for the device you are going to configure.
To configure the mail application:
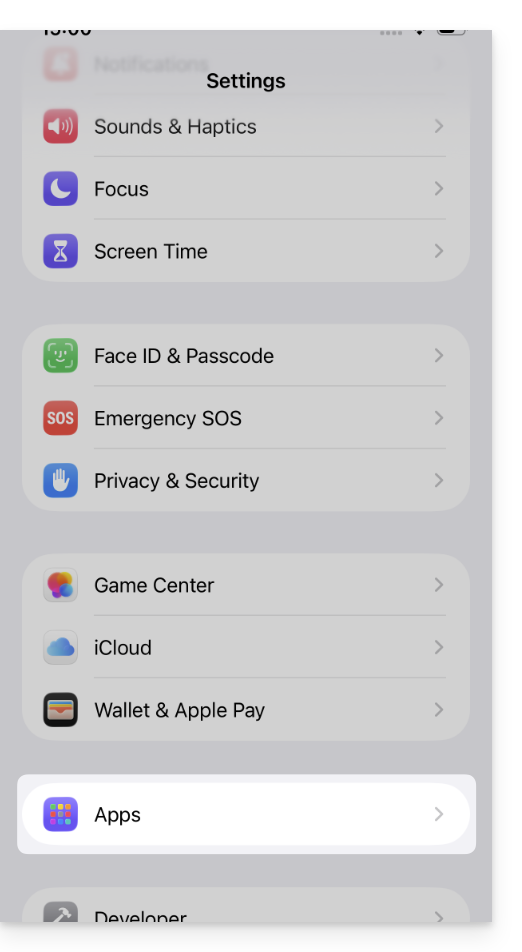
- Open the settings of the iPhone and tap on Apps:
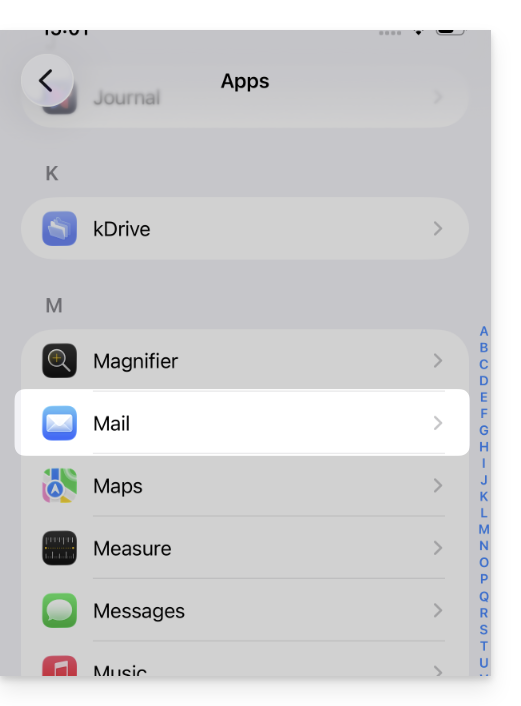
- In Apps, tap on Mail:
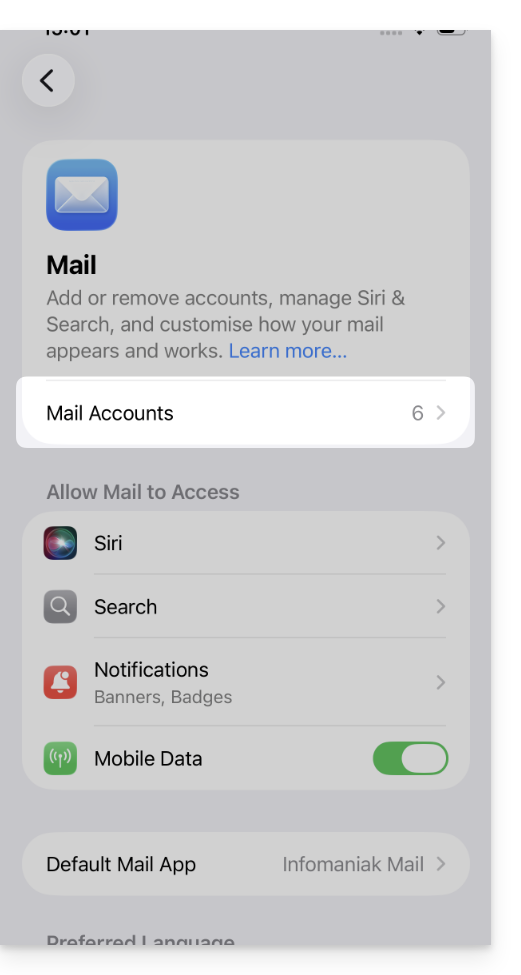
- Tap on Mail Accounts:
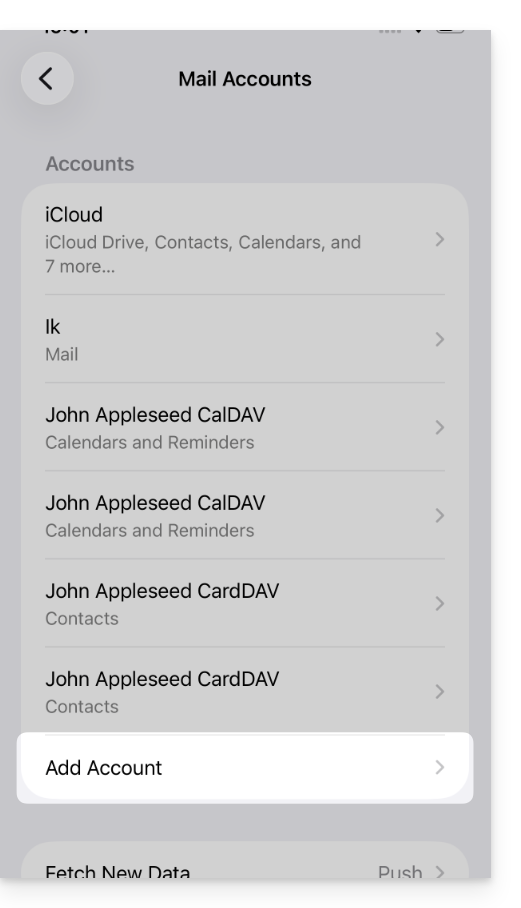
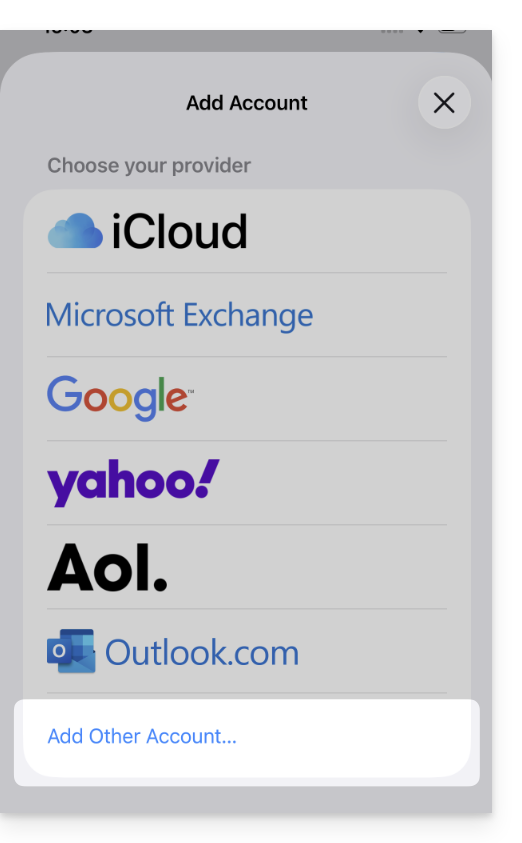
- Tap to add an account:
- Tap on Other Account:
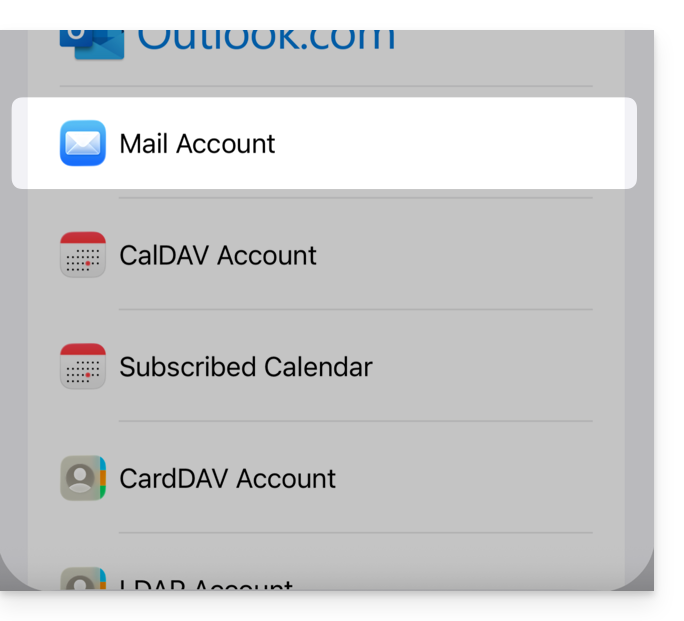
- Tap on Mail Account:
- Enter the email address to attach:
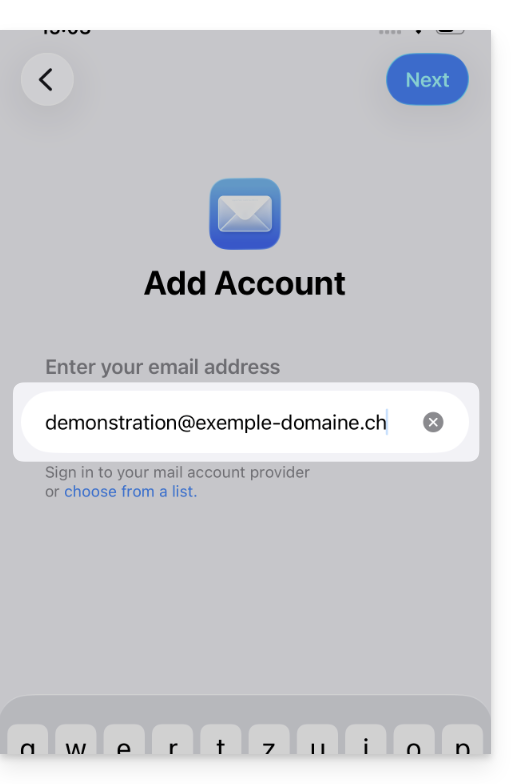
- Tap on Next at the top right.
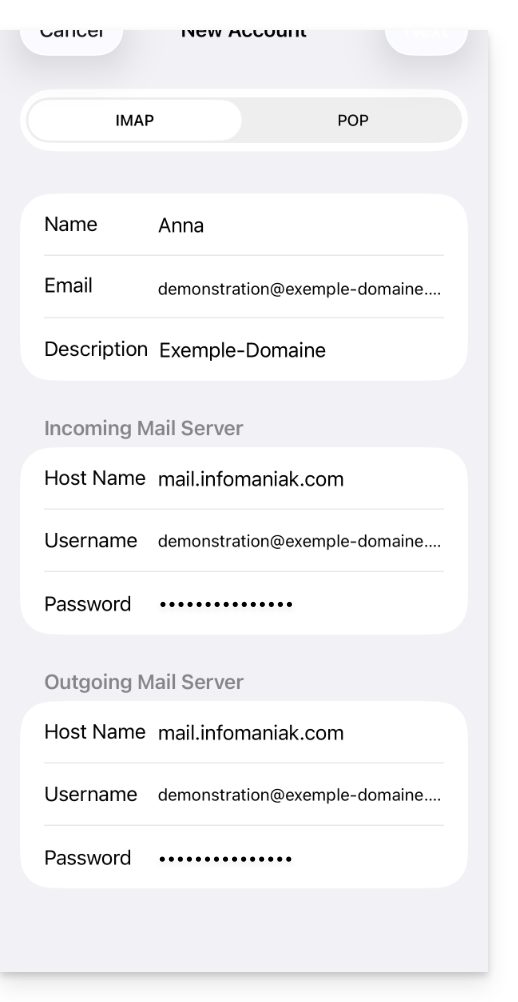
- The application mentions certain fields as being optional but they are not at all:
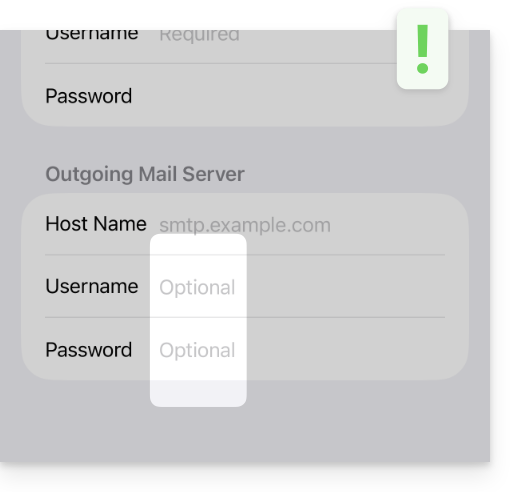
- Check and complete the missing information:
- Stay on the IMAP tab and click Next at the top right.
- Enable emails and save the configuration at the top right:
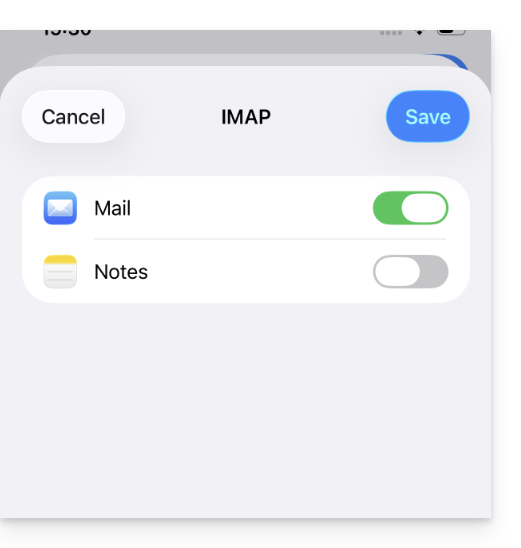
- Your email address is now configured in the application.
Recommended settings
- Incoming IMAP server =
mail.infomaniak.com - IMAP port =
993(with SSL) - Outgoing SMTP server =
mail.infomaniak.com - SMTP port & encryption protocol and command/method to activate this protocol:
587+ STARTTLS - Username = full & complete email address ( ? )
- Password = the one generated for the email address you want to access
- Authentication required for sending emails:
- It is activated in the SMTP settings of your application.
- Check "use the same settings as the incoming server" or, depending on the software/email clients, re-enter a username (= full & complete email address) and the generated password.
Refer to this other guide if you are looking for information about other compatible messaging ports and protocols (SSL / TLS for example).
In case of a problem
Check that the Mail Service is configured optimally.
There is no need to contact Infomaniak Support if your email address works well outside the application. The most common error concerns the use of an incorrect password. The troubleshooting guides help you resolve any potential issues:
- Refer to the solutions given in this other guide regarding email in general.
- Delete any Apple configuration profiles linked to your Infomaniak email before restarting the configuration.
And if your Apple Mail no longer works at the sending level (disconnected or missing SMTP server, for example) or after a password change, refer to this other guide.
This guide explains how to use the Gmail mobile app (app for iOS / Android smartphone or tablet) and the Gmail Web app (gmail.com online service) to access an email address hosted by Infomaniak.
Preamble
- It is recommended to use the Infomaniak Mail app (iOS / Android) to benefit from Infomaniak's security advantages.
- The various services offered by Infomaniak are all compatible with the corresponding standard protocols (IMAP/SMTP for email, for example), therefore if you encounter a problem with third-party software, contact its publisher or a Partner and consult the support policy as well as article 11.9 of the Infomaniak Terms and Conditions.
Using the Gmail mobile app for Infomaniak
Prerequisites
- Create the email address in my kSuite or a Mail Service / kSuite.
- Create a password for the email address on the device you are going to configure.
- Check that the Mail Service is optimally configured.
To add the email address managed by Infomaniak in IMAP to your Gmail mobile app (official guide):
- Go to the Settings of Gmail.
- Tap on Add an account.
- Choose Other.
- Enter the email address you wish to use.
- Choose the account type IMAP.
- Enter the password of the email address.
- Use the server name
mail.infomaniak.comfor:- Incoming IMAP server (reception):

- Outgoing SMTP server (sending):

- Incoming IMAP server (reception):
- Complete the addition of the address.
Import your "Infomaniak" emails into Gmail
Here is an alternative solution for which the following configuration is to be performed only once on gmail.com from a computer. Thus, the emails that arrive at your Infomaniak email address will be retrieved over time in Gmail via the POP3 protocol.
- Refer to this Google guide starting from “Step 2: Add another email account.”.
- Use these login details:
- POP server name =
mail.infomaniak.com - port =
995(check the box SSL connection)
- POP server name =
Send “Infomaniak” emails from Gmail
It is also possible to configure the gmail.com web app to send emails from an email address hosted by Infomaniak from the Google interface:
- Refer to this Google guide.
- Uncheck the box Treat as an alias.
- Use these login details:
- SMTP server name =
mail.infomaniak.com - port =
465(check the box Secure SSL connection (recommended))
- SMTP server name =
Modify your configuration
If necessary (following point 2 above):
This guide explains how to easily sort your messages using Plus Addressing ("+ addressing" or "sub-addressing"), i.e., aliases of your email address that do not need to be actually created on an Infomaniak Mail Service.
Preamble
- This feature is free and allows you to have multiple versions of your existing email address (= alias), in order to, for example, separate your personal emails from the newsletters you are subscribed to.
- These "wildcard" type aliases mean that a message can be sent to an email address containing a
+(for exampleabc+def@domain.xyz) and it will still arrive in the existing mailboxabc@domain.xyzand have the possibility of being filtered and sorted automatically based on what comes after the "+" if you set this up. - Note that it is also possible to create real aliases without the
+character... - Infomaniak is fully compatible with the DEA system on which the feature presented here depends; in case of a problem, contact the organization on which it is used.
Using a “disposable” alias with an Infomaniak email address
The next time you sign up for a newsletter or a customer account that requires a username:
- Simply use a formulation of your email address that includes the "+" sign (example: anna+newsletter@domain.xyz) instead of entering your actual email address:
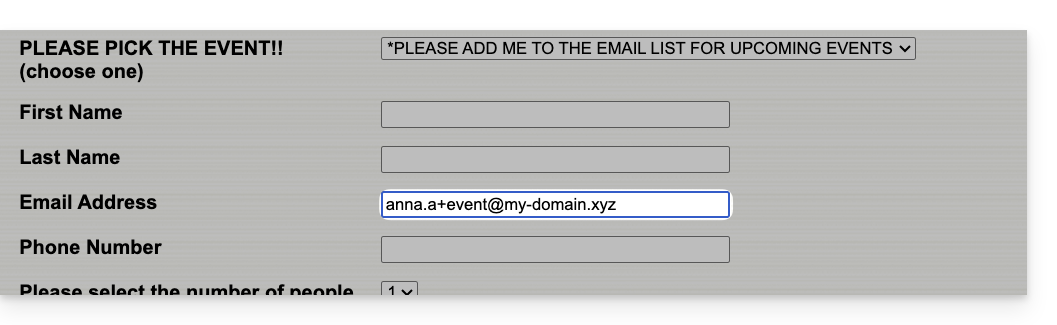
So if your usual email address is anna@domain.xyz, emails sent to anna+newsletter@domain.xyz or anna+nospam@domain.xyz (in short, anna+"whatever you want here"@domain.xyz ...) will arrive in the inbox of anna@domain.xyz.
Then, to automatically move incoming messages sent to your aliases into specific folders, refer to this other guide to create sorting filters based on the recipient of the received message.
You can also configure an email software/client so that sending from this type of email address works: refer to the second part of this other guide — this does not work for sending from the Infomaniak Mail Web app (online service ksuite.infomaniak.com/mail).
This guide explains how to delete folders that appear grayed out in the Web app Mail Infomaniak (online service ksuite.infomaniak.com/mail) or in some email software/clients such as Apple Mail, Mozilla Thunderbird, or Microsoft Outlook.
Ghost folders
Some email software/clients like Microsoft Outlook allow you to create subfolders of non-existent folders. For example, it is possible to create the folder /abc/klm/xyz while the folder "klm" does not exist.
On Mail Infomaniak or in other software, ghost folders like the folder "klm" appear in gray and cannot be deleted directly as they are only "paths" to a real subfolder.
To delete these ghost folders, it is necessary to delete their subfolders first (in this example: xyz).
Stubborn folders
If, when consulting your Infomaniak email address on Outlook, ghost folders persist or reappear instantly after deletion, here are the technical procedures recommended by Microsoft to force synchronization:
1. Force Outlook folders reset
Sometimes, Outlook's local folder table is corrupted. A simple command can often fix this without deleting anything:
- Close Outlook completely.
- Press the
Windows + Rkeys on your keyboard. - Type
outlook.exe /resetfoldersand validate (this restores missing or corrupted folders from the server).
2. Reset the IMAP cache (.ost)
If the problem persists, forcing Outlook to rebuild its local database is often the most effective solution:
- Close Outlook.
- Access the folder:
C:\Users\[Your Username]\AppData\Local\Microsoft\Outlook. - Identify the
.ostfile with the name of your Infomaniak address and delete it (or rename it to.oldfor safety). - Restart Outlook. The software will redownload all your messages and folders properly from the Infomaniak servers.
3. Use the MFCMAPI tool (Advanced Level)
MFCMAPI allows you to access the MAPI structure of your mailbox directly to delete what the standard Outlook interface refuses to touch:
- Download the latest version of MFCMAPI from GitHub (Official Source).
- Launch
MFCMAPI.exeand go toSession > Logon. Select your Outlook profile. - Double-click on your Infomaniak mail account in the list.
- In the new window, expand
Root Container(orRoot - Mailbox), thenIPM_SUBTREE. - Locate the problematic folder. Right-click and select
Delete folder. - Warning: In the dialog box, try simple deletion first. If this fails, retry by checking
DELETE_HARD_DELETE(permanent deletion at the server level).
4. Final verification via Webmail
If a folder is deleted in Outlook but keeps reappearing, check on the Infomaniak Web Mail app if the folder is present, and delete it first via the Web interface, then apply step #1 (resetfolders) in Outlook.
Deleting and immediately reconfiguring an account remains the simplest alternative if MFCMAPI seems too complex.
This guide explains how to connect the desktop app Outlook 2016 (desktop application on Windows) to an email address hosted by Infomaniak.
Preamble
- The various services offered by Infomaniak are all compatible with the corresponding standard protocols (IMAP/SMTP for email, for example), therefore if you encounter a problem with third-party software, contact its publisher or a Partner and consult the support policy as well as article 11.9 of the Infomaniak Terms of Service.
Add the email address to the application
Prerequisites
- Create the email address in my kSuite or a Mail Service / kSuite.
- Create a password for the email address on the device you are going to configure.
To configure the email application:
- Open the application.
- Click on the File menu:
- Click on Account Settings.
- Click on Add or Remove Accounts:
- Click on New:
- Enter the email address to connect.
- Click on Advanced Options.
- Click on Manual Configuration.
- Click on the blue Connect button:
- Click on IMAP:
- Enter the password for the email address to connect.
- Click on the blue Connect button:
- Uncheck the additional mobile device configuration box if necessary.
- Click on the blue Finish button:
- Click on Repair to correct some automatically added but incorrect information:
- Click on Advanced Options.
- Click on Manual Repair.
- Click on the blue Repair button:
- Check and complete the missing or incorrect information.
- Click on Outgoing Server:
- Check and complete the missing.
- Click on Next:
- Click on Finish:
- Click on Close:
- There you go, your email address is now correctly configured in the application:
Recommended settings
- Incoming IMAP server =
mail.infomaniak.com - IMAP port =
993(with SSL) - Outgoing SMTP server =
mail.infomaniak.com - SMTP port & encryption protocol and command/method to activate this protocol:
587+ STARTTLS - Username = the full and complete email address ( ? )
- Password = the one generated for the email address you want to view
- Authentication required for sending emails:
- It is activated in the SMTP settings of your application.
- Check "use the same parameters as the incoming server" or, depending on the software/email client, enter a username (= full & complete email address) and the generated password.
Refer to this other guide if you are looking for information about other mail ports and protocols compatible (SSL / TLS for example).
In case of a problem
Check that the Mail Service is configured optimally.
It is not necessary to contact Infomaniak Support if your email address works well outside the application. The most common error concerns the use of an incorrect password. The troubleshooting guides help you resolve any potential issues:
- Refer to the solutions provided in this other guide regarding email in general.
- This other guide is more specifically about Outlook.
… and if your Outlook no longer works since a change of email password, refer to this other guide.
This guide explains how to connect the mobile app Microsoft Outlook (app for smartphone or tablet iOS / Android) to an email address hosted by Infomaniak.
Preamble
- The app Outlook Lite is not compatible with the IMAP protocol… Only install the version offered above.
- Instead of the manual configuration below, it is recommended to use the app Infomaniak Mail (iOS / Android).
- The various services offered by Infomaniak are all compatible with the corresponding standard protocols (IMAP/SMTP for email, for example), therefore if you encounter a problem with third-party software, contact its publisher or a Partner and consult the support policy as well as article 11.9 of the Infomaniak Terms of Service.
Add the email address to the application
Prerequisites
- Create the email address in my kSuite or a Mail Service / kSuite.
- Create a password for the email address for the device you are going to configure.
To configure the email application:
- Open the application.
- Click on Add an account:
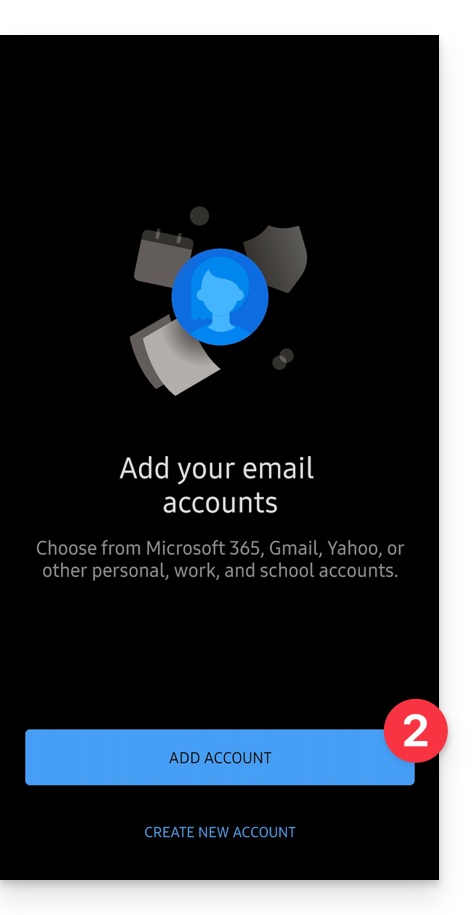
- Enter the email address to be linked.
- Click on Continue:

- Click on IMAP:

- Check and complete the missing information.
- Click on the icon ✓ at the top right:

- Click on the left to complete the configuration:

- That's it, your email address is now configured in the application:

Recommended settings
- Incoming IMAP server =
mail.infomaniak.com - IMAP port =
993(with SSL) - Outgoing SMTP server =
mail.infomaniak.com - SMTP port & encryption protocol and command/method to activate this protocol:
587+ STARTTLS - Username = full & complete email address ( ? )
- Password = the one generated for the email address you want to access
- Authentication required to send emails:
- It is activated in the SMTP settings of your application.
- Check "use the same parameters as the incoming server" or depending on the software/email clients, enter a username (= full & complete email address) and the generated password.
Refer to this other guide if you are looking for information about other compatible messaging ports and protocols (SSL / TLS for example).
In case of problem
Check that the Mail Service is configured optimally.
There is no need to contact Infomaniak Support if your email address works well outside the application. The most common error concerns the use of an incorrect password. The troubleshooting guides help you resolve any potential issues:
- Refer to the solutions given in this other guide regarding email in general.
- This other guide is more specifically about Outlook.
… and if your Outlook no longer works since a change of email password, refer to this other guide.
This guide explains how to transfer to Infomaniak email addresses currently hosted by Google (with a custom domain). Refer to this other guide if you are looking for information on importing a simple Gmail address (…@gmail.com).
Preamble
- The operation does not affect either the data already present on the destination address, or that of the source address.
- Any duplicates are managed: identical content will only be copied once.
- If needed, local partners referenced by Infomaniak can handle these procedures: launch a free call for tenders; they take care of everything, freeing you from technical details.
Google Prerequisites
- Activate two-step authentication (2FA):
- It is imperative to activate two-step authentication in Gsuite - if necessary, the organization's administrator must first allow users to activate it from admin.google.com.
- In the settings of your Google account (https://myaccount.google.com/), go to the Security tab and activate Two-Step Verification:

- Read the complete Google guide
- Create an application password:
- Once 2FA is activated, go back to Two-Step Verification and scroll to the bottom of the page to application passwords:

- Follow the complete Google guide:
- Click on Application Passwords.
- Enter your Gmail account password if prompted.
- Click on Select an app and then Mail.
- Click on Select a device and select Other (Custom name).
- Give a name to your password (e.g., Infomaniak), it's just descriptive.
- Click on Generate.
- Copy or note the password that appears on the screen (it does not contain spaces).
- Once 2FA is activated, go back to Two-Step Verification and scroll to the bottom of the page to application passwords:
Infomaniak Prerequisites
- Have a Mail Service on your Infomaniak Manager.
- Have a quota of available addresses or adjust it in advance if necessary.
- Ensure that the email is properly secured
Transfer emails from Gmail to Infomaniak
a. Recreate the email address(es) on Infomaniak
If you have many (10+) email addresses to create, follow this procedure for mass creation.
Access the Infomaniak Mail Service and create the email addresses:
- Click here to access the management of your product on the Infomaniak Manager (need help?).
- Click directly on the name assigned to the product concerned.
- Click the blue button Create an email address in the top right corner.
- Enter the address (what comes before the at sign @) for example contact or michelle.
- Click the blue Continue button.
- Select I will consult the email address alone.
- Click the blue Continue button.
- Enter a password.
- Click the blue Continue button.
- Click the blue Finish button.
- Restart at point 3 above to recreate all email addresses identically.
b. Import Google mail content to Infomaniak
If you have many (10+) email addresses to import, follow this procedure for bulk importation.
Access the Infomaniak Mail Service and import your emails:
- Click here to access the management of your product on the Infomaniak Manager (need help?).
- Click directly on the name assigned to the product concerned.
- Click on the chevron in the right part of the blue Create an email address button.
- Click on Import emails (direct link).
- Click on Import my emails into a single email address.
- Enter the existing email address at Google.
- Enter the password for this email address.
- Click on Advanced settings.
- Enter
imap.gmail.comin IMAP server address (or trymail.gmail.comin case of error). - Enter
993in IMAP port. - Enable SSL and disable TLS.
- Click on the blue Validate and continue button.
- Enter the email address (which was recreated at Infomaniak at point a.10 above).
- Click on the blue Import emails button.
- The import starts and runs in the background, an email is sent once the import is complete.
- Restart at point 3 above to import the rest of the email addresses.
Labels and data volume
The storage space displayed at Infomaniak may not match the one indicated in Gmail, notably due to the different handling of labels/tags.
Indeed, these, present in Gmail, will be converted into folders on the Infomaniak servers (same principle as when using an email retrieval with an IMAP email software/client like Thunderbird):
As a result, an email tagged in multiple Gmail folders may be counted multiple times during the migration, which explains why an account showing, for example, 6 GB in Gmail can occupy 18 GB once transferred to the Infomaniak servers.
Adjust the application settings
As soon as you take the necessary steps for the domain name associated with your email to work with Infomaniak, modify the settings of the email software/clients you use so that they connect correctly to the Infomaniak servers: follow the configuration assistant.
This guide explains how to connect the desktop app Mail (desktop application on Windows 10) to an email address hosted by Infomaniak.
Preamble
- The various services offered by Infomaniak are all compatible with the corresponding standard protocols (IMAP/SMTP for email, for example), therefore if you encounter a problem with third-party software, contact its publisher or a Partner and consult the support policy as well as section 11.9 of the Infomaniak Terms and Conditions.
Add the email address to the application
Prerequisites
- Create the email address in my kSuite or a Mail Service / kSuite.
- Create a password for the email address on the device you are going to configure.
To configure the email application:
- Open the application:
- Click on Settings.
- Click on Manage accounts.
- Click on Advanced setup (at the bottom).
- Choose Internet Mail.
- Check and complete the missing information.
- Leave all boxes checked.
- Click on Connect.
- Click on OK.
- Your email address is now configured in the application.
Recommended settings
- Incoming IMAP server =
mail.infomaniak.com - IMAP port =
993(with SSL) - Outgoing SMTP server =
mail.infomaniak.com - SMTP port & encryption protocol and command/method to activate this protocol:
587+ STARTTLS - Username = full & complete email address ( ? )
- Password = the one generated for the email address you want to access
- Authentication required to send emails:
- It is activated in the SMTP settings of your application.
- Check "use the same parameters as the incoming server" or, depending on the software/email clients, enter a username (= full & complete email address) and the generated password.
Refer to this other guide if you are looking for information about other mail ports and protocols compatible (SSL / TLS for example).
In case of a problem
Check that the Mail Service is configured optimally.
It is not necessary to contact Infomaniak Support if your email address works well outside the application. The most common error concerns the use of an incorrect password. The troubleshooting guides help you resolve any potential issues:
- Refer to the solutions provided in this other guide regarding email in general.
- This other guide is more specifically about Outlook.
… and if your Outlook no longer works since a change of email password, refer to this other guide.
This guide helps you set up a printer (Hewlett-Packard, Xerox, Canon, Epson, Brothers, etc.), a scanner, and any device capable of sending a message, via an email address hosted with Infomaniak.
⚠️ For additional help contact a partner or launch a free tender — also discover the role of the host.
Operating principles
It is imperative that your device allows the use of SMTP authentication to send emails.
Enable authentication and use the created email address as the username and the password you assigned to it.
As the mail server address, sometimes called the host name or hostname, use mail.infomaniak.com
If your printer rejects the server address in this format and asks for an IP address, it will unfortunately not be possible to configure your printer to send emails. Indeed, the IP addresses of the mail servers may change at any time, so it is essential that you use the address in the form of a name as indicated above.
Learn more
This guide presents the DNS Diagnostic tool, which allows you to check that the relationships between…
- DOMAIN NAME at Infomaniak
and
- MAIL SERVICE at Infomaniak
… are correct, so that Mail traffic goes to the right place.
Introduction
- To check, the tool verifies the MX, SPF, etc. records.
- You will thus be able to detect and correct certain Mail problems, especially if they are related to DNS (technical information that, broadly speaking, determines where such and such Mail traffic should be directed) by acting at the level of your domain.
- Automatic correction is only possible when the domain name is present in the same Organization as the product to which it must be attached.
- If this is not the case, then the correction will need to be done manually.
Diagnose a DNS issue
To access the DNS diagnostic for your domain name:
- Click here to access the management of your product on the Infomaniak Manager (need help?).
- Click directly on the name assigned to the product in question.
- Click on Domain Management in the left sidebar.
- Click on DNS Diagnostic in the left sidebar:

- If DNS issues are detected, a red display on the table indicates it:
- Correct each error individually by clicking the button to the right of the concerned element…
- … or all errors at once.
- If DNS issues are detected, a red display on the table indicates it:
Refer to this other guide regarding the same automatic verification process but for Web Hosting.
And if necessary, familiarize yourself with the mail-related security diagnostic.
This guide explains how to order a DNS zone from Infomaniak.
Preamble
- Having the DNS zone with Infomaniak is useful if your domain name is registered elsewhere (third-party provider/registrar) and you want to easily link this domain with Infomaniak products.
- Indeed, it is not enough to own a site
domain.xyzwith Infomaniak and to indicate the 2 DNS addresses of Infomaniak with the domain name registrar (if it is not Infomaniak) for the site to be displayed when you typedomain.xyzin a browser. - You must add a DNS zone in the same place as the hosting to make the site work easily.
- This will also be particularly useful if the service provider managing your domain name does not offer DNS zone management.
Order a DNS zone
To do this:
- Click here to access the Infomaniak domain Shop.
- Start a search with the name of the domain registered elsewhere.
- Click on the action menu ⋮ located to the right of the result obtained.
- Select Order a DNS zone:
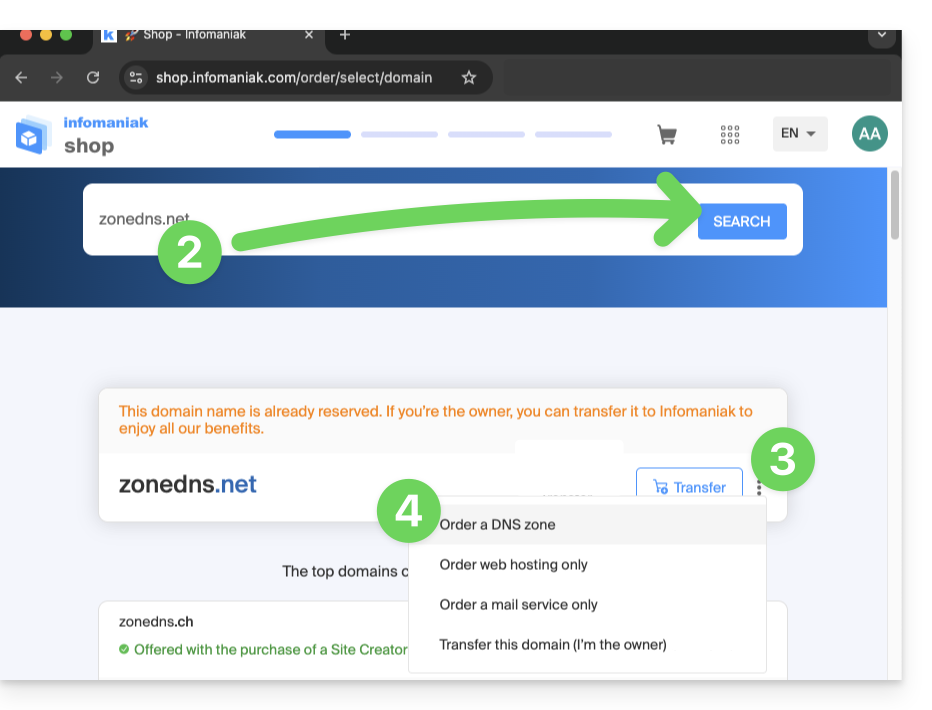
- Complete the purchase.
- Once added to your Manager, the zone can be edited.
The BIMI (Brand Indicators for Message Identification, brand indicators for message identification) offers businesses the ability to incorporate their logo into sent emails.
Preamble
- Infomaniak applications (and other companies around the globe - read the chapter in case of problem below) are compatible with BIMI and will display the logos next to received emails.
- Infomaniak Mail Services allow you to configure your email with your logo (read the prerequisites carefully); the benefits are numerous:
- increased trust: recipients can visually identify your emails, thus reducing the risk of phishing.
- brand reinforcement: a clearly visible logo in inboxes reinforces brand recognition.
- better deliverability: emails compliant with DMARC have a better chance of reaching the main inbox.
1. Create a logo
Create a logo in SVG format (Scalable Vector Graphics). This format is required as it ensures optimal quality regardless of the device or display size.
To be imported on the Infomaniak interface (read below) it must not exceed 10 Mo, but it can also be hosted on a publicly accessible secure server and you will simply need to indicate its URL for the BIMI DNS registration.
2. Obtain the VMC certificate
A verified logo certification (VMC) is required; it certifies that you are the legitimate owner of the logo. You can obtain this certification from recognized certification authorities such as DigiCert and Entrust.
When your VMC certificate is issued, you receive a PEM file containing the entity certificate. This PEM file includes your SVG-formatted logo as well as the VMC.
3. Add the logo to the Mail Service
Prerequisites
- All the indicators Global Security of your Mail Service must be green (SPF + DKIM + DMARC)!
To access the Mail Service and set the logo of your company:
- Click here to access the management of your Mail Service on the Infomaniak Manager (need help?).
- Click directly on the name assigned to the Mail Service concerned.
- Click on Global Security in the left sidebar.
- Click on the Create button (in the BIMI section):
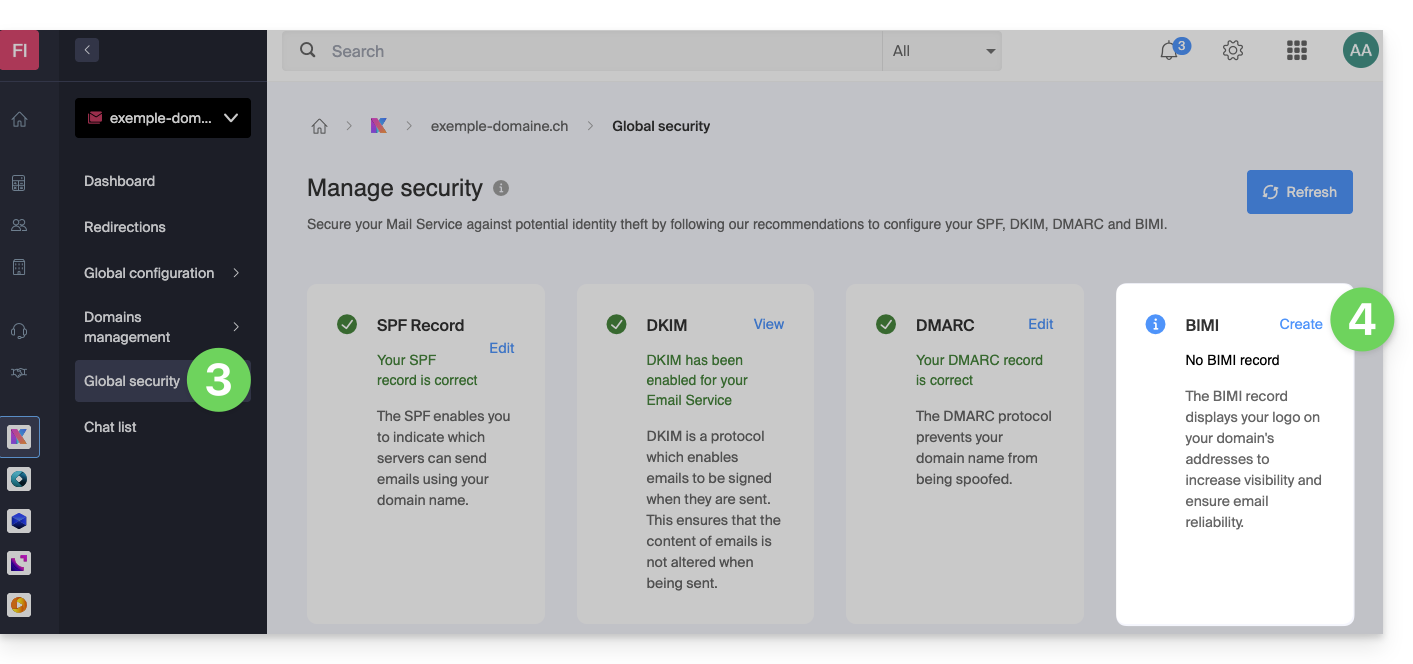
- Fill in the requested information from the documents received (see chapter 2 above) and do not forget to save.
In case of a problem
- If the Create button in the BIMI box remains grey, make sure to check the informative messages: DMARC may exist but may not be at the required rejection percentage, so adjust the parameters according to the indications.
- When there are multiple domains linked to the Mail Service, you must ensure that you have a certificate on each linked domain if you wish to have BIMI on them.
- Note that Microsoft Outlook, Apple Mail, Thunderbird, the Mail app from Samsung, among others, have not yet adopted BIMI.
Disable BIMI
To disable BIMI, simply go to the domain name management page linked to the Mail Service and delete the corresponding TXT record.
This guide explains how to link a domain name to an Infomaniak Mail Service
If the domain name is…
… with Infomaniak, same Organization
If your domain name is registered with Infomaniak and is in the same user account or Organization as the mailbox, then there is nothing to do.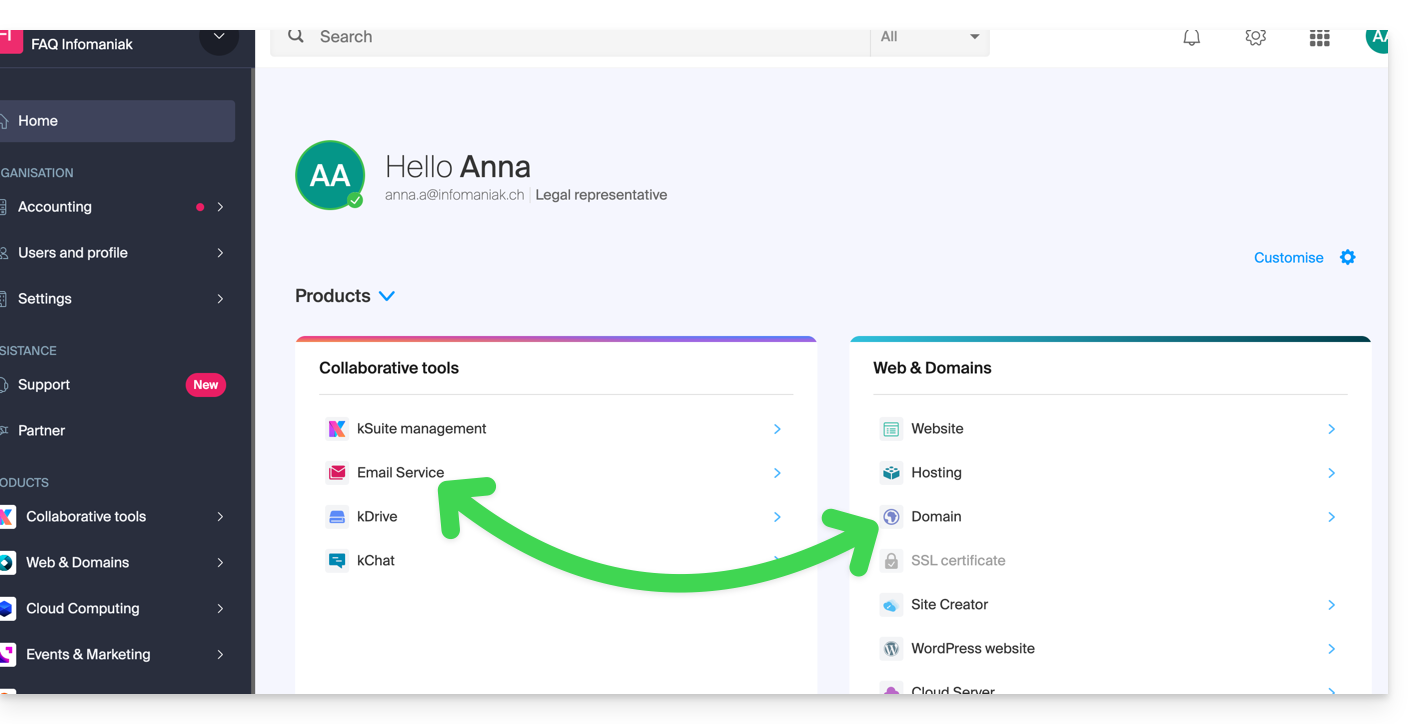
- Refer to this other guide to check and correct any potential configuration errors.
… with Infomaniak, different Organization
If your domain name is registered with Infomaniak but in a different user account or Organization, then:
- Edit its DNS zone by specifying Infomaniak's MX (+ SPF & DKIM).
- Any DNS addition/modification can take up to 48 hours to propagate.
OR
- Move it within the same Organization.
… with Infomaniak with external DNS
If your domain name has DNS that are not Infomaniak's, then:
- Edit the current DNS zone where it is located (if necessary, consult the help of the relevant provider) by specifying Infomaniak's MX (+ SPF & DKIM).
- Any DNS addition/modification can take up to 48 hours to propagate.
OR
- Change the current DNS and select the use of Infomaniak DNS.
- Any DNS addition/modification can take up to 48 hours to propagate.
- Refer to this other guide to check and correct any potential configuration errors.
… elsewhere with external DNS
If your domain name has DNS that are not Infomaniak's, then:
- Edit the current DNS zone where it is located (if necessary, refer to the help of the relevant provider) by specifying Infomaniak's MX (+ SPF & DKIM).
- Any DNS addition/modification can take up to 48 hours to propagate.
OR
- Change the current DNS (if necessary, refer to the help of the relevant provider) by specifying Infomaniak's (this implies having a DNS zone with Infomaniak.
- Any DNS addition/modification can take up to 48 hours to propagate.
- This DNS zone with Infomaniak will be configured correctly but refer to this other guide to check and correct any potential configuration errors.
… elsewhere but you are bringing it back
If your domain name is registered with another registrar and you want to transfer it to the same place as your Infomaniak mailbox, then:
- Transfer the domain name to Infomaniak (it will be configured correctly but refer to this other guide to check and correct any possible configuration errors).
Otherwise, consider ordering a new domain name if necessary.
This guide explains how to have multiple denominations (everything that comes after the at sign @ of your email address) for an existing Mail Service, by adding linked domain names.
Preamble
- Email addresses (existing and future) are automatically valid with all linked domains.
- To completely transform and reverse the domain names of a Mail Service, refer to this other guide.
- To rather modify the part of your email address that comes before the at sign
@, refer to this other guide. - Note also that you can rename your product in the Infomaniak Manager, but changing the name of a Mail Service has no effect on its addresses. You need to act on the domain name.
Add a domain name to the Mail Service
Prerequisites
- Own the new domain name (if necessary it will need to be created beforehand).
- Refer to the instructions of this other guide by applying the instructions corresponding to your situation (so that the domain name works when it is linked to your Mail Service).
Once the new domain name is ready to be used alongside the old one, it must be added to the Mail Service:
- Click here to access the management of your product on the Infomaniak Manager (need help?).
- Click directly on the name assigned to the product in question.
- Click on Domain Management in the left sidebar:
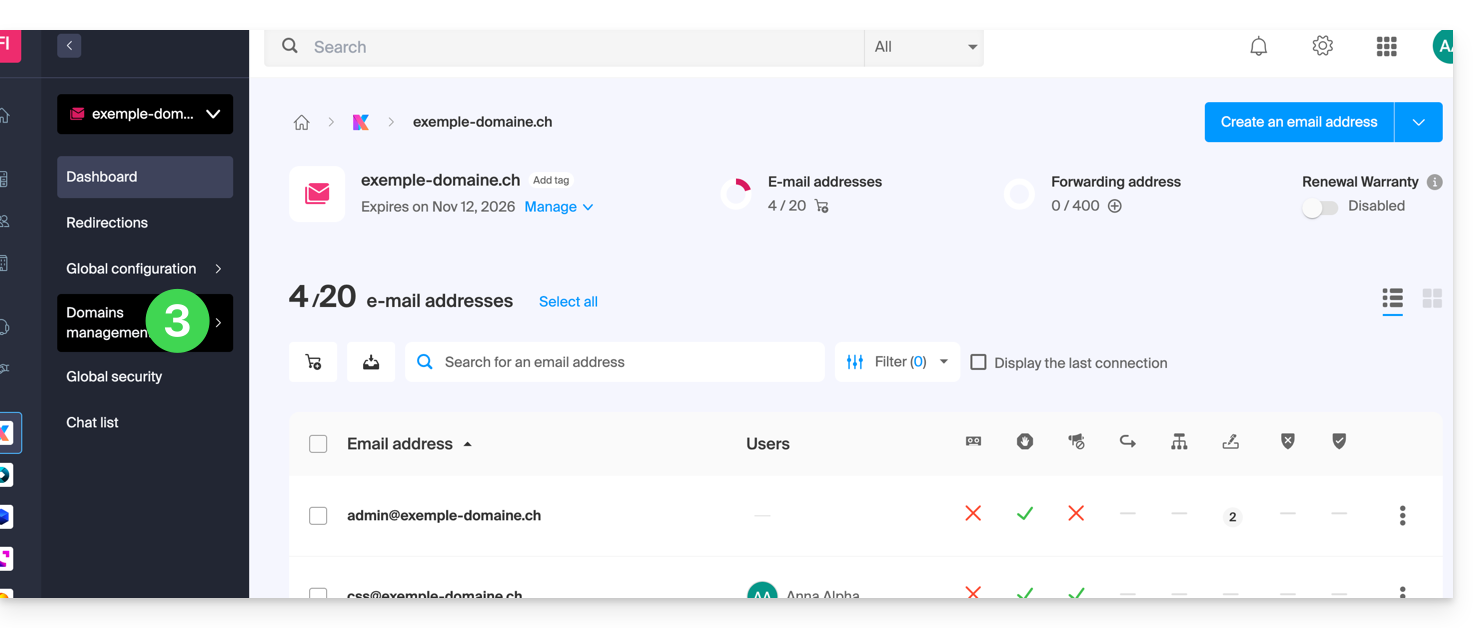
- Click on List of domains linked to the service in the left sidebar.
- Click the blue button Add a linked domain:
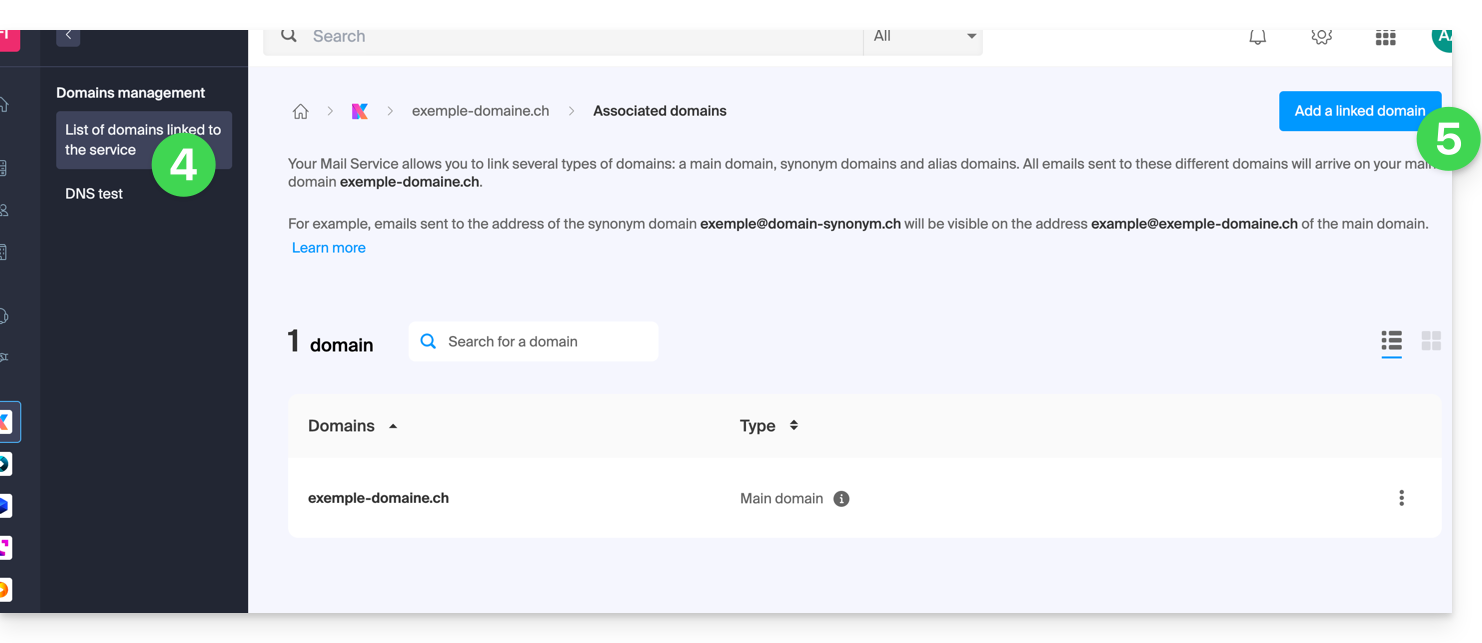
- It is possible to…
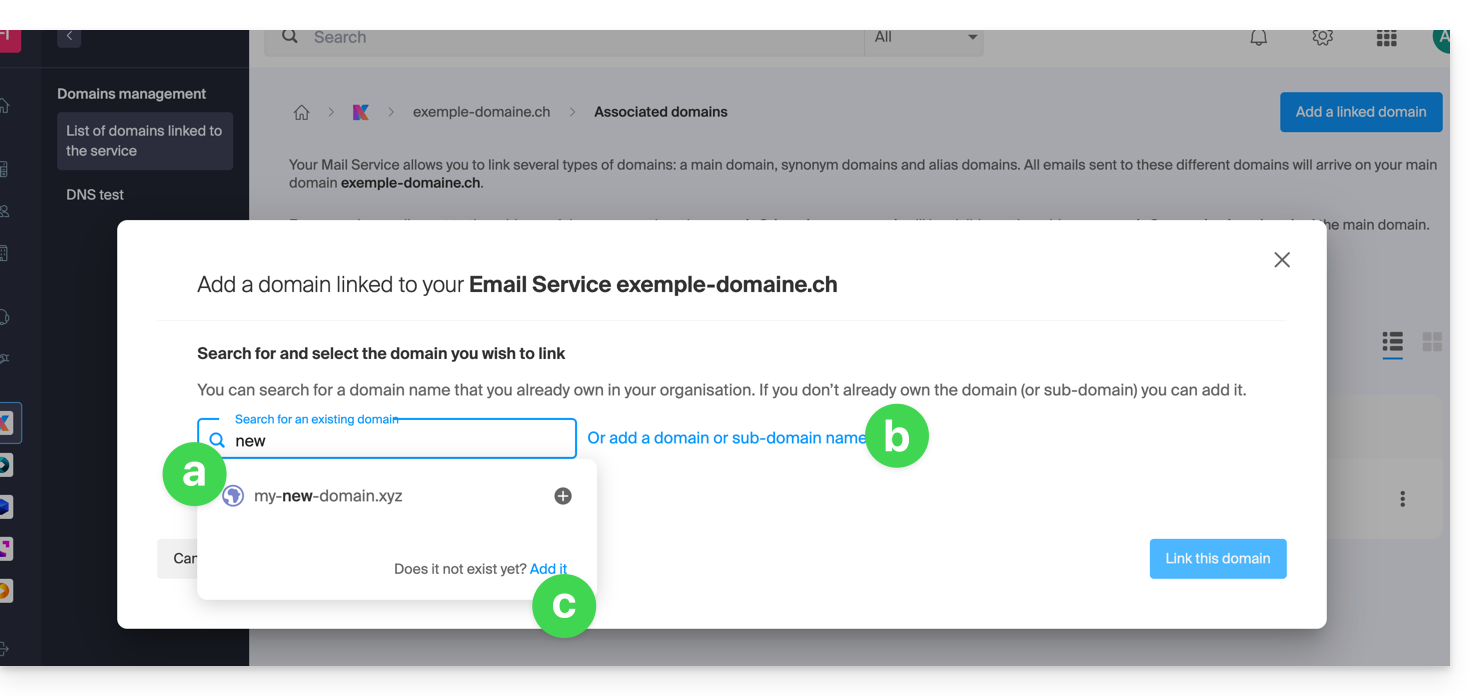
- … Search for an existing domain on the organization to which you are connected; this will link and automatically update the DNS zone of the added domain.
- … Add a domain name or subdomain to manually indicate the domain name or subdomain to be used (ideal if the domain name is elsewhere).
- … Buy a new domain name.
a: The domain exists at the Organization level
- Click on the proposed domain name.
- Click on the blue button Link this domain:

It is done, the Mail Service now responds to a second domain name: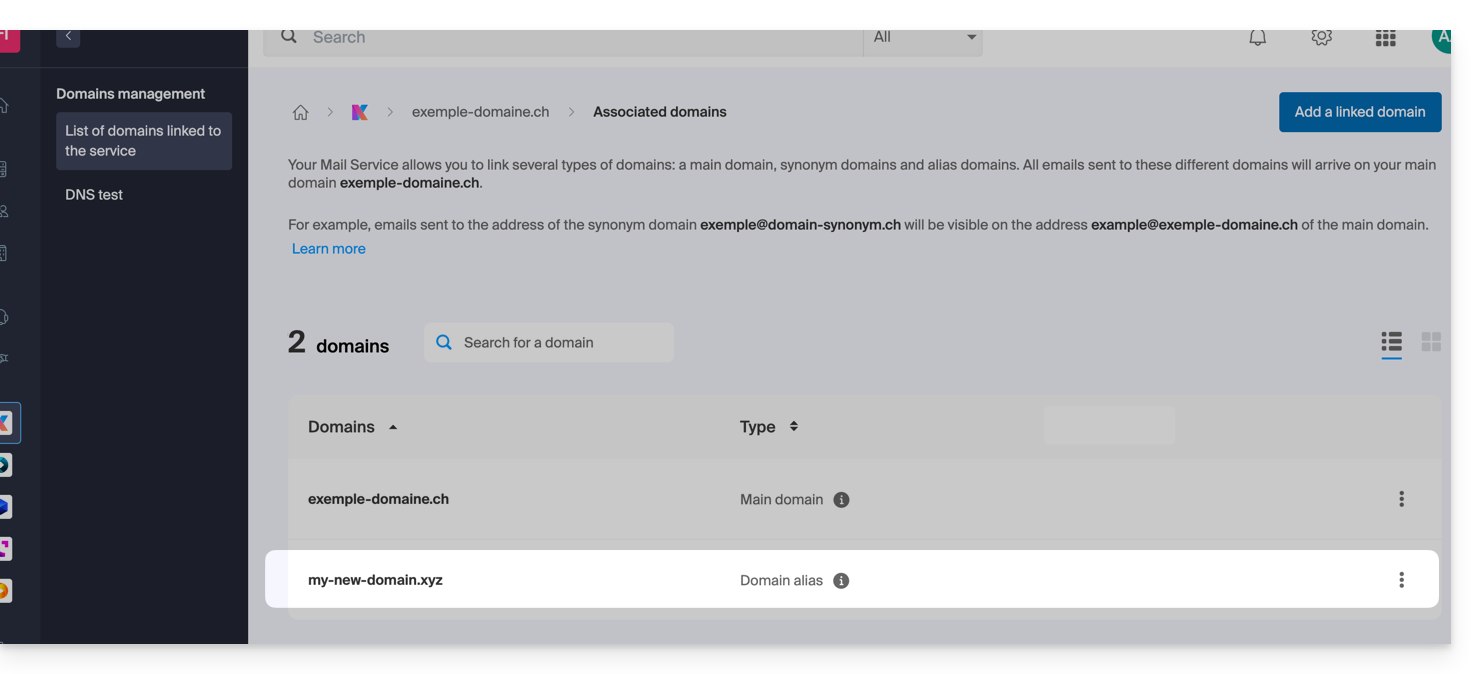
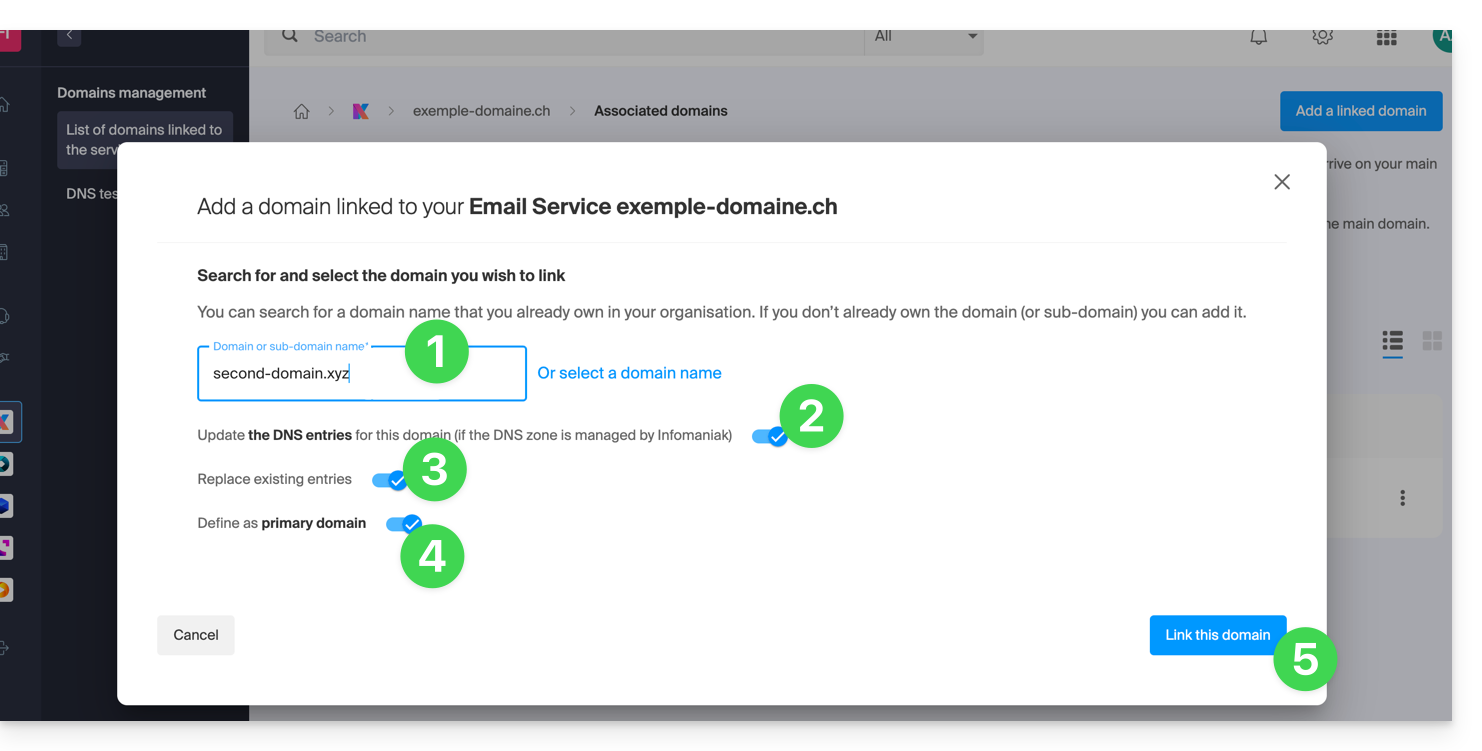
b: The domain exists but elsewhere (other Organization, other Registrar...)
- Enter the domain name to add.
- Activate the DNS entry update (if the domain name situation allows it, the DNS zone of the domain name will be automatically updated).
- If the point 2 above is active, then activate the replacement of any existing entries.
- Only reverse the domain name if you wish to set this new domain name as the main one (this is mainly an administrative rather than a technical issue).
- Click on the blue button Link this domain:
Example of use
The email contact@une-super-entreprise-familiale.com is a long email address. The synonym domain contact@usef.com is shorter and easier to remember.
By adding the domain "usef.com" to the Mail Service "une-super-entreprise-familiale.com" you authorize all messages sent to contact@usef.com (the linked domain) to arrive among the messages that the address contact@une-super-entreprise-familiale.com already receives.
This guide explains how to create and then automatically add a signature to messages sent from the Infomaniak Mail Web app (online service ksuite.infomaniak.com/mail).
⚠ Available with:
| kSuite | Free | |
| Standard | ||
| Business | ||
| Enterprise | ||
| my kSuite | * | |
| my kSuite+ | ||
| Mail Service | Starter 1 max. address | |
| Premium 5 min. addresses |
* Read this other guide regarding the limitations of the my kSuite offer.
Preamble
- The signature will also be visible when sending from the Infomaniak Mail app (iOS / Android).
- It will not be present with another sending method (a software like Outlook for example).
- It is also not added to the messages of the answering machine; it is necessary to add one in the out-of-office message directly.
- One or more signatures can be added from Mail and from the Manager where all the addresses of a Mail Service are managed. Choose which signature to use when sending.
Access signatures from the Infomaniak Web Mail app
Prerequisites
- Having permission to manage signatures: if you had been invited to the Infomaniak Web app Mail (online service ksuite.infomaniak.com/mail) to manage your address, it is possible that the Mail Service manager has revoked this right from their admin account.removed this right from their admin account.
To access signature management:
- Click here to access the Infomaniak Web app Mail (online service ksuite.infomaniak.com/mail).
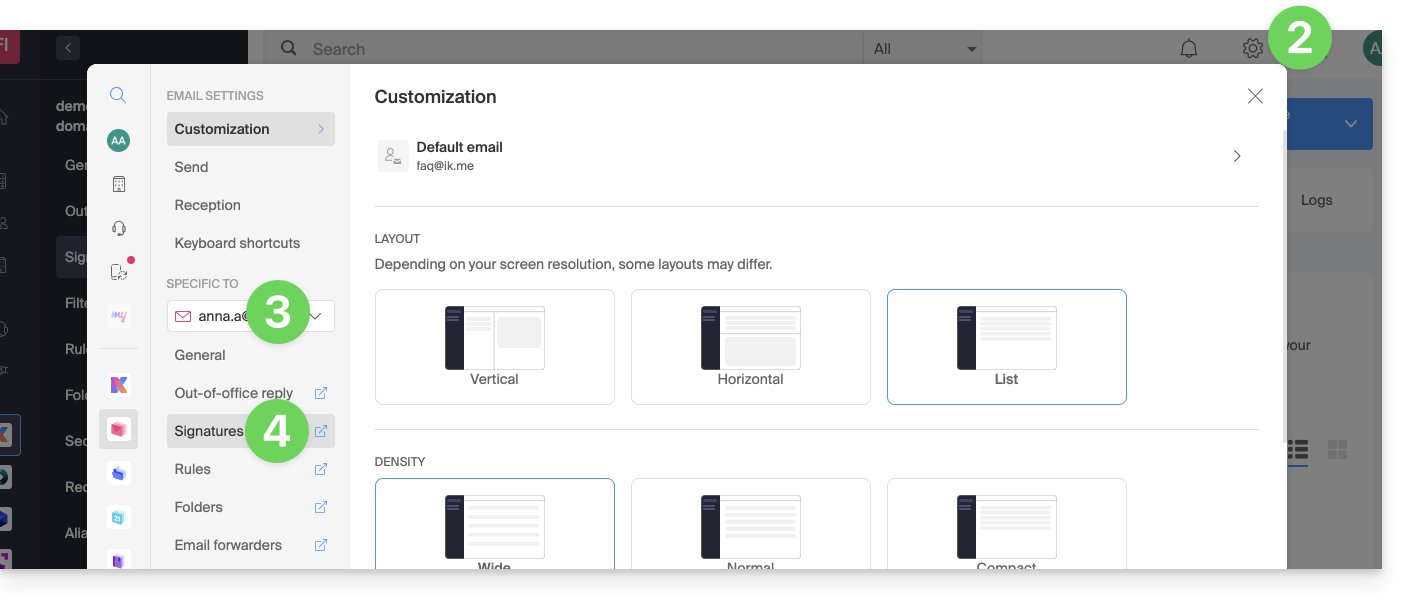
- Click on the Settings icon in the top right of the interface.
- Check or select the email address concerned in the dropdown menu of the left sidebar.
- Click on Signatures:
Access signatures from Mail Service
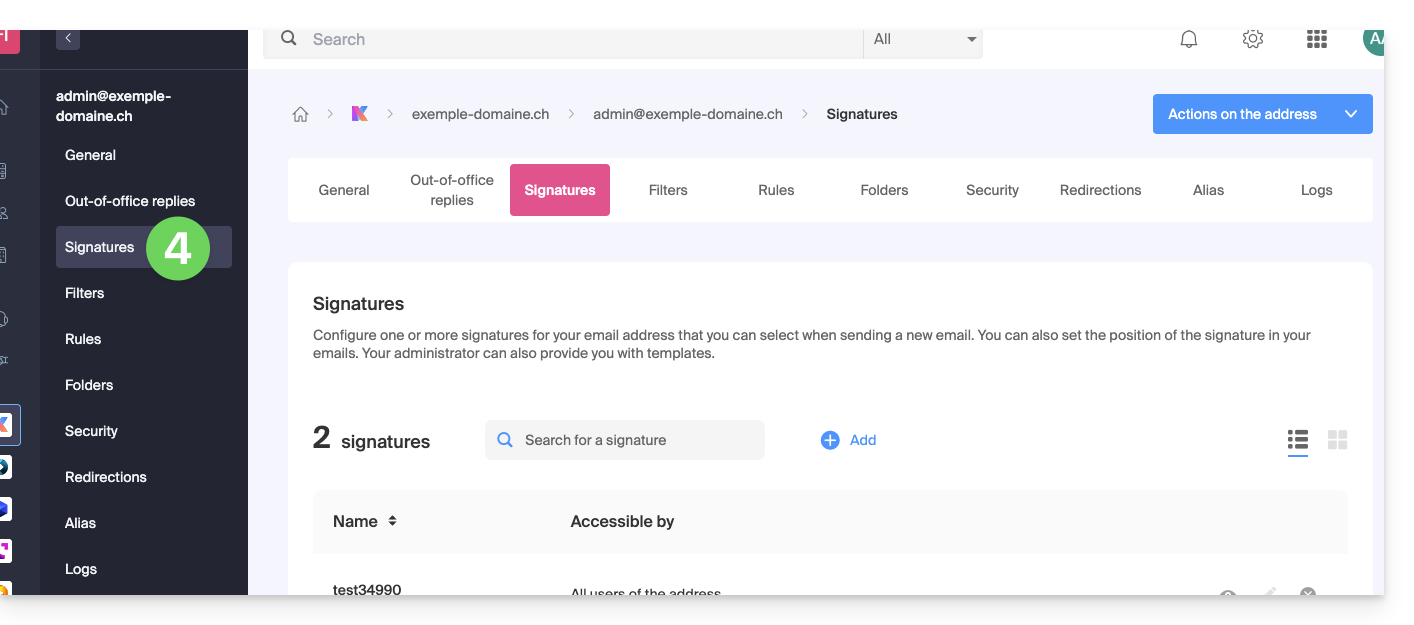
To access the Mail Service and signature management:
- Click here to access the management of your product on the Infomaniak Manager (need help?).
- Click directly on the name assigned to the product concerned.
- Click on the email address concerned in the table that appears
- Click on Signatures in the left sidebar:
Create and edit the signature
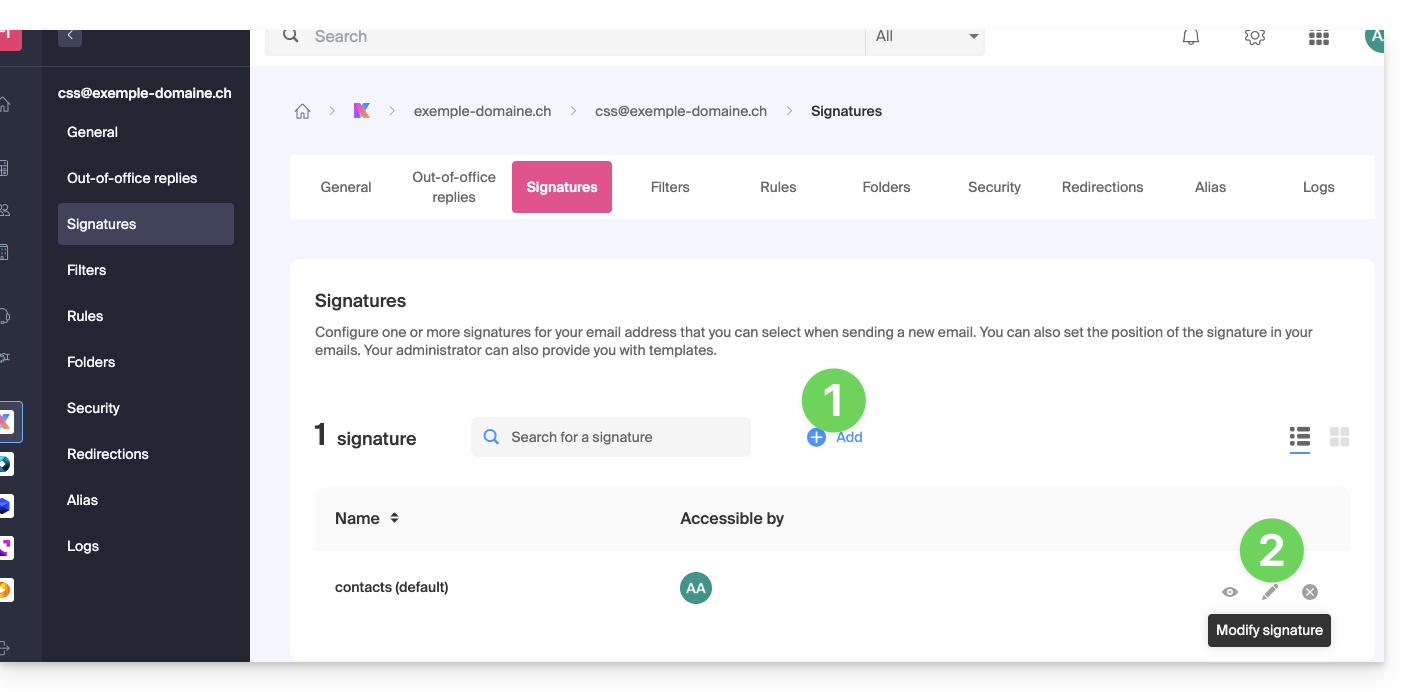
Two options are available to you:
- Click on Add to create a new signature.
- Click on the pencil icon ✎ next to an existing signature to edit it.
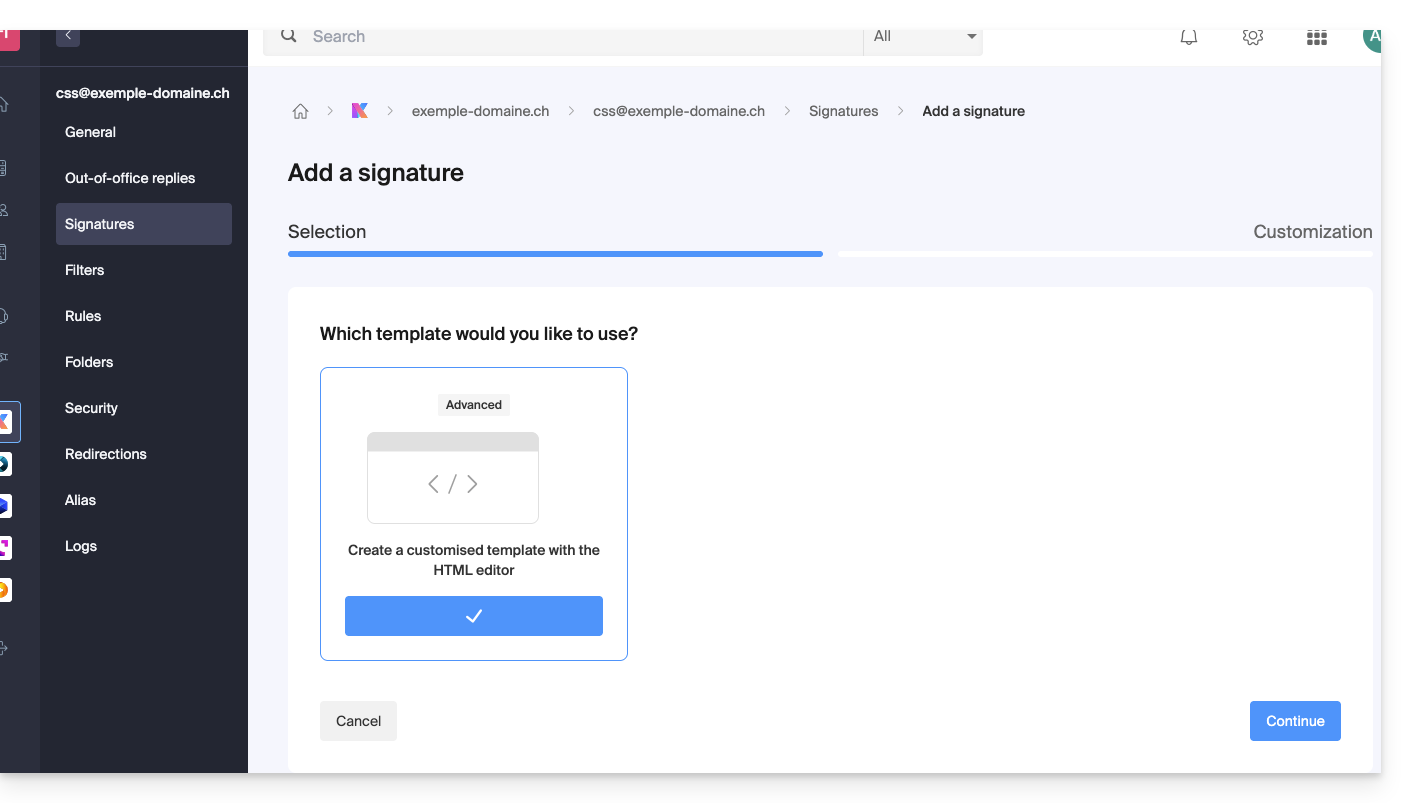
Then:
- Choose an existing template or a new one:
- Give a name to the signature.
- Specify a name for your identity (it will be displayed next to your email address in the messages received by your correspondents).
- Create the content of the signature in the designated frame (see below for formatting options)
- Choose whether or not to share the signature with all users of the Mail address.
- Click on Advanced settings to choose the location to insert your signature: before the message (= header) or after the message (= signature)
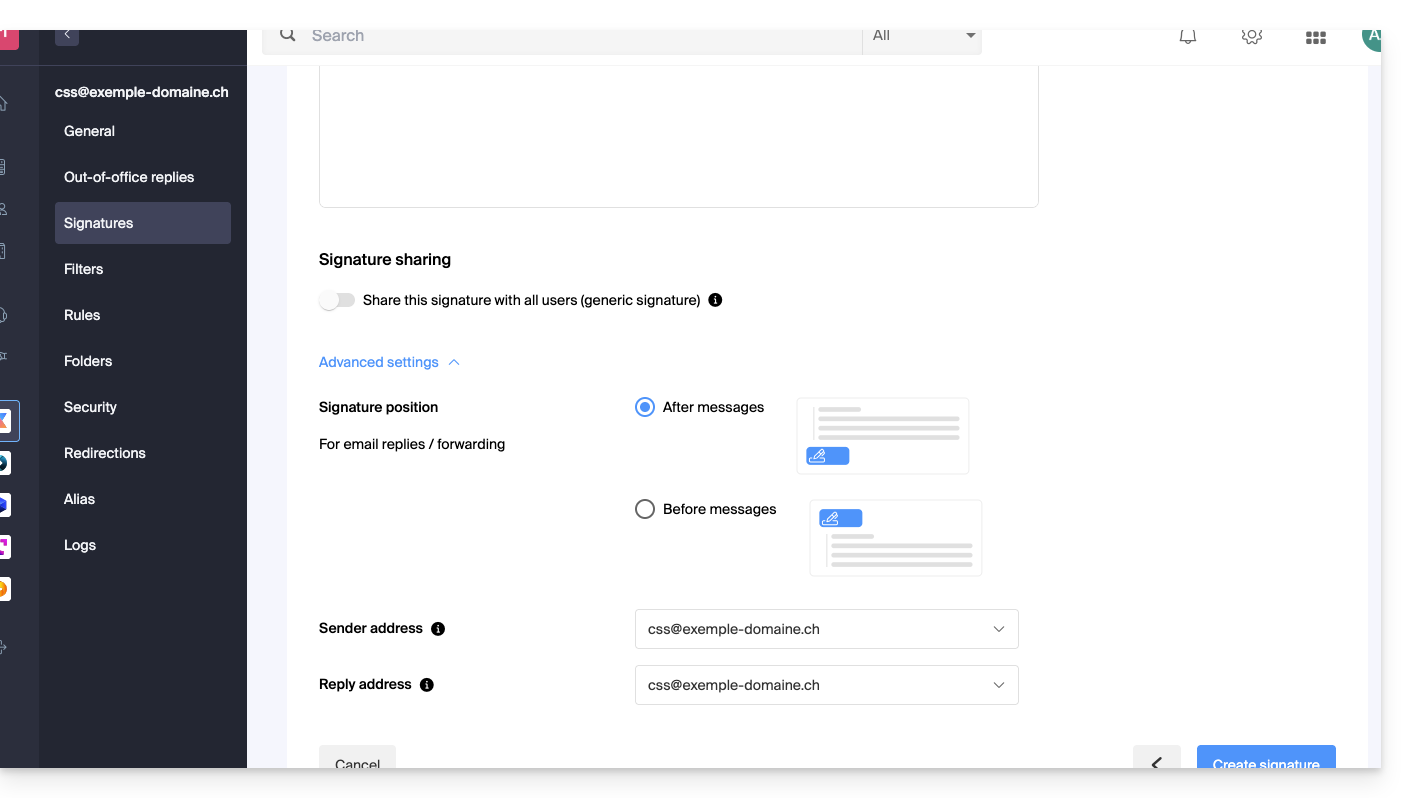
- Refer to this other guide regarding the choice of sending/replying addresses.
- Click the Create signature button.
Signature formatting
You can use an image, edit the HTML source code, and format your text using a tool palette.
To avoid excessive line breaks, use the Shift key in conjunction with the ENTER key on your keyboard, which is equivalent to the HTML tag <br> that causes a line break instead of a new paragraph.
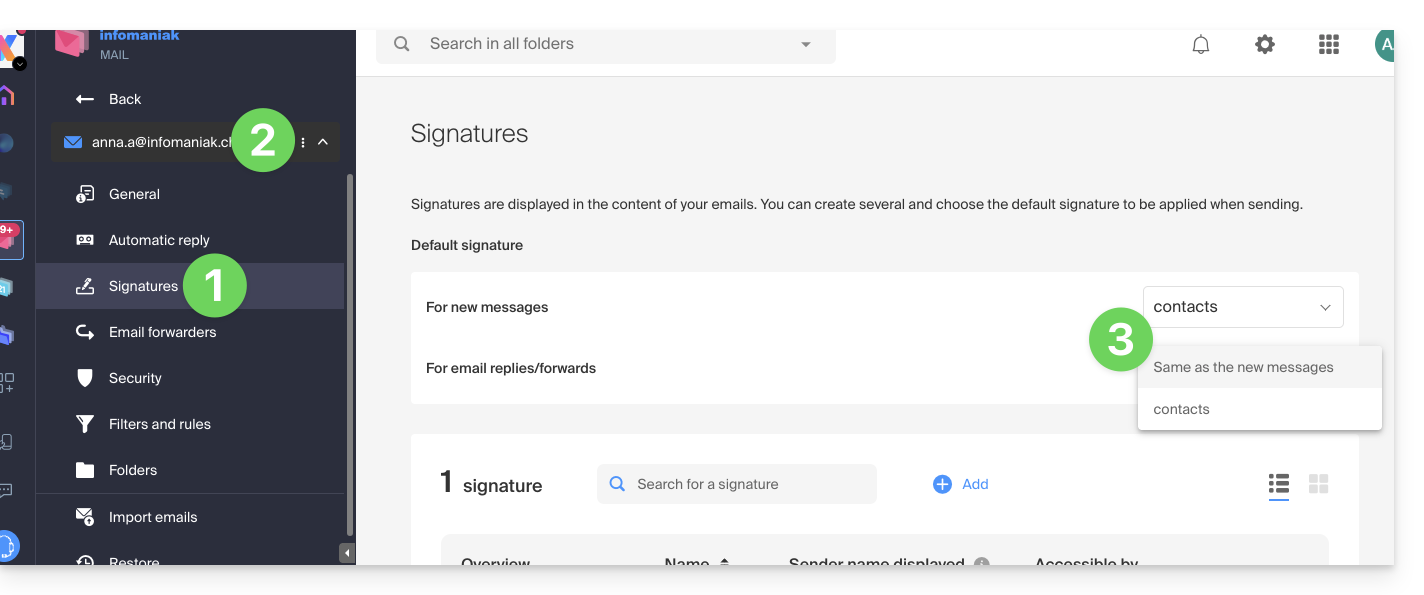
Set a default signature
To choose the signature used by default under certain conditions:
- Click here to access your signatures on the Infomaniak Mail Web app.
- Check or select the email address concerned in the dropdown menu of the left sidebar.
- Choose the signature that will be inserted by default when composing:
- a new message
- a reply/forward
By setting a default signature in my kSuite, it will be automatically displayed in the body of the email when composing. You will still have the option to change the signature.
There is a case where the default signature will not be the one automatically inserted by default when composing a message: refer to point 9 of this other guide.
Select or remove the signature when composing
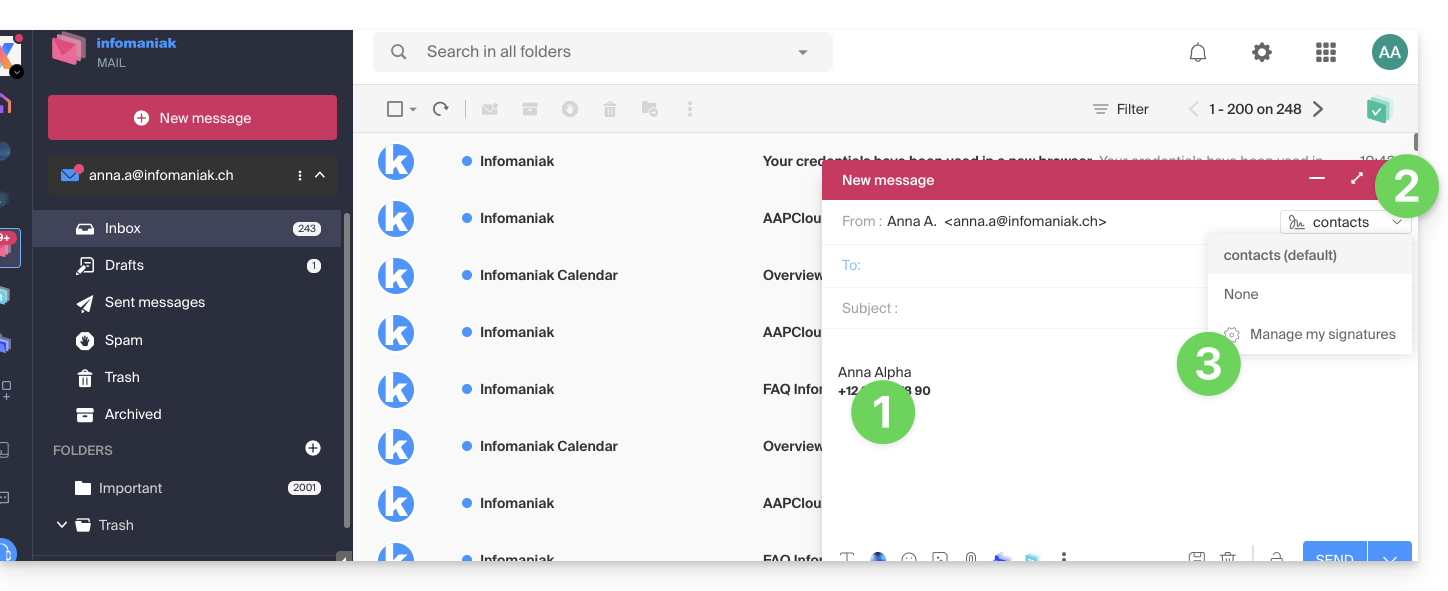
When you start composing a new message:
- The signature is automatically inserted.
- If multiple signatures exist, you can choose another identity via the dropdown menu.
- You can also quickly access the signature settings via the button in the toolbar:
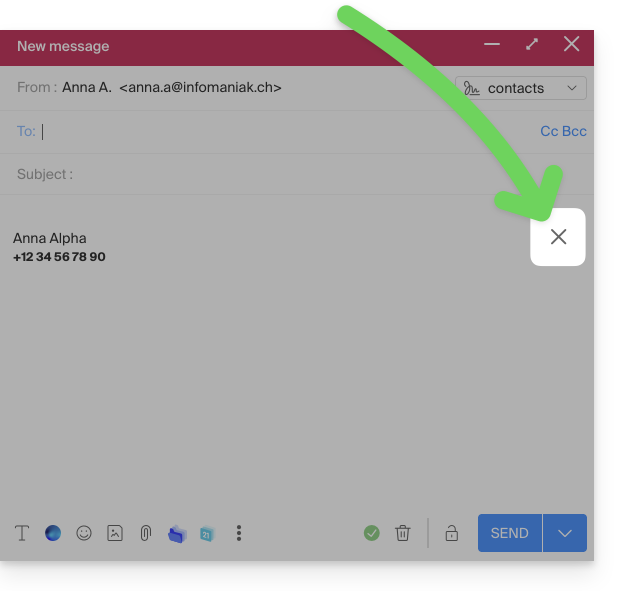
- You can remove the signature by hovering over it and clicking on the cross:
Associated addresses (multiple possible)
When a signature is derived from a template (whether it was created from a model proposed by Infomaniak or generated with the advanced editor):
- users do not have access to the content of the signature in edit mode,
- they can enter dynamic values such as the sender's name or personal data that may be requested such as profession or phone number,
- they can also modify the advanced settings of the signature (such as the position of the signature in the context of a reply/forward) but to date, this setting is common to all users of the signature (1)
When a signature has been created directly without using a template:
- if the signature is created from a predefined model:
- the behavior is the same as for the previous point, i.e., a signature created from a template
- if the signature was created via the advanced editor:
- users have access to the content of the signature in edit mode, but be careful, this content is shared; if Morgane modifies the content, Vanessa will have the same content once she has reloaded her Mail Infomaniak interface,
- only the sender's name is specific to the user and there are no dynamic values in this type of case,
- advanced settings follow the same principle as in other cases: they are common to all users
In all cases, assigning a default signature to an email account is at the user level. For example, within the same email account, the signature chosen by default by Morgane is independent of the one chosen by Vanessa.
Going further with templates
Refer to this other guide if you are looking for how to define custom templates that can be applied as soon as a new email address is created on your Mail Service, for example, or in bulk to all addresses in your domain.
This guide explains how to redirect emails from a Gmail, Bluewin, Outlook, Proton, Yahoo, etc. address to your Infomaniak-managed email address.
Preamble
- By setting up automatic redirection of all incoming emails on your previous messaging system, you can immediately use your new Infomaniak email address while ensuring you don't miss any messages.
- By responding to your emails from your new Infomaniak address, your contacts will automatically use it to write to you in the future.
- For additional help, contact the service provider where you want to activate message redirection; otherwise, contact a partner or launch a free tender — also discover the role of the host.
- You can also import content from another Mail provider directly to your Infomaniak address.
Specific guides
Refer to the official guides based on your previous provider:
- Gmail
- iCloud
- Microsoft (Outlook / Hotmail / Live)
- Orange
- Proton Mail (note, requires a paid plan)
- Sunrise:
- Click here to log in to Sunrise Mail.
- Click on Inbox.
- Click on Settings => Manage Inbox.
- Enter the corresponding email address under 'Transfer'.
- Yahoo (note, requires Yahoo Mail Pro)
Bluewin
- Bluewin (see also below):
- Click here to log in to Bluewin.
- Click on Settings then Automatic Transfer.
- Click on Set up automatic transfer.
- Follow the procedure to set up automatic redirection.
- Bluewin (alternative method):
- Click here to log in to MySwisscom.
- Click on the "More" menu then “Settings”:

- Then click on “Manage transfers”:

GMX
Click on these elements in order to set up a redirection rule from GMX:
This guide explains how to connect the desktop app Outlook 2013 (desktop application on Windows) to an email address hosted by Infomaniak.
Preamble
- The various services offered by Infomaniak are all compatible with the corresponding standard protocols (IMAP/SMTP for email, for example). Therefore, if you encounter a problem with third-party software, contact its publisher or a Partner and consult the support policy as well as article 11.9 of the Infomaniak Terms of Service.
Add the email address to the application
Prerequisites
- Create the email address in my kSuite or a Mail Service / kSuite.
- Create a password for the email address on the device you are going to configure.
To configure the email application:
- Open the application.
- Click on the File menu:
- Click on Account Settings.
- Click on Add or Remove Accounts:
- Click on New:
- Click on Manual Setup:
- Click on POP / IMAP.
- Click on Next:
- Check and complete the missing information.
- Click on More Settings:
- Click on the Outgoing Server tab.
- Click on My outgoing server requires authentication.
- Click on the Advanced tab:
- Replace the port numbers with the correct information and enable SSL.
- Click on OK:
- Click on Next:
- Click on Close:
- Click on Finish:
- Click on Close:
- There you go, your email address is now configured in the application:
Recommended settings
- Incoming IMAP server =
mail.infomaniak.com - IMAP port =
993(with SSL) - Outgoing SMTP server =
mail.infomaniak.com - SMTP port & encryption protocol and command/method to activate this protocol:
587+ STARTTLS - Username = the complete & full email address ( ? )
- Password = the one generated for the email address you want to access
- Mandatory authentication for sending emails:
- It is activated in the SMTP settings of your application.
- Check "use the same settings as the incoming server" or, depending on the software/email clients, enter a username (= complete & full email address) and the generated password.
Refer to this other guide if you are looking for information about other messaging ports and protocols compatible (SSL / TLS for example).
In case of a problem
Check that the Mail Service is configured optimally.
It is not necessary to contact Infomaniak Support if your email address works well outside the application. The most common error concerns the use of an incorrect password. The troubleshooting guides help you resolve any potential issues:
- Be aware of the solutions provided in this other guide regarding email in general.
- This other guide is more specifically about Outlook.
… and if your Outlook no longer works since a change in your email password, be aware of this other guide.