
Knowledge base
1000 FAQs, 500 tutorials and explanatory videos. Here, there are only solutions!
This guide explains how to maintain control over your MP3/AAC or HLS Radio Streaming streams by activating unique key (token) protection to decide, for example, whether a listener can listen to your radio or not.
Preamble
- The principle is simple: with each connection, you will make a request to the Infomaniak API, which will return a unique token with a limited and configurable lifespan. This token will authorize anyone who possesses it to consume the stream during this period.
- You can protect an MP3/AAC or HLS stream independently of each other (the same applies to geolocation).
- Activating the restriction involves changing the stream configuration, which may take a few minutes to be replicated on the servers.
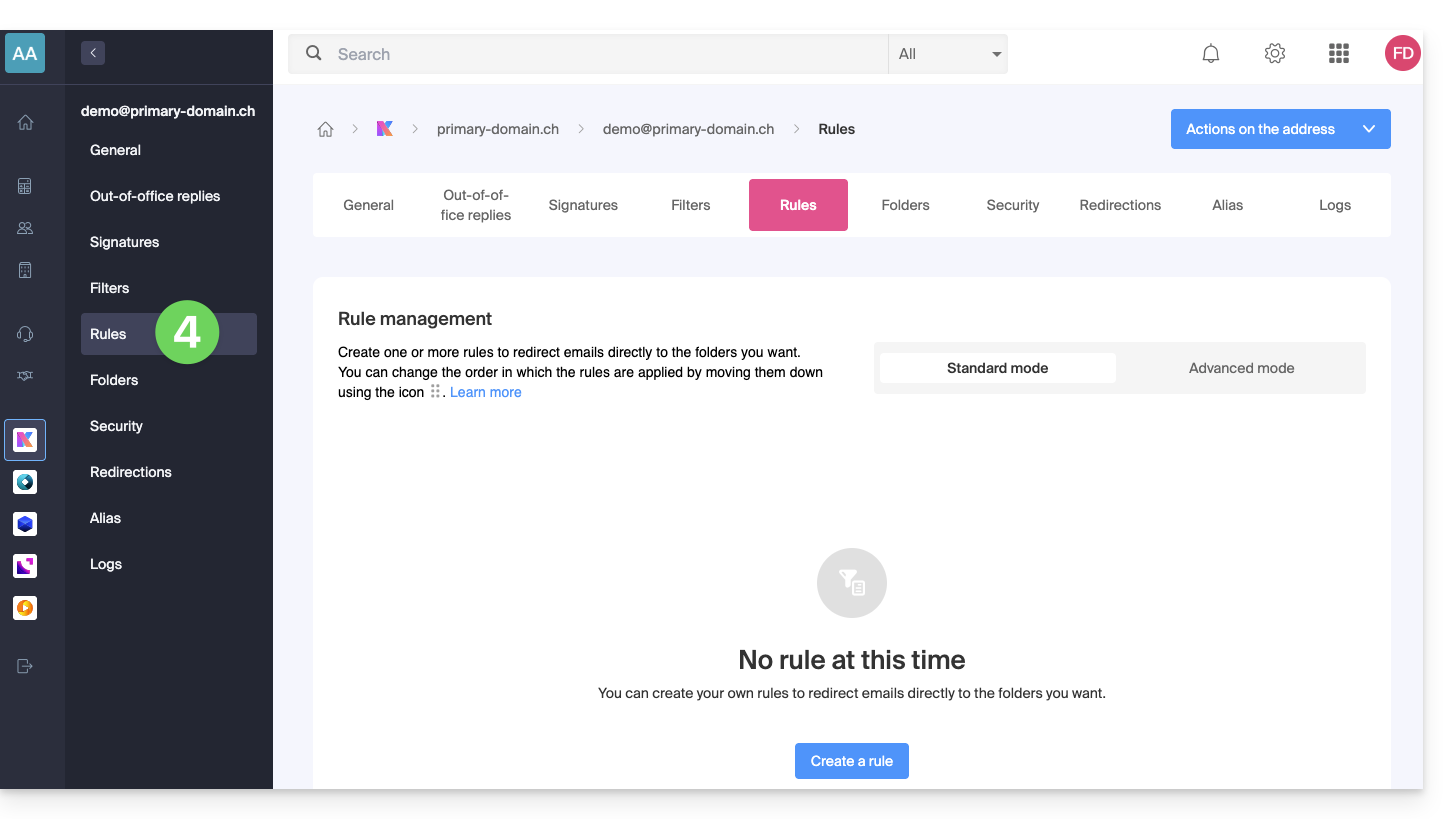
Protect an audio stream with a unique key
To do this, simply go to the restriction settings and activate token protection on the stream you wish to secure:
- Click here to access the management of your product on the Infomaniak Manager (need help?).
- Click directly on the name assigned to the product concerned.
- Click on the name of the audio stream concerned.
- Click on Restrictions in the left sidebar.
- Choose HLS if necessary.
- Click on the action menu ⋮ located to the right of the item concerned.
- Click on Token Restriction:

Then activate the protection.
Warning, at the moment you activate this option, access to the stream will be instantly blocked for new connections. Adapt your Players to take into account the restriction, as illustrated in the example below:
Create a Radio API Token
To access the Radio API, you must first authenticate using an application token. This step only needs to be done once. To create this application token, refer to this other guide.

The scope is radio and unlimited lifetime to avoid having to regenerate a code regularly. Once the token is generated, copy it to paste it in the example below.
Example of use in PHP language
For MP3/AAC or HLS, the code can be substantially the same, only the URL called in POST changes in its form.
Paste the generated token below instead of the one indicated:
if (!defined('API_TOKEN')) {
     define('API_TOKEN', 'AYF5lSh3c7Xy5974Fs12RTkTThujT-L9R4Xk2ZfGyP6sV7QqJ1oC3jD8nFtKzIxUeMw5oNzR6');
}
/**
 * Fonction générique pour executer des requêtes cURL
 *
 * @param string $method Méthode HTTP (GET, POST, PUT, etc...)
 * @param string $url Url de l'api a requêter
 * @param array $headers Liste des en-têtes HTTP (l'autorisation doit être passée ici avec un ['Authorization: Bearer ']
 * @param array $payload Un tableau contenant les données pour créer un token
 * @return mixed
 */

function request(string $method, string $url, array $headers = [], array $payload = []): mixed{
    // prepare options array
    $opts = [
        CURLOPT_HTTPHEADER => $headers,
        CURLOPT_RETURNTRANSFER => true,
        CURLOPT_URL => $url,
        CURLOPT_CUSTOMREQUEST => strtoupper($method),
    ];

    // add payload if relevant
    if ($payload && $method !== 'GET') {
        $opts[CURLOPT_POSTFIELDS] = json_encode($payload);
    }
    $ch = curl_init();
    curl_setopt_array($ch, $opts);
    $result = curl_exec($ch);
    if(curl_errno($ch)){
        throw new Exception(curl_error($ch));
    }
    $data = json_decode($result, true);
    if ($data['result'] === 'error') {
        throw new Exception($data['error']['description'] ?? 'an error occured');

    }
    return $data['data'];
}
We are going to create the token, the URL for creating the token is broken down as follows:
- For an MP3/AAC stream
POST https://api.infomaniak.com/1/radios/acl/streams/mountpoint.mp3/tokenExample to protect https://newradiotest.ice.infomaniak.ch/newradiotest-128.aac the route will be: https://api.infomaniak.com/1/radios/acl/streams/newradiotest-128.aac/token
- For an HLS stream
POST https://api.infomaniak.com/1/radios/acl/hls_streams/<stream>/tokenExample to protect https://myradiostream.radiohls.infomaniak.com/myradiostream/manifest.m3u8 the route will be: https://api.infomaniak.com/1/radios/acl/hls_streams/myradiostream/token
Example in the case of MP3/AAC, remember to adjust:
$token = request(
    'POST',
   'https://api.infomaniak.com/1/radios/acl/streams/newradiotest-128.aac/token',
    // en-tête d'authorization
    [
        'Authorization: Bearer ' . API_TOKEN,
        'Content-Type: application/json',
    ],
    /**
     * payload pour créer le token, vous pouvez passer les valeurs suivantes
     * window     | 300               | optionnel | durée de validité du token (default: 5 minutes)
     */

    [
        'window' => 3600, // 1h validity
    ]
);
It is important to note that if this code is generated at the time of page loading, the listener will have "window" seconds to start playing the stream. Beyond this deadline, the token will expire, and the stream will no longer be able to be started unless the page is reloaded. Depending on your needs and use case, it will be necessary to adjust this delay in the best possible way.
You will also need to replace the playback URL of your stream below with the one indicated while keeping the parameter $token at the end. And finally, we display the Player (here a simple html5 tag, but you can of course add any overlay afterwards, the token being passed in the parameters $_GET of the url).
$streamUrl = "https://newradiotest.ice.infomaniak.ch/newradiotest-128.aac?$token";
echo "<audio controls=""><source src="$streamUrl"></audio>";This guide concerns UTM tags, or Urchin Tracking Module, tags added to URLs to track and analyze the performance of online marketing campaigns from the Infomaniak Newsletter tool.
Preamble
- These UTM tags, which are optional, consist of specific parameters such as source, medium, campaign, term, and content, which help identify the origin of the traffic from a link.
- By using UTM tags, marketers can understand which campaigns generate traffic, which channels are the most effective, and which ads or strategies work best, based on the data collected by web analytics tools.
- UTM tags therefore allow you to create a correspondence between the links in your Newsletters and the tracking of a tool like Google Analytics on your site.
Enable the UTM feature
Enable this option in the very first step of creating your Newsletter:
- Click here to access the management of your product on the Infomaniak Manager (need help?).
- Click on the domain name concerned in the table that appears:
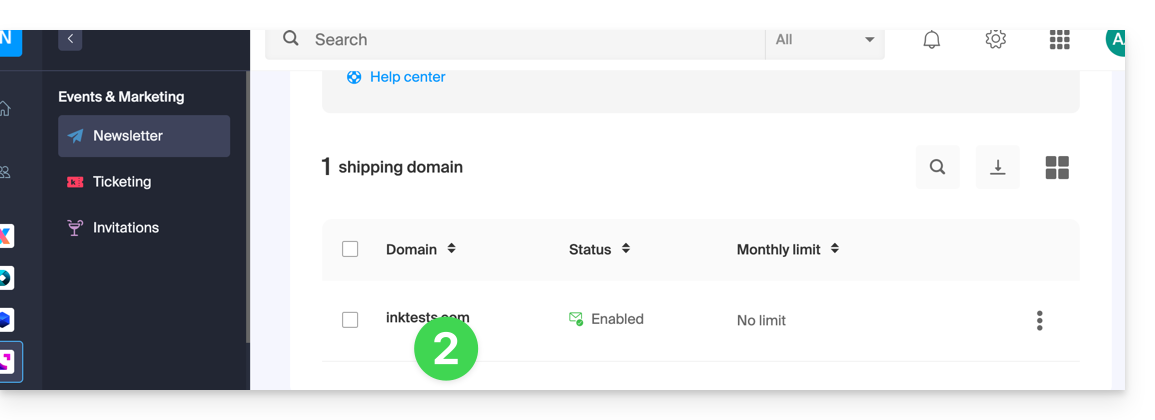
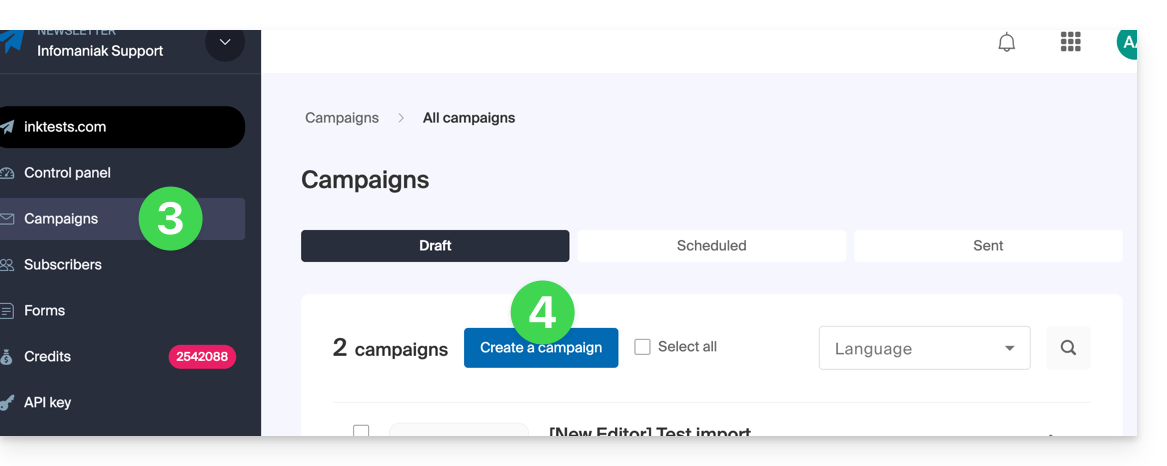
- Click on Campaigns in the left sidebar menu.
- Click on Create a campaign:
- Set the UTM parameter to ON using the toggle switch:
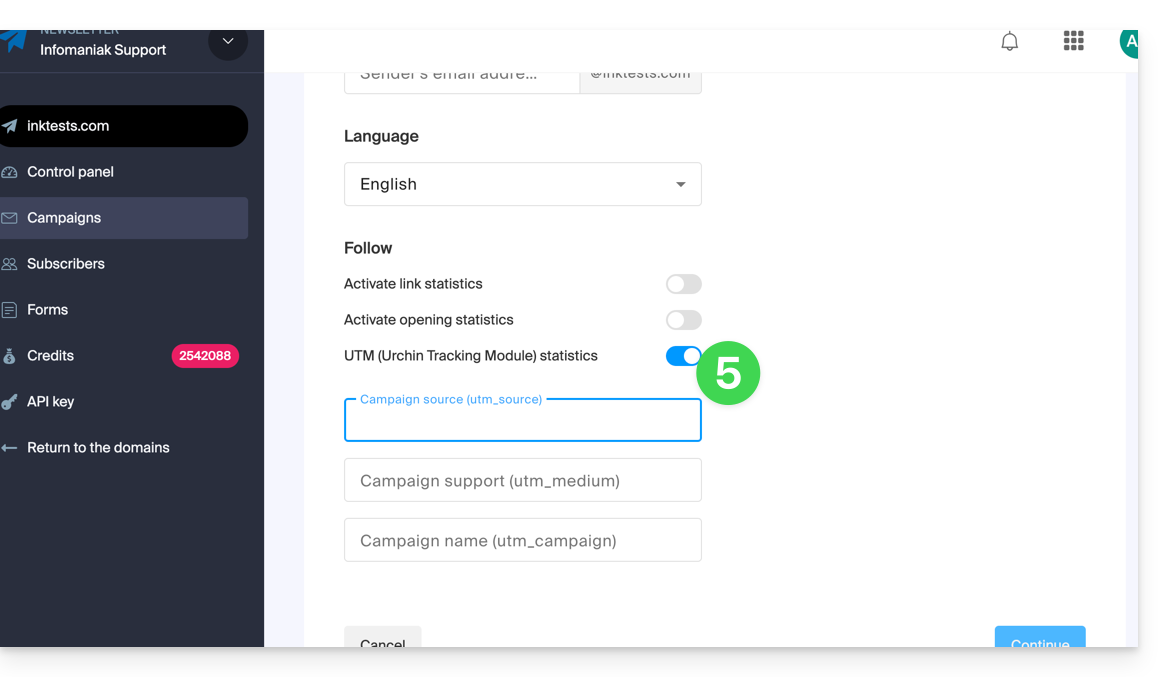
You will then find 3 fields to indicate keywords of type utm_parameters:
- campaign source (
utm_source) - campaign medium (
utm_mediumsuch as e-mail for example) - campaign name (
utm_campaign= the name of your campaign for example)
Therefore:
- Fill in the 3 UTM fields in step 1 of creating a Newsletter.
- Insert a link to the URL of your site (the latter must be properly configured and analyzed by Google Analytics for example) in the body of the Newsletter in step 3.
- When the reader clicks on it, they will arrive at the URL followed by the terms "
?utm_source=...&utm_medium=...&utm_campaign=..." with obviously your keywords in place of "...".
If you enter multiple keywords in these fields, any spaces will be replaced by underscore _ signs.
Later, it is planned to be able to enter dynamic formulas in these fields, such as today's date for example. Also, refer to the article https://news.infomaniak.com/comment-creer-un-objectif-google-analytics.
This guide explains the differences between Infomaniak's web hosting offers to help you choose the best solution according to your IT needs.
If you are looking to host your email, refer to this other guide.
Starter Web Hosting
Free Web Hosting
The Starter web hosting is offered for free with each domain name registered with Infomaniak. It provides 10 MB of disk space to create a website (basic pages in HTML language only - no PHP, no database) even without any particular knowledge thanks to the Welcome Page tool.
- Register or transfer a domain name with Infomaniak
- Learn more about the benefits included with a domain name
Shared Web Hosting
The flagship offer to create your websites
These web hostings are shared offers (the websites will be hosted on servers whose resources are shared with other customers). To ensure the reliability of these shared services, Infomaniak servers use on average only 40% of the CPU power and are equipped with professional-grade, latest-generation SSD disks.
Web hosting offers a minimum of 250 GB of disk space and allows you to manage multiple websites with multiple domain names. This offer includes all the technologies usually used to create professional websites: PHP, MySQL, FTP and SSH access, SSL certificates and easy installation of WordPress or common CMS, etc. It is also possible to add a Node.js site and/or Site Creator.
Note that without any hosting, it is also possible to obtain and then use Site Creator “standalone / standalone”. Refer to this other guide.
Cloud Server
Professional Web Hosting
With a Cloud Server, the resources allocated to you are not shared with other customers and you can customize the hardware and software configuration of your server according to your needs. A Cloud Server also allows you to use components that are not available on shared web hostings (Node.js, mongoDB, Sol, FFMPEG, etc.).
- A Cloud Server allows you to easily manage your server via the same administration interface as web hostings - you manage the sites in the same way.
- A VPS allows you to manage your server 100% autonomously with the version of Windows or the Linux distribution of your choice (
Debian,Ubuntu,openSUSE, ...) - solid technical skills are required to use a VPS, including VPS Lite.
Public Cloud (and Kubernetes Service)
Open, proven, and secure IaaS solution
For Infomaniak, it is the infrastructure that powers kDrive, Swiss Backup, and the Webmail, services used by several million users. But Public Cloud is accessible to everyone and provides the resources you need to develop your projects.
With personalized and tailored offers, you will have no trouble managing your development budget. No setup fees. No minimum amount. Cancelable at any time. You only pay for the resources actually used with Public Cloud at the end of each month, the same goes for Kubernetes Service.
Jelastic Cloud
Custom web hosting with the technologies of your choice
Jelastic Cloud allows you to create custom development environments with the technologies of your choice (PHP, Java, Docker, Ruby, etc.). It is a flexible cloud offer:
- Horizontal and vertical scaling of resources.
- Payment based on actual resource consumption.
- Easy customization of your infrastructure (redundancy, IP, SSL, load balancing, etc.).
This guide explains how to restore backups of previous versions of your files and other web data from your Infomaniak hosting, and how to set up an effective backup policy if the automatically and freely provided backups no longer meet your availability or security needs.
Web Hosting (Starter, Shared, Cloud Server)
Refer to these guides to restore automatic backups:
- of an entire hosting (FTP + MySQL),
- specific files on the hosting,
- specific databases,
- of a Web Application (Wordpress & Apps),
- Cloud Server SSH crons.
Refer to these guides to backup and restore:
- hosting with Swiss Backup and Restic (advanced),
- WordPress with Swiss Backup,
- WordPress with an extension.
Also refer to https://faq.infomaniak.com/snapshot.
Hosting v1 (old 60 Go offer)
- View and/or download the automatic backup (versioning) of your data on your FTP space under
/backupsand/backup_mysqlat the root of the domain (above/web). - Restore this data.
- Restore messages from Infomaniak automatic backups.
- Restore contacts or calendar events.
- Backup the current content of an email account:
- by downloading the current content locally,
- by duplicating all current content to a backup box,
- by copying future emails as they arrive to a backup box.
Domains / DNS Zones
- Restore deleted DNS records from Infomaniak automatic backups.
- Restore an expired domain in the redemption period.
This guide details the Managed Cloud Server offer from Infomaniak and the VPS offer from Infomaniak, which are intended for different uses.
Preamble
- Infomaniak offers two advanced hosting solutions:
- the Managed Cloud Server, which allows you to create multiple hosts (FTP/SSH spaces) on which you add your sites (Apache vhosts),
- and the VPS (Virtual Private Server), which offers complete administrative freedom and meets different needs.
Managed Cloud Server
The Cloud Server allows you to go beyond the limits of shared hosting. You can create and distribute your sites as you wish, define the root directory of each site, and adjust parameters such as memory_limit and max_execution_time.
Integrated tools are provided: cronjobs, Site Creator, simplified installation of WordPress, access and error logs (logs). It is also possible to add specific Apache modules or install a caching system.
The software environment is managed by Infomaniak (FastCGI, PHP-FPM). You do not have complete freedom to configure the server (no arbitrary software installation), but certain specific programs can be installed.
VPS (unmanaged)
The VPS gives you full control over the server, but it is your responsibility. Infomaniak manages the hardware and installs the version of Linux or Windows chosen at the time of ordering. No software intervention is performed by Infomaniak: you administer the system, install, and configure the software.
You can restart the server via the Infomaniak Manager. A snapshot system is available (excluding the VPS Lite offer).
Video content and alternatives
If your project mainly involves a large volume of videos, it is often preferable to separate video streaming from the main hosting. Associated with shared hosting, the Infomaniak VOD/AOD space allows you to efficiently store and stream videos, support traffic spikes, and obtain detailed viewing statistics.
Migration between Cloud Server and VPS
There is no automatic migration solution between a Managed Cloud Server and a VPS. To switch from one offer to another, you must cancel the product you no longer use and order the new offer. Infomaniak refunds, upon request, any new server if the cancellation occurs within 30 days of the order.
Thank you for trusting Infomaniak with the hosting of your website.
Preamble
- A web hosting is a storage space available on a computer, also called a "server", connected to the Internet and managed by a web host, Infomaniak.
- This storage space, made available to professionals and individuals, is used to install websites or other types of tools (CRM, extranet, intranet...) that need to be accessible via the Internet.
- These guides allow you to quickly use the essential functions of your new product, your web hosting, which can accommodate multiple websites.
Where to start?
- Create a WordPress website
- Build the site with Site Creator
- Install a web application (ownCloud, Joomla, Typo3, Drupal, phpBB, Simple Machines Forum, Magento, Prestashop, ...)
- Manage your FTP accounts/users
- Manage and publish files on your hosting via FTP Manager
- Manage your MySQL databases
- Add a site or subdomain to your hosting (multisites/multi domains)
- Link another domain name to an existing website (domain alias)
- Preview your site even if your domain name does not yet point to Infomaniak's servers
IMPORTANT: the domain name...
A web hosting, to be visible to the public on the Internet, must be associated with a domain name!
Your domain name is not managed by Infomaniak? Or is it in a different Organization than that of your web hosting? Then refer to this other guide to configure the DNS or the "A records" in order to link the domain name to your web hosting.
In case of a problem
To resolve a problem, please consult the Web Hosting Knowledge Base before contacting Infomaniak support.
Click here to share a review or suggestion about an Infomaniak product.
This guide details the technical and administrative aspects of hosting multiple websites on the same platform.
Technically
A hosting includes different websites. It is therefore possible to add multiple websites to a hosting (multi-site / multi-domain management). In this case, the resources of the hosting (disk space, databases, script execution time and memory, etc.) are shared among the different websites of the hosting.
The base Cloud Server plan contains a certain number of hostings (for example 5) and a higher number of websites (for example 20). In this example, this means that you can create 20 websites (with 20 different domain names/subdomains) that you can organize freely on your 5 hostings.
Administratively
At the Organization level on the Infomaniak Manager, management and access rights cannot be assigned to a specific website on a hosting. A user that you add to the Organization cannot have a right limited to a single site; they will always access the entire hosting.
At the server data level, however, it is possible to create an FTP user restricted to a specific folder (in this case, it will need to be limited to the folder where the site is located).
Limited management of one site among others on the same hosting can also be considered directly within the tool used for the site (WordPress user management for example).
This guide explains how to use GnuPG / PGP with PHP on a Cloud Server using a "pure PHP" alternative, following the obsolescence of the native extension.
Preamble
- The system extension
PHP_GnuPGis no longer maintained by the PHP community, so it is no longer available on recent environments. - There are two main "pure PHP" alternatives (installable via Composer) to continue signing or encrypting your data securely.
Option 1: Crypt_GPG (recommended)
This library is a "wrapper": it uses the gpg binary already installed on your Cloud Server. It is the most robust solution and the closest to the old extension.
To install the library in your project, connect via SSH and run the following command at the root of your site:
composer require pear/crypt_gpgHere is how to use the library to encrypt a message. Unlike the old extension, the approach here is object-oriented:
<?php
require_once 'vendor/autoload.php';

try {
    // Initialisation de l'objet GPG
    $gpg = new Crypt_GPG();

    // Spécifiez l'email correspondant à la clé publique importée sur le serveur
    $gpg->addEncryptKey('contact@exemple.com');

    $message = "Ceci est un message secret.";
    $enveloppe = $gpg->encrypt($message);

    echo $enveloppe;
} catch (Exception $e) {
    echo "Erreur : " . $e->getMessage();
}
Option 2: OpenPGP.php (independent)
This library is entirely written in PHP. It does not depend on the gpg software installed on the server, which ensures total portability of your code. Installation:
composer require singpolyma/openpgp-phpUsage example:
<?php
require_once 'vendor/autoload.php';
// La logique ici utilise directement les classes de la bibliothèque
// pour manipuler les paquets OpenPGP sans appel système.
⚠️ For additional help contact a partner or launch a free call for tenders — also discover the role of the host.
This guide presents several examples of using Varnish on Infomaniak Cloud Server.
Preamble
- For additional help contact a partner or launch a free call for tenders — also discover the role of the host.
- Become familiar with these other guides regarding the Varnish configuration language (VCL) to control request processing, routing, caching, and several other aspects:
Varnish Configuration
After installation, configuring Varnish includes important rules for caching and purging. Be careful not to accidentally allow unwanted IP addresses.
Here is what a basic configuration file might look like with a few common cases and different actions/rules in a single example:
vcl 4.0;
# Configuration du backend par défaut
backend default {
    .host = "127.0.0.80";  # Adresse IP du backend
    .port = "80";           # Port du backend
}
# Définition d'une liste de contrôle d'accès (ACL) pour les IPs autorisées à purger le cache
acl purge {
    "localhost";            # IP locale
    "1.2.3.4";              # IP de votre domicile
    "42.42.42.0"/24;        # Plage d'IP publique de votre entreprise
    ! "42.42.42.7";         # Exclusion d'une IP spécifique (ex : un collègue gênant)
}
# Traitement des requêtes à leur réception par Varnish
sub vcl_recv {
    # Autoriser les requêtes de purge
    if (req.method == "PURGE") {
        # Vérification si l'IP du client est autorisée à purger
        if (!client.ip ~ purge) {  # 'purge' fait référence à l'ACL définie plus haut
            # Retourne une page d'erreur si l'IP n'est pas autorisée
            return (synth(405, "Cette IP n'est pas autorisée à envoyer des requêtes PURGE."));
        }
        # Si l'IP est autorisée, purger le cache pour cette requête
        return (purge);
    }
    # Autoriser la purge de toutes les images via une requête PURGEALL
    if (req.method == "PURGEALL" && req.url == "/images") {
        if (!client.ip ~ purge) {
            return (synth(405, "Cette IP n'est pas autorisée à envoyer des requêtes PURGE."));
        }
        # Invalider tous les objets en cache correspondant à des images
        ban("req.url ~ \.(jpg|png|gif|svg)$");
        return (synth(200, "Images purgées."));
    }
    # Ne pas mettre en cache les pages avec une autorisation (header Authorization)
    if (req.http.Authorization) {
        # Passer la requête directement au backend sans la mettre en cache
        return (pass);
    }
}
# Traitement de la réponse du backend avant de la renvoyer au client
sub vcl_backend_response {
    # Mise en cache des images pour une durée de 1 jour
    if (beresp.http.content-type ~ "image") {
        set beresp.ttl = 1d;
    }
    # Si le backend indique que la réponse ne doit pas être mise en cache, respecter cette consigne
    if (beresp.http.uncacheable) {
        set beresp.uncacheable = true;
    }
}
Purge from the CLI interface
From there, the rules stated in the configuration above work on all requests, so if the configured site is "domain.xyz", you can simply use the CLI tool "curl" and do the following:
# Envoyer une requête PURGE pour purger la page d'accueil de "domain.xyz"
$ curl -X PURGE https://domain.xyz/
# Réponse renvoyée par le serveur Varnish
<!DOCTYPE html>
<html>
<head>
    <title>200 Purged</title>
</head>
<body>
    <h1>Erreur 200 : Purge effectuée</h1>
    <p>La page a été purgée avec succès.</p>
    <h3>Guru Meditation:</h3>
    <p>XID: 2</p>
    <hr>
    <p>Serveur de cache Varnish</p>
</body>
</html>
And there, the homepage has been purged. Or to purge another URL, just point the request to the latter:
# Envoyer une requête PURGE pour purger un fichier spécifique à "domain.xyz"
$ curl -X PURGE https://domain.xyz/some_path/some_file.html
# Réponse renvoyée par le serveur Varnish
<!DOCTYPE html>
<html>
<head>
    <title>200 Purged</title>
</head>
<body>
    <h1>Erreur 200 : Purge effectuée</h1>
    <p>Le fichier a été purgé avec succès.</p>
    <h3>Guru Meditation:</h3>
    <p>XID: 4</p>
    <hr>
    <p>Serveur de cache Varnish</p>
</body>
</html>
Or, as indicated in the VCL configuration, purge all images:
# Envoyer une requête PURGEALL pour purger toutes les images dans "domain.xyz"
$ curl -X PURGEALL https://domain.xyz/images
# Réponse renvoyée par le serveur Varnish
<!DOCTYPE html>
<html>
<head>
    <title>200 Purged images</title>
</head>
<body>
    <h1>Erreur 200 : Images purgées</h1>
    <p>Toutes les images ont été purgées avec succès.</p>
    <h3>Guru Meditation:</h3>
    <p>XID: 32770</p>
    <hr>
    <p>Serveur de cache Varnish</p>
</body>
</html>
Purge from a CMS
It is a bit more difficult to illustrate this case because there are many ways to manage caching from a backend. In the configuration example above, control over the "Uncacheable" header is added, which disables caching. With this option, any CMS could simply set this header on the response to disable caching of this request, for example.
From any PHP code and with the configuration above, you can simply send an HTTP request and use this snippet to perform a PURGE of the cache:
<?php
if ($curl = curl_init("http://127.0.0.1/some_url")) {
    curl_setopt_array($curl, [
        CURLOPT_RETURNTRANSFER => true,
        CURLOPT_CUSTOMREQUEST => "PURGE",
        CURLOPT_HTTPHEADER => [
            "Host: {$_SERVER['HTTP_HOST']}"
        ]
    ]);
    curl_exec($curl);
    if (curl_getinfo($curl, CURLINFO_HTTP_CODE) == 200) {
        echo "Cache purged!";
    }
    curl_close($curl);
}
?>This guide explains how to install and configure systemd on a Cloud Server and presents the main commands that can be used.
Prerequisites
- Follow the installation guide for
systemdon Cloud Server. - Consult the official documentation to learn about all the possibilities offered by systemd.
- The "unit" files must be placed in:
~/.config/systemd/user/ ( /home/clients/absolute-path-id/.config/systemd/user )(replacing absolute-path-id visible in your Manager) and the permissions must be set to 0644. - The
--userparameter must be specified in each command.
Main commands
Here is a non-exhaustive list of commands that can be used with systemd.
Force systemd to reload the unit files and take into account the changes:
systemctl --user daemon-reloadActivate a service:
systemctl --user enable --now SERVICENAME.serviceCheck the status of a service:
systemctl --user status SERVICENAME.serviceConfiguration of Node as a service with systemd
It will be necessary to create a "Unit" file with the ".service" extension, which must be saved in the directory:
~/.config/systemd/user/It is possible to reuse the example below by replacing the values starting with {} :
[Unit]
Description={Le nom du service} # Spécifier ici un nom du service. Celui-ci est obligatoire mais n'a pas d'impact sur le fonctionnement
[Service]
Restart=always
Environment=NODE_VERSION={la version souhaitée} # Spécifier ici la version de Node à utiliser. S'assurer qu'elle soit installée au préalable avec "nvm install {la version souhaitée}"
WorkingDirectory=%h/{repertoire du projet Node} # %h correspond à la racine de l'hébergement
ExecStart=/bin/bash -c "exec $HOME/.nvm/nvm-exec {commande de lancement du script node}" # Cette commande dépend du projet. Par exemple, "npm run start", "npm run serve" ou encore "node server.js" sont courants
[Install]
WantedBy=default.target
Additional actions with a Unit file
systemctl --user daemon-reloadStart the service (if it is already active, nothing happens):
systemctl --user start [Nom du Unit]Stop the service (if it is not active, nothing happens):
systemctl --user stop [Nom du Unit]Restart the service (if it is not running, it is started):
systemctl --user restart [Nom du Unit]Get information about the service; in particular:
- "Active" which indicates whether the service is running and for how long
- "CGroup" shows the process group that the service manages, this allows you to see the active processes, with their arguments and their ID
Under 'CGroup' are any logs (the standard output and error of the process):
systemctl --user status [Nom du Unit]Enable automatic service startup on server boot; NB: this does not start the service:
systemctl --user enable [Nom du Unit]Disable automatic service startup on server boot; NB: this does not stop the service:
systemctl --user disable [Nom du Unit]Configuration with user entries:
[Unit]
Description="nom service"
[Service]
Restart=always
Environment=NODE_VERSION=16.17
WorkingDirectory=%h/sites/"nom-repertoire-site"/
ExecStart=/bin/bash -c "exec $HOME/.nvm/nvm-exec npm run start"
[Install]
WantedBy=default.target
⚠️ For additional help contact a partner or launch a free tender — also discover the role of the host.
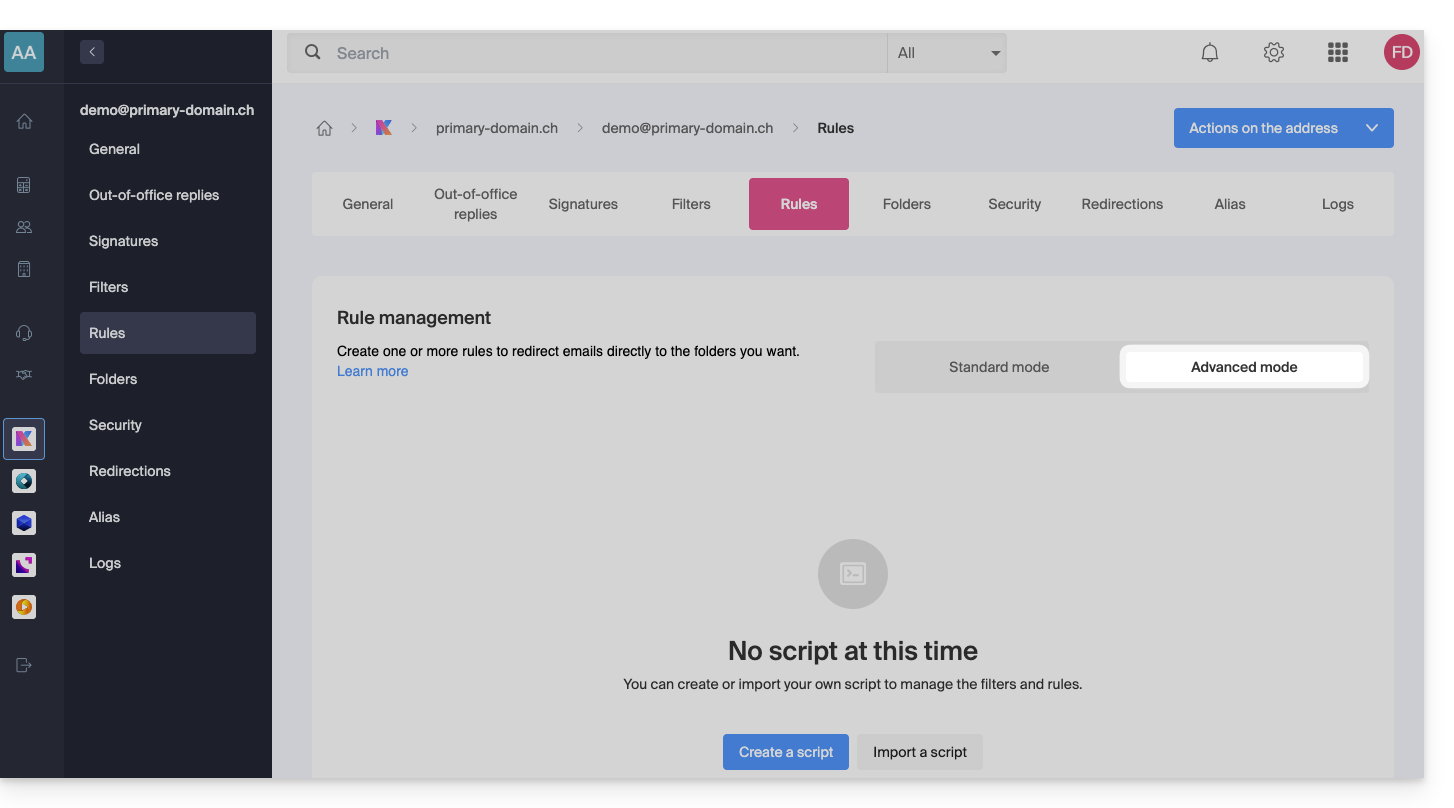
This guide explains how to create sorting rules in Advanced mode, scripts in Sieve language, to automatically classify your incoming emails on Infomaniak according to certain conditions.
⚠ Available with:
| kSuite | |
| Standard | |
| Business | |
| Enterprise | |
| my kSuite+ | |
| Mail Service | |
| Premium 5 min. addresses |
Preamble
- If you do not have a compatible offer or if you prefer a simplified configuration, refer to this other guide.
- ⚠️ No support is provided regarding the Sieve language (refer to this documentation — also discover the role of the host).
- Unlike the sorting rules offered within email software/clients (Microsoft Outlook, Mozilla Thunderbird, Apple Mail...), these rules will act directly on your mailbox server before even the IMAP connection.
- It is possible to import Sieve files via a button.
- By activating this mode, the existing standard rules will be kept but deactivated.
- The
redirectcommand (allowing to forward an email to another address) is not allowed in scripts.- If you import a Sieve script from another host, make sure to remove this command.
- To forward emails, use the assistant in Standard mode or the Redirections section of your Mail Service.
Access rules from the Infomaniak Web Mail app
Prerequisites
- Having permission to manage rules: if you had been invited to the Infomaniak Web app Mail (online service ksuite.infomaniak.com/mail) to manage your address, it is possible that the Mail Service manager has removed this right from their admin account.removed this right.
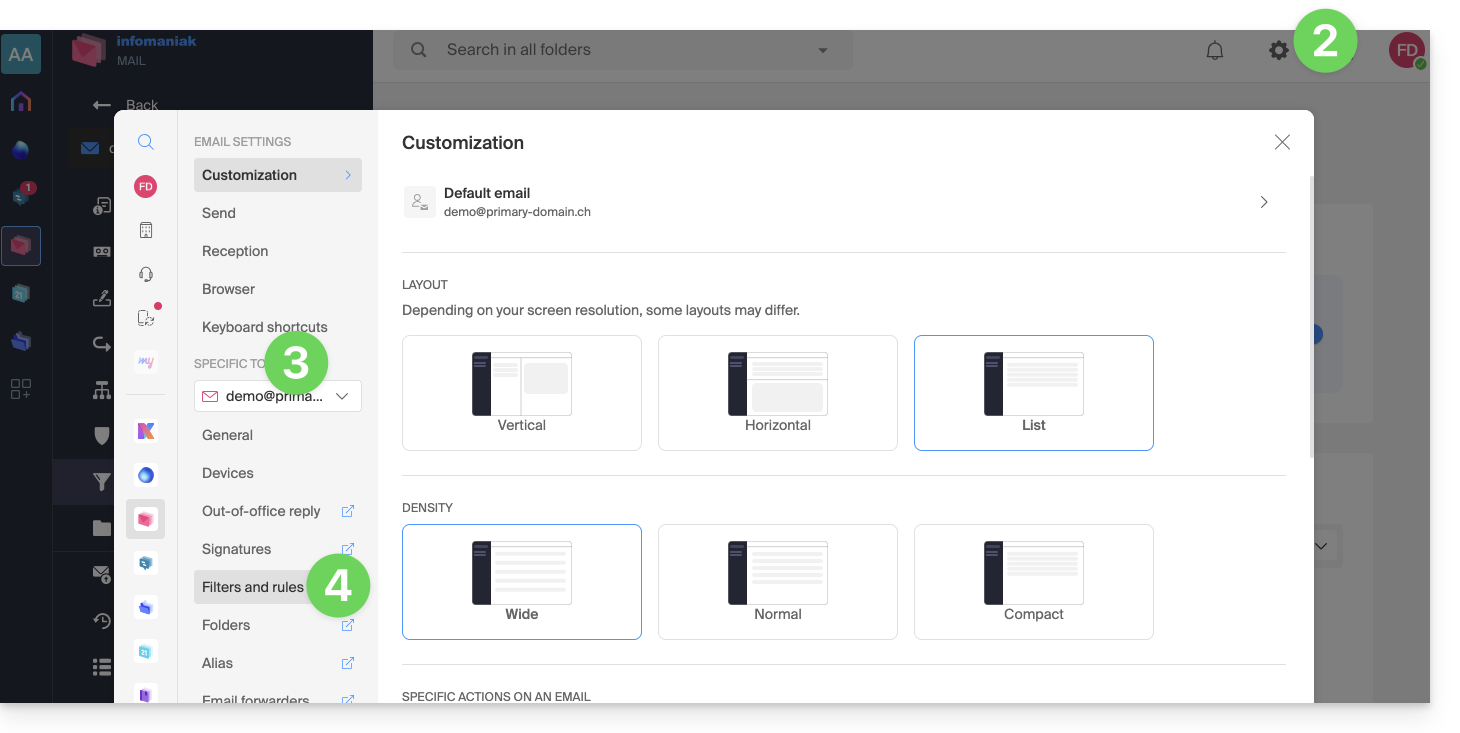
To access the sorting filters for your Infomaniak mailbox:
- Click here to access the Infomaniak Web app Mail (online service ksuite.infomaniak.com/mail).
- Click on the Settings icon in the top right corner.
- Check or select the email address concerned in the dropdown menu.
- Click on Filters and rules:
Access rules from a Mail Service
To access the sorting filters for your Infomaniak mailbox:
- Click here to access the management of your product on the Infomaniak Manager (need help?).
- Click directly on the name assigned to the product concerned.
- Click on the email address concerned in the table that appears.
- Click on the Rules tab from the left sidebar (or top bar):
Create a new rule in Advanced (expert) mode
- Make sure to click on Advanced mode:
First example of advanced sorting
Here is a simple example of a command using this language:
require ["fileinto"];
if address :contains "from" "facebook.com" {
    fileinto "fb";
} elsif header :matches "List-Unsubscribe" "*" {
    fileinto "nl";
} else {
    keep;
}
Explanations:
- Loading required extensions: use
require ["fileinto"];to indicate that you will use thefileintofunction. - Filtering Facebook messages: use
if address :contains "from" "facebook.com"to check if the sender's address contains "facebook.com"; if so, the message is filed in the "fb" folder withfileinto "fb";. - Filtering messages with an unsubscribe link: use
elsif header :matches "List-Unsubscribe" "*"to check if the "List-Unsubscribe" header is present in the message; if so, the message is filed in the "nl" folder withfileinto "nl";. - Keeping other messages: use
else { keep; }to keep all other messages that do not match the previous criteria.
Attention :
- If you need to mention a subfolder, use the separator
/(as in the second example), but it is not necessary to specifyINBOXin your codes - Make sure that the folders
fbandnlalready exist in your inbox; otherwise, the messages may not be sorted correctly - The filter
address :contains "from" "facebook.com"works correctly for addresses that contain "facebook.com" in the "from" field - The filter
header :matches "List-Unsubscribe" "*"checks only for the presence of the "List-Unsubscribe" header, not its content
Second example of advanced sorting
This code modifies the subject based on thesender (adds a prefix to the subject when an email passes the filter, for example):
require ["fileinto", "editheader", "variables", "regex"];
if address "sender" "owner-scientific-linux-devel at LISTSERV.FNAL.GOV" {
    if header :regex "subject" "((Re|Fwd): *)\\[SCIENTIFIC-LINUX-DEVEL\\] *(.*)" {
        deleteheader "Subject";
        addheader "Subject" "${1}${3}";
    } else {
        # Ajouter un préfixe si l'objet ne correspond pas déjà au modèle
        deleteheader "Subject";
        addheader "Subject" "[SL-Devel] ${1}";
    }
    fileinto "Mail List/SL-Devel";
}
Explanations:
- Required extensions:
fileinto: to classify messages into folders.editheader: to modify email headers.variables: to use variables in expressions.regex: for regular expressions.
- Condition on the sender:
if address "sender" "owner-scientific-linux-devel at LISTSERV.FNAL.GOV": checks if the sender matches.
- Condition on the subject:
if header :regex "subject" "((Re|Fwd): *)\\[SCIENTIFIC-LINUX-DEVEL\\] *(.*)": checks if the subject matches the specified pattern.deleteheader "Subject";andaddheader "Subject" "${1}${3}";: deletes the existing subject and adds a new subject with the captured parts.
- Adding a prefix if the subject does not already match the pattern:
addheader "Subject" "[SL-Devel] ${1}";: adds a prefix "[SL-Devel]" to the subject if it is not already present.
- Classifying the message:
fileinto "Mail List/SL-Devel";: classifies messages into the "Mail List/SL-Devel" folder.
Attention :
- Make sure that the folder
Mail List/SL-Develalready exists in your inbox. - Check that the script correctly modifies the subject of the emails to add or adjust the prefix if necessary.
This guide concerns website optimization and more specifically the use of a cache engine on it.
Introduction
- When Infomaniak notices that your website consumes more resources than other sites on the same server, an analysis is conducted.
- Often, it turns out that a simple modification of a request or a parameter would allow you to optimize your site and reduce the server load.
- You will then be contacted by email with instructions to follow, which often include the installation or activation of a cache engine.
- Resource consumption is not necessarily linked to the number of visitors.
- A well-optimized, up-to-date site with a properly configured cache engine can handle tens of thousands of daily visitors, while a poorly optimized site can consume far too many resources with just a few visits per day.
- A cache engine temporarily stores frequently used data to provide it more quickly upon new requests.
- This significantly improves the site's speed and reduces the load on databases or web services.
- To install a caching system on **Serveur Cloud** Infomaniak, refer to **this other guide**.
Enable a cache engine...
… on WordPress
WordPress has many cache plugins. Here are the most popular and effective ones:
- WP Super Cache (free, easy to set up)
- W3 Total Cache (advanced, multiple options)
- WP Rocket (paid, simple and performant interface)
Activation procedure:
- Log in to your WordPress admin.
- Go to Plugins > Add New.
- Search for one of the mentioned plugins, install it, and then activate it.
- Configure the cache options according to your needs: page caching, CSS/JS file minification, gzip compression, etc.
- Test the performance with and without cache using tools like Google PageSpeed Insights or GTmetrix.
To learn more, also check out:
- https://news.infomaniak.com/6-moyens-techniques-pour-optimiser-un-site-wordpress/
- https://news.infomaniak.com/memcached-w3totalcache/
- https://www.seomix.fr/?s=cache
... on Joomla
Log in to the Joomla administration and then follow these steps:
- Go to System > Global Configuration.
- Select the System tab.
- In the Cache section, enable the system cache.
- Choose the type of cache: Conservative (individual user cache) or Progressive (shared cache between users). Progressive caching is recommended for better performance.
- Set the cache validity duration in minutes (for example, 60 minutes for an active site or longer for a static site).
- Save the settings.
- To manually clear the cache, go to System > Manage cache and then delete the cache files.
Joomla 5 features improved cache management and a modernized interface compared to version 4.x.
... on PrestaShop
Log in to the PrestaShop administration then:
- Go to the menu Advanced Settings > Performance.
- In the Smarty section, enable the Cache option.
- In the CCC (Combine, Compress and Cache) section, enable all available options.
- In the Cache section, enable Use cache.
- Follow the instructions to install the recommended extensions or modules (e.g. Memcached, Redis) for additional optimization.
- Save your changes.
... on Magento
Magento 1.x is obsolete. For Magento 2, proceed as follows:
- Log in to the Magento admin.
- Go to System > Cache Management.
- The cache is enabled by default. You can flush or refresh the cache from this interface.
- Make sure all recommended cache types (Configuration, Page Cache, Layouts, etc.) are enabled.
- For optimal performance, use additional solutions like Redis or Varnish if your hosting supports them.
... on Contao (version 4.x)
Log in to the Contao back office then:
- Go to Modules > System > Configuration.
- In Cache mode, check the options Use system cache and Use browser cache.
- Save your changes.
... on Drupal (version 9.x)
For Drupal 7.x (still in use but not recommended), proceed as follows:
- Log in to the Drupal administration.
- Go to Configuration > Performance.
- Check the box Cache pages for anonymous users.
- Save.
For Drupal 9.x (recommended): caching is enabled by default and managed via internal modules. You can configure the cache in Configuration > Development > Performance. To further improve performance, use external systems such as Redis or Varnish if available.
This guide details the two main types of identifiers. They are distinct, even if the address format can be identical.
Infomaniak Account vs Email Address
Here is a summary of these 2 types of identifiers:
| Type of Identifier | Usage | Where to Use It | Associated Password |
|---|---|---|---|
| Infomaniak Account (login identifier) | Access all of your Infomaniak services. | Login to: | Password set when creating the user account. ⚠️ Different from the password of your email addresses. |
| Email Address Hosted with Infomaniak | Send and receive emails. | SMTP/IMAP Login…
| Password specific to each email address (there can be multiple). ⚠️ Different from the Infomaniak account password. |
What to do in case of a connection problem?
It is not necessary to contact Infomaniak Support (who does not have any of your passwords)…
- Problem with the Infomaniak account? Reset the account password.
- Problem with an email address? Reset the email password.
Explanations
- Like many other online services, you registered with Infomaniak using a personal email address.
- This personal email address serves as your login identifier when you want to access Infomaniak services.
- This login identifier has its own password (set when creating your Infomaniak user account – your personal email address, see above).
There is no link between…
- … this identifier/password pair described in points 1/2/3 above…
- … and the email addresses you have created or obtained subsequently with Infomaniak.
A link might exist if the address is the same (for example, you signed up with the email address toto@abc.xyz and you also manage this same email address at Infomaniak) but even in this case, the password will probably be different — once for the login identifier toto@abc.xyz and once for the email address toto@abc.xyz.
Other identifiers?
Acquiring other Infomaniak products involves obtaining other identifiers, such as those required for FTP, MySQL, SSH, WebDAV connections, etc., but these identifiers are completely independent of the two types described above.
This guide details how to get started with Swiss Backup, the solution for backup in an independent Swiss cloud.
2 Swiss Backup variants
Infomaniak offers two backup modes depending on what you want to back up:
1. CLOUD backups
Allows you to back up and synchronize files via the protocols:
- Swift (recommended)
- FTP / SFTP
- S3
- Synology NAS system
with the application of your choice…
2. ACRONIS backups
Ideal solution for backing up:
- Windows / macOS workstations
- iOS / Android mobiles (iPhone / Samsung, etc.)
- Windows / Linux servers
- VMware, Hyper-V, Virtuozzo virtual machines...
- Microsoft 365 / Google Workspace spaces...
using the Acronis Cyber Protect Cloud software which will perform automatic and customized backups…
You should have already made your choice when ordering a Swiss Backup backup space but it is quite possible to modify the offer at any time.
Click here to share feedback or a suggestion on an Infomaniak product.
This guide allows you to quickly use the essential functions of your new Cloud Server.
Install an application
- Create a WordPress website
- Install a web application (ownCloud, Joomla, Typo3, Drupal, phpBB, Simple Machines Forum, Magento, Prestashop, …)
- Install applications/technologies on Cloud Server (Fast Installer)
Configure the server
- Manage your MySQL databases
- Manage MySQL limits
- Manage your FTP accounts/users
- Manage and publish files on your hosting via FTP
- Modify resources and configuration
Manage sites and domains
If your domain name is not managed by Infomaniak or if your hosting is not managed in the same user account as your domain name, refer to this other guide to configure the DNS or records to link the domain name to your hosting. But also:
- Transfer a shared web hosting to a Cloud Server
- Add a site or subdomain to your hosting (multisite)
- Preview your site even if your domain name does not yet point to Infomaniak's servers
In case of a problem, consult the knowledge base before contacting Infomaniak support.
This guide details the limits of Site Creator by Infomaniak.
Site Creator Limits
Access the description of the Site Creator Free, Lite and Pro offers to compare the limits according to the offer you have.
In summary, Site Creator is available…
- … with each paid web hosting (the offer is equivalent to a Site Creator Pro without the free domain name)
- … or standalone (standalone available in 3 versions Free, Lite and Pro) and does not require any other particular offer in this case
Content
- The maximum number of pages that can be created, indicated on the sales page, includes any legal pages if you use them.
- With the Pro version, there is no limit to the number of pages or shop articles that can be added by Site Creator.
- The remaining free disk space available depending on the offer you have is specified on your dashboard:
FTP Management
- You cannot access the files of your site on the server side, either by FTP or by any other means than the manager proposed from the Infomaniak Manager.
Web Site Export
- It is not possible to import or export the website (to another host or other hosting for example).
- Themes or modules are not exportable (nor importable — refer to this other guide).
This guide explains how to optimize a website hosted on a Web Hosting to make it faster and provide a smooth navigation experience for all your visitors, regardless of their connection speed.
The role of the host
The loading speed of a website depends on many factors: server performance, host network infrastructure, visitor's internet connection, and site optimization itself.
As a host, Infomaniak strives to offer the best in hosting by continuously evolving its products and infrastructure:
- All hosting solutions run on the latest generation of SSD disks.
- The infrastructure benefits from over 70 Gbit/s of interconnection and redundancy with partners like Cogent or Level3.
- To handle traffic spikes, servers use regularly renewed 64-bit Intel Xeon processors. Shared servers use, on average, only 40% of their CPU power.
When you submit a support request regarding slowness, Infomaniak checks the following points:
- Your hosting server is functioning normally and has not encountered any incidents in the last 48 hours.
- The network infrastructure has not experienced any disruptions during this same period.
The role of the site owner and the webmaster
Infomaniak does not intervene on the content of the servers or on the development of the sites. The creation and maintenance of a site are distinct professions, although they use the tools and services provided by the host.
Analyze the cause of slowness
Here are the actions to take if you notice slowness on your site:
- Apply the Google PageSpeed Insights recommendations. These points concern the design of the site and not the server configuration. Refer to this other guide if the test recommends enabling resource compression.
- In case of slowness noticed from abroad, activate the DNS Fast Anycast.
- Install a caching system to reduce redundant database accesses and speed up display.
- Consider using a CDN.
- Test the server response time or TTFB.
- Scan your hosting to detect any potential viruses.
- Purge your databases regularly by deleting unnecessary entries.
- Use the latest PHP version compatible with your site or CMS.
- Avoid images, counters, or media hosted on external servers: if they are unreachable, your site will appear slow.
- Deactivate unnecessary or resource-intensive WordPress extensions.
- Keep your CMS and web applications regularly updated.
- Limit the impact of overly aggressive indexing robots by configuring a Crawl-delay.
- Analyze the error-logs: correcting the errors generated by your site improves its performance.
- Check the slowlogs to identify SQL queries taking more than 5 seconds to execute and optimize them (optimization examples).
- Add a server cache engine like Memcached (available on Cloud server only).
- Increase the max_children value (only on Cloud server).
If the problem persists
If you or your webmaster cannot find the source of the slowness, contact Infomaniak support in writing, providing the following information:
- Name of the hosted site.
- Exact dates and times of the slowness.
- Name of the database or FTP account possibly concerned.
- Your public IP address during tests (visible on https://www.infomaniak.com/ip).
- Type of slowness (display, FTP transfers, etc.).
- Indicate if you can normally access the Infomaniak site during these episodes.
- Complete result of a traceroute to
84.16.66.66. - Result of a speed test on speedtest.net by selecting Infomaniak as the destination server.
If your needs evolve
If shared hosting is no longer sufficient, consider switching to a Managed Cloud Server. Your site can be easily migrated to benefit from dedicated resources and advanced caching technologies.
Make your life easier! If needed, local partners referenced by Infomaniak can handle these procedures. Launch a free call for tenders to delegate these technical aspects.
This guide explains what you need to determine as a website visitor if you encounter a 403 error to resolve this issue.
What is the 403 error?
The HTTP 403 error code generally means that access to a resource is denied to the client by the server.
In what case does this error occur?
The user is not authenticated: the server requires the user to identify themselves to access the resource. This can be the case for private pages requiring authentication, for example.
The user is authenticated but does not have the necessary permissions: the server recognizes the user but does not authorize them to access the requested resource due to permission or role restrictions. This cause of 403 error may be an incorrect permission issue on a folder or file. For a folder, the error message is of type "403 Forbidden", for a file, "failed to open stream: Permission denied". In this case, you must verify that the permissions of your folders/files are correct, i.e., a minimum of 644 for a file and 755 for a folder. Refer to this other guide.
The user's IP address is blocked or restricted: the server may block access to a specific IP address for security reasons, protection against attacks... Refer to this other guide.
The requested resource does not exist on the server: in this case, the server returns a 403 error instead of a 404 error to avoid disclosing confidential information. If you are simply trying to access your homepage or a part of your site by indicating an address of type www.domain.xyz or www.domain.xyz/folder/ make sure there is a homepage named "index.html or .htm or .php" placed in the correct location (at the root of your FTP space, in the /web directory, or in the /folder/ directory). Refer to this other guide.
Additionally, check that there are no uppercase letters in the file name; all file or folder names present must be in lowercase, without accents or spaces.
Script-related error: if you were running a script, filling out a form, uploading a file online, and you get this type of message:
Accès interdit!
Vous n'avez pas le droit d'accéder à l'objet demandé.
Soit celui-ci est protégé, soit il ne peut être lu par le serveur.
Si vous pensez qu'il s'agit d'une erreur du serveur, veuillez contacter le gestionnaire du site.
Error 403
the cause may be a filter that prevents the unwanted use of scripts by spammers. Indeed, the Infomaniak antivirus blocks the uploading of files via scripts or via FTP. This concretely means that when a hacker sends a file identified as a virus via a form, an insecure script, or via FTP, its installation is directly blocked, the file is not uploaded to the server, and the upload generates a 403 error.
In case of a false positive, contact Infomaniak support by providing the URL of the page where you encounter this error message to precisely diagnose the origin of the problem.
However, there are many other cases in which you might receive a "403 forbidden" message and for very diverse reasons (PHP, perl, mod_security, .htaccess scripts, ...).
This guide explains how to obtain a backup space Swiss Backup, the backup solution in an independent Swiss cloud.
Prerequisites
- Determine which type of device will need to be backed up on Swiss Backup:
CLOUD BACKUPS - allows you to back up and synchronize files via the protocols:
- Swift (recommended)
- FTP / SFTP
- S3 Compatible
- Synology NAS system
with the application of your choice…
ACRONIS BACKUPS - ideal solution for backing up:
- Windows / macOS workstations
- Android / iOS (iPhone) mobiles
- Windows / Linux servers
- websites
- VMware, Hyper-V, Virtuozzo virtual machines...
- Microsoft 365 / Google Workspace spaces…
using the Acronis Cyber Protect Cloud software which allows you to store backup data using Swift in the backend and to create "protection plans" where you can choose between:
- full machine backup (all hard drives attached to the machine in SATA)
- file / folder backup (specifically of your choice)
- volume / disk backup (if you have external drives)
- backup scheduling
- backup retention period
- backup restoration
- backup encryption
Obtain Swiss Backup
To order a Swiss Backup backup space:
- Click here to access the management of your product on the Infomaniak Manager (need help?).
- Click on Order:

or on the shopping cart icon if a product is already active and you want to order an additional Swiss Backup:
- Choose the maximum size of all the storage space needed for your project(s), regardless of the number and type of backups you will perform

Here the example project is to back up 2 things:
- important and voluminous documents located on 1 NAS
- photos/videos from an Android mobile device

- Complete the order and pay.
- The Swiss Backup product appears in your Manager with the disk space and quotas selected during the order:
- You can then add the desired devices to your Swiss Backup interface: refer to this other guide.
This guide explains why a website may be "broken" or no longer display anything, following a password change at the level of a Web Hosting.
Broken link with the database
When your website and more particularly a script (CMS, WordPress, Prestashop or any other application using MySQL databases) can no longer connect to the MySQL MariaDB or other database, an error message may be displayed, such as:
Erreur lors de la connexion à la base de donnéesDatabase Error: Unable to connect to the database:Could not connect to MySQLLink to database cannot be established
Remember your last action...
In the event of an error on your site, you should always examine the recent history. In this case, has there been...
- ... an action on your part regarding the configuration file of the script in question? Has it been touched, modified, moved?
Sometimes, the involuntary insertion of a space before or after a word can cut the link between the web server and the database server. Go back over your file modifications.
If necessary, restore an old version of the files that you have modified recently.
- ... an action regarding the database password in the Infomaniak Manager?
If you change the password of your database via the Infomaniak Manager, then your script, which retrieves its information from the databases, will no longer display anything.Changing something in the Infomaniak Manager means you have to change it everywhere else. This change that you made in the Manager must also be reported / reflected in the script's configuration file by connecting via FTP and modifying the appropriate file, usually "wp-config.php", "configuration.php" or similar.
- ... a server move announced by Infomaniak?
If this error follows a server move or another operation announced by email and related to the product in question, do not hesitate to contact Infomaniak support.