
Knowledge base
1000 FAQs, 500 tutorials and explanatory videos. Here, there are only solutions!
This guide concerns the Discussion List service, which is only offered to Infomaniak users who have activated it in the past and for whom a tool migration was performed in early 2025.
Preamble
- The discussion list service differs from classic messaging or a newsletter service by unique features:
- Allow users to subscribe to a “subscription” via a simple registration form, the code for which is provided.
- Allow one or more designated moderator users to accept or reject registrations, send messages to subscribers, and then moderate member responses before publication.
- Allow users to contribute to the discussion by replying to a single address that automatically redistributes the mail to other members.
- Provide a simple and GDPR-compliant unsubscription option.
- Refer to this other guide regarding the service limits.
The registration forms (html code) that may have been previously integrated on different pages must be regenerated and reintegrated to work (refer to the Forms chapter below).
Access the discussion list
If the discussion list service has been activated in the past, it is accessible within your Mail Service:
- Click here to access the management of your Mail Service on the Infomaniak Manager (need help?).
- Click directly on the domain name assigned to the product in question.
- Click on Discussion List in the left sidebar:

Creation and configuration of the discussion list
To create a new discussion list:
- Click the Start button…

- … or click the button above your existing lists:

Otherwise:
- Edit an existing list by clicking on its name:

- Click on its tab Configuration:

The parameters necessary for the proper functioning of the system are as follows:
- A discussion list revolves around an email address that should not yet exist on the Mail Service of the domain concerned (and which cannot be created on it, nor modified thereafter).
- You can give a name to the list to identify it more easily if you have several or if the email address is not sufficiently explicit.
- You can also add an additional description.
- You need to determine the email address(es) that will be moderators (= highest permission on the list).
- You can set a language for your mailing list.
- The configuration of “who can subscribe to the list” is important:
- It is possible to specify that the user will have to confirm their subscription themselves (in addition to a moderator).
- The configuration of “who can write to the list” is just as important:
- You can use the service as a one-way tool, such as information dissemination, or as a multi-way tool, information exchange, discussion including with non-members (with moderation)...
Click on Advanced Options.

- It is possible to configure whether responses should be addressed…
- … to the sender with the source email address visible
- … to the list (everyone receives) with the source email address visible
- … to the list as coming from the list's email address itself
- Allows you to limit the size of emails sent via the discussion list (especially in case of attachment).
- Allows you to customize a message that will be automatically sent to an email address when subscribing to the list.
- Allows you to customize a message that will be automatically sent to an email address upon unsubscribing from the list.
- Click the button to save.
Subscription (depending on the settings of point 6 above)
- Subscribers can sign up by sending a message to the email address in the form
nom-de-la-liste-join@domaine-de-la-liste. - They can also be manually subscribed by the moderator via the interface, and in this case, they receive a notification email whose content can be customized.
- If the subscription made by a subscriber must be validated by a moderator, the latter receives an email:
- The moderator approves the request by clicking on the “
mailto:” type link, which generates a new message that can be sent to the email address in the formnom-de-la-liste-request@domaine-de-la-listewith the subjectaccept email-address-subscriberand in the body of the message the lineApproved: list-password, possibly adding a linestopto avoid the execution of other scripts, e.g. in the case where there is a signature.
- The moderator approves the request by clicking on the “
- If the subscription made by a subscriber must be validated by the subscriber himself, the latter receives an email to which he must reply (by clicking on the link to create a new reply email and pre-filled):

- And in this case, the moderator receives the request in a second step, after validation by the subscriber, and must respond to it to validate the subscription (the simplest is always to click on the link):

- And in this case, the moderator receives the request in a second step, after validation by the subscriber, and must respond to it to validate the subscription (the simplest is always to click on the link):
Unsubscription
- Subscribers can unsubscribe by sending a message to the email address in the form
nom-de-la-liste-leave@domaine-de-la-liste. - Upon unsubscribing, a confirmation request message is sent to the user.
- The user approves the request (always by clicking on the “
mailto:” type link, which generates a new message that can be sent to the email address in the formnom-de-la-liste-request@domaine-de-la-listewith the subject the command specified in the confirmation email and an empty message body).
- The user approves the request (always by clicking on the “
Sending/receiving messages
- Each subscriber can create a Mail signature and choose their name when sending the email.
- A footer is automatically added to each message sent via the mailing list:

- See also the
reply-toandfromparameters at point 9 above.
Message moderation
- To reject a message, the moderator must click on the “
mailto:” type link, which generates a new message that can be sent to the email address in the formnom-de-la-liste-request@domaine-de-la-liste. - When a moderator is also a member of the list, they do not receive the messages they send themselves, but obviously receive those sent by other moderators.
Forms (subscription/unsubscription)
To offer a website visitor the option to subscribe to your list, you can generate a code that you simply need to insert on your chosen site; example with Site Creator:
The Form tab allows you to specify the URL to which the user will be redirected after subscribing or unsubscribing:
- In case of an error when using the form, an error page may display the email address
moderation-owner@list-domainallowing you to contact the moderators. - A user already subscribed to the list can subscribe multiple times without any specific message being displayed.
Error Management
The system indicates the number of errors encountered by an address and the date:
This guide concerns domain names with the .se extension.
Preamble
- Domains in
.seare managed by Internetstiftelsen i Sverige (IIS), the official body that governs domain names in Sweden. - They were introduced in 1986 and it was during the 2000s that they gained popularity as their suffix could be used for words like "clo.se", "sen.se", etc.
- However, a Swedish court rejected the request of the artist Prince who claimed the domain prince.se and which was registered for local use (sale of jams, in relation to the Swedish word "prins", <h2>Change the owner of a <strong>.se</strong> domain</h2>).
To change the owner (or owner) of a .se domain, the procedure defined by the IIS involves filling out a specific form.
In the form, the IIS IDNO (ID Number) field is a key requirement:
- For Swedish citizens: indicate the social security number (Personnummer),
800101-1234for example,- For Swedish companies: use the company registration number (Organisationsnummer)
556123-4567for example,
- For Swedish companies: use the company registration number (Organisationsnummer)
For foreign citizens or non-Swedish companies: enter an identification number such as a passport number, an identity card, or an equivalent for your country.
- This is to authenticate the owner and prevent disputes or fraudulent use of the domain. The change can take a few days, depending on how quickly the documents are verified.
Cela sert à authentifier le propriétaire et à prévenir les litiges ou utilisations frauduleuses du domaine. Le changement peut prendre quelques jours, selon la rapidité avec laquelle les documents sont vérifiés.
This guide helps you identify and correct most email errors encountered after sending an email to a recipient. Refer to this other guide if you are looking for information about errors obtained when configuring an email address in a software/email client.
Preamble
- In general, a mail error message follows…
- … an incorrect configuration of the domain name used with your email,
- … a problem with (the mail provider of) your recipient.
- In all cases, a delivery failure report (Mailer Daemon or Mail Delivery Subsystem) containing the explanation is sent to the sender.
Finding and identifying the email error
When your message does not reach your recipient, an initial failure report (Temporary Delivery Failure Report) is sent and specifies that the server will attempt to resend your message several times.
A final delivery failure report (Final Delivery Failure Report or Undeliverable Mail) issued by the recipient's server is sent to the sender (via a pass through the Infomaniak mail server, hence the mention of Infomaniak at the beginning of most error messages you may receive) to inform that the email could not be delivered even after several attempts.
The notification always contains the reason for the failure. Example below:
This is the mail system at host smtp-1-1234.mail.infomaniak.ch.
I'm sorry to have to inform you that your message could not be delivered to one or more recipients. It's attached below.
For further assistance, please send mail to postmaster.
If you do so, please include this problem report. You can delete your own text from the attached returned message.
The mail system anna.a@abc.xyz: host mxbw-abc-xyz.abc-ab12.abc.ch[123.456.789.00] said: 550 5.1.1
anna.a@abc.xyz recipient rejected, account administratively disabled (in reply to RCPT TO command)
So here the address of your correspondent is apparently suspended by their email provider (account administratively disabled).
Sometimes you need to look for the reason for the error message received among its attachments (often a plain text file). Example:
Reporting-MTA: dns; mxbw.abc.ch [123.456.789.00]
Received-From-MTA: dns; smtp-1-1234.mail.infomaniak.ch [12.345.678.99]
Arrival-Date: Tue, 01 Aug 2023 15:49:22 +0200
Final-recipient: rfc822; anna.a@abc.xyz
Diagnostic-Code: smtp; 552 RCPT TO:anna.a@abc.xyz Mailbox disk quota exceeded
Last-attempt-Date: Tue, 01 Aug 2023 15:49:22 +0200Here the mailbox of your correspondent outside Infomaniak seems full (Mailbox disk quota exceeded).
Most common cases
SPF Failure
The SPF (Sender Policy Framework) record is not correctly configured:
Subject: Delivery Status Notification (Failure)
From: Mail Delivery System mailer-daemon@domain.xyz
To: Anna.A anna.a@abc.xyz
This is an automatically generated Delivery Status Notification.
Delivery to the following recipient failed due to SPF failure:
anna.a@abc.xyz
Technical details of SPF failure:
The sender's domain domain.xyz does not have a valid SPF record. Please contact your email administrator to correct the SPF configuration.
Solution: check the configuration of your domain name and especially the SPF type record if your website is hosted on Wix or another provider.
User Unknown
The email address specified in the message is invalid or does not exist:
Subject: Delivery Status Notification (Failure)
From: Mail Delivery System mailer-daemon@domain.xyz
To: Anna.A anna.a@abc.xyz
This is an automatically generated Delivery Status Notification.
Delivery to the following recipient failed permanently:
anna.a@abc.xyz
Technical details of permanent failure:
The email address does not exist. Please check the recipient's email address and try again.
Solution: carefully check the recipient's email address and correct it if necessary; make sure to use a valid email address for the recipient.
Temporary Failure
Le serveur de messagerie du destinataire rencontre des problèmes temporaires ou est indisponible.Solution: wait for a certain amount of time, then try sending the message again later. If the problem persists, contact the recipient's technical support for assistance.
Blocked by SPAM Filter (or Content Rejected)
The recipient's mail server has blocked the message due to anti-spam filtering rules:
Subject: Delivery Status Notification (Failure)
From: Mail Delivery System mailer-daemon@domain.xyz
To: Anna.A anna.a@domain.xyz
This is an automatically generated Delivery Status Notification.
Delivery to the following recipient failed due to the message being rejected as spam:
anna.a@domain.xyz
Technical details of delivery failure:
The content of the message triggered the spam filters of the recipient's email server. Please review the message content and try again.
Solution: check if your message contains elements that may be considered spam (keywords, suspicious links, etc.). Contact the recipient to verify if the message was filtered into the spam folder.
Refer to this other guide regarding outgoing spam and this other guide regarding incoming spam.
Bad Reputation
The recipient's mail server has blocked the message due to anti-spam filtering rules:
gmail-smtp-in.l.google.com said: 550-5.7.1
Our system has detected that this message is likely suspicious due to the very low reputation of the sending domain.
To best protect our users from spam, the message has been blocked.
Please visit https://support.google.com/mail/answer/188131 for more information.
Solution: check the reputation of the domain, determine if one of your email addresses has been recently exploited for malicious purposes, for example.
Domain Not Found (or DNS Error)
Le nom de domaine du destinataire n'a pas pu être résolu ou n'existe pas.Solution: check the spelling of the recipient's domain and correct it if necessary; ensure that the domain name and DNS are valid and active.
Mailbox Full
La boîte de réception du destinataire est pleine, empêchant la réception de nouveaux messages.Solution: inform the recipient of the situation and ask them to free up space by deleting emails or archiving items.
This cannot happen with email addresses managed by Infomaniak since they do not have storage size limits.
Part of their network is on our block list
If the error message (obtained in principle following a send operation performed from an online tool, placed on the server where your website is located, for example a Prestashop order confirmation or other online store you manage) contains this:
host hotmail-com.olc.protection.outlook.com[104.47.30.97] said: 550 5.7.1
Unfortunately, messages from [89.123.456.789] weren't sent. Please contact your Internet service provider since part of their network is on our block list.
Solution: change the email sending method. The sending is unauthenticated and comes from the server with a specific IP address that is apparently blocked by the recipient for some reason (Infomaniak does not intervene to request unblocking). Therefore, you need to configure the online tool to perform authenticated sends.
Less Frequent Errors
Deferred - Delayed
The error message Deferred - Delayed - Warning: message still undelivered after 4 hours, Will keep trying until message is 3 days old means that the Infomaniak mail server tried to connect to your correspondent's mail server to send the message but failed for an undetermined reason. This error message specifies that the Infomaniak server will continue to attempt to send your message during the period specified in the error message. If, after this delay, the message has still not been delivered, you will receive a final error message informing you that your message could not be delivered and that your correspondent did not receive it.
Greylisting Delay
This error Greylisting Delay occurs when the recipient's mail server, like Infomaniak, uses a technique called "greylisting" which imposes a temporary delay on the first attempt to deliver a message from an unknown sender. The Mailer Daemon may eventually send an error report indicating that delivery has been delayed due to greylisting. The error may also mention banned sender. You should try sending your message again a few minutes/hours later.
Malware message rejected
This error Malware message rejected occurs when the message contains an attachment, a link to a storage site like Dropbox, or dynamic content, including in the "forwarded" part of the message (in the case of a message "forward", for example). You should try resending the message from the Infomaniak Mail Web app (online service mail.infomaniak.com) instead of a mail application, and remove any content that may cause this error.
Message Size Exceeded / File Too Large
These errors Message Size Exceeded / File Too Large occur when the size of the message (or attachments) exceeds the limit allowed by the recipient's mail server. The Mailer Daemon will return an error report indicating that delivery failed due to the message size being exceeded.
Rate Limit Exceeded
This error Rate Limit Exceeded occurs when the sender has exceeded the frequency or volume limit allowed by the recipient's mail server. Mail servers may impose limits to prevent spam or system overload.
Sender denied: auth guards failed
Refer to this other guide if you encounter an error Sender denied: auth guards failed.
The message contains a unicode character in a disallowed header
This error The message contains a unicode character in a disallowed header may appear if you have inserted a special character like a heart ♥, for example, in the body of the email, the subject, or especially in the full name; the risk of being rejected by providers is very high: it is best to keep the use of signs, characters, and fonts as simple as possible.
This guide explains how to quickly obtain a password when you need to access an Infomaniak email address.
Generate an email address password
If you cannot follow these steps because you get different information on the screen, you probably do not have the necessary rights if you are not the original creator of the email address — refer to this other guide — an administrator can, for example, add the email address directly to your Web app Mail or send you a link allowing you to generate a password yourself.
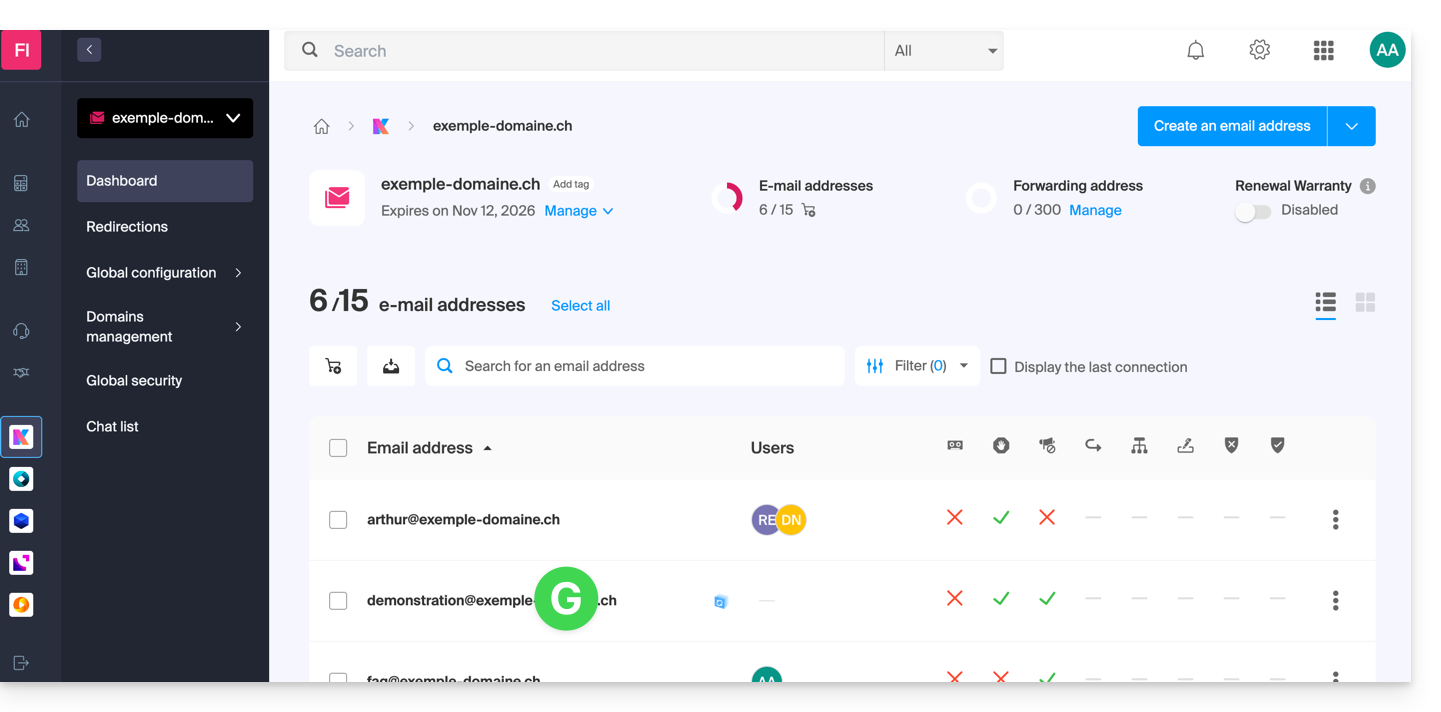
To add a password to the example address demonstration@exemple-domaine.ch:
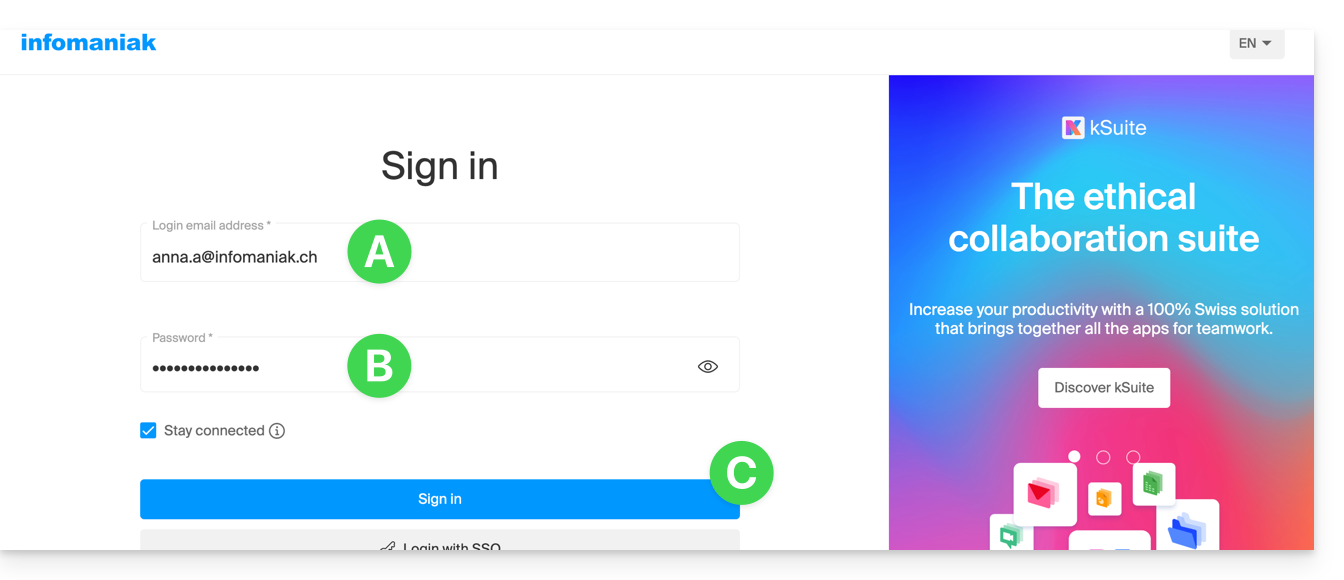
- Enter the login ID and password for your Infomaniak account on the page https://manager.infomaniak.com/:
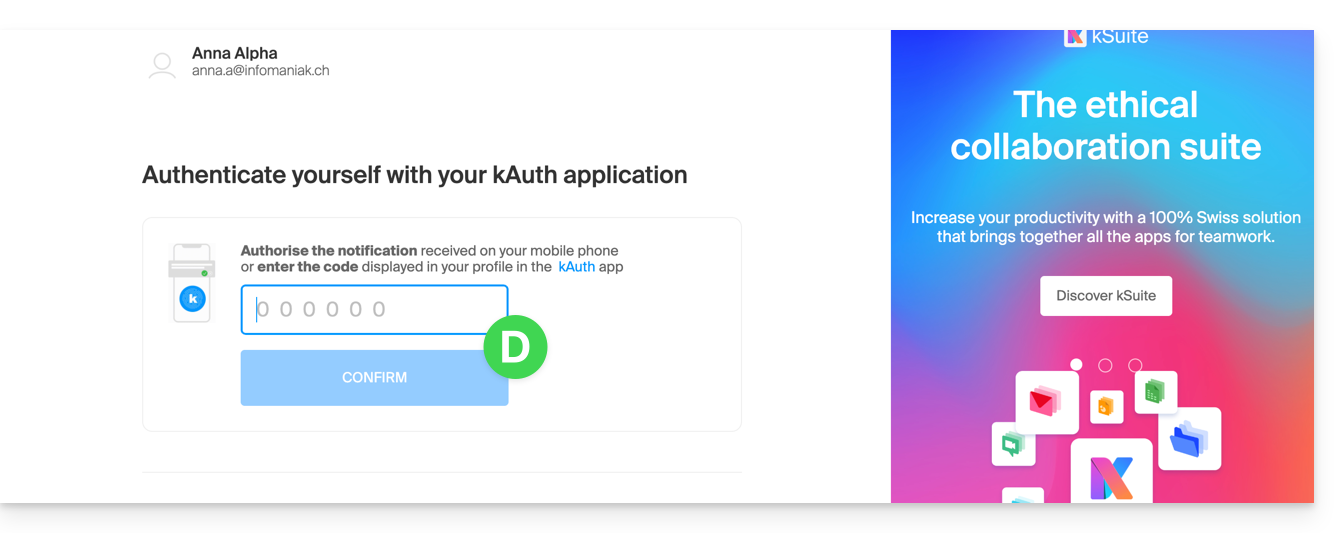
- Validate the entry in the Manager with the 2FA (two-factor authentication) method defined initially:
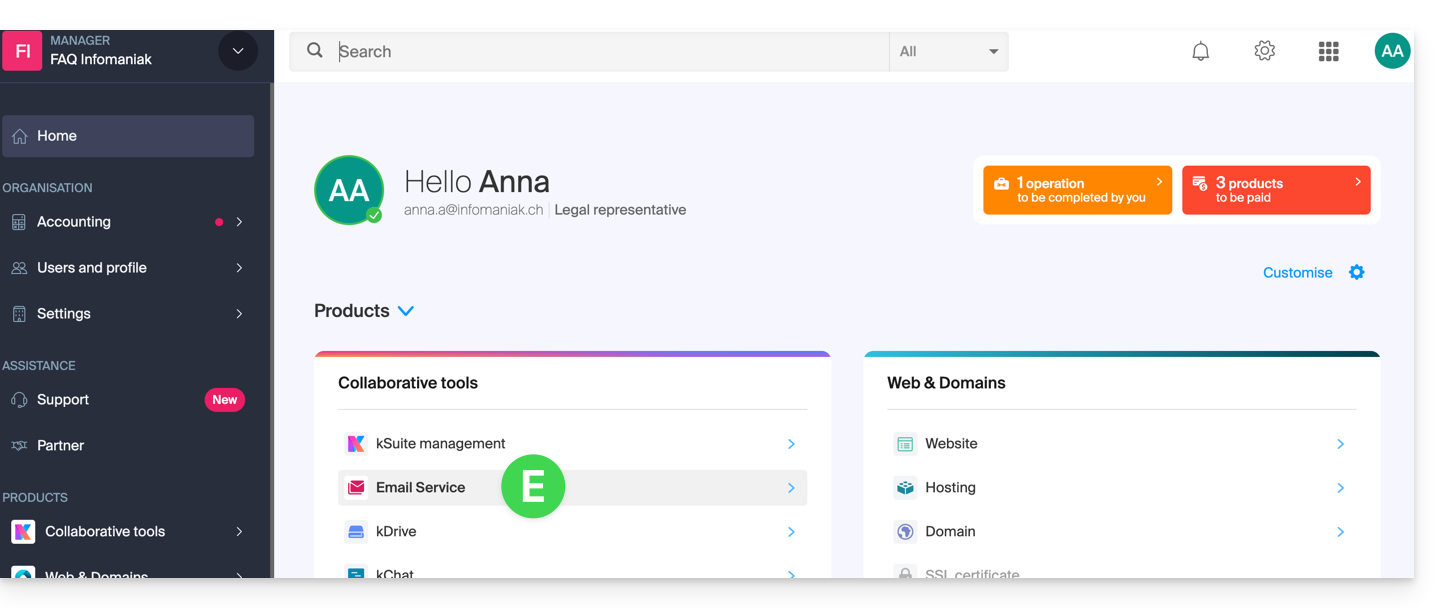
- Once on the dashboard, click on Mail Service:
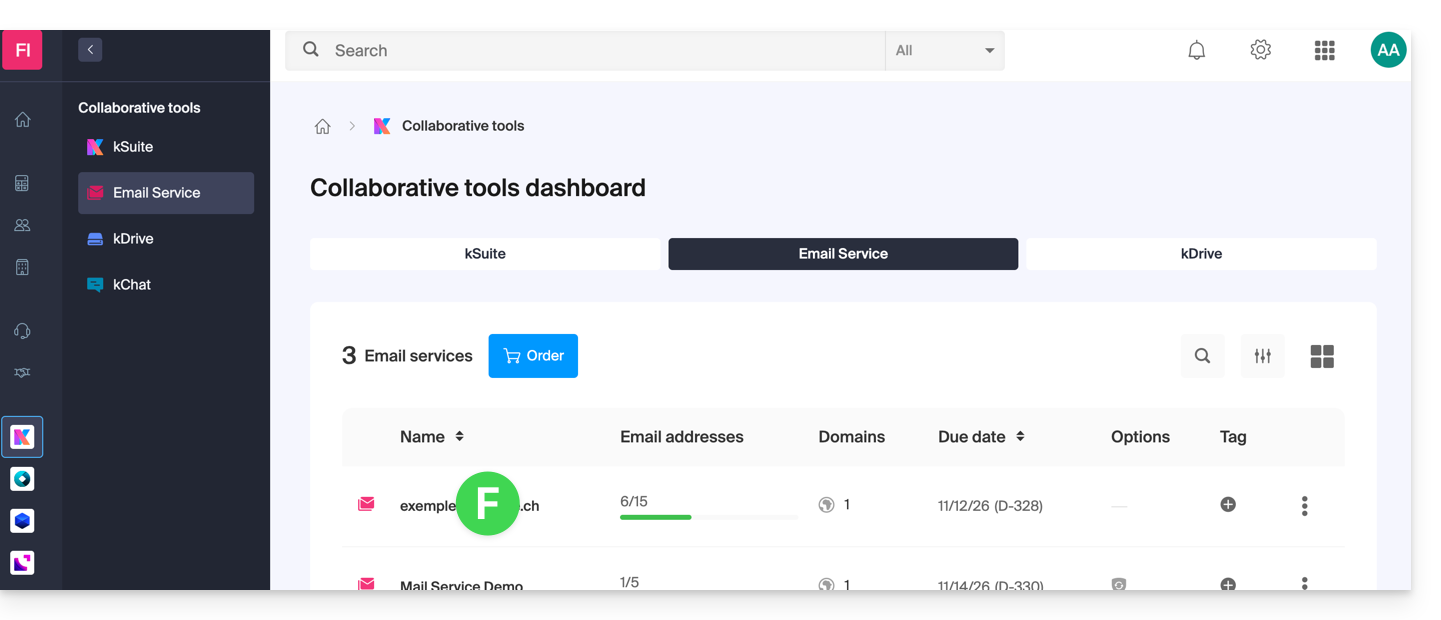
- Once on your Mail Services, click on the name / domain name to which the email address in question belongs:
- Once on the Mail Service to which the address belongs, click on the email address in question:
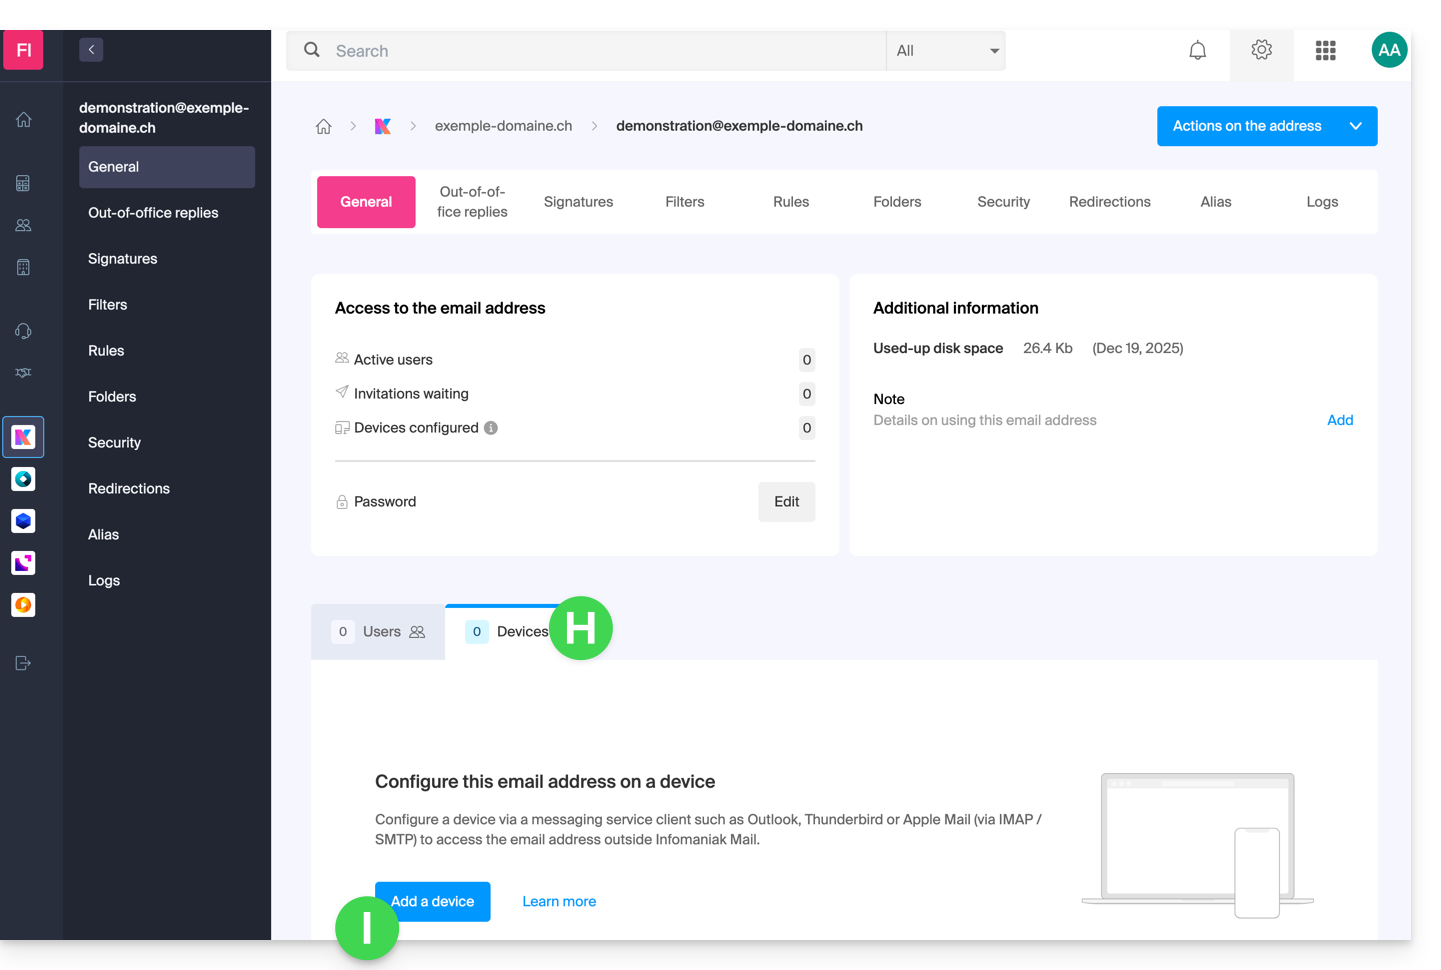
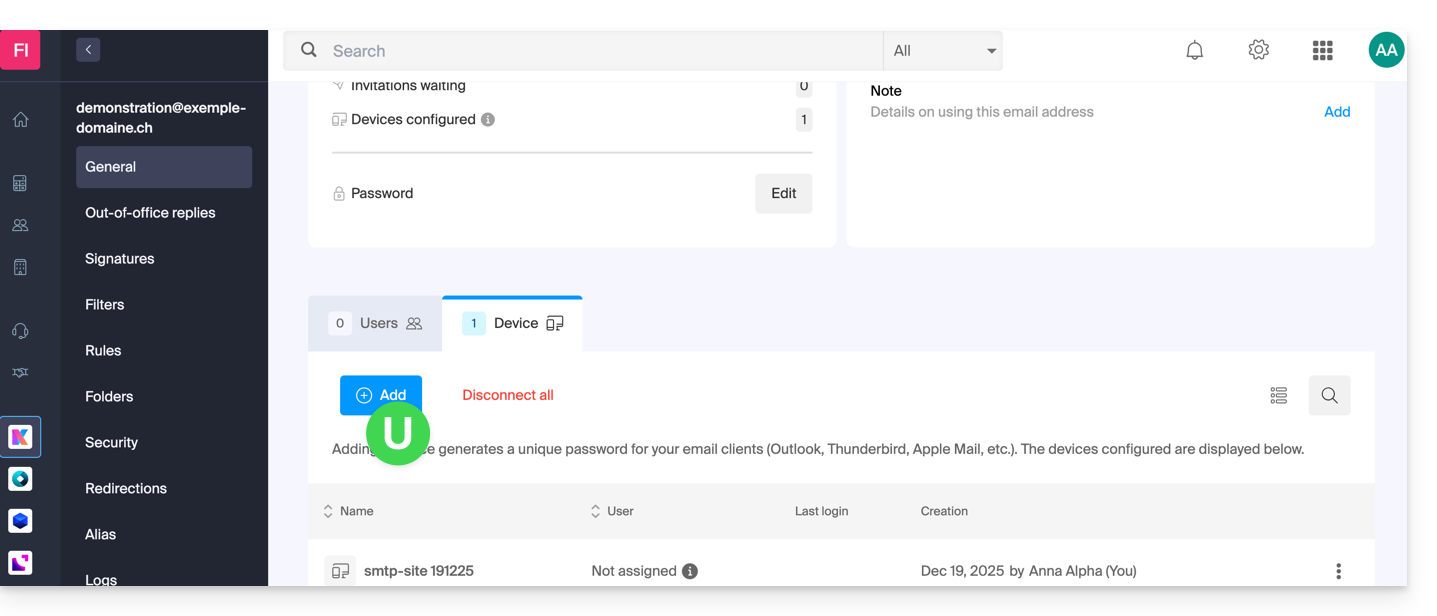
- Once on the email address in question, click on the Devices tab and then on Add a device:
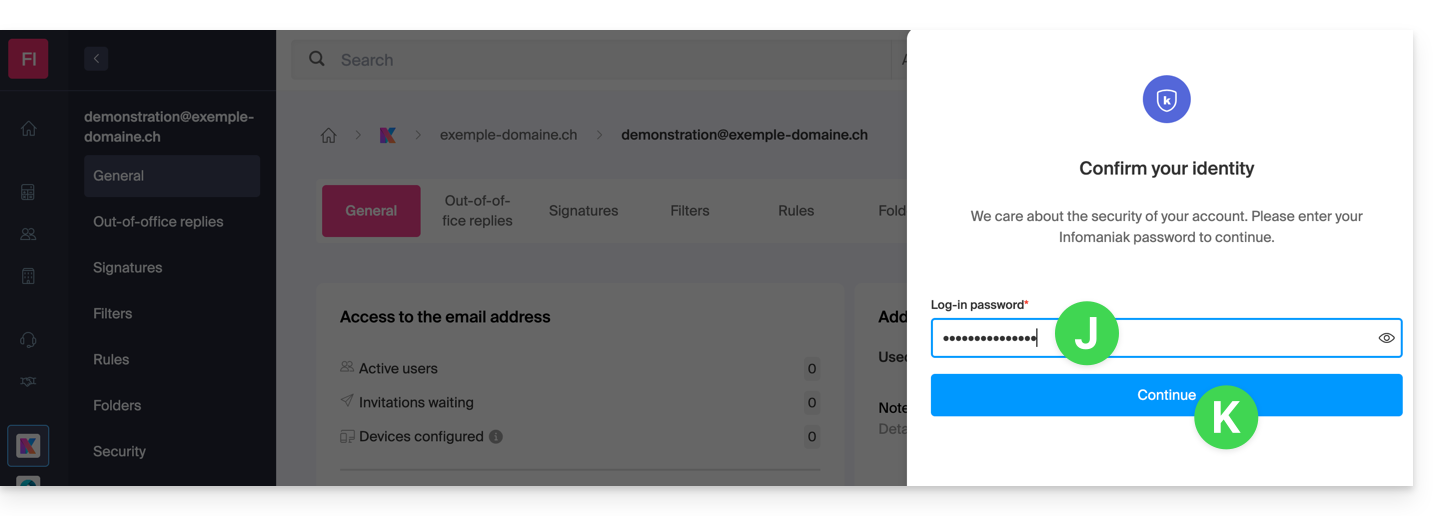
- At this stage, you may need to re-enter the login password (the one from point B above):
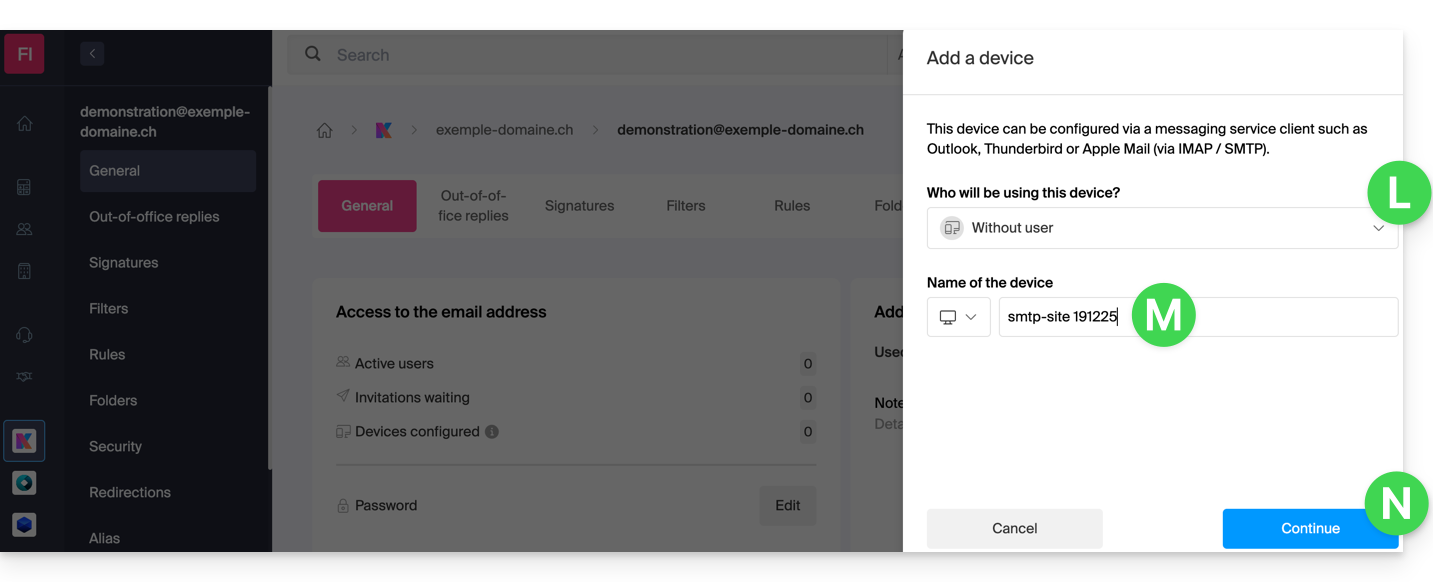
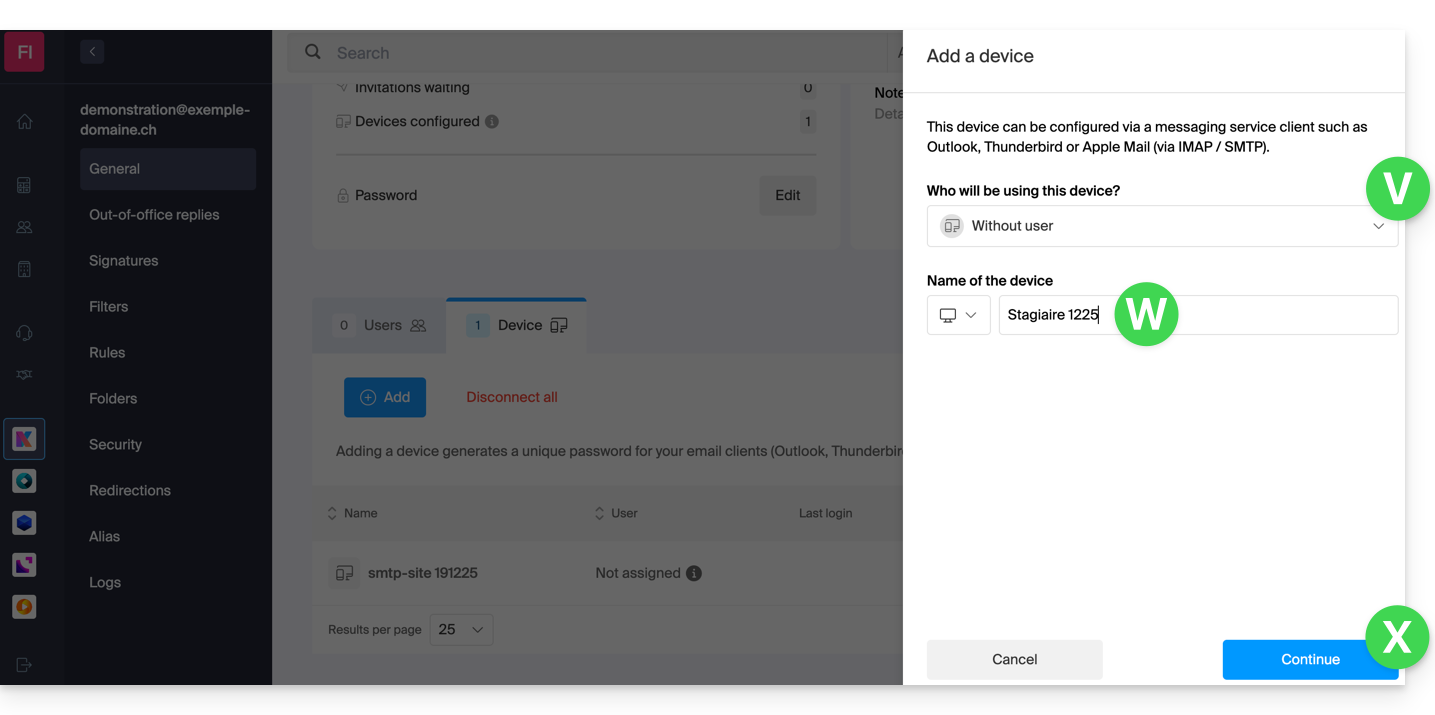
- Then choose not to specify a particular user, and enter a name that allows you to identify the reason for creating this device (here the user needs a password to be able to send emails from a site, and they add the current date as useful information):
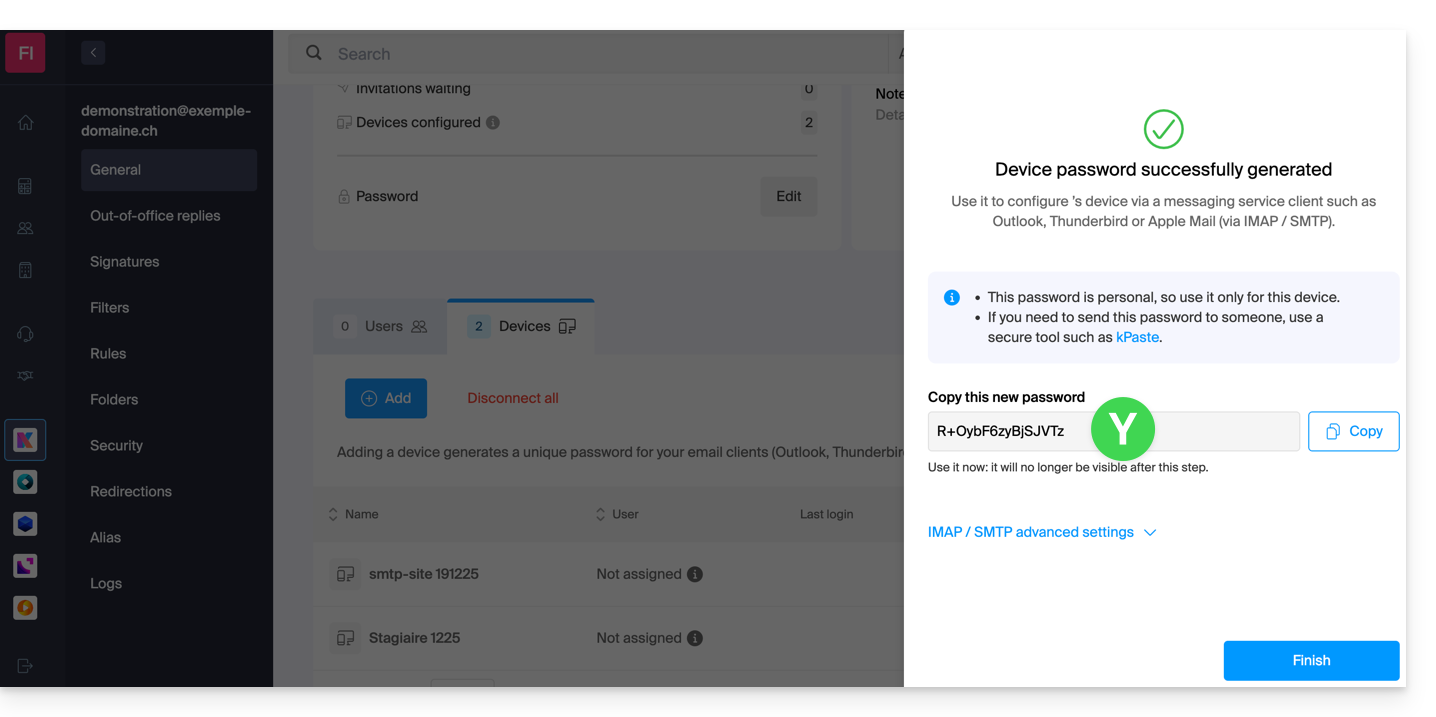
- The password is displayed, you can use it for your chosen purpose (note that it will not be possible to display it again later):
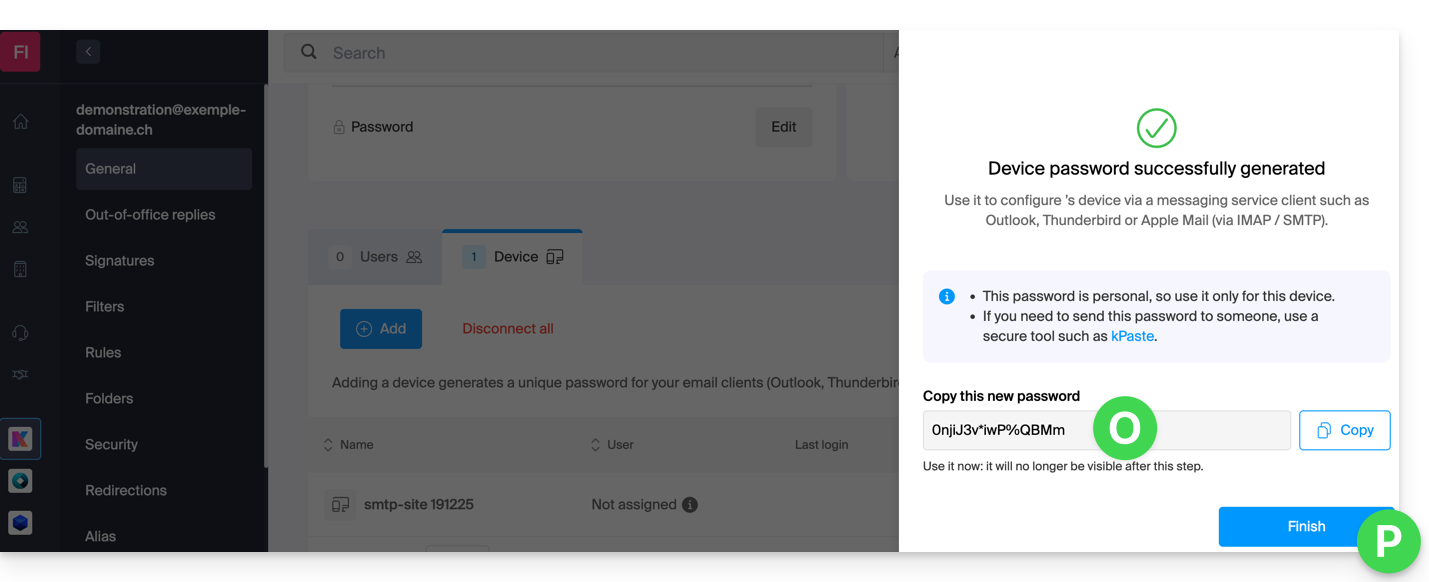
You clicked the “Finish” button (above “P”) without noting the password? No problem, generate a new one!
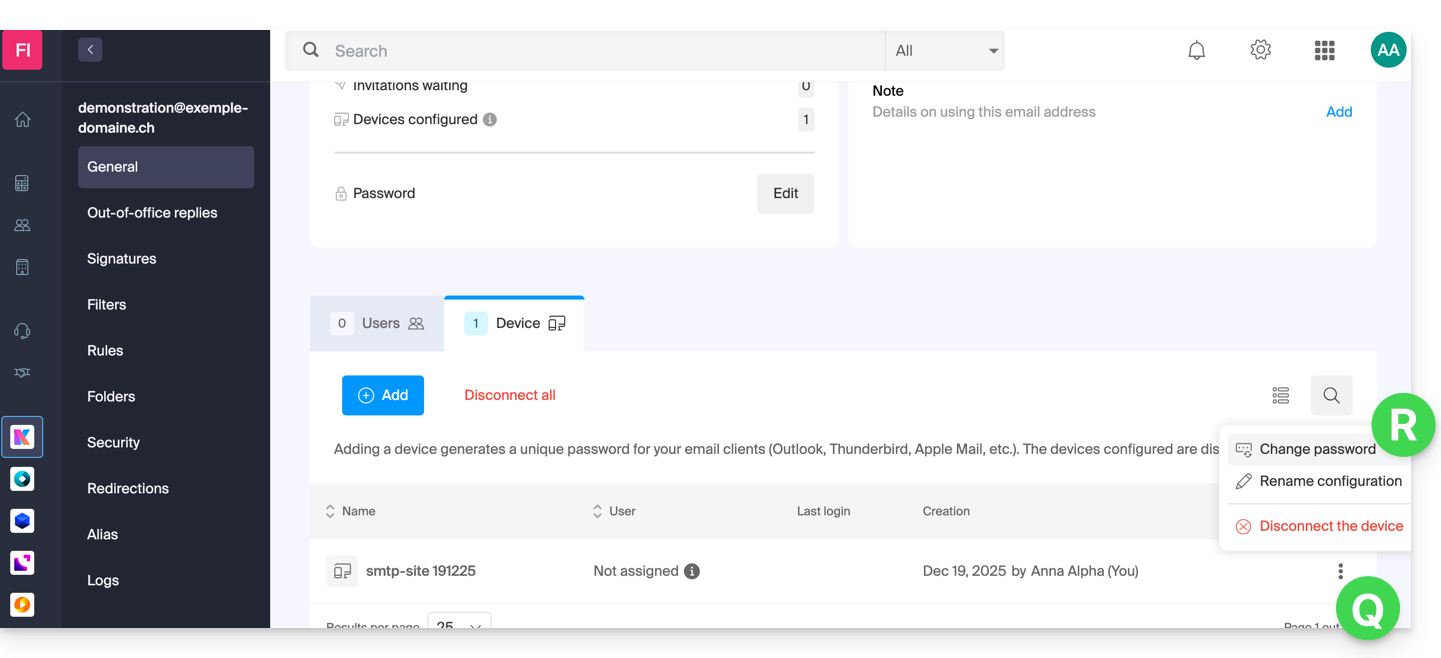
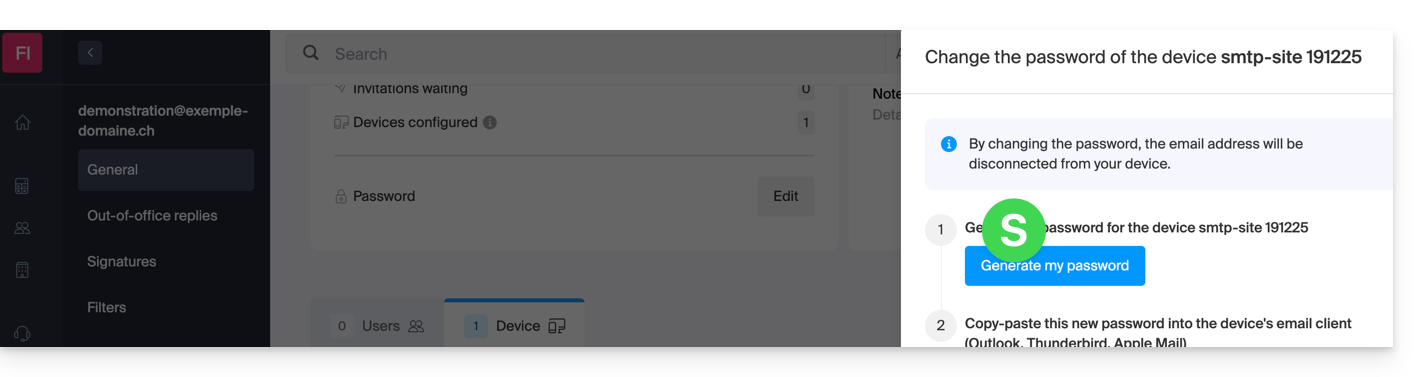
- Click on the action menu ⋮ located to the right of the newly created device to randomly generate a new password that will cancel the old one:
- Click the button to generate a new password:
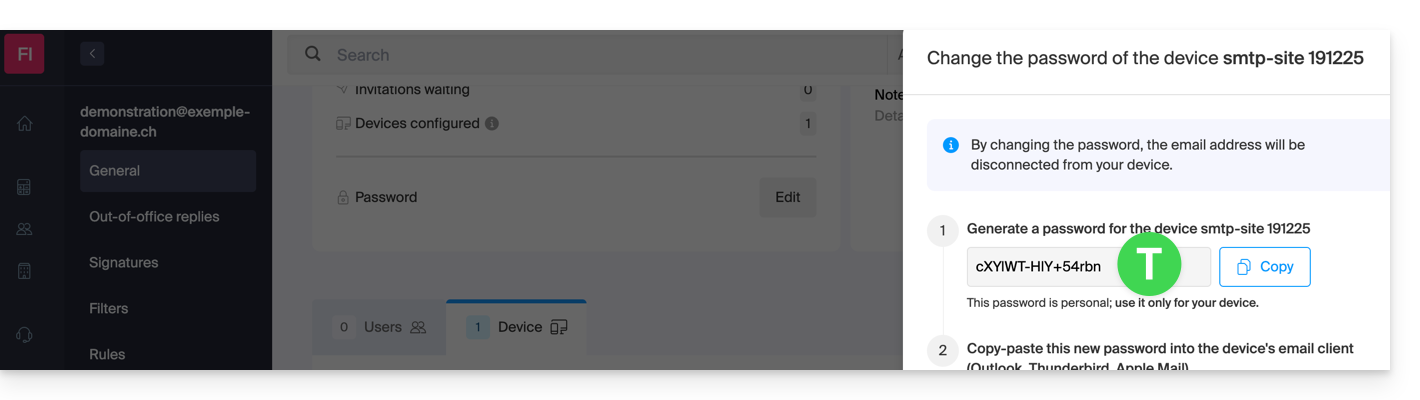
- The password that replaces the old one is displayed, you can use it for your chosen purpose (note that it will not be possible to display it again later):
Do you need a password for a secondary and temporary user? No problem, generate a second one!
- Click the button to Add another device:
- Then choose not to specify a particular user, and enter a name that allows you to identify the reason for creating this device (here the user needs a password for an intern for a week):
- Here it is, the password is displayed. You can use it for any purpose you choose (note, it will not be possible to display it again later. However, as before, it will of course be possible to regenerate one):
This guide explains the principle of on-the-fly URL rewriting.
Preamble
- On-the-fly URL rewriting is a technique that allows modifying the appearance of a web page's URLs without actually changing the resource's path.
- This process is done through virtual redirects, transforming a visible URL into a more aesthetic one while preserving the initial destination, invisible to visitors.
- This method is often used to make URLs simpler and more readable, by hiding the parameters of dynamic pages.
- In addition to improving aesthetics for visitors, it is beneficial for referencing, as search engines generally prefer URLs without complex parameters.
URL rewriting example
Take the example of the URL: article.php?id=25&categorie=4&page=3. It can be rewritten as: article-25-4-3.html or titre-article-25-4-3.html. Here is how to configure this in a .htaccess file if article.php is located in the web/admin/ directory:
Options +FollowSymlinks
RewriteEngine on
RewriteBase /admin/
RewriteRule ^article-([0-9]*)-([0-9]*)-([0-9]*).html$ article.php?id=$1&categorie=$2&page=$3 [L]- Options +FollowSymlinks: allows the use of symbolic links
- RewriteEngine on: enables Apache's URL rewriting module
- RewriteBase /admin/: specifies the working directory
- RewriteRule: defines the rewrite rule
With this configuration, when a user accesses article-25-4-3.html, they are redirected to article.php?id=25&categorie=4&page=3 without this being visible.
Even if URL rewriting is in place, the old URL remains functional. It is therefore crucial to update all internal links of your site to adopt the new URL format.
Redirect to another domain
If you own multiple domains pointing to the same site, you can redirect all requests to a main domain. For example, if www.domaine.xyz and www.mon-domaine.xyz lead to the same site, but www.mon-domaine.xyz is your main domain, use this rule in the .htaccess of www.domaine.xyz:
RewriteEngine On
RewriteRule ^(.*)$ http://www.mon-domaine.xyz/$1 [R=301]
This will redirect all pages from www.domaine.xyz to www.mon-domaine.xyz transparently, with a permanent redirect (R=301).
Also refer to this other guide on this subject.
This guide explains how to force the display of the web hosting name in the browser's address bar to one of the domain names installed as an alias/synonym or how to display the main domain in the address bar instead of the alias.
Limiting the 'duplicate content' or duplicate content
Assume you have the hosting your-domain.com with Infomaniak and as a synonym domain name you have installed www.synodomain.xyz.
By default, when you type one or the other of the domain names (your-domain.com or synodomain.xyz) in the address bar of your browser, it is the one you typed that will be displayed in the address bar.
You therefore have the possibility to force the display of a different address than the one that was typed. Thus, if someone types synodomain.xyz, then it is your-domain.com that will automatically be displayed in the address bar.
A code must be entered in a file called .htaccess which must be located at the root of your hosting (in the /web folder of your FTP). If this file does not exist yet, you must create it on the server.
Insert the following directives in the file:
RewriteEngine on
RewriteCond %{HTTP:X-Forwarded-Proto} !https
RewriteRule (.*) https://votre-domaine.com/$1 [R=301,L]
Adjust the code above according to these instructions:
- Replace
your-domain.comwith your domain name with the appropriate extension (.com, .fr, .ch, etc.) that you want to see displayed in the visitor's browser address bar. Addwww.before your-domain.com if necessary. - Replace the second line of the code above with "
RewriteCond %{HTTPS} off" if a loop error occurs, this means that HTTP/2 is active for this site
Also, refer to the automatic redirections to httpS.
This guide details the management of the Organization Directory, i.e., a “special” address book present in the Infomaniak Web app Contacts (online service ksuite.infomaniak.com/contacts).
Preamble
- The Organization Directory is "automatically created" by the various users who make up one of the Organizations to which your user is attached.
- This address book is automatically synchronized with all internal users of your Organization.
- It is not possible to export it.
- An administrator of the Organization can make certain entries in the directory private to hide them from users with fewer permissions.
Access the directory
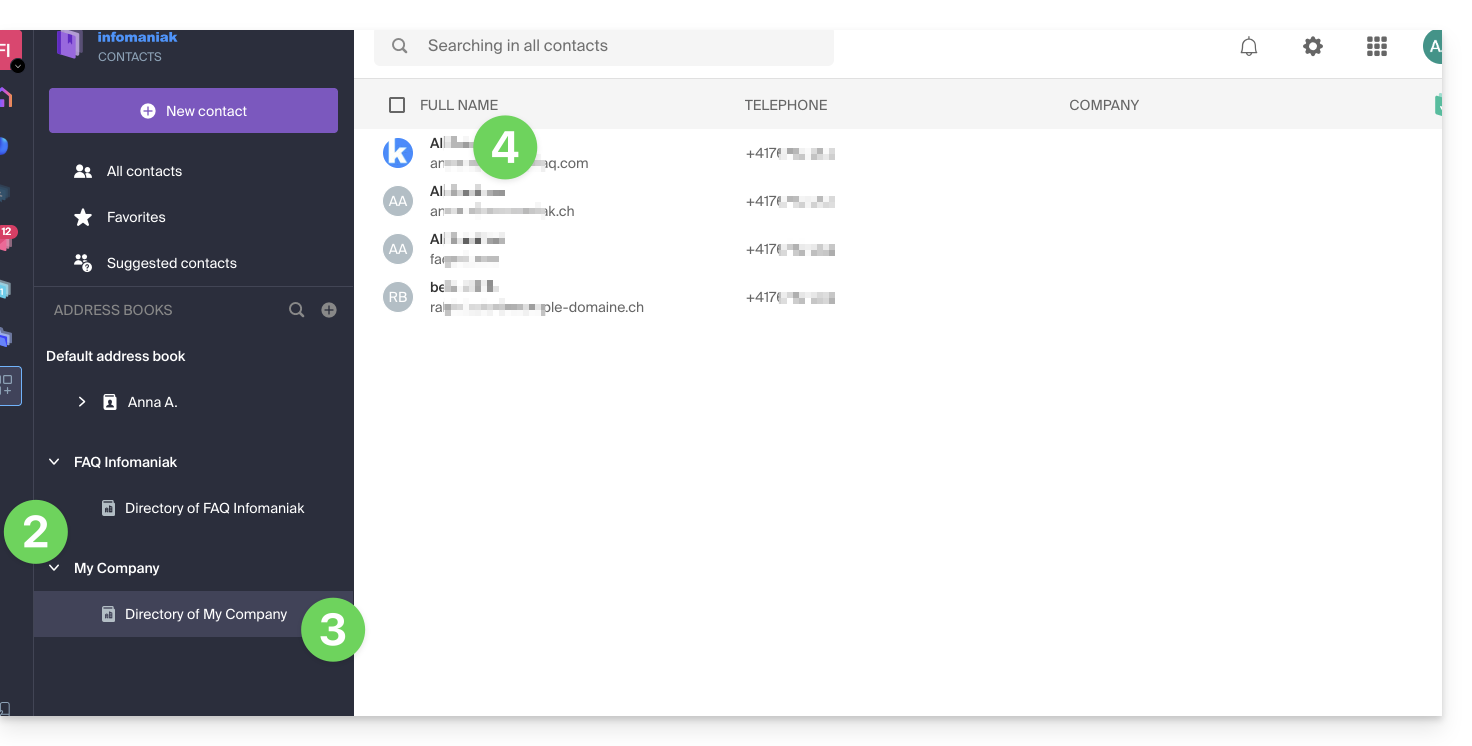
If your login corresponds to and belongs to multiple Organizations, you can access the different directories of your Organizations:
- Click here to access the Infomaniak Web app Contacts (online service ksuite.infomaniak.com/contacts).
- Click on the chevron to the left of the name of the Organization concerned.
- Click on Directory of {Organization name}.
- The Organization's contacts are displayed on the right:
Modify the details of a directory contact
You can do many things (copy, export the card, view email exchanges or calendar events, add to favorites, call, etc.) by clicking on the card of a contact in the Organization Directory address book but you will not be able to modify the details on behalf of the person concerned: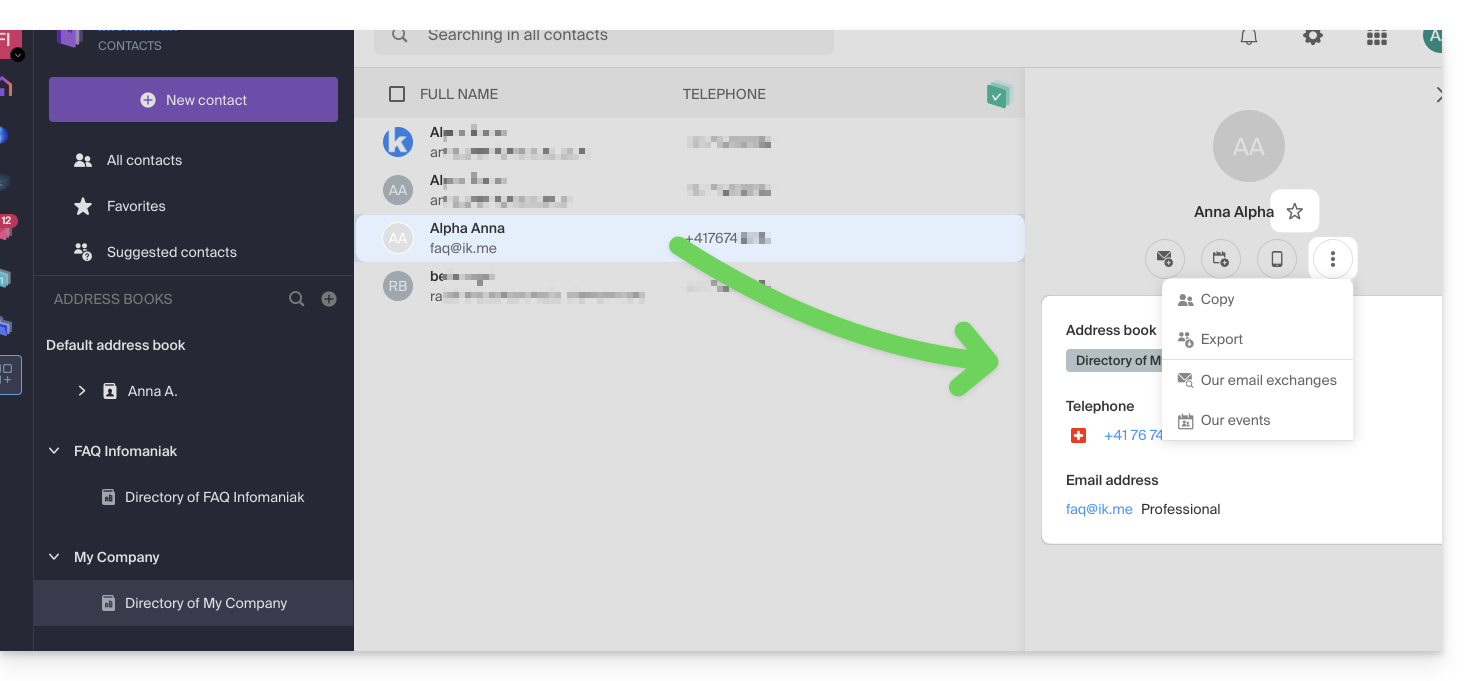
To modify the main information, the person concerned (for whom a change must be made) must log in to their profile and modify it (see below):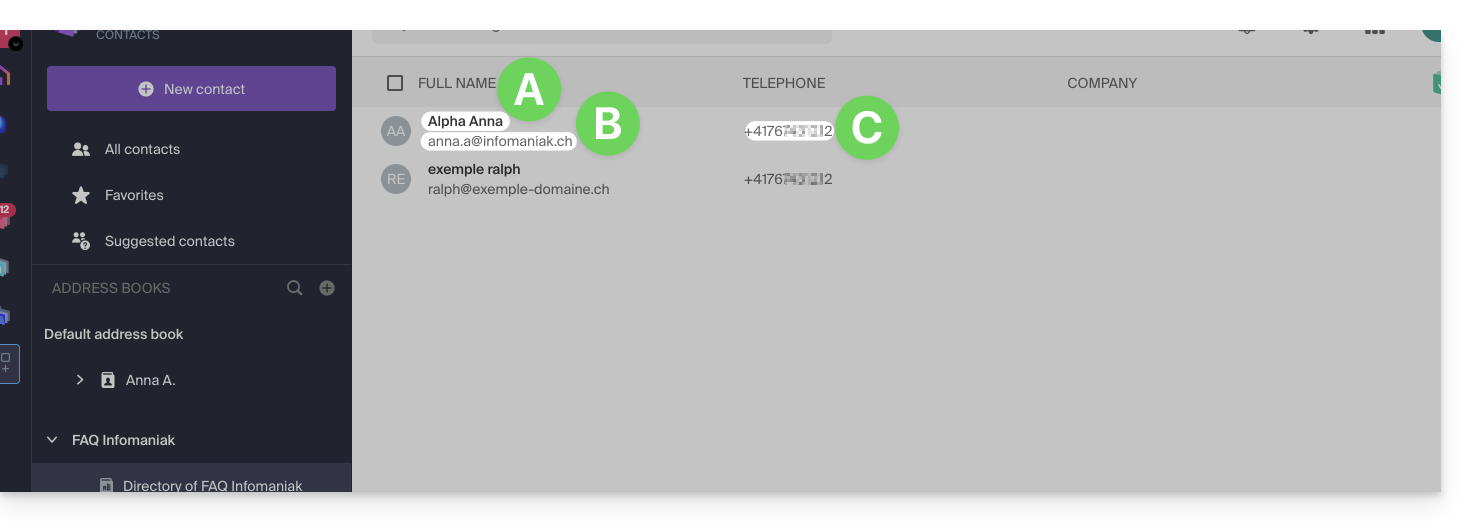
A. First and last name
To modify the first and last name visible in the directory, the user concerned (here anna.a@infomaniak.ch) must log in to their account and modify their details. Refer to this other guide on this subject.
B. Email address
To modify the email address visible in the directory, the user concerned (here user2@example-domain.ch) must log in to their account and modify their details. Refer to this other guide on this subject.
C. Phone number
To change the phone number visible in the directory, the user in question (here user2@exemple-domaine.ch) must log in to their account and update their contact details. Refer to this other guide on this topic.
This guide explains how to rename a Web hosting present in the Infomaniak Manager within your Organization.
Preamble
- A Web hosting is, schematically, the storage space reserved for hosting one or more of your websites.
- By default, your Infomaniak hosting takes the name of the first site you add to this hosting:
- You own the domain name "domaine.xyz" and want a site with this domain name…
- You purchase a Web hosting that will be automatically named "domaine.xyz" even if you later add a second site "toto.com".
- The hosting can be renamed with a more generic name like "My Websites" to better reflect its actual content.
- This renaming is intended to improve the readability/understanding of the products listed in your Manager and has strictly no impact on the addresses of the websites: refer to this other guide to act on the domain name.
Rename a Web hosting
To access the Web hosting to perform the name change:
- Click here to access the management of your product on the Infomaniak Manager (need help?).
- Click directly on the name assigned to the product concerned.
- Click on the Manage button.
- Click on Edit the name:
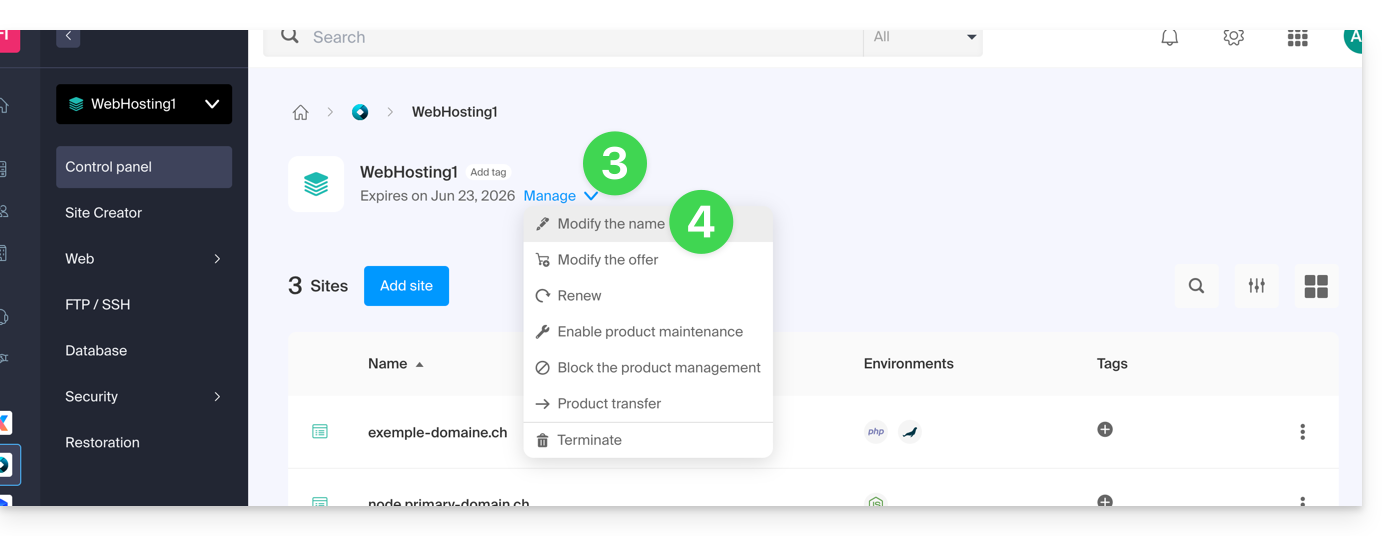
- Enter the desired name.
- Click on Save.