Knowledge base
1000 FAQs, 500 tutorials and instructional videos. Here, there are only solutions!
This guide explains how to back up a Cloud VPS in the form of a snapshot.
Preamble
- A snapshot is like a photo of your Cloud VPS at a given moment, containing everything on your server, including your operating system, your applications, your data, etc.
- Snapshots can be used, among other things, for…
- … protect your Cloud VPS in case of a problem: if you encounter a problem with your Cloud VPS, you can restore a snapshot to return to a previous state.
- … test modifications without risk: before making significant changes to your Cloud VPS, you can create a snapshot to be able to revert if necessary.
- You benefit from a free snapshot to back up your entire server in a dedicated space. If necessary, it is possible to order additional spaces or delete a snapshot to create a new one.
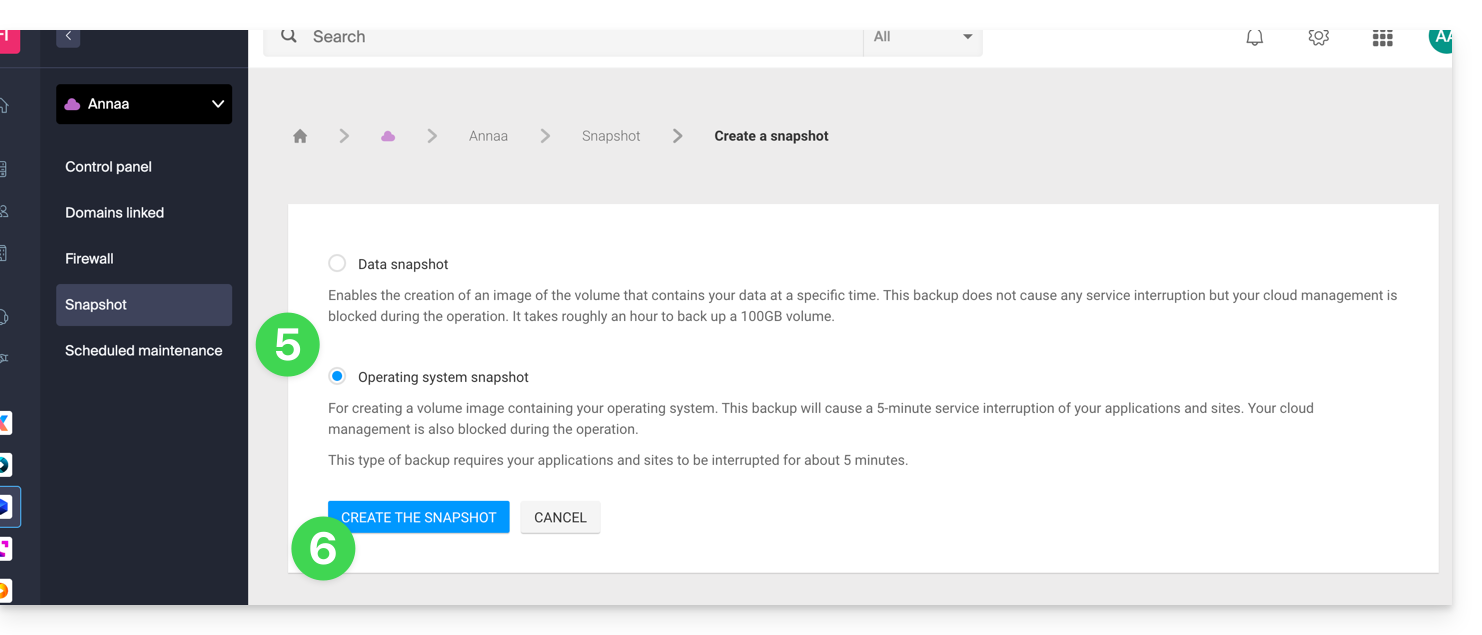
- Two types of backups are possible:
- Snapshot of data: allows you to create an image of the volume containing your data (not available for Windows distributions).
- Snapshot of the operating system: allows you to create an image of the volume containing your operating system. This type of backup involves a brief interruption of your applications and websites.
- It is recommended to create snapshots regularly, e.g., once a week or month; this will allow you to have a history of your Cloud VPS and to be able to revert in case of a problem.
- It is obviously possible to restore the state of the Cloud VPS thanks to the previously created snapshot.
Create a snapshot
To do this:
- Click here to access the management of your product on the Infomaniak Manager (need help?).
- Click directly on the name assigned to the product in question.
- Click on Snapshot in the left sidebar.
- Click the blue button Create a snapshot:
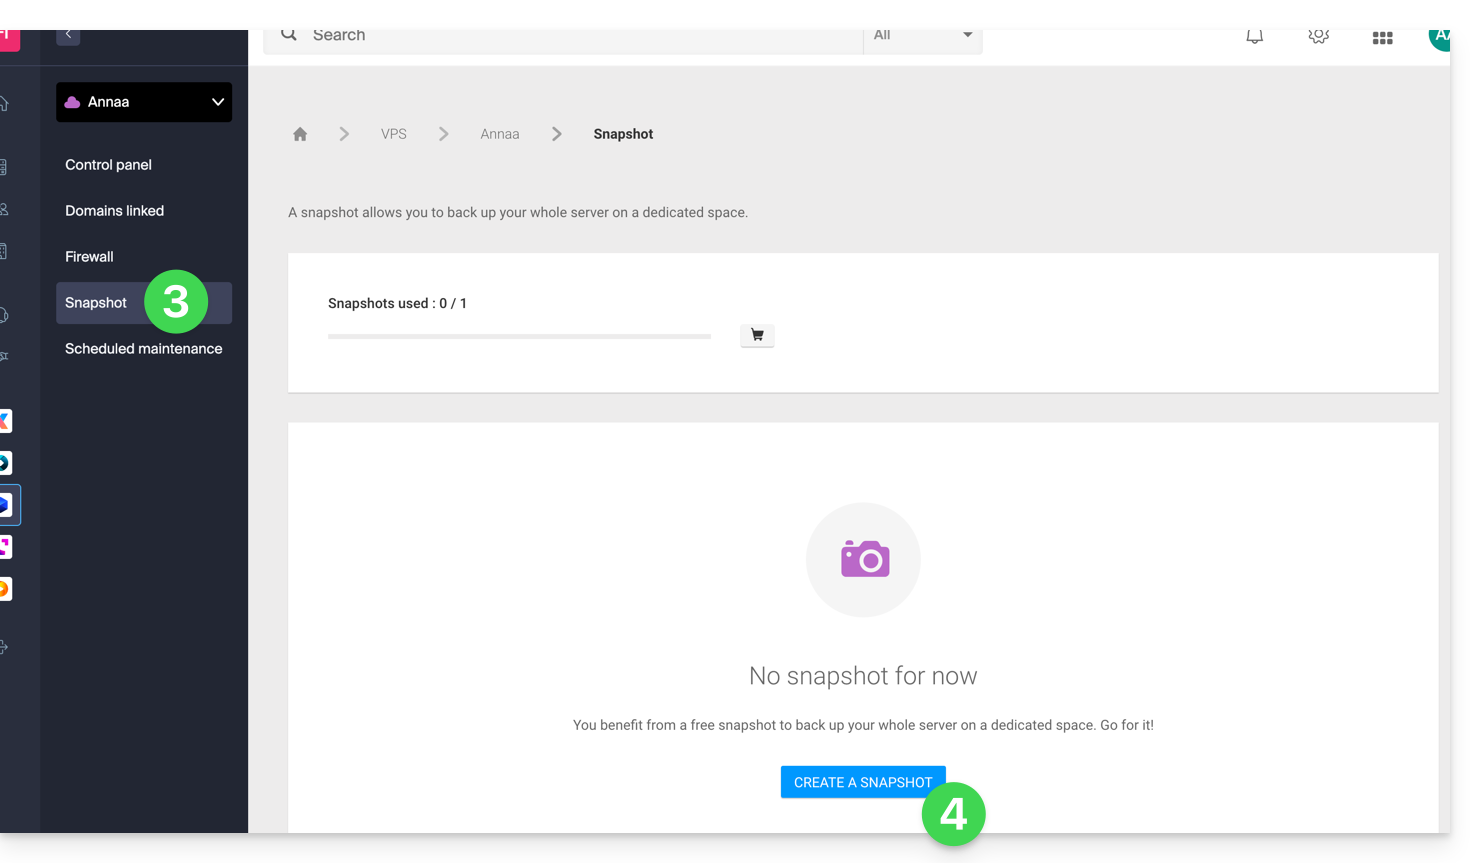
- Choose the type of snapshot to create (data or operating system).
- Click the blue button to start creating the snapshot:
- An email is sent when the snapshot is generated.
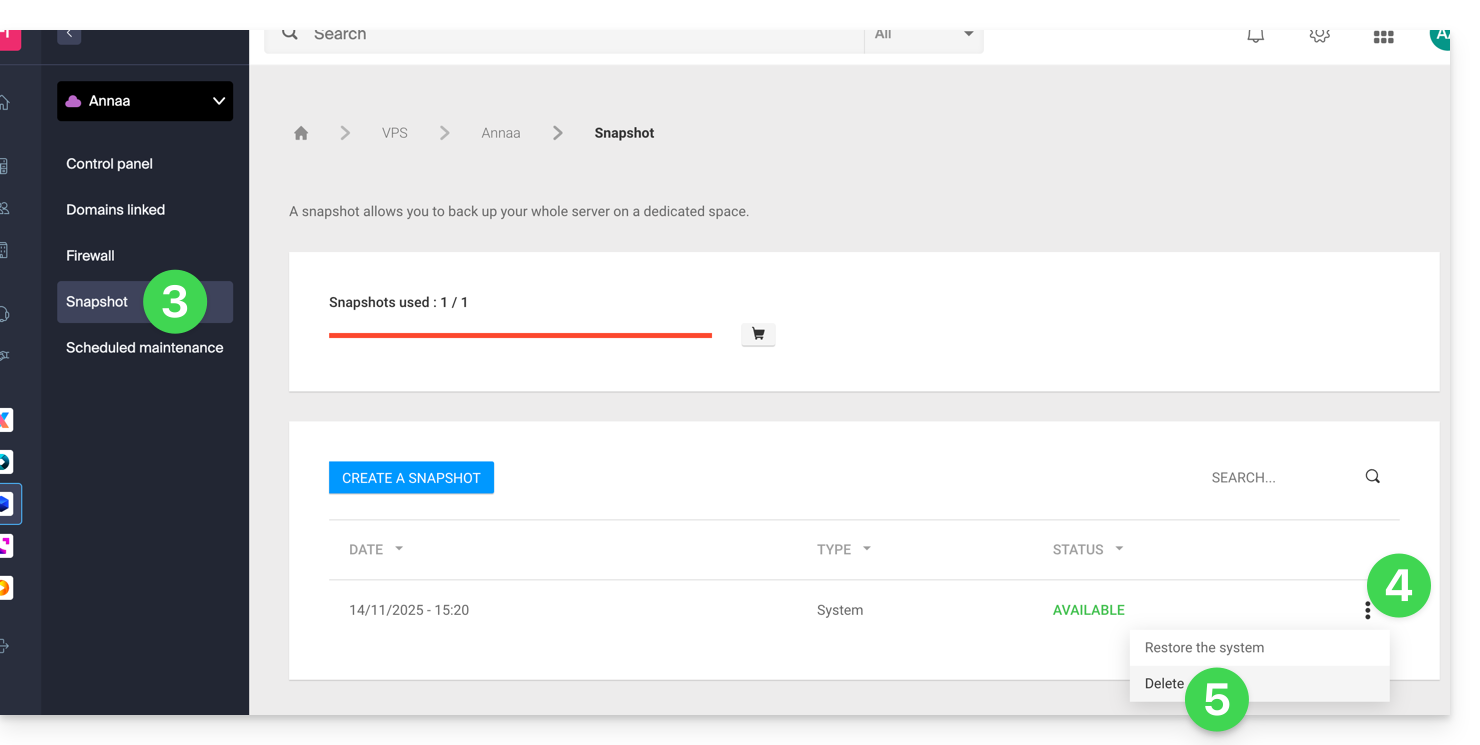
Delete a snapshot
To do this:
- Click here to access the management of your product on the Infomaniak Manager (need help?).
- Click directly on the name assigned to the product in question.
- Click on Snapshot in the left sidebar.
- Click on the action menu ⋮ to the right of the object concerned in the table that appears.
- Click on Delete:
Order additional snapshots
To do this:
- Click here to access the management of your product on the Infomaniak Manager (need help?).
- Click directly on the name assigned to the product in question.
- Click on Snapshot in the left sidebar.
- Click on the shopping cart icon:
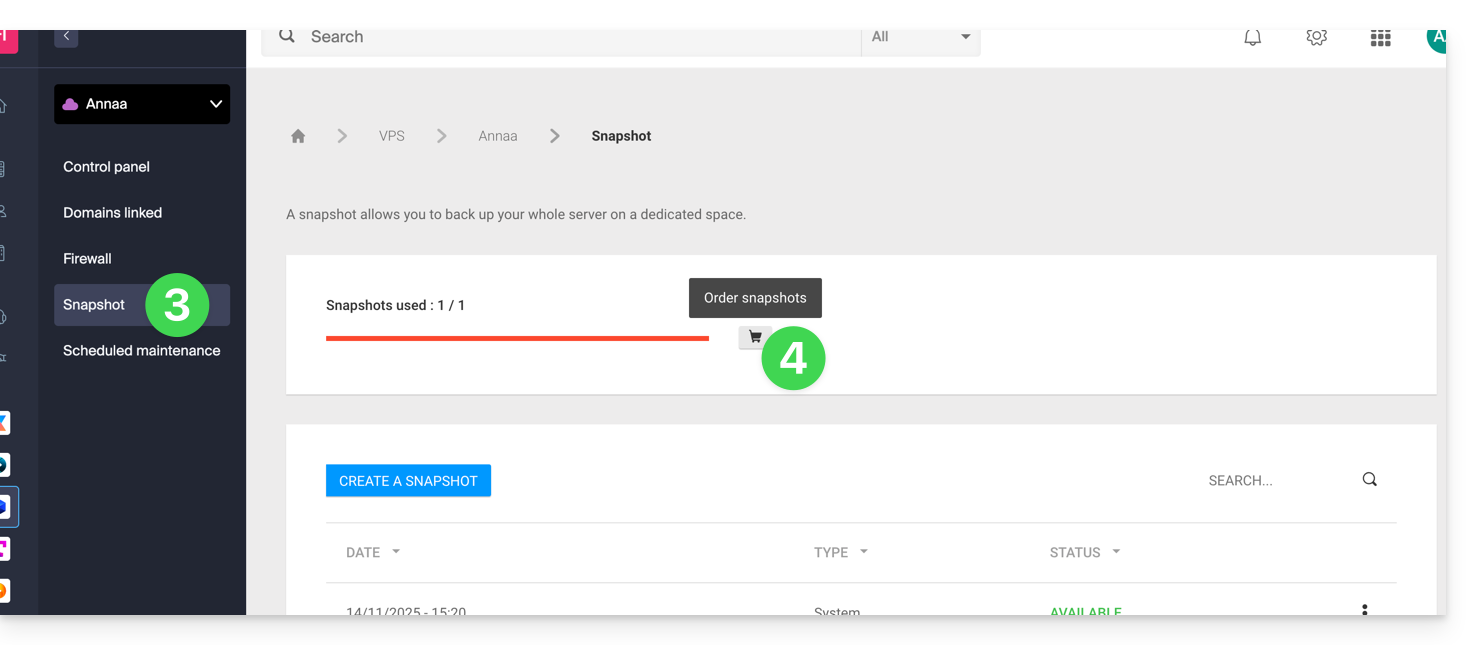
- Follow the instructions to complete the order.
It is not possible to order an additional snapshot if a snapshot is in progress.
Link to this FAQ:
Has this FAQ been helpful?
This guide explains how to restore a snapshot of VPS Cloud Infomaniak.
Warning: depending on the operating system installed, the system volume may be named /dev/sda, /dev/sda1 or /dev/vda; the same applies to the data volume /dev/sdb, /dev/sdb2 or /dev/vdb … It is therefore necessary to replace these indications with those corresponding to your situation.
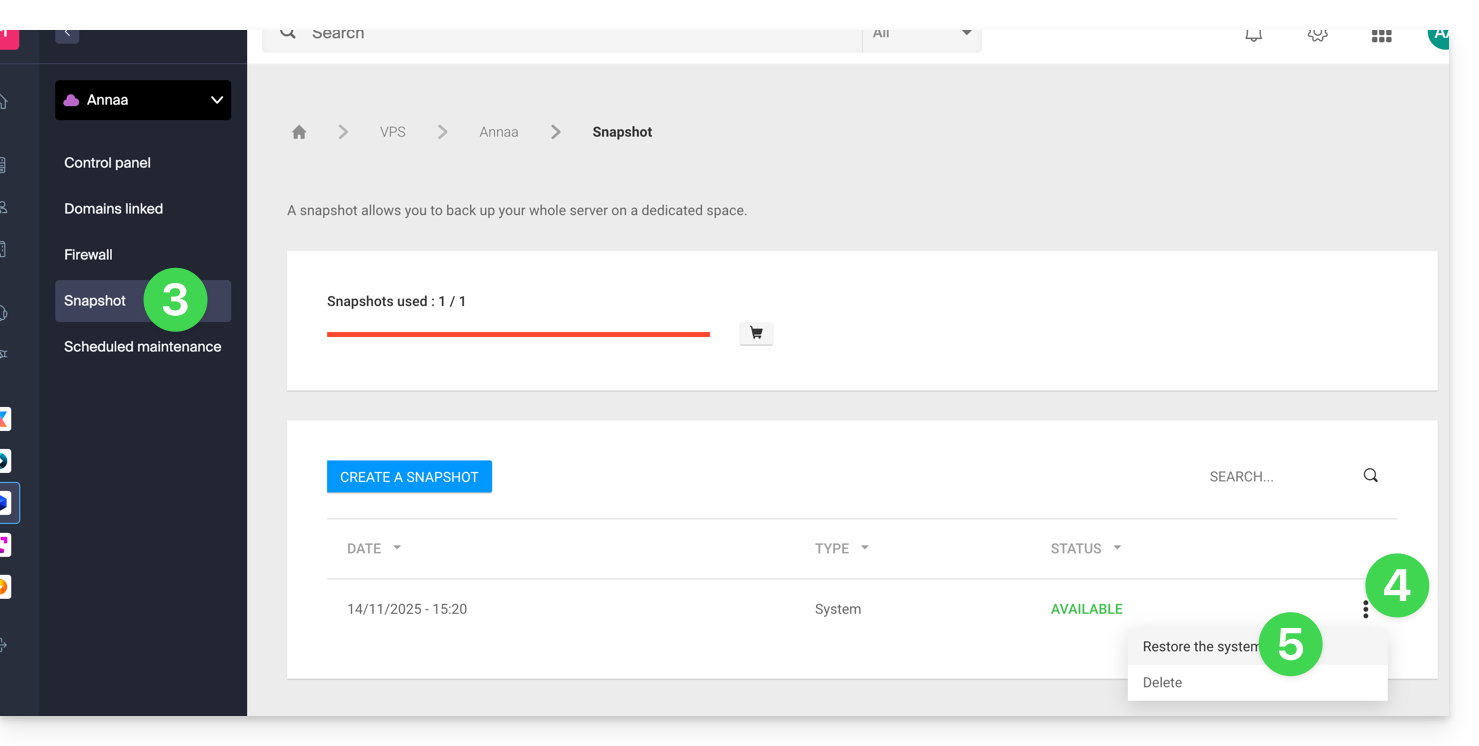
Restore a snapshot
To do this:
- Click here to access the management of your product on the Infomaniak Manager (need help?).
- Click directly on the name assigned to the product concerned.
- Click on Snapshot in the left sidebar menu.
- Click on the action menu ⋮ to the right of the object concerned in the table that appears.
- Click on Restore:
- Click the blue button to start the snapshot restoration.
- An email is sent when the snapshot is restored.
Restore the operating system disk
Restoring the system volume as in the example above is an irreversible operation. The operating system disk will be replaced by the snapshot and the server will be in the exact state of the backup date.
The data stored on the data volume (vdb) is not affected by this operation.
Restore the data disk (vdb)
Two data restoration modes are possible:
1. “Read-only” mode
If the size of the snapshot differs from the size of the volume, only this read-only mode is available.
This option allows you to mount the snapshot data image, which allows read-only access to the backup data.
For information, here are useful commands to exploit your backup:
- To access the main data volume:
mount /dev/vdb /mnt/. - To mount the data volume in a specific folder "backup":
mount -o nouuid -o ro,norecovery /dev/vdc /backup.
To know which letter to use (/dev/vd?), use the command lsblk:

2. “Restore” mode
Restoring the data volume is an irreversible operation. The data disk (vdb) will be replaced by the snapshot. At the end of the restoration, it will be necessary to remount the data volume so that your operating system refreshes the content.
The following procedure and commands are provided for informational purposes only:
- Make sure your data volume is not mounted:
* umount /mnt(/mnt or the location you chose to access your data). - Remount the data volume:
* mount /dev/(vdb) /mnt
To know the name of the data volume attached to your server, use the command lsblk (see above).
Link to this FAQ:
Has this FAQ been helpful?
Infomaniak does not perform any backups of the VPS Cloud / VPS Lite.
However, you can…
- … create a server snapshot (non-automated backup)
- … backup the server on Swiss Backup (automated backup)
Link to this FAQ:
Has this FAQ been helpful?
This guide details how to back up the data from your folders and nodes Jelastic Cloud via the OpenStack Swift protocol on Swiss Backup, the backup solution in an independent Swiss cloud.
Preamble
- To back up the data, an extension for Virtuozzo (Jelastic Cloud) is available in the node addons.
- Learn more about the extension (add-on) on Github.
- Do not look for the extension in the Marketplace, it is not there.
- The various services offered by Infomaniak are all compatible with the corresponding standard protocols (S3/Swift for storage, for example), therefore if you encounter a problem with third-party software, contact its publisher or a Partner and consult the support policy as well as article 11.9 of the Infomaniak TOS.
Configure the Swiss Backup extension on Jelastic Cloud
Prerequisites
- Use Jelastic Cloud (at least one Jelastic environment must be active with the extension installed for your backups to be visible).
- Have a Swiss Backup Infomaniak space with a quota of available devices (minimum 1) for a Cloud backup.
- Add 1 device of type Cloud to obtain the OpenStack Swift parameters.
To add the extension useful to Swiss Backup on Jelastic Cloud:
- Log in to the Jelastic Cloud Dashboard of your server.
- Go to the node addons section:

- Search for and install the Backup / Restoration extension:

Two types of backups are then possible and detailed below:
- Back up specific folders.
- Create a snapshot of an entire node.
Back up specific folders
To back up specific directories:
- Enter the username and password according to the information specific to your device.
- Check Backup your data.
- Check Backup specific folders
- Enter the absolute path of the folders to back up in the Folders to backup field; it is possible to specify multiple folders by separating each path with a comma, for example:
/root/admin/, /home/user1/, /jelastic/containers/(in this example, 3 folders have been specified)…
Next, you need to define the frequency of backups (read more below).
Back up an entire node
To back up an entire node:
- Enter the username and password of your Swift device on Swiss Backup.
- Check Backup your data.
- Check Backup all files to back up the entire file system of a node; some files are automatically excluded:
- the folders
/dev,/proc,/sys,/run - unmounted file systems as part of the root partition, including virtual file systems

- the folders
Next, you need to define the frequency of backups.
Define backup frequency and retention policy
Two options are available to perform the backup:
- daily (at 20h UTC)
- every hour (at the start of the hour, for example at 13h, 14h, etc.)
You can define the retention period of your backups in years, months, days, and hours. To keep your backups indefinitely, simply set the parameters to 0.
If, for example, you perform backups every hour and set a retention policy of 1 year, 2 months, 4 days, 2 hours, this means that each backup will be available for a period of 1 year, 2 months, 4 days, 2 hours (=10322 backups). Note that backups are deleted every Sunday at 22h30 (UTC).
Attention: do not set all parameters to 0, as permanent backups can cause backup failures.
Recommended limits:
- Year: 1
- Month: 12
- Days: 99
For an hourly backup (every hour), it is recommended to have a maximum retention of one month. Beyond this value, some backups may fail.
Restore backups
Restore data from a node
- Log in to your server's Jelastic Dashboard.
- Once the extension is added and the username and password of your Swift device on Swiss Backup are provided, check Restore your data.
- Select the node containing the backup to restore:

- Select the backup to restore and the restore folder.
- Click the Restore button:

Restore specific folders from a snapshot (CLI)
Each backup corresponds to a unique ID. You can include and exclude folders from your snapshots during a restore. To view your snapshots:
. /home/.config/swissbackup/openrc.shrestic snapshots
- Use
--excludeand--includeto restrict the restore to a subset of files in the snapshot. For example, to restore a single file:restore 79766175 --target /tmp/restore-work --include /work/foo
There are case-insensitive variants of --exclude and --include called --iexclude and --iinclude. These options work the same way but ignore the case of the paths.
Modify the backup configuration
To do this:
- Log in to your server's Jelastic Dashboard.
- Once the extension is added and the username and password of your Swift device on Swiss Backup are provided, modify the configuration as desired.
The backup schedule is set by a cron job, and backups are performed using the restic tool.
To manually modify the backup schedule (CLI), as a root user, run the command crontab -l to display the current times:
- The line containing
retention-all.shcorresponds to the backup task - The line containing
purge.shcorresponds to the backup retention task
Example:

Modify the schedule using the command crontab -e.
You can modify the line composed of the script retention-all.sh or retention.sh, these scripts correspond to the launch of your backups. Warning: the crons have been designed to avoid issues between backups and multiple deletions. Be mindful of the time required for backups and deletions…
- Learn more about cronjobs: crontab.guru
- Learn more about restic: restic.net
Manually delete backups (CLI)
To do this:
- Source the configuration file:
. /home/.config/swissbackup/openrc.sh - Display available backups:
restic snapshots - Delete the desired backup:
restic forget IdBackup --prune - Delete all backups of a file except one:
restic forget --tag folders --keep-last 1 --prune

Delete backup scheduling
This button allows you to delete the scheduling of your backup:
Uninstall the Swiss Backup extension
It is necessary to delete the backup scheduling (see above) before being able to delete the Swiss Backup extension:

Link to this FAQ:
Has this FAQ been helpful?
This guide explains how to restore backups of previous versions of your files and other web data from your Infomaniak hosting, and how to set up an effective backup policy if the automatically and freely provided backups no longer meet your availability or security needs.
Web Hosting (Starter, Shared, Cloud Server)
Refer to these guides to restore automatic backups:
- of an entire hosting (FTP + MySQL),
- specific files on the hosting,
- specific databases,
- of a Web Application (Wordpress & Apps),
- Cloud Server SSH crons.
Refer to these guides to backup and restore:
- hosting with Swiss Backup and Restic (advanced),
- WordPress with Swiss Backup,
- WordPress with an extension.
Also refer to https://faq.infomaniak.com/snapshot.
Hosting v1 (old 60 Go offer)
- View and/or download the automatic backup (versioning) of your data on your FTP space under
/backupsand/backup_mysqlat the root of the domain (above/web). - Restore this data.
- Restore messages from Infomaniak automatic backups.
- Restore contacts or calendar events.
- Backup the current content of an email account:
- by downloading the current content locally,
- by duplicating all current content to a backup box,
- by copying future emails as they arrive to a backup box.
Domains / DNS Zones
- Restore deleted DNS records from Infomaniak automatic backups.
- Restore an expired domain in the redemption period.
Link to this FAQ:
Has this FAQ been helpful?
This guide contains essential resources to get started with your VPS Cloud or VPS Lite offered by Infomaniak.
Preamble
- Support for
UEFIandSecure bootis not planned in the VPS Cloud / VPS Lite offer. - It is not possible to migrate a
vmdkfile to make it work on OpenStack asKVMis used for virtualization. - In case of a problem, refer to the knowledge base.
- Contact Infomaniak support for questions concerning only the hardware part of the VPS.
Getting started with a VPS Cloud / VPS Lite Linux
Getting started with a VPS Cloud / VPS Lite Windows
Which version (Cloud or Lite) to choose for the VPS?
- The configurations (vCPU / Ram / disk space) differ depending on the VPS offers, starting at 1 vCPU with very competitive prices.
- Make your choice according to your needs.
- Upgrading a VPS Lite to a VPS Cloud is not yet possible automatically, and reducing a subscribed offer is not possible.
- Refer to this other guide if you wish to migrate from VPS Lite to VPS Cloud (the migration is irreversible).
- The same Linux distributions & Windows versions are offered (Windows is not available on the smallest configurations).
- Only the official images of the operating systems are installed, without any security software such as fail2ban pre-installed.
- However, the firewall is configurable from the Manager and a VPS also benefits from anti-DDoS protection.
- Regarding port opening, refer to this other guide.
- On VPS Lite, the bandwidth is limited to 500 mbit/s and the guaranteed SLA + snapshots are not available.
Link to this FAQ:
Has this FAQ been helpful?
This guide details the Managed Cloud Server offer from Infomaniak and the VPS offer from Infomaniak, intended for different uses.
Preamble
- Infomaniak offers two advanced hosting solutions:
- The Managed Cloud Server, which allows you to create multiple hosts (FTP/SSH spaces) on which you add your sites (Apache vhosts),
- And the VPS (Virtual Private Server), which offers complete administrative freedom and meets different needs.
Managed Cloud Server
The Cloud Server allows you to go beyond the limits of shared hosting. You can create and distribute your sites as you wish, define the root directory of each site, and adjust parameters such as memory_limit and max_execution_time.
Integrated tools are provided: cronjobs, Site Creator, simplified installation of WordPress, access and error logs (logs). It is also possible to add specific Apache modules or install a caching system.
The software environment is managed by Infomaniak (FastCGI, PHP-FPM). You do not have complete freedom to configure the server (no arbitrary software installation), but certain specific programs can be installed.
VPS (unmanaged)
The VPS provides full control over the server, but it is your responsibility. Infomaniak manages the hardware and installs the version of Linux or Windows chosen at the time of order. No software intervention is performed by Infomaniak: you administer the system, install, and configure the software.
You can restart the server via the Infomaniak Manager. A snapshot system is available (excluding the VPS Lite offer).
Video content and alternatives
If your project mainly involves a large volume of videos, it is often preferable to separate video streaming from the main hosting. Combined with shared hosting, the Infomaniak VOD/AOD space allows you to efficiently store and stream videos, support traffic spikes, and obtain detailed viewing statistics.
Migration between Cloud Server and VPS
There is no automatic migration solution between a Managed Cloud Server and a VPS. To switch from one offer to another, you need to cancel the product you no longer use and order the new offer. Infomaniak refunds, upon request, any new server if the cancellation occurs within 30 days of the order.
Link to this FAQ:
Has this FAQ been helpful?