
Knowledge base
1000 FAQs, 500 tutorials and explanatory videos. Here, there are only solutions!
The JavaScript_Object_Notation extension of PHP is available. It is useful for processing JSON data in your PHP web applications, whether for exchanging data with web services, storing configurations, or communicating with front-end applications written in JavaScript.
This guide explains how to modify an existing Web Hosting offer to, for example, host additional websites if the maximum site quota is reached, or to obtain a more recent hosting solution to benefit from the latest versions of PHP & MySQL.
Modify the web hosting offer to…
… order additional sites, disk space, or IPs
To access the web hosting configurator:
- Click here to access the management of your product on the Infomaniak Manager (need help?).
- Click on the action menu ⋮ located to the right of the item concerned.
- Click on Modify the offer:
- Increase the values you wish to modify.
- Click on the Next button to proceed to the payment of the modifications made to the hosting:

… switch to a more recent server
To obtain a hosting solution on a more recent server and thus benefit, among other things, from the latest versions of PHP & MySQL, you can either…
- … refer to this other guide by following the procedure indicated to the end:

- … refer to this other guide by following the procedure indicated up to point 4 then click on the button to update:

If no information banner is displayed, it means you already benefit from a recent hosting offer.
This guide explains how to rename a Web hosting present in the Infomaniak Manager within your Organization.
Preamble
- A Web hosting is, schematically, the storage space reserved for hosting one or more of your websites.
- By default, your Infomaniak hosting takes the name of the first site you add to this hosting:
- You own the domain name "domaine.xyz" and want a site with this domain name…
- You purchase a Web hosting that will be automatically named "domaine.xyz" even if you later add a second site "toto.com".
- The hosting can be renamed with a more generic name like "My Websites" to better reflect its actual content.
- This renaming is intended to improve the readability/understanding of the products listed in your Manager and has strictly no impact on the addresses of the websites: refer to this other guide to act on the domain name.
Rename a Web hosting
To access the Web hosting to perform the name change:
- Click here to access the management of your product on the Infomaniak Manager (need help?).
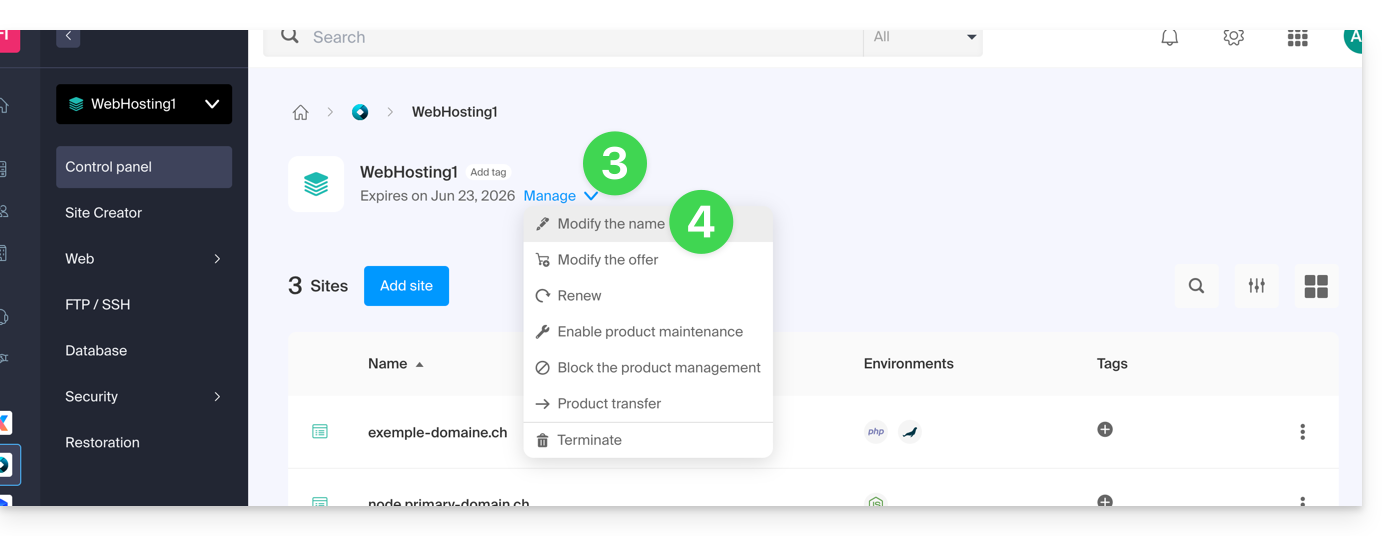
- Click directly on the name assigned to the product concerned.
- Click on the Manage button.
- Click on Edit the name:
- Enter the desired name.
- Click on Save.
This guide covers the ODBC functions of PHP.
The ODBC functions of PHP are only supported on Managed Cloud Server.
Open Database Connectivity functions
These are the functions used to interact with databases via the ODBC (Open Database Connectivity) interface, a standard for accessing data sources uniformly. Here are a few examples of using the ODBC functions of PHP:
- Ability to read data from an external database and display it on your website
- Insert or modify data in an external database
- Perform complex queries on an external database
The hosting platform for your sites *.perso.ch, *.users.ch, *.geneva-link.ch is evolving and this guide presents the procedure to follow to connect to your FTP space.
Modification of login credentials
The current hosting platform relies on the use of a prefix at the level of your FTP username. This is in the following form: persoch_
Thus, if your username was infomaniak, you will now need to use the following user to connect via FTP: persoch_infomaniak.
This guide explains how to work without the PECL SSH2 client module, which is unavailable on Infomaniak Web Hosting and Cloud Servers, by using the phpseclib library instead. This library works with native PHP without requiring any specific extension.
Preamble
- The use of
PECL SSH2 clientresults in errors of typeNo compatible key exchange algorithms foundorUnable to exchange encryption keysin its latest available version. Phpsecliballows:- SSH authentication via password or private key.
- Remote command execution.
- Secure file transfer (SFTP).
- SSH key management.
Using phpseclib
To integrate an SSH connection into a PHP script, use phpseclib as follows:
use phpseclib3\Net\SSH2;
use phpseclib3\Crypt\PublicKeyLoader;

$ssh = new SSH2('domain.xyz');
$key = PublicKeyLoader::load(file_get_contents('/path/to/private_key'));

if (!$ssh->login('utilisateur', $key)) {
    exit('Authentication Failed');
}

echo $ssh->exec('ls -la');This guide covers the Apache module mod_auth_mysql which allows user authentication and access authorization via a MySQL database.
With shared hosting
The module mod_auth_mysql is not available with shared hosting; you need to consider a Cloud Server or use PHP scripts and sessions.
This guide explains how to access InnoDB at Infomaniak.
Use the MySQL InnoDB storage engine
As soon as your Infomaniak hosting gives you access to MySQL / MariaDB databases, InnoDB is available at the same time (MyISAM previously).
InnoDB offers advanced features such as ACID transactions, row-level locks, full-text indexes, etc. You can take advantage of these features by using appropriate SQL statements in your queries.
This guide concerns the installation of PHP extensions on Infomaniak Web Hosting.
Using Zend PHP extensions
- Zend Guard Loader is a PHP extension that allows you to run PHP scripts encrypted via Zend Guard.
- Zend Guard Loader is installed by default for PHP <= 5.6 on all web hosting and is not available for PHP versions >= 5.6.
- Since PHP 5.3.x, the Zend Optimizer module has been replaced by ZendGuardLoader
- The ZendOPCache extension requires a Cloud Server configured with PHP 5.5 minimum
This guide concerns YAZ a software library used to implement the Z39.50 protocol, an information retrieval protocol that allows communication between different library systems (ILS) such as PMB widely used in France.
Infomaniak for efficient library management
On the Web Hosting Infomaniak, PMB is supported and YAZ is activated by default.
However, if you encounter errors such as Call to undefined function yaz_connect() it will be necessary to open ports via the Manager. Port 210 is the standard port used for Z39.50 communications but do not hesitate to consult the documentation of your applications.
For the old Infomaniak hosting plans, consider a change of offer.
Access to the system commands who and users is prohibited for LDAP users on all Infomaniak servers.
This guide explains how to specify a file that will be loaded before the desired page or at the beginning of each PHP script executed on your server, included as if it had been called with the require() function, but more globally using the PHP directive auto_prepend_file.
Preamble
- For example, to declare the headers of a website, you can create a
headers.phpfile that contains PHPheader()functions and that is prepended at the beginning of each PHP file…- … via a
.user.inifile (specific to a folder), - … or via the site configuration in the Manager (global) as explained below.
- … via a
- For additional help contact a partner or launch a free tender — also discover the role of the host.
Include a file globally from the Manager
To access the website management:
- Click here to access the management of your product on the Infomaniak Manager (need help?).
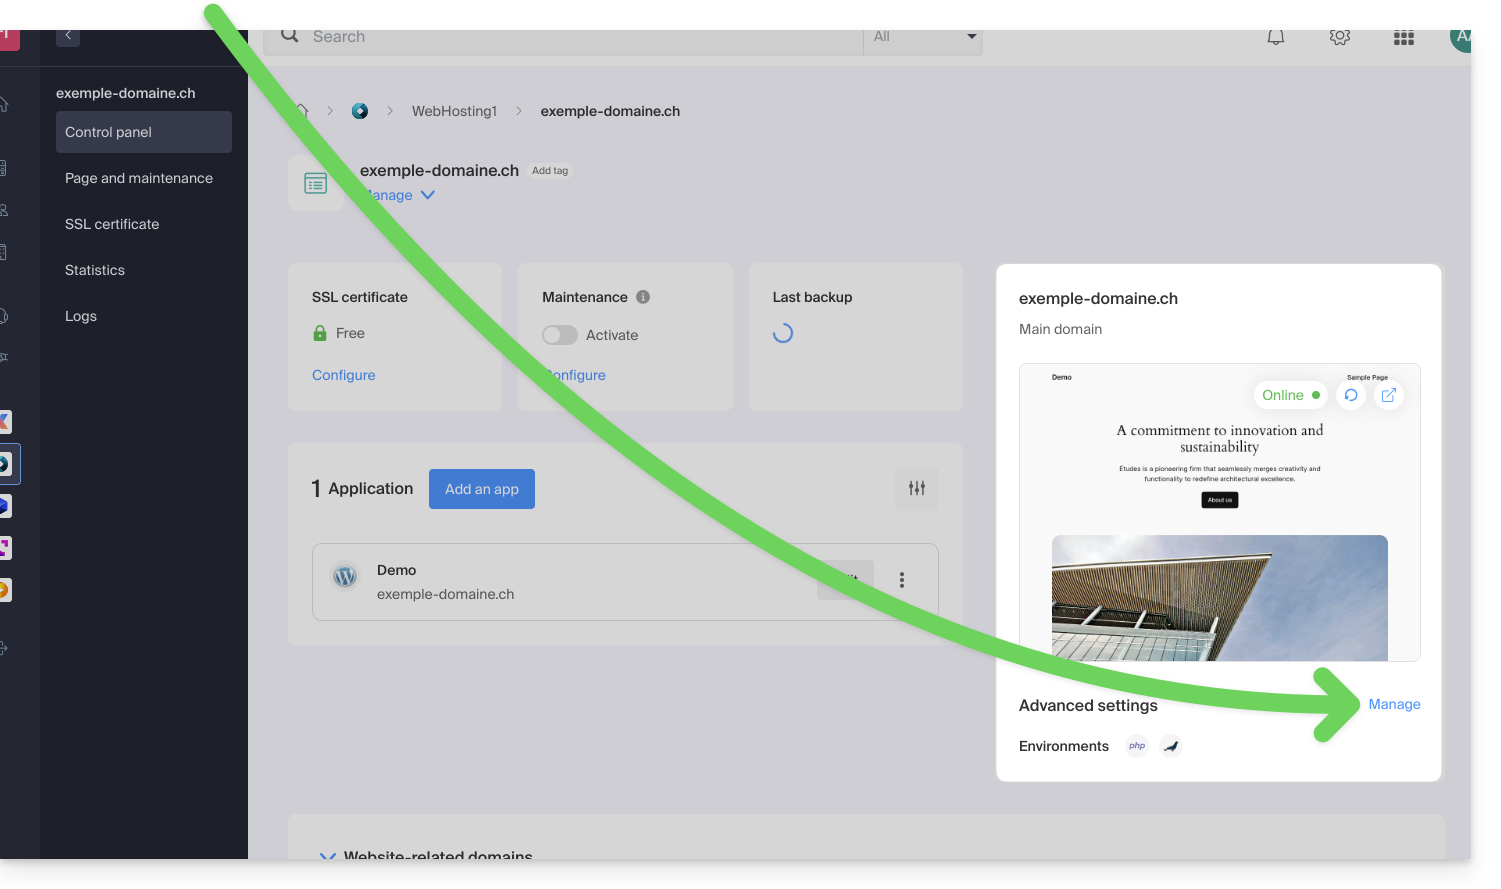
- Click directly on the name assigned to the product concerned:
- Click on Manage under Advanced settings:
- Click on the PHP / Apache tab.
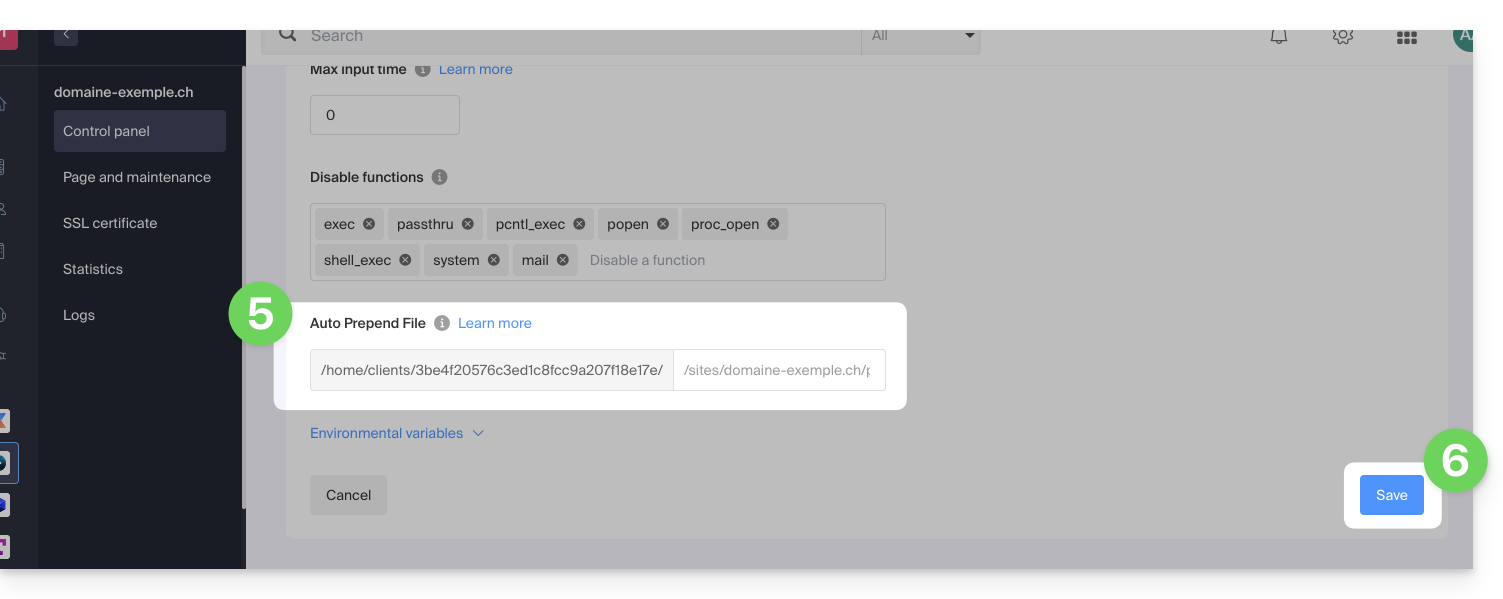
- Complete the line concerned by entering the path of the file to include.
- Click on the button at the bottom of the page to save:
After defining this directive, all PHP pages on your server will automatically include the specified file before executing their own code.
The headers defined in a .htaccess file are only valid for non-PHP (i.e., static) content.
Infomaniak uses php-fpm which receives the various headers via apache fast_cgi. In the RFC of cgi_www the header Strict-Transport-Security is not part of the headers passed via CGI and the Apache documentation confirms this. See this other RFC.
This guide will help you if, for example, you want to deploy a package like pymysql and it requires a version of python higher than the one offered on your hosting.
Preamble
- Anaconda is a free and open-source distribution of the Python programming language. This distribution aims to simplify package management and deployment.
- It is recommended to use conda delivered with a recent version of python and that installs in the user space, so that there is no conflict with the python system (as in a virtual environment, which always requires a system installation of the desired version).
- Refer to the official documentation.
- For additional help contact a partner or launch a free tender — also discover the role of the host.
Download the installer
uid165116@od-12345:~$ wget https://repo.anaconda.com/miniconda/Miniconda3-py37_4.10.3-Linux-x86_64.sh
--2021-07-28 18:21:10--  https://repo.anaconda.com/miniconda/Miniconda3-py37_4.10.3-Linux-x86_64.sh
Resolving repo.anaconda.com (repo.anaconda.com)... 2606:4700::6810:8303, 2606:4700::6810:8203, 104.16.131.3, ...
Connecting to repo.anaconda.com (repo.anaconda.com)|2606:4700::6810:8303|:443... connected.
HTTP request sent, awaiting response... 200 OK
Length: 89026327 (85M) [application/x-sh]
Saving to: ‘Miniconda3-py37_4.10.3-Linux-x86_64.sh’
Miniconda3-py37_4.10.3-Linux-x86_64.sh 100% [==============================================>] 84.90M 203MB/s in 0.4s 18:21:11 (100 MB/s) - ‘Miniconda3-py37_4.10.3-Linux-x86_64.sh’ saved [89026327/89026327]Check the hash
uid165116@od-12345:~$ test $(md5sum Miniconda3-py37_4.10.3-Linux-x86_64.sh | awk '{print $1}') == "9f186c1d86c266acc47dbc1603f0e2ed" && echo "OK"
OK
Start the installation
uid165116@od-12345:~$ bash Miniconda3-py37_4.10.3-Linux-x86_64.sh -b
PREFIX=/home/clients/fc84cbbf6dcbd6dd76b15d3e56c1789f/miniconda3
Unpacking payload ...
Collecting package metadata (current_repodata.json): done
Solving environment: done
## Package Plan ##environment location: /home/clients/fc84cbbf6dcbd6dd76b15d3e56c1789f/miniconda3added / updated specs:
- _libgcc_mutex==0.1=main
- _openmp_mutex==4.5=1_gnu
- brotlipy==0.7.0=py37h27cfd23_1003
- ca-certificates==2021.7.5=h06a4308_1
- certifi==2021.5.30=py37h06a4308_0
- cffi==1.14.6=py37h400218f_0
- chardet==4.0.0=py37h06a4308_1003
- conda-package-handling==1.7.3=py37h27cfd23_1
- conda==4.10.3=py37h06a4308_0
- cryptography==3.4.7=py37hd23ed53_0
- idna==2.10=pyhd3eb1b0_0
- ld_impl_linux-64==2.35.1=h7274673_9
- libffi==3.3=he6710b0_2
- libgcc-ng==9.3.0=h5101ec6_17
- libgomp==9.3.0=h5101ec6_17
- libstdcxx-ng==9.3.0=hd4cf53a_17
- ncurses==6.2=he6710b0_1
- openssl==1.1.1k=h27cfd23_0
- pip==21.1.3=py37h06a4308_0
- pycosat==0.6.3=py37h27cfd23_0
- pycparser==2.20=py_2
- pyopenssl==20.0.1=pyhd3eb1b0_1
- pysocks==1.7.1=py37_1
- python==3.7.10=h12debd9_4
- readline==8.1=h27cfd23_0
- requests==2.25.1=pyhd3eb1b0_0
- ruamel_yaml==0.15.100=py37h27cfd23_0
- setuptools==52.0.0=py37h06a4308_0
- six==1.16.0=pyhd3eb1b0_0
- sqlite==3.36.0=hc218d9a_0
- tk==8.6.10=hbc83047_0
- tqdm==4.61.2=pyhd3eb1b0_1
- urllib3==1.26.6=pyhd3eb1b0_1
- wheel==0.36.2=pyhd3eb1b0_0
- xz==5.2.5=h7b6447c_0
- yaml==0.2.5=h7b6447c_0
- zlib==1.2.11=h7b6447c_3The following NEW packages will be INSTALLED: _libgcc_mutex pkgs/main/linux-64::_libgcc_mutex-0.1-main
_openmp_mutex pkgs/main/linux-64::_openmp_mutex-4.5-1_gnu
brotlipy pkgs/main/linux-64::brotlipy-0.7.0-py37h27cfd23_1003
ca-certificates pkgs/main/linux-64::ca-certificates-2021.7.5-h06a4308_1
certifi pkgs/main/linux-64::certifi-2021.5.30-py37h06a4308_0
cffi pkgs/main/linux-64::cffi-1.14.6-py37h400218f_0
chardet pkgs/main/linux-64::chardet-4.0.0-py37h06a4308_1003
conda pkgs/main/linux-64::conda-4.10.3-py37h06a4308_0
conda-package-han~ pkgs/main/linux-64::conda-package-handling-1.7.3-py37h27cfd23_1
cryptography pkgs/main/linux-64::cryptography-3.4.7-py37hd23ed53_0
idna pkgs/main/noarch::idna-2.10-pyhd3eb1b0_0
ld_impl_linux-64 pkgs/main/linux-64::ld_impl_linux-64-2.35.1-h7274673_9
libffi pkgs/main/linux-64::libffi-3.3-he6710b0_2
libgcc-ng pkgs/main/linux-64::libgcc-ng-9.3.0-h5101ec6_17
libgomp pkgs/main/linux-64::libgomp-9.3.0-h5101ec6_17
libstdcxx-ng pkgs/main/linux-64::libstdcxx-ng-9.3.0-hd4cf53a_17
ncurses pkgs/main/linux-64::ncurses-6.2-he6710b0_1
openssl pkgs/main/linux-64::openssl-1.1.1k-h27cfd23_0
pip pkgs/main/linux-64::pip-21.1.3-py37h06a4308_0
pycosat pkgs/main/linux-64::pycosat-0.6.3-py37h27cfd23_0
pycparser pkgs/main/noarch::pycparser-2.20-py_2
pyopenssl pkgs/main/noarch::pyopenssl-20.0.1-pyhd3eb1b0_1
pysocks pkgs/main/linux-64::pysocks-1.7.1-py37_1
python pkgs/main/linux-64::python-3.7.10-h12debd9_4
readline pkgs/main/linux-64::readline-8.1-h27cfd23_0
requests pkgs/main/noarch::requests-2.25.1-pyhd3eb1b0_0
ruamel_yaml pkgs/main/linux-64::ruamel_yaml-0.15.100-py37h27cfd23_0
setuptools pkgs/main/linux-64::setuptools-52.0.0-py37h06a4308_0
six pkgs/main/noarch::six-1.16.0-pyhd3eb1b0_0
sqlite pkgs/main/linux-64::sqlite-3.36.0-hc218d9a_0
tk pkgs/main/linux-64::tk-8.6.10-hbc83047_0
tqdm pkgs/main/noarch::tqdm-4.61.2-pyhd3eb1b0_1
urllib3 pkgs/main/noarch::urllib3-1.26.6-pyhd3eb1b0_1
wheel pkgs/main/noarch::wheel-0.36.2-pyhd3eb1b0_0
xz pkgs/main/linux-64::xz-5.2.5-h7b6447c_0
yaml pkgs/main/linux-64::yaml-0.2.5-h7b6447c_0
zlib pkgs/main/linux-64::zlib-1.2.11-h7b6447c_3Preparing transaction: done
Executing transaction: done
installation finished.Launch conda
uid165116@od-12345:~$ source <(~/miniconda3/bin/conda shell.bash hook)Install pymysql (for example)
(base) uid165116@od-12345:~$ python3 -V
Python 3.7.10
(base) uid165116@od-12345:~$ pip3 install pymysql --user
Collecting pymysql
Downloading PyMySQL-1.0.2-py3-none-any.whl (43 kB)
|████████████████████████████████| 43 kB 892 kB/s
Installing collected packages: pymysql
Successfully installed pymysql-1.0.2This guide explains how to adjust the configuration of a Node.js site hosted on the Infomaniak infrastructure to adapt the behavior of your application according to its evolution, its dependencies or your technical preferences.
Prerequisites
- Install a Node.js site on your hosting.
- Test your modifications locally before applying them to production.
- Check that your scripts (
start,build) are properly defined in yourpackage.jsonfile. - If you modify the structure of your project, remember to adjust the execution folder and the associated commands.
- The listening port defined in the Manager must absolutely correspond to the one used in the application's code.
Access the configuration
Each site has a dedicated dashboard to control the application (start, stop, restart), access the execution console, manage Node.js versions, configure domains and activate SSL certificates:
- Click here to access the management of your product on the Infomaniak Manager (need help?).
- Click directly on the name assigned to the relevant product.
- You can open the console, stop the project (a maintenance page will be applied) or restart it.
- To access the advanced settings, click on Manage under Advanced Settings:

- Click on the Node.js tab to access the settings:

Apply the changes
To do this:
- Save the changes from the Manager interface.
- Restart your application for the changes to take effect.
Refer to this other guide if you encounter any issues.
Main commands
Execution folder
The execution folder indicates the location on the server where build and launch commands will be executed. It should point to the root directory of your application, i.e., where your package.json file is located.
For example, you can specify for the project root:
./or if your application is in a subfolder named app:
./appor if it is located in a backend folder:
./backendOptional build command
If your Node.js application requires a compilation step before it can be run, enter a build command in the designated field. This command will be executed automatically before the application starts.
For example, you can specify:
npm install && npm run buildor, if you use yarn :
yarn install && yarn buildIf your project does not require any compilation, this field can be left empty.
Launch command
The launch command corresponds to the instruction used to start your application. It must be identical to the one you use locally to run the project.
For example, you can specify:
node index.jsnpm startor
yarn startThis command should allow you to directly start the server or the entry point of your application as defined in your development environment.
Listening port
Your application must listen on a specific port that is defined in the Manager. This port is passed to your application via an environment variable PORT.
Example in your Node.js code:
const port = process.env.PORT || 8080;
app.listen(port, () => {
  console.log(`Application lancée sur le port ${port}`);
});
Make sure this port is properly accounted for in your code.
Node.js version
You can select the Node.js version that your site should use. It is recommended to use a stable and always supported version to ensure the security and compatibility of your application.
This guide provides suggestions for improving the response time of your Web Hosting with Infomaniak.
Preamble
- TTFB, or *Time To First Byte*, is a unit of measurement used to evaluate the response speed of a web server.
- TTFB measures the time between an HTTP request from a user or browser and the receipt of the first byte of the page to be viewed.
- This delay is particularly important. It can be part of the SEO criteria considered by search engines like Google.
- Make your life easier! If needed, local partners recommended by Infomaniak can handle these procedures. Launch a free call for tenders. They handle everything, freeing you from technical details.
Suggestions for improving TTFB
To speed up the site and achieve a better TTFB value:
- Use a content delivery network (CDN).
- Optimize the site's code.
- Optimize database queries.
- Limit HTTP requests.
- Embed CSS and JavaScript in your HTML pages to avoid calling external resources.
- Use an RFPL (*Response First, Process Later*) caching system.
Refer to the article by Criticalcase (in English) for more information.
Test the server response speed
If you are unsure about the server response speed, you can create a file called index2.html that will be saved at the same level as the index.html (or .php) file, and thus perform an optimization test (e.g., domain.xyz/index2.html) without the main site/CMS being taken into account.
If the response time is normal, this means that the slowness comes from the site and not the server.
To go further
Refer to the following resources:
- Google recommendations
- GTmetrix recommendations
- Test your site's response time from multiple countries
- Test your site's response time
- Optimize a site
WARNING: This method modifies Magento core files to disable advanced privilege checks (triggers, routines), which is a risky practice in terms of security, stability, and complicates future updates.
Today, Magento (now Adobe Commerce or Magento Open Source) is a modern platform that requires a server environment that meets its strict prerequisites. The current stable version is often 2.4.8 or a more recent patch version. These versions require up-to-date technologies such as PHP 8.2/8.3, MySQL 8.0/MariaDB 10.6 and a dedicated search engine such as Elasticsearch or OpenSearch.
For any new installation or migration, it is strongly recommended to use the latest stable version without any manual modification of the source code. You must choose a high-performance hosting type (Cloud Server or VPS/Dedicated) that guarantees access to all the system privileges required for secure and stable operation.
Absolutely avoid using the old patch below. Note that this patch is unnecessary in case of installation on a Cloud Server.
This guide explains how to patch the Magento installation so that it can be performed on an Infomaniak shared hosting, even without triggers & routines type privileges.
Resolve Magento 2 installation issues
Edit the file DbValidator.php:
--- setup/src/Magento/Setup/Validator/DbValidator.php.orig 2019-04-11 17:01:45.154767893 +0200
+++ setup/src/Magento/Setup/Validator/DbValidator.php 2019-04-13 21:37:02.560386985 +0200
@@ -150,12 +150,8 @@
'ALTER',
'CREATE TEMPORARY TABLES',
'LOCK TABLES',
- 'EXECUTE',
'CREATE VIEW',
- 'SHOW VIEW',
- 'CREATE ROUTINE',
- 'ALTER ROUTINE',
- 'TRIGGER'
+ 'SHOW VIEW'
];
// check global privileges
In case of SOAP/PHPfpm error
Depending on the version of Magento used, the soap function does not work correctly and may return the following error message: «Uncaught SoapFault exception: [Client] looks like we got no XML document».
The problem does not come from a bad server configuration, but rather from a poor design of Magento which does not take into account the case of PHP execution in an FPM environment. Thus, the SOAP requests generated by Magento contain double headers (non-compliant with the SOAP specification) and generate an error.
Be aware of this solution (not developed by Infomaniak).
This guide explains how to increase the max_children value on Cloud Server to increase the number of simultaneous PHP processes that can be used by your site. This will be very useful for resolving infinite page loading issues on your site.
Preamble
- By default on all hosting, the
max_childrenlimit is set to 20.- Although it is possible to increase this value from the Infomaniak Manager, the
max_childrenlimit is automatically adjusted based on the configuration of your Cloud Server. - To increase this limit on shared hosting, migrate to Cloud Server.
- Although it is possible to increase this value from the Infomaniak Manager, the
- To understand how to accurately calculate the necessary
max_children, refer to this article on the subject.
Increase the max_children value
Prerequisites
- Ensure that you have the necessary resources on the Cloud Server.
- Ensure that all resources of the Cloud Server are not being used; if it turns out that they are fully used, increasing the
max_childrenvalue will have no effect (Modify the resources of the Cloud Server). - Monitor the resources of your server, in case the resources of your server are reached, it will be necessary to check the optimization of the processes and your site before considering increasing the value
max_children. - Consult the PHP error reports from the
/ik-logsfolder (master process php logs - file name: php-fpm.log) to verify if the "max_children" limit has been exceeded... example of error:[05-Jul-2024 09:08:58] WARNING: [pool www.infomaniak.ch] server reached max_children setting (20), consider raising it
To access the management of PHP / Apache parameters of the site for which you need to increase the max_children value on Cloud Server, refer to this other guide.
You will be able to...
- … choose a new
max_childrenvalue: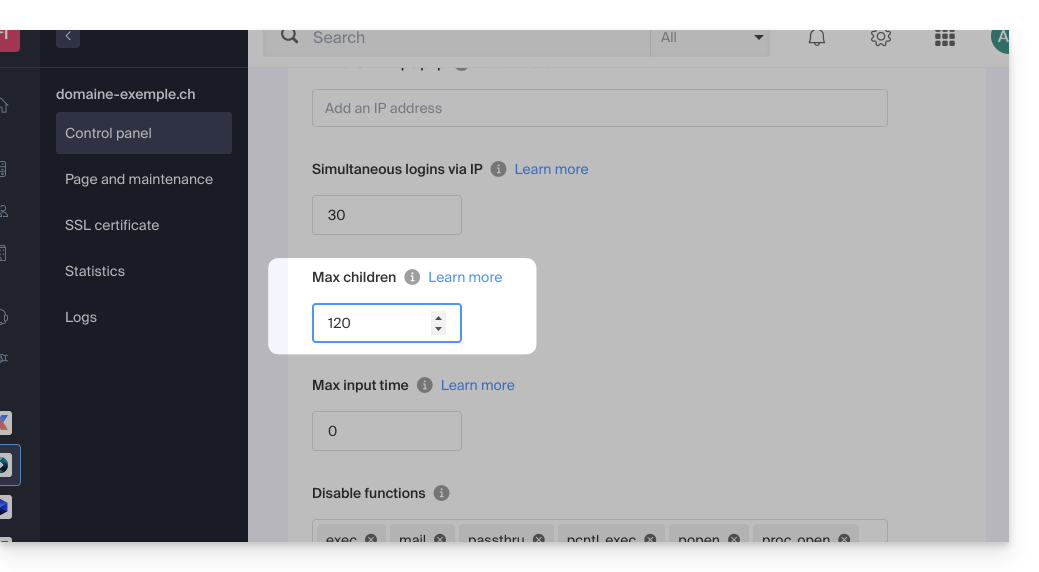
Do not forget to save the changes at the bottom of the page.
Limits depending on the server
Limit of max_children depending on the resources of the Cloud Server:
| Cloud Server Configuration | max_children |
|---|---|
| 2 CPU / 6 Go RAM | 20 |
| 4 CPU / 12 Go RAM | 40 |
| 6 CPU / 18 GB RAM | 60 |
| 8 CPU / 24 GB RAM | 80 |
| 12 CPU / 36 GB RAM | 120 |
| 16 CPU / 48 GB RAM | 160 |
| 24 CPU / 72 GB RAM | 240 |
| 32 CPU / 96 or 128 GB RAM | 320 |
This guide explains how to change the value of the directive php_value include_path.
Change the include_path
Like any other PHP parameter, include_path is defined in the .user.ini file.
Here is an example of a path to use in the .user.ini file:
include_path = .:/home/clients/123456789a12345b12fc345d/web/www.domainetest.abc/public/abc/includeRefer to this other guide regarding phpinfo to verify that your new directive is taken into account.
The Apache module mod_userdir is not available.
Writing to the /etc and /lib directories is disabled for security reasons.