
Knowledge base
1000 FAQs, 500 tutorials and explanatory videos. Here, there are only solutions!
This guide is intended for users who have chosen Infomaniak, a hosting provider committed to the planet: you will find below the details of the calculation method used to display CO2 on invoices, as well as tips to reduce your own digital footprint.
Preamble
- For Web hosting and Mail services, Infomaniak displays the amount of CO2 emitted annually, a figure based on a rigorous Life Cycle Analysis (LCA) method that adds two key factors:
- Material impact (Full life cycle)
- Thanks to the emission factors of the ResilioDB database, the calculation includes the emissions generated during the manufacturing (BLD), transport (DIS) and end-of-life/recycling (EOL) of each piece of equipment (servers, RAM, disks, etc.).
- Energy impact (Actual consumption)
- The actual electrical consumption of the servers is measured via the IPMI probes.
- This energy is then converted into CO2 equivalent according to Infomaniak's specific energy mix, which is very low in carbon (11.77g CO2eq/kWh).
- Material impact (Full life cycle)
- The total impact is then distributed according to the unit of use of the clients (per hosted website or per mailbox).
How can you act at your level?
If the hosting provider optimizes its infrastructures upstream, the end user also plays a key role. Here's how to reduce the footprint of your services.
For websites
The goal is to minimize the energy consumption of the servers and the visitors' terminals:
- Technical optimization: Compress images, minify scripts, and use modern formats (WebP).
- Clean design: Limit autoplay videos, ads, and heavy scripts that consume bandwidth.
- Best practices: For WordPress, it is recommended to consult the GreenIT sheets.
For email
Email communication can also be optimized:
- Sobriety: Prefer plain text emails over HTML and limit heavy graphical signatures.
- Attachments: Prefer sending download links (via kDrive or SwissTransfer) to large attachments, or use the compressed PDF format.
- Cleanup: Unsubscribe from unnecessary newsletters and use tracking tools to avoid sending unopened emails.
It is recommended to regularly monitor statistics to improve ecological performance. In the meantime, while waiting for Infomaniak's future integrated tools, it is possible to audit the impact of web pages via GreenFrame.io.
This guide will assist you in installing Ghost on Infomaniak, an ideal platform for blogs (regular writing, editorial format) and content-focused publishing sites, such as Substack or Medium.
Based on Node.js and using Markdown for writing, Ghost stands out for its lightness, whereas WordPress, although more flexible and universal, is heavier.
Prerequisites
- Have installed a blank Node.js type site on Infomaniak Web Hosting.
- Create an SSH access.
- Create a database.
- Have a valid and functional email address (especially the forgotten password features).
- Stop your Node.JS application before performing the following steps!
Installing Ghost
To do this:
- Connect to the server via SSH (need help?).
Clone and run the installation script (execute these commands one by one):
git clone https://github.com/Infomaniak/hosting-tools.git
cd hosting-tools/h3-ghost
bash ./install.sh
The script will now:
- Ask you a few questions (such as the URL of your site, database information, etc.)…
- Download and configure Ghost automatically…
- Take a few minutes — be patient!
Answer the questions carefully using the database details you noted earlier. Do not close the terminal until it has finished!
Configure your hosting (via the Infomaniak Manager)
Once the script is complete, go to your Infomaniak Control Panel:
- Click here to access the management of your product on the Infomaniak Manager (need help?).
- Click directly on the name assigned to the product concerned.
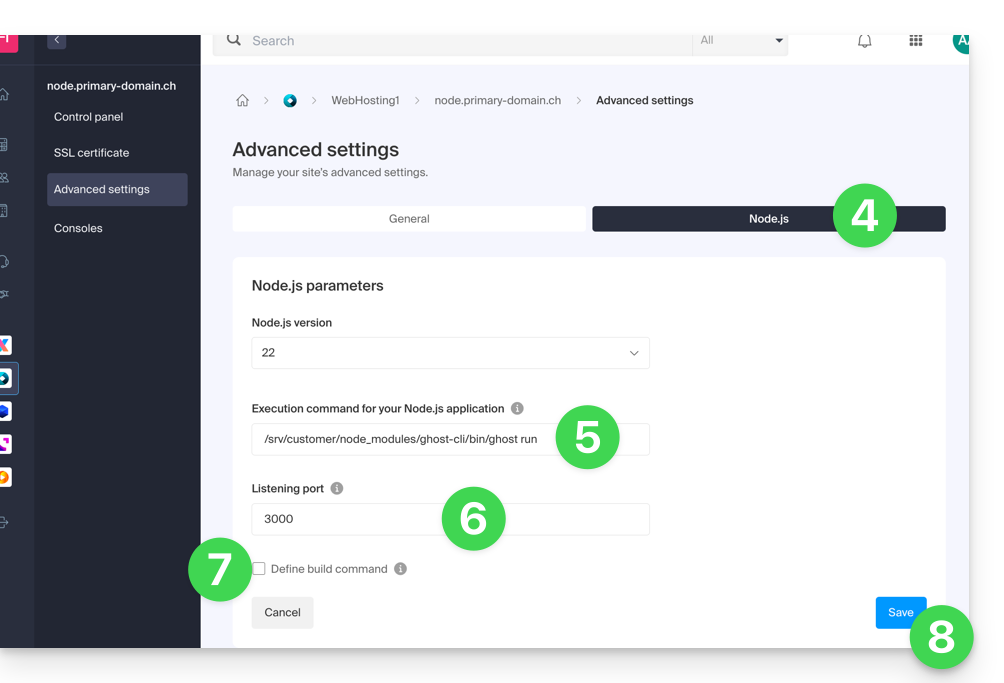
- Click on Manage under Advanced settings:

- Click on the Node.js tab to access the settings.
In the execution command field, enter:
/srv/customer/node_modules/ghost-cli/bin/ghost run- Check that the port number is
3000. - Command case build : disable it.
- Click the Save button at the bottom of the page:
- On the main page, click the Start button (or Restart if already running).
- Observe the logs showing the creation of the database and the startup of the application:

Done! Access your Ghost blog
Then go to the URL of your site to start:
- Open your browser and go to
https://votresite.com/ghost(replacevotresite.comwith your current domain). - The first time:
- You will create an administrator account (your login for the blog)...
- Then, you can start writing articles!
User / mail configuration
To create the first user, add /ghost to the URL of your site (for example https://ghost.domain.xyz/ghost) and follow the assistant.
You can also configure the "member portal support address": when new members want to register, the portal sends the double opt-in confirmation from a specific address. By default, it is the “noreply” address of your domain. To update it, navigate to “Settings”, “Membership”, “Portal settings”, “Customize”, and “Account page”:
Resolve a technical incompatibility between Ghost and MariaDB
There is a compatibility issue between Ghost and the MariaDB database. This results in this type of error:
[2025-01-01 12:54:28] ERROR "GET /ghost/api/admin/posts/6834625e35802b06f1496305/?formats=mobiledoc%2Clexical&include=tags%2Cauthors%2Cauthors.roles%2Cemail%2Ctiers%2Cnewsletter%2Ccount.conversions%2Ccount.clicks%2Csentiment%2Ccount.positive_feedback%2Ccount.negative_feedback" 400 27ms
Could not understand request.
Error ID:
8f2b0d90-3a30-11f0-a25f-fd9c83e1cf02
Error Code:
ER_BAD_FIELD_ERROR
----------------------------------------
Error: select `posts`.*, (with `k` as (select `member_id` from `members_subscription_created_events` where posts.id = members_subscription_created_events.attribution_id union select `member_id` from `members_created_events` where posts.id = members_created_events.attribution_id) select count(*) from `k`) as `count__conversions`, `posts`.*, (select count(distinct `members_click_events`.`member_id`) from `members_click_events` inner join `redirects` on `members_click_events`.`redirect_id` = `redirects`.`id` where posts.id = redirects.post_id) as `count__clicks`, `posts`.*, (select COALESCE(ROUND(AVG(score) * 100), 0) from `members_feedback` where posts.id = members_feedback.post_id) as `count__sentiment`, `posts`.*, (select count(*) from `members_feedback` where posts.id = members_feedback.post_id AND members_feedback.score = 0) as `count__negative_feedback`, `posts`.*, (select sum(`score`) from `members_feedback` where posts.id = members_feedback.post_id) as `count__positive_feedback` from `posts` where (`posts`.`type` = 'post' and `posts`.`status` in ('draft', 'published', 'scheduled', 'sent')) and `posts`.`id` = '2834125e33802b06e1433305' limit 1 - Unknown column 'posts.id' in 'where clause'
at Child.<anonymous> (/srv/customer/sites/ghost.domain.xyz/versions/5.120.2/core/server/models/base/plugins/crud.js:194:31)
at Packet.asError (/srv/customer/sites//versions/5.120.2/node_modules/mysql2/lib/packets/packet.js:740:17)
at Query.execute (/srv/customer/sites//versions/5.120.2/node_modules/mysql2/lib/commands/command.js:29:26)
at Connection.handlePacket (/srv/customer/sites//versions/5.120.2/node_modules/mysql2/lib/base/connection.js:475:34)
at PacketParser.onPacket (/srv/customer/sites//versions/5.120.2/node_modules/mysql2/lib/base/connection.js:93:12)
at PacketParser.executeStart (/srv/customer/sites//versions/5.120.2/node_modules/mysql2/lib/packet_parser.js:75:16)
at Socket.<anonymous> (/srv/customer/sites//versions/5.120.2/node_modules/mysql2/lib/base/connection.js:100:25)
at Socket.emit (node:events:518:28)
at addChunk (node:internal/streams/readable:561:12)
at readableAddChunkPushByteMode (node:internal/streams/readable:512:3)
at Readable.push (node:internal/streams/readable:392:5)
at TCP.onStreamRead (node:internal/stream_base_commons:189:23)
Some SQL queries generated by Ghost, using common table expressions (CTEs) nested in scalar subqueries, cause HTTP 400 errors when executed on MariaDB. These queries are valid in MySQL 8, which supports CTEs in scalar subqueries, but not in MariaDB up to version 10.6.
A patch exists to adapt Ghost's behavior and avoid these errors (refer to the official guide).
To use this patch, enter this command:
cd current
curl -L https://gist.githubusercontent.com/reneluria/8cbbfbc001e542c77d6d5887fbafe5d3/raw/65e0ce31753b4687d0eb67fc030734a35d3ffbad/ghost-post.patch | patch -p0
For additional help contact a partner or launch a free tender — also discover the role of the host.
This guide presents the various actions that are possible on a MySQL table depending on the rights granted to a user.
Actions on tables according to user rights…
... on shared web hosting
Read + Write + Admin
GRANT SELECT, INSERT, UPDATE, DELETE, CREATE, DROP, INDEX, ALTER, CREATE TEMPORARY TABLES, LOCK TABLES, CREATE VIEW, SHOW VIEWRead + Write
GRANT SELECT, INSERT, UPDATE, DELETE, CREATE TEMPORARY TABLES, LOCK TABLERead
GRANT SELECT... on Cloud Server
Read + Write + Admin
GRANT ALLRead + Write
GRANT SELECT, INSERT, UPDATE, DELETE, CREATE TEMPORARY TABLES, LOCK TABLESRead
GRANT SELECTThis guide presents the open ports available for Node.js sites (only) hosted by Infomaniak.
Outbound open ports
Web
- HTTP (tcp/80)
- Alternative HTTP (tcp/8080)
- HTTPS (tcp/443)
- FTP Data (tcp/20)
- FTP Control (tcp/21)
- POP3 (tcp/110)
- IMAP (tcp/143)
- SMTP submission (+ STARTTLS) (tcp/587)
- SMTPS (tcp/465)
- IMAPS (tcp/993)
- POP3S (tcp/995)
DB
- MySQL (tcp/3306)
- MongoDB (tcp/27017)
- PostgreSQL (tcp/5432)
- Redis (tcp/6379)
- Redis TLS (tcp/6380)
- ElasticSearch (tcp/9200)
Misc
- SSH (tcp/22)
- Git pack transfer (tcp/9418)
Open inbound ports
- HTTP (tcp/80)
- HTTPS (tcp/443)
- SSH (tcp/22)
This guide is for developers who want to use the ORM Propel on a hosting environment where command line access is restricted.
Preamble
- The ORM allows you to link the objects of an application to the tables of a database. You manipulate the data via
PHPobjects rather than writing rawSQL. Propelis the abstraction layer that manages these interactions (relations, joins, pagination) to simplify code maintenance.
Particularities & limitations
Propelis not pre-installed viaPear. You must install it manually in your project.- It is imperative to download the "Conventional Package" version of
Propel. - CLI commands (such as
propel-gen) are not executable on the server. - Consequently,
Propelis only used in "Runtime" mode in production. Class generation (build) must be performed locally. - The workflow consists of generating the code in a development environment and then transferring the resulting files to the server.
Dependencies
- The complete set of libraries required for
Propelis available, except forPhing. - The absence of
Phingdoes not impact production, as this tool is only required during the local generation phase.
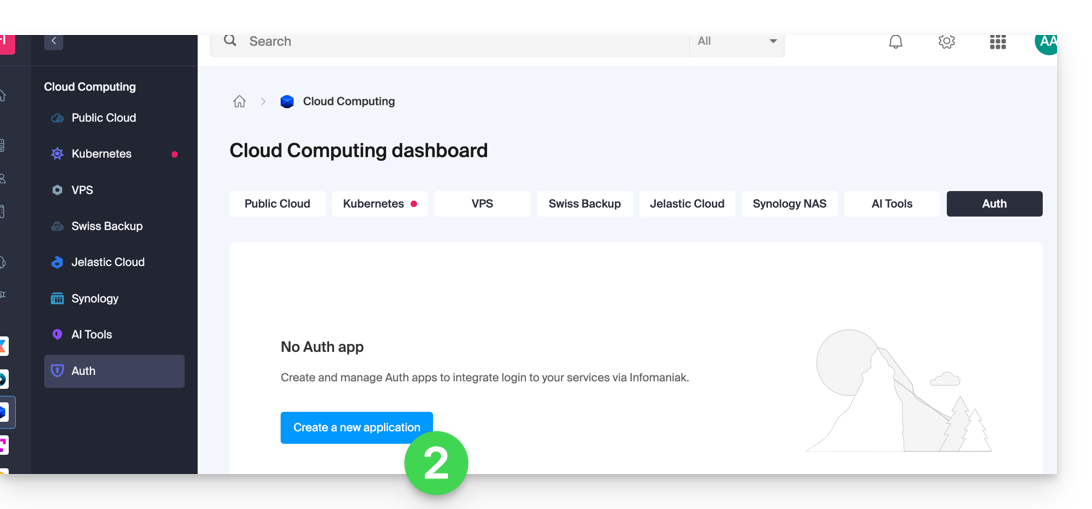
This guide concerns OAuth2 applications to connect to your external services via your Infomaniak login ID.
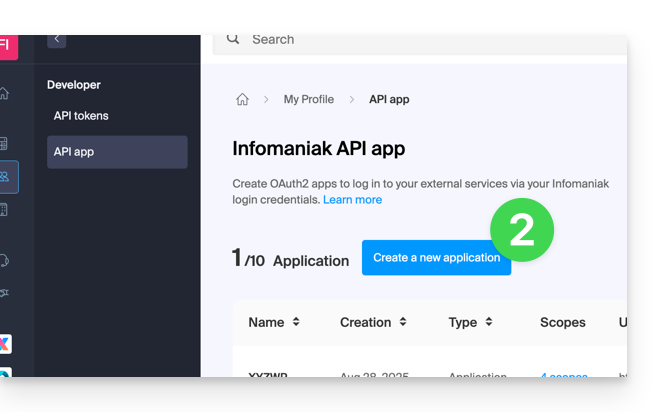
Manage Infomaniak OAuth2 apps
To do this:
- Click here to access the management of your product on the Infomaniak Manager (need help?).
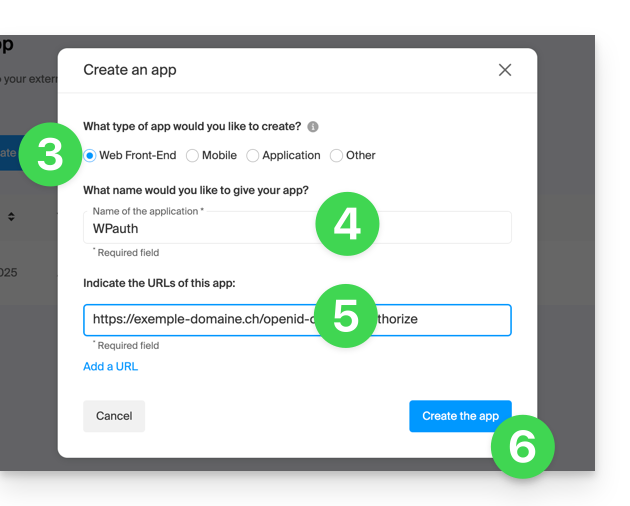
- Click the blue Create a new application button:
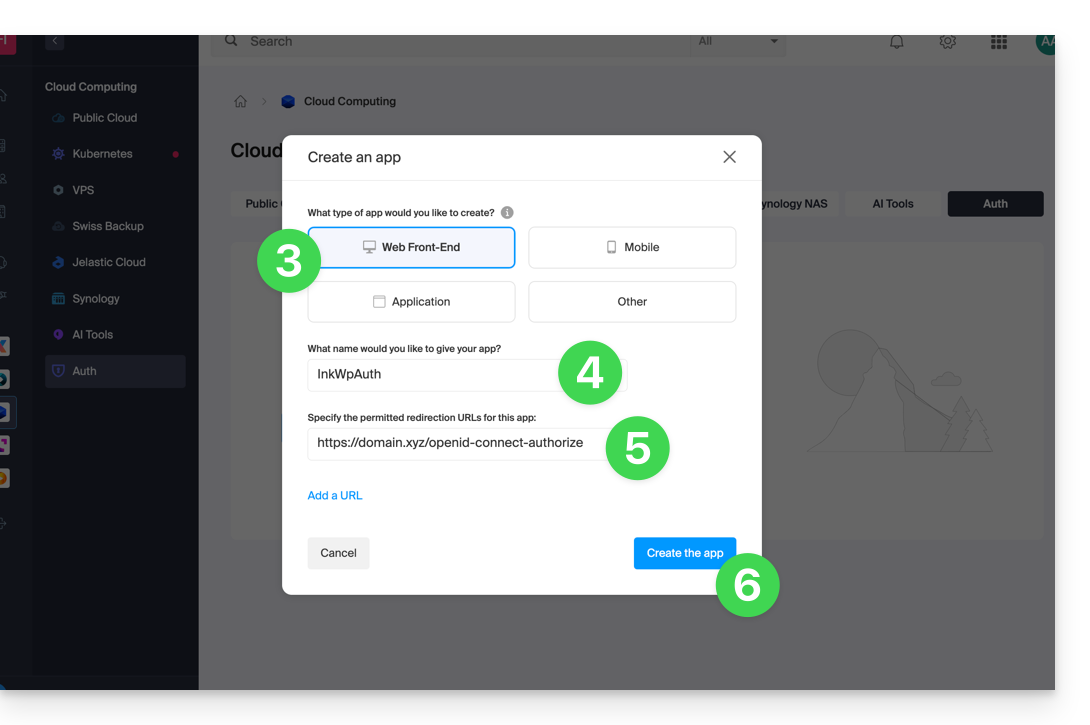
- Choose the type appropriate to your current need and project.
- Give a name to the application.
- Enter the URL of the application according to the technical information available to you.
- Click on the button to create the application:
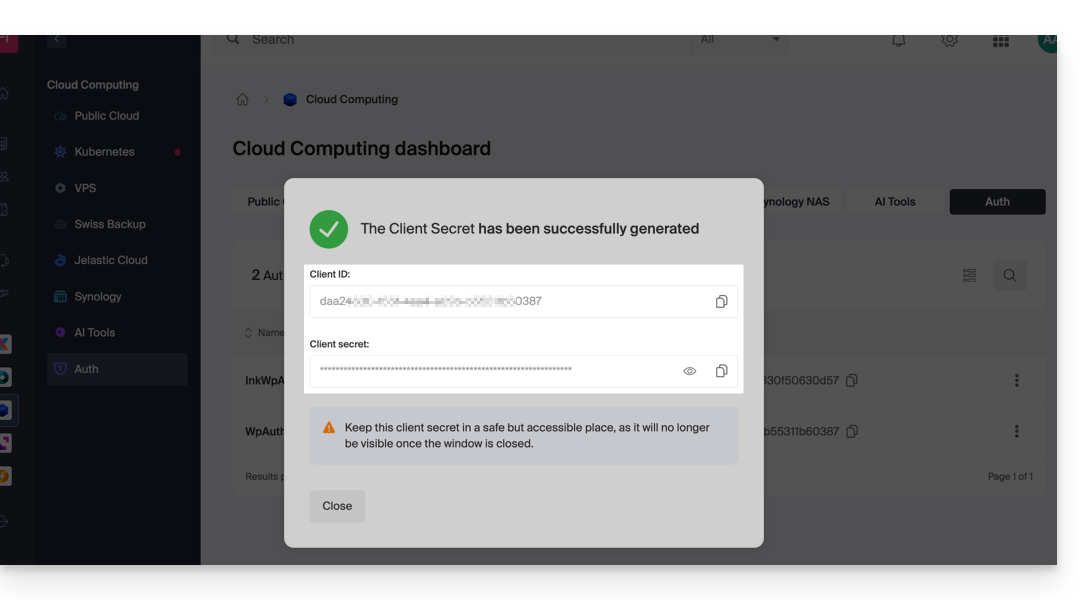
- Copy the information (
Client ID,Client secret) to a safe place - they will no longer be accessible after that: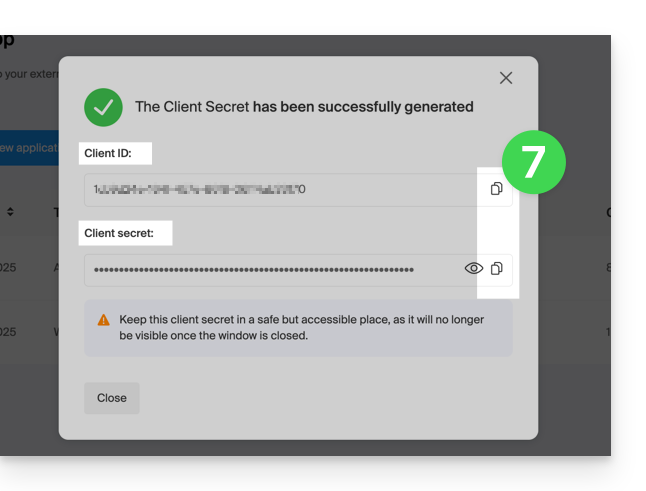
This guide concerns the WordPress module "Infomaniak Connect for OpenID" which allows users to log in to your WordPress site (whether it is hosted by Infomaniak or not) using their Infomaniak credentials.
Preamble
- Allowing login via an Infomaniak account on your WordPress site allows your visitors to comment, register for courses, or access any member-only content with a single click, without having to create a new account.
- It saves them time and is a safer method for you, as you do not have to manage additional passwords.
- The operation of this external module is identical to the options "Log in with Google", "Log in with Facebook" or "Log in with Apple"; it uses the standard OAuth2 and OpenID Connect protocols to enable single sign-on (SSO).
A. Create an application with Auth Infomaniak
To do this:
- Click here to access the management of your Auth product on the Infomaniak Manager (need help?).
- Click the button to Create a new application:
- Choose the type "Web Front-End".
- Give a name to your application.
- In the URL field, indicate the domain name corresponding to your WordPress site followed by
/openid-connect-authorize(refer to the GitHub documentation if necessary). - Click the button to complete the app creation:
- Carefully note the 2 pieces of information obtained when finalizing your OAuth2 application:
B. Configure the WordPress extension
To do this:
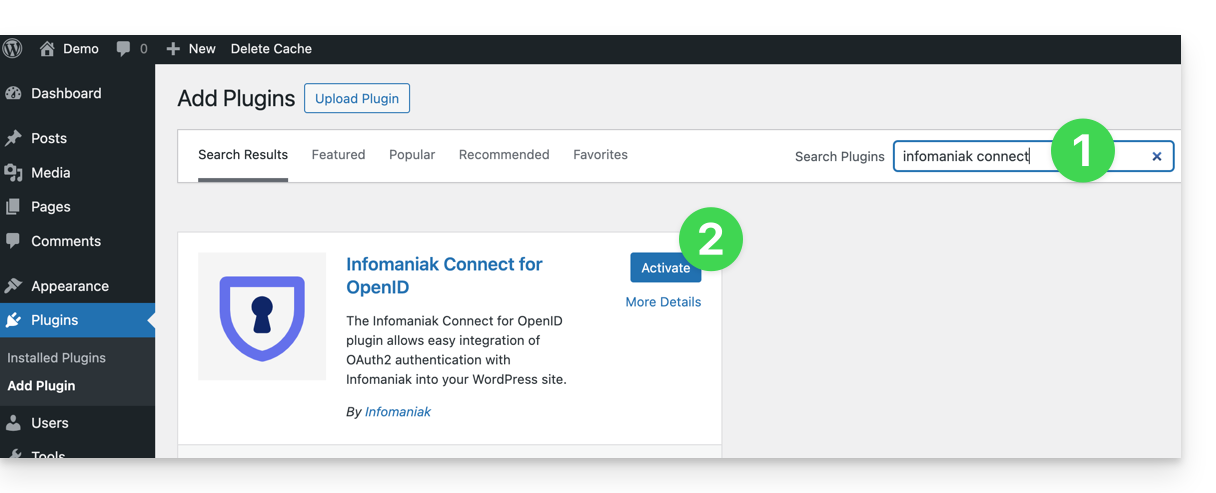
- Search for the extension
Infomaniak Connect for OpenIDon the WordPress extensions platform from your site. - Install and activate the extension:
- Configure the extension from the Settings menu:

- The only fields to fill in are Client ID and Client Secret Key and come from the information obtained in point A above:
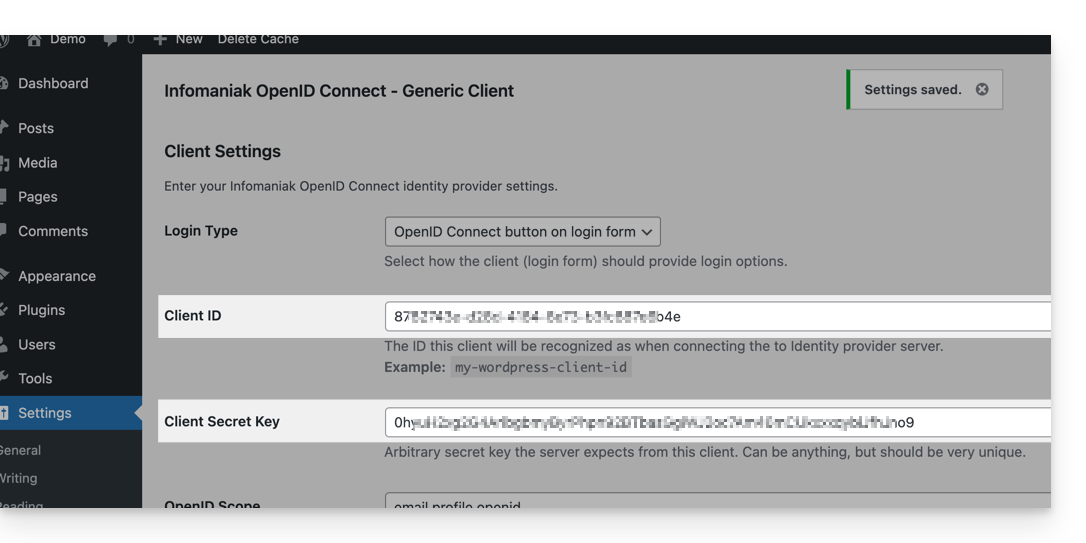
- Do not forget to save the changes made to the extension settings.
- An additional button for logging in with an Infomaniak identifier is now visible on your login page for users
/wp-admin(/wp-login.php):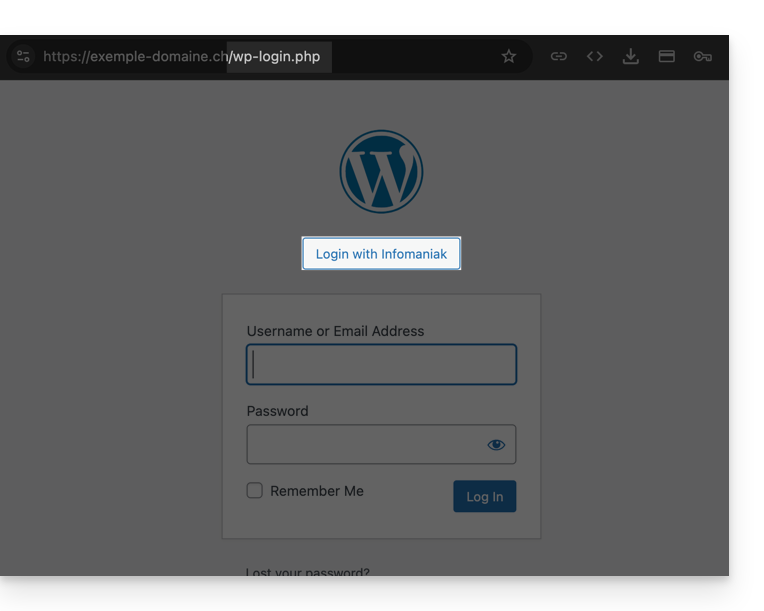
This guide helps to solve a problem on the Prestashop CMS and more specifically with its “Faceted Search” module that allows the management of filters in the product category pages.
The problem
This specific search module of Prestashop creates a cache in the database to speed up the search, however the corresponding table is never cleaned, which poses a problem for the hosting infrastructure.
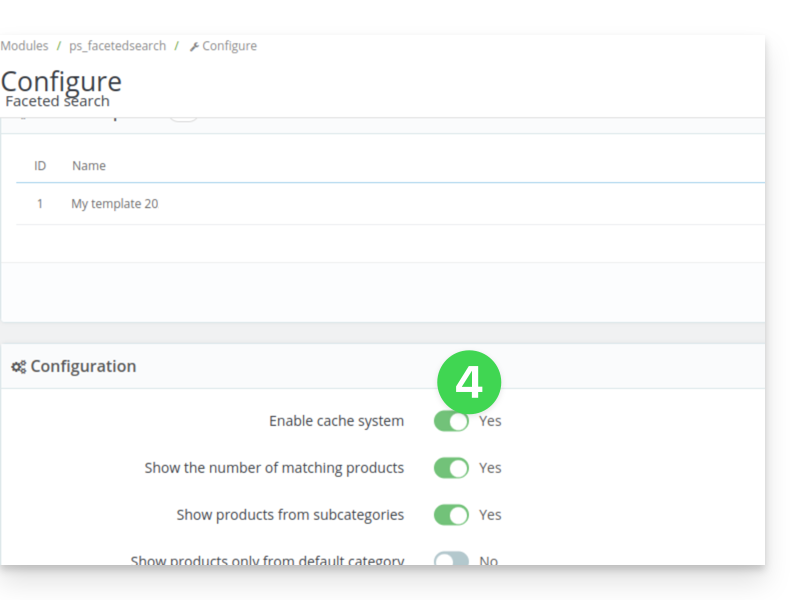
First solution
The first solution is to disable the proposed caching.
If you have a cache module, such as Ultimate Cache, there will be no negative impact.
To do this:
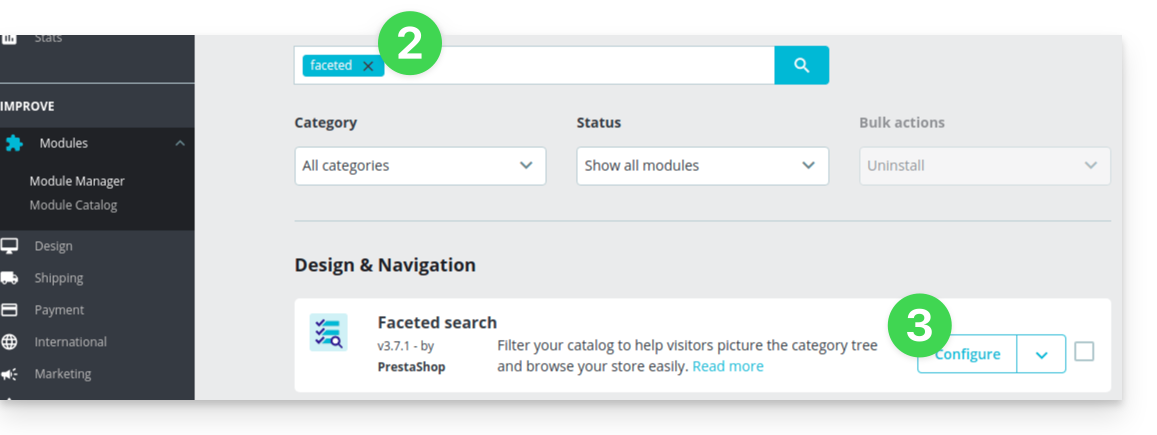
- In the PrestaShop administration panel, go to Modules → Module Manager.
- Select Modules and use the search field to find “facet”.
- Click on Configure next to the module obtained in the result:
- Disable the button for this:
Second solution
The second solution is to set up a cron job to clean the table, for example every night:
- From the module settings, copy the existing URL on the
Clear cachebutton:
Then from the Infomaniak Manager, create a webcron (refer to this other guide on this subject) to execute the URL copied in point 1 above, for example 1 time per day and per night.
This guide concerns the Typo3 module "t3ext-infomaniak-auth" which allows users to log in to your Typo3 site (whether it is hosted by Infomaniak or not) using their Infomaniak credentials.
Preamble
- Allowing login via an Infomaniak account on your Typo3 site enables your visitors to comment, register for courses, or access any member-only content with a single click, without having to create a new account.
- This saves them time and is a safer method for you, as you do not have to manage additional passwords.
- The operation of this external module is identical to the options "Sign in with Google", "Sign in with Facebook" or "Sign in with Apple"; it uses the standard protocols OAuth2 and OpenID Connect to enable single sign-on (SSO).
A. Create an application with Auth Infomaniak
To do this:
- Click here to access the management of your Auth product on the Infomaniak Manager (need help?).
- Click the button to Create a new application:
- Choose the type "Web Front-End".
- Give a name to your application.
- In the URL field, enter the domain name corresponding to your Typo3 site followed by
/openid-connect-authorize(refer to the GitHub documentation if necessary). - Click the button to complete the app creation:
- Carefully note the 2 pieces of information obtained during the finalization of your OAuth2 application:
B. Configure the Typo3 extension
Via SSH, deploy Composer if necessary to retrieve the t3ext-infomaniak-auth extension. To do this:
- The SSH command for installing the extension is here:
Then, in Typo3:
- Log in to your Typo3 admin interface.
- Check if necessary that the Infomaniak extension is activated:
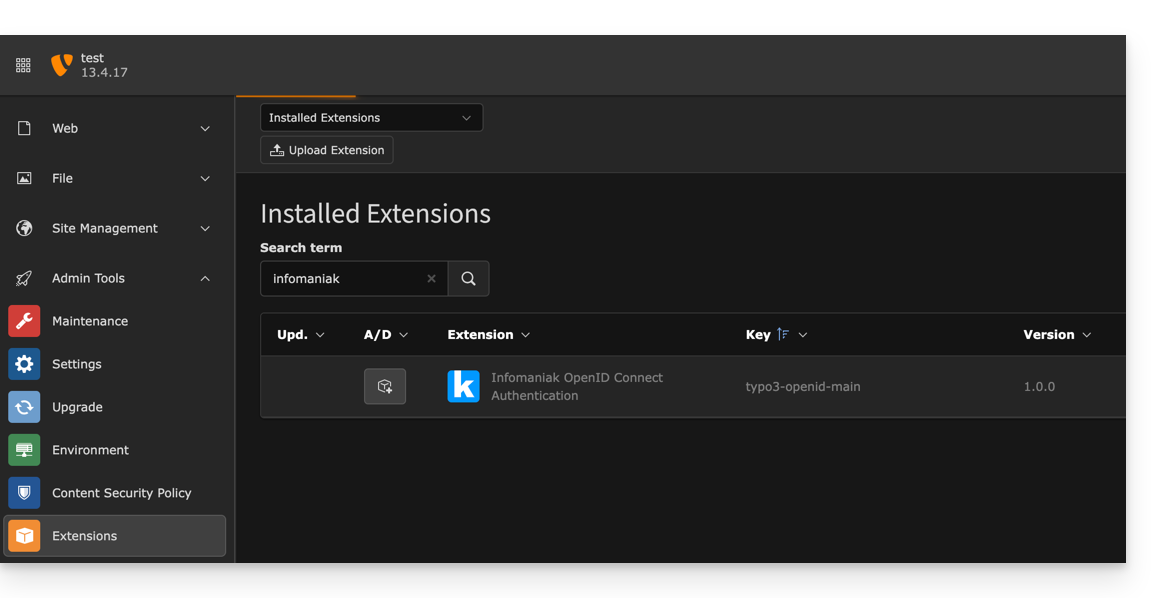
- Check if necessary that the Infomaniak extension is activated:
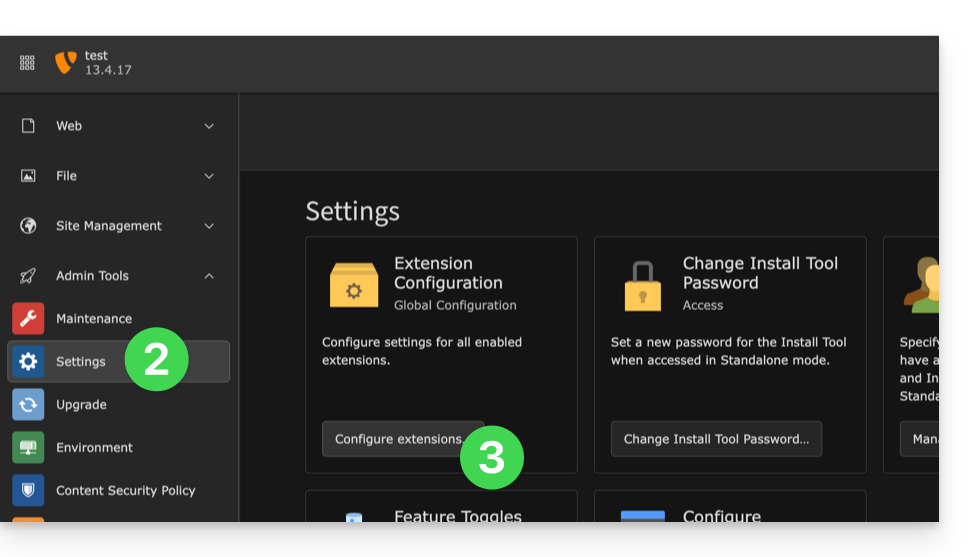
- Click on Settings in the left sidebar menu.
- Click on Configure extensions:
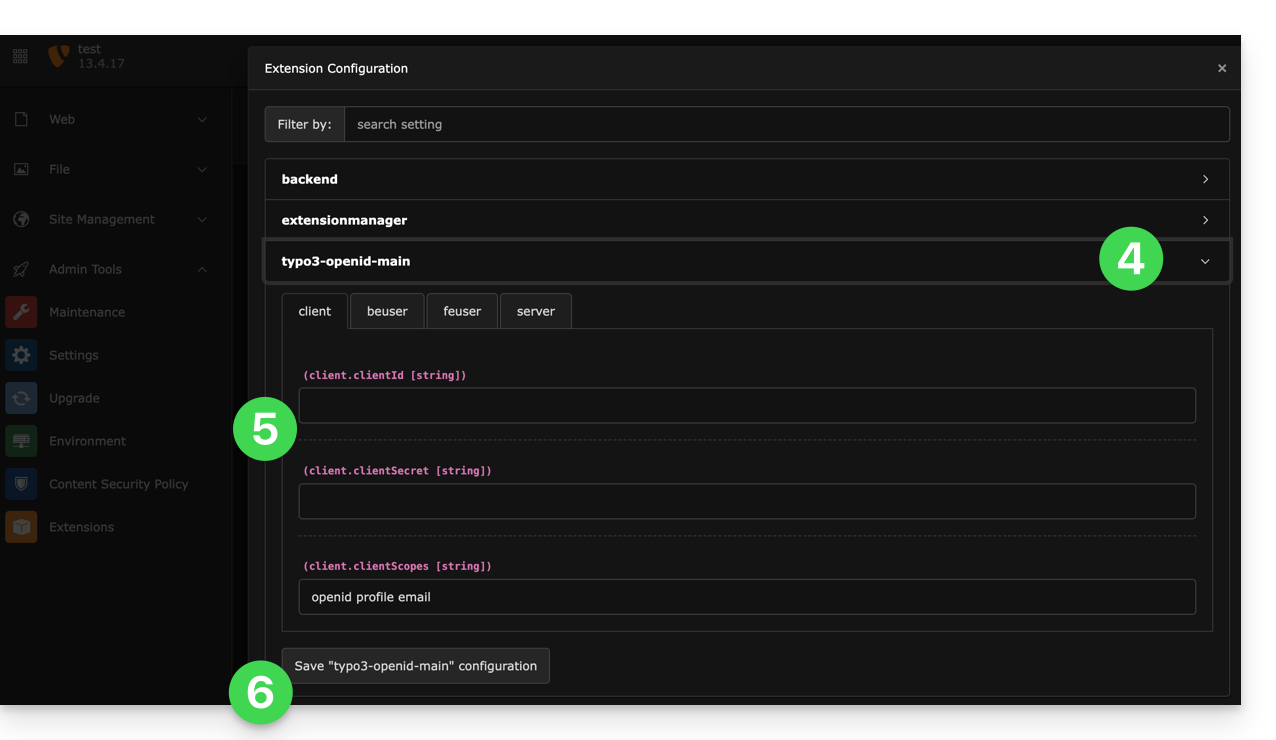
- Click on the chevron to the right of typo3-openid-main to expand the client tab.
- The only fields to fill in are clientID and clientSecret and come from the information obtained in section A above.
- Do not forget to save the changes made to the extension settings:
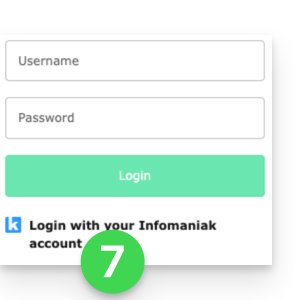
- An additional button, for logging in with an Infomaniak identifier, is now visible on your user login page:
Infomaniak offers various Site Creator plans, free or paid, that cater to different needs. It is essential to understand the conditions associated with each type of offer before making your choice.
Understanding the different Site Creator plans
Site Creator is available…
- … either free with each paid web hosting:
- In this case, 1 single Site Creator can be set up per Infomaniak web hosting.
- To manage multiple sites created with Site Creator within the same Organization, it is therefore necessary to have multiple web hostings.
- … or independently (standalone in 3 versions) and does not require any other particular offer in this case:
- Site Creator Free
- Site Creator Lite
- Site Creator Pro
1. Site Creator Free
This offer is positioned as a test and discovery solution and is completely free. It is aimed at users who want to familiarize themselves with the tool or publish a very simple web page:
- It only allows one web page and offers limited disk space (5 Go).
- This offer does not allow connection to a custom domain name (it will be in the form
*.infomaniak.site) and includes the mandatory display of Infomaniak's advertising notice. - Important growth modules, such as full blog management, the use of Artificial Intelligence for text generation, or the 'Site Map' feature, are not included.
2. Site Creator Lite
The Lite plan is Infomaniak's entry-level paid offer. It is ideal for creating a showcase website or a simple personal blog, as it eliminates the main constraints of the free version and unlocks the modules necessary for a complete site:
- It allows the creation of a more substantial site with a limit set to 5 web pages and more comfortable disk space (15 Go).
- It includes the offer of a domain name for one year and, importantly, the removal of any Infomaniak advertising notice on the site.
- Unlike the Free offer, the Lite plan unlocks access to important features for navigation and organization, including the Blog Creation and Management module as well as the Site Map module.
3. Site Creator Pro
The Pro offer is the premium formula of Site Creator. It is exclusively dedicated to the most ambitious projects, such as launching a complete online store, thanks to the lifting of all content restrictions and the integration of advanced commerce and analysis tools:
- It removes any content limitation by offering unlimited web pages and a large disk space of 50 Go.
- It is the only offer that includes complete E-commerce management (orders, stock, discounts) and allows the integration of essential payment gateways (Stripe, PayPal, Mollie) for online commercial activity.
- The Pro plan is the only one to give access to crucial external analysis and performance tracking tools, such as Google Analytics, Hotjar, and tools like Google reCaptcha.
Commitment to paid offers
Unlike other Infomaniak products, some Site Creator offers include a free domain name. These offers require a firm commitment for a minimum duration of 12 months, with no possibility of refund, even partial, even if:
- you decide to stop using Site Creator before the end of the first year,
- you cancel your products,
- you close your user account or your Organization.
Evolution of offers and preservation of your site
It is possible to switch from a free offer to a more comprehensive paid offer:
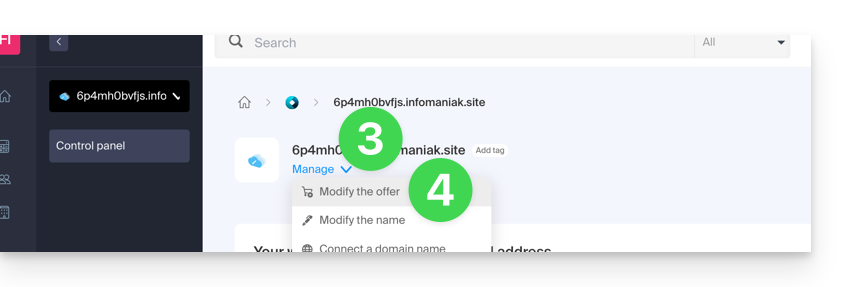
- Click here to access the management of your product on the Infomaniak Manager (need help?).
- Click directly on the name assigned to the product concerned.
- Then click on the chevron Manage.
- Click on Modify the offer:
It is also possible to switch to a higher offer (for example, from Lite to Pro).
However, it is not possible to downgrade to a lower offer or to return to a free offer once a paid offer is activated.
If you wish to keep your site active, you must necessarily renew the same paid offer. It is not possible to switch to a free version of Site Creator, even if:
- you do not use any of the paid modules,
- your site contains only one page.
What to do if you want to return to the free offer?
In this case, you must:
- cancel your current site after manually copying all the information you wish to keep,
- activate a new free Site Creator offer,
- recreate your site by pasting the contents retrieved from the old one.
This guide explains how to report spam or declare a false positive if spam-type messages slip through the cracks within an Infomaniak Mail Service, or conversely if a valid email has been incorrectly classified as spam; you can intervene in a few clicks.
Report spam
Prerequisites
- Check that the spam filter is active.
Next, to automatically move an email from your inbox that has evaded the anti-spam filter to the Spam folder:
- Click here to access the Infomaniak Mail Web app (online service ksuite.infomaniak.com/mail).
- Select the message in the inbox and then click on the Spam icon in the toolbar:
- You can also open it and declare it as Spam later:
- Another option: open it and click on the action menu ⋮ on the right:
Once you have clicked on Report as spam:
- The email is moved to the Spam folder (or to the manually defined folder)
- The sender's address is added to the blocked users list
- The filter is refined for better handling over time
Declare a false positive
Conversely, if you act on an email incorrectly considered as spam (false positive) by clicking on the "This is not spam" icon:
- The email is moved to the inbox...
- The sender's address is added to the list of authorized users...
- This also affects the filter and its criteria.
This guide details the ranges of public IP addresses used by Infomaniak; this facilitates, in particular, the configuration of security systems (firewall, filtering, whitelisting).
Preamble
- The addresses are indicated in CIDR format (example:
192.0.2.0/24), which groups several consecutive addresses. - The format of the listing includes the IP ranges (ranges) used by the following products:
- kuite: all kSuite products
- vps: all VPS
- public-cloud: all Public Cloud
- all: covers all IP addresses in the Infomaniak network
IPv4 & IPv6 address ranges
The link to the JSON file listing the IPs is:
https://prefixes.infomaniak.com/json
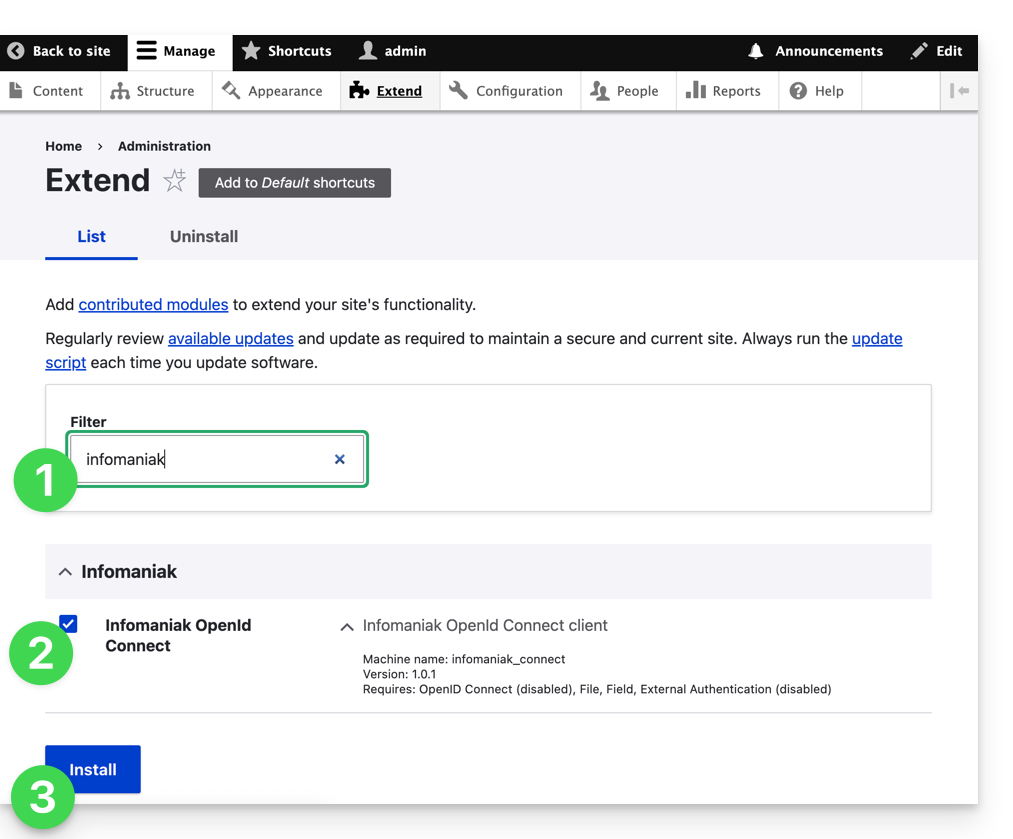
This guide concerns the Drupal module "Infomaniak_Connect" which allows users to log in to your Drupal site (whether it is hosted by Infomaniak or not) using their Infomaniak credentials.
Preamble
- Allowing login via an Infomaniak account on your Drupal site allows your visitors to comment, register for courses, or access any member-only content with a single click, without having to create a new account.
- This saves them time and is a safer method for you, as you do not have to manage additional passwords.
- The operation of this external module is identical to the options "Log in with Google", "Log in with Facebook" or "Log in with Apple"; it uses the standard protocols OAuth2 and OpenID Connect to enable single sign-on (SSO).
A. Create an application with Auth Infomaniak
To do this:
- Click here to access the management of your Auth product on the Infomaniak Manager (need help?).
- Click the button to Create a new application:
- Choose the type "Web Front-End".
- Give a name to your application.
- In the URL field, specify the domain name corresponding to your Drupal site followed by
/openid-connect-authorize(refer to the GitHub documentation if necessary). - Click the button to complete the app creation:
- Carefully note the 2 pieces of information obtained during the finalization of your OAuth2 application:
B. Configure the Drupal extension
Via SSH, deploy Composer if necessary to retrieve the openid_connect and infomaniak_connect extensions. To do this:
- You may need to edit the composer.json file as the version of
openid_connectis not yet considered stable. Add: "minimum-stability": "dev", "prefer-stable": true- The SSH commands for installing the 2 extensions are here:
Then, on Drupal:
- Search for the Infomaniak module among your pre-installed modules.
- Select it.
- Click the Install button:
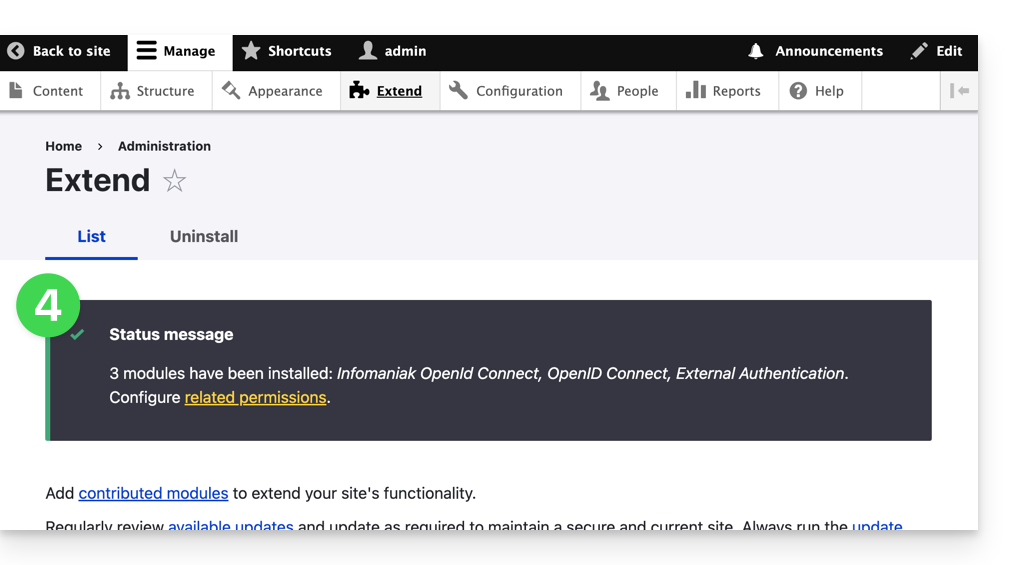
- The installation of the dependencies will proceed:
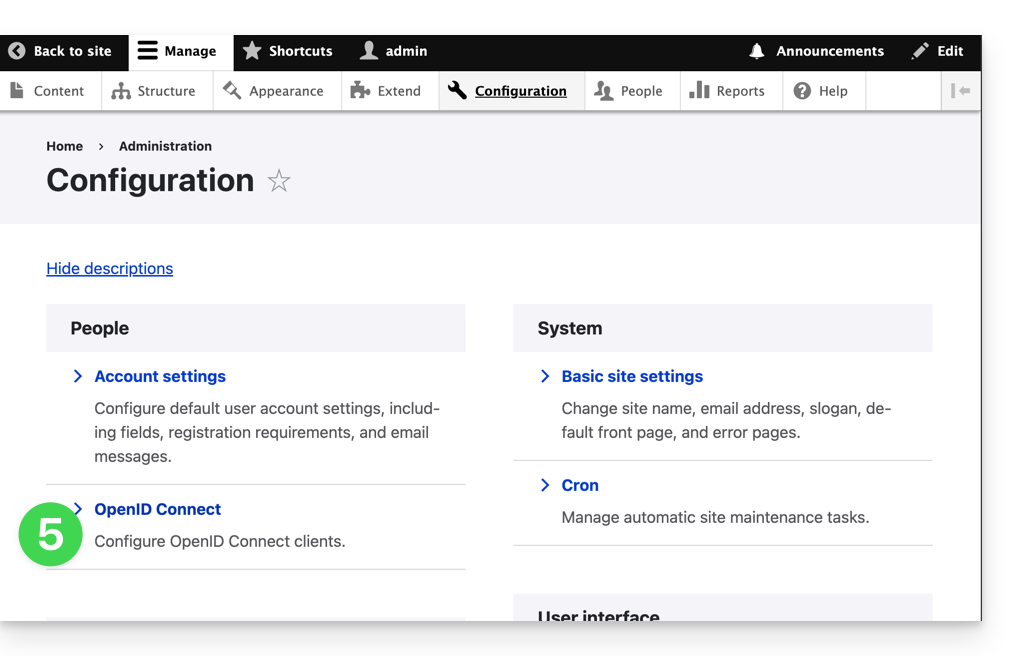
- Under Configuration, click to set up the OpenID connection:
- Click the edit button:
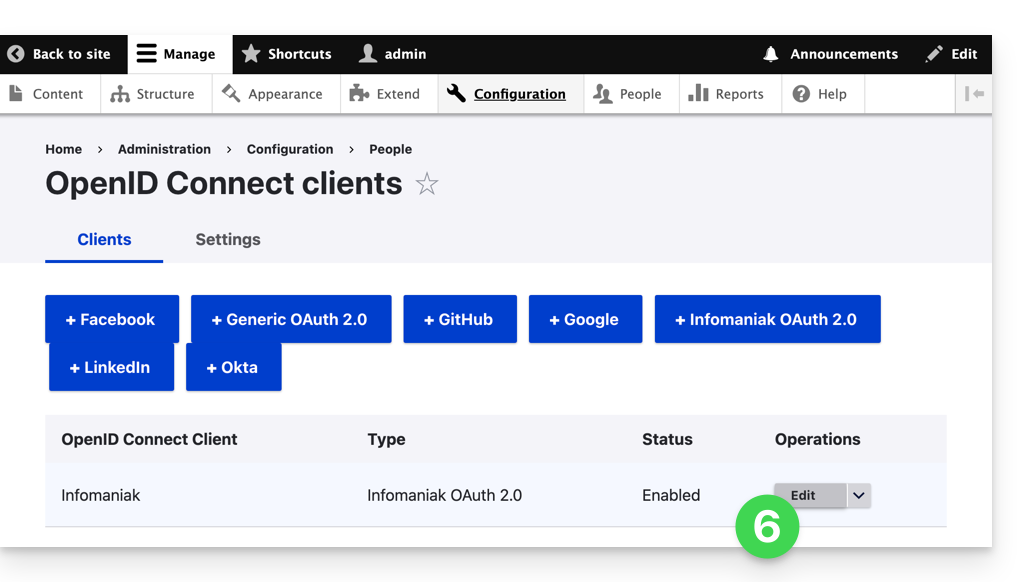
- The only fields to fill in are Client ID and Client Secret and come from the information obtained in point A above:
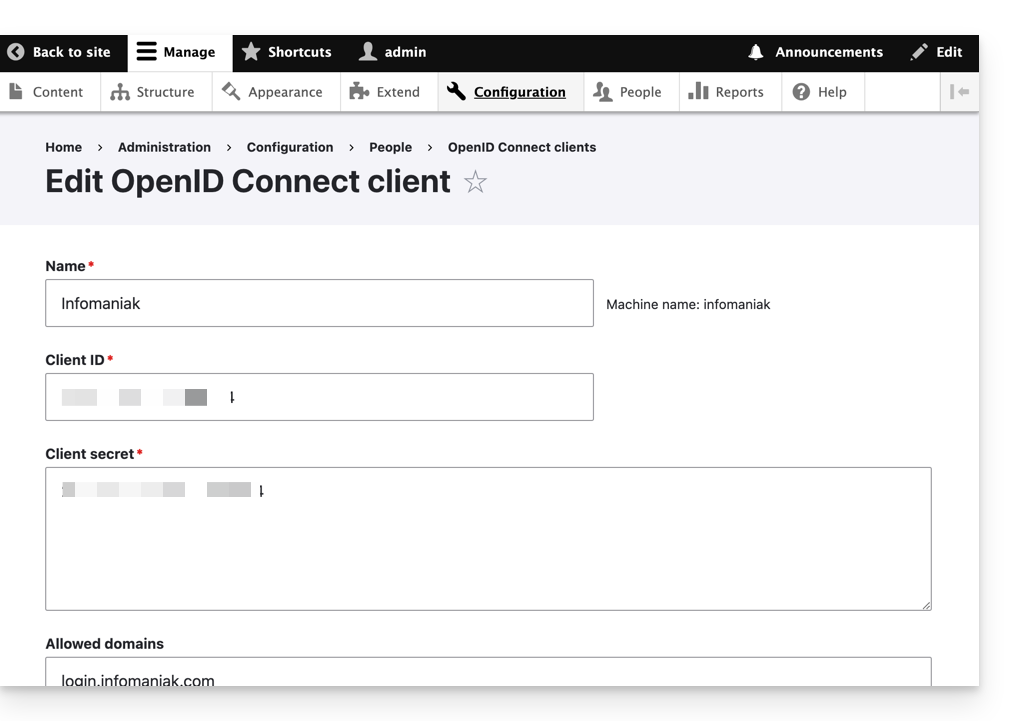
- Do not forget to save the changes made to the extension settings.
- In the Settings tab, you can choose the display type for your login page; do not forget to save:

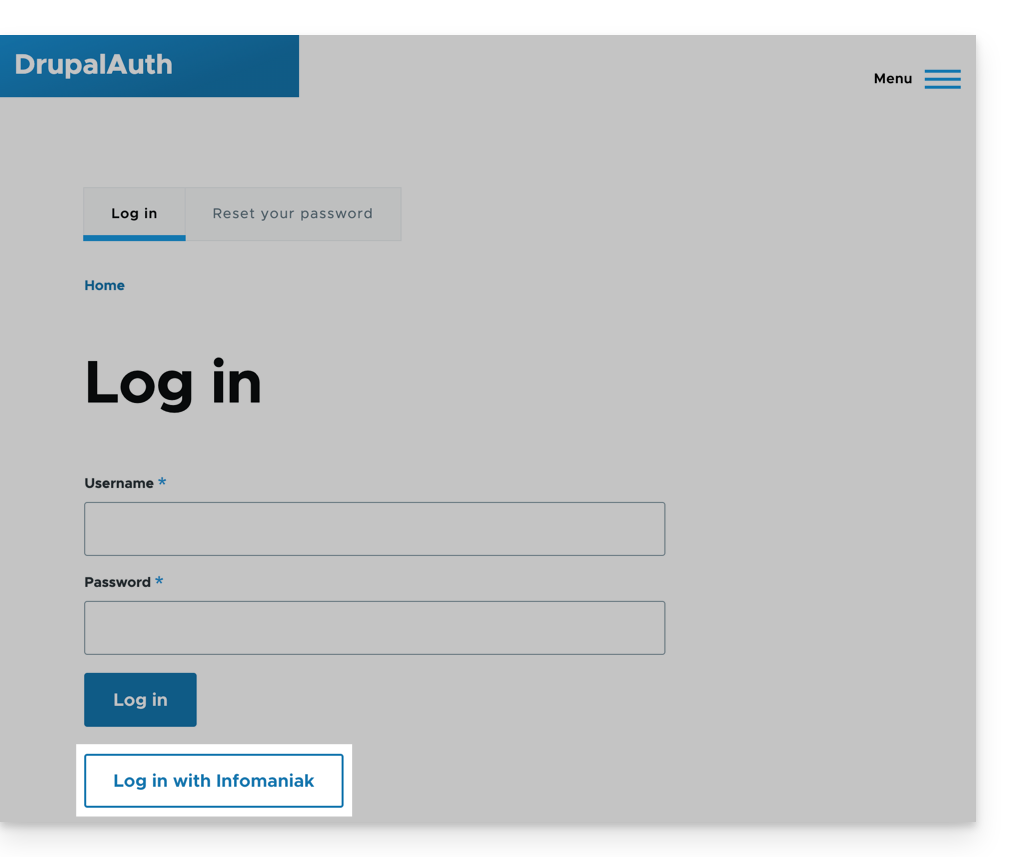
- An additional button, for logging in with an Infomaniak identifier, is now visible on your login page for users:
This guide explains how to resolve an SSL certificate (Let's Encrypt or Sectigo) installation issue if you are using Cloudflare with strict security rules, such as country or IP filtering.
Adjust SSL / geoblocking settings
When an SSL certificate is requested via Infomaniak (free Let's Encrypt or Sectigo), the certification authority must verify that you are the owner of the domain. This verification can be done via HTTP (using special files placed on your site), DNS, or email:
- Let's Encrypt uses
/.well-known/acme-challenge/. - Sectigo usually uses
/.well-known/pki-validation/(or DNS / email depending on the option chosen).
If these verifications fail (for example, because Cloudflare blocks access), the certificate cannot be issued or renewed. However, Let's Encrypt no longer verifies from a single location. For some time (and even more since March 2024), it performs its verifications from multiple countries at the same time – including new ones like Sweden or Singapore. Result: if one of these countries is blocked by your Cloudflare settings, the certificate request may fail, even if everything else is correctly configured.
Even worse: even if you try to make an exception only for the challenge address (.well-known/acme-challenge), it may not work with some Cloudflare rules. Indeed, country or IP blocking rules are applied before any URL path-based exception.
Adjust SSL/TLS mode
In Cloudflare, use the Full or Full (strict) mode. These modes temporarily tolerate an expired or self-signed certificate, until the validation is complete:
Allow validation paths
Avoid blocking "IP Access Rules" and prefer "Custom Rules" that allow unrestricted paths:
/.well-known/acme-challenge/(Let's Encrypt)/.well-known/pki-validation/(Sectigo)
Temporarily disable geoblocking
If necessary, temporarily disable geographic or IP blocking for the duration of the validation, then reactivate your protections after the certificate is issued or renewed.
This guide details the resource limit errors that can be encountered when managing and visiting a website.
Preamble
- Resource limits are set to maintain the integrity, stability, and performance of the shared server, while ensuring a fair experience for all users.
- If a website or application requires significantly higher resources, it may be necessary to switch to a Cloud Server or another type of virtual hosting where resources are allocated more flexibly.
Error origins
Fatal error: Maximum execution time of 30 seconds exceeded
This error occurs when the server has set an execution time limit for scripts, usually to avoid tasks that take too long. For example, if a script attempts to resize many large images in a single operation, this can exceed the allowed execution time limit. The server imposes this limit to ensure a quick response to user requests. The path often mentioned in the error can indicate a more precise origin (for example Fatal error: Maximum execution time of 30 seconds exceeded in /home/www/1234567abc/web/wp-includes/media.php on line 123)
memory_limit exceeded
This error occurs when the script or application uses more memory than allocated. This can happen when a script processes a large volume of data or when there is a memory leak. For example, an image management script can consume more memory than allowed, resulting in this error.
Resolution tips
A few tips to resolve these errors:
- Check the scripts that make multiple connections to the server to display data.
- Optimize the affected script(s) so that they require fewer resources.
- Increase the limits of the affected site to allow the script to do everything it needs to and/or limit the number of simultaneous connections (especially on a Cloud Server where limits (RAM, execution time, simultaneous connections) can be significantly increased).
- Migrate your hosting to a Cloud Server.
Also refer to this other guide.