Knowledge base
1000 FAQs, 500 tutorials and instructional videos. Here, there are only solutions!
This guide explains how to modify the dates and times of sales closures within the Infomaniak ticketing system.
Sales end parameters
You can modify the date and time of closure at each level independently: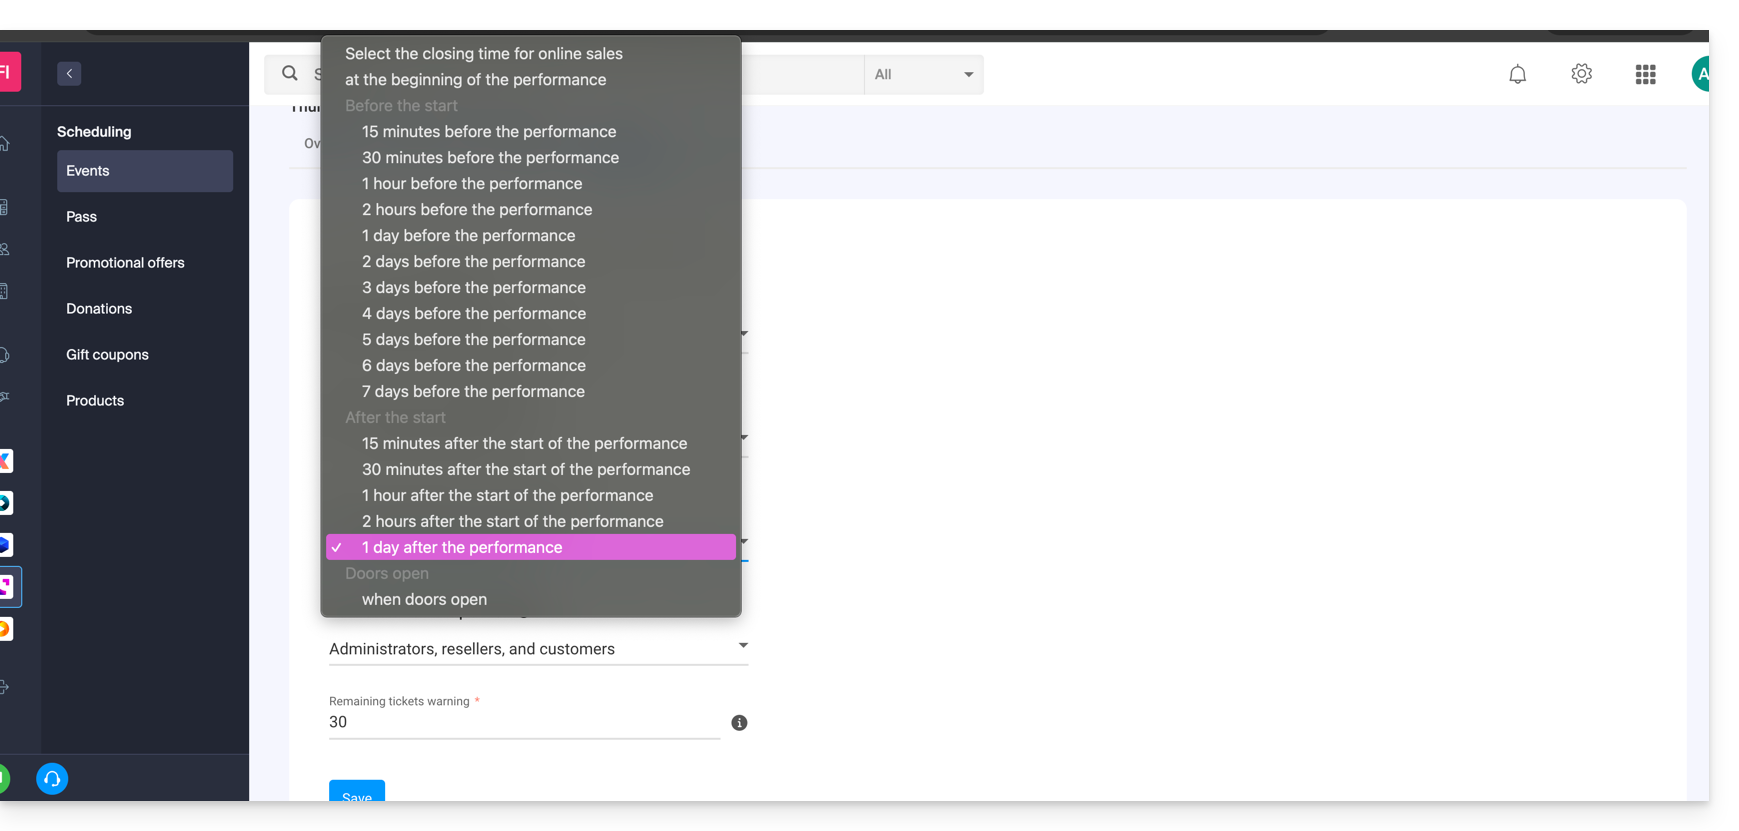
- End of online sales
- Allows you to close the event sales from your online ticketing system and on the Infomaniak portal. People will no longer be able to order tickets online for this event from a website.
- End of Reseller Counter Sales
- Defines when people with restricted access to the counter only will stop their sales from the counter on the manager or tablet.
- End of Administrator Counter Sales
- For administrators conducting sales from the Counter accessible from the manager or tablet.
Setting up sales end parameters
These parameters can be set when creating an event, during the third step of the procedure by activating the option Modify sales closure: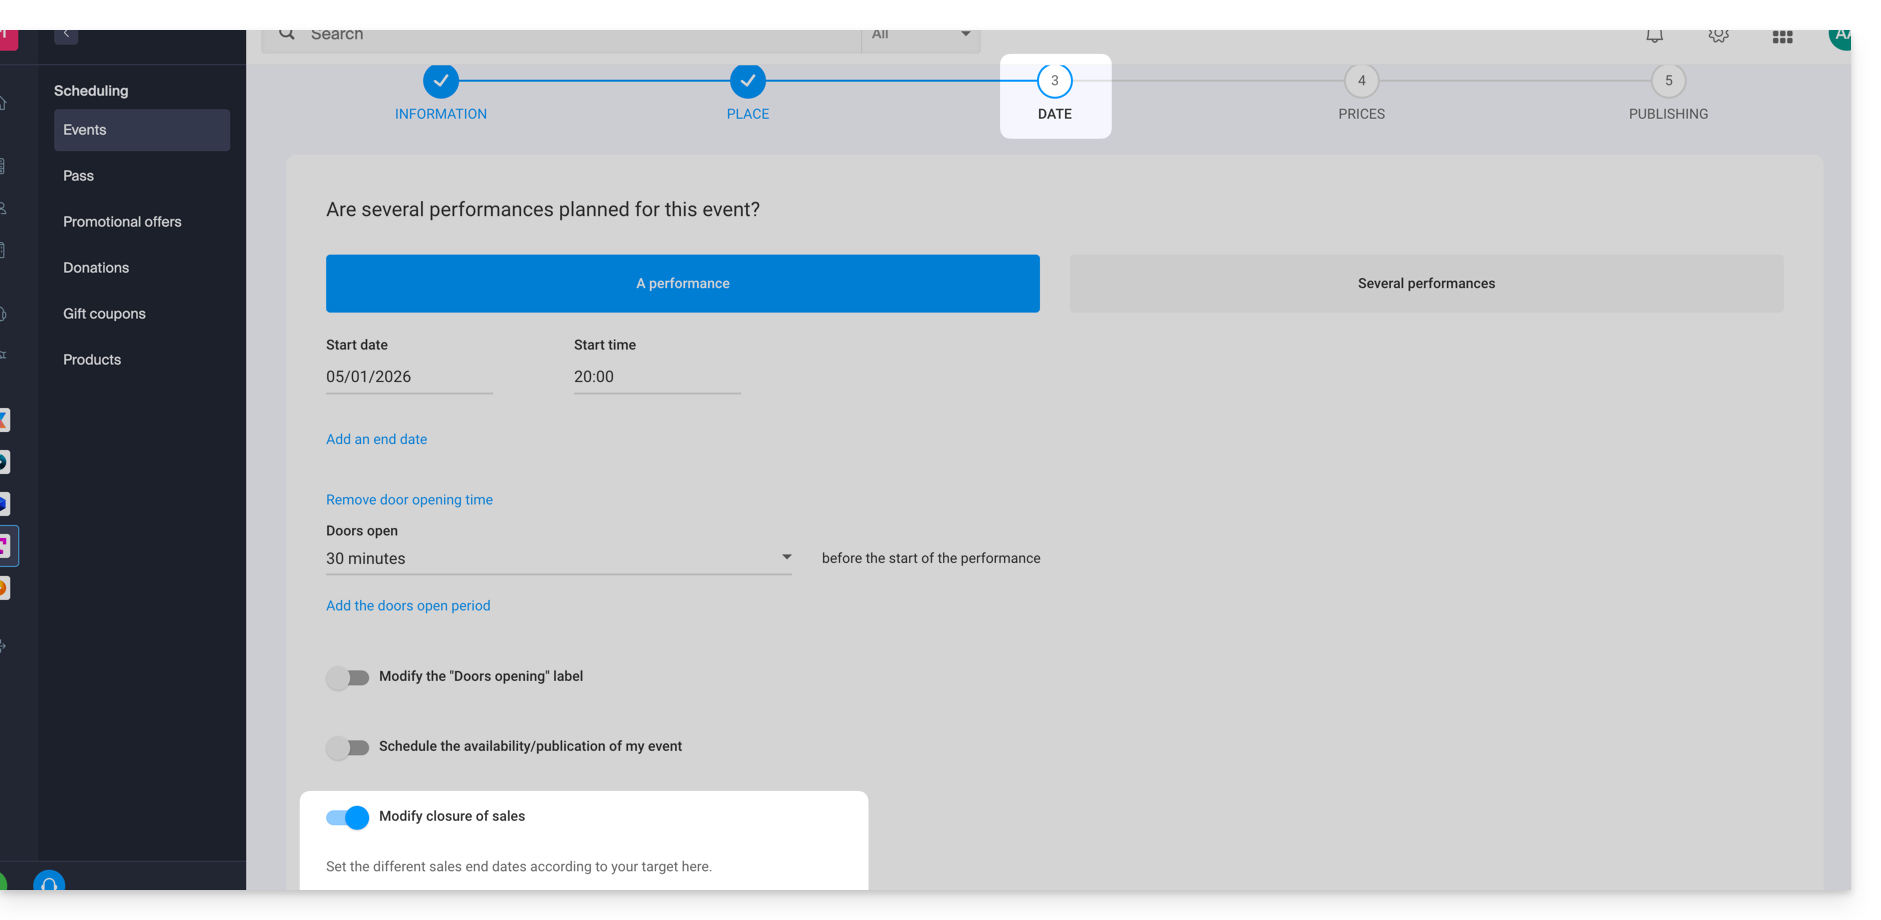
They can be edited at the event level once it is created by going to the Settings tab: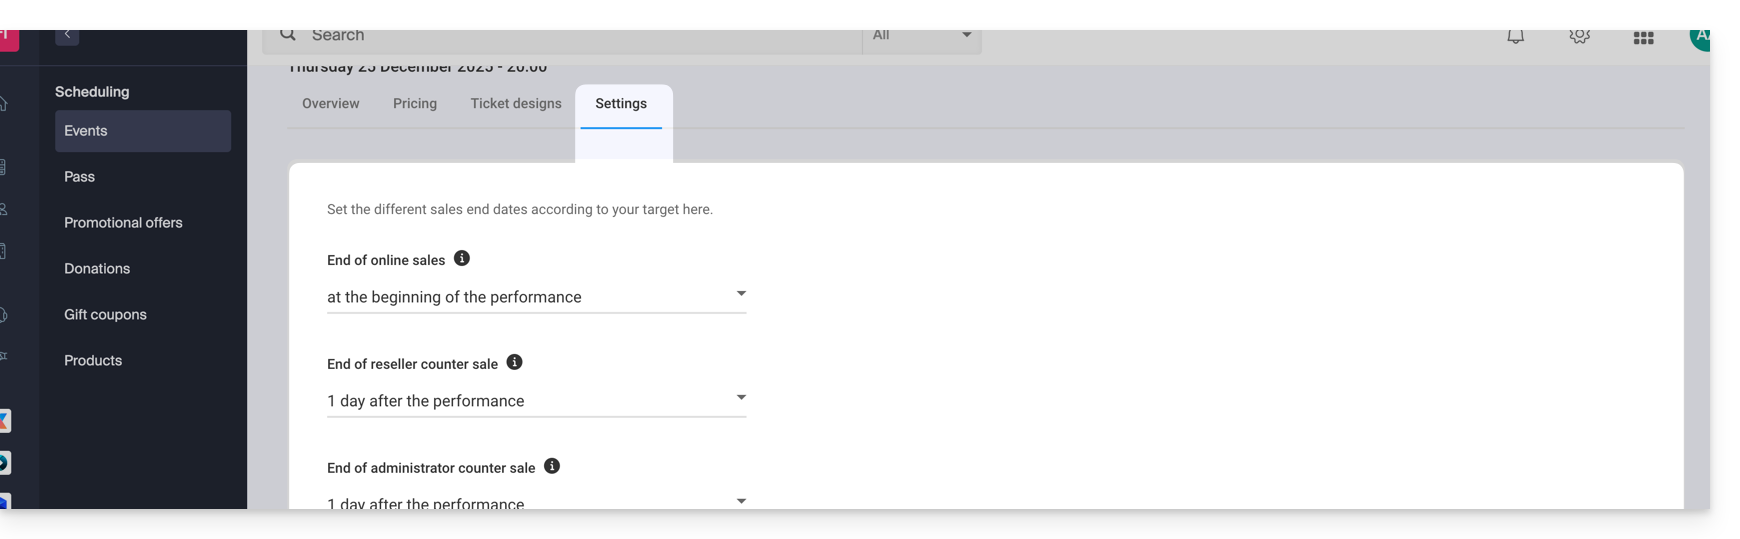
For multi-date events
The Settings tab is located at each performance. However, it is possible to modify the end of sales for multiple dates at once by using the actions on multiple dates:
- Go to the Dates tab of your event.
- Switch to list mode:

- Select the dates you want to configure.
- Click on Actions and Modify performance parameters:

Link to this FAQ:
Has this FAQ been helpful?
This guide explains how to view your monthly statements (as part of the Infomaniak ticketing system), print the corresponding accounting documents, configure your bank account to receive your payments, and, if necessary, request an exceptional advance.
Preamble
- The Infomaniak ticketing system generates a statement at the beginning of each month, summarizing the online sales of the previous month.
- This statement takes into account all sales made, minus the applicable commissions.
- The net amount is then automatically transferred to your bank account during the first week of the month, regardless of the status of the event.
Add and select a bank account
Before any payment, you must indicate a bank account from the "Infomaniak Collections" menu in the "Accounting" section of your ticketing system…
Once the account is added, you must select it at the top of the page in the “Settings” dropdown menu.
If a bank account has already been used for a payment (amount different from 0 under the Invoices column), it can no longer be modified for security reasons.
View and print a statement
To view or download a monthly statement in PDF format:
- Click here to access the management of your product on the Infomaniak Manager (need help?).
- Click directly on the name assigned to the ticketing system concerned by the event.
- Click on Accounting in the left sidebar menu.
- In the Reversed and archived collections section, select the desired statement (global or detailed).
- Click to print or download the PDF.
The statement can only be printed if the monthly period is archived.
Request an advance
If necessary, you can request an advance, up to once a week and until the 25th of the month:
- Processing is done within 48 business hours.
- An administrative deduction of 5.- is applied.
- Down payment requests are suspended 5 days before the end of the month.
Link to this FAQ:
Has this FAQ been helpful?
This guide explains how to set up donations (as part of the Infomaniak ticketing system).
Preamble
- By offering donations, you give customers the opportunity to support your organization or event.
- Online donations will have a commission applied related to banking fees.
- Donation campaigns can have the status active or inactive but will remain visible in all cases at the ticket office, with gift vouchers
Setting up donations
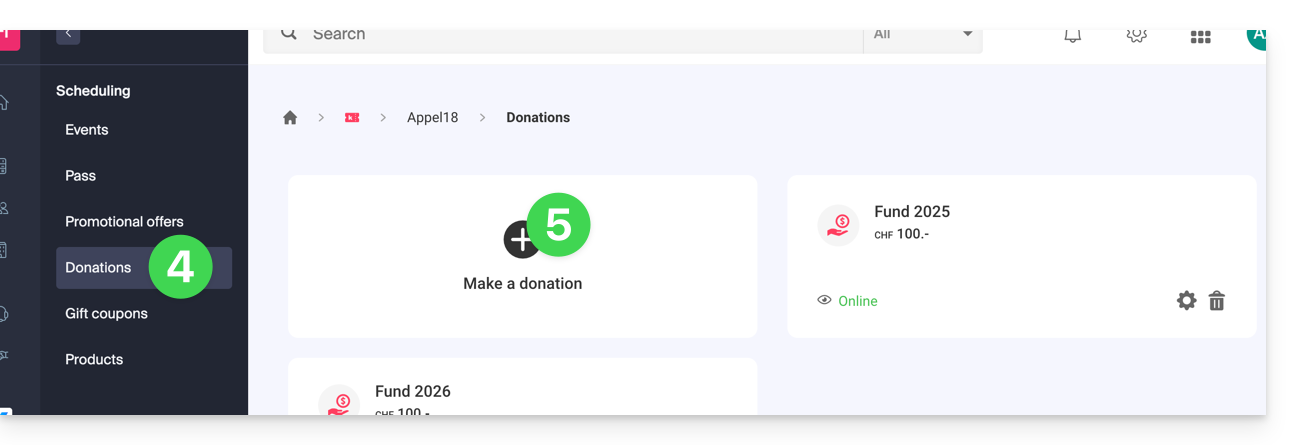
To do this:
- Click here to access the management of your product on the Infomaniak Manager (need help?).
- Click directly on the name assigned to the ticketing concerned by the event.
- Click on Programming in the left sidebar menu.
- Click on Donations in the left sidebar menu.
- Click on Add a donation:
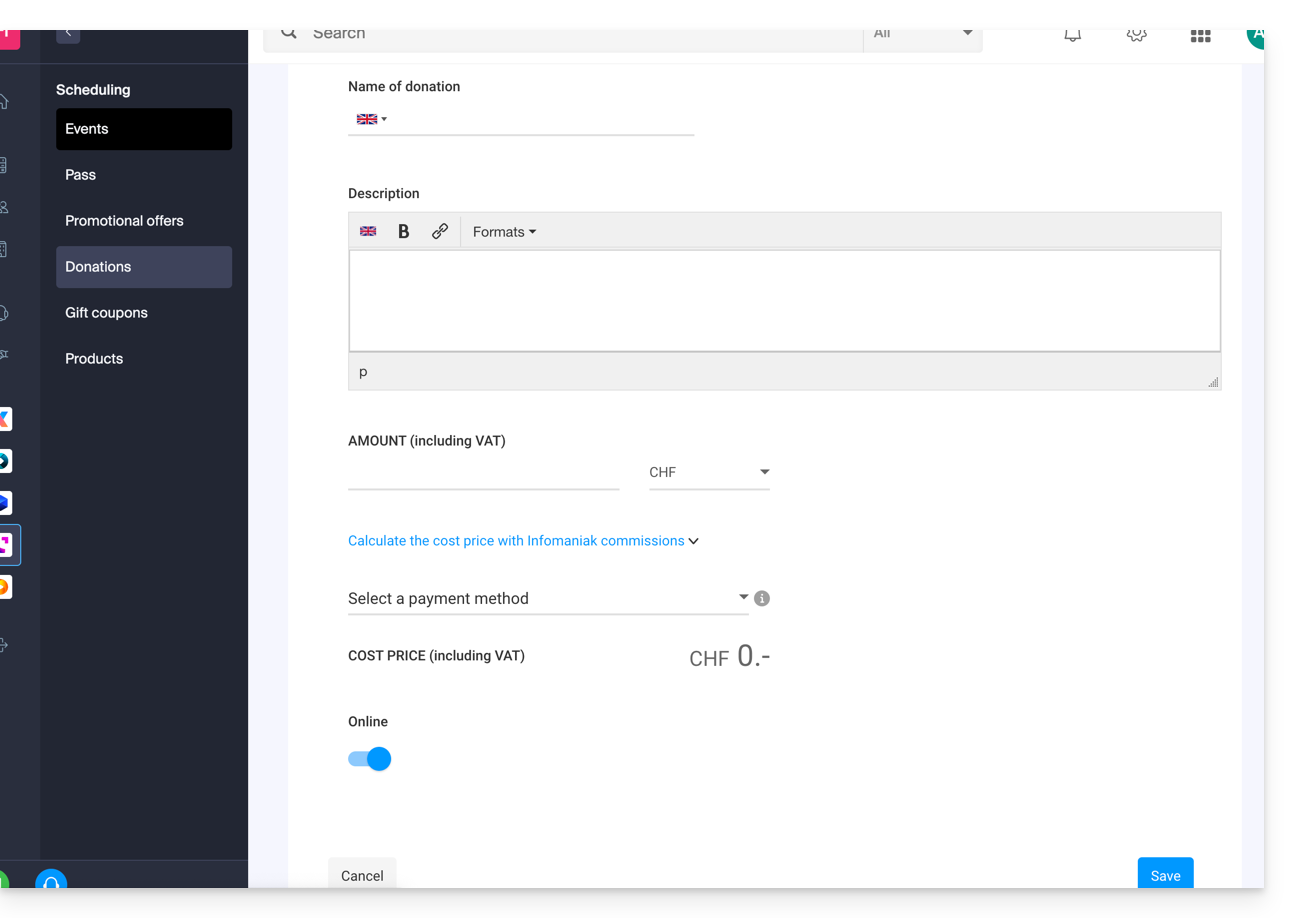
- Fill in the fields in the assistant, then click on the Save button at the bottom of the page:
Link to this FAQ:
Has this FAQ been helpful?
This guide details the integration tool for your ticketing system (as part of the Infomaniak ticketing system) to best promote your events.
Preamble
- It will only take a few clicks to set up all the options for your online store and publish it to make your sales.
- There is no need to update the links for each season or edition of your event: keep the same link and simply update the elements contained within it.
If you had them, your old ticketing URLs will continue to work and will be automatically redirected to your new online store. However, it is recommended to migrate to this new tool for any new season or edition of your events.
Manage the presentation of your online events
To access the options for the online ticketing system:
- Click here to access the management of your product on the Infomaniak Manager (need help?).
- Click directly on the name of the ticketing system concerned.
- Click on Ticketing Portal in the left sidebar:
- Click on Online Store in the left sidebar:
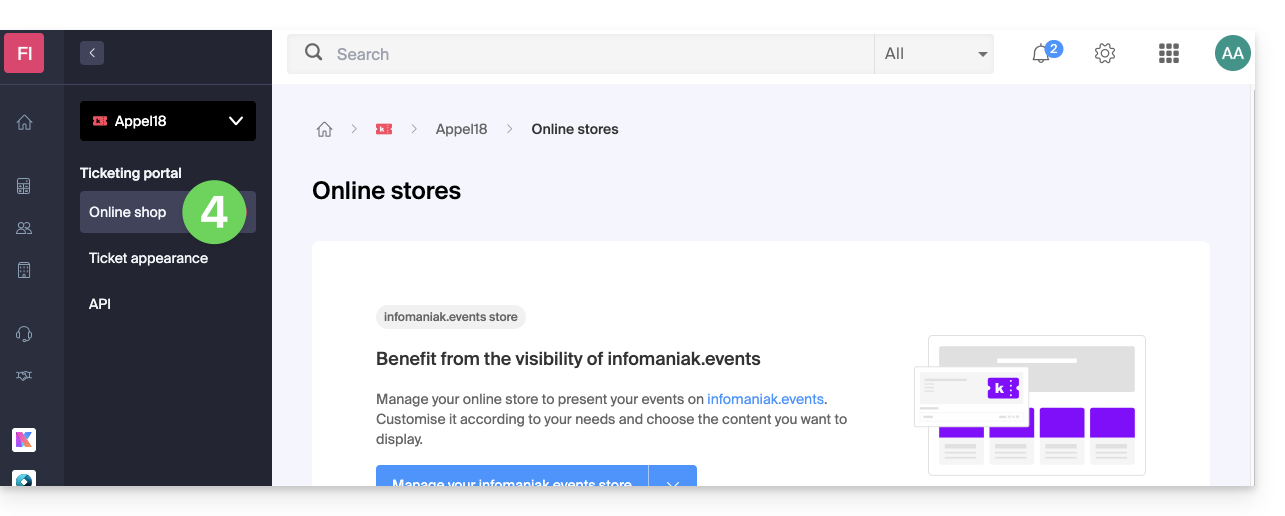
You arrive on the page of the online stores of the Ticketing Portal: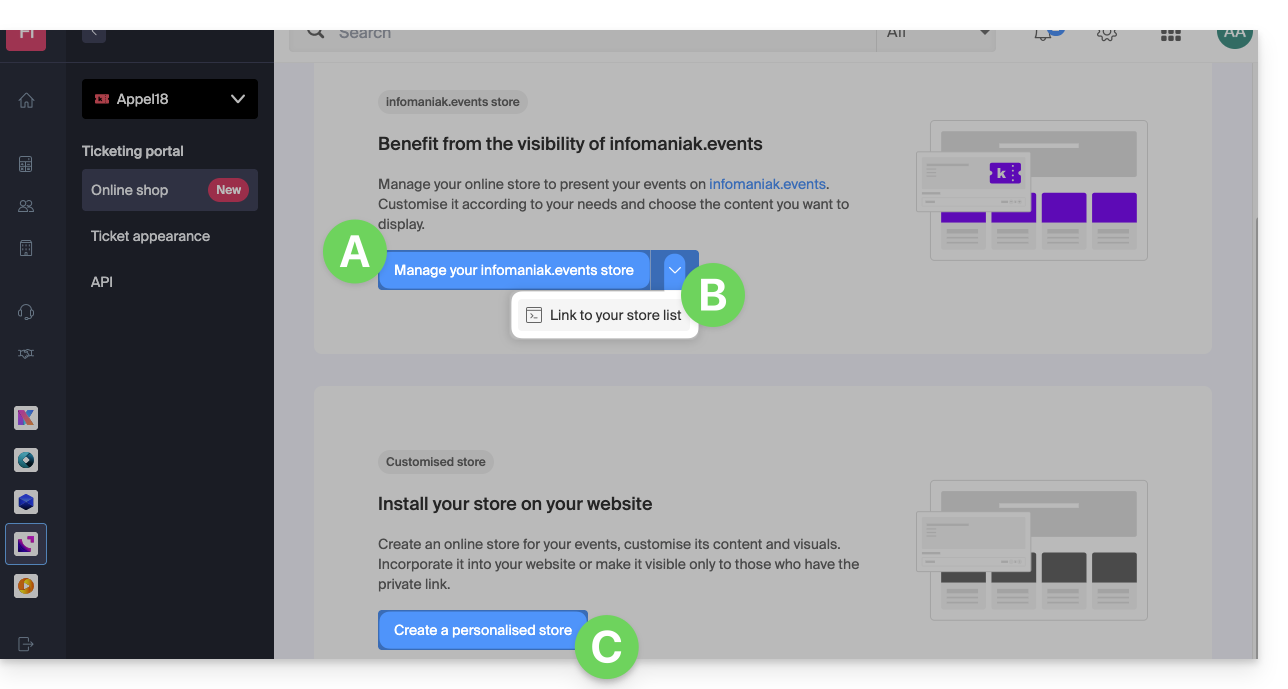
A. Create a store visible on infomaniak.events
- Make your events visible in the Infomaniak event portal search.
- Allow traditional search engines to reference your events.
- Customize the appearance of the main store of your ticketing system.
B. Integrate your multiple ticketing systems
- Access a page that groups all the "infomaniak.events" stores of your Organization.
C. Create a custom store
- Create stores for your specific uses (integration on your pages, for example).
- Add HTML / JavaScript or CSS scripts (for advanced users / developers).
Link to this FAQ:
Has this FAQ been helpful?
This guide explains how to configure the visual displayed on the screen of the device scanning tickets during an event (as part of the Infomaniak ticketing system).
Preamble
- Infomaniak offers an app for ticket control.
- It is possible to set a specific icon that will be displayed on the device screen when scanning a ticket.
- If the ticket is valid and an icon is set, the scanner will display the chosen icon on a green background.
Set up the scan validation icon
The choice of visual is configured in the advanced settings of a rate:
- Click here to access the management of your product on the Infomaniak Manager (need help?).
- Click directly on the name assigned to the ticketing related to the event.
- Click on Scheduling in the left sidebar.
- Click on Events in the left sidebar.
- Click on the relevant event.
- Click on the Pricing tab.
- If the event has multiple dates, this section is replaced by “Dates” which opens a calendar.
- Click on the date in the calendar to access the pricing…
- Click on the action menu ⋮ located to the right of the price (first expand the Zone using the chevron if necessary).
- Click on Edit:

- Then click on the chevron to expand the advanced settings.
- Enable the option Set a visual for the scan app.
- Select the icon name.
- Click the Confirm button:

Result on the scan device
Here is an example of the display when validating a correctly registered ticket:
Link to this FAQ:
Has this FAQ been helpful?
This guide explains how to make sales from an organizer account as well as on-site sales (within the framework of the Infomaniak ticketing system). If you wish to print free tickets, invitations, VIP or paid tickets, you can place an order from the ticket office and generate these tickets
Access the ticket office
To do this:
- Click here to access the management of your product on the Infomaniak Manager (need help?).
- Click directly on the name assigned to the ticketing concerned by the event.
- Click on Ticket Office in the left sidebar:

Create a new order from the ticket office
To do this:
- Choose whether the sale concerns an event, a pass or a gift voucher:

- Choose the desired event or item, as well as the number of tickets to put in the basket:

- Define the parameters in the basket, such as the seat in the room plan, the information in the forms by rates, and the use of a promotional code or gift voucher:

- It is possible to customize the information appearing on the tickets to be printed at this time
- Define a payment method. For a free ticket, such as an invitation, you will need to choose the payment method Free/Invitation
- Once the information has been entered, Validate the order
Associate the order with a customer
In the ticket office, assigning an order to a customer is optional. It is therefore necessary to enter it if you wish to be able to find an order with the customer's name or email address, send them the tickets by email, or be able to display the customer's first and last name on the ticket.
To do this, you will need to click on the Customer tab and search for an existing customer or create a new customer file.
If the sale concerns a pass, and an email address is attached to the pass, the customer would be proposed directly.

Print or send the tickets
You can print or send the tickets by email. To do this, go to the corresponding tab and choose the type of printing or email sending.
Other uses of the ticket office
The counter allows you to perform other important operations, such as exchanging bills or validating reservations; refer to this other guide.
Link to this FAQ:
Has this FAQ been helpful?
This guide explains how to access the tickets page and the ticket reports (within the framework of the ticketing system Infomaniak).
Access the tickets page
To do this:
- Click here to access the management of your product on the Infomaniak Manager (need help?).
- Click directly on the name assigned to the ticketing system related to the event.
- Click on Sales in the left sidebar.
- Click on Tickets in the left sidebar:

The Tickets page allows you to view tickets for a single event or a set of events and see at a glance the following information:
- The summary of your ticket list (total number of tickets, including those to be paid, refunded, canceled)
- The number of tickets scanned
- The number of attendees
- The zone, the price and the seat of the participant
- The ticket status
- The ticket order number
Actions on tickets (print, export, …)
When one or more tickets are selected, it is possible to perform the following actions:
- Print in the desired format (print@home, pre-printed, thermal, show, cinema)
- Cancel tickets (only if they are free)
- Scan / Unscan (resets the participant's entry)
- Export tickets/passes in
CSVformat
Search options
Many filters are at your disposal to refine your ticket searches, such as:
- By setting a date range for the order
- By setting a scan date range
- By selecting the sales channel (client shop, reseller/Administrator)
- By choosing the ticket type (regular or pass ticket)
- By choosing the order status of the ticket
- By selecting a price
The results of these searches can be exported in CSV format via the Export button:
Link to this FAQ:
Has this FAQ been helpful?
This guide explains how to assign a seating plan to events (within the framework of the Infomaniak ticketing system).
Preamble
- The seating plan allows participants to select their seats via an interactive interface.
- This feature allows them to precisely visualize the location of their seats in relation to the stage or field before finalizing their reservation.
Request a seating plan
To use a seating plan for an event of your choice, you need to create the seating plan and assign it to the customer account associated with the ticketing system.
To do this, please contact Infomaniak support and send the following information:
- The name of the venue or room.
- The address of the venue or room.
- A file with the seating plan (pdf, excel, csv, etc. format) with the row and seat numbers.
- The account on which the ticketing system is located.
The seating plan will be created and assigned to your Infomaniak account.
Price
The assignment of the seating plan costs CHF / EUR 200.-. The invoice will be sent to the address indicated on the Infomaniak account.
Link a seating plan to an event
Once the seating plan is created and assigned to your account, you need to select it on the event where you want to use it.
- Click here to access the management of your product on the Infomaniak Manager (need help?).
- Click directly on the name assigned to the ticketing system concerned by the event.
- Click on Programming in the left sidebar menu.
- Click on Events in the left sidebar menu.
- Create an event or go to an existing event and click on Manage and Modify to find the venue menu.
- Choose the desired room layout:

Once the room layout is selected, the event seat quota will be automatically adjusted according to the number of seats on the room layout.
Refer to this other guide to configure the room layout once it has been activated.
Link to this FAQ:
Has this FAQ been helpful?
This guide explains how to add users as resellers so they can sell tickets for your events (as part of the Infomaniak ticketing system).
Preamble
- If you have points of sale, partners, or simply cash desks at the entrance of the event, you can give them reseller access.
- You can then grant them the right to sell from the ticket office.
Add a reseller
To do this:
- Click here to access user management on the Infomaniak Manager (need help?).
- Click on the Add a user button at the top:
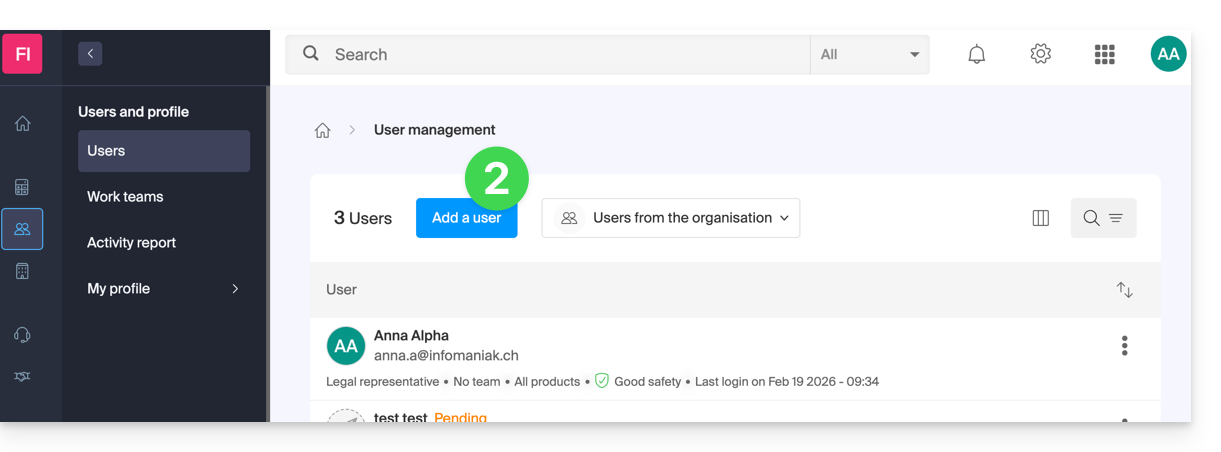
- Enter the different information of the user.
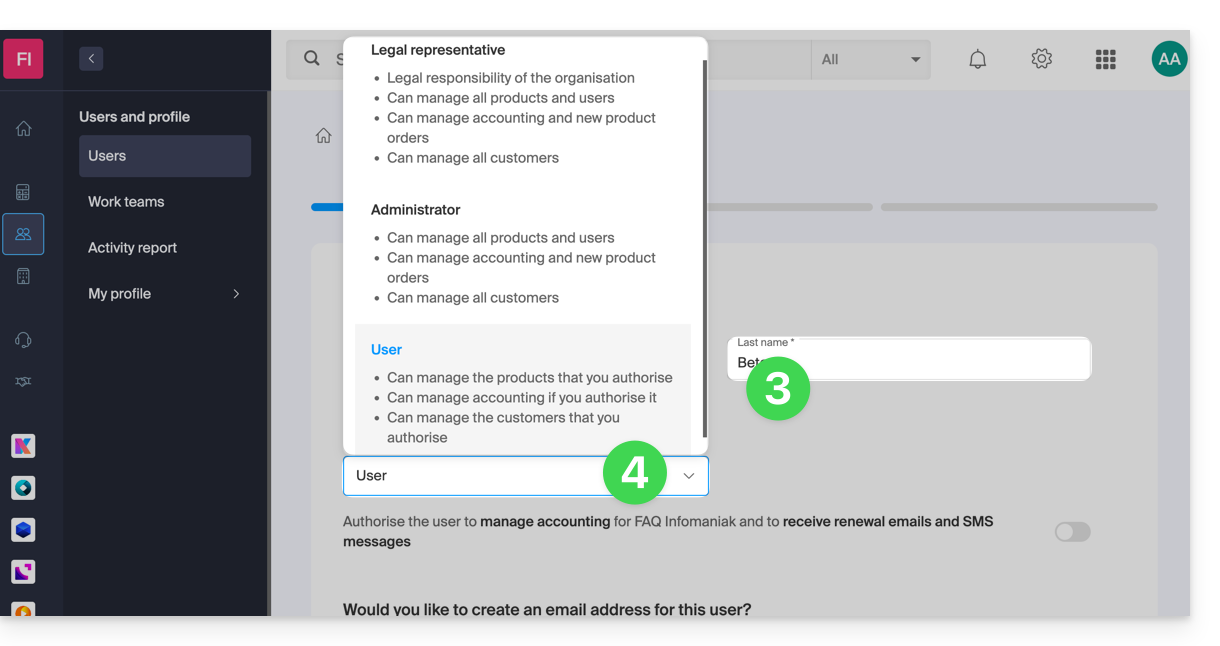
- Choose User as the role:
- Move on to the next step (choosing a possible work team) and then complete the invitation.
- Click to choose product access permissions:
- Expand the product administration section to click on Ticketing:
- A side panel opens — select the boxes to grant access to the relevant ticket offices:
- Save your selection.
Details of rights and user access
1. Managers
- Group owner (legal manager of the account)
- Group administrator
- Billing administrator
- Accounting
2. Users
- Administrative — no rights assigned
3. Technical
- Programming Management
- Clients
- Mailing
- Client Export
- Promotional Code (Code Generation)
- Store/Billet Design
- Ticketing Integration
- Settings
4. Statistics
- Sales Details
5. Ticket Control
- Ticket Control
6. Ticket Sales
- Ticket Sales
- Points of Sale
- Clients (except Mailing, Export, and Promo Code Management)
- Member Card Management
7. Staff Management
- Staff
Next Step
You can now create profiles to detail reseller access…
Link to this FAQ:
Has this FAQ been helpful?
Here are the different ticket formats available for on-site sales (within the framework of the Infomaniak ticketing system).
Thermal printer printing
- Show Format: 82 x 203.2 mm

- Cinema Format: 101.6 x 76.2 mm

Use of digital tickets
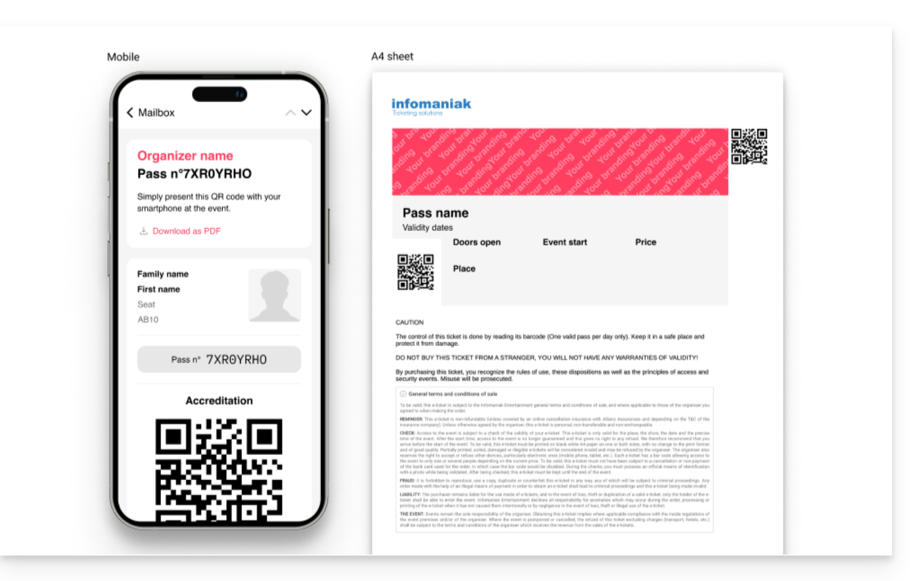
You can also send digital tickets directly to the customer's email address. To do this, when finalizing the order, you will simply need to link a customer file and the ticket sending option will appear directly in the order validation window:

Link to this FAQ:
Has this FAQ been helpful?
This guide provides a checklist of important points to check before going live with a ticket sale (within the Infomaniak ticketing system) to best promote your events to the public.
Browse the checklist
Here is the list of the most important elements to check before going live with ticketing for your event.
The ticketing system must be visible (point 7b below) to perform visibility checks on the shop. It can be visible and in test mode (point 7a) to prevent it from being published publicly.
- Has a bank account been added in the Accounting > Infomaniak Receipts menu?
- Has the integration link been retrieved and integrated?
- Note: The integration link has its own settings to display/hide events in the “Content” submenu.
- Ensure that the relevant events are set to "Active" (only if the "manually select items to display" parameter is enabled).
- Are Prices, Zones, Events set to Visible? To verify this:
- Event: Settings > Event > green/orange/red text with eye symbol below the event.
- Zone: Settings > Event > Pricing > eye symbol to the right of each zone.
- Prices: same as zones, but open the zones to see the prices they contain.
- Are the desired payment methods (Sales > Payment Methods) enabled?
- Are the organizer's information up to date (Settings > Ticketing Settings > organizer contact information)?
- An email is mandatory, and a reachable phone number is strongly advised.
- Is the VAT set correctly?
- Are the passes/subscriptions ok? (Programming > Passes)
- Do they all include the events they grant access to?
- Are their capacities and prices ok?
- Are they visible on the store? (eye symbol to the left of each pass in the list)
- In the Settings > Ticketing Settings menu:
- Disable test/demo mode.
- Enable ticketing.
Also refer to the getting started guide to get a better overview of the possibilities offered by your ticketing tool.
Link to this FAQ:
Has this FAQ been helpful?
This guide explains how to configure the floor plan when it has been activated for an event (as part of the Infomaniak ticketing system).
Prerequisites
- Have a floor plan and have it activated for the event in question.
- Have activated and created at least one pricing zone.
Apply zones to the floor plan
To access the event's pricing from the ticketing system:
- Click here to access the management of your product on the Infomaniak Manager (need help?).
- Click directly on the name assigned to the ticketing system concerned by the event.
- Click on Programming in the left sidebar menu.
- Click on Events in the left sidebar menu.
- Click on the event in question.
- Click on the Pricing tab.
- If the event has multiple dates, this section is replaced by “Dates” which opens a calendar.
- Click on the calendar date to access the pricing…
Once in this menu, you need to have at least one zone activated:
- Click on the action menu ⋮ located to the right of the zone in question.
- Make sure the box “Zone with numbered seats” is activated:

- A seat symbol should be next to the zone name in the list of prices.
- Then click on the “Manage the floor plan” button above the zones to open the floor plan management menu:

The logic here is to assign a zone to each seat, row, or section according to the needs of the event.
For example, below, a green zone and a red zone are distinguished. To assign seats to a zone:
- Select the seats by hovering over all the seats, or to select the entire row, click on its number.
- Click on each seat to configure, a black circle surrounds them indicating that they are selected.
- It is possible to click on the name of each row (A, B, C) to select all the seats in the row, and even to click on the name of the section (here, right, left, middle) to select all the seats in the section.
- Click next on the area to link to the selected seats.
- In the Zones menu that appears in the lower half of the page, click on the area to assign.
- The background of the selected seats will change to the color of the area.
- Repeat the operation for each remaining area to assign.
Block online sales for a seat/row/section
By default, all seats are available for online sale.
To block the online sale of certain seats, configure the restrictions directly in the seating plan:
- To block the sales of certain particular seats, open the seating plan management menu as explained above, and select (black circle) the seats/rows/sections.
- Instead of selecting the areas in the bottom menu, choose the type of Access:
- No restriction = default state, customers can purchase the seat
- Reserved for organizers = Only people with Admin status on the organization can purchase the ticket from the ticket office
- Reserved for resellers = Resellers can make the purchase from the ticket office (normal users/collaborators on the organizer with sales rights)
The section visible at the bottom named “Reserve” is no longer used and can be ignored.
Once the plan is configured, the seats can be put on sale. Make sure to assign a price to each area.
See who a specific seat is assigned to
In order to obtain the information relating to the allocation of seats and to identify the people who have reserved or occupied each seat according to the seating plan, you can use the seating plan management menu which displays the purchased seats with an orange fill.
If you click on the seat, the order information is displayed, and a link to the customer file is provided: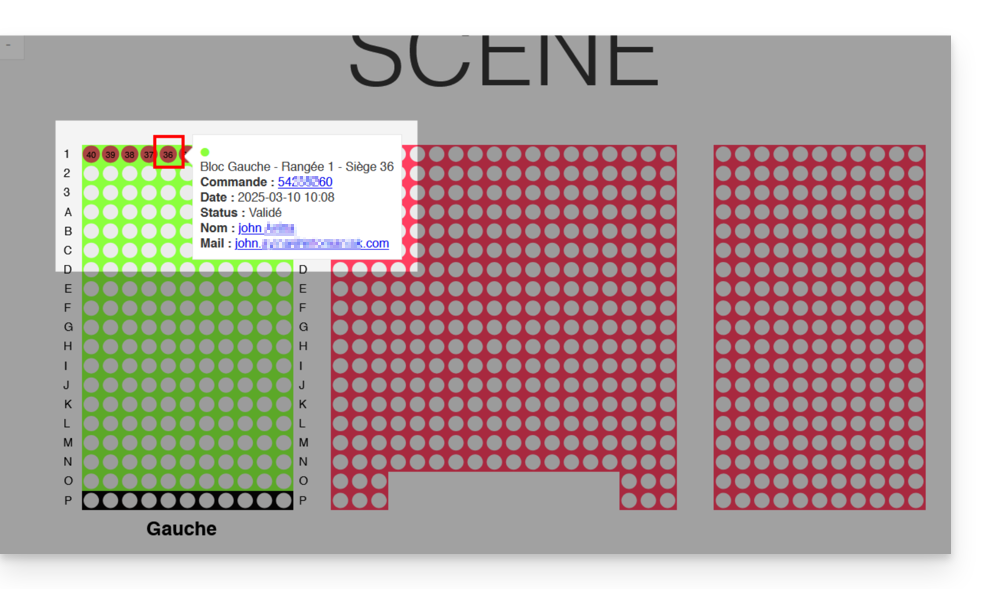
Link to this FAQ:
Has this FAQ been helpful?
This guide explains how to modify product access rights for a user in your Organization on the Infomaniak Manager.
Preamble
- Since you opened your account with Infomaniak, you are part of at least one Organization.
- If you were alone and it was not an invitation, an Organization was created in your name and you automatically become the legal representative.
- Otherwise, you belong to the Organization that invited you (to join its kSuite, to manage a product, etc.).
- It is possible to modify a user's role within your Organization.
- You can then define whether a user…
- … is part of your Organization and should become:
- Legal representative
- Administrator
- Collaborator (this is the part that is detailed below…)
- … is external to your Organization (limited rights):
- External users are not included in the sharing of calendars and address books for the entire Organization.
- … is part of your Organization and should become:
Who can access what…
Prerequisites
- Be Administrator or Legal representative within the Organization.
- Switch to the desired Organization first if you do not find the expected user list.
- Have added a user as a collaborator.
The guide below allows you to manage product access for collaborators and external users. Indeed, a legal representative or an Administrator already has access to all existing products within the Organization and visible on the Infomaniak Manager.
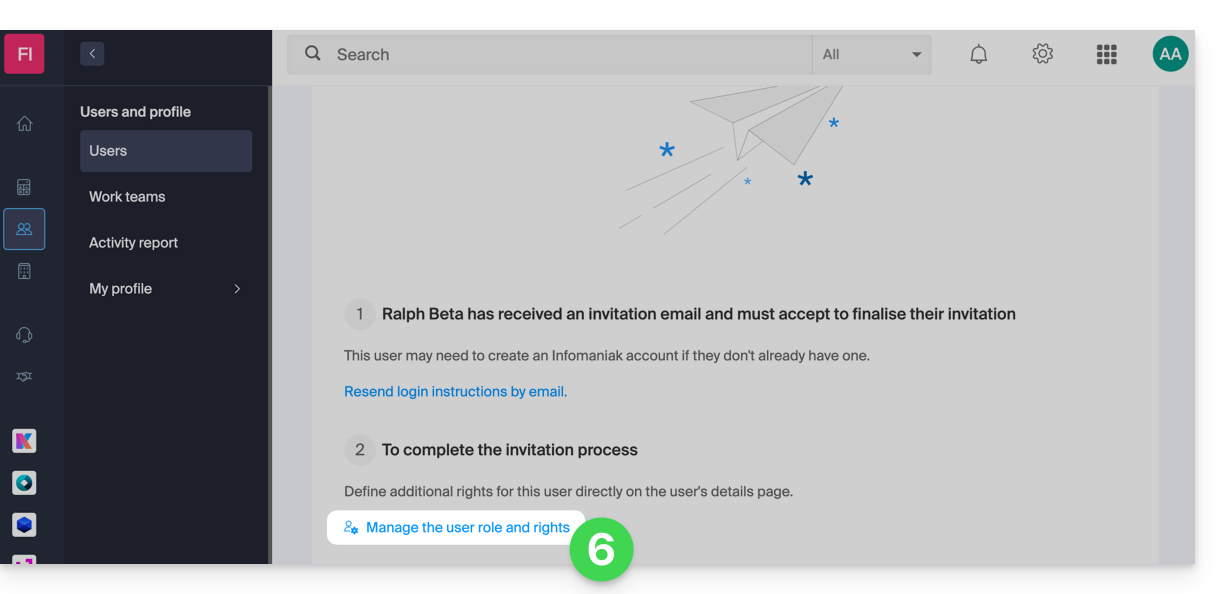
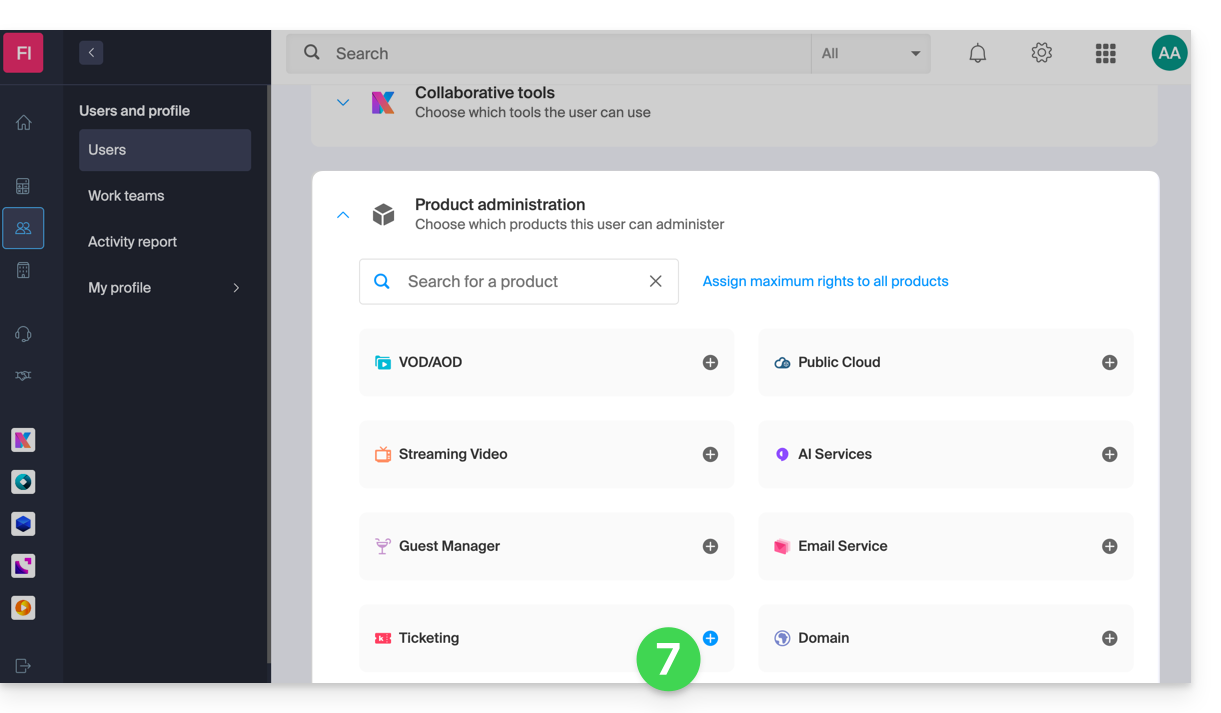
To modify the product access of an Organization user:
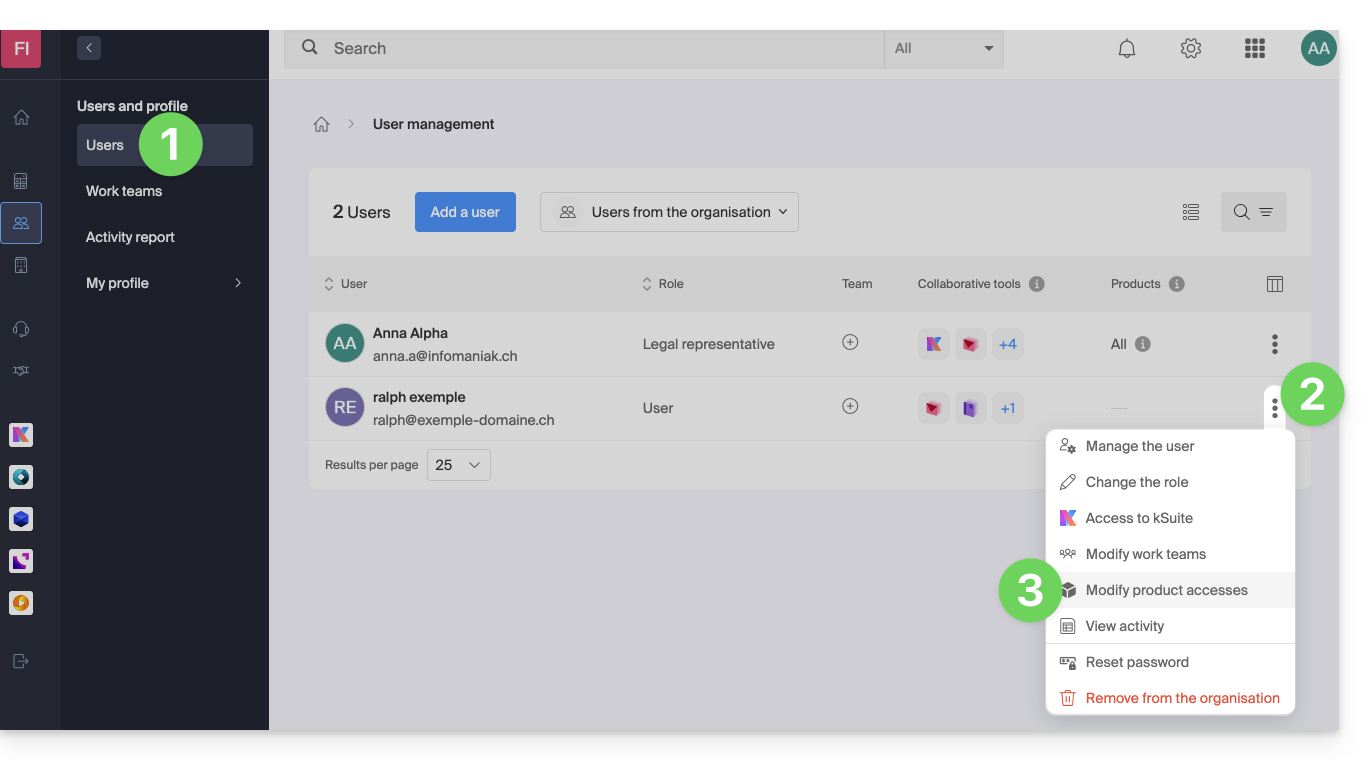
- Click here to access user management on the Infomaniak Manager (need help?).
- Click on the action menu ⋮ located to the right of the user concerned.
- Click on Modify product access:
- You can give access to everything with maximum permissions in 1 click.
- Otherwise, click on the product category to which you want to grant access.
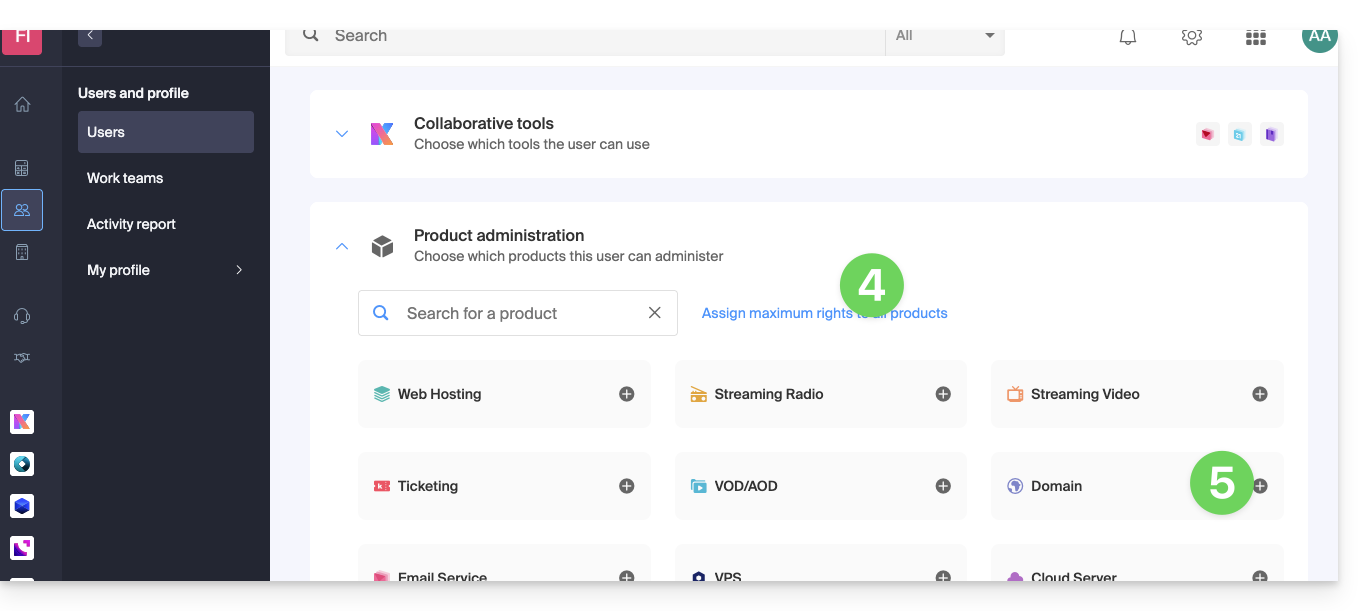
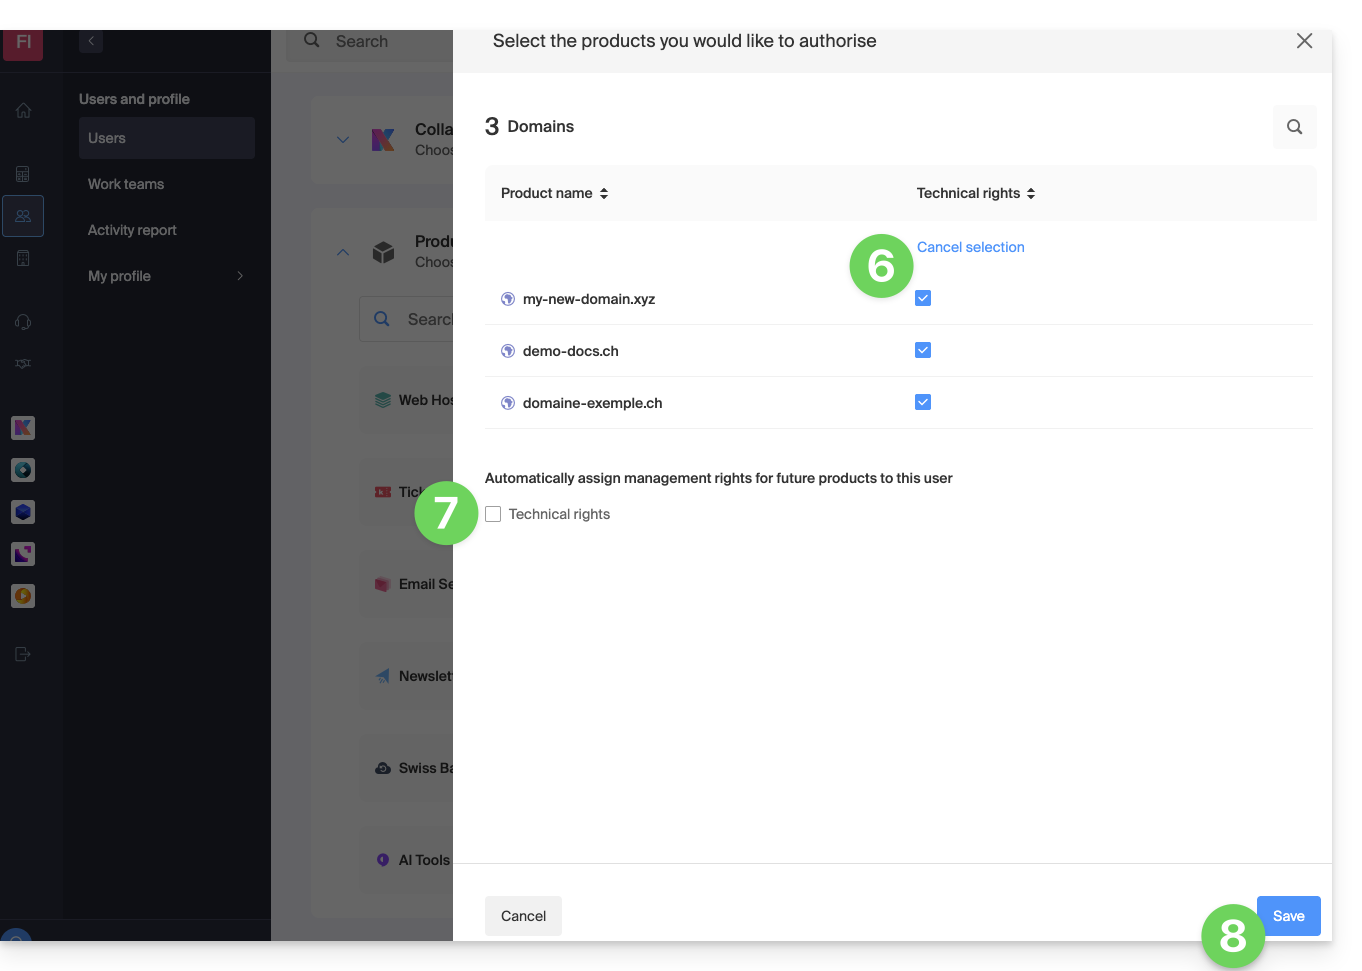
- Select the necessary product(s).
- If you have selected multiple products, decide whether a future additional product should automatically be visible to the user (and with what type of permissions).
- Click on the Save button:
- Rights are granted immediately.
- Click on the pencil icon ✎ to modify permissions:
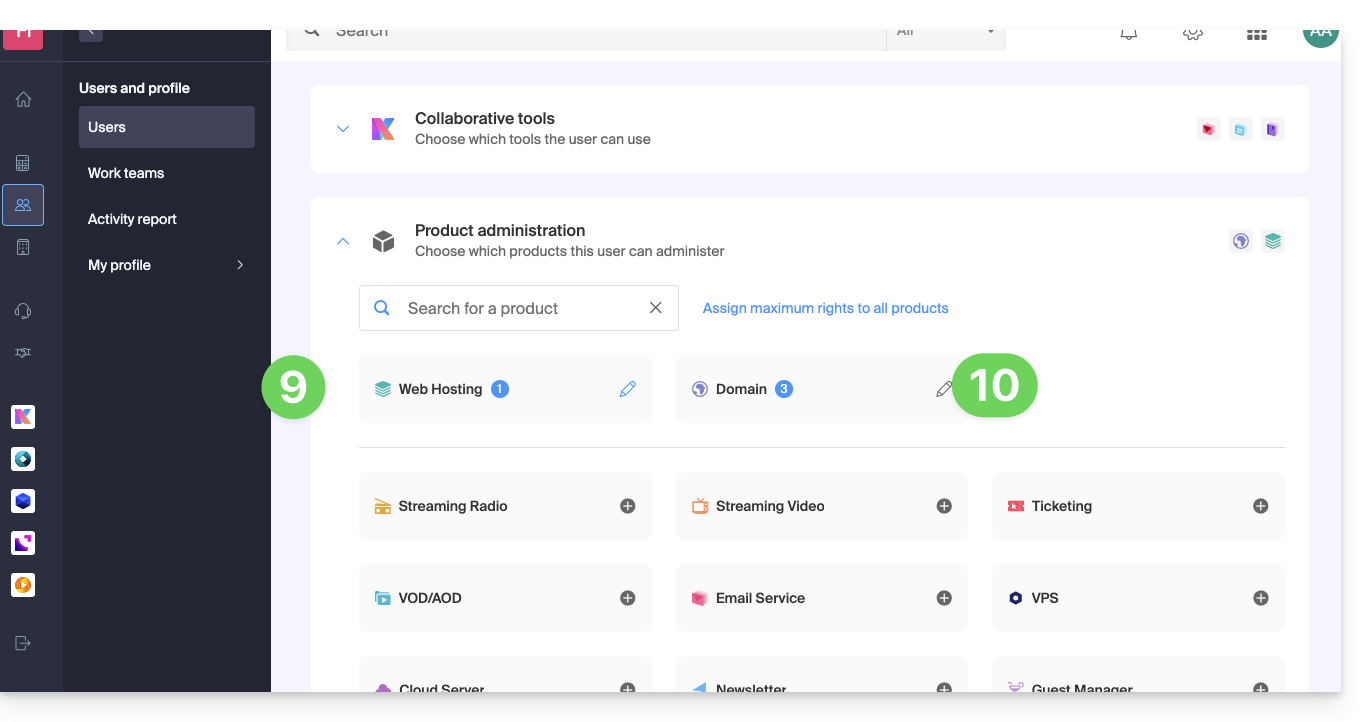
- Restart at step 5 if you need to grant access to multiple products.
Service usage / Service management
Be careful, on your product table, it is important to distinguish between product access (type kDrive for example, within the kSuite) and product management access: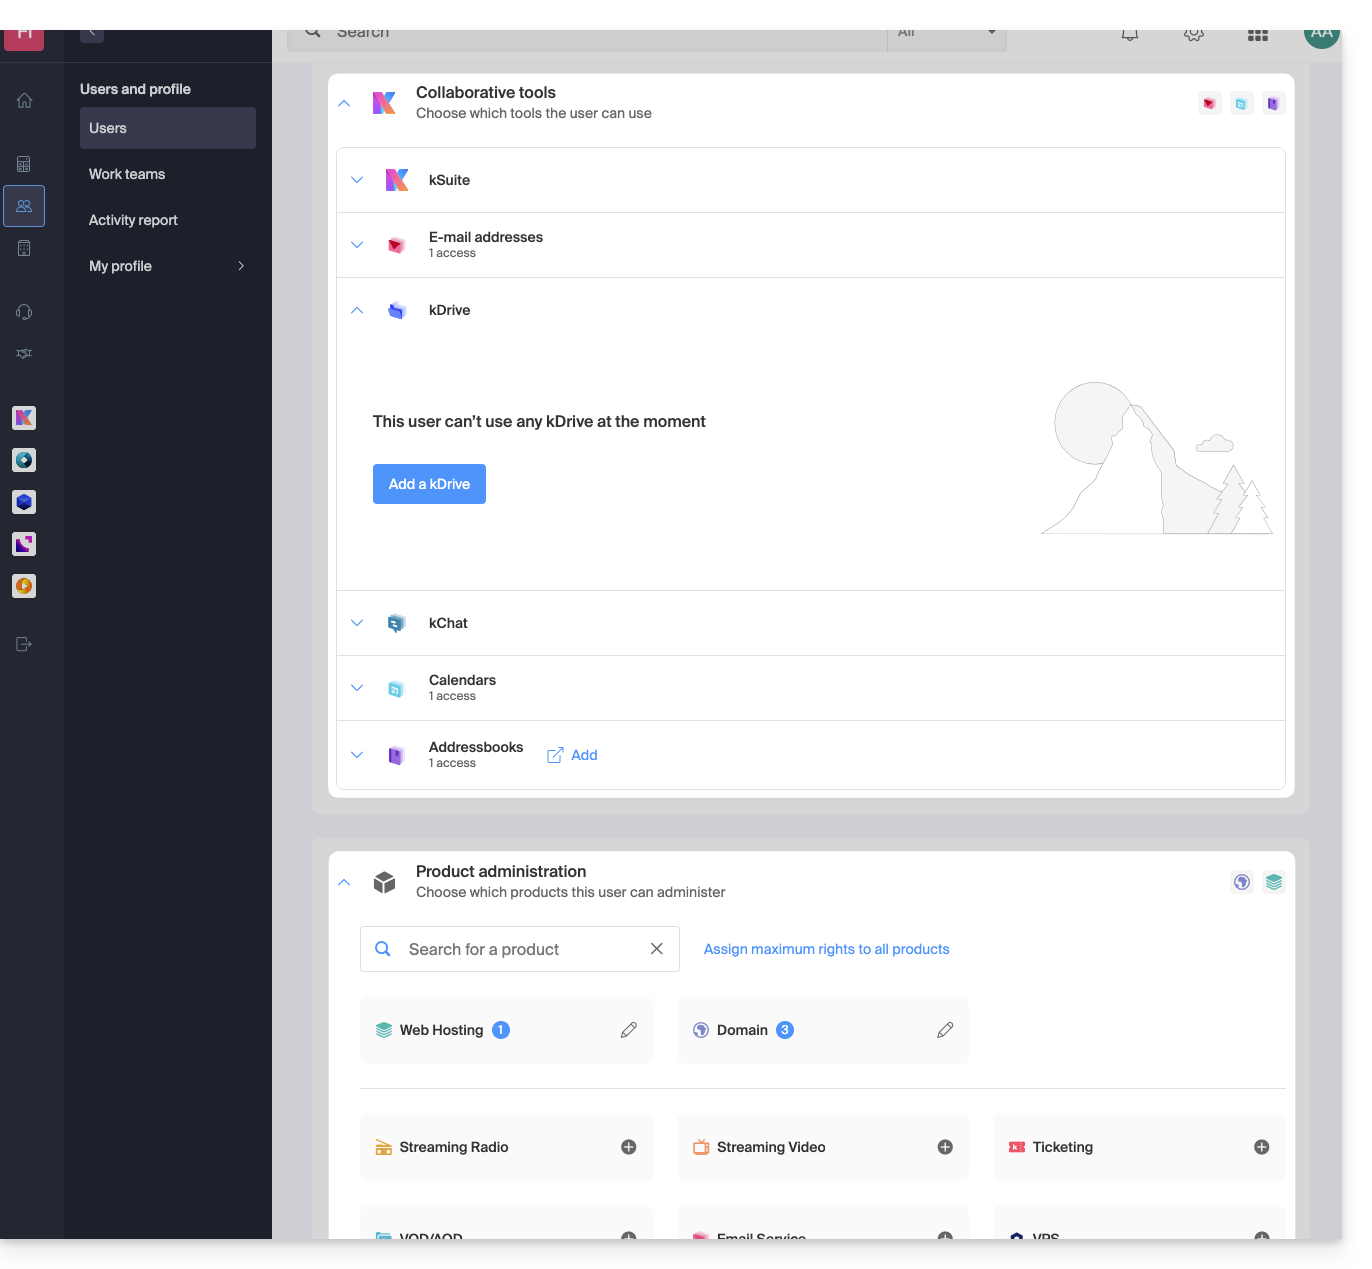
It is possible to authorize a user to use kDrive (they will be able to create a PDF for example) without granting them kDrive service management rights (they will not be able to change the offer, invite a new user, terminate, etc.).
Technical rights / Statistical rights
With certain services like kDrive, it is possible to give a collaborator TECHNICAL and/or STATISTICAL rights (adds access to the dashboard, share links, storage statistics, active users, connected devices, activity on kDrive):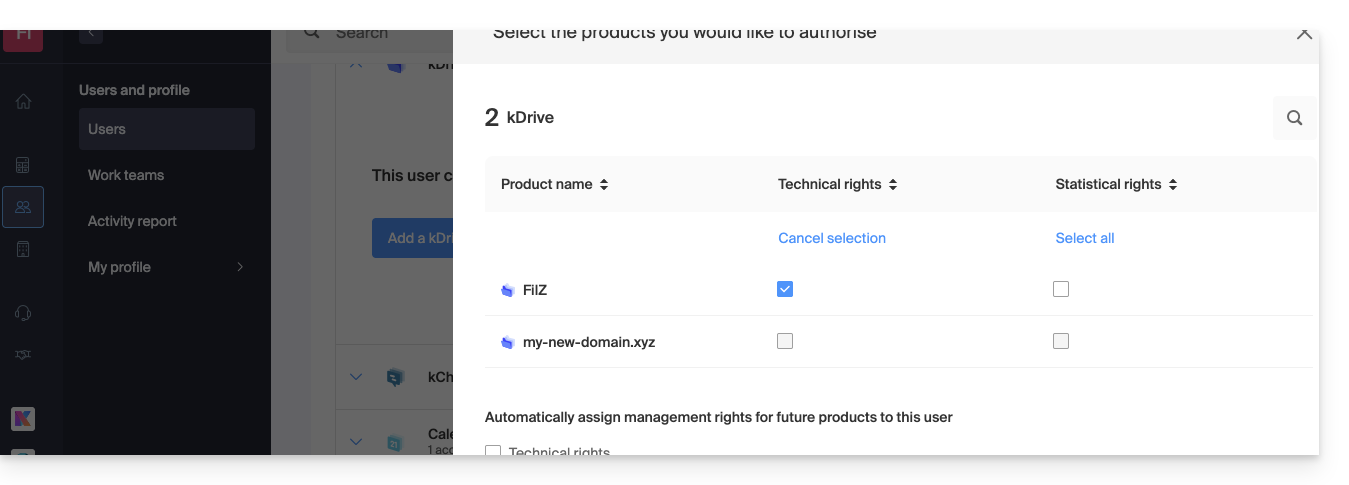
Other services like domain names do not have a STATISTICAL section: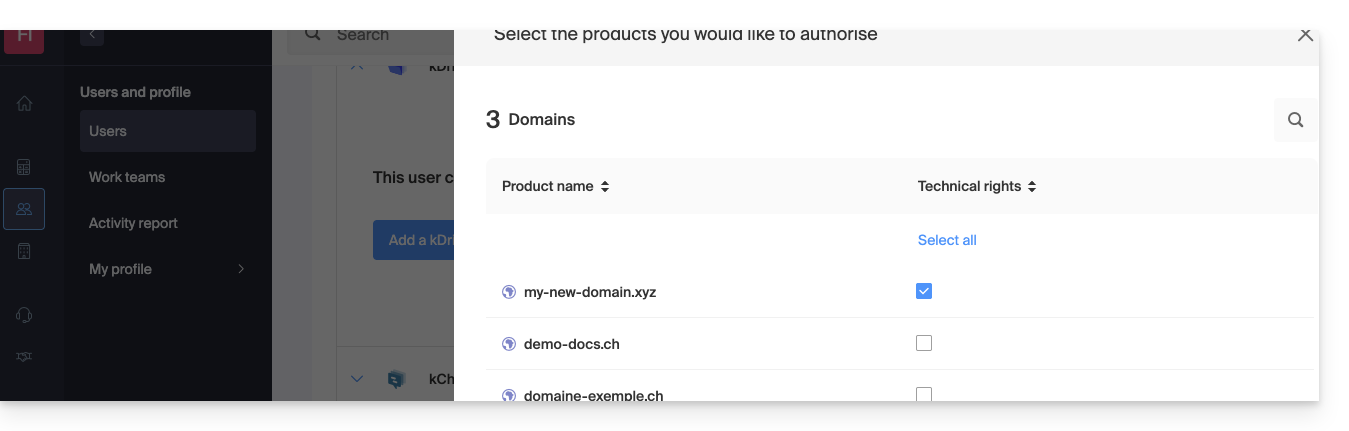
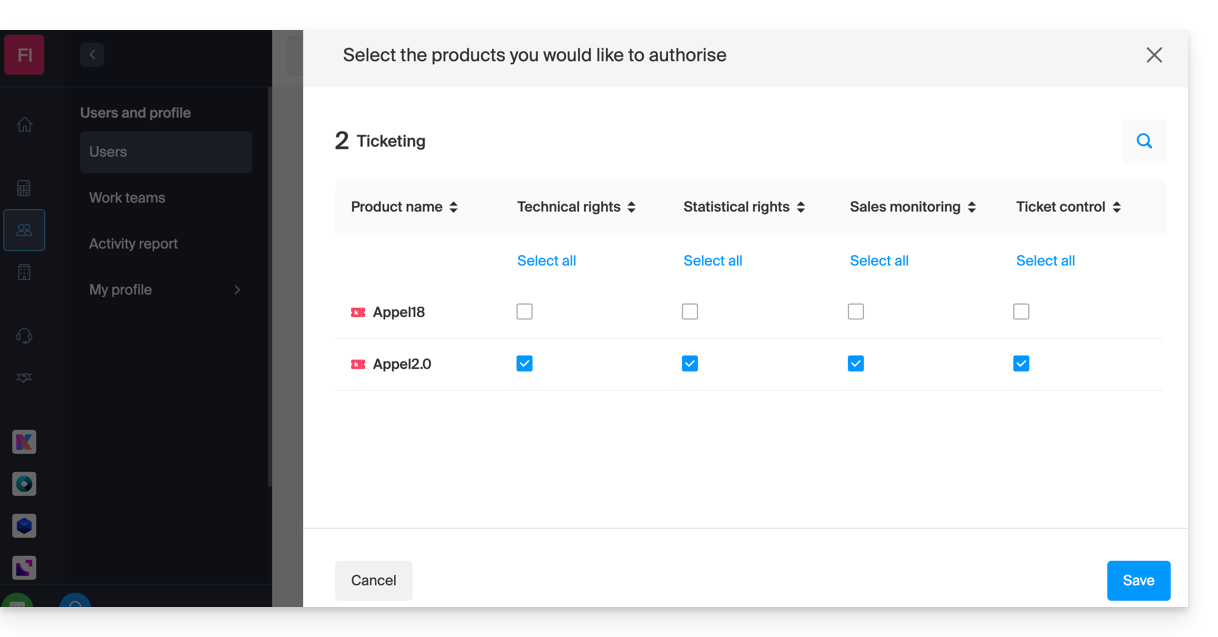
Certain specific services like ticketing allow granting even more detailed rights: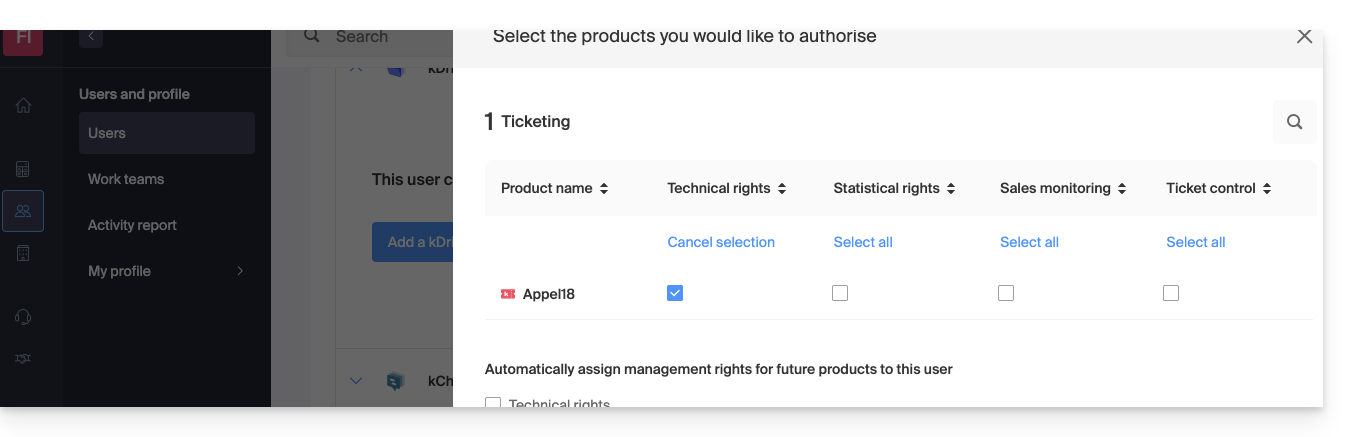
Easier access: Work Teams
To facilitate the addition of access rights to a product that is on your Organization, there are Work Teams. These allow you to create groups that are linked to Infomaniak products with the desired rights, very practical for giving a new collaborator in your Organization access to the products they will need in their daily activities.
Link to this FAQ:
Has this FAQ been helpful?
This guide explains how to duplicate an event, within the framework of the Infomaniak ticketing system, uniquely or recurrently.
Preamble
- If necessary, refer to this other guide regarding the duplication of an event on a second ticketing system.
Duplicate an event
To duplicate an event, for example, a previous season or edition:
- Click here to access the management of your product on the Infomaniak Manager (need help?).
- Click directly on the name assigned to the ticketing system on which the event to be duplicated is located.
- Click on Programming in the left sidebar menu.
- Click on Events in the left sidebar menu.
- Click on the action menu ⋮ located to the right of the event to be duplicated.
- Click on Duplicate:

- On the modal that opens, choose to duplicate the event uniquely (once) or recurrently (multiple times):
- Recurrent duplication allows you to duplicate the event over the entire period by choosing the dates (Monday to Sunday) for which you want this event to be duplicated.
- If necessary, indicate the new name of the event, the new dates, and the other parameters of the representation of your event.
- Click on Confirm to start the duplication.
Once the duplication is executed, refresh the page and determine whether the events should be visible to customers or hidden to customers and/or resellers, or complete for customers and/or resellers. You can also duplicate the seats in the case of numbered rooms.
Link to this FAQ:
Has this FAQ been helpful?
This guide explains how to import tickets that would be generated by another provider or an external reseller for your event within the framework of the Infomaniak ticketing system.
Prerequisites
- The import of third-party tickets requires that the event is already created on your Infomaniak ticketing system.
- You also need the list of tickets in a CSV format file with the barcode field that will be printed on the ticket.
Access import options
To do this:
- Click here to access the management of your product on the Infomaniak Manager (need help?).
- Click directly on the name assigned to the ticketing concerned by the event.
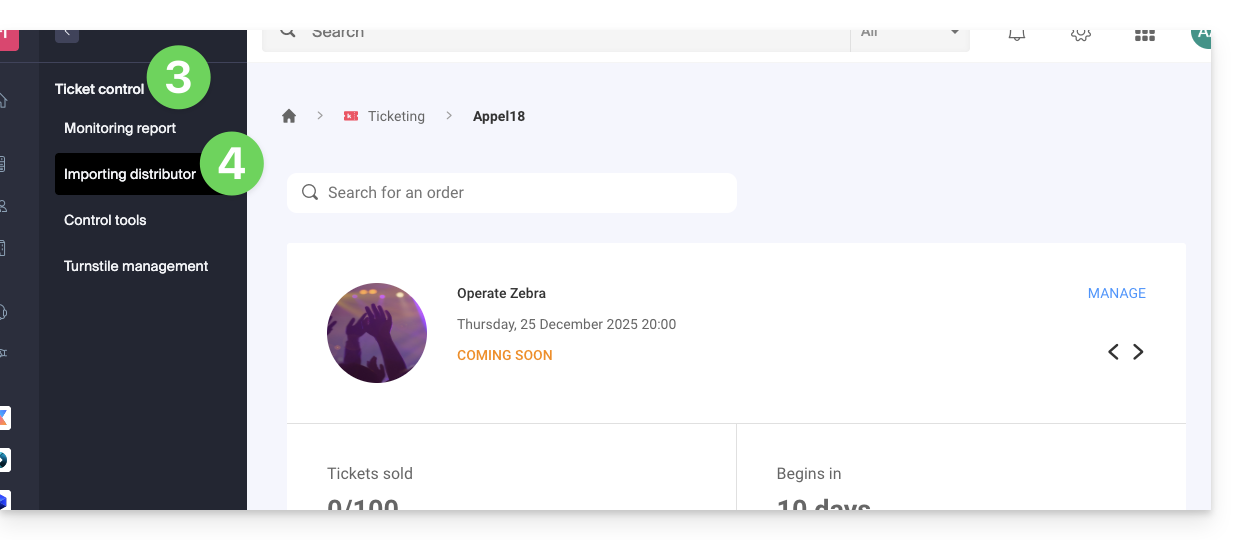
- Click on Ticket Control in the left sidebar.
- Click on Distributor Import in the left sidebar:
Import the CSV file
To do this:
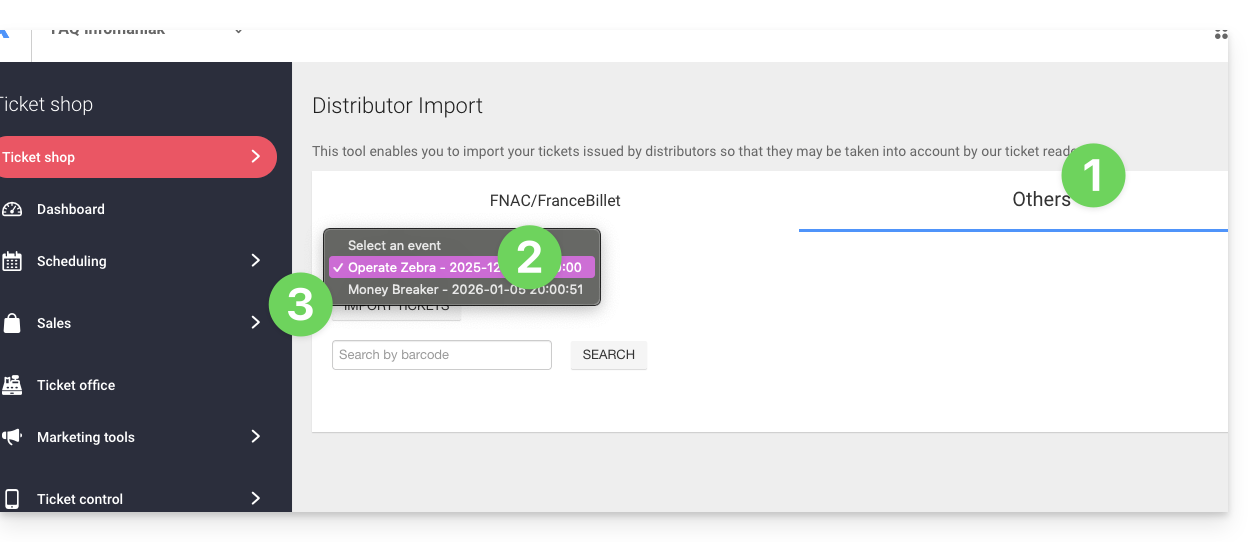
- Click on the tab FNAC/FranceBillet or Others depending on the reseller.
- Choose an event for which to import tickets.
- Click on Import Tickets:
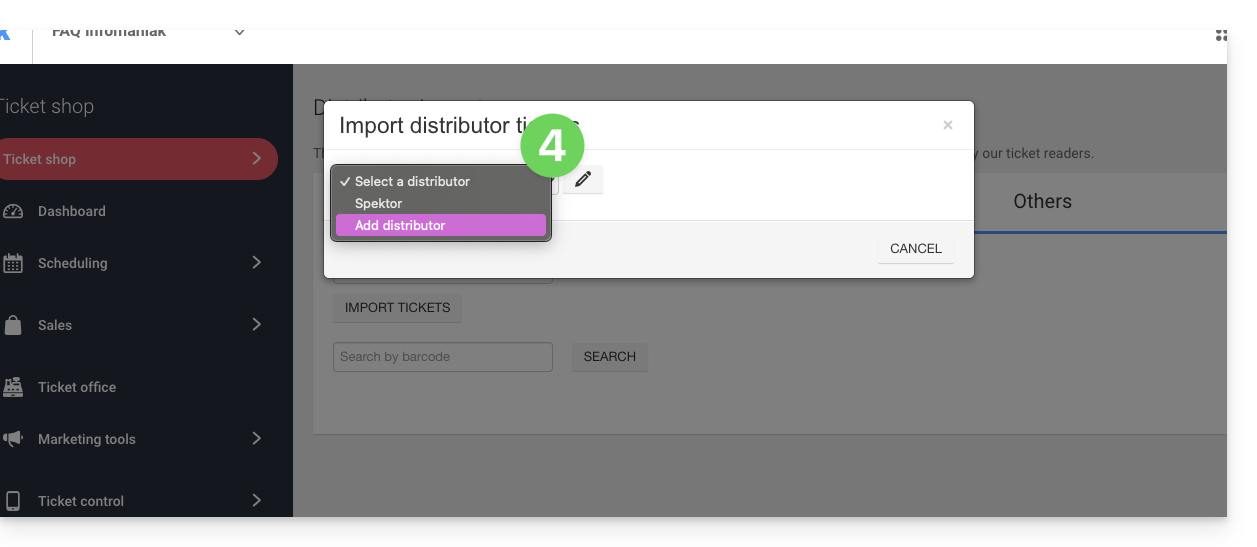
- Choose an existing distributor from the dropdown menu, or create one:
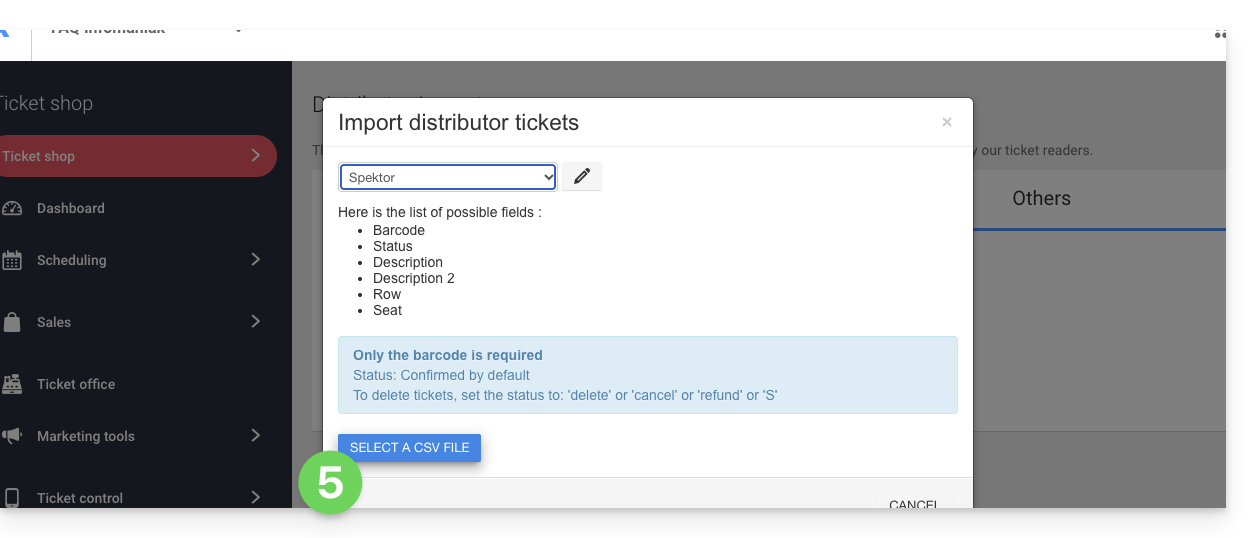
- Click on the button Choose a CSV file and upload the CSV file provided by the distributor:
- Select the rows to import. Warning:
- Check the first and last row of the imported information.
- These may contain headers or blank lines that can cause an error during import.
- Use the options at the top of the page to define the number of first and last rows to ignore:

- Link the columns to the information to be imported.
- The ticket barcode is the only mandatory field.
- If you are importing tickets from another Infomaniak ticketing system, select column 8 which is the QR code (in the form 2000000000A^0^100000000):

- Check the imported information and validate:
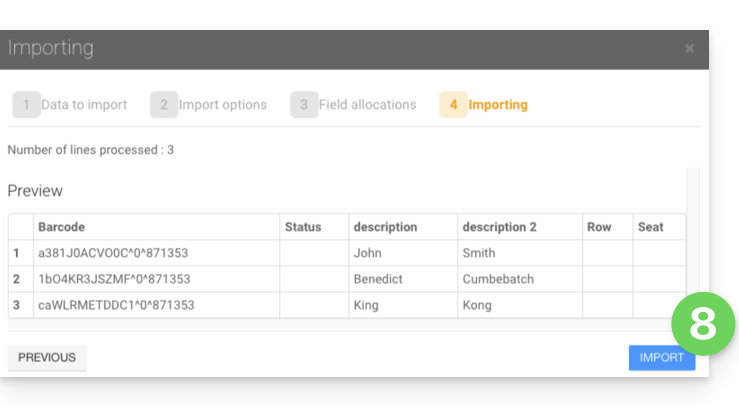
- The imported tickets will appear in a table at the bottom of the page:
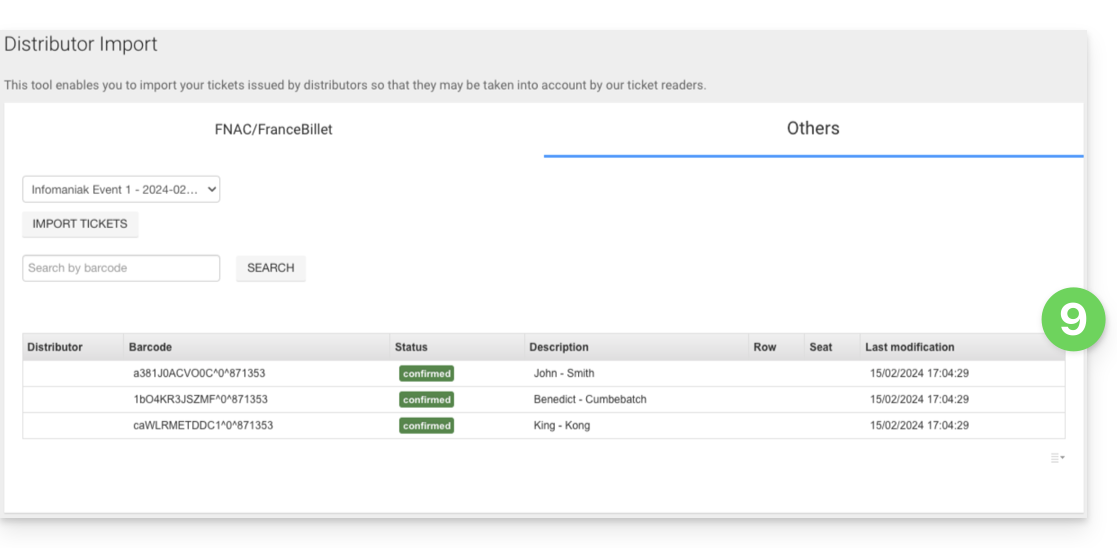
Control of imported tickets
Once the tickets are imported, they can be scanned with the ticket control application (available on iOS and Android).
They will also be deducted in the FNAC or Others column in the control report tool available from the left menu, Ticket Control, Control Report:
Link to this FAQ:
Has this FAQ been helpful?
This guide explains how the commissions applied to your sales work (within the framework of the Infomaniak ticketing system).
Free tickets
Infomaniak does not apply any commission on the sale of free tickets.
- If the price of your tickets is CHF 0.- or 0.- €, you will not pay anything for the sale of these tickets.
- Note: it is the value of the ticket that counts and not the payment method.
- A paid ticket validated with the free/invitation payment method is therefore not considered a free ticket.
- To create a free rate for your guests, refer to this other guide.
Paid tickets
Infomaniak commissions for paid tickets are composed of 3 parts:
- A fixed commission that remains constant regardless of the ticket price or payment method
- A percentage commission of the price of the ticket, applied to all online sales
- The banking fees for online transactions that vary according to the payment method used.
| Online sales | On-site sales | |||||||||
|---|---|---|---|---|---|---|---|---|---|---|
| Total commission | ||||||||||
| Banking commissions (variable depending on the payment method) | ||||||||||
| Infomaniak commission (percentage of the ticket price) | Total commission | |||||||||
| Infomaniak commission (fixed) | Infomaniak commission (fixed) | |||||||||
For the complete list of commission rates, refer to the pricing page on the sales page.
How are the commissions paid?
- Infomaniak commissions will be automatically calculated when the monthly statement is generated.
- It will be deducted from the monthly sales amount if the balance is sufficient.
- An invoice will be sent to you if the balance is insufficient.
Link to this FAQ:
Has this FAQ been helpful?
This guide explains how to use the group pricing feature (as part of the Infomaniak ticketing system).
Preamble
- This rate allows visitors to purchase multiple entries in one click.
- This option is particularly useful for families, school classes, or even grouped special offers.
- Although the buyer makes only one purchase, the group rate includes multiple tickets in a single purchase.
- Several tickets will therefore be issued, and each member of the group can then present their own ticket at the time of the event.
Manage the group rates of your event
To do this:
- Click here to access the management of your product on the Infomaniak Manager (need help?).
- Click directly on the name assigned to the ticketing concerned by the event.
- Click on Programming in the left sidebar menu.
- Click on Events in the left sidebar menu.
- Click directly on the name of the event.
- Then click on the Rates tab.
- Click on Add a rate:
- Choose to Add a rate.
- Choose the group rate.
- Specify:
- the name
- the number of tickets included in the rate
- the price of each individual entry (the price of the group rate will be equal to the individual price multiplied by the number of tickets)
- Activate any advanced settings.
- Click on Confirm:

The display of pricing varies depending on the type of event: for a multi-date event, it is managed via an action menu on the "Modify" button, while for a single-date event, it appears directly in the "Prices" tab at the top of the page.
Link to this FAQ:
Has this FAQ been helpful?
This guide explains how to create events with multiple performances (within the Infomaniak ticketing system).
Create a multi-date event
To do this:
- Click here to access the management of your product on the Infomaniak Manager (need help?).
- Click directly on the name of the ticket office concerned.
- Click on Programming in the left sidebar.
- Click on Events in the left sidebar.
- Click on the Add an event button.
- At the Date and Location step, you can choose the option Multiple performances:

- An interface with a calendar appears, choose the start date of the event.
- You can define whether the event lasts for several days, weeks, months, or if it is recurrent several times in the same day:

- Once the event is created and open for sale, you can track the progress of orders for each date using a List mode display:

Link to this FAQ:
Has this FAQ been helpful?
This guide explains how the payment deadline works before a cancellation of an order (within the framework of the ticketing system Infomaniak).
Prerequisites
- This feature is only available for orders using the 'Pay by invoice' payment method.
- By default, the deadline is 30 days after the order. A reminder will be automatically sent 10 days and 20 days after the order date. On the 30th day, the order will be canceled, and an email will be sent to the customer to inform them of the cancellation of their order.
Set the delay before order cancellation
When tickets for one of your events are purchased using the 'Payment on invoice' payment method, it is possible to configure an expiration rule before the automatic cancellation of the order.
- Click here to access the management of your product on the Infomaniak Manager (need help?).
- Click directly on the name assigned to the ticketing related to the event.
- Click on Sales in the left sidebar.
- Click on Payment methods in the left sidebar.
- Click on the ⏵ icon to expand the parameters for the 'On invoice' option:

- Set the availability duration of this payment method, the number of days before requesting payment from the client again, as well as the number of reminders:

Each reminder extends the payment deadline by as many days as the initial deadline. The order is automatically canceled at the end of the reminder period, which is calculated as follows:
- Number of days before the first reminder + (number of reminders multiplied by the number of days before the first reminder).
- In the example above, this gives: 5 + (2x5) = 15, meaning cancellation occurs 15 days after the first reminder.
Link to this FAQ:
Has this FAQ been helpful?
This guide explains how to create an event (within the framework of the Infomaniak ticketing system) that will be broadcast via the Infomaniak streaming service.
Prerequisites
- Have an Infomaniak ticketing system to create the event.
- Have an Infomaniak video streaming service to broadcast the event. Are you unsure about your monthly bandwidth needs?
Stream your event
A dedicated page has been set up to ensure that only people who have purchased a ticket to your event will have access to the event.
Creating a virtual event
To do this:
- Click here to access the management of your product on the Infomaniak Manager (need help?).
- Click directly on the name assigned to the ticketing system concerned by the event.
- Click on Programming in the left sidebar menu.
- Click on Events in the left sidebar menu.
- Click on the Add an event button.
- Enter the information related to your event.
- At the Location step, choose: No location or Virtual, then select: Broadcast the event live (livestreaming) and choose the streaming feed to broadcast your event:

Modifying an already created event
You can modify or add a location to an already created event, for example, to offer it as a stream:
- Click here to access the management of your product on the Infomaniak Manager (need help?).
- Click directly on the name assigned to the ticketing system concerned by the event.
- Click on Programming in the left sidebar menu.
- Click on Events in the left sidebar menu.
- Click on the event concerned.
- Click on the blue Modify button.
- At the Location step, choose: No location or Virtual, then select: Broadcast the event live (livestreaming) and choose the streaming feed to broadcast your event.
- To activate the seats for livestreaming, you will need to:
- Either click on the action menu ⋮ located to the right of the current rate, click on Modify and check the box: Live event (livestream) in addition to the box On-site event
- Either click on Add a zone, check the box: Live event (livestream) and indicate the number of seats available for livestreaming

- Click on Save.
The quantity of seats will influence the consumption of your Streaming Video offer. You can estimate the consumption based on the hours of broadcasting, the quality, and the number of viewers with the calculator. If you exceed your monthly consumption, the excess will be billed at CHF 0.20 per GB.
Link to this FAQ:
Has this FAQ been helpful?