Knowledge base
1000 FAQs, 500 tutorials and instructional videos. Here, there are only solutions!
This guide explains how to obtain a custom SSL certificate that you can use with Jelastic Cloud from Infomaniak.
Custom SSL certificates are only available with a paid account.
SSL Documentation
Refer to these guides:
- It is quite possible to purchase an SSL certificate from Infomaniak in order to install it on Jelastic Cloud afterwards.
- Integrated into Jelastic Cloud, you will also find a valid certificate but only for domains
xxx.jcloud.ik-server.com. - Let's Encrypt certificates can also be obtained for free and for any domain.
- It is possible to obtain a paid certificate, for any domain.
- For testing purposes, you can also set up a self-signed certificate.
Link to this FAQ:
Has this FAQ been helpful?
This guide details the various Infomaniak extensions available in the Jelastic Cloud marketplace.
Preamble
- Refer to this Infomaniak article on the subject.
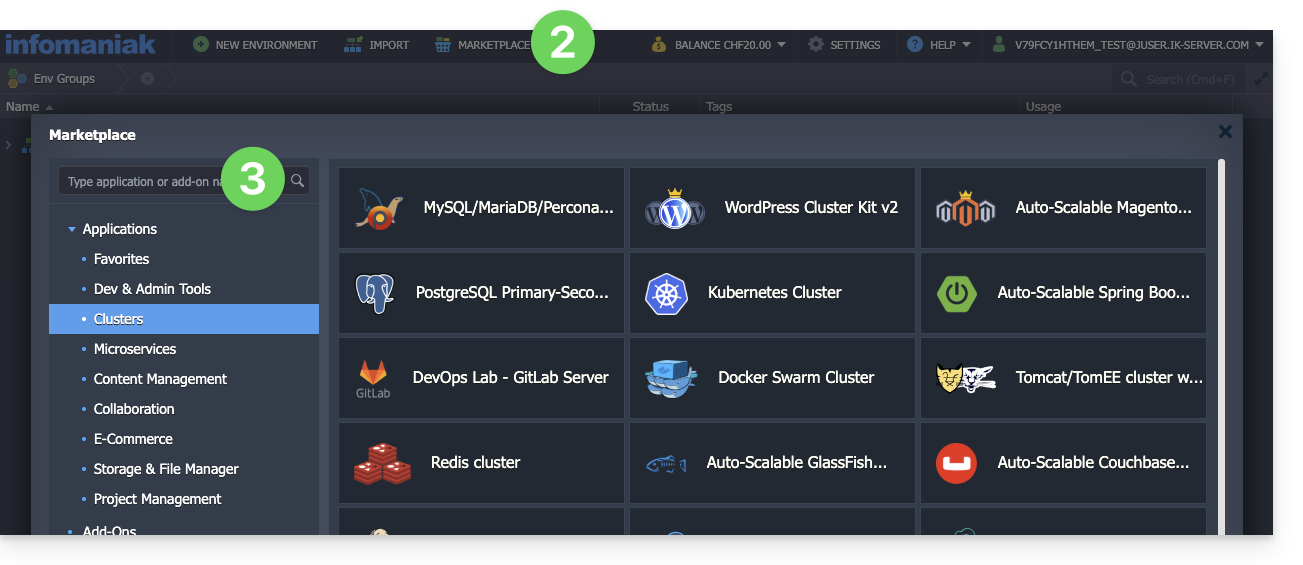
Install an extension from Marketplace
To do this:
- Log in to the Jelastic Cloud Dashboard of your server.
- Go to Marketplace.
- Search for and install the desired extension:
List of Jelastic Cloud extensions
- CPU Calculator simplifies the estimation of the power you need in vCPU.
- BitNinja protects with 1 click the Jelastic Cloud environment of your choice against the most common threats.
- Swiss Backup automates the backup of folders and environments of your choice. The plugin allows you to configure the frequency and retention policy of backups.
- ClamAV is an antivirus to scan on demand the containers of your choice. Practical for checking the presence of malware, mining or viruses.
- Grafana and Prometheus allow you to collect useful measurements from your containers and visualize them in modern dashboards in Grafana.
- Zabbix Server simplifies the deployment of a fully customizable alert system.
- SSH Direct Access facilitates access to your containers without going through the Jelastic public gateway. Ideal for having a backup access to your servers.
Link to this FAQ:
Has this FAQ been helpful?
This guide explains how to activate the automatic credit top-up for Jelastic Cloud.
Preamble
- Top-up allows the balance to be automatically updated as soon as it falls below the defined limit.
- Email tracking can be activated.
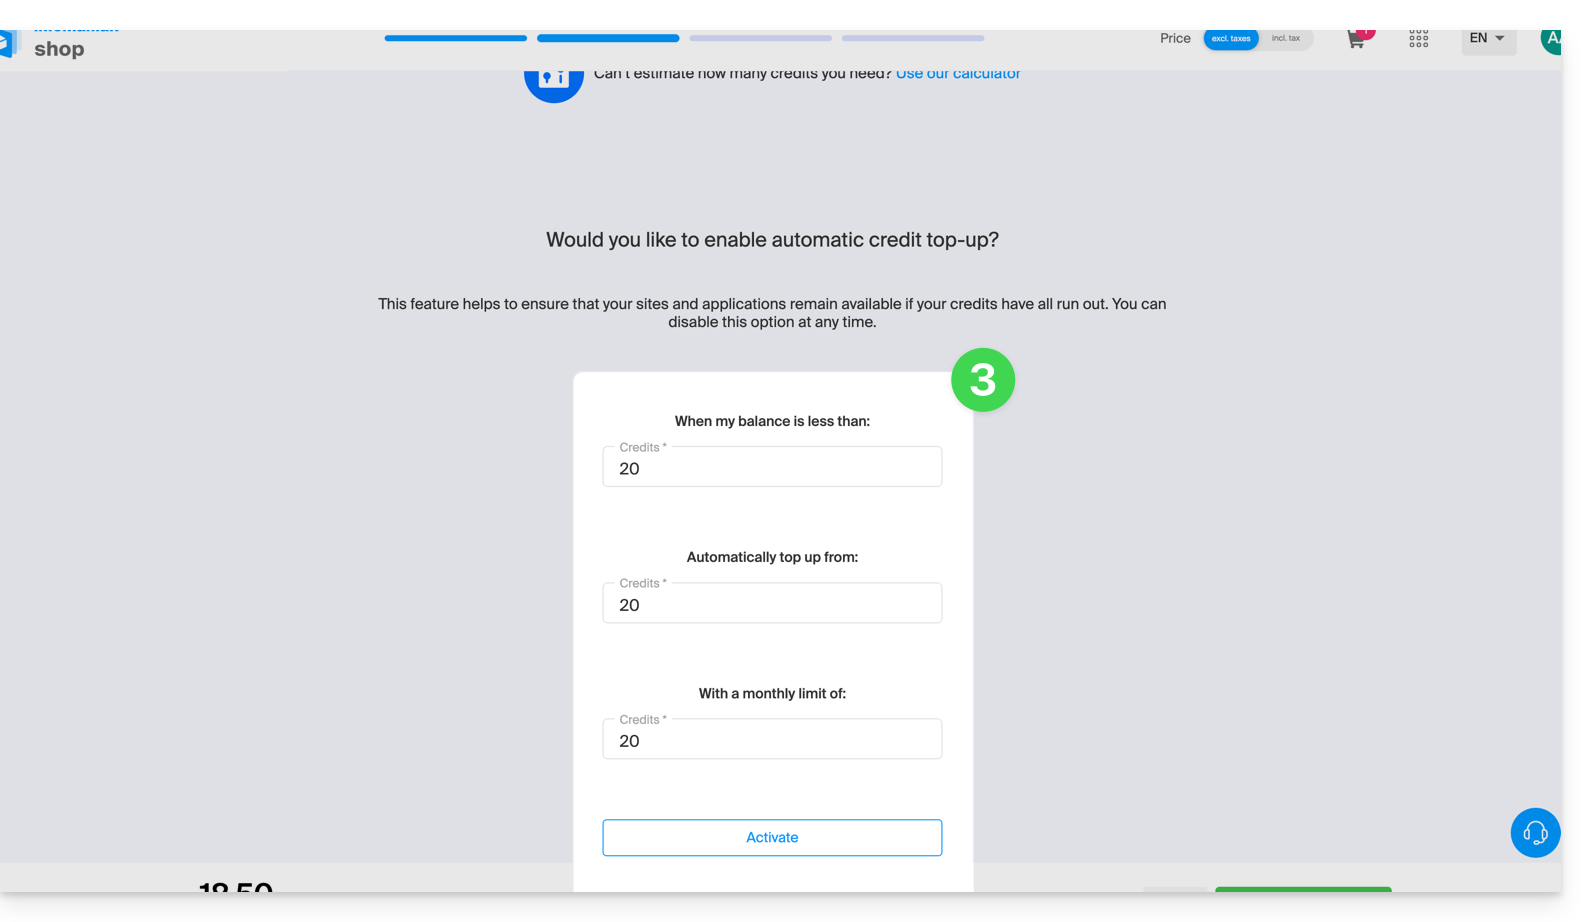
Define a payment profile
To access Jelastic Cloud:
- Click here to access the management of your product on the Infomaniak Manager (need help?).
- Click on the button to add credits:

- From the Infomaniak Shop that opens, activate automatic top-up by purchasing credit in the usual way:
Link to this FAQ:
Has this FAQ been helpful?
This guide explains the differences between Infomaniak's web hosting offers to help you choose the best solution according to your IT needs.
If you are looking to host your email, refer to this other guide.
Web Hosting Starter
Free web hosting
The Web Starter hosting is offered for free with each domain name registered with Infomaniak. It provides 10 MB of disk space to create a site (basic pages in HTML language only - no PHP, no database) even without particular knowledge thanks to the Welcome Page tool.
- Register or transfer a domain name with Infomaniak
- Learn more about the benefits included with a domain name
Shared Web Hosting
The flagship offer to create your sites
These web hostings are shared offers (the websites will be hosted on servers whose resources are shared with other customers). To ensure the reliability of these shared services, Infomaniak servers use on average only 40% of the CPU power and are equipped with professional last-generation SSD disks.
Web hosting offers a minimum of 250 GB of disk space and allows you to manage multiple websites with multiple domain names. This offer includes all the technologies usually used to create professional sites: PHP, MySQL, FTP and SSH access, SSL certificates and easy installation of WordPress or common CMS, etc. It is also possible to add a Node.js site and/or Site Creator.
Note that without any hosting, it is also possible to obtain and then use Site Creator “autonomous / standalone”. Refer to this other guide.
Cloud Server
Professional web hosting
With a Cloud Server, the resources allocated to you are not shared with other customers and you can customize the hardware and software configuration of your server according to your needs. A Cloud Server also allows you to use components that are not available on shared web hostings (Node.js, mongoDB, Sol, FFMPEG, etc.).
- A Cloud Server allows you to easily manage your server via the same administration interface as web hostings - you manage the sites in the same way.
- A VPS allows you to manage your server 100% autonomously with the version of Windows or the Linux distribution of your choice (
Debian,Ubuntu,openSUSE, ...) - solid technical skills are required to use a VPS, including VPS Lite.
Public Cloud (and Kubernetes Service)
Open, proven and secure IaaS solution
For Infomaniak, it is the infrastructure that powers kDrive, Swiss Backup and the Webmail, services used by several million users. But Public Cloud is accessible to everyone and provides the resources you need to develop your projects.
With the help of personalized and tailored offers, you will have no trouble managing your development budget. No setup fees. No minimum amount. Cancelable at any time. You only pay for the resources actually used with Public Cloud at the end of each month, the same goes for Kubernetes Service.
Jelastic Cloud
Custom web hosting with the technologies of your choice
Jelastic Cloud allows you to create custom development environments with the technologies of your choice (PHP, Java, Docker, Ruby, etc.). It is a flexible cloud offer:
- Horizontal and vertical scaling of resources.
- Payment based on actual resource consumption.
- Easy customization of your infrastructure (redundancy, IP, SSL, load balancing, etc.).
Link to this FAQ:
Has this FAQ been helpful?
This guide concerns user collaboration on Jelastic Cloud environments, which are not directly offered in the current Jelastic infrastructure.
Grant access to other users
The solutions offered so that other users can access your Jelastic environment depend on the type of access desired:
First case
You want to share access to the Jelastic dashboard (note that the user to whom these rights are assigned will have access to all environments present on the Jelastic Cloud dashboard).
For this operation, you need to assign rights to the product directly when creating the user. Rights as a collaborator are sufficient.
Second case
You want to share rights on a single environment; however, this action is not possible as it stands because collaboration is disabled for security reasons.
You can transfer an environment to the desired person, provided that the person has a Jelastic Cloud account in the same billing group (e.g., EUR or CHF billing). To perform this action, you need to change the environment owner (an action possible directly from the Jelastic dashboard and in the environment configuration tab).
Also refer to this other guide.
Link to this FAQ:
Has this FAQ been helpful?
Thank you for choosing Infomaniak to create your PaaS!
This guide helps you quickly use the main features of your new product Jelastic Cloud.
Frequently Asked Questions
- Introduction to Jelastic
- Containers and nodes: how they work
- Jelastic billing and Cloudlets operation
- Technologies compatible with Jelastic Cloud
- Create a VPS with Jelastic Cloud
- Methods for deploying an application
- Differences between Jelastic Cloud and a VPS
- Resources available according to account type
Consult all FAQs on Jelastic Cloud.
Technical resources
Consult the official Jelastic documentation (in English) for more technical details:
- Deploying applications in a cluster (WordPress, Magento, etc.)
- Creating an environment
- Deploying applications or code
- Configuring servers (Java, PHP, Ruby, etc.)
- Linking a domain name
- Adding a public IP address
- Tracking application statistics
- SSH access to your environment
- Managing resource consumption alerts
- Dynamic resizing: horizontal and vertical
- Installing packages without root access with Yum Packages Installer
For any questions or difficulties, do not hesitate to contact Infomaniak support.
Link to this FAQ:
Has this FAQ been helpful?
This guide explains how to deploy n8n using its official image Docker on the Jelastic Cloud (Infomaniak PaaS).
Preamble
- Unlike tools like Zapier or Make, n8n, a “fair-code” workflow automation tool, can be self-hosted, allowing you to maintain full control over your data while connecting hundreds of services via an intuitive visual interface.
- The official image used is
n8nio/n8n. - Using an external database (PostgreSQL) is highly recommended for stability and managing large volumes of data.
- The default internal port is
5678.
1. Creating the Jelastic environment
Follow these steps to configure your topology:
- Log in to the Jelastic Cloud dashboard.
- Click on New environment.
- In the creation wizard:
- Go to the Docker tab.
- Click on Select an image and search for
n8nio/n8n. Pin a version (e.g.,latestor a specific version like1.75.0). - Load Balancer: add a node (e.g., Nginx) to handle SSL and public access.
- Database: add a PostgreSQL node (version 14+ recommended).
- Allocate enough Cloudlets (8 min. recommended for peak n8n usage) and name your environment.
- Click on Create.
Note: adding a Load Balancer makes it easy to enable the Let's Encrypt module to secure your exchanges and webhooks in HTTPS.
2. Configuring storage and persistence
By default, Docker data is ephemeral. It is essential to mount a volume:
- On the n8n node, click on the Configuration icon (gear icon).
- Go to the Volumes section.
- Click on Add :
- Local path:
/home/node/.n8n
- Local path:
- Save; configuration files and local encryption will now be preserved.
3. Essential environment variables
Go to the Environment Variables section of the n8n container to set the following parameters:
| Variable | Suggested value / Description |
|---|---|
N8N_HOST | The domain name of your environment (e.g., n8n.name.jpc.infomaniak.com). |
WEBHOOK_URL | The full HTTPS URL (e.g., https://n8n.mydomain.com/). Essential for HTTP triggers. |
GENERIC_TIMEZONE | Europe/Bern (or your local timezone). |
N8N_ENCRYPTION_KEY | Generate a long random string. Keep it safe! |
Linking with PostgreSQL
To use the external database, also add:
DB_TYPE:postgresdbDB_POSTGRESDB_HOST: Internal IP address or DNS of the Postgres node.DB_POSTGRESDB_PORT:5432DB_POSTGRESDB_DATABASE: Database name (e.g.,n8n).DB_POSTGRESDB_USER: Your user.DB_POSTGRESDB_PASSWORD: Your password.
4. First access and security
- Once the container is restarted, open the URL of your environment.
- Account creation: n8n will ask you to create the first administrator account.
- SSL: if you are using a custom domain, install the Let's Encrypt add-on on the Load Balancer node.
Since version 1.0, the old variables N8N_BASIC_AUTH are obsolete. User management is now done directly in the n8n graphical interface.
5. Post-installation verification
- Create a test workflow with a Webhook node and check that the URL starts with
https. - Check the container logs for any connection errors.
Link to this FAQ:
Has this FAQ been helpful?
This guide concerns Jelastic Cloud which allows you to create pre-configured containers for Java, PHP, Ruby, Node.js, Python, and Go with just one click. You also have the option to deploy any custom Docker container in the Cloud.
Preamble
- In the context of Jelastic, a container or node refers to an isolation and execution unit in which your applications are deployed and run, while benefiting from the resources provided by the node on which they are placed.
- This allows for effective management of applications and optimization of resources according to the needs of your project.
Container
In Jelastic, a container is a virtual execution environment that isolates your applications and their dependencies from the rest of the system. It can be a Docker container or another type of container supported by Jelastic.
Each container acts as a distinct unit, meaning you can run multiple applications in different containers without them interfering with each other.
Node
A node is an instance of a virtual or physical server on which one or more containers can be deployed. In other words, a node is a virtual or physical machine that provides the resources (such as CPU, memory, storage, etc.) necessary to run your applications.
Jelastic automatically distributes containers across different nodes based on load and available resources to ensure optimal performance and high availability.
Link to this FAQ:
Has this FAQ been helpful?
Jelastic Cloud Infomaniak is one of the most complete and flexible PaaS solutions on the market.
Preamble
Node.js= official name of the language/environment.NodeJS= "technical" or simplified name in certain contexts (often for practical reasons, no real technical difference).
Supported languages
You will be able to deploy Java, PHP, Ruby, Node.js, Python and Go applications without having to adapt your code using Docker, Kubernetes, GIT, SVN or built-in extensions like Maven, Ant, Eclipse, NetBeans or IntelliJ IDEA.
Supported SQL and NoSQL databases
MariaDB, MongoDB, MySQL, Postgre, Redis, Neo4j, Cassandra, OrientDB, PerconaDB, CouchDB, Couchbase.
Supported application servers
Tomcat, TomEE, Jetty, GlassFish, Payara, Apache PHP, Apache Ruby, Apache Python, NGINX PHP, NGINX Ruby, NodeJS, JBoss, SmartFoxServer, SpringBoot, WildFly, Golang.
Supported load balancers
NGINX, Apache Balancer, HAProxy, Varnish.
Link to this FAQ:
Has this FAQ been helpful?
This guide compares the different Infomaniak Cloud solutions to help you choose the infrastructure best suited to your needs. In all cases, you benefit from dedicated and scalable resources.
Jelastic Cloud (PaaS)
Jelastic Cloud is a platform that allows you to create development environments on the fly without managing system administration:
- Maximum flexibility: the platform automatically adjusts your resources according to real-time load.
- Advantage: ideal if your consumption (CPU, RAM) varies greatly depending on the time of year.
- Billing: you only pay for the resources actually consumed.
Managed Cloud Server
A Cloud Server allows you to manage websites and web applications via a simplified interface, while allowing the installation of specific software:
- Simplicity: as easy to use as shared hosting, but with the power of dedicated resources.
- Advantage: ideal if your resource consumption is stable and predictable.
- Management: Infomaniak handles the technical maintenance and security updates of the server.
Cloud VPS and VPS Lite
The Cloud VPS or VPS Lite offer full root access to a Linux distribution:
- Total control: you manage your entire server and software configurations.
- Required skills: solid technical expertise in system administration is essential.
- Usage: recommended for specific needs with stable resource consumption.
For large-scale infrastructure needs, learn about the Public Cloud offer.
Link to this FAQ:
Has this FAQ been helpful?
This guide introduces Jelastic Cloud, the result of close collaboration between Infomaniak and Jelastic (Virtuozzo).
Infomaniak
Infomaniak provides the infrastructure, support, performance, security, and reliability of the solution. Its infrastructure always guarantees the availability and fluidity of applications, responding to traffic spikes and automatically reducing resource consumption during low periods. This flexibility optimizes the cost/performance ratio by only billing the resources actually used.
With this Cloud service, computing resources adapt to demand fluctuations while maintaining budget control. All data is managed in Switzerland in Infomaniak's data centers, with support available in five languages.
Jelastic
Jelastic handles maintenance, software development, and provides the software part of the product.
Founded in 2011, Jelastic automates the creation, resizing, clustering, and security updates of traditional and native Cloud applications. It also supports Java, PHP, Ruby, Node.js, Python, .NET, Go environments, as well as Docker clusters.
Link to this FAQ:
Has this FAQ been helpful?
This guide provides recommendations to follow in case of a 502 error with Jelastic Cloud Infomaniak.
Recommendations in case of a 502 error
Check these points:
- Check the URL entered in the address bar of your web browser.
- From your Jelastic console, click on the environment concerned, then on the icon "Open in browser":

- Check that the environment is not stopped or paused.
If the problem persists:
- Check that the SSL certificate is active.
- Check the proper functioning of the called application.
If these recommendations do not resolve the issue, contact Infomaniak support.
Link to this FAQ:
Has this FAQ been helpful?
This guide specifies the resources you can benefit from with a Jelastic Cloud depending on the type of account you have.
Preamble
- All Jelastic Cloud accounts offer benefits:
- Web applications: over 40 CMS installable in 1 click.
- Support for various technologies.
- Databases: SQL & NoSQL.
- SSL certificates: free with Let's Encrypt.
- Automatic backups: every 24 hours (incremental, over the last 7 days).
14-day trial account
The trial period allows you to test Jelastic Cloud without commitment. You can thus verify if this solution meets your expectations and estimate the resources you need. Thanks to the calculator, you will then be able to determine the hourly or monthly rate of your PaaS based on your tests.
During the trial period, you have the following resources:
- number of environments: 5
- power: 8 Cloudlets (3.2 GHz of CPU and 1 GB of RAM)
- SSD storage: 10 GB
- bandwidth: 20'000 Kb/s
Public IP addresses, custom SSL, Docker images, and Elastic VPS are only available with a paid account.
Paid account
As soon as you purchase Jelastic credits, the trial account restrictions are lifted and you can freely adjust the resources of your PaaS according to your needs:
- number of environments: according to your needs
- power: customizable according to your needs
- SSD storage: 20 GB included, then extendable up to 100 GB per environment
- incoming and outgoing traffic: 2.8 GB / hour (2.4 TB / month) included, then billed per GB
- bandwidth: 400'000 Kb/s
Link to this FAQ:
Has this FAQ been helpful?
This guide explains how to change the password of your Jelastic Cloud console.
Change the password
To access the administration interface of your Jelastic Cloud server:
- Click here to access the management of your product on the Infomaniak Manager (need help?).
- Click on Modify under Jelastic Password:
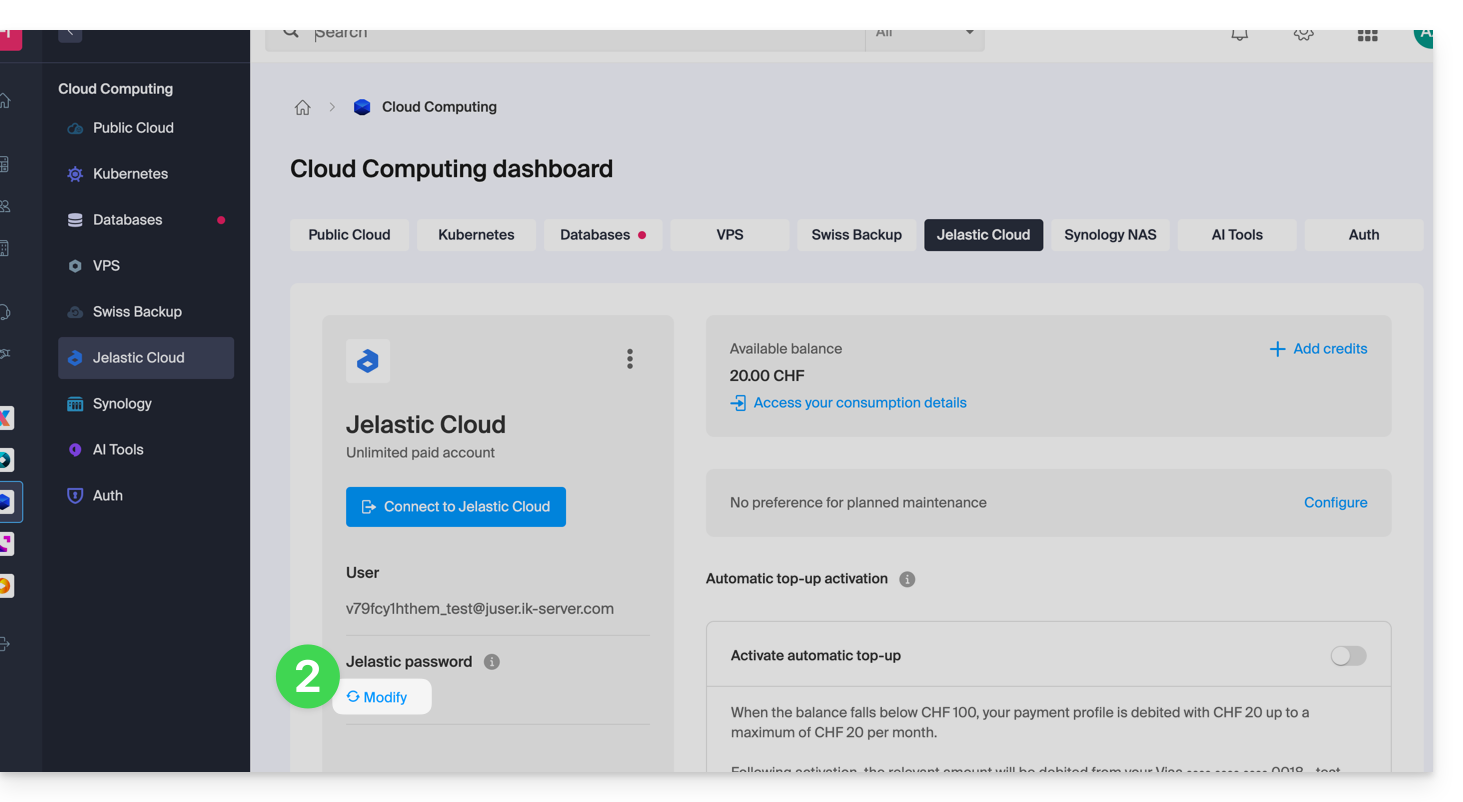
- Choose a new password.
- You can now access the console with this new password and your username (for example XXXYYYZZZ@juser.ik-server.com).
Lost with your passwords?
You should not confuse the password of your Infomaniak account with the one that allows you to manage your Jelastic Cloud:
- Your Infomaniak account allows you to manage your Infomaniak products on manager.infomaniak.com
- The Jelastic Cloud / Virtuozzo console allows you to administer your server app.jpc.infomaniak.com for example
Link to this FAQ:
Has this FAQ been helpful?
Jelastic provides an add-on that allows you to install packages requiring sudo permissions without needing root access.
Additional information
The Yum Packages Installer add-on allows you to install packages not provided by default in Jelastic containers (RPM packages, development tools, etc.) using yum. It offers an alternative for installing packages when direct root access is not available.
All the information required to use this add-on is described in the readme of the add-on.
Examples of common actions performed via the add-on:
- Install compilation tools:
gcc autoconf make - Install an external RPM: provide the full URL of the RPM in the installation field.
Link to this FAQ:
Has this FAQ been helpful?
This guide concerns the mobile app kCheck (application for iOS/Android smartphone or tablet), created to simplify identity verification procedures and strengthen the security of your Infomaniak account.
Preamble
- For security reasons, to guarantee the identity of the person making a specific request to Infomaniak, an identity verification procedure may be triggered in the following cases (non-exhaustive list):
- forgetting an Infomaniak account password (user account)
- forgetting a login email address
- deactivation of double authentication (2FA)
- unlocking an Infomaniak account
- during the first transfer of revenue for the product Ticketing
- when ordering a product (suspicion of spam or fraud, brand name, etc.)
- This application allows you to securely transfer the requested items.
- Infomaniak respects your privacy: the information transmitted via the kCheck application will be kept until the complete processing of your file; it will in all cases be automatically deleted after 72 hours in case of non-processing of this request.
Start identity verification
Prerequisites
- A QR code or a link provided by Infomaniak.
- The mobile app kCheck installed on your device iOS (iPhone, etc.) or Android.
- An Internet connection on the mobile device.
You can then have your identity verified with kCheck:
- Launch the kCheck app on your mobile.
- Press Start.
- Press Scan a QR code.
- Point the QR code provided using the camera.
- Enter your mobile phone number.
- Enter the confirmation code received.
- Authorize geolocation (mandatory to continue the procedure).
- Select the type of ID you have (ID card or passport).
- Follow the steps to photograph your ID.
- Take a selfie (of yourself) with your ID in your hand in front of you.
Your documents will then be securely transmitted to Infomaniak support. These requests are processed on a priority basis with an average response time of 2 hours during opening hours.
If your order is blocked...
For security reasons, some orders may be automatically blocked.
At the time of your order, an e-mail is sent to the email address connected to your Infomaniak Manager account. This email contains the procedure to unblock your order. If you do not find it, you can resend it from your Manager by clicking on Resend procedure from the red banner informing you of the blockage.
Prerequisites
- Open the email containing the unblocking procedure.
- The mobile app kCheck installed on your device iOS (iPhone, etc.) or Android.
- An Internet connection on the mobile device.
You can then start the unblocking procedure with kCheck:
- Launch the kCheck app on your mobile.
- Press Start.
- Press Scan a QR code.
- Scan the QR code present in the email.
- Follow the unblocking procedure to the end.
Special cases
- If there is no response from you within a 10-day period, the order is automatically canceled and the payment is fully refunded to the payment method used.
- In case you do not have a mobile device to follow this procedure, contact Infomaniak support.
Link to this FAQ:
Has this FAQ been helpful?
This guide details how to back up the data from your folders and nodes on Jelastic Cloud via the OpenStack Swift protocol on Swiss Backup, the backup solution in an independent Swiss cloud.
Preamble
- To back up the data, an extension for Virtuozzo (Jelastic Cloud) is available in the node add-ons.
- Learn more about the extension (add-on) on Github.
- Do not look for the extension in the Marketplace, it is not there.
- The various services offered by Infomaniak are all compatible with the corresponding standard protocols (S3/Swift for storage, for example), therefore if you encounter a problem with third-party software, contact its publisher or a Partner and consult the support policy as well as article 11.9 of the Infomaniak Terms and Conditions.
Configure the Swiss Backup extension on Jelastic Cloud
Prerequisites
- Use Jelastic Cloud (at least one Jelastic environment must be active with the extension installed for your backups to be visible).
- Have a Swiss Backup Infomaniak space with available device quota (minimum 1) for a Cloud backup.
- Add 1 device of type Cloud to obtain the OpenStack Swift parameters.
To add the extension useful to Swiss Backup on Jelastic Cloud:
- Log in to the Jelastic Cloud Dashboard of your server.
- Go to the node add-ons section:

- Search for and install the Backup / Restoration extension:

Two types of backups are then possible and detailed below:
- Back up specific folders.
- Create a snapshot of an entire node.
Back up specific folders
To back up specific directories:
- Enter the username and password according to the information specific to your device.
- Check Backup your data.
- Check Backup specific folders
- Enter the absolute path of the folders to be backed up in the Folders to backup field; it is possible to specify multiple folders by separating each path with a comma, for example:
/root/admin/, /home/user1/, /jelastic/containers/(in this example, 3 folders have been specified)…
Next, you need to define the frequency of backups (see below).
Backup an entire node
To back up an entire node:
- Enter the username and password of your Swift device on Swiss Backup.
- Check Backup your data.
- Check Backup all files to back up the entire file system of a node; some files are automatically excluded:
- the folders
/dev,/proc,/sys,/run - file systems not mounted as part of the root partition, including virtual file systems

- the folders
Next, you need to define the frequency of backups.
Define backup frequency and retention policy
Two options are available to perform the backup:
- daily (at 20h UTC)
- every hour (at the start of the hour, for example at 13h, 14h, etc.)
You can define the retention period of your backups in years, months, days, and hours. To keep your backups indefinitely, simply set the parameters to 0.
For example, if you perform backups every hour and set a retention policy of 1 year, 2 months, 4 days, 2 hours, this means that each backup will be available for a period of 1 year, 2 months, 4 days, 2 hours (=10322 backups). Note that backups are deleted every Sunday at 22h30 (UTC).
Warning: do not set all parameters to 0, as permanent backups can cause backup failures.
Recommended limits:
- Year: 1
- Month: 12
- Days: 99
For an hourly backup (every hour), it is recommended to have a maximum retention of one month. Beyond this value, some backups may fail.
Restore backups
Restore data from a node
- Log in to your server's Jelastic Dashboard.
- Once the extension is added and the username and password of your Swift device on Swiss Backup are provided, check Restore your data.
- Select the node containing the backup to restore:

- Select the backup to restore and the restore folder.
- Click the Restore button:

Restore specific folders from a snapshot (CLI)
Each backup corresponds to a unique ID. You can include and exclude folders from your snapshots during a restore. To view your snapshots:
. /home/.config/swissbackup/openrc.shrestic snapshots
- Use
--excludeand--includeto restrict the restore to a subset of files in the snapshot. For example, to restore a single file:restore 79766175 --target /tmp/restore-work --include /work/foo
There are case-insensitive variants of --exclude and --include called --iexclude and --iinclude. These options work the same way but ignore the case of the paths.
Modify the backup configuration
To do this:
- Log in to your server's Jelastic Dashboard.
- Once the extension is added and the username and password of your Swift device on Swiss Backup are provided, modify the configuration as desired.
The backup schedule is set by a cron job and backups are performed using the restic tool.
To manually modify the backup schedule (CLI), as a root user, run the command crontab -l to display the current times:
- The line containing
retention-all.shcorresponds to the backup task - The line containing
purge.shcorresponds to the backup retention task
Example:

Modify the schedule using the command crontab -e.
You can modify the line composed of the script retention-all.sh or retention.sh, these scripts correspond to the launch of your backups. Warning: the crons have been designed to avoid issues between backups and multiple deletions. Be mindful of the time required for backups and deletions…
- Learn more about cronjobs: crontab.guru
- Learn more about restic: restic.net
Manually delete backups (CLI)
To do this:
- Source the configuration file:
. /home/.config/swissbackup/openrc.sh - Display available backups:
restic snapshots - Delete the desired backup:
restic forget IdBackup --prune - Delete all backups of a file except one:
restic forget --tag folders --keep-last 1 --prune

Delete backup scheduling
This button allows you to delete the scheduling of your backup:
Uninstall the Swiss Backup extension
It is necessary to delete the backup scheduling (see above) before being able to delete the Swiss Backup extension:

Link to this FAQ:
Has this FAQ been helpful?
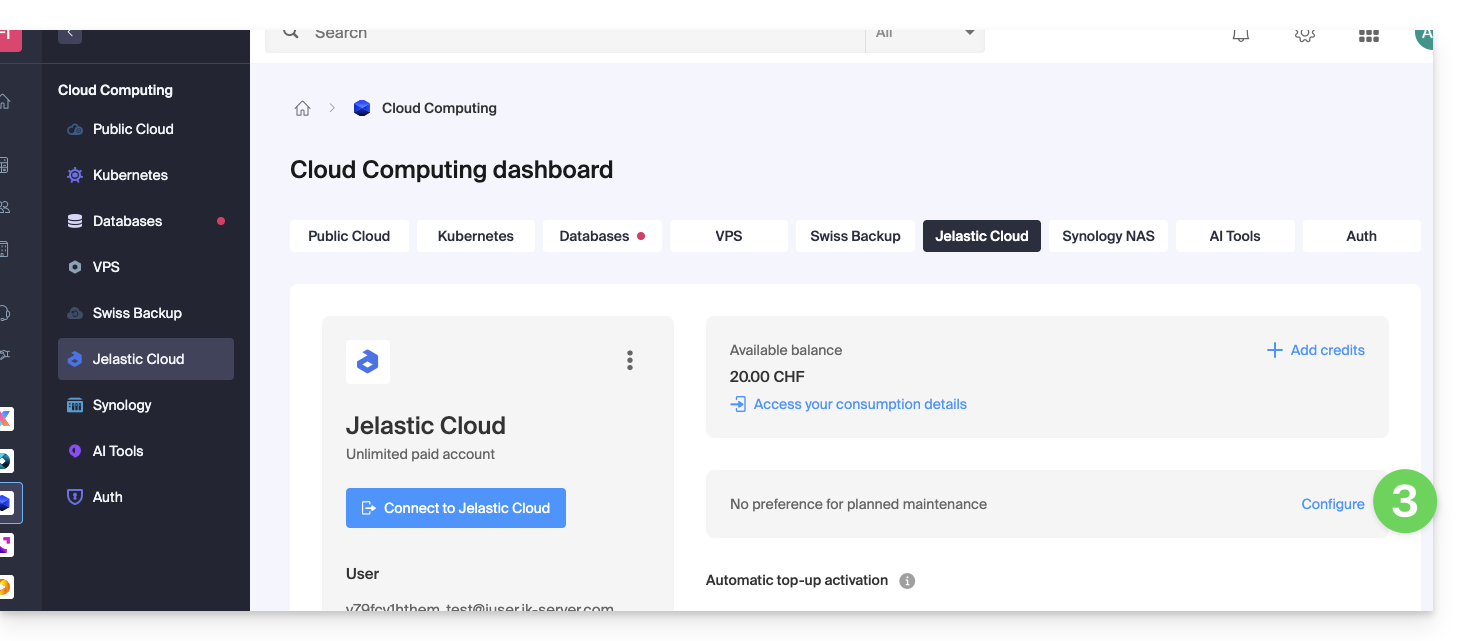
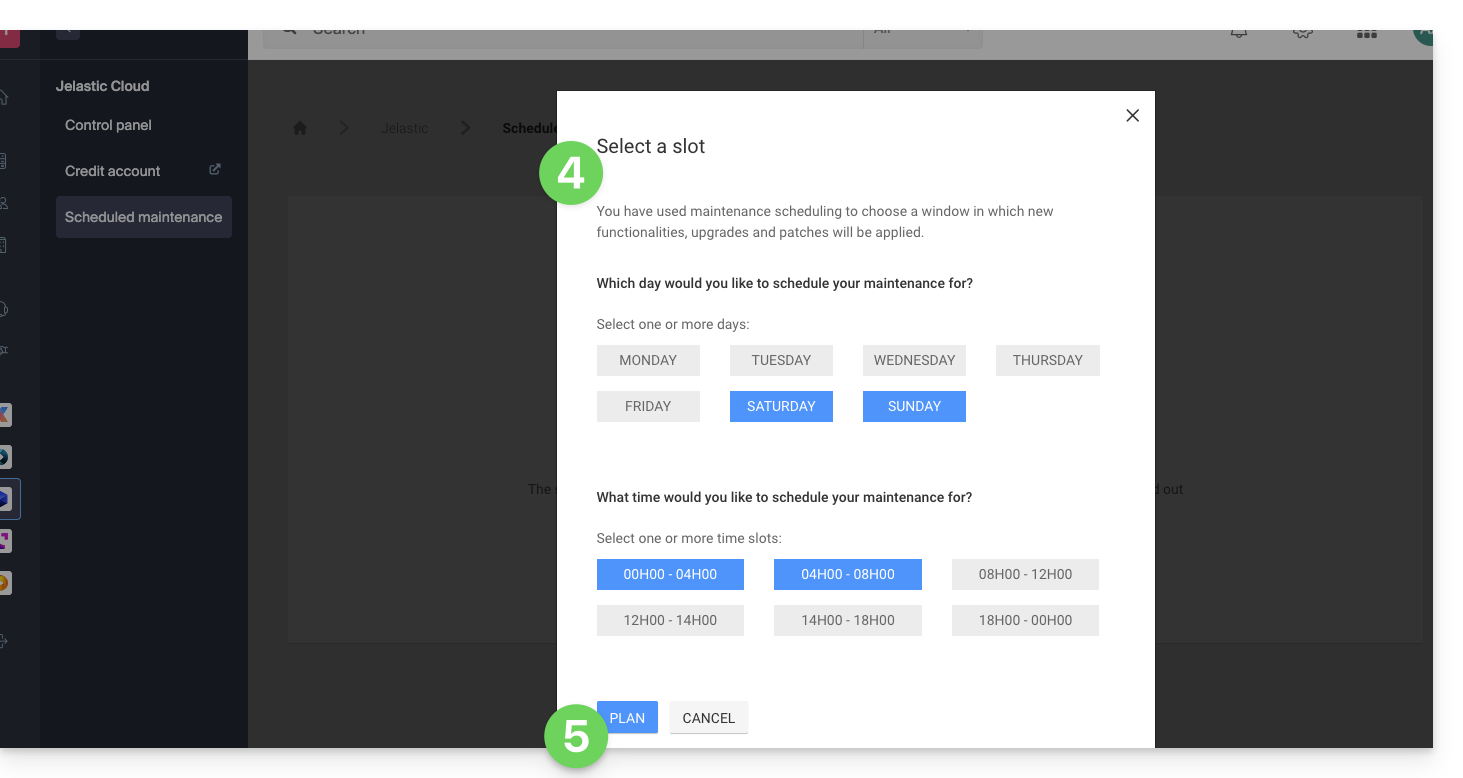
This guide explains how to customize the time slot(s) during which Infomaniak can perform maintenance to update your services (new features, fixes, etc.).
Preamble
- This feature is only available for:
- Cloud Servers
- Cloud VPS / Lite VPS
- Jelastic Cloud
- Without any indication from you, scheduled maintenance is usually performed by Infomaniak between 10 PM and 6 AM.
Modify the scheduled maintenance period
To do this:
- Click here to access the service for which you want to schedule maintenance on the Infomaniak Manager (need help?).
- Click directly on the name assigned to the product concerned.
- Click on Scheduled Maintenance in the left sidebar or on the central page depending on the service concerned (below Jelastic):
- Same principle for a VPS:
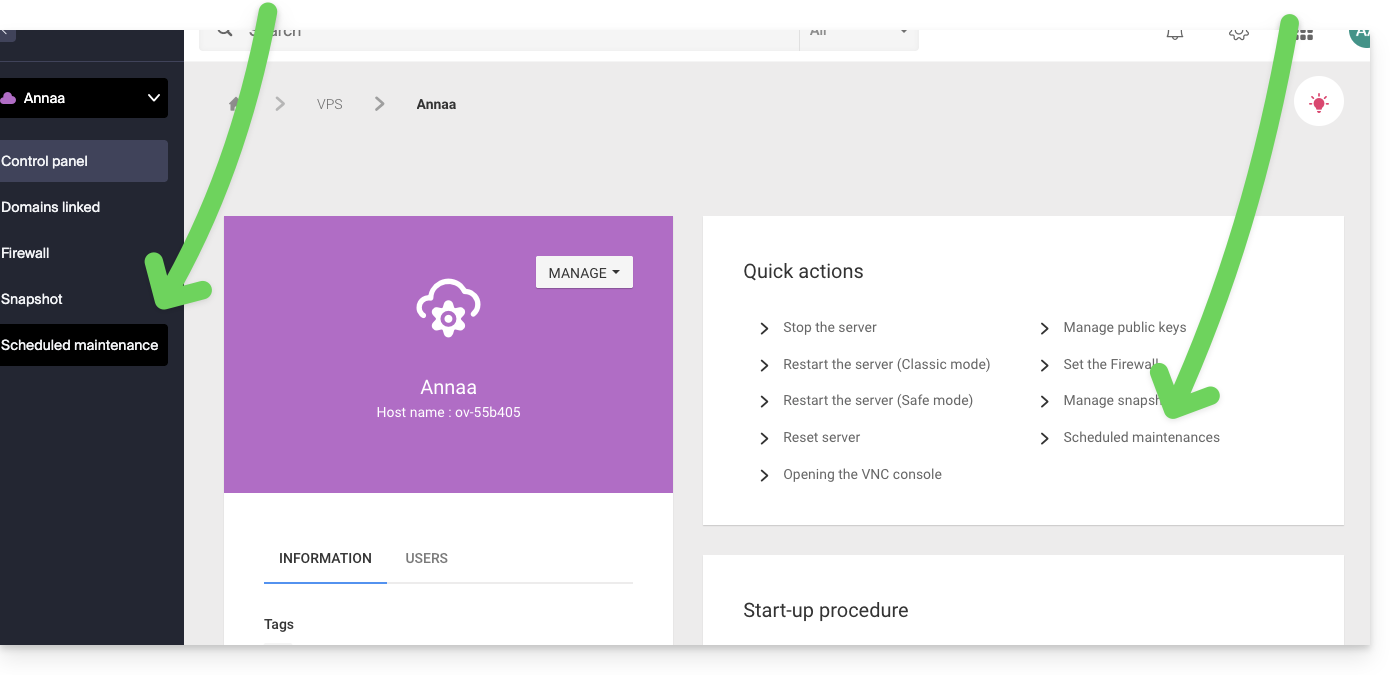
- Same principle for a VPS:
- Click the buttons to define, in blue, a preferred intervention slot.
- Validate by clicking the button at the bottom:
Link to this FAQ:
Has this FAQ been helpful?
This guide details how to transfer an Infomaniak Jelastic Cloud environment from one account to another; you can also refer to the official Jelastic documentation (in English only).
Prerequisites
- An environment can be transferred from any type of Jelastic Cloud account (trial, beta, deactivated, etc.); however, it is essential that the recipient of the transfer has a paid account.
- Also ensure that the destination account has not reached:
- the maximum number of cloudlets per container
- the maximum number of compute nodes available for an environment
- the maximum number of environments on the account
- Use the user email address of the destination account, which is found under the user section in the Jelastic dashboard of the destination account:

Transfer procedure
To perform the transfer:
- Log in to your Jelastic Cloud platform (you are leaving the Infomaniak Manager).
- Click on the Settings button next to the environment to be transferred:

- From the Settings menu, select the Change Owner option.
- Enter the email address of the destination account, then click Send:

- If the destination account exists and meets the transfer criteria, a notification indicating the sending of the request will appear.
- An icon will appear next to the environment to be transferred until the transfer request is accepted by the new owner.
- Once the transfer request is accepted, the environment is removed from your account.
It is possible to cancel the transfer procedure from the Settings menu, Change Owner, cancel the transfer request.
Once the transfer is complete, it is possible to cancel the Jelastic product from your account, all credits still available at the time of cancellation will be automatically transferred to your Infomaniak prepaid account.
Link to this FAQ:
Has this FAQ been helpful?