Knowledge base
1000 FAQs, 500 tutorials and instructional videos. Here, there are only solutions!
This guide helps you quickly use the essential features of the Guest Manager by Infomaniak, a tool that includes all the functionalities you need to create and manage online invitations.
Getting started with the tool
Discover how to create an event, send your invitations, and track participation in real-time:
- Setting up an invitation - key steps
- Manage contacts
- Send invitations from a custom address
- Difference between invitations and ticketing
- Credit pricing
In case of any issues, please consult the knowledge base before contacting support.
Click here to share feedback or a suggestion about an Infomaniak product.
Link to this FAQ: https://faq.infomaniak.com/2874
Has this FAQ been helpful?
This guide describes the differences between the Infomaniak Ticketing tool and the Guest Manager.
What type of event are you organizing?
- If you are organizing a one-time private event, such as a birthday party, a general assembly, or a graduation with a well-defined guest list, use the Guest Manager.
- This tool allows you to create an event, invite the people of your choice, and track their registrations and attendance.
- On the other hand, the Ticketing tool is better suited for events open to the public or those for which anyone with the link can purchase tickets.
| Infomaniak Ticketing | Guest Manager | |
|---|---|---|
| Issues tickets | ✔ | ✔ |
| Named tickets | ✗ Optional | ✔ |
| Possibility of paid tickets | ✔ | ✗ |
| Requires a known list of guests | ✗ Guests are not chosen | ✔ Recipient email addresses are mandatory |
| Purchase possible by anyone with a link | ✔ | ✗ No link is generated; everything is done by email |
| Only guests can respond to the invitation | ✗ | ✔ |
| Tickets for multiple events | ✔ | ✗ |
| Possibility to propose multiple dates | ✔ | ✗ |
| Form to fill out | ✔ | ✔ |
| Registration tracking feature | ✗ You can retrieve the list of customers | ✔ |
| Creates a link for ticket purchase | ✔ | ✗ |
| Sends a direct invitation to pick up tickets | ✗ | ✔ |
Link to this FAQ: https://faq.infomaniak.com/2879
Has this FAQ been helpful?
This guide explains how the invitation management system of the Infomaniak Guest Manager works.
Preamble
- The invitation quota of the guest manager is independent of the sending volumes of other products like the Newsletter!
- Infomaniak applies a decreasing rate according to the volume purchased.
- To view the current list of rates, go to the guest manager pricing page.
Sending volume and guest management
- You start with 200 free invitations; the count is simple: 1 unit = 1 guest or 1 companion.
- For example, if you send 100 invitations and allow 1 companion per guest, a total of 200 units will be deducted from your balance.
- The validity period of your purchased invitations is unlimited.
- Automatic reminders are free and are not deducted from your balance.
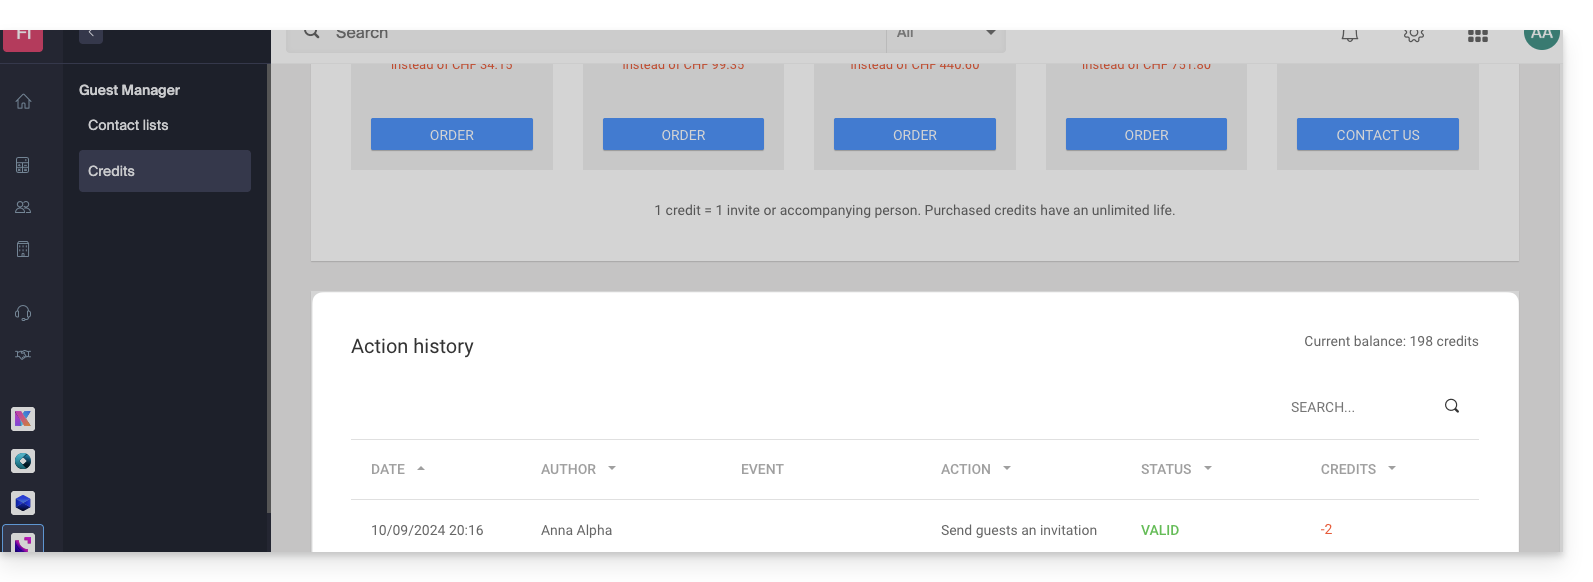
View invitation balance
To access the page for managing your balance:
- Click here to access the management of your product on the Infomaniak Manager (need help?).
- The number of invitations still available is displayed in the left menu:
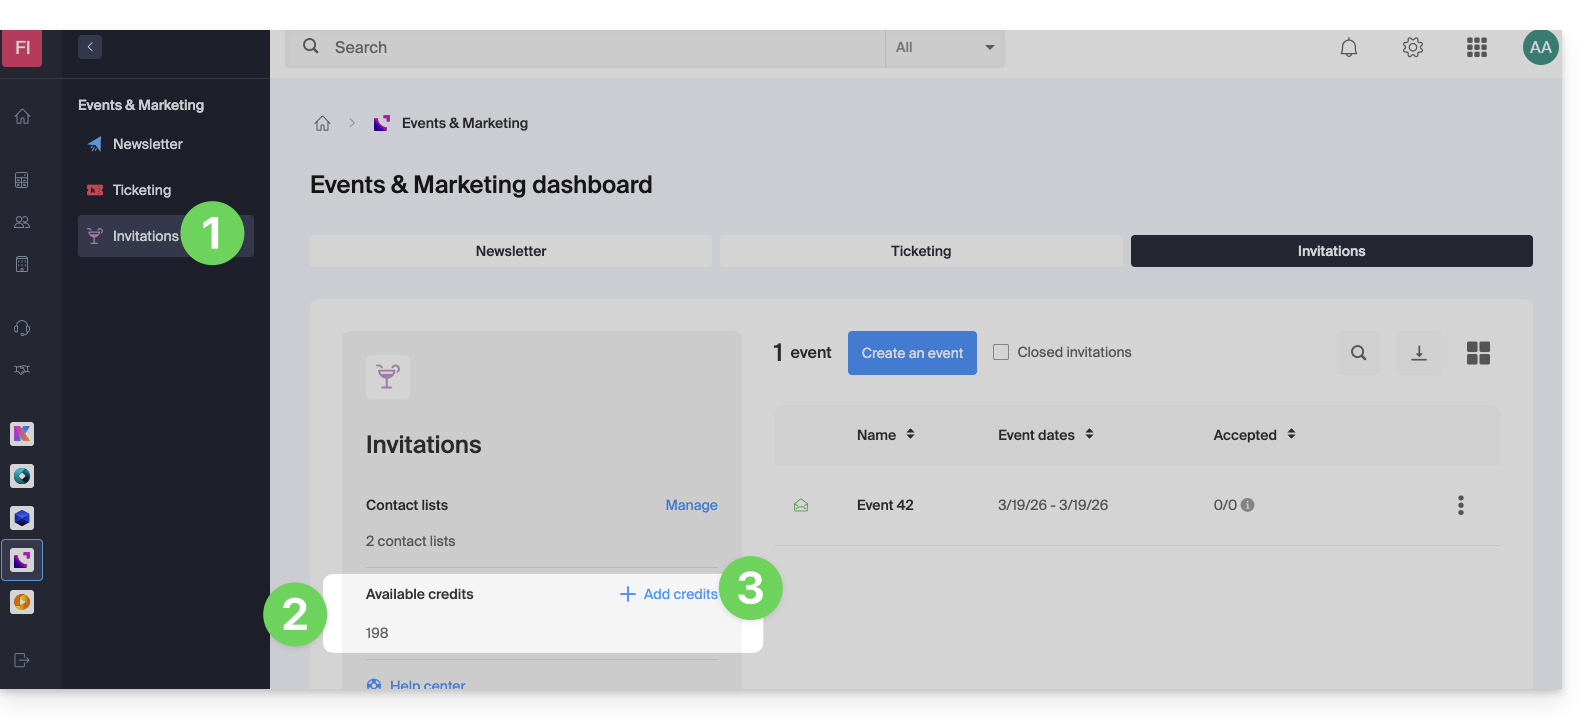
- Click on Add invitations to view the rates and history of your recharges:
Link to this FAQ: https://faq.infomaniak.com/2880
Has this FAQ been helpful?
This guide explains how to manage the email address used to send your invitations with the Infomaniak Guest Manager.
Preamble
- Any of your email addresses can be specified for sending Guest Manager invitations.
- There will be no issue with an email address already configured to be used with Infomaniak.
- For an email address from a generic domain such as
outlook.frorgmail.comthe email addressno-reply@infomaniak.comwill be automatically used as a replacement sending address, the same applies to all domain addresses for which you cannot modify the SPF (read below). - However, any responses will be sent to the email address you have provided.
- For an email address on a custom domain not yet configured to work with Infomaniak and for which you have access to the DNS zone, refer to the guide below to add the appropriate SPF.
Specify the sending email address
The email address from which your invitations will be sent must be entered in the first step of configuring your invitations (after creating your subscriber lists):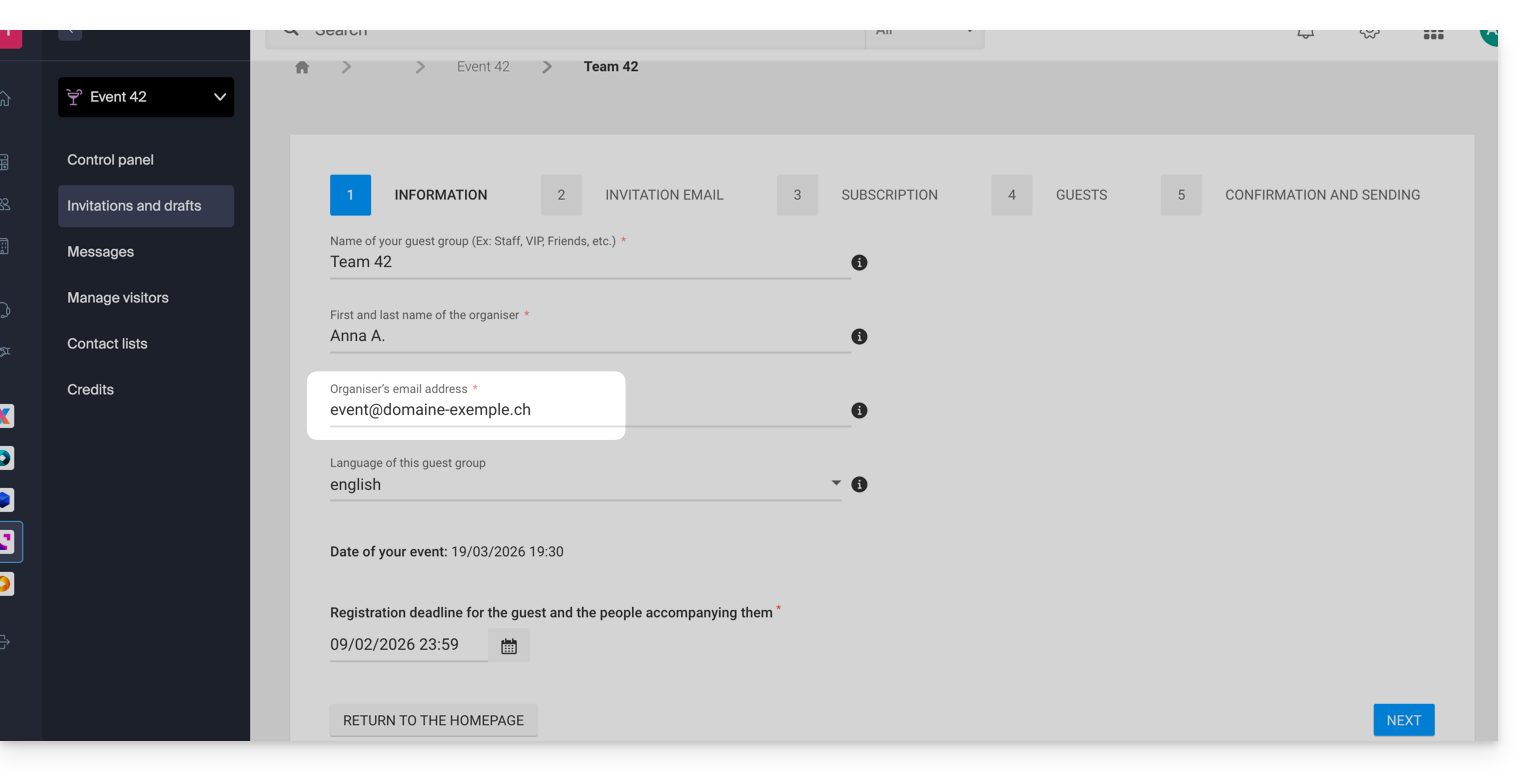
Depending on the specified email address, a popup appears when you click on Next warning you that the SPF must be correctly configured for the sends to be made from the address in question. Otherwise, the invitations will be sent from a no-reply@infomaniak.com address.
You can still review and modify the address in the last step by clicking on the pencil icon ✎: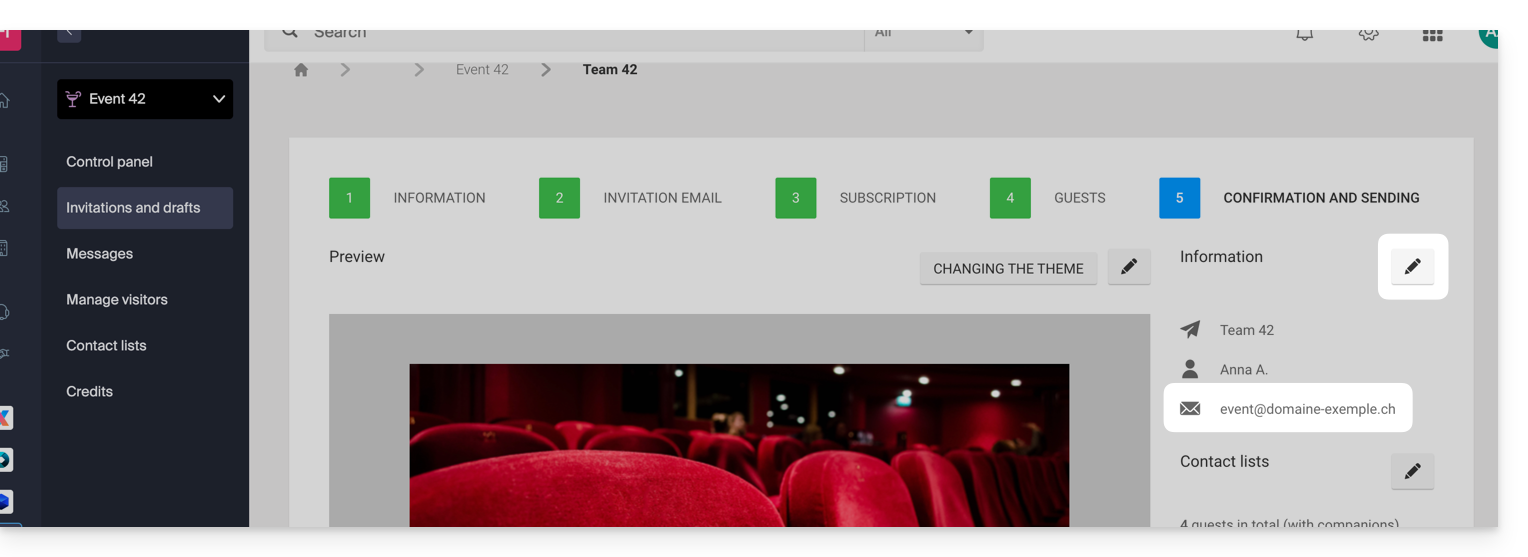
Add the Infomaniak SPF in the DNS zone
If you want to use a custom email address to send invitations, it is necessary to check and, if necessary, modify the SPF record of your domain to authorize Infomaniak to send emails on your behalf.
Refer to this guide especially the chapter “Add multiple SPF” to not replace your SPF but simply add Infomaniak's: v=spf1 include:spf.infomaniak.ch -all
Link to this FAQ: https://faq.infomaniak.com/2881
Has this FAQ been helpful?
This guide explains how to create, import, and manage contact lists in the Infomaniak Guest Manager.
Preamble
- It is possible to import a contact list
- up to a maximum of 1000 items
- in
CSVformat or possibly already existing on Infomaniak (Ticketing only — Newsletter + Contacts (vcard ksuite.infomaniak.com/contacts) excluded)
Create a contact list
The contacts in the Guest Manager are independent of your events. The list can be created and used for multiple events:
- Click here to access the management of your product on the Infomaniak Manager (need help?).
- Click on Create a list:

- Click on the Add button.
- Enter a name for your first contact list.
- Click on Confirm:

- Read and accept the general terms of use related to the import of existing email addresses.
- Choose the method to create your list:
- From a CSV file that you can upload from your computer (a sample file can be downloaded on the same page to help with data formatting)
- From an existing list — if you have already created contact lists
- Automatic import from Infomaniak's ticketing tool
- Add a single contact by manually entering the email address, name, and first name

Merge multiple lists together
To group the contacts from several different lists:
- Click here to access the management of your product on the Infomaniak Manager (need help?).
- Click on Manage:

- Click on the action menu ⋮ located to the right of the item concerned by the merge (= the list you want to keep).
- Click on Merge:

- An assistant allows you to select another item from your contact lists, which will be archived after its content is sent to the list that must remain (the assistant displays a preview of the effects and changes to be expected).
- Confirm the merge after verification:

Export a contact list
To obtain a CSV file of your contact list containing the information visible when you display the list on the Manager interface (including information fields such as the date of creation of the contact):
- Click here to access the management of your product on the Infomaniak Manager (need help?).
- Click on Manage:
- Click on the action menu ⋮ located to the right of the item concerned.
- Click on Export:

- Save the
.csvfile to your device.
Add contacts, delete addresses, etc.
From the same menu as above, it is possible at any time to add contacts to an existing list or delete them, duplicate lists, etc.
Link to this FAQ: https://faq.infomaniak.com/2882
Has this FAQ been helpful?
This guide details the key steps in creating an invitation with the Infomaniak Guest Manager.
Order of invitation creation
After creating your guest list, the creation of an event revolves around these elements:
- a name for the event
- a date and time for the start of the event
- an event end date and time (optional)
- verification of guest access during the event using a QR code (optional)
- location of the event
- an event type (inauguration, birthday, meal, etc.)

Next, to customize the appearance of the invitation:
- a logo
- a banner
- the colors

Next, to configure the sending:
- name of the invited group
- name of the organizer
- sending email
- language for automatic messages
- registration deadline

Next, to complete the content of the invitation email and the event registration confirmation:
- subject of the email
- filling in the content (including the insertion of variables/custom fields depending on the recipient)

Next, to customize the information requested during event registration (if the person accepts the invitation by clicking the button in the email):
- the pre-filled fields (name, first name, email address) and activation or deactivation of the possibility of modification by the guest
- the addition of fields such as text fields, multiple-choice questions, etc.

Next, to configure the recipients and any accompanying persons / spouses:
- which contact list(s) to send the invitation to
- number of possible authorized persons to accompany the guest (between 0 and 20)
- display or not the guest list in the invitation email

Next, to preview and prepare the sending:
- preview of the message, with the possibility to return to the editing of the different elements
- activation or not of the scheduling of the sending to be carried out in the future (and if so, on which date & time)
- activation or not of automatic reminders (and if so, on which date & time)
- sending a quick test to the address of your choice (not deducted from the invitation credits)

The creation of the invitation can be saved as a draft during all these steps and you will be able to return to its editing at any time from the main page:

Link to this FAQ: https://faq.infomaniak.com/2886
Has this FAQ been helpful?