
Knowledge base
1000 FAQs, 500 tutorials and explanatory videos. Here, there are only solutions!
This guide covers the steps to follow when you are healthcare professionals, Infomaniak customers, and wish to comply with the HIN system.
Preamble
- The acronym HIN stands for "Health Insurance Network".
- A HIN-type email address is an address used to send confidential and sensitive messages, such as medical records or test results, between healthcare professionals who have been authorized to use them.
- These addresses are protected by additional security measures to ensure that sensitive information does not fall into the wrong hands.
Obtaining an encrypted HIN email address
For your Infomaniak email address to be HIN-compatible:
- Click here to access the page of services offered by HIN and subscribe to their offer.
- Contact Infomaniak support in writing as soon as a contract is concluded, clearly mentioning the email address(es) concerned (pay special attention to the domain name and its extension
.com,.chetc.). - Wait for HIN to notify Infomaniak and for the solution to be implemented (several hours or days).

This guide helps you find the public IP address of your device, which can be useful for certain support requests, among other things.
Display the public IP address on the connected device
Click here to obtain the public IP address of your device in IPv4 and IPv6 format.
Alternative methods
Visit ipinfo.io or ifconfig.me.
... on macOS
- From a terminal application (command line interface, CLI) on your device, run the command
curl ifconfig.meand press enter. - The displayed address is the public IP address of the computer.
Do not forget that this address can change periodically, especially if the router restarts or if the internet service provider uses dynamic IP address allocation.
To automate the search for the public IP address, use commands or scripts that query services such as api.ipify.org ...
This guide explains how to allow a user (friend, colleague, client, family member, etc.) to easily and securely use an email address that you have created within an Infomaniak Mail Service as an administrator of the concerned Organization.
Preamble
- No password should be transmitted to them.
- The email address will be automatically added to the Infomaniak Mail interface of the user, after they accept the invitation.
- Refer to this other guide to manage existing users.
- Refer to this other guide if you are looking for additional information regarding the simple creation of an email address for yourself.
Invite to use the email…
…from the Mail Service
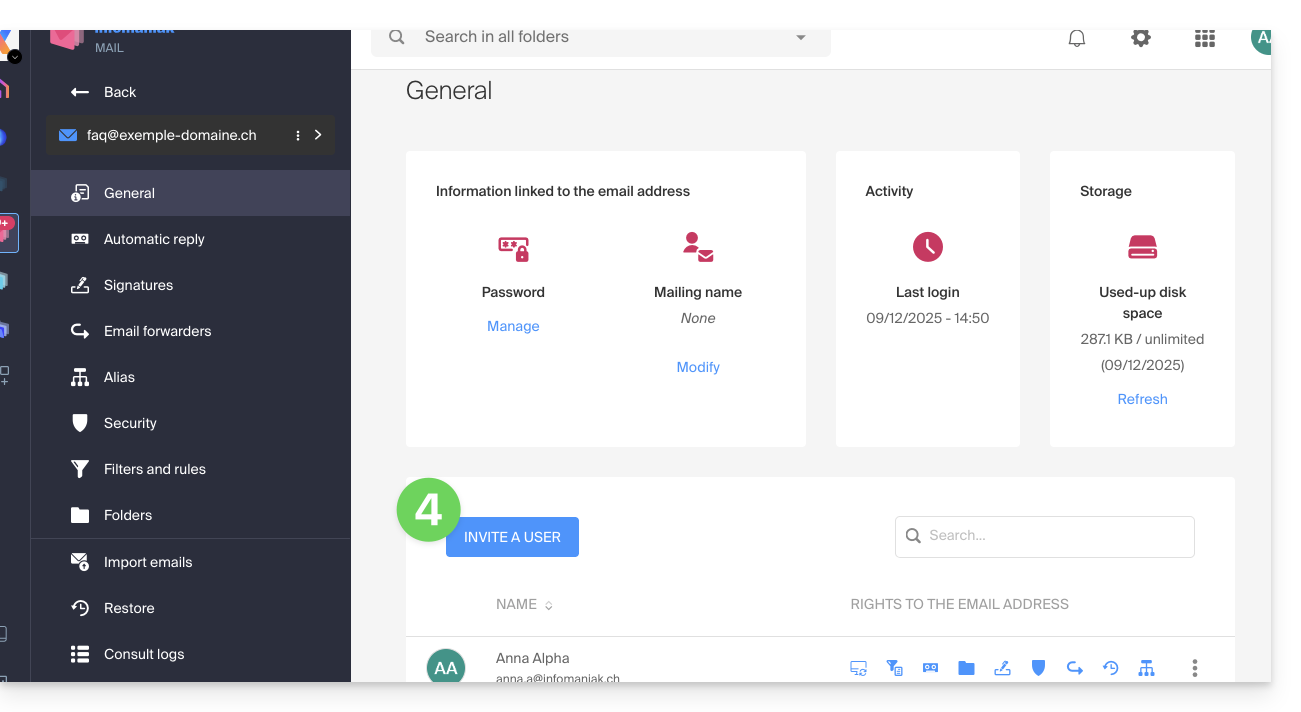
To allow an already active user to access the email address you wish to share:
- Click here to access the management of your product on the Infomaniak Manager (need help?).
- Click directly on the name assigned to the concerned product.
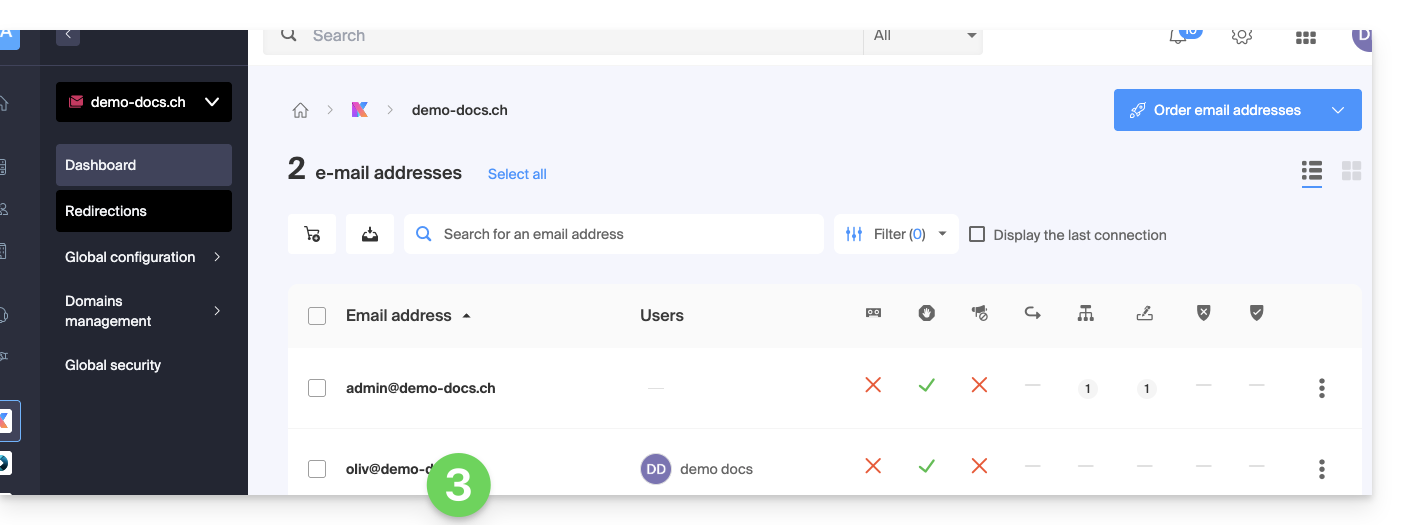
- Click on the concerned email address in the displayed table:
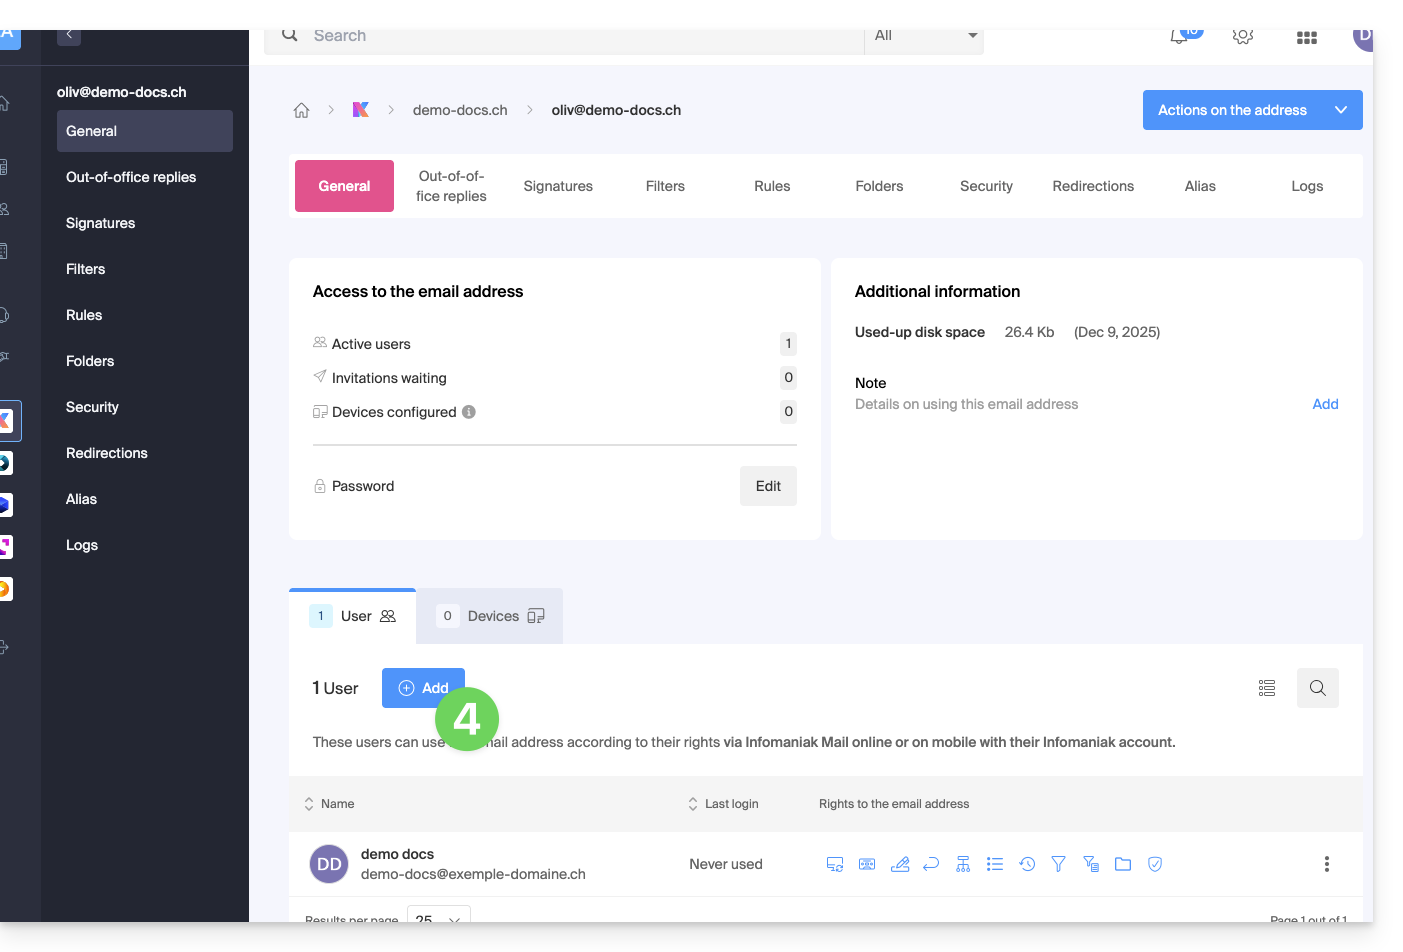
- Click on Add above the table of users currently accessing the concerned email address on Mail:
- Enter the password to log in to your Infomaniak account if prompted.
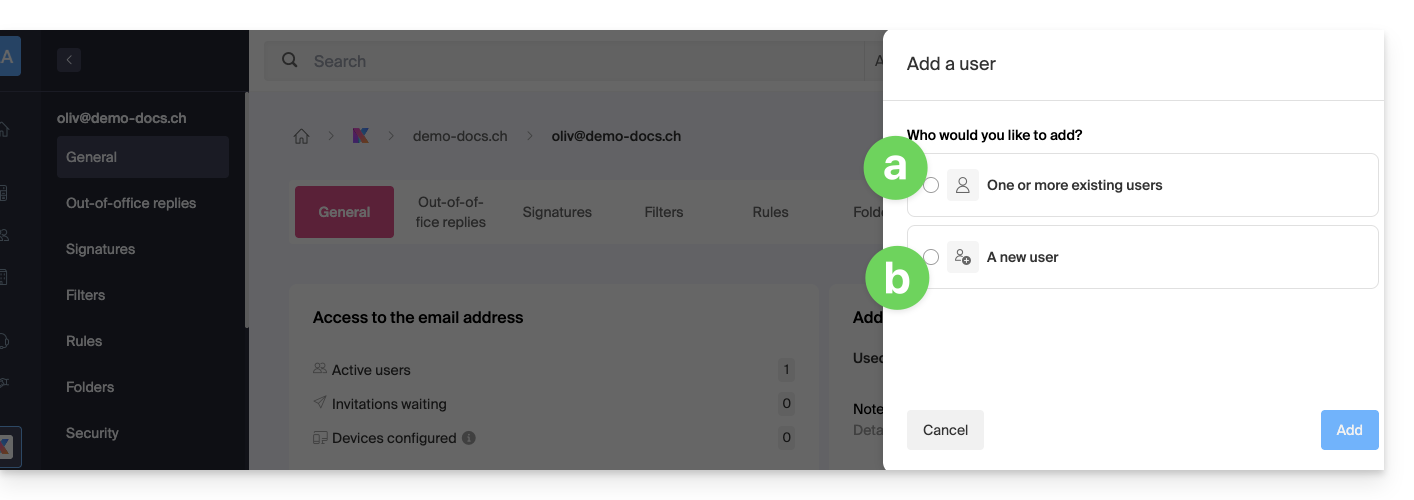
- Choose (a) one of the existing users within your Organization or (b) an external user to the Organization:
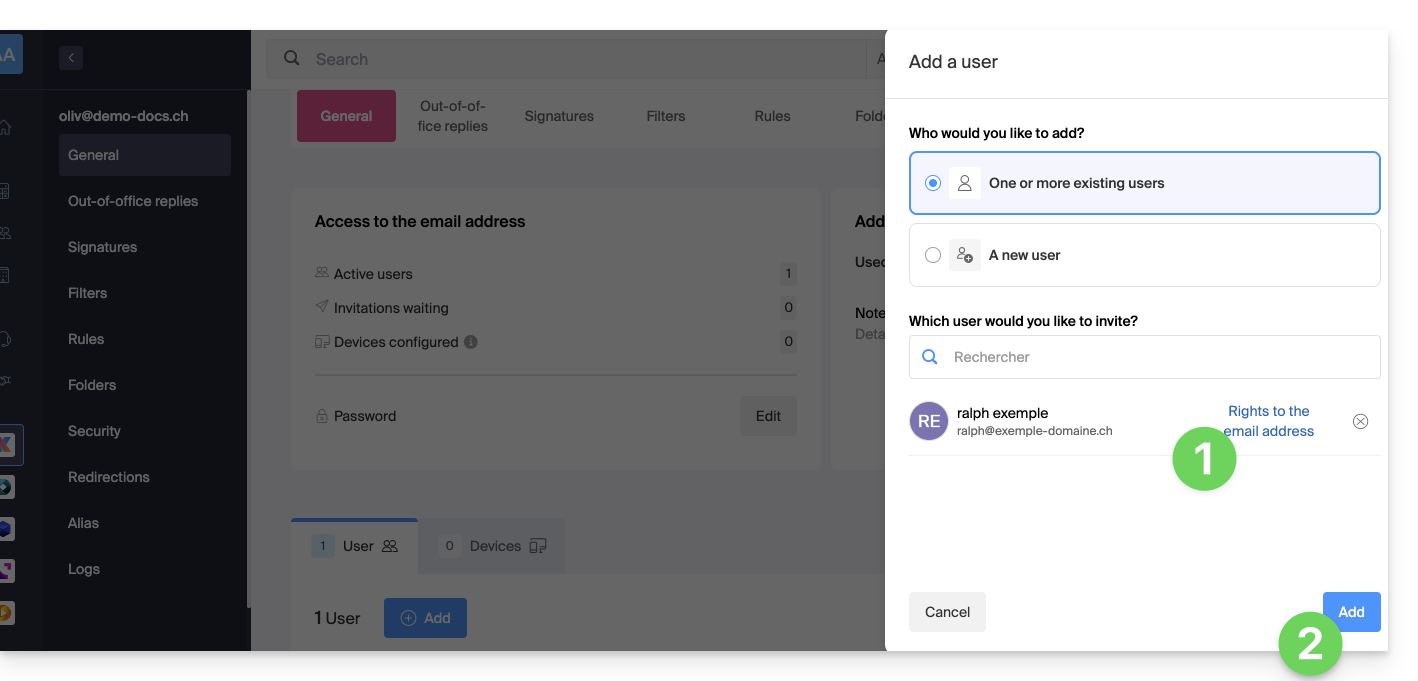
Choice [ a ]: existing user on the Organization
Nothing could be simpler:
- The concerned email address will be automatically visible and accessible to the selected user on the Infomaniak Mail web app (online service ksuite.infomaniak.com/mail) with the specified permissions.
- Click the button to Add the user:
- After the addition, it is always possible to restrict the user by clicking on the icons corresponding to the permissions…
- ... or even revoke their access to the email address:
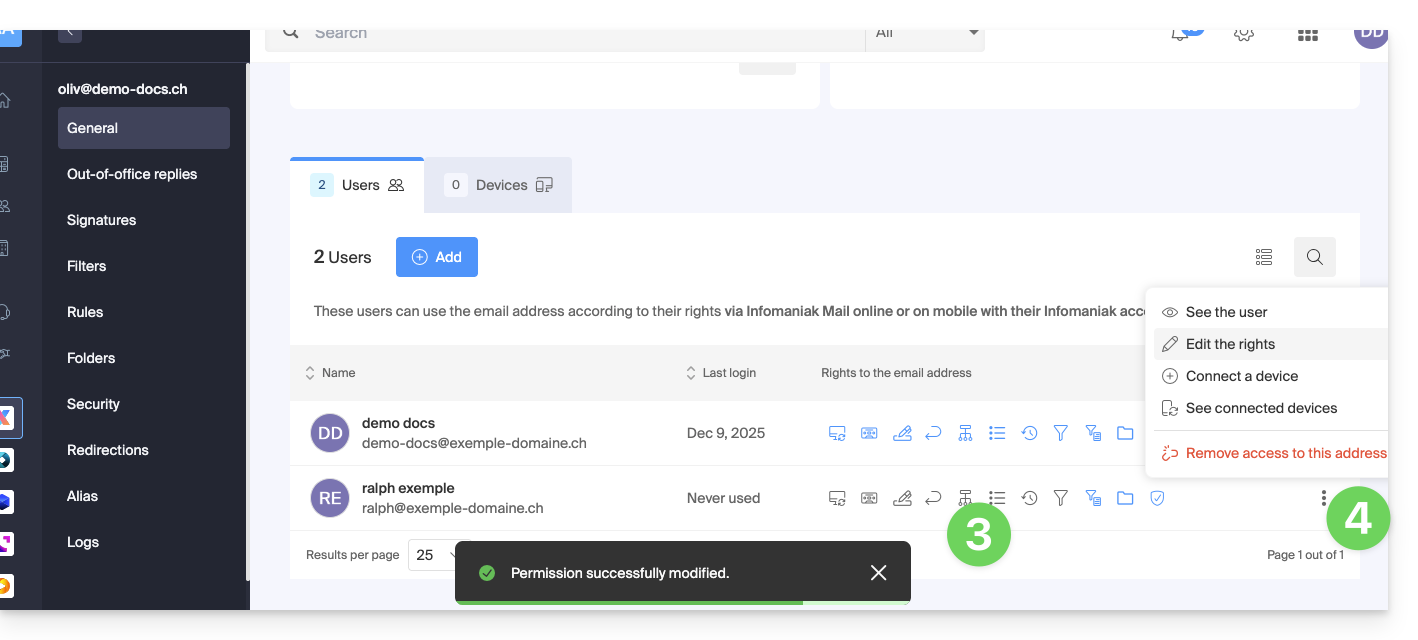
The user in question has access to the email address concerned: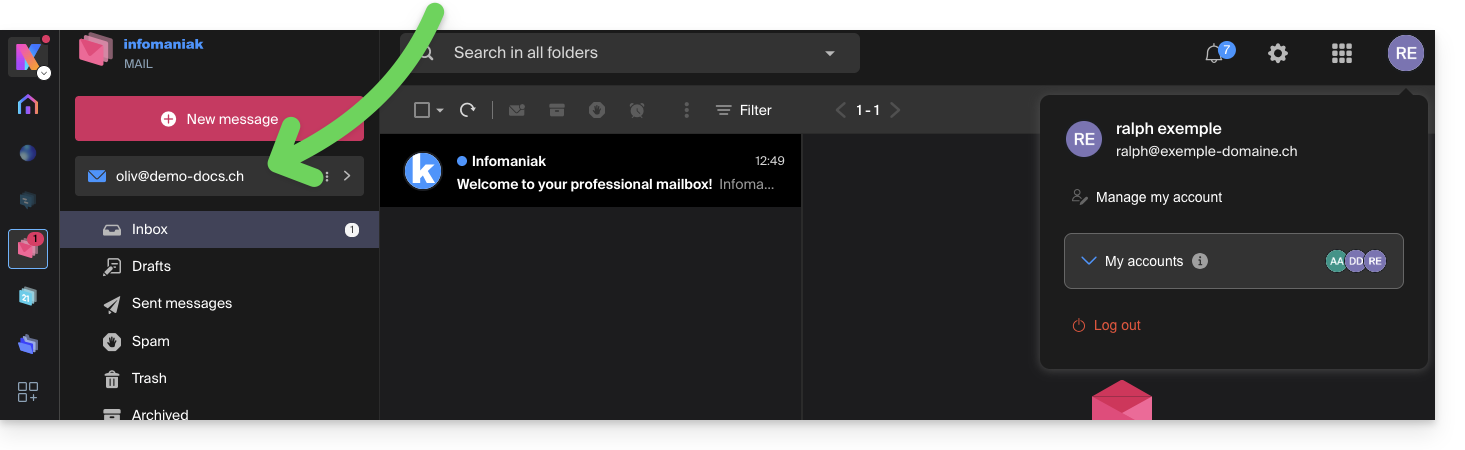
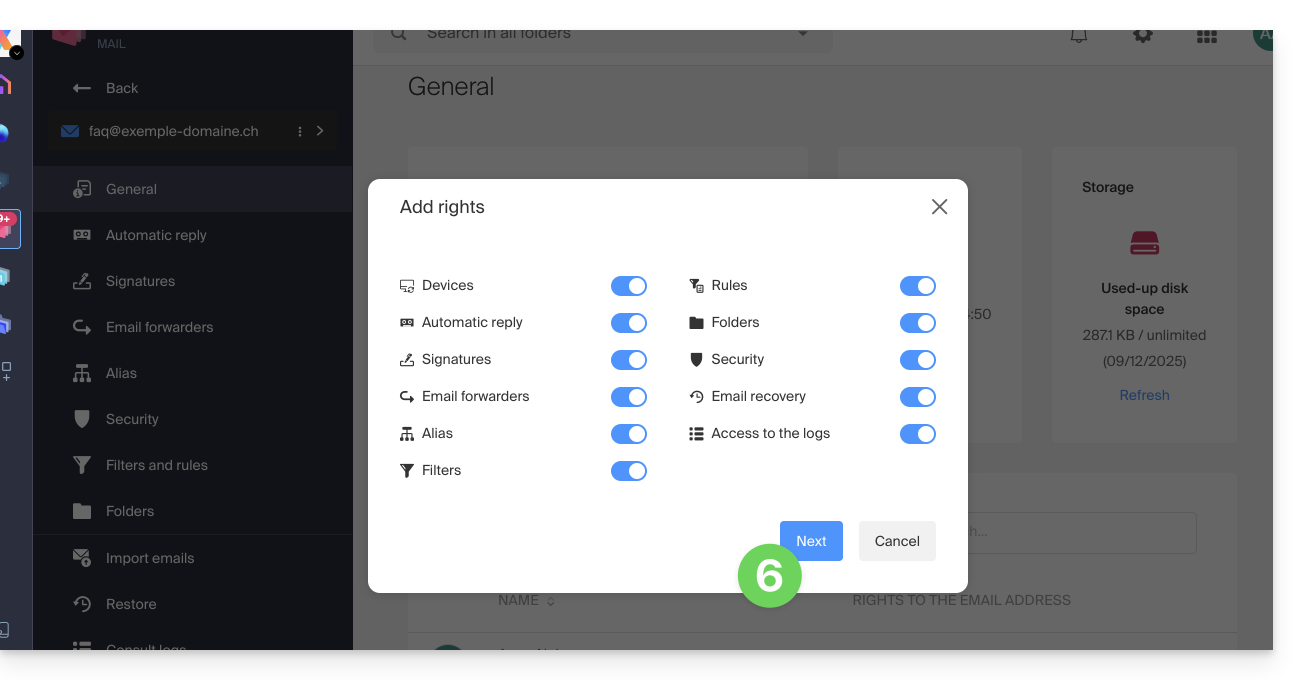
Option [ b ]: external user to the Organization
- Click the radio button to select the option for new user.
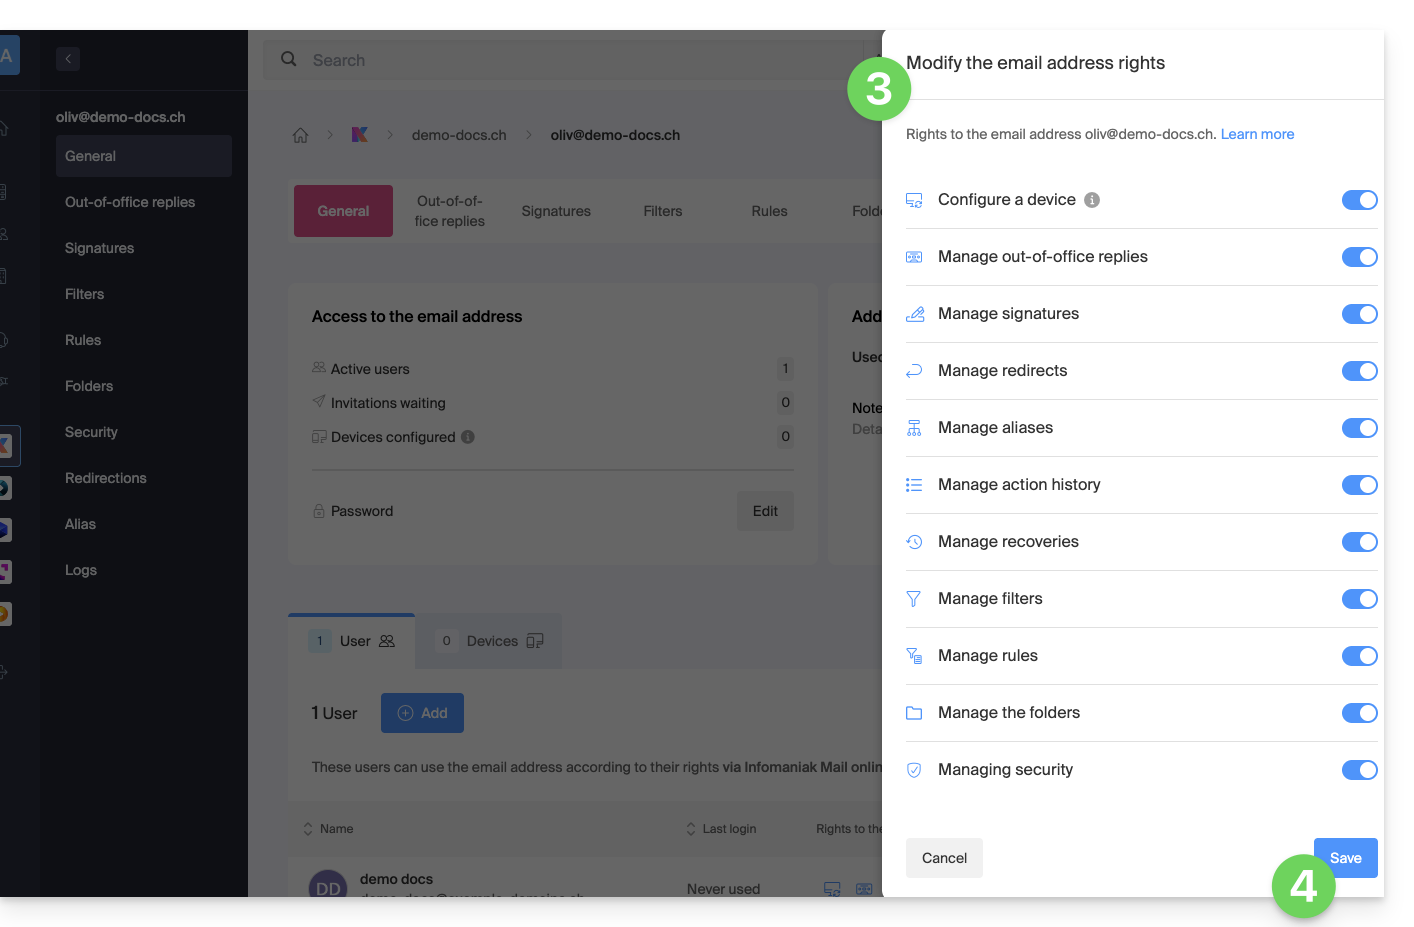
- Click to configure the user's rights:
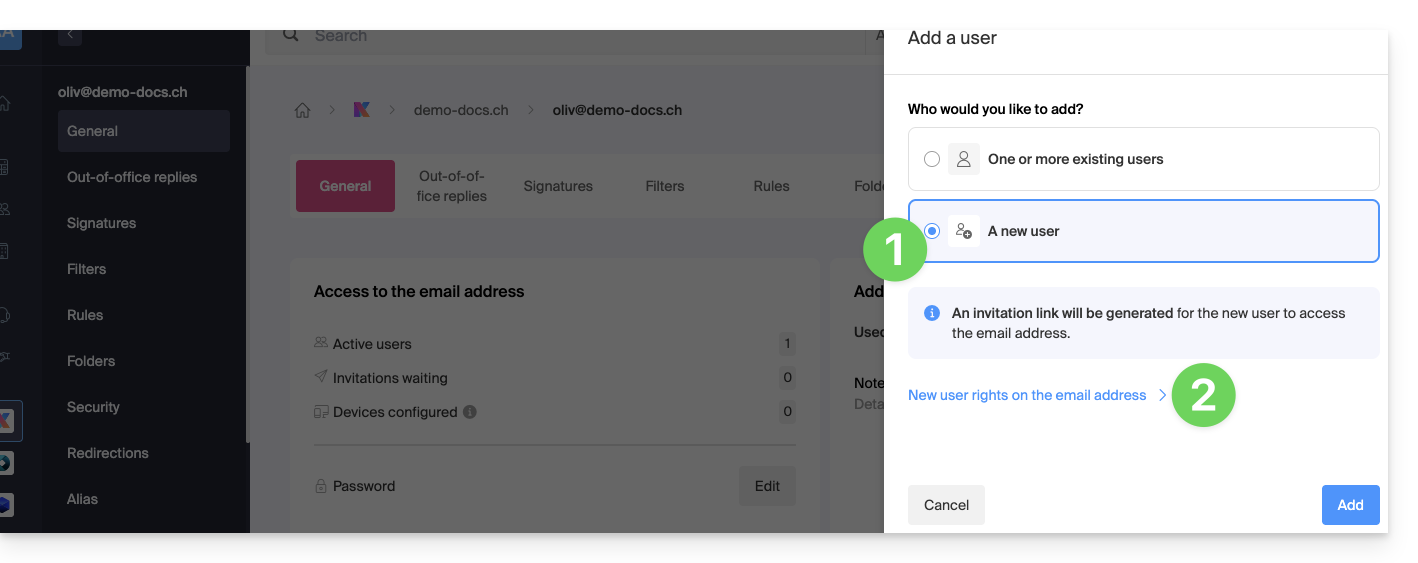
- Modify, if necessary, the permissions granted to the user for the email address concerned.
- Save the changes:
- Click the button to Add the user:
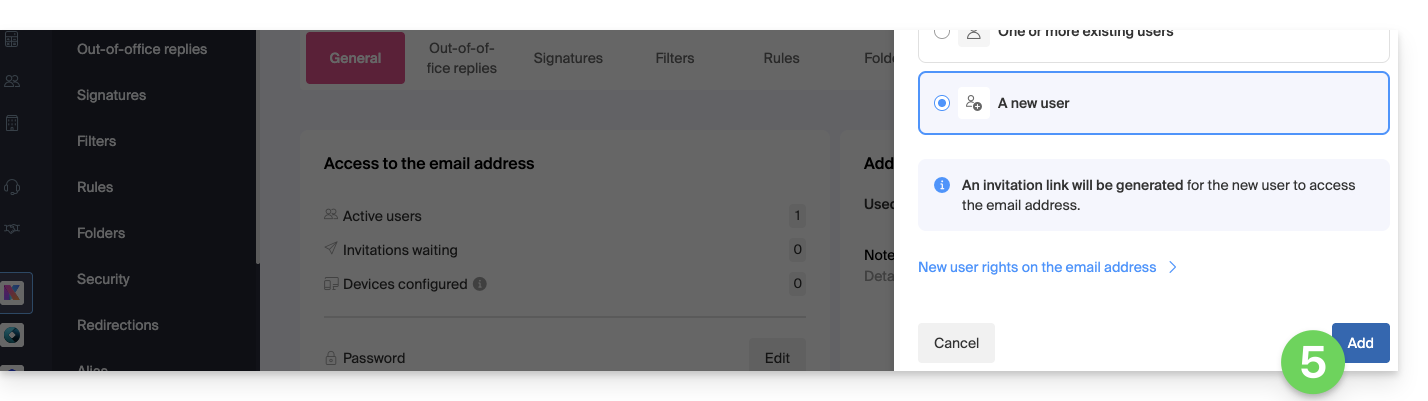
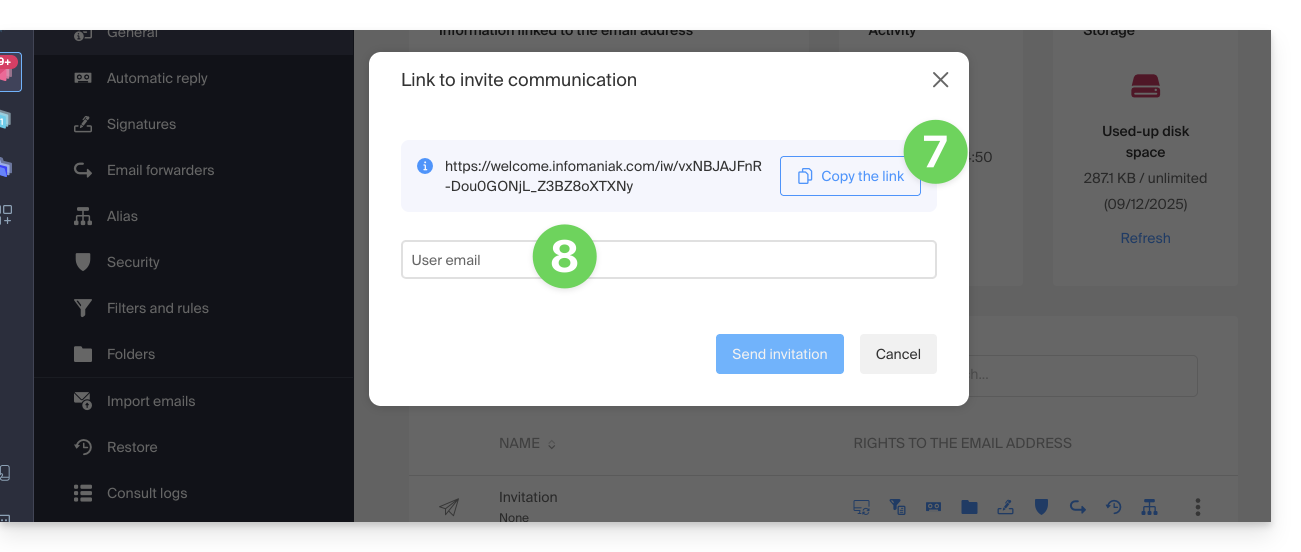
- The invitation is created, and the user just needs to execute the provided link (see below) to add the email address to their Infomaniak Mail.
- It is possible to send the invitation by email:
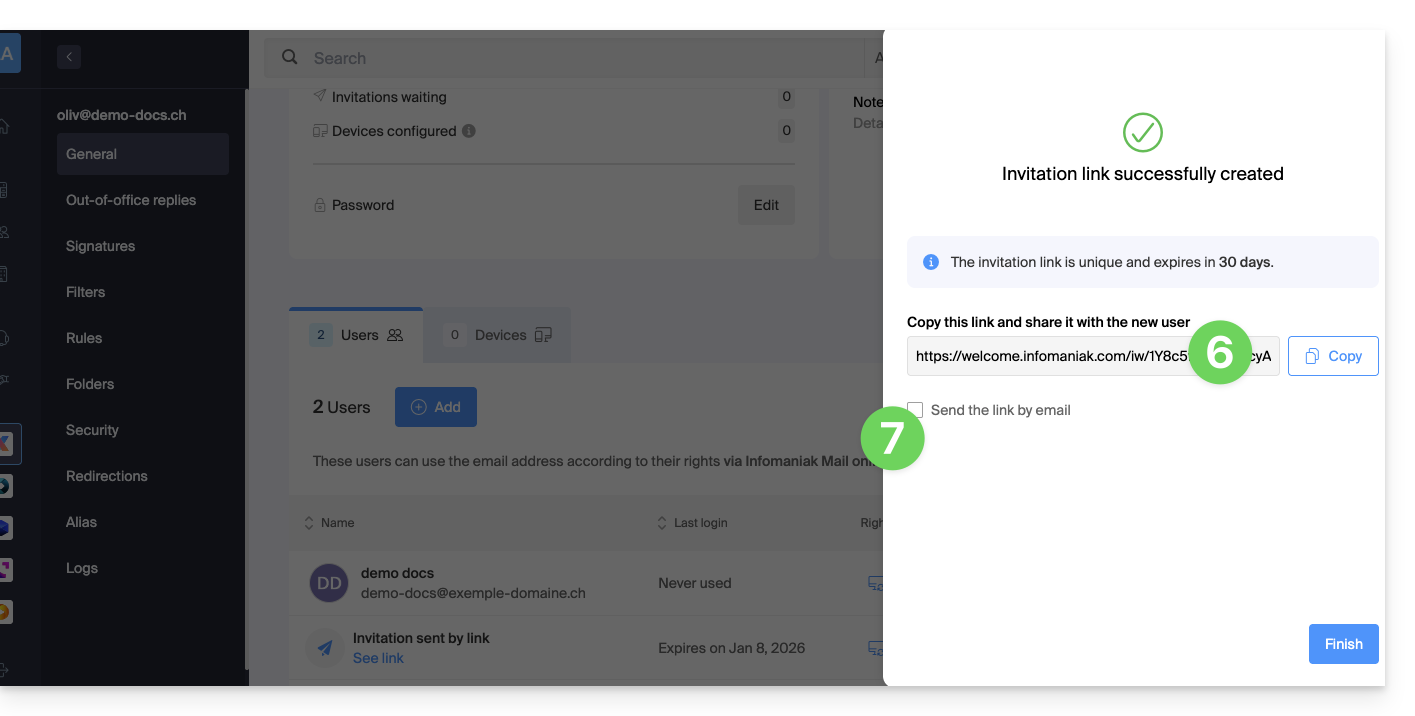
- The invitation is visible under the email address user tab, and it can be deleted at any time:

The user will have access to the email address concerned if they execute the invitation link while logged into their account…
- ... or if they log into their account after executing the invitation link:
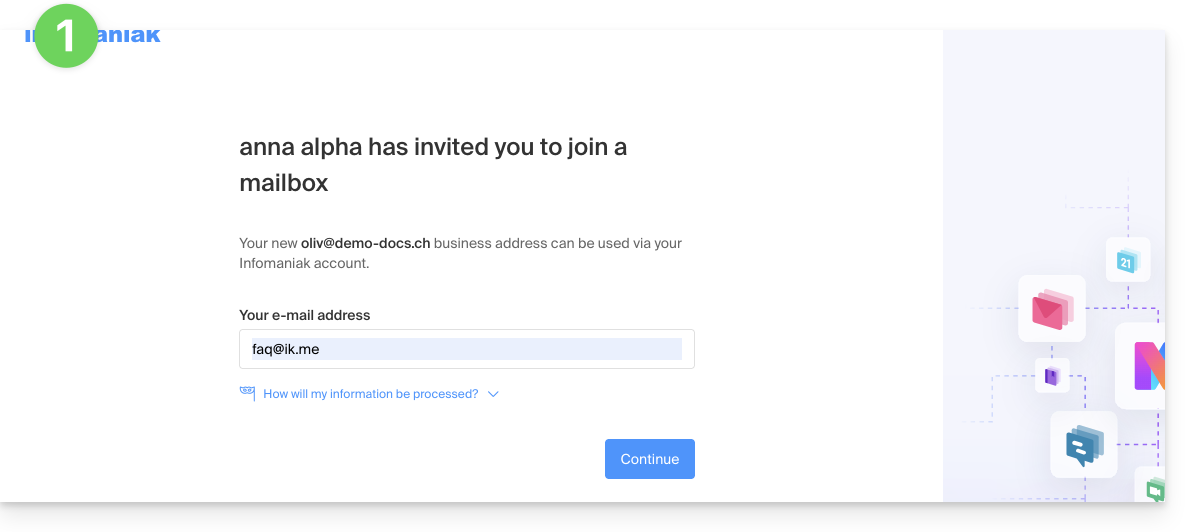
- If necessary, the user can still switch accounts before attaching the address if necessary:
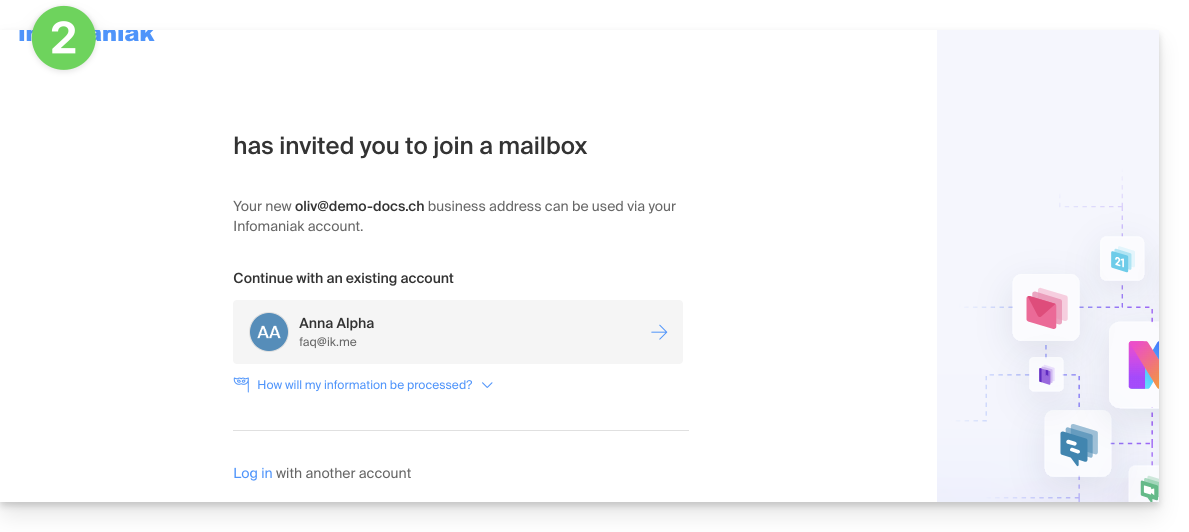
- The user in question has access to the email address concerned once they have chosen which Organization:
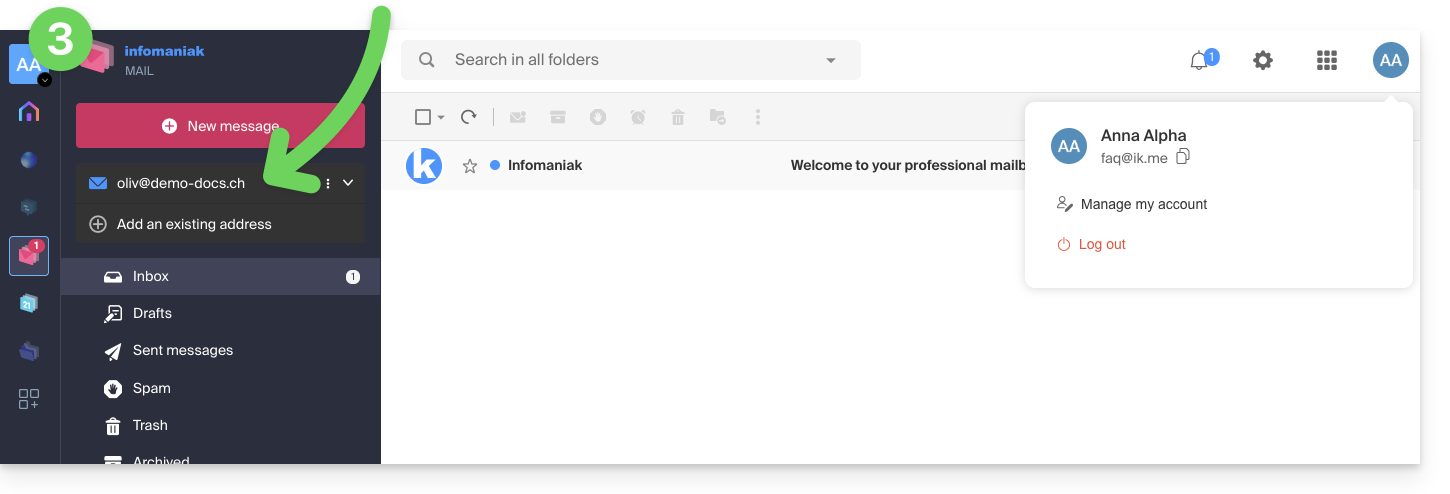
... from the Infomaniak Web Mail app
To access the same process as above but from the Infomaniak Web Mail app (online service ksuite.infomaniak.com/mail):
- Click here to access the Infomaniak Web Mail app (online service ksuite.infomaniak.com/mail).
- Click on the action menu ⋮ to the right of the email address concerned.
- Click on the Settings of the email address:
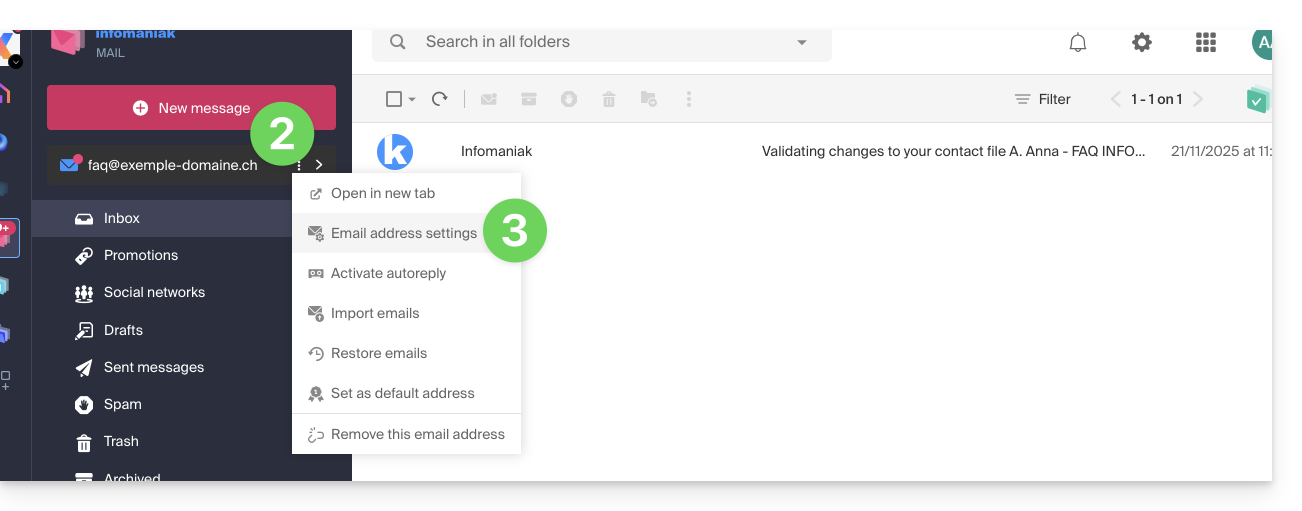
- Click on Invite a user:
- Enter the password to log in to your Infomaniak account if prompted.
- Modify, if necessary, the permissions granted to the user for the email address in question and click on Next:
- The invitation is created and the user will only need to execute the provided link to add the email address in question to their Infomaniak Mail.
- It is possible to send the invitation by email:
In case of a problem
If the Invite button (point 6 above) is not visible or remains greyed out, check that:
- your user account has sufficient permissions to administer the product in question
- the email address in question does not yet exist as a login identifier for an Infomaniak Organization
- the table under the button does not mention a user listed with an email address identical to the email address in question
Example: you want to invite someone to view the address anna.a@domain.xyz but the button is greyed out because a user anna.a@domain.xyz is listed in the table.
Solution: to be able to invite a new user to view the address in question, completely delete the user account with the login address being the email address in question.
This guide explains how to block (or allow) email senders globally on an entire Mail Service. Refer to this other guide if you are looking for information on how blocked and allowed sender lists work.
Manage Security on Global Configuration
A Mail Service administrator can add email addresses or even entire domains to the lists of approved or rejected senders, and these lists will be applied to all email addresses of a Mail Service (without modifying the existing settings already on each email address):
- Click here to access the management of your product on the Infomaniak Manager (need help?).
- Click directly on the name assigned to the product in question.
- Click on Global Configuration in the left sidebar menu.
- Click on the Security tab.
- Click the Add an address button in the Blocked address box to block an email from an unauthorized sender.
- Do the same for senders to be approved in the other box:

- Click Validate to activate these lists on all email addresses in the domain.
This guide details the specific rules to follow when using a password containing the "dollar" character $ to send an email via the SMTP Infomaniak in a script (PowerShell, Python, etc.).
Preamble
- If you encounter an authentication error (for example
auth failed,invalid login or password) when sending an email via SMTP, even though the password is correct and works in software like Outlook, the issue may be due to the handling of the character$in your script or configuration file. - To ensure reliable execution of your SMTP scripts, it is strongly advised to avoid any special character with syntactic meaning, particularly
$, in passwords used in scripts and configuration files. - The issue may also occur when connecting to databases.
Rules to follow
The character $ is a special symbol in many languages and environments. When it is used in a password in a script or configuration file, it can be mistakenly interpreted as a variable or control character.
Here are frequent cases where you should not use the character $ in a password:
- PowerShell:
$is used to declare variables. A password containing$can cause syntax errors or be truncated. - Bash / Shell (Linux):
$is also a variable prefix. It can trigger unexpected substitutions. - YAML files (for example Home Assistant, GitHub Actions, Docker Compose) :
$can be interpreted as an environment variable. - Files
.env,.ini, or other configuration files: the tools that read these files may attempt to interpret the variables. - Commands or URLs with authentication: a password containing
$may be improperly encoded or fail during parsing.
To correct or prevent this type of error:
- Avoid using the character
$in passwords intended for use in scripts or automated systems. - If you absolutely must use it, always enclose the password string correctly according to the language:
- In PowerShell: use single quotes
'password$Test'if possible. - In Python: ensure the string is well enclosed in single or double quotes, without interpretation.
- In Bash: escape the
$with a backslash\$.
- In PowerShell: use single quotes
This guide explains how to activate the Infomaniak anti-spam filter, which significantly reduces the number of unsolicited messages that can reach your Infomaniak email address if you share it with third parties.
Preamble
- Spam is unsolicited mail, often of an advertising or fraudulent nature, aimed at promoting products, services, or carrying out online scams; fortunately, Infomaniak has implemented strategies to combat this form of digital pollution.
- Thanks to the anti-spam filter, the messages you genuinely want to see quickly will no longer be buried among dozens of other unwanted messages, as the latter will be automatically placed in a special folder, the
Spamfolder (or in the spam destination folder - see below) and then automatically deleted after 30 days. - Moreover, the filter is automatically activated when creating an email address within an Infomaniak Mail Service or when subscribing to a my kSuite / my kSuite+ offer.
Activate the option from the Infomaniak Web Mail app
Prerequisites
- Have permission to manage the filter: it is possible that the Mail Service manager has revoked this right from their admin account.
To access your Infomaniak mail settings:
- Click here to access the Infomaniak Web Mail app (online service ksuite.infomaniak.com/mail).
- Click on the Settings icon in the top right corner.
- Check or select the relevant email address in the dropdown menu of the left sidebar.
- Click on Filters and rules:
- Activate the spam filter option, the effect is immediate (wait for the on-screen confirmation message); in this case, all future messages with a header indicating a high spam score (and blocked senders) will go to the Spam folder:
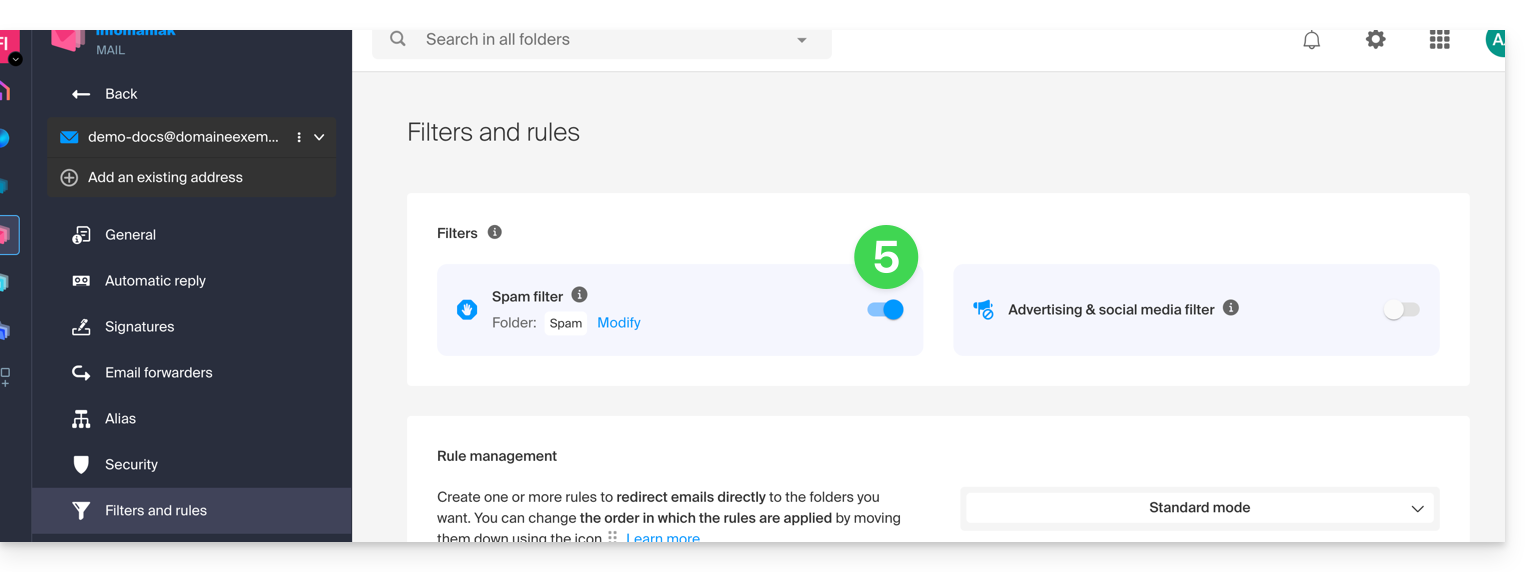
- Simply click the toggle switch again to deactivate the filter; in this case, all future messages will go to the inbox, including messages with a header indicating a high spam score.
Activate the option from a Mail Service
To access your Infomaniak mail settings:
- Click here to access the management of your product on the Infomaniak Manager (need help?).
- Click directly on the name assigned to the relevant product.
- Click on the relevant email address in the displayed table.
- Click on Filters in the left sidebar.
- Activate the spam filter option, the effect is immediate:
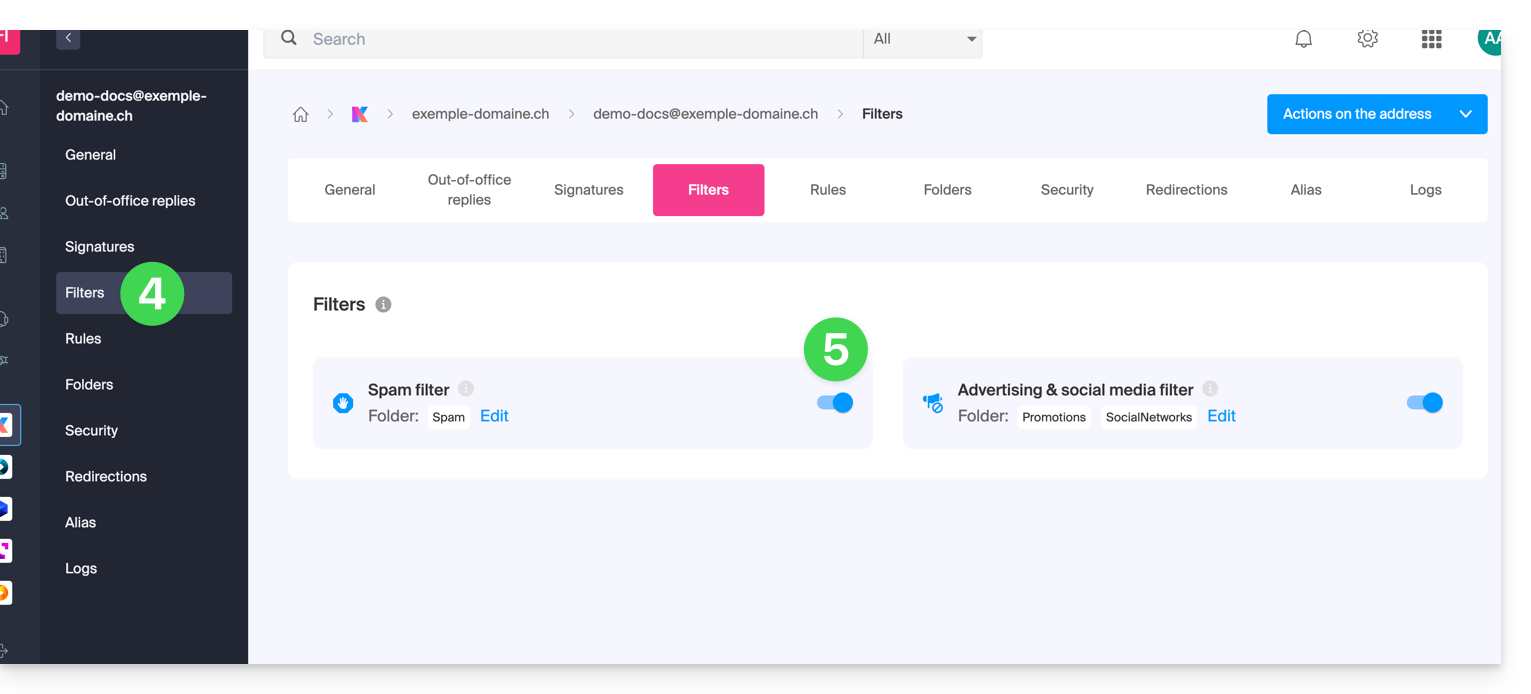
- Simply click the toggle switch again to disable the filter; in this case, all future messages will go to the inbox, including messages with a header indicating a high spam score (they can be processed downstream by your software/email client if it supports reading this type of header).
Note that you can activate it in bulk on multiple addresses at the same time.
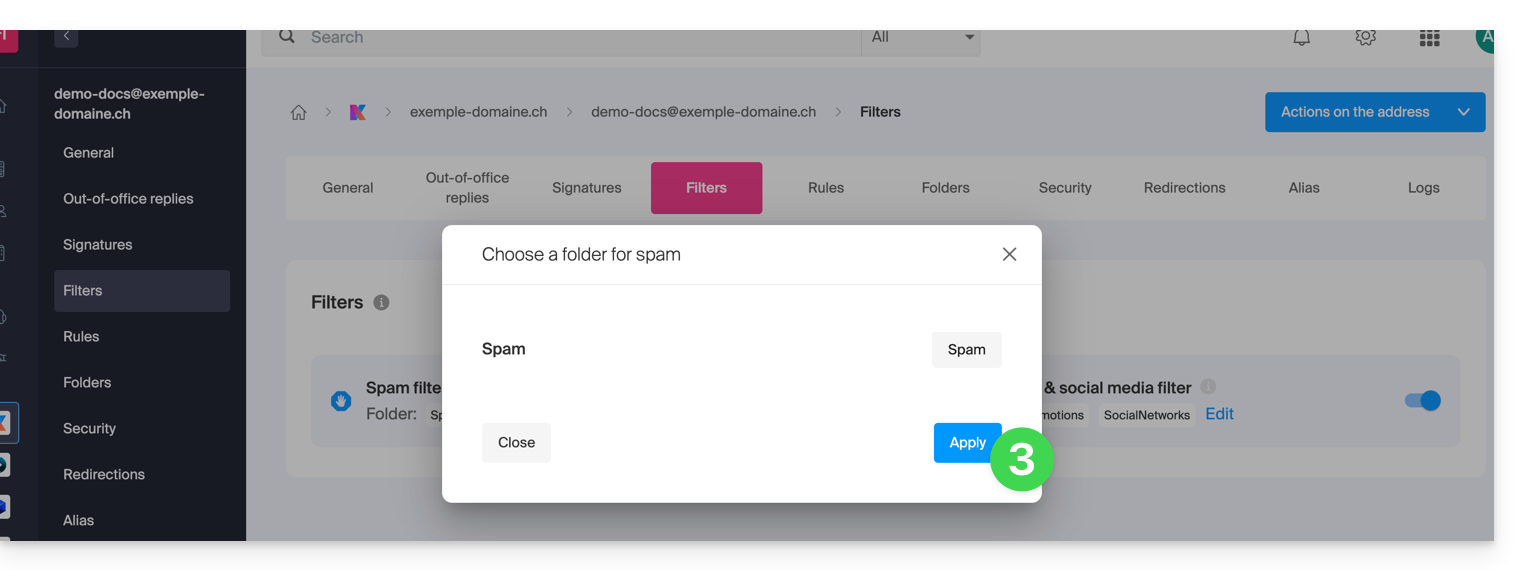
Customize the anti-spam filter
Modify the location of spam
You can choose the default location of the folder where messages considered as spam will be automatically placed (similar to special IMAP folders).
Where you have activated the spam filter:
- Click on Modify:
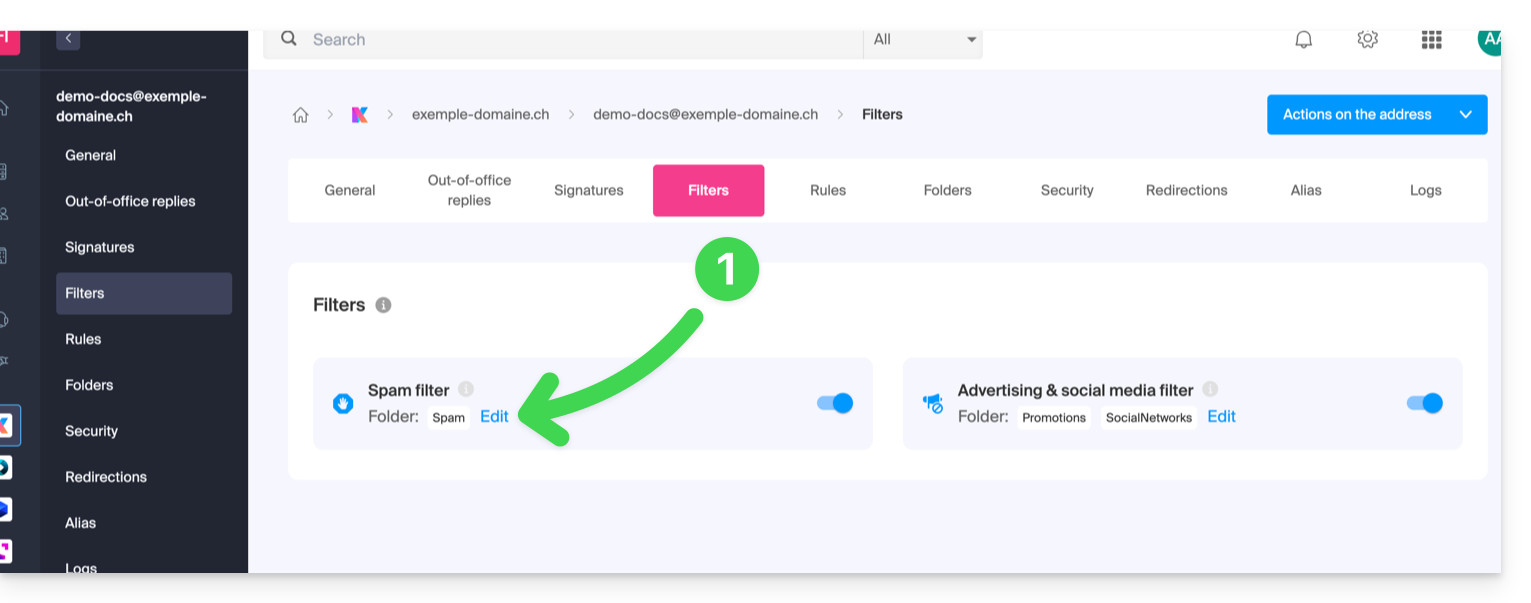
- Click on the folder name to choose another one (create a new one in advance if necessary):

- Click on the Validate button:
Report a filtering issue or manually block senders
Report unfiltered Spam or an email filtered when it is not Spam (false positive): refer to this other guide on this subject.
You can also specify in advance which senders should always go to the Spam folder (or vice versa, if they should not be filtered): refer to this other guide on this subject.
For added security, enable the external mail mention.
This guide helps you protect the reputation of your domain name, to maintain the trust of Internet users and service providers in your website or business, thereby facilitating the smooth operation of your email.
The web reputation
There are different types of reputation on the Internet, including personal reputation, corporate reputation, and domain reputation.
Domain reputation is essentially a score that determines how email systems decide what to let through to users' inboxes. Fundamentally, the reputation of your domain is a measure of the health and legitimacy of your domain. This reputation can be influenced by the security of your email and website.
For example, the reputation of a domain can decrease if…
- … the site visible at the domain address is hacked, leading to the mass sending of fraudulent emails,
- … the domain's email is exploited for the involuntary sending of spam.
If the reputation of your domain remains poor, your emails may be marked as spam and not reach their intended audience. This can harm email deliverability (see this other guide in English on this topic).
Improving domain reputation
By following these few tips, you can improve the reputation of your domain and, for example, boost all your email marketing efforts:
- Set up and verify SPF, DKIM, and DMARC records that help protect your domain from identity theft attacks.
- Check the reputation of your domain with tools such as Google Postmaster Tools, Sender Score, Microsoft SNDS, McAfee or Talos Intelligence and identify potential issues.
- Only send emails to users who have chosen to subscribe!
- Get trusted links or backlinks…
See this other guide about RBLs.
This guide explains how to add or modify one or more SRV type records in the DNS zone (of a domain name) managed on the Manager Infomaniak.
Preamble
- This type of record allows you to indicate which services are available for a domain.
- They are often used for XMPP, LDAP protocols or to configure Microsoft Office 365.
Modify the DNS zone
Refer to this other guide to manage this type of record in a DNS zone.
This guide explains what spamtrap email addresses are.
Preamble
- A spamtrap, also known as a honeypot, is a tool used to detect and catch spammers.
- It is essentially an email address or a system that is created to attract unwanted messages, such as spam.
How a Spamtrap Address Works
A spamtrap address works by attracting spam and identifying the senders of unwanted mail. Here's how it can happen:
- An email address is specifically created to act as a spam trap; it is generally configured so as not to receive legitimate communication.
- The spamtrap address is hidden or obscured so that it is not visible to legitimate users, but only to spammers; this can be done by placing it on hidden web pages, in forums inaccessible to the public or by making it invisible to humans (for example by using white text on a white background).
- Spammers use automated techniques to extract email addresses from various sources, such as websites, forums, social networks, or stolen address lists; during this process, they may inadvertently or intentionally include spamtraps in their lists.
- When a spammer sends a message to a spamtrap address, it is captured and recorded; since the address is not used for legitimate communication, any mail received is considered unwanted.
- When a spamtrap receives a spam, it triggers an alert for email service providers like Infomaniak; they can then identify the sender of the spam by examining the message headers or the information related to the source IP address.
- Once a spammer is identified through a spamtrap, measures can be taken to block or filter their unwanted messages; Infomaniak can add the spammer's IP address to a blacklist, implement stricter anti-spam filters or take other steps to protect their users.
This guide explains how to mark your chosen emails as "favorite" in the Infomaniak mail service to keep a "track" of these messages and display them separately if you wish.
Monitor one or several messages…
… from the Infomaniak Web Mail app
To add a message as a favorite:
- Click here to access the Web Mail Infomaniak app (online service mail.infomaniak.com).
- Click on the ☆… icon
- … to the left of a message in the message list
- … at the top right of the message reading window
- Once tracking is enabled, a dropdown menu in the top right corner allows you to display only a selection of your received messages according to several criteria: All, Read, Unread, Followed, Unfollowed.
… from the Infomaniak Mail mobile app
In the message list:
- Press and hold your finger on a message.
- Press the ☆ icon at the bottom of the screen.
- If necessary, exit the message selection by pressing the Cancel button at the top of the screen:
While reading a message:
- Press the ☆ icon at the top right of the message reading window:
It is also possible to set up a swipe gesture that would mark the swiped message as a favorite.
This guide explains how to connect the Apple Mail desktop app (desktop application on macOS) to an email address hosted by Infomaniak.
Preamble
- Your macOS computer will be automatically configured via .mobileconfig configuration profiles compatible with Apple, unlike a manual configuration.
- It is possible to remove a configuration profile once installed (scroll to the bottom of this page for instructions).
- The various services offered by Infomaniak are all compatible with the corresponding standard protocols (IMAP/SMTP for email, for example). Therefore, if you encounter a problem with third-party software, contact the publisher directly or a Partner and consult the support policy as well as section 11.9 of the Infomaniak Terms of Service.
Install a configuration profile
Prerequisites
- Create the email address in my kSuite or a Mail Service / kSuite.
- Create a password for the email address on the device you are going to configure.
- Check that the Mail Service is configured optimally.
You can download the profile from the device in question or send it from another device (if you already have a working email address, for example):
- Click here to access the Infomaniak configuration tool (online service https://config.infomaniak.com) — log in if necessary to your Infomaniak account on the Organization on which your email address is managed.
- Choose to install the profile on this device.
- Choose to synchronize emails.
- Enter the password for the email address (attached to Mail Infomaniak (Webmail)) that you wish to synchronize.
- Click on the blue Verify button:

- Download the configuration profile:

- Open the System Settings of the computer.
- Click on General in the sidebar, then click on Device Management (for macOS Sequoia 15 version). If you have a lower version or cannot find the profile, refer to the official documentation by changing the version of your system at the top of the page if necessary:

- Click on +:

- Locate and then open the previously downloaded file:

- Click on Continue:

- Enter the email address password.
- Click on Install:

- There you go, your email address is now configured in the Apple Mail application that you can open and control.
Delete an IMAP account
Refer to the chapter "Stop using an account" by changing the system version at the top of the page if necessary (be careful: do not delete a POP3 account without saving your messages first).
Delete an Apple profile
Refer to the official documentation by changing the system version at the top of the page if necessary.
*Why is it necessary to choose the guide version that exactly matches your macOS / iOS system version? Apple sometimes introduces subtle changes with each new system version, for example a path on iOS 15…
…becomes this on iOS 18…
This guide explains how to view the activity logs of email addresses contained within an Infomaniak Mail Service.
Preamble
- The logs of your email addresses are available for free for the last 20 days.
- Consulting the logs over a longer period is payable:
View the logs from the Infomaniak Web Mail app
Prerequisites
- Have a valid access to the Web Mail app Mail Infomaniak (online service ksuite.infomaniak.com/mail) to which the email address is attached.
- Be Administrator or Legal Representative within the Organization that manages the Mail Service.
- Have permission to view the logs: it is possible that the manager of the Mail Service has removed this right from your admin account.
Then to access the logs from Mail Infomaniak:
- Click here to access the Web Mail app Mail Infomaniak (online service ksuite.infomaniak.com/mail).
- Click on the Settings icon at the top right.
- Check or select the email address concerned in the dropdown menu of the left sidebar.
- Click on General below.
- Click on View the logs:

- Choose to view the logs of sent or received emails, and set the date and time.
- Click on Search.
View the logs from Mail Service
To access the Mail Service:
- Click here to access the management of your product on the Infomaniak Manager (need help?).
- Click directly on the name assigned to the product concerned.
- Click on the email address concerned in the table that appears:

- Click on Logs in the left sidebar menu.
- From the dropdown menu, select an email address (by default, it is the first address of the Mail Service that is selected).
- Choose to view the logs of sent or received emails, and set the date and time:

- Click on Search.
Log results
The email sending and receiving logs will be presented in the form of a table.
Hover your mouse over the possible icon ⓘ in the Status column to display more information if necessary:
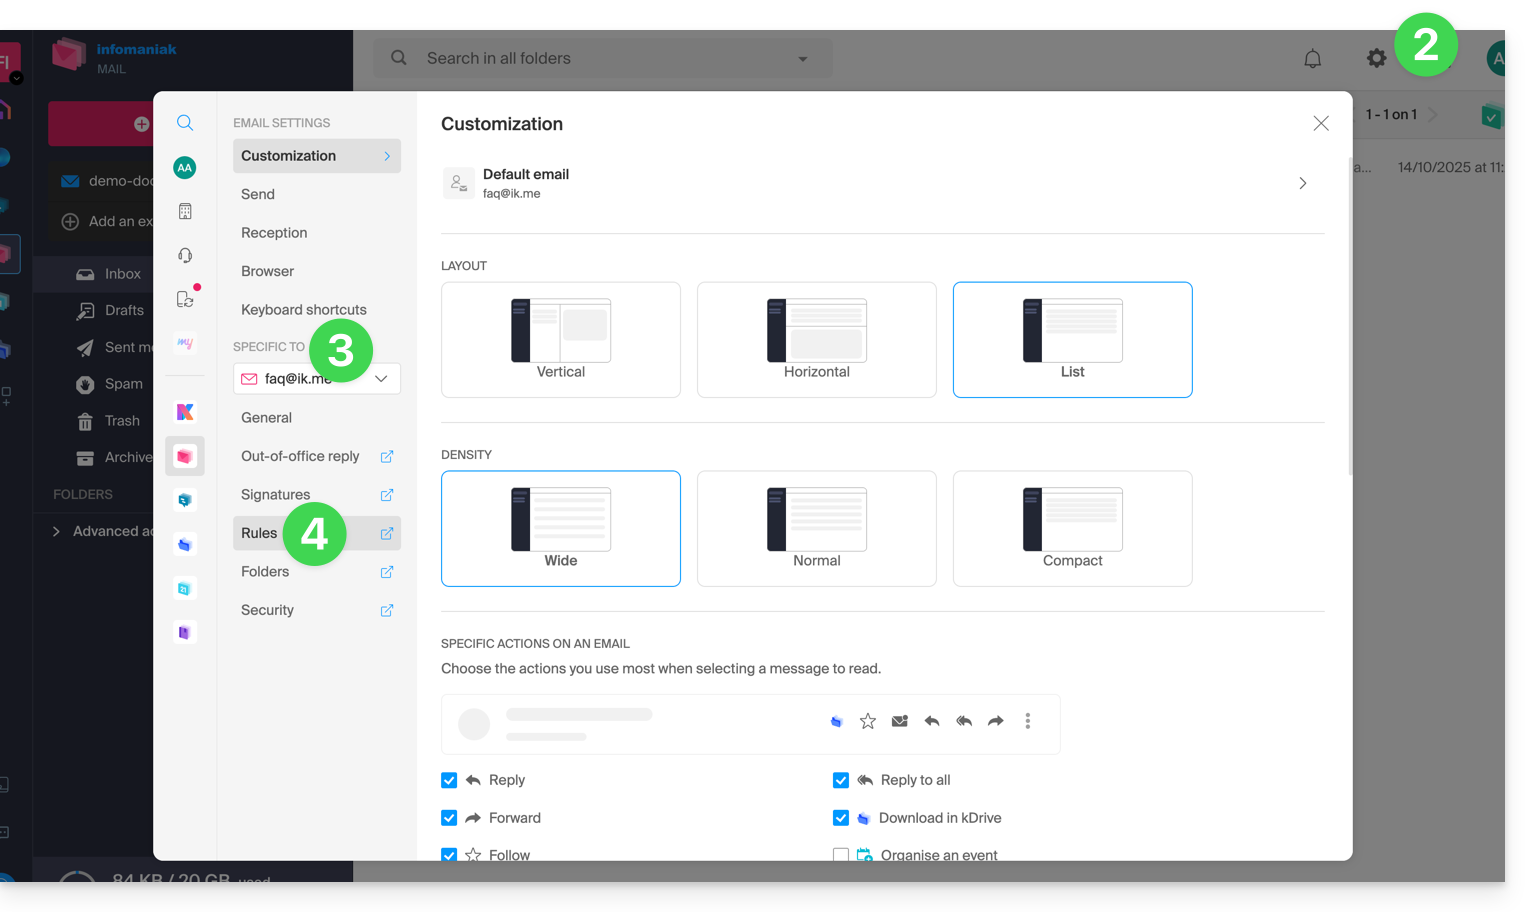
This guide explains how to create a template for the automatic message tool when absent for all your messaging on the Infomaniak Web app Mail (online service ksuite.infomaniak.com/mail).
Preamble
- A template allows you to create the neutral base of a tool that can then be used by multiple users of the same Infomaniak Mail service, or even personalized according to the person who will use it.
- In the case of a reply template, the creator of the template chooses the text that will be sent when a new sender contacts an address to which the template has been applied.
- You can also hide a template so that it is no longer used.
Create a reply template
To create a template:
- Click here to access the management of your product on the Infomaniak Manager (need help?).
- Click directly on the name assigned to the product concerned.
- Click on Global Configuration in the left sidebar.
- Click on the Reply tab.
- Click on Add a reply template:

- Fill in the fields and press Add the reply template:

- If the Make visible option is enabled (during creation or possible choice afterwards), the reply templates created will be suggested to users of email addresses.
Activate a template on an existing email address
It is necessary to have an existing template to activate it on one or more email addresses:
- Click here to access the management of your product on the Infomaniak Manager (need help?).
- Click directly on the name assigned to the product concerned.
- Click on the boxes to select one or more email addresses in the table that appears.
- Depending on the screen size, click first on the action menu ⋮ or directly on Apply an answering machine template.
- Select the template of your choice.
- Only the templates made visible are available when activating.
- Click on the button Activate:

This guide covers data protection regulations in Switzerland and Europe, and the measures taken by Infomaniak to secure your customer data and data within Web Hosting and Mail Services.
Understanding the difference between data security and data confidentiality
Data security aims to prevent any unauthorized access to your information. It relies on measures such as encryption, firewalls, or VPNs. A security breach can have disastrous consequences: imagine a hacker stealing your entire customer database and demanding a ransom to recover it. This type of attack – ransomware – can paralyze a company overnight.
Data confidentiality concerns who can access your information and how it is used. Even if your data is secure against hacking, it can be collected, analyzed, and resold… legally.
Example: you carefully store your customers' information, but unbeknownst to you, a service you use shares – anonymously – this data with third parties. Result? Your competitors can obtain valuable analyses of your market and target your own customers without ever needing to hack.
LPD & GDPR
In Switzerland, the LPD (Federal Law on Data Protection) and nLPD (for the "new Law" in effect since September 2023) protect the confidentiality of residents by regulating the collection and processing of personal data by organizations.
On the other hand, the GDPR (General Data Protection Regulation) of the EU, in effect since May 2018, influences global companies processing the data of European residents, including in Switzerland. While the LPD applies to the data of Swiss residents, the GDPR concerns that of EU residents. Swiss companies managing European data must comply with the GDPR requirements, including the designation of a Data Protection Officer and the conduct of Impact Assessments in case of risky processing.
Your role as an Infomaniak Client
Regarding the hosted data that belongs to you — and especially if it contains personal data of your visitors, contacts, or customers — it is your responsibility to ensure its compliance.
When processing this personal data, it is essential to inform users about the purpose and methods of this processing. This is usually done through a privacy policy or a data processing agreement (DPA).
Agreement between data controller and processor
A DPA (Data Processing Agreement), known in German as AVV (Auftragsverarbeitungsvertrag), in Italian as ATD (Accordo di Trattamento dei Dati), and in Spanish as CTA (Contrato de Tratamiento de Datos), translates to Data Processing Agreement or Personal Data Processing Contract.
It is a mandatory contract provided by the GDPR between a data controller and a processor. It defines the purpose, duration, and nature of the processing, as well as the obligations and security measures. Its goal is to protect the personal data entrusted to a service provider.
This GDPR certificate (in PDF format) can be generated and downloaded from the Manager (accessible to organization users who are owners or administrators):
- Click here to access DPA management on the Infomaniak Manager (need help?).
- Click the Generate button to download the customized PDF document:

Here are some tips on this subject:
- Inform about all data processing, not just those related to the website.
- Ensure easy access to the privacy statement on the website, for example, in the footer of each page.
- Generally, it is not necessary to obtain the user's approval for privacy statements (e.g., for forms); it is sufficient to indicate where to find the statement (example Site Creator).
- Keep in mind that new, more in-depth information rules may require adjustments to existing privacy statements.
It is crucial to differentiate between the security of the infrastructures where your data is hosted and the management and implementation of your data on your side. As a host, Infomaniak acts as a subcontractor for your GDPR-related obligations. In this context, its privacy policies and cookie usage, as well as its terms and conditions, provide the necessary guarantees regarding its compliance as a subcontractor.
If necessary, you can find professionals or online guides to help you in the compliance process.
Infomaniak's role
Like companies that work with user data, Infomaniak must comply with the LPD and, because some of these users are European citizens, the GDPR as well:
- the data privacy policy details the data that Infomaniak retains to provide and execute its services
- the policy related to the protection of your personal data describes Infomaniak's commitments as a subcontractor that hosts all of your data, including personal data
These commitments, as outlined in the general terms and specific conditions, are as follows:
- to keep your data within data centers exclusively located in Switzerland and never to transfer your information outside of these infrastructures
- to apply rigorous security standards and to continually improve processes to ensure a high level of security across all services
- to promptly inform you in case of a data breach
- to ensure transparency with you when Infomaniak uses subcontractors who may process your data
- to strengthen and develop physical security measures to prevent any unauthorized access to the infrastructures where your data is stored
- to implement physical and/or logical isolation systems (depending on the services) to separate the hosting of different clients; additionally, Infomaniak conducts annual penetration tests to ensure data integrity between clients
- to demonstrate a high level of reactivity in updating the security of the systems under its responsibility
Manage the cookies on the infomaniak.com site
When you visit the page infomaniak.com a choice must be made for the acceptance of certain cookies. To modify this choice later, access your preferences from the bottom of the site's page: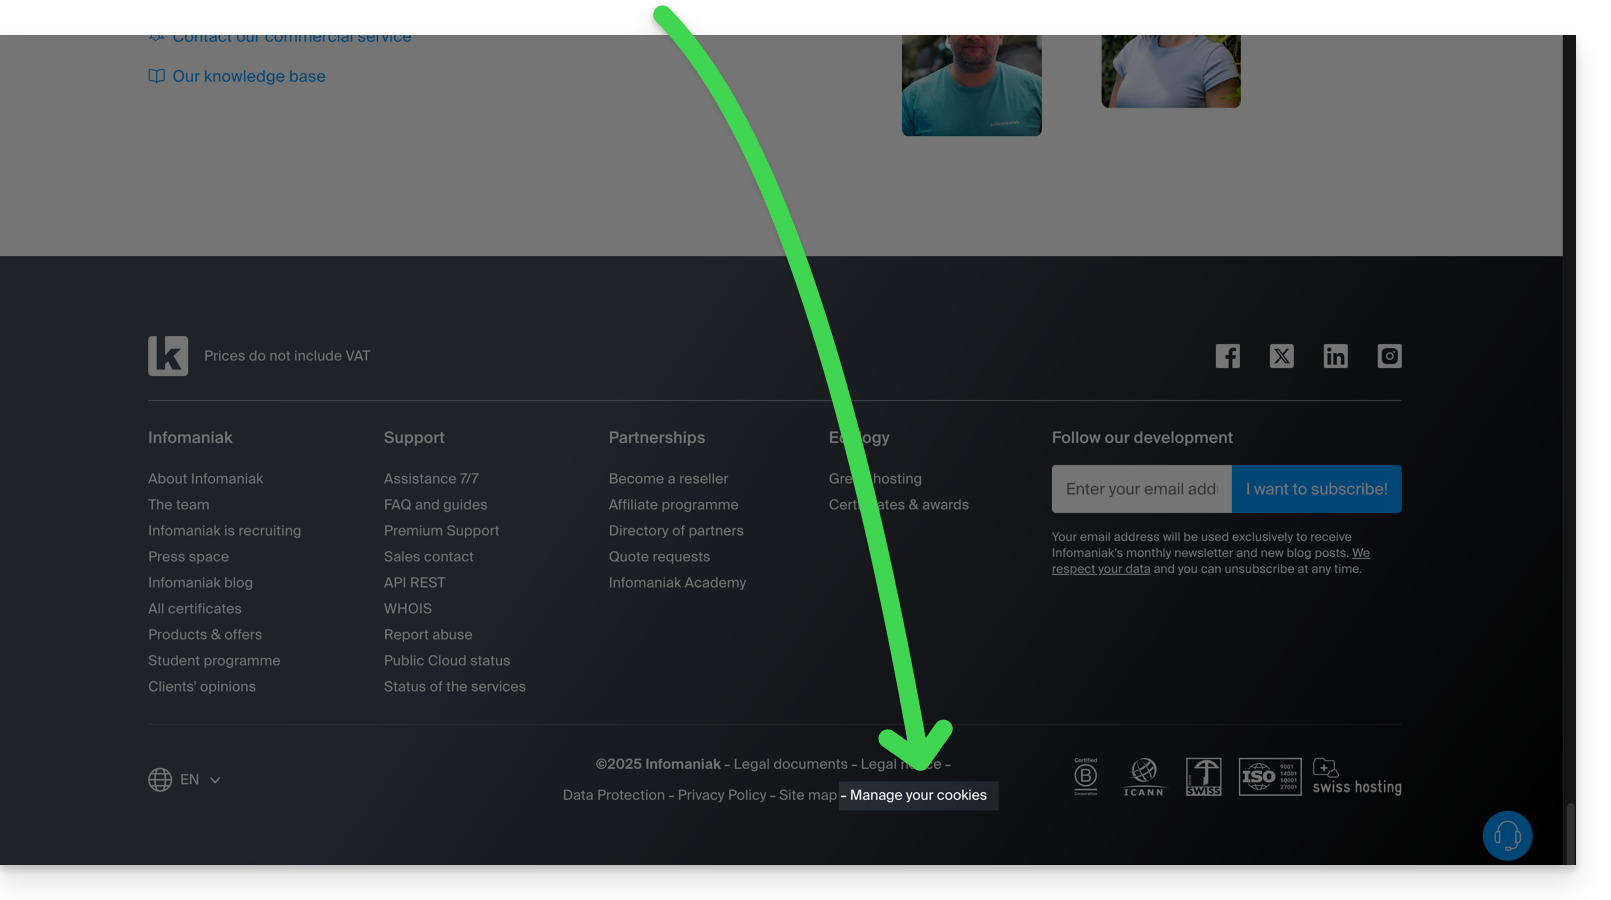
This guide explains how to create a template for the sorting/filtering tool (conditions that allow you to automatically classify your emails based on certain criteria) for all your mailboxes on the Infomaniak Web app Mail (online service mail.infomaniak.com).
Preamble
- A template allows you to create the neutral base of a tool that can then be used by multiple users of the same Infomaniak Mail service, or even personalized according to the person who will use it.
- In the case of a rule template, the creator of the template chooses the condition(s) that will trigger the action, but it is up to the end user, from their Mail, to define the action to be performed (e.g., moving to a specific folder) when they add a rule based on the existing template.
- For privacy reasons, it is not possible to apply sorting rules to multiple email addresses at the same time.
- You can also hide a template so that it is no longer used.
Create a sorting rule template
To create a template:
- Click here to access the management of your product on the Infomaniak Manager (need help?).
- Click directly on the name assigned to the product in question.
- Click on Global Configuration in the left sidebar.
- Click on the Rules tab.
- Click on Add a rule template:

- Give a name to the template.
- Define the condition for which the end user can choose the action to trigger.
- The different conditions available for sorting filters are presented in this other guide.
- If the Make visible option is enabled (during creation or also possible afterwards), the rule models created will be suggested to users of email addresses that go to their FILTERS AND RULES section.
- Press Add the model:

- When the user of an email address from the Mail Service on which the rule model has been defined goes to the configuration of their sorting rules, they will be able to choose the model as a basis for work, which will save them from having to reconfigure a potentially complex configuration, and simply choose the action to be performed:

- When the user of an email address from the Mail Service on which the rule model has been defined goes to the configuration of their sorting rules, they will be able to choose the model as a basis for work, which will save them from having to reconfigure a potentially complex configuration, and simply choose the action to be performed:
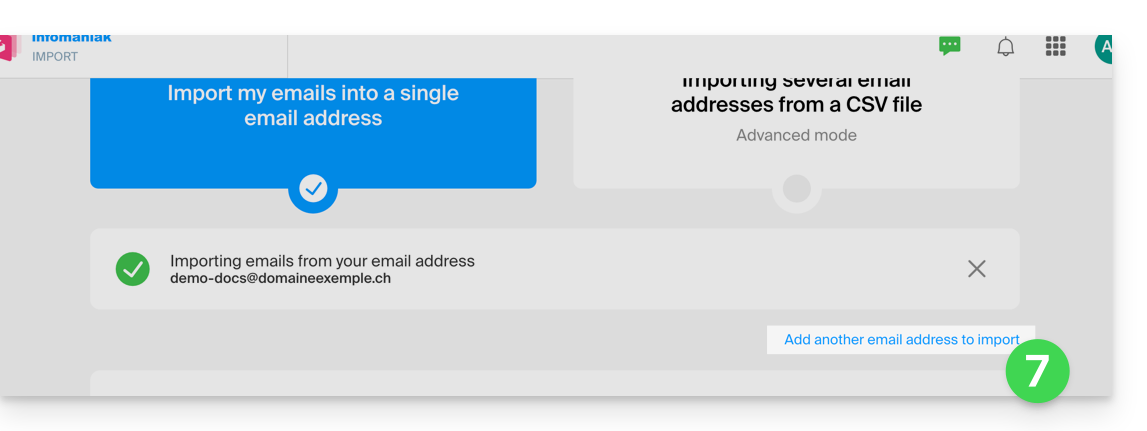
This guide explains how to copy the content of an Infomaniak email address (all email messages, folders, subfolders, in short, the entire structure of your mailbox) to another of your existing addresses at Infomaniak, thanks to the Infomaniak import tool!
Preamble
- The operation does not affect the data already present on the destination address, nor that of the source address.
- Any duplicates are managed: identical content will only be copied once.
- It is possible to specify a second address to import during the same process.
- If necessary, refer to this other guide to import messages from an external email provider other than Infomaniak.
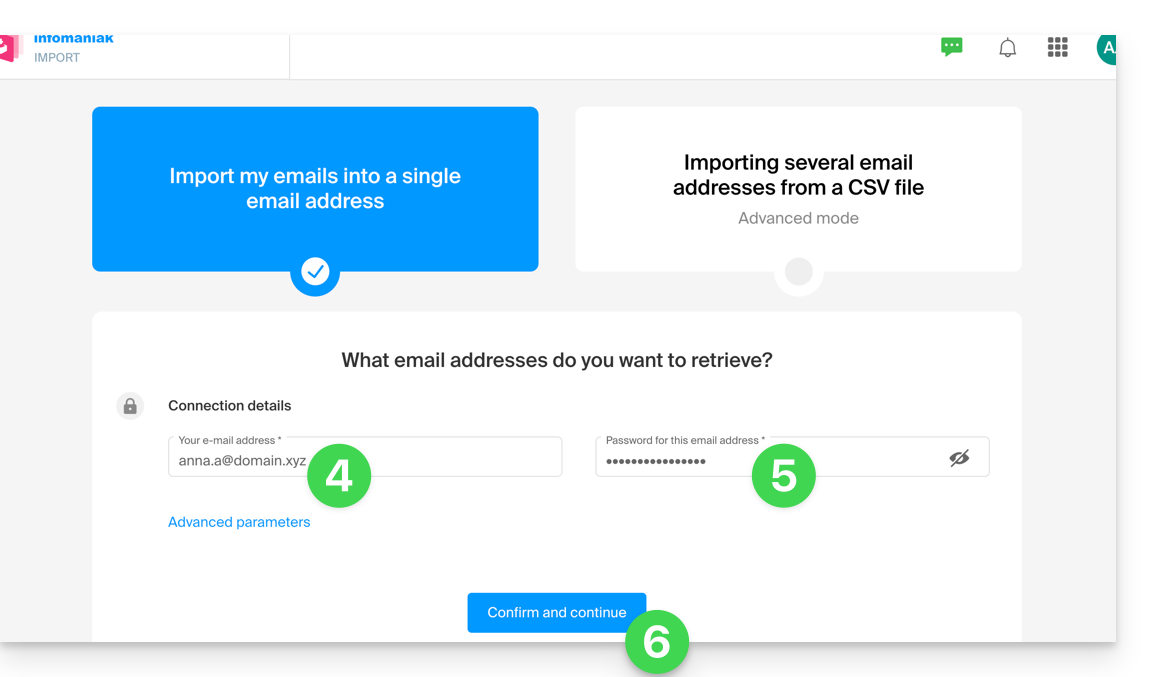
Copying emails from one account to another
To import the content of another email address:
- Go to the address https://import-email.infomaniak.com/.
- If necessary, log in to your Infomaniak account on the Organization of your choice; indeed, the import will be to an email address attached to the Infomaniak Web interface Mail (online service ksuite.infomaniak.com/mail) of the account you are using.
- Click on single import.
- Fill in the left field with your starting email address (whose content is to be copied).
- Fill in the right field with the password of the same email address (click here to verify that you are using the correct password and if necessary, modify the password of your email address).
- Click on Confirm:
- If necessary, enter a second email address to be imported at the same time:
- Choose which email address to import the emails to; the drop-down menu lists the email addresses currently attached to your Infomaniak Web interface Mail (online service ksuite.infomaniak.com/mail) of the Infomaniak account with which you are logged in:
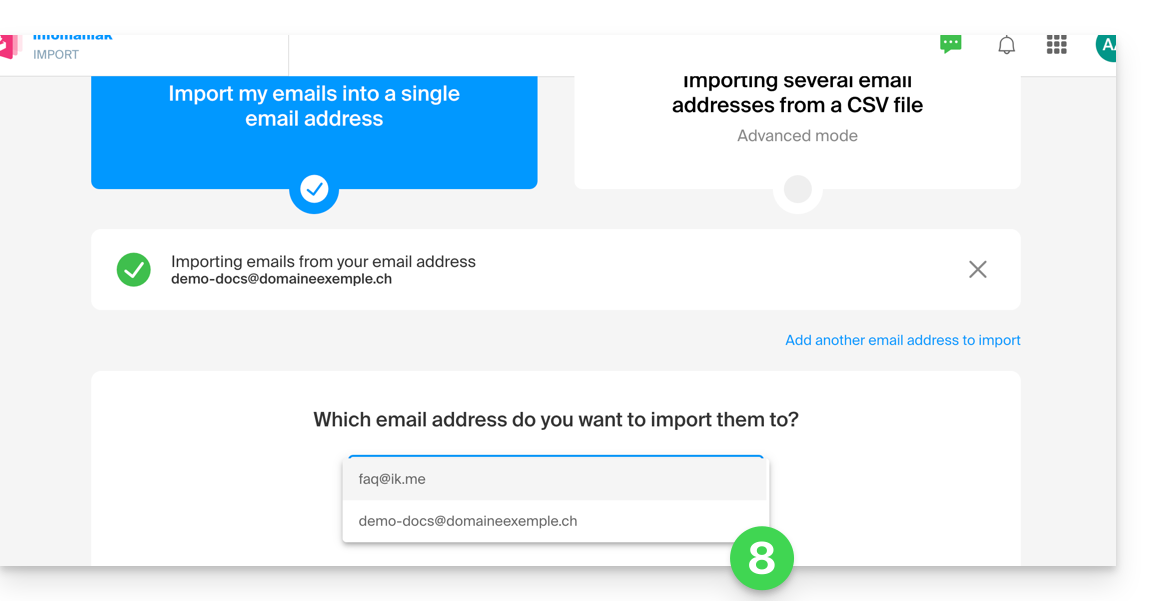
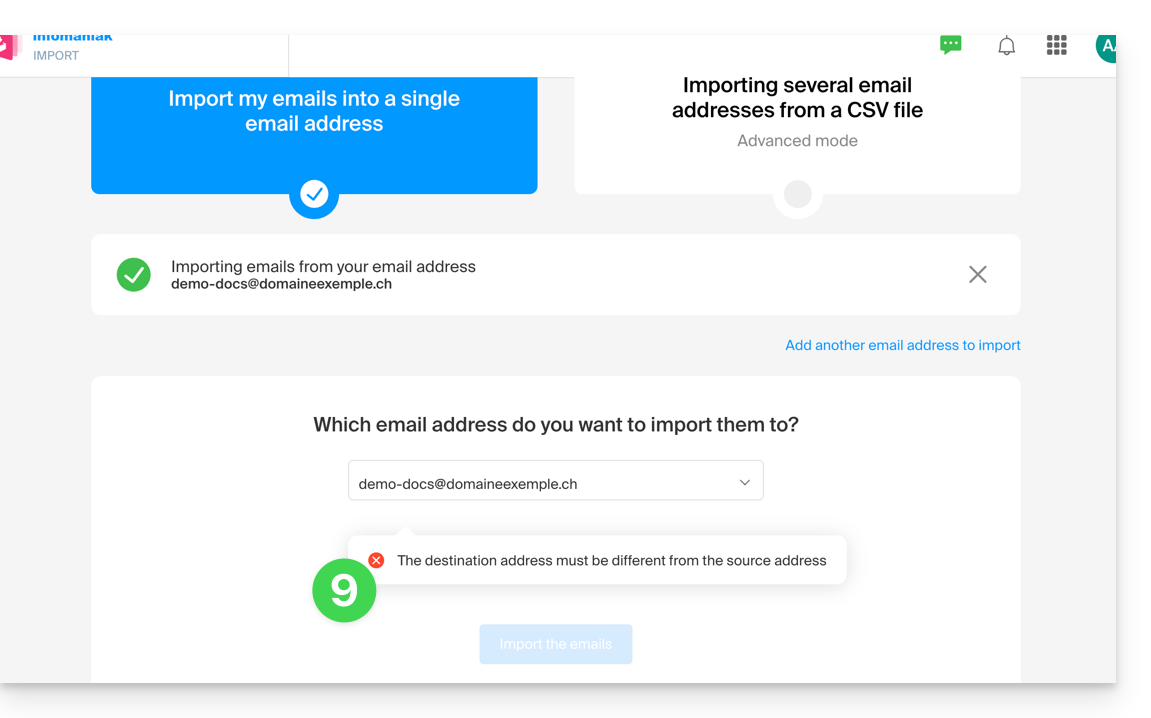
- It is obviously impossible to copy emails to the same address:
- After selecting the desired destination address from the list, click the blue button Import emails:
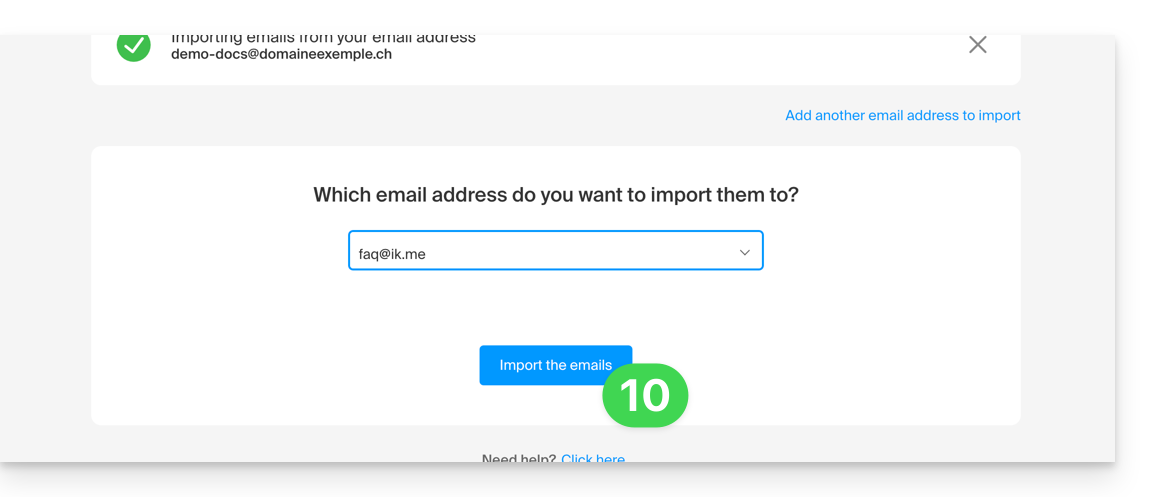
- The copy begins and continues in the background, you can close the window that appears.
- A confirmation email will be automatically sent to all email addresses concerned by the operation once the import is complete, mentioning the number of messages copied.
This guide explains how to connect the desktop app eM Client (desktop application on macOS / Windows) to an email address hosted by Infomaniak.
Preamble
- The various services offered by Infomaniak are all compatible with the corresponding standard protocols (IMAP/SMTP for email, for example), therefore if you encounter a problem with third-party software, contact its publisher or a Partner and consult the support policy as well as article 11.9 of the Infomaniak TOS.
Add the email address to the application
Prerequisites
- Create the email address in my kSuite or a Mail Service / kSuite.
- Create a password for the email address for the device you are going to configure.
To configure the email application:
- Open the application and choose the desired mode, then click on Next:

- Enter the email address to be linked, then click on the Start button next to the field:

- Enter the email address password, then click on Continue next to the field:

- Check the box and click on Yes:

- Check and complete the missing information:

- Choose the desired mode, then click on Next:

- There you go, your email address is now configured in the application:

Recommended settings
- Incoming IMAP server =
mail.infomaniak.com - IMAP Port =
993(with SSL) - Outgoing SMTP Server =
mail.infomaniak.com - SMTP Port & encryption protocol and command/method to activate this protocol:
587+ STARTTLS - Username = full & complete email address ( ? )
- Password = the one generated for the email address you want to access
- Authentication required for sending emails:
- It is activated in the SMTP settings of your application.
- Check "use the same parameters as the incoming server" or, depending on the software/email clients, enter a username (= full & complete email address) and the generated password.
Refer to this other guide if you are looking for information about other compatible messaging ports and protocols (SSL / TLS for example).
In case of problem
Check that the Mail Service is configured optimally.
It is not necessary to contact Infomaniak Support if your email address works well outside the application. The most common error concerns the use of an incorrect password. Refer to the solutions given in this other guide regarding email in general.
This guide presents the email authentication mechanisms and the ways to resolve the Sender Mismatch error.
Preamble
- The "Sender Mismatch" error occurs when the address used to send an email does not match the authentication address used when connecting to the SMTP server.
- This error is related to two specific elements:
- The
Return-path(also called "envelope sender"), which is used by the mail server to manage returns and delivery errors, - and the
Fromheader, which is the sender's address visible to the recipient in the message.
- The
Resolve the Sender Mismatch error
Technically, when sending an email via a mail software/client, you must authenticate using a username (= your email address) and a password.
If, after authentication, the sender's address specified in the "From" header or in the "Return-path" is different from the address used for authentication, the Infomaniak server may consider this an attempt at forgery. It is this inconsistency that triggers the "Sender Mismatch" error.
To correct this error:
- Check that the email address used for sending is the one you authenticate with (or a valid alias).
- Do not modify the
Return-pathorFromheader to another unauthorized address (if necessary, refer to this other guide to test another mail application or to correctly configure your current mail software/client).
The hosting platform for your sites *.perso.ch, *.users.ch, *.geneva-link.ch is evolving and this guide presents the procedure to follow to connect to your FTP space.
Modification of login credentials
The current hosting platform relies on the use of a prefix at the level of your FTP username. This is in the following form: persoch_
Thus, if your username was infomaniak, you will now need to use the following user to connect via FTP: persoch_infomaniak.
This guide explains how to perform a bulk action (deletion, activation of the anti-spam filter, etc.) on multiple email addresses within a Service Mail.
Bulk actions
To perform these "batch" actions, in bulk:
- Click here to access the management of your product on the Infomaniak Manager (need help?).
- Click directly on the name assigned to the product concerned.
- Check the box to the left of Email address to select all addresses, or select the desired addresses one by one.
- The list of available actions will then appear at the bottom of the page, including in the action menu ⋮ :

The possible bulk actions are as follows:
- activate the anti-spam filter
- activate the advertising filters
- apply general rights
- activate an automatic reply
- apply a signature template
- delete the redirections
- delete the email addresses