
Knowledge base
1000 FAQs, 500 tutorials and explanatory videos. Here, there are only solutions!
This guide helps you protect the reputation of your domain name to maintain the trust of internet users and service providers towards your website or your company, this to facilitate more generally the proper functioning of your email.
The Web reputation
There are different types of reputation on the Internet, including personal reputation, company reputation and domain reputation.
Domain reputation is essentially a score that determines how mail systems decide what to allow into users' inboxes. Fundamentally, your domain's reputation is a measure of the health and legitimacy of your domain. This reputation can be influenced by the security of the email and website.
For example, a domain's reputation may decrease if…
- … the website visible at the domain address is hacked, leading to the mass sending of fraudulent emails,
- ... the domain's email is exploited for the involuntary sending of spam.
If your domain's reputation remains poor, your emails may be marked as spam and not reach their intended audience. This can harm email deliverability (refer to this other guide in English for more information).
Improve the domain reputation
By following these few tips, you can improve the reputation of your domain and, for example, boost all your email marketing efforts:
- Set up and check SPF, DKIM and DMARC records to help protect your domain against identity theft attacks.
- Check your domain's reputation with tools such as Google Postmaster Tools, Sender Score, Microsoft SNDS, McAfee or Talos Intelligence and identify potential issues.
- Send emails only to users who have chosen to subscribe!
- Get trusted links or backlinks…
Check out this other guide about RBL.
This guide explains what spamtrap email addresses are.
Preamble
- A spamtrap, also known as a honeypot, is a tool used to detect and catch spammers.
- It is essentially an email address or a system that is created to attract unwanted messages, such as spam.
How a Spamtrap Address Works
A spamtrap address works by attracting spam and identifying the senders of unwanted mail. Here's how it can happen:
- An email address is specifically created to act as a spam trap; it is generally configured so as not to receive legitimate communication.
- The spamtrap address is hidden or obscured so that it is not visible to legitimate users, but only to spammers; this can be done by placing it on hidden web pages, in forums inaccessible to the public or by making it invisible to humans (for example by using white text on a white background).
- Spammers use automated techniques to extract email addresses from various sources, such as websites, forums, social networks, or stolen address lists; during this process, they may inadvertently or intentionally include spamtraps in their lists.
- When a spammer sends a message to a spamtrap address, it is captured and recorded; since the address is not used for legitimate communication, any mail received is considered unwanted.
- When a spamtrap receives a spam, it triggers an alert for email service providers like Infomaniak; they can then identify the sender of the spam by examining the message headers or the information related to the source IP address.
- Once a spammer is identified through a spamtrap, measures can be taken to block or filter their unwanted messages; Infomaniak can add the spammer's IP address to a blacklist, implement stricter anti-spam filters or take other steps to protect their users.
This guide explains how to mark your chosen emails as "favorite" in the Infomaniak mail service to keep a "track" of these messages and display them separately if you wish.
Monitor one or several messages…
… from the Infomaniak Web Mail app
To add a message as a favorite:
- Click here to access the Web Mail Infomaniak app (online service mail.infomaniak.com).
- Click on the ☆… icon
- … to the left of a message in the message list
- … at the top right of the message reading window
- Once tracking is enabled, a dropdown menu in the top right corner allows you to display only a selection of your received messages according to several criteria: All, Read, Unread, Followed, Unfollowed.
… from the Infomaniak Mail mobile app
In the message list:
- Press and hold your finger on a message.
- Press the ☆ icon at the bottom of the screen.
- If necessary, exit the message selection by pressing the Cancel button at the top of the screen:
While reading a message:
- Press the ☆ icon at the top right of the message reading window:
It is also possible to set up a swipe gesture that would mark the swiped message as a favorite.
This guide explains how to activate the Infomaniak anti-spam filter which significantly reduces the number of unsolicited messages that can arrive in your Infomaniak mail address if you share it with third parties. The messages you really want to see quickly will no longer be drowned out among dozens of other unwanted messages, as the latter will be automatically placed in a folder specifically dedicated to this effect.
Preamble
- Spam is unsolicited mail, often of a promotional or fraudulent nature, aimed at promoting products, services, or carrying out online scams; a persistent problem since the beginnings of email that has evolved with communication technologies, prompting the implementation of strategies to combat this form of digital pollution.
- The filter is automatically activated when creating an email address within a Infomaniak Mail Service or when subscribing to a my kSuite / my kSuite+ offer.
- Emails placed in the Spam folder (or in the spam destination folder - read more below) are automatically deleted after 30 days.
Activate the option from the Web Mail app
Prerequisites
- Having permission to manage the filter: if you had been invited to the Web Mail Infomaniak app (online service mail.infomaniak.com) to manage your address, it is possible that the Service Mail manager has revoked this right from their admin account.
To access the settings of your Infomaniak mailbox:
- Click here to access the Mail Infomaniak web app (online service mail.infomaniak.com).
- Click on the Settings icon at the top right.
- Check or select the relevant email address from the dropdown menu on the left sidebar.
- Click on Filters and rules:

- Enable (or disable) the spam filter option, the effect is immediate (wait for the on-screen confirmation message):

- Simply click the toggle switch again to disable the filter; in this case, all future messages will go to the inbox, including messages with a header indicating a high spam score.
Activate the option from a Mail Service
To access the settings of your Infomaniak mailbox:
- Click here to access the management of your product on the Manager Infomaniak (need help?).
- Click directly on the name assigned to the product in question.
- Click on the email address in question in the table that appears.
- Click on Filters and rules in the left sidebar.
- Enable the spam filter option, the effect is immediate:

- It is enough to click the toggle switch again to disable the filter; in this case, all future messages will go to the inbox, including messages with a header indicating a high spam score (they can be processed downstream by your software/email client if it supports reading this type of header).
Note that you can activate it in bulk for multiple addresses at once.
Report spam or mark as false positive
If spam messages slip through or, conversely, if a valid email has been incorrectly classified as spam, you can intervene in a few clicks.
Prerequisites
- Check that the spam filter is active.
- For added security, enable the external mail tag.
To automatically move an email from your inbox that may have slipped through the spam filter into the Spam folder:
- Click here to access the Mail Infomaniak web app (online service mail.infomaniak.com).
- Select the message in the inbox then click on the Spam icon in the toolbar:
- You can also open it and mark it as Spam at a later time:
- Another option: open it and click on the action menu ⋮ on the right:
Once you have clicked on Mark as spam:
- The email is moved to the Spam folder (or to the manually defined folder)
- The sender's address is added to the blocked users list
- the filter is refined for better handling over time
Report a false positive
On the other hand, if you act on an email that has been wrongly marked as spam (false positive) by clicking on the "This is not spam" icon:
- The email is moved to the inbox…
- The sender's address is added to the list of authorized users…
- This also affects the filter and its criteria.
Customize the anti-spam filter
Change the location of spam
You can choose the default location of the folder where messages considered as spam will automatically go (similar to special IMAP folders).
Still under Filters and rules where you have activated the spam filter:
- Click on Edit:

- Click on the folder name to select another one (create a new one in advance if necessary):

- Click on the Validate button.
Allow or block senders
You can specify in advance which senders should always go to the Spam folder (or vice versa): refer to this other guide for more information.
This guide explains how to manually create a discussion list system with your Mail Service, thanks to Mailman and the Public Cloud of Infomaniak!
⚠️ This guide is exclusively for users with a high level of technical expertise. No responsibility is assumed in case of damage or loss — be sure to back up your data before any manipulation. For assistance, contact a partner or launch a free tender. Also discover the role of the host.
Preamble
Mailmanis a free application for managing mailing lists, discussion groups, and newsletters.- The provided files allow for easy setup of
Mailman. - The server and its firewall are deployed with
Terraform, anInfrastructure as Code (IaaC)tool, and its configuration is done withAnsible. - This system allows you to create discussion lists for your various contacts (direction@, ecommerce@…).
Preparation…
… of your environment
- Having an Infomaniak Mail Service is essential to follow this tutorial.
- Download the files necessary for deploying
Mailmanon the Public Cloud via this GitHub repository.
... of the Mail Environment
- Create an address
mailman@domain.xyz(help) and keep the password safe (it will be used to configure the server). - Add the following aliases (help) :
- postorius
- mylist
- mylist-bounces
- mylist-confirm
- mylist-join
- mylist-leave
- mylist-owner
- mylist-request
- mylist-subscribe
- mylist-unsubscribe
Your mail environment is ready, let's proceed with the deployment of Mailman!
… of the Public Cloud
- Create a Public Cloud project and a user (help).
- Warning: the Public Cloud password must be secure. 2FA authentication on your Infomaniak account is strongly recommended.
- Click here to access the OpenStack dashboard and use the identifier
PCU-XXXXXXwith the defined password. - Download your
openrcfile. It allows you to authenticate as an administrator via command line (it contains information such as the identifier, password and datacenter).
You are ready to connect to the OpenStack administration.
... of the instance
To make your future instance accessible via SSH, HTTP and HTTPS, create a security group with the following command:
openstack security group create --description "Ports 22 - 80 - 443 pour Mailman" mailman-secThen add the necessary rules:
openstack security group rule create --dst-port 80 --protocol TCP mailman-sec
openstack security group rule create --dst-port 443 --protocol TCP mailman-sec
openstack security group rule create --dst-port 22 --protocol TCP mailman-sec
These steps can also be performed from the Horizon dashboard, in the Network → Security Groups tab. Refer to the Cloud documentation for more information on this subject.
Deploy the instance that will host Mailman with the following command:
openstack server create --flavor a1-ram2-disk20-perf1 --security-group mailman-sec --network ext-net1 --key-name <votre-clé> --image "Debian 11.5 bullseye" mailman3Once connected to the machine, update it:
sudo apt update && sudo apt upgrade -yInstall the openstack client:
sudo apt install python3-openstackclient -yInstall Ansible to automatically deploy Mailman:
sudo apt install ansible -yMailman Deployment
To deploy Mailman, import your SSH key and the OpenRC file via SFTP to the installation machine.
Use tools like putty, termius or mobaxterm (or any SSH/SFTP client) with the following information:
- IP: IP address of the created machine
- Port:
22 - SSH key:
.pemfile - User:
debian
In this guide, Termius was used for the SFTP transfer.
Download the necessary files:
wget https://github.com/reneluria/mailman-cloudMove the files next:
mv cle.pem mailman/
mv PCP-XXXX.sh mailman/
Access the folder:
cd mailman/Protect the key by assigning the correct permissions:
sudo chmod 600 tf-keypair.pemCreate a file inventory to configure SMTP, the domain, etc. :
nano inventoryFill in this template with your information:
mailman ansible_host=xxx.xxx.xxx.xxx
[all:vars]
ansible_python_interpreter=/usr/bin/python3
ansible_user=debian
ansible_ssh_private_key_file=id_tf_keypair
fqdn=mailman.<yourdomain>
mail_host=mail.infomaniak.com
mail_account=mailman@<yourdomain>
mail_password=<email_password>
mailman_user=mailman
mailman_password=<interface_password>
mailman_domain=<yourdomain>
mailman_email=<your_email>
Save with Ctrl + S, then exit with Ctrl + X.
Start the deployment:
ansible-playbook playbook.yml -DMailman is now accessible at your IP address: X.X.X.X/mailman3
Log in
Log in with the credentials defined in the inventory file for:
- Create a domain then a list « maliste »
In the list settings, it is recommended:
- DMARC Mitigations: Replace with the list's address »
- Modify messages: Reply to the list " and " Reply to the first strip »
This guide explains how to view the activity logs of email addresses contained within a Mail Service Infomaniak.
Introduction
- Your email logs are available free of charge for the last 20 days.
- Consulting logs for a longer period is chargeable:
Viewing logs from the Infomaniak Web Mail app
Prerequisites
- Have a valid access to the Web Mail app (online service mail.infomaniak.com) where the email address is attached.
- To be Administrator or Legal Responsible within the Organization that manages the Service Mail.
- Have permission to view the logs: if you had been invited to Mail to manage your address, it is possible that the manager of the Service Mail has removed this right from their admin account
Next, to access the logs from Mail:
- Click here to access the Web Mail app (online service mail.infomaniak.com).
- Click on the Settings icon at the top right.
- Check or select the relevant email address from the dropdown menu on the left sidebar.
- Click on General below.
- Click on View logs:

- Choose to view the logs of sent or received emails, and set the date and time.
- Click on Search.
View the logs from Service Mail
To access Service Mail:
- Click here to access your product management on the Infomaniak Manager (need help?).
- Click directly on the name assigned to the product in question.
- Click on the email address concerned in the table displayed

- Click on Logs in the left sidebar.
- From the drop-down menu, select an email address (by default, the first address of Service Mail is selected).
- Choose to view the logs of sent or received emails, and set the date and time:

- Click on Search.
Logs results
The logs for sent and received emails will be presented in a table format.
Hover your mouse over the possible icon ⓘ in the Status column to display more information if necessary:
This guide explains how message encryption works on the Web app Mail Infomaniak (online service mail.infomaniak.com).
Preamble
- When encryption is enabled, emails and attachments are encrypted upon receipt on Infomaniak servers, via the public keys of senders and recipients.
- Each email address generates a key upon first use, securely stored in the Infomaniak datacenters.
- The keys are based on elliptic curve cryptography (ECC) and use the OpenPGP standard.
- They are themselves encrypted in AES-256-GCM with automatic decryption via Infomaniak authentication.
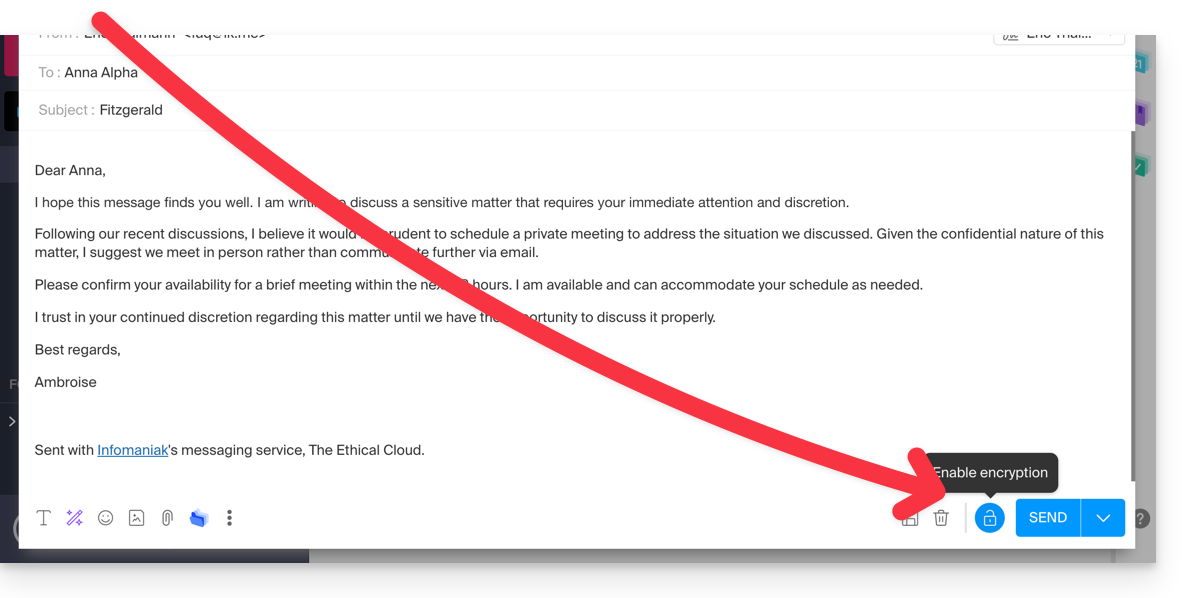
Enable email encryption
To automatically encrypt a message sent to an email address:
- Click here to access the Mail web app (online service mail.infomaniak.com).
- Compose a new message as you usually do.
- Click on the lock icon to the left of the Send button to enable encryption:
- Confirm the action if a confirmation window appears.
- The icon now represents a closed padlock and the overall color is changed.
- Press the Send button.
This action must be performed for each new send.
A. Recipient whose email is managed by Infomaniak
If the recipient of the encrypted email has an email address managed by Infomaniak, the encryption is completely transparent for both the sender and the recipient. A note will indicate that the message is encrypted…
- … in the recipient's inbox:

- … when opening the received message:

- … and in the sent folder of the sender:

B. External recipient
If the recipient of the encrypted email has an email address managed outside of Infomaniak services, encryption is still possible, but it requires the definition of a password:
- Click here to access the Mail web app (online service mail.infomaniak.com).
- Compose a new message as usual, but send it to an email address outside of Infomaniak.
- Click on the lock icon to the left of the Send button to activate encryption.
- A modal window opens to allow you to set a password.
- Enter a password and copy it to send it to the recipient by your own means (for example, kPaste) (you can agree on a password in advance so the recipient will already be informed):

- The icon now represents a closed padlock and you can send the email as usual.
The recipients will then receive a message notifying them that an encrypted email is waiting for them:
By clicking on the provided button, they will be redirected to a secure web page where the password must be entered.
Once the password is validated, the encrypted message can be viewed on the same page.
Storage and search
In search results, only the subject of encrypted messages will be visible, while their content will remain secure during storage.
This guide explains how to create a template for the sorting/filtering tool (conditions allowing you to automatically sort your emails based on certain criteria) for all your mailboxes on the Web app Mail Infomaniak (online service mail.infomaniak.com).
Preamble
- A model allows you to create the neutral base of a tool that can then be used by several users of the same Infomaniak Mail service, or even customized according to the person who will use it.
- In the case of a rule template, the creator of the template chooses the condition(s) that will trigger the action, but it is up to the end user, from their Mail, to define the action to be performed (e.g., moving to a specific folder) when they add a rule based on the existing template.
- For privacy reasons, it is not possible to apply sorting rules to multiple email addresses at the same time.
- You can also hide a model so that it is no longer used.
Create a sorting rule template
To create a model:
- Click here to access the management of your product on the Infomaniak Manager (need help?).
- Click directly on the name assigned to the relevant product.
- Click on Global Configuration in the left sidebar.
- Click on the Rules tab.
- Click on Add a rule template:

- Name the model.
- Define the condition under which the end user can choose the action to trigger.
- The various conditions available for sorting filters are presented in this other guide.
- If the Make visible option is enabled (during creation or also possible to choose afterwards), the created rule templates will be suggested to the users of the email addresses that go to their FILTERS AND RULES section.
- Click on Add the model:

- When the user of a mail address from the Mail Service on which the rule model has been defined goes to the configuration of their sorting rules, they can choose the model as a starting point, which will save them from having to redo a potentially complex configuration, and simply choose the action to perform:

- When the user of a mail address from the Mail Service on which the rule model has been defined goes to the configuration of their sorting rules, they can choose the model as a starting point, which will save them from having to redo a potentially complex configuration, and simply choose the action to perform:
This guide explains how to create a template for the automatic out-of-office message tool for all your email on the Web app Mail Infomaniak (online service mail.infomaniak.com).
Introduction
- A template allows you to create a neutral base for a tool that can then be used by several users of the same Infomaniak Mail service, or even customized according to the person who will use it.
- In the case of an out-of-office reply template, the creator of the template selects the text that will be sent when a new sender contacts an address to which the template has been applied.
- You can also hide a model so that it is no longer used.
Create an out-of-office reply template
To create a model:
- Click here to access the management of your product on the Manager Infomaniak (need help?).
- Click directly on the name assigned to the relevant product.
- Click on Global Configuration in the left sidebar.
- Click on the Auto-reply tab.
- Click on Add an out-of-office reply template:

- Fill in the fields and click on Add the responder model:

- If the Make visible option is enabled (during creation or can also be chosen afterwards), the created responder models will be suggested to the users of the mail addresses.
Activate a model on an existing email address
It is necessary to have an existing model to activate it on one or more email addresses:
- Click here to access the management of your product on the Manager Infomaniak (need help?).
- Click directly on the name assigned to the relevant product.
- Click on the boxes to select one or more email addresses in the table that appears.
- Depending on the screen size, first click on the action menu ⋮ or directly on Apply an out-of-office reply template.
- Select the model of your choice.
- Only the visible models are available upon activation.
- Click on the Activate button:

This guide explains how to connect the desktop app Apple Mail (desktop application on macOS) to an email address hosted by Infomaniak.
Preamble
- Your macOS computer will be automatically configured using configuration profiles .mobileconfig compatible with Apple, unlike a manual configuration.
- It is possible to delete a configuration profile once installed (scroll to the bottom of this page for explanations).
- ⚠️ All the services offered by Infomaniak are compatible with the corresponding standard protocols (notably IMAP/SMTP for email, WebDAV for sharing, S3/Swift for storage, etc.).
- Therefore, if you encounter a problem with third-party software, contact its publisher or a Partner and consult the support policy as well as article 11.9 of the Infomaniak Terms and Conditions.
Install a configuration profile
Prerequisites
- Create the address within my kSuite or on a Mail Service (Mail Service alone, or existing within a kSuite).
- Test the email password (do not confuse it with the one used to log in to the Infomaniak interface).
- Check on the Service Mail that the automatic diagnosis is correct.
- Have added the email address in question to Mail Infomaniak to use the synchronization assistant and for the Apple profile to work on your devices.
You can download the profile from the relevant device or send it from another device (if you already have an email address that works correctly, for example):
- Click here to access the Infomaniak configuration tool (online service https://config.infomaniak.com) — log in if necessary to your Infomaniak account on the Organization managing your email address.
- Choose to install the profile on this device.
- Choose to synchronize the emails.
- Enter the password for the email address (attached to Mail Infomaniak (Webmail)) that you wish to synchronize.
- Click the blue Verify button:

- Download the configuration profile:

- Open the System Settings of the computer.
- Click on General in the sidebar, then click on Device Management (for macOS Sequoia 15 version). If you have a lower version or cannot find the profile, refer to the official documentation by changing the system version at the top of the page if necessary:

- Click on +:

- Locate and then open the previously downloaded file:

- Click on Continue:

- Enter the email password.
- Click on Install:

- There you go, your email address is now configured in the Apple Mail application, which you can open and control.
Delete an IMAP account
Refer to the chapter "Stop using an account" by changing the system version at the top of the page* if necessary (note: do not delete a POP3 account without backing up your messages first).
Delete an Apple profile
Refer to the official documentation by changing the system version at the top of the page if necessary.
*Why is it necessary to choose the guide version that exactly matches your macOS / iOS system version? Apple introduces sometimes subtle changes with each new version of its system, for example a path on iOS 15…
… becomes this on iOS 18…