
Knowledge base
1000 FAQs, 500 tutorials and explanatory videos. Here, there are only solutions!
This guide explains how to manage the files of a Web Hosting with an FTP software/client.
Preamble
- To easily and quickly manage the files of your web hosting without having to install an application or enter FTP credentials, use Web FTP from your Infomaniak Manager (it allows, among other things, CHOWN and file compression/decompression
zip). - The various services offered by Infomaniak are all compatible with the corresponding standard protocols (FTP/S3/Swift for storage, for example), therefore if you encounter a problem with a third-party software, contact its publisher or a Partner and consult the support policy as well as article 11.9 of the Infomaniak TOS.
- Regarding the protocols supported by Infomaniak (FTP, SFTP, etc.) depending on your hosting offer (Starter, Node.js, etc.), refer to this other guide.
Parameters to provide for FTP software
Prerequisites
- Create an FTP/SSH account.
- Install an FTP software/client such as Filezilla, Cyberduck, Commander One, Transmit, etc.
Regardless of your FTP software/client, the 3 essential parameters for configuring an FTP access are always:
- Hostname: FTP server address
- Username: FTP account name
- Password: that of the FTP account

- The port number is usually left at default.
- The connection type and mode is usually left at default.
- If a limit on the number of simultaneous connections is offered, it is recommended to activate it.
Obtain the connection information to the hosting
You will find all the information on your Infomaniak Manager:
- Click here to access the management of your product on the Infomaniak Manager (need help?).
- Click directly on the name assigned to the product concerned.
- Click on FTP (or FTP / SSH) in the left sidebar

1. FTP Hostname
The hostname to use in your FTP software/client is specified at the top of the page obtained in point 3 above and an icon allows you to copy the address to the clipboard.
Starter Offer - Basic Web page

If the domain indicated is not functional (does not point to the hosting IP address for example) then use the IP address as the host name, in the form 123.45.678.123 (refer to this other guide).
Paid Web Hosting

Use the host name in the form xyzb.ftp.infomaniak.com for example.
2. FTP Username

The username is the name of the account to be created in your Manager: xyzb_abcdefg for example.
3. FTP User Password

The FTP user password is defined by the creator of the FTP account. If you forget it, edit the FTP account by clicking on it and set a new password.
Once the connection is established…
When you enter the 3 required parameters, your FTP application should display the directory structure of your hosting:
This guide explains how to install a new WordPress site with WordPress & Apps Infomaniak included in the offersWeb hosting paid.
Install WordPress Infomaniak…
... while creating a new site on hosting
In order to access the Web Hosting and add a new site by installing WordPress at the same time:
- Click here in order to access the management of your product on the Manager Infomaniak (Need help?).
- Click directly on the name assigned to the product concerned.
- Click on the button to add a site:

- Choose to install WordPress.
- Click the Next button:

- Click on the button to use a domain name already present in your Organization (or on the other button if you need to first order a new domain).
- Select the domain name from your already acquired domains (advanced options include choosing a custom location on the hosting server, and an earlier version of PHP).
- Click the Next button:

- Wait for a few minutes to create the site on the accommodation.
- Enter the requested information, it will serve you to connect in the WordPress dashboard (it is possible to modify this information at any time after installation).
- Click the Next button:

- Enter the information about your site (it is possible to modify this information at any time after installation).
- Click the Next button:

- Choose between the Divi theme and the official theme of the most recent WordPress version (it is possible to modify this information at any time after installation).
- Click Next.
- Choose whether to install two Premium extensions offered with your subscription: Monarch and Bloom.
- Click Next.
- Confirm the installation from the summary page.
- You can then log in to the WordPress dashboard or go back to the management of the Infomaniak website.
... on an existing and empty site
In order to access the existing blank site on the hosting and to install WordPress:
- Click here in order to access the management of your product on the Manager Infomaniak (Need help?).
- Click directly on the name assigned to the product concerned:

- Click on the button to add an application:

- Choose to install WordPress:

- At the bottom, click the Next button.
- Enter the requested information, it will serve you to connect in the WordPress dashboard (it is possible to modify this information at any time after installation).
- Click the Next button:

- Enter the information about your site (it is possible to modify this information at any time after installation).
- Click the Next button:

- Choose between the Divi theme and the official theme of the most recent WordPress version (it is possible to modify this information at any time after installation).
- Click Next.
- Choose whether to install two Premium extensions offered with your subscription: Monarch and Bloom.
- Click Next.
- Confirm the installation from the summary page.
- You can then log in to the WordPress dashboard or go back to the management of the Infomaniak website.
Uninstall WordPress Infomaniak...
... while deleting the hosting website (and keeping WordPress data or not)
In order to access the Web Hosting and remove the website:
- Click here in order to access the management of your product on the Manager Infomaniak (Need help?).
- Click directly on the name assigned to the product concerned.
- Click on the action menu to the right of the item.
- Click Unlink the site:

- Choose if you want to erase everything or keep the WordPress data on the hosting server.
- Confirm deletion:

... keeping the site on the accommodation
In order to access Web Hosting and uninstall WordPress:
- Click here in order to access the management of your product on the Manager Infomaniak (Need help?).
- Click directly on the name assigned to the product concerned.
- Click on the action menu to the right of the application.
- Click Remove Application:

- Confirm the deletion.
- Click Uninstall to remove WordPress:

Read more
This guide covers the support of secure hash functions (including SHA-256) by Infomaniak servers, as well as the emphasis on the security of SSL/TLS certificates using CSRs generated with SHA-256.
SHA-256 hashing algorithm
The cryptographic hash function SHA-1 is compatible and Infomaniak servers also support the SHA-256 function, which is useful for PayPal and SaferPay (SIX).
The CSRs (certificate signing requests) are in SHA-256 and not in SHA-1.
This guide explains how to suspend the administrative management of a product so that no user of the Organization can use it within the Infomaniak Manager. Upon request, it is also possible to block a user of your Organization, without deleting them.
Preamble
- By blocking the management of a product:
- Only administrators and the legal representative will be able to unblock it.
- Users with limited rights (collaborators and clients) who have access to this product will no longer be able to manage it.
- An email is sent to the users of the Organization.
Block a product
Prerequisites
- Be an administrator or legal representative (users with limited rights (collaborators and clients) who have access to this product will not be able to do this).
To block or unblock certain products for the entire organization:
- Click here to access product management on the Infomaniak Manager (need help?).
- Access the service you wish to block.
- Click on Manage on the dashboard of the product in question.
- Click on Block product management:

Suspend emails
A Mail Service cannot be blocked in the way indicated above, but it can be put into maintenance.
Prerequisites
- Be an administrator or legal representative (users with limited rights (collaborators and clients) who have access to this product will not be able to do this).
To suspend email addresses:
- Click here to access the management of your product on the Infomaniak Manager (need help?).
- Click on Manage.
- Click on Activate maintenance.
- Confirm by clicking on the red button to suspend the use of addresses (reception is not interrupted but consultation is impossible):

Block a user from the Organization
To quickly block a user from the Organization, in case of a security incident, contact Infomaniak support by authenticating (via the support code for example) and by justifying your request.
Thus, the main critical services, such as the Manager, the kDrive Web app and the Web Mail app will be inaccessible. Depending on the situation, also refer to these links to block other services such as messaging (IMAP / SMTP) or Web services.
To not block the user yourself but to indicate a procedure for them to follow to secure their account, refer to this other guide.
This guide explains how to link a domain name to an Web Hosting Infomaniak.
Where is your domain name registered?…
… At Infomaniak, same Organization
If your domain name is registered with Infomaniak and is in the same user account or organization as the email, then there is nothing to do.
- Refer to this other guide to check and correct any potential configuration errors.
… At Infomaniak, Different Organization
If your domain name is registered with Infomaniak but under a different user account or Organization, then:
- Edit its DNS zone by specifying the site's IP address in the form of an A record.
- Any DNS addition/modification can take up to 48 hours to propagate.
OR
- Move it within the same Organization.
… At Infomaniak with external DNS
If your domain name uses DNS that are not those of Infomaniak then:
- Edit the current DNS zone where it is located (if necessary, consult the help of the relevant service provider) by specifying the site's IP address in the form of an A record.
- Any DNS addition/modification can take up to 48 hours to propagate.
OR
- Change the current DNS and select the use of Infomaniak DNS.
- Any DNS addition or modification may take up to 48 hours to propagate.
- Refer to this other guide to check and correct any potential configuration errors.
… Elsewhere with external DNS
If your domain name has DNS records that are not those of Infomaniak then:
- Edit the current DNS zone where it is located (if necessary, refer to the help of the relevant service provider) by specifying the site's IP address in the form of an A record.
- Any DNS addition/modification can take up to 48 hours to propagate.
OR
- Change the current DNS (if necessary, refer to the help of the relevant provider) by specifying those of Infomaniak (this implies having a DNS zone with Infomaniak.
- Any DNS addition/modification can take up to 48 hours to propagate.
- This DNS zone with Infomaniak will be configured correctly but refer to this other guide to check and correct any potential configuration errors.
… Elsewhere but you bring it back
If your domain name is registered with another registrar and you wish to transfer it to the same location as your Infomaniak website, then:
- Transfer the domain name to Infomaniak (it will be configured correctly but refer to this other guide to check and correct any potential configuration errors).
- If the domain name is intended to be an alias for your main site, you must add the alias to your site.
This guide explains how to connect via SSH to a Web Hosting or a Cloud Server.
Connect via SSH…
… via a web browser
- Click here to access the management of your product on the Infomaniak Manager (need help?).
- Click directly on the name assigned to the product concerned.
- Click on FTP / SSH in the left sidebar menu.
- Click on the Web SSH button:
… via the terminal or an application
To connect via SSH, use the following commands from a Terminal type application (command line interface, CLI / Command Line Interface) on your device, for example:
- Terminal (application already integrated with macOS and Linux)
- PuTTY (Windows)
- Windows 10 SSH client (help in French / in English)
Then enter the following command:
ssh username@serverusernamebeing the username of the FTP accountserverbeing the host server (e.g. xxxx.ftp.infomaniak.com)
To know which command is available and know the path to use, run the command "whereis":
$ whereis mysql
mysql: /opt/mysql/bin/mysqlThis guide explains how to migrate an old Infomaniak hosting (old 60GB formula) to the current offer.
Preamble
- The current Infomaniak hostings are much more performant, flexible and secure than before.
- In all cases, your current site remains visible to your visitors during the migration:
- You decide, within a month, when you want to definitively switch to the version of the website that will have been copied or rebuilt on the new servers.
Migrate an old hosting to the current offer
Access the old generation Web hosting:
- Click here to access the management of your product on the Infomaniak Manager (need help?).
- Click on the action menu ⋮ located to the right of the item concerned.
- Click on Change offer.
- If you do not see the "Change offer" button, make sure you are logged in with an account that has billing rights.
Then follow the guide adapted to your situation:
- Keep your current site (recommended)
- Erase the content of your hosting and create a new site (ideal to start from scratch)
- Keep your current site and switch to a Cloud Server
This guide explains how to manage the content of a web hosting by accessing the server, notably via the FTP protocol or via command line (CLI) securely thanks to SSH.
Preamble
- To easily and quickly manage the files of your web hosting without having to install an application or enter FTP credentials, use Web FTP from your Infomaniak Manager (it notably allows CHOWN and compression/decompression of
zipfiles). - When creating a website via Apache/PHP hosting, a FTP/SSH/SFTP user is automatically created; you can create additional FTP accounts:
- A FTP + SSH account grants the user access to the entire content of a hosting and allows them to manage it via FTP/SFTP and SSH.
- A FTP account allows restricting a user's access to a folder and its subfolders; if you manage multiple sites on the same hosting, this allows distributing site management among several webmasters, for example.
- However, in the case of a Node.js site, no SSH/SFTP user is automatically created; it is necessary to manually create a user with SSH/SFTP rights to access your Node.js environment.
- Regarding the protocols supported by Infomaniak (FTP, SFTP, etc.) depending on your hosting plan (Starter, Node.js, etc.), refer to this other guide.
Manage FTP accounts and access
To access Websites to manage the FTP part:
- Click here to access the management of your hosting on the Infomaniak Manager (need help?).
- Click directly on the name assigned to the relevant hosting.
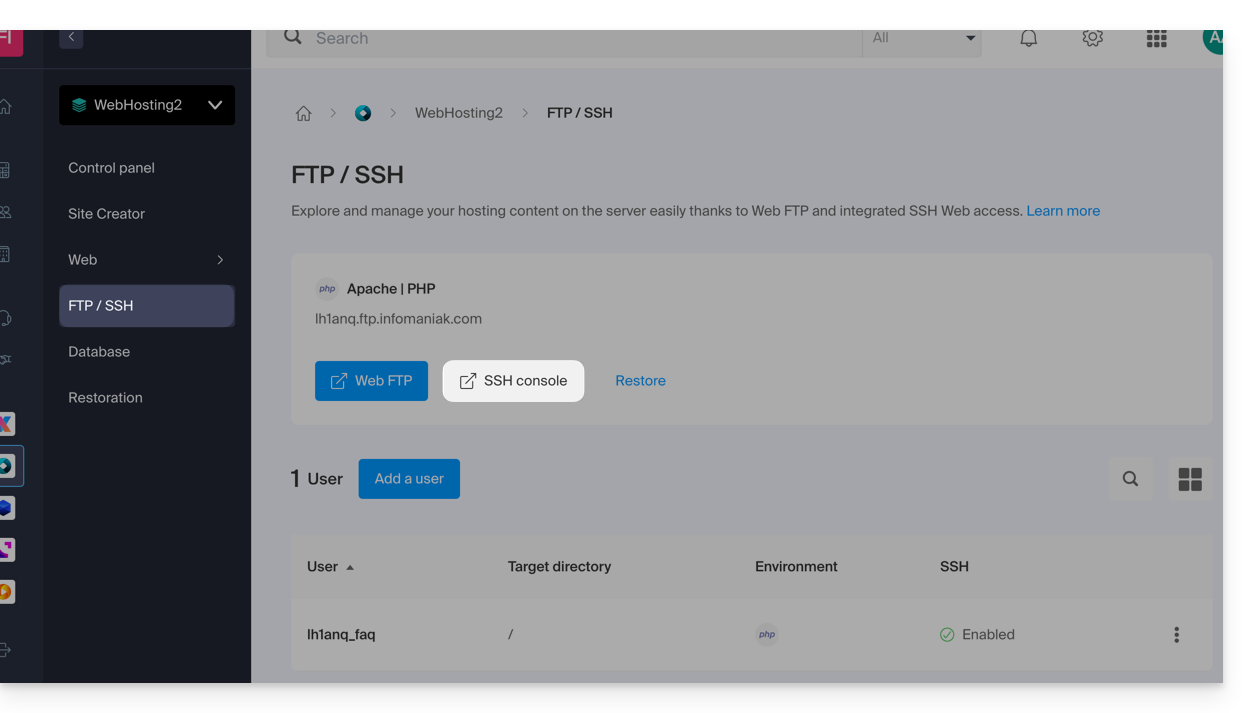
- Click on FTP / SSH in the left sidebar:

- From this point on, either…
- … click the Add button to create a new FTP/SSH account,
- … click on the name of the relevant account to change its password,
- … delete an account from the action menu ⋮ to the right of the relevant item.
- From this point on, either…
Set up an FTP software/client
With an FTP software/client like Filezilla or CyberDuck, manage files truly via FTP without limits (possibilities of background work, resumption of transfers after disconnection, bandwidth limitation, etc.).
Refer to this other guide if you are looking for information about configuring an FTP software/client.
This guide explains how to use the file manager Web FTP which allows you to manage the content of your Web Hosting in a simple and fast way.
Preamble
- The online service Web FTP / FTP Manager allows you to…
- … create files.
- … navigate through directories.
- … transfer files of less than 48 Mo* between your computer and the server:
- to go beyond this limit and for background work possibilities, resumption of transfers after disconnection, bandwidth limitation, etc., use an FTP software/client like Filezilla or CyberDuck!
- … manipulate existing files (copy, rename, move, delete, …).
- … edit and view text, php and html files of less than 1 Mo.
- … compress and decompress
zipfiles.
- With Web FTP it does not require any particular access as long as you have management rights on a hosting present in the Infomaniak Manager.
Access the server via Web FTP
To quickly access the site's server via FTP or SSH:
- Click here to access the management of your hosting on the Infomaniak Manager (need help?).
- Click directly on the name assigned to the hosting concerned.
- Click on FTP / SSH in the left sidebar.
- Click on the
SSH weborWeb FTPbuttons available to you:
Sending multiple files
It is not possible to upload folders due to the technology used which does not allow it.
Multiple file selection is however possible, which allows sending a large number of files at once in a previously created folder.
You can also consider uploading a zipped folder (.zip) and extract this archive once on the server, from the same WebFTP tool.
This guide provides solutions to errors of the type “Malicious site! The website has been reported as a malicious site and has been blocked based on your security preferences” ("STOP! This Website Can Harm Your Computer!" in English).
Who put this message?
This error or warning message…
- … IS NOT added by Infomaniak.
- … is generated by Google based on https://www.stopbadware.org/.
- … may no longer appear directly because…
- … you are no longer indexed by Google.
- … you are using a browser that does not rely on Google's checks.
What to do?
If this does not concern the site you are managing, refer to Google's help on the subject.
If the site is yours, refer to the advice below:
- Check the source code of the published page: there is surely additional code compared to the still healthy pages; it may be a malicious iframe or any inclusion…
- On the page in question, click on the “Why was this site blocked?” button and follow the instructions…
- Refer to the Google documentation on the subject.
- Monitor the vulnerability detection tool which may resolve the issue in the meantime.
Make your life easier! If needed, local partners referenced by Infomaniak can handle these procedures. Launch a free call for tenders. They handle everything, freeing you from technical details.
This guide explains how to change the PHP version available for your Infomaniak Web Hosting sites.
Preamble
- It is possible to switch from an old and potentially vulnerable PHP version to a recent one, but you will not be able to revert to this vulnerable version afterward for security reasons.
- The change is effective immediately and permanently.
- Refer to this other guide if you are looking for information about configuring the PHP version used in SSH.
Change the PHP version used for a website
It is possible to easily change the PHP version used on an entire website:
- Click here to access the management of your product on the Infomaniak Manager (need help?).
- Click directly on the name assigned to the product in question.
- Click on More information.
- Click on Modify:

- Choose the desired PHP version:

- Click on Save at the bottom of the page to save the modification.
It may be necessary to update your hosting beforehand to access the very latest PHP versions offered by Infomaniak.
This guide explains how to add a MySQL/MariaDB database, create or modify users, and how to find all the necessary parameters to configure your scripts and CMS on a Web Hosting.
Manage databases
To access the database management page of your hosting:
- Click here to access the management of your product on the Infomaniak Manager (need help?).
- Click directly on the name assigned to the product concerned.
- Click on Databases (or MariaDB if necessary) in the left sidebar:

Databases
Under the Databases tab, you can:
- Create a MySQL/MariaDB database by clicking the Add a database button.
- Import, export or restore a MySQL database by clicking the chevron to the right of the Add button.
Users
Under the Users tab, you can:
- Create a MySQL/MariaDB database user by clicking the Add a user button.
Configuration information
This is also where you will find the required information to configure CMS or web applications:
- The name of a database (e.g.
XXXX_dbname) - The username of a database (e.g.
XXXX_username) - The password of the username of a database (the one you chose when creating the MySQL/MariaDB user to redefine if you have forgotten it)
- The MySQL/MariaDB server of the databases / the host name / hostname (e.g.
XXXX.myd.infomaniak.com) with its version (5.7 for example)
User rights, shared servers & Cloud
- With read permissions: “SELECT”
- With write permissions: “INSERT, UPDATE, DELETE, CREATE TEMPORARY TABLES, LOCK TABLES”
- With admin permissions: “CREATE, DROP, INDEX, ALTER, CREATE VIEW, SHOW VIEW, REFERENCES”
- + “CREATE ROUTINE, ALTER ROUTINE, EXECUTE, TRIGGER, EVENT” on Cloud Server only (see this other guide on the subject)
- With no permissions: the user will not see the database appear in phpMyAdmin
Web application databases
- See this other guide on the subject of WordPress.
- See this other guide on the subject of Joomla.
This guide explains how to view information about visitors who have accessed your Web Hosting sites (traffic stats).
Preamble
- The result is presented in a simple format with a graph, allowing for easy interpretation.
- Annual, monthly, daily, and hourly statistics are displayed per site, http address, referring site, country, etc.
- Refer to this other guide if you are looking for information about access logs.
Access visit statistics
To view public traffic statistics:
- Click here to access your site management on the Infomaniak Manager (need help?)
- Click directly on the name assigned to the site in question.
- Click on Statistics in the left sidebar:
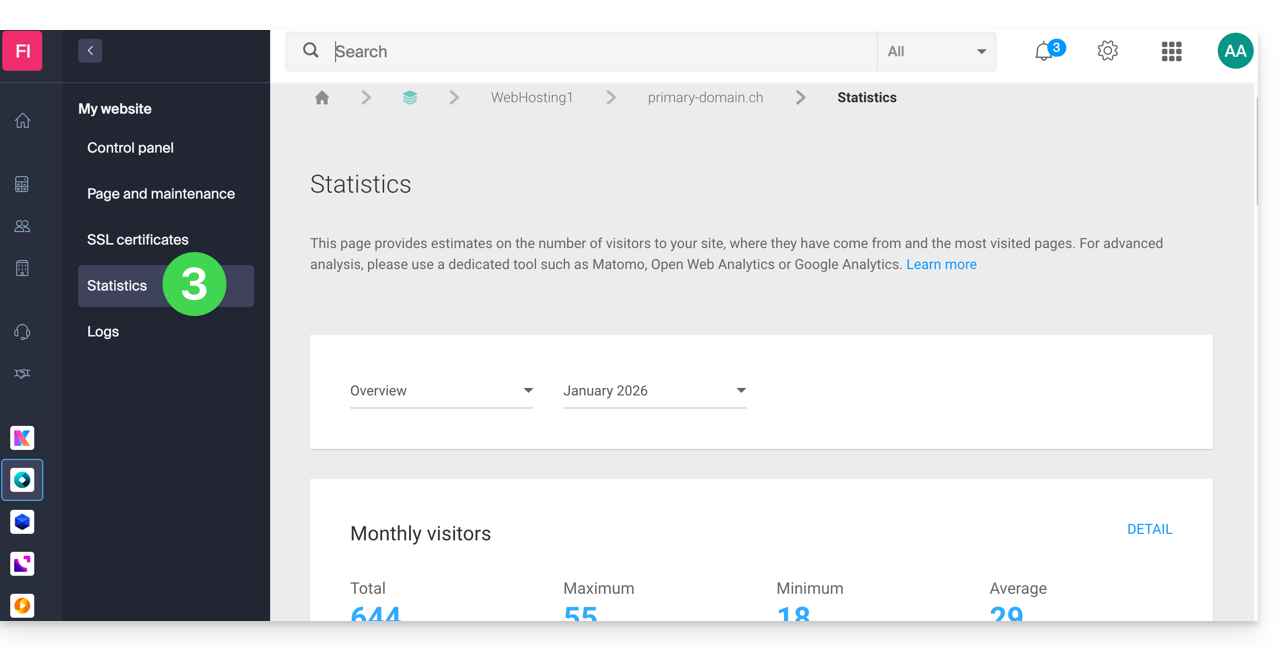
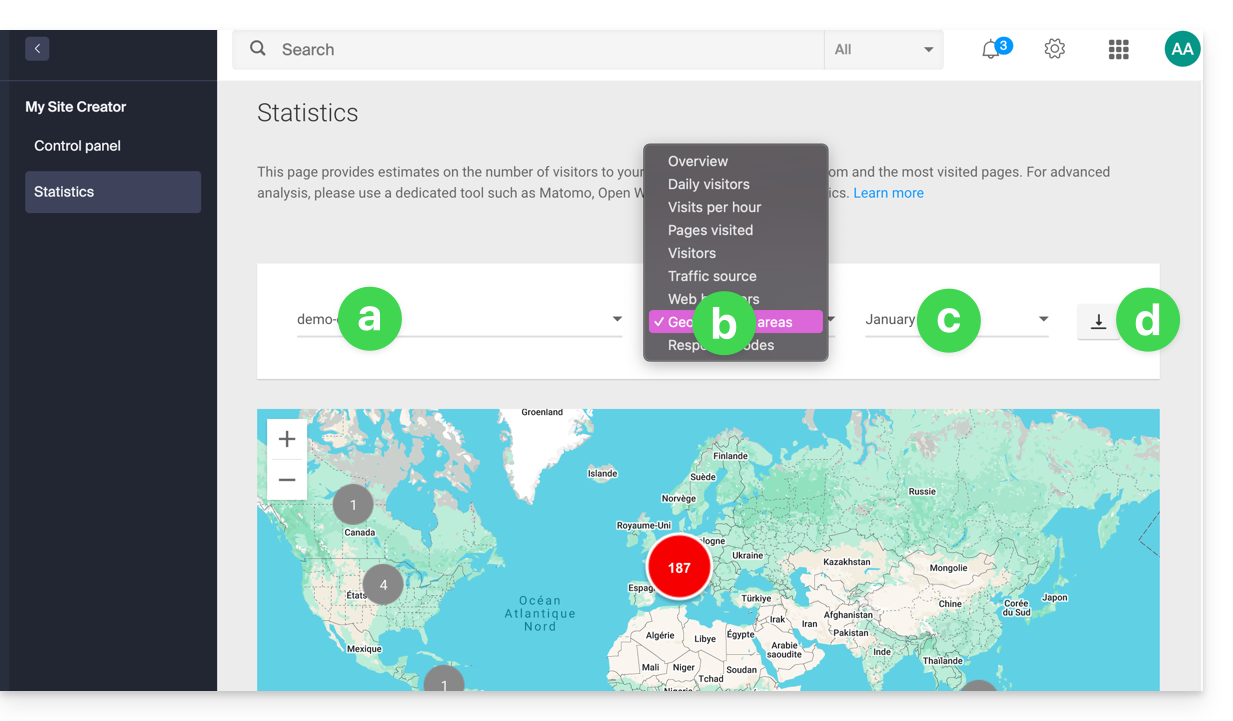
- The upper part allows you to choose:
- the potential site in question
- the type of desired statistics
- the period
- the download of the current tab's information to have it interpreted by a third-party tool:
Explanation of terms
There is no distinction between humans and robots. You can also use tools like Matomo, Open Web Analytics, Google Analytics, etc.
| Category | Description | Details |
|---|---|---|
| Hits | Each request made to the server is recorded | Hits include all requests, whether they are HTML pages, graphic files, audio, etc. Each element requested on your site, whether visible or not, is counted as a hit. It's as if each visitor presses an invisible button with each interaction with your site. |
| Files | Records requests that require data to be sent back | This category records requests that require the server to return data, such as graphic files or HTML files. The difference between hits and files can be likened to the difference between incoming requests and outgoing data. |
| Pages | Counts the number of pages displayed on your site | This counter measures the number of pages viewed on your site, excluding graphic or audio files. Each time a user accesses a new HTML page, it is recorded as a page view. |
| Visits | Calculates the time elapsed since the last visit from an IP address | A visit is recorded when the IP address requests data from the server. If this address returns within 30 minutes, it is considered a unique visit. If it exceeds 30 minutes, a new visit is counted. |
| Sites | Estimate of visits from fixed IP addresses | This category provides an estimate of the number of visits from fixed IP addresses, excluding connections via mobile networks or other dynamic connection technologies. This gives an overview of regular visitors to your site, often linked to businesses or institutions, which can help you better understand your target audience and tailor your content accordingly. |
| KB | Amount of data sent by the server in KB | This figure represents the total amount of data transferred during the given period, measured in kilobytes. It is calculated from the server logs, but may have some calculation errors due to variations in file size. |
| Total hits | A hit is an HTML request, each page view generates multiple hits | For example, if a page contains 3 images and a text, it will return 5 hits each time it is displayed: one for the page itself, one for the text, and 3 for the images. Thus, the total number of hits can be significantly higher than the number of page views. |
| Total files | Total number of files called by the visitors' browser. | This figure represents the number of specific files (images, HTML files, etc.) requested by visitors while browsing your site. It can be useful for assessing the complexity of your site and the variety of content viewed by visitors. |
| Total Pages | Total number of pages displayed | Each time an internet user accesses a new page on your site, it is counted as a page view. This number may differ from the total number of hits, as a single page can generate multiple hits if it contains multiple elements to load. |
| Total Visits | Total number of unique visits recorded | A unique visit is recorded each time an internet user accesses your site. If the same visitor returns within a 30-minute period, it is counted as a single visit. This number is an indicator of visitor engagement on your site. |
| Total KB | Total amount of data transferred in kilobytes | This figure represents the total size of the data sent by your server to visitors during the given period. It can be used to assess your site's bandwidth consumption and plan hosting upgrades if necessary. |
| Total unique sites | Total number of unique IP addresses that have visited your site | This number represents the number of distinct IP addresses that have accessed your site during the given period. It can be used to assess the diversity of traffic sources to your site and identify the most active audience segments. |
| Total unique URLs | Total number of unique paths taken during visits | This figure represents the number of distinct paths followed by visitors while browsing your site. Each unique URL corresponds to a specific page or file viewed by visitors. This can provide information about your site's navigation structure and the most viewed content. |
| Total unique referrers | Total number of distinct referring sites | This number represents the number of external sites that have directed traffic to your site through links. Referrers are important indicators of the effectiveness of your online marketing strategy and can help identify the most performing partners or traffic channels. |
Meaning of 'Commercial (com)' in the country list
When you view the statistics under 'Geographical areas', you will notice that 'Commercial' represents a significant portion of the traffic. This category includes users connected to the Internet via Internet Service Providers (ISPs) with a .com domain in their address. It is difficult to determine which country or countries are represented by .com as this extension is used by several ISPs from different countries. Additionally, the 'Commercial' category may also include companies using .com addresses regardless of their actual geographical location.
As for 'unresolved', these correspond to IP addresses that cannot be resolved to a specific geographical location. These addresses may result from various reasons such as ISP privacy settings or virtual private networks (VPNs). They therefore remain undetermined in the geographical location statistics.
This guide explains how to add an additional website to an existing Infomaniak hosting plan.
Preamble
- The hosting can be on a shared web hosting plan or on an Infomaniak Cloud Server.
- The additional site can be either:
- a second domain name (for example.
domain2.xyz), - or a subdomain (for example.
abc.domain.xyz) of a domain name that you already own.
- a second domain name (for example.
- In this multisite/multidomain management (virtual host), the total disk space and resources of your hosting are shared between your sites/subdomains.
Access site management
Prerequisites
- If the 20 site slots offered in the web hosting are already in use, order additional sites.
To access a web hosting plan and add a site:
- Click here to access the management of your products in the Infomaniak Manager (need help?).
- Click directly on the name assigned to the product concerned.
- Click on the blue button Add:

- Choose the optional content for the new site (A) or other specific installation, blank space, advanced technologies (Node.js for example) (B):
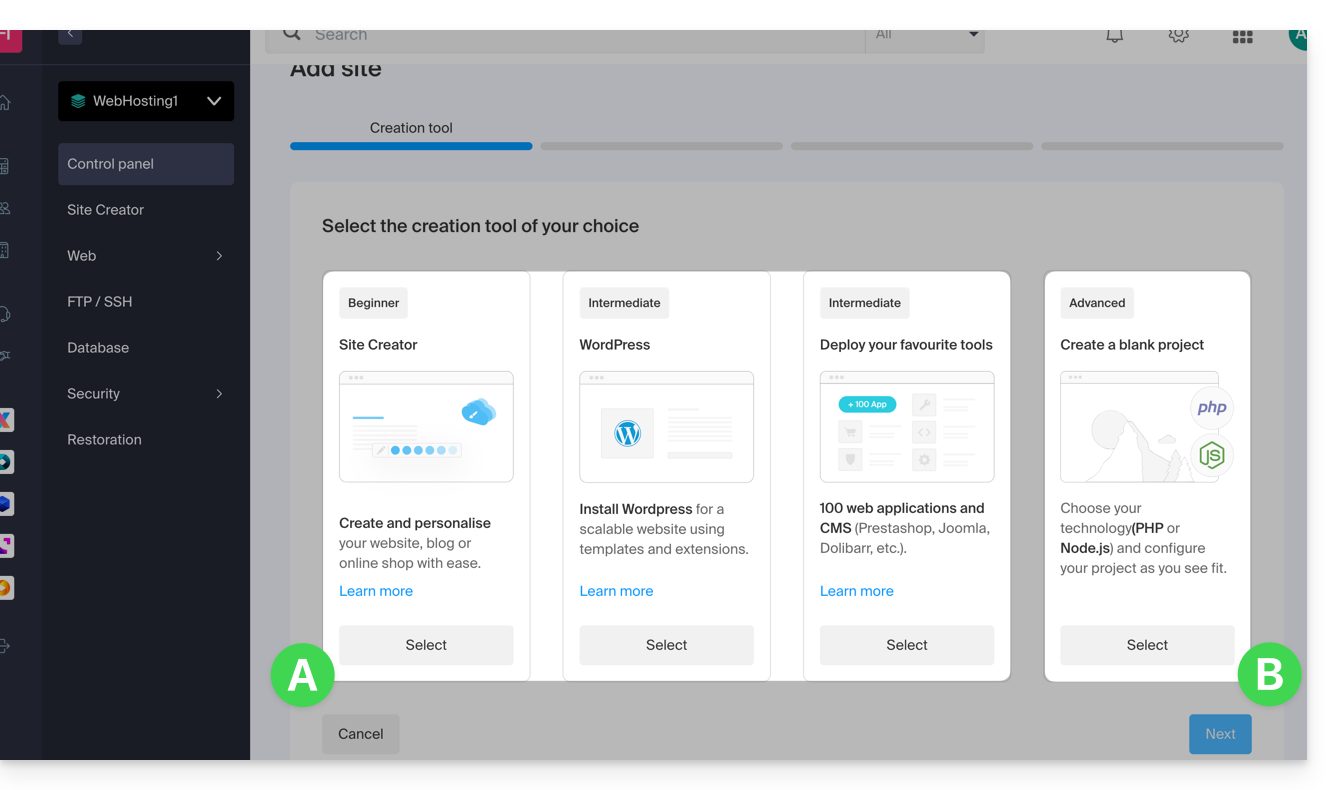
- Click on Next.
- Choose the type of domain to assign to this new site:
- an already acquired domain name
- a subdomain created from an already acquired domain name
- a domain name still available and to be ordered
- Enter the domain name (
domain2.xyz, for example) or the subdomain.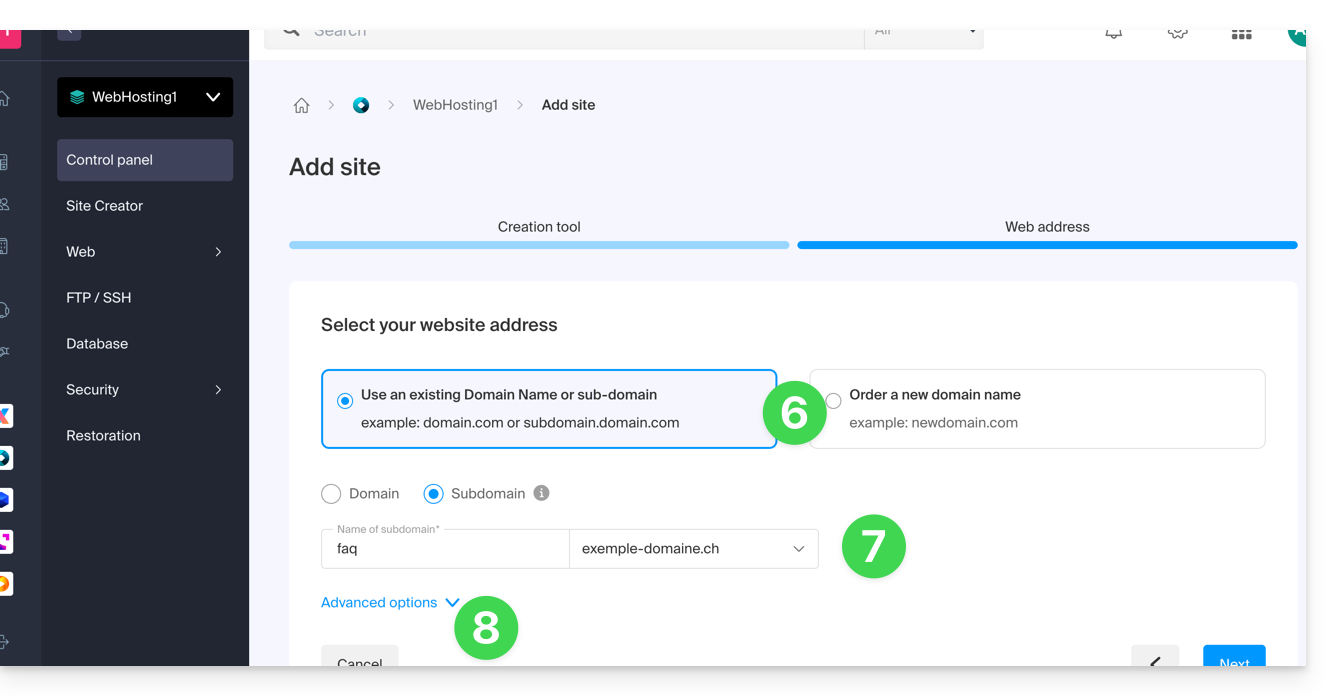
- Choose the optional advanced options, including:
- By default, the new site is added to the directory
/sites/domain2.xyzon your FTP server. - To manually define another directory, check Manually define the location and specify the path and name.
- Create a new folder if necessary:

- By default, the new site is added to the directory
- Click on Continue.
If it's a subdomain or if the domain name or its DNS zone is managed by Infomaniak, it is possible to automatically update the existing DNS entries. Otherwise, make the necessary changes with your registrar or transfer the management of the domain name to Infomaniak.
This guide is for you if you encounter a 500 error that can have various causes generally related to the development of your website on a Web Hosting, particularly with the rewrites of your .htaccess files.
Preamble
- Apache2, in place on the servers, no longer supports certain modules such as
mod_auth_anon,mod_auth_dbm,mod_authz_dbm,mod_cern_meta,mod_imap,mod_imagemap,mod_mime_magic - Apache2 is strict about syntax errors and when it encounters syntax errors in a
.htaccessfile, this can result in 500 Internal Server Errors or unexpected URL rewrite errors
Examples of syntax and correction
In this first example, the syntax error is that the rewrite rule does not specify the HTTP redirection response code to return.
RewriteRule ^articles/([0-9]+)/$ /article.php?id=$1 [L]The correction adds the R=301 directive to specify that the redirection should return a 301 (permanent) code:
RewriteRule ^articles/([0-9]+)/$ /article.php?id=$1 [L,R=301]
In this second example, the syntax error is that the Options directive does not correctly specify the options to enable or disable.
Options -Indexes FollowSymLinksThe correction adds the "+" sign to specify that FollowSymLinks should be enabled rather than disabled:
Options -Indexes +FollowSymLinksResolving these errors
- If the first page or another page displays a 500 error, rename the
.htaccessfile or comment out all lines with#and uncomment line by line until you find the problematic section. - If the error occurs after a modification made to one of your pages, the simplest solution is to restore the previous version of the file.
This guide explains how to install a free SSL certificate from Let's Encrypt on a website hosted by Infomaniak.
Preamble
- Once the certificate is installed, your website will be accessible in
httpandhttps… - If you want to include an alias domain name recently added to your site that already had a certificate, you need to update it.
- For multiple subdomains, refer to this other guide.
- Let's Encrypt limits the installation of certificates to:
- 100 subdomains
- 20 certificates for 7 days per registered domain
- 5 unsuccessful requests per account per hostname per hour
Install a free SSL certificate on a site
Prerequisites
- For the installation to be possible, the DNS of the domain name must be correctly configured to point to the site in question.
- If a change has just been made at this level, some operations may not be functional immediately.
To access websites to install an SSL certificate:
- Click here to access the management of your product on the Infomaniak Manager (need help?).
- Click directly on the name assigned to the product in question:

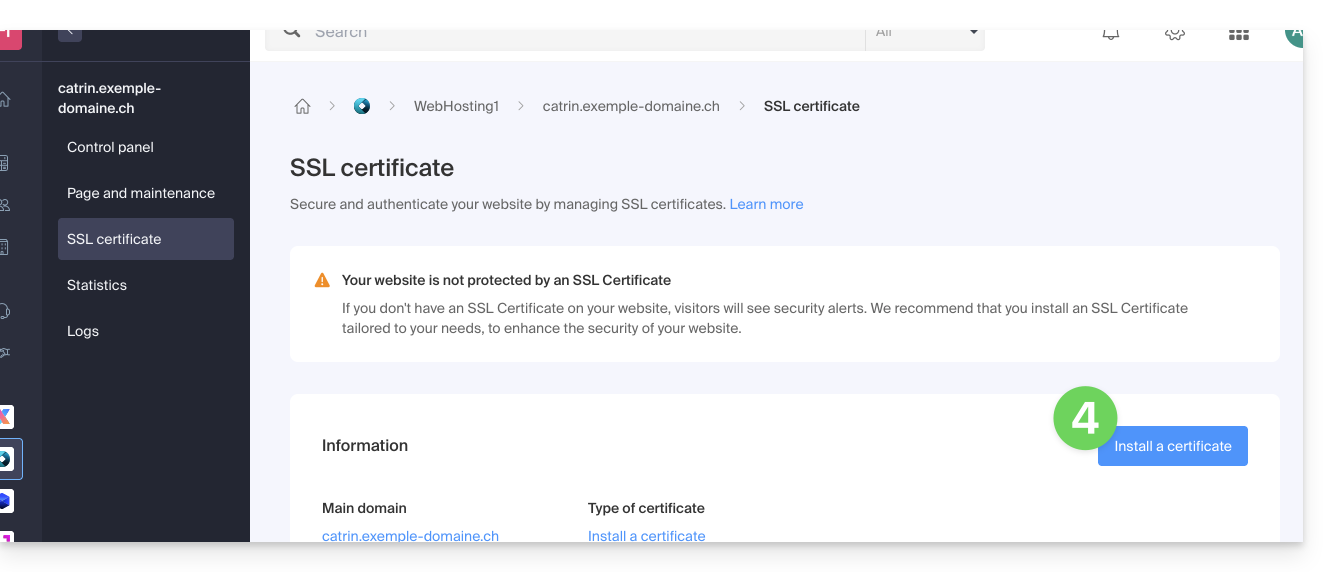
- Click on Configure under SSL Certificate:

- Click on the Install a certificate button:
- Choose the free certificate.
- Click on the Next button:

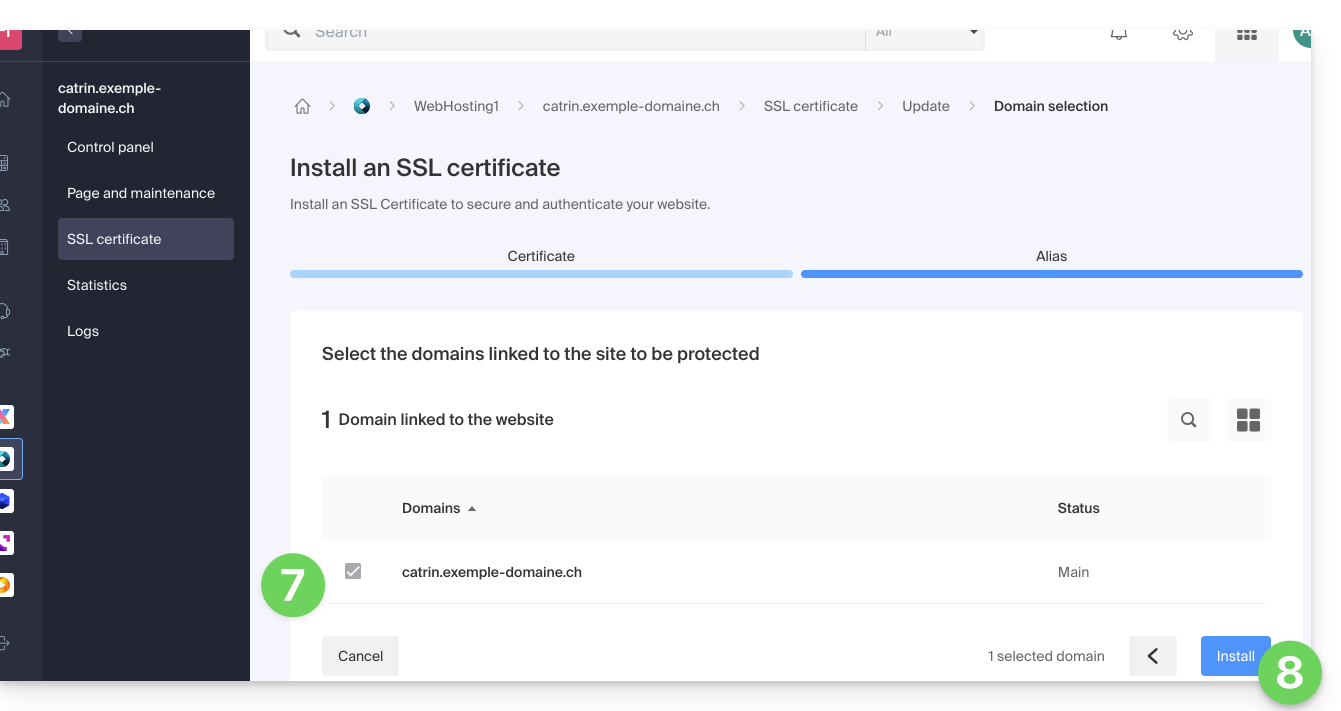
- Check or select the domains concerned.
- Click on the Install button:
- Wait a few minutes until the certificate is obtained on the site.
Refer to this guide if you encounter SSL errors and to this other guide specifically if you are using Cloudflare.
This guide explains how to disable or configure HSTS for a website.
Preamble
- When HSTS is enabled for a website, the server tells the site visitor (if their web browser is compatible) to replace all non-secure links with secure links.
- Example:
http://www.example.com/a/page/is automatically replaced byhttps://www.example.com/a/page/. - After activating an SSL certificate on a website, HSTS is configured as follows:
max-age=16000000.
Disable HSTS…
… with a CMS (WordPress, Joomla, etc.)
Include the following line in all pages generated by the CMS:
header( 'Strict-Transport-Security: max-age=0;' );For WordPress, for example, it is possible to add this directive in the functions.php file of your theme:
add_action( 'send_headers', 'add_header_xua' );
function add_header_xua() {
header( 'Strict-Transport-Security: max-age=0;' );
}
More details on WordPress
… with a PHP site
Include the following line in all php pages:
header( 'Strict-Transport-Security: max-age=0;' );To do this without having to modify each php page of a site, it is possible to use the auto_prepend_file directive in the .user.ini file of the concerned site:
auto_prepend_file=/home/clients/xxxx/web/hsts_disable.php... with the following hsts_disable.php file:
header( 'Strict-Transport-Security: max-age=0;' );… with a static content site (non-PHP)
Include this header in a .htaccess file:
# BEGIN DISABLE HSTS
<IfModule mod_headers.c>
Header always set Strict-Transport-Security "max-age=0; includeSubDomains;"
</IfModule>
# END DISABLE HSTS
Customize HSTS
The default value can be modified in your website's php files with the following directive:
header( 'Strict-Transport-Security: max-age=X; includeSubdomains; preload' );(X being the desired number of seconds).
Enable HSTS for all hosted subdomains
includeSubDomains; is enabled by default and as its name indicates, it will include subdomains in the "Strict Transport Security".
When the visitor goes to an unsecured subdomain, the browser will automatically redirect to HTTPS and cause a security error.
If this behavior is not desired, this header must be removed.
Clear the browser HSTS cache…
… on Chrome
- In Chrome, type
chrome://net-internals/#hsts. - Enter the domain name in the text field of the "Delete domain security policies" section.
- Click the Delete button.
- Enter the domain name in the text field of the "Query HSTS" section.
- Click the Query button.
- The response must be "
Not found".
… on Safari
- With Safari, start by closing the browser.
- Delete the file
~/Library/Cookies/HSTS.plist. - Reopen Safari.
… on Firefox
- With Firefox, close all tabs.
- Open the Firefox menu and click on History / View History.
- Search for the page whose HSTS preferences you want to delete.
- Right-click on one of the entries corresponding to it.
- Choose Forget this site.
This guide explains how to order a DNS zone from Infomaniak.
Preamble
- Having the DNS zone with Infomaniak is useful if your domain name is registered elsewhere (third-party provider/registrar) and you want to easily link this domain with Infomaniak products.
- Indeed, it is not enough to own a site
domain.xyzwith Infomaniak and to indicate the 2 DNS addresses of Infomaniak with the domain name registrar (if it is not Infomaniak) for the site to be displayed when you typedomain.xyzin a browser. - You must add a DNS zone in the same place as the hosting to make the site work easily.
- This will also be particularly useful if the service provider managing your domain name does not offer DNS zone management.
Order a DNS zone
To do this:
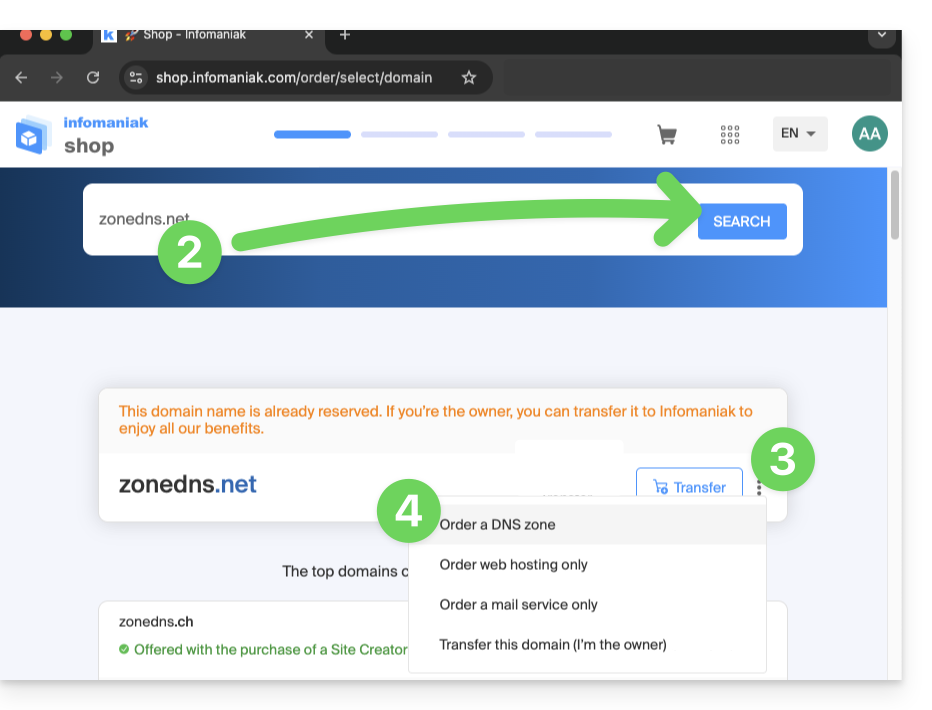
- Click here to access the Infomaniak domain Shop.
- Start a search with the name of the domain registered elsewhere.
- Click on the action menu ⋮ located to the right of the result obtained.
- Select Order a DNS zone:
- Complete the purchase.
- Once added to your Manager, the zone can be edited.
The BIMI (Brand Indicators for Message Identification, brand indicators for message identification) offers businesses the ability to incorporate their logo into sent emails.
Preamble
- Infomaniak applications (and other companies around the globe - read the chapter in case of problem below) are compatible with BIMI and will display the logos next to received emails.
- Infomaniak Mail Services allow you to configure your email with your logo (read the prerequisites carefully); the benefits are numerous:
- increased trust: recipients can visually identify your emails, thus reducing the risk of phishing.
- brand reinforcement: a clearly visible logo in inboxes reinforces brand recognition.
- better deliverability: emails compliant with DMARC have a better chance of reaching the main inbox.
1. Create a logo
Create a logo in SVG format (Scalable Vector Graphics). This format is required as it ensures optimal quality regardless of the device or display size.
To be imported on the Infomaniak interface (read below) it must not exceed 10 Mo, but it can also be hosted on a publicly accessible secure server and you will simply need to indicate its URL for the BIMI DNS registration.
2. Obtain the VMC certificate
A verified logo certification (VMC) is required; it certifies that you are the legitimate owner of the logo. You can obtain this certification from recognized certification authorities such as DigiCert and Entrust.
When your VMC certificate is issued, you receive a PEM file containing the entity certificate. This PEM file includes your SVG-formatted logo as well as the VMC.
3. Add the logo to the Mail Service
Prerequisites
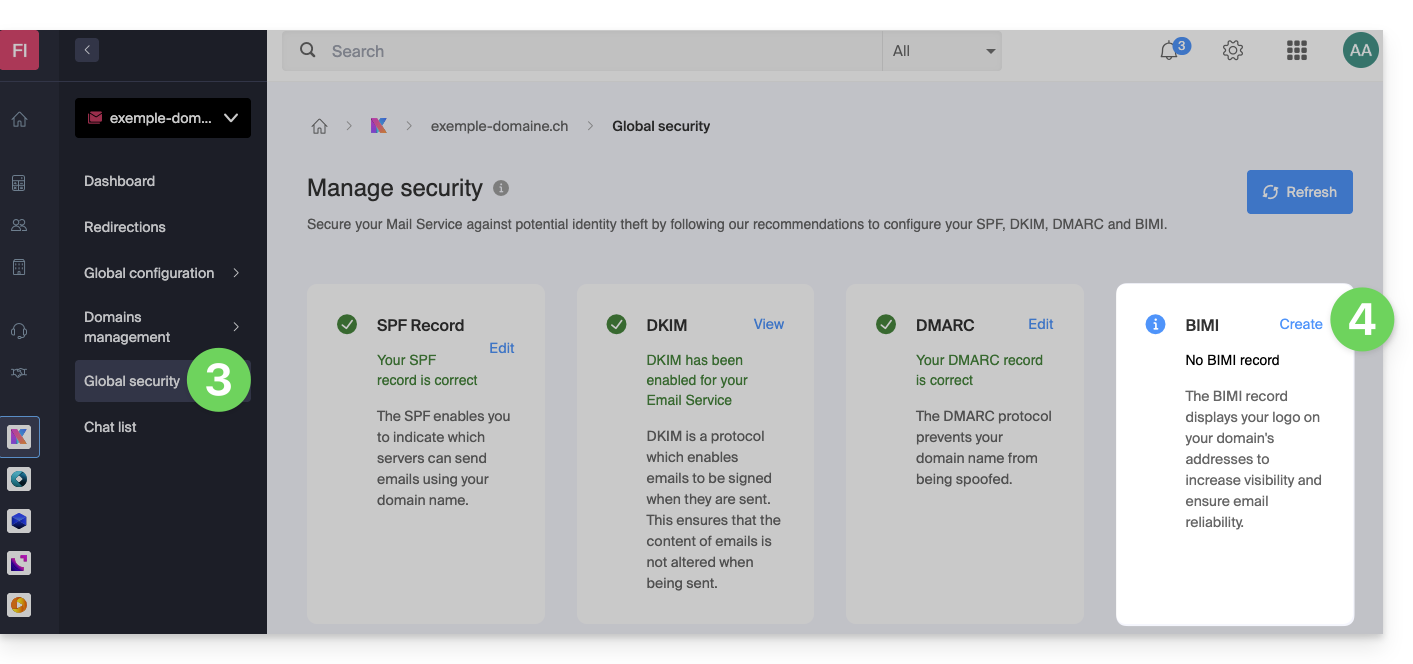
- All the indicators Global Security of your Mail Service must be green (SPF + DKIM + DMARC)!
To access the Mail Service and set the logo of your company:
- Click here to access the management of your Mail Service on the Infomaniak Manager (need help?).
- Click directly on the name assigned to the Mail Service concerned.
- Click on Global Security in the left sidebar.
- Click on the Create button (in the BIMI section):
- Fill in the requested information from the documents received (see chapter 2 above) and do not forget to save.
In case of a problem
- If the Create button in the BIMI box remains grey, make sure to check the informative messages: DMARC may exist but may not be at the required rejection percentage, so adjust the parameters according to the indications.
- When there are multiple domains linked to the Mail Service, you must ensure that you have a certificate on each linked domain if you wish to have BIMI on them.
- Note that Microsoft Outlook, Apple Mail, Thunderbird, the Mail app from Samsung, among others, have not yet adopted BIMI.
Disable BIMI
To disable BIMI, simply go to the domain name management page linked to the Mail Service and delete the corresponding TXT record.
This guide explains how to add a new domain name to a Web site Infomaniak.
Preamble
- When you add a new domain name to a Web site, it is referred to as a linked domain but also as an alias.
- In this case, an alias domain is an additional domain name, also linked to an existing site.
- For the Web site
domain.xyzto be reachable with a completely different domain name such asprivate.abcfor example, you need to addprivate.abcas an alias to the Web site. - Second example, for the site
domain.xyzto also be reachable withwww.domain.xyz, you need to add it as an alias to the domaindomain.xyz. In this example,domain.xyzis the parent site of the aliaswww.domain.xyz. Generally, the aliaswwwis already added automatically and present…
- For the Web site
Adding an alias to an existing site
Prerequisites
- If the domain name (intended to become an alias) or its DNS zone is managed by Infomaniak, everything is OK. If not:
- The A record of the domain name must point to Infomaniak.
- To simplify, you can delegate the management of the domain to Infomaniak.
- It is also necessary that the future alias is not already one, in which case it will be necessary to detach it from the current site beforehand (same if synonym).
To add an additional domain that will be linked to your Web site:
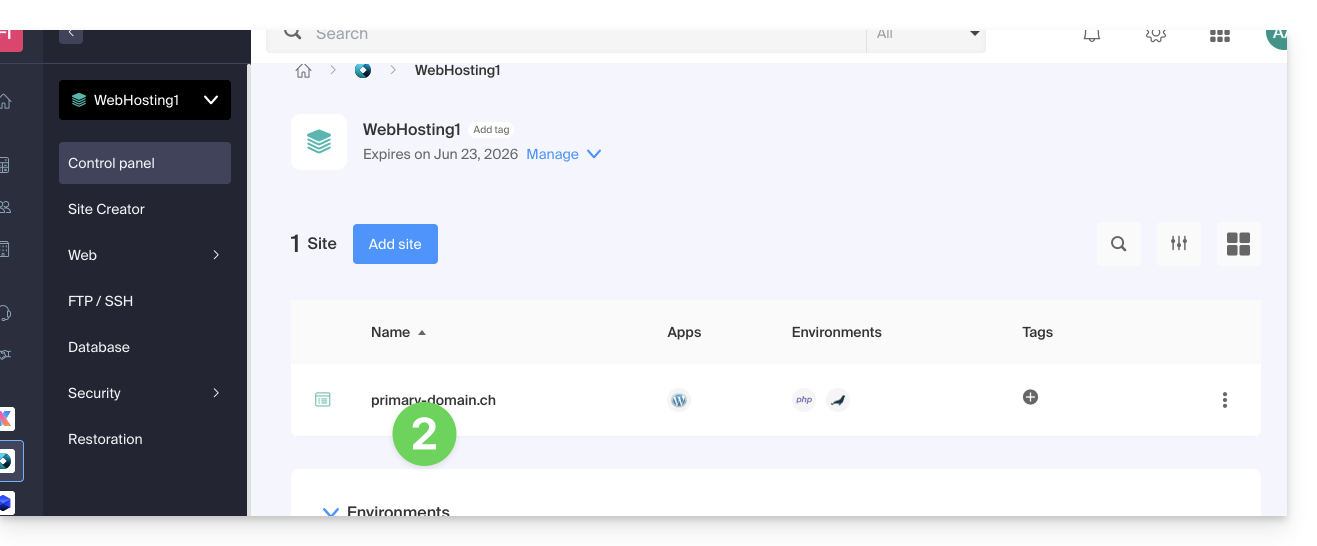
- Click here to access the management of your product on the Infomaniak Manager (need help?).
- Click directly on the name assigned to the product concerned:
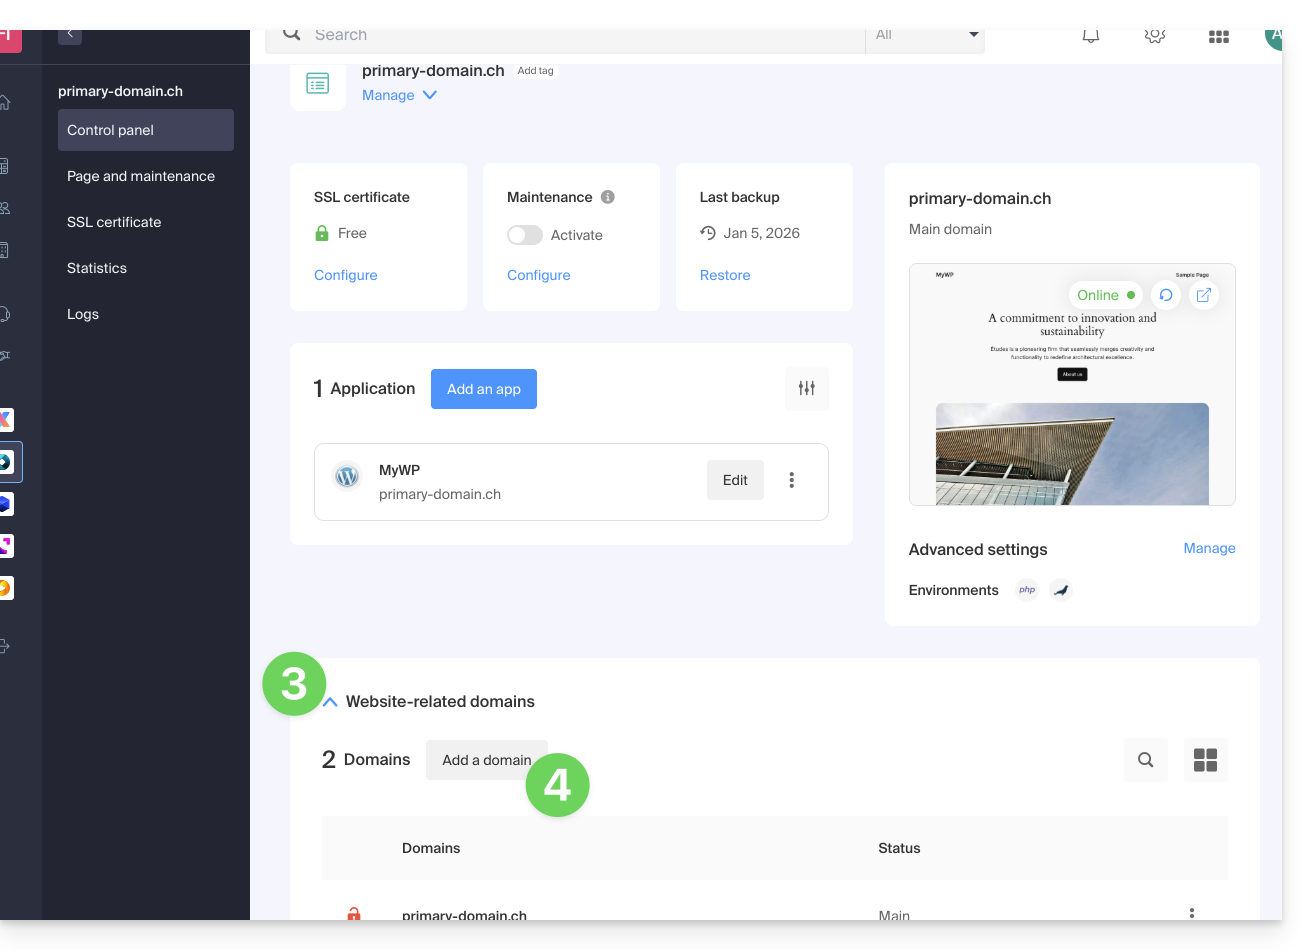
- Then click on the chevron to expand the Domains section of this site.
- Click on the Add a domain button:
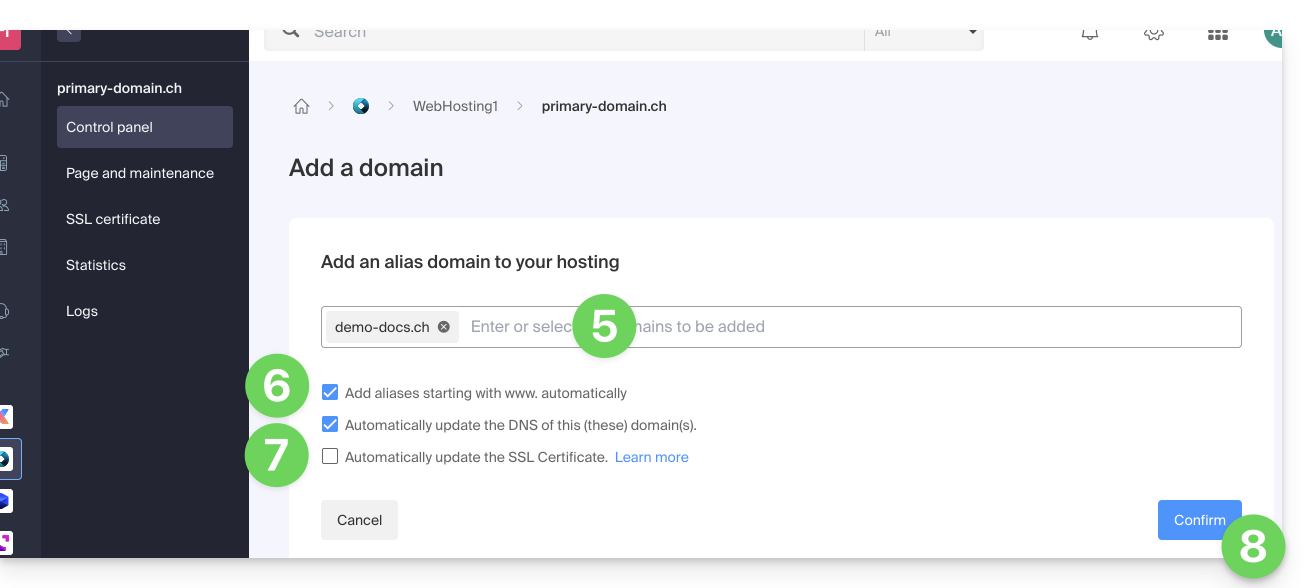
- Enter the domain name(s) to be added, separated by the Enter.
- If the alias or its DNS zone is managed by Infomaniak, it is possible to automatically update the DNS entries. Otherwise, make any necessary changes with your registrar or transfer the management of the domain name to Infomaniak.
- If you have an SSL certificate like Let's Encrypt, for example, you can request to update it here to include the new names.
- Click on Validate to complete the procedure:
To set the alias as the main domain, refer to this other guide.