
Knowledge base
1000 FAQs, 500 tutorials and explanatory videos. Here, there are only solutions!
This guide explains add a new domain name to a website Infomaniak.
Preamble
- When you add a new domain name to a website, we talk about related area but also of aliases.
- An alias domain in this case is an additional domain name, also linked to an existing site.
- To make the website
domain.xyzbe reachable with a whole other domain name likeprivate.abce.g., addprivate.abcas the alias of the website. - Second example, so that the site
domain.xyzcan also be reached withwww.domain.xyz, it must be added as an alias to the domaindomain.xyzIn this example,domain.xyzis the parent site of the aliaswww.domain.xyzIn general, the aliaswwwis already added automatically and now...
- To make the website
Add an alias to an existing site
Prerequisites
- If the domain name (intended to become alias) or its DNS area is managed by Infomaniak, everything is OK. If not:
- Domain name registration A must point to Infomaniak.
- To simplify, you canentrusting the management of the domain to Infomaniak.
- It is also necessary that the future alias is not already so, in which case it will have to be the disconnect from the current site in advance (i.e. synonym).
To add an additional domain that will be linked to your website:
- Click here in order to access the management of your product on the Manager Infomaniak (Need help?).
- Click directly on the nameallocated to the product concerned:

- Then click on the chevron to develop the game Areas of this site.
- Click on the button Add Domain:

- Enter the domain name(s) to be added, separating them by the key Enter.
- If the alias or its DNS area is managed by Infomaniak, it is possible to automatically update DNS entries In the opposite case, make any changes to your registrar or transfer domain name management to Infomaniak.
- If you have an SSL certificate like Let's Encrypt e.g. you can ask the update here to include the new names.
- Click on Validate to complete the procedure:

To define the alias as the main domain, take note of this other guide.
This guide explains how to redirect to a secure https version (SSL) all visitors to a website on Web Hosting Infomaniak.
Preamble
- This redirection is automatic in principle with a standard configuration and installation.
- For additional help contact a partner or launch a free call for tenders — also discover the role of the host.
Manual redirection via .htaccess file
Prerequisites
- Have a valid and functional SSL certificate for the Infomaniak website.
Then, modify or add the following 3 lines to the .htaccess file of the website concerned so that all its visitors automatically access its secure https version:
RewriteEngine on
RewriteCond %{HTTPS} off
RewriteRule (.*) https://domain.xyz/$1 [R=301,L]
Replace domain.xyz with your domain name with the appropriate extension (.com, .fr, .ch, etc.).
Replace the second line of the code above with RewriteCond %{HTTP:X-Forwarded-Proto} !https in case of a problem.
With a CMS
Most web applications like WordPress and Joomla have extensions/plugins that automatically redirect visitors to the secure https version of a site.
WordPress
If you are using a content management system (CMS) like WordPress to create your site, we recommend installing an extension to perform this redirection:
- Save the site's files and database as a precaution.
- Install the extension Really Simple SSL or similar from the WordPress console and activate it.
- Visitors are now automatically redirected to the https version of the site.
Joomla
Replace domain.xyz with your domain name with the appropriate extension (.com, .fr, .ch, etc.).
Find the line
var $live_site ='';in the Joomla configuration file (
configuration.php) on the server.Replace with
var $live_site = 'https://www.domain.xyz';Add three lines to your
.htaccessfile on the server:RewriteEngine On RewriteCond %{HTTPS} OFF RewriteRule (.*) https://%{HTTP_HOST}%{REQUEST_URI}- Open the Joomla administration panel in "System - Configuration".
- Click on the "Server" tab and under "Force SSL" choose "Admin and Site".
- Save and visitors will now be automatically redirected to the https version of the site.
Prestashop
- Access the general settings in the Prestashop back-office to enable SSL:
- < v1.7 click on "Preferences" then on "General"
- > v1.7 click on "Store Settings" then on "General"
- Enable the toggle switch "Enable SSL" to "YES"
- Click on "Save"
- In the same place, enable the toggle switch "Enable SSL on the entire site" to "YES".
- Click on "Save".
In case a security lock does not appear in the browser or a warning is displayed, check the template or modules as they may not be perfectly compatible with SSL. Your Prestashop then loads elements (images, .css or .js files, fonts...) in "http" while these should now be loaded in "https".
Drupal
Refer to this article (in English) which explains how to switch a Drupal site from http to https.
Alternative solutions
Replace domain.xyz with your domain name with the appropriate extension (.com, .fr, .ch, etc.).
In your .htaccess file, to force the site URL to be https:// but without www:
RewriteEngine On
RewriteCond %{HTTPS} off [OR]
RewriteCond %{HTTP_HOST} ^www. [NC]
RewriteRule (.*) https://domain.xyz/$1 [R=301,L]
In case of a redirection loop, adapt the code above to:
RewriteEngine on
RewriteCond %{HTTP:X-Forwarded-Proto} !https [OR]
RewriteCond %{HTTP_HOST} ^www. [NC]
RewriteRule (.*) https://domain.xyz/$1 [R=301,L]
In your .htaccess file, to force redirection with www
with subdomains:
RewriteEngine On
RewriteCond %{HTTPS} off [OR]
RewriteCond %{HTTP_HOST} !^www. [NC]
RewriteRule (.*) https://www.domain.xyz/$1 [R=301,L]
In case of a redirection loop, adapt the code above to:
RewriteEngine on
RewriteCond %{HTTP:X-Forwarded-Proto} !https [OR]
RewriteCond %{HTTP_HOST} !^www. [NC]
RewriteRule (.*) https://www.domain.xyz/$1 [R=301,L]
and without subdomains:
RewriteEngine on
RewriteCond %{HTTPS} off [OR]
RewriteCond %{HTTP_HOST} ^domain.xyz [NC]
RewriteRule (.*) https://www.domain.xyz/$1 [R=301,L]
In case of a redirection loop, adapt the code above to:
RewriteEngine on
RewriteCond %{HTTP:X-Forwarded-Proto} !https [OR]
RewriteCond %{HTTP_HOST} ^domain.xyz [NC]
RewriteRule (.*) https://www.domain.xyz/$1 [R=301,L]
Common errors following an https redirection
To resolve common issues that may arise after redirecting your website to its secure https version, refer to this other guide.
This guide explains how to enable or disable maintenance mode on a website hosted with Infomaniak Hosting.
Preamble
- Maintenance mode allows you to display a custom message to your visitors, for example, while resolving a technical issue.
- It is also possible to specify IP addresses that can bypass this page.
- An email is sent to the users of the Organization.
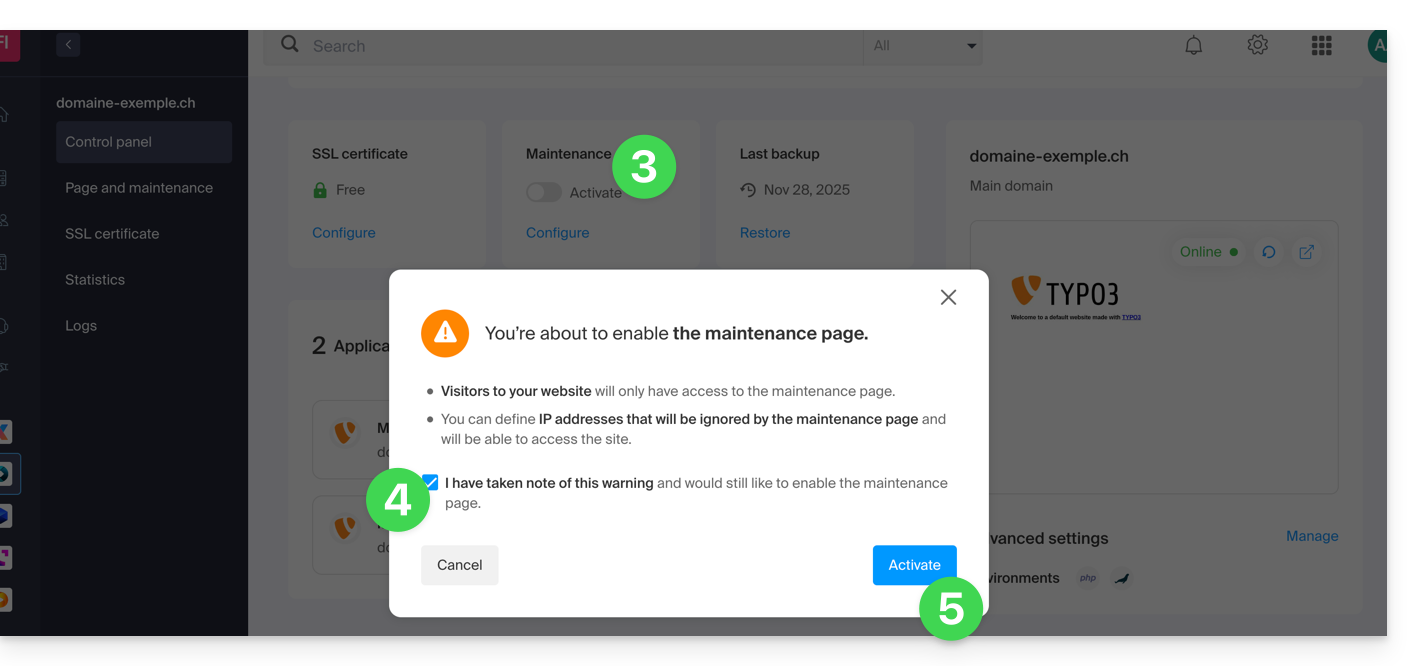
Enable maintenance mode
To enable a page that temporarily replaces your usual homepage:
- Click here to access the management of your product on the Infomaniak Manager (need help?).
- Click directly on the name assigned to the product in question.
- Click the toggle switch to enable the maintenance page.
- Confirm the warning.
- Click the button to enable:
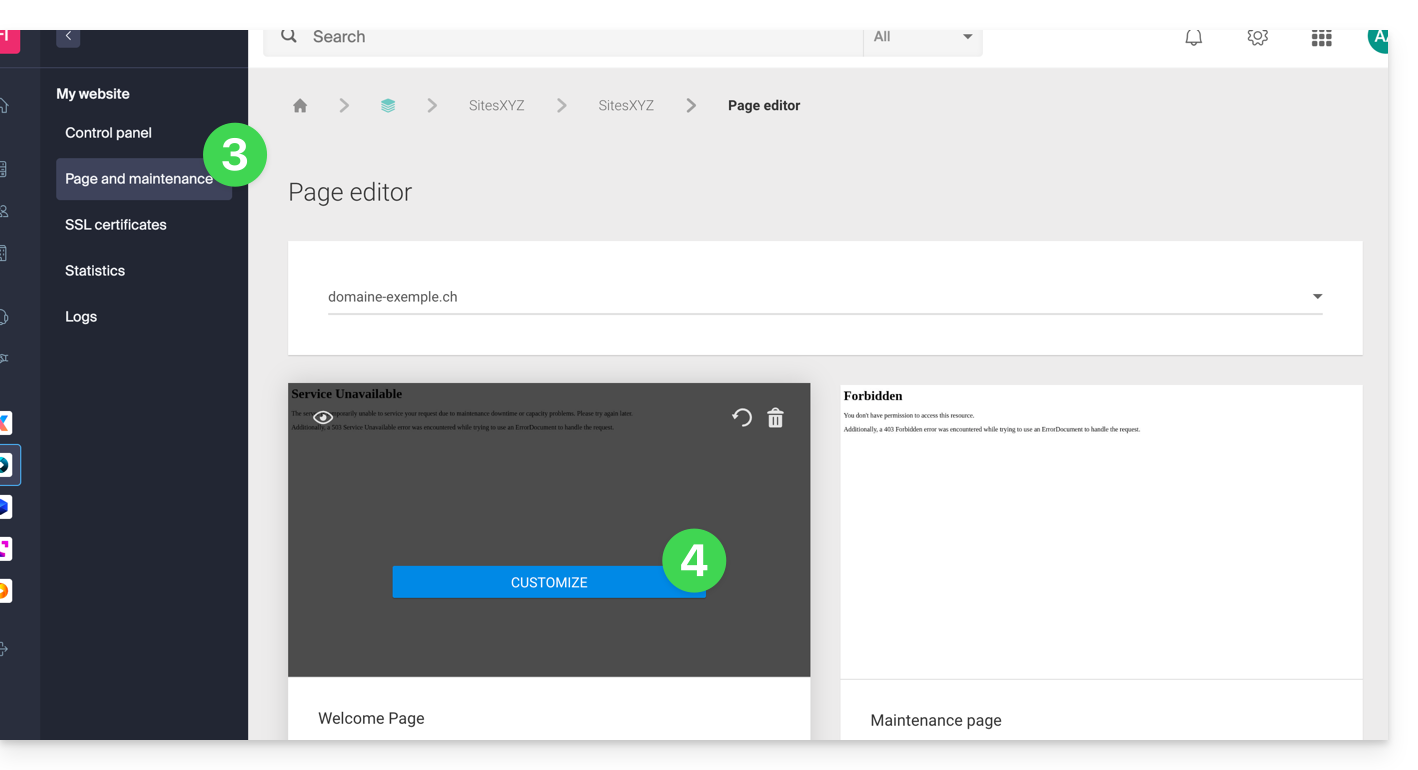
Customize the maintenance page
To set up a page with your desired message:
- Click here to access the management of your product on the Infomaniak Manager (need help?).
- Click directly on the name assigned to the product in question.
- Click on Maintenance Page in the left sidebar.
- Click on Create a page or the Customize button if it already exists:
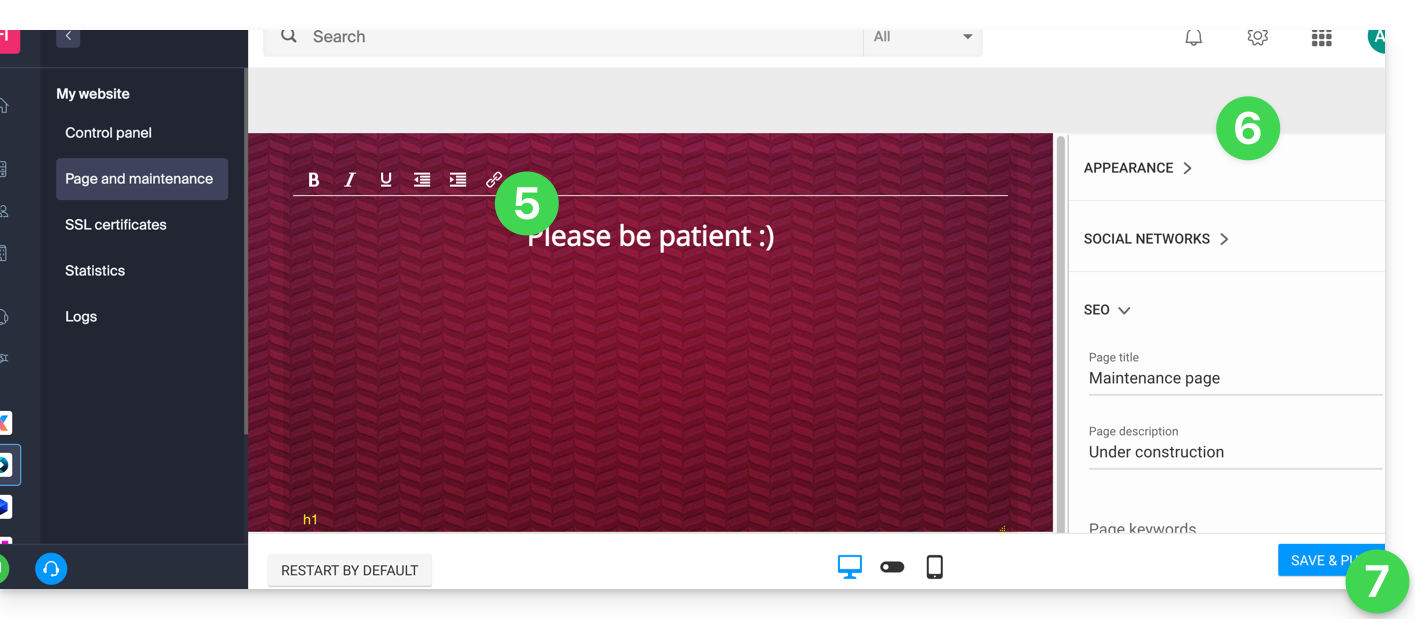
- Format the text of your choice.
- Configure the display using the elements on the right.
- Click on Save & Activate to publish the page:
Allow IP addresses
It is possible to display the real site even with maintenance mode activated. To do this, it is necessary to enter the IP addresses of the computers that should be able to bypass maintenance mode:
- Activate maintenance mode according to the procedure above.
- Go back to the maintenance page configuration page (see procedure above).
- Under Maintenance on the right, click on Insert my IP address to allow your computer to display the site without maintenance mode:
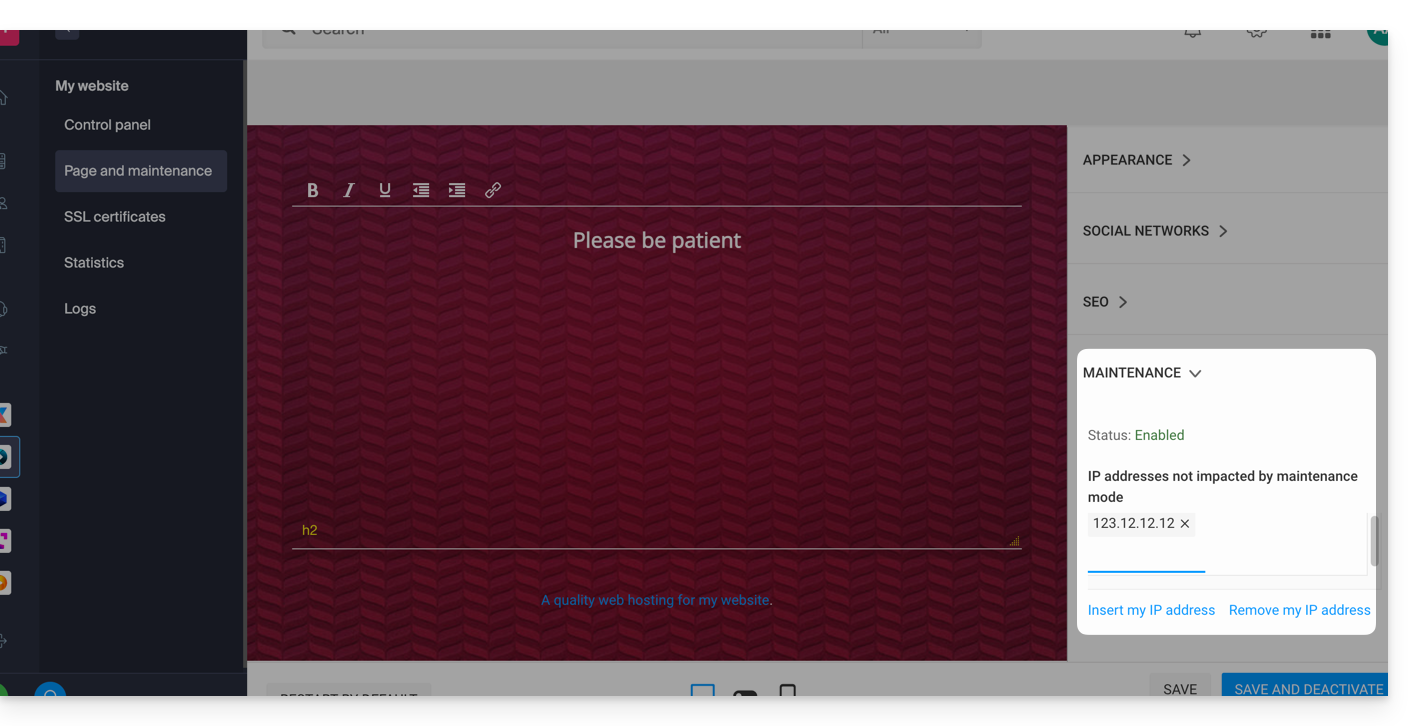
- It is also possible to manually enter the IPs to authorize.
- Click on Save and Publish.
If the IP addresses of the added computers change, it will be necessary to repeat these steps.
Disable maintenance mode
To disable the message that appears on your site during maintenance:
- Click here to access the management of your product on the Infomaniak Manager (need help?).
- Click directly on the name assigned to the product in question.
- Click either on the Disable button or on the toggle switch to disable the maintenance page:
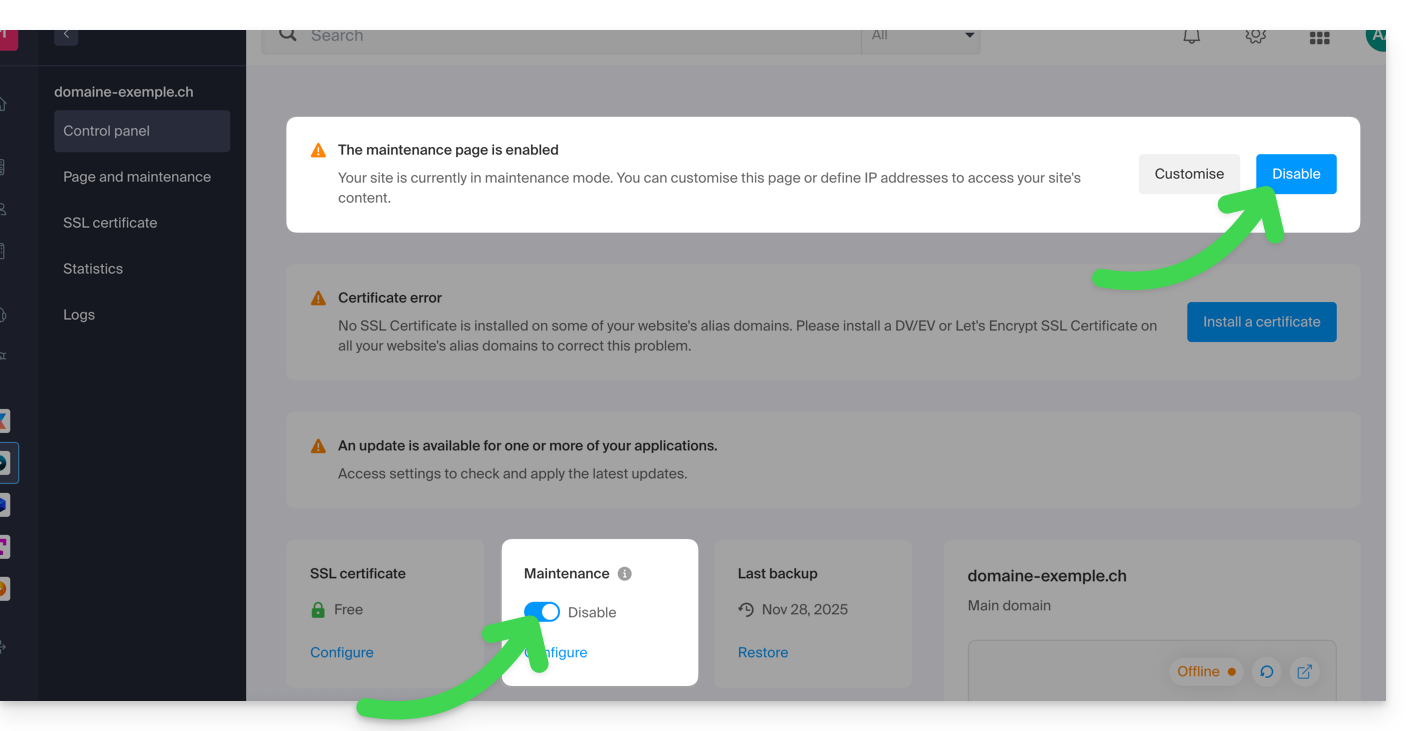
- Confirm the deactivation of maintenance.
Alternative method for WordPress
It is not recommended to activate the Infomaniak maintenance page above to then work in WordPress.
It is recommended to install a WordPress extension (there are dozens available) dedicated to maintenance within the CMS itself.
Otherwise, you can add the code <?php $upgrading = time(); ?> in a new empty file named .maintenance (the dot before the file name is important) placed on the server at the root of your site, which will deactivate all your pages except the WordPress homepage.
This guide concerns inbound and outbound traffic permissions between different hosts at the database level.
Access...
... to databases external to Infomaniak
From a Infomaniak Web hosting, it is possible to make MySQL queries to external servers without restriction.
... from the outside to the Infomaniak databases
Access to Infomaniak databases from outside the infrastructure is only allowed with a Serveur Cloud (you need to open port 3306 in TCP / inbound in the firewall).
Regarding access to MySQL databases from another Infomaniak Web hosting refer to this other guide.
Allow external connections on MongoDB
Regarding MongoDB, you need to disable the local_only option from Fast Installer:
- Click here to access the management of your product on the Infomaniak Manager (need help?).
- Click directly on the name assigned to the relevant product.
- Click on Fast Installer in the left sidebar.
- Click on
MongoDB. - Click on the action menu ⋮ to the right of the relevant item in the displayed table.
- Click on Configure:

- Disable
local_only:
- Save the changes.
The port 27017 for MongoDB must be opened in the firewall.
This guide explains how to create subdomains on an existing Infomaniak hosting using a .htaccess file.
Preamble
- The hosting can be on a Shared Web Hosting offer or on Infomaniak Cloud Server but this function is not possible with a Starter hosting.
- Subdomains can be added very easily to your current hosting since you have in the basic offer 20 sites per hosting (sites = subdomains).
- If you do not want to use this site volume available to you, you can follow the method below.
Create a subdomain as a shortcut
The subdomains created in this way facilitate the organization of a hosting. For example, the address vlog.domain.xyz will be the shortcut for the address domain.xyz/vlog. In other words, the address vlog.domain.xyz will redirect to the folder vlog which must be located at the root of the website domain.xyz. In this example, vlog is the subdomain of domain.xyz.
1. Add the subdomain as an alias for your website
To do this:
- Follow the alias addition procedure but please read the points 2 and 3 below.
- In the field to add the linked domain, enter the full address of the subdomain (e.g.
vlog.domain.xyz). - If your domain or its DNS zone is managed by Infomaniak, activate the following two options: Update DNS entries for this domain and Replace existing entries ; if this is not the case, create an A record with your registrar with the following information:
- field: the full URL address of the subdomain (e.g.
vlog.domain.xyz) - target: the IPv4 address (A record) of your site (refer to this other guide to find the A record of your site)
- field: the full URL address of the subdomain (e.g.
2. Modify the htaccess file of your website
Important: the following instructions are given for information only. You may need to adapt the code to make it work in your situation.
Using your FTP software/client or the FTP Manager, add and adapt the following code in the .htaccess file located at the root of your website:
RewriteCond %{HTTP_HOST} ^(.*)\.domain\.xyz [NC]
RewriteCond %{DOCUMENT_ROOT}/%1/ -d
RewriteCond %1::%{REQUEST_URI} !^(.*?)::/\1/?
RewriteRule "^(.*)$" "%{DOCUMENT_ROOT}/%1/$1" [L]
Explanation for the third line: https://stackoverflow.com/a/15981056
Replace on the first line:
domainwith your domain namexyzwith the extension of your domain name (ch, fr, etc.)
Now, the address vlog.domain.xyz should display the content of the vlog folder located at the root of your website. If this is not the case, check that the vlog folder exists at the root of your website.
This guide explains how to add or modify one or more A and AAAA type records in the DNS zone (of a domain name) managed on the Manager Infomaniak.
Preamble
- This type of record allows a domain name to point to a static IP address (usually a server), type A for IPv4 and AAAA for IPv6.
- This is the method generally used to redirect your domain name to the IP address of the web server on which your website is hosted. Moreover, this type of pointing is used automatically to link your domain name with your website if they are in the same place and in the same Infomaniak Organization.
- You should only modify this type of record if you have a specific configuration to set up (for example, pointing a subdomain to an external application).
Modify the DNS zone
Refer to this other guide to manage this type of record in a DNS zone.
This guide explains how to modify the server configuration of a site on Web Hosting Infomaniak.
Preamble
- Apache is the HTTP server.
- It is configured with a
.htaccessfile placed at the root of the website.
- It is configured with a
- PHP is a programming language used to create dynamic web pages via an HTTP server.
- It is possible to customize the PHP directives with a
.user.inifile, which will be effective in the folders and subfolders of the location of the .user.ini file.
- It is possible to customize the PHP directives with a
- Refer to this other guide regarding the creation of .htaccess & .user.ini files.
Modify the server configuration of a site…
… via the Manager
To modify the PHP configuration and most of the parameters (max_input_vars, allow_url_fopen, memory_limit, post_max_size + upload_max_filesize, etc.):
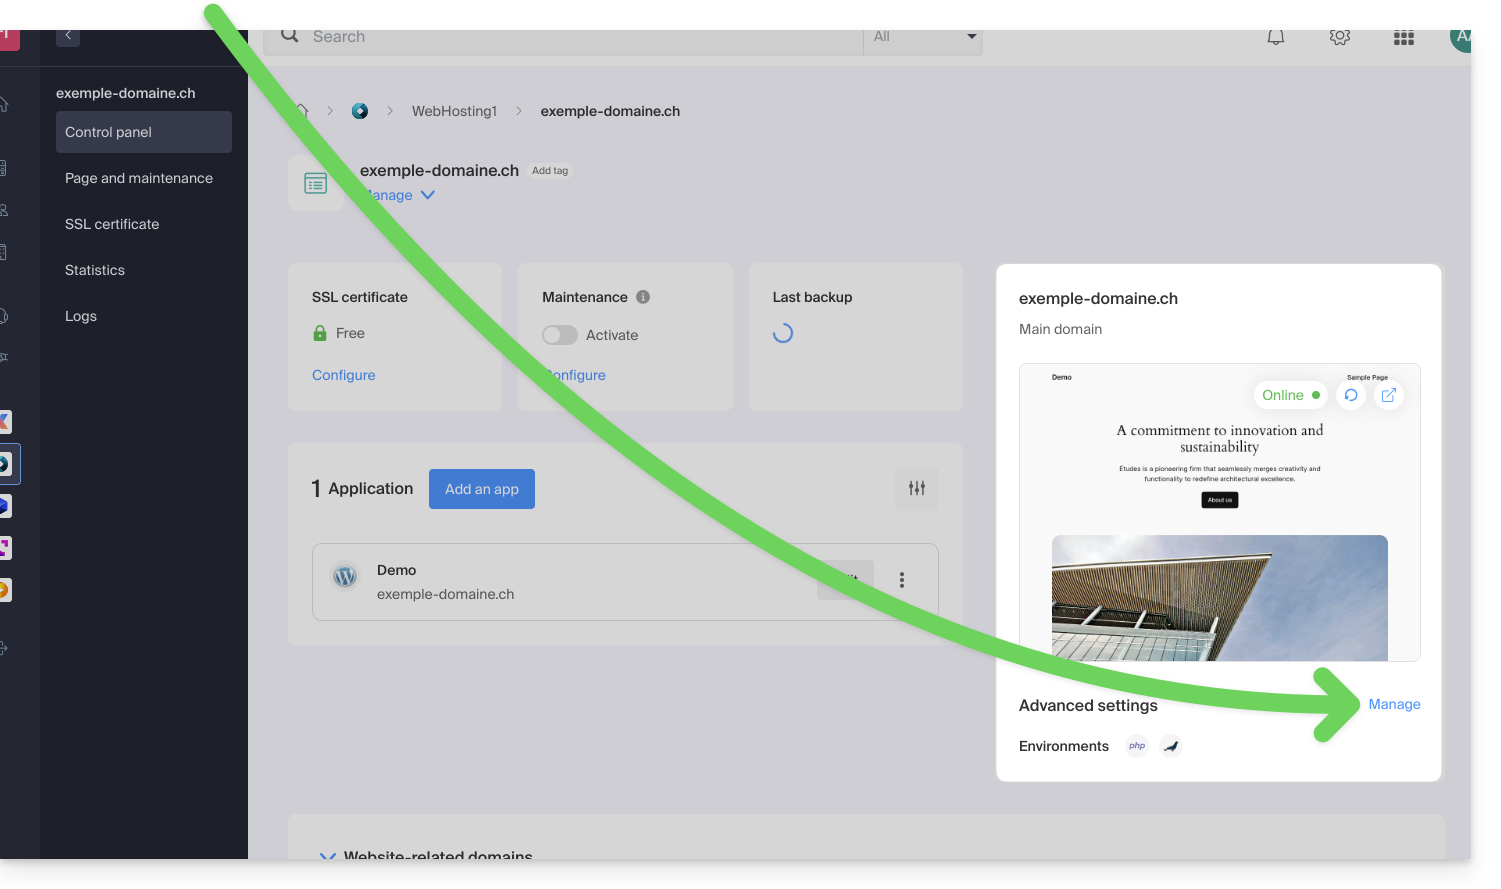
- Click here to access the management of your product on the Infomaniak Manager (need help?).
- Click directly on the name assigned to the product concerned.
- Click on Manage under Advanced Settings:
- Click on the different tabs General, PHP / Apache and PHP Extensions to proceed with the desired adjustments:
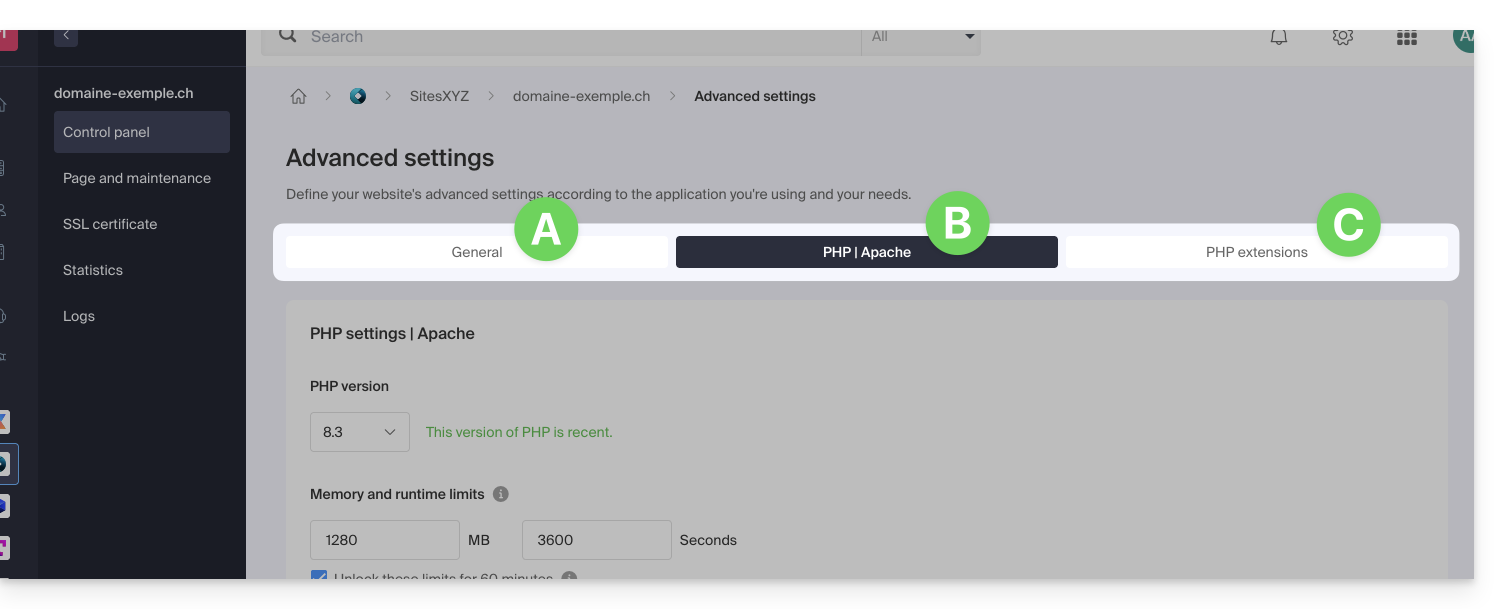
Do not forget to save the changes at the bottom of the page.
Refer to this other guide if you are looking for information regarding limit values and the possibilities of unlocking the latter.
… via the .user.ini file
For PHP directives that are not present on the Manager side, it is necessary to define the desired values in the .user.ini file, for example:
max_file_uploads = 20The list of existing directives can be found on the official PHP website but the elements with the indication PHP_INI_SYSTEM in the Modifiable column as well as max_input_time, memory_limit and mysqli.default_socket are not usable.
… in CLI
To customize PHP directives when executing scripts in command line (CLI) or in CRON tasks, it is necessary to specify the desired values in a .user.ini file.
Then, to apply these configurations, the PHP executable is used with the -c option followed by the path to the .user.ini file.
For example, to modify the memory limit available for PHP to 1024M, you can create or modify the .user.ini file using the following command:
echo 'memory_limit = 1024M' > .user.iniThis command writes the memory_limit directive with the value 1024M in the .user.ini file.
Next, when executing a PHP script from the command line or in a CRON task, use the PHP command with the -c option to specify the .user.ini file containing the custom configurations.
The following example enables allow_url_fopen for the WP CLI tool (allows, among other things, retrieving extensions):
php -d allow_url_fopen=On ~/bin/wp package install trepmal/wp-revisions-cliphp: the PHP executable-d allow_url_fopen=On: the-doption allows setting a PHP configuration directive (allow_url_fopen) with the valueOn~/bin/wp: path to the WP CLI executablepackage install trepmal/wp-revisions-cli: the specific command to install the WP CLI packagetrepmal/wp-revisions-cli
This ensures that the allow_url_fopen option is enabled during the execution of the specified WP CLI command. Enabling allow_url_fopen may be necessary for certain operations that involve opening remote URLs, such as downloading extensions or packages. Make sure this option is enabled securely and in accordance with best security practices.
This guide explains how to change the URL of your website from the WordPress app installed on your Web Hosting Infomaniak (only in the case where you have installed WordPress via the dedicated tools offered by Infomaniak).
This allows you to assign a different domain name to your WordPress site.
Prerequisites
- The domain name you wish to use must first be added as an alias to the main domain on the relevant site.
Change the address of a WordPress site
To change the address of the site created with WordPress Infomaniak to another domain name that is already in the same Organization:
- Click here to access the management of your WordPress site on the Infomaniak Manager (need help?).
- If your site does not appear here, it is because it was not installed via Infomaniak tools… refer to the official documentation.
- Click directly on the name assigned to the relevant product:

- Click on the action menu ⋮ located to the right of the relevant Web Application.
- Click on Settings for the application:

- Click on Edit to the right of the WordPress:

- Under Site URL, select the desired web address from the dropdown menu:
- If you have not followed the prerequisites above, the desired domain will not appear even if it is registered within the same Organization.
- If you have added the domain as an alias for the site, the desired domain will appear and you will be able to select it to replace the previous domain.
- Click on the Save button:

Domain ….preview.infomaniak.website?
Among the URLs present in the dropdown menu, the preview URL allows you to access your WordPress site in case the site's domain name is not yet correctly configured to point to your WordPress app.
This guide explains how…
- … generate a
CSRand private key to request a third-party certificate from a Certification Authority (CA), - … import this certificate for your Infomaniak site, using the
CRTobtained from theCA.
Preamble
- Although Infomaniak offers all the SSL certificates you might need…
- free Let's Encrypt certs for personal sites (only possible with sites hosted at Infomaniak),
- DV certs from Sectigo for professional/private sites that are not registered in the trade register,
- EV certs from Sectigo for companies registered in the trade register,
- It is also possible to install an SSL certificate obtained elsewhere (intermediate certificate from a certification authority of your choice), custom or self-signed certificates.
1. Generate a CSR (Certificate Signing Request)
A CSR (Certificate Signing Request or Certificate Signing Request) is an encoded file containing the information necessary to request an SSL/TLS certificate.
It must be generated on your side to ensure that the private key remains under your control, using for example OpenSSL.
Adapt and run the following command from a terminal application (command line interface, CLI) on your device:
openssl req -utf8 -nodes -sha256 -newkey rsa:2048 -keyout domain.xyz.key -out domain.xyz.csr -addext "subjectAltName = DNS:domain.xyz, DNS:www.domain.xyz"
Explanations
newkey rsa:2048: Generates a new 2048-bit RSA key.keyout domain.xyz.key: Specifies the file where the private key will be saved.out domain.xyz.csr: Specifies the file where the CSR will be saved.addext “subjectAltName = ...”: Adds additional domains via theSAN (Subject Alternative Name)extension, necessary to include all desired domains in the certificate (the main domain domain.xyz + any other associated domain or subdomain, such as www.domain.xyz).
After generation, you can check the contents of the CSR with the following command:
openssl req -in domain.xyz.csr -noout -textThis allows you to verify that all domains listed in subjectAltName are correctly included.
Once the CSR is generated, you can send it to the certification authority (CA) to obtain your SSL/TLS certificate.
2. Import the external certificate
Once validated, the CA issues a certificate (domain.xyz.crt) and sometimes an intermediate certificate (ca_bundle.crt). To access SSL certificate management:
- Click here to access the management of your product on the Infomaniak Manager (need help?).
- Click directly on the name assigned to the relevant product.
- Click on SSL Certificates in the left sidebar.
- Click the blue Install a certificate button:

- Choose the custom certificate.
- Click on the Next button:

- Import your certificate and private key, either by importing the
.crtand.keyfiles or by copy-pasting. - Click on Complete:

Alternative command to generate a self-signed certificate (optional)
If you want a local certificate for testing purposes only or without going through a CA (not recommended for production), you can use this command:
openssl req -x509 -nodes -days 365 -newkey rsa:2048 -keyout domain.xyz.key -out domain.xyz.crt -addext “subjectAltName = DNS:domain.xyz, DNS:www.domain.xyz”This generates both a self-signed certificate (domain.xyz.crt) and a private key (domain.xyz.key). However, self-signed certificates are not recognized as valid by public browsers or systems. They are only suitable for internal or development environments.
Import an intermediate certificate
When adding a custom SSL certificate, it is possible to import the intermediate certificate (by importing the .crt file or pasting the data provided by the certification authority):
This guide presents commands that can be executed to test a connection or a network and thus specify the source of a potential error more precisely.
Perform a Telnet...
TELNET allows you to test the connection to a server without considering all the additional settings of a mail or FTP application in order to determine the origin of a problem. If the connection does not go through on an SMTP server, you will need to check, for example, if your firewall is not blocking port 587 or 465.
... on macOS
- Search for Network Utility.
- Go to the
Ping,Lookup, orTraceroutetab depending on what you want to test. - You can also use a
Terminaltype application (command line interface,CLI / Command Line Interface) on your device and, depending on what you want to test, enter:traceroute [server]nc [server] [port]
Replace[server]with the server name or its IP address, the same for[port]...
... on Windows
Enable Telnet if necessary.
- Use a
Terminaltype application (command line interface,CLI / Command Line Interface) on your device, for example by typing Run thencmd. - In the window that opens, depending on what you want to test, type:
tracert [server]telnet [server] [port]
Example:telnet mail.infomaniak.com 587(allows you to test the SMTP port if your software/email client does not allow sending emails)...
... on Android
- Use the application Simple Telnet Client which allows you to test very simply via 2 fields to fill in (for example
mail.infomaniak.comand port143or993)...
Perform a PING
PING allows you to know if a machine is accessible via the Internet. You can also check with this tool if you are indeed addressing the correct machine, for example during a DNS change, by looking at the IP address obtained. It is possible to perform a ping on a domain name, a hostname or an IP address.
PING is definitely blocked on shared hostings.
This guide explains how to resolve issues that may occur with a Web Hosting if the latter has undergone modifications at the IP address level (for example, a server move) and your computer retains the old position in its DNS cache.
Flush the DNS cache...
When you visit a website, your computer stores a local association between the domain name and its IP address in the DNS cache. This speeds up the DNS resolution process for future visits to the same site, as the computer can avoid re-consulting the DNS servers to obtain the IP address.
By flushing the DNS cache, you force your computer to query the DNS servers again to obtain the latest up-to-date information on the IP addresses of the sites you visit.
... on Windows
Run the following command from a Terminal type application (command line interface, CLI / Command Line Interface) on your device. Example:
- Open the Start menu.
- Type cmd.
- In the search results, click on Command Prompt.
- Run the command
ipconfig /flushdns.
... on macOS
Run the following command from a Terminal type application (command line interface, CLI / Command Line Interface) on your device:
- Run the command
lookupd -flushcache(in case of failure:dscacheutil -flushcache).
... on Linux
Run the following command from a Terminal type application (command line interface, CLI / Command Line Interface) on your device:
- Run the command
sudo systemctl restart nscdorsudo /etc/init.d/nscd restartto restart nscd.
This guide explains how to change the target folder where your Website is stored on an Infomaniak Web Hosting.
Preamble
- On an Infomaniak Web Hosting, it is possible to install multiple Websites with their own domain name (multisite management).
- Each of these sites is stored in a folder of your hosting, which is the target of the site. It is possible to freely modify the target of a site. Example:
- The site
domain.xyzhas as target e.g. the folder/web… - You publish a site in a new subfolder of
/webnamed for example/web/v2… - By modifying the target
/webof the sitedomain.xyzto/web/v2, the sitedomain.xyzwill show the content of the folder/web/v2without obviously including this path in the browser's address bar and without leaving access to any files still located in/web.
- The site
- It is recommended not to create "
v2" in a subfolder of "web" but next to it, by creating the folder at the root of your hosting. - These folders actually exist on the server but you are not obliged to connect via FTP to manage them.
Display the folder of your Websites
To find the information about the folder in which your site is stored:
- Click here to access the management of your product on the Infomaniak Manager (need help?).
- Click directly on the name assigned to the product concerned.
- Then click on the chevron to expand the Information section of this site.
- The indication highlighted below is the location of the example site:

Modify the target or folder of a Website
To manage the location of a Website within the hosting:
- Click here to access the management of your product on the Infomaniak Manager (need help?).
- Click directly on the name assigned to the product concerned.
- Click on Manage in the Advanced Settings section:

- Manage the desired location for the site:

- Click on the button to Save at the bottom of the page.
This guide explains how to force the display of the web hosting name in the browser's address bar to one of the domain names installed as an alias/synonym or how to display the main domain in the address bar instead of the alias.
Limiting the 'duplicate content' or duplicate content
Assume you have the hosting your-domain.com with Infomaniak and as a synonym domain name you have installed www.synodomain.xyz.
By default, when you type one or the other of the domain names (your-domain.com or synodomain.xyz) in the address bar of your browser, it is the one you typed that will be displayed in the address bar.
You therefore have the possibility to force the display of a different address than the one that was typed. Thus, if someone types synodomain.xyz, then it is your-domain.com that will automatically be displayed in the address bar.
A code must be entered in a file called .htaccess which must be located at the root of your hosting (in the /web folder of your FTP). If this file does not exist yet, you must create it on the server.
Insert the following directives in the file:
RewriteEngine on
RewriteCond %{HTTP:X-Forwarded-Proto} !https
RewriteRule (.*) https://votre-domaine.com/$1 [R=301,L]
Adjust the code above according to these instructions:
- Replace
your-domain.comwith your domain name with the appropriate extension (.com, .fr, .ch, etc.) that you want to see displayed in the visitor's browser address bar. Addwww.before your-domain.com if necessary. - Replace the second line of the code above with "
RewriteCond %{HTTPS} off" if a loop error occurs, this means that HTTP/2 is active for this site
Also, refer to the automatic redirections to httpS.
This guide details how to work on a WordPress site with a development environment.
Preamble
- The process can be used at the beginning of a staging process, that is, the creation of a new version of your live website, in a development or testing environment:
- This allows website owners to test features, security updates, plugins, themes, WordPress updates, and content changes, without risking disruptions or issues on the live site.
- Once the tests have been conducted and the changes have been validated on the staging copy, it is possible to deploy them to production (on the live site) using automated deployment tools or by making the changes manually.
- Make your life easier! If needed, **local partners recommended by Infomaniak can handle these procedures**. Launch a **free call for tenders**. They take care of everything, freeing you from technical details.
Simple method
To install and set up a new WordPress site with the Infomaniak installer without overwriting your current website:
1. Install WordPress in a second location
Refer to this other guide to create the new site (in parallel with the old site domain.xyz) by assigning it a domain name in the form of new.domain.xyz for example and installing WordPress via Web Applications (Infomaniak WordPress installer).
At this stage, the main site (domain.xyz) remains untouched and you can calmly work on the new site new.domain.xyz. Both function in parallel.
2. Replace the old site with the new one
Once the new site is complete, you can delete the first site to reuse its domain name for the new one:
- Delete the old site to make the domain name available and reuse it.
- Add domain.xyz as an alias for
new.domain.xyz. - Reverse the alias with the main domain.
- Remove (unlink/delete)
new.domain.xyzwhich has become an alias. - As a precaution, check the main URL of the WordPress site via the Web Applications dashboard on the Infomaniak Manager, to ensure it matches the new name, and not the subdomain you had chosen.
Advanced method
To work on an existing WordPress site without modifying its public version, it is recommended to proceed in 3 steps:
- Duplicate the existing site
- Work on its copy
- Change the target directory of the production site to the production environment directory and modify the URLs of the pre-production site according to the domain name of the production site using a WordPress extension or via phpMyAdmin.
1. Duplicate the site to a second location
- Refer to this other guide to create the new site (in parallel with the old site
domain.xyz) by assigning it a domain name in the form ofnew.domain.xyzfor example and installing WordPress via the Applications Web (Infomaniak WordPress installer). - Copy your existing site and paste it onto the newly created second WordPress site, using a WordPress extension.
2. Edit the duplicated site
- At this stage, the main site (
domain.xyz) remains untouched and you can calmly work on the new sitenew.domain.xyz. Both function in parallel. - It is recommended to install a WordPress extension (there are dozens available) dedicated to putting the second site into maintenance mode.
- If you modify the structure of your site and the URLs of your articles/pages change, you can use a free extension like Redirection to automatically create redirects. This will prevent your visitors from encountering 404 pages while search engines reindex your site or if external sites link to your site.
3. Replace the target
- When you have finished redesigning your site, all you have to do is change the target directory of the production site to the production environment directory and change the URLs of the pre-production site according to the domain name of the production site using a plugin.
- If you are using a caching extension like WP-Rocket, W3 Total Cache or WP Super Cache, it will be necessary to completely clear all the cache or even disable and then reactivate the plugin.
- If you continued to modify your site in production during the site overhaul, it will be necessary to retrieve your modifications (articles, media, pages, etc.).
- After the usual checks (missing images, broken links, etc.), all you have to do is disable the maintenance mode of your site and admire the result.
This guide explains how to change the URL of your site containing a Web Application (such as Prestashop or Joomla) previously installed on your paid Web Hosting offer.
Prerequisites
- The domain name you wish to use must first be added as an alias to the main domain on the relevant site.
Specific guides
Refer to these guides if the application in question is:
Guides for any other Web Application
To change the address of the site created with an Infomaniak Web Application, to another domain name that is already in the same Organization:
- Click here to access the management of your product on the Infomaniak Manager (need help?).
- Click directly on the name assigned to the product concerned:

- Click on the action menu ⋮ located to the right of the relevant Web Application.
- Click on Settings for the application:

- Click on Modify to the right of the relevant Web Application address:

- Under Site URL, select the desired web address from the dropdown menu:
- If you have not followed the prerequisites above, the desired domain will not appear even if it is registered in the same Organization:

- If you have added the domain as an alias of the site, the desired domain will appear and you will be able to select it to replace the previous domain:

- If you have not followed the prerequisites above, the desired domain will not appear even if it is registered in the same Organization:
- Click on the Save button.
Domain ….preview.infomaniak.website ?
Among the URLs present in the dropdown menu, the preview URL allows you to access your site in case the site's domain name is not yet correctly configured to point to your Web Application:
Learn more
- Install or uninstall a Web Application
- Configure the backups of the Web Applications
- Restore a Web Application
This guide explains how to install a new Web Application (Joomla, Drupal, Typo3, PrestaShop, etc.) in a few clicks on the paid Web Hosting offers.
Prerequisites
- Have an Infomaniak Web Hosting (order if necessary).
- Add a blank website to the Infomaniak hosting.
Specific guides
Refer to these guides if you are concerned with the specific installation of:
Refer to this other guide regarding additional technologies that can be installed in a few clicks but on Cloud Server only.
Guides for any other Web Application
To access Web Hosting and install a Web Application:
- Click here to access the management of your product on the Infomaniak Manager (need help?).
- Click directly on the name assigned to the product concerned.
- Click on the button Add an app:

- Choose the desired application (if necessary, filter and search).
- Click on Select:

- Click at the bottom of the page on Next.
- Enter a name.
- Leave the default location or choose to install the app in a new folder that you can create using an icon visible to the right of point 8 in the image.
- Optionally choose to install a previous version if necessary.
- Click the button Next:

- Configure username and password.
- Specify certain advanced settings if necessary (backup type in particular).
- Read and accept the terms of use of the selected app.
- Click the button Next:

- Confirm the installation of the application in the next step and wait.
- Take note of any error message on the screen if, for example, the chosen installation folder is not empty or if the PHP version of the site on which you are attempting the installation is not compatible.
Uninstall a Web Application
To access Web Hosting and uninstall the previously installed application:
- Click here to access the management of your product on the Infomaniak Manager (need help?).
- Click directly on the name assigned to the product concerned.
- Click on the action menu ⋮ located to the right of the application to be uninstalled.
- Click on the trash can icon to delete the application:

- Confirm the deletion.
Learn more
- Modify the domain name associated with the Web Application
- Configure Web Application backups
- Restore a Web Application
This guide provides two methods to access the administration interface of a WordPress site installed via Infomaniak tools, for example, to update the content.
Prerequisites
- Know your login credentials…
Access the WordPress console…
1. … from the Manager
To access WordPress from the Manager:
- Click here to access the management of your WordPress site on the Infomaniak Manager (need help?).
- If your site does not appear here, it means it was not installed via Infomaniak tools… refer to the official documentation.
- Click directly on the name assigned to the product concerned.
- Click the Edit button to open the WordPress login page:

- Enter the username and password chosen during the WordPress installation.
2. … via the URL /wp-admin
By default, simply add the terms /wp-admin to the end of your domain name's URL in your web browser's address bar to access the WordPress console login page directly.
If your WordPress site address is, for example, https://domain.xyz, the address to access the WordPress administration interface will be https://domain.xyz/wp-admin.
What to do if the ./wp-admin shortcut does not work?
- If the
./wp-adminshortcut does not work, you may be using a security extension that modifies the URL of certain pages to limit attempts to hack your site (example of plugin)… - If you need to access the WordPress console and your domain name is not functional at the moment, you can switch the main domain name to the preview address.
This guide explains how to run the open source dependency manager Composer 2 using an SSH command.
Preamble
- Composer is an open source dependency manager for PHP that allows you to define, install, and update the libraries required for a PHP project.
- Composer 1 has been obsolete since 2021 and will no longer allow the installation of new packages or updates as of 2025.
- Only version 2 of Composer is now supported and available on all PHP versions from 7.2 to 8.3.
Run Composer 2
Composer 2 is already pre-installed and accessible via SSH. Therefore, it is not necessary to install it manually.
Simple usage
Log in to your hosting via SSH, then use the following command:
composerThis command will automatically run version 2 of Composer compatible with the PHP version currently in use in your session.
Check the active version
You can check the available version of Composer with:
composer --versionExample output: Composer version 2.5.0 2022-12-20 10:44:08
Force a specific PHP version
If you want to run Composer with a specific version of PHP, aliases are available. For example:
composer_php8.1 --versionor:
composer_php7.4These aliases allow you to run Composer 2 with the specified PHP interpreter, useful for testing or deploying a project on a target PHP version.
This guide details the sending of authenticated e-mails from a website hosted by Infomaniak using an SMTP configuration; the configuration of an authenticated SMTP server is presented for the main CMS.
Preamble
- The use of authenticated SMTP for sending e-mails from your applications has many advantages compared to the standard non-authenticated PHP mail() function:
- enhanced security,
- better delivery reliability,
- more accurate error handling,
- optimal compatibility with third-party mail servers,
- and complete traceability of shipments.
- Recommended settings:
- Outgoing SMTP server =
mail.infomaniak.com - SMTP port & encryption protocol and command/method to activate this protocol:
- Prioritize port
587+ STARTTLS: this is the official technical standard and the most compatible method with the majority of modern systems for authenticated submission. - Tolerate port
465+ SSL/TLS only as a compatibility option or alternative, specifying that it is implicit encryption, but that 587 remains the recommended choice.
- Prioritize port
- Username = the complete & full email address ( ? )
- Password = the one assigned to the email address you are using ( ? )
- Authentication required to send emails.
- Outgoing SMTP server =
SMTP configuration examples…
Prerequisites
- Have a mail service.
- You have the possibility to use the Mail Service offered by Infomaniak or any other mail service of your choice.
When you have an email address whose domain is attached to your website ( email@domain-site.xyz for example) enter its details to use it for sending from the web server via SMTP:
… on WordPress
- Log in to the WordPress administration panel.
- Install an SMTP extension (WP Mail SMTP works).
- Configure the extension, for example:

From then on, an email sent from a contact form present on the site (default form Divi for example) will be sent via an SMTP method.
To make sure, just look at the headers of a message received this way, in particular the line x-mailer which may mention for example WPMailSMTP/Mailer/smtp instead of PHPMailer.
Note: the x-mailer can be any indication not necessarily representative of the actual sending method!
... on Prestashop
- Log in to the Prestashop admin panel.
- Go to Advanced Settings then Email.
- Configure sending via SMTP:

Then check (to avoid an error like Could not instantiate mail function or sender mismatch) that the address you have configured in these advanced settings matches the address that Prestashop uses when sending. To do this:
- Log in to the Prestashop admin panel.
- Go to Store Settings.
- Click on Contact in the left sidebar menu.
- On the Contacts tab, check that the email address mentioned is the same as the one configured previously.
- Edit email addresses if necessary:

- Click on the Stores tab.
- Check (and correct if necessary) that the email address mentioned is the same as the one configured previously:

... on Joomla
- Log in to the Joomla admin panel.
- Click on System in the left sidebar menu.
- Click on Global Configuration:

- Click on the Server tab.
- Configure sending via the SMTP sending method:
